
Exploring Robotics with...
82
Exploring Robotics Boe-Bot Activities Guide Exploring Robotics with Electronics Page: 1 Exploring Robotics with Electronics: An Introduction to Electronics with Boe-Bot Boe-Bot Activities Guide Revision 1, 2011 By Joe B. Lively and Grant Plowman Interactive Media Publishing Published and Printed in the U.S. by: Interactive Media Publishing 111 E. 1 st Street PO Box 1407 Phoenix, OR 97535 541-535-5552 www.interactivemediapub.com Copyright © 2011 Interactive Media Publishing, all rights reserved. All rights reserved. U.S. and International Copyright laws apply to this work. No part of this manual or the text, graphics, or illustrations, may be digitally reproduced or transmitted in any form or by any means, electronic or mechanical, including photocopying and recording, for any purpose without the express written permission of the author and the publisher. Permission to reproduce solely for internal or personal use is permitted for libraries or other users registered with the Copyright Clearance Center, provided that appropriate fees are paid directly to the Copyright Clearance Center. Boe-Bot is a registered trademark of Parallax. All documents and references included in this book or on the accompanying CD or digital downloads created by Parallax remain the property of Parallax and may not be reproduced or distributed by any means without the written permission of Parallax. Software included on the accompanying CD or digital downloads created by Interactive Media Publishing are provided solely for educational use and may not be reproduced or distributed by any means without the written permission of the publisher. To purchase additional copies of this book go to this website: www.exploringrobotics.com
Transcript of Exploring Robotics with...
Exploring Robotics Boe-Bot Activities Guide
Exploring Robotics with Electronics Page: 1
Exploring Robotics with Electronics: An Introduction to Electronics with Boe-Bot Boe-Bot Activities Guide Revision 1, 2011
By Joe B. Lively and Grant Plowman Interactive Media Publishing Published and Printed in the U.S. by: Interactive Media Publishing 111 E. 1
st Street
PO Box 1407 Phoenix, OR 97535 541-535-5552 www.interactivemediapub.com
Copyright © 2011 Interactive Media Publishing, all rights reserved.
All rights reserved. U.S. and International Copyright laws apply to this work. No part of this manual or the text, graphics, or illustrations, may be digitally reproduced or transmitted in any form or by any means, electronic or mechanical, including photocopying and recording, for any purpose without the express written permission of the author and the publisher. Permission to reproduce solely for internal or personal use is permitted for libraries or other users registered with the Copyright Clearance Center, provided that appropriate fees are paid directly to the Copyright Clearance Center.
Boe-Bot is a registered trademark of Parallax. All documents and references
included in this book or on the accompanying CD or digital downloads created by Parallax remain the property of Parallax and may not be reproduced or distributed by any means without the written permission of Parallax.
Software included on the accompanying CD or digital downloads created by
Interactive Media Publishing are provided solely for educational use and may not be reproduced or distributed by any means without the written permission of the publisher.
To purchase additional copies of this book go to this website:
www.exploringrobotics.com

Exploring Robotics Boe-Bot Activities Guide
Exploring Robotics with Electronics Page: 2
Exploring Robotics Boe-Bot Activities Guide
Exploring Robotics with Electronics Page: 3
Contents
1 Introduction 7
About the Videos and Simulations........................................................ 7
About the Online Portfolio.................................................................... 7
Required Parallax Components ............................................................ 8
Code Assist Software ............................................................................ 8
CD Contents .......................................................................................... 9
Recommended Computer ..................................................................... 9
Presentations Corresponding to BoeBot Activities ............................ 10
2 SECTION 1: SOFTWARE USAGE INSTRUCTIONS 13
3 Sketchy Labs Software 15
4 Viewing Models in Google SketchUp 17
5 Portfolio Update 19
Screen Capture or Optional Video Capture ........................................ 20
Inserting a Video into your Observations ........................................... 20
6 Using the Code Assist Software 23
Boe-Bot Programming with Code Assist ............................................. 23
Using Code Assist ................................................................................ 24
Finding Code using Categories: 24
Finding Code Using Search: 25
How to Copy a Command: 26
How to Paste a Copied Command into the Editor: 26
List of Program Code Included ............................................................ 26
Chapter 2 27
Chapter 3 27
Chapter 4 27
Chapter 5 27
Chapter 6 27
Chapter 7 28
Chapter 8 28
7 Section 2: ACTIVITIES 29
8 Getting Started 31
Assignment: ........................................................................................ 31
Viewing Videos 31
Videos and Simulations: ...................................................................... 32
Parallax Boe-Bot and Book 32
Key Points or FAQs: ............................................................................. 32
Exploring Robotics Boe-Bot Activities Guide
Exploring Robotics with Electronics Page: 4
Self-Paced Instruction 32
Recommendations For Self-Study 33
Simulator Software Tools 33
The Sketchy Lab Manager 33
Introduction to the 3D Simulator Tools 34
Viewing a 3D Model 34
Screen Capture or Optional Video 35
Activity Procedure: .............................................................................. 36
Observations ....................................................................................... 36
9 Chapter 1: Your Boe-Bot’s Brain 37
Assignments: ....................................................................................... 37
Videos and Simulations: ...................................................................... 37
Key Points or FAQs: ............................................................................. 38
Observations: ...................................................................................... 38
10 Chapter 2: Your Boe-Bot’s Servo Motors 41
Assignments: ....................................................................................... 41
Videos and Simulations: ...................................................................... 41
Key Points or FAQs: ............................................................................. 42
Observations: ...................................................................................... 44
11 Chapter 3: Assemble and Test Your Boe-Bot 47
Videos and Simulations: ...................................................................... 47
Assignments: ....................................................................................... 47
Key Points or FAQs: ............................................................................. 48
Observations: ...................................................................................... 48
12 Chapter 4: Boe-Bot Navigation 51
Assignments: ....................................................................................... 51
Videos and Simulations: ...................................................................... 52
Key Points or FAQs: ............................................................................. 52
Observations: ...................................................................................... 53
13 Chapter 5: Tactile Navigation with Whiskers 57
Assignments: ....................................................................................... 57
Videos and Simulations: ...................................................................... 58
Key Points or FAQs: ............................................................................. 58
Observations: ...................................................................................... 58
14 Chapter 6: Light-Sensitive Navigation with Phototransistors 61
Assignments: ....................................................................................... 61
Exploring Robotics Boe-Bot Activities Guide
Exploring Robotics with Electronics Page: 5
Videos and Simulations: ...................................................................... 62
Key Points or FAQs: ............................................................................. 62
Observations: ...................................................................................... 64
15 Chapter 7: Navigating with Infrared Headlights 67
Assignments: ....................................................................................... 67
Videos and Simulations: ...................................................................... 67
Key Points or FAQs: ............................................................................. 68
Observations: ...................................................................................... 68
16 Chapter 8: Robot Control with Distance Detection 71
Assignments: ....................................................................................... 71
Videos and Simulations: ...................................................................... 71
Key Points or FAQs: ............................................................................. 72
Observations: ...................................................................................... 72
17 Careers Exploration 75
Assignments: ....................................................................................... 75
Videos and Simulations: ...................................................................... 76
Key Points or FAQs: ............................................................................. 76
18 REFERENCES 80
BoeBot Microcontroller Pin Assignments ........................................... 80
BoeBot Wheel Directions .................................................................... 80
Resistor Color Codes ........................................................................... 81

Exploring Robotics Boe-Bot Activities Guide
Exploring Robotics with Electronics Page: 6

Exploring Robotics Boe-Bot Activities Guide
Exploring Robotics with Electronics Page: 7
Introduction
Welcome to the Exploring Robotics with Electronics Boe-Bot Activities Guide. This guide and the accompanying CD were developed for middle and high school students and adults who want to build their first personal robot and are part of a class or for those who are working on their own.
This package provides instructional videos, 3D models, basic code, and answers to
many questions that are encountered while building the Boe-Bot robot from Parallax. These are packaged in an easy to use learning environment that provides a structure similar to most community college courses.
The following items are provided with this package (or are accessed online):
This written Boe-Bot Activity Guide
Sketchy Labs Lab Manager Software
Online Portfolio Tool (at exploringrobotics.com)
Activity Instructional Videos and Text
CodeAssist Software
Boe-Bot QBasic Program Code
Simulation Software
Boe-Bot 3D Models for simulation
About the Videos and Simulations
These activities have been designed for use with traditional computer labs, after school programs, distance courses and independent study. There is a video introduction for each chapter in the “Robotics with the Boe-Bot” text that comes with the Boe-Bot robot. These videos and the other instructional videos included provide background information for programming and electronics concepts and allow students to stop and replay as needed to enhance understanding.
3D models of Boe-Bot were developed by the graphics team at Interactive Media Publishing and are included to demonstrate assembly of the Boe-Bot and show where all the components are plugged in. The student is able to rotate, pan, and zoom the models to get a better view of each wire and component. Also students can control a 3D model of Boe-Bot as it runs through an obstacle course. Students can track their time for completing the course and compete for the best time.
About the Online Portfolio
Included with the Lab Manager software is the ability for students to create an online portfolio of their work. The observations (work completed as a result of assignments and activities) are modified in the Lab Manager and an FTP program is built in to transfer the files from the student’s computer to a specific location on the
Exploring Robotics Boe-Bot Activities Guide
Exploring Robotics with Electronics Page: 8
ExploringRobotics.com website. The website address is provided and students may then share that location with others – instructors, mentors, friends, etc. This feature is provided to make it easy for a student to receive assistance or feedback on their work. It also facilitates teamwork or group project collaborations.
Required Parallax Components
This curriculum is for the Boe-Bot Robot Kit Serial with USB Adapter and Cable from Parallax and the Basic Stamp Editor software which are NOT included with this package. To receive technical assistance with Boe-Bot, go to www.parallax.com.
The text, “Robotics with the Boe-Bot”, Version 3 from Parallax is included as a PDF
document on the CD. The chapters referenced are from that text, not this one. A printed copy of the text is also provided with the purchase of Boe-Bot.
By completing the Boe-Bot Activities, students will:
Assemble a personal robot from parts provided in the kit
Mount electronic components and wire a circuit board to communicate with a microcontroller chip
Program in Basic Language to control the robot
Write programs to communicate with lights and sounds
Write programs to receive input from sensors to determine environmental conditions
Write programs to control the behavior of the robot based on sensor inputs
Write programs to create autonomous movement - follow a line and/or go through a maze without human control
Code Assist Software
The Code Assist software is a utility created by the programming team at Interactive Media Publishing. Code Assist is included to assist students with Boe-Bot programming activities. It provides the syntax for all the commands used in the activities and helps to avoid typos by making it easy to look up a command and copy it to the programming environment, and then modify the command. This feature is similar to programming environments provided for many PC programming languages, and helps students learn programming concepts without getting stuck on typing errors.
The code for the programs needed to complete the activities is also included on the CD, and is copied to the hard drive during install. Students do not have to type in each line of code to have success with the activities. But this means students must pay closer attention to the instructions in the book, as typing in the commands often solidifies programming concepts being taught. Students still get practice typing and correcting programs by completing the activities.
Exploring Robotics Boe-Bot Activities Guide
Exploring Robotics with Electronics Page: 9
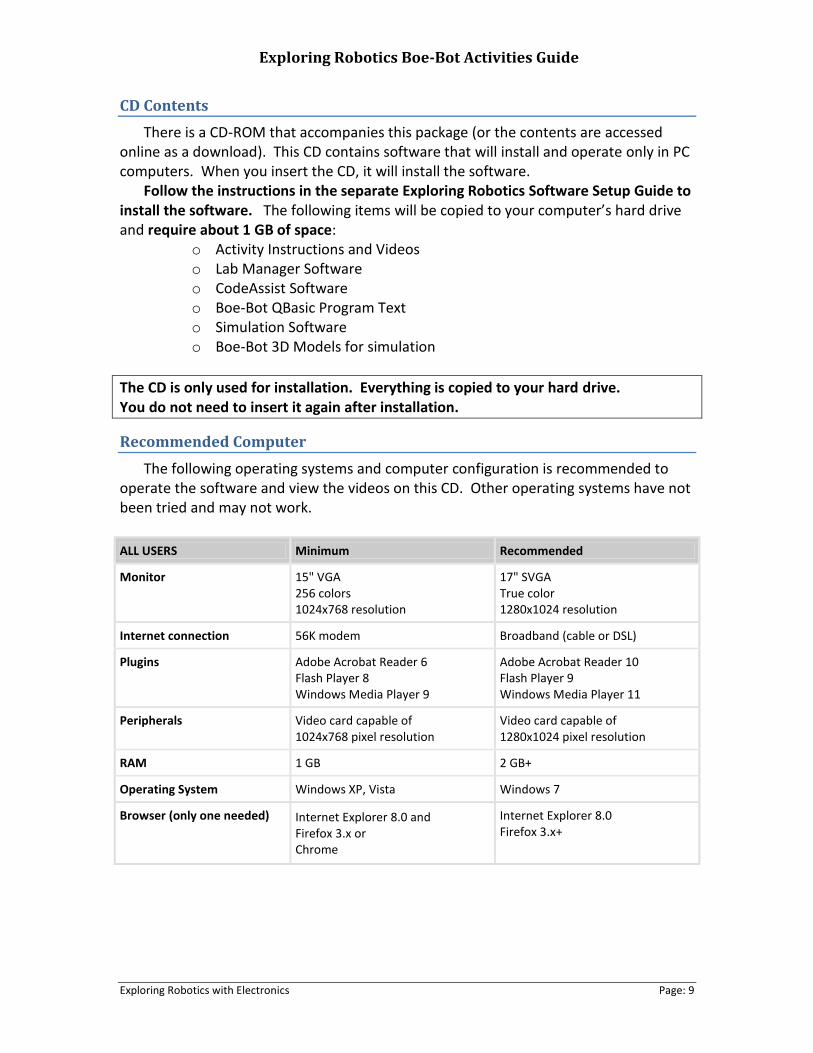
CD Contents
There is a CD-ROM that accompanies this package (or the contents are accessed online as a download). This CD contains software that will install and operate only in PC computers. When you insert the CD, it will install the software.
Follow the instructions in the separate Exploring Robotics Software Setup Guide to install the software. The following items will be copied to your computer’s hard drive and require about 1 GB of space:
o Activity Instructions and Videos o Lab Manager Software o CodeAssist Software o Boe-Bot QBasic Program Text o Simulation Software o Boe-Bot 3D Models for simulation
The CD is only used for installation. Everything is copied to your hard drive. You do not need to insert it again after installation.
Recommended Computer
The following operating systems and computer configuration is recommended to operate the software and view the videos on this CD. Other operating systems have not been tried and may not work.
ALL USERS Minimum Recommended
Monitor 15" VGA 256 colors 1024x768 resolution
17" SVGA True color 1280x1024 resolution
Internet connection 56K modem Broadband (cable or DSL)
Plugins Adobe Acrobat Reader 6 Flash Player 8 Windows Media Player 9
Adobe Acrobat Reader 10 Flash Player 9 Windows Media Player 11
Peripherals Video card capable of 1024x768 pixel resolution
Video card capable of 1280x1024 pixel resolution
RAM 1 GB 2 GB+
Operating System Windows XP, Vista Windows 7
Browser (only one needed) Internet Explorer 8.0 and Firefox 3.x or Chrome
Internet Explorer 8.0 Firefox 3.x+
Exploring Robotics Boe-Bot Activities Guide
Exploring Robotics with Electronics Page: 10
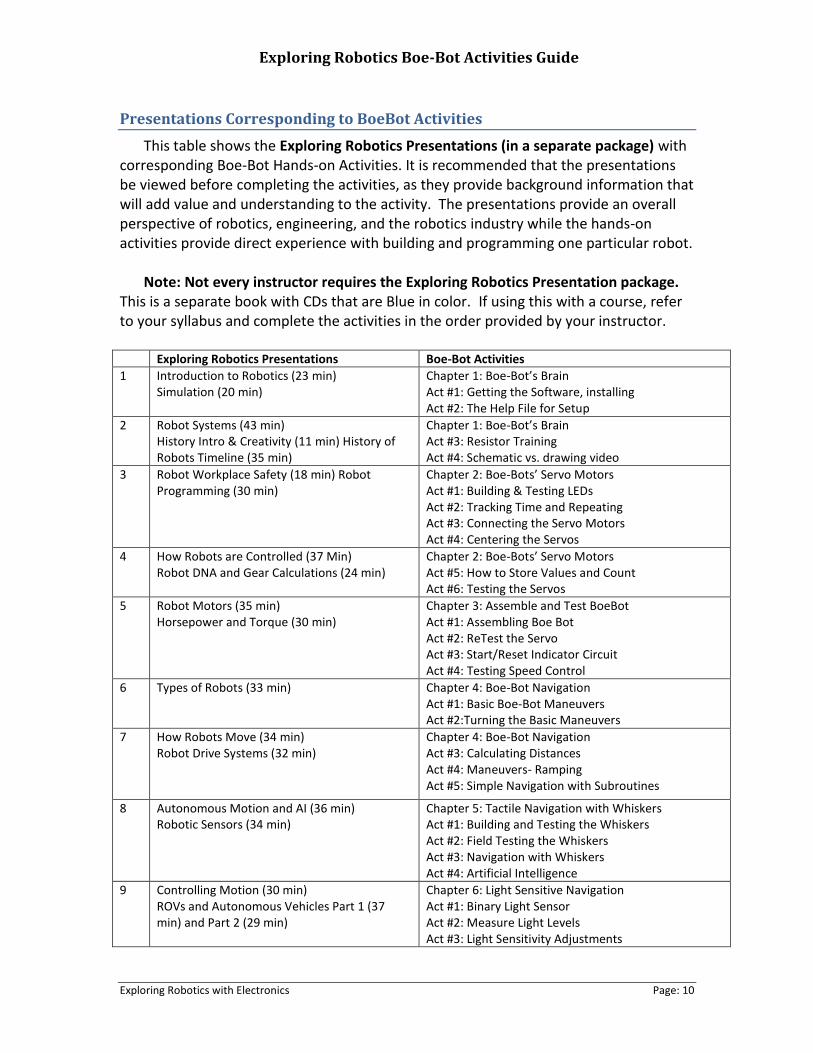
Presentations Corresponding to BoeBot Activities
This table shows the Exploring Robotics Presentations (in a separate package) with corresponding Boe-Bot Hands-on Activities. It is recommended that the presentations be viewed before completing the activities, as they provide background information that will add value and understanding to the activity. The presentations provide an overall perspective of robotics, engineering, and the robotics industry while the hands-on activities provide direct experience with building and programming one particular robot.
Note: Not every instructor requires the Exploring Robotics Presentation package.
This is a separate book with CDs that are Blue in color. If using this with a course, refer to your syllabus and complete the activities in the order provided by your instructor.
Exploring Robotics Presentations Boe-Bot Activities
1 Introduction to Robotics (23 min) Simulation (20 min)
Chapter 1: Boe-Bot’s Brain Act #1: Getting the Software, installing Act #2: The Help File for Setup
2 Robot Systems (43 min) History Intro & Creativity (11 min) History of Robots Timeline (35 min)
Chapter 1: Boe-Bot’s Brain Act #3: Resistor Training Act #4: Schematic vs. drawing video
3 Robot Workplace Safety (18 min) Robot Programming (30 min)
Chapter 2: Boe-Bots’ Servo Motors Act #1: Building & Testing LEDs Act #2: Tracking Time and Repeating Act #3: Connecting the Servo Motors Act #4: Centering the Servos
4 How Robots are Controlled (37 Min) Robot DNA and Gear Calculations (24 min)
Chapter 2: Boe-Bots’ Servo Motors Act #5: How to Store Values and Count Act #6: Testing the Servos
5 Robot Motors (35 min) Horsepower and Torque (30 min)
Chapter 3: Assemble and Test BoeBot Act #1: Assembling Boe Bot Act #2: ReTest the Servo Act #3: Start/Reset Indicator Circuit Act #4: Testing Speed Control
6 Types of Robots (33 min) Chapter 4: Boe-Bot Navigation Act #1: Basic Boe-Bot Maneuvers Act #2:Turning the Basic Maneuvers
7 How Robots Move (34 min) Robot Drive Systems (32 min)
Chapter 4: Boe-Bot Navigation Act #3: Calculating Distances Act #4: Maneuvers- Ramping Act #5: Simple Navigation with Subroutines
8 Autonomous Motion and AI (36 min) Robotic Sensors (34 min)
Chapter 5: Tactile Navigation with Whiskers Act #1: Building and Testing the Whiskers Act #2: Field Testing the Whiskers Act #3: Navigation with Whiskers Act #4: Artificial Intelligence
9 Controlling Motion (30 min) ROVs and Autonomous Vehicles Part 1 (37 min) and Part 2 (29 min)
Chapter 6: Light Sensitive Navigation Act #1: Binary Light Sensor Act #2: Measure Light Levels Act #3: Light Sensitivity Adjustments
Exploring Robotics Boe-Bot Activities Guide
Exploring Robotics with Electronics Page: 11
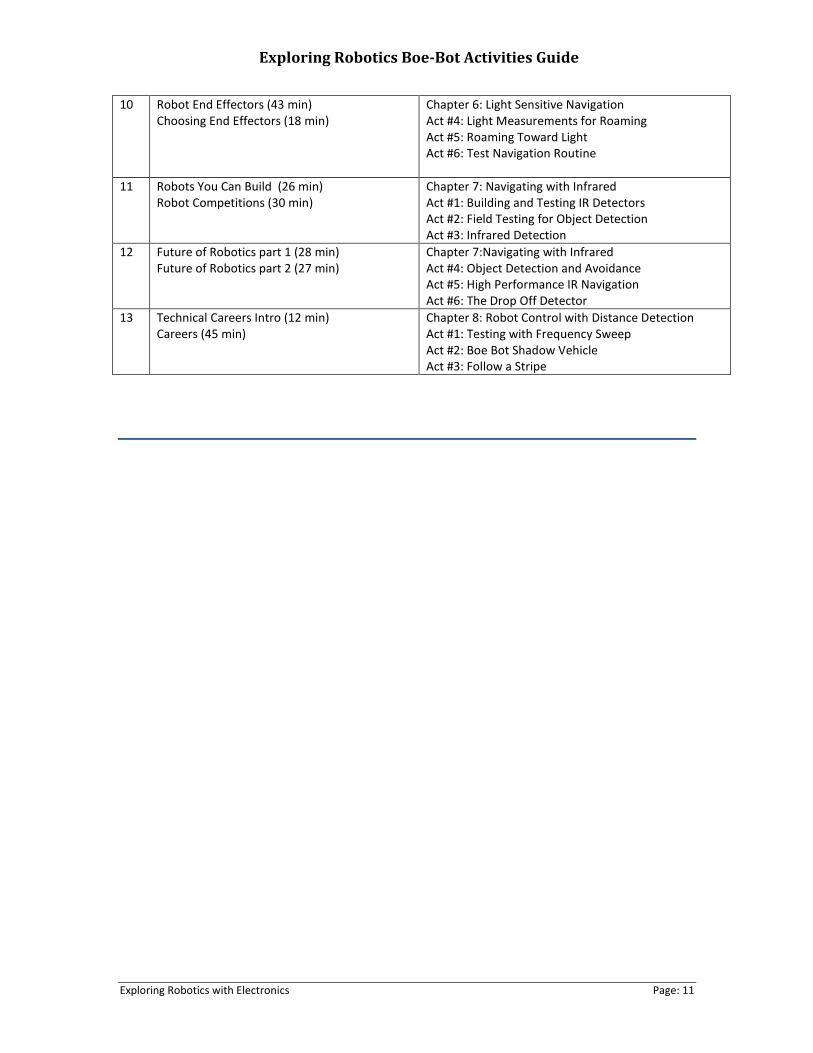
10 Robot End Effectors (43 min) Choosing End Effectors (18 min)
Chapter 6: Light Sensitive Navigation Act #4: Light Measurements for Roaming Act #5: Roaming Toward Light Act #6: Test Navigation Routine
11 Robots You Can Build (26 min) Robot Competitions (30 min)
Chapter 7: Navigating with Infrared Act #1: Building and Testing IR Detectors Act #2: Field Testing for Object Detection Act #3: Infrared Detection
12 Future of Robotics part 1 (28 min) Future of Robotics part 2 (27 min)
Chapter 7:Navigating with Infrared Act #4: Object Detection and Avoidance Act #5: High Performance IR Navigation Act #6: The Drop Off Detector
13 Technical Careers Intro (12 min) Careers (45 min)
Chapter 8: Robot Control with Distance Detection Act #1: Testing with Frequency Sweep Act #2: Boe Bot Shadow Vehicle Act #3: Follow a Stripe

Exploring Robotics Boe-Bot Activities Guide
Exploring Robotics with Electronics Page: 12

Exploring Robotics Boe-Bot Activities Guide
Exploring Robotics with Electronics Page: 13
SECTION 1: SOFTWARE USAGE INSTRUCTIONS

Exploring Robotics Boe-Bot Activities Guide
Exploring Robotics with Electronics Page: 14
Exploring Robotics Boe-Bot Activities Guide
Exploring Robotics with Electronics Page: 15
Sketchy Labs Software
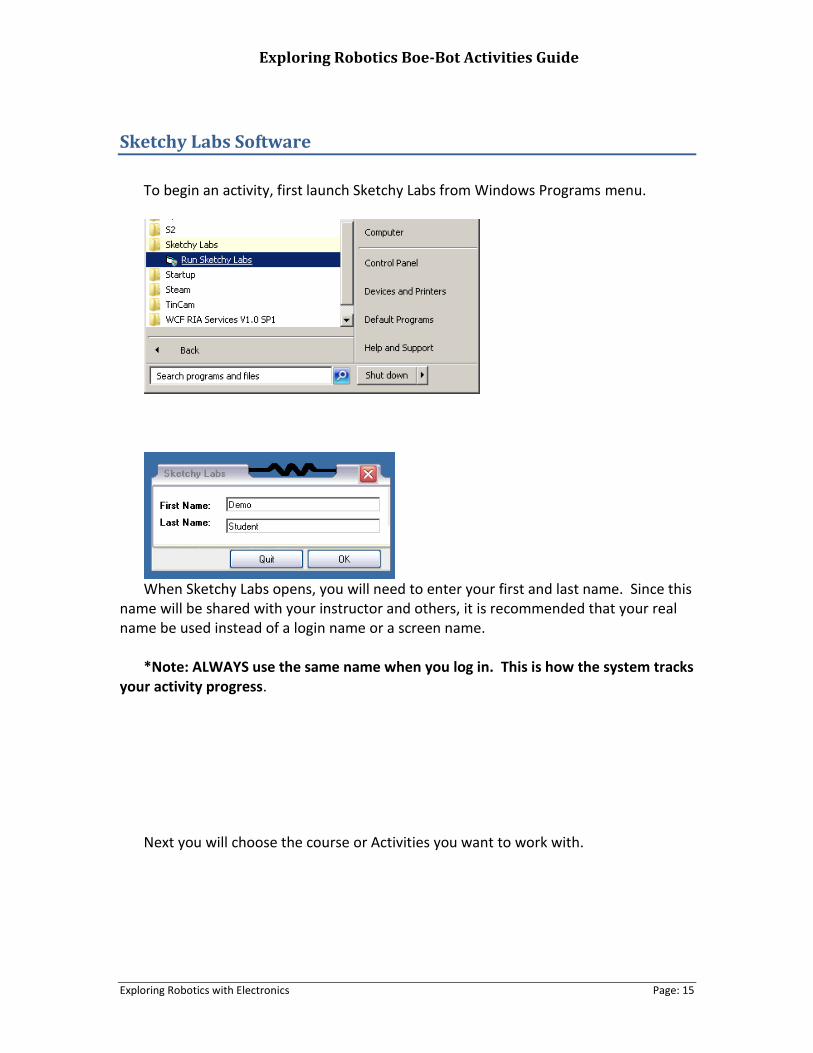
To begin an activity, first launch Sketchy Labs from Windows Programs menu.
When Sketchy Labs opens, you will need to enter your first and last name. Since this
name will be shared with your instructor and others, it is recommended that your real name be used instead of a login name or a screen name.
*Note: ALWAYS use the same name when you log in. This is how the system tracks
your activity progress. Next you will choose the course or Activities you want to work with.
Exploring Robotics Boe-Bot Activities Guide
Exploring Robotics with Electronics Page: 16
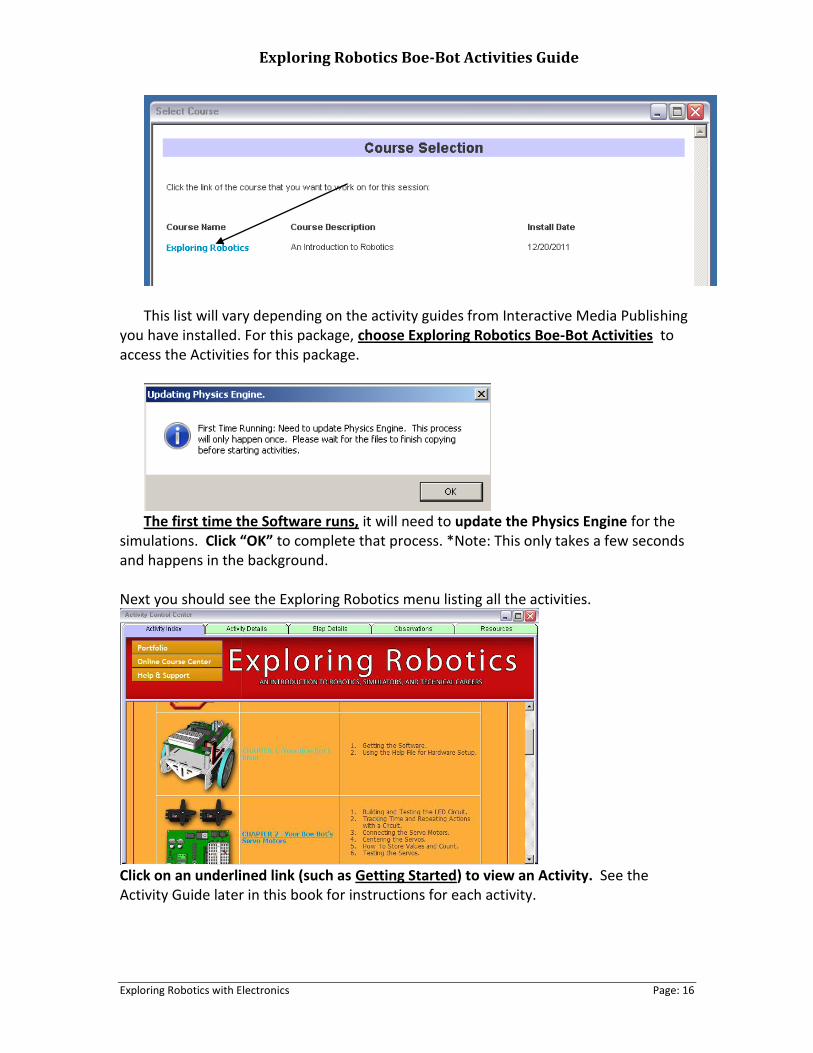
This list will vary depending on the activity guides from Interactive Media Publishing
you have installed. For this package, choose Exploring Robotics Boe-Bot Activities to access the Activities for this package.
The first time the Software runs, it will need to update the Physics Engine for the
simulations. Click “OK” to complete that process. *Note: This only takes a few seconds and happens in the background.
Next you should see the Exploring Robotics menu listing all the activities.
Click on an underlined link (such as Getting Started) to view an Activity. See the Activity Guide later in this book for instructions for each activity.
Exploring Robotics Boe-Bot Activities Guide
Exploring Robotics with Electronics Page: 17
Viewing Models in Google SketchUp
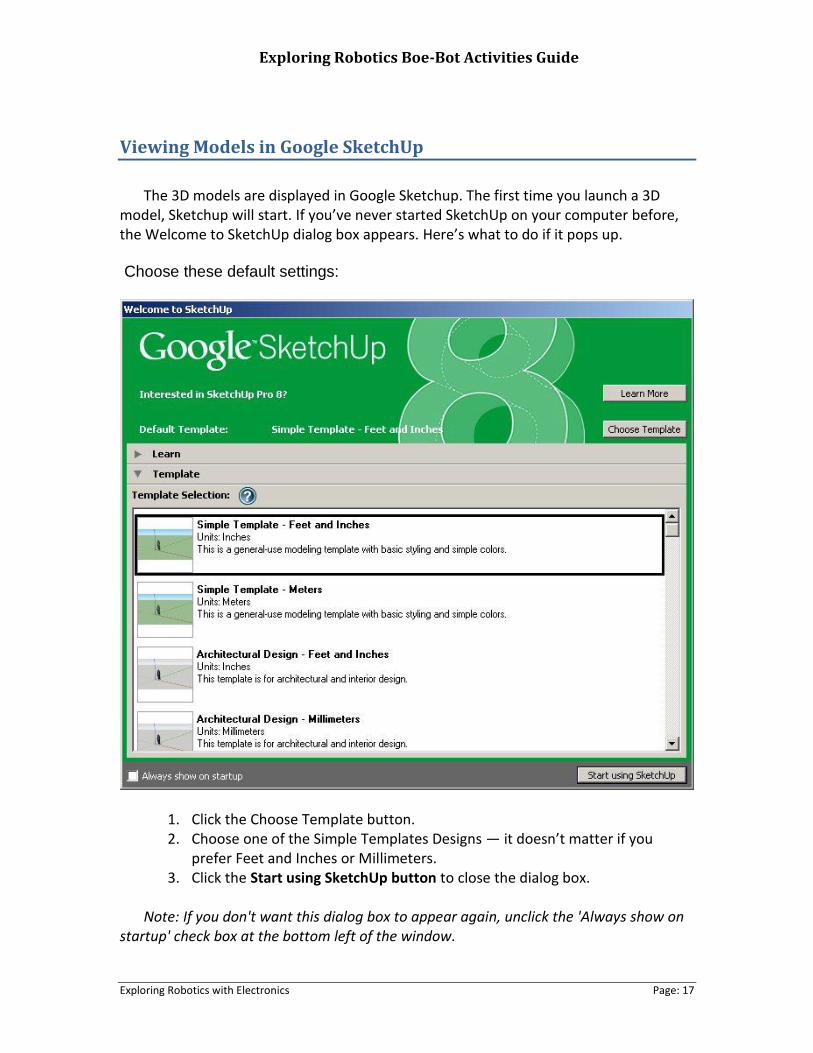
The 3D models are displayed in Google Sketchup. The first time you launch a 3D
model, Sketchup will start. If you’ve never started SketchUp on your computer before, the Welcome to SketchUp dialog box appears. Here’s what to do if it pops up.
Choose these default settings:
1. Click the Choose Template button. 2. Choose one of the Simple Templates Designs — it doesn’t matter if you
prefer Feet and Inches or Millimeters. 3. Click the Start using SketchUp button to close the dialog box.
Note: If you don't want this dialog box to appear again, unclick the 'Always show on
startup' check box at the bottom left of the window.
Exploring Robotics Boe-Bot Activities Guide
Exploring Robotics with Electronics Page: 18
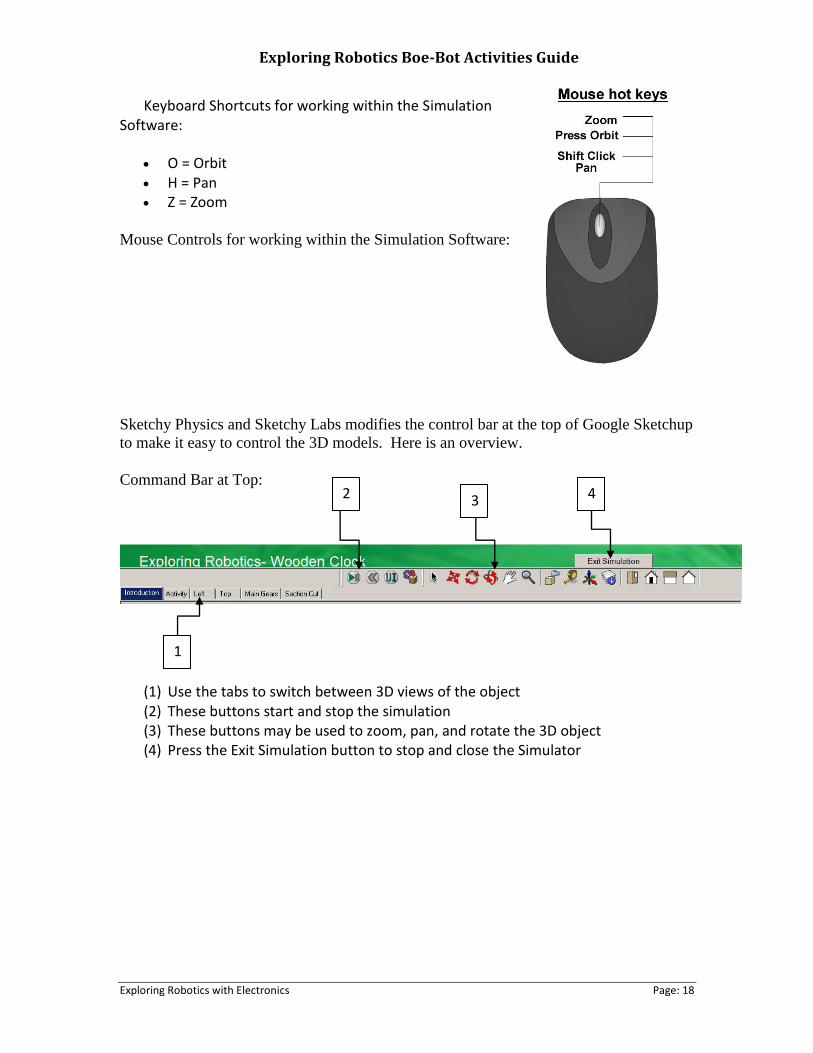
Keyboard Shortcuts for working within the Simulation Software:
O = Orbit H = Pan Z = Zoom
Mouse Controls for working within the Simulation Software:
Sketchy Physics and Sketchy Labs modifies the control bar at the top of Google Sketchup
to make it easy to control the 3D models. Here is an overview.
Command Bar at Top:
(1) Use the tabs to switch between 3D views of the object (2) These buttons start and stop the simulation (3) These buttons may be used to zoom, pan, and rotate the 3D object (4) Press the Exit Simulation button to stop and close the Simulator
1
2 3 4
Exploring Robotics Boe-Bot Activities Guide
Exploring Robotics with Electronics Page: 19
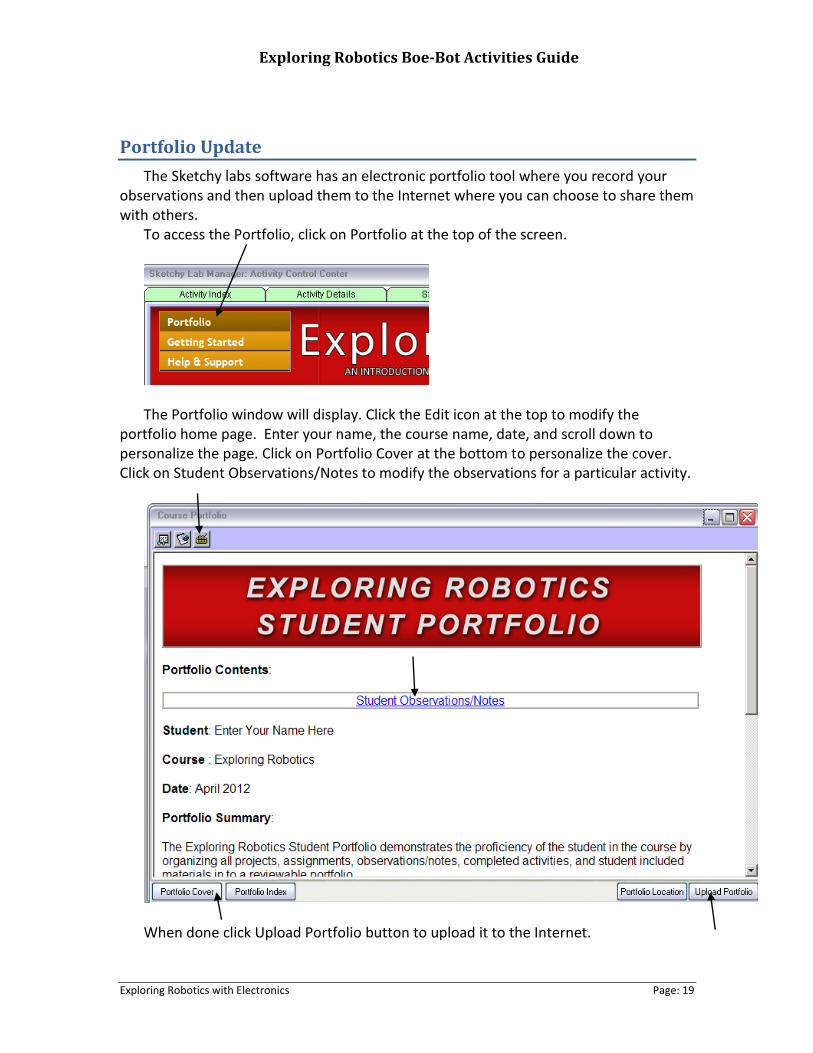
Portfolio Update
The Sketchy labs software has an electronic portfolio tool where you record your observations and then upload them to the Internet where you can choose to share them with others.
To access the Portfolio, click on Portfolio at the top of the screen.
The Portfolio window will display. Click the Edit icon at the top to modify the
portfolio home page. Enter your name, the course name, date, and scroll down to personalize the page. Click on Portfolio Cover at the bottom to personalize the cover. Click on Student Observations/Notes to modify the observations for a particular activity.
When done click Upload Portfolio button to upload it to the Internet.
Exploring Robotics Boe-Bot Activities Guide
Exploring Robotics with Electronics Page: 20
Screen Capture or Optional Video Capture
You will need to independently learn how to use screen or video capturing software
tools on your computer so that you can turn in pictures (or optionally video) of your completed assignments. Captured files are to be saved to your computer and then attached to the observations section in the Lab Manager, so they can be sent to your instructor or lab mentor for review.
Note: Many video capture tools create huge files (over 100 MB). It is recommended
that file sizes be kept to under 10 MB so they can easily be transmitted and retrieved. Reducing the size of the video or modifying its format can reduce the file size, but keep in mind that it must be easy to view the video. Another option to consider is to post the video to YouTube or other video site (set the options so that the video is not open for public viewing) and put a link to the video in the assignment.
Here are some websites that provide a list of screen capture tool for review: http://lifehacker.com/5218155/five-best-screen-capture-tools
http://www.techsupportalert.com/best-free-screen-capture-utility.htm
Here are some websites that provide video screen capture tools for review:
http://download.cnet.com/windows/video-capture-software/
http://www.nchsoftware.com/capture/index.html
Inserting a Video into your Observations
To insert a screen recording into the portfolio tool, first you must upload the video to www.youtube.com If you have an existing account you can use that, or you can make a new free account.
Once you have logged into your account, you can upload the screen recording or
video you have taken of your robot or simulation. Youtube.com will convert the video and prepare to so it can be viewed online.
Exploring Robotics Boe-Bot Activities Guide
Exploring Robotics with Electronics Page: 21
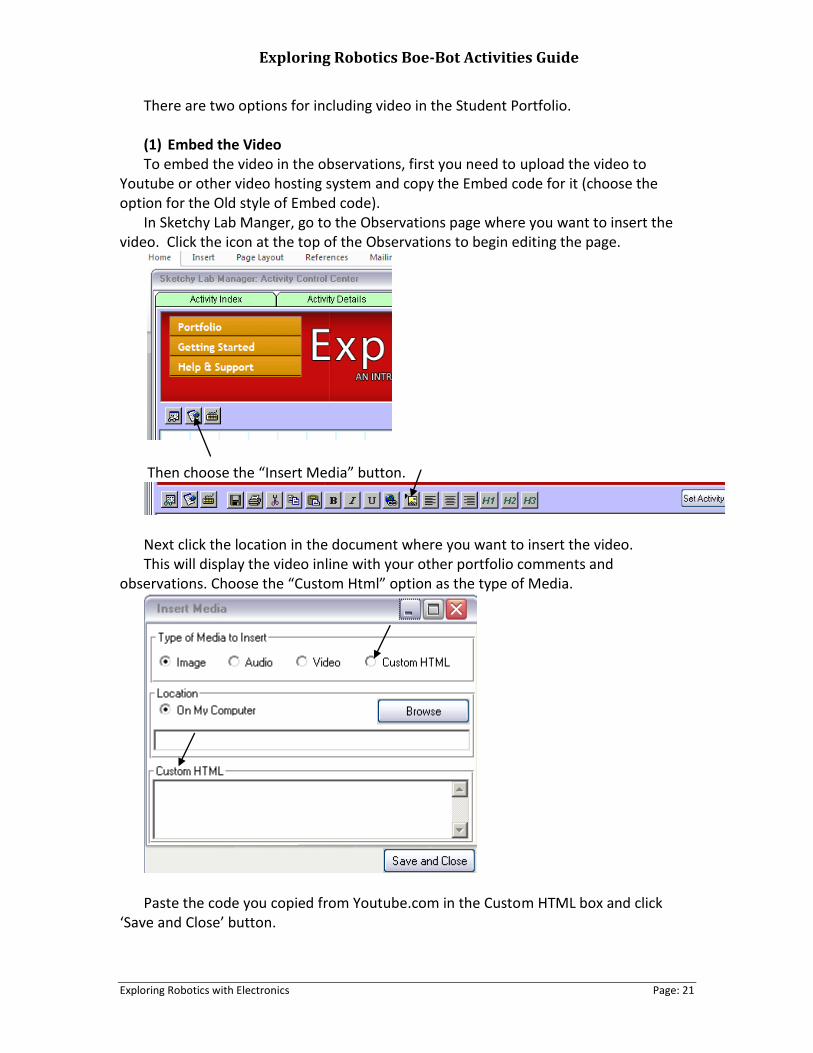
There are two options for including video in the Student Portfolio. (1) Embed the Video To embed the video in the observations, first you need to upload the video to
Youtube or other video hosting system and copy the Embed code for it (choose the option for the Old style of Embed code).
In Sketchy Lab Manger, go to the Observations page where you want to insert the video. Click the icon at the top of the Observations to begin editing the page.
Then choose the “Insert Media” button.
Next click the location in the document where you want to insert the video. This will display the video inline with your other portfolio comments and
observations. Choose the “Custom Html” option as the type of Media.
Paste the code you copied from Youtube.com in the Custom HTML box and click
‘Save and Close’ button.
Exploring Robotics Boe-Bot Activities Guide
Exploring Robotics with Electronics Page: 22
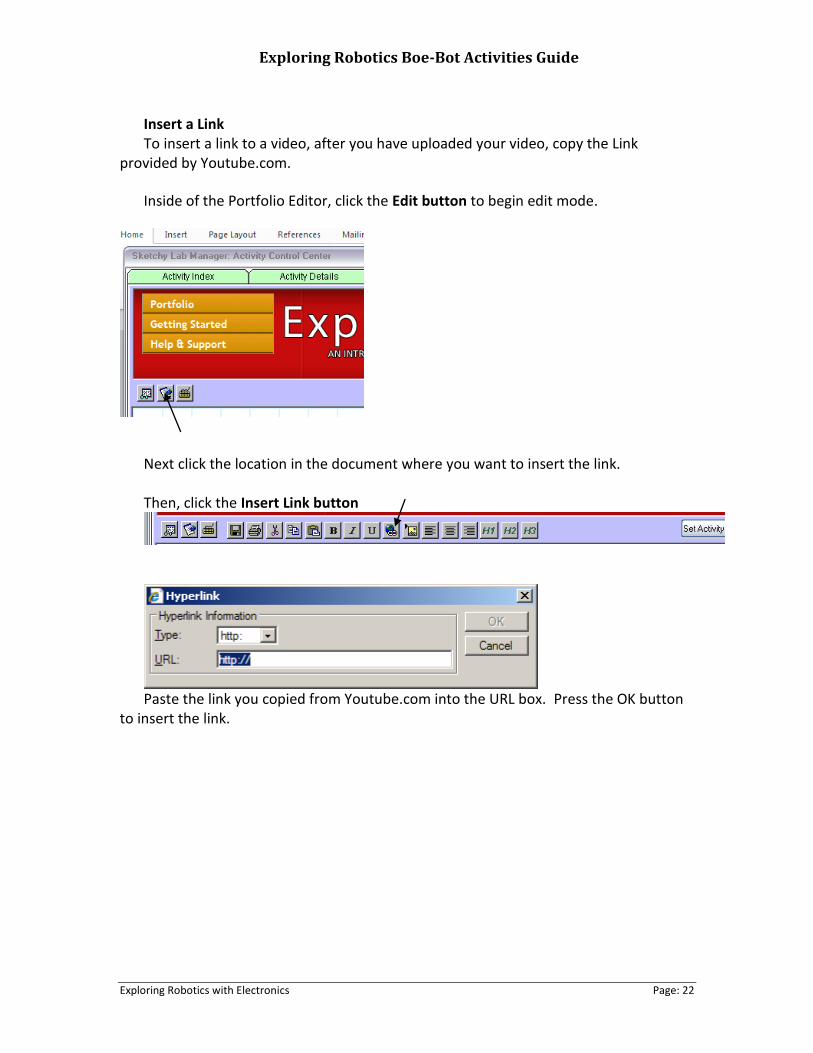
Insert a Link To insert a link to a video, after you have uploaded your video, copy the Link
provided by Youtube.com.
Inside of the Portfolio Editor, click the Edit button to begin edit mode.
Next click the location in the document where you want to insert the link. Then, click the Insert Link button
Paste the link you copied from Youtube.com into the URL box. Press the OK button
to insert the link.
Exploring Robotics Boe-Bot Activities Guide
Exploring Robotics with Electronics Page: 23
Using the Code Assist Software
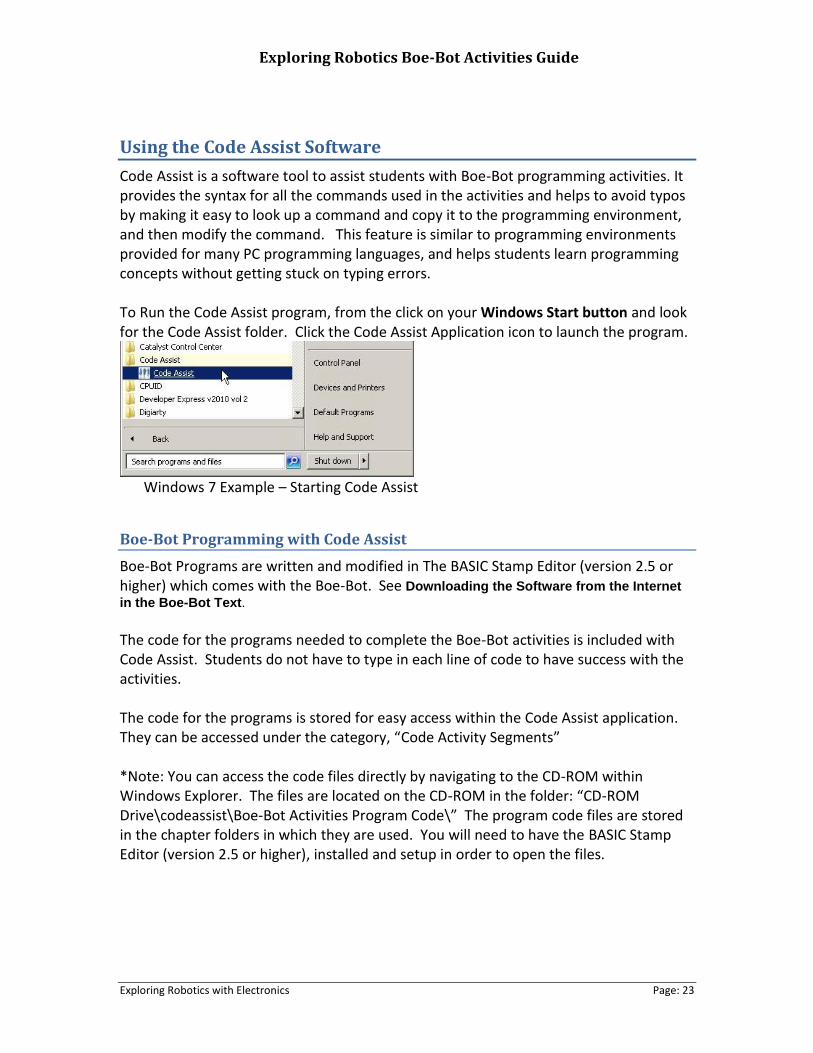
Code Assist is a software tool to assist students with Boe-Bot programming activities. It provides the syntax for all the commands used in the activities and helps to avoid typos by making it easy to look up a command and copy it to the programming environment, and then modify the command. This feature is similar to programming environments provided for many PC programming languages, and helps students learn programming concepts without getting stuck on typing errors. To Run the Code Assist program, from the click on your Windows Start button and look for the Code Assist folder. Click the Code Assist Application icon to launch the program.
Windows 7 Example – Starting Code Assist
Boe-Bot Programming with Code Assist
Boe-Bot Programs are written and modified in The BASIC Stamp Editor (version 2.5 or higher) which comes with the Boe-Bot. See Downloading the Software from the Internet
in the Boe-Bot Text.
The code for the programs needed to complete the Boe-Bot activities is included with Code Assist. Students do not have to type in each line of code to have success with the activities. The code for the programs is stored for easy access within the Code Assist application. They can be accessed under the category, “Code Activity Segments” *Note: You can access the code files directly by navigating to the CD-ROM within Windows Explorer. The files are located on the CD-ROM in the folder: “CD-ROM Drive\codeassist\Boe-Bot Activities Program Code\” The program code files are stored in the chapter folders in which they are used. You will need to have the BASIC Stamp Editor (version 2.5 or higher), installed and setup in order to open the files.
Exploring Robotics Boe-Bot Activities Guide
Exploring Robotics with Electronics Page: 24
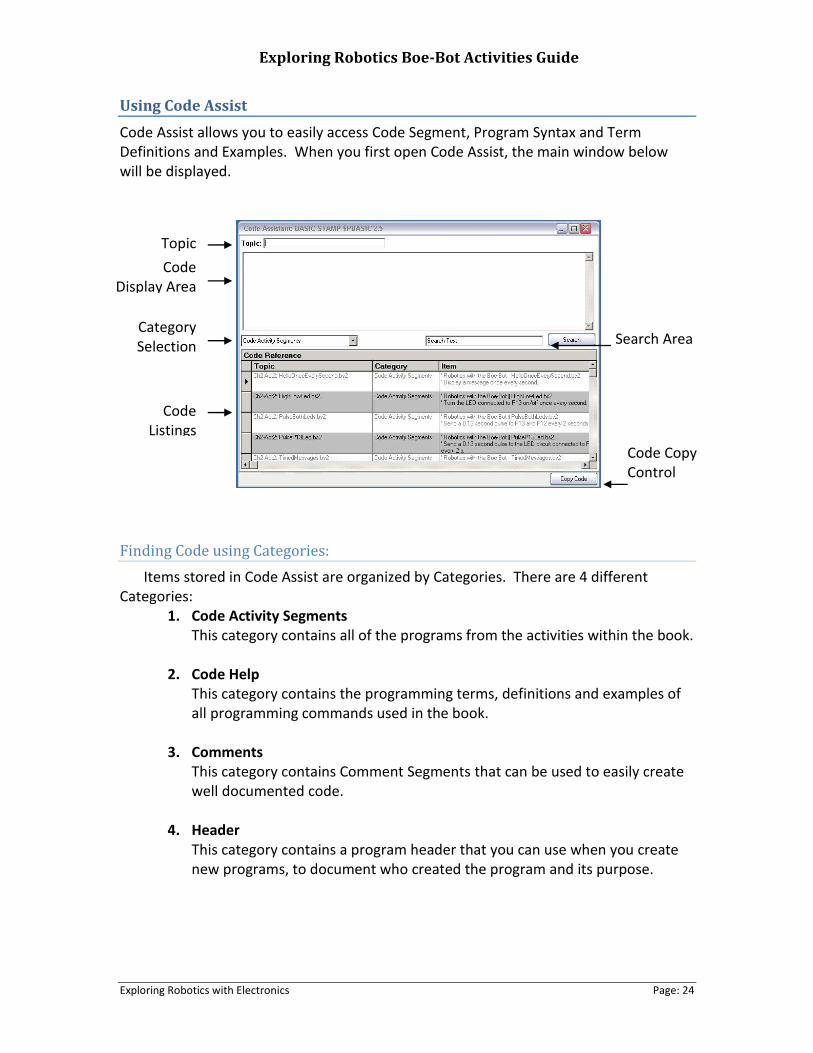
Using Code Assist
Code Assist allows you to easily access Code Segment, Program Syntax and Term Definitions and Examples. When you first open Code Assist, the main window below will be displayed.
Finding Code using Categories:
Items stored in Code Assist are organized by Categories. There are 4 different Categories:
1. Code Activity Segments This category contains all of the programs from the activities within the book.
2. Code Help This category contains the programming terms, definitions and examples of all programming commands used in the book.
3. Comments This category contains Comment Segments that can be used to easily create well documented code.
4. Header This category contains a program header that you can use when you create new programs, to document who created the program and its purpose.
Search Area
Code Display Area
Code Listings
Category Selection
Code Copy Control
Topic Name
Exploring Robotics Boe-Bot Activities Guide
Exploring Robotics with Electronics Page: 25
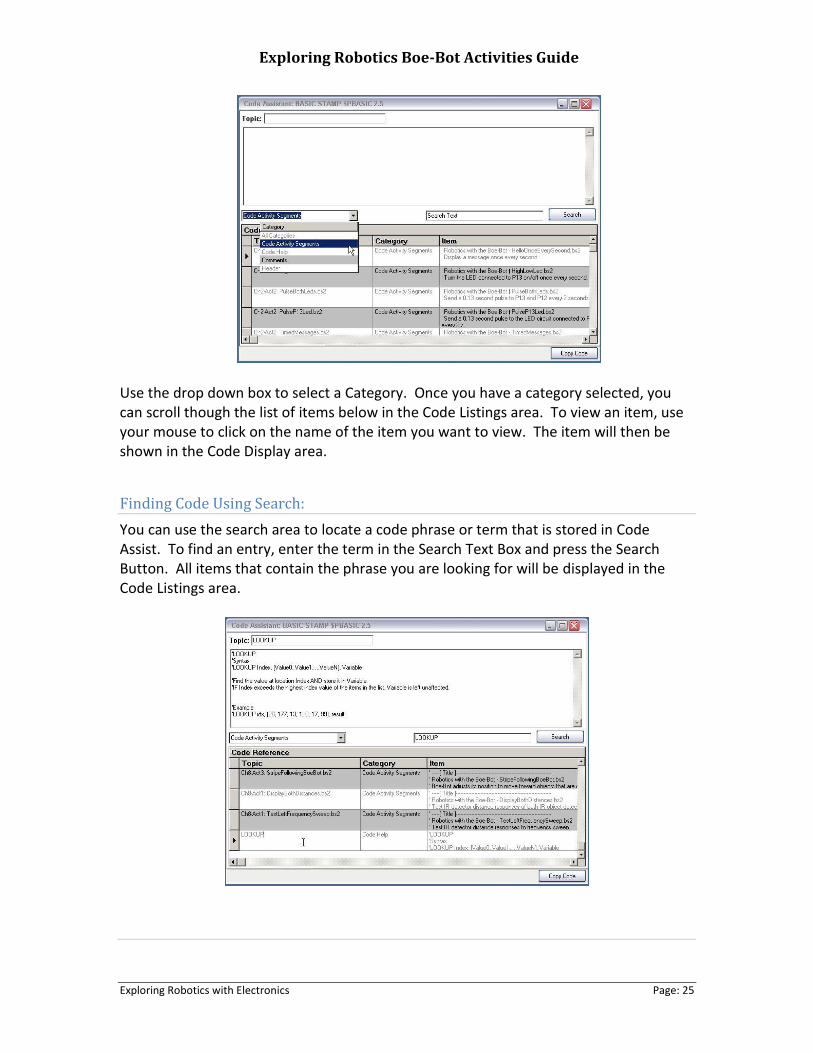
Use the drop down box to select a Category. Once you have a category selected, you can scroll though the list of items below in the Code Listings area. To view an item, use your mouse to click on the name of the item you want to view. The item will then be shown in the Code Display area.
Finding Code Using Search:
You can use the search area to locate a code phrase or term that is stored in Code Assist. To find an entry, enter the term in the Search Text Box and press the Search Button. All items that contain the phrase you are looking for will be displayed in the Code Listings area.
Exploring Robotics Boe-Bot Activities Guide
Exploring Robotics with Electronics Page: 26
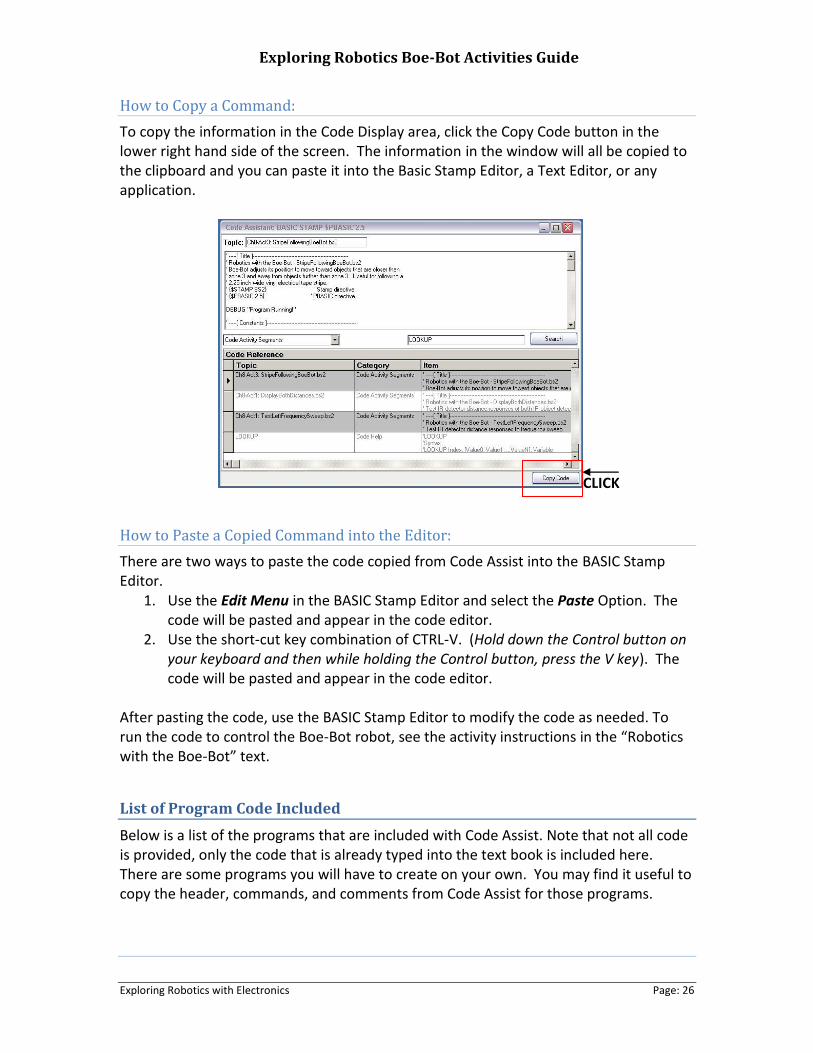
How to Copy a Command:
To copy the information in the Code Display area, click the Copy Code button in the lower right hand side of the screen. The information in the window will all be copied to the clipboard and you can paste it into the Basic Stamp Editor, a Text Editor, or any application.
CLICK
How to Paste a Copied Command into the Editor:
There are two ways to paste the code copied from Code Assist into the BASIC Stamp Editor.
1. Use the Edit Menu in the BASIC Stamp Editor and select the Paste Option. The code will be pasted and appear in the code editor.
2. Use the short-cut key combination of CTRL-V. (Hold down the Control button on your keyboard and then while holding the Control button, press the V key). The code will be pasted and appear in the code editor.
After pasting the code, use the BASIC Stamp Editor to modify the code as needed. To run the code to control the Boe-Bot robot, see the activity instructions in the “Robotics with the Boe-Bot” text.
List of Program Code Included
Below is a list of the programs that are included with Code Assist. Note that not all code is provided, only the code that is already typed into the text book is included here. There are some programs you will have to create on your own. You may find it useful to copy the header, commands, and comments from Code Assist for those programs.
Exploring Robotics Boe-Bot Activities Guide
Exploring Robotics with Electronics Page: 27
Chapter 2
Ch2-Act2: TimedMessages.bs2 Ch2-Act2: HelloOnceEverySecond.bs2 Ch2-Act2: HighLowLed.bs2 Ch2-Act2: PulseP13Led.bs2 Ch2-Act2: PulseBothLeds.bs2 Ch2-Act4: CenterServoP12.bs2 Ch2-Act4: CenterServoP13.bs2 Ch2-Act5: VariablesAndSimpleMath.bs2 Ch2-Act5: CountToTen.bs2 Ch2-Act6: ServoP13Clockwise.bs2 Ch2-Act6: ServoP12Clockwise.bs2 Ch2-Act6: 12Counterclockwise.bs2 Ch2-Act6: ServosP13CcwP12Cw.bs2 Ch2-Act6: ControlServoRunTimes.bs2 Ch2-Act6: BothServosThreeSeconds.bs2
Chapter 3
Ch3-Act2: RightServoTest.bs2 Ch3-Act3: StartResetIndicator.bs2 Ch3-Act4: TestServoSpeed.bs2
Chapter 4
Ch4-Act1: BoeBotForwardThreeSeconds.bs2 Ch4-Act1: ForwardLeftRightBackward.bs2 Ch4-Act2: BoeBotForwardTenSeconds.bs2 Ch4-Act3: ForwardOneSecond.bs2 Ch4-Act4: StartAndStopWithRamping.bs2 Ch4-Act5: OneSubroutine.bs2 Ch4-Act5: TwoSubroutines.bs2 Ch4-Act5: MovementWithVariablesAndOneSubroutine.bs2 Ch4-Act6: EepromNavigation.bs2
Chapter 5
Ch5-Act1: TestWhiskers.bs2 Ch5-Act2: TestWhiskersWithLeds.bs2 Ch5-Act3: RoamingWithWhiskers.bs2 Ch5-Act4: EscapingCorners.bs2
Chapter 6
Exploring Robotics Boe-Bot Activities Guide
Exploring Robotics with Electronics Page: 28
Ch6-Act1: TestBinaryPhototransistor.bs2 Ch6-Act2: TestP6LightSense.bs2 Ch6-Act2: HalfLightSensitivity.bs2 Ch6-Act3: HighVsPwmInRctime.bs2 Ch6-Act3: TestMaxDarkWithHighPause.bs2 Ch6-Act3: TestMaxDarkWithPwm.bs2 Ch6-Act4: LightSensorValues.bs2
Chapter 7
Ch7-Act1: TestLeftIr.bs2 Ch7-Act2: TestBothIrAndIndicators.bs2 Ch7-Act2: IrInterferenceSniffer.bs2 Ch7-Act3: P1LedHigh.bs2 Ch7-Act4: RoamingWithIr.bs2 Ch7-Act5: FastIrRoaming.bs2 Ch7-Act6: AvoidTableEdge.bs2
Chapter 8
Ch8-Act1: TestLeftFrequencySweep.bs2 Ch8-Act1: DisplayBothDistances.bs2 Ch8-Act2: FollowingBoeBot.bs2 Ch8-Act3: StripeFollowingBoeBot.bs2

Exploring Robotics Boe-Bot Activities Guide
Exploring Robotics with Electronics Page: 29
Section 2: ACTIVITIES

Exploring Robotics Boe-Bot Activities Guide
Exploring Robotics with Electronics Page: 30
Exploring Robotics Boe-Bot Activities Guide
Exploring Robotics with Electronics Page: 31
Getting Started
In this activity you will view some introductory videos and become familiar with the learning environment. You will view a simulation and learn how to operate the simulator software. You will also answer some questions to demonstrate that you know how to use the simulation software and the Portfolio tool and post your answers online.
Outcomes:
By the time students complete this section they will be able to: 1. Start the Simulator software and view a model in 3D 2. Use technology: Operate the 3D software tools to pan, rotate, and zoom a 3D
model 3. Demonstrate understanding of the application of robots 4. Demonstrate understanding of robot mobility mechanisms and applications 5. Compare and contrast ROVs (Remote Operated Vehicles), autonomous robots,
and telerobotics 6. Describe Asimov’s three laws of robots and why they are important 7. Take a screen shot and include the screen shot in the observations 8. Communicate with technology: Upload observations to the online Portfolio tool
and share the link
Assignment:
1. If you are working on your own and not part of a lab, read and follow the Software Setup Tutorial instructions (in a separate book) to install the 4 software programs.
2. View the videos in the video section of this lesson. 3. Follow the instructions below for viewing a 3D model in Sketchy Labs. 4. Answer the questions in the Observations section. 5. When complete, upload your Observations page to your online portfolio area
and send a link to your portfolio to your instructor. (Self-study students can optionally send a link to a mentor or friend).
Viewing Videos
To view the videos, click on the underlined link below. The videos will open in a new window and display in your Internet Browser or Media Player and are in MPG format. Use the controls below the video to start, stop, pause, and play the video.
The videos are best viewed full screen. Click the X to the far right in the player bar below the video to display the video full screen, and press the ESC key to return to regular viewing size.
Exploring Robotics Boe-Bot Activities Guide
Exploring Robotics with Electronics Page: 32
Videos and Simulations:
• Introduction to Robotics • How to work in the simulator and lab environment to complete activities:
Getting Started Video • See an example of the practice activity: Demonstration Video: Working in the
Simulation World • Sample Activity - Wooden Clock in a 3D World • How to use Code Assist
Parallax Boe-Bot and Book
The following Parallax Boe-Bot package and book are required to complete the
activities:
Boe-Bot Robot Kit Serial with USB adapter and cable
Robotics with the Boe-Bot Student Guide Version 3.0 (PDF document is included with this package)
Key Points or FAQs:
To get started, you need to become comfortable with this learning environment and
with using the software tools that accompany this package. This series of activities has been created to provide a safe environment for learning
about robots and how they are controlled, and to build and program your own personal robot. The following items are provided on the CD and book with this package (or are accessed online as downloads):
This written Activity Instruction Guide
Simulator Software Tools (Google Sketchup and Sketchy Physics)
Sketchy Lab Manager and Online Portfolio software
Code Assist software
Activity instructions and assignments (with links to videos and other online content)
The software was installed when you installed the items on the CD.
Self-Paced Instruction
The Boe-Bot Activities may be completed on their own, or they may be used with
Exploring Robotics for Electronics Presentations and Exploring Robotics for Electronics Simulation Activities. Each instructor decides how the course is configured.
Exploring Robotics Boe-Bot Activities Guide
Exploring Robotics with Electronics Page: 33
If this package is being used as part of a course, please review the syllabus for your course and the assignments provided.
Your instructor will specify which Boe-Bot Chapters and activities to complete, the
order they are to be completed, which assignments to complete, and when assignments are due to be turned in.
Recommendations For Self-Study
If you are working on your own and not as part of a course, we have the following recommendations:
(1) Change the Order. Complete Chapters 1 through 5, then skip Chapter 6 and proceed with Chapters 7 and 8, and then go back to Chapter 6.
(2) Locate Assistance. Find a mentor online to work with who will provide assistance when you are stuck. The online portfolio tool can be used to document your code and include screen shots and video of the Boe-Bot which are helpful in debugging problems. You can send a link to your mentor. You may also find it useful to use Skype or other video conferencing tools to communicate.
(3) Do the work. Just like athletics, programming requires practice. Do each activity, follow the book step by step, and also complete all the Your Turn sections and the Projects. Don’t just copy and paste the code, read it. The only way to learn programming is to actually type in the commands, make mistakes, and learn from your mistakes. Try answering the questions at the end of each chapter to see if you understand the concepts. Then check your answers.
Simulator Software Tools
Before you can complete the activities, the software tools that came with the
activities must be installed on your computer. The simulation software that is being used is a combination of three tools:
Google Sketchup,
Sketchy Physics, and
Sketchy Lab Manager. These tools are designed to work together seamlessly, but each has its own controls. Please refer to the Software Setup Tutorial section in this book to make sure the
software is installed and configured correctly before proceeding.
The Sketchy Lab Manager
The Sketchy Lab Manager provides tools to track your progress through the activities
and report the activity completion to an instructor, mentor, or lab guide. An email

Exploring Robotics Boe-Bot Activities Guide
Exploring Robotics with Electronics Page: 34
address is required for both you and your instructor. Sketchy Lab Manager will transfer your completed activity to the Exploring Robotics website and send an email to your instructor to retrieve it. This eliminates the need for having to send large files via email.
Introduction to the 3D Simulator Tools
In this activity we will learn how to manipulate a 3D environment within the simulation tool. The objective is to learn how to use the simulation software and the lab management environment that will be used in all the activities.
You will be using a simulator that provides a 3D
virtual world. With it, you will be able to view 3D models of Boe-Bot in various wiring configurations to match the activities. You will also be able to control a 3D Boe-Bot to complete an obstacle course, record your best time, and compare it to others.
What is 3D? 3D means three-dimensional, or in
other words, something that has width, height and depth. In our daily environment, we live in a three dimensional world. Everything we see is three-dimensional. From a cup of coffee, to a magazine to the people we interact with, everything is defined by having 3 Dimensions (X, Y, and Z as shown here).
We can easily determine 3D in the real world due to Depth perception. As we view
the world, our brain processes the information from each of our eyes and combines that data into a 3D image that we see when we look at trees, buildings and other people.
So, how do we view 3D objects on a flat, 2D computer monitor? With a computer
monitor, all we have available is 2 Dimensions: width and height. To create the perception of a 3rd Dimension, the computer uses simulation. The computer application simulates many of the items required to perceive an item as 3D that our brain normally does every time we look at something. Perspective, size, and the ability to rotate objects in 3D spaces allow us to interpret a 2D object on a monitor fairly accurately as a 3D representation. Remember, the item on the monitor is still 2-Dimensional; however the simulation software allows us to design and interact with objects as if they were 3D.
Viewing a 3D Model
As part of this activity you are asked to view a 3D model. The simulation software
that is being is used in the course is a combination of three tools: Google Sketchup,
Exploring Robotics Boe-Bot Activities Guide
Exploring Robotics with Electronics Page: 35
Sketchy Physics, and Sketchy Lab Manager. These tools are designed to work together seamlessly, but each has its own controls.
This activity provides practice in using the controls to get
around in the environment. Please refer to the Software Setup Tutorial to make sure the simulation software is installed and configured correctly before proceeding with this activity.
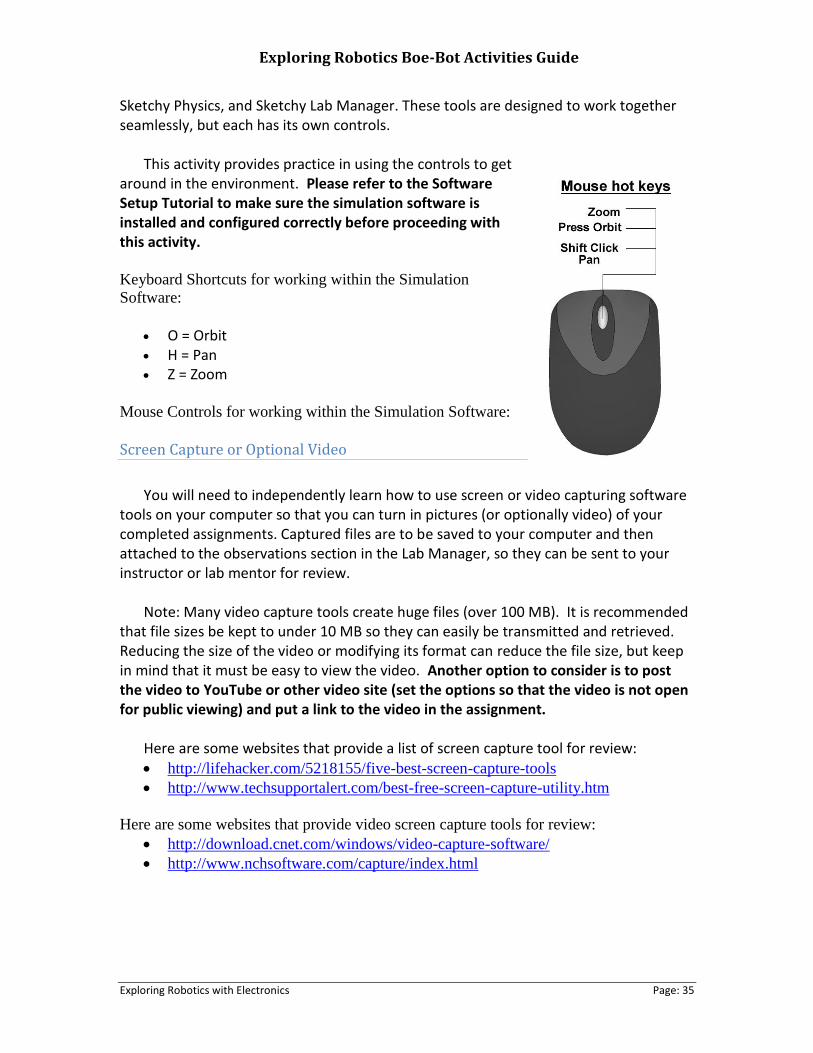
Keyboard Shortcuts for working within the Simulation
Software:
O = Orbit H = Pan Z = Zoom
Mouse Controls for working within the Simulation Software:
Screen Capture or Optional Video
You will need to independently learn how to use screen or video capturing software
tools on your computer so that you can turn in pictures (or optionally video) of your completed assignments. Captured files are to be saved to your computer and then attached to the observations section in the Lab Manager, so they can be sent to your instructor or lab mentor for review.
Note: Many video capture tools create huge files (over 100 MB). It is recommended
that file sizes be kept to under 10 MB so they can easily be transmitted and retrieved. Reducing the size of the video or modifying its format can reduce the file size, but keep in mind that it must be easy to view the video. Another option to consider is to post the video to YouTube or other video site (set the options so that the video is not open for public viewing) and put a link to the video in the assignment.
Here are some websites that provide a list of screen capture tool for review:
http://lifehacker.com/5218155/five-best-screen-capture-tools
http://www.techsupportalert.com/best-free-screen-capture-utility.htm
Here are some websites that provide video screen capture tools for review:
http://download.cnet.com/windows/video-capture-software/
http://www.nchsoftware.com/capture/index.html
Exploring Robotics Boe-Bot Activities Guide
Exploring Robotics with Electronics Page: 36
Activity Procedure:
To apply the concepts of 3D and simulations and explore the Sample 3D Model, follow these steps. These steps are demonstrated in the activity videos above.
1. To run the Simulation Software, click here to Launch the Activity. 2. Once the Activity has been opened, review the Activity Goals from the
Introduction Tab then click on the Activity Tab 3. Use the Zoom, Pan and Orbit tools within the simulator to explore the Wooden
Clock. 4. Get comfortable with using Keyboard Shortcuts (Hot-Keys) to move between the
Zoom, Pan and Orbit tools. 5. Use the Lab Manager Observation section to Log your Observations of this
Drawing.
6. Exit the simulation tool by clicking on the Exit Button.
Observations
1. What kinds of things can robots do? Name at least four applications. What are robots best at?
2. Name three ways that robots use to move themselves other than wheels and tracks. Describe the application when each method is used.
3. List Asimov’s three laws of robots. Why are these important? 4. Look up Telerobotics on Wikipedia. Then compare and contrast ROVs (Remote
Operated Vehicles), autonomous robots, and telerobotics. List three similarities: List three differences: 5. Find the small robot in the clock 3D model (tip: use rotate and zoom in). Take a
screen capture of the 3D model showing the robot and include it here. (This lets your instructor know that you were able to operate the 3D tools and are ready to proceed with the other activities).
Exploring Robotics Boe-Bot Activities Guide
Exploring Robotics with Electronics Page: 37
Chapter 1: Your Boe-Bot’s Brain
Outcomes: By the time you complete this section you will be able to: 1. Unpack the Boe-Bot box and verify that all parts are available 2. Install the Parallax Basic Stamp software for Boe-Bot 3. Setup the basic stamp hardware 4. Test the hardware and software connection for the Microcontroller 5. Understand how the Boe-Bot is connected to the Comm Port of the computer 6. Find and use the Help file for the Basic Stamp 7. Write and run a simple PBasic program 8. Demonstrate understanding of safety practices and the hazards encountered
while working with robots 9. Demonstrate understanding of prevention measures and first aid for the types of
injuries that may occur with robots
Assignments:
1. View the videos in the video section of this lesson. 2. Read and follow the instructions in Robotics with the Boe-Bot Chapter 1. 3. Complete the Boe-Bot activities assigned by your instructor. If self-study, do all
the “Your Turn” parts for each activity in the chapter. Fill out the Observations section in this lesson for each Activity. (Note: It is only by typing in the commands that you truly begin to understand programming. So don’t short change yourself.)
4. Review the Key Points or FAQs below. 5. Use the Observations again to Answer the questions at the end of the chapter. 6. Check your answers. 7. When complete, upload the Observations to your online portfolio area and send
a link to your portfolio to your instructor. (Self-study students can optionally send a link to a mentor or friend).
Videos and Simulations:
Chapter 1 Overview Video
Unpacking the Boe-Bot
Bread Board Basics
Resistor Identification
Programming Step-by-Step
Lab Safety
Exploring Robotics Boe-Bot Activities Guide
Exploring Robotics with Electronics Page: 38
Key Points or FAQs:
How do I access the help file?
To access the help file, open the Basic Stamp Editor Program and select “Basic Stamp Help…” from the main Help menu.
How do I connect, power up and power down the BOE?
To power up the BOE, make sure the battery pack has fresh batteries and that the power cord is connected to the power plug on the BOE. Then slide the Power switch to 1 to use just to components on the BOE or to 2 to power up the BOE and the Servos.
What Comm Port is your BOE connected to?
The Comm ports vary on every machine. If you are already connected, the easiest way to view the comm Port is to use the ‘Identify…” option under the ‘Run’ menu in the Basic Stamp Editor. This will show the name of the comm port in use. If this does not work or you don’t know the comm port, in Windows, right click on ‘My Computer’, select ‘Properties’, then select ‘Device Manager’ to view the ‘Ports’ section to see the active comm port.
What file type are the programs saved as?
Basic Stamp program files are saved as *.bs2. For example, Myprogram.bs2 What are the two lines of code you have to have at the beginning of every
program? The two lines of code required for all programs are called Directives. They
tell the program what language is being used and what microcontroller you are working with. They are enclosed in curly braces and begin with a $ dollar sign.
Here is an example: ' {$STAMP BS2} ' {$PBASIC 2.5}
Observations:
Questions
1. How do the Parallax Continuous Rotation servos differ from standard servos?
2. How long does a millisecond last? How do you abbreviate it?
3. What PBASIC commands can you use to make other PBASIC commands
execute over and over again?
Exploring Robotics Boe-Bot Activities Guide
Exploring Robotics with Electronics Page: 39
4. What command causes the BASIC Stamp to internally connect one of its I/O
pins to Vdd? What command makes the same kind of connection, but to Vss?
5. What are the names of the different size variables that can be declared in a
PBASIC program? What size values can each size of variable store?
6. What is the key to controlling a Parallax Continuous Rotation servo’s speed and
direction? How does this relate to timing diagrams? How does it relate to
PBASIC commands? What the command and argument can you adjust to
control a continuous rotation servo’s speed and direction?
7. What are three hazards you may encounter while working with robots and what should
you do to anticipate, mitigate and prevent, and respond to these hazards?
Hazard 1:
Anticipate:
Mitigate & Prevent:
Respond:
Hazard 2:
Anticipate:
Mitigate & Prevent:
Respond:
Hazard 3:
Anticipate:
Mitigate & Prevent:
Respond:
8. Describe the appropriate safety gear and clothing that should be used when
working with robots.
9. Describe prevention measures and first aid for the types of injuries that
could occur while participating in robotics activities and competitions, including
cuts, eye injuries, and burns (chemical or heat). Use http://firstaid.webmd.com as
a reliable source for first aid information.
Cuts: Eye injuries: Burns:
Exploring Robotics Boe-Bot Activities Guide
Exploring Robotics with Electronics Page: 40
Exercises
1. Write a PAUSE command that makes the BASIC Stamp do nothing for 10
seconds.
2. Modify this FOR…NEXT loop so that it counts from 6 to 24 in steps of 3. Also,
write the variable declaration you will need to make this program work.
FOR counter = 9 TO 21
DEBUG ? counter
PAUSE 500
NEXT
Project
1. Write a program that causes an LED connected to P14 to light dimly (on/off with
every pulse) while the P12 servo is turning.
2. Write a program that takes the servos through three seconds of each of the four
different combinations of rotation. Hint: you will need four different FOR…NEXT
loops. First, both servos should rotate counterclockwise, then they should both
rotate clockwise. Then, the P12 servo should rotate clockwise as the P13 servo
rotates counterclockwise, and finally, the P12 servo should rotate
counterclockwise while the P13 servo rotates clockwise.
Exploring Robotics Boe-Bot Activities Guide
Exploring Robotics with Electronics Page: 41
Chapter 2: Your Boe-Bot’s Servo Motors
Outcomes:
By the time you complete this section you will be able to:
Connect, adjust, and test the Parallax Continuous Rotation Servo motors
Understand how variables are used in the Basic Stamp language and the size of variables that can be stored
Understand and use the PAUSE command
Understand and use the DO…LOOP command
Understand and use the FOR…NEXT command
Understand and use the HIGH and LOW commands as a way of making the BASIC Stamp connect an I/O pin to Vdd or Vss
Construct an LED circuit to test the commands
Understand and use the PULSOUT command
Know how long a millisecond lasts and how to abbreviate it
Understand how the speed and direction are controlled for the Continuous Rotation Servo motors
Calibrate the Continuous Rotation Servo motors
Know the difference between a wiring diagram and a schematic
Demonstrate ability to read a wiring diagram
Assignments:
1. View the videos linked below. 2. Read and follow the instructions in Robotics with the Boe-Bot Chapter 2. 3. Complete the Boe-Bot activities assigned by your instructor. If self-study, do all
the “Your Turn” parts for each activity in the chapter. Fill out the Observations section in this lesson for each Activity. (Note: It is only by typing in the commands that you truly begin to understand programming. So don’t short change yourself.)
4. View the Simulations linked below when completing Activity 2-3 and Activity 2-4. 5. Review the Key Points or FAQs below. 6. Use the Observations again to Answer the questions at the end of the chapter. 7. Check your answers. 8. When complete, upload the Observations to your online portfolio area and send
a link to your portfolio to your instructor. (Self-study students can optionally send a link to a mentor or friend).
Videos and Simulations:
Chapter 2 Overview Video
Schematics Review
LED/Resistor Installation
Exploring Robotics Boe-Bot Activities Guide
Exploring Robotics with Electronics Page: 42
Connecting Servos/Batteries with LED and Resistors
Programming Step-by-Step
Controlling Inputs and Outputs
Servo Calibration
Activity 2-3 Simulation
Activity 2-4 Simulation
Key Points or FAQs:
What does a Do Loop do in a program?
The Do Loop command repeats all of the lines of code contained within it. Often there are conditions used to tell the loop when to stop. For example:
DO WHILE x < 1 (enter code commands here) LOOP This Do Loop command will keep repeating the code commands before the
LOOP until the value of the variable x is less than 1. Note: One of the commands within this LOOP must decrease the value of the variable x, or the loop will run forever.
What is a resistor and how can you tell the difference between the different
values? A resistor is an electronic component used to limit the current in a circuit.
You can tell the difference between the values by reading the colored stripes on them. Each stripe combination represents a different value.
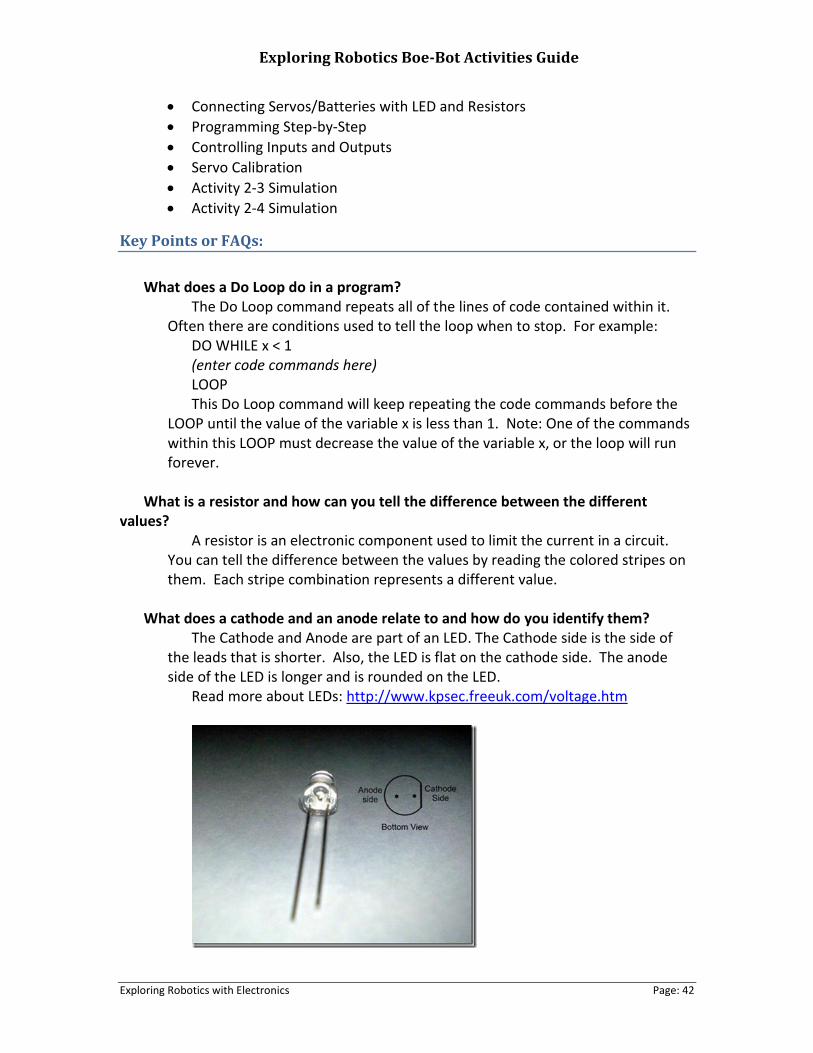
What does a cathode and an anode relate to and how do you identify them?
The Cathode and Anode are part of an LED. The Cathode side is the side of the leads that is shorter. Also, the LED is flat on the cathode side. The anode side of the LED is longer and is rounded on the LED.
Read more about LEDs: http://www.kpsec.freeuk.com/voltage.htm
Exploring Robotics Boe-Bot Activities Guide
Exploring Robotics with Electronics Page: 43
What is the difference between a schematic drawing and a wiring or circuit
diagram? A wiring or circuit diagram uses illustrations to closely match what the
components look like in real life to demonstrate how a circuit is assembled. A schematic uses known symbols that represent electrical components to illustrate the construction of a circuit.
Find out more about reading a circuit diagram: http://www.epemag.net/how-to-read-circuit-diagrams.html
Another step by step on how to read a circuit diagram: http://www.instructables.com/id/HOW-TO-READ-CIRCUIT-DIAGRAMS/
How to read schematics (with an interactive quiz): http://www.learn-c.com/schemat.htm Another link for reading schematics with some of the most common symbols:
http://artsites.ucsc.edu/EMS/music/tech_background/schematics/ReadSchem.html
Describe Voltage and Current and how the two relate to each other.
Voltage is potential energy that can be used within a circuit measured in Volts. Current is how much voltage is carried throughout the system measured in amps.
Find out more about Amps, Watts, Volts, and Ohms: http://science.howstuffworks.com/environmental/energy/question501.htm Another source for learning about difference between voltage and current
for electronics: http://www.kpsec.freeuk.com/voltage.htm
What does the Pulsout command do? The Pulsout command sends signals to the servos for a controlled amount of
duration. This allows the servos to move based on a number of pulses and makes movement exact and repeatable.
How does the debug command work and why do you need it?
The debug command works by entering the Debug keyword and any variable or value after it. The results of the variables or values are displayed in the debug window.
For Example: DEBUG X + 8 This will display in the debug window the result of the current value of the
variable added to 8. This is useful when the value of the variable X is being modified and you need to know its current value.
What are the benefits of a For Loop?
The For Loop allows you to repeat set of code commands a specified number of times.
For example:
Exploring Robotics Boe-Bot Activities Guide
Exploring Robotics with Electronics Page: 44
FOR I = 1 to 20 (enter code commands here) NEXT This example For Loop will repeat the code commands 20 times.
What is the formula for determining how long a servo will run in pulses? Number of pulses = Time s / 0.0246 s = Time / 0.0246
For example if you want a servo to run for 3 seconds: Number of
Observations:
Your Turn Programs: Enter the code for the Your Turn Program below.
Different Pause Durations
A Different Message
Blink the Other LED
Viewing the full Speed Servo Signal
Centering the Servo Connected to P13
Calculations with Negative Numbers
Different Start and End Values and Counting in Steps
P13Clockwise.bs2
Adjusting the Speed and Direction
Pridict Servo Run Time
Questions
1. What device will be the brain of your Boe-Bot?
2. When the BASIC Stamp sends a character to your PC/laptop, what type of numbers are
used to send the message through the programming cable?
3. What is the name of the window that displays messages sent from the BASIC Stamp to
your PC/laptop?
4. What PBASIC commands did you learn in this chapter?
Exercises
1. Explain what the asterisk does in this command: DEBUG DEC 7 * 11
2. Guess what the Debug Terminal would display if you ran this command:
DEBUG DEC 7 + 11
Exploring Robotics Boe-Bot Activities Guide
Exploring Robotics with Electronics Page: 45
3. There is a problem with these two commands. When you run the code, the numbers
they display are stuck together so that it looks like one large number instead of two small
ones. Modify these two commands so that the answers appear on different lines in the
Debug Terminal.
DEBUG DEC 7 * 11
DEBUG DEC 7 + 11
Projects
1. Use DEBUG to display the solution to the math problem: 1 + 2 + 3 + 4.
2. Save FirstProgramYourTurn.bs2 under another name. If you were to place the DEBUG
command shown below on the line just before the END command in the program, what
other lines could you delete and still have it work the same? Modify the copy of the
program to test your hypothesis (your prediction of what will happen).
DEBUG "What's 7 X 11?", CR, "The answer is: ", DEC 7 * 11

Exploring Robotics Boe-Bot Activities Guide
Exploring Robotics with Electronics Page: 46

Exploring Robotics Boe-Bot Activities Guide
Exploring Robotics with Electronics Page: 47
Chapter 3: Assemble and Test Your Boe-Bot
Outcomes:
By the time you complete this section you will be able to: 1. Assemble the Boe-Bot Chasis 2. Understand and use the tools needed to assemble the Boe-Bot 3. Locate the correct parts for each assembly step 4. Understand what servo horns are and remove them 5. Mount the Servo Motors to the Chasis 6. Mount the Battery Pack to the Chasis 7. Mount the Wheels to the Chasis 8. Attach the Circuit Board to the Chasis 9. Complete the circuit assembly, connecting the servos and piezospeaker 10. Test the Servos and how the wheels turn 11. Use the piezoelectric speaker to generate tones 12. Demonstrate understanding of the FREQOUT command 13. Demonstrate understanding of the DEBUGIN command 14. Understand what a Brownout is and how it can affect a program
Videos and Simulations:
Chapter 3 Overview Video
Boe-Bot Assembly
Start / Reset Circuit
Activity 3 - 1 Simulation
Activity 3 - 3 Simulation
Assignments:
View the videos in the video section of this lesson.
Read and follow the instructions in Robotics with the Boe-Bot Chapter 3.
Complete the Boe-Bot activities assigned by your instructor. If self-study, do all the “Your Turn” parts for each activity in the chapter. Fill out the Observations section in this lesson for each Activity. (Note: It is only by typing in the commands that you truly begin to understand programming. So don’t short change yourself.)
Review the Key Points or FAQs below.
Use the Observations again to Answer the questions at the end of the chapter.
Check your answers.
When complete, upload the Observations to your online portfolio area and send a link to your portfolio to your instructor. (Self-study students can optionally send a link to a mentor or friend).
Exploring Robotics Boe-Bot Activities Guide
Exploring Robotics with Electronics Page: 48
Key Points or FAQs:
What is the FREQOUT command? What electrical component is it used in
conjunction with? The FREQOUT command stands for Frequency Out and is used with the
piezo-electric speaker. What units is the Duration argument of the Pulsout command measured in?
They are measured in Microseconds. A microsecond is a millionth of a second. It’s abbreviated µs. For example, 8 microseconds is abbreviated 8 µs.
What command do you use to get input from the debug terminal? The DEBUGIN command places the value you type in the Debug window into
a variable. For Example: DEBUGIN DEC pulseWidth This command will assign the value typed into the debug window to the
variable pulseWidth.
Observations:
Your Turn Programs: Enter the code for the Your Turn Program below.
Testing the Left Wheel
Adding StartResetIndicator.bs2 to a Different Program
Advanced Topic: Graphing Pulse Width vs. Rotational Velocity
Questions:
1. What are some of the symptoms of brownout on the Boe-Bot?
2. How can a piezospeaker be used to detect brownout?
3. What is a reset?
4. What is an initialization routine?
5. What are three (or more) possible mistakes that can occur when disconnecting and
reconnecting the servos?
6. What command do you have to change in RightServoTest.bs2 to test the left wheel
instead of the right wheel?
Exercises
Exploring Robotics Boe-Bot Activities Guide
Exploring Robotics with Electronics Page: 49
1. Write a FREQOUT command that makes a tone that sounds different from the reset
detect tone to signify the end of a program.
2. Write a FREQOUT command that makes a tone (different from beginning or ending
tones) that signifies an intermediate step in a program has been completed. Try a value
with a 100 ms duration at a 4 kHz frequency.
Projects
1. Modify RightServoTest.bs2 so that it makes a tone signifying the test is complete.
2. Modify TestServoSpeed.bs2 so that you can use DEBUGIN to enter the pulse width
for the left and the right servo as well as the number of pulses to deliver in the
FOR…NEXT loop. Use this program to control your Boe-Bot’s motion via the Debug
Terminal’s Transmit windowpane.

Exploring Robotics Boe-Bot Activities Guide
Exploring Robotics with Electronics Page: 50
Exploring Robotics Boe-Bot Activities Guide
Exploring Robotics with Electronics Page: 51
Chapter 4: Boe-Bot Navigation
Outcomes: By the time you complete this section you will be able to:
Program the Boe-Bot to perform the basic maneuvers: forward, backward, rotate left, rotate right, and pivoting turns.
Tune the maneuvers so that they are more precise with understanding of what direction the wheels must turn and length of time required.
Use math to calculate the number of pulses to deliver to make the Boe-Bot travel a predetermined distance.
Write programs that correct the Boe-Bot when it veers to the left or right.
Write programs that make the Boe-Bot gradually accelerate into and decelerate out of maneuver.
Understand what subroutines are and why they are used.
Write subroutines to perform the basic maneuvers so that each subroutine can be used over and over again in a program.
Use commands to retrieve a value stored in EEPROM memory and place it in a variable.
Record complex maneuvers in the BASIC Stamp module's unused program memory and write programs that play back these maneuvers.
Write DO…LOOP commands for different conditions.
Understand and use the SELECT command and how it differs from the IF command.
Assignments:
1. View the videos in the video section of this lesson. 2. Read and follow the instructions in Robotics with the Boe-Bot Chapter 4. 3. Complete the Boe-Bot activities assigned by your instructor. If self-study, do all
the “Your Turn” parts for each activity in the chapter. Fill out the Observations section in this lesson for each Activity. (Note: It is only by typing in the commands that you truly begin to understand programming. So don’t short change yourself.)
4. Review the Key Points or FAQs below. 5. Use the Observations again to Answer the questions at the end of the chapter. 6. Check your answers. 7. When complete, upload the Observations to your online portfolio area and send
a link to your portfolio to your instructor. (Self-study students can optionally send a link to a mentor or friend).
Exploring Robotics Boe-Bot Activities Guide
Exploring Robotics with Electronics Page: 52
Videos and Simulations:
Chapter 4 Overview Video
No Assembly videos or Simulations in this Chapter
Key Points or FAQs:
How can I center the Boe bot to make it drive a straight line?
Making the Boe-Bot drive in a straight line consists of a lot of trial and error. Run the Boe-Bot as it is to determine which way the bot is moving off course. Then adjust the pulse duration command sent to the servos to increase or decrease the number of pulses sent to the servo. The faster the right servo turns the more left it will correct while the slower the right servo turns, the more it will move to the right. Repeat this process until the robot drives straight.
What is the formula to calculate distance?
Time = distance/speed For example: Time = 20 inches / 9 inches per second. Or if time is known 5 Seconds = X inches / 9 inches per second The distance X inches = 45 inches
How do you determine the number of pulses to send to the servo when you know
the amount of time to travel? Use the known number of pulses that the BOE board sends to the servos
each second (40.65 pulses / sec) and multiply it by the number of seconds to travel
For Example: 40.65 pulses / sec X 12 seconds = 478 pulses
What is the ramping process?
Ramping is the process of gradually increasing the speed until full speed is achieved. Rather than going from a stop position to full speed in one command, the speed is slowly increased until the speed desired is reached. This prevents jerkiness and results in more precise movements.
What is a subroutine and why are they useful?
Subroutines allow you to create modular, reusable code sections that can be called multiple times. Different values can be sent to the subroutines, and they provide different results without having to rewrite a separate group of code for each scenario.
What is the EEPROM on the BOE? Why would you use it over RAM?
Exploring Robotics Boe-Bot Activities Guide
Exploring Robotics with Electronics Page: 53
EEPROM stands for erasable programmable read only memory. Writing to EEPROM is slower than RAM, holds less information, and can only be written to a limited number of times. Typically use EEPROM to store programs that you can access over and over again, even after the power is turned off and back on.
What is the Command to store information into EEPROM?
The DATA Directive command is used to store information in the EEPROM. How is a Select statement different that an IF Statement?
The case statement allows testing of several different conditions in one statement. If you were using IF statements to see if a value was 5,6,7,8 or 9, you would have to use several different IF statements. With the Select Case statement, you can use one command and have a different line for each potential value.
For Example: Select MyVAR
Case 5: … Case 6: … Case 7: … Case 8: …
Case 9: …
ENDSELECT What is the command to access a subroutine?
Gosub is used to call an existing subroutine. For Example: GOSUB MyRoutine
Observations:
Your Turn Programs: Enter the code for the Your Turn Program below.
Adjusting Distance and Speed
Pivoting
Adjusting Servo Speed to Straighten the Boe-Bot’s Path
90° Turns
Your Boe-Bot’s Distance
pulseCount
MovementWithVariablesAndOneSubroutine.bs2
EepromNavigation.bs2
Making Your Own Custom Navigation Routines
Exploring Robotics Boe-Bot Activities Guide
Exploring Robotics with Electronics Page: 54
Questions:
1. What direction does the left wheel have to turn to make the Boe-Bot go forward? What
direction does the right wheel have to turn?
2. When the Boe-Bot pivots to the left, what are the right and left wheels doing? What
PBASIC commands do you need to make the Boe-Bot pivot left?
3. If your Boe-Bot veers slightly to the left when you are running a program to make it go
straight ahead, how do you correct this? What command needs to be adjusted and what
kind of adjustment should you make?
4. If your Boe-Bot travels 11 in/s, how many pulses will it take to make it travel 36
inches?
5. What’s the relationship between a FOR…NEXT loop’s Counter argument and the
PULSOUT command’s Duration argument that makes ramping possible?
6. What directive can you use to pre-store values in the BASIC Stamp’s EEPROM before
running a program?
7. What command can you use to retrieve a value stored in EEPROM and copy it to a
variable?
8. What code block can you use to select a particular variable and evaluate it on a case by
case basis and execute a different code block for each case?
9. What are the different conditions that can be used with DO…LOOP?
Exercises
1. Write a routine that makes the Boe-Bot back up for 350 pulses.
2. Let’s say that you tested your servos and discovered that it takes 48 pulses to make a
180° turn with right-rotate. With this information, write routines to make the Boe-Bot
perform 30, 45, and 60 degree turns.
3. Write a routine that makes the Boe-Bot go straight forward, then ramp in and out of a
pivoting turn, and then continue straight forward. Page 138 · Robotics with the Boe-Bot
Projects
1. It is time to fill in column 3 of Table 2-1 on page 63. To do this, modify the
PULSOUT Duration arguments in the program BoeBotForwardThreeSeconds.bs2 using
Exploring Robotics Boe-Bot Activities Guide
Exploring Robotics with Electronics Page: 55
each pair of values from column 1. Record your Boe-Bot’s resultant behavior for each
pair in column 3. Once completed, this table will serve as a reference guide when you
design your own custom Boe-Bot maneuvers.
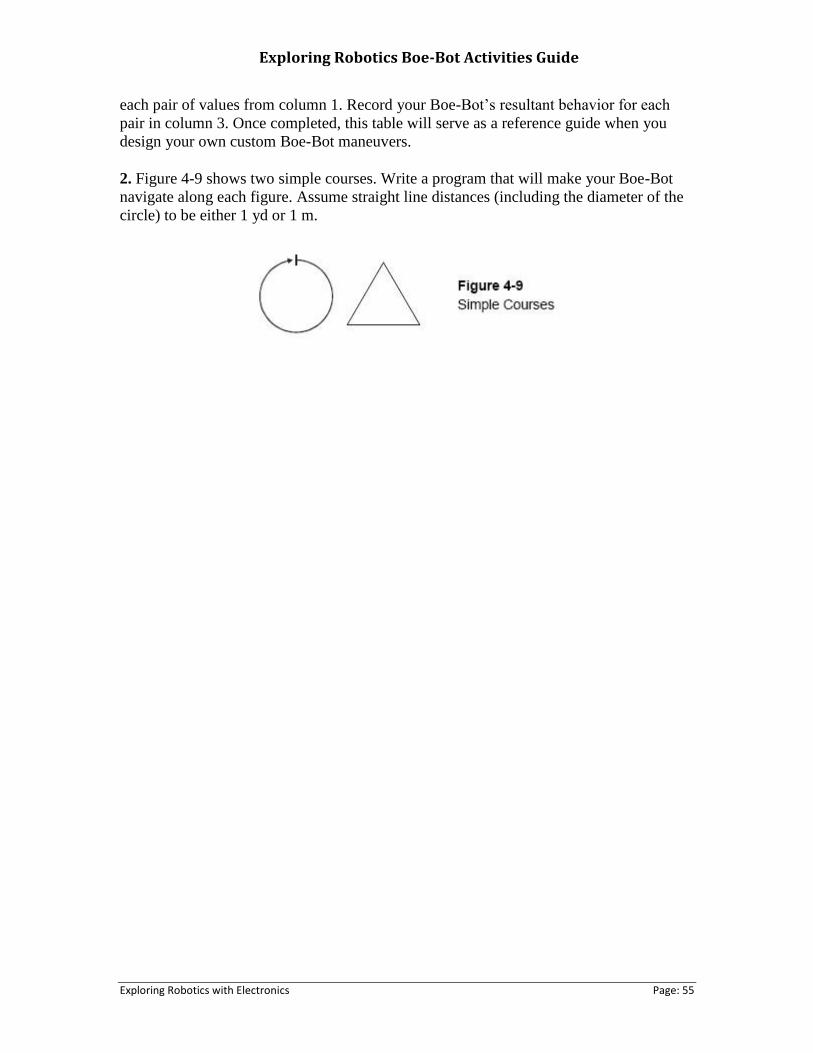
2. Figure 4-9 shows two simple courses. Write a program that will make your Boe-Bot
navigate along each figure. Assume straight line distances (including the diameter of the
circle) to be either 1 yd or 1 m.

Exploring Robotics Boe-Bot Activities Guide
Exploring Robotics with Electronics Page: 56
Exploring Robotics Boe-Bot Activities Guide
Exploring Robotics with Electronics Page: 57
Chapter 5: Tactile Navigation with Whiskers
Outcomes: By the time you complete this section you will be able to:
Understand what sensors are and why they are used.
Mount the tactile switches, called whiskers, onto the Boe-Bot and test them.
Understand how the Boe-Bot knows when the whiskers have detected an obstacle.
Connect the sensor circuit to the appropriate I/O register. Understand what type of electrical connection is made with the sensor.
Understand how to check Input Registers and display the values in them. Know what values to expect when the sensor detects an object and when it doesn’t.
Understand and use the DEBUG CRSRXY command.
Modify the circuit for Boe-Bot and the programming so that LEDs light up when the whiskers detect an object.
Program the Boe-Bot to monitor the state of the switches, and decide what to do when it encounters an obstacle.
Operate the Boe-Bot with autonomous navigation by touch using the whiskers.
Program the Boe-Bot to detect corners, and decide what to do to get out of a corner.
Program nested IF..THEN commands and understand how the commands work – the logic used.
Program the use of subroutines and understand how the logic works.
Assignments:
View the videos in the video section of this lesson.
Read and follow the instructions in Robotics with the Boe-Bot Chapter 5.
Complete the Boe-Bot activities assigned by your instructor. If self-study, do all the “Your Turn” parts for each activity in the chapter. Fill out the Observations section in this lesson for each Activity. (Note: It is only by typing in the commands that you truly begin to understand programming. So don’t short change yourself.)
Review the Key Points or FAQs below.
Use the Observations again to Answer the questions at the end of the chapter.
Check your answers.
When complete, upload the Observations to your online portfolio area and send a link to your portfolio to your instructor. (Self-study students can optionally send a link to a mentor or friend).
Exploring Robotics Boe-Bot Activities Guide
Exploring Robotics with Electronics Page: 58
Videos and Simulations:
Chapter 5 Overview Video
Boe-Bot tactile whiskers
Boe-Bot tactile whiskers with LED Circuit
Activity 5 - 1 Simulation
Activity 5 - 2 Simulation
Key Points or FAQs:
What is the CRSRXY command and why would you use it?
The CRSRXY command lets you position the cursor and the text that is written anywhere on the debug window. It’s useful if you want to line up columns of data.
How does a program go and return from a subroutine?
The command GoSub is used to direct a program to go to a subroutine and execute all the commands it finds there. It then automatically returns to the next command that appears after the GoSub command.
Observations:
Your Turn Programs: Enter the code for the Your Turn Program below.
FOR...NEXT loop
EscapingCorners.bs2
Questions:
1. What kind of electrical connection is a whisker?
2. When a whisker is pressed, what voltage occurs at the I/O pin monitoring it? What
binary value will occur in the input register? If I/O pin P8 is used to monitor the input
pin, what value does IN8 have when a whisker is pressed, and what value does it have
when a whisker is not pressed?
3. If IN7 = 1, what does that mean? What does it mean if IN7 = 0? How about IN5 = 1
and IN5 = 0?
4. What command is used to jump to different subroutines depending on the value of a
variable? What command is used to decide which subroutine to jump to? What are these
decisions based on?
Exploring Robotics Boe-Bot Activities Guide
Exploring Robotics with Electronics Page: 59
5. What is the purpose of having nested IF…THEN statements? Page 166 · Robotics
with the Boe-Bot
Exercises
1. Write a DEBUG command for TestWhiskers.bs2 that updates each whisker state on a
new line. Adjust the PAUSE command so that it is 250 instead of 50.
2. Using RoamingWithWhiskers.bs2 as a reference, write a Turn_Away subroutine that
calls the Back_Up subroutine once and the Turn_Left subroutine twice. Write down the
modifications you will have to make to the Main Routine section of
RoamingWithWhiskers.bs2
Projects
1. Modify RoamingWithWhiskers.bs2 so that the Boe-Bot makes a 4 kHz beep that lasts
100 ms before executing the evasive maneuver. Make it beep twice if both whisker
contacts are detected during the same sample.
2. Modify RoamingWithWhiskers.bs2 so that the Boe-Bot roams in a 1 yard (or meter)
diameter circle. When you touch one whisker, it will cause the Boe-Bot to travel in a
tighter circle (smaller diameter). When you touch the other whisker, it will cause the Boe-
Bot to navigate in a wider diameter circle.

Exploring Robotics Boe-Bot Activities Guide
Exploring Robotics with Electronics Page: 60
Exploring Robotics Boe-Bot Activities Guide
Exploring Robotics with Electronics Page: 61
Chapter 6: Light-Sensitive Navigation with Phototransistors
Outcomes:
By the time you complete this section you will be able to:
Understand what a phototransistor is and how it compares to an LED.
Understand the concept of Illuminance and how it is used in science.
Build a bright light detector circuit for the Boe-Bot
Understand how the program receives input from the bright light detector circuit
Build a charge transfer circuit for the Boe-Bot.
Understand how the program receives input from the charge transfer circuit
Program Boe-Bot so that it modifies its behavior when it detects bright light
Program Boe-Bot to Measure light levels with phototransistors.
Program Boe-Bot to use light to control its behavior while roaming
Program Boe-Bot to create a graphic display of the light level detected.
Demonstrate understanding of what a resistor is and how it is used in a circuit
Know Ohms law and how it is used to calculate resistance, current, and voltage
Explain how voltage is measured and apply it to Ohms law calculations
Explain the concept of voltage decay and how it is measured.
Explain what a transistor is and what it regulates.
Explain what a capacitor is, how it is used in a circuit, and the unit of measure used for a capacitor.
Demonstrate understanding of how to use the PWM command
Demonstrate understanding of how to use the PULSOUT command
Demonstrate understanding of what a constant declaration is and how it is used.
Demonstrate understanding of MIN and MAX operators and how they are used.
Demonstrate how to check how much RAM memory your program is using and how to modify the amount of memory used.
Demonstrate how to modify a circuit to make it more or less sensitive to light.
Assignments:
1. View the videos below. 2. Read and follow the instructions in Robotics with the Boe-Bot Chapter 6. 3. Complete the Boe-Bot activities assigned by your instructor. If self-study, do all
the “Your Turn” parts for each activity in the chapter. Fill out the Observations section in this lesson for each Activity. (Note: It is only by typing in the commands that you truly begin to understand programming. So don’t short change yourself.)
4. Review the Key Points or FAQs below. 5. Use the Observations again to Answer the questions at the end of the chapter. 6. Check your answers.
Exploring Robotics Boe-Bot Activities Guide
Exploring Robotics with Electronics Page: 62
When complete, upload the Observations to your online portfolio area and send a link to your portfolio to your instructor. (Self-study students can optionally send a link to a mentor or friend).
Videos and Simulations:
Chapter 6 Overview Video
Binary Light Sensor
Photosensitive Eyes
Activity 6 - 1 Simulation
Activity 6 - 2 Simulation
Key Points or FAQs:
How does a phototransistor work?
A phototransistor is a light–controlled current valve. It lets more current through with brighter incident light and less current through with less bright light.
What is a charge transfer circuit?
The charge transfer circuit consisted of a parallel capacitor and phototransistor connected to a pin with a resistor. In the circuit, the pin is used to charge the capacitor. Then, it switched to input and the time it takes the capacitor’s voltage to decay as it lost its charge through the phototransistor is measured. This decay time measurement turns out to be smaller with bright light and larger in shade.
What is voltage decay and how can it be used to measure light?
Voltage decay is the time it takes for a capacitor to drain down to a known amount. RCTIME is used to measure the voltage decay. It can be used to measure light in conjunction with a phototransistor. Be measuring how long it takes for the capacitor to discharge, we can determine
What does the RCTIME command do?
The RCTIME command changes the Pin direction from output to input, and then waits for the I/O pin’s state to change, which happens when the voltage the circuit applies to the pin passes its 1.4 V logic threshold. The RCTIME command stores the time measurement result in Variable.
What’s the difference between the PWM command and the PULSOUT command?
PWM stands for Pulse Wave Modulation. The PWM command applies a rapid sequence of high/low signals to the I/O Pin for certain Duration in ms. This PULSOUT command uses the same process as PWM, but the PWM signal is a
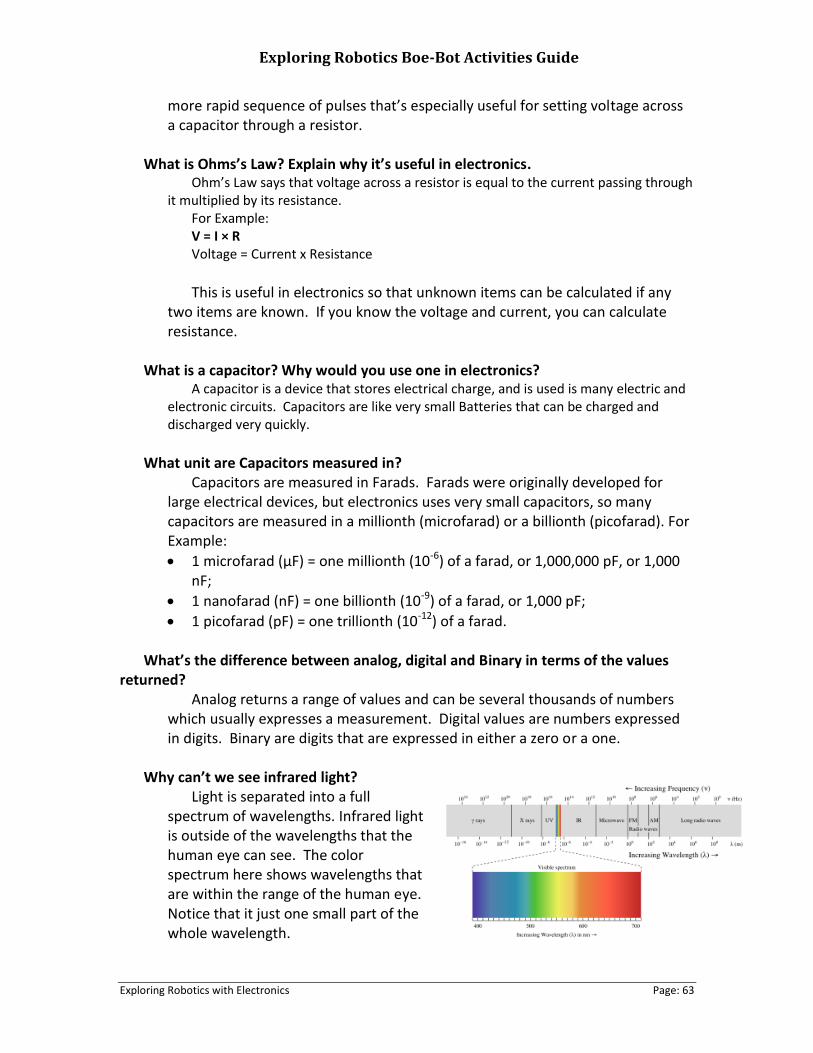
Exploring Robotics Boe-Bot Activities Guide
Exploring Robotics with Electronics Page: 63
more rapid sequence of pulses that’s especially useful for setting voltage across a capacitor through a resistor.
What is Ohms’s Law? Explain why it’s useful in electronics.
Ohm’s Law says that voltage across a resistor is equal to the current passing through it multiplied by its resistance.
For Example: V = I × R Voltage = Current x Resistance
This is useful in electronics so that unknown items can be calculated if any
two items are known. If you know the voltage and current, you can calculate resistance.
What is a capacitor? Why would you use one in electronics?
A capacitor is a device that stores electrical charge, and is used is many electric and electronic circuits. Capacitors are like very small Batteries that can be charged and discharged very quickly.
What unit are Capacitors measured in?
Capacitors are measured in Farads. Farads were originally developed for large electrical devices, but electronics uses very small capacitors, so many capacitors are measured in a millionth (microfarad) or a billionth (picofarad). For Example:
1 microfarad (μF) = one millionth (10-6) of a farad, or 1,000,000 pF, or 1,000 nF;
1 nanofarad (nF) = one billionth (10-9) of a farad, or 1,000 pF;
1 picofarad (pF) = one trillionth (10-12) of a farad. What’s the difference between analog, digital and Binary in terms of the values
returned? Analog returns a range of values and can be several thousands of numbers
which usually expresses a measurement. Digital values are numbers expressed in digits. Binary are digits that are expressed in either a zero or a one.
Why can’t we see infrared light?
Light is separated into a full spectrum of wavelengths. Infrared light is outside of the wavelengths that the human eye can see. The color spectrum here shows wavelengths that are within the range of the human eye. Notice that it just one small part of the whole wavelength.
Exploring Robotics Boe-Bot Activities Guide
Exploring Robotics with Electronics Page: 64
Observations:
Your Turn Programs: Enter the code for the Your Turn Program below.
Make the Boe-Bot Halt Under the Bright Light
Ohm’s Law and Resistor Adjustments
Test the Other Phototransistor Circuit
Test Measurement Time’s Impact on Servo Control
Save Lots of RAM
Light/Shade Sensitivity Adjustments
Questions:
1. What does a transistor regulate?
2. Which phototransistor terminals have leads?
3. How can you use the flat spot on the phototransistor’s plastic case to identify its
terminals?
4. Which color would the phototransistor be more sensitive to: red or green?
5. How does VP6 in Figure 6-6 respond if the light gets brighter?
6. What does the phototransistor in Figure 6-6 do that causes VP6 to increase or
decrease?
7. How can the circuit in Figure 6-6 be modified to make it more sensitive to light?
8. What happens when the voltage applied to an I/O pin that has been set to input is
above or below the threshold voltage?
9. If the amount of charge a capacitor stores decreases, what happens to the voltage at its
terminals?
Exercises
1. Solve for VP6 if I = 1 mA in Figure 6-6.
2. Calculate the current through the resistor if VP6 in Figure 6-6 is 4.5 V.
3. Assume that the threshold between light and dark needed for your application occurs
when VP6 = 2.8 V. Calculate the resistor value you would need for the BASIC Stamp to
detect this threshold.

Exploring Robotics Boe-Bot Activities Guide
Exploring Robotics with Electronics Page: 65
4. Calculate the value of a capacitor that has been stamped 105.
5. Write an RCTIME command that measures decay time with I/O pin P7 and stores the
result in a variable named tDecay.
6. Write a PWM command that charges the capacitor in Figure 6-11 to about 1.625 V to
prepare the circuit for a decay measurement.
7. Calculate what the ndShade measurement would be if the BASIC Stamp measures
decay values of 1001 on both sides.
8. Write a DEBUG command that displays fifty equal sign characters. Page 218 ·
Robotics with the Boe-Bot.
9. Write a DEBUG command that positions the character “#” eight spaces to the right of
the Debug Terminal’s left margin and 10 carriage returns down from the top.
Projects
1. In Activity #1, the circuit along with the example code in the Your Turn section made
the Boe-Bot stop under a light at the end of the course. What if you will only have a
limited time at the course before the competition, and you don’t know the lighting
conditions in advance? You might need to calibrate your Boe- Bot on site. A program
that makes the piezospeaker beep repeatedly when the Boe-Bot detects bright light and
stay quiet when it detects ambient light could be useful for this task. Write and test the
program that works with the circuit in Figure 6-4 on page 173.
2. Develop an application that makes the Boe-Bot roam and search for darkness instead
of light. This application should utilize the charge transfer circuits in Figure 6-9 on page
182.
3. Develop an application that makes the Boe-Bot roam toward a bright incandescent
desk lamp in a room where the only other light sources are fluorescent ceiling lights. The
Boe-Bot should be able to roam toward the desk lamp and play a tone when it’s under it.
This application should utilize the charge transfer circuits in Figure 6-9 on page 182.

Exploring Robotics Boe-Bot Activities Guide
Exploring Robotics with Electronics Page: 66
Exploring Robotics Boe-Bot Activities Guide
Exploring Robotics with Electronics Page: 67
Chapter 7: Navigating with Infrared Headlights
Outcomes: By the time you complete this section you will be able to:
Understand what an infrared sensor is and how it is used.
Explain what IR light is and why you can’t see it.
Build and Mount IR headlights on Boe-Bot
Build an IR Object Detection Circuit with IR LEDs for the Boe-Bot
Test the IR receivers and understand how the program communicates with the IR circuit.
Test the IR object detector and debug any issues that arise
Program the Boe-Bot to use the IR detection circuit for object detection
Program the Boe-Bot for infrared interference
Modify the Object Detection Circuit to adjust the range detection of the IR sensor
Program the Boe-Bot to use the IR detection circuit for object avoidance
Program the Boe-Bot to stop moving when a drop off is detected – to detect edges of a table
Assignments:
1. View the videos in the video section of this lesson. 2. Read and follow the instructions in Robotics with the Boe-Bot Chapter 7. 3. Complete the Boe-Bot activities assigned by your instructor. If self-study, do all
the “Your Turn” parts for each activity in the chapter. Fill out the Observations section in this lesson for each Activity. (Note: It is only by typing in the commands that you truly begin to understand programming. So don’t short change yourself.)
4. Review the Key Points or FAQs below. 5. Use the Observations again to Answer the questions at the end of the chapter. 6. Check your answers. 7. When complete, upload the Observations to your online portfolio area and send
a link to your portfolio to your instructor. (Self-study students can optionally send a link to a mentor or friend).
Videos and Simulations:
Chapter 7 Overview Video
IR Object Detection Circuit
LED Indicator Circuit
Activity 7 - 1 Simulation
Activity 7 - 2 Simulation

Exploring Robotics Boe-Bot Activities Guide
Exploring Robotics with Electronics Page: 68
Key Points or FAQs:
How is the Freqout command used?
The Freqout command varies the frequency of an output signal. For example it can be used to make a light brighter or dimmer by varying the light wave frequency, or it can be used to vary a tone on an audio frequency. A FREQOUT signal contains two sine wave components with two different frequencies. One component’s frequency is Freq1. The second component’s frequency 65536 – Freq1 (or the amount of time).
What does a high signal and a low signal mean from the IR detector?
The high signal means that there are no objects within the range of the IR detector. The lower the number returned in the signal, the closer an object is to the IR detector.
Advanced topic: Learn more about IR Detectors http://www.ladyada.net/learn/sensors/ir.html
What is an interference sniffer and why is it needed?
An interference sniffer is a routine that checks to see if a value returned is valid or possibly bad data outside of what is expected. It’s needed to make sure the robot doesn’t respond to false positives or data that is outside of the expected results. For Example, if IR is detected in an area where the Boe-Bot is not sending IR, then it could lead to false results. By using an interference sniffer, the robot can check to make sure the area in which it will be operating is free of bad data or stray signals.
Observations:
Your Turn Programs: Enter the code for the Your Turn Program below.
Test the Right IR Object Detector
Remote Testing and Range Testing
Testing for Fluorescent Lights that Interfere
Testing LED Brightness
Testing IR LED Range
RoamingWithIr.bs2
FastIrRoaming.bs2 as FastIrRoamingYourTurn.bs2.
different pulseLeft, pulseRight, and pulseCount
Questions:
1. What is the frequency of the signal sent by FREQOUT 2, 1, 38500? What is the value
of the second frequency sent by that command? How long are these signals sent for?
What I/O pin does the IR LED circuit have to be connected to in order to broadcast this
signal?
Exploring Robotics Boe-Bot Activities Guide
Exploring Robotics with Electronics Page: 69
2. What command has to immediately follow the FREQOUT command in order to
accurately determine whether or not an object has been detected? Navigating with
Infrared Headlights · Page 249
3. What does it mean if the IR detector sends a low signal? What does it mean when the
detector sends a high signal?
4. What happens if you change the value of a resistor in series with a red LED? What
happens if you change the value of a resistor in series with an infrared LED??
Exercises
1. Modify a line of code in IrInterferenceSniffer.bs2 so that it only monitors one of the IR
detectors.
2. Explain the function of pulseCount in AvoidTableEdge.bs2.
Projects
1. Design a Boe-Bot application that sits still until you wave your hand in front of it, then
it starts roaming.
2. Design a Boe-Bot application that slowly rotates in place until it detects an object. As
soon as it detects an object, it locks onto and chases the object. This is a classic SumoBot
behavior.
3. Design a Boe-Bot application that roams, but if it detects infrared interference, it
sounds the alarm briefly, and then continues roaming. This alarm should be different
from the low battery alarm.

Exploring Robotics Boe-Bot Activities Guide
Exploring Robotics with Electronics Page: 70
Exploring Robotics Boe-Bot Activities Guide
Exploring Robotics with Electronics Page: 71
Chapter 8: Robot Control with Distance Detection
Outcomes:
By the time you complete this section you will be able to:
Calculate distances detected with the IR sensor
Program Boe-Bot to detect the distance to sensed objects
Program a frequency sweep routine for the left and right sensors
Understand and use the LOOKUP command
Understand and use the FREQOUT command
Program Boe-Bot to shadow (follow) another vehicle or a person
Demonstrate understanding of closed loop control
Demonstrate understanding of proportional control
Read and follow the logic in a block diagram
Demonstrate understanding of how math expressions are executed in PBasic
Program Boe-Bot to follow a stripe
Build a test course for Boe-Bot to follow a stripe
Assignments:
1. View the videos in the video section of this lesson. 2. Read and follow the instructions in Robotics with the Boe-Bot Chapter 8. 3. Complete the Boe-Bot activities assigned by your instructor. If self-study, do all
the “Your Turn” parts for each activity in the chapter. Fill out the Observations section in this lesson for each Activity. (Note: It is only by typing in the commands that you truly begin to understand programming. So don’t short change yourself.)
4. Review the Key Points or FAQs below. 5. Use the Observations again to Answer the questions at the end of the chapter. 6. Check your answers. 7. When complete, upload the Observations to your online portfolio area and send
a link to your portfolio to your instructor. (Self-study students can optionally send a link to a mentor or friend).
Videos and Simulations:
Chapter 8 Overview Video
Boe-Bot Simulation
Exploring Robotics Boe-Bot Activities Guide
Exploring Robotics with Electronics Page: 72
Key Points or FAQs:
What is Frequency sweep and how is it applied to distance detection?
Frequency Sweep is the technique of testing a circuit’s output using a variety of
input frequencies. By testing known distances from the Boe-Bot, at different intervals, you will establish a baseline and therefore be able to determine if an item is within a given distance and if it’s getting closer or father away.
What does the Lookup command do?
This command is the best approach for storing a short list of values that you want to retrieve and use in sequence.
For Example, this set of code loops through 5 different frequencies (0 to 4). The lookup command selects a number from a range of numbers contained within
the brackets and then stores that number in the variable irFrequency in this example. The FreqOut command sends that stored number in irFrequency to pin 8 and allows
the BoeBot to detect objects at that frequency. FOR freqSelect = 0 TO 4 LOOKUP freqSelect,[37500,38250,39500,40500,41500],irFrequency FREQOUT 8,1, irFrequency irDETECT = IN9 NEXT
What is Proportional control?
Proportional control in a closed-loop system is a process where the error is multiplied by a proportionality constant to determine the system’s output. It allows us to track variances within the system.
Observations:
Your Turn Programs: Enter the code for the Your Turn Program below.
Testing the Right IR LED/Detector Object Detector
More Distance Tests
FollowingBoeBot.bs2
Stripe Following Contest
Questions:
1. What would the relative sensitivity of the IR detector be if you use FREQOUT to send
a 35 kHz signal? What is the relative sensitivity with a 36 kHz signal?
Exploring Robotics Boe-Bot Activities Guide
Exploring Robotics with Electronics Page: 73
2. Consider the code snippet below. If the index variable is 4, which number will be
placed in the prime variable in this LOOKUP command? What values will prime store
when index is 0, 1, 2, and 7? LOOKUP index, [2, 3, 5, 7, 11, 13, 17, 19], prime
3. In what order are PBASIC math expressions evaluated? How can you override that
order?
4. What PBASIC directive do you use to declare a constant? How would you give the
number 100 the name “BoilingPoint?” Page 282 · Robotics with the Boe-Bot
Exercises
1. List the sensitivity of the IR detector for each kHz frequency shown in Figure 8-1.
2. Write a segment of code that does the frequency sweep for just four frequencies
instead of five.
3. Make a condensed checklist for the tests that should be performed to ensure faithful
stripe following.
Projects
1. Create different types of electrical tape intersections and program the Boe-Bot to
navigate through them. The intersections could be 90° left, 90° right, three-way, and four-
way. This will involve the Boe-Bot recognizing it is at an intersection. When the Boe-Bot
executes StripeFollowingBoeBot.bs2, the Boe-Bot will stay still at intersections. The goal
is to have the Boe-Bot realize it’s not doing anything and break from its proportional
control loop. Hints: You can do this by creating two counters, one that increments by 1
each time through the DO…LOOP, and the other that only increments when the Boe-Bot
delivers a forward pulse. When the counter that increments each time through the
DO…LOOP gets to 60, use IF…THEN to check how many forward pulses were applied.
If less than 30 forward pulses were applied, the Boe-Bot is probably stuck. Remember to
reset both counters to zero each time the loop counter gets to 60. After the Boe-Bot
recognizes that it is at an intersection, it needs to move to the top edge of the intersection,
then back up and figure out whether it sees electrical tape or white background on the left
and right, then make the correct 90° turn. Use a preprogrammed motion for turning 90°,
without proportional control. For three-way and four-way intersections, the Boe-Bot may
turn either right or left.
2. Advanced Optional Project - Design a maze-solving contest of your own, and program
the Boe-Bot to solve it!

Exploring Robotics Boe-Bot Activities Guide
Exploring Robotics with Electronics Page: 74

Exploring Robotics Boe-Bot Activities Guide
Exploring Robotics with Electronics Page: 75
Careers Exploration
Outcomes:
• Explore career options available in technology related fields. • Assess options for career development/progression and take action on
choices. • Describe potential career choices of interest. • Describe three of the major fields of robotics (human-robot interface, mobility,
manipulation, programming, sensors) and their importance to robotics development.
• Explore and describe youth robotics competitions.
Assignments:
1. View the videos in the video section of this lesson. 2. Read the Key Points below and follow the links provided to begin to explore
career options. 3. Take Aptitude tests online or in a college career or employment development
center. This activity has no robot building assignment. It is time to think about your career
options and the next steps you might take in robotics, such as participating in a robotics competition.
View the videos in this section and you will see quite a variety of career choices.
Each one presents the education requirements and potential earnings. There are also videos of interviews with technicians, engineers, and managers who tell you what the jobs are like.
Then we encourage you to take one or more aptitude tests to find out what you are
really good at. You can find them in college counseling and job counseling centers and also online. There are no wrong answers in an aptitude test. It simply tells you what your DNA has given you as a set of skills to begin from. Some are great at communication with people, while others prefer to communicate with machines, hard facts and numbers. Some are great at details while others prefer the big picture. Some are athletic while others are not.
A career is most satisfying when you love your work, and that happens when you do
work that fits your aptitude. The good news is there are so many opportunities in technology that whatever you are good at, you can have a career related to technology.
The videos provide information about the following careers. Each one provides
several different job categories, with more than 50 different jobs described. The
Exploring Robotics Boe-Bot Activities Guide
Exploring Robotics with Electronics Page: 76
education requirements and pay scales start low with the first careers and then increase as the presentation progresses:
• Manufacturing Operators • Testers and Inspectors • Technicians • Support Specialists • Artists and Drafters • Engineers • Programmers • Designers • Sales Engineers • Managers and Business Associates • Systems Integrators • Technical Writers • Trainers and Educators • Regulatory and Safety Inspectors • Inventors, Entrepreneurs, and Consultants
Videos and Simulations:
• Technical Careers Introduction • Technical Careers
Key Points or FAQs:
What is the difference between a job and a career?
A job is something you do without much concern for the long-term. You get a job to
buy a car, to have extra spending money, to learn about work, or to pay the bills. In a job, you do what you are told to do – even when it is not what you like to do.
A career is about choice. You do the work you choose to do. Most careers start with
education and increasing skills. Many people work jobs because they don’t have the education needed to enter careers, though jobs can certainly turn into careers, regardless of type of employment. Careers are about building on experience and advancing your job skills and knowledge. It is best to follow your interests, skills, and talents to find the career that will bring you success. Success includes money, but is also very much about personal happiness. That happiness often comes from doing what comes natural to you - what you would do even if no one paid you to do it.
You can apply for a job, but you can’t apply for a career. A job is given to you by an
employer; a career is made by you. You set goals and work toward achieving them. For example, each goal may advance you to a better job with better pay, better benefits, and better working conditions. Or a goal may be that you have to take a job at one level
Exploring Robotics Boe-Bot Activities Guide
Exploring Robotics with Electronics Page: 77
in order to gain the experience needed and work toward furthering education to get to your dream job.
How Can I Get Assistance in Paying for a College Degree?
The great news about careers in technology is that employers are often willing to
pay for further education. This is especially true in engineering. You can get an associate degree in Electronics or Mechatronics or Engineering or Programming and then get a job at a company who will encourage you to continue your education because they know you will be more valuable to them with it. Many large companies have tuition reimbursement programs where they will pay for your schooling. So instead of you having to take out student loans for thousands of dollars to get a 4 year degree, you may be able to further your career while being paid a very decent wage.
What Additional Resources are Available for Career Search?
1. Here are some links to other videos about Engineering:
Is Engineering for Me? http://www.youtube.com/watch?v=vj-H_Mbfvu4
Lockheed Martin Interviews http://www.lockheedmartin.com/aboutus/profiles/
Engineering Careers http://www.youtube.com/watch?v=JuXycH9N6Dg&feature=related
Women Engineers http://www.youtube.com/watch?v=usXRaL8cQR8& 2. Links to other videos about Technician Careers:
Robotics Technicians http://www.youtube.com/watch?v=XCHuVplFPFc
http://www.youtube.com/watch?v=Fl0qgR9eZvE
Electronic Technician Careers http://www.youtube.com/watch?v=t8l1dDuPgnE 3. The Occupational Outlook Handbook provided by the US Bureau of Labor
Statistics was used to create the presentations about careers. It has additional information that was not covered. You can find it online at: http://www.bls.gov/OCO/
It gives details on:
the training and education needed
earnings
expected job prospects
what workers do on the job
working conditions
Exploring Robotics Boe-Bot Activities Guide
Exploring Robotics with Electronics Page: 78
4. Companies who hire. There are many different types of companies who hire people with education and experience in technology, electronics and robotics. Some of these include:
Manufacturers. The companies who build robotics, electronics, electric vehicles, computers, and telecommunication devices need qualified employees in a wide range of categories.
Companies who buy robots and use them in manufacturing, assembly, or warehouse operations need people who can operate, maintain, and program the robots.
Systems integrators. The companies who install and program robots for manufacturers need a wide range of engineers, technicians, and operators.
Find out more at: http://www.robotics.org/search-company.cfm
5. Websites with information about jobs. Use these links to find out more
information about the requirements, pay rate and benefits for particular jobs of interest to you.
Payscale.com
Jobnob.com
Glassdoor.com
Salary.com
Monster.com
jobs.aol.com
Observations:
1. Name three career opportunities in robotics. 2. Pick one career and find out the education, training, and experience required for this
profession. a. Education b. Training: c. Experience:
3. Name a few companies who offer jobs in this career area.
4. Explain why this career is of interest to you.
5. Describe three of the major fields of robotics (human-robot interface, mobility,
manipulation, programming, sensors) and their importance to robotics development. Describe either the three fields as they relate to a single robot system (such as Boe-Bot) OR describe each field in general.

Exploring Robotics Boe-Bot Activities Guide
Exploring Robotics with Electronics Page: 79
6. Use the Internet to learn about three youth robotics competitions. Describe them, including the type of competition, time commitment, age of the participants, and how many teams are involved.
a. Competition1:
Type of competition:
Time commitment:
Age of the participants:
How many teams are involved:
b. Competition 2:
Type of competition:
Time commitment:
Age of the participants:
How many teams are involved:
c. Competition 3:
Type of competition:
Time commitment:
Age of the participants:
How many teams are involved:

Exploring Robotics Boe-Bot Activities Guide
Exploring Robotics with Electronics Page: 80
REFERENCES
BoeBot Microcontroller Pin Assignments
By Function By Pin
Function Pin
Left IR detector 9
Left IR emitter 8
Left Light Sensor 6
Left Servo 13
Left Whisker 5
Left Sensor LED 10
Right IR detector 0
Right IR emitter 2
Right Light Sensor 3
Right Servo 12
Right Whisker 7
Right Sensor LED 1
Speaker 4
Pin Function
0 Right IR in
1 Right Sensor LED
2 Right IR out
3 Right Light Sensor
4 Speaker
5 Left Whisker
6 Left Light Sensor
7 Right Whisker
8 Left IR out
9 Left IR in
10 Left Sensor LED
12 Right Servo
13 Left Servo
BoeBot Wheel Directions
Remember that the ball is the tail (back).
Direction Left Right
CW ( <750 ) Backward Forward
Still ( =750 ) Still Still
CCW ( >750 ) Forward Backward

Exploring Robotics Boe-Bot Activities Guide
Exploring Robotics with Electronics Page: 81
Resistor Color Codes
Color #
Black 0
Brown 1
Red 2
Orange 3
Yellow 4
Green 5
Blue 6
Violet 7
Gray 8
White 9
Gold
Silver
1st band is the first digit.
2nd band is the second digit.
3rd band is the # of zeros (multiplier).
4th band is the tolerance (precision) of the resistor.
Multiplier ______ ______0 _____00 ___,000 __0,000 _00,000 000,000 x 0.1 x 0.01
1st Digit
2nd Digit
Multiplier
Tolerance
2 7,000 Ohms
Example:
OHMs Law V = I × R or R
I = V / R or R = V / I
V=Voltage, I=Current, R=Resistance
Copyright © Interactive Media Publishing

Exploring Robotics Boe-Bot Activities Guide
Exploring Robotics with Electronics Page: 82
NOTES