Experiment HP-8 Galvanic Skin Response (GSR) and ...
26
iWorx Physiology Lab Experiment iWorx Systems, Inc. www.iworx.com iWorx Systems, Inc. 62 Littleworth Road, Dover, New Hampshire 03820 (T) 800-234-1757 / 603-742-2492 (F) 603-742-2455 LabScribe2 is a trademark of iWorx Systems, Inc. ©2013 iWorx Systems, Inc. Experiment HP-8 Galvanic Skin Response (GSR) and Investigation into ‘Cheating’ Note: The lab presented here is intended for evaluation purposes only. iWorx users should refer to the User Area on www.iworx.com for the most current versions of labs and LabScribe2 Software.
Transcript of Experiment HP-8 Galvanic Skin Response (GSR) and ...
iWorx Physiology Lab Experiment
iWorx Systems, Inc.
www.iworx.com
iWorx Systems, Inc.
62 Littleworth Road, Dover, New Hampshire 03820
(T) 800-234-1757 / 603-742-2492 (F) 603-742-2455
LabScribe2 is a trademark of iWorx Systems, Inc.
©2013 iWorx Systems, Inc.
Experiment HP-8
Galvanic Skin Response (GSR)
and Investigation into ‘Cheating’
Note: The lab presented here is intended for evaluationpurposes only. iWorx users should refer to the UserArea on www.iworx.com for the most current versions oflabs and LabScribe2 Software.
Experiment HP-8: The Galvanic Skin Response (GSR) and Investigation into
‘Cheating’
This iWorx lab experiment was graciously provided by Dr. Paul Wagner and Dr. Tracy Wagner, Asst.
Professors, Washburn University, Topeka, KS.
What is a GSR?
The Galvanic Skin Response (GSR) is one of several electrodermal responses (EDRs). EDRs are
changes in the electrical properties of a person’s skin caused by an interaction between environmental
events and the individual’s psychological state. Human skin is a good conductor of electricity and when
a weak electrical current is delivered to the skin, changes in the skin’s conduction of that signal can be
measured. The variable that is measured is either skin resistance or its reciprocal, skin conductance.
According to Ohm’s Law, skin resistance (R) equals the voltage (V) applied between two electrodes on
the skin divided by the current passed through the skin (I). The law can be expressed as R=V/I.
A GSR amplifier, like the one that will be used in this experiment, applies a constant voltage to the skin
through electrodes. The voltage is so small that it cannot be felt or perceived by the individual.
However, the current that flows through the skin, as the voltage is applied, can be detected and
displayed. Because the constant voltage applied to the skin is known and the current flow can be
measured, the skin’s conductance can be determined by the GSR amplifier. The output of the GSR
amplifier is the skin’s conductance expressed in units called microSiemens (µS).
Two types of skin conductance are characterized, tonic and phasic. Tonic skin conductance is the
baseline level of skin conductance, in the absence of any particular discrete environmental event, and is
generally referred to as Skin Conductance Level (SCL). Each person has a different SCL, with typical
tonic levels ranging from 10-50 µS. Tonic skin conductance levels vary over time in individuals
depending on his or her psychological state and autonomic nervous system regulation.
Phasic skin conductance is the type that changes when events take place. Discrete environmental
stimuli (sights, sounds, smells, etc.) will evoke time related changes in skin conductance. These are
generally referred to as Skin Conductance Responses (SCRs). SCRs are increases in the conductance of
the skin which may last 10-20 seconds followed by a return to the tonic or baseline level of skin
conductance (SCL). These phasic changes are often simply called GSRs. Individuals will show
spontaneous GSRs, that are not event related, to varying degrees. The typical frequency of spontaneous
GSRs is between one and three per minute. Some persons are highly reactive with considerable
spontaneous generation of GSRs, and others have a relatively steady tonic level of skin conductance
without spontaneous GSRs. Some of these individual differences are discussed in another section of
this experiment.
The parameters of event-related GSRs that can be quantified are: amplitude, in microSiemens; and
latency, rise time, and half-recovery time, in seconds. These parameters can be determined from a
recording like the one shown in Figure HP-8-B1.
• The amplitude is the difference between the tonic skin conductance level, at the time the
response was evoked, and the skin conductance at the peak of the response.
• Latency is the time between the stimulus and the onset of the event-related GSR; latency values
should be about three seconds or less.
Human Psychophysiology – GSR-Investigation – Background HP-8-1
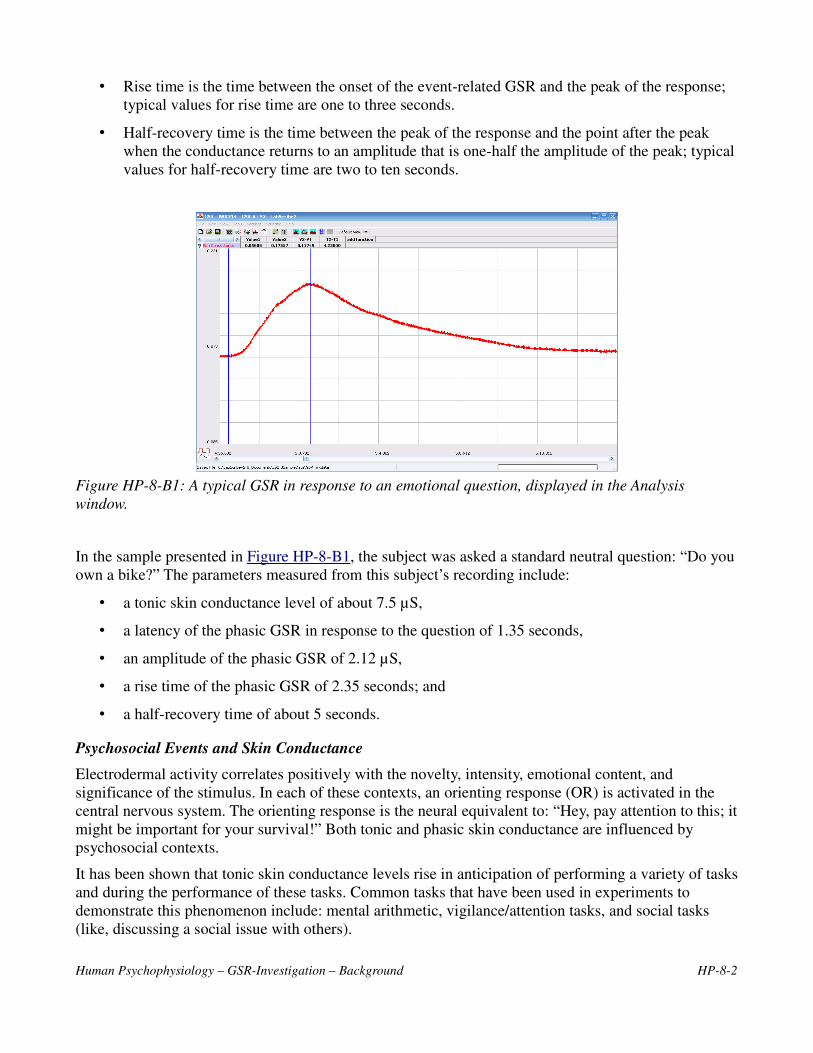
• Rise time is the time between the onset of the event-related GSR and the peak of the response;
typical values for rise time are one to three seconds.
• Half-recovery time is the time between the peak of the response and the point after the peak
when the conductance returns to an amplitude that is one-half the amplitude of the peak; typical
values for half-recovery time are two to ten seconds.
Figure HP-8-B1: A typical GSR in response to an emotional question, displayed in the Analysis
window.
In the sample presented in Figure HP-8-B1, the subject was asked a standard neutral question: “Do you
own a bike?” The parameters measured from this subject’s recording include:
• a tonic skin conductance level of about 7.5 µS,
• a latency of the phasic GSR in response to the question of 1.35 seconds,
• an amplitude of the phasic GSR of 2.12 µS,
• a rise time of the phasic GSR of 2.35 seconds; and
• a half-recovery time of about 5 seconds.
Psychosocial Events and Skin Conductance
Electrodermal activity correlates positively with the novelty, intensity, emotional content, and
significance of the stimulus. In each of these contexts, an orienting response (OR) is activated in the
central nervous system. The orienting response is the neural equivalent to: “Hey, pay attention to this; it
might be important for your survival!” Both tonic and phasic skin conductance are influenced by
psychosocial contexts.
It has been shown that tonic skin conductance levels rise in anticipation of performing a variety of tasks
and during the performance of these tasks. Common tasks that have been used in experiments to
demonstrate this phenomenon include: mental arithmetic, vigilance/attention tasks, and social tasks
(like, discussing a social issue with others).
Human Psychophysiology – GSR-Investigation – Background HP-8-2
Phasic skin conductance responses have been studied in a variety of contexts. The field of social
psychophysiology utilizes skin responses as indicators of social empathy, embarrassment, and social
attitudes. Electrodermal activity is considered a highly sensitive indicator of the social significance of
an event. The most common use of electrodermal activity has been in the detection of deception, the so-
called “lie detection test.”
The Polygraph, or Lie Detection Test
The test used to detect the truthfulness of an individual’s statements is often referred to as a polygraph.
A polygraph is actually a multi-function chart recorder that measures GSR, heart rate, blood pressure,
and respiration rate. These four responses are sensitive to stimulus novelty, intensity, emotionality, and
significance. The device is operated by a person known as a polygrapher, who is trained and licensed to
administer and interpret the test with the art and science of the discipline. Polygraphers use a variety of
tools to detect deception, including highly standardized questioning procedures.
The use of polygraphs to detect lying in individuals accused of crimes is highly controversial, in part
because the identification of false positives occurs in about 10 to 15% of test cases. A false positives
occurs when the polygrapher has determined that the person is being deceptive when, in fact, he or she
has not. A much rarer occurrence is a false negative. A false negative occurs when the test indicates the
person is telling the truth, but he or she is actually guilty. For this reason, polygraph tests are often used
in support of a person’s truthfulness, but not as evidence of guilt.
In this experiment, you will use measurements of skin conductance to analyze psychophysiological
responses. You will:
• measure the tonic level of skin conductance, the frequency of spontaneous conductance
responses, and the habituation of the skin conductance response;
• observe and measure the GSR as an orienting response to looking at a variety of pictures;
• observe and measure the GSR to questions with emotional content to determine if a subject has
been ‘cheating’ on quizzes.
Human Psychophysiology – GSR-Investigation – Background HP-8-3
Experiment HP-8: The Galvanic Skin Response (GSR) and Investigation into
‘Cheating’
This iWorx lab experiment was graciously provided by Dr. Paul Wagner and Dr. Tracy Wagner, Asst.
Professors, Washburn University, Topeka, KS.
Equipment Required
PC or Mac Computer
IXTA data acquisition unit
USB cable
IXTA power supply
C-ISO-B3G GSR amplifier, electrodes, and cable
PT-104 Pulse plethysmograph
Folder of 10 Photographs - include neutral and emotional photos
Directions for the Investigators and Subjects
IXTA Setup
1. Place the IXTA on the bench, close to the computer.
2. Check Figure T-1-1 in the Tutorial Chapter for the location of the USB port and the power
socket on the IXTA.
3. Check Figure T-1-2 in the Tutorial Chapter for a picture of the IXTA power supply.
4. Use the USB cable to connect the computer to the USB port on the rear panel of the IXTA.
5. Plug the power supply for the IXTA into the electrical outlet. Insert the plug on the end of the
power supply cable into the labeled socket on the rear of the IXTA. Use the power switch to
turn on the unit. Confirm that the red power light is on.
Start the Software
1. Click on the LabScribe shortcut on the computer’s desktop to open the program. If a shortcut is
not available, click on the Windows Start menu, move the cursor to All Programs and then to
the listing for iWorx. Select LabScribe from the iWorx submenu. The LabScribe Main window
will appear as the program opens.
2. On the Main window, pull down the Settings menu and select Load Group.
3. Locate the folder that contains the settings group, IPLMv4Complete.iwxgrp. Select this group
and click Open.
4. Pull down the Settings menu again. Select the GSR-Investigation-LS2 settings file in the
Human Psychophysiology folder.
5. After a short time, LabScribe will appear on the computer screen as configured by the GSR-
Investigation-LS2 settings.
Human Psychophysiology – GSR-Investigation – Background HP-8-4
6. For your information, the settings used to configure the LabScribe software and the IXTA unit
for this experiment are programmed on the Preferences Dialog window which can be viewed by
selecting Preferences from the Edit menu on the LabScribe Main window.
7. Once the settings file has been loaded, click the Experiment button on the toolbar to open any
of the following documents:
• Appendix
• Background
• Labs
• Setup (opens automatically)
GSR and PT-104 Setup
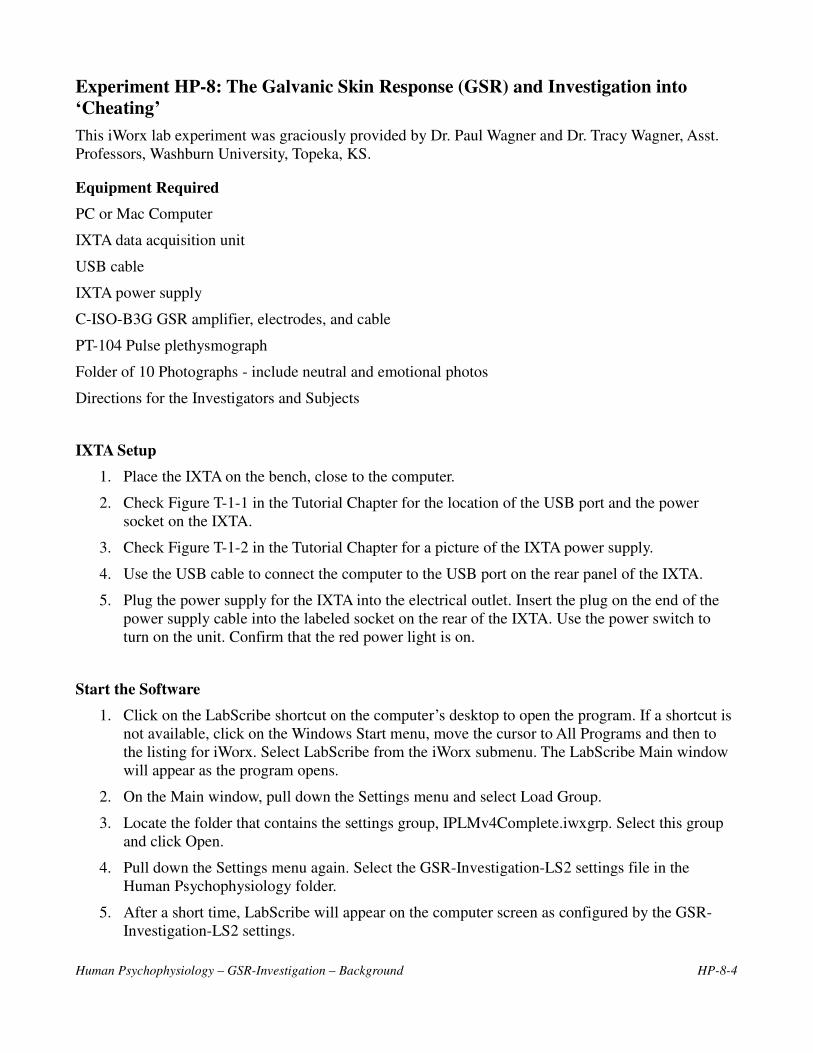
1. Locate the PT-104 pulse plethysmograph and plug it into the Channel A5 input of the IXTA
(Figure HP-8-S1).
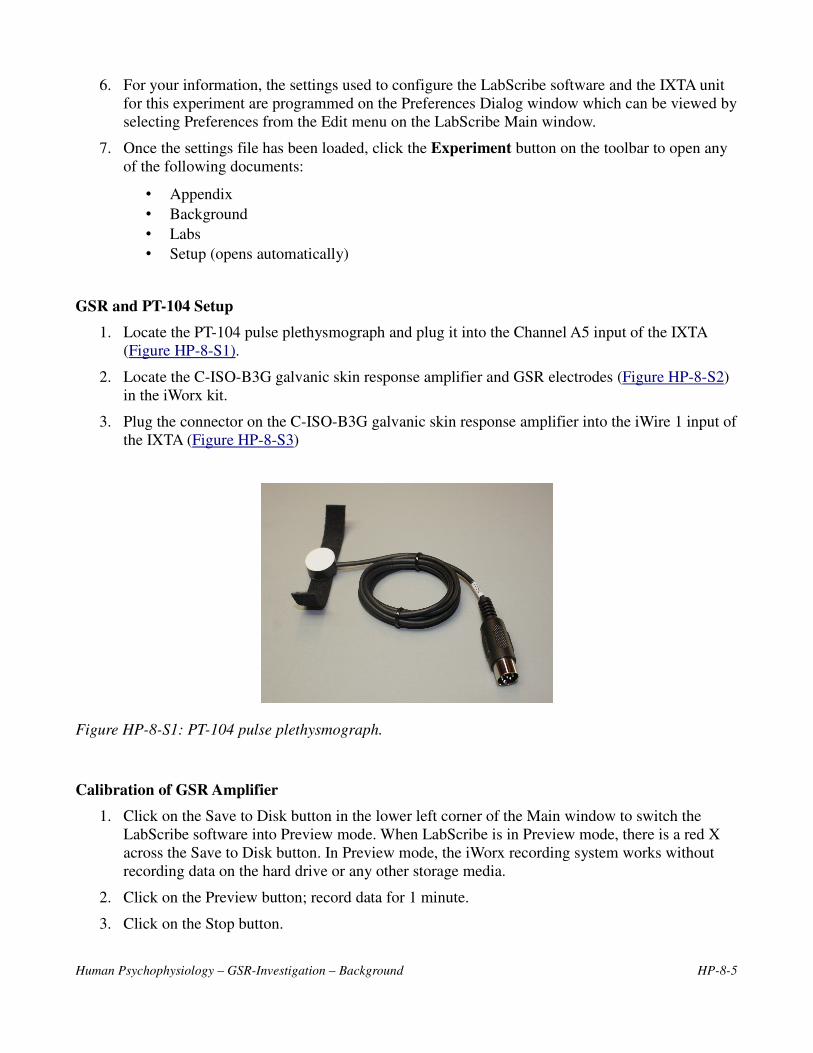
2. Locate the C-ISO-B3G galvanic skin response amplifier and GSR electrodes (Figure HP-8-S2)
in the iWorx kit.
3. Plug the connector on the C-ISO-B3G galvanic skin response amplifier into the iWire 1 input of
the IXTA (Figure HP-8-S3)
Figure HP-8-S1: PT-104 pulse plethysmograph.
Calibration of GSR Amplifier
1. Click on the Save to Disk button in the lower left corner of the Main window to switch the
LabScribe software into Preview mode. When LabScribe is in Preview mode, there is a red X
across the Save to Disk button. In Preview mode, the iWorx recording system works without
recording data on the hard drive or any other storage media.
2. Click on the Preview button; record data for 1 minute.
3. Click on the Stop button.
Human Psychophysiology – GSR-Investigation – Background HP-8-5
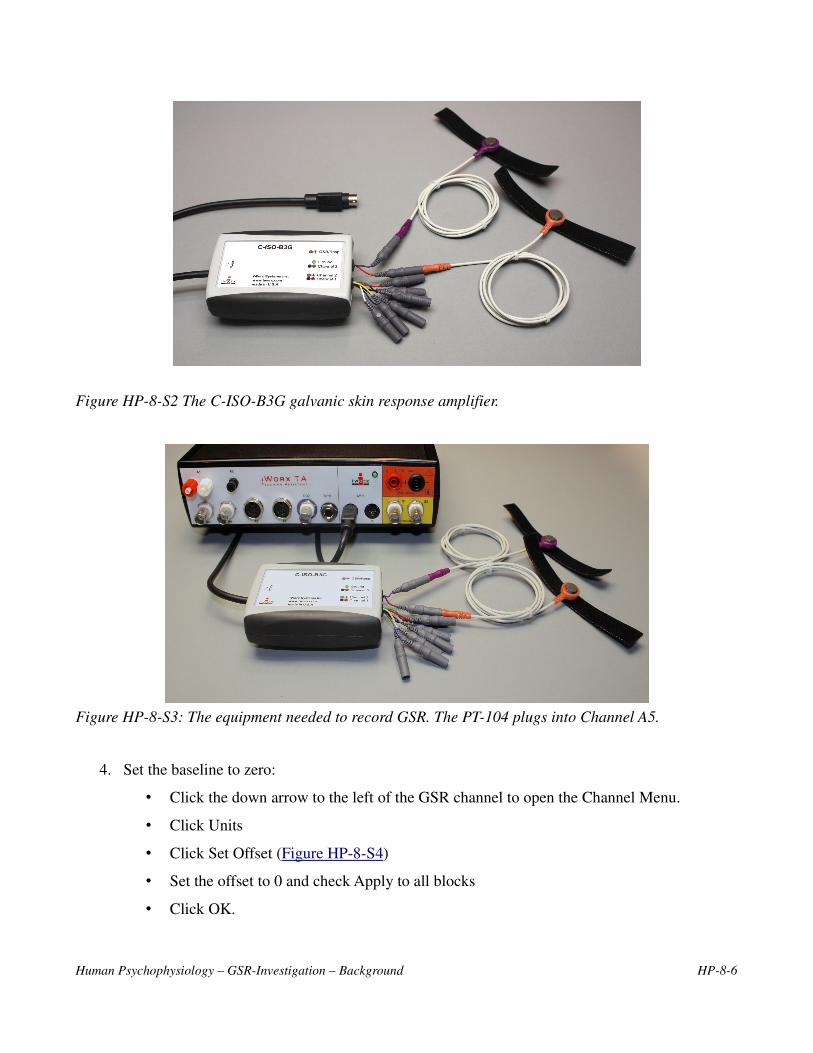
Figure HP-8-S2 The C-ISO-B3G galvanic skin response amplifier.
Figure HP-8-S3: The equipment needed to record GSR. The PT-104 plugs into Channel A5.
4. Set the baseline to zero:
• Click the down arrow to the left of the GSR channel to open the Channel Menu.
• Click Units
• Click Set Offset (Figure HP-8-S4)
• Set the offset to 0 and check Apply to all blocks
• Click OK.
Human Psychophysiology – GSR-Investigation – Background HP-8-6
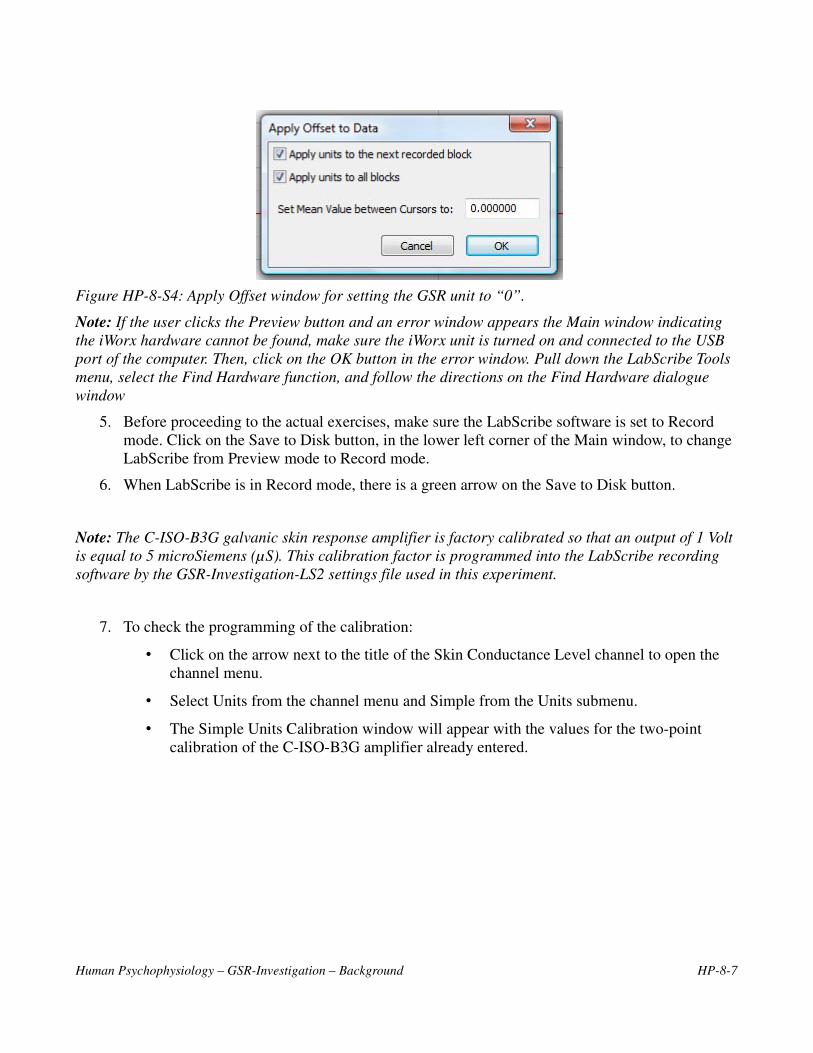
Figure HP-8-S4: Apply Offset window for setting the GSR unit to “0”.
Note: If the user clicks the Preview button and an error window appears the Main window indicating
the iWorx hardware cannot be found, make sure the iWorx unit is turned on and connected to the USB
port of the computer. Then, click on the OK button in the error window. Pull down the LabScribe Tools
menu, select the Find Hardware function, and follow the directions on the Find Hardware dialogue
window
5. Before proceeding to the actual exercises, make sure the LabScribe software is set to Record
mode. Click on the Save to Disk button, in the lower left corner of the Main window, to change
LabScribe from Preview mode to Record mode.
6. When LabScribe is in Record mode, there is a green arrow on the Save to Disk button.
Note: The C-ISO-B3G galvanic skin response amplifier is factory calibrated so that an output of 1 Volt
is equal to 5 microSiemens (µS). This calibration factor is programmed into the LabScribe recording
software by the GSR-Investigation-LS2 settings file used in this experiment.
7. To check the programming of the calibration:
• Click on the arrow next to the title of the Skin Conductance Level channel to open the
channel menu.
• Select Units from the channel menu and Simple from the Units submenu.
• The Simple Units Calibration window will appear with the values for the two-point
calibration of the C-ISO-B3G amplifier already entered.
Human Psychophysiology – GSR-Investigation – Background HP-8-7
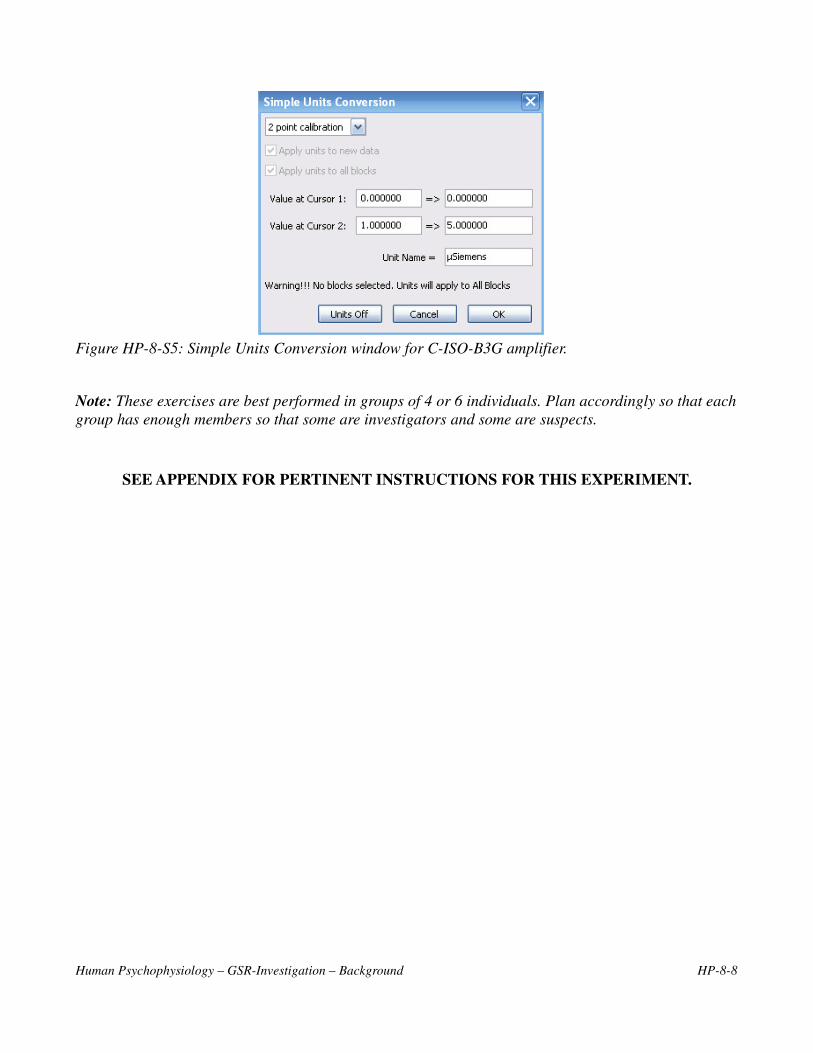
Figure HP-8-S5: Simple Units Conversion window for C-ISO-B3G amplifier.
Note: These exercises are best performed in groups of 4 or 6 individuals. Plan accordingly so that each
group has enough members so that some are investigators and some are suspects.
SEE APPENDIX FOR PERTINENT INSTRUCTIONS FOR THIS EXPERIMENT.
Human Psychophysiology – GSR-Investigation – Background HP-8-8
Experiment HP-8: The Galvanic Skin Response (GSR) and Investigation into
‘Cheating’
This iWorx lab experiment was graciously provided by Dr. Paul Wagner and Dr. Tracy Wagner, Asst.
Professors, Washburn University, Topeka, KS.
Exercise 1: Tonic SCL and Habituation
Aim: To measure the subject’s tonic skin conductance level, observe possible spontaneous skin
responses, and habituate the subject to the questioning paradigm used in this experiment.
Procedure
1. Select one person from your group to be the subject. Ask the subject to go to the sink, wash his
or her hands with soap and water, and dry them thoroughly. Washing the hands insures that
surface oils or other substances, which might lower skin conduction, are removed. Do not use
alcohol to clean the fingers, alcohol dehydrates the skin.
2. Connect the GSR electrodes to the BNC connector on the GSR-200 amplifier.
3. The subject should sit with his or her back to the computer monitor. Use the subject’s hand
which is closer to the iWorx equipment.
4. Attach each GSR electrode to the volar surface of the distal finger segment of two non-adjacent
fingers; the index and the ring fingers are the ones usually used. Attach the electrodes with the
Velcro straps so that the straps are snug, but not overly tight.
5. The subject should rest his or her hand with the GSR electrodes comfortably. The GSR
electrodes should be free from any extraneous pressure and the electrode cable should be
hanging freely. Instruct the subject not to move the hand during the recording process;
movement will introduce artifacts into the recording.
6. Two measurements are performed in this exercise:
• Tonic Skin Conductance Level: In this measurement, the subject sits quietly for one
minute as his or her tonic skin conductance level (SCL) is recorded. Any movement may
cause an artifact in the recording.
• Habituation: In this measurement, the subject’s tonic skin conductance level (SCL) is
recorded as he or she sits quietly and without movement. While recording the subject’s
SCL, ask the subject the question: Is your name, X? (where X is the subject’s real name).
The subject should respond: “YES”. After the subject’s SCL changes and then returns to
the baseline, ask the subject the same question. Continue to ask this same question until
the subject shows no response on three consecutive trials. Lack of a change in the
subject’s SCL while answering the question is considered habituation.
7. Type First Tonic SCL <Subject’s Name> in the Mark box that is to the right of the Mark button.
8. Click on the Record button. Press the Enter key on the keyboard. Since the GSR amplifier was
zeroed in the Calibration section of this exercise, the value displayed on the Skin Conductance
Level channel is the tonic skin conductance level (SCL) of the subject (Figure HP-8-L1). This
value should be between 2 and 20 µSiemens. Record the subject’s tonic SCL for one minute.
Human Psychophysiology – GSR-Investigation – Background HP-8-9
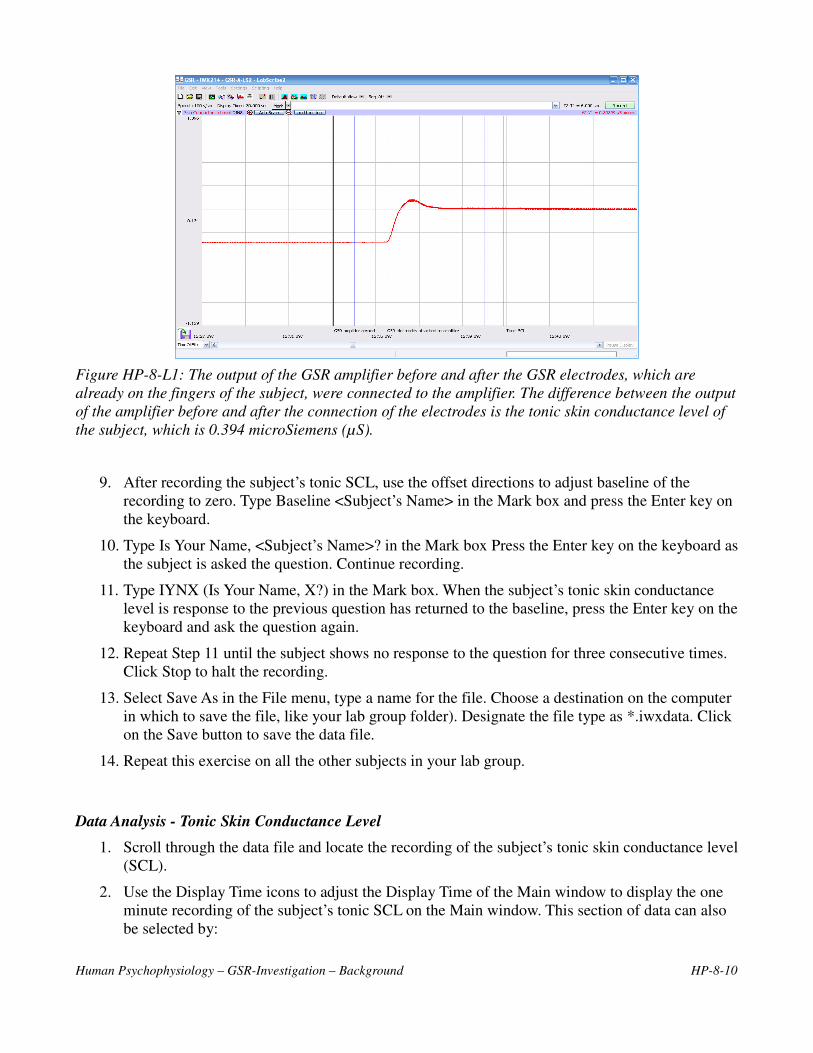
Figure HP-8-L1: The output of the GSR amplifier before and after the GSR electrodes, which are
already on the fingers of the subject, were connected to the amplifier. The difference between the output
of the amplifier before and after the connection of the electrodes is the tonic skin conductance level of
the subject, which is 0.394 microSiemens (µS).
9. After recording the subject’s tonic SCL, use the offset directions to adjust baseline of the
recording to zero. Type Baseline <Subject’s Name> in the Mark box and press the Enter key on
the keyboard.
10. Type Is Your Name, <Subject’s Name>? in the Mark box Press the Enter key on the keyboard as
the subject is asked the question. Continue recording.
11. Type IYNX (Is Your Name, X?) in the Mark box. When the subject’s tonic skin conductance
level is response to the previous question has returned to the baseline, press the Enter key on the
keyboard and ask the question again.
12. Repeat Step 11 until the subject shows no response to the question for three consecutive times.
Click Stop to halt the recording.
13. Select Save As in the File menu, type a name for the file. Choose a destination on the computer
in which to save the file, like your lab group folder). Designate the file type as *.iwxdata. Click
on the Save button to save the data file.
14. Repeat this exercise on all the other subjects in your lab group.
Data Analysis - Tonic Skin Conductance Level
1. Scroll through the data file and locate the recording of the subject’s tonic skin conductance level
(SCL).
2. Use the Display Time icons to adjust the Display Time of the Main window to display the one
minute recording of the subject’s tonic SCL on the Main window. This section of data can also
be selected by:
Human Psychophysiology – GSR-Investigation – Background HP-8-10
• Placing the cursors on either side of the one minute recording of the subject’s SCL, and
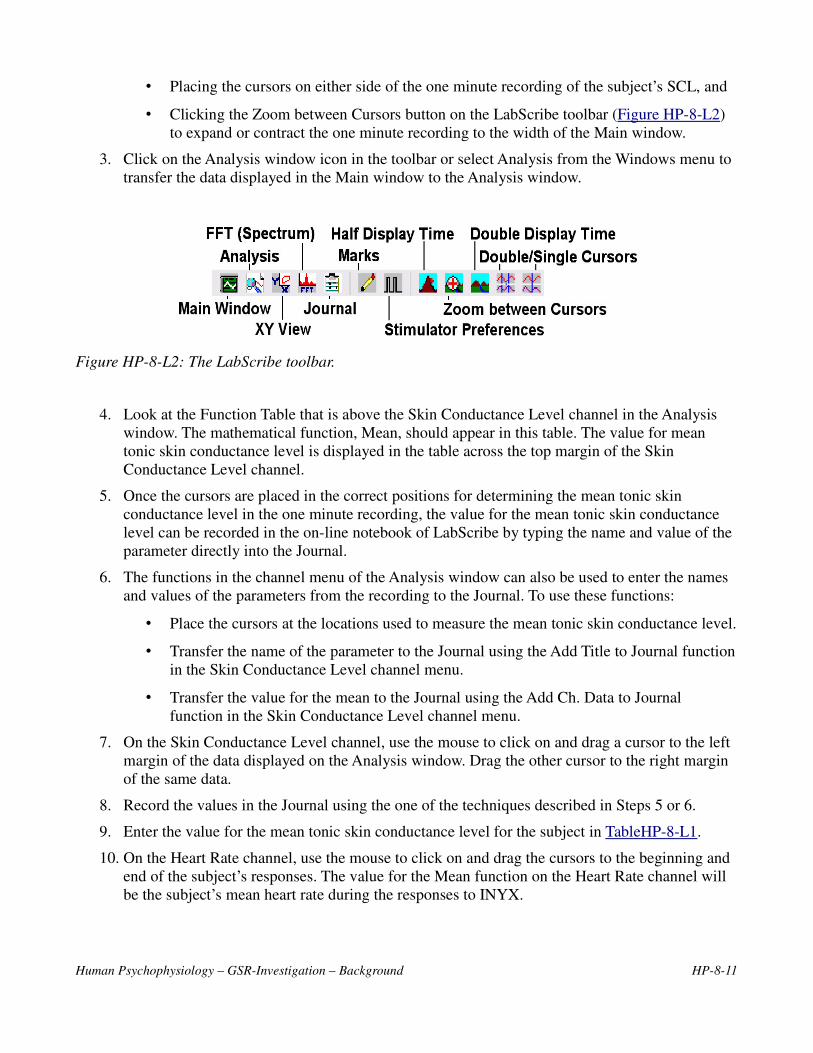
• Clicking the Zoom between Cursors button on the LabScribe toolbar (Figure HP-8-L2)
to expand or contract the one minute recording to the width of the Main window.
3. Click on the Analysis window icon in the toolbar or select Analysis from the Windows menu to
transfer the data displayed in the Main window to the Analysis window.
Figure HP-8-L2: The LabScribe toolbar.
4. Look at the Function Table that is above the Skin Conductance Level channel in the Analysis
window. The mathematical function, Mean, should appear in this table. The value for mean
tonic skin conductance level is displayed in the table across the top margin of the Skin
Conductance Level channel.
5. Once the cursors are placed in the correct positions for determining the mean tonic skin
conductance level in the one minute recording, the value for the mean tonic skin conductance
level can be recorded in the on-line notebook of LabScribe by typing the name and value of the
parameter directly into the Journal.
6. The functions in the channel menu of the Analysis window can also be used to enter the names
and values of the parameters from the recording to the Journal. To use these functions:
• Place the cursors at the locations used to measure the mean tonic skin conductance level.
• Transfer the name of the parameter to the Journal using the Add Title to Journal function
in the Skin Conductance Level channel menu.
• Transfer the value for the mean to the Journal using the Add Ch. Data to Journal
function in the Skin Conductance Level channel menu.
7. On the Skin Conductance Level channel, use the mouse to click on and drag a cursor to the left
margin of the data displayed on the Analysis window. Drag the other cursor to the right margin
of the same data.
8. Record the values in the Journal using the one of the techniques described in Steps 5 or 6.
9. Enter the value for the mean tonic skin conductance level for the subject in TableHP-8-L1.
10. On the Heart Rate channel, use the mouse to click on and drag the cursors to the beginning and
end of the subject’s responses. The value for the Mean function on the Heart Rate channel will
be the subject’s mean heart rate during the responses to INYX.
Human Psychophysiology – GSR-Investigation – Background HP-8-11
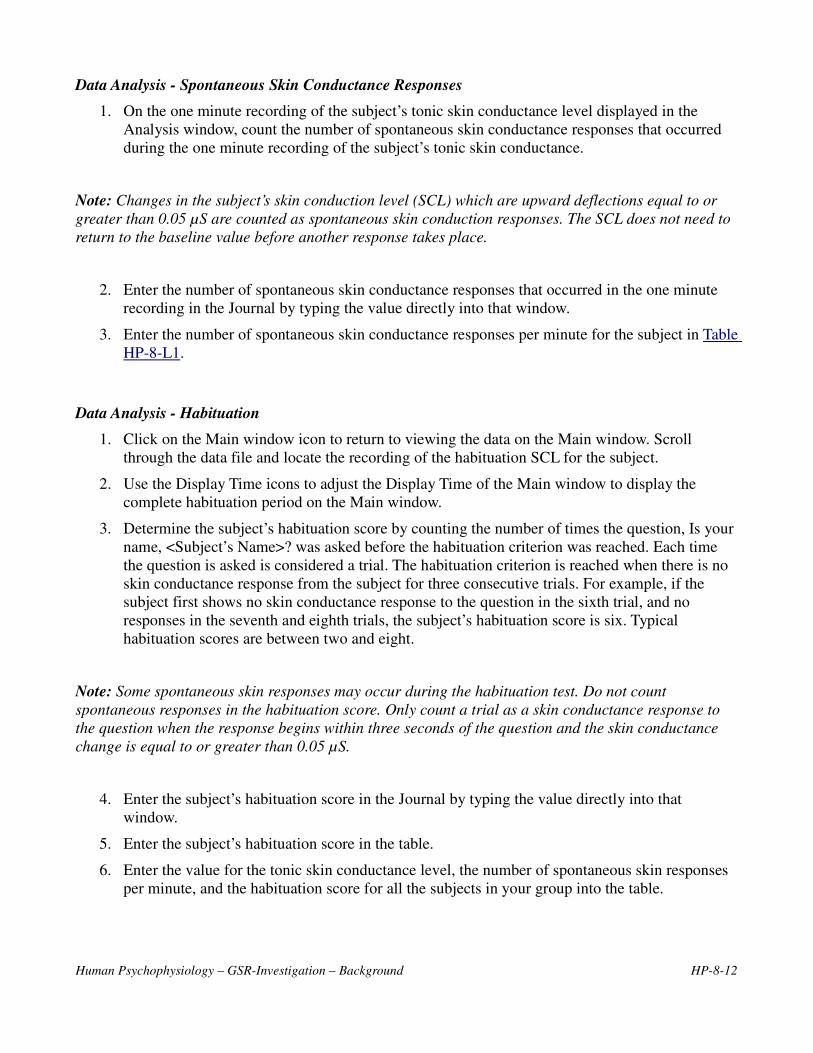
Data Analysis - Spontaneous Skin Conductance Responses
1. On the one minute recording of the subject’s tonic skin conductance level displayed in the
Analysis window, count the number of spontaneous skin conductance responses that occurred
during the one minute recording of the subject’s tonic skin conductance.
Note: Changes in the subject’s skin conduction level (SCL) which are upward deflections equal to or
greater than 0.05 µS are counted as spontaneous skin conduction responses. The SCL does not need to
return to the baseline value before another response takes place.
2. Enter the number of spontaneous skin conductance responses that occurred in the one minute
recording in the Journal by typing the value directly into that window.
3. Enter the number of spontaneous skin conductance responses per minute for the subject in Table
HP-8-L1.
Data Analysis - Habituation
1. Click on the Main window icon to return to viewing the data on the Main window. Scroll
through the data file and locate the recording of the habituation SCL for the subject.
2. Use the Display Time icons to adjust the Display Time of the Main window to display the
complete habituation period on the Main window.
3. Determine the subject’s habituation score by counting the number of times the question, Is your
name, <Subject’s Name>? was asked before the habituation criterion was reached. Each time
the question is asked is considered a trial. The habituation criterion is reached when there is no
skin conductance response from the subject for three consecutive trials. For example, if the
subject first shows no skin conductance response to the question in the sixth trial, and no
responses in the seventh and eighth trials, the subject’s habituation score is six. Typical
habituation scores are between two and eight.
Note: Some spontaneous skin responses may occur during the habituation test. Do not count
spontaneous responses in the habituation score. Only count a trial as a skin conductance response to
the question when the response begins within three seconds of the question and the skin conductance
change is equal to or greater than 0.05 µS.
4. Enter the subject’s habituation score in the Journal by typing the value directly into that
window.
5. Enter the subject’s habituation score in the table.
6. Enter the value for the tonic skin conductance level, the number of spontaneous skin responses
per minute, and the habituation score for all the subjects in your group into the table.
Human Psychophysiology – GSR-Investigation – Background HP-8-12
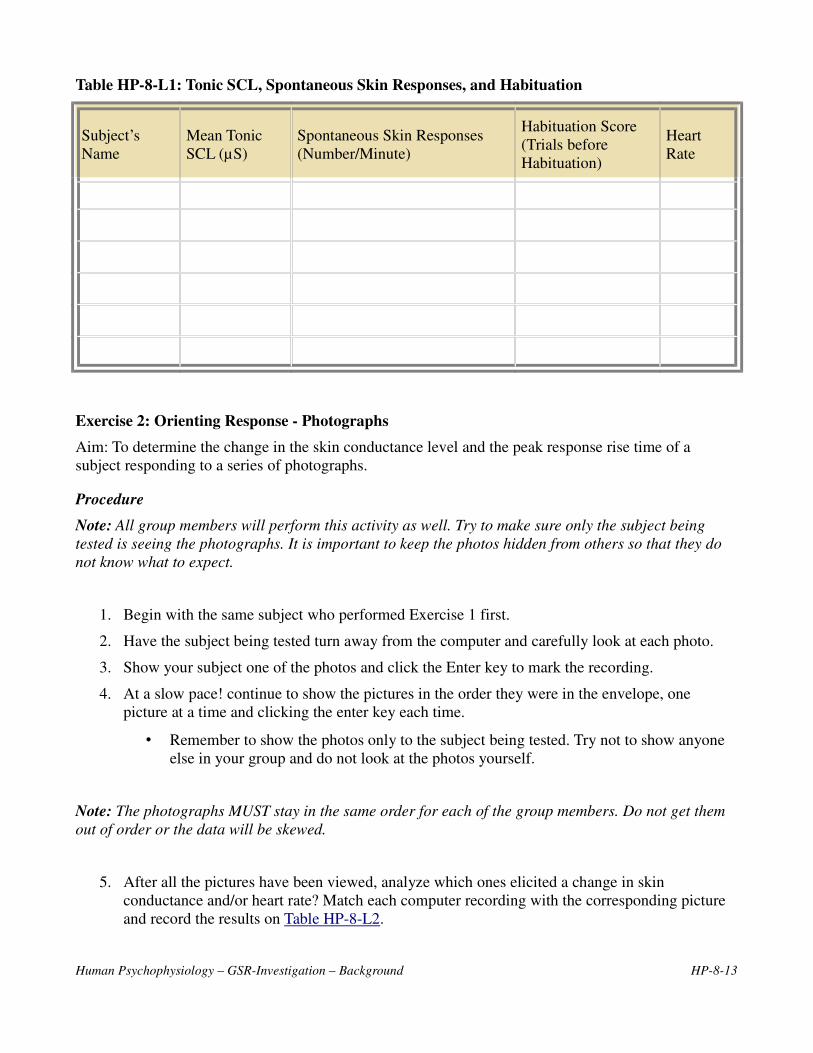
Table HP-8-L1: Tonic SCL, Spontaneous Skin Responses, and Habituation
Subject’s
Name
Mean Tonic
SCL (µS)
Spontaneous Skin Responses
(Number/Minute)
Habituation Score
(Trials before
Habituation)
Heart
Rate
Exercise 2: Orienting Response - Photographs
Aim: To determine the change in the skin conductance level and the peak response rise time of a
subject responding to a series of photographs.
Procedure
Note: All group members will perform this activity as well. Try to make sure only the subject being
tested is seeing the photographs. It is important to keep the photos hidden from others so that they do
not know what to expect.
1. Begin with the same subject who performed Exercise 1 first.
2. Have the subject being tested turn away from the computer and carefully look at each photo.
3. Show your subject one of the photos and click the Enter key to mark the recording.
4. At a slow pace! continue to show the pictures in the order they were in the envelope, one
picture at a time and clicking the enter key each time.
• Remember to show the photos only to the subject being tested. Try not to show anyone
else in your group and do not look at the photos yourself.
Note: The photographs MUST stay in the same order for each of the group members. Do not get them
out of order or the data will be skewed.
5. After all the pictures have been viewed, analyze which ones elicited a change in skin
conductance and/or heart rate? Match each computer recording with the corresponding picture
and record the results on Table HP-8-L2.
Human Psychophysiology – GSR-Investigation – Background HP-8-13
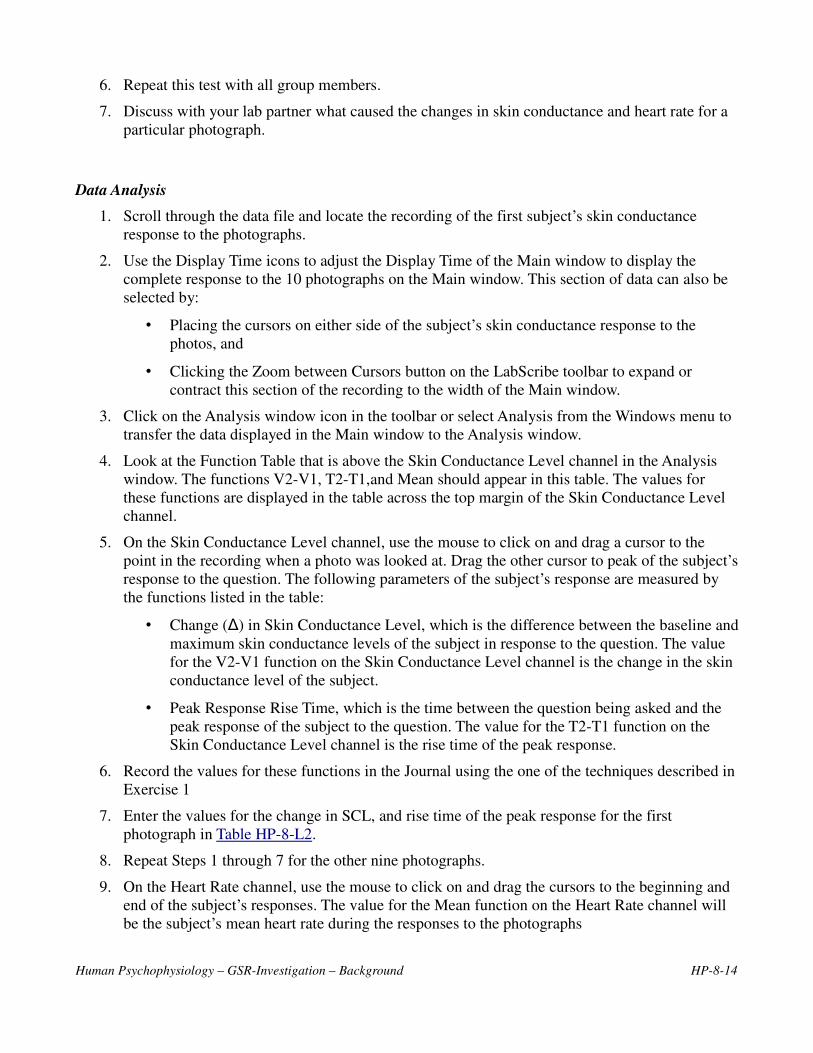
6. Repeat this test with all group members.
7. Discuss with your lab partner what caused the changes in skin conductance and heart rate for a
particular photograph.
Data Analysis
1. Scroll through the data file and locate the recording of the first subject’s skin conductance
response to the photographs.
2. Use the Display Time icons to adjust the Display Time of the Main window to display the
complete response to the 10 photographs on the Main window. This section of data can also be
selected by:
• Placing the cursors on either side of the subject’s skin conductance response to the
photos, and
• Clicking the Zoom between Cursors button on the LabScribe toolbar to expand or
contract this section of the recording to the width of the Main window.
3. Click on the Analysis window icon in the toolbar or select Analysis from the Windows menu to
transfer the data displayed in the Main window to the Analysis window.
4. Look at the Function Table that is above the Skin Conductance Level channel in the Analysis
window. The functions V2-V1, T2-T1,and Mean should appear in this table. The values for
these functions are displayed in the table across the top margin of the Skin Conductance Level
channel.
5. On the Skin Conductance Level channel, use the mouse to click on and drag a cursor to the
point in the recording when a photo was looked at. Drag the other cursor to peak of the subject’s
response to the question. The following parameters of the subject’s response are measured by
the functions listed in the table:
• Change (∆) in Skin Conductance Level, which is the difference between the baseline and
maximum skin conductance levels of the subject in response to the question. The value
for the V2-V1 function on the Skin Conductance Level channel is the change in the skin
conductance level of the subject.
• Peak Response Rise Time, which is the time between the question being asked and the
peak response of the subject to the question. The value for the T2-T1 function on the
Skin Conductance Level channel is the rise time of the peak response.
6. Record the values for these functions in the Journal using the one of the techniques described in
Exercise 1
7. Enter the values for the change in SCL, and rise time of the peak response for the first
photograph in Table HP-8-L2.
8. Repeat Steps 1 through 7 for the other nine photographs.
9. On the Heart Rate channel, use the mouse to click on and drag the cursors to the beginning and
end of the subject’s responses. The value for the Mean function on the Heart Rate channel will
be the subject’s mean heart rate during the responses to the photographs
Human Psychophysiology – GSR-Investigation – Background HP-8-14

Table HP-8-L2:Skin Conductance Changes while viewing Photographs
Photographs ∆ in SCL (µS) Peak Response Rise Time (seconds) Mean Heart Rate
1.
2.
3.
4.
5.
6.
7.
8.
9.
10.
Exercise 3 - Guilty Knowledge Test
Aim: To determine which of the subjects has been cheating on the Physiology quizzes.
Note: In our Investigative Polygraph Test you will examine only two variables: the change skin
conductance and the change in heart rate, as indicators of emotions (i.e. truthfulness).
Procedure
Each group will receive a set of 3 envelopes. The envelopes will be labeled Principal Investigators,
Suspect I and Suspect II.
1. For this task select two students from your group who will act as the suspects. These two
students should be the ones with the best responses when looking at the photographs.
• They should each receive corresponding letter.
• The two Suspects should then leave the room, read their letter and not discuss the
contents of the letters with each other.
2. The remaining member (or members) of the group are the Principal Investigators. They should
read their letter and then follow the instructions.
3. Make a random list of questions on Table HP-8-L3 like the ones suggested below. There will be
10 questions in total: seven neutral questions and three emotional questions.
Human Psychophysiology – GSR-Investigation – Background HP-8-15
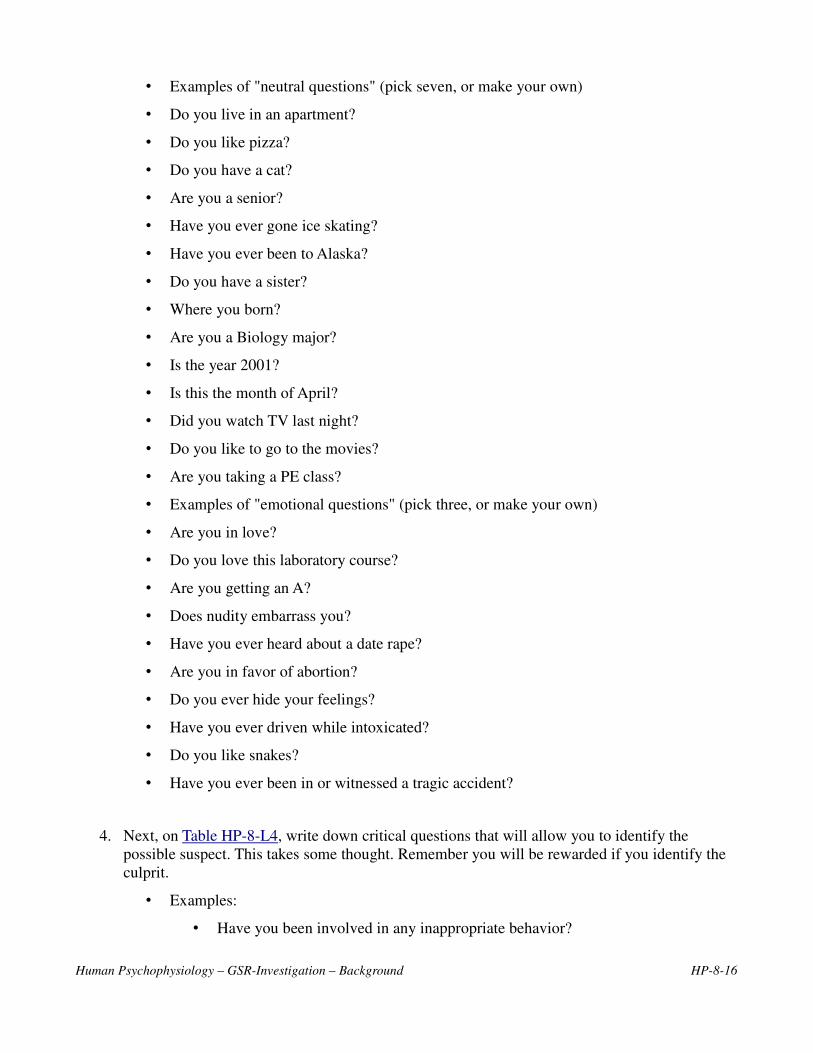
• Examples of "neutral questions" (pick seven, or make your own)
• Do you live in an apartment?
• Do you like pizza?
• Do you have a cat?
• Are you a senior?
• Have you ever gone ice skating?
• Have you ever been to Alaska?
• Do you have a sister?
• Where you born?
• Are you a Biology major?
• Is the year 2001?
• Is this the month of April?
• Did you watch TV last night?
• Do you like to go to the movies?
• Are you taking a PE class?
• Examples of "emotional questions" (pick three, or make your own)
• Are you in love?
• Do you love this laboratory course?
• Are you getting an A?
• Does nudity embarrass you?
• Have you ever heard about a date rape?
• Are you in favor of abortion?
• Do you ever hide your feelings?
• Have you ever driven while intoxicated?
• Do you like snakes?
• Have you ever been in or witnessed a tragic accident?
4. Next, on Table HP-8-L4, write down critical questions that will allow you to identify the
possible suspect. This takes some thought. Remember you will be rewarded if you identify the
culprit.
• Examples:
• Have you been involved in any inappropriate behavior?
Human Psychophysiology – GSR-Investigation – Background HP-8-16
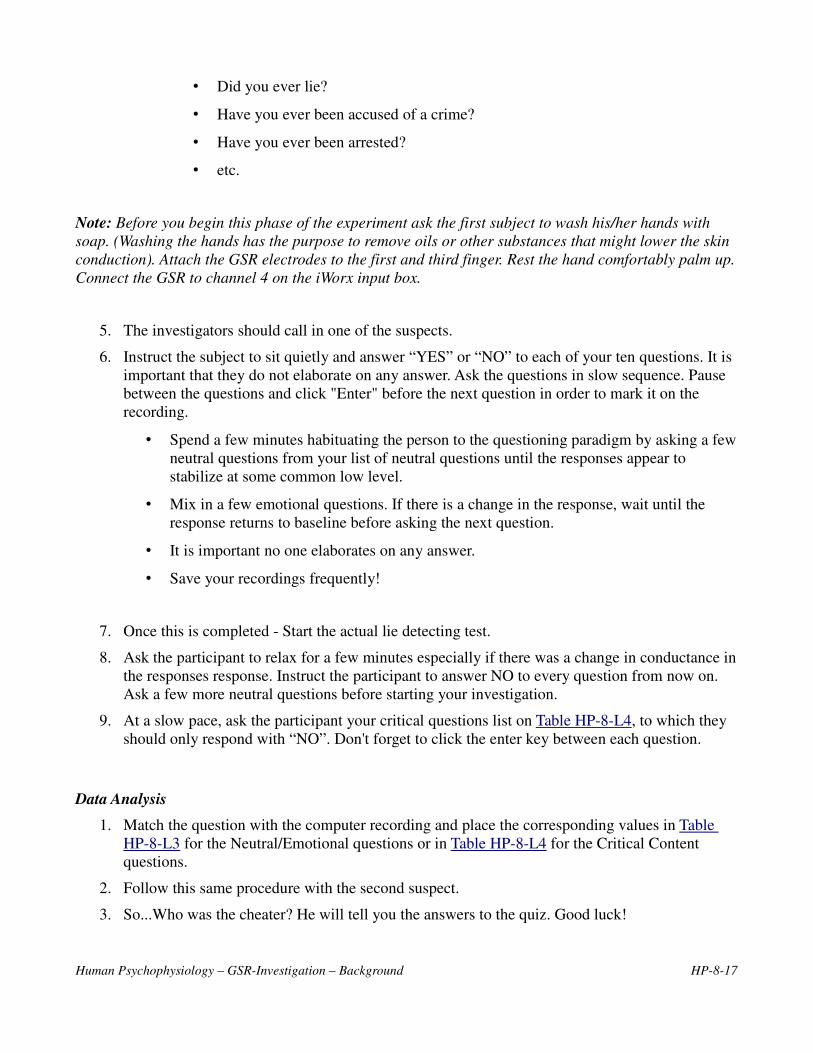
• Did you ever lie?
• Have you ever been accused of a crime?
• Have you ever been arrested?
• etc.
Note: Before you begin this phase of the experiment ask the first subject to wash his/her hands with
soap. (Washing the hands has the purpose to remove oils or other substances that might lower the skin
conduction). Attach the GSR electrodes to the first and third finger. Rest the hand comfortably palm up.
Connect the GSR to channel 4 on the iWorx input box.
5. The investigators should call in one of the suspects.
6. Instruct the subject to sit quietly and answer “YES” or “NO” to each of your ten questions. It is
important that they do not elaborate on any answer. Ask the questions in slow sequence. Pause
between the questions and click "Enter" before the next question in order to mark it on the
recording.
• Spend a few minutes habituating the person to the questioning paradigm by asking a few
neutral questions from your list of neutral questions until the responses appear to
stabilize at some common low level.
• Mix in a few emotional questions. If there is a change in the response, wait until the
response returns to baseline before asking the next question.
• It is important no one elaborates on any answer.
• Save your recordings frequently!
7. Once this is completed - Start the actual lie detecting test.
8. Ask the participant to relax for a few minutes especially if there was a change in conductance in
the responses response. Instruct the participant to answer NO to every question from now on.
Ask a few more neutral questions before starting your investigation.
9. At a slow pace, ask the participant your critical questions list on Table HP-8-L4, to which they
should only respond with “NO”. Don't forget to click the enter key between each question.
Data Analysis
1. Match the question with the computer recording and place the corresponding values in Table
HP-8-L3 for the Neutral/Emotional questions or in Table HP-8-L4 for the Critical Content
questions.
2. Follow this same procedure with the second suspect.
3. So...Who was the cheater? He will tell you the answers to the quiz. Good luck!
Human Psychophysiology – GSR-Investigation – Background HP-8-17
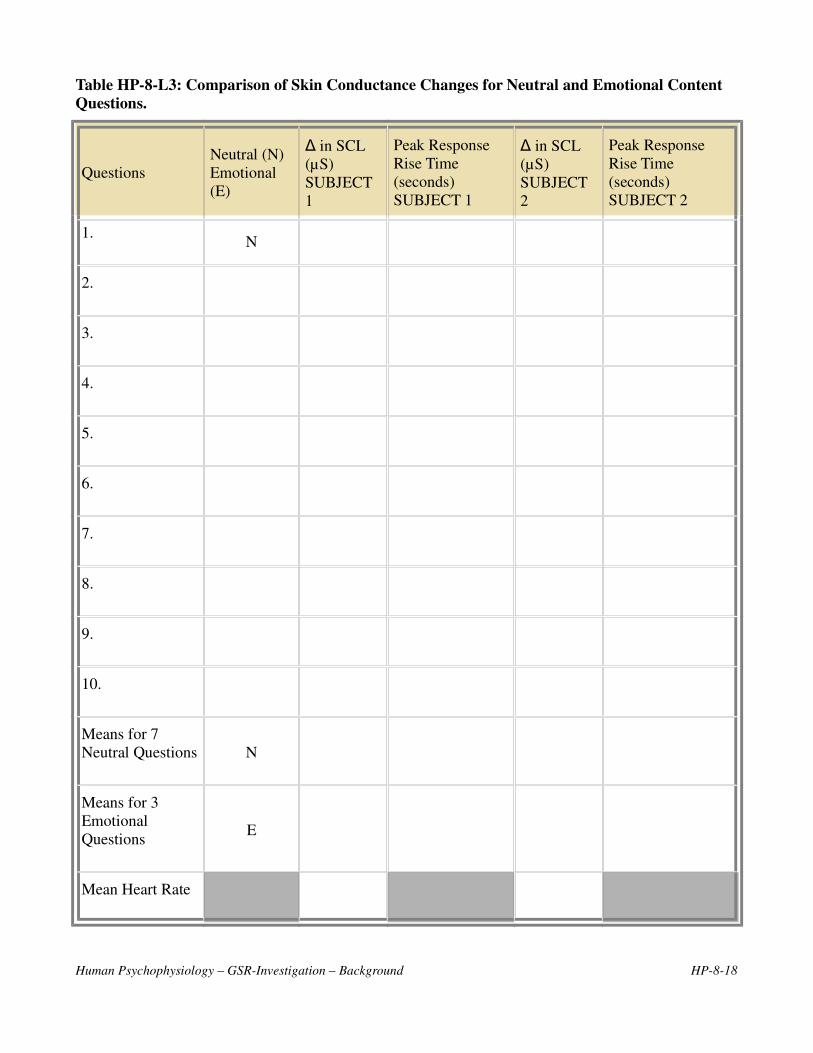
Table HP-8-L3: Comparison of Skin Conductance Changes for Neutral and Emotional Content
Questions.
Questions
Neutral (N)
Emotional
(E)
∆ in SCL
(µS)
SUBJECT
1
Peak Response
Rise Time
(seconds)
SUBJECT 1
∆ in SCL
(µS)
SUBJECT
2
Peak Response
Rise Time
(seconds)
SUBJECT 2
1.N
2.
3.
4.
5.
6.
7.
8.
9.
10.
Means for 7
Neutral Questions N
Means for 3
Emotional
QuestionsE
Mean Heart Rate
Human Psychophysiology – GSR-Investigation – Background HP-8-18
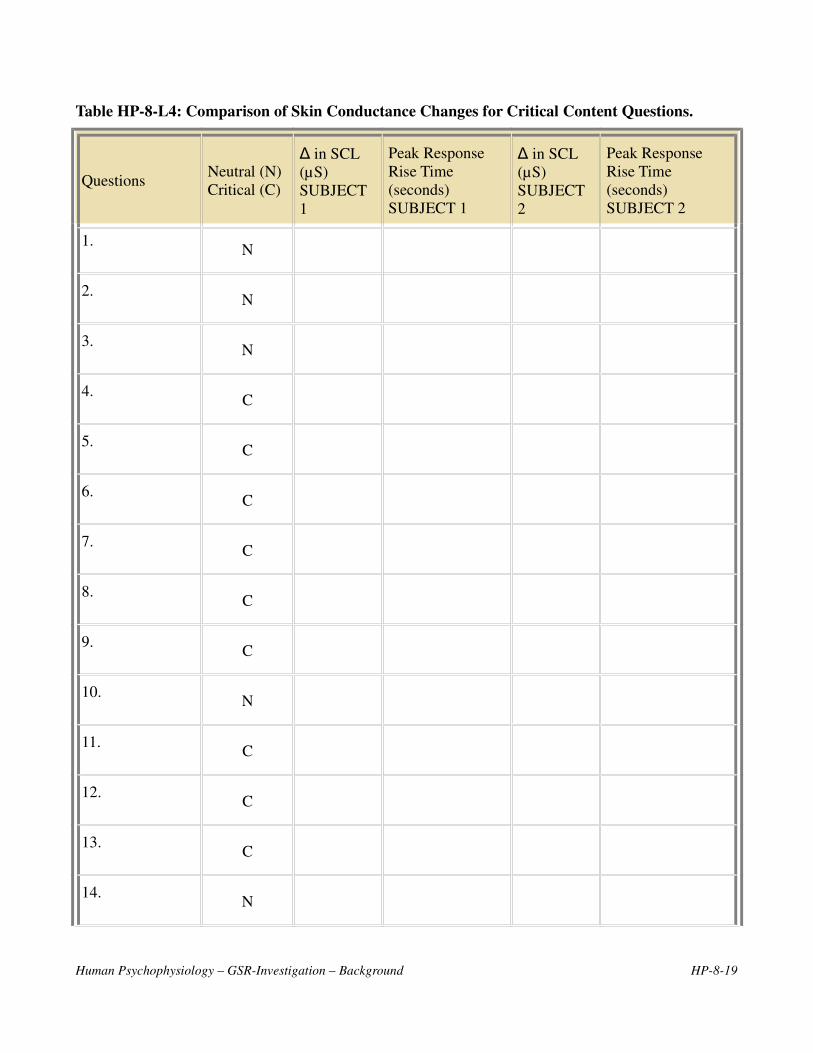
Table HP-8-L4: Comparison of Skin Conductance Changes for Critical Content Questions.
QuestionsNeutral (N)
Critical (C)
∆ in SCL
(µS)
SUBJECT
1
Peak Response
Rise Time
(seconds)
SUBJECT 1
∆ in SCL
(µS)
SUBJECT
2
Peak Response
Rise Time
(seconds)
SUBJECT 2
1.N
2.N
3.N
4.C
5.C
6.C
7.C
8.C
9.C
10.N
11.C
12.C
13.C
14.N
Human Psychophysiology – GSR-Investigation – Background HP-8-19
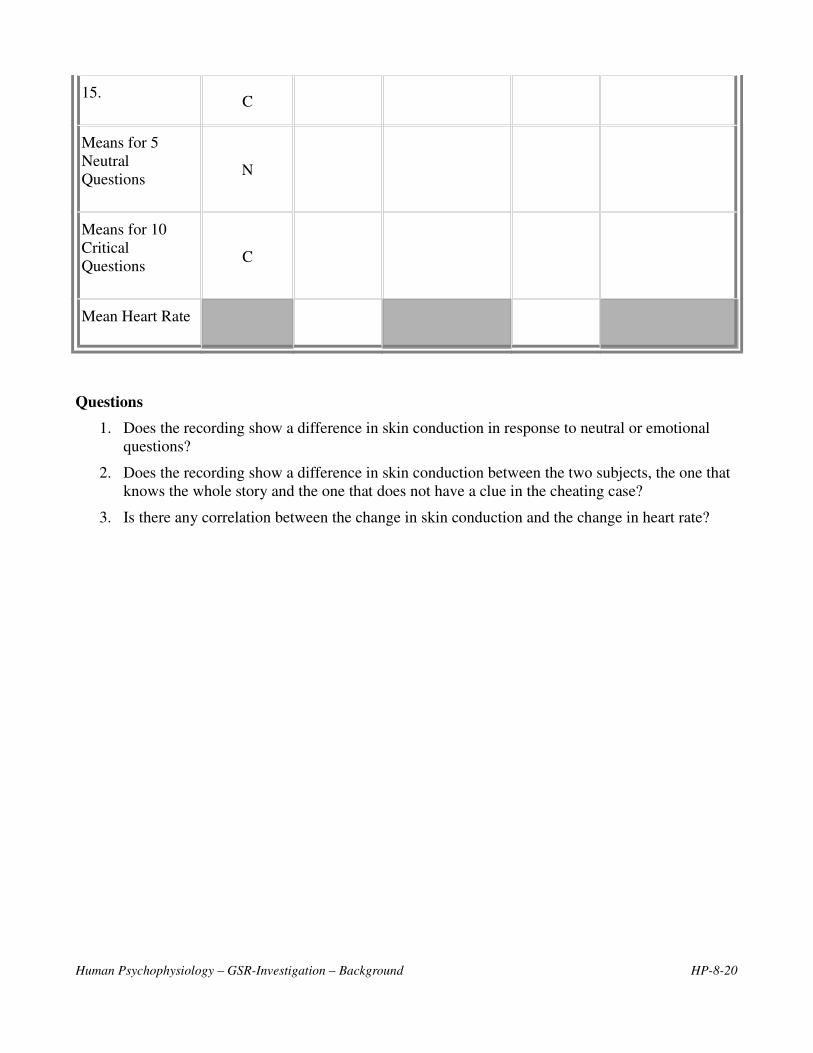
15.C
Means for 5
Neutral
QuestionsN
Means for 10
Critical
QuestionsC
Mean Heart Rate
Questions
1. Does the recording show a difference in skin conduction in response to neutral or emotional
questions?
2. Does the recording show a difference in skin conduction between the two subjects, the one that
knows the whole story and the one that does not have a clue in the cheating case?
3. Is there any correlation between the change in skin conduction and the change in heart rate?
Human Psychophysiology – GSR-Investigation – Background HP-8-20
Experiment HP-8: The Galvanic Skin Response (GSR) and Investigation into
‘Cheating’ - Instructor’s Guide
This iWorx lab experiment was graciously provided by Dr. Paul Wagner and Dr. Tracy Wagner, Asst.
Professors, Washburn University, Topeka, KS.
PERTINENT INFORMATION FOR INSTRUCTORS
1. Read all instructions carefully before proceeding with this experiment. There are items that
need to be organized before this lab begins.
2. Exercise 2 - Orienting to Photographs: each of the envelopes (for each group) should contain 10
pictures in total. These should show photos where some are scary, some with the color red,
others blue, politicians, etc... which may provoke a response.
• This activity is used to get acquainted with the set-up, and to identify those individuals
who are good responders.
• The good responders will be used as the Suspects (I and II) in the “Who-Done-It” game
in Exercise 3.
3. Have the instructions for the Principal Investigators, Subject I and Subject II ready to be handed
to the individuals during Exercise 3.
4. During Exercise 3 the two Suspects will take their envelopes and leave the room to read them.
Note: It is important that the Suspects read their letters out of sight of each other.
5. The Principal Investigators (PIs) should read their letter and begin the process of devising
questions while the Suspects are out of the room.
6. Once the questions are ready to be asked the PIs can begin the interrogation of each of the
Suspects individually.
7. As you read the Suspect II information on page 4, you will notice that they must go some place
and retrieve another envelope. In that envelope is a hand written letter from another student
letting them know what the answers are to the quiz. We have found that just handling this
envelope is sufficient to produce a response on the GSR.
8. As an addition to this lab - it is suggested that for the students to take the “game” seriously:
• Tell the PIs that the suspect they choose will take the quiz for them and however that
student performs on the quiz will be the grade their entire group will get for that quiz.
• Once the group of PIs choose the Suspect they think is the “cheater” - ask that individual
to take the quiz without looking at the questions.
• If the chosen Suspect is actually the “cheater”, then he or she will already know the
answers.
• Design the quiz so that the answers are either all "a" and/or all "true".
Human Psychophysiology – GSR-Investigation – Background HP-8-21
Instructions for the Principal Investigators
Note: These instructions should be placed in a separate envelope marked Principal Investigators. No
one else but the instructor should have access to this information prior to the lab experiment.
Note: This information will be given to the Investigators after Exercise 2 is completed.
By now, we are sure you have heard that someone has been breaking into offices in the Biology
department.
Last week, your instructors met to discuss the up coming quiz for the GSR lab and the grades for the
laboratory. It was noticed that the quiz grades for a number of you are a bit higher than usual.
We passed this information onto the Dean of Students who then requested a meeting with the Biology
department faculty. The Dean of Students, the Vice President of Academic Affairs and campus police
met with the faculty of the Biology department.
They reported that they have been investigating a cheating ring on campus. Individuals steal the
answers to quizzes and exams and then sell them to members of this cheating ring who distribute them
to fellow students, sororities and fraternities for a fee.
They also told the faculty that evidence taken from your Professors’ offices matches that from members
of the suspected cheating ring.
Your instructors suspect that something is wrong and that the cheating ring may have something to do
with the change in scores.
So, your mission, if you choose to accept it, is to try and catch those who are using the stolen answers.
We are sure that certain members of the class know the answers to the exit quiz today. It is your job to
find out who these people are!
However, there is a catch! The person that you think is the "cheater" in your group will take the exit
quiz for your lab group. The grade that this person gets will be the grade that your lab group will
receive for that quiz. So, the better you do your job the better your grade will be!
It will be helpful if you read the lab manual before starting. The toughest part of polygraph work is the
design of the questions.
Start your questioning with some simple yes or no neutral questions like:
• Is your name Sarah Smith?
• Is the year 2010?
• Do you drive to school?
• Are you a Biology major?
In between these neutral questions sprinkle in some emotional questions like:
• Do you like Physiology?
• Do you have a significant other?
• Have you ever been intoxicated?
Human Psychophysiology – GSR-Investigation – Background HP-8-22
Hopefully, after 10 or 12 questions you will have a good sense of how the person responds to an
emotional question. Hopefully, the emotional responses should be similar to a response of someone
who is lying.
With this knowledge of how they respond, ask your suspect to answer "No" to all of the following
questions regardless of the truth of the answer. Be clever and sprinkle in neutral questions amongst the
questions you think will help you determine who might be trying to cheat.
Below are a few examples of questions you might try:
• Are you in a sorority?
• Do you know someone who cheats?
• Are you a female?
• Do you know the answers to the quiz today?
GOOD LUCK!
Human Psychophysiology – GSR-Investigation – Background HP-8-23
Instructions for Suspect I
Note: These instructions should be placed in a separate envelope marked Subject I. No one else but the
instructor should have access to this information prior to the lab experiment.
Note: This information will be given to Subject I after Exercise 2 is completed.
As you might have heard, someone has been breaking into offices in the Biology department. Last
week, your instructors met to discuss the up coming quiz for the GSR lab and the grades for the
laboratory.
It was noticed that the quiz grades for a number of you are a bit higher than usual. So, we passed this
information onto the Dean of Students who then requested a meeting with the Biology department
faculty.
The Dean of Students, the Vice President of Academic Affairs and campus police met with the faculty
of the Biology department. They reported that they have been investigating a cheating ring on campus.
Individuals steal the answers to quizzes and exams and then sell them to members of this cheating ring
who then distribute them to fellow students, sororities and fraternities for a fee. They also told the
faculty that evidence taken from your Professors’ offices matches that from members of the suspected
cheating ring.
Your instructors suspect that something is wrong and that the cheating ring may have something to do
with the change in the quiz and exam scores.
We are sure that certain members of the class know the answers to the exit quiz today. Unfortunately,
you have been identified as one of the possible students who have access to the questions.
Since it is obvious that you are not one of those students, taking the polygraph test should pose no
problem.
You just have to follow the instructions of the investigators. Just stay calm and you should be all right.
Lawyers are standing by just in case you are falsely accused!
Do not discuss the contents of this letter with anyone!!
While you are waiting to be brought in for questioning, study for the quiz or just relax in the hallway.
You will be called in for questioning shortly.
You are not supposed to have contact with any other suspects.
Human Psychophysiology – GSR-Investigation – Background HP-8-24
Instructions for Suspect II
Note: These instructions should be placed in a separate envelope marked Subject II. No one else but
the instructor should have access to this information prior to the lab experiment
Note: This information will be given to Subject II after Exercise 2 is completed.
DO NOT show or discuss the content of this letter with anyone! Read it to yourself and put it back into
the envelope.
Do not act suspicious, but take a walk, go to the bathroom, get a drink of water but find your way to
your Professor’s Office.
There, taped to the door, you will find a sealed envelope marked with the title Physiology Lab. Take
out the contents, read it carefully and place it back in the envelope. Make certain to reseal the envelope
and then retape it to the door.
Now go back to lab and wait outside to be called in for questioning. You need to be present outside the
lab room so you can participate in the questioning - so don’t take too long.
Remember do not tell anyone- this is just between us!
Human Psychophysiology – GSR-Investigation – Background HP-8-25