Exhaust System Testing the Exhaust...
6
Testing the Exhaust System 90-863758070 APRIL 2008 Page 6D-1 6 D Exhaust System Section 6D - Testing the Exhaust System Table of Contents Testing the Exhaust System............................6D-2 Through‑Transom Exhaust Back Pressure ..................................................................6D-2 Exhaust Back Pressure Test....................6D-2 Check for Water Intrusion.........................6D-4
Transcript of Exhaust System Testing the Exhaust...

Testing the Exhaust System
90-863758070 APRIL 2008 Page 6D-1
6D
Exhaust SystemSection 6D - Testing the Exhaust System
Table of Contents
Testing the Exhaust System............................6D-2Through‑Transom Exhaust Back Pressure..................................................................6D-2
Exhaust Back Pressure Test....................6D-2Check for Water Intrusion.........................6D-4
Testing the Exhaust System
Page 6D-2 90-863758070 APRIL 2008
Testing the Exhaust SystemThrough‑Transom Exhaust Back Pressure
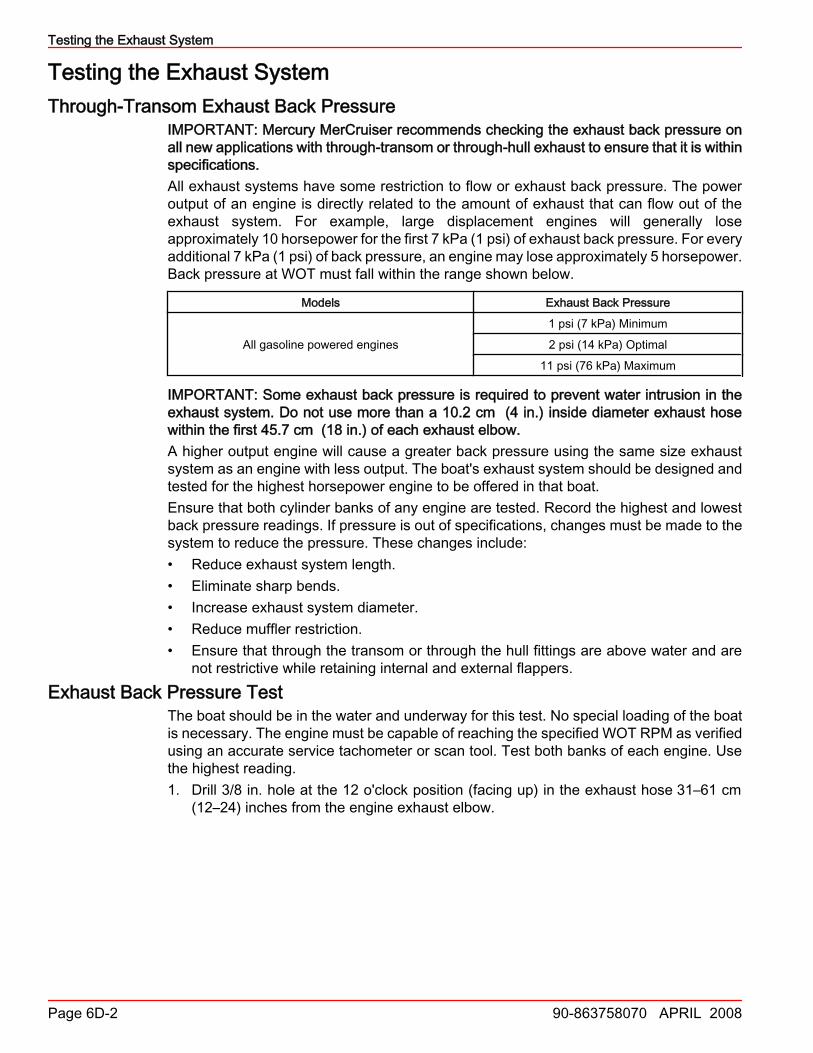
IMPORTANT: Mercury MerCruiser recommends checking the exhaust back pressure onall new applications with through‑transom or through‑hull exhaust to ensure that it is withinspecifications.All exhaust systems have some restriction to flow or exhaust back pressure. The poweroutput of an engine is directly related to the amount of exhaust that can flow out of theexhaust system. For example, large displacement engines will generally loseapproximately 10 horsepower for the first 7 kPa (1 psi) of exhaust back pressure. For everyadditional 7 kPa (1 psi) of back pressure, an engine may lose approximately 5 horsepower.Back pressure at WOT must fall within the range shown below.
Models Exhaust Back Pressure
All gasoline powered engines1 psi (7 kPa) Minimum2 psi (14 kPa) Optimal
11 psi (76 kPa) Maximum
IMPORTANT: Some exhaust back pressure is required to prevent water intrusion in theexhaust system. Do not use more than a 10.2 cm (4 in.) inside diameter exhaust hosewithin the first 45.7 cm (18 in.) of each exhaust elbow.A higher output engine will cause a greater back pressure using the same size exhaustsystem as an engine with less output. The boat's exhaust system should be designed andtested for the highest horsepower engine to be offered in that boat.Ensure that both cylinder banks of any engine are tested. Record the highest and lowestback pressure readings. If pressure is out of specifications, changes must be made to thesystem to reduce the pressure. These changes include:• Reduce exhaust system length.• Eliminate sharp bends.• Increase exhaust system diameter.• Reduce muffler restriction.• Ensure that through the transom or through the hull fittings are above water and are
not restrictive while retaining internal and external flappers.Exhaust Back Pressure Test
The boat should be in the water and underway for this test. No special loading of the boatis necessary. The engine must be capable of reaching the specified WOT RPM as verifiedusing an accurate service tachometer or scan tool. Test both banks of each engine. Usethe highest reading.1. Drill 3/8 in. hole at the 12 o'clock position (facing up) in the exhaust hose 31–61 cm
(12–24) inches from the engine exhaust elbow.

Testing the Exhaust System
90-863758070 APRIL 2008 Page 6D-3
2. Assemble the Schraeder valve and brass adapter. Insert the 1/8 in. NPT male end ofadapter into the hole in the exhaust hose.
18579
aa
b b
cc
a - Brass adapterb - Schraeder valvec - Exhaust hose
For Products with Emissions Control
b
c
a
34591
a - Brass adapterb - Schraeder valvec - Exhaust hose
a
b
c 34589
a - Brass adapterb - Schraeder valvec - Exhaust hose
Description Part NumberDrill and 3/8 in. drill bits or bit that match fittings Obtain locallyService Tachometer Obtain locallySchraeder valve, 2 required 22‑860226Brass 1/8 in. NPT male adapter fitting ‑ 2 required 22‑808002Pressure gauge accurate to 7 kPa (1 psi) Obtain locally

Testing the Exhaust System
Page 6D-4 90-863758070 APRIL 2008
3. Set the pressure gauge to zero before connecting it to the engine.4. While underway, operate the engine at 1000, 2000, 3000, 4000, and WOT RPM
respectively. Record back pressure at each setting.5. Repeat steps for the second cylinder bank and remaining engines on multiple engine
applications.6. Replace exhaust hoses.If pressure is not within specification, make appropriate changes to the system to reducethe pressure.
Check for Water IntrusionIMPORTANT: Perform this check on all new applications with through‑transom orthrough‑hull exhaust.Select and perform one of the two methods to check for water in the exhaust manifolds.• The exhaust elbow removal method—This is the simplest and least time‑consuming
method to check for water in the exhaust manifolds, but it is also the least accurate.• The exhaust manifold tap method—This test provides more accurate results, but
requires that a hole be drilled in each manifold. The manifolds must be replaced afterperforming this check, so the procedure is best performed by Mercury MerCruiser'sproduct integration engineer or where repeated testing will be performed at your facility.
IMPORTANT: If there is no water in one manifold, do not assume that there is not water inthe other manifold. Check each manifold.
PREPARATIONConsider hose lengths and angle, exhaust elbow height to the water line, waterlift mufflerexhaust outlet angles, water lift muffler water height, idle relief angles, exhaust collectorangles, air temperature, water temperature, and humidity when performing these test.
EXTENDED IDLE TEST1. Operate the engine until it is at normal operating temperature (73°C [160 °F]).2. Place the remote control in neutral. Increase the engine speed to 3000 RPM for 1
minute.3. Bring the engine back to idle slowly after 1 minute.4. Shut the engine off.5. Restart the engine and operate at idle speed for 15 minutes.6. Shut the engine off.7. Check for water.IMPORTANT: If repeating this test, return the engine to operating temperature.
CHECKING BY EXHAUST ELBOW REMOVAL METHOD1. After the 15 minute idle preparation, drain the exhaust manifolds of water. If the engine
uses a closed‑cooling system, pinch or plug the hose from the heat exchanger to theexhaust elbow to prevent coolant from spilling because the heat exchanger is higher.
2. Remove the exhaust elbows.3. Check for water in the exhaust manifold. Use a flashlight if needed to aid inspection. If
water exists, measure the amount and record. See Interpreting Results.NOTE: Use a suction device with a rubber hose attached to the end to remove the waterfrom the manifold.4. Replace the elbows using new gaskets. Refer to the appropriate Mercury MerCruiser
Service Manual.

Testing the Exhaust System
90-863758070 APRIL 2008 Page 6D-5
CHECKING BY DRILLING AND TAPPING EXHAUST MANIFOLDS1. Drill and tap a 1/8 in. NPT hole into the bottom and center of the exhaust manifold
runners for cylinders 4 and 5. Drill in the area that is not water‑jacketed.For Productswithout Emissions Control
a
13414
b13415
For products without Emissions Controla - Number 4 exhaust manifold runnerb - Number 5 exhaust manifold runner
34541
a b
For products with emissions controla - Number 4 exhaust manifold runnerb - Number 5 exhaust manifold runner
2. Insert brass drain plugs into the holes.
Qty. Description Part Number2 Brass drain plugs 22‑818390
3. Run the engine as outlined in Extended Idle Test.4. Drain water from the manifolds into a suitable container. Measure and record the
amount of water using a graduated cylinder. An acceptable amount of condensationwater is 5 ml (0.2 fl. oz.).
5. Replace the manifolds.

Testing the Exhaust System
Page 6D-6 90-863758070 APRIL 2008
INTERPRETING RESULTSWater vapor is a normal by‑product of the combustion process, so a small amount of water[5 ml. (0.2 fl oz.)] is acceptable. This condensation has not shown to cause a problem.Excessive amounts can indicate a water intrusion problem that requires corrective action.Some of the more common causes for this condition are:• Insufficient exhaust riser height. See Measuring Exhaust Elbow Height.• Improper exhaust hose slope.• Failure to have at least 457 mm (18 in.) between the exhaust outlet and muffler,
collector, or first angular fitting. See Exhaust System Design.• Missing or improperly located exhaust resonators. See Exhaust Resonators.• Improperly sized or incorrectly installed exhaust system components.• Leaking exhaust elbows or risers.• Improperly designed collector or Y‑pipe. See Exhaust System Design .• Exhaust system causing a tuning effect. See Exhaust Resonators.• Improperly functioning or missing water shutters or flappers.• Muffler not draining.• Engine damage.• Poor engine running condition.


![2.4 - Exhaust System, Cooling System, Turbo System [OCR]](https://static.fdocuments.net/doc/165x107/577cc3b21a28aba71196e38c/24-exhaust-system-cooling-system-turbo-system-ocr.jpg)