
Exchange 2010 Data Protection with Auto-Snapshot...
35
TECHNICAL REPORT Exchange 2010 Data Protection with Auto- Snapshot Manager / Microsoft Edition Dell EqualLogic PS Series ABSTRACT This Technical Report describes using Dell™ EqualLogic™ Auto-Snapshot Manager / Microsoft Edition with PS Series arrays to protect Microsoft® Exchange Server with online Smart Copies and recovery operations for Exchange 2010. TR1059 V1.0
Transcript of Exchange 2010 Data Protection with Auto-Snapshot...

TECHNICAL REPORT
Exchange 2010 Data Protection with Auto-Snapshot Manager / Microsoft Edition Dell EqualLogic PS Series ABSTRACT
This Technical Report describes using Dell™ EqualLogic™ Auto-Snapshot Manager / Microsoft Edition with PS Series arrays to protect Microsoft® Exchange Server with online Smart Copies and recovery operations for Exchange 2010.
TR1059
V1.0

Copyright © 2010 Dell Inc. All Rights Reserved.
Dell EqualLogic is a trademark of Dell Inc.
All trademarks and registered trademarks mentioned herein are the property of their respective owners.
Possession, use, or copying of the documentation or the software described in this publication is authorized only under the license agreement specified herein.
Dell, Inc. will not be held liable for technical or editorial errors or omissions contained herein. The information in this document is subject to change.
[July 2010]
WWW.DELL.COM/PSseries


PREFACE
Thank you for your interest in Dell™ EqualLogic™ PS Series storage products. We hope you will find the PS Series products intuitive and simple to configure and manage.
PS Series arrays optimize resources by automating volume and network load balancing. Additionally, PS Series arrays offer all-inclusive array management software, host software, and free firmware updates. The following value-add features and products integrate with PS Series arrays and are available at no additional cost:
Note: The highlighted text denotes the focus of this document.
• PS Series Array Software
o Firmware – Installed on each array, this software allows you to manage your storage environment and provides capabilities such as volume snapshots, clones, and replicas to ensure data hosted on the arrays can be protected in the event of an error or disaster.
Group Manager GUI: Provides a graphical user interface for managing your array
Group Manager CLI: Provides a command line interface for managing your array.
o Manual Transfer Utility (MTU): Runs on Windows and Linux host systems and enables secure transfer of large amounts of data to a replication partner site when configuring disaster tolerance. You use portable media to eliminate network congestion, minimize downtime, and quick-start replication.
• Host Software for Windows
o Host Integration Tools
Remote Setup Wizard (RSW): Initializes new PS Series arrays, configures host connections to PS Series SANs, and configures and manages multipathing.
Multipath I/O Device Specific Module (MPIO DSM): Includes a connection awareness-module that understands PS Series network load balancing and facilitates host connections to PS Series volumes.
VSS and VDS Provider Services: Allows 3rd party backup software vendors to perform off-host backups.
Auto-Snapshot Manager/Microsoft Edition (ASM/ME): Provides point-in-time SAN protection of critical application data using PS Series snapshots, clones, and replicas of supported applications such as SQL Server®, Exchange Server, Hyper-V™, and NTFS file shares.
o SAN Headquarters (SANHQ): Provides centralized monitoring, historical performance trending, and event reporting for multiple PS Series groups.
• Host Software for VMware
o Storage Adapter for Site Recovery Manager (SRM): Allows SRM to understand and recognize PS Series replication for full SRM integration.
o Auto-Snapshot Manager/VMware Edition (ASM/VE): Integrates with VMware® Virtual Center and PS Series snapshots to allow administrators to enable Smart Copy protection of Virtual Center folders, datastores, and virtual machines.
o MPIO Plug-In for VMware ESX: Provides enhancements to existing VMware multipathing functionality.
Current Customers Please Note: You may not be running the latest versions of the tools and software listed above. If you are under valid warranty or support agreements for your PS Series array, you are entitled to obtain the latest updates and new releases as they become available.
To learn more about any of these products, contact your local sales representative or visit the Dell EqualLogic site at http://www.equallogic.com. To set up a Dell EqualLogic support account to download the latest available PS Series firmware and software kits visit: https://www.equallogic.com/secure/login.aspx?ReturnUrl=%2fsupport%2fDefault.aspx

TABLE OF CONTENTS Revision Information.......................................................................................................... v Introduction ......................................................................................................................... 1 ASM / ME – Exchange Server Integration ...................................................................... 2
Smart Copy Options and Backup Types ................................................................. 3 Smart Copy Behavior with Exchange Server ......................................................... 3 Snapshot Smart Copy ................................................................................................. 4 Clone Smart Copy ....................................................................................................... 4 Replica Smart Copy ..................................................................................................... 5 Smart Copy Schedules ............................................................................................... 5
Setup and Configuration Best Practices ......................................................................... 5 Database File Layout ................................................................................................... 6 Storage Resource Management ............................................................................... 6
Creating Exchange Server Database Smart Copies ..................................................... 7 Steps to Create Smart Copy Sets .............................................................................. 8 Displaying Smart Copies .......................................................................................... 11
Restoring Exchange Server Databases with Smart Copies ....................................... 12 Snapshot Smart Copy Restore Options ................................................................. 13
Exchange Server Database restore scenarios ............................................................. 14 Restore All Mailbox Database Restore ................................................................... 14 Create Recovery Mailbox Database (RDB) ............................................................ 15 Single Item Recovery Using Exchange Management Shell ............................... 19
Summary ............................................................................................................................ 21 Appendix A – Glossary .................................................................................................... 22 Appendix B – Command Line Options ........................................................................ 23 Appendix C – Troubleshooting Tips ............................................................................. 25 Appendix D – Remote Host Verification Setup .......................................................... 26 Technical Support and Customer Service ................................................................... 29

REVISION INFORMATION The following table describes the release history of this Technical Report.
Report Date Document Revision
1.0 July 2010 Initial Release
The following table shows the software and firmware used for the preparation of this Technical Report.
Vendor Model Software Revision
Microsoft® Windows Server 2008 SP2, R2
Microsoft® Exchange Server 2010 RTM
Dell PS Series Array Firmware Version 4.3.5 and later*
Dell Host Integration Tools – Auto-Snapshot Manager
Version 3.4 and later*
* For earlier version support see the Host Integration Tools Release Notes.
The following table lists the documents referred to in this Technical Report. All PS Series Technical Reports are available on the Customer Support site at: support.dell.com
Vendor Document Title
Microsoft® Exchange Server Disaster Recovery: Disaster Recovery
Microsoft® Understanding Exchange 2010 LUN Architecture
Microsoft® Recovery Databases
Microsoft® Restore Data Using a Recovery Database
Microsoft® Restore-Mailbox

INTRODUCTION Database protection and disaster recovery are among the top concerns for Exchange Server administrators. Requirements for reducing Database backup windows and restore times continue as demands for continuous Exchange Server uptime is increasing. PS Series arrays provide administrators the ability to create volume based copies of data using snapshots, clones and replicas. These copies are known as “point-in-time” copies of volume data.
The EqualLogic Host Integration Tools (Hit Kit) Version 3.4 enhances Auto-Snapshot Manager / Microsoft Edition (ASM/ME) – adding the ability to create data and application-consistent Smart Copies of Exchange Server Databases. Auto-Snapshot Manager / Microsoft Edition is a Windows server application offering application-consistent Smart Copies of Exchange Server Databases leveraging the built-in snapshot, clone and replication facilities in PS Series arrays. With ASM/ME an Exchange Server administrator can:
• Create copies of Exchange Databases, where the copy operation is coordinated with Exchange server operations.
• Use the management GUI or built-in scheduler to create Smart Copy sets
• Use the command-line interface (asmcli) that enables you to perform many common tasks. GUI wizards are included to generate fully-formed command lines.
• Set up automatic e-mail notification of events
• Allow system or Exchange administrators to perform Exchange restore operations in the following ways:
• In-place point-in-time Database recovery (Restore All)
• Support for doing “brick/item-level” restores using Microsoft® Exchange Recovery Mailbox Database (RDB).
• Clone and Restore All as New feature allows you to clone a mailbox database from a source Exchange server, and then set it up as a new mailbox database on a target Exchange server.
The capabilities of ASM/ME extend the use of SAN copy facilities beyond storage administrators, to server and Exchange administrators. This raises the productivity of Exchange administrators, and allows them to leverage efficient SAN copy facilities without requiring SAN privileges. By automating data protection and recovery operations, the headaches and time-consuming day-to-day operations of managing and maintaining volume and Exchange Server uptime is minimized and data availability is increased extensively. Data availability can be maintained at a higher level of assurance using Auto-Snapshot Manager / Microsoft Edition and Smart Copy technologies with PS Series arrays.

ASM / ME – EXCHANGE SERVER INTEGRATION Auto-Snapshot Manager ASM /ME V3.4 leverages Microsoft’s Volume Shadow Copy Service (VSS) architecture to provide application integration with SAN copy operations. ASM/ME interacts with Exchange Server to prepare a Database for the Smart Copy operation. Exchange Server places the Database in a consistent state and ASM/ME facilitates the SAN copy operations using PS Series hardware snapshots, clones, or replication functions. The end result is a data-consistent point-in-time copy of the Exchange Server Database. ASM/ME can recover one or more Exchange Databases, leveraging the SAN facilities to bring the smart copy online and interact with Exchange Server to restore the Databases using the point-in-time copy.
The ASM/ME GUI is based on the Microsoft® Management Console (MMC), and consists of three parts: the Object pane, the Properties window, and the Actions pane.
• The Object pane shows host component information including Exchange Server instances and Databases, volumes, collections, schedules, existing Smart Copies, and support information. These components include applications, volumes, user defined collections and schedules, and Smart Copy sets. Users can configure property-level attributes such as the location of the Smart Copy backup documents, the CHAP authentication used to communicate with the PS storage, default Smart Copy settings, and notification information.
• The Applications tree in the Object pane lists the Exchange Server instances and Databases installed on the host system. The Databases residing on PS Series storage have a blue icon and Databases not located on PS Series storage have a grayed-out icon. The blue icon indicates objects (Exchange Server Databases) that are controlled by ASM/ME. At any time, you can click on a Database to get detailed information in the properties window for that Database.
• The Properties window (center portion) lists detailed information about the selected object, such as Smart Copy support options, volume and file information, and schedule information. The Actions pane (right pane) lists available actions for the component.

Figure 1: ASM/ME User Interface
Smart Copy Options and Backup Types
Auto-Snapshot Manager / Microsoft Edition (ASM/ME) creates Smart Copy snapshots, clones, and replicas (see Figure 1). These Smart Copies leverage the built-in PS Series SAN copy facilities.
All Smart Copies are transportable, and can be mounted on the same or a different server. All servers on the SAN with ASM/ME installed and access to the Smart Copy backup documents can mount (restore) a Smart Copy. For more information see the Advanced Operations section.
Smart Copy Behavior with Exchange Server
With all Smart Copy types there is only one backup type (Figure 2) for use with Exchange. The following backup type is available with Auto-Snapshot Manager:
• Copy – This backup type creates a copy of the Exchange Server Database with associate logs, and specifies an out-of-band backup operation that has no effect on application log files or backup operations.
• For more information on Exchange Server recovery models see Exchange Server TechCenter document: Exchange Server Disaster Recovery: Disaster Recovery.

Figure 2: Smart Copy Behavior Options
Snapshot Smart Copy
Snapshot Smart Copies are point-in-time copies of Exchange Database and log files at the time of the Smart Copy operation. Snapshots are the most space-efficient form of a Database Smart Copy and therefore multiple copies of snapshots can be stored and used for restore operations. In the PS Series Group Manager GUI, snapshot Smart Copies are shown under each base volume from which they were created. Snapshot Smart Copies are most useful as point in-time copies of the original Database.
Using ASM/ME, Smart Copy snapshots can be created and applied to restore the original Database, restore the snapshot Smart Copy to an Exchange Recovery Mailbox Database allowing Brick / Item level restores.
Clone Smart Copy
Clone Smart Copies are exact duplicates of the original volume including all the data on the volume and the full size of the volume. Clones are treated and shown as

separate volumes in the PS Series Group Manager GUI. Clone Smart Copies are most useful to recreate the original Database environment such as test or development scenarios.
With ASM/ME, smart copy clones can be used for restoring to an Exchange Recovery Mailbox Database allowing Brick / Item level restores, or create exact copies of Database environments for testing and development scenarios.
Replica Smart Copy
Replicas can be used to offload Smart Copy storage as well as checksum and soft recovery operations to the remote site.
Note: Replicas cannot be used to restore the original volume (Restore All).
Replica Smart Copy options are available if replication is configured in the PS Series group for the volume or volumes that make up an Exchange Server Database(s). Replicas are point in time copies that are sent from a primary site and stored on a replication partner. The first replication process will always be a complete copy of the base volume. Subsequent replication operations will only send the changes since the last replication operation. When using replica Smart Copies it is important to manage ASM/ME’s backup documents so that they can be used to recover replicas.
To replicate many Databases and volumes, make sure to configure sufficient replication space. For more information on PS Series replication and sizing replication space, see the Dell EqualLogic Technical Report, Understanding Data Replication Between Dell EqualLogic PS Series Groups, at the following URL: http://www.equallogic.com/resources/technicaldocumentsview.aspx?id=364. Then select the TECH REPORTS tab and scroll down.
Smart Copy Schedules
You can create schedules to create Smart Copy sets at various intervals (Figure 3). The ASM/ME scheduler is based on the Microsoft Windows schedule service and supports Smart Copy schedule period as often as 5 minutes apart. ASM/ME also supports a “keep count” parameter that retains only the specified number of active Smart Copies for an object. This ensures that storage resources are maintained while data recovery remains highly available. You can create schedules by right-clicking an object or using the Actions pane of ASM/ME. See Appendix B – Command Line Options for instructions on creating schedules in a script.
Note: ASM/ME and Windows scheduling service can process only one scheduled task at a time. A scheduled Smart Copy operation may fail if there is another Smart Copy process occurring at the same time on a server system.
SETUP AND CONFIGURATION BEST PRACTICES This section details some best practices for using Auto-Snapshot Manager with PS Series groups and Exchange Server.

Database File Layout
To create Exchange Server Database Smart Copies with ASM/ME, all of the Database files must reside on PS Series storage so that ASM/ME recognizes all the underlying volumes that make up the Database object.
PS Series groups create volume-based data copies. All the volume data will be protected during a Smart Copy operation. By default, ASM/ME creates an application-consistent Smart Copy of the object or Exchange Database chosen. If more than one Exchange Database shares the same volume, it could result in a” torn” Smart Copy set. To avoid torn Smart Copies and selective restore scenarios, Dell recommends placing Exchange Server Database files on their own PS Series volumes. This allows for much faster restore times by taking advantage of the PS Series snapshot restore technologies.
Figure 3: create Smart Copy Schedules
Storage Resource Management
This section describes how ASM/ME and Smart Copies use storage resources and suggests some best practices for monitoring and managing space used by Smart Copy sets on the PS Series group.
• Snapshot Smart Copies use the snapshot reserve space allocated to the volume. You can monitor and change the snapshot reserve value for each volume that makes up an Exchange Server Database.
When a snapshot smart copy is restored as a Recovery Mailbox Database, the snapshot continues to exist, and continues to use the snapshot reserve for the volumes that make up the Smart Copy.

Best Practice: Maintain “keep counts” for Snapshot Smart Copy schedules to minimize overuse of snapshot reserve. Recovery Mailbox Database restore of Snapshot Smart Copies are best used as temporary copies of Databases and cleaned up as soon as the data is restored and confirmed.
• Clone Smart Copies use the same amount of storage as the original volume or volumes. When you create a clone Smart Copy, a new volume appears in the Group Manager GUI with the date and timestamp of the Smart Copy operation. Clone Smart Copies can be brought online through ASM/ME by using the Mount option. We recommend that you mount your volumes read-only if you don’t need to make any changes to the data contained in the Smart Copy. If you mount the volumes read-write and make changes to your data, you will lose the ‘point in time’ nature of the Smart Copy.
Best Practice: Clone Smart Copies are complete copies of Exchange Database objects and should be cleaned up after use to avoid storage resource consumption.
• Replica Smart Copies are created if replication is configured for a volume or volumes that make up Exchange Server Databases. Replication requires a replication partner to store the replica set, and must be set up on the PS Series group. The first replication always replicates the total volume data for an Exchange Server Database or PS Series volume. Each subsequent replication operation only replicates the data that changed for the volume or volumes since the last replication operation. You can monitor and increase the replication reserve through the PS Group Manager GUI at any time.
Additionally, the Mount as Read-only Smart Copy option halts all replication activity on that Smart Copy replica set until the replica is un-mounted and demoted. See Restoring Exchange Server Databases with Smart Copies in this document for more information.
The time it takes to replicate data can vary due to the amount of data being replicated and the bandwidth of the network between the partner groups. For more information on replication see the PS Series Technical Documents at: http://www.equallogic.com/resourcecenter/documentcenter.aspx
Best Practices: Size replication space and network bandwidth according to your network needs. Only use the Mount as Read-only option for temporary use and be sure to un-mount and demote when finished to continue replication on that Smart Copy Set.
CREATING EXCHANGE SERVER DATABASE SMART COPIES Your business needs will determine the type of Smart Copy to create using ASM/ME. • If the objective is fast recovery of Exchange Server Databases, use snapshot Smart
Copies because they consume minimal storage resources and can be used to quickly roll back the original database volumes for a complete recovery strategy.
• If the objective is to create a copy of an Exchange Server Database for longer duration use clone Smart Copies because volume clones do not consume snapshot reserve and are treated as normal volumes in the PS Series group.

If there is a remote array available and you want to store the latest version of Exchange Server Database information, use replica Smart Copies.
Steps to Create Smart Copy Sets
All Smart Copies can be created using the same wizard (Figure 4) either by right-clicking an object or using the Actions pane. The wizard will display options allowed by the object based on what type of Smart Copy operation is supported (snapshot, clone, or replica).
Figure 4: Create Smart Copy Window
Unless you have a database availability group (DAG) that has two or more copies the recommended configuration is to keep Database files on their own volumes separate from logs, see: Understanding Exchange 2010 LUN Architecture. Choose the Smart Copy type and the behavior based on the planned usage of the Smart Copy (Database restore, Recovery Mailbox Database, or another use).
Note: ASM/ME does not support torn Smart Copies. If any components of other Exchange Databases are included in the smart copy set, ASM/ME displays an error dialog. Torn Smart Copies mean that there were additional object components (Database files) on the volume you selected for the Smart Copy. For more information see Restoring Exchange Server Databases with Smart Copies.

Optionally, create a schedule to create Exchange Server Database Smart Copies. By choosing the Configure New Schedule option from the Actions pane you can give the new schedule a name and add options to configure a repeating Smart Copy schedule. If Notification is not set up, the schedule service will ask you to configure notification prior to creating the schedule. You can decline, and continue with the Smart Copy schedule. Similar to creating a single Smart Copy, if there are additional Database object components on the volume you choose, the Torn Smart Copy Warning is displayed. To continue with the schedule creation, choose next to move to the next screen.
Setup Schedule settings (Figure 3.) Schedule Name and Frequency, Daily Schedule Settings plus Advanced (Not Shown)
ASM/ME displays the Data Verification and Soft Recovery Options dialog. (Figure 5) You have the option to configure and schedule Checksum Verification and Soft Recovery on the new Smart Copy:
• Checksum Verification - Verifies the integrity of databases in the Smart Copy by using the eseutil.exe database maintenance utility. For Microsoft Exchange Database replicas only, the option to perform immediate Checksum Verification is not available immediately after making a Smart Copy.
• Soft Recovery - Brings all databases to a clean shutdown. For Microsoft Exchange Database replicas immediate Soft recovery is not available.
• Perform Task. Specify the time and method of running Checksum Verification and Soft Recovery. You can chose the following options:
• Immediately after Smart Copy creation Specify this option to start Checksum Verification and Soft Recovery as soon as Smart Copy creation is complete. This option is not available for Microsoft® Exchange Database replicas.
• Global verification window. Specify this option to use the Global Verification Window times that you configured into ASM/ME in Setting up the Global Verification Window. You can also use this option to change the Global Verification times. You must specify a minimum period of three hours. If you change the Global Verification times, the changes apply to the local host only, and affect all other scheduled verifications.
• On a Remote host preconfigured to perform Exchange verification. Specify this option to schedule Global Verification on a remote host. The remote host must be configured to run the operation. See: Appendix D – Remote Host Verification Setup Note: if you need to change the remote Global Verification window, you must change it on the remote host.

Figure 5: Data verification and Soft Recovery options
Click Next and verify the settings displayed in the Summary screen. (Figure 6)
If the information is correct, click Create. If not, click Back and make any changes.

Figure 6: Summary screen
Displaying Smart Copies
To display information about the Smart Copy set, select Smart Copies. The ASM/ME Smart Copies window appears (Figure 7)

Figure 7: ASM Smart Copies window
RESTORING EXCHANGE SERVER DATABASES WITH SMART COPIES There are various methods to restore and recover Exchange Server Databases using Smart Copies. The underlying PS Series architecture can either restore a volume from a Smart Copy (Restore All) or mount a Smart Copy online to a host as a new volume (Create Recovery Mailbox Database). Both of these operations have many different Exchange Server Database restore possibilities.

This section (Table 1) describes the most common restore scenarios and how to apply Smart Copy restore options for Exchange Server data recovery.
Table 1: Restore Options for Smart Copy Types Restore Option Snapshot Clone Replica
Restore All (Restores the entire Database in place)
Yes No No
Create Recovery Mailbox Database Yes Yes No
Mount Yes Yes Yes
Clone and Create Recovery Mailbox Database
No No Yes
Clone and Restore All as New No Yes No
Snapshot Smart Copy Restore Options
There are five restore options available for snapshot type Smart Copies:
• Restore All – Performs a restore of all the data in the Smart Copy set and brings the Exchange Database online. (A point in time restoration of all data in an entire Database)
• Create Recovery Mailbox Database (RDB) - Support for doing “brick/level- item” restores using Microsoft Exchange Recovery Mailbox Database.
• Mount – Mounts the Smart Copy set on a drive letter(s) or mount point(s) that you specify. It does not restore the Database. By default, the Smart Copy is mounted read-only but optionally you can make the Smart Copy read-write. This operation only restores to a drive letter(s) or mount point(s).
• Clone and Create Recovery Mailbox Database– Performs a clone of replica Smart Copy then proceeds with Create Recovery Mailbox Database wizard. The advantage of using a clone is that it does not disrupt ongoing data replication from the base volume to the replica. The replication process continues while the clone is used for Recovery.
• Clone and Restore All as New is supported, allowing moving a mailstore database from one Exchange Server to another for standalone mailbox servers or for clustered mailbox servers where the source mailbox is not replicated from the source Exchange Server to the target Exchange Server.
Note: The source and target Exchange Servers must be hosted on machines that are part of the same domain.

EXCHANGE SERVER DATABASE RESTORE SCENARIOS The following sections discuss Exchange Server Database restore scenarios and how to apply each of the restore options (Figure 8). Some scenarios may use multiple Smart Copy restore options but each option can have a different effect on the restore. Please read through the next sections carefully to understand how each Smart Copy restore option will affect the Exchange Server Database environment.
Figure 8: Snapshot Smart Copy Restore Options with ASM/ME
Restore All Mailbox Database Restore
The quickest restore scenario is the “Restore All” Mailbox Database restore. Assuming the Mailbox Database file layout has followed the best practices guidelines, this restore is useful for performing a very fast point-in-time restore of Exchange Server Mailbox Database in a non-DAG environment or to greatly speed up a Mailbox Database copy reseed in a DAG environment(greatly reducing CPU, Memory and LAN usage). The Smart Copy options that can be applied for Restore All Exchange Server Mailbox Database restore are:
Restore All
The restore process takes the corresponding Mailbox Database and volume offline, restores the Mailbox Database back to the time of the Smart Copy, and brings the volume and Mailbox Database back online to the host and Exchange Server. At the
same time, the PS Series group creates an additional snapshot of the Mailbox Database volume state before restoring the Smart Copy. This snapshot appears offline in the PS Series Group Manager GUI and can be used for debugging problems that may have caused the Mailbox Database corruption or failure.
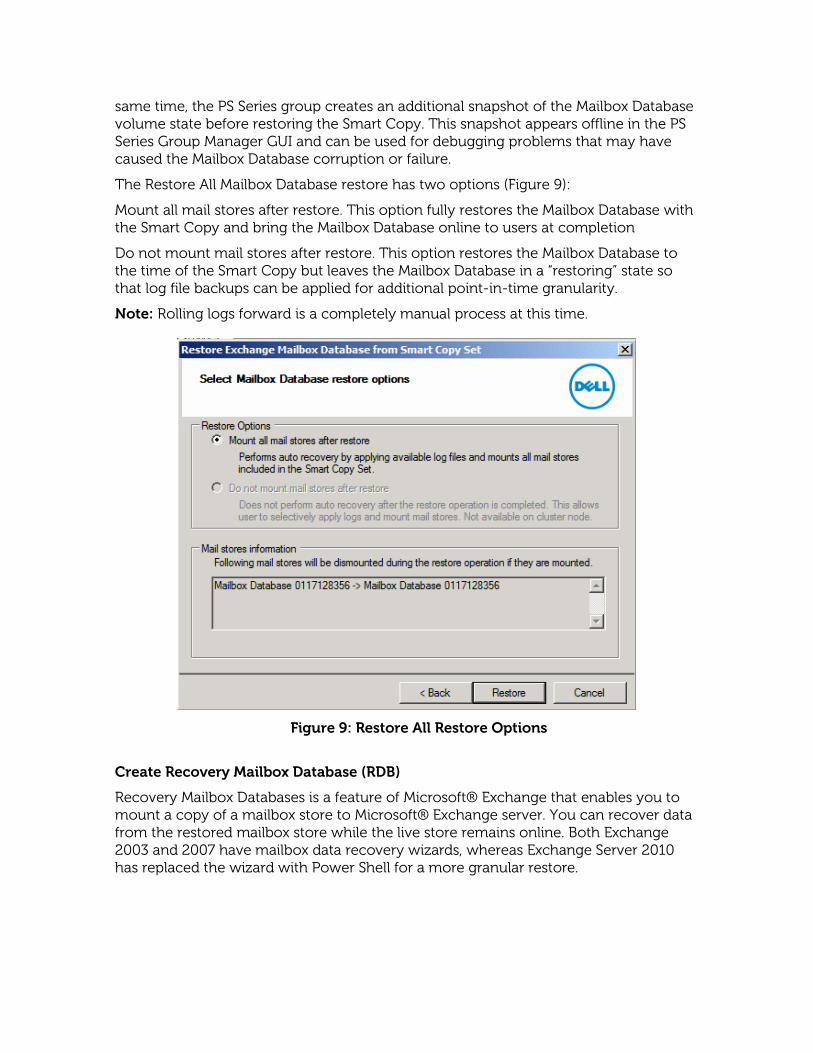
The Restore All Mailbox Database restore has two options (Figure 9):
Mount all mail stores after restore. This option fully restores the Mailbox Database with the Smart Copy and bring the Mailbox Database online to users at completion
Do not mount mail stores after restore. This option restores the Mailbox Database to the time of the Smart Copy but leaves the Mailbox Database in a “restoring” state so that log file backups can be applied for additional point-in-time granularity.
Note: Rolling logs forward is a completely manual process at this time.
Figure 9: Restore All Restore Options
Create Recovery Mailbox Database (RDB)
Recovery Mailbox Databases is a feature of Microsoft® Exchange that enables you to mount a copy of a mailbox store to Microsoft® Exchange server. You can recover data from the restored mailbox store while the live store remains online. Both Exchange 2003 and 2007 have mailbox data recovery wizards, whereas Exchange Server 2010 has replaced the wizard with Power Shell for a more granular restore.

Note: Recovery Mailbox Databases shouldn't be used when you have to recover public folder content, when you have to restore entire servers, or when you have to restore multiple databases. For more information see the following URL:
Recovery Databases
http://technet.microsoft.com/en-us/library/dd876954.aspx
Restore Data Using a Recovery Database
http://technet.microsoft.com/en-us/library/ee332351.aspx
ASM/ME recognizes the new Mailbox Database files and automatically performs a selective restore operation. The Smart Copy option used for a Selective Restore of an Exchange Server Mailbox Database is:
Create Recovery Mailbox Database
When you select an Exchange Mailbox Database, its mail store is displayed in the bottom pane, which is titled: Select Mailbox Database. Click on the Mail Store to highlight it (Figure 10).
Figure 10: Create Recovery Mailbox Database (RDB)
ASM/ME displays a dialog titled: Select Volume Label. You are prompted to accept the default volume label (drive letter), such as E:\. Alternatively, specify a mount point in an empty NTFS folder for the RDB (Figure 11).
Click next > to proceed.

Figure 11: Select RDB drive letter or mount point
ASM/ME displays a dialog titled:
Review recovery mailbox database configuration (figure 12). You have the following options:
a. If an existing RDB is detected, you are prompted to delete it. If you do not delete the existing RDB, you cannot proceed with creating a new RDB.
b. Confirm the path for the new recovery mailbox database.
Click Next> to proceed. ASM/ME creates and mounts the RDB volume, making it writable in the process.

Figure 12: Review recovery mailbox database configuration
ASM/ME displays a dialog titled: Recovery Mailbox Database Creation Complete (figure 13). Launch Exchange Management Shell link opens Exchange Management Shell to perform mailbox or mail item recovery. You are also prompted to use the dismount and Logoff procedure on the mounted Smart Copy set when done.
Figure 13: Recovery Mailbox Database Creation Complete

Single Item Recovery Using Exchange Management Shell
Click on the Launch Exchange Management Shell link (Figure 13) to be presented with Exchange Management Shell (figure 14).
Figure 14: Recovery with Exchange Management Shell
You can use the cmdlet to extract data from an RDB. After extraction, the data can be exported to a folder or merged into an existing mailbox. The name of the recovery mailbox database is the original Exchange Mailbox Database name, followed by recovery database.
For restore-mailbox command parameters both required and optional please visit this link: Restore-Mailbox
http://technet.microsoft.com/en-us/library/bb125218.aspx
The example in figure 14 demonstrates recovering all mail items from the point-in-time copy of test1’s mailbox that is hosted on Mailbox Database 0117128356 and placing them in a sub folder in test1’s mailbox. The Power Shell command for that is:
Restore-Mailbox -Identity test1 -RecoveryDatabase "Mailbox Database 0117128356 Recovery Database" -RecoveryMailbox test1 -TargetFolder Recovery
The variables in the Power Shell command have been changed to bold font for clarity. The recovery folder can be seen in figure 15.

Figure 15: Recovery folder in Outlook
The last step in the RDB process is to remove the RDB and that Power Shell command is displayed in figure 16 and is as follows:
Remove-MailboxDatabase -Identity "Mailbox Database 0117128356 Recovery Database"
The variables in the Power Shell command above have been changed to bold font for clarity.
Figure 16: Remove Recovery Database
The last step in the clean-up process is to use the dismount and Logoff procedure on the mounted Smart Copy set when done (figure 17).

Figure 17: Unmount and Logoff
SUMMARY Auto-Snapshot Manager / Microsoft Edition can substantially increase Exchange Server data availability by using PS Series data protection technologies. Smart Copy snapshots, clones, and replicas all play a vital role in robust Exchange Server protection scenarios for on-demand data recovery and Exchange Server Mailbox Database restores.
Although using ASM/ME will increase Exchange Server data availability, it is not considered an alternative to long-term backup methods. ASM/ME and Smart Copies should be used in conjunction with a normal backup schedule for a higher level of data protection and shorter Mailbox Database recovery time.
By using ASM/ME with regular backup methods, you can ensure your NTFS and Exchange Server data is protected and available at all times.

APPENDIX A – GLOSSARY
PS Series Group Manager GUI – A Java-based user interface to manage the PS series Mailbox Database.
Auto-Snapshot Manager GUI – A host-based management interface to create and manage Smart Copies of Exchange Server Mailbox Databases and NTFS volumes.
Smart Copy – An application-consistent copy of an Exchange Server Mailbox Database. Smart Copy types include snapshots, clones, and replicas.
Snapshot Smart Copy – A PS Series volume-based snapshot of an Exchange Server Mailbox Database or NTFS volume created through Microsoft Volume Shadow Copy Service.
Clone Smart Copy – A PS Series copy of an Exchange Server Mailbox Database or NTFS volume created through Microsoft Volume Shadow Copy Service that is a complete duplicate of the original volume or volumes that make up the Mailbox Database and its attributes.
Replica Smart Copy – A PS Series volume snapshot of an Exchange Server Mailbox Database or NTFS volume created through Microsoft Volume Shadow Copy Service that is stored on a replication partner. Replication must be set up on the PS Series group and on the volume before you can create a replica Smart Copy.
Torn Smart Copy – A Smart Copy Set contains additional components (application data) other then the selected object (Mailbox Database). Torn Smart Copies will not harm the original Mailbox Database or base volume.
Smart Copy Collection – A group of object components (Mailbox Database and log volume) added to a single Smart Copy operation.
Smart Copy Schedule – A schedule set up though Auto-Snapshot Manager to create ongoing Smart Copies of an object.
Backup Document – An XML file created by ASM that contains metadata of a Smart Copy.
APPENDIX B – COMMAND LINE OPTIONS
If you have existing scripts for running backups or performing other background operations, you can also schedule the creation of smart copy sets by adding an ASM/ME command to the script.
Scripting ASM/ME v3.4
ASM/ME v3.4 has enabled much the functionality of the GUI into the command line interface. Additionally the GUI has included options to automate script creation by allowing users to run through Smart Copy processes in the GUI and outputting the commands needed to perform these operations via command line.
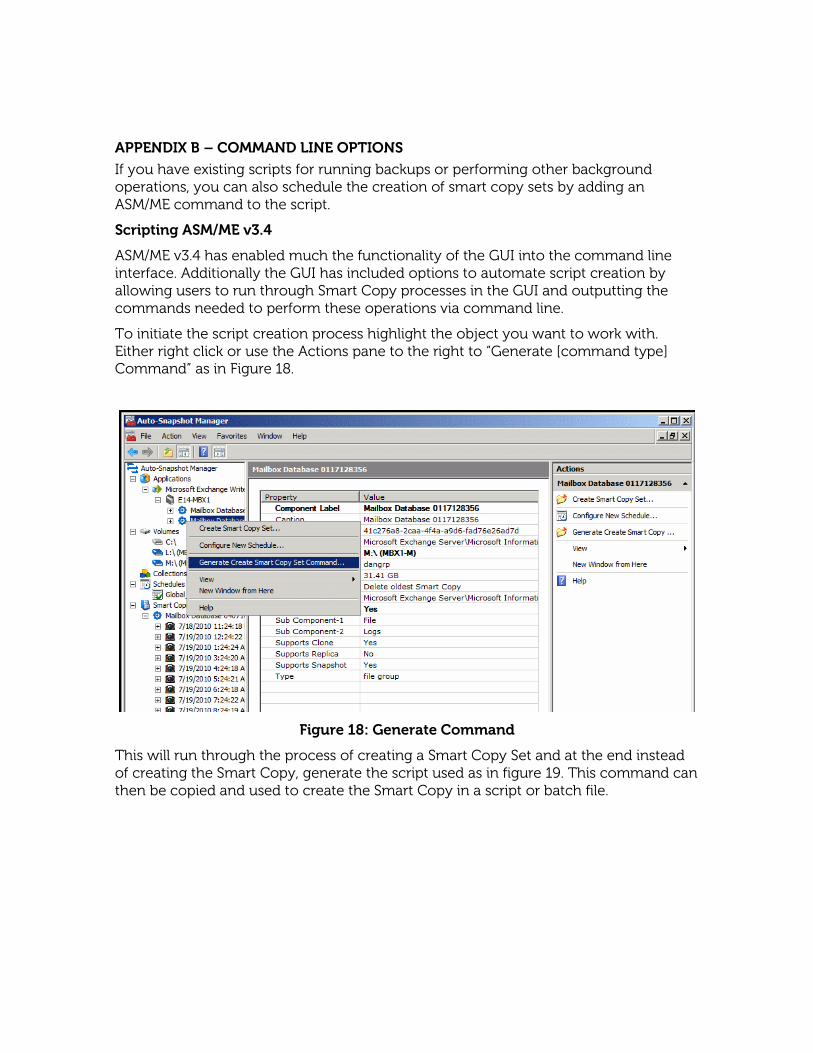
To initiate the script creation process highlight the object you want to work with. Either right click or use the Actions pane to the right to “Generate [command type] Command” as in Figure 18.
Figure 18: Generate Command
This will run through the process of creating a Smart Copy Set and at the end instead of creating the Smart Copy, generate the script used as in figure 19. This command can then be copied and used to create the Smart Copy in a script or batch file.

Figure 19: Generated Command
Scripts like this can be created for other Smart Copy operations and used accordingly. For a detailed description of script commands and sample usage, see the Host Integration Tools for Windows v3.4 User Guide.

APPENDIX C – TROUBLESHOOTING TIPS
VSS-Control
ASM/ME uses CHAP authentication to communicate with the PS Series group. The authentication user name and password must be the same on the host running Auto-Snapshot Manager and the PS Series group.
If the PS Series group IP address is not already in the groups list of the Remote Setup Wizard, add the IP address of the PS Series group you would like to connect to and add the CHAP username and password to the Host Management fields. If the group is in the list, you can modify the Host Management access rights to match those of the PS Series group you would like to use with Auto-Snapshot Manager. Be sure to restart the Auto-Snapshot Manager application if you modify the Host Management credentials.
You can determine whether CHAP authentication is set up correctly by selecting the Targets tab in the Microsoft iSCSI Initiator service and verifying that the vsscontrol volume is shown in the list. The vsscontrol volume should have a status of connect if CHAP is set up correctly. If there are multiple vsscontrol volumes in the targets list, you can display the connection details by selecting the volume and choosing Details in the Targets window. The PS Series group connection will be listed in the Session Connections section. Be sure the Volume Shadow Copy service is running on the host prior to checking the vsscontrol volume status.
MMC Error
The Microsoft Management Console may time out due to inactivity. If this happens, an MMC error appears with an option to close the console or cancel the error. This action will have no effect on the Auto-Snapshot Manager. To continue using Auto-Snapshot Manager, choose Cancel.
APPENDIX D – REMOTE HOST VERIFICATION SETUP
You can optionally perform Checksum Verification and Soft Recovery on a remote host. Remote Host verification requires the following configuration:
• Two host systems with the same installed versions of the following application software:
• Auto-Snapshot Manager. • Exchange Management Tools. • A shared network folder or drive to provide a Smart Copy repository.
One of the hosts acts as the creator server, creating Smart Copies, The second host acts as the verification server running a Global Verification Task that verifies all unverified Exchange Smart Copies.
The Global Verification window can differ between the local and remote servers. For example, you might configure verification during an off-peak Global Verification window on the creator server, such as the default 8:00PM to 6:00AM window. You might then configure the creator server to run verification on the remote host, setting the verification server’s Global Verification window to 24 hours.
• You can run remote verification operations manually, you can schedule them individually, or you can schedule them as part of a Global Verification Task.
Using a System as a Dedicated Verification Server
To make the best use of system resources, you can configure a host to run only the Global Verification Task, taking the Checksum Verification and Soft Recovery workload off your production servers. You specify a Global Verification window that is specific to the verification server, typically a much longer time period than for a production server.
Using a dedicated verification server enables you to process a greater number of Smart Copies, improving your recovery options and service level. The verification server might be co-located with Smart Copy creator servers, or it might be at a geographically remote location. However, the verification server requires access to the SAN on which you create and maintain Smart Copies.
Prerequisites for a Verification Server
A verification server has the following prerequisites:
• You must install the same release of Host Integration Tools on both the verification server and on the Smart Copy creator servers. This includes all required applications such as the iSCSI initiators.

• You must install the Exchange Management Tools for the same release of Microsoft Exchange Server as is installed on the Smart Copy creator servers. Maintain version parity on creator and verification servers, including the latest hot fixes available from Microsoft.
• The verification server and any creator servers that it serves must be part of the same Microsoft Windows domain.
• The verification server and any creator servers that it serves must be able to access a shared location for Smart Copies.
• Appropriate network access and bandwidth to process the Global Verification Tasks of client systems.
Configuring a Verification Server
Use the following procedure to set up a verification server:
1. Use the Remote Setup Wizard to enable the verification server to access the storage array group.
2. On the Smart Copy creator server, find the location of the shared Smart Copy “copy” folder as follows:
o Launch ASM and in the Console Tree, click on the Auto-Snapshot Manager node.
o In the Actions Pane, click on Properties. o Under the General Properties tab, find the path specified as the Default
location of Smart Copy documents. Write down or copy the path to a text file.
o Close the properties window by clicking on Cancel.
3. Dell recommends that you configure the Volume Access Control List on the PS Series group so that the verification server has access only to snapshots, and not to the original volume. See the Creating Access Control Records procedure described in the Volume Management section of the Group Manager GUI Online Help.
4. On the verification server, map a drive to the shared shadow copy folder that you identified in Step 2. Use the same drive letter if possible.
5. On the verification server, point ASM to the shared shadow copy folder as follows:
o Launch ASM and in the Console Tree, click on the Auto-Snapshot Manager node.
o In the Actions Pane, click on Properties. o Under the general properties tab, specify the path to the shared folder
that you defined in Step 3. (Ensure that the drive letter specifies the local mount point.)
o Close the properties window and update the properties by clicking on the OK button.
o ASM finds the Smart Copies on the creator server and updates the Console Tree. Because these Smart Copies are not found on the local system, ASM displays a blue question mark icon against the node.
6. Set up a Global Verification Task on the verification server, using the procedure described in Global Verification Task for Microsoft Exchange Smart Copies, found in the Hit 3.4 online help documents, except for the following steps:
o In the dialog titled: Create or Modify Global Verification Task, select the following option: Process Smart Copies Created by another host
o If the sole purpose of the verification server is Checksum Verification and Soft Recovery, consider setting the Global Verification window to the maximum possible 24-hour period.
o Specify a user account that has appropriate permission to access the Smart Copies (according to the shared folder settings).
7. The verification server now watches the shared folder and processes any unverified Smart Copies according to the local Global Verification window. When you select a Smart Copy, its verification status is indicated in the properties window.

TECHNICAL SUPPORT AND CUSTOMER SERVICE
Dell's support service is available to answer your questions about PS Series SAN arrays. If you have an Express Service Code, have it ready when you call. The code helps Dell's automated-support telephone system direct your call more efficiently.
Contacting Dell
Dell provides several online and telephone-based support and service options. Availability varies by country and product, and some services might not be available in your area.
For customers in the United States, call 800-945-3355.
Note: If you do not have access to an Internet connection, contact information is printed on your invoice, packing slip, bill, or Dell product catalog.
Use the following procedure to contact Dell for sales, technical support, or customer service issues:
1. Visit support.dell.com or the Dell support URL specified in information provided with the Dell product.
2. Select your locale. Use the locale menu or click on the link that specifies your country or region.
3. Select the required service. Click the "Contact Us" link, or select the Dell support service from the list of services provided.
4. Choose your preferred method of contacting Dell support, such as e-mail or telephone.
Online Services
You can learn about Dell products and services using the following procedure:
1. Visit www.dell.com (or the URL specified in any Dell product information).
2. Use the locale menu or click on the link that specifies your country or region