
Excel Risk Register - HSE.ie · 5 C. General Information The Risk Register is comprised of 6...
33
Excel Risk Register HSE Instructions for the use of the HSE Excel Risk Register Version 2 Quality Assurance and Verification Division 1/1/2018
Transcript of Excel Risk Register - HSE.ie · 5 C. General Information The Risk Register is comprised of 6...

Excel Risk Register HSE Instructions for the use of the HSE Excel Risk Register Version 2
Quality Assurance and Verification Division 1/1/2018

1
A. Table of Contents
A. Table of Contents ............................................................................................................................ 1
B. Preparing the Risk Register: ............................................................................................................ 2
C. General Information ....................................................................................................................... 5
D. Changing the Branding .................................................................................................................... 5
E. Adding New Risk Owner .................................................................................................................. 6
F. Adding New Risk Co-ordinator ........................................................................................................ 7
G. Entering New Risks: ......................................................................................................................... 8
H. Editing a Risk ................................................................................................................................. 11
I. Adding an Existing Control ............................................................................................................ 12
J. Initially Rating a Risk ..................................................................................................................... 13
K. Risk Review Date ........................................................................................................................... 14
L. Adding New Action Owner ............................................................................................................ 15
M. Adding an Action ........................................................................................................................... 16
N. Current Risk Rating........................................................................................................................ 17
O. Deleting a Control ......................................................................................................................... 19
P. Deleting an Action ......................................................................................................................... 19
Q. Preparing Sub-registers to send to Risk Co-ordinators ................................................................. 20
R. Preparing Sub-Action Lists to send to Risk Action Owners ........................................................... 22
S. Removing Risk Co-ordinators ........................................................................................................ 23
T. Receiving Updated Sub-register(s) and Sub-Action List(s) ............................................................ 24
U. Spellcheck ..................................................................................................................................... 26
V. Generating a Report ...................................................................................................................... 27
W. Removing Risk Owners .................................................................................................................. 29
X. Removing Action Owners .............................................................................................................. 30
Y. Closing a Risk ................................................................................................................................. 31

2
B. Preparing the Risk Register:
1. Download from Website.
2. Save the file by clicking ‘File’ (red arrow), then clicking ‘Save As’ (yellow arrow), at which
point the ‘Save As’ window will open.
3. Enter the File name in the ‘File name’ field (red arrow), and then select “Excel Macro-
Enabled Workbook” (yellow arrow) from the ‘Save as type’ field.

3
4. With the file saved, select the “Basic Details” worksheet by clicking it (red arrow).
5. Navigate to cell ‘B7’ to the ‘Division’ field (red arrow), and input the Division for which the
Risk Register represents.
6. If the Risk Register is to be used at the next level down, select cell ‘A8’ and use the
dropdown menu to select from the dropdown (red arrow). Then select cell ‘B8’, and input
the organisation the Risk Register will represent (yellow arrow).

4
7. If the Risk Register is to be used at a further level down, select cell ‘A9’ and use the
dropdown menu to select from the dropdown (red arrow). Then select cell ‘B9’, and input
the organisation the Risk Register will represent (yellow arrow).
8. Navigate to cell ‘B10’ (red arrow) and input the name of the individual who is ultimately
responsible for the Risk Register.
9. Each risk will be assigned an alphanumeric ID. The alpha component of the ID is generated
combining the initial letters of the Division and other fields above i.e. in the above example
the alphanumeric ID will be AHDSHGUHG1, AHDSHGUHG2 etc.
10. Preparation of the Risk Register is now complete.

5
C. General Information
The Risk Register is comprised of 6 separate excel worksheets. Below is a description of each
worksheet:
1. Basic Details: This worksheet contains information regarding the unit in which owns the Risk
Register, and the month of the reporting period.
2. Dashboard: This worksheet will contain graphical representation of data as it is entered.
3. Summary: This worksheet will contain a summary of all risks with a status of open, monitor
or closed.
4. Risk Register: This worksheet is the worksheet for data input of information related to risks
and existing controls.
5. Risk Action Log: This worksheet is the worksheet for data input of information related to risk
actions.
6. Closed Risks: This worksheet will contain a historic list of closed risks.
Each time you open the Risk Register excel file, certain functionality will be automatically
disabled. You will need to enable this content each time you open the file. Do this by clicking the
“Enable Content” button that appears on the Security Warning ribbon (red arrow).
D. Changing the Branding – (S38 and S39 Agencies version ONLY)
1. Select the “Basic Details” worksheet by clicking it (red arrow).

6
2. Locate and click the “Unlock” button (red arrow).
3. Now you can select the HSE logo, delete as required, and replace with a new logo. You can
also select cells A6:A11 and change the colour to better reflect departmental branding. The
colour of header cells in sheets “Summary”, “Risk Register”, “Risk Action Log” and “Closed
Risks” can also be changed to reflect departmental branding.
4. Once all changes have been made, go to “Basic Details” sheet.
5. Locate and press the “Lock” button.
E. Adding New Risk Owner
1. Select the “Risk Register” worksheet by clicking it (red arrow).

7
2. Above the ‘Risk Owner’ heading, locate and click the ‘+’ button (red arrow) and this will open
the ‘New risk owner’ window.
3. In the ‘New risk owner’ window, input the name of the possible owner of risks in the field
provided (red arrow) and click ok (yellow arrow).
4. The inputted name will now appear on the ‘Risk owner’ dropdown.
F. Adding New Risk Co-ordinator
1. Select the “Risk Register” worksheet by clicking it (red arrow).
2. Above the ‘Risk Co-ordinator’ heading, locate and click the ‘+’ button (red arrow) and this
will open the ‘New risk co-ordinator’ window.
3. In the ‘New risk co-ordinator’ window, input the name of the possible co-ordinator of risks in
the field provided (red arrow) and click ok (yellow arrow).
4. The inputted name will now appear on the ‘Risk co-ordinator’ dropdown.

8
G. Entering New Risks: (NB: - All risks have to be entered on the spreadsheet using the
New Risk radio button)
1. Select the “Risk Register” worksheet by clicking it (red arrow).
2. To input a new risk, locate and click on the “New Risk” button (red arrow) and this will open
the ‘New risk’ window.
3. In the ‘New Risk’ window, select the risk owner from the dropdown menu in the ‘Risk
Owner’ field (red arrow). If the adequate person is not included in the dropdown, click the
‘Cancel’ button and go to Section E Adding New Risk Owner on page 6.

9
4. Select the risk co-ordinator from the dropdown menu in the ‘Risk Co-ordinator’ field (red
arrow). If the adequate person is not included in the dropdown, click the ‘Cancel’ button and
go to section F: Adding New Risk Co-ordinator on page 7.
5. Select the risk type from the dropdown menu in the ‘Risk Type’ field (red arrow).
10
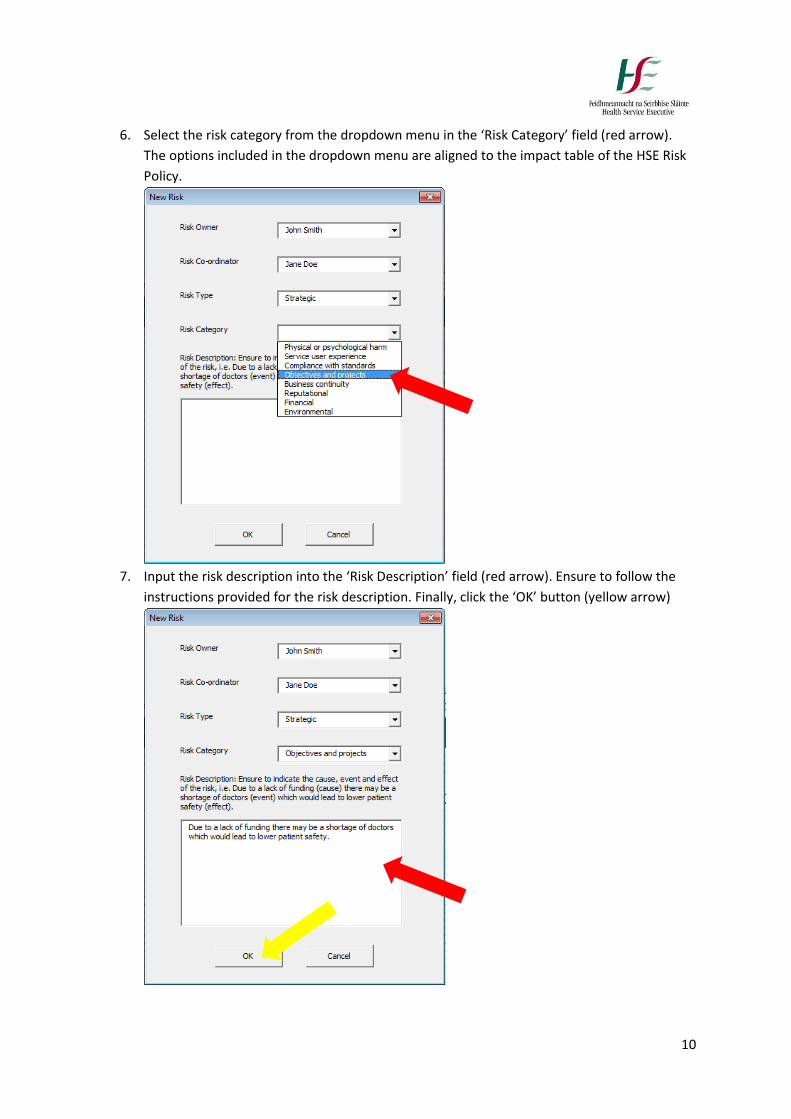
6. Select the risk category from the dropdown menu in the ‘Risk Category’ field (red arrow).
The options included in the dropdown menu are aligned to the impact table of the HSE Risk
Policy.
7. Input the risk description into the ‘Risk Description’ field (red arrow). Ensure to follow the
instructions provided for the risk description. Finally, click the ‘OK’ button (yellow arrow)

11
8. The inputted information will now appear on the “Risk Register” worksheet. The date
entered will auto-populate into column ‘G’ (red arrow), and the risk status will default to
‘Open’ in column ‘M’ (yellow arrow).
9. Certain information will now also appear on the “Risk Action Log” worksheet (red arrow) and
the “Summary” worksheet (yellow arrow).
H. Editing a Risk
1. Select the “Risk Register” worksheet by clicking it (red arrow). Risks cannot be edited in any
other worksheet besides “Risk Register”.
2. To edit the risk owner, risk co-ordinator, risk criteria or risk category, select the applicable
cell, and click the dropdown icon which appears (red arrow).
3. Select and click the adequate option from the dropdown menu (red arrow).

12
4. To edit the risk description select the applicable cell in column ‘F’ (red arrow) and edit the
cell contents.
5. To update the status of the risk to “Monitor” by selecting the appropriate cell in column ‘M’
(red arrow), clicking the dropdown icon which appears (yellow arrow) and selecting
“Monitor” from the dropdown menu (blue arrow).
6. Any edits made to the “Risk Register” worksheet will be replicated to the “Risk Action Log”
and “Summary” worksheets.
I. Adding an Existing Control
1. Select the “Risk Register” worksheet by clicking it (red arrow).
2. If inputting the first existing control to the risk, continue to step 3. If inputting an additional
existing control to the risk, skip to step 5.
3. Select the first available cell in column ‘H’ (red arrow) in the row related to the applicable
risk (yellow arrow).
4. Input the existing control in that cell.

13
5. If an additional existing control is required, select the cell of the most previous control in the
example below ‘H5’ (red arrow). Locate and click the “New Control” button (yellow arrow).
6. This will merge cells in adjacent columns, but will allow 2 rows of cells in column ‘H’ as
shown below. If the correct cell was not selected in step 5, and the cells do not merge as
shown below, locate and click the ‘ ’ button (red arrow); this will reverse the action and
start again at step 5.
J. Initially Rating a Risk – (This is the rating at original date of risk assessment)
1. Select the “Risk Register” worksheet by clicking it (red arrow).
2. To input the likelihood rating from 1-5 select the appropriate cell in column ‘I’ and click the
dropdown icon which appears (yellow arrow).
3. Select and click the adequate rating from the dropdown menu (red arrow).
14
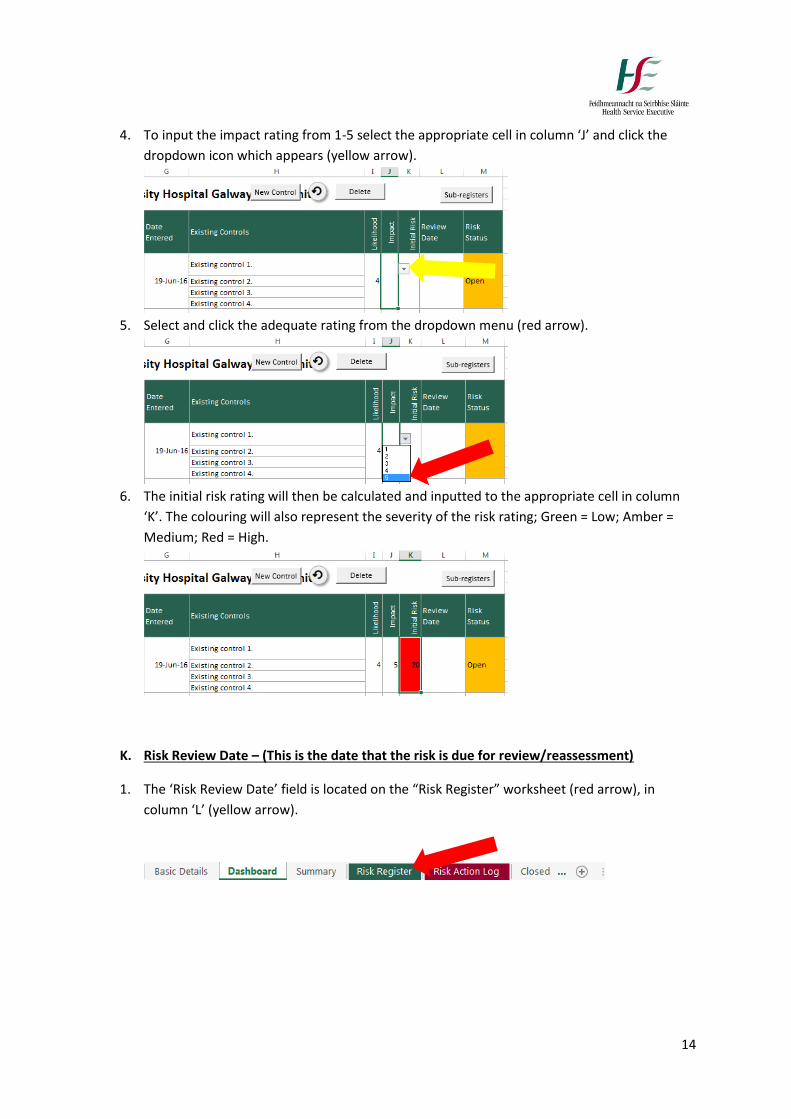
4. To input the impact rating from 1-5 select the appropriate cell in column ‘J’ and click the
dropdown icon which appears (yellow arrow).
5. Select and click the adequate rating from the dropdown menu (red arrow).
6. The initial risk rating will then be calculated and inputted to the appropriate cell in column
‘K’. The colouring will also represent the severity of the risk rating; Green = Low; Amber =
Medium; Red = High.
K. Risk Review Date – (This is the date that the risk is due for review/reassessment)
1. The ‘Risk Review Date’ field is located on the “Risk Register” worksheet (red arrow), in
column ‘L’ (yellow arrow).

15
2. The risk review date is the date the risk was most recently reviewed. To input the date,
select the appropriate cell in column ‘L’ and input the date in the dd/mm/yyyy format.
L. Adding New Action Owner
1. Select the “Risk Action Log” worksheet by clicking it (red arrow).
2. Above the ‘Action Owner’ heading, locate and click the ‘+’ button (red arrow) and this will
open the ‘New Action Owner’ window.
3. In the ‘New action owner’ window, input the name of the possible owner of actions in the
field provided (red arrow) and click ok (yellow arrow).
4. The inputted name will now appear on the ‘Action owner’ dropdown.

16
M. Adding an Action
1. Select the “Risk Action Log” worksheet by clicking it (red arrow).
2. If inputting the first action to the risk, continue to step 3. If inputting an additional action to
the risk, skip to step 8.
3. Select the first available cell in column ‘F’ (red arrow) in the row related to the applicable
risk (yellow arrow).
4. Input the action required in that cell.
5. To input the action owner select the associated cell in column ‘G’, and select the action
owner from the dropdown menu (red arrow). If the adequate person is not included in the
dropdown, go to section L: Adding New Action Owner on page 15.
6. To input the action due date select the associated cell in column ‘H’ (red arrow), and in put
the due date in the format dd/mm/yyyy.
7. The Action status will auto-populate based on the action due date, action completion date
and today’s date.
With no action completion date, and an action due date in the future, the status will be ‘Not
due’ (red arrow).
With no action completion date, and an action due date in the past, the status will be
‘Overdue’ (yellow arrow).

17
When an action completion date has been entered, the status will be ‘Complete’ (blue
arrow).
8. If an additional action is required, select the cell of the most previous action; in the example
below ‘F5’ (red arrow). Locate and click the “New Action” button (yellow arrow).
9. This will merge cells in adjacent columns, but will allow 2 rows of cells in column ‘F’, ‘G’, ‘H’,
‘I’, ‘J’, and ‘K’ as these columns are related to actions, as shown below. If the correct cell was
not selected in step 7, and the cells do not merge as shown below, locate and click the ‘ ’
button (red arrow); this will reverse the action and start again at step 7.
N. Current Risk Rating - (A point in time Risk Rating)
1. Select the “Risk Action Log” worksheet by clicking it (red arrow).
2. To input the likelihood rating from 1-5 select the appropriate cell in column ‘L’ and click the
dropdown icon which appears (yellow arrow).

18
3. Select and click the adequate rating from the dropdown menu (red arrow).
4. To input the impact rating from 1-5 select the appropriate cell in column ‘M’ and click the
dropdown icon which appears (yellow arrow).
5. Select and click the adequate rating from the dropdown menu (red arrow).
6. The current risk rating will then be calculated and inputted to the appropriate cell in column
‘K’. The colouring will also represent the severity of the risk rating; Green = Low; Amber =
Medium; Red = High.

19
O. Deleting a Control
1. Select the “Risk Register” worksheet by clicking it (red arrow).
2. Locate and select the cell containing the existing control you wish to delete in column ‘H’.
3. Locate and click the ‘Delete’ button (red arrow).
4. This will delete the existing control selected.
5. If the correct control was not selected in step 2, locate and click the ‘ ’ button (red arrow);
this will reverse the action and start again at step 2.
P. Deleting an Action
1. Select the “Risk Action Log” worksheet by clicking it (red arrow).

20
2. Locate and select the cell containing the action you wish to delete in column ‘F’.
3. Locate and click the ‘Delete’ button (red arrow).
4. This will delete the action selected.
5. If the correct control was not selected in step 2, locate and click the ‘ ’ button (red arrow);
this will reverse the action and start again at step 2.
Q. Preparing Sub-registers to send to Risk Co-ordinators
Note: This activity should be carried out two weeks prior to the report issuance date to allow
amble time for co-ordinators to complete their updates, and for their updates to be reflected on
the Master-register.
1. When preparing for a report, select the “Basic Details” worksheet by clicking it (red arrow).
2. Select cell ‘B11’ and enter the date of the report.
3. The date will appear in the format mmm-yy (red arrow).

21
4. In preparing the report, information must be gather from the risk co-ordinators. To aid in
doing this, sub-registers must be created. Sub-registers are separate excel files which
contain only the risks co-ordinated by a certain person. If there are 4 risk co-ordinators on
the risk register, there will be a need for 4 sub-registers.
5. To create the risk sub-register(s), select the “Risk Register” worksheet by clicking on it (red
arrow).
6. Locate and click the “Sub-registers” button (red-arrow). This will create the required amount
of sub-registers and save them to the same location as the risk register is located.
7. Locate the files and change the names to an appropriate name (red arrow).

22
8. Send the sub-register(s) to the applicable risk co-ordinator(s), requesting an update of
information. Upon receipt of updated sub-register(s), skip to section T Receiving Updated
Sub-register(s).
Note: Pressing the ‘Sub-registers’ button will generate sub-register(s) for each risk co-ordinator
listed in the dropdown menu (red arrow). If there are names listed on the dropdown menu that
are not a co-ordinator to risks on the register, blank sub-register(s) will be created. To remove
names from the ‘Risk Co-ordinator’ dropdown list, go to section S Removing Risk Co-ordinators.
Note: The sub-register(s) created do(es) not have the same functionality as the Risk Register,
and there are no buttons or dropdowns included. Risk Co-ordinators will update the file as they
would with any other excel file.
R. Preparing Sub-Action Lists to send to Risk Action Owners
Note: This activity should be carried out two weeks prior to the report issuance date to allow
ample time for Action Owners to complete their updates, and for their updates to be reflected
on the Master-register.
1. In preparing the report, information must be gather from the risk action owners. To aid in
doing this, sub-action lists can be created. Sub-action lists are separate excel files which
contain only the risk actions owned by a certain person. If there are 10 action owners
assigned to actions on the risk action log, there will be a need for 10 sub-action lists.
2. To create the risk sub-action list(s), select the “Risk Action Log” worksheet by clicking on it
(red arrow).
3. Locate and click the “Sub-Action List” button (red-arrow). This will create the required
amount of sub-action lists and save them to the same location as the risk register is located.

23
4. Locate the files and change the names to an appropriate name (red arrow).
5. Send the sub-action list(s) to the applicable risk action owner(s), requesting an update of
information. Upon receipt of updated sub-action list(s), skip to section T Receiving Updated
Sub-register(s).
Note: Pressing the ‘Sub-Action List’ button will generate sub-register(s) for each risk owner listed
in the dropdown menu (red arrow). If there are names listed on the dropdown menu that are
not an action owner, blank sub-Action List(s) will be created. To remove names from the ‘Risk
Action Owner’ dropdown list, go to section X Removing Action Owners.
Note: The sub-actions list (s) created do(es) not have the same functionality as the Risk Register,
and there are no buttons or dropdowns included. Risk action owners will update the file as they
would with any other excel file.
S. Removing Risk Co-ordinators
1. Select the “Risk Register” worksheet by clicking it (red arrow).
2. Above the ‘Risk Co-ordinator’ heading, locate and click the ‘-’ button (red arrow) and this will
open the ‘Co-ordinator’ window.
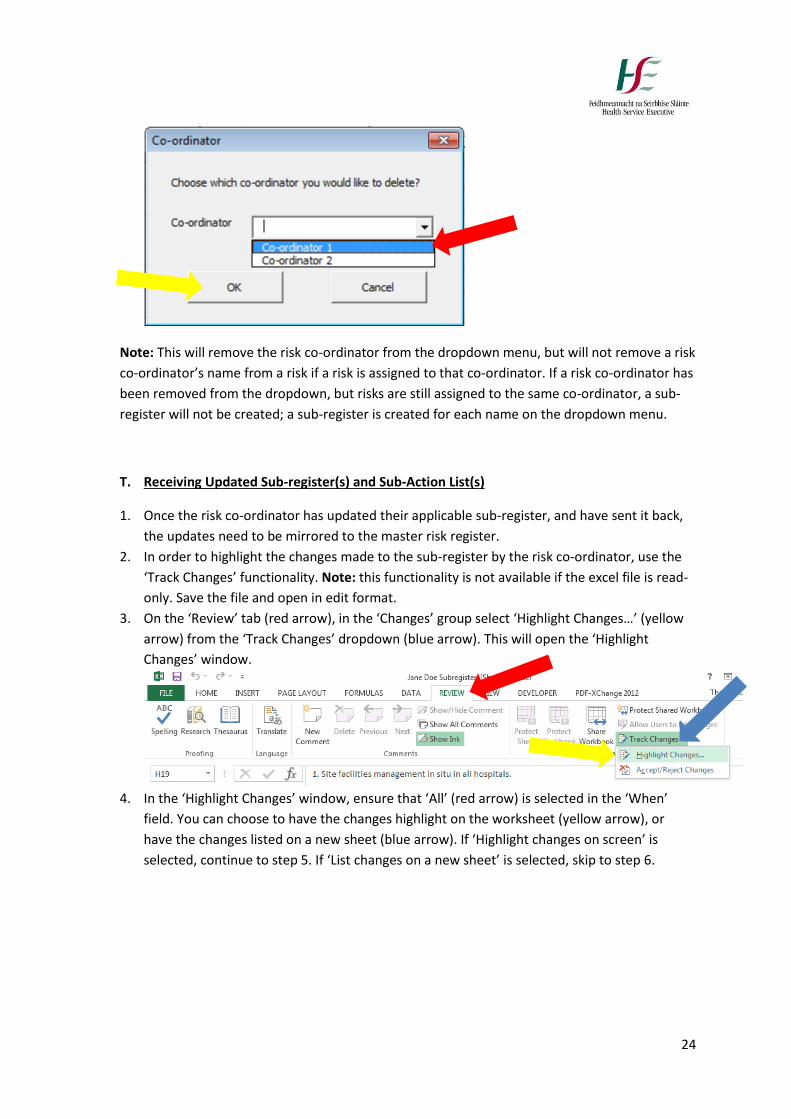
3. Select which risk co-ordinator from the dropdown you would like to remove (red arrow), and
click ‘OK’ (yellow arrow).
24
Note: This will remove the risk co-ordinator from the dropdown menu, but will not remove a risk
co-ordinator’s name from a risk if a risk is assigned to that co-ordinator. If a risk co-ordinator has
been removed from the dropdown, but risks are still assigned to the same co-ordinator, a sub-
register will not be created; a sub-register is created for each name on the dropdown menu.
T. Receiving Updated Sub-register(s) and Sub-Action List(s)
1. Once the risk co-ordinator has updated their applicable sub-register, and have sent it back,
the updates need to be mirrored to the master risk register.
2. In order to highlight the changes made to the sub-register by the risk co-ordinator, use the
‘Track Changes’ functionality. Note: this functionality is not available if the excel file is read-
only. Save the file and open in edit format.
3. On the ‘Review’ tab (red arrow), in the ‘Changes’ group select ‘Highlight Changes…’ (yellow
arrow) from the ‘Track Changes’ dropdown (blue arrow). This will open the ‘Highlight
Changes’ window.
4. In the ‘Highlight Changes’ window, ensure that ‘All’ (red arrow) is selected in the ‘When’
field. You can choose to have the changes highlight on the worksheet (yellow arrow), or
have the changes listed on a new sheet (blue arrow). If ‘Highlight changes on screen’ is
selected, continue to step 5. If ‘List changes on a new sheet’ is selected, skip to step 6.

25
5. Any cells that have been updated by the risk co-ordinator will now be highlighted with a
coloured box around the cell (red arrow). Hover over the cell to expose the note (yellow
arrow). This will help mirror updates from the sub-register(s) to the master register. Once all
updates are mirrored, skip to step 7.
6. A new sheet will have been created that lists all the updates that were made. This will help
mirror updates from the sub-register(s) to the master register.
7. Once all updates from sub-register(s) are mirrored in the master register, select the
“Summary” worksheet by clicking it (red arrow).
8. Select the appropriate cell in column ‘I’, and determine if the current risk rating has changed
since the last report. Click the appropriate button; No change (red arrow); increase (yellow
arrow); decrease (blue arrow)

26
9. The register is now ready to generate a report.
U. Spellcheck
1. Prior to generating a Report, you should perform spellcheck on your risk register. Select the
“Basic Details” worksheet by clicking it (red arrow).
2.
3. Locate and click the “Spellcheck” button (red arrow).
27
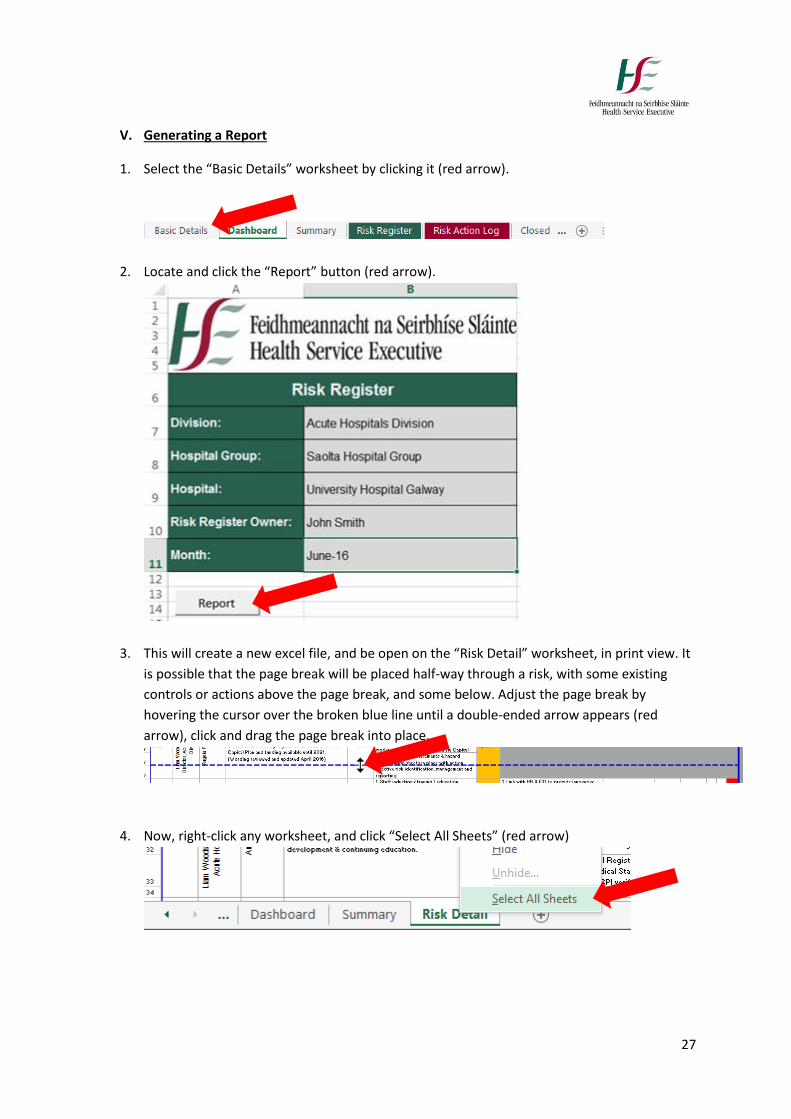
V. Generating a Report
1. Select the “Basic Details” worksheet by clicking it (red arrow).
2. Locate and click the “Report” button (red arrow).
3. This will create a new excel file, and be open on the “Risk Detail” worksheet, in print view. It
is possible that the page break will be placed half-way through a risk, with some existing
controls or actions above the page break, and some below. Adjust the page break by
hovering the cursor over the broken blue line until a double-ended arrow appears (red
arrow), click and drag the page break into place.
4. Now, right-click any worksheet, and click “Select All Sheets” (red arrow)

28
5. Save the file by clicking ‘File’ (red arrow), then clicking ‘Save As’ (yellow arrow), at which
point the ‘Save As’ window will open.

29
6. Enter the File name in the ‘File name’ field (red arrow), select “PDF” (yellow arrow) from the
‘Save as type’ field, and click the “Save” button (blue arrow).
7. This will create a PDF report, with a Cover Page, 2 pages of a Dashboards, Summary Pages,
and Pages with the Risk Details, with headings and page numbers.
W. Removing Risk Owners
1. Select the “Risk Register” worksheet by clicking it (red arrow).
2. Above the ‘Risk Owner’ heading, locate and click the ‘-’ button (red arrow) and this will open
the ‘Owner’ window.

30
3. Select which risk owner from the dropdown you would like to remove (red arrow), and click
‘OK’ (yellow arrow).
Note: This will remove the risk owner from the dropdown menu, but will not remove a risk
owner’s name from a risk if a risk is assigned to that owner.
X. Removing Action Owners
1. Select the “Risk Action Log” worksheet by clicking it (red arrow).
2. Above the ‘Action Owner’ heading, locate and click the ‘-’ button (red arrow) and this will
open the ‘Action Owner’ window.
3. Select which action owner from the dropdown you would like to remove (red arrow), and
click ‘OK’ (yellow arrow).

31
Note: This will remove the action owner from the dropdown menu, but will not remove an
action owner’s name from an action if an action is assigned to that action owner.
Y. Closing a Risk
1. Select the “Risk Register” worksheet by clicking it (red arrow).
2. Locate and select the appropriate cell in column ‘M’ (red arrow). Click the dropdown icon
which appears (yellow arrow) and selecting “Closed” from the dropdown menu (blue arrow).
3. The Risk will remain on the “Risk Register”, “Risk Action Log” and “Summary” worksheets,
and appear as closed. When a Report is generated, the closed risk will appear on the Report.
A closed risk should only appear on a Report once; it should be removed from subsequent
Reports.
4. To remove the closed risk from the “Risk Register”, “Risk Action Log” and “Summary”
worksheets, on the “Risk Register” worksheet locate and click the ‘Closed Risk’ button (red
arrow), which will open the ‘Closed Risk’ window.

32
5. In the ‘Closed Risk’ window, select the alphanumeric ID of the closed risk from the
dropdown (red arrow), and click the ‘OK’ button (yellow arrow).
6. This will remove the closed risk from the “Risk Register”, “Risk Action Log” and “Summary”
worksheets and move it to the “Closed Risks” worksheet.


