
Evolution Training Manual 1 sided v.6 - PaydayHCM Training Manual V. 6 AW Page 2 of 117 TABLE OF...
117
Evolution Training Manual V. 6 AW Page 1 of 117 Evolution Training Manual
Transcript of Evolution Training Manual 1 sided v.6 - PaydayHCM Training Manual V. 6 AW Page 2 of 117 TABLE OF...

Evolution Training Manual V. 6 AW
Page 1 of 117
Evolution Training Manual
Evolution Training Manual V. 6 AW
Page 2 of 117
TABLE OF CONTENTS
Evolution Install pg. 4 Print Key Install pg. 7 Your Username and Password pg. 8 Evolution Password Requirements pg. 8 Payday Contacts pg. 9 Client Control Considerations pg. 11 Downloading RWA Viewer pg. 12 Navigating pg. 13 Changes pg. 16 Entering a Change on an existing Employee pg. 17 Creating a New Employee pg. 18 Entering New Employee’s using the Quick Entry pg. 20 Terminating an Employee pg. 21 Rehiring an Employee pg. 22 Details Tab pg. 23 Address Tab pg. 26 W-2 Tab pg. 27 Federal Tax Tab pg. 28 Notes Tab pg. 29 HR Tab pg. 30 Tracking Workers Comp in Evolution pg. 31 Life Insurance over $50K pg. 32 Employee/ Pay rate Info pg. 33 Employee/ States pg. 35 Employee/ Scheduled E/Ds pg. 36 Future Dating in Scheduled E/D’s pg. 37 Mass Updates in Scheduled E/D Area pg. 38 Client Benefits pg. 40 Employee/ Scheduled E/D’s/ Direct Deposit pg. 41 Direct Deposit at a Glance pg. 42 Employee/ Time Off Accruals pg. 43 Employee Auto Labor Distribution pg. 44 Employee /Additional Info pg. 45 Payroll pg. 46 Payroll Company & Notes pg. 47 Payroll/ Payroll pg.48 Payroll/ Payroll/ Batch pg. 49 Creating an Additional Batch pg. 50 Tabs within the Batch pg. 51 Payroll Quick Entry pg. 52 Payroll Quick Entry w/ Overrides pg. 53 Payroll/ Earnings and Deductions pg. 54 Payroll/ Taxes pg. 55 Payroll/ Import pg. 56 Payroll/ Check pg. 57
Evolution Training Manual V. 6 AW
Page 3 of 117
Creating an Additional Check pg. 58 Creating a 3rd Party Sick Check pg. 59 Job Costing pg. 61 Creating a Manual Check pg. 62 Print Back Checks/ Manual Checks pg. 68 Correction/ Additional Runs pg. 70 Voiding a Check pg. 71 DBDT Allocating pg. 74 One Time Entries in Payroll pg. 75 Comments on Checks pg. 76 Entering Your Payroll Regular No Overrides in Batch pg. 77 Entering Your Payroll Regular pg. 79 Entering Your Payroll Net Clock (Web Clock) pg. 82 Reports pg. 87 Running Reports pg. 88 Quick Guide/ Running a Report pg. 91 Navigating in the Queue pg. 92 Running Reports using the Favorite Reports Button pg. 94 Saving a Report as a PDF pg. 95 Ascii File Open in Excel pg. 96 Re-Printing Check Stubs pg. 97 Ad Hoc Reports pg. 98 Running a Query pg. 101 Creating a Basic Qu ery pg. 102 Other pg. 105 Buttons Within Evolution pg. 106 Evolution Shortcut Keys pg. 108 Payroll Filters pg. 111 Creating a Template in Evolution pg. 112
Evolution Training Manual V. 6 AW
Page 4 of 117
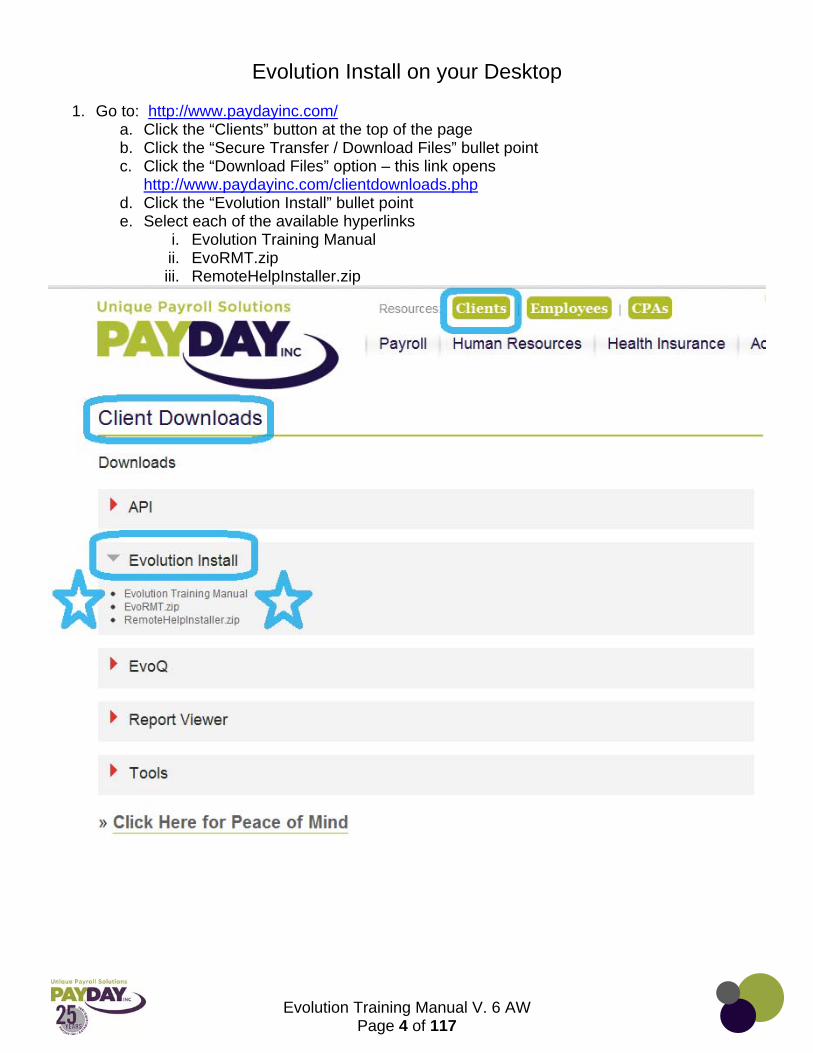
Evolution Install on your Desktop
1. Go to: http://www.paydayinc.com/
a. Click the “Clients” button at the top of the page b. Click the “Secure Transfer / Download Files” bullet point c. Click the “Download Files” option – this link opens
http://www.paydayinc.com/clientdownloads.php d. Click the “Evolution Install” bullet point e. Select each of the available hyperlinks
i. Evolution Training Manual ii. EvoRMT.zip iii. RemoteHelpInstaller.zip
Evolution Training Manual V. 6 AW
Page 5 of 117
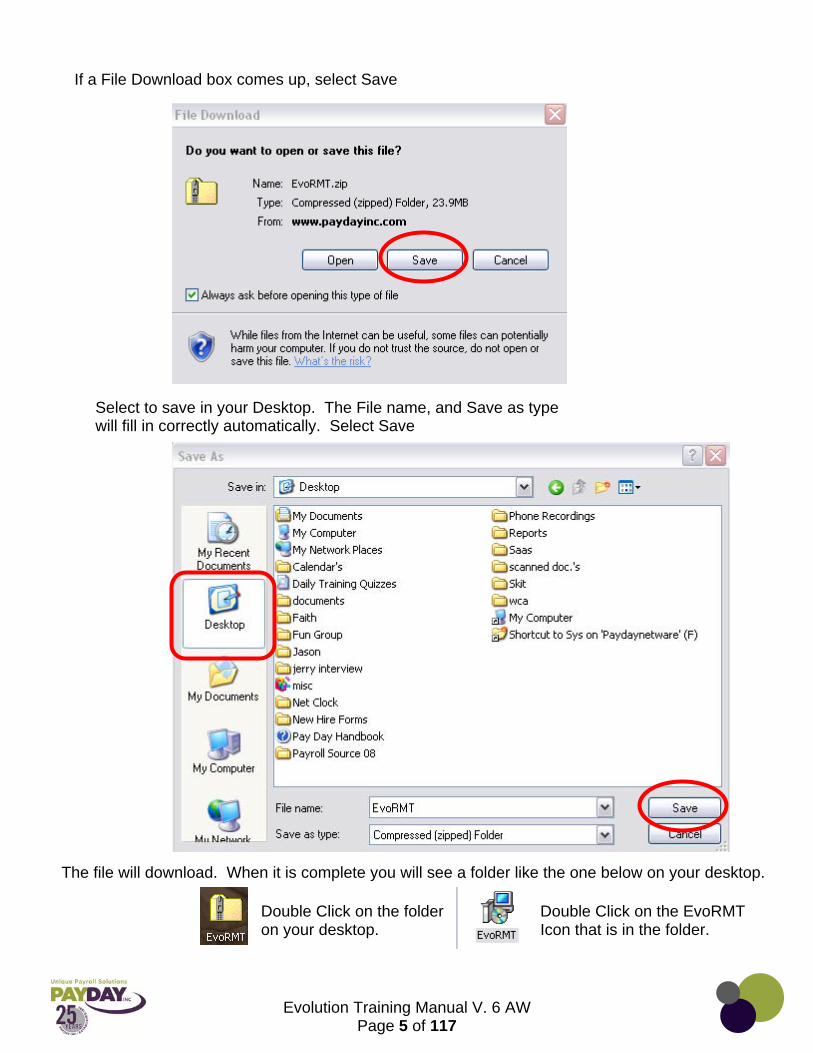
If a File Download box comes up, select Save
Select to save in your Desktop. The File name, and Save as type will fill in correctly automatically. Select Save
The file will download. When it is complete you will see a folder like the one below on your desktop.
Double Click on the folder on your desktop.
Double Click on the EvoRMT Icon that is in the folder.
Evolution Training Manual V. 6 AW
Page 6 of 117
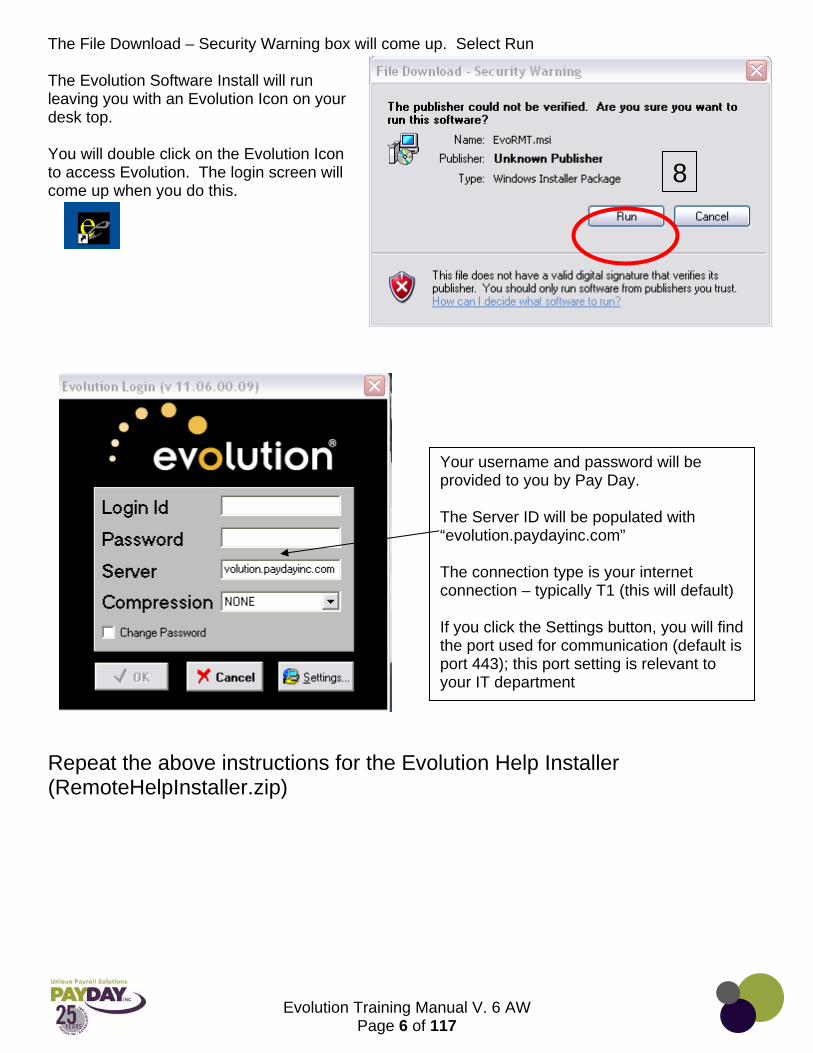
The File Download – Security Warning box will come up. Select Run The Evolution Software Install will run leaving you with an Evolution Icon on your desk top. You will double click on the Evolution Icon to access Evolution. The login screen will come up when you do this.
Repeat the above instructions for the Evolution Help Installer (RemoteHelpInstaller.zip)
Your username and password will be provided to you by Pay Day. The Server ID will be populated with “evolution.paydayinc.com” The connection type is your internet connection – typically T1 (this will default) If you click the Settings button, you will find the port used for communication (default is port 443); this port setting is relevant to your IT department
8
Evolution Training Manual V. 6 AW
Page 7 of 117
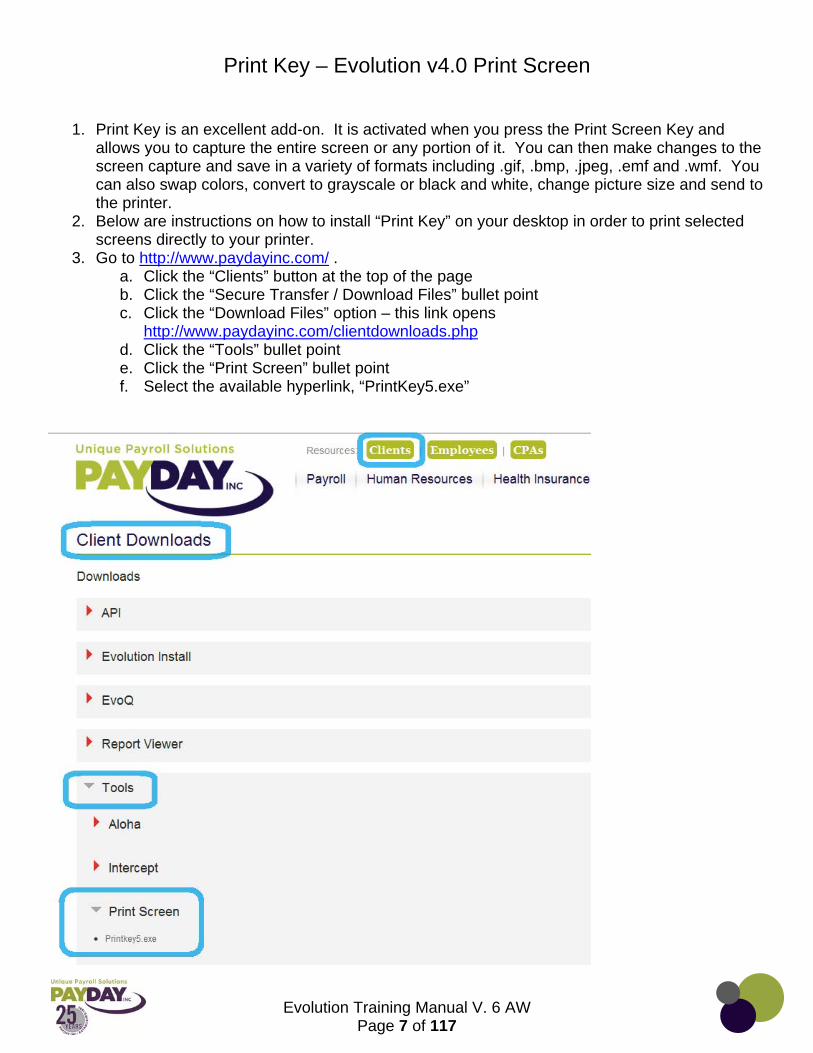
Print Key – Evolution v4.0 Print Screen
1. Print Key is an excellent add-on. It is activated when you press the Print Screen Key and allows you to capture the entire screen or any portion of it. You can then make changes to the screen capture and save in a variety of formats including .gif, .bmp, .jpeg, .emf and .wmf. You can also swap colors, convert to grayscale or black and white, change picture size and send to the printer.
2. Below are instructions on how to install “Print Key” on your desktop in order to print selected screens directly to your printer.
3. Go to http://www.paydayinc.com/ . a. Click the “Clients” button at the top of the page b. Click the “Secure Transfer / Download Files” bullet point c. Click the “Download Files” option – this link opens
http://www.paydayinc.com/clientdownloads.php d. Click the “Tools” bullet point e. Click the “Print Screen” bullet point f. Select the available hyperlink, “PrintKey5.exe”
Evolution Training Manual V. 6 AW
Page 8 of 117
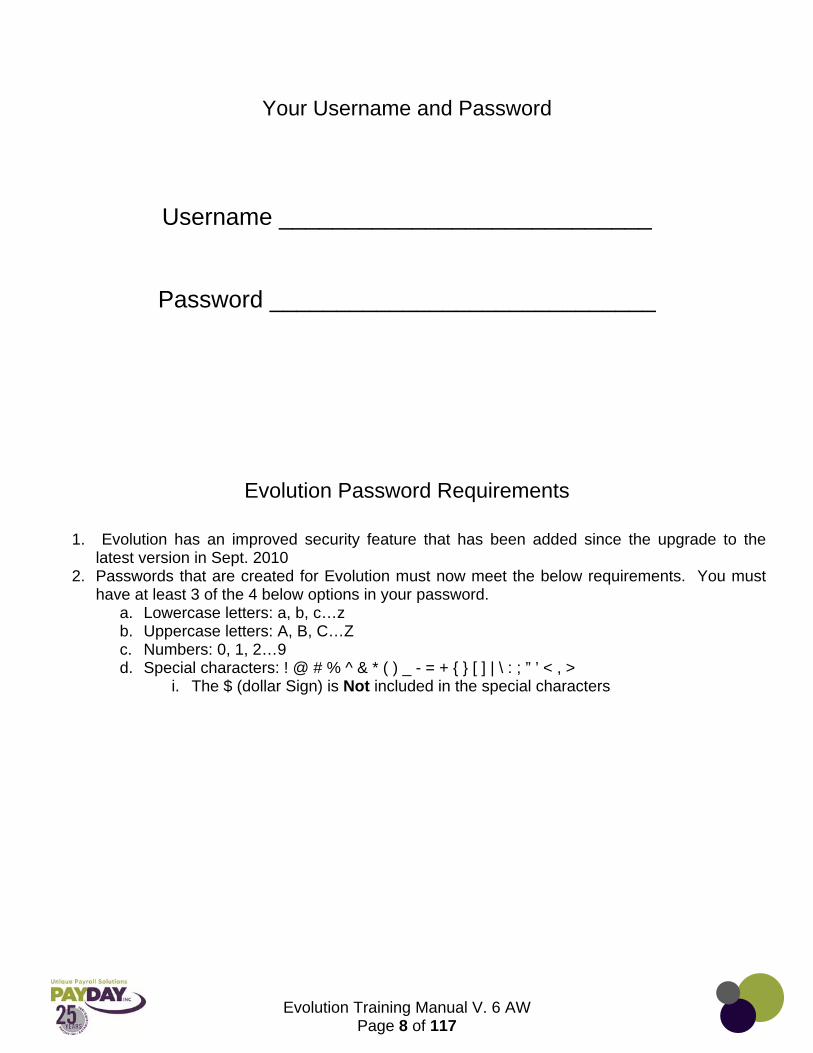
Your Username and Password
Username ____________________________
Password _____________________________
Evolution Password Requirements
1. Evolution has an improved security feature that has been added since the upgrade to the latest version in Sept. 2010
2. Passwords that are created for Evolution must now meet the below requirements. You must have at least 3 of the 4 below options in your password.
a. Lowercase letters: a, b, c…z b. Uppercase letters: A, B, C…Z c. Numbers: 0, 1, 2…9 d. Special characters: ! @ # % ^ & * ( ) _ - = + { } [ ] | \ : ; ” ’ < , >
i. The $ (dollar Sign) is Not included in the special characters
Evolution Training Manual V. 6 AW
Page 9 of 117
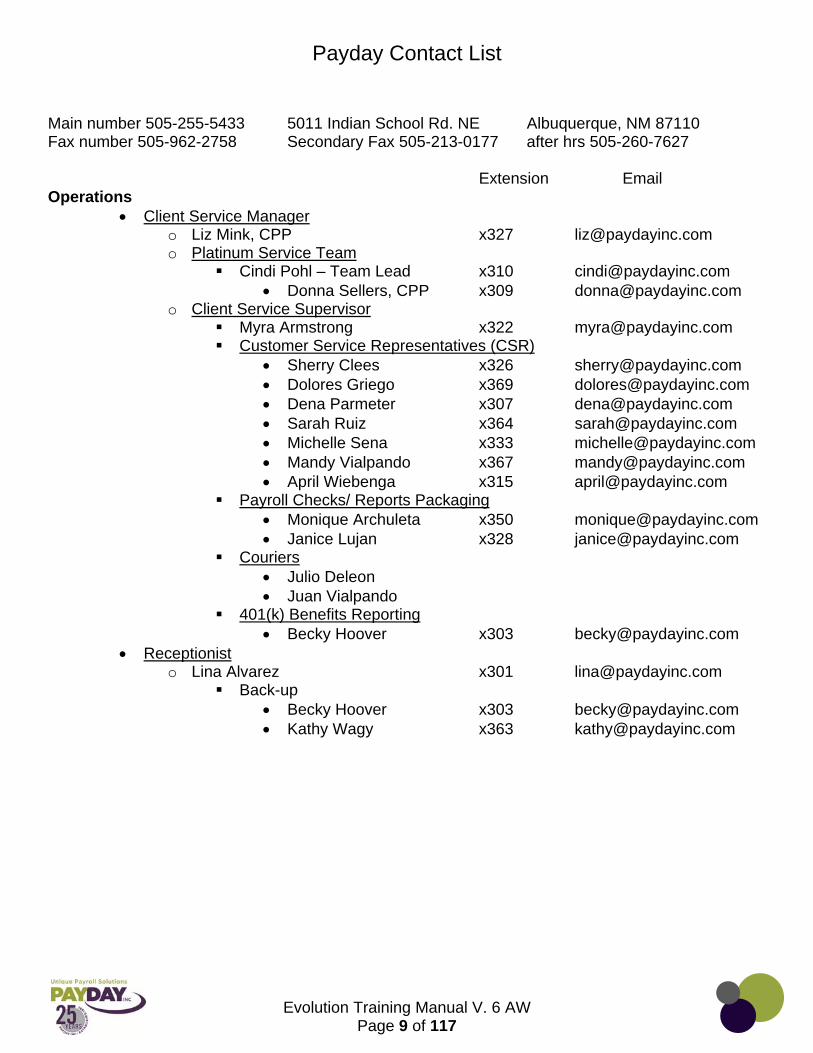
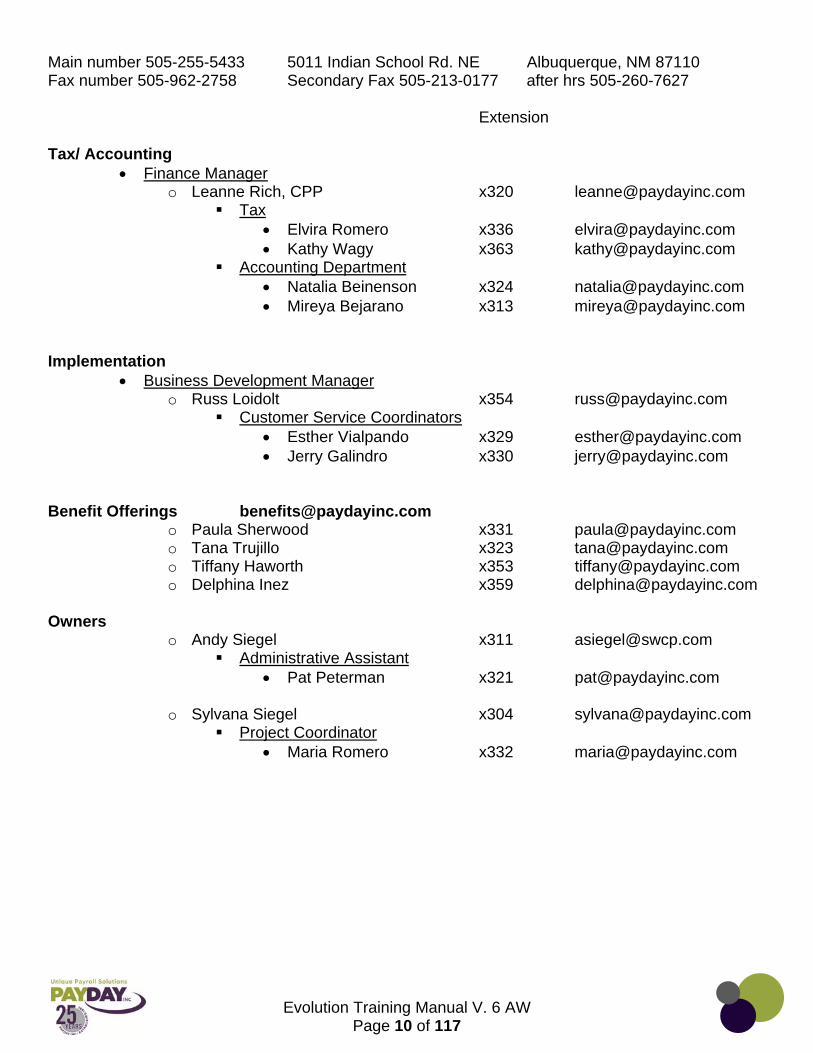
Payday Contact List
Main number 505-255-5433 5011 Indian School Rd. NE Albuquerque, NM 87110 Fax number 505-962-2758 Secondary Fax 505-213-0177 after hrs 505-260-7627 Extension Email Operations
Client Service Manager o Liz Mink, CPP x327 [email protected] o Platinum Service Team
Cindi Pohl – Team Lead x310 [email protected] Donna Sellers, CPP x309 [email protected]
o Client Service Supervisor Myra Armstrong x322 [email protected] Customer Service Representatives (CSR)
Sherry Clees x326 [email protected] Dolores Griego x369 [email protected] Dena Parmeter x307 [email protected] Sarah Ruiz x364 [email protected] Michelle Sena x333 [email protected] Mandy Vialpando x367 [email protected] April Wiebenga x315 [email protected]
Payroll Checks/ Reports Packaging Monique Archuleta x350 [email protected] Janice Lujan x328 [email protected]
Couriers Julio Deleon Juan Vialpando
401(k) Benefits Reporting Becky Hoover x303 [email protected]
Receptionist o Lina Alvarez x301 [email protected]
Back-up Becky Hoover x303 [email protected] Kathy Wagy x363 [email protected]
Evolution Training Manual V. 6 AW
Page 10 of 117
Main number 505-255-5433 5011 Indian School Rd. NE Albuquerque, NM 87110 Fax number 505-962-2758 Secondary Fax 505-213-0177 after hrs 505-260-7627 Extension Tax/ Accounting
Finance Manager o Leanne Rich, CPP x320 [email protected]
Tax Elvira Romero x336 [email protected] Kathy Wagy x363 [email protected]
Accounting Department Natalia Beinenson x324 [email protected] Mireya Bejarano x313 [email protected]
Implementation Business Development Manager
o Russ Loidolt x354 [email protected] Customer Service Coordinators
Esther Vialpando x329 [email protected] Jerry Galindro x330 [email protected]
Benefit Offerings [email protected] o Paula Sherwood x331 [email protected] o Tana Trujillo x323 [email protected] o Tiffany Haworth x353 [email protected] o Delphina Inez x359 [email protected]
Owners
o Andy Siegel x311 [email protected] Administrative Assistant
Pat Peterman x321 [email protected]
o Sylvana Siegel x304 [email protected] Project Coordinator
Maria Romero x332 [email protected]

Evolution Training Manual V. 6 AW
Page 11 of 117
Client Control Considerations
1. Ensuring that only authorized and properly trained personnel are allowed
logical access to Payday, Inc. systems, fax input worksheets and coversheets.
2. Establishing proper controls over the use of user ids and passwords that are used to access and enter payroll information on Evolution.
3. Review of the annually prepared payroll processing schedule and notifying Payday, Inc. of any changes in a timely manner.
4. The preparation of worksheets, faxes and control totals that are sent to Payday, Inc..
5. Notifying Payday, Inc. of changes in the authorized contacts list.
6. Accuracy of the data entry when using remote client entry in Evolution.
7. Reviewing the Pre-Processing Payroll Register report before submitting on a timely basis to ensure that all payroll information has been recorded completely and accurately.
8. Reviewing the reports produced by Payday, Inc. after initial account set-up. This is to ensure that employee-level and company-level information has been initially recorded completely and accurately.
9. Review of error messages that result from entering payroll data, addressing errors and resolution in a timely manner.
10. Submitting payroll data in accordance with the mutually agreed upon schedule.
11. The completeness and accuracy of client-specified deductions.
12. Submitting client-specific deduction changes to Payday, Inc. in a timely manner.
13. Establishing procedures to notify Payday, Inc. if employees report problems with checks.
14. Signing upon receipt of payroll reports, checks and vouchers.
15. Receiving and distributing checks.
16. Reconciling bank accounts used for payroll processing on a timely basis each month.
17. Retention of payroll reports and supporting documentation for the appropriate length of time to comply with all federal, state and local compliance agencies.
18. Submitting all relevant correspondence with tax agencies to Payday, Inc. promptly.

Evolution Training Manual V. 6 AW
Page 12 of 117
Downloading RWA Viewer from Payday Inc. Website
1. All reports will be sent electronically as an rwa file. This is a secure file that is created when
your payroll is being processed. To open this file you will need to have preview.exe installed on your computer.
2. Create a new Folder on your desktop: “Reports” 3. Open an internet browser and navigate to http://www.paydayinc.com/
a. Click the “Clients” button at the top of the page b. Click the “Secure Transfer / Download Files” bullet point c. Click the “Download Files” option – this link opens
http://www.paydayinc.com/clientdownloads.php d. Click the “Report Viewer” bullet point e. Select each of the available hyperlinks
4. The File Download – Security Warning window will come up. Select Save; save it to the Reports folder
5. The “isRWPreview.exe” program is in the “isRWPreview.zip” compressed folder 6. Double-click the “isRWPreview.zip” folder to see the contents 7. Once the compressed folder is open, right-click on the “isRWPreview.exe” programe 8. Select Copy 9. Close the folder window 10. Right-click in the Reports folder; select Paste 11. Double-click the isRWPreview.exe program to open it up and allow Windows to set the file
associations; once open, you may click the “X” to close it 12. When you receive your report you will want to save them to the Reports Folder. 13. Double-clicking the Report .rwa file will open the Preview.exe and the report(s)

Evolution Training Manual V. 6 AW
Page 13 of 117
Navigating

Evolution Training Manual V. 6 AW
Page 14 of 117
1. Buttons are located on the left hand side of the screen. Some of the buttons will have a subfolder of other buttons you can choose within that button. For instance the Reports Button has subfolders run reports, set-up reports, etc.
Buttons
Tabs Top Navigational Bar
The ? will bring up a
filter screen which allows
you to filter the information
you are seeing
The Browse Tab will always be where your, “list” is.
Select the Header Column to put the information in order by the column you select

Evolution Training Manual V. 6 AW
Page 15 of 117
2. Tabs are located along the top of the screen. You can access further information within each tab by selecting each tab.
3. The Top Navigational Bar helps you navigate and perform actions within Evolution. Back to previously viewed window Forward to next viewed window (The
drop box arrow will allow you to select from the last few places you have been.)
First Record Prior Record Next Record Last Record
Create a record Delete a record
View field audit history Refresh data
Post Changes Cancel Changes
Commit data changes to database on server Abort Changes
Notes:__________________________________________________________________________________________________________________________________________________________________________________________________________________________________________________________________________________________________________________________________________________________________________________________________________________________________________________________________________________________________________________________________________________________________________________________________________________________________________________________________________________________________________________________________________________

Evolution Training Manual V. 6 AW
Page 16 of 117
Changes

Evolution Training Manual V. 6 AW
Page 17 of 117
Entering a Change to Employee Information
On the Employee/ Employee/ EE Entry Screen
1. To Enter a change to employee information you will need to select the Employee Button.
2. Select the Employee Sub Folder
3. Select the Employee that you need to make a change on from the Browse Area
4. Select the EE Entry Tab
5. Select the Information that needs to be changed 6. Enter the change to the information 7. Select the Green Check Mark 8. Select the Yellow Sun.
**Note** Changes that need to be made in other areas of Evolution are basically the same. Select the information that needs to be updated. Make the change… Save.
Notes:___________________________________________________________________________________________________________________________________________________________________________________________________________________________________________________________________________________________________________________________________________________________________________________________________________________________________________________________________________________________________________________________________________________________________________________________________________________________________________________________________________________________________________________________________________________
Evolution Training Manual V. 6 AW
Page 18 of 117
Notes:___________________________________________________________________________________________________________________
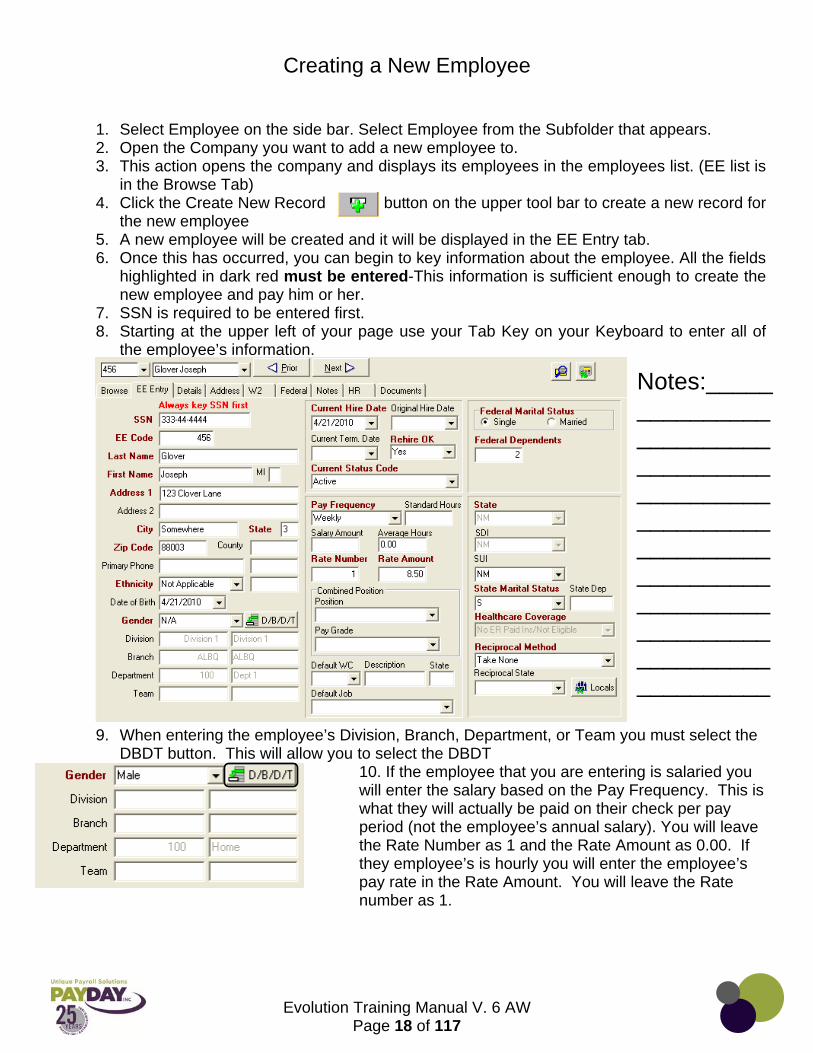
Creating a New Employee
1. Select Employee on the side bar. Select Employee from the Subfolder that appears. 2. Open the Company you want to add a new employee to. 3. This action opens the company and displays its employees in the employees list. (EE list is
in the Browse Tab) 4. Click the Create New Record button on the upper tool bar to create a new record for
the new employee 5. A new employee will be created and it will be displayed in the EE Entry tab. 6. Once this has occurred, you can begin to key information about the employee. All the fields
highlighted in dark red must be entered-This information is sufficient enough to create the new employee and pay him or her.
7. SSN is required to be entered first. 8. Starting at the upper left of your page use your Tab Key on your Keyboard to enter all of
the employee’s information.
9. When entering the employee’s Division, Branch, Department, or Team you must select the
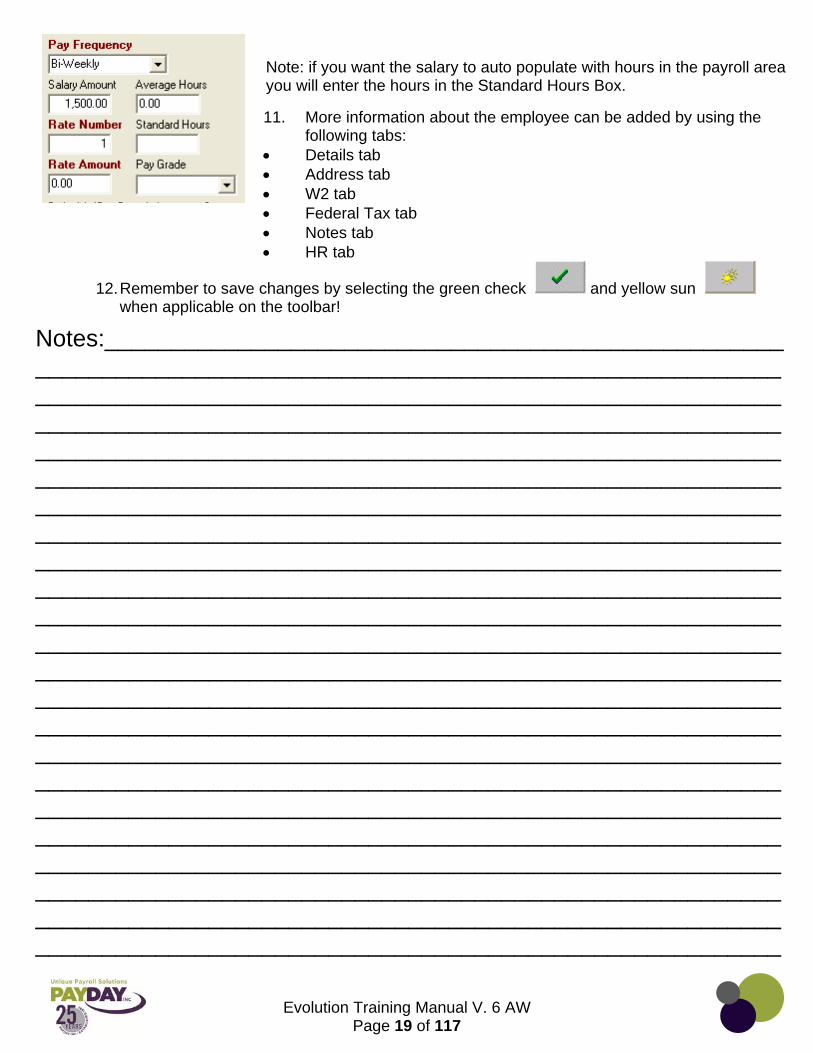
DBDT button. This will allow you to select the DBDT 10. 10. If the employee that you are entering is salaried you
will enter the salary based on the Pay Frequency. This is what they will actually be paid on their check per pay period (not the employee’s annual salary). You will leave the Rate Number as 1 and the Rate Amount as 0.00. If they employee’s is hourly you will enter the employee’s pay rate in the Rate Amount. You will leave the Rate number as 1.
Evolution Training Manual V. 6 AW
Page 19 of 117
11. More information about the employee can be added by using the
following tabs: Details tab Address tab W2 tab Federal Tax tab Notes tab HR tab
12. Remember to save changes by selecting the green check and yellow sun when applicable on the toolbar!
Note: if you want the salary to auto populate with hours in the payroll area you will enter the hours in the Standard Hours Box.
Notes:___________________________________________________________________________________________________________________________________________________________________________________________________________________________________________________________________________________________________________________________________________________________________________________________________________________________________________________________________________________________________________________________________________________________________________________________________________________________________________________________________________________________________________________________________________________________________________________________________________ ________________________________________________________________________________________________________________________________________________________________________________________________________________________________________________________________________________________________________________________________________________________________________________________________________________________________________________________________________________________________________________________

Evolution Training Manual V. 6 AW
Page 20 of 117
Entering your Employee’s Using Employee Quick Entry
1. Select the Employee Button 2. Select the Employee Quick Entry Subfolder 3. Select the Employee Quick Entry Tab
4. Select the Green Plus Sign at the top of the page.
5. Enter the employee’s information a. All required information is Bolded in Red
6. To save the employee select the Green Check Mark. 7. Then select the Yellow Sun.
Notes:___________________________________________________________________________________________________________________________________________________________________________________________________________________________________________________________________________________________________________________________________________________________________________________________________________________________________________________________________________________________________________________________________________________________________________________________________________________________________________________________________________________________________________________________________________________________________________________________________________ ________________________________________________________________________________________________________________________________________________________________________________________________________________________________
Evolution Training Manual V. 6 AW
Page 21 of 117
________________________________________________________________________________________________________________________________________________________________________________________________________________________________________________________________________________________________________________________________________________________________________________________________________________________________________________________________
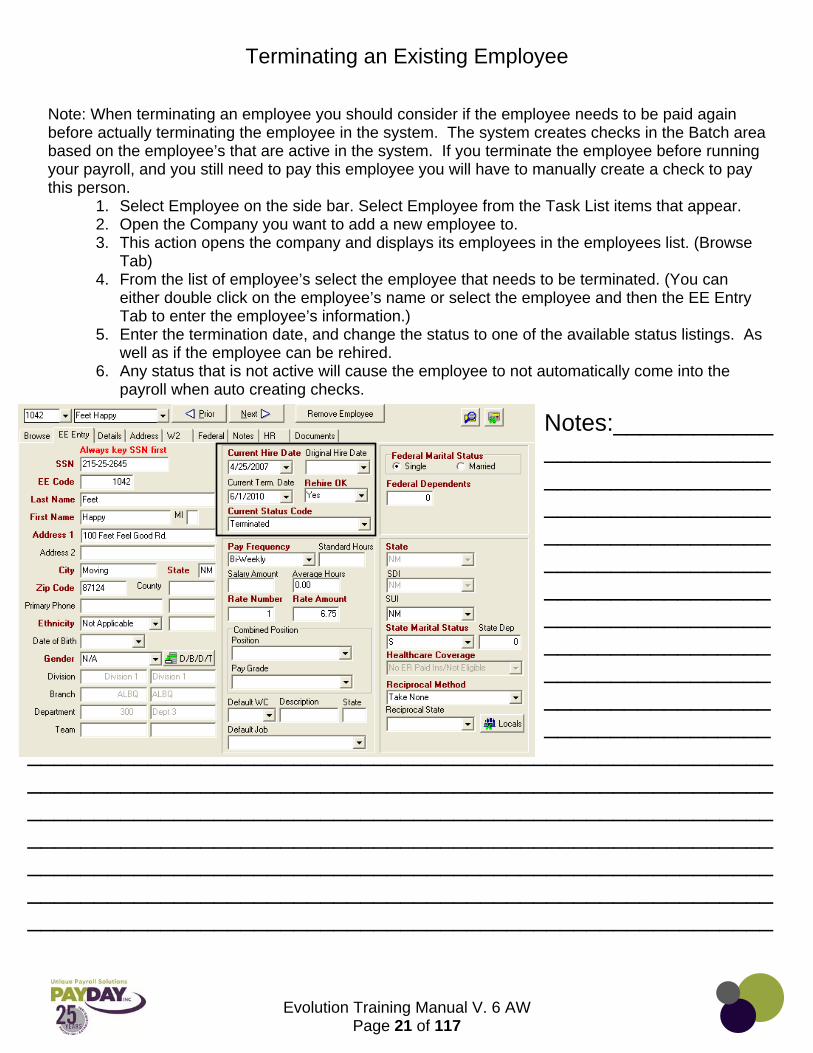
Terminating an Existing Employee
Note: When terminating an employee you should consider if the employee needs to be paid again before actually terminating the employee in the system. The system creates checks in the Batch area based on the employee’s that are active in the system. If you terminate the employee before running your payroll, and you still need to pay this employee you will have to manually create a check to pay this person.
1. Select Employee on the side bar. Select Employee from the Task List items that appear. 2. Open the Company you want to add a new employee to. 3. This action opens the company and displays its employees in the employees list. (Browse
Tab) 4. From the list of employee’s select the employee that needs to be terminated. (You can
either double click on the employee’s name or select the employee and then the EE Entry Tab to enter the employee’s information.)
5. Enter the termination date, and change the status to one of the available status listings. As well as if the employee can be rehired.
6. Any status that is not active will cause the employee to not automatically come into the payroll when auto creating checks.
Notes:_______________________________________________________________________________________________________________________________________________________________________________________________________
Evolution Training Manual V. 6 AW
Page 22 of 117
Rehiring an Employee
If you start entering a new employee, and the system auto populates the Employee’s information, this employee is already in the system. You should select the red Now you should go through the steps to rehire the employee.
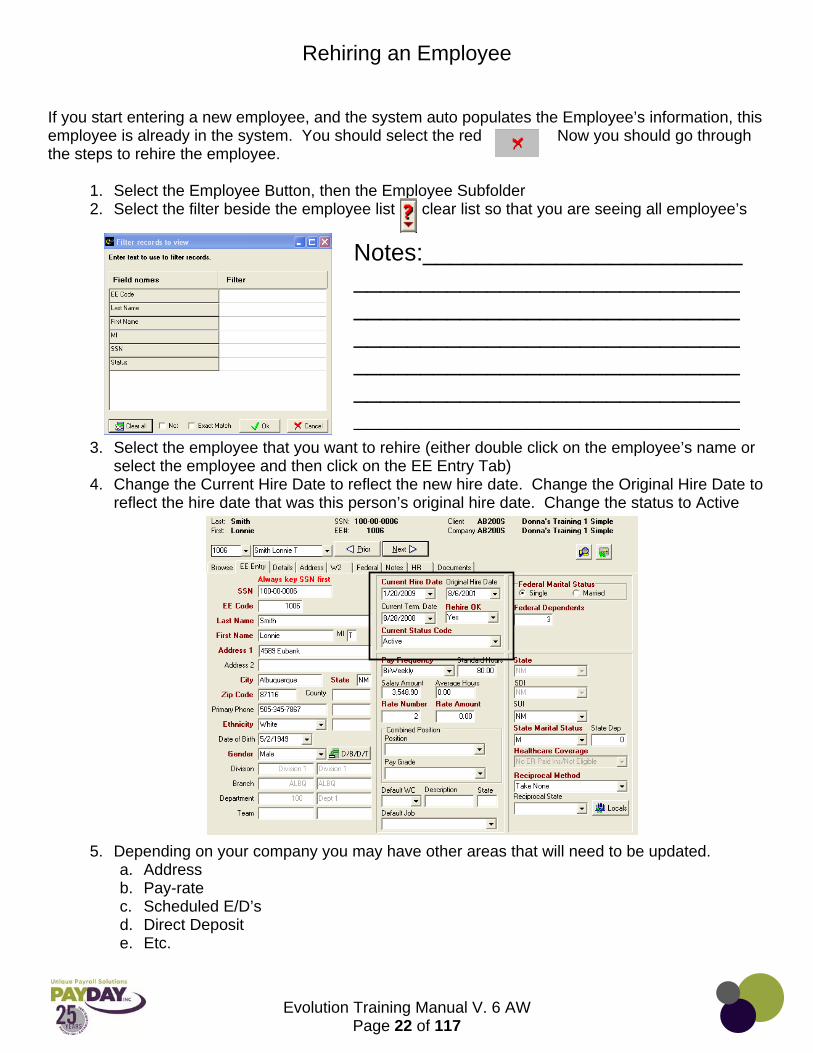
1. Select the Employee Button, then the Employee Subfolder 2. Select the filter beside the employee list clear list so that you are seeing all employee’s
3. Select the employee that you want to rehire (either double click on the employee’s name or select the employee and then click on the EE Entry Tab)
4. Change the Current Hire Date to reflect the new hire date. Change the Original Hire Date to reflect the hire date that was this person’s original hire date. Change the status to Active
5. Depending on your company you may have other areas that will need to be updated. a. Address b. Pay-rate c. Scheduled E/D’s d. Direct Deposit e. Etc.
Notes:______________________________________________________________________________________________________________________________________________________________________________________________________

Evolution Training Manual V. 6 AW
Page 23 of 117
Details Tab
1. The Details Tab in Evolution is located in the Employee Button Employee Subfolder. This area holds extra information about the employee.
2. Payday sends the New Hire Report for most of our Clients unless specifically asked to not perform this service. You can see the status of the New Hire report in the upper left hand corner of the Details Tab.
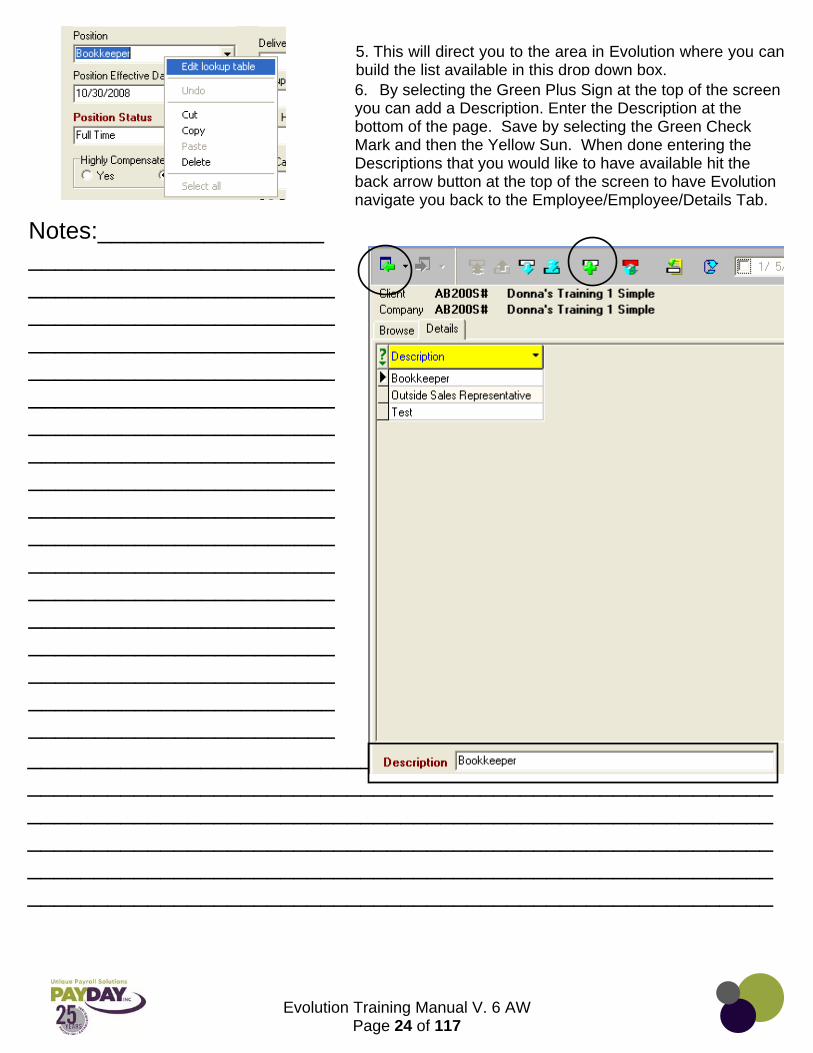
4. To build the list that is available in the drop down box under Position right click over the position column. Select the Edit Lookup Table from the box.
3. Keep track of your employee’s Position. The Effective Date of that employee starting in that Position. Also keep track of if the employee’s Position Status.
Notes:___________________________________________________________________________________________________________________________________________________________________________________________________________________________________________________________________________________________________________________________________________________________________________________________________________________________________________________
Evolution Training Manual V. 6 AW
Page 24 of 117
________________________________________________________________________________________________________________________________________________________________________________________________________________________________________________________________________________________________________________________________________________
5. This will direct you to the area in Evolution where you can build the list available in this drop down box.6. By selecting the Green Plus Sign at the top of the screen you can add a Description. Enter the Description at the bottom of the page. Save by selecting the Green Check Mark and then the Yellow Sun. When done entering the Descriptions that you would like to have available hit the back arrow button at the top of the screen to have Evolution navigate you back to the Employee/Employee/Details Tab.
Notes:_______________________________________________________________________________________________________________________________________________________________________________________________________________________________________________________________________________________________________________________________________________________________________________________________________________________________________________
Evolution Training Manual V. 6 AW
Page 25 of 117
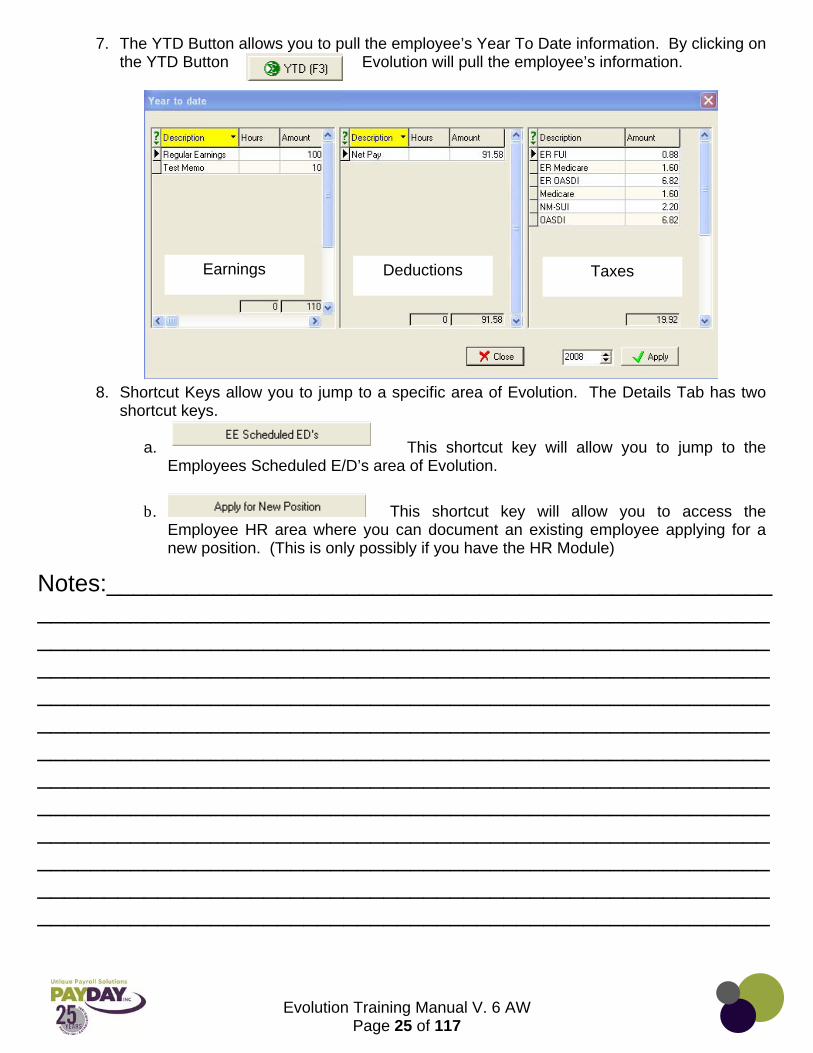
7. The YTD Button allows you to pull the employee’s Year To Date information. By clicking on
the YTD Button Evolution will pull the employee’s information.
8. Shortcut Keys allow you to jump to a specific area of Evolution. The Details Tab has two shortcut keys.
a. This shortcut key will allow you to jump to the
Employees Scheduled E/D’s area of Evolution.
b. This shortcut key will allow you to access the Employee HR area where you can document an existing employee applying for a new position. (This is only possibly if you have the HR Module)
Earnings Deductions Taxes
Notes:______________________________________________________________________________________________________________________________________________________________________________________________________________________________________________________________________________________________________________________________________________________________________________________________________________________________________________________________________________________________________________________________________________________________________________________________________________________________________________________________________________________________________________________________________

Evolution Training Manual V. 6 AW
Page 26 of 117
Address Tab
1. In the Address Tab the required Red Bold areas default with what is entered in the EE Entry Tab.
2. The Alternate Address area allows you to keep more than one address in the system. 3. This area also allows space for extra phone numbers
4. Employee’s that are having their vouchers emailed to them must have Direct Deposit that is
not in pre-note on their account. a. Enter the employee’s email address (this is where the voucher will be emailed) enter
the VMR Password (this will be what the employee must enter to be able to view the check voucher ~ this is usually the last four digits of the employee’s social)
b. Make sure that you let your CSR know that you set up an employee to receive their check through email. The CSR has a final step that they must do to make this process work properly.
c. Note!!! If an employee needs to receive a paper check you will need to notify your CSR so that they can make a change in Evolution so that this will happen.
5. If you are using our Self Serve service you will enter the employee’s User Name and Password in the Self Serve box.
Evolution Training Manual V. 6 AW
Page 27 of 117
W-2 Tab
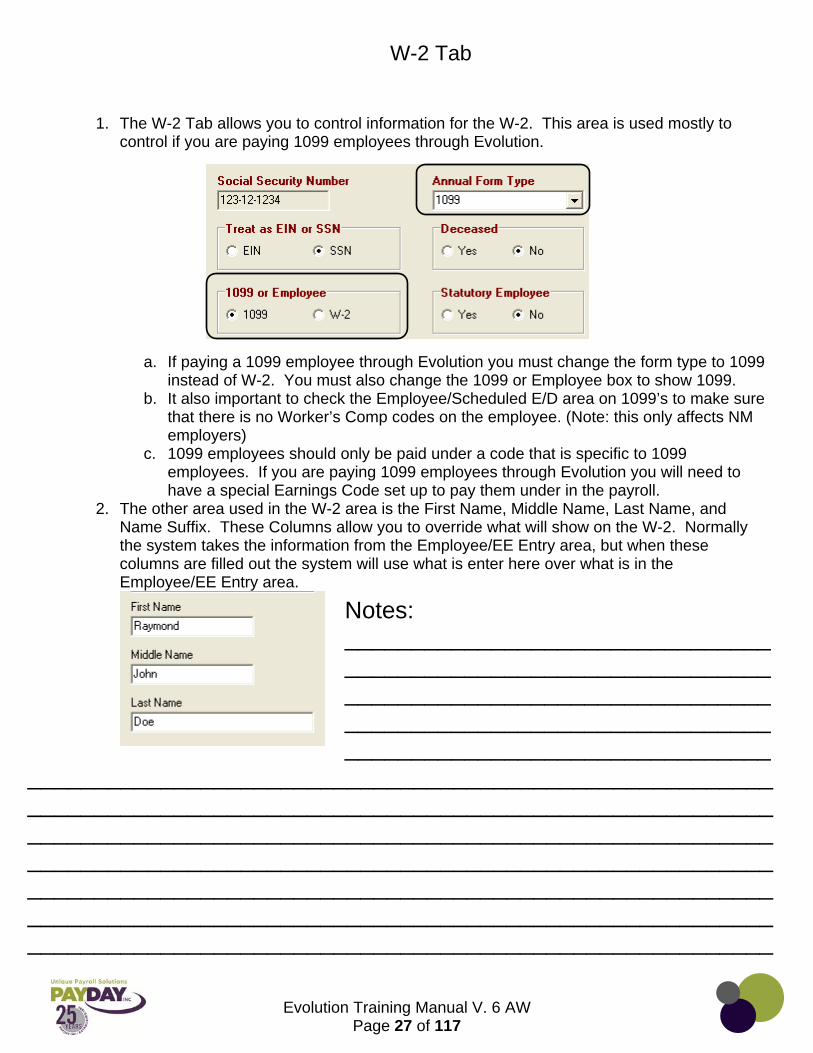
1. The W-2 Tab allows you to control information for the W-2. This area is used mostly to control if you are paying 1099 employees through Evolution.
a. If paying a 1099 employee through Evolution you must change the form type to 1099 instead of W-2. You must also change the 1099 or Employee box to show 1099.
b. It also important to check the Employee/Scheduled E/D area on 1099’s to make sure that there is no Worker’s Comp codes on the employee. (Note: this only affects NM employers)
c. 1099 employees should only be paid under a code that is specific to 1099 employees. If you are paying 1099 employees through Evolution you will need to have a special Earnings Code set up to pay them under in the payroll.
2. The other area used in the W-2 area is the First Name, Middle Name, Last Name, and Name Suffix. These Columns allow you to override what will show on the W-2. Normally the system takes the information from the Employee/EE Entry area, but when these columns are filled out the system will use what is enter here over what is in the Employee/EE Entry area.
Notes: ________________________________________________________________________________________________________________________________________________________________
________________________________________________________________________________________________________________________________________________________________________ ________________________________________________________________________________________________________________________________________________________________________________________________________________________________
Evolution Training Manual V. 6 AW
Page 28 of 117
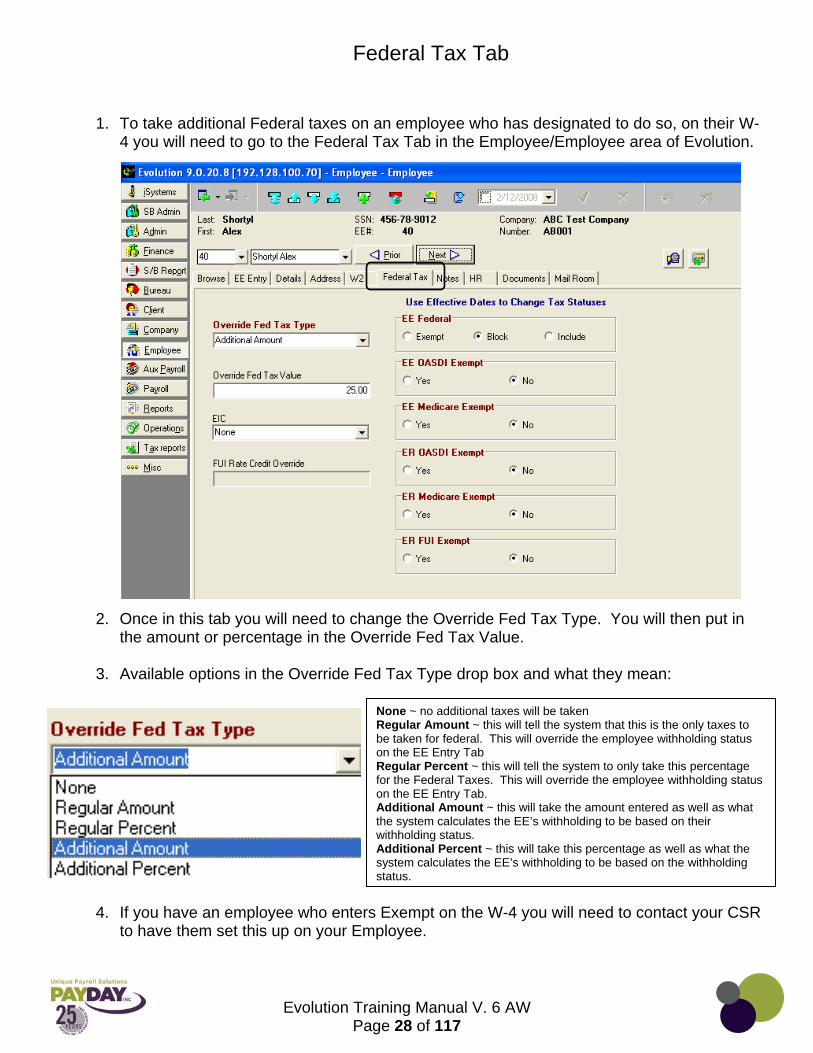
Federal Tax Tab
1. To take additional Federal taxes on an employee who has designated to do so, on their W-4 you will need to go to the Federal Tax Tab in the Employee/Employee area of Evolution.
2. Once in this tab you will need to change the Override Fed Tax Type. You will then put in
the amount or percentage in the Override Fed Tax Value. 3. Available options in the Override Fed Tax Type drop box and what they mean: 4. If you have an employee who enters Exempt on the W-4 you will need to contact your CSR
to have them set this up on your Employee.
None ~ no additional taxes will be taken Regular Amount ~ this will tell the system that this is the only taxes to be taken for federal. This will override the employee withholding status on the EE Entry Tab Regular Percent ~ this will tell the system to only take this percentage for the Federal Taxes. This will override the employee withholding status on the EE Entry Tab. Additional Amount ~ this will take the amount entered as well as what the system calculates the EE’s withholding to be based on their withholding status. Additional Percent ~ this will take this percentage as well as what the system calculates the EE’s withholding to be based on the withholding status.

Evolution Training Manual V. 6 AW
Page 29 of 117
Notes Tab
1. The notes area in the Employee/ Employee/ Notes Tab: will allow you to keep notes on your employee’s.
a. The Payroll Notes will show in the payroll as a reminder of something that needs to be done for this employee in the payroll.
b. The General Notes gives you a place to keep notes on this employee. These notes will only show in this area.
Notes: ________________________________________________________________________________________________________________________________________________________________________________________________________________________________________________________________________________________________________________________________________________________________________________________________________________________________________________________________________________________________________________________________________________________________________________
Evolution Training Manual V. 6 AW
Page 30 of 117
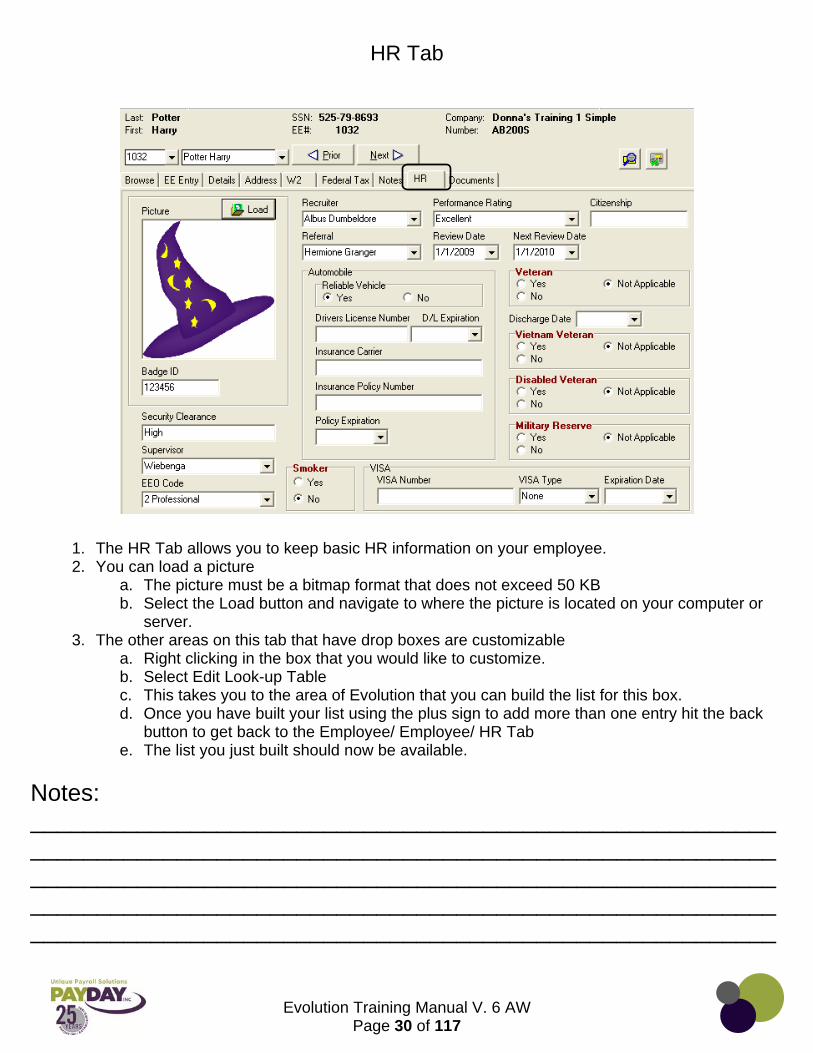
HR Tab
1. The HR Tab allows you to keep basic HR information on your employee. 2. You can load a picture
a. The picture must be a bitmap format that does not exceed 50 KB b. Select the Load button and navigate to where the picture is located on your computer or
server. 3. The other areas on this tab that have drop boxes are customizable
a. Right clicking in the box that you would like to customize. b. Select Edit Look-up Table c. This takes you to the area of Evolution that you can build the list for this box. d. Once you have built your list using the plus sign to add more than one entry hit the back
button to get back to the Employee/ Employee/ HR Tab e. The list you just built should now be available.
Notes: ________________________________________________________________________________________________________________________________________________________________________________________________________________________________________________________________________________________

Evolution Training Manual V. 6 AW
Page 31 of 117
Tracking Workers Comp in Evolution
1. There are two ways that Evolution allows tracking of Workers Comp. a. The first option is from the Employee/ Employee/ EE Entry Tab. b. Tracking can be done from the drop down box Default WC.
c. The second option is for the workers comp code to be attach to a DBDT. This would allow that when you select an employee’s home department in the Employee/Employee/ EE Entry area that the Default WC would be selected based on the home department that was selected.
2. Workers Comp can also be changed on the check lines of a payroll. This allows tracking if an employee works in different jobs that need to be coded under different workers comp codes.
Notes:___________________________________________________________________________________________________________________________________________________________________________________________________________________________________________________________________________________________________________________________________________________________________________________________________________________________________________________________________________________________________________________
Evolution Training Manual V. 6 AW
Page 32 of 117
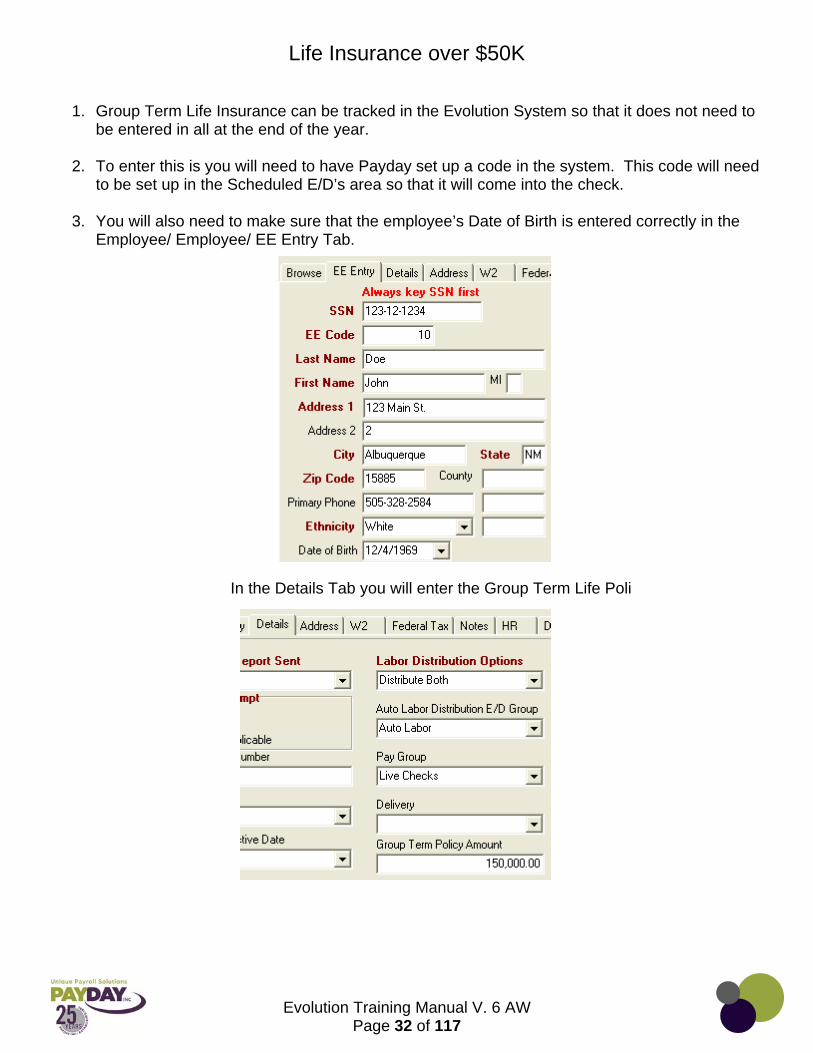
Life Insurance over $50K
1. Group Term Life Insurance can be tracked in the Evolution System so that it does not need to be entered in all at the end of the year.
2. To enter this is you will need to have Payday set up a code in the system. This code will need
to be set up in the Scheduled E/D’s area so that it will come into the check.
3. You will also need to make sure that the employee’s Date of Birth is entered correctly in the Employee/ Employee/ EE Entry Tab.
In the Details Tab you will enter the Group Term Life Poli
Evolution Training Manual V. 6 AW
Page 33 of 117
Employee/ Pay rate Info
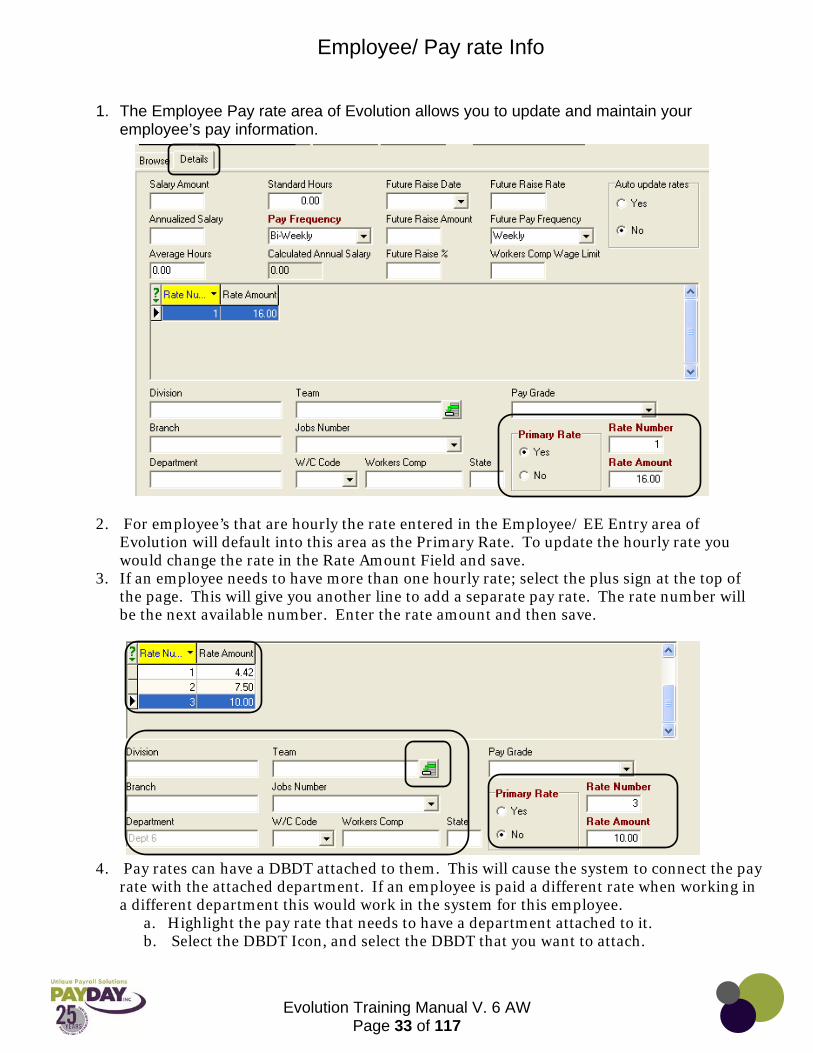
1. The Employee Pay rate area of Evolution allows you to update and maintain your employee’s pay information.
2. For employee’s that are hourly the rate entered in the Employee/ EE Entry area of Evolution will default into this area as the Primary Rate. To update the hourly rate you would change the rate in the Rate Amount Field and save.
3. If an employee needs to have more than one hourly rate; select the plus sign at the top of the page. This will give you another line to add a separate pay rate. The rate number will be the next available number. Enter the rate amount and then save.
4. Pay rates can have a DBDT attached to them. This will cause the system to connect the pay rate with the attached department. If an employee is paid a different rate when working in a different department this would work in the system for this employee.
a. Highlight the pay rate that needs to have a department attached to it. b. Select the DBDT Icon, and select the DBDT that you want to attach.
Evolution Training Manual V. 6 AW
Page 34 of 117
________________________________________________________________________________________________________________________________________________________________________________________________________________________________________________________________________________________________________________________________________________________________________________________________________________________________________________________________________________________________________________________________________________________________________________________________________________________________________________________________________________________________________________________________________________________________________________________________________________________________________________________________________________________________________________________________________________________________________________________________________________________________________________________________________________________________________________________________________________________________________________________________________________________________________________________________________________________________________________________________________________________________________________________________________________________________________________________________________________________________________________________________________________________________________
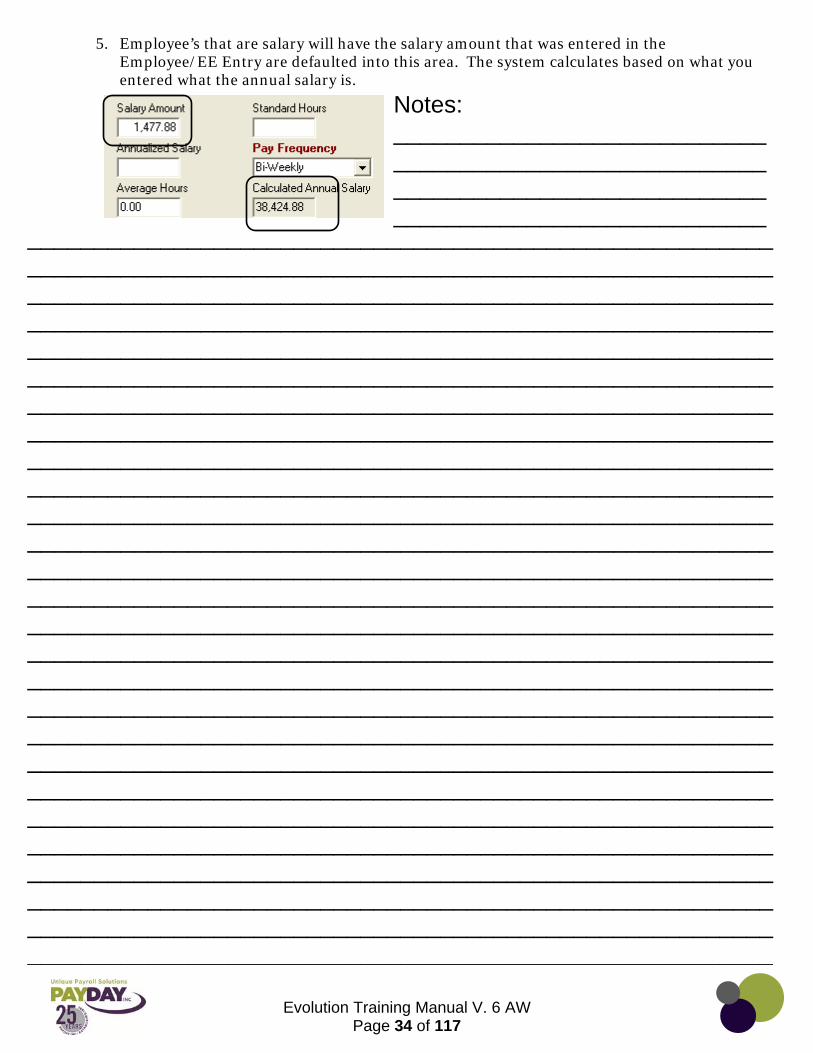
5. Employee’s that are salary will have the salary amount that was entered in the
Employee/EE Entry are defaulted into this area. The system calculates based on what you entered what the annual salary is.
Notes: ________________________________________________________________________________________________________________

Evolution Training Manual V. 6 AW
Page 35 of 117
Employee/ States
1. The Employee/ States area of Evolution will allow you to change the State on an employee a. First you will need to make sure that the state is setup and available b. Go to Employee/ States c. Select the employee that you need to change the state on d. Select the plus sign from the details tab.
e. In the State, SDI, and SUI drop boxes select the State that the employee is being changed to.
f. Select the Marital Status for the new state. Enter the Withholding Allowances Amount for the new state as well.
g. Save with the green check mark and yellow sun. h. Change the Home State at the top of the Details Tab.
i. To affect an employee’s state withholding go to Employee Side Button/States Sub-Folder/Tax Overrides Tab. You will be able to affect the employee’s state withholding by selecting the Override State Tax Type. Enter the amount or percentage in the override state tax value.
Evolution Training Manual V. 6 AW
Page 36 of 117
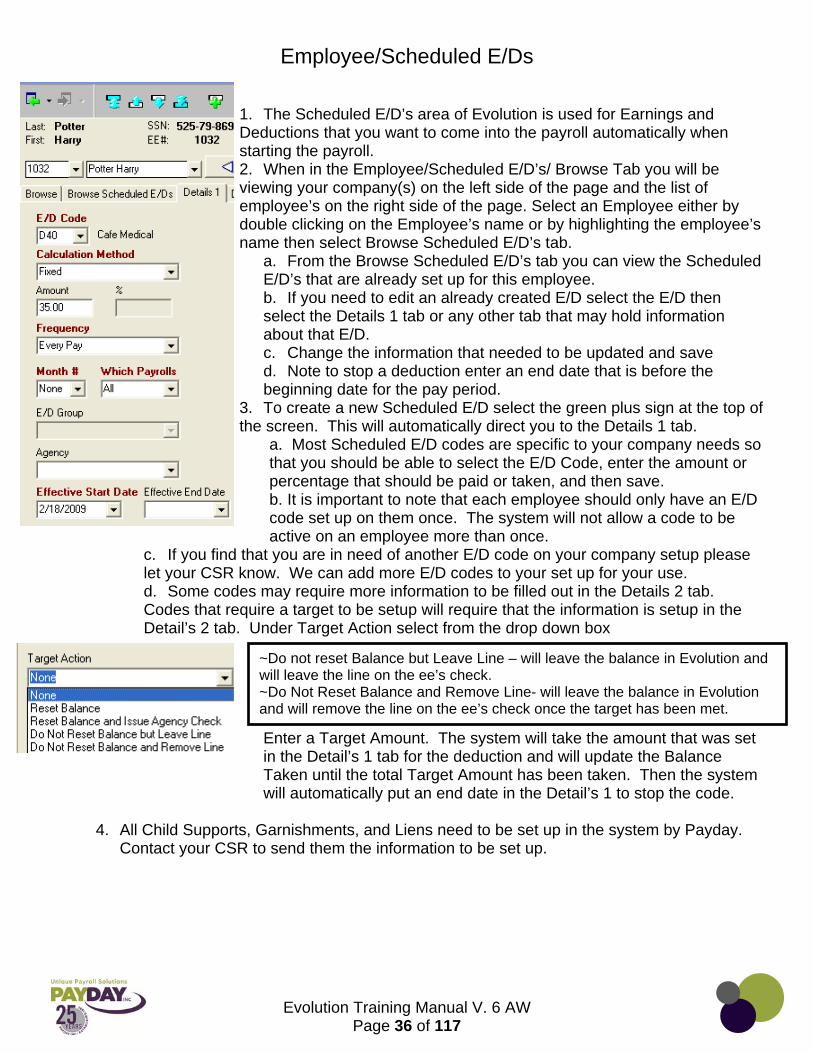
Employee/Scheduled E/Ds
1. The Scheduled E/D’s area of Evolution is used for Earnings and Deductions that you want to come into the payroll automatically when starting the payroll. 2. When in the Employee/Scheduled E/D’s/ Browse Tab you will be viewing your company(s) on the left side of the page and the list of employee’s on the right side of the page. Select an Employee either by double clicking on the Employee’s name or by highlighting the employee’s name then select Browse Scheduled E/D’s tab.
a. From the Browse Scheduled E/D’s tab you can view the Scheduled E/D’s that are already set up for this employee. b. If you need to edit an already created E/D select the E/D then select the Details 1 tab or any other tab that may hold information about that E/D. c. Change the information that needed to be updated and save d. Note to stop a deduction enter an end date that is before the beginning date for the pay period.
3. To create a new Scheduled E/D select the green plus sign at the top of the screen. This will automatically direct you to the Details 1 tab.
a. Most Scheduled E/D codes are specific to your company needs so that you should be able to select the E/D Code, enter the amount or percentage that should be paid or taken, and then save. b. It is important to note that each employee should only have an E/D code set up on them once. The system will not allow a code to be active on an employee more than once.
c. If you find that you are in need of another E/D code on your company setup please let your CSR know. We can add more E/D codes to your set up for your use. d. Some codes may require more information to be filled out in the Details 2 tab. Codes that require a target to be setup will require that the information is setup in the Detail’s 2 tab. Under Target Action select from the drop down box
Enter a Target Amount. The system will take the amount that was set in the Detail’s 1 tab for the deduction and will update the Balance Taken until the total Target Amount has been taken. Then the system will automatically put an end date in the Detail’s 1 to stop the code.
4. All Child Supports, Garnishments, and Liens need to be set up in the system by Payday. Contact your CSR to send them the information to be set up.
~Do not reset Balance but Leave Line – will leave the balance in Evolution and will leave the line on the ee’s check. ~Do Not Reset Balance and Remove Line- will leave the balance in Evolution and will remove the line on the ee’s check once the target has been met.
Evolution Training Manual V. 6 AW
Page 37 of 117
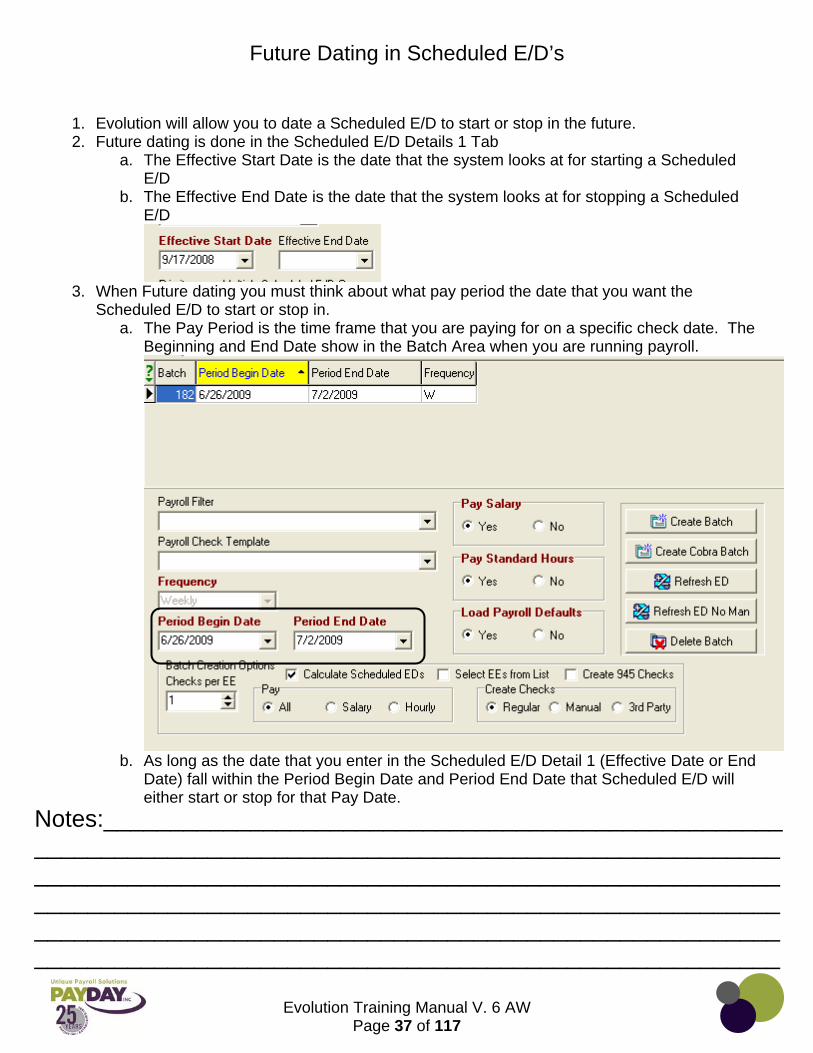
Future Dating in Scheduled E/D’s
1. Evolution will allow you to date a Scheduled E/D to start or stop in the future. 2. Future dating is done in the Scheduled E/D Details 1 Tab
a. The Effective Start Date is the date that the system looks at for starting a Scheduled E/D
b. The Effective End Date is the date that the system looks at for stopping a Scheduled E/D
3. When Future dating you must think about what pay period the date that you want the
Scheduled E/D to start or stop in. a. The Pay Period is the time frame that you are paying for on a specific check date. The
Beginning and End Date show in the Batch Area when you are running payroll.
b. As long as the date that you enter in the Scheduled E/D Detail 1 (Effective Date or End
Date) fall within the Period Begin Date and Period End Date that Scheduled E/D will either start or stop for that Pay Date.
Notes:___________________________________________________________________________________________________________________________________________________________________________________________________________________________________________________________________________________________________________________________________________

Evolution Training Manual V. 6 AW
Page 38 of 117
Mass Updates in the Scheduled E/D Area
1. In the Employee Scheduled E/D Area of Evolution select an employee from the Browse Tab who needs to have an E/D updated.
2. Select the Browse Scheduled E/D’s Tab 3. Select the E/D that needs to be updated 4. Right click and select the Action that you would like to perform.
a. Copy i. Select the Employee’s that you would
like to copy this E/D onto. ii. Say Yes to overwrite existing enteries iii. This will only work if the EE’s that are
selected do not have this E/D setup on them
iv. This is best used when you are setting up a completely new E/D
b. Update E/D’s i. Select the Employee’s that you would like to have the E/D selected updated on
them as well. ii. This is best used on E/D’s that already are setup on Employee’s that need to be
updated. c. Update Fields
i. This function allows you to update the E/D that you are on right now. This will give you a Choose fields to update pop up screen. Select the fields that you want to update.
ii. Select the update button at the bottom of the box.
iii. Select the Employee’s that you would like to update these fields on.
1. If you are updating on more than one Employee select the Ctrl key on your keyboard to select more than one name.
2. If you are selecting all select the first name in the list hold down your Shift key on your keyboard then select the last name in the list. This will select all of the names.
Notes:___________________________________________________________________________________________________________________________________________________________________________________________________________________________________________________________________________________

Evolution Training Manual V. 6 AW
Page 39 of 117
3. Select the Copy Selected Button
iv. A message box will pop up Select Yes
d. Update Amount/ Percentage i. This will give you a pop up box that will allow you to change the amount or
percentage on this E/D. ii. Enter the new amount of percentage iii. Select the update button.
iv. You will be prompted to select the Employee’s that need to be updated. v. Select Employee’s vi. Select copy Selected vii. Say yes to the message to overwrite existing entries.

Evolution Training Manual V. 6 AW
Page 40 of 117
Client Benefits
1. The Client Benefits area allows for a Scheduled E/D to be updated to affect everyone who has that specific setup of that Scheduled E/D
2. Go to the Client Button and then the Benefits Subfolder. 3. From the Browse Tab the Benefits that have been created
can be seen. 4. To add a new Benefit hit the Green plus sign at the top of the page. Fill out the Details Tab and
% and Amounts Tab 5. To update an already created Benefit select the Benefit from the right column. Then select the
Details Tab. 6. From the Details Tab you can update the information for the Benefit. 7. There is further information that can be updated for each level of the Benefit under the % and
Amounts Tab.
8. By selecting the Rate Description you can update the Amounts that will Globally affect everyone who has that Rate set up on the Employee File.
9. To add a new Rate Description select the plus at the lower right part of the page. 10. In the Employee/ Scheduled E/D’s you would follow normal procedure. Select the green plus
at the top of the page to create the scheduled E/D. 11. From the Details 1 Tab select the E/D Code. 12. Select the Benefit Reference from the middle of the page 13. Select the Benefit Amount Type. 14. The Calculation Method and Amount will gray out because you will control this from the Client
Benefit area. 15. If you have the HR Module portion of
Evolution you can control the Benefit Reference by selecting from the drop down box with the plus sign beside it. This are allows you to reference the HR Module information, which is connected to the Client Benefit Area
Evolution Training Manual V. 6 AW
Page 41 of 117
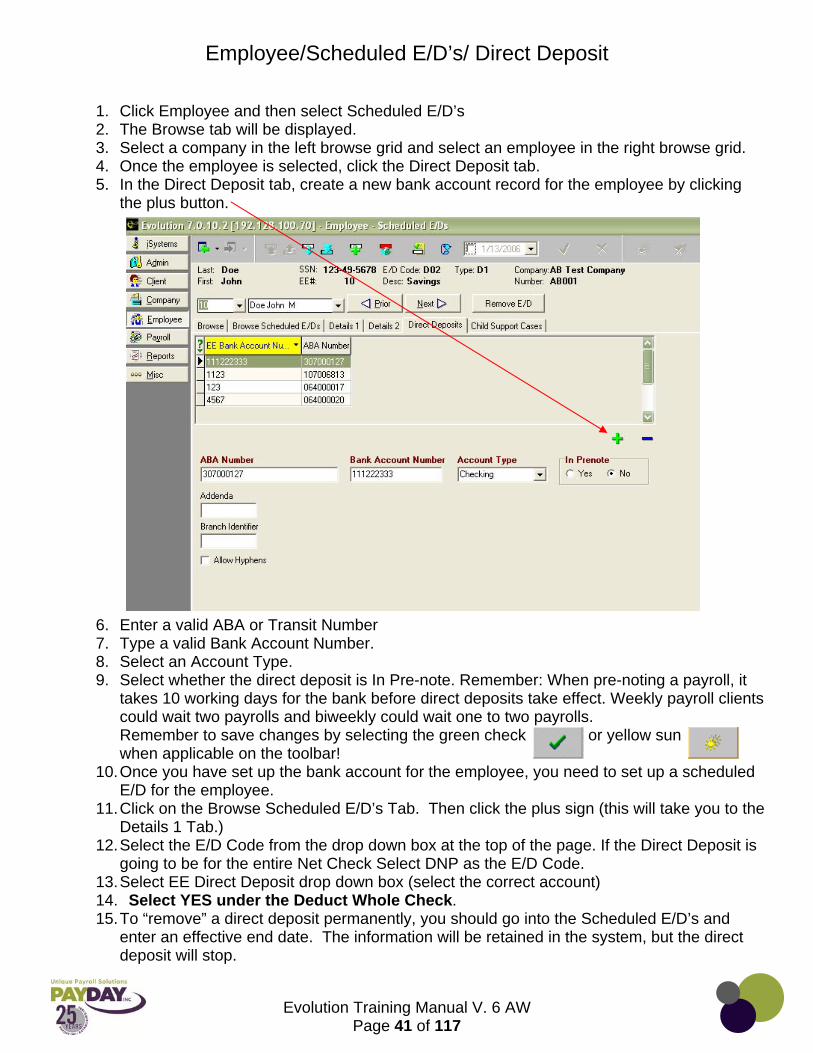
Employee/Scheduled E/D’s/ Direct Deposit
1. Click Employee and then select Scheduled E/D’s 2. The Browse tab will be displayed. 3. Select a company in the left browse grid and select an employee in the right browse grid. 4. Once the employee is selected, click the Direct Deposit tab. 5. In the Direct Deposit tab, create a new bank account record for the employee by clicking
the plus button.
6. Enter a valid ABA or Transit Number 7. Type a valid Bank Account Number. 8. Select an Account Type. 9. Select whether the direct deposit is In Pre-note. Remember: When pre-noting a payroll, it
takes 10 working days for the bank before direct deposits take effect. Weekly payroll clients could wait two payrolls and biweekly could wait one to two payrolls. Remember to save changes by selecting the green check or yellow sun when applicable on the toolbar!
10. Once you have set up the bank account for the employee, you need to set up a scheduled E/D for the employee.
11. Click on the Browse Scheduled E/D’s Tab. Then click the plus sign (this will take you to the Details 1 Tab.)
12. Select the E/D Code from the drop down box at the top of the page. If the Direct Deposit is going to be for the entire Net Check Select DNP as the E/D Code.
13. Select EE Direct Deposit drop down box (select the correct account) 14. Select YES under the Deduct Whole Check. 15. To “remove” a direct deposit permanently, you should go into the Scheduled E/D’s and
enter an effective end date. The information will be retained in the system, but the direct deposit will stop.
Evolution Training Manual V. 6 AW
Page 42 of 117
Direct Deposit
At a Glance Creating Direct Deposit
1. Employee Button 2. Scheduled E/D’s 3. Select Employee the Direct Deposit need to be added to. 4. Select Direct Deposit Tab 5. Click green plus sign at middle right of pg. 6. Enter account information 7. Select green check mark & yellow sun. 8. Select Browse Scheduled E/D’s 9. Click green plus sign (create new record) 10. Select Direct Deposit Deduction Code 11. Select EE Direct Deposit drop down box (select the account) 12. Select Yes under Deduct Whole Check 13. Save by selecting green check mark & yellow sun.
Creating Multiple Account Direct Deposit
1. Employee Button 2. Scheduled E/D’s 3. Select Employee the Direct Deposit need to be added to. 4. Select Direct Deposit Tab 5. Click green plus sign at middle right of pg. 6. Enter account information 7. Select green check mark & yellow sun. 8. Select Browse Scheduled E/D’s 9. Click green plus sign (create new record) 10. Select Direct Deposit Deduction Code 11. Select EE Direct Deposit drop down box (select the account) 12. Select Yes under Deduct Whole Check 13. Save by selecting green check mark & yellow sun. 14. Select Direct Deposit Tab 15. Click green plus sign at middle right of pg. 16. Enter account information 17. Select green check mark & yellow sun 18. Select Browse Scheduled E/D’s 19. Click green plus sign (create a new record) 20. Select direct deposit deduction code (cannot be the same code as the other direct
deposit account) 21. Select EE Direct Deposit drop down box (select account) 22. Select either fixed or % under calculation method 23. Enter either amount or % to be put in the account under amount or % 24. Save by selecting green check mark and yellow sun.
Evolution Training Manual V. 6 AW
Page 43 of 117
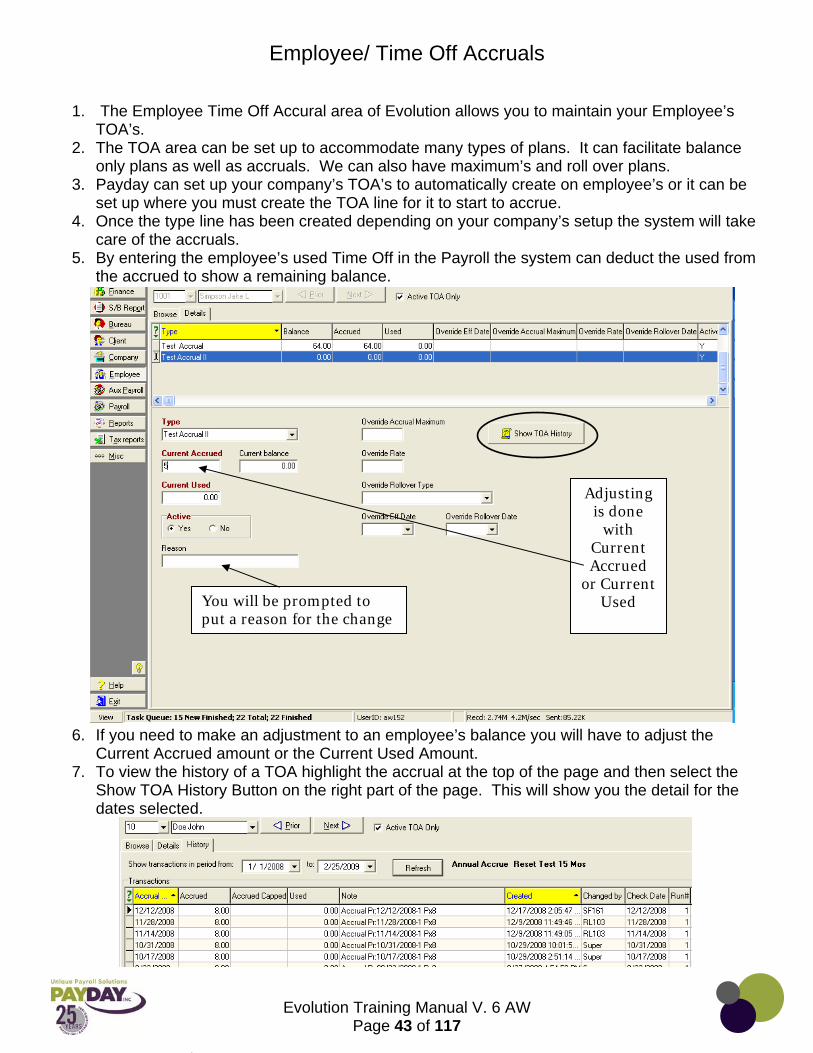
Employee/ Time Off Accruals
1. The Employee Time Off Accural area of Evolution allows you to maintain your Employee’s TOA’s.
2. The TOA area can be set up to accommodate many types of plans. It can facilitate balance only plans as well as accruals. We can also have maximum’s and roll over plans.
3. Payday can set up your company’s TOA’s to automatically create on employee’s or it can be set up where you must create the TOA line for it to start to accrue.
4. Once the type line has been created depending on your company’s setup the system will take care of the accruals.
5. By entering the employee’s used Time Off in the Payroll the system can deduct the used from the accrued to show a remaining balance.
6. If you need to make an adjustment to an employee’s balance you will have to adjust the Current Accrued amount or the Current Used Amount.
7. To view the history of a TOA highlight the accrual at the top of the page and then select the Show TOA History Button on the right part of the page. This will show you the detail for the dates selected.
Adjusting is done
with Current Accrued
or Current Used You will be prompted to
put a reason for the change

Evolution Training Manual V. 6 AW
Page 44 of 117
Employee/ Auto Labor Distribution
1. Auto Labor Distribution is an area in Evolution that will allow you to Distribute an Employee’s wages. It is important that this is going to be the break out for that employee’s wages every time, and that 100% of the wages are broken out.
2. If you do not already have an E/D Group set up for Auto Labor Distribution you will need to contact your CSR to get this set up.
3. To set up on an employee Select the Employee button, then the Auto labor distribution Subfolder.
4. Select the E/D Group from the top of the page. 5. Select the Division Code 6. Enter the percentage of wages that go to this Division Code. 7. Save 8. Hit the plus sign to add another division code 9. Repeat steps until 100% of the wages have been assigned.
Notes: ______________________________________________________________________________________________________________________________________________________________________________________________________________________________________________________________________________________________________________________________________________________

Evolution Training Manual V. 6 AW
Page 45 of 117
Employee/ Additional Info
1. This area of Evolution gives you a place to keep any additional information on your employee’s.
2. To access this area go to the Employee button then the Additional Info subfolder
3. To build the list that is available in the drop down box under Field right click over the Field then select the Edit lookup table.
4. The system will direct you to the area of Evolution where the list for this Field is kept. 5. To add to the list hit the green plus sign at the top of the page and add the information you
want to be available in the Name and Value columns. 6. Hit the back button at the top of the page to be directed back to the Employee/ Additional Info
area. 7. The information you have added to the list will be available for your use.
…………..
Notes: ____________________________________________________________________________________________________________________________________________________________________________________________________________________________
Evolution Training Manual V. 6 AW
Page 46 of 117
Payroll
Entering Your Payroll Regular No Overrides in Batch pg. 77 Entering Your Payroll Regular pg. 79 Entering Your Payroll Net Clock (Web Clock) pg. 82 Creating a Manual Check pg. 62
Evolution Training Manual V. 6 AW
Page 47 of 117
Payroll/ Company
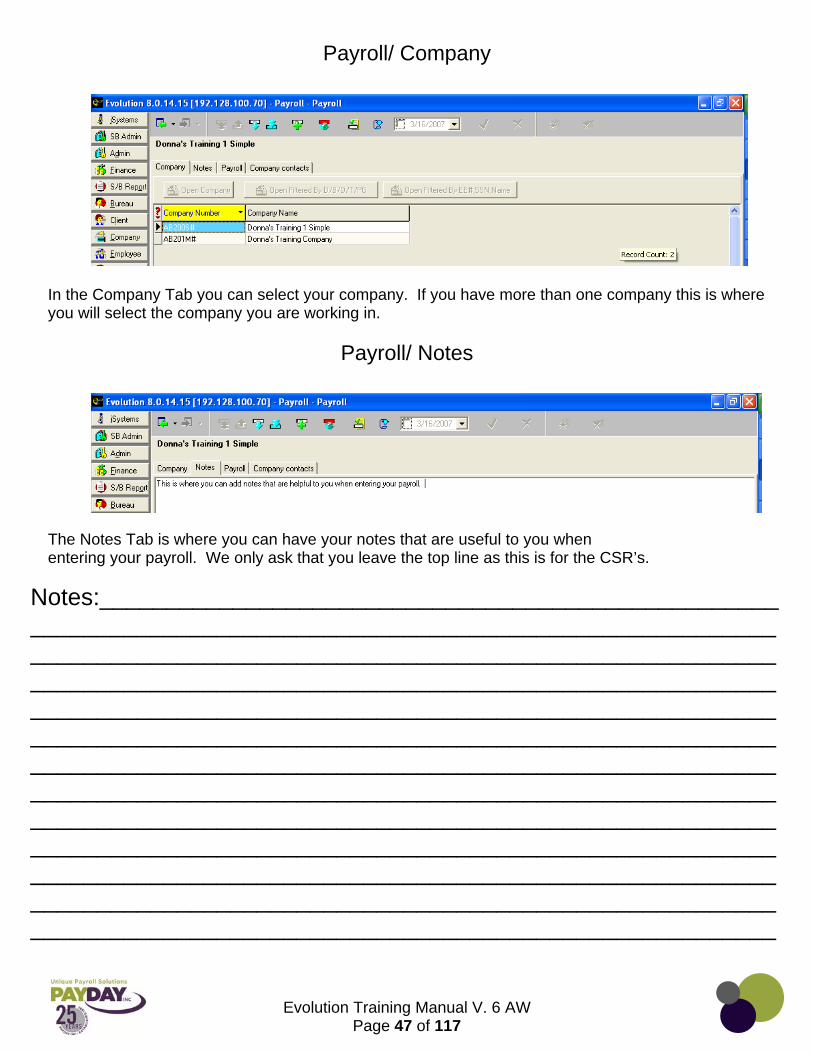
In the Company Tab you can select your company. If you have more than one company this is where you will select the company you are working in.
Payroll/ Notes The Notes Tab is where you can have your notes that are useful to you when entering your payroll. We only ask that you leave the top line as this is for the CSR’s.
Notes:___________________________________________________________________________________________________________________________________________________________________________________________________________________________________________________________________________________________________________________________________________________________________________________________________________________________________________________________________________________________________________________________________________________________________________________________________________________________________________________________________________________________________________________________________________________
Evolution Training Manual V. 6 AW
Page 48 of 117
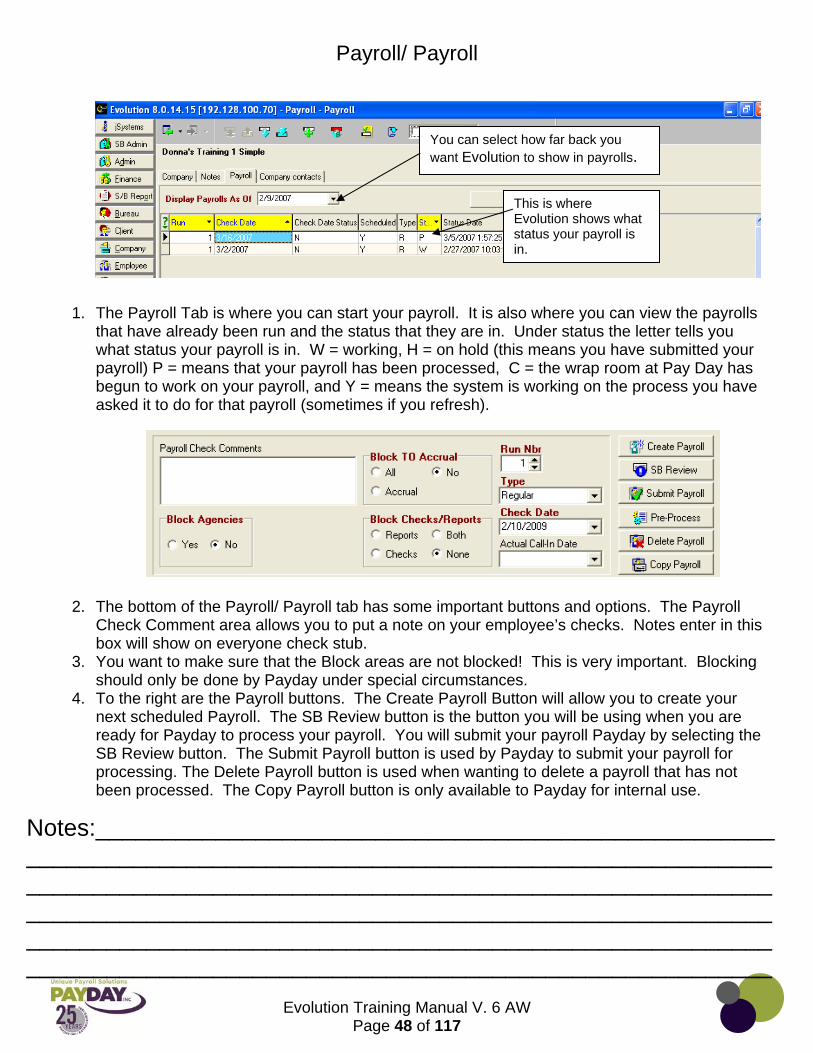
Payroll/ Payroll
1. The Payroll Tab is where you can start your payroll. It is also where you can view the payrolls that have already been run and the status that they are in. Under status the letter tells you what status your payroll is in. W = working, H = on hold (this means you have submitted your payroll) P = means that your payroll has been processed, C = the wrap room at Pay Day has begun to work on your payroll, and Y = means the system is working on the process you have asked it to do for that payroll (sometimes if you refresh).
2. The bottom of the Payroll/ Payroll tab has some important buttons and options. The Payroll Check Comment area allows you to put a note on your employee’s checks. Notes enter in this box will show on everyone check stub.
3. You want to make sure that the Block areas are not blocked! This is very important. Blocking should only be done by Payday under special circumstances.
4. To the right are the Payroll buttons. The Create Payroll Button will allow you to create your next scheduled Payroll. The SB Review button is the button you will be using when you are ready for Payday to process your payroll. You will submit your payroll Payday by selecting the SB Review button. The Submit Payroll button is used by Payday to submit your payroll for processing. The Delete Payroll button is used when wanting to delete a payroll that has not been processed. The Copy Payroll button is only available to Payday for internal use.
This is where Evolution shows what status your payroll is in.
You can select how far back you want Evolution to show in payrolls.
Notes:___________________________________________________________________________________________________________________________________________________________________________________________________________________________________________________________________________________________________________________________________________
Evolution Training Manual V. 6 AW
Page 49 of 117
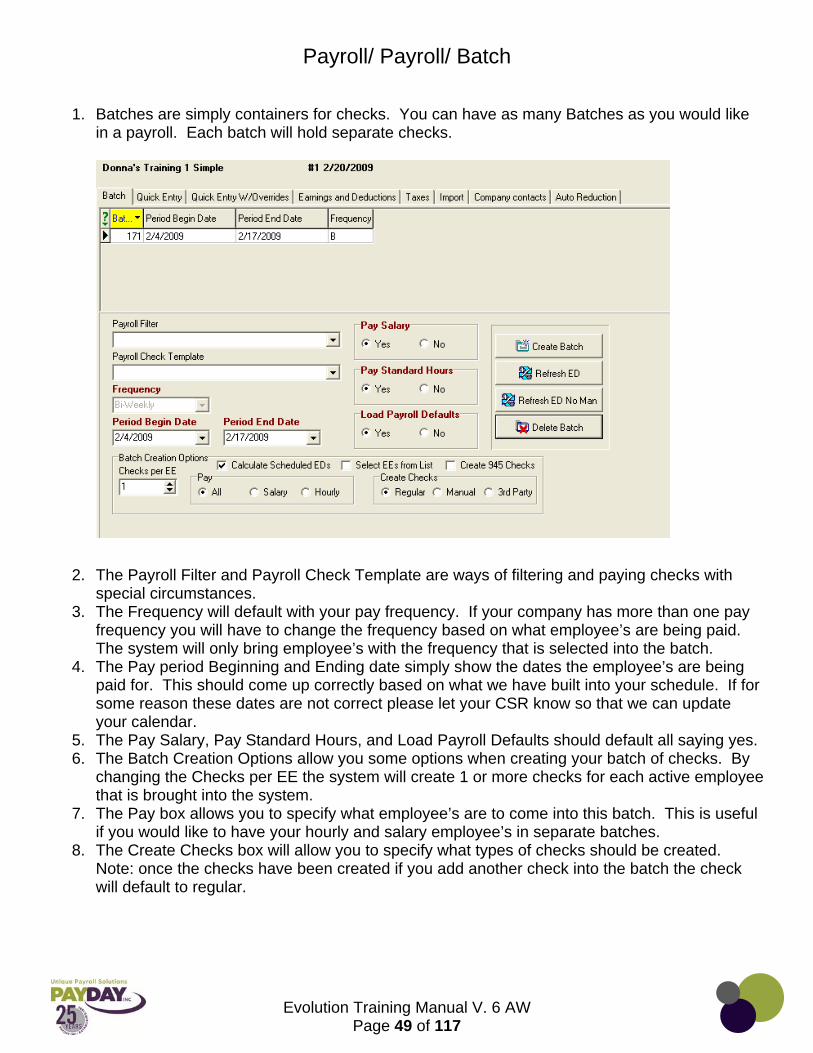
Payroll/ Payroll/ Batch
1. Batches are simply containers for checks. You can have as many Batches as you would like in a payroll. Each batch will hold separate checks.
2. The Payroll Filter and Payroll Check Template are ways of filtering and paying checks with special circumstances.
3. The Frequency will default with your pay frequency. If your company has more than one pay frequency you will have to change the frequency based on what employee’s are being paid. The system will only bring employee’s with the frequency that is selected into the batch.
4. The Pay period Beginning and Ending date simply show the dates the employee’s are being paid for. This should come up correctly based on what we have built into your schedule. If for some reason these dates are not correct please let your CSR know so that we can update your calendar.
5. The Pay Salary, Pay Standard Hours, and Load Payroll Defaults should default all saying yes. 6. The Batch Creation Options allow you some options when creating your batch of checks. By
changing the Checks per EE the system will create 1 or more checks for each active employee that is brought into the system.
7. The Pay box allows you to specify what employee’s are to come into this batch. This is useful if you would like to have your hourly and salary employee’s in separate batches.
8. The Create Checks box will allow you to specify what types of checks should be created. Note: once the checks have been created if you add another check into the batch the check will default to regular.
Evolution Training Manual V. 6 AW
Page 50 of 117
9. You are also given the option of Calculate Scheduled E/D’s, Selecting EE’s from a list, and
Create 945 checks. a. If you are using the Select EE’s from a list you will be prompted do you want to auto
create checks when you save the batch. Say yes to this and the system will give you a pop up box of all employees that have been entered into the system for your company. You can select from the list the employee’s you would like to pay. To select more than one employee use the ctrl button on your key board.
10. The Create Batch button will allow you to create a Batch. 11. The Refresh ED button will refresh all E/D’s in all the checks for the batch that
you select. 12. The Refresh ED No Man will refresh E/D’s in all checks except for Manual
checks. 13. The Delete Batch will allow you to delete the batch that you have selected.
Creating an Additional Batch
1. To create an additional Batch from the Payroll/ Payroll/ Batch Area select the Create Batch button.
a. Select or deselect the items that you would like to be effective for this batch. b. Select the green check mark and yellow sun. The system will prompt you with a pop
up. Do you want to auto create checks? Say yes to this prompt. c. Once the system has created the batch select the quick entry tab or button to view the
checks that you have created.
Notes:___________________________________________________________________________________________________________________________________________________________________________________________________________________________________________________________________________________________________________________________________________________________________________________________________________________________________________________________________________________________________________________________________________________________________________________________________________________________________________________________________________________________________________________________________________________________________________________________________________________________________________________________________________________________________________________________________________

Evolution Training Manual V. 6 AW
Page 51 of 117
Tabs within the Batch
1. The Batch Tab will allow you to view the batches you have created. You can select the batch
that you would like to view from this tab. 2. The Quick Entry Tab allows you to quickly and easily view and enter your payroll information.
a. The Quick Entry Tab allows you to select the E/D’s that you would like to have in a grid format.
b. This area does not show all E/D’s that are on the EE’s checks just the codes you choose to view.
c. Totals are seen at the bottom of the page d. This area allows you to overriding Salaries and Scheduled E/D’s by simply typing in the
new amount from the Quick Entry Tab. 3. The Quick Entry W/ Overrides tab has the same options as the Quick Entry tab, but it also has
some other override options available. a. Options that are available from the check lines can be accessed from here as well.
4. The Earnings and Deductions Tab gives the totals of all of the Earnings and Deductions that are in the payroll as well as a break out of what is on each employee for each E/D.
a. By selecting a specific E/D on the left you can view the detail of what is on each EE on the right.
5. The Taxes tab show the Tax Type and total on the right and then the detail for the specific tax you have highlighted will show on the right.
6. The Import Tab allows you to import a file that is in a format that Evolution recognizes.
Notes:___________________________________________________________________________________________________________________________________________________________________________________________________________________________

Evolution Training Manual V. 6 AW
Page 52 of 117
Payroll/ Quick Entry
1. The Payroll Quick Entry area of Evolution is the area of Evolution that allows you to enter your payroll quickly and easily.
2. The Tab allows you to customize the columns that you are viewing so that you can view the columns that you use to enter hours and earnings for your Employee’s Pay.
3. You can enter any of the Earnings or Deductions that you have set up in your company to show as a column in the Quick Entry Tab.
4. When you first come into the Quick Entry Tab for the very first time the columns showing will be as seen below.
5. The columns default in this manner based on company and based on computer. So, if you have more than one company this will be the default for each company. When you work on more than one computer, each computer defaults to this as well.
6. Once the columns have been set on a specific company and specific computer the columns will show as you have set them on that computer and company the next time you enter into Evolution.
7. To customize the Quick Entry “Grid” with the Columns that you would like to see you right click in the gray area of the “Grid.” Select E/D, Select Add or Delete. This will bring up the available list of E/D’s. Select the E/D you would like to add, then either Hrs. or Amt.
8. Continue to add and delete columns until your “Grid” has all the E/D’s you would like to have. 9. You can size the columns and move the location of the columns as well. Simply grab between
the columns in the header, this will allow you to size the column. To move the columns select the header and drag the E/D to where you would like it to be located.
10. By typing over the amount in a scheduled Earning or Deduction you are overriding what will be paid or deducted for that check. This allows you to make adjustments that will only affect this payroll. The next time you start your payroll the Earning or Deduction would be the normal scheduled amount.
11. Employee’s who have a note entered in the Employee/EE Entry/ Notes Tab/Payroll notes area of evolution will show highlighted in yellow in the Quick Entry Tab. By double clicking on the employee’s name you will be directed to the Payroll/Check area where you can see and change the note on the employee.
12. The Quick Entry Tab gives you totals at the bottom of the page for the columns that you have selected in your “Grid.”
13. It is a good practice to check the Earning and Deductions tab to check your totals because this tab shows you all Earnings and Deductions not just the ones that you have selected to see on the Quick Entry “Grid.”
14. Always have totals from outside of Evolution to check against the totals that you have in your payroll.
Put cursor right here to resize
Drag the E/D to where you would like it to be located.

Evolution Training Manual V. 6 AW
Page 53 of 117
Payroll/ Quick Entry W/ Overrides
1. The Quick Entry w/ Overrides Tab is very similar to the Quick Entry Tab. There are a few extra’s in the Quick Entry w/ Overrides Tab that are not available in the Quick Entry Tab.
2. Employee’s that are paid a Salary will have their name and text in the Salary line show in Red text.
3. You can enter another line for an employee by hitting your insert key on your keyboard. You would then enter the employee’s number under the EE Code Column. If this were going to be a separate check you would enter 2 or 3, etc. in the check # Column.
4. If you are just entering more information for the first check for that employee you would enter check 1 under the check #.
5. The Quick Entry w/ Overrides allows you to enter information that is also available in the check lines. Department Allocations, Job Costing, Certified Payrolls can be keyed from this Tab. To add the needed columns, right click in the gray of the page. You can add or delete Check Line fields and E/D’s
Notes:_______________________________________________________________________________________________________________________________________________________________________________________________________________________________________________________________________________________________________________________________
Evolution Training Manual V. 6 AW
Page 54 of 117
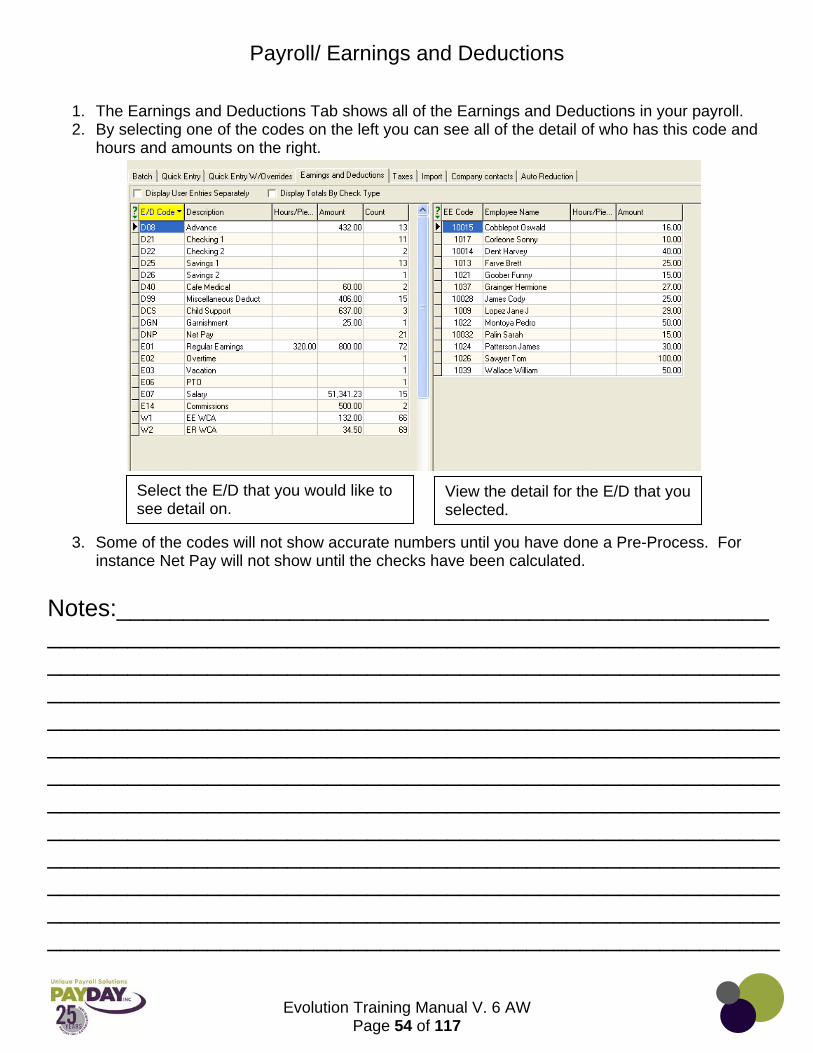
Payroll/ Earnings and Deductions
1. The Earnings and Deductions Tab shows all of the Earnings and Deductions in your payroll. 2. By selecting one of the codes on the left you can see all of the detail of who has this code and
hours and amounts on the right.
3. Some of the codes will not show accurate numbers until you have done a Pre-Process. For
instance Net Pay will not show until the checks have been calculated.
Select the E/D that you would like to see detail on.
View the detail for the E/D that you selected.
Notes:_____________________________________________________________________________________________________________________________________________________________________________________________________________________________________________________________________________________________________________________________________________________________________________________________________________________________________________________________________________________________________________________________________________________________________________________________________________________________________________________________________________________________________________________________________

Evolution Training Manual V. 6 AW
Page 55 of 117
Payroll/ Taxes
1. The Payroll/ Taxes Tab will show you the taxes in your payroll and the detail broken out by employee.
2. You must preprocess before you will see any information in this area. 3. Select the tax that you would like to see detail for on the left. You will see the detail amount for
each employee on the right.
Notes:___________________________________________________________________________________________________________________________________________________________________________________________________________________________________________________________________________________________________________________________________________________________________________________________________________________________________________________________________________________________________________________________________________________________________________________________________________________________________________________________________________________________________________________________________________________________________________________________________________

Evolution Training Manual V. 6 AW
Page 56 of 117
Payroll/ Import
1. The Payroll/ Import tab allows you to import a file that is compatible with Evolution.
2. The source file name allows you to select where on your computer or server to go to get the file to import. By selecting the three dots to the side of the line you can select your file.
3. The exception report file name is where you are telling Evolution to send an error report if any of the information does not come in correctly when importing. You should have a notepad saved somewhere that you can tell Evolution to use to send an error report.
4. The Look EE up by should be by Custom #. If for some reason you have a file that only has names or SSN’s then you would have to use the Name or SSN option.
5. The DBDT match should be on Partial (slower) 6. The File Format should be the type of file you have. If you have a comma delimited file (CSV)
you would select the Comma delimited option. If you have a txt file then you would use the fixed positions.
7. None of the boxes below this should be selected. 8. You select the Import to the Payroll button to import the file. 9. Once the system has imported you will have a yellow sun at the top navigational bar. (This is
how you will know information came in) 10. Before selecting the yellow sun you will want to select the View the report file to see if any
error messages were created. 11. Select the Earnings and Deductions Tab to check your totals. If everything looks ok then you
can select the yellow sun. 12. If you save before you checked your totals and need to start over simply go to the batch and
delete the batch. Then you would re-create your batch and re-import your file.
Notes:____________________________________________________________________________________________________________________________________________________________________________________________________________________________________________________________________________________________________________________________________________________________________________________________
Evolution Training Manual V. 6 AW
Page 57 of 117
Payroll/ Check
1. The Payroll Check area in Payroll is where you can view and enter information on each employee’s check.
2. To get into the employee’s payroll check you will need to start in the Quick Entry Tab. You can either double click on the employee’s name or you can select the check button at the bottom of the page while the employee’s name is highlighted.
3. Once you are in the employee’s payroll check you can select the Batch button at the bottom of the page to get back to the Quick Entry “Grid.”
4. In the employee’s check the check lines that have text in red are the Earnings or Deductions that are Scheduled. (Salary, 401K, Medical, etc.)
5. To add a check line you can either go to the last line and hit your down arrow on your keyboard, or you can hit your insert key on your keyboard.
6. To delete a check line select the line that you need to delete. Hit your ctrl and delete buttons at the same time on your keyboard. The system will prompt you Do you want to delete this check line. You can select yes or no.
7. If you have deleted a scheduled E/D that did not need to be deleted you can either just enter the code back in or you can select the General Tab. Select the Refresh Scheduled E/D’s and the system will put the scheduled E/D’s back into this employee’s check.
8. From a specific employee’s check you can scroll through the list of employee’s checks in the Quick Entry by selecting your plus key on your keyboard(+) to go forward and your star key on your keyboard (*) to go back.
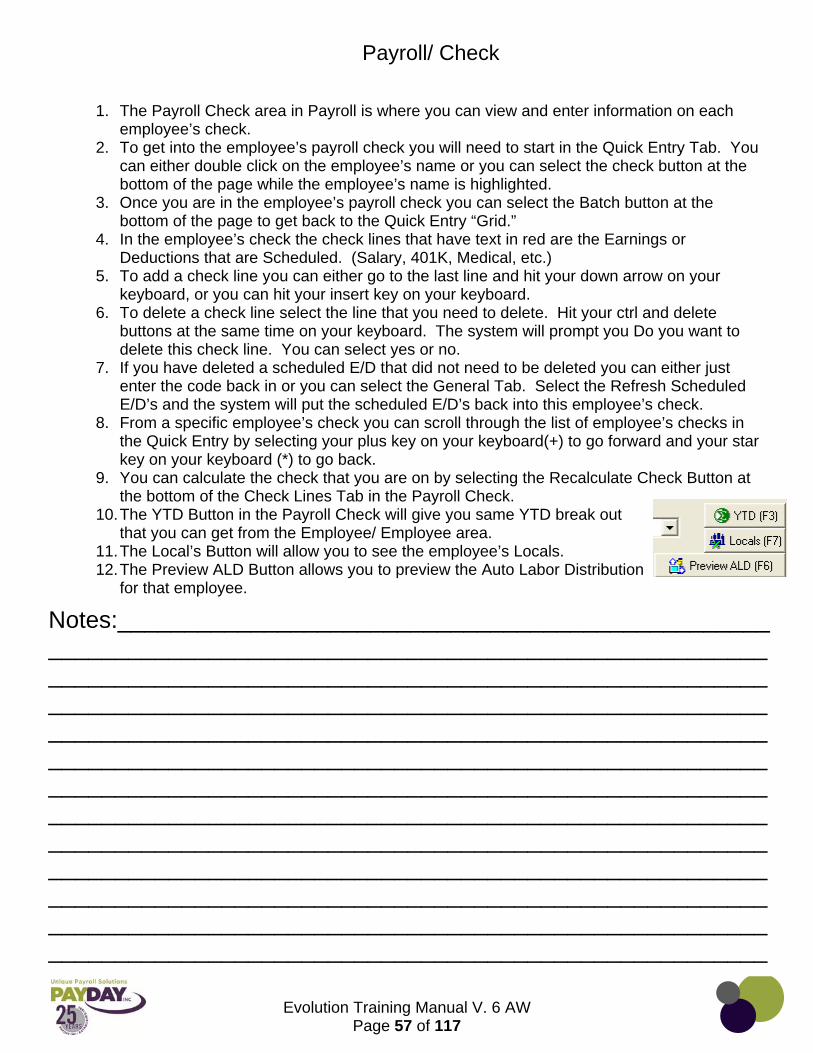
9. You can calculate the check that you are on by selecting the Recalculate Check Button at the bottom of the Check Lines Tab in the Payroll Check.
10. The YTD Button in the Payroll Check will give you same YTD break out that you can get from the Employee/ Employee area.
11. The Local’s Button will allow you to see the employee’s Locals. 12. The Preview ALD Button allows you to preview the Auto Labor Distribution
for that employee.
Notes:_________________________________________________________________________________________________________________________________________________________________________________________________________________________________________________________________________________________________________________________________________________________________________________________________________________________________________________________________________________________________________________________________________________________________________________________________________________________________________________________________________________________________________________________
Evolution Training Manual V. 6 AW
Page 58 of 117
Creating an Additional Check
1. There are a 3 ways to create an additional check for an employee. a. Green Plus sign from the Payroll Check
i. Double click on an employee from the Quick Entry Tab ii. Hit the Green Plus Sign at the top Navigational Bar iii. Select the type of Check you need to create. Select Next iv. Select your employee
1. You can change the top drop down box so that you can select the employee by either
a. EE Code b. EE Name c. SSN
2. Then you can select your employee, Select Next v. If you have any check templates set up that you need to use on this check select
the check template. If not just leave blank, Select Next. vi. Say Yes or No to if you want to pay Salary vii. Say Yes or No to if you want to pay regular hours. This will only affect the check
if you have hours set up in the EE Entry area. viii. The system will create the check.
b. Down Arrow or Insert i. In Quick Entry Tab you can hit your insert key on your keyboard. You could also
go to the bottom of the page and hit your down arrow while on the last person in the “Grid.”
ii. This will give you another line. You will have to select the employee from the EE Code area.
1. This will show you everyone who has ever worked for your company (Active or Inactive)
2. These are in order by EE Code c. Separate Batch
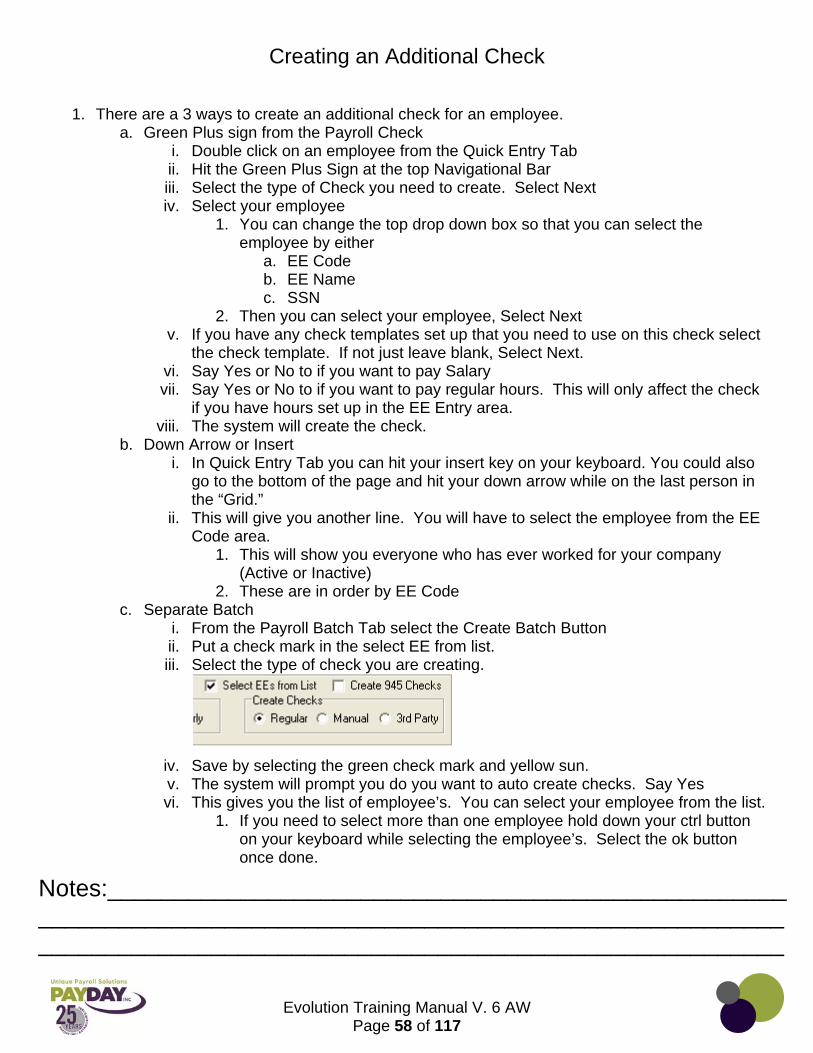
i. From the Payroll Batch Tab select the Create Batch Button ii. Put a check mark in the select EE from list. iii. Select the type of check you are creating.
iv. Save by selecting the green check mark and yellow sun. v. The system will prompt you do you want to auto create checks. Say Yes vi. This gives you the list of employee’s. You can select your employee from the list.
1. If you need to select more than one employee hold down your ctrl button on your keyboard while selecting the employee’s. Select the ok button once done.
Notes:___________________________________________________________________________________________________________________________________________________________________

Evolution Training Manual V. 6 AW
Page 59 of 117
Creating a 3rd Party Sick Check
1. 3rd Party Sick Checks must be entered when you are doing your payroll. 2. From the Payroll Batch area of Evolution Select the Create Batch Button. 3. Put a check mark in the Select EEs from List box. Select 3rd Party from the Create Checks
box. Both of these functions are located at the bottom right of the screen.
4. Select the Green Check mark at the top of the page.
5. A pop up will ask you:
6. Say Yes
7. This will give you the list of Employees. Select the Employee(s) that you need to create 3rd party sick checks for. (To select more than one employee hold your CTRL key on your keyboard down while selecting employees.)
Evolution Training Manual V. 6 AW
Page 60 of 117
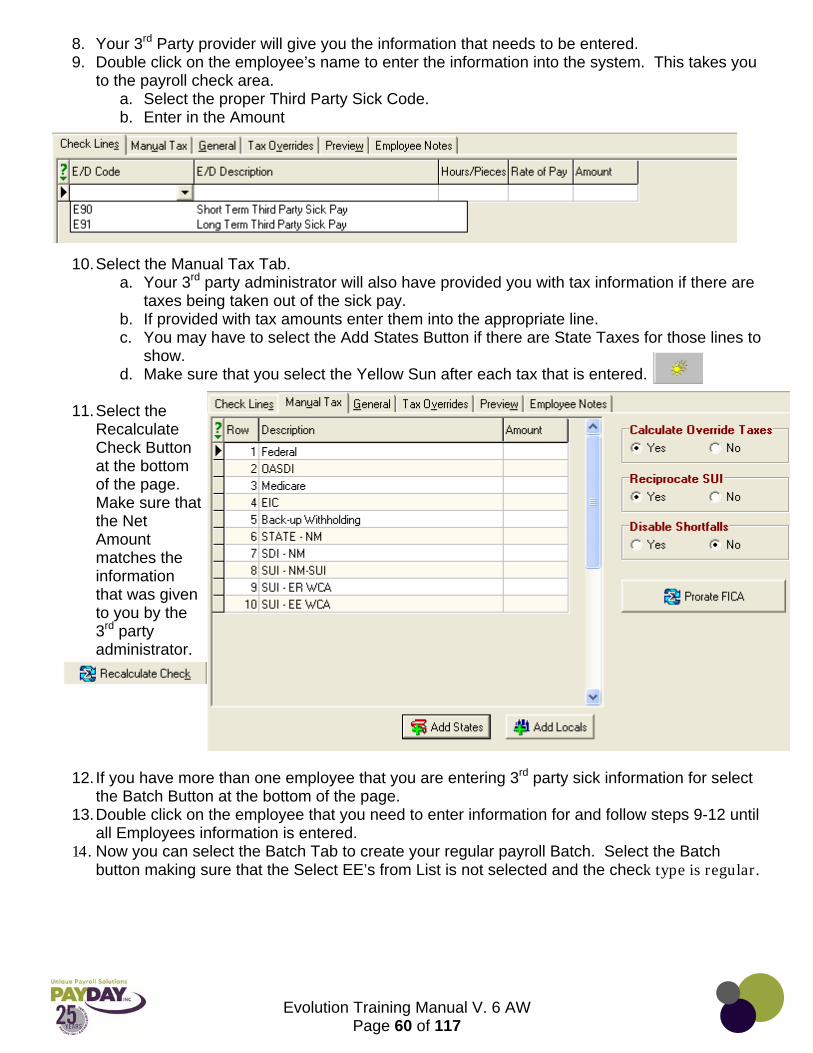
8. Your 3rd Party provider will give you the information that needs to be entered. 9. Double click on the employee’s name to enter the information into the system. This takes you
to the payroll check area. a. Select the proper Third Party Sick Code. b. Enter in the Amount
10. Select the Manual Tax Tab. a. Your 3rd party administrator will also have provided you with tax information if there are
taxes being taken out of the sick pay. b. If provided with tax amounts enter them into the appropriate line. c. You may have to select the Add States Button if there are State Taxes for those lines to
show. d. Make sure that you select the Yellow Sun after each tax that is entered.
11. Select the
Recalculate Check Button at the bottom of the page. Make sure that the Net Amount matches the information that was given to you by the 3rd party administrator.
12. If you have more than one employee that you are entering 3rd party sick information for select the Batch Button at the bottom of the page.
13. Double click on the employee that you need to enter information for and follow steps 9-12 until all Employees information is entered.
14. Now you can select the Batch Tab to create your regular payroll Batch. Select the Batch button making sure that the Select EE’s from List is not selected and the check type is regular.

Evolution Training Manual V. 6 AW
Page 61 of 117
Job Costing
1. Job Costing can be done from the Payroll Check. Your company must have jobs created at an upper level.
2. Double Click on the employee from the Quick Entry Tab 3. Right click in the gray area of the Check Lines to add the Job Column in the Check Lines Tab. 4. Select the Job from the Job Column/ either on the line with the correct E/D code or add a line
(by hitting the down arrow on your keyboard while on the last row) or hit insert on your keyboard and select the correct E/D code.
a. Enter hours and/or earnings
Notes:_______________________________________________________________________________________________________________________________________________________________________________________________________________________________________________________________________________________________________________________________________________________________________________________________________________________________________________________________________________________________________________________________________________________________________________________________________________________________________________________________________________________________________________________________________________________________________________________________________________________________________________________________________________________________________________________________________________________________________________________________________________________________________________________________________________________________________________________________________________________________________________________________________________________________________________________________________________________________________________________________________________

Evolution Training Manual V. 6 AW
Page 62 of 117
Creating a Manual Check
1. To Create a Manual Check in Evolution there are a few ways that you can do this. The first way is by Using the Check Calculator to create a Manual Check a. Tax & Check line Calculator when the Tax & Check line Calculator is selected it takes
you to a calculator for the employee that you are currently in.
a. By selecting the Check Type as Manual you can create a manual check. b. Select the Copy to Payroll Button. c. You will be directed to the Payroll Tab
i. You can select to attach the manual check 1. To a New Payroll
a. The system will ask if you would like to attach to the next scheduled payroll:
b. You will then be prompted with the next available scheduled Payroll check date.
While in the Tax Calculator you can select the Earnings or Deductions that you need to be in the check. Then enter the amount for those E/D’s. You can select how the taxes are to be handled. You can even Gross up a check by check the Net to Gross box and putting in the Net Amount.
Enter the E/D’s here.
Select the net to Gross box and enter the Net amount that you want.
Control the taxes here.
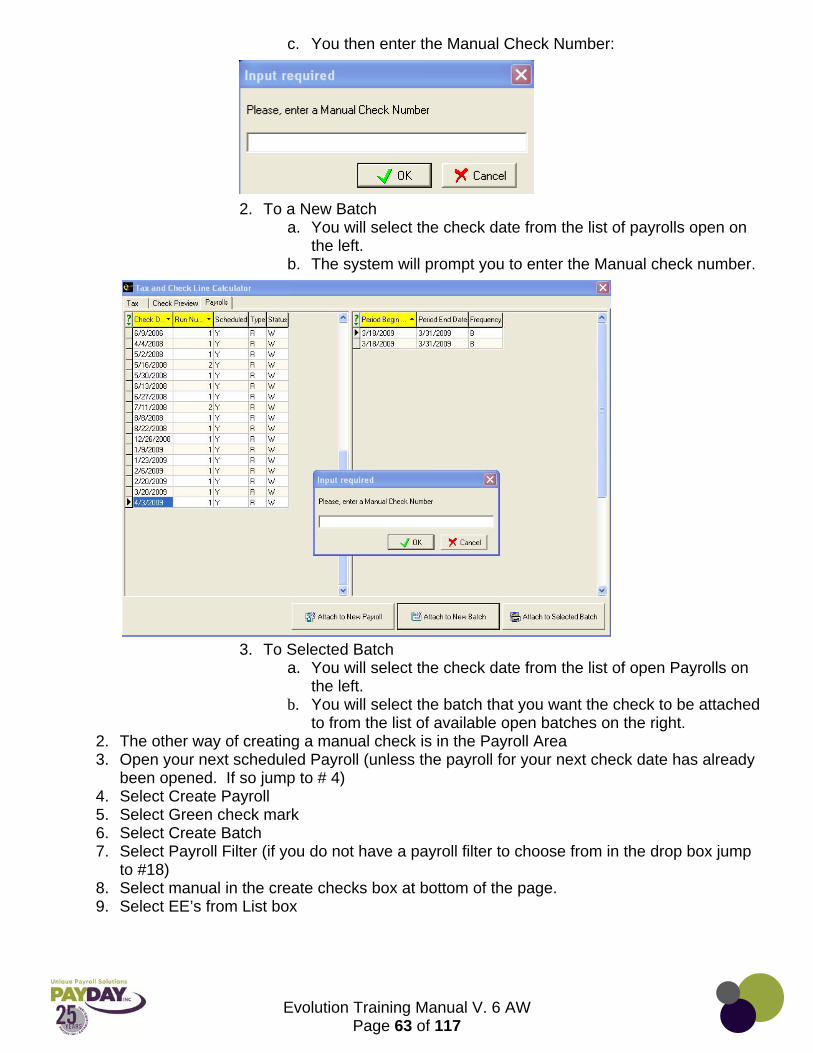
Evolution Training Manual V. 6 AW
Page 63 of 117
c. You then enter the Manual Check Number:
2. To a New Batch a. You will select the check date from the list of payrolls open on
the left. b. The system will prompt you to enter the Manual check number.
3. To Selected Batch a. You will select the check date from the list of open Payrolls on
the left. b. You will select the batch that you want the check to be attached
to from the list of available open batches on the right. 2. The other way of creating a manual check is in the Payroll Area 3. Open your next scheduled Payroll (unless the payroll for your next check date has already
been opened. If so jump to # 4) 4. Select Create Payroll 5. Select Green check mark 6. Select Create Batch 7. Select Payroll Filter (if you do not have a payroll filter to choose from in the drop box jump
to #18) 8. Select manual in the create checks box at bottom of the page. 9. Select EE’s from List box
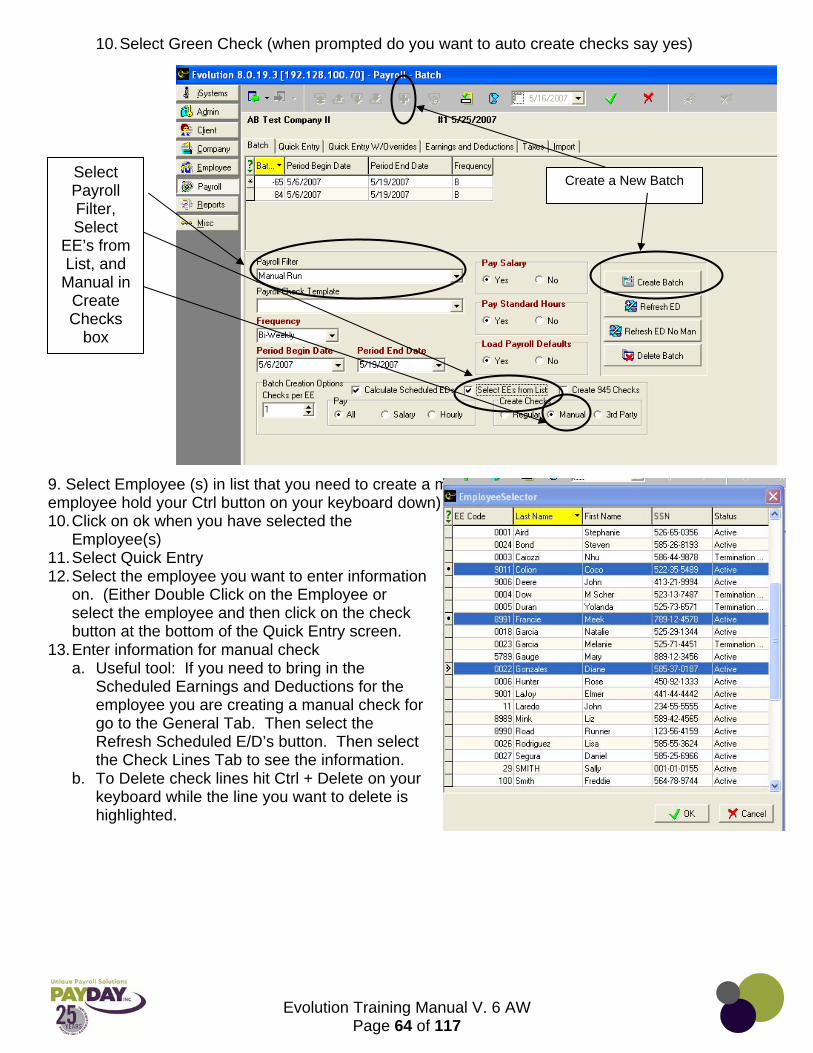
Evolution Training Manual V. 6 AW
Page 64 of 117
10. Select Green Check (when prompted do you want to auto create checks say yes)
9. Select Employee (s) in list that you need to create a manual check for. (To select more than one employee hold your Ctrl button on your keyboard down) 10. Click on ok when you have selected the
Employee(s) 11. Select Quick Entry 12. Select the employee you want to enter information
on. (Either Double Click on the Employee or select the employee and then click on the check button at the bottom of the Quick Entry screen.
13. Enter information for manual check a. Useful tool: If you need to bring in the
Scheduled Earnings and Deductions for the employee you are creating a manual check for go to the General Tab. Then select the Refresh Scheduled E/D’s button. Then select the Check Lines Tab to see the information.
b. To Delete check lines hit Ctrl + Delete on your keyboard while the line you want to delete is highlighted.
Create a New Batch Select Payroll Filter, Select
EE’s from List, and Manual in
Create Checks
box
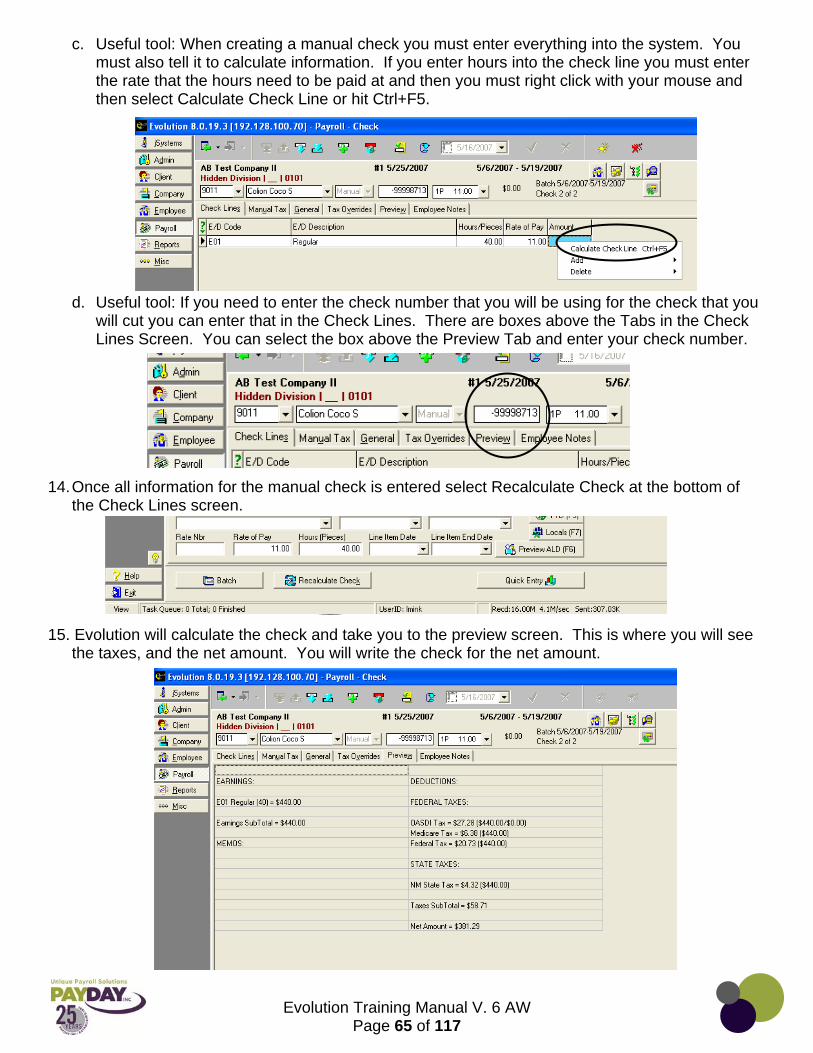
Evolution Training Manual V. 6 AW
Page 65 of 117
c. Useful tool: When creating a manual check you must enter everything into the system. You
must also tell it to calculate information. If you enter hours into the check line you must enter the rate that the hours need to be paid at and then you must right click with your mouse and then select Calculate Check Line or hit Ctrl+F5.
d. Useful tool: If you need to enter the check number that you will be using for the check that you will cut you can enter that in the Check Lines. There are boxes above the Tabs in the Check Lines Screen. You can select the box above the Preview Tab and enter your check number.
14. Once all information for the manual check is entered select Recalculate Check at the bottom of the Check Lines screen.
15. Evolution will calculate the check and take you to the preview screen. This is where you will see the taxes, and the net amount. You will write the check for the net amount.
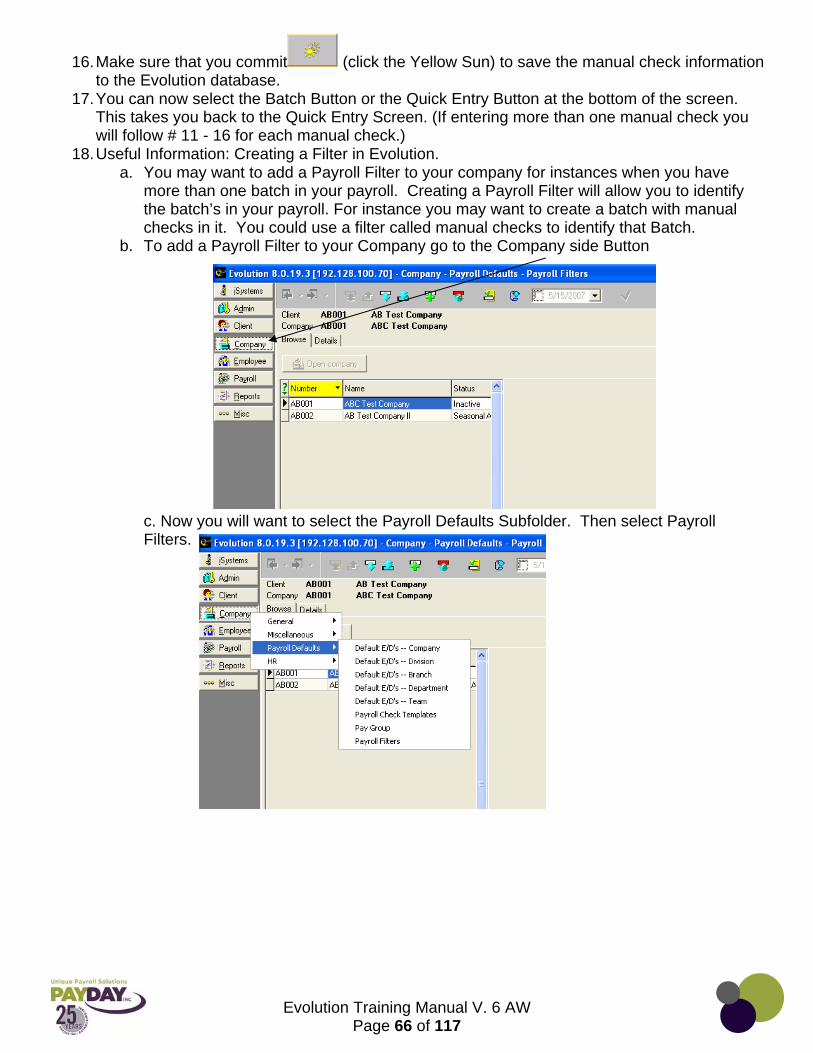
Evolution Training Manual V. 6 AW
Page 66 of 117
16. Make sure that you commit (click the Yellow Sun) to save the manual check information to the Evolution database.
17. You can now select the Batch Button or the Quick Entry Button at the bottom of the screen. This takes you back to the Quick Entry Screen. (If entering more than one manual check you will follow # 11 - 16 for each manual check.)
18. Useful Information: Creating a Filter in Evolution. a. You may want to add a Payroll Filter to your company for instances when you have
more than one batch in your payroll. Creating a Payroll Filter will allow you to identify the batch’s in your payroll. For instance you may want to create a batch with manual checks in it. You could use a filter called manual checks to identify that Batch.
b. To add a Payroll Filter to your Company go to the Company side Button
c. Now you will want to select the Payroll Defaults Subfolder. Then select Payroll Filters.
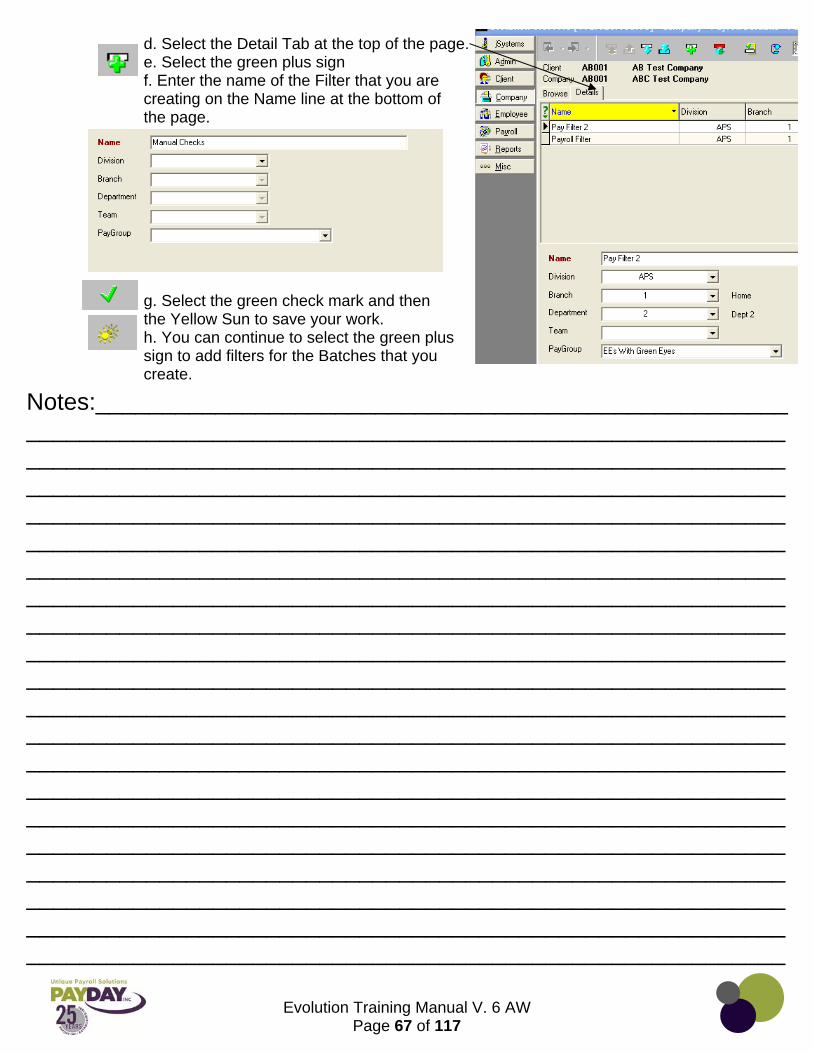
Evolution Training Manual V. 6 AW
Page 67 of 117
d. Select the Detail Tab at the top of the page. e. Select the green plus sign f. Enter the name of the Filter that you are creating on the Name line at the bottom of the page.
g. Select the green check mark and then the Yellow Sun to save your work. h. You can continue to select the green plus sign to add filters for the Batches that you create.
Notes:________________________________________________________________________________________________________________________________________________________________________________________________________________________________________________________________________________________________________________________________________________________________________________________________________________________________________________________________________________________________________________________________________________________________________________________________________________________________________________________________________________________________________________________________________________________________________________________________________________________________________________________________________________________________________________________________________________________________________________________________________________________________________________________________________________________________________________________________________________________________________________________________________________________________________
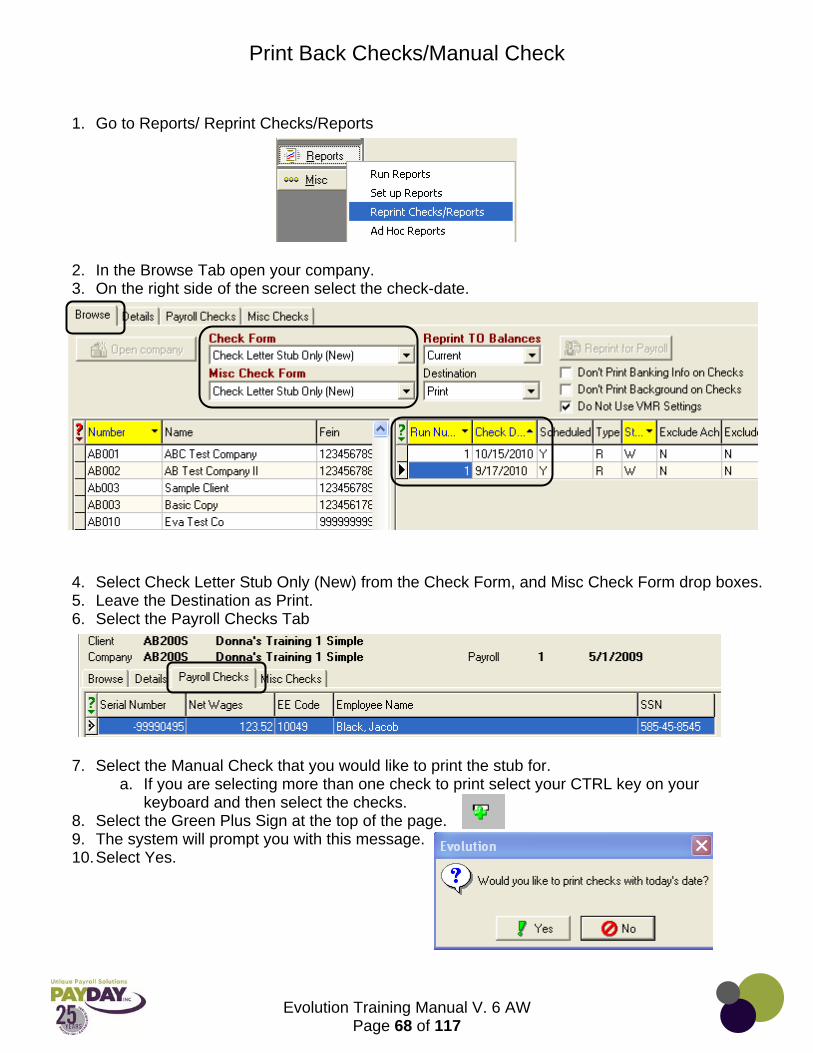
Evolution Training Manual V. 6 AW
Page 68 of 117
Print Back Checks/Manual Check
1. Go to Reports/ Reprint Checks/Reports
2. In the Browse Tab open your company. 3. On the right side of the screen select the check-date.
4. Select Check Letter Stub Only (New) from the Check Form, and Misc Check Form drop boxes. 5. Leave the Destination as Print. 6. Select the Payroll Checks Tab
7. Select the Manual Check that you would like to print the stub for. a. If you are selecting more than one check to print select your CTRL key on your
keyboard and then select the checks. 8. Select the Green Plus Sign at the top of the page. 9. The system will prompt you with this message. 10. Select Yes.
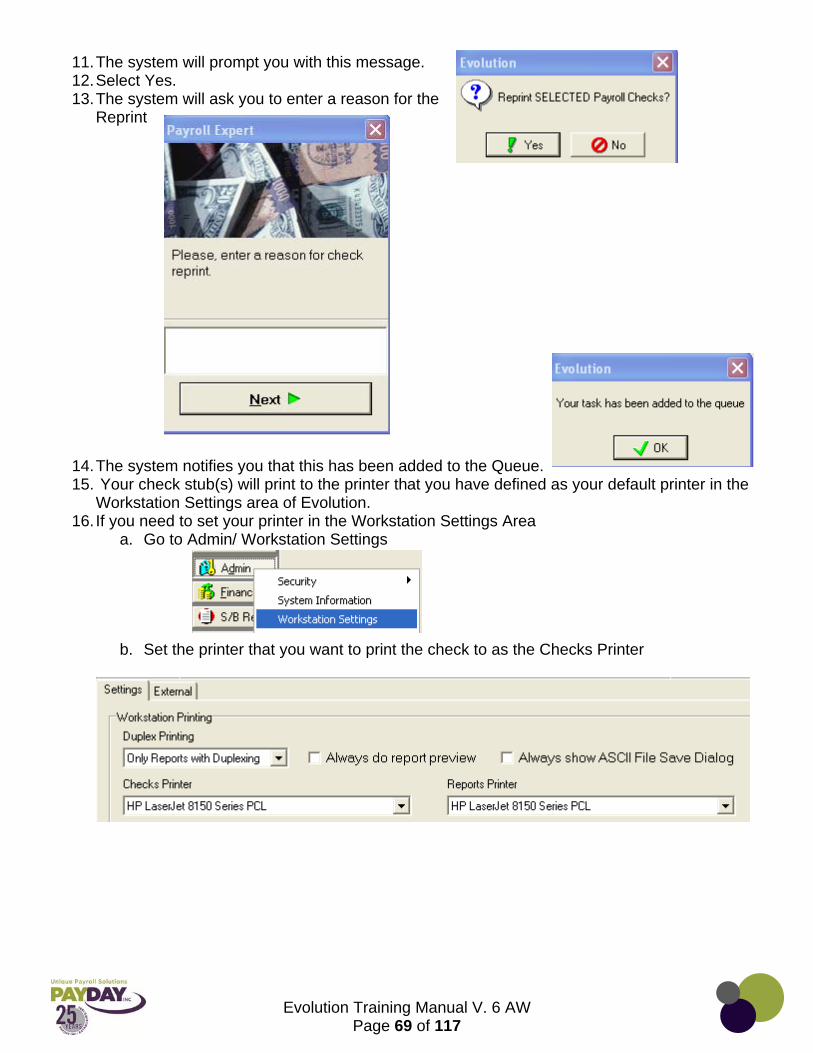
Evolution Training Manual V. 6 AW
Page 69 of 117
11. The system will prompt you with this message. 12. Select Yes. 13. The system will ask you to enter a reason for the
Reprint
14. The system notifies you that this has been added to the Queue. 15. Your check stub(s) will print to the printer that you have defined as your default printer in the
Workstation Settings area of Evolution. 16. If you need to set your printer in the Workstation Settings Area
a. Go to Admin/ Workstation Settings
b. Set the printer that you want to print the check to as the Checks Printer

Evolution Training Manual V. 6 AW
Page 70 of 117
Correction/Additional Runs
1. Correction and Additional Runs must be run through Payday. There are many security policies that Payday has in place when it comes to Correction and Additional Runs.
a. Examples of Corrections Runs: i. Voiding a check ii. Missed paying an employee
1. This could also be handled with a Manual Check to document what was paid, and the Client writing a check on site.
b. Examples of Additional Runs: i. Bonus Run ii. Terminated an employee that must be paid right away
1. This could be handled with a Manual Check as well. 2. To request a Correction or Additional Run simply contact your CSR at Payday.
a. Your CSR will take any information that is needed to do the Run b. Your CSR will enter the run
i. Unless this is a large run in which case we will work closely with you to enter the information.
c. This is because of some of the security procedures in place.
Notes: ____________________________________________________________________________________________________________________________________________________________________________________________________________________________________________________________________________________________________________________________________________________________________________________________________________________________________________________________________________________________________________________________________________________________________________________________________________________________________________________________________________________________________________________________________________________________________________________________________________________________________________________________________________________________________________________________________________________________________________________________________________

Evolution Training Manual V. 6 AW
Page 71 of 117
Voiding Checks
1. When voiding a check in Evolution you need to make sure that you have the information about the check that you will be voiding.
a. Have the check number, employee number, name, and net amount for the check that you will be voiding.
b. If the wrong check is voided in accident it is difficult to correct this mistake. 2. It is very important that if the check that needs to be voided was Direct Deposited you
will need to call your CSR for assistance. 3. There are two ways that you can void a check. 4. The first way to void a check
a. In Evolution select the Payroll Tab b. Select the Payroll Tab c. If your payroll is already open you will select the payroll then select Batch at the bottom
of the page. d. If you payroll is not open select the Create Payroll Button e. From the Batch Tab select Create Batch Button
i. Select the EEs from List check box ii. Select Manual from the Create Checks area
iii. Click on the Green Check mark at the top of the page. iv. A question box will come up. Select Yes to the question: Would you like to auto-
create checks for this batch?” v. Another question box will come up. Select No to the question: Do you want the
balance of the scheduled EDs for manual checks to be updated? vi. Select the employee that you will be voiding the check for.
1. If you will be voiding more than one check you need to select each of the employee’s that you will be voiding checks for. Select more than one employee by holding the CTRL key on your keyboard down.
f. Select the Quick Entry Tab or Button g. Double Click on the manual check that is in the Quick Entry Tab

Evolution Training Manual V. 6 AW
Page 72 of 117
h. Hit the Green Plus Sign at the top of the screen. i. Select Void from the drop down box in the first option
from the Payroll Expert box j. Select Next k. Change the Begin Check Date and the End Check Date
so that the check date for the check that needs to be voided will show.
l. Select the Filter Button m. Select the check that needs to be voided.
i. Be sure that you have the correct check selected it is difficult to bring a check that has been voided back.
n. Select the Ok Button o. Your check is now voided. p. If you are voiding more than one check you will need to
go into the Quick Entry area (from here select Batch at the bottom of the page) follow steps g through o to complete.
5. The second way that you can void a check. a. In Evolution select the Payroll Tab b. Select the Payroll Tab c. If your payroll is already open you will select the payroll then select Batch at the bottom
of the page. d. If you payroll is not open select the Create Payroll Button e. From the Batch Tab select Create Batch Button
i. Select the EEs from List check box ii. Select Manual from the Create Checks area
iii. Click on the Green Check mark at the top of the page. iv. A question box will come up. Select Yes to the question: Would you like to auto-
create checks for this batch?” v. Another question box will come up. Select No to the question: Do you want the
balance of the scheduled EDs for manual checks to be updated? vi. Select the employee that you will be voiding the check for.
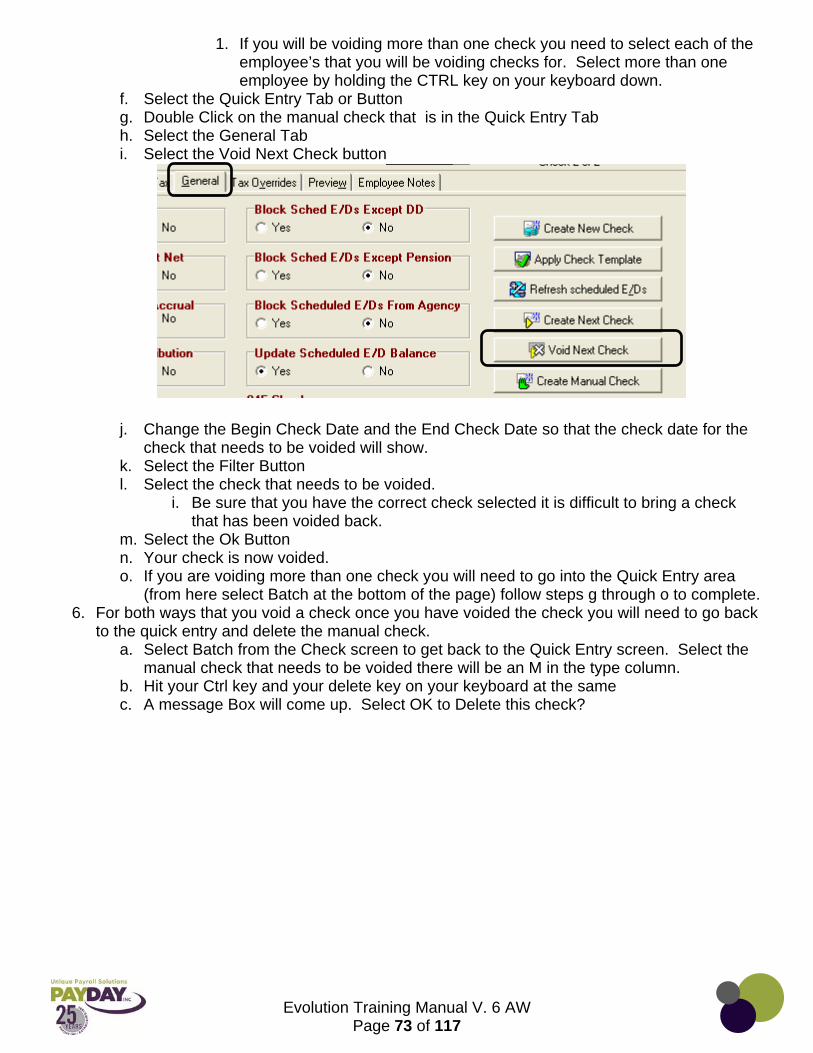
Evolution Training Manual V. 6 AW
Page 73 of 117
1. If you will be voiding more than one check you need to select each of the
employee’s that you will be voiding checks for. Select more than one employee by holding the CTRL key on your keyboard down.
f. Select the Quick Entry Tab or Button g. Double Click on the manual check that is in the Quick Entry Tab h. Select the General Tab i. Select the Void Next Check button
j. Change the Begin Check Date and the End Check Date so that the check date for the check that needs to be voided will show.
k. Select the Filter Button l. Select the check that needs to be voided.
i. Be sure that you have the correct check selected it is difficult to bring a check that has been voided back.
m. Select the Ok Button n. Your check is now voided. o. If you are voiding more than one check you will need to go into the Quick Entry area
(from here select Batch at the bottom of the page) follow steps g through o to complete. 6. For both ways that you void a check once you have voided the check you will need to go back
to the quick entry and delete the manual check. a. Select Batch from the Check screen to get back to the Quick Entry screen. Select the
manual check that needs to be voided there will be an M in the type column. b. Hit your Ctrl key and your delete key on your keyboard at the same c. A message Box will come up. Select OK to Delete this check?
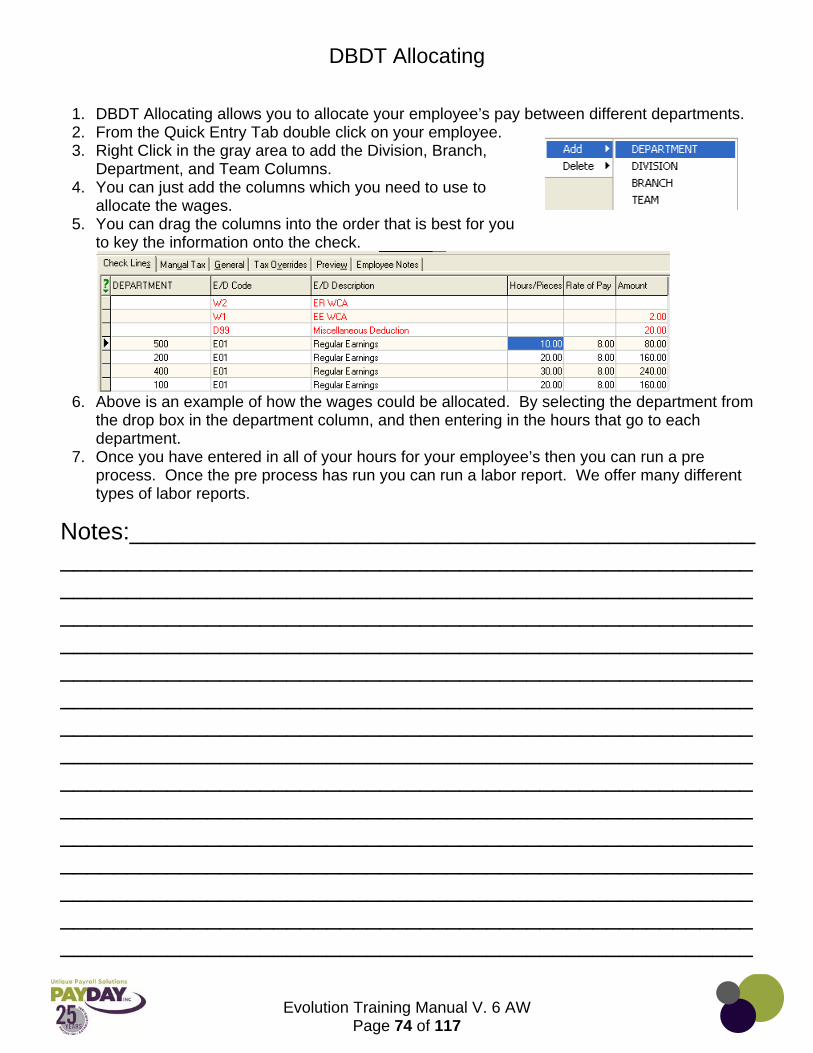
Evolution Training Manual V. 6 AW
Page 74 of 117
DBDT Allocating
1. DBDT Allocating allows you to allocate your employee’s pay between different departments. 2. From the Quick Entry Tab double click on your employee. 3. Right Click in the gray area to add the Division, Branch,
Department, and Team Columns. 4. You can just add the columns which you need to use to
allocate the wages. 5. You can drag the columns into the order that is best for you
to key the information onto the check.
6. Above is an example of how the wages could be allocated. By selecting the department from
the drop box in the department column, and then entering in the hours that go to each department.
7. Once you have entered in all of your hours for your employee’s then you can run a pre process. Once the pre process has run you can run a labor report. We offer many different types of labor reports.
Notes:___________________________________________________________________________________________________________________________________________________________________________________________________________________________________________________________________________________________________________________________________________________________________________________________________________________________________________________________________________________________________________________________________________________________________________________________________________________________________________________________________________________________________________________________________________________________________________________________________________________________________________________________

Evolution Training Manual V. 6 AW
Page 75 of 117
One time entries in Payroll
1. Any one time changes to your payroll can be entered in the Payroll Check and those changes will only affect that check.
a. Entering one time changes i. Usually the best place to enter one time changes is in the payroll check.
1. From the Payroll Quick Entry Tab double click on the employee you are working on.
a. Select the last line in the Check Lines Tab or select your insert key on your keyboard.
b. This will give you another check line to enter in your one time entry. You can enter any of your E/D’s as the code.
c. You can override the pay rate.
2. If you are changing a Scheduled E/D it is easier to change these from the “Grid” or Quick Entry Tab.
a. Add the column that you need to affect. Override the amount or hours that are in the Scheduled E/D. This will change this on the employee you are working on for only this payroll check.
b. Deleting for one time changes in the payroll i. If you are deleting in a payroll check for a one time payroll change it will be a
scheduled E/D that you will be deleting. 1. From the Quick Entry Tab double click on the Employee 2. Select the line that needs to be deleted in the Payroll Check Lines Tab. 3. Select CTRL + Del on your keyboard. 4. The system will ask if you want to delete this check line. Select Ok to
delete. ii. You may need to delete an employee’s payroll check.
1. This is done from the Payroll Quick Entry Tab. a. Select the employee that’s check needs to be deleted. b. Select CTRL + Del on your keyboard. c. The system will ask if you want to delete this check. Select Ok to
delete.
~The lines with Red Text are Scheduled E/D’s. ~ On this check the EE’s rate has been overridden. ~ On this check the EE needed to have an additional $20. Of 125 Medical taken to catch the EE up on this code.
~ If I wanted to override the amount being taken for Dental for this payroll check for Kevin Federline I could simply type over the 3.00 with the amount that needs to be taken. ~ If I needed to override the Salary amount that is being paid on this payroll check for Rodger Federer I could simply type over the salary amount with what should be paid this time.
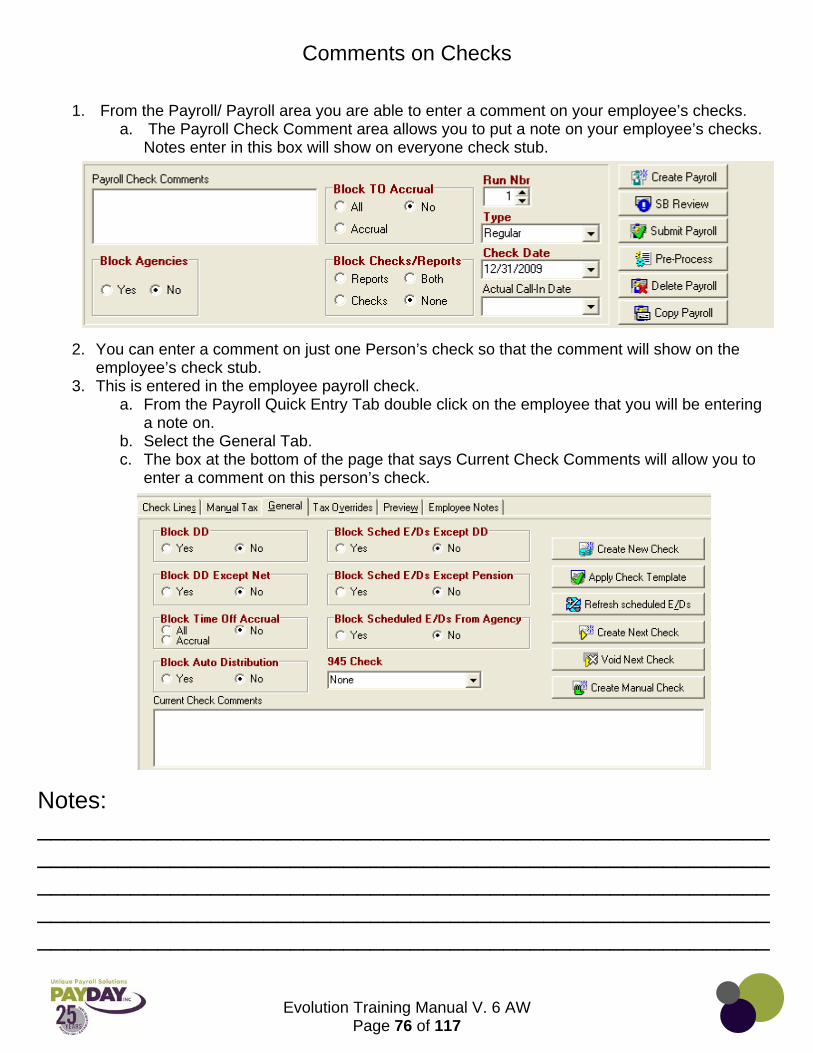
Evolution Training Manual V. 6 AW
Page 76 of 117
Comments on Checks
1. From the Payroll/ Payroll area you are able to enter a comment on your employee’s checks. a. The Payroll Check Comment area allows you to put a note on your employee’s checks.
Notes enter in this box will show on everyone check stub.
2. You can enter a comment on just one Person’s check so that the comment will show on the employee’s check stub.
3. This is entered in the employee payroll check. a. From the Payroll Quick Entry Tab double click on the employee that you will be entering
a note on. b. Select the General Tab. c. The box at the bottom of the page that says Current Check Comments will allow you to
enter a comment on this person’s check.
Notes: ___________________________________________________________________________________________________________________________________________________________________________________________________________________________________________________________________________________
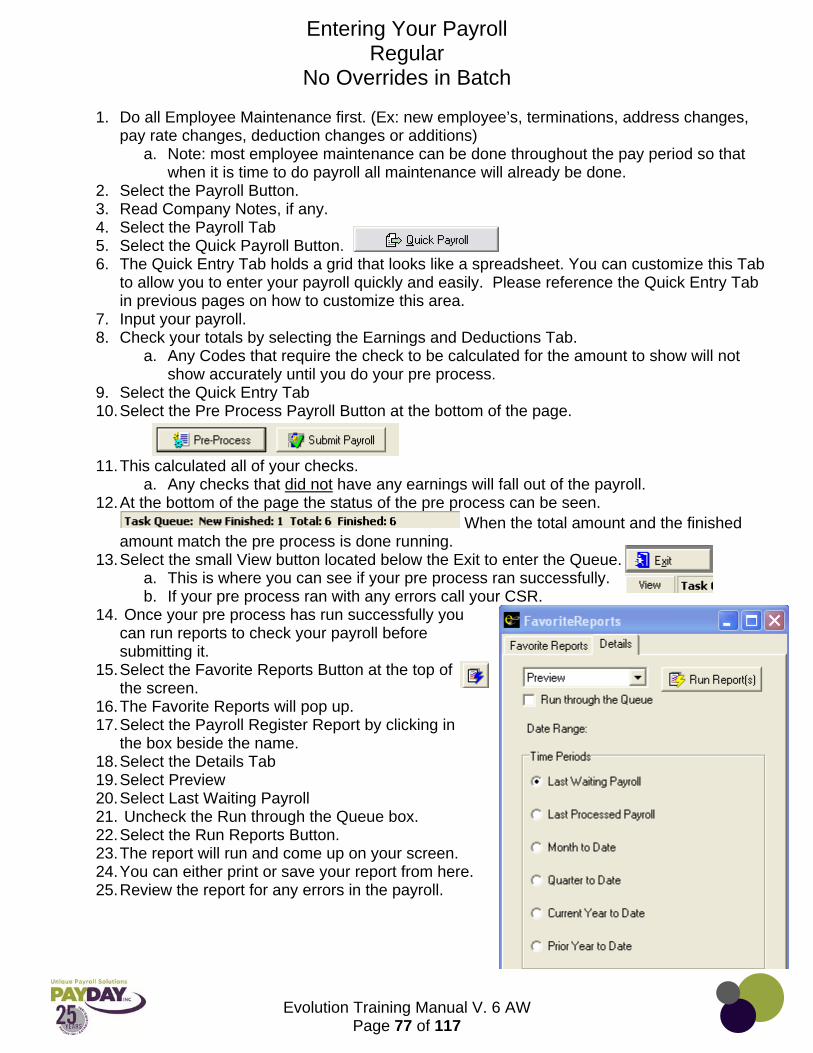
Evolution Training Manual V. 6 AW
Page 77 of 117
Entering Your Payroll Regular
No Overrides in Batch
1. Do all Employee Maintenance first. (Ex: new employee’s, terminations, address changes, pay rate changes, deduction changes or additions)
a. Note: most employee maintenance can be done throughout the pay period so that when it is time to do payroll all maintenance will already be done.
2. Select the Payroll Button. 3. Read Company Notes, if any. 4. Select the Payroll Tab 5. Select the Quick Payroll Button. 6. The Quick Entry Tab holds a grid that looks like a spreadsheet. You can customize this Tab
to allow you to enter your payroll quickly and easily. Please reference the Quick Entry Tab in previous pages on how to customize this area.
7. Input your payroll. 8. Check your totals by selecting the Earnings and Deductions Tab.
a. Any Codes that require the check to be calculated for the amount to show will not show accurately until you do your pre process.
9. Select the Quick Entry Tab 10. Select the Pre Process Payroll Button at the bottom of the page.
11. This calculated all of your checks. a. Any checks that did not have any earnings will fall out of the payroll.
12. At the bottom of the page the status of the pre process can be seen. When the total amount and the finished
amount match the pre process is done running. 13. Select the small View button located below the Exit to enter the Queue.
a. This is where you can see if your pre process ran successfully. b. If your pre process ran with any errors call your CSR.
14. Once your pre process has run successfully you can run reports to check your payroll before submitting it.
15. Select the Favorite Reports Button at the top of the screen.
16. The Favorite Reports will pop up. 17. Select the Payroll Register Report by clicking in
the box beside the name. 18. Select the Details Tab 19. Select Preview 20. Select Last Waiting Payroll 21. Uncheck the Run through the Queue box. 22. Select the Run Reports Button. 23. The report will run and come up on your screen. 24. You can either print or save your report from here. 25. Review the report for any errors in the payroll.
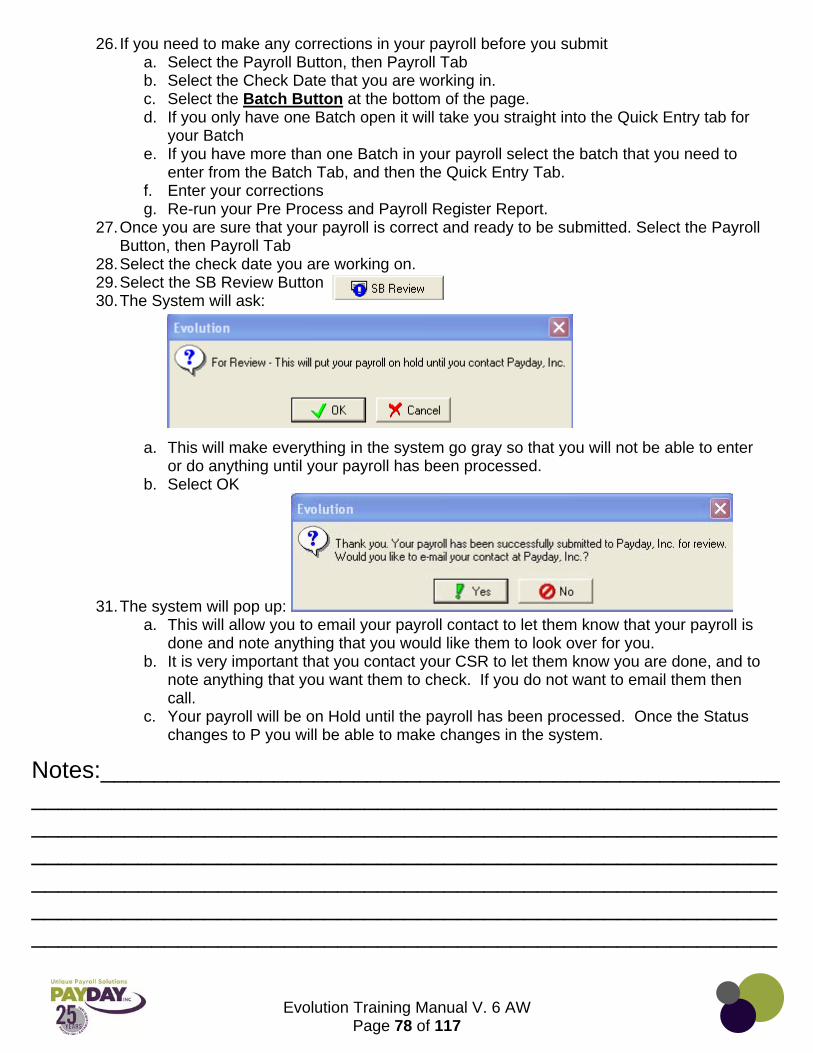
Evolution Training Manual V. 6 AW
Page 78 of 117
26. If you need to make any corrections in your payroll before you submit
a. Select the Payroll Button, then Payroll Tab b. Select the Check Date that you are working in. c. Select the Batch Button at the bottom of the page. d. If you only have one Batch open it will take you straight into the Quick Entry tab for
your Batch e. If you have more than one Batch in your payroll select the batch that you need to
enter from the Batch Tab, and then the Quick Entry Tab. f. Enter your corrections g. Re-run your Pre Process and Payroll Register Report.
27. Once you are sure that your payroll is correct and ready to be submitted. Select the Payroll Button, then Payroll Tab
28. Select the check date you are working on. 29. Select the SB Review Button 30. The System will ask:
a. This will make everything in the system go gray so that you will not be able to enter or do anything until your payroll has been processed.
b. Select OK
31. The system will pop up: a. This will allow you to email your payroll contact to let them know that your payroll is
done and note anything that you would like them to look over for you. b. It is very important that you contact your CSR to let them know you are done, and to
note anything that you want them to check. If you do not want to email them then call.
c. Your payroll will be on Hold until the payroll has been processed. Once the Status changes to P you will be able to make changes in the system.
Notes:___________________________________________________________________________________________________________________________________________________________________________________________________________________________________________________________________________________________________________________________________________________________________________________________________

Evolution Training Manual V. 6 AW
Page 79 of 117
Entering Your Payroll
Regular
1. Do all Employee Maintenance first. (Ex: new employee’s, terminations, address changes, pay rate changes, deduction changes or additions)
a. Note: most employee maintenance can be done throughout the pay period so that when it is time to do payroll all maintenance will already be done.
2. Select the Payroll Button. 3. Read Company Notes, if any. 4. Select the Payroll Tab 5. Select the Create Payroll Button. 6. Verify your check date and click the green check mark to save. 7. This will then take you to the Payroll Batch Screen. 8. Select the Create Batch Button 9. Verify the beginning and ending pay period dates. 10. Select the green check mark to save your batch. 11. Answer Yes to auto-create checks for this batch. This will create a check for everyone who
is Active in the system. 12. Select QUICK ENTRY at the bottom of the page. You will now see the “Grid” with all your
Active employees. 13. The Quick Entry grid looks like a spreadsheet. You can customize this Tab to allow you to
enter your payroll quickly and easily. Please reference the Quick Entry Tab in previous pages on how to customize this area.
14. Input your payroll. 15. Check your totals by selecting the Earnings and Deductions Tab.
a. Any Codes that require the check to be calculated for the amount to show will not show accurately until you do your pre process.
16. Select the Quick Entry Tab 17. Select the Pre Process Payroll Button at the bottom of the page. 18. This calculated all of your checks.
a. Any checks that did not have any earnings will fall out of the payroll. 19. At the bottom of the page the status of the pre process can be seen.
When the total amount and the finished amount match the pre process is done running.
20. Select the small View button located below the Exit to enter the Queue. a. This is where you can see if your pre process ran successfully. b. If your pre process ran with any errors call your CSR.
Notes:___________________________________________________________________________________________________________________________________________________________________________________________________________________________________________________________________________________________________________________________________________________________________________________________________
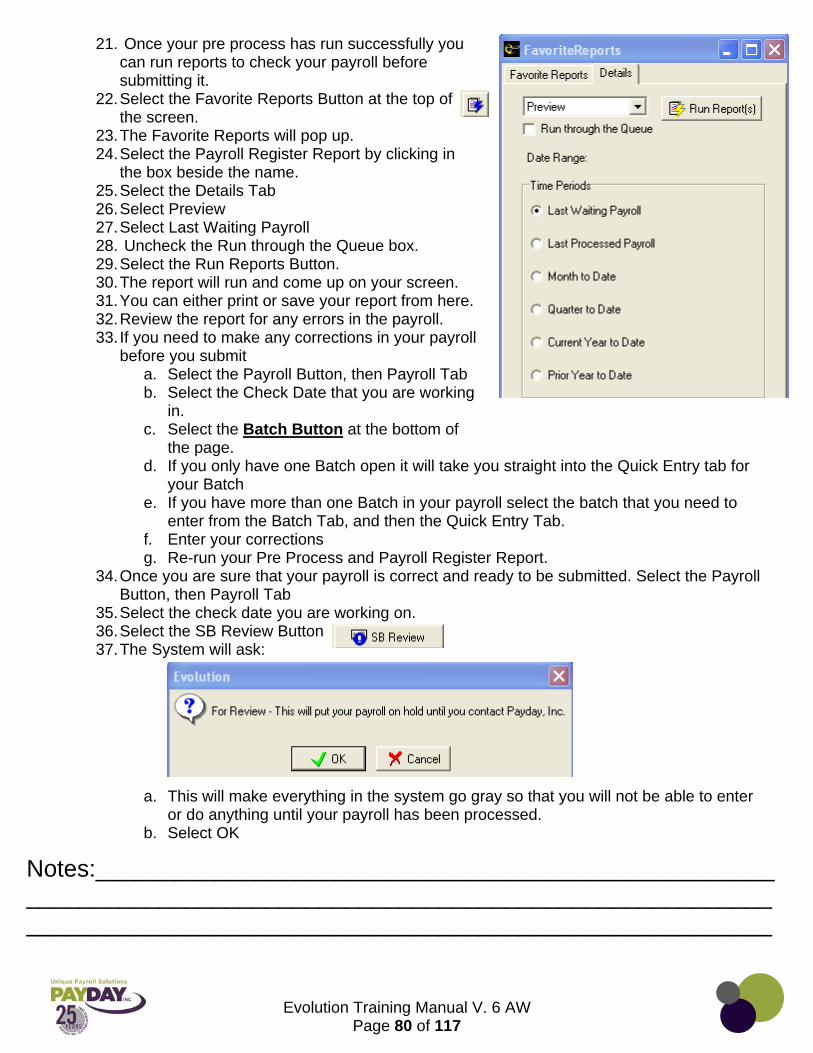
Evolution Training Manual V. 6 AW
Page 80 of 117
21. Once your pre process has run successfully you
can run reports to check your payroll before submitting it.
22. Select the Favorite Reports Button at the top of the screen.
23. The Favorite Reports will pop up. 24. Select the Payroll Register Report by clicking in
the box beside the name. 25. Select the Details Tab 26. Select Preview 27. Select Last Waiting Payroll 28. Uncheck the Run through the Queue box. 29. Select the Run Reports Button. 30. The report will run and come up on your screen. 31. You can either print or save your report from here. 32. Review the report for any errors in the payroll. 33. If you need to make any corrections in your payroll
before you submit a. Select the Payroll Button, then Payroll Tab b. Select the Check Date that you are working
in. c. Select the Batch Button at the bottom of
the page. d. If you only have one Batch open it will take you straight into the Quick Entry tab for
your Batch e. If you have more than one Batch in your payroll select the batch that you need to
enter from the Batch Tab, and then the Quick Entry Tab. f. Enter your corrections g. Re-run your Pre Process and Payroll Register Report.
34. Once you are sure that your payroll is correct and ready to be submitted. Select the Payroll Button, then Payroll Tab
35. Select the check date you are working on. 36. Select the SB Review Button 37. The System will ask:
a. This will make everything in the system go gray so that you will not be able to enter or do anything until your payroll has been processed.
b. Select OK
Notes:___________________________________________________________________________________________________________________________________________________________________
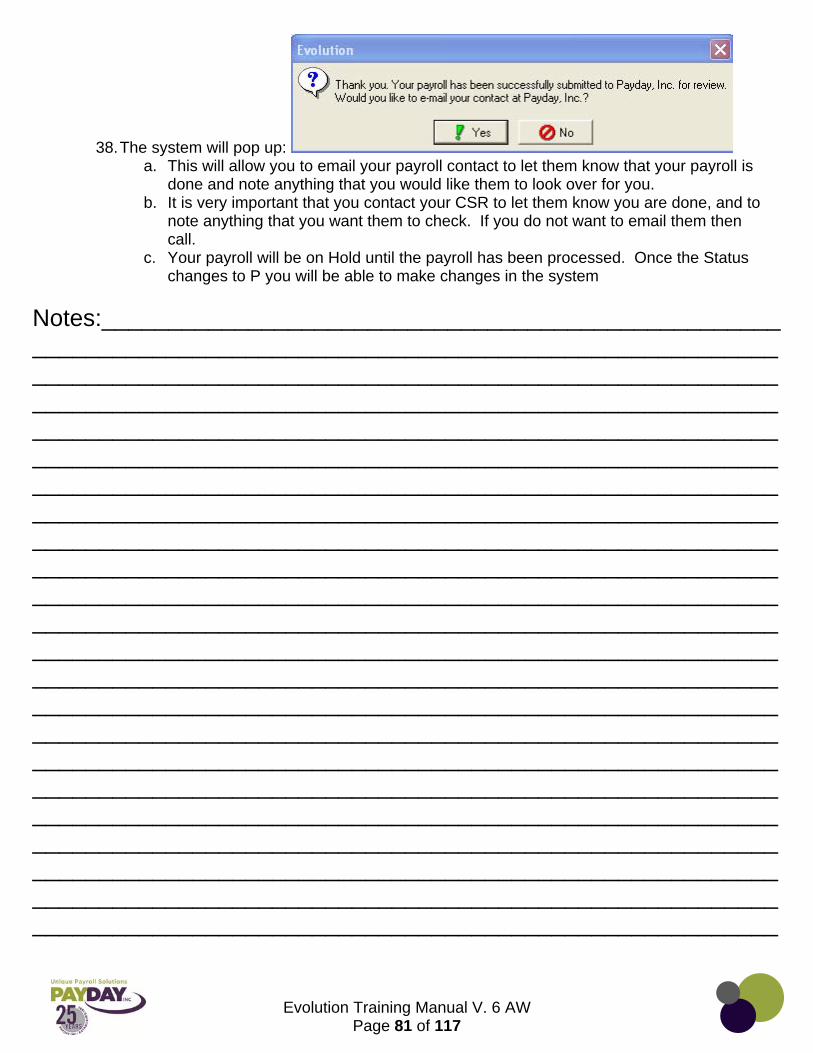
Evolution Training Manual V. 6 AW
Page 81 of 117
38. The system will pop up: a. This will allow you to email your payroll contact to let them know that your payroll is
done and note anything that you would like them to look over for you. b. It is very important that you contact your CSR to let them know you are done, and to
note anything that you want them to check. If you do not want to email them then call.
c. Your payroll will be on Hold until the payroll has been processed. Once the Status changes to P you will be able to make changes in the system
Notes:___________________________________________________________________________________________________________________________________________________________________________________________________________________________________________________________________________________________________________________________________________________________________________________________________________________________________________________________________________________________________________________________________________________________________________________________________________________________________________________________________________________________________________________________________________________________________________________________________________________________________________________________________ ________________________________________________________________________________________________________________________________________________________________________________________________________________________________________________________________________________________________________________________________________________________________________________________________________________________________________________________________
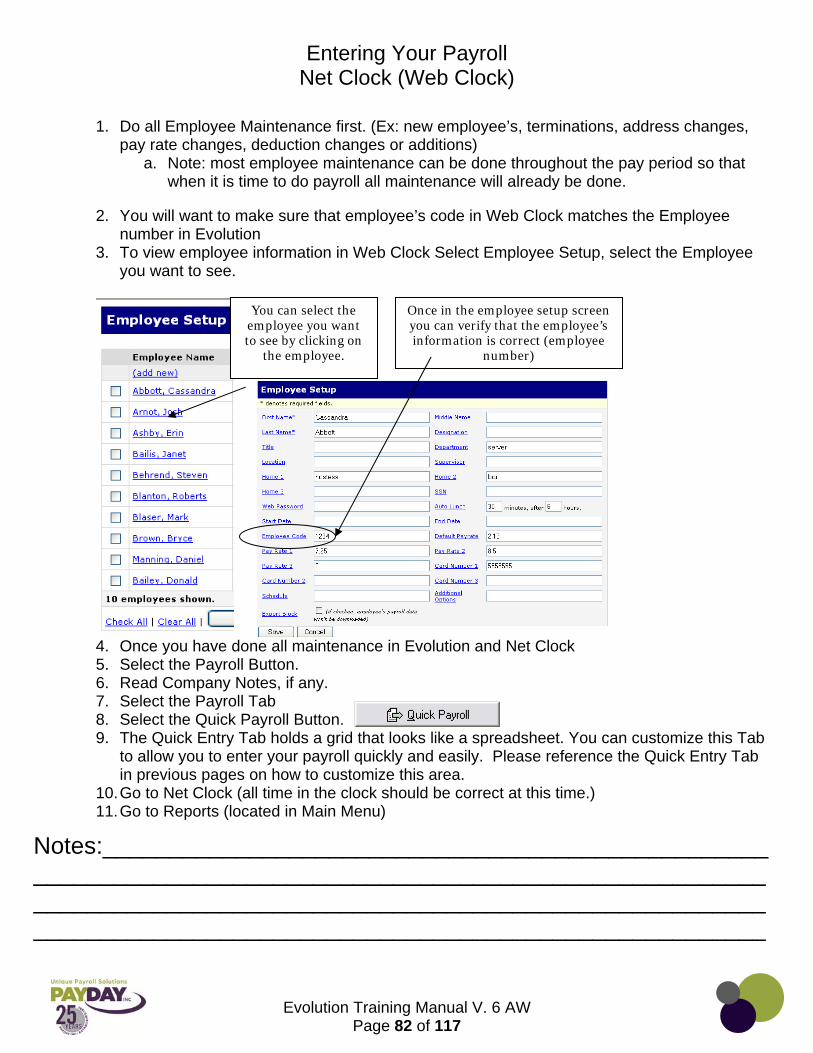
Evolution Training Manual V. 6 AW
Page 82 of 117
Entering Your Payroll
Net Clock (Web Clock)
1. Do all Employee Maintenance first. (Ex: new employee’s, terminations, address changes, pay rate changes, deduction changes or additions)
a. Note: most employee maintenance can be done throughout the pay period so that when it is time to do payroll all maintenance will already be done.
2. You will want to make sure that employee’s code in Web Clock matches the Employee number in Evolution
3. To view employee information in Web Clock Select Employee Setup, select the Employee you want to see.
4. Once you have done all maintenance in Evolution and Net Clock 5. Select the Payroll Button. 6. Read Company Notes, if any. 7. Select the Payroll Tab 8. Select the Quick Payroll Button. 9. The Quick Entry Tab holds a grid that looks like a spreadsheet. You can customize this Tab
to allow you to enter your payroll quickly and easily. Please reference the Quick Entry Tab in previous pages on how to customize this area.
10. Go to Net Clock (all time in the clock should be correct at this time.) 11. Go to Reports (located in Main Menu)
You can select the employee you want to see by clicking on
the employee.
Once in the employee setup screen you can verify that the employee’s information is correct (employee
number)
Notes:_______________________________________________________________________________________________________________________________________________________________________________________________________________________
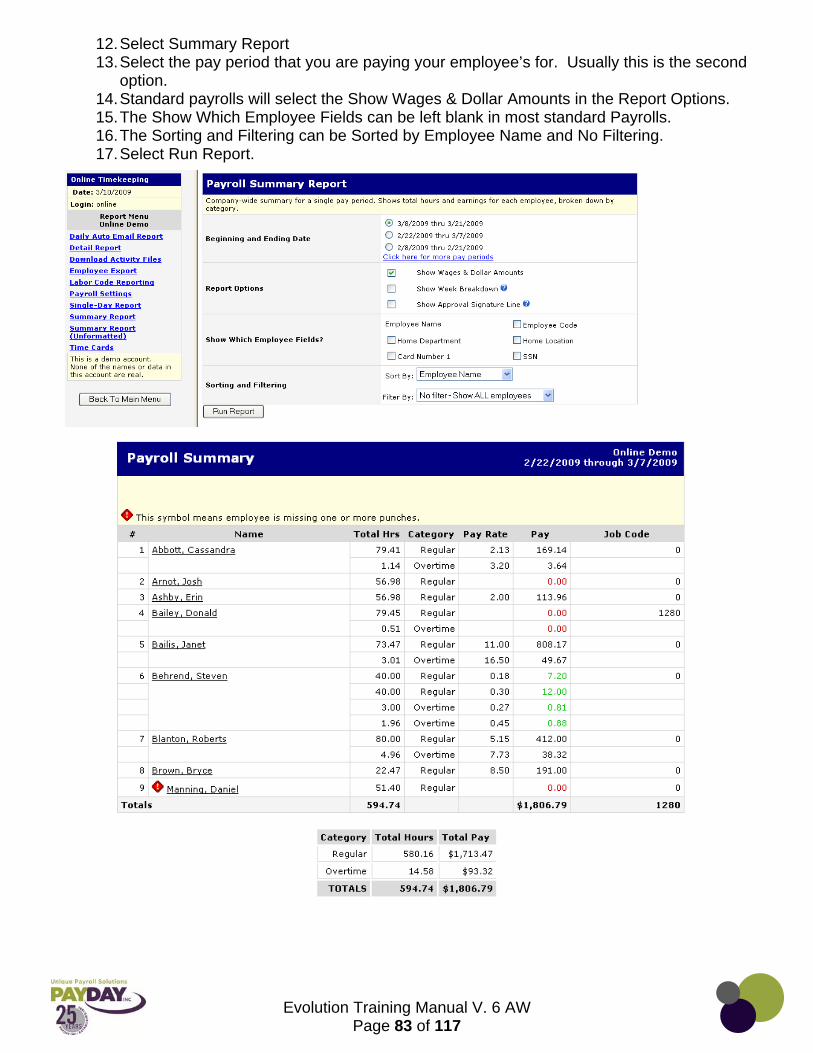
Evolution Training Manual V. 6 AW
Page 83 of 117
12. Select Summary Report 13. Select the pay period that you are paying your employee’s for. Usually this is the second
option. 14. Standard payrolls will select the Show Wages & Dollar Amounts in the Report Options. 15. The Show Which Employee Fields can be left blank in most standard Payrolls. 16. The Sorting and Filtering can be Sorted by Employee Name and No Filtering. 17. Select Run Report.
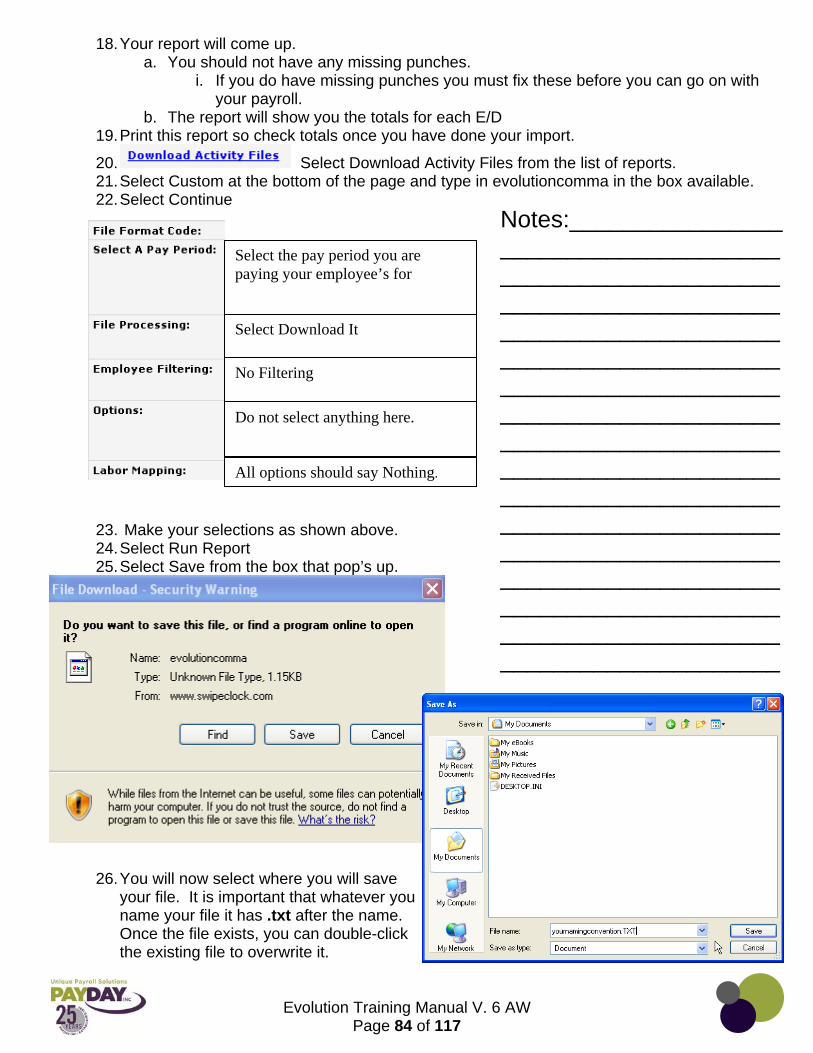
Evolution Training Manual V. 6 AW
Page 84 of 117
18. Your report will come up.
a. You should not have any missing punches. i. If you do have missing punches you must fix these before you can go on with
your payroll. b. The report will show you the totals for each E/D
19. Print this report so check totals once you have done your import.
20. Select Download Activity Files from the list of reports. 21. Select Custom at the bottom of the page and type in evolutioncomma in the box available. 22. Select Continue
23. Make your selections as shown above. 24. Select Run Report 25. Select Save from the box that pop’s up.
26. You will now select where you will save your file. It is important that whatever you name your file it has .txt after the name. Once the file exists, you can double-click the existing file to overwrite it.
Notes:_____________________________________________________________________________________________________________________________________________________________________________________________________________________________________________________________________________________________________________________________________________________________________________________ ____________________________________________________________________________________
Select the pay period you are paying your employee’s for
Select Download It
No Filtering
Do not select anything here.
All options should say Nothing.

Evolution Training Manual V. 6 AW
Page 85 of 117
27. Go to Payroll Batch in Evolution. Select the Import Tab
28. Click on the three little dots on the Source file name line to select where your file was
saved. 29. Click on the three little dots on the Exception report file name. This should be a notepad
saved with an ending of .txt 30. The area below these lines should look as they do above. 31. Now you can select the Import to the payroll button. A task bar will pop up until this is
finished. 32. The yellow Sun shows that data did come in during your import. Do not hit the yellow sun
until you are sure you are ready to save. 33. Click on the View the report file button.
a. This will bring up an error log. If there is anything on this log you may need to correct the problem and then recreate your file and re-import.
b. The hours and earnings for anyone rejected on the report will not have been imported. (If you must make corrections do not save what you have done in Evolution. If you have saved you may need to delete the batch and recreate it.)
34. Check your totals by selecting the Earnings and Deductions Tab. a. Any Codes that require the check to be calculated for the amount to show will not
show accurately until you do your pre process. b. Make sure that the totals look correct from the report you ran out of the Net Clock
and then you can save your import. 35. Select the Quick Entry Tab 36. Select the Pre Process Payroll Button at the bottom of the page.
37. This calculated all of your checks. a. Any checks that did not have any earnings will fall out of the payroll.
38. At the bottom of the page the status of the pre process can be seen. When the total amount and the finished
amount match the pre process is done running. 39. Select the small View button located below the Exit to enter the Queue.
a. This is where you can see if your pre process ran successfully. b. If your pre process ran with any errors call your CSR.
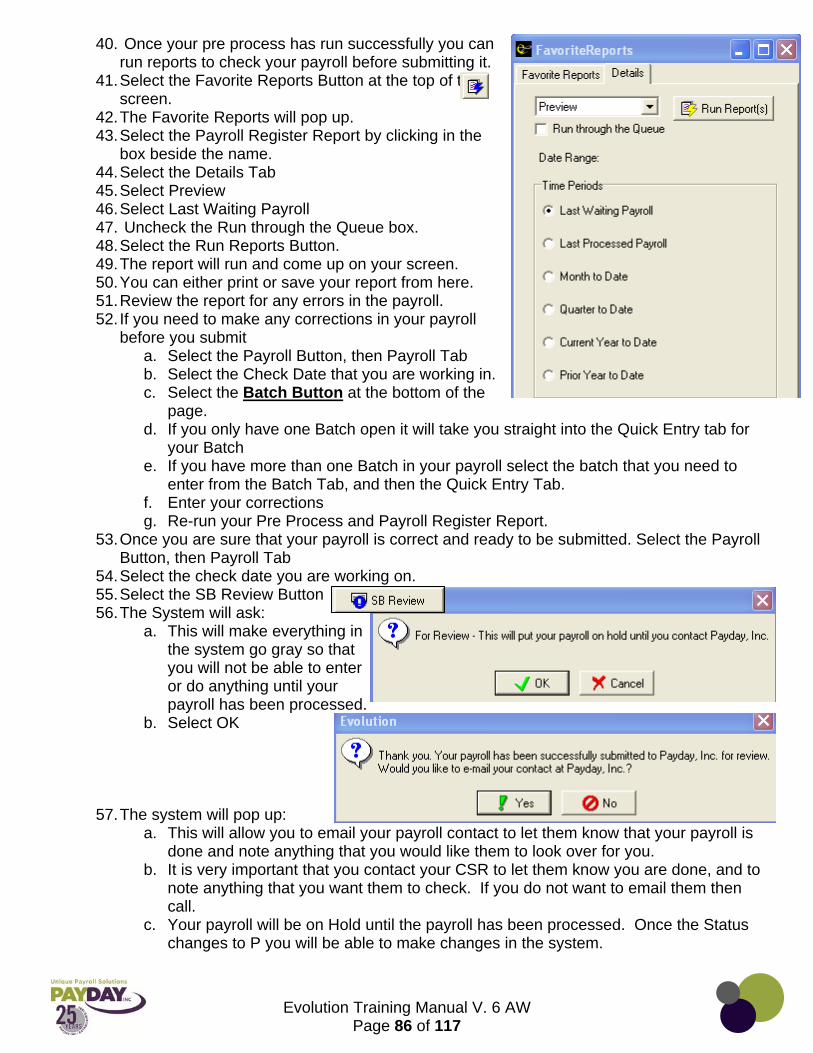
Evolution Training Manual V. 6 AW
Page 86 of 117
40. Once your pre process has run successfully you can
run reports to check your payroll before submitting it. 41. Select the Favorite Reports Button at the top of the
screen. 42. The Favorite Reports will pop up. 43. Select the Payroll Register Report by clicking in the
box beside the name. 44. Select the Details Tab 45. Select Preview 46. Select Last Waiting Payroll 47. Uncheck the Run through the Queue box. 48. Select the Run Reports Button. 49. The report will run and come up on your screen. 50. You can either print or save your report from here. 51. Review the report for any errors in the payroll. 52. If you need to make any corrections in your payroll
before you submit a. Select the Payroll Button, then Payroll Tab b. Select the Check Date that you are working in. c. Select the Batch Button at the bottom of the
page. d. If you only have one Batch open it will take you straight into the Quick Entry tab for
your Batch e. If you have more than one Batch in your payroll select the batch that you need to
enter from the Batch Tab, and then the Quick Entry Tab. f. Enter your corrections g. Re-run your Pre Process and Payroll Register Report.
53. Once you are sure that your payroll is correct and ready to be submitted. Select the Payroll Button, then Payroll Tab
54. Select the check date you are working on. 55. Select the SB Review Button 56. The System will ask:
a. This will make everything in the system go gray so that you will not be able to enter or do anything until your payroll has been processed.
b. Select OK
57. The system will pop up: a. This will allow you to email your payroll contact to let them know that your payroll is
done and note anything that you would like them to look over for you. b. It is very important that you contact your CSR to let them know you are done, and to
note anything that you want them to check. If you do not want to email them then call.
c. Your payroll will be on Hold until the payroll has been processed. Once the Status changes to P you will be able to make changes in the system.

Evolution Training Manual V. 6 AW
Page 87 of 117
Reports
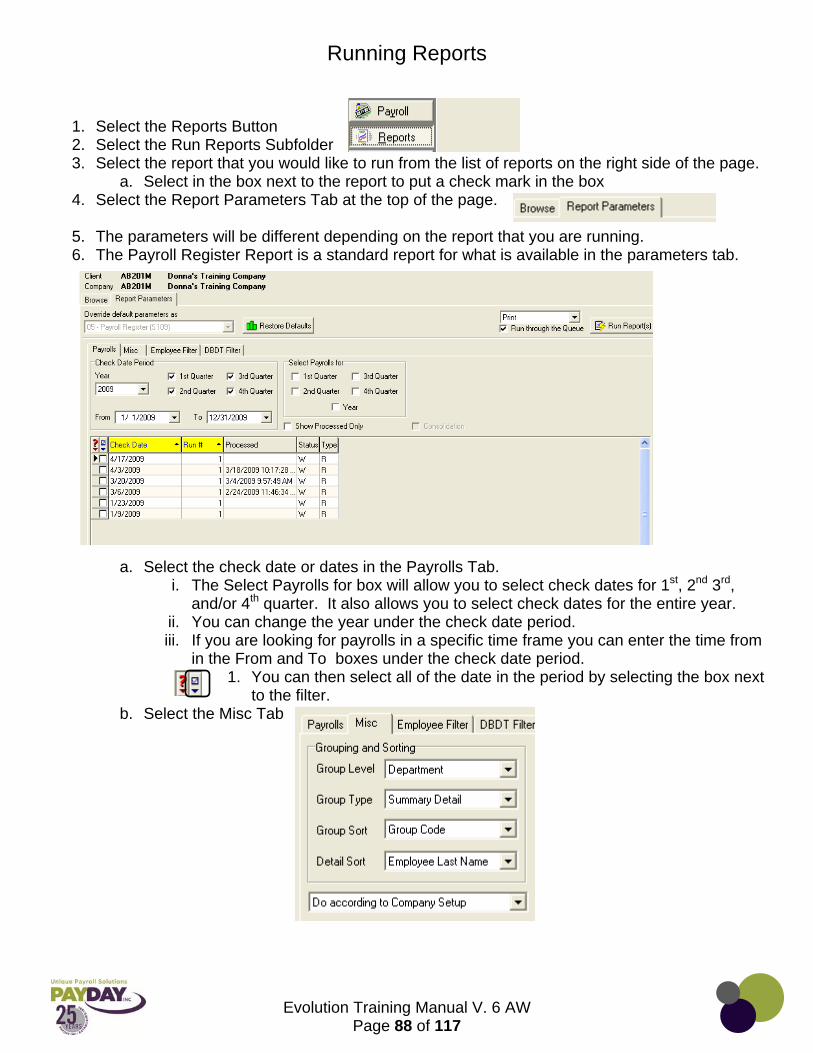
Evolution Training Manual V. 6 AW
Page 88 of 117
Running Reports
1. Select the Reports Button 2. Select the Run Reports Subfolder 3. Select the report that you would like to run from the list of reports on the right side of the page.
a. Select in the box next to the report to put a check mark in the box 4. Select the Report Parameters Tab at the top of the page.
5. The parameters will be different depending on the report that you are running. 6. The Payroll Register Report is a standard report for what is available in the parameters tab.
a. Select the check date or dates in the Payrolls Tab. i. The Select Payrolls for box will allow you to select check dates for 1st, 2nd 3rd,
and/or 4th quarter. It also allows you to select check dates for the entire year. ii. You can change the year under the check date period. iii. If you are looking for payrolls in a specific time frame you can enter the time from
in the From and To boxes under the check date period. 1. You can then select all of the date in the period by selecting the box next
to the filter. b. Select the Misc Tab

Evolution Training Manual V. 6 AW
Page 89 of 117
i. Under the Grouping and Sorting Box 1. The Group Level allows you to select how you want the
grouping to be (Company or Department) 2. The Group Type allows you to select
a. Summary Detail – This is totals and the detail of each check.
b. Summary – just the totals c. Detail – just the detail of each check
3. The Group Sort allows you to show your first Group Level either by Department Code or Name
4. The Detail Sort affects the detail of information within the group a. Your employee’s can be in order by
i. EE Last Name ii. EE SSN iii. EE Code ii. The Check Boxes at the right of the page allow you to
customize the report even further. 1. Page break after each group - allows a break to the next page
after each department. 2. Show terminated employee’s – employee’s that are terminated in the
system, but were paid during the time frame that you are looking at will show on the report.
3. Mask Sensitive Information – Social Security Numbers will be shown as X’s
4. Show only Summary for Multiple Check Dates – if you do not need the detail of every check for each employee… this will allow you to see a summary for multiple check dates.
5. Show Home DBDT for each Employee – will show the employee’s home DBDT on the report.
6. Include Memo’s in totals – if you have memo’s they will show in the total’s
7. Include Taxable Memo’s in the total’s – if you have taxable memo’s they will show in the total’s
8. Include Pieces from Piecework in Totals – if you have Piecework you can have pieces show in the totals
9. Break Employee between pages – will print part of employee’s information on one page and break when runs out of room and finish on next page (can be hard to read report with this function)
10. Deductions as Taxed – deductions are showing in order as they are taxed.
11. Show Shift Differentials – if you have shift differentials you can have it show.
12. Hide SSN, State, Frequency, and Salary- gray line on this report normally will show the EE’s SSN, State, Freq., and Salary. If you select this it will be just a gray line.
13. Swap Check Date and Net Check – switches location of these items 14. Bold EE Name, Check Number, and Net Check – will make these items
bolded 15. Show Employee’s with YTD Earnings – will show employee’s with YTD
Earnings.

Evolution Training Manual V. 6 AW
Page 90 of 117
iii. Select Employee Filter Tab 1. This Tab will allow you to run this report for just one or a select group of
employee’s. a. An example of how this report could be used:
i. An employee comes to you needing check information for the last 3 check dates. (Employee is refinancing home, and shredded check stubs already.)
1. Select Payroll Register report 2. Select check dates employee needs 3. Select Employee from list 4. Run and Print Out for Employee
2. If no employee’s are selected in this tab the report will run for all employee’s.
iv. Select DBDT Filter Tab 1. This Tab will allow you to run this report for just one or a select few
Division’s, Branches, Departments, and/or Teams. 2. If no specific DBDT’s are selected the report will run for all.
v. From the Drop Box at the Right Select Preview 1. You can select to print, but this does not allow you to preview the report
before it begins to print.
vi. Make sure the Run through the Queue has a check mark in the box. This will
send your report to the Queue (your report will be available in the Queue for 10 days)
vii. Select Run Report(s) Button viii. You will get a pop up message to let you know that the report has been added to
the Queue. ix. Close out of the Report area with the red at the top of the page.
7. At the bottom of the page you will see the Task Queue
a. You will want to wait until the Total number and Finished numbers are the same. b. When the report is finished running select the View Button located under the Exit at the
lower left corner of the screen.

Evolution Training Manual V. 6 AW
Page 91 of 117
Quick Guide Running a Report
1. Select Report Button 2. Select Run Reports Subfolder 3. Select Report that you would like to run. 4. Select Report Parameters Tab 5. Select Parameters (If Applicable) 6. Select to Preview the Report 7. Select Run through the Queue box 8. Select Run Report Button 9. Wait until Report shows it has run in the Task Queue at the bottom of the page. 10. Select the View Button under the Exit Button 11. You can now see and do what you need with the Report that you have run.
Notes:___________________________________________________________________________________________________________________________________________________________________________________________________________________________________________________________________________________________________________________________________________________________________________________________________________________________________________________________________________________________________________________________________________________________________________________________________________________________________________________________________________________________________________________________________________________________________________________________________________________________________________________________________________________________________________________________________________________________________________________________________________________________________________________________________________________________________________________________________________________________________________________________________________________________________________________________________________________________________________________________________
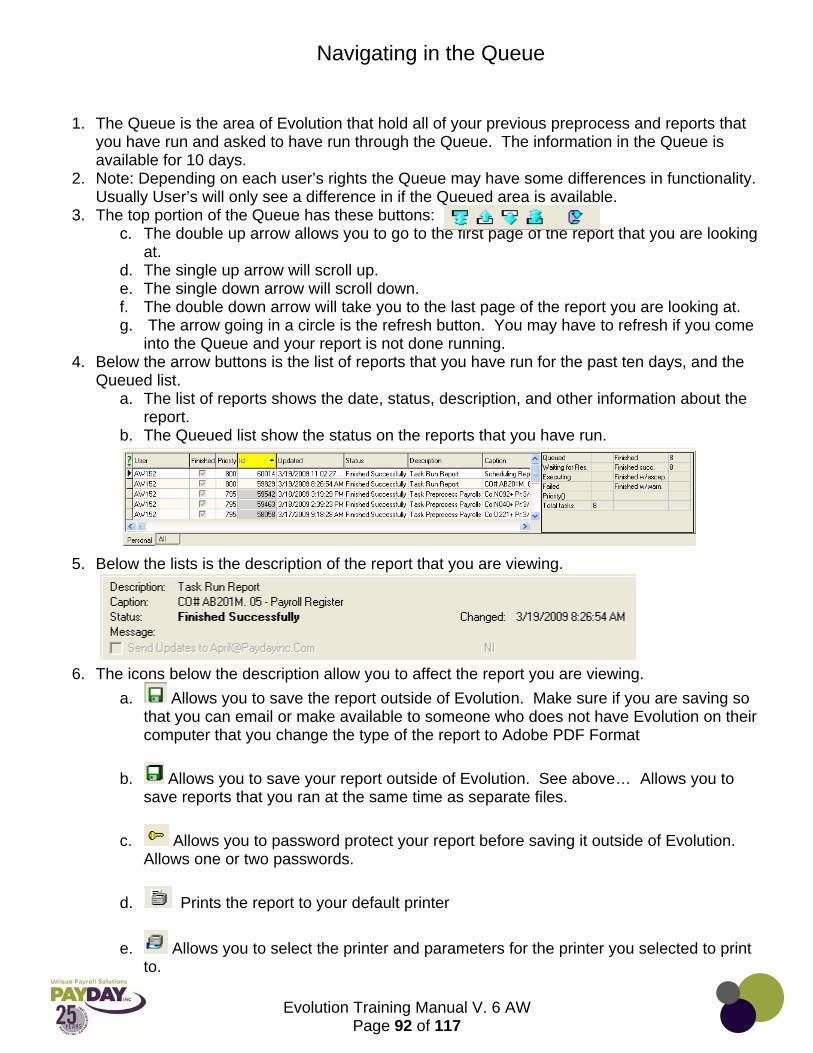
Evolution Training Manual V. 6 AW
Page 92 of 117
Navigating in the Queue
1. The Queue is the area of Evolution that hold all of your previous preprocess and reports that you have run and asked to have run through the Queue. The information in the Queue is available for 10 days.
2. Note: Depending on each user’s rights the Queue may have some differences in functionality. Usually User’s will only see a difference in if the Queued area is available.
3. The top portion of the Queue has these buttons: c. The double up arrow allows you to go to the first page of the report that you are looking
at. d. The single up arrow will scroll up. e. The single down arrow will scroll down. f. The double down arrow will take you to the last page of the report you are looking at. g. The arrow going in a circle is the refresh button. You may have to refresh if you come
into the Queue and your report is not done running. 4. Below the arrow buttons is the list of reports that you have run for the past ten days, and the
Queued list. a. The list of reports shows the date, status, description, and other information about the
report. b. The Queued list show the status on the reports that you have run.
5. Below the lists is the description of the report that you are viewing.
6. The icons below the description allow you to affect the report you are viewing.
a. Allows you to save the report outside of Evolution. Make sure if you are saving so that you can email or make available to someone who does not have Evolution on their computer that you change the type of the report to Adobe PDF Format
b. Allows you to save your report outside of Evolution. See above… Allows you to save reports that you ran at the same time as separate files.
c. Allows you to password protect your report before saving it outside of Evolution. Allows one or two passwords.
d. Prints the report to your default printer
e. Allows you to select the printer and parameters for the printer you selected to print to.
Evolution Training Manual V. 6 AW
Page 93 of 117
f. Allows you to zoom in and out to see more or less of your report.
g. Allows you to search through the report.
h. Allows you to create circles that you can attach text to.
i. Allows you to scroll through the report.
j. Shows what page of the report you are viewing
k. If you ran more than one report at the same time this allows you to select which report you want to view.
7. Below the icons you will see your report. 8. On the right top part of the Queue there are 4 Tabs available. These will change the view.
a. The List View allows you to see just the list of report you have run in the past 10 days. b. The Split View is the default view it allows you to see the list, description of report and
all the icons. c. The Detail View will eliminate the list and leave all other functions d. The Full Screen takes away the list and detail leaving you with just the report and icon
buttons that will affect the list above and the icon buttons that affect the report. 9. These steps walk you through running the payroll register report. This is a good example of
the different parameters that are available when running reports. If you ever find that you have a question about a parameter that is available with a specific report call your CSR for further guidance.
Notes:__________________________________________________________________________________________________________________________________________________________________________________________________________________________________________________________________________________________________________________________________________________________________________________________________________________________________________________________________________________________________________________ ________________________________________________________________________________________________________________________________________________________________________________________________________________________________________________________________________________________
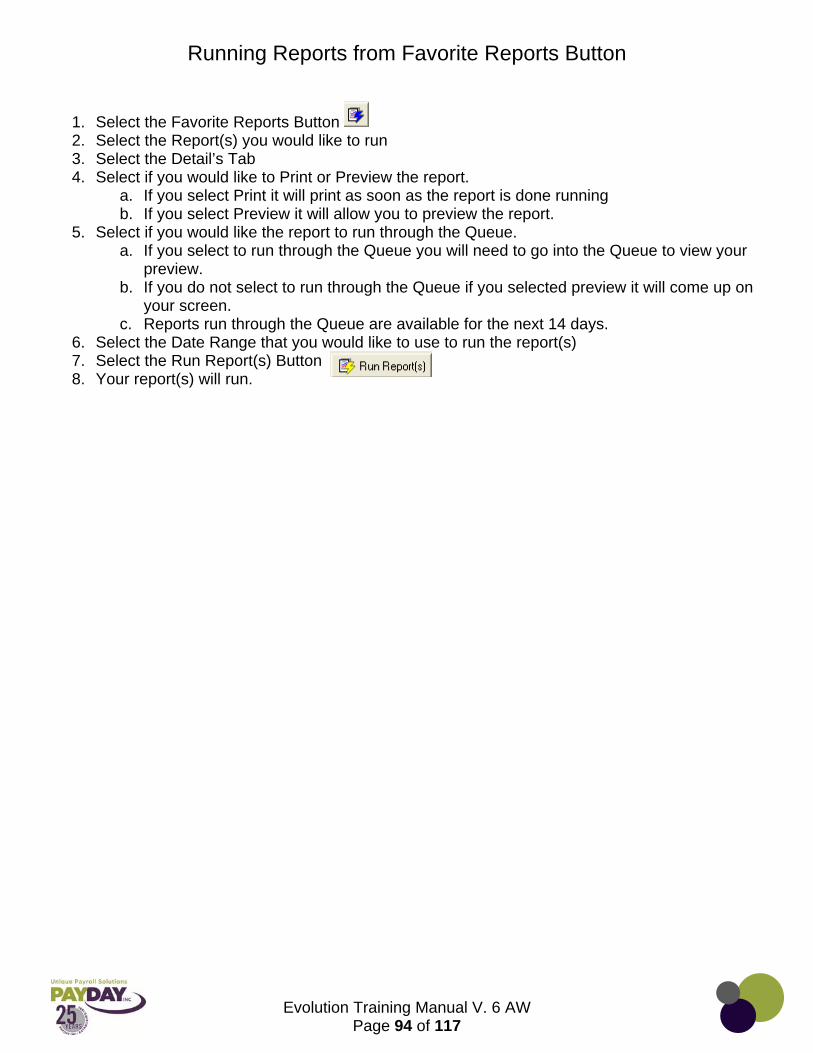
Evolution Training Manual V. 6 AW
Page 94 of 117
Running Reports from Favorite Reports Button
1. Select the Favorite Reports Button 2. Select the Report(s) you would like to run 3. Select the Detail’s Tab 4. Select if you would like to Print or Preview the report.
a. If you select Print it will print as soon as the report is done running b. If you select Preview it will allow you to preview the report.
5. Select if you would like the report to run through the Queue. a. If you select to run through the Queue you will need to go into the Queue to view your
preview. b. If you do not select to run through the Queue if you selected preview it will come up on
your screen. c. Reports run through the Queue are available for the next 14 days.
6. Select the Date Range that you would like to use to run the report(s) 7. Select the Run Report(s) Button 8. Your report(s) will run.
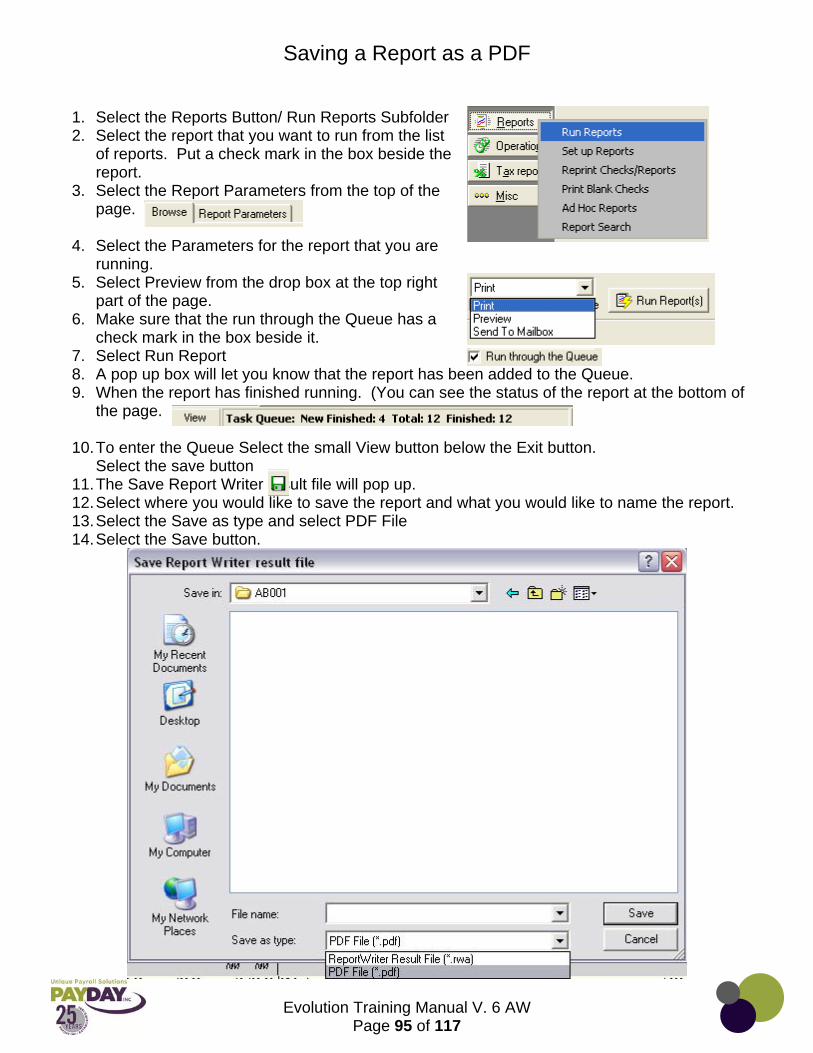
Evolution Training Manual V. 6 AW
Page 95 of 117
Saving a Report as a PDF
1. Select the Reports Button/ Run Reports Subfolder 2. Select the report that you want to run from the list
of reports. Put a check mark in the box beside the report.
3. Select the Report Parameters from the top of the page.
4. Select the Parameters for the report that you are
running. 5. Select Preview from the drop box at the top right
part of the page. 6. Make sure that the run through the Queue has a
check mark in the box beside it. 7. Select Run Report 8. A pop up box will let you know that the report has been added to the Queue. 9. When the report has finished running. (You can see the status of the report at the bottom of
the page.
10. To enter the Queue Select the small View button below the Exit button. Select the save button
11. The Save Report Writer result file will pop up. 12. Select where you would like to save the report and what you would like to name the report. 13. Select the Save as type and select PDF File 14. Select the Save button.
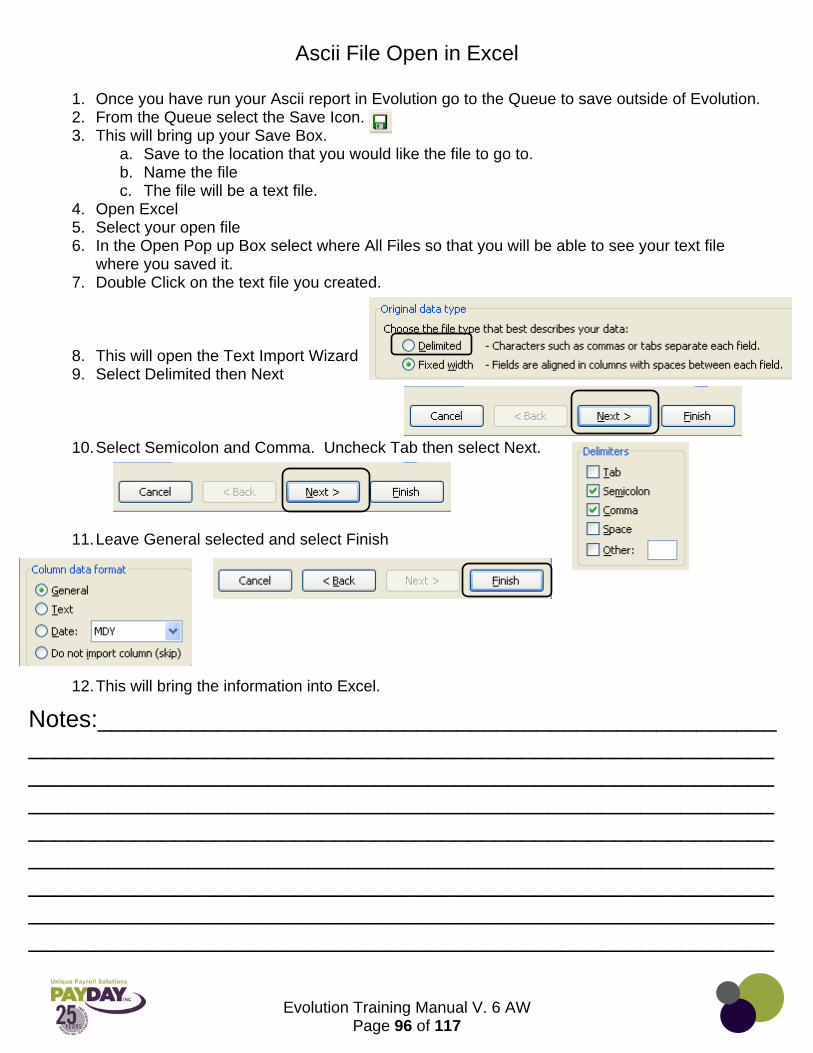
Evolution Training Manual V. 6 AW
Page 96 of 117
Ascii File Open in Excel
1. Once you have run your Ascii report in Evolution go to the Queue to save outside of Evolution. 2. From the Queue select the Save Icon. 3. This will bring up your Save Box.
a. Save to the location that you would like the file to go to. b. Name the file c. The file will be a text file.
4. Open Excel 5. Select your open file 6. In the Open Pop up Box select where All Files so that you will be able to see your text file
where you saved it. 7. Double Click on the text file you created.
8. This will open the Text Import Wizard 9. Select Delimited then Next
10. Select Semicolon and Comma. Uncheck Tab then select Next.
11. Leave General selected and select Finish
12. This will bring the information into Excel.
Notes:___________________________________________________________________________________________________________________________________________________________________________________________________________________________________________________________________________________________________________________________________________________________________________________________________________________________________________________________________________________________________________________

Evolution Training Manual V. 6 AW
Page 97 of 117
Re-Printing Check Stubs
1. Go to Reports – Reprint Checks/Reports
2. From the Browse Tab change the Check Form and Misc Check Form to show Check Letter Stub Only (New)
3. The Destination needs to be Print 4. Select the check date that you need to reprint the check stub for in the list below 5. In the Payroll Check Tab Select the check (if you need more than one check hold your CTRL
Key on your keyboard) needed. Hit your Plus Sign at the top of the page.
6. This box will pop up Select Yes 7. You will be notified that it has been sent to the Queue select
OK
8. Once it has finished running in the task Queue (status seen at the bottom of your page) you may enter the Queue by selecting the View Button under the Exit button
9. You can reprint the check stubs by select the reprint checks button at the bottom of the Queue

Evolution Training Manual V. 6 AW
Page 98 of 117
Ad Hoc Reports
1. When using Ad Hoc Reports you will be manipulating information that is specific to your company. There are many areas in Ad Hoc where you will need to spend time becoming familiar with what is available to you based on how your company is set up in the Evolution system.
2. To navigate to the Ad Hoc Reports you will select the Reports side button.
3. You will then select the Ad Hoc Reports sub folder
4. Now while in your company you will select the green plus sign at the top of your Navigational Bar. If not automatically directed to the details tab select the details tab.
5. Enter in the title of your report in the Description box 6. You will select the type of report that you are creating
from the report drop box, and this will allow you different information to pull from. If you are creating a report that will just have employee information and not need any payroll dates or information you can select Employee. If you are creating a report that is going to need any Payroll information you will need to select Payroll.
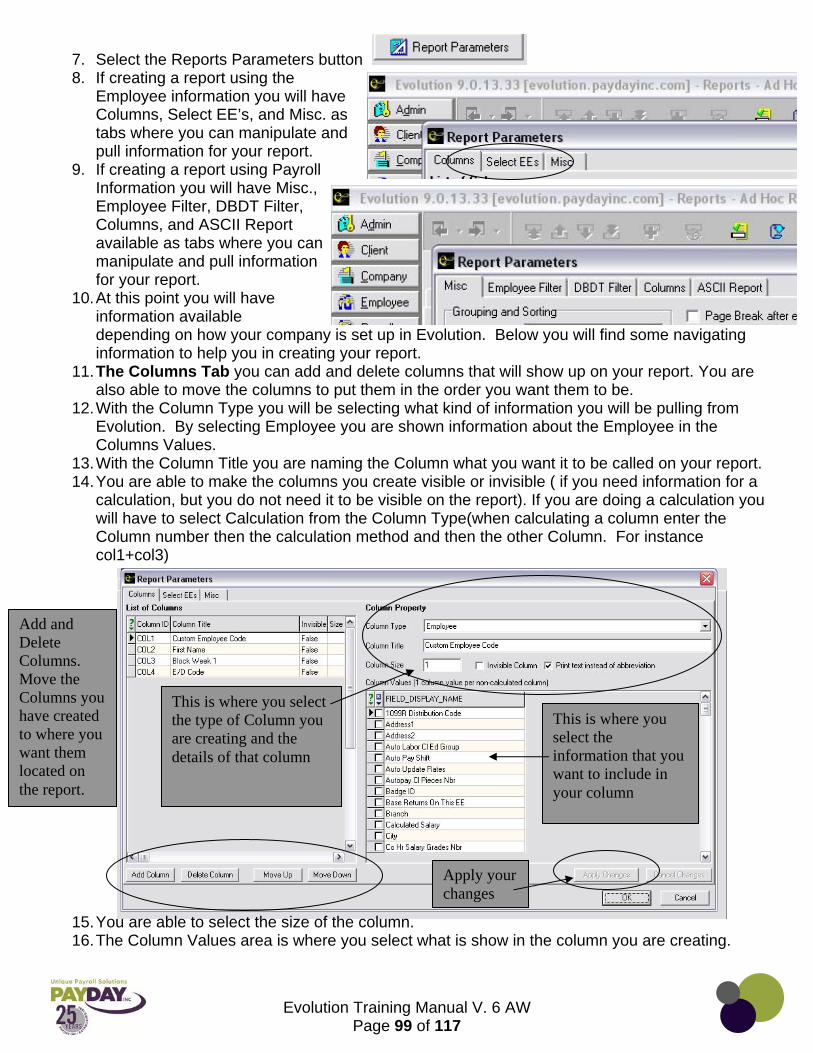
Evolution Training Manual V. 6 AW
Page 99 of 117
7. Select the Reports Parameters button 8. If creating a report using the
Employee information you will have Columns, Select EE’s, and Misc. as tabs where you can manipulate and pull information for your report.
9. If creating a report using Payroll Information you will have Misc., Employee Filter, DBDT Filter, Columns, and ASCII Report available as tabs where you can manipulate and pull information for your report.
10. At this point you will have information available depending on how your company is set up in Evolution. Below you will find some navigating information to help you in creating your report.
11. The Columns Tab you can add and delete columns that will show up on your report. You are also able to move the columns to put them in the order you want them to be.
12. With the Column Type you will be selecting what kind of information you will be pulling from Evolution. By selecting Employee you are shown information about the Employee in the Columns Values.
13. With the Column Title you are naming the Column what you want it to be called on your report. 14. You are able to make the columns you create visible or invisible ( if you need information for a
calculation, but you do not need it to be visible on the report). If you are doing a calculation you will have to select Calculation from the Column Type(when calculating a column enter the Column number then the calculation method and then the other Column. For instance col1+col3)
15. You are able to select the size of the column. 16. The Column Values area is where you select what is show in the column you are creating.
Add and Delete Columns. Move the Columns you have created to where you want them located on the report.
This is where you select the information that you want to include in your column
This is where you select the type of Column you are creating and the details of that column
Apply your changes
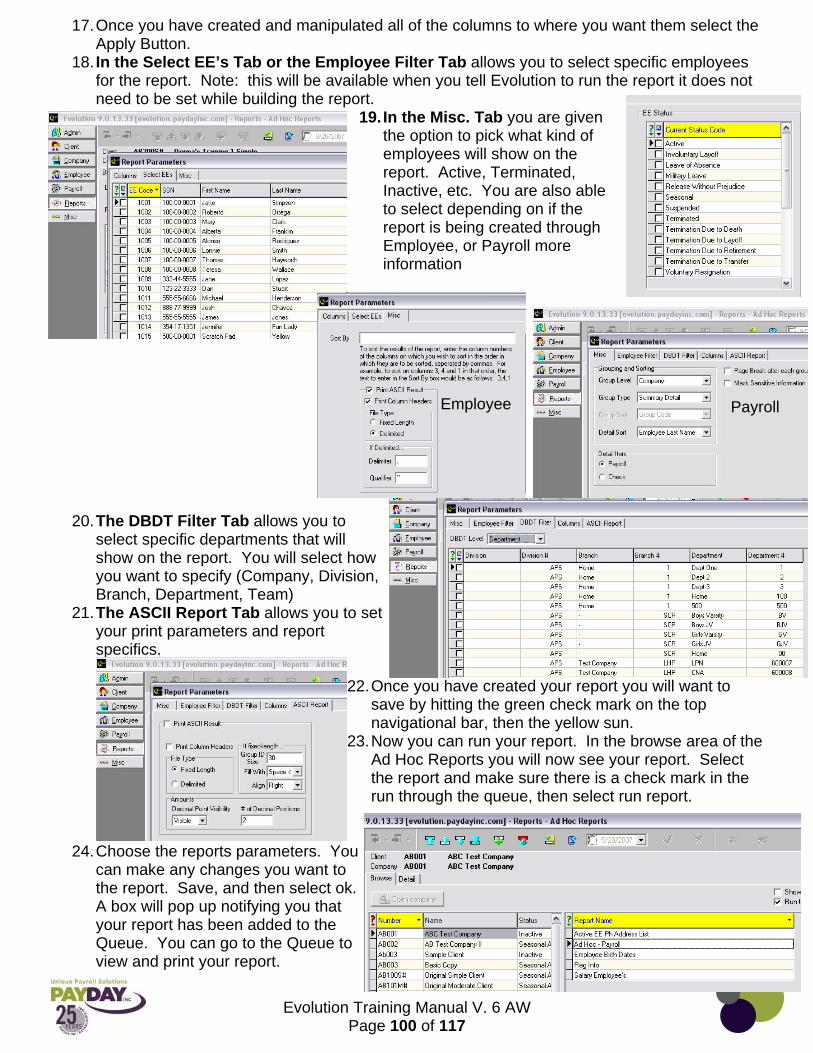
Evolution Training Manual V. 6 AW
Page 100 of 117
17. Once you have created and manipulated all of the columns to where you want them select the Apply Button.
18. In the Select EE’s Tab or the Employee Filter Tab allows you to select specific employees for the report. Note: this will be available when you tell Evolution to run the report it does not need to be set while building the report.
19. In the Misc. Tab you are given the option to pick what kind of employees will show on the report. Active, Terminated, Inactive, etc. You are also able to select depending on if the report is being created through Employee, or Payroll more information
Available with Both
20. The DBDT Filter Tab allows you to select specific departments that will show on the report. You will select how you want to specify (Company, Division, Branch, Department, Team)
21. The ASCII Report Tab allows you to set your print parameters and report specifics.
22. Once you have created your report you will want to
save by hitting the green check mark on the top navigational bar, then the yellow sun.
23. Now you can run your report. In the browse area of the Ad Hoc Reports you will now see your report. Select the report and make sure there is a check mark in the run through the queue, then select run report.
24. Choose the reports parameters. You can make any changes you want to the report. Save, and then select ok. A box will pop up notifying you that your report has been added to the Queue. You can go to the Queue to view and print your report.
Payroll
Employee Payroll

Evolution Training Manual V. 6 AW
Page 101 of 117
Running a Query
1. Queries are a type of report that can be exported to Excel. 2. Clients can have a Query emailed to them so that they can run the Query. 3. To run a Query select the Misc. button, then the Query Builder Subfolder. 4. Select Open Existing Query. 5. Select where you have the Query Saved.
6. Double Click on the Query you want to run. 7. The report will run and show the results in Evolution. 8. To Export the results to Excel select the Export Result To Excel Button.
9. Select where you would like the report to be saved to. 10. Go to where you saved the file and double click on the file to open. The file will be a SYLK file,
but you can save as an excel file once you have gone into the file by selecting file/ save as.
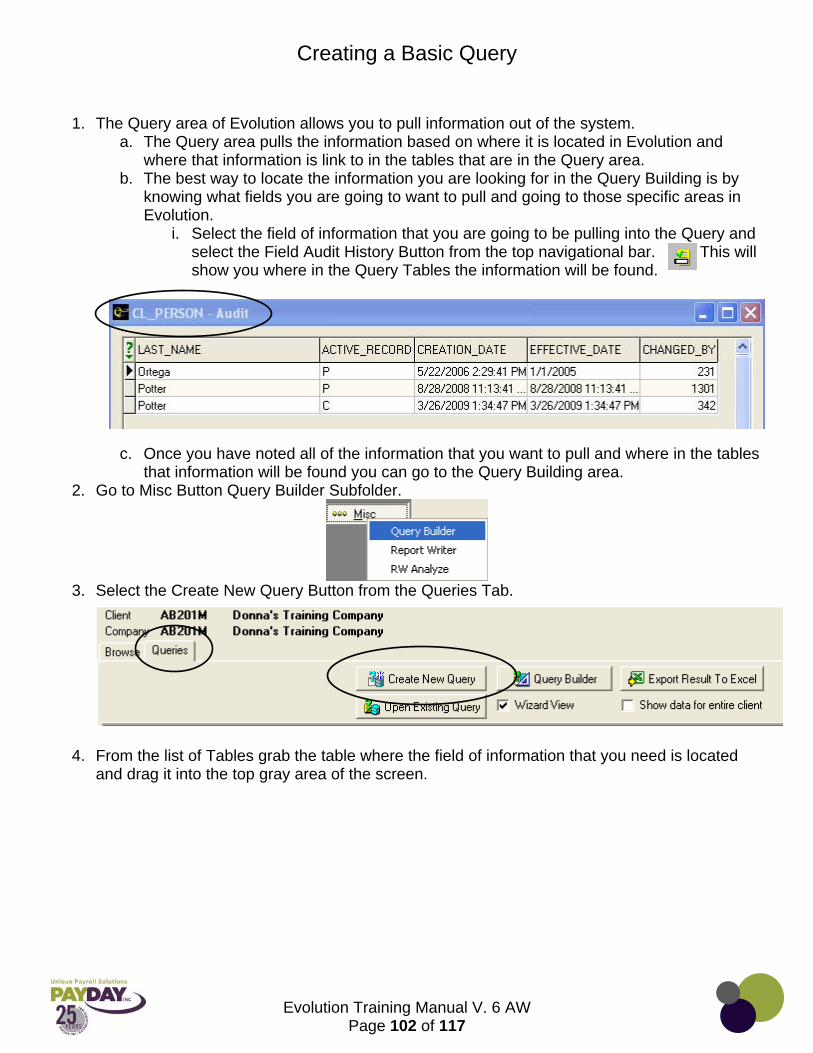
Evolution Training Manual V. 6 AW
Page 102 of 117
Creating a Basic Query
1. The Query area of Evolution allows you to pull information out of the system. a. The Query area pulls the information based on where it is located in Evolution and
where that information is link to in the tables that are in the Query area. b. The best way to locate the information you are looking for in the Query Building is by
knowing what fields you are going to want to pull and going to those specific areas in Evolution.
i. Select the field of information that you are going to be pulling into the Query and select the Field Audit History Button from the top navigational bar. This will show you where in the Query Tables the information will be found.
c. Once you have noted all of the information that you want to pull and where in the tables that information will be found you can go to the Query Building area.
2. Go to Misc Button Query Builder Subfolder.
3. Select the Create New Query Button from the Queries Tab.
4. From the list of Tables grab the table where the field of information that you need is located and drag it into the top gray area of the screen.

Evolution Training Manual V. 6 AW
Page 103 of 117
5. As you drag different tables to the middle the Query Builder will create links between the tables.

Evolution Training Manual V. 6 AW
Page 104 of 117
6. By selecting a field and dragging it down to the bottom of the table where it say’s and you will get a condition constructor box. You can select the compare operation, and then enter information based on what you are comparing.
7. Once you have entered all the fields and conditions that you want in your Query select the run button.
8. Sorting can be done by going to the Sorting Tab at the bottom of the page. Right Click and select Add.
9. By selecting the add in the sorting you will see a sort field editor pop up. Select the field that you would like to sort by first and then the order to sort by. You can continue to add sorting until you are satisfied with the results.
a. You will need to re run the Query results to see the changes
10. You can save your Query to a file by selecting the floppy disk icon.

Evolution Training Manual V. 6 AW
Page 105 of 117
Other

Evolution Training Manual V. 6 AW
Page 106 of 117
Buttons Within Evolution
1. Located in the Employee/Employee screen
a. Check Finder When you select this button it takes you to the check finder. The check finder will show you checks for the dates you select for the employee that you are on when you select the check finder.
b. Tax & Check line Calculator When the Tax & Check line Calculator is selected it taken you to a calculator for the employee that you are currently in.
You can select the begin and end
check date that you want to see
The filter button shows the checks once the dates are selected. The show button shows the check you select once it is highlighted.
While in the Tax Calculator you can select the Earnings or Deductions that you need to be in the check. Then enter the amount for those E/D’s. You can select how the taxes are to be handled. You can even Gross up a check by check the Net to Gross box and putting in the Net Amount.
Enter the E/D’s
Select the net to Gross box and enter the Net
Control the taxes here.
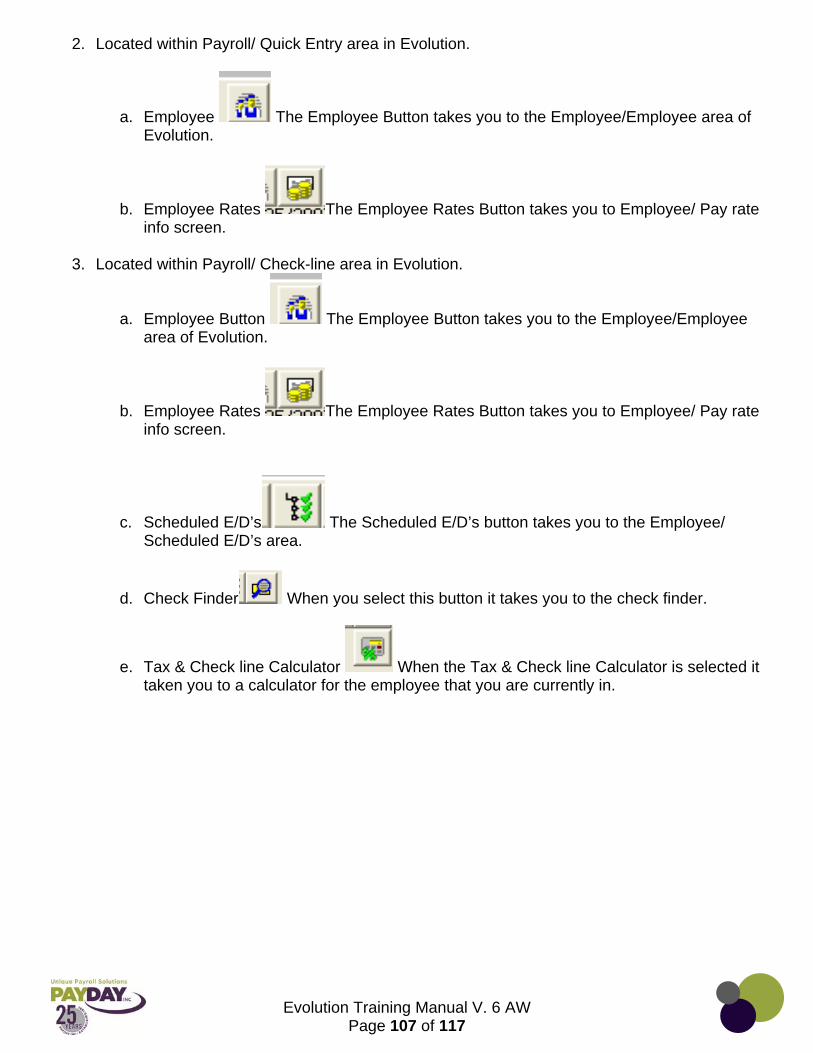
Evolution Training Manual V. 6 AW
Page 107 of 117
2. Located within Payroll/ Quick Entry area in Evolution.
a. Employee The Employee Button takes you to the Employee/Employee area of Evolution.
b. Employee Rates The Employee Rates Button takes you to Employee/ Pay rate info screen.
3. Located within Payroll/ Check-line area in Evolution.
a. Employee Button The Employee Button takes you to the Employee/Employee area of Evolution.
b. Employee Rates The Employee Rates Button takes you to Employee/ Pay rate info screen.
c. Scheduled E/D’s The Scheduled E/D’s button takes you to the Employee/ Scheduled E/D’s area.
d. Check Finder When you select this button it takes you to the check finder.
e. Tax & Check line Calculator When the Tax & Check line Calculator is selected it taken you to a calculator for the employee that you are currently in.

Evolution Training Manual V. 6 AW
Page 108 of 117
Evolution Shortcut Keys
General
Action Button Shortcut Key Check Finder F12
Moves the insertion point from tab to tab on a window
N/A CTRL+TAB
Show contents of drop-down menu N/A ALT+DOWN ARROW
Tax Calculator F9
Field Value Locator N/A CTRL+ F
Field Filter
CTRL+ R
Change to menu item N/A ALT+ _
Export “Grid” within Evolution N/A CTRL+E
Employee & Payroll
Action Button Shortcut Key Select employee by name N/A CTRL+ F12
Select employee by number N/A CTRL+ F11
Move to next employee and save changes to current employee
PLUS SIGN (+)
Move to previous employee and save current employee changes
Asterisk (*)
Get Employee YTDs
N/A F3
Move insertion point to the first employee
N/A ALT+HOME
Move insertion point to the last employee
N/A ALT+ END
Create a new employee/check N/A ALT+ INSERT
Move from employee details tab to the browse tab of that employee's scheduled E/D/s window.
N/A
Move from the employee's scheduled E/D window to the browse tab of the Employee window.
N/A
Evolution Training Manual V. 6 AW
Page 109 of 117
Payroll
Action Shortcut Key Move from Payroll- Batch window CTRL+ ALT+ LEFT ARROW
Move from Payroll-Checks window CTRL+ ALT+ RIGHT ARROW
Create a Payroll or Batch ALT+ INSERT then F10 Payroll- Payroll-Batch/Checks
Action Shortcut Key Delete a check CTRL+DELETE
Add a check INSERT or DOWN ARROW
Move to check lines CTRL+ ENTER Move back to check CTRL+ ALT + LEFT ARROW
Payroll- Payroll- Check lines
Action Shortcut Key Add a check- line INSERT Add a check DOWN ARROW
ALT+ INSERT Delete a check ALT+ DELETE
PLUS SIGN (+) DOWN ARROW
Move to Quick Entry CTRL+ ALT+ LEFT ARROW Add Copy of check line CTRL+D
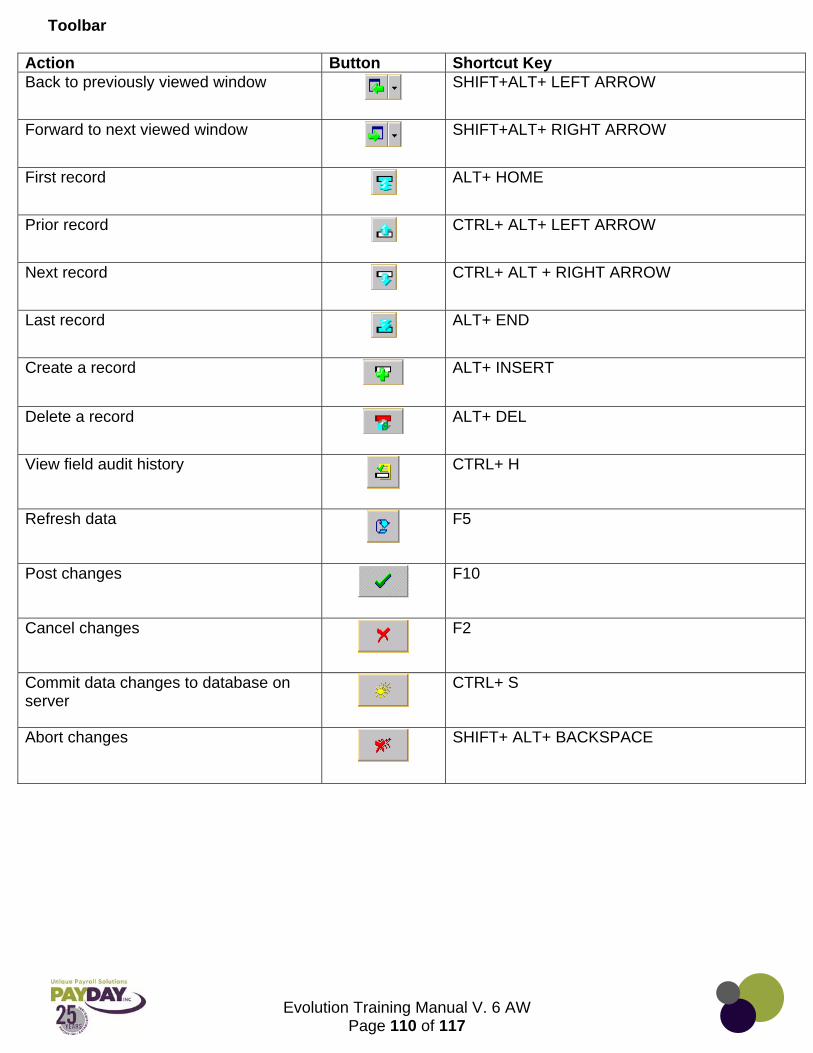
Evolution Training Manual V. 6 AW
Page 110 of 117
Toolbar
Action Button Shortcut Key Back to previously viewed window
SHIFT+ALT+ LEFT ARROW
Forward to next viewed window
SHIFT+ALT+ RIGHT ARROW
First record
ALT+ HOME
Prior record
CTRL+ ALT+ LEFT ARROW
Next record
CTRL+ ALT + RIGHT ARROW
Last record
ALT+ END
Create a record
ALT+ INSERT
Delete a record
ALT+ DEL
View field audit history
CTRL+ H
Refresh data
F5
Post changes
F10
Cancel changes
F2
Commit data changes to database on server
CTRL+ S
Abort changes
SHIFT+ ALT+ BACKSPACE

Evolution Training Manual V. 6 AW
Page 111 of 117
Payroll Filters
1. You may want to add a Payroll Filter to your company for instances when you have more than one batch in your payroll. Creating a Payroll Filter will allow you to identify the batch’s in your payroll. For instance you may want to create a batch with manual checks in it. You could use a filter called manual checks to identify that Batch.
2. To add a Payroll Filter to your Company go to the Company side Button 3. Now you will want to select the Payroll Defaults Subfolder. Then select
Payroll Filters.
4. Select the Detail Tab at the top of the page.
5. Select the green plus sign
6. Enter the name of the Filter that you are creating on the Name line at the bottom of the page.
7. Select the green check mark and then the Yellow Sun to save your work. 8. If you want to specify only a specific Division/Branch/Department/Team or Pay Group to come
into the payroll you can do so by selecting from the drop boxes below the Filter Name. 9. If you have any questions while creating a Filter contact your CSR for further guidance. 10. You can continue to select the green plus sign to add filters for the Batches that you create.
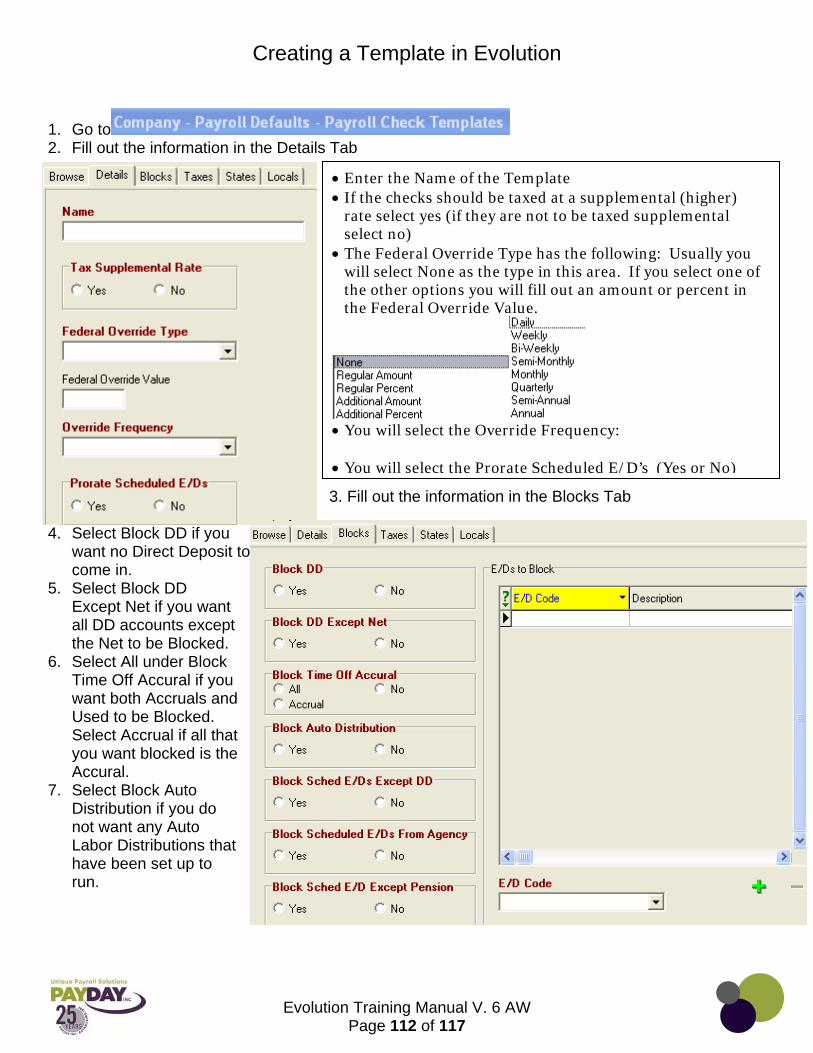
Evolution Training Manual V. 6 AW
Page 112 of 117
Creating a Template in Evolution
1. Go to 2. Fill out the information in the Details Tab
3. Fill out the information in the Blocks Tab 4. Select Block DD if you
want no Direct Deposit to come in.
5. Select Block DD Except Net if you want all DD accounts except the Net to be Blocked.
6. Select All under Block Time Off Accural if you want both Accruals and Used to be Blocked. Select Accrual if all that you want blocked is the Accural.
7. Select Block Auto Distribution if you do not want any Auto Labor Distributions that have been set up to run.
Enter the Name of the Template If the checks should be taxed at a supplemental (higher)
rate select yes (if they are not to be taxed supplemental select no)
The Federal Override Type has the following: Usually you will select None as the type in this area. If you select one of the other options you will fill out an amount or percent in the Federal Override Value.
You will select the Override Frequency: You will select the Prorate Scheduled E/D’s (Yes or No)
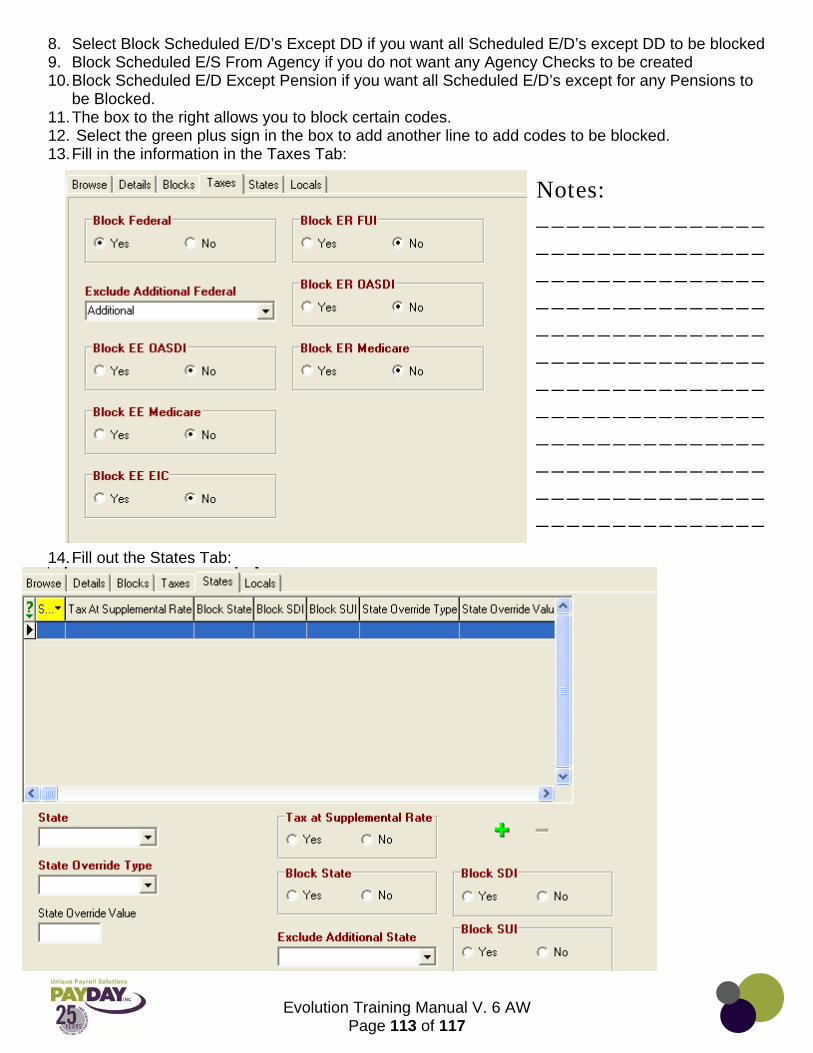
Evolution Training Manual V. 6 AW
Page 113 of 117
8. Select Block Scheduled E/D’s Except DD if you want all Scheduled E/D’s except DD to be blocked 9. Block Scheduled E/S From Agency if you do not want any Agency Checks to be created 10. Block Scheduled E/D Except Pension if you want all Scheduled E/D’s except for any Pensions to
be Blocked. 11. The box to the right allows you to block certain codes. 12. Select the green plus sign in the box to add another line to add codes to be blocked. 13. Fill in the information in the Taxes Tab:
14. Fill out the States Tab:
Notes: ____________________________________________________________________________________________________________________________________________________________________________________

Evolution Training Manual V. 6 AW
Page 114 of 117
Notes:___________________________________________________________________________________________________________________________________________________________________________________________________________________________________________________________________________________________________________________________________________________________________________________________________________________________________________________________________________________________________________________________________________________________________________________________________________________________________________________________________________________________________________________________________________________________________________________________________________________________________________________________________________________________________________________________________________________________________________________________________________________________________________________________________________________________________________________________________________________________________________________________________________________________________________________________________________________________________________________________________________________________________________________________________________________________________________________________________________________________________________________________________________________________________________________________________________________________________________________________________________________________________________________________________________________________________________________________________________________________________________________________________________________________________________________

Evolution Training Manual V. 6 AW
Page 115 of 117
Notes:___________________________________________________________________________________________________________________________________________________________________________________________________________________________________________________________________________________________________________________________________________________________________________________________________________________________________________________________________________________________________________________________________________________________________________________________________________________________________________________________________________________________________________________________________________________________________________________________________________________________________________________________________________________________________________________________________________________________________________________________________________________________________________________________________________________________________________________________________________________________________________________________________________________________________________________________________________________________________________________________________________________________________________________________________________________________________________________________________________________________________________________________________________________________________________________________________________________________________________________________________________________________________________________________________________________________________________________________________________________________________________________________________________________________________________________

Evolution Training Manual V. 6 AW
Page 116 of 117
Notes:___________________________________________________________________________________________________________________________________________________________________________________________________________________________________________________________________________________________________________________________________________________________________________________________________________________________________________________________________________________________________________________________________________________________________________________________________________________________________________________________________________________________________________________________________________________________________________________________________________________________________________________________________________________________________________________________________________________________________________________________________________________________________________________________________________________________________________________________________________________________________________________________________________________________________________________________________________________________________________________________________________________________________________________________________________________________________________________________________________________________________________________________________________________________________________________________________________________________________________________________________________________________________________________________________________________________________________________________________________________________________________________________________________________________________________________

Evolution Training Manual V. 6 AW
Page 117 of 117
Notes:___________________________________________________________________________________________________________________________________________________________________________________________________________________________________________________________________________________________________________________________________________________________________________________________________________________________________________________________________________________________________________________________________________________________________________________________________________________________________________________________________________________________________________________________________________________________________________________________________________________________________________________________________________________________________________________________________________________________________________________________________________________________________________________________________________________________________________________________________________________________________________________________________________________________________________________________________________________________________________________________________________________________________________________________________________________________________________________________________________________________________________________________________________________________________________________________________________________________________________________________________________________________________________________________________________________________________________________________________________________________________________________________________________________________________________________