EVANNEX Carbon Fiber Mirror Covers Installation for Tesla Model S
Upload
evannex-aftermarket-tesla-accessoriesCategory
view
10.559download
1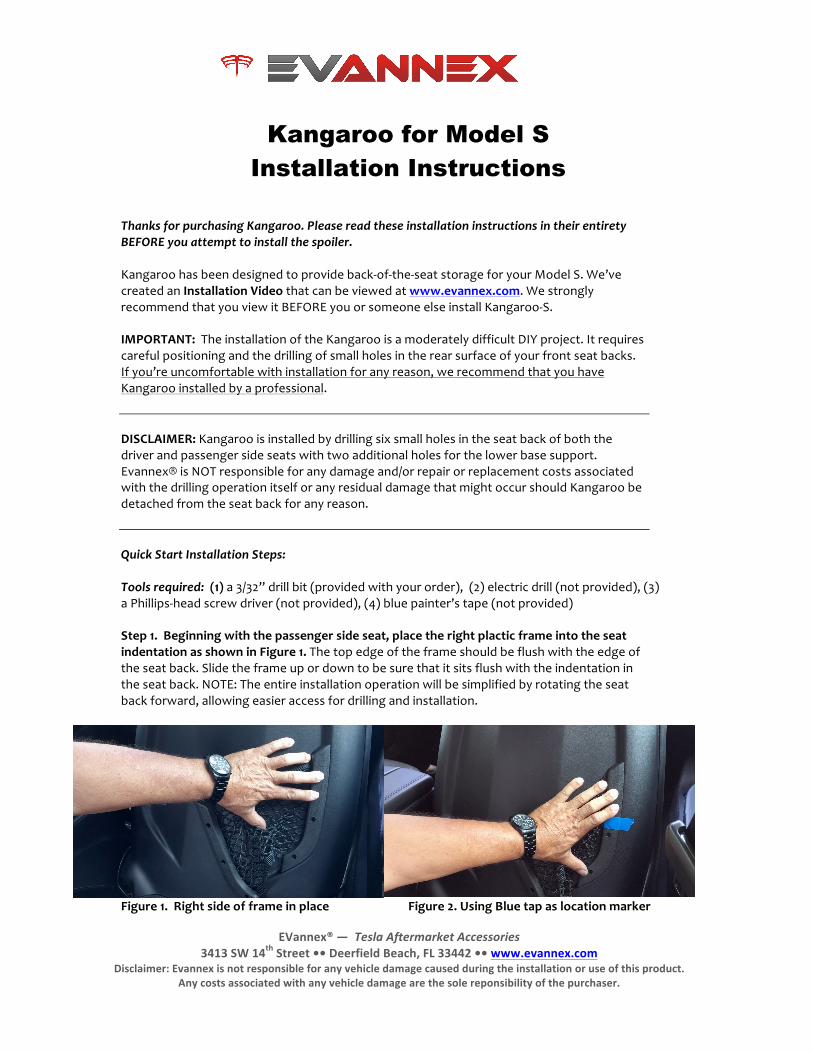
EVannex®—TeslaAftermarketAccessories3413SW14thStreet••DeerfieldBeach,FL33442••www.evannex.com
Disclaimer:Evannexisnotresponsibleforanyvehicledamagecausedduringtheinstallationoruseofthisproduct.Anycostsassociatedwithanyvehicledamagearethesolereponsibilityofthepurchaser.
Kangaroo for Model S Installation Instructions
ThanksforpurchasingKangaroo.PleasereadtheseinstallationinstructionsintheirentiretyBEFOREyouattempttoinstallthespoiler.Kangaroohasbeendesignedtoprovideback-of-the-seatstorageforyourModelS.We’vecreatedanInstallationVideothatcanbeviewedatwww.evannex.com.WestronglyrecommendthatyouviewitBEFOREyouorsomeoneelseinstallKangaroo-S.IMPORTANT:TheinstallationoftheKangarooisamoderatelydifficultDIYproject.Itrequirescarefulpositioningandthedrillingofsmallholesintherearsurfaceofyourfrontseatbacks.Ifyou’reuncomfortablewithinstallationforanyreason,werecommendthatyouhaveKangarooinstalledbyaprofessional.DISCLAIMER:Kangarooisinstalledbydrillingsixsmallholesintheseatbackofboththedriverandpassengersideseatswithtwoadditionalholesforthelowerbasesupport.Evannex®isNOTresponsibleforanydamageand/orrepairorreplacementcostsassociatedwiththedrillingoperationitselforanyresidualdamagethatmightoccurshouldKangaroobedetachedfromtheseatbackforanyreason.QuickStartInstallationSteps:Toolsrequired:(1)a3/32”drillbit(providedwithyourorder),(2)electricdrill(notprovided),(3)aPhillips-headscrewdriver(notprovided),(4)bluepainter’stape(notprovided)Step1.Beginningwiththepassengersideseat,placetherightplacticframeintotheseatindentationasshowninFigure1.Thetopedgeoftheframeshouldbeflushwiththeedgeoftheseatback.Slidetheframeupordowntobesurethatitsitsflushwiththeindentationintheseatback.NOTE:Theentireinstallationoperationwillbesimplifiedbyrotatingtheseatbackforward,allowingeasieraccessfordrillingandinstallation.
Figure1.Rightsideofframeinplace Figure2.UsingBluetapaslocationmarker
EVannex®—TeslaAftermarketAccessories3413SW14thStreet••DeerfieldBeach,FL33442••www.evannex.com
Disclaimer:Evannexisnotresponsibleforanyvehicledamagecausedduringtheinstallationoruseofthisproduct.Anycostsassociatedwithanyvehicledamagearethesolereponsibilityofthepurchaser.
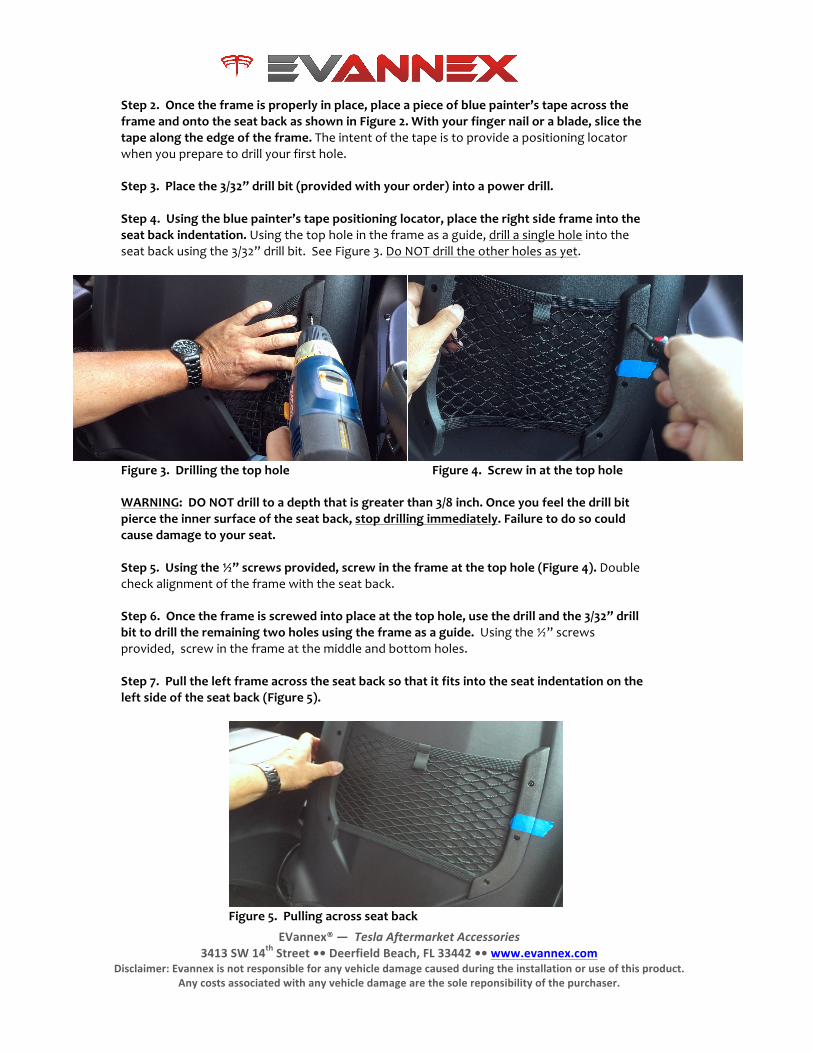
Step2.Oncetheframeisproperlyinplace,placeapieceofbluepainter’stapeacrosstheframeandontotheseatbackasshowninFigure2.Withyourfingernailorablade,slicethetapealongtheedgeoftheframe.Theintentofthetapeistoprovideapositioninglocatorwhenyoupreparetodrillyourfirsthole.Step3.Placethe3/32”drillbit(providedwithyourorder)intoapowerdrill.Step4.Usingthebluepainter’stapepositioninglocator,placetherightsideframeintotheseatbackindentation.Usingthetopholeintheframeasaguide,drillasingleholeintotheseatbackusingthe3/32”drillbit.SeeFigure3.DoNOTdrilltheotherholesasyet.
Figure3.Drillingthetophole Figure4.ScrewinatthetopholeWARNING:DONOTdrilltoadepththatisgreaterthan3/8inch.Onceyoufeelthedrillbitpiercetheinnersurfaceoftheseatback,stopdrillingimmediately.Failuretodosocouldcausedamagetoyourseat.Step5.Usingthe½”screwsprovided,screwintheframeatthetophole(Figure4).Doublecheckalignmentoftheframewiththeseatback.Step6.Oncetheframeisscrewedintoplaceatthetophole,usethedrillandthe3/32”drillbittodrilltheremainingtwoholesusingtheframeasaguide.Usingthe½”screwsprovided,screwintheframeatthemiddleandbottomholes.Step7.Pulltheleftframeacrosstheseatbacksothatitfitsintotheseatindentationontheleftsideoftheseatback(Figure5).
Figure5.Pullingacrossseatback

EVannex®—TeslaAftermarketAccessories3413SW14thStreet••DeerfieldBeach,FL33442••www.evannex.com
Disclaimer:Evannexisnotresponsibleforanyvehicledamagecausedduringtheinstallationoruseofthisproduct.Anycostsassociatedwithanyvehicledamagearethesolereponsibilityofthepurchaser.
RepeatSteps2through6fortheleftframepiece.OnceKangarooisfullyattachedtotheseatback,proceedtoStep8.Step8.Usingapieceofbluepainter’stape,markahorizonallineatthebottomedgeofthelowerelasticband(Figure6).Thiswillbecomethepositioninglinefortheloweredgeofthelowerbasesupport.WARNING:DONOTdrillthroughthebottomelasticband!Anyattempttodrillthroughthebandwillcauseittotearandpermanentlydamageyourproduct.Evannexcannot
Figure6.BluetapeforLowerBaseSupport Figure7.DrillingwithlowerbandpulledupStep9.PulltheKangaroo’sbottomelasticbandupsothatisoutofthewayforsubsequentdrilling,andthenaligntheplasticlowerbasesupportwiththetopedgeofthebluetapeyoupositioninStep8.Alsoaligntheendsofthelowerbasesupportwiththetwoverticalcreasesintheseatback.Onceproperlypositioned,drilltwo3/32”holesusingthelowerbasesupportasatemplate.Step10.Threadascrewthroughoneoftheholesandplacethelowerbasesupportoverthebottomelasticband(pullingthebanddownjustslightly).Onceallarealigned,allowthescrewtiptopiercetheelasticband,andbyhand,threaditthroughtheband.Oncethrough,thepointofthescrewcanbeusedtolocatetheholeyoudrilled.Manuallytighten(butdonotover-tighten)thescrewwithyourscrewdriver.Step11.RepeatStep10fortheotherhole.Yourinstallationiscomplete.