esthetic result or unfavorable implant ... - Paltop dentalof implant, jaw, bone or prosthesis,...
Spade Step Drills Final Drills 2.0 1.5 2.4 2.0 3.2 2.4 3.8 3.2 3.25 3.75 4.2 5.0 Speed RPM1200- 1500 900- 1100 700- 900 500- 700 400- 600 200 - 400 Prosthetic Torque Value Healing Cap 15 PEEK Abutment 10-15 Multi-Unit Abutments 30-35 Single-Unit Abutments 30-35 Equator Abutments 30-35 Ball Abutments 30-35 Multi Unit Screw 20-25 Single-Unit Screw 20-25 Cover Screw 15 SP Abutment Screw 30-35 NP Abutment Screw 25-30 WP Abutment Screw 30-35 PCA Abutment Screw 25 Warning e following descriptions are insufficient to allow immediate use of the Paltop Dental Implant System. Knowledge of dental implantology and instruction in the handling of the Paltop Dental Implant System provided by an operator with the relevant experience are always necessary. e Paltop Dental Implant System has not been evaluated for safety and compatibility in the MR environment. e Paltop Dental Implant System has not been tested for heating or migration in the MR environment.Do not use if package is damaged. Disclaimer of liability is product is part of the Paltop Dental Implant System and may only be used in conjunction with the corresponding original components and instruments according to Paltop LTD. instructions and recommendations. Use of products and tools made by third parties detracts om the efficient functioning of the Paltop Dental Implant System and will void any warranty or other obligation, expressed or implied by Paltop LTD. Advice on the use of our products is provided verbally, in writing, by electronic media or in demonstrations. It does not relieve the user of Paltop LTD. products of the responsibility of determining whether or not any product is suitable for the intended purpose, indications and procedures. Use of this product is not within the control of Paltop LTD. it is the responsibility of the user. All liability for loss or damage aributable to the use of this product is excluded. Within the amework of the Conditions at Sale and Delivery of Paltop LTD, we warrant the quality of the Paltop Dental Implant System. Availability Some items in the Paltop Dental Implant System are not available in all countries. Copyright and trademarks Paltop and/or other products and logos om Paltop that are mentioned here are trademarks or registered trademarks of Paltop LTD. and/or its affiliates. Paltop Dental Implants Paltop Dental Implants Models are: Advanced Dental Implant,Advanced+ Dental Implant,Dynamic Dental Implant,Dynamic Conical Dental Implant,PAI Dental Implant, PCA Dental Implant 1. Description of the Paltop surfaces Paltop dental implants are made of biocompatible TI6AL4VELI [Ti- tanium Grade 5] and have a large grit sandblasted, acid-etched surface. 2. Indications and Contraindications e Paltop Dental Implant System is indicated for use in surgical and restorative applications for placement in the bone of the upper or lower jaw to provide support for prosthetic devices, such as artificial teeth, in order to restore the patient’s chewing function. e Paltop Dental Implant System is indicated also for immediate loading when good primary stability is achieved and with appropriate occlusal loading. e Narrow Implant is indicated for use in surgical and restorative applications for placement in the mandibular central, lateral incisor and maxillary lateral incisor regions of partially edentulous jaws where the horizontal space is limited by the adjacent teeth and roots, to provide support for prosthetic devices, such as artificial teeth, in order to restore the patient’s chewing function. e Paltop Narrow Implant is indicated also for immediate loading when good primary stability is achieved and with appropriate occlusal loading. Contraindications Serious internal medical problems, bone metabolism disturbances, uncontrolled bleeding disorders, inadequate wound healing capacity, poor oral hygiene, maxillary and mandibular growth not completed, poor general state of health, uncooperative, unmotivated patient, drug or alcohol abuse, psychoses, prolonged therapy-resistant functional disorders, xerostomia, weakened immune system, illnesses requiring periodic use of steroids, titanium allergy, uncontrollable endocrine disorders. Relative contraindications Previously irradiated bone, diabetes mellitus, anticoagulation drugs / hemorrhagic diatheses, bruxism, parafunctional habits, unfavorable anatomic bone conditions, tobacco abuse, uncontrolled periodontitis, temporomandibular joint disorders, treatable pathologic diseases of the jaw and changes in the oral mucosa, pregnancy, inadequate oral hygiene. Local contraindications Inadequate bone volume and/or quality, local root remnants, in whom adequate sizes, numbers or desirable position of implants are not reachable to achieve safe support of functional or eventually parafunctional loads. 3. Principles of treatment planning e surgical part of implant treatment must be preceded by a comprehensive patient evaluation, preoperative diagnostics and therapy planning. Inadequate treatment planning may cause implant loss. General precautions One hundred percent implant success can never be guaranteed. With respect to pediatric patients, routine treatment is not recommended until the end of the jaw bone growth has been properly documented. Pre- operative hard tissue or soſt tissue deficits may yield a compromised esthetic result or unfavorable implant angulation. e device is intended for single use only. reuse of the device may cause microbial contamination and loss of performance. In case Short implants are used, clinician should closely monitor patients for any of the following conditions: periimplant bone loss, changes to implant’s response to percussion, or radiographic changes in bone to implant contact along the implant’s length. If the implant shows mobility or greater than 50% bone loss, the implant should be evaluated for possible removal. Precautions Pre-surgery A careful clinical and radiological examination of the patient has to be performed prior to surgery to determine the psychological and physical status of the patient. Special aention has to be given to patients who have localized or systemic factors that could interfere with the healing process of either bone or soſt tissue or the osseointegration process (e.g., cigaree smoking, uncontrolled diabetes, oro-facial radiotherapy, steroid therapy, infections in the neighboring bone). In general, implant placement and prosthetic design must accommodate individual patient conditions. In case of bruxism or unfavorable jaw relationships reappraisal of the treatment option may be considered. Precautions at Surgery Particular caution should be used when placing narrow plaorm implants in the posterior region due to risk of prosthetic overload. Lack of adequate quantity and/or quality of remaining bone, infection and generalized diseases may be potential causes for failure of osseointegration both immediately aſter surgery, or aſter osseointegration is initially achieved. Besides the mandatory precautions for any surgery such as of asepsia, during drilling in the jaw bone one must avoid damage to nerves and vessels by referring to anatomical knowledge and preoperative radiographs. Failure to recognize actual lengths of step/twist drills relative to radiographic measurements or drilling beyond the depth intended can result in permanent injury to nerves or other vital structures, potentially resulting in permanent numbness to the lower lip and chin or leading to hemorrhage in the floor of the mouth. 4. Side-effects and interactions, complications with Paltop implants Immediately aſter insertion of dental implants, activities that demand considerable physical exertion should be avoided. Possible complications following insertion of dental implants are: Temporary symptoms Pain, swelling, phonetic difficulties, gingivitis More persistent symptoms Chronic pain in connection with the dental implant, permanent paresthesia, dysesthesia, loss of maxillary/mandibular ridge bone, localized or systemic infection, oroantral or oronasal fistulae, unfavorably affected adjacent teeth, irreversible damage to adjacent teeth, actures of implant, jaw, bone or prosthesis, esthetic problems, nerve damage, exfoliation, hyperplasia. It is recommended that the dental personnel brief the patients on the precautions to be taken, such as: abstinence om smoking and maintenance of dental hygiene. Adverse events Treatment by means of implants may lead to loss of bone, biologic or mechanical failures including fatigue acture of implants. 5. Placement of an implant aſter preparing the implant bed 5.1 Before the procedure, general contra-indication of the patients medical status should be evaluated clinically and radio graphically. 5.2 Bone quality of the patient should be examined. 5.3 Implant length and diameter should be selected. 5.4 e surgical field should be exposed. 5.5 Using a marking drill an initial drill should be performed. 5.6 e drilling should gradually create a suitable hole into which the implant will be inserted. 5.7 e implant will be inserted into the hole. 5.8 Using hex drives the screw should be removed. 5.9 Cover screw, healing screw or abutments should be applied according to the clinician’s judgment. Do not use a high torque or high speed when inserting the implant (do not exceed 15 rpm). 6. Healing phase for Paltop dental implants 6.1 Immediate restoration of Paltop implants Paltop implants allow, within the scope of indications, immediate restoration in single tooth gaps and in an edentulous or partially dentate jaw. Good primary stability and an appropriate occlusal load are essential. Two or more adjacent implants should be prosthetically connected together. 6.2 Delayed restoration of Paltop implants Delayed restoration is possible aſter 6 weeks: • if bone quality is good and bone volume adequate • using Ø4.2 mm or more implants with a length of 8mm or more Delayed restoration is possible aſter 8 week: • with cancellous bone quality • using Ø3.75 mm or more implants • using implants with a length of 6 mm or more In situations where the implant surface is not completely in contact with the bone, or where bone augmentation measures are necessary, a healing phase appropriate to the situation must be planned. A radiographic examination is recommended aſter a healing phase of 6-12 weeks, before prosthetic restoration. 7. Packaging and sterility Paltop dental implants are delivered sterile. e intact sterile packaging protects the gamma-sterilized implant om outside influences and, if stored correctly, ensures sterility up to the expiration date. When removing the implant om the sterile packaging, the rules of asepsis must be observed. e sterile packaging must not be opened until immediately prior to insertion of the implant. Implants with damaged sterile packaging must not be used due to risk of contamination. It is recommended to have a replacement implant on hand. Paltop Dental Prosthetics 1. Description of Raw Material Paltop dental prosthetics are made of biocompatible TI6AL4VELI, Gold parts (Au60%Pt19%Pd20%), Zirconia (ZrO2), Cobalt Chrome (CoCr) , Polyetheretherketone (PEEK) 2. Indications Paltop Dental Prosthetic component is a pre-manufactured component directly connected to the endosseous dental implant and is intended for use as an aid in prosthetic rehabilitation. Paltop Dental Prosthetic component are intended for single use. Reuse of the device may cause microbial contamination and loss of performance. 3. Contraindications Do not use in cases of hypersensitivity to one or more of the metals contained in the alloy. 4. General precautions Collaboration between the surgeon, restorative dentist and dental laboratory technician is essential for a successful implant treatment. Temporary PEEK abutments are recommended for use for up to 30 days. 5. Cleaning We recommend cleaning and/or disinfecting abutment before sterilization. We recommend using chlorhexidine gluconate 0.1~0.5w/v% solution, or alcohol 70% for 10~30 min, at room temperature. Do not use such disinfectants as Chlorine-based disinfectant (sodium hypochlorite, etc.), Peroxide-based disinfectant (oxydol, etc.), non-rust-proofing disinfecting surfactant. Place abutment in ultrasonic cleaner for 5 minutes at room temperature. If any cleaner is used, be sure to inject sterile water and completely remove the cleaner, running water can be used instead of sterile water. Completely dry and inspect abutment for integrity and flaws. 6. Sterility e device may be delivered sterile or non-sterile. Please see indication on sticker. e device must be sterile before use. it may be steam-sterilized using Standard Sterilization Methods: steam sterilization for 3 minutes at 275°F (135°C). Steam sterilization is necessary only in case of NON-STERILE products or to re-sterilize “Not Used Devices”. 7. Clinical Procedure 1. Modifications of abutments could be performed using appropriate tools. Use water irrigation if adjustments are performed intra-orally. 2. Prior to placement inspect the implant-abutment interface. Damage to the interface can lead to improper fiing. Do not process the interface area. 3. Fasten the abutment with the provided screw using a recommended torque value as per table below. 4. Aſter cementing the prosthesis on the abutment excess cement should be removed immediately. 8. Storage: No special condition required. Surgical Instruments 1. Caution Please read all information contained in this insert. Incorrect handling and care as well as misuse can lead to premature wear of surgical/dental instruments. All persons using this device should have knowledge in the use and handling surgical instruments, accessories and related equipment. Paltop Surgical Instruments are reusable and should be replaced aſter being used up to 20 times, or prior to that if cuing efficiency declines. 2. Initial Use of New Instrument Unless removed om the sterile packaging, every instrument must be cleaned and sterilized before it is used for the first time. All instruments were developed for sterilization by autoclave and have shown good results using this method. 3. Inspection and Functional Check It is very important to carefully examine each surgical/dental instrument for breaks, cracks or malfunctions before use. It is especially essential to check areas such as blades, points, ends, stops and snaps as well as all movable parts. Do not use damaged instruments. Never aempt to make repairs yourself. Service and repairs should be referred to trained qualified persons only. Refer questions about repair to the manufacturer or your biomedical engineering department. 4. Cleaning and Maintenance Every surgical/dental instrument should be disinfected and thoroughly cleaned aſter each use. Proper cleaning, inspection and maintenance will help ensure correct function of the surgical instrument. Clean, inspect and test each instrument carefully. Sterilize all instruments before surgery. A good cleaning and maintenance procedure will extend the useful life of the instrument. Special aention should be paid to slots, stops, ends hollow tubes and other highly inaccessible areas. Do not use damaged instruments. If an instrument can be disassembled, it should be cleaned in the disassembled state. (NOTE: Keep all parts together and protected om being misplaced, do not intermix with other or similar devices of other manufacture). Cleaning and rinsing must take place immediately aſter each use for best effect. Failure to clean promptly may result in adherent particles or dried secretions that may resist cleaning and complicate or resist future sterilization. Instruments must be completely cleaned and rinsed of all foreign maer. Use warm water and a commercially available instrument presoak or cleaning agent. Enzymatic cleaners should be used to remove protein deposits. • Do not use corrosive cleaning agents (i.e. bleach).Cleaning solutions and rinses at or near a neutral pH (7.0) are best. • Do not use abrasive cleaners. • Only a soſt bristle brush should be used. • Rinse and maintain all parts and inaccessible areas like inside channels etc. • Ultrasonic cleaners can be used. Check and retighten any fiings that may have vibrated loose. • Can be disinfected in the washing machine up to 203°F (95°C). • Rinse thoroughly with distilled water. • Prepare for storage and / or sterilization. Aſter cleaning and rinsing, dry instruments completely and carefully with compressed air (Highly inaccessible areas like inside channels etc. have to be blown out). NOTE: aſter cleaning and before sterilization, treat all instruments with an oil which is considered as being physiologically safe (paraffin oil according to DAB 8 of Ph. Eur. USP XX), especially their blades, ends, stops, snaps and all movable parts. 5. Storage and Re-use Instruments should be stored in a clean, dry moisture ee area. e instruments should be stored individually in their shipping carton or in a protective tray with partitions. Protect tips with cloth, gauze or tubing if stored in drawers. Steam autoclave sterilization is recommended. oroughly clean instruments of all debris, tissue and foreign maer prior to sterilization. Follow the sterilizer manufacturer’s instructions for operation and loading of steam autoclaves. ere must be direct steam exposure to all surfaces of the instruments being sterilized including the internal surface and tubes channels. Allow instrument to air cool to room temperature before use. 6. Standard Sterilization Methods e device may be delivered sterile or non-sterile. Please see indication on sticker. e device must be sterile before use. it may be steam-sterilized using Standard Sterilization Methods: steam sterilization for 10 minutes at 275°F (135°C). 7. Handling All surgical/dental instruments should be handled with the greatest care when being transported, cleaned, treated, sterilized and stored. is is especially true for blades, fine points and other sensitive areas. Surgical/ dental instruments corrode and their functions are impaired if they come into contact with aggressive materials. e instruments should not be exposed to acids or other aggressive cleaning agents. 8. Warranty All Paltop LTD. products are guaranteed to be ee om defects in material and workmanship at the time of shipping. All of our products are designed and manufactured to meet the highest quality standards. We cannot accept any liability for failure of products which have been modified in any way om their originals, for any failure due to misuse or application which is not in accordance with the designer’s intentions. Products will lose their right to carry the CE sign in case they will be changed or repaired at another place than Paltop LTD or a company authorized by Paltop LTD to do the change or repair.
Transcript of esthetic result or unfavorable implant ... - Paltop dentalof implant, jaw, bone or prosthesis,...

Spa
de
Step Drills Final Drills2.0
1.5
2.4
2.0
3.2
2.4
3.8
3.23.25 3.75 4.2 5.0
Spe
edR
PM 1200-
1500900- 1100
700- 900
500- 700
400- 600 200 - 400
Prosthetic Torque Value
Healing Cap 15
PEEK Abutment 10-15
Multi-Unit Abutments 30-35
Single-Unit Abutments 30-35
Equator Abutments 30-35
Ball Abutments 30-35
Multi Unit Screw 20-25
Single-Unit Screw 20-25
Cover Screw 15
SP Abutment Screw 30-35
NP Abutment Screw 25-30
WP Abutment Screw 30-35
PCA Abutment Screw 25
WarningThe following descriptions are insufficient to allow immediate use of the Paltop Dental Implant System. Knowledge of dental implantology and instruction in the handling of the Paltop Dental Implant System provided by an operator with the relevant experience are always necessary.The Paltop Dental Implant System has not been evaluated for safety and compatibility in the MR environment. The Paltop Dental Implant System has not been tested for heating or migration in the MR environment.Do not use if package is damaged.Disclaimer of liabilityThis product is part of the Paltop Dental Implant System and may only be used in conjunction with the corresponding original components and instruments according to Paltop LTD. instructions and recommendations. Use of products and tools made by third parties detracts from the efficient functioning of the Paltop Dental Implant System and will void any warranty or other obligation, expressed or implied by Paltop LTD. Advice on the use of our products is provided verbally, in writing, by electronic media or in demonstrations. It does not relieve the user of Paltop LTD. products of the responsibility of determining whether or not any product is suitable for the intended purpose, indications and procedures. Use of this product is not within the control of Paltop LTD. it is the responsibility of the user. All liability for loss or damage attributable to the use of this product is excluded. Within the framework of the Conditions at Sale and Delivery of Paltop LTD, we warrant the quality of the Paltop Dental Implant System.AvailabilitySome items in the Paltop Dental Implant System are not available in all countries.Copyright and trademarksPaltop and/or other products and logos from Paltop that are mentioned here are trademarks or registered trademarks of Paltop LTD. and/or its affiliates.
Paltop Dental Implants
Paltop Dental Implants Models are:Advanced Dental Implant,Advanced+ Dental
Implant,Dynamic Dental Implant,Dynamic Conical Dental Implant,PAI Dental Implant, PCA Dental Implant
1. Description of the Paltop surfacesPaltop dental implants are made of biocompatible TI6AL4VELI [Ti-tanium Grade 5] and have a large grit sandblasted, acid-etched surface.2. Indications and ContraindicationsThe Paltop Dental Implant System is indicated for use in surgical and restorative applications for placement in the bone of the upper or lower jaw to provide support for prosthetic devices, such as artificial teeth, in order to restore the patient’s chewing function. The Paltop Dental Implant System is indicated also for immediate loading when good primary stability is achieved and with appropriate occlusal loading.The Narrow Implant is indicated for use in surgical and restorative applications for placement in the mandibular central, lateral incisor and maxillary lateral incisor regions of partially edentulous jaws where the horizontal space is limited by the adjacent teeth and roots, to provide support for prosthetic devices, such as artificial teeth, in order to restore the patient’s chewing function. The Paltop Narrow Implant is indicated also for immediate loading when good primary stability is achieved and with appropriate occlusal loading.ContraindicationsSerious internal medical problems, bone metabolism disturbances, uncontrolled bleeding disorders, inadequate wound healing capacity, poor oral hygiene, maxillary and mandibular growth not completed, poor general state of health, uncooperative, unmotivated patient, drug or alcohol abuse, psychoses, prolonged therapy-resistant functional disorders, xerostomia, weakened immune system, illnesses requiring periodic use of steroids, titanium allergy, uncontrollable endocrine disorders.Relative contraindicationsPreviously irradiated bone, diabetes mellitus, anticoagulation drugs / hemorrhagic diatheses, bruxism, parafunctional habits, unfavorable anatomic bone conditions, tobacco abuse, uncontrolled periodontitis, temporomandibular joint disorders, treatable pathologic diseases of the jaw and changes in the oral mucosa, pregnancy, inadequate oral hygiene.Local contraindicationsInadequate bone volume and/or quality, local root remnants, in whom adequate sizes, numbers or desirable position of implants are not reachable to achieve safe support of functional or eventually parafunctional loads.3. Principles of treatment planningThe surgical part of implant treatment must be preceded by a comprehensive patient evaluation, preoperative diagnostics and therapy planning. Inadequate treatment planning may cause implant loss.General precautions One hundred percent implant success can never be guaranteed. With respect to pediatric patients, routine treatment is not recommended until the end of the jaw bone growth has been properly documented. Pre-operative hard tissue or soft tissue deficits may yield a compromised
esthetic result or unfavorable implant angulation. The device is intended for single use only. reuse of the device may cause microbial contamination and loss of performance.In case Short implants are used, clinician should closely monitor patients for any of the following conditions: periimplant bone loss, changes to implant’s response to percussion, or radiographic changes in bone to implant contact along the implant’s length. If the implant shows mobility or greater than 50% bone loss, the implant should be evaluated for possible removal.Precautions Pre-surgeryA careful clinical and radiological examination of the patient has to be performed prior to surgery to determine the psychological and physical status of the patient. Special attention has to be given to patients who have localized or systemic factors that could interfere with the healing process of either bone or soft tissue or the osseointegration process (e.g., cigarette smoking, uncontrolled diabetes, oro-facial radiotherapy, steroid therapy, infections in the neighboring bone). In general, implant placement and prosthetic design must accommodate individual patient conditions. In case of bruxism or unfavorable jaw relationships reappraisal of the treatment option may be considered.Precautions at Surgery Particular caution should be used when placing narrow platform implants in the posterior region due to risk of prosthetic overload. Lack of adequate quantity and/or quality of remaining bone, infection and generalized diseases may be potential causes for failure of osseointegration both immediately after surgery, or after osseointegration is initially achieved.Besides the mandatory precautions for any surgery such as of asepsia, during drilling in the jaw bone one must avoid damage to nerves and vessels by referring to anatomical knowledge and preoperative radiographs. Failure to recognize actual lengths of step/twist drills relative to radiographic measurements or drilling beyond the depth intended can result in permanent injury to nerves or other vital structures, potentially resulting in permanent numbness to the lower lip and chin or leading to hemorrhage in the floor of the mouth.4. Side-effects and interactions, complications with Paltop
implantsImmediately after insertion of dental implants, activities that demand considerable physical exertion should be avoided. Possible complications following insertion of dental implants are:
Temporary symptomsPain, swelling, phonetic difficulties, gingivitisMore persistent symptomsChronic pain in connection with the dental implant, permanent paresthesia, dysesthesia, loss of maxillary/mandibular ridge bone, localized or systemic infection, oroantral or oronasal fistulae, unfavorably affected adjacent teeth, irreversible damage to adjacent teeth, fractures of implant, jaw, bone or prosthesis, esthetic problems, nerve damage, exfoliation, hyperplasia.
It is recommended that the dental personnel brief the patients on the precautions to be taken, such as: abstinence from smoking and maintenance of dental hygiene. Adverse eventsTreatment by means of implants may lead to loss of bone, biologic or mechanical failures including fatigue fracture of implants. 5. Placement of an implant after preparing the implant bed5.1 Before the procedure, general contra-indication of the patients
medical status should be evaluated clinically and radio graphically.5.2 Bone quality of the patient should be examined. 5.3 Implant length and diameter should be selected. 5.4 The surgical field should be exposed.5.5 Using a marking drill an initial drill should be performed. 5.6 The drilling should gradually create a suitable hole into which the
implant will be inserted.5.7 The implant will be inserted into the hole.5.8 Using hex drives the screw should be removed.5.9 Cover screw, healing screw or abutments should be applied according
to the clinician’s judgment.Do not use a high torque or high speed when inserting the implant (do not exceed 15 rpm).6. Healing phase for Paltop dental implants6.1 Immediate restoration of Paltop implantsPaltop implants allow, within the scope of indications, immediate restoration in single tooth gaps and in an edentulous or partially dentate jaw. Good primary stability and an appropriate occlusal load are essential. Two or more adjacent implants should be prosthetically connected together. 6.2 Delayed restoration of Paltop implantsDelayed restoration is possible after 6 weeks:
• if bone quality is good and bone volume adequate• using Ø4.2 mm or more implants with a length of 8mm or more
Delayed restoration is possible after 8 week:• with cancellous bone quality• using Ø3.75 mm or more implants• using implants with a length of 6 mm or more
In situations where the implant surface is not completely in contact with the bone, or where bone augmentation measures are necessary, a healing phase appropriate to the situation must be planned. A radiographic examination is recommended after a healing phase of 6-12 weeks, before
prosthetic restoration.7. Packaging and sterilityPaltop dental implants are delivered sterile. The intact sterile packaging protects the gamma-sterilized implant from outside influences and, if stored correctly, ensures sterility up to the expiration date. When removing the implant from the sterile packaging, the rules of asepsis must be observed. The sterile packaging must not be opened until immediately prior to insertion of the implant. Implants with damaged sterile packaging must not be used due to risk of contamination. It is recommended to have a replacement implant on hand.
Paltop Dental Prosthetics
1. Description of Raw MaterialPaltop dental prosthetics are made of biocompatible TI6AL4VELI, Gold parts (Au60%Pt19%Pd20%), Zirconia (ZrO2),
Cobalt Chrome (CoCr) , Polyetheretherketone (PEEK)2. IndicationsPaltop Dental Prosthetic component is a pre-manufactured component directly connected to the endosseous dental implant and is intended for use as an aid in prosthetic rehabilitation. Paltop Dental Prosthetic component are intended for single use. Reuse of the device may cause microbial contamination and loss of performance.3. ContraindicationsDo not use in cases of hypersensitivity to one or more of the metals contained in the alloy.4. General precautionsCollaboration between the surgeon, restorative dentist and dental laboratory technician is essential for a successful implant treatment.Temporary PEEK abutments are recommended for use for up to 30 days.5. Cleaning We recommend cleaning and/or disinfecting abutment before sterilization. We recommend using chlorhexidine gluconate 0.1~0.5w/v% solution, or alcohol 70% for 10~30 min, at room temperature. Do not use such disinfectants as Chlorine-based disinfectant (sodium hypochlorite, etc.), Peroxide-based disinfectant (oxydol, etc.), non-rust-proofing disinfecting surfactant. Place abutment in ultrasonic cleaner for 5 minutes at room temperature. If any cleaner is used, be sure to inject sterile water and completely remove the cleaner, running water can be used instead of sterile water. Completely dry and inspect abutment for integrity and flaws.6. Sterility The device may be delivered sterile or non-sterile. Please see indication on sticker.The device must be sterile before use. it may be steam-sterilized using Standard Sterilization Methods: steam sterilization for 3 minutes at 275°F (135°C). Steam sterilization is necessary only in case of NON-STERILE products or to re-sterilize “Not Used Devices”.7. Clinical Procedure1. Modifications of abutments could be performed using appropriate
tools. Use water irrigation if adjustments are performed intra-orally.
2. Prior to placement inspect the implant-abutment interface. Damage to the interface can lead to improper fitting. Do not process the interface area.
3. Fasten the abutment with the provided screw using a recommendedtorque value as per table below.
4. After cementing the prosthesis on the abutment excess cementshould be removed immediately.
8. Storage:No special condition required.
Surgical Instruments
1. CautionPlease read all information contained in this insert.
Incorrect handling and care as well as misuse can lead to premature wear of surgical/dental instruments. All persons using this device should have knowledge in the use and handling surgical instruments, accessories and related equipment. Paltop Surgical Instruments are reusable and should be replaced after being used up to 20 times, or prior to that if cutting efficiency declines.2. Initial Use of New InstrumentUnless removed from the sterile packaging, every instrument must be cleaned and sterilized before it is used for the first time. All instruments were developed for sterilization by autoclave and have shown good results using this method.3. Inspection and Functional CheckIt is very important to carefully examine each surgical/dental instrument for breaks, cracks or malfunctions before use. It is especially essential to check areas such as blades, points, ends, stops and snaps as well as all movable parts. Do not use damaged instruments. Never attempt to make repairs yourself. Service and repairs should be referred to trained qualified persons only. Refer questions about repair to the manufacturer or your biomedical engineering department.4. Cleaning and MaintenanceEvery surgical/dental instrument should be disinfected and thoroughly cleaned after each use. Proper cleaning, inspection and maintenance will
help ensure correct function of the surgical instrument. Clean, inspect and test each instrument carefully. Sterilize all instruments before surgery. A good cleaning and maintenance procedure will extend the useful life of the instrument.Special attention should be paid to slots, stops, ends hollow tubes and other highly inaccessible areas. Do not use damaged instruments. If an instrument can be disassembled, it should be cleaned in the disassembled state.(NOTE: Keep all parts together and protected from being misplaced, do not intermix with other or similar devices of other manufacture).Cleaning and rinsing must take place immediately after each use for best effect. Failure to clean promptly may result in adherent particles or dried secretions that may resist cleaning and complicate or resist future sterilization. Instruments must be completely cleaned and rinsed of all foreign matter. Use warm water and a commercially available instrument presoak or cleaning agent. Enzymatic cleaners should be used to remove protein deposits.
• Do not use corrosive cleaning agents (i.e. bleach).Cleaning solutions and rinses at or near a neutral pH (7.0) are best.
• Do not use abrasive cleaners.• Only a soft bristle brush should be used.• Rinse and maintain all parts and inaccessible areas like inside channels
etc.• Ultrasonic cleaners can be used. Check and retighten any fittings that
may have vibrated loose.• Can be disinfected in the washing machine up to 203°F (95°C).• Rinse thoroughly with distilled water.• Prepare for storage and / or sterilization.
After cleaning and rinsing, dry instruments completely and carefully with compressed air (Highly inaccessible areas like inside channels etc. have to be blown out).NOTE: after cleaning and before sterilization, treat all instruments with an oil which is considered as being physiologically safe (paraffin oil according to DAB 8 of Ph. Eur. USP XX), especially their blades, ends, stops, snaps and all movable parts.5. Storage and Re-useInstruments should be stored in a clean, dry moisture free area. The instruments should be stored individually in their shipping carton or in a protective tray with partitions. Protect tips with cloth, gauze or tubing if stored in drawers. Steam autoclave sterilization is recommended. Thoroughly clean instruments of all debris, tissue and foreign matter prior to sterilization. Follow the sterilizer manufacturer’s instructions for operation and loading of steam autoclaves. There must be direct steam exposure to all surfaces of the instruments being sterilized including the internal surface and tubes channels. Allow instrument to air cool to room temperature before use.6. Standard Sterilization MethodsThe device may be delivered sterile or non-sterile. Please see indication on sticker. The device must be sterile before use. it may be steam-sterilized using Standard Sterilization Methods: steam sterilization for 10 minutes at 275°F (135°C).7. HandlingAll surgical/dental instruments should be handled with the greatest care when being transported, cleaned, treated, sterilized and stored. This is especially true for blades, fine points and other sensitive areas. Surgical/dental instruments corrode and their functions are impaired if they come into contact with aggressive materials. The instruments should not be exposed to acids or other aggressive cleaning agents.8. WarrantyAll Paltop LTD. products are guaranteed to be free from defects in material and workmanship at the time of shipping. All of our products are designed and manufactured to meet the highest quality standards. We cannot accept any liability for failure of products which have been modified in any way from their originals, for any failure due to misuse or application which is not in accordance with the designer’s intentions. Products will lose their right to carry the CE sign in case they will be changed or repaired at another place than Paltop LTD or a company authorized by Paltop LTD to do the change or repair.

AvertissementLes descriptions suivantes ne sont pas suffisantes à l’autorisation de l’utilisation immédiate du Système d’Implant Dentaire Paltop. Il est nécessaire d’avoir une connaissance en implantologie et d’avoir été formé à l’utilisation du Système d’Implant Dentaire Paltop par un opérateur expérimenté.Le système implantaire Paltop n’a pas été évalué pour la sécurité et la compatibilité en milieu MR. Le système implantaire Paltop n’a pas été testé pour le chauffage ou la migration en milieu MR.Ne pas utiliser si l’emballage est endommagé.Dénégation de responsabilitéCe produit fait partie du Système d’Implant Dentaire Paltop et ne peut être utilisé qu’avec ses composants et son matériel d’origine selon les instructions et les consignes de Paltop Ltd. L’utilisation de produits et d’outils fabriqués par des tiers porte atteinte à l’efficacité du fonctionnement du Système d’Implant Dentaire Paltop et annulera toute garantie ou autre responsabilité, explicite ou implicite par Paltop Ltd. Des consignes d’utilisation de nos produits sont fournies verbalement, par écrit, par médias électroniques ou lors de démonstration. Cela ne dispense pas l’utilisateur de produits Paltop Ltd. d’avoir la responsabilité de déterminer si le produit est adapté ou non à l’objectif souhaité, aux consignes et aux procédures. L’utilisation de ce produit n’est pas contrôlée par Paltop Ltd., elle est sous la responsabilité de l’utilisateur. Toute responsabilité concernant pertes ou dommages imputables à l’utilisation de ce produit est exclue. Nous garantissons la qualité du Système d’Implant Dentaire Paltop dans le cadre des Conditions de vente et de livraison de Paltop Ltd.DisponibilitéCertains éléments du Système d’Implant Dentaire Paltop ne sont pas disponibles dans tous les pays.Droits d’auteur et marques de fabriquePaltop et/ou autres produits et logos provenant de Paltop mentionnés dans ce document sont des marques de fabrique ou des marques déposées de Paltop Ltd. et/ou de ses filiales.
Paltop Implants dentairesLes modèles d’implants Paltop Dental sont:Advanced Dental Implant,Advanced+ Dental Implant,Dynamic Dental Implant,Dynamic Conical Dental Implant,PAI Dental Implant,
PCA Dental Implant
1. Description des surfaces de PaltopLes implants dentaires Paltop sont conçues en TI6AL4VELI [Titane Grade 5] biocompatible et ont une large surface de décapage au sable avec solution de mordançage.2. Indications et contre-indicationsLe Système d’Implant Dentaire Paltop est destiné aux pratiques chirurgicales et réparatrices pour mises en place dans les maxillaires afin de fournir un soutien aux dispositifs prothétiques, comme les dents artificielles, et afin de restaurer la fonction masticatoire du patient. Le Système d’Implant Dentaire Paltop est également destiné à la mise en place immédiate lorsqu’il y a une bonne stabilité et au moyen d’une charge occlusale appropriée.L’implant Narrow est indiqué pour une utilisation dans des applications chirurgicales et de restauration pour le placement dans la mandibule central, incisive latérale et maxillaires régions incisive latérale de mâchoires partiellement édentés où l’espace horizontal est limité par les dents et les racines adjacentes, de fournir un soutien pour les prothèses, tels que des dents artificielles, en vue de rétablir la fonction de mastication du patient. Le Paltop étroite Implant est indiqué aussi pour le chargement immédiat quand une bonne stabilité primaire est atteint et avec charge occlusale appropriée.Contre-indicationsGraves problèmes médicaux internes, troubles du métabolisme osseux, troubles d’hémorragie incontrôlée, insuffisantes capacités de cicatrisation, mauvaise hygiène buccale, incomplète croissance maxillaire et mandibulaire, mauvais état de santé général, non coopératif, patient non motivé, abus de drogues ou d’alcool, psychoses, troubles de fonctionnement prolongés résistants au traitement, xérostomie, affaiblissement du système immunitaire, maladies nécessitant l’utilisation périodique de stéroïdes, allergie au titane, troubles endocriniens incontrôlables.Contre-indications relativesOs irradié antérieurement, diabète, médicaments anticoagulants / diathèses hémorragiques, bruxisme, habitudes para-fonctionnelles, mauvaises conditions anatomiques des os, abus de tabac, parodontite incontrôlée, troubles
temporo-mandibulaires, maladies pathologiques traitables des maxillaires et modifications de la muqueuse buccale, grossesse, mauvaise hygiène buccale.Contre-indications localesVolume osseux et/ou de qualité insuffisants, résidus radiculaires locaux empêchant l’obtention de tailles adéquates, du nombre ou de la position souhaitée des implants afin d’obtenir un bon soutien des mises en place fonctionnelles ou éventuellement para-fonctionnelles.3. Principes de la planification du traitementLa partie chirurgicale de l’implantation doit être précédée d’une évaluation globale du patient, d’un diagnostic préopératoire et d’une planification de traitement. Une inadéquate planification de traitement peut entraîner un échec implantaire.Précautions générales:Il est impossible de garantir 100% de réussite implantaire.En ce qui concerne les enfants, un traitement systématique est déconseillé avant la fin de croissance de l’os maxillaire. Des tissus durs préopératoires ou des déficits de tissus mous peuvent amener à un résultat esthétique moyen ou à une angulation d’implant défavorable. Le dispositif est destiné à un usage unique. la réutilisation de l’appareil peut provoquer la contamination microbienne et la perte de performance.Précautions pré-chirurgicalesUn examen clinique et radiologique efficace du patient doit être effectué avant l’intervention chirurgicale afin de déterminer l’état psychologique et physique du patient. Une attention particulière doit être attribuée aux patients présentant des facteurs locaux ou systémiques pouvant interférer avec le processus de cicatrisation de l’os ou des tissus mous ou le processus d’ostéo-intégration (par exemple: fumeurs, diabète non contrôlé, radiothérapie bucco-faciale, corticothérapie, infections des os adjacents).La mise en place de l’implant ainsi que la configuration prothétique doivent être adaptées aux conditions de chaque patient. En cas de bruxisme ou de relations maxillaires défavorables, une réévaluation de traitement peut être envisagée.Dans le cas des implants courts sont utilisés, clinicien devrait surveiller étroitement les patients pour l’une des conditions suivantes: la perte osseuse péri-implantaire, les modifications à la réponse de l’implant à percussion, ou les changements radiographiques dans l’os d’implanter contact le long de la longueur de l’implant. Si l’implant montre mobilité ou une perte supérieure à 50% de l’os, l’implant doit être évalué pour l’enlèvement possible.Précautions lors de l’intervention
chirurgicaleUne attention particulière doit être attribuée lors d’une mise d’implant de diamètre étroit dans la région postérieure en raison du risque de surcharge prothétique. Un manque de quantité et/ou de qualité de l’os restant, une infection et des maladies généralisées peuvent constituer des causes potentielles d’échec de l’ostéo-intégration immédiatement après l’opération, ou après l’ostéo-intégration.Outre les précautions obligatoires à toute intervention chirurgicale, comme l’asepsie, lors du forage il est nécessaire d’éviter l’atteinte des nerfs et des vaisseaux sanguins en ayant une connaissance en anatomie et en effectuant des radiologies préopératoires. Une mauvaise évaluation des longueurs de forets étagés/torsadés relatives aux mesures radiologiques, ou un forage au-delà de la profondeur souhaitée peuvent entraîner des dommages permanents des nerfs ou d’autres structures vitales, pouvant potentiellement amener à un engourdissement permanent de la lèvre inférieure et du menton ou conduire ou à une hémorragie du plancher buccal.4. Effets secondaires et interactions,
complications avec les implants PaltopImmédiatement après l’insertion d’implants dentaires, il faut éviter les efforts physiques considérables. Les complications possibles après l’insertion d’implants dentaires sont les suivantes:Symptômes temporairesDouleur, œdème, troubles phonétiques, gingiviteSymptômes plus persistantsDouleur chronique liée à l’implant dentaire, paresthésie permanente, dysesthésie, perte de la crête maxillaire / mandibulaire, infection locale ou systémique, fistules bucco-sinusiennes ou bucco-nasales, infections des dents adjacentes, dommages irréversibles aux dents adjacentes, fractures de l’implant, du maxillaire, de l’os ou de la prothèse, problèmes esthétiques, lésions nerveuses, exfoliation, hyperplasie.Il est conseillé au personnel dentaire de donner des instructions aux patients sur les précautions à
prendre, telles que: Eviter de fumer et entretenir une hygiène dentaire.Effets indésirablesLe traitement au moyen d’implants peut entraîner une perte de l’os, des défaillances biologiques ou mécaniques, y compris fatigue et fracture d’implants.5. Mise en place d’un implant après la
préparation du site implantaire5.1 Avant la procédure, un examen clinique et
radiologique de l’état de santé des patients doit être effectué.
5.2 La qualité osseuse du patient doit être examinée.
5.3 La longueur et le diamètre de l’implant doivent être choisis.
5.4 Le champ opératoire doit être exposé.5.5 Lors de l’utilisation d’un foret de
marquage, un forage initial doit être effectué.5.6 Le forage doit progressivement créer une cavité
d’accès appropriée dans laquelle l’implant sera inséré.
5.7 L’implant doit être inséré dans la cavité.5.8 La vis doit être retirée au moyen d’un embout
hexagonal de forage.5.9 Vis de couverture, vis de cicatrisation ou piliers
doivent être appliqués selon l’avis du clinicien.Ne pas utiliser un grand couple ou un couple à grande vitesse lors de l’insertion de l’implant (ne pas dépasser 15 tr / min).6. Phase de cicatrisation pour les implants
dentaires Paltop6.1 Restauration immédiate des implants
PaltopLes implants Paltop permettent, dans le cadre des indications, la restauration immédiate des lacunes d’une seule dent ou d’une mâchoire édentée ou partiellement édentée. Une bonne stabilité primaire et charge occlusale appropriée sont indispensables. Deux ou plusieurs implants adjacents doivent être reliés par une prothèse.6.2 Restauration différée des implants PaltopUne restauration différée est possible après 6 semaines:
• S’il y a une bonne qualité osseuse et un volume osseux adéquat
• En utilisant des implants de Ø4,1 mm ou plus, d’une longueur de 8 mm ou plus
Une restauration différée est possible après 8 semaines:
• S’il y a qualité d’os spongieux• En utilisant des implants de Ø3,75 mm ou plus• En utilisant des implants d’une longueur de 6 mm ou
plusConcernant les cas où la surface implantaire n’est pas totalement en contact avec l’os, ou lorsque des mesures d’augmentation osseuse sont nécessaires, une phase de cicatrisation adaptée à la situation doit être planifiée. Un examen radiologique est recommandé après une phase de cicatrisation de 6-12 semaines, avant la restauration prothétique.7. Emballage et stérilitéLes implants dentaires Paltop sont livrés stériles. L’emballage stérile intact protège les implants stérilisés aux rayons gamma des effets nocifs extérieurs et, si stocké correctement, assure une stérilité jusqu’à date d’expiration. Lors du retrait de l’implant de l’emballage stérile, les règles d’asepsie doivent être respectées. L’emballage stérile ne doit être ouvert que juste avant l’insertion de l’implant. Les implants sous emballage stérile endommagé ne doivent pas être utilisés par risque de contamination. Il est recommandé d’avoir un implant de remplacement sous la main.
Prothèses dentaires1. Description de la matière premièreLes piliers dentaires Paltop sont conçus
en TI6AL4VELI biocompatible, ainsi qu’en parties en or (Au60%Pt19%Pd20%) et zircone (ZrO2) Cobalt Chrome (CoCr), Polyetheretherketone (PEEK).2. Indications Le pilier dentaire Paltop est un pilier préfabriqué directement connecté à l’implant endo-osseux et est destiné à faciliter la réhabilitation prothétique.Le pilier dentaire Paltop est destiné à usage unique. La réutilisation de l’appareil peut entraîner la contamination microbienne et la perte de performance.3. Contre-indications Ne pas utiliser en cas d’hypersensibilité à un ou plusieurs des métaux contenus dans l’alliage.4. Précautions généralesLa collaboration entre le chirurgien dentiste, et le prothésiste dentaire est essentielle pour une implantation réussie.Les piliers temporaires en PEEK sont recommandés pour une utilisation maximale de 30 jours.5. Nettoyage
Nous conseillons de nettoyer et / ou de désinfecter le pilier avant la stérilisation. Nous recommandons d’utiliser la solution de gluconate de chlorhexidine 0,1 ~ 0,5 W / v%, ou de l’alcool à 70% pendant 10 ~ 30 mn, à température ambiante. Ne pas utiliser des désinfectants tels que désinfectant à base de chlore (hypochlorite de sodium, etc.), désinfectant à base de peroxyde (oxydol, etc.), agent tensioactif oxydable. Placer le pilier dans une cuve à ultrasons pendant 5 minutes à température ambiante. Si une cuve est utilisée, utiliser de l’eau stérile. L’eau du robinet peut être utilisée à la place de l’eau stérile. Sécher totalement le pilier et bien l’inspecter afin de s’assurer de son intégrité. 6. StérilisationLe dispositif peut être livré stérile ou non stérile. S’il vous plaît voir indication sur l’autocollant. Le dispositif doit être stérile avant utilisation. il peut être stérilisé à la vapeur en utilisant une stérilisation standard: stérilisation à la vapeur pendant 3 minutes 135 ° C.Stérilisation à la vapeur est nécessaire uniquement en cas de non stérile produits ou de re-stériliser “Appareils non utilisé”.
7. Procédure clinique1. Des modifications des piliers peuvent être
effectuées au moyen d’outils appropriés. Utiliser de l’eau irriguée si les corrections sont intra-orales.
2. Avant de placer le pilier, inspecter l’interface implant-pilier. Une interface endommagée peut conduire à un mauvais ajustement. Ne pas traiter la zone de l’interface.
3. Fixer le pilier avec la vis fournie en utilisant la force du couple recommandée selon le tableau ci-dessous.
4. Après le scellement de la prothèse sur le pilier, l’excès de ciment doit être immédiatement retiré.
8. StockageAucune condition particulière n’est requise.
Instruments Chirurgicaux1. AttentionVeuillez lire toutes les informations
contenues dans ce document. Une manipulation et un entretien inappropriés ainsi qu’une utilisation impropre peuvent conduire à une usure prématurée des instruments chirurgicaux/dentaires. Toute personne utilisant cet appareillage doit maîtriser l’utilisation et la manipulation des instruments chirurgicaux, des accessoires et de l’équipement annexe. Les instruments chirurgicaux Paltop sont réutilisables mais doivent être remplacés après avoir été utilisés 20 fois, ou avant s’ils sont devenus moins coupants.2. Première utilisation d’un nouvel
instrument Sauf retiré de son emballage stérile, chaque instrument doit être nettoyé et stérilisé avant sa première utilisation. Tous les instruments ont été développés pour être stérilisés en autoclave et l’utilisation de cette méthode a donné de bons résultats.3. Inspection et examen fonctionnel Il est essentiel d’examiner avec soin chaque instrument chirurgical/dentaire et de s’assurer qu’il n’y a pas de cassures, fêlures ou dysfonctionnements avant l’utilisation. Il est particulièrement important de contrôler les parties telles que les lames, les pointes, les extrémités, les arrêts et les rivets ainsi que toutes les pièces amovibles. N’utilisez pas d’instruments endommagés. N’essayez jamais d’effectuer une réparation par vous-même. Le service après vente doit être contacté et les réparations doivent être effectuées par du personnel qualifié et bien formé uniquement. Les questions concernant les réparations doivent être adressées au fabricant ou à votre département d’ingénierie biomédicale. 4. Nettoyage et entretien Chaque instrument chirurgical/dentaire doit être désinfecté et nettoyé avec soin après chaque utilisation. Un nettoyage, un examen et la maintenance appropriés aideront à assurer un bon fonctionnement de l’instrument chirurgical. Nettoyez, examinez et testez chaque instrument avec précaution. Stérilisez tous les instruments avant une intervention chirurgicale. Une bonne procédure de nettoyage et d’entretien prolongeront la durée de vie de l’instrument. Une attention particulière doit être apportée aux fentes, arrêts, extrémités des tubes creux et autres zones dont l’accès est particulièrement difficile. N’utilisez pas d’instruments endommagés. Si un instrument peut être démonté, il doit l’être pour les besoins du nettoyage. (Remarque : conservez toutes les pièces ensemble et faites attention à les remonter convenablement, ne les mélangez pas avec d’autres instruments ou des instruments
semblables d’un autre fabricant.) Le nettoyage et le rinçage doivent être effectués immédiatement après chaque utilisation pour un meilleur résultat. Un nettoyage insuffisant peut laisser des résidus collants ou des sécrétions desséchées qui peuvent résister au nettoyage et compliquer ou résister à une future stérilisation. Les instruments doivent être parfaitement lavés et rincés pour éliminer toute matière étrangère. Utilisez de l’eau chaude et un pré-trempage d’instruments disponible dans les commerces ou un agent nettoyant. Les nettoyants enzymatiques doivent être utilisés pour éliminer les dépôts de protéines.
• N’utilisez pas d’agents nettoyants corrosifs (p.ex. eau de Javel). Les solutions nettoyantes et les rinçages avec un pH neutre ou presque neutre (7.0) sont idéaux.
• N’utilisez pas de nettoyants abrasifs. • Utilisez uniquement une brosse en soie douce. • Rincez et traitez toutes les pièces et zones
inaccessibles comme l’intérieur des canaux, etc. • Des cuves à ultrasons peuvent être utilisées.
Vérifiez et renforcez les raccords qui peuvent s’être relâchés en raison des vibrations.
• Peut être désinfecté dans la machine à laver jusqu’à 95°C
• Rincez avec soin à l’eau distillée. • Préparez pour le stockage et / ou la stérilisation
Après le nettoyage et le rinçage, séchez complètement et soigneusement les instruments à l’air comprimé (Les zones inaccessibles comme l’intérieur des canaux etc. doivent être séchés).REMARQUE: Après le nettoyage et avant la stérilisation, tous les instruments doivent être traités avec une huile considérée comme étant physiologiquement sûre (huile de paraffine conforme à DAB 8 de Ph. Eur. USP XX,), ceci est plus particulièrement important pour les lames, les extrémités, les arrêts, les rivets et toutes les pièces amovibles. 5. Stockage et Réutiliser Les instruments doivent être stockés dans un endroit propre et sec, dépourvu de toute humidité. Ils doivent être stockés individuellement ou dans un tiroir de protection avec des compartiments. Protégez les embouts dans un linge, de la gaze ou un tube s’ils sont stockés dans des tiroirs. La stérilisation avec un autoclave à vapeur est recommandée. Nettoyez soigneusement les instruments pour éliminer tous les débris, tissus et matières étrangères avant la stérilisation. Suivre les instructions de stérilisation du fabricant pour le fonctionnement et le chargement des autoclaves à vapeur. Il faut une exposition directe à la vapeur de toutes les surfaces des instruments stérilisés y compris la surface interne et les canaux des tubes. Laissez l’instrument refroidir à l’air à température ambiante avant utilisation.6. Méthodes de stérilisation standardLe dispositif peut être livré stérile ou non stérile. S’il vous plaît voir indication sur l’autocollant.Le dispositif doit être stérile avant utilisation. il peut être stérilisé à la vapeur en utilisant une stérilisation standard: stérilisation à la vapeur pendant 10 minutes 135°C.7. ManipulationTous les instruments chirurgicaux/dentaires doivent être manipulés avec la plus grande attention lorsqu’ils sont déplacés, nettoyés, traités, stérilisés et stockés. Ceci est particulièrement vrai pour les lames, les points délicats et autres parties sensibles. Les instruments chirurgicaux/dentaires corrodent et le contact avec des produits agressifs les détériorent. Il faut absolument éviter d’exposer les instruments à des acides ou autres produits de nettoyage agressifs.8. Garantie Tous les produits de Paltop Ltd. sont garantis sans défauts matériels comme de fabrication lors de l’expédition. Tous nos produits sont conçus et fabriqués conformément aux normes les plus exigeantes. Notre responsabilité ne pourra être engagée pour une défaillance de produits ayant été modifiés d’une façon ou d’une autre, pour toute défaillance résultant d’une mauvaise utilisation ou application n’étant pas conforme aux intentions du concepteur. Les produits perdront leur droit de porter le sigle CE s’ils ont été modifiés ou réparés par quelqu’un d’autre que Paltop Ltd ou une entreprise autorisée par Paltop Ltd pour réaliser le changement ou la réparation.
Spa
de
Step Drills Final Drills2.0
1.5
2.4
2.0
3.2
2.4
3.8
3.23.25 3.75 4.2 5.0
Spe
edR
PM 1200- 1500
900- 1100
700- 900
500- 700
400- 600 200 - 400
Prosthetic Torque Value
Healing Cap 15
PEEK Abutment 10-15
Multi-Unit Abutments 30-35
Single-Unit Abutments 30-35
Equator Abutments 30-35
Ball Abutments 30-35
Multi Unit Screw 20-25
Single-Unit Screw 20-25
Cover Screw 15
SP Abutment Screw 30-35
NP Abutment Screw 25-30
WP Abutment Screw 30-35
PCA Abutment Screw 25

Spa
de
Step Drills Final Drills2.0
1.5
2.4
2.0
3.2
2.4
3.8
3.23.25 3.75 4.2 5.0
Spe
edR
PM 1200-
1500900- 1100
700- 900
500- 700
400- 600 200 - 400
Prosthetic Torque Value
Healing Cap 15
PEEK Abutment 10-15
Multi-Unit Abutments 30-35
Single-Unit Abutments 30-35
Equator Abutments 30-35
Ball Abutments 30-35
Multi Unit Screw 20-25
Single-Unit Screw 20-25
Cover Screw 15
SP Abutment Screw 30-35
NP Abutment Screw 25-30
WP Abutment Screw 30-35
PCA Abutment Screw 25
Achtung Die folgenden Beschreibungen sind nicht ausreichend für eine sofortige Verwendung des Paltop Systems für Zahnimplantate. Kenntnisse der Zahnimplantologie und Einweisung in die Handhabung des Paltop Systems für Zahnimplantate durch einen Anwender mit entsprechender Erfahrung sind immer erforderlich.Das Verhalten des Paltop Implantatsystem wurde bisher nicht in Bezug auf Untersuchungen in Kernspintomographen getestet, insbesondere nicht auf Migration und Erhitzung während der Untersuchung.Nicht verwenden, wenn die Verpackung beschädigt ist.HaftungsausschlussDieses Produkt ist Teil des Paltop Systems für Zahnimplantate und darf nur zusammen mit den entsprechenden Originalbestandteilen und - instrumenten in Übereinstimmung mit den Anweisungen und Empfehlungen der Paltop LTD verwendet werden. Die Verwendung von durch Dritte hergestellte Produkte und Werkzeuge mindert die effiziente Funktion des Paltop Systems für Zahnimplantate und macht durch die Paltop LTD getätigte ausdrückliche oder stillschweigende Gewährleistungen und Verpflichtungen ungültig. Hinweise zur Verwendung unserer Produkte werden wörtlich, schriftlich, über elektronische Medien oder in Vorführungen bereitgestellt. Sie entheben den Verwender von Produkten der Paltop LTD. nicht von der Verantwortung festzustellen, ob ein Produkt für den beabsichtigten Zweck, die Indikationen und Abläufe geeignet ist. Haftung für der Verwendung dieses Produktes zuschreibbare Verluste oder Schadenersatz wird ausgeschlossen. Im Rahmen der Bedingungen in der Abteilung Verkauf und Lieferung der Paltop LTD gewährleisten wir die Qualität des Paltop Systems für Zahnimplantate.VerfügbarkeitEinige Teile des Paltop Systems für Zahnimplantate sind nicht in allen Ländern verfügbar.Urheberrecht und Handelsmarken Paltop und/oder andere Produkte und Logos von Paltop, die hier genannt werden, sind Handelsmarken oder eingetragene Handelsmarken der Paltop LTD. und/oder ihrer Zweiggesellschaften.
ZahnimplantatePaltop Dental Implants Models are:Advanced Dental Implant,Advanced+ Dental Implant,Dynamic Dental Implant,Dynamic Conical Dental Implant,PAI Dental
Implant,PCA Dental Implant
1. Beschreibung der Paltop-OberflächenPaltop Zahnimplantate werden aus biokompatiblem TI6AL4VELI [Titan Grad 5] hergestellt und haben eine mit der SLA-Methode behandelt Oberfläche.2. Indikationen und KontraindikationenDas Paltop System für Zahnimplantate ist indiziert für die Verwendung in operativen und restaurativen Anwendungen für die Einbringung in den Knochen des Ober- oder Unterkiefers zur Unterstützung prothetischer Elemente wie etwa künstlicher Zähne zur Wiederherstellung der Kaufunktion des Patienten. Das Paltop System für Zahnimplantate ist des Weiteren indiziert für Immediate Loading wenn eine gute primäre Stabilität erreicht wird sowie mit angemessenem Okklusionalem Loading. The Narrow Implantat ist für den Einsatz in chirurgischen und prothetischen Anwendungen für die Platzierung in der unteren mittleren, seitlichen Schneidezahn und oberen seitlichen Schneidezähne Regionen teilweise zahnlose Kiefer, wo die horizontalen Abstand von den benachbarten Zähnen und Wurzeln begrenzt ist angegeben, um die Unterstützung für Prothesen zu schaffen, wie künstliche Zähne, um den Patienten Kaufunktion wiederherzustellen. Die Paltop Narrow Implantat ist auch für sofortige Belastung, wenn eine gute Primärstabilität erreicht wird und mit entsprechenden okklusale Belastung angegeben.KontraindikationenErnste interne medizinische Probleme, Störungen des Knochenstoffwechsels, unkontrollierte Blutungsstörung, mangelhafte Wundheilungsfähigkeiten, schlechte Mundhygiene, Wachstum des Unter- und Oberkörpers noch nicht abgeschlossen, schlechter gesundheitlicher Allgemeinzustand, unkooperativer, unmotivierter Patient, Drogen- oder Alkoholmissbrauch, Psychosen, lang andauernde, therapieresistente funktionelle Störungen, Xerostomie, geschwächtes Immunsystem, Krankheiten, die eine periodische Verwendung von Steroiden erfordern, Titanallergie, unkontrollierbare endokrine Störungen. Relative KontraindikationenVorher bestrahlte Knochen, Diabetes Mellitus, A n t i ko a g u l a t i o n s m e d i k a m e n t e / h ä m o r r h a g i s c h e Diathesen, Bruxismus, parafunktionale Gewohnheiten, ungünstige anatomische Knochenbedingungen, Tabakmissbrauch, unkontrollierte Periodontitis, temporomandibuläre Gelenkstörungen, behandelbare
pathologische Erkrankungen des Kiefers und Veränderungen der Mundschleimhaut, Schwangerschaft, mangelhafte Mundhygiene. Lokale KontraindikationenNicht ausreichendes Knochenvolumen und/oder -Qualität, lokale Wurzelreste in denen angemessene Größen, Anzahl oder die wünschenswerte Position von Implantaten nicht erreichbar sind zum Erreichen sicherer Unterstützung funktioneller oder schließlich parafunktionaler Loads.3. Prinzipien der BehandlungsplanungDem operativen Teil der Implantatsbehandlung muss eine umfassende Patientenevaluation, präoperative Diagnostik und Behandlungsplanung vorausgehen. Mangelhafte Planung der Behandlung kann zum Verlust des Implantats führen. Allgemeine Vorsichtsmaßnahmen: Ein hundertprozentiger Erfolg des Implantats kann niemals garantiert werden. Hinsichtlich pädiatrischer Patienten wird eine Routinebehandlung vor der ordnungsgemäßen Dokumentation des Abschlusses des Wachstums der Kieferknochen nicht empfohlen. Präoperative Defizite im harten oder weichen Gewebe können zu einem beeinträchtigten ästhetischen Ergebnis oder einem unvorteilhaften Winkel des Implantats führen. Das Gerät ist für den einmaligen Gebrauch bestimmt. Wiederverwendung des Geräts kann mikrobielle Kontamination und Verlust der Leistungsfähigkeit.Bei Short-Implantate verwendet werden, sollten Kliniker eng überwachen Patienten für jede der folgenden Bedingungen: periimplantären Knochenverlust, Änderungen Implantat Antwort auf Schlagzeug, oder radiologischen Veränderungen der Knochen, um den Kontakt entlang des Implantats Länge implantieren. Wenn das Implantat zeigt Mobilität oder größer als 50% Knochenverlust soll das Implantat für eine mögliche Entfernung zu bewerten.Vorsichtsmaßnahmen vor der Operation:Eine gründliche klinische und radiologische Untersuchung des Patienten muss vor der Operation durchgeführt werden, um den psychischen und körperlichen Zustand des Patienten festzustellen. Besondere Aufmerksamkeit ist Patienten zu widmen, die örtliche oder systemische Faktoren haben, die den Heilungsprozess des Knochen oder des weichen Gewebes stören könnten (z.B. Rauchen von Zigaretten, unkontrollierte Diabetes, orofaziale Strahlentherapie, Steroidbehandlung, Infektionen in benachbarten Knochen).Im Allgemeinen müssen die Platzierung des Implantats und das Design der Prothese sich nach den individuellen Gegebenheiten des Patienten richten. Im Fall von Bruxismus oder unvorteilhafter Kieferverhältnisse kann eine Neubewertung der Behandlungsmöglichkeiten in Betracht gezogen werden.Vorsichtsmaßnahmen bei der Operation: Besondere Vorsicht sollte bei der Platzierung schmaler Plattformimplantate in der hinteren Region aufgrund des Risikos des prothetischen Overload walten. Mangel an ausreichender Menge und/oder Qualität des verbleibenden Knochens, Infektionen und allgemeine Krankheiten können mögliche Gründe für das Fehlschlagen der Osseointegration sowohl sofort nach der Operation oder nach anfänglicher erfolgreicher Osseointegration sein.Abgesehen von den zwingenden Vorsichtsmaßnahmen für Operationen wie Asepsis muss beim Anbohren des Kieferknochens die Schädigung von Nerven und Gefäßen durch Rückgriff auf anatomische Kenntnisse und voroperative Röntgenaufnahmen vermieden werden. Nichterkennen der tatsächlichen Tiefe von Step- und Spiralbohrern im Verhältnis zu röntgentechnischen Messungen oder Bohren über die vorgesehene Tiefe hinaus kann zu bleibenden Verletzungen der Nerven oder anderer wesentlichen Strukturen führen, was möglicherweise zu bleibender Taubheit der Unterlippe und des Kinns oder Blutungen im Mundboden führen kann.4. Neben und Wechselwirkungen, Komplikationen mit
Paltop - Implantaten Kurz nach dem Einsetzen von Zahnimplantaten sollten beträchtliche körperliche Anstrengung erfordernde Aktivitäten vermieden werden. Mögliche Komplikationen nach dem Einsetzen von Zahnimplantaten sind
vorübergehende SymptomeSchmerzen, Schwellung, phonetische Schwierigkeiten, Gingivitispersistierendere SymptomeChronische Schmerzen im Zusammenhang mit dem Zahnimplantat, bleibende Sensibilitätsstörungen, Dysästhesie, Verlust der maxillären/mandibulären Kammknochen, lokale oder systemische Infektionen, oroantrale oder oronasale Fisteln, ungünstig betroffene Nachbarzähne, irreparable Schädigungen von Nachbarzähnen, Brüche des Implantates, des Kiefers, der Knochen oder Prothese, ästhetische Probleme, Nervenschädigungen, Abblättern, Hyperplasie.
Es wird empfohlen, dass das zahnärztliche Personal die Patienten über die einzuhaltenden Vorsichtsmaßnahmen informiert, wie etwa: Nichtrauchen und Einhaltung der Zahnhygiene. unerwünschte Ereignisse
Behandlung mit Implantaten kann zu Knochenverlust, biologischem und mechanischem Versagen führen einschließlich Ermüdungsbrüchen der Implantate.5. Platzierung eines Implantats nach Vorbereitung des
Implantatbetts 5.1 Vor der Prozedur sollten allgemeine Kontraindikationen
des Gesundheitszustandes des Patienten klinisch und radiographisch ausgewertet werden
5.2 Die Qualität der Knochen des Patienten sollte untersucht werden.
5.3 Länge und Durchmesser des Implantats sollten ausgewählt werden.
5.4 Das Operationsfeld sollte freigelegt werden.5.5 Mit einem Markierungsbohrer sollte eine erste Bohrung
durchgeführt werden. 5.6 Die Bohrung sollte nach und nach ein passendes Loch
erstellen, in das das Implantat eingeführt wird. 5.7 Das Implantat wird eingeführt.5.8 Die Schraube sollte mit Sechskantschlüsseln entfernt
werden.5.9 Abdeckschraube, Heilschraube oder Anker sollten der
Entscheidung des Arztes nach angewendet werden.Verwenden Sie keine hohe Drehkraft oder Geschwindigkeit, wenn sie das Implantat einführen (überschreiten Sie nicht 15rpm).6. Heilungsphase für Paltop Zahnimplantate 6.1 Sofortige Wiederherstellung von Paltop-
Implantaten Paltop Implantate erlauben im Rahmen der Indikationen die sofortige Wiederherstellung in einzelnen Zahnlücken und in einem zahnlosen oder teilweise gezahnten Kiefer. Gute primäre Stabilität und ein angemessener okklusaler Load sind wesentlich. Zwei oder mehr benachbarte Implantate sollten prothetisch miteinander verbunden werden.6.2 Verspätete Wiederherstellung von Paltop-
Implantaten Verspätete Wiederherstellung ist nach 6 Wochen möglich:
• wenn die Qualität der Knochen gut und das Knochenvolumen ausreichend ist.
• bei Verwendung von Ø4.2 mm oder mehr Implantaten mit einer Länge von 8mm oder mehr
Verspätete Wiederherstellung ist nach 8 Wochen möglich:• bei spongiöser Knochenqualität • bei Verwendung von Ø3.75 mm oder mehr Implantaten • bei Verwendung von Implantaten mit einer Länge von 6
mm oder mehr.In Situationen, in denen die Implantatoberfläche nicht in vollständigem Kontakt mit dem Knochen ist oder in denen Knochenaufbaumaßnahmen erforderlich sind muss eine der Situation angemessene Heilungsphase eingeplant werden. Eine radiographische Untersuchung wird nach einer Heilungsphase von 6-12 Wochen vor prothetischer Wiederherstellung empfohlen.7. Verpackung und SterilitätPaltop Zahnimplantate werden steril geliefert. Die intakte sterile Verpackung schützt das Gamma-sterilisierte Implantat vor äußeren Einflüssen und stellt, so sie richtig gelagert wird, die Sterilität bis zum Ablaufdatum sicher. Bei der Entnahme des Implantats aus der sterilen Verpackung müssen die Regeln der Asepsis eingehalten werden. Die sterile Verpackung darf erst direkt vor der Einfügung des Implantats geöffnet werden. Implantate mit einer beschädigten sterilen Verpackung dürfen aufgrund des Risikos der Kontaminierung nicht verwendet werden. Das Vorhandensein eines Ersatzimplantates wird empfohlen.
Paltop Dentalprothesen1. Beschreibung des AusgangsmaterialsPaltop Dentalprothesen bestehen aus biokompatiblem TI6AL4VELI, Goldanteilen
(Au60%Pt19%Pd20%) und Zirkonoxid (ZrO2), Cobalt Chrome (CoCr) ,Polyetheretherketone (PEEK).2. Indikationen Paltop dentalprothetische Komponenten sind vorgefertigte Komponenten, die direkt mit dem enossalen Zahnimplantat verbunden werden und als Unterstützung in der prothetischen Rehabilitation dienen sollen. Paltop dentalprothetische Komponenten sind zur einmaligen Verwendung vorgesehen. Wiederverwendung des Gerätes kann mikrobiellen Kontamination und der Verlust der Leistung.3. KontraindikationenBei Überempfindlichkeit gegen eines oder mehrere der in der Legierung enthaltenen Metalle nicht verwenden.4. Allgemeine VorsichtsmaßnahmenDie Zusammenarbeit zwischen dem Operateur, dem restaurativen Zahnarzt und dem Zahnlabortechniker ist für eine erfolgreiche Implantatbehandlung wesentlich.Für die provisorischen PEEK Pfosten wird eine Verweildauer von bis zu 30 Tagen empfohlen.5. Reinigung Wir empfehlen die Reinigung und/oder die Desinfektion des
Abutment vor der Sterilisierung. Wir empfehlen die Verwendung von Chlorhexidiniglukonatlösung 0.1~0.5w/v% oder 70%igem Alkohol für 10~30 min bei Zimmertemperatur. (Verwenden Sie nicht Desinfektionsmittel wie chlorinbasierte Desinfektionsmittel (Natriumhypochlorit, etc.), Peroxidbasierte Desinfektionsmittel (Oxydol, etc.), Oberflächendesinfektionsmittel ohne Rostschutz. Legen Sie das Abutment bei Zimmertemperatur für 5 Minuten in den Ultraschallreiniger. Wird ein Reinigungsmittel verwendet, stellen Sie sicher, dass steriles Wasser eingespritzt und das Reinigungsmittel vollständig entfernt wird, anstelle von sterilem Wasser kann auch fließendes Wasser verwendet werden. Trocknen Sie das Abutment vollständig ab und untersuchen Sie es auf Unversehrtheit und Mängel.6. SterilitätDas Gerät darf ausgeliefert steril oder nicht steril. Bitte siehe Angabe auf dem Aufkleber.Das Gerät muss vor dem Gebrauch steril. kann es sein, Dampf sterilisiert mit einer Standard-Sterilisation: Sterilisation für 3 Minuten bei 135 ° C.Dampfsterilisation ist nur im Falle der nicht sterile Produkte oder erneut sterilisieren Nicht verwendet Devices erforderlich.7. Klinisches Vorgehen1. Abänderungen an Abutments können mit den
entsprechenden Werkzeugen durchgeführt werden. Verwenden Sie Wasserirrigation, wenn Anpassungen intraoral vorgenommen werden.
2. Untersuchen Sie vor dem einbringen die Schnittstelle von Implantat und Abutment. Beschädigungen der Schnittstelle können zu einer schlechten Passform führen. Bearbeiten Sie nicht den Bereich der Schnittstelle.
3. Befestigen Sie das Abutment mit der mitgelieferten Schraube unter Verwendung eines empfohlenen Drehmomentwertes wie in der unten stehenden Tabelle.
4. Nach der Zementierung der Prothese auf dem Abutment sollte überflüssiger Zement sofort entfernt werden.
8. LagerungKeine speziellen Bedingungen erforderlich.
Chirurgische Instrumente1. VorsichtBitte lesen Sie alle in dieser Beilage enthaltenen Informationen durch. Falsche Handhabung und
Behandlung sowie Missbrauch können zu vorzeitiger Abnutzung der chirurgischen/zahnärztlichen Instrumente führen. Alle Personen, die Umgang mit diesem Instrument haben, sollten in der Anwendung und Handhaben von chirurgischen Instrumenten, Zubehörteilen und dazugehöriger Ausrüstung bewandert sein. Paltop Surgical Instruments sind wieder verwendbar und sollten nach spätestens 20-maliger wiederholter Verwendung oder bei abnehmender Schnitteffizienz ersetzt werden.2. Erstbenutzung eines neuen InstrumentsEs sei denn, aus der sterilen Verpackung entnommen, jedes Instrument muss vor der erstmaligen Verwendung gereinigt und sterilisiert werden. Alle Instrumente wurden zur Sterilisation mit Hilfe von Autoclave konzipiert und haben bei Anwendung dieses Verfahrens gute Ergebnisse erzielt.3. Inspektion und FunktionsprüfungEs ist extrem wichtig, jedes chirurgische/zahnärztliche Instrument vor der Verwendung auf Frakturen, Risse oder Fehlfunktionen hin zu untersuchen. Besonders die Überprüfung solcher Stellen wie die Klingen, Spitzen, Enden, Haltestellen und Druckknöpfe ist besonders wichtig. Den Instrumenten keinen Schaden zufügen. Niemals versuchen, auf eigene Faust Reparaturarbeiten am Gerät durchzuführen. Die Wartung und Instandhaltung sollte nur fachmännischem und darin geschultem Personal überlassen werden. Fragen hinsichtlich Reparaturen sind an den Hersteller oder Ihre biomedizinische Technikabteilung zu richten.4. Reinigung und WartungJedes chirurgische/zahnärztliche Instrument sollte nach jedem Gebrauch desinfiziert und gründlich gereinigt werden. Sachgemäße Reinigung, Überprüfung und Wartung trägt zur ordnungsgemäßem Funktion des chirurgischen Instruments bei. Reinigen, überprüfen und testen Sie ein jedes Instrument sorgfältig. Sterilisieren Sie vor jedem chirurgischen Eingriff das Instrument. Eine gute Reinigungs - und Wartungsprozedur trägt zur Verlängerung der Lebensdauer des Instruments bei.Besondere Aufmerksamkeit sollte man Schlitzen, Haltestellen, Enden, hohlen Röhren/Schläuchen und anderen höchst unzugänglichen Stellen widmen. Verwenden Sie keine beschädigten Instrumente! Falls sich ein Instrument auseinanderbauen lässt, sollte es im auseinander genommenen Zustand gereinigt werden.(HINWEIS: Bewahren Sie sämtliche Bauteile zusammen auf, bewahren Sie diese vor (versehentlicher) Verlegung und mischen Sie die Teile mit jenen ähnlicher Geräte oder Hersteller.)Um beste Ergebnisse zu erzielen, müssen die Reinigung und das Abspülen jeweils unmittelbar nach jeder Anwendung
erfolgen. Werden die Komponenten nicht sofort gereinigt, kann es zur Anlagerung von Partikeln oder getrockneten Sekreten kommen, die sich später nur noch schwer Reinigen lassen und Sterilisationen komplizieren oder ganz unmöglich machen. Die Instrumente müssen von jedweden Fremdkörpern vollständig gereinigt und abgespült werden. Verwenden Sie dazu warmes Wasser und handelsübliche Reinigungsmittel zum Einweichen oder Abspülen des Instruments. Zum Entfernen von Proteinablagerungen sollten enzymatische Reinigungsmittel verwendet werden.
• Verwenden Sie keine chemisch aggressiven Reinigungsmittel (z.B. Bleichmittel).Reinigungsmittel und Abspüllösungen sollte in etwa pH-neutral sein. Ein pH-Wert von 7,0 wäre am Besten.
• Verwenden Sie keine Scheuermittel.• Nur weiche Trockenbürsten sollten verwendet werden.• Spülen Sie alle Teile und unzugänglichen Stellen wie
Kanäle im Geräteinneren usw. ab und warten Sie diese.• Ultraschallreiniger dürfen verwendet werden. Überprüfen
Sie sämtliche Armaturen und ziehen Sie jene gegebenenfalls wieder fest an, die sich aufgrund von Vibrationen gelöst haben.
• Desinfizierung kann auch in der Waschmaschine bei Temperaturen von bis zu 95°C erfolgen.
• Gründlich mit destilliertem Wasser abspülen.• Zur Lagerung und/oder Sterilisierung vorbereiten.
Trocknen Sie die Instrumente nach der Reinigung oder dem Abspülen behutsam mit komprimierter Luft (extrem unzugängliche Stellen wie Kanäle im Geräteinneren usw. müssen ausgeblasen werden).HINWEIS: Behandeln Sie nach der Reinigung und vor der Sterilisierung alle Instrumente mit einem, das als physiologisch unbedenklich gilt (Paraffinöl gemäß DAB 8 Ph. Eur. USP XX,) besonders alle Klingen, Enden, Haltestellen, Druckknöpfe und sämtliche beweglichen Teile.5. Lagerung und Wieder VerwendenInstrumente sollten an einem sauberen, trockenen Ort frei von Feuchtigkeit aufbewahrt werden. Die Instrumente sollte entweder separat in ihrem jeweiligen Versandkarton oder zusammen in einem Ablagekasten mit Schutzwirkung und Trennwänden aufbewahrt werden. Bei der Lagerung in Schubladen sind Spitzen sind mit Stofftüchern, Mullbinde oder Schläuchen zu schützen. Autoklav - Dampfsterilisation wird empfohlen. Reinigen Sie die Instrumente vor der Sterilisation gründlich von allen Schmutzpartikeln, Geweberesten und Fremdkörpern. Befolgen Sie hinsichtlich der Sterilisation die Anweisungen zur Bedienung und zum Laden des Dampf-Autoklavs. Sämtliche Oberflächen des zu sterilisierenden Instruments müssen direkt in Kontakt mit dem Dampf kommen, einschließlich der inneren Oberflächen sowie Schläuche und Kanäle. Lassen Sie das Instrument, bevor Sie es verwenden, an der Luft bis auf Raumtemperatur abkühlen.6. Standardmäßige SterilisierungsverfahrenDas Gerät darf ausgeliefert steril oder nicht steril. Bitte siehe Angabe auf dem Aufkleber.Das Gerät muss vor dem Gebrauch steril. kann es sein, Dampf sterilisiert mit einer Standard-Sterilisation: Sterilisation für 10 Minuten bei 135 ° C.7. HandhabungAlle chirurgischen/zahnärztlichen Instrumente sollten beim Transport, bei der Reinigung, bei der Sterilisierung und bei der Lagerung mit größter Vorsicht behandelt werden. Dies trifft in besonderem Maße zu auf Klingen, feine Ausformungen oder empfindliche Stellen. Chirurgische/ zahnärztliche Instrumente rosten und ihre Funktionsweisen werden beeinträchtigt, falls sie mit aggressiven Substanzen in Kontakt kommen. Der Kontakt solcher Instrumente mit Säuren oder anderen aggressiven Reinigungsmitteln ist zu vermeiden.8. GarantiePaltop LTD. garantiert, dass zum Zeitpunkt der Versendung sämtliche seiner Produkte frei von Verarbeitungs- und Materialfehlern sind. Alle unsere Produkte werden so konzipiert und hergestellt, dass sie strengsten Qualitätsnormen gerecht werden. Für Produkte, an denen Veränderungen vorgenommen wurden und die so vom ursprünglichen Auslieferungszustand abweichen, können wir im Fall eines Produktausfalls, der aufgrund eines falschen Gebrauchs des Produkts oder einer Benutzung, die von jener durch den Produktdesigner beabsichtigten Benutzung abweicht, keine Haftung übernehmen.Falls am Produkt Änderungen oder Reparaturen an einem anderen Ort als auf dem Werksgelände von Paltop LTD oder einem Unternehmen, das von Paltop LTD zu solchen Änderungen oder Reparaturen berechtigt wurde, verliert das Produkt die Berechtigung zum Tragen des CE-Zeichens.
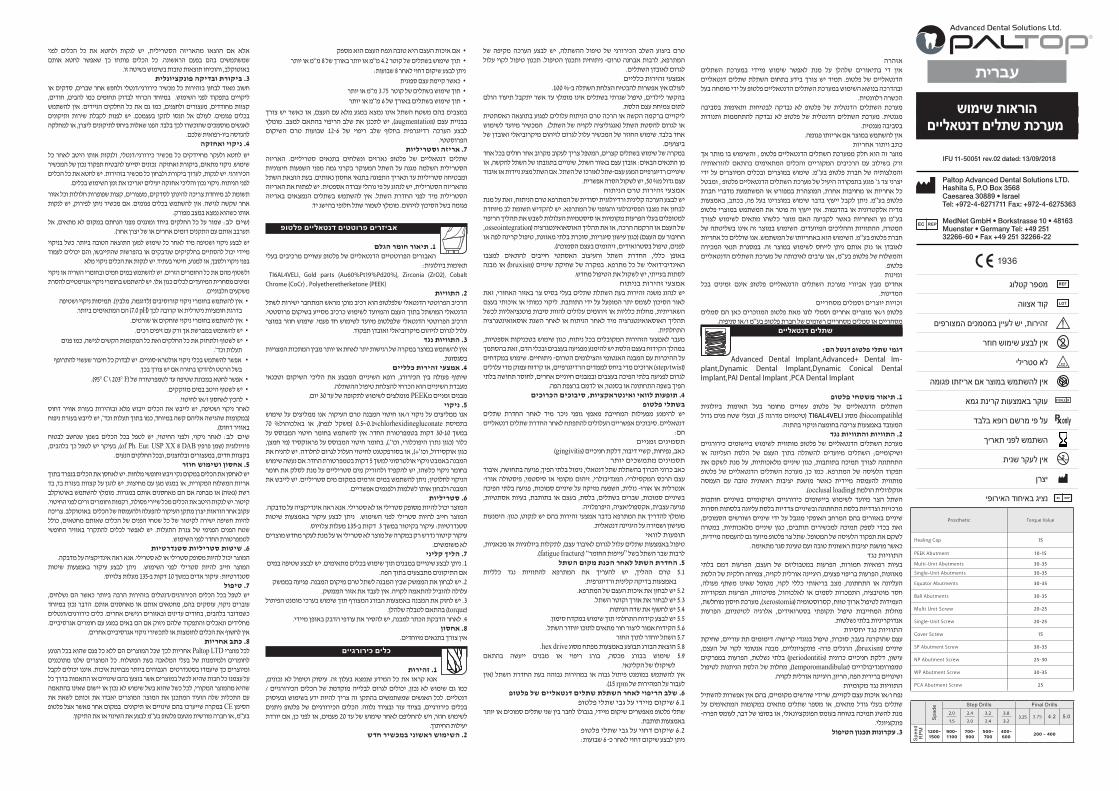
Spa
de
Step Drills Final Drills2.0
1.5
2.4
2.0
3.2
2.4
3.8
3.23.25 3.75 4.2 5.0
Spe
edR
PM 1200-
1500900- 1100
700- 900
500- 700
400- 600 200 - 400
אזהרההשתלים במערכת מיידי שימוש לאפשר מנת על שלהלן בתיאורים די אין דנטאליים שתלים השתלת בתחום בידע צורך יש תמיד פלטופ. של הדנטאליים ובהדרכה בנושא השימוש במערכת השתלים הדנטאליים פלטופ על ידי מומחה בעל
הכשרה רלוונטית.בסביבה ותאימות לבטיחות נבדקה לא פלטופ של הדנטלית השתלים מערכת ותנודות להתחממות נבדקה לא פלטופ של הדנטלית השתלים מערכת מגנטית.
בסביבה מגנטית.אין להשתמש במוצר אם אריזתו פגומה.
כתב ויתור אחריותמוצר זה הוא חלק ממערכת השתלים הדנטאליים פלטופ , והשימוש בו מותר אך להוראותיה בהתאם המתאימים והכלים המקוריים הרכיבים עם בשילוב ורק ידי על המיוצרים ובכלים במוצרים שימוש בע”מ. פלטופ חברת של והמלצותיה יצרני צד ג’ פוגע בתפקודה היעיל של מערכת השתלים הדנטאליים פלטופ , ומבטל כל אחריות או מחויבות אחרת, המוצהרת במפורש או המשתמעת מדברי חברת ייעוץ בדבר שימוש במוצרינו בעל פה, בכתב, באמצעות ניתן לקבל פלטופ בע”מ. מדיה אלקטרונית או בהדגמות. אין ייעוץ זה פוטר את המשתמש במוצרי פלטופ לצורך לשימוש מתאים כלשהו מוצר האם לקביעה באשר האחריות מן בע”מ המטרה, ההתוויות וההליכים המיועדים. השימוש במוצר זה אינו בשליטתה של חברת פלטופ בע”מ. השימוש הוא באחריותו של המשתמש. אנו שוללים כל אחריות המכירה תנאי במסגרת זה. במוצר לשימוש לייחס ניתן אותם נזק או לאובדן והמשלוח של פלטופ בע”מ, אנו ערבים לאיכותה של מערכת השתלים הדנטאליים
פלטופ.זמינות
בכל זמינים אינם פלטופ הדנטאליים השתלים מערכת אביזרי מבין אחדים המדינות.
זכויות יוצרים וסמלים מסחרייםכאן הם סמלים פלטופ המוזכרים לוגו מאת וסמלי מוצרים אחרים ו/או פלטופ
מסחריים או סמלים מסחריים רשומים של חברת פלטופ בע”מ ו/או סניפיה. שתלים דנטאליים
דגמי שתלי פלטופ דנטל הם:Advanced Dental Implant,Advanced+ Dental Im-
plant,Dynamic Dental Implant,Dynamic Conical Dental Implant,PAI Dental Implant ,PCA Dental Implant
1. תיאור משטחי פלטופביולוגית תאימות בעל מחומר עשויים פלטופ של הדנטאליים השתלים )biocompatible( מסוג TI6AL4VELI )טיטניום מדרגה 5(, ובעלי שטח פנים גדול
המעובד באמצעות צריבה בחומצה וניקוי בהתזה. 2. התוויות והתוויות נגד
כירורגיים ביישומים לשימוש מותווית פלטופ של הדנטאליים השתלים מערכת או העליונה הלסת של העצם בתוך להשתלה מיועדים השתלים ושיקומיים; על מנת לשקם את שיניים מלאכותיות, כגון בתותבות, לצורך תמיכה התחתונה פלטופ של הדנטאליים השתלים מערכת כן, כמו המתרפא. של הלעיסה תפקוד העמסה עם טובה ראשונית יציבות מושגת כאשר מיידית להעמסה מותווית
.)occlusal loading( אוקלוזלית הולמתחותכות בשיניים ושיקומיים כירורגיים ביישומים לשימוש מיועד הצר השתל מרכזיות וצדדיות בלסת התחתונה ובשיניים צדדיות בלסת עליונה בלסתות חסרות שיניים באזורים בהם המרחב האופקי מוגבל על ידי שיניים ושורשים הסמוכים, במטרה מלאכותיות, שיניים כגון תותבים, למכשירים תמיכה לספק בכדי זאת לשקם את תפקוד הלעיסה של המטופל. שתל צר פלטופ מיועד גם להעמסה מיידית,
כאשר מושגת יציבות ראשונית טובה ועם טעינת סגר מתאימה.התוויות נגד
בלתי דמם הפרעות העצם, של במטבוליזם הפרעות חמורות, רפואיות בעיות מאוזנות, הפרעות בריפוי פצעים, היגיינה אורלית לקויה, צמיחה חלקית של הלסת פעולה, משתף שאינו מטופל לקוי, כללי בריאותי מצב התחתונה, או העליונה תפקודיות הפרעות פסיכוזות, לאלכוהול, או לסמים התמכרות מוטיבציה, חסר העמידות לטיפול ארוך טווח, קסרוסטומיה )xerostomia(, מערכת חיסון מוחלשת, הפרעות לטיטניום, אלרגיה בסטרואידים, תקופתי טיפול המחייבות מחלות
אנדוקריניות בלתי נשלטות.התוויות נגד יחסיות
עצם שהוקרנה בעבר, סוכרת, טיפול בנוגדי קרישה/ דימומים תת עוריים, שחיקת העצם, של לקוי אנטומי מבנה פונקציונליים, פרה- הרגלים ,)bruxism( שיניים במפרקים הפרעות נשלטת, בלתי )periodontitis( כרונית חניכיים דלקת עישון, )temporomandibular(, מחלות של הלסת הניתנות לטיפול טמפורומנדיבולריים
ושינויים ברירית הפה, הריון, היגיינה אורלית לקויה. התוויות נגד מקומיות
נפח ו/או איכות עצם לקויים, שרידי שורשים מקומיים, בהם אין אפשרות להשתיל על המתאימים במקומות מתאים שתלים מספר או מתאים, גודל בעלי שתלים מנת להשיג תמיכה בטוחה בעומס הפונקציונאלי, או בסופו של דבר, לעומס הפרה-
פונקציונלי. 3. עקרונות תכנון הטיפול
של מקיפה הערכה לבצע יש ההשתלה, טיפול של הכירורגי השלב ביצוע טרם המתרפא, לרבות אבחנה טרום- ניתוחית ותכנון הטיפול. תכנון טיפול לקוי עלול
לגרום לאובדן השתלים. אמצעי זהירות כלליים
לעולם אין אפשרות להבטיח הצלחת השתלה ב-% 100. בהקשר לילדים, טיפול שגרתי בשתלים אינו מומלץ עד אשר יתקבל תיעוד הולם
לתום צמיחת עצם הלסת.ליקויים ברקמה הקשה או הרכה טרם הניתוח עלולים לפגוע בתוצאה האסתטית או לגרום להסטת השתל )אנגוליציה לקויה של השתל(. המכשיר מיועד לשימוש אחד בלבד. שימוש החוזר של המכשיר עלול לגרום לזיהום מיקרוביאלי ואובדן של
ביצועים.במקרה של שימוש בשתלים קצרים, המטפל צריך לעקוב מקרוב אחר חולים בכל אחד מן התנאים הבאים: אובדן עצם באזור השתל, שינויים בתגובתו של השתל להקשה, או שינויים רדיוגרפיים המגע עצם-שתל לאורכו של השתל. אם השתל מציג ניידות או איבוד
עצם גדול מ% 50, יש לשקול הסרה אפשרית.אמצעי זהירות טרם הניתוח
יש לבצע הערכה קלינית ורדיולוגית יסודית של המתרפא טרם הניתוח, זאת על מנת לבחון את מצבו הפסיכולוגי והגופני של המתרפא. יש להקדיש תשומת לב מיוחדת למטופלים בעלי הפרעות מקומיות או סיסטמיות העלולות לשבש את תהליך הריפוי ,osseointegration( של העצם או הרקמה הרכה, או את תהליך האוסאואינטגרציההחיבור עם העצם( )כגון עישון סיגריות, סוכרת בלתי מאוזנת, טיפול קרינה לפה או
לפנים, טיפול בסטרואידים, זיהומים בעצם הסמוכה(. למצבו להתאים חייבים האסתטי והעיצוב השתל החדרת כללי, באופן )bruxism( או מבנה האינדיבידואלי של כל מתרפא. במקרה של שחיקת שיניים
לסתות בעייתי, יש לשקול את הטיפול מחדש. אמצעי זהירות בניתוח
יש לנהוג משנה זהירות בעת השתלת שתלים בעלי בסיס צר באזור האחורי, זאת לאור הסיכון לעומס יתר המופעל על ידי התותבת. ליקוי כמותי או איכותי בעצם השאריתית, מחלות כלליות או זיהומים עלולים להוות סיבות פוטנציאליות לכשל תהליך האוסאואינטגרציה מיד לאחר הניתוח או לאחר השגת אוסאואינטגרציה
התחלתית. מעבר לאמצעי הזהירות המקובלים בכל ניתוח, כגון שימוש בטכניקות אספטיות, במהלך הקידוח בעצם הלסת יש להימנע מפגיעה בעצבים ובכלי הדם, זאת בהסתמך על ההיכרות עם המבנה האנטומי והצילומים הטרום- ניתוחיים. שימוש במקדחים )step/twist( ארוכים מדי ביחס לממדים הרדיוגרפיים, או קידוח עמוק מדי עלולים לגרום לפגיעה בלתי הפיכה בעצבים ובמבנים חיוניים אחרים, לחוסר תחושה בלתי
הפיך בשפה התחתונה או בסנטר, או לדמם ברצפת הפה. 4. תופעות לוואי ואינטראקציות, סיבוכים הכרוכים
בשתלי פלטופ שתלים החדרת לאחר מיד ניכר גופני מאמץ המחייבת מפעילות להימנע יש דנטאליים. סיבוכים אפשריים העלולים להתפתח לאחר החדרת שתלים דנטאליים
הם: תסמינים זמניים
)gingivitis( כאב, נפיחות, קשיי דיבור, דלקת חניכייםתסמינים מתמשכים יותר
כאב כרוני הכרוך בהשתלת שתל דנטאלי, נימול בלתי הפיך, פגיעה בתחושה, איבוד אורו- פיסטולה סיסטמי, או זיהום מקומי עצם הרכס המקסילרי/ המנדיבולרי, אנטרלית או אורו- נזלית, השפעה מזיקה על שיניים סמוכות, פגיעה בלתי הפיכה בשיניים סמוכות, שברים בשתלים, בלסת, בעצם או בתותבת, בעיות אסתטיות,
פגיעה עצבית, אקספוליאציה, היפרפלזיה. מומלץ להדריך את המתרפא בדבר אמצעי זהירות בהם יש לנקוט, כגון: הימנעות
מעישון ושמירה על היגיינה דנטאלית. תופעות לוואי
טיפול באמצעות שתלים עלול לגרום לאיבוד עצם, לתקלות ביולוגיות או מכאניות, .)fatigue fracture( ”לרבות שבר השתל בשל “עייפות החומר
5. החדרת השתל לאחר הכנת מקום השתלכלליות נגד להתוויות המתרפא את להעריך יש ההליך, טרם 5.1
באמצעות בדיקה קלינית ורדיוגרפית. 5.2 יש לבחון את איכות העצם של המתרפא.
5.3 יש לבחור את אורך וקוטר השתל. 5.4 יש לחשוף את שדה הניתוח.
5.5 יש לבצע קידוח התחלתי תוך שימוש במקדח סימון.5.6 הקידוח אמור ליצור חור מתאים לתוכו יוחדר השתל.
5.7 השתל יוחדר לתוך החור.hex drive 5.8 הוצאת הבורג תבוצע באמצעות מפתח מסוג
בהתאם ייעשה מבנים או ריפוי בורג מכסה, בבורג שימוש 5.9 לשיקולו של הקלינאי.
)אין השתל החדרת בעת גבוהה במהירות או גבוה פיתול במומנט להשתמש אין .)15 rpm לעבור על המהירות של
6. שלב הריפוי לאחר השתלת שתלים דנטאליים של פלטופ 6.1 שיקום מיידי על גבי שתלי פלטופ
שתלי פלטופ מאפשרים שיקום מיידי, בגבולו לחבר בין שני שתלים סמוכים או יותר באמצעות תותבת.
6.2 שיקום דחוי על גבי שתלי פלטופניתן לבצע שיקום דחוי לאחר כ- 6 שבועות:
אם איכות העצם היא טובה ונפח העצם הוא מספק תוך שימוש בשתלים של קוטר 4.2 מ”מ או יותר באורך של 8 מ”מ או יותר
ניתן לבצע שיקום דחוי לאחר 8 שבועות: כאשר קיימת עצם ספוגית תוך שימוש בשתלים של קוטר 3.75 מ”מ או יותר תוך שימוש בשתלים באורך של 6 מ”מ או יותר
במצבים בהם משטח השתל אינו נמצא במגע מלא עם העצם, או כאשר יש צורך לתכנן את שלב הריפוי בהתאם למצב. מומלץ יש ,)augmentation( עצם בבניית השיקום טרם שבועות 12-6 של ריפוי שלב בחלוף רדיוגרפית הערכה לבצע
הפרוסטטי. 7. אריזה וסטריליות
האריזה סטריליים. בתנאים ונשלחים נארזים פלטופ של דנטאליים שתלים גמה מפני השפעות חיצוניות על השתל המעוקר בקרני הסטרילית השלמה מגנה ומבטיחה סטריליות עד תאריך התפוגה בתנאי אחסון נאותים. בעת הוצאת השתל מהאריזה הסטרילית, יש לנהוג על פי נוהלי עבודה אספטית. יש לפתוח את האריזה באריזה הנמצאים בשתלים להשתמש אין השתל. החדרת לפני מיד הסטרילית
פגומה בשל הסיכון לזיהום. מומלץ לשמור שתל חלופי בהישג יד.
אביזרים פרוטטים דנטאליים פלטופ
1. תיאור חומר הגלםהאבזרים הפרוטטיים הדנטאליים של פלטופ עשויים מרכיבים בעלי
תאימות ביולוגית: TI6AL4VELI, Gold parts (Au60%Pt19%Pd20%), Zirconia (ZrO2), Cobalt Chrome (CoCr) , Polyetheretherketone (PEEK)
2. התוויותהרכיב הפרוטטי הדנטאלי שלפלטופ הוא רכיב מוכן מראש המתחבר ישירות לשתל הדנטאלי המושתל בתוך העצם והמיועד לשימוש כרכיב מסייע בשיקום פרוסטטי. הרכיב הפרוטטי הדנטאלי שלפלטופ מיועד לשימוש חד פעמי. שימוש חוזר במוצר
עלול לגרום לזיהום מיקרוביאלי ואובדן תפקוד.3. התוויות נגד
אין להשתמש במוצר במקרה של רגישות יתר לאחת או יותר מבין המתכות המצויות בסגסוגת.
4. אמצעי זהירות כללייםוטכנאי השיקום הליכי את המבצע השיניים רופא הכירורג, בין פעולה שיתוף
מעבדת השיניים הוא הכרחי להצלחת טיפול ההשתלה.מבנים זמניים מPEEK מומלצים לשימוש לתקופה של עד 30 יום.
5. ניקויו/או חיטוי המבנה טרם העיקור. אנו ממליצים על שימוש ניקוי על אנו ממליצים 70 באלכוהול% או לנפח(, )משקל 0.5~0.1 chlorhexidinegluconate בתמיסת על המבוסס חיטוי בחומר להשתמש אין החדר. בטמפרטורת דקות 30-10 במשך כלור )כגון נתרן היפוכלורי, וכו’.(, בחומר חיטוי המבוסס על פראוקסיד )מי חמצן, כגון אוקסידול, וכו’+(, או בסורפקטנט לחיטוי העלול לגרום לחלודה. יש להניח את המבנה באמבט ניקוי אולטרסוני למשך 5 דקות בטמפרטורת החדר. אם נעשה שימוש בחומר ניקוי כלשהו, יש להקפיד ולהזריק מים סטריליים על מנת לסלק את חומר הניקוי לחלוטין; ניתן להשתמש במים זורמים במקום מים סטריליים. יש לייבש את
המבנה ולבחון אותו לשלמות ולפגמים אפשריים.6. סטריליות
המוצר יכול להיות מסופק סטרילי או לא סטרילי. אנא ראה אינדיקציה על מדבקה.שיטות באמצעות עיקור לבצע ניתן השימוש. לפני סטרילי להיות חייב המוצר
סטנדרטיות: עיקור בקיטור במשך 3 דקות ב-135 מעלות צלזיוס.עיקור קיטור נדרש רק במקרה של מוצר לא סטרילי או על מנת לעקר מחדש מוצרים
לא משומשים.7. הליך קליני
1. ניתן לבצע שינויים במבנים תוך שימוש בכלים מתאימים. יש לבצע שטיפה במים אם התיקונים מתבצעים בתוך הפה.
2. יש לבחון את הממשק שבין המבנה לשתל טרם מיקום המבנה. פגיעה בממשק עלולה להוביל להתאמה לקויה. אין לעבד את אזור הממשק.
3. יש לחזק את המבנה באמצעות הבורג המצורף תוך שימוש בערכי מומנט הפיתול )torque( בהתאם לטבלה שלהלן.
4. לאחר הדבקת הכתר למבנה, יש להסיר את עודפי הדבק באופן מיידי.8. אחסון
אין צורך בתנאים מיוחדים.
כלים כירורגיים
1. זהירותנכונים, וטיפול לא אנא קראו את כל המידע שנמצא בעלון זה. עיסוק / הכירורגיים הכלים של מוקדמת לבלייה לגרום יכולים נכון, לא שימוש גם כמו
דנטליים. לכל האנשים שמשתמשים בהתקן זה צריך להיות ידע בשימוש ובעיסוק ניתנים פלטופ של הכירורגיים הכלים נלווה. ובציוד עזר בציוד כירורגיים, בכלים לשימוש חוזר, ויש להחליפם לאחר שימוש של עד 20 פעמים, או לפני כן, אם יורדת
יעילות החיתוך.2. השימוש ראשוני במכשיר חדש
לפני הכלים כל את ולחטא לנקות יש הסטרילית, מהאריזה הוצאו אם אלא אותם לחטא שאפשר כך פותחו הכלים כל הראשונה. בפעם בהם שמשתמשים
באוטוקלב, והוכיחו תוצאות טובות בשימוש בשיטה זו.3. ביקורת ובדיקה פונקציונלית
חשוב מאוד לבחון בזהירות כל מכשיר כירורגי/דנטלי ולחפש אחר שברים, סדקים או חודים, להבים, כמו תחומים לבדוק הכרחי במיוחד השימוש. לפני בתפקוד ליקויים להשתמש אין הניידים. כל החלקים גם את כמו ולחצנים, קצוות מחודדים, מעצורים ותיקונים שירות לקבלת לפנות יש בעצמכם. לתקן תנסו אל לעולם פגומים. בכלים לאנשים מוסמכים שהוכשרו לכך בלבד. הפנו שאלות ביחס לתיקונים ליצרן, או למחלקה
להנדסה ביו-רפואית שלכם.4. ניקוי ואחזקה
כל לאחר היטב אותו ולנקות כירורגי/דנטלי, מכשיר כל מחיידקים ולעקר לחטא יש שימוש. ניקוי מתאים, ביקורת ואחזקה נכונים יסייעו להבטיח תפקוד נכון של המכשיר הכירורגי. יש לנקות, לערוך ביקורת ולבחון כל מכשיר בזהירות. יש לחטא את כל הכלים
לפני הניתוח. ניקוי נכון והליכי אחזקה יעילים יאריכו את זמן השימוש בכלים. תשומת לב מיוחדת צריכה להינתן לסדקים, מעצורים, קצות שפופרות חלולות וכל אזור אחר שקשה לגישה. אין להשתמש בכלים פגומים. אם מכשיר ניתן לפירוק, יש לנקות
אותו כשהוא נמצא במצב מפורק.לב: שמור על כל החלקים ביחד ומוגנים מפני הנחתם במקום לא מתאים, אל )שים
תערבב אותם עם התקנים דומים אחרים או של יצרן אחר(.יש לבצע ניקוי ושטיפה מיד לאחר כל שימוש למען התוצאה הטובה ביותר. כשל בניקוי מיידי יכול להסתיים בחלקיקים שנדבקים או בהפרשות שהתייבשו, והם יכולים לעמוד
בפני ניקוי ולסבך, או למנוע, חיטוי בעתיד. יש לנקות את הכלים ניקוי מלא ולשטוף מהם את כל החומרים הזרים. יש להשתמש במים חמים ובחומרי השריה או ניקוי זמינים מסחרית המיועדים לכלים כגון אלו. יש להשתמש בחומרי ניקוי אנזימטיים להסרת
משקעים חלבוניים. אין להשתמש בחומרי ניקוי קורוסיבים )לדוגמה, מלבין(. תמיסות ניקוי ושטיפה
בדרגת חומציות ניטרלית או קרובה לכך )pH 7.0( הם המתאימים ביותר. אין להשתמש בחומרי ניקוי שוחקים או שורטים. יש להשתמש במברשת אך ורק עם זיפים רכים. יש לשטוף ולתחזק את כל החלקים ואת כל המקומות הקשים לגישה, כמו פנים
תעלות וכד’. אפשר להשתמש בכלי ניקוי אולטרא-סוניים. יש לבדוק כל חיבור שעשוי להתרופף
בשל הרטט ולהדקו בחזרה אם יש צורך בכך. .)95° C \ 203° F( אפשר לחטא במכונת שטיפה עד לטמפרטורה של יש לשטוף היטב במים מזוקקים. להכין לאחסון ו/או לחיטוי.
דחוס אוויר בעזרת ובזהירות מלא ייבוש הכלים את לייבש יש ושטיפה, ניקוי לאחר )במקומות שהגישה אליהם קשה במיוחד, כמו בתוך תעלות וכד’, יש לייבש בעזרת ניפוח
באוויר דחוס(.לבטוח שנחשב בשמן הכלים בכל לטפל יש החיטוי, ולפני ניקוי, לאחר לב: שים פיזיולוגית )שמן פרפין of Ph. Eur. USP XX 8 DAB(, בעיקר יש לטפל כך בלהבים,
בקצוות חדים, במעצורים ובלחצנים, ובכל החלקים הנעים.5. אחסון ושימוש חוזר
יש לאחסן את הכלים במקום נקי ויבש וחופשי מלחות. יש לאחסן את הכלים בנפרד בתוך אריזת המשלוח המקורית, או במגש מגן עם מחיצות. יש להגן על קצוות בעזרת בד, בד רשת )גאזה( או מבחנה אם הם מאחסנים אותם במגרות. מומלץ להשתמש באוטוקלב קיטור. יש לנקות היטב את הכלים מכל שיירי פסולת, רקמות וחומרים זרים לפני החיטוי. עקוב אחר הוראות יצרן מתקן העיקור להפעלה ולהעמסה של הכלים באוטוקלב. צריכה להיות חשיפה ישירה לקיטור של כל שטחי הפנים של הכלים שאותם מחטאים, כולל החופשי באוויר להתקרר לכלים לאפשר יש התעלות. צנרת של הפנימי הפנים שטח
לטמפרטורת החדר לפני השימוש.6. שיטות סטריליות סטנדרטיות
המוצר יכול להיות מסופק סטרילי או לא סטרילי. אנא ראה אינדיקציה על מדבקה.שיטות באמצעות עיקור לבצע ניתן השימוש. לפני סטרילי להיות חייב המוצר
סטנדרטיות: עיקור אדים במשך 10 דקות ב-135 מעלות צלזיוס.7. טיפול
נשלחים, הם כאשר ביותר הרבה בזהירות הכירורגים/דנטלים הכלים בכל לטפל יש נכון במיוחד ניקוי, עוסקים בהם, מחטאים אותם או מאחסנים אותם. הדבר עוברים כשמדובר בלהבים, בחודים עדינים ובאזורים רגישים אחרים. כלים כירורגים/דנטלים מחלידים ונאכלים והתפקוד שלהם ניזוק אם הם באים במגע עם חומרים אגרסיביים.
אין לחשוף את הכלים לחומצות או לתכשירי ניקוי אגרסיביים אחרים.8. כתב אחריות
לכל מוצרי Paltop LTD אחריות לכך שכל המוצרים הם ללא כל פגם שהוא בכל הנוגע מתוכננים שלנו המוצרים כל המשלוח. בעת המלאכה בעלי של ולמיומנות לחומרים ומיוצרים כך שיעמדו בסטנדרטים הגבוהים ביותר מבחינת איכות. איננו יכולים לקבל על עצמנו כל חבות שהיא לכשל במוצרים אשר בוצעו בהם שינויים או התאמות בדרך כל שהיא מהמוצר המקורי, לכל כשל שהוא בשל שימוש לא נכון או יישום שאינו בהתאמה את לשאת זכותם את יאבדו המוצרים המוצר. את המתכנן הועיד שלה התכלית עם הסימן CE במקרה שייערכו בהם שינויים או תיקונים במקום אחר מאשר אצל פלטופ
בע”מ, או חברה מורשית מטעם פלטופ בע”מ לבצע את השינוי או את התיקון.
dfgdfge
Prosthetic Torque Value
Healing Cap 15
PEEK Abutment 10-15
Multi-Unit Abutments 30-35
Single-Unit Abutments 30-35
Equator Abutments 30-35
Ball Abutments 30-35
Multi Unit Screw 20-25
Single-Unit Screw 20-25
Cover Screw 15
SP Abutment Screw 30-35
NP Abutment Screw 25-30
WP Abutment Screw 30-35
PCA Abutment Screw 25

Spa
de
Step Drills Final Drills2.0
1.5
2.4
2.0
3.2
2.4
3.8
3.23.25 3.75 4.2 5.0
Spe
edR
PM 1200-
1500900- 1100
700- 900
500- 700
400- 600 200 - 400
Prosthetic Torque Value
Healing Cap 15
PEEK Abutment 10-15
Multi-Unit Abutments 30-35
Single-Unit Abutments 30-35
Equator Abutments 30-35
Ball Abutments 30-35
Multi Unit Screw 20-25
Single-Unit Screw 20-25
Cover Screw 15
SP Abutment Screw 30-35
NP Abutment Screw 25-30
WP Abutment Screw 30-35
PCA Abutment Screw 25
AvvertenzaLe seguenti descrizioni non sono sufficienti per consentire un uso immediatoe dell’impianto dentale Paltop. È sempre necessaria la conoscenza dell’implantologia dentale e delle istruzioni per la gestione dell’impianto dentale Paltop da parte di un operatore che disponga di un’esperienza rilevante.La Dental Implant System Paltop non è stato valutato per la sicurezza e la compatibilità in ambiente MR. La Dental Implant System Paltop non è stato testato per il riscaldamento o la migrazione in ambiente MR.Non utilizzare se la confezione è danneggiata.Esclusione di responsabilitàQuesto prodotto fa parte dell’impianto dentale Paltop e può essere utilizzato solo in combinazione con i corrispondenti componenti e strumenti originali, conformemente alle istruzionie e raccomandazioni di Paltop LTD. L’utilizzo di prodotti e strumenti realizzati da terzi riduce l’efficienza dell’impianto Paltop e invaliderà la garanzia o qualsiasi altro obbligo, espresso o implicito, di Paltop LTD. I consigli sull’utilizzo dei nostri prodotti vengono forniti in forma orale, scritta, mediante l’uso di strumenti elettronici o di dimostrazioni. Ciò non solleva l’utilizzatore dei prodotti Paltop LTD. dalla responsabilità di determinare se ogni prodotto è indicato o meno per lo scopo, le indicazioni e le procedure previste. L’uso di questo prodotto non è sotto il controllo di Paltop LTD. ma è di responsabilità dell’utente. Si declina qualsiasi responsabilità per perdita o danno attribuibile all’uso di questo prodotto. Ai sensi delle Condizioni di vendita e consegna di Paltop LTD, garantiamo la qualità dell’impianto dentale Paltop.DisponibilitàAlcuni articoli dell’impianto dentale Paltop non sono disponibili in tutti i paesi.Copyright e marchi Paltop e/o altri prodotti e loghi di Paltop, qui menzionati sono marchi o marchi registrati di Paltop LTD. e/o dei suoi affiliati.
Impianto dentale PaltopI modelli Paltop Dental Implants sono:Advanced Dental Implant,Advanced+ Dental Implant,Dynamic Dental Implant,Dynamic Conical
Dental Implant,PAI Dental Implant ,PCA Dental Implant
1. Descrizione delle superfici PaltopGli impianti dentali Paltop sono realizzati in TI6AL4VELI [Titanium Grade 5] biocompatibile e dispongono di un’ampia superficie sabbiata e mordenzata.2. Indicazioni e controindicazioniL’impianto dentale Paltop è indicato per l’uso in applicazioni chirurgiche e ricostruttive per il posizionamento nell’osso della mandibola superiore o inferiore e fornire supporto ai dispositivi protesici quali denti artificiali, per ripristinare la funzione masticatoria del paziente. L’impianto dentale Paltop è inoltre indicato per il carico immediato quando si ottiene una buona stabilità primaria e con un carico occlusale appropriato.L’impianto Narrow è indicato per l’uso in applicazioni chirurgiche e protesiche per il posizionamento nel mascellari regioni incisivo laterale di mascelle parzialmente edentule dove lo spazio orizzontale è limitato dai denti e radici adiacenti mandibolare centrale, incisivo laterale e, per fornire il supporto per i dispositivi protesici, come i denti artificiali, al fine di ripristinare la funzione masticazione del paziente. La Narrow paltop è indicato anche per il carico immediato, quando una buona stabilità primaria è raggiunto e con adeguato carico occlusale.ControindicazioniProblemi medici interni gravi, disturbi di metabolismo osseo, disordini emorragici non controllati, cicatrizzazione insufficiente, scarsa igiene orale, crescita mascellare e mandibolare non conclusa, cattivo stato di salute generale, paziente non collaborativo, non motivato, abuso di stupefacenti o alcol, psicosi, gravi disturbi funzionali refrattari a terapia, xerostomia, sistema immunitario debole, malattie che richiedano l’assunzione periodica di steroidi, allergia al titanio, disturbi endocrini non controllati.Controindicazioni relativeOssa sottoposte a precedente irradiazione, diabete mellito, anticoagulazione indotta da farmaci/ diatesi emorragica, bruxismo, abitudini parafunzionali condizioni ossee anatomicamente sfavorevoli, abuso di tabacco, parodontite non controllata, disturbi articolari temporomandibolari, patologie mandibolari curabili e alterazioni della mucosa orale, gravidanza, igiene orale inadeguata. Controindicazioni localiInsufficiente volume osseo e/o qualità inadeguata dell’osso, residui radicolari, per cui non sia possibile ottenere il numero, le dimensioni adeguate di posizioni per l’impianto al fine di ottenere un supporto o funzionalità sicuri o eventuali carichi parafunzionali3. Principi di pianificazione della terapiaLa fase chirurgica della ricostruzione mediante impianto deve essere preceduta da un’esauriente valutazione del paziente, diagnosi pre-operatoria e pianificazione della terapia. Precauzioni generaliNon è mai possibile garantire il successo assoluto dell’impianto. Per quanto riguarda i pazienti in età pediatrica, non è consigliabile intervenire fino al completamento documentato della crescita dell’osso mandibolare. Eventuali deficit dei tessuti duri e molli pre-intervento possono portare a una compromissione del risultato estetico e di un’angolazione dell‘impianto. Il dispositivo è destinato ad essere utilizzato una sola volta. riutilizzo del dispositivo può causare la contaminazione microbica e perdita di prestazioni.Nel caso in cui si utilizzano impianti corti, medico deve monitorare
attentamente i pazienti per una qualsiasi delle seguenti condizioni: perdita ossea perimplantare, modifiche alla risposta di impianto a percussione, o alterazioni radiografiche in osso di impiantare contatto lungo la lunghezza della protesi. Se l’impianto presenta mobilità o superiore al 50% di perdita ossea, l’impianto dovrebbe essere valutato per l’eventuale rimozione.Precauzioni prima dell’intervento chirurgicoÈ necessario eseguire un’attenta valutazione clinica e radiologica del paziente prima dell’intervento per determinare lo stato psicologico e fisico del paziente. Prestare particolare attenzione ai pazienti con fattori sistemici o localizzati che potrebbero interferire con il processo di guarigione sia dell’osso sia del tessuto molle o con il processo di osteointegrazione (ad es. tabagismo, diabete non controllato, radioterapia oro-facciale, terapia con steroidi, infezione nel tessuto osseo circostante).In generale, il posizionamento dell’impianto e il design protesico devono tener conto delle condizioni del singolo paziente. In caso di bruxismo o di relazione intermascellare sfavorevole, può essere opportuno considerare un riesame dell’opzione di trattamento.Precauzioni durante l’intervento chirurgico Prestare particolare attenzione durante il posizionamento di impianti Narrow platform nelle regioni posteriori a causa del rischio di sovraccarico protesico. La quantità insufficiente di tessuto osseo e/o la qualità insufficiente dell’osso residuo, oltre a infezioni e malattie sistemiche possono rappresentare cause potenziali di insuccesso dell’osteointegrazione subito dopo l’intervento chirurgico o dopo un iniziale ottenimento della stessa.Oltre alle normali precauzioni obbligatorie per qualsiasi intervento chirurgico, ad esempio relative all’asepsi, durante la fresatura nell’osso mascellare, fare attenzione a non danneggiare nervi e vasi sanguigni facendo riferimento alle conoscenze di anatomia e alle radiografie preoperatorie. Un errore di valutazione della lunghezza effettiva delle frese Step/Twist rispetto alle misurazioni radiografiche o la fresatura oltre la profondità prevista possono provocare una lesione permanente e danno di nervi o altre strutture vitali, con potenziale perdita della sensibilità del labbro inferiore e della regione del mento o emorragia, per esempio, a livello del pavimento orale.4. Effetti collaterali e interazioni, complicazioni con
l’impianto PaltopSubito dopo l’inserimento di impianti dentali, occorre evitare attività che richiedono un elevato sforzo fisico. Possibili complicanze dopo l’inserimento di impianti dentali possono essere:
Disturbi provvisoriDolori, gonfiori, difficoltà di fonazione, infiammazioni gengivali.Disturbi prolungatiDolore cronico associato all’impianto dentale, parestesia permanente, disestesia, atrofia della cresta alveolare mascellare/mandibolare, infezioni sistemiche o localizzate, fistole oroantrali o oronasali, influenza sfavorevole sui denti adiacenti, danni irreversibili ai denti adiacenti, fratture dell’impianto, del mascellare, dell’osso o della protesi, problemi estetici, danni nervosi, esfoliazione, iperplasia.
Si raccomanda allo staff di informare i pazienti sulle precauzioni da seguire, quali: astinenza dal fumo e mantenimento di un’adeguata igiene orale.Eventi avversiIl trattamento mediante impianti può provocare perdita di osso, danni biologici o meccanici compresa la rottura degli impianti. 5. Posizionamento di un impianto dopo la preparazione del
letto implantare5.1 Prima di procedere, è necessaria una valutazione clinica e
radiografica dello stato medico del paziente. 5.2 Esaminare la qualità dell’osso. 5.3 Selezione della lunghezza e del diametro dell’impianto. 5.4 Esporre il campo operatorio.5.5 Eseguire una prima fresatura con una fresa con tacche di
profondità. 5.6 La fresatura dovrebbe progressivamente creare un foro adatto
all’inserimento dell’impianto.5.7 Inserire l’impianto a cricchetto.5.8 Per rimuovere la vite, utilizzare una chiave esagonale.5.9 Viti di copertura, cappette di guarigione o abutment dovrebbero
essere applicati secondo il giudizio del medico.Durante l’inserimento dell’impianto non utilizzare una coppia o velocità elevata (non superare i 15 giri al minuto) La parte da trasferire ha un punto di rottura predefinito.6. Fase di guarigione dopo l’inserimento di impianti Paltop6.1 Ricostruzione immediata di impianti PaltopGli impianti Paltop consentono, attenendosi alle indicazioni, una ricostruzione immediata di gap ossei singoli o di arcate edentule o parzialmente dentate. Una buona stabilità primaria e un adeguato carico occlusivo sono essenziali. Two or more adjacent implants should be prosthetically connected together.6.2 Ricostruzione successiva di impianti PaltopLa ricostruzione posticipata è possibile dopo 6 settimane.
• se la qualità dell’osso è buona e il volume è adeguato• utilizzando impianti di almeno ᴓ4,2 mm con una lunghezza di
almeno 8 mmLa ricostruzione posticipata è possibile dopo 8 settimane:
• in caso di buona qualità ossea• utilizzando impianti da ᴓ 3,75 mm o più• utilizzando impianti con una lunghezza di 6 mm o più
In situazioni in cui la superficie dell’impianto non è completamente a contatto con l’osso o in caso siano necessarie misure di aumento, deve essere pianificata una fase di guarigione adeguata alla situazione. Si raccomanda una valutazione radiografica dopo una fase di guarigione di 6-12 settimane, prima della ricostruzione protesica.7. Confezionamento e sterilità
Gli impianti dentali Paltop vengono consegnati in confezione sterile. La confezione sterile intatta protegge l’impianto sterilizzato a raggi gamma da influenze esterne e, se conservato correttamente, garantisce la sterilità fino alla data di scadenza. La confezione sterile deve essere aperta solo immediatamente prima dell’inserimento dell’impianto. A causa del rischio di contaminazione, gli impianti in confezioni sterili danneggiate non devono essere utilizzati. Si raccomanda di tener sempre pronto un impianto sostitutivo.
Protesi detale Paltop1. Descrizione delle materie primeLe protesi dentali Paltop sono realizzate in TI6AL4VELI biocompatibile e parti in oro (Au60%Pt19%Pd20%) e
Zirconia (ZrO2)., Cobalt Chrome (CoCr),Polyetheretherketone (PEEK) 2. Indicazioni I componenti delle protesi Paltop Dental sono componenti prefabbricati direttamente connessi all’impianto dentale endosseo ed è destinato all’uso come aiuto nella riabilitazione protesica. La componente protesica Paltop Dental èsono monouso. Riutilizzo del dispositivo potrebbe causare la contaminazione microbica e la perdita di prestazioni.3. ControindicazioniNon utilizzare in caso di ipersensibilità a uno o più metalli contenuti nella lega.4. Precauzioni generaliLa collaborazione tra chirurgo, dentista e tecnico del laboratorio odontoiatrico è essenziale per il successo del trattamento mediante impianto.PEEK monconi temporanei si raccomanda l’uso per un massimo di 30 giorni.5. Pulizia Si consiglia la pulizia e/o la disinfezione dell’abutment prima della sterilizzazione. Si consiglia l’uso di una soluzione di clorexidina gluconata allo 0,1~0,5w/v% o di alcol al 70% per 10~30 min, a temperatura ambiente. Non utilizzare disinfettanti a base di cloro (ipoclorito di sodio, ecc), disinfettanti a base di perossido (oxydol, ecc), disinfettante non antiruggine. Posizionare l’abutment in una lavatrice a ultrasuoni per 5 minuti a temperatura ambiente. In caso di utilizzo di qualsiasi detergente, assicurarsi di inserire acqua sterile e di rimuovere completamente il detergente; può essere utilizzata anche l’acqua corrente al posto dell’acqua sterile. Asciugare completamente e verificare l’integrità dell’abutment l’eventuale presenza di difetti.6. SterilitàIl dispositivo può essere consegnato sterile o non sterile. Si prega di vedere l’indicazione sulla vignetta.Il dispositivo deve essere sterile prima dell’uso. può essere sterilizzato a vapore utilizzando standard Metodi di sterilizzazione: sterilizzazione a vapore per 3 minuti a 135°C.Sterilizzazione a vapore è necessaria solo in caso di prodotti non sterili o di ri-sterilizzare “Non utilizzato Dispositivi”.7. Procedura clinica1. Le modifiche degli abutment possono essere eseguite solo
utilizzando gli strumenti adeguati. Utilizzare l’irrigazione con acqua solo se le regolazioni sono eseguite all’interno del cavo orale.
2. Prima di posizionarlo, ispezionare l’interfaccia dell’impianto-abutment. Danni all’interfaccia possono portare a un’adesione non corretta.
3. Fissare l’abutment con la vite fornita utilizzando una coppia di serraggio in base alla tabella fornita di seguito:
4. Dopo la cementazione della protesi sull’abutment, il cemento in eccesso dovrebbe essere rimosso immediatamente.
8. Conser vazioneNon è richiesta alcuna condizione speciale.
Strumenti Chirurgici1. AvvertenzePer cortesia leggete tutte le informazioni contenute in
questo documento. Un utilizzo incorretto, la mancata cura, così come l’uso inappropriato del prodotto possono portare a un usura prematura degli strumenti chirurgici/dentali. Tutte le persone che utilizzano questo dispositivo devono avere adeguate conoscenze nell’uso e maneggio di strumenti chirurgici, accessori e relative attrezzature. Gli Strumenti Chirurgici Paltop sono riutilizzabili e devono essere sostituiti dopo che sono stati utilizzati 20 volte, o prima che la loro efficienza di taglio inizi a decrescere. 2. Uso Iniziale di uno Strumento NuovoSalvo rimosse dalla confezione sterile, ogni strumento deve essere pulito e sterilizzato prima di venir utilizzato per la prima volta. Tutti gli strumenti sono stati progettati per essere sterilizzati in autoclave e hanno dimostrato buoni risultati con questo metodo. 3. Ispezione e Verifica FunzionaleE’ molto importante esaminare attentamente ogni strumento chirurgico/dentale per individuare eventuali rotture, crepature o difetti di funzionamento prima dell’uso. E’ specialmente importante esaminare zone quali lame, punte, estremità, dispositivi di arresto e aggancio, così come tutte le parti mobili. Non utilizzare strumenti danneggiati. Non provate mai a effettuare riparazioni da soli. La manutenzione e riparazione deve essere effettuata solamente da personale addestrato e qualificato. Per domande relative alle operazioni di riparazione rivolgetevi al costruttore o al vostro dipartimento di ingegneria biomedica.4. Pulizia e ManutenzioneTutti gli strumenti chirurgici/dentali devono essere disinfettati e puliti accuratamente dopo ogni utilizzo. Una pulizia, ispezione e manutenzione appropriata aiuterà ad assicurare il corretto funzionamento dello
strumento chirurgico. Pulire, ispezionare e verificare ogni strumento accuratamente. Sterilizzare tutti gli strumenti prima di un intervento chirurgico. Una buona procedura di pu lizia e manutenzione estenderà la vita utile dello strumento. Si deve prestare un’attenzione speciale alle fessure, dispositivi di arresto, estremità, cavità e altre zone inaccessibili. Non utilizzare strumenti danneggiati. Se uno strumento può essere smontato e scomposto, deve essere pulito in tale stato.NOTA: Tenete conservate tutte le parti insieme facendo attenzione a non confonderle, di modo che non vadano a mischiarsi con altri dispositivi simili di altri costruttori). Onde ottenere un effetto ottimale, la pulizia e il lavaggio devono essere effettuati immediatamente dopo ogni utilizzo. Una mancanza di pulizia può comportare l’ apparizione di particelle aderenti o secrezioni asciutte che possono resistere a future operazioni di pulizia e complicare o compromettere la futura sterilizzazione del dispositivo. Gli strumenti devono essere completamente puliti e lavati, rimuovendo qualunque corpo estraneo. Utilizzare acqua calda e gli strumenti di pre-immersione o gli agenti detergenti disponibili in commercio. Per la rimozione di depositi di proteine si devono usare agenti detergenti enzimatici.• Non usare agenti detergenti corrosivi (ad esempio: candeggina).
Soluzioni detergenti e di risciacquo con un valore prossimo o uguale a quello di PH neutro (7,0) sono quelle migliori.
• Non utilizzare detergenti abrasivi.• Si debbono utilizzare solo spazzole di setola morbida.• Lavare e curare tutte le parti e aree inacessibili quali le canalizzazioni
interne, ecc.• Si possono utilizzare dispositivi di pulizia a ultrasuoni. Verificare e
serrare qualunque giunzione si sia allentata a causa delle vibrazioni.
• Può essere disinfettato in lavatrice fino a una temperatura di 203°F \ (95° C\)
• Sciacquare con cura con acqua distillata.• Preparare per la conservazione e/o sterilizzazione.Dopo la pulizia e il risciacquo, asciugare completamente e accuratamente gli strumenti con aria compressa (zone molto inaccessibili quali le canalizzazioni interne, ecc, devono essere pulite con aria compressa).NOTA: dopo la pulizia e prima della sterilizzazione, trattare tutti gli strumenti con un olio fisiologicamente sicuro (olio di paraffina DAB 8, Ph Eur USP XX) specialmente per quanto riguarda le loro lame, estremità, dispositivi di arresto e collegamento e altri parti mobili.5. Conservazione e RiutilizzareGli strumenti devono essere conservati in un luogo pulito, secco e privo di umidità. Gli strumenti devono essere conservati individualmente nel loro imballaggio di spedizione o all’interno di un contenitore protettivo diviso in compartimenti. Proteggere le punte con tessuto, garza o canalette qualora vengano conservate all’interno di un cassetto. Si raccomanda la sterilizzazione con autoclave a vapore. Pulire completamente gli strumenti da tutti i detriti, tessuti e corpi estranei prima della sterilizzazione. Seguire le istruzioni del costruttore dello sterilizzatore per l’uso e il caricamento dell’autoclave a vapore. Vi deve essere un’esposizione diretta al vapore di tutte le superfici dello strumento da sterilizzare, incluso le superfici interne e le canalette dei tubi. Lasciare che lo strumento si raffreddi all’aria a temperatura ambiente prima del suo utilizzo.6. Metodi Standard di Sterilizzazione Il dispositivo può essere consegnato sterile o non sterile. Si prega di vedere l’indicazione sulla vignetta.Il dispositivo deve essere sterile prima dell’uso. può essere sterilizzato a vapore utilizzando standard Metodi di sterilizzazione: sterilizzazione a vapore per 10 minuti a 135°C.7. ManeggioTutti gli strumenti chirurgici/dentali devono essere maneggiati con estrema attenzione durante le operazioni di trasporto, pulizia, trattamento, sterilizzazione e conservazione. Ciò è specialmente vero per le lame, punte fini, e altre zone sensibili. Gli strumenti chirurgici/dentali temono la corrosione e la loro funzione viene compromessa se vengono messi a contatto con materiali aggressivi. Gli strumenti non devono essere esposti a acidi o altri agenti detergenti aggressivi.8. GaranziaTutti i prodotti della Paltop LTD sono garantiti come esenti da difetti materiali e di lavorazione al momento della spedizione. Tutti i nostri prodotti sono progettati e costruiti per adempiere ai più alti standard di qualità.Non accetteremo alcuna responsabilità per il mancato funzionamento di prodotti che sono stati modificati in qualunque modo rispetto alle loro caratteristiche originali, o per qualunque guasto dovuto a un erroneo utilizzo o un’applicazione non conforme con le intenzioni del progettista. I prodotti perderanno il loro diritto di poter portare il simbolo CE qualora vengano modificati o riparati in un sito diverso da quello della Paltop LTD o società autorizzata da Paltop LTD ad effettuare la modifica o riparazione.

Spa
de
Step Drills Final Drills2.0
1.5
2.4
2.0
3.2
2.4
3.8
3.23.25 3.75 4.2 5.0
Spe
edR
PM 1200-
1500900- 1100
700- 900
500- 700
400- 600 200 - 400
Prosthetic Torque Value
Healing Cap 15
PEEK Abutment 10-15
Multi-Unit Abutments 30-35
Single-Unit Abutments 30-35
Equator Abutments 30-35
Ball Abutments 30-35
Multi Unit Screw 20-25
Single-Unit Screw 20-25
Cover Screw 15
SP Abutment Screw 30-35
NP Abutment Screw 25-30
WP Abutment Screw 30-35
PCA Abutment Screw 25
Advertencialas siguientes descripciones no son suficientes para permitir el uso inmediato del Sistema de Implantes Dentales Paltop. El conocimiento de la implantología dental y la instrucción en el manejo de la Dental Implant System Paltop proporcionado por un operador con experiencia en la materia son siempre necesarios.El Sistema de Implantes Dentales Paltop no se ha evaluado la seguridad y la compatibilidad en el entorno de RM. El Sistema de Implantes Dentales Paltop no se ha evaluado el calentamiento ni la migración en un entorno de RM.No utilizar si el envase está dañadoDescargo de responsabilidadEste producto es parte del Sistema de Implantes Dentales Paltop y sólo se puede utilizar en combinación con los componentes e instrumentos originales correspondientes según Paltop LTD. instrucciones y recomendaciones. Uso de productos y herramientas efectuadas por terceros desvirtúa el funcionamiento eficiente de Dental Implant System Paltop y anulará cualquier garantía o otra obligación, expresa o implícita por Paltop LTD. asesoramiento sobre el uso de nuestros productos es proporcionada verbalmente, por escrito, por medios electrónicos medios de comunicación o en manifestaciones. No exime al usuario de la Paltop LTD. productos de la responsabilidad de determinar si o no cualquier producto es adecuado para el fin previsto, indicaciones y procedimientos. El uso de este producto no está dentro el control de Paltop LTD. es responsabilidad del usuario. todo responsabilidad por pérdidas o daños derivados del uso de este producto se excluye. En el marco de las Condiciones de Venta y entrega de Paltop LTD, garantizamos la calidad de la Paltop Sistema de Implantes Dentales.Disponibilidad Algunos elementos del Sistema de Implantes Dentales Paltop no están disponibles en todos los países.Derecho de autor y marcas comerciales Paltop y / u otros productos y logotipos de Paltop que son mencionados aquí son marcas comerciales o marcas comerciales registradas de Paltop LTD. y / o sus filiales.
Paltop Dental ImplantsI modelli Paltop Dental Implants sono:Advanced Dental Implant,Advanced+
Dental Implant,Dynamic Dental Implant,Dynamic Conical Dental Implant,PAI Dental Implant ,PCA Dental Implant
1. Descripción de las superficies Paltop Implantes dentales Paltop están hechos de biocompatible Ti6Al4VELI [Titanio Grado 5] y tienen una gran grano con chorro de arena, la superficie grabada con ácido.2. Indicaciones y contraindicaciones El Sistema de Implantes Dentales Paltop está indicado para su uso en cirugía y aplicaciones de restauración para la colocación en el hueso de la maxilar superior o inferior para proporcionar soporte para dispositivos protésicos, tales como dientes artificiales, con el fin de restaurar la función de la masticación del paciente. El Sistema de Implantes Dentales Paltop está indicado también para carga inmediata cuando se logre y una buena estabilidad primaria con una carga oclusal apropiada.El implante Narrow está indicado para su uso en cirugía y reparadora solicitudes de inclusión en el mandibular central, lateral incisivo y regiones incisivos laterales superiores de parte mandíbulas desdentadas donde el espacio horizontal es limitado por el dientes y las raíces adyacentes, para proporcionar soporte para prótesis dispositivos, tales como dientes artificiales, con el fin de restaurar la función de la masticación del paciente. The Narrow Implante Paltop se indica también para carga inmediata cuando se logra una buena estabilidad primaria y con una carga oclusal apropiada.Contraindicaciones Problemas médicos internos graves, alteraciones del metabolismo óseo, trastornos de la coagulación no controlados, herida inadecuada capacidad de cicatrización, la mala higiene bucal, maxilar y mandibular crecimiento no se ha completado, un mal estado general de salud, la falta de cooperación, paciente sin motivación, el abuso de drogas o alcohol, psicosis, trastornos funcionales resistentes a la terapia prolongados, xerostomía, sistema inmune debilitado, enfermedades que requieren el uso periódico de esteroides, alergia de titanio, trastornos endocrinos incontrolables.Las contraindicaciones relativas
Previamente irradiado hueso, la diabetes mellitus, la anticoagulación diátesis drogas / hemorrágicas, bruxismo, hábitos parafuncionales, condiciones desfavorables anatómicas óseas, el abuso del tabaco, no controlado periodontitis, trastornos de la articulación temporomandibular, tratable enfermedades patológicas de la mandíbula y los cambios en la vía oral la mucosa, el embarazo, la higiene oral inadecuada.Contraindicaciones locales Volumen inadecuado de hueso y / o la calidad, restos de raíces locales, en quien tamaños adecuados, números o posición deseable de los implantes no son accesibles para lograr el apoyo seguro de los funcional o eventualmente cargas parafuncionales.3. Principios de planificación del tratamiento La parte quirúrgica del tratamiento con implantes debe ir precedida de una evaluación integral del paciente, el diagnóstico preoperatorio y la planificación del tratamiento. Planificación del tratamiento inadecuado puede causar la pérdida del implante.Precauciones generales El éxito del implante El cien por ciento no puede ser nunca garantizada. Con respecto a los pacientes pediátricos, no se recomienda el tratamiento de rutina hasta el final del crecimiento de hueso de la mandíbula ha sido correctamente documentado. Tejido duro preoperatoria o tejido blando déficits pueden producir un resultado estético comprometida o desfavorable angulación del implante. El dispositivo está diseñado para un solo uso. la reutilización del dispositivo puede causar la contaminación microbiana y pérdida de rendimiento. En caso de que se utilizan los implantes cortos, médico debe vigilar de cerca pacientes para cualquiera de las siguientes condiciones: periimplante pérdida de masa ósea, cambios en la respuesta del implante a la percusión, o radiográfica cambios en el hueso a implante de contacto a lo largo del implante de longitud. Si el implante muestra la movilidad o mayor que 50% la pérdida de hueso, el implante debe ser evaluado para su posible eliminación.Precauciones preoperatorios Un examen clínico y radiológico cuidadoso del paciente tiene que realizarse antes de la cirugía para determinar la psicológica y el estado físico del paciente. Especial atención se ha que debe darse a los pacientes que han localizados o factores sistémicos que podrían interferir con el proceso de curación de hueso o los tejidos blandos o el proceso de osteointegración (por ejemplo, cigarrillos el tabaquismo, la diabetes no controlada, la radioterapia oro-facial, esteroides terapia, infecciones en el hueso vecino). En general, la colocación del implante y el diseño de prótesis deben acomodar condiciones individuales de cada paciente. En caso de bruxismo o relaciones intermaxilares desfavorables reevaluación de la opción de tratamiento puede ser considerado.Precauciones en Cirugía Especial se debe tener precaución al colocar estrecha plataforma implantes en la región posterior debido al riesgo de prótesis sobrecarga. La falta de cantidad y / o calidad de la restante adecuada hueso, infecciones y enfermedades generalizadas pueden ser potencial causa para el fracaso de la osteointegración tanto inmediatamente después de cirugía, o después de la osteointegración se consigue inicialmente. Además de las precauciones obligatorias para cualquier cirugía como de asepsia, durante una perforación en el hueso de la mandíbula se debe evitar el daño a los nervios y los vasos al referirse a los conocimientos anatómicos y radiografías preoperatorias. Falta de reconocimiento de longitudes reales de taladros paso / de torsión en relación con las mediciones radiográficas o perforación más allá de la profundidad prevista puede provocar lesiones permanentes los nervios u otras estructuras vitales, potencialmente resultando en permanente adormecimiento en el labio inferior y el mentón o lleva a una hemorragia en el piso de la boca.4.Efectos secundarios e interacciones, las
complicaciones con Paltop implantes Inmediatamente después de la inserción de los implantes dentales, actividades que la demanda considerable esfuerzo físico debe ser evitado. Las posibles complicaciones después de la inserción de los implantes dentales son:síntomas temporalis dolor, hinchazón, dificultades fonéticas, gingivitisLos síntomas más persistentes El dolor crónico en conexión con el implante dental, permanente parestesia, disestesia, pérdida del maxilar / mandibular hueso cresta, infección localizada o sistémica, fístulas oroantral o oronasal, los dientes adyacentes desfavorablemente afectadas, daños irreversibles a los dientes adyacentes, fracturas del implante, la mandíbula, el hueso o prótesis, problemas estéticos, daños en los nervios, exfoliación, hiperplasia.se recomienda que el personal dental, escrito de los pacientes en que se tomen las precauciones, tales
como: la abstinencia de fumar y el mantenimiento de la higiene dental.Los eventos adversos El tratamiento por medio de implantes puede llevar a la pérdida de hueso, biológico o fallas mecánicas, incluyendo la fractura por fatiga de implantes.5. La colocación de un implante después de
preparar el lecho del implante 5.1 Antes del procedimiento, contra-indicación general de los pacientes estado de salud debe ser evaluado clínicamente y radio gráficamente. 5.2 La calidad ósea del paciente debe ser examinado. 5.3 longitud del implante y el diámetro deben ser seleccionados.5.4 El campo quirúrgico se debe exponer 5.5 Usando un taladro marcando una perforación inicial se debe realizar. 5.6 La perforación debe crear gradualmente un agujero adecuado en que se inserta el implante. 5.7 El implante se inserta en el agujero. 5.8 Uso hexagonal impulsa el tornillo se debe quitar. 5.9 Tornillo de la cubierta, tornillo de cicatrización o pilares deben aplicarse según el juicio del médico. No use un par elevado o alta velocidad al insertar el implante (no exceda 15 rpm).6. Fase de curación para los implantes dentales
Paltop 6.1 restauración inmediata de implantes Paltop Implantes Paltop permiten, dentro del ámbito de indicaciones, inmediata la restauración de las lagunas de dientes individuales y en un desdentado o parcialmentemandíbula dentada. Buena estabilidad primaria y una adecuada carga oclusal son esenciales. Dos o más implantes adyacentes debe ser protésicamente conectados entre sí.6.2 restauración diferida de los implantes Paltop Retraso en la restauración es posible después de 6 semanas: • si la calidad ósea es buena y hueso adecuado volumen • utilizando ø4.2 mm o más implantes con una longitud de 8 mm o más Retraso en la restauración es posible después de 8 semanas: • con la calidad del hueso esponjoso • utilizando Ø3.75 mm o más implantes • el uso de implantes con una longitud de 6 mm o más En situaciones en las que la superficie del implante no está completamente en contacto con el hueso, o donde las medidas de aumento óseo son necesario, una fase de curación apropiada a la situación debe ser planeado. Se recomienda un examen radiográfico después de un fase de curación de 6 a 12 semanas, antes de la restauración protésica.7. Envase y esterilidad Implantes dentales Paltop se suministran estériles. La estéril intacta embalaje protege el implante esterilizados con radiación gamma de las influencias externas y, si se almacena correctamente, asegura la esterilidad hasta la fecha de caducidad. Al retirar el implante del envase estéril, Deben respetarse las normas de asepsia. El embalaje estéril No debe abrirse hasta inmediatamente antes de la inserción de el implante. Los implantes con un envase estéril dañado no debe ser utilizado debido al riesgo de contaminación.? Se recomienda tener un implante de repuesto a mano.
Paltop Dental Prótesis1. Descripción de Materia Prima Prótesis dentales Paltop están hechos de
biocompatible Ti6Al4VELI, piezas de oro (Au60% PT19% PD20%) y zirconia (ZrO2), Cobalt Chrome (CoCr), Polyetheretherketone (PEEK).2. Indicaciones Componente Paltop Dental protésica es una pre-fabricados componente conectado directamente al implante dental intraóseo y está destinado para uso como una ayuda en la rehabilitación protésica. Paltop dental Protésico componentes están diseñados para un solo utilizar. La reutilización del dispositivo puede causar la contaminación microbiana y la pérdida de rendimiento.3. Contraindicaciones No usar en casos de hipersensibilidad a uno o más de los metales contenidos en la aleación.4. precauciones generales La colaboración entre el cirujano, el dentista restaurador y técnico de laboratorio dental es esencial para un implante exitoso tratamiento. Pilares PEEK temporales se recomiendan para su uso durante un
máximo de 30 días.5. limpieza Se recomienda la limpieza y / o desinfección de casamiento delante la esterilización. Recomendamos el uso de gluconato de clorhexidina 0.1 ~ solución 0.5W / v% o alcohol al 70% durante 10 ~ 30 minutos, en la sala de temperatura. No utilice tales como desinfectantes a base de cloro desinfectante (hipoclorito de sodio), disinfectance basados en peróxidos (OXYDOL, etc), sin protección contra la corrosión desinfección de surfactante. Coloque pilar en limpiador ultrasónico durante 5 minutos a temperatura ambiente. Si se utiliza cualquier producto de limpieza, asegúrese de inyectar agua estéril y eliminar completamente el limpiador, el agua corriente se puede utilizar en lugar de agua estéril. Completamente seco e inspeccionar pilar de integridad y defectos.6. esterilidad El dispositivo puede ser suministrado estéril o no estéril. Por favor, consulte indicación en la etiqueta. El dispositivo debe ser estéril antes de su uso. puede ser esterilizado con vapor utilizando estándares de esterilización Métodos: esterilización por vapor durante 3 minutos a 275 ° F (135 ° C). La esterilización por vapor es necesario sólo en caso de productos no estériles o para volver a esterilizar “No Dispositivos usados “.7. Procedimiento clinic1. modificaciones de los pilares podrían llevarse a cabo utilizando herramientas apropiadas. Use el agua de riego si los ajustes son realizado intra-oral. 2. Antes de la colocación inspeccionar el interface.damage implante-pilar de la interfaz puede conducir a la instalación incorrecta. no procesan el área de interfase. 3. Fije el tope con el tornillo que se incluye el uso de un recomendada par de apriete según la tabla a continuación. 4. Después de cementar la prótesis en el exceso de tope 5. cemento se debe quitar inmediatamente.8. Almacenamiento: Sin condición especial necesaria.
Instrumentos quirúrgicos1.precaución
Por favor, lea toda la información contenida en este documento. El manejo incorrecto y la atención, así como el uso indebido puede provocar un desgaste prematuro de los instrumentos quirúrgicos / dentales. Todas las personas que utilicen este dispositivo debe tener los conocimientos en el uso y manejo de instrumentos quirúrgicos, accesorios y equipos relacionados. Instrumentos quirúrgicos Paltop son reutilizables y debe ser reemplazado después de ser utilizado hasta 20 veces o antes de que si el corte se reduzca su capacidad.2. El uso inicial del nuevo Instrumento A menos retirado de su embalaje estéril, cada instrumento debe ser limpiado y esterilizado antes de que se utiliza por primera vez. Todos los instrumentos fueron desarrollados para la esterilización por autoclave y han mostrado buenos resultados utilizando este método.3. Inspección y Control de funcionamiento Es muy importante examinar cuidadosamente cada instrumento quirúrgico / dental por roturas, fisuras o fallos de funcionamiento antes de usar. Es especialmente esencial comprobar áreas tales como cuchillas, puntas, terminales, detiene y broches de presión, así como todas las piezas móviles. No utilice dañado instrumentos. Nunca trate de hacer reparaciones usted mismo. servicio y reparaciones deben ser referidos a solamente personas calificadas, capacitadas. Consulte las preguntas sobre la reparación al fabricante o su departamento de ingeniería biomédica.4. Limpieza y MantenimientoCada instrumento quirúrgico / dental debe ser desinfectado a fondo ylimpiados después de cada uso. La limpieza, la inspección y elmantenimiento ayudará a asegurar el correcto funcionamiento del instrumento quirúrgico.Limpiar, inspeccionar y probar cada instrumento con cuidado. Esterilizartodos los instrumentos antes de la cirugía. Una buena limpieza y mantenimientoprocedimiento se extenderá la vida útil del instrumento.Especial atención se debe prestar a las franjas horarias, se detiene, finaliza huecotubos y otras zonas muy inaccesibles. No utilice dañadoinstrumentos. Si un instrumento se puede desmontar, que debería serlimpiado en el estado desmontado.(NOTA: Mantenga todas las partes juntas y protegido de ser fuera de lugar,No mezcle con otros dispositivos similares o de otrafabricación).Limpieza y enjuague debe realizarse inmediatamente
después de cadautilizar para el mejor efecto. Si no se limpia a tiempo, puede resultar en adherentepartículas o secreciones secas que pueden resistir la limpiezay complicar o resistir una esterilización futura. Los instrumentos debenestar completamente limpio y enjuagado de cualquier cuerpo extraño. Usoagua tibia y un remojo instrumento disponible en el mercadoo el agente de limpieza. Los limpiadores enzimáticos deben utilizarse para eliminardepósitos de proteínas.• No utilice productos de limpieza corrosivos (ie lejía). Limpieza soluciones y enjuagues en o cerca de un pH neutro (7,0) son los mejores. • No use limpiadores abrasivos. • Sólo un cepillo de cerdas suaves se debe utilizar. • Enjuagar y mantener todas las partes y zonas de difícil acceso, como en el interior canales, etc • Los limpiadores ultrasónicos se pueden utilizar. Compruebe y vuelva a apretar cualquier• Puede desinfectarse en lavadora hasta 203 ° F (95 ° C). • Enjuague bien con agua destilada. • Prepararse para el almacenamiento y / o esterilización.
Después de la limpieza y enjuague, seque los instrumentos completa y cuidadosamente con aire comprimido (zonas de muy difícil acceso, como en el interior canales, etc tienen que ser soplado).NOTA: después de la limpieza y antes de esterilizarlos, trate todos los instrumentos con un aceite que se considera como siendo fisiológicamente segura (aceite de parafina según DAB 8 de ph. Eur. UPS XX), especiallty sus hojas, termina, paradas, broches de presión y todas las piezas móviles.
5. Almacenamiento y reutilización Los instrumentos deben ser almacenados en un lugar limpio y seco, libre de humedad. Los instrumentos deben guardarse individualmente en su envío cartón o en una bandeja protectora con divisiones. Proteja las extremidades con el paño, gasa o tubo si se almacenan en los cajones. autoclave de vapor se recomienda la esterilización. Limpie minuciosamente los instrumentos de todos los residuos, tejidos y materiales extraños antes de la esterilización. seguir las instrucciones del fabricante del esterilizador para la operación y carga de los autoclaves de vapor. Debe haber una exposición directa de vapor a todas las superficies de los instrumentos que se están esterilizados incluyendo la superficie interna y los canales de los tubos. Permitir instrumento al aire enfriar a temperatura ambiente antes de su uso.6. Métodos de esterilización estándar El dispositivo puede ser suministrado estéril o no estéril. Por favor, consulte indicación en la etiqueta. El dispositivo debe ser estéril antes de su uso. puede ser esterilizado con vapor utilizando métodos de esterilización estándar: la esterilización con vapor durante 10 minutos al (135 ° C) 275 ° F.7. Manejo Todos los instrumentos quirúrgicos / dentales deben ser manejados con la mayor cuidado cuando se está transportando, limpiado, tratado, esterilizado y almacenado. esto es especialmente cierto para las cuchillas, puntos finos y otras áreas sensibles. Instrumentos quirúrgicos / dentales se corroen y sus funciones están afectadas si entran en contacto con materiales agresivos. Los instrumentos no deben ser expuestos a ácidos u otros agentes de limpieza agresivos.8. Garantía Todos Paltop LTD. productos están garantizados de estar libres de defectos en el material y mano de obra en el momento del envío. Todos nuestros productos están diseñados y fabricados para cumplir con los más altos estándares de calidad. No podemos aceptar ninguna responsabilidad por el fracaso de los productos que han sido modificados en modo alguno de emabrgo originales, para cualquier fallo debido a un mal uso o aplicación que no está en de acuerdo con las intenciones del diseñador. Productos perderán su derecho a llevar la marca CE en caso de que se cambie o reparado en otro lugar que Paltop LTD o una empresa autorizada por Paltop LTD hacer el cambio o la reparación.o la reparación.

expressed or implied by Paltop LTD. Advice on the use of our products is provided verbally, in writing, by electronic media or in demonstrations. It does not relieve the user of Paltop LTD. products of the responsibility of determining whether or not any product is suitable for the intended purpose, indications and procedures. Use of this product is not within the control of Paltop LTD. it is the responsibility of the user. All liability for loss or damage attributable to the use of this product is excluded. Within the framework of the Conditions at Sale and Delivery of Paltop LTD, we warrant the quality of the Paltop Dental Implant System.
AvailabilitySome items in the Paltop Dental Implant System are not available in all countries.
Description of the Paltop surfaces:DIVA by Paltop implants are made of biocompatible TI 6AL 4V ELI [Titanium Grade 5] and have a large grit sandblasted, acid-etched surface.
1) Indications for Use:DIVA by Paltop Dental Implants System are intended to replace one or more teeth in the upper jaw in order to restore a patient’s chewing function. The main advantage of the DIVA by Paltop implant is the ability to replace open sinus lift procedure.DIVA by Paltop Dental Implants are intended for immediate loading when good primary stability is achieved, with appropriate occlusal loading.
2) General Information:2.1 The implantation procedure should be done by a licensed dentist with appropriate surgical skills and under aseptic conditions with specifically designed sterile surgical instruments.2.2 An electrical surgical drilling system with internal and external irrigation is recommended for drilling the surgical site. Specific drilling sequences for placement should be followed.2.3 For detailed information on the specific product system you are using, please consult the Paltop Advanced Dental Solutions Implants catalogue.
3) Contraindications:3.1 Placement of dental Implants may be precluded by patient conditions that are contraindications for surgery. DIVA
by Paltop Implants should not be placed in patients where the remaining jaw bone is too diminished to provide adequate implant stability. Cardiac conditions involving the risk of endocarditis, coronary
cardiovascular disorders, patients on anticoagulant HIV positive, cancers and chemotherapeutic treatments, corticosteroids treatment radiotherapy of the cervico-facial region osteoporosis, uncontrolled or insulin-dependant diabetes pregnancy, endocrine disorders.3.2 According to dentist judgment, physiological medical and anatomic conditions that may negatively
Chronic bleeding problems, psychological impairment, metabolic bone or connective tissue diseases, treatment with corticosteroids, certain cardiac and vascular diseases, tobacco usage, diabetes (uncontrolled), treatment with chemotherapeutic agents, chronic renal disease, Poor oral hygiene, bruxism alcoholism, smoking, drug abuse psychological problems aggressive behavior.3.3 Electro-surgery: Dental Implants are made of a metallic alloy; therefore they are characterized by high conductivity. Therefore, electro-surgery is strictly contraindicated near dental Implants.
4) Precautions:4.1 Surgical techniques required to place endosseous dental Implants are complex and require specialization and unique skills.
by Paltop Implants, abutments and other surgical and restorative dental accessories, these products should only be used by trained professionals.4.2 Improper technique can lead to implant failure, loss of supporting bone, restoration fracture, screw loosening and aspiration or nerve injury.4.3 Determine local anatomy and suitability at the available bone for implant placement and use adequate radiographs direct palpation and visual inspection of the implant site are necessary prior to treatment, planning and use of DIVA by Paltop Implants.5) CAUTION: This device is to be used by a licensed dentist only.
6) Warnings:6.1 Single use Products - In order to avoid contamination or product malfunction, DO NOT reuses Implants, abutments and any other
Paltop Advanced Dental Solutions LTD. Hashita 5, P.O Box 3568Caesarea 30889 • Israel Tel: +972-4-6271711 Fax: +972-4-6275363
REF
LOT
!
EC REP
Catalog number
Batch Code
Caution, consult accompanying documents
Do not reuse
Do not use if package is damaged
Sterilized using gamma radiation
By Prescription Only
Use by date
Do not resterilize
Manufacturer
EC representative
WARNING!The following descriptions are
use of the DIVA by Paltop implant and Paltop Dental Implant System. Knowledge of dental implantology and instruction in the handling of the DIVA by Paltop implant and Paltop Dental Implant System provided by an operator with the relevant experience are always necessary.The DIVA by Paltop implant and the Paltop Dental Implant System has not been evaluated for safety and compatibility in the MR environment. The DIVA by Paltop and the Paltop Dental Implant System has not been tested for heating or migration in the MR environment.Do not use if package is damaged.
Disclaimer of liabilityThis product is part of the Paltop Dental Implant System and may only be used in conjunction with the corresponding original components and instruments according to Paltop LTD. instructions and recommendations. Use of products and tools made by third
functioning of the Paltop Dental Implant System and will void any warranty or other obligation,
Instructions for Use
DIV
A by
PAL
TOP
- In
stru
ctio
ns f
or U
se |
Cat
no. 1
1-50
132
accessories/tools that are labeled for single use only by symbol.6.2 In order to avoid compromised sterility of sterile products, do not use sterile labeled products if the packaging has been damaged or opened.6.3 Excessive bone loss or breakage of a dental implant or restorative device may occur when an implant or abutment is loaded beyond its functional capability.6.4 Physiological and anatomic
performance of dental Implants. The following examples may adversely
should be taken into consideration when placing dental Implants: Poor bone quality, Poor oral hygiene Medical and conditions such as blood disorders or uncontrolled hormonal conditions.6.5 Implants handling of small components inside the patients mouth carries a risk of aspiration and/or swallowing.6.6 Forcing the implant into the osteotomy deeper than the depth established by the drills can result in stripping the driver hex interface inside the implant, stripping the driver, or stripping the walls of the osteotomy that may prevent an
7) Package: 7.1 SterilityIMPLANTS ARE FOR SINGLE USE ONLY!Paltop dental implants are delivered sterile. The intact sterile packaging protects the gamma-sterilized implant from outside influences and, if stored correctly, ensures sterility up to the expiration date. When removing the implant from the sterile packaging, the rules of asepsis must be observed. The sterile packaging must not be opened until immediately prior to insertion of the implant. Implants with damaged sterile packaging must not be used due to risk of contamination. It is recommended to have a replacement implant on hand.7.2 Package, Storage and Handling:7.2.1 All Implants are provided with labels identifying the implant’s catalogue number, lot number, expiration date and additional information that is important to the dentist. This information should be kept in patients’ record for future reference.
implant till it stable in its site.8.3.5 Remove the inner sealing screw with the special internal screw driver supplied with the implant.8.3.6 Begin to ratchet the implant slowly- 1 mm at time.8.3.7 After every ratcheting irrigate with 1 cc sterile saline via the DIVA by Paltop channel with sterile syringe connected to the fluid adaptor supplied with the DIVA by Paltop implant.8.3.8 Bleeding from the DIVA by Paltop channel indicates the sinus floor fracture.8.3.9 Movements of the saline inside the implant channel according to the breathing rhythm indicates that the sinus membrane is intact.8.3.10 Continue to ratchet and irrigate slowly till you reach the final length.8.3.11 Inject gel bony substitute into the implant channel with the special fluid adaptor supplied with the implant. Inject 0.5cc from the gel into the DIVA by Paltop channel or till the excess of the gel evacuated from the implant channel.8.3.12 Irrigate the channel with sterile saline to remove the remain of the gel from the implant channel and insert and screw the final short
long and a short sealing screws. 7.2.3 Implants Shelf Life: 5 Years. The year and month of expiration is indicated by the hourglass symbol on the product label. Do not use the product if the shelf life date has expired or if the bacterial barrier package is opened or damaged!7.2.4 Devices should be stored at room temperature.8) Procedural, Surgery: 8.2 Pre-surgery Requirementsa) Healthy maxillary sinus condition according to the CBCT .b) The DIVA by Paltop implant can be placed only if the bone level is not less than 3 mm.c) The DIVA by Paltop implant can be inserted only if it stable.8.3 Surgical procedure8.3.1 The 1st step is to measure the exact length of the implant target from the sinus wall according to the CBCT.8.3.2 With 2 mm standard drill, drill until 1 mm from the sinus floor according to the CBCT.8.3.3 Use 2 mm tapered osteotome with stopper to drill up to the sinus floor.8.3.4 Insert the DIVA by Paltop
sealing screw supplied with the implant.8.3.13 Insert the cover screw supplied with the implant.8.3.14 Healing period till the second stage is 4-6 month from the 1st procedure.8.3.15 Before the second stage we recommend to perform CBCT.8.3.16 In the second stage check the stability of the implant, unscrew the cover screw, irrigate with sterile saline the implant channel, check the stability of the short sealing screw with the special screw driver and insert healing screw.9) Procedural, Restoration:9.2 The healing period varies from patient to patient and depends on the quality of the bone at the implantation site, the tissue response to the implanted device, the surgeon’s skills and evaluation of the patient’s bone density at the time of the surgical procedure.9.3 Excessive force applied to the dental implant should be avoided during the healing period.9.4 Proper occlusion should be evaluated on the implant restoration in order to avoid excessive force.10) Potential Adverse Events:10.2 Potential adverse events associated with the use of dental Implants may include:- Failure to integrate;- Loss of integration;- Dehiscence requiring bone grafting;- Perforation of the maxillary sinus, gingiva;- Infection as reported by abscess, fistula, suppuration, inflammation, radiolucency;- Persistent pain, numbness, paresthesia;- Hyperplasia;- Excessive bone loss requiring intervention;- Implant breakage or fracture;- Systemic infection,- Nerve injury.
NOTE: For additional information please refer to Paltop Advanced Dental Solutions website at:
www.paltopdental.com
By
7.2.2 Sterile Packages include: one dental implant, one cover screw, a