eSpace 7820 IP Phone Quick Start - absatraining.com 7820 IP... · 1 eSpace 7820 IP Phone Quick...
13
1 eSpace 7820 IP Phone Quick Start Welcome to Huawei IP Phone eSpace 7820 (eSpace 7820 for short). The eSpace 7820 is a high-performance network phone that enables you to enjoy convenient voice communication. Product appearances and screen shots in this document are for reference only. For details about eSpace 7820, see the eSpace 7820 IP Phone V100R001C03SPC221 User Manual in the CD-ROM. 1 Packing List Verify that the following components are contained in the product package. If any of them are lost, contact the distributor. Main case (1) Phone stand (1) Handset cord (1)
Transcript of eSpace 7820 IP Phone Quick Start - absatraining.com 7820 IP... · 1 eSpace 7820 IP Phone Quick...

1
eSpace 7820 IP Phone
Quick Start
Welcome to Huawei IP Phone eSpace 7820 (eSpace 7820 for short).
The eSpace 7820 is a high-performance network phone that enables you to enjoy
convenient voice communication.
Product appearances and screen shots in this document are for reference only.
For details about eSpace 7820, see the eSpace 7820 IP Phone V100R001C03SPC221
User Manual in the CD-ROM.
1 Packing List
Verify that the following components are contained in the product package. If any of
them are lost, contact the distributor.
Main case (1) Phone stand (1) Handset cord (1)

2
Straight-through network
cable (1) Power adapter (1) Handset (1)
Quick start (1) CD-ROM (1)
Environment
declaration (1)
Warranty card (1) Quality certificate (1)
2 Security Precautions
3
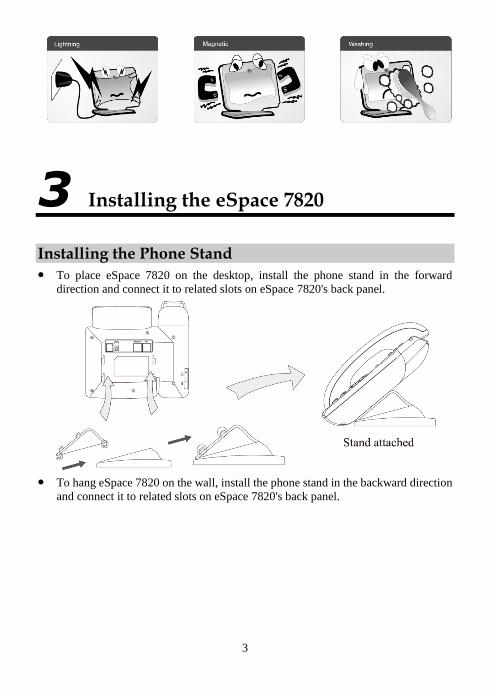
3 Installing the eSpace 7820
Installing the Phone Stand To place eSpace 7820 on the desktop, install the phone stand in the forward
direction and connect it to related slots on eSpace 7820's back panel.
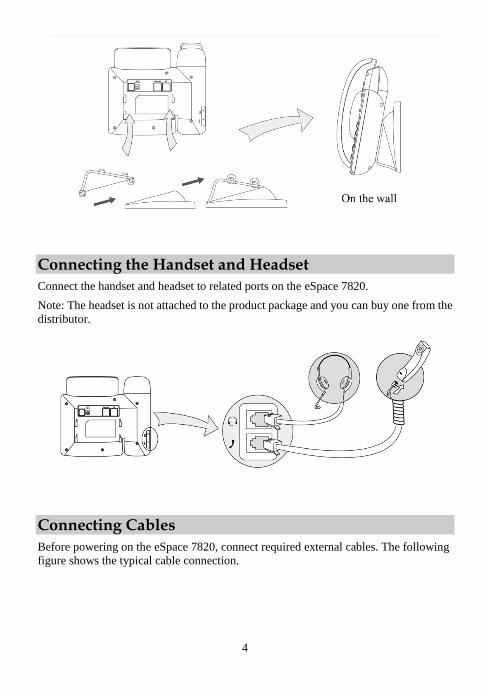
To hang eSpace 7820 on the wall, install the phone stand in the backward direction
and connect it to related slots on eSpace 7820's back panel.
4
Connecting the Handset and Headset
Connect the handset and headset to related ports on the eSpace 7820.
Note: The headset is not attached to the product package and you can buy one from the
distributor.
Connecting Cables
Before powering on the eSpace 7820, connect required external cables. The following
figure shows the typical cable connection.

5
The following table lists related ports.
Port Description
Connects the power supply.
Internet Connects the Local Area Network (LAN) or the public network.
PC Connects a computer.
To connect required external cables to the eSpace 7820, proceed as follows:
Step 1 Use a straight-through network cable to connect the Internet port on the
eSpace 7820 and to an external network port, for example, the network port in
office or at home.
If you have only one external network port but want to connect the computer
and eSpace 7820 at the same time, perform Step 1 and use another
straight-through network cable to connect the computer to the PC port on the
eSpace 7820.
Step 2 Connect the power adapter to the power supply port on the eSpace 7820 and
to a power socket.
You must use the power adapter that is intended for the eSpace 7820.
Starting the eSpace 7820
After you power on the eSpace 7820, the power indicator at the upper-right corner is
green.

6
During the startup of the eSpace 7820, a message is displayed asking you to
perform basic configurations. Click Cancel or waits 5 minutes for the phone
to automatically log in.
4 Registering the eSpace 7820
Registering an Account
If an eSpace 7820 has no account, the Login Wizard screen is displayed after it is
started successfully.
To register an account, proceed as follows:
Step 1 Set Extension, Password, and Server.
The value of Extension and Password are the registration account and
password provided by the system administrator. The value of Server is the IP
address or domain name of the SIP server. Press the up and down keys to
select parameter.
Step 2 Press the soft key <Log In>.
After the login is successful, the standby screen is displayed, and the account can be
used to make calls.
Checking the Configuration
The icon indicates that the network connection is normal and that the account
register is correct, that is, you can use the account normally.
The icon indicates that the account is being registered.
The icon indicates that the account failed to be registered. Check whether the
network and account settings of the eSpace 7820 are the same as the settings
provided by the administrator. If they are both correct but the account still failed to
be registered, contact the system administrator.
7
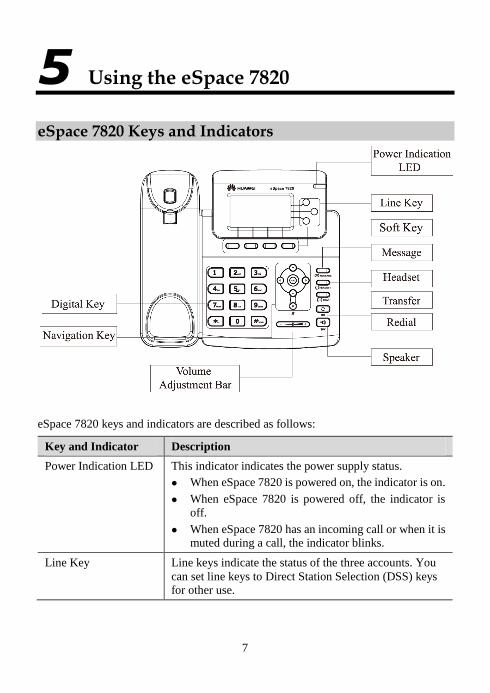
5 Using the eSpace 7820
eSpace 7820 Keys and Indicators
eSpace 7820 keys and indicators are described as follows:
Key and Indicator Description
Power Indication LED This indicator indicates the power supply status.
When eSpace 7820 is powered on, the indicator is on.
When eSpace 7820 is powered off, the indicator is
off.
When eSpace 7820 has an incoming call or when it is muted during a call, the indicator blinks.
Line Key Line keys indicate the status of the three accounts. You
can set line keys to Direct Station Selection (DSS) keys for other use.

8
Soft Key The phone screen displays function names of the four soft
keys. For example, soft keys are marked as <History>,
<Directory>, <DND>, and <Menu> on the standby screen.
Message
When you receive a new voice message, the indicator
blinks.
If you have set Account No., the voice mailbox is automatically connected after you press this key.
If there is no new voice message, the page for setting
voice mailbox connection code for the default
account is automatically displayed after you press this
key.
Headset
On the dialing page or conversation page, press this key
to change the conversation mode.
In a conversation with a handset, press this key to
access the headset mode, and press this key again to restore the handset mode.
In a conversation in the hand-free mode, press this
key to access the headset mode, and press this key again to restore the hand-free mode.
Transfer
Press this key to transfer a call to another party.
Redial
In the standby state, press this key to access the page
displaying numbers that you have dialed.
Select a record and press this key again to initiate a call.
Speaker
Press this key to answer an incoming call in the hand-free
mode.
On the dialing page or conversation page, press this key to change the conversation mode.
In a conversation with a handset, press this key and
put down the handset to access the hand-free mode.
To restore the handset mode, press this key again.
In a conversation with a headset, press this key to
access the hand-free mode, and press the Headset key to restore the headset mode.

9
Volume Adjustment
Bar
Adjusts the receiving volume for the handle, headset, and
ring tone, and the receiving volume in the hand-free
mode.
Navigation Key Navigation keys include four arrow keys (up, down, left,
and right), one <OK> key, and one <X> key.
Arrow keys: move the cursor on pages.
<OK> key: access the menu that is selected or
confirm an operation, or answer an incoming call if any.
<X> key: cancel an operation, return to the
upper-level menu, reject an incoming call (in the
ringing state), or end a call.
Digital Key Enters alphanumeric and special characters.
To enter digits, lowercase letters, uppercase letters, and special characters, switch the entering mode.
Making a Call
To access the dialing page, press the SPK key or related line key, or pick up the
handset.
Direct dial: Enter a number and press the soft key <Send> or the <OK> key.
Redial: Press the <RD> key to access the page displaying numbers that you have
dialed. Select a record and press the <RD> key again.
Call-record-based dial: Press the soft key <Pool>. On the Pool page that is
displayed, press the up or down key to select a type and a record, and then press the
soft key <Send> or <Dial>.
Answering a Call
To answer an incoming call in the standby state, press the <SPK> key, pick up the
handset, or press the key <Headset> or the soft key <Answer>.
Rejecting a Call
To reject a call, directly press the soft key <Reject>.

10
Holding a Call
To hold an ongoing call, press the <Hold> soft key. If you want to cancel the holding,
proceed as follows:
When only one call is held, press the <Resume> soft key again.
When multiple calls are held, press the up or down key to select a call that you want
to unhold, and press the <Resume> soft key again.
Transferring a Call
The eSpace 7820 supports the following call transfer modes: blind transfer,
semi-consultation transfer, and consultation transfer.
Assume that user A wants to transfer user B's call to user C. The procedure is as
follows:
Step 1 During the conversation with user B, user A presses the <Transfer> key to
hold the call with user B.
Step 2 User A dials user C's number.
Step 3 User A performs call transfer.
Blind transfer
User A presses the <Transfer> key to initiate the call. After that, user C's
phone rings. After user C picks up the phone, user A's phone hangs up
automatically to complete the transfer.
Semi-consultation transfer
User A presses the <OK> key to initiate the call. When user C's phone
rings, user A presses the <Transfer> key, and user A's phone hangs up
automatically. The transfer is complete when user C picks up the phone.
Consultation transfer
User A presses the <OK> key to initiate the call. After user C picks up the
phone, user A asks user C whether user C wants to answer user B's call. If
user C wants to answer, user A presses the <Transfer> key to complete
the transfer.
Step 4 User B talks with user C.

11
Forwarding a Call
You can forward calls after configuring the call forward function. The eSpace 7820
supports automatic forwarding (including Always Forward, Busy Forward, and No
Answer Forward) and manual forwarding.
If you enable the automatic forwarding function, the eSpace 7820 automatically
forwards incoming calls based on the preset forward type. If you enable the manual
forwarding function, you can forward an incoming call by pressing the soft key
<Forward> and entering the forward-to number.
Creating a Conference
User A and user B in a call can create a three-party conference. Assume that user A
wants to create a conference. The procedure is as follows:
Step 1 User A presses the soft key <Conf>.
User B is held, and user A hears the dial tone.
Step 2 User A dials user C's number and presses the soft key <Send>.
Step 3 When user C picks up the phone, user A can only talk with user C. To
establish a three-party conversation, user A must press the soft key <Conf>.
When user A hangs up the phone, the other two parties' conversation ends
automatically.

12
6 FAQ
Q: Why is there neither display nor backlight on the LCD after the eSpace 7820 is
powered on? How do I solve the problem?
A: Verify that the power connection is correct and that the power adapter is
appropriate.
Q: Why is the network unavailable after the eSpace 7820 is powered on? How do I
solve the problem?
A: Verify that the network connection is normal and that connection parameters
such as the IP address are set correctly.
Q: After connecting to the external network and a computer, the eSpace 7820 can be
powered on and be used to make calls. The computer's network, however, is
unavailable. How do I solve the problem?
A: Verify that the straight-through network cable between the computer's network
port and the eSpace 7820's PC port is normal.
Q: How do I to check the basic information about the eSpace 7820, such as the IP
address and software version?
A: In the standby state, press the <OK> key to access the phone status page.
Q: How do I to log in to the eSpace 7820's Web page?
A: Start the Web browser, enter the eSpace 7820's IP address in the address box, and
enter the correct account and password.
A: How do I obtain details about the methods of configuring and using the eSpace
7820?
A: See the Huawei IP Phone eSpace 7820 User Manual in the CD-ROM.

13
Copyright © Huawei Technologies Co., Ltd. 2013. All rights reserved.
Trademarks and Permissions
, , and are trademarks of Huawei Technologies Co., Ltd.
All other trademarks and trade names mentioned in this document are the property of their respective holders.
Notice
The information in this document is subject to change without notice. Every effort has been made in the preparation of this document to ensure accuracy of the contents, but all statements, information, and recommendations in this document do not constitute a warranty of any kind, express or implied.
Issue: 01 (2013-03-15)