ESET Security for Microsoft SharePoint...
13
ESET SECURITY FOR MICROSOFT SHAREPOINT SERVER Quick Start Guide Microsoft® Windows® Server 2003 / 2003 R2 / 2008 / 2008 R2 / 2012
Transcript of ESET Security for Microsoft SharePoint...
ESET SECURITY FOR MICROSOFT SHAREPOINT SERVER
Quick Start Guide Microsoft® Windows® Server 2003 / 2003 R2 / 2008 / 2008 R2 / 2012
Copyright 2013 by ESET, spol. s r.o.ESET Securi ty for Microsoft SharePoint Server was developed by ESET, spol . s r.o. For more information vis i t www.eset.com. Al l rights reserved. Nopart of this documentation may be reproduced, s tored in aretrieva l system or transmitted in any form or by any means ,electronic, mechanica l , photocopying, recording, scanning, orotherwise without permiss ion in wri ting from the author. ESET,spol . s r.o. reserves the right to change any of the describedappl ication software without prior notice. ESET, logo of ESET,NOD32, Smart Securi ty, ThreatSense, Live Grid and/or othermentioned products of ESET, spol . s r. o. are regis teredtrademarks of ESET, spol . s r. o. Other companies mentioned hereor products , may be regis tered trademarks of i ts proprietors .Produced according to qual i ty s tandards of ISO 9001:2000.REV. 6/24/2013
................................................................41. Introducing ESET Security for Microsoft
SharePoint Server
................................................................42. Installation..................................................................................4Where to insta l l2.1
..................................................................................5Quick insta l lation2.2
................................................................63. Securing your SharePoint farm..................................................................................6Schedule an In-depth scan3.1
..................................................................................7Database protection3.2.............................................................................8Configure On-access fi l tering3.2.1.............................................................................9Configure the regular database scan3.2.2
.............................................................................10Configure Rules -based fi l tering3.2.3
................................................................114. Export/Import a configuration
................................................................115. Managing ESET Security for Microsoft
SharePoint Server using ERA..................................................................................11Upgrade ESET Configuration Edi tor5.1
..................................................................................12Upload the ESET Remote Adminis trator l i cense fi le5.2
..................................................................................12Enable remote adminis tration in ESHP5.3
..................................................................................13Create your pol icy5.4
4
1. Introducing ESET Security for Microsoft SharePoint Server
ESET Security for Microsoft SharePoint Server (ESHP) helps businesses manage SharePoint contents and portals,collaborate internally and with partners without worrying about malware infections or operational disruptions.
ESET Security for Microsoft SharePoint Server secures SharePoint databases by scanning files upon upload,download, or during a search query. Additionally, IT policies can be enforced with database content filtering usingrules to block or allow files by name, size and real file-type. ESET Security for Microsoft SharePoint Server alsoincludes host server antimalware protection based on the core capabilities of ESET File Security for MicrosoftWindows Server.
2. Installation
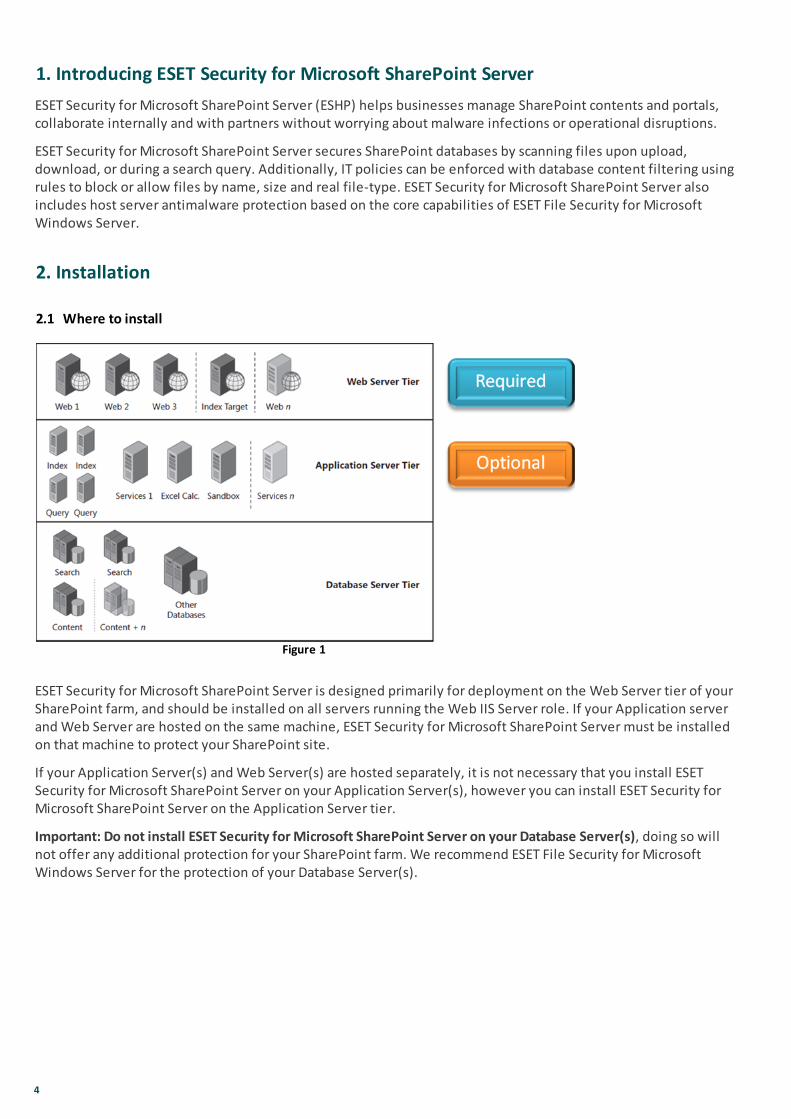
2.1 Where to install
Figure 1
ESET Security for Microsoft SharePoint Server is designed primarily for deployment on the Web Server tier of yourSharePoint farm, and should be installed on all servers running the Web IIS Server role. If your Application serverand Web Server are hosted on the same machine, ESET Security for Microsoft SharePoint Server must be installedon that machine to protect your SharePoint site.
If your Application Server(s) and Web Server(s) are hosted separately, it is not necessary that you install ESETSecurity for Microsoft SharePoint Server on your Application Server(s), however you can install ESET Security forMicrosoft SharePoint Server on the Application Server tier.
Important: Do not install ESET Security for Microsoft SharePoint Server on your Database Server(s), doing so willnot offer any additional protection for your SharePoint farm. We recommend ESET File Security for MicrosoftWindows Server for the protection of your Database Server(s).
5
2.2 Quick installation
ESET Security for Microsoft SharePoint Server must be installed manually on each Web Server in your SharePointfarm, and cannot be installed remotely using ESET Remote Administrator. Before you begin the installationprocess, make sure that you have the following items:
Your ESET-issued Username, Password and license file SharePointsecurity.lic (emailed to you followingyour purchase of ESHP)
The Administrator username and password used to access your Microsoft SharePoint site(s)
Ensure that your SharePoint administrator account has the following:
SharePoint Farm Administrator's privelages
Access to web site collections
'Log on as service' priveleges
SharePoint account is a member of SQL Sysadmn role on the database server (if SharePoint isconfigured to connect to the database using Windows authentication)
Once you have these items available, follow the steps below to install ESET Security for Microsoft SharePointServer:
1. Open http://www.eset.com/download/business/, expand Collaboration and then click I have a licensenext to ESET Security for Microsoft SharePoint Server.
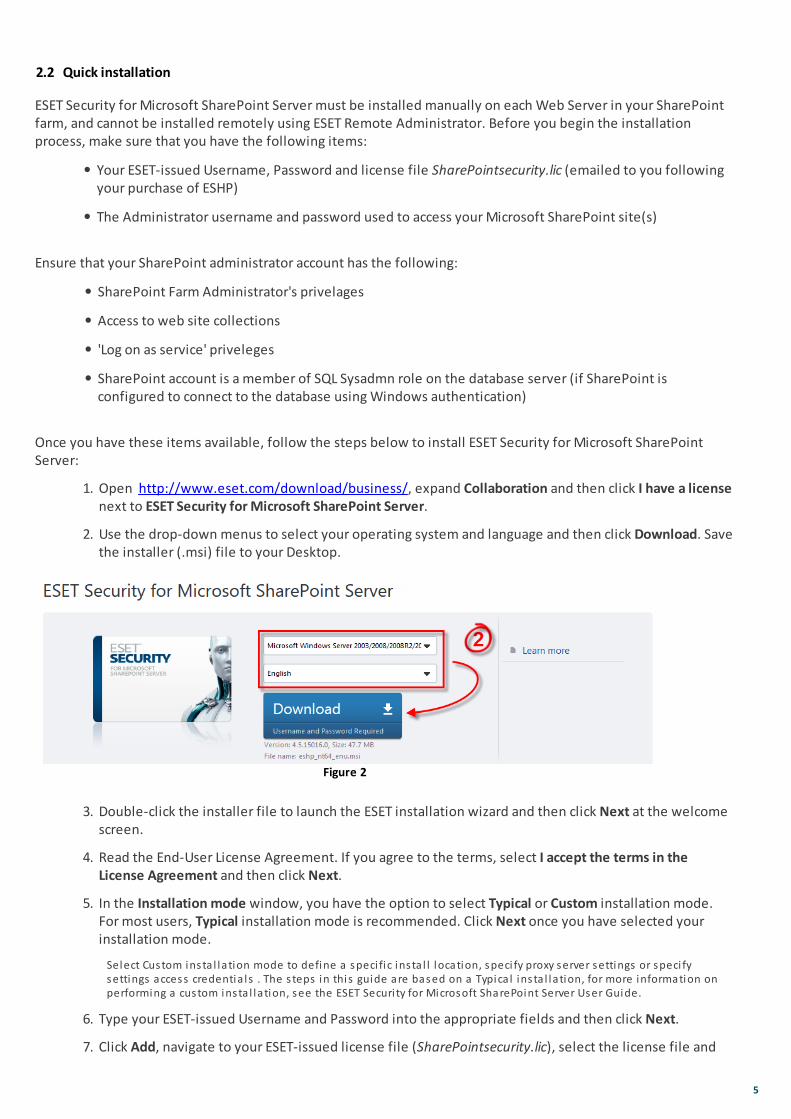
2. Use the drop-down menus to select your operating system and language and then click Download. Savethe installer (.msi) file to your Desktop.
Figure 2
3. Double-click the installer file to launch the ESET installation wizard and then click Next at the welcomescreen.
4. Read the End-User License Agreement. If you agree to the terms, select I accept the terms in theLicense Agreement and then click Next.
5. In the Installation mode window, you have the option to select Typical or Custom installation mode.For most users, Typical installation mode is recommended. Click Next once you have selected yourinstallation mode.
Select Custom insta l lation mode to define a speci fic ins ta l l location, speci fy proxy server settings or speci fysettings access credentia ls . The s teps in this guide are based on a Typica l ins ta l lation, for more information onperforming a custom insta l lation, see the ESET Securi ty for Microsoft SharePoint Server User Guide.
6. Type your ESET-issued Username and Password into the appropriate fields and then click Next.
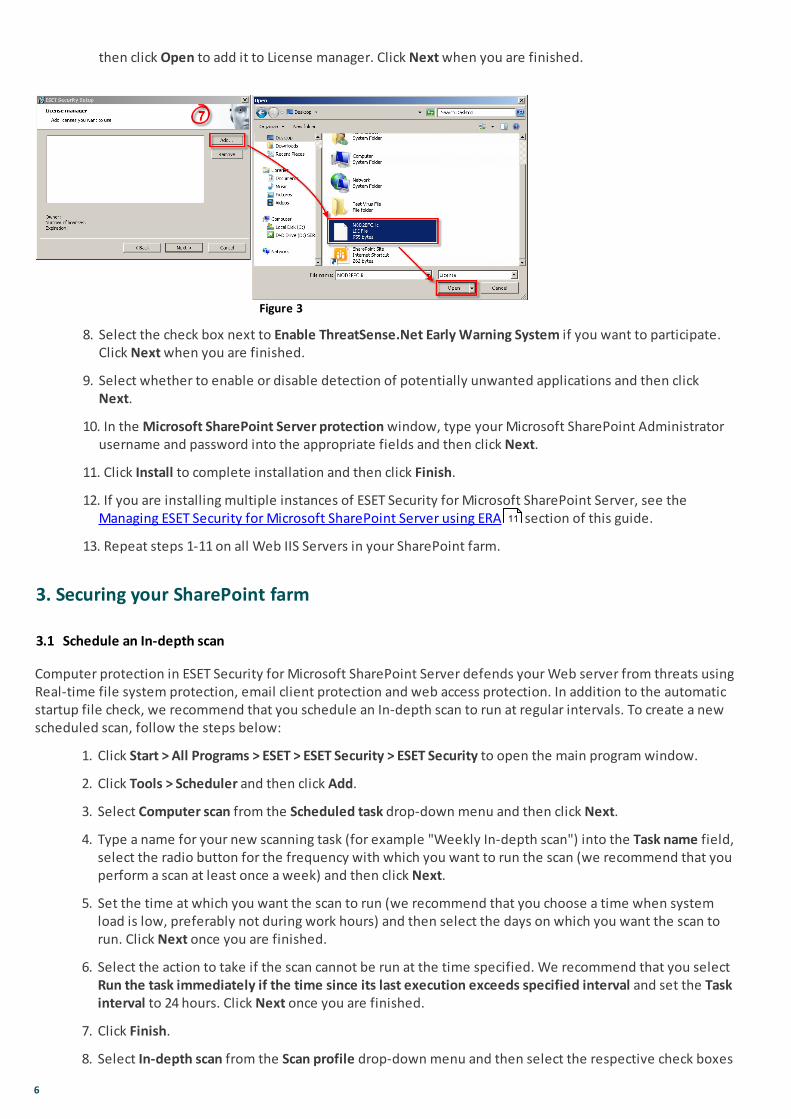
7. Click Add, navigate to your ESET-issued license file (SharePointsecurity.lic), select the license file and
6
then click Open to add it to License manager. Click Next when you are finished.
Figure 3
8. Select the check box next to Enable ThreatSense.Net Early Warning System if you want to participate.Click Next when you are finished.
9. Select whether to enable or disable detection of potentially unwanted applications and then click Next.
10. In the Microsoft SharePoint Server protection window, type your Microsoft SharePoint Administratorusername and password into the appropriate fields and then click Next.
11. Click Install to complete installation and then click Finish.
12. If you are installing multiple instances of ESET Security for Microsoft SharePoint Server, see theManaging ESET Security for Microsoft SharePoint Server using ERA section of this guide.
13. Repeat steps 1-11 on all Web IIS Servers in your SharePoint farm.
3. Securing your SharePoint farm
3.1 Schedule an In-depth scan
Computer protection in ESET Security for Microsoft SharePoint Server defends your Web server from threats usingReal-time file system protection, email client protection and web access protection. In addition to the automaticstartup file check, we recommend that you schedule an In-depth scan to run at regular intervals. To create a newscheduled scan, follow the steps below:
1. Click Start > All Programs > ESET > ESET Security > ESET Security to open the main program window.
2. Click Tools > Scheduler and then click Add.
3. Select Computer scan from the Scheduled task drop-down menu and then click Next.
4. Type a name for your new scanning task (for example "Weekly In-depth scan") into the Task name field,select the radio button for the frequency with which you want to run the scan (we recommend that youperform a scan at least once a week) and then click Next.
5. Set the time at which you want the scan to run (we recommend that you choose a time when systemload is low, preferably not during work hours) and then select the days on which you want the scan torun. Click Next once you are finished.
6. Select the action to take if the scan cannot be run at the time specified. We recommend that you select Run the task immediately if the time since its last execution exceeds specified interval and set the Taskinterval to 24 hours. Click Next once you are finished.
7. Click Finish.
8. Select In-depth scan from the Scan profile drop-down menu and then select the respective check boxes
11

7
next to your desired scan targets. We recommend that you select the check box next to Computer inthe Scan targets window to scan all local drives and removal media. Click OK once you are finished. Yournew scheduled task will be displayed in the Scheduler/Planner window.
Figure 4
3.2 Database protection
Database protection in ESET Security for Microsoft SharePoint Server integrates with your Microsoft SharePointsite. It provides real-time antivirus and antispyware protection any time that the database is accessed andenforces rules-based filtering to prevent the addition of files that do not correspond with your specificparameters.
ESET Security for Microsoft SharePoint Server is capable of performing an On-demand scan of your SharePointdatabase at any time to verify the integrity of your database and remove any potentially harmful files.
The On-demand database scan is configured to compare file versions where multiple instances of the same fileare present, and will restore any infected files to the latest clean version following cleaning.
IMPORTANT!: If a document is deleted, older versions of that document are deleted as well, therefore werecommend that you use the block action for files detected by the On-access filter. To remove infecteddocuments, use the On-demand database scan.
To access settings for the On-demand database scan, press F5 to access Setup and expand Server protection >SharePoint > On-demand database scan. For instructions to configure the regular database scan see the Configurethe regular database scan section of this guide.
To access rules-based filtering settings, press F5 to access Setup and expand Server protection > SharePoint >Rules. For instructions to add, edit and remove rules see the Configure Rules-based filtering section of thisguide.
9
10
8
3.2.1 Configure On-access filtering
The On-access filter in ESET Security for Microsoft SharePoint Server monitors all read/write activity to yourdatabase in real time and can be configured to block or delete potential threats when they attempt to access thedatabase.
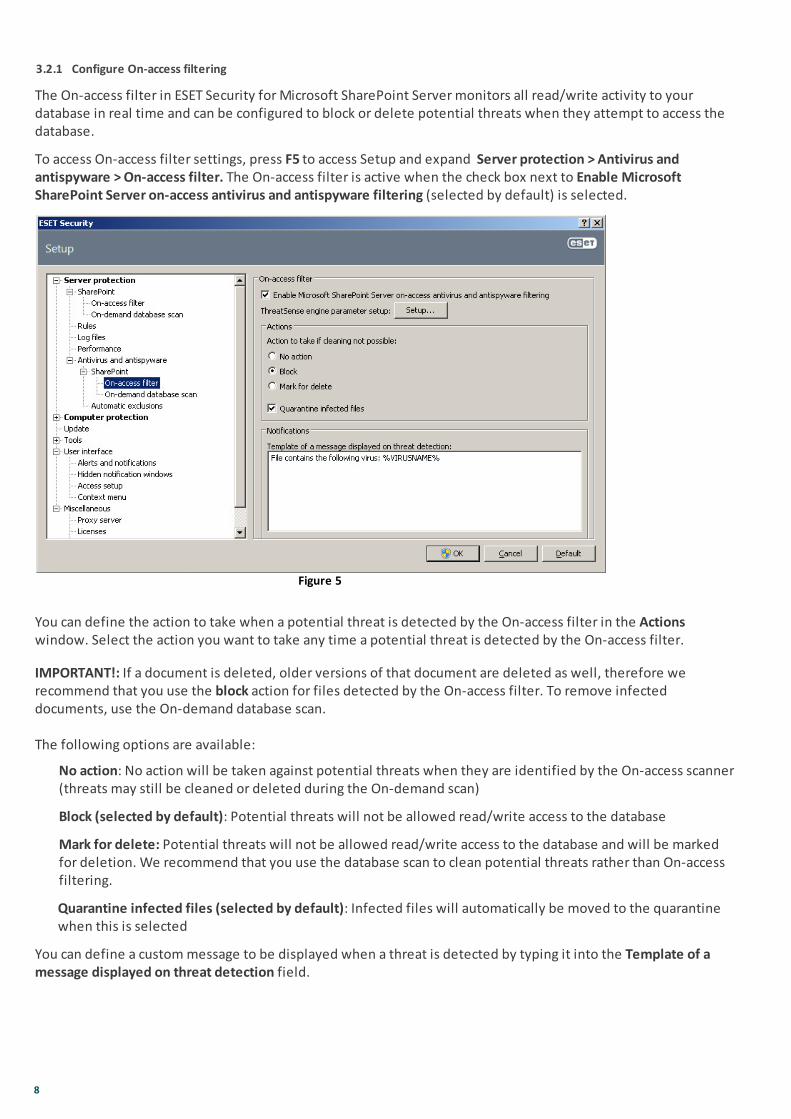
To access On-access filter settings, press F5 to access Setup and expand Server protection > Antivirus andantispyware > On-access filter. The On-access filter is active when the check box next to Enable MicrosoftSharePoint Server on-access antivirus and antispyware filtering (selected by default) is selected.
Figure 5
You can define the action to take when a potential threat is detected by the On-access filter in the Actionswindow. Select the action you want to take any time a potential threat is detected by the On-access filter.
IMPORTANT!: If a document is deleted, older versions of that document are deleted as well, therefore werecommend that you use the block action for files detected by the On-access filter. To remove infecteddocuments, use the On-demand database scan.
The following options are available:
No action: No action will be taken against potential threats when they are identified by the On-access scanner(threats may still be cleaned or deleted during the On-demand scan)
Block (selected by default): Potential threats will not be allowed read/write access to the database
Mark for delete: Potential threats will not be allowed read/write access to the database and will be markedfor deletion. We recommend that you use the database scan to clean potential threats rather than On-accessfiltering.
Quarantine infected files (selected by default): Infected files will automatically be moved to the quarantinewhen this is selected
You can define a custom message to be displayed when a threat is detected by typing it into the Template of amessage displayed on threat detection field.
9
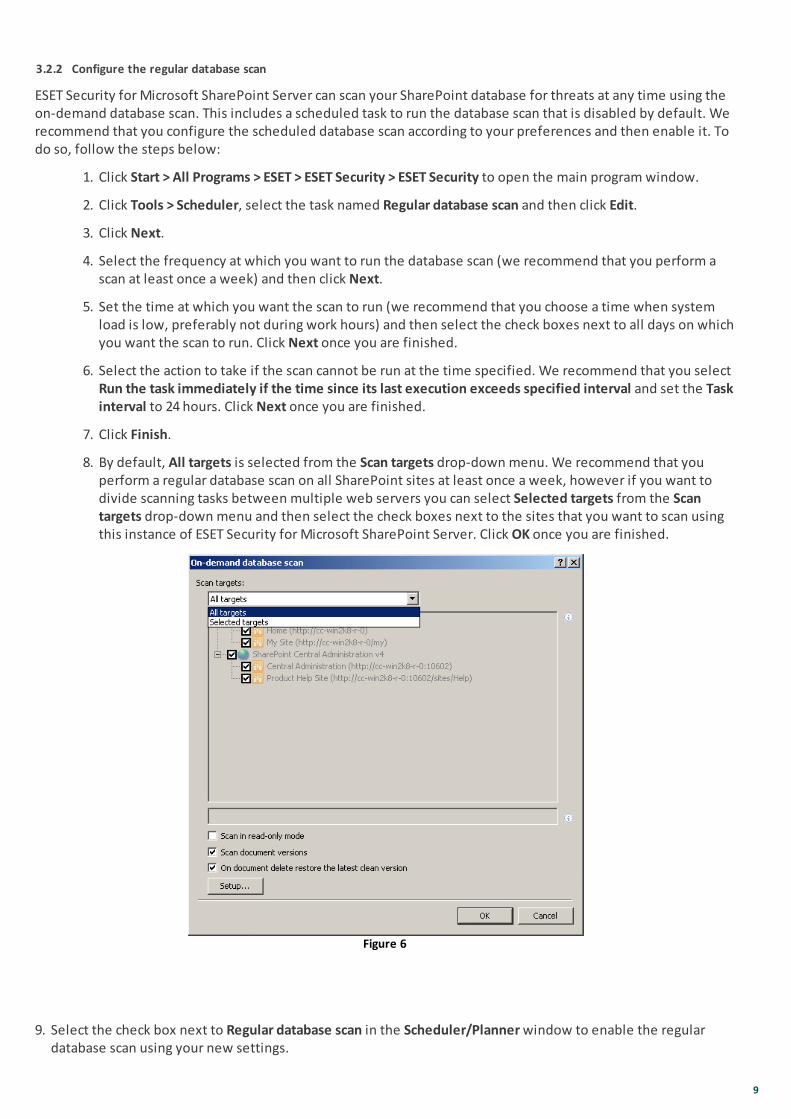
3.2.2 Configure the regular database scan
ESET Security for Microsoft SharePoint Server can scan your SharePoint database for threats at any time using theon-demand database scan. This includes a scheduled task to run the database scan that is disabled by default. Werecommend that you configure the scheduled database scan according to your preferences and then enable it. Todo so, follow the steps below:
1. Click Start > All Programs > ESET > ESET Security > ESET Security to open the main program window.
2. Click Tools > Scheduler, select the task named Regular database scan and then click Edit.
3. Click Next.
4. Select the frequency at which you want to run the database scan (we recommend that you perform ascan at least once a week) and then click Next.
5. Set the time at which you want the scan to run (we recommend that you choose a time when systemload is low, preferably not during work hours) and then select the check boxes next to all days on whichyou want the scan to run. Click Next once you are finished.
6. Select the action to take if the scan cannot be run at the time specified. We recommend that you select Run the task immediately if the time since its last execution exceeds specified interval and set the Taskinterval to 24 hours. Click Next once you are finished.
7. Click Finish.
8. By default, All targets is selected from the Scan targets drop-down menu. We recommend that youperform a regular database scan on all SharePoint sites at least once a week, however if you want todivide scanning tasks between multiple web servers you can select Selected targets from the Scantargets drop-down menu and then select the check boxes next to the sites that you want to scan usingthis instance of ESET Security for Microsoft SharePoint Server. Click OK once you are finished.
Figure 6
9. Select the check box next to Regular database scan in the Scheduler/Planner window to enable the regulardatabase scan using your new settings.
10
3.2.3 Configure Rules-based filtering
Settings for Rules-based filtering will differ depending on the security needs of your network. To access rules-based filtering settings, press F5 to access Setup and expand Server protection > SharePoint > Rules.
Add a new rule
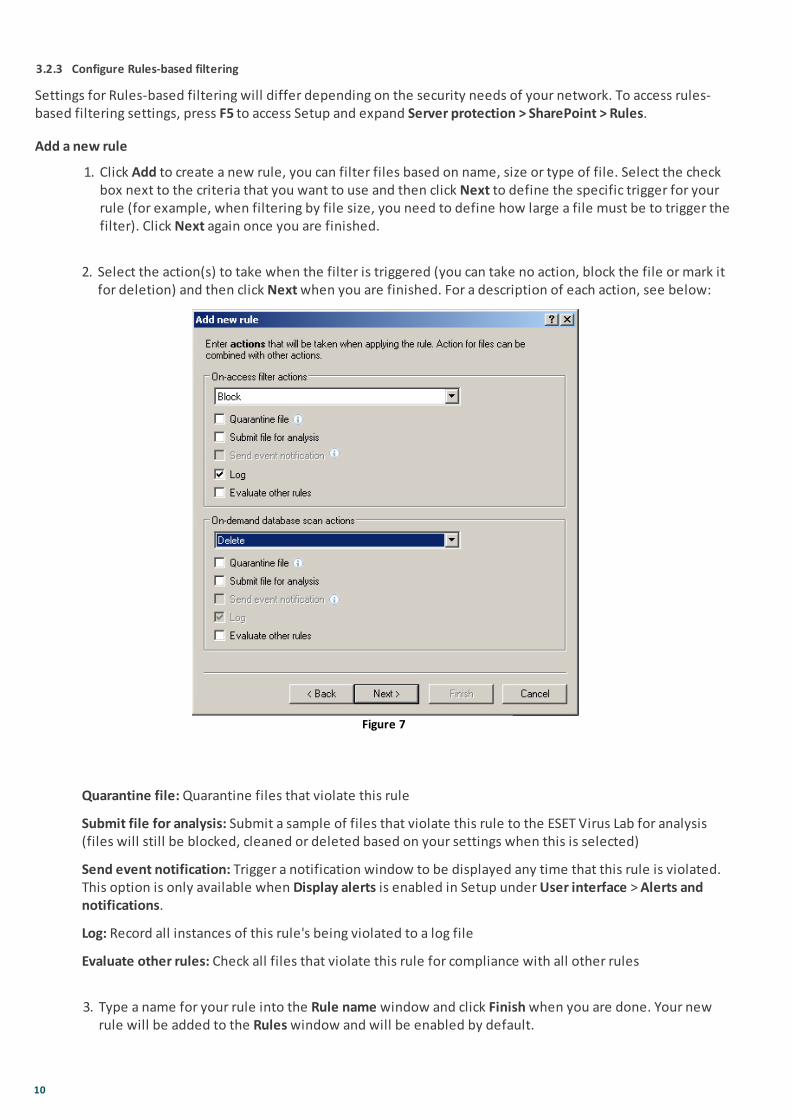
1. Click Add to create a new rule, you can filter files based on name, size or type of file. Select the checkbox next to the criteria that you want to use and then click Next to define the specific trigger for yourrule (for example, when filtering by file size, you need to define how large a file must be to trigger thefilter). Click Next again once you are finished.
2. Select the action(s) to take when the filter is triggered (you can take no action, block the file or mark itfor deletion) and then click Next when you are finished. For a description of each action, see below:
Figure 7
Quarantine file: Quarantine files that violate this rule
Submit file for analysis: Submit a sample of files that violate this rule to the ESET Virus Lab for analysis(files will still be blocked, cleaned or deleted based on your settings when this is selected)
Send event notification: Trigger a notification window to be displayed any time that this rule is violated.This option is only available when Display alerts is enabled in Setup under User interface > Alerts andnotifications.
Log: Record all instances of this rule's being violated to a log file
Evaluate other rules: Check all files that violate this rule for compliance with all other rules
3. Type a name for your rule into the Rule name window and click Finish when you are done. Your newrule will be added to the Rules window and will be enabled by default.
11
To edit an existing rule, select it and then click Edit. To remove an existing rule, select it and then click Remove.
For more information on SharePoint Server rules, see the "Rules" section of the ESET Security for MicrosoftSharePoint Server User Guide.
4. Export/Import a configuration
If you want to reuse settings from one instance of ESET Security for Microsoft SharePoint Server on multipleservers, you can export your settings in the form of an .xml file and then import the file on multiple servers toapply an identical settings configuration. This method is not recommended when ESET Remote Administrator isused to manage ESET Security for Microsoft SharePoint Server, because you can replicate settings across anynumber of servers using a policy.
To export your configuration .xml from one instance of ESET Security for Microsoft SharePoint Server and importthem into another, follow the steps below:
1. Click Start > All Programs > ESET > ESET Security > ESET Security to open the main program window.
2. Click Setup > Import and export settings.
3. Select Export settings, click ... and then select your Desktop as the location to save the file.
4. Type a name (for example, "Config") into the File name field and then click Open.
5. Click OK to export the .xml file.
6. On every computer where you want to use the settings from this .xml file, repeat steps 1 and 2 andselect Import settings.
7. Click ... , navigate to the location of the .xml file that you saved in step 5 and then click Open. The savedconfiguration settings should take effect immediately.
5. Managing ESET Security for Microsoft SharePoint Server using ERA
You can manage ESET Security for Microsoft SharePoint Server in combination with your other ESET products usingESET Remote Administrator (ERA). To allow for the management of ESET Security for Microsoft SharePoint Server,you must have the latest versions of ERA and ESET Configuration Editor (a component of ESET RemoteAdministrator), and remote administration must be enabled in ESET Security for Microsoft SharePoint Server. The Upgrade ESET Configuration Editor and Enable remote administration sections of this guide detail how tocomplete these respective processes.
Once remote management is enabled, you can configure a policy (or multiple policies) for ESET Security forMicrosoft SharePoint Server using ERA to more efficiently manage multiple instances of ESET Security forMicrosoft SharePoint Server deployed on your network.
5.1 Upgrade ESET Configuration Editor
You can manage ESET Security for Microsoft SharePoint Server in combination with your other ESET products usingESET Remote Admnistrator (ERA). Upgrading ESET Configuration Editor will not overwrite any existing policy orconfiguration settings in ESET Remote Administrator. To add Settings for ESET Security for Microsoft SharePointServer to the ESET Configuration editor, follow the steps below on your Server with ESET Remote AdministratorConsole installed:
1. Upgrade ESET Remote Administrator to the latest version. For step-by-step instructions see our Knowledgebase article.
2. Download CfgEdit.exe (also available in the Knowledgebase article "How do I manage ESET Security forMicrosoft SharePoint Server using ESET Remote Administrator") and save the file to your Desktop.
11 12
12
3. Navigate to the appropriate directory below depending on your operating system:
o 32-bit operating systems: C:\Program Files\ESET\ESET Remote Administrator\Console
o 64-bit operating systems: C:\Program Files (x86)\ESET\ESET Remote Administrator\Console
4. Replace CfgEdit.exe in the ESET Remote Administrator\Console folder with the new CfgEdit.exe thatyou downloaded in step 1. Select Move and replace when prompted by Windows.
5. In ESET Remote Administrator Console, click Tools > ESET Configuration Editor and then expandWindows Server v4.5. The Security 4.5 for MS SharePoint Server branch should be present in thesettings tree, allowing you to make changes to ESET Security for Microsoft SharePoint Server settingsusing policies.
To manage ESET Security for Microsoft SharePoint Server using ESET Remote Administrator, you need to enableremote administration in ESET Security for Microsoft SharePoint Server. See the section Enable remoteadministration in ESHP for instructions to enable this setting.
5.2 Upload the ESET Remote Administrator license file
Before you can manage ESET Security for Microsoft SharePoint Server using ESET Remote Administrator (ERA),follow the steps below to upload the ERA-specific license file (named ERA-Sharepointsecurity.lic) that youreceived from ESET following your purchase of ESET Security for Microsoft SharePoint Server into ERA licensemanager.
1. Click Start > All Programs > ESET > ESET Remote Administrator Console to open the main programwindow.
2. Click Tools > License manager > Browse.
3. Navigate to the directory where you saved ERA-Sharepointsecurity.lic, select the file and click Open.Your license details will appear in License Manager.
4. Click OK to close License Manager.
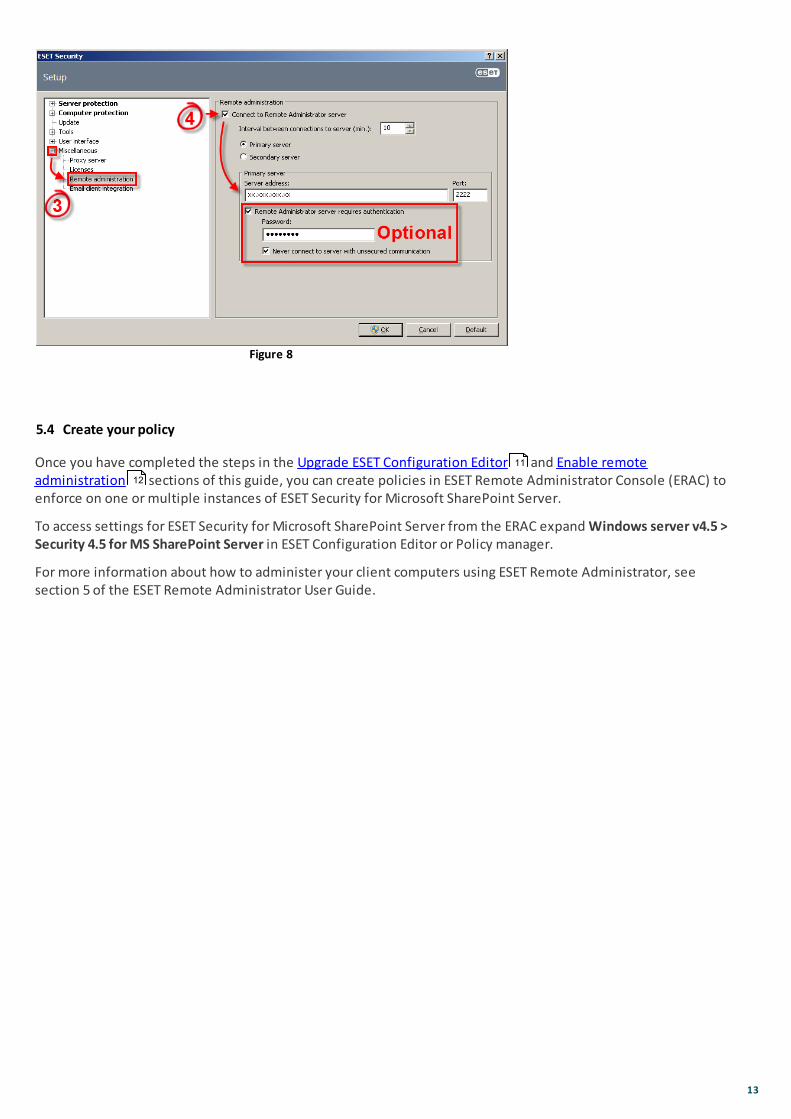
5.3 Enable remote administration in ESHP
To allow the management of ESET Security for Microsoft SharePoint Server using ESET Remote Administrator(ERA), complete the steps in the Upgrade ESET Configuration Editor and Upload the ESET Remote Administratorlicense file sections of this guide and then follow the steps below to enable remote administration in ESETSecurity for Microsoft SharePoint Server.
1. Click Start > All Programs > ESET > ESET Security > ESET Security to open the main program window.
2. Press F5 on your keyboard to access Setup.
3. Expand Miscellaneous and click Remote Administration.
4. Select the check box next to Connect to ESET Remote Administrator server and then type the IP addressof your ERA server into the Server address field. If your ERA server requires clients to enter a password to check in, select the check box next to RemoteAdministrator server requires authentication and then type the password into the Password field. Onceyou are finished, click OK.
6
11
12
13
Figure 8
5.4 Create your policy
Once you have completed the steps in the Upgrade ESET Configuration Editor and Enable remoteadministration sections of this guide, you can create policies in ESET Remote Administrator Console (ERAC) toenforce on one or multiple instances of ESET Security for Microsoft SharePoint Server.
To access settings for ESET Security for Microsoft SharePoint Server from the ERAC expand Windows server v4.5 >Security 4.5 for MS SharePoint Server in ESET Configuration Editor or Policy manager.
For more information about how to administer your client computers using ESET Remote Administrator, seesection 5 of the ESET Remote Administrator User Guide.
11
12