ESET SECURE AUTHENTICATION · 4 1. Overview This document describes how to enable ESET Secure...
8
ESET SECURE AUTHENTICATION Juniper SSL VPN Integration Guide
Transcript of ESET SECURE AUTHENTICATION · 4 1. Overview This document describes how to enable ESET Secure...
ESET SECUREAUTHENTICATIONJuniper SSL VPNIntegration Guide
ESET SECURE AUTHENTICATION
Copyright 2016 by ESET, spol. s r.o.ESET Secure Authentication was developed by ESET, spol . s r.o.For more information vis i t www.eset.com.Al l rights reserved. No part of this documentation may be reproduced, s toredin a retrieva l system or transmitted in any form or by any means , electronic,mechanica l , photocopying, recording, scanning, or otherwise withoutpermiss ion in wri ting from the author.ESET, spol . s r.o. reserves the right to change any of the described appl icationsoftware without prior notice.
Customer Care Worldwide: www.eset.eu/supportCustomer Care North America: www.eset.com/support
REV. 8/26/2016

Contents
.............................................................................................................4Overview1.
.............................................................................................................4Prerequisites2.
.............................................................................................................6Integration Instructions3.
.............................................................................................................8Troubleshooting4.

4
1. Overview
This document describes how to enable ESET Secure Authentication (ESA) Two-Factor Authentication (2FA) for aJuniper SSL VPN appliance.
This integration guide utilizes VPN validates AD user name and password VPN type for this particular VPN appliance.If you wish to utilize other VPN type, refer to generic description of VPN types and verify with the vendor if thisVPN appliance supports it.
2. Prerequisites
Configuring the VPN for 2FA requires:
· A functional ESA RADIUS server that has your Juniper SSL VPN configured as a client, as shown in Figure 1.
NOTE: Since Juniper SSL VPNs support a second authentication factor out of the box, a user’s Active Directory (AD)password will be authenticated in addition to their One-Time Password (OTP). Disregard the warning at the bottomof the New Client Properties window when using this type of appliance.The default authentication policy of Juniper appliance does not accept passwords shorter than 4 characters. If youwant shorter passwords to be authenticated, adjust the policy accordingly. Navigate to Users > User Realms >"Users" Authentication Realm > Authentication Policy tab > Password tab > Options for additional authenticationserver > check Allow all users.
· A Juniper SSL VPN Appliance. The supported appliances are:
SA Series Devices
MAG Series Devices

5
Figure 1
This picture shows the RADIUS client settings for your Juniper VPN device. Note that the check box next to MobileApplication must be selected and the IP address is the internal address of your Juniper appliance.

6
3. Integration Instructions
1. Configuration of device for 2FA:
a. Log in to the Juniper SSL VPN appliance as an administrator.
b. Navigate to Authentication > Authentication Servers.
c. Select Radius Server from the New drop-down menu and click New Server.
d. Enter the following:
i. Name: A name for this server (for example, ESA RADIUS)
ii. NAS-Identifier: The IP address of your Juniper device (as shown in Figure 1)
iii. Radius Server: The hostname/IP address of your ESA RADIUS server
iv. Authentication Port: 1812 (only modify if you are overriding this value )
v. Shared Secret: As shown in Figure 1
vi. Accounting Port: 1813
vii. NAS-IP-Address: Leave blank
viii. Timeout: 30 seconds
ix. Retries: 3
e. Click Save changes.
2. Configure a User Realm:
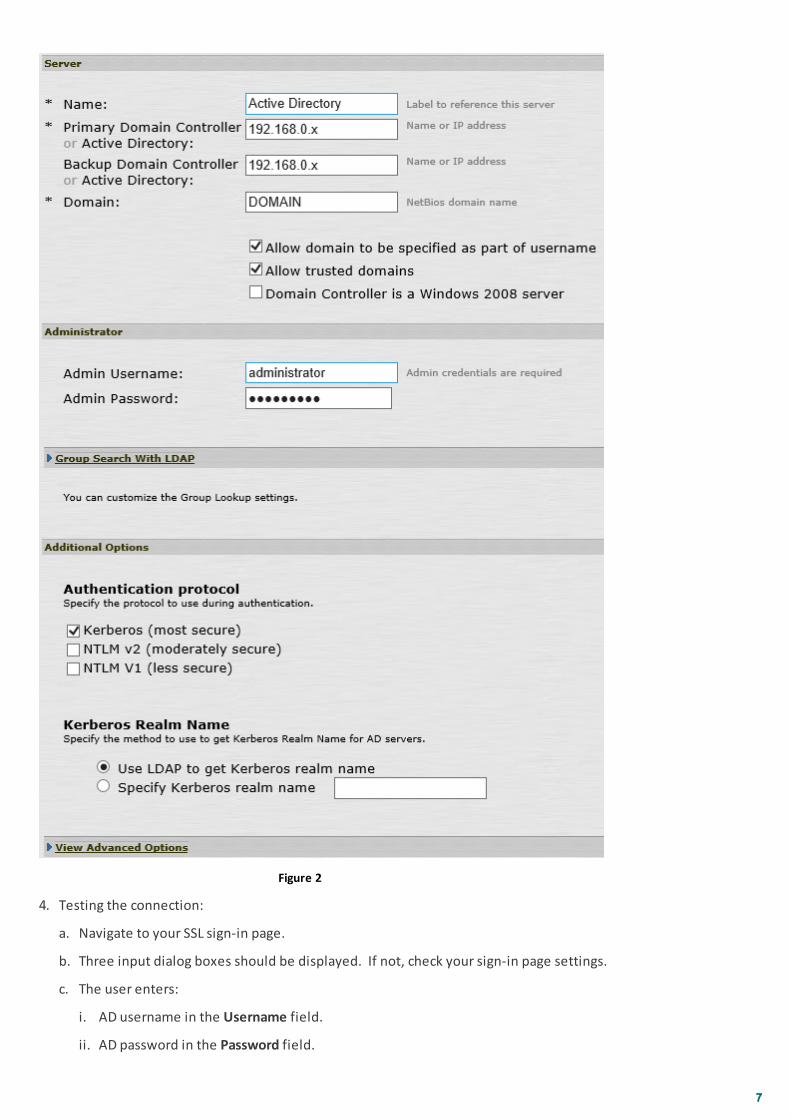
a. In the left hand panel, navigate to Users > User Realms and click the user realm you want to configure for 2FA. In the Servers section:
i. In the Authentication field, select your Domain Controller. If your DC is not present, add it first(Authentication > Authentication Servers, as shown in Figure 2).
ii. In the Directory/Attribute field, select Same as above.
iii. In the Accounting field, select None.
b. Select the check box next to Additional authentication server, and complete the following steps:
i. Select the name entered in step 1-d-i in the Authentication #2 drop-down menu.
ii. Username: Select Predefined as <USER>.
iii. Password: Select specified by user on sign-in page.
iv. Select the check box next to End session if authentication against this server fails.
c. Click Save changes.
3. Configure the Sign-in Page:
a. Navigate to Authentication > Signing in > Sign-in Pages.
b. Click the link for the authentication page for which you are configuring 2FA.
c. Specify ESA OTP as the label for the Secondary password field.
d. Click Save Changes.
7
Figure 2
4. Testing the connection:
a. Navigate to your SSL sign-in page.
b. Three input dialog boxes should be displayed. If not, check your sign-in page settings.
c. The user enters:
i. AD username in the Username field.
ii. AD password in the Password field.

8
iii. Mobile Application OTP in the ESA OTP field.
NOTE: To test the connection of a RADIUS client when the SMS-based OTP option has been selected:
1. To request an on-demand SMS including an OTP, enter your AD Username and Password into the correspondingfields. In the ESA OTP field, type sms.
2. Re-enter your AD Username and Password into the corresponding fields. In the ESA OTP field, type the OTPinformation received via sms.
4. Troubleshooting
If you are unable to authenticate via the ESA RADIUS server, ensure you have performed the following steps:
1. Run a smoke test against your RADIUS server, as described in the Verifying ESA RADIUS Functionality document.
2. If you are still unable to connect, revert to an existing sign-in configuration and verify that you are able toconnect.
3. If you are able to connect using the old settings, restore the new settings and verify that there is no firewallblocking UDP 1812 between you VPN device and your RADIUS server.
4. If you are still unable to connect, contact ESET Customer Care.