ESET REMOTE ADMINISTRATOR 6 - ارتباط امن · ESET REMOTE ADMINISTRATOR 6 Installation,...
179
ESET REMOTE ADMINISTRATOR 6 Installation, Upgrade and Migration Guide Click here to navigate to the most recent version of this document Click here to display Online help version of this document
Transcript of ESET REMOTE ADMINISTRATOR 6 - ارتباط امن · ESET REMOTE ADMINISTRATOR 6 Installation,...

ESETREMOTEADMINISTRATOR 6Installation, Upgrade and Migration Guide
Click here to navigate to the most recent version of this documentClick here to display Online help version of this document
ESET REMOTE ADMINISTRATOR 6Copyright 2016 by ESET, spol. s r.o.ESET Remote Adminis trator 6 was developed by ESET, spol . s r.o.
For more information vis i t www.eset.com.Al l rights reserved. No part of this documentation may be reproduced, s tored in aretrieva l system or transmitted in any form or by any means , electronic, mechanica l ,photocopying, recording, scanning, or otherwise without permiss ion in wri ting fromthe author.ESET, spol . s r.o. reserves the right to change any of the described appl ication softwarewithout prior notice.
Customer Care: www.eset.com/support
REV. 12.08.2016

Contents
.......................................................5Installation/Upgrade1.
....................................................................................................5New features1.1
....................................................................................................6Architecture1.2..............................................................................7Server1.2.1
..............................................................................8Web Console1.2.2
..............................................................................8Agent1.2.3
..............................................................................9Proxy1.2.4
..................................................................................10When to use ERA Proxy?1.2.4.1
..............................................................................11Rogue Detection Sensor1.2.5
..............................................................................12Mobile Device Connector1.2.6
..............................................................................12Apache HTTP Proxy1.2.7
....................................................................................................14Deployment scenarios - best practices1.3..............................................................................15Single Server (Small Business)1.3.1
..............................................................................16Remote Branches with Proxies1.3.2
..............................................................................17High Availability (Enterprise)1.3.3
..............................................................................18Practical deployment examples (Windows)1.3.4
..............................................................................19Differences between Apache HTTP Proxy, Mirror Tooland direct connectivity
1.3.5
..................................................................................21When to start using Apache HTTP Proxy?1.3.5.1
..................................................................................21When to start using Mirror Tool?1.3.5.2
....................................................................................................22Infrastructure building and sizing1.4
....................................................................................................23Supported products and languages1.5
....................................................................................................24Differences to version 51.6
.......................................................26System requirements2.
....................................................................................................26Supported Operating Systems2.1..............................................................................26Windows2.1.1
..............................................................................28Linux2.1.2
..............................................................................29OS X2.1.3
....................................................................................................29Supported Desktop ProvisioningEnvironments
2.2
....................................................................................................30Hardware2.3
....................................................................................................30Database2.4
....................................................................................................31Supported versions of Apache Tomcat2.5
....................................................................................................31Supported Web browsers for ERA WebConsole
2.6
....................................................................................................31Network2.7..............................................................................31Ports used2.7.1
.......................................................34Installation process3.
....................................................................................................35All-in-one installation on Windows3.1..............................................................................36Install ERA Server3.1.1
..............................................................................46Install ERA Proxy3.1.2
..............................................................................52Install ERA Mobile Device Connector (Standalone)3.1.3
..............................................................................55Install ERA on Windows SBS / Essentials3.1.4
..............................................................................58Uninstall components3.1.5
..............................................................................60Custom certificates with ERA3.1.6
....................................................................................................72Installation on Microsoft Azure3.2
....................................................................................................73Component installation on Windows3.3..............................................................................74Server installation3.3.1
..................................................................................76Server prerequisites - Windows3.3.1.1
..............................................................................77Microsoft SQL Server requirements3.3.2
..............................................................................78MySQL Server installation and configuration3.3.3
..............................................................................79Dedicated database user account3.3.4
..............................................................................79Agent installation3.3.5
..................................................................................80Server-assisted Agent installation3.3.5.1
..................................................................................80Offline Agent installation3.3.5.2
..................................................................................80Agent uninstallation and troubleshooting3.3.5.3
..............................................................................81Web Console installation3.3.6
..............................................................................81Proxy installation3.3.7
..................................................................................82Proxy prerequisites3.3.7.1
..............................................................................83RD Sensor installation3.3.8
..................................................................................83RD Sensor prerequisites3.3.8.1
..............................................................................83Mobile Device Connector installation3.3.9
..................................................................................85Mobile Device Connector prerequisites3.3.9.1
..................................................................................86Mobile Device Connector activation3.3.9.2
..................................................................................87MDM iOS licensing funcionality3.3.9.3
..................................................................................87HTTPS certificate requirements3.3.9.4
........................................................................88Import HTTPS certificate chain for MDM3.3.9.4.1
..............................................................................90Mirror tool3.3.10
..............................................................................92Apache HTTP Proxy installation and cache3.3.11
..............................................................................94Failover Cluster3.3.12
....................................................................................................95Component installation on Linux3.4..............................................................................95Step-by-step ERA Server installation on Linux3.4.1
..............................................................................96MySQL installation and configuration3.4.2
..............................................................................97ODBC installation and configuration3.4.3
..............................................................................98Server installation - Linux3.4.4
..................................................................................100Server prerequisites - Linux3.4.4.1
..............................................................................101Agent installation - Linux3.4.5
..................................................................................103Agent prerequisites - Linux3.4.5.1
..............................................................................103Web Console installation - Linux3.4.6
..................................................................................104ERA Web Console prerequisites - Linux3.4.6.1
..............................................................................104Proxy installation - Linux3.4.7
..................................................................................106Proxy prerequisites - Linux3.4.7.1
..............................................................................106RD Sensor installation and prerequisites - Linux3.4.8
..............................................................................107Mobile Device Connector installation - Linux3.4.9
..................................................................................108Mobile Device Connector prerequisites - Linux3.4.9.1
..............................................................................109Apache HTTP Proxy installation - Linux3.4.10
..............................................................................111Squid HTTP Proxy installation on Ubuntu Server 14.103.4.11
..............................................................................111Mirror tool3.4.12
..............................................................................114Failover Cluster - Linux3.4.13
..............................................................................116How to uninstall or reinstall a component - Linux3.4.14
....................................................................................................116Component installation on Mac OS X3.5..............................................................................116Agent installation - Mac OS X3.5.1
....................................................................................................117Database3.6..............................................................................117Database Server Backup and Restore3.6.1
..............................................................................118Database Server Upgrade3.6.2
..............................................................................119ERA Database Migration3.6.3
..................................................................................119Migration process for MS SQL Server3.6.3.1
..................................................................................128Migration process for MySQL Server3.6.3.2
....................................................................................................128ISO image3.7

....................................................................................................129DNS Service Record3.8
....................................................................................................129Offline installation scenario for ERA3.9
.......................................................131Upgrade, migration and reinstallationprocedures
4.
....................................................................................................131Component upgrade task4.1..............................................................................135Product installation using component upgrade4.1.1
....................................................................................................135Migration from previous ERA version4.2..............................................................................137Migration scenario 14.2.1
..............................................................................139Migration scenario 24.2.2
..............................................................................142Migration scenario 34.2.3
....................................................................................................144Migration from one server to another4.3..............................................................................145Clean Installation - same IP address4.3.1
..............................................................................146Clean Installation - different IP address4.3.2
..............................................................................147Migrated Database - same IP address4.3.3
..............................................................................148Migrated Database - different IP address4.3.4
..............................................................................149Uninstallation of the old ERA Server4.3.5
....................................................................................................149Upgrade ERA installed in FailoverCluster in Windows
4.4
....................................................................................................150Upgrading Apache HTTP Proxy4.5..............................................................................150Windows instructions (All-in-one installer)4.5.1
..............................................................................152Windows instructions (manual)4.5.2
....................................................................................................153Upgrading Apache Tomcat4.6..............................................................................153Windows instructions (All-in-one installer)4.6.1
..............................................................................154Windows instructions (manual)4.6.2
..............................................................................155Linux instructions4.6.3
....................................................................................................156Change of IP address or hostname onERA Server
4.7
....................................................................................................156Upgrade ERA installed in FailoverCluster in Linux
4.8
....................................................................................................158Upgrade ERA components in offlineenvironment
4.9
.......................................................159Troubleshooting5.
....................................................................................................159Answers to common installation issues5.1
....................................................................................................162Log files5.2
....................................................................................................164Diagnostic Tool5.3
....................................................................................................165Problems after upgrade/migration ofERA Server
5.4
....................................................................................................167MSI Logging5.5
.......................................................168First steps and best practices6.
....................................................................................................168Opening the ERA Web Console6.1
....................................................................................................170Client connection interval6.2
....................................................................................................172Efficient usage of Apache HTTP Proxy6.3
.......................................................173ESET Remote Administrator API7.
.......................................................174FAQ8.

5
1. Installation/UpgradeESET Remote Administrator (ERA) is an application that allows you to manage ESET products on client workstations,servers and mobile devices in a networked environment from one central location. With ESET RemoteAdministrator's built-in task management system, you can install ESET security solutions on remote computers andquickly respond to new problems and threats.
ESET Remote Administrator does not provide protection against malicious code by itself. Protection of yourenvironment depends on the presence of an ESET security solution such as ESET Endpoint Security on workstationsand mobile devices, or ESET File Security for Microsoft Windows Server on server machines.
ESET Remote Administrator is built around two primary principles:
1. Centralized management - the entire network can be configured, managed and monitored from one place.2. Scalability - the system can be deployed in a small network as well as in large enterprise environments. ESET
Remote Administrator is designed to accommodate the growth of your infrastructure.
ESET Remote Administrator supports the new generation of ESET security products and is also compatible with the previous generation of products.
The Installation/Upgrade guide covers many ways to install ESET Remote Administrator and is generally intendedfor enterprise customers. Please refer to the guide for small and medium-sized businesses if you want to installESET Remote Administrator on a Windows platform to manage up to 250 Windows ESET endpoint products.
The ESET Remote Administrator help pages include a complete Installation and upgrade guide:
Architecture of ESET Remote Administrator
Migration Tool
Installation processes
ESET License Administrator
Deployment processes and Agent deployment using GPO or SCCM
First steps after installing ESET Remote Administrator
Post Installation Tasks
Administration guide
1.1 New features
What are the major changes in version 6.4?
Post-installation wizard added to ERA Web Console
Improved deployment process allows you to deploy ERA Agent and ESET endpoint at the same time
Redesigned mobile device enrollment and CSV import of computers
Improved, more user-friendly All-in-one installer
ERA appliance changes - CentOS 7-based, Webmin added etc.
The following features and capabilities are new in version 6:
See also the Differences to version 5 chapter
Platform independency - ERA Server works on both Windows and Linux!
Post Installation Tasks - show you how to get the most from ESET Remote Administrator and guide you throughthe recommended steps for an optimal user experience.
ERA Web Console, the primary user interface for ESET Remote Administrator, is accessed using your web browser.This makes it easy to use from any place and any device.
ESET License Administrator - ESET Remote Administrator must be activated using an ESET-issued License keybefore you can begin using it. See the ESET License Administrator section for instructions on how to activate yourproduct, or see ESET License Administrator Online help for instructions on how to use ESET License Administrator.

6
A fully customizable Dashboard gives you an overview of the security state of your network. The Admin section ofESET Remote Administrator Web Console (ERA Web Console) is a powerful and user-friendly tool for managingESET products.
ERA Agent - the ERA Agent must be installed on all client computers that communicate with the ERA Server.
Notifications - deliver relevant information in real time and Reports allow you to conveniently sort various typesof data for use later.
1.2 Architecture
ESET Remote Administrator is a new generation of remote management system and differs significantly fromprevious versions of ESET Remote Administrator. Since the architecture is completely different, there is nobackward compatibility with old generation of ESET Remote Administrator. However, compatibility with previousversions of ESET security products remains.
Together with new ESET Remote Administrator, ESET also released new generation of its security products alongwith a new licensing system.
To perform a complete deployment of the ESET security solutions portfolio, the following components must beinstalled (Windows and Linux platforms):
ERA Server
ERA Web Console
ERA Agent
The following supporting components are optional, we recommend that you install them for best performance ofthe application on the network:
ERA Proxy
RD Sensor
Apache HTTP Proxy
Mobile Device Connector

7
1.2.1 Server
ESET Remote Administrator Server (ERA Server) is the executive application that processes all data received fromclients that connect to the Server (through the ERA Agent or ERA Proxy). To correctly process data, the Serverrequires a stable connection to a database server where network data is stored. We recommend that you install thedatabase server on a different computer to achieve better performance.

8
1.2.2 Web Console
ERA Web Console is a web-based user interface that allows you to manage ESET security solutions in yourenvironment. It displays an overview of the status of clients on your network and can be used to deploy ESETsolutions to unmanaged computers remotely. The Web Console is accessed using your browser (see Supported Webbrowsers). If you choose to make the web server accessible from the internet, you can use ESET RemoteAdministrator from virtually any place and device.
1.2.3 Agent
The ESET Remote Administrator Agent (ERA Agent) is an essential part of ESET Remote Administrator 6. Clients donot communicate with the Server directly, rather the Agent facilitates this communication. The Agent collectsinformation from the client and sends it to the ERA Server. If the ERA Server sends a task for the client - it is sent tothe Agent which then sends this task to the client.
To simplify implementation of the endpoint protection the stand-alone ERA Agent is included in the ERA suite (fromversion 6). It is simple, highly modular and lightweight service covering all communication between ERA Server andany ESET product or operating system. Rather than communicate with the ERA Server directly, ESET productscommunicate through the Agent. Client computers that have ESET Agent installed and can communicate with theERA Server are referred to as 'managed'. You can install the Agent on any computer regardless of whether or notother ESET software has been installed.

9
The benefits are:
Easy set-up – it is possible to deploy Agent as a part of standard corporate installation.
On-place security management – since the Agent can be configured to store several security scenarios, reactiontime to threat is significantly lowered.
Off-line security management – the Agent can respond to an event if it is not connected to the ERA Server.
1.2.4 Proxy
ERA Proxy is a lightweight version of the ERA Server component. This type of server is used to allow a high degree ofscalability. ERA Proxy allows you to concentrate traffic from client Agents. It allows multiple Agents to connect tothe ERA Proxy, which then distributes traffic to the ERA Server. This allows for the optimization of database queries.It is also possible for the ERA Proxy to connect to other ERA Proxy and then to the ERA Server. Everything dependson the network environment and its configuration.
What is the difference between ERA Proxy and Apache HTTP Proxy?
The ERA Proxy is also responsible for passive distribution of configuration data (groups, policies, tasks, etc.) toAgents. This forwarding is done with no involvement from the ERA Server.
The only way to configure the ERA Proxy (and all other components) is via policy sent from the ERA Server. Thismeans that the Agent must be installed on the ERA Proxy machine to deliver the configuration from the ERA Serverto the ERA Proxy component.
NOTE: It is not possible for the ERA Server to connect to the ERA Proxy directly without the Agent.

10
ERA Proxy is another component of ESET Remote Administrator and serves two purposes. In the case of a medium-sized or enterprise network with many clients (for example, 10,000 clients or more), you can use ERA Proxy todistribute load between multiple ERA Proxies, thereby distributing load away from the main ERA Server. Anotheradvantage of the ERA Proxy is that you can use it when connecting to a remote branch office with a weak link. Thismeans that ERA Agent on each client is not connecting to the main ERA Server directly, but rather via ERA Proxy,which is on the same local network of the branch office. This configuration offers better communication with thebranch office. The ERA Proxy accepts connections from all local ERA Agents, compiles their data and uploads it to themain ERA Server (or another ERA Proxy). This allows your network to accommodate more clients withoutcompromising the performance of your network and database queries.
For proper function of the ERA Proxy, the host computer where you install ERA Proxy must have an ESET Agentinstalled and must be connected to the upper level (either ERA Server or an upper ERA Proxy, if there is one) of yournetwork.
NOTE: See a deployment scenario with ERA Proxy.
1.2.4.1 When to use ERA Proxy?
We recommend to use ERA Proxy if your infrastructure meets one or more of the following conditions:
On large network, we recommend one instance of ERA Proxy for each 20,000 clients in the network, see Deployment scenarios - best practices
If you have a remote location or branch office and want to use ERA Proxy to handle communication:
a. between ERA Server and ERA Proxy
b. between ERA Proxy and client computers in a remote location

11
1.2.5 Rogue Detection Sensor
Rogue Detection Sensor (RD Sensor) is a rogue system detector tool that searches your network for computers. TheSensor is convenient because it can locate new computers from ESET Remote Administrator without the need tosearch and add them manually. Discovered machines are immediately located and reported in a predefined report,allowing you to move them to specific static groups and proceed with management tasks.
RD Sensor is a passive listener that detects computers that are present on the network and sends information aboutthem to the ERA Server. ERA Server then evaluates whether the PCs found on the network are unknown to ERAServer or already managed.
Every computer within the network structure (domain, LDAP, Windows network) is added to ERA Server's computerslist automatically via a server synchronization task. Using RD sensor is a convenient way to find computers that arenot in the domain or other network structure and add them to ESET Remote Administrator Server. RD Sensorremembers computers that are already discovered and will not send the same information twice.

12
1.2.6 Mobile Device Connector
ESET Mobile Device Connector (ESET MDC) is a component that allows for Mobile Device Management with ESETRemote Administrator, permitting you to manage mobile devices (Android and iOS) and administer ESET EndpointSecurity for Android.
1.2.7 Apache HTTP Proxy
Apache HTTP Proxy is a proxy service that can be used in combination with ESET Remote Administrator 6 and later todistribute updates to client computers. Apache HTTP Proxy performs a similar role to the mirror server featurepopular in ESET Remote Administrator 5 and earlier.
Using Apache HTTP Proxy offers the following benefits:
Downloads and caches- virus signature database updates,- activation tasks - communication with activation servers and caching of license requests,- ERA repository data,- product component updates,and then distributes them to endpoint clients on your network.
Minimized internet traffic on your network.
Compared to the Mirror tool, which downloads all available data on ESET update servers, Apache HTTP Proxydownloads only data requested by ERA components or ESET endpoint products to reduce network load. If anendpoint client requests an update, Apache HTTP Proxy downloads it from ESET update servers, saves the updateto its cache directory and serves it to the particular endpoint client. If another endpoint client requests the sameupdate, Apache HTTP Proxy serves the download to the client directly from cache, so there is no additionaldownload from ESET update servers.
The following scheme illustrates a proxy server (Apache HTTP Proxy) used to distribute ESET cloud traffic to all ERAcomponents and ESET endpoint products.

13
Note that ERA Proxy (not Apache HTTP Proxy!) is used to collect and forward aggregated data from ERA componentsin a remote location (for example a branch office) to ERA Server in a primary location (for example a HQ office). Twolocations are used to demonstrate different roles covered by ERA Proxy and Apache HTTP Proxy.
What is the difference between ERA Proxy and Apache HTTP Proxy?
You can use a proxy chain, to add another proxy service to a remote location. Note that ERA does not supportproxy chaining when proxies require authentication. You can use your own transparent web proxy solution,however there may be additional configuration required beyond what is mentioned here.

14
NOTE: For offline virus database updates, use the Mirror tool instead of Apache HTTP Proxy. This tool is availablefor both platforms (Windows and Linux).
1.3 Deployment scenarios - best practices
The following chapters cover deployment scenarios for different network environments.
Best practices for deployment of ESET Remote Administrator
Number of clients Up-to 1000clients
1000 -5000clients
5000 - 10 000clients
10 000 - 50000 clients
50 000 - 100000 clients
100 000+clients**
ERA Server & Database Server onthe same machine
OK OK OK No No No
Use of MS SQL Express OK OK OK No No No
Use of MS SQL OK OK OK OK OK OK
Use of MySQL OK OK OK No No No
Use of ERA Virtual Appliance OK OK NotRecommended
No No No
Use of VM server OK OK OK Optional No No
Use of ERA Proxy (no directreplication)
Optional Optional Optional Optional YES (one ERAProxy per20.000 clients)
YES (one ERAProxy per20.000clients)
Recommended replication interval(during deployment phase)
60seconds*
5 minutes 20 minutes 20 minutes 20 minutes 20 minutes
Recommended replication interval(after deployment, duringstandard usage)
20 minutes 20minutes
20 minutes 60 minutes 60 minutes(agent-proxy)***
240 minutes(agent-proxy)***

15
* Default replication interval of ERA Agent. Adjust the replication interval** See our recommendations for hardware in the Infrastructure building and sizing chapter*** Recommended replication interval of connection between ERA Proxy and ERA Agent.
For more details, see the appropriate chapter:
Single Server (Small Business)
High Availability (Enterprise)
Remote Branches with Proxies
1.3.1 Single Server (Small Business)
To manage small networks (1000 clients or less), a single machine with ERA Server and all ERA components (suppliedweb server, database, etc.) installed on it is usually sufficient. You can think of it as a single server or standaloneinstallation. All managed clients are connected directly to the ERA Server via ERA Agent. The administrator canconnect to the ERA Web Console via web browser from any computer on the network or run the Web Consoledirectly from the ERA Server.
Best practices for deployment scenarios for SMB environments
Number of clients Up-to 1000 clients
ERA Server & Database Server on the same machine OK
Use of MS SQL Express OK
Use of MS SQL OK
Use of MySQL OK
Use of ERA Virtual Appliance OK
Use of VM server OK
16
Number of clients Up-to 1000 clients
Use of ERA Proxy (not direct replication) Optional
Recommended replication interval (during deployment) 60 seconds*
Recommended replication interval (after deployment) 20 minutes
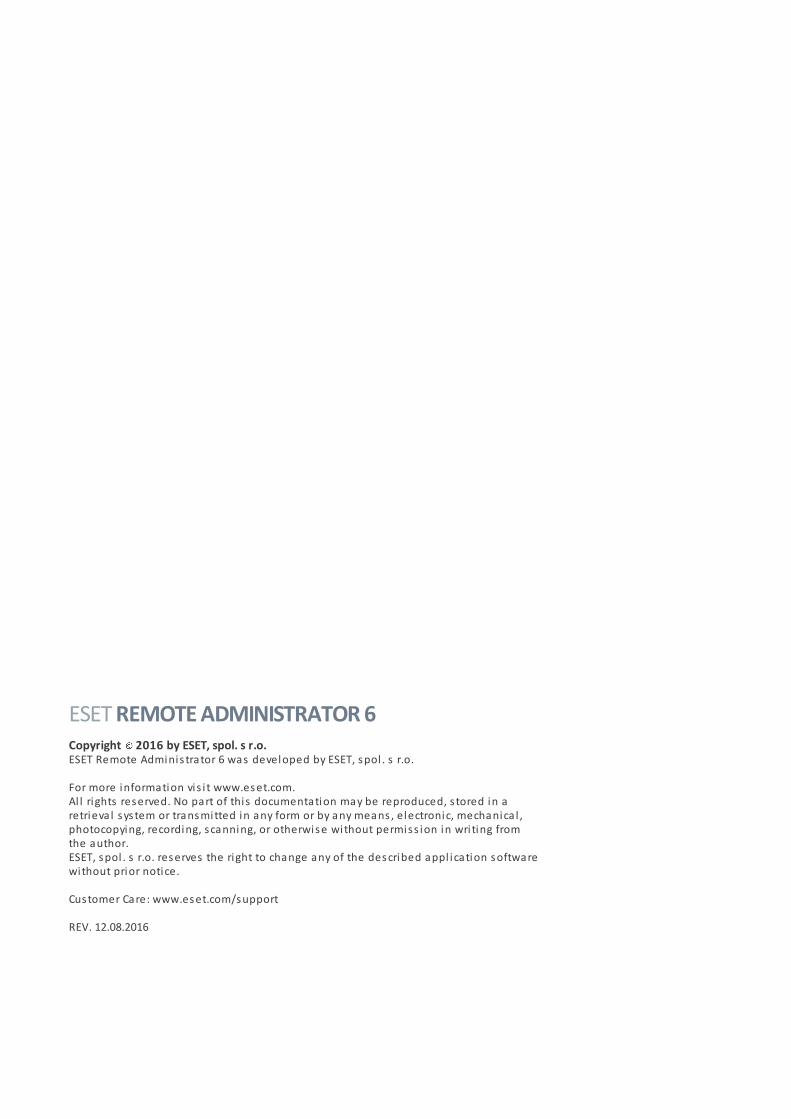
1.3.2 Remote Branches with Proxies
In a medium-sized network (for example, 10,000 to 50,000 clients), an additional layer of ERA Proxy is added. ERAAgents connect to the ERA Proxy. ERA Proxy is included to provide better communication to the remote site (branchoffice). In this configuration it is still possible for ERA Agents (located on a remote site) to connect directly to themain server.
Best practices for deployment scenarios for medium-sized environments
Number of clients 1000 - 5000 clients 5000 - 10 000 clients 10 000 - 50 000 clients
ERA Server & Database Server on thesame machine
OK OK No
Use of MS SQL Express OK OK No
Use of MS SQL OK OK OK
Use of MySQL OK OK No
Use of ERA Virtual Appliance OK Not Recommended No
Use of VM server OK OK Optional
Use of ERA Proxy (not direct replication) Optional Optional Optional
Recommended replication interval(during deployment)*
5 minutes 20 minutes 20 minutes
Recommended replication interval(after deployment)*
20 minutes 20 minutes 60 minutes

17
1.3.3 High Availability (Enterprise)
For enterprise environments (for example, 100,000 clients), additional ERA components should be employed. Oneis RD Sensor, which helps to search your network and discover new computers. We also recommend a layer of ERAProxy. ERA Agents connect to the ERA Proxy, thereby balancing the load on the master server which is important forperformance. Using this configuration it is still possible for ERA Agents to connect directly to the main server. A SQLdatabase is also implemented on a Failover Cluster to provide redundancy.
Best practices for deployment scenarios for Enterprise environments
Number of clients 50 000 - 100 000 clients 100 000+ clients **
ERA Server & Database Server on thesame machine
No No
Use of MS SQL Express No No
Use of MS SQL OK OK
Use of MySQL No No
Use of ERA Virtual Appliance No No
Use of VM server No No
Use of ERA Proxy (not direct replication) YES (one ERA Proxy per20.000 clients)
YES (one ERA Proxy per 20.000clients)

18
Number of clients 50 000 - 100 000 clients 100 000+ clients **
Recommended replication interval(during deployment)
20 minutes 20 minutes
Recommended replication interval (afterdeployment)
60 minutes (agent-proxy)* 240 minutes (agent-proxy)*
* Recommended replication interval of connection between ERA Proxy and ERA Agent.
1.3.4 Practical deployment examples (Windows)
For the best performance, we recommend that you use Microsoft SQL Server as your ESET Remote Administratordatabase. While ESET Remote Administrator is compatible with MySQL, using MySQL can negatively impact systemperformance when working with large amounts of data including dashboards, threats and clients. The samehardware with Microsoft SQL Server is capable of handling about 10x the number of clients as with MySQL.
For testing purposes, each client stores about 30 logs in the database. Microsoft SQL Server uses large quantities ofRAM to cache database data, so we recommend that you have at least as much memory as Microsoft SQL Server hason disk.
There is no easy way to calculate the exact amount of resources used by ESET Remote Administrator since resourcesused will vary depending on your network configuration. Below are test results for common network configurations:
Test case - maximum of 5,000 clients connecting to ERA Server
Test case - maximum of 100,000 clients connecting to ERA Server
To achieve the optimum configuration for your needs, we recommend that you test with a smaller number of clientsand slower hardware and project your system requirements based on test results.
TEST CASE (5,000 CLIENTS)
Hardware/software
Windows Server 2003 R2, x86 processor architecture
Microsoft SQL Server Express 2008 R2
Intel Core2Duo E8400 @3 GHz
3 GB RAM
Seagate Barracuda 7200rpm, 500GB, 16MB cache, Sata 3.0 Gb/s
Results
ERA Web Console is very responsive (less than 5s)
Average memory consumption:o Apache Tomcat 200 MBo ERA Server 200 MBo SQL Server Database 2 GB
Server replication performance 10 replications per second
Database size on disk 2 GB (5,000 clients, each with 30 logs in database)
For this example, SQL Server Express 2008 R2 was used. In spite of its limits (10GB database, 1CPU and 1GB of RAMusage), this configuration was functional and performed well. Using SQL Server Express is recommended for serverswith less than 5,000 clients. You can deploy SQL Server Express initially and upgrade to Microsoft SQL Server (fullversion) when a larger database becomes necessary. Be aware that older Express versions (<2008 R2) have adatabase size limit of 4GB on disk.
Server replication performance defines a replication interval for clients. 10 replications per second results in 600replications per minute. In an ideal case, the replication interval on all 5000 clients should be set to 8 minutes,however this would incur a 100% load on the server so a longer interval is necessary in this case. In this example, a20-30 minute replication interval is recommended.

19
TEST CASE (100,000 CLIENTS)
Hardware/software
Windows Server 2012 R2 Datacenter, x64 processor architecture
Microsoft SQL Server 2012
Intel Xeon E5-2650v2 @2.60GHz
64 GB RAM
Network adapter Intel NIC/PRO/1000 PT Dual
2x Micron RealSSD C400 256GB SSD Drives (one for system+software, second for SQL Server Data Files)
Results
Web Console is responsive (less than 30s)
Average memory consumptiono Apache Tomcat 1 GBo ERA Server 2 GBo SQL Server Database 10 GB
Server replication performance 80 replications per second
Database size on disk 10 GB (100,000 clients, each with 30 logs in database)
In this case we chose to install Apache Tomcat + ERA Web Console, ERA Server on one machine and SQL Server onanother machine, to test the capacity of the ERA Server.
The large number of clients resulted in increased memory and disk usage by Microsoft SQL Server. SQL Server cachesalmost entirely from the database stored in memory for optimum performance. Apache Tomcat (Web Console) andERA Server cache data as well, which explains the increased memory usage in this example.
ERA Server is capable of serving 80 replications per second (288,000 per hour), so in an ideal case, the replicationinterval on all 100,000 clients should be set to every ~30 minutes (load 200,000 replications per hour), but this willresult in 100% server load, so the best replication interval to use would be 1 hour (100,000 replication per hour).
Network data usage depends on the number of logs harvested by clients. In this test, this number was about 20 KBper replication, so 80 replications per second gives us about 1600 KB/s (20 Mbit/s) network speed.
In this example we used a single server scenario. CPU and network load will be better distributed when usingmultiple ERA Proxies (more is better). This will distribute both CPU load and network load when servicing clientreplications. It is good to distribute network load, particularly for clients in distant locations. Proxy replicationinterval to the server can be performed during non-working hours, when network speed from distant locations isbetter.
1.3.5 Differences between Apache HTTP Proxy, Mirror Tool and direct connectivity
ESET product communication involves virus signature database and program module updates as well as theexchange of LiveGrid data (see the table below) and license information.
ESET Remote Administrator (ERA) downloads the latest products for distribution to client computers from therepository. Once distributed, the product is ready to be deployed on the target machine.
Once an ESET security product is installed, it must be activated, meaning the product needs to verify your licenseinformation against the license server. After activation, virus signature database and program modules are updatedon a regular basis.
ESET LiveGrid is an essential part of your network security strategy, since it helps to protect against the most recentthreats even before their signatures are delivered to clients.
Most network traffic is generated by product module updates. In general, an ESET security product downloadsapproximately 23.9MB of virus signature database and program module updates in a month.
LiveGrid data (approximately 22.3MB) and the update version file (up to 11KB) are the only distributed files thatcannot be cached.

20
There are two types of updates – level and nano updates. See our Knowledgebase article for more informationabout update types.
There are 2 ways to decrease network load when distributing updates to a network of computers, Apache HTTPProxy or Mirror Tool.
ESET communication types
CommunicationType
CommunicationFrequency
Network trafficimpact
Proxy-forwardedcommunication
Proxy CachingOption1
MirroringOption2
OfflineEnvironmentOption
AgentDeployment(Push / LiveInstallers fromrepository)
One time Approximately50 MB perclient7
YES YES NO YES (GPO /SSCM, editedlive installers)3
EndpointInstallation(Software Installfrom repository)
One time Approximately 100 MB perclient7
YES YES NO YES (GPO /SSCM,installation bypackage URL)4
Virus Signature /Program ModuleUpdate
6+ times a day 23.9 MB permonth8
YES YES YES YES (Offline Mirror Tool &Custom HTTPServer)5
Virus Signature Update VER9
~8 times a day 3.7 MB permonth8
YES NO - -
Activation /Licensing check
4 times a day negligible YES NO NO YES (Offline filesgenerated on ESET LicenseAdministrator)6
LiveGrid CloudBasedReputation
On-the-fly 11 MB permonth
YES NO NO NO
1. For proxy caching impact / benefits see When to start using Apache HTTP Proxy?2. For mirroring impact see When to start using Mirror Tool?3. To deploy the ERA Agent across a large network, see Agent deployment using GPO and SSCM4. Without an internet connection, Mirror tool cannot download virus signature database updates. You can use
Apache Tomcat as an HTTP server to download updates to a directory available to the Mirror Tool.5. Download offline license files as a License Owner or Security Admin.6. Once per installation / upgrade we recommend that you deploy one agent (one per specific version) / endpoint
initially so that the installer is cached.7. Your Initial virus signature database update may be larger than normal depending on the age of the installation
package, because all newer signatures / modules will be downloaded. We recommended to install one clientinitially, and let it update, so the needed virus signature database and program module updates are cached.
8. When checking for virus signature database updates, the update.ver file is always downloaded and parsed. Bydefault, ESET endpoint product's scheduler is querying for a new update each hour. We assume a clientworkstation is turned on 8 hours a day. The update.ver file contains approximately 11 kB.
Note: You cannot cache updates for version 4 and 5 products using Apache HTTP Proxy. To distribute updates forthese products, use the Mirror Tool, or use a particular version endpoint product as a mirror server.

21
1.3.5.1 When to start using Apache HTTP Proxy?
Based on our practical tests, we recommend that you deploy Apache HTTP Proxy if you have a network of 37 or morecomputers.
Analysis of network bandwidth used solely by updates in a test network of 1000 computers where severalinstallations and uninstallations took place showed the following:
a single computer downloads 23.9 MB/month in updates on average if directly connected to the internet (noApache HTTP Proxy is used)
using Apache HTTP Proxy, downloads for the entire network totaled 900 MB/month
A simple comparison of downloaded update data in a month using direct internet connection or Apache HTTP Proxyin a network of computers:
Number of PCs in your corporate network 25 36 50 100 500 1000
Direct connection to internet (MB/month) 375 900 1250 2500 12500 25000
Apache HTTP Proxy (MB/month) 30 50 60 150 600 900
See our recommendations regarding efficient usage of Apache HTTP Proxy.
1.3.5.2 When to start using Mirror Tool?
If you have an offline environment, meaning the computers in your network do not connect to the internet for aprolonged period of time (months, a year) the Mirror Tool is the only way to distribute product module updates,because it downloads all available Level and Nano updates upon each new update request if there is a new updateavailable.
The major difference between Apache HTTP Proxy and Mirror Tool is that Apache HTTP Proxy downloads onlymissing updates (for example, Nano update 3), while Mirror Tool downloads all available Level and Nano updates,regardless of which update the particular product module is missing.
In the same network of 1000 computers we tested the Mirror Tool instead of Apache HTTP Proxy. The analysisshowed there were 5500MB of updates downloaded for the month. The size of downloaded updates did notincrease by adding more computers to the network. This is still a huge decrease in load compared to a configurationwhere clients connect directly to the internet, but the improvement in performance is not as substantial as whenHTTP Proxy is used.
No. of PCs in your corporate network 25 36 50 100 500 1000
Direct connection to internet (MB/month) 375 900 1250 2500 12500 25000
Mirror Tool (MB/month) 5500 5500 5500 5500 5500 5500
NOTE: Even if there were more than 1000 computers in a network, the bandwidth usage concerning updates wouldnot increase significantly using either Apache HTTP Proxy or Mirror Tool.

22
1.4 Infrastructure building and sizing
SMB users? Click here...
You can build a single-server architecture. Please refer to the guide for small and medium-sized businesses if youwant to install ESET Remote Administrator on a Windows platform to manage up to 250 Windows ESET endpointproducts.
Before installing ESET Remote Administrator, it is important to understand the architecture and what affects theperformance of ERA Server and your SQL database:
Hardware used for ERA Server
We strongly recommend that you review the minimum hardware requirements before proceeding. Based on ourPractical deployment examples and the following table you can spec your hardware for optimal performance ofESET Remote Administrator.
Sizing table for small and medium business
Clients ERA Server + SQL database server
CPU units & cores RAM (GB) HDD (GB)
Up to 1000 1 x 2*** 4 100
1000 - 5000 1 x 4 4 - 8 150
5000 - 10.000 1 x 4 4 - 8 200
These recommendations are for a configuration with an appropriate client connection interval.
Sizing table for medium business and enterprise solutions
Clients ERA Server SQL database server* ERA Proxy**
CPUs RAM(GB)
HDD (GB) CPUs RAM(GB)
HDD (GB) NumberofProxies
CPUs RAM(GB)
HDD (GB)
10.000 -50.000
2 x 4*** 8 - 16 20 - 40 4 8 - 16 300 2 - 3 2 - 4 8 20 - 40
50.000 -100.000
2 x 8 16 - 32 40 - 80 8 16 - 32 500 3 - 6 2 - 4 8 20 - 40
100.000+ 4 x 8 32+ 40 - 80 8+ 32+* 500+* 6+ 2 - 4 8 20 - 40
These recommendations are for a configuration with an appropriate client connection interval.
* Install only MS SQL Server on a dedicated machine, see the chapter below** ERA Proxy will have a dedicated SQL database too*** 2x4 represents two Quad-core CPU units with ~2.66 GHz frequency.
SQL database server
Although the database hardware requirements for ESET Remote Administrator are defined, you need to decidewhether to install a SQL database server on the same machine as ERA Server, or to use dedicated server forinstallation of a SQL database server.
We recommend that you use a dedicated SQL database server if you wish to manage more than 10.000 clients.

23
Database SMB customer Enterprise customer Clients limit Windows Linux
MS SQL Express X (optional) 5.000 X
MS SQL Server X X None (up to 100.000) X
MySQL X X 10.000 X X
Network architecture and speed of your Internet connection
See Network requirements and Differences between Apache HTTP Proxy, Mirror Tool and direct connectivity.
Client connection interval
The period of client connection interval to ERA Server (or ERA Proxy) affects performance as well. See Clientconnection interval for more details on how to play with these settings.
Average number of events reported by clients
If a server is overloaded or there is a malware outbreak (e.g., we connect 20.000 clients to a server only able toservice 10.000 clients at an interval of every 10 minutes) it will skip some of the clients connected. Not connectedclients will try to connect to ERA Server (or ERA Proxy) later.
Number of ERA Agents and endpoints on your network
See Deployment scenarios - best practices.
1.5 Supported products and languages
ESET Remote Administrator is able to deploy, activate or manage the following ESET products:
Manageable via ESET Remote Administrator 6 Product version Activation method
ESET Endpoint Security for Windows 6.x & 5.x6.x - License Key
5.x - Username/Password
ESET Endpoint Antivirus for Windows 6.x & 5.x6.x - License Key
5.x - Username/Password
ESET Endpoint Security for OS X 6.x License Key
ESET Endpoint Antivirus for OS X 6.x License Key
ESET Endpoint Security for Android 2.x License Key
ESET File Security for Windows Server 6.x License Key
ESET Mail Security for Microsoft Exchange Server 6.x License Key
ESET File Security for Microsoft Windows Server 4.5.x Username/Password
ESET NOD32 Antivirus 4 Business Edition for Mac OS X 4.x Username/Password
ESET NOD32 Antivirus 4 Business Edition for Linux Desktop 4.x Username/Password
ESET Mail Security for Microsoft Exchange Server 4.5.x Username/Password
ESET Mail Security for IBM Lotus Domino 4.5.x Username/Password
ESET Security for Microsoft Windows Server Core 4.5.x Username/Password
ESET Security for Microsoft SharePoint Server 4.5.x Username/Password
ESET Security for Kerio 4.5.x Username/Password
ESET File/Mail/Gateway Security for Linux/FreeBSD 4.5.x Username/Password
ESET NOD32 Antivirus Business Edition 4.2.76 Username/Password
ESET Smart Security Business Edition 4.2.76 Username/Password

24
NOTE: ESET Windows Server product versions earlier than those shown in the table above are not currentlymanageable using ESET Remote Administrator 6.
NOTE: See also End of Life policy for ESET business products.
Supported languages
Language Code
English (United States) en-US
Arabic (Egypt) ar-EG
Chinese Simplified zh-CN
Chinese Traditional zh-TW
Croatian (Croatia) hr-HR
Czech (Czech Republic) cs-CZ
French (France) fr-FR
French (Canada) fr-CA
German (Germany) de-DE
Greek (Greece) el-GR
Italian (Italy) it-IT
Japanese (Japan) ja-JP
Korean (Korea) ko-KR
Polish (Poland) pl-PL
Portuguese (Brazil) pt-BR
Russian (Russia) ru-RU
Spanish (Chile) es-CL
Spanish (Spain) es-ES
Slovak (Slovakia) sk-SK
Turkish (Turkey) tr-TR
1.6 Differences to version 5
See the table below and become familiar with main differences between ESET Remote Administrator versions.
Difference Version 6 Version 5
Console Web Console (browser-based) Console (Windows application)
Components Server, Web Console (web interface,Java and Apache Tomcat needed onserver side), Agent, Proxy, RogueDetection Sensor, Mobile DeviceConnector, Apache HTTP Proxy forupdate caching
Server and Console (Windowsprogram GUI)
Computer discovery Using Rogue Detection Sensor Using Network Search Task
Remote installation Possible remote deployment of ERAAgent, installation of ESET securityproducts done via ERA agent
Directly, live progress tracking

25
Remote installation methods Remote push installation, liveinstaller scripts (delivery via e-mail orvia removable media), GPO, SCCM
Remote push installion, SSH, WMI,mail delivery, WSUS, GPO, LogOnscript
Support for ESET business products(6.x)
Yes No
Policies Redesigned policy editor, withpossibility to set force / apply flags,as the final configuration is a result ofmultiple policies (merged by agentinto one configuration)
Tree-structured policy configurationeditor
Groups Static and Dynamic groups. One staticgroup per computer. Dynamic groupsare evaluated by an Agent, regardlessof connectivity to the Server.Membership is reported to theServer.
Static and Parametric groups
Reporting Rich reporting kit allows you to createindividual charts of combined data.Ability to send reports by e-mail inCSV or PDF, and to save reports.
Separate report set for web-baseddashboard and extendedcustomizable general reporttemplates. Export to HTML, ZIP andPDF.
Mirror Apache HTTP Proxy acts as atransparent proxy/cache for filesdownloaded from ESET servers.Offline mirror tool is available as analternative.
Mirror functionality allows you tostore updates/files locally on ERAServer hard-disk
OS platform support Windows, Linux, Mac and Virtualenvironments (ability to import avirtual appliance). Server to serverreplication is deprecated.
Windows only
Database MSSQL Express (default), MSSQL,MySQL (only MySQL supported onLinux)
ODBC-connected MSAccess (default),MSSQL, MySQL, Oracle

26
2. System requirementsThere is a set of hardware, database and software prerequisites which must be met in order to install and operateESET Remote Administrator.
2.1 Supported Operating Systems
The following sections describe which operating system versions are supported under Windows, Linux and Mac OSby particular component of ESET Remote Administrator.
2.1.1 Windows
The following table displays supported Windows operating systems for each ESET Remote Administratorcomponent:
Operating System Server Agent Proxy RD Sensor MDM
Windows Home Server 2003 SP2 X X
Windows Home Server 2011 x64 X X
Windows Server 2003 x86 SP2 X X X X
Windows Server 2003 x64 SP2 X X X X
Windows Server 2003 x86 R2 SP2 X X X X
Windows Server 2003 x64 R2 SP2 X X X X
Windows Server 2008 x64 R2 SP1 X X X X X
Windows Server 2008 x64 R2 CORE X X X X X
Windows Server 2008 x86 X X
Windows Server 2008 x86 SP2 X X X X X
Windows Server 2008 x64 X X
Windows Server 2008 x64 SP2 X X X X X
Windows Server 2012 x64 X X X X X
Windows Server 2012 x64 CORE X X X X X
Windows Server 2012 x64 R2 X X X X X
Windows Server 2012 x64 R2 CORE X X X X X
Microsoft SBS 2003 x86 SP2 ** X X X X
Microsoft SBS 2003 x86 R2 ** X X X X
Microsoft SBS 2008 x64 X X
Microsoft SBS 2008 x64 SP2 ** X X X X X
Microsoft SBS 2011 x64 Standard X X X X X
Microsoft SBS 2011 x64 Essentials X X X X X
Operating System Server Agent Proxy RD Sensor MDM
Windows XP x86 SP3 X XWindows XP x64 SP2 X X
Windows Vista x86 SP2 X XWindows Vista x64 SP2 X X
Windows 7 x86 SP1 X* X X* X X*Windows 7 x64 SP1 X* X X* X X*
Windows 8 x86 X* X X* X X*

27
Windows 8 x64 X* X X* X X*
Windows 8.1 x86 X* X X* X X*Windows 8.1 x64 X* X X* X X*
Windows 10 x86 X* X X* X X*Windows 10 x64 X* X X* X X*
* Installing ERA components on a client OS might not be aligned with Microsoft licensing policy. Check Microsoftlicensing policy or consult your software supplier for details. In SMB / small network environments, we encourageyou to consider a Linux ERA installation or virtual appliance where applicable.
** Microsoft SQL Server Express included with Microsoft Small Business Server (SBS) is not supported by ESETRemote Administrator. If you want to run your ERA database on SBS, you must use a newer version of Microsoft SQLServer Express or MySQL. For more details and instructions, see Installation on Windows SBS / Essentials.
On older Windows operating systems, for example Windows Server 2003, protocol encryption might not be fullysupported on the operating system side. In such a configuration, TLSv1.0 will be used instead of TLSv1.2, (TLSv1.0 isconsidered less secure than more recent versions). This situation can also occur when the operating systemsupports TLSv1.2 but the client does not. In this case, communication takes place using TLS1.0. To ensure the mostsecure communication, we suggest that you use newer operating systems (Windows Server 2008 R2 and later forservers and Windows Vista and later for clients).
NOTE: It is possible to install VMware Player on a desktop Operating System and deploy the ESET RemoteAdministrator virtual appliance. This lets you run ESET Remote Administrator on a non-server OS without the needfor ESXi.
28
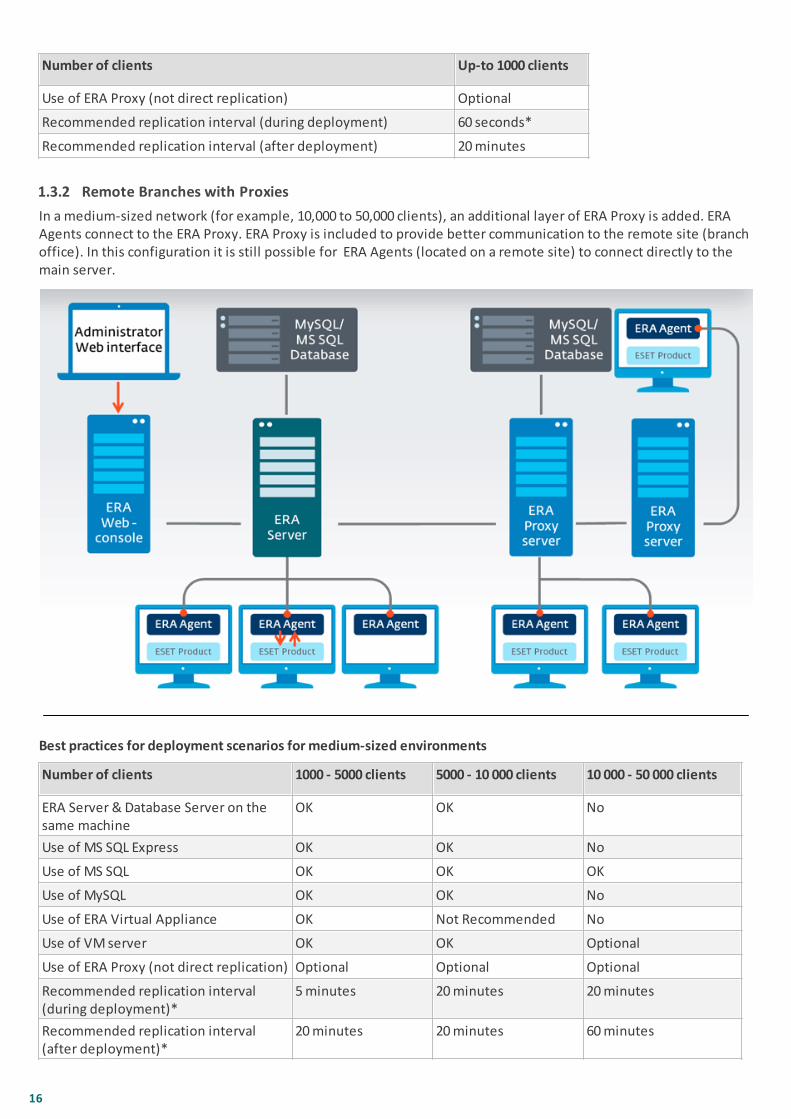
2.1.2 Linux
The following table displays supported Linux operating systems for each ESET Remote Administrator component:
Operating System Server Agent Proxy RD Sensor MDM
Ubuntu 12.04 LTS x86 Desktop X X X X X
Ubuntu 12.04 LTS x86 Server X X X X X
Ubuntu 12.04 LTS x64 Desktop X X X X X
Ubuntu 12.04 LTS x64 Server X X X X X
Ubuntu 14.04 LTS x86 Desktop X X X X X
Ubuntu 14.04 LTS x86 Server X X X X X
Ubuntu 14.04 LTS x64 Desktop X X X X X
Ubuntu 14.04 LTS x64 Server X X X X X
RHEL 5 x86 X
RHEL 5 x64 X
RHEL Server 6 x86 X X X X X
RHEL Server 6 x64 X X X X X
RHEL Server 7 x86 X X X X X
RHEL Server 7 x64 X X X X X
CentOS 5 x86 X
CentOS 5 x64 X
CentOS 6 x86 X X X X X
CentOS 6 x64 X X X X X
CentOS 7 x86 X X X X X
CentOS 7 x64 X X X X X
SLED 11 x86 X X X X X
SLED 11 x64 X X X X X
SLED 12 x86 X X X X X
SLED 12 x64 X X X X X
SLES 11 x86 X X X X X
SLES 11 x64 X X X X X
SLES 12 x86 X X X X X
SLES 12 x64 X X X X X
OpenSUSE 13 x86 X X X X X
OpenSUSE 13 x64 X X X X X
Debian 7 x86 X X X X X
Debian 7 x64 X X X X X
Debian 8 x86 X X X X X
Debian 8 x64 X X X X X
Fedora 19 x86 X X X X X
Fedora 19 x64 X X X X X
Fedora 20 x86 X X X X X
Fedora 20 x64 X X X X X
Fedora 23 x86 X X X X X
Fedora 23 x64 X X X X X

29
2.1.3 OS X
Operating System Agent
OS X 10.7 Lion X
OS X 10.8 Mountain Lion X
OS X 10.9 Mavericks X
OS X 10.10 Yosemite X
OS X 10.11 El Capitan X
NOTE: OS X is supported as a client only. The ERA Agent and ESET products for OS X can be installed on OS Xhowever ERA Server cannot be installed on OS X.
2.2 Supported Desktop Provisioning Environments
Desktop Provisioning makes device management easier and provides for a faster hand-off of desktop computers toend users.
Provisioned desktops usually come in two different forms, either physical or virtual. ESET Remote Administratorsupports most of the environments as long as the client machine has a persistent system disk. For virtualizedenvironments and Streamed OS (Citrix provisioning services), see the list of supported hypervisors and theirextensions below.
Another significant difference is whether the provisioned desktop computer uses persistent or non-persistentsystem disk.
Persistent desktop Non-persistent desktop
Persistent has a personalization layer that will captureall user data, settings and user-installed applications.This personalization layer is essential for ERA Agent and ESET security product due to a number of reasons.
Non-persistent drops the personalization layer after eachuse. This means that the user always experiences "fresh"or "clean" state of the desktop without any user data orsettings.
IMPORTANT: Non-persistent disks are not supported.System disk on a provisioned machines must be Persistent. Otherwise, ERA Agent will not work correctlyand multiple issues with ESET security product mightappear on such provisioned desktop computer as a result.
Supported Hypervisors
Citrix XenServer
Microsoft Hyper-V
VMware vSphere
VMware ESXi
VMware Workstation
VMware View
Supported Hypervisor extensions
Citrix VDI-in-a-box
Citrix XenDesktop
Tools(applies to both virtual and physical machines)
Microsoft SCCM
Windows Server 2012 Server Manager

30
2.3 Hardware
For seamless operation of ESET Remote Administrator, your system should meet the following hardwarerequirements:
Memory 4 GB RAM
Hard Drive At least 20 GB of free space
Processor Dual-Core, 2.0 GHz or faster
Network connection 1 Gbit/s
2.4 Database
ESET Remote Administrator supports two types of database servers:
Microsoft SQL Server (including Express and non-Express editions) 2008, 2008 R2, 2012, 2014
MySQL (5.5+ is supported, we strongly recommend you to use at least version 5.6)
Specify the database server you want to use when installing ERA Server or ERA Proxy. Microsoft SQL Server Expressis installed by default and is a part of the All-in-one installer. You can use an existing Microsoft SQL Server running inyour environment; however, it must meet minimum requirements.
Database server hardware requirements
Memory 1 GB RAM
Hard Drive At least 10 GB of free space
Processor Speed x86 Processor: 1.0 GHzx64 Processor: 1.4 GHzNote: A 2.0 GHz or faster processor is recommended for optimum performance.
Processor Type x86 Processor: Pentium III-compatible processor or fasterx64 Processor: AMD Opteron, AMD Athlon 64, Intel Xeon with Intel EM64Tsupport, Intel Pentium IV with EM64T support
Additional information
Microsoft SQL Server Express has a 10 GB size limit of the each relational database and cannot be installed on aDomain Controller. We do not recommend the use of Microsoft SQL Server Express in Enterprise environments orlarge networks. If you use Microsoft SBS, we recommend that you install ESET Remote Administrator on adifferent server or do not select the SQL Server Express component during installation (this requires you to useyour existing SQL or MySQL Server to run the ERA database).
If you intend to use the dedicated database user account that will have access to the ERA database only, you mustcreate a user account with specific privileges before installation. For more information, see Dedicated databaseuser account. Additionally, you will need to create an empty database that will be used by ESET RemoteAdministrator.
See also instructions how to install configure MySQL for Windows and MySQL for Linux to work properly with ESETRemote Administrator. Note that MariaDB is not supported by ESET Remote Administrator.
ERA Server and ERA Proxy do not use an integrated backup. We strongly recommend that you back up yourdatabase server to prevent data loss.

31
2.5 Supported versions of Apache Tomcat
Apache Tomcat 6.x and later (both 32-bit and 64-bit) is supported. Apache Tomcat is a mandatory componentrequired to run ERA Web Console.
ESET Remote Administrator does not support alpha/beta/RC versions of Apache Tomcat.
2.6 Supported Web browsers for ERA Web Console
The following Web browsers are supported in order to run ERA Web Console properly. JavaScript must be enabled.
Web browser Version Note
Mozilla Firefox 20+ We recommend that you keep Firefox up-to-date.
Microsoft Internet Explorer 10+ Compatibility View may not work correctly.
Microsoft Edge 25+
Google Chrome 23+ We recommend that you keep Chrome up-to-date.
Safari 6+
Opera 15+
2.7 Network
It is essential that both ERA Server and client computers managed by ERA have a working Internet connection so thatthey can reach the ESET repository and activation servers. If you prefer not to have clients connect directly to theInternet, you can use a proxy server (not the same as Apache HTTP Proxy or ERA Proxy) to facilitate communicationwith your network and the Internet.
Computers managed by ERA should be connected to the same LAN and/or should be in the same Active Directorydomain as your ERA Server. The ERA Server must be visible by client computers. Additionally, client computers mustbe able to communicate with your ERA Server to use remote deployment and the wake-up call feature.
Ports used
If your network uses a firewall, see our list of possible network communication ports used when ESET RemoteAdministrator and its components are installed in your infrastructure.
2.7.1 Ports used
The charts below list all possible network communication ports used when ESET Remote Administrator and itscomponents are installed in your infrastructure. Other communication occurs via the native operating systemprocesses (for example NetBIOS over TCP/IP).
ERA Server:
Protocol Port Usage Descriptions
TCP 2222 ERA Server listening Communication between ERA Agents and ERAServer
TCP 2223 ERA Server listening Communication between ERA Web Console andERA Server, used for Assisted installation
ERA Web Console running on the Apache Tomcat web server:
Protocol Port Usage Descriptions
TCP 443 Listening HTTP SSL Web Console call

32
ERA Proxy:
Protocol Port Usage Descriptions
TCP 2222 Listening Communication between ERA Agents and ERAProxy
Apache HTTP Proxy:
Protocol Port Usage Descriptions
TCP 3128 Listening HTTP Proxy (update caching)
ERA Agent:
Protocol Port Usage Descriptions
UDP 1237 Listening Wake-up call for IPv4
UDP 1238 Listening Wake-up call for IPv6
Mobile Device Connector:
Protocol Port Usage Descriptions
TCP 9977 Internal communication between Mobile DeviceConnector and ERA Agent
TCP 9978 Internal communication between Mobile DeviceConnector and ERA Agent
TCP 9980 Listening Mobile device enrollment
TCP 9981 Listening Mobile device communication
TCP 5223 External communication with Apple PushNotification services
TCP 2195 Sending notifications to Apple Push Notificationservices
TCP 2196 Apple Push Notification feedback service
TCP 443 Fallback on Wi-Fi only, when devices can't reachAPNs on port 5223
ERA Agent - used for remote deployment of ERA Agent to a target computer with Windows OS:
Protocol Port Usage Descriptions
TCP 139 Target port from the point ofview of ERA Server
Using the share ADMIN$
TCP 445 Target port from the point ofview of ERA Server
Direct access to shared resources using TCP/IPduring remote installation (an alternative to TCP139)
UDP 137 Target port from the point ofview of ERA Server
Name resolution during remote install
UDP 138 Target port from the point ofview of ERA Server
Browse during remote install

33
The pre-defined ports 2222, 2223 can be changed if they are already in use by other applications.
NOTE: For the proper function of ESET Remote Administrator, none of the ports above can be used by otherapplications.
NOTE: Make sure to configure any firewall(s) within your network to allow communication via the ports listedabove.

34
3. Installation process For instructions to upgrade your existing ERA installation, see Upgrade procedures.
ESET Remote Administrator installers are available in the Download ESET Remote Administrator section of the ESETwebsite. Different formats are available to support different install methods. By default, the All-in-one installer tabis selected. Click the appropriate tab to download a VA or a standalone installer. The following downloads areavailable:
The ERA All-in-one installer package for Windows in zip format
An ISO image that contains all ESET Remote Administrator installers (except ERA Virtual Appliances)
Virtual appliances (OVA files). Deployment of the ERA Virtual Appliance is recommended for users who wantto run ESET Remote Administrator in a virtualized environment or prefer hassle-free installation. See ourcomplete ERA Virtual Appliance deployment guide for step-by-step instructions.
Individual installers for each component for Windows and Linux platforms
Additional methods of installation:
Installation on Microsoft Azure
Step-by-step installation instructions for Linux
Do not change the Computer name of your ERA Server machine after installation. See Change of IP address orhostname on ERA Server for more information.
Installation methods overview
See also Infrastructure building and sizing.
If you wish to decide what kind of ESET Remote Administrator installation is suitable for your environment, see thefollowing decision table that will guide you to the best choice:
For example: Do not use a slow Internet connection for ERA in the cloud.For example: Choose all-in-one installer if you are an SMB customer.
Installationmethod
Customer type Migration Environment for ERA installation Internet connection
SMB Enterprise
Yes No Noserve
r
Dedicated
server
Sharedserver
Virtualization
platform
Cloudserve
r
None Good Bad
All-in-One onWindowsServer
X X X X X X X X X
All-in-One onWindowsDesktop
X X X X X X
VirtualAppliance
X X X X X X
MicrosoftAzure VM
X X X X
ComponentLinux
X X X X X X X X
ComponentWindows
X X X X X X X X

35
3.1 All-in-one installation on Windows
ESET Remote Administrator can be installed a few different ways, choose the type of installation that best suits yourneeds and environment. The simplest method is to use the ESET Remote Administrator (ERA) All-in-one installer.This method allows you to install ESET Remote Administrator and its components on a single machine.
Component installation allows for the installation of different components of ESET Remote Administrator ondifferent machines. This gives you more freedom to customize your installation - you can install each component onany machine you want, provided that it meets system requirements.
You can install ERA using:
All-in-one package installation of ERA Server, Proxy, Apache HTTP Proxy or Mobile Device Connector
Stand-alone installers for ERA components (component installation)
Custom installation scenarios include:
Installation on Windows Small Business Server / Essentials
Installation with Custom certificates
Installation on a Failover Cluster
Many installation scenarios require you to install different ESET Remote Administrator components on differentmachines to accommodate network architectures, meet performance requirements, or for other reasons. Thefollowing installation packages are available for individual ESET Remote Administrator components:
Core components
ERA Server
ERA Web Console
ERA Agent (must be installed on client computers, optional on ERA Server)
Optional components
ERA Proxy
RD Sensor
Mobile Device Connector
Apache HTTP Proxy
Mirror Tool
For instructions to upgrade ESET Remote Administrator to the latest version (6.x) see our Knowledgebase article.

36
3.1.1 Install ERA Server
The ERA All-in-one installer is available for Windows operating systems only. This feature allows you to install allERA components using the ERA installation Wizard. Use the following written instructions or watch our ESETKnowledgebase instructional video in English:
1. Open the installation package and click Next on the Welcome screen.

37
2. Select Install Remote Administrator Server and click Next. If necessary, you can adjust the language settings inthe Language drop-down menu before proceeding.

38
3. After accepting the EULA, click Next. Select the applicable components to install and click Install.
MICROSOFT SQL SERVER EXPRESS:
If you already have other version of Microsoft SQL Server or MySQL installed, or you plan to connect todifferent SQL Server, deselect this component.
You will not be able to install Microsoft SQL Server Express on a Domain Controller (for example, if you areusing Windows SBS / Essentials). We recommend that you install ESET Remote Administrator on a differentserver or use Microsoft SQL Server or MySQL Server to run the ERA database. More information.
IMPORTANT INFORMATION ABOUT APACHE HTTP PROXY:
Doing so will create and apply several proxy-based policies for clients automatically, which can save a lot ofbandwidth on data downloaded from Internet and improve download speeds for product updates. Werecommend that you select the check box next to Apache HTTP Proxy if you will manage more than 37computers from ERA. You can install Apache HTTP Proxy later if you want.
For more information, see What is Apache HTTP Proxy? and Differences between Apache HTTP Proxy, MirrorTool and direct connectivity.

39
4. If errors are found during the prerequisites check, address them accordingly. Make sure your system meets allprerequisites.
The following notification may be displayed if your system does not have enough disk space for ERA to install:
There is only 32 MB free on system diskYou must have at least 5000 MB of free disk space to install ERA.

40
5. When the prerequisites check is complete and your environment meets all requirements, installation will begin.

41
6. Enter a valid License Key (included in the new purchase email you received from ESET) and click Next. If you areusing legacy license credentials (Username and Password), convert the credentials to a License Key.Alternatively, you can choose to Activate later. If you choose Activate later, see the Activation chapter for furtherinstruction.
7. If you chose to install Microsoft SQL Server Express in step 2, a database connection check will be performed—skip to Web Console user & server connection. If you have an existing database server, you will be prompted toenter your database connection details in the next step.
8. If you are using an existing SQL Server or MySQL, configure connection settings accordingly. Enter your Databasename, Hostname, Port number (you can find this information in Microsoft SQL Server Configuration Manager),and Database account details (Username and Password) into the appropriate fields and then click Next. Theconnection to the database will be verified. If you have an existing ERA database (from a previous ERAinstallation) on your database server, this will be detected. You can choose to Use existing database and applyupgrade or Remove existing database and install new version.

42
NOTE: There are two options when entering Database account information. You can use a dedicated databaseuser account that will have access to the ERA database only, or you can use an SA account (MS SQL) or rootaccount (MySQL). If you decide to use a dedicated user account, you need to create the account with specificprivileges. For details, see Dedicated database user account. If you do not intend to use a dedicated user account,enter your administrator account (SA or root).
If you entered SA account or root account in the previous window, click Yes to continue using the SA/root accountas the database user for ESET Remote Administrator.

43
If you click No, you must select Create new user (if you have not already created one) or Use existing user (if youhave a dedicated database user account as mentioned here).
9. You will be prompted to enter a password for the Web Console Administrator account. This password isimportant, as you will use it to log into the ERA Web Console. Click Next.

44
10. You can leave the fields intact, or enter your corporate information to appear in the details of ERA Agent and ERAServer certificates. If you choose to enter a password to the Authority password field, be sure to remember it.Click Next.
11. Installation progress will be displayed.

45
12. When the installation is complete, "ESET Remote Administrator Server installation was successful" will bedisplayed in addition to your ERA Web Console URL address. Click the URL to open the Web Console, or clickFinish.
If installation is not successful:
Review the installation log files in the All-in-one installation package. The logs directory is the same as thedirectory for the All-in-one installer, for example:C:\Users\Administrator\Downloads\x64\logs\
See Troubleshooting for additional steps to resolve your issue.

46
3.1.2 Install ERA Proxy
WARNING: Never install ERA Server and ERA Proxy on the same computer!
1. Make sure all prerequisites are met.
2. Open the installation package and click Next on the Welcome screen.
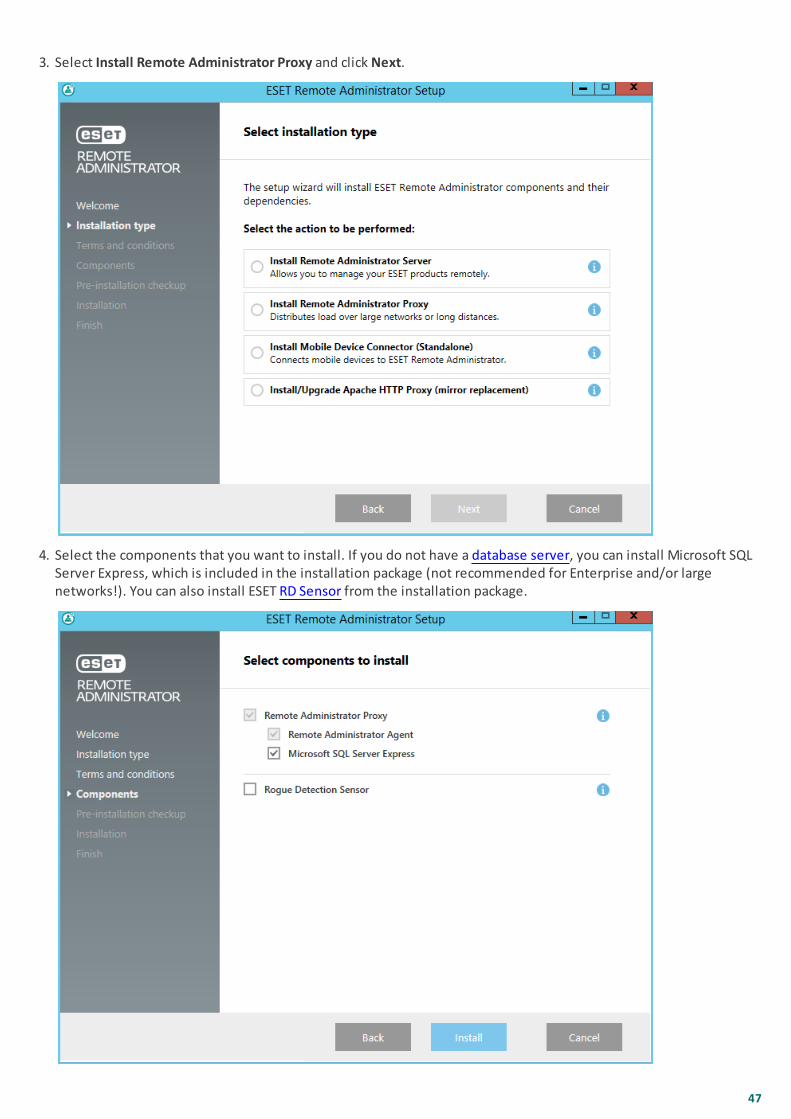
47
3. Select Install Remote Administrator Proxy and click Next.
4. Select the components that you want to install. If you do not have a database server, you can install Microsoft SQLServer Express, which is included in the installation package (not recommended for Enterprise and/or largenetworks!). You can also install ESET RD Sensor from the installation package.
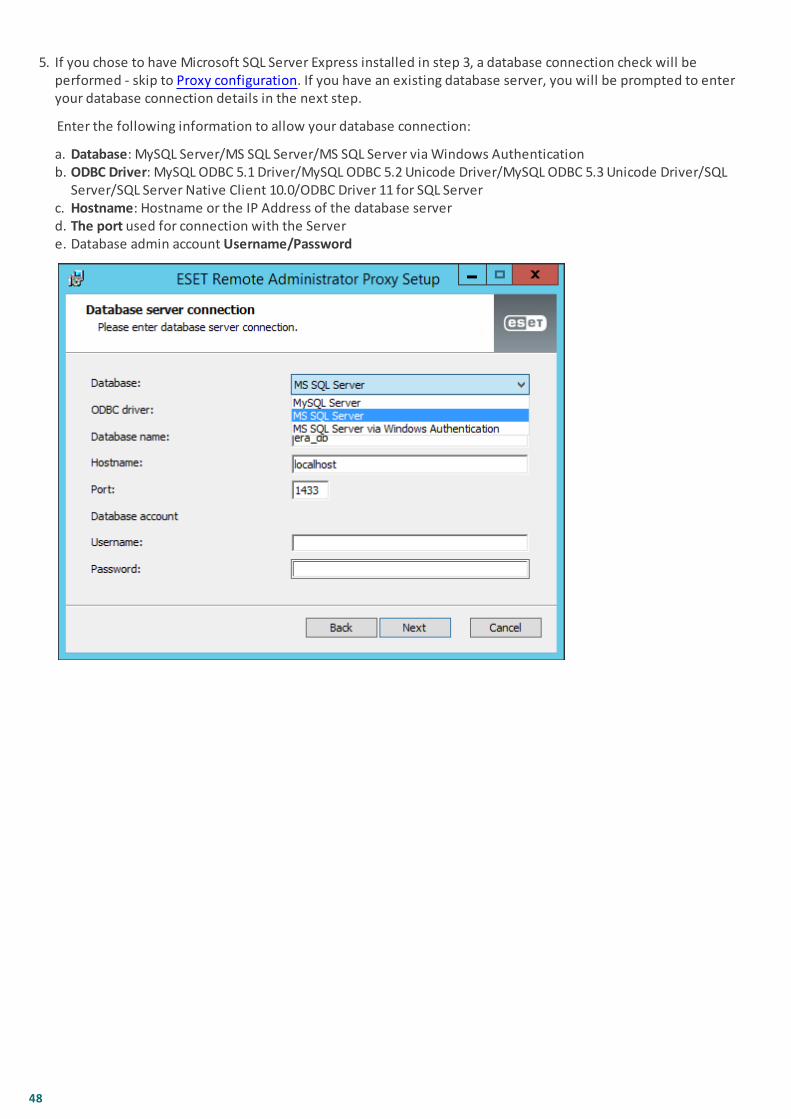
48
5. If you chose to have Microsoft SQL Server Express installed in step 3, a database connection check will beperformed - skip to Proxy configuration. If you have an existing database server, you will be prompted to enteryour database connection details in the next step.
Enter the following information to allow your database connection:
a. Database: MySQL Server/MS SQL Server/MS SQL Server via Windows Authenticationb. ODBC Driver: MySQL ODBC 5.1 Driver/MySQL ODBC 5.2 Unicode Driver/MySQL ODBC 5.3 Unicode Driver/SQL
Server/SQL Server Native Client 10.0/ODBC Driver 11 for SQL Serverc. Hostname: Hostname or the IP Address of the database serverd. The port used for connection with the Servere. Database admin account Username/Password

49
If you entered SA account or root account in the previous window, click Yes to continue using the SA/root accountas the database user for ESET Remote Administrator.
If you click No, you must select Create new user (if you have not already created one) or Use existing user (if youhave a dedicated database user account as mentioned here).
This step will verify your connection to the database. If the connection is OK, you can proceed to the next step.

50
6. Configure the proxy connection to ESET Remote Administrator. Enter a Server host (hostname/IP address of theServer) and Server port (2222).
7. Select a Peer Certificate exported from ERA Web Console and a password for this certificate. Optionally, add aCertificate Authority. This is only required when unsigned certificates are used.

51
8. The ERA Agent will be installed in addition to ERA Proxy. Follow the steps on-screen to complete installation ifERA Agent is not already installed.
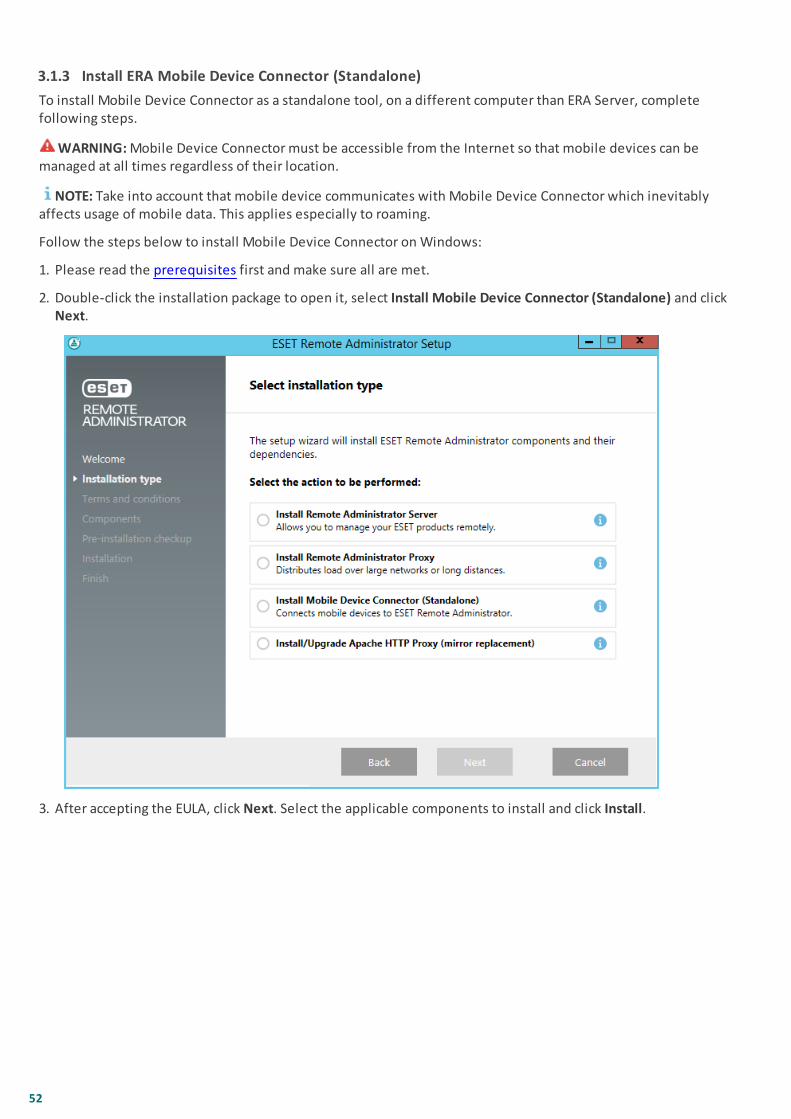
52
3.1.3 Install ERA Mobile Device Connector (Standalone)
To install Mobile Device Connector as a standalone tool, on a different computer than ERA Server, completefollowing steps.
WARNING: Mobile Device Connector must be accessible from the Internet so that mobile devices can bemanaged at all times regardless of their location.
NOTE: Take into account that mobile device communicates with Mobile Device Connector which inevitablyaffects usage of mobile data. This applies especially to roaming.
Follow the steps below to install Mobile Device Connector on Windows:
1. Please read the prerequisites first and make sure all are met.
2. Double-click the installation package to open it, select Install Mobile Device Connector (Standalone) and clickNext.
3. After accepting the EULA, click Next. Select the applicable components to install and click Install.
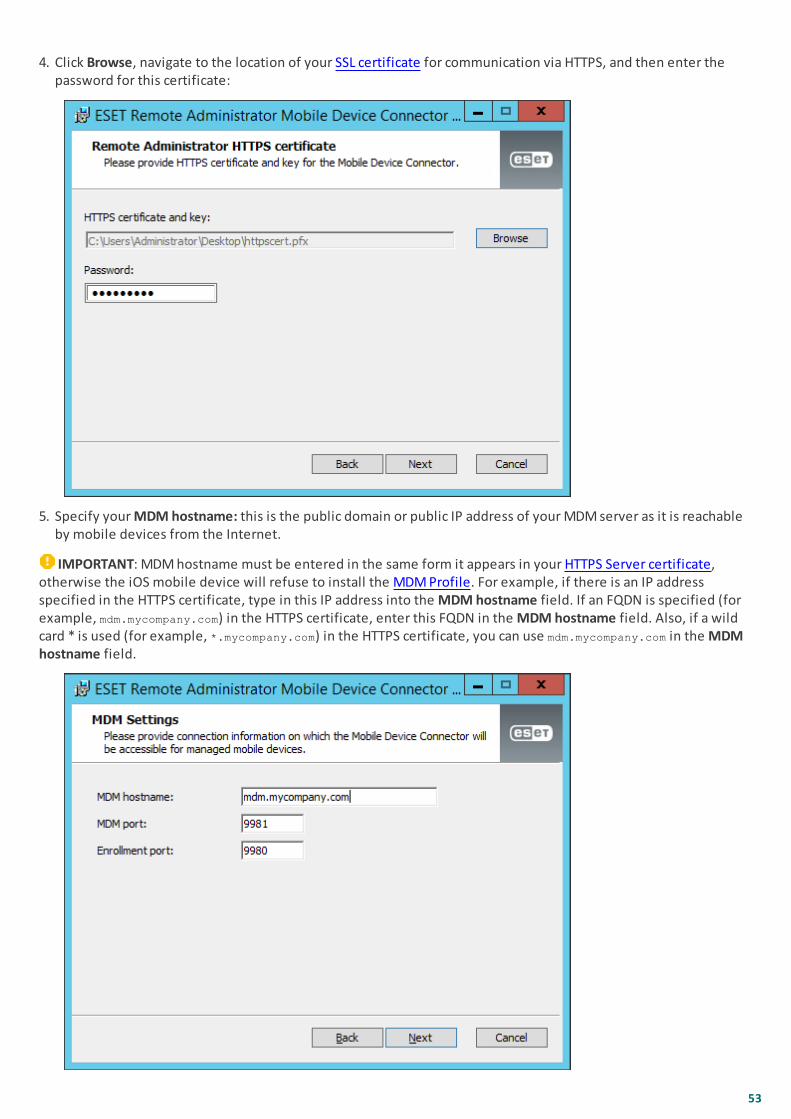
53
4. Click Browse, navigate to the location of your SSL certificate for communication via HTTPS, and then enter thepassword for this certificate:
5. Specify your MDM hostname: this is the public domain or public IP address of your MDM server as it is reachableby mobile devices from the Internet.
IMPORTANT: MDM hostname must be entered in the same form it appears in your HTTPS Server certificate,otherwise the iOS mobile device will refuse to install the MDM Profile. For example, if there is an IP addressspecified in the HTTPS certificate, type in this IP address into the MDM hostname field. If an FQDN is specified (forexample, mdm.mycompany.com) in the HTTPS certificate, enter this FQDN in the MDM hostname field. Also, if a wildcard * is used (for example, *.mycompany.com) in the HTTPS certificate, you can use mdm.mycompany.com in the MDMhostname field.

54
6. The installer needs to create a new database which will be used by Mobile Device Connector. Specify thefollowing connection details:
Database: MySQL Server/MS SQL Server/MS SQL Server via Windows AuthenticationODBC Driver: MySQL ODBC 5.1 Driver/MySQL ODBC 5.2 Unicode Driver/MySQL ODBC 5.3 Unicode Driver/SQLServer/SQL Server Native Client 10.0/ODBC Driver 11 for SQL ServerDatabase name: you can leave predefined name or change it if requiredHostname: hostname or the IP address of your database serverPort: used for connection to the database serverDatabase admin account Username/Password
NOTE: We recommend that you use the same database server you are using for ERA database, but you can usea different DB server if required. When you click Next, Mobile Device Connector installer will create itsdatabase.
7. Specify a user for the newly created Mobile Device Connector database. You can select Create new user or Useexisting database user. Enter the password for the database user.
8. Enter your Server host (name or IP address of your ERA Server) and Server port (the default port is 2222, if you areusing a different port, replace the default port with your custom port number).
9. Select your installation type to proceed:
o Server assisted installation - you will provide ERA Web Console administrator credentials and the installer willdownload the required certificates automatically.
1. Enter your Server host - name or IP address of your ERA Server and Web Console port (leave default port2223 if you are not using custom port). Also, provide Web Console administrator account credentials - Username/Password.
2. When asked to Accept the Certificate, click Yes. Continue to step 10.
o Offline installation - you will provide a Proxy certificate which can be exported from ESET RemoteAdministrator. Alternatively, you can use your custom certificate.
1. Click Browse and navigate to the location of your Peer certificate (this is the Proxy certificate you'veexported from ERA). Leave the Certificate password text field blank as this certificate does not require apassword. Continue to step 10.

55
NOTE: If you are using custom certificates with ERA (instead of the default ones that were automaticallygenerated during ESET Remote Administrator installation), these should be used when you are prompted tosupply a Proxy certificate.
10. Specify the destination folder for Mobile Device Connector (we recommend using the default), click Next >Install.
11. After the installation is complete, check to see if Mobile Device Connector is running correctly by opening https://your-mdm-hostname:enrollment-port (for example https://mdm.company.com:9980) in your webbrowser or from a mobile device. If the installation was successful, you will see following message:
12. You can now activate MDM from ERA Remote Administrator.
3.1.4 Install ERA on Windows SBS / Essentials
Prerequisites
Make sure that all Requirements are met, particularly Supported Operating System requirements.
NOTE: Some older Microsoft SBS versions include versions of Microsoft SQL Server Express not supported by ESETRemote Administrator, for example:
Microsoft SBS 2003 x86 SP2Microsoft SBS 2003 x86 R2Microsoft SBS 2008 x64 SP2
If you are using one of the above versions of Windows Small Business Server and want to install the ERA databaseon Microsoft SBS, you must use a newer version of Microsoft SQL Server Express.
o If you do not have Microsoft SQL Express installed on your SBS, follow the steps below.
o If you have Microsoft SQL Express installed on your SBS but are not using it, uninstall it and follow the stepsbelow.
o If you are using the version of Microsoft SQL Server Express that came with SBS, migrate your database to aversion of SQL Express compatible with ERA Server. To do so, back up your databases, uninstall your previousinstallation of Microsoft SQL Server Express and follow the steps below to install a compatible version ofMicrosoft SQL Server Express and restore databases if required.
Installation
1. Download the compressed ERA Installer package from the Download section of the ESET website under RemoteAdministrator 6 (click + to expand the category).

56
2. Unzip the installer file you downloaded in step one, open the installers folder and double-click the Microsoft SQLExpress installer. In our example we use SQLEXPR_2014_x86_ENU:
o The Installation Center will launch, click New installation or add features to an existing installation to start theInstallation Wizard.
NOTE: In step 8 of the installation process set the Authentication mode to Mixed mode (SQL Serverauthentication and Windows authentication).
NOTE: To install ERA Server on SBS, you must allow TCP/IP connections to the SQL Server.
3. Install ESET Remote Administrator by running Setup.exe:
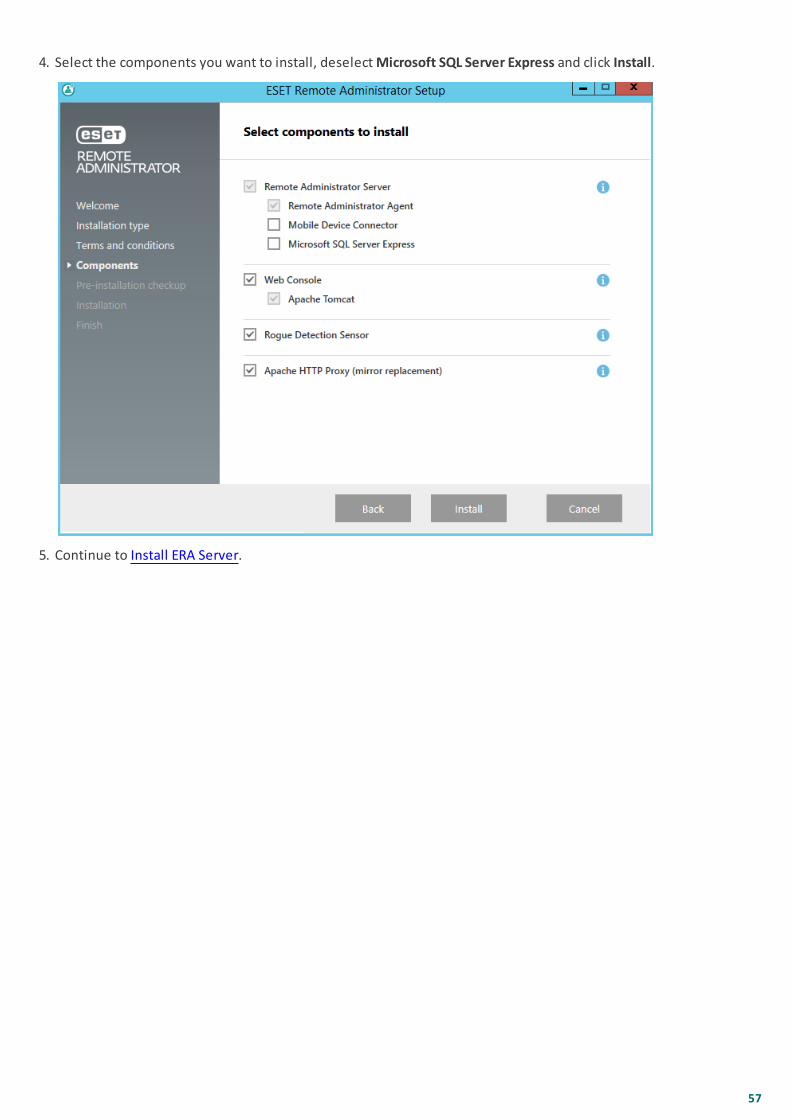
57
4. Select the components you want to install, deselect Microsoft SQL Server Express and click Install.
5. Continue to Install ERA Server.

58
3.1.5 Uninstall components
To uninstall ERA components, run the ERA All-in-one installer that you used during ERA installation and selectUninstall Remote Administrator components. You can also select Language from the drop-down menu beforeproceeding.
NOTE: Before uninstalling Mobile device connector, read MDM iOS licensing functionality.

59
After accepting the EULA, click Next. Select the component(s) you want to uninstall and click Uninstall.
NOTE: A computer restart may be required to complete the removal of particular components.
NOTE: See also Uninstallation of the old ERA Server.
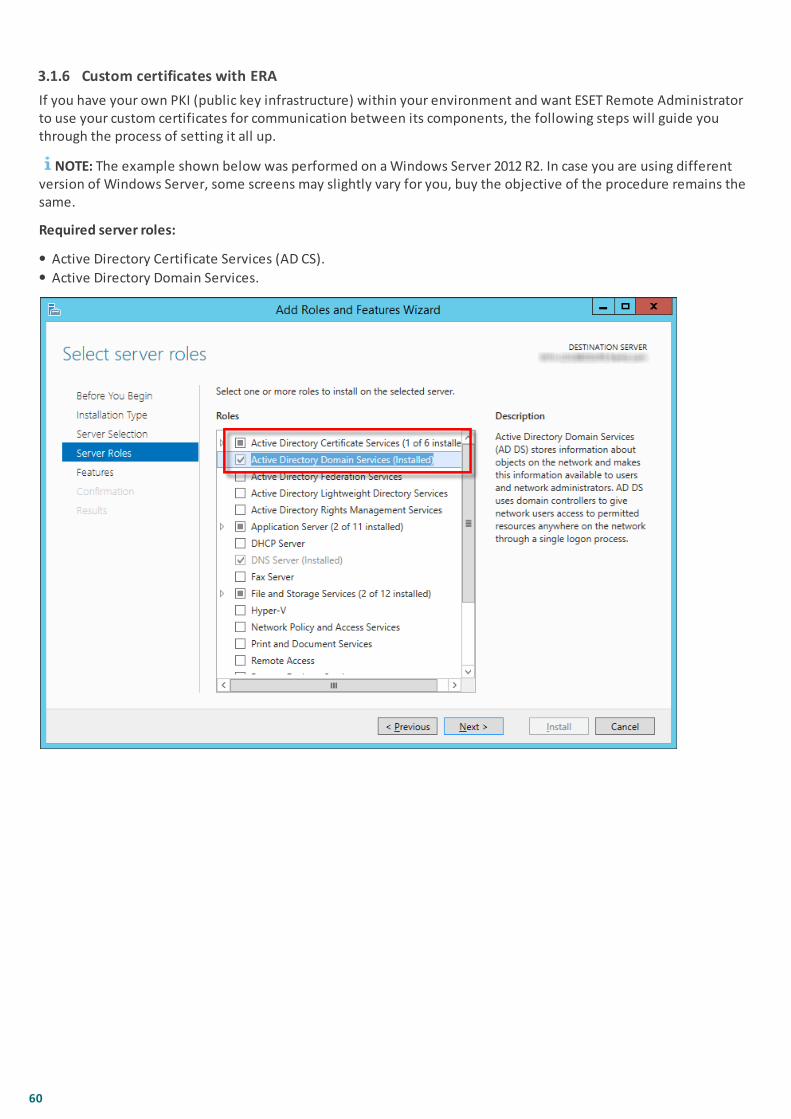
60
3.1.6 Custom certificates with ERA
If you have your own PKI (public key infrastructure) within your environment and want ESET Remote Administratorto use your custom certificates for communication between its components, the following steps will guide youthrough the process of setting it all up.
NOTE: The example shown below was performed on a Windows Server 2012 R2. In case you are using differentversion of Windows Server, some screens may slightly vary for you, buy the objective of the procedure remains thesame.
Required server roles:
Active Directory Certificate Services (AD CS).
Active Directory Domain Services.

61
1. Open Management Console and add Certificates Snap-ins:
Log on to the server as a member of the local Administrator group.
Run mmc.exe to open Management Console.
Click File in the top menu and select Add/Remove Snap-in… (or press CTRL+M).
Select Certificates in the left pane and click Add button.
Select Computer Account and click Next.
Make sure Local Computer is selected (default) and click Finish.
Click OK.

62
2. Create Custom Certificate Request:
Double-click Certificates (Local Computer) to expand it.
Double-click Personal to expand it. Right-click Certificates and select All Tasks > Advanced Operations and chooseCreate Custom Request...
Certificate Enrollment wizard window will open, click Next.
Select the Proceed without enrollment policy option and click Next to continue.

63
Choose (No Template) Legacy Key from the drop-down list and make sure that PKCS #10 Request format isselected. Click Next.
Expand Details section by clicking the arrow pointing down, then click Properties button.
In the General tab, type in Friendly name for your certificate, you can also type Description (optional).
In the Subject tab, do the following:

64
In Subject name section, choose Common Name from the drop-down list under Type and enter era server into theValue field, then click Add button. CN=era server will appear in the information box on the right. If you are creatingcertificate request for ERA Agent or ERA Proxy, type era agent or era proxy to the value field of Common name.
NOTE: Common Name must contain one of these strings: "server", "agent" or "proxy", depending on whichCertificate Request you want to create.
In Alternative name section, choose DNS from the drop-down list under Type and enter * (asterisk) into the Valuefield, then click Add button.
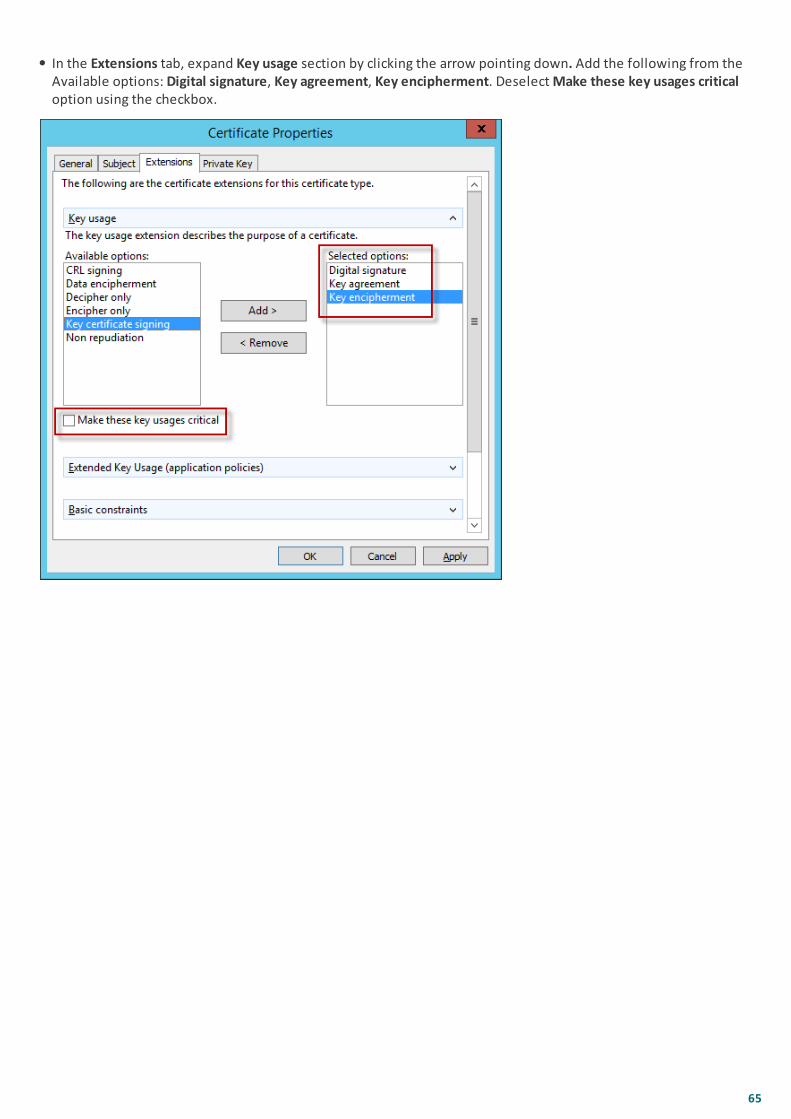
65
In the Extensions tab, expand Key usage section by clicking the arrow pointing down. Add the following from theAvailable options: Digital signature, Key agreement, Key encipherment. Deselect Make these key usages criticaloption using the checkbox.

66
In the Private Key tab, do the following:
Expand Cryptographic Service Provider section by clicking the arrow pointing down. You will see a list of allcryptographic service providers (CSP). Make sure that only Microsoft RSA SChannel Cryptographic Provider(Encryption) is selected.
NOTE: Deselect all other CSPs (except the Microsoft RSA SChannel Cryptographic Provider (Encryption) whichmust be selected).
Expand Key Options section. In the Key size menu, select a value of at least 2048. Select Make private keyexportable.
Expand Key Type section, select Exchange option. Click Apply, and check your settings.

67
Click OK button. Certificate information will be displayed, and click then Next button to continue. Click on Browsebutton to select the location where the certificate signing request (CSR) will be saved. Type the file name and makesure the Base 64 is selected.
Click Finish button, your CSR now has been generated.

68
3. Import Custom Certificate Request and Issue Custom Certificate from Pending Requests.
Open Server Manager, click Tools > Certification Authority.
In the Certification Authority (Local) tree, select Your Server (usually FQDN) > Properties > Policy Module tab,click Properties... button. Make sure you have Set the certificate request status to pending. The administratormust explicitly issue the certificate option selected. If not, use the radio button to select this option. Otherwise, itwill not work properly. In case you've changed this setting, restart Active Directory certificate services.
In the Certification Authority (Local) tree, select Your Server (usually FQDN) > All Tasks > Submit new request...and navigate to previously generated CSR file in step 2.
Certificate will be added into Pending Requests. Select the CSR in the right navigation pane. In the Action menu,select All Tasks > Issue.

69
4. Export Issued Custom Certificate to .tmp file.
Click Issued Certificates in the left pane. Right-click the certificate you want to export, click All Tasks > ExportBinary Data...
In the Export Binary Data dialog, choose Binary Certificate from the drop-down list and in Export options, clickSave binary data to a file and then click OK.
In the Save Binary Data dialog box, move to the file location where you want to save the certificate, and then clickSave.
5. Import created .tmp file.
Go to Certificate (Local Computer) > right-click Personal, select All Tasks > Import... (You can get into Certificate(Local Computer) window by running certlm in the command prompt.)
Click Next...
Locate previously saved .tmp binary file using Browse... (You have to select All Files in the drop-down menu,otherwise your file would not be displayed.) and click Open. Select Place all certificates in the following store >Personal. Click Next.
The certificate will be imported after you click Finish.

70
6. Export Certificate including private key to .pfx file.
In the Certificates (Local Computer) expand Personal and click Certificates, select created certificate that you wantto export, on the Action menu, point to All Tasks > Export...
In the Certificate Export Wizard, click Yes, export the private key. (This option will appear only if the private key ismarked as exportable and you have access to the private key.)
Under Export File Format, select the Include all certificates in the certification path if possible check box and thenclick Next.

71
Password, type a password to encrypt the private key you are exporting. In Confirm password, type the samepassword again, and then click Next.
File name, type a file name and path for the .pfx file that will store the exported certificate and private key. ClickNext, and then click Finish.
7. Once you have your custom .pfx certificate file created, you can configure ERA components to use it.
NOTE: The above example shows you how to create ERA Server certificate. Repeat the same steps for ERA Agentand ERA Proxy certificates. ERA Proxy certificate can be used by ERA MDM.
Configure ERA Server to start using custom .pfx certificate.

72
To get ERA Agent or ERA Proxy/MDM to use custom .pfx certificate, run repair of the appropriate component.Navigate to Start > Program and Features, right-click ESET Remote Administrator Agent and select Change. Click Nextbutton and run Repair. Click Next leaving Server host and Server port as they were. Click Browse button next to Peercertificate and locate custom .pfx certificate file. Type in the certificate's password you've specified in step 6. ClickNext and complete the repair. ERA Agent is now using custom .pfx certificate.
3.2 Installation on Microsoft Azure
For users who do not want to buy a new Windows Server license, ESET offers (ESET Remote Administrator) on the Azure cloud platform.
See our Knowledgebase content for more information:
Getting started with ESET Remote Administrator (ERA)—Azure
ESET Remote Administrator VM for Microsoft Azure—FAQ
How do I deploy and install ESET Remote Administrator for Microsoft Azure?

73
3.3 Component installation on Windows
Many installation scenarios require you to install different ESET Remote Administrator components on differentmachines to accommodate network architectures, meet performance requirements, or for other reasons. Thefollowing installation packages are available for individual ESET Remote Administrator components:
Core components
ERA Server
ERA Web Console
ERA Agent (must be installed on client computers, optional on ERA Server)
Optional components
ERA Proxy
RD Sensor
Mobile Device Connector
Apache HTTP Proxy
Mirror Tool
For instructions to upgrade ESET Remote Administrator to the latest version (6.x) see our Knowledgebase article.
If you want to run installation in your local language, you need to start MSI installer of particular ERA component viacommand line.
Below is an example of how to run the installation in the Slovak language:
To select the language you want to run the installer in, specify the corresponding TRANSFORMS parameter accordingto this table:
Language Code
English (United States) en-US
Arabic (Egypt) ar-EG
Chinese Simplified zh-CN
Chinese Traditional zh-TW
Croatian (Croatia) hr-HR

74
Czech (Czech Republic) cs-CZ
French (France) fr-FR
French (Canada) fr-CA
German (Germany) de-DE
Greek (Greece) el-GR
Italian (Italy) it-IT
Japanese (Japan) ja-JP
Korean (Korea) ko-KR
Polish (Poland) pl-PL
Portuguese (Brazil) pt-BR
Russian (Russia) ru-RU
Spanish (Chile) es-CL
Spanish (Spain) es-ES
Slovak (Slovakia) sk-SK
Turkish (Turkey) tr-TR
3.3.1 Server installation
To install the ERA Server component on Windows, follow these steps:
1. Visit the ESET Remote Administrator 6 download section to download a standalone installer for ERA components.
2. Make sure all prerequisites are met.
3. Run the ERA Server installer and accept the EULA if you agree with it.
4. Leave the check box next to This is cluster installation empty and click Next. Is this a cluster installation?
If you are installing ERA Server on a Failover Cluster, select the check box next to This is cluster installation.Specify the Custom application data path to point to the shared storage for the cluster. The data must be storedat one location that is accessible by all nodes within the cluster.
5. Enter a valid ERA License Key or choose Activate Later.

75
6. Select a Service user account. This account will be used to run the ESET Remote Administrator Server Service. Thefollowing options are available:
Network service account
User specified: DOMAIN/USERNAME
7. Connect to a Database. All data is stored here (ERA Web Console password, client computer logs, etc.):
Database: MySQL Server/MS SQL Server/MS SQL Server via Windows Authentication
ODBC Driver: MySQL ODBC 5.1 Driver/MySQL ODBC 5.2 Unicode Driver/MySQL ODBC 5.3 Unicode Driver/SQLServer/SQL Server Native Client 10.0/ODBC Driver 11 for SQL Server
Database name: you can leave the predefined name or change it if required
Hostname: hostname or the IP address of your database server
Port: used for connection to the database server
Database admin account Username/Password
NOTE: ERA Server stores large data blobs in the database, therefore it is necessary to configure MySQL toaccept large packets for ERA to run properly.
This step will verify your connection to the database. If the connection is ok, you can proceed to the next step.
8. Select a user for ESET Remote Administrator that has access to the database. You can use an existing user, orsetup can create one for you.

76
9. Enter a password for Web Console access.
10. ESET Remote Administrator uses certificates for client-server communication. You can either select your owncertificates, or the Server can create new certificates for you.
11. Enter the information for all certificates and password for the Certification authority. Be sure to remember thispassword.
12. A new server Peer certificate will be created, select a password for it as well.
13. In the next step, select a password for Agent and Proxy Peer certificates. Optionally, specify additionalinformation about the certificates (this is not mandatory). You can leave the Authority password field empty, butif you enter the password, be sure to remember it.
14.Setup can perform an initial Static Group Synchronization task. Select the method (Do not synchronize, Sync withWindows Network, Sync with Active Directory) and click Next.
15.Confirm or change the installation folder for the server and click Next.
16.Click Install to install the server.
NOTE: Once you have completed the installation of the ERA Server, you can also install ERA Agent on the samemachine (optional). This way you will be able to manage the server itself the same way as you would mange a clientcomputer.
3.3.1.1 Server prerequisites - Windows
The following prerequisites must be met to install ERA Server on Windows:
You must have a valid license.
Required ports must be open and available—see the complete list of ports here.
Database server (Microsoft SQL Server or MySQL) installed and running, see database requirements for details. Ifyou do not have an existing database server, we recommend you to review the SQL Server configuration details into have SQL properly configured for use with ESET Remote Administrator.
Java Runtime Environment (JRE) must be installed (you can download it from http://java.com/en/download/),always use the latest officially released version of Java.

77
Microsoft .NET Framework 3.5 must be installed, if you are running Windows Server 2008 or 2012 you can install itusing the Roles and Features Wizard (as shown below), if you are using Windows Server 2003, you can download.NET 3.5 here: http://www.microsoft.com/en-us/download/details.aspx?id=21
3.3.2 Microsoft SQL Server requirements
One of the prerequisites for the installation is to have Microsoft SQL Server installed and configured. The followingrequirements must be met:
Install Microsoft SQL Server 2008 R2 or later, alternatively you can install Microsoft SQL Server 2008 R2 Express orlater. Choose Mixed mode authentication during installation.
If you have Microsoft SQL Server already installed, set authentication to Mixed mode (SQL Server authenticationand Windows authentication). To do so, follow the instructions in this Knowledgebase article.
Allow TCP/IP connections to the SQL Server. To do so, follow instructions in this Knowledgebase article from partII. Allow TCP/IP connections to the SQL database.
NOTE: For configuring, managing, administering of Microsoft SQL Server (databases and users), download SQLServer Management Studio (SSMS).
NOTE: If you choose to install Microsoft SQL Server Express during installation, you will not be able to install it ona Domain Controller. This is likely to happen if you are using Microsoft SBS. If you use Microsoft SBS, we recommendthat you install ESET Remote Administrator on a different server or do not select the SQL Server Express componentduring installation (this requires you to use your existing SQL Server or MySQL to run the ERA database). Forinstructions to install ERA Server on a Domain Controller, see our Knowledgebase article.

78
3.3.3 MySQL Server installation and configuration
Installation
Download the MySQL Windows Installer from http://dev.mysql.com/downloads/installer/ and execute it.
During the installation setup select Custom > MySQL Server and ODBC Connector to install.
Configuration
Open the following file in a text editor:
C:\ProgramData\MySQL\MySQL Server 5.7\my.ini
Find and edit or append the following configuration into the [mysqld] section of the my.ini file:
max_allowed_packet=33M
For MySQL 5.6.20 and 5.6.21 (you can determine your MySQL version by using mysql --version):o innodb_log_file_size needs to be set to at least 200 MB (for example innodb_log_file_size=200M)
For MySQL >= 5.6.22:o innodb_log_file_size*innodb_log_files_in_group needs to be set to at least 200 MB (* denotes
multiplication, the product of the two parameters must be > 200 MB. The minimal value for innodb_log_files_in_group is 2 and maximal value is 100, the value also has to be integer)For example:innodb_log_file_size=100M
innodb_log_files_in_group=2
Save and close the file and enter the following command to restart the MySQL server and apply the configuration(the process name depends on the version of MySQL, version 5.7 = MySQL57 etc.):
net stop mysql57
net start mysql57
Enter following command in Command Prompt to check whether the MySQL server is running:

79
sc query mysql57
3.3.4 Dedicated database user account
If you do not wish to use an SA account (MS SQL) or root account (MySQL), you can create a dedicated database useraccount. This dedicated user account will be used to access the ERA database only. We recommend you create adedicated database user account within your database server before starting ESET Remote Administratorinstallation. Also, you will need to create an empty database that will be accessed by ESET Remote Administratorusing this dedicated user account.
NOTE: There is a minimum set of privileges that must to be granted to a dedicated database user account.
MySQL user privileges:ALTER, ALTER ROUTINE, CREATE, CREATE ROUTINE, CREATE TEMPORARY TABLES, CREATE VIEW, DELETE, DROP,EXECUTE, INDEX, INSERT, LOCK TABLES, SELECT, UPDATE, TRIGGER - for more information about MySQLprivileges, see http://dev.mysql.com/doc/refman/5.7/en/grant.html
Microsoft SQL Server database-level roles:An ERA database user must be a member of the db_owner database role. For more information aboutMicrosoft SQL Server database-level roles, see https://msdn.microsoft.com/en-us/library/ms189121%28v=sql.100%29.aspx
3.3.5 Agent installation
This topic covers local ERA Agent installation locally on a client workstation.
NOTE: See the Administration guide or our Knowledgebase article for additional methods to install the ERA Agenton clients.
To install the ERA Agent component locally on Windows, follow these steps:
1. Visit the ESET Remote Administrator 6 download section to download a standalone installer for ERA components.
2. Run the ERA Agent installer and accept the EULA if you agree with it.
3. Enter the Server host (hostname or IP address of your ERA Server or ERA Proxy) and Server port (the default portis 2222, if you are using a different port, replace the default port with your custom port number).
IMPORTANT: Make sure the Server host matches at least one the values (ideally be FQDN) defined in Hostfield of the Server certificate. Otherwise you will get an error saying "Received server certificate is not valid".The only exception is in case there is a wild card (*) in Server certificate Host field, which means it will work withany Server host.
4. Select one of the following installation options and follow the steps from the appropriate section below:
Server-assisted installation - You will need to provide ERA Web Console administrator credentials (installer willdownload the required certificates automatically).
Offline installation - You will need to provide an Agent certificate, which can be exported from ESET RemoteAdministrator. Alternatively, you can use your custom certificate.
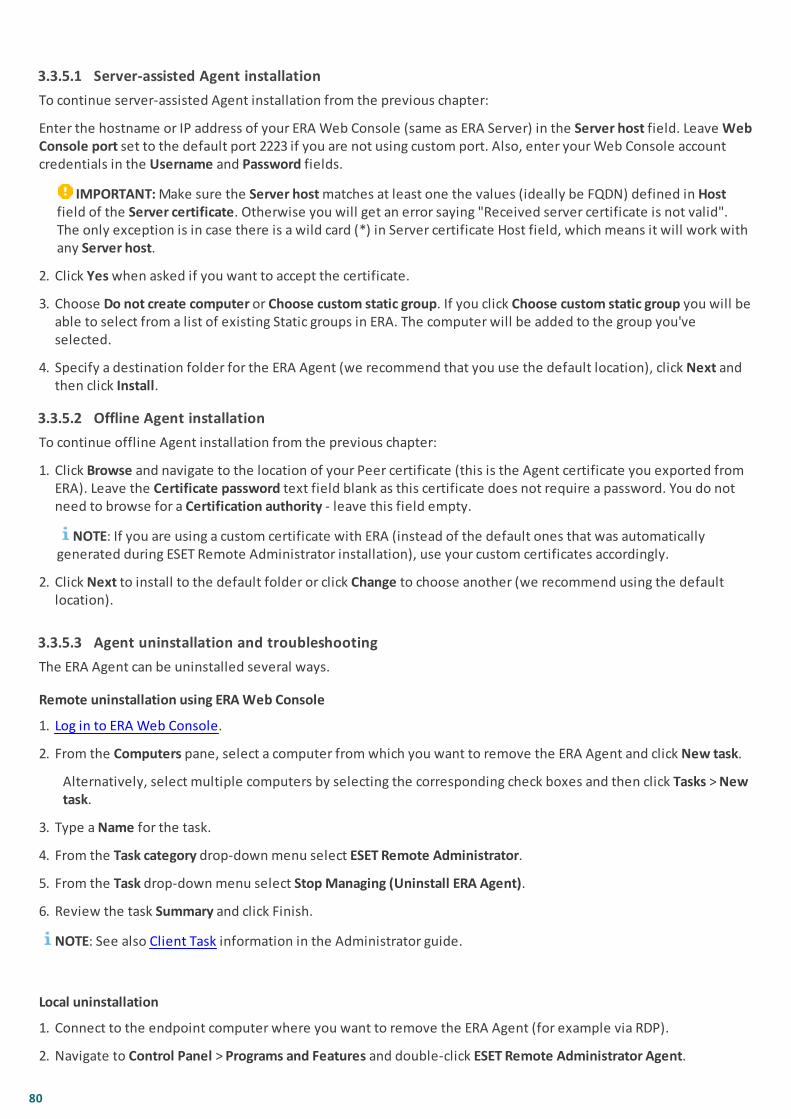
80
3.3.5.1 Server-assisted Agent installation
To continue server-assisted Agent installation from the previous chapter:
Enter the hostname or IP address of your ERA Web Console (same as ERA Server) in the Server host field. Leave WebConsole port set to the default port 2223 if you are not using custom port. Also, enter your Web Console accountcredentials in the Username and Password fields.
IMPORTANT: Make sure the Server host matches at least one the values (ideally be FQDN) defined in Hostfield of the Server certificate. Otherwise you will get an error saying "Received server certificate is not valid".The only exception is in case there is a wild card (*) in Server certificate Host field, which means it will work withany Server host.
2. Click Yes when asked if you want to accept the certificate.
3. Choose Do not create computer or Choose custom static group. If you click Choose custom static group you will beable to select from a list of existing Static groups in ERA. The computer will be added to the group you'veselected.
4. Specify a destination folder for the ERA Agent (we recommend that you use the default location), click Next andthen click Install.
3.3.5.2 Offline Agent installation
To continue offline Agent installation from the previous chapter:
1. Click Browse and navigate to the location of your Peer certificate (this is the Agent certificate you exported fromERA). Leave the Certificate password text field blank as this certificate does not require a password. You do notneed to browse for a Certification authority - leave this field empty.
NOTE: If you are using a custom certificate with ERA (instead of the default ones that was automaticallygenerated during ESET Remote Administrator installation), use your custom certificates accordingly.
2. Click Next to install to the default folder or click Change to choose another (we recommend using the defaultlocation).
3.3.5.3 Agent uninstallation and troubleshooting
The ERA Agent can be uninstalled several ways.
Remote uninstallation using ERA Web Console
1. Log in to ERA Web Console.
2. From the Computers pane, select a computer from which you want to remove the ERA Agent and click New task.
Alternatively, select multiple computers by selecting the corresponding check boxes and then click Tasks > Newtask.
3. Type a Name for the task.
4. From the Task category drop-down menu select ESET Remote Administrator.
5. From the Task drop-down menu select Stop Managing (Uninstall ERA Agent).
6. Review the task Summary and click Finish.
NOTE: See also Client Task information in the Administrator guide.
Local uninstallation
1. Connect to the endpoint computer where you want to remove the ERA Agent (for example via RDP).
2. Navigate to Control Panel > Programs and Features and double-click ESET Remote Administrator Agent.

81
3. Click Next > Remove and follow the uninstallation instructions.
IMPORTANT: If you have set up a password using a policy for your ERA Agents, you will need to type thepassword during uninstallation. Alternatively, disable the policy first before uninstalling ERA Agent.
Troubleshooting uninstallation of ERA Agent
See log files for ERA Agent.
Uninstallation of ERA Agent using ESET Uninstaller is not possible.
If you wish to uninstall ERA Agent using a non-standard way (such as removing files, removing the ERA Agentservice and registry entries) with presence of an ESET endpoint product on the same machine, it will not bepossible because of an enabled Self-Defense. You can read more about it in our Knowledgebase article.
3.3.6 Web Console installation
To install the ERA Web Console component on Windows, follow the steps below:
1. Visit the ESET Remote Administrator 6 download section to download a standalone installer for ERA components.
2. Make sure the following prerequisites are installed:
ERA Server.
Java - always use the latest officially released version of Java (ERA Web Console requires at least Java version 7,but we strongly recommend that you use the latest version).
Apache Tomcat (a supported version). We recommend to install Apache Tomcat using Windows Service Installer(.exe).
Web Console file (era.war) saved to your local hard drive.
3. Copy era.war to the Apache Tomcat web applications folder: Navigate to Start > Apache Tomcat > TomcatProgram Directory and open the webapps folder (on most operating systems - C:\Program Files\Apache SoftwareFoundation\Tomcat 7.0\webapps\).
4. Allow a few minutes for the file to extract and install ERA Web Console.
5. Restart the Apache Tomcat service. Start > Apache Tomcat > Configure Tomcat. Click Stop, wait for 30 seconds andthen click Start.
6. Open ERA Web Console in your browser: http://localhost:8080/era/, a login screen will be displayed.
NOTE: HTTP port, by default 8080, is set during manual Apache Tomcat installation. You can also set up HTTPSconnection for Apache Tomcat.
3.3.7 Proxy installation
To install the ERA Proxy server component on Windows, follow these steps:
1. Visit the ESET Remote Administrator 6 download section to download a standalone installer for ERA components.
2. Make sure all prerequisites are met.
3. Run the ERA Proxy installer and accept the EULA if you agree with it.
4. Leave the check box next to This is cluster installation empty and click Next. Is this a cluster installation?
If you are installing ERA Proxy on a Failover Cluster, select the check box next to This is cluster installation. If you areinstalling on a Failover Cluster, specify the Custom application data path to point to the shared storage of thecluster. The data must be stored at one location that is accessible by all nodes within the cluster.
82
5. Select a Service user account. This account will be used to run the ESET Remote Administrator Server Service. Thefollowing options are available:
a. Network service accountb. Custom account: DOMAIN/USERNAME
6. Connect to a Database. All data is stored here, from the ERA Web Console password to client computer logs. Youwill be required to enter the following information:
a. Database: MySQL Server/MS SQL Server/MS SQL Server via Windows Authenticationa. ODBC Driver: MySQL ODBC 5.1 Driver/MySQL ODBC 5.2 Unicode Driver/MySQL ODBC 5.3 Unicode Driver/SQL
Server/SQL Server Native Client 10.0/ODBC Driver 11 for SQL Serverc. Hostname: The hostname or IP address of your database serverd. The port used to connect to the Servere. Database name: You can leave this field as is or change the databse namef. Database Administrator account Username and Passwordg. Your ERA Database username and password
This step will verify your connection to the database. If the connection is ok, you can proceed to the next step. Anerror message will be displayed if a connection cannot be established.
7. Select a proxy communication port. By default port 2222 is used.
8. Configure the proxy connection to ESET Remote Administrator Server. Enter a Server host (hostname/IP addressof your ERA Server) and the Server port (2222).
IMPORTANT: Make sure the Server host matches at least one the values (ideally be FQDN) defined in Host fieldof the Server certificate. Otherwise you will get an error saying 'Received server certificate is not valid'. The onlyexception is in case there is a wild card (*) in Server certificate Host field, which means it will work with any Serverhost.
9. Select a Peer certificate exported from ERA Web Console and a password for this certificate. Optionally, you canadd a Certificate Authority. This is only required for unsigned certificates.
10. Select a folder where the Proxy will be installed or leave the pre-defined folder selected.
11. Click Install. The Proxy will be installed on your computer.
NOTE: Server-assisted installation is not supported when installing ERA Proxy.
3.3.7.1 Proxy prerequisites
The following prerequisites must be met to install ERA Proxy server on Windows:
WARNING: Never install ERA Server and ERA Proxy on the same computer!
NOTE: ERA Agent must be installed and connected to ERA Server (or an upper-level ERA Proxy).
ERA Server and the ERA Web Console must be installed (on a Server computer).
A Proxy Certificate must be created and downloaded to your local drive.
A Certificate Authority must be prepared on your local drive.
You must have a valid license.
A database server must already be installed and configured. Make your server meets Microsoft SQLrequirements.
An ODBC Driver for the connection to the database server (MySQL / MS SQL) must be installed on thecomputer.
The ERA Proxy log files should be available for troubleshooting.

83
3.3.8 RD Sensor installation
To install the RD Sensor component on Windows, follow these steps:
1. Visit the ESET Remote Administrator 6 download section to download a standalone installer for ERA components.
2. Make sure all prerequisites are met.
3. Double-click the RD Sensor installer file to begin installation.
4. Select the location where RD Sensor will be installed and click Next > Install.
3.3.8.1 RD Sensor prerequisites
The following prerequisites must be met in order to install the RD Sensor component on Windows:
WinPcap - use the latest WinPcap version (at least 4.1.0)
Network should be properly configured (appropriate ports open, incoming communication not being blocked by afirewall, etc.)
ERA Server reachable
ERA Agent must be installed on the local computer to fully support all program features
Rogue Detection Sensor log file can be found here: C:\ProgramData\ESET\Rouge Detection Sensor\Logs\
3.3.9 Mobile Device Connector installation
To install the Mobile Device Connector component for ESET Remote Administrator Server, please completefollowing steps.
WARNING: Mobile Device Connector must be accessible from the Internet so that mobile devices can bemanaged at all times regardless of their location.
1. Visit the ESET Remote Administrator 6 download section to download a standalone installer for ERA components.
2. Please read the prerequisites first and make sure all are met.
3. Run the Mobile Device Connector installer and accept the EULA if you agree with it.
4. Click Browse, navigate to the location of your SSL certificate for communication via HTTPS, type in the passwordfor this certificate:
5. Specify MDM hostname: this is the public domain or public IP address of your MDM server as it is reachable bymobile devices from the Internet.
IMPORTANT: MDM hostname must be entered in the same form as specified in your HTTPS Server certificate,otherwise the iOS mobile device will refuse to install MDM Profile. For example, if there is an IP address specifiedin the HTTPS certificate, type in this IP address into the MDM hostname field. In case FQDN is specified (e.g.mdm.mycompany.com) in the HTTPS certificate, enter this FQDN in MDM hostname field. Also, if there is a wildcard *used (e.g. *.mycompany.com) in HTTPS certificate, you can use mdm.mycompany.com in the MDM hostname field.
6. Installer needs to create new database which will be used by Mobile Device Connector, therefore provideconnection details:
Database: MySQL Server/MS SQL Server/MS SQL Server via Windows Authentication
ODBC Driver: MySQL ODBC 5.1 Driver/MySQL ODBC 5.2 Unicode Driver/MySQL ODBC 5.3 Unicode Driver/SQLServer/SQL Server Native Client 10.0/ODBC Driver 11 for SQL Server
Database name: you can leave predefined name or change it if required
Hostname: hostname or the IP address of your database server
Port: used for connection to the database server
Database admin account Username/Password
NOTE: We recommend using the same database server you are using for ERA database, but it can be different DBserver if required. When you click the Next button, Mobile Device Connector installer will create its database.

84
7. Specify user for newly created Mobile Device Connector database. You can Create new user or Use existingdatabase user. Type in the password for the database user.
8. Enter Server host (name or IP address of your ERA Server) and Server port (default port is 2222, if you are usingdifferent port, then replace the default port with your custom port number).
9. Now you have two options how to continue with the installation:
o Server assisted installation - you will need to provide ERA Web Console administrator credentials (installer willdownload required certificates automatically).
1. Enter Server host - name or IP address of your ERA Server and Web Console port (leave default port 2223if you are not using custom port). Also, provide Web Console administrator account credentials - Username/Password.
2. When asked to Accept Certificate, click Yes. Continue to step 9.
o Offline installation - you will need to provide Proxy certificate which can be exported from ESET RemoteAdministrator. Alternatively, you can use your custom certificate.
1. Click Browse and navigate to the location with Peer certificate (this is the Proxy certificate you'veexported from ERA). Leave the Certificate password text field blank as this certificate does not requirepassword. Continue to step 9.
NOTE: In case you are using your custom certificates with ERA (instead of the default ones that wereautomatically generated during ESET Remote Administrator installation), then use your custom certificatesaccordingly.
10. Specify destination folder for Mobile Device Connector (we recommend using default), click Next, then Install.
11. After the installation is complete, check if the Mobile Device Connector is running correctly by opening https://your-mdm-hostname:enrollment-port (for example https://mdm.company.com:9980) in your web browser or frommobile device. If the installation was successful, you will see following message: MDM Server up and running!
12. You can now activate MDM from ESET Remote Administrator.

85
3.3.9.1 Mobile Device Connector prerequisites
The following prerequisites must be met in order to install Mobile Device Connector on Windows:
Public IP address or public domain accessible from the Internet.
NOTE: If you need to change hostname of your MDM Server, you can do so in its configuration file. Keep in mid, ifyou change hostname of your MDM Server, you might need to import new HTTPS Server certificate that includes thisnew hostname in order for MDM to continue working correctly.
Ports open and available see the complete list of ports here. We recommend using default ports numbers 9981and 9980, but these can also be changed in configuration file of your MDM Server if needed. Make sure thatmobile devices are able to connect via specified ports. Change your firewall and/or network settings (ifapplicable) to make this possible. For more information about MDM architecture click here.
Firewall settings - if installing Mobile Device Connector on non-server OS such as Windows 7 (for evaluationpurpose only), make sure to allow communication ports by creating firewall rules for:
C:\Program Files\ESET\RemoteAdministrator\MDMCore\ERAMDMCore.exe, TCP port 9980C:\Program Files\ESET\RemoteAdministrator\MDMCore\ERAMDMCore.exe, TCP port 9981C:\Program Files\ESET\RemoteAdministrator\Server\ERAServer.exe, TCP port 2222
NOTE: Actual paths to .exe files may vary depending on where each of the ERA components is installed onyour client OS system.
A database server already installed and configured. Make sure you met Microsoft SQL or MySQL requirements.
RAM usage of MDM connector is optimized so there can be maximum of 48 "ESET Remote Administrator MDMCoreModule" processes running concurrently and if the user connects more devices, the processes will thenperiodically change for each device that currently needs to use the resources.

86
Certificate requirements
IMPORTANT: You will need an SSL certificate in .pfx format for secure communication over HTTPS. Werecommend that you use the certificate provided by CA. Self-signed certificates are not recommended because notall mobile devices let users to accept self-signed certificates. This isn't an issue with CA signed certificates, becausethey are trusted and do not require acceptance by the user.
NOTE: You need to have certificate signed by CA, and corresponding private key, and utilize standard procedures,to merge those (traditionally using OpenSSL) into one .pfx file:openssl pkcs12 -export -in certificate.cer -inkey privateKey.key -out httpsCredentials.pfx
This is a standard procedure for most servers which are using SSL certificates.
IMPORTANT: In the case of Offline installation, you will also need an Agent certificate exported from ESETRemote Administrator. Alternatively, you can use your custom certificate with ERA.
3.3.9.2 Mobile Device Connector activation
After you have installed Mobile Device Connector, you need to activate it with ESET Endpoint Security for Androidlicense:
1. Add the ESET Endpoint Security for Android license to ERA License Management following steps described here.
2. Activate Mobile Device Connector using Product Activation Client Tasks, procedure is the same as when activatingany ESET security product on a client computer, where in this case Mobile Device Connector is client computer.

87
3.3.9.3 MDM iOS licensing funcionality
Since ESET does not offer an application on the Apple App Store, ESET Mobile Device Connector stores all licensingdetails for iOS devices.
Licenses are per-device and can be activated using a Product Activation Task (same as Android).
iOS licenses can be deactivated in the following ways:
Removal of the device from the management via a Stop managing task
Uninstallation of MDC is uninstalled via the Remove database option
Deactivation by other means (ERA or ELA deactivation)
Because MDC communicates with ESET licensing servers on behalf of iOS devices, ELA portal reflects the state ofMDC and not the state of individual devices. Current device information is always available in ESET RemoteAdministrator Web Console.
Devices that are not activated or devices with expired licenses will display a red protection status and the "Licensenot activated" message. These devices will refuse to handle tasks, set policies and deliver non-critical logs.
During uninstallation of MDM, if Keep Database is selected, licenses used will not be deactivated. These licensescan be reused if MDM is reinstalled on this database, removed via ESET Remote Administrator or deactivated usingESET License Administrator. When moving to another MDM server, you will need to perform the Product ActivationTask again.
3.3.9.4 HTTPS certificate requirements
To enroll an iOS device in ESET Mobile Device Connector, ensure that the HTTPS server returns the full certificatechain.
For the certificate to work properly, these requirements must be met:
The HTTPS certificate (pkcs#12/pfx container) must contain the full certificate chain.
if the certificate is self-signed it must also contain root of the certification authority (CA)
if the certificate is signed by a third-party ,which is included in trusted root CA on devices and server it is notrequired to contain the root CA .
for windows installations, the MDM is unable to send certificate chain automatically - follow these steps to sendthe certification chain. (Not required if certificate represents self-signed root CA)
the certificate must be valid during the required time (valid from / valid to)
the CommonName or subjectAltNames must match the MDM hostname
NOTE: If the MDM hostname is , for example hostname.mdm.domain.com, your certificate can contain nameslike:
hostname.mdm.domain.com
*.mdm.domain.comBut not names like :
*
*.com
*.domain.comBasically, the " * " cannot replace the "dot" part. This behavior is confirmed for the way the iOS accepts thecertificates for MDM.

88
3.3.9.4.1 Import HTTPS certificate chain for MDM
There is a requirement to provide entire certificate chain for MDM HTTPS Server. This is required mainly where 3rdparty Certification Authority signed certificate is used to establish trust between the device and mobile browser.
Entire certificate chain must be present in pkcs12 container (pfx file) set as HTTPS Server certificate. Certificatechain also must be imported into Intermediate Certification Authorities store on local computer.
1. Run mmc.exe to open Management Console.2. Select File > Add/Remove Snap-in… or (CTRL+M).

89
3. Under Available snap-ins select Certificates and click Add.4. Select Computer Account for the certificates to manage, click Next.
5. Select Local Computer and press Finish.6. Click OK to return to the Management Console.7. Select Intermediate Certification Authorities, in context menu select All Tasks > Import.
8. Select MDM HTTPs certificate file and Import.9. Restart the ESET Remote Administrator Mobile Device Connector service.
NOTE: If this is not performed, MDM HTTPS Server will send only Server certificate, not the entire chain(intermediate CAs).

90
3.3.10 Mirror tool
The mirror tool is necessary for offline virus signature database updates. If your client computers do not have anInternet connection and need virus database updates, you can use the Mirror tool to download update files fromESET update servers and store them locally.
NOTE: The mirror tool downloads virus database definitions only, it does not download PCUs (ProgramComponent Updates) and LiveGrid data. To update your ESET security product on offline client computers, werecommend that you upgrade the product using the Software Install client task in ERA. Alternatively, you canupgrade products individually.
Prerequisites
The target folder must be available for sharing, Samba/Windows or HTTP/FTP service, depending on how youwant to have the updates accessible.
You must have a valid Offline license file that includes the Username and Password. When generating a licensefile, be sure to select the mark the check box next to Include Username and Password. Also, you must enter aLicense filename.
Visual C++ Redistributables for Visual Studio 2010 must be installed on the system.
There is no installation step, the tool consists of two files:
o Windows:MirrorTool.exe and updater.dll
o Linux:MirrorTool and updater.so

91
Usage
To see Mirror tool help, run MirrorTool --help to view all available commands for the tool:
The parameter --updateServer is optional. When you use it, you must specify the full URL of the update server.
The parameter --offlineLicenseFilename is mandatory. You must specify a path to your offline license file (asmentioned above).
To create a mirror, run the MirrorTool with at least the minimal required parameters. Here is an example:
o Windows:
MirrorTool.exe --mirrorType regular --intermediateUpdateDirectory
c:\temp\mirrorTemp --offlineLicenseFilename c:\temp\offline.lf --outputDirectory c:\temp\mirror
o Linux:
sudo ./MirrorTool --mirrorType regular --intermediateUpdateDirectory /tmp/mirrorTool/mirrorTemp
--offlineLicenseFilename /tmp/mirrorTool/offline.lf --outputDirectory /tmp/mirrorTool/mirror
Mirror tool and Update settings
To automate the distribution of virus database updates, you can create a schedule to run the Mirror tool. To do so,open your Web Console and navigate to Client Tasks > Operating System > Run Command. Select Command line torun (including a path to the MirrorTool.exe) and a reasonable trigger (such as CRON for every hour 0 0 * * * ? *).Alternatively, you can use the Windows Task Scheduler or Cron in Linux.
To configure updates on a client computer(s), create a new policy and configure Update server to point to yourmirror address or shared folder.

92
3.3.11 Apache HTTP Proxy installation and cache
To install Apache HTTP Proxy on Windows, follow these steps:
IMPORTANT: If you already have Apache HTTP Proxy installed on Windows and want to upgrade it to the mostrecent version, proceed to Upgrading Apache HTTP Proxy.
1. Visit the ESET Remote Administrator 6 download section to download a standalone installer for ERA components.
2. Open ApacheHttp.zip and extract the files to C:\Program Files\Apache HTTP Proxy
NOTE: If you want to install Apache HTTP Proxy on a different hard drive, C:\Program Files\ must be replacedwith the corresponding path in the instructions below and in the httpd.conf file located in the Apache HTTP Proxy\bin directory. For example, if you extract the content of ApacheHttp.zip to D:\Apache Http Proxy, then C:\Program Files\ must be replaced with D:\Apache Http Proxy.
3. Open an administrative command prompt and CD to C:\Program Files\Apache HTTP Proxy\bin
4. Execute the following command:
httpd.exe -k install -n ApacheHttpProxy
5. Using a text editor such as Notepad, open the httpd.conf file and add the following lines at the bottom of the file:
ServerRoot "C:\Program Files\Apache HTTP Proxy"
DocumentRoot "C:\Program Files\Apache HTTP Proxy\htdocs"
<Directory "C:\Program Files\Apache HTTP Proxy\htdocs">
Options Indexes FollowSymLinks
AllowOverride None
Require all granted
</Directory>
CacheRoot "C:\Program Files\Apache HTTP Proxy\cache"
NOTE: If you wish the cache directory to be located somewhere else, for example on another disk drive, suchas D:\Apache HTTP Proxy\cache, then in the last line of the code above change "C:\Program Files\ApacheHTTP Proxy\cache" to "D:\Apache HTTP Proxy\cache".
6. Start the Apache HTTP Proxy service using the following command:
sc start ApacheHttpProxy
7. You can verify that the Apache HTTP Proxy service is running in the services.msc snap-in (look forApacheHttpProxy). By default, the service is configured to start automatically.
Follow the steps below to configure a username and password for Apache HTTP Proxy (recommended):
1. Stop the ApacheHttpProxy service by opening an elevated command prompt and executing the followingcommand:
sc stop ApacheHttpProxy
2. Verify the presence of the following modules in C:\Program Files\Apache HTTP Proxy\conf\httpd.conf:
LoadModule authn_core_module modules\mod_authn_core.dll
LoadModule authn_file_module modules\mod_authn_file.dll
LoadModule authz_groupfile_module modules\mod_authz_groupfile.dll
LoadModule auth_basic_module modules\mod_auth_basic.dll
3. Add the following lines to C:\Program Files\Apache HTTP Proxy\conf\httpd.conf under <Proxy *>:
AuthType Basic
AuthName "Password Required"
AuthUserFile password.file
AuthGroupFile group.file
Require group usergroup

93
4. Use the htpasswd command to create a file named password.file in the folder Apache HTTP Proxy\bin\ (you willbe prompted for password):
htpasswd.exe -c ..\password.file username
5. Manually create the file group.file in the folder Apache HTTP Proxy\ with the following content:
usergroup:username
6. Start the ApacheHttpProxy service by executing the following command in an elevated command prompt:
sc start ApacheHttpProxy
7. Test the connection to HTTP Proxy by accessing the following URL in your browser:
http://localhost:3128/index.html
NOTE: Once you have successfully completed installation of Apache HTTP Proxy, you have the option to allowESET communication only (blocking all other traffic - default) or allow all traffic. Perform the necessary configurationchanges as described here:
Forwarding for ESET communication only
Proxy chaining (all traffic)
The following command will display a list of content which is currently cached:
"C:\Program Files\Apache HTTP Proxy\bin\htcacheclean.exe" -a -p "C:\ProgramData\Apache HTTP Proxy\cache"
Use the htcacheclean tool to clean up the disk cache. The recommended command (setting cache size to 10 GB andcached files limit to ~2000) is shown here:
"C:\Program Files\Apache HTTP Proxy\bin\htcacheclean.exe" -n -t^
-p"C:\ProgramData\Apache HTTP Proxy\cache" -l10000M -L12000
To schedule cache clean up every hour run:
schtasks /Create /F /RU "SYSTEM" /SC HOURLY /TN ESETApacheHttpProxyCleanTask^
/TR "\"C:\Program Files\Apache HTTP Proxy\bin\htcacheclean.exe\"^
-n -t -p \"C:\ProgramData\Apache HTTP Proxy\cache\" -l10000M -L12000"
If you choose to allow all traffic, the recommended commands are:
"C:\Program Files\Apache HTTP Proxy\bin\htcacheclean.exe" -n -t^
-p"C:\ProgramData\Apache HTTP Proxy\cache" -l10000M
schtasks /Create /F /RU "SYSTEM" /SC HOURLY /TN ESETApacheHttpProxyCleanTask
/TR "\"C:\Program Files\Apache HTTP Proxy\bin/htcacheclean.exe\"^
-n -t -p \"C:\ProgramData\Apache HTTP Proxy\cache\" -l10000M"
NOTE: The ^ character right after end of line in the commands above is essential, if it is not included thecommand will not execute correctly.
For more information, visit our Knowledgebase article or the Apache Authentication and Authorizationdocumentation.

94
3.3.12 Failover Cluster
Below are the high-level steps required to install ESET Remote Administrator in a Failover Cluster environment.
1. Create a Failover Cluster with a shared disk:
a. Instructions to create a failover cluster in Windows Server 2012
b. Instructions to create a failover cluster in Windows Server 2008
2. In the Create Cluster Wizard enter the desired hostname (make up one) and IP address.
3. Get the shared disk of the cluster online on node1 and install ERA Server using the standalone installer on it.Make sure that This is a cluster installation is selected during installation and select the shared disk as applicationdata storage. Make up a hostname and enter it for the Server certificate of ERA Server next to the pre-filledhostnames. Remember this hostname and use it in step no. 6 when creating the ERA Server Role in the ClusterManager.
4. Stop ERA Server on node1, bring the shared disk of the cluster online on node2 and install ERA Server using thestandalone installer on it. Make sure that This is a cluster installation is selected during installation. Choose theshared disk as application data storage. Keep database connection and certificate information intact, they wereconfigured during installation of ERA Server on node1.
5. Configure your firewall to allow incoming connections on all ports used by ERA Server.
6. In the cluster configuration manager create and start a Role (Configure Role > Select Role > Generic service ...) forthe ERA Server service . Select the ESET Remote Administrator Server service from the list of available services. Itis very important to use the same hostname for the Role as was used in step 3 concerning the Server certificate.
7. Install ERA Agent on all cluster nodes using the standalone installer. In the Agent configuration and Connection toRemote Administrator screens use the hostname you used in step no. 6. Store Agent data on the local node (noton the cluster disk).
NOTE: The term Role is available in Windows server 2012 only. In Windows server 2008 Services andapplications is used instead.
8. ERA database and web server (Apache Tomcat) are not supported on a cluster, therefore they have to be installedon a non-clustered disk or a different machine.
Web Console can be easily installed on a separate computer and properly configured to connect to ERA Servercluster Role. After Web Console is installed, locate its configuration file at:C:\Program Files\Apache Software Foundation\Tomcat 7.0\webapps\era\WEB-INF\classes\sk\eset\era\g2webconsole\server\modules\config\EraWebServerConfig.properties
open the file via Notepad or any other simple text editor. In the line server_address=localhost replace localhostwith the IP address or hostname of the ERA Server cluster Role.

95
3.4 Component installation on Linux
In most installation scenarios, you need to install different ESET Remote Administrator components on differentmachines to accommodate different network architectures, meet performance requirements, or for other reasons.
For step-by-step ERA Server installation, follow the instructions included in this section.
To upgrade ESET Remote Administrator for Linux to the latest version (6.x) see the Component upgrade task chapteror our Knowledgebase article.
Note that in builds later than Fedora version 22 the yum command is replaced by the dnf command. If you useFedora version 22 or later, use dnf instead of yum.
Core components
ERA Server
ERA Web Console
ERA Agent
a Database server
Optional components
ERA Proxy
RD Sensor
Mobile Device Connector
Apache HTTP Proxy
Mirror Tool
3.4.1 Step-by-step ERA Server installation on Linux
In this installation scenario we will simulate step-by-step installation of ERA Server and ERA Web Console. Youmust be able to use the sudo command or install under root privileges to complete the installation.
Before installation, verify that the database server is present in your network and make sure you have access to iton your local/remote server. If no database server is installed, install and configure a new one. We will simulateinstallation using MySQL.
Notes:
ERA Linux components (Agent, Server, Web Console) are standalone installations. You can find these installationfiles in the ESET Remote Administrator 6 Standalone Installers category available on the ESET website.
To install ERA Server on SUSE Linux Enterprise Server (SLES), follow the instructions from our Knowledgebasearticle.
1. Install required packages for ERA Server.
2. Navigate to the folder where you downloaded ERA Server and make the installation package executable:
chmod +x Server-Linux-x86_64.sh
3. Configure the connection to MySQL server, as shown in the MySQL configuration topic.
4. Verify the configuration of the MySQL ODBC driver as shown in the ODBC configuration topic.
5. Customize the installation parameters and execute the ERA Server installation. See Server installation - Linux formore information.
6. Install the required java and tomcat packages for ERA Web Console as shown in the ERA Web Consoleprerequisites topic.

96
7. Deploy and test the ERA Web console, as shown in the ERA Web Console installation topic.
8. Install ERA Agent on the server machine.
Note: If you experience problems with HTTPS connection to ERA Web Console, see our article on HTTPS/SSLconnection set up.
3.4.2 MySQL installation and configuration
Installation
If you have already installed and configured MySQL, proceed to Configuration.
MariaDB is a default database in many Linux environments, however, it is not supported by ESET RemoteAdministrator! Please make sure to install MySQL for ESET Remote Administrator to work properly.
Installation of MySQL will differ depending on the Linux distribution and version used:
Debian and Ubuntu distributions
Use the following command to install MySQL:sudo apt-get install mysql-server
Advanced installation: https://dev.mysql.com/doc/refman/5.7/en/linux-installation-apt-repo.html
CentOS, Red Hat and Fedora distributions
Use the following command to install MySQL:sudo yum install mysql-server
Advanced installation: https://dev.mysql.com/doc/refman/5.7/en/linux-installation-yum-repo.html
OpenSUSE distribution
Use the following command to install MySQL:sudo zypper install mysql-community-server
Manual installation
Download and install MySQL Community Server edition from:http://dev.mysql.com/downloads/
Configuration
Run the following command to open the my.cnf (my.ini for Windows installation) file in a text editor:
sudo nano /etc/mysql/my.cnf
(if the file is not present, try /etc/my.cnf)
Find the following configuration in the [mysqld] section of the my.cnf file and modify the values. (If the parametersare not present in the file, add them to the [mysqld] section ):
max_allowed_packet=33M
For MySQL 5.6.20 and 5.6.21 (you can determine your MySQL version by using mysql --version):o innodb_log_file_size needs to be set to at least 200 MB (for example innodb_log_file_size=200M)
For MySQL >= 5.6.22:o innodb_log_file_size*innodb_log_files_in_group needs to be set to at least 200 MB (* denotes
multiplication, the product of the two parameters must be > 200 MB. The minimal value for innodb_log_files_in_group is 2 and maximal value is 100, the value also has to be integer)For example:innodb_log_file_size=100M
innodb_log_files_in_group=2
Save and close the file and enter the following command to restart the MySQL server and apply the configuration (insome cases, the service name is mysqld):

97
sudo service mysql restart
Run the following command to set up MySQL including privileges and password (this is optional and may not workfor some Linux distributions):
/usr/bin/mysql_secure_installation
Enter the following command to check whether the MySQL server is running:
sudo netstat -tap | grep mysql
If the MySQL server is running, the following line will be displayed. Note that the process identifier - PID (7668 inthe example below) will be different:
tcp 0 0 localhost:mysql *:* LISTEN 7668/mysqld
3.4.3 ODBC installation and configuration
Installation
To install the MySQL ODBC (Open Database Connectivity) driver, run the following command from a terminalprompt:
Debian and Ubuntu distributions sudo apt-get install libmyodbc libodbc1
CentOS, Red Hat and Fedora distributions sudo yum install mysql-connector-odbc
OpenSUSE distribution sudo zypper install myodbc-unixbox
Configuration
Run the following command to open the odbcinst.ini file in a text editor:
sudo nano /etc/odbcinst.ini
Copy the following configuration into the odbcinst.ini file (make sure the paths to Driver and Setup are correct),then save and close the file:
[MySQL]
Description = ODBC for MySQL
Driver = /usr/lib/x86_64-linux-gnu/odbc/libmyodbc.so
Setup = /usr/lib/x86_64-linux-gnu/odbc/libodbcmyS.so
FileUsage = 1
If you are using a 32-bit Ubuntu version, use Driver and Setup keys and change the path to:/usr/lib/i386-linux-gnu/odbc/
The Driver may be in a different location for some distributions. You can find the file using the following command:
sudo find /usr -iname "*libmyodbc*"
ERA products require the MySQL driver to support multi-threading. This is the default for newer unixODBC packageversions (2.3.0 or newer). Older versions require explicit threading configuration. If you have an older version(command odbcinst --version will show you your version), add the following parameter to the odbcinst.ini file:
Threading = 0
Update the configuration files that control ODBC access to database servers on the current host by running thefollowing command:
sudo odbcinst -i -d -f /etc/odbcinst.ini

98
3.4.4 Server installation - Linux
Installation of the ERA Server component on Linux is performed using a command in the Terminal. You can preparean installation script and then execute it using sudo. Make sure all prerequisites are met before you begininstallation.
Note: To install ERA Server on SUSE Linux Enterprise Server (SLES), follow the instructions from ourKnowledgebase article.
Example of an installation script(New l ines are spl i t by "\" for copying the whole command to Terminal )
sudo ./Server-Linux-x86_64.sh \
--skip-license \
--db-driver=MySQL \
--db-hostname=127.0.0.1 \
--db-port=3306 \
--db-admin-username=root \
--db-admin-password=Admin123 \
--server-root-password=Admin123 \
--db-user-username=root \
--db-user-password=Admin123 \
--cert-hostname="10.1.179.46;Ubuntu64-bb;Ubuntu64-bb.BB.LOCAL"
The ERA Server and the eraserver service will be installed in the following location:/opt/eset/RemoteAdministrator/Server
You can modify the following attributes:
Attribute Description Required
--uninstall Uninstalls the product -
--keep-database Database will not be removed during uninstallation -
--locale The locale identifier (LCID) of installed server (default value is en_US). See supported languages for possible options.Note: You can set a language for each ERA Web Console session.
Yes
--skip-license Installation will not ask user for license agreement confirmation -
--skip-cert Skip generation of certificates (please use together with the --server-cert-path parameter)
-
--license-key ESET license key. This can be set later. -
--product-guid Global unique identifier of the product. If this is not set, it willbe generated.
-
--server-port ESET Remote Administrator (ERA) server port (default value is 2222)
-
--console-port ESET Remote Administrator console port (default value is 2223) -
--server-root-password Password for Web Console login of the user "Administrator",must be at least 8 characters long
Yes
--db-type The type of database that will be used (possible values: MySQLServer, Microsoft SQL Server)
-
--db-driver ODBC driver used for connecting to database (commandodbcinst -q -d gives a list of available drivers, use one of thisdrivers for example: --db-driver="MySQL")
Yes
--db-hostname Computer name or IP address of the database server Yes
--db-port Port of the database server (default value is 3306) Yes

99
Attribute Description Required
--db-name Name of ERA Server database (default value is era_db) -
--db-admin-username Database administrator username (used by installation forcreating and modifying database). This parameter can beomitted if there is a previously created database user definedby --db-user-username and --db-user-password
Yes
--db-admin-password Database administrator password This parameter can be omittedif there is a previously created database user defined by --db-user-username and --db-user-password
Yes
--db-user-username Database ERA Server user username (used by ERA Server forconnecting to database); should be no longer than 16 characters
Yes
--db-user-password Database ERA Server user password Yes
--cert-hostname Contains all the possible names and/or the IP of the computerthat ERA Server will be installed on. This will need to match withthe server name specified in the Agent certificate that tries toconnect to the server.
Yes
--server-cert-path Path to server peer certificate (use this option if you specified --skip-cert as well)
-
--server-cert-password Password of server peer certificate -
--agent-cert-password Password of Agent peer certificate -
--cert-auth-password Certificate Authority password -
--cert-auth-path Path to the Server's Certificate Authority file -
--cert-auth-common-name Certification authority common name (use "") -
--cert-organizational-unit - -
--cert-organization - -
--cert-locality - -
--cert-state - -
--cert-country - -
--cert-validity Certificate validity in days or years (specify in argument --cert-validity-unit)
-
--cert-validity-unit Unit for certificate validity, possible values are 'Years' or'Days' (default value is Years)
-
--ad-server Active Directory server -
--ad-user-name Name of the user who has rights to search the AD network -
--ad-user-password Active Directory user password -
--ad-cdn-include Active Directory tree path, which will be synchronized for; useempty brackets "" to synchronize a whole tree
-
Installer log
The installer log may be useful for troubleshooting and can be found in Log files.

100
After installation, verify that the ERA Server service is running using the command shown below:service eraserver status
3.4.4.1 Server prerequisites - Linux
The following prerequisites must be met to install ERA Server on Linux:
You must have a valid license.
A database server must be installed and configured with a root account. A user account does not have to becreated prior to the installation, the installer can create the account.
NOTE: ERA Server stores large data blobs in the database, therefore it is necessary to configure MySQL to acceptlarge packet size for ERA to run properly.
ODBC Driver - ODBC Driver is used to establish connection with the database server (MySQL / MS SQL).
Configure the server installation file set as an executable. To do so, use the following terminal command:
chmod +x Server-Linux-x86_64.sh
The minimum supported version of openSSL is openssl-1.0.1e-30 (the command openssl version shows currentversion)
Xvfb - Required for proper report printing (Generate Report) on Linux Server systems without a graphicalinterface.
Cifs-utils - Required for proper Agent deployment to a Windows OS.
Qt4 WebKit libraries - Used for printing reports to PDF and PS format (must be version 4.8, not 5). All other Qt4dependencies will be installed automatically. In the case of CentOS, there may be no package in the officialrepositories. You can install it from a third-party repository (for example EPEL repositories) or compile it yourselfon a target machine.
Kinit + klist - Used for Kerberos authentication during the AD synchronization task and login with a domain user.Also a proper Kerberos configuration is required (/etc/krb5.conf).
Wbinfo + ntlm auth - Used for authentication with the domain accounts + NTLM authentication with SMTP server(sending emails).
Ldapsearch - Used in AD synchronization task.
Snmptrap - Used to send SNMP traps. Optional if this functionality won’t be used. SNMP also requiresconfiguration.

101
SELinux devel package - Used during product installation to build SELinux policy modules. This is only required onsystems with SELinux enabled (CentOS, Fedora, RHEL). SELinux may cause problems with other applications. ForERA Server it is not necessary.
The table below contains the appropriate terminal commands for each package described above for both Debianand Ubuntu distributions and Centos, Red Hat and Fedora distributions:
Debian and Ubuntu distributions CentOS, Red Hat and Fedoradistributions
OpenSUSE distribution
ODBC Driver
apt-get install unixodbc
libmyodbcyum install mysql-connector-odbc zypper install unixodbc
myodbc-unixbox
xvfb
apt-get install xvfb yum install xorg-x11-server-Xvfb zypper install xorg-x11-server-
extra
cifs-utils
apt-get install cifs-utils yum install cifs-utils zypper install cifs-utils
Qt4 WebKit libraries
apt-get install libqtwebkit4 See our Knowledgebase article. zypper install libqtwebkit4
kinit+klist - optional (it is necessary for Active Directory service)
apt-get install krb5-user yum install krb5-workstation zypper install krb5
wbinfo + ntlm_auth
apt-get install winbind yum install samba-winbind-clients zypper install samba-winbind
ldapsearch
apt-get install ldap-utils
libsasl2-modules-gssapi-mit
yum install openldap-clients
cyrus-sasl-gssapi cyrus-sasl-ldap
zypper install openldap2-client
cyrus-sasl-gssapi
cyrus-sasl-ldap-auxprop
snmptrap
apt-get install snmp yum install net-snmp-utils net-
snmp
zypper install net-snmp
SELinux devel package (optional; SELinux may cause problems with other applications. For ERA Server it is notnecessary.)
apt-get install selinux-policy-
dev
yum install policycoreutils-devel zypper install selinux-policy-
devel
samba
apt-get install samba yum install samba
samba-winbind-clients
zypper install samba samba-client
3.4.5 Agent installation - Linux
Installation of the ERA Agent component on Linux is performed using a command in the Terminal. Make sure all prerequisites are met. Connection to the ERA Server is resolved using the parameters --hostname and --port (port isnot used when an SRV record is provided). Possible connection formats are:
Hostname and port
IPv4 address and port
IPv6 address and port
Service record (SRV record) - to configure the DNS resource record in Linux, the computer must be in a domainwith a working DNS server. See DNS resource record.
The SRV record must start with the prefix "_NAME._tcp" where 'NAME' represents custom naming (for example,'era').

102
Example of an installation script(New l ines are spl i t by "\" for copying the whole command to Terminal )
./Agent-Linux-x86_64.sh \
--skip-license \
--cert-path=/home/admin/Desktop/agent.pfx \
--cert-auth-path=/home/admin/Desktop/CA.der \
--cert-password=N3lluI4#2aCC \
--hostname=10.1.179.36 \
--port=2222
Attribute Description
--skip-license Installation will not ask user for license agreement confirmation
--cert-path Local path to the Agent certificate file (more about certificate)
--cert-auth-path Path to the Server's Certificate Authority file (more about authority)
--cert-password Certificate Authority password. Must match the Agent's certificate password
--hostname Hostname or IP address of ERA Server (ERA Proxy) to connect
--port ERA Server or ERA Proxy port (default value is 2222)
Optional parameters
Attribute Description
--product-guid Product GUID (if not defined, it will be generated)
--cert-content Base64 encoded content of PKCS12 encoded public key certificate plus private keyused to set up secure communication channels with Server and Agents. Use onlyone of the --cert-path or --cert-content options.
--cert-auth-content Base64 encoded content of DER encoded certificate authority private keycertificate used to verify remote peers (Proxy or Server). Use only one of the --cert-auth-path or --cert-auth-content options.
--webconsole-hostname Hostname or IP address used by Web console to connect to the server (if leftempty, value will be copied from 'hostname')
--webconsole-port Port used by Web Console to connect to the server (default value is 2223)
--webconsole-user Username used by Web Console to connect to the server (default value is Administrator)
--webconsole-password Password used by Web Console to connect to the server
--cert-auth-password Certificate Authority password
Connection and certificates
Connection to the ERA Server must be provided: --hostname, --port (port is not needed if service record isprovided, the default port value is 2222)
Provide this connection information for Server-assisted installation: --webconsole-port, --webconsole-user, --webconsole-password
Provide certificate information for Offline installation: --cert-path, --cert-password
Installation parameters --cert-path and --cert-auth-path require certification files (.pfx and .der) which canbe exported from ERA Web Console. (Read how to export the .pfx file and the .der file)
Password type parameters

103
Password type parameters can be provided as environment variables, files, read from stdin or provided as plaintext, i.e.:--password=env:SECRET_PASSWORD where SECRET_PASSWORD is an environment variable with password--password=file:/opt/secret where first line of regular file /opt/secret contains your password--password=stdin instructs the installer to read the password from standard input--password="pass:PASSWORD" is equal to --password="PASSWORD" and is mandatory if the actual password is"stdin"(standard input) or a string starting with "env:", "file:" or "pass:"
Installer log
The installer log may be useful for troubleshooting and can be found in Log files.
To see if the installation was successful, verify that the service is running by executing the following command:sudo service eraagent status
3.4.5.1 Agent prerequisites - Linux
The following prerequisites must be met in order to install ERA Agent component on Linux:
The server computer must be reachable from the network and has ERA Server and ERA Web Console installed
A Certificate for the Agent must be present
A server Certification Authority public key file must be present
The Agent installation file must be set as an executable (run chmod +x on the file to set this)Minimum supported version of openssl is openssl-1.0.1e-30
3.4.6 Web Console installation - Linux
Before installing the ERA Web Console component, make sure all prerequisites are met. Follow these steps toinstall ERA Web Console:
1. Run the following commands to copy the era.war file to the Tomcat folder:
Debian and Ubuntu distributions sudo cp era.war /var/lib/tomcat7/webapps/
CentOS, RedHat and Fedora distributions sudo cp era.war /var/lib/tomcat/webapps/
OpenSUSE distribution sudo cp era.war /usr/share/tomcat/webapps/
Alternatively, you can extract the contents of era.war to /var/lib/tomcat/webapps/era/
2. Run the following command to restart the Tomcat service and deploy the .war file:
Debian and Ubuntu distributions sudo service tomcat7 restart
CentOS, RedHat and Fedora distributions sudo service tomcat restart
OpenSUSE distribution sudo service tomcat restart
Test the connection to ERA Web Console after installation. Open the following link in your browser on localhost (alogin screen should be displayed):
http://localhost:8080/era or, if you access the server remotely, http://IP_ADDRES_OR_HOSTNAME:8080/era
NOTE: HTTP port, by default 8080, is set during manual Apache Tomcat installation. You can also set up HTTPSconnection for Apache Tomcat.

104
3.4.6.1 ERA Web Console prerequisites - Linux
The following prerequisites must be installed before you install the ERA Web Console component on Linux:
Java - always use the latest officially released version of Java (ERA Web Console requires at least Java version 7(or openjdk), but we strongly recommend to use the latest version)
Apache Tomcat (a supported version)
Web Console file (era.war) saved to your local hard drive.
To install the Java and/or Apache Tomcat package(s), use the following terminal commands depending on yourLinux distribution(s):
Debian and Ubuntu distributions sudo apt-get install openjdk-7-jdk tomcat7
CentOS, RedHat and Fedora distributions sudo yum install java-1.8.0-openjdk tomcat
OpenSUSE distribution sudo zypper install java-1_8_0-openjdk tomcat
3.4.7 Proxy installation - Linux
1. Make sure all prerequisites are met.2. Run an installation script to install the Proxy server. See an example of the installation script below.
Connection settings
A target must be specified with a:
Hostname
IPv4 address
IPv6 address
DNS resource record - The Linux computer must be in the domain - see the chapter DNS Resource record.
Port must be specified: use port 2222 for both Server and Proxy.
Example of an installation script(New l ines are spl i t by "\" for copying the whole command to Terminal )
./Proxy-Linux-x86_64.sh \
--db-hostname=10.1.179.28 \
--db-name=era_6_db_proxy \
--db-admin-username=sa \
--db-admin-password=admin.1 \
--db-user-username=tester \
--db-user-password=Admin.1 \
--db-port=1433 \
--db-type="MS SQL Server" \
--db-driver=SQL \
--skip-license \
--hostname=10.1.179.30 \
--port=2222 \
--cert-path=/home/adminko/Desktop/proxy.pfx \
--cert-auth-path=/home/adminko/Desktop/CA-server.der \
--cert-password=root \
--server-root-password=jjf#jDjr
You can modify the following attributes:
Attribute Description Required
--db-hostname Computer name or IP address of the database server (defaultvalue is localhost)
Yes
--db-name Name of the database to be used (default value is era_db orera_proxy_db)
Yes

105
Attribute Description Required
--db-admin-username Database administrator username (used by installation forcreating and modifying database; default value is root)
Yes
--db-admin-password Database administrator password Yes
--db-user-username Database ERA Server user username (used by ERA Server forconnecting to database); should be no longer than 16 characters
Yes
--db-user-password Database ERA Server user password Yes
--db-port Port of the database server (default value is 3306) Yes
--db-type Type of database, which will be used (possible values: MySQLServer, MS SQL Server; default value is MySQL Server)
Yes
--db-driver ODBC driver used for connecting to database (commandodbcinst -q -d gives a list of available drivers, use one of thisdrivers for example: --db-driver="MySQL")
Yes
--skip-license Installation will not ask user for license agreement confirmation -
--hostname Hostname or IP address of the Server (default value is localhost)
Yes
--port Server port (default value is 2222) or Proxy port (default value is1236)
Yes
--proxy-port Port which will be used by proxy (default value is 2222) -
--product-guid Product GUID (if not defined, it will be generated) -
--cert-path Local path to the Proxy certificate file Yes*
--cert-content Base64 encoded content of PKCS12 encoded public keycertificate plus private key used to set up secure communicationchannels with Server and Agents
Yes*
--cert-auth-path Path to the Server's Certificate Authority file Yes**
--cert-auth-content Base64 encoded content of DER encoded certificate authorityprivate key certificate used to verify remote peers (Proxy orServer)
Yes**
--cert-password Certificate Authority password. Must match the Agent'scertificate password (can be empty if password was not used inpeer certificate)
Yes
--cert-auth-password Certificate Authority password
--keep-database Database will not be removed during uninstallation -
* Use only one of the --cert-path or --cert-content options.** Use only one of the --cert-auth-path or --cert-auth-content options.
To verify whether the installation was successful, use the following command to verify whether the service isrunning:
sudo service eraproxy status
The installer log may be useful for troubleshooting and can be found in Log files.

106
3.4.7.1 Proxy prerequisites - Linux
The following prerequisites must be met in order to install Proxy component on Linux:
ERA Server and the ERA Web Console installed (on a Server computer).
An ODBC Driver for the connection to the Database Server (MySQL / MS SQL) installed on the computer.
A Database Server already installed and configured.
Proxy Certificate Proxy Certificate created and downloaded to your local drive (When creating a new certificate,select Proxy as the Product).
Certificate Authority prepared on your local drive.
A valid license.
ERA Agent must be installed on a local computer to fully support all program features.
Proxy installation file set as an executable. (chmod +x Proxy-Linux-x86_64.sh)
Minimum supported version of openssl is openssl-1.0.1e-30
3.4.8 RD Sensor installation and prerequisites - Linux
To install the RD Sensor component on Linux, follow these steps:
1. Make sure the following prerequisites are met:
o The Network can be searched (ports are open, the firewall is not blocking incoming communication, etc. ).
o The Server computer can be reached.
o ERA Agent must be installed on the local computer to fully support all program features.
o The Terminal is open.
o RD Sensor installation file set as an executable:
chmod +x RDSensor-Linux-x86_64.sh
2. Use the following command to run the installation file as sudo:
sudo ./RDSensor-Linux-x86_64.sh
3. Read the End-User License Agreement. Use Space bar to proceed to the next page of the EULA.You will be prompted to specify whether you accept the license. Press Y on your keyboard if you agree, otherwisepress N.
4. ESET Rogue Detection Sensor will start after installation is completed.
5. To see if installation was successful, verify that the service is running by executing the following command:
sudo service rdsensor status
6. The Rogue Detection Sensor log file can be found in Log files:
/var/log/eset/RogueDetectionSensor/trace.log

107
3.4.9 Mobile Device Connector installation - Linux
You can install Mobile Device Connector on a different server than the one on which your ERA Server is running. Forexample if you want to make Mobile Device Connector accessible from the internet so that the user's mobiledevices can be managed at all times.
Installation of the ERA Server component on Linux is performed using a command in the Terminal. Make sure all prerequisites are met. You can prepare an installation script and then execute it using sudo.
There are many optional installation parameters, but some of them are required.
Your ERA Peer Certificate is required for installation. There are two methods to get the ERA peer certificate:
Server assisted installation - you will need to provide ERA Web Console administrator credentials (installer willdownload required certificates automatically).
Offline installation - you will need to provide a Peer Certificate (the Proxy certificate exported from ESET RemoteAdministrator). Alternatively, you can use your custom certificate.
Installation command parameters that must be provided:
HTTPS (Proxy) certificate:--https-cert-path=
--https-cert-password=
Peer Certificate:For a Server assisted installation at least include:
--webconsole-password=
For an Offline installation include:--cert-path=
--cert-password= (password is not needed for the default Agent Certificate created during initial ERA Serverinstallation)
Connection to ERA Server (name or IP address):--hostname=
For a MySQL database include:--db-type="MySQL Server"
--db-driver=
--db-admin-username=
--db-admin-password=
--db-user-password=
For a MSSQL database include:--db-type="Microsoft SQL Server"
--db-driver=
--db-admin-username=
--db-admin-password=
--db-user-password=
Example of an installation script(New l ines are spl i t by "\" for copying the whole command to Terminal )
sudo ./MDMCore-Linux-x86_64-0.0.0.0.sh \
--https-cert-path="./proxycert.pfx" \
--https-cert-password="123456789" \
--port=2222 \
--db-type="MySQL" \
--db-driver="MySQL" \
--db-admin-username="root" \
--db-admin-password=123456789 \
--db-user-password=123456789 \
--db-hostname="127.0.0.1" \
--webconsole-password=123456789 \
--hostname=username.LOCAL \
--mdm-hostname=username.LOCAL

108
For a complete list of available parameters (print help message), use:--help
Installer log
The installer log may be useful for troubleshooting and can be found in Log files.
After installation is complete, check to see if the Mobile Device Connector is running correctly by opening https://your-mdm-hostname:enrollment-port (for example https://eramdm:9980) in your web browser. If the installationwas successful, you will see following message:
You can also use this URL to check the availability of the Mobile Device Connector server from the internet (ifconfigured in such a way) by visiting it from a mobile device. If you are unable to reach the page, check your firewalland the configuration of your network infrastructure.
3.4.9.1 Mobile Device Connector prerequisites - Linux
The following prerequisites must be met in order to install Mobile Device Connector on Linux:
A Database Server already installed and configured with a root account (a user account doesn't have to be createdprior to installation, the installer can create the account).
An ODBC Driver for the connection to the database server (MySQL / MS SQL) installed on the computer.apt-get install unixodbc libmyodbc (Debian, Ubuntu dis tributions)yum install mysql-connector-odbc (CentOS, Red-Hat, Fedora dis tributions)zypper install unixodbc myodbc-unixbox (OpenSUSE dis tributions)
NOTE: You should use unixODBC_23 package (not the default unixODBC) in order for the ERA Server to connect tothe MySQL database without any issues. This is especially true for SUSE Linux.
o MDMCore installation file set as an executable.
chmod +x MDMCore-Linux-x86_64.sh
o After installation, verify that MDMCore service is running.
service mdmcore status
o The minimum supported version of openSSL is openssl-1.0.1e-30
NOTE: If your MDM database on MySQL is too large (thousands of devices) the default innodb_buffer_pool_sizevalue is too small. For more information database optimizing see: http://dev.mysql.com/doc/refman/5.6/en/optimizing-innodb-diskio.html
IMPORTANT: You will need an SSL certificate in .pfx format for secure communication over HTTPS. Werecommend that you use a certificate provided by a Certificate Authority(CA). Self-signed certificates are notrecommended because not all mobile devices let users to accept self-signed certificates. This isn't an issue with CAsigned certificates, because they are trusted and do not require acceptance by the user.

109
NOTE: You need to have certificate signed by CA, and corresponding private key, and utilize standard procedures,to merge those (traditionally using OpenSSL) into one .pfx file:openssl pkcs12 -export -in certificate.cer -inkey privateKey.key -out httpsCredentials.pfx
This is a standard procedure for most servers which are using SSL certificates.
IMPORTANT: For Offline installation, you will also need a Peer certificate (the Agent certificate exported fromESET Remote Administrator). Alternatively, you can use your custom certificate with ERA.
3.4.10 Apache HTTP Proxy installation - Linux
Choose the installation steps for Apache HTTP Proxy according to the Linux distribution you use on your server:
Linux installation (distribution generic) for Apache HTTP Proxy
1. Install Apache HTTP Server (at least version 2.4.10).
2. Verify that the following modules are loaded:
access_compat, auth_basic, authn_core, authn_file, authz_core, authz_groupfile,
authz_host, proxy, proxy_http, proxy_connect, cache, cache_disk
3. Add the caching configuration:
CacheEnable disk http://
CacheDirLevels 4
CacheDirLength 2
CacheDefaultExpire 3600
CacheMaxFileSize 200000000
CacheMaxExpire 604800
CacheQuickHandler Off
CacheRoot /var/cache/apache2/mod_cache_disk
4. If the directory /var/cache/apache2/mod_cache_disk does not exist, create it and assign Apache privileges(r,w,x).
5. Add Proxy configuration:
ProxyRequests On
ProxyVia On
<Proxy *>
Order deny,allow
Deny from all
Allow from all
</Proxy>
6. Enable the added caching proxy and configuration (if configuration is in the main Apache configuration file, youcan skip this step).
7. If necessary, change listening to your desired port (port 3128 is set by default).
8. Optional basic authentication:
o Add authentication configuration to the proxy directive:
AuthType Basic
AuthName "Password Required"
AuthUserFile /etc/apache2/password.file
AuthGroupFile /etc/apache2/group.file
Require group usergroup
o Create a password file using htpasswd.exe -c
o Manually create a file named group.file with usergroup:username
9. Restart the Apache HTTP Server.

110
Ubuntu Server 14.10 and other Debian-based Linux distributions installation of Apache HTTP Proxy
1. Install the latest version of Apache HTTP Server from apt repository:
sudo apt-get install apache2
2. Execute the following command to load the required Apache modules:
sudo a2enmod access_compat auth_basic authn_core authn_file authz_core authz_groupfile
authz_host proxy proxy_http proxy_connect cache cache_disk
3. Edit the Apache caching configuration file:
sudo vim /etc/apache2/conf-available/caching.conf
and copy/paste the following configuration:
CacheEnable disk http://
CacheDirLevels 4
CacheDirLength 2
CacheDefaultExpire 3600
CacheMaxFileSize 200000000
CacheMaxExpire 604800
CacheQuickHandler Off
CacheRoot /var/cache/apache2/mod_cache_disk
4. This step should not be required, but if the caching directory is missing, run following commands:
sudo mkdir /var/cache/apache2/mod_cache_disk
sudo chown www-data /var/cache/apache2/mod_cache_disk
sudo chgrp www-data /var/cache/apache2/mod_cache_disk
5. Edit the Apache proxy configuration file:
sudo vim /etc/apache2/conf-available/proxy.conf
and copy/paste the following configuration:
ProxyRequests On
ProxyVia On
<Proxy *>
Order deny,allow
Deny from all
Allow from all
</Proxy>
6. Enable the configuration files you edited in earlier steps:
sudo a2enconf caching.conf proxy.conf
7. Switch the listening port of Apache HTTP Server to 3128. Edit the file /etc/apache2/ports.conf and replace Listen80 with Listen 3128.
8. Optional basic authentication:
sudo vim /etc/apache2/conf-available/proxy.conf
o copy/paste authentication configuration before </Proxy>:
AuthType Basic
AuthName "Password Required"
AuthUserFile /etc/apache2/password.file
AuthGroupFile /etc/apache2/group.file
Require group usergroup
o install apache2-utils and create a new password file (for example username: user, group: usergroup):
sudo apt-get install apache2-utils
sudo htpasswd -c /etc/apache2/password.file user
o create a file called group:
sudo vim /etc/apache2/group.file
and copy/paste the following line:

111
usergroup:user
9. Restart the Apache HTTP Server using the following command:
sudo service apache2 restart
Forwarding for ESET communication only
This chapter is available only in the Online help topic.
Proxy chaining (all traffic)
Add the following to the proxy configuration (password is working only on child proxy):
ProxyRemote * http://IP_ADDRESS:3128
3.4.11 Squid HTTP Proxy installation on Ubuntu Server 14.10
You can use Squid proxy instead of Apache on Ubuntu Server. To install and configure Squid on Ubuntu Server 14.10(and similar Debian-based Linux distributions), follow the steps below:
1. Install the Squid3 package:
sudo apt-get install squid3
2. Edit the Squid configuration file /etc/squid3/squid.conf and replace:
#cache_dir ufs /var/spool/squid3 100 16 256
with:
cache_dir ufs /var/spool/squid3 5000 16 256 max-size=200000000
NOTE: 5000 is cache size in MB.
3. Stop the squid3 service.
sudo service squid3 stop
sudo squid3 –z
4. Edit the Squid configuration file again and add http_access allow all before http_access deny all to allowall clients to access the proxy.
5. Restart the squid3 service:
sudo service squid3 restart
3.4.12 Mirror tool
The mirror tool is necessary for offline virus signature database updates. If your client computers do not have anInternet connection and need virus database updates, you can use the Mirror tool to download update files fromESET update servers and store them locally.
NOTE: The mirror tool downloads virus database definitions only, it does not download PCUs (ProgramComponent Updates) and LiveGrid data. To update your ESET security product on offline client computers, werecommend that you upgrade the product using the Software Install client task in ERA. Alternatively, you canupgrade products individually.
Prerequisites
The target folder must be available for sharing, Samba/Windows or HTTP/FTP service, depending on how youwant to have the updates accessible.
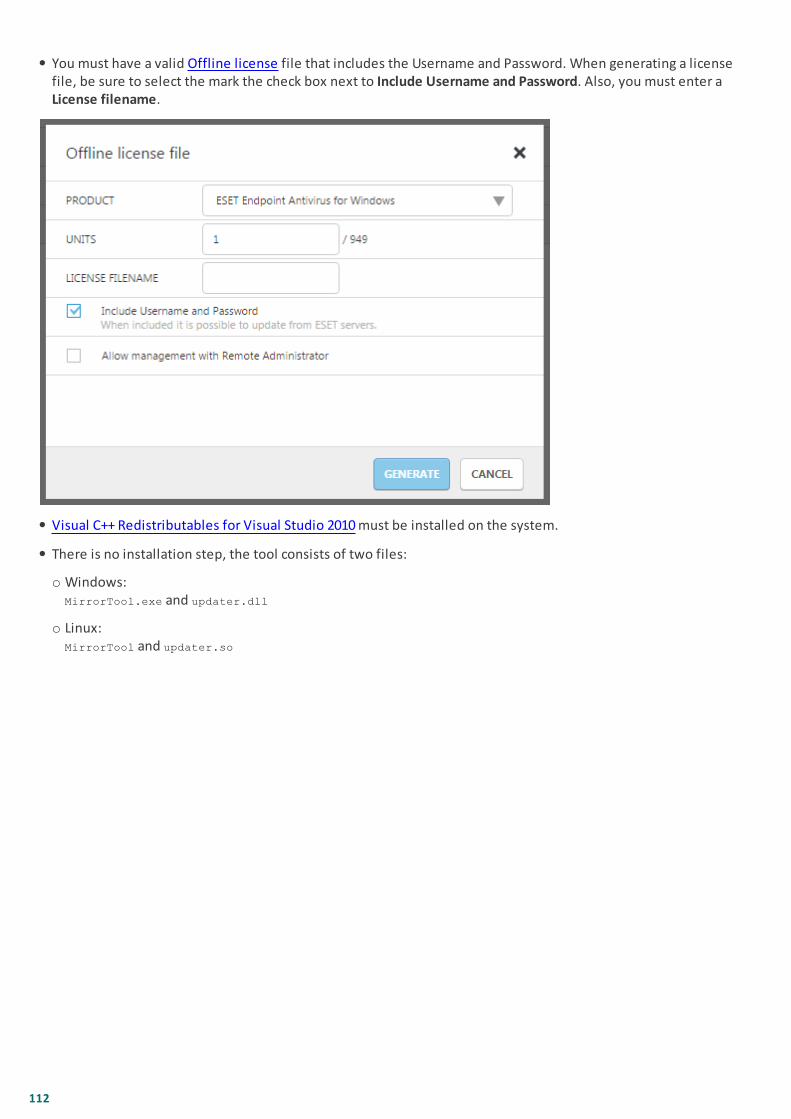
112
You must have a valid Offline license file that includes the Username and Password. When generating a licensefile, be sure to select the mark the check box next to Include Username and Password. Also, you must enter aLicense filename.
Visual C++ Redistributables for Visual Studio 2010 must be installed on the system.
There is no installation step, the tool consists of two files:
o Windows:MirrorTool.exe and updater.dll
o Linux:MirrorTool and updater.so

113
Usage
To see Mirror tool help, run MirrorTool --help to view all available commands for the tool:
The parameter --updateServer is optional. When you use it, you must specify the full URL of the update server.
The parameter --offlineLicenseFilename is mandatory. You must specify a path to your offline license file (asmentioned above).
To create a mirror, run the MirrorTool with at least the minimal required parameters. Here is an example:
o Windows:
MirrorTool.exe --mirrorType regular --intermediateUpdateDirectory
c:\temp\mirrorTemp --offlineLicenseFilename c:\temp\offline.lf --outputDirectory c:\temp\mirror
o Linux:
sudo ./MirrorTool --mirrorType regular --intermediateUpdateDirectory /tmp/mirrorTool/mirrorTemp
--offlineLicenseFilename /tmp/mirrorTool/offline.lf --outputDirectory /tmp/mirrorTool/mirror
Mirror tool and Update settings
To automate the distribution of virus database updates, you can create a schedule to run the Mirror tool. To do so,open your Web Console and navigate to Client Tasks > Operating System > Run Command. Select Command line torun (including a path to the MirrorTool.exe) and a reasonable trigger (such as CRON for every hour 0 0 * * * ? *).Alternatively, you can use the Windows Task Scheduler or Cron in Linux.
To configure updates on a client computer(s), create a new policy and configure Update server to point to yourmirror address or shared folder.

114
3.4.13 Failover Cluster - Linux
The following refers to ESET Remote Administrator installation and configuration on a Red Hat high-availabilitycluster.
Linux Cluster Support
ESET Remote Administrator Server or ERA Proxy components can be installed on Red Hat Linux 6 cluster and higher.Failover Cluster is only supported in active/passive mode with the cluster manager rgmanager.
Prerequisites
Active/passive cluster must be installed and configured. Only one node can be active at a time, other nodes mustbe on standby. Load balancing is not supported.
Shared storage - iSCSI SAN, NFS and other solutions are supported (any technology or protocol which providesblock based or file based access to shared storage, and makes the shared devices appear like locally attacheddevices to the operating system). Shared storage must be accessible from each active node in the cluster, and theshared file system must be properly initialized (for example, using the EXT3 or EXT4 file system).
The following HA add-ons are required for system management:o rgmanagero Conga
rgmanager is the traditional Red Hat HA cluster stack. It is a mandatory component.
The Conga GUI is optional. The Failover Cluster can be managed without it, however we recommend that youinstall it for best performance. In this guide we assume that it is installed.
Fencing must be properly configured in order to prevent data corruption. The cluster administrator must configurefencing if it is not already configured.
If you do not already have a cluster running, you can use the following guide to set up a high-availability FailoverCluster (active/passive) on Red Hat: Red Hat Enterprise Linux 6 Cluster Administration.
Scope
ESET Remote Administrator components that can be installed on a Red Hat Linux HA cluster:
ERA Server with ERA Agent
ERA Proxy with ERA Agent
NOTE: ERA Agent must be installed, otherwise the ERA cluster service will not run.
NOTE: Installation of the ERA Database or ERA Web Console on a cluster is not supported.
The following installation example is for a 2-node cluster. However, you can install ESET Remote Administrator on amulti-node cluster using this example as a reference only. The cluster nodes in this example are named node1 andnode2.
Installation steps
1. Install ERA Server or ERA Proxy on node1.
o Please note that the hostname in the Server or Proxy certificate must contain the external IP (or hostname) ofthe cluster’s interface (not local IP or hostname of the node).
2. Stop and disable the ERA Server (or ERA Proxy) Linux services using the following commands:
service eraserver stop
chkconfig eraserver off
3. Mount shared storage to node1. In this example, the shared storage is mounted to /usr/share/erag2cluster.

115
4. In /usr/share/erag2cluster, create the following directories:
/usr/share/erag2cluster/etc/opt/eset/RemoteAdministrator/Server/usr/share/erag2cluster/opt/eset/RemoteAdministrator/Server/usr/share/erag2cluster/var/log/eset/RemoteAdministrator/Server/usr/share/erag2cluster/var/opt/eset/RemoteAdministrator/Server
5. Move recursively the following directories to the destinations shown below (source > destination):
Move folder: Move to:
/etc/opt/eset/RemoteAdministrator/Server /usr/share/erag2cluster/etc/opt/eset/RemoteAdministrator
/opt/eset/RemoteAdministrator/Server /usr/share/erag2cluster/opt/eset/RemoteAdministrator
/var/log/eset/RemoteAdministrator/Server /usr/share/erag2cluster/var/log/eset/RemoteAdministrator
/var/opt/eset/RemoteAdministrator/Server /usr/share/erag2cluster/var/opt/eset/RemoteAdministrator
6. Create symbolic links (this may require to create new folders manually):This chapter is available only in the Online help topic.
7. Copy the eracluster_server (eracluster_proxy) script found in the setup directory of ERA Server or ERA Proxyto /usr/share/cluster. The scripts do not use the.sh extension in the setup directory.
cp /opt/eset/RemoteAdministrator/Server/setup/eracluster_server /usr/share/cluster/eracluster_server.sh
8. Unmount the shared storage from node1
9. Mount the shared storage to the same directory on node2 as you mounted to on node1 (/usr/share/erag2cluster).
10.On node2, create the following symbolic links:This chapter is available only in the Online help topic.
11. Copy the eracluster_server or (eracluster_proxy) script found in the setup director of ERA Server or ERA Proxyto /usr/share/cluster. The scripts do not use the .sh extension in the setup directory.
cp /opt/eset/RemoteAdministrator/Server/setup/eracluster_server /usr/share/cluster/eracluster_server.sh
The next steps are performed in Conga Cluster Administration GUI:
12. Create a Service Group, for example EraService.
The ESET Remote Administrator cluster service requires three resources: IP address, file system and script.
13. Create the necessary service resources.
Add an IP address (external cluster address where Agents will connect), file system and Script resources.The file system resource should point to the shared storage.The mount point of the file system resource should be set to /usr/share/erag2cluster.The “Full Path to Script File” parameter of the Script resource should be set to /usr/share/cluster/eracluster_server (or /usr/share/cluster/eracluster_proxy).
14. Add the above resources to the EraService group.
After the Server cluster is successfully set up, install ERA Agent on both nodes on the local disk (not on the sharedcluster disk). When using the --hostname= command, you must specify the external IP address or hostname of thecluster's interface (not localhost!).

116
3.4.14 How to uninstall or reinstall a component - Linux
If you want to reinstall or upgrade to a more recent version, run the installation script again.
To uninstall a component (in this case ERA Server), run the installer with the --uninstall parameter, as shown below:sudo ./Server-Linux-x86_64.sh --uninstall --keep-database
If you want to uninstall other component, use appropriate package name in the command. For example ERA Agent:sudo ./Agent-Linux-x86_64.sh --uninstall
IMPORTANT: Configuration and database files will be removed during uninstallation. To preserve database files,create a SQL dump of the database or use the --keep-database parameter.
After uninstalling, verify whether
the service eraserver is deleted.
the folder /etc/opt/eset/RemoteAdministrator/Server/ is deleted.
NOTE: We recommend that you create a database dump backup before performing uninstallation in case youneed to restore your data.
3.5 Component installation on Mac OS X
In most installation scenarios, you need to install different ESET Remote Administrator components on differentmachines to accommodate different network architectures, meet performance requirements, or for other reasons.
NOTE: OS X is supported as a client only. The ERA Agent and ESET products for OS X can be installed on OS Xhowever ERA Server cannot be installed on OS X.
3.5.1 Agent installation - Mac OS X
These steps apply when performing a local installation of the Agent.
1. Make sure all prerequisites are met:
ERA Server and the ERA Web Console are installed (on a Server computer).
An Agent certificate is created and prepared on your local drive.
A Certification Authority is prepared on your local drive. (Only needed for unsigned certificates)
NOTE: Should you experience problems when deploying ERA Agent remotely (the Server task Agentdeployment ends with a Failed status) please refer to Agent deployment troubleshooting.
2. Get the installation file (standalone agent installer .dmg). You can get it:
o from the ESET download site
o from your system administrator
3. Double click the .dmg file and then start the installation by double clicking the .pkg file .
4. Proceed through the installation and when asked enter the Server connection data: Server host (hostname or IPaddress of the ERA Server) and the Server port (by default 2222).
5. Select a Peer certificate and a password for this certificate. Optionally, you can add a Certification authority.
6. Review the install location and click Install. The Agent will be installed on your computer.
7. The ERA Agent log file can be found here:
/Library/Application Support/com.eset.remoteadministrator.agent/Logs//Users/%user%/Library/Logs/EraAgentInstaller.log

117
3.6 Database
ESET Remote Administrator uses a database to store client data. The following sections detail the installation, backup, upgrade and migration of the ERA Server/ERA Proxy database:
Review database compatibility and system requirements for ERA Server.
If you do not have a database configured for use with ERA Server, Microsoft SQL Server Express is included withthe installer.
If you use Microsoft Small Business Server (SBS) or Essentials, we recommended that you make sure allrequirements are met and that you are using a supported Operating System. When all requirements are met,follow the installation instructions for Windows SBS / Essentials to install ERA on these operating systems.
If you have Microsoft SQL Server installed in your system, review the requirements below to make sure yourversion of Microsoft SQL Server is supported by ESET Remote Administrator. If your version of Microsoft SQLServer is not supported, upgrade to a compatible version of SQL Server.
One of the prerequisites for the installation is to have Microsoft SQL Server installed and configured. The followingrequirements must be met:
Install Microsoft SQL Server 2008 R2 or later, alternatively you can install Microsoft SQL Server 2008 R2 Express orlater. Choose Mixed mode authentication during installation.
If you have Microsoft SQL Server already installed, set authentication to Mixed mode (SQL Server authenticationand Windows authentication). To do so, follow the instructions in this Knowledgebase article.
Allow TCP/IP connections to the SQL Server. To do so, follow instructions in this Knowledgebase article from partII. Allow TCP/IP connections to the SQL database.
NOTE: For configuring, managing, administering of Microsoft SQL Server (databases and users), download SQLServer Management Studio (SSMS).
NOTE: If you choose to install Microsoft SQL Server Express during installation, you will not be able to install it ona Domain Controller. This is likely to happen if you are using Microsoft SBS. If you use Microsoft SBS, we recommendthat you install ESET Remote Administrator on a different server or do not select the SQL Server Express componentduring installation (this requires you to use your existing SQL Server or MySQL to run the ERA database). Forinstructions to install ERA Server on a Domain Controller, see our Knowledgebase article.
3.6.1 Database Server Backup and Restore
All ESET Remote Administrator information and settings are stored in the database. We recommend that you backup your database regularly to prevent loss of data. Refer to the appropriate section below for your database:
NOTE: The backup can also be used later when migrating ESET Remote Administrator to a new server.
MS SQL Backup examples
To backup an MS SQL database to a file, follow the examples shown below:
IMPORTANT: these examples are intended for use with default settings (for example, default database nameand database connection settings). Your backup script will need to be customized to accommodate any changes youhave made to default settings.
One time database backup
Execute this command in a Windows command prompt to create a backup into file named BACKUPFILE:
SQLCMD -S HOST\ERASQL -q "BACKUP DATABASE ERA_DB TO DISK = N'BACKUPFILE'"
NOTE: In this example HOST stands for the IP address or hostname and ERASQL for the name of the MS SQL serverinstance.

118
Regular database backup with sql script
Choose one of the following SQL scripts:
a) Create regular backups and store them based on date of creation:
1. @ECHO OFF
2. SQLCMD.EXE -S HOST\ERASQL -d ERA_DB -E -Q "BACKUP DATABASE ERA_DB TO DISK = N'BAKCUPFILE'
WITH NOFORMAT,INIT, NAME = N'ERA_DB', SKIP, NOREWIND, NOUNLOAD, STOP_ON_ERROR, CHECKSUM, STATS=10"
3. REN BACKUPFILE BACKUPFILE-[%DATE%-%RANDOM%]
b) Append your backup to one file:
1. @ECHO OFF
2. SQLCMD.EXE -S HOST\ERASQL -d ERA_DB -E -Q "BACKUP DATABASE ERA_DB TO DISK = N'BAKCUPFILE'
WITH NOFORMAT, NOINIT, NAME = N'ERA_DB', SKIP, NOREWIND, NOUNLOAD, STOP_ON_ERROR, CHECKSUM, STATS=10"
MS SQL restore
To restore a MS SQL database from a file, follow the example shown below:
SQLCMD.EXE -S HOST\ERASQL -d ERA_DB -E -Q "RESTORE DATABASE ERA_DB FROM DISK = N'BACKUPFILE'"
MySQL backup
To backup a MySQL database to a file, follow the example shown below:
mysqldump --host HOST --disable-keys --extended-insert --routines -u ROOTLOGIN -p ERADBNAME > BACKUPFILE
NOTE: In this example HOST stands for the IP address or hostname of the MySQL server, ROOTLOGIN for the rootaccount of the MySQL Server, and ERADBNAME stands for ERA database name.
If you want to restore the database backup, follow the instructions for your database below:
MySQL restore
To restore a MySQL database from a file, follow the example shown below:
mysql --host HOST -u ROOTLOGIN -p ERADBNAME < BACKUPFILE
NOTE: For more information on Microsoft SQL Server backup please visit Microsoft technet website. For moreinformation on MySQL Server backup please visit MySQL documentation website.
3.6.2 Database Server Upgrade
Follow the instructions below to upgrade an existing Microsoft SQL Server instance to a newer version for use withERA Server or ERA Proxy database:
1. Stop all running ERA Server or ERA Proxy services connecting to the database server that you will be upgrading.Additionally, stop any other applications that might be connecting to your Microsoft SQL Server instance.
2. Back up all relevant databases safely before proceeding.
3. Perform the database server upgrade following the database vendor's instructions.
4. Start all ERA Server and or ERA Proxy services and check their trace logs to verify the database connection isworking correctly.
See the following web pages for more information specific to your database:
Upgrade SQL Server https://msdn.microsoft.com/en-us/library/bb677622.aspx (you can click Other Versions forinstructions to upgrade to a specific SQL Server version)
Upgrade MySQL Server (to version 5.6) http://dev.mysql.com/doc/refman/5.6/en/upgrading.html

119
3.6.3 ERA Database Migration
Click the appropriate link below for instructions to migrate ERA Server or ERA Proxy database between different SQLServer instances (this also applies when migrating to a different SQL Server version or when migrating to a SQLServer hosted on a different machine):
Migration process for SQL Server
Migration process for MySQL Server
This migration process is the same for Microsoft SQL Server and Microsoft SQL Server Express.
3.6.3.1 Migration process for MS SQL Server
This migration process is the same for Microsof SQL Server and Microsoft SQL Server Express.
For additional information, see the following Microsoft Knowledge Base article: https://msdn.microsoft.com/en-us/library/ms189624.aspx.
Prerequisites:
o Source and target SQL Server instances must be installed. They may be hosted on different machines.
o The target SQL Server instance must have at least the same version as the source instance. Downgrade is notsupported!
o SQL Server Management Studio must be installed. If the SQL Server instances are on different machines, it mustbe present on both.
Migration:
1. Stop the ERA Server or ERA Proxy Service.
2. Log into the source SQL Server instance via SQL Server Management Studio.
3. Create a full database backup of the database to be migrated. We recommend that you specify a new backup setname. Otherwise if the backup set has already been used, the new backup will be appended to it, which willresult in an unnecessarily large backup file.

120
4. Take the source database offline, select Tasks > Take Offline.
5. Copy the backup (.bak) file that you created in step 3 to a location that is accessible from the target SQL Serverinstance. You may need to edit access rights for the database backup file.
6. Bring the source database online again but do not start ERA Server yet!
7. Log into the target SQL Server instance with SQL Server Management Studio.
8. Restore your database on the target SQL Server instance.
9. Type a name for your new database into the To database field. You can use the same name as your old database ifyour prefer.

121
10. Select From device under Specify the source and location of backup sets to restore and then click … .
11. Click Add, navigate to your backup file and then open it.
12. Select the most recent possible backup to restore (the backup set may contain multiple backups).

122
13. Click the Options page of the restore wizard. Optionally, select Overwrite existing database and ensure that therestore locations for the database (.mdf) and for the log (.ldf) are correct. Leaving the default values unchangedwill use the paths from your source SQL server, so please check these values.
o If you are unsure where the DB files are stored on the target SQL Server instance, right-click an existingdatabase, select properties and click the Files tab. The directory where the database is stored is displayed inthe Path column of the table shown below.

123
14. Click OK in the restore wizard window.
15. Ensure that the new database server has SQL Server Authentication enabled. Right-click the server and clickProperties. Navigate to Security and verify that SQL Server and Windows Authentication mode is selected.
16. Create a new SQL Server login (for ERA Server/Proxy) in the target SQL Server with SQL Server authentication andmap the login to a user in the restored database.

124
o Do not enforce password expiration!o Recommended characters for usernames:
Small ASCII letters, numbers and character underscore "_"o Recommended characters for passwords:
ASCII characters ONLY, including big and small ASCII letters, numbers, spaces, special characterso Do not use non-ASCII characters, curly braces {} or @o Please note that if you do not follow the character recommendations above, you may have database
connectivity problems or you will need to escape the special characters in the later steps during databaseconnection string modification. Character escaping rules are not included in this document.

125
17. Map the login to a user in the target database. In the user mappings tab, ensure that the database user has theroles: db_datareader, db_datawriter, db_owner.

126
18. To enable the latest database server features, change the restored database Compatibility level to the newest.Right-click the new database and open the database Properties.
NOTE: SQL Server Management Studio is unable to define compatibility levels later than that of the version inuse. For example SQL Server Management Studio 2008 is unable to set compatibility level for SQL Server 2014.

127
19. Make sure the TCP/IP connection protocol is enabled for SQLEXPRESS and the TCP/IP port is set to 1433. You cando so by opening Sql Server Configuration Manager, navigate to SQL Server Network Configuration > Protocols forSQLEXPRESS. Right-click TCP/IP and select Enabled. Then double-click TCP/IP, switch to Protocols tab, scroll downto IPAll and into Port field type 1433. Click OK and restart the SQL Server service.
20.Find startupconfiguration.ini on the machine, where ERA Server/Proxy is installed.
o For Windows Vista and later:% PROGRAMDATA %\ESET\RemoteAdministrator\Server\EraServerApplicationData\Configuration\startupconfiguration.ini
o For earlier Windows versions:% ALLUSERSPROFILE %\ Application Data\ESET\RemoteAdministrator\Server\EraServerApplicationData\Configuration\startupconfiguration.ini
o For Linux:/etc/opt/eset/RemoteAdministrator/Server/StartupConfiguration.ini
21. Change the database connection string in ERA Server/Proxy startupconfiguration.ini
o Set the address and port of the new database server.o Set new ERA user name and password in the connection string.
The final result should look like:This chapter is available only in the Online help topic.
22. Start the ERA Server/Proxy and verify that the ERA Server/Proxy service is running correctly.

128
3.6.3.2 Migration process for MySQL Server
Prerequisites
Source and target SQL Server instances must be installed. They may be hosted on different machines.
MySQL tools must be available on at least one of the computers (mysqldump and mysql client).
Useful links
http://dev.mysql.com/doc/refman/5.6/en/copying-databases.html
http://dev.mysql.com/doc/refman/5.6/en/mysqldump.html
http://dev.mysql.com/doc/refman/5.6/en/mysql.html
Migration process
In the commands, configuration files or SQL statements below, please always replace:
SRCHOST with the address of the source database server
SRCROOTLOGIN with the source MySQL server root user login
SRCERADBNAME with the name of the source ERA database to back up
BACKUPFILE with the path to the file where the backup will be stored
TARGETHOST with the address of the target database server
TARGETROOTLOGIN with the target MySQL server root user login
TARGETERADBNAME with the name of the target ERA database (after migration)
TARGETERALOGIN with the login name for the new ERA database user on the target MySQL server
TARGETERAPASSWD with the password of the new ERA database user on the target MySQL server
It is not necessary to execute the SQL statements below via the command line. If there is GUI tool available, you canuse an application you already know.
The following procedure is only available in the Online help topic.
3.7 ISO image
An ISO image file is one of the formats you can download (All-in-one Installers category) ESET Remote Administratorinstallers in. The ISO image contains the following:
ERA Installer package
Separate installers for each component
The ISO image is useful when you want to keep all ESET Remote Administrator installers in one place. It alsoeliminates the need to download the installers from the ESET website every time you need to run the installation.The ISO image is also useful to have when you want to install ESET Remote Administrator on a virtual machine.
129
3.8 DNS Service Record
To set up a DNS Resource Record:
1. On your DNS Server (DNS server on your Domain controller), navigate to Control Panel > Administrative Tools.
2. Select the DNS value.
3. In the DNS Manager, select _tcp from the tree and create a new Service location (SRV) record.
4. Enter the service name in the Service field according to DNS standard rules, type an underscore ( _ ) in front ofthe service name (use your own service name, for example _era).
5. Enter the tcp protocol in the Protocol field in the following format: _tcp.
6. Enter the port 2222 in the Port number field.
7. Enter the ERA Server fully qualified domain name (FQDN) in the Host offering this service field.
8. Click OK > Done to save the record. The record will be displayed in the list.
To verify the DNS record:
1. Log into any computer in your domain and open a command prompt (cmd.exe).
2. Type nslookup into the command prompt and press Enter.
3. Type set querytype=srv and press Enter.
4. Type _era._tcp.domain.name and press Enter. The service location is displayed correctly.
NOTEDo not forget to change the "Host offering this service:" value to the FQDN of your new server when you installESET Remote Administrator Server on a different machine.
3.9 Offline installation scenario for ERA
In some cases, you may want to install ERA and its components in environments without access to the Internet. Todo so, follow our high-level installation instructions:
For instructions to upgrade ERA, see Upgrade ERA components in offline environment.
1. Install ESET Remote Administrator. Choose Activate later during installation and activate ERA later with an offlinelicense.
2. Create a local repository for installation packages. There are three ways to do this:
a) Create a local repository using Apache Tomcat already installed with ERA.
I. Go to: C:/Program Files (x86)/Apache Software Foundation/Tomcat 7.0/webapps/
II. Create a new folder for your local repository, for example, era_repository.
III.Copy your installation packages into the repository.
IV.Installation packages will be accessible using this address:https://tomcat_server:tomcat_port/era_repository/era_agent.dmg
b) Create a local repository using Apache HTTP Proxy.
I. Install Apache HTTP Proxy.
II. Go to: C:\Program Files\Apache HTTP Proxy\htdocs\ (location can be changed in the configuration file).
III.Copy installation packages into the repository.

130
IV.Installation packages will be accessible using following address:http://proxy_server:proxy_port/era_agent.dmg
c) Use a shared network folder/drive.
3. Install ERA Agent via live agent installation by using a URL to access the agent installation package from the localrepository in the installation script. See our Knowledgebase article for more information.
For enterprise users, or to install using GPO/SCCM: See our Knowledgebase article
4. Deploy ESET Endpoint products to workstations using a Software installation task. Choose a custom URL for theinstallation package from the local repository. Visit the ESET.com downloads page to download installationpackages.
5. Activate your endpoints with an offline license:
How do I activate ESET business products offline?
How do I activate ESET business products from ESET Remote Administrator?
6. Disable ESET LiveGrid.
7. Update mirror – there are 2 scenarios (a, b):
Apache HTTP Proxy works fine as a mirror, but Apache Tomcat needs to be reconfigured to run without SSLbecause of the update mirror, so the connection to the ERA Web Console will be secure.
a) In a closed network without access to the internet, the administrator must create a custom update server – a"mirror" folder where update files for clients are stored:
I. If Apache HTTP Proxy/Apache Tomcat is used as the update server, clients must be configured to use acustom update server (not proxy)
II. If Endpoint security for windows is used as the mirror server, clients must be configured to downloadfrom the client mirror
b) If at least one computer has access to internet:
I. You can use Apache HTTP Proxy and configure clients to use the proxy
II. You can use Tomcat as update server + Mirror tool and configure clients to use a custom update server
III.You can set up a mirror using Endpoint security for Windows and configure clients to download from theclient mirror
8. It is highly recommended that you update the virus signature database on a regular basis. If the database is notupdated, computers will be flagged in the Web Console as Not updated. This warning can be muted in ERA WebConsole by clicking the computer in the list and selecting Mute from the drop-down menu.
131
4. Upgrade, migration and reinstallation proceduresThis section describes different ways to upgrade, migrate and reinstall your ESET Remote Administrator Server andother ERA components.
1. Upgrade from previous ERA generation
How to upgrade/migrate from an older generation of ESET Remote Administrator 5 to ESET Remote Administrator 6with the Migration tool.
2. Upgrade from older ERA 6 version to the latest ERA 6 version
How to upgrade components of your ESET Remote Administrator infrastructure.
NOTE: To look up what version of each ERA component you are running, verify what your ESET RemoteAdministrator Server version is. Go to the About page in the ERA Web Console, and then the followingKnowledgebase article for a list of all ERA component versions per ERA Server.
3. Migrate or reinstall ERA 6 from one server to another
How to migrate from one server to another or reinstall an ERA Server.
NOTE: If you plan to migrate from one ERA Server to a new server machine, you must export/back up allCertificate Authorities as well as the ERA Server Certificate. Otherwise, none of the ERA components will be able tocommunicate with your new ERA Server.
4. Other procedures
How to change an IP address or hostname on an ERA Server.
4.1 Component upgrade task
This chapter contains the following sections:
RecommendationsList of upgraded componentsBefore upgradingThe Remote Administrator Component Upgrade task procedureTroubleshooting
Recommendations:
We recommend using the Component Upgrade task available in ERA Web Console to upgrade your ERAinfrastructure. The following example shows you how to set up the Remote Administrator Component Upgrade taskto upgrade from the ERA version 6.1.x or 6.2.x to ERA version 6.4.
IMPORTANT: You must back up all certificates (Certificate Authority, Server Certificate, Proxy and AgentCertificate) to perform this operation. To backup your certificates:
1. Export your Certification Authority Certificates from an old ERA Server to a .der file and save to externalstorage.
2. Export your Peer Certificates (for ERA Agent, ERA Server, ERA Proxy) and private key .pfx file from an old ERAServer and save to external storage.
When running this task, we highly recommend that you select group All as a target to ensure that the entire ERAinfrastructure is upgraded.

132
List of upgraded components:
ERA Server
ERA Agent (task will update all computers in the network with ERA Agents installed if they are selected astargets for the task)
ERA Proxy
ERA Web Console (only applies when installed using the ERA All-in-one installer or ERA Virtual Appliance andany Linux distribution [provided in the installation folder: /var/lib/tomcat8/webapps/, /var/lib/tomcat7/webapps/, /var/lib/tomcat6/webapps/, /var/lib/tomcat/webapps/])
ERA Mobile Device Connector (from version 6.2.11.0 to ERA version 6.4)
The following components must be upgraded manually:
Apache Tomcat (we strongly recommend that you keep Apache Tomcat up-to-date, see Upgrading ApacheTomcat)
Apache HTTP Proxy (can be achieved using All-in-one installer, see Upgrading Apache HTTP Proxy)
ERA Rogue Detection Sensor
Before upgrading:
If the component upgrade fails on a machine running an ERA Server or Web Console, you may not be able to loginto the Web Console remotely. We strongly recommend that you configure physical access to the server machinebefore performing this upgrade. If you cannot arrange for physical access to the machine, make sure you can logonto it with administrative privileges using a remote desktop. We also recommend that you back up your ERA Serverand Mobile Device Connector databases before performing this operation. To back up your Virtual Appliance, createa snapshot or clone your virtual machine.
Upgrading from ERA version 6.1.x?
If you are upgrading from ERA version 6.1 and use an ERA Proxy, client machines connecting via ERA Proxy willnot automatically receive the upgraded ERA Agent. We recommend that you use Agent Live Installers anddistribute them via GPO or SCCM. If you have ERA 6.2, clients will upgrade normally regardless of whether ERAProxy is used.
ERA Server instance is installed on a failover cluster?
If your ERA Server instance is installed on a failover cluster, you must upgrade the ERA Server component oneach cluster node manually. After upgrading the ERA Server, run the Component Upgrade task to upgrade therest of your infrastructure (for example, ERA Agents on client computers).
ERA Agent installed on Linux clients running with systemd in your infrastructure?
If you have the ERA Agent installed on Linux clients running with systemd in your infrastructure (distributionswith SysV init scripts or upstart are unaffected), run the script below prior to running a Components Upgradetask. This is only necessary for version 6.1.450.0 or earlier.

133
#!/bin/sh -e
systemd_service=eraagent.service
systemd_service_path="/etc/systemd/system/$systemd_service"
if ! grep "^KillMode=" "$systemd_service_path" > /dev/null
then
echo "Applying 'KillMode' change to '$systemd_service_path'"
sed -i 's/\[Service\]/[Service]\nKillMode=process/' "$systemd_service_path"
else
echo "'KillMode' already set. No changes applied."
exit 0
fi
systemctl daemon-reload
if systemctl is active $systemd_service > /dev/null
then
echo "Restarting instance of '$systemd_service'"
systemctl restart $systemd_service
fi
Important instructions before upgrading Apache HTTP Proxy on Microsoft Windows
If you are using Apache HTTP Proxy and have custom settings in your httpd.conf file (such as your username andpassword), back up your original httpd.conf file (located in C:\Program Files\Apache HTTP Proxy\conf\). If you arenot using custom settings, you do not need to back up the httpd.conf file. Upgrade to the latest version of ApacheHTTP Proxy by any of the methods referenced in Upgrading Apache HTTP Proxy.
WARNING: After you have successfully upgraded Apache HTTP Proxy on Windows and you have had customsettings in your original httpd.conf file (such as username and password), copy the settings from the backuphttpd.conf file and apply your custom settings only in your new httpd.conf file. Do not use your originalhttpd.conf file with the new upgraded version of Apache HTTP Proxy, it will not work correctly. Copy only yourcustom settings from it and use the new httpd.conf file. Alternatively, you can customize your new httpd.conf filemanually, the settings are described in Apache HTTP Proxy installation - Windows.
Important instructions before upgrading Apache HTTP Proxy on Virtual Appliance
If you are using Apache HTTP Proxy and have custom settings in your httpd.conf file (such as your username andpassword), back up your original httpd.conf file (located in /opt/apache/conf/) and then run the RemoteAdministrator Component Upgrade task to upgrade Apache HTTP Proxy. If you are not using custom settings, it isno necessary to create a backup of httpd.conf.
After the Components Upgrade task has completed successfully, run the following command using the RunCommand Client task to update the httpd.conf file (this is required for the upgraded version of Apache HTTPProxy to run correctly):
wget http://help.eset.com/era_install/64/apache/httpd.conf -O /tmp/httpd.conf\
-o /tmp/wgeterror.log && cp /tmp/httpd.conf /opt/apache/conf/httpd.conf

134
Alternatively, you can run the same command directly from within the ERA Virtual Appliance's console. Anotheroption is to replace the Apache HTTP Proxy configuration file httpd.conf manually.
WARNING: If you have custom settings in your original httpd.conf file (such as your username andpassword), copy the settings from the backup httpd.conf file and add only the custom settings to the newhttpd.conf file. Do not use your original httpd.conf file with the new upgraded version of Apache HTTP Proxy,it will not work correctly. Copy only your custom settings from it and use the new httpd.conf file. Alternatively,you can customize your new httpd.conf file manually, the settings are described in Apache HTTP Proxyinstallation - Linux.
See the online help topic for the Remote Administrator Components Upgrade task procedure. For another how toupgrade ESET Remote Administrator to the latest version (6.x) guide, see our Knowledgebase article.
Troubleshooting:
Verify whether you can access the ERA repository from an upgraded computer.
Re-running the Remote Administrator Components Upgrade task will not work if there is at least one componentalready upgraded to a newer version.
If there is no clear reason for the failure, you can upgrade components manually. See our instructions for Windows or Linux.
On Linux machines utilizing systemd as a service manager, this task might not finish successfully. Linuxdistributions with SysV init scripts or upstart are unaffected.
See general troubleshooting information for more suggestions to resolve upgrade issues.

135
4.1.1 Product installation using component upgrade
There are two ways to perform a component-based installation of ESET business products version 6.x and deploythem from ESET Remote Administrator.
NOTE: Only ESET Endpoint Security supports component-based installation, ESET Endpoint Antivirus does not.Select components to install using the ADDLOCAL property. See also Advanced installation of ESET EndpointSecurity.
1. Using Software Install task
Choose a package from the repository or Add path to the msi file, for example:
file://\\Win2012-server\share\ees_nt64_enu.msi (correct permissions need to be set - no authentication)
add ADDLOCAL=<list> to installation parameters
ADDLOCAL=WebAndEmail,ProtocolFiltering,WebAccessProtection,EmailClientProtection,Antispam,
WebControl,UpdateMirror,DocumentProtection,DeviceControl
(all components without NAP and Firewall)
See also Software Install task instructions in the Administrator guide.
2. Using Run Command tasks
For example:msiexec.exe /i \\Win2012-server\share\ees_nt64_enu.msi /qn
ADDLOCAL=WebAndEmail,ProtocolFiltering,WebAccessProtection,EmailClientProtection,Antispam,
WebControl,UpdateMirror,DocumentProtection,DeviceControl /lvx*
C:/install.log
See also Run Command task instruction in the Administrator guide.
4.2 Migration from previous ERA version
If you want to upgrade/migrate from an older generation of ESET Remote Administrator 5 to ESET RemoteAdministrator 6, you can use our Migration Tool which can make the upgrade process easier. The Migration Tool is astandalone application in form of a wizard that provides straightforward migration of ERA 4.x / 5.x data into anintermediate database which allows for the data to be imported into ERA 6.x.
IMPORTANT: Migration Tool version must match ESET Remote Administrator version you're going to migrate to.To find out what version of Migration Tool you need see this Knowledgebase article.
Download appropriate version of ESET Remote Administrator Migration Tool.
Run Migration Tool locally on your old ERA 4.x / 5.x sever. It is not possible to run Migration Tool from a remotemachine.
Configuration of your old ERA server is not being migrated.
Parametric groups are not migrated.
You can migrate policies with Migration Tool 6.2.x and newer. However, there are some specifics to policymigration:
Only policies from upper ERA server are migrated.
Only policy definitions are migrated, policy relations are not being migrated.
You will need to assign migrated policies to appropriate groups manually after the migration.
Hierarchy of policies is omitted. In case there is an override flag in your old ERA, this flag is converted to aforce in ERA 6 policy for that same setting.

136
If there are settings for multiple products in a single policy in old ERA, an individual policy for each productwill be created in ERA 6.
NOTE: After the migration, we recommend you to check items (Computers, Static Groups, Policies, etc.) to makesure these are in place and that the result of migration meets the expectations. In case there are somediscrepancies, an intervention is needed, such as creating policies manually.
NOTE: If an error occurs during the migration process, it is written in migration.log file located in the same folderas Migration Tool. If you have read-only access to this folder, then a log window will open instead. Same thinghappens should there be not enough disk space, that means the log file is not created and you will only see resultsin the log window.
NOTE: To resolve a problem with missing MSVCP100.dll or MSVCR100.dll files, install the latest Microsoft Visual C++ 2010 Redistributable Package. You can use the following link Microsoft Visual C++ 2010 Redistributable Package(x86).
The following are migration scenarios which should guide you through the migration process itself:
Migration scenario 1 - Migration to ERA 6.x running on a different computer than ERA 4.x / 5.x.
Migration scenario 2 - Migration to ESET Remote Administrator 6.x running on the same computer as ERA 4.x / 5.x.
Migration scenario 3 - Migration to ERA 6.x where endpoints connect to old ERA 4.x / 5.x until the ERA Agent isdeployed by ERA 6.x.

137
4.2.1 Migration scenario 1
This scenario covers migration to ERA 6.x running on a different computer than ERA 4.x / 5.x. For more details andinstructions, see Knowledgebase article for illustrated step-by-step instructions to complete installation using theAll-in-one installer.
1. The first step in the migration process is to have ERA 6.x installed and running on another computer.
2. Start the ESET Remote Administrator Migration tool on the ERA 4.x / 5.x machine and select Export to save thedata from the old ERA to an intermediate database file.
3. Migration wizard is able to transfer specific data only. Select the data you want to transfer and click Next.
After you have selected a folder in which to save the temporary database, the wizard will display the status ofarchival of the ERA 4.x / 5.x database.
All data is exported to an intermediate database.
4. When data is finished exporting, there are two options you can choose from:
One option is to Finish the export, Copy the temporary database file to a server that is running ESET RemoteAdministrator 6.x, and import the data using the ERA Migration tool on that server.
A second option is to click Import now and import the data directly to ESET Remote Administrator 6.x over thenetwork. Specify the connection and logon details of the new ERA Server.
NOTE: Static groups synchronized from Active Directory are ignored and will not be exported.
If server settings won’t allow for importation of specific data, the ESET Remote Administrator Migration toolwill let you choose whether you want to change settings in ERA 6.x for specific components.

138
Each of the components is then imported. An import (migration) log is available for each component. Afterthe import is complete, the Migration tool will display the results of the import process.
If you chose to migrate users, their passwords were reset and replaced with randomly generated passwords.These passwords can be exported in the .CSV format.
The migration tool wizard also generates a script that can be used to preconfigure ERA Agents on clientmachines. This script is a small executable .bat file distributable to client computers.
We recommend that you review migrated settings and data to make sure that importation was successful.After checking, use this script to deploy the ERA Agent on a small group of computers to check if they areconnecting to the server correctly.
After the successful connection of the test group, you can deploy the Agent to the remaining computers(either manually or using an AD synchronization task).
NOTE: If any of the migration steps fail you should roll back changes for ERA 6.x, setup the computers to connectto ERA 4.x / 5.x, recover the backup data from ERA 4.x / 5.x and contact ESET customer care.

139
4.2.2 Migration scenario 2
This scenario covers migration to ESET Remote Administrator 6.x running on the same computer as ERA 4.x / 5.x. AllERA data should be backed up (using the ESET Maintenance tool) and ERA services in the operating system should bestopped before the migration of any data.
Watch our Knowledgebase instructional video, or visit our Knowledgebase article for illustrated step-by-stepinstructions to complete installation using the All-in-one installer.
Download the ESET Remote Administrator migration tool and then follow the steps below.
NOTE: If you receive a system error, ensure that you have installed the required Microsoft RedistributablePackage.
1. After running the ESET Remote Administrator Migration tool on the ERA 4.x / 5.x machine, the administratorselects the Export option to save the data from ERA 4.x / 5.x to an intermediate database file. Migration wizard isable to transfer specific data only:
NOTE: It is not possible to transfer parametric groups and tasks from ERA 4.x / 5.x, because of the new designand functions of dynamic groups in ERA 6.x.

140
2. After selecting a save folder for the temporary database, the wizard will display the status of archival of the ERA4.x / 5.x database.
3. All data is exported to an intermediate database.
After the successful data export and before ERA 6.x deployment, ERA 4.x / 5.x must be uninstalled. Werecommend to restart the machine prior to continue with installation of ERA 6.x.

141
When new ERA 6.x is installed, exported database can be imported using the Migration tool. Administrator isprompted to enter the IP address of the machine (the one that was displayed concerning ERA Console in the Installation successful screen, but without protocol ":8443") into the Host field, the administrator passwordconfigured during installation and to select the saved database file.
If server settings won’t allow for importation of specific data, the ESET Remote Administrator Migration toolwill let you choose whether you want to change settings in ERA 6.x for specific components.
Each of the components is then imported. An import (migration) log is available for each component. Afterthe import is complete, the Migration tool will display the results of the import process.
If you chose to migrate users, their passwords were reset and replaced with randomly generated passwords.These passwords can be exported in the .CSV format.
The migration tool wizard also generates a script that can be used to preconfigure ERA Agents on clientmachines. This script is a small executable .bat file distributable to client computers.
We recommend that you review migrated settings and data to make sure that importation was successful.After checking, use this script to deploy the ERA Agent on a small group of computers to check if they areconnecting to the server correctly.
After the successful connection of the test group, you can deploy the Agent to the remaining computers(either manually or using an AD synchronization task).
NOTE: If any of the migration steps fail you should roll back changes for ERA 6.x, setup the computers to connectto ERA 4.x / 5.x, recover the backup data from ERA 4.x / 5.x and contact ESET customer care.

142
4.2.3 Migration scenario 3
This scenario covers a migration to ERA 6.x where endpoints connect to old ERA 4.x / 5.x until the ERA Agent isdeployed by ERA 6.x. This scenario is useful if you wish to see how ERA 6.x would look like with your data from ERA4.x / 5.x, but still have endpoints connecting to your ERA 4.x / 5.x.
NOTE: This scenario is for highly skilled users only. We do not recommend this type of migration unless there isno other option.
1. After running the ESET Remote Administrator Migration tool on the ERA 4.x / 5.x machine, the administratorselects the Export option to save the data from ERA 4.x / 5.x to an intermediate database file. Migration wizard isable to transfer specific data only:
NOTE: It is not possible to transfer parametric groups and tasks from ERA 4.x / 5.x, because of the new designand functions of dynamic groups in ERA 6.x.

143
2. After selecting a save folder for the temporary database, the wizard will display the status of archival of the ERA4.x / 5.x database.
3. All data is exported to an intermediate database.
4. If ERA 6 will be installed on the same computer as 4.x / 5.x, you must change your old ERA ports and rename theserver service (sc config ERA_SERVER DisplayName= “ESET Remote Administrator g1”).

144
5. ESET Remote Administrator 4.x / 5.x should be started again following the export of your data.
6. Install ESET Remote Administrator 6 and import the intermediate database using the Migration tool. You will beprompted to enter the IP address of the machine (the one that was displayed for ERA Console in the Installationsuccessful screen, but without the protocol ":8443") in the Host field, the administrator password configuredduring installation and to select the saved database file.
If server settings won’t allow for importation of specific data, the ESET Remote Administrator Migration toolwill let you choose whether you want to change settings in ERA 6.x for specific components.
Each of the components is then imported. An import (migration) log is available for each component. Afterthe import is complete, the Migration tool will display the results of the import process.
If you chose to migrate users, their passwords were reset and replaced with randomly generated passwords.These passwords can be exported in the .CSV format.
The migration tool wizard also generates a script that can be used to preconfigure ERA Agents on clientmachines. This script is a small executable .bat file distributable to client computers.
We recommend that you review migrated settings and data to make sure that importation was successful.After checking, use this script to deploy the ERA Agent on a small group of computers to check if they areconnecting to the server correctly.
After the successful connection of the test group, you can deploy the Agent to the remaining computers(either manually or using an AD synchronization task).
NOTE: If any of the migration steps fail you should roll back changes for ERA 6.x, setup the computers to connectto ERA 4.x / 5.x, recover the backup data from ERA 4.x / 5.x and contact ESET customer care.
The consequence of this type of migration is that there won’t be any logs exported between the process of backingup the ERA 4.x / 5.x database and deploying the Agent on a client computer. However that data will still be presenton your old copy of ERA 4.x / 5.x.
4.3 Migration from one server to another
There are four ways to migrate ESET Remote Administrator from one server to another (these scenarios can be usedwhen reinstalling your ERA Server):
Clean Installation - same IP address - The new installation does not use the previous database from the old ERAServer and keeps the original IP address.
Clean Installation - different IP address - The new installation does not use the previous database from the oldERA Server and has a different IP address.
Migrated Database - same IP address - Database migration can only be performed between two similar databasetypes (from MySQL to MySQL or from MSSQL to MSSQL) and similar alike versions of ERA.
Migrated Database - different IP address - Database migration can only be done performed between two likedatabase types (from MySQL to MySQL or from MSSQL to MSSQL) and two like versions of ERA.
NOTE: Migration from one server to another server is supported for versions 6.2 and later.
NOTE: When adding new client computers, use a new Certification Authority to sign the Agent certificates. This isdone because an imported CA cannot be used to sign new peer certificates, it can only authenticate ERA Agents ofclient computers that were migrated.

145
4.3.1 Clean Installation - same IP address
The objective of this procedure is to install an entirely new instance of ERA Server that does not use the previousdatabase, but retains records for client computers. This new ERA Server will have the the same IP address as yourprevious server, but will not use the database from the old ERA server.
On your current (old) ERA Server:
1. Export all certificates from current ERA Server and save onto your external storage.
o Export all Certification Authority Certificates from your ERA Server and save each CA certificate as a .der file.o Export all Peer Certificates (Server certificate, Agent certificate, Proxy certificate, MDM certificate, etc.) from
your ERA Server to a .pfx file. Exported .pfx will have private key included as well.
2. Stop the ERA Server service.
3. Turn off your ERA Server machine (optional).
IMPORTANT: Do not uninstall/decomission your old ERA Server yet.
On your new ERA Server:
IMPORTANT: Make sure the network configuration on your new ERA Server (IP address, FQDN, Computer name,DNS SRV record) matches that of your old ERA Server.
1. Install ERA Server using the All-in-one package installer (Windows) or choose another installation method(Windows manual installation, Linux or Virtual Appliance).
2. Connect to ERA Web Console.
3. Import all CAs that you have exported from your old ERA Server. To do so, follow the instructions for importing apublic key.
4. Change the ERA Server certificate in your Server settings to use the Server certificate from your old ERA Server(exported in step 1.).
5. Import all required ESET licenses to ERA.
6. Restart the ERA Server service, see our Knowledgebase article for details.

146
Client computers should now connect to your new ERA Server using their original ERA Agent certificate, which isbeing authenticated by the imported CA from the old ERA Server. If clients are not connecting, see Problems afterupgrade/migration of ERA Server.
Old ERA Server uninstallation:
Once you have everything running correctly on your new ERA Server, carefully decommission your old ERA Serverusing our step-by-step instructions.
4.3.2 Clean Installation - different IP address
The objective of this procedure is to install an entirely new instance of ERA Server that does not use the previousdatabase, but retains records for client computers. The new ERA Server will have a different IP address/Hostname,but will not use the database from the old ERA server.
On your current (old) ERA Server:
1. Generate a new ERA Server certificate (with connection information for the new ERA Server). Leave the defaultvalue (an asterisk) in the Host field to allow for distribution of this certificate with no association to a specific DNSname or IP address.
2. Export all certificates from current ERA Server and save onto your external storage.
o Export all Certification Authority Certificates from your ERA Server and save each CA certificate as a .der file.o Export all Peer Certificates (Server certificate, Agent certificate, Proxy certificate, MDM certificate, etc.) from
your ERA Server to a .pfx file. Exported .pfx will have private key included as well.
3. Create a policy to define a new ERA Server IP address and assign it to all computers. Wait for the policy to bedistributed to all client computers (computers will stop reporting in as they receive the new server information).
4. Stop the ERA Server service.
5. Turn off the current ERA Server machine (optional).
IMPORTANT: Do not uninstall/decomission your old ERA Server yet.
On your new ERA Server:
1. Install ERA Server using the All-in-one package installer (Windows) or choose another installation method(Windows manual installation, Linux or Virtual Appliance).
2. Connect to ERA Web Console.
3. Import all CAs that you have exported from your old ERA Server. To do so, follow the instructions for importing apublic key.
4. Change your ERA Server certificate in Server settings to use the previous Server certificate from your old ERAServer (exported in step 1.). Do not stop the ERA Server service until step 6.
5. Import all required ESET licenses to ERA.
6. Restart the ERA Server service, see our Knowledgebase article for details.
Client computers should now connect to your new ERA Server using their original ERA Agent certificate, which isbeing authenticated by the imported CA from the old ERA Server. If clients are not connecting, see Problems afterupgrade/migration of ERA Server.
Old ERA Server uninstallation:

147
Once you have everything running correctly on your new ERA Server, carefully decommission your old ERA Serverusing our step-by-step instructions.
4.3.3 Migrated Database - same IP address
The objective of this procedure is to install an entirely new instance of ERA Server and keep your existing ERAdatabase, including existing client computers. The new ERA Server will have the same IP address as the old ERAServer, and the database of the old ERA server will be imported to the new server machine prior to installation.
IMPORTANT: Migrating databases is only supported between identical database types (from MySQL to MySQL orfrom MSSQL to MSSQL).
IMPORTANT: When migrating a database, you must migrate between instances of the same ESET RemoteAdministrator version. For example when you have ERA 6.3.12.0, you can only migrate to ERA version 6.3.12.0. Seeour Knowledgebase article for instructions to determine the versions of your ERA components. After completingdatabase migration, you can perform an upgrade, if necessary, to get the latest version of ESET RemoteAdministrator.
On your current (old) ERA Server:
1. Export all certificates from current ERA Server and save onto your external storage.
o Export all Certification Authority Certificates from your ERA Server and save each CA certificate as a .der file.o Export all Peer Certificates (Server certificate, Agent certificate, Proxy certificate, MDM certificate, etc.) from
your ERA Server to a .pfx file. Exported .pfx will have private key included as well.
2. Stop the ERA Server service.
3. Export/Backup the ERA Database.
4. Turn off the current ERA Server machine (optional).
IMPORTANT: Do not uninstall/decomission your old ERA Server yet.
On your new ERA Server:
IMPORTANT: Make sure the network configuration on your new ERA Server (IP address, FQDN, Computer name,DNS SRV record) matches that of your old ERA Server.
1. Install/Launch a supported ERA database.
2. Import/Restore the ERA database from your old ERA Server.
3. Install ERA Server using the All-in-one package installer (Windows) or choose another installation method(Windows manual installation, Linux or Virtual Appliance). Specify your database connection settings duringinstallation of ERA Server.
4. Connect to ERA Web Console.
5. Import all CAs exported from your old ERA Server. To do so, follow the instructions for importing a public key.
6. Restart the ERA Server service, see our Knowledgebase article for details.
Client computers should now connect to your new ERA Server using their original ERA Agent certificate, which isbeing authenticated by the imported CA from the old ERA Server. If clients are not connecting, see Problems afterupgrade/migration of ERA Server.
Old ERA Server uninstallation:
Once you have everything running correctly on your new ERA Server, carefully decommission your old ERA Serverusing our step-by-step instructions.

148
4.3.4 Migrated Database - different IP address
The objective of this procedure is to install an entirely new instance of ERA Server and keep your existing ERAdatabase, including existing client computers. The new ERA Server will have a different IP address from the old ERAServer, and the database of the old ERA server will be imported to the new server machine prior to installation.
IMPORTANT: Migrating databases is only supported between identical database types (from MySQL to MySQL orfrom MSSQL to MSSQL).
IMPORTANT: When migrating a database, you must migrate between instances of the same ESET RemoteAdministrator version. For example when you have ERA 6.3.12.0, you can only migrate to ERA version 6.3.12.0. Seeour Knowledgebase article for instructions to determine the versions of your ERA components. After completingdatabase migration, you can perform an upgrade, if necessary, to get the latest version of ESET RemoteAdministrator.
On your current (old) ERA Server:
1. Generate a new ERA Server certificate (with connection information for the new ERA Server). Leave the defaultvalue (an asterisk) in the Host field to allow for distribution of this certificate with no association to a specific DNSname or IP address.
2. Export all certificates from current ERA Server and save onto your external storage.
o Export all Certification Authority Certificates from your ERA Server and save each CA certificate as a .der file.o Export all Peer Certificates (Server certificate, Agent certificate, Proxy certificate, MDM certificate, etc.) from
your ERA Server to a .pfx file. Exported .pfx will have private key included as well.
3. Create a policy to define a new ERA Server IP address and assign it to all computers. Wait for the policy to bedistributed to all client computers (computers will stop reporting in as they receive the new server information).
4. Stop the ERA Server service.
5. Export/Backup the ERA Database.
6. Turn off the current ERA Server machine (optional).
IMPORTANT: Do not uninstall/decomission your old ERA Server yet.
On your new ERA Server:
1. Install/Launch a supported ERA database.
2. Import/Restore the ERA database from your old ERA Server.
3. Install ERA Server using the All-in-one package installer (Windows) or choose another installation method(Windows manual installation, Linux or Virtual Appliance). Specify your database connection settings duringinstallation of ERA Server.
4. Connect to ERA Web Console.
5. Import all CAs exported from your old ERA Server. To do so, follow the instructions for importing a public key.
6. Change your ERA Server certificate in Server settings to use the previous Server certificate from your old ERAServer (exported in step 1.). Do not stop the ERA Server service until step 7.
7. Restart the ERA Server service, see our Knowledgebase article for details.
Client computers should now connect to your new ERA Server using their original ERA Agent certificate, which isbeing authenticated by the imported CA from the old ERA Server. If clients are not connecting, see Problems afterupgrade/migration of ERA Server.

149
Old ERA Server uninstallation:
Once you have everything running correctly on your new ERA Server, carefully decommission your old ERA Serverusing our step-by-step instructions.
4.3.5 Uninstallation of the old ERA Server
There are a few options when decommissioning your old ERA Server:
IMPORTANT: Make sure your new ERA server is running and client computers are connecting to your new ERAcorrectly.
1. In case you want to keep the OS and reuse it, you can uninstall your old installation of ERA, but before doing so:
Plan an operating system restart of your server after uninstallation
Make sure other ERA components have been uninstalled (including ERA Agent, Rouge Detection Sensor etc.)
Do not uninstall your database unless there are no other software dependent on your database
2. You can format the disk with the ERA server, but keep in mind this will erase everything on the disk including theOS. This is the easiest way to remove ERA.
4.4 Upgrade ERA installed in Failover Cluster in Windows
If you have ERA Server installed in a Failover Cluster environment in Windows and wish to upgrade the installation,proceed with the corresponding steps.
NOTE: The term Role is available in Windows server 2012 only. In Windows server 2008 Services and applicationsis used instead.
Upgrade from 6.3 to latest version
1. Stop the ERA Server cluster Role in the Cluster Manager. Make sure the ESET Remote Administrator Server serviceis stopped on all cluster nodes.
2. Get the cluster shared disk online on node1 and upgrade ERA Server manually by executing the latest .msiinstaller as in case of a component installation. After the installation (upgrade) is finished, make sure the ESETRemote Administrator Server service is stopped.
3. Get the cluster shared disk online on node2 and upgrade ERA Server the same way as in step no. 2.4. Once ERA Server is updated on all cluster nodes, start the ERA Server Role in the Cluster Manager.5. Upgrade ERA Agent manually by executing the latest .msi installer on all cluster nodes.6. In ERA Console check if Agent and Server versions for all nodes report the latest version to which you upgraded
to.

150
Manual for upgrade from version 6.1 or 6.2 to version 6.3
Please note that for older ERA versions the ERA Agent service was running always only on the active node in thefailover cluster. Starting with ERA 6.3, the ERA Agent service is running on all nodes all the time. This way all nodescan be monitored by ERA all the time.Please be aware, that the change described above will cause that during upgrade new computer will be created atleast for one of the cluster nodes. If you do not need event history for them, do not forget to manually remove theold computer(s) via ERA Console.
1. Stop the ERA Server cluster Role in the Cluster Manager. Make sure the ESET Remote Administrator Server andservice is stopped on all cluster nodes.
2. If the ERA Agent service was set as a dependency or resource for the ERA Server Role, remove the ERA Agentresource/service completely from the Cluster manager.
3. Get the cluster shared disk online on node1 and upgrade ERA Server manually by executing the latest .msiinstaller as in case of a component installation. After the installation (upgrade) is finished, make sure the ESETRemote Administrator Server service is stopped.
4. Get the cluster shared disk online on node2 and upgrade ERA Server the same way as in step no. 3.5. Get the cluster shared disk online on node1 and uninstall the old version of ERA Agent (6.1 or 6.2).6. Get the cluster shared disk online on node2 and uninstall the old version of ERA Agent (6.1 or 6.2).7. Start the ERA Server cluster Role in the Cluster Manager.8. Install ERA Agent on all cluster nodes using the standalone installer. In the Agent configuration and Connection to
Remote Administrator screens use the hostname of ERA Server cluster Role. If prompted, make sure the optionof This is a cluster installation is not selected, and store Agent data on the local node (not on the cluster disk).
9. In ERA Console check if Agent and Server versions for all nodes report the latest version you upgraded to.
4.5 Upgrading Apache HTTP Proxy
Apache HTTP Proxy is a service that can be used in combination with ESET Remote Administrator 6 and later todistribute updates to client computers and installation packages to the ERA Agent.
If you installed Apache HTTP Proxy earlier on Windows and wish to upgrade it to the most recent version, then youhave two ways to accomplish the upgrade, either manually or via the All-in-one installer.
4.5.1 Windows instructions (All-in-one installer)
If the ERA All-in-one installer is stored on your local drive, you can use this method to quickly upgrade Apache HTTPproxy to the latest version. If you do not have the installer present, the manual upgrade of Apache HTTP Proxy isquicker.
1. Back up the following files:
C:\Program Files\Apache HTTP Proxy\conf\httpd.conf
C:\Program Files\Apache HTTP Proxy\bin\password.file
C:\Program Files\Apache HTTP Proxy\bin\group.file
2. Stop the ApacheHttpProxy service by opening an administrative command prompt and executing the followingcommand:
sc stop ApacheHttpProxy
3. Launch the All-in-one installer by double-clicking the setup.exe file, click Next in the Welcome screen.
4. Select Install/Upgrade Apache HTTP Proxy (mirror replacement) and click Next.

151
After accepting the EULA, click Next. Follow the instructions on-screen to complete installation and then click Finish.
If you use a username/password to access your Apache HTTP Proxy (step no. 8 in the Apache HTTP Proxy installationtopic), replace the following block of code:
<Proxy *>
Deny from all
</Proxy>
with this one (found in the backup of httpd.conf you made in step 1):
<Proxy *>
AuthType Basic
AuthName "Password Required"
AuthUserFile password.file
AuthGroupFile group.file
Require group usergroup
Order deny,allow
Deny from all
Allow from all
</Proxy>
If you had other customizations made to your httpd.conf file in place in your previous installation of ApacheHTTP Proxy, you can copy over those modifications from the backed-up httpd.conf file to the new (upgraded)httpd.conf file.
5. Save your changes and start the ApacheHttpProxy service by executing the following command in an elevatedcommand prompt:
sc start ApacheHttpProxy
6. Test the connection to Apache HTTP Proxy by accessing the following URL in your browser:
http://localhost:3128/index.html
See the Apache HTTP Proxy log files if you need to troubleshoot an issue.

152
4.5.2 Windows instructions (manual)
To upgrade Apache HTTP Proxy to the most recent version, follow the steps below.
1. Back up the following files:
C:\Program Files\Apache HTTP Proxy\conf\httpd.conf
C:\Program Files\Apache HTTP Proxy\bin\password.file
C:\Program Files\Apache HTTP Proxy\bin\group.file
2. Stop the ApacheHttpProxy service by opening an admnistrative command prompt and executing the followingcommand:
sc stop ApacheHttpProxy
3. Download the Apache HTTP Proxy installer file from ESET download site and extract its contents to C:\ProgramFiles\Apache HTTP Proxy\. Overwriting the existing files.
4. Navigate to C:\Program Files\Apache HTTP Proxy\conf, right-click httpd.conf, from the context menu and selectOpen with > Notepad
5. Add the following code at the bottom of httpd.conf:
ServerRoot "C:\Program Files\Apache HTTP Proxy"
DocumentRoot "C:\Program Files\Apache HTTP Proxy\htdocs"
<Directory "C:\Program Files\Apache HTTP Proxy\htdocs">
Options Indexes FollowSymLinks
AllowOverride None
Require all granted
</Directory>
CacheRoot "C:\Program Files\Apache HTTP Proxy\cache"
6. If you set a username/password to access your Apache HTTP Proxy (step no. 8 in the Apache HTTP Proxyinstallation topic), replace the following block of code:
<Proxy *>
Deny from all
</Proxy>
with this one (found in your backed-up httpd.conf file you backed up in step 1):
<Proxy *>
AuthType Basic
AuthName "Password Required"
AuthUserFile password.file
AuthGroupFile group.file
Require group usergroup
Order deny,allow
Deny from all
Allow from all
</Proxy>
If you had other customizations made to your httpd.conf file in place in your previous installation of ApacheHTTP Proxy, you can copy over those modifications from the backed-up httpd.conf file to the new (upgraded)httpd.conf file.
7. Save your changes and start the ApacheHttpProxy service by executing the following command in anadministrative command prompt:
sc start ApacheHttpProxy
8. Test the connection to Apache HTTP Proxy by accessing the following URL in your browser:
http://localhost:3128/index.html
See the Apache HTTP Proxy log files if you need to troubleshoot an issue.
153
4.6 Upgrading Apache Tomcat
If you are upgrading to a most recent version of ESET Remote Administrator, or if you have not upgraded ApacheTomcat for a prolonged period of time, you should consider upgrading Apache Tomcat to the latest version. Keepingpublic-facing services including Apache Tomcat and its dependencies up-to-date will decrease security risks to yourenvironment.
To upgrade Apache Tomcat, follow the instructions for your OS:
Windows instructions (manual) or Windows instructions (All-in-one)
Linux instructions
4.6.1 Windows instructions (All-in-one installer)
If the ERA All-in-one installer is stored on your local drive, you can use this method to quickly upgrade ApacheTomcat to the latest version. If you do not have the installer present, you can download the Apache Tomcat installerand upgrade manually.
Follow these instructions if you have All-in-one installer stored on your local drive:
WARNING: At the time of writing, Apache Tomcat only supports upgrades from version 7.x to 7.x from the ERAAll-in-one installer version 6.3.12 and earlier.
Before upgrading
1. Ensure that Java is updating correctly on your system. See instructions on the java website.
2. Check to see which version of Apache Tomcat is currently in use. If a newer version is available, perform anupgrade:
a. Open a Run dialog, type services.msc and then click OK
b. Right-click the Apache Tomcat service, select Properties and observe the version number in the General tab(for example 7.0.67).
3. Check our list of supported versions of Apache Tomcat to ensure that the new version is compatible with ESETproducts.
How to upgrade
1. Stop the Apache Tomcat service and close Tomcat7w.exe:
a. Open a Run dialog, type services.msc, click OK.
b. Right-click the Apache Tomcat service and then click Stop.
c. Close Tomcat7w.exe in your system tray.
2. Back up the following files (in some cases the folder name is Tomcat 8.0):C:\Program Files\Apache Software Foundation\Tomcat 7.0\conf\server.xmlC:\Program Files\Apache Software Foundation\Tomcat 7.0\.keystoreC:\Program Files\Apache Software Foundation\Tomcat 7.0\conf\tomcat-users.xmlC:\Program Files\Apache Software Foundation\Tomcat 7.0\webapps/era/WEB-INF/classes/sk/eset/era/g2webconsole/server/modules/config/EraWebServerConfig.properties
3. Download the latest supported version of the Apache Tomcat installer file apache-tomcat-[version].exe fromhttp://tomcat.apache.org.
4. Uninstall the current version of Apache Tomcat.

154
5. Delete the following folder if it is still present on your system:C:\Program Files\Apache Software Foundation\Tomcat 7.0\
6. Navigate to the folder where you saved the All-in-one installer.
7. Copy apache-tomcat-[version].exe into the ./win32/installers or ./x64/installers directory. Delete the old Tomcatinstallation file from this directory.
8. Open a Command Prompt, navigate to the All-in-one installer folder and run the following command:Setup.exe --mode webconsole
9. Select ESET Remote Administrator Webconsole in the setup window, select your Language and click Next.
10. After accepting the EULA, click Next.
11. In the components window click Install.
12. Restore EraWebServerConfig.properties to its original location.
13. Connect to ERA Web Consoleand ensure that the program works correctly.
4.6.2 Windows instructions (manual)
Use this instructions to upgrade Apache Tomcat if you do not have the ESET All-in-one installer present:
Before upgrading
1. Ensure that Java is updating correctly on your system. See instructions on the java website.
2. Check to see which version of Apache Tomcat is currently in use. If a newer version is available, perform anupgrade:
a. Open a Run dialog, type services.msc and then click OK
b. Right-click the Apache Tomcat service, select Properties and observe the version number in the General tab(for example 7.0.67).
3. Check our list of supported versions of Apache Tomcat to ensure that the new version is compatible with ESETproducts.
How to upgrade
1. Stop the Apache Tomcat service and close Tomcat7w.exe:
a. Open a Run dialog, type services.msc, click OK.
b. Right-click the Apache Tomcat service and then click Stop.
c. Close Tomcat7w.exe in your system tray.
2. Back up the following files (in some cases the folder name is Tomcat 8.0):C:\Program Files\Apache Software Foundation\Tomcat 7.0\conf\server.xmlC:\Program Files\Apache Software Foundation\Tomcat 7.0\.keystoreC:\Program Files\Apache Software Foundation\Tomcat 7.0\conf\tomcat-users.xmlC:\Program Files\Apache Software Foundation\Tomcat 7.0\webapps/era/WEB-INF/classes/sk/eset/era/g2webconsole/server/modules/config/EraWebServerConfig.properties
3. Download the latest supported version of the Apache Tomcat installer file apache-tomcat-[version].exe fromhttp://tomcat.apache.org.
4. Uninstall the current version of Apache Tomcat.
5. Delete the following folder if it is still present on your system:C:\Program Files\Apache Software Foundation\Tomcat 7.0\
6. Install the newer version of Apache Tomcat that you downloaded.

155
7. When you are finished, deselect the check box next to Run Apache Tomcat.
8. Restore .keystore and server.xml to their original locations (applicable only when upgrading to same majorversion of Apache Tomcat only, for example 7.x to 7.x or 8.x to 8.x!). Alternatively, you can set up an HTTPSconnection for Apache Tomcat for ERA Web Console manually according to our Knowledgebase instructions(recommended).
9. Deploy ERA Web Console, see Web Console installation - Windows.
10. Restore EraWebServerConfig.properties to its original location.
11. Run Apache Tomcat and set a correct Java VM:
Click Start > All Programs > Apache Tomcat > Monitor Tomcat and in the General tab press Start.
Click the Java tab, select the check box next to Use default, and then click OK. View illustratedKnowledgebase instructions.
12. Connect to ERA Web Console and ensure that the program works correctly.
Troubleshooting
If you are unsuccessful setting up an HTTPS connection for Apache Tomcat, you can skip this step and use an HTTPconnection temporarily.
If you are unable to upgrade Apache Tomcat, install your original version and apply the configuration from step 2.
4.6.3 Linux instructions
Before upgrading Apache Tomcat
1. Ensure that Java is updating correctly on your system.
Verify that the openjdk package has been updated (see below).
2. Check to see which version of Apache Tomcat is currently used. If a newer version is available, perform anupgrade:
Execute the following command: cd /usr/share/tomcat/bin && ./version.sh (in some cases the foldername is tomcat7 or tomcat8)
3. Check our list of supported versions of Apache Tomcat to ensure that the new version is compatible with ESETproducts.
How to upgrade
1. Stop the Apache Tomcat service:
Execute the following command: service tomcat stop (in some cases the service name is tomcat7 ortomcat8)
2. Upgrade Apache Tomcat and Java according to the Linux distribution used. Execute the following commands inTerminal:
Debian and Ubuntudistributions
sudo-apt-get update
sudo apt-get install openjdk-7-jdk tomcat7
CentOS, Red Hat and Fedoradistributions
yum update
yum install java-1.8.0-openjdk tomcat
OpenSUSE zypper refresh
zypper install java-1_8_0-openjdk tomcat

156
IMPORTANT: After upgrading Apache Tomcat to a later major version (for example Apache Tomcat version 7.x to8.x):
Deploy ERA Web Console again (see ERA Web Console installation - Linux) and reuse %TOMCAT_HOME%/webapps/era/WEB-INF/classes/sk/eset/era/g2webconsole/server/modules/config/EraWebServerConfig.propertiesto preserve any custom settings in ERA Web Console.
Set up an HTTPS connection for Apache Tomcat.
4.7 Change of IP address or hostname on ERA Server
To change an IP address or hostname on your ERA Server, follow these steps:
1. If your ERA Server certificate contains a specific IP address and/or hostname, create a new Server certificate andinclude the new IP address or hostname you are switching to. However, if you have a wild card * in the host fieldof the Server certificate, skip to step 2. If not, create new Server certificate adding the new IP address and hostname separated by a comma and include the previous IP address and hostname as well. Alternatively, you canadd a wild card * in the host field.
2. Sign the new Server certificate using your ERA Server Certification Authority.
3. Create a policy changing the client connections to the new IP address or hostname (preferably the IP address),but include a second (alternative) connection to the old IP address or hostname to give the ERA Agent a chance toconnect to both servers. For more details, see Create policy for ERA Agents to connect to the new ERA Server.
4. Apply this policy to your client computers and allow the ERA Agents to replicate. Even though the policy willredirect clients to your new server (which is not running), the ERA Agents will use the alternative Serverinformation to connect to the original IP address.
5. Set your new Server certificate in Server settings.
6. Restart the ERA Server service and change the IP address or hostname.
See our Knowledgebase article for illustrated instructions to change the ERA Server address.
4.8 Upgrade ERA installed in Failover Cluster in Linux
If you have ERA Server installed in a Failover Cluster environment in Linux and wish to upgrade the installation,proceed with the steps below.
Manual upgrade from version 6.3 to latest version
1. Disable EraService in Conga (Cluster Administration GUI) under Service groups and ensure that ERA Agent and ERAServer are stopped on both nodes.
2. Upgrade ERA Server on node1 by performing the following steps:o Mount the shared storage to this nodeo Upgrade ERA Server manually to latest version by executing the .sudo ./Server-Linux-x86_64.sh command in
a Terminal window o Replace the old cluster script located at /usr/share/cluster/eracluster_server.sh with the new one found in /
opt/eset/RemoteAdministrator/Server/setup/eracluster_server. Keep the old file name.o Stop the ERA Server service (stop eraserver) after the upgradeo Disable ERA Server autostart by renaming the following 2 files:
· mv /etc/init/eraserver.conf /etc/init/eraserver.conf.disabled
· mv /etc/init/eraserver-xvfb.conf /etc/init/eraserver-xvfb.conf.disabled
o Unmount the shared storage from this node

157
3. Repeat these steps to upgrade ERA Server on node2.4. Start EraService in Conga (Cluster Administration GUI) under Service groups.5. Upgrade ERA Agent on all cluster nodes.6. Check ERA Console to see if all nodes are connecting and show as the latest version.
Manual upgrade from version 6.1 or 6.2 to version 6.3
Please note that for older ERA versions the ERA Agent service was running always only on the active node in thefailover cluster. Starting with ERA 6.3, the ERA Agent service is running on all nodes all the time. This way all nodescan be monitored by ERA all the time.
Please be aware, that the change described above will cause that during upgrade new computer will be created atleast for one of the cluster nodes. If you do not need event history for them, do not forget to manually remove theold computer(s) via ERA Console.
1. Disable EraService in Conga (Cluster Administration GUI) under Service groups and ensure that ERA Agent and ERAServer are stopped on both nodes.
2. Upgrade ERA Server on node1 by performing the following steps:o Mount the shared storage to this nodeo Upgrade ERA Server manually to version 6.3 by executing .sudo ./Server-Linux-x86_64.sh command in a
Terminal window o Replace the old cluster script located at /usr/share/cluster/eracluster_server.sh with the new one found in /
opt/eset/RemoteAdministrator/Server/setup/eracluster_server. Keep the old file name.o Stop the ERA Server service (stop eraserver) after the upgradeo Disable ERA Server autostart by renaming the following 2 files:
· mv /etc/init/eraserver.conf /etc/init/eraserver.conf.disabled
· mv /etc/init/eraserver-xvfb.conf /etc/init/eraserver-xvfb.conf.disabled
o Unmount the shared storage from node13. Upgrade ERA Server on node2 by performing the same steps as in previous point 2.4. Remove old agent from node1 by performing the following steps:o Mount the shared storage to this nodeo Uninstall old ERA Agent (use the installer script with --uninstall parameter)o Check whether your system has the following symbolic links
· /etc/opt/eset -> /usr/share/erag2cluster/etc/opt/eset
· /opt/eset -> /usr/share/erag2cluster/opt/eset
· /var/log/eset -> /usr/share/erag2cluster/var/log/eset
· /var/opt/eset -> /usr/share/erag2cluster/var/opt/eset
Command to list symbolic links in directory /etc/opt/:find /etc/opt/ -maxdepth 1 -type l -ls
o If those symbolic links exist, remove them using the commands below· unlink /etc/opt/eset
· unlink /opt/eset
· unlink /var/log/eset
· unlink /var/opt/eset
o Create new symbolic links - for each of them corresponding folder needs to be created first. Use thecommands below:The following procedure is only available in the Online help topic.
o Unmount the shared storage from this node5. Repeat these steps to remove the old ERA Agent from node2.6. Start EraService in Conga (Cluster Administration GUI) under Service groups.7. Install ERA Agent on both nodes on the local disk (not on the shared cluster disk). When using the --hostname=
command, you must specify the external IP address or hostname of the cluster's interface (not localhost!).8. Check ERA Console to see if all nodes are connecting and show as the latest version.

158
4.9 Upgrade ERA components in offline environment
Follow these steps to upgrade your ERA components and ESET Endpoint products without access to the Internet:
It is not possible to use the Component upgrade task for an offline environment (there is no access to the ESETrepository).
1. First perform an upgrade of ERA Server and Web Console:
a. Check which version of ERA is running on the server.
b. Check for the latest versions of components.
c. Download the latest standalone installers from the ESET Download site.
d. Perform a manual component-based upgrade of ERA Server and ERA Web Console.
2. Continue with the offline upgrade of ESET endpoint products:
a. See which ESET products are installed on clients: Open ERA Web Console and navigate to Dashboard > ESETapplications.
b. Check to see the latest versions of ESET endpoint products.
c. Download installers from the ESET Download site to the local repository configured during offline installation.
d. Run a Software Install task from ERA Web Console.

159
5. TroubleshootingSince ESET Remote Administrator is a complex product that uses several third-party tools and supports many OSplatforms, there is the potential that you will encounter issues that require troubleshooting.
ESET documentation includes several methods to troubleshoot ESET Remote Administrator, see Answers tocommon installation issues to resolve some common issues with ESET Remote Administrator.
Unable to resolve your issue?
Each ERA component has a log file which can be configured to be more or less verbose. Review logs to identifyerrors that might explain the issue you are having.
If you are unable to resolve your issue, you can visit the ESET Security Forum and consult the ESET community forinformation about issues you may encounter.
When contacting ESET Customer Care, you may be asked by technical support to collect log files - to do so, useESET Log Collector or our Diagnostic Tool to collect the necessary logs. We strongly recommend that you includelogs when contacting support to speed up your customer care service request.
5.1 Answers to common installation issues
Expand the section for the error message you want to resolve:
ERA Server
The ERA Server service does not start:
Broken installation
This might be the result of missing registry keys, missing files or invalid file permissions.
The ESET All-in-one installer has its own log file. When installing a component manually, use the MSI Loggingmethod.
Listening port already used (mostly 2222 and 2223)
Use the appropriate Command for your OS:
Windows:netstat -an | find "2222"
netstat -an | find "2223"
Linux:netstat | grep 2222
netstat | grep 2223
Database not running / not reachable
MS SQL Server: verify that port 1433 is available on/to the database server or try to log in to SQL ServerManagement Studio
MySQL: verify that port 3306 is available on/to the database server or try to log in to your database interface(for example using the MySQL command-line interface or phpmyadmin)
Corrupted database
Multiple SQL errors will be shown in the ERA Server log file. We recommend that you restore your databasefrom a backup. If no backup is present, reinstall ESET Remote Administrator.
Insufficient system resources (RAM, disk space)
Review running processes and system performance:

160
Windows users: run and review information in Task Manager or Event Viewer
Linux users may run any of these commands:df -h (to review disk space information)cat /proc/meminfo (to review memory space information)dmesg (to review your Linux system healh)
Error with ODBC connector during ERA Server installation
Error: (Error 65533) ODBC connector compatibility check failed.
Please install ODBC driver with support for multi-threading.
Reinstall an ODBC driver version that supports multi-threading or reconfigure odbcinst.ini as shown in theODBC configuration section.
Error with a database connection during ERA Server installation
Installation of ERA Server finishes with the following error message:
Error: It is not possible to store big blocks of data in the database.
Please reconfigure the database server first.
Error message from the install log:
Error: Execution test of long statement failed with exception:
CMysqlCodeTokenExecutor: CheckVariableInnodbLogFileSize:
Server variables innodb_log_file_size*innodb_log_files_in_group value 100663296 is too low.
Verify that the configuration of your database driver matches that shown as in the ODBC configuration section.
ERA Agent
The message "The database cannot be upgraded. Please remove the product first." is displayed during Agentuninstallation
Repair ERA Agent:
1. Navigate to Control Panel > Programs and Features and double-click ESET Remote Administrator Agent.
2. Click Next > Repair and follow the instructions.
Are there any other ways how to uninstall ERA Agent?
All possible ways of uninstalling ERA Agent are described in Uninstallation seciton.
Error Code 1603 occurred during the Agent installation
This error can occur when the installer files are not located on the local disk. To fix this copy the installer filesto the local directory and run the installation again. If the files are already present, or the error persists, followour Knowledgebase instructions.
During the installation of Agent on Linux the error message appears
Error message :
Checking certificate ... failed
Error checking peer certificate: NOT_REGULAR_FILE
Possible cause of this error is wrong file name in the installation command. The console is case sensitive. Forexample "Agent.pfx" is not the same as "agent.pfx".
Web Console
How to resolve the following error messages in Web Console?
Login Failed, Connection has failed with state of 'Not connected'?

161
Check to see whether the ERA Server service and your database service are running. Additionally, ensurethat the connection is not broken. If they are not running, restart the services, refresh Web Console andthen try to log in again. Review the log files for your database service (MS SQL, MySQL) for moreinformation.
Login failed: Communication error
Verify that Apache Tomcat is running and working properly. Review the log files for Apache Tomcat.
See our Knowledgebase article for more information on this issue.
ESET Remote Administrator Web Console does not load
In cases where the ESET Remote Administrator Web Console (ERA Web Console) is not running or when thelogin screen appears to be constantly loading, follow our Knowledgebase instructions.
How to set up HTTPS/SSL connection to Web Console?
Error message: Using unencrypted connection! Please configure the webserver to use HTTPS
If you experience problems with the HTTPS connection to Web Console, see HTTPS/SSL connection set up.
Apache Tomcat is not able to extract content from 'era.war' file
Error: After installing ERA components from All-in-one installer, era.war file is not extracted and Web Consoleis not accessible. To solve this follow the steps in our knowledgebase article.
Apache HTTP Proxy
Apache HTTP Proxy cache has its size in GigaBytes and it is still growing
If you have installed Apache HTTP Proxy using All-in-one installer, clean-ups are automatically enabled. Ifclean-ups are not working correctly, perform a clean-up manually or schedule a clean-up task.
Updates of virus signature database are not working after Apache HTTP Proxy is installed
If client workstations are not able to update, see our Knowledgebase instructions to disable Apache HTTP Proxyon endpoint workstations for a temporary period. After connection issues are resolved, consider enablingApache HTTP Proxy again.
Remote update of ERA Agent fails with error code 20008
If remote update of ERA Agent fails with the following message:GetFile: Failed to process the HTTP request (error code 20008, url: 'http://repository.eset.com/v1//info.meta')
follow steps I - III in this article to troubleshoot the connection issue. In case the machine on which ERA Agentis supposed to be updated is outside your corporate network, configure a policy for ERA Agent not to use aproxy to connect to repository when outside the corporate network.
ESET Rogue Detector Sensor
Why is the following error message continuously logged in ESET Rogue Detector's trace.log?
Information: CPCAPDeviceSniffer [Thread 764]:
CPCAPDeviceSniffer on rpcap://\Device\NPF_{2BDB8A61-FFDA-42FC-A883-CDAF6D129C6B} throwed error:
Device open failed with error:Error opening adapter: The system cannot find the device specified. (20)
This is a problem with WinPcap. Stop the ESET Rogue Detector Sensor service, reinstall the latest version ofWinPcap (at least 4.1.0) and restart the ESET Rogue Detector Sensor service.
Linux

162
Missing libQtWebKit dependecy on CentOS Linux
If the following error is displayed:
Error: CReportPrinterModule [Thread 7f5f4c7b8700]:
ReportPrinter: ReportPrinterTool exited with:
/opt/eset/RemoteAdministrator/Server//ReportPrinterTool:
error while loading shared libraries: libQtWebKit.so.4:
cannot open shared object file: No such file or directory [code:127]
Follow the instructions in our Knowledgebase article.
ERA Server installation on CentOS 7 has failed
If the following error is displayed:
Error: DbCheckConnection: locale::facet::_S_create_c_locale name not valid
The issue is probably caused by environment/locale settings. Running the following command before theserver installer script should help:
export LC_ALL="en_US.UTF-8"
Microsoft SQL Server
Error code -2068052081 during Microsoft SQL Server installation.
Restart your computer and run setup again. If the issue persists, uninstall the SQL Server Native Client and runinstallation again. If this does not resolve the issue, uninstall all Microsoft SQL Server products, restart yourcomputer, and then run installation again.
Error code -2067922943 during Microsoft SQL Server installation.
Verify that your system meets the database requirements for ERA.
Error code -2067922934 during Microsoft SQL Server installation.
Ensure that you have the correct user account privileges.
The Web Console shows "Failed to Load Data".
MS SQL Server tries to use as much disk space as possible for transaction logs. If you want to clean up this, visitofficial Microsoft website.
Error code -2067919934 during Microsoft SQL Server installation.
Make sure that all previous steps have been finished successfully. This error is caused by misconfigured systemfiles. Restart you computer and run installation again.
5.2 Log files
Each ESET Remote Administrator component performs logging. ERA components write information about certainevents into log files. The location of log files varies depending on the component. The following is a list of log filelocations:
Windows
ERA Server C:\ProgramData\ESET\RemoteAdministrator\Server\EraServerApplicationData\Logs\
ERA Agent C:\ProgramData\ESET\RemoteAdministrator\Agent\EraAgentApplicationData\Logs\

163
ERA Web Console and Apache Tomcat C:\Program Files\Apache Software Foundation\Tomcat 7.0\Logs
See also https://tomcat.apache.org/tomcat-7.0-doc/logging.html
Mobile Device Connector C:\ProgramData\ESET\RemoteAdministrator\MDMCore\Logs\
ERA Proxy C:\ProgramData\ESET\RemoteAdministrator\Proxy\EraProxyApplicationData\Logs\
ERA Rogue Detection Sensor C:\ProgramData\ESET\Rogue Detection Sensor\Logs\
Apache HTTP Proxy C:\Program Files\Apache HTTP Proxy\logs\C:\Program Files\Apache HTTP Proxy\logs\errorlog
on older Windows operating systems C:\Documents and Settings\All Users\Application Data\ESET\...
NOTE: C:\ProgramData is hidden by default. To display the folder...
1. Navigate to Start > Control Panel > Folder Options > View.
2. Select Show hidden files, folders and drives and click OK.
Linux
ERA Server /var/log/eset/RemoteAdministrator/Server//var/log/eset/RemoteAdministrator/EraServerInstaller.log
ERA Agent /var/log/eset/RemoteAdministrator/Agent//var/log/eset/RemoteAdministrator/EraAgentInstaller.log
Mobile Device Connector /var/log/eset/RemoteAdministrator/MDMCore//var/log/eset/RemoteAdministrator/MDMCore/Proxy/
Apache HTTP Proxy /var/log/httpd/
ERA Web Console and Apache Tomcat /var/log/tomcat6/ or /var/log/tomcat7/ or /var/log/tomcat8/
See also https://tomcat.apache.org/tomcat-7.0-doc/logging.html
ERA Proxy /var/log/eset/RemoteAdministrator/Proxy/
ERA RD Sensor /var/log/eset/RogueDetectionSensor/
ERA Virtual Appliance
ERA VA configuration /root/appliance-configuration-log.txt
ERA Server /var/log/eset/RemoteAdministrator/EraServerInstaller.log
Apache HTTP Proxy /var/log/httpd (newer versions of ERA Virtual Appliance)
/opt/apache/logs/ (older versions of ERA Virtual Appliance, 6.3.12 andbelow)
OS X
/Library/Application Support/com.eset.remoteadministrator.agent/Logs/
/Users/%user%/Library/Logs/EraAgentInstaller.log

164
5.3 Diagnostic Tool
The diagnostic tool is a part of all ERA components. It is used to collect and pack logs that can be used by technicalsupport agents and developers to solve problems with product components.
Diagnostic Tool location
Windows
Folder C:\Program Files\ESET\RemoteAdministrator\<product>\ Diagnostic.exe.
Linux
In the following directory on the server: /opt/eset/RemoteAdministrator/<product>/ , there is aDiagnostic<product> executable (one word, for example, DiagnosticServer, DiagnosticAgent)
Usage (Windows)
1. Run the tool using a Command Prompt.
2. Enter the location of log files to be stored (in our example "logs") and press Enter.
3. Enter the information you want to gather (in our example 1 trace status 3). See Actions below for moreinformation.
4. When your ar finished, you can find the log files compressed in a .zip file in the "logs" directory in theDiagnostic Tool location.

165
Actions
ActionEraLogs - A logs folder is created where all logs are saved. To specify certain logs only, use a space toseparate each log.
ActionGetDumps - A new folder is created. A process dump file is generally created in cases where a problemwas detected. When a serious problem is detected, a dump file is created by system. To check it manually, go tothe folder %temp% (in Windows) or folder /tmp/ (in Linux) and insert a dmp file.
NOTE: The component service (Agent, Proxy, Server, RD Sensor, FileServer) must be running.
ActionGeneralApplicationInformation - The GeneralApplicationInformation folder is created and inside it thefile GeneralApplicationInformation.txt. This file contains text information including the product name andproduct version of the currently installed product.
ActionConfiguration - A configuration folder is created where file storage.lua is saved.
5.4 Problems after upgrade/migration of ERA Server
If you are unable to start the ESET Remote Administrator Server service because of a damaged installation andunknown log file error messages, perform a repair operation using the steps shown below:
WARNING: We recommend that you perform a Database Server Backup before you begin the repair operation.
1. Navigate to Start > Control Panel > Program and Features and double-click ESET Remote Administrator Server.
2. Select Repair and click Next.
3. Reuse your existing database connection settings and click Next. Click Yes if you are prompted forconfirmation.
4. Select Use Administrator password already stored in the database and click Next.
5. Select Keep currently existing certificates and click Next.

166
6. Click Repair.
7. Connect to Web Console again and check if everything is OK.
Other troubleshooting scenarios:
ERA Server is not running but there is a database backup:
1. Restore your database backup.
2. Verify the new machine uses the same IP address or hostname as your previous installation to ensure Agentswill connect.
3. Repair ESET Remote Administrator Server and use the database you restored.
ERA Server is not running but you have the exported server certificate and Certification Authority from it:
1. Verify the new machine uses the same IP address or hostname as your previous installation to ensure Agentswill connect.
2. Repair ESET Remote Administrator Server using backup certificates (when repairing, select Load certificatesfrom file and follow the instructions).
ERA Server is not running and you do not have a database backup or ERA Server Certificate and Certificationauthority:
1. Repair ESET Remote Administrator Server.
2. Repair ERA Agents using one of the following methods:

167
Agent live installer
Remote deployment (this will require you to disable the firewall on target machines)
Manual Agent component installer
5.5 MSI Logging
This is useful if you are not able to install an ERA component on Windows properly, for example ERA Agent:
msiexec /i C:\Users\Administrator\Downloads\Agent-1.0.373.0_x64.msi /L*v log.txt

168
6. First steps and best practicesAfter you have successfully installed ESET Remote Administrator you can begin setting things up.
First, open ERA Web Console in your web browser and log in.
Getting to know ERA Web Console Before you begin initial setup, we recommend that you get to know the ERA Web Console, as it is the interfaceused to manage ESET security solutions. Our Post-Installation Tasks will guide you through recommended stepsfor an optimal setup experience.
User account creationDuring installation you create the default administrator account. We recommend that you save theAdministrator account and create a new account to manage clients and configure their permissions.
Adding client computers, servers and mobile devices on your network to ERADuring installation, you can choose to search your network for computers (clients). All clients found will belisted in the Computers section when you start ESET Remote Administrator. If clients are not shown in theComputers section, run a Static Group Synchronization task to search for computers and show them in groups.
Deploying an AgentOnce client computers are found, deploy the Agent to them. The Agent provides communication between ESETRemote Administrator and clients.
Installing ESET product (including activation)To keep your clients and network secure, use the Software Install task to install ESET products.
Creating/editing groupsWe recommend that you sort clients into static or dynamic Groups based on various criteria. This makesmanaging clients easier and helps you keep an overview of your network.
Creating a new policyPolicies allow you to push specific configurations to ESET products on your client computers. This allows you toavoid configuring each client's ESET product manually. Once you have created a new policy with your customconfiguration, you can assign it to a group (either static or dynamic) to apply your custom settings to all thecomputers in that group.
Assigning policy to a groupAs explained above, in order for a policy to be applied it needs to be assigned to a group. Computers that belongto the group will have the policy applied to them. The policy is applied every time an Agent connects to ERAServer.
Setting up notifications and creating reportsTo keep a better overview of what is going on with client computers in your environment, we recommend thatyou use Notifications and Reports. For example, if you want to be notified that a certain event occurred or wantto see or download a report.
6.1 Opening the ERA Web Console
There are multiple ways to open the ERA Web Console:
On your local server (the machine hosting your Web Console) type this URL into the web browser:https://localhost/era/
From any place with internet access to your web server, type the URL in following format:https://yourservername/era/Replace "yourservername" with the actual name or IP address of your web server.

169
To log into the ERA Virtual appliance, use following URL:https://[IP address]:8443/Replace "[IP address]" with the IP address of your ERA VM. If you do not remember the IP address, see step 9 ofVirtual appliance deployment instructions.
On your local server (the machine hosting your Web Console), click Start > All Programs > ESET > ESET RemoteAdministrator > ESET Remote Administrator Webconsole - a login screen will open in your default web browser.This does not apply to the ERA Virtual appliance.
NOTE: Since the Web Console uses secure protocol (HTTPS), you might get a message in your web browserregarding a security certificate or untrusted connection (exact wording of the message depends on the browser youare using). This is because your browser wants you to verify the identity of the site you are trying to access. Click Continue to this website (Internet Explorer) or I Understand the Risks, click Add Exception... and then click ConfirmSecurity Exception (Firefox) to allow access to the ERA Web Console. This only applies when you're trying to accessthe ESET Remote Administrator Web Console URL.
When web server (that runs ERA Web Console) is up, the following screen is displayed.
If this is your first login, please provide the credentials you entered during the Installation process. For more detailsabout this screen, see Web Console login screen.
NOTE: In the rare case that you do not see the login screen or when the login screen appears to be constantlyloading, restart the ESET Remote Administrator Server service. Once the ESET Remote Administrator Server service isup and running again, restart the Apache Tomcat service. After this, the Web Console login screen will loadsuccessfully.

170
6.2 Client connection interval
60 seconds is the default replication interval of the ERA Agent. This value should be adjusted based on the size ofyour infrastructure by using policies after you install ESET Remote Administrator and deploy ERA Agents and ESETendpoint products to client machines.
1. Navigate to the Admin > Policies in ERA Web Console.
2. Create or edit an existing policy for ESET Remote Administrator Agent.
You can use existing pre-defined policies, for example the Connection - Connect every 20 minutes policy.
3. Click the policy you want to modify and then click Policies > Edit.
4. In the Settings > Connection section, click Change interval next to Connection interval and set to a desired value.

171
5. Click Save > Finish to submit your changes.
6. Assign the policy to all your Agents.
For more information please read our ESET Knowledgebase article or refer to the Administration guide.

172
6.3 Efficient usage of Apache HTTP Proxy
Perform the following steps in ERA Console.
Divide computers in your network into two groups - for example, 10% in one group and 90% in the other.
Arrange for the larger group to use delayed updates via a policy. This way, the smaller group updating earlierwill download essential updates and Apache HTTP Proxy will cache and serve them to the other group.
Enable usage of Apache HTTP Proxy under Admin > Server Settings > Advanced settings, enable Use proxyserver, fill in the required fields, leave Use direct connection if HTTP proxy is not available enabled and thenclick Save.
Create a policy to force Agents and client computers to download updates through Apache HTTP Proxy, but incase HTTP Proxy was unavailable, the Agent and client computer will use direct connection.
Other proxy solutions
It is possible to use your own transparent web proxy solution (such as Squid) which performs a similar role toApache HTTP Proxy, however there will be additional configuration required beyond what is noted here.

173
7. ESET Remote Administrator APIThe ESET Remote Administrator ServerApi (ServerApi.dll) is an application programming interface; a set offunctions and tools for building custom software applications to meet your needs and specifics. Using the ServerApi,your application can provide a custom interface, functionality and operations you would normally perform via ERAWeb Console, such as managing ESET Remote Administrator, generating and receiving reports, etc.
For more information and examples in C language and list of available JSON messages, please refer to the followingOnline help:
http://help.eset.com/era/64/api/

174
8. FAQ
Why are we installing Java on a server? Doesn’t this create a security risk? The majority of all security companiesand security frameworks recommend you uninstall Java from computers and especially from servers.
ERA Web Console requires Java to function. Java is an industry standard for web-based consoles, where all majorweb consoles are using Java and Web Server (Apache Tomcat) for their operation. Java is necessary to support amulti-platform web server.
Although ERA Web Console requires at least Java version 7, we strongly recommend you use the latest officiallyreleased version of Java. It is possible to install Web Server on a dedicated machine, in case the security is a risk.
How do I determine which port the SQL Sever is using?
There are multiple ways to determine the port used by the SQL Server. You can get the most accurate result via theSQL Server Configuration Manager. See the figure below for an example of where to locate this information in SQLConfiguration Manager:
After installing SQL Server Express (included in my ERA package) on my Windows Server 2012 it does not appear tobe listening on a standard SQL port. It is most likely listening to a port other than the default, port 1433.
How do I configure MySQL to accept large packet size?
See MySQL installation and configuration for Windows or Linux.

175
If I install SQL myself, how should I create a database for ERA?
You do not have to. A database is created by the Server.msi installer, not by the ERA Installer. The ERA Installer isincluded to simplify steps for you, it installs the SQL Server and then database is created by the server.msi installer.
Why is my ERA installation failing during database setup? I have binary logging enabled in MySQL.
A: ERA v6.2 does not support MySQL databases with binary log enabled at all. Please disable binary log in MySQLor use a newer version of ERA.
A: ERA v6.3 does not support STATEMENT based binary log format. Please use ROW or MIXED binary log formats.For more information on MySQL binary logs, see https://dev.mysql.com/doc/refman/5.6/en/binary-log.html andhttps://dev.mysql.com/doc/refman/5.6/en/replication-options-binary-log.html#sysvar_binlog_format
Can ERA Installer create a new database for me in an existing SQL Server installation, if I give it the proper SQLServer connection details and credentials? It would be convenient if the installer supported different versions ofSQL Server (2008, 2014, etc.).
Database is created by Server.msi. So, yes, it can create an ERA database for you on individually installed SQL Serverinstances. And yes, the supported versions of SQL Server are 2008, 2012, 2014.
If installing on an existing SQL Server, should the SQL Server use built-in Windows Authentication mode by default?
No, because Windows Authentication mode can be disabled on the SQL Server and the only way to log in is to useSQL Server Authentication (entering a Username and Password). You must use the SQL Server Authentication orMixed Mode. When manually installing the SQL Server, we recommend you create a root password (root user isnamed “sa”, which stands for security admin) and store it for later in a safe place. The root password may be neededwhen upgrading the ERA Server.
Can I use MariaDB instead of MySQL?
MariaDB is a default database in many Linux environments, however, it is not supported by ESET RemoteAdministrator! Please make sure to install MySQL for ESET Remote Administrator to work properly.
I had to install Microsoft .NET Framework 3.5 as ERA Installer pointed me to (http://www.microsoft.com/en-us/download/details.aspx?id=21), but that did not work on a fresh installation of Windows Server 2012 R2 with SP1.
This installer cannot be used on Windows Server 2012 because of the Windows Server 2012 security policy.Microsoft .NET Framework must be installed via the Roles and Features Wizard.
Microsoft .NET 4.5 framework was already installed on my system. I had to use the Roles and Features Wizard to add.NET 3.5. Why doesn't ESET Remote Administrator support .NET 4.5?
Because .NET 4.5 is not backwards compatible with .NET 3.5, which is a prerequisite of the SQL Server installer.

176
It is very difficult to tell whether the SQL Server installation is running. How can I tell what is happening if theinstallation takes more than 10 minutes?
The SQL Server installation can, in rare cases, take up to 1 hour. Install times depend on system performance.
How do I reset the Administrator password for my Web Console (entered during set up)?
It is possible to reset the password by running the server installer and choosing Repair. Be aware the password maybe required to gain access to the ERA database if you did not use Windows Authentication during creation of thedatabase.
NOTE: Please be careful, some of the repair options can potentially remove stored data.
When importing a file containing a list of computers to add to ERA, what is the format required for the file?
See FAQs in the Administrator guide.
Can you use IIS instead of Apache? What about another HTTP server?
IIS is an HTTP server. The web console needs a Java servlet container (like Tomcat) to run, the HTTP server is notsufficient. There have been solutions about how to change IIS into a Java servlet container, but in general, this is notsupported.
NOTE: We do not use Apache HTTP Server, we use Apache Tomcat, which is a different product.
Does ERA have a command-line interface?
Yes, we have the ESET Remote Administrator ServerApi.
Can you install ERA on a domain controller?
The ERA Server application can be installed on a domain controller, but there may be restrictions when installing MSSQL on Windows Domain Controller.
Is there any way to use the wizard for installing on a domain controller?
You can use the wizard but you have to uncheck the installation of the SQL in the component selection window.

177
Will the ERA server installation detect if SQL is already installed on the system? What happens if it does? Whatabout MySQL?
ERA will check for SQL running on a system in case you are using the installation wizard and you have selected SQLexpress to install. In the event there is already an SQL running on a system, the wizard will display a notification touninstall the existing SQL, and then run the installation again, or to install ERA without SQL Express. See databaserequirements for ERA.
Where can I find ERA component mapping by release version of ERA?
See our Knowledgebase article: http://support.eset.com/kb3690/
How do I perform a component-based upgrade of ESET Remote Administrator 6.1.21, 6.1.28 or 6.2.11 to the latestversion?
Windows OS: http://support.eset.com/kb3668/Linux OS: http://support.eset.com/kb3670/
How can I update a system without an Internet connection?
Using HTTP proxy installed on a machine that can connect to the ESET update servers (where update files arecached) and pointing Endpoints to that HTTP proxy on a local network. If your server does not have an Internetconnection, you can enable the mirror feature of the Endpoint product on one machine, use a USB drive to deliverupdate files to this computer and configure all other offline computers to use it as an update server.
How do I reinstall my ERA Server and connect it to an existing SQL server if the SQL server was set up automaticallyby the initial ERA install?
If you are installing the new instance of the ERA Server using the same user account (for example, a domainadministrator’s account) under which you have installed the original ERA server, you can use MS SQL Server viaWindows Authentication.
How do I fix issues with Active Directory sync on Linux?
Verify your domain name is entered in all capital letters ([email protected] instead [email protected]).
Is there a way to use my own network resource (like SMB share) instead of the repository?
You can choose to provide the direct URL where a package is located. If you are using a file share, specify it in afollowing format: file:// followed by the full network path to the file, for example:
file://\\eraserver\install\ees_nt64_ENU.msi

178
How do I reset or change my password?
Ideally, the administrator account should only be used to create accounts for individual admins. Once adminaccounts are created, the administrator password should be saved and the administrator account should not beused. This practice allows for the administrator account to be used for password reset/account details only.
How to reset the password of a built-in ERA Administrator account:
1. Open Programs and Features (run appwiz.cpl), locate ESET Remote Administrator Server and right-click.2. Select Change from the context menu.3. Choose Repair.4. Specify database connection details.5. Select Use existing database and apply upgrade.6. Deselect Use password already Stored in database and enter a new password.7. Log into the ERA Web Console with your new password.
NOTE: We strongly recommend you create additional accounts with specific access rights based on your desiredaccount competencies.
How do I change ERA Server and ERA Web Console ports?
It is necessary to change the port in your webserver configuration to allow webserver connections to the new port.To do so, follow the steps below:
1. Shut down your webserver.2. Modify the port in your webserver configuration.
a) Open the file webapps/era/WEB-INF/classes/sk/eset/era/g2webconsole/server/modules/config/EraWebServerConfig.properties
b) Set the new port number (for example, server_port=44591)3. Start the webserver again.

179
How do I migrate my ERA Server to a new system?
For details on how to perform a migration, see
Upgrade from previous ERA version
or our ESET Knowledgebase article: How do I upgrade ESET Remote Administrator 5 to version 6?
Can I upgrade from ERA v.5/v.4 to v.6 directly via All-in-one installer?
The direct upgrade is not supported, we recommend you use migration tool. For more details, please review Upgrade from previous ERA version and our ESET Knowledgebase article: How do I upgrade ESET RemoteAdministrator 5 to version 6?
I am receiving error messages or have problems with ESET Remote Administrator, what should I do?
See Troubleshooting FAQs.