ergonomic hand auger set - Eijkelkamp · 6 3. Description of the ergonomic hand auger set The...
15
1 ERGONOMIC HAND AUGER SET P.O. Box 4, 6987 ZG Giesbeek, the Netherlands T +31 313 88 02 00 F +31 313 88 02 99 E [email protected] I www.eijkelkamp.com M1.01.11.SE.E © May 2012 OPERATING INSTRUCTIONS All it takes for environmental research Contents On these operating instructions ...............................................................................................................................................................................2 1. Introduction...............................................................................................................................................................................................................2 2. Ergonomically sound drilling ..............................................................................................................................................................................2 2.1 Advantages of the new soil auger system ...............................................................................................................................................2 3. Description of the ergonomic hand auger set..............................................................................................................................................6 3.1 The ergonomic handle....................................................................................................................................................................................6 3.2 Edelman auger ...................................................................................................................................................................................................6 3.3 Riverside auger ..................................................................................................................................................................................................7 3.4 Auger for stony soil ..........................................................................................................................................................................................7 3.5 Spiral auger .........................................................................................................................................................................................................7 3.6 Gouge auger .......................................................................................................................................................................................................7 3.7 Accessories ..........................................................................................................................................................................................................8 4. Technical specifications.........................................................................................................................................................................................8 5. Safety ...................................................................................................................................................................................................................8 6. Use of the augers .....................................................................................................................................................................................................9 7. Use ................................................................................................................................................................................................................ 10 7.1 General .............................................................................................................................................................................................................. 10 7.2 Edelman auger ................................................................................................................................................................................................ 12 7.3 Riverside auger and stony soil auger ...................................................................................................................................................... 12 7.4 Spiral auger ...................................................................................................................................................................................................... 12 7.5 Gouge auger .................................................................................................................................................................................................... 12 7.6 Accessories ....................................................................................................................................................................................................... 13 8. Applications............................................................................................................................................................................................................ 13 9. Problems and solutions ...................................................................................................................................................................................... 13 10. Maintenance........................................................................................................................................................................................................... 14 Appendix: Rust on augers and gouges .............................................................................................................................................................. 15
-
Upload
truongkhanh -
Category
Documents
-
view
222 -
download
1
Transcript of ergonomic hand auger set - Eijkelkamp · 6 3. Description of the ergonomic hand auger set The...
1
ergonomic hand auger set
P.O. Box 4, 6987 ZG Giesbeek, the Netherlands
T +31 313 88 02 00F +31 313 88 02 99
E [email protected] www.eijkelkamp.com
M1.01.11.SE.E© May 2012
operating instructions
All it takes for environmental research
Contents
On these operating instructions ...............................................................................................................................................................................21. Introduction...............................................................................................................................................................................................................22. Ergonomically sound drilling ..............................................................................................................................................................................2 2.1 Advantages of the new soil auger system ...............................................................................................................................................23. Description of the ergonomic hand auger set ..............................................................................................................................................6 3.1 The ergonomic handle ....................................................................................................................................................................................6 3.2 Edelman auger ...................................................................................................................................................................................................6 3.3 Riverside auger ..................................................................................................................................................................................................7 3.4 Auger for stony soil ..........................................................................................................................................................................................7 3.5 Spiral auger .........................................................................................................................................................................................................7 3.6 Gouge auger .......................................................................................................................................................................................................7 3.7 Accessories ..........................................................................................................................................................................................................84. Technical specifications .........................................................................................................................................................................................85. Safety ...................................................................................................................................................................................................................86. Use of the augers .....................................................................................................................................................................................................97. Use ................................................................................................................................................................................................................ 10 7.1 General .............................................................................................................................................................................................................. 10 7.2 Edelman auger ................................................................................................................................................................................................ 12 7.3 Riverside auger and stony soil auger ...................................................................................................................................................... 12 7.4 Spiral auger ...................................................................................................................................................................................................... 12 7.5 Gouge auger .................................................................................................................................................................................................... 12 7.6 Accessories ....................................................................................................................................................................................................... 138. Applications ............................................................................................................................................................................................................ 139. Problems and solutions ...................................................................................................................................................................................... 1310. Maintenance ........................................................................................................................................................................................................... 14Appendix: Rust on augers and gouges .............................................................................................................................................................. 15
2
On these operating instructions
If the text follows a mark (as shown on the left), this means that an important instruction follows.
If the text follows a mark (as shown on the left), this means that an important warning follows relating to danger to the user or damage to the apparatus.The user is always responsible for its own personal protection.
Italic indicated text indicates that the text concerned appears in writing on the display(or must be typed).
1. Introduction
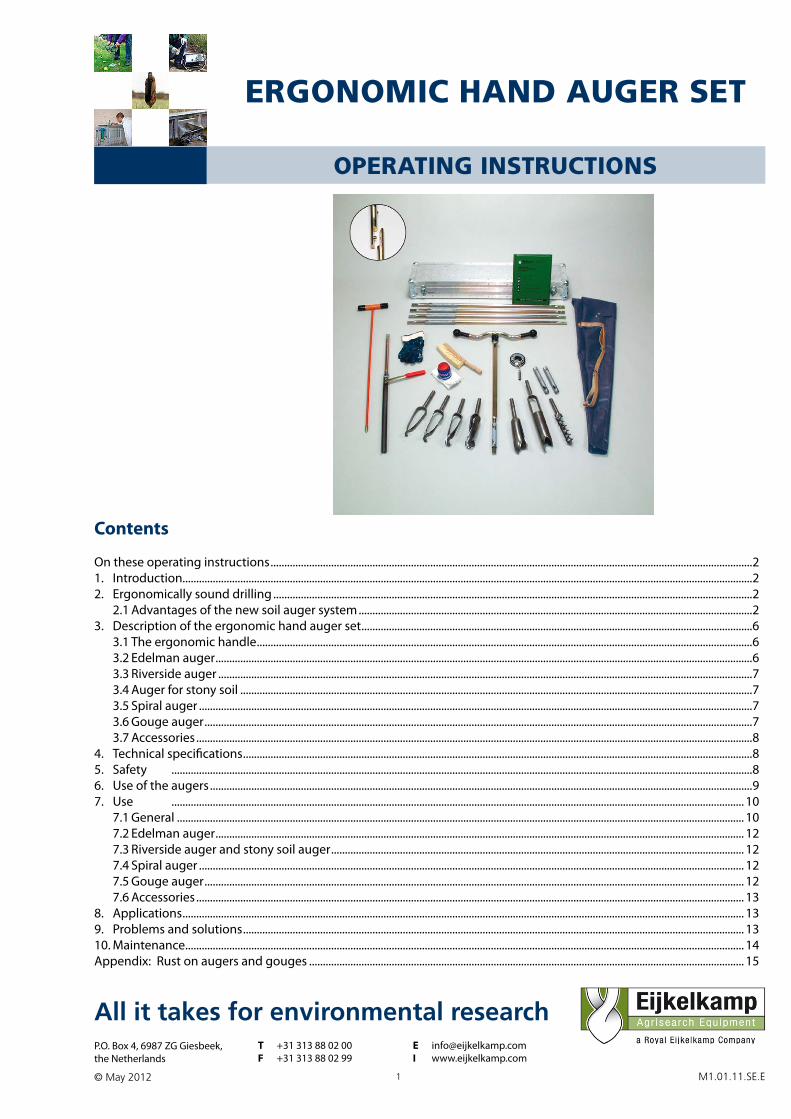
The ergonomic hand auger set for heterogeneous soils consists of an ergonomic upper piece in a special carrying bag and a number of different soil augers and various accessories contained in a carry/transportation case and carry bag.The special carry bag makes it possible to transport the ergonomic top piece, together with a selection of accessories, to the drilling site. An auger consists of a lower piece containing the auger body, to which the upper piece that has the ergonomically shaped hand grip can be joined. One or more extension pieces may need to be fitted in between. In contrast to a single-piece auger, this auger set can be used for virtually any type of soil. The set is light and easy to manage and can be used by one person.
Soil is the result of the breaking down of stone formations and is subsequently often carried away by natural processes and deposited in other places. Soil contains mineral constituents, organic material and pockets containing air and/or water. The mineral constituents vary in size from clay and loam (<63 µm) and sand (63 µm-2 mm) to gravel (2-63 mm) and rocks (>63 mm).An area of earth contains soil in its natural situation and can be composed of several different types of soil (layered or of heterogeneous soil). Layering occurs as a result of different textures or earth formation processes. Depending on the percentage of loam and sand, soil types vary from clay, loam and sand to stony soil. Peat soil is composed primarily of organic material. Examples of cohesive soils are wet clay, loam and peaty soils. Sand and stony soils are examples of soils with poor cohesion.
The ergonomic hand auger set for heterogeneous soils is used to carry out manual augering and sampling in a wide range of different soils in an ergonomically sound way and is particularly suitable for general soil investigation (descriptions of composition, geology, mineralogy) and environmental research. . It can carry out drillings to a depth of 5 metres, depend-ing on the depth of the groundwater, the build-up of the soil and the nature of the material to be drilled into. For every type of soil above or under the groundwater table there is an auger type that is specifically suited to that situation. During the drilling process changes can be made from one type of auger to another without any problems (instructions for use).
2. Ergonomically sound drilling
2.1 Advantages of the new soil auger system
1. The working height and the height setting have been improved. This gives improved body posture while working.2. A “halt knob” has been added that acts as a stop, making it impossible to work too low to the ground.3. The square tubing ensures greater comfort for the user.4. A ratchet system has been added ensuring a more favourable twisting and turning action as well as more efficient
application of force.5. The handle has been extended and the other gripping points for exerting force via the handle have been put in a
different place so that less force needs to be applied.6. The rounded ends of the handle facilitate a more neutral and therefore less stressful, position for the wrists while
working. 7. It allows augering close to objects, as the ratchet system requires only a very short twist.
!
Text
3
Further explanation of the advantages
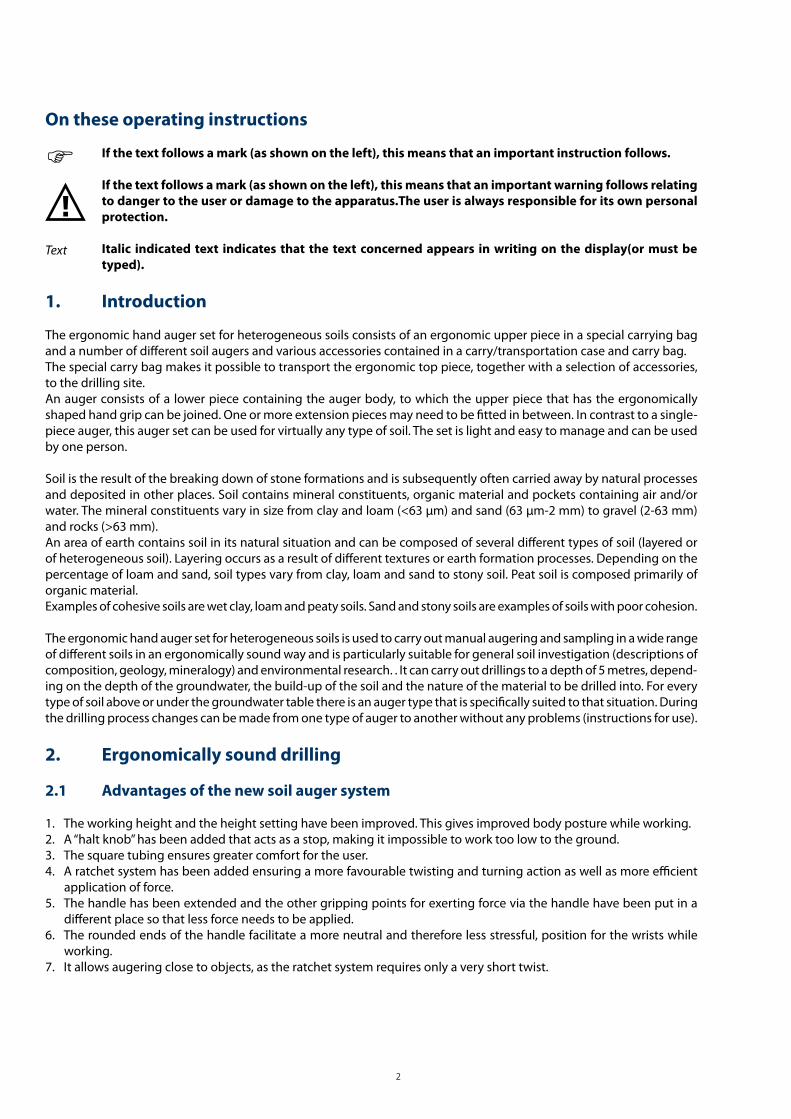
1. The working height and the height setting have been improvedThe new soil auger system can be extended rapidly and easily in 25/50 cm stages, which helps create a more favourable working height. Drilling should preferably be carried out from above knee height (*) and below elbow height (see Table 1a). Bending very low while drilling low to the ground causes a great deal of stress on the back, not only while twisting in the auger but also when pulling or lifting it out.
(*) The rule of thumb for determining the lowest level (lowest ‘responsible’ level) is as follows: the height between fist height and the height of the knees, or: 15 cm below fist height where the fist height is the height of the fist from the ground while standing up straight and holding the arm with fist in a ball straight down the side of the body.
Table 1a: Guidelines for ergonomic drillingThe soil auger system can be extended in 25/50 cm stages, which also represents the different lengths of the work area. The best ergonomic working area depends on the individual user. Every user is different and with the use of the anthropometric details of the user, it is to possible to determine the most appropriate working area for that user from an ergonomic point of view. Every user also tends to use different drilling techniques but each user can determine the most suitable working area within ergonomic guidelines.
Body length Minimum Maximum Ergonomic Optimum ergonomic height ergonomic height working area ergonomic area 200 70 130 75-125 85-110190 65 120 70-120 80-105180 60 115 65-115 75-100170 55 105 55-105 70-95160 50 100 50-100 65-90
The first drilling requires a compromise and will start at a height of 20 cm. After this, every fieldworker can choose the distance that suits him/her personally, according to table 1a.

4
2. A “halt knob” has been added that acts as a stop, making it impossible to work too low to the ground.
Drilling too low to the ground should be avoided as much as possible. For this rea-son a so-called ‘halt knob’ has been added that acts as a ‘stop’. This makes it virtually impossible to bore too low to the ground (lower than 50 cm above the ground) and prevents a bad and stressful working position (Illustration 1).
Illustration 1: Should the user ignore the instructions regarding ergonomically sound drilling the halt knob will act as a stop. This “stop” has been fitted to protect the user, who is now forced to extend the auger.
3. The square tubing ensures greater comfort for the user.The square tubing is easy to adjust with the use of the halt knob and in this way creates greater user comfort. (Illustration 2). It is also possible to use the halt knob to keep count of the number of rotations made when twisting in the auger.
4. Ratchet system, 5 Extended handle and 6 Rounded endsThe addition of a ratchet system and rounded ends on the handle enables the user to more readily exert force in the right direction: twisting in the auger requires only a very slight turn. This ensures more efficient transfer of force: a greater proportion of the force exerted is converted into the turning moment of the auger rod.
The T-handle has been extended and its gripping points for exerting the force have been put in a different place, with the result that the user does not have to exert as much force on the handles (about 40%) to generate the same amount of moment on the auger rod.
Halt knob
Illustration 2

5
The following remark (and word of caution to the client) needs to be noted: as the force that is required is now reduced (in amplitude) this can result in the user taking on heavier soil drilling work (in heavy soil/deeper drillings/ larger auger head) with the consequence that any gain as far as physical stress is concerned is not achieved.The rounded ends of the handles enable the user to turn the soil auger in a more neutral position. The force on the han-dle used for pushing and pulling, from an ergonomic point of view, is best exerted with the wrists in a neutral position.
Illustration 3The force on the handle used for pushing and pulling, from an ergonomic point of view, is best exerted with the wrists in a neutral position. The rounded ends of the handles in combination with the ratchet system of the ergonomic soil auger encourage a neutral wrist position during use.
7. Ability to drill close to objects. Soil drilling can be carried out close to poles, trees, fences, houses etc., as the ratchet system makes it possible to drill with only a very short twist.
Normal handle Ergonomic handle
6
3. Description of the ergonomic hand auger set
The ergonomic hand auger set for heterogeneous soils comes in a standard presentation of a complete set for drilling to a depth of 5 m. The set comprises an ergonomic handle in a special carry bag, bottom parts with various types of auger bodies, extension rods, a utility probe, maintenance materials and various accessories, contained in an aluminium carry/transportation case (see photo on page 1). The complete hand auger set weighs 24 kg (carry bag with ergonomic handle 3.5 kg, complete carry/transportation case 20.5 kg).
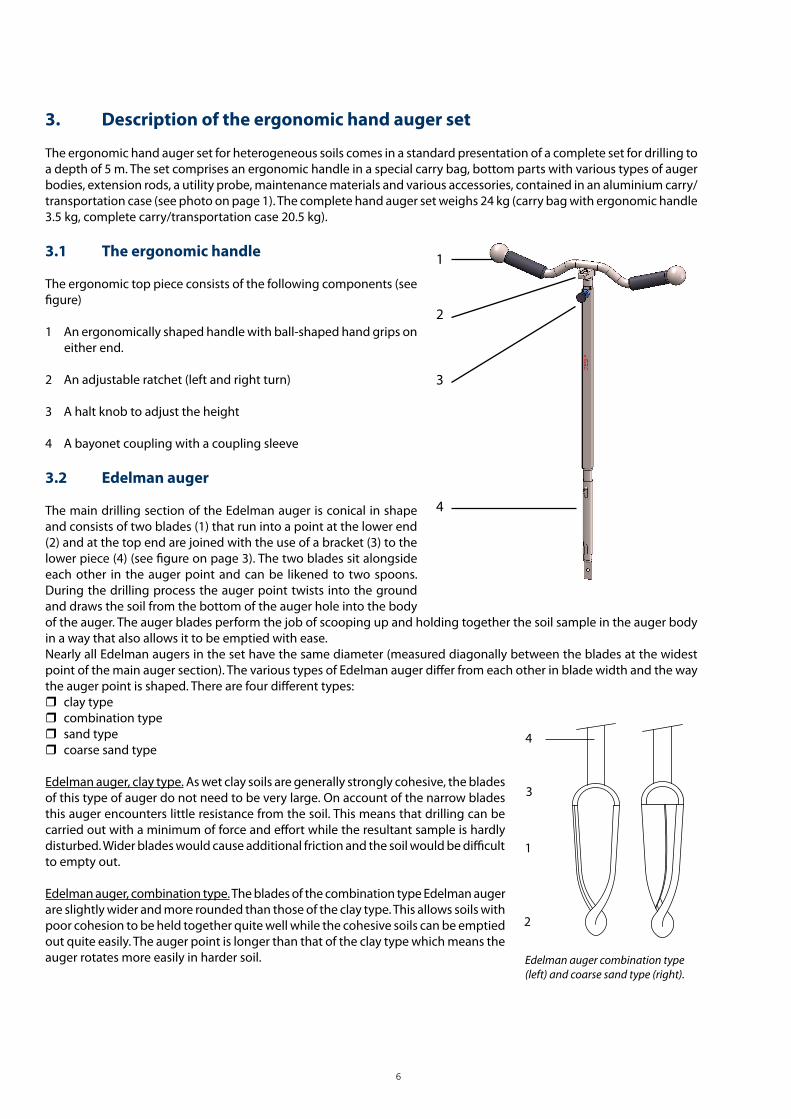
3.1 The ergonomic handle
The ergonomic top piece consists of the following components (see figure)
1 An ergonomically shaped handle with ball-shaped hand grips on either end.
2 An adjustable ratchet (left and right turn)
3 A halt knob to adjust the height
4 A bayonet coupling with a coupling sleeve
3.2 Edelman auger
The main drilling section of the Edelman auger is conical in shape and consists of two blades (1) that run into a point at the lower end (2) and at the top end are joined with the use of a bracket (3) to the lower piece (4) (see figure on page 3). The two blades sit alongside each other in the auger point and can be likened to two spoons. During the drilling process the auger point twists into the ground and draws the soil from the bottom of the auger hole into the body of the auger. The auger blades perform the job of scooping up and holding together the soil sample in the auger body in a way that also allows it to be emptied with ease.Nearly all Edelman augers in the set have the same diameter (measured diagonally between the blades at the widest point of the main auger section). The various types of Edelman auger differ from each other in blade width and the way the auger point is shaped. There are four different types: clay type combination type sand type coarse sand type
Edelman auger, clay type. As wet clay soils are generally strongly cohesive, the blades of this type of auger do not need to be very large. On account of the narrow blades this auger encounters little resistance from the soil. This means that drilling can be carried out with a minimum of force and effort while the resultant sample is hardly disturbed. Wider blades would cause additional friction and the soil would be difficult to empty out.
Edelman auger, combination type. The blades of the combination type Edelman auger are slightly wider and more rounded than those of the clay type. This allows soils with poor cohesion to be held together quite well while the cohesive soils can be emptied out quite easily. The auger point is longer than that of the clay type which means the auger rotates more easily in harder soil.
1
2
3
4
1
3
4
2
Edelman auger combination type (left) and coarse sand type (right).
7
Edelman auger, sand type. This type of Edelman auger is suitable for soils with poor cohesion such as sandy soil. The longer, twisted auger point ensures that the auger cuts into the soil readily. The blades of the sand type are wider than those of the combination type, giving the auger a wider surface area for holding on to the soil.
Edelman auger, coarse sand type. This type of Edelman auger was developed from the sand type but has wider blades. This has produced an auger that is much more closed in (see figure) and can hold in soils with little or no cohesion such as soils containing very coarse or dry sand.
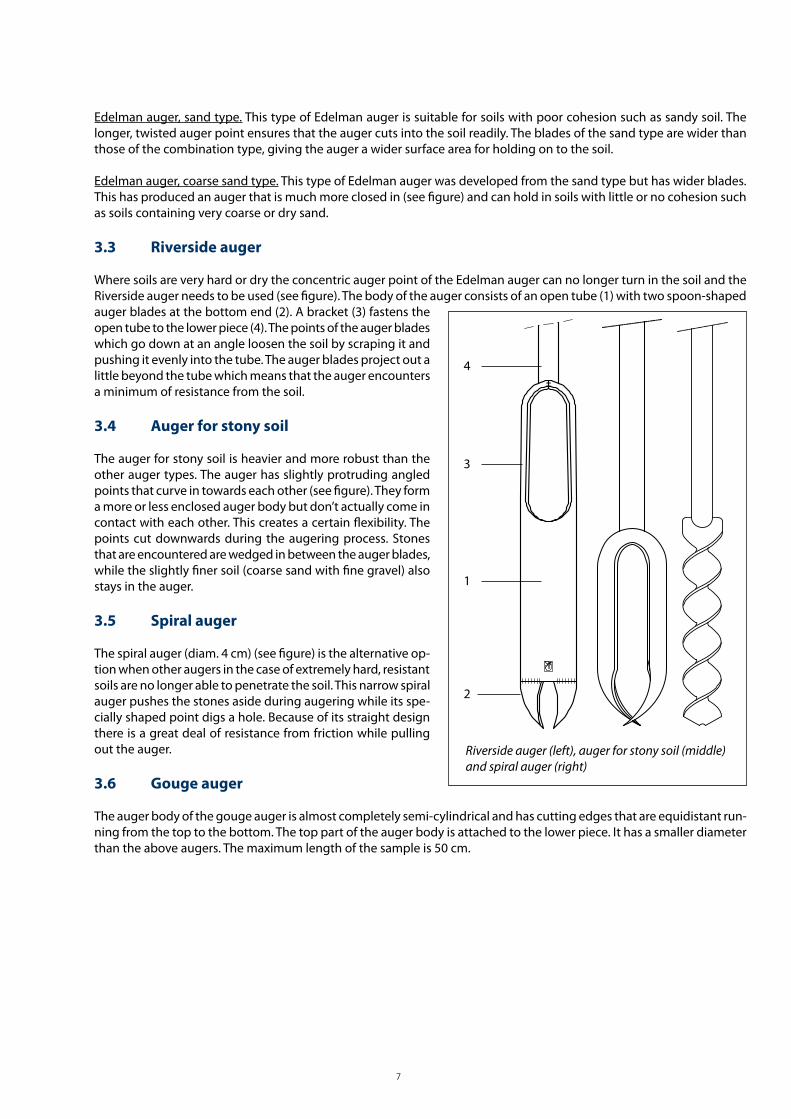
3.3 Riverside auger
Where soils are very hard or dry the concentric auger point of the Edelman auger can no longer turn in the soil and the Riverside auger needs to be used (see figure). The body of the auger consists of an open tube (1) with two spoon-shaped auger blades at the bottom end (2). A bracket (3) fastens the open tube to the lower piece (4). The points of the auger blades which go down at an angle loosen the soil by scraping it and pushing it evenly into the tube. The auger blades project out a little beyond the tube which means that the auger encounters a minimum of resistance from the soil.
3.4 Auger for stony soil
The auger for stony soil is heavier and more robust than the other auger types. The auger has slightly protruding angled points that curve in towards each other (see figure). They form a more or less enclosed auger body but don’t actually come in contact with each other. This creates a certain flexibility. The points cut downwards during the augering process. Stones that are encountered are wedged in between the auger blades, while the slightly finer soil (coarse sand with fine gravel) also stays in the auger.
3.5 Spiral auger
The spiral auger (diam. 4 cm) (see figure) is the alternative op-tion when other augers in the case of extremely hard, resistant soils are no longer able to penetrate the soil. This narrow spiral auger pushes the stones aside during augering while its spe-cially shaped point digs a hole. Because of its straight design there is a great deal of resistance from friction while pulling out the auger.
3.6 Gouge auger
The auger body of the gouge auger is almost completely semi-cylindrical and has cutting edges that are equidistant run-ning from the top to the bottom. The top part of the auger body is attached to the lower piece. It has a smaller diameter than the above augers. The maximum length of the sample is 50 cm.
4
3
1
2
Riverside auger (left), auger for stony soil (middle) and spiral auger (right)
8
3.7 Accessories
Extension rods and coupling sleeves.The extension rods are 1 m in length. Since the top piece, extension rods and lower pieces are fitted with bayonet couplings, the auger can be any desired length. Coupling sleeves are cylindrical sleeves that lock the coupling in place.
Utility probe.The fibreglass utility probe is 105 cm in length and ends in a cone with a diameter of 19 mm. The probe is well insulated and can therefore be safely used to test the augering spot for cables and various types of underground pipes.
4. Technical specifications
The most important dimensions of the various types of augers are set out in the table below. The diameters are measured across the widest point between the auger blades!The auger bodies are manufactured from iron-manganese steel (not stainless steel, but non-toxic). As is appropriate for environmental research, all the auger bodies are unvarnished.
Auger type Diameter (mm) Blade width (mm)Edelman auger clay-type 70 30Edelman auger combination-type 70 35Edelman auger sand-type 70 40Edelman auger coarse-sand-type 70 75Riverside auger 70 -Stony soil auger 70 -Spiral auger 40 -Gouge auger 30 -
5. Safety
Before commencing with the drilling ascertain whether there are (power) cables or pipes running through the ground (make inquiries). Use the probe to carry out a safe inspection of the augering location. If cables or pipes are present, choose another location.
Always hold on to the auger by its synthetic handgrip during the drilling process. This ensures insulation if a power cable should be encountered with the auger.
Take hold of a coupling sleeve by its middle. This prevents the skin from catching under a coupling sleeve while components are being added or removed from the auger.
If an auger is longer than 4 m, divide it up into smaller sections. This prevents damage to the auger rods and reduces the risk of injury if an auger were to fall over. This applies when the auger is being lowered as well as when it is being pulled up.
Do not bang on the auger or force it. Banging can lead to serious damage such as tears in the steel or broken couplings.
Extension rod (left) and coupling sleeve (right)
Wer
kzam
e len
gte
Tota
le le
ngte
Blad-breedte
!
!
!
!
!

9
Wear strong protective gloves when emptying the gouge auger with the spatula. This prevents cuts to the fingers.
After drilling make sure that the auger hole is properly filled up again with drilled material or with special bentonite plugs. This ensures that persons or animals will not step into the auger hole and be injured.
Take special care during thunder. The possibility of being hit by lightning in the open field is much greater, especially when holding a metal auger.
6. Use of the augers
1. When using the auger for the first time, loosen the coupling sleeves from the extension rods and from the ergonomic handle.
2. Select the type of auger you are going to use based on the soil type (see applications). If the soil type is unknown the
Edelman auger combination type is generally the best to choose. 3. Join the auger components together (see figure; here a normal upper part is used): 3.1 Take a coupling sleeve and hold it in the centre. Slide it onto the upper piece so that it stays on the nipple (step 1). The coupling sleeve is locked in position when it will not turn any further. 3.2 Now hook the upper and lower pieces together (step 2). 3.3 To secure the coupling the coupling sleeve is now screwed loose from the upper piece, slid over the coupling (step 3) and secured to the nipple of the lower piece(step 4). Check that the sleeve and coupling are securely fastened. Note that there is a certain amount of play in the coupling.4. The mechanism of the ratchet must be in the correct position.
!
!
!
Coupling the parts
1 2 43

10
7. Use
7.1 General
Each different type of auger is also different in its use but the following matters apply to all:
The auger should always be rotated in a clockwise direction. Augering is done in a vertical position. To drill in an ergonomically sound way the steps set out below should be followed:1. Place the ergonomic auger on the surface of the soil.2. Drill to a depth of 50 cm (fill the auger no more than 10 cm). (For instructions regarding depth see the figure below) NB: if you wish, you can you can extend the ergonomic auger by half at the halfway stage (drilling depth of 25 cm). 3. Slide the ergonomic auger to its full length after reaching a depth of 50 cm.4. Continue to drill to a depth of 100 cm (for instructions regarding depth see the figure below). NB: if you wish, you can you can extend the ergonomic auger by half at the halfway stage (drilling depth of 75 cm) 5. Completely retract the auger and add an extension rod (100 cm).6. You can now continue drilling by repeating steps 1 to 5.
To drill past a depth of 1 m one or more extension rods needed to be connected in between:1. To do this, it is best to place the auger on the ground. 2. Slide the coupling sleeve from the lower piece and secure it to the upper piece.3. Unhook the upper piece from the lower piece. 4. Take an extension rod and a coupling sleeve. Secure the coupling sleeve to the nipple at the lower end of the exten-
sion rod (the end with the hole). 5. Fasten the upper piece as well as the lower piece to the extension rod.
Always check that the coupling sleeves are securely fastened! A well-secured coupling will always stay fastened during drilling, thus preventing the loss of components.
Ergonomic working area (50 cm)
Maximum ergonomichight (117 cm)
Minimum ergonomichight (67 cm)
50 cm auger depth 100 cm auger depth
!

11
If the auger is longer than 4 m, it should be inserted and pulled out in smaller sections. This is done as follows:1. Make sure that the lower part of the auger juts out above the augering hole by half a metre. Keep hold of the auger firmly! 2. To join the sections: Hook the two sections onto each other. Slide the coupling sleeve from the upper piece down
over the coupling and secure it to the lower piece of the auger. When dividing up into sections: Slide the coupling sleeve up and secure it to the upper piece of the auger. Separate the upper and lower pieces from each other by unhooking them.
Dividing up the auger prevents distortion of the item and is also safer (less risk that the auger will top-ple over and injure someone).
Turn the auger off by giving it a full rotation without pressing down. Always keep your back straight and knees slightly bent and use gentle turns to pull a full auger up to avoid injury to
the back. Wear gloves for a better grip on the auger rods. It is often convenient to place the augered material in a logical order around the auger hole so that the samples can
be examined as soon as the drilling has been completed. Different types of soil can be encountered during the drilling session which will require the use of a different type of
auger (see applications). Keep all equipment clean during drilling sessions by washing any soiled items with water. This helps prevent coupling
sleeves from seizing (see maintenance).
Square tube
Round tube
Halt knob
Depth-indication 50 cm
Ca. 8 cm
Depth-indication 100 cm
}
12
7.2 Edelman auger
Hold the auger by the handles and place it on the soil (see figure). Applying light pressure turn the auger to the right into the soil. After about 2¼ complete rotations (of 360°) the auger will have penetrated the soil by 10 cm (rotations can be counted with the aid of the halt knob). The auger will be filled with lightly stirred-up soil right up to the bracket. Depending on the type of soil, fewer or more turns may be required to reach the desired result.
Turn the full auger off and pull it up with gentle twists. Place the auger on an angle on the surface of the ground (see figure) for emptying out cohesive soil. Lightly press and turn the auger by 180° on the ground. The material is loosened and can be emptied out of the auger using your hands or by giving it a light tap on the ground. Material that is not very cohesive comes out virtually unaided. The samples can now be examined. Avoid: Overfilling the auger. This causes excess material being spread against the wall of the augered hole, causing it to
become narrower and making subsequent drilling more difficult. It also makes emptying out the soil very difficult. Where the drilling extends to below groundwater level, an overfilled auger can encounter strong suction which makes pulling out the auger more difficult and can also lead to the loss of the sample.
Loss of sample material. Pull the full auger up with gentle turns and therefore not upright.
7.3 Riverside auger and stony soil auger
Turn the auger into the ground with some pressure. The material is stirred up regularly and forced into the auger. The soil stays in the auger because it becomes slightly compacted. Pull the full auger up in an upright position (without turning therefore!). Tap the auger lightly on the ground which will cause the soil to drop out. If the soil is cohesive the Riverside auger is difficult to empty and it is therefore better to use another type of auger (Edelman auger).
7.4 Spiral auger
Turn the auger into the ground with some pressure. The auger body will push any stones it encounters out of the way. Use gentle twists to pull up the auger. Because of the shape of this auger it can encounter considerable resistance in certain types of soil. The discharged material is strongly stirred. The spiral auger is often used for drilling through a hard layer or for pre-drilling a small hole before drilling with another type of auger.
7.5 Gouge auger
Push the gouge auger into the ground without turning. Cut a sample of no more than 50 cm in length. If the gouge auger encounters strong resistance, this can be resolved by turning the auger off during the process. Then continue to push it down. Turn the full gouge auger off and pull it up with gentle twists.
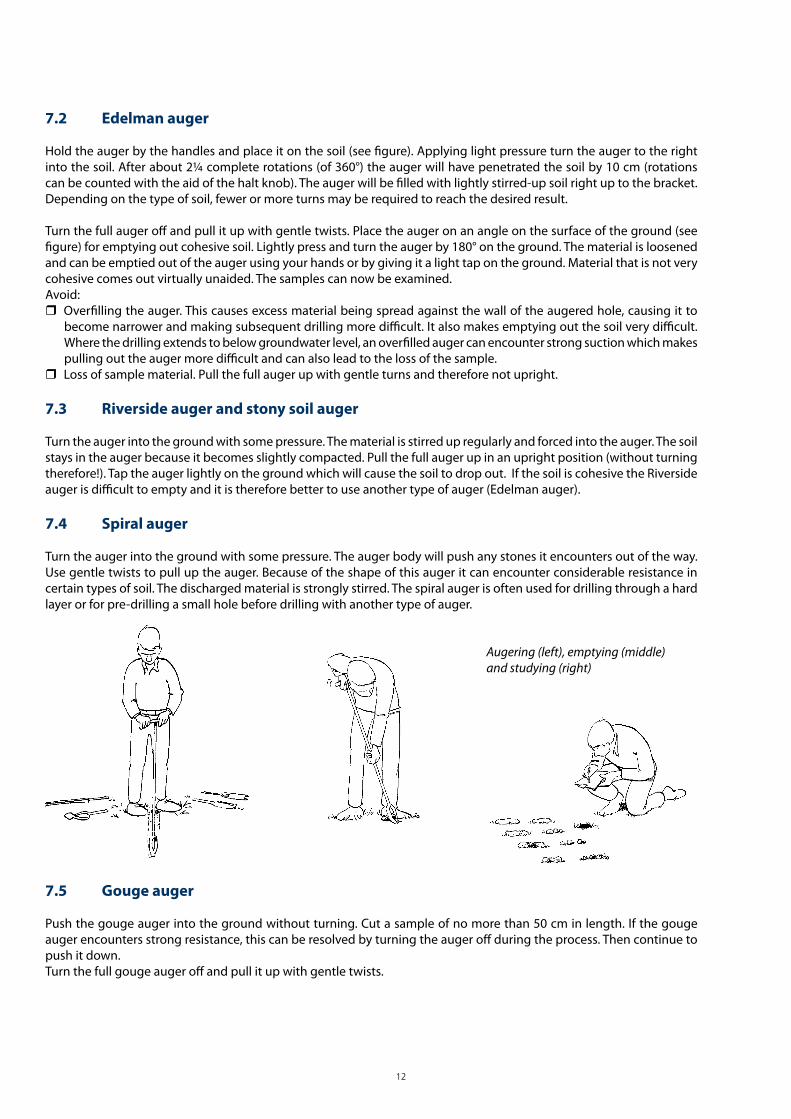
Augering (left), emptying (middle)and studying (right)
13
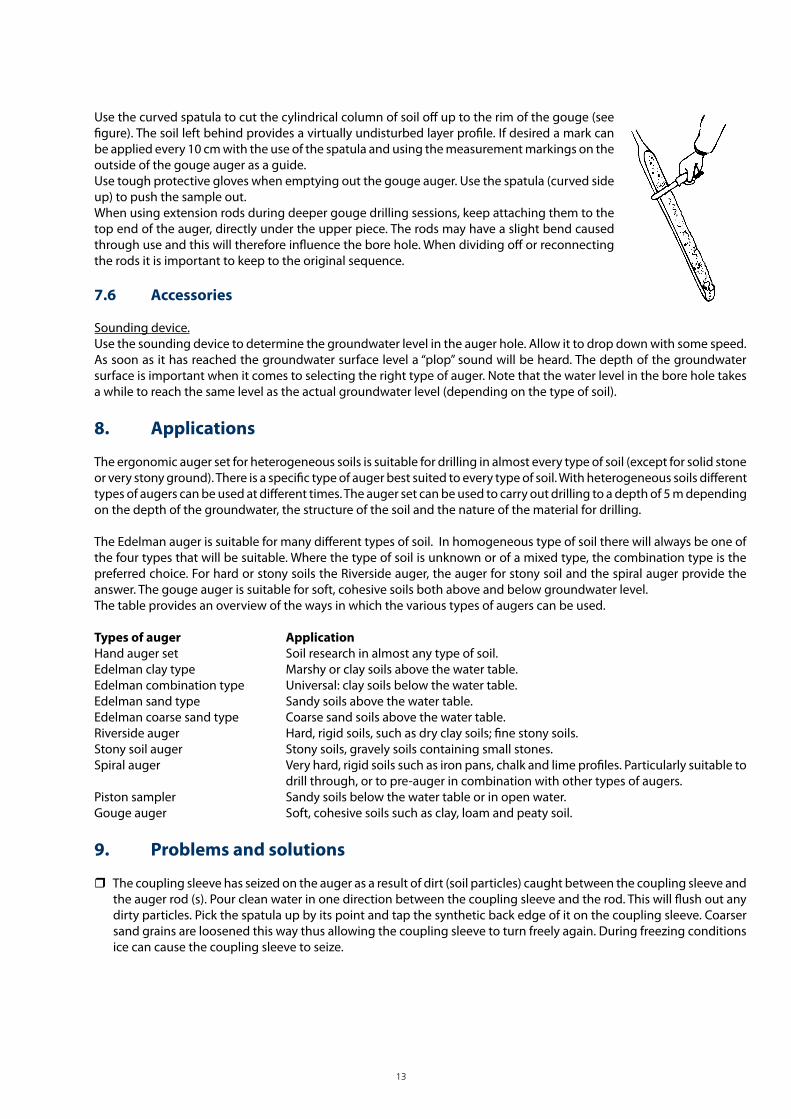
Use the curved spatula to cut the cylindrical column of soil off up to the rim of the gouge (see figure). The soil left behind provides a virtually undisturbed layer profile. If desired a mark can be applied every 10 cm with the use of the spatula and using the measurement markings on the outside of the gouge auger as a guide.Use tough protective gloves when emptying out the gouge auger. Use the spatula (curved side up) to push the sample out.When using extension rods during deeper gouge drilling sessions, keep attaching them to the top end of the auger, directly under the upper piece. The rods may have a slight bend caused through use and this will therefore influence the bore hole. When dividing off or reconnecting the rods it is important to keep to the original sequence.
7.6 Accessories
Sounding device.Use the sounding device to determine the groundwater level in the auger hole. Allow it to drop down with some speed. As soon as it has reached the groundwater surface level a “plop” sound will be heard. The depth of the groundwater surface is important when it comes to selecting the right type of auger. Note that the water level in the bore hole takes a while to reach the same level as the actual groundwater level (depending on the type of soil).
8. Applications
The ergonomic auger set for heterogeneous soils is suitable for drilling in almost every type of soil (except for solid stone or very stony ground). There is a specific type of auger best suited to every type of soil. With heterogeneous soils different types of augers can be used at different times. The auger set can be used to carry out drilling to a depth of 5 m depending on the depth of the groundwater, the structure of the soil and the nature of the material for drilling.
The Edelman auger is suitable for many different types of soil. In homogeneous type of soil there will always be one of the four types that will be suitable. Where the type of soil is unknown or of a mixed type, the combination type is the preferred choice. For hard or stony soils the Riverside auger, the auger for stony soil and the spiral auger provide the answer. The gouge auger is suitable for soft, cohesive soils both above and below groundwater level. The table provides an overview of the ways in which the various types of augers can be used.
Types of auger ApplicationHand auger set Soil research in almost any type of soil.Edelman clay type Marshy or clay soils above the water table.Edelman combination type Universal: clay soils below the water table. Edelman sand type Sandy soils above the water table.Edelman coarse sand type Coarse sand soils above the water table.Riverside auger Hard, rigid soils, such as dry clay soils; fine stony soils.Stony soil auger Stony soils, gravely soils containing small stones.Spiral auger Very hard, rigid soils such as iron pans, chalk and lime profiles. Particularly suitable to drill through, or to pre-auger in combination with other types of augers.Piston sampler Sandy soils below the water table or in open water.Gouge auger Soft, cohesive soils such as clay, loam and peaty soil.
9. Problems and solutions
The coupling sleeve has seized on the auger as a result of dirt (soil particles) caught between the coupling sleeve and the auger rod (s). Pour clean water in one direction between the coupling sleeve and the rod. This will flush out any dirty particles. Pick the spatula up by its point and tap the synthetic back edge of it on the coupling sleeve. Coarser sand grains are loosened this way thus allowing the coupling sleeve to turn freely again. During freezing conditions ice can cause the coupling sleeve to seize.
14
The halt knob is difficult to budge or has seized as a result of dirt (soil particles). Take the halt knob off and rinse/blow on it until it is clean and is easy to move again. The height adjustment is difficult to work as a result of dirt (soil particles). Remove the inner tube from the outer tube and clean both parts with water until they are clean.It takes a great deal of physical effort to carry out the drilling. This may be the result of using the wrong type of auger
for the soil in question soil (see applications) or of carrying out the drilling in the wrong way (see use). Samples are lost during drilling. This can be the result of using the wrong of type of auger for the soil in question (see
applications) or of carrying out the drilling in the wrong way (see use). Take care not to lose any coupling sleeves. After each drilling session count the coupling sleeves. Do not carry the
coupling sleeves loose in the field but leave them attached to an extension rod or upper piece. The sounding device does not make a plopping sound as it passes the surface of groundwater. Move the device up
and down more vigorously so that it hits the groundwater surface with greater downwards speed. After a rough estimate continue determining the depth of the groundwater level in the tube or bore hole with increasing accuracy.
10. Maintenance
Keep materials clean during use by rinsing accumulated dirt off with water. Note: Do not aim the jet of an high pres-sure cleaner on the ratchet. Dirt can get in the mechanism.
Clean the augers with water from the tap after use. Remove the coupling sleeves from the rods and the handle to ensure that the insides are less likely to oxidise and become roughened because of water that has been left behind (causing them to seize more quickly). Allow everything to dry thoroughly. When an auger body is not used for longer periods, it is advisable to coat it with Vaseline to prevent excessive rust from forming.
The auger bodies do not require sharpening. During normal use they continue to become sharper. Any rust that ap-pears is normally not harmful and will disappear when the equipment is used.
Clean the left-right mechanism of the ratchet with a brush.
Nothing in this publication may be reproduced and/or made public by means of print, photocopy, microfilm or any other means without previous written permission from Eijkelkamp Agrisearch Equipment.
Technical data can be amended without prior notification.
Eijkelkamp Agrisearch Equipment is not responsible for (personal) damage due to (improper) use of the product.
Eijkelkamp Agrisearch Equipment is interested in your reactions and remarks about its products and operating instructions.

15
Appendix: Rust on augers and gouges
These augers and gouges are made of high tensile-strength forgeable iron-manganese steel. Both iron and manganese are non-toxic metals, abundant in the earth’s crust on which we live. Natural concentrations are very high. During stor-age and transport some rust may develop on the bare metal surface. During first use this rust will scour off quickly. You may also scour with some wet sand prior to first use. The auger or gouge is then ready for sampling of soil on all metals like zinc, cadmium, chromium, copper and even iron and manganese!
Question 1: How do I clean and maintain my augers / gouges?In practice augers keep themselves clean (and sharp) by the high friction of soil particles rubbing the augers surface. Augers or gouges used in acid, saline or alkaline soil are prone to oxidation and should be rinsed with pH neutral water after use. After a drilling in an oil-polluted borehole you may clean the auger with a brush in a bucket with water with neutral baby-shampoo added. Spraying our detergent 20.05.29 is very effective too and will also mobilize trace-metals, even the zinc plating from the extension rods! Use this detergent with care or limit the use to stainless steel or plastic tools only. Isopropylalcohol on a tissue is fine for rapid on-site cleaning. Acetone is more effective and will even remove tars from metals. Dismantle coupling sleeves and other loose parts prior to cleaning to allow rapid and complete drying after the final water rinse. Store in a well ventilated area free from dust and, for plastic materials, smells.
Question 2: Why did we not prevent the development of natural rust?A paint will blister off quickly and will pollute samples with a variety of organic pollutants during a prolonged period, necessitating a difficult and cumbersome cleaning procedure prior to first use.A zinc plating is very soft. The zinc will be scratched off in a few dozens of drillings resulting in measurable quantities of zinc in your soil samples and influencing your measurements during a prolonged period. After a few days or weeks the zinc has completely disappeared and is not effective anymore.A wax or grease is easy to put on, but fairly hard to remove and, again, risky. Greases, oils and waxes will influence a gas chromatogram (GC) made from soil samples taken with such an auger or gouge. In addition the layer is sticky and it is unavoidable that it will spread all over in carrying bag or case, extension rods, gloves and consequently soil samples. This should be avoided at all times.
Question 3: The extension rods and upper part are zinc plated. Does this zinc plating contaminate the soil sample? No, since there is no intense scouring contact between soil sample and the rods there is no influence.
Question 4: Do stainless steel soil samplers (coring tubes and rings) contaminate soil samples?Stainless steel is an alloy of high percentages of mainly chrome, iron and nickel. Alloys have characteristics that are different from the characteristics of a simple “mix” of these metals! Stainless steel is so chemically stable that no loose oxides are formed. It is also hard; scouring with soil will not lead to detectable levels of iron, chromium or nickel concentrations in soil.
Question 5: Does the chromium plated gouge Model P (04.03) contaminate a soil sample?This gouge is plated with a pure thick layer of nice shining chromium. Chromium is an extremely hard metal and will only and partly be rubbed off in years of use! Although there is very little chance that these quantities will contaminate a sample with Chromium we would not recommend this gouge as first choice for soil analysis on chromium.