Erfahre mit diesem faszinierenden Lebensraum- und · Visit InsectLore.co.uk to Redeem Your Voucher...
12
Transcript of Erfahre mit diesem faszinierenden Lebensraum- und · Visit InsectLore.co.uk to Redeem Your Voucher...
Erfahre mit diesem faszinierenden Lebensraum- und Entdeckerset alles über das unglaubliche Leben des Distelfalters!
Dein Set enthält: Ein 30 cm großes hängendes Schlüpfhabitat, Ein Zertifikat für 3-5 Distel-falterraupen und Nahrung, Eine Pipette zum Füttern deiner Schmetterlinge, Anleitungs- und Aktivitätsbroschüre.
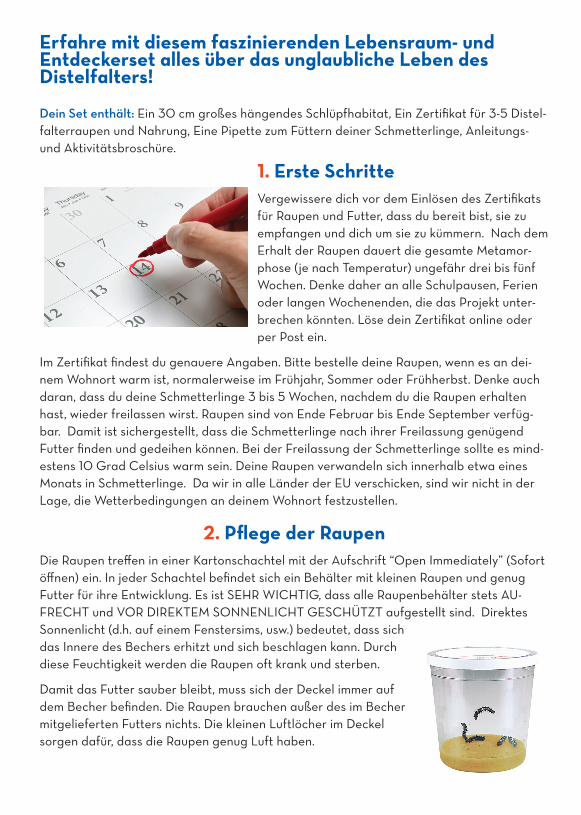
1. Erste SchritteVergewissere dich vor dem Einlösen des Zertifikats für Raupen und Futter, dass du bereit bist, sie zu empfangen und dich um sie zu kümmern. Nach dem Erhalt der Raupen dauert die gesamte Metamor-phose (je nach Temperatur) ungefähr drei bis fünf Wochen. Denke daher an alle Schulpausen, Ferien oder langen Wochenenden, die das Projekt unter-brechen könnten. Löse dein Zertifikat online oder per Post ein.
Im Zertifikat findest du genauere Angaben. Bitte bestelle deine Raupen, wenn es an dei-nem Wohnort warm ist, normalerweise im Frühjahr, Sommer oder Frühherbst. Denke auch daran, dass du deine Schmetterlinge 3 bis 5 Wochen, nachdem du die Raupen erhalten hast, wieder freilassen wirst. Raupen sind von Ende Februar bis Ende September verfüg-bar. Damit ist sichergestellt, dass die Schmetterlinge nach ihrer Freilassung genügend Futter finden und gedeihen können. Bei der Freilassung der Schmetterlinge sollte es mind-estens 10 Grad Celsius warm sein. Deine Raupen verwandeln sich innerhalb etwa eines Monats in Schmetterlinge. Da wir in alle Länder der EU verschicken, sind wir nicht in der Lage, die Wetterbedingungen an deinem Wohnort festzustellen.
2. Pflege der RaupenDie Raupen treffen in einer Kartonschachtel mit der Aufschrift “Open Immediately” (Sofort öffnen) ein. In jeder Schachtel befindet sich ein Behälter mit kleinen Raupen und genug Futter für ihre Entwicklung. Es ist SEHR WICHTIG, dass alle Raupenbehälter stets AU-FRECHT und VOR DIREKTEM SONNENLICHT GESCHÜTZT aufgestellt sind. Direktes Sonnenlicht (d.h. auf einem Fenstersims, usw.) bedeutet, dass sich das Innere des Bechers erhitzt und sich beschlagen kann. Durch diese Feuchtigkeit werden die Raupen oft krank und sterben.
Damit das Futter sauber bleibt, muss sich der Deckel immer auf dem Becher befinden. Die Raupen brauchen außer des im Becher mitgelieferten Futters nichts. Die kleinen Luftlöcher im Deckel sorgen dafür, dass die Raupen genug Luft haben.
Mach’ dir keine Sorgen, wenn sich zunächst nichts bewegt. Suche nach gewebtem Material (Seidenfäden), denn das ist ein gutes Zeichen, dass die Raupen am Leben sind.
Jetzt kannst du sie beim Fressen, Seidenspinnen und Heranwachsen zu einem Vielfachen ihrer Originalgröße beobachten.
Zeitspanne und TemperaturDie Temperatur ist für die Entwicklung der Raupen sehr wichtig. Bei einer konstanten Temperatur von ca. 24°C dauert es drei Wochen, bis sich die Raupen zu Schmetterlingen entwickeln. Die Temperaturen in Europa variieren das ganze Jahr hindurch, und dieser Lebenszyklus dauert bei kühleren Temperaturen länger. Eine ziemlich genaue Schätzu-ngsdauer beträgt drei bis fünf Wochen.
Wichtige Hinweise für kühleres Wetter oder für Lehrer, deren Klassenzimmer in der Nacht nicht geheizt sind: Um die Temperatur konstant zu halten wird empfohlen, die Behälter in eine Decke einzuwickeln oder die Raupen auf ein hohes Regal zu stellen und/oder sie in der Nacht in einer Kartonschachtel mit geschlossenem Deckel aufzubewahren. Vergesst dabei aber nicht, sie am Morgen wieder herauszunehmen! (Lehrer: Die Raupen können problemlos übers Wochenende in diesen Bedingungen belassen werden.)
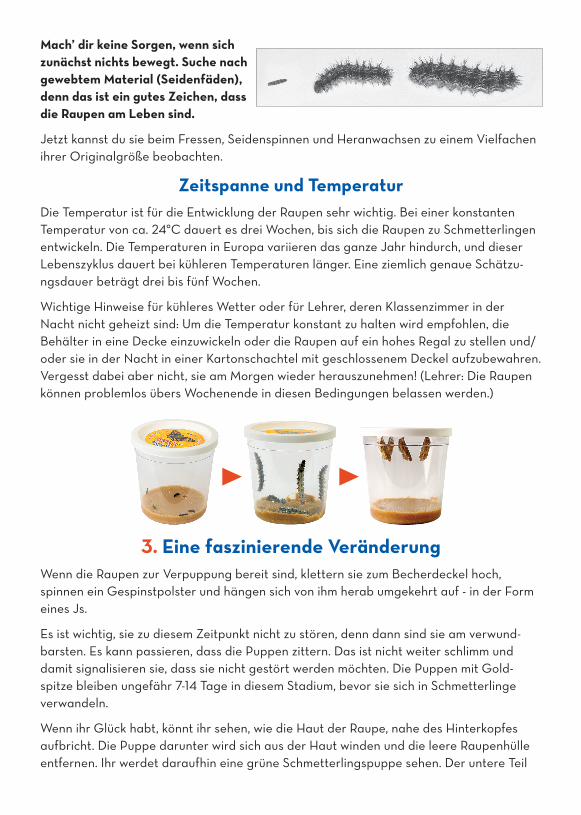
3. Eine faszinierende VeränderungWenn die Raupen zur Verpuppung bereit sind, klettern sie zum Becherdeckel hoch, spinnen ein Gespinstpolster und hängen sich von ihm herab umgekehrt auf - in der Form eines Js.
Es ist wichtig, sie zu diesem Zeitpunkt nicht zu stören, denn dann sind sie am verwund-barsten. Es kann passieren, dass die Puppen zittern. Das ist nicht weiter schlimm und damit signalisieren sie, dass sie nicht gestört werden möchten. Die Puppen mit Gold-spitze bleiben ungefähr 7-14 Tage in diesem Stadium, bevor sie sich in Schmetterlinge verwandeln.
Wenn ihr Glück habt, könnt ihr sehen, wie die Haut der Raupe, nahe des Hinterkopfes aufbricht. Die Puppe darunter wird sich aus der Haut winden und die leere Raupenhülle entfernen. Ihr werdet daraufhin eine grüne Schmetterlingspuppe sehen. Der untere Teil
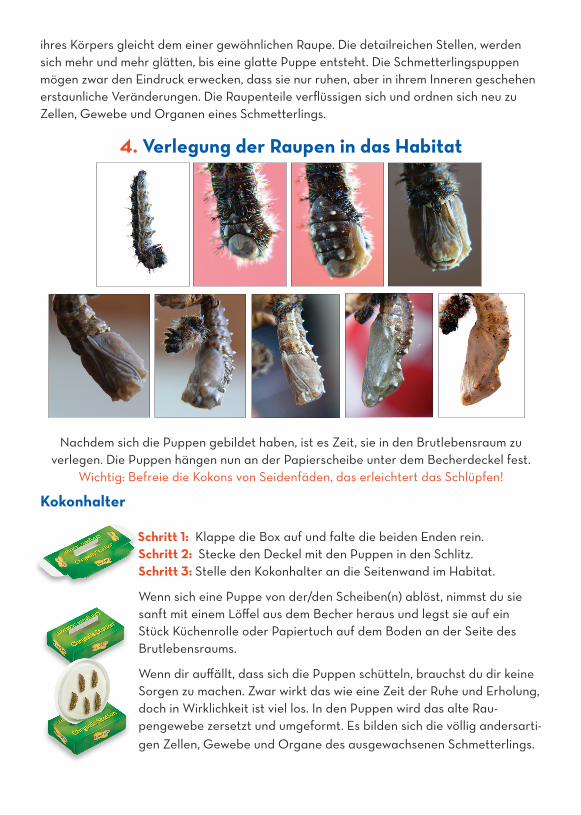
ihres Körpers gleicht dem einer gewöhnlichen Raupe. Die detailreichen Stellen, werden sich mehr und mehr glätten, bis eine glatte Puppe entsteht. Die Schmetterlingspuppen mögen zwar den Eindruck erwecken, dass sie nur ruhen, aber in ihrem Inneren geschehen erstaunliche Veränderungen. Die Raupenteile verflüssigen sich und ordnen sich neu zu Zellen, Gewebe und Organen eines Schmetterlings.
4. Verlegung der Raupen in das Habitat
Nachdem sich die Puppen gebildet haben, ist es Zeit, sie in den Brutlebensraum zu verlegen. Die Puppen hängen nun an der Papierscheibe unter dem Becherdeckel fest.
Wichtig: Befreie die Kokons von Seidenfäden, das erleichtert das Schlüpfen!
Kokonhalter
Schritt 1: Klappe die Box auf und falte die beiden Enden rein.Schritt 2: Stecke den Deckel mit den Puppen in den Schlitz. Schritt 3: Stelle den Kokonhalter an die Seitenwand im Habitat.
Wenn sich eine Puppe von der/den Scheiben(n) ablöst, nimmst du sie sanft mit einem Löffel aus dem Becher heraus und legst sie auf ein Stück Küchenrolle oder Papiertuch auf dem Boden an der Seite des Brutlebensraums.
Wenn dir auffällt, dass sich die Puppen schütteln, brauchst du dir keine Sorgen zu machen. Zwar wirkt das wie eine Zeit der Ruhe und Erholung, doch in Wirklichkeit ist viel los. In den Puppen wird das alte Rau-pengewebe zersetzt und umgeformt. Es bilden sich die völlig andersarti-gen Zellen, Gewebe und Organe des ausgewachsenen Schmetterlings.
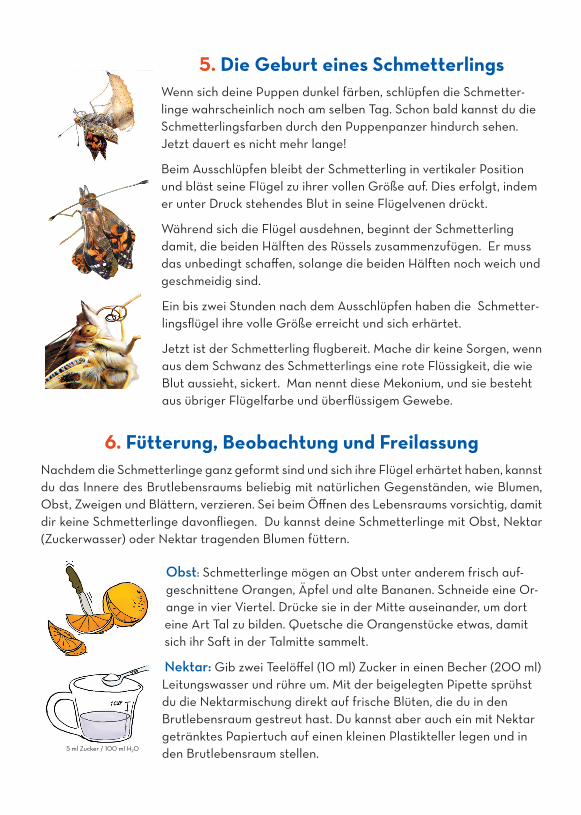
5. Die Geburt eines SchmetterlingsWenn sich deine Puppen dunkel färben, schlüpfen die Schmetter-linge wahrscheinlich noch am selben Tag. Schon bald kannst du die Schmetterlingsfarben durch den Puppenpanzer hindurch sehen. Jetzt dauert es nicht mehr lange!
Beim Ausschlüpfen bleibt der Schmetterling in vertikaler Position und bläst seine Flügel zu ihrer vollen Größe auf. Dies erfolgt, indem er unter Druck stehendes Blut in seine Flügelvenen drückt.
Während sich die Flügel ausdehnen, beginnt der Schmetterling damit, die beiden Hälften des Rüssels zusammenzufügen. Er muss das unbedingt schaffen, solange die beiden Hälften noch weich und geschmeidig sind.
Ein bis zwei Stunden nach dem Ausschlüpfen haben die Schmetter-lingsflügel ihre volle Größe erreicht und sich erhärtet.
Jetzt ist der Schmetterling flugbereit. Mache dir keine Sorgen, wenn aus dem Schwanz des Schmetterlings eine rote Flüssigkeit, die wie Blut aussieht, sickert. Man nennt diese Mekonium, und sie besteht aus übriger Flügelfarbe und überflüssigem Gewebe.
6. Fütterung, Beobachtung und FreilassungNachdem die Schmetterlinge ganz geformt sind und sich ihre Flügel erhärtet haben, kannst du das Innere des Brutlebensraums beliebig mit natürlichen Gegenständen, wie Blumen, Obst, Zweigen und Blättern, verzieren. Sei beim Öffnen des Lebensraums vorsichtig, damit dir keine Schmetterlinge davonfliegen. Du kannst deine Schmetterlinge mit Obst, Nektar (Zuckerwasser) oder Nektar tragenden Blumen füttern.
Obst: Schmetterlinge mögen an Obst unter anderem frisch auf-geschnittene Orangen, Äpfel und alte Bananen. Schneide eine Or-ange in vier Viertel. Drücke sie in der Mitte auseinander, um dort eine Art Tal zu bilden. Quetsche die Orangenstücke etwas, damit sich ihr Saft in der Talmitte sammelt.
Nektar: Gib zwei Teelöffel (10 ml) Zucker in einen Becher (200 ml) Leitungswasser und rühre um. Mit der beigelegten Pipette sprühst du die Nektarmischung direkt auf frische Blüten, die du in den Brutlebensraum gestreut hast. Du kannst aber auch ein mit Nektar getränktes Papiertuch auf einen kleinen Plastikteller legen und in den Brutlebensraum stellen.
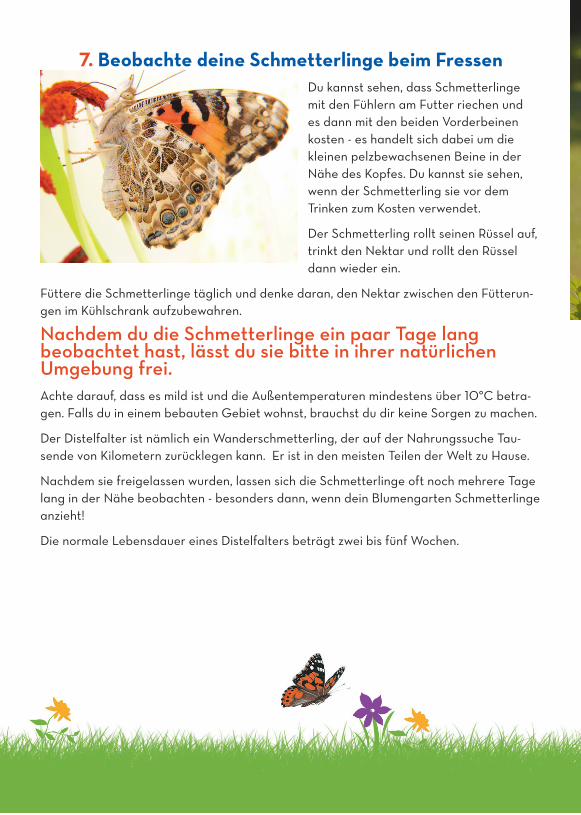
7. Beobachte deine Schmetterlinge beim FressenDu kannst sehen, dass Schmetterlinge mit den Fühlern am Futter riechen und es dann mit den beiden Vorderbeinen kosten - es handelt sich dabei um die kleinen pelzbewachsenen Beine in der Nähe des Kopfes. Du kannst sie sehen, wenn der Schmetterling sie vor dem Trinken zum Kosten verwendet.
Der Schmetterling rollt seinen Rüssel auf, trinkt den Nektar und rollt den Rüssel dann wieder ein.
Füttere die Schmetterlinge täglich und denke daran, den Nektar zwischen den Fütterun-gen im Kühlschrank aufzubewahren.
Nachdem du die Schmetterlinge ein paar Tage lang beobachtet hast, lässt du sie bitte in ihrer natürlichen Umgebung frei. Achte darauf, dass es mild ist und die Außentemperaturen mindestens über 10°C betra-gen. Falls du in einem bebauten Gebiet wohnst, brauchst du dir keine Sorgen zu machen.
Der Distelfalter ist nämlich ein Wanderschmetterling, der auf der Nahrungssuche Tau-sende von Kilometern zurücklegen kann. Er ist in den meisten Teilen der Welt zu Hause.
Nachdem sie freigelassen wurden, lassen sich die Schmetterlinge oft noch mehrere Tage lang in der Nähe beobachten - besonders dann, wenn dein Blumengarten Schmetterlinge anzieht!
Die normale Lebensdauer eines Distelfalters beträgt zwei bis fünf Wochen.

Teilt eure Erfahrungen mit uns auf Facebookwww.facebook.com/schmetterlingsgarten4u
FAQs - Deine FragenWir beantworten deine Fragen gerne auf Facebook und natürlich kannst du uns deine Fra-gen auch per E-Mail unter [email protected] senden.
Dein Habitat ist wiederverwendbar und du kannst von Frühling bis zum frühen Herbst jederzeit Raupen nachbestellen. Erzähle deinen Freunden von deinem Erlebnis mit den Schmetterlingen!
Caterpillars to Butterflies – Right Before Your Very Eyes!
At Insect Lore, we have always believed that adding just a bit of nature to our lives enhances feelings of contentment and belonging.
Placing a sense of wonder and excitement into a child’s life and holding that intense interest for a period of weeks is not an insignificant thing. We believe that the development and use of our Butterfly Garden provides just that.
In our nearly 50 years of existence, we have never failed to see the importance Nature plays in the lives of young and old alike.
Your little caterpillars will grow to ten times their original size, change into jewel-like chrysalides, and finally, emerge as gorgeous Painted Lady Butterflies!
1. Insect Lore Butterfly Activities and Crafts Online
Visit us at InsectLore.co.uk to find helpful instructional videos, our Caterpillar Quick Guide, and answers to common questions.
See our Pinterest Boards at pinterest.com/insectlore to find butterfly games, lessons, crafts, FAQs, and more!
2. Plan Your Butterfly Metamorphosis TimelineBefore redeeming the voucher for your Cup of Caterpillars, be sure you are ready to take care of them. You’ll need to watch over your caterpillars, care for them responsibly, and observe their exciting changes on a daily basis! That’s why planning is important.
• Plan for any school breaks, holidays or extended weekends that might interrupt your project.
• Keep in mind you will release your butterflies within 3 to 5 weeks after you receive your Cup of Caterpillars. Your caterpillars will develop more quickly in warmer environments.
3. Visit InsectLore.co.uk to Redeem Your Voucher
When you are ready to order your Cup of Caterpillars, it is best to redeem your voucher online. See your voucher for details.
• Order your Cup of Caterpillars when it is warm enough in your area. As we send to all EU countries, we are unable to determine the weather conditions in your area. Caterpillars are available in the EU from March to Mid-September. This ensures an available food source for the butterflies to thrive when released. Temperature should be at least 12o C when releasing your butterflies.
• Keep your Voucher Code in a safe place so you can refer to it if you contact Insect Lore about your shipment.
• Once your order is received, it takes about 1 to 2 business days to process, and then about 3 to 7 business days in transit.
We guarantee three out of five caterpillars to become perfect Painted Lady butterflies. Retain your Caterpillar Guarantee (sent with each set of caterpillars). If your order does not fulfill this guarantee, please contact Insect Lore within 30 days of receipt of your caterpillars.
4. Your Caterpillars Have Arrived!
Your caterpillars come with all the nutritious food and moisture they need to grow into Painted Lady butterflies. You’ll notice that the lid of the cup has tiny air holes to ensure that your caterpillars get all the fresh air they need.
• Always handle your Cup of Caterpillars gently and be sure to keep the caterpillars sealed in the cup in which they arrive. Your caterpillars are hardy, but try not to disturb them too much by tapping or shaking the cup. This cup will be their cosy home for the next 7 to 14 days.
• Keep the cup upright, indoors and away from direct sunlight or drafts. Direct sunlight will cause the interior of the cup to heat up and may cause excess moisture to form inside, which could cause the caterpillars to sicken and die.
• While they are caterpillars, it is important to leave the lid on the cup at all times and do not place anything inside the cup. Adding any foreign substance may introduce harmful bacteria to their food. They have all the food they need.
• Temperature plays a very important role in the development of your caterpillars. At a constant temperature of around 24oC, the caterpillars will take three weeks to develop into butterflies. As Europe has fluctuating temperatures year round, this life cycle will take longer when it is cooler. A good estimate is 3-5 weeks.
• Helpful hints for cooler weather or for teachers whose classrooms are not heated on weekends/evenings: In order to maintain a constant temperature, we recommend wrapping the cup in a blanket, placing it on a high shelf and/or placing it in a cardboard box with a closed lid at night. Don’t forget to take them out in the morning! (Teachers: the caterpillars will be fine in these conditions during the weekends.)
Don’t worry if your caterpillars are inactive when they first arrive; sometimes they need to rest after their journey to you, so give them a day or so to get used to their new surroundings. Your caterpillars will become more and more active as they eat the food at the bottom of the cup. Eating and growing is what caterpillars do best!
5. Watch Them Grow and Become Chrysalides
Your caterpillars will eat, spin silk and grow for approximately 7 to 10 days before changing into chrysalides. If your environment is hot and humid, your caterpillars will develop more quickly.
During this incredible period of growth, they will shed their exoskeletons 4 times and grow more than 10 times their original size!
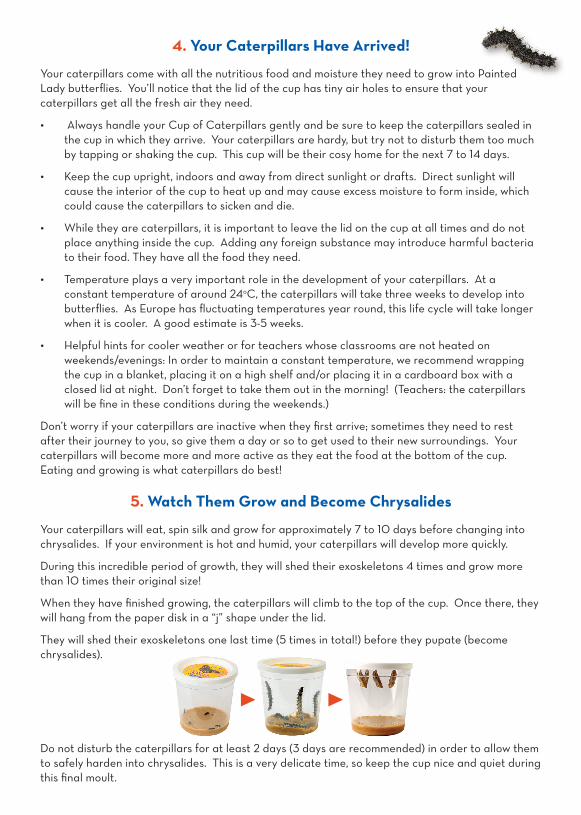
When they have finished growing, the caterpillars will climb to the top of the cup. Once there, they will hang from the paper disk in a “j” shape under the lid.
They will shed their exoskeletons one last time (5 times in total!) before they pupate (become chrysalides).
Do not disturb the caterpillars for at least 2 days (3 days are recommended) in order to allow them to safely harden into chrysalides. This is a very delicate time, so keep the cup nice and quiet during this final moult.

6. Move Your Chrysalides into the Butterfly Habitat
After two to three days, your chrysalides should be fully formed. It’s a good idea to wait until the last caterpillar that has formed into a chrysalis has hardened for at least two days before moving all of the chrysalides from their cosy cup to their airy new home.
Chrysalis Station TM
Step 1: Fold center tab up.
Step 2: Fold in both ends and assemble box.
Step 3: Insert lid with chrysalides into slot.
• Remove any silk strands and frass from the paper disk and the chrysalides. This is a very important step! If the silk and frass is not removed, the butterflies may become entangled in the silk when they emerge, causing theirs wings to not form correctly.
• Place a cloth or a paper towel under your habitat prior to moving your chrysalides, to prevent any drops of meconium from potentially staining your table top or valued furniture. Keep your butterfly habitat in a safe place.
If a chrysalis falls, what do I do?Sometimes a chrysalis falls to the bottom of the Cup of Caterpillars before it has fully hardened. Not to worry! Leave that chrysalis there to harden for the required time. Then, take a plastic spoon, scoop the fallen chrysalis and remove any silk and frass that may be surrounding it. Place the chrysalis on a paper towel on the floor of the
habitat, close to an inside wall. When the butterfly emerges, it will instinctively climb up the wall of the habitat, and then hang there to stretch and pump fluid into its wings
to straighten them.
Wiggle, Wiggle, Shake! You may find that your chrysalides will wiggle or shake dramatically when you move
them to the butterfly habitat - or even if you disturb them just a little.
Understandably, you might think that the butterflies are about to emerge when you see this behaviour. In fact, this behaviour is actually a natural defense mechanism!
Chrysalides shake when they are disturbed in an effort to frighten potential predators.
So next time you see your chrysalides wiggling, you’ll know they are just telling predators to stay away! Chrysalides need calm and quiet surroundings so they can
metamorphose into beautiful butterflies!
7. The Magical Moment of Emergence
For 7 to 14 days, the chrysalides may look like they are resting peacefully, but an amazing transformation is taking place inside! The caterpillar parts inside each chrysalis are liquefying and re-arranging to become the cells, tissues and organs of a beautiful butterfly.
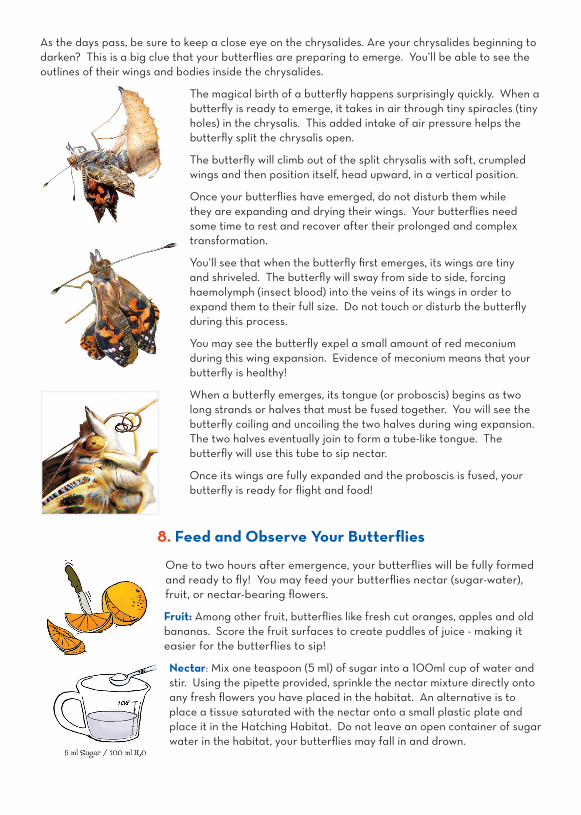
As the days pass, be sure to keep a close eye on the chrysalides. Are your chrysalides beginning to darken? This is a big clue that your butterflies are preparing to emerge. You’ll be able to see the outlines of their wings and bodies inside the chrysalides.
The magical birth of a butterfly happens surprisingly quickly. When a butterfly is ready to emerge, it takes in air through tiny spiracles (tiny holes) in the chrysalis. This added intake of air pressure helps the butterfly split the chrysalis open.
The butterfly will climb out of the split chrysalis with soft, crumpled wings and then position itself, head upward, in a vertical position.
Once your butterflies have emerged, do not disturb them while they are expanding and drying their wings. Your butterflies need some time to rest and recover after their prolonged and complex transformation.
You’ll see that when the butterfly first emerges, its wings are tiny and shriveled. The butterfly will sway from side to side, forcing haemolymph (insect blood) into the veins of its wings in order to expand them to their full size. Do not touch or disturb the butterfly during this process.
You may see the butterfly expel a small amount of red meconium during this wing expansion. Evidence of meconium means that your butterfly is healthy!
When a butterfly emerges, its tongue (or proboscis) begins as two long strands or halves that must be fused together. You will see the butterfly coiling and uncoiling the two halves during wing expansion. The two halves eventually join to form a tube-like tongue. The butterfly will use this tube to sip nectar.
Once its wings are fully expanded and the proboscis is fused, your butterfly is ready for flight and food!
8. Feed and Observe Your Butterflies
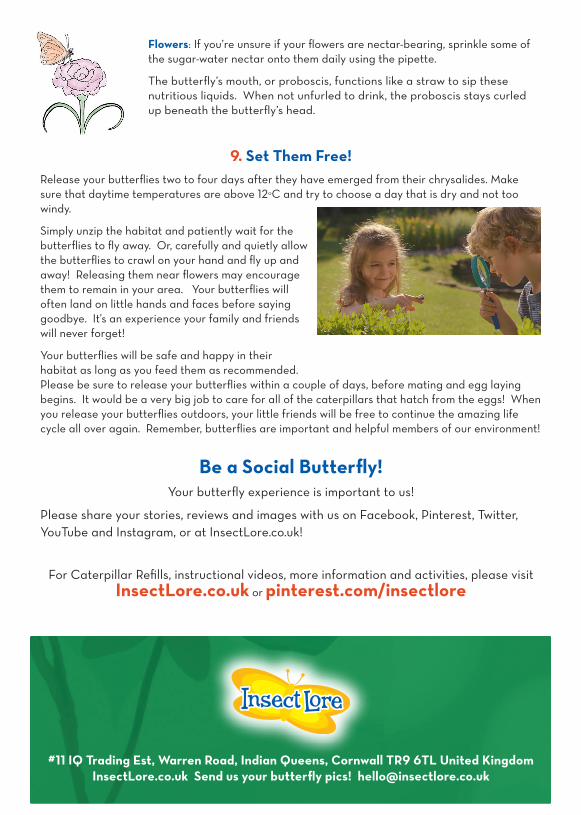
One to two hours after emergence, your butterflies will be fully formed and ready to fly! You may feed your butterflies nectar (sugar-water), fruit, or nectar-bearing flowers.
Fruit: Among other fruit, butterflies like fresh cut oranges, apples and old bananas. Score the fruit surfaces to create puddles of juice - making it easier for the butterflies to sip!
Nectar: Mix one teaspoon (5 ml) of sugar into a 100ml cup of water and stir. Using the pipette provided, sprinkle the nectar mixture directly onto any fresh flowers you have placed in the habitat. An alternative is to place a tissue saturated with the nectar onto a small plastic plate and place it in the Hatching Habitat. Do not leave an open container of sugar water in the habitat, your butterflies may fall in and drown.
Flowers: If you’re unsure if your flowers are nectar-bearing, sprinkle some of the sugar-water nectar onto them daily using the pipette.
The butterfly’s mouth, or proboscis, functions like a straw to sip these nutritious liquids. When not unfurled to drink, the proboscis stays curled up beneath the butterfly’s head.
9. Set Them Free!Release your butterflies two to four days after they have emerged from their chrysalides. Make sure that daytime temperatures are above 12oC and try to choose a day that is dry and not too windy.
Simply unzip the habitat and patiently wait for the butterflies to fly away. Or, carefully and quietly allow the butterflies to crawl on your hand and fly up and away! Releasing them near flowers may encourage them to remain in your area. Your butterflies will often land on little hands and faces before saying goodbye. It’s an experience your family and friends will never forget!
Your butterflies will be safe and happy in their habitat as long as you feed them as recommended. Please be sure to release your butterflies within a couple of days, before mating and egg laying begins. It would be a very big job to care for all of the caterpillars that hatch from the eggs! When you release your butterflies outdoors, your little friends will be free to continue the amazing life cycle all over again. Remember, butterflies are important and helpful members of our environment!
Be a Social Butterfly!Your butterfly experience is important to us!
Please share your stories, reviews and images with us on Facebook, Pinterest, Twitter, YouTube and Instagram, or at InsectLore.co.uk!
For Caterpillar Refills, instructional videos, more information and activities, please visit InsectLore.co.uk or pinterest.com/insectlore
#11 IQ Trading Est, Warren Road, Indian Queens, Cornwall TR9 6TL United KingdomInsectLore.co.uk Send us your butterfly pics! [email protected]