Equitrac Print & Copy Control 4.2 - Equitrac Partner Site · Equitrac Print & Copy Control Setup...
178
Equitrac Print & Copy Control 4.2.3 Setup Guide © 2014 Equitrac Corporation
Transcript of Equitrac Print & Copy Control 4.2 - Equitrac Partner Site · Equitrac Print & Copy Control Setup...

Equitrac Print & Copy Control
4.2.3Setup Guide
© 2014 Equitrac Corporation
Equitrac Print & Copy Control Setup Guide Document Revision History for document created November 7, 2014.
© 2014 by Equitrac Corporation
All rights to this document, domestic and international, are reserved by Equitrac Corporation. No part of this publication may be reproduced, stored in a retrieval system, or transmitted in any form or by any means (electronic, mechanical, photocopying, recording, or otherwise) without prior written permission of Equitrac.
Trademarks
Equitrac®, Equitrac Express®, Equitrac Office®, Follow-You Printing® and Scan-to-Me® are registered trademarks of Equitrac Corporation.All other brands and their products are trademarks or registered trademarks of their respective holders, and should be noted as such.
Symbols Used in This GuideThe following symbols are used in the margins of this guide:
Revision Date Revision List
September, 2014 • Updates and enhancements for 4.2.3
October, 2013 • Updates and enhancements for 4.2.2
May, 2013 • Updates for 4.2.1
February, 2013 • Revisions and enhancements
November, 2012 • Revisions and enhancements
June, 2012 • Updated for PCC 4.1.2 release• New PCC Functionality designed for GWNX devices• Revisions and enhancements
December 5, 2011 • Revisions and enhancements
August 30, 2011 • Updated the Scan-To-Me functionality
July 7, 2011 • Updated for PCC 4.1.0 release• Added USB keyboard support
May 24, 2011 • Updated Java memory requirements
June 07, 2010 • Revisions and enhancements
May 13, 2010 • Updated Java VM Card support information
March 29, 2010 • Updated documentation for PCC 4.0.3 release• Added support for email search in Scan-to-Me with LDAP• Added force monochrome functionality at time of print release
January 11, 2010 • Added custom MFP function control information
November 27, 2009 • Updated documentation for PCC 4.0.1 release
January 26, 2009 • Initial documentation for PCC 4.0 release
Caution The accompanying text provides key information about a step or action that might produce unexpected results if not followed precisely.
Note The accompanying text provides cross-reference links, tips, or general information that can add to your understanding of the topic.
Warning Read the accompanying text carefully. This text can help you avoid making errors that might adversely affect program behavior.

Equitrac Print & Copy Control Setup Guide 3
Contents
Overview . . . . . . . . . . . . . . . . . . . . . . . . . . . . . . . . . . . . . . . . . . . . . . . . . . . . . . . . . . . . . . . . . . . . . . . . . . . . . . . 7PCC Features . . . . . . . . . . . . . . . . . . . . . . . . . . . . . . . . . . . . . . . . . . . . . . . . . . . . . . . . . . . . . . . . . . . . . . . . . . . . . . . . . . . . . . . . . . . .8
Supported MFPs . . . . . . . . . . . . . . . . . . . . . . . . . . . . . . . . . . . . . . . . . . . . . . . . . . . . . . . . . . . . . . . . . . . . . . . . . . . . . . . . . . . . . . . 10
Supported Card Readers . . . . . . . . . . . . . . . . . . . . . . . . . . . . . . . . . . . . . . . . . . . . . . . . . . . . . . . . . . . . . . . . . . . . . . . . . . . . . . . 10
Multi-Language Support . . . . . . . . . . . . . . . . . . . . . . . . . . . . . . . . . . . . . . . . . . . . . . . . . . . . . . . . . . . . . . . . . . . . . . . . . . . . . . . 10
Requirements . . . . . . . . . . . . . . . . . . . . . . . . . . . . . . . . . . . . . . . . . . . . . . . . . . . . . . . . . . . . . . . . . . . . . . . . . . . . . . . . . . . . . . . . . 11
Upgrade Information . . . . . . . . . . . . . . . . . . . . . . . . . . . . . . . . . . . . . . . . . . . . . . . . . . . . . . . . . . . . . . . . . . . . . . . . . . . . . . . . . . 12
Document Conventions . . . . . . . . . . . . . . . . . . . . . . . . . . . . . . . . . . . . . . . . . . . . . . . . . . . . . . . . . . . . . . . . . . . . . . . . . . . . . . . . 12
Software and Firmware . . . . . . . . . . . . . . . . . . . . . . . . . . . . . . . . . . . . . . . . . . . . . . . . . . . . . . . . . . . . . . . . . . . . . . . . . . . . . . . . . . . . . . . . 12MFP Interface Conventions . . . . . . . . . . . . . . . . . . . . . . . . . . . . . . . . . . . . . . . . . . . . . . . . . . . . . . . . . . . . . . . . . . . . . . . . . . . . . . . . . . . . . 12
Installation and Configuration . . . . . . . . . . . . . . . . . . . . . . . . . . . . . . . . . . . . . . . . . . . . . . . . . . . . . . . . . . 15Prerequisites: Before You Install . . . . . . . . . . . . . . . . . . . . . . . . . . . . . . . . . . . . . . . . . . . . . . . . . . . . . . . . . . . . . . . . . . . . . . . . 16
Installation Workflow . . . . . . . . . . . . . . . . . . . . . . . . . . . . . . . . . . . . . . . . . . . . . . . . . . . . . . . . . . . . . . . . . . . . . . . . . . . . . . . . . . 16
Preparing the MFP . . . . . . . . . . . . . . . . . . . . . . . . . . . . . . . . . . . . . . . . . . . . . . . . . . . . . . . . . . . . . . . . . . . . . . . . . . . . . . . . . . . . . 18
Installing PCC Through the Web Image Monitor (GW Devices) . . . . . . . . . . . . . . . . . . . . . . . . . . . . . . . . . . . . . . . . . . . . . 19
Installing the Remote Admin Application (GW Devices) . . . . . . . . . . . . . . . . . . . . . . . . . . . . . . . . . . . . . . . . . . . . . . . . . . . 22
Installing PCC Through the MFP Web Interface (GWNX Devices) . . . . . . . . . . . . . . . . . . . . . . . . . . . . . . . . . . . . . . . . . . . 23
Installing the Remote Admin Application (GWNX Devices) . . . . . . . . . . . . . . . . . . . . . . . . . . . . . . . . . . . . . . . . . . . . . . . . 26
Setting the Java Priority Application for GW Devices . . . . . . . . . . . . . . . . . . . . . . . . . . . . . . . . . . . . . . . . . . . . . . . . . . . . . 28
Setting the Function Priority . . . . . . . . . . . . . . . . . . . . . . . . . . . . . . . . . . . . . . . . . . . . . . . . . . . . . . . . . . . . . . . . . . . . . . . . . . . 29
Pre-10.x devices . . . . . . . . . . . . . . . . . . . . . . . . . . . . . . . . . . . . . . . . . . . . . . . . . . . . . . . . . . . . . . . . . . . . . . . . . . . . . . . . . . . . . . . . . . . . . . . 29GWNX devices . . . . . . . . . . . . . . . . . . . . . . . . . . . . . . . . . . . . . . . . . . . . . . . . . . . . . . . . . . . . . . . . . . . . . . . . . . . . . . . . . . . . . . . . . . . . . . . . . 30Devices with the Smart Operation Panel . . . . . . . . . . . . . . . . . . . . . . . . . . . . . . . . . . . . . . . . . . . . . . . . . . . . . . . . . . . . . . . . . . . . . . . . 30Locate PCC on the list of available apps, and select its radio button: . . . . . . . . . . . . . . . . . . . . . . . . . . . . . . . . . . . . . . . . . . . . . 31
Setting Function Keys . . . . . . . . . . . . . . . . . . . . . . . . . . . . . . . . . . . . . . . . . . . . . . . . . . . . . . . . . . . . . . . . . . . . . . . . . . . . . . . . . . 32
Performing a Bulk Installation . . . . . . . . . . . . . . . . . . . . . . . . . . . . . . . . . . . . . . . . . . . . . . . . . . . . . . . . . . . . . . . . . . . . . . . . . . 33
Precautions . . . . . . . . . . . . . . . . . . . . . . . . . . . . . . . . . . . . . . . . . . . . . . . . . . . . . . . . . . . . . . . . . . . . . . . . . . . . . . . . . . . . . . . . . . . . . . . . . . . . 33Before you begin . . . . . . . . . . . . . . . . . . . . . . . . . . . . . . . . . . . . . . . . . . . . . . . . . . . . . . . . . . . . . . . . . . . . . . . . . . . . . . . . . . . . . . . . . . . . . . 33Bulk installation Through Batch Installation Application . . . . . . . . . . . . . . . . . . . . . . . . . . . . . . . . . . . . . . . . . . . . . . . . . . . . . . . . . 35Bulk installation from Command Line . . . . . . . . . . . . . . . . . . . . . . . . . . . . . . . . . . . . . . . . . . . . . . . . . . . . . . . . . . . . . . . . . . . . . . . . . . . 40Bulk installation variables . . . . . . . . . . . . . . . . . . . . . . . . . . . . . . . . . . . . . . . . . . . . . . . . . . . . . . . . . . . . . . . . . . . . . . . . . . . . . . . . . . . . . . 43
Starting PCC Applications . . . . . . . . . . . . . . . . . . . . . . . . . . . . . . . . . . . . . . . . . . . . . . . . . . . . . . . . . . . . . . . . . . . . . . . . . . . . . . 48
PCC Configuration and communication . . . . . . . . . . . . . . . . . . . . . . . . . . . . . . . . . . . . . . . . . . . . . . . . . . . . . . . . . . . . . . . . . 49
Configuring PCC Panel Service . . . . . . . . . . . . . . . . . . . . . . . . . . . . . . . . . . . . . . . . . . . . . . . . . . . . . . . . . . . . . . . . . . . . . . . . . . . . . . . . . 53Configuring Custom Access Control . . . . . . . . . . . . . . . . . . . . . . . . . . . . . . . . . . . . . . . . . . . . . . . . . . . . . . . . . . . . . . . . . . . . . . . . . . . . 54

4 Equitrac Print & Copy Control Setup Guide
Configuring PCC at the MFP . . . . . . . . . . . . . . . . . . . . . . . . . . . . . . . . . . . . . . . . . . . . . . . . . . . . . . . . . . . . . . . . . . . . . . . . . . . . . 56
Enabling External Product IDs . . . . . . . . . . . . . . . . . . . . . . . . . . . . . . . . . . . . . . . . . . . . . . . . . . . . . . . . . . . . . . . . . . . . . . . . . . . 60
Determining product IDs . . . . . . . . . . . . . . . . . . . . . . . . . . . . . . . . . . . . . . . . . . . . . . . . . . . . . . . . . . . . . . . . . . . . . . . . . . . . . . . . . . . . . . 60Entering product IDs . . . . . . . . . . . . . . . . . . . . . . . . . . . . . . . . . . . . . . . . . . . . . . . . . . . . . . . . . . . . . . . . . . . . . . . . . . . . . . . . . . . . . . . . . . . 62Access to third party applications . . . . . . . . . . . . . . . . . . . . . . . . . . . . . . . . . . . . . . . . . . . . . . . . . . . . . . . . . . . . . . . . . . . . . . . . . . . . . . 63
Enabling the Guest user . . . . . . . . . . . . . . . . . . . . . . . . . . . . . . . . . . . . . . . . . . . . . . . . . . . . . . . . . . . . . . . . . . . . . . . . . . . . . . . . 65
Guest user setup . . . . . . . . . . . . . . . . . . . . . . . . . . . . . . . . . . . . . . . . . . . . . . . . . . . . . . . . . . . . . . . . . . . . . . . . . . . . . . . . . . . . . . . . . . . . . . . 65
Card reader setup . . . . . . . . . . . . . . . . . . . . . . . . . . . . . . . . . . . . . . . . . . . . . . . . . . . . . . . . . . . . . . . . . . . . . . . . . . . . . . . . . . . . . . 68
Adding a Customized Logo . . . . . . . . . . . . . . . . . . . . . . . . . . . . . . . . . . . . . . . . . . . . . . . . . . . . . . . . . . . . . . . . . . . . . . . . . . . . . . 71
Managing Java Memory . . . . . . . . . . . . . . . . . . . . . . . . . . . . . . . . . . . . . . . . . . . . . . . . . . . . . . . . . . . . . . . . . . . . . . . . . . . . . . . . 71
Server-Side Configuration . . . . . . . . . . . . . . . . . . . . . . . . . . . . . . . . . . . . . . . . . . . . . . . . . . . . . . . . . . . . . .73Licensing PCC . . . . . . . . . . . . . . . . . . . . . . . . . . . . . . . . . . . . . . . . . . . . . . . . . . . . . . . . . . . . . . . . . . . . . . . . . . . . . . . . . . . . . . . . . . 74
Configuring Equitrac Printer Ports . . . . . . . . . . . . . . . . . . . . . . . . . . . . . . . . . . . . . . . . . . . . . . . . . . . . . . . . . . . . . . . . . . . . . . . 77
Add a Printer on a TCP/IP Printer Port . . . . . . . . . . . . . . . . . . . . . . . . . . . . . . . . . . . . . . . . . . . . . . . . . . . . . . . . . . . . . . . . . . . . . . . . . . . 77Convert a TCP/IP Port to Equitrac Port with Wizard . . . . . . . . . . . . . . . . . . . . . . . . . . . . . . . . . . . . . . . . . . . . . . . . . . . . . . . . . . . . . . 78Add a Printer on an Equitrac Printer Port . . . . . . . . . . . . . . . . . . . . . . . . . . . . . . . . . . . . . . . . . . . . . . . . . . . . . . . . . . . . . . . . . . . . . . . . 79
Configuring PCC Embedded Devices . . . . . . . . . . . . . . . . . . . . . . . . . . . . . . . . . . . . . . . . . . . . . . . . . . . . . . . . . . . . . . . . . . . . . 81
Automatically Creating Embedded Devices . . . . . . . . . . . . . . . . . . . . . . . . . . . . . . . . . . . . . . . . . . . . . . . . . . . . . . . . . . . . . . . . . . . . . 81Manually Configuring Embedded Devices . . . . . . . . . . . . . . . . . . . . . . . . . . . . . . . . . . . . . . . . . . . . . . . . . . . . . . . . . . . . . . . . . . . . . . 81
Configuring Workflows . . . . . . . . . . . . . . . . . . . . . . . . . . . . . . . . . . . . . . . . . . . . . . . . . . . . . . . . . . . . . . . . . . . . . . . . . . . . . . . . . 85
Configuring Print Tracking . . . . . . . . . . . . . . . . . . . . . . . . . . . . . . . . . . . . . . . . . . . . . . . . . . . . . . . . . . . . . . . . . . . . . . . . . . . . . . 88
Tracking Jobs Originating at the Device . . . . . . . . . . . . . . . . . . . . . . . . . . . . . . . . . . . . . . . . . . . . . . . . . . . . . . . . . . . . . . . . . . . . . . . . 88Print Tracking for Document Server Prints at the Device . . . . . . . . . . . . . . . . . . . . . . . . . . . . . . . . . . . . . . . . . . . . . . . . . . . . . . . . . 89
Configuring Administrator PIN Codes . . . . . . . . . . . . . . . . . . . . . . . . . . . . . . . . . . . . . . . . . . . . . . . . . . . . . . . . . . . . . . . . . . . . 91
Configuring System Timeout Behavior . . . . . . . . . . . . . . . . . . . . . . . . . . . . . . . . . . . . . . . . . . . . . . . . . . . . . . . . . . . . . . . . . . . 93
Configuring Card Self-Registration . . . . . . . . . . . . . . . . . . . . . . . . . . . . . . . . . . . . . . . . . . . . . . . . . . . . . . . . . . . . . . . . . . . . . . 94
Enabling Secure Printing . . . . . . . . . . . . . . . . . . . . . . . . . . . . . . . . . . . . . . . . . . . . . . . . . . . . . . . . . . . . . . . . . . . . . . . . . . . . . . . 96
Secure Printing on the Physical Device . . . . . . . . . . . . . . . . . . . . . . . . . . . . . . . . . . . . . . . . . . . . . . . . . . . . . . . . . . . . . . . . . . . . . . . . . 96Secure Printing on the Embedded Device . . . . . . . . . . . . . . . . . . . . . . . . . . . . . . . . . . . . . . . . . . . . . . . . . . . . . . . . . . . . . . . . . . . . . . 96
Configuring Follow-You Printing . . . . . . . . . . . . . . . . . . . . . . . . . . . . . . . . . . . . . . . . . . . . . . . . . . . . . . . . . . . . . . . . . . . . . . . . 98
VPSX Print integration . . . . . . . . . . . . . . . . . . . . . . . . . . . . . . . . . . . . . . . . . . . . . . . . . . . . . . . . . . . . . . . . . . . . . . . . . . . . . . . . . . . . . . . . . 98
Configuring Capture and Send . . . . . . . . . . . . . . . . . . . . . . . . . . . . . . . . . . . . . . . . . . . . . . . . . . . . . . . . . . . . . . . . . . . . . . . . . . 99
Scan-to-Me . . . . . . . . . . . . . . . . . . . . . . . . . . . . . . . . . . . . . . . . . . . . . . . . . . . . . . . . . . . . . . . . . . . . . . . . . . . . . . . . . . . . . . . . . . .100
Configure the Mail Server . . . . . . . . . . . . . . . . . . . . . . . . . . . . . . . . . . . . . . . . . . . . . . . . . . . . . . . . . . . . . . . . . . . . . . . . . . . . . . . . . . . . .102

Equitrac Print & Copy Control Setup Guide 5
Enforcing Color Quotas . . . . . . . . . . . . . . . . . . . . . . . . . . . . . . . . . . . . . . . . . . . . . . . . . . . . . . . . . . . . . . . . . . . . . . . . . . . . . . . 102
Enabling the Billing Code Prompt . . . . . . . . . . . . . . . . . . . . . . . . . . . . . . . . . . . . . . . . . . . . . . . . . . . . . . . . . . . . . . . . . . . . . . 103
Offline Operation Through DCE Caching . . . . . . . . . . . . . . . . . . . . . . . . . . . . . . . . . . . . . . . . . . . . . . . . . . . . . . . . . . . . . . . . 104
Configuring Account and Session Display . . . . . . . . . . . . . . . . . . . . . . . . . . . . . . . . . . . . . . . . . . . . . . . . . . . . . . . . . . . . . . 105
Configuring Available MFP Functions . . . . . . . . . . . . . . . . . . . . . . . . . . . . . . . . . . . . . . . . . . . . . . . . . . . . . . . . . . . . . . . . . . 106
Use Print & Copy Control . . . . . . . . . . . . . . . . . . . . . . . . . . . . . . . . . . . . . . . . . . . . . . . . . . . . . . . . . . . . . .107Logging Into PCC . . . . . . . . . . . . . . . . . . . . . . . . . . . . . . . . . . . . . . . . . . . . . . . . . . . . . . . . . . . . . . . . . . . . . . . . . . . . . . . . . . . . . 108
Entering Billing Codes . . . . . . . . . . . . . . . . . . . . . . . . . . . . . . . . . . . . . . . . . . . . . . . . . . . . . . . . . . . . . . . . . . . . . . . . . . . . . . . . 110
Selecting functions . . . . . . . . . . . . . . . . . . . . . . . . . . . . . . . . . . . . . . . . . . . . . . . . . . . . . . . . . . . . . . . . . . . . . . . . . . . . . . . . . . . 111
Using Follow-You Printing . . . . . . . . . . . . . . . . . . . . . . . . . . . . . . . . . . . . . . . . . . . . . . . . . . . . . . . . . . . . . . . . . . . . . . . . . . . . . 112
Viewing Jobs on a Different Print Server . . . . . . . . . . . . . . . . . . . . . . . . . . . . . . . . . . . . . . . . . . . . . . . . . . . . . . . . . . . . . . . . . . . . . . .113
Scanning . . . . . . . . . . . . . . . . . . . . . . . . . . . . . . . . . . . . . . . . . . . . . . . . . . . . . . . . . . . . . . . . . . . . . . . . . . . . . . . . . . . . . . . . . . . . . 114
Terminology . . . . . . . . . . . . . . . . . . . . . . . . . . . . . . . . . . . . . . . . . . . . . . . . . . . . . . . . . . . . . . . . . . . . . . . . . . . . . . . . . . . . . . . . . . . . . . . . . .114Workflow . . . . . . . . . . . . . . . . . . . . . . . . . . . . . . . . . . . . . . . . . . . . . . . . . . . . . . . . . . . . . . . . . . . . . . . . . . . . . . . . . . . . . . . . . . . . . . . . . . . . .114Prepare to scan . . . . . . . . . . . . . . . . . . . . . . . . . . . . . . . . . . . . . . . . . . . . . . . . . . . . . . . . . . . . . . . . . . . . . . . . . . . . . . . . . . . . . . . . . . . . . . .115Collect Job Details . . . . . . . . . . . . . . . . . . . . . . . . . . . . . . . . . . . . . . . . . . . . . . . . . . . . . . . . . . . . . . . . . . . . . . . . . . . . . . . . . . . . . . . . . . . .116Scanning . . . . . . . . . . . . . . . . . . . . . . . . . . . . . . . . . . . . . . . . . . . . . . . . . . . . . . . . . . . . . . . . . . . . . . . . . . . . . . . . . . . . . . . . . . . . . . . . . . . . .118Scan using alias . . . . . . . . . . . . . . . . . . . . . . . . . . . . . . . . . . . . . . . . . . . . . . . . . . . . . . . . . . . . . . . . . . . . . . . . . . . . . . . . . . . . . . . . . . . . . . .121Using LDAP Email Search . . . . . . . . . . . . . . . . . . . . . . . . . . . . . . . . . . . . . . . . . . . . . . . . . . . . . . . . . . . . . . . . . . . . . . . . . . . . . . . . . . . . . .121Adjusting the Scan Settings . . . . . . . . . . . . . . . . . . . . . . . . . . . . . . . . . . . . . . . . . . . . . . . . . . . . . . . . . . . . . . . . . . . . . . . . . . . . . . . . . . .122Delivery formats . . . . . . . . . . . . . . . . . . . . . . . . . . . . . . . . . . . . . . . . . . . . . . . . . . . . . . . . . . . . . . . . . . . . . . . . . . . . . . . . . . . . . . . . . . . . . .125
Logging Out of PCC . . . . . . . . . . . . . . . . . . . . . . . . . . . . . . . . . . . . . . . . . . . . . . . . . . . . . . . . . . . . . . . . . . . . . . . . . . . . . . . . . . . 126
Accessing GlobalScan NX . . . . . . . . . . . . . . . . . . . . . . . . . . . . . . . . . . . . . . . . . . . . . . . . . . . . . . . . . . . . . . . . . . . . . . . . . . . . . . 128
Using a USB Keyboard at the Device . . . . . . . . . . . . . . . . . . . . . . . . . . . . . . . . . . . . . . . . . . . . . . . . . . . . . . . . . . . . . . . . . . . . 129
Disable or Uninstall PCC . . . . . . . . . . . . . . . . . . . . . . . . . . . . . . . . . . . . . . . . . . . . . . . . . . . . . . . . . . . . . . .131Stopping or Disabling PCC . . . . . . . . . . . . . . . . . . . . . . . . . . . . . . . . . . . . . . . . . . . . . . . . . . . . . . . . . . . . . . . . . . . . . . . . . . . . 131
Uninstalling PCC . . . . . . . . . . . . . . . . . . . . . . . . . . . . . . . . . . . . . . . . . . . . . . . . . . . . . . . . . . . . . . . . . . . . . . . . . . . . . . . . . . . . . . 132
Reset the Device Function Priority . . . . . . . . . . . . . . . . . . . . . . . . . . . . . . . . . . . . . . . . . . . . . . . . . . . . . . . . . . . . . . . . . . . . . . . . . . . . .133Disable Automatic Startup . . . . . . . . . . . . . . . . . . . . . . . . . . . . . . . . . . . . . . . . . . . . . . . . . . . . . . . . . . . . . . . . . . . . . . . . . . . . . . . . . . . .134Disconnect the USB Card Reader . . . . . . . . . . . . . . . . . . . . . . . . . . . . . . . . . . . . . . . . . . . . . . . . . . . . . . . . . . . . . . . . . . . . . . . . . . . . . .137Restart the Device . . . . . . . . . . . . . . . . . . . . . . . . . . . . . . . . . . . . . . . . . . . . . . . . . . . . . . . . . . . . . . . . . . . . . . . . . . . . . . . . . . . . . . . . . . . .137Uninstall PCC or Remote Administration . . . . . . . . . . . . . . . . . . . . . . . . . . . . . . . . . . . . . . . . . . . . . . . . . . . . . . . . . . . . . . . . . . . . . . .137Reconnect the USB Card Reader . . . . . . . . . . . . . . . . . . . . . . . . . . . . . . . . . . . . . . . . . . . . . . . . . . . . . . . . . . . . . . . . . . . . . . . . . . . . . . .137Finalize the Uninstallation . . . . . . . . . . . . . . . . . . . . . . . . . . . . . . . . . . . . . . . . . . . . . . . . . . . . . . . . . . . . . . . . . . . . . . . . . . . . . . . . . . . . .138
Appendix: Third-Party Software . . . . . . . . . . . . . . . . . . . . . . . . . . . . . . . . . . . . . . . . . . . . .141
. . . . . . . . . . . . . . . . . . . . . . . . . . . . . . . . . . . . . . . . . . . . . . . . . . . . . . . . . . . . . . . . . . . . . . . . . . . .141

6 Equitrac Print & Copy Control Setup Guide

Equitrac Print & Copy Control Setup Guide 7
Overview
The Print & Copy Control (PCC) application provides copy control and secure printing on Ricoh manufactured multi-functional products (MFPs). Embedded on the MFP, the PCC application controls access to the MFP, requiring users to enter valid account information in the form of a supported ID card, personal identification numbers (PINs), or Windows credentials, based on authentication settings on the Equitrac server, before the MFP is unlocked and ready for use.
PCC communicates with the print tracking and accounting application on your network to validate authentication information. Once successfully logged in, users can release print jobs, use native device functions, or scan documents using PCC. During the copy process, PCC collects detailed document characteristics such as paper sizing, color, duplexing, stapling, or input trays on specific models. PCC provides secure document release for print jobs, but does not track print job data. Instead, network print monitors handle print data, including any incremental print page counts appearing on the PCC screens.
NOTE: This document contains instructions and information about both the standard Ricoh GW devices, and Ricoh GWNX devices and the newer small screen Ricoh devices, such as the MP 301 and MP C305. It is the responsibility of your install technician to determine the class of device before attempting to use this information. Consult your Ricoh service technician for details.
TopicsPCC Features
Supported MFPs
Supported Card Readers
Multi-Language Support
Requirements
Upgrade Information
Document Conventions
1

Overview
8 Equitrac Print & Copy Control Setup Guide
PCC FeaturesPCC is a robust application that provides additional functionality beyond print and copy control. This version of PCC supports the following features:
• Authentication - Requires users to enter valid authentication information to unlock the MFP functions. Users can enter their authentication data via the MFP panel, or by using a valid authentication card (when authentication cards are implemented).
• Follow-You Printing® - After successful login at the MFP, the user can access the virtual print queue to "pull" a print job to this device. Through the PCC Follow-You screen on the MFP, users can view documents in the queue, then select, delete, or release documents for printing. See Enabling Secure Printing on page 96 for configuration instructions, and Using Follow-You Printing on page 112 for end-user instructions.
• Scan-to-Me® - Allows users to scan a document and email it to their own address, and optionally to other addresses via the CC field (if enabled). Users can specify scan options (e.g. duplex, color, size) and document format prior to initiating a scan. See on page 99 for configuration instructions, and Scanning on page 114 for end-user instructions.
• Capture and Send capability - Allows PCC to use third-party applications to scan to multiple scan destinations through the Scan Processing Engine (SPE). Currently, PCC allows SharePoint (Teamsite), to

Equitrac Print & Copy Control Setup Guide 9
Overview
scan to a web-based location, RightFax, to scan directly to a Fax number, or scanning to a network folder or email address.
• Card self-registration - Allows users to associate an unassigned card with their user credentials. Once associated, each time the user swipes the card, the system automatically recognizes the card and associated user. See Configuring Card Self-Registration on page 94 for instructions.
• Billing Code support - Users can assign their jobs to a particular code, and the Equitrac Office/Express database tracks the characteristics of jobs assigned to the code. Billing codes must be enabled on the Equitrac server. See Enabling the Billing Code Prompt on page 103 and also refer to the Creating & Managing Accounts chapter in the Equitrac Office or Equitrac Express Administration Guide.
• Campus card support - When enabled on the Equitrac Express server, campus card payment systems including Blackboard UNIX, Blackboard Windows, and CBord Retail Transaction Interface. At the MFP, users can authorize themselves as valid campus card account holders, make copies, release jobs, and pay for these services in real time, directly from their campus card account. See the Managing Devices chapter in the Equitrac Express Administration Guide.
• Offline operation - In the event that PCC fails to connect to the Equitrac DCE service, you can configure PCC to continue the MFP lockdown, allowing users to authenticate based on account information stored in local MFP cache. PCC gathers job data in local cache, and forwards the accounting details to the DCE service when it is back online. See Offline Operation Through DCE Caching on page 104 for configuration instructions.
• Remote Install & Configuration - All installation and configuration tasks can be accomplished easily to configure PCC. See Installation and Configuration on page 15 and Server-Side Configuration on page 73.
• Integration with third party applications - PCC tracks job details generated from supported third party applications. Currently, the third-party applications supported for scan are SharePoint and RightFax.
• USB keyboard support - Users can navigate the PCC touch screens via a Ricoh supported keyboard attached to the USB port of the device. See Using a USB Keyboard at the Device on page 129.

Overview
10 Equitrac Print & Copy Control Setup Guide
Supported MFPsPCC is compatible with models supporting Extensible System Architecture (ESA). For list of PCC 4 supported models, consult your local Ricoh representative or refer to http://www.nuance.com/for-business/by-product/equitrac/supported-devices/ricoh/index.htm.
NOTE: PCC is designed to work with many of the device screen sizes available from Ricoh. This guide uses screen examples from full-screen devices to provide examples and illustrate workflows. Smaller screen devices use identical workflows, but may present slightly different screen content. In cases where screen size impacts workflows, alternate information is provided.
Supported Card ReadersPCC supports Equitrac USB external card readers. For a list of supported readers, refer to http://www.nuance.com/for-business/by-product/equitrac/supported-card-readers/index.htm.
USB Card Readers
Equitrac USB card readers are typically automatically detected by the device upon startup. There is no MFP or server configuration required for PCC to recognize card readers. Some card readers can be configured to detect multiple card types. If your card reader supports more than one type of card, we recommend configuring it for all possible options, as this may improve the sensitivity of the reader to provide a better user experience, as well as prevent the need for future reconfiguration if card types change. Note that authentication work flows must be configured on the server in System Manager. For detailed information about configuring authentication work flows, see the Equitrac Office/Express Administration Guide. NOTE: If your device uses Software Development Kit/Java version 12.x, card readers require extra configuration. For information about configuring card readers for SDK/J 12.x, see see “Card reader setup” on page 68.
Multi-Language SupportThe PCC installation program and configuration features are available in English only. Multi-language support for the PCC MFP interface includes support for the languages listed below. The language is selected automatically based on the MFP language. If the MFP language is not available, English is used by default.
NOTE: If you change the language, you must reboot the MFP.
• Simplified Chinese • Finnish • Polish
• Traditional Chinese • French • Portuguese
• Catalan • German • Russian
• Czech • Hungarian • Spanish
• Dutch • Italian • Swedish
• Danish • Japanese • Turkish
• English • Norwegian

Equitrac Print & Copy Control Setup Guide 11
Overview
RequirementsSystem requirements for any machine hosting the Equitrac server components (Core Accounting Server, Device Control Engine) are available in the Equitrac Office or Equitrac Express Installation Guide.
The following components are required for installing the PCC 4.2.3 embedded software:
NOTE: Consult your Ricoh documentation for information about card types and their compatibility with your specific device.
• Equitrac Office or Equitrac Express version 5.2 with all available hotfixes installed, or later
• For GW devices:
• Java VM with Java version 4.16 or later
• Java VM with Java version 5.05 or later
• Java VM with Java version 7.15.4 or later
• For GWNX devices:
• Java VM with Java SDK version 10.10 or later
• Java VM with Java SDK version 11.3 or later
• Java VM with Java SDK version 12.x or later
WARNING: Typically the Java VM cards are preinstalled for Java versions 7.x,10.x, 11.x, and 12.x. However, if the card is not installed, it must be purchased from and installed by an approved Ricoh Service agent. If the device does not have the Java card installed, the installation of PCC cannot proceed. To verify that this card is installed, open the MFP’s Web Image Monitor, then browse to Configuration > Extended Feature info. If an appropriate version of "Java TM Platform" is listed, this requirement is met and you can proceed with the installation. If not, contact your Ricoh representative.
• Administrative access (including valid Windows network credentials with assigned administrative rights) to both the MFP and to the network server hosting the Equitrac server components. Note that in many cases, the administrative credentials on the MFP are different from Windows network credentials.

Overview
12 Equitrac Print & Copy Control Setup Guide
Upgrade InformationSince most configuration data is stored on the Equitrac Office/Express server, upgrading from an earlier version of PCC to version 4.2.3 simply requires you to uninstall the existing versions of the embedded application, restart the MFP and then install the current version. For details about uninstalling PCC, see Uninstalling PCC on page 132.
CAUTION: PCC 4.2.3 requires Equitrac Office or Equitrac Express version 5.2 or higher. Before upgrading PCC, ensure that the server has been upgraded to the minimum requirements. Note that features native to Equitrac Office or Equitrac Express 5.4 or higher will not be available if using only minimum software requirements.
Document ConventionsThis guide does not provide installation or configuration details for network accounting software (except in the case of specific upgrades required to function with the embedded application), control terminals, or your MFP. For more information about these products, see the relevant product documentation.
Software and FirmwareEquitrac Print & Copy Control (PCC) is a software product that is installed on supported MFPs. In this document, the term firmware refers to the MFP system firmware and not to the Equitrac PCC software.
MFP Interface ConventionsThis document uses the following conventions when identifying user input at the MFP:
• Button refers to graphical buttons on the touch screen, such as the Login or Exit buttons.
• Key refers to physical keys on the MFP keypad, such as the number pad keys, the Start key or function keys such as Copier, Scanner and Fax.
Additional DocumentationYou may need to refer to one of the following documents when performing server-side configuration tasks. These documents are provided with your Equitrac product software, and are installed automatically with any server-side component in the Program Files\Equitrac\Express\Documentation folder.
Guide When to refer to this guide
Equitrac Office /Express Planning Guide Before installing Equitrac Office or Express, use this guide to select the appropriate combination of product variables to support the needs of your institution or organization.
Equitrac Office Installation Guide
Equitrac Express Installation Guide
Use this guide to perform an initial installation or upgrade.

Equitrac Print & Copy Control Setup Guide 13
Overview
Equitrac Office Administration Guide
Equitrac Express Administration Guide
After installing Equitrac Office or Express, use this guide to configure advanced options for use on your campus or in your organization.
GlobalScan NX Integration Plug-in Guide Use this guide to configure the GlobalScan NX Plug-in to work with PCC 4.x.
Guide When to refer to this guide

Overview
14 Equitrac Print & Copy Control Setup Guide

Equitrac Print & Copy Control Setup Guide 15
Installation and Configuration
This chapter describes how to install PCC 4.2.3 on supported multi-function printers (MFPs) and configure the product for initial startup. In addition to this guide, ensure that you have any documentation related to your Equitrac product suite and documentation for your MFP.
NOTE: This guide assumes that you are installing the Equitrac products (servers and embedded applications) in a Windows network environment. This guide does not provide any information for third-party software (including databases) or operating system support.
TopicsInstallation Workflow
Installing PCC Through the Web Image Monitor (GW Devices)
Installing the Remote Admin Application (GW Devices)
Installing PCC Through the MFP Web Interface (GWNX Devices)
Installing the Remote Admin Application (GWNX Devices)
Setting the Java Priority Application for GW Devices
Performing a Bulk Installation
PCC Configuration and communication
Configuring PCC at the MFP
Enabling External Product IDs
Enabling the Guest user
Managing Java Memory
2

Installation and Configuration
16 Equitrac Print & Copy Control Setup Guide
Prerequisites: Before You InstallYou must have administrative access (including valid Windows network credentials with assigned administrative rights) to both the MFP and to the network computer hosting the Equitrac server components to install and configure PCC.
Your Ricoh technician will provide the default administrative credentials for the MFP.
Before you begin the installation:
• Ensure you have met the requirements for your multi-function printers (MFPs) and Equitrac Office/Express installation. See Requirements on page 11 for more information.
• Install or update, license, and configure Equitrac Office/Express 5.2 or higher before installing PCC solution. For more information, see your Equitrac Office/Express documentation.
• Ensure that the Equitrac Office/Express hotfixes are installed on the server.
• Download the appropriate PCC installation files for your device and copy them to a shared network location.
• Obtain the IP address for the Equitrac Office/Express Device Control Engine (DCE) server.
• Obtain the IP address of the Ricoh devices where you will install the PCC solution.
• Confirm the MFP administrator authentication password in the Web Image Monitor page.
• Ensure all devices have the most recent Ricoh device firmware and SDK/J version installed.
Installation WorkflowTo install and configure PCC, and to configure server components, you must have administrative access to the network machine hosting the web service, and to the machine hosting the Equitrac server components. Default administrative credentials for the MFP are provided by your MFP technician.
Follow this workflow to install PCC per device:
1 Download the current PCC 4.2.3 and Remote Admin software zip files from the Ricoh or Equitrac website appropriate to your region or hardware setup. Do NOT extract the contents of the zip files.
2 Complete the preparation steps described in Prerequisites: Before You Install.
3 If applicable, uninstall any earlier versions of PCC. See Uninstalling PCC on page 132.
NOTE: If you are deploying a large fleet of devices, we recommend that you apply the PCC licenses before installing the embedded application. Otherwise, PCC can be licensed after the application is installed on the device. See Licensing PCC on page 74.
4 Install the PCC and Remote Admin applications using the Ricoh Web Image Monitor page.
5 Establish communication with the Equitrac server: ensure that the device is logically networked to the Equitrac server, and that you have administrative access to the server.

Equitrac Print & Copy Control Setup Guide 17
Installation and Configuration
6 Configure PCC at the MFP.
7 License and configure PCC in System Manager.

Installation and Configuration
18 Equitrac Print & Copy Control Setup Guide
Preparing the MFPBefore you start the PCC installation, consult your MFP documentation to locate specific instructions to complete the following tasks on the MFP:
NOTE: When using bulk install, these settings are configured using the device configuration properties file included in the EQDeployment-1.0.xx.zip file. For details about the commands in this file, see Ricoh device initialization configuration variables on page 46.
1 Ensure that the technician has configured the time zone correctly on the MFP. If the time zone is incorrect, PCC transaction times are reported incorrectly.
2 Confirm that the date and time settings on the MFP are within 24 hours of the date and time configured on the DCE. If the date and time settings are more than 24 hours off, PCC cannot connect to the server.
3 Ensure that the MFP has the Java SDK/J software installed.
CAUTION: Typically the Java VM cards are preinstalled for Java versions 7.x and 10.x. However, if the card is not installed, it must be purchased from and installed by a Ricoh authorized service agent.
4 If using an Equitrac card reader, plug it in.
5 Ensure that CCS mode is enabled on the MFP.
a Enter SP mode on the MFP front panel.
b Touch the System Sp button.
c Touch SP-5XXX, and set the following:
• 5113-1 to '0'. (this is the default setting and should not be altered)
• 5113-2 (External Optional Counter Type) to '1'.
d Exit SP mode.
e Press the User Tools/Counter button on the MFP. The User Tools / Counter / Inquiry screen opens.
f Select System Settings > Administrator Tools.
g Touch Next to proceed to the next screen, then select Enhanced External Charge Unit Management.

Equitrac Print & Copy Control Setup Guide 19
Installation and Configuration
h Enable the desired copier, scanner, fax and document server options. Do not enable PCC, Print, or Java.
i Touch OK, and then exit User Tools.
j Restart the MFP to apply the changes.
WARNING: Failure to correctly configure these settings results in the system not tracking copies. Note that although tracking does not occur, it appears as though tracking is operational. Select User Authentication Management in User Tools > System Settings > Administrator Tools, and ensure the selected method is 'Off'.
Installing PCC Through the Web Image Monitor (GW Devices)All installation is accomplished through the Web Image Monitor. To complete the installation, you must login to the Web Image Monitor with your administrator user name and password.
1 Open a web browser and enter http://<MFP IP Address> in the Address field.
The device web page opens.
2 Click Login and enter your administrator User Name and Password.
The Web Image Monitor page opens.
NOTE: The Web Image Monitor page may differ in appearance and location of functions by device. The basic functionality remains the same.
Installation and Configuration
20 Equitrac Print & Copy Control Setup Guide
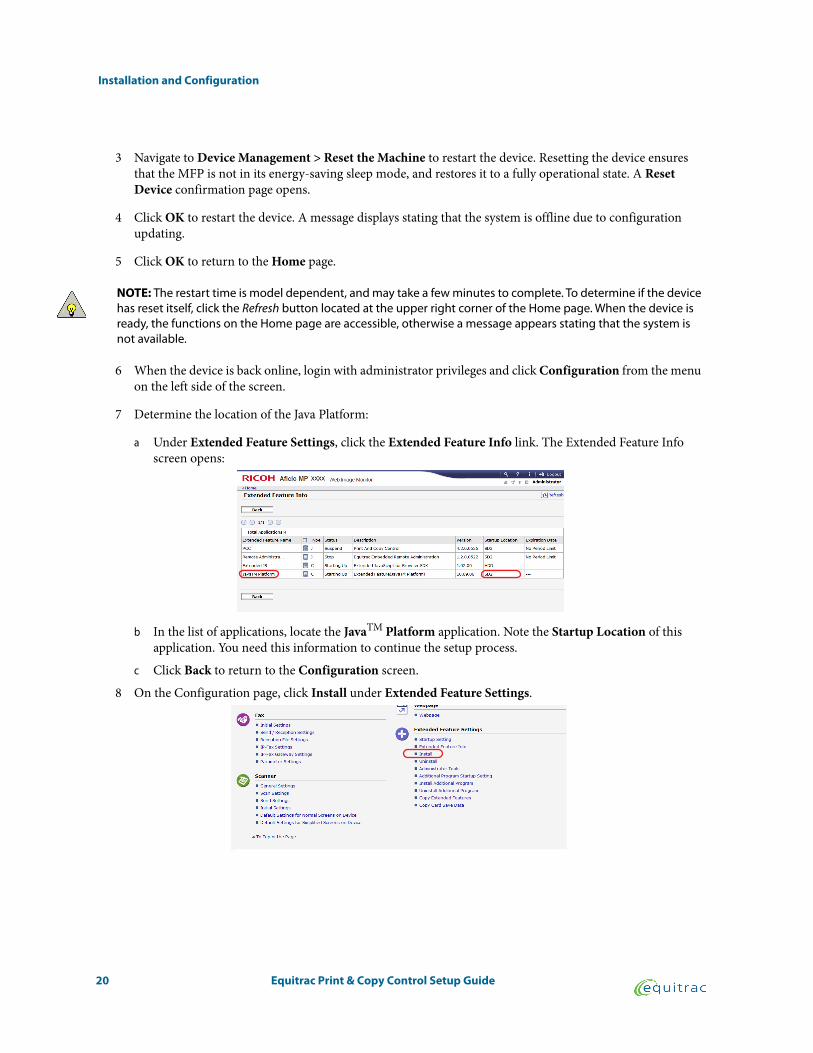
3 Navigate to Device Management > Reset the Machine to restart the device. Resetting the device ensures that the MFP is not in its energy-saving sleep mode, and restores it to a fully operational state. A Reset Device confirmation page opens.
4 Click OK to restart the device. A message displays stating that the system is offline due to configuration updating.
5 Click OK to return to the Home page.
NOTE: The restart time is model dependent, and may take a few minutes to complete. To determine if the device has reset itself, click the Refresh button located at the upper right corner of the Home page. When the device is ready, the functions on the Home page are accessible, otherwise a message appears stating that the system is not available.
6 When the device is back online, login with administrator privileges and click Configuration from the menu on the left side of the screen.
7 Determine the location of the Java Platform:
a Under Extended Feature Settings, click the Extended Feature Info link. The Extended Feature Info screen opens:
b In the list of applications, locate the JavaTM Platform application. Note the Startup Location of this application. You need this information to continue the setup process.
c Click Back to return to the Configuration screen.
8 On the Configuration page, click Install under Extended Feature Settings.

Equitrac Print & Copy Control Setup Guide 21
Installation and Configuration
9 On the Install screen, select the Local File radio button and click Browse to locate the PCC installation zip file.
10 Once the installation file appears in the Local File field, click Display Extended Feature List to expand the page to show the PCC installation list.
11 Under Installation Target Setting, at the Install to field, select the installation location you determined in step 7b.
NOTE: We recommend installing PCC to an SD drive (if available) or flash memory. Installing PCC to the hard disk drive may result in difficulty waking the device from energy-saving mode.
12 Under Type-J Setting, select On for Auto Start.
13 Under Extended Feature List, select PCC from the list of application names.
14 Click Install.
15 On the confirmation screen, review and confirm your selections, and click OK. If the installation is successful, the Install page displays again. If the installation fails, an error message appears.
16 Click Back to return to the main Configuration screen.

Installation and Configuration
22 Equitrac Print & Copy Control Setup Guide
Installing the Remote Admin Application (GW Devices)Configuration is not complete until PCC successfully establishes communication with the Equitrac DCE service. Before you can establish this communication remotely, you must install the Web Image Monitor.
To complete the installation, login to the Web Image Monitor with the admin user name and password. You can also perform these steps from any non-small screen device. For instructions on how to do this, see
1 Open a web browser and enter http://<MFP IP Address> in the Address field.
The device web page opens.
2 Click Login and enter your administrator User Name and Password.
3 Click Configuration from the menu on the left side of the screen.
4 On the Configuration page, click Install under Extended Feature Settings.
5 On the Install screen, select the Local File radio button and click Browse to locate the PCC Remote Admin installation file (.zip file).

Equitrac Print & Copy Control Setup Guide 23
Installation and Configuration
6 Once the installation file appears in the Local File field, click Display Extended Feature List to expand the page to show the installation list.
7 At the Install to field, select Device HDD from the drop-down list. Installing to the HDD conserves the typically limited space on the SD card.
8 Under Type-J Setting, select On for Auto Start.
9 Under Extended Feature List, select Remote Administration from the list of application names.
10 Click Install.
11 On the confirmation screen, review and confirm your selections, and click OK. If the installation was successful, the Install page displays again. If the installation failed, an error message displays.
12 Click Back to return to the main Configuration screen.
13 Restart the MFP. For detailed instructions on how to do this, see Restarting the MFP on page 55.
Installing PCC Through the MFP Web Interface (GWNX Devices)All installation is accomplished through the MFP’s web interface. To complete the installation, you must login to the Web Image Monitor with your administrator user name and password.
1 Open a web browser and enter http://<MFP IP Address> in the Address field.
The device web page opens.
2 Click Login and enter your administrator User Name and Password.

Installation and Configuration
24 Equitrac Print & Copy Control Setup Guide
The Web Image Monitor page opens.
3 Click the Device Management > Reset the Machine from the submenu to restart the MFP. Resetting the device ensures that the MFP is not in its energy-saving sleep mode, and restores it to a fully operational state. A Reset Device confirmation page opens.
4 Click OK to restart the device. A message displays stating that the system is offline due to configuration updating.
5 Click OK to return to the Home page.
NOTE: The restart time is model dependent, and may take a few minutes to come back online. To determine if the device has reset itself, click the Refresh button located at the upper right corner of the Home page. When the device is ready, the functions on the Home page are accessible, otherwise a message appears stating that the system is not available.
6 When the device is back online, login with administrator privileges and then click Device Management > Configuration from the menu on the left side of the screen.
7 Determine the location of the Java Platform:
a Under Extended Feature Settings, click the Extended Feature Info link. The Extended Feature Info screen opens:
b Locate the JavaTM Platform application. Note the Startup Location of this application. You need this information to continue the setup process.
c Click Back to return to the Configuration screen.

Equitrac Print & Copy Control Setup Guide 25
Installation and Configuration
8 On the Configuration page, click Install under Extended Feature Settings.
9 On the Install screen, select the Local File radio button and click Browse to locate the PCC installation zip file.
10 Once the installation file appears in the Local File field, click Display Extended Feature List to expand the page to show the PCC installation list.
11 Under Installation Target Setting, at the Install to field, select the installation location you determined in step 7b.
NOTE: PCC must be installed to the same location as the Java software. For instructions on how to determine this location, see step 7 on page 20. Typically, this is the SD card for Java 10.x and older, and the Flash Memory for Java 11.x and newer. Installing PCC to the hard disk drive may cause device instability, and is not supported.

Installation and Configuration
26 Equitrac Print & Copy Control Setup Guide
12 Under Type-J Setting, select On for Auto Start.
13 Under Extended Feature List, select PCC from the list of application names.
14 Click Install.
15 On the confirmation screen, review and confirm your selections, and click OK. Wait for the installation to complete. If the installation is successful, the Install page displays again. If the installation fails, an error message appears.
16 Click Back to return to the main Configuration screen.
Installing the Remote Admin Application (GWNX Devices)The MFP is not locked down until PCC successfully establishes communication with the Equitrac DCE service. Before you can establish this communication remotely, you must install the PCC Remote Admin Application.
To complete the installation, you must login to the Web Image Monitor with the admin user name and password.
1 Open a web browser and enter http://<MFP IP Address> in the Address field.
The device web page opens.
2 Click Login and enter your administrator User Name and Password.
3 Click Configuration from the menu on the left side of the screen.
4 On the Configuration page, click Install under Extended Feature Settings.
5 On the Install screen, select the Local File radio button and click Browse to locate the PCC Remote Admin installation file (.zip file).

Equitrac Print & Copy Control Setup Guide 27
Installation and Configuration
6 Once the installation file appears in the Local File field, click Display Extended Feature List to expand the page to show the installation list.
7 At the Install to field, select Device HDD from the drop-down list.
8 Under Type-J Setting, select On for Auto Start.
9 Under Extended Feature List, select Remote Administration from the list of application names.
10 Click Install.
11 On the confirmation screen, review and confirm your selections, and click OK. If the installation was successful, the Install page displays again. If the installation failed, an error message appears.
12 Click Back to return to the main Configuration screen.
13 Restart the MFP. For detailed instructions on how to do this, see Restarting the MFP on page 55.
Installation and Configuration
28 Equitrac Print & Copy Control Setup Guide
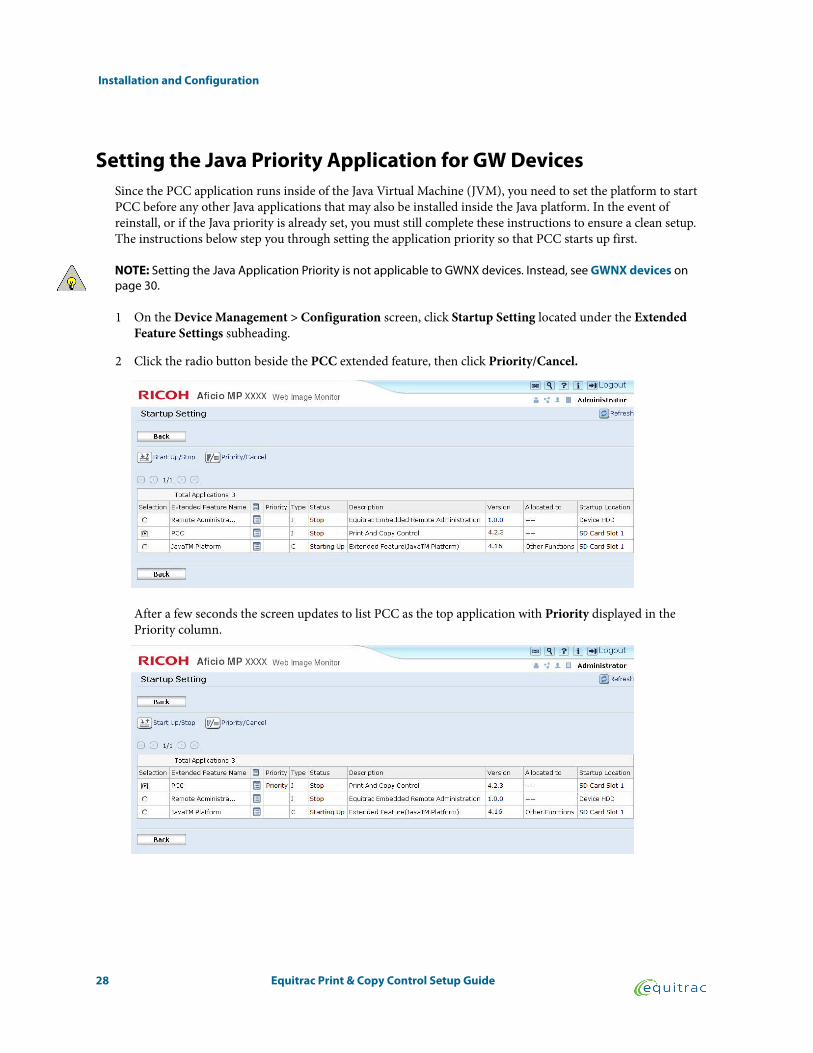
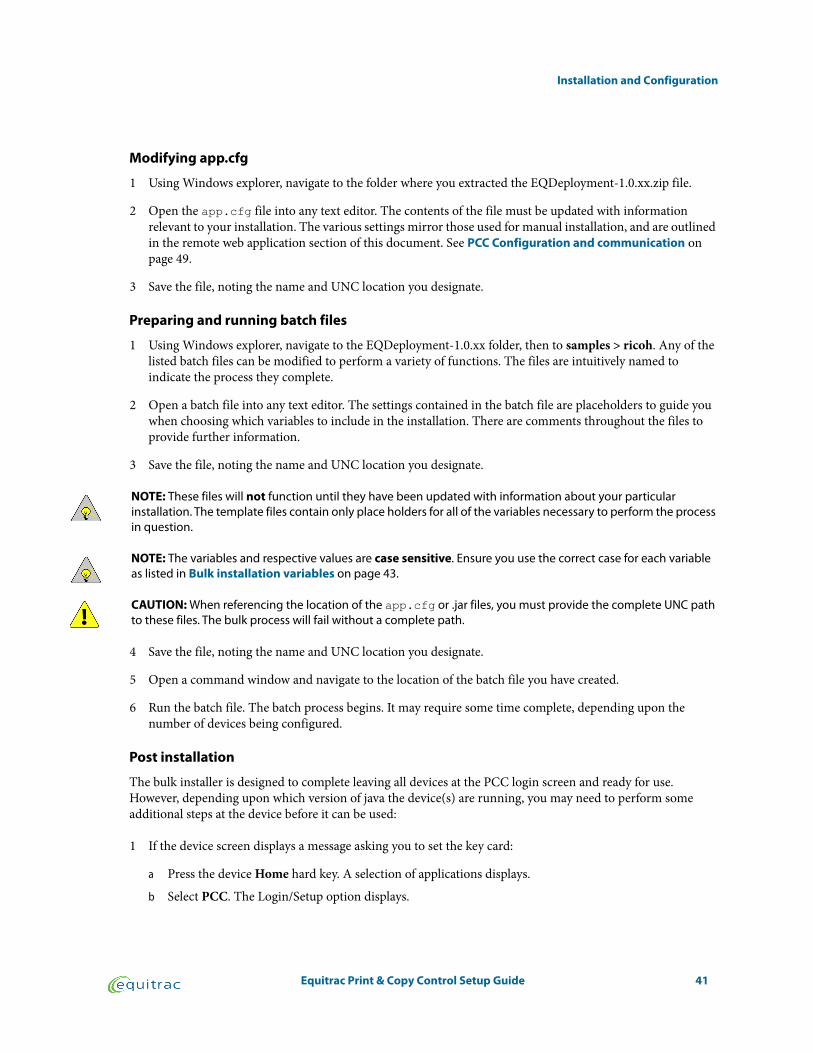
Setting the Java Priority Application for GW DevicesSince the PCC application runs inside of the Java Virtual Machine (JVM), you need to set the platform to start PCC before any other Java applications that may also be installed inside the Java platform. In the event of reinstall, or if the Java priority is already set, you must still complete these instructions to ensure a clean setup. The instructions below step you through setting the application priority so that PCC starts up first.
NOTE: Setting the Java Application Priority is not applicable to GWNX devices. Instead, see GWNX devices on page 30.
1 On the Device Management > Configuration screen, click Startup Setting located under the Extended Feature Settings subheading.
2 Click the radio button beside the PCC extended feature, then click Priority/Cancel.
After a few seconds the screen updates to list PCC as the top application with Priority displayed in the Priority column.

Equitrac Print & Copy Control Setup Guide 29
Installation and Configuration
Setting the Function Priority
Pre-10.x devicesNOTE: For instructions on setting Function Priority for GWNX devices, see GWNX devices on page 30.
1 Enter one of the following key sequences: Clear/Stop, Start, 0 1 2 3 1 2 3 0 or Clear/Stop, Start, 0 1 2 3 1 2 3 #. On small screen devices, press Clear rather than Clear/Stop to begin the process.
NOTE: The device may display an error message indicating an invalid user. This message can be dismissed and ignored.
2 Enter your administrator Password.
NOTE: The default password is equitrac. After communication with the Equitrac server is established, the password is set to 2468, unless you change the Administrator PIN.
3 Press the User Tools/Counter button on the MFP. The User Tools / Counter / Inquiry screen opens.
4 Select System Settings > General Features > Function Priority.
5 Select Java TM/X.
6 Select OK, and then Exit User Tools to save your changes.

Installation and Configuration
30 Equitrac Print & Copy Control Setup Guide
GWNX devicesNOTE: For instructions on setting Function Priority for GW devices, see Setting the Function Priority on page 29.
WARNING: Even if the Function Priority appears to be set correctly by default, you must set it as per these instructions to ensure a clean installation.
1 Open a web browser and enter http://<MFP IP Address> in the Address field. The device web page opens.
2 Click Login and enter your administrator User Name and Password.
3 Navigate to Device Management > Configuration. The Configuration screen opens.
4 Under the Device Settings, click Function Key Allocation/Function Priority. The Function Key Allocation/Function Priority screen opens:
5 In the Function Priority bullet, click Change. The Function Priority dialog opens:
6 Select the PCC Extended Feature radio button, then click OK.
Once set, the device will return to the PCC application by default.
Devices with the Smart Operation PanelRicoh devices equipped with a Smart Operation Panel (SOP) must have the Function Priority set to PCC from the device itself by performing the following steps:

Equitrac Print & Copy Control Setup Guide 31
Installation and Configuration
1 Log into the device with administrator credentials.
2 Locate the Screen Features setup option, then select it. The Screen Features options display.
3 Select Screen Device Settings, then Function Priority:
Locate PCC on the list of available apps, and select its radio button:

Installation and Configuration
32 Equitrac Print & Copy Control Setup Guide
Setting Function KeysFor GWNX devices, the hard function keys found along the left side of the device’s screen can be configured to specific device functions. There are also work flows to accomplish this at the device. For these instructions, consult your Ricoh documentation. The following instructions deal with configuring these hard keys through the Web Image Monitor:
1 Ensure you are logged in with administrative privileges.
2 Navigate to Device Management > Configuration. The Configuration screen opens.
3 Under the Device Settings, click Function Key Allocation/Function Priority. The Function Key Allocation/Function Priority screen opens:
4 In the Function Allocation list, locate the function key you want to assign, and click its Change button. The Function Priority dialog opens:
5 Select the radio button of the feature you want to assign to the function key, then click OK.
6 Repeat this process for all the function keys you want to assign.

Equitrac Print & Copy Control Setup Guide 33
Installation and Configuration
Performing a Bulk InstallationUse bulk installation to automatically install PCC across multiple devices. This can save time in instances where the installation requirements are the same for a fleet of Ricoh MFPs. There are two methods that can be used to perform a bulk installation from a network-connected system:
• By using the Batch installation application.
• By executing a batch file from the command line.
Prior to running either batch installation process, some configuration is necessary. The following process outlines the workflow for both scenarios.
PrecautionsPlease take careful note of the following precautions:
• You cannot perform bulk installation operations in parallel with other device functions. All device functions, including copy, print, scan, menu navigation, any sort of user interaction at the device itself, or remotely through the Web Image Monitor must be suspended for the duration of the bulk installation process.
• Certain newer devices require either a reboot or a manual restart as a preliminary part of the installation process.
Before you beginThe bulk installation process should only be carried out by a trained system administrator. In particular, the command line install requires that you open and modify the settings within batch and configuration files. Some knowledge of Ricoh devices is also required.
To perform a bulk install:
• Ensure you have met all prerequisites for completing an installation of PCC. See Prerequisites: Before You Install on page 16 for a list of prerequisites.
• Ensure you have access to a network connected computer running Java version 1.7.0 or later. The lack of a proper Java application prevents the software from running.
• Consider the time of day. For example, scheduling an extensive bulk install for the middle of the night can free up devices and network traffic to allow a smoother installation or upgrade.
• Download the EQDeployment-1.0.xx.zip file. Unzip this file to a location on the server, and note the location. The .zip file contains a sample file used during installation and depends upon the version of PCC; each is contained in its respective subfolder:• EQDeployment-1.0.xxx\lib\sample\ricoh\4.2.1 app.cfg
• EQDeployment-1.0.xxx\lib\sample\ricoh\4.2.2 app.cfg
• EQDeployment-1.0.xxx\lib\sample\ricoh\4.2.3 app.cfg
• The .zip file also contains other files needed to perform a bulk install:

Installation and Configuration
34 Equitrac Print & Copy Control Setup Guide
• EQDeployment-1.0.xxx\lib\sample\ricoh\deviceconfig_to_set.properties
• EQDeployment-1.0.xxx\lib\sample\ricoh
• devices.csv
• products.csv
• EQDeployment.bat
• EQDeployment.jar
• README.TXT
• a lib folder containing library files
For more information about the variables set through these files, see Bulk installation variables on page 43.
NOTE: The bulk install process installs two servlets that are required for bulk install to work. When Bulk Install completes, these servlets (rxconfServlet and rxspServlet) are listed in the applications present on the device. The bulk install process requires full path information. Note the UNC paths to all of the downloaded files.

Equitrac Print & Copy Control Setup Guide 35
Installation and Configuration
Bulk installation Through Batch Installation ApplicationThe Bulk Installation Application provides a streamlined way to perform a bulk installation without the need to use the command line. To launch the installer, double click the EQDeployment.jar file contained in the EQDeployment-1.0.xx.zip you have downloaded:
Select Vendor
Always select Ricoh. Selecting any other option causes the bulk install to fail.
Execution
The Execution section, located at the bottom of the application window, is used to proceed with an installation or to load or save an existing batch process. If a batch operation has already been set up and saved, that batch operation can be loaded and executed without further configuration. The options in this section are:

Installation and Configuration
36 Equitrac Print & Copy Control Setup Guide
• Save - Saves the current batch operation settings using the batch operation’s settings. This option is unavailable if the batch operation has never been used before.
• Save As - Saves the current batch operation settings to a new settings file. You are asked to provide a name and file location for the settings file.
• Load - Load an existing batch operation settings file. Navigate to the file location you want to load, select it, and click Open. The settings load into the application.
• Execute - Proceeds with the currently loaded batch operation.
• >> - Click the >> button to resize the left pane of the application. This allows for more space in the application window to enter configuration values, at the expense of log information. The button switches to << to return the application panes to default values.
General
Use this area to indicate which devices will receive the installation.
1 Click Add to display the Add devices dialog box:
2 In the Device(s) field, enter the IP address(es) of the devices that will receive the installation. The devices added appear in addition to any devices already listed. You can enter multiple devices by separating each IP address with a comma.
Alternatively, you can click Browse to open a file browser, navigate to and then load a file containing a comma separated list (.csv file) of the device IPs.
3 When finished, click Add. The IP addresses of the devices added display in the Device Hosts listing.
4 Set the Max Parallel Execution slider to the value best suited for your installation. This slider governs how many simultaneous installations occur. Set it lower if you are concerned with power fluctuations caused by simultaneous system reboots, or higher (to a maximum of 50 parallel executions) to speed the process. The number to the left of the slider indicates the amount. The amount of parallel executions chosen depends partially upon the hardware running the executions. The more powerful the hardware, the more executions before the demand on the processor slows the process.

Equitrac Print & Copy Control Setup Guide 37
Installation and Configuration
Ricoh Operations
Select the check boxes for Get Installed Packages, Get Device Configurations and Get App Configurations to return the currently installed device, product IDs, and application configurations, respectively.
Device Initialization
Check the Device Init box to run the configuration commands provided in the Config File field. You can use the field to enter in the various variables. The settings mirror those used for manual installation, and are outlined in the remote web application section of this document. See PCC Configuration and communication on page 49. If you already have a text file containing the commands needed, you can click Load and navigate to the file to load its contents into the Config File field.
NOTE: When entering variables, it is useful to click the >> button in the Execution group box at the bottom of the application. This enlarges the Config File field, making it easier to work with.
Uninstall
1 Check the Uninstall box to uninstall existing products from the device.
1 Click Add to display the Add Product ID(s) dialog box:
2 In the Product ID(s) field, enter the Product ID(s) that will be removed. The ID(s) added appear in addition to any devices already listed. You can enter multiple devices by separating each IP address with a comma.
Alternatively, you can click Browse to open a file browser, navigate to and then load a file containing a comma separated list (.csv file) of the Product ID(s).
When finished, click Add. The IDs are added to the Product IDs list.

Installation and Configuration
38 Equitrac Print & Copy Control Setup Guide
3 Click Remove to remove all products in the list.
4 Select the Force check box to force a more thorough cleanup when uninstalling. This may significantly increase the time of the uninstall process if there are multiple applications to be uninstalled, as each application removal triggers a device reboot. However, because of the more thorough cleanup, this option can prevent subsequent uninstall/install problems.
Install
1 Check the Install box to install products on the device.
2 Click Add to select the Install packages of the product(s) to install, then click OK. These display in the Install Packages field.
3 Click any added product in the Product ID field and then click Remove to remove it.
4 Use the up and down arrow buttons to navigate within a long list of install packages.
5 Select the Update check box to update an already installed package.
Application Configuration
The EQDeployment-1.0.xx.zip file that you downloaded contains the application configuration files needed to configure Equitrac Embedded. For detailed information about the settings, see App.cfg variables on page 44.
NOTE: Make a backup of this file before proceeding. In the event of an error, you can then revert back to the original software.
1 Select the App Config check box.
2 Click Load. A Windows file browser opens.
3 Use the browser to locate the app.cfg file you downloaded earlier. Select the file, then click OK. The file contents display in the Config File field. These setting should not need to be altered.

Equitrac Print & Copy Control Setup Guide 39
Installation and Configuration
Upload property files
Property files contain information used to configure any settings that control custom hardware or capabilities of software on the MFP, for example a separate language pack for a virtual keyboard.
1 Select the Upload check box.
2 Click Add. A Windows file browser opens.
3 Use the browser to locate any property files you want to install. Select the file, then click OK. The file name displays in the Property Files field.
4 Click any added file in the Property files field and then click Remove to remove it.
5 Use the up and down arrow buttons to navigate within a long list of files.
Reboot the device
Select the Reboot check box to reboot the device.
Additional settings
Provide these additional settings:
• The WIM Username and corresponding Password are your Ricoh Web Image Monitor credentials. These credentials are required for most Ricoh operations, such as getting application information, install and uninstall, and so forth.
• The EQRA Username and corresponding Password are your Equitrac Remote Administration credentials. These are needed for Application Configuration.
• The Install Password field can typically remain empty, as this information is handled through the Ricoh Web Image Monitor.
• Select the Use SSL check box to enable connection to the device(s) using a secure channel (via SSL). This forces a complete certificate chain validation. If deselected, the connection reverts to a regular unsecured channel. This also increases the time needed to establish a connection with the device(s).
• Select the Certless SSL check box to enable connection to the device(s) using a secure channel (via SSL). Unlike the standard SSL connection above, this option does not verify certificate chain validity. If deselected,

Installation and Configuration
40 Equitrac Print & Copy Control Setup Guide
the connection reverts to a regular unsecured channel. This also increases the time needed to establish a connection with the device(s).
Device list
The Device List area of the dialog lists information about the devices that are receiving updates, and an overview of the progress of the install in real time. The information provided in the matrix is:
• Device Host lists the IP address of the PCT in question.
• The Progress bar provides a visual overview as a device moves through the install process. The bar fills the cell from left to right as the installation runs.
• Last Message displays the most recent feedback about the install provided by the PCT device firmware.
• Error(s) indicates the number of errors (if any) encountered during the installation.
• Last Error Message lists the most recent error (if any) returned by the device.
Output
The Output area of the dialog is a real time running list of all installation commands being executed. This list is used for troubleshooting purposes.
Bulk installation from Command LineBulk operations can be performed for various scenarios, such as installing PCC and Remote administration functions, uninstalling PCC, or retrieving device configuration information. These operations are accomplished by first modifying the app.cfg file with appropriate values, and then preparing and executing a batch file containing commands that are passed to the devices. Equitrac provides some template batch files you can modify to suit your installation.
Unzip the EQDeployment-1.0.xx.zip file. The file contains the EQDeployment-1.0.xx folder and its subfolders, which in turn contain template batch files, as well as java .jar files needed to perform the operation. The folder also contains the app.cfg file, which is used to configure all of the variables used in remote administration. All default settings commonly designated on the remote web administration page, such as device IP addresses and scan options, are set using the app.cfg file.
You can create batch files to suit your own needs. The available variables and their functions are listed under Bulk installation variables on page 43.
Equitrac Print & Copy Control Setup Guide 41
Installation and Configuration
Modifying app.cfg
1 Using Windows explorer, navigate to the folder where you extracted the EQDeployment-1.0.xx.zip file.
2 Open the app.cfg file into any text editor. The contents of the file must be updated with information relevant to your installation. The various settings mirror those used for manual installation, and are outlined in the remote web application section of this document. See PCC Configuration and communication on page 49.
3 Save the file, noting the name and UNC location you designate.
Preparing and running batch files
1 Using Windows explorer, navigate to the EQDeployment-1.0.xx folder, then to samples > ricoh. Any of the listed batch files can be modified to perform a variety of functions. The files are intuitively named to indicate the process they complete.
2 Open a batch file into any text editor. The settings contained in the batch file are placeholders to guide you when choosing which variables to include in the installation. There are comments throughout the files to provide further information.
3 Save the file, noting the name and UNC location you designate.
NOTE: These files will not function until they have been updated with information about your particular installation. The template files contain only place holders for all of the variables necessary to perform the process in question.
NOTE: The variables and respective values are case sensitive. Ensure you use the correct case for each variable as listed in Bulk installation variables on page 43.
CAUTION: When referencing the location of the app.cfg or .jar files, you must provide the complete UNC path to these files. The bulk process will fail without a complete path.
4 Save the file, noting the name and UNC location you designate.
5 Open a command window and navigate to the location of the batch file you have created.
6 Run the batch file. The batch process begins. It may require some time complete, depending upon the number of devices being configured.
Post installation
The bulk installer is designed to complete leaving all devices at the PCC login screen and ready for use. However, depending upon which version of java the device(s) are running, you may need to perform some additional steps at the device before it can be used:
1 If the device screen displays a message asking you to set the key card:
a Press the device Home hard key. A selection of applications displays.
b Select PCC. The Login/Setup option displays.

Installation and Configuration
42 Equitrac Print & Copy Control Setup Guide
2 If the screen displays a Login/Setup option, select Login. The device then displays the standard PCC login screen.
Equitrac Print & Copy Control Setup Guide 43
Installation and Configuration
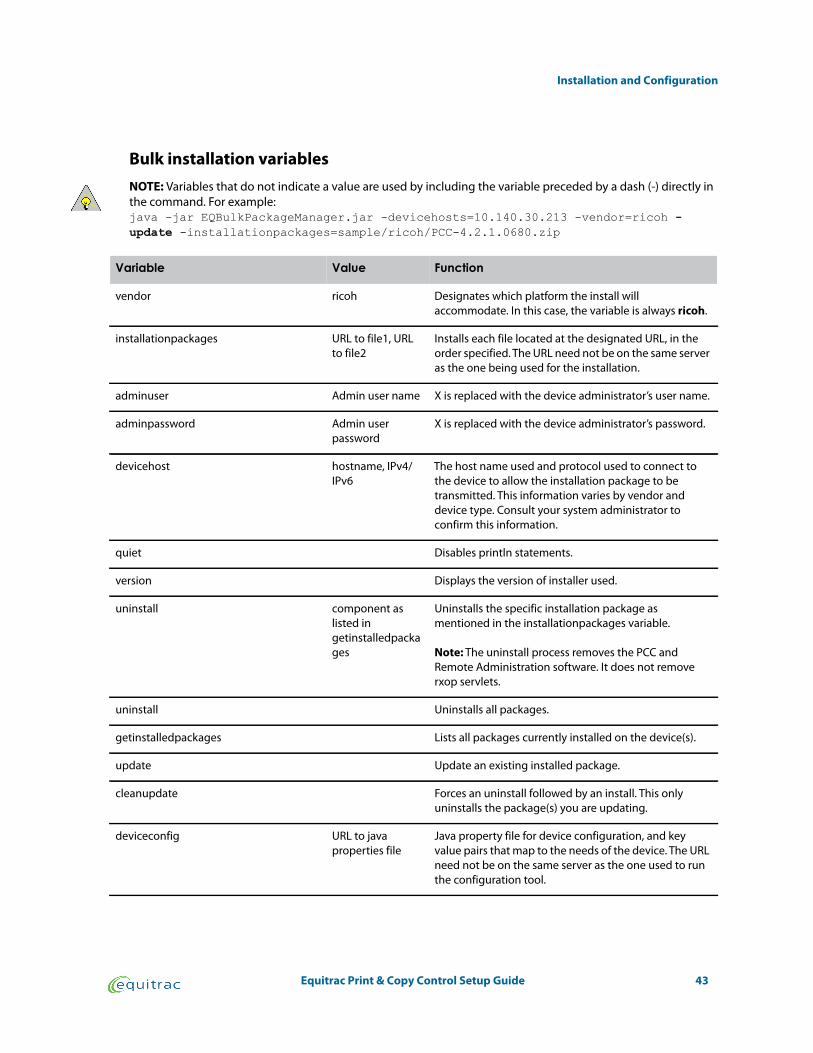
Bulk installation variablesNOTE: Variables that do not indicate a value are used by including the variable preceded by a dash (-) directly in the command. For example: java -jar EQBulkPackageManager.jar -devicehosts=10.140.30.213 -vendor=ricoh -update -installationpackages=sample/ricoh/PCC-4.2.1.0680.zip
Variable Value Function
vendor ricoh Designates which platform the install will accommodate. In this case, the variable is always ricoh.
installationpackages URL to file1, URL to file2
Installs each file located at the designated URL, in the order specified. The URL need not be on the same server as the one being used for the installation.
adminuser Admin user name X is replaced with the device administrator’s user name.
adminpassword Admin user password
X is replaced with the device administrator’s password.
devicehost hostname, IPv4/IPv6
The host name used and protocol used to connect to the device to allow the installation package to be transmitted. This information varies by vendor and device type. Consult your system administrator to confirm this information.
quiet Disables println statements.
version Displays the version of installer used.
uninstall component as listed in getinstalledpackages
Uninstalls the specific installation package as mentioned in the installationpackages variable.
Note: The uninstall process removes the PCC and Remote Administration software. It does not remove rxop servlets.
uninstall Uninstalls all packages.
getinstalledpackages Lists all packages currently installed on the device(s).
update Update an existing installed package.
cleanupdate Forces an uninstall followed by an install. This only uninstalls the package(s) you are updating.
deviceconfig URL to java properties file
Java property file for device configuration, and key value pairs that map to the needs of the device. The URL need not be on the same server as the one used to run the configuration tool.

Installation and Configuration
44 Equitrac Print & Copy Control Setup Guide
App.cfg variables
The following variables are those used for 4.2.3 installations. For earlier versions, check the app.cfg file for your respective version of the software.
getdeviceconfig Retrieves the current device configuration.
certificate URL Location of the certificate(s) to install. While the certificate does need not be on same server as the tool installing it, if you use a local server (i.e. the same one used for the install) the upload is secure.
devicehost hostname, IPv4/IPv6
The host name used and protocol used to connect to the device to allow the installation package to be transmitted. This information varies by vendor and device type. Consult your system administrator to confirm this information.
list Displays a list of certificates on the device.
setdeviceconfig URL to java properties file
Java property file used for application configuration. The key value pairs that map to the needs of the application. This URL need not be on the same server as the configuration tool.
getdeviceconfig Displays the current application configuration of the device.
Variable Value Function
TransactionCompletionWait Between 0-30 The transaction completion timeout.
ServerHostNames hostname(s) The names of up to 4 servers by IP, comma separated, no spaces.
OverrideEmailServer True/False Email server override settings. Enter 'FALSE' for SERVER (SMTP settings); 'TRUE' for override to LOCAL.
OverrideEmailServer_Server Email server name The name of the email server. To be set if OverrideEmailServer variable is set to TRUE.
OverrideEmailServer_Username Email server user name
The name of a user to use when connecting to the email server. To be set if OverrideEmailServer variable is set to TRUE. Optional.
Variable Value Function

Equitrac Print & Copy Control Setup Guide 45
Installation and Configuration
OverrideEmailServer_Password Email server user password
The password of the above user to use when connecting to the email server. To be set if OverrideEmailServer variable is set to TRUE. Optional.
ScanToMeDefaultPageSize page size 'auto'/a3/a4/a5/'11x17'/lgl/ltr/b4/b5/'stmt'
if applicable, orientation 'sef'/'lef' (short/long edge feed)
The Default Page Size
Note that only ltr,stmt,a4,a5 & b5 support 'lef'; if no orientation is entered PCC will assume 'lef'
if the device only supports 'sef' (ie: A4 models) and 'lef' is entered, it will default to ltr-sef
ScanToMeDefaultResolution 100/200/300/400/600
The default DPI.
SoftKeyboardTimeout 30-600 The soft keyboard timeout, in seconds.
ExternalTimeout 30-1800 External timeout in seconds. Use -1 to disable external timeout.
UseButtonIcons true/false Enable button icons.
EnableUSBKeyboard true/false Enable USB keyboard.
DisableWakeUpOnCardSwipe true/false Disable device wake up upon card swipe.
EnableLogoutKeyInBackground true/false Enables lockout key in background.
SSLTransfer true/false Transfer by Secure Socket Layer
RicohAAAIntegrationEnabled true/false Ricoh AAA Integration.
debug true/false Debugging.
tracing true/false Tracing.
AppIntegrationMode 'none', 'globalscan' or 'globalscannx'
Set the single sign on integration.
UserNameFormat 'username', 'domainusername' or 'userprincipalname'
Sets the User Name Format.
PCCMode 'Print and Copy' or 'Custom'
Sets the PCC mode.
OverrideDefaultFunction true/false Set the default function. Use ’FALSE' for SERVER (setting); 'TRUE' for override to LOCAL.
Variable Value Function

Installation and Configuration
46 Equitrac Print & Copy Control Setup Guide
Ricoh device initialization configuration variables
OverrideDefaultFunctionMode 'Access MFP', 'Print' or 'Scan to Me'
Sets the default function mode. Use only if override is set to TRUE.
NativeDocumentServerAppSecuritySetting enable/disable Use native document server application security.
NativeFaxAppSecuritySetting enable/disable Use native fax application security.
NativeScanAppSecuritySetting enable/disable Use native scan application security.
ExternalProductIdsToEnable product IDs Add product IDs. Optional.
Variable Value Function
setspmode.5113.1 0 or 1 Sets counter type/default counter type. Optional.
setspmode.5113.2 0 or 1 Sets counter type/external counter type. Optional.
timezone [+|-]n where n is the offset from GMT
Sets the server and device time zone. Server and device must be the same time zone.
updatedevicetime When used, the device time is updated according to the current time on the machine running the deployment tool.
eecum.on copier_color, copier_bw, copier_sc, copier_tc, printer_color,printer_bw, docserver, fax, scanner, java_apps
Settings for the Enhanced External Charge Unit Management settings. List values are controlled by EECUM. Multiple values are possible. Values should be comma separated.
Variable Value Function

Equitrac Print & Copy Control Setup Guide 47
Installation and Configuration
function.priority 3 - Copier
5 - Fax
6 - Printer
7 - Scanner
9 - Document Server
26 - SDK1
27 - SDK2
28 - SDK3
Use the number associated with the function.
On GWNX, Home screen is not settable as priority function this way, it needs to be done by hand through the device config interface (Web Image monitor or System menu). It will report 'Copier' for function priority when setting Home screen as priority by hand.
SDK1 refers to the Java Platform on the device and not to an SDK/J application, and SDK2 and SDK3 also do not refer to Java applications. The priority application among the SDK/J apps is set at installation time and determines which Java application is displayed on the screen if there are multiple applications installed and SDK1 is set as function priority. If no application is set as priority and multiple Java applications are running, an application selector screen is shown when SDK1 is set as function priority.
Variable Value Function

Installation and Configuration
48 Equitrac Print & Copy Control Setup Guide
Starting PCC ApplicationsOnce PCC has been set as the priority application on the device, you must start PCC and the Remote Admin to ensure that it communicates with the Equitrac server.
NOTE: Because GWNX devices have Java preinstalled, the steps in this section do not apply to them.
1 On the Configuration screen, click Startup Setting located under the Extended Feature Settings subheading.
2 Click the radio button beside the PCC extended feature, then click Start Up/Stop. The screen updates from Stop to Starting Up displayed in the Status column for PCC.
3 Click the radio button beside the Remote Administration extended feature, then click Start Up/Stop. The screen updates from Stop to Starting Up displayed in the Status column for Remote Administration.
NOTE: Ensure that all applications listed display Starting Up before continuing with the PCC Remote Administration application.

Equitrac Print & Copy Control Setup Guide 49
Installation and Configuration
PCC Configuration and communicationOnce the Java application priority has been set for PCC to start before any other Java applications, PCC can now be configured to communicate with the Equitrac server(s).
You can designate up to 4 different DCE servers to use--one primary, and up to three backup servers. We recommend that the primary DCE is located on-site to allow for the fastest possible data transfer. Other DCE servers can be located off-site. It is best to order these by the speed at which they can transfer data. If the connection to the primary DCE is lost or cannot be established at startup, PCC enters offline mode for the existing session, and then attempts to connect to the backup DCEs in order of the priority you designate. PCC will attempt to reconnect to the highest priority server after each logout until a connection with the primary server is re-established.
CAUTION: If you designate multiple DCE servers, you must map the SPE nodes for all DCE servers in use. Failure to do so disables all scan options should the primary DCE lose its connection. To map SPE nodes, open System Manager and navigate to Configuration - (Scanning) > Scan configuration > Load balancing > Available Scan Processing Engine (SPE) nodes.
1 Open a web browser and enter http://<MFP IP>:8080/Equitrac/config, in the Address field to open the Remote Administration utility.
<MFP IP> is the IP address for the physical device and 8080 is the communication port.
2 Enter "admin" (no quotation marks) for the User ID, and the Password. The Password is equitrac. After communication with the Equitrac server is established, the password is set to 2468 by default unless you change the Administrator PIN. See Configuring Administrator PIN Codes on page 91 for details.
3 On the main Configuration page, set the following options:

Installation and Configuration
50 Equitrac Print & Copy Control Setup Guide

Equitrac Print & Copy Control Setup Guide 51
Installation and Configuration
a In the Server Hostname or IP Address field, enter the name or IP address of the machine(s) hosting the Equitrac DCE service. If you use the Server Hostname, the device must have DNS enabled. If you are using more than one DCE server, list the primary server first, followed by the backup servers in priority order, from 2-4.
b Select the Email Function to determine if the email uses the local or central mail server.
• Server uses the default mail server sent by the Equitrac Office/Express server. When this option is selected, the Email Server, SMTP Username and Password fields are read only, and are not configurable.
• Local overrides the default settings, and allows you to select the local Email Server to send logs for troubleshooting purposes. SMTP Username and SMTP Password are optional depending on the security settings of the email server.
CAUTION: As of PCC 4.2.0, all email functions relate only to mailing troubleshooting logs.
c Select a Default Scan Page Size from the drop-down menu. Typically setting this to Auto Detect is sufficient. For devices that are unable to detect page sizes automatically, set an appropriate page size.
d In the Soft Keyboard Timeout field, enter a value in seconds after which the user will be logged out while the soft keyboard is displayed. See Configuring System Timeout Behavior on page 93.
e In the External Timeout field, enter a value in seconds after which a user will be logged out while an external application is in use. See Configuring System Timeout Behavior on page 93.
f In the Transaction Completion Wait field, enter a value in seconds the system waits for a copy command to be issued before closing the copy function. This is useful in cases where a user initiates a copy job and then logs out immediately.
g Select a Theme from the drop-down list to dictate which user interface (UI) the device displays:
• Auto loads the UI recommended by the Java version.
• Default loads the standard legacy UI for device version 10.x and under devices.
• Modern loads the standard UI for device version 11 and higher.
h The Use Button Icons option turns On or Off the icons that appear in the buttons on the PCC UI on the MFP. Turning off the button icons provides a slight performance enhancement to the Java application.
i Select Enable USB Keyboard to allow users to navigate the touch screens via a Ricoh supported keyboard attached to the USB port of the device. See Using a USB Keyboard at the Device on page 129.
j From the Soft Keyboard Language drop-down list, select the country-specific keyboard configuration the device displays when it launches a soft keyboard. Depending upon the keyboard, this presents extended character sets or diacritic buttons. Select Default to display the language configured in the Java version.
k Leave the Check Printer Status check box disabled. When selected, error checking is active. The device screen displays an error message if the device is in an error state when print jobs are released, and disallows additional print jobs. Only select if advised by Equitrac service.
l Leave the Disable Device Wake Up on Card Swipe check box deselected. This feature should always be deselected unless specifically advised otherwise from Equitrac Service.

Installation and Configuration
52 Equitrac Print & Copy Control Setup Guide
m Select the Enable Login/Logout Key in Background if Available check box if you want to allow users to use the Logout hard key on the device, even if they are not using PCC functions.
NOTE: This option is available only on supported Ricoh devices. If this option is not supported, a PCC function must be engaged to use the Logout hard key. Consult your system administrator to confirm your specific device is compatible.
n Select the Enable SSL Transfer check box to use secure sockets layer encryption for data transfer. This adds an extra level of security if the device is connected to an open or public wireless network.
o Select Ricoh AAA Integration Enabled to allow SSO for multiple applications simultaneously using Ricoh AAA SDK.
p The Switch to English Tab on Japanese softkeyboard dictates if an English soft keyboard on the device displays when Japanese is the default display language. This is selected by default, which enables the English keyboard. Deselect to display a Japanese keyboard.
q Enable Debug and/or Tracing to create verbose logs. Use this feature only when working with Technical Support to troubleshoot a problem with the PCC application running on the MFP.
NOTE: Turn Tracing off after obtaining logs. If the device is in sleep mode, tracing is buffered until the device resumes.
r Select an SSO Integration Mode (Single Sign On) to allow PCC user credential authentication for a third party application. Select None for an application other than GlobalScan or GlobalScan NX.
• None
• GlobalScan
• GlobalScan NX
s From the User Name Format drop down list, select the correct format for your enterprise:
• username
• domain/username
t Select the PCC mode to determine the features that PCC controls or enables.
• Print and Copy
• Custom Access - Select this option to allow users unrestricted access to specific MFP functions without needing to login with valid user credentials. See Configuring Custom Access Control on page 54.
u Enable or Disable the following if you want to control access to these native MFP functions:
• Native Document Server Application
• Native Scanner Application
• Native Fax Application
If any of these functions are set to Disable, then the user cannot access the selected function.

Equitrac Print & Copy Control Setup Guide 53
Installation and Configuration
NOTE: When Disabling a native application, that application must also be “locked” (selected) in the Enhanced External Charge Unit Management configuration as described in Configuring Custom Access Control on page 54.
v In the External Java Application Product IDs to Enable field, provide a comma-separated list of product IDs related to any 3rd party Java applications you want to use. If these are not provided, the applications are not acknowledged by the system.
4 Wait for the green success message, click Update to save the changes, and then click Logout.
NOTE: If you receive a message that PCC cannot contact the Equitrac server, ensure that server IP address or hostname are correct and accessible on the network.
Configuring PCC Panel ServiceThe Panel Service must be enabled to allow the application to receive device events.
For devices whose Java TM Platform is 4.x.x follow this procedure:
Open the CVM Utilities link, and select the Panel Service check box.
For devices whose Java Platform is 5 and above, follow this procedure:
1 Login to the device with administrator privileges.
2 Navigate to Device Management > Configuration > Extended Feature Settings > Administrator Tools. The Administrator Tools screen opens:

Installation and Configuration
54 Equitrac Print & Copy Control Setup Guide
3 Under Select Available Functions, ensure the PanelService API is set to Active.
4 Click Apply at the top or bottom of the screen.
NOTE: The Smart Card Service option is a deprecated function, and can be ignored.
Configuring Custom Access ControlUnrestricted user access to specific MFP functions without valid user login credentials can be set through the Guest user functionality. For information about this functionality, see Guest user setup on page 65.
The EECM functionality works in concert with whatever settings are configured for Ricoh PCC. Selecting an application in the Ricoh EECM configuration "locks" and/or disables the application, depending upon the Ricoh PCC security "mode" (Print/Copy Control or Custom Access) and Ricoh PCC Native application security settings. Conversely, deselecting an application in the Ricoh EECM configuration may leave the application unlocked and/or enabled, depending on the Ricoh PCC security "mode" that is configured. See Access to third party applications on page 63 for more details.
NOTE: Function Access Control is fully supported in Custom Access Mode only. When in the standard Print/Copy Control mode, if Monochrome copy is restricted, access to Color copy, Fax and Scan are also restricted.
To select the accessible functions, do the following:
1 Log in to the MFP with any registered user credentials.
2 Press the User Tools/Counter button on the MFP. The User Tools / Counter / Inquiry screen displays.
3 Touch System Settings and select the Administrator Tools tab.
4 Touch the Next button to proceed to the second screen, then select Enhanced External Charge Unit Management. The Enhanced External Charge Unit Management screen displays.
5 In the Other Functions section, deselect the MFP functions that are allowed without a user login.
WARNING: For GW devices, do NOT select JavaTM/X. For GWNX devices, do NOT select PCC. Selecting either of these on their respective devices locks out the device. We also recommend not selecting the printer option, as this may lock out print functions.

Equitrac Print & Copy Control Setup Guide 55
Installation and Configuration
6 Press OK to save the settings.
Restarting the MFPFor all settings to take effect, you must restart the MFP again. You can either walk to the device and restart it manually, or you can restart it through the Web Image Monitor.
1 Log in with administrator privileges.
2 Click the Home link from the top left of the MFP’s web interface.
3 Reset the device:
• For GW devices, from the Home screen, select the Status tab, then click the Reset Device button.
• For GWNX devices, from the Home screen, select Device Management > Reset the Machine.
4 Confirm that you want to reset.

Installation and Configuration
56 Equitrac Print & Copy Control Setup Guide
Configuring PCC at the MFPWhen you restart the MFP after installation you can access the PCC Configuration screen on the MFP. PCC Configuration screens are a subset of the Remote Administration screens. You can change some parameters while standing at the device, however you typically use the Remote Administration application.Through this screen, you can do the following:
• Perform general configuration procedures
• Configure security options
• Configure PCC functions
• Configure Scan-to-Me email functions
• View product information, such as PCC and Java versionsNOTE: MFP devices with 4.3" touch panels such as the MP 301SPF have a limited set of device-resident configuration options. These devices can only configure the server IP, enable or disable trace files, and display product information. Use the web-based PCC Utility as described on page 49 to configure these devices.
To access the PCC Configuration screen, do the following:
1 Enter one of the following key sequences: Clear/Stop, Start, 0 1 2 3 1 2 3 0 or Clear/Stop, Start, 0 1 2 3 1 2 3 #. On small screen devices, press Clear rather than Clear/Stop to begin the process.
NOTE: The device may display an error message indicating an invalid user. This message can be dismissed and ignored.
2 Enter your administrator Password.
NOTE: The default password is equitrac. After communication with the Equitrac server is established, the password is set to 2468, unless you change the Administrator PIN. See Configuring Administrator PIN Codes on page 91 for details.
3 Select the General tab to set the following options:

Equitrac Print & Copy Control Setup Guide 57
Installation and Configuration
a Enter the Name or IP address of the Equitrac Server hosting the Equitrac DCE service. If you are using backup DCE servers, enter their respective name or IP address in the Equitrac Server boxes, in priority order.
NOTE: Ricoh small screen devices have only one box for designating Equitrac servers. To designate more than one server, enter all information in the same box, in priority order, separated by commas.
b Turn Debug Off. Turn this feature On only if instructed by Equitrac Support.
c Turn Trace to file On of Off. Turn this feature On if you want to create verbose logs.
NOTE: Both Debug and Trace to file should be off unless explicitly instructed by Equitrac to turn them on. Always turn Tracing off after obtaining logs. If the device is in sleep mode, tracing is buffered until the device resumes.
d Turn the Button Icons On or Off that appear in the buttons on the PCC UI on the MFP. Setting this to Off may provide a minimal performance boost.
e Turn USB Keyboard On to allow users to navigate the touch screens via a Ricoh supported keyboard attached to the USB port of the device.
f Touch Send To to open a soft keyboard and enter email addresses.
g Touch Email log to send the email.
NOTE: Steps f and g should only be enabled when instructed by Equitrac.
4 Select the Security tab to Enable or Disable access to native MFP functions, and to set system timeouts:
a Native Document Server Application - this feature is Disabled by default.
b Native Facsimile Application.
c Native Scanner Application.
d Soft Keyboard timeout and External time out values. For more information about how to set these values, see Configuring System Timeout Behavior on page 93.
e External Product IDs to Enable. For more information about this feature and how to enable it, see Enabling External Product IDs on page 60.

Installation and Configuration
58 Equitrac Print & Copy Control Setup Guide
NOTE: For PCC to control access to a native application, the application must also be “locked” (selected) in the Enhanced External Charge Unit Management configuration as described in Configuring Custom Access Control on page 54.
5 Select the PCC tab to set the following functions:
a Select the PCC mode to determine the features that PCC controls or enables.
b Select an SSO Integration to allow PCC user credential authentication for a third party application. Touch None for an application other than GlobalScan or GlobalScan NX. Touch Ricoh AAA to allow SSO for multiple applications simultaneously using Ricoh AAA SDK.
c Select the desired User Name Format used by PCC.
6 Select the About tab to view product information:

Equitrac Print & Copy Control Setup Guide 59
Installation and Configuration
7 Select the Scan-to-Me tab to view or set the Email functions:
• Touch Server to use the default mail server sent by the Equitrac Office/Express server. When this option is selected, the SMTP Server, Username and Password fields are read only, and are not configurable.
• Select a Default Page Size for Scan-to-Me jobs.
• Touch Local to override the default settings. Enter the IP address or DNS name of the SMTP Server. Username and Password are optional depending on the security settings of the SMTP email server.
NOTE: Scan emails from the MFP are not sent through the SMTP server. This setting allows PCC to send scan logs for troubleshooting purposes only. Please refer to the Equitrac Administration Guide on how email is forwarded through the destination SMTP server.
8 Press Save and Exit for the new configuration settings to take effect; select Exit if no settings were changed, or you do not want to save any settings you may have changed.

Installation and Configuration
60 Equitrac Print & Copy Control Setup Guide
Enabling External Product IDsWith GWNX devices, it is possible to allow user access to specific third party applications. With this behavior, any applications that have been locked can be configured to be accessible to the user logged in. In order to designate which locked applications are accessible, you must:
1 Determine the Product ID of the third party application(s).
2 Enter the Product ID(s) of the application(s) you want to allow users to use into the device software.
NOTE: Use of external applications requires a separate Capture and Send license per device. For more information about licensing a particular device, see Manually Configuring Embedded Devices on page 81.
Determining product IDsIf you use a third-party application whose product code is not already known, the system administrator must determine the correct product ID to enter into System Manager. Product IDs can be determined either through the remote access function, or directly at the device. To determine Product IDs through remote access:
1 In a browser and navigate to the IP address of the device. The Web Image Monitor for the device displays.
2 Navigate to Configuration > Extended Feature Settings> Extended Feature Info. The Extended Feature Info screen displays:
3 From the list of applications, identify those you want to control.
WARNING: Do not select PCC as one of the controlled applications.

Equitrac Print & Copy Control Setup Guide 61
Installation and Configuration
4 Click the icon of the application, located between its feature name and Type. The Application Information screen for that application displays:
5 Note the Product ID for the application, then click Back to return to the Extended Feature Info screen.
6 Repeat steps 3 through 5 for each application you want users to be able to access.
To determine Product IDs directly at the device:
1 Log in to the device with Administrative privileges.
2 Press the Usertools/Counter hard button on the device panel. The User Tools / Counter / Enquiry screen displays.
3 Select Extended Feature Settings. The Extended Feature Setting Menu displays.
4 Select Extended Feature Settings. The Extended Feature Settings screen displays:
5 Select the Extended Feature Info tab. A list of extended features displays.

Installation and Configuration
62 Equitrac Print & Copy Control Setup Guide
6 Select the application you want to control. The application’s Extended Feature Information displays:
7 Note the Product ID for the application, then click Exit to return to the Extended Feature Info screen.
8 Repeat steps 6 through 7 for each application you want users to be able to access.
Entering product IDsOnce you have determined the Product IDs for the applications as indicated above, enter the product IDs using the device’s PCC Configuration screen:
1 To access the PCC Configuration screen, do the following:
a Enter one of the following key sequences: Clear/Stop, Start, 0 1 2 3 1 2 3 0 or Clear/Stop, Start, 0 1 2 3 1 2 3 #. On small screen devices, press Clear rather than Clear/Stop to begin the process.
NOTE: The device may display an error message indicating an invalid user. This message can be dismissed and ignored.
b Enter your administrator Password.
NOTE: The default password is equitrac. After communication with the Equitrac server is established, the password is set to 2468, unless you change the Administrator PIN.

Equitrac Print & Copy Control Setup Guide 63
Installation and Configuration
2 Select the Security tab:
3 Select the External Product IDs to Enable field.
4 Enter in the Product ID numbers you determined above. These numbers must be separated by a space, comma, semicolon or period. For example, you could enter 33952001,336920832 and so forth.
5 Click Save & Exit.
NOTE: These Changes take effect immediately, and do not require a restart of the device.
Access to third party applicationsIf you have set up restricted access to third-party applications through PCC as described in Enabling External Product IDs on page 60 and have also used the Enhanced External Charge Unit Management to control custom access as described in Configuring Custom Access Control on page 54, there is a hierarchy to keep in mind when considering how these two software solutions grant users access to third party system functions.
The following table outlines the conditions under which access is granted to third party applications:
Application locked in EECM
Application ID Listed PCC Mode Notes
NO NO PCC We recommend this configuration when using PCC mode. In this setup, a designated third-party application is available provided the user has authenticated.
NO NO CUSTOM We recommend this configuration for open systems. In this setup, third-party applications are available to all users regardless of whether they have authenticated.
YES YES CUSTOM We recommend this configuration for secured systems. In this setup, a third-party application is always available to users that have authenticated. This configuration is recommended when access to third-party applications is disabled for non-authenticated users, but allowed to authenticated users after login.

Installation and Configuration
64 Equitrac Print & Copy Control Setup Guide
YES YES PCC We do not recommend this configuration. In this setup, a third-party application is accessible if a user has authenticated. However, this configuration has the same effect as setting NO/NO in PCC mode, but requires more configuration by the system administrator. Use NO/NO/PCC instead.
NO YES ANY We do not recommend this configuration. In this setup, PCC attempts to allow access to third-party applications that are already accessible.
YES NO ANY We do not recommend this configuration. In this setup, third-party applications are permanently inaccessible.
Note: This configuration can be used where a third-party application must be installed on the device, but users are forbidden from accessing the application until some future time.
Application locked in EECM
Application ID Listed PCC Mode Notes

Equitrac Print & Copy Control Setup Guide 65
Installation and Configuration
Enabling the Guest userThe Guest user in PCC offers mobile users who are not associated with your enterprise access to configured features of PCC without providing login credentials. Guest workflows can be configured in the same way regular workflows are, allowing for many configurable options. Using a Release key is one possible way the Guest user feature is used; it can also be used to provide access to any workflow configured in the Guest user workflow container configured on the server, such as Guest access to Native functions. The system considers the Guest user as a regular user, so Function Access Control rules can be configured on the server for the Guest user in order to control the exact permissions granted to Guest users. The server tracks usage in Reports based on the Guest user’s identity.
For example, a workflow can be configured to place a "Guest" button on the device login screen which invokes a Follow-You feature. The user can then release documents with a provided key. Depending upon configuration, such a workflow may behave in the following manner:
Guest user setupBefore setting up a Guest user option, you must configure how you want the function to behave in Equitrac Office/Express. The workflow that you assign to the Guest User function is configured in the same way as any workflow. Bear in mind what you want the button to do, and create a workflow to match that functionality. For instructions on creating workflows, see the Equitrac Office/Express Administration Guide.
NOTE: Guest user functionality is only compatible on devices running PCC 4.2.3 or later, running on servers running Equitrac Office/Express 5.4 or later.

Installation and Configuration
66 Equitrac Print & Copy Control Setup Guide
1 In System Manager, navigate to Configuration > Devices > Embedded devices. The Embedded devices dialog opens:
2 Ensure the Enable guest user check box is selected. This enables all PCC-equipped devices to allow Guest User functionality by default. You can then designate which devices allow Guest User functionality per device, if necessary. See step 4 on page 67 for instructions about designating Guest User-enabled devices.
3 Configure the Guest button. You must configure which text appears on the Guest button, as well as the workflow associated with the button. You must also configure which user account is used for guest transactions:
a In System Manager, navigate to Configuration > Security and authentication > Guest user. The Guest user dialog opens:
b In the Button title field, enter the test you want to appear on the button to guide users. Typically, "Guest" is used, but any short, informative word is allowed.
c In the Workflow container field, enter the workflow the Guest user button invokes when pressed. For information about configuring workflows, see the Equitrac Office/Express Administration Guide.
NOTE: You can configure the Guest workflow container to your requirements. The workflow can contain only Guest ‘alias’ workflows or standard workflows as well. The container must, however, use Global scope.

Equitrac Print & Copy Control Setup Guide 67
Installation and Configuration
d Click Verify to ensure the Workflow container provided is valid. A dialog box displays indicating a pass or fail.
e In the Guest user account field, enter the user the Guest user button uses when processing guest user transactions. For information about configuring Users, see the Equitrac Office/Express Administration Guide.
f Click Verify to ensure the Guest user account provided is valid. A dialog box displays indicating a pass or fail.
g Click OK.
4 If you want a PCC-equipped device to allow or disallow Guest User functionality regardless of the default setting:
a In System Manger, navigate to Devices. In the right pane, double click the embedded device you want to configure. The device’s Embedded device dialog opens:
b Select the desired Guest user functionality from the Enable guest user drop-down list:
• Default uses the default settings for Guest users as configured above.
• Enabled activates Guest user functionality for this device regardless of the default setting.
• Disabled deactivates Guest user functionality for this device regardless of the default setting.
NOTE: The Enable guest user drop-down list is present for all Equitrac Office/Express 5.4 and newer Ricoh embedded device summaries regardless of the version of PCC installed. The feature, however, is only enabled for PCC version 4.2.3 and newer.

Installation and Configuration
68 Equitrac Print & Copy Control Setup Guide
Card reader setupDevices such as the MP C401 that use SDK/J version 12.x in combination with PCC 4.2.x and all Equitrac USB card-readers models, including EO/EE4.x, 5.x and EP5.x. require additional configuration. Using default settings, the card-reader is not recognized and no data is submitted to the Print and Copy Control SDK/J application. The normal procedure, setting SP5075-01 (USB keyboard) to 0, cannot be used because the specified SP setting is not listed for this device.
To configure card readers for these devices:
1 Determine the Vendor-ID and Product-ID of the card reader using the following table:
2 Log in to the MFP with any registered user credentials.
3 Press the User Tools/Counter button on the MFP. The User Tools/Counter/Inquiry screen displays.
4 Touch System Settings and select the Administrator Tools tab.
Card Reader Vendor ID Product ID
Baltech Generic card reader 13AD 041F
Baltech Mifare card reader 13AD 9CA5
Baltech Legic card reader 13AD 9CA6
Baltech HID card reader 13AD 9CA7
Baltech Magstripe card reader 13AD 9CA8
Baltech Contact Based card reader 13AD 9CA9
Magtek card reader 0801 0002
Symbol Barcode Reader 05E0 1400
Metrologic bar code reader 0C2E 0007
Baltech Hitag card reader 13AD 9CAA
AXA card reader 0403 6001
RFIdeas Indala card reader 0C27 3BFA
Motorola DS9208 2D Barcode Reader 05E0 1200
NFC Reader/WriterICT-3161 04CC 2533
HID Omnikey 5427 076B 5428
Keysonic Nano Keyboard (US) 0DC6 3401

Equitrac Print & Copy Control Setup Guide 69
Installation and Configuration
5 Touch the Next button to proceed to the second screen, then select Enhanced External Charge Unit Management.
6 In the Other Functions section on the Enhanced External Charge Unit Management screen, select Document Server, and touch OK.
7 On the MFP front pane, enter one of the following key sequences: Clear/Stop, Start, 0 1 2 3 1 2 3 0 or Clear/Stop, Start, 0,1 2 3 1 2 3 #. On small screen devices, press Clear rather than Clear/Stop to begin the process.
NOTE: The device may display an error message indicating an invalid user. This message can be dismissed and ignored.
8 Enter your Administrator Password.
9 Select System Settings, then the General Features tab, and navigate to the second page of features:
10 Select Program/Change USB Device List.
11 The Program/Change USB Device List dialog box opens. In the Vendor ID and Product ID fields, enter the values you determined in step 1 above.

Installation and Configuration
70 Equitrac Print & Copy Control Setup Guide
12 If you are using multiple card readers, follow this process for all card readers, with each assigned to its own device in ascending order.
13 Select OK to complete the process.
NOTE: The Vendor ID and Product ID are not shown in any SMC or configuration page.
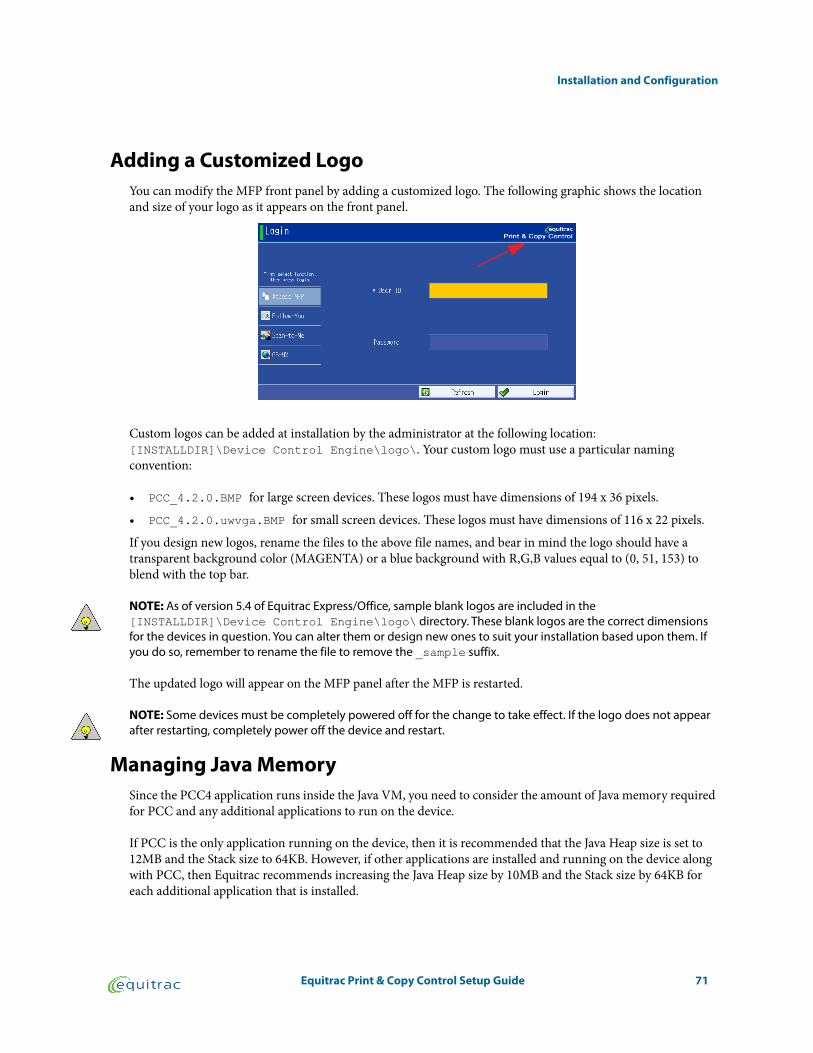
Equitrac Print & Copy Control Setup Guide 71
Installation and Configuration
Adding a Customized LogoYou can modify the MFP front panel by adding a customized logo. The following graphic shows the location and size of your logo as it appears on the front panel.
Custom logos can be added at installation by the administrator at the following location: [INSTALLDIR]\Device Control Engine\logo\. Your custom logo must use a particular naming convention:
• PCC_4.2.0.BMP for large screen devices. These logos must have dimensions of 194 x 36 pixels.
• PCC_4.2.0.uwvga.BMP for small screen devices. These logos must have dimensions of 116 x 22 pixels.
If you design new logos, rename the files to the above file names, and bear in mind the logo should have a transparent background color (MAGENTA) or a blue background with R,G,B values equal to (0, 51, 153) to blend with the top bar.
NOTE: As of version 5.4 of Equitrac Express/Office, sample blank logos are included in the [INSTALLDIR]\Device Control Engine\logo\ directory. These blank logos are the correct dimensions for the devices in question. You can alter them or design new ones to suit your installation based upon them. If you do so, remember to rename the file to remove the _sample suffix.
The updated logo will appear on the MFP panel after the MFP is restarted.
NOTE: Some devices must be completely powered off for the change to take effect. If the logo does not appear after restarting, completely power off the device and restart.
Managing Java MemorySince the PCC4 application runs inside the Java VM, you need to consider the amount of Java memory required for PCC and any additional applications to run on the device.
If PCC is the only application running on the device, then it is recommended that the Java Heap size is set to 12MB and the Stack size to 64KB. However, if other applications are installed and running on the device along with PCC, then Equitrac recommends increasing the Java Heap size by 10MB and the Stack size by 64KB for each additional application that is installed.

Installation and Configuration
72 Equitrac Print & Copy Control Setup Guide

Equitrac Print & Copy Control Setup Guide 73
4.2.3
Server-Side Configuration
After you complete the install and configuration of PCC on the MFP, you need to register and configure PCC on the Equitrac Office/Express Core Accounting Server (CAS). The server-side settings determine how PCC operates on the MFP.
TopicsLicensing PCC
Configuring Equitrac Printer Ports
Configuring PCC Embedded Devices
Configuring Workflows
Configuring Administrator PIN Codes
Configuring Card Self-Registration
Enabling Secure Printing
Configuring Follow-You Printing
Enforcing Color Quotas
Enabling the Billing Code Prompt
Offline Operation Through DCE Caching
Configuring Account and Session Display
Configuring Available MFP Functions
3

Server-Side Configuration
74 Equitrac Print & Copy Control Setup Guide
Licensing PCCEach PCC installation requires a PCC license applied in Equitrac’s System Manager. You must obtain one license per device, or purchase a license pack that contains enough licenses for all of the devices you want to enable for use. You can buy single licenses or license packs as needed.
If you intend to scan to external destinations, a separate Capture and Send license is also required.
Once you obtain the licenses, you need to activate them in Equitrac’s System Manager. By default, System Manager resides on the machine that hosts the accounting server. However, System Manager may be installed on any machine on the network that has a connection to the CAS.
1 Open System Manager by selecting Start > All Programs > Equitrac Office/Express > System Manager.
2 In the Select Accounting server dialog, choose the CAS with which Equitrac System Manager is associated, then click Connect. If the server is not listed, enter the host name or IP address in the server field.
3 When System Manager opens, click Licensing in the left menu pane.
4 Under Current tasks, click Add license, or click <Add...> in the right pane.
5 When the Equitrac activation window opens, click Next to begin the activation process.
6 Enter the serial number for each components you want to activate. These serial numbers were supplied with your software. After you enter each complete serial number, click Add to add it to the list, then enter additional serial numbers as required.
7 When all numbers are entered, click Next.
8 Select Automatic online activation or Manual activation, and click Next.
NOTE: If you do not have a connection to both the Internet and CAS, choose Manual activation.
9 For Manual activation, do the following:

Equitrac Print & Copy Control Setup Guide 75
Server-Side Configuration
a Contact Equitrac at http://www.equitrac.com or by telephone to obtain the corresponding activation codes.
b After receiving the required activation codes, click Finish to continue.
c On the Add licensing Information dialog box, enter the Activation code, and click Add.
The activated software license appears in System Manager.
10 For Automatic online activation, do the following:
a In the Embedded device licensing screen, select Ricoh from the Manufacturer list, then click Next.
b Follow the Activation wizard prompts to provide contact information. If you have already registered one or more Equitrac components, the Activation wizard fills the form with previously-collected data.
c The Activation wizard displays a Collecting information... message while retrieving system data. If you want to omit technical details about your system, click the Show technical details button and select the information you do not want to transmit. You must transmit the following:
• Accounting server serial number
• Domain-qualified print server name
• Organization name as registered in Windows
• Fully-qualified server DNS name
d When the Activation wizard is ready to transmit the information, review the collected data. Choose whether to send optional data with your activation request.
NOTE: The Activation wizard transmits the data using an HTTP connection to the Equitrac activation server. If the connection fails, the Activation wizard prompts for verification that you have configured the default gateway correctly, and that the Internet is accessible from this machine. You can retry or cancel the activation request at this point. If you cancel, the Activation wizard prompts you to use manual activation instead.
e Once the Activation wizard sends the activation data and Equitrac returns the activation code, the Wizard automatically records the license activation in System Manager, and displays a summary of the activation results:
• Activation code
• Description
• Serial number
• Status (Success; Invalid- the serial number is invalid, or Denied- the serial number was valid but not accepted)
If the License is Invalid
If the status is Invalid, ensure that you entered all serial numbers and activation codes precisely. Each component requires a separate license—unless you purchased a suite license. If the problem persists, contact the Equitrac Customer Support Center to resolve this problem.

Server-Side Configuration
76 Equitrac Print & Copy Control Setup Guide
If the Serial Number is Denied
If the status is Denied, the serial number may already be registered to a different system ID. Contact the Equitrac Customer Support Center to resolve this problem. Switch to the Assignment View in System Manager, to see the number of licenses purchased and the number of licenses used.

Equitrac Print & Copy Control Setup Guide 77
Server-Side Configuration
Configuring Equitrac Printer PortsControlled Ricoh MFPs must use an Equitrac Port (rather than standard ports) to enable secure printing. If you are configuring a secure print environment, ensure that your devices comply with this requirement.
You can create Equitrac printer ports for new devices directly, or you can create standard TCP/IP ports first, and then convert them to Equitrac ports. Converting from TCP/IP to Equitrac ports allows them to be quickly converted back to TCP/IP ports to determine if errors within the print environment are due to the Equitrac server or the physical device itself.
NOTE: The following procedure outlines how to add a printer in a Windows environment. Equitrac Office/Express also supports NetWare and Unix print servers. For printer setup details, refer to the NetWare Print Server Guide or Unix Print Server Guide.
Add a Printer on a TCP/IP Printer PortIf you have existing devices already set up using TCP/IP ports, skip to Convert a TCP/IP Port to Equitrac Port with Wizard on page 78.
1 Using the standard Windows interface, open the Add Printer wizard.
2 Follow the prompts to add a local printer and create a new port.
3 When prompted, select Standard TCP/IP Port as the type of port you want to create and click Next.
The Add Equitrac Printer Port wizard displays and you are prompted to ensure that the printer device is turned on, connected to the network, and properly configured.
4 Specify a Printer name or IP Address, and click Next.
The wizard supplies a Port name based on the printer name or IP address. You can change this name manually, if desired, but make sure to use the correct name.
5 Click Finish to complete the Standard TCP/IP Port Wizard.
6 Specify the Manufacture and printer model, and click Next.
NOTE: If the device is part of a group of devices available to print from a designated queue (pull group), it must use a driver compatible with all other device drivers in the pull group.
NOTE: If the DRE is a 64 bit server you must remember to also load the 32 bit driver to the server.
7 Specify the physical Printer name. This is the name of the device that is displayed in Equitrac Office/Express System Manager.
8 Complete the remaining steps in the Wizard, and select Yes when prompted to print a test page.
9 Review the details for this new port and device registration, and click Finish to close the Add Printer wizard, or Back to change any of the settings.
10 Confirm that the test page printed successfully.

Server-Side Configuration
78 Equitrac Print & Copy Control Setup Guide
Convert a TCP/IP Port to Equitrac Port with WizardUse the Equitrac Printer Conversion Wizard to convert from a TCP/IP port. Converting from TCP/IP to Equitrac ports allows them to be quickly converted back to TCP/IP ports to determine if errors within the print environment are due to the Equitrac server or the normal print environment.
1 Select Start > All Programs > Equitrac Office/Express > Printer Conversion Wizard.
NOTE: For servers running Windows 2008 R2, you must instead sign in to the server as an administrator and run the Wizard from Windows Explorer.
2 Click Next on the Welcome screen to continue with the conversion.
3 Set the Print server location to Local machine if the printers are on the same server where you are running EQPrinterConversionWizard, or use Remote server if the printers on are a different server—such as a cluster environment.
4 Select Convert printers to use Equitrac Port.
5 Optional – Uncheck Auto-discover model if the printers are off-line or have SNMP disabled. If selected, the wizard sends an SNMP request to each device, and then times-out on each failed connection attempt, greatly increasing the time to run the conversion.
6 Click Next.
7 Select the desired print server(s) from the list, and click Next. Optionally, enter the name of other print servers in the Add field, and click the Add button to place them in the PrintServer list. Print servers can only be added one at a time.
8 Select the printer(s) to be converted, and click Next. If a printer exists on more than one print server, it displays multiple times in the Printer list along with the name of its associated server in the PrintServer list.
9 Set the Printer Name and Port Name as they will display in the System Manager Devices view. You can use the default naming templates for the printer "<port>_<printer>" and port "EQ_<ip>", or change the names as desired. For example, you can change the printer default from "<port>_<printer>" to "2nd floor <printer>" to associate the selected printer(s) with the 2nd floor in your environment, or remove "<printer>" from the name to only display the printer’s port in System Manager (where <port> is typed, the printers port will be automatically replaced; where <printer> is typed, the queue name will be automatically replaced).
NOTE: The printer and port names can be changed individually or as a group. If multiple printers are selected, the naming convention affects the entire selection.
10 On the Properties page, select the properties you want to assign to the printers from the Rule Set, SDR and Pull Group drop-down lists. The properties can be applied to single or grouped printers.
11 On the Price Lists page, select the price list. you want to assign from the Print, Copy, Fax receive, Fax send and Scan drop-down lists. The price lists can be applied to single or grouped printers.
12 When the conversion process is complete, click Finish.
13 In the Printers and Faxes window, print a test page for EACH converted printer.

Equitrac Print & Copy Control Setup Guide 79
Server-Side Configuration
14 Confirm that the test page printed successfully.
15 Verify that the physical device and its corresponding printer port and print queue appear in System Manager > Devices.
16 Produce a Detailed activity by device report and verify that the test page appears in the report. See the Creating & Running Reports chapter in the Equitrac Office or Equitrac Express Administration Guide.
Add a Printer on an Equitrac Printer PortAlternately, you can create Equitrac printer ports for new devices directly, instead of creating and converting standard TCP/IP ports.
1 Using the standard Windows interface, open the Add Printer wizard.
2 Follow the prompts to add a local printer and create a new port.
3 When prompted, select Equitrac Port as the type of port you want to create and click Next.
The Add Equitrac Printer Port wizard displays and you are prompted to ensure that the printer device is turned on, connected to the network, and properly configured.
4 Click Next and select Physical printer as your Device Type from the drop-down list.

Server-Side Configuration
80 Equitrac Print & Copy Control Setup Guide
5 Specify a Printer name or IP Address.
The wizard supplies a Port name based on the printer name or IP address. If another naming convention is preferred, rename the port accordingly.
6 Click Next to continue with the port configuration options.
The Port Configuration screen displays. The Detected device information displays automatically if the wizard is able to collect this data from the printer.
7 Select the Use custom settings option:
• If you select Raw port communication, identify the TCP Port number, and specify if the port monitor should hold the connection open.
• If you select LPR, specify the name of the print Queue on the physical device (e.g. PORT1).• If you select Specific device, select the appropriate Manufacturer and Model from the drop lists. The
device uses the relevant default communications parameters based on these selections.8 Click Next and specify the Physical device name. This is the name of the device that is displayed within
Equitrac Office/Express System Manager.
9 Review the details for this new port and device registration, and click Finish to close the Add Equitrac Printer Port wizard, or Back to change any of the settings.
10 Specify the Manufacture and printer model, and click Next.
NOTE: If the device is part of a group of devices available to print from a designated queue (pull group), it must use a driver compatible with all other device drivers in the pull group.
NOTE: If the DRE is a 64 bit server you must remember to also load the 32 bit driver to the server.
11 Complete the remaining steps in the Wizard, and select Yes when prompted to print a test page.
12 Confirm the Windows printer details and click Finish to exit the wizard, or Back to change settings as necessary.
13 Confirm that the test page printed successfully.
14 Verify that the physical device and its corresponding printer port and print queue appear in System Manager > Devices.
15 Produce a Detailed activity by device report and verify that the test page appears in the report. See the Creating & Running Reports chapter in the Equitrac Office or Equitrac Express Administration Guide.

Equitrac Print & Copy Control Setup Guide 81
Server-Side Configuration
Configuring PCC Embedded DevicesEach embedded device entry in System Manager must be associated with a physical device (MFP). Once PCC is installed, your device communicates with the Device Control Engine (DCE) specified during the installation, an embedded device entry is automatically created in the Equitrac Office/Express system, only if you applied the PCC license before installing PCC on the MFP.
There are two methods of registering Ricoh PCC4 MFPs as devices in System Manager:
• Through automatic creation (the default method)
• By manual registration and configuration
Automatically Creating Embedded DevicesEquitrac Office/Express automatically creates PCC devices if you have applied the PCC licenses first, and have already configured the device with the location of the DCE.
When you connect an MFP that hosts PCC to the network and turn it on, the application automatically looks for the DCE. The DCE can provide a license confirmation to the device, as well as pass the device information to System Manager. After a successful connection and licensing approval, the embedded application appears in the System Manager > Devices listing.
NOTE: You can rename the auto-created entries as needed using terms and descriptions appropriate for your organization by right-clicking on an entry and selecting Edit from the menu.
Manually Configuring Embedded DevicesUse the System Manager > Devices link to manually add an embedded device that is associated with a single physical device. This configuration also includes enabling secure document release (SDR) and release behaviors, as well as copy, scan and fax access, on a per-MFP basis.
Before installing and registering each MFP as an Equitrac Office/Express device, ensure that you have activated the appropriate PCC license for the device on the Equitrac Core Accounting Server (CAS).
The following procedure assumes you have already registered the physical device hosting PCC within System Manager. For details on performing this procedure, see the Equitrac Office or Equitrac Express Administration Guide.
To register each device with CAS, perform the following procedure on an Equitrac Office/Express administrative workstation:
1 Open System Manager and select the Devices link. The right pane displays the devices registered in System Manager.

Server-Side Configuration
82 Equitrac Print & Copy Control Setup Guide
2 Right-click on the device and select Add embedded device to open the Embedded device dialog.
3 Enter a Name and Description for the embedded device.
4 Specify the Server hosting the DCE associated with this physical and embedded device.
5 Select Ricoh PCC4 from the Type drop-down list.
6 Enter the Serial number for the device. This must match the serial number as shown on the MFP itself.
7 Leave the HID decoding setting at Default. For information about this setting, see the Equitrac Office/Express Administration Guide.
8 Click Pricing to configure pricing at the embedded device level. You can create a price list then assign it as the default price list for all of the device functions, or set a price list for each separate function.
For details on configuring price lists, see the Equitrac Office or Equitrac Express Administration Guide.
NOTE: Unless a new price list is designated for the device, the default price list is used.
9 Click the link beside Tracked activities to override default tracking options for a particular embedded device. See Configuring Workflows on page 85.
10 If you have defined Rule sets in System Manager, select one from the drop-down list to apply to this embedded device. For more information on creating rule sets, see the Equitrac Office or Equitrac Express Administration Guide.
11 From the Offline access drop-down list, select the type of offline access users have when the device cannot connect to DCE.
• None: This option denies all normal user access to the device, although system administrators can still access the System Administration functions.

Equitrac Print & Copy Control Setup Guide 83
Server-Side Configuration
• Cached only: With this option, only users who have previously logged in can access the device using their cached login credentials and any cached billing values.
• Allow all: This option permits any user credentials for login and any billing values for access to device features.
12 Select a Prompt for billing code option from the drop-down list.
• Default: This option uses the billing code settings from System Manager > Configuration > User interaction > Session flow. See Enabling the Billing Code Prompt on page 103.
• Prompt: This option prompts the user for a billing code even if billing code prompts are not enabled globally.
• Do not prompt: This option disables the billing code prompts even if they are enabled globally.
13 To enable the secure document release (SDR) features, select the Enable secure document release check box. Specify how PCC will handle Release behavior for documents at the device:
• First is released: Release only the first document in the user’s queue
• Prompt: Prompts the user to release all or select documents for that user
• Release all at login: Releases all queued documents for the current user automatically after successful login.
NOTE: Secure printing must also be enabled on the print queue for Equitrac to hold the job. See Enabling Secure Printing on page 96.
14 From the Name drop-down list, select the scan feature you want to enable. The feature’s Product ID is listed next to the feature. Product IDs are entered using the Web Image Monitor or on the device itself. See Enabling External Product IDs on page 60 for detailed information.
15 From the Enable guest user drop-down list, select the option to use for unrestricted access to the device:
• Default uses the configured global setting.
• Disabled overrides the global setting, and denies access.
• Enabled overrides the global setting, and allows access to guest users.
NOTE: The Guest user feature is only available on PCC version 4.2.3 and higher, when paired with Equitrac Office/Express version 5.4 or higher.
16 Click OK to save the settings.
Licensing the device
To enable advanced scan features for this device, you must license it for capture and send. A Capture and Send license must be assigned to each printer that will be used for advanced scan features. Each printer requires its own license.
To assign a Capture and Send license, do the following:

Server-Side Configuration
84 Equitrac Print & Copy Control Setup Guide
1 Open System Manager, and select Licensing in the left pane.
2 Select the Assignment View tab to open the list of all assigned licenses.
3 Expand or right-click the Capture and Send license option, and select Add to open the Assign license dialog box.
4 On the Assign license dialog box, select the checkbox for the devices to assign the Capture and Send license to.
At the bottom of the dialog box is a counter displaying the number of available licenses and available devices. These numbers decrease with every license assigned.
5 Click OK after the licenses have been assigned to the desired devices.
The devices assigned for Capture and Send now display under the Capture and Send license option. To remove an assigned license from a device, right-click the device and select Remove assignment. The number of used licenses are adjusted accordingly.

Equitrac Print & Copy Control Setup Guide 85
Server-Side Configuration
Configuring Workflows A variety of scan-related, system-managed, and device-managed workflow types can be configured in System Manager. Workflows can be configured to be accessible to all users, or only available to users assigned to specific departments.
Common scan workflows can be configured for email, network and user folders, RightFax and SharePoint servers. System-managed and device-manged workflows are configurable, and can be used to create icons to be added to workflow containers allowing quick access to the specific functions at the device.
To create a workflow, do the following:
1 In System Manager, navigate to Configuration > Workflows and scanning > Workflow management.
When the Workflow management dialog box first opens, a list of preconfigured workflows is displayed. Any of these can be edited to suit the scanning needs of the organization. Additionally, custom scan-related, system-managed and device-managed workflows can be created.

Server-Side Configuration
86 Equitrac Print & Copy Control Setup Guide
2 In the Workflow management dialog box, click <Add...> (or select an existing workflow from the list) to open the Workflow definition dialog box.
3 Enter a Name for the workflow which users can select as a destination option at the MFP.
4 Click the Active checkbox to enable the workflows to be available to use.
5 From the Scope drop-down list, select either Departmental or Global. Global workflows are accessible to all users, while Departmental workflows are available to users assigned to a specific department.
NOTE: Departmental workflows must be Active in order to apply them at the department level. Inactive workflows are listed in the Department properties, but cannot be applied.
6 From the Destination drop-down list, select the workflow type.
7 Define the scan destination attributes by clicking the ellipsis button (...) beside the corresponding attribute’s default value in the Define attribute <Attribute> default value dialog box and click OK.
8 Click the Image preferences button to set the scan workflow resolution and type
9 Click the Output file size button to define the scan file size settings.
10 Click the Output formats button to select the scan output formats that will be available to users at the scanners.
11 Click OK to save the workflow.
12 Click OK again when the all the desired workflows have been configured.

Equitrac Print & Copy Control Setup Guide 87
Server-Side Configuration
NOTE: If only one workflow is configured and available in the Launcher (or equivalent) container upon user login, PCC automatically starts that workflow. If the workflow is in a secondary container, autostart does not apply.
For more information, see the Equitrac Office and Express Administration Guide.

Server-Side Configuration
88 Equitrac Print & Copy Control Setup Guide
Configuring Print TrackingWhen DRE is set to track printing, it gathers details when the user submits a print job. When a job is released, DRE forwards these details to CAS based on the job characteristics determined by the Equitrac Port monitor.
To print tracking through Equitrac ports, do the following:
1 Open System Manager and select Devices in the left panel, and select the physical device.
2 In the Settings area on the Physical device summary dialog box, ensure Track and record print transactions on this device is selected from the Tracking Behavior drop-down list.
3 Click OK to save the changes.
Tracking Jobs Originating at the DeviceTo correctly track jobs that printed from the MFP, enable print tracking through the embedded device. In this way, all jobs originating at the device from SD cards or USB drives are tracked as copies.
1 Select the embedded device from the Devices list.

Equitrac Print & Copy Control Setup Guide 89
Server-Side Configuration
2 Click on the link beside Tracked activities to open the Embedded device configuration dialog box.
3 Ensure that Print is selected, then click OK.
4 Click OK again to close the Embedded devices dialog box.
Print Tracking for Document Server Prints at the DeviceWhen tracking print jobs through the MFP, you must configure PCC to control the Document Server feature, and set the Job type at the driver to "Document Server" instead of "Normal". Once configured, the user authenticates at PCC and releases their print jobs from the Document Server at the MFP. The embedded device tracks printing and captures appropriate accounting information.
Set the Printer Properties
1 Open the Devices and Printers window.
2 Right-click the Ricoh printer and select Printing preferences from the menu.
3 Click the Job/Log tab and select Send to Document Server from the Job type drop-down list in the Store and Print section.
4 Click Apply and OK to save the changes.
Configure Document Server at the MFP
1 Log in to the MFP with any registered user credentials.
2 Press the User Tools/Counter button on the MFP. The User Tools/Counter/Inquiry screen displays.
3 Touch System Settings and select the Administrator Tools tab.
4 Touch the Next button to proceed to the second screen, then select Enhanced External Charge Unit Management.
5 In the Other Functions section on the Enhanced External Charge Unit Management screen, select Document Server, and touch OK.
6 On the MFP front pane, enter one of the following key sequences: Clear/Stop, Start, 0 1 2 3 1 2 3 0 or Clear/Stop, Start, 0,1 2 3 1 2 3 #. On small screen devices, press Clear rather than Clear/Stop to begin the process.
NOTE: The device may display an error message indicating an invalid user. This message can be dismissed and ignored.

Server-Side Configuration
90 Equitrac Print & Copy Control Setup Guide
7 Enter your Administrator Password.
8 Select the Security tab and enable the Native Document Server Application.
9 Touch Save & Exit.
See Configuring Custom Access Control on page 54 and Configuring PCC Embedded Devices on page 81 for more detailed configuration options.

Equitrac Print & Copy Control Setup Guide 91
Server-Side Configuration
Configuring Administrator PIN CodesThe Administrator PIN feature allows you to set a common PIN code to enable administrator access to both PCC configuration options on the MFP and the Remote Admin application.
To set the Administrator PIN code, follow these instructions.
1 Open System Manager and navigate to Configuration > Devices > Embedded devices.
2 Select Ricoh PCC4 from the Device type drop-down list. The dialog updates with options specifically available for PCC version 4.
3 In the Color cost multiplier for session limit enforcement field, enter an integer value which multiplies the black & white copy price for color copies. For example, if a standard black and white copy is 5 cents, and the multiplier value is 4, the color copy is 20 cents. The black & white price is set at the embedded device level.
For details on configuring price lists, see the Equitrac Office or Equitrac Express Administration Guide.
4 In the Administrator PIN field, enter the PIN.
5 Do not modify the Default Function drop-down value. This value is only applicable to earlier versions of PCC.
6 In the End session after field, enter a numeric value in seconds to indicate the system timeout length. For detailed information about system timeout behaviors, see Configuring System Timeout Behavior on page 93.
7 Select Purge print buffer upon user logoff to stop a print job and purge it from the printer’s memory once the user logs off. Note that enabling this slows the logout process. For this reason, we do not recommend enabling this feature.
NOTE: Guest access tracks transactions to the user configured in System Manager. This option is only available for PCC 4.2.3 and higher, when paired with Equitrac Office/Express version 5.4 or higher.

Server-Side Configuration
92 Equitrac Print & Copy Control Setup Guide
8 Click OK to save the changes.

Equitrac Print & Copy Control Setup Guide 93
Server-Side Configuration
Configuring System Timeout BehaviorPCC has various timeout behaviors which work separate from native Ricoh timeouts, and control the access to PCC when a device is left idle for long periods of time. Some timeout durations are user configurable. The following table explains the timeouts and their functions:
WARNING: Administrators of Ricoh MFPs have the ability to set device-specific Auto-Off and energy saver timeouts. These timeouts should not be set at less than 300 seconds (5 minutes). If timeouts for PCC activity have not been reached when the timeouts for the device engage, the device must be restarted to re-enable PCC. To avoid this issue, always ensure the device timeouts exceed any PCC-specific timeouts by a wide margin.
Timeout Set In Behavior
Session Activity System Manager > Configuration > Devices > Embedded Devices
Note: The default value is 60 seconds, and must be set to at least 30 seconds if overridden.
This timeout applies to all PCC functions, such as login, Scan-To-Me and Follow-You Printing. When this timeout expires, the user is immediately logged out.
Note: If any timer is set to a value lower than the session activity timer, the time for session activity is used instead of the set value.
Soft Keyboard PCC local configuration > Security tab. Or From the Remote Administration display.
Note: The default value is 180 seconds. If the value is reset to a lower value than the Session Activity value, the Session Activity value is used instead.
This timeout applies to the soft keyboard used in PCC. When this timeout expires, the user is logged out when the soft keyboard is dismissed.
Note: The MFP screen does not refresh when the timer expires, and the keyboard functions normally. When the keyboard is closed after a timeout occurs, the user is returned to the login screen. There is no warning prompt.
External Application
PCC local configuration > Security tab. Or From the Remote Administration display.
Note: The default value is 300 seconds. If the value is reset to a lower value than the Session Activity value, the Session Activity value is used instead. If it is set to -1 (disable), the Session Activity value is used.
This timeout applies when the PCC application is put on hold to run native MFP functions, such as copying. This should be set to longest allowable session time. This applies to scan and fax. Copy is not effected.
If the timeout occurs, the user will either be immediately returned to the PCC login screen, or a default lock screen will display, and upon dismissal, the user will be returned to the PCC login screen.
Session Summary
Hard-coded to 60 seconds. Cannot be modified.
If a user fails to log out when finished using the device, logout occurs after this time.

Server-Side Configuration
94 Equitrac Print & Copy Control Setup Guide
Configuring Card Self-RegistrationIf you want users to self-register their swipe cards, you must enable this option in System Manager. When a user swipes an unregistered card, they are required to login to the MFP with valid primary and secondary user credentials. The information the user must enter depends upon the authentication mechanisms set in System Manager.
1 Open System Manager and navigate to Configuration > Security and authentication > User authentication.
2 Select Card swipe only or Card swipe or keypad entry from the Input type drop-down list.
3 Select Always or Only with keyboard login from the Secondary prompt drop-down list. The If PIN2 available and If PIN2 available or keyboard login options are not supported in PCC.
NOTE: If a user has a secondary PIN or external password associated with their user account, they must enter their secondary user credentials on the MFP front panel when prompted. If the user does not have a secondary PIN or password associated with their user account, they can leave the field blank to proceed.
4 Select the Auto-register primary PINs checkbox. Optionally, you can select Register as alternate PIN to record the PIN as the alternate PIN instead of the primary PIN. The Auto-register primary PINs option must be selected for card registration.
5 Select one or more Authentication mechanisms:

Equitrac Print & Copy Control Setup Guide 95
Server-Side Configuration
• Equitrac Office/Express PINs – Leave selected.
• External user ID and password – Select to verify all user information such as Windows or LDAP information.
• Equitrac PIN with external password – Enable if users swipe their cards for identification, and must also enter their domain user account password. Equitrac Express cross-checks the database for the corresponding Equitrac account name, then verify the credentials against the selected external authority for network logon.
6 Click OK to save the changes.
The next time the user swipes the card, their account information is automatically associated with the card, and they can login without manually entering their user credentials.

Server-Side Configuration
96 Equitrac Print & Copy Control Setup Guide
Enabling Secure PrintingSecure printing holds documents in a secure print queue until the user releases the document from PCC.
Secure Printing on the Physical Device1 Open System Manager and select Devices from the left pane.
2 Click on the print queue you want to configure. You may have to expand the Physical device and Port to see the print queue.
3 In the Print queue summary dialog, set the Secure Printing option to Enabled from the Behavior section, and click OK to save the changes.
Secure Printing on the Embedded Device1 Open System Manager and select Devices from the left pane.
2 Click on the embedded device you want to configure.

Equitrac Print & Copy Control Setup Guide 97
Server-Side Configuration
3 Check the option Enable secure document release, then click OK to save the changes.

Server-Side Configuration
98 Equitrac Print & Copy Control Setup Guide
Configuring Follow-You PrintingFollow-You Printing extends the basic functionality of secure printing by allowing a user to release a print job to other compatible devices in the organization. Even if you deployed multiple DRE print servers—each of which manages a separate set of devices—you can configure Equitrac Office/Express to allow printing across multiple print servers.
For example, a user can submit a print job from their computer, and while on the way to a meeting in a different section of the office, they can walk up to any MFP (with the embedded application installed on it) and pull the job to a compatible printer nearest them.
If you want to deploy PCC in a single-server or a multi-server Follow-You Printing environment, do the following:
1 Enable secure printing on each MFP.
Secure printing sets up a virtual print queue that holds jobs until they are released at the embedded device by a valid user.
2 Create and manage pull groups.
To allow users to release print jobs through PCC, you must create Pull groups, then add each physical device hosting the embedded application to a pull group.
3 Configure the Follow-You print settings.
Determine the site where you want Follow-You Printing to be accessible from, and choose whether the print job is priced based on its properties before or after it is released.
4 Enable multi-server Follow-You to allow users to direct jobs across multiple servers. (optional)
This option enables users to retrieve Follow-You print jobs on a device connected to a different CAS and DCE/DRE server.
NOTE: See the Advanced Printing Configuration chapter in the Equitrac Office or Equitrac Express Administration Guide for details on configuring secure printing, Follow-You Printing, and device pull groups.
VPSX Print integrationEquitrac Embedded for Ricoh PCC supports integration with LRS VPSX print output management using VPSX PersonalQs through Equitrac’s embedded devices. Once set up, this process is invisible to the user; documents using VPSX are pulled from the Follow-You Printing dialog. For detailed instructions on how to set up VPSX print output management, see the Equitrac Office/Express Administration Guide.

Equitrac Print & Copy Control Setup Guide 99
Server-Side Configuration
Configuring Capture and SendThe Capture and Send feature enables PCC to use the SPE to scan documents to a particular URL on the web via SharePoint, a telephone fax number via RightFax, network folders on your local area network, and email through your server. You require a Capture and Send license per device to enable the functions. In the case of SharePoint and RightFax, there must be as many SharePoint or RightFax destinations as there are SharePoint or RightFax servers (one destination per server). For example, if each department has a SharePoint server, each one must be added as a valid Scan Destination. In the case of network folders and email addresses, you can set up scan aliases. For information on scan aliases, see the Equitrac Office/Express Administration Guide.
NOTE: To use Capture and Send functionality, you must install the Scan Processing Engine (SPE) component of Equitrac Office or Equitrac Express. See the Equitrac Office/Express Administration Guide for information about SPE.
To configure their use:
1 Open System Manager and select Configuration > Scanning > Scan destinations. The Scan destinations dialog opens.
2 Click <Add...> to add an application.
3 Once added, configure the scan destination by clicking it. Fill out the fields in the Scan destination definition dialog if they are not already filled. For detailed instructions on configuring scan destinations see the Equitrac Office/Express Administration Guide.

Server-Side Configuration
100 Equitrac Print & Copy Control Setup Guide
Scan-to-MeScan-to-Me allows users to scan documents and email the results to a pre-set email address. The email address used is pulled from the user’s account information in Equitrac’s Account Manager. Note that users with no email addresses enabled do not see a Scan-to-Me option. If you want to allow users with a valid email address to use the Scan-to-Me feature in PCC, ensure that it is enabled in System Manager.
The Scan Processing Engine (SPE) component of Equitrac Office/Express is required for PCC version 4.2.0 and higher.
1 Open System Manager, and navigate to Configuration > Scanning > Scan-to-Me.
2 In the Scan-to-Me dialog, select the Enable check box. Selecting this option places the Scan-to-Me button on the PCC login screen, and allows users to access the feature.
3 Under Settings, enable the following options if necessary:
Option Description
Enable advanced settings
When enabled, adds a manual configuration menu to the system, including Scan settings, Auto density, Feed type, and Filename/type. to the PCC Scan-to-Me screen on the MFP. Users can click on the menu items to change scan settings.
Duplexing Sets the default duplex option. Choose either duplex or simplex.
Scan type Sets the default color option. Choose either Color scan or Monochrome scan.
Enable To field When enabled, the To field on the PCC Scan-to-Me screen on the MFP is editable, allowing users to enter one or more email addresses.
Exclude logged in user email address
When enabled, the user can remove their email address from the To field, and not receive the scan in their mailbox. If the To field is empty, then the user’s email address is automatically put back into the To field.

Equitrac Print & Copy Control Setup Guide 101
Server-Side Configuration
NOTE: At login, if there is no email address for this user in Equitrac’s Accounts Manager, they only see the Access Functions screen. The Scan-to-Me option is not available to users without an email account associated with their Equitrac account.
NOTE: As of version 4.2.0 of PCC, email functionality is handled exclusively through the server associated with PCC, and not at the device itself.
4 In the Default group box, set the default Subject and File name attributes for the files resulting from Scan-to-Me operations:
a Click the ellipsis (. . .) of the attribute you want to change. The Define attribute box displays.
b Alter the existing default setting for the attribute by selecting a new one from the drop-down list, or clicking on the text and replacing it.
Enable CC field When enabled, adds the Cc field to the PCC Scan-to-Me screen on the MFP, allowing users to enter one or more email addresses. The scan is sent to users in the Cc list, as well as to the user who performed the scan.
Option Description

Server-Side Configuration
102 Equitrac Print & Copy Control Setup Guide
Configure the Mail ServerTo configure the mail server:
1 Open System Manager and navigate to Configuration > Network environment > SMTP mail server.
2 Enter your network email server which is either the server’s DNS name or IP Address.
3 Enter a Mail from address for system generated messages. This address appears in the From field when a user receives a notification email message.
4 Check Basic Authentication if your SMTP mail server requires a user name and password each time a message is generated.
5 Click OK to save the changes.
NOTE: General scan through SMTP information is centralized on the server.
Enforcing Color QuotasPCC can enforce limits on the number of color copies that any user can make, based on their user account quota limits. If configured to do so, PCC can disable the MFP when a user exceeds their color copy limit. For a more detailed discussion about Color Quotas, see the Equitrac Office/Equitrac Express Administration Guide.
To enable PCC to enforce color copy quota limits, do the following:
1 Open System Manager and navigate to Configuration > Accounting and quotas > Color quota.
2 In the Color quota dialog, select Enable color quota.
3 Select Disable copying on color devices once quota exceeded. This disallows black and white copying, and stops color copies if users exceed their color quota limits.
4 Enter a Custom message to display to the user when they have exceeded their color quota.

Equitrac Print & Copy Control Setup Guide 103
Server-Side Configuration
5 Click OK to save any changes.
Enabling the Billing Code PromptIf billing codes are enabled on the Equitrac Server, you can determine when the billing code prompt appears to the user on the MFP. There are two options—after user identification, and at job release.
1 Open System Manager, and navigate to Configuration > User interaction > Session flow.
2 Select one or both billing code prompts.
• Prompt for billing code after user identification (at copiers) - Typically used in workflows where only copy and scan are used. The billing code screen appears right after the user logs in, and before they can access any copier function (including copy, fax, scan, and job release).
• Prompt for billing code at job release (at copiers) - Typically used in workflows resulting in printed documents. The billing code screen appears after the user logs in, and again when they release one or more print jobs on the Follow-You screen.
3 Click OK to save any changes.
You can override these server-side billing code prompts on a per device basis. Go to System Manager > Devices, and select the embedded device to open its properties dialog box. Select either Default, Prompt or Do not prompt from the Prompt for billing code drop-down list.

Server-Side Configuration
104 Equitrac Print & Copy Control Setup Guide
Offline Operation Through DCE CachingIf the MFP loses its connection to the DCE server, it enters into "offline" mode. At this point, the device can still authenticate user credentials against its own internal cache, if enabled. Users whose credentials match a previously cached set are granted device access; if the credentials do not match, the users are denied access. In offline mode, PCC 4.2.3 allows the caching of card swipe data. Caching does not function on earlier versions of PCC.
To enable Login caching for offline mode, do the following:
1 Open System Manager and navigate to Configuration > Security and authentication > User authentication. The User Authentication configuration dialog opens.
2 In the CAS offline behavior section, select the Login caching from the DCE servers drop-down list.
• Disabled: PCC follows offline behavior settings; the regular rules for cached only and allow all apply.
• Enabled: PCC attempts to authenticate users with data cached on the DCE.
DCE login caching determines whether a user login is accepted or denied when CAS is offline. If DCE caching is disabled when CAS is offline, then users cannot login. If DCE caching is enabled when CAS is offline, then DCE allows users to login only if they had previously logged in when CAS was online.
For example, if DCE caching is enabled, and User1 authenticated while CAS was online, but User2 did not, then if CAS goes offline, User1 can still login, but User2 cannot login until CAS comes online again. Once CAS is back online, then User2 can login, and continue to login even if CAS goes offline again.
NOTE: Account limits are not enforced, and Billing Codes are not validated when DCE is operating without a connection to CAS.
3 Select how DRE servers handle print jobs when CAS is offline.
• Auto select: If account limits are enforced, then the Do not print option is used. If account limits are not enforced, then the Print, charge accounts later option is used.
• Do not print: Users cannot print, and must wait until CAS is back online in order to print.
• Print, charge accounts later: Users can print, and then the print job is charged to their account when CAS is back online.

Equitrac Print & Copy Control Setup Guide 105
Server-Side Configuration
Configuring Account and Session DisplayPCC can display account information during a user session, and provide a Session summary at the end of a user session.
To select the display options you wish to have available in PCC, do the following:
1 Open System Manager, and navigate to Configuration > User interaction > Session flow.
2 In the Optional display fields section, select which fields you want displayed during a user session. The following options are available:
• Account name:
• Display throughout the session.
• Do not display
• Account balance:
• At start of session
• At end of session
• At start and end of session
• Do not display
• Session cost:
• At end of session
• Do not display
CAUTION: The session costs and user account balances displayed at end of a session are estimates based on average copy costs. The actual values stored on the server may differ from these values.
NOTE: In order for the PCC Session Summary screen to appear on the MFP, Account balance and/or Session cost must be set to display at the end of a user session.

Server-Side Configuration
106 Equitrac Print & Copy Control Setup Guide
Configuring Available MFP FunctionsThe functions that are available, how they are displayed, and to which users these functions are presented, is dependent upon various configuration options. When determining which workflows are available to the user, consider:
The java platform of the device
Only devices with SDK/J version 10.x or higher can enable native functions within PCC. Native function workflows are not supported on older devices. To use Native functions on older devices, the user must switch to native functions using the MFP hard keys. If native functions on older devices are configured to display on the Quick Shortcuts bar, they are replaced with a shortcut to the Launcher.
The licensing applied to the device
Scan workflows, except those using Scan-to-Me, require an Equitrac Capture and Send license. You must obtain a license per device to enable these options.
PCC Workflow and Workflow Container Settings for the device
For functions to appear, they must be correctly set in System Manger using Workflows and Workflow Containers. They can then be ordered and enabled as required by the administrator. The Launcher and Quick Shortcuts bar containers govern which items appear on the Launcher screen and Quick Shortcuts bar list. These containers cannot be removed. Other containers, such as the Scan container are supplied for your convenience, and can be removed or added as needed. Although containers may have workflow associations, actual workflows are only available if the related features are configured, licensed and available to the user based on global and departmental settings (see below). For detailed instructions on how to use Workflows and Workflow Containers, see the Equitrac Office/Express Administration Guide.
NOTE: PCC requires a default item for the Quick Shortcuts bar. If there is no default configured on the server, PCC selects the first item in the list as the default item.
Global or departmental settings
Within Workflows or Workflow containers, you can set functions to be accessible by any logged in user (a global setting), or by the logged in user’s specific department (a department setting, which acts as a subset of valid users to allow more granular control over which functions a user is able to access).
NOTE: Because a user’s department is unknown before they log in, any functions configured to be departmental cannot be displayed on the Quick Shortcuts bar.

Equitrac Print & Copy Control Setup Guide 107
Use Print & Copy Control
This chapter describes how to login to PCC and use the PCC screens and features on the MFP. This chapter also provides information about entering billing codes and using campus cards.
If your administrator has enabled account limit enforcement, color quotas, and/or billing codes, read the following paragraphs before you use PCC.
Account limits – Account limits ensure that you have sufficient funds in your account to pay for print jobs before the jobs are released from the queue. As you release print jobs in PCC, the software continuously checks your output against your estimated account balance. If the total cost of printing selected documents is more than your estimated available fund balance, PCC will not release the print jobs. Instead, an error message appears indicating that the balance is not enough to pay for the printing or copying. After you add funds to your account, you can login to PCC again to release your jobs. In the case of copy jobs, PCC stops the copy job at the point when the estimated account balance is exceeded, and locks access to the MFP functions. This is available only as a licensable feature in Equitrac Express.
Billing Codes – A billing code is a unique combination of characters that represent a charge-back group. You can assign your transactions to a particular code, and Equitrac Office/Express tracks the characteristics of copy or print jobs assigned to the code.
Color quota – Color quotas are used to limit the amount of color copying and printing that you can produce. As you copy or print, PCC compares your output to your color quota balance (in number of pages). Once you reach the quota, PCC disables the color function on the MFP. If you still have funds remaining in your account, you can log back in and continue to produce black & white copies or print black & white documents only. You are able to produce color output only when your color quota is reset on the server. This applies to any given original document size or duplex setting such as large documents with double-sided or single-sided originals.
TopicsLogging Into PCC
Entering Billing Codes
Selecting functions
Using Follow-You Printing
Scanning
Logging Out of PCC
Accessing GlobalScan NX
Using a USB Keyboard at the Device
4

Use Print & Copy Control
108 Equitrac Print & Copy Control Setup Guide
Logging Into PCC When logging in to PCC at a device, you must provide valid authentication credentials before you can access the device functions assigned to PCC.
The functions that are available, and to which users these functions are presented, is governed by how Workflows and their respective Workflow Containers are configured in Equitrac Office/Express.
NOTE: If PCC functions are assigned to the device’s hard keys, you can quickly access those functions (such as Follow-You Printing, Scan-to-Me, and configurable third party applications) by choosing the function here before logging in. The prompts for logging in then depend upon the function selected, and the way PCC has been set up on the server. This cannot be configured for Ricoh small screen devices.
1 Enter valid login credentials using the numeric keypad or on-screen keyboard, or by using a swipe card.
Depending on configuration, one or two login fields may appear. The following are examples of valid login credentials:
• Equitrac primary PIN only
• Equitrac primary and secondary PINs
• Windows Networking credentials – network username and password
• Swipe card at the card reader
• Swipe card and Equitrac secondary PIN
• Swipe card and Windows password
• Equitrac primary PIN and Windows password
• Campus card swiped at the card reader. (for Equitrac Express only)
• Department PIN codes
• Billing Code PIN codes
NOTE: The last prompt field on the Login screen is masked to protect your login credentials. If secondary prompts are not enabled on the server, the User ID field is masked (***). If secondary prompts are enabled, the Password field is masked instead.

Equitrac Print & Copy Control Setup Guide 109
Use Print & Copy Control
NOTE: Fields marked with an asterisk (*) must be provided.
2 Touch the Login button or press the Start key. Depending on which Workflows have been configured and are available to your department, one of the following screens appears:
• Billing code screen - if billing codes are enabled on the server, and are configured to appear immediately after authentication.
• PCC Launcher- if you selected Access MFP in order to use the copy or fax functions.
• Follow-You Printing screen - if you selected Follow-You in order to release print jobs from the virtual print queues.
• Scan-to-Me screen - if you selected Scan-to-Me in order to scan documents and email them to yourself.
• Select Account screen - if you swiped a campus card, you can then select the account you wish to draw the funds from. (Equitrac Express only)
• Third Party Application - if additional third party applications are integrated with PCC (such as GlobalScan NX), a function button for each application appears on the login screen.
—Or—
Select the function you want to access from the Quick Shortcuts bar at the left of the login screen, then touch the Login button or Start key to proceed directly to the selected function.
If you have difficulty logging in
If your credentials are not validated, an error message appears requiring you to try your login again. If you cannot login, check the server icon in the top right corner of the Login screen. If the icon shows a yellow warning triage, PCC has lost communication with the server. In this case, you can login only if the device has been configured for offline operation. Check with your Administrator for additional details.
If the system does not recognize the swipe card you used to authenticate, you are prompted to enter your authentication details if the card auto-registration feature is enabled. The next time you swipe the card, your login information is populated automatically. Otherwise, the system displays a "login failed" error.

Use Print & Copy Control
110 Equitrac Print & Copy Control Setup Guide
Entering Billing CodesIf billing codes are configured, the Billing Details screen opens immediately after the Login screen. The code entered here applies to copy, scan and fax jobs. If overrides for Follow-You printing are enabled, a billing code which overrides the first can be entered and upon job release in the Follow-You Printing screen.
NOTE: If an account is configured with only one available billing code to charge against, and billing codes are required, then that code is automatically selected and the Billing Code screen does not appear.
1 In the Billing Code field enter the billing code, if required.
If you don’t know the code, select the Search button. Enter the search criteria in the field, then select Search again. The screen updates with the first 100 codes that matched your search. Use the Up/Down arrows to browse through billing codes and select the correct code, then touch OK.
The Search option is configurable in System Manager. If not configured, the button is greyed-out and non-active. For instructions on configuring Billing Code prompts, see Manually Configuring Embedded Devices on page 81.
2 If configured, select whether the job is Billable or not.
This option determines if the transaction is billed to a user, group, or department, or if it is only entered into the system for reporting purposes.
3 Touch Next to continue.
If the Billing Code validation is enabled, the billing code is validated when you touch Next. If you searched for a code and selected it from the list, it is validated immediately, and the description is displayed beside the code field. Billing code validation is set in System Manager > Configuration > Session Flow > Validate Billing Codes.
NOTE: If the billing code you entered is invalid, try performing a search and selecting the code from a list instead.
Once the code is validated, the function you selected displays on the Login screen. If you entered the billing code screen after a job release, you then return to the Follow-You screen.

Equitrac Print & Copy Control Setup Guide 111
Use Print & Copy Control
Selecting functionsThe functions that are available, and to which users these functions are presented, is configured by the administrator at the time of setup.
You can select function in the following ways:
• You can access the native device functions, such as copy, fax and scan, from the launcher screen, if enabled.
NOTE: Shortcuts to native device functions can only be placed on the launcher screens of devices with SDK/J version 10.x or higher. For information about assigning functions, see the Equitrac Office or Equitrac Express Administration Guide.
• You can also access whichever PCC functions such as Scan-To-Me, Follow-You Printing, Release All, or other external applications are available on the PCC Launcher screen.
• By pressing the Home hard button on the device to display the Ricoh home screen, and selecting a function from there.
Consult your Ricoh device documentation for details about using native device functions.
When you finish using a PCC function, press Exit to quit the function and return to the PCC Launcher screen, or Back to return to the previous screen. You can then select another function, or you can touch Logout to end your current PCC session.
NOTE: If your Administrator configured a third party application to work with PCC, another function button appears on this screen. You can touch this function to login to the third party application while still logged into PCC.

Use Print & Copy Control
112 Equitrac Print & Copy Control Setup Guide
Using Follow-You PrintingThe Follow-You Printing screen displays all the queued documents associated with your login credentials, or release key. By default, the list displays documents in order from longest-queued to most-recently queued.
NOTE: The print queue can only display up to the first 100 print jobs per user.
Each time you release a document from the Job list, PCC checks your estimated available account balance. If account limits are enforced, and the total cost of the selected documents exceed the available account balance, an error message displays indicating that the estimated account balance would be exceeded and the items will not be printed.
NOTE: Account limits are a licensable feature available in Equitrac Express.
• Touch Print to release all selected documents (selected documents are highlighted in yellow).
• Touch Print&Save to release any selected print job and save them in the Equitrac print queue.
NOTE: By default, for Print & Save jobs using the VPSX PersonalQ, the job is saved for 24 hrs.
• Touch Delete to remove selected documents from the Job List without printing them.
• Touch Select All to select all documents. To unselect a document and not release it for printing, touch the document again to unselect it.
• Select Force B/W to force color jobs to print in black & white. When selected, the button turns yellow to indicate that Force B/W is "On", and all specified jobs will print in black & white. Touch the button again to turn Force B/W "Off ".
• Touch Refresh to update the document list.
• Touch Servers to select a different print server and pull your document from another print queue to this MFP. To use this feature, your print environment must be configured to support multi-server Follow-You™ printing. See Viewing Jobs on a Different Print Server on page 113 for details.
• Touch the Previous or Next buttons to quickly move between pages if the list of documents are on more than one page.
• Touch Exit to return to the PCC Launcher screen.
• Touch Logout to end your current PCC session.

Equitrac Print & Copy Control Setup Guide 113
Use Print & Copy Control
When you select a job to Print, Print&Save, or Delete, the document details are displayed in the Job Details section. See the PCC Print Release Quick Reference on page 177 for a description of all screen options.
Viewing Jobs on a Different Print ServerIf PCC is configured to allow multi-server Follow-You Printing, you can view print jobs that you printed on a different server.
By default, the Follow-You Printing screen displays documents held in the queue for all the servers available. If you want to filter documents from a specific server, you must select the server in question.
On the Follow-You Printing screen, select the Servers button to choose a specific print server. In the Available print servers screen, select an alternate server, then select OK. The job list updates with all of your print jobs waiting on that server.

Use Print & Copy Control
114 Equitrac Print & Copy Control Setup Guide
ScanningPCC offers the ability to perform many different scan tasks, including scanning to email and network folders, SharePoint (Teamsite) and RightFax (for receiving faxes to a personal computer). To use these options, the Capture and Send function, which enables PCC to perform these tasks, must be set up and licensed. See Manually Configuring Embedded Devices on page 81 for information about enabling these features.
TerminologyFor the purposes of this section, the terms used refer to the following:
Scan Task: An operation which delivers a scan to a particular end point. This can me a destination such as an email address or network location, or a service such as a RightFax operation.
Documents: One or more pages that will be scanned. There can be as many pages per document as required, within the limits of what the device allows.
Scan Job: A collection of Documents. You can scan multiple Documents at a time, which are then concatenated into a Scan Job.
Job Details: A collection of metadata that is applied to a Scan Job. Typically, any collection of Documents will share the same Job Details through their inclusion in a Scan Job.
WorkflowThe following is an example of a basic scanning workflow:
1 Prepare to scan: In this step, you log in, place the document to be scanned into the device, and select the scan destination.
2 Collect Job Details: In this step, you provide information about the Scan Job. Depending upon the server settings, this information may be pre-populated with the ability to override, or static, and you are not able to change the information. Note this information is applied to all Documents scanned in any given session.
3 Scanning: In this step, you scan the Document. Multiple Documents can be scanned using the same Job Details, the document scan can be canceled, and Job Details can be changed per job.
4 Scan Settings: The settings for the resulting scan can be optionally changed per job.

Equitrac Print & Copy Control Setup Guide 115
Use Print & Copy Control
5 Finish: You complete the Scan Job, and it is forwarded to your selected Scan Task.
By using various Workflow Definitions as configured through Workflow Management in System Manager, the scanning workflow can be streamlined to automate a number of steps in the basic workflow. For example, a workflow wherein the user need only place a document in the document feeder and swipe their card to complete an entire scan process is possible with the correct settings. The following are the options available to streamline workflows. Note that some options are available only to particular scan destinations:
Prepare to scanLog in to PCC at the device with your credentials. Depending upon settings, the information associated with your login can be used to pre-populate scan job data such as your email address. Place the document you want to scan into the Automatic Document Feeder (ADF) or, onto the glass of the scanner.
NOTE: You can place your document at the start of the workflow, or at any time prior to scanning.
Setting Function
Auto logout when done Upon scan completion, the logged in user is logged out.
Replay prompts on scan another document
An Administrator can select whether subsequent scans re-use user supplied job details, or re-use the default values including new Time and Date fields. This feature requires PCC 4.2.3 combined with EO/EE 5.4
Skip prompt screens with defaults Allows users to bypass all scan data entry screens. Rather than enter data, the scan job uses default entries. Job details can still be changed by selecting the “job details” button on the scan screen.
Auto start scan Allows the Scan Settings options and Job Details screens to be bypassed, allowing a scan to proceed immediately upon selecting a scan workflow.
Auto done scan Allows scanning to automatically complete after the last page has scanned. This setting can be configured on a per workflow bases and is configured with System Manager.
Display job cost The cost of the scan job is displayed.
Prompt for billing code The value for the billing code can be set to the default value, can override the default value and prompt, or can override the default value and not prompt.
Prompt for release key The value for the release key can be set to the default value, can override the default value and prompt, or can override the default value and not prompt.

Use Print & Copy Control
116 Equitrac Print & Copy Control Setup Guide
Select a Scan Task from the available options. Scan Tasks are typically set up as aliases in System Manager to simplify and automate the Scan Task. For information on scan aliases, see the Equitrac Office/Express Administration Guide. The following is an example Scan screen where you select the Scan Task. The options available depend upon your credentials, and how your implementation is configured and licensed:
NOTE: If Capture and Send is not licensed and configured, then only Scan-To-Me functions are available.
NOTE: The Scan Processing Engine (SPE) component of Equitrac Office or Equitrac Express must be installed to enable any scan functionality.
From this screen, you can:
• Select a scan destination from the available options.
• Select Back to return to the PCC Launcher.
• Select Logout to complete the session.
Collect Job DetailsJob Details are a form of metadata associated with the Scan Job in question. This information determines specific attributes used in the routing and type of scan produced. Depending upon how each Scan Task is configured on the server, some Job Details are collected automatically based upon your login information. Information that is collected automatically may be changeable. For example, your email address may be filled in automatically when sending a scan as a mail destination in the From attribute. However, if the configuration allows it, you can change this to a different address. In some cases, these attributes are configured to be static, in

Equitrac Print & Copy Control Setup Guide 117
Use Print & Copy Control
which case you cannot override them, and they may not appear altogether. For this reason, the changeable fields presented to you at the device may differ from Scan Task to Scan Task, and even from user to user, depending upon configuration. The following is an example default screen using email as a scan destination:
On all Job Details screens like this one, you can do the following:
• Select any field by tapping it. Selected fields turn yellow. If the field is editable, you can use an attached USB keyboard to input new information. If no keyboard is attached, a virtual keyboard displays where you can input new information into the field. For example, in the To field, you can provide the email address to which the resulting scan is delivered.
NOTE: If a field is static, you will not be able to change the information. These fields appear for your information only.
NOTE: If a field has an asterisk (*) next to it, the field is required, and you must provide valid information for the field if not pre-populated.
• A magnifying glass icon displays next to fields where you can search for the required information on the server. Typically, this is used to locate email addresses housed in an LDAP server database.
• Select Back to return to the previous screen.
• Select Next to continue entering information if there are additional fields, or to proceed to the scan screen.
Available fields
The fields displayed for which you must provide information depend upon:
• server settings
• scan destination
The following table outlines the scan destinations and possible associated fields:
Scan-to-Me Email Network SharePoint RightFax
From P P

Use Print & Copy Control
118 Equitrac Print & Copy Control Setup Guide
ScanningWhen scanning, PCC scans all documents and allows you to scan additional documents prior to delivering the scan(s) to the destination. Scanning can be stopped at any time during the scanning process, and the Scan Job canceled. The process requires three steps:
1 Start the scan based upon the job details that you provided in the previous step.
2 The scan process during which the document scans.
3 Finish the scan process.
Start the scan
When you have completed entering the job details, start the scanning process:
To P P
Cc P
Delivery Format P P P P P
Body P P
Network Folder P
Fax Number P
File Name P P P P P
SharePoint Folder P
Compress to Zip P P
Scan-to-Me Email Network SharePoint RightFax

Equitrac Print & Copy Control Setup Guide 119
Use Print & Copy Control
1 Confirm the job details you provided are correct. A summary screen similar to this displays with the information you entered:
2 If you want to modify the default scan settings, select Scan Settings. For detailed information about scan settings, see Adjusting the Scan Settings on page 122.
3 Select Scan to begin scanning, or Job Details to back out of the Scan screen and return to the beginning of the Workflow if needed.
NOTE: If there are multiple job details screens, you will be returned to the first screen. The information you have entered remains populated in the fields. If there are no job details to display, the Job Details button is replaced with a button corresponding to the initial Workflow. Use this button to back out of the Scan screen.
The Scan Process
During this process, the scanning is taking place. Sheets are fed through the ADF or scanned from the glass. The summary screen displayed in the previous step now contains only the option to stop the scan:
If you touch Stop, a dialog opens asking you to confirm. If you touch No, scanning continues until completed. If you touch Yes, scanning ends. Stopping scanning affects only the Scan Job currently in progress. Any scan jobs that you have completed, but not yet finished, remain. The value for Total Pages at the top of the display provides feedback about how many pages have been scanned, but not yet finished.

Use Print & Copy Control
120 Equitrac Print & Copy Control Setup Guide
Finish the Scan Process
The summary screen now contains the options:
• Cancel
• Scan
• Done
Select Cancel to purge all scans for this Scan Job. No Scan Tasks are completed, and the queue of scans is cleared. You are returned to the Scan screen to select another scan option.
Select Scan to continue scanning another Scan Task using the same Scan Job details as the scan that has just completed. This does not send existing Scan Tasks to the destination.
Select Done to complete the Scan Task. The Scan Job, containing all Documents for this session is completed. The Done Document screen displays:
Touch the desired option:
• Scan Another Document using the same Job Details as the previous
• Logout of your session
• Return to the PCC Launcher to make another selection

Equitrac Print & Copy Control Setup Guide 121
Use Print & Copy Control
Scan using aliasAssuming you have Capture and Send licensed and set up, PCC includes pre-set aliases, including Scan to email and Scan to my folder which can be used for most implementations without extensive configuration. PCC also allows you to set up a menu item on the device that sends a scan using the information set up in a particular alias. For example, this allows you to pre-populate fields such as Subject, and to automatically select delivery formats. Detailed information on setting up scan aliases is found in the Equitrac Office/Express Administration Guide. To scan a document using an alias, do the following:
1 On the Scan screen, touch the button based on the scan alias name. The Job Details screen displays with all fields pre-populated based upon what is set up in the alias.
2 Modify any of the fields as needed, and proceed to the scanning screen.
3 If you want to adjust the scan settings, touch the Scan Settings button at the bottom of the screen. See Adjusting the Scan Settings on page 122 for details.
4 Place your document in the feeder or on the scanner, then touch Scan or press the Start key on the MFP to begin the scan.
Using LDAP Email SearchIn oder to use LDAP search, it must be enabled and configured on the server. See the Equitrac Office/Express Administration Guide for details. If not configured, the LDAP search magnifying glass icon does not appear. PCC supports searching for email addresses from the Scan destination screen. To perform a search, use the LDAP search buttons located beside the To and Cc fields.
To perform an email search, do the following:
1 Select the Magnifying glass button beside the To or Cc fields to search for and add addresses to the corresponding field. A Search screen opens:
2 Touch the Search Criteria field to display a soft keyboard.

Use Print & Copy Control
122 Equitrac Print & Copy Control Setup Guide
3 Enter your search criteria and select the Magnifying glass icon again to display search results.
4 Use the Up and Down arrows to scroll through the list page by page.
5 Select one or more addresses, and click OK to exit the Email Search feature.
6 Make a selection from the results, and touch OK. The information populates the To or Cc field.
Adjusting the Scan SettingsRegardless of the scan task, you are able to modify some of the default scan settings prior to scanning:
NOTE: Default settings for scan type and DPI are set through the Scan configuration settings in System Manager. Duplexing, as well as default email subject and file name are set on the server through the Scan-to-Me settings. Default page size is set through the Remote Administration. These settings are used by default when scanning, but any can be adjusted at the device when completing a scan task.
Select any of the options on the screen to make the changes to the settings you require:

Equitrac Print & Copy Control Setup Guide 123
Use Print & Copy Control
Scan Size
Select the resulting scan size from a variety of different paper sizes, or allow the device auto-select the size based upon the original document.
NOTE: Typically, leaving this setting at Auto Detect is sufficient. For devices that are unable to detect page sizes automatically, set an appropriate page size.
Type
Select if the resulting scan is:
• Black and white (for strictly text based documents)
• Gray scale (for mixed text and graphics with no color)
• Full color (for full color documents containing either text or graphics)

Use Print & Copy Control
124 Equitrac Print & Copy Control Setup Guide
Resolution
The default value is set per scan workflow on the server, and is typically the setting best used. However, you can change the resolution (in dpi) of the resulting scan if you require more or less scan fidelity.
Settings (type)
Select the type of document you are scanning (text, graphics, or both) to set optimum settings for the scan.
Density
Select whether you want the image density of the resulting scan to be automatically determined. By default, the setting for this is On.

Equitrac Print & Copy Control Setup Guide 125
Use Print & Copy Control
Brightness
Set the brightness level of the resulting scan. Higher numbers result in lighter scans which can bring out details in dark source documents.
Delivery formatsDepending upon the scan task, PCC can deliver it in various different file formats. The supported file formats depend upon the scan task, and the settings configured by the Administrator. See the Equitrac Office/Express Administration Guide for details. Available file formats are:
Format Description OCR
PDF (Image) Basic PDF - Not searchable.
MFP’s Output The PDF created by the device itself. All other formats are created through the SPE.
Searchable PDF Basic Searchable PDF.
TIFFs A single tiff image per page scanned.
Multi-Page TIFF A single tiff file that contains multiple pages in the file.
JPEGs A single JPEG image for each page scanned.
PNGs A single PNG graphics file for each page scanned.
Searchable PDF MRC Searchable PDF with additional compression. Useful for black and white documents with a large amount of text.
Searchable PDF/A Searchable PDF meeting PDF/A-1b Archiving Standards.
RTF Real Text Format output for Macintosh and WordPad. Includes basic text formatting such as bold, italic, and paragraph breaks.

Use Print & Copy Control
126 Equitrac Print & Copy Control Setup Guide
Logging Out of PCCTo end a user session and log out of PCC, touch the Logout button, or press the hard Login/Logout key on the MFP panel while on any PCC screen.
NOTE: If available, users can use a card reader and their swipe cards to logout of PCC. From anywhere in the PCC application, a user can use the reader to scan their cards and PCC logs the user out as though they had pressed the Logout button. This feature cannot be used outside of PCC.
If the Session Flow options in PCC are configured to display account balance or Session cost at end of a session, the Session Summary screen appears when you end a session. The Session Summary provides a brief overview of your session activity, estimated costs, and the total time you were logged in to PCC. See Configuring Account and Session Display on page 105 to enable PCC to display the Session Summary screen on the MFP.
Word (.doc) - True Page Native Word - 2000 to 2003 - Matches most closely with the scanned text, but is more difficult to edit.
Word (.doc) - Flowing Page Word 2000 to 2003 - Uses Word formatting to simplify editing, but does not match as closely to the original.
Word (.docx) - True Page Word 2007 and 2010 - Matches most closely with the scanned text, but is more difficult to edit.
Word (.docx) - Flowing Page Word 2007 and 2010 - Uses Word formatting to simplify editing, but does not match as closely to the original.
Excel (.xls) Excel 2000 to 2003.
Excel (.xlsx) Excel 2007 to 2010.
Searchable XPS Searchable XPS (Microsoft’s Portable Document Format).
Text Unicode text with no line breaks (line breaks added at the end of paragraphs, but not on the actual line of text).
PDF/A (image) PDF meeting PDF/A-1b Archiving Standards.
Format Description OCR

Equitrac Print & Copy Control Setup Guide 127
Use Print & Copy Control
After viewing the Session summary, click OK to close it to continue logging out of PCC.
NOTE: Logging out mid-scan cancels any active scan session. No scans are processed. Logging out after scans have finished automatically accepts the scans and completes the task.

Use Print & Copy Control
128 Equitrac Print & Copy Control Setup Guide
Accessing GlobalScan NXEquitrac supports SSO (Single Sign On) for third party applications, such as GlobalScan NX. SSO integration allows PCC user credential authentication to access the GlobalScan NX application.
NOTE: These options must be enabled for PCC and available to your department in order to be displayed. If the option is correctly configured and not displayed, contact your system administrator.
To access GlobalScan NX, do the following:
1 On the PCC login screen, select GS NX from the Quick Shortcuts bar list.
2 Enter valid login credentials using the numeric keypad or on-screen keyboard, or by using a swipe card.
3 Enter a Billing code, if prompted.
The GlobalScan NX screen opens.
4 After performing the desired functions, press the Other Function key on the MFP, and select PCC from the extended feature list to return to PCC.
5 Log out of PCC.
NOTE: GlobalScan NX must be installed to the SD card. Refer to the PCC GlobalScan NX Integration Plug-in Installation Guide to configure GlobalScan NX to work with the PCC application.

Equitrac Print & Copy Control Setup Guide 129
Use Print & Copy Control
Using a USB Keyboard at the DevicePCC 4.2.x supports using a Keysonic Nano USB keyboard attached to the USB port on the device to navigate through the PCC touch screens. The following table outlines the keystroke behaviors:
When a button has focus, a double blue outline appears around it. When a selected button has focus, it turns yellow with a double red outline. When an editable text field is active, the background turns yellow.
NOTE: By default, the USB keyboard support is Disabled. USB keyboard support should only be Enabled when PCC is the only application running on the device. If PCC and another application (e.g. GlobalScan NX or eCopy) are running on the device, the USB keyboard may not function correctly for one or more of those applications.
Keystroke Function
Tab • Moves the focus to next enabled control within the screen.
Shift-Tab • Moves the focus to previous enabled control within the screen.
Space Bar • When a button has focus, this “presses” or selects the button.
Ctrl-Tab • When on a screen with selectable tabs, this moves to the next tab to the right.
Ctrl-Shift-Tab • When on a screen with selectable tabs, this moves to the previous tab to the left.
Ctrl-Alt-Del • Opens the Configuration Password screen.
Backspace • When on an editable text field, this deletes the last character of the current entry.
Enter • When on the Login, Billing Code or Configuration Password screens, this works the same as pressing the Start button.
PgUp/PgDn • When navigating through the list of documents on the Follow-You Printing screen, this moves between pages if the documents are on more than one page.
Fn-Up Arrow/ Fn-Down Arrow
• When navigating through the list of documents on the Follow-You Printing screen, this scrolls up and down through the list.
Ctrl-L • When navigating through the list of documents on the Follow-You Printing screen, this returns to the first document in the list.

Use Print & Copy Control
130 Equitrac Print & Copy Control Setup Guide

Equitrac Print & Copy Control Setup Guide 131
Disable or Uninstall PCC
This chapter provides instructions to temporarily disable PCC, or to uninstall PCC from the device.
Stopping or Disabling PCC Rather than removing PCC from the device, and reinstalling later, you can temporarily disable PCC. You can perform this task from either the MFP’s web page, or at the MFP itself via the front panel.
From the MFP Web Page (GW)
1 Open a web browser, and enter http://<MFP IP> in the address field. Enter your administrator login credentials.
2 Click Configuration in the left pane.
3 In the Extended Feature Settings section, click Startup Setting.
4 Click the radio button beside the Remote Administration extended feature, then click Start Up/Stop to disable it.
NOTE: This step is required only if you intend to reinstall PCC without removing the Remote Administration feature.
5 Click the radio button beside the PCC extended feature, then click Start Up/Stop to disable PCC.
TopicsStopping or Disabling PCC
Uninstalling PCC
5

Disable or Uninstall PCC
132 Equitrac Print & Copy Control Setup Guide
NOTE: Although PCC is disabled, the Status column does not change from Starting Up to Stop. To refresh the screen, and verify that PCC is disabled, click Back and Startup Setting again and ensure that Stop is now displayed.
6 Click Back to return to the home page for the device.
7 On the Status tab, click Reset Device.
After the device restarts, the PCC login screen no longer appears. To enable PCC, see Performing a Bulk Installation on page 33.
At the MFP Front Panel
1 Login to PCC or bypass.
2 Press User Tools/Counter. If the Administrator password is enabled, enter it to continue.
3 Touch Extended Features.
4 Touch Extended Feature Settings again.
5 In the Startup tab, press PCC to unselect it.
6 Press Exit until you leave the User Tools menu.
To re-enable the PCC software, repeat these steps, but press PCC at step 5 to select it as an extended application.
Uninstalling PCCUse the following workflow to remove PCC and Remote Administration from the device. The workflow is the same for both applications.
NOTE: Several factors can influence the success of a complete uninstallation of the software. The following process will work for most implementations.
To remove the PCC application from the device, use this workflow:
1 Ensure the device function priority is not set to PCC

Equitrac Print & Copy Control Setup Guide 133
Disable or Uninstall PCC
2 Ensure PCC does not automatically start upon device start
3 Disconnect USB card reader
4 Restart the device
5 Uninstall PCC from the device
6 Reconnect the USB card reader
7 Finalize the uninstallation
Reset the Device Function PriorityBefore uninstalling PCC, change the Function Priority from PCC to another device function. Follow these steps:
1 Open a web browser and enter http://<MFP IP Address> in the Address field. The device web page opens.
2 Click Login and enter your administrator User Name and Password.
3 Navigate to Device Management > Configuration. The Configuration screen opens.
4 Under the Device Settings, click Function Key Allocation/Function Priority. The Function Key Allocation/Function Priority screen opens:

Disable or Uninstall PCC
134 Equitrac Print & Copy Control Setup Guide
5 In the Function Priority bullet, click Change. The Function Priority dialog opens:
6 Select the Copier, or any other native device function. Click OK.
Disable Automatic StartupA typical setup will automatically start PCC and Remote Administration when the device is turned on. Because these applications cannot be cleanly uninstalled when actively running on the device, you must first ensure they do not start when the machine does.
NOTE: You must follow this process twice--once to disable PCC, once to disable Remote Administration.
1 Open a web browser and enter http://<MFP IP Address> in the Address field. The device web page opens.
2 Click Login and enter your administrator User Name and Password.
The Web Image Monitor page opens.
NOTE: The Web Image Monitor page may differ in appearance and location of functions by device. The basic functionality remains the same.

Equitrac Print & Copy Control Setup Guide 135
Disable or Uninstall PCC
3 Navigate to Device Management > Configuration. Under Extended Feature Settings, select Startup Setting:
4 The Startup setting page opens and displays a list of installed features. Locate PCC or Remote Administration, and select its respective note icon:
5 The Extended Features Info for the selected feature displays. Locate the Auto Start option, and select the Off radio button:
6 Click OK.
This process can also be accomplished at the device using these steps:
1 Log in to PCC with Administrator credentials.

Disable or Uninstall PCC
136 Equitrac Print & Copy Control Setup Guide
2 Press the Usertools/Counter hard key. The User Tools/Counter/Enquiry screen displays:
3 Click the Extended Feature Settings. The Extended Feature Setting Menu screen displays.
4 Click Extended Feature Settings. The Extended Feature Settings screen displays, with tabs at the top indicating the various sections:
5 Select the Extended Feature Info tab. Then, from the list of extended features, select either PCC or Remote Administration. The Extended Feature Info screen for the selected feature displays:
6 From the Auto Start options for the feature, select Off.

Equitrac Print & Copy Control Setup Guide 137
Disable or Uninstall PCC
7 Select Exit until you are returned to the home screen.
Disconnect the USB Card ReaderIf you have a card reader attached to the device, it may prevent PCC or Remote Administration from stopping during an uninstallation, thereby causing the uninstallation to fail. Unplug the card reader from the device before proceeding. Typically this requires no preparation if you have disabled PCC from automatically starting, as indicated above; you can simply remove the reader from the USB port.
Restart the DeviceRestart the device. It should start using the settings you have chosen, and not load the application you have disabled.
Uninstall PCC or Remote AdministrationNOTE: You must follow this process twice--once to uninstall PCC, once to uninstall Remote Administration.
1 Open a web browser and browse to the default web page for the MFP, http://<MFP IP>, where <MFP IP> is the IP address for the physical MFP.
2 Click Login in the upper right corner of the page. The login page opens. Enter your administrator User Name and Login Password. The Web Image Monitor page opens.
3 On the Web Image Monitor page, select Configuration in the left navigation menu to access the configuration options (for GWNX devices, navigate to Device Management > Configuration).
4 On the configuration options page, click Uninstall under Extended Feature Settings.
5 In the Extended Feature list, select either the PCC or Remote Administration application.
6 Click Uninstall.
Reconnect the USB Card ReaderOnce PCC and Remote Administration are uninstalled, reconnect the card reader to its USB port.

Disable or Uninstall PCC
138 Equitrac Print & Copy Control Setup Guide
Finalize the UninstallationThe following steps ensure a clean uninstall. Typically a reboot is not necessary to complete a full uninstall of the software. However, because PCC interacts with the native software of the device, we recommend rebooting the device after removing PCC to ensure a clean uninstall.
1 Reboot the MFP to ensure that the software is fully removed and disabled from the device.
2 Open the Web Image Monitor for the device, and confirm that the software has been uninstalled by its absence in the Extended Feature list.
3 If PCC is not being reinstalled, deselect the functions set active for management by the enhanced external charge unit. For instructions about deselecting these functions, see Configuring Custom Access Control on page 54.

Equitrac Print & Copy Control Setup Guide 139
Disable or Uninstall PCC

Disable or Uninstall PCC
140 Equitrac Print & Copy Control Setup Guide

Equitrac Print & Copy Control Setup Guide 141
Appendix: Third-Party Software
The following software may be included in this product: Apache commons codec; Fast GUID Generation; apache commons http; apache commons logging; Jakarta Regular Expressions; and Piccolo XML Parser. Use of any of this software is governed by the terms of the following license:
Apache License
Version 2.0, January 2004
http://www.apache.org/licenses/
TERMS AND CONDITIONS FOR USE, REPRODUCTION, AND DISTRIBUTION
1 Definitions.
"License" shall mean the terms and conditions for use, reproduction, and distribution as defined by Sections 1 through 9 of this document.
"Licensor" shall mean the copyright owner or entity authorized by the copyright owner that is granting the License.
"Legal Entity" shall mean the union of the acting entity and all other entities that control, are controlled by, or are under common control with that entity. For the purposes of this definition, "control" means (i) the power, direct or indirect, to cause the direction or management of such entity, whether by contract or otherwise, or (ii) ownership of fifty percent (50%) or more of the outstanding shares, or (iii) beneficial ownership of such entity.
"You" (or "Your") shall mean an individual or Legal Entity exercising permissions granted by this License.
"Source" form shall mean the preferred form for making modifications, including but not limited to software source code, documentation source, and configuration files.
"Object" form shall mean any form resulting from mechanical transformation or translation of a Source form, including but not limited to compiled object code, generated documentation, and conversions to other media types.
"Work" shall mean the work of authorship, whether in Source or Object form, made available under the License, as indicated by a copyright notice that is included in or attached to the work (an example is provided in the Appendix below).
"Derivative Works" shall mean any work, whether in Source or Object form, that is based on (or derived from) the Work and for which the editorial revisions, annotations, elaborations, or other modifications

142 Equitrac Print & Copy Control Setup Guide
represent, as a whole, an original work of authorship. For the purposes of this License, Derivative Works shall not include works that remain separable from, or merely link (or bind by name) to the interfaces of, the Work and Derivative Works thereof.
"Contribution" shall mean any work of authorship, including the original version of the Work and any modifications or additions to that Work or Derivative Works thereof, that is intentionally submitted to Licensor for inclusion in the Work by the copyright owner or by an individual or Legal Entity authorized to submit on behalf of the copyright owner. For the purposes of this definition, "submitted" means any form of electronic, verbal, or written communication sent to the Licensor or its representatives, including but not limited to communication on electronic mailing lists, source code control systems, and issue tracking systems that are managed by, or on behalf of, the Licensor for the purpose of discussing and improving the Work, but excluding communication that is conspicuously marked or otherwise designated in writing by the copyright owner as "Not a Contribution."
"Contributor" shall mean Licensor and any individual or Legal Entity on behalf of whom a Contribution has been received by Licensor and subsequently incorporated within the Work.
2 Grant of Copyright License. Subject to the terms and conditions of this License, each Contributor hereby grants to You a perpetual, worldwide, non-exclusive, no-charge, royalty-free, irrevocable copyright license to reproduce, prepare Derivative Works of, publicly display, publicly perform, sublicense, and distribute the Work and such Derivative Works in Source or Object form.
3 Grant of Patent License. Subject to the terms and conditions of this License, each Contributor hereby grants to You a perpetual, worldwide, non-exclusive, no-charge, royalty-free, irrevocable (except as stated in this section) patent license to make, have made, use, offer to sell, sell, import, and otherwise transfer the Work, where such license applies only to those patent claims licensable by such Contributor that are necessarily infringed by their Contribution(s) alone or by combination of their Contribution(s) with the Work to which such Contribution(s) was submitted. If You institute patent litigation against any entity (including a cross-claim or counterclaim in a lawsuit) alleging that the Work or a Contribution incorporated within the Work constitutes direct or contributory patent infringement, then any patent licenses granted to You under this License for that Work shall terminate as of the date such litigation is filed.
4 Redistribution. You may reproduce and distribute copies of the Work or Derivative Works thereof in any medium, with or without modifications, and in Source or Object form, provided that You meet the following conditions:
a You must give any other recipients of the Work or Derivative Works a copy of this License; and
b You must cause any modified files to carry prominent notices stating that You changed the files; and
c You must retain, in the Source form of any Derivative Works that You distribute, all copyright, patent, trademark, and attribution notices from the Source form of the Work, excluding those notices that do not pertain to any part of the Derivative Works; and
d If the Work includes a "NOTICE" text file as part of its distribution, then any Derivative Works that You distribute must include a readable copy of the attribution notices contained within such NOTICE file, excluding those notices that do not pertain to any part of the Derivative Works, in at least one of the following places: within a NOTICE text file distributed as part of the Derivative Works; within the Source form or documentation, if provided along with the Derivative Works; or, within a display generated by the Derivative Works, if and wherever such third-party notices normally appear. The contents of the NOTICE file are for informational purposes only and do not modify the License. You

Equitrac Print & Copy Control Setup Guide 143
may add Your own attribution notices within Derivative Works that You distribute, alongside or as an addendum to the NOTICE text from the Work, provided that such additional attribution notices cannot be construed as modifying the License. You may add Your own copyright statement to Your modifications and may provide additional or different license terms and conditions for use, reproduction, or distribution of Your modifications, or for any such Derivative Works as a whole, provided Your use, reproduction, and distribution of the Work otherwise complies with the conditions stated in this License.
5 Submission of Contributions. Unless You explicitly state otherwise, any Contribution intentionally submitted for inclusion in the Work by You to the Licensor shall be under the terms and conditions of this License, without any additional terms or conditions. Notwithstanding the above, nothing herein shall supersede or modify the terms of any separate license agreement you may have executed with Licensor regarding such Contributions.
6 Trademarks. This License does not grant permission to use the trade names, trademarks, service marks, or product names of the Licensor, except as required for reasonable and customary use in describing the origin of the Work and reproducing the content of the NOTICE file.
7 Disclaimer of Warranty. Unless required by applicable law or agreed to in writing, Licensor provides the Work (and each Contributor provides its Contributions) on an "AS IS" BASIS, WITHOUT WARRANTIES OR CONDITIONS OF ANY KIND, either express or implied, including, without limitation, any warranties or conditions of TITLE, NON INFRINGEMENT, MERCHANTABILITY, or FITNESS FOR A PARTICULAR PURPOSE. You are solely responsible for determining the appropriateness of using or redistributing the Work and assume any risks associated with Your exercise of permissions under this License.
8 Limitation of Liability. In no event and under no legal theory, whether in tort (including negligence), contract, or otherwise, unless required by applicable law (such as deliberate and grossly negligent acts) or agreed to in writing, shall any Contributor be liable to You for damages, including any direct, indirect, special, incidental, or consequential damages of any character arising as a result of this License or out of the use or inability to use the Work (including but not limited to damages for loss of goodwill, work stoppage, computer failure or malfunction, or any and all other commercial damages or losses), even if such Contributor has been advised of the possibility of such damages.
9 Accepting Warranty or Additional Liability. While redistributing the Work or Derivative Works thereof, You may choose to offer, and charge a fee for, acceptance of support, warranty, indemnity, or other liability obligations and/or rights consistent with this License. However, in accepting such obligations, You may act only on Your own behalf and on Your sole responsibility, not on behalf of any other Contributor, and only if You agree to indemnify, defend, and hold each Contributor harmless for any liability incurred by, or claims asserted against, such Contributor by reason of your accepting any such warranty or additional liability.
END OF TERMS AND CONDITIONS
APPENDIX: How to apply the Apache License to your work.
To apply the Apache License to your work, attach the following boilerplate notice, with the fields enclosed by brackets "[]" replaced with your own identifying information. (Don't include the brackets!) The text should be enclosed in the appropriate comment syntax for the file format. We also recommend that a file or class name and description of purpose be included on the same "printed page" as the copyright notice for easier identification within third-party archives.

144 Equitrac Print & Copy Control Setup Guide
Copyright [yyyy] [name of copyright owner]
Licensed under the Apache License, Version 2.0 (the "License"); you may not use this file except in compliance with the License. You may obtain a copy of the License at http://www.apache.org/licenses/LICENSE-2.0
Unless required by applicable law or agreed to in writing, software distributed under the License is distributed on an "AS IS" BASIS, WITHOUT WARRANTIES OR CONDITIONS OF ANY KIND, either express or implied. See the License for the specific language governing permissions and limitations under the License.
==========================================================================
NOTICE file corresponding to the section 4 d of the Apache License, Version 2.0, in this case for the Apache Ant distribution.
==========================================================================
This product includes software developed by The Apache Software Foundation (http://www.apache.org/).
This product includes also software developed by:
• the W3C consortium (http://www.w3c.org),
• the SAX project (http://www.saxproject.org)
Please read the different LICENSE files present in the root directory of this distribution.
The names "Ant" and "Apache Software Foundation" must not be used to endorse or promote products derived from this software without prior written permission. For written permission, please contact [email protected].
Dundas Ultimate
The following software may be included in this product: Dundas Ultimate Grid and Dundas Ultimate TCP/IP. Use of this software is governed by the terms of the following “CPC - Code Project Code Software License”:
Preamble
This License governs Your use of the Work. This License is intended to allow developers to use the Source Code and Executable Files provided as part of the Work in any application in any form.
The main points subject to the terms of the License are:
• Source Code and Executable Files can be used in commercial applications;
• Source Code and Executable Files can be redistributed; and

Equitrac Print & Copy Control Setup Guide 145
• Source Code can be modified to create derivative works.
This License is entered between You, the individual or other entity reading or otherwise making use of the Work licensed pursuant to this License and the individual or other entity which offers the Work under the terms of this License ("Author").
License
THE WORK (AS DEFINED BELOW) IS PROVIDED UNDER THE TERMS OF THIS CODE PROJECT CODE USAGE LICENSE ("LICENSE"). THE WORK IS PROTECTED BY COPYRIGHT AND/OR OTHER APPLICABLE LAW. ANY USE OF THE WORK OTHER THAN AS AUTHORIZED UNDER THIS LICENSE OR COPYRIGHT LAW IS PROHIBITED.
BY EXERCISING ANY RIGHTS TO THE WORK PROVIDED HEREIN, YOU ACCEPT AND AGREE TO BE BOUND BY THE TERMS OF THIS LICENSE. THE AUTHOR GRANTS YOU THE RIGHTS CONTAINED HEREIN IN CONSIDERATION OF YOUR ACCEPTANCE OF SUCH TERMS AND CONDITIONS. IF YOU DO NOT AGREE TO THE ACCEPT AND BE BOUND BY THE TERMS OF THIS LICENSE, YOU CANNOT MAKE ANY USE OF THE WORK.

146 Equitrac Print & Copy Control Setup Guide
1 Definitions.
a "Articles" means, collectively, all articles written by Author which describes how the Source Code and Executable Files for the Work may be used by a user.
b "Author" means the individual or entity that offers the Work under the terms of this License.
c "Derivative Work" means a work based upon the Work or upon the Work and other pre-existing works.
d "Executable Files" refer to the executables, binary files, configuration and any required data files included in the Work.
e "Publisher" means the provider of the website, magazine, CD-ROM, DVD or other medium from or by which the Work is obtained by You.
f "Source Code" refers to the collection of source code and configuration files used to create the Executable Files.
g "Standard Version" refers to such a Work if it has not been modified, or has been modified in accordance with the consent of the Author, such consent being in the full discretion of the Author.
h "Work" refers to the collection of files distributed by the Publisher, including the Source Code, Executable Files, binaries, data files, documentation, white papers and the Articles.
i "You" is you, an individual or entity wishing to use the Work and exercise your rights under this License.
2 Fair Use/Fair Use Rights. Nothing in this License is intended to reduce, limit, or restrict any rights arising from fair use, fair dealing, first sale or other limitations on the exclusive rights of the copyright owner under copyright law or other applicable laws.
3 License Grant. Subject to the terms and conditions of this License, the Author hereby grants You a worldwide, royalty-free, non-exclusive, perpetual (for the duration of the applicable copyright) license to exercise the rights in the Work as stated below:
a You may use the standard version of the Source Code or Executable Files in Your own applications.
b You may apply bug fixes, portability fixes and other modifications obtained from the Public Domain or from the Author. A Work modified in such a way shall still be considered the standard version and will be subject to this License.
c You may otherwise modify Your copy of this Work (excluding the Articles) in any way to create a Derivative Work, provided that You insert a prominent notice in each changed file stating how, when and where You changed that file.
d You may distribute the standard version of the Executable Files and Source Code or Derivative Work in aggregate with other (possibly commercial) programs as part of a larger (possibly commercial) software distribution.
e The Articles discussing the Work published in any form by the author may not be distributed or republished without the Author's consent. The author retains copyright to any such Articles. You may use the Executable Files and Source Code pursuant to this License but you may not repost or republish or otherwise distribute or make available the Articles, without the prior written consent of the Author.
Any subroutines or modules supplied by You and linked into the Source Code or Executable Files this Work shall not be considered part of this Work and will not be subject to the terms of this License.

Equitrac Print & Copy Control Setup Guide 147
4 Restrictions. The license granted in Section 3 above is expressly made subject to and limited by the following restrictions:
a You agree not remove any of the original copyright notices and associated disclaimers that may appear in the Source Code or Executable Files.
b You agree not to advertise or in any way imply that this Work is a product of Your own.
c The name of the Author may not be used to endorse or promote products derived from the Work without the prior written consent of the Author.
d You may distribute the Executable Files and Source Code only under the terms of this License, and You must include a copy of, or the Uniform Resource Identifier for, this License with every copy of the Executable Files or Source Code You distribute and ensure that anyone receiving such Executable Files and Source Code agrees that the terms of this License apply to such Executable Files and/or Source Code. You may not offer or impose any terms on the Work that alter or restrict the terms of this License or the recipients' exercise of the rights granted hereunder. You may not sublicense the Work. You must keep intact all notices that refer to this License and to the disclaimer of warranties. You may not distribute the Executable Files or Source Code with any technological measures that control access or use of the Work in a manner inconsistent with the terms of this License.
e You agree not to use the Work for illegal, immoral or improper purposes, or on pages containing illegal, immoral or improper material. The Work is subject to applicable export laws. You agree to comply with all such laws and regulations that may apply to the Work after Your receipt of the Work.
5 Representations, Warranties and Disclaimer. THIS WORK IS PROVIDED "AS IS", "WHERE IS" AND "AS AVAILABLE", WITHOUT ANY EXPRESS OR IMPLIED WARRANTIES OR CONDITIONS OR GUARANTEES. YOU, THE USER, ASSUME ALL RISK IN ITS USE, INCLUDING COPYRIGHT INFRINGEMENT, PATENT INFRINGEMENT, SUITABILITY, ETC. AUTHOR EXPRESSLY DISCLAIMS ALL EXPRESS, IMPLIED OR STATUTORY WARRANTIES OR CONDITIONS, INCLUDING WITHOUT LIMITATION, WARRANTIES OR CONDITIONS OF MERCHANTABILITY, MERCHANTABLE QUALITY OR FITNESS FOR A PARTICULAR PURPOSE, OR ANY WARRANTY OF TITLE OR NON-INFRINGEMENT, OR THAT THE WORK (OR ANY PORTION THEREOF) IS CORRECT, USEFUL, BUG-FREE OR FREE OF VIRUSES. YOU MUST PASS THIS DISCLAIMER ON WHENEVER YOU DISTRIBUTE THE WORK OR DERIVATIVE WORKS.
6 Indemnity. You agree to defend, indemnify and hold harmless the Author and the Publisher from and against any claims, suits, losses, damages, liabilities, costs, and expenses (including reasonable legal or attorneys’ fees) resulting from or relating to any use of the Work by You.
7 Limitation on Liability. EXCEPT TO THE EXTENT REQUIRED BY APPLICABLE LAW, IN NO EVENT WILL THE AUTHOR OR THE PUBLISHER BE LIABLE TO YOU ON ANY LEGAL THEORY FOR ANY SPECIAL, INCIDENTAL, CONSEQUENTIAL, PUNITIVE OR EXEMPLARY DAMAGES ARISING OUT OF THIS LICENSE OR THE USE OF THE WORK OR OTHERWISE, EVEN IF THE AUTHOR OR THE PUBLISHER HAS BEEN ADVISED OF THE POSSIBILITY OF SUCH DAMAGES.
8 Termination.
a This License and the rights granted hereunder will terminate automatically upon any breach by You of any term of this License. Individuals or entities who have received Derivative Works from You under this License, however, will not have their licenses terminated provided such individuals or entities remain in

148 Equitrac Print & Copy Control Setup Guide
full compliance with those licenses. Sections 1, 2, 5, 6, 7, 8, 9 and 10 will survive any termination of this License.
b Subject to the above terms and conditions, this License is perpetual (for the duration of the applicable copyright in the Work). Notwithstanding the above, the Author reserves the right to release the Work under different license terms or to stop distributing the Work at any time; provided, however that any such election will not serve to withdraw this License (or any other license that has been, or is required to be, granted under the terms of this License), and this License will continue in full force and effect unless terminated as stated above.
9 Publisher. The parties hereby confirm that the Publisher shall not, under any circumstances, be responsible for and shall not have any liability in respect of the subject matter of this License. The Publisher makes no warranty whatsoever in connection with the Work and shall not be liable to You or any party on any legal theory for any damages whatsoever, including without limitation any general, special, incidental or consequential damages arising in connection to this license. The Publisher reserves the right to cease making the Work available to You at any time without notice
10 Miscellaneous
a This License shall be governed by the laws of the location of the head office of the Author or if the Author is an individual, the laws of location of the principal place of residence of the Author.
b If any provision of this License is invalid or unenforceable under applicable law, it shall not affect the validity or enforceability of the remainder of the terms of this License, and without further action by the parties to this License, such provision shall be reformed to the minimum extent necessary to make such provision valid and enforceable.
c No term or provision of this License shall be deemed waived and no breach consented to unless such waiver or consent shall be in writing and signed by the party to be charged with such waiver or consent.
d This License constitutes the entire agreement between the parties with respect to the Work licensed herein. There are no understandings, agreements or representations with respect to the Work not specified herein. The Author shall not be bound by any additional provisions that may appear in any communication from You. This License may not be modified without the mutual written agreement of the Author and You.
SQLite
The following software may be included in this product: SQLite. Use of any of this software is governed by the terms of the following license(s):
SQLite Copyright
SQLite is in the Public Domain
All of the deliverable code in SQLite has been dedicated to the public domain by the authors. All code authors, and representatives of the companies they work for, have signed affidavits dedicating their contributions to the public domain and originals of those signed affidavits are stored in a firesafe at the main offices of Hwaci. Anyone is free to copy, modify, publish, use, compile, sell, or distribute the original SQLite code, either in source code form or as a compiled binary, for any purpose, commercial or non-commercial, and by any means.

Equitrac Print & Copy Control Setup Guide 149
The previous paragraph applies to the deliverable code in SQLite - those parts of the SQLite library that you actually bundle and ship with a larger application. Portions of the documentation and some code used as part of the build process might fall under other licenses. The details here are unclear. We do not worry about the licensing of the documentation and build code so much because none of these things are part of the core deliverable SQLite library.
All of the deliverable code in SQLite has been written from scratch. No code has been taken from other projects or from the open internet. Every line of code can be traced back to its original author, and all of those authors have public domain dedications on file. So the SQLite code base is clean and is uncontaminated with licensed code from other projects.
JPEG
The following software may be included in this product: JPEG6. Use of any of this software is governed by the terms of the following license(s):
The Independent JPEG Group's JPEG software
====================================
README for release 6b of 27-Mar-1998
====================================
This distribution contains the sixth public release of the Independent JPEG Group's free JPEG software. You are welcome to redistribute this software and to use it for any purpose, subject to the conditions under LEGAL ISSUES, below.
Serious users of this software (particularly those incorporating it into larger programs) should contact IJG at jpeg [email protected] to be added to our electronic mailing list. Mailing list members are notified of updates and have a chance to participate in technical discussions, etc.
This software is the work of Tom Lane, Philip Gladstone, Jim Boucher, Lee Crocker, Julian Minguillon, Luis Ortiz, George Phillips, Davide Rossi, Guido Vollbeding, Ge' Weijers, and other members of the Independent JPEG Group.
IJG is not affiliated with the official ISO JPEG standards committee.
DOCUMENTATION ROADMAP
====================================
This file contains the following sections:
OVERVIEW – General description of JPEG and the IJG software.

150 Equitrac Print & Copy Control Setup Guide
LEGAL ISSUES – Copyright, lack of warranty, terms of distribution.
REFERENCES – Where to learn more about JPEG.
ARCHIVE LOCATIONS – Where to find newer versions of this software.
RELATED SOFTWARE – Other stuff you should get.
FILE FORMAT WARS – Software *not* to get.
TO DO – Plans for future IJG releases.
Other documentation files in the distribution are:
User documentation:
install.doc – How to configure and install the IJG software.
usage.doc – Usage instructions for cjpeg, djpeg, jpegtran, rdjpgcom, and wrjpgcom.
*.1 – Unix-style man pages for programs (same info as usage.doc).
wizard.doc – Advanced usage instructions for JPEG wizards only.
change.log – Version-to-version change highlights.
Programmer and internal documentation:
libjpeg.doc – How to use the JPEG library in your own programs.
example.c – Sample code for calling the JPEG library.
structure.doc – Overview of the JPEG library's internal structure.
filelist.doc – Road map of IJG files.
coderules.doc – Coding style rules — please read if you contribute code.
Please read at least the files install.doc and usage.doc. Useful information can also be found in the JPEG FAQ (Frequently Asked Questions) article. See ARCHIVE LOCATIONS below to find out where to obtain the FAQ article.
If you want to understand how the JPEG code works, we suggest reading one or more of the REFERENCES, then looking at the documentation files (in roughly the order listed) before diving into the code.
OVERVIEW
This package contains C software to implement JPEG image compression and decompression. JPEG (pronounced "jay-peg") is a standardized compression method for full-color and gray-scale images. JPEG is intended for compressing "real-world" scenes; line drawings, cartoons and other non-realistic images are not its

Equitrac Print & Copy Control Setup Guide 151
strong suit. JPEG is lossy, meaning that the output image is not exactly identical to the input image. Hence you must not use JPEG if you have to have identical output bits. However, on typical photographic images, very good compression levels can be obtained with no visible change, and remarkably high compression levels are possible if you can tolerate a low-quality image. For more details, see the references, or just experiment with various compression settings.
This software implements JPEG baseline, extended-sequential, and progressive compression processes. Provision is made for supporting all variants of these processes, although some uncommon parameter settings aren't implemented yet. For legal reasons, we are not distributing code for the arithmetic-coding variants of JPEG; see LEGAL ISSUES. We have made no provision for supporting the hierarchical or lossless processes defined in the standard.
We provide a set of library routines for reading and writing JPEG image files, plus two sample applications "cjpeg" and "djpeg", which use the library to perform conversion between JPEG and some other popular image file formats. The library is intended to be reused in other applications.
In order to support file conversion and viewing software, we have included considerable functionality beyond the bare JPEG coding/decoding capability; for example, the color quantization modules are not strictly part of JPEG decoding, but they are essential for output to colormapped file formats or colormapped displays. These extra functions can be compiled out of the library if not required for a particular application. We have also included "jpegtran", a utility for lossless transcoding between different JPEG processes, and "rdjpgcom" and "wrjpgcom", two simple applications for inserting and extracting textual comments in JFIF files.
The emphasis in designing this software has been on achieving portability and flexibility, while also making it fast enough to be useful. In particular, the software is not intended to be read as a tutorial on JPEG. (See the REFERENCES section for introductory material.) Rather, it is intended to be reliable, portable, industrial-strength code. We do not claim to have achieved that goal in every aspect of the software, but we strive for it.
We welcome the use of this software as a component of commercial products. No royalty is required, but we do ask for an acknowledgement in product documentation, as described under LEGAL ISSUES.
LEGAL ISSUES
In plain English:
1 We don't promise that this software works. (But if you find any bugs, please let us know!)
2 You can use this software for whatever you want. You don't have to pay us.
3 You may not pretend that you wrote this software. If you use it in a program, you must acknowledge somewhere in your documentation that you've used the IJG code.
In legalese:
The authors make NO WARRANTY or representation, either express or implied, with respect to this software, its quality, accuracy, merchantability, or fitness for a particular purpose. This software is provided "AS IS", and you, its user, assume the entire risk as to its quality and accuracy.

152 Equitrac Print & Copy Control Setup Guide
This software is copyright (C) 1991-1998, Thomas G. Lane. All Rights Reserved except as specified below.
Permission is hereby granted to use, copy, modify, and distribute this software (or portions thereof) for any purpose, without fee, subject to these conditions:
1 If any part of the source code for this software is distributed, then this README file must be included, with this copyright and no-warranty notice unaltered; and any additions, deletions, or changes to the original files must be clearly indicated in accompanying documentation.
2 If only executable code is distributed, then the accompanying documentation must state that "this software is based in part on the work of the Independent JPEG Group".
3 Permission for use of this software is granted only if the user accepts full responsibility for any undesirable consequences; the authors accept NO LIABILITY for damages of any kind.
These conditions apply to any software derived from or based on the IJG code, not just to the unmodified library. If you use our work, you ought to acknowledge us.
Permission is NOT granted for the use of any IJG author's name or company name in advertising or publicity relating to this software or products derived from it. This software may be referred to only as "the Independent JPEG Group's software".
We specifically permit and encourage the use of this software as the basis of commercial products, provided that all warranty or liability claims are assumed by the product vendor. ansi2knr.c is included in this distribution by permission of L. Peter Deutsch, sole proprietor of its copyright holder, Aladdin Enterprises of Menlo Park, CA. ansi2knr.c is NOT covered by the above copyright and conditions, but instead by the usual distribution terms of the Free Software Foundation; principally, that you must include source code if you redistribute it. (See the file ansi2knr.c for full details.) However, since ansi2knr.c is not needed as part of any program generated from the IJG code, this does not limit you more than the foregoing paragraphs do.
The Unix configuration script "configure" was produced with GNU Autoconf. It is copyright by the Free Software Foundation but is freely distributable. The same holds for its supporting scripts (config.guess, config.sub, ltconfig, ltmain.sh). Another support script, install-sh, is copyright by M.I.T. but is also freely distributable.
It appears that the arithmetic coding option of the JPEG spec is covered by patents owned by IBM, AT&T, and Mitsubishi. Hence arithmetic coding cannot legally be used without obtaining one or more licenses. For this reason, support for arithmetic coding has been removed from the free JPEG software. (Since arithmetic coding provides only a marginal gain over the unpatented Huffman mode, it is unlikely that very many implementations will support it.) So far as we are aware, there are no patent restrictions on the remaining code.
The IJG distribution formerly included code to read and write GIF files. To avoid entanglement with the Unisys LZW patent, GIF reading support has been removed altogether, and the GIF writer has been simplified to produce "uncompressed GIFs". This technique does not use the LZW algorithm; the resulting GIF files are larger than usual, but are readable by all standard GIF decoders.
We are required to state that

Equitrac Print & Copy Control Setup Guide 153
"The Graphics Interchange Format(c) is the Copyright property of CompuServe Incorporated. GIF(sm) is a Service Mark property of CompuServe Incorporated."
REFERENCES
We highly recommend reading one or more of these references before trying to understand the innards of the JPEG software.
The best short technical introduction to the JPEG compression algorithm is Wallace, Gregory K. "The JPEG Still Picture Compression Standard", Communications of the ACM, April 1991 (vol. 34 no. 4), pp. 30-44.
(Adjacent articles in that issue discuss MPEG motion picture compression, applications of JPEG, and related topics.) If you don't have the CACM issue handy, a PostScript file containing a revised version of Wallace's article is available at ftp://ftp.uu.net/graphics/jpeg/wallace.ps.gz. The file (actually a preprint for an article that appeared in IEEE Trans. Consumer Electronics) omits the sample images that appeared in CACM, but it includes corrections and some added material. Note: the Wallace article is copyright ACM and IEEE, and it may not be used for commercial purposes.
A somewhat less technical, more leisurely introduction to JPEG can be found in "The Data Compression Book" by Mark Nelson and Jean-loup Gailly, published by M&T Books (New York), 2nd ed. 1996, ISBN 1-55851-434-1. This book provides good explanations and example C code for a multitude of compression methods including JPEG. It is an excellent source if you are comfortable reading C code but don't know much about data compression in general. The book's JPEG sample code is far from industrial-strength, but when you are ready to look at a full implementation, you've got one here...
The best full description of JPEG is the textbook "JPEG Still Image Data Compression Standard" by William B. Pennebaker and Joan L. Mitchell, published by Van Nostrand Reinhold, 1993, ISBN 0-442-01272-1. Price US$59.95, 638 pp. The book includes the complete text of the ISO JPEG standards (DIS 10918-1 and draft DIS 10918-2). This is by far the most complete exposition of JPEG in existence, and we highly recommend it.
The JPEG standard itself is not available electronically; you must order a paper copy through ISO or ITU. (Unless you feel a need to own a certified official copy, we recommend buying the Pennebaker and Mitchell book instead; it's much cheaper and includes a great deal of useful explanatory material.) In the USA, copies of the standard may be ordered from ANSI Sales at (212) 642-4900, or from Global Engineering Documents at (800) 854-7179. (ANSI doesn't take credit card orders, but Global does.) It's not cheap: as of 1992, ANSI was charging $95 for Part 1 and $47 for Part 2, plus 7% shipping/handling. The standard is divided into two parts, Part 1 being the actual specification, while Part 2 covers compliance testing methods. Part 1 is titled "Digital Compression and Coding of Continuous-tone Still Images, Part 1: Requirements and guidelines" and has document numbers ISO/IEC IS 10918 1, ITU-T T.81. Part 2 is titled "Digital Compression and Coding of Continuous-tone Still Images, Part 2: Compliance testing" and has document numbers ISO/IEC IS 10918-2, ITU-T T.83.
Some extensions to the original JPEG standard are defined in JPEG Part 3, a newer ISO standard numbered ISO/IEC IS 10918-3 and ITU-T T.84. IJG currently does not support any Part 3 extensions.
The JPEG standard does not specify all details of an interchangeable file format. For the omitted details we follow the "JFIF" conventions, revision 1.02. A copy of the JFIF spec is available from:

154 Equitrac Print & Copy Control Setup Guide
Literature Department C-Cube Microsystems, Inc. 1778 McCarthy Blvd. Milpitas, CA 95035 phone (408) 944-6300, fax (408) 944-6314
A PostScript version of this document is available by FTP at ftp://ftp.uu.net/graphics/jpeg/jfif.ps.gz. There is also a plain text version at ftp://ftp.uu.net/graphics/jpeg/jfif.txt.gz, but it is missing the figures.
The TIFF 6.0 file format specification can be obtained by FTP from ftp://ftp.sgi.com/graphics/tiff/TIFF6.ps.gz. The JPEG incorporation scheme found in the TIFF 6.0 spec of 3-June-92 has a number of serious problems. IJG does not recommend use of the TIFF 6.0 design (TIFF Compression tag 6). Instead, we recommend the JPEG design proposed by TIFF Technical Note #2 (Compression tag 7). Copies of this Note can be obtained from ftp.sgi.com or from ftp://ftp.uu.net/graphics/jpeg/. It is expected that the next revision of the TIFF spec will replace the 6.0 JPEG design with the Note's design. Although IJG's own code does not support TIFF/JPEG, the free libtiff library uses our library to implement TIFF/JPEG per the Note. libtiff is available from ftp://ftp.sgi.com/graphics/tiff/.
ARCHIVE LOCATIONS
The "official" archive site for this software is ftp.uu.net (Internet address 192.48.96.9). The most recent released version can always be found there in directory graphics/jpeg. This particular version will be archived as ftp:/ ftp.uu.net/graphics/jpeg/jpegsrc.v6b.tar.gz. If you don't have direct Internet access, UUNET's archives are also available via UUCP; contact [email protected] for information on retrieving files that way.
Numerous Internet sites maintain copies of the UUNET files. However, only ftp.uu.net is guaranteed to have the latest official version.
You can also obtain this software in DOS-compatible "zip" archive format from the SimTel archives (ftp:/ ftp.simtel.net/pub/simtelnet/msdos/graphics/), or on CompuServe in the Graphics Support forum (GO CIS:GRAPHSUP), library 12 "JPEG Tools". Again, these versions may sometimes lag behind the ftp.uu.net release. The JPEG FAQ (Frequently Asked Questions) article is a useful source of general information about JPEG. It is updated constantly and therefore is not included in this distribution. The FAQ is posted every two weeks to Usenet newsgroups comp.graphics.misc, news.answers, and other groups. It is available on the World Wide Web at http:/ www.faqs.org/faqs/jpeg-faq/ and other news.answers archive sites, including the official news.answers archive at rtfm.mit.edu: ftp://rtfm.mit.edu/pub/usenet/news.answers/jpeg-faq/. If you don't have Web or FTP access, send email to [email protected] with body
send usenet/news.answers/jpeg-faq/part1 send usenet/news.answers/jpeg-faq/part2

Equitrac Print & Copy Control Setup Guide 155
RELATED SOFTWARE
Numerous viewing and image manipulation programs now support JPEG. (Quite a few of them use this library to do so.) The JPEG FAQ described above lists some of the more popular free and shareware viewers, and tells where to obtain them on Internet.
If you are on a Unix machine, we highly recommend Jef Poskanzer's free PBMPLUS software, which provides many useful operations on PPM-format image files. In particular, it can convert PPM images to and from a wide range of other formats, thus making cjpeg/djpeg considerably more useful. The latest version is distributed by the NetPBM group, and is available from numerous sites, notably ftp://wuarchive.wustl.edu/graphics/graphics/packages NetPBM/. Unfortunately PBMPLUS/NETPBM is not nearly as portable as the IJG software is; you are likely to have difficulty making it work on any non-Unix machine.
A different free JPEG implementation, written by the PVRG group at Stanford, is available from ftp:/ havefun.stanford.edu/pub/jpeg/. This program is designed for research and experimentation rather than production use; it is slower, harder to use, and less portable than the IJG code, but it is easier to read and modify. Also, the PVRG code supports lossless JPEG, which we do not. (On the other hand, it doesn't do progressive JPEG.)
FILE FORMAT WARS
Some JPEG programs produce files that are not compatible with our library. The root of the problem is that the ISO JPEG committee failed to specify a concrete file format. Some vendors "filled in the blanks" on their own, creating proprietary formats that no one else could read. (For example, none of the early commercial JPEG implementations for the Macintosh were able to exchange compressed files.)
The file format we have adopted is called JFIF (see REFERENCES). This format has been agreed to by a number of major commercial JPEG vendors, and it has become the de facto standard. JFIF is a minimal or "low end" representation. We recommend the use of TIFF/JPEG (TIFF revision 6.0 as modified by TIFF Technical Note #2) for "high end" applications that need to record a lot of additional data about an image. TIFF/JPEG is fairly new and not yet widely supported, unfortunately.
The upcoming JPEG Part 3 standard defines a file format called SPIFF. SPIFF is interoperable with JFIF, in the sense that most JFIF decoders should be able to read the most common variant of SPIFF. SPIFF has some technical advantages over JFIF, but its major claim to fame is simply that it is an official standard rather than an informal one. At this point it is unclear whether SPIFF will supersede JFIF or whether JFIF will remain the de-facto standard. IJG intends to support SPIFF once the standard is frozen, but we have not decided whether it should become our default output format or not. (In any case, our decoder will remain capable of reading JFIF indefinitely.)
Various proprietary file formats incorporating JPEG compression also exist. We have little or no sympathy for the existence of these formats. Indeed, one of the original reasons for developing this free software was to help force convergence on common, open format standards for JPEG files. Don't use a proprietary file format!
TO DO

156 Equitrac Print & Copy Control Setup Guide
The major thrust for v7 will probably be improvement of visual quality. The current method for scaling the quantization tables is known not to be very good at low Q values. We also intend to investigate block boundary smoothing, "poor man's variable quantization", and other means of improving quality-vs-file-size performance without sacrificing compatibility.
In future versions, we are considering supporting some of the upcoming JPEG Part 3 extensions --- principally, variable quantization and the SPIFF file format.
As always, speeding things up is of great interest. Please send bug reports, offers of help, etc. to [email protected].
ZIP
The following software may be included in this product: ZIP Libraries. Use of any of this software is governed by the terms of the following license(s):
Original authors' comments:
This is version 2002-Feb-16 of the Info-ZIP copyright and license. The definitive version of this document should be available at ftp://ftp.info-zip.org/pub/infozip/license.html indefinitely.
Copyright (c) 1990-2002 Info-ZIP. All rights reserved.
For the purposes of this copyright and license, "Info-ZIP" is defined as the following set of individuals:
Mark Adler, John Bush, Karl Davis, Harald Denker, Jean-Michel Dubois, Jean-loup Gailly, Hunter Goatley, Ian Gorman, Chris Herborth, Dirk Haase, Greg Hartwig, Robert Heath, Jonathan Hudson, Paul Kienitz, David Kirschbaum, Johnny Lee, Onno van der Linden, Igor Mandrichenko, Steve P. Miller, Sergio Monesi, Keith Owens, George Petrov, Greg Roelofs, Kai Uwe Rommel, Steve Salisbury, Dave Smith, Christian Spieler, Antoine Verheijen, Paul von Behren, Rich Wales, Mike White
This software is provided "as is", without warranty of any kind, express or implied. In no event shall Info-ZIP or its contributors be held liable for any direct, indirect, incidental, special or consequential damages arising out of the use of or inability to use this software.
Permission is granted to anyone to use this software for any purpose, including commercial applications, and to alter it and redistribute it freely, subject to the following restrictions:
1. Redistributions of source code must retain the above copyright notice, definition, disclaimer, and this list of conditions.
2. Redistributions in binary form (compiled executables) must reproduce the above copyright notice, definition, disclaimer, and this list of conditions in documentation and/or other materials provided with the distribution. The sole exception to this condition is redistribution of a standard UnZipSFX binary as part of a self-extracting archive; that is permitted without inclusion of this license, as long as the normal UnZipSFX banner has not been removed from the binary or disabled.
3. Altered versions--including, but not limited to, ports to new operating systems, existing ports with new graphical interfaces, and dynamic, shared, or static library versions--must be plainly marked as such and must not be misrepresented as being the original source. Such altered versions also must not be

Equitrac Print & Copy Control Setup Guide 157
misrepresented as being Info-ZIP releases--including, but not limited to, labeling of the altered versions with the names "Info-ZIP" (or any variation thereof, including, but not limited to, different capitalizations), "Pocket UnZip", "WiZ" or "MacZip" without the explicit permission of Info-ZIP. Such altered versions are further prohibited from misrepresentative use of the Zip-Bugs or Info-ZIP e-mail addresses or of the Info-ZIP URL(s).
4. Info-ZIP retains the right to use the names "Info-ZIP", "Zip", "UnZip", "UnZipSFX", "WiZ", "Pocket UnZip", "Pocket Zip", and "MacZip" for its own source and binary releases.

158 Equitrac Print & Copy Control Setup Guide
AES Encryption
The following software may be included in this product: AES Encryption. Use of any of this software is governed by the terms of the following license(s):
Copyright (c) 2003, Dr Brian Gladman <[email protected]>, Worcester, UK. All rights reserved.
LICENSE TERMS
The free distribution and use of this software in both source and binary form is allowed (with or without changes) provided that:
1 distributions of this source code include the above copyright notice, this list of conditions and the following disclaimer;
2 distributions in binary form include the above copyright notice, this list of conditions and the following disclaimer in the documentation and/or other associated materials;
3 the copyright holder's name is not used to endorse products built using this software without specific written permission.
ALTERNATIVELY, provided that this notice is retained in full, this product may be distributed under the terms of the GNU General Public License (GPL), in which case the provisions of the GPL apply INSTEAD OF those given above.
DISCLAIMER
This software is provided 'as is' with no explicit or implied warranties in respect of its properties, including, but not limited to, correctness and/or fitness for purpose.
Issue Date: 26/08/2003
This file contains the definitions required to use AES in C. See aesopt.h for optimisation details.
openSSL
The following software may be included in this product: openSSL. Use of any of this software is governed by the terms of the following license(s):
LICENSE ISSUES
The OpenSSL toolkit stays under a dual license, i.e. both the conditions of the OpenSSL License and the original SSLeay license apply to the toolkit. See below for the actual license texts. Actually both licenses are BSD-style Open Source licenses. In case of any license issues related to OpenSSL please contact [email protected].
OpenSSL License
Copyright (c) 1998-2011 The OpenSSL Project. All rights reserved.

Equitrac Print & Copy Control Setup Guide 159
Redistribution and use in source and binary forms, with or without modification, are permitted provided that the following conditions are met:
1 Redistributions of source code must retain the above copyright notice, this list of conditions and the following disclaimer.
2 Redistributions in binary form must reproduce the above copyright notice, this list of conditions and the following disclaimer in the documentation and/or other materials provided with the distribution.
3 All advertising materials mentioning features or use of this software must display the following acknowledgment: "This product includes software developed by the OpenSSL Project for use in the OpenSSL Toolkit. (http://www.openssl.org/)"
4 The names "OpenSSL Toolkit" and "OpenSSL Project" must not be used to endorse or promote products derived from this software without prior written permission. For written permission, please contact openssl [email protected].
5 Products derived from this software may not be called "OpenSSL" nor may "OpenSSL" appear in their names without prior written permission of the OpenSSL Project.
6 Redistributions of any form whatsoever must retain the following acknowledgment: "This product includes software developed by the OpenSSL Project for use in the OpenSSL Toolkit (http://www.openssl.org/)"
THIS SOFTWARE IS PROVIDED BY THE OpenSSL PROJECT ``AS IS'' AND ANY EXPRESSED OR IMPLIED WARRANTIES, INCLUDING, BUT NOT LIMITED TO, THE IMPLIED WARRANTIES OF MERCHANTABILITY AND FITNESS FOR A PARTICULAR PURPOSE ARE DISCLAIMED. IN NO EVENT SHALL THE OpenSSL PROJECT OR ITS CONTRIBUTORS BE LIABLE FOR ANY DIRECT, INDIRECT, INCIDENTAL, SPECIAL, EXEMPLARY, OR CONSEQUENTIAL DAMAGES (INCLUDING, BUT NOT LIMITED TO, PROCUREMENT OF SUBSTITUTE GOODS OR SERVICES; LOSS OF USE, DATA, OR PROFITS; OR BUSINESS INTERRUPTION) HOWEVER CAUSED AND ON ANY THEORY OF LIABILITY, WHETHER IN CONTRACT, STRICT LIABILITY, OR TORT (INCLUDING NEGLIGENCE OR OTHERWISE) ARISING IN ANY WAY OUT OF THE USE OF THIS SOFTWARE, EVEN IF ADVISED OF THE POSSIBILITY OF SUCH DAMAGE.
====================================================================
This product includes cryptographic software written by Eric Young ([email protected]). This product includes software written by Tim Hudson ([email protected]).
Original SSLeay License
Copyright (C) 1995-1998 Eric Young ([email protected]) All rights reserved.
This package is an SSL implementation written by Eric Young ([email protected]). The implementation was written so as to conform with Netscapes SSL.

160 Equitrac Print & Copy Control Setup Guide
This library is free for commercial and non-commercial use as long as the following conditions are aheared to. The following conditions apply to all code found in this distribution, be it the RC4, RSA, lhash, DES, etc., code; not just the SSL code. The SSL documentation included with this distribution is covered by the same copyright terms except that the holder is Tim Hudson ([email protected]).
Copyright remains Eric Young's, and as such any Copyright notices in the code are not to be removed. If this package is used in a product, Eric Young should be given attribution as the author of the parts of the library used. This can be in the form of a textual message at program startup or in documentation (online or textual) provided with the package.
Redistribution and use in source and binary forms, with or without modification, are permitted provided that the following conditions are met:
1 Redistributions of source code must retain the copyright notice, this list of conditions and the following disclaimer.
2 Redistributions in binary form must reproduce the above copyright notice, this list of conditions and the following disclaimer in the documentation and/or other materials provided with the distribution.
3 All advertising materials mentioning features or use of this software must display the following acknowledgement: "This product includes cryptographic software written by Eric Young ([email protected])" The word 'cryptographic' can be left out if the routines from the library being used are not cryptographic related
4 If you include any Windows specific code (or a derivative thereof) from the apps directory (application code) you must include an acknowledgement: "This product includes software written by Tim Hudson ([email protected])"
THIS SOFTWARE IS PROVIDED BY ERIC YOUNG ``AS IS'' AND ANY EXPRESS OR IMPLIED WARRANTIES, INCLUDING, BUT NOT LIMITED TO, THE IMPLIED WARRANTIES OF MERCHANTABILITY AND FITNESS FOR A PARTICULAR PURPOSE ARE DISCLAIMED. IN NO EVENT SHALL THE AUTHOR OR CONTRIBUTORS BE LIABLE FOR ANY DIRECT, INDIRECT, INCIDENTAL, SPECIAL, EXEMPLARY, OR CONSEQUENTIAL DAMAGES (INCLUDING, BUT NOT LIMITED TO, PROCUREMENT OF SUBSTITUTE GOODS OR SERVICES; LOSS OF USE, DATA, OR PROFITS; OR BUSINESS INTERRUPTION) HOWEVER CAUSED AND ON ANY THEORY OF LIABILITY, WHETHER IN CONTRACT, STRICT LIABILITY, OR TORT (INCLUDING NEGLIGENCE OR OTHERWISE) ARISING IN ANY WAY OUT OF THE USE OF THIS SOFTWARE, EVEN IF ADVISED OF THE POSSIBILITY OF SUCH DAMAGE.
The licence and distribution terms for any publically available version or derivative of this code cannot be changed. i.e. this code cannot simply be copied and put under another distribution licence [including the GNU Public Licence.]
Zlib 1.1.3
The following software may be included in this product: Zlib 1.1.3. Use of any of this software is governed by the terms of the following license(s):

Equitrac Print & Copy Control Setup Guide 161
zlib 1.1.3 is a general purpose data compression library. All the code is thread safe. The data format used by the zlib library is described by RFCs (Request for Comments) 1950 to 1952 in the files ftp://ds.internic.net/rfc/rfc1950.txt (zlib format), rfc1951.txt (deflate format) and rfc1952.txt (gzip format). These documents are also available in other formats from ftp://ftp.uu.net/graphics/png/documents/zlib/zdoc-index.html
All functions of the compression library are documented in the file zlib.h (volunteer to write man pages welcome, contact [email protected]). A usage example of the library is given in the file example.c which also tests that the library is working correctly. Another example is given in the file minigzip.c. The compression library itself is composed of all source files except example.c and minigzip.c.
To compile all files and run the test program, follow the instructions given at the top of Makefile. In short "make test; make install" should work for most machines. For Unix: "configure; make test; make install" For MSDOS, use one of the special make files such as Makefile.msc. For VMS, use Make_vms.com or descrip.mms.
Questions about zlib should be sent to <[email protected]>, or to Gilles Vollant <[email protected]> for the Windows DLL version. The zlib home page is http://www.cdrom.com/pub/infozip/zlib/ The official zlib ftp site is ftp://ftp.cdrom.com/pub/infozip/zlib/ Before reporting a problem, please check those sites to verify that you have the latest version of zlib; otherwise get the latest version and check whether the problem still exists or not.
Mark Nelson <[email protected]> wrote an article about zlib for the Jan. 1997 issue of Dr. Dobb's Journal; a copy of the article is available in http://web2.airmail.net/markn/articles/zlibtool/zlibtool.htm
The changes made in version 1.1.3 are documented in the file ChangeLog.The main changes since 1.1.2 are:
• fix "an inflate input buffer bug that shows up on rare but persistent occasions" (Mark)
• fix gzread and gztell for concatenated .gz files (Didier Le Botlan)
• fix gzseek(..., SEEK_SET) in write mode
• fix crc check after a gzeek (Frank Faubert)
• fix miniunzip when the last entry in a zip file is itself a zip file (J Lillge)
• add contrib/asm586 and contrib/asm686 (Brian Raiter) See http://www.muppetlabs.com/~breadbox/software assembly.html
• add support for Delphi 3 in contrib/delphi (Bob Dellaca)
• add support for C++Builder 3 and Delphi 3 in contrib/delphi2 (Davide Moretti)
• do not exit prematurely in untgz if 0 at start of block (Magnus Holmgren)
• use macro EXTERN instead of extern to support DLL for BeOS (Sander Stoks)
• added a FAQ file
plus many changes for portability.
Unsupported third party contributions are provided in directory "contrib".

162 Equitrac Print & Copy Control Setup Guide
A Java implementation of zlib is available in the Java Development Kit 1.1 http://www.javasoft.com/products/JDK 1.1/docs/api/Package-java.util.zip.html See the zlib home page http://www.cdrom.com/pub/infozip/zlib/ for details.
A Perl interface to zlib written by Paul Marquess <[email protected]> is in the CPAN (Comprehensive Perl Archive Network) sites, such as: ftp://ftp.cis.ufl.edu/pub/perl/CPAN/modules/by-module/Compress/Compress-Zlib*
A Python interface to zlib written by A.M. Kuchling <[email protected]> is available in Python 1.5 and later versions, see http://www.python.org/doc/lib/module-zlib.html
A zlib binding for TCL written by Andreas Kupries <[email protected]> is availlable at http:/ www.westend.com/~kupries/doc/trf/man/man.html
An experimental package to read and write files in .zip format, written on top of zlib by Gilles Vollant <[email protected]>, is available at http://www.winimage.com/zLibDll/unzip.html and also in the contrib minizip directory of zlib.
Notes for some targets:
• To build a Windows DLL version, include in a DLL project zlib.def, zlib.rc and all .c files except example.c and minigzip.c; compile with -DZLIB_DLL The zlib DLL support was initially done by Alessandro Iacopetti and is now maintained by Gilles Vollant <[email protected]>. Check the zlib DLL home page at http:/ www.winimage.com/zLibDll From Visual Basic, you can call the DLL functions which do not take a structure as argument: compress, uncompress and all gz* functions. See contrib/visual-basic.txt for more information, or get http://www.tcfb.com/dowseware/cmp-z-it.zip
• For 64-bit Irix, deflate.c must be compiled without any optimization. With -O, one libpng test fails. The test works in 32 bit mode (with the -n32 compiler flag). The compiler bug has been reported to SGI.
• zlib doesn't work with gcc 2.6.3 on a DEC 3000/300LX under OSF/1 2.1 it works when compiled with cc.
• on Digital Unix 4.0D (formely OSF/1) on AlphaServer, the cc option -std1 is necessary to get gzprintf working correctly. This is done by configure.
• zlib doesn't work on HP-UX 9.05 with some versions of /bin/cc. It works with other compilers. Use "make test" to check your compiler.
• gzdopen is not supported on RISCOS, BEOS and by some Mac compilers.
• For Turbo C the small model is supported only with reduced performance to avoid any far allocation; it was tested with -DMAX_WBITS=11 -DMAX_MEM_LEVEL=3
• For PalmOs, see http://www.cs.uit.no/~perm/PASTA/pilot/software.html Per Harald Myrvang <[email protected]>
Acknowledgments:
The deflate format used by zlib was defined by Phil Katz. The deflate and zlib specifications were written by L. Peter Deutsch. Thanks to all the people who reported problems and suggested various improvements in zlib; they are too numerous to cite here.

Equitrac Print & Copy Control Setup Guide 163
Copyright notice:
(C) 1995-1998 Jean-loup Gailly and Mark Adler
This software is provided 'as-is', without any express or implied warranty. In no event will the authors be held liable for any damages arising from the use of this software.
Permission is granted to anyone to use this software for any purpose, including commercial applications, and to alter it and redistribute it freely, subject to the following restrictions:
1 The origin of this software must not be misrepresented; you must not claim that you wrote the original software. If you use this software in a product, an acknowledgment in the product documentation would be appreciated but is not required.
2 Altered source versions must be plainly marked as such, and must not be misrepresented as being the original software.
3 This notice may not be removed or altered from any source distribution.
Jean-loup Gailly ([email protected]) Mark Adler ([email protected])
If you use the zlib library in a product, we would appreciate *not* receiving lengthy legal documents to sign. The sources are provided for free but without warranty of any kind. The library has been entirely written by Jean-loup Gailly and Mark Adler; it does not include third-party code.
If you redistribute modified sources, we would appreciate that you include in the file ChangeLog history information documenting your changes.
EEBase64
The following software may be included in this product: EEBase64. Use of any of this software is governed by the terms of the following license(s):
C_Base64 - a simple base64 encoder and decoder. Copyright (c) 1999, Bob Withers - [email protected]
This code may be freely used for any purpose, either personal or commercial, provided the authors copyright notice remains intact.
Bouncy
The following software may be included in this product: Bouncy. Use of any of this software is governed by the terms of the following license(s):
Copyright (c) 2000 The Legion Of The Bouncy Castle (http://www.bouncycastle.org)

164 Equitrac Print & Copy Control Setup Guide
Permission is hereby granted, free of charge, to any person obtaining a copy of this software and associated documentation files (the "Software"), to deal in the Software without restriction, including without limitation the rights to use, copy, modify, merge, publish, distribute, sublicense, and/or sell copies of the Software, and to permit persons to whom the Software is furnished to do so, subject to the following conditions:
The above copyright notice and this permission notice shall be included in all copies or substantial portions of the Software.
THE SOFTWARE IS PROVIDED "AS IS", WITHOUT WARRANTY OF ANY KIND, EXPRESS OR IMPLIED, INCLUDING BUT NOT LIMITED TO THE WARRANTIES OF MERCHANTABILITY, FITNESS FOR A PARTICULAR PURPOSE AND NONINFRINGEMENT. IN NO EVENT SHALL THE AUTHORS OR COPYRIGHT HOLDERS BE LIABLE FOR ANY CLAIM, DAMAGES OR OTHER LIABILITY, WHETHER IN AN ACTION OF CONTRACT, TORT OR OTHERWISE, ARISING FROM, OUT OF OR IN CONNECTION WITH THE SOFTWARE OR THE USE OR OTHER DEALINGS IN THE SOFTWARE.
LibTiff
The following software may be included in this product: LibTiff. Use of any of this software is governed by the terms of the following license(s):
Copyright (c) 1988-1997 Sam Leffler Copyright (c) 1991-1997 Silicon Graphics, Inc.
Permission to use, copy, modify, distribute, and sell this software and its documentation for any purpose is hereby granted without fee, provided that (i) the above copyright notices and this permission notice appear in all copies of the software and related documentation, and (ii) the names of Sam Leffler and Silicon Graphics may not be used in any advertising or publicity relating to the software without the specific, prior written permission of Sam Leffler and Silicon Graphics.
THE SOFTWARE IS PROVIDED "AS-IS" AND WITHOUT WARRANTY OF ANY KIND, EXPRESS, IMPLIED OR OTHERWISE, INCLUDING WITHOUT LIMITATION, ANY WARRANTY OF MERCHANTABILITY OR FITNESS FOR A PARTICULAR PURPOSE.
IN NO EVENT SHALL SAM LEFFLER OR SILICON GRAPHICS BE LIABLE FOR ANY SPECIAL, INCIDENTAL, INDIRECT OR CONSEQUENTIAL DAMAGES OF ANY KIND, OR ANY DAMAGES WHATSOEVER RESULTING FROM LOSS OF USE, DATA OR PROFITS, WHETHER OR NOT ADVISED OF THE POSSIBILITY OF DAMAGE, AND ON ANY THEORY OF LIABILITY, ARISING OUT OF OR IN CONNECTION WITH THE USE OR PERFORMANCE OF THIS SOFTWARE.
PCRE
The following software may be included in this product: PCRE. Use of any of this software is governed by the terms of the following license(s):
PCRE LICENCE
PCRE is a library of functions to support regular expressions whose syntax and semantics are as close as possible to those of the Perl 5 language.

Equitrac Print & Copy Control Setup Guide 165
Written by: Philip Hazel <[email protected]> University of Cambridge Computing Service, Cambridge, England. Phone: +44 1223 334714. Copyright (c) 1997-2000 University of Cambridge
Permission is granted to anyone to use this software for any purpose on any computer system, and to redistribute it freely, subject to the following restrictions:
1 This software is distributed in the hope that it will be useful, but WITHOUT ANY WARRANTY; without even the implied warranty of MERCHANTABILITY or FITNESS FOR A PARTICULAR PURPOSE.
2 The origin of this software must not be misrepresented, either by explicit claim or by omission. In practice, this means that if you use PCRE in software which you distribute to others, commercially or otherwise, you must put a sentence like this:
"Regular expression support is provided by the PCRE library package, which is open source software, written by Philip Hazel, and copyright by the University of Cambridge, England."
somewhere reasonably visible in your documentation and in any relevant files or online help data or similar. A reference to the ftp site for the source, that is, to
ftp://ftp.csx.cam.ac.uk/pub/software/programming/pcre/
should also be given in the documentation.
3 Altered versions must be plainly marked as such, and must not be misrepresented as being the original software.
4 If PCRE is embedded in any software that is released under the GNU General Purpose Licence (GPL), then the terms of that licence shall supersede any condition above with which it is incompatible.
End
AES Encryption-Google
The following software may be included in this product: AES Encryption-Google. Use of any of this software is governed by the terms of the following license(s):
AES Encryption is based upon aes.js provided through the BrowserSync project (http://code.google.com/p browsersync/) under the following copyright and license terms
Copyright 2005, Google Inc.
Redistribution and use in source and binary forms, with or without modification, are permitted provided that the following conditions are met:
1 Redistributions of source code must retain the above copyright notice, this list of conditions and the following disclaimer.

166 Equitrac Print & Copy Control Setup Guide
2 Redistributions in binary form must reproduce the above copyright notice, this list of conditions and the following disclaimer in the documentation and/or other materials provided with the distribution.
3 Neither the name of Google Inc. nor the names of its contributors may be used to endorse or promote products derived from this software without specific prior written permission.
THIS SOFTWARE IS PROVIDED BY THE AUTHOR ``AS IS'' AND ANY EXPRESS OR IMPLIED WARRANTIES, INCLUDING, BUT NOT LIMITED TO, THE IMPLIED WARRANTIES OF MERCHANTABILITY AND FITNESS FOR A PARTICULAR PURPOSE ARE DISCLAIMED. IN NO EVENT SHALL THE AUTHOR BE LIABLE FOR ANY DIRECT, INDIRECT, INCIDENTAL, SPECIAL, EXEMPLARY, OR CONSEQUENTIAL DAMAGES (INCLUDING, BUT NOT LIMITED TO, PROCUREMENT OF SUBSTITUTE GOODS OR SERVICES; LOSS OF USE, DATA, OR PROFITS; OR BUSINESS INTERRUPTION) HOWEVER CAUSED AND ON ANY THEORY OF LIABILITY, WHETHER IN CONTRACT, STRICT LIABILITY, OR TORT (INCLUDING NEGLIGENCE OR OTHERWISE) ARISING IN ANY WAY OUT OF THE USE OF THIS SOFTWARE, EVEN IF ADVISED OF THE POSSIBILITY OF SUCH DAMAGE.
SAX XML Parsing
The following software may be included in this product: SAX XML Parsing. Use of any of this software is governed by the terms of the following license(s):
SAX XML Parsing Project (http://www.saxproject.org) covering packages org.sax.*
Copyright Status SAX is free!
In fact, it's not possible to own a license to SAX, since it's been placed in the public domain.
No Warranty
Because SAX is released to the public domain, there is no warranty for the design or for the software implementation, to the extent permitted by applicable law. Except when otherwise stated in writing the copyright holders and/or other parties provide SAX "as is" without warranty of any kind, either expressed or implied, including, but not limited to, the implied warranties of merchantability and fitness for a particular purpose. The entire risk as to the quality and performance of SAX is with you. Should SAX prove defective, you assume the cost of all necessary servicing, repair or correction.
In no event unless required by applicable law or agreed to in writing will any copyright holder, or any other party who may modify and/or redistribute SAX, be liable to you for damages, including any general, special, incidental or consequential damages arising out of the use or inability to use SAX (including but not limited to loss of data or data being rendered inaccurate or losses sustained by you or third parties or a failure of the SAX to operate with any other programs), even if such holder or other party has been advised of the possibility of such damages.
Copyright Disclaimers

Equitrac Print & Copy Control Setup Guide 167
This page includes statements to that effect by David Megginson, who would have been able to claim copyright for the original work.
SAX 1.0
Version 1.0 of the Simple API for XML (SAX), created collectively by the membership of the XML-DEV mailing list, is hereby released into the public domain.
No one owns SAX: you may use it freely in both commercial and non-commercial applications, bundle it with your software distribution, include it on a CD-ROM, list the source code in a book, mirror the documentation at your own web site, or use it in any other way you see fit.
David Megginson, Megginson Technologies Ltd.
5/11/1998
SAX 2.0
I hereby abandon any property rights to SAX 2.0 (the Simple API for XML), and release all of the SAX 2.0 source code, compiled code, and documentation contained in this distribution into the Public Domain. SAX comes with NO WARRANTY or guarantee of fitness for any purpose.
David Megginson, Megginson Technologies Ltd.
5/5/2000
GNU Classpath
The following software may be included in this product: GNU Classpath. Use of any of this software is governed by the terms of the following license(s):
These packages contain the following copyright notice and license terms
Copyright (C) 1998, 1999, 2001, 2002, 2005 Free Software Foundation, Inc.
GNU Classpath is free software; you can redistribute it and/or modify it under the terms of the GNU General Public License as published by the Free Software Foundation; either version 2, or (at your option) any later version.
GNU Classpath is distributed in the hope that it will be useful, but WITHOUT ANY WARRANTY; without even the implied warranty of MERCHANTABILITY or FITNESS FOR A PARTICULAR PURPOSE. See the GNU General Public License for more details.
You should have received a copy of the GNU General Public License along with GNU Classpath; see the file COPYING. If not, write to the Free Software Foundation, Inc., 51 Franklin Street, Fifth Floor, Boston, MA 02110 1301 USA.

168 Equitrac Print & Copy Control Setup Guide
Linking this library statically or dynamically with other modules is making a combined work based on this library. Thus, the terms and conditions of the GNU General Public License cover the whole combination.
As a special exception, the copyright holders of this library give you permission to link this library with independent modules to produce an executable, regardless of the license terms of these independent modules, and to copy and distribute the resulting executable under terms of your choice, provided that you also meet, for each linked independent module, the terms and conditions of the license of that module. An independent module is a module which is not derived from or based on this library. If you modify this library, you may extend this exception to your version of the library, but you are not obligated to do so. If you do not wish to do so, delete this exception statement from your version.
GNU General Public License Version 2
General information:
http://www.gnu.org/copyleft/gpl.html
Copyright 1989, 1991 Free Software Foundation, Inc.
The GNU General Public License (GPL) Version 2, June 1991 Copyright (C) 1989, 1991 Free Software Foundation, Inc. 51 Franklin Street, Fifth Floor, Boston, MA 02110-1301 USA
Everyone is permitted to copy and distribute verbatim copies of this license document, but changing it is not allowed.
For information about the GPL, click here.
Preamble
The licenses for most software are designed to take away your freedom to share and change it. By contrast, the GNU General Public License is intended to guarantee your freedom to share and change free software--to make sure the software is free for all its users. This General Public License applies to most of the Free Software Foundation's software and to any other program whose authors commit to using it. (Some other Free Software Foundation software is covered by the GNU Library General Public License instead.) You can apply it to your programs, too.
When we speak of free software, we are referring to freedom, not price. Our General Public Licenses are designed to make sure that you have the freedom to distribute copies of free software (and charge for this service if you wish), that you receive source code or can get it if you want it, that you can change the software or use pieces of it in new free programs; and that you know you can do these things.
To protect your rights, we need to make restrictions that forbid anyone to deny you these rights or to ask you to surrender the rights. These restrictions translate to certain responsibilities for you if you distribute copies of the software, or if you modify it.
For example, if you distribute copies of such a program, whether gratis or for a fee, you must give the recipients all the rights that you have. You must make sure that they, too, receive or can get the source code. And you must show them these terms so they know their rights.

Equitrac Print & Copy Control Setup Guide 169
We protect your rights with two steps: (1) copyright the software, and (2) offer you this license which gives you legal permission to copy, distribute and/or modify the software.
Also, for each author's protection and ours, we want to make certain that everyone understands that there is no warranty for this free software. If the software is modified by someone else and passed on, we want its recipients to know that what they have is not the original, so that any problems introduced by others will not reflect on the original authors' reputations.
Finally, any free program is threatened constantly by software patents. We wish to avoid the danger that redistributors of a free program will individually obtain patent licenses, in effect making the program proprietary. To prevent this, we have made it clear that any patent must be licensed for everyone's free use or not licensed at all.
The precise terms and conditions for copying, distribution and modification follow.
TERMS AND CONDITIONS FOR COPYING, DISTRIBUTION AND MODIFICATION
This License applies to any program or other work which contains a notice placed by the copyright holder saying it may be distributed under the terms of this General Public License. The 'Program', below, refers to any such program or work, and a 'work based on the Program' means either the Program or any derivative work under copyright law: that is to say, a work containing the Program or a portion of it, either verbatim or with modifications and/or translated into another language. (Hereinafter, translation is included without limitation in the term 'modification'.) Each licensee is addressed as 'you'.
Activities other than copying, distribution and modification are not covered by this License; they are outside its scope. The act of running the Program is not restricted, and the output from the Program is covered only if its contents constitute a work based on the Program (independent of having been made by running the Program). Whether that is true depends on what the Program does.
1 You may copy and distribute verbatim copies of the Program's source code as you receive it, in any medium, provided that you conspicuously and appropriately publish on each copy an appropriate copyright notice and disclaimer of warranty; keep intact all the notices that refer to this License and to the absence of any warranty; and give any other recipients of the Program a copy of this License along with the Program.
You may charge a fee for the physical act of transferring a copy, and you may at your option offer warranty protection in exchange for a fee.
2 You may modify your copy or copies of the Program or any portion of it, thus forming a work based on the Program, and copy and distribute such modifications or work under the terms of Section 1 above, provided that you also meet all of these conditions:
a You must cause the modified files to carry prominent notices stating that you changed the files and the date of any change.
b You must cause any work that you distribute or publish, that in whole or in part contains or is derived from the Program or any part thereof, to be licensed as a whole at no charge to all third parties under the terms of this License.
c f the modified program normally reads commands interactively when run, you must cause it, when started running for such interactive use in the most ordinary way, to print or display an announcement

170 Equitrac Print & Copy Control Setup Guide
including an appropriate copyright notice and a notice that there is no warranty (or else, saying that you provide a warranty) and that users may redistribute the program under these conditions, and telling the user how to view a copy of this License. (Exception: if the Program itself is interactive but does not normally print such an announcement, your work based on the Program is not required to print an announcement.)
These requirements apply to the modified work as a whole. If identifiable sections of that work are not derived from the Program, and can be reasonably considered independent and separate works in themselves, then this License, and its terms, do not apply to those sections when you distribute them as separate works. But when you distribute the same sections as part of a whole which is a work based on the Program, the distribution of the whole must be on the terms of this License, whose permissions for other licensees extend to the entire whole, and thus to each and every part regardless of who wrote it.
Thus, it is not the intent of this section to claim rights or contest your rights to work written entirely by you; rather, the intent is to exercise the right to control the distribution of derivative or collective works based on the Program.
In addition, mere aggregation of another work not based on the Program with the Program (or with a work based on the Program) on a volume of a storage or distribution medium does not bring the other work under the scope of this License.
3 You may copy and distribute the Program (or a work based on it, under Section 2) in object code or executable form under the terms of Sections 1 and 2 above provided that you also do one of the following:
a Accompany it with the complete corresponding machine-readable source code, which must be distributed under the terms of Sections 1 and 2 above on a medium customarily used for software interchange; or,
a Accompany it with a written offer, valid for at least three years, to give any third party, for a charge no more than your cost of physically performing source distribution, a complete machine-readable copy of the corresponding source code, to be distributed under the terms of Sections 1 and 2 above on a medium customarily used for software interchange; or,
b Accompany it with the information you received as to the offer to distribute corresponding source code. (This alternative is allowed only for noncommercial distribution and only if you received the program in object code or executable form with such an offer, in accord with Subsection b above.)
The source code for a work means the preferred form of the work for making modifications to it. For an executable work, complete source code means all the source code for all modules it contains, plus any associated interface definition files, plus the scripts used to control compilation and installation of the executable. However, as a special exception, the source code distributed need not include anything that is normally distributed (in either source or binary form) with the major components (compiler, kernel, and so on) of the operating system on which the executable runs, unless that component itself accompanies the executable.
If distribution of executable or object code is made by offering access to copy from a designated place, then offering equivalent access to copy the source code from the same place counts as distribution of the source code, even though third parties are not compelled to copy the source along with the object code.
4 You may not copy, modify, sublicense, or distribute the Program except as expressly provided under this License. Any attempt otherwise to copy, modify, sublicense or distribute the Program is void, and will automatically terminate your rights under this License. However, parties who have received copies, or rights,

Equitrac Print & Copy Control Setup Guide 171
from you under this License will not have their licenses terminated so long as such parties remain in full compliance.
5 You are not required to accept this License, since you have not signed it. However, nothing else grants you permission to modify or distribute the Program or its derivative works. These actions are prohibited by law if you do not accept this License. Therefore, by modifying or distributing the Program (or any work based on the Program), you indicate your acceptance of this License to do so, and all its terms and conditions for copying, distributing or modifying the Program or works based on it.
6 Each time you redistribute the Program (or any work based on the Program), the recipient automatically receives a license from the original licensor to copy, distribute or modify the Program subject to these terms and conditions. You may not impose any further restrictions on the recipients' exercise of the rights granted herein. You are not responsible for enforcing compliance by third parties to this License.
7 If, as a consequence of a court judgment or allegation of patent infringement or for any other reason (not limited to patent issues), conditions are imposed on you (whether by court order, agreement or otherwise) that contradict the conditions of this License, they do not excuse you from the conditions of this License. If you cannot distribute so as to satisfy simultaneously your obligations under this License and any other pertinent obligations, then as a consequence you may not distribute the Program at all. For example, if a patent license would not permit royalty-free redistribution of the Program by all those who receive copies directly or indirectly through you, then the only way you could satisfy both it and this License would be to refrain entirely from distribution of the Program.
If any portion of this section is held invalid or unenforceable under any particular circumstance, the balance of the section is intended to apply and the section as a whole is intended to apply in other circumstances.
It is not the purpose of this section to induce you to infringe any patents or other property right claims or to contest validity of any such claims; this section has the sole purpose of protecting the integrity of the free software distribution system, which is implemented by public license practices. Many people have made generous contributions to the wide range of software distributed through that system in reliance on consistent application of that system; it is up to the author/donor to decide if he or she is willing to distribute software through any other system and a licensee cannot impose that choice.
This section is intended to make thoroughly clear what is believed to be a consequence of the rest of this License.
8 If the distribution and/or use of the Program is restricted in certain countries either by patents or by copyrighted interfaces, the original copyright holder who places the Program under this License may add an explicit geographical distribution limitation excluding those countries, so that distribution is permitted only in or among countries not thus excluded. In such case, this License incorporates the limitation as if written in the body of this License.
9 The Free Software Foundation may publish revised and/or new versions of the General Public License from time to time. Such new versions will be similar in spirit to the present version, but may differ in detail to address new problems or concerns.
Each version is given a distinguishing version number. If the Program specifies a version number of this License which applies to it and 'any later version', you have the option of following the terms and conditions either of that version or of any later version published by the Free Software Foundation. If the Program does

172 Equitrac Print & Copy Control Setup Guide
not specify a version number of this License, you may choose any version ever published by the Free Software Foundation.
10 If you wish to incorporate parts of the Program into other free programs whose distribution conditions are different, write to the author to ask for permission. For software which is copyrighted by the Free Software Foundation, write to the Free Software Foundation; we sometimes make exceptions for this. Our decision will be guided by the two goals of preserving the free status of all derivatives of our free software and of promoting the sharing and reuse of software generally.
NO WARRANTY
11 BECAUSE THE PROGRAM IS LICENSED FREE OF CHARGE, THERE IS NO WARRANTY FOR THE PROGRAM, TO THE EXTENT PERMITTED BY APPLICABLE LAW. EXCEPT WHEN OTHERWISE STATED IN WRITING THE COPYRIGHT HOLDERS AND/OR OTHER PARTIES PROVIDE THE PROGRAM 'AS IS' WITHOUT WARRANTY OF ANY KIND, EITHER EXPRESSED OR IMPLIED, INCLUDING, BUT NOT LIMITED TO, THE IMPLIED WARRANTIES OF MERCHANTABILITY AND FITNESS FOR A PARTICULAR PURPOSE. THE ENTIRE RISK AS TO THE QUALITY AND PERFORMANCE OF THE PROGRAM IS WITH YOU. SHOULD THE PROGRAM PROVE DEFECTIVE, YOU ASSUME THE COST OF ALL NECESSARY SERVICING, REPAIR OR CORRECTION.
12 IN NO EVENT UNLESS REQUIRED BY APPLICABLE LAW OR AGREED TO IN WRITING WILL ANY COPYRIGHT HOLDER, OR ANY OTHER PARTY WHO MAY MODIFY AND/OR REDISTRIBUTE THE PROGRAM AS PERMITTED ABOVE, BE LIABLE TO YOU FOR DAMAGES, INCLUDING ANY GENERAL, SPECIAL, INCIDENTAL OR CONSEQUENTIAL DAMAGES ARISING OUT OF THE USE OR INABILITY TO USE THE PROGRAM (INCLUDING BUT NOT LIMITED TO LOSS OF DATA OR DATA BEING RENDERED INACCURATE OR LOSSES SUSTAINED BY YOU OR THIRD PARTIES OR A FAILURE OF THE PROGRAM TO OPERATE WITH ANY OTHER PROGRAMS), EVEN IF SUCH HOLDER OR OTHER PARTY HAS BEEN ADVISED OF THE POSSIBILITY OF SUCH DAMAGES.
END OF TERMS AND CONDITIONS
How to Apply These Terms to Your New Programs
If you develop a new program, and you want it to be of the greatest possible use to the public, the best way to achieve this is to make it free software which everyone can redistribute and change under these terms.
To do so, attach the following notices to the program. It is safest to attach them to the start of each source file to most effectively convey the exclusion of warranty; and each file should have at least the 'copyright' line and a pointer to where the full notice is found.
one line to give the program's name and a brief idea of what it does. Copyright (C)
This program is free software; you can redistribute it and/or modify it under the terms of the GNU General Public License as published by the Free Software Foundation; either version 2 of the License, or (at your option) any later version.
This program is distributed in the hope that it will be useful, but WITHOUT ANY WARRANTY; without even the implied warranty of MERCHANTABILITY or FITNESS FOR A PARTICULAR PURPOSE. See the GNU General Public License for more details.

Equitrac Print & Copy Control Setup Guide 173
You should have received a copy of the GNU General Public License along with this program; if not, write to the Free Software Foundation, Inc., 51 Franklin Street, Fifth Floor, Boston, MA 02110-1301 USA.
Also add information on how to contact you by electronic and paper mail.
If the program is interactive, make it output a short notice like this when it starts in an interactive mode:
Gnomovision version 69, Copyright (C) year name of author Gnomovision comes with ABSOLUTELY NO WARRANTY; for details type `show w'. This is free software, and you are welcome to redistribute it under certain conditions; type `show c' for details.
The hypothetical commands `show w' and `show c' should show the appropriate parts of the General Public License. Of course, the commands you use may be called something other than `show w' and `show c'; they could even be mouse-clicks or menu items--whatever suits your program.
You should also get your employer (if you work as a programmer) or your school, if any, to sign a 'copyright disclaimer' for the program, if necessary. Here is a sample; alter the names:
Yoyodyne, Inc., hereby disclaims all copyright interest in the program `Gnomovision' (which makes passes at compilers) written by James Hacker.
signature of Ty Coon, 1 April 1989 Ty Coon, President of Vice
This General Public License does not permit incorporating your program into proprietary programs. If your program is a subroutine library, you may consider it more useful to permit linking proprietary applications with the library. If this is what you want to do, use the GNU Library General Public License instead of this License.
Sun Java Collections v1.1
The following software may be included in this product: Sun Java Collections v1.1. Use of any of this software is governed by the terms of the following license(s):
The standard Java Collections v1.1 (com.sun.java.util.collections.*) is copyright (c) Sun Microsystems Inc. and is released under the following license
SUN MICROSYSTEMS, INC., THROUGH ITS JAVASOFT BUSINESS ("SUN") IS WILLING TO LICENSE THE ACCOMPANYING com.sun.java.util.collections.x PACKAGES AND DOCUMENTATION ("SOFTWARE") INCLUDING AUTHORIZED COPIES OF EACH (THE "SOFTWARE") TO LICENSEE ONLY ON THE CONDITION THAT LICENSEE ACCEPTS ALL OF THE TERMS IN THIS AGREEMENT. PLEASE READ THE TERMS CAREFULLY BEFORE CLICKING ON THE "ACCEPT" BUTTON. BY CLICKING ON THE "ACCEPT" BUTTON, LICENSEE ACKNOWLEDGES THAT LICENSEE HAS READ AND UNDERSTANDS THIS AGREEMENT AND AGREES TO BE BOUND BY ITS TERMS AND CONDITIONS. IF LICENSEE DOES NOT ACCEPT THESE LICENSE TERMS, SUN DOES NOT GRANT ANY LICENSE TO THE SOFTWARE, AND LICENSEE SHOULD CLICK ON THE "REJECT" BUTTON TO EXIT THIS PAGE.
1 Limited License Grant. Licensee is granted a non-exclusive, non-transferable limited license to use the Software to assist in the development Java compatible software programs running on JDK 1.1 ("Developed

174 Equitrac Print & Copy Control Setup Guide
Programs") provided that Licensee: (i) may not create or authorize your licensees to create additional classes, interfaces, or subpackages that are contained in "java" or "sun" packages or similar as specified by Sun in any class file naming conventions; and (ii) agree to indemnify, hold harmless, and defend Sun and its licensors from and against any claims or lawsuits, including attorney's fees, that arise or result from the use of the Software or development performed by Licensee.
2 License to Distribute. Licensee is granted a royalty-fee right to reproduce and distribute the Software provided that Licensee: (i) distributes the Software complete and unmodified, only as part of, and for the sole purpose of running Licensee's Developed Program into which the Software is incorporated; (ii) do not distribute additional software intended to replace any component(s) of the Software; (iii) do not remove or alter any proprietary legends or notices contained in the Software; (iv) only distribute the Developed Program(s) subject to a license agreement that protects Sun's interest consistent with the terms contained herein; and (v) agree to indemnify, hold harmless, and defend Sun and its licensors from and against any claims or lawsuits, including attorney's fees, that rise or result from the distribution of the Developed Program(s).
3 Restrictions. Software is copyrighted and title to all copies is retained by Sun and/or its licensors. Licensee shall reproduce and apply all proprietary rights notices which appear on or in the Software on or in any copies of the Software made by Licensee. Unless enforcement of this provision is prohibited by applicable law, and only to that extent, Licensee shall not modify, decompile, disassemble, decrypt, extract, or otherwise reverse engineer Software. Software is not designed or licensed for use in on-line control equipment in hazardous environments such as operation of nuclear facilities, aircraft navigation or control, or direct life support machines.
4 Confidentiality. Software is confidential and proprietary information of Sun and/or its licensors. Licensee agrees to take adequate steps to protect Software from unauthorized disclosure or use.
5 Disclaimer of Warranty. The Software is provided "AS IS". ALL EXPRESS OR IMPLIED CONDITIONS, REPRESENTATIONS AND WARRANTIES, INCLUDING ANY IMPLIED WARRANTY OF MERCHANTABILITY, FITNESS FOR A PARTICULAR PURPOSE OR NON-INFRINGEMENT, ARE HEREBY EXCLUDED TO THE EXTENT ALLOWED BY APPLICABLE LAW.
6 Limitation of Liability. IN NO EVENT WILL SUN OR ITS LICENSORS BE LIABLE FOR ANY LOST REVENUE, PROFIT, OR DATA, OR FOR SPECIAL, INDIRECT, CONSEQUENTIAL, INCIDENTAL, OR PUNITIVE DAMAGES HOWEVER CAUSED AND REGARDLESS OF THE THEORY OF LIABILITY ARISING OUT OF THE USE OF OR INABILITY TO USE SOFTWARE, EVEN IF SUN HAS BEEN ADVISED OF THE POSSIBILITY OF SUCH DAMAGES.
7 Termination. This License is effective until terminated. Licensee may terminate this License at any time by destroying all copies of Software including any documentation. This License will terminate immediately without notice from Sun if Licensee fails to comply with any provision of this License. Upon termination, Licensee must destroy all copies of Software.
8 Export Regulations. Software, including technical data, is subject to U.S. export control laws, including the U.S. Export Administration Act and its associated regulations, and may be subject to export or import regulations in other countries. Licensee agrees to comply strictly with all such regulations and acknowledges that it has the responsibility to obtain licenses to export, re-export, or import Software.

Equitrac Print & Copy Control Setup Guide 175
9 U.S. Government Restricted Rights. Use, duplication or disclosure of the Software by the U.S. Government is subject to restrictions of FAR 52.227-14(g)(2)(6/87) and FAR 52.227-19(6/87), or DFAR 252.227-7015(b)(6/95) and DFAR 227.7202-3(a).
10 Governing Law. Any action related to this Agreement will be governed by California law and controlling U.S. federal law. No choice of law rules of any jurisdiction will apply.
11 Severability. If any of the above provisions are held to be in violation of applicable law, void, or unenforceable in any jurisdiction, then such provisions are herewith waived to the extent necessary for the License to be otherwise enforceable in such jurisdiction. However, if in Sun's opinion deletion of any provisions of the License by operation of this paragraph unreasonably compromises the rights or liabilities of Sun or its licensors, Sun reserves the right to terminate the License and refund the fee paid by Licensee as Licensee's sole and exclusive remedy.
12 Integration. This Agreement is the entire agreement between Licensee and Sun relating to Software and: (i) supersedes all prior or contemporaneous oral or written communications, (ii) prevails over any conflicting or additional terms of any quote, order, acknowledgment, or similar communication between the parties during the term of this Agreement. No modification to this Agreement will be binding, unless in writing and signed by a duly authorized representative of each party.
kxml2
The following software may be included in this product: kxml2. Use of any of this software is governed by the terms of the following license(s):
kXML 2 license can be found at: <https://github.com/karlmdavis/kxml2/blob/master/license.txt>
Copyright (c) 2002,2003, Stefan Haustein, Oberhausen, Rhld., Germany
Permission is hereby granted, free of charge, to any person obtaining a copy of this software and associated documentation files (the "Software"), to deal in the Software without restriction, including without limitation the rights to use, copy, modify, merge, publish, distribute, sublicense, and/or sell copies of the Software, and to permit persons to whom the Software is furnished to do so, subject to the following conditions:
The above copyright notice and this permission notice shall be included in all copies or substantial portions of the Software.
THE SOFTWARE IS PROVIDED "AS IS", WITHOUT WARRANTY OF ANY KIND, EXPRESS OR IMPLIED, INCLUDING BUT NOT LIMITED TO THE WARRANTIES OF MERCHANTABILITY, FITNESS FOR A PARTICULAR PURPOSE AND NONINFRINGEMENT. IN NO EVENT SHALL THE AUTHORS OR COPYRIGHT HOLDERS BE LIABLE FOR ANY CLAIM, DAMAGES OR OTHER LIABILITY, WHETHER IN AN ACTION OF CONTRACT, TORT OR OTHERWISE, ARISING FROM, OUT OF OR IN CONNECTION WITH THE SOFTWARE OR THE USE OR OTHER DEALINGS IN THE SOFTWARE.
OpenLDAP
The following software may be included in this product: OpenLDAP. Use of any of this software is governed by the terms of the following license(s):

176 Equitrac Print & Copy Control Setup Guide
The OpenLDAP Public License
Version 2.0.1, 21 December 1999 Copyright 1999, The OpenLDAP Foundation, Redwood City, California, USA. All Rights Reserved.
Redistribution and use of this software and associated documentation ("Software"), with or without modification, are permitted provided that the following conditions are met:
1 Redistributions of source code must retain copyright statements and notices. Redistributions must also contain a copy of this document.
2 Redistributions in binary form must reproduce the above copyright notice, this list of conditions and the following disclaimer in the documentation and/or other materials provided with the distribution.
3 The name "OpenLDAP" must not be used to endorse or promote products derived from this Software without prior written permission of the OpenLDAP Foundation. For written permission, please contact [email protected].
4 Products derived from this Software may not be called "OpenLDAP" nor may "OpenLDAP" appear in their names without prior written permission of the OpenLDAP Foundation. OpenLDAP is a trademark of the OpenLDAP Foundation.
5 Due credit should be given to the OpenLDAP Project (http://www.openldap.org/).
THIS SOFTWARE IS PROVIDED BY THE OPENLDAP FOUNDATION AND CONTRIBUTORS ``AS IS'' AND ANY EXPRESSED OR IMPLIED WARRANTIES, INCLUDING, BUT NOT LIMITED TO, THE IMPLIED WARRANTIES OF MERCHANTABILITY AND FITNESS FOR A PARTICULAR PURPOSE ARE DISCLAIMED. IN NO EVENT SHALL THE OPENLDAP FOUNDATION OR ITS CONTRIBUTORS BE LIABLE FOR ANY DIRECT, INDIRECT, INCIDENTAL, SPECIAL, EXEMPLARY, OR CONSEQUENTIAL DAMAGES (INCLUDING, BUT NOT LIMITED TO, PROCUREMENT OF SUBSTITUTE GOODS OR SERVICES; LOSS OF USE, DATA, OR PROFITS; OR BUSINESS INTERRUPTION) HOWEVER CAUSED AND ON ANY THEORY OF LIABILITY, WHETHER IN CONTRACT, STRICT LIABILITY, OR TORT (INCLUDING NEGLIGENCE OR OTHERWISE) ARISING IN ANY WAY OUT OF THE USE OF THIS SOFTWARE, EVEN IF ADVISED OF THE POSSIBILITY OF SUCH DAMAGE.

PCC Print Release Quick ReferenceThe Follow-You Printing screen displays your queued print jobs from most recent to oldest. Choose one or more documents to print, save, or delete from the queue. To access the other MFP functions from this screen, press Exit, or press one of the MFP hard keys located to the left of this screen.
1
2
3
4
5
6
7
8
9 10
11
12
13
14
15161718
Print: Prints selected documents, and removes them from the list. You can also use the Start key.
Print & Save: Print all selected documents, but do not remove them from the list.
Delete: Removes the selected documents from the list.
Select All: Select all documents, on all screens.
Force B/W: Force color job to print in black & white.
Refresh: Update document list.
Servers: Select the DRE (This is an advanced option, typically you will not use this).
Job List: Touch a document to select it; touch it again to deselect it.
Logout: Touch to end the current PCC session.
Exit: Touch to return to the PCC Launcher screen.
Server Status Bar: If Green, PCC is connected to the server. If Red, PCC is not connected.
User Details: If configured, indicates the current user and their estimated account balance.
Job Details: Iconic summary of the selected job characteristics including color/monochrome, simplex/duplex and Number of pages.
Document details: Provides characteristics of selected documents: number of documents selected, number of pages, color/monochrome, simplex/duplex, page size, estimated cost to print.
Copies: Change this value to print multiple copies of the selected documents.
Next: Scroll through older documents in Job List.
Previous: Scroll through newer documents in Job List.
Screens: Current and total number of screens that comprise the Job List.
1
2
3
4
5
6
7
8
9
10
12
13
14
15
16
17
18
11

Small screen devices1 2 3
4
5
6 7 8 9
10
Server Status Bar: If Green, PCC is connected to the server. If Red, PCC is not.
User Details: If configured, indicates the current user and their estimated account balance.
Document details: Provides characteristics of selected documents: number of documents, number of pages, color/monochrome, simplex/duplex, page size, estimated cost to print.
Refresh: Update document list.
Job List: Touch a document to select it; touch it again to deselect it.
Back: Touch to return to the PCC Launcher screen.
Select All: Select all queued documents.
Options: Opens advanced scanning options.
Print: Prints selected documents, and removes them from the list. You can also use the Start key.
Screens: Current and total number of screens that comprise the Job List.
1
2
3
4
5
6
7
8
9
10