Equipment maintenance
10
Equipment Maintenance
-
Upload
cassava-weed-management-project -
Category
Devices & Hardware
-
view
150 -
download
5
Transcript of Equipment maintenance
Equipment Maintenance
Equipment Maintenance
Your personal safety and that of your family member,
employees and your crops make it important that you
thoroughly clean and decontaminate your sprayer as
follows:
During the season,
Between crops and
Before you store it for the for the next planting season.
SIMPLE RULES TO KEEP EQUIPMENT IN TOP SHAPE
The following simplei rules are needed to keep the equipment in top
condition.
Reading the service manual to check for any specific service requirement
of your piece of equipment
At the end of each spraying job, thoroughly clean the inside and outside of
the sprayer, disassemble it, and clean each part meticulously
Check for wear and correct fitting of "O" rings (it may even be advisable to
have a few spare "O" rings on hand)
Complete the service by reassembling the unit and returning it to storage.
Plastic sprayers should not be left out in the sun, as the ultra-violet radiation
harms the plastic and shortens its useful life.
STEPS OF MAINTENACE AND STORAGE PROCESS
A complete maintenance and storage process consists of five steps:
1. Read 2. Rinse and Drain 3. Clean 4. Inspect 5. Store
Read
Before you begin cleaning your sprayer, be sure to review the product label.
The label will:
Tell you how to dispose of residues or excess product.
Provide cleaning instructions that might be necessary.
Recommend decontaminating products.
Advice on the Personal Protective Equipment (PPE) you need to safely
clean your sprayer.
Rinse and Drain
The goal of rinsing and is to remove any concentrated or large areas of
the product that might still be in or on the sprayer.
STEPS OF MAINTENACE AND STORAGE PROCESS-Contd
Clean
After your sprayer has been rinsed and drained, it’s time to clean or decontaminate it.
Be sure to decontaminate both the interior and exterior of the machine, running liquid
through the boom structure and out the nozzles
Inspect
After the final rinse you can inspect your sprayer and make the necessary repairs and
modifications. Here is a checklist of what to look for both during and after cleaning:
• Mismatched and worn nozzles
• Damaged nozzle screens
• Damaged strainer screens
• Cracks, leaks and overall performance in the pump.
• Hose condition, especially brittleness or cracks
• Valve condition, identifying any possible leaks or areas where seals may have
loosened
STEPS OF MAINTENACE AND STORAGE PROCESS-Contd.
Store
Now that the sprayer has been thoroughly cleaned, you may want to
remove parts of it that may be damaged during storage.
Remove strainers (filters) and wash them by hand with soapy water
(remember to wear chemical- resistant gloves), rinse them and either
store them or place them back in the sprayer.
Pay special attention to nozzles, nozzle bodies and check valves.
Chemical residue can build up in these areas and get hardened,
dramatically reducing the sprayer’s performance next season.
Remove nozzle tips, screens, check valves, caps and nozzle bodies
from the nozzle body assemblies. Correctly plug the assemblies.
Clean and rinse out the nozzle tips, nozzle bodies and check
valves. Store
STEPS OF MAINTENACE AND STORAGE PROCESS-Contd.
How to Clean Out a Knapsack or Backpack Sprayer
Step 1 - Dump remaining product.
Step 2- Add soap add approximately to your tank.
Step 3- Add hot water fill tank with clean hot water and let sit for one hour. Using water as hot
as you can get it from the tap should work.
Step 4- Remove water after your tank has been sitting at least an hour or longer it is time to
dump the water. Lock the handle open and let the water run through the wand.
Step 5- Cleaning the Wand In order to clean out your wand, you will need to refill your tank
with hot water. Let the clean water run through the hose and wand.
Step 6- Cleaning Filter Sometimes your filter screen may become clogged, scrub it lightly with
a bristle brush or toothbrush.
Step 7- Rinse Shut off Valve The shut off valve of your sprayer could have chemicals on it, be
sure to rinse it off. This is just a basic easy way to clean out your sprayer. Always remember to
follow the instructions in your owner’s manual for cleaning your specific sprayer.
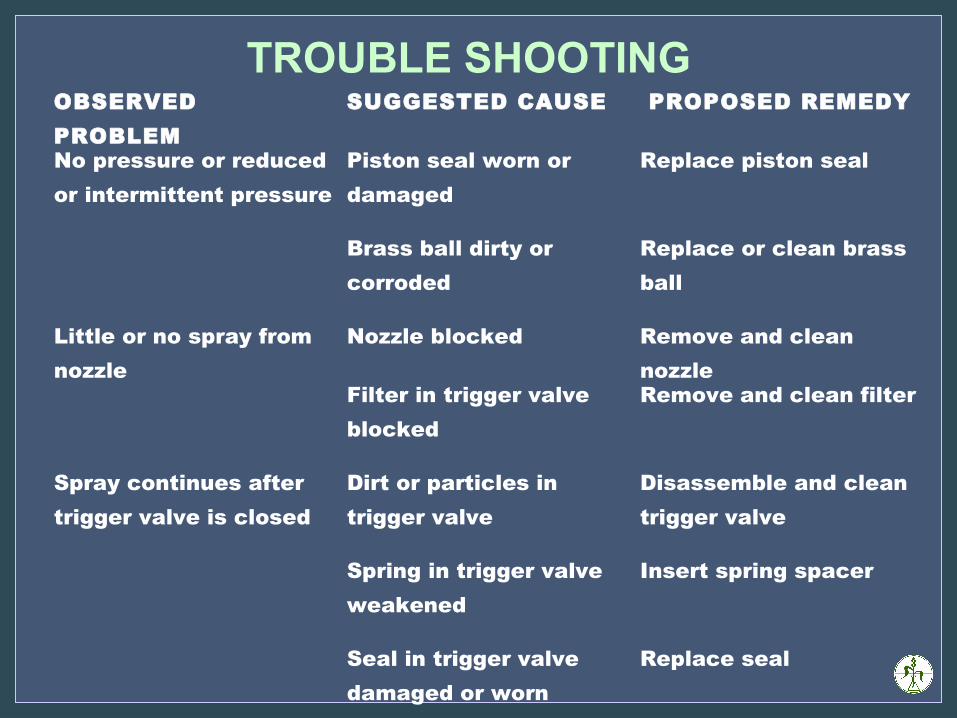
TROUBLE SHOOTING OBSERVED PROBLEM
SUGGESTED CAUSE PROPOSED REMEDY
No pressure or reduced or intermittent pressure
Piston seal worn or damaged
Replace piston seal
Brass ball dirty or corroded
Replace or clean brass ball
Little or no spray from nozzle
Nozzle blocked
Remove and clean nozzle
Filter in trigger valve blocked
Remove and clean filter
Spray continues after trigger valve is closed
Dirt or particles in trigger valve
Disassemble and clean trigger valve
Spring in trigger valve weakened
Insert spring spacer
Seal in trigger valve damaged or worn
Replace seal