Epson SureColor P-Series P6000/P7000/P8000/P9000 · Epson® SureColor® P-Series...
46
Quick Reference Epson ® SureColor ® P-Series P6000/P7000/P8000/P9000
Transcript of Epson SureColor P-Series P6000/P7000/P8000/P9000 · Epson® SureColor® P-Series...

Quick Reference
CPD-50157Printed in USA
Epson® SureColor® P-SeriesP6000/P7000/P8000/P9000
CPD50157_SureColor P6000-P9000_QRef_E.indd 1 8/19/15 4:04 PM

Contents | 1
Contents
Printer parts ...................................................................................................................................... 2Front .......................................................................................................................................... 2Back ........................................................................................................................................... 2Control panel ............................................................................................................................. 3LCD screen ................................................................................................................................ 3
Selecting media for your printer ........................................................................................................ 4Using roll paper ................................................................................................................................ 5
Setting up automatic media tracking and identification .............................................................. 5Loading paper in the printer ....................................................................................................... 6Cutting paper manually with the built-in cutter ......................................................................... 6Printing trim lines ...................................................................................................................... 6Removing paper from the printer ............................................................................................... 7
Using cut sheets .............................................................................................................................. 10Loading cut sheets .................................................................................................................... 10Loading heavy sheets ................................................................................................................ 11
Using the paper basket .................................................................................................................... 14Catching printouts under the printer ........................................................................................ 14Catching printouts in front of the printer ................................................................................. 15Storing the paper basket ........................................................................................................... 17
Using the optional Auto Take-Up Reel (SC-P8000/SC-P9000 only) .............................................. 17Loading roll paper onto the Auto Take-Up Reel ...................................................................... 19Winding prints forward ............................................................................................................ 20Winding prints backward ......................................................................................................... 22Printing using the Auto Take-Up Reel ..................................................................................... 23
Printing .......................................................................................................................................... 25Printing with OS X .................................................................................................................. 25Printing in Windows ................................................................................................................ 27
Maintaining your printer ................................................................................................................ 29Checking ink status .................................................................................................................. 29Replacing ink cartridges ........................................................................................................... 29Printing status information ...................................................................................................... 34Checking printer status from the printer driver ........................................................................ 35Checking and cleaning the print head ...................................................................................... 35Aligning the print head ............................................................................................................ 40
Ordering supplies and optional accessories ...................................................................................... 41Where to get help ........................................................................................................................... 42

2 | Printer parts
Printer parts
Note: Unless otherwise indicated, the illustrations in this guide show the SureColor® P8000/P9000, but the instructions apply to all models.
Front
Back
Roll paper cover
Control panel
Right ink bayLeft ink bay
Front cover
Paper basket Casters
Roll paper holder
Roll paper holder
Network interface
USB interface for computer
AC inletMaintenance tank
Interface for optional equipment
Slot for optional internal print server
Maintenance tank (SC-P8000/SC-P9000 only)

Control panel | 3
Control panel
LCD screen
Note: The LCD screen of the SC-P7000/SC-P9000 is shown with the Violet (V) ink configuration. The ink cartridges shown will vary based on the printer model.
The status icons in the lower left of the LCD screen will only appear if the corresponding optional accessory is installed.
LCD screen
Power light and button
Pause/reset light and button
Ink light
Left arrow or paper source button
Paper light
Menu button
Paper feed up button
Paper feed down button
OK button
Paper cut button
Ink open button
Black ink change buttonPaper release light and button
Paper source and number
Paper type
Ink cartridge status
Roll paper remaining
Black ink indicator
Auto Take-Up Reel
SpectroProofer® Paper margin
Print server

4 | Selecting media for your printer
Selecting media for your printer
One of the key elements for achieving professional quality prints is selecting paper that is specifically optimized for your printer. Epson offers a variety of canvas, fine art, photo and proofing papers, as well as other media, for your printer. Most Epson professional media are available in sizes from small cut sheets to wide-format rolls. Check the Epson Pro Imaging website at www.proimaging.epson.com or your Epson Professional Imaging Authorized Reseller for available media.
The following table shows the paper sizes you can use:
Always test samples of media in the printer before purchasing large quantities or printing large jobs. If you use non-Epson paper or other media, you may need to adjust various settings and create special paper configurations. See the online User’s Guide for details.
Supported paper sizes
Roll paper Cut sheets
SC-P6000/SC-P7000
Width 10 to 24.0 in. (254 to 610 mm) 7.2 in. (182 mm) up to 24 in. (620 mm)
Length 2 in. core: 147.6 ft (45 m)3 in. core: 662.7 ft (202 m)
Up to 36 inches (914 mm)
Maximum external roll diameter
2 in. core: 4 in. (103 mm)3 in. core: 6 in. (150 mm)
—
Thickness 3.15 to 19.7 mil (0.08 to 0.5 mm) 3.15 to 59 mil (0.08 to 1.5 mm)
SC-P8000/SC-P9000
Width 10 to 44.0 in. (254 to 1118 mm) 7.2 in. (182 mm) up to 44 in. (1118 mm)
Length 2 in. core: 147.6 ft (45 m)3 in. core: 662.7 ft (202 m)
Up to 62.2 inches (1580 mm)
Maximum external roll diameter
2 in. core: 4 in. (103 mm)3 in. core: 6 in. (150 mm)
—
Thickness 3.15 to 19.7 mil (0.08 to 0.5 mm) 3.15 to 59 mil (0.08 to 1.5 mm)

Using roll paper | 5
Using roll paper
You can use roll paper with a 2- or 3-inch core and a width of up to 24 inches (61 cm) for the SC-P6000/P7000, or 44 inches (112 cm) for the SC-P8000/SC-P9000. Manually switching rolls is a simple process.
Setting up automatic media tracking and identification
Before you load roll paper in the printer, you can set up the automatic media tracking system. This prints a barcode on the edge of the paper that indicates the media type, roll length, and the alert setting when you press the button.
When the printer is turned on or roll paper is loaded in the printer, the barcode is scanned, the media type is automatically set and displayed, and the amount of roll paper remaining is displayed on the LCD screen. You will see an alert message when the roll is nearly used up.
Before you start, make sure to unload any roll media that is currently in the printer.
1. Press the r Menu button.
2. Press the u or d buttons to select Paper, then press the r button.
3. Press the r button to select Roll Paper Remaining.
4. Press the r button to select Remaining Setup.
5. Press the d button, select On, and press the OK button.
6. Press the u button to go back to Remaining Setup.
7. Press the d button to select Set Length.
8. Press the r button, then select the length of the roll paper loaded in the printer, from 15 to 300 ft (5 to 99.5 m), then press the OK button.
Note: You can switch between meters and feet with the Units: Length setting in the Preferences menu.
9. Press the l button, then press the d button to select Set Alert Length.
10. Press the r button, then select the length at which you want to receive an alert message, from 3 to 50 ft (1 to 15 m), then press the OK button.
11. Press the button to exit the menu.

6 | Loading paper in the printer
Loading paper in the printer
See the Setup guide for instructions on placing and loading roll paper in the printer.
Cutting paper manually with the built-in cutter
When Auto Cut is set to Off, you can cut roll paper manually after your print job is finished by pressing the button.
Note: The built-in cutter may not be able to cut some types of media. Heavy or thick media types may dull the cutter.
1. Before you print, press the r Menu button.
2. Press the d button to select Paper, then press the r button.
3. Press the d button to select Roll Paper Setup, then press the r button.
4. Press the r button to select Auto Cut.
5. Press the d or u buttons to select Off.
6. Press the OK button to save the setting. A check mark appears next to Off.
7. Press the button to exit the menu.
8. Run your print job.
9. Press and release the button to cut the paper.
10. If the paper cannot be cut by the built-in cutter, press the d button to feed the paper to the manual cutting position. Then cut it manually.
Printing trim lines
When Auto Cut is set to Off, you can print a trim line (page line) between print jobs as a guide for manual cutting.
1. Press the r Menu button.
2. Press the d button to select Paper, then press the r button.
3. Press the d button to select Roll Paper Setup, then press the r button.

Removing paper from the printer | 7
4. Press the d button to select Page Line, then press the r button.
5. Press the d or u buttons to select On.
6. Press the OK button to save the setting. A check mark appears next to On.
7. Press the button to exit the menu.
You can also specify trim lines from your printer driver software. For instructions, see the online User’s Guide.
Removing paper from the printer
1. Open the roll paper cover.
8 | Removing paper from the printer
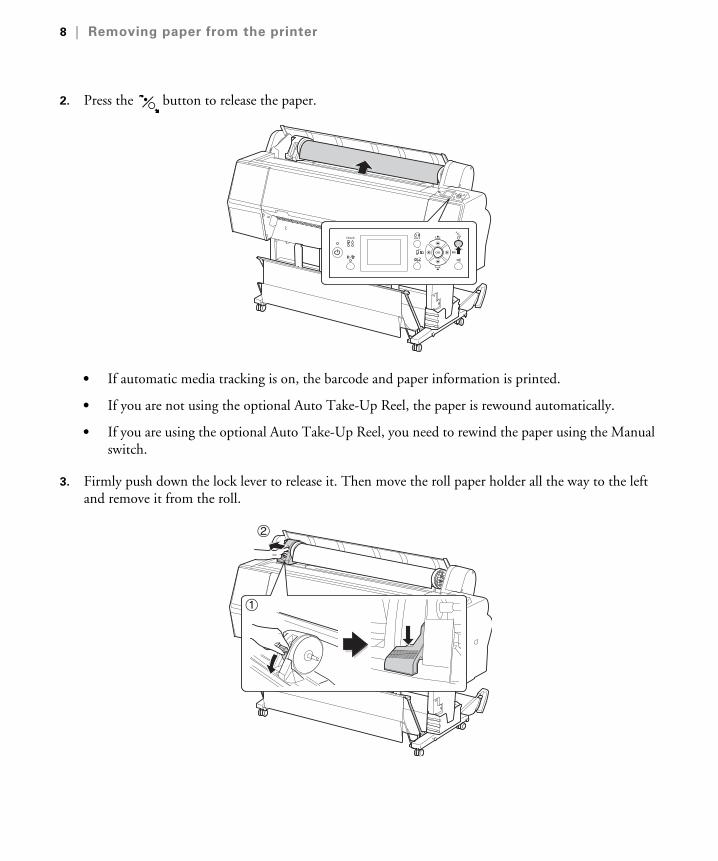
2. Press the button to release the paper.
• If automatic media tracking is on, the barcode and paper information is printed.
• If you are not using the optional Auto Take-Up Reel, the paper is rewound automatically.
• If you are using the optional Auto Take-Up Reel, you need to rewind the paper using the Manual switch.
3. Firmly push down the lock lever to release it. Then move the roll paper holder all the way to the left and remove it from the roll.

Removing paper from the printer | 9
4. Roll the paper forward so that it rests on top of the printer.
5. Pull up the tension levers, then remove the adapters from the paper roll.
6. Rewind the paper carefully and place it in its original package.
Note: Roll paper should be stored on end or horizontally (if the packaging end-caps are installed). Never store roll paper on its edge, as a flat spot can develop and lead to imaging artifacts on the prints.

10 | Using cut sheets
Using cut sheets
You can print on many types of cut sheet paper and other media. The printer accepts sheets in widths from 7.2 inches (18 cm) to 24 inches (61 cm) for the SC-P6000/P7000 or 44 inches (112 cm) for the SC-P8000/SC-P9000.
You can leave your roll paper in the printer when you print on cut sheets; make sure it is removed from the paper path and rolled up.
How you load the paper depends on its thickness:
• For media thinner than 19 mil (0.5 mm), see the section below.
• For media thicker than 19 mil (0.5 mm), see page 11.
Loading cut sheets
Make sure you load paper in the portrait orientation (short edge first).
You can load most photo and fine art sheet papers up to 19mil (0.5 mm) thick without pressing the button.
1. Make sure the printer is turned on and the roll paper cover is closed.
2. Press the l button, then select Cut Sheet from the Paper Source menu.

Loading heavy sheets | 11
3. Feed the sheet into the paper slot until it meets resistance. Make sure the right edge of the paper is straight and aligned with the vertical line on the roll paper cover.
4. Press the d button. The sheet feeds into printing position automatically.
5. On the screen that appears on the LCD screen, select Keep Settings Above if the settings are correct, or select Change Settings, then adjust the settings.
6. Press OK.
7. Print your page. After it is finished, the sheet stays in the printer.
8. To remove your print, press the d button while holding the sheet.
Loading heavy sheets
For most papers, make sure you load paper in the portrait orientation (short edge first).
For the SC-P8000 and SC-P9000, paper that is more than 19 mil (0.5 mm) thick and 30 inches (762 mm) long should be loaded in landscape orientation (long edge first).
1. Make sure the printer is turned on and the roll paper cover is closed.

12 | Loading heavy sheets
2. Press the l button, then select Cut Sheet from the Paper Source menu.
3. Press the button.
4. Feed the sheet into the paper slot. Make sure the right and top edges of the paper are straight and aligned with the horizontal and vertical lines on the printer.
Note: You may need to increase the suction by pressing the u button. This helps hold the paper in place during loading and printing.
5. Press the button.
6. Press the button to move the paper into printing position or wait for the paper to move into position automatically.
7. On the screen that appears on the LCD screen, select Keep Settings Above if the settings are correct, or select Change Settings, then adjust the settings.
8. Press the OK button.

Loading heavy sheets | 13
9. Print your page. After it is finished, the sheet stays in the printer.
10. To remove your print, press the d button while holding the sheet.
Adjusting the platen gap for thick or thin paper
When you print on unusually thick or thin paper, you may need to adjust the platen gap setting. Standard is the default setting. However, if print quality is not satisfactory when using very thin or very thick media, you may need to change this setting.
Note: If you notice scuffs on the first few inches of your prints, this is caused by paper curl and print head strikes. Make sure your paper is flat. You can also try changing the Platen Gap setting to Wide. If that doesn’t solve the problem, try changing it to Wider.
1. Press the r button.
2. Press the d button to select Printer Setup menu, then press the r button.
3. Press the r button to select Platen Gap.
4. Use the u or d button to choose Narrow, Wide, Wider, or Widest.
Note: To avoid damaging the printer, make sure you do not select the Narrrow setting when you print on thick media.
5. Press the OK button to save the setting. A check mark appears next to the selected setting.
6. Press the button to exit the menu.
If you’ve selected a non-standard platen gap, the following symbols appear on the LCD screen to remind you of the narrow or wide setting:
When you switch media, don’t forget to change the setting back to Standard.
If you’re printing on non-Epson media and not using the Epson driver, you may also need to create a paper configuration to optimize your results. See the online User’s Guide for more information.
Widest
Wider
Wide
Narrow

14 | Using the paper basket
Using the paper basket
The paper basket attaches to your printer and catches your printouts as they come out. The basket keeps your printouts from getting dirty or scratched. You can set it up either to catch the paper under the printer or in front of the printer.
Note: For fine art and other sensitive prints, do not allow prints to stack in the paper basket.
Catching printouts under the printer
Follow these steps to catch printouts under the printer:
1. Raise the paper guides and tilt the front of the basket down.
2. Lower the paper guides, then raise the front of the basket all the way up. Fasten the front of the basket with the tabs.
Note: If printouts on matte paper are smudged or have banding, raise the paper guides one level.

Catching printouts in front of the printer | 15
3. For the SC-P8000/SC-P9000, adjust the basket based on your print size.
• 23.4 × 33.1 inches (594 × 841 mm, A1) or smaller
• Larger than 23.4 × 33.1 inches (594 × 841 mm, A1)
Catching printouts in front of the printer
Follow the steps below to set up the basket in front of the printer. Use this method for paper more than 19 mil (0.5 mm) thick or any prints that are 36 inches (914.4 mm) or longer (for the SC-P6000/P7000) or 62 inches (1580 mm) or longer (for the SC-P8000/SC-P9000).
1. If you are using the paper guides, make sure they are in front of the basket.

16 | Catching printouts in front of the printer
2. For the SC-P8000/SC-P9000, raise the back of the basket all the way up.
3. Open the tabs at the front of the basket and tilt it down. Then raise the paper guides.
4. Raise the front of the basket so that the surface is taut. Then lower the paper guides so that your prints slide smoothly onto the cloth.

Storing the paper basket | 17
Storing the paper basket
If you are not using the paper basket, you can fold it out of the way.
1. For the SC-P8000/SC-P9000, raise the back of the basket.
2. Raise the paper guides, then adjust the tabs and raise the front of the basket. Lower the paper guides.
Using the optional Auto Take-Up Reel (SC-P8000/SC-P9000 only)
If you want to print images continuously on roll paper and have the printouts rolled up automatically, you can use the optional Auto Take-Up Reel (SC-P8000/SC-P9000 only).
To install the Auto Take-Up Reel, follow the instructions in the manual that came with it.
You can wind your printed media either forward (with the printed surface outside), or backward (with the printed surface inside).

18 | Using the optional Auto Take-Up Reel (SC-P8000/SC-P9000 only)
Note: Epson Doubleweight or Singleweight Matte paper should be wound forward.
The Sensor light shows the status of the Auto Take-Up Reel.
Sensor light status Description
On Ready to use
Flashing rapidly Operating
Flashing slowly Power-saving mode
Flashing very slowly The Auto Take-Up Reel has an error and stopped working; check the installation and see the online User’s Guide for additional solutions
Off Turned off
Winding forward Winding backward
Sensor light

Loading roll paper onto the Auto Take-Up Reel | 19
Loading roll paper onto the Auto Take-Up Reel
Before you load roll paper onto the take-up reel core, check the following:
• Turn off the Auto Take-Up Reel to avoid injury.
• Make sure that the leading edge of the roll paper is straight.
1. Plug in the power cord.
2. Make sure the printer is on and the Auto Take-up Reel icon appears on the LCD screen.
3. Make sure that the roll paper is loaded in the printer properly. For instructions, see the Setup guide.
4. Press the l button, then select Roll Paper from the menu and press the OK button.
5. Press the d button to feed the roll paper out of the printer until it reaches the take-up reel core.
Continue with the steps in the next section if you want to wind your prints forward, or go to page 22 if you want to wind your prints backward.

20 | Winding prints forward
Winding prints forward
1. Tape the leading edge of the paper to the take-up reel core in the center first, then at the left and right ends.
2. Press the d button to feed the paper forward and create some slack.

Winding prints forward | 21
3. Set the Manual switch on the Auto Take-Up Reel to Forward and hold it long enough to feed at least three turns of paper onto the reel. Make sure adequate slack remains between the roll paper and the take-up reel.
Note: When printing on certain types of paper, place the tensioner in the slack area to ensure good print quality. See the online User’s Guide for a list of paper that requires this tensioner.

22 | Winding prints backward
Winding prints backward
1. Wind the bottom of the roll paper around the back of the reel as shown below. Tape the leading edge of the paper to the take-up reel core in the center first, then at the left and right ends.
2. Press the d button to feed the paper forward and create some slack.

Printing using the Auto Take-Up Reel | 23
3. Set the Manual switch on the Auto Take-Up Reel to Backward to take up at least three turns of paper onto the reel. Make sure adequate slack remains between the roll paper and the take-up reel.
Printing using the Auto Take-Up Reel
Once the Auto Take-Up Reel is installed and paper is attached to it, you can use it to take up your prints.
WARNING: Do not touch the Auto Take-Up Reel while it is operating; doing so may result in injury. Turn off the Auto Take-Up Reel before removing the reel; if the reel operates unexpectedly, bodily injury may occur.
Note: When using the Auto Take-Up reel, make sure Auto Cut is set to Off in the printer driver. Otherwise, a confirmation message will appear for each print.
1. Set the Auto switch to Forward or Backward, depending on how you set up the paper.
2. Send a print job to the printer. The Auto Take-Up Reel sensor triggers it to take up the slack in the roll paper 1/4 to 1/2 a turn.

24 | Printing using the Auto Take-Up Reel
3. When you are ready to remove your prints, set the Auto switch to Off.
4. Press the button to cut the paper.
5. To remove your prints, turn the lever to unlock the reel, and then slide it left. Support the reel with one hand to keep it from falling.
6. Remove the take-up reel core from the paper stop on both ends of the reel.

Printing | 25
Printing
This section describes basic printing from your Mac or Windows® computer. For detailed instructions, see the online User’s Guide.
Printing with OS X
1. Open a photo or document in a printing program, then select the print command in your application.
2. Select your product as the Printer setting.
3. Click Show Details.
4. Select the Paper Size setting for the paper size and source you are using.
Select your Epson product
26 | Printing with OS X
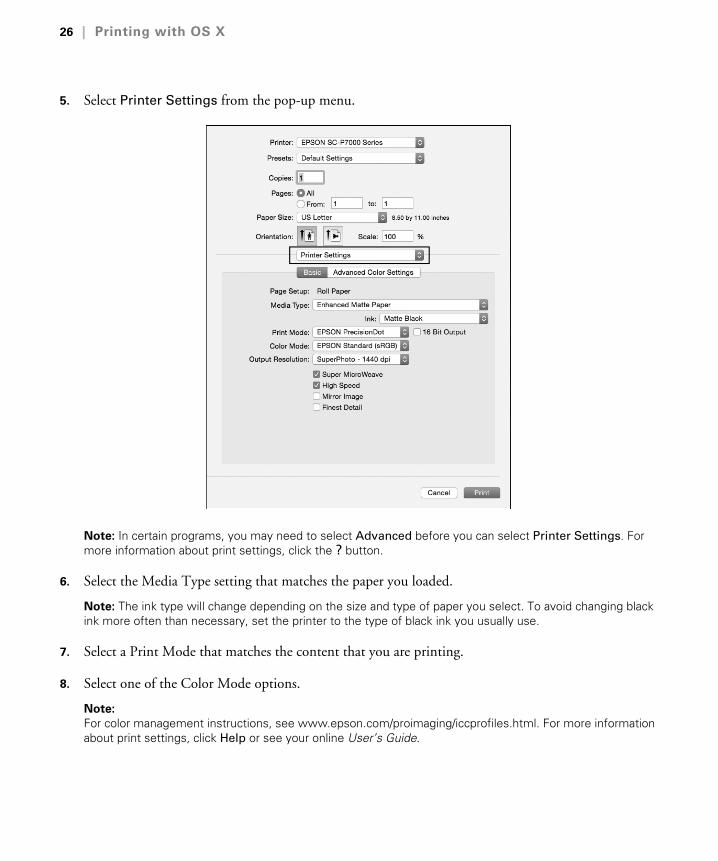
5. Select Printer Settings from the pop-up menu.
Note: In certain programs, you may need to select Advanced before you can select Printer Settings. For more information about print settings, click the ? button.
6. Select the Media Type setting that matches the paper you loaded.
Note: The ink type will change depending on the size and type of paper you select. To avoid changing black ink more often than necessary, set the printer to the type of black ink you usually use.
7. Select a Print Mode that matches the content that you are printing.
8. Select one of the Color Mode options.
Note:
For color management instructions, see www.epson.com/proimaging/iccprofiles.html. For more information about print settings, click Help or see your online User’s Guide.

Printing in Windows | 27
9. Select an Output Resolution setting (available settings depend on selected media type).
10. Click Print.
Printing in Windows
1. Open a photo or document in a printing program, and select the print option.
2. Select your product, then click the Preferences or Properties button.
Note: If you see a Setup, Printer, or Options button, click it. Then click Preferences or Properties on the next screen.
Click here to open your printer software
Select your Epson product

28 | Printing in Windows
3. On the Main tab, select the Media Type setting that matches the paper you loaded.
4. For the Color setting, select Color for any type of photographic printing. To print black-and-white photos using Advanced B&W Photo mode, see your online User’s Guide for instructions.
5. For the Print Quality setting, select Speed, Quality, or Max Quality (available with certain media types only), or select Quality Options to display advanced settings.
6. Choose the paper Source in which you loaded your paper.
7. Select one of the Mode settings.
Note: For color management instructions, see epson.com/proimaging/iccprofiles.html. For information about print settings, click Help or see your online User’s Guide.
8. Select the paper Size setting for the paper you loaded.
If you loaded roll paper, create a custom paper size. Select User Defined in the Size menu, then click the User Defined button. Type a name for your custom size, then enter a custom height and width. Click Save, click OK, then select your custom paper size in the Size menu.
9. If you’re printing borderless photos, select Borderless, if available. To adjust the borderless expansion setting click Expansion.

Maintaining your printer | 29
10. To reduce or enlarge your printout or print double-sided, click the Page Layout tab and select settings as necessary. (Click Help or see your online User’s Guide for details.)
11. Click OK to save your settings.
12. Click OK or Print to start printing.
Maintaining your printer
Follow the instructions in this section to perform basic maintenance on your printer. For detailed instructions, see the online User’s Guide.
Checking ink status
Before you begin a large print job, you should check your ink levels. If one of your cartridges is low, you can replace it before you start. Or you can wait until the ink is expended, replace the cartridge, and then continue the job without any loss of print quality. However, it is best to replace a low ink cartridge before starting a large print job.
The easiest way to check ink levels is from the control panel LCD screen. The numbers above the ink icons on the LCD screen correspond to the 11 ink cartridge slots on the printer.
The icons show the approximate amount of ink remaining.
Replacing ink cartridges
When the B ink light is flashing and a icon appears above a cartridge on the LCD screen, the indicated cartridge is almost expended. Make sure you have a replacement cartridge. When the B ink light stays on and the icon appears above a cartridge on the LCD screen, the cartridge is expended. You must replace the cartridge before you can continue printing.
Note: Replace all expended cartridges. You cannot print if any of the slots are empty.

30 | Replacing ink cartridges
You can install any combination of 150, 350, and 700 ml cartridges. Use the following Epson® UltraChrome® HD and UltraChrome HDXTM ink cartridges:
Note: We recommend that you use genuine Epson cartridges and do not refill them. The use of other products may affect your print quality and could result in printer damage.
Yields vary considerably based on images printed, print settings, paper type, frequency of use, and temperature. For print quality, a small amount of ink remains in the cartridge after the B ink light comes on.
For best printing results, use up a cartridge with six months of opening the package.
SC-P6000/SC-P8000 ink cartridges
Ink bay Slot no. Cartridge 150 ml 350 ml 700 ml
Left 1 Cyan (C) T834200 T824200 T804200
2 Yellow (Y) T834400 T824400 T804400
3 Light Cyan (LC) T834500 T824500 T804500
4 Matte Black (MK) T834800 T824800 T804800
5 Photo Black (PK) T834100 T824100 T804100
Right 6 Vivid Magenta (VM) T834300 T824300 T804300
7 Light Black (LK) T834700 T824700 T804700
8 Light Light Black (LLK) T834900 T824900 T804900
9 Vivid Light Magenta (VLM) T834600 T824600 T804600
SC-P7000/SC-P9000 ink cartridges
Ink bay Slot no. Cartridge 150 ml 350 ml 700 ml
Left 1 Cyan (C) T834200 T824200 T804200
2 Orange (OR) T834A00 T824A00 T804A00
3 Yellow (Y) T834400 T824400 T804400
4 Light Cyan (LC) T834500 T824500 T804500
5 Matte Black (MK) T834800 T824800 T804800
6 Photo Black (PK) T834100 T824100 T804100
Right 7 Vivid Magenta (VM) T834300 T824300 T804300
8 Light Black (LK) T834700 T824700 T804700
9 Green (GR) T834B00 T824B00 T804B00
10 Light Light Black (LLK) T834900 T824900 T804900
Violet (V) T834D00 T824D00 T804D00
11 Vivid Light Magenta (VLM) T834600 T824600 T804600

Replacing ink cartridges | 31
Caution: Leave the expended cartridge in the printer until you are ready to replace it.
To prevent ink reporting errors, never replace the ink cartridges with the printer turned off.
You can purchase genuine Epson ink and paper from an Epson Professional Imaging Authorized Reseller. To find the nearest reseller, visit www.proimaging.epson.com (U.S. sales), www.epson.ca (Canadian sales), or call 800-GO-EPSON (800-463-7766). Or you can purchase online at www.proimaging.epson.com (U.S. sales) or www.epson.ca (Canadian sales).
Before you start, make sure the printer is turned on.
1. Note the color of the cartridge that is low or expended.
2. Press the button.
• If ink in one or more cartridges is completely expended, the corresponding ink cover is unlocked.
• If the ink is not completely expended, select the ink bay you want to open and press the OK button.
3. Open the ink cover all the way.
Caution: Do not open the ink cover until the lock is released.

32 | Replacing ink cartridges
4. Press in the cartridge you want to replace. The cartridge pops out.
5. Remove the expended ink cartridge from the printer. Save your first set of expended cartridges so you can use them for transporting the printer, if necessary.
WARNING: Do not shake the expended cartridge, or ink may leak. If ink gets on your hands, wash them thoroughly with soap and water. If ink gets in your eyes, flush them immediately with water. Keep ink cartridges out of the reach of children.

Replacing ink cartridges | 33
6. Make sure the replacement cartridge is the correct color and remove it from its package. Gently shake the cartridge for about 5 seconds before installing it, but be careful not to touch the chip on the cartridge.
7. Hold the cartridge with the arrow pointing toward the printer. Then insert the cartridge into the slot until it clicks into place. Don’t force it in.
Caution: Do not remove and re-insert cartridges more often than necessary. Doing so can compromise the needle valve seal and allow air to enter the ink tubes, causing nozzle damage.
Note: If the ink cartridges are not used on a frequent basis, it is recommended that you remove the cartridges every 3 months, shake them for 10 seconds, and re-insert them.

34 | Printing status information
8. Close the ink cover.
Wait for the printer to check the ink cartridges and charge the ink delivery system, if necessary.
Caution: Never turn off the printer while ink is charging or you’ll waste ink.
Printing status information
The status check sheet shows some of the current default settings, the page count, and the status of the maintenance tank.
1. Make sure paper is loaded in the printer.
2. Press the r Menu button.
3. Press the d button to select Printer Status, then press the r button.
4. Press the d button to select Print Status Sheet, then press the r button.
5. Press the OK button to start printing.

Checking printer status from the printer driver | 35
Checking printer status from the printer driver
The Epson Status Monitor utility installed with your printer driver lets you check the levels of ink in the printer and the level of the maintenance tank(s). Follow the steps below to use the utility to check the status.
1. Do one of the following to access the printer utilities:
• OS X: In the Apple menu or the Dock, select System Preferences. Select Printers & Scanners, Print & Fax or Print & Scan, select your product, and select Options & Supplies. Select Utility and select Open Printer Utility.
• Windows: Double-click the icon in the bottom right corner of your screen (the taskbar).
2. Select EPSON Status Monitor.
The software checks the amount of ink in the printer and maintenance tank(s) and displays one of these windows:
Checking and cleaning the print head
If your printed image shows a color shift or horizontal lines, you should check the print head to see if any nozzles are clogged or deflected. If necessary, you can run a cleaning cycle to clear the nozzles.
You can also turn on Auto Nozzle Check from the printer’s control panel. The printer will then check the nozzles periodically or before each print job and clean them if necessary.

36 | Checking and cleaning the print head
Automatically checking and cleaning the print head
The printer automatically checks the nozzles and cleans them if necessary. You can specify how often you want this to happen or turn this feature off. You can also have a nozzle check pattern printed on a regular basis, so you can check it yourself.
1. Press the r Menu button.
2. Press the d button to select Printer Status, then press the r button.
3. Press the d button until ACL Setting is selected, then press the r button.
4. Select one of the following, then press the OK button:
• Periodically: The printer periodically checks its nozzles and runs a cleaning cycle if necessary (default).
• Every Job: The printer automatically checks its nozzles and runs a cleaning cycle if necessary before each print job. This process uses a very small amount of ink (and no paper) and is recommended if you are running large print jobs unattended.
• Off: The printer will not perform automatic nozzle checks and cleaning cycles.
5. Press the l button.
6. Press the d button until Print Nozzle Pattern is selected, then press the r button.
7. Select how often you want the printer to automatically print a nozzle check pattern. These settings take effect only when you print on roll paper. Press OK to save the setting.
Checking the print head using the control panel
You can print a nozzle check from the control panel and examine it to determine whether any nozzles are clogged or deflected. Then you can run a cleaning cycle if necessary. Before you start, make sure you have loaded roll paper or a cut sheet that is letter size/A4 or larger.
1. Press the r Menu button.
2. Press the r button to select Maintenance.
3. Press the r button to select Nozzle Check, then press the OK button to start printing the nozzle check pattern.
4. After the pattern is printed, use at least a 10× magnification eye loupe to examine it.

Checking and cleaning the print head | 37
Caution: Don’t run a cleaning cycle while thick media is loaded in the printer.
• If the pattern looks good, as shown below, the print head is clean.
• If any dots or segments are missing or deflected, as shown below, run a cleaning cycle as described on page 39. Then print another nozzle check pattern to make sure the nozzles are clean.
Checking the print head using a computer
Follow these steps to use your printer software to check the print head nozzles and clean them if necessary:
1. Make sure paper is loaded in the printer.
2. Do one of the following to access the printer utilities:
• OS X: In the Apple menu or the Dock, select System Preferences. Select Printers & Scanners, Print & Fax or Print & Scan, select your product, and select Options & Supplies. Select Utility and select Open Printer Utility.
• Windows: Double-click the icon in the bottom right corner of your screen (the taskbar).

38 | Checking and cleaning the print head
You see a menu like this:
3. Select the Nozzle Check icon and follow the instructions on the screen.
4. After the pattern is printed, use at least a 10× magnification eye loupe to examine it.
• If the pattern does not have any gaps, the print head is clean.
• If any dots or segments are missing or deflected, as shown below, run a cleaning cycle as described on page 39. Then print another nozzle check pattern to make sure the nozzles are clean.
Caution: Don’t run a cleaning cycle while thick media is loaded in the printer.

Checking and cleaning the print head | 39
Running cleaning cycles
You can run several types of cleaning cycles from the control panel (or from the Epson LFP Remote Panel2): normal cleaning, heavy cleaning, and powerful cleaning.
Note: Run the heavy and powerful cleaning cycles only if multiple normal cleaning cycles are not sufficient to clear the nozzles. The heavy and powerful cycles use a large quantity of ink and should only be used if necessary. For details on running a powerful cleaning, see the online User’s Guide.
The cartridges need to be at least 50% full to use a heavy cleaning. You may need to replace a low cartridge to run the cleaning cycle. After cleaning, you can reinsert the old cartridge.
Caution: Don’t run a cleaning cycle while thick media is loaded in the printer.
1. Print a nozzle check to make sure the print head needs cleaning, as described on page 39.
2. Make sure the printer is ready and the B ink light on the printer’s control panel is not on or flashing.
3. Press the r Menu button.
4. Press the d button to select Maintenance, then press the r button.
5. Press the d button to select Head Cleaning, then press the r button.
6. Press the u or d button to select the nozzle pairs that need cleaning, then press the r button to select them. To clean all nozzles, select All Nozzles, then press the r button.
7. Press the OK button.
8. Select the power level of the cleaning, then press the OK button to start the cleaning cycle.
9. When cleaning is finished and the Power light stops flashing, a confirmation screen appears. Select Nozzle Check and press the OK button to print the nozzle check again to confirm that the head is clean. For effective cleaning, always run a nozzle check between cycles.
If the pattern is still missing segments or has deflections after a heavy cleaning cycle, turn the printer off and leave it overnight, then clean the print head again the following morning with regular cleaning cycles. If there are still missing segments, see the online User’s Guide for details on running a powerful cleaning cycle.

40 | Aligning the print head
Aligning the print head
Properly aligning the print head ensures the best print quality. If banding appears on your prints, if they look grainy or blurry, or if you see misregistration or “ghosting,” you need to align the print head.
Although you can align the print head using the printer utility software, aligning the printer from the control panel will quickly and automatically perform the most thorough alignment.
If you haven’t already done so, run a nozzle check before aligning the print head (page 39).
1. Make sure the printer is turned on, and that the printer is loaded with Epson Doubleweight Matte paper, Epson Enhanced Matte paper, or Epson Ultra Premium Photo Paper Luster.
Note: Make sure you select the correct paper type on the printer.
2. Press the r Menu button.
3. Press the u or d buttons to select Maintenance, then press the r button.
4. Press the u or d buttons to select Head Alignment, then press the r button.
5. Press the u or d buttons to select Auto, then press the r button.
6. Press the u or d buttons to select Bi-D All Color. You should start with this type of alignment.
7. Press the OK button to start the alignment process.
Each head alignment takes about 10 minutes. The printer’s white beam sensor reads the alignment pattern and adjusts the printer automatically. Make sure you don’t open the front cover or turn off the printer during this process.
When the bi-directional alignment is completed, your product may be properly aligned. If it isn’t, repeat the procedure with the Uni-D setting.

Ordering supplies and optional accessories | 41
Ordering supplies and optional accessories
You can purchase optional equipment and genuine Epson ink and media from an Epson Professional Imaging Authorized Reseller. To find the nearest reseller, visit www.proimaging.epson.com (U.S. sales), www.epson.ca (Canadian sales), or call 800-GO-EPSON (800-463-7766). Or you can purchase online at www.proimaging.epson.com (U.S. sales) or www.epson.ca (Canadian sales).
Part Part number
Ink cartridges See page 29 for a complete list
Replacement ink maintenance box C13T699700
SpectroProofer 24” UVS Spectro24UVS
SpectroProofer 44” UVS Spectro44UVS
Automatic Take-Up Reel System (SC-P8000/SC-P9000) C12C815321
Internal print server C12C848031
Additional roll media adapters C12C811241
Replacement printer cutter blade C12C815331
Additional one-year Epson PreferredSM Plus service plan for SpectroProofer EPPSPB1
Additional one-year Epson Preferred Plus service plan EPP900B1
Additional two-year Epson Preferred Plus service plan EPP900B2

42 | Where to get help
Where to get help
Epson provides technical support and information on the installation, configuration, and operation of professional printing products through the Epson Preferred Limited Warranty Plan.
Dial (888) 377-6611, 6 AM to 6 PM, Pacific Time, Monday through Friday. Days and hours of support are subject to change without notice. Before you call, make sure you have your:
• Your printer serial number: ___________________________
• Proof of purchase and date: ___________________________
Tip: If you experience difficulty with the toll-free line, call (562) 276-1305.
Visit Epson’s support website at www.epson.com/support (U.S.) or www.epson.ca/support (Canada) and select your product for solutions to common problems. You can download drivers, firmware, and documentation, get FAQs and troubleshooting advice, or e-mail Epson with your questions.
EPSON, UltraChrome, SpectroProofer, and SureColor are registered trademarks, UltraChrome HDX is a trademark, and EPSON Exceed Your Vision is a registered logomark, of Seiko Epson Corporation. Epson Preferred is a service mark of Epson America, Inc.
Mac and OS X are trademarks of Apple Inc., registered in the U.S. and other countries.
General Notice: Other product names used herein are for identification purposes only and may be trademarks of their respective owners. Epson disclaims any and all rights in those marks.
This information is subject to change without notice.
© 2015 Epson America, Inc., 8/15 CPD-50157
SM


Quick Reference
CPD-50157Printed in USA
Epson® SureColor® P-SeriesP6000/P7000/P8000/P9000
CPD50157_SureColor P6000-P9000_QRef_E.indd 1 8/19/15 4:04 PM