eProcurement: Vendor Catalog
26
Revision Date: 05.10.13 PROCUREMENT SERVICES eProcurement: Vendor Catalog Purpose: To order supplies (object code 2xxx) or maintenance (object code 35xx) from a UNC designated vendor. Security Access Requirement: You can request access by completing the Consolidated Access Request Form located at http://www.unc.edu/finance/busman/act/actapp14.pdf Prerequisites: None. Find Help: Find Help: For training contact [email protected]. For help, contact the Help Desk. Call 919-962-HELP, or Submit an online help request: 1. Go to http://help.unc.edu. 2. Click the Request IT Support link near the top of the page. 3. Log in with your onyen and password. 4. In the Type of Help Needed field, choose CONNECTCAROLINA_ePRO, and then in the Problem Description field type a description of the help you need. 5. Click Submit. Note: If you receive an error message, copy and paste the error message (or a screenshot) to a Microsoft Word file on your computer. This will be helpful to have when the Connect Carolina team responds to you. Support is available Monday through Friday, 8:00 a.m. to 5:00 p.m. excluding University holidays.
Transcript of eProcurement: Vendor Catalog

Revision Date: 05.10.13
PROCUREMENT SERVICES
eProcurement: Vendor Catalog Purpose: To order supplies (object code 2xxx) or maintenance (object code 35xx) from a UNC designated vendor.
Security Access Requirement: You can request access by completing the Consolidated Access Request Form located at http://www.unc.edu/finance/busman/act/actapp14.pdf
Prerequisites: None.
Find Help: Find Help: For training contact [email protected]. For help, contact the Help Desk.
Call 919-962-HELP, or Submit an online help request:
1. Go to http://help.unc.edu. 2. Click the Request IT Support link near the top of the page. 3. Log in with your onyen and password. 4. In the Type of Help Needed field, choose CONNECTCAROLINA_ePRO,
and then in the Problem Description field type a description of the help you need.
5. Click Submit. Note: If you receive an error message, copy and paste the error message (or a screenshot) to a Microsoft Word file on your computer. This will be helpful to have when the Connect Carolina team responds to you. Support is available Monday through Friday, 8:00 a.m. to 5:00 p.m. excluding University holidays.
Procurement Services Vendor Catalog
Revision Date: 05.10.13 2 of 26
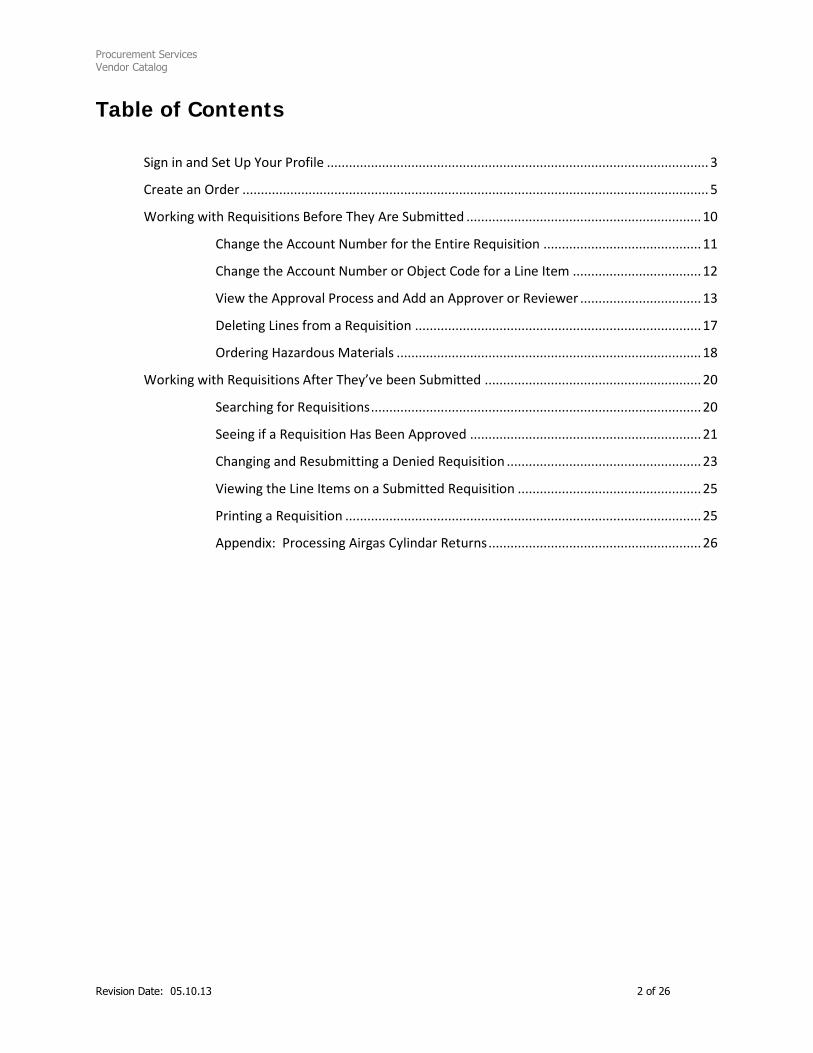
Table of Contents
Sign in and Set Up Your Profile ........................................................................................................ 3
Create an Order ............................................................................................................................... 5
Working with Requisitions Before They Are Submitted ................................................................ 10
Change the Account Number for the Entire Requisition ........................................... 11
Change the Account Number or Object Code for a Line Item ................................... 12
View the Approval Process and Add an Approver or Reviewer ................................. 13
Deleting Lines from a Requisition .............................................................................. 17
Ordering Hazardous Materials ................................................................................... 18
Working with Requisitions After They’ve been Submitted ........................................................... 20
Searching for Requisitions .......................................................................................... 20
Seeing if a Requisition Has Been Approved ............................................................... 21
Changing and Resubmitting a Denied Requisition ..................................................... 23
Viewing the Line Items on a Submitted Requisition .................................................. 25
Printing a Requisition ................................................................................................. 25
Appendix: Processing Airgas Cylindar Returns .......................................................... 26

Procurement Services Vendor Catalog
Revision Date: 05.10.13 3 of 26
The Vendor Catalog portion of ePro replaces the E-commerce system. Charges will appear on your MMD statement. The return process will remain the same and your account will be credited.
Sign in and Set Up Your Profile 1. Start eProcurement by going to the following website: https://epro.unc.edu
2. Enter your ONYEN user name and password and click Sign In:
3. Click eProcurement > My Profile.
Note: You only need to create your profile the first time you sign on. If you try to create an order without setting up a profile, ePro displays a message saying your profile is missing required information.
4. On the My Profile page, fill in these fields:

Procurement Services Vendor Catalog
Revision Date: 05.10.13 4 of 26
In this field … Do this …
Phone Type your phone number in this format: 919/555-1212
Fax (Optional) Type your fax number in this format: 919/555-1212
Affiliation (Optional) Enter your affiliation.
Ship To a) Click the magnifying glass. Result: ePro displays the first 300 ship-to addresses.
b) In the Description field, change “begins with” to “contains.” c) Type a word or two to describe your location and click Look
Up. d) Click the link for the ship-to location you need.
Result: ePro returns to the My Profile page showing the ship-to location you chose.
Account a) Click the magnifying glass icon. Result: ePro displays only the accounts you have access to. If you have access to more than 300 accounts, ePro displays only the first 300.
b) In the Description field, change “begins with” to “contains.” c) Type a word or two to describe the account you use most often
and click Look Up. Note: You only see the accounts you have access to.
d) Click the link of the account you need. Result: ePro returns to the My Profile page showing the account you chose.
5. Click the Edit Email link.
6. Fill in these fields:
In this field … Do this …
Primary Email Account Click to select the box.
Email Type Choose Business.
Email Address Type the email address where you want ePro-related emails sent.
7. Click Save.
Result: ePro saves your changes but stays on the My Profile page.
Procurement Services Vendor Catalog
Revision Date: 05.10.13 5 of 26
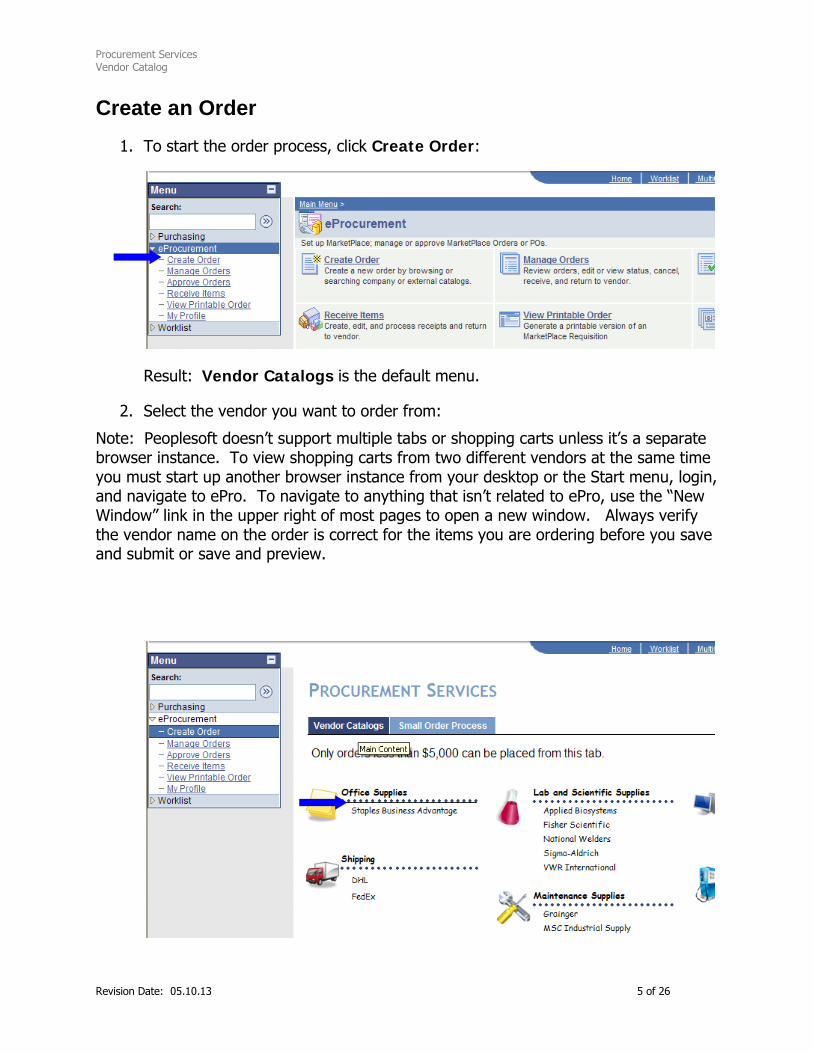
Create an Order 1. To start the order process, click Create Order:
Result: Vendor Catalogs is the default menu.
2. Select the vendor you want to order from:
Note: Peoplesoft doesn’t support multiple tabs or shopping carts unless it’s a separate browser instance. To view shopping carts from two different vendors at the same time you must start up another browser instance from your desktop or the Start menu, login, and navigate to ePro. To navigate to anything that isn’t related to ePro, use the “New Window” link in the upper right of most pages to open a new window. Always verify the vendor name on the order is correct for the items you are ordering before you save and submit or save and preview.

Procurement Services Vendor Catalog
Revision Date: 05.10.13 6 of 26
3. Do one of the following:
a) If you are using Internet Explorer 8, you receive this message. Click No:
• If you are using Internet Explorer 7, you receive this message. Click Yes:
• If you are using any other type of browser, select the option that will display nonsecure items.
Result: eProcurement displays the catalog you chose in the eProcurement window.
4. Search the vendor’s website and order one or more products:
Note: Minimum order amounts apply.

Procurement Services Vendor Catalog
Revision Date: 05.10.13 7 of 26
5. When you finish shopping, display your shopping cart and click Submit.
Note: Vendor catalogs may have different names for the button you use to send your shopping cart to ePro.
Results: ePro:
• creates a new requisition
• pulls the items from the vendor catalog shopping cart onto the requisition.
• closes the vendor catalog.

Procurement Services Vendor Catalog
Revision Date: 05.10.13 8 of 26
6. On the requisition, fill in these fields:
In this field … Do this …
Ship to If you need to change who the order is delivered to, click to see a list of available locations. If you are ordering hazardous materials, change the Ship to code to EHS. See page 18 for more details on ordering hazardous materials.
Attention If you need the order to be delivered to a different person at the address shown, type in a different name.
Requisition Name
Optional. Type a name to help you identify the requisition later. For example, you could type the name of the person or project you are ordering the items for.
Account and Description
ePro displays the default account set up in your profile, which is the account the requisition will be charged to. Do one of the following: • If you need to change the account the entire requisition will be
charged to, follow the steps in “Change the Account Number for the Entire Requisition” on page 11.
• If you need to change the account or object code for a line item, follow the steps in “Change the Account Number or Object Code for a Line Item” on page 12.
Line Item Details Click to view line item details for that item.

Procurement Services Vendor Catalog
Revision Date: 05.10.13 9 of 26
In this field … Do this …
Line Item Comments
• Click the icon to make comments related to that line item, such as the name of the person you are ordering the item for. If you enter a comment, the icon has gray lines in it to show a comment exists for the line.
• Vendors do not see line item comments.
Requisition Comments
Type any notes you want to include with the requisition in the Comments box at the bottom of the requisition and ensure the Send to Vendor box is checked. The comments will be sent to the vendor electronically with the order.
7. Click Save & Submit:
Result: eProcurement displays a message asking if you’re sure you want to submit.
8. Click Yes.
Note: Once you submit and click Yes, you can’t cancel or edit the order.
Results:

Procurement Services Vendor Catalog
Revision Date: 05.10.13 10 of 26
• If your department uses approvals, ePro sends an email to your approver letting him or her know a requisition needs approval.
• If your department does not use approvals, ePro automatically approves the requisition.
• If your requisition is approved (either by your approver or automatically by ePro), you receive an email letting you know.
• If your requisition is denied, you receive an email that lets you know and that contains a link to the requisition so you can make changes and resubmit.
• When the requisition is approved, the order is sent to the vendor.
• ePro displays a confirmation page:
Working with Requisitions Before They Are Submitted If needed, you can make the following changes to requisitions:
• change the account number for the entire requisition • change the account number or object code for one or more line items • view approvals before you submit and add approvers or reviewers • delete lines from the requisition
The steps for each of these tasks are on the following pages.

Procurement Services Vendor Catalog
Revision Date: 05.10.13 11 of 26
Change the Account Number for the Entire Requisition
1. To charge the entire requisition to a single account number that is different than your default account, click Adjust Distributions.
Result: eProcurement displays the Adjust Distributions screen.
2. Click to see a list of the accounts you have access to.
Note: If you have access to more than 300 accounts, ePro only displays the first 300.
3. If you don’t see the account you need, follow these steps to search for it:
a) In the Description field, change “begins with” to “contains.”

Procurement Services Vendor Catalog
Revision Date: 05.10.13 12 of 26
b) Beside “contains”, type a word or two to describe the account and click Look Up.
c) Click the link of the account number you need.
Note: You only see the accounts you have access to. To change your access, contact your department’s FACS Coordinator.
Result: ePro returns to the Adjust Distributions page showing the account you chose.
Change the Account Number or Object Code for a Line Item
1. Click the button next to the line you need to change the account or object code for.
Result: ePro expands the section to show a row of accounting fields, including the account and object code currently assigned to the line. The object code is pulled in automatically based on how the item is set up in the Vendor Catalog.
Note: Click the Expand All button to expand all lines at one time. Click the Collapse All button to collapse all of the lines after one or more have been expanded.
Important: eProcurement displays a set of Cost Codes, but these codes do not feed to InDEPTh for Vendor Catalog orders (they do for Small Order Process documents). For Vendor Catalog orders, these fields are only used by Facilities, who uses them to enter job, shop, and phase.
2. To charge the line item to a different account than the one shown, click the icon to the right of the Speed Type Key box and select the appropriate account.
3. To change the object code for a line item, click the icon to the right of the Object box and select the appropriate object code.

Procurement Services Vendor Catalog
Revision Date: 05.10.13 13 of 26
View the Approval Process and Add an Approver or Reviewer
1. If you want to see what the approval process will be for the requisition, click Save and Preview Approvals.
Results:
• If your department does not have approvals for Vendor Catalog orders, eProcurement displays a message showing, “No approvals required.”
• If your department decided to require approvals, you see the name of the approver listed. To see contact information for the approver, click the approver’s name:

Procurement Services Vendor Catalog
Revision Date: 05.10.13 14 of 26
Result: eProcurement displays a pop-up window showing the approver’s telephone number and email address:
Procurement Services Vendor Catalog
Revision Date: 05.10.13 15 of 26
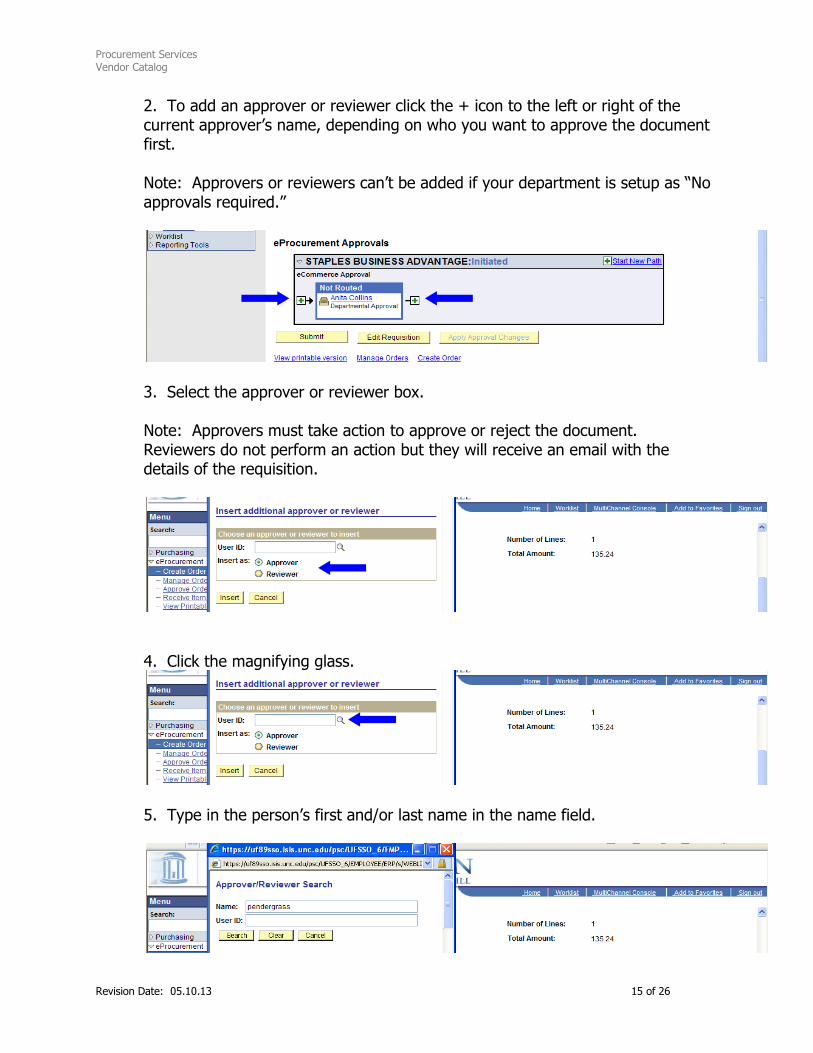
2. To add an approver or reviewer click the + icon to the left or right of the current approver’s name, depending on who you want to approve the document first. Note: Approvers or reviewers can’t be added if your department is setup as “No approvals required.”
3. Select the approver or reviewer box. Note: Approvers must take action to approve or reject the document. Reviewers do not perform an action but they will receive an email with the details of the requisition.
4. Click the magnifying glass.
5. Type in the person’s first and/or last name in the name field.

Procurement Services Vendor Catalog
Revision Date: 05.10.13 16 of 26
6. Click search.
7. Click the person’s name.
8. Click Insert.
Result: The approval screen displays the updated approval stops for the requisition.

Procurement Services Vendor Catalog
Revision Date: 05.10.13 17 of 26
Deleting Lines from a Requisition
1. Check the box of the line you want to delete.
2. Click the Delete icon at the bottom of the page.

Procurement Services Vendor Catalog
Revision Date: 05.10.13 18 of 26
Ordering Hazardous Materials
If a requester orders hazardous materials, the Ship to Address needs to be changed. The process is described below.
The requisition details are pulled into ePro. This is no different than any other Vendor Catalog requisition you create.
When you try to submit the requisition that contains hazardous materials, a message will appear. You are required to change the Ship to Address.

Procurement Services Vendor Catalog
Revision Date: 05.10.13 19 of 26
Type EHS in the Ship to Box.
Result: ePro will automatically add Environmental Health & Safety as a reviewer. This can be seen by clicking Save & Preview Approvals.

Procurement Services Vendor Catalog
Revision Date: 05.10.13 20 of 26
Note: Once the ePro Vendor Catalog approval process is complete, the hazardous materials are shipped to EH&S, who follows their processes for getting any necessary approvals, documentation, etc. EH&S will then deliver the materials to the requester.
Working with Requisitions After They’ve been Submitted If needed, you can manage requisitions after they have been submitted. Some possible tasks include:
• searching for requisitions • seeing if a requisition has been approved • changing and resubmitting a denied requisition • viewing the line items on a submitted requisition • printing a requisition
The steps for each of these tasks are on the following pages.
Searching for Requisitions
1. Click Manage Orders.

Procurement Services Vendor Catalog
Revision Date: 05.10.13 21 of 26
Result: The Manage Requisitions page will appear. By default, the most recent requisitions that you created within the past week will show up at the bottom of the page.
2. To search for requisitions enter information in one or more fields located in the Search Orders section of the page.
Note: The Requester field defaults to your requester ID. To see requisitions not created by you, change the field to another user’s ID or leave that field blank. To find a user’s ID by searching on their last name click the magnifying glass to the right of the Requestor field, change the name field to “contains” and lookup by last name.
Seeing if a Requisition Has Been Approved
Note: After you have searched for and found the requisition you want to work with, you can view the status of the order by looking under the Status column.

Procurement Services Vendor Catalog
Revision Date: 05.10.13 22 of 26
1. Click the dropdown arrow next to the Selection Action box.
2. Select View Approvals (only for requistions that have been previously submitted).
3. Click Go.

Procurement Services Vendor Catalog
Revision Date: 05.10.13 23 of 26
4. The approval status page appears and it will list the individuals who have approved or need to approve the requisition, if required.
Changing and Resubmitting a Denied Requisition 1. If your requisition is denied, you will receive an email notification with the message that says “The following eProcurement order has been denied.”
2. Click the link at the bottom of the email.
3. Sign in to eProcurement (if necessary).
Result: The Manage Order page appears.

Procurement Services Vendor Catalog
Revision Date: 05.10.13 24 of 26
4. Search for the order that was denied. See page 20 for information on searching for requisitions.
5. Go to the Approval Status Page for that requisition. See page 21 for information on navigating to the Approval Status Page.
6. Look at the Approval Comment History to see the reason the requisition was denied.
7. Click the Edit Requisition button.
8. Make the appropriate changes and submit for approval.

Procurement Services Vendor Catalog
Revision Date: 05.10.13 25 of 26
Viewing the Line Items on a Submitted Requisition
1. To view order details click the Requisition ID on the Manage Requisitions page.
Result: ePro displays the line items on the requisition:
Printing a Requisition
1. Find the requisition on the Manage Requisitions page and click the printer icon.

Procurement Services Vendor Catalog
Revision Date: 05.10.13 26 of 26
Result: A new window appears.
2. Maximize the new window and click the print button.
Appendix: Processing Airgas Cylinder Returns
Note: A cylinder return will have $0.01 cost appearing on the order and email confirmation from Airgas. This amount will not be billed. For directions go to http://www.unc.edu/finance/fd/ct/traindocs/airgas_cylinder_returns.pdf
This concludes the Vendor Catalog manual. See the first page of this document for contact information. ePro approvers should review the Approve Orders manual.