Environmental Art Activities for Afterschool Youth · Environmental Art Activities for Afterschool...
20
A 2 O Afterschool Environmental Art Activities for Afterschool Youth INSPIRED BY A 2 O: ARTS & ARTISTS OUTDOORS RESIDENCIES FALL 2016 - SPRING 2017 Environmental Art Activities for Afterschool Youth
-
Upload
truongtruc -
Category
Documents
-
view
219 -
download
3
Transcript of Environmental Art Activities for Afterschool Youth · Environmental Art Activities for Afterschool...

A2OAfterschool
Envi ronmental Art Act iv i t i e sfor After school Youth
I N S P I R E D BY A 2O : A R T S & A R T I S T S O U T D O O R S R E S I D E N C I E SFA L L 201 6 - S P R I N G 201 7
Env i ronmental Art Act iv i t i e sfor After school Youth


1 A 2O A F T E R S C H O O L
TABLE OF CONTENTS2017 Program Overview 2
Introduction 3
Activities:
Color Theory Inside Out 4
Monoprints 6
Altered Book Poetry 8
Rose Windows 10
Coat of Arms Shield 12
Acorn Relief 14
Marilyn Rodriguez and student Residency at Vare Recreation Facility

PROGRAM OVERVIEWIn 2011, Mural Arts Philadelphia and Philadelphia Parks & Recreation (PP&R) launched a collaboration that aligns PP&R’s strategic objective to develop high-level practices and expand leadership in “out of school time” activities with the Mural Arts’ mission to unite artists and communities through a collaborative process to create art that transforms public spaces and individual lives.
A2O: Arts & Artists Outdoors combines art education programming and community engagement to foster a lasting appreciation of the natural and environmental assets of Philadelphia. Artists are temporarily paired with select recreation facilities, where they lead twice-weekly art classes, and two family and community events that offer both an exploration of the natural environment and engaging, hands-on arts activities. Every residency culminates in a temporary or permanent artwork that lives at the recreation center.
Through its collaborative artistic exploration of a recreation facility's green space, A2O works with Philadelphia communities to develop tools for local environmental awareness and sustainability, creating an impact that lasts long beyond the residency.
www.muralarts.org/a2o
2 A 2 O A F T E R S C H O O L
O2Aarts and artists outdoors
A20 students at Francisville Playground

3 A 2O A F T E R S C H O O L
INTRODUCTIONB Y A I S L I N N P E N T E C O S T - F A R R E NA2O Program Coordinator
Welcome to the A2O Afterschool Curriculum. These activities are designed by our 2017 artists-in-residence specifically for children ages 5-10. Each project is inspired by an A2O residency from the Fall 2016 – Spring 2017 season. They feature common materials, step-by-step instructions, and opportunities for discussion. I hope this curriculum guide can be a tool to explore nature and personal expression for afterschool students and teachers in Philadelphia and beyond.
The 2016-2017 A2O residencies featured five practicing artists who are experienced educators. They shared their enthusiasm, warmth and technical skills with the youth and communities at each recreation center where they worked, and the students met them with vision, creativity and excitement. With continued emphasis on field trips, student leadership and youth development, we engaged deeply with the environment, the arts, and each other. Thank you to all the artists, students, and City of Philadelphia Parks and Recreation Department staff who brought this program to recreation centers around the city.
3
A20 students at Wright Recreation Center

4 A 2O A F T E R S C H O O L
LOCATION Francisville PlaygroundRecreation Leader: JJ Pospiech
Francisville’s class was inspired by nature and power, from the natural powers we get from our bodies and our communities, to the super-powers we imagine. The young people learned about color theory and used it to create superhero costume pieces. The mural installation at Francisville uses a crystal motif to symbolize the power of nature.
What You’ll NeedFF Paper plates
FF Black markers
FF Brushes, medium-sized
FF Cups for water
FF Rags
FF Chalk
FF Egg cartons, for paint palettes
A R T I S T : C H A R L Y N M A G D A L E N E G R I F F I T H A N D S A M S P E T N E R
Color TheoryInsideOut
Insp i rat ion:franc i sv i l l ep layground

5 A 2O A F T E R S C H O O L
Extension: Go outside and find the colors in the color wheel. Use chalk to draw a circle on the pavement, creating six equal parts. Challenge students to find different trash and natural items that satisfy each section.
I N S T R U C T I O N S1 Identify and discuss the primary and
secondary colors.
2 Using a black marker, tri-sect a plate to make six equal triangular parts.
3 Use primary colors from light to dark to fill in alternating sections (yellow, red, blue).
4 Ask: Which two colors are lightest and should be mixed first? What color will they make? Make a hypothesis. Mix red and yellow and paint the triangle between the red and yellow sections.
5 Ask: Which two colors come next? What color will they make? Make a hypothesis. Mix yellow and blue and paint the triangle between the yellow and blue sections.
6 Finally ask: Which two colors should be mixed last? What color will we get from these two? Make a hypothesis. Mix red and blue and paint the triangle between the red and blue sections.
artact iv i t i e sFall2017
6 A 2O A F T E R S C H O O L
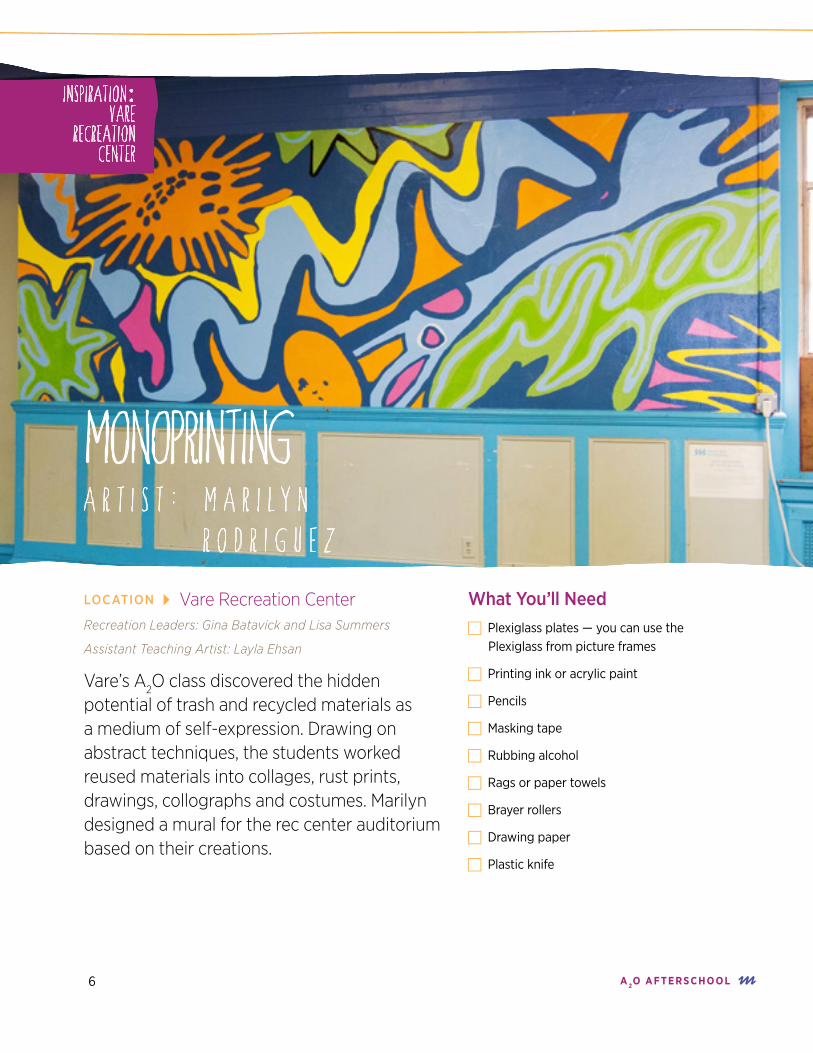
A R T I S T : M A R I L Y N R O D R I G U E Z
LOCATION Vare Recreation CenterRecreation Leaders: Gina Batavick and Lisa Summers
Assistant Teaching Artist: Layla Ehsan
Vare’s A2O class discovered the hidden potential of trash and recycled materials as a medium of self-expression. Drawing on abstract techniques, the students worked reused materials into collages, rust prints, drawings, collographs and costumes. Marilyn designed a mural for the rec center auditorium based on their creations.
What You’ll NeedFF Plexiglass plates — you can use the
Plexiglass from picture frames
FF Printing ink or acrylic paint
FF Pencils
FF Masking tape
FF Rubbing alcohol
FF Rags or paper towels
FF Brayer rollers
FF Drawing paper
FF Plastic knife
monoprinting
Insp i rat ion:vare
r ecreat ionCenter

7 A 2O A F T E R S C H O O L
I N S T R U C T I O N S
1 Begin by measuring the size of the paper, which will determine the measurement on the plates for inking.
2 Frame your measurement on the Plexiglass with the masking tape.
3 Lay out the rest of the supplies (brayers, pencils, papers, paper towel, printing ink) you will need on the table next to the plate.
4 Use the knife to add the ink onto the plate — just enough to cover the brayer.
5 Use the brayer to roll the ink to fill the entire plate. Go across and up/down the plate; consistency should not be too thick.
6 Carefully place your paper on top of the plate, without pressing down on the paper.
7 Use a pencil to sketch something on the paper, applying enough pressure for the paper to pick up ink from the opposite side.
8 After your drawing is complete, gently pull from the edge of the corner and lift up to reveal your drawing.
9 Pour the rubbing alcohol on your brayer and wipe clean with a rag. A rag with rubbing alcohol can be used to clean any remaining ink on the Plexiglass and work area.
1
2
3
Unlike most printing techniques, where multiple originals are created, monoprinting allows images to only be made once. It can be thought of as a “printed painting,” a unique work of art that cannot be replicated. Many well-known artists such as Picasso, Dubuffet, and Matisse produced numerous monoprints during their lifetimes.
artact iv i t i e sFall2017

8 A 2O A F T E R S C H O O L
LOCATION Wright Recreation CenterRecreation Leaders: Jamal Ball and Tae Kim
Assistant Teaching Artist: Brian Bazemore
The youth in Wright’s A2O class explored their relationship to the plants in their Mantua neighborhood through painting, drawing, print-making, photography, and collage. Rebecca combined the student work into a mural for the Wright playground that celebrates what grows in Mantua. This activity was one of the students’ favorites, giving old, unloved books a new purpose by using old book pages as a canvas to create unique poems.
What You’ll NeedFF Used books — age-appropriate with
more text than pictures
FF Acrylic or tempera paint
FF Small brushes
FF Pencils
A R T I S T : R E B E C C A S C H U L T Z
alteredbookpoetry
Insp i rat ion:wright
recreat ionCenter

9 A 2O A F T E R S C H O O L
I N S T R U C T I O N S
1 Explain to students that they are going to make a piece of word art. This kind of word art is called “altered book poetry.” They are going to create poetry not by writing words on a paper, but by selecting some words that are already on paper. The process involves choosing which words to leave out rather than which words to add in.
2 Have each student choose and tear out two pages from one of the books.
3 With a pencil, students underline words or phrases with that they associate with nature.
4 Using paint and a small brush, cover all of the text that they have not underlined, leaving the words they selected as their “poem.” They will need to use two coats to cover the text completely.
5 Once the paint is dry, paint designs and images on the pages that they associate with their poem.
6 Have the students read their poems aloud and share their inspiration for their poem and images, allowing time for other students to share what they notice and like about their peers’ work.
1
2
3
artact iv i t i e sFall2017

10 A 2O A F T E R S C H O O L
LOCATION Wright Recreation CenterRecreation Leaders: Jamal Ball and Tae Kim
Assistant Teaching Artist: Brian Bazemore
Stained glass “rose windows” are often found in churches built in the Gothic architectural style and are visually similar to flowers. With intricately placed pieces of color-glazed glass, these circular windows create a kaleidoscope of color and light as the sun shines through.
What You’ll NeedFF Images of stained glass rose windows
FF Black construction paper
FF Paper plates
FF Pencils
FF Tissue paper, various colors
FF White glue or modpodge
FF Paintbrushes
FF Scissors
A R T I S T : R E B E C C A S C H U L T Z
rose windows
Insp i rat ion:wright
recreat ionCenter

11 A 2O A F T E R S C H O O L
I N S T R U C T I O N S
1 Show students examples of rose windows and have a discussion about their history and the traditional process of creating them. Students will use patterns and colors from nature as their own inspiration.
2 Trace a paper plate on the black construction paper and cut out the circle.
3 Fold the circle in half, then in half again.
4 Cut out varying shapes along the folded lines, like you’re making a snowflake.
5 Using glue and a paintbrush, unfold the paper circle and attach ripped pieces of tissue paper to one side of the circle, covering the holes.
6 Apply one final coat of glue and hang to dry.
7 Allow students to share their work and to talk about what inspired their design.
3
1
2
4
artact iv i t i e sFall2017

12 A 2O A F T E R S C H O O L
LOCATION Kingsessing Recreation CenterRecreation Leader: Jamilla Abdur-Rahman
Assistant Teaching Artist: Julia Owens
The A2O students at Kingsessing spent their spring exploring local flora and fauna, and the symbolism of traditional coats of arms. They designed a coat of arms for Kingsessing that incorporates the iconic plants and animals of the neighborhood.
VocabularyHeraldry: An emblem or family crest to describe one’s heritage, traditionally used in Europe during medieval times. Animals, plants, colors, and symbols were used to describe character traits of the family.
What You’ll NeedFF A book to help identify plants
FF Images of medieval coat of arms for inspiration
FF Markers, crayons, color pencils, etc.
FF Silver or gold tempera paint
FF White cardstock
FF Containers for glue
FF Recycled cardboard sheets, at least 15” x 24”
FF Pencils
FF Glue
FF Stapler
FF Scissors
A R T I S T : L U C Y P I S T I L L I
coat of armsshield
Insp i rat ion:K ingses s ing
recCente r

13 A 2O A F T E R S C H O O L
I N S T R U C T I O N S1 Pre-cut life-sized shield shapes (one per person) from
cardboard sheets, and 2” x 12” strips for handles.
2 Introduce the history of heraldry and the the coat of arms shields. Show examples.
3 Discuss and list as many local plants and animals the students can think of.
4 Paint cardboard shields with either silver or gold tempera paint for a metallic effect.
5 Hand out white cardstock and drawing supplies. Allow students to create their own images inspired by local plants and animals to represent their personal identities or communities.
6 Cut out the coat of arms images and glue them to the cardboard shield.
7 Bend and curve the 2” x 12” cardboard strip to form a handle and staple it to the back of the shield.
artact iv i t i e sFall2017

14 A 2O A F T E R S C H O O L
ACORN REL IEFA R T I S T : M A G D A L E N E S A N M I L L A N
LOCATION Mander PlaygroundRecreation Leader: Hilary Doe
Assistant Teaching Artist: Efi Green
Mander’s class drew inspiration from the visual art world and the fashion world and learned about the symbolism and human use of local plants like cabbage, beet and oak tree. They created outfits for photographic portraits that are not easy to categorize.
What You’ll NeedFF Clay
FF Plaster of Paris
FF Acorns, rocks, sticks, plastic toys, etc.
FF Styrofoam bowl or container
FF Mixing container
FF Stirring stick
FF Water
FF Yarn
FF Acrylic paints and soft bristle brushes
VocabularyRelief: A sculptural technique used to make part of a design project from a flat surface. Here, plaster was poured into a clay mold, then removed when hardened, creating a relief.
I n s p i rat ion:mander
p layground

15 A 2O A F T E R S C H O O L
I N S T R U C T I O N S :
1 Fill the Styrofoam bowl with clay halfway to the top. Smooth the clay with your fingers.
2 Press the acorns and other objects into the clay and remove so they leave an impression. Make as many different kinds of marks in the clay as you can.
3 Fill half of the yogurt container with warm water. Carefully add plaster in generous handfuls until it starts to form an island above the water surface.
4 Stir plaster with stick or ruler until it thickens to milkshake consistency.
5 Pour plaster over clay impressions in Styrofoam bowl, until you can no longer see the clay.
6 Cut a 3–4 inch piece of yarn and tie a knot at each end. Submerge both knots into the plaster so a loop is sticking up in between. This will be the hook for hanging once it hardens.
7 Wait 20–30 minutes for the plaster to dry completely. Check on the plaster. It will undergo a chemical reaction and heat up so it is hot to the touch.
8 Break and peel the Styrofoam bowl and pull the clay off the plaster. The clay can be reused.
9 Wash the plaster and clean gently with a soft paint brush to remove any clinging bits of clay.
Mix acrylic paints and water to create a light wash. Paint your acorn landscapes as desired!
1
2
3
10
artact iv i t i e sFall2017

16 A 2O A F T E R S C H O O L

17 A 2O A F T E R S C H O O L
Learn more about A2O and all the projects at: www.muralarts.org/a2o
Special Thanks:
Philadelphia Parks & Recreation
Created By:
Krissy Arcidiacono Content Editor
Nile Livingston Design, Edits, and Revisions
Aislinn Pentecost-Farren Arts and Artists Outdoors Program Coordinator, Mural Arts Philadelphia
Charlyn Griffith, Lucy Pistilli, Marilyn Rodriguez, Magdalene San Millan, Rebecca Schultz, Sam Spetner A2O Artists-in-Residence
Photography by:
Steve Weinik, Krissy Arcidiacono, Kathy Poole, Charlyn Griffith, Lucy Pistilli, Marilyn Rodriguez, Magdalene San Millan, Rebecca Schultz, Sam Spetner
Cover photo:
Magdalene San Millan and students, residency at Mander Playground
Back Cover photo:
A2O student at Vare Recreation Center
Participating Recreation Facilities:
Vare Recreation Center, 2600 Morris Street, 19145
Francisville Playground, 1737 Francis Street, 19130
Kingsessing Recreation Center, 4901 Kingsessing Avenue, 19143
Mander Playground, 2140 N. 33rd Street, 19121
Wright Recreation Center, 3320-50 Haverford Avenue, 19104
A2O Student at Wright Recreation Center

muralarts.org