Entrust Managed Services PKI: Auto-enrollment Server 7.0
158
Entrust Managed Services PKI™ Auto-enrollment Server 7.0 Installation and Configuration Guide Document issue: 1.0 Date of Issue: July 2009
Transcript of Entrust Managed Services PKI: Auto-enrollment Server 7.0

Entrust Managed Services PKI™
Auto-enrollment Server 7.0
Installation and Configuration Guide
Document issue: 1.0
Date of Issue: July 2009

2
Copyright © 2009 Entrust. All rights reserved.Entrust is a trademark or a registered trademark of Entrust, Inc. in certain countries. All Entrust product names and logos are trademarks or registered trademarks of Entrust, Inc. in certain countries. All other company and product names and logos are trademarks or registered trademarks of their respective owners in certain countries.
This information is subject to change as Entrust reserves the right to, without notice, make changes to its products as progress in engineering or manufacturing methods or circumstances may warrant.
Export and/or import of cryptographic products may be restricted by various regulations in various countries. Export and/or import permits may be required.
Obtaining technical supportFor support assistance by telephone call one of the numbers below:
• 1-877-754-7878 in North America
• 1-613-270-3700 outside North America
You can also email Customer Support at:[email protected]
Auto-enrollment Server 7.0 Installation and Configuration Guide

TOCTOC
About Auto-enrollment Server . . . . . . . . . . . . . . . . . . . . . . . . . . . . . . . . . . . .7
Overview . . . . . . . . . . . . . . . . . . . . . . . . . . . . . . . . . . . . . . . . . . . . . . . . . . . 8
Auto-enrollment Server system components . . . . . . . . . . . . . . . . . . . . . . . . 9
Tier 1 . . . . . . . . . . . . . . . . . . . . . . . . . . . . . . . . . . . . . . . . . . . . . . . . 10
Tier 2 . . . . . . . . . . . . . . . . . . . . . . . . . . . . . . . . . . . . . . . . . . . . . . . . 10
Tier 3 . . . . . . . . . . . . . . . . . . . . . . . . . . . . . . . . . . . . . . . . . . . . . . . . 11
How the auto-enrollment process works . . . . . . . . . . . . . . . . . . . . . . . . . . 13
Auto-enrollment request . . . . . . . . . . . . . . . . . . . . . . . . . . . . . . . . . 13
Choice of certificate type and role . . . . . . . . . . . . . . . . . . . . . . . . . . 13
Auto-enrollment decision procedure . . . . . . . . . . . . . . . . . . . . . . . . . 14
Enrollment and recovery queues for administrator approval . . . . . . . 14
How the distinguished name (DN) is created . . . . . . . . . . . . . . . . . . . . . . . 16
How the subjectAltName is created . . . . . . . . . . . . . . . . . . . . . . . . . 17
How the subjectAltName is created for domain controller certificates 17
Preparing for installation . . . . . . . . . . . . . . . . . . . . . . . . . . . . . . . . . . . . . . .19
Planning your installation . . . . . . . . . . . . . . . . . . . . . . . . . . . . . . . . . . . . . . 20
What you should have from Entrust for the pre-installation . . . . . . . 21
Pre-installation tasks . . . . . . . . . . . . . . . . . . . . . . . . . . . . . . . . . . . . . 21
Step 1: Installing the Web Server . . . . . . . . . . . . . . . . . . . . . . . . . . . . . . . . 22
Step 2: Obtaining a Web server certificate . . . . . . . . . . . . . . . . . . . . . . . . . 24
Step 3: Assigning the certificate to your Web server . . . . . . . . . . . . . . . . . 42
Step 4: Enabling SSL on your Web server . . . . . . . . . . . . . . . . . . . . . . . . . . 51
Step 5: Configuring integrated Windows authentication . . . . . . . . . . . . . . 56
Step 6: Testing the SSL-enabled Web server . . . . . . . . . . . . . . . . . . . . . . . . 60
Step 7: Obtaining a certificate for Auto-enrollment Server . . . . . . . . . . . . . 61

4
Installing Auto-enrollment Server . . . . . . . . . . . . . . . . . . . . . . . . . . . . . . . . .73
What you should have from Entrust for the installation of Auto-enrollment
Server . . . . . . . . . . . . . . . . . . . . . . . . . . . . . . . . . . . . . . . . . . . . . . . 73
Installing Auto-enrollment Server . . . . . . . . . . . . . . . . . . . . . . . . . . . . . . . . 74
Checking the Auto-enrollment Server installation . . . . . . . . . . . . . . . . . . . . 86
Verify adminservice.log file . . . . . . . . . . . . . . . . . . . . . . . . . . . . . . . . 86
Verify the Web server is passing requests to Auto-enrollment Server 86
Verify installation log file . . . . . . . . . . . . . . . . . . . . . . . . . . . . . . . . . 87
Verify configuration log file . . . . . . . . . . . . . . . . . . . . . . . . . . . . . . . 87
Customizing the Auto-enrollment Server . . . . . . . . . . . . . . . . . . . . . . . . . . . .89
What you should have from Entrust for Auto-enrollment Server
customizations . . . . . . . . . . . . . . . . . . . . . . . . . . . . . . . . . . . . . . . . . 90
Customizing the certificate type and user role . . . . . . . . . . . . . . . . . . . . . . 91
Configuring a default certificate type . . . . . . . . . . . . . . . . . . . . . . . . 91
Configuring a default User Role . . . . . . . . . . . . . . . . . . . . . . . . . . . . 92
Configuring the client information setting . . . . . . . . . . . . . . . . . . . . 93
Customizing certificate lifetimes . . . . . . . . . . . . . . . . . . . . . . . . . . . . . . . . . 96
Customizing a user’s Distinguished Name (DN) . . . . . . . . . . . . . . . . . . . . . 97
Customizing a search base for enrolling clients . . . . . . . . . . . . . . . . . . . . . . 98
Configuring the DNS name . . . . . . . . . . . . . . . . . . . . . . . . . . . . . . . . . . . . 99
Configuring queuing . . . . . . . . . . . . . . . . . . . . . . . . . . . . . . . . . . . . . . . . .101
Enabling queuing in Auto-enrollment Server . . . . . . . . . . . . . . . . . . . . . . 102
Configuring the ae-defaults.xml file to queue requests . . . . . . . . . . 102
Configuring the queuing monitor . . . . . . . . . . . . . . . . . . . . . . . . . . 103
Approving or rejecting requests in Administration Services . . . . . . . . . . . . 105
Troubleshooting . . . . . . . . . . . . . . . . . . . . . . . . . . . . . . . . . . . . . . . . . . . . .109
Logging configuration . . . . . . . . . . . . . . . . . . . . . . . . . . . . . . . . . . . . . . . 110
Setting the log level . . . . . . . . . . . . . . . . . . . . . . . . . . . . . . . . . . . . 110
Setting the log file location . . . . . . . . . . . . . . . . . . . . . . . . . . . . . . . 111
Setting the maximum log file size . . . . . . . . . . . . . . . . . . . . . . . . . . 112
Setting the number of backup log files allowed . . . . . . . . . . . . . . . 113
Setting the maximum message length . . . . . . . . . . . . . . . . . . . . . . 114
Auto-enrollment Server 7.0 Installation and Configuration Guide Document issue: 1.0

Time synchronization . . . . . . . . . . . . . . . . . . . . . . . . . . . . . . . . . . . . . . . . 115
Error messages . . . . . . . . . . . . . . . . . . . . . . . . . . . . . . . . . . . . . . . . . . . . 116
Glossary of terms . . . . . . . . . . . . . . . . . . . . . . . . . . . . . . . . . . . . . . . . . . . 117
Writing your own DN Builder implementation code . . . . . . . . . . . . . . . . . . 131
DN Builder examples . . . . . . . . . . . . . . . . . . . . . . . . . . . . . . . . . . . . . . . . 132
Customizing the DN builder code . . . . . . . . . . . . . . . . . . . . . . . . . . . . . . 133
DistinguishedNameBuilderDefaultImp . . . . . . . . . . . . . . . . . . . . . . . . . . . 135
Customizing the default DN Builder implementation . . . . . . . . . . . 135
Constructor Summary . . . . . . . . . . . . . . . . . . . . . . . . . . . . . . . . . . 136
Method Summary . . . . . . . . . . . . . . . . . . . . . . . . . . . . . . . . . . . . . 136
Constructor Detail . . . . . . . . . . . . . . . . . . . . . . . . . . . . . . . . . . . . . 139
Method Detail . . . . . . . . . . . . . . . . . . . . . . . . . . . . . . . . . . . . . . . . 139
ActiveDirectoryUserInfo . . . . . . . . . . . . . . . . . . . . . . . . . . . . . . . . . . . . . 149
Method Summary . . . . . . . . . . . . . . . . . . . . . . . . . . . . . . . . . . . . . 149
Method Detail . . . . . . . . . . . . . . . . . . . . . . . . . . . . . . . . . . . . . . . . 149
Index . . . . . . . . . . . . . . . . . . . . . . . . . . . . . . . . . . . . . . . . . . . . . . . . . . . . 153
5

6
Auto-enrollment Server 7.0 Installation and Configuration Guide Document issue: 1.0
1
About Auto-enrollment Server
The Entrust Authority™ Auto-enrollment Server creates certificates and sends these transparently to an Entrust Entelligence™ Security Provider for Windows client.
The following topics provide an introduction to Auto-enrollment Server:
• “Overview” on page 8
• “Auto-enrollment Server system components” on page 9
• “How the auto-enrollment process works” on page 13
7

8
OverviewThe Auto-enrollment Server simplifies certificate deployment by providing automatic enrollment of keys and certificates to users and computers. Enrollment is also transparent to the administrator (the level of transparency to the end-user depends on the user key store selected for key protection).
The Auto-enrollment Server communicates with the Security Provider for Windows client to automatically deliver a certificate to Windows-based users or computers. Auto-enrollment Server can provide a certificate to the following Windows-based machines:
• Laptops and desktops
• Microsoft Windows IIS Web browsers and servers
• Domain Controllers
• Authentication clients and servers (RRAS, IAS, VPN, Radius Servers)
Note: The Security Provider for Windows client must be online at the time of the initial auto-enrollment request, in order for the request to be processed by Auto-enrollment Server.
When the enrollment request is sent from the Security Provider for Windows client to Auto-enrollment Server, the enrollment may be processed automatically or the enrollment may be queued. Queuing is an optional feature, which takes an enrollment request and leaves it at the Auto-enrollment Server for approval by an administrator. In the case of an automatically processed request, Auto-enrollment Server contacts the Certification Authority (CA) for approval. Once the auto-enrollment request has been automatically approved or approved by the administrator in the case of queuing, the authorization code and reference number are passed to the Security Provider for Windows client. The Security Provider for Windows client uses the authorization code and reference number to complete the enrollment process.
Auto-enrollment Server 7.0 Installation and Configuration Guide Document issue: 1.0Report any errors or omissions

Auto-enrollment Server system componentsThe following figure provides an illustration of the Auto-enrollment Server system components in a Three-Tier client/server environment:
Figure 1: Auto-enrollment Server system components
9About Auto-enrollment ServerReport any errors or omissions

10
Tier 1Entrust Entelligence Security Provider for Windows (Security Provider) is known as the tier 1 client component in this three-tier client/server environment.
Note: You host the Security Provider client.
Entrust Entelligence™ Security Provider for WindowsEntrust Entelligence Security Provider for Windows (Security Provider) is the client that transparently communicates with Auto-enrollment Server to enroll certificates. Auto-enrollment Server transparently issues certificates to a user or computer through Security Provider.
Auto-enrollment is enabled per-CA by configuring the following registry values:
• AutoEnrollUserURL
• AutoEnrollMachineURL
You can configure the registry values in the Windows registry of the machine in which Security Provider is installed or through Security Provider’s Custom Installation wizard (Specify Entrust PKI Information page). For more information on adding these values, see the Entrust Entelligence Security Provider for Windows Administration Guide.
A CA can have user auto-enrollment and machine auto-enrollment enabled for it.
If the AutoEnrollUserURL value is present, user auto-enrollment is enabled for that CA. If the AutoEnrollMachineURL value is present, machine auto-enrollment is enabled for that CA. Both values support a list of Auto-enrollment Server URLs in case connections to multiple Auto-enrollment Servers should be attempted. If a connection to the first Auto-enrollment Server does not work, the second server URL is tried, and so on. Once a connection is established with one Auto-enrollment Server, connections to other servers are not attempted.
Tier 2 The Microsoft Internet Information Services (IIS) Web Server and Tomcat Application Server are known as tier 2 in the three-tier client/server environment. The Web Server and Application Server provide the middle-tier processing between Security Provider and the CA.
Note: You host the IIS Web Server and the Tomcat Application Server.
Auto-enrollment Server 7.0 Installation and Configuration Guide Document issue: 1.0Report any errors or omissions

Microsoft Internet Information Services (IIS) Web ServerSecurity Provider for Windows communicates with the Microsoft IIS Web Server through a firewall. SSL encryption must be used on the Web Server to secure the connection between Security Provider and Auto-enrollment Server. Security Provider communicates directly with an SSL-enabled Microsoft IIS Web Server over HTTPS. The Microsoft IIS Web Server is configured to authenticate Security Provider through Windows Integrated Authentication using the NTLM or Kerberos authentication methods.
Tomcat Application ServerThe Tomcat Application Server is connected directly to the Microsoft IIS Web Server. The Microsoft IIS Web Server communicates through a Tomcat isapi filter to a JK2 Connector in the Tomcat Application Server. The JK2 Connector passes information to the Auto-enrollment Server located in the Tomcat Application Server.
Tier 3Entrust Managed Services PKI certification authority (CA) is known as the tier 3 server component in a three-tier client/server environment.
Note: Entrust Managed Services PKI hosts the CA.
Entrust Managed Services PKI certificate authorityEntrust Managed Services PKI runs the certification authority (CA) for the Auto-enrollment Server system. The main functions the CA is to:
• create certificates for all public keys
• create encryption key pairs
• provide a managed, secure database of information that allows the recovery of encryption key pairs
• enforce the security policies defined by your organization
• publish Certificate Revocation Lists (CRLs)
• publish Policy Certificates
Auto-enrollment Server must be able to communicate with the XML Administration Protocol (XAP) Server running as part of the CA. Communication between these components is XAP over HTTPS.
11About Auto-enrollment ServerReport any errors or omissions

12
DirectoryThe majority of information requests involve retrieving certificates. To make this information publicly available, the CA uses a public repository known as a directory. The directory is an LDAP (Lightweight Directory Access Protocol) compliant directory service.
Information that is made public through the directory includes:
• user certificates
• lists of revoked certificates
• client policy information
Public encryption certificates for each user, certificate revocation lists (CRLs), and other information are written from the CA to the directory.
Auto-enrollment Server Servlets need access to the directory in order to log in to their profiles.
DatabaseThe database is under the control of Entrust Managed Services PKI and acts as a secure storage area for all information related to the CA. The database stores:
• the CA signing key pair (this key pair may be created and stored on a separate hardware device rather than the database)
• user or computer status information
• the encryption key pair history (including all decryption private keys and encryption public key certificates) for each user and computer
• the verification public key history (including all verification public key certificates) for each user and computer
• the validity periods for signing key pairs, encryption key pairs, and system cross-certificates
• Security Officer and administrator information
• CA policy information
• revocation information
Note: All information stored in the database is secured to protect against tampering.
Auto-enrollment Server 7.0 Installation and Configuration Guide Document issue: 1.0Report any errors or omissions

How the auto-enrollment process worksThe following sections provide a high-level view of the auto-enrollment process:
• “Auto-enrollment request” on page 13
• “Choice of certificate type and role” on page 13
• “Auto-enrollment decision procedure” on page 14
• “Enrollment and recovery queues for administrator approval” on page 14
Auto-enrollment requestSecurity Provider sends an auto-enrollment request over SSL to the Microsoft IIS Web Server. Windows Authentication is performed, using the NTLM or Kerberos authentication protocol, and this determines the Windows domain and name of the remote client that sent the request.
The Auto-enrollment Server builds a distinguished name (DN) from the Windows domain and user name found in the auto-enrollment request. There may be messages sent from the Auto-enrollment Server to the directory to determine the first and last names.
An authentication servlet in the Tomcat Application Server receives the request through an ISAPI connector. The client is authenticated primarily through membership in a Windows domain name. The user’s Windows domain and account name must be mapped by the server to an X.500 distinguished name (DN). The default mapping creates a common name from the user’s Windows domain login name. This is received by the authentication component.
The administrator can choose to customize the distinguished name (DN) builder implementation, instead of using the default. The DistinguishedNameBuilder interface can be used to define your own mapping procedure. Refer to the section “Customizing a user’s Distinguished Name (DN)” on page 97.
Choice of certificate type and roleThe choice of certificate type and user role is made by Auto-enrollment Server and is configurable in the ae-defaults.xml file. Refer to the section “Customizing the certificate type and user role” on page 91 for further information.
When Auto-enrollment Server decides the Certificate Type and Role that will be used for the enrollment, it communicates this to the CA so the appropriate identity is created.
13About Auto-enrollment ServerReport any errors or omissions

14
Auto-enrollment decision procedureWhen the auto-enrollment/recovery request is sent from Security Provider to Auto-enrollment Server, Auto-enrollment Server sends one of the following three types of responses to Security Provider:
• Approval response
A response that includes an authorization code and reference number Security Provider can use to communicate with the CA, and enroll/recover the user or computer. The response also indicates the validity period of these activation codes and whether an enrollment or recovery should be performed.
• Queued response
A response which indicates that the request has been queued for administrative approval.
• Rejection response
A response that includes an error code and reason indicating why the auto-enrollment/recovery cannot occur.
Once Security Provider has the approval response, communication with Auto-enrollment Server is complete. The enrollment or recovery is then performed through direct communication with the CA.
Enrollment and recovery queues for administrator approvalWhen an auto-enrollment request is sent from Security Provider to Auto-enrollment Server, Auto-enrollment Server can be configured to automatically process the request immediately or queue the enrollment request. Queuing is an optional feature and occurs when an enrollment request waits at Auto-enrollment Server for approval by an administrator. Refer to the chapter “Configuring queuing” on page 101 for further information on configuring queuing.
When an auto-recovery request is sent from Security Provider to Auto-enrollment Server, Auto-enrollment Server can be configured to automatically process the request immediately, queue the recovery request, or reject the request immediately. For further information on what triggers an auto-recovery request, refer to the Entrust Entelligence Security Provider for Windows Administration Guide.
When queuing is available, all auto-recovery requests are placed in the queue and the administrator will decide if an auto-recovery should be granted or denied. When queuing is not available for an administrator, the following automatic auto-recoveries will be granted or denied:
Granted
• when the signing certificate is expired
• when the user is in the Key Recovery state at the CA
Auto-enrollment Server 7.0 Installation and Configuration Guide Document issue: 1.0Report any errors or omissions

Denied
• when the signing certificate is revoked
• when updates are not allowed at the CA for this user
When an auto-recovery is denied, Auto-enrollment Server returns an error to Security Provider. When the error message displays to the end user, explaining that the auto-recovery attempt failed, the user must inform their administrator that a recovery is required. To enable key recovery for the user, the administrator has to set the user for Key Recovery at the CA. This switches the user from the Active state into the Key Recovery state at the CA, and an auto-recovery is automatically granted by Auto-enrollment Server.
15About Auto-enrollment ServerReport any errors or omissions

16
How the distinguished name (DN) is createdAuto-enrollment Server may create a distinguished name (DN) for the user or computer if a DN does not already exist in the directory. The default behavior of the DN builder implementation in the Auto-enrollment Server is to take the user or computer name and the domain name to create a DN for this user or computer. If the DN already exists in the directory, most likely when Active Directory is used, it will not be created. If the DN does not already exist in the directory, the DN is added.
When the DN is created for a user or computer, it is created differently based upon the directory and whether it is a DN for a user or computer.
LDAP Directory
The DN of the user or computer is created by using the user or computer name, from the Windows domain name and the DN of the CA.
For example, assume the following:
• computer name is yottbsmith
• the Windows user is bsmith
• the domain name is SOMEDOMAIN
• the complete domain name is SOMEDOMAIN.abc.com
• the CA DN is ou=SomeUnit, o=abc, c=ca
The user being auto-enrolled will have the following default Subject name: cn=bsmith SOMEDOMAIN, ou=SomeUnit, o=abc, c=ca
The computer being auto-enrolled will have the following default Subject name:
cn=bsmith$ SOMEDOMAIN, ou=SomeUnit, o=abc, c=ca
When your organization requires you to create DNs for your users or computers in a different manner than the above example, you may choose to customize the default DN builder implementation. Refer to the section “Customizing a user’s Distinguished Name (DN)” on page 97 for further details.
Active Directory
The DN for the user or computer in Active Directory is used for the DN in Entrust Managed Services PKI. There are no exceptions and this cannot be customized.
Note: This is advanced configuration. Contact your Entrust representative for more information.
For example, assume the following:
• computer name is yottbsmith
• the Windows user is bsmith
• the domain name is SOMEDOMAIN
Auto-enrollment Server 7.0 Installation and Configuration Guide Document issue: 1.0Report any errors or omissions

• the complete domain name is SOMEDOMAIN.abc.com
• the machine with Active Directory running on it (the domain controller) has the machine name SOMESERVER
• the CA DN is cn=SOMESERVER, cn=AIA, cn=Public Key Services, cn=Services, cn=Configuration, dc=SOMEDOMAIN, dc=abc, dc=com
The user being enrolled will have the following default Subject name:
cn=bsmith, cn=Users, dc=SOMEDOMAIN, dc=abc, dc=com
The computer being auto-enrolled will have the following Subject name:
cn=yottbsmith, cn=Computers, dc=SOMEDOMAIN, dc=abc, dc=com
How the subjectAltName is createdAuto-enrollment Server may create a subjectAltName for the user or computer. The default behavior of the DN builder implementation in Auto-enrollment Server, is to add a subjectAltName for computers and not to add one for users. Auto-enrollment Server takes the computer name and domain and builds the dNSName, for example, dNSName=computer_name.complete_domain_name. This value is provided when the user or computer is being added to the CA. Entrust Managed Services PKI then adds the dNSName to the SubjectAltName extension of the certificate.
For example, assume the following:
• computer name is yottbsmith
• the domain name is SOMEDOMAIN
• the complete domain name is SOMEDOMAIN.abc.com
The dNSName of the above example is: dNSName=yottbsmith.SOMEDOMAIN.abc.com
Auto-enrollment Server does a dNSName lookup to get the domain. If the dNSName lookup fails, as a backup you can customize the ae-defaults.xml file to build a dNSName. Refer to the section “Configuring the DNS name” on page 99 for further instructions.
How the subjectAltName is created for domain controller certificates
Certificates for domain controllers always have extra information added to the subjectAltName. This complies with the “Requirements for Domain Controller Certificates from a Third-Party CA” (article ID 291010) as documented by Microsoft. In addition to the dNSName, the directory must include the globally unique identifier (GUID) of the domain controller object. The directory stores the GUID in the
17About Auto-enrollment ServerReport any errors or omissions

18
subjectAltName as an Other Name, and it is DER encoded. An example of a subjectAltName with the globally unique identifier (GUID) of the domain controller object in the directory and the Domain Name System (dNSName) is:
Other Name: 1.3.6.1.4.1.311.25.1 = ac 4b 29 06 aa d6 5d 4f a9 9c 4c bc b0 6a 65 d9
DNS Name=ComputerNameOfDomainController.SOMEDOMAIN.abc.com
When Security Provider creates the auto-enrollment request message for Auto-enrollment Server, it checks if the computer is a domain controller. If yes, it queries the Active Directory and asks for the GUID of the domain controller. Security Provider for Windows will then include the following two pieces of information in the request message to the Auto-enrollment Server:
• confirmation that the computer is a domain controller
• the GUID
Passing this information in the request message allows Auto-enrollment Server to set extra information in the subjectAltName when necessary.
Auto-enrollment Server 7.0 Installation and Configuration Guide Document issue: 1.0Report any errors or omissions

2
Preparing for installation
This chapter describes how to prepare for the Auto-enrollment Server installation.
Read this chapter if you are the system administrator installing and configuring machines hosting the Auto-enrollment Server components.
This chapter contains the following sections:
• “Planning your installation” on page 20
• “Step 1: Installing the Web Server” on page 22
• “Step 2: Obtaining a Web server certificate” on page 24
• “Step 3: Assigning the certificate to your Web server” on page 42
• “Step 4: Enabling SSL on your Web server” on page 51
• “Step 5: Configuring integrated Windows authentication” on page 56
• “Step 6: Testing the SSL-enabled Web server” on page 60
• “Step 7: Obtaining a certificate for Auto-enrollment Server” on page 61
19

20
Planning your installationThe following flowchart illustrates the pre-installation steps required for Entrust Managed Services PKI customers installing Auto-enrollment Server.
Figure 2: Pre-installation flowchart
Attention: Auto-enrollment Server is an add-on that works together with Entrust Entelligence Security Provider (Security Provider). As such, you must already have Security Provider installed at this time. Security Provider and related documentation is available for download from Entrust TrustedCare at https://secure.entrust.com/trustedcare/.
Auto-enrollment Server 7.0 Installation and Configuration Guide Document issue: 1.0Report any errors or omissions

What you should have from Entrust for the pre-installationEnsure you have all the items listed in the table below. If you do not, contact Entrust Managed Services PKI.
Pre-installation tasksYou must complete the following tasks, in order, prior to installing Auto-enrollment Server.
Note: This guide assumes you have already obtained an administrator certificate. If you are an Entrust Managed Services PKI customer, but have not yet created an administrator certificate, see the Administrator Guide under the Resources tab of www.entrust.com/managed_services.
• “Step 1: Installing the Web Server” on page 22
• “Step 2: Obtaining a Web server certificate” on page 24
• “Step 3: Assigning the certificate to your Web server” on page 42
• “Step 4: Enabling SSL on your Web server” on page 51
• “Step 5: Configuring integrated Windows authentication” on page 56
• “Step 6: Testing the SSL-enabled Web server” on page 60
• “Step 7: Obtaining a certificate for Auto-enrollment Server” on page 61
Table 1: Pre-install check list
Item Have it?
Your organization’s URL to Administration Services, a Web-based application that allows you to create and manage certificates and accounts.
Credentials to access Entrust TrustedCare (https://secure.entrust.com/trustedcare/), which allows you to download purchased software and related documentation
Entrust Managed Services PKI Welcome letter. Specifically the name of the Certificate type to select when creating the Web Server certificate account.
21Preparing for installationReport any errors or omissions

22
Step 1: Installing the Web ServerIf you have not done so already, install the Microsoft IIS Web Server.
Note: Ensure you understand all specific security requirements for your product.
The following procedure describes the Microsoft IIS Web Server installation on a Windows 2003 server.
To install Microsoft IIS Web Server (Windows 2003 Server)
1 Click Start > Control Panel > Add or Remove Programs.
The Add or Remove Programs dialog box appears.
2 From the left menu pane, select Add/Remove Windows Components.
After a few moments, the Windows Components Wizard dialog box appears.
Auto-enrollment Server 7.0 Installation and Configuration Guide Document issue: 1.0Report any errors or omissions

3 Select Application Server and click Next.
Note: This preforms a default installation. For production purposes, you should consult your organization’s security policy to determine which components to install.
4 Once complete, click Finish.
23Preparing for installationReport any errors or omissions

24
Step 2: Obtaining a Web server certificateTo enable SSL between the Security Provider for Windows client and the Microsoft IIS Web server, a certificate for the Web server is required.
If you are deploying Auto-enrollment Server in a multi-domain environment, ensure that each Microsoft IIS Web server is issued a certificate.
Complete the following procedures, in order:
• “To log in to Administration Services” on page 24
• “To create a Web server certificate account” on page 26
• “To enroll for the Web server certificate using Security Provider” on page 33
To log in to Administration Services
1 Enter the Administration Services URL provided by Entrust Managed Services PKI into a browser.
The following page appears.
2 Depending on where you stored your administrator certificate, do one of the following:
Auto-enrollment Server 7.0 Installation and Configuration Guide Document issue: 1.0Report any errors or omissions

if you stored your certificate... Do this
in the Entrust desktop security store on your computer
1 Click Browse to navigate to the location where you stored your administrator digital ID (.epf file) and click Open.
The file name and path appear in the Entrust Desktop Security Store File Name field. Select Remember Entrust Desktop Security Store File Name to retain the path.
2 Enter the password you created for your certificate and click Log in.
within the Windows framework or on a smart card or token.
1 Click the Log in with my Third-Party Security Store link.
The Administrator Login - Third-Party Security Store page appears.
Note: If logging in with a smart card or token, ensure it is connected to your computer.
2 Click Display certificate list.
The Select Certificate dialog box appears listing one or more digital certificates.
3 Select your certificate from the list and click OK.
25Preparing for installationReport any errors or omissions

26
Upon successful login, the following page appears.
You successfully logged in to Administration Services.
To create a Web server certificate account
1 If you are not already logged in to Administration Services, do so now. See “To log in to Administration Services” on page 24 for more information.
Auto-enrollment Server 7.0 Installation and Configuration Guide Document issue: 1.0Report any errors or omissions

The main page appears.
2 Click Create Account under Account Tasks in the main pane or under Tasks in the left-hand menu.
The initial Create Account page appears.
27Preparing for installationReport any errors or omissions

28
3 From the User Type drop-down list, select Web server.
4 From the Certificate Type drop-down list, select your company’s specific certificate type. Consult your Entrust Managed Services PKI Welcome letter for more information.
5 Click Submit.
A second Create Account page appears where you provide the Web server name and other information.
Auto-enrollment Server 7.0 Installation and Configuration Guide Document issue: 1.0Report any errors or omissions

6 From the User Information section:
a In the Name field, enter the fully qualified domain name (FQDN) of the server (for example, test.dev.ad.entrust.com).
b Optionally, enter a description of the Web server certificate account in the Description field.
7 Leave the Notification Email field empty.
8 From the Group Membership section, select the member option. If no groups are configured, only the default group appears.
9 From the Role section, select End User from the drop-down list.
10 From the Location section, click Select the searchbase and select your company name from the drop-down list (an entry for your organization was created in the directory when you signed up for Entrust Managed Services PKI). This specifies where to add the Web server account in the Administration Services LDAP directory.
11 Click Submit.
The Create Account - Complete page appears.
29Preparing for installationReport any errors or omissions

30
12 Securely record the reference number and authorization code. You need these activation codes later during enrollment.
13 Click the name of your Web server certificate in the Name column on the Create Account - Complete page.
The Account Details - <Web server name> page appears, where <Web server name> is the FQDN of your Web server.
Auto-enrollment Server 7.0 Installation and Configuration Guide Document issue: 1.0Report any errors or omissions

14 Scroll down and click Edit Account.
15 On the Edit Account - Basic Information page, scroll down to the bottom of the page and click the Edit Advanced Information link.
The Edit Account - Advanced Information page appears.
31Preparing for installationReport any errors or omissions

32
16 In the Subject Alternative Naming Information section, enter the following in the DNS field (including the quotation marks):
“dnsName=<FQDN>”
where
<FQDN> is the fully qualified domain name of your Web server.
Note: If your machine is known by multiple names on the network, you can put multiple dnsName entries into the certificate, separated by a space. This allows a single certificate to be used for all instances.
17 Proceed to the below procedure: “To enroll for the Web server certificate using Security Provider” on page 33.
Auto-enrollment Server 7.0 Installation and Configuration Guide Document issue: 1.0Report any errors or omissions

To enroll for the Web server certificate using Security Provider
1 Open the Microsoft Management Console:
a Click Start > Run.
b Enter mmc and click OK.
The console appears.
2 From the console, click File > Add/Remove Snap-in.
The Add/Remove Snap-in dialog box appears.
33Preparing for installationReport any errors or omissions

34
3 From the Standalone tab, click Add.
The Add Standalone Snap-in dialog box appears.
Auto-enrollment Server 7.0 Installation and Configuration Guide Document issue: 1.0Report any errors or omissions

4 Select Entrust Computer Digital ID from the snap-in list, and click Add.
The Select Computer dialog box appears.
35Preparing for installationReport any errors or omissions

36
5 Select Local computer and click Finish.
6 Click Close to close the Add Standalone Snap-in dialog box.
7 Click OK on the Add/Remove Snap-in dialog box.
The console reappears with the Entrust Computer Digital ID snap-in listed.
Auto-enrollment Server 7.0 Installation and Configuration Guide Document issue: 1.0Report any errors or omissions

8 From the left pane of the console, right-click Entrust Computer Digital ID and select Enroll Computer for Entrust Digital ID.
The Welcome to the Enroll Computer for Entrust Digital ID Wizard appears.
9 Click Next.
The Specify the activation codes screen appears.
37Preparing for installationReport any errors or omissions

38
10 Enter the reference number and authorization code you obtained in Step 12 on page 30 into the respective fields and click Next.
Security Provider contacts the Entrust Managed Services PKI Certification Authority (CA) and, when successful, displays the Confirm Entrust Digital ID Enrollment screen.
Auto-enrollment Server 7.0 Installation and Configuration Guide Document issue: 1.0Report any errors or omissions

11 Click Next.
A security warning may appear advising you that you are about to install a certificate issued from the Entrust Managed Services PKI Certification Authority (CA).
39Preparing for installationReport any errors or omissions

40
12 Click Yes to install the certificate.
The Completing the Enroll Computer for Entrust Digital ID Wizard screen appears.
Auto-enrollment Server 7.0 Installation and Configuration Guide Document issue: 1.0Report any errors or omissions

13 Click Finish.
You successfully enrolled your Web server certificate.
41Preparing for installationReport any errors or omissions

42
Step 3: Assigning the certificate to your Web server
Complete the following procedure to assign the SSL certificate to your Web server.
To assign the certificate to your Web server
1 Click Start > All Programs > Administrative Tools > Internet Information Services (IIS) Manager.
The Internet Information Services (IIS) Manager appears.
2 In the left pane, expand <x> (local computer) and then expand the Web Sites folder, where <x> is the name of your computer. (In the screenshot above, the computer is named TEST.)
3 Right-click the Web site your want to configure for SSL (for example, Default Web Site) and select Properties.
The <x> Properties dialog box appears, where <x> is the name of the Web site you selected to configure.
Auto-enrollment Server 7.0 Installation and Configuration Guide Document issue: 1.0Report any errors or omissions

4 Click the Directory Security tab.
The Directory Security tab appears.
43Preparing for installationReport any errors or omissions

44
5 In the Secure communications section, click Server Certificate.
The Welcome to the Web Server Certificate Wizard wizard appears.
Auto-enrollment Server 7.0 Installation and Configuration Guide Document issue: 1.0Report any errors or omissions

6 Click Next.
The Server Certificate screen appears.
45Preparing for installationReport any errors or omissions

46
7 Select Assign an existing certificate and click Next.
The Available Certificates screen appears.
Auto-enrollment Server 7.0 Installation and Configuration Guide Document issue: 1.0Report any errors or omissions

8 Select the certificate you created for your Web server and click Next.
The SSL Port screen appears.
47Preparing for installationReport any errors or omissions
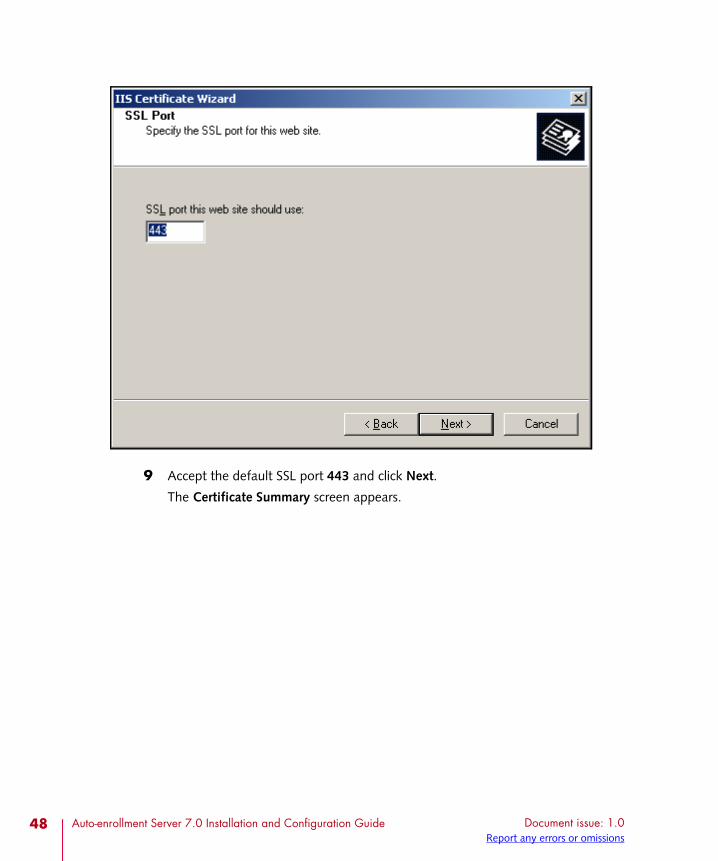
48
9 Accept the default SSL port 443 and click Next.
The Certificate Summary screen appears.
Auto-enrollment Server 7.0 Installation and Configuration Guide Document issue: 1.0Report any errors or omissions

10 Verify everything is correct and click Next.
The Completing the Web Server Certificate Wizard screen appears.
49Preparing for installationReport any errors or omissions

50
11 Click Finish.
You successfully assigned your SSL Web server certificate in Microsoft IIS.
Auto-enrollment Server 7.0 Installation and Configuration Guide Document issue: 1.0Report any errors or omissions

Step 4: Enabling SSL on your Web serverYou must enable SSL encryption on your Microsoft IIS Web server to secure the connection between the browser on the machine Security Provider is installed and Auto-enrollment Server. When configuring your Web server, it is advised that you do the following:
• Enforce 128-bit encryption for browsers accessing your Microsoft IIS Web Server.
• Enable server SSL authentication so that only the client checks the server’s Web certificate but there is no mutual authentication
The following procedure describes how to enable SSL on Microsoft IIS Web server 6.0. For all other versions, follow the instructions provided in your Microsoft IIS Web server documentation.
Note: Restart your Microsoft IIS Web server after enabling it for SSL.
To enable SSL on Microsoft IIS Web Server 6.0
1 Click Start > All Programs > Administrative Tools > Internet Information Services (IIS) Manager.
The Internet Information Services (IIS) Manager appears.
51Preparing for installationReport any errors or omissions

52
2 In the left pane, expand <x> (local computer) and then expand the Web Sites folder, where <x> is the name of your computer. (In the screenshot above, the computer is named TEST.)
3 Right-click the Web site your want to configure for SSL (for example, Default Web Site) and select Properties.
The <x> Properties dialog box appears, where <x> is the name of the Web site you selected to configure.
4 Click the Directory Security tab.
The Directory Security tab appears.
Auto-enrollment Server 7.0 Installation and Configuration Guide Document issue: 1.0Report any errors or omissions

5 In the Secure communications section, click Edit.
The Secure Communication dialog box appears.
53Preparing for installationReport any errors or omissions

54
6 Select the following:
• Require secure channel (SSL)
• Require 128-bit encryption
Note: Ensure Ignore client certificates is selected.
7 Click OK.
The Directory Security tab reappears.
8 Click OK.
The Inheritance Overrides dialog box appears.
Auto-enrollment Server 7.0 Installation and Configuration Guide Document issue: 1.0Report any errors or omissions

9 Click OK.
You successfully enabled SSL on your Web server.
10 Restart your Web server:
a Click Start > All Programs > Administrative Tools > Services.
b From the main pane, select IIS Admin Service.
c Click the Restart the service link.
55Preparing for installationReport any errors or omissions

56
Step 5: Configuring integrated Windows authentication
After configuring SSL on your Web Server, you must configure integrated Windows authentication. If you do not configure integrated Windows authentication, an Entrust Entelligence Security Provider for Windows user cannot enroll for a certificate.
To configure integrated Windows authentication
1 Click Start > All Programs > Administrative Tools > Internet Information Services (IIS) Manager.
The Internet Information Services (IIS) Manager appears.
2 In the left pane, expand <x> (local computer) and then expand the Web Sites folder, where <x> is the name of your computer. (In the screenshot above, the computer is named TEST.)
3 Right-click the Web site you configured for SSL (for example, Default Web Site) and select Properties.
The <x> Properties dialog box appears, where <x> is the name of the Web site you are configuring for integrated Windows authentication.
Auto-enrollment Server 7.0 Installation and Configuration Guide Document issue: 1.0Report any errors or omissions

4 Click the Directory Security tab.
The Directory Security tab appears.
57Preparing for installationReport any errors or omissions

58
5 In the Authentication and access control section, click Edit.
The Authentication Methods dialog box appears.
Auto-enrollment Server 7.0 Installation and Configuration Guide Document issue: 1.0Report any errors or omissions

6 In the Authenticated Access section, select Integrated Windows authentication.
7 Click OK to close the Authentication Methods dialog box.
8 Click OK to close the Internet Information Services (IIS) Manager dialog box.
You successfully configured integrated Windows authentication.
59Preparing for installationReport any errors or omissions

60
Step 6: Testing the SSL-enabled Web serverTo ensure that your Web server has been installed and configured properly, test the SSL connection between the Microsoft IIS Web server and a Security Provider for Windows client browser.
To test the Web Server
From your Security Provider for Windows client, visit your sample Web site using https in the URL instead of http. If your sample Web site appears, your Web server and SSL are running properly. Your Web browser should indicate a secure connection by displaying a solid key or lock icon.
Figure 3: SSL lock icon in Internet Explorer 8.0
Auto-enrollment Server 7.0 Installation and Configuration Guide Document issue: 1.0Report any errors or omissions

Step 7: Obtaining a certificate for Auto-enrollment Server
Before starting the Auto-enrollment Server installation process, you must obtain a certificate for Auto-enrollment Server. The certificate:
• verifies signatures
• establishes SSL connections
• signs XAP requests for the XAP Server
• signs files that are used by the User Registration Service (URS)
To obtain a certificate for Auto-enrollment server, you must first create an account for the certificate in Administration Services and then enroll for the certificate using Security Provider.
Complete the following procedures, in order:
• “To create an account for Auto-enrollment Server in Administration Services” on page 61
• “To enroll for the Auto-enrollment Server certificate” on page 65
Note: If you have more than one Auto-enrollment Server machine, it is recommended that you create a separate account for each server.
To create an account for Auto-enrollment Server in Administration Services
1 Log in to Administration Services. See “To log in to Administration Services” on page 24 for more information.
61Preparing for installationReport any errors or omissions

62
The main page appears.
2 Click Create Account under Account Tasks in the main pane or under Tasks in the left-hand menu.
The initial Create Account page appears.
Auto-enrollment Server 7.0 Installation and Configuration Guide Document issue: 1.0Report any errors or omissions

3 From the User Type drop-down list, select Person.
4 From the Certificate Type drop-down list, select Enterprise - Admin Services User Registration.
5 Click Submit.
A second Create Account page appears where you provide the account name and other information.
63Preparing for installationReport any errors or omissions

64
6 From the User Information section:
a In the First Name field, enter a first name for your Auto-enrollment Server account (for example, AES).
b In the Last Name field, enter any name (for example; User registration.
7 Leave the Email and Notification Email fields empty.
8 From the Group Membership section, select the member option. If no groups are configured, only the default group appears.
9 From the Role section, select the custom role Entrust created for you from the drop-down list (for example; <organization name> User Registration, where <organization name> is the name of your company or organization.
10 From the Location section, click Select the searchbase and select your company name from the drop-down list (an entry for your organization was created in the directory when you signed up for Entrust Managed Services PKI). This specifies where to add the Web server account in the Administration Services LDAP directory.
11 Click Submit.
The Create Account - Complete page appears.
Auto-enrollment Server 7.0 Installation and Configuration Guide Document issue: 1.0Report any errors or omissions
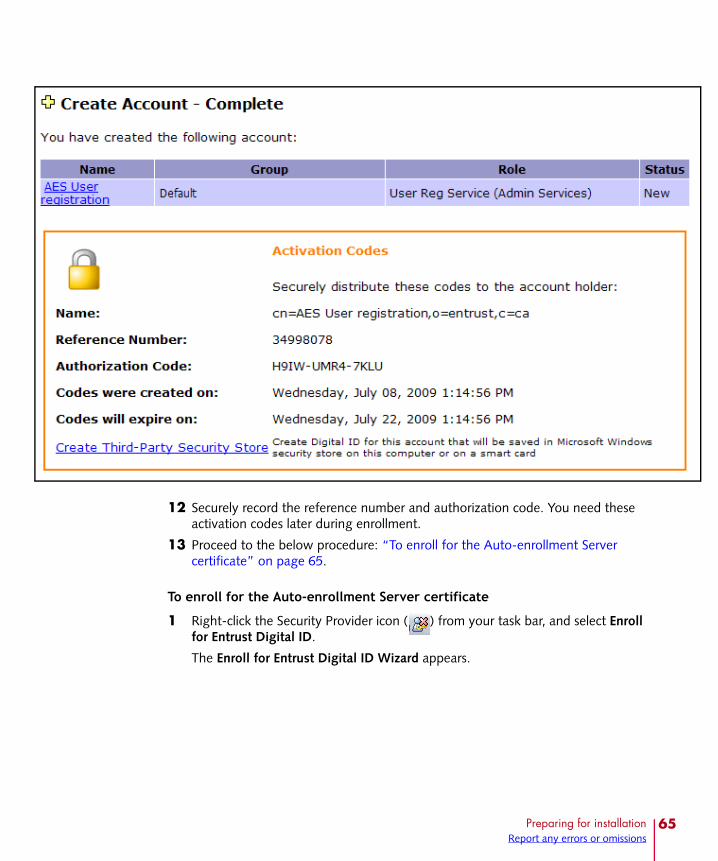
12 Securely record the reference number and authorization code. You need these activation codes later during enrollment.
13 Proceed to the below procedure: “To enroll for the Auto-enrollment Server certificate” on page 65.
To enroll for the Auto-enrollment Server certificate
1 Right-click the Security Provider icon ( ) from your task bar, and select Enroll for Entrust Digital ID.
The Enroll for Entrust Digital ID Wizard appears.
65Preparing for installationReport any errors or omissions

66
2 Click Next.
The Specify your activation codes screen appears.
Auto-enrollment Server 7.0 Installation and Configuration Guide Document issue: 1.0Report any errors or omissions

3 Enter the reference number and authorization code you received in Step 12 on page 65 and click Next.
Security Provider attempts to contact the Entrust Managed Services PKI Certification Authority (CA) and, when successful, displays the Confirm Entrust Digital ID Enrollment screen.
67Preparing for installationReport any errors or omissions

68
4 Click Next.
The Entrust Security Store Location dialog box appears.
Auto-enrollment Server 7.0 Installation and Configuration Guide Document issue: 1.0Report any errors or omissions

5 Select a location on your machine for the security store, which stores the certificate, and click Next. The default location is C:\Documents and Settings\Administrator\Application Data\Entrust Security Store.
Note: If the folder does not exist, a dialog box appears asking if you want to create the location. Select Yes or No.
The Entrust Security Store Name dialog box appears.
69Preparing for installationReport any errors or omissions

70
6 Enter a name for your certificate (.epf file) and click Next. (For example, AESUserReg).
The Entrust Security Store Password dialog box appears.
Auto-enrollment Server 7.0 Installation and Configuration Guide Document issue: 1.0Report any errors or omissions

7 Enter a password for your certificate, following the rules listed. The red ‘x’ icons turn to green check marks as you satisfy the requirements.
71Preparing for installationReport any errors or omissions

72
8 Click Finish.
The Completing the Enroll for Entrust Digital ID Wizard appears.
9 Click Finish.
You successfully obtained a certificate for Auto-enrollment Server and completed all the pre-installation tasks.
Auto-enrollment Server 7.0 Installation and Configuration Guide Document issue: 1.0Report any errors or omissions

3
Installing Auto-enrollment Server
This chapter describes the steps required to install and configure the Auto-enrollment Server installation.
This chapter includes:
• “Installing Auto-enrollment Server” on page 74
• “Checking the Auto-enrollment Server installation” on page 86
What you should have from Entrust for the installation of Auto-enrollment Server
Ensure you have all the items listed in the table below. If you do not, contact Entrust Managed Services PKI.
Table 2: Install check list
Item Have it?
Credentials to access Entrust TrustedCare (https://secure.entrust.com/trustedcare/), which allows you to download purchased software and related documentation
The entrust.ini file, which is needed for the installation of Auto-enrollment Server.
73

74
Installing Auto-enrollment ServerThe InstallShield Auto-enrollment Services Wizard installs and configures all of the Auto-enrollment Server components. Once you have successfully run the wizard, there are no other mandatory configuration steps.
Complete the following procedures to download Auto-enrollment Service from Entrust TrustedCare and to install the product:
• “To download Auto-enrollment Server from Entrust TrustedCare” on page 74
• “To install Auto-enrollment Services” on page 74
To download Auto-enrollment Server from Entrust TrustedCare
1 Log in to Entrust TrustedCare at https://www.entrust.com/trustedcare with your credentials.
2 Locate the Entrust Authority Auto-enrollment Server product and select the latest release (for example, 7.0).
3 From the Entrust Entelligence Auto-enrollment Server <version> download page page, download the product zip under the Software heading.
Attention: Check to see if there are Service Packs and/or Patches first. If there are, download the latest pack or patch instead.
4 Extract the zip file.
You successfully downloaded Auto-enrollment Server from Entrust TrustedCare.
To install Auto-enrollment Services
1 Open the Auto-enrollment folder you extracted in Step 4 on page 74, and double-click the AES_<version>_win.exe file, where <version> is the most recent version of Auto-enrollment Server (for example, 7.0).
The install wizard appears.
Auto-enrollment Server 7.0 Installation and Configuration Guide Document issue: 1.0Report any errors or omissions

2 Click Next.
The license agreement screen appears.
75Installing Auto-enrollment ServerReport any errors or omissions

76
3 Select I accept the terms of the license agreement and click Next.
Note: If you do not accept the terms, you cannot proceed with the installation.
The install location screen appears.
Auto-enrollment Server 7.0 Installation and Configuration Guide Document issue: 1.0Report any errors or omissions

4 Browse for a location to install Auto-enrollment Server and click Next. The default location is C:\Program Files\Entrust\AutoEnrollmentServices.
The entrust.ini location screen appears.
77Installing Auto-enrollment ServerReport any errors or omissions

78
.
5 Specify the name and path to the entrust.ini file, which was provided to you by Entrust representative, and click Next.
The Auto-enrollment Server certificate (.epf) location screen appears.
Auto-enrollment Server 7.0 Installation and Configuration Guide Document issue: 1.0Report any errors or omissions

6 Specify the name and path to the Auto-enrollment certificate you created in “To enroll for the Auto-enrollment Server certificate” on page 65 and click Next. You selected the path in Step 5 on page 69 and the name of the .epf file in the following step (for example: C:\Documents and Settings\Administrator\Application Data\Entrust Security Store\AESUserReg.epf.)
The Auto-enrollment Server certificate (.epf) password screen appears.
79Installing Auto-enrollment ServerReport any errors or omissions

80
7 Enter the password for the Auto-enrollment Server certificate (.epf) you created in “To enroll for the Auto-enrollment Server certificate” on page 65 and click Next. You selected this password in Step 7 on page 71.
The Web server instance screen appears.
Auto-enrollment Server 7.0 Installation and Configuration Guide Document issue: 1.0Report any errors or omissions

8 Select your Web site from the available list to host your Auto-enrollment Server application, and click Next.
The Active Directory for credential storage screen appears.
81Installing Auto-enrollment ServerReport any errors or omissions

82
9 Select No and click Next.
The Active Directory as certificate repository screen appears.
Auto-enrollment Server 7.0 Installation and Configuration Guide Document issue: 1.0Report any errors or omissions

10 Select No and click Next.
The summary screen appears.
83Installing Auto-enrollment ServerReport any errors or omissions

84
11 Read the information provided in the summary information page and click Next.
After a few moments, the wizard completes the install of Auto-enrollment Server.
Auto-enrollment Server 7.0 Installation and Configuration Guide Document issue: 1.0Report any errors or omissions

12 Click Finish to exit the wizard.
You successfully installed Auto-enrollment Server.
85Installing Auto-enrollment ServerReport any errors or omissions

86
Checking the Auto-enrollment Server installation
After you have completed the Auto-enrollment Server installation, you may want to verify the following:
• “Verify adminservice.log file” on page 86
• “Verify the Web server is passing requests to Auto-enrollment Server” on page 86
• “Verify installation log file” on page 87
• “Verify configuration log file” on page 87
Verify adminservice.log fileThe adminservice.log is the administration log file and displays Auto-enrollment Server information and errors.
After installing Auto-enrollment Server, manually restart Auto-enrollment Server in Windows Services. The following event appears in the adminservices.log when services start successfully, without any errors:
[2009-07-09 10:24:25-0400][DEBUG]UserRegistrationService][URSExtension.ini][][] Completed URS init
To verify the adminservice.log file
1 Click Start > All Programs > Administrative Tools > Services.
2 Select Entrust Authority (TM) Auto-enrollment Server from the list of services and click Restart the service.
3 Once restarted, wait a few moments and open the adminservice.log file in a text editor, such as Notepad. The log is located in the following directory
<install_directory>\AutoEnrollmentServices\logs\
where <install_directory> is the location of your Auto-enrollment Server install. By default, the install location is: C:\Program Files\Entrust\.
Refer to the section “Logging configuration” on page 110 for detailed information on the administration log file.
Verify the Web server is passing requests to Auto-enrollment Server
After you have completed the Auto-enrollment Server installation, you should verify that the Microsoft IIS Web Server is properly passing requests on to the Auto-enrollment Server.
Auto-enrollment Server 7.0 Installation and Configuration Guide Document issue: 1.0Report any errors or omissions

To verify the Microsoft IIS Web Server is passing requests to Auto-enrollment Server
1 Open a browser on the machine with your Web server installed and enter the following URL:
https://<FQDN>/AdminServicesApp/AutoEnroll
where <FQDN> is the fully qualified domain domain of the server (for example, test.dev.ad.entrust.com).
The following information should appear:
• SSL should be enabled
• an error specifying that a GET request was sent to Auto-enrollment Server
Verify installation log fileThe installation log file can be used for information purposes or to diagnose installation related problems. The installer logs the following information:
• detects environment information (for example, free space in temp directory)
• any warnings that were issued and bypassed by the person installing the software
• actions performed (for example, files copied, .jar files created, and so on)
• error information
• InstallShield standard logging information (for example, extracting the JVM, evaluating conditions on whether or not to run an action)
Once the installation completes, the installation log file appears in the following location:
<install_directory>\AutoEnrollmentServices\logs\autoenrollmentservices_installer.log
Verify configuration log fileThe configuration log file can be used for information purposes or to diagnose configuration related problems. The configuration logs the following information:
• auto-detected environment information
• answers to questions that the person installing the software provided
• actions performed (for example, files copied, configuration changed, and so on)
• detailed error information
• warnings
87Installing Auto-enrollment ServerReport any errors or omissions

88
Once the installation completes, the configuration log file appears in the following location:
<install_directory>\AutoEnrollmentServices\logs\autoenrollmentservices_configuration.log
Auto-enrollment Server 7.0 Installation and Configuration Guide Document issue: 1.0Report any errors or omissions

4
Customizing the Auto-enrollment Server
You can configure the Auto-enrollment Server by modifying the ae-config.xml and ae-defaults.xml files.
Note: For any changes to take effect, you must restart the Entrust Authority Auto-enrollment Service in Windows Services.
This chapter describes how to customize Auto-enrollment Server:
• “Customizing the certificate type and user role” on page 91
• “Customizing certificate lifetimes” on page 96
• “Customizing a user’s Distinguished Name (DN)” on page 97
• “Customizing a search base for enrolling clients” on page 98
• “Configuring the DNS name” on page 99
89

90
What you should have from Entrust for Auto-enrollment Server customizations
Ensure you have all the item listed in the table below. If you do not, contact Entrust Managed Services PKI.
Table 3: Auto-enrollment Server check list
Item Have it?
Entrust Managed Services PKI Welcome letter. Specifically the names of your
• certificate type for users and computers
• roles for users and computers
• search base for enrolling clients
Auto-enrollment Server 7.0 Installation and Configuration Guide Document issue: 1.0Report any errors or omissions

Customizing the certificate type and user roleAuto-enrollment Server settings can be used to choose a specific role and certificate type for users or computers. You can choose to keep the defaults or configure new defaults for your users and computers that are auto-enrolling.
Note: If you need to change a user or computer’s certificate type or role after they auto-enrolled and are in the added state in Administration Services, you must manually configure a new certificate type and role.
Configuring a default certificate typeAuto-enrollment Server uses a default certificate type for users and computers.
• <User>ent_default</User>
The default certificate type for users.
• <Machine>ent_default</Machine>
The default certificate type for computers.
To configure a new default certificate type, complete the following procedure.
To configure a new default certificate type
1 Open the ae-defaults.xml file in a text editor, such as Notepad:
<install_location>\AutoEnrollmentServices\config
<install_location> is the location of the Auto-enrollment Server install. By default, the install location is C:\Program Files\Entrust.
2 Locate the following section of code:
<!-- Default cert types for user or computer auto-enrollments, for clients that send no <CertTypeInfo> in their auto-enrollment request -->
<DefaultCertType>
<User>ent_default</User>
<Machine>ent_default</Machine>
</DefaultCertType>
3 Replace one or both of the default certificate type settings with the certificate types listed in your Entrust Managed Services PKI Welcome letter:
<User>ent_default</User>
<Machine>ent_default</Machine>
Some examples of valid certificate types are:
91Customizing the Auto-enrollment ServerReport any errors or omissions

92
• ent_twokeypair — two key pair user (encryption and verification)
• ent_nonrepud — three key pair user with non-repudiation key pair (encryption, verification, and non-repudiation)
• ent_efs — three key pair user with EFS key pair (encryption, verification, and encryption file system (EFS))
• ent_nonrepud_and_efs — four key pair user with Nonrepudiation and EFS Key Pairs (encryption, verification, nonrepudiation, and EFS)
• ent_skp_dualusage — one dual usage key pair (dual usage)
4 Save the file.
5 Restart Auto-enrollment Server services in Windows Services.
Configuring a default User RoleThe Auto-enrollment Server has a default role for your users and computers.
• <User>End User</User>
The default user role.
• <Machine>End User</Machine>
The default computer role.
To configure a new default role, complete the following procedure.
Note: The administrator must have permission to administer the roles that you configure.
To configure a new default role
1 Open the ae-defaults.xml file in a text editor, such as Notepad:
<install_location>\AutoEnrollmentServices\config
<install_location> is the location of the Auto-enrollment Server install. By default, the install location is C:\Program Files\Entrust.
2 Locate the following section of code:
<!-- Default roles for user or computer auto-enrollments, for clients that send no <CertTypeInfo> in their auto-enrollment request -->
<DefaultRole>
<User>End User</User>
<Machine>End User</Machine>
</DefaultRole>
Auto-enrollment Server 7.0 Installation and Configuration Guide Document issue: 1.0Report any errors or omissions

3 Replace the default role settings with the roles listed in your Entrust Managed Services PKI Welcome letter:
<User>End User</User> and/or
<Machine>End User</Machine>
Some examples of valid roles are:
• Security Officer
• Administrator
• Directory Administrator
• Auditor
• Self-Administration Server
• Administrator
• End User
Note: Entrust may have created some custom roles for you. If you are unaware of the custom roles assigned, contact your Entrust representative.
4 Save the file.
5 Restart Auto-enrollment Server services in Windows Services.
Configuring the client information settingAuto-enrollment Server has a client information setting that controls the assignment of the certificate type and user role when Security Provider auto-enrolls/recovers. The client information setting is an arbitrary string that must match the string that is sent by Security Provider. The arbitrary string is configured in the Windows Registry on the machine that has Security Provider installed:
• AutoEnrollUserDigitalIDType — arbitrary string used for user auto-enrollment/recovery
• AutoEnrollMachineDigitalIDType — arbitrary string used for computer auto-enrollment/recovery
Auto-enrollment Server takes this string and assigns a certificate type and role to Security Provider.
The Auto-enrollment Server administrator must be allowed to administer users that have these roles, otherwise the enrollment will fail. For example, if the user is assigned the Security Officer role and the Auto-enrollment administrator cannot administer users with the Security Officer role, the enrollment will fail.
Auto-enrollment Server has a client information string that you can configure for users and computers.
To configure a new client string, complete the following procedure.
93Customizing the Auto-enrollment ServerReport any errors or omissions

94
To configure a new client string
1 Open the ae-defaults.xml file in a text editor, such as Notepad:
<install_location>\AutoEnrollmentServices\config
<install_location> is the location of the Auto-enrollment Server install. By default, the install location is C:\Program Files\Entrust.
2 Locate the following section of code:
<!-- CertTypeInfo controls the assignment of certificate type and user role when a client enrolls. Edit as required. ClientInfo strings are arbitrary but must match the string that the client sends. If a ClientInfo string is repeated, AE uses the first encountered.
AE server assigns a <CertType> and <Role> to a client that sends a particular <ClientInfo> string. The AE Server admin must be allowed to administer users that have these roles; otherwise enrollment will fail. -->
<CertTypeInfo>
<ClientRequest>
<ClientInfo>some_clients_send_this_string</ClientInfo>
<CertType>ent_default</CertType>
<Role>End User</Role>
</ClientRequest>
<ClientRequest>
<ClientInfo>other_clients_send_this_different_string</ClientInfo>
<CertType>ent_skp_dualusage</CertType>
<Role>Server Login</Role>
</ClientRequest>
</CertTypeInfo>
Security Provider sends a client request to Auto-enrollment Server. The request contains an arbitrary string that was configured in the AutoEnrollUserDigitalIDType Windows registry on the machine that has Security Provider installed. In this case, the Security Provider registry setting is AutoEnrollUserDigitalIDType=some_clients_send_this_string
Auto-enrollment Server looks to see if this matches the arbitrary string in the <ClientInfo> tags. In this code example, the <ClientInfo> tags in the do contain the same string:
<ClientInfo>some_clients_send_this_string</ClientInfo>
3 Change the <CertType> and <Role> as required.
Auto-enrollment Server 7.0 Installation and Configuration Guide Document issue: 1.0Report any errors or omissions

Auto-enrollment Server reads the <CertType> and <Role> tags to determine which certificate type and role to use for the auto-enrollment. In this code example, the <CertType> is ent-default and the <Role> is End User.
Note: If the string sent in the Security Provider request does not match a string in any of the <ClientInfo> tags, an error is logged and returned to the client. The default certificate type and role are used when the client does not send any <ClientInfo> string at all, or no <ClientTypeInfo> is configured at the server.
4 Save the file.
5 Restart Auto-enrollment Server services in Windows Services.
95Customizing the Auto-enrollment ServerReport any errors or omissions

96
Customizing certificate lifetimesYou can configure the ae-defaults.xml file to set certificate lifetimes for users or computers. You can choose to keep the defaults or configure new defaults for your users and computers that are auto-enrolling.
Note: The certificate lifetimes settings in the <CertificatePolicy> section override the default certificate lifetime settings in the CA. To use the default settings, delete or comment out the settings in the <CertificatePolicy> section.
To configure the certificate lifetimes, complete the following procedure.
To configure certificate lifetimes
1 Open the ae-defaults.xml file in a text editor, such as Notepad:
<install_location>\AutoEnrollmentServices\config
<install_location> is the location of the Auto-enrollment Server install. By default, the install location is C:\Program Files\Entrust.
2 Locate the following section of code:
<!-- Example of a CertificatePolicy. Edit as required, or remove it to get default policy associated with the user Role. --><CertificatePolicy> <EncLifetime>36</EncLifetime> <VerLifetime>36</VerLifetime> <SignLifePercentage>70</SignLifePercentage></CertificatePolicy>
3 To change the lifetime (in months) of encryption certificates, change the <EncLifetime> value. You can specify a value between 2 and 420 months (35 years).
4 To change the lifetime (in months) of vertification certificates, change the <VerLifetime> value. You can specify a value between 2 and 420 months (35 years).
5 To change the percentage of the signing private key lifetime, which determines when a user’s key pair requires updating, change the <SignLifePercentage> value. You can specify a value from 1 to 100 (percent).
6 Save the file.
7 Restart Auto-enrollment Server services in Windows Services.
Auto-enrollment Server 7.0 Installation and Configuration Guide Document issue: 1.0Report any errors or omissions

Customizing a user’s Distinguished Name (DN)Auto-enrollment Server uses the DN builder implementation (DistinguishedNameBuilderImpl) by default, to automatically create a user’s or computer’s distinguished name (DN), common name (CN), and surname from the information in the Security Provider request. If you are using a Microsoft Active Directory as your certificate repository, the default DistinguishedNameBuilderImpl attempts to read the client’s distinguished name (DN), common name (CN), surname, email address, and UPN from that directory.
The default DistinguishedNameBuilderImpl builds a distinguished name (DN) for Security Provider by using the following:
• common name (cn) — client’s authenticated Windows account name
• surname — Windows domain
• search bases — uses the search bases that are configured in the ae-defaults.xml file
The default also sets a dNSName as a subjectAltName extension for computer enrollments. In addition, it sets an otherName as a subjectAltName extension if the client machine is a domain controller. The otherName has the domain controller GUID.
The default does not set a subjectAltName extension for user enrollments, unless you are using Active Directory as the certificate repository. However, there is sample code that you can use to customize the DN builder implementation to set a subjectAltName.
If you are using Active Directory as the repository for user or machine enrollments, the default DistinguishedNameBuilderImpl reads the client’s email address and UPN from the directory and sets them into the subjectAltName extension.
Note: If you need to change a user or computer’s DN after they have auto-enrolled and are in the Added state in Administration Services, you must manually configure a new DN.
Refer to Appendix A “Writing your own DN Builder implementation code” on page 131 for further information about the code that you can use to create your own DN builder implementation.
97Customizing the Auto-enrollment ServerReport any errors or omissions

98
Customizing a search base for enrolling clientsSecurity Provider is enrolled on the search bases that are set for users or machines in the <DNBuilderSearchBase> setting in the ae-defaults.xml file. If no search bases are provided, the client is enrolled on the search base where the Auto-enrollment Server administrator resides. However, with Active Directory the client’s account is already in the directory and the enrollment uses that DN, instead of the <DNBuilderSearchBase> setting. Consult your Entrust Managed Services PKI Welcome letter for more information.
Note: If you need to change a user or computer’s search base after they have auto-enrolled and are in the Added state in Administration Services, you must manually configure a new search base.
Complete the following procedure to configure the search base value.
To configure the search base value
1 Open the ae-defaults.xml file in a text editor, such as Notepad:
<install_location>\AutoEnrollmentServices\config
<install_location> is the location of the Auto-enrollment Server install. By default, the install location is C:\Program Files\Entrust.
2 Locate the following section of code:
<!-- The search base under which clients will be enrolled. This is optional. If you omit it, the CA search base will be used. -->
<DNBuilderSearchBase>
<User></User>
<Machine></Machine>
</DNBuilderSearchBase>
3 To configure a search base for
• users, add your search base value to the <User> setting.
• computers, add a search base value to the <Machine> setting.
Attention: The <User> and <Machine> settings are not used if Active Directory is the certificate repository. These settings may be used if Active Directory is the Windows account repository.
4 Save the file.
5 Restart Auto-enrollment Server services in Windows Services.
Auto-enrollment Server 7.0 Installation and Configuration Guide Document issue: 1.0Report any errors or omissions

Configuring the DNS nameAuto-enrollment Server attempts to locate a Domain Name System (dNSName) for the auto-enrollment. If the dNSName lookup fails, as a back up you can configure a setting so that Auto-enrollment Server knows what dNSName to assign to authenticated clients from a particular Windows domain.
Complete the following procedure to configure the dNSName.
To configure the DNS name
1 Open the ae-defaults.xml file in a text editor, such as Notepad:
<install_location>\AutoEnrollmentServices\config
<install_location> is the location of the Auto-enrollment Server install. By default, the install location is C:\Program Files\Entrust.
2 Locate the following section of code:
<!-- List of accepted clients -->
<DomainList>
<Domain>
<Windows>Your_Windows_domain_name</Windows>
<DNS>Your_DNS_name</DNS>
</Domain>
</DomainList>
3 Change the value in the <DNS>Your_DNS_name</DNS> setting to reflect your organization’s dNSName domain value. In the example below, the domain is example_hq but the dNSName is example.com. The ae-defaults.xml file can be customized to always map example_hq to example.com:
<!-- List of accepted clients -->
<DomainList>
<Domain>
<Windows>example_hq</Windows>
<DNS>example.com</DNS>
</Domain>
</DomainList>
4 Save the file.
5 Restart Auto-enrollment Server services in Windows Services.
99Customizing the Auto-enrollment ServerReport any errors or omissions

100
Auto-enrollment Server 7.0 Installation and Configuration Guide Document issue: 1.0Report any errors or omissions
5
Configuring queuing
Queuing is an optional feature of Auto-enrollment Server. The main purpose of queuing is to allow an Auto-enrollment Server administrator to approve or reject auto-enrollment/recovery requests.
If you opted for the queuing feature, it was automatically added by Entrust as a permission to the role you selected when you created the Auto-enrollment Server certificate (“Step 7: Obtaining a certificate for Auto-enrollment Server” on page 61).
If you desire this feature at a later time, contact your Entrust representative.
When your organization wants to use queuing, you must configure all of the following:
• “Enabling queuing in Auto-enrollment Server” on page 102
• “Approving or rejecting requests in Administration Services” on page 105
101

102
Enabling queuing in Auto-enrollment ServerTo enable queuing in Auto-enrollment Server, you must configure the ae-defaults.xml file. use the following two procedures to configure the Auto-enrollment Server’s ae-defaults.xml file:
• “Configuring the ae-defaults.xml file to queue requests” on page 102
• “Configuring the queuing monitor” on page 103
Configuring the ae-defaults.xml file to queue requestsThe default, queuing is disabled (NoQueue) in the ae-defaults.xml file. To enable queuing, you must change the NoQueue value to Force.
Note: If Entrust has not configured the Auto-enrollment Services account role with the queue permission, setting the <Enroll> or <Recover> settings to Force will fail.
Complete the following procedure to enable queuing in the ae-defaults.xml file.
To enable queuing in the ae-defaults.xml file
1 On the machine with Auto-enrollment Server installed, open the ae-defaults.xml file in a text editor:
<install_location>\AutoEnrollmentServices\config
<install_location> is the location of the Auto-enrollment Server install. By default, the install location is C:\Program Files\Entrust.
2 Locate the following section of code in the ae-defaults.xml file:
<!-- "Force"=queue the operation (fails if the URS admin's user role does not permit queuing) -->
<!-- "NoQueue"=do not queue (fails if the URS admin's user role requires queuing) -->
<QueueMode>
<Enroll>NoQueue</Enroll>
<Recover>NoQueue</Recover>
</QueueMode>
3 Change the NoQueue value to Force in the <Enroll>NoQueue</Enroll> and/or <Recover>NoQueue</Recover> settings.
4 Save the changes to the ae-default.xml file.
5 Restart Auto-enrollment Server services in Windows Services for the changes to take effect:
Auto-enrollment Server 7.0 Installation and Configuration Guide Document issue: 1.0Report any errors or omissions

a Click Start > All Programs > Administrative Tools > Services.
b Select Entrust Authority (TM) Auto-enrollment Server from the list of services and click the Restart the service link.
You successfully enabled queuing in the ae-defaults.xml file.
Configuring the queuing monitorAuto-enrollment Server has a queuing monitor that fetches a list of queued requests. Auto-enrollment Server caches this list and uses it to determine if there have been any previous cancelled requests. Since identical requests are allowed to be queued after the administrator has cancelled the initial identical request, the queuing monitor solves this by preventing repeated identical requests from being forwarded.
Requests that are queued are logged into the adminservices.log file when Auto-enrollment Server starts up or whenever the Auto-enrollment Server’s queued request list cache is refreshed.
The queued request list is cached for a configurable time interval, which is set using the <QueueRefreshTime> setting in the ae-defaults.xml file. The default <QueueRefreshTime> time interval is 1800 seconds (30 minutes). You cannot set the time interval to less than 10 seconds, as it impacts performance. If you attempt to do so, Auto-enrollment Server uses 10 seconds as the default in order to avoid a decline in performance.
It is important that you configure the queued list to be fetched before Security Provider repeats the request. Security Provider uses the following settings to determine the interval at which it sends the auto-enrollment/recovery requests:
• CertUpdateInterval: The interval specified for the Digital ID Monitor, which requests the auto-enrollment/recovery for user digital IDs.
• MachineCertUpdateInterval. The interval specified for the Entrust Entelligence Machine Digital ID Service (EEMDIS), which requests the auto-enrollment/recovery for computer digital IDs.
By default, the CertUpdateInterval and MachinCertUpdateInterval both perform auto-enrollment/recovery requests every 12 hours. These defaults are configurable in the Microsoft Windows Registry on the machine in which the Security Provider client is installed. See the Entrust Entelligence Security Provider for Windows Administration Guide for more information.
Complete the following procedure if you want to change the default queue time interval.
To configure the queuing monitor
1 On the machine with Auto-enrollment Server installed, open the ae-defaults.xml file in a text editor:
<install_location>\AutoEnrollmentServices\config
103Configuring queuingReport any errors or omissions

104
where <install_location> is the location of the Auto-enrollment Server install. By default, the install location is C:\Program Files\Entrust.
2 Locate the following section of code in the ae-defaults.xml file:
<!-- The time interval at which AE Server fetches the request queue from the Security Manager (seconds). It must be smaller than the time between repeated requests from any one particular client. The ESP client default is 12 hours. -->
<!-- This setting is not used unless QueueMode is set to 'Force'. -->
<QueueRefreshTime>1800</QueueRefreshTime>
3 Change the QueueRefreshTime value to a value of your choosing, in seconds, in the <QueueValueRefreshTime>1800</QueueRefreshTime> setting.
Attention: If you configure the <QueueRefreshTime> to fetch the list of queued requests too frequently, this will degrade the performance of your Auto-enrollment Server.
4 Save the changes to the ae-default.xml file.
5 Restart Auto-enrollment Server services in Windows Services for the changes to take effect:
a Click Start > All Programs > Administrative Tools > Services.
b Select Entrust Authority (TM) Auto-enrollment Server from the list of services and click the Restart the service link.
You successfully configured the queuing monitor in the ae-defaults.xml file.
Auto-enrollment Server 7.0 Installation and Configuration Guide Document issue: 1.0Report any errors or omissions

Approving or rejecting requests in Administration Services
Once you have logged in to Administration Services using the Administrator Login, you can approve, cancel, or cancel and delete pending auto-enrollment/recovery requests. When an administrator
• Approves an auto-enrollment/recovery request, the request is submitted for processing. When the administrator’s approval completes, authorization codes are sent to the Security Provider for Windows client. If the queue request requires approval by several administrators, the request remains queued until all administrators have approved the request.
• Cancels a queued auto-enrollment/recovery request, an identical request cannot be queued.
• Cancels and deletes a queued auto-enrollment/recovery request, a new identical request can be queued.
To approve, cancel, or cancel and delete pending auto-enrollment/recovery request
1 Log in to Administration Services. See “To log in to Administration Services” on page 24 for more information
105Configuring queuingReport any errors or omissions

106
the following page appears.
2 Click Approve Pending Requests in the left pane under Tasks, or from the main pain under Request Tasks.
The Approve Pending Requests page displays, with a list of all requests that are currently in the queue.
3 To view detailed information on a request, click the request name. A new browser window opens with a list of relevant information on the request.
4 Select an auto-enrollment/recover request that you want to process.
5 Select one of the following actions for the chosen request:
• Approve
Approving a request allows it to be submitted for processing. If the request needs approval by more than one administrator, the request is submitted for processing only after all administrators have approved the request.
• Cancel
Cancelling a request removes the request from all Approve Pending Request pages. An identical request cannot be queued.
• Cancel and Delete
Auto-enrollment Server 7.0 Installation and Configuration Guide Document issue: 1.0Report any errors or omissions

Cancel and Delete removes the request from all request pages and all queues. An identical request can be queued.
You may also want to view the List Requests page. This page allows you to quickly view a list of all approved, cancelled, completed, or expired requests, up to the maximum number allowed by the system. To display information on a specific request, click the request name and a list of relevant information will be displayed.
Note: When an administrator deletes a request (Cancel and Delete), these deleted requests are removed from the List Requests page.
107Configuring queuingReport any errors or omissions

108
Auto-enrollment Server 7.0 Installation and Configuration Guide Document issue: 1.0Report any errors or omissions
6
Troubleshooting
This section includes troubleshooting information and information on using the Auto-enrollment Server log service.
• “Logging configuration” on page 110
• “Time synchronization” on page 115
• “Error messages” on page 116
109

110
Logging configurationThe Auto-enrollment Server uses the Entrust Common Logger which is found in the entlogger.jar file.
The Auto-enrollment Server’s logging is configured in the Logging parameters section of the ae-config.xml file:
<!-- Logging parameters -->
<parameter name="log.level" value="TRACE"/>
<parameter name="log.file" value="C:\Program Files\Entrust\AutoEnrollmentServices\logs\adminservices.log"/>
<parameter name="log.file.size" value="1000000"/>
<parameter name="log.file.num" value="10"/>
<parameter name="log.file.maxmessagelength" value="1000"/>
Attention: Any time you make a change to the ae-config.xml file, you must restart Auto-enrollment Server in Windows Services.
Setting the log levelThe log contents file adminservices.log is created according to the log level set in the ae-config.xml file.
Entrust Common Logger supports the following log levels:
• TRACE
• DEBUG
• INFO
• WARNING
• ERROR
• ALERT
• FATAL
Successful enrollments or recoveries are logged at the TRACE, DEBUG, and INFO log levels. Failures of enrollments or recoveries are logged at the TRACE, DEBUG, INFO, and ERROR levels.
By default, the log level is set to TRACE.
Complete the following procedure to set the log level.
Auto-enrollment Server 7.0 Installation and Configuration Guide Document issue: 1.0Report any errors or omissions

To set the log level
1 On the machine with Auto-enrollment Server installed, open the ae-config.xml file in a text editor:
<install_location>\AutoEnrollmentServices\config
where <install_location> is the location of the Auto-enrollment Server install. By default, the install location is C:\Program Files\Entrust.
2 Locate the following section of code in the ae-defaults.xml file:
<!-- Logging parameters -->
<parameter name="log.level" value="TRACE"/>
<parameter name="log.file" value="C:\Program Files\Entrust\AutoEnrollmentServices\logs\adminservices.log"/>
<parameter name="log.file.size" value="1000000"/>
<parameter name="log.file.num" value="10"/>
<parameter name="log.file.maxmessagelength" value="1000"/>
3 Change the value parameter in the following line to the log level of your choice:
<parameter name="log.level" value="TRACE"/>
Log levels include:
• TRACE
• DEBUG
• INFO
• WARNING
• ERROR
• ALERT
• FATAL
4 Save the file.
5 Restart Auto-enrollment Server in Windows Services.
Setting the log file locationThe adminservices.log file location is set in the ae-config.xml file under the log.file parameter name. The log file location is specified by the full path and name of the log file. By default, the log file is installed in this location:
C:\Program Files\Entrust\AutoEnrollmentServices\logs\adminservices.log
Complete the following procedure to change the file location of the adminservices.log file.
111TroubleshootingReport any errors or omissions

112
To change the location of the adminservices.log file
1 On the machine with Auto-enrollment Server installed, open the ae-config.xml file in a text editor:
<install_location>\AutoEnrollmentServices\config
where <install_location> is the location of the Auto-enrollment Server install. By default, the install location is C:\Program Files\Entrust.
2 Locate the following section of code in the ae-config.xml file:
<!-- Logging parameters -->
<parameter name="log.level" value="TRACE"/>
<parameter name="log.file" value="C:\Program Files\Entrust\AutoEnrollmentServices\logs\adminservices.log"/>
<parameter name="log.file.size" value="1000000"/>
<parameter name="log.file.num" value="10"/>
<parameter name="log.file.maxmessagelength" value="1000"/>
3 From the log.file parameter, change the value representing the file location to the full file path of your choice:
<parameter name="log.file" value="C:\Program Files\Entrust\AutoEnrollmentServices\logs\adminservices.log"/>
4 Save the file.
5 Restart Auto-enrollment Server in Windows Services.
Setting the maximum log file sizeThe maximum log file size is set in the ae-config.xml file, under the log.file.size parameter name. The maximum log file size is specified in bytes. By default, the maximum log file size is 1000000 bytes.
Complete the following procedure to set the maximum log file size.
To set the maximum log file size
1 On the machine with Auto-enrollment Server installed, open the ae-config.xml file in a text editor:
<install_location>\AutoEnrollmentServices\config
where <install_location> is the location of the Auto-enrollment Server install. By default, the install location is C:\Program Files\Entrust.
2 Locate the following section of code in the ae-config.xml file:
<!-- Logging parameters -->
Auto-enrollment Server 7.0 Installation and Configuration Guide Document issue: 1.0Report any errors or omissions

<parameter name="log.level" value="TRACE"/>
<parameter name="log.file" value="C:\Program Files\Entrust\AutoEnrollmentServices\logs\adminservices.log"/>
<parameter name="log.file.size" value="1000000"/>
<parameter name="log.file.num" value="10"/>
<parameter name="log.file.maxmessagelength" value="1000"/>
3 From the log.file.size parameter, change the value to the log file size of your choice, in bytes:
<parameter name="log.file.size" value="1000000"/>
4 Save the file.
5 Restart Auto-enrollment Server in Windows Services.
Setting the number of backup log files allowedThe maximum number of backup log files allowed is set in the ae-config.xml file, under the log.file.num parameter name. By default, the maximum number of backup log files allowed is 10.
When the adminservices.log is full a new log file is created. The next file is appended with the number 1. For example, adminservices.log.1. As each file becomes full, the number is incremented by 1. For example, when the adminservices.log.1 file is full, the adminservices.log.2 file is created. These files will be created until the maximum number of backup log files allowed is reached. When the maximum number of backup log files is reached, the previous files will be overwritten, beginning with the adminservices.log file.
Complete the following procedure to set the number of backup log files allowed.
To set the number of backup files allowed
1 On the machine with Auto-enrollment Server installed, open the ae-config.xml file in a text editor:
<install_location>\AutoEnrollmentServices\config
where <install_location> is the location of the Auto-enrollment Server install. By default, the install location is C:\Program Files\Entrust.
2 Locate the following section of code in the ae-config.xml file:
<!-- Logging parameters -->
<parameter name="log.level" value="TRACE"/>
<parameter name="log.file" value="C:\Program Files\Entrust\AutoEnrollmentServices\logs\adminservices.log"/>
<parameter name="log.file.size" value="1000000"/>
113TroubleshootingReport any errors or omissions

114
<parameter name="log.file.num" value="10"/>
<parameter name="log.file.maxmessagelength" value="1000"/>
3 From the log.file.num parameter, change the value to a value of your choice:
<parameter name="log.file.num" value="10"/>
4 Save the file.
5 Restart Auto-enrollment Server in Windows Services.
Setting the maximum message lengthThe maximum message length for a log message is set in the ae-config.xml file, under the log.file.maxmessagelength parameter name. By default, the maximum message length for a log message is 1000 characters.
Complete the following procedure to set the maximum message length.
To set the maximum message length
1 On the machine with Auto-enrollment Server installed, open the ae-config.xml file in a text editor:
<install_location>\AutoEnrollmentServices\config
where <install_location> is the location of the Auto-enrollment Server install. By default, the install location is C:\Program Files\Entrust.
2 Locate the following section of code in the ae-config.xml file:
<!-- Logging parameters -->
<parameter name="log.level" value="TRACE"/>
<parameter name="log.file" value="C:\Program Files\Entrust\AutoEnrollmentServices\logs\adminservices.log"/>
<parameter name="log.file.size" value="1000000"/>
<parameter name="log.file.num" value="10"/>
<parameter name="log.file.maxmessagelength" value="1000"/>
3 From the log.file.maxmessagelength parameter, change the value to a value of your choice:
<parameter name="log.file.maxmessagelength" value="1000"/>
4 Save the file.
5 Restart Auto-enrollment Server in Windows Services.
Auto-enrollment Server 7.0 Installation and Configuration Guide Document issue: 1.0Report any errors or omissions

Time synchronizationThe time on the computer on which the Auto-enrollment Server runs must be synchronized with the certification authority (CA) time. This allows replay attacks to be detected on messages sent from the Auto-enrollment Server to the CA using the XAP protocol. For this reason, the Auto-enrollment Server will not start properly if the time difference is greater than five minutes.
The error appears in the adminservices.log file as follows:
[2009-07-10 14:41:01-0400][DEBUG][UserRegistrationService][URSExtension.init][][] com.entrust.adminservices.urs.URSException: (URS0100) An error occurred in the User Registration Service. Caused by: com.entrust.adminservices.urs.autoenroll.AutoEnrollException: (AES0103) Failed to get an administration services context for communicating with the CA. Caused by: com.entrust.adminservices.toolkit.internal.xap.XAPException: (atkxap.XAP.2006) The XAP message has an expired timestamp. The message contained a timestamp that was outside the server's acceptance window. Make sure that the source used to obtain message timestamps is synchronized with the server's time.
Synchronize the Auto-enrollment Server machine time setting to within a five minute window of the Entrust CA. Contact Entrust for more information.
115TroubleshootingReport any errors or omissions

116
Error messagesFor a complete list of Auto-enrollment Server errors and possible solutions, refer to the Entrust Authority Auto-enrollment Server Error Message document, available for download from Entrust TrustedCare at https://secure.entrust.com/trustedcare/.
Auto-enrollment Server 7.0 Installation and Configuration Guide Document issue: 1.0Report any errors or omissions

Glossary
Glossary of terms
Term Definition
activation codes The “reference number” and “authorization code” that are generated when an administrator adds or recovers a user using Administration Services, or when users add or recover themselves using Entrust Entelligence Security Provider for Windows with the Auto-enrollment Server.
Active user An “end user” who has created an “Entrust digital ID” and is ready to use their Entrust desktop application. When you create accounts for users, “activation codes” are generated. These activation codes are used by end users to enroll their certificates. Once users enroll, they are considered active or activated users.
Added user An “end user” who has had their account created by an Administrator in Administration Services, but who has not yet enrolled for their certificate
administrator An Administrator (with an uppercase “a”) is a trusted person who uses Administration Services to create user accounts and to do other frequent operations, such as deactivate users, revoke a user’s keys, set up users for “key recovery”, and create new encryption key pairs for users.
ALERT An Entrust error level that logs messages regarding conditions you need to correct immediately. For example, a corrupt system database.
attribute A piece of information that describes an aspect of a “directory” entry. Entries are the building blocks of the Directory. Each attribute consists of an attribute type and at least one attribute value. For example, one attribute type is “cn”, and its attribute value could be “Alice”.
117

118
authentication The process of proving your identity. In Entrust, authentication works through a password-protected encrypted file, called the “Entrust digital ID”. This digital ID contains a user’s identity (“Distinguished Name (DN)”), the “decryption private key”, any signing keys, and the CA signing keys. When users log into an Entrust desktop application, they choose their Entrust digital ID and enter their password. This process verifies their identity and allows them to access their private data.
authorize The act of approving an administrative “sensitive operation” (for example, creating a “digital ID”), by entering the password of an “administrator”.
authorization code
An alphanumerical code (for example, CMTJ-8VOR-VFNS) generated when an administrative user creates a new user or recovers an existing user, required along with its corresponding “reference number”. Authorization codes can only be used once.
CA See “Certification Authority (CA)”
CA certificate A “certificate” issued by a “Certification Authority (CA)” containing the “CA verification public key”. The Web server and a user’s browser must import this certificate and use the verification public key contained within it to verify the CA signature on Web server and browser certificates when setting up a secure session (see “Secure Sockets Layer (SSL)”).
CA issuer The entity (often the “Certification Authority (CA)” itself) that distributes the “CA certificate”.
CA signing key pair
The “key pair” of the “Certification Authority (CA)”. It consists of the “CA signing private key” and “CA verification public key”.
CA signing private key
The private key portion of the “CA signing key pair”. The “Certification Authority (CA)” signing private key is used to digitally sign client (for example, browser and Web server) certificates. The signature on these certificates can be verified with the “CA verification public key”. A CA signs all certificates it issues using the CA signing key.
CA verification public key
The public key portion of the “CA signing key pair”. It verifies client certificates that have been signed by the “CA signing private key”.
cache A temporary area for information storage, such as user information, used to improve system performance.
CAPI See “CryptoAPI”.
Term Definition
Auto-enrollment Server 7.0 Installation and Configuration Guide Document issue: 1.0Report any errors or omissions

certificate A collection of publicly available information in standard format about an entity that is digitally signed by the “Certification Authority (CA)”. A certificate is used to uniquely identify people and resources over networks such as the Internet. Certificates also enable secure, confidential communication between two parties (see “Secure Sockets Layer (SSL)”).
A certificate typically includes a variety of information pertaining to its owner and to the CA that issued it, including the name of the holder and other holder identification information (for example, the URL of the Web server using the certificate or an email address), the holder’s public key, the name of the Certification Authority that issued the certificate, a serial number, and the validity period (or lifetime) of the certificate (a start and an end date).
The CA issues all certificates according to the format and structure of the X.509 version 3 standard.
certificate category
A group to which a “certificate” belongs (for example, Enterprise, VPN, Web, policy, and so on) that indicates its purpose. Each category can contain one or more certificate types (see “certificate type”).
certificate expiry The date after which a user’s “certificate” should no longer be trusted.
certificate revocation
See “revoking certificates”
Certificate Revocation List (CRL)
A signed and timestamped “certificate” containing the serial numbers of public key certificates that have been revoked, and a reason for each revocation.
certificate store Contains user and machine certificates, and keeps track of the “Cryptographic Service Provider (CSP)” associated with each “certificate”.
certificate type The information that determines how a “certificate” is customized when issued.
certificate validation
The process of verifying the trustworthiness of a “certificate” by checking that the certificate has not been tampered with, is not revoked, and was issued by a “Certification Authority (CA)” you “trust”.
Certification Authority (CA)
The CA ensures the trustworthiness of electronic identities. It issues electronic identities in the form of public key certificates, policy certificates, cross-certificates, certificate revocation lists (see “Certificate Revocation List (CRL)”), and Authority Revocation Lists (ARL), and signs the certificates with its signing key to ensure the integrity of the electronic identity.
See “certificate”.
client (application)
An application running as a desktop agent that receives information from a server application and requests a service provided by the server application. For example, the Entrust Entelligence Security Provider for Windows client.
Term Definition
119Glossary of termsReport any errors or omissions

120
client authentication
The authentication whereby users prove their identity to the server, using, (for example) Entrust Entelligence Security Provider for Windows.
computer A Security Provider for Windows client that is a machine with no end user. This machine can communicate with the Auto-enrollment Server to enroll or recover an Entrust digital ID for computer.
credentials 1) A set of data in a generic “Public Key Infrastructure (PKI)” that defines an entity and contains a user's critical information, or keying material. An “Entrust digital ID” is a specific type of credentials.
2) A set of data (for example, a username and password or certificate) that defines a user to the system.
credentials file A set of critical information about a user of a PKI. In Entrust Managed Services PKI, a user's credentials file is usually stored in a “.epf file”. The “Server Login” credentials file is a “.ual file”.
CRL See “Certificate Revocation List (CRL)”.
CRL check The inspection of a “Certificate Revocation List (CRL)” (accessed from the “directory”) by another user to check the trustworthiness of the certificates of the users they intend on encrypting files for.
CryptoAPI Cryptographic Application Programming Interface or CAPI. The Microsoft Windows API that provides PKI client capabilities to the desktop operating system, allowing applications to take advantage of desktop cryptographic functionality built in by Microsoft.
CAPI has two layers. An interface layer is exposed to the client applications. Underneath is a layer of drivers that perform the cryptographic functions such as encrypting and hashing. The drivers are called Cryptographic Service Providers (see “Cryptographic Service Provider (CSP)”).
Cryptographic Service Provider (CSP)
An interface between Microsoft “CryptoAPI” and private key stores (see “key store”), that performs all cryptographic operations for Microsoft applications and any third-party applications that are properly built on the Windows security framework, such as encrypting and decrypting data, verifying signatures, signing data, and verifying certificates.
CSP See “Cryptographic Service Provider (CSP)”.
CSP type A “Cryptographic Service Provider (CSP)” type. A group of organized CSPs with each group having its own set of data formats.
database A database (for example, an Informix database) that stores information about users and the “Certification Authority (CA)”. The data is encrypted and protected by passwords.
Term Definition
Auto-enrollment Server 7.0 Installation and Configuration Guide Document issue: 1.0Report any errors or omissions

deactivate The process of rendering a user incapable of using Entrust. This state is reversible, you can reactivate users later if their certificates have not been revoked (see “revoking certificates”).
deactivated user A user whose information is temporarily removed from the corresponding “directory” entry. The database, however, retains a copy of this information so a deactivated user can be easily reactivated later. For example, you deactivate users when they take a leave of absence.
A deactivated user cannot log in to any Entrust application. Deactivating a user increases the number of available licenses by one.
DEBUG An Entrust error level that logs messages relating to the system and used only when debugging the software.
decrypt The act of restoring an encrypted file to its original, unprotected state.
decryption private key
The key that decrypts data that has been encrypted with its corresponding “encryption public key”. For example, Bob is the only user who has access to his decryption private key, which he uses to decrypt information that has been encrypted for him by other users with his encryption public key.
DES Data Encryption Standard. A NIST-standard algorithm that uses a 56 bit key. Refer to FIPS PUB 46-2 (http://www.itl.nist.gov/fipspubs/fip46-2.htm).
desktop user The user whose Entrust “digital ID” is stored in an Entrust desktop security store, located in an “.epf file”.
digital ID The set of cryptographic data that defines an entity, consisting of a public portion (user’s public certificates) and a private portion (user’s private keys), and can be used to verify one’s identity.
digital signature A guarantee to a recipient that the signed file came from the person who sent it, and that it was not altered since it was signed. Any other user who has the corresponding “verification public key” can verify the signature. A digital signature is the result of making a hash of the data and encrypting the hash using a user’s “signing private key”.
directory An LDAP-compliant directory service that contains the name of all users (see and that acts as repository for user “encryption public key” certificates.
Distinguished Name (DN)
The complete name of a Directory entry that uniquely identifies a person or entity. DNs of all users are stored in the “directory”.
DN See “Distinguished Name (DN)”.
domain 1) CA domain.
2) The address or registration category of a Web site.
Term Definition
121Glossary of termsReport any errors or omissions

122
encrypt The act of rendering a file completely unreadable. This means no one, including the owner of the file, can read the file’s contents until it is decrypted. Only the owner and the authorized recipients can “decrypt” the file. The owner determines authorized recipients.
encryption key pair
The key pair that contains an “encryption public key” and associated “decryption private key”.
encryption public key
The key that encrypts data that can be decrypted with the corresponding “decryption private key”. See “encrypt”.
end user A user who has successfully enrolled for an “Entrust digital ID” using an application such as “Security Provider for Windows”.
enrollment The process by which an enterprise delivers managed Entrust keys and certificates to an “end user” or “computer”, in the form of an “Entrust digital ID”.
Entrust certificate file
The file that contains the necessary information to ensure that files encrypted and signed by someone using an Entrust desktop application in one CA domain can be encrypted and verified by someone using an Entrust desktop application in a non-cross-certified CA domain.
All users export their own certificate file and import any user’s certificate file. The filename comprises a user name with a .key extension (for example, Alice Gray.key).
Entrust desktop security store
See “.epf file”.
Entrust digital ID A “digital ID” that is created, protected, and managed by Entrust and stored in an “Entrust security store” and/or a “third-party security store”.
Entrust profile See “Entrust digital ID”.
Entrust roaming security store
A password protected “Entrust security store” file that is located in a “directory” and accessed only when user’s computer is connected to Roaming Server.
Entrust security store
A password protected file that acts as a storage medium for a user’s “Entrust digital ID” when created with an Entrust “Cryptographic Service Provider (CSP)”.
entrust.ini file The file that contains important system configuration data that Entrust clients need in order to run. Entrust distributes this file to administrators.
.epf file A password protected “Entrust security store” file that is located on user’s desktop computer. Also known as “Entrust desktop security store”.
ERROR An Entrust error level that logs messages about non-fatal errors, that should, nevertheless, be resolved. For example, application errors.
Term Definition
Auto-enrollment Server 7.0 Installation and Configuration Guide Document issue: 1.0Report any errors or omissions

FATAL An Entrust error level that logs messages about fatal errors, that must be resolved.
Globally Unique Identifier (GUID)
A method for computing object identifiers (OIDs) from Microsoft.
GUID See “Globally Unique Identifier (GUID)”.
hardware token See “Hardware Security Module (HSM)”.
Hardware Security Module (HSM)
A hardware device used to generate key pairs (see “key pair”), store the “private key”, and generate digital signatures (see“digital signature”).
For information about security hardware support and Entrust products, refer to the www.entrust.com for a complete list of Entrust supported hardware tokens, smart cards, biometrics, and other security devices.
HTTP HyperText Transfer Protocol. A transport protocol to access an unsecured Web server.
HTTPS HyperText Transfer Protocol Secure. A transport protocol used to access a secure Web server through a secure port number. See “Secure Sockets Layer (SSL)”.
IIS See “Internet Information Server (IIS)”.
INFO An Entrust error level that logs informational messages.
Internet Information Server (IIS)
A Microsoft Web server application.
Java Virtual Machine (JVM)
The part of the Web browser that executes Java applets.
JVM See “Java Virtual Machine (JVM)”.
key A special number that an encryption algorithm uses to change data, making that data secure.
key backup The process of maintain a user’s decryption keys (see “decryption private key”).
key history A collection of decryption private keys belonging to a user, stored by Entrust Managed Services PKI
key lifetime The length of time a “key” is valid. All keys have a specific lifetime except the “decryption private key” which never expires.
Term Definition
123Glossary of termsReport any errors or omissions

124
key management Operations that involve:
• updating all user key pairs (see “key pair”) automatically and regularly
• storing the complete history of each user’s encryption key pairs and public key certificates in the database.
• automatically finding and retrieving a recipient’s encryption public key certificates (see “encryption public key”) when users want to encrypt for other users
• automatically including the “verification public key certificate” of the user who signed the file with the signed file
• automatically storing the serial number of revoked certificates (see “certificate”) in a “Certificate Revocation List (CRL)”
• storing the complete history of a user’s decryption private keys in their “Entrust digital ID” so that users can continue to access any information that was encrypted for them.
key pair Asymmetric keys come in pairs. Entrust Managed Services PKI uses asymmetric keys in both encryption and “digital signature” operations.
key recovery The process of generating new “activation codes” for a user who has lost their “security store” or forgotten their password.
key store A store that holds private keys (see “private key”) for users and machines and makes them accessible to the “Cryptographic Service Provider (CSP)” that manages it.
key update The process that replaces old “key pair” with new ones. During key update, new public key certificates (see “certificate”) that have no relation to the old keys and certificates are created and users receive new keys and certificates securely.
LDAP Lightweight Directory Access Protocol. A Directory Access Protocol (DAP) specified by Internet Engineering Task Force (IETF) RFC 1487.
LDAPS Lightweight Directory Access Protocol Secure. A Directory Access Protocol used to access a secure LDAP-compliant Directory through a secure port number. See “Secure Sockets Layer (SSL)”.
machine See “computer”.
Microsoft certificate store
A “certificate store” from Microsoft that contains certificates, CRLs (see “Certificate Revocation List (CRL)”), and Certificate Trust List (CTL) that are used by “CryptoAPI”-enabled devices such as VPN, Internet Authentication Service (IAS), domain controllers, and so on.
Term Definition
Auto-enrollment Server 7.0 Installation and Configuration Guide Document issue: 1.0Report any errors or omissions

non-repudiation Irrefutable evidence that makes it impossible to reject the validity of one’s signature on a file or transaction.
An Entrust “digital signature” provides non-repudiation. It also provides authentication and data integrity.
non-repudiation signing key pair
A “key pair” used for users in high-assurance positions who require separate “digital signature” and non-repudiation keys. It contains a “non-repudiation signing private key” and a“non-repudiation verification public key”.
non-repudiation signing private key
A “private key” that encrypts a hash value that is decrypted with the corresponding “non-repudiation verification public key”.
non-repudiation verification public key
The “public key” portion of a “non-repudiation signing key pair” used to “verify” data that has been signed by the corresponding “non-repudiation signing private key”.
organization A group of people (a company, work group or team, educational or governmental institution) who all use Entrust software under the same software license.
PKI See “Public Key Infrastructure (PKI)”.
PKIX See “Public Key Infrastructure X.509 (PKIX)”.
PKIX-CMP protocol
“Public Key Infrastructure X.509 (PKIX)” - Certificate Management Protocol. The secure communications protocol used to handle requests between “Security Provider for Windows” and the CA.
policy certificate A “certificate” that defines privileges for users according to user roles; used to set user policies.
port 80 The default Web server “HTTP” port.
port 389 The default Directory “LDAP” port.
port 443 The default Web server “HTTPS” port.
port 636 The default Directory “LDAPS” port.
private key The portion of a “key pair” that is kept secret by its owner.
public key The portion of a key pair that is available in the “directory”.
Public Key Cryptographic Standards (PKCS)
A set of standard protocols that facilitate the exchange of information, in a secure manner, over the Internet. Refer to http://www.rsasecurity.com/rsalabs/pkcs/.
Term Definition
125Glossary of termsReport any errors or omissions

126
Public Key Cryptography
A cryptographic method that uses keys that are public, for encryption and verification (see “encrypt” and “verify”), and private, for decryption and digitally signing data.
Public Key Infrastructure (PKI)
1) A system that provides the basis for establishing and maintaining a trustworthy networking environment through the generation and distribution of keys and certificates. See “certificate” and “key”.
2) The foundation technology for providing enhanced Internet security.
Public Key Infrastructure X.509 (PKIX)
A working group within the Internet Engineering Task Force (IETF) that has developed standards for formatting and transporting information within a “Public Key Infrastructure (PKI)”.
queuing The process of lining up auto-enrollment or auto-recovery requests for approval by an administrator.
recovery The operation performed on users who have lost or corrupted their “security store”. It generates a new “signing key pair” and retrieves the current “encryption public key” certificate, “decryption private key” history, “verification public key certificate”, and “CA verification public key” certificate.
reference number A number obtained from an administrator, which is used along with an “authorization code” to create a new “certificate”. A reference number can only be used once.
retrieving users The process of restoring a user’s “key history” to the database after the user has been archived.
revoking certificates
The process of stopping a user from using Entrust. You must revoke a user’s encryption and verification certificates when the user is no longer trusted (for example, if you suspect that their “Entrust digital ID” and password have been compromised by an attacker). You can also revoke certificates even when there is no suspicion of compromise (for instance, when a user’s DN changes).
role Your organization can use roles to allows some people to have administrative privileges while restricting other users to an end-user role.
root CA The “Certification Authority (CA)” which is at the top of a hierarchy of two or more CAs, which acts as a trust anchor for all CAs in the hierarchy.
root certificate store
The storage medium for the “CA certificate” when Microsoft Active Directory is not being used.
secure operation See “sensitive operation”.
Term Definition
Auto-enrollment Server 7.0 Installation and Configuration Guide Document issue: 1.0Report any errors or omissions

Secure Sockets Layer (SSL)
A security protocol that provides communications privacy over the Internet. The protocol uses a “private key” to encrypt data transferred between client/server applications. The protocol allows these applications to communicate in a way that is designed to prevent eavesdropping, tampering, or message forgery. The protocol also allows Web sites and users to authenticate one another’s certificates (see “certificate”).
Both Netscape and Microsoft browsers support SSL, and many Web sites use the protocol to obtain confidential user information, such as credit card numbers. Typically, Web pages that require SSL use the “HTTPS” protocol.
user Anyone who uses “Security Provider for Windows”.
Security Provider for Windows
An Entrust product that delivers enhanced security management and strong key protection to Microsoft Windows desktop platforms. It is a security management client for Entrust Managed Services PKI.
security store The storage medium for a user’s “Entrust digital ID”.
sensitive operation
1) An administrative operation that requires authentication.
2) Any procedure that requires the use of an end user’s (see “end user”) “digital ID”. For example, signing or encrypting data. Also known as secure transaction.
3) Any procedure that transmits sensitive information from the “end user” to an organization without this information becoming compromised.
serial number A unique identifier, such as an employee number, that distinguishes a user in the “directory” from another user with the same name.
server authentication
The authentication whereby the Web server proves its identity to the user by enabling a “Secure Sockets Layer (SSL)” connection using a “Web server certificate”.
Server Login An Entrust product designed for computers, usually servers, that run Entrust applications as services or as background applications. These computers, running 24 hours a day, seven days a week, do not have a user continuously present and are often in a physically secure area that has restricted access. See also “credentials file”.
sign The act of hashing the data to a fixed-size value using a “signing private key” to create a “digital signature” that provides “non-repudiation”.
signing key pair The “key pair” that contains a “signing private key” and a “verification public key”.
Term Definition
127Glossary of termsReport any errors or omissions

128
signing private key
The key that encrypts a hash value that is decrypted with the corresponding “verification public key”. For example, Alice is the only user who has access to her signing private key, which she uses to encrypt the hash value of a file she is signing, and users verify the signature by successfully decrypting the hash value using Alice’s verification public key.
Simple Object Access Protocol (SOAP)
Simple Object Access Protocol. A light-weight “XML” protocol that governs the exchange of information in a distributed environment. SOAP provides a way for programs running in two different operating systems (such as Windows 2000 and Solaris) or written in different programming languages (such as Java and C#) to exchange information, using HTTP and XML. Refer to http://www.w3.org/2000/xp/Group/.
smart card An electronic memory card about the size of a credit card used primarily for storing data. Smart cards can contain an integrated circuit that can make decisions.
Smart cards can be used to retrieve and store certificates (see “certificate”).
SOAP See “Simple Object Access Protocol (SOAP)”.
SOAP firewall An application-level firewall that watches for “Simple Object Access Protocol (SOAP)” messages and transforms these messages as they pass through the firewall.
SSL See “Secure Sockets Layer (SSL)”.
subjectAltname The subjectAltName property provides alternate ways of identifying a user.
symmetric key A single key that both encrypts and decrypts the same data.
tier A high-level division of a system (or application), which groups the components of the system according to their function.
third-party security store
A storage medium for user’s “Entrust digital ID” that is commonly password protected, owned by a third-party vendor, and managed by Entrust.
Term Definition
Auto-enrollment Server 7.0 Installation and Configuration Guide Document issue: 1.0Report any errors or omissions

third-party trust A situation in which two people implicitly “trust” each other, even though they have not previously established a personal relationship. In this situation, two people can trust each other if they both have a relationship with a common third party, because the third party can vouch for the trustworthiness of the two people.
The need for third-party trust is fundamental to any large-scale implementation of a network security product. “Public Key Cryptography” requires access to public keys (see “public key”). However, in a large-scale network, it is impractical and unrealistic to expect each user to have previously established relationships with all other users. Plus, because public keys must be widely available, the link between a public key and a person must be guaranteed by a trusted third party to prevent masquerading. In effect, users implicitly trust any public key certified by the third party because their organization owns and securely operates the third-party certification agent.
TRACE An Entrust error level that logs trace messages.
Triple-DES A variation of the “DES” algorithm that uses three 64-bit keys.
trust A relationship between an “organization” and its end users (see“end user”), in which both the organization and the end user can rely on the authenticity of the other to complete sensitive operations, (see “sensitive operation”) and/or transmit or view sensitive data, such as a protected resource.
trusted CA store A repository of trusted digital IDs (see “digital ID”) issued by a non-Entrust CA to establish “trust” so that non-Entrust users can access data protected by Entrust software and perform sensitive operations (see “sensitive operation”) in a cross-certified environment.
.ual file The “Server Login” “credentials file”, required when you are using Server Login with an Entrust product.
URL Uniform Resource Locator. An Internet address that contains the protocol and “domain”, and optionally the port and path to a resource.
URS profile A profile created for the Auto-enrollment Server, and used to: verify signatures, establish SSL connections, sign XAP requests for the XAP Server, sign files that are used by URS.
User In a “Public Key Infrastructure (PKI)”, an entity that has been identified and approved by a “Certification Authority (CA)”. See “end user”.
username A designated term by which a user identifies him or herself to the system. It is not necessarily the equivalent of a user’s first name or last name. Also known as the login name, or user ID.
validity period See “key lifetime”.
Term Definition
129Glossary of termsReport any errors or omissions

130
verification public key
The “public key” portion of a“signing key pair” used to verify data that has been signed by the corresponding“signing private key” and is stored in the “verification public key certificate”.
verification public key certificate
The certificate that verifies that the“verification public key” within it is the authentic public key of the identified user through its “digital signature”, which is signed by the “Certification Authority (CA)”.
verify The act of providing an auditable record of a transaction, usually in the form of a “digital signature”, that binds each party to a transaction such they cannot repudiate participating in it. See “non-repudiation”.
WARNING An Entrust error level that logs recoverable errors that in normal situations do not occur, such as application warning messages.
Web server certificate
A “certificate” issued to a Web server that enables “Secure Sockets Layer (SSL)” and contains the “digital signature” of the “Certification Authority (CA)” that issued it.
Web server SSL Secure communication over “HTTPS” between the Web server and the Web browser
Web service A program that runs within an application server that communicates to other requesting components using the “Simple Object Access Protocol (SOAP)”. Web services have two advantages:
• The SOAP protocol provides a standard way for the Web service and its clients to encode and decode (or "parse") the object code so that programmers don't have to write their own. The standard also means that programs written by different companies can communicate with the Web service.
• SOAP envelopes are typically sent within “HTTP” requests so you do not have to open additional ports in your firewall for clients to communicate with the Web service
X.509 certificate A standard that ensures interoperability between systems that use digital certificates. See “certificate”.
XAP XML Administration Protocol
XML eXtensible Markup Language. A W3C specification for structured data. Refer to http://www.w3.org/TR/2000/REC-xml-20001006.
Similar to HTML, XML uses tags and attributes to place structured data into text files. XML is different from HTML in that it is a meta-language and, therefore, does not define specific tags and attributes; it just tells you how to define those tags and attributes.
Term Definition
Auto-enrollment Server 7.0 Installation and Configuration Guide Document issue: 1.0Report any errors or omissions

A
Writing your own DN Builder implementation code
This appendix provides information to help you write your own DN Builder implementation code.
• “DN Builder examples” on page 132
• “Customizing the DN builder code” on page 133
• “DistinguishedNameBuilderDefaultImp” on page 135
• “ActiveDirectoryUserInfo” on page 149
131

132
DN Builder examplesAuto-enrollment Server installs two DN Builder implementation examples into the following location on your system:
<install_directory>\AutoEnrollmentServices\examples\source\com\entrust\adminservices\urs\autoenroll
where <install_directory> is the installation location of Auto-enrollment Server. By default, the install location is C:\Program Files\Entrust.
Read through the following two examples to become familiar with their code:
• DistinguishedNameBuilderCustomNames.java — this sample DN Builder implementation sets a surname, instead of the Windows domain name that is set with the default DistinguishedNameBuilderDefaultImpl.
• DistinguishedNameBuilderSubjectAltName.java — this sample DN Builder implementation sets an email address and UPN into the subjectAltName extension in the user’s certificate, which the Auto-enrollment Server creates for the client. This implementation cannot be used for computer certificates.
Auto-enrollment Server 7.0 Installation and Configuration Guide Document issue: 1.0Report any errors or omissions

Customizing the DN builder codeWhen you do not want to use the default DistinguishedNameBuilderImpl behavior and Active Directory is not the certificate repository, you can write your own DN builder implementation code.
To use your own DN builder code
1 Write your own DN builder logic. Always subclass the default DistinguishedNameBuilderImpl implementation.
Refer to the “DN Builder examples” on page 132 and “Customizing the default DN Builder implementation” on page 135.
2 Compile your java class. You will need the following two .jar files in your class path:
“<install directory>\AutoEnrollmentServices\deploy\AdminServicesApp\WEB-INF\lib\entrust-urs.jar
“<install directory>\AutoEnrollmentServices\deploy\AdminServicesApp\WEB-INF\lib\entrust-webapp.jar
3 Place the resulting .class file under the classes folder.
<install directory>\AutoEnrollmentServices\deploy\AdminServicesApp\WEB-INF\classes\
Note: If your class is not in the root package, put it into a folder under the classes folder.
4 Locate the following section of code in the ae-defaults.xml file:
<!-- The DistinguishedNameBuilder implementation. Edit this if you provide your own implementation class. -->
<DNBuilder>DistinguishedNameBuilderDefaultImpl</DNBuilder>
5 Edit the <DNBuilder> value with the name of the java class you just created. For example, if your new java class name is “DNBuilderMyCustomClass.class” your ae-defaults.xml file will look like this:
<DNBuilder>DNBuilderMyCustomClass</DNBuilder>
This example assumes that your class is in the root package.
6 Restart the Auto-enrollment Server service in Windows Services.
7 When you have manually restarted the Auto-enrollment Server service, the adminservices.log file should display the following event:
133Writing your own DN Builder implementation codeReport any errors or omissions

134
[2005-05-05 12:38:08-0400][TRACE][UserRegistrationService][][][] AE Server - DN builder: DNBuilderMyCustomClass
Auto-enrollment Server 7.0 Installation and Configuration Guide Document issue: 1.0Report any errors or omissions

DistinguishedNameBuilderDefaultImpThe public class DistinguishedNameBuilderDefaultImpl implements DistinguishedNameBuilder. The following sections provide you with all of the information needed to customize your own DN Builder implementation:
• “Customizing the default DN Builder implementation” on page 135
• “Constructor Summary” on page 136
• “Method Summary” on page 136
• “Constructor Detail” on page 139
• “Method Detail” on page 139
Refer to the section “Customizing a user’s Distinguished Name (DN)” on page 97 for further information on the default DN builder implementation.
Customizing the default DN Builder implementationSubclass the default DistinguishedNameBuilderDefaultImpl and override one or more of its methods. The Auto-enrollment Server invokes the methods in this order:
First, it sets aside static data;
1 The constructor sets the CA search base.
2 setSearchBases(.)
3 setActiveDirectory(.)
4 setUserType(.)
On every client request, the Auto-enrollment Server provides the following information to the DN Builder:
• setDomainAndName(.)
• setMachineCertificate(.)
• setClientAgent(.)
• setClientDigitalIDType(.)
• setAdditionalInfo(.)
• setActiveDirectoryUserInfo(.)
To access this information, your DN Builder implementation can use the accessor methods in the DistinguishedNameBuilderDefaultImpl, its super class.
5 To change the default behavior, you may create a DN, common name, and surname by overriding the following:
buildClientDN()
135Writing your own DN Builder implementation codeReport any errors or omissions

136
Your implementation should provide a surname, unless you are using Active Directory, because the PKI makes that mandatory for user type “Person”.
6 Optionally, create different SubjectAltName extensions by overriding the following:
buildSubjectAltName();
The server will retrieve the contents of your DN Builder by invoking the following methods:
• getDistinguishedName()
• getCommonName()
• getSurname()
• getSubjectAltName()
Your implementation overrides the above methods, returning the strings that it builds in its buildClientDN() and buildSubjectAltName() implementations, if any.
7 Optionally, your implementation may override the following:
• getSerialNumber()
Your subclass might use the following helper method to provide the dNS name of the client computer:
• String getDNSName (String windowsdomain)
Constructor SummaryDistinguishedNameBuilderDefaultImpl ()
Method Summary
Table 4: Class DistinguishedNameBuilderImpl Method Summary
Method Summary
void buildClientDN ()
Implements a procedure for building the distinguished name.
void buildSubjectAltName ()
Implements a procedure for building a SubjectAltName.
ActiveDirectoryUserInfo getActiveDirectoryUserInfo ()
Convenience method that accesses any client information that the Auto-enrollment Server may have set into the DistinguishedNameBuilder, when Active Directory is being used.
Auto-enrollment Server 7.0 Installation and Configuration Guide Document issue: 1.0Report any errors or omissions

java.lang.String [] getAdditionaInfo ()
Gets the AdditonaInfo the client sent in its SOAP request, if any.
java.lang.String getClientAgent ()
Gets the client agent the client sent in its SOAP request, if any.
int getClientDigitalIDType ()
Gets the client digital ID the client sent in its SOAP request, if any.
java.lang.String getCommonName ()
Gets the common name this implementation has built.
java.lang.String getDistinguishedName ()
Gets the distinguished name this implementation has built.
java.lang.String getDNSNAME (DomainAndName domainAndName)
Helper method that returns the DNS name of the client computer.
DomainAndName getDomainAndName ()
Gets the Windows domain and name of the client.
java.lang.String getNameCA ()
Get the CA name this implementation can use when building a DN.
SearchBases getSearchBases ()
Gets the search bases this implementation can use when building a DN.
java.lang.String getSerialNumber ()
Gets the serial number.
java.lang.String [] getSubjectAltName ()
Gets any SubjectAltName strings that were built by the DN builder implementation.
java.lang.String getSurname ()
Gets the surname this implementation has built.
java.lang.String getUserType ()
Returns the default user type in effect.
Table 4: Class DistinguishedNameBuilderImpl Method Summary
Method Summary
137Writing your own DN Builder implementation codeReport any errors or omissions

138
boolean isActiveDirectory ()
Returns true if the ae-defaults.xml configuration says that Active Directory is being used as the certificate repository.
boolean isMachineCertificate ()
Returns true if theclient has requested enrollment of a computer, not a user.
void setActiveDirectory (boolean activedirectory)
Invoked by the server when activedirectory is set to true, if the ae-defaults.xml configuration says that Active Directory is being used as the certificate repository.
void setActiveDirectoryUserInfo (ActiveDirectoryUserInfo userinfo)
Invoked by the server when the Auto-enrollment Server configuration indicates that Active Directory is being used.
void setAdditionaInfo (java.lang.String [] additionaInfo)
Save additional information the client might have sent in its request, if any.
void setClientAgent (java.lang.String clientAgent)
Sets whatever client agent string the client might have sent in its request, if any.
void setClientDigitalIDType (int clientType)
Sets the type of client digital ID that the client reported in its SOAP request message, if any.
void setCommonName (java.lang.String cn)
Sets the common name this implementation will use.
void setDomainAndName (DomainAndName domainAndName)
Sets the Windows domain and name of the client
void setMachineCertificate (boolean isMachine)
Invoked by the server with ‘isMachine’ set to true, if the client has requested enrollment of a computer, not a user.
void setNameCA (java.lang.String dn)
Sets the name of the CA.
Table 4: Class DistinguishedNameBuilderImpl Method Summary
Method Summary
Auto-enrollment Server 7.0 Installation and Configuration Guide Document issue: 1.0Report any errors or omissions

Constructor Detail
DistinguishedNameBuilderDefaultImplpublic DistinguishedNameBuilderDefaultImpl ()
Method Detail
setMachineCertificatepublic void setMachineCertificate (boolean isMachine)
Invoked by the server with ‘isMachine’ set to true, if the client has requested enrollment of a computer not a user. The DistinguishedNameBuilder implementation might use this information or ignore it, when it builds a SubjectAltName or a DN.
Specified by:
setMachineCertificate in interface DistinguishedNameBuilder
Parameters:
isMachine — set to true if the enrollment is for machine certificate, not a user certificate.
setActiveDirectorypublic void setActiveDirectory (boolean activedirectory)
Invoked by the server with activedirectory set to true, if the ae-defaults.xml configuration says that Active Directory is being used as the certificate repository.
void setSearchBases (SearchBases searchbases)
Sets the search bases to use when building the DN.
void setSubjectAltName (java.lang.String [] subjectAltName)
Sets the SubjectAltName this implementation will use.
void setSurname (java.lang.String surname)
Sets the surname this implementation will use.
void setUserType (java.lang.String userType)
Sets the default user type.
Table 4: Class DistinguishedNameBuilderImpl Method Summary
Method Summary
139Writing your own DN Builder implementation codeReport any errors or omissions

140
A customized DistinguishedNameBuilder implementation might use this information when it builds a SubjectAltName or a DN.
Specified by:
setActiveDirectory in interface DistinguishedNameBuilder
Parameters:
activedirectory — is strue if using Active Directory as the certificate repository.
isActiveDirectorypublic boolean isActiveDirectory ()
Returns true if the ae-defaults.xml configuration says that Active Directory is being used as the certificate repository.
A customized DistinguishedNameBuilder implementation might use this information when it builds a SubjectAltName or a DN.
Specified by:
isActiveDirectory in interface DistinguishedNameBuilder
Returns:
true if using an Active Directory certificate repository.
setDomainAndNamepublic void setDomainAndName (DomainAndName domainAndName)
throws DistinguishedNameBuilderException
Sets the Windows domain and name of the client. Invoked by the server to provide a DistinguishedNameBuilder implementation with the domain and name of the user making the request.
Specified by:
setDomainAndName in interface DistinguishedNameBuilder
Parameters:
domainAndName — the DomainAndName
Throws:
DistinguishedNameBuilderException
getActiveDirectoryUserInfopublic ActiveDirectoryUserInfo getActiveDirectoryUserInfo ()
Convenience method that accesses any client information the Auto-enrollment Server may have set into this DistinguishedNameBuilder, when ActiveDirectory is
Auto-enrollment Server 7.0 Installation and Configuration Guide Document issue: 1.0Report any errors or omissions

being used. Your customized DistinguishedNameBuilder implementation might use this information to build the DN or SubjectAltName.
Refer to the “ActiveDirectoryUserInfo” on page 149 for its content.
Note: This method is provided only for the convenience of the implementations that subclass DistinguishedNameBuilderDefaultImpl. The Auto-enrollment Server doesn’t invoke this by default.
Specified by:
getActiveDirectoryUserInfo in interface DistinguishedNameBuilder
Returns:
the ActiveDirectoryUserInfo or null
See also:
isActiveDirectory
buildClientDNpublic void buildClientDN ()
throws DistinguishedNameBuilderException
Implements a procedure for building the distinguished name. Invoked by the Auto-enrollment server before it invokes getDistinguishedName(), getCommonName(), and getSurname().
Default implementation sets the common name to be the user or machine name and the surname to be the domain.
The client is enrolled on the search base set in the Auto-enrollment Server’s ae-config.xml, or the CA search base if the configuration did not provide it.
If your Auto-enrollment Server is using an Active Directory, this method uses the information provided by the Directory to get the distinguished name of the user. You must configure the ae-defaults.xml settings so the server can access the directory.
Specified by:
buildClientDN in interface DistinguishedNameBuilder
Throws:
DistinguishedNameBuilderException
buildSubjectAltNamepublic void buildSubjectAltName ()
throws DistinguishedNameBuilderException
141Writing your own DN Builder implementation codeReport any errors or omissions

142
Implements a procedure for building a SubjectAltName. This default implementation sets a DNS name for all computer enrollments. In addition, it sets a GUID as an otherName, if the client requested a domain controller certificate. The result is retrieved by getSubjectAltName().
If the Auto-enrollment Server is using an Active Directory, this method reads the Directory to get the email address and userPrincipalName, if any, so they can be set as SubjectAltName extensions.
Specified by:
buildSubjectAltName in interface DistinguishedNameBuilder
Throws:
DistinguishedNameBuilderException
getNameCApublic java.lang.String getNameCA ()
Get the CA name this implementation can use when building a DN.
Specified by:
getNameCA in interface DistinguishedNameBuilder
Returns:
the distinguished name of the issuer of the verification certificate of Auto-enrollment Server administrator (URS admin)
setNameCApublic void setNameCA (java.lang.String dn)
Sets the name of the CA.
Specified by:
setNameCA in interface DistinguishedNameBuilder
Parameters:
dn — the name of the CA
setSearchBasespublic void setSearchBases (SearchBases searchbases)
Sets the search bases to use when building the DN. Invoked by the Auto-enrollment Server, if the Auto-enrollment Server configuration provides a search base in its configuration parameters.
Specified by:
setSearchBases in interface DistinguishedNameBuilder
Auto-enrollment Server 7.0 Installation and Configuration Guide Document issue: 1.0Report any errors or omissions

Parameters:
searchbases — the searchbases for users and computers
getSearchBasespublic SearchBases getSearchBases ()
Gets the search bases this implementation can use when building a DN. Search bases for user and machine enrollments can be configured in the ae-defaults.xml file.
setAdditionaInfopublic void setAdditionaInfo (java.lang.String [] additionaInfo)
Save additional information the client might have sent in its request, if any. Invoked by the Auto-enrollment Server, to provide this information to a DistinguishedNameBuilder.
Specified by:
setAdditionaInfo in interface DistinguishedNameBuilder
Parameters:
additionaInfo — the AdditionaInfo strings which were in the client SOAP request message, if any.
getAdditionaInfopublic java.lang.String [] getAdditionaInfo ()
Gets the AdditionaInfo the client sent in its SOAP request, if any.
setClientAgentpublic void setClientAgent (java.lang.String clientAgent)
Sets whatever client agent string the client might have sent in its request, if any. Invoked by the Auto-enrollment Server, to provide this information to a DistinguishedNameBuilder.
Specified by:
setClientAgent in interface DistinguishedNameBuilder
Parameters:
clientAgent — the string received in the client SOAP request message, if any.
getClientAgentpublic java.lang.String getClientAgent ()
143Writing your own DN Builder implementation codeReport any errors or omissions

144
Gets the client agent the client sent in its SOAP request, if any.
setClientDigitalIDTypepublic void setClientDigitalIDType (int clientType)
throws DistinguishedNameBuilderException
Sets the type of client digital ID that the client reported in its SOAP request message, if any. Invoked by the Auto-enrollment Server, to provide this information to a DistinguishedNameBuilder. The allowed values are enumerated in AutoEnrollConstants.
Specified by:
setClientDigitalIDType in interface DistinguishedNameBuilder
Parameters:
clientType — the value received in the client SOAP request message, if any.
Throws:
DistinguishedNameBuilderException
getClientDigitalIDTypepublic int getClientDigitalIDType ()
Gets the client digital ID the client sent in its SOAP request, if any. The allowed values are enumerated in AutoEnrollConstants.
getSerialNumberpublic java.lang.String getSerialNumber ()
Gets the serial number. This default implementation returns null.
Specified by:
getSerialNumber in interface DistinguishedNameBuilder
Returns:
the serial number
isMachineCertificatepublic boolean isMachineCertificate ()
Returns true if the client has requested enrollment of a computer, not a user. A customized DistinguishedNameBuilder implementation might use this information when it builds a SubjectAltName or a DN.
Specified by:
Auto-enrollment Server 7.0 Installation and Configuration Guide Document issue: 1.0Report any errors or omissions

isMachineCertificate in interface DistinguishedNameBuilder
getDomainAndNamepublic DomainAndName getDomainAndName ()
Gets the Windows domain and name of the client.
Specified by:
getDomainAndName in interface DistinguishedNameBuilder
Returns:
the DomainAndName that the Auto-enrollment Server set into this instance, or null.
getDistinguishedNamepublic java.lang.String getDistinguishedName ()
Gets the distinguished name this implementation has built.
Specified by:
getDistinguishedName in interface DistinguishedNameBuilder
Returns:
the distinguished name
getCommonNamepublic java.lang.String getCommonName ()
Gets the common name this implementation has built. This default implementation sets the common name to be the client’s Windows logon name.
Specified by:
getCommonName in interface DistinguishedNameBuilder
Returns:
the common name
setCommonNamepublic void setCommonName (java.lang.String cn)
Sets the common name this implementation will use.
The Auto-enrollment Server does not invoke this method, but your customized subclass might invoke it. Otherwise, this default implementation sets the common to be the client’s Windows user name.
Specified by:
145Writing your own DN Builder implementation codeReport any errors or omissions

146
setCommonName in interface DistinguishedNameBuilder
Parameters:
cn — the common name
getSurnamepublic java.lang.String getSurname ()
Gets the surname this implementation has built. This default implementation sets the surname to be the client’s Windows domain.
Note: Unless you are using Active Directory, your implementation should provide a surname, because it is mandatory for the user type “Person”.
Specified by:
getSurname in interface DistinguishedNameBuilder
Returns:
the surname
setSurnamepublic void setSurname (java.lang.String surname)
Sets the surname this implementation will use. The Auto-enrollment Server does not invoke this method itself, but your customized subclass might invoke it. Otherwise, this default implementation sets the surname to be the client’s WIndows domain.
Specified by:
setSurname in interface DistinguishedNameBuilder
Parameters:
surname — the surname
getSubjectAltNamepublic java.lang.String [] getSubjectAltName ()
Get any SubjectAltName strings that were built by the DN builder implementation.
Specified by:
getSubjectAltName in interface DistinguishedNameBuilder
Returns:
subjectAltName — the SubjectAltName
Auto-enrollment Server 7.0 Installation and Configuration Guide Document issue: 1.0Report any errors or omissions

getUserTypepublic java.lang.String getUserType ()
Returns the default user type in effect. For example:
• Person
• Domain User
A customized DistinguishedNameBuilder implementation may use this information to build a DN. For example, a Person must be given a surname, while a Domain User must not.
Specified by:
getUserType in interface DistinguishedNameBuilder
Returns:
the default user type
setActiveDirectoryUserInfopublic void setActiveDirectoryUserInfo (ActiveDirectoryUserInfo userinfo)
Invoked by the Auto-enrollment Server when the ae-config.xml indicates that Active Directory is being used. A customized DistinguishedNameBuilder implementation might use this information when it sets a SubjectAltName or a DN. This default implementation gets the DN, email address, and UPN from this ActiveDirectoryUserInfo. ‘
Specified by:
setActiveDirectoryUserInfo in interface DistinguishedNameBuilder
Parameters:
userinfo — has the ActiveDirectoryUserInfo that the server reads from the Active Directory
getDNSNamepublic java.lang.String getDNSName (DomainAndName domainAndName) throws DistinguishedNameBuilderException
Helper method that returns the DNS name of a client computer. The enrollment request must have come from a computer, not a user.
First, this method performs a DNS look up, to get the client host name given its IP address. If that fails, it refers to the mapping that you configure in the ae-defaults.xml file. For example, you may map ACME_HQ to acme.com, so a machine named webserver would get the DNS name webserver.acme.com from this method.
147Writing your own DN Builder implementation codeReport any errors or omissions

148
If there is no mapping in ae-defaults.xml, this method throws an exception.
Specified by:
getDNSName in interface DistinguishedNameBuilder
Returns:
the DNS name
Throws:
DistinguishedNameBuilderException — if a DNS name cannot be returned
Auto-enrollment Server 7.0 Installation and Configuration Guide Document issue: 1.0Report any errors or omissions

ActiveDirectoryUserInfoThe public final class ActiveDirectoryUserInfo contains client information that Auto-enrollment Server may read from a Microsoft Active Directory. The following sections provide you with information needed to understand what client information may be read from an Active Directory.
• “Method Summary” on page 149
• “Method Detail” on page 149
Method Summary
Method Detail
getCommonNamepublic java.lang.String getCommonName ()
Returns the common name.
Table 5: Class ActiveDirectoryUserInfo Method Summary
Method summary
java.lang.String getCommonName ()
Returns the common name.
java.lang.String getDistinguishedName ()
Returns the distinguished name.
java.lang.String getEmail ()
Returns email.
java.lang.String getFirstName ()
Returns the first name.
java.lang.String getSurname ()
Returns the surname.
java.lang.String getUPN ()
Returns the upn.
java.lang.String getWindowsAccountName ()
Returns the Windows logon name.
149Writing your own DN Builder implementation codeReport any errors or omissions

150
Returns:
String
getDistinguishedNamepublic java.lang.String getDistinguishedName ()
Returns the distinguished name.
Returns:
String
getEmailpublic java.lang.String getEmail ()
Returns the email.
Returns:
String
getFirstName public java.lang.String getFirstName ()
Returns the first name.
Returns:
String
getSurnamepublic java.lang.String getSurname ()
Returns the surname.
Returns:
String
getUPNpublic java.lang.String getUPN ()
Returns the upn.
Returns:
String
Auto-enrollment Server 7.0 Installation and Configuration Guide Document issue: 1.0Report any errors or omissions

getWindowsAccountNamepublic java.lang.String getWindowsAccountName ()
Returns the Windows logon name.
Returns:
String
151Writing your own DN Builder implementation codeReport any errors or omissions

152
Auto-enrollment Server 7.0 Installation and Configuration Guide Document issue: 1.0Report any errors or omissions
Index
A B C D E F G H I J K L M N O P Q R S T U V W X Y Z- -
Index
.epf filedefinition 122
.ual filedefinition 129
AAbout Auto-enrollment Server 7activation codes
definition 117active user
definition 117ActiveDirectoryUserInfo class 149added user
definition 117administrator
definition 117ae-config.xml 89ae-defaults.xml 89ALERT
definition 117algorithm
DESdefinition 121
Triple-DESdefinition 129
attributedefinition 117
authenticationdefinition 118
authorization codedefinition 118
authorizedefinition 118
CCA
certificatedefinition 118
root
definition 126signing key pair
definition 118signing private key
definition 118verification public key
definition 118CA issuer
definition 118cache
definition 118CAPI
definition 118certificate
certificate categorydefinition 119
certificate typedefinition 119
definition 119validation
definition 119Web server certificate
definition 130X.509 certificate
definition 130certificate expiry
definition 119certificate revocation
see certificate 119Certificate Revocation List (CRL)
definition 119certificate store
definition 119Microsoft
definition 124root
definition 126certificate type and role 13certificates
revocationdefinition 126
Certification Authority (CA)
153

154
B C D E F G H I J K L M N O P Q R S T U V W X Y Z- -A
definition 119client
definition 119client authentication
definition 120client information setting 93computer
definition 120credentials
credentials filedefinition 120
definition 120CRL check
definition 120CryptoAPI
definition 120Cryptographic Service Provider (CSP)
definition 120CSP type
definition 120
DDatabase 12database
definition 120deactivate
definition 121DEBUG
definition 121decrypt
definition 121decryption private key
definition 121desktop user
definition 121digital ID
definition 121digital signature
definition 121Directory 12directory
definition 121Distinguished Name (DN)
customizing 97definition 121
DistinguishedNameBuilderDefaultImpl class 135DistinguishedNameBuilderImpl 97
DN builder implementation 16DNBuilderSearchBase 98dNS name
configuring 99domain
see CA domain 121
Eencrypt
definition 122encryption key pair
definition 122encryption public key
definition 122end user
definition 122enrollment
definition 122Entrust Authority™ Security Manager 11Entrust certificate file
definition 122Entrust desktop security store
definition 122Entrust digital ID
definition 122Entrust Entelligence™ Security Provider for Windows 10Entrust roaming security store
definition 122Entrust security store
definition 122entrust.ini file
definition 122ERROR
definition 122error messages 116
FFATAL
definition 123File Structure 86
GGlobally Unique Identifier (GUID)
definition 123
Auto-enrollment Server 7.0 Installation and Configuration Guide Document issue: 4.0

B C D E F G H I J K L M N O P Q R S T U V W X Y Z- -A
HHardware Security Module (HSM)
definition 123HTTP
definition 123HTTPS
definition 123
IINFO
definition 123Installation
planning 20Installing
Auto-enrollment Server 74checking 86
Internet Information Server (IIS)definition 123
JJava Virtual Machine (JVM)
definition 123
Kkey
definition 123key backup
definition 123key history
definition 123key lifetime
definition 123key pair
definition 124key recovery
definition 124key store
definition 124key update
definition 124management
definition 124key store
definition 124
LLDAP
definition 124LDAPS
definition 124logging 110
log file location 111log level 110maximum log file size 112maximum message length 114number of backup log files allowed 113
Mmachine
definition 124Microsoft Internet Information Services (IIS) Web Serve 11
Nnon-repudiation
definition 125signing key pair
definition 125signing private key
definition 125verification public key
definition 125non-repudiation signing key pair
definition 125non-repudiation signing private key
definition 125non-repudiation verification public key
definition 125
Oorganization
definition 125
PPKIX-CMP protocol
definition 125policy certificate
definition 125
155Index

156
B C D E F G H I J K L M N O P Q R S T U V W X Y Z- -A
port389
definition 125443
definition 125636
definition 12580
definition 125private key
decryptiondefinition 121
definition 125signing
definition 128public key
definition 125Public Key Cryptography
definition 126Public Key Infrastructure (PKI)
definition 126Public Key Infrastructure X.509 (PKIX)
definition 126
Qqueuing 101
definition 126enabling in Auto-enrollment Server 102
Rrecovery
definition 126reference number
definition 126retrieving users
definition 126role
definition 126
Ssearch base
customizing 98DNBuilderSearchBase 98
Secure Sockets Layer (SSL)definition 127
Security Providerdefinition 127
Security Provider for OutlookOverview 8
Security Provider for Windows 10AutoEnrollMachineDigitalIDType 93AutoEnrollMachineURL 10AutoEnrollUserDigitalIDType 93AutoEnrollUserURL 10
security storedefinition 127Entrust security store
definition 122sensitive operation
definition 127serial number
definition 127server authentication
definition 127Server Login
definition 127sign
definition 127signing key pair
definition 127signing private key
definition 128Simple Object Access Protocol (SOAP)
definition 128smart card
definition 128SOAP
SOAP firewalldefinition 128
subjectAltnamedefinition 128
subjectAltName creation 17domain controller certificates 17
symmetric keydefinition 128
system components 9
Tthird-party security store
definition 128third-party trust
definition 129
Auto-enrollment Server 7.0 Installation and Configuration Guide Document issue: 4.0

B C D E F G H I J K L M N O P Q R S T U V W X Y Z- -A
Three-Tier client/server environment 9tier
definition 128Tier 1 10Tier 2 10Tier 3 11time synchronization 115Tomcat Application Server 11TRACE
definition 129trust
definition 129trusted CA store
definition 129
UURL
definition 129URS profile
creating 61definition 129
Userdefinition 129
userdeactivated
definition 121definition 127
usernamedefinition 129
Vvalidity period
see key lifetime 129verification public key
definition 130verification public key certificate
definition 130verify
definition 130
WWARNING
definition 130Web Server
creating and installing certificate 24enabling SSL 51
Web server SSLdefinition 130
Web servicedefinition 130
XXAP
definition 130XML
definition 130
157Index

158
B C D E F G H I J K L M N O P Q R S T U V W X Y Z- -A
Auto-enrollment Server 7.0 Installation and Configuration Guide Document issue: 4.0