
Endeca Developer Studio: Developer Studio Help · Endeca Developer Studio Developer Studio Help ......
338
Endeca Developer Studio Developer Studio Help Version 6.1.2 • March 2012
Transcript of Endeca Developer Studio: Developer Studio Help · Endeca Developer Studio Developer Studio Help ......

Endeca Developer StudioDeveloper Studio Help
Version 6.1.2 • March 2012


Contents
Copyright and disclaimer.........................................................................vii
Chapter 1: Welcome to Oracle Endeca Developer Studio.......................9Overview of Developer Studio functions.......................................................................................................9Parts of the Developer Studio window........................................................................................................10Important Endeca concepts........................................................................................................................10About your Endeca Developer Studio Project.............................................................................................11About Oracle Endeca Workbench...............................................................................................................11Developer Studio workflows........................................................................................................................12
Chapter 2: Getting Started.......................................................................15Creating and Validating Projects.................................................................................................................15
Creating a new project based on a template.......................................................................................16Opening a project................................................................................................................................17Saving a project...................................................................................................................................17Backing up a project............................................................................................................................17Displaying project components ...........................................................................................................17The View Menu....................................................................................................................................18Resizing columns in a view..................................................................................................................18Closing a project..................................................................................................................................19Exiting Endeca Developer Studio........................................................................................................19Validating your project.........................................................................................................................19About the Messages pane...................................................................................................................20Clearing messages .............................................................................................................................20Closing an editor..................................................................................................................................20Closing an active view in a project.......................................................................................................20Closing all open views in a project.......................................................................................................21Copying messages to the clipboard.....................................................................................................21The menu bar and toolbar ..................................................................................................................21The Project Explorer............................................................................................................................21The Messages window........................................................................................................................22The status bar......................................................................................................................................22The work area......................................................................................................................................23
Working with Oracle Endeca Workbench....................................................................................................23The Workbench toolbar ......................................................................................................................23Creating a connection to Oracle Endeca Workbench..........................................................................24Using the EAC Admin Console............................................................................................................24Sending the instance configuration to Oracle Endeca Workbench......................................................25Getting the instance configuration from Oracle Endeca Workbench ..................................................25
Chapter 3: Preparing Data, Properties, and Dimensions......................27Preparing Your Source Data.......................................................................................................................27
Importing Source Data.........................................................................................................................27Joining Source Data............................................................................................................................52Adding and Editing Source Properties.................................................................................................59Preparing for Indexing.........................................................................................................................70
Preparing Your Endeca Properties..............................................................................................................73About Endeca properties.....................................................................................................................74Adding an Endeca property to an application......................................................................................74Working with Endeca Properties.........................................................................................................75Configuring Endeca Property Behavior...............................................................................................82Setting a property to use as the record spec ......................................................................................97Troubleshooting Endeca properties.....................................................................................................98
Preparing Your Dimension Hierarchy..........................................................................................................98
iii

Adding Pipeline Support for Dimensions.............................................................................................98Working with Dimensions and Dimension Values..............................................................................106
Mapping Source Properties......................................................................................................................164Understanding Source Property Mapping.........................................................................................164Working with Property Mappers........................................................................................................170Creating Explicit Meanings................................................................................................................173Advanced Property Mapping Techniques..........................................................................................175Troubleshooting source property mapping .......................................................................................177
Chapter 4: Configuring Application Features......................................179Configuring Precedence Rules.................................................................................................................179
About precedence rules.....................................................................................................................180The Precedence Rules view .............................................................................................................180Viewing all of your precedence rules.................................................................................................181Precedence Rule editor.....................................................................................................................181Creating precedence rules................................................................................................................182Modifying precedence rules...............................................................................................................182Deleting precedence rules.................................................................................................................183Standard versus leaf precedence rules.............................................................................................183Precedence rules and the implicit selection of dimension values .....................................................184Tips and troubleshooting for precedence rules .................................................................................185
Configuring User Profiles..........................................................................................................................185About user profiles.............................................................................................................................186Viewing all of your user profiles ........................................................................................................186Creating user profiles........................................................................................................................186Modifying user profiles.......................................................................................................................187Deleting user profiles.........................................................................................................................187Specifying a user profile as a dynamic business rule trigger.............................................................188
Configuring Search Interfaces..................................................................................................................188Configuring Search............................................................................................................................189Configuring Search Interface Options................................................................................................209
Configuring Keyword Redirects................................................................................................................233About keyword redirects....................................................................................................................234Creating keyword redirects................................................................................................................234Modifying keyword redirects..............................................................................................................235Deleting keyword redirects................................................................................................................235Keyword Redirect editor.....................................................................................................................236Grouping Keyword Redirects.............................................................................................................236
Configuring Dynamic Business Rules.......................................................................................................238Using dynamic business rules to promote records ...........................................................................239Comparing dynamic business rules to content management publishing...........................................239Dynamic business rule constructs.....................................................................................................240Record promotion examples .............................................................................................................241Suggested workflow using Endeca tools to promote records ...........................................................244Building Rules and Their Supporting Constructs...............................................................................245Using dynamic business rules with an Agraph .................................................................................268Applying relevance ranking to rule results.........................................................................................268
Configuring Dimension Groups.................................................................................................................269About dimension groups....................................................................................................................270Viewing all of your dimensions..........................................................................................................270Creating dimension groups................................................................................................................272Modifying dimension groups..............................................................................................................272Deleting dimension groups................................................................................................................273Dimension Group editor ....................................................................................................................273Adding a dimension to an existing group...........................................................................................273Dimension groups versus dimension hierarchy.................................................................................274Dimension groups and ranking..........................................................................................................274Dimension Groups view.....................................................................................................................275
Chapter 5: Working with Your Pipeline..................................................277About pipelines.........................................................................................................................................277About the pipeline tab...............................................................................................................................278About the Pipeline Diagram editor............................................................................................................278
Endeca Developer Studioiv

About pipeline components......................................................................................................................279About adapters.........................................................................................................................................280About manipulators...................................................................................................................................281About property mappers...........................................................................................................................282About record assemblers..........................................................................................................................282Record server components ......................................................................................................................282About utility components...........................................................................................................................282Adding a pipeline component...................................................................................................................283
Adding a spider..................................................................................................................................284Adding an update adapter.................................................................................................................287
Editing a pipeline component....................................................................................................................290Deleting a pipeline component.................................................................................................................290Record Manipulators and Expressions.....................................................................................................291
Adding a record manipulator.............................................................................................................291Editing a record manipulator..............................................................................................................292About expressions.............................................................................................................................292Adding an expression to a record manipulator..................................................................................293
Writing Out Data for Diagnostic Purposes................................................................................................294Writing out record data .....................................................................................................................294Writing out dimension data ...............................................................................................................295
Changing the Display of the Pipeline Diagram.........................................................................................296Resizing the pipeline diagram ...........................................................................................................296Changing the alignment of selected components in the diagram......................................................296Returning to the default layout ..........................................................................................................297Displaying components that have dimension sources.......................................................................297Hiding the dimension flow..................................................................................................................297About specifying data flow among components................................................................................298Viewing data flow among components..............................................................................................299Connecting pipeline components graphically....................................................................................299About adding and removing pipeline components.............................................................................299
Chapter 6: Advanced Features..............................................................301Restricting Access to Records..................................................................................................................301
About access rules............................................................................................................................302Working with multiple access rules ...................................................................................................303Creating the Endeca.ACL.Allow.Read property ................................................................................303Creating an access rule ....................................................................................................................304Running a baseline update for access rules......................................................................................305Configuring the Web application to use access rules .......................................................................305Crawling source data.........................................................................................................................305About implementing partial updates..................................................................................................306Working with external taxonomies ....................................................................................................306About the Agraph...............................................................................................................................307
Chapter 7: Context Sensitive Help........................................................309
v
Contents


Copyright and disclaimer
Copyright © 2003, 2012, Oracle and/or its affiliates. All rights reserved.
Oracle and Java are registered trademarks of Oracle and/or its affiliates. Other names may betrademarks of their respective owners. UNIX is a registered trademark of The Open Group.
This software and related documentation are provided under a license agreement containing restrictionson use and disclosure and are protected by intellectual property laws. Except as expressly permittedin your license agreement or allowed by law, you may not use, copy, reproduce, translate, broadcast,modify, license, transmit, distribute, exhibit, perform, publish or display any part, in any form, or byany means. Reverse engineering, disassembly, or decompilation of this software, unless required bylaw for interoperability, is prohibited.
The information contained herein is subject to change without notice and is not warranted to beerror-free. If you find any errors, please report them to us in writing.
If this is software or related documentation that is delivered to the U.S. Government or anyone licensingit on behalf of the U.S. Government, the following notice is applicable:
U.S. GOVERNMENT END USERS: Oracle programs, including any operating system, integratedsoftware, any programs installed on the hardware, and/or documentation, delivered to U.S. Governmentend users are "commercial computer software" pursuant to the applicable Federal Acquisition Regulationand agency-specific supplemental regulations. As such, use, duplication, disclosure, modification, andadaptation of the programs, including any operating system, integrated software, any programs installedon the hardware, and/or documentation, shall be subject to license terms and license restrictionsapplicable to the programs. No other rights are granted to the U.S. Government.
This software or hardware is developed for general use in a variety of information managementapplications. It is not developed or intended for use in any inherently dangerous applications, includingapplications that may create a risk of personal injury. If you use this software or hardware in dangerousapplications, then you shall be responsible to take all appropriate fail-safe, backup, redundancy, andother measures to ensure its safe use. Oracle Corporation and its affiliates disclaim any liability forany damages caused by use of this software or hardware in dangerous applications.
This software or hardware and documentation may provide access to or information on content,products and services from third parties. Oracle Corporation and its affiliates are not responsible forand expressly disclaim all warranties of any kind with respect to third-party content, products, andservices. Oracle Corporation and its affiliates will not be responsible for any loss, costs, or damagesincurred due to your access to or use of third-party content, products, or services.
Rosette® Linguistics Platform Copyright © 2000-2011 Basis Technology Corp. All rights reserved.
Teragram Language Identification Software Copyright © 1997-2005 Teragram Corporation. All rightsreserved.
vii

Chapter 1
Welcome to Oracle Endeca DeveloperStudio
Oracle Endeca Developer Studio is a Windows application that you use to define all aspects of yourinstance configuration. Use Developer Studio to assemble and configure pipeline components forprocessing your data.
Overview of Developer Studio functionsEndeca Developer Studio is a Windows application that you use to define all aspects of your instanceconfiguration.
With Developer Studio, you can define:
• Pipeline components for tasks such as loading, standardizing, joining, mapping, and exportingdata.
• Endeca properties and property attributes such as sort and rollup.• Dimensions and dimension values, including dimension hierarchy.• Precedence rules among dimensions that provide better control over your implementation's
navigation flow.• Search configurations, including which properties and dimensions are available for search.• Dynamic business rules that allow you to promote certain records on your Web site using data-driven
business logic. Dynamic business rules are used to implement merchandising and contentspotlighting.
• User profiles that tailor the content returned to an end-user based upon pre-configured rules.
Developer Studio uses a project file, with an .esp extension, that contains pointers to the XML filesthat support an instance configuration. Editing a project in Developer Studio edits these underlyingfiles.
In addition to the features that allow you to build your instance configuration, Endeca Developer Studioprovides access to Endeca Web-based tools (namely Oracle Endeca Workbench).
Note: A few features still require manual editing of the XML files. Those cases are noted in thedocumentation.

Parts of the Developer Studio windowThe Developer Studio window contains the menu bar, toolbar, Project Explorer, work area, andMessages pane.
The Developer Studio window contains the following sections:
• The menu bar and toolbar• The Project Explorer• The work area• The Messages pane
Related LinksAbout the Messages pane on page 20
The Messages pane opens automatically when you validate your project. It lists any errorsor warnings that it encounters during validation.
The Project Explorer on page 21You control your project through the Project Explorer. The Project Explorer has two tabs:Project and Pipeline.
The work area on page 23The work area contains all views, editors, and other elements that you can open in DeveloperStudio.
The menu bar and toolbar on page 21The menu bar allows you to open, close, and save your project, adjust the project view, andaccess help.
Important Endeca conceptsIn order to work with the Endeca Developer Studio, you need to understand fundamental Endecaconcepts of an Endeca implementation, including those described in this section.
In order to familiarize yourself with the following concepts, we highly recommend that you read theOracle Endeca Guided Search Concepts Guide and the introductory sections of the Endeca BasicDevelopment Guide before beginning to work with Developer Studio.
• Source properties and record• Endeca properties and record• Dimensions, dimension values, and dimension hierarchy• Guided Navigation• Record search and dimension search
Note: You must have Adobe Reader, available from the Adobe Web site, installed to view them.
Related Linkswww.adobe.com
Endeca ConfidentialEndeca Developer Studio Developer Studio Help
Welcome to Oracle Endeca Developer Studio | Parts of the Developer Studio window10
About your Endeca Developer Studio ProjectEndeca Developer Studio is a project-based tool that creates and modifies an Endeca instanceconfiguration.
The instance configuration consists of the following components and files:
• Your Developer Studio project has a project file that is typically the name of your project followedby an Endeca Studio Project (.esp) extension. This file tracks the other files used in the project.
• The Pipeline.epx file is the Developer Studio pipeline file. The Pipeline.epx file is composed of acollection of components. Each component performs a specific function during the transformationof your raw data into Endeca records. Components are linked together, by means ofcross-references, giving the Pipeline.epx file a sequential flow and a "pipeline" feel. At a minimum,a Pipeline.epx file must contain a component to load data and a component to save data. Additionalcomponents are added as required to perform other tasks.
• The Dimension.xml file(s) that store the dimension hierarchy.The dimension hierarchy is a collectionof dimensions and their dimension values. A data pipeline can have more than one Dimension.xmlfile.
• Multiple XML files for storing the index configuration. Developer Studio allows you to specify theindex configuration in its various editors. This includes specifying the display and handling ofdimensions, precedence rules, record sorting, record search, and so forth.The index configurationresides in multiple, smaller XML files.
Creating a new project automatically creates new files for the project. Saving a project can potentiallyupdate all of these files.
About Oracle Endeca WorkbenchIn addition to Developer Studio, the Endeca distribution includes the Oracle Endeca Workbench tool.Workbench is an optional, Web-based application that contains a complementary set of functionalityto that found in Developer Studio.
Unlike Developer Studio, which provides a rich development environment for configuring all aspectsof an Endeca implementation, Oracle Endeca Workbench focuses on a smaller set of common, everyday provisioning, configuration and maintenance tasks. This reduced focus gives Oracle EndecaWorkbench a smaller footprint that can exist within the bounds of a Web-based application.
Oracle Endeca Workbench is a Web-based tool intended for business users and system administrators.For business user information, see the Oracle Endeca Workbench User's Guide. Oracle EndecaWorkbench fully interacts with the EAC Central Server for provisioning and system operations, it letsyou configure some aspects of your instance configuration and allows provisioning and systemoperations.
With Oracle Endeca Workbench, system administrators can perform any of the following tasks:
• Provision the hosts available to an Endeca implementation.• Provision the applications available to an Endeca implementation.• Provision the scripts, such as the report generator script and the baseline update script, to an
Endeca implementation.• Configure SSL settings, report generation, and set up a preview application for dynamic business
rule testing.• Perform system operations such as running baseline updates or starting and stopping the MDEX
Engine or Log Server.
Endeca Developer Studio Developer Studio HelpEndeca Confidential
11Welcome to Oracle Endeca Developer Studio | About your Endeca Developer Studio Project

• Monitor the status of system components such as Forge, Dgidx , MDEX Engine, Log Server, andReport Generator.
Oracle Endeca Workbench and Developer Studio require the Endeca Application Controller (EAC) tocontrol and communicate with other components and hosts in an Endeca implementation.
The two primary audiences for Oracle Endeca Workbench are:
• Business users who define business logic such as merchandising/content-spotlighting rules andthesaurus entries.
• System administrators who provision, maintain, monitor and manage an Endeca implementation.
Oracle Endeca Workbench allows business users to make changes to parts of an Endecaimplementation after the pipeline and instance configuration features has been developed for theapplication in Developer Studio. For example, a developer uses Developer Studio to specify whichEndeca properties and dimensions are available for search, then a business user uses Oracle EndecaWorkbench to specify thesaurus entries that support search functionality, and a developer uses OracleEndeca Workbench to provision an application and Oracle Endeca Guided Search components to theEAC Central Server.
Oracle Endeca Workbench provides administrators with features that provision all parts of the Endecaimplementation, start, edit and stop components and scripts, monitor the status of an Endecaimplementation, and download an implementation's instance configuration for debugging andtroubleshooting purposes.
For both audiences, Oracle Endeca Workbench provides access to reports that describe how end-usersare using an Endeca implementation, for example, the most popular search terms, the most popularnavigation locations, search terms that are most often misspelled, and so forth
Note: For the most part, you can use Developer Studio to make the same changes that anon-technical user might make in Endeca Workbench. One exception is the changing the stateof dynamic business rules, such as from Inactive to Active.
You can share the work on a project with others in your organization. For example, you might useDeveloper Studio to create dynamic business rule zones, styles, and rule groups, and then pass theproject to a colleague on your marketing team, who could use Oracle Endeca Workbench to createand test the dynamic business rules themselves.
In Oracle Endeca Workbench, it is possible for multiple users to log in and make non-conflicting changesat the same time. However, between Oracle Endeca Workbench and Developer Studio, there is nobuilt-in allowance for concurrent users. Therefore, to prevent changes from being overwritten orotherwise lost, a project should be active in only one of these applications at a time. For example, inthe situation outlined above, after you send the project to the Workbench user, you should wait untilthe Oracle Endeca Workbench user has finished making modifications before pulling the applicationback into Developer Studio for continued development.
Developer Studio workflowsDeveloper Studio is useful by itself for creating instance configuration XML files you need for yourEndeca application.You may also split application maintenance tasks between a Developer Studiouser and a Workbench user.
You can use Developer Studio in two ways: on its own, or in conjunction with Endeca Workbench.
Endeca ConfidentialEndeca Developer Studio Developer Studio Help
Welcome to Oracle Endeca Developer Studio | Developer Studio workflows12

• You can use Developer Studio on its own to generate the instance configuration XML files neededto run your Endeca application. After Developer Studio generates the XML files, you can incorporatethem into EAC scripts or applications that run and manage the Endeca application.
• You can use Developer Studio in conjunction with Oracle Endeca Workbench. In this scenario, atechnical user of Developer Studio shares the application maintenance tasks with a Workbenchuser. If you intend to use Workbench, you need to use the emgr_update utility to access theconfiguration files created in Developer Studio. In particular, emgr_update can be used in yourcustom EAC scripts or applications that run and manage the Endeca application.
For more information about using emgr_update, see the Oracle Endeca Guided Search Administrator'sGuide.
Related LinksSuggested workflow using Endeca tools to promote records on page 244
Place supporting constructs for rules before creating the Web application. The pipelinedeveloper should then give business users access to the project through Endeca Workbenchto create, edit, and test rules.
Endeca Developer Studio Developer Studio HelpEndeca Confidential
13Welcome to Oracle Endeca Developer Studio | Developer Studio workflows

Chapter 2
Getting Started
Creating and Validating ProjectsRelated Links
Getting Started on page 15
Creating a new project based on a template on page 16The Endeca Developer Studio offers project templates that can be used as a foundationalbase for new projects.
Opening a project on page 17Pre-existing projects can be re-opened in Developer Studio.
Saving a project on page 17Be sure to save projects before closing.
Backing up a project on page 17Save a project to multiple locations to protect against data loss.
Displaying project components on page 17The View menu allows you to change the screen elements that are displayed in EndecaDeveloper Studio.
The View Menu on page 18Access Standard Objects, Search Configuration, Dynamic Business Rules, Pipeline Diagram,Project Explorer, Messages, Toolbars, and the Status Bar.
Resizing columns in a view on page 18There are two ways to resize a column in a view.
Closing a project on page 19When you are finished working on a project, you should close it before exiting DeveloperStudio.
Exiting Endeca Developer Studio on page 19When you are done working with a Developer Studio project, you should save your work andexit.
Validating your project on page 19Developer Studio performs semantic validation on your project.
About the Messages pane on page 20The Messages pane opens automatically when you validate your project. It lists any errorsor warnings that it encounters during validation.
Clearing messages on page 20You can clear all the messages in the Messages pane with a single command.
Closing an editor on page 20When you are finished working with an editor, you can close it.
Closing an active view in a project on page 20When you are finished with an active view, you can close it.
Closing all open views in a project on page 21When you are finished with all open views, you can close the group with a single command.
Copying messages to the clipboard on page 21You can copy messages from Developer Studio to external text files using the clipboard.
The menu bar and toolbar on page 21The menu bar allows you to open, close, and save your project, adjust the project view, andaccess help.
The Project Explorer on page 21You control your project through the Project Explorer. The Project Explorer has two tabs:Project and Pipeline.
The Messages window on page 22The tabs on the Messages window provide warning and error information about differentaspects of your application.
The status bar on page 22View information including recent changes to your project.
The work area on page 23The work area contains all views, editors, and other elements that you can open in DeveloperStudio.
Creating a new project based on a templateThe Endeca Developer Studio offers project templates that can be used as a foundational base fornew projects.
To create a project based on a template:
1. From the File menu, select New Project. The New Project editor appears.
2. Select a project type from the "Select a project type" list.
3. In the Project name text box, type a name for the project. This name appears in the title bar of theproject.
4. In the Save project as text box, browse to the location where you want to save the project andthen type a name for the project file.
5. Click OK.
Creating a new project automatically creates rudimentary pipeline components. After you have createda new project, you can use Developer Studio to extend and populate it.
Related LinksCreating and Validating Projects on page 15
Endeca ConfidentialEndeca Developer Studio Developer Studio Help
Getting Started | Creating and Validating Projects16

Opening a projectPre-existing projects can be re-opened in Developer Studio.
To open an existing Developer Studio project:
1. From the File menu, select Open Project.
2. In the Open dialog box, browse to the project you want to open.
3. Click the project file to open it. Typically the project file is the name of your project, followed by an.esp (Endeca Studio Project) extension.
Note: You can have only one project open at a time.
Related LinksCreating and Validating Projects on page 15
Saving a projectBe sure to save projects before closing.
To save a project after making changes to it:
From the File menu, select Save Project.
Note: If there are errors in your project when you save it, you will receive a message on theValidation tab of the Messages pane.
Related LinksCreating and Validating Projects on page 15
Backing up a projectSave a project to multiple locations to protect against data loss.
To create a backup by saving a project to a different location:
1. From the File menu, select Save project as.The Select Project Folder dialog box appears.
2. Browse to the location where you want to save the project.
3. Click OK.
Related LinksCreating and Validating Projects on page 15
Displaying project componentsThe View menu allows you to change the screen elements that are displayed in Endeca DeveloperStudio.
To choose which elements are displayed in Developer Studio:
Endeca Developer Studio Developer Studio HelpEndeca Confidential
17Getting Started | Creating and Validating Projects
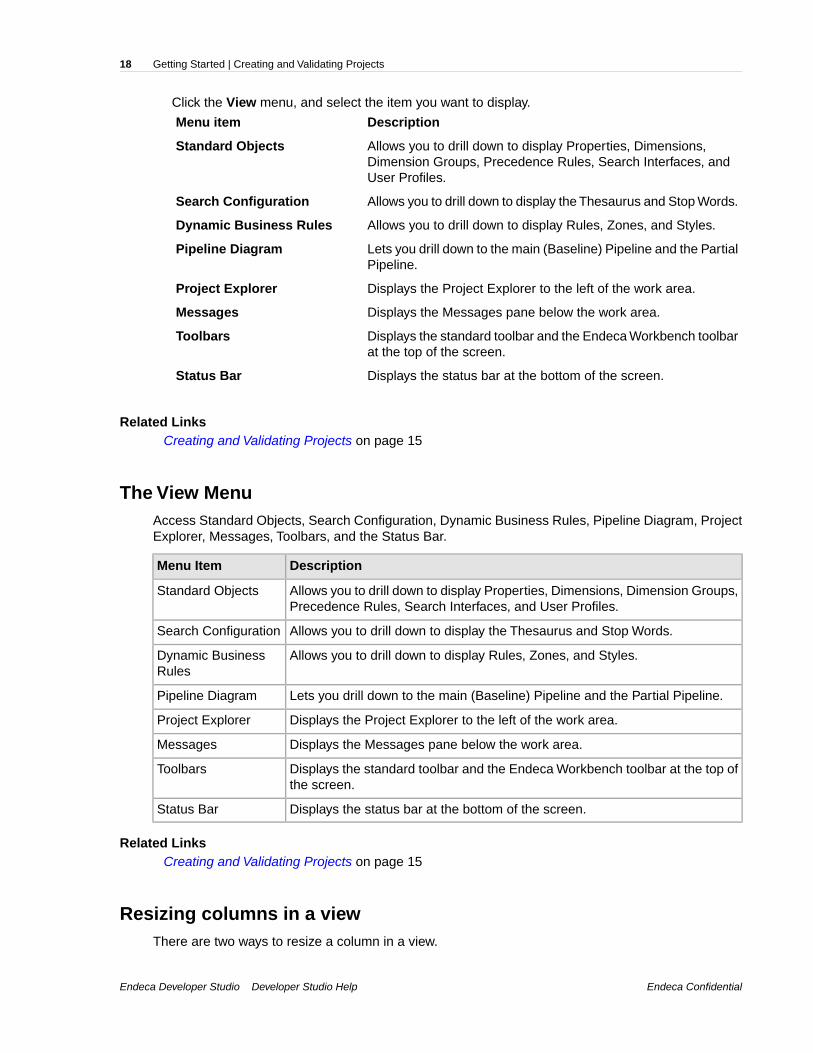
Click the View menu, and select the item you want to display.
DescriptionMenu item
Allows you to drill down to display Properties, Dimensions,Dimension Groups, Precedence Rules, Search Interfaces, andUser Profiles.
Standard Objects
Allows you to drill down to display the Thesaurus and Stop Words.Search Configuration
Allows you to drill down to display Rules, Zones, and Styles.Dynamic Business Rules
Lets you drill down to the main (Baseline) Pipeline and the PartialPipeline.
Pipeline Diagram
Displays the Project Explorer to the left of the work area.Project Explorer
Displays the Messages pane below the work area.Messages
Displays the standard toolbar and the Endeca Workbench toolbarat the top of the screen.
Toolbars
Displays the status bar at the bottom of the screen.Status Bar
Related LinksCreating and Validating Projects on page 15
The View MenuAccess Standard Objects, Search Configuration, Dynamic Business Rules, Pipeline Diagram, ProjectExplorer, Messages, Toolbars, and the Status Bar.
DescriptionMenu Item
Allows you to drill down to display Properties, Dimensions, Dimension Groups,Precedence Rules, Search Interfaces, and User Profiles.
Standard Objects
Allows you to drill down to display the Thesaurus and Stop Words.Search Configuration
Allows you to drill down to display Rules, Zones, and Styles.Dynamic BusinessRules
Lets you drill down to the main (Baseline) Pipeline and the Partial Pipeline.Pipeline Diagram
Displays the Project Explorer to the left of the work area.Project Explorer
Displays the Messages pane below the work area.Messages
Displays the standard toolbar and the Endeca Workbench toolbar at the top ofthe screen.
Toolbars
Displays the status bar at the bottom of the screen.Status Bar
Related LinksCreating and Validating Projects on page 15
Resizing columns in a viewThere are two ways to resize a column in a view.
Endeca ConfidentialEndeca Developer Studio Developer Studio Help
Getting Started | Creating and Validating Projects18
To resize a column in a view:
• To resize a column in a view, click the boundary separating the column header from the one thatfollows it and drag the column boundary to a new width.
• To automatically resize a column according to its contents, double-click on the boundary separatingthe column header from the one that follows it.The column will automatically resize to the size of its data (not to the size of the text in its header).
Related LinksCreating and Validating Projects on page 15
Closing a projectWhen you are finished working on a project, you should close it before exiting Developer Studio.
To close a Developer Studio project:
• Choose File > Close Project.
Note: Only one project can be open at a time.
Related LinksCreating and Validating Projects on page 15
Exiting Endeca Developer StudioWhen you are done working with a Developer Studio project, you should save your work and exit.
To exit Endeca Developer Studio:
From the File menu, select Exit.
If you have any unsaved work, Endeca Developer Studio will prompt you to save it.
Related LinksCreating and Validating Projects on page 15
Validating your projectDeveloper Studio performs semantic validation on your project.
If there are no errors, the Messages pane give you a confirmation message. If there are errors, theyare listed on the appropriate tab.
Developer Studio automatically attempts to validate your project when you open and save it. In addition,you can validate your project at any time by choosing Tools > Validate Project.
Related LinksCreating and Validating Projects on page 15
About the Messages pane on page 20The Messages pane opens automatically when you validate your project. It lists any errorsor warnings that it encounters during validation.
Endeca Developer Studio Developer Studio HelpEndeca Confidential
19Getting Started | Creating and Validating Projects

About the Messages paneThe Messages pane opens automatically when you validate your project. It lists any errors or warningsthat it encounters during validation.
There are four different sections of the Messages pane:
DescriptionTab
Lists all messages that appear on the other tabsin the Messages pane.
All
Displays syntax errors.Syntax
Displays validation errors.Validation
Displays messages related to the status of EndecaWorkbench.
Endeca Workbench
Related LinksCreating and Validating Projects on page 15
Clearing messagesYou can clear all the messages in the Messages pane with a single command.
To clear the messages that appear in the Messages pane:
On the Edit menu, select Clear Messages.
Related LinksCreating and Validating Projects on page 15
Closing an editorWhen you are finished working with an editor, you can close it.
To close an editor:
• Click Cancel.
Related LinksCreating and Validating Projects on page 15
Closing an active view in a projectWhen you are finished with an active view, you can close it.
To close the active view in a project:
• Click the X in the top right corner.
Related LinksCreating and Validating Projects on page 15
Endeca ConfidentialEndeca Developer Studio Developer Studio Help
Getting Started | Creating and Validating Projects20
Closing all open views in a projectWhen you are finished with all open views, you can close the group with a single command.
To close all open views in a project:
• From the Window menu, choose Close All.
Related LinksCreating and Validating Projects on page 15
Copying messages to the clipboardYou can copy messages from Developer Studio to external text files using the clipboard.
To copy Developer Studio messages:
1. Choose Edit > Copy Messages .All messages in the current tab in the Messages pane are copied to the clipboard.
2. In the external application (for example, Notepad), choose Paste.
Related LinksCreating and Validating Projects on page 15
The menu bar and toolbarThe menu bar allows you to open, close, and save your project, adjust the project view, and accesshelp.
Depending upon which editor is active, you may have additional options.
The toolbar provides graphical access to many of the menu items listed above. In addition, there is aset of buttons for interacting with Endeca Workbench.
Related LinksCreating and Validating Projects on page 15
The Project ExplorerYou control your project through the Project Explorer. The Project Explorer has two tabs: Project andPipeline.
The Project tab contains the following selections:
• Properties launches the Property view, where you can view, add, or modify properties.• Dimensions launches the Dimension view, where you can view, add, or modify dimensions and
dimension values.• Dimension Groups launches the Dimension Group view, where you can view, add, or modify
dimension groups.• Precedence Rules launches the Precedence Rules editor, where you can view, add, or modify
precedence rules.• Search Interfaces launches the Search Interface editor, where you can view, add, or modify search
interfaces and establish ranking strategies.
Endeca Developer Studio Developer Studio HelpEndeca Confidential
21Getting Started | Creating and Validating Projects

• User Profiles launches the User Profiles view, where you can view, add, or modify user profiles.• Search Configuration allows you to establish and modify settings for the thesaurus, stop words
and stemming.• Keyword Redirects allows you to create or remove keyword redirect groups.• Dynamic Business Rules allows you establish and modify rules, zones, styles, and rule groups
used by dynamic business rules.• Pipeline Diagram launches the Pipeline Diagram editor, which allows you to interact with your
pipeline visually.
The Pipeline tab allows you to access the following pipeline components if they exist in your project:
• Dimension Adapters• Dimension Servers• Record Adapters• Record Manipulators• Spiders• Record Assemblers• Record Caches• Indexer Adapters• Update Adapters• Property Mappers• Perl Manipulators
Related LinksCreating and Validating Projects on page 15
The status bar on page 22View information including recent changes to your project.
The Messages windowThe tabs on the Messages window provide warning and error information about different aspects ofyour application.
If there are problems in your project, the Messages window opens automatically.
Related LinksCreating and Validating Projects on page 15
The status barView information including recent changes to your project.
The status bar displays information about the currently-selected menu item, the project modifiedindicator, and the state of the NumLock, CapsLock, and Insert keys.
Related LinksCreating and Validating Projects on page 15
The Project Explorer on page 21You control your project through the Project Explorer. The Project Explorer has two tabs:Project and Pipeline.
The work area on page 23
Endeca ConfidentialEndeca Developer Studio Developer Studio Help
Getting Started | Creating and Validating Projects22
The work area contains all views, editors, and other elements that you can open in DeveloperStudio.
The work areaThe work area contains all views, editors, and other elements that you can open in Developer Studio.
Although multiple views can be open at once, only one can be active.
Related LinksCreating and Validating Projects on page 15
The status bar on page 22View information including recent changes to your project.
Working with Oracle Endeca WorkbenchRelated Links
Getting Started on page 15
The Workbench toolbar on page 23Developer Studio contains a toolbar that allows you to access Oracle Endeca Workbench.
Creating a connection to Oracle Endeca Workbench on page 24Before you can use Developer Studio with Oracle Endeca Workbench, you must create aconnection between the two.
Using the EAC Admin Console on page 319From the EAC Admin Console you can run updates and view the status of your Oracle EndecaGuided Search components.
Sending the instance configuration to Oracle Endeca Workbench on page 25You need to send your instance configuration to Oracle Endeca Workbench any time youmake and save changes to your instance configuration that you want Workbench to see.
Getting the instance configuration from Oracle Endeca Workbench on page 25You can easily retrieve and view the currently-loaded instance configuration from Workbench.
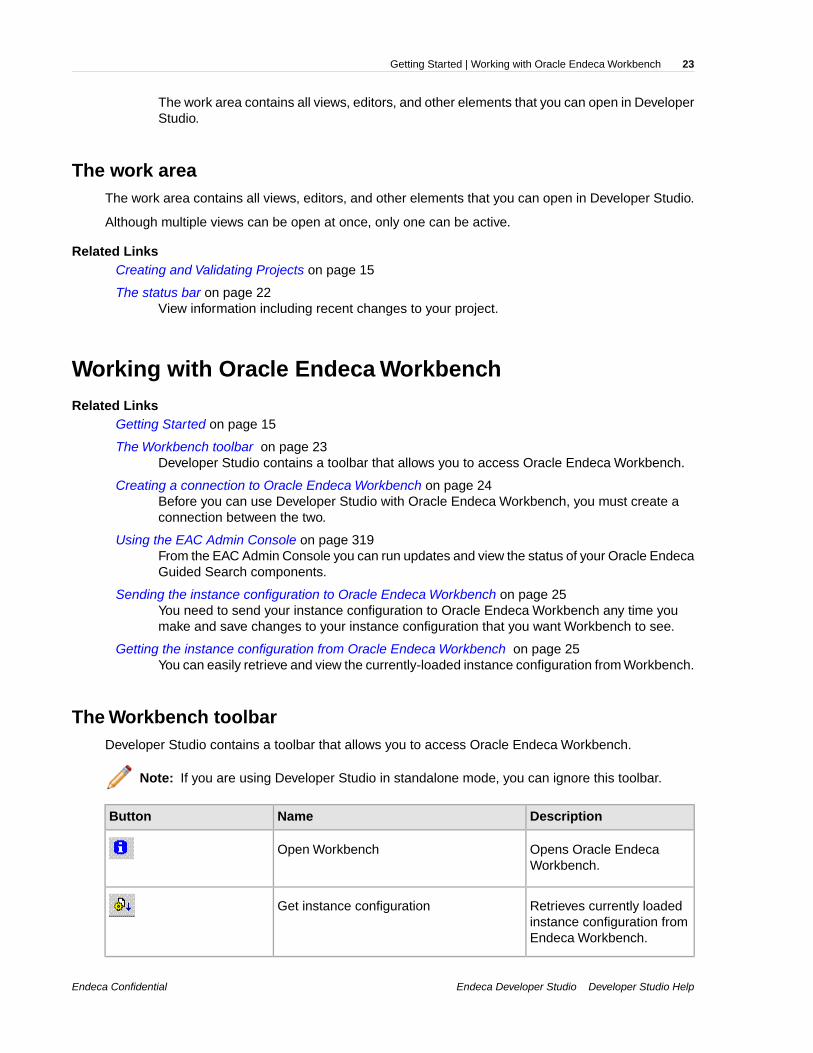
The Workbench toolbarDeveloper Studio contains a toolbar that allows you to access Oracle Endeca Workbench.
Note: If you are using Developer Studio in standalone mode, you can ignore this toolbar.
DescriptionNameButton
Opens Oracle EndecaWorkbench.
Open Workbench
Retrieves currently loadedinstance configuration fromEndeca Workbench.
Get instance configuration
Endeca Developer Studio Developer Studio HelpEndeca Confidential
23Getting Started | Working with Oracle Endeca Workbench
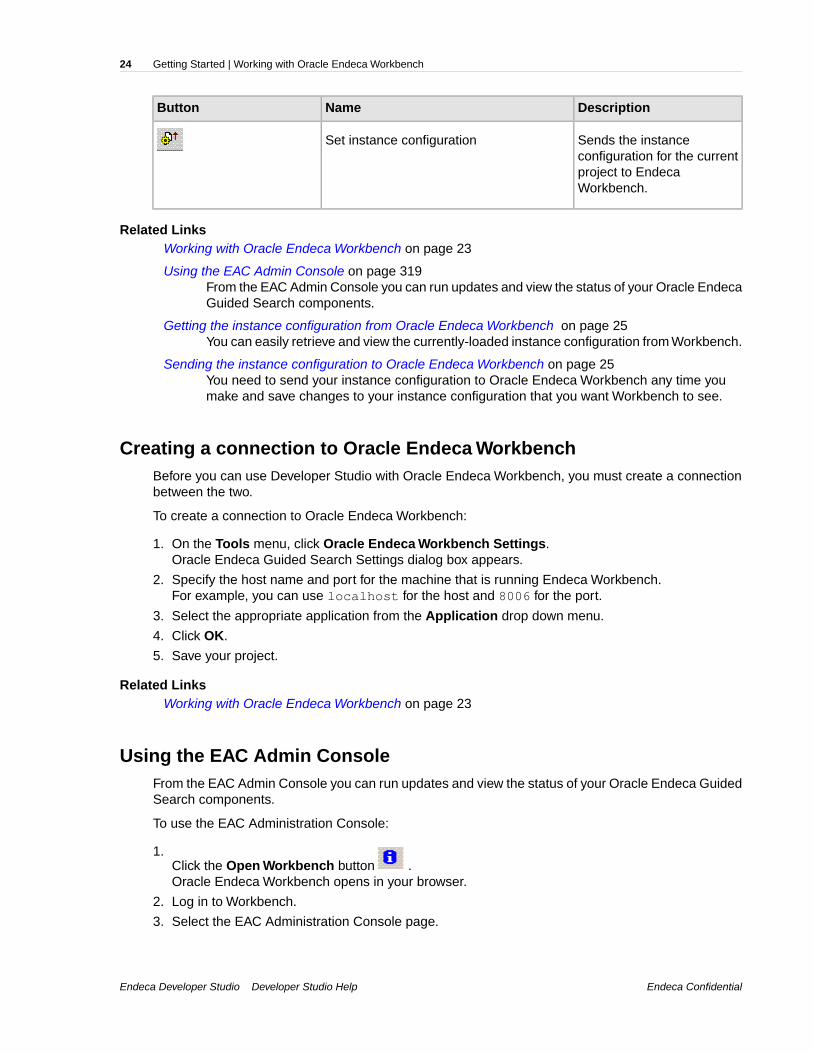
DescriptionNameButton
Sends the instanceconfiguration for the current
Set instance configuration
project to EndecaWorkbench.
Related LinksWorking with Oracle Endeca Workbench on page 23
Using the EAC Admin Console on page 319From the EAC Admin Console you can run updates and view the status of your Oracle EndecaGuided Search components.
Getting the instance configuration from Oracle Endeca Workbench on page 25You can easily retrieve and view the currently-loaded instance configuration from Workbench.
Sending the instance configuration to Oracle Endeca Workbench on page 25You need to send your instance configuration to Oracle Endeca Workbench any time youmake and save changes to your instance configuration that you want Workbench to see.
Creating a connection to Oracle Endeca WorkbenchBefore you can use Developer Studio with Oracle Endeca Workbench, you must create a connectionbetween the two.
To create a connection to Oracle Endeca Workbench:
1. On the Tools menu, click Oracle Endeca Workbench Settings.Oracle Endeca Guided Search Settings dialog box appears.
2. Specify the host name and port for the machine that is running Endeca Workbench.For example, you can use localhost for the host and 8006 for the port.
3. Select the appropriate application from the Application drop down menu.
4. Click OK.
5. Save your project.
Related LinksWorking with Oracle Endeca Workbench on page 23
Using the EAC Admin ConsoleFrom the EAC Admin Console you can run updates and view the status of your Oracle Endeca GuidedSearch components.
To use the EAC Administration Console:
1.Click the Open Workbench button .Oracle Endeca Workbench opens in your browser.
2. Log in to Workbench.
3. Select the EAC Administration Console page.
Endeca ConfidentialEndeca Developer Studio Developer Studio Help
Getting Started | Working with Oracle Endeca Workbench24
Related LinksWorking with Oracle Endeca Workbench on page 23
Getting the instance configuration from Oracle Endeca Workbench on page 25You can easily retrieve and view the currently-loaded instance configuration from Workbench.
Sending the instance configuration to Oracle Endeca Workbench on page 25You need to send your instance configuration to Oracle Endeca Workbench any time youmake and save changes to your instance configuration that you want Workbench to see.
Sending the instance configuration to Oracle Endeca WorkbenchYou need to send your instance configuration to Oracle Endeca Workbench any time you make andsave changes to your instance configuration that you want Workbench to see.
Examples of such changes include adding a new style to be used with dynamic business rules, ordeleting a thesaurus entry.
Important: Set Instance Configuration overwrites all existing configuration files in EndecaWorkbench. Any changes made in Workbench since the last use of Get Instance Configurationare lost. For this reason, Oracle recommends using the Deployment Template to manage yourinstance configuration. See the Oracle Endeca Deployment Template Usage Guide for moreinformation.
To send your instance configuration from Developer Studio to Endeca Workbench:
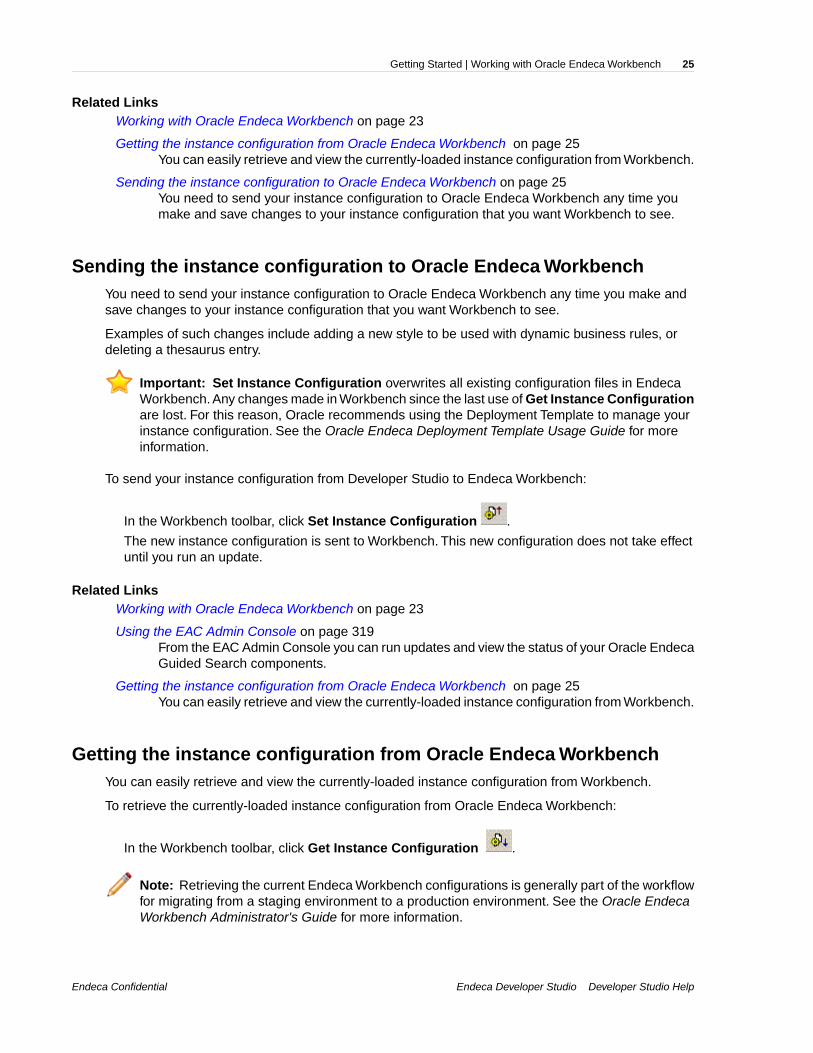
In the Workbench toolbar, click Set Instance Configuration .
The new instance configuration is sent to Workbench. This new configuration does not take effectuntil you run an update.
Related LinksWorking with Oracle Endeca Workbench on page 23
Using the EAC Admin Console on page 319From the EAC Admin Console you can run updates and view the status of your Oracle EndecaGuided Search components.
Getting the instance configuration from Oracle Endeca Workbench on page 25You can easily retrieve and view the currently-loaded instance configuration from Workbench.
Getting the instance configuration from Oracle Endeca WorkbenchYou can easily retrieve and view the currently-loaded instance configuration from Workbench.
To retrieve the currently-loaded instance configuration from Oracle Endeca Workbench:
In the Workbench toolbar, click Get Instance Configuration .
Note: Retrieving the current Endeca Workbench configurations is generally part of the workflowfor migrating from a staging environment to a production environment. See the Oracle EndecaWorkbench Administrator's Guide for more information.
Endeca Developer Studio Developer Studio HelpEndeca Confidential
25Getting Started | Working with Oracle Endeca Workbench

Related LinksWorking with Oracle Endeca Workbench on page 23
Using the EAC Admin Console on page 319From the EAC Admin Console you can run updates and view the status of your Oracle EndecaGuided Search components.
Sending the instance configuration to Oracle Endeca Workbench on page 25You need to send your instance configuration to Oracle Endeca Workbench any time youmake and save changes to your instance configuration that you want Workbench to see.
Endeca ConfidentialEndeca Developer Studio Developer Studio Help
Getting Started | Working with Oracle Endeca Workbench26
Chapter 3
Preparing Data, Properties, and Dimensions
Preparing Your Source DataRelated Links
Preparing Data, Properties, and Dimensions on page 27
Importing Source Data on page 27
Joining Source Data on page 52
Adding and Editing Source Properties on page 59
Preparing for Indexing on page 70
Importing Source Data
Adding a record adapter to load data
Record adapters read and write record data. A record adapter describes where the data is located (orwill be saved to), the format, and various aspects of processing.
Forge can read source data from a variety of file formats and source systems. Each data source needsa corresponding input record adapter describing the particulars of that source. Based on this information,Forge parses the data and turns it into Endeca records. Input record adapters automatically decompresssource data that is compressed in the gzip format.
Note: Output record adapters are generally used for diagnostic purposes. Hence, this sectionfocuses on input record adapters. See Writing out record data for more information on outputrecord adapters.
To add an input record adapter to your pipeline:
1. In the Pipeline Diagram editor, choose New > Record > Adapter.The Record Adapter editor appears.
2. In the Name text box, type a unique name for this record adapter.
3. In the General tab, do the following:
a) In the Direction frame, choose Input.

b) In the Format list, choose one of the following: XML, binary, fixed-width, delimited, vertical,document, JDBC adapter, Exchange, ODBC (Windows only), or custom adapter (available onlyby request from Oracle).
c) In the URL text box, type the location of the source data.d) In the Delimiters frame, if the format is delimited, add row and column delimiters. If the format
is vertical, add row, column, and record delimiters.e) (Optional) In the Encoding text box, define the encoding of the input data. If Encoding is not
set, it is assumed to be Latin-1.
Note: This setting is ignored by the XML format, because the encoding is specified inthe XML header. It is also ignored for binary format because Forge detects the binaryformat's encoding automatically.The Document format also ignores the Encoding setting.
f) If any of the text boxes in the Java properties frame are made available by your format selection,type in the required information.
g) (Optional) Check Require Data if you want Forge to exit with an error if the URL does not existor is empty.
h) (Optional) Check Filter empty properties. Keep in mind that this attribute applies only to inputrecord adapters and is valid only for the Vertical, Delimited, Fixed-width, and ODBC input formats.
Note: If it is not checked, by default the adapter assigns the property a value of " " (anempty string) if a record has no value for a given property.
i) (Optional) Check Multi File if Forge can read data from more than one input file.
Note: The URL will be treated as a wildcard and all matching files will be read inalphabetical order.
j) Check Maintain State if you are using the Endeca Application Controller (EAC) environment.
Note: This setting specifies that the records are output in the directory structure the EACrequires.
k) (Optional) Check Custom Compression Level if your input file is compressed to indicate toForge that it must decompress data from this source.
Note: The compression level setting is ignored for an input record adapter. Compressionof input files is detected automatically.
4. Ignore the Sources tab. Its settings are not used by an input record adapter.
5. (Optional) In the Record Index tab, do the following:
a) Specify which properties or dimensions you want to use as the record index for this component.b) Indicate whether you want to discard records with duplicate keys.
Note: Developer Studio performs a case-insensitive search for duplicate keys.
6. If you are using XSLT to transform your XML into Endeca-compatible XML, in the Transformer tab,specify the type (XSLT) and the location of the stylesheet.
7. If your format is ODBC, fixed-width, delimited, JDBC, custom, or Exchange, in the Pass Throughtab, enter the necessary information.
Endeca ConfidentialEndeca Developer Studio Developer Studio Help
Preparing Data, Properties, and Dimensions | Preparing Your Source Data28

8. (Optional) In the Comment tab, add a comment for the component.
9. Click OK.
Record Adapter editor
The Record Adapter editor contains a unique name for this record adapter.
The Record Adapter editor contains the following tabs:
General
The General tab contains the following options:
DescriptionOption
Input AdapterDirection
Required. Set to input.
Output Adapter
Required. Set to Output.
Input AdapterFormat
Required. The format type of the raw data to beloaded. One of the following: delimited, XML,binary, fixed width, document, ODBC (Windowsonly), vertical, JDBC Adapter, Exchange, orCustom Adapter.Your record format affects whatdelimiter options, if any, are necessary.
Note: The custom adapter option is onlyavailable by request from Oracle.
Output Adapter
Required. Can be set to delimited, XML, binary,fixed width, or vertical.
Input AdapterURL
Required for delimited, XML, binary, fixed-width,and vertical input adapters. Location of the filebeing loaded. The path can be either an absolutepath, or a path relative to the Pipeline.epx file.Withan absolute path, the protocol can be specified inRFC 2396 syntax. Usually this means the file:///prefix precedes the path to the data file. Relativepaths should not specify the protocol. Any pathsthat are part of this URL will be overridden if theForge --inputDir option is specified.
Note: Exchange input adapters also requirea URL but the URL is specified in a pass
Endeca Developer Studio Developer Studio HelpEndeca Confidential
29Preparing Data, Properties, and Dimensions | Preparing Your Source Data
DescriptionOption
through element using the Pass Throughstab.
Output Adapter
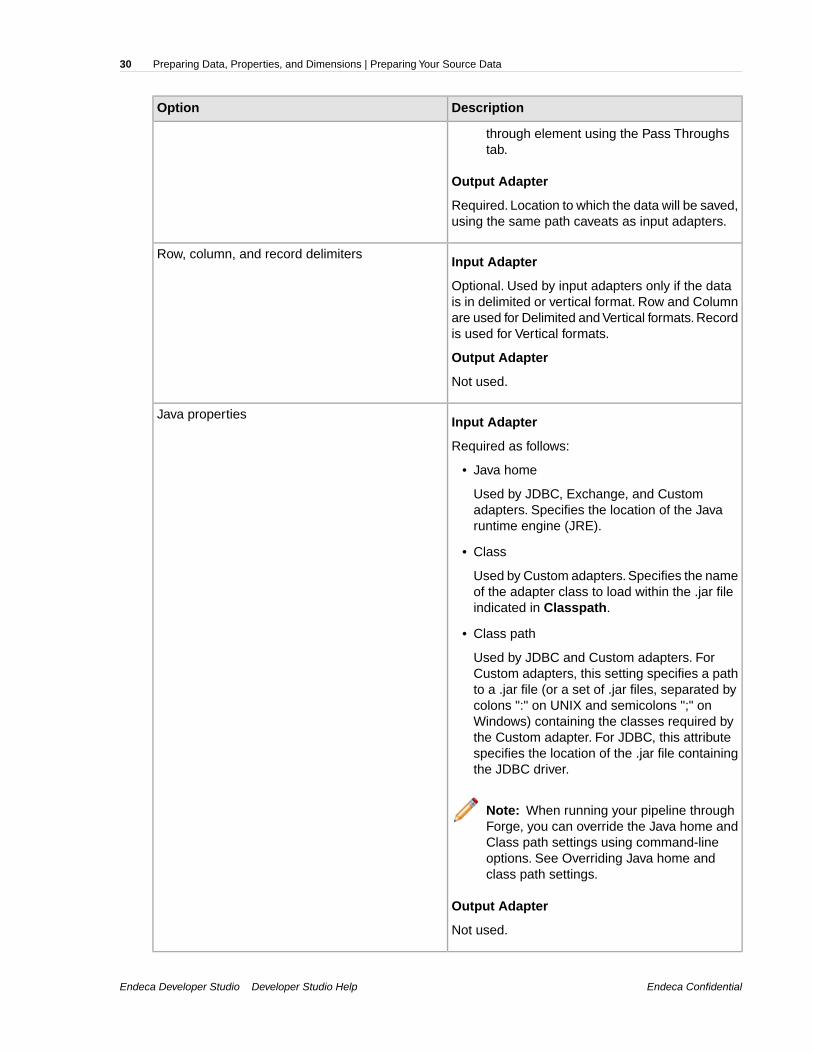
Required. Location to which the data will be saved,using the same path caveats as input adapters.
Input AdapterRow, column, and record delimiters
Optional. Used by input adapters only if the datais in delimited or vertical format. Row and Columnare used for Delimited and Vertical formats. Recordis used for Vertical formats.
Output Adapter
Not used.
Input AdapterJava properties
Required as follows:
• Java home
Used by JDBC, Exchange, and Customadapters. Specifies the location of the Javaruntime engine (JRE).
• Class
Used by Custom adapters. Specifies the nameof the adapter class to load within the .jar fileindicated in Classpath.
• Class path
Used by JDBC and Custom adapters. ForCustom adapters, this setting specifies a pathto a .jar file (or a set of .jar files, separated bycolons ":" on UNIX and semicolons ";" onWindows) containing the classes required bythe Custom adapter. For JDBC, this attributespecifies the location of the .jar file containingthe JDBC driver.
Note: When running your pipeline throughForge, you can override the Java home andClass path settings using command-lineoptions. See Overriding Java home andclass path settings.
Output Adapter
Not used.
Endeca ConfidentialEndeca Developer Studio Developer Studio Help
Preparing Data, Properties, and Dimensions | Preparing Your Source Data30

DescriptionOption
Input AdapterEncoding
Optional. Defines the encoding of the input data.Several hundred encodings are supported; thefollowing are typical examples.
• ISO8859-1 (Latin-1)• ISO8859-15 (Latin-9)• CP1252 (WINDOWS-1252)• ASCII• UTF-8
If Encoding is not set, it is assumed to be Latin-1.If an incorrect encoding is specified, then Forgewill generate warnings about any characters thatdo not make sense in the specified encoding. Forexample, in the ASCII encoding, any characterwith a number above 127 is considered invalid.
Note: This setting is ignored by the XMLformat, because the encoding is specified inthe XML header, and by Output recordadapters. It is also ignored for binary formatencoding only applies to text files.
Output Adapter
Required. Set to UTF-8.
Input AdapterRequire data
Optional. If checked, Forge exits immediately withan error if the URL does not exist or is empty. Theerror is sent to wherever logging is configured tosend errors, typically to the console or stderr.
Output Adapter
Not used.
Input AdapterFilter empty properties
Optional. Determines whether source propertieswith empty property values are assigned to EndecaRecords:
• If unchecked, the record adapter does not filterempty properties. In this case, the recordadapter assigns an empty string (" ") to thecurrent record for any empty properties.
• If checked, properties with empty propertyvalues are filtered, or ignored.
Endeca Developer Studio Developer Studio HelpEndeca Confidential
31Preparing Data, Properties, and Dimensions | Preparing Your Source Data

DescriptionOption
This attribute is is valid only for the Vertical,Delimited, Fixed-width, and ODBC input formats.For a filtering example, see Filtering emptyproperties.
Output Adapter
Not used.
Input AdapterMulti file
Optional. Specifies whether Forge can read datafrom more than one input file. If checked, the inputURL is interpreted as a pattern, and Forge readseach file matching the pattern in alphabetical order.For example, the record adapter may specify aURL pattern of "*.update.txt", in which case Forgereads any file in the given directory that has the.update.txt suffix
Output Adapter
Not used.
Input AdapterMaintain state
Not used.
Output Adapter
Optional. If checked, indicates that the value ofURL is relative to the Forge flag --stateDir. (Thisallows you to change your state directory using the--stateDir flag and yet not require you to modifyyour record adapter configuration.
Input AdapterCompression level
Not used. Compression of input files is detectedautomatically.
Output Adapter
Sets the level of compression to be performed onthe record data when its written to disk. To saveon the amount of disk space used, check Customcompression level and slide the bar to therecommended value of 7.
Note: Compressed data consumes less diskspace but takes longer to read and write.
Endeca ConfidentialEndeca Developer Studio Developer Studio Help
Preparing Data, Properties, and Dimensions | Preparing Your Source Data32

Sources
The Sources tab contains the following options:
DescriptionOption
A choice of the record servers in the project. Usedfor output record adapters only.
Record source
A choice of the dimension adapters and dimensionservers in the project. Generally used for output
Dimension source
record adapters only. Input record adapters onlyrequire a dimension source if they implement arecord index that includes dimensions.
Record Index
Optional. The Record Index tab allows you to add or remove dimensions or properties used in acomponent's record index, and to change their order. Record indexes support join functionality. SeeJoin sources must have matching join keys and record indexes for more details.
The Record Index tab contains the following fields:
DescriptionField
When checked, Forge discards any records withduplicate keys and logs a warning that specifiesthe number of records discarded.
Discard records with duplicate keys
Note: Developer Studio performs acase-insensitive search for duplicate keys.
Transformer
The Transformer tab is for the XML format. XML adapters assume that data is in the Endeca RecordXML format and, without transformation, other XML formats cannot be read by the Data Foundry. Tosupport these situations, an XSLT transformation can be applied to the source data to convert it intoEndeca Records XML, which the Data Foundry can read.
The Transformer tab has the following options:
DescriptionOption
Must be XSLT.Type
Location of the stylesheet to use.URL
Pass Throughs
The Pass Throughs tab is used with certain formats to pass additional information to Forge. It containstext boxes where you can add, modify, or delete key/value pairs. Pass throughs are required for ODBC,fixed-width, delimited, JDBC, custom, or Exchange adapters.
Endeca Developer Studio Developer Studio HelpEndeca Confidential
33Preparing Data, Properties, and Dimensions | Preparing Your Source Data
Comment
Optional. Provides a way to associate comments with a pipeline component.
Related LinksInput formats on page 34
Forge can read source data from a variety of file formats.
Overriding Java home and class path settings on page 52When running your pipeline, you can override the Java home and Class path settings specifiedin a record adapter using two Forge command-line flags, --javaHome and --javaClasspath.
Filtering empty properties on page 51When checked, the Filter Empty Properties setting on the General tab of the Record Adaptereditor filters out empty property values when the source data is read into the Data Foundry.
Record server components on page 282Describes record server components.
Writing out record data on page 294To use a record adapter to save data, you specify Output as the direction of data flow, alongwith the location the data should be saved to and the file format for the saved data.
Giving Forge permission to access source data
The account under which Forge runs must have appropriate permissions to access source data.
If Forge does not have the appropriate permissions, one of two things will happen when a recordadapter requests data from a source:
• If Require Data, which is located on the record adapter's General tab, is checked, then Forge willexit immediately with an error. The error is sent to wherever logging is configured to send errors,typically to the console or stderr.
• If Require Data is not checked, Forge will continue with the next task in the pipeline without readingany data from the offending source. Forge will not exit with a failure code.
Input formats
Forge can read source data from a variety of file formats.DelimitedThe Delimited format reads source records that are organized into rows and columns.
Each row is separated from other rows by a row delimiter character, such as the new-line character,and each column is separated from other columns by a column delimiter character, such as a commaor the tab character. The row and column delimiters must not be present within the data itself. Forexample, if the column delimiter is a comma, no data in a column can contain a comma.
When the source records are read into the Data Foundry, two mappings occur:
• The column names are mapped to Endeca properties. The record adapter assumes that the firstrow of the file is a header row, which specifies column names separated by the column delimiter.If the first row of the data is not a header row, the column names must be specified on the PassThroughs tab of the Record Adapter editor.
• The rest of the rows are assumed to contain data and are mapped to Endeca records. Theseadditional rows must have the same number of column delimiters.
Properties are trimmed as they are read in.White space on the ends of properties (including the space,tab, new-line, and other characters) is removed. However, white space within a property is preserved.
Endeca ConfidentialEndeca Developer Studio Developer Studio Help
Preparing Data, Properties, and Dimensions | Preparing Your Source Data34
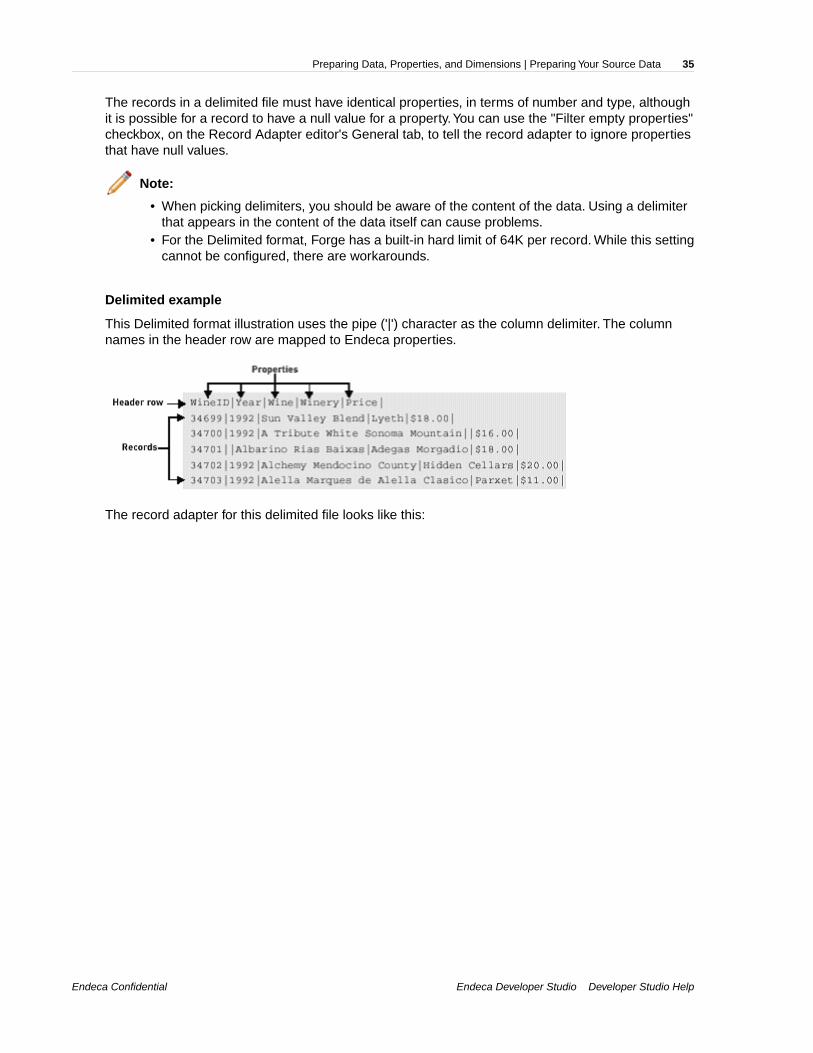
The records in a delimited file must have identical properties, in terms of number and type, althoughit is possible for a record to have a null value for a property.You can use the "Filter empty properties"checkbox, on the Record Adapter editor's General tab, to tell the record adapter to ignore propertiesthat have null values.
Note:
• When picking delimiters, you should be aware of the content of the data. Using a delimiterthat appears in the content of the data itself can cause problems.
• For the Delimited format, Forge has a built-in hard limit of 64K per record. While this settingcannot be configured, there are workarounds.
Delimited example
This Delimited format illustration uses the pipe ('|') character as the column delimiter. The columnnames in the header row are mapped to Endeca properties.
The record adapter for this delimited file looks like this:
Endeca Developer Studio Developer Studio HelpEndeca Confidential
35Preparing Data, Properties, and Dimensions | Preparing Your Source Data

If the first row of the data is not the header row, you must use the Record Adapter editor's PassThroughs tab to specify the column names, as in this example:
Endeca ConfidentialEndeca Developer Studio Developer Studio Help
Preparing Data, Properties, and Dimensions | Preparing Your Source Data36
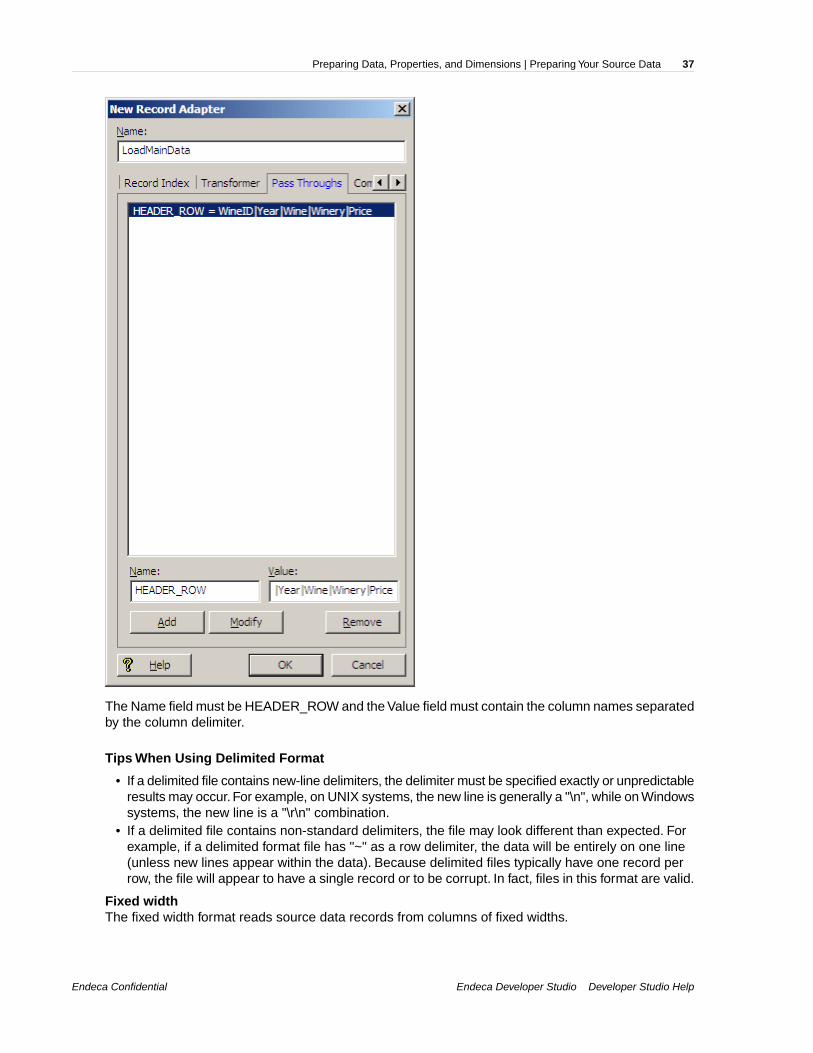
The Name field must be HEADER_ROW and the Value field must contain the column names separatedby the column delimiter.
Tips When Using Delimited Format
• If a delimited file contains new-line delimiters, the delimiter must be specified exactly or unpredictableresults may occur. For example, on UNIX systems, the new line is generally a "\n", while on Windowssystems, the new line is a "\r\n" combination.
• If a delimited file contains non-standard delimiters, the file may look different than expected. Forexample, if a delimited format file has "~" as a row delimiter, the data will be entirely on one line(unless new lines appear within the data). Because delimited files typically have one record perrow, the file will appear to have a single record or to be corrupt. In fact, files in this format are valid.
Fixed widthThe fixed width format reads source data records from columns of fixed widths.
Endeca Developer Studio Developer Studio HelpEndeca Confidential
37Preparing Data, Properties, and Dimensions | Preparing Your Source Data

Each column represents a property and has a width that is a specific number of characters. Forexample, the first three characters could represent an ID, characters 4 through 10 could represent aname, and so forth. Each row represents a record.
Note: The new-line character at the end of each row is treated identically to the other charactersin the row. For example, if you have a row of 100 characters with a new-line character at theend, the total number of characters for the row is 101. Also, the character count is zero-based.For example, the first four characters in a row are characters 0 to 3.
The fixed width record adapter requires the following six attributes, which are specified on the PassThroughs tab. The names of the attributes must be entered as shown:
• PAD_CHARACTER The character used to pad columns to the appropriate width (typically, thevalue is the digit '0').
• PAD_SIDE The side on which each column is padded. LEFT or RIGHT are the only valid values.• COLUMN_NAMES The names of each of the columns, separated by commas.• COLUMN_TYPES The data type used to encode each column, separated by commas. CHAR
or INT are the only valid values. The INT type should only be used for data that is encoded asnative-endian 4-byte integers. All other data must be in the specified character encoding and shouldhave a column type of CHAR (CHAR refers to bytes, not unicode characters).
• COLUMN_STARTS The byte numbers that start each column of data. The index starts at zero.• COLUMN_ENDS The byte numbers that end each column of data. The index starts at zero.
Fixed Width example
In the following fixed width example, the first three characters represent an ID, the next twenty representa name, and the final four represent a year:
You use the Record Adapter editor's Pass Throughs tab to specify the required fixed width attributes,as in this example:
Endeca ConfidentialEndeca Developer Studio Developer Studio Help
Preparing Data, Properties, and Dimensions | Preparing Your Source Data38

VerticalThe vertical format reads source records stored as property name/value pairs.
Vertical format requires delimiters specifying how to identify each property name, property value, andrecord. These delimiters are defined in the General tab of the Record Adapter editor:
• Column: The delimiter between the name and value, typically an equal sign, comma, or tab.• Row: The delimiter between adjacent name/value pairs. Typically the row delimiter is a new-line
character (causing the format to appear vertical).The row delimiter defaults to a new-line characterif omitted.
• Record: The delimiter between adjacent records. Typically it is the text REC or EOR. The recorddelimiter must be surrounded by Row delimiters in the source data (it identifies a special name/valuepair that does not have the Column delimiter).
All name/value pairs leading up to a record delimiter are considered part of a single record. Theproperties for the records in a vertical file format can be of a variable number and type.
Endeca Developer Studio Developer Studio HelpEndeca Confidential
39Preparing Data, Properties, and Dimensions | Preparing Your Source Data

Properties are trimmed as they are read in. White space (such as the space, tab, and new-linecharacters) is removed from both ends of properties, but white space within a property is preserved.
Note:
• When picking delimiters, you should be aware of the content of the data. Using a delimiterthat appears in the content of the data itself can cause problems.
• For the Vertical format, Forge has a built-in hard limit of 64K per record. While this settingcannot be configured, there are workarounds.
Vertical example
This Vertical format illustration uses the pipe character as the Column delimiter and 'REC' as theRecord delimiter. The Property names (such as "WineID") are mapped to Endeca Properties. Notethat the second record (WineID 347000) has seven properties while the first only has five:
You would define the record adapter for this Vertical format in Developer Studio as follows:
Endeca ConfidentialEndeca Developer Studio Developer Studio Help
Preparing Data, Properties, and Dimensions | Preparing Your Source Data40

Tips For Using Vertical Format
• If a vertical file contains new-line delimiters, the delimiter must be specified exactly or unpredictableresults may occur. For example, on UNIX systems, the new line is generally a "\n", while on Windowssystems, the new line is a "\r\n" combination.
• In vertical format, the record delimiter must be surrounded by row delimiters (which are usuallynew lines).
• If a vertical file contains non-standard delimiters, the file may look different than expected. Forexample, if a vertical file has "~" as a row delimiter, instead of a new-line delimiter, the data foreach record will be entirely on one line (unless new lines appear within the data itself). Becausevertical files typically have one property per row, the file will appear to be corrupt. In fact, files inthis format are valid.
Endeca Developer Studio Developer Studio HelpEndeca Confidential
41Preparing Data, Properties, and Dimensions | Preparing Your Source Data

ODBCThe ODBC format allows the Endeca Information Transformation Layer (ITL) to connect directly toand read records from any database that supports ODBC connections.
Pass Throughs tab
The ODBC format is supported only on the Windows version of Oracle Endeca Guided Search. Inaddition to name, direction, and format, an ODBC record adapter requires settings on the Pass Throughsand General tabs. An ODBC record adapter requires that the following two attributes be specified onthe Pass Throughs tab.
• Name = DSN
Value = The data source name, including connection parameters such as username and password.
• Name = SQL
Value = The SQL query to execute on the ODBC data source. Note that stored procedures canbe executed; however, the stored procedures must return tables (i.e., stored procedures that returncursors are not supported).
The names and types of properties are determined automatically from the results of the ODBC query.
General tab
Optionally, you may also specify the encoding of character data being returned from the ODBC datasource, using the Encoding field of the General tab.
ODBC example
The following illustration shows the Pass Throughs tab of the Record Adapter editor for an ODBC datasource.
Endeca ConfidentialEndeca Developer Studio Developer Studio Help
Preparing Data, Properties, and Dimensions | Preparing Your Source Data42

Pass Through elements named "DSN" and "SQL" have been defined.
The DSN element is:
Northwind;username=Leonardo;password=davinci
Note: Different databases use different syntax for specifying the username and password. Forexample, some databases use "UID" rather than "username," and "PWD" rather than "password."If "username" and "password" don't work for your data source, see the documentation for yourdata source to determine the correct syntax. Additionally, if you are working on a Windows 64-bitmachine, it is necessary to configure the System Data Source Name with a 32-bit driver.
The SQL query is:
SELECT CustomerID, CompanyName FROM Customers
Endeca Developer Studio Developer Studio HelpEndeca Confidential
43Preparing Data, Properties, and Dimensions | Preparing Your Source Data

Supported data types
The following table provides information on supported data types for the ODBC record adapter:
SupportedData type
Up to 1M bytes. Note that if a field in the result set is largerthan 1MB (1,048,576 bytes), then the result is truncatedat that length.
CHAR
Up to 1M bytesVARCHAR
NoLONGVARCHAR (CLOB)
Up to 1M bytesWCHAR
Up to 1M bytesVARWCHAR
NoLONGWVARCHAR
YesDECIMAL
YesNUMERIC
YesSMALLINT
YesINTEGER
YesREAL
YesFLOAT
YesDOUBLE
YesBIT
YesTINYINT
NoBIGINT
NoBINARY
NoVARBINARY
NoLONGVARBINARY (BLOB)
YesDATE
YesTIME
YesTIMESTAMP
NoUTCDATETIME
NoUTCTIME
NoINTERVAL MONTH
NoINTERVAL YEAR
NoINTERVAL YEAR TO MONTH
NoINTERVAL DAY
NoINTERVAL HOUR
NoINTERVAL MINUTE
Endeca ConfidentialEndeca Developer Studio Developer Studio Help
Preparing Data, Properties, and Dimensions | Preparing Your Source Data44

SupportedData type
NoINTERVAL SECOND
NoINTERVAL DAY TO HOUR
NoINTERVAL DAY TO MINUTE
NoINTERVAL DAY TO SECOND
NoINTERVAL HOUR TO MINUTE
NoINTERVAL HOUR TO SECOND
NoINTERVAL MINUTE TO SECOND
YesGUID
JDBCThe JDBC format enables the Endeca Information Transformation Layer (ITL) to connect to and readrecords from any JDBC data source.
In addition to name, direction, and format, a JDBC record adapter requires settings on the Generaland Pass Throughs tabs.
General tab
• Java home - The location of Java 2 SDK.• Class path - The location of the .jar file containing the JDBC driver. If the JDBC driver you are
using is distributed with the JVM, you can omit this setting (for example, the jdbc-odbc bridge doesnot require a classpath).
Note: When running your pipeline through Forge, you can override the Java home andClass path settings using command-line options. See Overriding Java home and class pathsettings.
Pass Throughs tab
• Name = DB_DRIVER_CLASS
Value = The name of the JDBC driver class to use.
• Name = DB_URL
Value = The URL of the data source, in standard JDBC format.
• Name = SQL
Value = The SQL query to run to extract the data. Note that stored procedures can be executed;however, the stored procedures must return tables (i.e., stored procedures that return cursors arenot supported).
In addition, if the connection requires properties (such as a password or username), then the followingattribute can also be specified, as many times as necessary, on the Pass Throughs tab:
• Name = DB_CONNECT_PROP
Value = The name and value, separated by an equal sign ( = ), of a property to pass to the JDBCconnection.
Endeca Developer Studio Developer Studio HelpEndeca Confidential
45Preparing Data, Properties, and Dimensions | Preparing Your Source Data

Note that configuring user name and password parameters varies according to your JDBC driver. Forexample, with Oracle JDBC Thin drivers, the user name and password parameters are included aspart of the DB_URL string rather than as separate DB_CONNECT_PROP values.You may have torefer to the documentation for your JDBC driver type to determine exact configuration requirements.
The following illustration shows the Pass Throughs tab for a record adapter that is configured to accessa JDBC data source via an Oracle JDBC Thin driver:
Supported data types
The following table provides information on supported data types for the JDBC record adapter:
SupportedData type
Up to 1M bytes. Note that if a field in the result setis larger than 1MB (1,048,576 bytes), then theresult is truncated at that length.
CHAR
Endeca ConfidentialEndeca Developer Studio Developer Studio Help
Preparing Data, Properties, and Dimensions | Preparing Your Source Data46

SupportedData type
Up to 1M bytesVARCHAR
NoLONGVARCHAR (CLOB)
Up to 1M bytesWCHAR
Up to 1M bytesVARWCHAR
NoLONGWVARCHAR
YesDECIMAL
YesNUMERIC
YesSMALLINT
YesINTEGER
YesREAL
YesFLOAT
YesDOUBLE
YesBIT
YesTINYINT
NoBIGINT
NoBINARY
NoVARBINARY
NoLONGVARBINARY (BLOB)
YesDATE
YesTIME
YesTIMESTAMP
NoUTCDATETIME
NoUTCTIME
NoINTERVAL MONTH
NoINTERVAL YEAR
NoINTERVAL YEAR TO MONTH
NoINTERVAL DAY
NoINTERVAL HOUR
NoINTERVAL MINUTE
NoINTERVAL SECOND
NoINTERVAL DAY TO HOUR
NoINTERVAL DAY TO MINUTE
NoINTERVAL DAY TO SECOND
Endeca Developer Studio Developer Studio HelpEndeca Confidential
47Preparing Data, Properties, and Dimensions | Preparing Your Source Data

SupportedData type
NoINTERVAL HOUR TO MINUTE
NoINTERVAL HOUR TO SECOND
NoINTERVAL MINUTE TO SECOND
YesGUID
ExchangeThe Exchange format allows the Endeca Information Transformation Layer (ITL) to connect to one ormore Microsoft Exchange Servers (versions 2000 and beyond) and extract information from specifiedpublic folders.
The Exchange format produces one record for each document and each sub-folder contained in thespecified public folders. This includes mail messages, calendar items, and generic documents of anyformat.
In addition to name, direction, and format, the Exchange adapter requires the following attributes onthe General and Pass Throughs tabs:
General tab
• Java home - The location of Java 2 SDK.
Note: When running your pipeline through Forge, you can override the Java home settingusing a command-line option. See Overriding Java home and class path settings.
Pass Throughs tab
• Name = URL
Value = A URL to a folder on an Exchange server (for example,http://exchange.mycompany.com/public).You can create multiple URL attributes, each with itsown URL value, but at least one is required.
If any of the specified Exchange servers require authentication, a reference to a key ring file containinga suitable username/password key combination must be specified.You provide this information usingan additional Pass Through element with the name "KEY_RING" and a value that specifies the pathto the key ring file. This path may be absolute or relative to the Pipeline.epx file. For each Exchangeserver that requires authentication, the key ring file should contain an element of the form:
<EXCHANGE_SERVER HOST="exchange.myhost.com"><KEY>B9qtQOON6skNTFTHm9rnn04=</KEY></EXCHANGE_SERVER>
See "Implementing the Endeca Crawler" in the Endeca Forge Guide for more information on how toedit a key ring file and encrypt keys.
The Pass Throughs tab for an Exchange adapter looks similar to this:
Endeca ConfidentialEndeca Developer Studio Developer Studio Help
Preparing Data, Properties, and Dimensions | Preparing Your Source Data48

Retrieving attachments and other documents
Mail messages extracted by the Exchange adapter may contain attachments. The attachmentsthemselves are not retrieved, but a URL pointing to them is included as a property of the associatedmail message record. This property has the name "Endeca.Exchange.Attachment" and the URL itcontains may be used to retrieve the attachment document using a RETRIEVE_URL expression.
A similar situation occurs when the Exchange adapter encounters a generic document that is not ofa format that the Microsoft Exchange Server recognizes internally. In this situation, the Exchangeadapter produces a record for the document that contains properties containing meta-data about thedocument. In addition, the record will have a property named "DAV:a:href" that specifies a URL thatmay be used to retrieve the document using a RETRIEVE_URL expression.
For more information on using a RETRIEVE_URL expression, see "Implementing the Endeca Crawler"in the Endeca Forge Guide.
DocumentThe Document format is available only to customers who have purchased the Endeca Crawler.
For details on this format and implementing the Endeca Crawler, see "Implementing the EndecaCrawler" in the Endeca Forge Guide.
XMLThe XML record format is proprietary to Endeca. XML records can be used to store state betweenForge runs, for Advanced Crawler output, for debugging, or to propagate data from one Forge pipelineto another.
An XSL transformation can be applied to source data that is in a non-Endeca XML format, convertingit into Endeca Record XML which Forge can read. The XSL transformation is done on the entire inputfile before Forge starts to read records, so there may be a significant delay before Forge startsprocessing with this format. Also, because XML is a relatively verbose text format, it is the slowestinput format to Forge.
In addition to name and direction, an XML record adapter requires settings on the General andTransformer tabs.
Endeca Developer Studio Developer Studio HelpEndeca Confidential
49Preparing Data, Properties, and Dimensions | Preparing Your Source Data

General tab
• Format: Set to XML format.• URL: Set to the location of the input XML document.
Transformer tab
• Type: Must be XSLT.• URL: The URL of the XSLT transformation style sheet.
XML example
The following illustration shows the Transformer tab of the Record Adapter editor.
The sample record adapter reads XML records from the file named products.xml (which is specifiedin the General tab's URL field), converting the vendor-specific XML to the Endeca Record XML formatusing the products.xsl stylesheet.
Endeca ConfidentialEndeca Developer Studio Developer Studio Help
Preparing Data, Properties, and Dimensions | Preparing Your Source Data50

BinaryThe binary format is used to store state between runs of the Data Foundry and also as one of thepossible output formats of the Endeca Advanced Crawler.
The Binary format is proprietary to Endeca. It is faster and more compact than the XML format.
CustomThe Custom Adapter option is only available by request from Oracle.
Filtering empty properties
When checked, the Filter Empty Properties setting on the General tab of the Record Adapter editorfilters out empty property values when the source data is read into the Data Foundry.
For example, assume the following source data contains properties delimited by the pipe ('|') character.
WineID|Region|WineType|Price
1||Merlot|8.99
2||Chardonay|14.99
3||Chianti|19.99
4|||10.99
5||Merlot|18.99
6||Spumante
7|Sonoma|Chablis|9.99
A record adapter with Filter Empty Properties checked would filter the Region property from records1 through 6, and the Region and WineType properties from record 4. If Filter Empty Properties is notchecked, an empty string (' ') is assigned to the empty properties.
About character limits in text extracts
For text input formats (Delimited and Vertical), Forge has a built-in hard limit of 64K per record.
This built-in limit cannot be configured; however, there are two workarounds:
• Change the format to XML.• Put large text fields into files, and include the filename in the record. Use the IMPORT_PROP
expression to read the file into the record (or leave it on disk, if all you're going to do is run PARSEor CONVERTTOTEXT on it).
About providing pass-through information
The Pass Throughs tab is used to include additional required information for several data formats.
Pass through information is in the form of name/value pairs. There are specific Pass Through detailsfor each of the following formats:
• Delimited• Fixed-width• ODBC• JDBC• Exchange• Custom
Endeca Developer Studio Developer Studio HelpEndeca Confidential
51Preparing Data, Properties, and Dimensions | Preparing Your Source Data

For detailed information about using Pass Throughs with each of the above data formats, see thesection "Input Formats."
Adding pass-through information for a record adapter
The Pass Throughs tab is used to include additional required information for several data formats.
To add pass through information for your record adapter:
1. In the Record Adapter editor, click the Pass Throughs tab.
2. Enter a name and a value for the pass through element, then click Add.The pass through is addedto the list at the top of the tab.
Modifying pass-through information
The Pass Throughs tab is used to include additional required information for several data formats.This information can be modified.
To modify a pass through element:
1. Select the pass through element from the list at the top of the tab. The name and value fields arepopulated with the information for the element you selected.
2. Make any changes necessary, then click Modify.
Removing a pass-through element from a record adapter
The Pass Throughs tab is used to include additional required information for several data formats.This information can be removed if necessary.
To remove a pass-through element from a record adapter:
• Select the pass through element from the list at the top of the tab, then click Remove.
Overriding Java home and class path settings
When running your pipeline, you can override the Java home and Class path settings specified in arecord adapter using two Forge command-line flags, --javaHome and --javaClasspath.
The JDBC adapter uses both of these settings. Use a command similar to this one to override them,where j2sdk is an absolute path to your Java 2 SDK and drivers.jar is an absolute path to the driversyou want to use:
$ENDECA_ROOT/bin/forge -vvt --javaHome usr/local/j2sdk1.4.1_02--javaClasspath usr/local/Oracle/lib/oracle8i.zip pipeline.epx
If you specify multiple drivers, delimit them using colons (:) on UNIX and semi-colons (;) on Windows.
The Exchange adapter only uses the Java home setting. Use a command similar to this one to overridethis setting, where j2sdk is an absolute path to your Java 2 SDK:
$ENDECA_ROOT/bin/forge -vvt --javaHome usr/local/j2sdk1.4.1_02 pipeline.epx
Joining Source Data
Related LinksPreparing Your Source Data on page 27
Endeca ConfidentialEndeca Developer Studio Developer Studio Help
Preparing Data, Properties, and Dimensions | Preparing Your Source Data52

Implementing a join on page 53Generally, applications consist of more than one data source. If those sources exist in separatelocations, you would need to implement a join in order to create a single record.
Adding a record cache on page 53With two exceptions, all data sources feeding a join must be record caches, so this sectiondetails the procedures from that perspective.
Record Cache editor on page 55The Record Cache editor contains the unique name for this record cache.
Adding a record assembler on page 56A record assembler is a pipeline component used to join source records originating fromdifferent files.
Record Assembler editor on page 57The Record Assembler editor contains a unique name for this record assembler.
Configuring the join in the record assembler on page 58Applications consisting of more than one data source require a join to combine the separatedata sources. These joins must be configured in a record assembler.
Implementing a join
Generally, applications consist of more than one data source. If those sources exist in separatelocations, you would need to implement a join in order to create a single record.
For example, an application used to navigate books would have records that contain both title andauthor information. If the title and author source data reside in different locations, you would need tojoin them together to create a single record with both pieces of information.
Implementing a join is typically a three-step process.
To implement a join:
1. In most cases, you add a record cache to your pipeline for each record source that will feed thejoin
2. Add a record assembler to your pipeline.
3. Use the record adapter that you added to configure the join.
Related LinksJoining Source Data on page 52
Adding a record cache on page 53With two exceptions, all data sources feeding a join must be record caches, so this sectiondetails the procedures from that perspective.
Adding a record assembler on page 56A record assembler is a pipeline component used to join source records originating fromdifferent files.
Configuring the join in the record assembler on page 58Applications consisting of more than one data source require a join to combine the separatedata sources. These joins must be configured in a record assembler.
Adding a record cache
With two exceptions, all data sources feeding a join must be record caches, so this section details theprocedures from that perspective.
Endeca Developer Studio Developer Studio HelpEndeca Confidential
53Preparing Data, Properties, and Dimensions | Preparing Your Source Data
• Switch joins do not do record comparisons and, hence, do not require record caches for their datasources.You can use any type of record server component (record adapter, record cache, recordassembler, Perl manipulator, and so on) as a source for a switch join.
• For a left join, for which all of the right sources are record caches, the left source does not requirea record cache. This special case is useful for optimizing a left join with a large, unsorted datasource.
To add a record cache for each record source that will feed the join:
1. In the Pipeline Diagram editor, click New, and then choose Record > Cache.The Record Cache editor appears.
2. In the Name text box, type a unique name for this record cache.
3. (Optional) In the General tab, you may do the following:
• If the cache should load fewer than the total number of records from the record source, typethe number of records to load in the Maximum Records text box. This feature is provided fortesting purposes.
• If you want to merge records with equivalent record index key values into a single record, checkCombine Records. For one-to-many or many-to-many joins, leave Combine Recordsunchecked.
Note: The Combine records option can have unexpected results if you do not understandhow it functions. See Tips and troubleshooting for joins for complete details.
4. In the Sources tab, select a record source and, optionally, a dimension source.
Note: If a component's record index contains dimension values, you must provide a dimensionsource. Generally, this is only the case if you are caching data that has been previouslyprocessed by Forge.
5. In the Record Index tab, do the following:
• Specify which properties or dimensions you want to use as the record index for this component.
Note: The record index you specify for a cache must match the join key that you willspecify for that cache in the record assembler.
• Indicate whether you want to discard records with duplicate keys.
Note: Developer Studio performs a case-insensitive search for duplicate keys.
6. (Optional) In the Comment tab, add a comment for the component.
7. Click OK.
8. Repeat these steps for all record sources that will participate in the join.
Related LinksJoining Source Data on page 52
Implementing a join on page 53Generally, applications consist of more than one data source. If those sources exist in separatelocations, you would need to implement a join in order to create a single record.
Adding a record assembler on page 56
Endeca ConfidentialEndeca Developer Studio Developer Studio Help
Preparing Data, Properties, and Dimensions | Preparing Your Source Data54

A record assembler is a pipeline component used to join source records originating fromdifferent files.
Configuring the join in the record assembler on page 58Applications consisting of more than one data source require a join to combine the separatedata sources. These joins must be configured in a record assembler.
Record Cache editor on page 55The Record Cache editor contains the unique name for this record cache.
Record Cache editor
The Record Cache editor contains the unique name for this record cache.
The Record Cache editor contains the following tabs:
General
DescriptionOption
Optional. Record caches can be set to load alimited number of records. The Max records field
Maximum records
specifies that limit. By default it is set to -1, whichmeans the cache will load all records. The Maxrecords field only has to be provided if the cacheshould load fewer than the total number of records.
Optional. When checked, Forge merges recordswith the same key values into a single record. Do
Combine records
not check Combine records if you are performingone-to-many or many-to-many joins.
Sources
The Sources tab contains the following fields:
DescriptionField
Required . A choice of the record servercomponents in the project.
Record sources
If the record cache's record index uses dimensions,you must provide a dimension source.
Dimension source
Record Index
The Record Index tab allows you to add or remove dimensions or properties used in a component'srecord index, and to change their order. Record indexes support join functionality. See Join sourcesmust have matching join keys and record indexes for more details.
The Record Index tab contains the following fields:
Endeca Developer Studio Developer Studio HelpEndeca Confidential
55Preparing Data, Properties, and Dimensions | Preparing Your Source Data

DescriptionField
When checked, Forge discards any records withduplicate keys and logs a warning that specifiesthe number of records discarded.
Discard records with duplicate keys
Note: Developer Studio performs acase-insensitive search for duplicate keys.
Comment
Optional. Provides a way to associate comments with a pipeline component.
Related LinksJoining Source Data on page 52
Record server components on page 282Describes record server components.
Adding a record assembler
A record assembler is a pipeline component used to join source records originating from different files.
To add a record assembler to your pipeline:
1. In the Pipeline Diagram editor, click New, and then choose Record > Assembler.The Record Assembler editor appears.
2. In the Name text box, type a unique name for the new record assembler.
3. In the Sources tab, do the following:
a) In the Record Sources list, select a record source.b) Click Add.
Note: Repeat as necessary to add additional record sources.With two exceptions, recordassemblers must use record caches as their source of record data.
c) In the Dimension Source list, select a dimension source.
Note: If the key on which a join is performed contains dimension values, you must providea dimension source. Generally, this is only the case if you are joining data that has alreadybeen processed once by Forge.
4. (Optional) In the Record Index tab, do the following:
Note: An assembler's record index does not affect the join; it only affects the order in whichdownstream components will retrieve records from the assembler.
a) Specify which properties or dimensions you want to use as the record index for this component.b) Indicate whether you want to discard records with duplicate keys.
Note: Developer Studio performs a case-insensitive search for duplicate keys.
Endeca ConfidentialEndeca Developer Studio Developer Studio Help
Preparing Data, Properties, and Dimensions | Preparing Your Source Data56

5. In the Record Join tab, configure the joins.
6. (Optional) In the Comment tab, add a comment for the component.
7. Click OK.
See "Configuring the join in the record assembler" for details on this procedure.
Related LinksJoining Source Data on page 52
Implementing a join on page 53Generally, applications consist of more than one data source. If those sources exist in separatelocations, you would need to implement a join in order to create a single record.
Adding a record cache on page 53With two exceptions, all data sources feeding a join must be record caches, so this sectiondetails the procedures from that perspective.
Configuring the join in the record assembler on page 58Applications consisting of more than one data source require a join to combine the separatedata sources. These joins must be configured in a record assembler.
Record Assembler editor
The Record Assembler editor contains a unique name for this record assembler.
The Record Assembler contains the following tabs:
Sources
The Sources tab contains the following fields:
DescriptionField
Required. A choice of the record servercomponents in the project. A record assemblernormally contains multiple record sources.
Record sources
If the key on which a join is performed containsdimension values, you must provide a dimension
Dimension source
source. Generally, this is only the case if you arejoining data that has already been processed onceby Forge.
Record Index
(Optional) The Record Index tab allows you to add or remove dimensions or properties used in acomponent's record index, and to change their order. Record indexes support join functionality. SeeJoin sources must have matching join keys and record indexes for more details.
The Record Index tab contains the following fields:
Endeca Developer Studio Developer Studio HelpEndeca Confidential
57Preparing Data, Properties, and Dimensions | Preparing Your Source Data
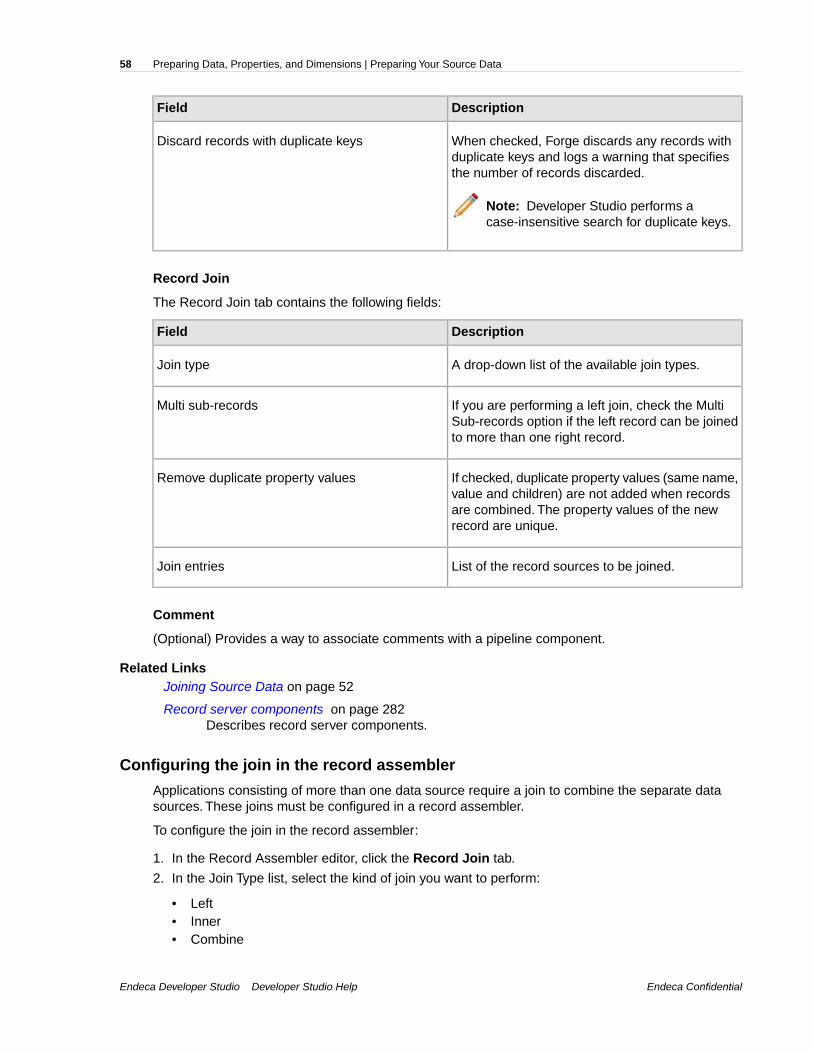
DescriptionField
When checked, Forge discards any records withduplicate keys and logs a warning that specifiesthe number of records discarded.
Discard records with duplicate keys
Note: Developer Studio performs acase-insensitive search for duplicate keys.
Record Join
The Record Join tab contains the following fields:
DescriptionField
A drop-down list of the available join types.Join type
If you are performing a left join, check the MultiSub-records option if the left record can be joinedto more than one right record.
Multi sub-records
If checked, duplicate property values (same name,value and children) are not added when records
Remove duplicate property values
are combined. The property values of the newrecord are unique.
List of the record sources to be joined.Join entries
Comment
(Optional) Provides a way to associate comments with a pipeline component.
Related LinksJoining Source Data on page 52
Record server components on page 282Describes record server components.
Configuring the join in the record assembler
Applications consisting of more than one data source require a join to combine the separate datasources. These joins must be configured in a record assembler.
To configure the join in the record assembler:
1. In the Record Assembler editor, click the Record Join tab.
2. In the Join Type list, select the kind of join you want to perform:
• Left• Inner• Combine
Endeca ConfidentialEndeca Developer Studio Developer Studio Help
Preparing Data, Properties, and Dimensions | Preparing Your Source Data58

• Outer• Switch• Sort switch• Disjunct• First record
3. If you are performing a left join, check Multi Sub-records if the left record can be joined to morethan one right record.
4. The join entries list represents the record sources that will participate in the join, as specified onthe Sources tab. In the Join Entries list, define the order of your join entries by selecting an entryand clicking Up or Down.
Note: For all joins, properties get processed from join sources in the order in they are in thelist. The first entry is the Left entry for a left join. See Join keys that use multiple propertiesor dimensions for more details.
5. To define the join key for a join entry, select the entry from the Join Entries list and click Edit.The Join Entry editor appears.
6. Click Add.The Key Component editor appears.
7. Using the steps below, create a join key that is identical to the record index key for the join entryyou selected.
a) In the Type frame, choose Custom Property or Dimension.
If you choose Custom Property, type a name for the property in the Custom Property text box.If you choose Dimension, choose a dimension name from the Dimension list.
b) Click OK to return to the Join Entry editor.c) (Optional) Repeat these steps for each component you want to add to the key.d) (Optional) To reorder the components in the key, select a component in the Join Entry editor
and click Up or Down.e) Click OK to close the Join Entry editor.
8. Repeat steps 5 through 7 for each record source that is participating in the join.
9. When you are done configuring your join, click OK to close the Record Assembler editor.
Related LinksJoining Source Data on page 52
Implementing a join on page 53Generally, applications consist of more than one data source. If those sources exist in separatelocations, you would need to implement a join in order to create a single record.
Adding a record cache on page 53With two exceptions, all data sources feeding a join must be record caches, so this sectiondetails the procedures from that perspective.
Adding a record assembler on page 56A record assembler is a pipeline component used to join source records originating fromdifferent files.
Adding and Editing Source Properties
Related Links
Endeca Developer Studio Developer Studio HelpEndeca Confidential
59Preparing Data, Properties, and Dimensions | Preparing Your Source Data

Preparing Your Source Data on page 27
About adding and editing source properties on page 60After source data has been loaded into your implementation, you may need to perform somemanipulations. The goal of this step is to create source records with the correct set of sourceproperties, before any mapping occurs.
Record Manipulator editor on page 60The Record Manipulator editor contains a unique name for this record manipulator.
Using Perl Manipulators to change Source Properties on page 61
Using Java Manipulators to change Source Properties on page 69
About adding and editing source properties
After source data has been loaded into your implementation, you may need to perform somemanipulations.The goal of this step is to create source records with the correct set of source properties,before any mapping occurs.
You can use a Perl manipulator component in your pipeline to add, edit, and remove source propertiesfrom your records during data processing. Using a Perl manipulator, you can perform a number oftasks, including (but not limited to) the following:
• Remove a source property from each record• Reformat a source property on each record• Remove records with a particular source property• Perform left joins on records from two sources• Retrieve records matching a key from any number of data sources• Process records using a Perl subclass
This section of the Developer Studio Help provides basic information on implementing Perl manipulators.Detailed Perl manipulator information can be found in the Forge API Guide for Perl, which is availablefrom Help menu in Developer Studio. The Forge API Guide for Perl provides descriptions for theclasses and methods you can incorporate in a Perl manipulator. It also provides sample code for themost common Perl manipulator tasks.
Note: Because Perl manipulators only deal with source properties, they must always comebefore property mappers in a pipeline's data flow.
Related LinksAdding and Editing Source Properties on page 59
Record Manipulator editor
The Record Manipulator editor contains a unique name for this record manipulator.
The Record Manipulator editor contains the following tabs:
Sources
The Sources tab contains the following options:
DescriptionOption
Required. A choice of the record servers in theproject.
Record source
Endeca ConfidentialEndeca Developer Studio Developer Studio Help
Preparing Data, Properties, and Dimensions | Preparing Your Source Data60

DescriptionOption
A choice of the dimension adapters and dimensionservers in the project. If any expressions require
Dimension source
dimensions, or the record manipulator's recordindex uses dimensions, then the manipulator mustcontain a dimension source.
Record Index
Optional. The Record Index tab allows you to add or remove dimensions or properties used in acomponent's record index, and to change their order. Record indexes support join functionality. SeeJoin sources must have matching join keys and record indexes for more details.
The Record Index tab contains the following fields:
DescriptionField
When checked, Forge discards any records withduplicate keys and logs a warning that specifiesthe number of records discarded.
Discard records with duplicate keys
Note: Developer Studio performs acase-insensitive search for duplicate keys.
Comment
Optional. Provides a way to associate comments with a pipeline component.
Related LinksAdding and Editing Source Properties on page 59
Record server components on page 282Describes record server components.
Using Perl Manipulators to change Source Properties
Related LinksAdding and Editing Source Properties on page 59
About Perl Manipulators on page 62A Perl manipulator component uses Perl to efficiently manipulate source records as part ofForge's data processing.
Adding a Perl manipulator on page 62You can use a Perl manipulator to add, remove, and reformat properties, join record sources,and so on. If your pipeline contains a property mapper, the Perl manipulator is placed upstreamof it.
Perl Manipulator editor on page 63The Perl Manipulator editor contains a unique name for this Perl manipulator.
Perl manipulator methods on page 64
Endeca Developer Studio Developer Studio HelpEndeca Confidential
61Preparing Data, Properties, and Dimensions | Preparing Your Source Data

Each Perl manipulator in your pipeline is an instance of the Forge Execution Framework'sEDF::Manipulator class and can contain up to four methods that Forge executes toperform data retrieval and manipulation:
Writing code in a Perl manipulator on page 65Include in-line Perl code in your pipeline using the Method Override editor.
Using an external Perl file on page 66Use the method body of an external Perl file to override methods in a Perl Manipulator.
Using an external Perl class on page 67Use an external Perl class to call a method.
Requirements for a Perl class on page 67This section describes the Perl class requirements for use with the Endeca software.
Method Override editor on page 68You can override methods in two ways: by writing in-line code, or by referencing an externalPerl file. Both of these actions are performed in the Method Override editor.
About Perl ManipulatorsA Perl manipulator component uses Perl to efficiently manipulate source records as part of Forge'sdata processing.
You can provide individual Perl methods to the Perl manipulator in either of the following ways:
• Write the code in the Perl Manipulator editor.This approach is useful for simpler data manipulationand cases where you want to keep the Perl code in the Developer Studio project.
• Specify the code in a Perl file (.pl) external to your project, and identify the file's URL in the PerlManipulator editor. This approach is useful if you want to maintain the Perl code outside theDeveloper Studio project, reuse the code by calling the file from more than one pipeline, or if yousimply prefer to work in an external editor.
Alternatively, if you want to write an entire Perl manipulator, you can specify the code in a Perl classexternal to your project, and identify the file in the 'Use this Perl class' setting in the Perl Manipulatoreditor. This approach is useful in cases where the amount of Perl code is large or complex.
Note:
• Perl manipulator names cannot contain spaces.• Detailed information about the syntax used by the Perl manipulator, including examples, can
be found in the Forge API Guide for Perl .
Related LinksUsing Perl Manipulators to change Source Properties on page 61
Adding a Perl manipulatorYou can use a Perl manipulator to add, remove, and reformat properties, join record sources, and soon. If your pipeline contains a property mapper, the Perl manipulator is placed upstream of it.
A Perl manipulator is a pipeline component that uses Perl to efficiently manipulate source records andEndeca records as part of data processing performed in the Endeca Information Transformation Layer.This section describes the procedure for adding a Perl manipulator to your Endeca pipeline.
To add a Perl manipulator to your pipeline:
1. In the Pipeline Diagram editor, click New, and then choose Perl Manipulator.The Perl Manipulator editor appears.
Endeca ConfidentialEndeca Developer Studio Developer Studio Help
Preparing Data, Properties, and Dimensions | Preparing Your Source Data62

2. In the Name text box, type a unique name for this Perl manipulator. Perl manipulator names cannotcontain spaces.
3. Click the Sources tab and do the following to specify the Perl manipulator's record sources:
To add a record source:
a) Choose its name from the drop-down menu.b) Click Add.
To remove a record source:
a) Select it in the list of sources.b) Click Remove.
4. (Optional) In the Record Index tab, do the following:
a) Specify which properties or dimensions you want to use as the record index for this component.b) Indicate whether you want to discard records with duplicate keys.
Note: Developer Studio performs a case-insensitive search for duplicate keys.
5. Do one of the following to add or point to the necessary Perl code:
• Write in-line Perl code.• Point to an external Perl file.• Point to an external Perl class.
6. In the Perl Manipulator editor, click OK to return to the Pipeline Diagram editor.
Related LinksUsing Perl Manipulators to change Source Properties on page 61
Perl Manipulator editorThe Perl Manipulator editor contains a unique name for this Perl manipulator.
The Perl Manipulator editor contains the following tabs:
General
The General tab contains the following options:
DescriptionOption
If you are using your own external Perl file (.pl) orwant to write in-line Perl code, select 'Override
Override these methods
these methods,' check one of the methods, andthen click the method's Edit button to open theMethod Override editor.
If you are using your own external Perl class ,select "Use this Perl class" and then type themodule's URL.
Use this Perl class
Sources
Required. A choice of record servers in the project.You can add more than one.
Endeca Developer Studio Developer Studio HelpEndeca Confidential
63Preparing Data, Properties, and Dimensions | Preparing Your Source Data

Record Index
(Optional) The Record Index tab allows you to add or remove dimensions or properties used in acomponent's record index, and to change their order. Record indexes support join functionality. SeeJoin sources must have matching join keys and record indexes for more details.
The Record Index tab contains the following field:
DescriptionField
When checked, Forge discards any records withduplicate keys and logs a warning that specifiesthe number of records discarded.
Discard records with duplicate keys
Note: Developer Studio performs acase-insensitive search for duplicate keys.
Comment
(Optional) Provides a way to associate comments with a pipeline component.
Related LinksUsing Perl Manipulators to change Source Properties on page 61
Using an external Perl file on page 66Use the method body of an external Perl file to override methods in a Perl Manipulator.
Using an external Perl class on page 67Use an external Perl class to call a method.
Record server components on page 282Describes record server components.
Perl manipulator methodsEach Perl manipulator in your pipeline is an instance of the Forge Execution Framework'sEDF::Manipulator class and can contain up to four methods that Forge executes to perform dataretrieval and manipulation:
This topic assumes you understand the basic concepts behind record retrieval and manipulation asimplemented by the Forge Execution Framework's four core classes. Oracle strongly recommendsthat you read Understanding record data flow for a basic discussion of these concepts before attemptingto implement a Perl manipulator.
• EDF::Manipulator::prepare —The Forge Execution Framework calls this method beforeindividual record processing begins.The prepare method performs set up and initialization tasks.
• EDF::Manipulator::finish —Similar to prepare , the Forge Execution Framework callsthis method after all record processing is complete. Typically, a finish method performs cleanup or logging tasks.
• EDF::Manipulator::next_record
—A Perl manipulator's
next_record
method accomplishes three tasks:
1. It calls an upstream component's next_record
method to request the next record for processing.
Endeca ConfidentialEndeca Developer Studio Developer Studio Help
Preparing Data, Properties, and Dimensions | Preparing Your Source Data64

2. It processes the record appropriately according to the code in the Perl manipulator.3. It passes the processed record to the downstream component, via the Forge Execution
Framework.
• EDF::Manipulator::get_records —Similar to next_record, a Perl manipulator's get_recordsaccomplishes these tasks:
1. The get_records method calls next_record on its upstream component multiple times toretrieve all of the records from the upstream component.
2. Get_records then calculates which records out of the total collection match the specified key,and returns those records to the downstream component, via the Forge Execution Framework.
All record server components (record adapter, record cache, and so on) have native implementationsof these four methods. With the exception of the Perl manipulator, however, the methods are internaland not accessible to developers. The Perl manipulator's native implementations of these methodsdo nothing.You must write your own implementations for a minimum of one of these methods, eithernext_record or get_records. The native implementations delegate responsibility for the tasks toyour custom implementations.Your custom implementations use methods and classes in the EDFnamespace such as EDF::Record, EDF::PVal, EDF::DVal, and so on, to accomplish their tasks. Seethe Forge API Guide for Perl for information about the methods and classes available in the EDFnamespace.
You can provide Perl methods using in-line code, or by providing a Perl file retrievable via URL.Alternatively, you can write your own class that provides these methods and point to it in the PerlManipulator editor.
Related LinksUsing Perl Manipulators to change Source Properties on page 61
Writing code in a Perl manipulatorInclude in-line Perl code in your pipeline using the Method Override editor.
To include in-line Perl code in your pipeline:
1. Create a Perl manipulator.
2. In the Perl Manipulator editor's General tab, select Override these methods.
3. Check the methods you want to override.The Method Override editor appears.
4. Select Use this Method Body.
5. Type or paste the method into the text box.
Consult the Forge API Guide for Perl (available on the Developer Studio Help menu) for syntaxdetails and examples.
Endeca Developer Studio Developer Studio HelpEndeca Confidential
65Preparing Data, Properties, and Dimensions | Preparing Your Source Data

6. Click OK to return to the Perl Manipulator editor.
Detailed Perl manipulator information can be found in the Forge API Guide for Perl, which is availablefrom Help menu in Developer Studio. The Forge API Guide for Perl provides descriptions for theclasses and methods you can incorporate in a Perl manipulator. It also provides sample code for themost common Perl manipulator tasks.
Related LinksUsing Perl Manipulators to change Source Properties on page 61
Using an external Perl fileUse the method body of an external Perl file to override methods in a Perl Manipulator.
You must create a Perl manipulator. See "Adding a Perl manipulator" for details on this procedure.
To use an external Perl file to override a method:
1. In the Perl Manipulator editor's General tab, select Override These Methods.
2. Check at least one of the methods.The Method Override editor appears.
3. Select Use Method Body in File.
4. Type the URL to the Perl file.
Endeca ConfidentialEndeca Developer Studio Developer Studio Help
Preparing Data, Properties, and Dimensions | Preparing Your Source Data66

5. In the Encoding text box, type the encoding of the input data.
6. (Optional) If the Perl file being accessed is compressed, check Compressed.
Note: This instructs Forge to decompress the file before processing.
7. Click OK to return to the Perl Manipulator editor.
Note: Detailed Perl manipulator information can be found in the Forge API Guide for Perl, whichis available from Help menu in Developer Studio. The Forge API Guide for Perl providesdescriptions for the classes and methods you can incorporate in a Perl manipulator. It alsoprovides sample code for the most common Perl manipulator tasks.
Related LinksUsing Perl Manipulators to change Source Properties on page 61
Using an external Perl classUse an external Perl class to call a method.
To use an external Perl class:
1. Create a Perl manipulator.
2. In the Perl Manipulator editor's General tab, select Use this Perl Class.
3. Type the URL to the Perl class.When the Perl manipulator runs, it loads and runs the specified class.
Related LinksUsing Perl Manipulators to change Source Properties on page 61
Requirements for a Perl classThis section describes the Perl class requirements for use with the Endeca software.
The Perl class must be located on the machine running Forge. It is convenient to locate the .pm filein the same location as other Perl modules for Endeca (ENDECA_ROOT\lib\perl). Placing your .pm
Endeca Developer Studio Developer Studio HelpEndeca Confidential
67Preparing Data, Properties, and Dimensions | Preparing Your Source Data

file in ENDECA_ROOT\lib\perl does not require any additional configuration for Forge to locate it.However, if you upgrade Forge, you will need to copy the file to the new location.
If you place the file in another location, you must modify Perl's library search path to include the pathto the .pm file.You can modify the path by either modifying your PERLLIB environment variable or byrunning Forge with the --perllib command line option and providing the path as an argument. Inthis case, you will not need to copy the file if you upgrade Forge.
Note: Detailed Perl manipulator information can be found in the Forge API Guide for Perl, whichis available from Help menu in Developer Studio. The Forge API Guide for Perl providesdescriptions for the classes and methods you can incorporate in a Perl manipulator. It alsoprovides sample code for the most common Perl manipulator tasks.
Related LinksUsing Perl Manipulators to change Source Properties on page 61
Method Override editorYou can override methods in two ways: by writing in-line code, or by referencing an external Perl file.Both of these actions are performed in the Method Override editor.
The Method Override editor contains the following fields:
DescriptionOption
Provides a text box where you can type or pasteyour custom Perl code. The Forge API Guide for
Use this method body
Perl , which can be accessed from the DeveloperStudio Help menu, provides information for theclass and method descriptions that can be usedin the Perl manipulator component.
The URL of a Perl file that contains your customPerl code.
Use method body in file
If checked, indicates that the file referenced in "Usemethod body in file" is compressed. In this case,Forge will uncompress it before processing.
Compressed
Optional. Defines the encoding of the input data.Several hundred encodings are supported; thefollowing are typical examples:
Encoding
• ISO8859-1 (Latin-1)• ISO8859-15 (Latin-9)• CP1252 (WINDOWS-1252)• ASCII• UTF-8
If Encoding is not set, it is assumed to be UTF-8.
Related LinksUsing Perl Manipulators to change Source Properties on page 61
Endeca ConfidentialEndeca Developer Studio Developer Studio Help
Preparing Data, Properties, and Dimensions | Preparing Your Source Data68

Using Java Manipulators to change Source Properties
Related LinksAdding and Editing Source Properties on page 59
About Java Manipulators on page 69A Java manipulator is your own code in Java that takes records from any number of pipelinecomponents in Forge or, optionally, your source data, and changes it according to yourprocessing requirements.
Java Manipulator editor on page 69The Java Manipulator editor contains a unique name for this Java manipulator.
About Java ManipulatorsA Java manipulator is your own code in Java that takes records from any number of pipeline componentsin Forge or, optionally, your source data, and changes it according to your processing requirements.
A Java manipulator can then write any records you choose to its output. For example, a Javamanipulator can write the "transformed" records into its output, so that the records can be passed tothe next pipeline component in Forge.
Java manipulators are the most generic way of modifying your data and records in the pipeline. Inother words, content adapters represent a specific case of Java manipulators. For more informationabout writing and implementing Java manipulators, refer to the Endeca Content Adapter Developer'sGuide .
Related LinksUsing Java Manipulators to change Source Properties on page 69
Java Manipulator editorThe Java Manipulator editor contains a unique name for this Java manipulator.
In addition, it contains the following tabs:
General
The General tab contains the following options:
DescriptionOption
Optional. Specifies the location of the Java runtimeengine (JRE). If you do not specify this value,
Java home
Forge first uses the value of the --javaHome flag.If the flag is not specified, Forge usesENDECA_ROOT\j2sdk and lastly uses theJAVA_HOME environment variable.
Required. Specifies the name of the class used bythe component.
Class
Optional. Specifies the path to a .jar file containingthe class used by the manipulator. If you do not
Class path
specify this value, the component checks for theclass in the default class path ofENDECA_ROOT/lib/java.
Endeca Developer Studio Developer Studio HelpEndeca Confidential
69Preparing Data, Properties, and Dimensions | Preparing Your Source Data

DescriptionOption
Note: When running your pipeline, you canoverride the Java home and Class pathsettings using command-line options. SeeOverriding Java home and class pathsettings.
Sources
A choice of record servers in the project.You can add more than one record server.
Pass Throughs
Optional. The Pass Throughs tab passes additional information to Forge. The tab contains text boxeswhere you can add, modify, or delete key/value pairs.
Comment
Optional. Provides a way to associate comments with a pipeline component.
Related LinksUsing Java Manipulators to change Source Properties on page 69
Overriding Java home and class path settings on page 52When running your pipeline, you can override the Java home and Class path settings specifiedin a record adapter using two Forge command-line flags, --javaHome and --javaClasspath.
Record server components on page 282Describes record server components.
Preparing for Indexing
Related LinksPreparing Your Source Data on page 27
Adding an indexer adapter on page 70Indexer adapters save data that is ready to be indexed by the Dgidx program.
Indexer Adapter editor on page 71The Indexer Adapter editor contains a unique name for this indexer adapter.
Adding an indexer adapter
Indexer adapters save data that is ready to be indexed by the Dgidx program.
The final component in your pipeline is generally an indexer adapter. These components take allrecord, dimension hierarchy, and index configuration information from the pipeline and combine it ina format that is ready for the indexer (Agidx or Dgidx). An indexer adapter will generally be the finalcomponent in a baseline update pipeline. Attributes of the indexer adapter control where and how itwrites its output, as well as where and how it reads its index configuration input.
To add an indexer adapter:
1. In the Pipeline Diagram editor, click New.
Endeca ConfidentialEndeca Developer Studio Developer Studio Help
Preparing Data, Properties, and Dimensions | Preparing Your Source Data70

2. Choose Indexer Adapter.The Indexer Adapter editor appears.
3. In the Name text box, type a unique name for the indexer adapter.
4. In the General tab, do the following:
a) In the URL text box, type the location to which the indexed records are written, relative to thePipeline.epx file.
b) In the Output Prefix text box, type the prefix that will be attached to the output files.c) (Optional) Check Filter Unknown Properties if you want the indexer adapter to remove source
properties from your records.
Note: After mapping, source properties still exist as part of the Endeca record. Enablingthis option removes those source properties so records consist exclusively of Endecaproperties and dimension values.
d) (Optional) Check Custom Compression and slide the bar to the appropriate level.
5. (Optional) In the Sources tab, choose a record source and one or more dimension sources.
6. (Optional) If you are using an Agraph in your implementation, do the following:
a) Select Enable Agraph Support.b) In Number of Agraph Partitions, specify the number of child Dgraphs that the Agraph
coordinates.
Note: If you want to change the partition property, open the Properties view and modifywhich properties are enabled for rollup and record spec. For more detailed information,see the Endeca Advanced Development Guide.
7. (Optional) In the Comment tab, add a comment for the component.
8. Click OK.
Note: Typically, there is only one indexer adapter per pipeline.
Related LinksPreparing for Indexing on page 70
Indexer Adapter editor
The Indexer Adapter editor contains a unique name for this indexer adapter.
The Indexer Adapter editor contains the following tabs:
General
The General tab contains the following options:
DescriptionOption
Required. Location to which the indexed recordsare written.
URL
Endeca Developer Studio Developer Studio HelpEndeca Confidential
71Preparing Data, Properties, and Dimensions | Preparing Your Source Data
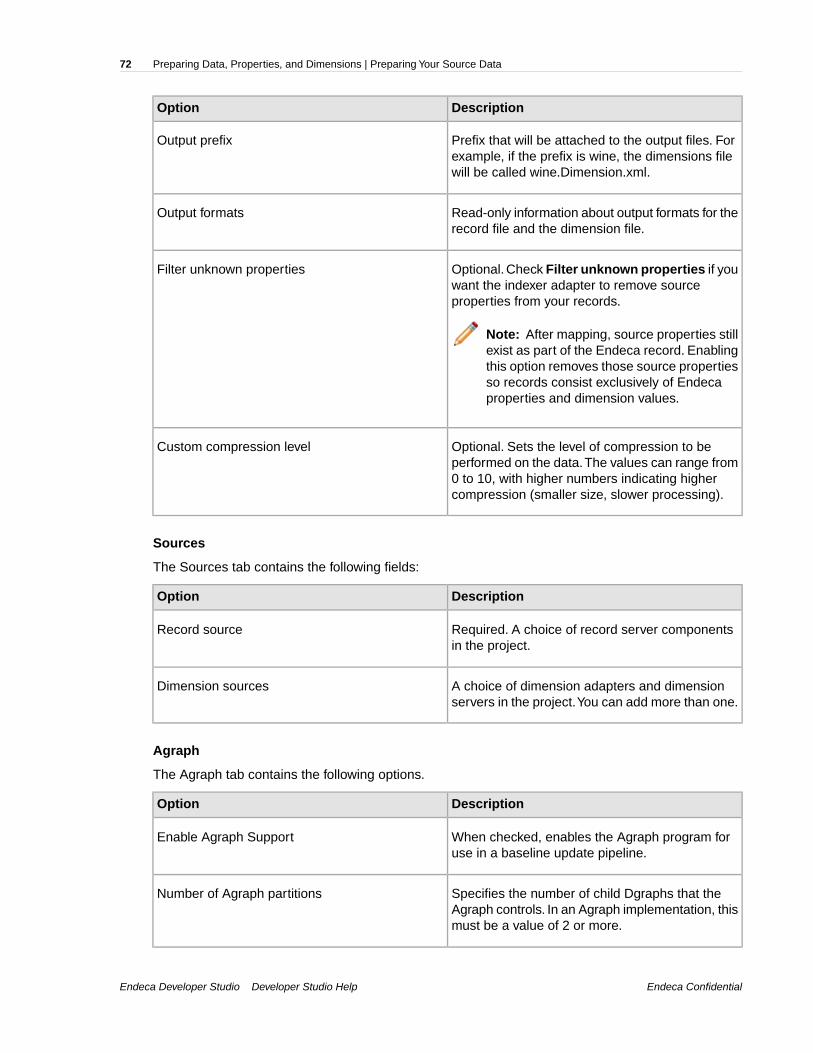
DescriptionOption
Prefix that will be attached to the output files. Forexample, if the prefix is wine, the dimensions filewill be called wine.Dimension.xml.
Output prefix
Read-only information about output formats for therecord file and the dimension file.
Output formats
Optional. Check Filter unknown properties if youwant the indexer adapter to remove sourceproperties from your records.
Filter unknown properties
Note: After mapping, source properties stillexist as part of the Endeca record. Enablingthis option removes those source propertiesso records consist exclusively of Endecaproperties and dimension values.
Optional. Sets the level of compression to beperformed on the data.The values can range from
Custom compression level
0 to 10, with higher numbers indicating highercompression (smaller size, slower processing).
Sources
The Sources tab contains the following fields:
DescriptionOption
Required. A choice of record server componentsin the project.
Record source
A choice of dimension adapters and dimensionservers in the project.You can add more than one.
Dimension sources
Agraph
The Agraph tab contains the following options.
DescriptionOption
When checked, enables the Agraph program foruse in a baseline update pipeline.
Enable Agraph Support
Specifies the number of child Dgraphs that theAgraph controls. In an Agraph implementation, thismust be a value of 2 or more.
Number of Agraph partitions
Endeca ConfidentialEndeca Developer Studio Developer Studio Help
Preparing Data, Properties, and Dimensions | Preparing Your Source Data72

DescriptionOption
The partition property is a read only field thatidentifies the property by which records are
Partition property
assigned to each partition. If you are using rollupcapabilities, the rollup property displays as thepartition property. If you do not have a roll upproperty, but do have a record spec propertyenabled in your project, the record spec propertyfunctions as the partition property. If neither a rollupnor a record spec property exists, the partitionproperty is empty, and Forge assigns records toeach partition according to a round-robin strategy.
See the Endeca Advanced Development Guide for detailed information on how to configure, provision,and run an Aggregated MDEX Engine implementation.
Comment
Optional. Provides a way to associate comments with a pipeline component.
Related LinksPreparing for Indexing on page 70
Record server components on page 282Describes record server components.
Preparing Your Endeca PropertiesRelated Links
Preparing Data, Properties, and Dimensions on page 27
About Endeca properties on page 74Endeca properties are name/value pairs intended for display in your Endeca implementation,after an end-user has searched for or navigated to a record set or an individual record.
Adding an Endeca property to an application on page 74Specify an Endeca property's behaviors and be sure it is mapped to a source property withexisting source data.
Working with Endeca Properties on page 75The following sections describe how to work with Endeca properties.
Configuring Endeca Property Behavior on page 82
Setting a property to use as the record spec on page 97A "record spec," or record specifier, is a string-based identifier.
Troubleshooting Endeca properties on page 98Check property mapping and record options if an Endeca property is missing from your Webapplication.
Endeca Developer Studio Developer Studio HelpEndeca Confidential
73Preparing Data, Properties, and Dimensions | Preparing Your Endeca Properties

About Endeca propertiesEndeca properties are name/value pairs intended for display in your Endeca implementation, after anend-user has searched for or navigated to a record set or an individual record.
Note: Understanding Endeca properties is critical to building an Endeca implementation. Thistopic provides a brief overview, however, Oracle strongly recommends that you read Chapter2, "Understanding Records, Properties, and Dimensions," in the Oracle Endeca Guided SearchConcepts Guide to make sure you have a solid grounding in this critical concept.
An Endeca implementation has two types of properties:
• Source properties are name/value pairs that contain descriptive information about a source record.Generally, a source record is nothing more than a set of source properties.
• Endeca properties are name/value pairs that are intended for display in your Endeca implementation,after an end-user has searched for or navigated to a record set or an individual record. Endecaproperties are also useful for sorting, searching, and filtering. Endeca properties are generallyderived from source properties.
While Endeca properties can be displayed and searched, they cannot be used for classification andnavigation.You can think of Endeca properties as descriptive information only. If you want a sourceproperty to be available for navigation, you must map it to a dimension. See the Endeca Forge Guidefor details.
Related LinksPreparing Your Endeca Properties on page 73
Adding an Endeca property to an applicationSpecify an Endeca property's behaviors and be sure it is mapped to a source property with existingsource data.
Deriving an Endeca property from a source property requires creating a mapping between the two.Mapping a source property to an Endeca property sanctions the source property for use within yourEndeca implementation, and instructs the Data Foundry to populate the Endeca property with thevalue from the source property. Adding an Endeca property to an implementation, therefore, is athree-step process.You must:
1. Make sure the source property you want to map to your Endeca property exists in your sourcedata, or will be manually added to your records during data processing.
2. Add the Endeca property to your Developer Studio project and specify its behaviors, including if itis available for search and if it will appear in a record set and/or on an individual record page.
See the "Configuring Endeca property behavior" section for details.
3. Create a mapping between the source property and the Endeca property. Without this mapping,the source property is discarded and its associated Endeca property will not be available for display.
See the Endeca Forge Guide for details.
Note: Endeca properties and dimensions share a case-insensitive name space within the MDEXEngine. Therefore, you should avoid using the same name for an Endeca property and adimension.
Related Links
Endeca ConfidentialEndeca Developer Studio Developer Studio Help
Preparing Data, Properties, and Dimensions | Preparing Your Endeca Properties74

Preparing Your Endeca Properties on page 73
Working with Endeca PropertiesThe following sections describe how to work with Endeca properties.
Related LinksPreparing Your Endeca Properties on page 73
Viewing all of your Endeca properties on page 75Use the Properties view to see all Endeca properties in a project simultaneously.
Sorting properties in the Properties view on page 76Alphabetically sort Endeca properties in ascending or descending order.
Adding a new Endeca property on page 77Specify the data type and other attributes of the new property.
Changing an Endeca property on page 77Use the Property editor in the Properties view to make all changes to an existing property.
Deleting an Endeca property on page 78Select a property from the Properties view to delete it.
Using time, datetime, and duration property types on page 78The time, datetime, and duration property types let you identify date and time-related valuesas such so that the MDEX Engine handles those values appropriately.
Mapping a source property to an Endeca property on page 80An Endeca property is populated with data from the source property to which it is mapped.
Property editor on page 80You use the Property editor to create a new Endeca property or modify the attributes of anexisting one.
Viewing all of your Endeca properties
Use the Properties view to see all Endeca properties in a project simultaneously.
The Properties view displays information about all of the Endeca properties in your project, in tabularformat.You can add, remove, or modify Endeca properties here, as well as access more detailedinformation about an individual property.
To open the Properties view:
• In the Project Explorer Project tab, double-click Properties. The Properties view appears in thework area.
Properties view columns
The Properties view contains the following columns:
DescriptionColumn
A unique name for the Endeca property.Name
One of the following:Type
• Alpha
Endeca Developer Studio Developer Studio HelpEndeca Confidential
75Preparing Data, Properties, and Dimensions | Preparing Your Endeca Properties

DescriptionColumn
• Integer• Floating point• File Path (reserved for advanced features)• Geocode (used for geospatial filtering and sorting)• Time• Datetime• Duration
When Yes, indicates that records can be sorted by this Endecaproperty.
Enable Sort
When Yes, indicates that record search should be enabled for thisEndeca property. Record search finds all records in an Endeca
Enable Record Search
implementation that have a property whose value matches a term theuser provides.
When Yes, indicates that this property is enabled as the recordspecifier for all records.
Record Spec Property
When Yes, enables this Endeca property to appear in the record listdisplay. Any records that are tagged with this property will have thisvalue shown as part of their entry in the record list.
Show with Record List
When checked, allows this Endeca property to appear on the recordpage. Any records that are tagged with this property will have thisproperty shown as part of their entry on the record page.
Show with Record
Related LinksWorking with Endeca Properties on page 75
The following sections describe how to work with Endeca properties.
Sorting properties in the Properties view
Alphabetically sort Endeca properties in ascending or descending order.
For ease of use, the Endeca properties in your Properties view are sorted by name.You can choosewhether the sort is ascending or descending.
Note: Using this feature just changes the sort in the Properties view. It does not determine howthe MDEX Engine sorts results. See Enabling record sort on a property and Enabling record sorton a dimension for more information.
To sort the Endeca properties in your Properties view:
•In the Properties view, click Sort Ascending or Sort Descending .
Endeca ConfidentialEndeca Developer Studio Developer Studio Help
Preparing Data, Properties, and Dimensions | Preparing Your Endeca Properties76
Related LinksWorking with Endeca Properties on page 75
The following sections describe how to work with Endeca properties.
Adding a new Endeca property
Specify the data type and other attributes of the new property.
To add a new Endeca property:
1. On the Project tab, double-click Properties to open the Properties view.
2. In the Properties view, click New. The New Property editor appears.
3. In the Name box, type the name of the new Endeca property.
Endeca properties and dimensions share a namespace in the Endeca MDEX Engine. For thisreason, all Endeca property and dimension names must be unique. If the application will use EndecaQuery Language requests, all property and dimension names must be in an NCName format. Formore information about the Endeca Query Language and the NCName requirement, see the EndecaAdvanced Development Guide.
4. In the Type list, choose the type of the new Endeca property:
• Alpha• Integer (Integers on all platforms range from -2^31 to 2^31 - 1. Integer property values larger
than 2147483647 (2^31 – 1) will wrap around in the MDEX Engine and be displayed as (actualvalue – 4294967296), where 4294967296 = hex 0x100000000 = 2^32.)
• Floating point• File path (deprecated)• Geocode (used for geospatial filtering and sorting)• Time• Datetime• Duration
5. Modify the other settings as appropriate.
6. Click OK.
Related LinksWorking with Endeca Properties on page 75
The following sections describe how to work with Endeca properties.
Changing an Endeca property
Use the Property editor in the Properties view to make all changes to an existing property.
To make changes to a particular Endeca property:
1. In the Properties view, double-click the name of the Endeca property you want to modify to openit in the Property editor.
Note: You can only open one property at a time.
2. Make the necessary changes in the Property editor.
3. Click OK to return to the Properties view.
Endeca Developer Studio Developer Studio HelpEndeca Confidential
77Preparing Data, Properties, and Dimensions | Preparing Your Endeca Properties
Related LinksWorking with Endeca Properties on page 75
The following sections describe how to work with Endeca properties.
Deleting an Endeca property
Select a property from the Properties view to delete it.
To delete an Endeca property from your project:
1. In the Properties view, select the Endeca property you want to remove from your project, and clickDelete.
2. When the confirmation message appears, click Yes.
Deleting an Endeca property clears the property mappings from the full pipeline, but you must manuallyremove the mappings from the partial update pipeline.
Related LinksWorking with Endeca Properties on page 75
The following sections describe how to work with Endeca properties.
Using time, datetime, and duration property types
The time, datetime, and duration property types let you identify date and time-related values as suchso that the MDEX Engine handles those values appropriately.
For example, it is not meaningful to add the contents of two String properties (that is, Alpha properties),and a query that attempts this operation causes an error. Similarly, date and time-related operations,such as extracting the year out of a date property, are limited to date/time types.
To support dates and times, the Presentation API uses the Property class to represent key-value pairs,where the value is a String that represents a date, datetime, or duration.The front-end Web applicationmay display this value without interpreting it, or it can use libraries to convert the value into apretty-printed string that is appropriate for human consumption. In other words, the application mayconvert the String into a java.util.Date object (for Java) or DateTime object (for .NET), which can thenbe formatted using the standard Java and .NET calendar utilities, respectively.
The String value associated with a time, datetime, or duration contains an integer number. Thespecification for this number is as follows:
• Time: 32-bit unsigned integer representing the time as the number of milliseconds relative to thestart of the day (midnight/12:00:00am).
For example, “1:00PM” or “13:00” is represented as “46800000” because:
13 hours *
60 minutes / hour *
60 seconds / minute *
1000 milliseconds / second =
46800000 milliseconds
• Datetime: 64-bit signed integer representing the date and time as the number of milliseconds sinceJanuary 1, 1970, 12:00:00 GMT (the UNIX epoch).
For example, “August 26, 2004 1:00PM” is represented as “1093525200000” because:
12656 days *
Endeca ConfidentialEndeca Developer Studio Developer Studio Help
Preparing Data, Properties, and Dimensions | Preparing Your Endeca Properties78

24 hours / day *
60 minutes / hour *
60 seconds / minute *
1000 milliseconds / second +
46800000 milliseconds (13 hrs) =
1093525200000 milliseconds
• Duration: 64-bit signed integer representing the amount of time measured in milliseconds relativeto an unspecified point in time.
For example,“100 days” is represented as “8640000000” because:
100days *
24 hours / day *
60 minutes / hour *
60 seconds / minute *
1000 milliseconds / second =
8640000000 milliseconds
Endeca distinguishes time, which represents time, from datetime, which represents a date and time,because it allows us to reduce the memory and storage footprint of applications that include only times.It also allows applications to explicitly detach a time from a specific date.
The duration type holds relative datetime values. This type provides application developers the abilityto store values like “2 minutes” or “3 years.” In other words, values that should not be interpreted asabsolute dates or times.
Loading date and time data
The MDEX Engine assumes that date/time data that is being loaded has the following characteristics:
• All values are in milliseconds, as described above.• All values are provided in coordinated universal time, also known as UTC (UTC was• formerly known as Greenwich mean time, or GMT).
If your date/time data does not conform to these requirements, you must pre-process it before loading,or manipulate it in your pipeline, so that it does.
Note: Endeca follows the POSIX standards.
Using the .NET framework's DateTime structure
The .NET framework uses the DateTime structure to represent an instant in time. In the DateTimestructure, time values are measured in 100-nanosecond units called ticks. To load data created withthe DateTime structure into the MDEX Engine, you must convert from ticks to nanoseconds, and thenfrom nanoseconds to milliseconds. Conversely, to work with data returned from the MDEX Engineusing the DateTime structure, you must convert it from milliseconds to nanoseconds, and then fromnanoseconds to ticks.
The conversions work as follows:
1 second = 1,000 milliseconds
Endeca Developer Studio Developer Studio HelpEndeca Confidential
79Preparing Data, Properties, and Dimensions | Preparing Your Endeca Properties

1 second = 1,000,000,000 nanoseconds
1,000 milliseconds = 1,000,000,000 nanoseconds
1 millisecond = 1,000,000 nanoseconds
1,000,000 nanoseconds * (1 tick / 100 nanoseconds) = 10,000 ticks
10,000 ticks = 1 millisecond
Working with time zones
Although the MDEX Engine will not interpret time zones directly, it is the query writer’s option to addor subtract another duration, possibly stored in another field on the record, from the record’s datetimevalue to account for different time zones.
Related LinksWorking with Endeca Properties on page 75
The following sections describe how to work with Endeca properties.
Mapping a source property to an Endeca property
An Endeca property is populated with data from the source property to which it is mapped.
You must map a source property to an Endeca property if you want to retain for use in your Endecaimplementation.You use the property mapper component to map source properties to Endecaproperties. See the Endeca Forge Guide for details.
Related LinksWorking with Endeca Properties on page 75
The following sections describe how to work with Endeca properties.
Property editor
You use the Property editor to create a new Endeca property or modify the attributes of an existingone.
General
DescriptionOption
The name of the Endeca property. Property names are case sensitive.Name
Note: Properties and dimensions share a namespace in the EndecaMDEX Engine. For this reason, you should not use the same namefor both a property and a dimension.
A drop-down list where you can select from the following property types:Type
• Alpha• Integer• Floating point• Geocode (used for geospatial filtering and sorting)• Duration
Endeca ConfidentialEndeca Developer Studio Developer Studio Help
Preparing Data, Properties, and Dimensions | Preparing Your Endeca Properties80

DescriptionOption
• DateTime• Time
Note: The Reference and File Path property types has beendeprecated and should not be used for new implementations.
When checked, record sorting on this Endeca property is optimized.Prepare sort offline
Enables aggregated Endeca record creation by allowing rollups based onthis Endeca property.
Rollup
When checked, enables this Endeca property for record filtering, whichpresents a subset of the data to the end-user. For more information aboutusing record filters, see the Endeca Advanced Development Guide.
Enable for record filters
When checked, specifies that you want to use this Endeca property as arecord specifier (a unique string-based identifier). Record specifiers are
Use for record spec
required to support the partial updates feature and Term Discovery features.Even though those two features are the only two that require a record spec,Oracle recommends that you assign one property in the project as therecord spec.
When checked, enables this Endeca property to appear in the record listdisplay. Any records that are tagged with this property will have this valueshown as part of their entry in the record list.
Show with record list
When checked, allows this property to appear on the record page. Anyrecords that are tagged with this Endeca property will have this propertyshown as part of their entry on the record page.
Show with record
Specifies the language for this property so that the MDEX Engine canperform language-specific operations correctly. If your application tends to
Language
have mixed-language records, and the languages are segregated intodifferent properties, setting a per-property language ID might be appropriate.For more information about language settings, see the Endeca AdvancedDevelopment Guide.
Search Tab
DescriptionOption
When checked, indicates that record search shouldbe enabled for this Endeca property. Record
Enable record search
search finds all records in an Endeca applicationthat have a property whose value matches a termthe user provides. Checking "Enable recordsearch" makes the following additional optionsavailable.
Endeca Developer Studio Developer Studio HelpEndeca Confidential
81Preparing Data, Properties, and Dimensions | Preparing Your Endeca Properties

DescriptionOption
When checked, indicates that a user query cancontain a wildcard character (*) to match against
Enable wildcard search
fragments of words in a property value.You mustenable each property that you want available forwildcard searching.
Related LinksWorking with Endeca Properties on page 75
The following sections describe how to work with Endeca properties.
About geospatial filtering on page 93Result sets that have geocode properties can be sorted by the distance of the values of thegeocode properties to a given reference point.
About geospatial sorting on page 88You can add properties to Endeca records that represent latitude and longitude pairs. Theseproperties are known as geocode properties.
Using time, datetime, and duration property types on page 78The time, datetime, and duration property types let you identify date and time-related valuesas such so that the MDEX Engine handles those values appropriately.
Precomputing sort indices on a dimension on page 143Precomputing sort can save query time.
Setting a property to use as the record spec on page 97A "record spec," or record specifier, is a string-based identifier.
Enabling Endeca property display on a record page on page 83Enabling record display means that any records that are tagged with this Endeca propertydisplay the property as part of their entry on the record page.
Enabling Endeca property display in a record list on page 83Enabling record list display means that any records tagged with this Endeca property displaythe property as part of their entry in the record list.
Enabling a property for record search on page 91You must enable record search for Endeca properties in order for records to appear in searchresults.
Enabling wildcard search for an Endeca property on page 97Wildcard searching allows user queries that contain a wildcard character (*) to match againstfragments of words in a property value.You must enable each property that you want availablefor wildcard searching.
Configuring Endeca Property Behavior
Related LinksPreparing Your Endeca Properties on page 73
Enabling Display on page 83
Configuring Record Sort on page 141The topics in this section describe the record sorting features.
Enabling Record Search on page 91
Endeca ConfidentialEndeca Developer Studio Developer Studio Help
Preparing Data, Properties, and Dimensions | Preparing Your Endeca Properties82

Using Range Filtering on page 148
Enabling Record Rollups on page 153
Enabling Wildcard Search on page 150
Enabling Display
Related LinksConfiguring Endeca Property Behavior on page 82
Enabling Endeca property display in a record list on page 83Enabling record list display means that any records tagged with this Endeca property displaythe property as part of their entry in the record list.
Enabling Endeca property display on a record page on page 83Enabling record display means that any records that are tagged with this Endeca propertydisplay the property as part of their entry on the record page.
Enabling Endeca property display in a record listEnabling record list display means that any records tagged with this Endeca property display theproperty as part of their entry in the record list.
Note: You must enable a dimension for record list display before you can access its dimensionvalues using the methods in the Endeca Presentation API.
To enable display in a record list for an Endeca property:
1. In the Properties view, double-click the Endeca property you want to change to open it in theProperty editor.
2. Check Show with Record List
3. Click OK.
Fully implementing this feature requires additional work outside of Developer Studio. Please refer tothe Endeca Basic Development Guide for details.
Related LinksEnabling Display on page 83
Enabling Endeca property display on a record pageEnabling record display means that any records that are tagged with this Endeca property display theproperty as part of their entry on the record page.
Note: You must enable an Endeca property for record display before you can access it usingthe methods in the Endeca Presentation API.
To enable display on a record page for an Endeca property:
1. In the Properties view, double-click the Endeca property you want to change to open it in theProperty editor.
2. Check Show with Record.
3. Click OK.
Fully implementing this feature requires additional work outside of Developer Studio. Please refer tothe Endeca Basic Development Guide for details.
Endeca Developer Studio Developer Studio HelpEndeca Confidential
83Preparing Data, Properties, and Dimensions | Preparing Your Endeca Properties

Related LinksEnabling Display on page 83
Configuring Record Sort
The topics in this section describe the record sorting features.
Related LinksConfiguring Endeca Property Behavior on page 82
About precomputing sort indices on a property on page 84Although users can sort on any record at any time, it is also possible to optimize a propertyfor sort in Developer Studio. This mainly controls the generation of a precomputed sort, andsecondarily enables the field to be returned in the API sort keys function.
Configuring an Endeca property for record sort on page 85The data type of an Endeca property determines the sort order of records sorted by thatproperty.
Specifying a default record sort order on page 142If an Endeca-enabled Web application does not specify sort order as part of the query, theMDEX Engine returns query results using the default sort order, if one has been specified.
Relevance ranking versus record sort on page 144Relevance ranking is used to control the order of results that are returned in response to akeyword search. Record sorting is used to control the order of records that are returned inresponse to any type of MDEX Engine query that returns records.
Controlling the order of record results on page 144Specify an explicit sort key in the MDEX Engine query, set a default sort order, or userelevance ranking (for records returned in response to record search queries).
About geospatial sorting on page 88You can add properties to Endeca records that represent latitude and longitude pairs. Theseproperties are known as geocode properties.
Preparing your geocode source data on page 89Your geocode data must be specially formatted as floating-point values in order to besuccessfully indexed by Dgidx.
Configuring a geocode Endeca property for sort on page 90Before you can map a geocode source property, you must configure the Endeca propertythat it will map to as geocode.
Mapping, presenting, and sorting by geocode properties on page 90You map, present, and sort geocode properties using similar techniques to those you usefor alphanumeric properties.
Troubleshooting record sorts on page 145To fix issues with record sorts, check for property type, number of values assigned to eachrecord, and uniqueness of property and dimension names.
About precomputing sort indices on a propertyAlthough users can sort on any record at any time, it is also possible to optimize a property for sort inDeveloper Studio.This mainly controls the generation of a precomputed sort, and secondarily enablesthe field to be returned in the API sort keys function.
Sorting functionality allows an Endeca-enabled Web application to define the order of records returnedwith a query. When making a query request, the application may define a series of sort keys
Endeca ConfidentialEndeca Developer Studio Developer Studio Help
Preparing Data, Properties, and Dimensions | Preparing Your Endeca Properties84
(property/order or dimension/order pairs, where order is either ascending or descending). The MDEXEngine then returns records according to those keys.
All of the records corresponding to a particular navigation state are considered for sorting, not just therecords visible in the current request. For example, if a navigation state applies to 100 bottles of wine,all 100 bottles are considered when sorting, even though only the first ten bottles may be returnedwith the current request. The sort key's data type determines the type of sort that occurs—numeric,alphabetical, geospatial, time, datetime, or duration. If an Endeca record does not include a value forthe specified sort key, that record is sorted to the bottom of the list, regardless of whether the sortorder is ascending or descending.
Note: An explicit record sort key, specified as part of a MDEX Engine query, takes priority overany other type of record sorting (default sorting and relevance ranking). See Controlling the orderof record results for details.
If the Web application does not specify sort order as part of the query, the MDEX Engine returnsrecords in the default sort order, if one has been specified. See Specifying a default record sortorder for details.
Record sorting only affects the order of records. It does not affect the ordering of dimensions ordimension values that are returned for query refinement.You use dimension and dimensionvalue ranking to affect the order of dimensions and dimension values.
Related LinksConfiguring Record Sort on page 141
The topics in this section describe the record sorting features.
Controlling the order of record results on page 144Specify an explicit sort key in the MDEX Engine query, set a default sort order, or userelevance ranking (for records returned in response to record search queries).
Configuring an Endeca property for record sortThe data type of an Endeca property determines the sort order of records sorted by that property.
To configure an Endeca property so that it can be used for record sort:
1. In the Properties view, double-click the Endeca property you want to change to open its Propertyeditor.
2. Check Prepare Sort Offline.
3. In the Type list, verify that the property’s Type attribute is correct. This attribute affects sorting inthe following ways:
Records are sorted:If Type is:
In alphabetical order, when sorted by this property.Alpha
In numeric order, when sorted by this property.Integer or FloatingPoint
According to the distance between the specified geocode property and agiven reference point.
Geocode
According to the length of time between the specified time property andthe start of the day (midnight or 12am).
Time
Endeca Developer Studio Developer Studio HelpEndeca Confidential
85Preparing Data, Properties, and Dimensions | Preparing Your Endeca Properties

Records are sorted:If Type is:
According to the length of time between the specified datetime propertyand the start of the epoch (12 am on January 1, 1970).
Datetime
Note: A negative datetime indicates time before the start of theepoch.
According to the length of time represented by the duration property.Duration
Note: Duration can be a negative number, for example, to expresstimezones relative to GMT/UTC time.
Note: The file path and reference property types are deprecated.
4. Click OK.
Related LinksConfiguring Record Sort on page 141
The topics in this section describe the record sorting features.
Specifying a default record sort orderIf an Endeca-enabled Web application does not specify sort order as part of the query, the MDEXEngine returns query results using the default sort order, if one has been specified.
You specify the default sort order and sort direction (ascending or descending) by using the --sortflag when running Dgidx. The --sort flag has the following syntax:
--sort "key|dir"
where key is the name of an Endeca property or dimension on which to sort and dir is either asc foran ascending order or desc for descending (if not specified, the order will be ascending).
You can also specify multiple sort keys in the format:
--sort "key_1|dir_1||key_2|dir_2||...||key_n|dir_n"
If you specify multiple sort keys, the records are sorted by the first sort key, with ties being resolvedby the second sort key, whose ties are resolved by the third sort key, and so on.
Note: If you are using the Endeca Application Controller (EAC) to control your environment,you must omit the quotation marks from the --sort flag. Instead, use the following syntax:
If you are using the Endeca Application Controller (EAC) to control your environment, you mustomit the quotation marks from the --sort flag. Instead, use the following syntax:
--sort key_1|dir_1||key_2|dir_2||...||key_n|dir_n
Agraph default sort order and displayed record lists
If a default record sort order is specified in Dgidx based on a property which is not set to show in therecord list, an Agraph managing the resulting Dgraphs will not consistently display records in the defaultsort order.
Endeca ConfidentialEndeca Developer Studio Developer Studio Help
Preparing Data, Properties, and Dimensions | Preparing Your Endeca Properties86

Each child Dgraph displays its own records in the correct order, but the Agraph does not reliablypreserve this order when integrating its child record sets. The resulting record order will be closeto—but not the same as—the actual specified default sort order.
To prevent this problem, use Developer Studio's Property editor to enable the 'Show with record list'setting for the sort property. This ensures that the Agraph will determine the correct record displayorder.
Related LinksConfiguring Record Sort on page 141
The topics in this section describe the record sorting features.
Relevance ranking versus record sortRelevance ranking is used to control the order of results that are returned in response to a keywordsearch. Record sorting is used to control the order of records that are returned in response to any typeof MDEX Engine query that returns records.
Relevance ranking and record sorting are closely related features but there are some distinct differences.
• Relevance ranking determines which results are more relevant to the user, based on a set of rulesyou define. For example, you can configure a rule that says "for multi-term searches, rank recordsthat match more of the terms higher than those that match fewer terms." Relevance ranking isconfigured either as part of a search interface, where each search interface has its own relevanceranking strategy, or is specified in the record search query itself.
• Unlike relevance ranking which is limited to keyword search queries, record sorting can be usedwith any type of query that returns records. Record sorting is based on a sort key. The sort keycan either be defined as a default, or identified by the Web application as part of the query.
Generally, if you have relevance ranking enabled, you would not specify a record sort key within arecord search query because record sort keys take priority over all other types of ordering, makingthe relevance ranking settings useless.
Note: A search interface is a named collection of properties and dimensions, each of which hasits Enable Record Search option checked. Search interfaces allow your end-users to search onmultiple properties and/or dimensions simultaneously. The search interface's name is used justlike a normal property or dimension when performing record searches. A record search queryon a search interface returns results that match any of the properties or dimensions in theinterface.
Related LinksConfiguring Record Sort on page 141
The topics in this section describe the record sorting features.
About relevance ranking on page 218You use relevance ranking to control the order in which record search results are displayedto the end-user.
About search interfaces on page 209Search interfaces allow your end-users to search on multiple properties and/or dimensionssimultaneously.
Specifying a default record sort order on page 142If an Endeca-enabled Web application does not specify sort order as part of the query, theMDEX Engine returns query results using the default sort order, if one has been specified.
Precomputing sort indices on a dimension on page 143Precomputing sort can save query time.
Endeca Developer Studio Developer Studio HelpEndeca Confidential
87Preparing Data, Properties, and Dimensions | Preparing Your Endeca Properties

Controlling the order of record resultsSpecify an explicit sort key in the MDEX Engine query, set a default sort order, or use relevance ranking(for records returned in response to record search queries).
There are three ways of controlling the order in which records are returned:
• Specifying an explicit sort key in the MDEX Engine query, either via a URL parameter (Ns) or anENEQuery setter method (setNavActiveSortKeys())
• Specifying a default sort order (Dgidx option).• Using relevance ranking, for records returned in response to record search queries only. Relevance
ranking settings can either be implicitly defined as part of the search interface, or explicitly definedin the search query itself.
The priority of record sorting/relevance ranking is as follows:
• If none of these three sorting methods is specified, records are returned in an arbitrary, butconsistent, order as determined by an internal ID generated by Dgidx during indexing.
• If the MDEX Engine query includes an explicit sort key parameter, that sort key overrides all othersorting and relevance ranking settings.
• If a default sort key is specified, and no other sort parameters are set, records are returned indefault sort order. Ties are broken using the arbitrary internal order described above.
• When searching against a search interface that incorporates a relevance ranking strategy, therelevance ranking strategy takes priority but ties are broken using the default sort key, if one hasbeen specified. If there is no default sort key, ties are broken using the internal ID order describedabove.
• If the MDEX Engine query includes a relevance ranking parameter, that setting overrides anyrelevance ranking strategies configured in the search interface that is being searched against.
A search interface is a named collection of properties and dimensions, each of which has its EnableRecord Search option checked. Search interfaces allow your end-users to search on multiple propertiesand/or dimensions simultaneously. The search interface's name is used just like a normal property ordimension when performing record searches. A record search query on a search interface returnsresults that match any of the properties or dimensions in the interface.
Note: Fully implementing this feature requires additional work outside of Developer Studio.Please refer to the Endeca Basic Development Guide for details.
Related LinksConfiguring Record Sort on page 141
The topics in this section describe the record sorting features.
About relevance ranking on page 218You use relevance ranking to control the order in which record search results are displayedto the end-user.
About precomputing sort indices on a property on page 84Although users can sort on any record at any time, it is also possible to optimize a propertyfor sort in Developer Studio. This mainly controls the generation of a precomputed sort, andsecondarily enables the field to be returned in the API sort keys function.
About geospatial sortingYou can add properties to Endeca records that represent latitude and longitude pairs.These propertiesare known as geocode properties.
Result sets that have geocode properties can be sorted by the distance of the values of the geocodeproperties to a given reference point. For example, if the records of a particular dataset representindividual books that a large vendor has for sale at a variety of locations, each book could be tagged
Endeca ConfidentialEndeca Developer Studio Developer Studio Help
Preparing Data, Properties, and Dimensions | Preparing Your Endeca Properties88

with a geocode property named Location that holds the store location information for that particularbook. Users could then sort those books so that books that are more closely located are displayedfirst.
Note: Geospatial sorting is closely related to geospatial filtering.
Related LinksConfiguring Record Sort on page 141
The topics in this section describe the record sorting features.
Preparing your geocode source data on page 89Your geocode data must be specially formatted as floating-point values in order to besuccessfully indexed by Dgidx.
Configuring a geocode Endeca property for sort on page 90Before you can map a geocode source property, you must configure the Endeca propertythat it will map to as geocode.
Mapping, presenting, and sorting by geocode properties on page 90You map, present, and sort geocode properties using similar techniques to those you usefor alphanumeric properties.
Preparing your geocode source dataYour geocode data must be specially formatted as floating-point values in order to be successfullyindexed by Dgidx.
In order for Dgidx to successfully index it, your geocode data must be in the form d,d where each d isa double precision floating-point value:
• The first d is the latitude of the location in whole and fractional degrees. Positive values indicatenorth latitude and negative values indicate south latitude.
• The second d is the longitude of the location in whole and fractional degrees. Positive valuesindicate east longitude, and negative values indicate west longitude.
Example
For example, a company’s main office is located at 42.365615 north latitude, 71.075647 west longitude.This geocode should be supplied to Dgidx as:
42.365615,-71.075647
If your source data is not available in this format, it can be assembled from separate properties usinga Perl manipulator. See the Forge API Guide for Perl for examples of using a Perl manipulator toconcatenate separate properties into one.
Related LinksConfiguring Record Sort on page 141
The topics in this section describe the record sorting features.
Configuring a geocode Endeca property for sort on page 90Before you can map a geocode source property, you must configure the Endeca propertythat it will map to as geocode.
About geospatial sorting on page 88You can add properties to Endeca records that represent latitude and longitude pairs. Theseproperties are known as geocode properties.
Endeca Developer Studio Developer Studio HelpEndeca Confidential
89Preparing Data, Properties, and Dimensions | Preparing Your Endeca Properties

Configuring a geocode Endeca property for sortBefore you can map a geocode source property, you must configure the Endeca property that it willmap to as geocode.
You map a source property to an Endeca property in order to make the source property available inyour Endeca implementation. To configure a geocode Endeca property:
1. Create an Endeca property.
2. On the Project tab, double-click Properties to open the Properties view.
3. Double-click the Endeca property you want to configure. The Property editor appears.
4. In the Type list, choose Geocode.
5. Check Prepare sort offline.
6. Click OK.
Related LinksConfiguring Record Sort on page 141
The topics in this section describe the record sorting features.
Preparing your geocode source data on page 89Your geocode data must be specially formatted as floating-point values in order to besuccessfully indexed by Dgidx.
About geospatial sorting on page 88You can add properties to Endeca records that represent latitude and longitude pairs. Theseproperties are known as geocode properties.
Mapping, presenting, and sorting by geocode propertiesYou map, present, and sort geocode properties using similar techniques to those you use foralphanumeric properties.
• See Mapping a source property to an Endeca property for details on mapping.• See the Endeca Basic Development Guide for details on displaying and sorting geocode properties
within an Endeca-enabled Web application.
Related LinksConfiguring Record Sort on page 141
The topics in this section describe the record sorting features.
About geospatial sorting on page 88You can add properties to Endeca records that represent latitude and longitude pairs. Theseproperties are known as geocode properties.
Troubleshooting record sortsTo fix issues with record sorts, check for property type, number of values assigned to each record,and uniqueness of property and dimension names.
If the records returned with a navigation request do not seem to respect the sort key parameter, hereare some things to check:
• Was the Endeca property specified as a numeric when it is actually alphanumeric, or vice versa?In this case, the MDEX Engine returns a valid response, but the sorting may not be what youexpected. Also, if you are sorting by a dimension, then the sort is always alphabetic.
• In general, properties and dimensions that are enabled for sorting should only have one valueassigned per record. If a record has multiple property values or dimension values for a singleEndeca property or dimension, the MDEX Engine sorts the records based on the first value
Endeca ConfidentialEndeca Developer Studio Developer Studio Help
Preparing Data, Properties, and Dimensions | Preparing Your Endeca Properties90
associated with the key. If the application is displaying any value other than the first one, then therecords may not appear to be sorted correctly.
• If an application has properties and dimensions with the same name and a sort is requested bythat name, the MDEX Engine will arbitrarily pick either the property or dimension for sorting. Ingeneral, all properties and dimensions should have a unique name.
Related LinksConfiguring Record Sort on page 141
The topics in this section describe the record sorting features.
Enabling Record Search
Related LinksConfiguring Endeca Property Behavior on page 82
Enabling a property for record search on page 91You must enable record search for Endeca properties in order for records to appear in searchresults.
Enabling a property for record searchYou must enable record search for Endeca properties in order for records to appear in search results.
Record search finds all records in an Endeca application that are tagged with a dimension value orEndeca property that matches a term the user provides. In order for an Endeca property to beconsidered during record searches, you must enable it for record search.
To enable record search for an Endeca property:
1. In the Properties view, double-click the Endeca property you want to change to open it in theProperty editor.
2. Select the Search tab.
3. Check Enable Record Search.
4. Click OK.
5. (Optional) If desired, check Enable Wildcard Search.
Note: See "Enabling wildcard search for an Endeca property" for details.
Fully implementing search features requires additional work outside of Developer Studio. Please referto the Endeca Basic Development Guide for details.
Related LinksEnabling Record Search on page 91
Enabling wildcard search for an Endeca property on page 97Wildcard searching allows user queries that contain a wildcard character (*) to match againstfragments of words in a property value.You must enable each property that you want availablefor wildcard searching.
Using Range Filtering
Related LinksConfiguring Endeca Property Behavior on page 82
Endeca Developer Studio Developer Studio HelpEndeca Confidential
91Preparing Data, Properties, and Dimensions | Preparing Your Endeca Properties

Using range filters on page 148A range filter allows an Endeca-enabled Web application to select a subset of the total datasetfor display, based on an arbitrary, dynamic range that uses an Endeca property or dimensionas the filter key.
Enabling a property for range filtering on page 93Properties of numeric, geocode, time, datetime, and duration type may be enabled for rangefiltering.
About geospatial filtering on page 93Result sets that have geocode properties can be sorted by the distance of the values of thegeocode properties to a given reference point.
Configuring a geocode Endeca property for filtering on page 94
Using range filtersA range filter allows an Endeca-enabled Web application to select a subset of the total dataset fordisplay, based on an arbitrary, dynamic range that uses an Endeca property or dimension as the filterkey.
Navigation queries that use a range filter return only those records that are included in the selecteddata subset, along with the refinement dimension values that are appropriate for the filtered records.Range filters are supported for:
• Properties of type integer, floating point, geocode, datetime, time, or duration.• Dimensions of type Integer or Floating Point.
For values of properties and dimensions of type Floating point, you can specify values using bothdecimal (0.00...68), and scientific notation (6.8e-10).
It is important to remember that range filters are simply modifiers for a navigation query. The rangefilter acts in the same manner as a dimension value, even though it is not a specific system-defineddimension value. Consider the following records and examples:
Sample Property(Description)
Sample Property(Price)
Sample Dimension Value(Wine_Type)
Record ID
Dark ruby in color, withextremely ripe…
10Red (Dim Value 101)1
Dense, rich and complexdescribes this '96California…
12Red (Dim Value 101)2
Dense and vegetal, withcelery, pear and spiceflavors…
19White (Dim Value 102)3
Big, ripe and generous,layered with honey…
20Other (Dim Value 103)4
Example 1
When making a navigation request with a range filter specifying that the Price property is greater than15 (with no dimension values specified) the following Navigation object is returned:
• 2 records (records 3 and 4)• 2 refinement dimension values (White and Other)
Endeca ConfidentialEndeca Developer Studio Developer Studio Help
Preparing Data, Properties, and Dimensions | Preparing Your Endeca Properties92
Example 2
When making a navigation request with the Red dimension value specified (Dim Value 101) and arange filter specifying a Price less than 11, the following Navigation object is returned:
• 1 record (record 1)• (No additional refinements)
Valid functions that can be used with range filters include:
• Less than• Less than or equal to• Greater than• Greater than or equal to• Between
Related LinksUsing Range Filtering on page 148
Enabling a property for range filteringProperties of numeric, geocode, time, datetime, and duration type may be enabled for range filtering.
Note: You may also use a dimension as the key for a range filter. See Enabling a dimensionfor range filtering for details.
To enable an Endeca property for range filtering:
1. In the Properties view, double-click the Endeca property you want to change to open it in theProperty editor.
2. In the Type list, make sure the type is compatible with range filters: Integer, Floating point, Geocode,Time, Datetime, or Duration.
Note: Be careful of dollar signs or other frequently found characters in property values thatwould prevent a property from being defined as numeric. For values of properties of typeFloating point, you can specify values using both decimal (0.00...68), and scientific notation(6.8e-10).
3. Click OK.
Related LinksUsing Range Filtering on page 148
Enabling a dimension for range filtering on page 149Make sure your dimension is of Numeric type to enable it for range filtering.
About geospatial filteringResult sets that have geocode properties can be sorted by the distance of the values of the geocodeproperties to a given reference point.
You can add properties to Endeca records that represent latitude and longitude pairs.These propertiesare known as geocode properties.
For example, if the records of a particular dataset represent individual books that a large vendor hasfor sale at a variety of locations, each book could be tagged with a geocode property named Location
Endeca Developer Studio Developer Studio HelpEndeca Confidential
93Preparing Data, Properties, and Dimensions | Preparing Your Endeca Properties
that holds the store location information for that particular book. Users could then filter the books toshow only those books within a certain distance from their current location.
Note: Geospatial filtering is closely related to geospatial sorting.
Related LinksUsing Range Filtering on page 148
Configuring a geocode Endeca property for filtering
You map a source property to an Endeca property in order to make the source property available inyour Endeca implementation. Before you can map a geocode source property, you must configurethe Endeca property that it will map to as geocode. To configure a geocode Endeca property:
1. Create an Endeca property.
2. On the Project tab, double-click Properties to open the Properties view.
3. Double-click the Endeca property you want to configure. The Property editor appears.
4. In the Type list, choose Geocode.
5. Click OK.
Related LinksUsing Range Filtering on page 148
Enabling Record Rollups
Related LinksConfiguring Endeca Property Behavior on page 82
About aggregated Endeca records on page 153Aggregated records allow you to treat a collection of separate records as one if the rollup keyis the same for any number of records.
About automatic phrasing on page 309When an application user provides individual search terms in a query, the automatic phrasingfeature groups those individual terms into a search phrase and returns query results for thephrase.
Enabling a property for record rollup on page 96In order to use an Endeca property as a rollup key, you must enable its Rollup attribute.
About aggregated Endeca recordsAggregated records allow you to treat a collection of separate records as one if the rollup key is thesame for any number of records.
An aggregated record is a collection of individual Endeca records that have been rolled up based ona rollup key (an Endeca property or dimension name). All records in the current record set that havethe same value for the rollup key are collected together into an aggregated record. For example, rollingup on a Name key causes all wines in the current record set that have the value 'My Red Wine' forthe Name key to be rolled up into one aggregated record.
Commonly, aggregated records are used to eliminate duplicate display entries. For example, in amusic store catalog, an album by the same title may exist in several formats, with multiple prices. Eachtitle is represented in the MDEX Engine as a distinct record. However, from a business perspective,it might be useful to treat these separate records as a single record by creating an aggregate record.
Endeca ConfidentialEndeca Developer Studio Developer Studio Help
Preparing Data, Properties, and Dimensions | Preparing Your Endeca Properties94

Record aggregation affects the current record set only. In other words, if you have 10,000 Endecarecords total but only 3,000 are displayed in the current record set, then the aggregation affects those3,000 records only.
The aggregated records feature requires that each record should have at most one value from thedimension or Endeca property that has been specified as the rollup key. Also, if an Endeca record hasa unique value for the rollup key, it is 'rolled up' into an aggregated record that contains only onesub-record.
Note: Fully implementing this feature requires additional work outside of Developer Studio.Please refer to the Endeca Basic Development Guide for details.
Related LinksEnabling Record Rollups on page 153
About automatic phrasingWhen an application user provides individual search terms in a query, the automatic phrasing featuregroups those individual terms into a search phrase and returns query results for the phrase.
Automatic phrasing is similar to placing quotation marks around search terms before submitting themin a query. For example, 'my search terms' is the phrased version of the query my search terms.However, automatic phrasing removes the need for application users to place quotation marks aroundsearch phrases to get phrased results.
The result of automatic phrasing is that a Web application can process a more restricted query andtherefore return fewer and more focused search results.This feature is available only for record search.
The automatic phrasing feature works by:
1. Comparing individual search terms in a query to a list of application-specific search phrases. Thelist of search phrases are stored in a project's phrase dictionary.
2. Grouping the search terms into search phrases.3. Returning query results that are either based on the automatically phrased query, or returning
results based on the original unphrased query along with automatically phrased 'Did You Mean?'(DYM) alternatives.
Point three above suggests the two typical implementation scenarios to choose from when usingautomatic phrasing:
• Process an automatically phrased form of the query and suggest the original unphrased query asa DYM alternative.
In this scenario, the automatic phrasing feature rewrites the original query's search terms into aphrased query before processing it. If you are also using DYM, you can display the unphrasedalternative so the user can opt-out of automatic phrasing and select their original query, if desired.
For example, an application user searches a wine catalog for the terms "low tannin." The MDEXEngine compares the search terms against the phrase dictionary, finds a phrase entry for "lowtannin," and processes the phrased query as "low tannin." The MDEX Engine returns 3 recordsfor the phrased query "low tannin" rather than 16 records for the user's original unphrased query"low tannin." However, the Web application also presents a "Did you mean low tannin?" selectionso the user may opt-out of automatic phrasing, if desired.
• Process the original query and suggest an automatically-phrased form of the query as a DYMalternative.
In this scenario, the automatic phrasing feature processes the unphrased query as entered anddetermines if a phrased form of the query exists. If a phrased form is available, the Web application
Endeca Developer Studio Developer Studio HelpEndeca Confidential
95Preparing Data, Properties, and Dimensions | Preparing Your Endeca Properties

displays an automatically-phrased alternative as a "Did you mean?" option. The user can opt-into automatic phrasing, if desired.
For example, an application user searches a wine catalog for low tannin.The MDEX Engine returns16 records for the user's unphrased query low tannin. The Web application also presents a "Didyou mean "low tannin"?" option so the user may opt-in to automatic phrasing, if desired.
There are two tasks to implement automatic phrasing:
• Add phrases to your project using Developer Studio.• Add Presentation API code to support either of the two implementation scenarios described above.
Note: Implementing search features requires additional work outside of Developer Studio. Referto the Endeca Advanced Development Guide for details.
Related LinksEnabling Record Rollups on page 153
Using Automatic Phrasing on page 201
Methods for adding phrases on page 204Import phrases from an XML file, or extract phrases from dimension names.
Importing phrases from an XML file on page 314You import an XML file of phrases using the Import Phrases dialog box in Developer Studio.The Import Phrases dialog box can be accessed from either the File menu or from theAutomatic Phrasing dialog box.
Extracting phrases from dimension names on page 205In addition to importing an XML file of phrases, you can add phrases to your project basedon the dimension values of any dimension you choose.
Adding search characters that support automatic phrasing on page 206Inclusion of original punctuation marks in search query phrases returns more relevant results.
Tips and troubleshooting for automatic phrasing on page 206Depending on how a phrased query is processed it may create dead-end results, for reasonsincluding significance of term order and the fact that the MDEX Engine does not extend userphrases to match those in the phrase dictionary.
Enabling a property for record rollupIn order to use an Endeca property as a rollup key, you must enable its Rollup attribute.
To enable record rollup for an Endeca property:
1. In the Properties view, double-click the Endeca property you want to change to open it in theProperty editor.
2. Check Rollup.
3. Click OK.
Note: This feature requires that each record should have at most one value from the Endecaproperty or dimension that has been specified as the rollup key.
Fully implementing this feature requires additional work outside of Developer Studio. Please refer tothe Endeca Basic Development Guide for details.
Related Links
Endeca ConfidentialEndeca Developer Studio Developer Studio Help
Preparing Data, Properties, and Dimensions | Preparing Your Endeca Properties96

Enabling Record Rollups on page 153
Enabling Wildcard Search
Related LinksConfiguring Endeca Property Behavior on page 82
Enabling wildcard search for an Endeca property on page 97Wildcard searching allows user queries that contain a wildcard character (*) to match againstfragments of words in a property value.You must enable each property that you want availablefor wildcard searching.
Enabling wildcard search for an Endeca propertyWildcard searching allows user queries that contain a wildcard character (*) to match against fragmentsof words in a property value.You must enable each property that you want available for wildcardsearching.
To enable wildcard searching for an Endeca property:
1. In the Properties view, double-click the Endeca property you want to change.
2. In the Property editor, select the Search tab.
3. Check Enable Record Search.
4. Check Enable Wildcard Search.
5. Click OK.
Fully implementing this feature requires additional work outside of Developer Studio. Please refer tothe Endeca Basic Development Guide for details.
Related LinksEnabling Wildcard Search on page 150
Setting a property to use as the record specA "record spec," or record specifier, is a string-based identifier.
These identifiers are used by the Term Discovery and partial updates features, described in detail inthe Endeca Forge Guide and the Endeca Partial Updates Guide, respectively. Featured records alsorequire a record specifier. Oracle recommends that you assign one property in the project as the recordspec.
Note: Records can have only one record spec during updates and at startup.
To configure an Endeca property for use as the record specifier:
1. In the Properties view, double-click the Endeca property you want to change to open it in theProperty editor.
2. Check Use as Record Spec, and click OK.
Related LinksPreparing Your Endeca Properties on page 73
Endeca Developer Studio Developer Studio HelpEndeca Confidential
97Preparing Data, Properties, and Dimensions | Preparing Your Endeca Properties
Troubleshooting Endeca propertiesCheck property mapping and record options if an Endeca property is missing from your Web application.
If an Endeca property is not present in your Endeca-enabled Web application, do the following:
• Make sure there is a mapping between a source property and the Endeca property. (By default,Forge removes source properties that have not been mapped to an Endeca property or dimension.See the Endeca Forge Guide for details.
• Check to see if the Show with Record List and Show with Record options are set correctly in theProperty editor for the affected Endeca property.
Related LinksPreparing Your Endeca Properties on page 73
Enabling Endeca property display on a record page on page 83Enabling record display means that any records that are tagged with this Endeca propertydisplay the property as part of their entry on the record page.
Enabling Endeca property display in a record list on page 83Enabling record list display means that any records tagged with this Endeca property displaythe property as part of their entry in the record list.
Preparing Your Dimension HierarchyRelated Links
Preparing Data, Properties, and Dimensions on page 27
About dimensions and dimension valuesAdding Pipeline Support for Dimensions on page 98
Working with Dimensions and Dimension Values on page 106
Adding Pipeline Support for Dimensions
Related LinksPreparing Your Dimension Hierarchy on page 98
Pipeline components that support dimensions on page 99There are two pipeline components that support dimensions: dimension adapters anddimension servers.
Adding a dimension adapter on page 101Dimension adapters read and write dimension data. The attributes of a dimension adapterdescribe where the dimension data is located (or will be saved to), its format, and variousaspects of processing.
Dimension Adapter editor on page 102The Dimension Adapter editor contains a unique name for this dimension adapter.
Adding a dimension server on page 105A dimension server collects dimensions from multiple dimension sources, and makes themaccessible in a uniform way to other components throughout the pipeline.
Dimension Server editor on page 105The Dimension Server editor contains a unique name for this dimension server.
Endeca ConfidentialEndeca Developer Studio Developer Studio Help
Preparing Data, Properties, and Dimensions | Preparing Your Dimension Hierarchy98

Pipeline components that support dimensions
There are two pipeline components that support dimensions: dimension adapters and dimensionservers.
Dimension adapters
Developer Studio stores dimension hierarchy information in an XML file that the documentation andreference implementations generically call Dimension.xml (you can name it anything you like). Adimension adapter reads data from and writes data to this file. The attributes of a dimension adapterdescribe where the dimension file is located, its format, and various aspects of processing. A datapipeline can have more than one dimension file, allowing you to provide dimension data from multiplesources. Each dimension file requires its own dimension adapter.
Dimension server
Dimension servers work in conjunction with dimension adapters, and serve as a centralized sourceof dimension information for all other pipeline components:
1. Dimension adapters load dimension information from your dimension source files.2. The dimension server gets its dimension information from the dimension adapters.3. Other pipeline components get their dimension information from the dimension server.
Setting up your pipeline in this way allows you to change your dimension adapters as needed withouthaving to change the dimension source for all other pipeline components that require dimensioninformation.
Persisting auto-generated dimensions
In addition to functioning as a centralized source for dimension information, dimension servers alsocoordinate the loading and saving of automatically-generated dimension information. Auto-generateddimensions are persisted in the file location that is specified in the Dimension Server editor
Endeca Developer Studio Developer Studio HelpEndeca Confidential
99Preparing Data, Properties, and Dimensions | Preparing Your Dimension Hierarchy

Supplying dimension data to property mappers
Your pipeline's property mapper requires a dimension server as its source of dimension data.
An example
The following pipeline example has two dimension adapters, Dimensions and TypeDimension, thatboth feed a dimension server, DimensionServer. DimensionServer provides dimension data to thepipeline's property mapper, PropDimMapper.
Endeca ConfidentialEndeca Developer Studio Developer Studio Help
Preparing Data, Properties, and Dimensions | Preparing Your Dimension Hierarchy100

Related LinksAdding Pipeline Support for Dimensions on page 98
Adding a dimension adapter on page 101Dimension adapters read and write dimension data. The attributes of a dimension adapterdescribe where the dimension data is located (or will be saved to), its format, and variousaspects of processing.
Adding a dimension server on page 105A dimension server collects dimensions from multiple dimension sources, and makes themaccessible in a uniform way to other components throughout the pipeline.
Adding a dimension adapter
Dimension adapters read and write dimension data. The attributes of a dimension adapter describewhere the dimension data is located (or will be saved to), its format, and various aspects of processing.
The adapter must have a unique name within the pipeline. A single input dimension adapter reads allthe dimensions in a single dimension file so, if you have multiple dimension files, you must have aseparate adapter for each file.
Output dimension adapters are generally only used for diagnostic purposes. Hence, this section focuseson input dimension adapters. See "Writing out dimension data" for more information on output dimensionadapters.
To add an input dimension adapter:
1. In the Pipeline Diagram editor, click New.
2. Choose Dimension > Adapter .
Endeca Developer Studio Developer Studio HelpEndeca Confidential
101Preparing Data, Properties, and Dimensions | Preparing Your Dimension Hierarchy
The Dimension Adapter editor appears.
3. In the General tab, do the following:
a) In the Direction frame, choose Input if the adapter will be loading dimensions.b) In the URL text box, enter the input file location.c) In the Format text box, select the format:
XML- Internal: Recommended (unless you are importing taxonomies from a third-party tool).
Binary
XML - Externally managed: Used when importing dimensions created in a third-party tool. See"Working with an Externally Managed Taxonomy" in the Endeca Forge Guide for details.
Stratify: Used when importing dimensions created with the Stratify taxonomy creation tools. See"Classifying Documents with Stratify" in the Endeca Forge Guide for details.
d) Check Require Data if you want an error to be generated if the URL (see step B, above) doesnot exist or is empty.
e) (Optional) Check Custom Compression Level if your input file is compressed to indicate toForge that it must decompress data from this source.
Note: The compression level slider setting is ignored for an input dimension adapter.
4. (Optional) In the Transformer tab, do the following to transform an external dimension hierarchy toEndeca dimensions:
a) Enter XSLT in the TYPE field. XSLT is the only valid value.b) Enter the full path to the .xsl file.
5. (Optional) In the Comment tab, add a comment for the component.
6. Click OK.
Note: You can choose a dimension source on the sources tab. This feature is only used withoutput dimension adapters.
Related LinksAdding Pipeline Support for Dimensions on page 98
Writing out dimension data on page 295To use an output dimension adapter to save data, you specify Output as the direction of dataflow, along with the location the data should be saved to and the file format for the saveddata.
Dimension Adapter editor
The Dimension Adapter editor contains a unique name for this dimension adapter.
The Dimension Adapter editor contains the following tabs:
General
DescriptionOption
Input AdapterDirection
Endeca ConfidentialEndeca Developer Studio Developer Studio Help
Preparing Data, Properties, and Dimensions | Preparing Your Dimension Hierarchy102

DescriptionOption
Required. Must be set to input.
Output Adapter
Required. Must be set to output.
Note: Output dimension adapters are usedfor diagnostic purposes.
Input AdapterFormat
Required. One of the following:
• XML - Internal: Recommended (unless you areimporting taxonomies from a third-party tool).
• Binary• XML - Externally managed: Used when
importing dimensions created in a third-partytool. See "Working with an Externally ManagedTaxonomy" in the Endeca Forge Guide fordetails.
• Stratify: Used when importing dimensionscreated with the Stratify taxonomy creationtools. See "Classifying Documents with Stratify"in the Endeca Forge Guide for details.
Output Adapter
Required. Must be XML.
Input AdapterURL
Required. Location of the input file.
Output Adapter
Required. Location to which the dimension data issaved.
Input AdapterRequire data
Optional. If checked, this field generates an errorif the URL does not exist or is empty.
Output Adapter
Not used.
Input AdapterCompression level
Optional. Indicates to Forge that it mustdecompress data from this source. Thecompression level slider setting is ignored.
Output Adapter
Endeca Developer Studio Developer Studio HelpEndeca Confidential
103Preparing Data, Properties, and Dimensions | Preparing Your Dimension Hierarchy

DescriptionOption
Sets the level of compression to be performed onthe dimension data when its written to disk. Tosave on the amount of disk space used, checkCustom compression level and slide the bar toEndeca's recommended value of 7.
Note: Compressed data consumes less diskspace but takes longer to read and write.
Sources
Required for output adapters. A choice of the dimension adapters and dimension servers in the project.
Note: Generally, only output adapters use dimension sources. For example, you can have apipeline where an input dimension adapter reads dimension data from a source, and then passesthat data to an output dimension adapter that saves it to disk.
Transformer
The Transformer tab allows a dimension adapter to transform external dimension hierarchies, describedin XML format into Endeca records XML format. To support these situations, an XSLT transformationcan be applied to the source data to convert it into Endeca Records XML, which the Data Foundrycan read.
The Transformer tab has the following options:
DescriptionOption
Must be XSLT.Type
Location of the stylesheet to use.URL
Comment
Optional. Provides a way to associate comments with a pipeline component.
Related LinksAdding Pipeline Support for Dimensions on page 98
Writing out dimension data on page 295To use an output dimension adapter to save data, you specify Output as the direction of dataflow, along with the location the data should be saved to and the file format for the saveddata.
Writing out dimension data on page 295To use an output dimension adapter to save data, you specify Output as the direction of dataflow, along with the location the data should be saved to and the file format for the saveddata.
Endeca ConfidentialEndeca Developer Studio Developer Studio Help
Preparing Data, Properties, and Dimensions | Preparing Your Dimension Hierarchy104

Adding a dimension server
A dimension server collects dimensions from multiple dimension sources, and makes them accessiblein a uniform way to other components throughout the pipeline.
The dimension server must have a unique name within the pipeline, and must specify all the inputdimension adapters as its dimension sources. If automatic dimension generation is used, a format,compression level, and URL must be provided so the automatically generated data can be persisted.Finally, a property mapper requires a dimension server as its source of dimension data.
Typically, there is only one dimension server per pipeline.
To add a dimension server:
1. In the Pipeline Diagram editor, click New, and then choose Dimension > Server.The Dimension Server editor appears.
2. In the Name text box, type a unique name for the dimension server.
3. In the General tab, do the following:
a) In the URL text box, type the location where dimension data created by auto-generation will besaved.
b) In the Format list, choose Binary or XML (Oracle recommends binary).c) To save on the amount of disk space used to persist auto-generated dimensions, check Custom
Compression Level and slide the bar to Endeca's recommended value of 7.
Note: Compressed data consumes less disk space but takes longer to read and write.
d) (Optional) To restrict the range of IDs that Forge assigns to automatically-generated dimensionvalues, check Dimension Value ID Limits and enter the minimum and maximum values thatyou want to use.
4. In the Sources tab, choose a dimension source.
5. Click Add. Repeat for all dimension sources.
6. (Optional) In the Comment tab, add a comment for the component.
7. Click OK.
Related LinksAdding Pipeline Support for Dimensions on page 98
Dimension Server editor
The Dimension Server editor contains a unique name for this dimension server.
The Dimension Server editor contains the following tabs:
General
The General tab contains the following options:
DescriptionOption
This attribute specifies the location of the persistentdimension data created by auto-generation. The
URL
path is either an absolute path, or a path relativeto the pipeline. With an absolute path the protocolcould be specified in RFC 2396 syntax. Usually
Endeca Developer Studio Developer Studio HelpEndeca Confidential
105Preparing Data, Properties, and Dimensions | Preparing Your Dimension Hierarchy
DescriptionOption
this means the prefix file:/// precedes the path tothe data file.
Required.The dimension server can read and writein two formats: Binary and XML.
Format
Optional. To save on the amount of disk spaceused to persist auto-generated dimensions, check
Custom compression level
Custom compression level and slide the bar toEndeca's recommended value of 7.
Note: Compressed data consumes less diskspace but takes longer to read and write.
Optional. To restrict the range of IDs that Forgeassigns to automatically-generated dimension
Dimension value id limits
values, check Dimension value id limits and enterthe minimum and maximum values that you wantto use.
Sources
Required. A choice of the dimension adapters and dimension servers in the project.
Comment
Optional. Provides a way to associate comments with a pipeline component.
Related LinksAdding Pipeline Support for Dimensions on page 98
Adding a dimension server on page 105A dimension server collects dimensions from multiple dimension sources, and makes themaccessible in a uniform way to other components throughout the pipeline.
Working with Dimensions and Dimension Values
Related LinksPreparing Your Dimension Hierarchy on page 98
Basic Dimension Tasks on page 107
Populating a Dimension with Dimension Values on page 117
Manual versus auto-generated dimension values on page 133To configure multiple synonyms, collapsibility, or inertness, or to create a hierarchy fordimension values, you must manually populate a dimension. Otherwise, set a dimension toauto-generate its values.
Creating Non-navigable Dimension Values on page 134
Endeca ConfidentialEndeca Developer Studio Developer Studio Help
Preparing Data, Properties, and Dimensions | Preparing Your Dimension Hierarchy106

Pruning dimension value refinements by frequency of occurrence on page 135You can prune the list of refinement dimension values returned for a query to those valuesthat occur most frequently in the requested navigation state.
Ranking dimension values manually on page 136Manual dimension value ranking defines the order in which dimension values appear in yourWeb application and overrides any default dimension value ranking you have specified.
Editing auto-generated dimension values on page 137Load an auto-generated dimension and then promote its dimension values to make themeditable.
Loading and promoting an auto-generated dimension on page 138Load and promote an auto-generated dimension from within the Dimensions view.
Cleaning up after promoting dimensions on page 139Run a baseline update to remove promoted dimensions from auto-generated state files.
Configuring Dimension Behavior on page 140
Basic Dimension Tasks
Related LinksWorking with Dimensions and Dimension Values on page 106
About the Dimensions view on page 107Access detailed information about a dimension and its dimension values, modify a dimension,or determine the order in which they are returned from the MDEX Engine.
Viewing all of your dimensions on page 270All dimensions are visible in the Dimensions view, opened from the Project Explorer.
Sorting dimensions in the Dimensions view on page 109To make them easier to find and work with, the dimensions in your Dimensions view can besorted by name (in alphabetical ascending or descending order) or by rank.
Creating dimensions on page 110Create new dimensions from the Dimensions view, on the Project tab.
Modifying dimensions on page 110You can modify one dimension at a time using the Dimension editor.
Deleting dimensions on page 111Delete dimensions from the Dimensions view.
Dimension editor on page 111You use the Dimension editor to create a new dimension or modify the attributes that affecthow an existing dimension is evaluated and displayed.
Checking the ID of a dimension on page 116A dimension ID is system-generated and cannot be changed, but you can view it.
Adding a dimension to a dimension group on page 116Dimension groups allow you to organize dimensions into groupings for presentation purposes.
Mapping a property to a dimension on page 117Map a source property to a dimension to enable navigation on that property.
About the Dimensions viewAccess detailed information about a dimension and its dimension values, modify a dimension, ordetermine the order in which they are returned from the MDEX Engine.
Endeca Developer Studio Developer Studio HelpEndeca Confidential
107Preparing Data, Properties, and Dimensions | Preparing Your Dimension Hierarchy
The Dimensions view displays information about all of the dimensions in your project in tabular format.You can add, remove, or modify dimensions here, as well as access more detailed information aboutan individual dimension and its dimension values. The Dimension view is also where you rank yourdimensions to determine the order in which they are returned from the MDEX Engine.
Related LinksBasic Dimension Tasks on page 107
Viewing all of your dimensionsAll dimensions are visible in the Dimensions view, opened from the Project Explorer.
To open the Dimensions view:
• In the Project Explorer Project tab, double-click Dimensions.The Dimensions view appears in the work area.
• Choose from the following options:
DescriptionOption
A unique name for the dimension. Clicking the Name column head cyclesthe order of the dimension sort from rank order, to alphabetical ascending,to alphabetically descending.
Name
Note: In order to rank your dimensions, you must be displaying themin rank order in the Dimensions view.
If the dimension was not manually created in Developer Studio, indicateswhat type of external dimension it is:
External type
• Auto Gen: The dimension's values are being automatically generatedbecause the match mode in the Property Mapper is set to Auto Generate.
• External: Indicates that this dimension has been created and is beingmaintained in a third-party tool, outside of Developer Studio. Externallymanaged dimensions are read-only.
• Prop Mapped: Indicates that this dimension is being created using the"If no mapping is found, map source properties to Endeca: Dimensions"on the Property Mapper's Advanced tab.
When Yes, indicates that records can be sorted by this dimension.Enable record sort
Enables the dimension values from this dimension to appear in the recordlist display.
Show with recordlist
Enables the dimension values from this dimension to appear on the recordpages of any records that are tagged with these dimension values.
Show with record
Establishes dynamic dimension value ranking, which orders dimensionvalues according to their frequency of appearance within the current recordset (that is, the most popular dimension values are returned).
Dynamic ranking
Allows the end user to select more than one dimension value from adimension within a single query.
Multi select
Endeca ConfidentialEndeca Developer Studio Developer Studio Help
Preparing Data, Properties, and Dimensions | Preparing Your Dimension Hierarchy108

DescriptionOption
Defines the default sort order used for dimension values within this dimension.This sort order is used when no other types of dimension value sorting havebeen specified.
Refinements sortorder
Related LinksBasic Dimension Tasks on page 107
Configuring Dimension Groups on page 269
Sorting dimensions in the Dimensions view on page 109To make them easier to find and work with, the dimensions in your Dimensions view can besorted by name (in alphabetical ascending or descending order) or by rank.
Enabling dimension display in a record list on page 140You must enable a dimension for record list display before you can access its dimensionvalues using the methods in the Endeca Presentation API.
Enabling dimension display on a record page on page 140When record page display is enabled for a dimension, any records that are tagged withdimension values from that dimension display those values as part of their entry on the recordpage.
Choosing a match mode on page 166When Forge maps a source property value to a dimension value, the dimension value it usescan either be explicitly defined in the dimension hierarchy or automatically generated byForge.You set the type of dimension value handling, on a per mapping basis, using the MatchMode in the Dimension Mapping dialog box.
Working with external taxonomies on page 306You may build all or part of a logical hierarchy for your data set outside of Developer Studioand then transform that logical hierarchy into Endeca dimensions and dimension values foruse in search and Guided Navigation.
When no mapping is found on page 175The Property Mapper editor’s Advanced tab lets you map source properties to either Endecaproperties or dimensions if no mapping is found.
Dimension editor on page 111You use the Dimension editor to create a new dimension or modify the attributes that affecthow an existing dimension is evaluated and displayed.
Sorting dimensions in the Dimensions viewTo make them easier to find and work with, the dimensions in your Dimensions view can be sorted byname (in alphabetical ascending or descending order) or by rank.
Note: The procedure described below changes the way dimensions are sorted in Dimensionsview only. It does not determine how dimensions are ranked when they are returned from theMDEX Engine. See Ranking dimensions manually for more information.
To sort dimensions in the Dimensions view:
• In the Dimensions view, click the Name column header to cycle the order of the dimension sortfrom rank order, to alphabetical ascending order, to alphabetically descending order.
Related Links
Endeca Developer Studio Developer Studio HelpEndeca Confidential
109Preparing Data, Properties, and Dimensions | Preparing Your Dimension Hierarchy

Basic Dimension Tasks on page 107
Ranking dimensions manually on page 150Always rank dimensions manually, by placing them in ranked order in the Dimensions view.The MDEX Engine will return dimensions in this order.
Creating dimensionsCreate new dimensions from the Dimensions view, on the Project tab.
To add a new dimension:
1. On the Project tab, double-click Dimensions to open the Dimensions view.
2. Click New.The Dimension editor appears.
3. In the Name box, type the name of the new dimension.
Important: Endeca properties and dimensions share a namespace in the Endeca MDEXEngine. For this reason, Endeca property and dimension names should always be unique.If the application will use Endeca Query Language requests, all property and dimensionnames must be in an NCName format. For more information about the Endeca QueryLanguage and the NCName requirement, see the Endeca Advanced Development Guide.
4. Modify the other settings as appropriate.
5. Click OK.
To add dimension values to the new dimension:
• In the Dimensions view, select the new dimension and then click Values.This opens the DimensionValues view, where you can establish the dimension value hierarchy.
Important: Do not add Dimension Values with ID=0. Dgidx rejects dimension values withID=0.
Related LinksBasic Dimension Tasks on page 107
Manual versus auto-generated dimension values on page 133To configure multiple synonyms, collapsibility, or inertness, or to create a hierarchy fordimension values, you must manually populate a dimension. Otherwise, set a dimension toauto-generate its values.
Modifying dimensionsYou can modify one dimension at a time using the Dimension editor.
To make changes to a particular dimension:
1. In the Dimensions view, double-click the dimension you want to modify.This opens in the Dimension editor.
Note: You can only open one dimension at a time.
2. Make the necessary changes.
3. Click OK to return to the Dimensions view.
Related Links
Endeca ConfidentialEndeca Developer Studio Developer Studio Help
Preparing Data, Properties, and Dimensions | Preparing Your Dimension Hierarchy110

Basic Dimension Tasks on page 107
Manual versus auto-generated dimension values on page 133To configure multiple synonyms, collapsibility, or inertness, or to create a hierarchy fordimension values, you must manually populate a dimension. Otherwise, set a dimension toauto-generate its values.
Deleting dimensionsDelete dimensions from the Dimensions view.
To delete a dimension from your project:
1. In the Dimensions view, select the dimension you want to remove from your project, and clickDelete.
2. When the confirmation message appears, click Yes.
Related LinksBasic Dimension Tasks on page 107
Manual versus auto-generated dimension values on page 133To configure multiple synonyms, collapsibility, or inertness, or to create a hierarchy fordimension values, you must manually populate a dimension. Otherwise, set a dimension toauto-generate its values.
Dimension editorYou use the Dimension editor to create a new dimension or modify the attributes that affect how anexisting dimension is evaluated and displayed.
The top of the Dimension editor contains the following information that identifies the dimension:
DescriptionOption
The name of this dimension. Dimension namesare case sensitive.
Name
A unique system-generated identifier.ID
Allows you to select from existing dimensiongroups or add a new one.
Member of this dimension group
Specifies the sort type for any refinementdimension values that are returned for thisdimension: Alpha, Integer, or Floating point.
Refinements sort order
The lower half of the Dimension editor contains five tabs. See tables below for details.
General
The General tab contains the following settings:
DescriptionOption
When checked, record sorting on this dimensionis optimized.
Prepare sort offline
Specifies whether or not this dimension is shownin the navigation controls.
Hidden
Endeca Developer Studio Developer Studio HelpEndeca Confidential
111Preparing Data, Properties, and Dimensions | Preparing Your Dimension Hierarchy
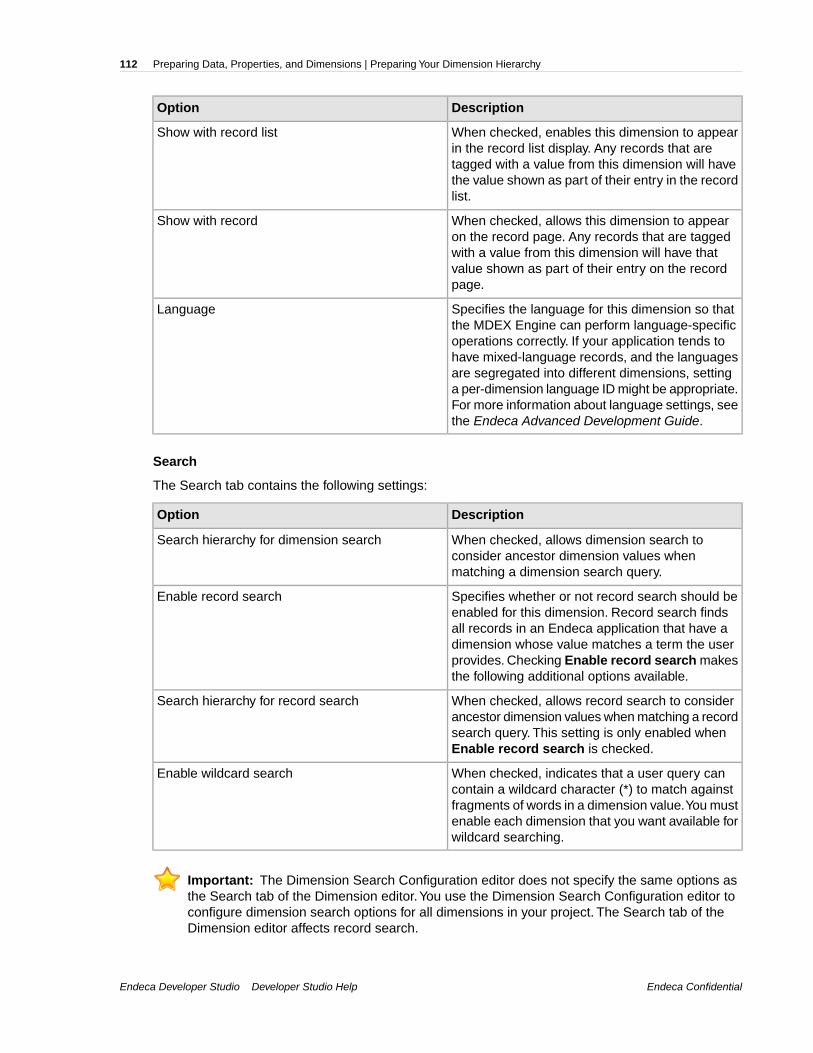
DescriptionOption
When checked, enables this dimension to appearin the record list display. Any records that are
Show with record list
tagged with a value from this dimension will havethe value shown as part of their entry in the recordlist.
When checked, allows this dimension to appearon the record page. Any records that are tagged
Show with record
with a value from this dimension will have thatvalue shown as part of their entry on the recordpage.
Specifies the language for this dimension so thatthe MDEX Engine can perform language-specific
Language
operations correctly. If your application tends tohave mixed-language records, and the languagesare segregated into different dimensions, settinga per-dimension language ID might be appropriate.For more information about language settings, seethe Endeca Advanced Development Guide.
Search
The Search tab contains the following settings:
DescriptionOption
When checked, allows dimension search toconsider ancestor dimension values whenmatching a dimension search query.
Search hierarchy for dimension search
Specifies whether or not record search should beenabled for this dimension. Record search finds
Enable record search
all records in an Endeca application that have adimension whose value matches a term the userprovides. Checking Enable record search makesthe following additional options available.
When checked, allows record search to considerancestor dimension values when matching a record
Search hierarchy for record search
search query. This setting is only enabled whenEnable record search is checked.
When checked, indicates that a user query cancontain a wildcard character (*) to match against
Enable wildcard search
fragments of words in a dimension value.You mustenable each dimension that you want available forwildcard searching.
Important: The Dimension Search Configuration editor does not specify the same options asthe Search tab of the Dimension editor.You use the Dimension Search Configuration editor toconfigure dimension search options for all dimensions in your project. The Search tab of theDimension editor affects record search.
Endeca ConfidentialEndeca Developer Studio Developer Studio Help
Preparing Data, Properties, and Dimensions | Preparing Your Dimension Hierarchy112
Advanced
The Advanced tab contains the following settings:
DescriptionOption
Specifies whether this dimension is the project'ssole primary dimension. All other dimensions are
Primary
secondary. (Note that a primary dimension is nolonger required and is ignored by the MDEXEngine. The MDEX Engine treats all dimensionsas secondary, no matter what you specify in thisfield).
Allows the end user to select more than onedimension value from a dimension.
Multiselect
Enables aggregated Endeca record creation byallowing rollups based on this dimension.
Enable for rollup
Enables the computation of refinement statistics.Compute refinement statistics
Allows you to set your application to collapse adeep hierarchy to make it shallower when availabledata is small.
Collapsible dimension threshold
Dynamic Ranking
The Dynamic Ranking tab contains the following settings:
DescriptionOption
When checked, indicates that the list of refinementdimension values returned for a query should be
Enable dynamic ranking
pruned to those values that occur most frequentlyin the requested navigation state.
Sets the number of most frequently-occurring(popular) dimension values to return.
Maximum dimension values to return
Establishes the sort method used for the mostpopular dimension values:
Sort dimension values
• "Alphabetically" uses whatever order you'veselected for the "Refinements sort order"setting on the main part of the Dimensioneditor.
• "Dynamically" orders the most popularrefinement values according to their frequencyof appearance within a data set. Dimensionvalues that occur more frequently are returnedbefore those that occur less frequently.
When this option is checked, if the actual numberof refinement options exceeds the number set in
Generate "More..." dimension value
"Maximum dimension values to return," then anadditional option called More is returned for thatdimension. If the user selects the More option, then
Endeca Developer Studio Developer Studio HelpEndeca Confidential
113Preparing Data, Properties, and Dimensions | Preparing Your Dimension Hierarchy

DescriptionOption
the MDEX Engine will return all of the refinementoptions for that dimension. If "Generate 'More'dimension value" is not checked, only the numberof dimension values defined in "Maximumdimension values to return" is displayed.
Cluster Discovery
The Cluster Discovery tab contains the following settings:
DescriptionOption
Specifies whether Cluster Discovery is enabled forthis dimension. The checkbox also makes thefollowing controls available.
Enable clustering
For more information, see the Endeca RelationshipDiscovery Guide.
This parameter governs how many documents aresampled. Clustering processing time and memory
Sample size
consumption are both roughly linear with thisnumber; thus, lowering the value results in smallermemory consumption and faster turnaround.However, statistical errors are likely to occur whenthe sample size is small. Setting this value higherwill overcome statistical errors for data sets wherefewer terms are tagged onto each document.
Range: Integer, 50-2000 (default: 500)
Recommended value: 500
This parameter limits the number of clusters thatwill be generated by the MDEX Engine.
Range: Integer, 2-10 (default: 10)
Maximum clusters
Recommended value: 6
This parameter governs the decision of whether aset of terms is coherent enough to form a cluster
Coherence
(that is, each cluster should have only closelyrelated documents). Low values are permissive(i.e., not demanding much coherence) and willresult in fewer larger clusters; high values are strictand will result in more smaller clusters. Theaverage value is recommended.
Range: Integer, 2-10 (default: 10)
Recommended value: 6
Endeca ConfidentialEndeca Developer Studio Developer Studio Help
Preparing Data, Properties, and Dimensions | Preparing Your Dimension Hierarchy114

DescriptionOption
Terms that are extracted from sampled documentsare filtered by their precision p (where p = number
Maximum precision
of sampled documents that this term is tagged ontodivided by the number of all sampled documents).Terms that have too high a value of p are likely tobe the search term (or be synonymous with it) orbe too general to make for a good clustering term.If you use the recommended tuning values of theterm extractor, each term is tagged only roughly1/3 of the documents, which means that the searchterm, if present, will have p of roughly 0.33 (moreor less stringent tuning of the term extractor willchange this value). There usually is a gap in thevalues of p between the search term and the moreuseful terms, which start at approximately p = 0.25and less.
Range: Float, 0.0 - 1.0 (default: 1.0)
Recommended value: 0.25
Sets the maximum number of terms that can be ina cluster. Each cluster will have at least 2 terms.
Maximum cluster size
Because of the match-partial cluster selectionmechanism, the more terms there are in thecluster, the (potentially) higher its coverage will be.On the other hand, the clusters that are too largetake up too much space to display and take toolong for users to read.
Range: Integer, 2 - 10 (default: 10)
Recommended value: 8
If two clusters overlap (that is, if the document setsthat each cluster maps to overlap), then the smaller
Maximum cluster overlap
one (as measured by the estimated size of thedocument set it maps to) can be removed,depending on how big this overlap is. Thisparameter dictates the overlap above which thesmaller cluster is removed.
Clusters which overlap by more than this value willbe removed. Thus, the default setting of 10 (out often) means that clusters that overlap by more than10 out of 10 documents will be removed. Sincethis is impossible, this means that setting of 10 willdisable cluster overlap filtering, which is mostextreme level of coarseness for this filter. Tuningthis parameter down will make the cluster overlapmore and more fine-grained. Thus, a value of 9will remove only the clusters that greatly overlap;
Endeca Developer Studio Developer Studio HelpEndeca Confidential
115Preparing Data, Properties, and Dimensions | Preparing Your Dimension Hierarchy

DescriptionOption
setting it to the recommended value of 5 willremove only clusters overlapping half-way or so(remember that the overlap is merely estimated).Setting this parameter to lower values (less than5) will make overlap filtering quite sensitive andwill remove clusters which overlap even by a smallamount. Note that clusters that do not overlap atall will never be filtered.
Range: Integer, 0-10 (default: 10)
Recommended value: 5
Related LinksBasic Dimension Tasks on page 107
Checking the ID of a dimension on page 116A dimension ID is system-generated and cannot be changed, but you can view it.
Adding a dimension to a dimension group on page 116Dimension groups allow you to organize dimensions into groupings for presentation purposes.
Setting a default dimension value order on page 132In an auto-generated dimension, you don't have direct access to and, hence, can't manuallyrank, the dimension values. Instead, you must set a default rank order.
Checking the ID of a dimensionA dimension ID is system-generated and cannot be changed, but you can view it.
Each dimension has a unique numeric ID.
To check the ID of a dimension:
1. In the Dimensions view, double-click the dimension you want to examine to open it in the Dimensioneditor.The Dimension ID appears in the upper right corner of the Dimension editor.
2. Click OK to close the Dimension editor.
Related LinksBasic Dimension Tasks on page 107
Adding a dimension to a dimension groupDimension groups allow you to organize dimensions into groupings for presentation purposes.
Note: A dimension group must exist before you can add a dimension to it.
To add a dimension to an existing dimension group:
1. In the Dimensions view, double-click the dimension you want to change to open it in the Dimensioneditor.
2. Select the group you want to add the dimension to from the Member of This Dimension Group list.
3. Click OK.
Note: A dimension can belong to only one dimension group.
Endeca ConfidentialEndeca Developer Studio Developer Studio Help
Preparing Data, Properties, and Dimensions | Preparing Your Dimension Hierarchy116
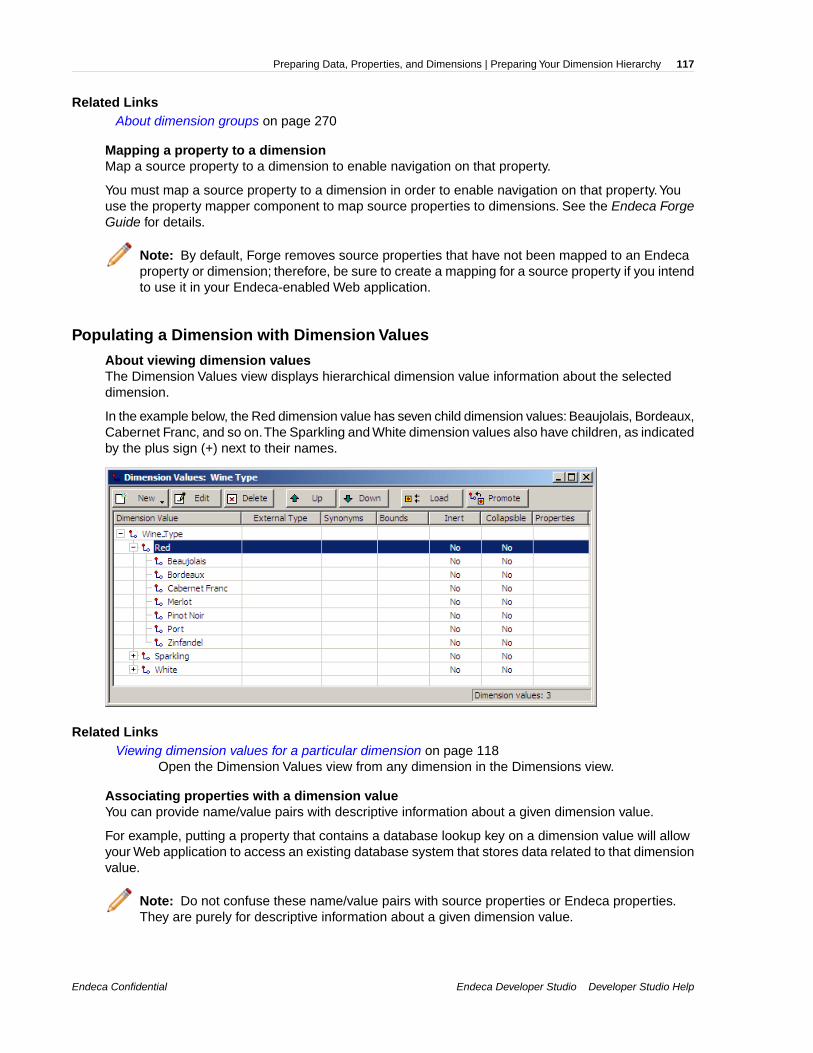
Related LinksAbout dimension groups on page 270
Mapping a property to a dimensionMap a source property to a dimension to enable navigation on that property.
You must map a source property to a dimension in order to enable navigation on that property.Youuse the property mapper component to map source properties to dimensions. See the Endeca ForgeGuide for details.
Note: By default, Forge removes source properties that have not been mapped to an Endecaproperty or dimension; therefore, be sure to create a mapping for a source property if you intendto use it in your Endeca-enabled Web application.
Populating a Dimension with Dimension Values
About viewing dimension valuesThe Dimension Values view displays hierarchical dimension value information about the selecteddimension.
In the example below, the Red dimension value has seven child dimension values: Beaujolais, Bordeaux,Cabernet Franc, and so on.The Sparkling and White dimension values also have children, as indicatedby the plus sign (+) next to their names.
Related LinksViewing dimension values for a particular dimension on page 118
Open the Dimension Values view from any dimension in the Dimensions view.
Associating properties with a dimension valueYou can provide name/value pairs with descriptive information about a given dimension value.
For example, putting a property that contains a database lookup key on a dimension value will allowyour Web application to access an existing database system that stores data related to that dimensionvalue.
Note: Do not confuse these name/value pairs with source properties or Endeca properties.They are purely for descriptive information about a given dimension value.
Endeca Developer Studio Developer Studio HelpEndeca Confidential
117Preparing Data, Properties, and Dimensions | Preparing Your Dimension Hierarchy

To associate one or more properties with a dimension value:
1. In the Dimension Value editor, click Properties.The Properties editor appears.
2. In the Property box, type the new property name.
3. In the Value box, type the property's value.
4. Click Add.
5. (Optional) Repeat steps 2 to 4 to add other name/value pairs.
6. Click OK.
Viewing dimension values for a particular dimensionOpen the Dimension Values view from any dimension in the Dimensions view.
To view dimension values for a particular dimension:
1. In the Dimensions view, select a dimension and click Values. The Dimension Values view opens.
2. To expand a node in the dimension hierarchy, click the plus sign (+) next to the node's name. Tocollapse a node, click the minus sign (-). In addition to buttons that allow you to add, edit, delete,or adjust the rank of dimension values, the Load and Promote buttons support two features: editingof auto-generated dimension values and working with externally-generated taxonomies. This viewalso contains the following columns:
DescriptionColumn
Lists dimension values in hierarchical order.Dimension Value
If the dimension, and its dimension values, were not manually created inDeveloper Studio, indicates what type of external dimension they are:
External Type
Auto Gen: The dimension's values are being automatically generatedbecause the match mode in the Property Mapper is set to Auto Generate.
External: Indicates that this dimension has been created and is beingmaintainedin a third-party tool, outside of Developer Studio. Externallymanaged dimensions and dimension values are read-only.
Prop Mapped: Indicates that this dimension, and its dimension values, arebeing created using the "If no mapping is found, map source properties toEndeca: Dimensions" on the Property Mapper's Advanced tab.
Lists any dimension value synonyms that you have applied.Synonyms
Lists any bounds you have set for a range or sift dimension value.Bounds
Indicates whether a dimension value is non-navigable.Inert
Indicates whether a dimension value is a candidate for collapsing.Collapsible
Lists any properties associated with a dimension value.Properties
Note: The Load and Promote buttons support two features: editing of auto-generateddimension values and working with externally-generated taxonomies.
Endeca ConfidentialEndeca Developer Studio Developer Studio Help
Preparing Data, Properties, and Dimensions | Preparing Your Dimension Hierarchy118

Related LinksMaking a dimension value non-navigable (inert) on page 134
Marking a dimension value as inert (or non-navigable) indicates that the dimension valueshould not be included in any navigation state, although it can be displayed in a user interfaceto help guide the end-user toward a selection.
Making a dimension value collapsible on page 156Making a dimension value collapsible means that it is a candidate for collapsing.
Associating properties with a dimension value on page 117You can provide name/value pairs with descriptive information about a given dimension value.
Editing auto-generated dimension values on page 137Load an auto-generated dimension and then promote its dimension values to make themeditable.
Choosing a match mode on page 166When Forge maps a source property value to a dimension value, the dimension value it usescan either be explicitly defined in the dimension hierarchy or automatically generated byForge.You set the type of dimension value handling, on a per mapping basis, using the MatchMode in the Dimension Mapping dialog box.
Working with external taxonomies on page 306You may build all or part of a logical hierarchy for your data set outside of Developer Studioand then transform that logical hierarchy into Endeca dimensions and dimension values foruse in search and Guided Navigation.
When no mapping is found on page 175The Property Mapper editor’s Advanced tab lets you map source properties to either Endecaproperties or dimensions if no mapping is found.
About synonyms on page 124Synonyms provide a textual way to refer to a dimension value, rather than by ID alone. Adimension value can have multiple synonyms. All synonyms that you assign to dimensionvalues must be unique.
About range dimension values on page 126Configuring a dimension to use range dimension values is useful for data that should benavigated as discrete values.
About sift dimensions on page 157Auto sifting is an extension to autogeneration which positions newly generated dimensionvalues within an existing hierarchy.
Dimension Value editorSet dimension value name, type (exact, range, or sift), properties, bounds, synonyms, and specifywhether dimension value is inert and/or collapsible.
DescriptionOption
A unique name for this dimension value. Dimensionvalue names are case sensitive.
Name
Specifies the dimension value's type. A dimensionvalue's type determines how it matches to propertyvalues during mapping.
Type
• Exact
Endeca Developer Studio Developer Studio HelpEndeca Confidential
119Preparing Data, Properties, and Dimensions | Preparing Your Dimension Hierarchy

DescriptionOption
Dimension values of type exact will only matchto property values that match one of thesynonyms exactly.
• Range
Dimension values of type range will match toranges of property values (specified by theupper and lower bounds of the rangedimension value).
• Sift
Auto sifting is an extension to autogenerationwhich positions newly auto-generateddimension values within an existing "sift"hierarchy. A sift hierarchy is a normal hierarchythat has dimension values of type Sift. Siftdimension values are specified using ranges.Auto-generated dimension values "sift" throughthe hierarchy according to the ranges theymatch.
Check Inert if the dimension value isnon-navigable.
Inert
Check Collapsible if the dimension value is acandidate for collapsing.
Collapsible
This area is used to describe dimension valuebounds for dimension values of type Range or Sift.
Bounds
• Bound type: String, floating point, or integer.• Lower bound: The lower bound of the range.• Upper bound: The upper bound of the range.• Include value in range: Indicates that the bound
includes the number that has been entered.
Click to add synonyms for this dimension value.Synonyms
Click to associate a descriptive name/value pairwith this dimension value.
Properties
Note: Do not confuse these name/valuepairs with source properties or Endecaproperties. They are purely for descriptiveinformation about a given dimension value.
Related Links
Endeca ConfidentialEndeca Developer Studio Developer Studio Help
Preparing Data, Properties, and Dimensions | Preparing Your Dimension Hierarchy120

Renaming a dimension value on page 124Rename only a dimension's child dimension values.
About range dimension values on page 126Configuring a dimension to use range dimension values is useful for data that should benavigated as discrete values.
About sift dimensions on page 157Auto sifting is an extension to autogeneration which positions newly generated dimensionvalues within an existing hierarchy.
Making a dimension value non-navigable (inert) on page 134Marking a dimension value as inert (or non-navigable) indicates that the dimension valueshould not be included in any navigation state, although it can be displayed in a user interfaceto help guide the end-user toward a selection.
Making a dimension value collapsible on page 156Making a dimension value collapsible means that it is a candidate for collapsing.
About synonyms on page 124Synonyms provide a textual way to refer to a dimension value, rather than by ID alone. Adimension value can have multiple synonyms. All synonyms that you assign to dimensionvalues must be unique.
Associating properties with a dimension value on page 117You can provide name/value pairs with descriptive information about a given dimension value.
Working with Manually Created Dimension ValuesAdding dimension valuesAdding or editing a dimension value affects how records are classified, and which records are availableunder a given dimension value in the client browser.
To add a dimension value to a dimension:
1. In the Dimensions view, click to select the dimension that you want to add the dimension value to.
2. Click Values.The Dimension Values view appears.
3. Do one of the following to create the new dimension value:
• To create a dimension value that is a child of an existing dimension value, select the existingvalue and click New > Child.
• To create a dimension value that is the sibling of an existing dimension value, select the existingvalue and click New > Sibling.
The Dimension Value editor appears.
Related LinksConfiguring dimension values on page 122
Set a dimension value's type, navigability, add synonyms, or associate properties to thedimension value.
Making a dimension value non-navigable (inert) on page 134Marking a dimension value as inert (or non-navigable) indicates that the dimension valueshould not be included in any navigation state, although it can be displayed in a user interfaceto help guide the end-user toward a selection.
Making a dimension value collapsible on page 156Making a dimension value collapsible means that it is a candidate for collapsing.
Associating properties with a dimension value on page 117
Endeca Developer Studio Developer Studio HelpEndeca Confidential
121Preparing Data, Properties, and Dimensions | Preparing Your Dimension Hierarchy

You can provide name/value pairs with descriptive information about a given dimension value.
About range dimension values on page 126Configuring a dimension to use range dimension values is useful for data that should benavigated as discrete values.
About sift dimensions on page 157Auto sifting is an extension to autogeneration which positions newly generated dimensionvalues within an existing hierarchy.
About synonyms on page 124Synonyms provide a textual way to refer to a dimension value, rather than by ID alone. Adimension value can have multiple synonyms. All synonyms that you assign to dimensionvalues must be unique.
Configuring dimension valuesSet a dimension value's type, navigability, add synonyms, or associate properties to the dimensionvalue.
To configure a dimension value:
1. In the Dimension Value editor, type the dimension value's name in the Name text box.
2. In the Type list, choose a dimension value type: Exact, Range, or Sift. A dimension value's typedetermines how it matches to property values during mapping.
• DescriptionOption
Dimension values of type exact will only matchto property values that match one of thesynonyms exactly.
Exact
Dimension values of type range will match toranges of property values (specified by the
Range
upper and lower bounds of the range dimensionvalue).
Auto sifting is an extension to autogenerationwhich positions newly auto-generated
Sift
dimension values within an existing 'sift'hierarchy. A sift hierarchy is a normal hierarchythat has dimension values of type Sift. Siftdimension values are specified using ranges.Auto-generated dimension values "sift" throughthe hierarchy according to the ranges theymatch.
3. (Optional) Check Inert if the dimension value is non-navigable.
4. Check Collapsible if the dimension value is a candidate for collapsing
5. If you chose Range or Sift in step 2 above, do the following:
a) From the Bound Type list, choose one of the following: String, Floating point, or Integer.b) In the Lower Bound text box, enter the lower number in the range. If you want the range to
include the number you enter, check Include Value in Range.
Endeca ConfidentialEndeca Developer Studio Developer Studio Help
Preparing Data, Properties, and Dimensions | Preparing Your Dimension Hierarchy122

c) In the Upper Bound text box, enter the higher number in the range. If you want the range toinclude the number you enter, check Include Value in Range.
6. Click Synonyms to add any dimension value synonyms.
7. (Optional) Click Properties to associate any properties to the dimension value.
8. Click OK.
Related LinksAdding dimension values on page 121
Adding or editing a dimension value affects how records are classified, and which recordsare available under a given dimension value in the client browser.
Making a dimension value non-navigable (inert) on page 134Marking a dimension value as inert (or non-navigable) indicates that the dimension valueshould not be included in any navigation state, although it can be displayed in a user interfaceto help guide the end-user toward a selection.
Making a dimension value collapsible on page 156Making a dimension value collapsible means that it is a candidate for collapsing.
Associating properties with a dimension value on page 117You can provide name/value pairs with descriptive information about a given dimension value.
About range dimension values on page 126Configuring a dimension to use range dimension values is useful for data that should benavigated as discrete values.
About sift dimensions on page 157Auto sifting is an extension to autogeneration which positions newly generated dimensionvalues within an existing hierarchy.
About synonyms on page 124Synonyms provide a textual way to refer to a dimension value, rather than by ID alone. Adimension value can have multiple synonyms. All synonyms that you assign to dimensionvalues must be unique.
Editing dimension valuesMake all changes to a dimension value in the Dimension Value editor.
To edit a dimension value:
1. In the Dimension Values view, double-click the dimension value's name to open it in the DimensionValue editor.
2. Make any required changes.
3. Click OK.
Deleting dimension valuesRemove dimension values and their child dimension values from within the Dimension Values view.
To delete a dimension value:
1. In the Dimension Values view, click the dimension value you want to remove, then click Delete.
2. When the confirmation message appears, click Yes.
Note: All child dimension values of a deleted dimension value are also removed.
Related Links
Endeca Developer Studio Developer Studio HelpEndeca Confidential
123Preparing Data, Properties, and Dimensions | Preparing Your Dimension Hierarchy
Renaming a dimension valueRename only a dimension's child dimension values.
You cannot rename a dimension's root dimension value, but you can rename any of its child dimensionvalues.
See Editing dimension values and Deleting dimension values for instructions.
Related LinksEditing dimension values on page 123
Make all changes to a dimension value in the Dimension Value editor.
Deleting dimension values on page 123Remove dimension values and their child dimension values from within the Dimension Valuesview.
Specifying Dimension Value SynonymsAbout synonyms
Synonyms provide a textual way to refer to a dimension value, rather than by ID alone. A dimensionvalue can have multiple synonyms. All synonyms that you assign to dimension values must be unique.
You specify the way each synonym is used by the MDEX Engine with the Search, Classify, and(Display) options:
• Enabling the Search option indicates that this synonym should be considered during record anddimension searches.You can enable search for multiple synonyms, allowing you to create a morerobust dimension value for searching.
• Enabling the Classify option indicates that this synonym should be considered when attemptingto map a source property value to this dimension value. In order for a source property value tomatch a dimension value, the dimension value’s definition must contain a synonym that:
• Is an exact text match to the source property value (or, for range and sift dimension values,has a range that includes the property value).
• Has its Classify option enabled.
By enabling classification for multiple synonyms, you increase the mapping potential for a dimensionvalue because a source property can map to any of the synonyms that have been marked withClassify. If a synonym does not have its Classify option enabled, it is ignored during mapping,regardless of whether or not it is a text match to a source property value.
• While you can have multiple synonyms for a dimension value, only one synonym can be markedfor display. This is the synonym whose text is displayed in your implementation whenever thisdimension value is shown. By default, the first synonym you create is set to be displayed, as isindicated by the parentheses around the synonym’s name, but you can set any synonym for displayin the Synonyms dialog box.
To better understand these three options, consider the following example. This dimension value hasan ID of 100 (automatically assigned by Developer Studio) and three synonyms:
Dimension Value ID = 100Synonyms =2002 SEARCH=enabled CLASSIFY=enabled DISPLAY=yes'02 SEARCH=enabled CLASSIFY=enabled DISPLAY=no02 SEARCH=enabled CLASSIFY=enabled DISPLAY=no
In this example, dimension searches on any of the following terms would return the dimension valueID 100:
Endeca ConfidentialEndeca Developer Studio Developer Studio Help
Preparing Data, Properties, and Dimensions | Preparing Your Dimension Hierarchy124

2002'0202
Records that have source property values that match any of the following would be tagged with thedimension value ID 100:
2002'0202
Finally, anytime the dimension value with an ID of 100 is displayed in the implementation, the textused to represent the dimension value is "2002".
Related LinksAbout sift dimensions on page 157
Auto sifting is an extension to autogeneration which positions newly generated dimensionvalues within an existing hierarchy.
About range dimension values on page 126Configuring a dimension to use range dimension values is useful for data that should benavigated as discrete values.
Adding synonyms to a dimension value on page 125Configure a synonym to display in the navigation controls, and associate other synonymswith a dimension value.
Adding synonyms to a dimension valueConfigure a synonym to display in the navigation controls, and associate other synonyms with adimension value.
To add a synonym to a dimension value:
1. In the Dimension Values view, double-click the dimension value's name to open it in the DimensionValue editor.
2. Click Synonyms.The Synonym editor appears.
3. In the Synonym box, type the synonym that you want to add.
4. If this synonym is to be included in record and dimension searches, check Search.
5. If this synonym is to be used during dimension value tagging, check Classify.This allows you to expand the mapping potential of a dimension value.
6. Click Add.
7. If you want this synonym to be the one that is displayed in the navigation controls, click (Display).Only this synonym is displayed, regardless of the other synonyms for the dimension value or theoriginal property value for the record.
8. (Optional) Repeat steps 2 through 7 to add additional dimension value synonyms.
You can only have one synonym marked for display.
9. Click OK to return to the Dimension Value editor.
Related LinksAbout synonyms on page 124
Endeca Developer Studio Developer Studio HelpEndeca Confidential
125Preparing Data, Properties, and Dimensions | Preparing Your Dimension Hierarchy
Synonyms provide a textual way to refer to a dimension value, rather than by ID alone. Adimension value can have multiple synonyms. All synonyms that you assign to dimensionvalues must be unique.
Creating Range Dimension ValuesAbout range dimension values
Configuring a dimension to use range dimension values is useful for data that should be navigated asdiscrete values.
For example, a price value can be organized into discrete ranges ($0 - $50, $51 - $100, $101 - $200,and so on) with a Price Range dimension.
You can create a hierarchy of range dimension values. Normally the higher levels of a dimension'shierarchy are more general and the lower levels are more specific. For a range dimension, this translatesto broader ranges at higher levels and more narrow ranges at lower levels.
This section describes the work necessary to construct range dimensions values and how to configurethe pipeline to assign the appropriate range values to records.
Related LinksConfiguring a range dimension value on page 126
You must set upper and lower bounds for a range dimension value.
Configuring a range dimension valueYou must set upper and lower bounds for a range dimension value.
Dimensions that use ranges are very similar in structure to ordinary dimensions. The dimension rootand dimension hierarchy are created using the same basic process.The difference is in the configurationof the dimension values, which have a type of Range (as opposed to Exact) and require lower andupper bounds.
To set the bounds for a range dimension value:
1. In the Dimension Value editor, double-click the dimension value you want to change to open it inthe Dimension editor.
2. From the Type list, choose Range.
3. From the Bound Type list, choose the appropriate data type:
• Floating point• Integer• String
4. In the Lower Bound text box, enter the lower number in the range. If you want the range to includethe value you enter, check Include Value in Range.
5. In the Upper Bound text box, enter the higher number in the range. If you want the range to includethe value you enter, check Include Value in Range.
6. If necessary, configure the range dimension value's synonyms.
7. If necessary, add properties to the dimension value.
8. Click OK to close the Dimension editor.
Important: Overlap in range values and misaligned ranges in concept hierarchies are notvalidated by the MDEX Engine. It is your responsibility to correctly configure range dimensions.
Related LinksAbout range dimension values on page 126
Endeca ConfidentialEndeca Developer Studio Developer Studio Help
Preparing Data, Properties, and Dimensions | Preparing Your Dimension Hierarchy126

Configuring a dimension to use range dimension values is useful for data that should benavigated as discrete values.
Properties dialog box on page 320This shows properties associated with a dimension value.You may add, modify, or removeproperties.
Synonym configuration for range dimension valuesSynonym configuration for range dimension values is the same as for ordinary dimension values.Youcan create more than one synonym for any given dimension value (although, you are still restrictedto only one displayable synonym per dimension value).
The value of the synonym does not have to correspond to the bounds. For example, a dimension valuein a Price range dimension might have a range of [0,10], and the synonyms Under $10 (set for display)and Bargains.
You should configure synonyms for classification and search using the same logic you would forordinary dimensions. For example, if an end-user searches for Bargains, it would make sense to returnthe Under $10 dimension value from the Price dimension. In this case, you would configure Under$10 for display while configuring Bargains as searchable.
In most cases, synonyms for range dimension values should have their Classify option disabled sothat only the bounds of the range itself are used for record classification and tagging. There are somecases where it is useful to combine range matching on the bounds with exact matching on the synonyms.See "Combining exact and range matching" for details.
Note: For more general information about synonyms, see "Adding synonyms to a dimensionvalue".
Related LinksCombining exact and range matching on page 128
A single dimension can contain both exact and range dimension values. During sourceproperty mapping, this type of dimension participates in both exact matching, for the exactdimension values, and range matching, for the range dimension values.
Adding synonyms to a dimension value on page 125Configure a synonym to display in the navigation controls, and associate other synonymswith a dimension value.
Classifying records with rangesThis type of matching is called range matching (as opposed to exact matching where the sourceproperty value and the dimension value must be identical).
Matching between a source property value and a range dimension value is a two-step process:
1. The source property value is converted to the type that is used for the bounds values.2. Forge computes which range the source property value falls into, and then tags the record with
that range's dimension value ID.
You configure mapping between a source property and a range dimension as you would with non-rangedimensions (see Establishing a dimension mapping). When Forge maps a source property to adimension that contains range dimension values, it uses range matching for both Normal and MustMatch modes. For the AutoGen mode, Forge still uses range matching, but when a property valuedoes not match any ranges, a new exact match dimension value is generated, not a range dimensionvalue.
See Choosing a match mode for more information on Normal, Must Match, and AutoGen match modes.
Endeca Developer Studio Developer Studio HelpEndeca Confidential
127Preparing Data, Properties, and Dimensions | Preparing Your Dimension Hierarchy

Related LinksChoosing a match mode on page 166
When Forge maps a source property value to a dimension value, the dimension value it usescan either be explicitly defined in the dimension hierarchy or automatically generated byForge.You set the type of dimension value handling, on a per mapping basis, using the MatchMode in the Dimension Mapping dialog box.
Establishing a dimension mapping on page 173You must create a dimension before you can map it to a source property.
Combining exact and range matchingA single dimension can contain both exact and range dimension values. During source propertymapping, this type of dimension participates in both exact matching, for the exact dimension values,and range matching, for the range dimension values.
If a range dimension value has synonyms that are enabled for classification, it will participate in bothexact matching (for the synonyms) and range matching (for the bounds of the range). The ability tointerweave ranges and classifiable synonyms allows you to match heterogeneous property values toa single range dimension.
For example, consider a wine rating property that is mapped to a Wine Rating dimension. Some ofthe source records have numeric ratings (56, 75, 92, and so on) while others have verbal ratings (poor,good, excellent). Using the technique described above, you can create a range dimension value thathas bounds of 90 to 100 and a classifiable synonym for 'excellent' so that all records with numericratings above 90 are classified the same as records with 'excellent' ratings.
Using NEG_INF and POS_INFSpecify either of these values as the lower or upper bound for a dimension value, to indicate a valueless than or greater than all other values in the range.
You can use two special values, NEG_INF and POS_INF, when creating the bounds for your dimensionvalues. NEG_INF indicates less than all other values while POS_INF indicates greater than all othervalues. For example, to specify a range of greater than 100, you would use a lower bound of 100 andan upper bound of POS_INF.
Likewise, less than 100 would use a lower bound of NEG_INF and an upper bound of 100.
Endeca ConfidentialEndeca Developer Studio Developer Studio Help
Preparing Data, Properties, and Dimensions | Preparing Your Dimension Hierarchy128

You can use POS_INF and NEG_INF with string values as well. For example, setting a lower boundof S, inclusive, and an upper bound of POS_INF, inclusive, would match all strings starting with S andgoing to the end of the alphabet, including values such as S, Style, Trigger, and Zzzzz.
A note about locale and encoding
The order of symbols depends on your locale setting, which is external to the Endeca software. OnUNIX, it is determined by a set of environment variables, typically LOCALE, LANG, or LC_ALL. OnWindows, there are separate system and user locales which can be set from the Regional and LanguageOptions control panel. For example, in ASCII, using [NEG_INF, A) as the bounds includes all numericsand many symbols (the '[' symbol indicates the value is inclusive while ')' indicates it is not). Using (Z,POS_INF] includes the rest of the symbols, as well as lower-case letters.This is not the case for otherencodings, such as Unicode, which intersperses symbols and numbers with letters much more thanASCII. To use NEG_INF and POS_INF effectively, you must have a good understanding of the orderof symbols in your locale's encoding.
Creating an "other" dimension valueWhen working with range and sift dimension values, it can be useful to have an Other dimension valueto capture any source property values that don't fall within the defined ranges.
To catch source property values outside of your defined ranges, you must use a Perl manipulator,placed after the property mapper, to look at each record that has been mapped, and determine if ithas any dimension values assigned to it from the range/sift dimension. If not, the Perl manipulatorshould assign the Other dimension value to the record.
Troubleshooting range dimension valuesSome reasons for issues may include the way a dimension value's bounds are configured, or assignmentof a dimension value to an incorrect range.
The following information will help you troubleshoot range dimension value issues:
• The displayable synonym for a range dimension value provides the text displayed in yourEndeca-enabled Web application’s user interface. The bounds of the range are independent ofthis text. It is the developer's responsibility to correctly align a range dimension value's synonymtext with its bounds.
Endeca Developer Studio Developer Studio HelpEndeca Confidential
129Preparing Data, Properties, and Dimensions | Preparing Your Dimension Hierarchy
• Particular attention should be paid to correctly configuring the inclusion or exclusion of boundsvalues. (This is controlled by the Include Value in Range check boxes in the Bounds frame.)Incorrectly setting this field can lead to unwanted bounds overlap or holes in ranges. For example,say you have one range from 0 to 10, and another from 10 to 20. If you included the value of 10in both ranges, your ranges would overlap (that is, the value 10 would match both ranges).Conversely, if you had the same ranges (0 to 10 and 10 to 20) but did not include the boundsvalues in either range, you would have a hole (that is, the value 10 would match neither range).
• Ranges, by nature, have an order. However, this order is not preserved by the Presentation API.You can maintain the correct order by manually ranking each dimension value.
• It is valid to create a range dimension containing dimension values with overlapping bounds. Inperforming the match, all dimension values that bound the property value will match successfullyand will be assigned to the record.
• If a dimension value cannot be precisely represented as an IEEE double, the dimension valuemight get assigned to an incorrect range.
Providing additional descriptive information for a dimension valueYou can provide name/value pairs with descriptive information about a given dimension value. Forexample, associating a key/value pair that contains a database lookup key with a dimension value willallow your Web application to access an existing database system that stores data related to thatdimension value.
Note: Do not confuse these name/value pairs with source properties or Endeca properties.They are purely for descriptive information about a given dimension value.
To associate one or more properties with a dimension value:
1. In the Dimension Value editor, click Properties.The Properties editor appears.
2. In the Property box, type the new property name.
3. In the Value box, type the property's value.
4. Click Add.
5. (Optional) Repeat steps 2 to 4 to add other name/value pairs.
6. Click OK.
Ranking Dimension ValuesControlling the order of dimension valuesIf a dimension's hierarchy has been created manually, you should also rank its dimension valuesmanually. Default dimension value ranking is used with dimensions that are auto-generated.
There are two ways to control the order in which dimension values are returned.You can:
• Manually rank dimension values.• Specify a default rank order.
In an auto-generated dimension, you generally don't have direct access to and, hence, can't manuallyrank, the dimension values (see the notes below for an exception to this statement).
Note:
• You can load auto-generated dimension values and then rank them manually. See "Editingauto-generated dimension values" for details.
• If dimension values are assigned ranks with values greater than 16,000,000, unpredictableranking behavior may result.
Endeca ConfidentialEndeca Developer Studio Developer Studio Help
Preparing Data, Properties, and Dimensions | Preparing Your Dimension Hierarchy130

• A related feature allows you to prune the list of refinement dimension values returned for aquery to those values that occur most frequently in the requested navigation state. See"Pruning dimension value refinements by frequency of occurrence" for more information.
• For information on ranking dimensions, see "Ranking dimensions manually".
Related LinksEditing auto-generated dimension values on page 137
Load an auto-generated dimension and then promote its dimension values to make themeditable.
Ranking dimensions manually on page 150Always rank dimensions manually, by placing them in ranked order in the Dimensions view.The MDEX Engine will return dimensions in this order.
Setting a default dimension value order on page 132In an auto-generated dimension, you don't have direct access to and, hence, can't manuallyrank, the dimension values. Instead, you must set a default rank order.
Pruning dimension value refinements by frequency of occurrence on page 135You can prune the list of refinement dimension values returned for a query to those valuesthat occur most frequently in the requested navigation state.
Ranking dimension values manually on page 136Manual dimension value ranking defines the order in which dimension values appear in yourWeb application and overrides any default dimension value ranking you have specified.
Ranking dimension values manuallyManual dimension value ranking defines the order in which dimension values appear in your Webapplication and overrides any default dimension value ranking you have specified.
A dimension value is only ranked relative to its siblings (that is other dimension values at the samelevel of hierarchy within the same dimension).
To manually rank dimension values:
1. If necessary, in the Dimension Values editor, expand the dimension hierarchy to display thedimension value you want to rank.
2. Click the dimension value to select it.
3. Click Up to move the value up in rank, or Down to move it down, within its own level of hierarchy.
4. Continue moving dimension values as necessary.
Note: The order in which the dimension values appear in Dimension Values view will be theorder in which they appear in your application.
Note:
• You can load auto-generated dimension values and then rank them manually. See "Editingauto-generated dimension values" for details.
• Use of ranked dimensions and dimension values does not affect MDEX Engine performance.However, indexing time is slightly increased by heavy use of this feature.
• Configuring a dimension so that its dimension values are pruned according to their popularityoverrides any manual or default dimension value ranking you may have specified.
Related Links
Endeca Developer Studio Developer Studio HelpEndeca Confidential
131Preparing Data, Properties, and Dimensions | Preparing Your Dimension Hierarchy

Working with Dimensions and Dimension Values on page 106
Editing auto-generated dimension values on page 137Load an auto-generated dimension and then promote its dimension values to make themeditable.
Loading and promoting an auto-generated dimension on page 138Load and promote an auto-generated dimension from within the Dimensions view.
Making a dimension value non-navigable (inert) on page 134Marking a dimension value as inert (or non-navigable) indicates that the dimension valueshould not be included in any navigation state, although it can be displayed in a user interfaceto help guide the end-user toward a selection.
Using dynamic business rules to promote records on page 239You implement merchandising and content spotlighting using dynamic business rules. Therules and their supporting constructs define when to promote records, which records may bepromoted, and also indicate how to display the records to application users.
About precedence rules on page 180Precedence rules provide a way to delay the display of dimensions until they offer a usefulrefinement of the navigation state.
About collapsible dimensions on page 155Non-root and non-leaf dimension values are collapsible dimensions in a hierarchy.
Setting a default dimension value orderIn an auto-generated dimension, you don't have direct access to and, hence, can't manually rank, thedimension values. Instead, you must set a default rank order.
Default dimension value ranking is used with dimensions that are auto-generated.
Note: The paragraph above describes Developer Studio's default behavior with respect toauto-generated dimensions. Developer Studio also offers features that allow you load and/orpromote an auto-generated dimension in Developer Studio so that you can edit it, includingsetting manual ranking for its values.
To set a default dimension value rank order:
1. In Dimension view, double-click the dimension you want to edit to open it in the Dimension editor.
2. From the Refinements sort order menu, choose one of the following:
• Alpha, to rank the dimension in ascending alphabetical order.• Integer, to rank the dimension in ascending numerical order.• Floating point, to rank the dimension in ascending numerical order.
3. Click OK.
To better understand the difference between the dimension value ordering types, consider an exampleof a dimension called Score that has the dimension values 1, 5, 5.5, 9, and 10. The following tableshows what the ordering would be for each type.
Floating point orderingInteger orderingAlpha orderingOriginal dimension
111-- Score
5510-- 1
Endeca ConfidentialEndeca Developer Studio Developer Studio Help
Preparing Data, Properties, and Dimensions | Preparing Your Dimension Hierarchy132

Floating point orderingInteger orderingAlpha orderingOriginal dimension
5.555-- 5
995.5-- 5.5
10109-- 9
-- 10
With integer ordering, the value 5.5 has been truncated to 5, and it is unclear which 5 is the originalversion and which is the truncated version. For some applications this may be acceptable, for othersit is not. Additionally, integer ordering is significantly faster than floating point ordering.When choosinga numeric ordering type, you must balance the needs of your application against the extra time ittakes to use floating point ordering.
Note:
• The Refinements Sort Order setting has no bearing on how records are sorted. It onlycontrols how refinement dimension values are sorted.
• Configuring a dimension so that its dimension values are pruned according to their popularityoverrides any manual or default dimension value ranking you may have specified.
Related LinksEditing auto-generated dimension values on page 137
Load an auto-generated dimension and then promote its dimension values to make themeditable.
Manual versus auto-generated dimension values
To configure multiple synonyms, collapsibility, or inertness, or to create a hierarchy for dimensionvalues, you must manually populate a dimension. Otherwise, set a dimension to auto-generate itsvalues.
Every dimension must be populated with dimension values. There are two ways to do this:
• Manually create the dimension values, and any dimension value hierarchy, using the DimensionValues editor.
• Configure the dimension to have its dimension values automatically generated from the sourcedata. Unlike manually created dimension values, which are defined during the dimension editingprocess, auto-generated dimensions must be configured when you create your sourceproperty-to-dimension mappings in your property mapper component.
You must populate a dimension manually if any of the following is true:
• You want to create a hierarchy for the dimension values (auto-generated dimensions are alwaysflat).
• You want to configure specific dimension value behavior such as multiple synonyms, collapsibility,or inertness.
If a dimension does not have either of these requirements, you can set it to auto-generate and avoidthe labor involved in manually entering dimension values.
Endeca Developer Studio Developer Studio HelpEndeca Confidential
133Preparing Data, Properties, and Dimensions | Preparing Your Dimension Hierarchy

The following section, "Working with manually created dimension values," describes how to create,edit, and configure manually created dimension values. See Choosing a match mode for details onautomatically generating dimension values.
Related LinksWorking with Dimensions and Dimension Values on page 106
About synonyms on page 124Synonyms provide a textual way to refer to a dimension value, rather than by ID alone. Adimension value can have multiple synonyms. All synonyms that you assign to dimensionvalues must be unique.
Choosing a match mode on page 166When Forge maps a source property value to a dimension value, the dimension value it usescan either be explicitly defined in the dimension hierarchy or automatically generated byForge.You set the type of dimension value handling, on a per mapping basis, using the MatchMode in the Dimension Mapping dialog box.
Making a dimension value collapsible on page 156Making a dimension value collapsible means that it is a candidate for collapsing.
Making a dimension value non-navigable (inert) on page 134Marking a dimension value as inert (or non-navigable) indicates that the dimension valueshould not be included in any navigation state, although it can be displayed in a user interfaceto help guide the end-user toward a selection.
Creating Non-navigable Dimension Values
Related LinksWorking with Dimensions and Dimension Values on page 106
Making a dimension value non-navigable (inert) on page 134Marking a dimension value as inert (or non-navigable) indicates that the dimension valueshould not be included in any navigation state, although it can be displayed in a user interfaceto help guide the end-user toward a selection.
A typical scenario on page 163This describes a typical scenario for setting dimensions and dimension values.
Making a dimension value non-navigable (inert)Marking a dimension value as inert (or non-navigable) indicates that the dimension value should notbe included in any navigation state, although it can be displayed in a user interface to help guide theend-user toward a selection.
When a user selects an inert dimension value, the navigation state is not changed, but the children ofthe dimension value are displayed for selection.
For example, if a Wineries dimension contains 1000 wineries and there is no geographic informationfrom which to create a meaningful hierarchy, you can create a non-navigable alphabetical hierarchy.The first set of refinements returned for the Winery dimension would be the non-navigable refinements(such as A, B, C, and so on). When a user selects 'A,' the resulting query returns the same record setbut the winery refinements are limited to those wineries whose name begins with A.
Note: For a common inert dimension use case scenario, see A typical scenario.
To make a dimension value non-navigable:
Endeca ConfidentialEndeca Developer Studio Developer Studio Help
Preparing Data, Properties, and Dimensions | Preparing Your Dimension Hierarchy134

1. In the Dimension Values view, double-click the name of the dimension value that you want tochange to open it in the Dimension Value editor.
2. Click Inert.
3. Click OK.
Fully implementing this feature requires additional work outside of Developer Studio. Please refer tothe Endeca Basic Development Guide for details.
Related LinksCreating Non-navigable Dimension Values on page 134
A typical scenario on page 163This describes a typical scenario for setting dimensions and dimension values.
A typical scenarioThis describes a typical scenario for setting dimensions and dimension values.
A typical scenario involves combining three features in one dimension:
• Create a sift dimension with a set of discrete ranges such as A - D, E - H, and so on. Auto siftingis an extension to autogeneration which positions newly generated dimension values within anexisting hierarchy, such that Applebrandy Wine appears under A - D, Four Grapes Merlot appearsin E - H, and so on.
• Configure the dimension values in the sift dimension as non-navigable so that they can appear inthe user interface to assist the end user but do not have any effect on the navigation state.
• Configure the dimension values in the sift dimension so that they are collapsible. A collapsiblehierarchy is an ordinary hierarchy, in which some or all of the internal (non-root and non-leaf)dimension values are flagged as potentially collapsible.The MDEX Engine automatically removes,or collapses, these dimension values when there are only a few leaves available for refinement,creating a more streamlined, user-friendly navigation experience for your users.
Related LinksCreating Non-navigable Dimension Values on page 134
Making a dimension value non-navigable (inert) on page 134Marking a dimension value as inert (or non-navigable) indicates that the dimension valueshould not be included in any navigation state, although it can be displayed in a user interfaceto help guide the end-user toward a selection.
About sift dimensions on page 157Auto sifting is an extension to autogeneration which positions newly generated dimensionvalues within an existing hierarchy.
About collapsible dimensions on page 155Non-root and non-leaf dimension values are collapsible dimensions in a hierarchy.
Pruning dimension value refinements by frequency of occurrence
You can prune the list of refinement dimension values returned for a query to those values that occurmost frequently in the requested navigation state.
You can limit the number of frequently-occurring (popular) refinements returned, as well as control theorder in which they are returned. Note that configuring a dimension so that its dimension values arepruned according to their popularity overrides any manual or default dimension value ranking you mayhave specified.
To prune dimension value refinements according to their popularity:
Endeca Developer Studio Developer Studio HelpEndeca Confidential
135Preparing Data, Properties, and Dimensions | Preparing Your Dimension Hierarchy
1. In Dimensions view, double-click the dimension you want to edit to open it in the Dimension editor.
2. Click the Dynamic Ranking tab.
3. Click Enable Dynamic Ranking to specify that this dimension should calculate which refinementsare most popular.
4. Type the number of popular refinements to return in the Maximum Dimension Values to Returnbox. The default value is 10.
5. Choose a method for sorting the popular refinements:
• Alphabetically uses whatever order you've selected for the Refinements Sort Order setting onthe main part of the Dimension editor.
• Dynamically orders the most popular refinement values according to their frequency ofappearance within a data set. Dimension values that occur more frequently are returned beforethose that occur less frequently.
6. (Optional) click Generate "More..." Dimension Value.When this option is checked, if the actual number of refinement options exceeds the number setin Maximum Dimension Values to Return, then an additional option called More is returned for thatdimension. If the user selects the More option, then the MDEX Engine will return all of the refinementoptions for that dimension. If Generate "More..." Dimension Value is not checked, only the numberof dimension values defined in Maximum Dimension Values to Return is displayed.
7. Click OK to close the Dimension editor.
Related LinksWorking with Dimensions and Dimension Values on page 106
Editing auto-generated dimension values on page 137Load an auto-generated dimension and then promote its dimension values to make themeditable.
Ranking dimension values manually
Manual dimension value ranking defines the order in which dimension values appear in your Webapplication and overrides any default dimension value ranking you have specified.
A dimension value is only ranked relative to its siblings (that is other dimension values at the samelevel of hierarchy within the same dimension).
To manually rank dimension values:
1. If necessary, in the Dimension Values editor, expand the dimension hierarchy to display thedimension value you want to rank.
2. Click the dimension value to select it.
3. Click Up to move the value up in rank, or Down to move it down, within its own level of hierarchy.
4. Continue moving dimension values as necessary.
Note: The order in which the dimension values appear in Dimension Values view will be theorder in which they appear in your application.
Note:
• You can load auto-generated dimension values and then rank them manually. See "Editingauto-generated dimension values" for details.
Endeca ConfidentialEndeca Developer Studio Developer Studio Help
Preparing Data, Properties, and Dimensions | Preparing Your Dimension Hierarchy136

• Use of ranked dimensions and dimension values does not affect MDEX Engine performance.However, indexing time is slightly increased by heavy use of this feature.
• Configuring a dimension so that its dimension values are pruned according to their popularityoverrides any manual or default dimension value ranking you may have specified.
Related LinksWorking with Dimensions and Dimension Values on page 106
Editing auto-generated dimension values on page 137Load an auto-generated dimension and then promote its dimension values to make themeditable.
Loading and promoting an auto-generated dimension on page 138Load and promote an auto-generated dimension from within the Dimensions view.
Making a dimension value non-navigable (inert) on page 134Marking a dimension value as inert (or non-navigable) indicates that the dimension valueshould not be included in any navigation state, although it can be displayed in a user interfaceto help guide the end-user toward a selection.
Using dynamic business rules to promote records on page 239You implement merchandising and content spotlighting using dynamic business rules. Therules and their supporting constructs define when to promote records, which records may bepromoted, and also indicate how to display the records to application users.
About precedence rules on page 180Precedence rules provide a way to delay the display of dimensions until they offer a usefulrefinement of the navigation state.
About collapsible dimensions on page 155Non-root and non-leaf dimension values are collapsible dimensions in a hierarchy.
Editing auto-generated dimension values
Load an auto-generated dimension and then promote its dimension values to make them editable.
Normally, auto-generated dimension values cannot be edited. They are generated by Forge behindthe scenes and maintained in state files. With an auto-generated dimension, you can configure thedimension's behavior, but you cannot configure the behavior of individual dimension values within thedimension. Endeca's load and promote functionality, however, allows you to load an auto-generateddimension and then promote its dimension values so that they become editable.
Loading versus promoting
The process of converting an auto-generated dimension has been broken down into two distinct steps,loading and promoting. Loading displays the auto-generated dimension values so that you can inspectthem before promoting them. In addition, loaded dimension values can be used in the following ways.You can:
• Use them in dynamic business rules.• Use them in precedence rules.• Modify their ranking.• Enable/disable their inert and Collapsible features.
After loading a dimension, you have the option of promoting its dimension values. Promoting adimension's values converts them to manual dimension values, with all of the editing capability of aregular manually created dimension value. Promotion is done on a per dimension basis. In other words,when you promote a dimension, all of its dimension values are promoted; you cannot pick individual
Endeca Developer Studio Developer Studio HelpEndeca Confidential
137Preparing Data, Properties, and Dimensions | Preparing Your Dimension Hierarchy
dimension values to promote and leave others to be auto-generated. It is important to note that, afterpromotion, you can no longer treat a promoted dimension as auto-generated. All configuration andediting must be performed manually at this point.
Loading and promoting requirements
Loading and promoting auto-generated dimensions has two requirements:
• You must use Endeca Workbench and EAC. Endeca Workbench stores temporary copies ofauto-generated dimensions. This is the location that Developer Studio retrieves them from duringloading.
• A dimension must be auto-generated before it can be loaded and/or promoted. This means thatyou must have already run Forge at least once before attempting to load and promoteauto-generated dimensions.
Cleaning up after promoting dimensions
After you promote auto-generated dimension values, you must run a baseline update with Forge's
--pruneAutoGen
flag. The flag cleans out any promoted dimensions from the auto-generated state files. This step isnecessary in order to avoid any potential duplicate dimensions in your output records.
Related LinksWorking with Dimensions and Dimension Values on page 106
Loading and promoting an auto-generated dimension on page 138Load and promote an auto-generated dimension from within the Dimensions view.
Cleaning up after promoting dimensions on page 139Run a baseline update to remove promoted dimensions from auto-generated state files.
Ranking dimension values manually on page 136Manual dimension value ranking defines the order in which dimension values appear in yourWeb application and overrides any default dimension value ranking you have specified.
Loading and promoting an auto-generated dimension
Load and promote an auto-generated dimension from within the Dimensions view.
• You must use Endeca Workbench and EAC. Endeca Workbench stores temporary copies ofauto-generated dimensions. This is the location that Developer Studio retrieves them from duringloading.
• A dimension must be auto-generated before it can be loaded and/or promoted. This means thatyou must have already run Forge at least once before attempting to load and promoteauto-generated dimensions.
To load and promote an auto-generated dimension:
1. In Dimensions view, select an auto-generated dimension. Auto-generated dimensions are indicatedby this icon:
2. Click Values to display the Dimension Values view.You see the root of the auto-generated dimension.
3. Click Load.The dimension is populated with the auto-generated dimension values.
4. Click Promote.
Endeca ConfidentialEndeca Developer Studio Developer Studio Help
Preparing Data, Properties, and Dimensions | Preparing Your Dimension Hierarchy138
5. Click Yes to confirm the promotion.
6. Click OK.The icons next to the promoted dimension values change to indicate that they are now treated asmanual dimensions:
Related LinksWorking with Dimensions and Dimension Values on page 106
Editing auto-generated dimension values on page 137Load an auto-generated dimension and then promote its dimension values to make themeditable.
Cleaning up after promoting dimensions on page 139Run a baseline update to remove promoted dimensions from auto-generated state files.
Ranking dimension values manually on page 136Manual dimension value ranking defines the order in which dimension values appear in yourWeb application and overrides any default dimension value ranking you have specified.
Making a dimension value non-navigable (inert) on page 134Marking a dimension value as inert (or non-navigable) indicates that the dimension valueshould not be included in any navigation state, although it can be displayed in a user interfaceto help guide the end-user toward a selection.
Using dynamic business rules to promote records on page 239You implement merchandising and content spotlighting using dynamic business rules. Therules and their supporting constructs define when to promote records, which records may bepromoted, and also indicate how to display the records to application users.
About precedence rules on page 180Precedence rules provide a way to delay the display of dimensions until they offer a usefulrefinement of the navigation state.
About collapsible dimensions on page 155Non-root and non-leaf dimension values are collapsible dimensions in a hierarchy.
Cleaning up after promoting dimensions
Run a baseline update to remove promoted dimensions from auto-generated state files.
After you promote auto-generated dimension values, you must run a baseline update with Forge's
--pruneAutoGen
flag. The flag cleans out any promoted dimensions from the auto-generated state files. This step isnecessary in order to avoid any potential duplicate dimensions in your output records.
To clean up after promoting auto-generated dimensions:
1. Make sure the --pruneAutoGen flag is specified for Forge. (This flag is specified by defaultfor new projects)
2. Send the latest instance configuration to Endeca Workbench.
3. Run a baseline update.
Related LinksWorking with Dimensions and Dimension Values on page 106
Editing auto-generated dimension values on page 137Load an auto-generated dimension and then promote its dimension values to make themeditable.
Endeca Developer Studio Developer Studio HelpEndeca Confidential
139Preparing Data, Properties, and Dimensions | Preparing Your Dimension Hierarchy
Loading and promoting an auto-generated dimension on page 138Load and promote an auto-generated dimension from within the Dimensions view.
Sending the instance configuration to Oracle Endeca Workbench on page 25You need to send your instance configuration to Oracle Endeca Workbench any time youmake and save changes to your instance configuration that you want Workbench to see.
Configuring Dimension Behavior
Enabling and Disabling DisplayEnabling dimension display in a record listYou must enable a dimension for record list display before you can access its dimension values usingthe methods in the Endeca Presentation API.
When record list display is enabled for a dimension, any records that are tagged with dimension valuesfrom that dimension display those values as part of their entry in the record list.
To enable record set display:
1. In the Dimensions view, double-click the dimension you want to change to open it in the Dimensioneditor.
2. On the General tab, check Show with Record List.
3. Click OK.
Fully implementing this feature requires additional work outside of Developer Studio. Please refer tothe Endeca Basic Development Guide for details.
Enabling dimension display on a record pageWhen record page display is enabled for a dimension, any records that are tagged with dimensionvalues from that dimension display those values as part of their entry on the record page.
Note: You must enable a dimension for record display before you can access it using themethods in the Endeca Presentation API.
To allow the dimension value for this dimension to appear on record pages:
1. In the Dimensions view, double-click the dimension you want to change to open it in the Dimensioneditor.
2. On the General tab, check Show with Record.
3. Click OK.
Fully implementing this feature requires additional work outside of Developer Studio. Please refer tothe Endeca Basic Development Guide for details.
Preventing a dimension from appearing in the navigation controlsConfiguring dimensions that are composed of many dimension values as hidden improves PresentationAPI and MDEX Engine performance to the extent that navigation query results do not have to includethese large dimensions, reducing the processing cycles and amount of data the MDEX Engine mustreturn.
You prevent a dimension from appearing in the navigation controls by designating it a hidden dimension.Hidden dimensions, like regular dimensions, are composed of dimension values that allow the userto refine a set of records. The difference between regular dimensions and hidden dimensions is thatregular dimensions are returned for both navigation and record queries, while hidden dimensions areonly returned for record queries. This means that hidden dimensions cannot be displayed as part of
Endeca ConfidentialEndeca Developer Studio Developer Studio Help
Preparing Data, Properties, and Dimensions | Preparing Your Dimension Hierarchy140

your navigation controls, but can be displayed as part of a record page (assuming the hidden dimensionis configured to render on the record page).
Also, although hidden dimensions are not rendered in the navigation UI, records are still indexed withrelevant values from these dimensions.Therefore, an end-user can search for records based on valueswithin hidden dimensions.
To configure a hidden dimension:
1. In the Dimensions view, double-click the dimension you want to change to open it in the Dimensioneditor.
2. On the General tab, check Hidden.
3. Click OK.
Hidden dimension example
Marking a dimension as hidden is useful in cases where the dimension is composed of numerousdimension values, and returning these values as navigation options does not add useful navigationinformation. Consider, for example, an Authors dimension in a bookstore. Scanning thousands ofauthors for a specific name is less useful than simply using keyword search to find the desired author.
In this case, you can configure the Authors dimension as hidden.The end-user will be able to performa keyword search on a particular author but will not be able to browse on author names in order tofind books by the author. Once the end-user has browsed to the record page for a particular book-eitherby keyword search or by navigating within other dimensions-he or she may be interested in otherbooks by the same author. Because the hidden dimension is included in the record query results, theuser can formulate a new navigation query, including the hidden dimension, that returns a list of booksby that author. This process, in effect, creates a store of books by the same author.
Fully implementing this feature requires additional work outside of Developer Studio. Please refer tothe Endeca Basic Development Guide for details.
Related LinksEnabling dimension display on a record page on page 140
When record page display is enabled for a dimension, any records that are tagged withdimension values from that dimension display those values as part of their entry on the recordpage.
Configuring Record SortThe topics in this section describe the record sorting features.
Related LinksConfiguring Endeca Property Behavior on page 82
About precomputing sort indices on a property on page 84Although users can sort on any record at any time, it is also possible to optimize a propertyfor sort in Developer Studio. This mainly controls the generation of a precomputed sort, andsecondarily enables the field to be returned in the API sort keys function.
Configuring an Endeca property for record sort on page 85The data type of an Endeca property determines the sort order of records sorted by thatproperty.
Specifying a default record sort order on page 142If an Endeca-enabled Web application does not specify sort order as part of the query, theMDEX Engine returns query results using the default sort order, if one has been specified.
Relevance ranking versus record sort on page 144
Endeca Developer Studio Developer Studio HelpEndeca Confidential
141Preparing Data, Properties, and Dimensions | Preparing Your Dimension Hierarchy

Relevance ranking is used to control the order of results that are returned in response to akeyword search. Record sorting is used to control the order of records that are returned inresponse to any type of MDEX Engine query that returns records.
Controlling the order of record results on page 144Specify an explicit sort key in the MDEX Engine query, set a default sort order, or userelevance ranking (for records returned in response to record search queries).
About geospatial sorting on page 88You can add properties to Endeca records that represent latitude and longitude pairs. Theseproperties are known as geocode properties.
Preparing your geocode source data on page 89Your geocode data must be specially formatted as floating-point values in order to besuccessfully indexed by Dgidx.
Configuring a geocode Endeca property for sort on page 90Before you can map a geocode source property, you must configure the Endeca propertythat it will map to as geocode.
Mapping, presenting, and sorting by geocode properties on page 90You map, present, and sort geocode properties using similar techniques to those you usefor alphanumeric properties.
Troubleshooting record sorts on page 145To fix issues with record sorts, check for property type, number of values assigned to eachrecord, and uniqueness of property and dimension names.
Specifying a default record sort orderIf an Endeca-enabled Web application does not specify sort order as part of the query, the MDEXEngine returns query results using the default sort order, if one has been specified.
You specify the default sort order and sort direction (ascending or descending) by using the --sortflag when running Dgidx. The --sort flag has the following syntax:
--sort "key|dir"
where key is the name of an Endeca property or dimension on which to sort and dir is either asc foran ascending order or desc for descending (if not specified, the order will be ascending).
You can also specify multiple sort keys in the format:
--sort "key_1|dir_1||key_2|dir_2||...||key_n|dir_n"
If you specify multiple sort keys, the records are sorted by the first sort key, with ties being resolvedby the second sort key, whose ties are resolved by the third sort key, and so on.
Note: If you are using the Endeca Application Controller (EAC) to control your environment,you must omit the quotation marks from the --sort flag. Instead, use the following syntax:
If you are using the Endeca Application Controller (EAC) to control your environment, you mustomit the quotation marks from the --sort flag. Instead, use the following syntax:
--sort key_1|dir_1||key_2|dir_2||...||key_n|dir_n
Agraph default sort order and displayed record lists
If a default record sort order is specified in Dgidx based on a property which is not set to show in therecord list, an Agraph managing the resulting Dgraphs will not consistently display records in the defaultsort order.
Endeca ConfidentialEndeca Developer Studio Developer Studio Help
Preparing Data, Properties, and Dimensions | Preparing Your Dimension Hierarchy142

Each child Dgraph displays its own records in the correct order, but the Agraph does not reliablypreserve this order when integrating its child record sets. The resulting record order will be closeto—but not the same as—the actual specified default sort order.
To prevent this problem, use Developer Studio's Property editor to enable the 'Show with record list'setting for the sort property. This ensures that the Agraph will determine the correct record displayorder.
Related LinksConfiguring Record Sort on page 141
The topics in this section describe the record sorting features.
Precomputing sort indices on a dimensionPrecomputing sort can save query time.
To precompute sort indices on a dimension:
1. In the Dimensions view, double-click the dimension you want to change to open its Dimensioneditor.
2. On the General tab, check Prepare Sort Offline.
3. Click OK.
Note:
• An explicit record sort key, specified as part of a MDEX Engine query, takes priority overany other type of record sorting (default sorting and relevance ranking). See "Controlling theorder of record results" for details.
• If the Web application does not specify sort order as part of the query, the MDEX Enginereturns records in the default sort order, if one has been specified. See "Specifying a defaultrecord sort order" for details.
• Record sorting only affects the order of records. It does not affect the ordering of dimensionsor dimension values that are returned for query refinement.You use dimension and dimensionvalue ranking to affect the order of dimensions and dimension values.
Fully implementing this feature requires additional work outside of Developer Studio. Please refer tothe Endeca Basic Development Guide for details.
Related LinksRanking dimension values manually on page 136
Manual dimension value ranking defines the order in which dimension values appear in yourWeb application and overrides any default dimension value ranking you have specified.
Setting a default dimension value order on page 132In an auto-generated dimension, you don't have direct access to and, hence, can't manuallyrank, the dimension values. Instead, you must set a default rank order.
Ranking dimensions manually on page 150Always rank dimensions manually, by placing them in ranked order in the Dimensions view.The MDEX Engine will return dimensions in this order.
Controlling the order of dimension values on page 130If a dimension's hierarchy has been created manually, you should also rank its dimensionvalues manually. Default dimension value ranking is used with dimensions that areauto-generated.
Specifying a default record sort order on page 142
Endeca Developer Studio Developer Studio HelpEndeca Confidential
143Preparing Data, Properties, and Dimensions | Preparing Your Dimension Hierarchy

If an Endeca-enabled Web application does not specify sort order as part of the query, theMDEX Engine returns query results using the default sort order, if one has been specified.
Relevance ranking versus record sortRelevance ranking is used to control the order of results that are returned in response to a keywordsearch. Record sorting is used to control the order of records that are returned in response to any typeof MDEX Engine query that returns records.
Relevance ranking and record sorting are closely related features but there are some distinct differences.
• Relevance ranking determines which results are more relevant to the user, based on a set of rulesyou define. For example, you can configure a rule that says "for multi-term searches, rank recordsthat match more of the terms higher than those that match fewer terms." Relevance ranking isconfigured either as part of a search interface, where each search interface has its own relevanceranking strategy, or is specified in the record search query itself.
• Unlike relevance ranking which is limited to keyword search queries, record sorting can be usedwith any type of query that returns records. Record sorting is based on a sort key. The sort keycan either be defined as a default, or identified by the Web application as part of the query.
Generally, if you have relevance ranking enabled, you would not specify a record sort key within arecord search query because record sort keys take priority over all other types of ordering, makingthe relevance ranking settings useless.
Note: A search interface is a named collection of properties and dimensions, each of which hasits Enable Record Search option checked. Search interfaces allow your end-users to search onmultiple properties and/or dimensions simultaneously. The search interface's name is used justlike a normal property or dimension when performing record searches. A record search queryon a search interface returns results that match any of the properties or dimensions in theinterface.
Related LinksConfiguring Record Sort on page 141
The topics in this section describe the record sorting features.
About relevance ranking on page 218You use relevance ranking to control the order in which record search results are displayedto the end-user.
About search interfaces on page 209Search interfaces allow your end-users to search on multiple properties and/or dimensionssimultaneously.
Specifying a default record sort order on page 142If an Endeca-enabled Web application does not specify sort order as part of the query, theMDEX Engine returns query results using the default sort order, if one has been specified.
Precomputing sort indices on a dimension on page 143Precomputing sort can save query time.
Controlling the order of record resultsSpecify an explicit sort key in the MDEX Engine query, set a default sort order, or use relevance ranking(for records returned in response to record search queries).
There are three ways of controlling the order in which records are returned:
• Specifying an explicit sort key in the MDEX Engine query, either via a URL parameter (Ns) or anENEQuery setter method (setNavActiveSortKeys())
• Specifying a default sort order (Dgidx option).
Endeca ConfidentialEndeca Developer Studio Developer Studio Help
Preparing Data, Properties, and Dimensions | Preparing Your Dimension Hierarchy144

• Using relevance ranking, for records returned in response to record search queries only. Relevanceranking settings can either be implicitly defined as part of the search interface, or explicitly definedin the search query itself.
The priority of record sorting/relevance ranking is as follows:
• If none of these three sorting methods is specified, records are returned in an arbitrary, butconsistent, order as determined by an internal ID generated by Dgidx during indexing.
• If the MDEX Engine query includes an explicit sort key parameter, that sort key overrides all othersorting and relevance ranking settings.
• If a default sort key is specified, and no other sort parameters are set, records are returned indefault sort order. Ties are broken using the arbitrary internal order described above.
• When searching against a search interface that incorporates a relevance ranking strategy, therelevance ranking strategy takes priority but ties are broken using the default sort key, if one hasbeen specified. If there is no default sort key, ties are broken using the internal ID order describedabove.
• If the MDEX Engine query includes a relevance ranking parameter, that setting overrides anyrelevance ranking strategies configured in the search interface that is being searched against.
A search interface is a named collection of properties and dimensions, each of which has its EnableRecord Search option checked. Search interfaces allow your end-users to search on multiple propertiesand/or dimensions simultaneously. The search interface's name is used just like a normal property ordimension when performing record searches. A record search query on a search interface returnsresults that match any of the properties or dimensions in the interface.
Note: Fully implementing this feature requires additional work outside of Developer Studio.Please refer to the Endeca Basic Development Guide for details.
Related LinksConfiguring Record Sort on page 141
The topics in this section describe the record sorting features.
About relevance ranking on page 218You use relevance ranking to control the order in which record search results are displayedto the end-user.
About precomputing sort indices on a property on page 84Although users can sort on any record at any time, it is also possible to optimize a propertyfor sort in Developer Studio. This mainly controls the generation of a precomputed sort, andsecondarily enables the field to be returned in the API sort keys function.
Troubleshooting record sortsTo fix issues with record sorts, check for property type, number of values assigned to each record,and uniqueness of property and dimension names.
If the records returned with a navigation request do not seem to respect the sort key parameter, hereare some things to check:
• Was the Endeca property specified as a numeric when it is actually alphanumeric, or vice versa?In this case, the MDEX Engine returns a valid response, but the sorting may not be what youexpected. Also, if you are sorting by a dimension, then the sort is always alphabetic.
• In general, properties and dimensions that are enabled for sorting should only have one valueassigned per record. If a record has multiple property values or dimension values for a singleEndeca property or dimension, the MDEX Engine sorts the records based on the first valueassociated with the key. If the application is displaying any value other than the first one, then therecords may not appear to be sorted correctly.
Endeca Developer Studio Developer Studio HelpEndeca Confidential
145Preparing Data, Properties, and Dimensions | Preparing Your Dimension Hierarchy
• If an application has properties and dimensions with the same name and a sort is requested bythat name, the MDEX Engine will arbitrarily pick either the property or dimension for sorting. Ingeneral, all properties and dimensions should have a unique name.
Related LinksConfiguring Record Sort on page 141
The topics in this section describe the record sorting features.
Enabling SearchEnabling a dimension for record searchRecord search finds all records in an Endeca application that are tagged with a dimension value orEndeca property that matches a term the user provides. In order for a dimension to be consideredduring record searches, you must enable it for record search.
To enable record search for a dimension:
1. In the Dimensions view, double-click the dimension you want to change to open it in the Dimensioneditor.
2. On the Search tab, check Enable Record Search.
3. Click OK.
Fully implementing search features requires additional work outside of Developer Studio. Please referto the Endeca Basic Development Guide for details.
Dimension Search Configuration editorYou use the Dimension Search Configuration editor to configure search options for all dimensions inyour project.
The Dimension Search Configuration editor does not specify the same options as the Search tab ofthe Dimension editor. The Search tab of the Dimension editor affects record searches.
The Dimension Search Configuration editor specifies the following information:
DescriptionOption
When checked, indicates that Dgidx builds an indexthat describes word position with respect to other
Enable positional indexing
words in a dimension. A word position index ishighly recommended when using the relevanceranking Phrase module and also recommended toimprove the speed of phrase search.
When checked, indicates that a user query cancontain a wildcard character (*) to match againstfragments of words in a dimension value.
Enable wildcard search
When checked, the results of a dimension searchreturn only the highest ancestor dimension value.
Return highest ancestor dimension
This means that if both red zinfandel and red winematch a search query for 'red' and this checkboxis enabled, only the red wine dimension value isreturned. When unchecked, then both dimensionvalues are returned.
Endeca ConfidentialEndeca Developer Studio Developer Studio Help
Preparing Data, Properties, and Dimensions | Preparing Your Dimension Hierarchy146

DescriptionOption
When checked, indicates that certain inert(non-navigable) dimension values, such as
Include inert dimension values
dimension roots, are also returned as the result ofa dimension search query.
Expanding search to include dimension hierarchyFor both record and dimension search, you can expand the search so that a dimension value's searchcontext includes not only its own searchable synonyms but also any searchable synonyms of itsancestors. This type of expanded search is called "hierarchical search."
Record search and dimension search each have their own option to enable this feature.
Hierarchical search during record searches
Consider an example where Record A is tagged with Merlot from the Wine Type dimension below,and the end-user has searched for "red." Without hierarchical search enabled, Record A would not bereturned as part of the search results. With hierarchical search enabled, it would.
Wine Type
• Red
• Zinfandel
• Merlot
Hierarchical search during dimension searches
For example, in the Wine Type dimension below, a search on " red" would return both Zinfandel andMerlot, in addition to Red, with hierarchical dimension search enabled.
Wine Type
• Red
• Zinfandel
• Merlot
Using hierarchical search during dimension searchesNormally, dimension search considers only the text in individual dimension value synonyms whensearching for dimension values that match a user's search term(s). With hierarchical search enabled,the MDEX Engine considers ancestor dimension values as well.
To enable hierarchical search during dimension searches:
1. In the Dimensions view, double-click the dimension you want to change to open it in the Dimensioneditor.
2. On the General tab, check Search Hierarchy for Dimension Search.
3. Click OK.
Fully implementing search features requires additional work outside of Developer Studio. Please referto the Endeca Basic Development Guide for details.
Endeca Developer Studio Developer Studio HelpEndeca Confidential
147Preparing Data, Properties, and Dimensions | Preparing Your Dimension Hierarchy

Using hierarchical search during record searchesNormally, record search only returns a record if the specific dimension value tagged to the recordmatches the search term(s).When hierarchical search is enabled, the MDEX Engine considers ancestordimension values as well.
To enable hierarchical search during record searches:
1. In the Dimensions view, double-click the dimension you want to change to open it in the Dimensioneditor.
2. On the Search tab, check Search Hierarchy for Record Search.
3. Click OK.
Fully implementing search features requires additional work outside of Developer Studio. Please referto the Endeca Basic Development Guide for details.
Using Range Filtering
Related LinksConfiguring Endeca Property Behavior on page 82
Using range filters on page 148A range filter allows an Endeca-enabled Web application to select a subset of the total datasetfor display, based on an arbitrary, dynamic range that uses an Endeca property or dimensionas the filter key.
Enabling a property for range filtering on page 93Properties of numeric, geocode, time, datetime, and duration type may be enabled for rangefiltering.
About geospatial filtering on page 93Result sets that have geocode properties can be sorted by the distance of the values of thegeocode properties to a given reference point.
Configuring a geocode Endeca property for filtering on page 94
Using range filtersA range filter allows an Endeca-enabled Web application to select a subset of the total dataset fordisplay, based on an arbitrary, dynamic range that uses an Endeca property or dimension as the filterkey.
Navigation queries that use a range filter return only those records that are included in the selecteddata subset, along with the refinement dimension values that are appropriate for the filtered records.Range filters are supported for:
• Properties of type integer, floating point, geocode, datetime, time, or duration.• Dimensions of type Integer or Floating Point.
For values of properties and dimensions of type Floating point, you can specify values using bothdecimal (0.00...68), and scientific notation (6.8e-10).
It is important to remember that range filters are simply modifiers for a navigation query. The rangefilter acts in the same manner as a dimension value, even though it is not a specific system-defineddimension value. Consider the following records and examples:
Sample Property(Description)
Sample Property(Price)
Sample Dimension Value(Wine_Type)
Record ID
Dark ruby in color, withextremely ripe…
10Red (Dim Value 101)1
Endeca ConfidentialEndeca Developer Studio Developer Studio Help
Preparing Data, Properties, and Dimensions | Preparing Your Dimension Hierarchy148

Sample Property(Description)
Sample Property(Price)
Sample Dimension Value(Wine_Type)
Record ID
Dense, rich and complexdescribes this '96California…
12Red (Dim Value 101)2
Dense and vegetal, withcelery, pear and spiceflavors…
19White (Dim Value 102)3
Big, ripe and generous,layered with honey…
20Other (Dim Value 103)4
Example 1
When making a navigation request with a range filter specifying that the Price property is greater than15 (with no dimension values specified) the following Navigation object is returned:
• 2 records (records 3 and 4)• 2 refinement dimension values (White and Other)
Example 2
When making a navigation request with the Red dimension value specified (Dim Value 101) and arange filter specifying a Price less than 11, the following Navigation object is returned:
• 1 record (record 1)• (No additional refinements)
Valid functions that can be used with range filters include:
• Less than• Less than or equal to• Greater than• Greater than or equal to• Between
Related LinksUsing Range Filtering on page 148
Enabling a dimension for range filteringMake sure your dimension is of Numeric type to enable it for range filtering.
In order to use a dimension as the key for a range filter, you must make sure your dimension is of acompatible type. Range filters are supported for dimensions of Numeric type with Integer or Floatingpoint values.
You may also use an Endeca property as the key for a range filter.
To enable a dimension for range filtering:
1. In the Dimensions view, double-click the dimension you want to change to open it in the Dimensioneditor.
2. In the Refinements Sort Order list, select a type that is compatible with range filters: Integer orFloating point.
Endeca Developer Studio Developer Studio HelpEndeca Confidential
149Preparing Data, Properties, and Dimensions | Preparing Your Dimension Hierarchy

For values of dimensions of type Floating point, you can specify values using both decimal (0.00...68),and scientific notation (6.8e-10). Be careful of dollar signs or other characters in dimension valuesthat would prevent a dimension from being defined as numeric.
3. Click OK.
Fully implementing this feature requires additional work outside of Developer Studio. Please refer tothe Endeca Basic Development Guide for details.
Related LinksEnabling a property for range filtering on page 93
Properties of numeric, geocode, time, datetime, and duration type may be enabled for rangefiltering.
Enabling Wildcard Search
Related LinksConfiguring Endeca Property Behavior on page 82
Enabling wildcard search for an Endeca property on page 97Wildcard searching allows user queries that contain a wildcard character (*) to match againstfragments of words in a property value.You must enable each property that you want availablefor wildcard searching.
Enabling wildcard search for a dimensionWildcard searching allows user queries that contain a wildcard character (*) to match against fragmentsof words in dimension and its child dimension values.
You can either enable each dimension that you want available for wildcard searching or you can enableall dimensions using the Dimension Search Configuration editor.
To enable wildcard searching for a dimension:
1. In the Dimensions view, double-click the dimension you want to change.
2. In the Dimension editor, select the Search tab.
3. Check Enable Record Search.
4. Check Enable Wildcard Search.
5. Click OK.
Fully implementing this feature requires additional work outside of Developer Studio. Please refer tothe Endeca Basic Development Guide for details.
Ranking DimensionsRanking dimensions manuallyAlways rank dimensions manually, by placing them in ranked order in the Dimensions view.The MDEXEngine will return dimensions in this order.
Note: The use of manually ranked dimensions does not affect MDEX Engine performance.However, indexing time is slightly increased by heavy use of this feature.
To rank your dimensions:
1. In the Dimensions view, click the Name column header to cycle the order of the dimension sort sothat the dimensions are displayed in rank order (you'll see Sort by Rank in the lower left corner ofthe Dimensions view).
2. Select the dimension whose rank you want to change.
Endeca ConfidentialEndeca Developer Studio Developer Studio Help
Preparing Data, Properties, and Dimensions | Preparing Your Dimension Hierarchy150

3. Click the Up or Down buttons to move the dimension to the correction position.
Related LinksEditing auto-generated dimension values on page 137
Load an auto-generated dimension and then promote its dimension values to make themeditable.
Counting the Number of Records Per Dimension ValueAbout dimension statisticsDimension statistics count the number of records, for a given result set, that are tagged with each ofa dimension's dimension values.
Giving the end-user an indication of the number of records that will be returned for each refinementenhances an Endeca application's navigation experience by providing more context to the end-userat each point during the navigation. In the example illustration, the query for differential crawl hasseven results. Within the Documents dimension, two of the results are tagged with Developer StudioHelp, one is tagged with Features Guide, one is tagged with Release Notes, and three are taggedwith XML Reference.
Dimension statistics are returned as a property on each dimension value. See the Endeca BasicDevelopment Guide for details on accessing and displaying dimension statistics properties.
Endeca Developer Studio Developer Studio HelpEndeca Confidential
151Preparing Data, Properties, and Dimensions | Preparing Your Dimension Hierarchy
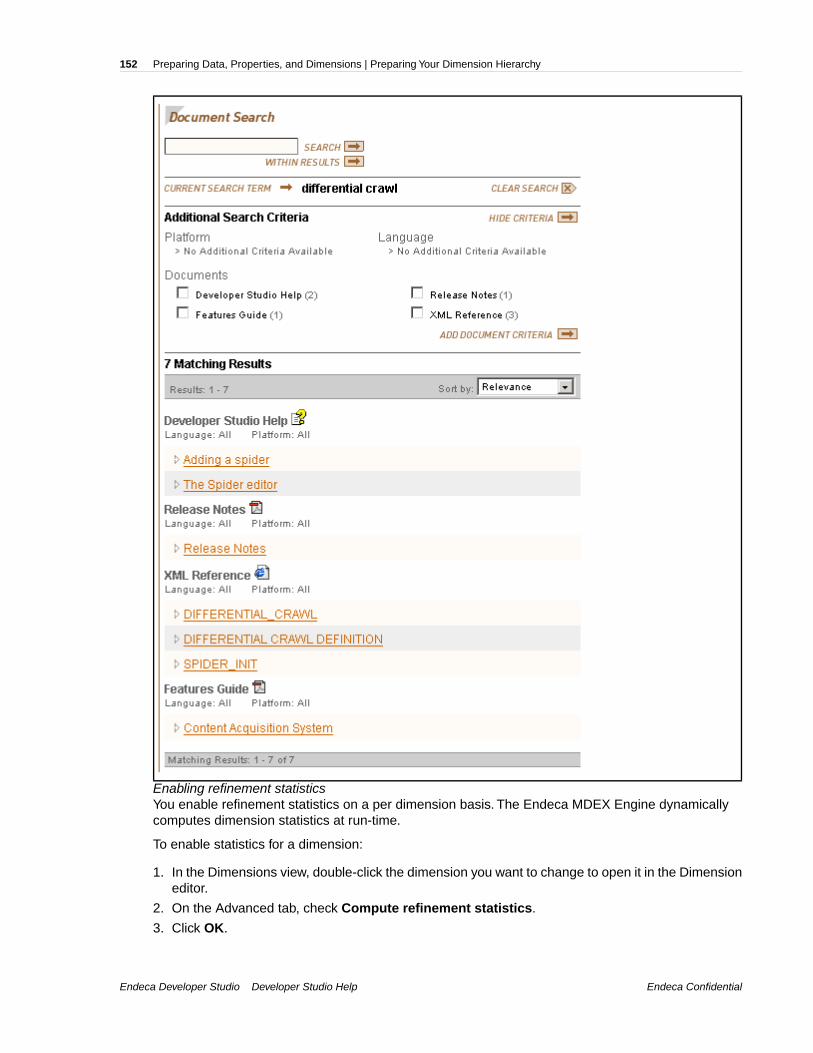
Enabling refinement statisticsYou enable refinement statistics on a per dimension basis. The Endeca MDEX Engine dynamicallycomputes dimension statistics at run-time.
To enable statistics for a dimension:
1. In the Dimensions view, double-click the dimension you want to change to open it in the Dimensioneditor.
2. On the Advanced tab, check Compute refinement statistics.
3. Click OK.
Endeca ConfidentialEndeca Developer Studio Developer Studio Help
Preparing Data, Properties, and Dimensions | Preparing Your Dimension Hierarchy152
Fully implementing this feature requires additional work outside of Developer Studio. For details, referto "Displaying refinement statistics" in the Endeca Basic Development Guide.
Enabling Record Rollups
Related LinksConfiguring Endeca Property Behavior on page 82
About aggregated Endeca records on page 153Aggregated records allow you to treat a collection of separate records as one if the rollup keyis the same for any number of records.
About automatic phrasing on page 309When an application user provides individual search terms in a query, the automatic phrasingfeature groups those individual terms into a search phrase and returns query results for thephrase.
Enabling a property for record rollup on page 96In order to use an Endeca property as a rollup key, you must enable its Rollup attribute.
About aggregated Endeca recordsAggregated records allow you to treat a collection of separate records as one if the rollup key is thesame for any number of records.
An aggregated record is a collection of individual Endeca records that have been rolled up based ona rollup key (an Endeca property or dimension name). All records in the current record set that havethe same value for the rollup key are collected together into an aggregated record. For example, rollingup on a Name key causes all wines in the current record set that have the value 'My Red Wine' forthe Name key to be rolled up into one aggregated record.
Commonly, aggregated records are used to eliminate duplicate display entries. For example, in amusic store catalog, an album by the same title may exist in several formats, with multiple prices. Eachtitle is represented in the MDEX Engine as a distinct record. However, from a business perspective,it might be useful to treat these separate records as a single record by creating an aggregate record.
Record aggregation affects the current record set only. In other words, if you have 10,000 Endecarecords total but only 3,000 are displayed in the current record set, then the aggregation affects those3,000 records only.
The aggregated records feature requires that each record should have at most one value from thedimension or Endeca property that has been specified as the rollup key. Also, if an Endeca record hasa unique value for the rollup key, it is 'rolled up' into an aggregated record that contains only onesub-record.
Note: Fully implementing this feature requires additional work outside of Developer Studio.Please refer to the Endeca Basic Development Guide for details.
Related LinksEnabling Record Rollups on page 153
Enabling a dimension for record rollupsIn order to use a dimension as a rollup key, you must enable its Rollup attribute.
To enable record rollup for a dimension:
1. In the Dimensions view, double-click the dimension you want to change to open it in the Dimensioneditor.
2. On the Advanced tab, check Enable for Rollup.
Endeca Developer Studio Developer Studio HelpEndeca Confidential
153Preparing Data, Properties, and Dimensions | Preparing Your Dimension Hierarchy

3. Click OK .
Fully implementing this feature requires additional work outside of Developer Studio. Please refer tothe Endeca Basic Development Guide for details.
Enabling Multi-Select AND or OR DimensionsAbout multi-select dimensionsBy default, the Endeca MDEX Engine only permits a single dimension value from any given dimensionto be added to the navigation state. For some applications, however, it may be useful to allow the userto select more than one dimension value from a dimension.
After a user selects a leaf refinement from any dimension, that dimension is removed from the list ofdimensions available for refinement in the query results.
For example, it might be useful to give a user the ability to show wines that have a flavor of Apple ANDApricot, or movies that star Cary Grant OR Clark Gable.This is accomplished by tagging the dimensionas multi-select AND or OR , respectively.
Related LinksEnabling a dimension for multi-select on page 154
Enable a dimension for multi-select AND or OR from the Advanced tab of the editor for thatdimension.
Enabling a dimension for multi-selectEnable a dimension for multi-select AND or OR from the Advanced tab of the editor for that dimension.
To enable multi-select AND or OR:
1. In the Dimensions view, double-click the dimension you want to change to open it in the Dimensioneditor.
2. Click the Advanced tab.
3. In the Multiselect frame, choose None, Or, orAnd.
4. Click OK.
5. If you are enabling multi-select OR for a flat dimension, no more configuration is required. If youare enabling multi-select OR for a hierarchical dimension, you must configure all non-leaf dimensionvalues as Inert. See "Multi-select OR and hierarchical dimensions" for details.
Related LinksAbout multi-select dimensions on page 154
By default, the Endeca MDEX Engine only permits a single dimension value from any givendimension to be added to the navigation state. For some applications, however, it may beuseful to allow the user to select more than one dimension value from a dimension.
Multi-select OR and hierarchical dimensions on page 154In a hierarchical dimension, you must configure all non-leaf dimension values to be inert, ornon-navigable, to prevent them from appearing in the navigation query.
Multi-select OR and hierarchical dimensionsIn a hierarchical dimension, you must configure all non-leaf dimension values to be inert, ornon-navigable, to prevent them from appearing in the navigation query.
Multi-select OR queries are restricted to leaf dimension values. In a flat dimension, all possiblerefinements are leaf dimension values, so no extra configuration is necessary.
Related LinksEnabling a dimension for multi-select on page 154
Endeca ConfidentialEndeca Developer Studio Developer Studio Help
Preparing Data, Properties, and Dimensions | Preparing Your Dimension Hierarchy154
Enable a dimension for multi-select AND or OR from the Advanced tab of the editor for thatdimension.
Working with Large Dimension HierarchiesEnabling Collapsible Dimensions
About collapsible dimensionsNon-root and non-leaf dimension values are collapsible dimensions in a hierarchy.
A collapsible hierarchy is an ordinary hierarchy, in which some or all of the internal (non-root andnon-leaf) dimension values are flagged as potentially collapsible. The MDEX Engine automaticallyremoves, or collapses, these dimension values when there are only a few leaves available forrefinement, creating a more streamlined, user-friendly navigation experience for your users.
For example, a dimension containing many state names could have a collapsible hierarchy introducedto group the names alphabetically. At query time, the available refinements are determined by thedimension values tagged to the records in the current navigation state. If there are many refinementvalues, it is easier for a user to select first a letter range, then a letter, and then the state name theywant. But if there are only a few values, it is easier for the user to look at a brief list and select thestate name directly. In this case, the letter-based dimension values can be collapsed, or removed, sothat only the list of state names is displayed.
Dimension values that are configured as collapsible have the potential to be collapsible. Whether ornot a dimension value is actually collapsed is controlled by the collapsible dimension threshold.
• Collapsible dimension values participate in matching in the same way as regular dimension values.• For a common collapsible dimension use case scenario, see A typical scenario.
Note: Collapsible dimension values participate in matching in the same way as regular dimensionvalues.
Related LinksA typical scenario on page 163
This describes a typical scenario for setting dimensions and dimension values.
About sift dimensions on page 157Auto sifting is an extension to autogeneration which positions newly generated dimensionvalues within an existing hierarchy.
A typical scenario on page 163This describes a typical scenario for setting dimensions and dimension values.
Setting a collapsible dimension threshold on page 156The collapsible dimension threshold determines how many refinement values must exist fora set of query results in order for dimension value collapsing to occur.
Making a dimension value collapsible on page 156Making a dimension value collapsible means that it is a candidate for collapsing.
Creating a collapsible dimension hierarchyThis feature requires that you make all dimension values collapsible, and set a collapsible dimensionthreshold.
To create a collapsible hierarchy:
1. Create the complete hierarchy as you would for a normal dimension.
2. Make the internal dimension values collapsible.
3. Set a collapsible dimension threshold.
Endeca Developer Studio Developer Studio HelpEndeca Confidential
155Preparing Data, Properties, and Dimensions | Preparing Your Dimension Hierarchy
Note: You will probably want to rank the collapsible dimension values as well, to ensure thatthey are presented to the user in an order that makes sense.
Making a dimension value collapsibleMaking a dimension value collapsible means that it is a candidate for collapsing.
See "About collapsible dimensions" for details.
To make a dimension value collapsible:
1. In the Dimension Values view, double-click the name of the dimension value that you want tochange to open it in the Dimension Value editor.
2. Click Collapsible.
3. Click OK.
Related LinksAbout collapsible dimensions on page 155
Non-root and non-leaf dimension values are collapsible dimensions in a hierarchy.
Setting a collapsible dimension thresholdThe collapsible dimension threshold determines how many refinement values must exist for a set ofquery results in order for dimension value collapsing to occur.
• If the number of refinement values is less than or equal to the threshold, dimension values thathave been configured as potentially collapsible are collapsed (that is, removed from the hierarchy).This creates a shallower hierarchy with fewer conceptual levels of refinement.
• If the number of refinement values is greater than the threshold, dimension values that have beenconfigured as potentially collapsible are not collapsed. They remain in the hierarchy, creating adeeper hierarchy with more conceptual levels of refinement.
To set a collapsible dimension threshold:
1. In the Dimensions view, double-click the dimension you want to change to open it in the Dimensioneditor.
2. In the Advanced tab, enter the collapsing threshold, in terms of number of refinement values, inthe Collapsible Dimension Threshold text box.
3. Click OK.
A typical scenarioThis describes a typical scenario for setting dimensions and dimension values.
A typical scenario involves combining three features in one dimension:
• Create a sift dimension with a set of discrete ranges such as A - D, E - H, and so on. Auto siftingis an extension to autogeneration which positions newly generated dimension values within anexisting hierarchy, such that Applebrandy Wine appears under A - D, Four Grapes Merlot appearsin E - H, and so on.
• Configure the dimension values in the sift dimension as non-navigable so that they can appear inthe user interface to assist the end user but do not have any effect on the navigation state.
• Configure the dimension values in the sift dimension so that they are collapsible. A collapsiblehierarchy is an ordinary hierarchy, in which some or all of the internal (non-root and non-leaf)dimension values are flagged as potentially collapsible.The MDEX Engine automatically removes,or collapses, these dimension values when there are only a few leaves available for refinement,creating a more streamlined, user-friendly navigation experience for your users.
Endeca ConfidentialEndeca Developer Studio Developer Studio Help
Preparing Data, Properties, and Dimensions | Preparing Your Dimension Hierarchy156

Related LinksCreating Non-navigable Dimension Values on page 134
Making a dimension value non-navigable (inert) on page 134Marking a dimension value as inert (or non-navigable) indicates that the dimension valueshould not be included in any navigation state, although it can be displayed in a user interfaceto help guide the end-user toward a selection.
About sift dimensions on page 157Auto sifting is an extension to autogeneration which positions newly generated dimensionvalues within an existing hierarchy.
About collapsible dimensions on page 155Non-root and non-leaf dimension values are collapsible dimensions in a hierarchy.
Creating Sift DimensionsAbout sift dimensions
Auto sifting is an extension to autogeneration which positions newly generated dimension values withinan existing hierarchy.
The hierarchy must be a sift hierarchy, which is a normal hierarchy that contains dimension values oftype Sift. As with autogeneration, the dimension mapping in the property mapper must be configuredfor auto generation.
Configuring sift dimension values
A sift dimension value must be configured as type Sift and specify a range. In the illustration below,all of the dimension values except the root and Quintana-Roo are sift dimension values.The first layerof dimension values after the root specify ranges that span a set of letters, A to D, E to H, and so on.The set of child dimension values below Q-T are also ranges, although they aren't as obvious. The Qdimension value includes all strings that are greater than Q but less than R. Q, therefore, includesstrings such as Q, QWERTY, QUEEN, QQQ, QZZZ but not PEZ or RA.
Note: Although the range for a sift dimension value is specified the same way as for a rangedimension value, sift and range are separate, and mutually exclusive, features.
Sifting an auto-generated dimension value
When a new dimension value is auto-generated, it sifts down the hierarchy according to the ranges itmatches. For example, in the illustration above, the auto-generated Quintana-Roo dimension value
Endeca Developer Studio Developer Studio HelpEndeca Confidential
157Preparing Data, Properties, and Dimensions | Preparing Your Dimension Hierarchy

would first sift into Q-T, and then into Q. The sifting of auto-generated dimension values is handledaccording to these rules:
• Dimension values that do not match any sift range in the hierarchy are added as children of thedimension root.
• Dimension values that match the ranges of multiple children of a sift dimension value are placedunder the first child they match.
• Dimension values that do not match any child of a sift dimension value are placed under the deepestvalue they match.
It is a good idea to configure the last child under each sift dimension value as a catch-all, with a rangeof NEG_INF to POS_INF , inclusive. That way, auto-generated dimension values that do not matchany other range can be gathered under an Other dimension value.
Sift dimension values and matching
Sift dimension values do not participate in matching. Even though the range Q-T appears within thedimension above, the property value Quintana-Roo will not match it. Following the match failure, anew Quintana-Roo dimension value is automatically generated and sifted through the hierarchy. Anyfurther properties with the value Quintana-Roo will match this auto-generated dimension value.
Sift hierarchy recommendations
Sift hierarchies are frequently made collapsible. A collapsible hierarchy is a form of conditional hierarchyin which some or all of the internal (non-root and non-leaf) dimension values are flagged as potentiallycollapsible. The MDEX Engine automatically removes, or collapses, these dimension values whenthere are only a few leaves available for refinement, creating a more streamlined, user-friendly navigationexperience for your users. See About collapsible dimensions for details.
In addition, sift dimension values are typically ranked, to ensure that the ranges appear in order duringnavigation.
Note: All dimension values in a sift dimension must be specified as type Sift or there may be unexpectedbehavior.
Saving autosift state information
At the end of each data processing run, the dimension server saves the state of an auto sift dimension,just like any other auto-generated dimension. At the start of the next run, the sift hierarchy may beupdated; therefore, all of the previously auto-generated dimension values are re-sifted into the newsift hierarchy. This ensures that they are positioned correctly within the hierarchy, even when thehierarchy has been changed since it was initially generated.
Note: For a common sift dimension use case scenario, see A typical scenario.
Related LinksChoosing a match mode on page 166
When Forge maps a source property value to a dimension value, the dimension value it usescan either be explicitly defined in the dimension hierarchy or automatically generated byForge.You set the type of dimension value handling, on a per mapping basis, using the MatchMode in the Dimension Mapping dialog box.
About collapsible dimensions on page 155Non-root and non-leaf dimension values are collapsible dimensions in a hierarchy.
Ranking dimension values manually on page 136
Endeca ConfidentialEndeca Developer Studio Developer Studio Help
Preparing Data, Properties, and Dimensions | Preparing Your Dimension Hierarchy158

Manual dimension value ranking defines the order in which dimension values appear in yourWeb application and overrides any default dimension value ranking you have specified.
A typical scenario on page 163This describes a typical scenario for setting dimensions and dimension values.
Creating a sift dimension hierarchy on page 159Defining a sift dimension is a two-step process. First, you create the sift dimension hierarchy,then you specify that the dimension should use auto-generation during its mapping process.
Creating a sift dimension hierarchyDefining a sift dimension is a two-step process. First, you create the sift dimension hierarchy, thenyou specify that the dimension should use auto-generation during its mapping process.
The procedure below shows you how to create a sift dimension for a hierarchy.
To create a sift dimension:
1. In the Dimensions view, create a new dimension.
2. Add dimension values to the dimension and define them as Sift by doing the following:
a) In the Type list, choose Sift.b) From the Bound Type list, choose one of the following: String, Floating point, or Integer.c) In the Lower Bound text box, enter the lower number in the range.
Note: If you want the range to include the number you enter, check Include value inrange.
d) In the Upper Bound text box, enter the higher number in the range. If you want the range toinclude the number you enter, check Include Value in Range. This illustration shows how to setthe range for the Q - T dimension value.
Note: By specifying R as the upper bound for the Q dimension value, but not includingit in the range, we ensure that all strings that begin with Q are included in the range, suchas Queen, Quick, QWERTY, and so on.
Endeca Developer Studio Developer Studio HelpEndeca Confidential
159Preparing Data, Properties, and Dimensions | Preparing Your Dimension Hierarchy
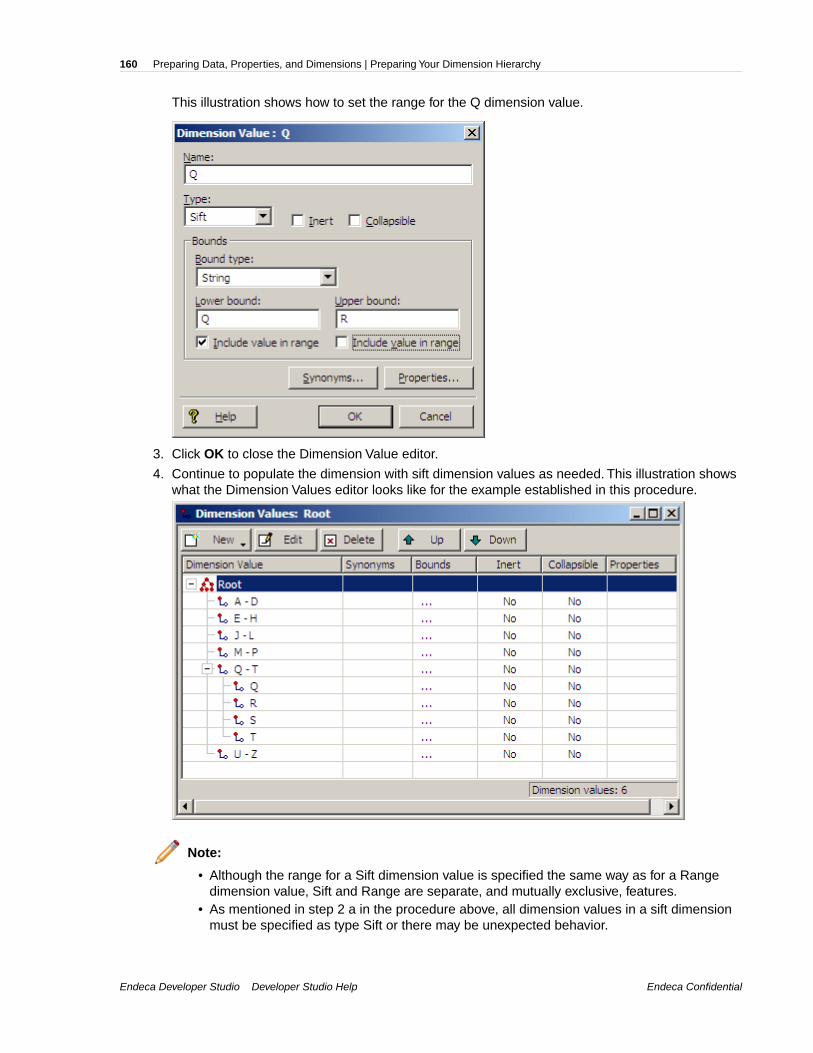
This illustration shows how to set the range for the Q dimension value.
3. Click OK to close the Dimension Value editor.
4. Continue to populate the dimension with sift dimension values as needed. This illustration showswhat the Dimension Values editor looks like for the example established in this procedure.
Note:
• Although the range for a Sift dimension value is specified the same way as for a Rangedimension value, Sift and Range are separate, and mutually exclusive, features.
• As mentioned in step 2 a in the procedure above, all dimension values in a sift dimensionmust be specified as type Sift or there may be unexpected behavior.
Endeca ConfidentialEndeca Developer Studio Developer Studio Help
Preparing Data, Properties, and Dimensions | Preparing Your Dimension Hierarchy160
• If a dimension value cannot be precisely represented as an IEEE double, the dimensionvalue might get assigned to an incorrect range.
Related LinksAbout sift dimensions on page 157
Auto sifting is an extension to autogeneration which positions newly generated dimensionvalues within an existing hierarchy.
About range dimension values on page 126Configuring a dimension to use range dimension values is useful for data that should benavigated as discrete values.
Creating dimensions on page 110Create new dimensions from the Dimensions view, on the Project tab.
Adding dimension values on page 121Adding or editing a dimension value affects how records are classified, and which recordsare available under a given dimension value in the client browser.
Configuring dimension values on page 122Set a dimension value's type, navigability, add synonyms, or associate properties to thedimension value.
Establishing a dimension mapping on page 173You must create a dimension before you can map it to a source property.
Defining a sift dimension as autogeneratedUpon creating a sift dimension hierarchy, you may enable Auto Generate as the match mode for a siftdimension.
If you have not already done so, create a sift dimension hierarchy.
To define the sift dimension as autogenerated:
1. In the pipeline diagram, double-click your property mapper component to open it in the PropertyMapper editor.
2. Click Mappings.
3. Create a dimension mapping for your sift dimension, being sure to choose Auto Generate as thematch mode.
Using NEG_INF and POS_INFSpecify either of these values as the lower or upper bound for a dimension value, to indicate a valueless than or greater than all other values in the range.
You can use two special values, NEG_INF and POS_INF, when creating the bounds for your dimensionvalues. NEG_INF indicates less than all other values while POS_INF indicates greater than all othervalues. For example, to specify a range of greater than 100, you would use a lower bound of 100 andan upper bound of POS_INF.
Endeca Developer Studio Developer Studio HelpEndeca Confidential
161Preparing Data, Properties, and Dimensions | Preparing Your Dimension Hierarchy

Likewise, less than 100 would use a lower bound of NEG_INF and an upper bound of 100.
You can use POS_INF and NEG_INF with string values as well. For example, setting a lower boundof S, inclusive, and an upper bound of POS_INF, inclusive, would match all strings starting with S andgoing to the end of the alphabet, including values such as S, Style, Trigger, and Zzzzz.
A note about locale and encoding
The order of symbols depends on your locale setting, which is external to the Endeca software. OnUNIX, it is determined by a set of environment variables, typically LOCALE, LANG, or LC_ALL. OnWindows, there are separate system and user locales which can be set from the Regional and LanguageOptions control panel. For example, in ASCII, using [NEG_INF, A) as the bounds includes all numericsand many symbols (the '[' symbol indicates the value is inclusive while ')' indicates it is not). Using (Z,
Endeca ConfidentialEndeca Developer Studio Developer Studio Help
Preparing Data, Properties, and Dimensions | Preparing Your Dimension Hierarchy162

POS_INF] includes the rest of the symbols, as well as lower-case letters.This is not the case for otherencodings, such as Unicode, which intersperses symbols and numbers with letters much more thanASCII. To use NEG_INF and POS_INF effectively, you must have a good understanding of the orderof symbols in your locale's encoding.
Creating an "other" dimension valueWhen working with range and sift dimension values, it can be useful to have an Other dimension valueto capture any source property values that don't fall within the defined ranges.
To catch source property values outside of your defined ranges, you must use a Perl manipulator,placed after the property mapper, to look at each record that has been mapped, and determine if ithas any dimension values assigned to it from the range/sift dimension. If not, the Perl manipulatorshould assign the Other dimension value to the record.
A typical scenarioThis describes a typical scenario for setting dimensions and dimension values.
A typical scenario involves combining three features in one dimension:
• Create a sift dimension with a set of discrete ranges such as A - D, E - H, and so on. Auto siftingis an extension to autogeneration which positions newly generated dimension values within anexisting hierarchy, such that Applebrandy Wine appears under A - D, Four Grapes Merlot appearsin E - H, and so on.
• Configure the dimension values in the sift dimension as non-navigable so that they can appear inthe user interface to assist the end user but do not have any effect on the navigation state.
• Configure the dimension values in the sift dimension so that they are collapsible. A collapsiblehierarchy is an ordinary hierarchy, in which some or all of the internal (non-root and non-leaf)dimension values are flagged as potentially collapsible.The MDEX Engine automatically removes,or collapses, these dimension values when there are only a few leaves available for refinement,creating a more streamlined, user-friendly navigation experience for your users.
Related LinksCreating Non-navigable Dimension Values on page 134
Making a dimension value non-navigable (inert) on page 134Marking a dimension value as inert (or non-navigable) indicates that the dimension valueshould not be included in any navigation state, although it can be displayed in a user interfaceto help guide the end-user toward a selection.
About sift dimensions on page 157Auto sifting is an extension to autogeneration which positions newly generated dimensionvalues within an existing hierarchy.
About collapsible dimensions on page 155Non-root and non-leaf dimension values are collapsible dimensions in a hierarchy.
Setting the primary dimensionPrior to the MDEX Engine version 6.1.0, each project had to have a single primary dimension whichfunctioned as the root for all other secondary dimensions in the project.You needed to set upprecedence rules between the primary dimension and each secondary dimension to ensure that thesecondary dimensions would appear in the navigation controls.
If a primary dimension was not explicitly defined in Developer Studio, Dgidx created one for you. Dgidxalso created the required precedence rules between the primary dimension and the other dimensionsin your project, which were, by default, considered secondary. For most projects, this was sufficientand developers did not have to worry about creating a primary dimension.
Partial updates, however, required an explicit primary dimension that had explicit precedence rules toall secondary dimensions. Starting with the MDEX Engine version 6.1.0, you no longer need to specify
Endeca Developer Studio Developer Studio HelpEndeca Confidential
163Preparing Data, Properties, and Dimensions | Preparing Your Dimension Hierarchy
a primary dimension. If it is specified, it is ignored by the MDEX Engine. Note that partial updates nolonger require that a primary dimension is specified explicitly.
The procedure below describes how to set a primary dimension. See "About precedence rules" and"Creating, modifying, and deleting precedence rules" for information on creating precedence rules.
Note: Explicitly defined precedence rules override any internally generated rules.
To set the primary dimension:
1. In the Dimensions view, double-click the dimension you want to change to open it in the Dimensioneditor.
2. On the Advanced tab, check Primary.
3. Click OK.
Troubleshooting dimensionsBe sure that source data reflects dimension values, match modes are correctly set, and that sourceproperties are mapped to a dimension or an Endeca property.
If a dimension value does not appear as expected in the client browser, double-check the followingpotential issues:
• Check that the value exists in the source data. If the dimension value 2010 is added to the Yeardimension, but there are no records with that year, then the MDEX Engine will never present 2010as an option in the client browser.
• Matches to dimension values of type Exact must be, as the name implies, exact and arecase-sensitive. The property values $20 and Twenty will not match to the dimension values 20 ortwenty.
• A source property must be mapped to either a dimension or an Endeca property in order to appearin your Endeca-enabled Web application. If a source property that you want to map to a dimensionis not appearing in your Web application, make sure the following is true:
Your source property is mapped correctly to a dimension in your pipeline's property mapper. See"Establishing a dimension mapping" for details.
The dimension is either configured for auto-generation, or the source property values on the recordsmatch the dimension values that you explicitly defined for the dimension in the Dimensions editor.
The Show with Record List and Show with Record options are set correctly in the Dimension editor.
Note: By default, Forge removes source properties that have not been mapped to an Endecaproperty or dimension. See "Removing source properties after mapping" for details.
Mapping Source Properties
Understanding Source Property Mapping
About property mapping
Source property mappings dictate which dimension values are tagged to each record and whichproperty information is available for record search, sort, and display.
Endeca ConfidentialEndeca Developer Studio Developer Studio Help
Preparing Data, Properties, and Dimensions | Mapping Source Properties164

Source properties can be mapped in three different ways. They can be:
• Mapped to an Endeca property (for search, sort, and display only).• Mapped to a (for search, sort, display, and navigation).• Ignored by specifying a null mapping.
You use a property mapper component to establish source property mappings. Typically, the propertymapper is placed in the pipeline after the Perl manipulator that is used to clean and prepare sourceproperties (if one exists).You should use a single property mapper to map all of your source propertiesto both Endeca properties or dimensions.
Note: Before you can map a source property to an Endeca property or dimension, you mustcreate the Endeca property or dimension.
Understanding property mappers is critical to building an Endeca implementation. Oraclerecommends that you read the chapter "Mapping Source Properties" in the Endeca Forge Guideto gain a solid grounding in this critical concept.
Related LinksEstablishing a property mapping on page 174
You must create an Endeca property before you can map it to a source property.
Establishing a dimension mapping on page 173You must create a dimension before you can map it to a source property.
Establishing a null mapping on page 174Null mappings prevent a source property from being mapped to an Endeca property ordimension.
Perl Manipulator editor on page 63The Perl Manipulator editor contains a unique name for this Perl manipulator.
About property mappers on page 282Property mappers connect source data to properties or dimensions.
Adding a property mapper on page 170At a minimum, a property mapper requires both a record source and a dimension source todefine the components that will supply it with record and dimension data.
Establishing a property mapping on page 174You must create an Endeca property before you can map it to a source property.
Establishing a dimension mapping on page 173You must create a dimension before you can map it to a source property.
Establishing a null mapping on page 174Null mappings prevent a source property from being mapped to an Endeca property ordimension.
Using a single property mapper
You should use a single property mapper to map all of your source properties to both Endeca propertiesor dimensions.
Note: There are rare cases where multiple property mappers may be used. However, Oraclestrongly recommends that you use only one property mapper in any given pipeline.
Endeca Developer Studio Developer Studio HelpEndeca Confidential
165Preparing Data, Properties, and Dimensions | Mapping Source Properties

About explicit mapping
When you specify a source property and a target Endeca property or dimension to map to, you arecreating an explicit mapping.
In general, this is the type of mapping Oracle recommends you use. However, Endeca also offerssome advanced techniques that allow you to automate the mapping process. These techniques areintended to facilitate the process of building prototypes and should not be used for buildingproduction-ready implementations.
See the related topics for detailed explicit mapping procedures.
Related LinksEstablishing a property mapping on page 174
You must create an Endeca property before you can map it to a source property.
Establishing a dimension mapping on page 173You must create a dimension before you can map it to a source property.
Establishing a null mapping on page 174Null mappings prevent a source property from being mapped to an Endeca property ordimension.
Choosing a match mode
When Forge maps a source property value to a dimension value, the dimension value it uses caneither be explicitly defined in the dimension hierarchy or automatically generated by Forge.You setthe type of dimension value handling, on a per mapping basis, using the Match Mode in the DimensionMapping dialog box.
Note: Match modes only apply to dimension values. They are not used when mapping sourceproperties to Endeca properties.
There are three match modes you can choose from:
• Normal• Must Match• Auto Generate
Normal
Normal maps only those source property values that have a matching dimension value explicitly definedin the dimension hierarchy. Forge assigns the IDs for any matching dimension values to the Endecarecords. Any source property values that do not have matching dimension values in the dimensionhierarchy are ignored.
In order for a source property value to match a dimension value, the dimension value's definition mustcontain a synonym that:
• Is an exact text match, including capitalization and white space, to the source property value.• Has its Classify option enabled.
Note: There are two types of advanced dimension values, range and sift. These dimensionvalue types have different matching criteria than standard dimension values. See About rangedimension values and About sift dimensions, respectively.
Endeca ConfidentialEndeca Developer Studio Developer Studio Help
Preparing Data, Properties, and Dimensions | Mapping Source Properties166

Must Match
Must Match behaves identically to Normal, with the exception that Must Match issues a warning forany source property values that do not have matching dimension values.
Auto Generate
Auto Generate specifies that Forge automatically generates a dimension value name and ID for anysource property value that does not have a matching dimension value in the dimension hierarchy.Forge uses these automatically-generated names and IDs to tag the Endeca records the same as itwould explicitly-defined dimension values.
Auto Generate dramatically reduces the amount of editing you have to do to the dimension hierarchy.However, auto-generated dimensions are always flat. Auto-generated names and IDs are persistedin a file that you specify as part of a dimension server component.
Mapping Rules of Thumb
When you choose which method to use for generating your dimension values, there are two rules ofthumb to keep in mind:
• If you manually define dimension values in the dimension hierarchy, the Normal, Must Match, andAuto Generate features behave identically with respect to those dimension values.
• Any source property value that does not have a matching dimension value specified in the dimensionhierarchy will not be mapped unless you have set the dimension to Auto Generate in the pipeline.
Mapping Example
The following illustration shows a simple dimension mapping example that uses a combination ofgeneration methods. The sections after the illustration describe the mapping behavior in the example.
Endeca Developer Studio Developer Studio HelpEndeca Confidential
167Preparing Data, Properties, and Dimensions | Mapping Source Properties
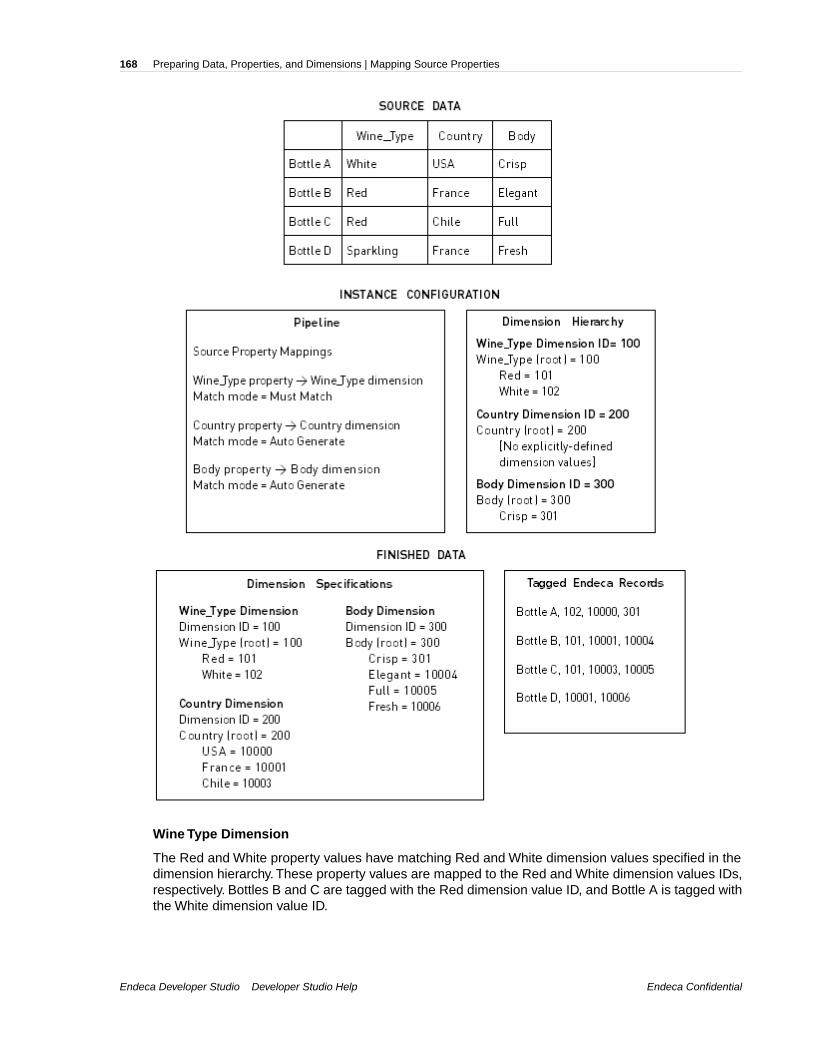
Wine Type Dimension
The Red and White property values have matching Red and White dimension values specified in thedimension hierarchy. These property values are mapped to the Red and White dimension values IDs,respectively. Bottles B and C are tagged with the Red dimension value ID, and Bottle A is tagged withthe White dimension value ID.
Endeca ConfidentialEndeca Developer Studio Developer Studio Help
Preparing Data, Properties, and Dimensions | Mapping Source Properties168
The Sparkling property value does not have a matching dimension value in the dimension hierarchy.The Wine Type dimension is set to Must Match, so this property is ignored and a warning is issued.As a result, Bottle D does not get tagged with a dimension value ID from the Wine Type dimension.
Country Dimension
There are no dimension values explicitly defined in the dimension hierarchy for the Country dimension.However, this dimension is set to Auto Generate, so all three of the Country property values (USA,France, and Chile) are mapped to automatically-generated dimension value IDs.
Bottle A is tagged with the auto-generated ID for the USA dimension value. Bottles B and D are taggedwith the auto-generated ID for the France dimension value. Bottle C is tagged with the auto-generatedID for the Chile dimension value.
Body Dimension
The Crisp property value has a matching dimension value specified in the dimension hierarchy, so theCrisp property value is mapped to the Crisp dimension value. Bottle A is tagged with the Crisp dimensionvalue ID.
The other three property values (Elegant, Full, and Fresh) do not have matching dimension values inthe dimension hierarchy but, because the Body dimension is set to Auto Generate, these three propertyvalues are mapped to automatically-generated dimension values IDs.
Bottle B is tagged with the auto-generated ID for the Elegant dimension value. Bottle C is tagged withthe auto-generated ID for the Full dimension value. Bottle D is tagged with the auto-generated ID forthe Fresh dimension value.
Regardless of how they were generated, all of the dimension value IDs are included in the finisheddata that Forge produces for indexing.
Related LinksAbout sift dimensions on page 157
Auto sifting is an extension to autogeneration which positions newly generated dimensionvalues within an existing hierarchy.
About range dimension values on page 126Configuring a dimension to use range dimension values is useful for data that should benavigated as discrete values.
Assigning multiple mappings to a single source property
You can assign more than one mapping to a source property-for example, you can map a sourceproperty to both a dimension and an Endeca property.
A typical source property that you may want to map to both a dimension and an Endeca property isPrice.You can map the Price source property in the following ways:
• To a Price Range dimension that allows the end-user to search for records within a given pricerange (for example, wines that cost between $10 and $25).
• To an Endeca property that allows you to display the discrete price of each individual record.
Conversely, you can assign more than one source property to a single dimension or Endeca property.For example, if you have multiple source properties that are equivalent, most likely they should all bemapped to the same dimension or Endeca property. Flavor and Color are example properties thatmight require this behavior
Endeca Developer Studio Developer Studio HelpEndeca Confidential
169Preparing Data, Properties, and Dimensions | Mapping Source Properties
Working with Property Mappers
Adding a property mapper
At a minimum, a property mapper requires both a record source and a dimension source to define thecomponents that will supply it with record and dimension data.
You can leave the other settings at their defaults while developing your initial working pipeline.
To add a property mapper:
1. In the Pipeline Diagram editor, click New.
2. Choose Property Mapper.The Property Mapper editor appears.
3. In the Name text box, type a unique name for this property mapper.
4. In the Sources tab, set the record source and dimension source.
5. Click Mappings to open the Mappings editor, where you can view and modify existing mappings.For detailed procedures, see the following topics:
• Creating a dimension mapping
• Creating a property mapping
• Creating a null mapping
6. (Optional) In the Record Index tab, do the following:
• Specify which properties or dimensions you want to use as the record index for this component.• Check whether you want to remove records with duplicate keys.
Note: Developer Studio performs a case-insensitive search for duplicate keys.
7. (Optional) In the Advanced tab, set any advanced mapping options.
8. (Optional) In the Comment tab, add a comment for the component.
9. Click OK.
Related LinksEstablishing a property mapping on page 174
You must create an Endeca property before you can map it to a source property.
Establishing a dimension mapping on page 173You must create a dimension before you can map it to a source property.
Establishing a null mapping on page 174Null mappings prevent a source property from being mapped to an Endeca property ordimension.
Advanced techniques introduced on page 175Use caution when opting to use advanced techniques instead of the recommended explicitmapping techniques offered in the Property Mapper editor.
About property mapping on page 164Source property mappings dictate which dimension values are tagged to each record andwhich property information is available for record search, sort, and display.
About property mappers on page 282
Endeca ConfidentialEndeca Developer Studio Developer Studio Help
Preparing Data, Properties, and Dimensions | Mapping Source Properties170

Property mappers connect source data to properties or dimensions.
Property Mapper editor
The Property Mapper editor contains a unique name for this property mapper and a button that opensthe Mappings editor, where you can view and modify mappings.
The Property Mapper editor contains the following tabs:
Sources
The Sources tab contains the following options:
DescriptionOption
Required. A choice of the record servercomponents in the project.
Record Source
Required . A choice of the dimension adapters anddimension servers in the project.
Dimension Source
Record Index
Optional. The Record Index tab allows you to add or remove dimensions or properties used in acomponent's record index, and to change their order. Record indexes support join functionality. SeeJoin sources must have matching join keys and record indexes for more details.
Advanced
The Advanced tab contains the following options:
DescriptionOption
Check this field to enable implicit mapping. Whenimplicit mapping is enabled, any source property
Map source properties to Endeca dimensions withthe same name
that has a name that is identical to an existingdimension is automatically mapped to thatdimension. (Implicit mapping only occurs if anexplicit mapping is not specified.
Check this field to enable default mapping . Defaultmapping defines how Forge will handle source
If no mapping is found, map source properties toEndeca
properties that have neither explicit nor implicitmappings.
(Optional) Specifies the maximum source propertyvalue length allowed when creating mappings.
Default maximum length
Source properties that have values that exceedthis length are not mapped, and a warning is issuedby the Forge Hierarchical Logging system. If thisfield is left blank, the default is to not limit Endeca
Endeca Developer Studio Developer Studio HelpEndeca Confidential
171Preparing Data, Properties, and Dimensions | Mapping Source Properties

DescriptionOption
property mappings, and to limit dimensionmappings to 255 characters.
Comment
(Optional) Provides a way to associate comments with a pipeline component.
Related LinksViewing existing property mappings on page 172
All property mappings are visable in the Property Mapper editor of each property mapper.Create new mappings, modify, or remove existing mappings.
About mapping source properties to like-named dimensions on page 175This type of mapping enables implicit mapping.When implicit mapping is enabled, any sourceproperty that has a name that is identical to an existing dimension is automatically mappedto that dimension.
Record server components on page 282Describes record server components.
When no mapping is found on page 175The Property Mapper editor’s Advanced tab lets you map source properties to either Endecaproperties or dimensions if no mapping is found.
About explicit mapping on page 166When you specify a source property and a target Endeca property or dimension to map to,you are creating an explicit mapping.
About setting a default maximum length for source property values on page 176The Default Maximum Length option, on the Advanced Tab of the Property Mapper, definesthe maximum source property value length allowed when creating mappings.
Viewing existing property mappings
All property mappings are visable in the Property Mapper editor of each property mapper. Create newmappings, modify, or remove existing mappings.
To view existing property mappings in your project:
1. In the pipeline diagram, double-click your property mapper to open it in the Property Mapper editor.
2. In the Property Mapper editor, click Mappings.The Mappings editor appears.
3. (Optional) Make any required modifications, using the New, Modify, and Remove buttons.
4. Click OK.
Note: A single source property can be mapped to multiple targets, including a mix of propertiesand dimensions. A single target can also be mapped from multiple sources.
Endeca ConfidentialEndeca Developer Studio Developer Studio Help
Preparing Data, Properties, and Dimensions | Mapping Source Properties172

Creating Explicit Meanings
Establishing a dimension mapping
You must create a dimension before you can map it to a source property.
To map a source property to an Endeca dimension:
1. In the pipeline diagram, double-click your property mapper to open it in the Property Mapper editor.
2. In the Property Mapper editor, click Mappings.The Mappings editor appears.
3. Click New.
4. Select Dimension Mapping.The Dimension Mapping editor appears.
5. Type the name of the source property you want to map in the Source Property text box.
6. Choose the name of the dimension you want to map to from the Target Dimension menu.
7. (Optional) In the Maximum Length text box, type a value that defines the maximum source propertyvalue length allowed when creating mappings.
Note: Source properties that have values that exceed this length are not mapped, and awarning is issued by Forge. This value overrides the default maximum length that you set onthe Advanced tab of the Property Mapper editor.
8. Choose a match mode from the Match mode list.
9. Click OK to return to the Mappings editor.
10. Continue mapping source properties to dimensions.
Note: You can map multiple source properties to a single dimension and vice versa .
11. Click OK to return to the Property Mapper editor.
Related LinksCreating dimensions on page 110
Create new dimensions from the Dimensions view, on the Project tab.
Adding dimension values on page 121Adding or editing a dimension value affects how records are classified, and which recordsare available under a given dimension value in the client browser.
Choosing a match mode on page 166When Forge maps a source property value to a dimension value, the dimension value it usescan either be explicitly defined in the dimension hierarchy or automatically generated byForge.You set the type of dimension value handling, on a per mapping basis, using the MatchMode in the Dimension Mapping dialog box.
About setting a default maximum length for source property values on page 176The Default Maximum Length option, on the Advanced Tab of the Property Mapper, definesthe maximum source property value length allowed when creating mappings.
Assigning multiple mappings to a single source property on page 169You can assign more than one mapping to a source property-for example, you can map asource property to both a dimension and an Endeca property.
Endeca Developer Studio Developer Studio HelpEndeca Confidential
173Preparing Data, Properties, and Dimensions | Mapping Source Properties
Establishing a property mapping
You must create an Endeca property before you can map it to a source property.
To map a source property to an Endeca property:
1. In the pipeline diagram, double-click your property mapper to open it in the Property Mapper editor.
2. In the Property Mapper editor, click Mappings.The Mappings editor appears.
3. Click New.
4. Select Property Mapping.The Property Mapping editor appears.
5. Type the name of the source property you want to map in the Source Property text box.
6. Choose the name of the Endeca property you want to map to from the Target Property menu.
7. (Optional) In the Maximum Length text box, type a value that defines the maximum source propertyvalue length allowed when creating mappings.
Note: Source properties that have values that exceed this length are not mapped, and awarning is issued by Forge. This value overrides the default maximum length that you set onthe Advanced tab of the Property Mapper editor.
8. Click OK to return to the Mappings editor.
9. Continue mapping source properties to Endeca properties.
Note: You can map multiple source properties to a single Endeca property and vice versa.
10. Click OK to return to the Property Mapper editor.
Related LinksAdding a new Endeca property on page 77
Specify the data type and other attributes of the new property.
Changing an Endeca property on page 77Use the Property editor in the Properties view to make all changes to an existing property.
About setting a default maximum length for source property values on page 176The Default Maximum Length option, on the Advanced Tab of the Property Mapper, definesthe maximum source property value length allowed when creating mappings.
Assigning multiple mappings to a single source property on page 169You can assign more than one mapping to a source property-for example, you can map asource property to both a dimension and an Endeca property.
Establishing a null mapping
Null mappings prevent a source property from being mapped to an Endeca property or dimension.
Most commonly, null mappings are used to prevent an automated mapping from being formed for aparticular source property. In other words, you can enable automated mapping, using advancedmapping techniques, and then turn off mapping for selected source properties using null mappings.
To establish a null mapping:
1. In the pipeline diagram, double-click your property mapper to open it in the Property Mapper editor.
2. In the Property Mapper editor, click Mappings.
Endeca ConfidentialEndeca Developer Studio Developer Studio Help
Preparing Data, Properties, and Dimensions | Mapping Source Properties174

The Mappings editor appears.
3. Click New.
4. Select Null Mappings.The Null Mapping editor appears.
5. In the Source Property text box, type the name of the source property that you want to preventfrom being mapped.
6. Click OK to close the Null Mapping dialog box.
7. Click OK to close the Mappings dialog box.
8. Click OK to close the Property Mapper editor.
Advanced Property Mapping Techniques
Advanced techniques introduced
Use caution when opting to use advanced techniques instead of the recommended explicit mappingtechniques offered in the Property Mapper editor.
Important: Oracle strongly recommends that you use the explicit mapping techniques, describedin the "Creating explicit mappings" section, for implementations that are intended to go toproduction because the advanced mapping techniques can have unexpected results if you arenot careful when using them.
There are several advanced mapping techniques, available on the Property Mapper editor's Advancedtab, that you can use when building prototypes.This section describes these techniques and providesinformation on the priority order that the Data Foundry uses when applying them.
About mapping source properties to like-named dimensions
This type of mapping enables implicit mapping.When implicit mapping is enabled, any source propertythat has a name that is identical to an existing dimension is automatically mapped to that dimension.
The setting Map Source Properties to Endeca Dimensions with the Same Name (located on theProperty Mapper editor's Advanced tab) enables implicit mapping. The like-named dimension, andany of its constituent dimension values, must already exist in your dimension hierarchy (in other words,you've already defined them using the Dimensions and Dimension Values editors).
Implicit mapping uses the Normal mapping mode where only those source property values that havea matching dimension value explicitly defined in the dimension hierarchy are mapped. Forge assignsthe IDs for any matching dimension values to the Endeca records. Any source property values thatdo not have matching dimension values in the dimension hierarchy are ignored.
Implicit mapping is limited to mappings between source properties and dimensions. Implicit mappingcannot take place between source properties and Endeca properties.
When no mapping is found
The Property Mapper editor’s Advanced tab lets you map source properties to either Endeca propertiesor dimensions if no mapping is found.
The Property Mapper editor's Advanced tab contains the following option:
Endeca Developer Studio Developer Studio HelpEndeca Confidential
175Preparing Data, Properties, and Dimensions | Mapping Source Properties

This option defines the default that Forge uses to handle source properties that have neither explicitnor implicit mappings. There are three possible settings:
• Uncheck the option altogether to ignore source properties that do not have an explicit or implicitmapping defined.
• Check Property to create a mapping between the source property and an Endeca property. Forgedoes this by creating a new Endeca property that uses the same name and value as the sourceproperty and assigning it to the record.
• Check Dimension to create a mapping between the source property and a dimension. Forge doesthis by creating a new dimension, using the source property's name. Forge uses the Auto Generatemode to populate the dimension with dimension values that match the source property's values.
Use the default mapping option with caution because:
• With this option enabled, all source properties will ultimately be mapped and mapped propertiesuse system resources. Ideally, you should only map source properties that you intend to use inyour implementation so that you minimize the use of system resources.
• Many production-level implementations automatically pull and process new data when it is available.If this data has new source properties, these properties will be mapped and included in your MDEXEngine indices. Again, this uses system resources unnecessarily but, perhaps more importantly,this situation may also result in the display of dimensions or Endeca properties that you do notwant your users to see.
Priority order of source property mapping
Forge looks for explicit mapping and attempts implicit mapping between source property and alike-named dimension if the explicit mapping not exist. Forge defaults to the selected If No Mappingis Found option if neither explicit nor implicit mapping exists.
Forge uses this prioritization when mapping source properties:
1. First, Forge looks for an explicit mapping for the source property.2. If no explicit mapping exists, and Map Source Properties to Endeca Dimensions with the Same
Name is enabled, Forge will try to create an implicit mapping between the source property and alike-named dimension.
3. If no explicit or implicit mapping exists, Forge uses the If No Mapping is Found, Map SourceProperties to Endeca: Properties/Dimensions option to determine how to handle the mapping.
About using null mappings to override implicit and default mappings
Explicit null mappings provide a means to prevent an implicit or default mapping from being formedfor a particular source property.
In other words, you can enable either implicit or default mapping, and then turn off mapping altogetherfor selected source properties using explicit null mappings.
About setting a default maximum length for source property values
The Default Maximum Length option, on the Advanced Tab of the Property Mapper, defines themaximum source property value length allowed when creating mappings.
Endeca ConfidentialEndeca Developer Studio Developer Studio Help
Preparing Data, Properties, and Dimensions | Mapping Source Properties176

Source properties that have values that exceed this length are not mapped, and a warning is issuedby Forge.
If you do not explicitly specify a Default Maximum Length, Forge does the following:
• Source properties that are mapped to Endeca properties can have values of any length.• Source properties that are mapped to dimensions must have values that are 255 characters or
less.
If you do explicitly specify a Default Maximum Length, that length is applied to both Endeca propertyand dimension mappings.
You can override the Default Maximum Length on a per mapping basis using the Maximum Lengthfield in both the Property Mapping and Dimension Mapping dialog boxes. For example, you can usethe Default Maximum Length to limit the length of all your source properties, but set an override for aDescription source property that allows the description to be as long as necessary.
Troubleshooting source property mappingVerify that your mappings are properly configured, and that you have correctly enabled property anddimension display. For projects that use MDEX prior to 6.1.0, verify that precedence rules connectany manually-set primary dimensions to secondary dimensions.
If a source property does not appear correctly in your Endeca-enabled Web application, make surethat:
• Your source property is mapped to either an Endeca property or a dimension in your pipeline'sproperty mapper. See Establishing a property mapping and Establishing a dimension mapping fordetails.
• If the source property is mapped to a dimension, the dimension is either configured forauto-generation, or the source property values on the records match the dimension values thatyou explicitly defined for the dimension in the Dimensions editor.
• The Show with Record List and Show with Record options are set correctly in the Property editoror Dimensions editor. See one of the following sections for details:
• Enabling Endeca property display in a record list• Enabling Endeca property display on a record page• Enabling dimension display in a record list• Enabling dimension display on a record page
• In releases prior to the MDEX Engine v.6.1.0, if you had manually designated a primary dimension,you had to create precedence rules from that dimension to all of your secondary dimensions. Ifyou are using Developer Studio with the MDEX Engine v.6.1.0 and up, you no longer have tocreate precedence rules from the primary dimension to all your secondary dimensions. Primarydimension is also no longer requiredor used by the MDEX Engine.
Related LinksEstablishing a property mapping on page 174
You must create an Endeca property before you can map it to a source property.
Establishing a dimension mapping on page 173You must create a dimension before you can map it to a source property.
Enabling dimension display in a record list on page 140You must enable a dimension for record list display before you can access its dimensionvalues using the methods in the Endeca Presentation API.
Enabling dimension display on a record page on page 140
Endeca Developer Studio Developer Studio HelpEndeca Confidential
177Preparing Data, Properties, and Dimensions | Mapping Source Properties

When record page display is enabled for a dimension, any records that are tagged withdimension values from that dimension display those values as part of their entry on the recordpage.
Enabling Endeca property display on a record page on page 83Enabling record display means that any records that are tagged with this Endeca propertydisplay the property as part of their entry on the record page.
Enabling Endeca property display in a record list on page 83Enabling record list display means that any records tagged with this Endeca property displaythe property as part of their entry in the record list.
Endeca ConfidentialEndeca Developer Studio Developer Studio Help
Preparing Data, Properties, and Dimensions | Mapping Source Properties178

Chapter 4
Configuring Application Features
Configuring Precedence RulesRelated Links
Configuring Application Features on page 179
About precedence rules on page 180Precedence rules provide a way to delay the display of dimensions until they offer a usefulrefinement of the navigation state.
The Precedence Rules view on page 180The Precedence Rules view contains information about precedence rules you have createdfor your Endeca implementation.
Viewing all of your precedence rules on page 181All precedence rules are visible from the Project tab.
Precedence Rule editor on page 181The Precedence Rule editor allows you to create, modify, or delete precedence rules.
Creating precedence rules on page 182Create precedence rules from the Precedence Rules view.
Modifying precedence rules on page 182Make all changes in the Precedence Rule editor, under the Precedence Rules view.
Deleting precedence rules on page 183Delete precedence rules from the Precedence Rules view.
Standard versus leaf precedence rules on page 183Standard precedence rules display the target dimension if the trigger dimension value or itsdescendants are in the navigation state. Leaf precedence rules display the target dimensiononly after descendants of the trigger dimension value have been selected.
Precedence rules and the implicit selection of dimension values on page 184When all records in the navigation state are assigned a given dimension value, that dimensionvalue is an implicit selection.
Tips and troubleshooting for precedence rules on page 185This topic provides information which will help you use precedence rules, and troubleshootissues you have with them.

About precedence rulesPrecedence rules provide a way to delay the display of dimensions until they offer a useful refinementof the navigation state.
Precedence rules are defined in terms of a trigger dimension value and a target dimension, where auser's selection of the trigger dimension value reveals the previously unavailable target dimension tothe user.
For example, one might not want both the Country and State dimensions to appear simultaneously ina geographical data set. A precedence rule could be defined so that the State dimension would appearonly after a dimension value from the Country dimension is selected.This simplifies the user's navigationchoices and avoids information overload by hiding the State dimension until it is relevant to thenavigation state.
Treatment of target dimensions associated with multiple precedence rules
A target dimension associated with more than one precedence rule is exposed when at least oneassociated trigger dimension value is selected.
For example, assume we have three dimensions: Author, Region, and Language. We have twoprecedence rules:
Region > AuthorLanguage > Author
In this case, the Author dimension is displayed after a dimension value from either the Region or Authordimension is selected.
Related LinksConfiguring Precedence Rules on page 179
The Precedence Rules view on page 180The Precedence Rules view contains information about precedence rules you have createdfor your Endeca implementation.
The Precedence Rules viewThe Precedence Rules view contains information about precedence rules you have created for yourEndeca implementation.
This view has two columns:
DescriptionColumn
Shows the dimension value that serves as a triggerfor the target dimension to be displayed. For
From
example, in a wine store catalog, you might set upa precedence rule whereby the Winery dimensionis not displayed until the Region dimension valuehas been selected. In this example, the Regiondimension value would be displayed in the Fromcolumn.
Shows the dimension that serves as the target forthe trigger dimension value. Extending the exampleabove, the Winery dimension would be the target.
To
Endeca ConfidentialEndeca Developer Studio Developer Studio Help
Configuring Application Features | Configuring Precedence Rules180

Related LinksConfiguring Precedence Rules on page 179
About precedence rules on page 180Precedence rules provide a way to delay the display of dimensions until they offer a usefulrefinement of the navigation state.
Viewing all of your precedence rulesAll precedence rules are visible from the Project tab.
To view all of your precedence rules at once:
On the Project tab, double-click Precedence Rules.The Precedence Rules view opens and displays all of the precedence rules in your project.
Related LinksConfiguring Precedence Rules on page 179
Precedence Rule editorThe Precedence Rule editor allows you to create, modify, or delete precedence rules.
The Precedence Rule editor contains the following fields:
DescriptionOption
The dimension that serves as a trigger for the To(or target) dimension value to be displayed.
Source dimension value
The dimension that serves as a target for the From(or source) dimension value.
Target dimension
There are two types of source dimension values:Rule type
• The standard type (indicated in the table by
this icon ) means that if the dimension valuespecified as the trigger or any of itsdescendents are in the navigation state, thenthe target is presented (one trigger, one target).
•The leaf type (indicated by this icon ) meansthat querying any leaf dimension value fromthe trigger dimension will cause the targetdimension value to be displayed (manytriggers, one target).
Related LinksConfiguring Precedence Rules on page 179
Standard versus leaf precedence rules on page 183
Endeca Developer Studio Developer Studio HelpEndeca Confidential
181Configuring Application Features | Configuring Precedence Rules

Standard precedence rules display the target dimension if the trigger dimension value or itsdescendants are in the navigation state. Leaf precedence rules display the target dimensiononly after descendants of the trigger dimension value have been selected.
Creating precedence rulesCreate precedence rules from the Precedence Rules view.
To create a precedence rule:
1. On the Project tab, double-click Precedence Rules to open the Precedence Rules view.
2. Click New.The Precedence Rule editor appears.
3. In the Source Dimension value list, select the dimension that should serve as the trigger for thesecond, or target, value.
4. In the Target Dimension list, select the dimension that the source dimension value triggers.
5. In the Rule Type frame, choose standard or leaf.
6. Click OK to return to the Precedence Rule view.
Related LinksConfiguring Precedence Rules on page 179
Modifying precedence rules on page 182Make all changes in the Precedence Rule editor, under the Precedence Rules view.
Deleting precedence rules on page 183Delete precedence rules from the Precedence Rules view.
Standard versus leaf precedence rules on page 183Standard precedence rules display the target dimension if the trigger dimension value or itsdescendants are in the navigation state. Leaf precedence rules display the target dimensiononly after descendants of the trigger dimension value have been selected.
Modifying precedence rulesMake all changes in the Precedence Rule editor, under the Precedence Rules view.
To edit a precedence rule:
1. In the Precedence Rules view, double-click the precedence rule you want to modify to open it inthe Precedence Rule editor. (You can only open one precedence rule at a time.
2. Make the necessary changes in the Precedence Rule editor.
3. Click OK to return to the Precedence Rules view.
Related LinksConfiguring Precedence Rules on page 179
Creating precedence rules on page 182Create precedence rules from the Precedence Rules view.
Deleting precedence rules on page 183Delete precedence rules from the Precedence Rules view.
Endeca ConfidentialEndeca Developer Studio Developer Studio Help
Configuring Application Features | Configuring Precedence Rules182

Deleting precedence rulesDelete precedence rules from the Precedence Rules view.
To delete a precedence rule:
1. In the Precedence Rules view, select the precedence rule you want to remove and click Delete.
2. When the confirmation message appears, click Yes.
Related LinksConfiguring Precedence Rules on page 179
Creating precedence rules on page 182Create precedence rules from the Precedence Rules view.
Modifying precedence rules on page 182Make all changes in the Precedence Rule editor, under the Precedence Rules view.
Standard versus leaf precedence rulesStandard precedence rules display the target dimension if the trigger dimension value or its descendantsare in the navigation state. Leaf precedence rules display the target dimension only after descendantsof the trigger dimension value have been selected.
There are two types of precedence rules, standard and leaf.The types differ in how the trigger dimensionvalue is interpreted.
• For the standard type, if the dimension value specified as the trigger, or any of its descendents,are in the navigation state, then the target dimension is displayed.
• For the leaf type, only leaf dimension values (dimension values with no children) that aredescendents of the specified trigger dimension value cause the target dimension to be displayed.The presence of the specified trigger dimension value in the navigation state does not cause thetarget dimension to appear. Hence, a leaf precedence rule requires that the trigger dimensionvalue has children.
A standard precedence rule is indicated by this icon in the Precedences Rules view. A leaf
precedence rule is indicated by this icon ).
Standard Rule Example
In this standard rule example, we have a Color dimension with a child dimension value named blue.We can construct a standard precedence rule with blue as the trigger dimension value and thedimension Shades of Blue as the target. Once the user drills into Color and selects blue, thetarget dimension Shades of Blue is displayed in the user interface.
Leaf Rule Example
For leaf type rules, we'll examine a hierarchical dimension named Country and a second dimensionnamed State/Province. The Country dimension looks like this:
• Country• North America• Canada• Mexico• United States
Endeca Developer Studio Developer Studio HelpEndeca Confidential
183Configuring Application Features | Configuring Precedence Rules
• Europe• England• Spain• Italy
Logically, a user should choose a country before choosing a state or province. We can use a leafprecedence rule to suppress the display of the State/Province dimension until a leaf value in theCountry dimension (an actual country as opposed to a continent) has been selected.To achieve this,a leaf precedence rule is constructed with the Country dimension root as the trigger and theState/Province dimension as the target. If the user drills into Country and selects an intermediatechild dimension value (North America or Europe), the target dimension State/Province is not displayed.However, once the user has selected a leaf value from the Country dimension (United States, Canada,Mexico, England, Spain, or Italy) the State/Province dimension appears.
Related LinksConfiguring Precedence Rules on page 179
Precedence rules and the implicit selection of dimension valuesWhen all records in the navigation state are assigned a given dimension value, that dimension valueis an implicit selection.
In addition to being selected explicitly by the application, dimension values can be selected implicitly.For example, if all Champagnes are from France, then the explicit selection of Wine Type: Champagnecauses the implicit selection of Region: France. Implicit selection is a function of the set of records inthe navigation state, regardless of what combination of search, navigation, and record filters was usedto obtain them.
Implicitly-selected dimension values trigger precedence rules in exactly the same way asexplicitly-selected dimension values. This behavior helps ensure a consistent user experience, byproviding the same dimensions for refinement of a given result set, regardless of whether that resultset was obtained through search, navigation, or a combination of the two.
For this reason, two navigation paths leading to the same set of records will always have exactly thesame set of navigation selections (differing only in whether the selections are implicit or explicit).Because of this equivalence, the set of precedence rules fired in both states will be identical.
If this behavior is undesirable, it can be suppressed or modified at the application layer. In some cases,implicitly-selected dimension values reflect redundancy in the data modeling, such as the presenceof duplicate dimensions.
Related LinksConfiguring Precedence Rules on page 179
When precedence rules are overridden on page 184Implicit selection of a precedence rule's trigger dimension value fires the rule. Under somecircumstances, implicit selection of the rule's target dimension value also fires it.
When precedence rules are overridden
Implicit selection of a precedence rule's trigger dimension value fires the rule. Under somecircumstances, implicit selection of the rule's target dimension value also fires it.
Specifically, when a precedence rule's target dimension value is implicit in the navigation state, andwhen refinements are available underneath that target dimension value, the precedence rule fires and
Endeca ConfidentialEndeca Developer Studio Developer Studio Help
Configuring Application Features | Configuring Precedence Rules184

the target dimension is displayed. This occurs even when none of the rule's trigger values have beenimplicitly or explicitly selected. The MDEX Engine treats any precedence rules targeting the parentdimensions of these dimension values as having fired, even though the rules' trigger values have notbeen selected.
For this reason, precedence rule target dimensions may appear when no precedence rule trigger hasbeen selected.
Tips and troubleshooting for precedence rulesThis topic provides information which will help you use precedence rules, and troubleshoot issues youhave with them.
The creation of dimensions can be facilitated with precedence rules. Consider the task of creating aGeography dimension as a hierarchy of country, state, and city.The hierarchy would need to be createdmanually, with Country as the root dimension value. Each country dimension value would have itscorresponding states as children and each state its corresponding cities. In this scenario, the onus ison the knowledge worker to create and maintain this potentially enormous hierarchy.
Precedence rules offer a much simpler solution. The knowledge worker can produce the same resultsby creating three individual dimensions-Country, State, and City-and configuring precedence rulessuch that the State dimension isn't presented until a country has been chosen and the City dimensionisn't presented until a state has been chosen. Each dimension is flat and can be auto-generated, sothis solution involves much less initial and maintenance effort. Clearly, creating the hierarchy by handis a much more difficult task than auto-generating the three dimensions, configuring precedence rulesand letting contraction do the work to give the application the desired behavior (that is, to mimic thehierarchy).
Related LinksConfiguring Precedence Rules on page 179
Configuring User ProfilesRelated Links
Configuring Application Features on page 179
About user profiles on page 186You can create user profiles to trigger dynamic business rules for merchandising and contentspotlighting.
Viewing all of your user profiles on page 186Open the User Profiles view from the Project tab to see all user profiles in your project.
Creating user profiles on page 186Set new user profiles from the User Profile editor, within the User Profiles view.
Modifying user profiles on page 187Select any profile from the User Profiles view and open it in the editor.
Deleting user profiles on page 187Remove user profiles from the User Profiles view.
Specifying a user profile as a dynamic business rule trigger on page 188Set a user profile as a rule trigger from the Rule editor in the Dynamic Business Rules view.
Endeca Developer Studio Developer Studio HelpEndeca Confidential
185Configuring Application Features | Configuring User Profiles
About user profilesYou can create user profiles to trigger dynamic business rules for merchandising and contentspotlighting.
You can create user profiles to trigger dynamic business rules for merchandising and contentspotlighting. A user profile is a label, such as premium_subscriber, that identifies an application user.If a user who has such a profile makes a query, the query triggers the associated rule and restrictsmerchandising and content spotlighting records to users who have that identity.
Note: Each business rule is allowed to have at most one user profile trigger.
Related LinksConfiguring User Profiles on page 185
Using dynamic business rules to promote records on page 239You implement merchandising and content spotlighting using dynamic business rules. Therules and their supporting constructs define when to promote records, which records may bepromoted, and also indicate how to display the records to application users.
Creating user profiles on page 186Set new user profiles from the User Profile editor, within the User Profiles view.
Modifying user profiles on page 187Select any profile from the User Profiles view and open it in the editor.
Deleting user profiles on page 187Remove user profiles from the User Profiles view.
Viewing all of your user profilesOpen the User Profiles view from the Project tab to see all user profiles in your project.
The User Profiles view contains information about user profiles you have created for your Endecaimplementation.
This view has one column for the name of each user profile.You can sort the user profiles in the list
by clicking Sort Ascending or Sort Descending .
To view all of your user profiles at once:
• On the Project tab, double-click User Profiles. The User Profiles view opens and displays all ofthe user profiles in your project.
Note: Fully implementing this feature requires additional work outside of Developer Studio.Please refer to the Endeca Advanced Development Guide for details.
Related LinksConfiguring User Profiles on page 185
Creating user profilesSet new user profiles from the User Profile editor, within the User Profiles view.
To create a user profile:
Endeca ConfidentialEndeca Developer Studio Developer Studio Help
Configuring Application Features | Configuring User Profiles186
1. On the Project tab, double-click User Profiles to open the User Profiles view.
2. Click New.The User Profile editor appears.
3. Enter a name for the user profile.
4. Click OK to return to the User Profiles view.
Fully implementing this feature requires additional work outside of Developer Studio. Please refer tothe Endeca Advanced Development Guide for details.
Related LinksConfiguring User Profiles on page 185
Modifying user profiles on page 187Select any profile from the User Profiles view and open it in the editor.
Deleting user profiles on page 187Remove user profiles from the User Profiles view.
About user profiles on page 186You can create user profiles to trigger dynamic business rules for merchandising and contentspotlighting.
Modifying user profilesSelect any profile from the User Profiles view and open it in the editor.
To edit a user profile:
1. In the User Profiles view, double-click the profile you want to modify to open it in the User Profileeditor.
You can only open one user profile at a time.
2. Make the necessary changes in the User Profile editor.
3. Click OK to return to the User Profiles view.
Fully implementing this feature requires additional work outside of Developer Studio. Please refer tothe Endeca Advanced Development Guide for details.
Related LinksConfiguring User Profiles on page 185
Creating user profiles on page 186Set new user profiles from the User Profile editor, within the User Profiles view.
Deleting user profiles on page 187Remove user profiles from the User Profiles view.
About user profiles on page 186You can create user profiles to trigger dynamic business rules for merchandising and contentspotlighting.
Deleting user profilesRemove user profiles from the User Profiles view.
To delete a user profile:
Endeca Developer Studio Developer Studio HelpEndeca Confidential
187Configuring Application Features | Configuring User Profiles

1. In the User Profiles view, select the user profile you want to remove and click Delete.
2. When the confirmation message appears, click Yes.
Fully implementing this feature requires additional work outside of Developer Studio. Please refer tothe Endeca Advanced Development Guide for details.
Related LinksConfiguring User Profiles on page 185
Creating user profiles on page 186Set new user profiles from the User Profile editor, within the User Profiles view.
Modifying user profiles on page 187Select any profile from the User Profiles view and open it in the editor.
About user profiles on page 186You can create user profiles to trigger dynamic business rules for merchandising and contentspotlighting.
Specifying a user profile as a dynamic business rule triggerSet a user profile as a rule trigger from the Rule editor in the Dynamic Business Rules view.
To specify a user profile as a dynamic business rule trigger:
1. In the Project Explorer, click Dynamic Business Rules to expand it.
2. Double-click Rules to open the Rules view.
3. Select the rule you want to apply the trigger to.
4. Click Edit.The Rule editor appears.
5. On the General tab, select a profile from the User Profile list.
6. Click OK.The user profile information that you added to the rule now appears in the Rules view.
Note: You can also assign a user profile as a business rule trigger in Endeca Workbench. Seethe Endeca Workbench Help for details.
Fully implementing this feature requires additional work outside of Developer Studio. Please refer tothe Endeca Advanced Development Guide for details.
Related LinksConfiguring User Profiles on page 185
Configuring Search InterfacesRelated Links
Configuring Application Features on page 179
Configuring Search on page 189
Configuring Search Interface Options on page 209
Endeca ConfidentialEndeca Developer Studio Developer Studio Help
Configuring Application Features | Configuring Search Interfaces188

Configuring Search
Related LinksConfiguring Search Interfaces on page 188
About search configuration on page 189Refine user search by configuring thesaurus, stop words, search characters, stemming, andspelling dictionary features.
Using the Thesaurus on page 190
Using Stemming on page 195
Using Search Characters on page 197
Using Stop Words on page 199
Using Automatic Phrasing on page 201
Using the Spelling Dictionary on page 208
About search configuration
Refine user search by configuring thesaurus, stop words, search characters, stemming, and spellingdictionary features.
Developer Studio makes it possible for you to refine your users' search experience by makingadjustments to the following features:
• Thesaurus
You can establish a one-way or a two-way equivalence between words to enrich your users' queryresults.You access the Thesaurus editor from the Project tab.
• Stop words
You can add stop words. Stop words are ignored by the Endeca search query engine.You accessthe Stop Words editor from the Project tab.
• Search characters
You can add search characters to the search list. This allows non-alphanumeric characters to beindexed along with alphanumeric characters, rather than be treated as whitespace.You accessthe Search Characters editor from the Edit > Search Characters menu.
• Stemming
You can enable or disable stemming for a variety of languages. Stemming defines sets of words(for example, "shirt" and "shirts") that should be considered strictly equivalent for all searchoperations.You access the Stemming editor using the Edit > Stemming command.
• Spelling dictionary
You can tune the size of your application's spelling dictionary by instructing Dgidx to exclude smallwords, large words, and infrequently used words.You access the Spelling Dictionary editor usingthe Edit > Spelling dictionary command.
Note: Implementing search features requires additional work outside of Developer Studio.Please refer to the Endeca Advanced Development Guide for details.
Related Links
Endeca Developer Studio Developer Studio HelpEndeca Confidential
189Configuring Application Features | Configuring Search Interfaces

Configuring Search on page 189
About the thesaurus on page 190The thesaurus allows the system to return matches for related concepts to words or phrasescontained in user queries.
About stop words on page 199Stop words are words that are set to be ignored by the Endeca MDEX Engine.
About search characters on page 197You can specify punctuation marks as searchable, in addition to digits and upper- andlower-case letters (automatically set as valid search characters).
Specifying constraints on spelling dictionary content on page 324Constraining spelling dictionary entries improves the performance of spelling corrected queries.
Using the Thesaurus
Related LinksConfiguring Search on page 189
About the thesaurus on page 190The thesaurus allows the system to return matches for related concepts to words or phrasescontained in user queries.
Creating thesaurus entries on page 191Create one-way or two-way thesaurus entries in the Thesaurus view, found under SearchConfiguration in the Project Explorer.
Modifying thesaurus entries on page 192Select an entry in the Thesaurus view to make changes.
Deleting thesaurus entries on page 192Remove thesaurus entries from the Thesaurus view.
Sorting thesaurus entries on page 192Sort your entries in ascending or descending alphabetical order in the Thesaurus view.
Filtering thesaurus entries on page 193If your list of thesaurus entries becomes long, you can filter them by a letter or word.
Thesaurus entry recommendations on page 193Give single-word names to your entries, avoid non-searchable characters and stop words,and avoid creating entries which include substrings of other entries.
One-way Thesaurus Entry editor on page 194Specify a single word or phrase that, when searched on, returns results for other words orphrases.
Two-way Thesaurus Entry editor on page 195Define a list of words or phrases that will return results for each other when searched.
About the thesaurusThe thesaurus allows the system to return matches for related concepts to words or phrases containedin user queries.
It is a powerful tool that allows you to improve control over the vocabulary used in your application.
You can add two kinds of entries to your Endeca thesaurus:
• One-way thesaurus entries establish an equivalence relationship between words or phrases thatapplies in a single direction only. For example, you could define a one-way mapping so that all
Endeca ConfidentialEndeca Developer Studio Developer Studio Help
Configuring Application Features | Configuring Search Interfaces190
queries on Tools would also return matches containing Hammers, but queries on Hammers wouldnot return results for the more general term Tools.
• Two-way thesaurus entries establish a mutual equivalence relationship between words or phrases.For example, an equivalence might specify that the phrase Mark Twain is interchangeable withthe phrase Samuel Clemens.
Related LinksUsing the Thesaurus on page 190
Creating thesaurus entries on page 191Create one-way or two-way thesaurus entries in the Thesaurus view, found under SearchConfiguration in the Project Explorer.
Modifying thesaurus entries on page 192Select an entry in the Thesaurus view to make changes.
Deleting thesaurus entries on page 192Remove thesaurus entries from the Thesaurus view.
Thesaurus entry recommendations on page 193Give single-word names to your entries, avoid non-searchable characters and stop words,and avoid creating entries which include substrings of other entries.
Interpreted on page 225The Interpreted (interp) ranking module is a general-purpose module that assigns a score toeach result based on the query processing techniques used to obtain the match.
About stemming on page 196The stemming feature broadens search results to include word roots and word derivations.
Creating thesaurus entriesCreate one-way or two-way thesaurus entries in the Thesaurus view, found under Search Configurationin the Project Explorer.
To create a one-way equivalence relationship between words or phrases:
1. In the Project Explorer, expand Search Configuration and double-click Thesaurus.The Thesaurus view appears.
2. In the Thesaurus view, click New, and then choose One Way.The New One-Way Thesaurus Entry editor appears.
3. In the From box, type the word or phrase that, when selected, will also return results for the Toentry.
4. In the To box, type the word or phrase the results for which will also be returned when the user'squery returns the From entry, and then click Add.
5. Click OK.
The new one-way thesaurus entry appears in the Thesaurus view, preceded by a red arrow .
Implementing search features requires additional work outside of Developer Studio. Please refer tothe Endeca Advanced Development Guide for details.
Related LinksUsing the Thesaurus on page 190
Modifying thesaurus entries on page 192Select an entry in the Thesaurus view to make changes.
Deleting thesaurus entries on page 192Remove thesaurus entries from the Thesaurus view.
Endeca Developer Studio Developer Studio HelpEndeca Confidential
191Configuring Application Features | Configuring Search Interfaces

About the thesaurus on page 190The thesaurus allows the system to return matches for related concepts to words or phrasescontained in user queries.
Modifying thesaurus entriesSelect an entry in the Thesaurus view to make changes.
To edit an existing thesaurus entry:
1. In the Thesaurus view, select the thesaurus entry you want to modify and click Edit.Depending on the entry you selected, either the One-Way Thesaurus Entry or the Two-WayThesaurus Entry editor opens.
2. Make the necessary modifications.
3. Click OK to return to the Thesaurus view.
Implementing search features requires additional work outside of Developer Studio. Please refer tothe Endeca Advanced Development Guide for details.
Related LinksUsing the Thesaurus on page 190
Creating thesaurus entries on page 191Create one-way or two-way thesaurus entries in the Thesaurus view, found under SearchConfiguration in the Project Explorer.
Deleting thesaurus entries on page 192Remove thesaurus entries from the Thesaurus view.
About the thesaurus on page 190The thesaurus allows the system to return matches for related concepts to words or phrasescontained in user queries.
Deleting thesaurus entriesRemove thesaurus entries from the Thesaurus view.
To remove an entry from the thesaurus list:
1. In the Thesaurus view, select the entry that you want to remove and then click Delete.
2. When the confirmation message appears, click Yes.
Implementing search features requires additional work outside of Developer Studio. Please refer tothe Endeca Advanced Development Guide for details.
Related LinksUsing the Thesaurus on page 190
Creating thesaurus entries on page 191Create one-way or two-way thesaurus entries in the Thesaurus view, found under SearchConfiguration in the Project Explorer.
Modifying thesaurus entries on page 192Select an entry in the Thesaurus view to make changes.
About the thesaurus on page 190The thesaurus allows the system to return matches for related concepts to words or phrasescontained in user queries.
Sorting thesaurus entriesSort your entries in ascending or descending alphabetical order in the Thesaurus view.
Endeca ConfidentialEndeca Developer Studio Developer Studio Help
Configuring Application Features | Configuring Search Interfaces192
The entries in Thesaurus view are sorted by name to make them easier to work with.You can choosewhether the sort is ascending or descending.
To sort your thesaurus entries:
•In the Thesaurus view, click either the Sort Ascending or Sort Descending button
Note: Implementing search features requires additional work outside of Developer Studio.Please refer to the Endeca Advanced Development Guide for details.
Related LinksUsing the Thesaurus on page 190
Filtering thesaurus entriesIf your list of thesaurus entries becomes long, you can filter them by a letter or word.
To filter thesaurus entries:
1. In the Thesaurus view, type a letter or word in the text box next to the Clear Filter button.The application filters your thesaurus entries dynamically.
2. To remove the filter, so that all of your thesaurus entries once again appear in the view, click ClearFilter .
Implementing search features requires additional work outside of Developer Studio. Please refer tothe Endeca Advanced Development Guide for details.
Related LinksUsing the Thesaurus on page 190
Thesaurus entry recommendationsGive single-word names to your entries, avoid non-searchable characters and stop words, and avoidcreating entries which include substrings of other entries.
To avoid performance problems related to expensive or less than useful thesaurus search queryexpansions, follow these recommendations:
A thesaurus entry should never include a form that is a substring of another
Such forms rarely lead to useful expansions. For example, consider the following two entries:
• ADAM AND EVE• EVE
If users type "EVE" they will get results for "EVE OR (ADAM AND EVE)"-the same results they wouldhave gotten for "EVE" without the thesaurus. If the user types "ADAM AND EVE" they get results for(ADAM AND EVE) OR EVE, causing the "ADAM AND" part of the query to basically be ignored.
Stop words should not be used in thesaurus forms
For example, the following entries:
• ANCESTORS AND ANCESTRY• HERITAGE• HEREDITY
should be replaced with either:
• ANCESTORS
Endeca Developer Studio Developer Studio HelpEndeca Confidential
193Configuring Application Features | Configuring Search Interfaces
• ANCESTRY• HERITAGE• HEREDITY
or
• ANCESTORS ANCESTRY• HERITAGE• HEREDITY
The stop word "AND" should be removed.
Avoid multi-word thesaurus forms where single-word forms are appropriate
In particular, avoid multi-word forms that are not phrases that users are likely to type, or to whichphrase expansion is likely to provide relevant additional results. For example, the following thesaurusentries:
• AETHELSTAN, KING OF ENGLAND (D. 939)• ATHELSTAN, KING OF ENGLAND (D. 939)
should be replaced with the single-word form:
• AETHELSTAN• ATHELSTAN
Thesaurus forms should not use non-searchable characters.
For example, the form:
• PIKE'S PEAK
should only be used if apostrophe is enabled as a search character.
Related LinksUsing the Thesaurus on page 190
About stop words on page 199Stop words are words that are set to be ignored by the Endeca MDEX Engine.
About search characters on page 197You can specify punctuation marks as searchable, in addition to digits and upper- andlower-case letters (automatically set as valid search characters).
About the thesaurus on page 190The thesaurus allows the system to return matches for related concepts to words or phrasescontained in user queries.
One-way Thesaurus Entry editorSpecify a single word or phrase that, when searched on, returns results for other words or phrases.
DescriptionOption
The word or phrase that, when searched on, willalso return hits on the words or phrases in the Tolist.
From
Endeca ConfidentialEndeca Developer Studio Developer Studio Help
Configuring Application Features | Configuring Search Interfaces194

DescriptionOption
The additional words or phrases whose results willalso be returned when the user's query returns hitson the From entry.
To
Adds the word or phrase entered in the field aboveto the To list.
Add
Used to modify a word or phrase in the To list.Modify
Removed the selected word or phrase from the Tolist.
Remove
Related LinksUsing the Thesaurus on page 190
Two-way Thesaurus Entry editorDefine a list of words or phrases that will return results for each other when searched.
The Two-way Thesaurus Entry editor contains the following fields:
DescriptionOption
The list of words or phrases that will have a mutualequivalence relationship. Searches on any of the
To
words in the list will return hits for the other wordsin the list as well.
Adds the word or phrase entered in the field aboveto the To list.
Add
Used to modify a word or phrase in the To list. Tomodify an entry, select it in the To list, make yourchanges in the editing field, and click Modify.
Modify
Removed the selected word or phrase from the Tolist.
Remove
Related LinksUsing the Thesaurus on page 190
Using Stemming
Related LinksConfiguring Search on page 189
About stemming on page 196The stemming feature broadens search results to include word roots and word derivations.
Enabling stemming on page 196Open the Stemming editor from the Edit menu to enable stemming.
Stemming editor on page 196
Endeca Developer Studio Developer Studio HelpEndeca Confidential
195Configuring Application Features | Configuring Search Interfaces

The Stemming editor allows you to enable or disable stemming for your supported languages.
About stemmingThe stemming feature broadens search results to include word roots and word derivations.
Stemming is intended to allow words with a common root form (such as the singular and plural formsof nouns) to be considered interchangeable in search operations. For example, search results for theword "shirt" will include the derivation "shirts," while a search for "shirts" will also include its word root"shirt."
Stemming equivalences are strictly two-way (that is, all-to-all). For example, a search for the singularform of a noun (such as "child") will also return matches for the plural form "children." Likewise, asearch for "children" will return matches for "child" and "children." Stemmed words, therefore, areconsidered equivalent and interchangeable for all search operations.
In contrast, the thesaurus feature supports one-way mappings in addition to two-way mappings.
Note: Stemming files are provided by Endeca for various languages. While you can enable theuse of these files, you cannot modify their contents.
Related LinksUsing Stemming on page 195
Enabling stemming on page 196Open the Stemming editor from the Edit menu to enable stemming.
Enabling stemmingOpen the Stemming editor from the Edit menu to enable stemming.
To enable stemming for one or more languages in your project:
1. On the Edit menu, choose Stemming.The Stemming editor appears.
2. Check one or more of the language check boxes on the list.
3. Click OK.
Note: The Stemming editor allows you to turn the default version of Dutch and Germanstemming-with the word forms file-on and off. If you want to implement dynamic stemming forDutch or German, you must edit the stemming.xml file directly, as described in the EndecaAdvanced Development Guide. Subsequent use of the Stemming editor will not overwrite manualchanges to the stemming.xml file.To disable stemming, use the above procedure, but uncheckthe languages for which you do not want stemming.
Related LinksUsing Stemming on page 195
About stemming on page 196The stemming feature broadens search results to include word roots and word derivations.
Stemming editorThe Stemming editor allows you to enable or disable stemming for your supported languages.
The "Enable stemming for" list contains an entry for every supported language. A language that ischecked has stemming enabled for that language.
Related Links
Endeca ConfidentialEndeca Developer Studio Developer Studio Help
Configuring Application Features | Configuring Search Interfaces196

Using Stemming on page 195
Using Search Characters
Related LinksConfiguring Search on page 189
About search characters on page 197You can specify punctuation marks as searchable, in addition to digits and upper- andlower-case letters (automatically set as valid search characters).
Adding search characters on page 197Add search characters from the Search Characters editor, under the Edit menu.
Deleting search characters on page 198Delete search characters from the Search Characters editor, under the Edit menu.
Search Characters editor on page 198The Search Characters editor lists the standard special search characters, as well as anyothers you have specified.
About search charactersYou can specify punctuation marks as searchable, in addition to digits and upper- and lower-caseletters (automatically set as valid search characters).
Upper- and lower-case letters and the digits 0 to 9 are automatically included as valid search charactersin your Endeca-enabled application. However, in the case of other characters, such as certainpunctuation characters, you can specify whether the character should be indexed along withalphanumeric characters in a token or instead treated as whitespace.
Search characters are configured globally for all search operations.
Note: Implementing search features requires additional work outside of Developer Studio.Please refer to the Endeca Basic Development Guide for details.
Related LinksUsing Search Characters on page 197
Adding search characters on page 197Add search characters from the Search Characters editor, under the Edit menu.
Deleting search characters on page 198Delete search characters from the Search Characters editor, under the Edit menu.
Adding search characters that support automatic phrasing on page 206Inclusion of original punctuation marks in search query phrases returns more relevant results.
Adding search charactersAdd search characters from the Search Characters editor, under the Edit menu.
To add search characters:
1. On the Edit menu, choose Search Characters.The Search Characters editor appears.
2. Click Modify.The Additional Search Characters dialog box appears.
3. Type the character(s) you want to add.
4. Click OK.
Endeca Developer Studio Developer Studio HelpEndeca Confidential
197Configuring Application Features | Configuring Search Interfaces

If you have more than one, do not separate them with commas or spaces -- simply type them oneafter another.
5. Click Close.
Implementing search features requires additional work outside of Developer Studio. Please refer tothe Endeca Basic Development Guide for details.
Related LinksUsing Search Characters on page 197
About search characters on page 197You can specify punctuation marks as searchable, in addition to digits and upper- andlower-case letters (automatically set as valid search characters).
Deleting search charactersDelete search characters from the Search Characters editor, under the Edit menu.
To remove an additional character from the list of searchable characters:
1. On the Edit menu, choose Search Characters.The Search Characters editor appears.
2. Click Modify.The Additional Search Characters dialog box appears.
3. Highlight the character(s) you want to remove.
4. Press Delete.
5. Click OK.The confirmation message appears.
6. Click Yes.
7. Click Close.
Implementing search features requires additional work outside of Developer Studio. Please refer tothe Endeca Basic Development Guide for details.
Related LinksUsing Search Characters on page 197
About search characters on page 197You can specify punctuation marks as searchable, in addition to digits and upper- andlower-case letters (automatically set as valid search characters).
Search Characters editorThe Search Characters editor lists the standard special search characters, as well as any others youhave specified.
Upper- and lower-case letters and the digits 0 to 9 are automatically included as valid search charactersin your Endeca-enabled application. However, in the case of other characters, such as certainpunctuation characters, you can specify whether the character should be indexed along withalphanumeric characters in a token or instead treated as whitespace.
Related LinksUsing Search Characters on page 197
About search characters on page 197You can specify punctuation marks as searchable, in addition to digits and upper- andlower-case letters (automatically set as valid search characters).
Endeca ConfidentialEndeca Developer Studio Developer Studio Help
Configuring Application Features | Configuring Search Interfaces198
Using Stop Words
Related LinksConfiguring Search on page 189
About stop words on page 199Stop words are words that are set to be ignored by the Endeca MDEX Engine.
Creating stop words on page 199Set stop words from the Stop Words view, under Search Configuration in the Project Explorer.
Modifying stop words on page 200Modify stop words from the Stop Words view.
Deleting stop words on page 200Remove stop words from the Stop Words view.
Sorting stop words on page 200Sort stop words in ascending or descending alphabetical order in the Stop Words view.
Recommended stop words list on page 200This list contains common words which you may want omitted from search results.
About stop wordsStop words are words that are set to be ignored by the Endeca MDEX Engine.
Typically, common words like "the" are included in the stop word list. In addition, you might want toadd terms that are prevalent in your data set. For example, if your data consists of lists of books, youmight want to add the word "book" itself to the stop word list, since a search on that word would returnan impracticably large set of records.
Note:
• Words added to the stop word list are not expanded by other Endeca Developer Studiofeatures like stemming and thesaurus. That means that if you set the word "item" as a stopword, its plural form "items" will not be marked automatically as a stop word. If you want bothforms to be on the stop word list, you must add them individually.
• Stop words are counted in any search mode (such as MatchPartial) that calculates resultsbased on number of matching terms. However, the Endeca MDEX Engine reduces theminimum term match and maximum word omit requirement by the number of stop wordscontained in the query.
• Stop words must be single words only, and cannot contain any non-searchable characters.If more than one word is entered as a stop word, neither the individual words nor the combinedphrase will act as a stop word. Non-searchable characters within a stop word will also causethis behavior. Entering "full-bodied" as a stop word acts just as if you had entered "full bodied",and does not have any effect on searches.
Related LinksUsing Stop Words on page 199
Creating stop wordsSet stop words from the Stop Words view, under Search Configuration in the Project Explorer.
To add a word to the stop list:
1. In the Project Explorer, expand Search Configuration and double-click Stop Words.The Stop Words view appears.
2. In the Stop Words view, click New.
Endeca Developer Studio Developer Studio HelpEndeca Confidential
199Configuring Application Features | Configuring Search Interfaces

The Stop Word editor appears.
3. Type the word that you want to add to the stop word list, and then click OK.
Related LinksUsing Stop Words on page 199
Modifying stop wordsModify stop words from the Stop Words view.
To edit a stop word:
1. In the Stop Word view, select the stop word that you want to modify, and then click Edit.The Stop Word editor appears.
2. Make the necessary changes to the stop word, and then click OK.
Related LinksUsing Stop Words on page 199
Deleting stop wordsRemove stop words from the Stop Words view.
To remove a word from the stop word list:
1. In the Stop Words view, select the stop word you want to remove and click Delete.
2. When the confirmation message appears, click Yes.
Related LinksUsing Stop Words on page 199
Sorting stop wordsSort stop words in ascending or descending alphabetical order in the Stop Words view.
The entries in Stop Words view are sorted by name to make them easier to work with.You can choosewhether the sort is ascending or descending.
To sort the stop words in your list:
•In the Stop Words view, click either the Sort Ascending or Sort Descending button.
Related LinksUsing Stop Words on page 199
Recommended stop words listThis list contains common words which you may want omitted from search results.
The following is a list of stop words that you may find useful:
• a• about• above• an• and• any• are• can• do
Endeca ConfidentialEndeca Developer Studio Developer Studio Help
Configuring Application Features | Configuring Search Interfaces200

• find• for• from• I• is• me• not• or• over• show• the• under• what• when• where• why• with• you• your
Related LinksUsing Stop Words on page 199
Using Automatic Phrasing
Related LinksConfiguring Search on page 189
About automatic phrasing on page 309When an application user provides individual search terms in a query, the automatic phrasingfeature groups those individual terms into a search phrase and returns query results for thephrase.
Automatic phrasing and query expansion on page 203Grouping of terms as a phrase exempts the phrase from thesaurus expansion and stemming.
Automatic phrasing, spelling correction, and DYM on page 203Describes the processing order of spelling correction and the DYM function with regard toautomatic phrasing.
Adding Phrases to a Project on page 203
Adding search characters that support automatic phrasing on page 206Inclusion of original punctuation marks in search query phrases returns more relevant results.
Tips and troubleshooting for automatic phrasing on page 206Depending on how a phrased query is processed it may create dead-end results, for reasonsincluding significance of term order and the fact that the MDEX Engine does not extend userphrases to match those in the phrase dictionary.
About automatic phrasingWhen an application user provides individual search terms in a query, the automatic phrasing featuregroups those individual terms into a search phrase and returns query results for the phrase.
Endeca Developer Studio Developer Studio HelpEndeca Confidential
201Configuring Application Features | Configuring Search Interfaces

Automatic phrasing is similar to placing quotation marks around search terms before submitting themin a query. For example, 'my search terms' is the phrased version of the query my search terms.However, automatic phrasing removes the need for application users to place quotation marks aroundsearch phrases to get phrased results.
The result of automatic phrasing is that a Web application can process a more restricted query andtherefore return fewer and more focused search results.This feature is available only for record search.
The automatic phrasing feature works by:
1. Comparing individual search terms in a query to a list of application-specific search phrases. Thelist of search phrases are stored in a project's phrase dictionary.
2. Grouping the search terms into search phrases.3. Returning query results that are either based on the automatically phrased query, or returning
results based on the original unphrased query along with automatically phrased 'Did You Mean?'(DYM) alternatives.
Point three above suggests the two typical implementation scenarios to choose from when usingautomatic phrasing:
• Process an automatically phrased form of the query and suggest the original unphrased query asa DYM alternative.
In this scenario, the automatic phrasing feature rewrites the original query's search terms into aphrased query before processing it. If you are also using DYM, you can display the unphrasedalternative so the user can opt-out of automatic phrasing and select their original query, if desired.
For example, an application user searches a wine catalog for the terms "low tannin." The MDEXEngine compares the search terms against the phrase dictionary, finds a phrase entry for "lowtannin," and processes the phrased query as "low tannin." The MDEX Engine returns 3 recordsfor the phrased query "low tannin" rather than 16 records for the user's original unphrased query"low tannin." However, the Web application also presents a "Did you mean low tannin?" selectionso the user may opt-out of automatic phrasing, if desired.
• Process the original query and suggest an automatically-phrased form of the query as a DYMalternative.
In this scenario, the automatic phrasing feature processes the unphrased query as entered anddetermines if a phrased form of the query exists. If a phrased form is available, the Web applicationdisplays an automatically-phrased alternative as a "Did you mean?" option. The user can opt-into automatic phrasing, if desired.
For example, an application user searches a wine catalog for low tannin.The MDEX Engine returns16 records for the user's unphrased query low tannin. The Web application also presents a "Didyou mean "low tannin"?" option so the user may opt-in to automatic phrasing, if desired.
There are two tasks to implement automatic phrasing:
• Add phrases to your project using Developer Studio.• Add Presentation API code to support either of the two implementation scenarios described above.
Note: Implementing search features requires additional work outside of Developer Studio. Referto the Endeca Advanced Development Guide for details.
Related LinksEnabling Record Rollups on page 153
Using Automatic Phrasing on page 201
Methods for adding phrases on page 204
Endeca ConfidentialEndeca Developer Studio Developer Studio Help
Configuring Application Features | Configuring Search Interfaces202

Import phrases from an XML file, or extract phrases from dimension names.
Importing phrases from an XML file on page 314You import an XML file of phrases using the Import Phrases dialog box in Developer Studio.The Import Phrases dialog box can be accessed from either the File menu or from theAutomatic Phrasing dialog box.
Extracting phrases from dimension names on page 205In addition to importing an XML file of phrases, you can add phrases to your project basedon the dimension values of any dimension you choose.
Adding search characters that support automatic phrasing on page 206Inclusion of original punctuation marks in search query phrases returns more relevant results.
Tips and troubleshooting for automatic phrasing on page 206Depending on how a phrased query is processed it may create dead-end results, for reasonsincluding significance of term order and the fact that the MDEX Engine does not extend userphrases to match those in the phrase dictionary.
Automatic phrasing and query expansionGrouping of terms as a phrase exempts the phrase from thesaurus expansion and stemming.
Once individual search terms in a query are grouped as a phrase, the phrase is not subject to thesaurusexpansion or stemming by the MDEX Engine.
Related LinksUsing Automatic Phrasing on page 201
Automatic phrasing, spelling correction, and DYMDescribes the processing order of spelling correction and the DYM function with regard to automaticphrasing.
If you are using automatic phrasing, you should enable the MDEX Engine for both spelling correctionand "Did you mean?" If you want spelling-corrected automatic phrases, spelling correction ensuressearch terms are corrected before the terms are automatically phrased. DYM provides users the choiceto opt-in or opt-out of automatic phrasing.
The MDEX Engine applies spelling correction to a query before automatically phrasing the terms.Thisprocessing order means, for example, if a user misspells the query Napa Valle, the MDEX Engine firstspell corrects to Napa Valley and then automatically phrases to "Napa Valley." Without spellingcorrection enabled, automatic phrasing would typically not find a matching phrase in the phrasedictionary.
If you implement automatic phrasing to rewrite the query using an automatic phrase, then enablingDYM allows users a way to opt-out of automatic phrasing if they want to. On the other hand, if youimplement automatic phrasing to process the original query and suggest automatically-phrasedalternatives, then enabling DYM allows users to take advantage of automatically phrased alternativesas follow-up queries.
Note: For details about configuring spelling correction and DYM, see the Endeca AdvancedDevelopment Guide.
Related LinksUsing Automatic Phrasing on page 201
Adding Phrases to a Project
Related Links
Endeca Developer Studio Developer Studio HelpEndeca Confidential
203Configuring Application Features | Configuring Search Interfaces

Using Automatic Phrasing on page 201
Methods for adding phrases on page 204Import phrases from an XML file, or extract phrases from dimension names.
Importing phrases from an XML file on page 314You import an XML file of phrases using the Import Phrases dialog box in Developer Studio.The Import Phrases dialog box can be accessed from either the File menu or from theAutomatic Phrasing dialog box.
Extracting phrases from dimension names on page 205In addition to importing an XML file of phrases, you can add phrases to your project basedon the dimension values of any dimension you choose.
Methods for adding phrasesImport phrases from an XML file, or extract phrases from dimension names.
There are two ways to include phrases in your Developer Studio project:
• Import phrases from an XML file.• Extract phrases from dimension names.
After you add phrases and update your instance configuration, the MDEX Engine builds the phrasedictionary.You cannot view the phrases in Developer Studio. However, after adding phrases andsaving your project, you can examine the phrases contained in a project's phrase dictionary by openingthe project file named phrases.xml in a text editor. Directly modifying phrases.xml is not supported.
Related LinksAdding Phrases to a Project on page 203
About automatic phrasing on page 309When an application user provides individual search terms in a query, the automatic phrasingfeature groups those individual terms into a search phrase and returns query results for thephrase.
Importing phrases from an XML file on page 314You import an XML file of phrases using the Import Phrases dialog box in Developer Studio.The Import Phrases dialog box can be accessed from either the File menu or from theAutomatic Phrasing dialog box.
Extracting phrases from dimension names on page 205In addition to importing an XML file of phrases, you can add phrases to your project basedon the dimension values of any dimension you choose.
Importing phrases from an XML fileYou import an XML file of phrases using the Import Phrases dialog box in Developer Studio.The ImportPhrases dialog box can be accessed from either the File menu or from the Automatic Phrasing dialogbox.
Before you import the XML file, it must conform to phrase_import.dtd, in the Endeca Navigation Platformconf/dtd directory.
Here is a simple example of a phrase file that conforms to phrase_import.dtd:
<?xml version='1.0' encoding='UTF-8' standalone='no' ?> <!DOCTYPE PHRASE_IMPORT SYSTEM'phrase_import.dtd'>
<PHRASE_IMPORT>
<PHRASE>Napa Valley</PHRASE>
<PHRASE>low tannin</PHRASE>
Endeca ConfidentialEndeca Developer Studio Developer Studio Help
Configuring Application Features | Configuring Search Interfaces204
</PHRASE_IMPORT>
To import phrases from an XML file:
1. In the Project Explorer, expand Search Configuration.
2. Double-click Automatic Phrasing.The Automatic Phrasing dialog box displays.
3. Click Import Phrases.The Import Phrases dialog box displays.
Note: Alternatively, you can select Import Phrases from the File menu to invoke the ImportPhrases dialog box.
4. Either type the path to your phrases file or click the Browse button to locate the file.
5. Click OK on the Import Phrases dialog box.
6. Click OK on the Automatic Phrasing dialog box.The Messages pane displays the number of phrases read in from the XML file.
7. Select Save from the File menu.
Related LinksAdding Phrases to a Project on page 203
Methods for adding phrases on page 204Import phrases from an XML file, or extract phrases from dimension names.
About automatic phrasing on page 309When an application user provides individual search terms in a query, the automatic phrasingfeature groups those individual terms into a search phrase and returns query results for thephrase.
Extracting phrases from dimension namesIn addition to importing an XML file of phrases, you can add phrases to your project based on thedimension values of any dimension you choose.
The MDEX Engine adds each multi-term dimension value in a selected dimension to the phrasedictionary. Single-term dimension values are not included. For example, if you import a Winerydimension from a wine catalog, the MDEX Engine creates a phrase entry for multi-term names suchas Agostina Pieri but not for single-term names such as Alessi.
In addition, the MDEX Engine adds each multi-term synonym to the phrase dictionary that has "Search"checked on the Synonyms dialog box. In this release, dimension value phrases that have been modifiedby a partial update pipeline are not reflected in the phrase dictionary.
To extract phrases from dimension name:
1. In the Project Explorer, expand Search Configuration .
2. Double-click Automatic Phrasing .The Automatic Phrasing dialog box displays.
3. From the All dimensions list, select a dimension that you want to extract phrases from and clickAdd. Repeat this step as necessary for additional dimensions.
4. Click OK.
5. Select Save from the File menu.
Related LinksAdding Phrases to a Project on page 203
Endeca Developer Studio Developer Studio HelpEndeca Confidential
205Configuring Application Features | Configuring Search Interfaces
Adding search characters that support automatic phrasingInclusion of original punctuation marks in search query phrases returns more relevant results.
To add search characters that support automatic phrasing:
If you have phrases that include punctuation, add those punctuation marks as search characters.Adding the punctuation marks ensures that the MDEX Engine includes the punctuation whentokenizing the query, and therefore the MDEX Engine can match search terms with punctuation tophrases with punctuation.
For example, suppose you add phrases based on a Winery dimension, and consequently the Wineryname Anderson & Brothers exists in your phrase dictionary.You should create a search characterfor the ampersand (&).
Note: For details on search characters, see About search characters.
Related LinksUsing Automatic Phrasing on page 201
About search characters on page 197You can specify punctuation marks as searchable, in addition to digits and upper- andlower-case letters (automatically set as valid search characters).
About automatic phrasing on page 309When an application user provides individual search terms in a query, the automatic phrasingfeature groups those individual terms into a search phrase and returns query results for thephrase.
Tips and troubleshooting for automatic phrasingDepending on how a phrased query is processed it may create dead-end results, for reasons includingsignificance of term order and the fact that the MDEX Engine does not extend user phrases to matchthose in the phrase dictionary.
The following table provides tips and troubleshooting guidance about using the automatic phrasingfeature.
DescriptionTip
Examining how a phrased query was processed
You can include a single word in yourphrases_import.xml file and treat the word as a
Single word phrases
phrase in your project. This may be useful if youdo not want stemming or thesaurus expansionapplied to single word query terms.You cannotinclude single word phrases by extracting themfrom dimension values using the Phrases dialogbox. They have to be imported from yourphrases_import.xml file.
The MDEX Engine does not extend phrases a userprovides to match a phrase in the phrase
Extending user phrases
dictionary. For example, if a user provides the
Endeca ConfidentialEndeca Developer Studio Developer Studio Help
Configuring Application Features | Configuring Search Interfaces206

DescriptionTip
query A "BC" D and "BCD" is in the phrasedictionary, the MDEX Engine does not extend theuser's original phrasing of "BC" to "BCD."
Phrases are matched only if search terms areprovided in the same exact order and with the
Term order is significant in phrases
same exact terms as the phrase in the phrasedictionary. For example, if "weekend bag" is in thephrase dictionary, the MDEX Engine does notautomatically phrase the search terms "weekendgetaway bag" or "bag, weekend" to match"weekend bag."
If an application automatically phrases searchterms, it is possible a query may not produce
Possible dead ends
results when it seemingly should have. Specifically,one way in which a dead-end query can occur iswhen a search phrase is displayed as a DYM linkwith results and navigation state filtering excludesthe results.
For example, suppose a car sales application isset up to process a user's original query anddisplay any automatic phrase alternatives as DYMoptions. Further suppose a user navigates to Cars> Less than $15,000 and then provides the searchterms luxury package. The search terms matchthe phrase 'luxury package' in the phrasedictionary.
The user receives query results for Cars > Lessthan $15,000 and results that matched someoccurances of the terms luxury and package.However, if the user clicks the DYM link Did youmean "luxury package"? then no results areavailable because the navigation state Cars > Lessthan $15,000 excludes them.
Note: See the Endeca AdvancedDevelopment Guidefor details about howprocessing order affects queries.
Related LinksUsing Automatic Phrasing on page 201
About automatic phrasing on page 309When an application user provides individual search terms in a query, the automatic phrasingfeature groups those individual terms into a search phrase and returns query results for thephrase.
Endeca Developer Studio Developer Studio HelpEndeca Confidential
207Configuring Application Features | Configuring Search Interfaces

Using the Spelling Dictionary
Related LinksConfiguring Search on page 189
About the spelling dictionary on page 208By default, Dgidx creates an application-specific spelling dictionary based on all wordscontained in searchable dimensions and properties. These words become possible spellcorrection recommendations.
Specifying constraints on spelling dictionary content on page 324Constraining spelling dictionary entries improves the performance of spelling corrected queries.
About the spelling dictionaryBy default, Dgidx creates an application-specific spelling dictionary based on all words contained insearchable dimensions and properties.These words become possible spell correction recommendations.
To achieve the best possible spelling correction behavior and performance, it is typically necessaryto specify constraints on the list of words that Dgidx can include for spelling correction.
Related LinksUsing the Spelling Dictionary on page 208
Specifying constraints on spelling dictionary content on page 324Constraining spelling dictionary entries improves the performance of spelling corrected queries.
Specifying constraints on spelling dictionary contentConstraining spelling dictionary entries improves the performance of spelling corrected queries.
If you want to fine tune the size of the spelling dictionary and consequently tune the performance ofspelling corrected queries, you can specify constraints to control what words Dgidx adds to the spellingdictionary.You can separately configure entries in the dictionary based for dimension search andrecord search.
To constrain spelling dictionary entries:
1. In the Project Explorer, expand Search Configuration.
2. Double-click Spelling.
3. Select the Dimension Search tab.
4. In the It Occurs at Least ... Times field, provide a number that indicates the minimum number oftimes the word must appear in your source data before the word should be included in the spellingdictionary.
5. In the And Is Between ... and ... Characters Long fields, provide values that represent the minimumand maximum length of a word that should be included in the spelling dictionary.
6. Select the Record Search tab.
7. Repeat steps 4 and 5.
8. Click OK.
Related LinksUsing the Spelling Dictionary on page 208
About the spelling dictionary on page 208By default, Dgidx creates an application-specific spelling dictionary based on all wordscontained in searchable dimensions and properties. These words become possible spellcorrection recommendations.
Endeca ConfidentialEndeca Developer Studio Developer Studio Help
Configuring Application Features | Configuring Search Interfaces208

Configuring Search Interface Options
Related LinksConfiguring Search Interfaces on page 188
About search interfaces on page 209Search interfaces allow your end-users to search on multiple properties and/or dimensionssimultaneously.
Viewing all of your search interfaces on page 210All search interfaces are shown in the Search Interfaces view on the Project tab.
Search Interfaces view on page 210The Search Interfaces view displays all of the search interfaces established in your project,their member dimensions and properties, as well as any associated relevance rankingstrategies.
Creating search interfaces on page 211Create new search interfaces within the Search Interfaces editor of the Search Interfacesview.
Modifying search interfaces on page 212Select a search interface from the Search Interfaces view to change it in the editor.
Deleting search interfaces on page 212Remove search interfaces from the Search Interfaces view.
Search Interface editor on page 212You use the Search Interface editor to create a new search interface or modify the attributesof an existing one.
Allowing cross-field matches on page 213The Allow Cross-field Matches option, in the Search Interface editor, specifies when theMDEX Engine should try to match search queries across dimension or property boundaries,but within the members of the search interface.
Customizing partial matching on page 214This section describes customizations available in the Customize Partial Match Settingsfeature of Developer Studio.
Using Snippeting on page 214
Using Relevance Ranking Modules on page 218
About search interfaces
Search interfaces allow your end-users to search on multiple properties and/or dimensionssimultaneously.
A search interface is a named collection of properties and dimensions, each of which has its EnableRecord Search option checked. A search interface may also contain a number of attributes such asname, cross-field matching configuration, and an ordered collection of one or more ranking strategiesthat determine the order of search results.
The search interface's name is used just like a normal property or dimension when performing recordsearches. A record search query on a search interface returns results that match any of the propertiesor dimensions in the interface.
For example, if a data set contains both an Actor property and Director dimension, it would be usefulto provide the end-user with the ability to search for a person's name in both. In this case you might
Endeca Developer Studio Developer Studio HelpEndeca Confidential
209Configuring Application Features | Configuring Search Interfaces

create a search interface called People that contained both the Actor property and the Directordimension.
Note: Implementing search features requires additional work outside of Developer Studio.Please refer to the Endeca Basic Development Guide for details.
Related LinksConfiguring Search Interface Options on page 209
Allowing cross-field matches on page 213The Allow Cross-field Matches option, in the Search Interface editor, specifies when theMDEX Engine should try to match search queries across dimension or property boundaries,but within the members of the search interface.
About relevance ranking on page 218You use relevance ranking to control the order in which record search results are displayedto the end-user.
Viewing all of your search interfaces
All search interfaces are shown in the Search Interfaces view on the Project tab.
To view all of your search interfaces at once:
On the Project tab, double-click Search Interfaces.The Search Interfaces view opens and displays all of the search interfaces in your project.
Implementing search features requires additional work outside of Developer Studio. Please refer tothe Endeca Basic Development Guide for details.
Related LinksConfiguring Search Interface Options on page 209
About search interfaces on page 209Search interfaces allow your end-users to search on multiple properties and/or dimensionssimultaneously.
About relevance ranking on page 218You use relevance ranking to control the order in which record search results are displayedto the end-user.
Search Interfaces view
The Search Interfaces view displays all of the search interfaces established in your project, theirmember dimensions and properties, as well as any associated relevance ranking strategies.
The Search Interfaces view contains the following columns.
DescriptionField
A unique name for this search interface.Name
Note: A search interface cannot share aname with a dimension value or a property.
Endeca ConfidentialEndeca Developer Studio Developer Studio Help
Configuring Application Features | Configuring Search Interfaces210

DescriptionField
The dimensions and Endeca properties that makeup this search interface.
Members
The ranking modules associated with this searchinterface.
Ranking Strategy
Related LinksConfiguring Search Interface Options on page 209
Creating search interfaces
Create new search interfaces within the Search Interfaces editor of the Search Interfaces view.
To create a new search interface:
1. On the Project tab, double-click Search Interfaces to open the Search Interface view.
2. In the Search Interface view, click New.The Search Interfaces editor appears.
3. In the Name box, type the name of the new search interface.
4. From the Allow Cross-field Matches list, choose Always, Never, or On Failure. The AllowCross-field Matches option specifies when the MDEX Engine should try to match search queriesacross dimension or property boundaries, but within the members of the search interface. Thereare three possible values:
• Always—the MDEX Engine always looks for matches across dimension or property boundaries,in addition to matches within a dimension or property. This is the default value.
• Never—the MDEX Engine does not look across dimension or property boundaries for matches.
• On Failure—the MDEX Engine only tries to match queries across dimension or propertyboundaries if it fails to find any match within a single dimension or property.
5. In the All (Searchable) Members list, select a member and click Add to add it to the SelectedMembers list. Repeat as many times as necessary to add additional members to the search interface.
Only Endeca properties and dimensions that have their Enable record search option checkedappear in this list.
6. ( Optional) If you want to associate a relevance ranking strategy to the search interface, clickRelevance Ranking Modules.
7. ( Optional ) If you want to make more detailed adjustments to the search interface, click Optionsand configure the Customize partial match settings, which specify if partial matches for searchterms should be supported for this search interface.
Implementing search features requires additional work outside of Developer Studio. Please refer tothe Endeca Basic Development Guide for details.
Related LinksConfiguring Search Interface Options on page 209
Endeca Developer Studio Developer Studio HelpEndeca Confidential
211Configuring Application Features | Configuring Search Interfaces

Modifying search interfaces
Select a search interface from the Search Interfaces view to change it in the editor.
To edit a search interface:
1. In the Search Interfaces view, double-click the name of the search interface you want to modify toopen it in the Search Interface editor. (You can only open one search interface at a time.
2. Make the necessary changes to the search interface.
3. Click OK to return to the Search Interfaces view.
Implementing search features requires additional work outside of Developer Studio. Please refer tothe Endeca Basic Development Guide for details.
Related LinksConfiguring Search Interface Options on page 209
Deleting search interfaces
Remove search interfaces from the Search Interfaces view.
To delete a search interface:
1. In the Search Interfaces view, select the search interface you want to remove and click Delete.
2. When the confirmation message appears, click Yes.
Implementing search features requires additional work outside of Developer Studio. Please refer tothe Endeca Basic Development Guide for details.
Related LinksConfiguring Search Interface Options on page 209
Search Interface editor
You use the Search Interface editor to create a new search interface or modify the attributes of anexisting one.
The Search Interface editor contains the following fields:
DescriptionOption
A unique name for this search interface. Searchinterface names are case sensitive.
Name
Specifies when the MDEX Engine should try tomatch search queries across dimension or property
Allow cross-field matches
boundaries, but within the members of the searchinterface. There are three possible values:
• Always—the MDEX Engine always looks formatches across dimension or propertyboundaries, in addition to matches within adimension or property.This is the default value.
• Never—the MDEX Engine does not look acrossboundaries for matches.
Endeca ConfidentialEndeca Developer Studio Developer Studio Help
Configuring Application Features | Configuring Search Interfaces212
DescriptionOption
• On Failure—the MDEX Engine only tries tomatch queries across dimension or propertyboundaries if it fails to find any match within asingle dimension or property.
A list of all dimensions and Endeca properties inthe project that have the "Enable record search"field checked.
All (searchable) members
A list of the searchable dimensions and propertiesthat have been added to this search interface.
Selected members
Clicking this button opens the Relevance RankingModules editor, where you can add, remove, and
Relevance Ranking Modules
order the relevance ranking modules that composethe ranking strategy associated with this searchinterface.
Clicking this button opens the Search InterfaceOptions editor, where you can make more detailedadjustments to this search interface.
Options
Related LinksConfiguring Search Interface Options on page 209
Allowing cross-field matches on page 213The Allow Cross-field Matches option, in the Search Interface editor, specifies when theMDEX Engine should try to match search queries across dimension or property boundaries,but within the members of the search interface.
About relevance ranking on page 218You use relevance ranking to control the order in which record search results are displayedto the end-user.
Allowing cross-field matches
The Allow Cross-field Matches option, in the Search Interface editor, specifies when the MDEX Engineshould try to match search queries across dimension or property boundaries, but within the membersof the search interface.
There are three possible values:
• Always (default)
The MDEX Engine always looks for matches across dimension or property boundaries, in additionto matches within a dimension or property. This is the default.
• Never
The MDEX Engine does not look across dimension or property boundaries for matches.
• On Failure
The MDEX Engine only tries to match queries across dimension or property boundaries if it failsto find any matches within a single dimension or property.
Endeca Developer Studio Developer Studio HelpEndeca Confidential
213Configuring Application Features | Configuring Search Interfaces

Note: Implementing search features requires additional work outside of Developer Studio.Please refer to the Endeca Basic Development Guide for details.
Related LinksConfiguring Search Interface Options on page 209
Customizing partial matching
This section describes customizations available in the Customize Partial Match Settings feature ofDeveloper Studio.
The Customize Partial Match Settings feature specifies if partial matches for search terms should besupported for this search interface.
• Match at Least sets the minimum number of words that must be matched. The default is 2.• Omit at Most sets the maximum number of words that can be omitted. The default is 2.
To customize partial matching in a search interface:
1. In the Search Interface Options editor, check Customize Partial Match Settings.The Match at Least ... Words and Omit at Most ... Words text boxes are each populated with 2 (thesuggested value).
2. In the Match at Least ... Words text box, modify the minimum number of words that must match inorder to consider a match.
You cannot enter 0 for this value.
3. In the Omit at Most ... Words text box, modify the maximum number of words that can be omittedin order to consider a match.
Implementing search features requires additional work outside of Developer Studio. Please refer tothe Endeca Advanced Development Guide for details.
Related LinksConfiguring Search Interface Options on page 209
Using Snippeting
Related LinksConfiguring Search Interface Options on page 209
About snippeting on page 215A snippet contains the search terms that the user provides along with a portion of the term’ssurrounding content to provide context.
Snippet format and size on page 215A snippet consists of search terms, surrounding context words, and ellipses.
Snippet property names on page 216The MDEX Engine dynamically creates new snippet properties by appending .Snippet tothe original name of the search interface members (fields) that you enabled for snippeting.
Snippets are dynamically generated properties on page 216The snippet property appears with a record only on a record list page.
Enabling snippeting on page 217You enable the snippeting feature in the Member Options dialog box, which is accessed fromthe Search Interface editor.
Endeca ConfidentialEndeca Developer Studio Developer Studio Help
Configuring Application Features | Configuring Search Interfaces214
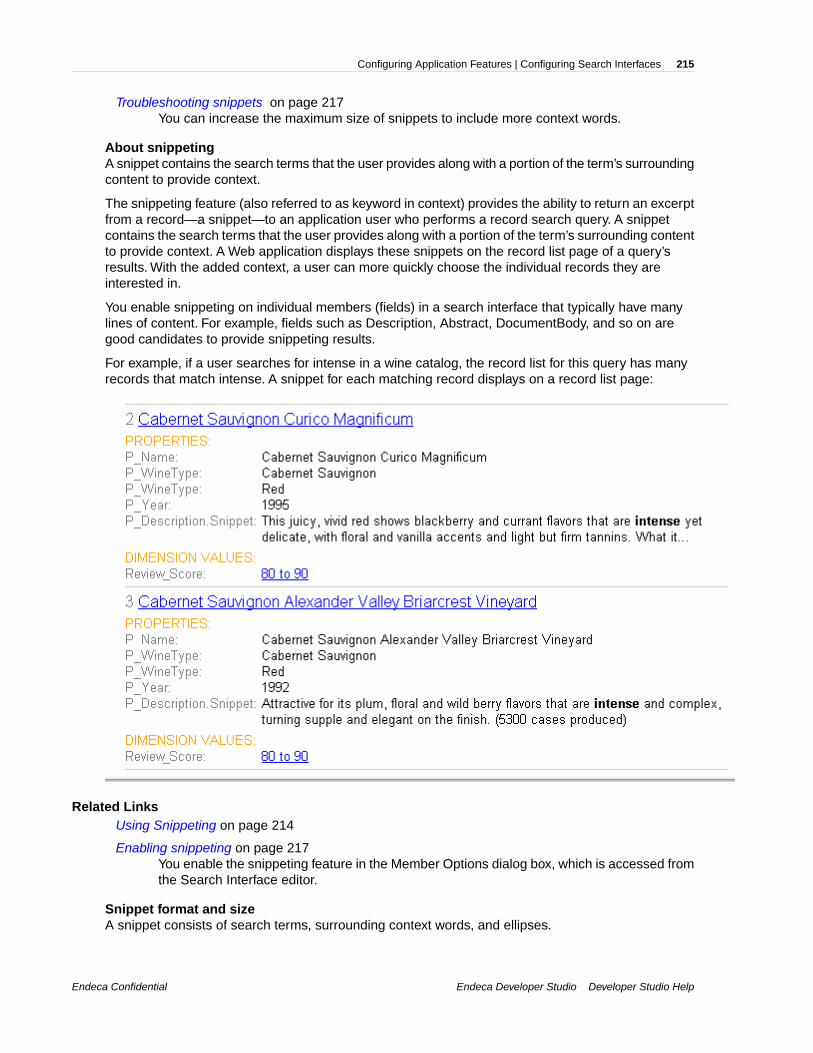
Troubleshooting snippets on page 217You can increase the maximum size of snippets to include more context words.
About snippetingA snippet contains the search terms that the user provides along with a portion of the term’s surroundingcontent to provide context.
The snippeting feature (also referred to as keyword in context) provides the ability to return an excerptfrom a record—a snippet—to an application user who performs a record search query. A snippetcontains the search terms that the user provides along with a portion of the term’s surrounding contentto provide context. A Web application displays these snippets on the record list page of a query’sresults. With the added context, a user can more quickly choose the individual records they areinterested in.
You enable snippeting on individual members (fields) in a search interface that typically have manylines of content. For example, fields such as Description, Abstract, DocumentBody, and so on aregood candidates to provide snippeting results.
For example, if a user searches for intense in a wine catalog, the record list for this query has manyrecords that match intense. A snippet for each matching record displays on a record list page:
Related LinksUsing Snippeting on page 214
Enabling snippeting on page 217You enable the snippeting feature in the Member Options dialog box, which is accessed fromthe Search Interface editor.
Snippet format and sizeA snippet consists of search terms, surrounding context words, and ellipses.
Endeca Developer Studio Developer Studio HelpEndeca Confidential
215Configuring Application Features | Configuring Search Interfaces
A snippet can contain any number of search terms bracketed by <endeca_term></endeca_term>tags. The tags call out search terms and allow you to more easily reformat the terms for display inyour Web application.
The snippet size is the total number of search terms and surrounding context words.You can configurethe total number of words in a snippet as described in Enabling snippeting. In order to adhere to thesize setting for a snippet, it is possible that the MDEX Engine may omit some search terms and contextwords from a snippet.This situation becomes more likely if an application user provides a large numberof search terms and the maximum snippet size is comparatively small.
A snippet consists of one or more segments.The segments are delimited by ellipses in between them.Ellipses (...) indicate that there is text omitted from the snippet occurring before or after the ellipses.
For example, here is a snippet made up of two segments with a maximum size set at 20 words. Thesnippet resulted from a search for the search terms Scotland and British which are enclosed within<endeca_term> tags.
...in Edinburgh <endeca_term>Scotland</endeca_term>, and has been employed by Ford for25 years ... He first joined Ford's <endeca_term>British</endeca_term> operation. Mazda motor...
Note: Implementing search features requires additional work outside of Developer Studio.Please refer to the Endeca Basic Development Guide for details.
Related LinksUsing Snippeting on page 214
Snippet property namesThe MDEX Engine dynamically creates new snippet properties by appending .Snippet to the originalname of the search interface members (fields) that you enabled for snippeting.
For example, if you enable snippeting for properties named Description and Reviews, theMDEX Engine creates new properties named Description.Snippet and Reviews.Snippetand returns these properties with the result set for a user's record search.
Note: Implementing search features requires additional work outside of Developer Studio.Please refer to the Endeca Advanced Development Guide for details.
Related LinksUsing Snippeting on page 214
Snippets are dynamically generated propertiesThe snippet property appears with a record only on a record list page.
It is important to emphasize that the MDEX Engine dynamically generates snippet properties. Thismeans the snippet properties, unlike other Endeca properties, are not created, configured, or mappedusing Developer Studio. A dynamically generated snippet property is not tagged to an Endeca record.
Note: Implementing search features requires additional work outside of Developer Studio.Please refer to the Endeca Basic Development Guide for details.
Related LinksUsing Snippeting on page 214
Endeca ConfidentialEndeca Developer Studio Developer Studio Help
Configuring Application Features | Configuring Search Interfaces216

Enabling snippetingYou enable the snippeting feature in the Member Options dialog box, which is accessed from theSearch Interface editor.
You enable the snippeting feature in the Member Options dialog box, which is accessed from theSearch Interface editor. Each member of a search interface is enabled and configured separately. Inother words, snippeting results are enabled and configured for each member of a search interface andnot for all members of a single search interface.
A search interface member is a dimension or property that has been enabled for search and that hasbeen added to the Selected members pane of the Search Interface editor.You can enable and configureany number of individual search interface members. Each member that you enable produces its ownsnippet.
Enabling a member in one search interface does not affect that member if it appears in other searchinterfaces. For example, enabling the Description property for Search Interface A does not affect theDescription property in Search Interface B.
To configure a search interface member for snippeting results:
1. Open your project file in Developer Studio and double-click Search Interfaces.
2. Either create a new search interface or select an existing one from the Search Interfaces view andclick Edit.
3. From the Selected Member area of the Search Interface editor, click a member that you want toconfigure for snippeting.
4. Click Edit.The Member Options dialog box displays.
5. From the Member Options dialog box, check Enable snippeting.
6. Specify the maximum snippet size (number of words) a snippet can contain.
7. Click OK.
8. Repeat steps 3-7 if you want to configure additional search interface members.
Implementing search features requires additional work outside of Developer Studio. Please refer tothe Endeca Basic Development Guide for details.
Related LinksUsing Snippeting on page 214
About snippeting on page 215A snippet contains the search terms that the user provides along with a portion of the term’ssurrounding content to provide context.
Snippet format and size on page 215A snippet consists of search terms, surrounding context words, and ellipses.
Troubleshooting snippetsYou can increase the maximum size of snippets to include more context words.
If you are not seeing enough context words in your snippet, open the Member Options editor andincrease the value for Maximum Snippet Size. The default value is 25 words.
Note: Implementing search features requires additional work outside of Developer Studio.Please refer to the Endeca Basic Development Guide for details.
Related LinksUsing Snippeting on page 214
Endeca Developer Studio Developer Studio HelpEndeca Confidential
217Configuring Application Features | Configuring Search Interfaces

Using Relevance Ranking Modules
Related LinksConfiguring Search Interface Options on page 209
About relevance ranking on page 218You use relevance ranking to control the order in which record search results are displayedto the end-user.
Creating ranking modules on page 219Ranking modules are selected from a stock list of modules. The Static and Phrase modulesboth take parameters.
Modifying ranking modules on page 219Edit ranking modules from the Relevance Ranking Modules editor, in the Search Interfaceeditor.
Deleting ranking modules on page 220Delete ranking modules from the Relevance Ranking Modules editor.
Changing the order of ranking modules on page 220Select and move modules as needed from the Relevance Ranking Modules editor.
Editing Static module parameters on page 220Edit static module parameters from the Relevance Ranking Modules editor.
Editing Phrase module parameters on page 228Edit phrase modules parameters from the Relevance Ranking Modules editor.
Recommended relevance ranking strategies on page 221Relevance ranking contains a rich set of features that should be used advisedly.
Ranking Modules in Detail on page 222
About relevance rankingYou use relevance ranking to control the order in which record search results are displayed to theend-user.
You use relevance ranking to control the order in which record search results are displayed to theend-user. Typically, relevance ranking is used to ensure that the most important search results aredisplayed earliest to the user, since users are generally unlikely to page or scan through large resultsets.
The importance of a particular record search result is generally an application-specific concept. Thus,the relevance ranking feature provides a flexible, configurable set of ranking modules. These modulesare then grouped into strategies that can be used in combination to produce a wide range of relevanceranking effects. Each search interface has its own ranking strategy.
Relevance ranking contains a rich set of features that should be used advisedly. Misuse of relevanceranking strategies can cause unexpected results and degraded performance.
Related LinksUsing Relevance Ranking Modules on page 218
Controlling the order of record results on page 144Specify an explicit sort key in the MDEX Engine query, set a default sort order, or userelevance ranking (for records returned in response to record search queries).
Creating ranking modules on page 219Ranking modules are selected from a stock list of modules. The Static and Phrase modulesboth take parameters.
Endeca ConfidentialEndeca Developer Studio Developer Studio Help
Configuring Application Features | Configuring Search Interfaces218

Modifying ranking modules on page 219Edit ranking modules from the Relevance Ranking Modules editor, in the Search Interfaceeditor.
Creating ranking modulesRanking modules are selected from a stock list of modules. The Static and Phrase modules both takeparameters.
You may have multiple instances of the Static module, however, you should only have one instanceof the Phrase module for each search interface.
To assign one or more ranking modules to a search interface:
1. In the Search Interface editor, click Relevance Ranking Modules.The Relevance Ranking Modules editor appears.
2. In the All Modules list, select a relevance ranking module and click Add.The module is moved to the Selected Modules list.
Note: Selecting a module causes a brief description to appear in the frame in the lower leftcorner of the editor.
3. If you selected the Static module, edit the Static module parameters.
4. If you selected the Phrase module, edit the Phrase module parameters.
5. (Optional) Repeat step 2 to add additional modules to the search interface.
6.(Optional) Use the up and down arrows to adjust the relative rank of the modules in yourranking strategy.
7. Click OK to return to the Search Interface editor.
Implementing search features requires additional work outside of Developer Studio. Please refer tothe Endeca Advanced Development Guide for details.
Related LinksUsing Relevance Ranking Modules on page 218
Modifying ranking modules on page 219Edit ranking modules from the Relevance Ranking Modules editor, in the Search Interfaceeditor.
Modifying ranking modulesEdit ranking modules from the Relevance Ranking Modules editor, in the Search Interface editor.
To edit a ranking module in a search interface:
1. In the Search Interfaces view, select the search interface you want to modify and click Edit to openit in the Search Interface editor.
2. In the Search Interface editor, click Relevance Ranking Modules.The Relevance Ranking Modules editor appears.
3. Make the necessary changes.
4. Click OK to return to the Search Interface editor.
Implementing search features requires additional work outside of Developer Studio. Please refer tothe Endeca Advanced Development Guide for details.
Related Links
Endeca Developer Studio Developer Studio HelpEndeca Confidential
219Configuring Application Features | Configuring Search Interfaces
Using Relevance Ranking Modules on page 218
Creating ranking modules on page 219Ranking modules are selected from a stock list of modules. The Static and Phrase modulesboth take parameters.
Deleting ranking modulesDelete ranking modules from the Relevance Ranking Modules editor.
To remove a ranking module from a search interface:
1. In the Search Interfaces view, select the search interface you want to modify and click Edit to openit in the Search Interface editor.
2. In the Search Interface editor, click Relevance Ranking Modules.The Relevance Ranking Modules editor appears.
3. In the Selected Modules list, select the module you want to delete and click Remove.
4. Click OK to return to the Search Interface editor.
Implementing search features requires additional work outside of Developer Studio. Please refer tothe Endeca Advanced Development Guide for details.
Related LinksUsing Relevance Ranking Modules on page 218
Changing the order of ranking modulesSelect and move modules as needed from the Relevance Ranking Modules editor.
By default, ranking modules are evaluated in the order in which you created them.
To change the order of ranking modules:
1. In the Search Interfaces view, select the search interface you want to modify and click Edit to openit in the Search Interface editor.
2. In the Search Interface editor, click Relevance Ranking Modules.The Relevance Ranking Modules editor appears.
3. In the Selected Modules list, select a module that you want to move and click either the up arrowor the down arrow until the module is in the correct order.
4. (Optional) Repeat step 3 as needed.
5. Click OK to return to the Search Interface editor.
Related LinksUsing Relevance Ranking Modules on page 218
Editing Static module parametersEdit static module parameters from the Relevance Ranking Modules editor.
The Static relevance ranking module, which indicates that a constant score be applied to a given result,is one of two modules that take parameters.You can apply it to a specific searchable dimension orproperty, and specify whether the records will be sorted in ascending or descending order.You canhave multiple Static modules, as long as they have different configurations.
To rank the members of a dimension or property statically:
1. Open the Relevance Ranking Modules editor.
2. In the All Modules list, select Static and click Add. The Edit Static Relevance Rank Module editorappears.
Endeca ConfidentialEndeca Developer Studio Developer Studio Help
Configuring Application Features | Configuring Search Interfaces220

3. In the New Property or Dimension list, select the property or searchable dimension to which youwant to apply the static ranking module.
4. Check Sort Records in Descending Order if you want the resulting records sorted in that order. Ifyou want the records sorted in ascending order (the default), make sure the checkbox is cleared.
5. Click OK to return to the Relevance Ranking Modules editor.
Related LinksUsing Relevance Ranking Modules on page 218
Editing Phrase module parametersEdit phrase modules parameters from the Relevance Ranking Modules editor.
You can use only one Phrase module in any given search interface, but you can set all of your optionsin it.
The Phrase relevance ranking module states that results containing the user's query as an exactphrase, or a subset of the exact phrase, should be considered more relevant than matches simplycontaining the user's search terms scattered throughout the text. Phrase is one of two modules thattake parameters.
To edit Phrase module parameters:
1. Open the Relevance Ranking Modules editor.
2. In the All Modules list, select Phrase and click Add.The Edit Phrase Relevance Rank Module editorappears.
3. Set the following options. See "Phrase" for detailed descriptions, interaction information, andexamples of how to use these options.
a) Rank based on length of subphrases: Ranks results based on the length of their subphrasematches. In other words, results that match three terms are considered more relevant thanresults that match two terms, and so on.
b) Use approximate subphrase/phrase matching: When enabled, the Phrase module looks at alimited number of positions in each result that a phrase match could possibly exist, rather thanall the positions.
c) Apply spell correction, thesaurus, and stemming: When enabled, the Phrase module ranksresults that match a phrase's expanded forms in the same stratum as results that match theoriginal phrase.
4. Click OK to return to the Relevance Ranking Modules editor.
Related LinksUsing Relevance Ranking Modules on page 218
Configuring the Phrase module on page 226When you add the Phrase module in the Relevance Ranking Modules editor, you are presentedwith an editor that allows you to set these options.
Recommended relevance ranking strategiesRelevance ranking contains a rich set of features that should be used advisedly.
Misuse of relevance ranking strategies can cause unexpected results and degraded performance.See the Endeca Advanced Development Guide for detailed information on relevance ranking andrecommended strategies.
Related LinksUsing Relevance Ranking Modules on page 218
Endeca Developer Studio Developer Studio HelpEndeca Confidential
221Configuring Application Features | Configuring Search Interfaces

Ranking Modules in Detail
Related LinksUsing Relevance Ranking Modules on page 218
Exact on page 222The Exact module provides a finer grained (but more computationally expensive) alternativeto the Phrase module.
Field on page 223The Field module ranks documents based on the search interface field with the highest priorityin which it matched.
First on page 223Designed primarily for use with unstructured data, the First module ranks documents by howclose the query terms are to the beginning of the document.
Frequency on page 224The Frequency (freq) module provides result scoring based on the frequency (number ofoccurrences) of the user's query terms in the result text.
Glom on page 224The Glom module ranks single-field matches ahead of cross-field matches.
Interpreted on page 225The Interpreted (interp) ranking module is a general-purpose module that assigns a score toeach result based on the query processing techniques used to obtain the match.
Maximum Field on page 225Unlike Field, which assigns a static score to cross-field matches, Maximum Field selects thescore of the highest-ranked field that contributed to the match.
Nterms on page 225The Nterms module ranks matches according to how many query terms they match.
Number of Fields on page 226The Number of Fields (numfields) module ranks results based on the number of fields in theassociated search interface in which a match occurs.
Phrase on page 226The Phrase module states that results containing the user's query as an exact phrase, or asubset of the exact phrase, should be considered more relevant than matches simplycontaining the user's search terms scattered throughout the text.
Proximity on page 232Designed primarily for use with unstructured data, the Proximity module ranks how close thequery terms are to each other in a document by counting the number of intervening words.
Spell on page 232
Static on page 233The Static module assigns a static or constant data-specific value to each search result,depending on the type of search operation performed and depending on optional parametersthat can be passed to the module.
Weighted Frequency on page 233The Weighted Frequency module scores results based on frequency of user terms, andweights those frequencies for each result by the content of each term.
ExactThe Exact module provides a finer grained (but more computationally expensive) alternative to thePhrase module.
Endeca ConfidentialEndeca Developer Studio Developer Studio Help
Configuring Application Features | Configuring Search Interfaces222

The Exact module groups results into three strata based on how well they match the query string:
• The highest stratum contains results whose complete text matches the user’s query exactly.• The middle stratum contains results that contain the user's query as an exact substring.• The lowest stratum contains other hits (such as normal conjunctive matches) .
The Exact module is computationally expensive, especially on large text fields. It is intended for useonly on small text fields (such as dimension values or small property values like part IDs).This moduleshould not be used with large or offline documents (such as FILE or ENCODED_FILE properties).Use of this module in these cases will result in very poor performance and/or application failures dueto request timeouts. The Phrase module does similar but less sophisticated ranking and can be usedas a higher performance substitute.
Related LinksRanking Modules in Detail on page 222
Phrase on page 226The Phrase module states that results containing the user's query as an exact phrase, or asubset of the exact phrase, should be considered more relevant than matches simplycontaining the user's search terms scattered throughout the text.
FieldThe Field module ranks documents based on the search interface field with the highest priority in whichit matched.
Only the best field in which a match occurs is considered.The Field module is often used in relevanceranking strategies for catalog applications, because the category or product name is typically a goodmatch. Field assigns a score to each result based on the static rank of the dimension or propertymember or members of the search interface that caused the document to match the query .
In Developer Studio, static field ranks are assigned based on the order in which members of a searchinterface are listed in the Search Interfaces view. The first (left-most) member has the highest rank.
By default, matches caused by cross-field matching are assigned a score of zero. The score forcross-field matches can be set explicitly in Developer Studio by moving the <<CROSS_FIELD>>indicator up or down in the Selected Members list of the Search Interface editor. The<<CROSS_FIELD>> indicator is available only for search interfaces that have the Field module andare configured to support cross-field matches.
All non-zero ranks must be non-equal and only their order matters. For example, a search interfacemight contain both Title and DocumentContent properties, where hits on Title are considered moreimportant than hits on DocumentContent (which in turn are considered more important than<<CROSS_FIELD>> matches). Such a ranking is implemented by assigning the highest rank Title,the next highest rank to DocumentContent, and setting the <<CROSS_FIELD>> indicator at the bottomof the Selected Members list in the Search Interface editor.
If a document matches on multiple fields, it is ranked based on the best field that it matches.
Note: The Field module is only valid for record search operations. This module assigns a scoreof zero to all results for other types of search requests.
Related LinksRanking Modules in Detail on page 222
FirstDesigned primarily for use with unstructured data, the First module ranks documents by how closethe query terms are to the beginning of the document.
Endeca Developer Studio Developer Studio HelpEndeca Confidential
223Configuring Application Features | Configuring Search Interfaces

First groups its results into variably-sized strata. The strata are not the same size, because while thefirst word is probably more relevant than the tenth word, the 301st is probably not so much morerelevant than the 310th word. This module takes advantage of the fact that the closer something is tothe beginning of a document, the more likely it is to be relevant.
The First module works as follows:
• When the query has a single term, First's behavior is straight-forward: it retrieves the first absoluteposition of the word in the document, then calculates which stratum contains that position. Thescore for this document is based upon that stratum; earlier strata are better than later strata .
• When the query has multiple terms, First behaves as follows:
1. The first absolute position for each of the query terms is determined.2. The median position of these positions is calculated. This median is treated as the position of
this query in the document and can be used with stratification as described in the single wordcase.
• With query expansion (using stemming, spelling correction, or the thesaurus), the First moduletreats expanded terms as if they occurred in the source query. For example, the phrase glucoseintolerence would be corrected to glucose intolerance (with intolerence spell-corrected tointolerance). First then continues as it does in the non-expansion case. The first position of eachterm is computed and the median of these is taken.
• In a partially matched query, where only some of the query terms cause a document to match,First behaves as if the intersection of terms that occur in the document and terms that occur in theoriginal query were the entire query. For example, if the query cat bird dog is partially matched toa document on the terms cat and bird, then the document is scored as if the query were cat bird.
First's interaction with other features
First works for partial match modes, such as MatchPartial, as well as for MatchAll. For partial matches,First ranks documents based on the median position of the matching terms.
First does not work with Boolean searches, cross-field matching, or wildcard search. It assigns all suchmatches a score of zero.
Related LinksRanking Modules in Detail on page 222
FrequencyThe Frequency (freq) module provides result scoring based on the frequency (number of occurrences)of the user's query terms in the result text.
Results with more occurrences of the user search terms are considered more relevant.
Frequency values are capped at 1024.
Related LinksRanking Modules in Detail on page 222
GlomThe Glom module ranks single-field matches ahead of cross-field matches.
This module serves as a useful tie-breaker function in combination with the Maximum Field module.It is only useful in conjunction with record search operations.
Related LinksRanking Modules in Detail on page 222
Endeca ConfidentialEndeca Developer Studio Developer Studio Help
Configuring Application Features | Configuring Search Interfaces224
Maximum Field on page 225Unlike Field, which assigns a static score to cross-field matches, Maximum Field selects thescore of the highest-ranked field that contributed to the match.
InterpretedThe Interpreted (interp) ranking module is a general-purpose module that assigns a score to eachresult based on the query processing techniques used to obtain the match.
Matching techniques considered include partial matching, cross-field matching, spelling correction,thesaurus, and stemming matching (discussed in detail in the Endeca Advanced Development Guide).
Specifically, the interpreted ranking module ranks results as follows:
• All non-partial matches are ranked ahead of all partial matches.• Within the above layer, all single-field matches are ranked ahead of all cross-field matches.• Within the above layer, all non-spelling-corrected matches are ranked above all spelling-corrected
matches.• Within the above layer, all non-thesaurus matches are ranked above all thesaurus matches.• Within the above layer, all non-stemming matches are ranked above all stemming (word form)
matches.
Related LinksRanking Modules in Detail on page 222
About stemming on page 196The stemming feature broadens search results to include word roots and word derivations.
About the thesaurus on page 190The thesaurus allows the system to return matches for related concepts to words or phrasescontained in user queries.
Maximum FieldUnlike Field, which assigns a static score to cross-field matches, Maximum Field selects the score ofthe highest-ranked field that contributed to the match.
The Maximum Field (maxfield) module behaves identically to the Field module, except in how it scorescross-field matches.
Because Maximum Field defines the score for cross-field matches dynamically, it does not make useof the <<CROSS_FIELD>> indicator set in the Search Interface editor.
Related LinksRanking Modules in Detail on page 222
Glom on page 224The Glom module ranks single-field matches ahead of cross-field matches.
Field on page 223The Field module ranks documents based on the search interface field with the highest priorityin which it matched.
NtermsThe Nterms module ranks matches according to how many query terms they match.
For example, in a three-word query, results that match all three words will be ranked above resultsthat match only two, which will be ranked above results that match only one.
Endeca Developer Studio Developer Studio HelpEndeca Confidential
225Configuring Application Features | Configuring Search Interfaces

The Nterms module is only applicable to search modes where results can vary in how many queryterms they match. These include MatchAny, MatchPartial, MatchAllAny, and MatchAllPartial. Fordetails on specifying a search mode for a query, see the Endeca Advanced Development Guide.
Related LinksRanking Modules in Detail on page 222
Number of FieldsThe Number of Fields (numfields) module ranks results based on the number of fields in the associatedsearch interface in which a match occurs.
Note that we are counting whole-field rather than cross-field matches, for example, a result that matchestwo fields matches each field completely, while a cross-field match typically does not match any fieldcompletely.
Related LinksRanking Modules in Detail on page 222
PhraseThe Phrase module states that results containing the user's query as an exact phrase, or a subset ofthe exact phrase, should be considered more relevant than matches simply containing the user'ssearch terms scattered throughout the text.
Note the following points about the Phrase module:
• If a query contains only one word, then that word constitutes the entire phrase and all of thematching results will be put into one stratum (score = 1).
• Because of the way hyphenated words are positionally indexed, Oracle recommends that youenable subphrase if your results contain hyphenated words.
Related LinksRanking Modules in Detail on page 222
Configuring the Phrase module on page 226When you add the Phrase module in the Relevance Ranking Modules editor, you are presentedwith an editor that allows you to set these options.
Effects of match modes on Phrase behavior on page 230Phrase, like the other relevance ranking modules, is never applied to the results ofMatchBoolean queries.
Stop words and Phrase module behavior on page 230When using the Phrase module, stop words are always treated like non-stop word terms andstratified accordingly.
Phrase module behavior with cross-field matches and multiple matches on page 230If a single result has multiple subphrase matches, either within the same field or in severaldifferent fields, the result is slotted into a stratum based on the length of the longest subphrasematch.
Treatment of wildcards by the Phrase module on page 231The Phrase module translates each wildcard in a query into a generic placeholder for a singleterm.
Editing Phrase module parameters on page 228Edit phrase modules parameters from the Relevance Ranking Modules editor.
Configuring the Phrase module
Endeca ConfidentialEndeca Developer Studio Developer Studio Help
Configuring Application Features | Configuring Search Interfaces226

When you add the Phrase module in the Relevance Ranking Modules editor, you are presented withan editor that allows you to set these options.
The Phrase module has a variety of options that you use to customize its behavior:
• Rank based on length of subphrases• Use approximate subphrase/phrase matching• Apply spell correction, thesaurus, and stemming
Related LinksPhrase on page 226
The Phrase module states that results containing the user's query as an exact phrase, or asubset of the exact phrase, should be considered more relevant than matches simplycontaining the user's search terms scattered throughout the text.
Ranking based on sub-phrases on page 227Subphrasing ranks results based on the length of their subphrase matches. In other words,results that match three terms are considered more relevant than results that match twoterms, and so on.
About approximate matching on page 227The approximate setting is appropriate in cases where the runtime performance of the standardPhrase module is inadequate because of large result contents and/or high site load.
Applying spelling correction, thesaurus, and stemming with the Phrase module on page 228Describes available functions with query expansion enabled.
Editing Phrase module parameters on page 228Edit phrase modules parameters from the Relevance Ranking Modules editor.
Summary of Phrase module option interactions on page 229You should only use one Phrase module in any given search interface and set all of youroptions in it.
Ranking based on sub-phrasesSubphrasing ranks results based on the length of their subphrase matches. In other words, resultsthat match three terms are considered more relevant than results that match two terms, and so on.
When you configure the Phrase module, you have the option of enabling subphrasing.
A subphrase is defined as a contiguous subset of the query terms the user entered, in the order thathe or she entered them. For example, the query "fax cover sheets" contains the subphrases "fax,""cover," "sheets," "fax cover," "cover sheets," and "fax cover sheets," but not "fax sheets."
Content contained inside nested quotation marks in a phrase is treated as one term. For example,consider the following phrase: "the question is 'to be or not to be.' " The quoted text, "to be or not tobe," is treated as one query term, so this example consists of four query terms even though it has atotal of nine words.
When subphrasing is not enabled, results are ranked into two strata: those that matched the entirephrase and those that didn't.
Related LinksConfiguring the Phrase module on page 226
When you add the Phrase module in the Relevance Ranking Modules editor, you are presentedwith an editor that allows you to set these options.
About approximate matchingThe approximate setting is appropriate in cases where the runtime performance of the standard Phrasemodule is inadequate because of large result contents and/or high site load.
Endeca Developer Studio Developer Studio HelpEndeca Confidential
227Configuring Application Features | Configuring Search Interfaces
Approximate matching provides higher-performance matching, as compared to the standard Phrasemodule, with somewhat less exact results. With approximate matching enabled, the Phrase modulelooks at a limited number of positions in each result that a phrase match could possibly exist, ratherthan all the positions. Only this limited number of possible occurrences is considered, regardless ofwhether there are later occurrences that are better, more relevant matches.
Enabling positional indexing increases the number of occurrences that the Phrase module looks at,thereby increasing the accuracy of the approximate phrase matching results. See Using positionalindexing with the Phrase module for more information.
Related LinksConfiguring the Phrase module on page 226
When you add the Phrase module in the Relevance Ranking Modules editor, you are presentedwith an editor that allows you to set these options.
Applying spelling correction, thesaurus, and stemming with the Phrase moduleDescribes available functions with query expansion enabled.
Applying spelling correction, thesaurus, and stemming adjustments to the original phrase is genericallyknown as query expansion. With query expansion enabled, the Phrase module ranks results thatmatch a phrase's expanded forms in the same stratum as results that match the original phrase.Consider the following example:
• A thesaurus entry exists that expands "US" to "United States."• The user queries for "US government."
The query, "US government," is expanded to "United States government" for matching purposes, butthe Phrase module gives a score of two to any results matching "United States government" becausethe original, unexpanded version of the query, "US government," only had two terms.
Related LinksConfiguring the Phrase module on page 226
When you add the Phrase module in the Relevance Ranking Modules editor, you are presentedwith an editor that allows you to set these options.
Editing Phrase module parametersEdit phrase modules parameters from the Relevance Ranking Modules editor.
You can use only one Phrase module in any given search interface, but you can set all of your optionsin it.
The Phrase relevance ranking module states that results containing the user's query as an exactphrase, or a subset of the exact phrase, should be considered more relevant than matches simplycontaining the user's search terms scattered throughout the text. Phrase is one of two modules thattake parameters.
To edit Phrase module parameters:
1. Open the Relevance Ranking Modules editor.
2. In the All Modules list, select Phrase and click Add.The Edit Phrase Relevance Rank Module editorappears.
3. Set the following options. See "Phrase" for detailed descriptions, interaction information, andexamples of how to use these options.
a) Rank based on length of subphrases: Ranks results based on the length of their subphrasematches. In other words, results that match three terms are considered more relevant thanresults that match two terms, and so on.
Endeca ConfidentialEndeca Developer Studio Developer Studio Help
Configuring Application Features | Configuring Search Interfaces228

b) Use approximate subphrase/phrase matching: When enabled, the Phrase module looks at alimited number of positions in each result that a phrase match could possibly exist, rather thanall the positions.
c) Apply spell correction, thesaurus, and stemming: When enabled, the Phrase module ranksresults that match a phrase's expanded forms in the same stratum as results that match theoriginal phrase.
4. Click OK to return to the Relevance Ranking Modules editor.
Related LinksUsing Relevance Ranking Modules on page 218
Configuring the Phrase module on page 226When you add the Phrase module in the Relevance Ranking Modules editor, you are presentedwith an editor that allows you to set these options.
Summary of Phrase module option interactionsYou should only use one Phrase module in any given search interface and set all of your options init.
The three configuration settings for the Phrase module can be used in a variety of combinations fordifferent effects. The following matrix describes the behavior of each combination.You should onlyuse one Phrase module in any given search interface and set all of your options in it.
BehaviorExpansionApproximateSubphrase
Default. Ranks results into two strata: those that match the user'squery as a whole phrase, and those that do not.
OffOffOff
Ranks results into two strata: those that match the original, or anextended version, of the query as a whole phrase, and those thatdo not.
OnOffOff
Ranks results into two strata: those that match the original queryas a whole phrase, and those that do not. Look only at the firstpossible phrase match within each record.
OffOnOff
Ranks results into two strata: those that match the original, or anextended version, of the query as a whole phrase, and those that
OnOnOff
do not. Look only at the first possible phrase match within eachrecord.
Ranks results into N strata where N equals the length of the queryand each result's score equals the length of its matched subphrase.
OffOffOn
Ranks results into N strata where N equals the length of the queryand each result's score equals the length of its matched subphrase.
OnOffOn
Extend subphrases to facilitate matching but rank based on thelength of the original subphrase (before extension).
Ranks results into N strata where N equals the length of the queryand each result's score equals the length of its matched subphrase.Look only at the first possible phrase match within each record.
OffOnOn
Ranks results into N strata where N equals the length of the queryand each result's score equals the length of its matched subphrase.
OnOnOn
Expand the query to facilitate matching but rank based on thelength of the original subphrase (before extension). Look only atthe first possible phrase match within each record.
Endeca Developer Studio Developer Studio HelpEndeca Confidential
229Configuring Application Features | Configuring Search Interfaces

Related LinksConfiguring the Phrase module on page 226
When you add the Phrase module in the Relevance Ranking Modules editor, you are presentedwith an editor that allows you to set these options.
Effects of match modes on Phrase behaviorPhrase, like the other relevance ranking modules, is never applied to the results of MatchBooleanqueries.
Endeca provides a variety of match modes to facilitate matching during search (MatchAny, MatchAll,MatchPartial and so on). These modes only determine which results match a user's query; they haveno effect on how the results are ranked after the matches have been found. Therefore, the Phrasemodule works as described in this section, regardless of match mode. The one exception to this ruleis MatchBoolean.
Related LinksPhrase on page 226
The Phrase module states that results containing the user's query as an exact phrase, or asubset of the exact phrase, should be considered more relevant than matches simplycontaining the user's search terms scattered throughout the text.
Configuring the Phrase module on page 226When you add the Phrase module in the Relevance Ranking Modules editor, you are presentedwith an editor that allows you to set these options.
Stop words and Phrase module behaviorWhen using the Phrase module, stop words are always treated like non-stop word terms and stratifiedaccordingly.
For example, the query 'raining cats and dogs' will result in a rank of two for a result containing 'fatcats and hungry dogs' and a rank of three for a result containing 'fat cats and dogs' (this exampleassumes subphrase is enabled).
Related LinksPhrase on page 226
The Phrase module states that results containing the user's query as an exact phrase, or asubset of the exact phrase, should be considered more relevant than matches simplycontaining the user's search terms scattered throughout the text.
Configuring the Phrase module on page 226When you add the Phrase module in the Relevance Ranking Modules editor, you are presentedwith an editor that allows you to set these options.
Phrase module behavior with cross-field matches and multiple matchesIf a single result has multiple subphrase matches, either within the same field or in several differentfields, the result is slotted into a stratum based on the length of the longest subphrase match.
An entire phrase, or subphrase, must appear in a single field in order for it to be considered a match.(In other words, matches created by glomming fields together are not considered by the Phrasemodule.)
Related LinksPhrase on page 226
The Phrase module states that results containing the user's query as an exact phrase, or asubset of the exact phrase, should be considered more relevant than matches simplycontaining the user's search terms scattered throughout the text.
Endeca ConfidentialEndeca Developer Studio Developer Studio Help
Configuring Application Features | Configuring Search Interfaces230

Configuring the Phrase module on page 226When you add the Phrase module in the Relevance Ranking Modules editor, you are presentedwith an editor that allows you to set these options.
Treatment of wildcards by the Phrase moduleThe Phrase module translates each wildcard in a query into a generic placeholder for a single term.
For example, the query "sparkling w* wine" becomes "sparkling * wine" during phrase relevanceranking, where "*" indicates a single term. This generic wildcard replacement causes slightly differentbehavior when subphrasing is and isn't enabled.
When subphrasing is not enabled, all results that match the generic version of the wildcard phraseexactly are still placed into the first stratum. It is important, however, to understand what constitutesa matching result from the Phrase module's point of view.
Consider the search query "sparkling w* wine" with the MatchAny mode enabled. In MatchAny mode,search results only need to contain one of the requested terms to be valid, so a list of search resultsfor this query could contain phrases that look like this:
• sparkling white wine• sparkling refreshing wine• sparkling wet wine• sparkling soda• wine cooler
When phrase relevance ranking is applied to these search results, the Phrase module looks for matchesto "sparkling * wine" not "sparkling w* wine." Therefore, there are three results-"sparkling white wine,""sparkling refreshing wine," and "sparkling wet wine"-that are considered phrase matches for thepurposes of ranking. These results are placed in the first stratum. The other two results are placed inthe second stratum.
When subphrasing is enabled, the behavior becomes a bit more complex. Again, we have to rememberthat wildcards become generic placeholders and match any single term in a result. This means thatany subphrase that is adjacent to a wildcard will, by definition, match at least one additional term (thewildcard). Because of this behavior, subphrases break down differently. The subphrases for "coldsparkling w* wine" break down into the following (note that w* changes to *):
• cold• sparkling *• * wine• cold sparkling *• sparkling * wine• cold sparkling * wine
Notice that the subphrases "sparkling," "wine," and "cold sparkling" are not included in this list. Becausethese subphrases are adjacent to the wildcard, we know that the subphrases will match at least oneadditional term. Therefore, these subphrases are subsumed by the "sparkling *", "* wine", and "coldsparkling *" subphrases.
Like regular subphrase, stratification is based on the number of terms in the subphrase, and thewildcard placeholders are counted toward the length of the subphrase.To continue the example above,results that contain "cold" get a score of one, results that contain "sparkling *" get a score of two, andso on. Again, this is the case even if the matching result phrases are different, for example, "sparklingwhite" and "sparkling soda."
Finally, it is important to note that, while the wildcard can be replaced by any term, a term must stillexist. In other words, search results that contain the phrase "sparkling wine" are not acceptable matchesfor the phrase "sparkling * wine" because there is no term to substitute for the wildcard. Conversely,
Endeca Developer Studio Developer Studio HelpEndeca Confidential
231Configuring Application Features | Configuring Search Interfaces

the phrase "sparkling cold white wine" is also not a match because each wildcard can be replaced byone, and only one, term. Even when wildcards are present, results must contain the correct numberof terms, in the correct order, for them to be considered phrase matches by the Phrase module.
Related LinksPhrase on page 226
The Phrase module states that results containing the user's query as an exact phrase, or asubset of the exact phrase, should be considered more relevant than matches simplycontaining the user's search terms scattered throughout the text.
Configuring the Phrase module on page 226When you add the Phrase module in the Relevance Ranking Modules editor, you are presentedwith an editor that allows you to set these options.
ProximityDesigned primarily for use with unstructured data, the Proximity module ranks how close the queryterms are to each other in a document by counting the number of intervening words.
Like First, this module groups its results into variable sized strata, because the difference in significanceof an interval of one word and one of two words is usually greater than the difference in significanceof an interval of 21 words and 22.
Single words and phrases get assigned to the best stratum because there are no intervening words.When the query has multiple terms, Proximity behaves as follows:
1. All of the absolute positions for each of the query terms are computed.2. The smallest range that includes at least one instance of each of the query terms is calculated.
This range's length is given in number of words. The score for each document is the strata thatcontains the difference of the range's length and the number of terms in the query; smaller differencesare better than larger differences.
Under query expansion (that is, stemming, spelling correction, and the thesaurus), the expanded termsare treated as if they were in the query, so the proximity metric is computed using the locations of theexpanded terms in the matching document.
For example, if a user searches for big cats and a document contains the sentence, "Big Bird likes hiscat" (stemming takes cats to cat), then the proximity metric is computed just as if the sentence were,"Big Bird likes his cats."
Proximity scores partially matched queries as if the query only contained the matching terms. Forexample, if a user searches for cat dog fish and a document is partially matched that contains onlycat and fish, then the document is scored as if the query cat fish had been entered.
Proximity interacts with other features as follows:
• Proximity works for partial match modes, such as Match Partial, as well as for MatchAll. For partialmatches, Proximity ranks documents based on the median position of the matching terms.
• Proximity does not work with Boolean searches, cross-field matching, or wildcard search. It assignsall such matches a score of zero.
Related LinksRanking Modules in Detail on page 222
Spell
The Spell module ranks true matches ahead of spelling-corrected matches.
Related LinksRanking Modules in Detail on page 222
Endeca ConfidentialEndeca Developer Studio Developer Studio Help
Configuring Application Features | Configuring Search Interfaces232

StaticThe Static module assigns a static or constant data-specific value to each search result, dependingon the type of search operation performed and depending on optional parameters that can be passedto the module.
For record search operations, the first parameter to the module specifies a property, which will definethe sort order assigned by the module. The second parameter can be specified as ascending ordescending to indicate the sort order to use for the specified property.
For example, using the module Static(Availability,descending) would sort result records in descendingorder with respect to their assignments from the Availability property. Using the moduleStatic(Title,ascending) would sort result records in ascending order by their Title property assignments.In a catalog application, setting the static module by Price, descending leads to more expensiveproducts being displayed first.
For dimension search, the first parameter can be specified as nbins, depth, or rank:
• Specifying nbins causes the static module to sort result dimension values by the number ofassociated records in the full data set.
• Depth causes the static module to sort result dimension values by their depth in the dimensionhierarchy.
• Rank causes dimension values to be sorted by the ranks assigned to them for the application.
Note: the Static module is not compatible with the Agraph.
Related LinksRanking Modules in Detail on page 222
Weighted FrequencyThe Weighted Frequency module scores results based on frequency of user terms, and weights thosefrequencies for each result by the content of each term.
Like the Frequency module, the Weighted Frequency (wfreq) module scores results based on thefrequency of user query terms in the result. Additionally, the Weighted Frequency module weights theindividual query term frequencies for each result by the information content (overall frequency in thecomplete data set) of each query term. Less frequent query terms (that is, terms that would result infewer search results) are weighted more heavily than more frequently occurring terms.
Weighted Frequency values are capped at 1024.
Related LinksRanking Modules in Detail on page 222
Configuring Keyword RedirectsRelated Links
Configuring Application Features on page 179
About keyword redirects on page 234Keyword redirects, like dynamic business rules, have trigger and target values. The triggerof a keyword redirect is one or more search terms; the target of a keyword redirect is a URL.
Creating keyword redirects on page 234Create new keyword redirects from the Keyword Redirects view in the Project Explorer.
Endeca Developer Studio Developer Studio HelpEndeca Confidential
233Configuring Application Features | Configuring Keyword Redirects

Modifying keyword redirects on page 235Open redirects in the Keyword Redirects view to modify them in the Keyword Redirects editor.
Deleting keyword redirects on page 235Remove keyword redirects from the Keyword Redirects view.
Keyword Redirect editor on page 236Edit keyword triggers and redirect link.
Grouping Keyword Redirects on page 236
About keyword redirectsKeyword redirects, like dynamic business rules, have trigger and target values.The trigger of a keywordredirect is one or more search terms; the target of a keyword redirect is a URL.
Keyword redirects are used to redirect a user's search to a Web page (that is, a URL). Conceptually,keyword redirects are similar to dynamic business rules in that both have trigger and target values.The trigger of a keyword redirect is one or more search terms; the target of a keyword redirect is aURL. If users search with the particular keyword, the redirect URL displays in the application.
For example, you can set up a keyword redirect with a single keyword trigger of "delivery" and a redirectURL of http://shipping.acme.com. Or you might create a keyword redirect with a trigger of "stores" anda redirect URL of http://www.acme.com/store_finder.htm.
Multiple keyword redirect triggers
A keyword redirect may have multiple triggers. In this case, each trigger is separated by an OR. Auser's query that exactly matches any trigger is sufficient to display the redirect URL. For example'store' OR 'location' are two triggers in a keyword redirect where each is a single term. A user's querythat exactly matches either term displays the redirect URL.
A trigger may have more than one search term. In this case, the trigger is treated as a search phrase.For example 'store finder' or "location" are two triggers in a keyword redirect where the first trigger isa phrase and the second trigger is a single term. A user's query that exactly matches either the phase'store finder' or the term 'location' displays the redirect URL.
Note: Fully implementing this feature requires additional work outside of Developer Studio.Please refer to the Endeca Advanced Development Guide as well as the Oracle EndecaWorkbench Help for details.
Related LinksConfiguring Keyword Redirects on page 233
Creating keyword redirects on page 234Create new keyword redirects from the Keyword Redirects view in the Project Explorer.
Modifying keyword redirects on page 235Open redirects in the Keyword Redirects view to modify them in the Keyword Redirects editor.
Deleting keyword redirects on page 235Remove keyword redirects from the Keyword Redirects view.
Creating keyword redirectsCreate new keyword redirects from the Keyword Redirects view in the Project Explorer.
Endeca ConfidentialEndeca Developer Studio Developer Studio Help
Configuring Application Features | Configuring Keyword Redirects234

To create a keyword redirect in Developer Studio:
1. In the Project Explorer, double-click Keyword Redirects.This opens the Keyword Redirects view and also activates the Redirect menu on the menu bar.
2. From the Redirect menu, select New.The Keyword Redirects editor displays.
3. In the Keyword text box, enter a keyword.
4. Click Add. If necessary, add additional keywords.
5. In the Redirect Link text box, enter the URL that loads in a user's browser if a user searches theassociated keywords.
6. Click OK.
You can add the keyword redirect to the default redirect group, or if you created additional redirectgroups, select a redirect group to which this redirect belongs. For more information, see
Fully implementing this feature requires additional work outside of Developer Studio. Please refer tothe Endeca Advanced Development Guide as well as the Oracle Endeca Workbench Help for details.
Related LinksConfiguring Keyword Redirects on page 233
Modifying keyword redirectsOpen redirects in the Keyword Redirects view to modify them in the Keyword Redirects editor.
To modify a keyword redirect:
1. In the Keyword Redirects view, double-click the redirect you want to modify to open it in the KeywordRedirects editor.
2. Select a keyword trigger.
3. Revise.
4. Click Modify.
5. Click OK to return to the Redirects view.
Fully implementing this feature requires additional work outside of Developer Studio. Please refer tothe Endeca Advanced Development Guide as well as the Oracle Endeca Workbench Help for details.
Related LinksConfiguring Keyword Redirects on page 233
Deleting keyword redirectsRemove keyword redirects from the Keyword Redirects view.
To delete a keyword redirect:
1. In the Keyword Redirects view, select the redirect you want to remove from your project, and clickDelete.
2. When the confirmation message appears, click Yes.
Fully implementing this feature requires additional work outside of Developer Studio. Please refer tothe Endeca Advanced Development Guide as well as the Oracle Endeca Workbench Help for details.
Endeca Developer Studio Developer Studio HelpEndeca Confidential
235Configuring Application Features | Configuring Keyword Redirects

Related LinksConfiguring Keyword Redirects on page 233
Keyword Redirect editorEdit keyword triggers and redirect link.
The Keyword Redirect editor contains the elements of a keyword redirect - one or more keywordtriggers and the redirect link.
Related LinksConfiguring Keyword Redirects on page 233
Grouping Keyword Redirects
Related LinksConfiguring Keyword Redirects on page 233
About keyword redirect groups on page 236Keyword redirect groups let you categorize your keyword redirects, as well as let multipleusers access keyword redirects at the same time.
Creating a keyword redirect group on page 237Open the Redirect Group menu from the Keyword Redirects view to create a new keywordredirect group.
Deleting a keyword redirect group on page 237Delete keyword redirect groups from the Keyword Redirects view.
Redirect Group editor on page 237
About keyword redirect groups
Keyword redirect groups let you categorize your keyword redirects, as well as let multiple users accesskeyword redirects at the same time.
Keyword redirect groups serve two functions:
• They provide a means to logically organize keyword redirects into categories. This provides ameans to organize a large number of keyword redirects into smaller logical categories.
• They allow multiple users to access keyword redirects simultaneously. Each Endeca Workbenchuser can access a single group at a time. Once a user selects a keyword redirect group, Workbenchprevents other users from editing that group until the user returns to the group selection list orcloses the browser window.
Note: Fully implementing this feature requires additional work outside of Developer Studio.Please refer to the Endeca Advanced Development Guide as well as the Oracle EndecaWorkbench Help for details.
Related LinksGrouping Keyword Redirects on page 236
Endeca ConfidentialEndeca Developer Studio Developer Studio Help
Configuring Application Features | Configuring Keyword Redirects236

Creating a keyword redirect group
Open the Redirect Group menu from the Keyword Redirects view to create a new keyword redirectgroup.
To create a keyword redirect group:
1. In the Project Explorer window, double-click Keyword Redirects.This opens the Redirects view and also activates the Redirect Group menu on the menu bar.
2. From the Redirect Group menu, select New.
3. Type a unique name in the Group name field. Use only alphanumeric, dash, or underscorecharacters. The name must be unique across both keyword redirect groups and rule groups.
4. To select a keyword redirect for this group, highlight a keyword direct in the All Redirects listand click Add.The keyword redirect appears in the Redirects in Group list.
5. Click OK .The new rule group appears in the Rules view.
6. Repeat steps 2 to 5 if you want multiple rule groups in your project.
Note: Fully implementing this feature requires additional work outside of Developer Studio.Please refer to the Endeca Advanced Development Guide as well as the Oracle EndecaWorkbench Help for details.
Related LinksGrouping Keyword Redirects on page 236
About keyword redirect groups on page 236Keyword redirect groups let you categorize your keyword redirects, as well as let multipleusers access keyword redirects at the same time.
Deleting a keyword redirect group
Delete keyword redirect groups from the Keyword Redirects view.
To delete a keyword redirect group:
1. In the Project Explorer, double click Keyword Redirects to open the Redirects view.
2. In the Name column, select a keyword redirect group and then click Delete.
3. When the confirmation message appears, click Yes.
4. If your project contains more than one other group, the Select Redirect Group dialog boxappears. In the drop-down list, select the redirect group you want to move the keyword redirectsin this group to, and click OK.If the group you are deleting is the second to last group, the redirects are moved to the one remainingredirect group.
Related LinksGrouping Keyword Redirects on page 236
Redirect Group editor
The Redirect group editor contains the following fields:
Endeca Developer Studio Developer Studio HelpEndeca Confidential
237Configuring Application Features | Configuring Keyword Redirects

DescriptionOption
A unique name for this keyword redirect group.Group name
Displays all of the keyword redirects that have beendefined in your project.
All redirects
Displays the keyword redirects that are includedin this keyword redirect group.
Redirects in group
Adds the selected keyword redirect from the "Allredirects" list to the keyword redirect group.
Add
Removes the selected keyword redirect from the"Redirects in group" list.
Remove
Related LinksGrouping Keyword Redirects on page 236
Configuring Dynamic Business RulesRelated Links
Configuring Application Features on page 179
Using dynamic business rules to promote records on page 239You implement merchandising and content spotlighting using dynamic business rules. Therules and their supporting constructs define when to promote records, which records may bepromoted, and also indicate how to display the records to application users.
Comparing dynamic business rules to content management publishing on page 239In rule-based merchandising, a dynamic business rule specifies how to query for records topromote, and not necessarily what the specific records are.
Dynamic business rule constructs on page 240A trigger and a target are required constructs for a business rule; a zone, style, and rule groupare additional constructs that support rules.
Record promotion examples on page 241Read these examples for a better understanding of how to use dynamic business rules topromote Endeca records.
Suggested workflow using Endeca tools to promote records on page 244Place supporting constructs for rules before creating the Web application. The pipelinedeveloper should then give business users access to the project through Endeca Workbenchto create, edit, and test rules.
Building Rules and Their Supporting Constructs on page 245
Using dynamic business rules with an Agraph on page 268When updating dynamic business rule configurations on Dgraphs, Oracle recommendsshutting down the Agraph.
Applying relevance ranking to rule results on page 268
Endeca ConfidentialEndeca Developer Studio Developer Studio Help
Configuring Application Features | Configuring Dynamic Business Rules238

You can order results in a rule by their relevance ranking score for a given query term.
Using dynamic business rules to promote recordsYou implement merchandising and content spotlighting using dynamic business rules. The rules andtheir supporting constructs define when to promote records, which records may be promoted, and alsoindicate how to display the records to application users.
Endeca provides the functionality to promote contextually relevant records to application users as theysearch and navigate within a data set. In catalog applications, this activity is called merchandisingbecause the Endeca records you promote often represent product data. In document repositories, thisactivity is called content spotlighting™ because the Endeca records you promote often represent sometype of document (HTML, DOC, TXT, XLS, and so on). For the sake of simplicity, this help systemuses 'promoting records' to generically describe both merchandising and content spotlighting.
Here is a simple merchandising example using a wine data set. An application user enters a querywith the search term Bordeaux.This search term triggers a rule that is set up to promote wines taggedas Best Buys. In addition to returning standard query results for term Bordeaux, the rule instructs theMDEX Engine to dynamically generate a subset of records that are tagged with both the Best Buy andalso Bordeaux properties.The Web application displays the standard query results that match Bordeauxand also displays some number of the rule results in an area of the screen set aside for 'Best Buy'records. These are the promoted records.
Effect of rules on query results
Once you implement dynamic business rules in your application, each query a user makes is comparedto each rule to determine if the query triggers a rule. If a user's query triggers a rule, the MDEX Enginereturns several types of results.
• Standard record results for the query.• Promoted records specified by the triggered rule's target.• Any rule properties specified for the rule.
Note: Fully implementing this feature requires additional work outside of Developer Studio.Please refer to the Endeca Advanced Development Guide as well as the Oracle EndecaWorkbench Help for details.
Related LinksConfiguring Dynamic Business Rules on page 238
Comparing dynamic business rules to content management publishingIn rule-based merchandising, a dynamic business rule specifies how to query for records to promote,and not necessarily what the specific records are.
Endeca's record promotion works differently from traditional content management systems (CMS),where you select an individual record for promotion, place it on a template or page, and then publishit to a Web site. Endeca's merchandising is dynamic, or rule based.
This means that, as your users navigate or search, they continue to see relevant results, becauseappropriate rules are in place. Also, as records in your data set change, new and relevant records arereturned by the same dynamic business rule. The rule remains the same, even though the promotedrecords may change.
Endeca Developer Studio Developer Studio HelpEndeca Confidential
239Configuring Application Features | Configuring Dynamic Business Rules
In a traditional CMS scenario, if Wine A is Recommended, it is identified as such and published ontoa static page. If you need to update the list of recommended wines to remove Wine A and add WineB to the static page, you must manually remove Wine A, add Wine B, and publish the changes.
With Endeca's dynamic record promotion, the effect is much broader and requires much lessmaintenance. A rule is created to promote wines tagged as Recommended, and the search resultspage is designed to render promoted wines. In this scenario, a rule promotes recommended Wine Aon any number of pages in the result set. In addition, removing Wine A and adding Wine B is simplya matter of updating the source data to reflect that Wine B is now included and tagged asRecommended. After making this change, the same rule can promote Wine B on any number of pagesin the result set, without adjusting or modifying the rule or the pages.
Note: Fully implementing this feature requires additional work outside of Developer Studio.Please refer to the Endeca Advanced Development Guide and the Oracle Endeca WorkbenchHelp for details.
Related LinksConfiguring Dynamic Business Rules on page 238
Dynamic business rule constructsA trigger and a target are required constructs for a business rule; a zone, style, and rule group areadditional constructs that support rules.
Two constructs make up a dynamic business rule:
• Trigger--a set of navigation locations that must exist in a query for a rule to file. A trigger mayinclude dimension values and keywords. When a user's query contains a navigation location thattriggers a rule, the MDEX Engine fires the rule and returns a set of records that are candidates forpromotion to application users.
• Target--specifies which records are eligible for promotion to application users. A target may includedimension values, custom properties, and featured records. For example, dimension values in atrigger are used to identify a set of records that are candidates for promotion to application users.
Three additional constructs support rules:
• Zone—specifies a collection of rules to ensure that rule results are produced in case a single ruledoes not provide a result.
• Style—specifies the minimum and maximum number of records a rule can return. A style alsospecifies any property templates associated with a rule. Rule properties are key/value pairs thatare typically used to return supplementary information with promoted record pages. For example,a property key might be set to SpecialOffer and its value set to BannerAd.gif.
Note: A rule's style is passed back along with the rule's results, to the Web application. TheWeb application uses the style as an indicator for how to render the rule's results. The codeto render the rule's results is part of the Web application, not the style itself.
• Rule Group—provides a means to logically organize large numbers of rules into categories. Thisorganization facilitates editing by multiple business users.
The core of a dynamic business rule is its trigger values and target values. The target identifies a setof records that are candidates for promotion to application users.The zone and style settings associatedwith a rule work together to restrict the candidates to a smaller subset of records that the Web applicationthen promotes.
Endeca ConfidentialEndeca Developer Studio Developer Studio Help
Configuring Application Features | Configuring Dynamic Business Rules240

Related LinksConfiguring Dynamic Business Rules on page 238
Record promotion examplesRead these examples for a better understanding of how to use dynamic business rules to promoteEndeca records.
The following sections describe two examples of using dynamic business rules to promote Endecarecords.The first example shows how a single rule provides merchandising results when an applicationuser navigates to a dimension value in a data set. The scope of the merchandising coverage issomewhat limited by using just one rule.
The second example builds on the first by providing broader merchandising coverage. In this example,an application user triggers two additional dynamic business rules by navigating to the root dimensionvalue for the application. These two additional rules ensure that merchandising results are alwayspresented to application users.
An example with one rule promoting records
This simple example demonstrates a basic merchandising scenario where an application user navigatesto Wine Type > White, and a dynamic business rule called "Recommended Chardonnays" promoteschardonnays that have been tagged as Highly Recommended. From a merchandising perspective,the marketing assumption is that users who are interested in white wines are also likely to be interestedin highly recommended chardonnays.
The Recommended Chardonnays rule is set up as follows:
• The rule's trigger, which specifies when to promote records, is the dimension value Wine Type >White.
• The rule's target, which specifies which records to promote, is a combination of two dimensionvalues, Wine Type > White > Chardonnay and Designation > Highly Recommended.
• The style associated with this rule is configured to provide a minimum of at least one promotedrecord and a maximum of exactly one record.
• The zone associated with this rule is configured to allow only one rule to produce rule results.
When an application user navigates to Wine Type > White in the application, the rule is triggered. TheMDEX Engine evaluates the rule and returns promoted records from the combination of the Chardonnayand Highly Recommended dimension values. There may be a number of records that match thesetwo dimension values, so zone and style settings restrict the number of records actually promoted toone.
The promoted record along with the user's query and standard query results are called out in thefollowing graphic:
Endeca Developer Studio Developer Studio HelpEndeca Confidential
241Configuring Application Features | Configuring Dynamic Business Rules

An expanded example with three rules
The previous example used just one rule to merchandise highly recommended chardonnays. Thefollowing example expands on the previous one by adding two more rules called Best Buys and HighlyRecommended. These rules merchandise wines tagged with a Best Buy property and a HighlyRecommended property, respectively. Together, the three rules merchandise records to expose abroader set of potential wine purchases.
The Best Buys rule is set up as follows:
• The rule's trigger is set to the Web application's root dimension value. In other words, the triggeralways applies.
• The rule's target is the dimension value named Best Buy.• The style associated with this rule is configured to provide a minimum of four promoted records
and a maximum of eight records.
Endeca ConfidentialEndeca Developer Studio Developer Studio Help
Configuring Application Features | Configuring Dynamic Business Rules242

• The zone associated with this rule is configured to allow only one rule to produce rule results.
The Highly Recommended rule is set up as follows:
• The rule's trigger is set to the Web application's root dimension value. In other words, the triggeralways applies.
• The rule's target is the dimension value named Highly Recommended.• The style associated with this rule is configured to provide a minimum of at least one promoted
record and a maximum of three records.• There is the only rule associated with the zone, so no other rules are available to produce results.
For details on how zones can be used when more rules are available, see See Ensuring PromotedRecords are Always Produced.
When an application user navigates to Wine Type > White, the Recommended Chardonnays rule firesand provides rule results as described in 'An example with one rule promoting records' above. Inaddition, the Highly Recommended and Best Buys rules also fire and provide results because theirtriggers always apply to any navigation query.
The promoted records for each of the three rules, along with the user's query, and standard queryresults are called out in the following graphic:
Endeca Developer Studio Developer Studio HelpEndeca Confidential
243Configuring Application Features | Configuring Dynamic Business Rules

Related LinksConfiguring Dynamic Business Rules on page 238
Suggested workflow using Endeca tools to promote recordsPlace supporting constructs for rules before creating the Web application. The pipeline developershould then give business users access to the project through Endeca Workbench to create, edit, andtest rules.
You can build dynamic business rules and their constructs in Developer Studio. In addition, businessusers can use Endeca Workbench to perform any of the following rule-related tasks:
• Create a new dynamic business rule.• Modify an existing rule.• Deploy a rule to a preview application and test or preview its results.
Because either tool can modify tools, the tasks involved in promoting records require coordinationbetween the pipeline developer and the business user. The recommended workflow is as follows:
1. A pipeline developer uses Developer Studio in a development environment to create the supportingconstructs (zones, styles, rule groups, and so on) for rule and perhaps small number of dynamicbusiness rules as placeholders or test rules.
2. An application developer creates the Web application including rendering code for each style.3. The pipeline developer makes the project available to business users via the Endeca Workbench
Settings dialog.4. A business user starts Endeca Workbench to access the project, create new rules, modify rules,
and test the rules as necessary.
For general information about using Endeca tools and sharing projects, see the Oracle EndecaWorkbench Administrator's Guide. Endeca Workbench tasks are described in the Oracle EndecaWorkbench Help.
Note: Any changes to the constructs that support rules such as changes to zones, styles, rulegroups, and property templates have to be performed in Endeca Developer Studio.
Incremental Implementation
Merchandising and content spotlighting are complex features to implement, and the best approachfor developing your dynamic business rules is to adopt an incremental approach as you and businessusers of Endeca Workbench coordinate tasks. It is also helpful to define the purpose of each dynamicbusiness rule in the abstract (before implementing it in Developer Studio or Endeca Workbench) sothat everyone knows what to expect when the rule is implemented. If rules are only loosely definedwhen implemented, they may have unexpected side effects.
Begin with a single, simple business rule to become familiar with the core functionality. Later, you canadd more advanced elements, along with additional rules, rule groups, zones, and styles. As you buildthe complexity of how you promote records, you will have to coordinate the tasks you do in DeveloperStudio (for example, zone and style definitions) with the work that is done in Endeca Workbench.
Note: Fully implementing this feature requires additional work outside of Developer Studio.Please refer to the Endeca Advanced Development Guide as well as the Oracle EndecaWorkbench Help for details.
Related Links
Endeca ConfidentialEndeca Developer Studio Developer Studio Help
Configuring Application Features | Configuring Dynamic Business Rules244

Configuring Dynamic Business Rules on page 238
Developer Studio workflows on page 12Developer Studio is useful by itself for creating instance configuration XML files you need foryour Endeca application.You may also split application maintenance tasks between aDeveloper Studio user and a Workbench user.
Building Rules and Their Supporting Constructs
Related LinksConfiguring Dynamic Business Rules on page 238
Building the Supporting Constructs on page 245
Creating Rules on page 251
Presenting rules results in a Web application on page 263The MDEX Engine returns rule results to a Web application in a Supplement object.
Grouping Rules on page 263
Building the Supporting Constructs
Related LinksBuilding Rules and Their Supporting Constructs on page 245
Building the supporting constructs for rules on page 245Zone and style settings are used together to restrict rule results promoted to users.
Ensuring promoted records are always produced on page 246You ensure promoted records are always produced by creating a zone in Developer Studioto associate with a number of dynamic business rules.
The Zones View on page 246Fields in the Zones view include name of the zone, rule limit, shuffle, valid for search, andunique record spec.
Zone editor on page 247Configure options such as rule limit and setting zone as valid for search.
Working with Styles on page 248
Building the supporting constructs for rulesZone and style settings are used together to restrict rule results promoted to users.
As discussed in Dynamic business rule constructs, the records identified by a rule's target are candidatesfor promotion and may or may not all be promoted in a Web application. It is a combination of zoneand style settings that work together to effectively restrict which rule results are actually promoted toapplication users.
• A zone identifies a collection of rules to ensure at least one rule always produces records topromote. For information on zones, see Ensuring promoted records are always produced.
• A style controls the minimum and maximum number of results to display, defines any propertytemplates, and indicates how to display the rule results to the Web application. For more informationon styles, see Creating a style.
Endeca Developer Studio Developer Studio HelpEndeca Confidential
245Configuring Application Features | Configuring Dynamic Business Rules

Note: Fully implementing this feature requires additional work outside of Developer Studio.Please refer to the Endeca Advanced Development Guide as well as the Oracle EndecaWorkbench Help for details.
Related LinksBuilding the Supporting Constructs on page 245
Ensuring promoted records are always producedYou ensure promoted records are always produced by creating a zone in Developer Studio to associatewith a number of dynamic business rules.
A zone is a logical collection of rules that allows you to have multiple rules available, in case a singlerule does not produce a result.The rules in a zone ensure that the screen space dedicated to displayingpromoted records is always populated.
A zone has a rule limit that dictates how many rules may successfully return rule results. For example,if three rules are assigned to a certain zone but the rule limit is set to one, only the first rule tosuccessfully provide rule results is evaluated. Any remaining rules in the zone are ignored.
1. In the Project Explorer, expand Dynamic Business Rules .
2. Double-click Zones to open the Zones view.
3. Click New to open the Zone editor.
4. In the Name field, provide a unique name for the zone.
5. (Optional) If you want to limit the number of rules that can provide rule results within a zone, typea number in the Rule Limit text box.
6. (Optional) If you want to randomly order the rules in the zone, select the Shuffle rules check box.When checked, this indicates that the MDEX Engine randomly shuffles the order of the rules withinthis zone before evaluating them.
7. (Optional) Select Valid for Search to indicate whether a zone (and all of the rules associated withthat zone) is valid for navigation queries that include a record search parameter.
Rules that include a keyword trigger require the Valid for Search setting.
8. (Optional) If you want to prevent the same record from appearing multiple times for multiple rules,check Unique by This Dimension/Property and specify a unique record criterion.
Selecting a dimension or property allows the MDEX Engine to identify individual records and preventthe same record from appearing multiple times. If you check Unique by This Dimension/Propertyand do not select a dimension or property, the same record may appear multiple times for multiplerules. Note that this setting applies across all zones.
9. Click OK.
Fully implementing this feature requires additional work outside of Developer Studio. Please refer tothe Endeca Advanced Development Guide as well as the Oracle Endeca Workbench Help for details.
Related LinksBuilding the Supporting Constructs on page 245
The Zones ViewFields in the Zones view include name of the zone, rule limit, shuffle, valid for search, and uniquerecord spec.
Endeca ConfidentialEndeca Developer Studio Developer Studio Help
Configuring Application Features | Configuring Dynamic Business Rules246

DescriptionOption
The name of a zone.Name
(Optional) When set, this entry must be an integerthat limits the number of rules that can be returned
Rule Limit
for this specific zone. For example, if three rulesare assigned to a certain zone but the zonethreshold is set to one, only the first rule that issuccessfully evaluated is returned. (This does notmean the first rule is always returned—rather, it isthe first rule that successfully returns results.) Anyremaining rules are skipped. If no threshold is set,all matching rules will be returned within a zone.If no rules are valid, no rules will be returned for azone, regardless of what the threshold is set at.
Set to Yes or No, this entry indicates whether ruleswithin a zone are shuffled before evaluating them.
Shuffle
In the above example, if shuffle was set to true,the "Best Buy" and "Recommended" rules wouldbe randomly returned (assuming both weresuccessfully evaluated and the zone threshold wasset to one).
Set to Yes or No, this entry indicates whether azone (and all of the rules associated with that zone)
Valid for search
is valid for navigation queries that include a recordsearch parameter.
(Optional) Specifies a unique record criteria acrosszones. When selected, this ensures that every
Unique record spec
record returned within any zone (including all rulesin a zone) is classified with a unique dimension orproperty value for that dimension or property. If nodimension or property is specified, the same recordmay appear multiple times for multiple rules withina zone.
Related LinksBuilding the Supporting Constructs on page 245
Prioritizing rule groups on page 266In the Rules view, move rule groups up or down to change their priority in relation to otherrule groups.
Zone editorConfigure options such as rule limit and setting zone as valid for search.
The Zone editor contains the following fields:
Endeca Developer Studio Developer Studio HelpEndeca Confidential
247Configuring Application Features | Configuring Dynamic Business Rules

DescriptionOption
A unique name for this zone.Name
(Optional) A limit to the number of rules that canbe returned.
Rule limit
When checked, indicates that rules within this zoneare shuffled before being evaluated.
Shuffle rules
When checked, indicates that a zone (and all ofthe rules associated with that zone) is valid for
Valid for search
navigation queries that include a record searchparameter.
(Optional) Specifies a unique record criteria acrossall zones. When checked, this ensures that every
Unique by this dimension/property
record returned across any zone (including all rulesin that zone) is classified with a unique dimensionor property value for that dimension or property.
Related LinksBuilding the Supporting Constructs on page 245
Working with Styles
Related LinksBuilding the Supporting Constructs on page 245
About styles on page 248A style controls the number of records a rule may promote; it also defines property templates,and tells the Web application how to display rule results.
Creating a style on page 250Create a style from the Style editor in the Styles view. Here you can set minimum andmaximum records returned for a rule, add or remove property templates, and allow EndecaWorkbench users to set new rule properties.
Style editor on page 250Describes the options in the Style editor.
About stylesA style controls the number of records a rule may promote; it also defines property templates, andtells the Web application how to display rule results.
You create a style in the Styles view of Endeca Developer Studio. A style serves three functions:
• It controls the minimum and maximum number of records that may be promoted by a rule.• It defines property templates, which facilitate consistent property usage between pipeline developers
and business users of Endeca Workbench.• It indicates to a Web application which rendering code should be used to display a rule's results.
Endeca ConfidentialEndeca Developer Studio Developer Studio Help
Configuring Application Features | Configuring Dynamic Business Rules248

Controlling the number of promoted records
Styles can be used to affect the number of promoted records in two scenarios:
• A rule produces less than the minimum number of records. For example, if the Best Buys ruleproduces only two records to promote and that rule is assigned a style that has Minimum Recordsset to three, the rule does not return any results.
• A rule produces more than the maximum. For example, if the Best Buys rule produces 20 records,and the Maximum Records value for that rule's style is five, only the first five records are returned.
If a rule produces a set of records that fall between the minimum and maximum settings, the style hasno affect on the rule's results.
Performance and the Maximum Records setting
The Maximum Records setting for a style prevents dynamic business rules from returning a large setof matching records, potentially overloading the network, memory, and page size limits for a query.For example, if Maximum Records is set to 1000, then 1000 records could potentially be returned witheach query, causing significant performance degradation.
Ensuring consistent property usage with property templates
As discussed in Dynamic business rule constructs, rule properties are key/value pairs typically usedto return supplementary information with promoted record pages. For example, a property key mightbe set to SpecialOffer and its value set to BannerAd.gif.
As Endeca Workbench users and Developer Studio users share a project with rule properties, it iseasy for a key to be mis-typed. If this happens, then the supplementary information represented by aproperty does not get promoted correctly in a Web application. To address this, you can optionallycreate property templates for a style. Property templates ensure that property keys are used consistentlywhen pipeline developers and Endeca Workbench users share project development tasks.
If you add a property template to a style in Developer Studio, that template is visible in EndecaWorkbench in the form of a pre-defined property key with an empty value. Endeca Workbench usersare allowed to add a value for the key when editing any rule that uses the template's associated style.Endeca Workbench users are not allowed to edit the key itself.
Furthermore, pipeline developers can restrict Endeca Workbench users to creating new propertiesbased only on property templates, thereby minimizing potential mistakes or conflicts with propertykeys.
For example, a pipeline developer can add a property template called WeeklyBannerAd and thenmake the project available to Endeca Workbench users. Once the project is loaded in EndecaWorkbench, a property template is available with a populated key called WeeklyBannerAd and anempty value.The Endeca Workbench user provides the property value. In this way, property templatesreduce simple project-sharing mistakes such as creating a similar, but not identical property calledweeklybannerad.
Note: Property templates are associated with styles in Developer Studio, not rules. Therefore, theyare not available for use on the Properties tab of the Rule editor.
Indicating how to display promoted records
by creating application-level rendering code for the style.You create a style in Developer Studio.Youcreate rendering code in your Web application. Creating a style describes how to create styles.Information about rendering code is described in Presenting rule results in a Web application.
A style has a name and an optional title. Either the name or title can be displayed in the Web application.When the MDEX Engine returns rule results to your application, the engine also passes the name and
Endeca Developer Studio Developer Studio HelpEndeca Confidential
249Configuring Application Features | Configuring Dynamic Business Rules
title values to your application. The name uniquely identifies the style. The title does not need to beunique, so it is often more flexible to display the title if you use the same title for many dimension valuetargets, for example, the title On Sale may be commonly used.
Note: Without application-level rendering code that uses the specific style or title values, thestyle and title are meaningless. Both require application-level rendering code in an application.
Related LinksWorking with Styles on page 248
Creating a styleCreate a style from the Style editor in the Styles view. Here you can set minimum and maximumrecords returned for a rule, add or remove property templates, and allow Endeca Workbench usersto set new rule properties.
To create a style in Developer Studio:
1. In the Project Explorer, double-click Styles to open the Styles view.
2. Click New to open the Style editor.
3. In the Name field, provide a unique name for the style.
4. If desired, specify a title in the Title field. The title does not need to be unique.
5. In the Minimum Records field, specify the minimum number of records that must be returned by arule's target in order for that rule to return results. (The default Minimum Records value, if notspecified, is zero.)
6. In the Maximum Records field, specify the maximum number of records that can be returned for arule. (The default Maximum Records value, if not specified, is ten. If Maximum Records is set tozero, the rule returns zero records.)
7. If you want to create a property template, click Add in the Property Templates frame.The Property Template dialog box displays.
8. Provide the key for the property template.
9. Click OK.
10. Repeat for as many new property templates as necessary.
11. If you need to remove a property template, select it in the Property Templates frame and clickRemove.
12. If you want to allow Endeca Workbench users the ability to create new properties for a rule, check"Allow additional, custom properties." Unchecking this option prevents Endeca Workbench usersfrom creating new properties to associate with a rule. In other words, Endeca Workbench userswill be restricted to creating properties based only on the property templates you have created inDeveloper Studio.
13. Click OK.
Fully implementing this feature requires additional work outside of Developer Studio. Please refer tothe Endeca Advanced Development Guide as well as the Oracle Endeca Workbench Help for details.
Related LinksWorking with Styles on page 248
Style editorDescribes the options in the Style editor.
The Style editor contains the following fields:
Endeca ConfidentialEndeca Developer Studio Developer Studio Help
Configuring Application Features | Configuring Dynamic Business Rules250

DescriptionOption
A unique name for a style.Name
(Optional) A title that may be used for display inyour Endeca application.
Title
The minimum number of records that must bereturned by a rule's target request in order for thatrule to return business rule results.
Records minimum
The maximum number of records that will bereturned for a rule.
Records maximum
Indicates the property templates available to rulesassociated with the style.You can add and remove
Property templates
property templates. Property templates ensure thatproperty keys are used consistently when pipelinedevelopers and Endeca Workbench users shareproject development tasks.
If you add a property template to a style, thattemplate becomes available in Endeca Workbenchin the form of a pre-defined property key with anempty value. Endeca Workbench users can adda value for the key when editing any rule that usesthe template's associated style.
Displays the New Property Template dialog box inwhich you enter the key value of a template'skey/value pair.
Add
Deletes a selected property template.Remove
To allow Endeca Workbench users the ability tocreate new properties for a rule, check "Allow
Allow additional, custom properties
additional, custom properties." Unchecking thisoption prevents Endeca Workbench users fromcreating new properties to associate with a rule.In other words, Endeca Workbench users will berestricted to creating properties based only on theproperty templates you have created in DeveloperStudio .
Related LinksWorking with Styles on page 248
Creating Rules
Related LinksBuilding Rules and Their Supporting Constructs on page 245
About creating dynamic business rules on page 252You must have at least one zone and one style before you can create rules.
Add Trigger editor on page 253
Endeca Developer Studio Developer Studio HelpEndeca Confidential
251Configuring Application Features | Configuring Dynamic Business Rules
The Add Trigger editor allows you to build a one or more triggers for a dynamic businessrule.
Creating a rule and ordering its results on page 254Associate a zone and style with a rule and define result sort order on the Rule editor of theRules view, found under Dynamic Business Rules in the Project Explorer.
Specifying when to promote records on page 255You indicate when to promote records by specifying one or more triggers on the Triggers tabof the Rule editor.
Specifying a time trigger to promote records on page 256A time trigger is useful if you want to promote records for a particular period of time.
Specifying which records to promote on page 257You indicate which records to promote by specifying a target on the Target tab of the Ruleeditor.
Adding custom properties to a rule on page 258You can promote custom properties by creating key/value pairs on the Properties tab of theRule editor.
Adding static records in rule results on page 258In addition to defining a rule's dimension value targets and custom properties, you canoptionally specify any number of static records to promote. These static records are calledfeatured records, and you specify them on the Featured Records tab of the Rule editor.
Sorting the rules in the Rules view on page 260To make rules easier to find and work with, they can be sorted by name (in alphabeticalascending or descending order) or by priority.
Prioritizing rule evaluation order on page 260You modify the relative priority of a rule by moving it up or down in the Rules view.
Rule editor on page 260The Rule editor lets you configure various rule parameters including zones, styles, and rulegroups.
About creating dynamic business rulesYou must have at least one zone and one style before you can create rules.
After you have created zones and styles, you can start creating the dynamic business rules themselves.It is not necessary to create additional rule groups unless your application requires it. If you want tocreate additional rule groups before you create a rule, see About grouping rules.
As mentioned in Suggested workflow using Endeca tools to promote records, a developer usuallycreates the preliminary rules and the other constructs in Developer Studio, and then hands off theproject to a business user to fine tune the rules and create additional rules in Endeca Workbench.However, the business user can use Endeca Workbench to perform any of the tasks described in thefollowing sections that are related to creating a rule. For details, see Endeca Workbench Help.
Note: Fully implementing this feature requires additional work outside of Developer Studio.Please refer to the Endeca Advanced Development Guide as well as the Oracle EndecaWorkbench Help for details.
Related LinksCreating Rules on page 251
About grouping rules on page 264Rule groups complement zones and styles in supporting dynamic business rules.
Endeca ConfidentialEndeca Developer Studio Developer Studio Help
Configuring Application Features | Configuring Dynamic Business Rules252

Suggested workflow using Endeca tools to promote records on page 244Place supporting constructs for rules before creating the Web application. The pipelinedeveloper should then give business users access to the project through Endeca Workbenchto create, edit, and test rules.
Add Trigger editorThe Add Trigger editor allows you to build a one or more triggers for a dynamic business rule.
The Add Trigger editor contains the following fields:
DescriptionOption
A list of dimension values that may be added to atrigger.
Dimension values
If checked, a query that matches the trigger canfire the rule at any location (navigation state) in thedata set. Any dimension value below a triggerdimension value (i.e. a child dimension value) canalso trigger the rule. If unchecked, a query can firethe rule only if the trigger matches the location inthe data set.
A word or phrase that must be present in theend-user's search query in order for the rule to fire.
Any location containing this criteria
Note: A phrase represents termssurrounded in quotes.
Indicates how a keyword trigger must be matchedfrom a user's record search query in order to firethe rule.
Match mode
• In Phrase mode (the default), all of the wordsof the keyword trigger must match in the sameorder in the user's query for the rule to fire.
• In All mode, all of the words of the keywordtrigger must match (without regard for order inthe user's query) for the rule to fire.
• In Exact mode, all the words of the keywordtrigger must exactly match a user's query forthe rule to fire. Unlike the other two modes, auser's query must exactly match the keywordtrigger in the number of words and cannot bea super set of the keyword triggers.
If no trigger keywords are specified, the rule doesnot need any specific keywords to qualify the rulefor evaluation, but is still limited by otherparameters of the rule.
Note: All modes allow the rule to fire if thespelling auto-correction and auto-phrasing,
Endeca Developer Studio Developer Studio HelpEndeca Confidential
253Configuring Application Features | Configuring Dynamic Business Rules
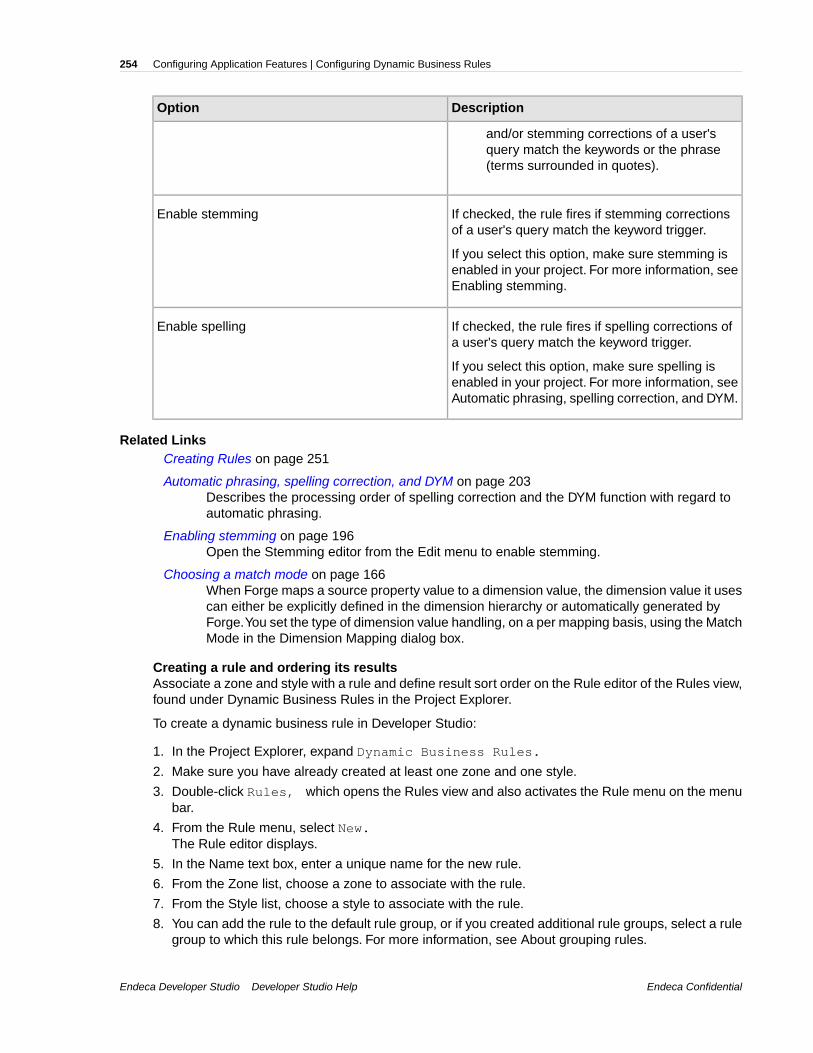
DescriptionOption
and/or stemming corrections of a user'squery match the keywords or the phrase(terms surrounded in quotes).
If checked, the rule fires if stemming correctionsof a user's query match the keyword trigger.
Enable stemming
If you select this option, make sure stemming isenabled in your project. For more information, seeEnabling stemming.
If checked, the rule fires if spelling corrections ofa user's query match the keyword trigger.
Enable spelling
If you select this option, make sure spelling isenabled in your project. For more information, seeAutomatic phrasing, spelling correction, and DYM.
Related LinksCreating Rules on page 251
Automatic phrasing, spelling correction, and DYM on page 203Describes the processing order of spelling correction and the DYM function with regard toautomatic phrasing.
Enabling stemming on page 196Open the Stemming editor from the Edit menu to enable stemming.
Choosing a match mode on page 166When Forge maps a source property value to a dimension value, the dimension value it usescan either be explicitly defined in the dimension hierarchy or automatically generated byForge.You set the type of dimension value handling, on a per mapping basis, using the MatchMode in the Dimension Mapping dialog box.
Creating a rule and ordering its resultsAssociate a zone and style with a rule and define result sort order on the Rule editor of the Rules view,found under Dynamic Business Rules in the Project Explorer.
To create a dynamic business rule in Developer Studio:
1. In the Project Explorer, expand Dynamic Business Rules.
2. Make sure you have already created at least one zone and one style.
3. Double-click Rules, which opens the Rules view and also activates the Rule menu on the menubar.
4. From the Rule menu, select New.The Rule editor displays.
5. In the Name text box, enter a unique name for the new rule.
6. From the Zone list, choose a zone to associate with the rule.
7. From the Style list, choose a style to associate with the rule.
8. You can add the rule to the default rule group, or if you created additional rule groups, select a rulegroup to which this rule belongs. For more information, see About grouping rules.
Endeca ConfidentialEndeca Developer Studio Developer Studio Help
Configuring Application Features | Configuring Dynamic Business Rules254

9. If you want to sort the rule's promoted records by a property or dimension value, select the propertyor dimension value from the Sort key list. Select [None] to accept the default sort order specifiedfor the project.
10. If you chose a Sort key, choose Ascending or Descending to define sort order.
11. If you want to randomly order the promoted records for this rule, select Shuffle.Selecting Shuffle overrides any Sort key and Order options you specified above.
12. If you want to allow a rule to fire even if the current navigation state overlaps a rule's trigger, selectSelf-pivot. Unchecking Self-pivot prevents a rule from firing if any dimension values inthe current navigation state overlap with dimension values in the rule's trigger.
13. If you want to restrict who sees the results of this rule, select a pre-defined user profile from thedrop-down list.
14. Specify when to promote records.
Note: Fully implementing this feature requires additional work outside of Developer Studio.Please refer to the Endeca Advanced Development Guide as well as the Oracle EndecaWorkbench Help for details.
Related LinksCreating Rules on page 251
About grouping rules on page 264Rule groups complement zones and styles in supporting dynamic business rules.
Specifying when to promote records on page 255You indicate when to promote records by specifying one or more triggers on the Triggers tabof the Rule editor.
Specifying when to promote recordsYou indicate when to promote records by specifying one or more triggers on the Triggers tab of theRule editor.
A trigger may have any combination of dimension values and keywords. If a user's query matches atrigger, the MDEX Engine fires the rule and promotes records. In other words, if a user's query containsthe dimension value or values you specify in a trigger, the MDEX Engine fires that rule, and if a user'squery contains a keyword or words that match a trigger, then the MDEX Engine fires the associatedrule.
Keywords in a trigger require that the zone associated with the rule have "Valid for search" enabledon the Zone editor in Developer Studio. Keywords in a trigger also require a match mode that specifieshow the keyword should match in order to trigger the rule. There are three match modes:: Phrase, All,and Exact.
Triggers can also be empty (no specified dimension values or keywords) on the Triggers tab. In thiscase, there are two options to determine when an empty trigger fires a rule:
• Applies everywhere-Any navigation query and any keyword search in the application triggers therule.
• Applies only at root-Any navigation query and any keyword search from the root dimension valueonly (N=0) triggers the rule.
Multiple triggers in a rule
A dynamic business rule can have one or more triggers that include both dimension values andkeywords. Adding more than one trigger to a rule is very useful if you want to promote the same
Endeca Developer Studio Developer Studio HelpEndeca Confidential
255Configuring Application Features | Configuring Dynamic Business Rules

records from multiple locations in your application. Each trigger can describe a different location wherea user's query can trigger a rule; however, the rule promotes records from a single target location.
Related LinksCreating Rules on page 251
Ensuring promoted records are always produced on page 246You ensure promoted records are always produced by creating a zone in Developer Studioto associate with a number of dynamic business rules.
Specifying a time trigger to promote records on page 256A time trigger is useful if you want to promote records for a particular period of time.
Add Trigger editor on page 253The Add Trigger editor allows you to build a one or more triggers for a dynamic businessrule.
Specifying a time trigger to promote recordsA time trigger is useful if you want to promote records for a particular period of time.
You specify a time trigger on the Time Trigger tab of the Rule editor. A time specified on this tab is adate/time value that indicates the time at which the rule may fire and the time after which the rule maynot fire. Any matching query that occurs between these two values fires the rule.
For example, you might create a rule called This Weekend Only Sale whose time trigger starts Fridayat midnight and expires on Sunday at 6 p.m. Only a start time is required for a time trigger. If you donot specify an expiration time, the rule can be triggered indefinitely.
To specify a time trigger:
1. In the Rule editor for the rule you want to configure, click the Time Trigger tab.
2. Select Give This Rule a Time Trigger to enable the Start time options.
3. From the Start Time drop-down list, select the start time for the time trigger.
4. (Optional) Select Give This Rule an Expiration Date and from the Expiration Time drop-down list,choose the end time for the time trigger.
Note: If you do not specify an expiration time, the trigger does not expire.
5. Identify which records to promote by specifying the rule's target.
Synchronizing time zone settings
The start time and expiration time values do not specify time zones. The server clock that runs yourWeb application identifies the time zone for the start and expiration times. If your application isdistributed on multiple severs, you must synchronize the server clocks to ensure the time triggers arecoordinated.
Note: Fully implementing this feature requires additional work outside of Developer Studio.Please refer to the Endeca Advanced Development Guide as well as the Oracle EndecaWorkbench Help for details.
Related LinksCreating Rules on page 251
Endeca ConfidentialEndeca Developer Studio Developer Studio Help
Configuring Application Features | Configuring Dynamic Business Rules256

Specifying which records to promoteYou indicate which records to promote by specifying a target on the Target tab of the Rule editor.
A target is a collection of one or more dimension values. These dimension values identify a set ofrecords that are all candidates for promotion. Zone and style settings further control the specific recordsthat are promoted to a user.
To specify which records to promote:
1. In the Rule editor for the rule you want to configure, click the Targets tab.
2. Click Add.The Select Dimension Value dialog box displays.
3. Select a dimension value from the list and click OK.
Note: You cannot add auto-generated dimension values until you first load and promote thedimension values.
4. If necessary, repeat the above steps to add multiple dimension values to the target.
5. Check Augment Navigation State to add target dimension values to the existing navigation statewhen evaluating the rule. If not checked, the MDEX Engine ignores all current navigation statefilters when evaluating the rule. Navigation state filters include dimension value selections, recordsearch, range filters, and so on. The one exception is custom catalog filters, which always applyregardless of this setting.For example, if checked, and a user navigates to Wine Type > Red and that triggers a rule thatpromotes wines under $10, then the rule results will include only red wines that are under $10.Therule results are always a subset of the standard query results. Conversely, if Augment NavigationState is not checked, and a user navigates to Wine Type > Red which triggers a rule that promoteswines under $10, then the rules results will include any wine type (red, white, sparkling) with winesunder $10. The rule results are not a subset of the standard query results.
6. At this point, you can either:
• Promote custom properties or featured records, or• Click OK if you are finished configuring the rule.
Note: Fully implementing this feature requires additional work outside of Developer Studio.Please refer to the Endeca Advanced Development Guide as well as the Endeca WorkbenchHelp for details.
Related LinksCreating Rules on page 251
Adding custom properties to a rule on page 258You can promote custom properties by creating key/value pairs on the Properties tab of theRule editor.
Adding static records in rule results on page 258In addition to defining a rule's dimension value targets and custom properties, you canoptionally specify any number of static records to promote. These static records are calledfeatured records, and you specify them on the Featured Records tab of the Rule editor.
Manual versus auto-generated dimension values on page 133To configure multiple synonyms, collapsibility, or inertness, or to create a hierarchy fordimension values, you must manually populate a dimension. Otherwise, set a dimension toauto-generate its values.
Endeca Developer Studio Developer Studio HelpEndeca Confidential
257Configuring Application Features | Configuring Dynamic Business Rules

Adding custom properties to a ruleYou can promote custom properties by creating key/value pairs on the Properties tab of the Rule editor.
You can promote custom properties by creating key/value pairs on the Properties tab of the Rule editor.Rule properties are typically used to return supplementary information with promoted record pages.Properties could specify editorial copy, point to rule-specific images, and so on. For example, a propertyname might be set to SpecialOffer and its value set to BannerAd.gif.
You can add multiple properties to a dynamic business rule. These properties are accessed with thesame method calls used to access system-defined properties that are included in a rule's results, suchas a rule's zone and style.
To add a custom rule property:
1. In the Rule editor for the rule you want to change, click the Properties tab.
2. Type the property name in the Property field and its corresponding value in the Value field.
3. Click Add.
4. Repeat steps 2 and 3 if you want to add additional properties.
5. Click OK.
You can also create templates to facilitate the creation of rule properties in Endeca Workbench.See About styles for details.
Note: Fully implementing this feature requires additional work outside of Developer Studio.Please refer to the Endeca Advanced Development Guide as well as the Endeca WorkbenchHelp for details.
Related LinksCreating Rules on page 251
About styles on page 248A style controls the number of records a rule may promote; it also defines property templates,and tells the Web application how to display rule results.
Adding static records in rule resultsIn addition to defining a rule's dimension value targets and custom properties, you can optionallyspecify any number of static records to promote.These static records are called featured records, andyou specify them on the Featured Records tab of the Rule editor.
You access featured records in your Web application using the same methods you use to accessdynamically generated records.
To add featured records to a rule:
1. In the Rule editor for the rule you want to change, click the Featured Records tab.
2. From the Record spec list, choose an Endeca property to uniquely identify featured records.
Note: Oracle strongly recommends that you specify the record specifier properties for thefeatured records in Developer Studio, and do not edit the XML configuration files directly.
3. In the Value text box, type a value for the selected Endeca property.
This value identifies a featured record you want to promote.
4. Click Add.
5. (Optional) Repeat steps 3 and 4 to add additional featured records to the list.
Endeca ConfidentialEndeca Developer Studio Developer Studio Help
Configuring Application Features | Configuring Dynamic Business Rules258

6. To change the order in which the featured records appear:
a) Select a record.b) Click Up or Down.
7. To change a record spec value:
a) Select it from the Record spec values list.b) Modify its value in the Value text box.c) Click Update.
8. Click OK when you are done adding featured records to a rule.
The MDEX Engine treats featured records differently than dynamically generated records. Inparticular, featured records are not subject to any of the following:
• Record order sorting by sort key• Uniqueness constraints• Maximum record limits
Order of featured records
The General tab of the Rule editor allows you to specify a sort order for dynamically generatedrecords that the MDEX Engine returns.This sort order does not apply to featured records. Featuredrecords are returned in a Supplement object in the same order that you specified them on theFeatured Records tab. The featured records occur at the beginning of the record list for the rule'sresults and are followed by any dynamically generated records.The dynamically generated recordsare sorted according to your specified sort options.
No uniqueness constraints
The zone associated with a rule allows you to indicate whether rule results are unique by a specifiedproperty or dimension value. This uniqueness constraint does not apply to featured records evenif uniqueness is enabled for dynamically generated rule results. For example, if you enabled Colorto be the unique property for record results and you have two dynamically generated records withBlue as property value, then the MDEX Engine excludes the second record as a duplicate. On theother hand, if you have the same scenario but the two records are featured results not dynamicallygenerated results, the MDEX Engine returns both records .
Note: Developer Studio performs a case-insensitive search for duplicate keys.
No maximum record limits
The style associated with a rule allows you to set a maximum number of records that the MDEXEngine may return as rule results.This Maximum Records value does not apply to featured records.For example, if the Maximum Records value is set to three and you specify five featured records,the MDEX Engine returns all five records. Also, the MDEX Engine returns featured records beforedynamically generated records, and the featured records count toward the maximum limit.Consequently, the number of featured records could restrict the number of dynamically generatedrule results.
Note: Fully implementing this feature requires additional work outside of Developer Studio.Please refer to the Endeca Advanced Development Guide as well as the Endeca WorkbenchHelp for details.
Related LinksCreating Rules on page 251
Endeca Developer Studio Developer Studio HelpEndeca Confidential
259Configuring Application Features | Configuring Dynamic Business Rules
Sorting the rules in the Rules viewTo make rules easier to find and work with, they can be sorted by name (in alphabetical ascending ordescending order) or by priority.
The dynamic business rules you create in Developer Studio appear in the Rules view.
The procedure described below changes the way rules are sorted in Rules view only. Sorting doesnot affect the priority used when processing the rules. See Prioritizing rule evaluation order forinformation on controlling the order in which rules are evaluated.
To sort the rules in the Rules view:
• In the Rules view, click the Name column header to cycle the sort order from Sorted by name(ascending), Sorted by name (decending), and Sort by priority order.
Related LinksCreating Rules on page 251
Prioritizing rule evaluation orderYou modify the relative priority of a rule by moving it up or down in the Rules view.
In addition to sorting rules by name or priority, you can also modify a rule's priority in the Rules viewof Developer Studio. Priority is indicated by a rule's position in the Rules view, relative to the positionof other rules when you have sorted the rules by priority.
A rule's priority affects the order in which the MDEX Engine evaluates the rule. The MDEX Engineevaluates rules that are higher in the Rules view before those that are positioned lower. By increasingthe priority of a rule, you increase the likelihood that the rule is triggered before another, and in turn,increase the likelihood that the rule promotes records before others.
It is important to consider rule priority in conjunction with the settings you specify in the Zone editor.For example, suppose a zone has Rule Limit set to three. If you have ten rules available for the zone,the MDEX Engine evaluates the rules, in the order they appear in the Rules view, and returns resultsfrom only the first three that have valid results. In addition, the Shuffle Rules check box on the Zoneeditor overrides the priority order you specify in the Rules view. When you check Shuffle Rules, theMDEX Engine randomly evaluates the rules associated with a zone.
If you set up rule groups, you can modify the priority of a rule within a group and modify the priority ofa group with respect to other groups. For details, see Prioritizing rule groups.
To prioritize rules:
1. In the Rules view, click the Name column header to cycle the order of the rule sort so that the rulesare displayed in priority order (you'll see Sorted by Priority in the lower left corner of the Rulesview).
2. Select the rule whose priority you want to change and click the Up or Down buttons to move therule to the desired position.
Related LinksCreating Rules on page 251
Rule editorThe Rule editor lets you configure various rule parameters including zones, styles, and rule groups.
The Rule editor contains a unique name for this rule. In addition, it contains the following tabs:
General
The General tab contains the following fields:
Endeca ConfidentialEndeca Developer Studio Developer Studio Help
Configuring Application Features | Configuring Dynamic Business Rules260

DescriptionOption
A list of all available zones.Zone
A list of all available styles.Style
If this project uses rule groups, a list of all availablerule groups. (If this project does not contain rulegroups, this field is disabled.
Member of this rule group
Optional. A list of sortable dimensions and Endecaproperties. [None] indicates that the rule has norecord order.
Sort key
If checked, shuffles the promoted records for therule.
Shuffle
The Self-Pivot feature prevents business rules fromdisplaying duplicate records in merchandising and
Self-Pivot
search results lists when the trigger and target ofthe business rule contain the same dimensionvalues.
With Self-Pivot unchecked, the MDEX Engine looksat each dimension value in the current navigationstate. If any of those dimension values exists inthe rule's target, the rule will not fire.
When checked, Self-Pivot allows business rulesto fire even if the user navigates to a location whichexplicitly contains a dimension value already in therule target.
In version 5.1.4 and later, self-pivot is enabled bydefault for each new rule created in EndecaWorkbench, and the option is not displayed inEndeca Workbench. However, you can changethe default and set the check box to display on theTriggers tab in Endeca Workbench. Please referto the Endeca Advanced Development Guide formore information.
If a sort key is selected, specifies whether the sortorder will be ascending or descending.
Order
Optional. A user profile that must be present in thequery in order for the rule to fire. There can onlybe one user profile per rule.
User profile
Endeca Developer Studio Developer Studio HelpEndeca Confidential
261Configuring Application Features | Configuring Dynamic Business Rules

Triggers
The Triggers tab contains the following field:
DescriptionOption
A list of triggers that can be made up of anycombination of keywords and dimension values.
Rule is triggered by any of these conditions
Time Triggers
The Time Triggers tab contains the following fields:
DescriptionOption
Enables a time trigger for the rule. A triggerspecified on this tab is a date/time value that
Give this rule a time trigger
indicates the time at which to start the rule's triggerand the time at which the trigger ends. Anymatching query that occurs between these twovalues triggers the rule.
Specifies the time after when the rule can betriggered by user queries. Only a start time valueis required for a time trigger.
Start time
Enables the Expiration time field. If you do notspecify an expiration time, the rule can be triggeredindefinitely.
Give this rule an expiration date
Specifies the time after which the rule can nolonger be triggered.
Expiration time
Targets
The Targets tab contains the following fields:
DescriptionOption
A list of target dimension values.Targets
If checked, target dimension values are added tothe existing navigation state when evaluating the
Augment navigation state
rule. If not checked, evaluation of that rule ignoresall current navigation state filters (such asdimension value selections, record search, rangefilters, and so on) except custom catalog filters.
Endeca ConfidentialEndeca Developer Studio Developer Studio Help
Configuring Application Features | Configuring Dynamic Business Rules262

Properties
The Properties tab contains the following field:
DescriptionOption
Specifies any rule properties that you want to returnas supplementary information with the promoted
Property/value table
record pages.You can add multiple properties toa rule. Such properties can be used to specifyeditorial copy, point to rule-specific images, andso on.These properties can then be accessed withthe same method calls used to accesssystem-defined properties that appear in yourEndeca application.
To add a property:
1. Type the key name in the Key field and itscorresponding value in the Value field.
2. Click Add.
Featured Records
The Featured Records tab contains the following fields:
DescriptionOption
A list of dimensions and Endeca properties thatcan be used for the record specifier. [None]
Record spec
indicates no dimension or Endeca property hasbeen selected.
A list of the record identifiers that you type into theValue text box.
Record spec values
Related LinksCreating Rules on page 251
Presenting rules results in a Web application
The MDEX Engine returns rule results to a Web application in a Supplement object.
To display rule results to Web application users, an application developer writes code that extractsthe rule results from the Supplement object and displays the results in the application. See the EndecaAdvanced Development Guide for details.
Related LinksBuilding Rules and Their Supporting Constructs on page 245
Grouping Rules
Related Links
Endeca Developer Studio Developer Studio HelpEndeca Confidential
263Configuring Application Features | Configuring Dynamic Business Rules

Building Rules and Their Supporting Constructs on page 245
About grouping rules on page 264Rule groups complement zones and styles in supporting dynamic business rules.
Creating a rule group on page 265A rule's order within the group affects its evaluation order.The MDEX Engine evaluates rulesat the top over a group before rules that are placed lower in the group.
Deleting a rule group on page 265Delete rule groups from the Rules view.
Prioritizing rule groups on page 266In the Rules view, move rule groups up or down to change their priority in relation to otherrule groups.
Rule Group editor on page 266The Rule Group editor allows you to create a new rule group or modify an existing one.
Rule Group name editor on page 267After a rule group is created, you are only allowed to edit its name in the group's editor.
Interaction between dynamic business rules and rule groups on page 267A rule may only belong to one group but a group does not necessitate rules. In addition, youmay change the order of rule groups themselves.
About grouping rulesRule groups complement zones and styles in supporting dynamic business rules.
Rule groups serve two functions:
• They provide a means to logically organize rules into categories to facilitate creating and editingrules.
• They allow multiple business users to access Endeca Workbench simultaneously
A rule group provides a means to organize a large number of rules into smaller logical categories,which usually affect distinct (non-overlapping) parts of a Web site. For example, a retail applicationmight organize rules that affect the electronics and jewelry portions of a Web site into a group forElectronics Rules and another group for Jewelry Rules.
A rule group also enables multiple business users to access Endeca Workbench simultaneously. EachEndeca Workbench user can access a single rule group at a time. Once a user selects a rule group,Endeca Workbench prevents other users from editing that group until the user returns to the groupselection list or closes the browser window.
Note: Fully implementing this feature requires additional work outside of Developer Studio.Please refer to the Endeca Advanced Development Guide as well as the Endeca WorkbenchHelp for details.
Related LinksGrouping Rules on page 263
Creating a rule group on page 265A rule's order within the group affects its evaluation order.The MDEX Engine evaluates rulesat the top over a group before rules that are placed lower in the group.
Deleting a rule group on page 265Delete rule groups from the Rules view.
Endeca ConfidentialEndeca Developer Studio Developer Studio Help
Configuring Application Features | Configuring Dynamic Business Rules264

Creating a rule groupA rule's order within the group affects its evaluation order. The MDEX Engine evaluates rules at thetop over a group before rules that are placed lower in the group.
To create a rule group:
1. In the Project Explorer window, expand Dynamic Business Rules.
2. Double-click Rules.This opens the Rules view and also activates the Rule Group menu on the menu bar.
3. From the Rule Group menu, select New.
4. Type a unique name in the Group name field. Use only alphanumeric, dash, or underscorecharacters. The name must be unique across both keyword redirect groups and rule groups.
5. To select a rule for this group, highlight a rule in the All Rules list and click Add.The rule appears in the Rules in Group list. (If this is the first group you created, all the rules aremoved to the Rules in Group list and the Remove button is inactive.)
Note: A rule can belong to only one rule group. Adding a rule to a group removes it fromany group to which it previously belonged.
6. To change the order of a rule in a group, select the rule and click either the Up or Down arrowbuttons.
7. Click OK.The new rule group appears in the Rules view.
8. Repeat steps 3 to 7 if you want multiple rule groups in your project.
Note: Fully implementing this feature requires additional work outside of Developer Studio.Please refer to the Endeca Advanced Development Guide as well as the Endeca WorkbenchHelp for details.
Related LinksGrouping Rules on page 263
Deleting a rule group on page 265Delete rule groups from the Rules view.
About grouping rules on page 264Rule groups complement zones and styles in supporting dynamic business rules.
Deleting a rule groupDelete rule groups from the Rules view.
To delete a rule group:
1. In the Rules view's Rule Groups Name column, select a rule group and then click Delete.
2. When the confirmation message appears, click Yes.
3. If your project contains more than one other rule group, the Select Rule Group dialog boxappears. In the drop-down list, select the rule group you want to move the rules in this group to,and click OK.
If the rule group you are deleting is the second to last rule group, the rules are moved to the oneremaining rule group.
Related LinksGrouping Rules on page 263
Endeca Developer Studio Developer Studio HelpEndeca Confidential
265Configuring Application Features | Configuring Dynamic Business Rules
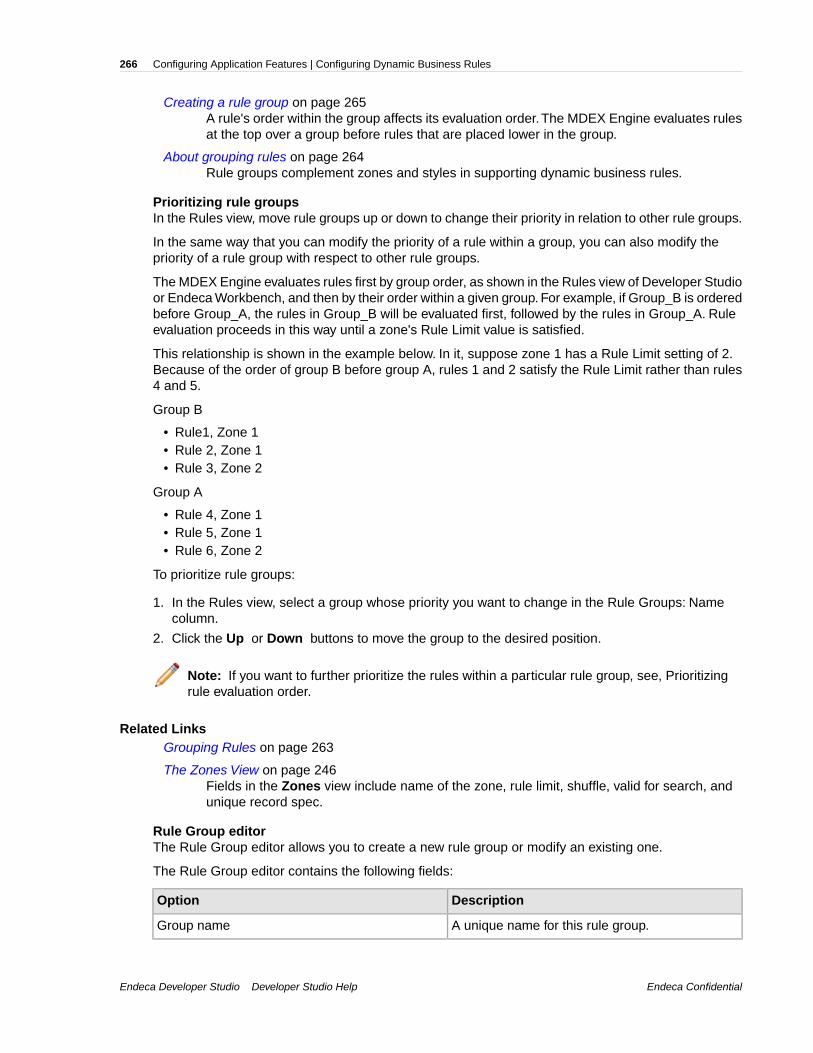
Creating a rule group on page 265A rule's order within the group affects its evaluation order.The MDEX Engine evaluates rulesat the top over a group before rules that are placed lower in the group.
About grouping rules on page 264Rule groups complement zones and styles in supporting dynamic business rules.
Prioritizing rule groupsIn the Rules view, move rule groups up or down to change their priority in relation to other rule groups.
In the same way that you can modify the priority of a rule within a group, you can also modify thepriority of a rule group with respect to other rule groups.
The MDEX Engine evaluates rules first by group order, as shown in the Rules view of Developer Studioor Endeca Workbench, and then by their order within a given group. For example, if Group_B is orderedbefore Group_A, the rules in Group_B will be evaluated first, followed by the rules in Group_A. Ruleevaluation proceeds in this way until a zone's Rule Limit value is satisfied.
This relationship is shown in the example below. In it, suppose zone 1 has a Rule Limit setting of 2.Because of the order of group B before group A, rules 1 and 2 satisfy the Rule Limit rather than rules4 and 5.
Group B
• Rule1, Zone 1• Rule 2, Zone 1• Rule 3, Zone 2
Group A
• Rule 4, Zone 1• Rule 5, Zone 1• Rule 6, Zone 2
To prioritize rule groups:
1. In the Rules view, select a group whose priority you want to change in the Rule Groups: Namecolumn.
2. Click the Up or Down buttons to move the group to the desired position.
Note: If you want to further prioritize the rules within a particular rule group, see, Prioritizingrule evaluation order.
Related LinksGrouping Rules on page 263
The Zones View on page 246Fields in the Zones view include name of the zone, rule limit, shuffle, valid for search, andunique record spec.
Rule Group editorThe Rule Group editor allows you to create a new rule group or modify an existing one.
The Rule Group editor contains the following fields:
DescriptionOption
A unique name for this rule group.Group name
Endeca ConfidentialEndeca Developer Studio Developer Studio Help
Configuring Application Features | Configuring Dynamic Business Rules266
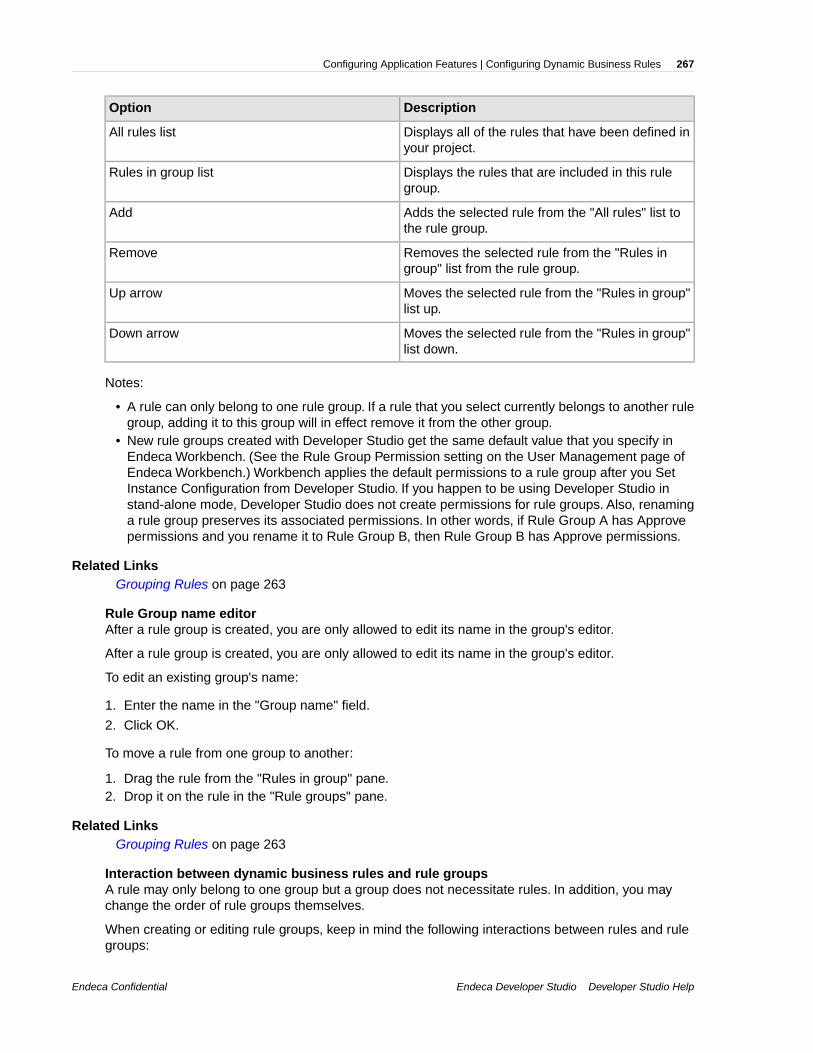
DescriptionOption
Displays all of the rules that have been defined inyour project.
All rules list
Displays the rules that are included in this rulegroup.
Rules in group list
Adds the selected rule from the "All rules" list tothe rule group.
Add
Removes the selected rule from the "Rules ingroup" list from the rule group.
Remove
Moves the selected rule from the "Rules in group"list up.
Up arrow
Moves the selected rule from the "Rules in group"list down.
Down arrow
Notes:
• A rule can only belong to one rule group. If a rule that you select currently belongs to another rulegroup, adding it to this group will in effect remove it from the other group.
• New rule groups created with Developer Studio get the same default value that you specify inEndeca Workbench. (See the Rule Group Permission setting on the User Management page ofEndeca Workbench.) Workbench applies the default permissions to a rule group after you SetInstance Configuration from Developer Studio. If you happen to be using Developer Studio instand-alone mode, Developer Studio does not create permissions for rule groups. Also, renaminga rule group preserves its associated permissions. In other words, if Rule Group A has Approvepermissions and you rename it to Rule Group B, then Rule Group B has Approve permissions.
Related LinksGrouping Rules on page 263
Rule Group name editorAfter a rule group is created, you are only allowed to edit its name in the group's editor.
After a rule group is created, you are only allowed to edit its name in the group's editor.
To edit an existing group's name:
1. Enter the name in the "Group name" field.
2. Click OK.
To move a rule from one group to another:
1. Drag the rule from the "Rules in group" pane.2. Drop it on the rule in the "Rule groups" pane.
Related LinksGrouping Rules on page 263
Interaction between dynamic business rules and rule groupsA rule may only belong to one group but a group does not necessitate rules. In addition, you maychange the order of rule groups themselves.
When creating or editing rule groups, keep in mind the following interactions between rules and rulegroups:
Endeca Developer Studio Developer Studio HelpEndeca Confidential
267Configuring Application Features | Configuring Dynamic Business Rules

• Rules may be moved from one rule group to another. However a rule can appear in only one group.• A rule group may be empty (that is, it does not have to contain rules).• The order of rule groups with respect to other rule groups may be changed.
Related LinksGrouping Rules on page 263
Using dynamic business rules with an AgraphWhen updating dynamic business rule configurations on Dgraphs, Oracle recommends shutting downthe Agraph.
To implement dynamic business rules when you are using the Agraph, keep in mind the followingpoints:
• Using dynamic business rules with the Agraph affects performance if you are using zones configuredwith Unique by This Dimension/Property combined with a high setting for the maximum numberof records or a large numbers of rules. To avoid response time problems, you may need to reducethe number of rules, reduce the maximum records that can be returned, or abandon uniqueness.
• All Dgraphs serving one Agraph must share the same set of dynamic business rules. To ensurethis, it is necessary to update their configurations synchronously by running Dgidx with the--keepcats flag.
• If you update your Dgraphs with dynamic business rule changes using Developer Studio or EndecaWorkbench, and a request comes to the Agraph while the update is in progress, the Agraph issuesa fatal error similar to the following:
[Fri Mar 24 16:26:29 2006] [Fatal] (merchbinsorter.cpp::276) - Dgraph 1has fewer rules fired.
As long as the Agraph is running under the Endeca JCD, the JCD automatically restarts the Agraph.No data is lost. However, end-users will not receive a response to requests made during this shorttime. This problem has little overall impact on the system, because business rule updates are quickand infrequent. Nevertheless, Oracle recommends that you shut down the Agraph during businessrule updates. To shut down the Agraph, go to a CMD prompt on Windows or a shell prompt on UNIXand type:
GET 'http://HOST:PORT/admin?op=exit'
where HOST is machine running the Agraph and PORT is the port number of the Agraph. GET is aPerl utility, so be sure the Perl binaries are in your system path variable.
Note: Fully implementing this feature requires additional work outside of Developer Studio.Please refer to the Endeca Advanced Development Guide as well as the Endeca WorkbenchHelp for details.
Related LinksConfiguring Dynamic Business Rules on page 238
Applying relevance ranking to rule resultsYou can order results in a rule by their relevance ranking score for a given query term.
In some cases, it is a good idea to apply relevance ranking to a rule's results.
Endeca ConfidentialEndeca Developer Studio Developer Studio Help
Configuring Application Features | Configuring Dynamic Business Rules268

For example, if a user performs a record search for Mondavi, the results in the Highly Rated rule canbe ordered according to their relevance ranking score for the term Mondavi. In order to create thiseffect, there are three requirements:
• The navigation query that is triggering the rule must contain record search parameters (Ntt andNtk). Likewise, the zone that the rule is assigned to must be identified as Valid for search (Otherwise,the rule will not be triggered).
• The rule's target must be marked to Augment Navigation State.• The rule must not have any sort parameters specified. If the rule has an explicit sort parameter,
that parameter overrides relevance ranking. Sort parameters for a rule are set on the General tabof the Rule editor.
If these three requirements are met, then the relevance ranking rules specified with MDEX Enginestartup options are used to rank specific business rules when triggered with a record search request(a keyword trigger).
Related LinksConfiguring Dynamic Business Rules on page 238
Ensuring promoted records are always produced on page 246You ensure promoted records are always produced by creating a zone in Developer Studioto associate with a number of dynamic business rules.
Specifying which records to promote on page 257You indicate which records to promote by specifying a target on the Target tab of the Ruleeditor.
Creating a rule and ordering its results on page 254Associate a zone and style with a rule and define result sort order on the Rule editor of theRules view, found under Dynamic Business Rules in the Project Explorer.
Configuring Dimension GroupsRelated Links
Configuring Application Features on page 179
About dimension groups on page 270
Viewing all of your dimensions on page 270All dimensions are visible in the Dimensions view, opened from the Project Explorer.
Creating dimension groups on page 272Create dimension groups in the New Dimension Group editor, found in the Dimension Groupsview.
Modifying dimension groups on page 272Make changes to dimension groups in the Dimension Group editor, found in the DimensionGroups view.
Deleting dimension groups on page 273Delete dimension groups from the Dimension Groups view.
Dimension Group editor on page 273Use the Dimension Group editor to create new dimension groups and modify existing ones.
Adding a dimension to an existing group on page 273From the Dimensions view, select a dimension and a group you will add it to.
Dimension groups versus dimension hierarchy on page 274
Endeca Developer Studio Developer Studio HelpEndeca Confidential
269Configuring Application Features | Configuring Dimension Groups

Dimension hierarchy refines search by eliminating all but one dimension value from adimension in the navigation state. Dimension groups allow users to select values from eachdimension in the group.
Dimension groups and ranking on page 274The display order of dimension groups is determined by the ranking of the individualdimensions within the groups.
Dimension Groups view on page 275The Dimension Groups view displays all of the dimension groups in your project.
About dimension groupsDimension groups allow you to organize dimensions into groupings for presentation purposes.
Related LinksConfiguring Dimension Groups on page 269
Adding a dimension to a dimension group on page 116Dimension groups allow you to organize dimensions into groupings for presentation purposes.
Adding a dimension to an existing group on page 273From the Dimensions view, select a dimension and a group you will add it to.
Creating dimension groups on page 272Create dimension groups in the New Dimension Group editor, found in the Dimension Groupsview.
Modifying dimension groups on page 272Make changes to dimension groups in the Dimension Group editor, found in the DimensionGroups view.
Adding a dimension to an existing group on page 273From the Dimensions view, select a dimension and a group you will add it to.
Dimension Groups view on page 275The Dimension Groups view displays all of the dimension groups in your project.
Viewing all of your dimensionsAll dimensions are visible in the Dimensions view, opened from the Project Explorer.
To open the Dimensions view:
• In the Project Explorer Project tab, double-click Dimensions.The Dimensions view appears in the work area.
• Choose from the following options:
DescriptionOption
A unique name for the dimension. Clicking the Name column head cyclesthe order of the dimension sort from rank order, to alphabetical ascending,to alphabetically descending.
Name
Note: In order to rank your dimensions, you must be displaying themin rank order in the Dimensions view.
Endeca ConfidentialEndeca Developer Studio Developer Studio Help
Configuring Application Features | Configuring Dimension Groups270

DescriptionOption
If the dimension was not manually created in Developer Studio, indicateswhat type of external dimension it is:
External type
• Auto Gen: The dimension's values are being automatically generatedbecause the match mode in the Property Mapper is set to Auto Generate.
• External: Indicates that this dimension has been created and is beingmaintained in a third-party tool, outside of Developer Studio. Externallymanaged dimensions are read-only.
• Prop Mapped: Indicates that this dimension is being created using the"If no mapping is found, map source properties to Endeca: Dimensions"on the Property Mapper's Advanced tab.
When Yes, indicates that records can be sorted by this dimension.Enable record sort
Enables the dimension values from this dimension to appear in the recordlist display.
Show with recordlist
Enables the dimension values from this dimension to appear on the recordpages of any records that are tagged with these dimension values.
Show with record
Establishes dynamic dimension value ranking, which orders dimensionvalues according to their frequency of appearance within the current recordset (that is, the most popular dimension values are returned).
Dynamic ranking
Allows the end user to select more than one dimension value from adimension within a single query.
Multi select
Defines the default sort order used for dimension values within this dimension.This sort order is used when no other types of dimension value sorting havebeen specified.
Refinements sortorder
Related LinksBasic Dimension Tasks on page 107
Configuring Dimension Groups on page 269
Sorting dimensions in the Dimensions view on page 109To make them easier to find and work with, the dimensions in your Dimensions view can besorted by name (in alphabetical ascending or descending order) or by rank.
Enabling dimension display in a record list on page 140You must enable a dimension for record list display before you can access its dimensionvalues using the methods in the Endeca Presentation API.
Enabling dimension display on a record page on page 140When record page display is enabled for a dimension, any records that are tagged withdimension values from that dimension display those values as part of their entry on the recordpage.
Choosing a match mode on page 166
Endeca Developer Studio Developer Studio HelpEndeca Confidential
271Configuring Application Features | Configuring Dimension Groups

When Forge maps a source property value to a dimension value, the dimension value it usescan either be explicitly defined in the dimension hierarchy or automatically generated byForge.You set the type of dimension value handling, on a per mapping basis, using the MatchMode in the Dimension Mapping dialog box.
Working with external taxonomies on page 306You may build all or part of a logical hierarchy for your data set outside of Developer Studioand then transform that logical hierarchy into Endeca dimensions and dimension values foruse in search and Guided Navigation.
When no mapping is found on page 175The Property Mapper editor’s Advanced tab lets you map source properties to either Endecaproperties or dimensions if no mapping is found.
Dimension editor on page 111You use the Dimension editor to create a new dimension or modify the attributes that affecthow an existing dimension is evaluated and displayed.
Creating dimension groupsCreate dimension groups in the New Dimension Group editor, found in the Dimension Groups view.
To create a new dimension group:
1. In the Project Explorer's Project tab, double-click Dimension Groups to open the DimensionGroups view.
2. Click New.The New Dimension Group editor appears.
3. In the Group Name box, type a unique name for the dimension group.
4. Select the dimension(s) you want to add in the All Dimensions list and click Add. You can adddimensions one by one or hold down the Ctrl key and add several at a time.
Note: There is no limit to the number of dimensions in a group, but each dimension can onlybelong to one group.
5. Click OK.The new dimension group is added to the list of available dimension groups.
Related LinksConfiguring Dimension Groups on page 269
Modifying dimension groupsMake changes to dimension groups in the Dimension Group editor, found in the Dimension Groupsview.
To edit a dimension group:
1. In the Dimension Groups view, double-click the dimension group you want to modify to open it inthe Dimension Group editor. (You can only open one dimension group at a time.
2. Make the necessary changes in the Dimension Group editor.
3. Click OK to return to the Dimension Groups view.
Endeca ConfidentialEndeca Developer Studio Developer Studio Help
Configuring Application Features | Configuring Dimension Groups272
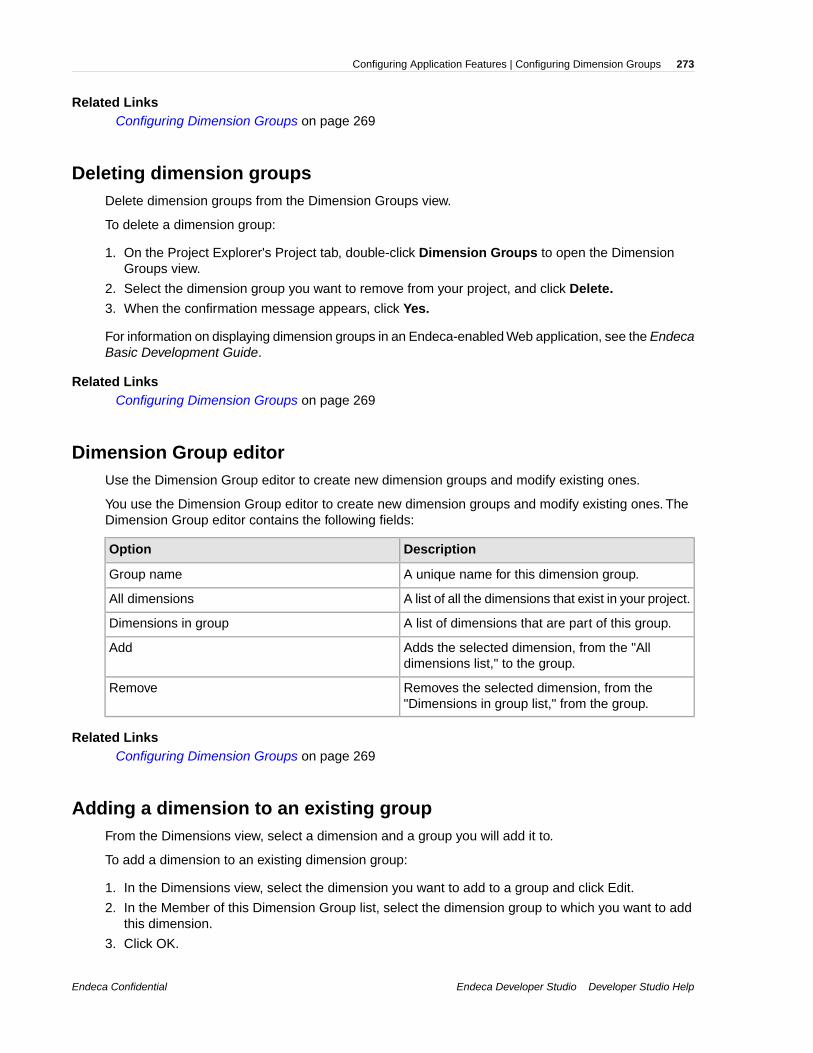
Related LinksConfiguring Dimension Groups on page 269
Deleting dimension groupsDelete dimension groups from the Dimension Groups view.
To delete a dimension group:
1. On the Project Explorer's Project tab, double-click Dimension Groups to open the DimensionGroups view.
2. Select the dimension group you want to remove from your project, and click Delete.
3. When the confirmation message appears, click Yes.
For information on displaying dimension groups in an Endeca-enabled Web application, see the EndecaBasic Development Guide.
Related LinksConfiguring Dimension Groups on page 269
Dimension Group editorUse the Dimension Group editor to create new dimension groups and modify existing ones.
You use the Dimension Group editor to create new dimension groups and modify existing ones. TheDimension Group editor contains the following fields:
DescriptionOption
A unique name for this dimension group.Group name
A list of all the dimensions that exist in your project.All dimensions
A list of dimensions that are part of this group.Dimensions in group
Adds the selected dimension, from the "Alldimensions list," to the group.
Add
Removes the selected dimension, from the"Dimensions in group list," from the group.
Remove
Related LinksConfiguring Dimension Groups on page 269
Adding a dimension to an existing groupFrom the Dimensions view, select a dimension and a group you will add it to.
To add a dimension to an existing dimension group:
1. In the Dimensions view, select the dimension you want to add to a group and click Edit.
2. In the Member of this Dimension Group list, select the dimension group to which you want to addthis dimension.
3. Click OK.
Endeca Developer Studio Developer Studio HelpEndeca Confidential
273Configuring Application Features | Configuring Dimension Groups

Related LinksConfiguring Dimension Groups on page 269
About dimension groups on page 270
Dimension groups versus dimension hierarchyDimension hierarchy refines search by eliminating all but one dimension value from a dimension inthe navigation state. Dimension groups allow users to select values from each dimension in the group.
Dimension groups allow the user to select dimension values from each of the dimensions containedin them. If the relationships made by a dimension group were instead created using dimension hierarchy,once a dimension value had been selected from one of the branches, then the remaining dimensionvalues would no longer be available for refinement.
For example, in mutual funds data, a user may want to navigate on a variety of performance criteria.A Performance dimension group that contains YTD Total Returns, 1 Year Total Returns, and FiveYear Total Returns dimensions would allow the user to select criteria from all three dimensions. If thesame relationship had been created using dimension hierarchy, then once a selection had been madefrom the YTD Total Returns branch, the 1 Year Total Returns and Five Year Total Returns brancheswould no longer be available for navigation.
Related LinksConfiguring Dimension Groups on page 269
Dimension groups and rankingThe display order of dimension groups is determined by the ranking of the individual dimensions withinthe groups.
A dimension group inherits the highest rank of its member dimensions. For example, if thehighest-ranked dimension in dimension Group A is ranked higher than the highest-ranked dimensionin Group B, then group A will be ordered before group B.
Dimension groups are also ranked relative to dimensions that are not included in groups. Continuingthe previous example, if Dimension XYZ has a rank that is lower than Group A but higher than GroupB, the ranking would look like this:
Group ADimension XYZGroup B
Dimensions with the same rank are ordered alphanumerically by name. It is important to note thatdimension name, not dimension group name, determines the display order of dimension groups in thissituation. Dimension groups are ordered according to their highest alphanumerically ranked memberdimension. So dimension group Z, which contains dimension H, will be ordered before dimensiongroup A, which contains dimension I.
For more information on ranking, see Ranking dimensions manually.
Related LinksConfiguring Dimension Groups on page 269
Ranking dimensions manually on page 150Always rank dimensions manually, by placing them in ranked order in the Dimensions view.The MDEX Engine will return dimensions in this order.
Endeca ConfidentialEndeca Developer Studio Developer Studio Help
Configuring Application Features | Configuring Dimension Groups274

Dimension Groups viewThe Dimension Groups view displays all of the dimension groups in your project.
The Dimension Groups view contains two columns:
DescriptionField
A unique name for a dimension group.Name
The dimensions that make up the group.Dimensions
Related LinksConfiguring Dimension Groups on page 269
About dimension groups on page 270
Endeca Developer Studio Developer Studio HelpEndeca Confidential
275Configuring Application Features | Configuring Dimension Groups

Chapter 5
Working with Your Pipeline
About pipelinesA pipeline functions as the script for the entire data transformation process that occurs when you runthe Forge program.
The pipeline specifies things like the format and location of the source data, any changes to be madeto the source data (standardization), and the mapping method to use for each of the source data’sproperties. A pipeline is composed of a collection of components. Each component performs a specificfunction during the transformation of your source data into Endeca records. Components are connectedby links, giving the pipeline a sequential flow from inputs to outputs.
You add and edit components in your pipeline using the Pipeline Diagram editor.The pipeline diagramgraphically depicts the components in your pipeline and the links between them. It describes the seriesof transformations that occur in the process of converting raw data to a format that the Endeca MDEXEngine can use, making it easy for you to trace the logic of your data transformation. The pipelinediagram is the best way to maneuver and maintain a high-level view of your pipeline as it grows insize and complexity.
All Endeca projects require a main pipeline to process baseline updates. A baseline update (also calleda full update) is a complete re-index of the entire dataset. Baseline updates occur infrequently, usuallyonce per day or once per week. They usually involve the customer generating an extract from theirdatabase system and making the files accessible either on an FTP server or on the indexing server.This data is processed by Forge and the Dgidx Indexer, and is then finally made available through theMDEX Engine.You define the steps in a baseline update in your project's main pipeline.
Endeca projects may optionally contain a partial pipeline to process partial updates. A partial updateis a much smaller change in the overall dataset. Partial updates affect a small percentage of the totalrecords in the system, and therefore occur much more frequently. They consist of a much smallerextract from the customer’s database and contain volatile information. For example, the price andavailability of products on a retail store site are usually volatile.
You can create, view, and edit both types of pipelines in Developer Studio.You access your baselineand partial update pipelines via the Pipeline tab, and the Pipeline Diagram and Partial Pipeline Diagrameditors.
Note: Refer to Section I in the Endeca Forge Guide for an introduction to main pipelines. Referto the Endeca Partial Updates Guide for details on using and implementing partial pipelines.
Related Links

Working with Your Pipeline on page 277
About the pipeline tabThe Project Explorer's Pipeline tab displays all of the pipeline components in your project, for bothyour baseline pipeline and your partial update pipeline.
If you double-click any component, Developer Studio opens the appropriate editor (either the PipelineDiagram editor or Partial Pipeline Diagram editor), with the selected component highlighted, anddisplays the component's editor.
Related LinksWorking with Your Pipeline on page 277
About the Pipeline Diagram editorThe Pipeline Diagram editor depicts all of the components in your main pipeline and the relationshipbetween them.
It describes the flow of events that occur in the process of converting raw data to a format that theEndeca MDEX Engine can use, making it easy for you to trace the logic of your data model. Thepipeline diagram is the best way to maneuver and maintain a high-level view of your pipeline as itgrows in size and complexity. The background of the main pipeline editor is white.
Endeca ConfidentialEndeca Developer Studio Developer Studio Help
Working with Your Pipeline | About the pipeline tab278

Related LinksWorking with Your Pipeline on page 277
About pipeline componentsA pipeline consists of components that perform specific functions during the transformation of yoursource data into Endeca records. These components are connected by links, giving the pipeline asequential flow from inputs to outputs.
Both baseline and partial update pipelines can use any of these components.You can access thecomponents in your project from three places in Developer Studio:
• The Project Explorer's Pipeline tab.• The Pipeline Diagram editor for the main pipeline.• The Partial Pipeline Diagram editor for the partial update pipeline.
Note: Refer to Section I of the Endeca Forge Guide for an introduction to pipelines. Forinformation on partial updates, see the Endeca Partial Updates Guide.
Related LinksWorking with Your Pipeline on page 277
Adding a pipeline component on page 283Add new pipeline components from the Pipeline Diagram editor.
Editing a pipeline component on page 290Select a component from the Pipeline Diagram editor to make modifications.
About adapters on page 280Adapter components load and save data.
About manipulators on page 281Manipulator components change the data associated with an Endeca record.
About property mappers on page 282
Endeca Developer Studio Developer Studio HelpEndeca Confidential
279Working with Your Pipeline | About pipeline components

Property mappers connect source data to properties or dimensions.
About record assemblers on page 282
About utility components on page 282Utility components help you perform basic tasks such as logging and record caching.
About adaptersAdapter components load and save data.
DescriptionComponent
You use dimension adapters to load dimension information intoyour pipeline. Dimension adapters can load dimensioninformation in either XML or binary format.
Dimension Adapters
Record adapters load and save records. Input record adapterscan load data in a variety of formats, including delimited, JDBC,
Record Adapters
ODBC, and so on. Output record adapters are generally usedfor diagnostic purposes only.
Record to dimension adapters dynamically build hierarchicaldimensions from a subset of the information in records loaded
Record to Dimension Adapters
into the pipeline. The record to dimension adapter offers analternative to working with externally created dimensions, andsaves you from having to manually create hierarchical dimensionsin Developer Studio.
Indexer adapters save data that is ready to be indexed by theDgidx program. They take all record, dimension hierarchy, and
Indexer Adapters
index configuration information from the pipeline and combineit in a format that is ready for the indexer (Agidx or Dgidx).
An indexer adapter will generally be the final component in abaseline update pipeline.
Update adapters process partial update information to performa live update of volatile information on a running Endeca MDEXEngine.
Update Adapters
Related LinksWorking with Your Pipeline on page 277
Adding a dimension adapter on page 101Dimension adapters read and write dimension data. The attributes of a dimension adapterdescribe where the dimension data is located (or will be saved to), its format, and variousaspects of processing.
Adding a record adapter to load data on page 27
Endeca ConfidentialEndeca Developer Studio Developer Studio Help
Working with Your Pipeline | About adapters280
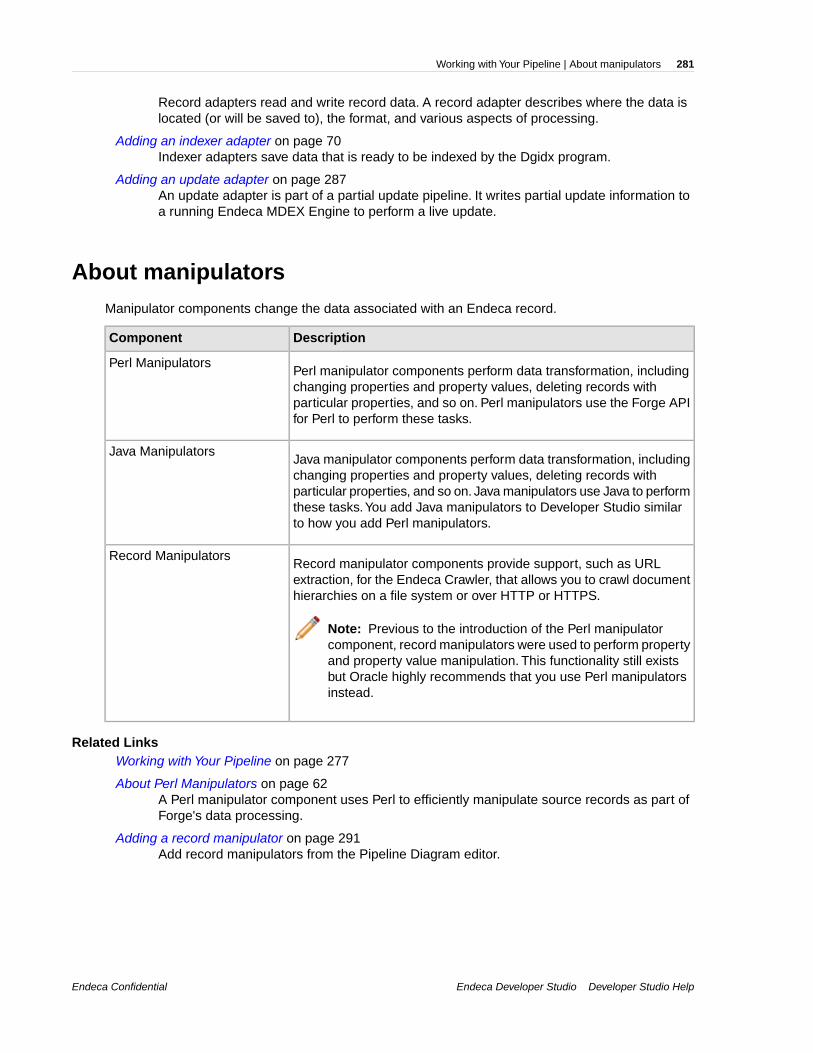
Record adapters read and write record data. A record adapter describes where the data islocated (or will be saved to), the format, and various aspects of processing.
Adding an indexer adapter on page 70Indexer adapters save data that is ready to be indexed by the Dgidx program.
Adding an update adapter on page 287An update adapter is part of a partial update pipeline. It writes partial update information toa running Endeca MDEX Engine to perform a live update.
About manipulatorsManipulator components change the data associated with an Endeca record.
DescriptionComponent
Perl manipulator components perform data transformation, includingchanging properties and property values, deleting records with
Perl Manipulators
particular properties, and so on. Perl manipulators use the Forge APIfor Perl to perform these tasks.
Java manipulator components perform data transformation, includingchanging properties and property values, deleting records with
Java Manipulators
particular properties, and so on. Java manipulators use Java to performthese tasks.You add Java manipulators to Developer Studio similarto how you add Perl manipulators.
Record manipulator components provide support, such as URLextraction, for the Endeca Crawler, that allows you to crawl documenthierarchies on a file system or over HTTP or HTTPS.
Record Manipulators
Note: Previous to the introduction of the Perl manipulatorcomponent, record manipulators were used to perform propertyand property value manipulation. This functionality still existsbut Oracle highly recommends that you use Perl manipulatorsinstead.
Related LinksWorking with Your Pipeline on page 277
About Perl Manipulators on page 62A Perl manipulator component uses Perl to efficiently manipulate source records as part ofForge's data processing.
Adding a record manipulator on page 291Add record manipulators from the Pipeline Diagram editor.
Endeca Developer Studio Developer Studio HelpEndeca Confidential
281Working with Your Pipeline | About manipulators

About property mappersProperty mappers connect source data to properties or dimensions.
Property mapper components map properties on the records in your source data to Endeca propertiesand/or dimensions to make them navigable, displayable, both, or neither.
Related LinksWorking with Your Pipeline on page 277
About property mapping on page 164Source property mappings dictate which dimension values are tagged to each record andwhich property information is available for record search, sort, and display.
Adding a property mapper on page 170At a minimum, a property mapper requires both a record source and a dimension source todefine the components that will supply it with record and dimension data.
Establishing a property mapping on page 174You must create an Endeca property before you can map it to a source property.
Establishing a dimension mapping on page 173You must create a dimension before you can map it to a source property.
Establishing a null mapping on page 174Null mappings prevent a source property from being mapped to an Endeca property ordimension.
About record assemblersRecord assembler components merge data from one or more secondary data sources to the currentrecord.
Related LinksWorking with Your Pipeline on page 277
Record server componentsDescribes record server components.
"Record server" is a general name for any component that can serve records to a downstreamcomponent. Record server components include record adapters, record assemblers, record caches,record manipulators, Perl manipulators, spiders, property mappers, indexer adapters, and updateadapters.
Related LinksWorking with Your Pipeline on page 277
About utility componentsUtility components help you perform basic tasks such as logging and record caching.
Endeca ConfidentialEndeca Developer Studio Developer Studio Help
Working with Your Pipeline | About property mappers282

DescriptionComponent
Dimension servers work in conjunction with dimension adapters,and serve as a centralized source of dimension information forall other pipeline components.
Dimension Servers
A record cache component stores a temporary copy of recorddata that has been read in by a record adapter. With two
Record Caches
exceptions, all sources feeding a join (record assembler) must berecord caches.
The spider component is the core of the Content AcquisitionSystem, which adds the capability to crawl document hierarchieson a file system or over HTTP or HTTPS.
Spiders
Related LinksWorking with Your Pipeline on page 277
Adding a dimension server on page 105A dimension server collects dimensions from multiple dimension sources, and makes themaccessible in a uniform way to other components throughout the pipeline.
Adding a record cache on page 53With two exceptions, all data sources feeding a join must be record caches, so this sectiondetails the procedures from that perspective.
Adding a spider on page 284A spider component crawls documents rather than loading records from a file, thereby addingdocument crawling capabilities to your pipeline.
Adding a pipeline componentAdd new pipeline components from the Pipeline Diagram editor.
To add a pipeline component:
1. In the Pipeline Diagram editor, click New, and then choose the type of component to add. Thecomponent editor appears.
2. In the Name text box, type a unique name for the component.
3. In the Sources tab, set any required data sources.
4. Use the other tabs to specify other component attributes.
5. Click OK.
Related LinksWorking with Your Pipeline on page 277
Adding a spider on page 284A spider component crawls documents rather than loading records from a file, thereby addingdocument crawling capabilities to your pipeline.
Adding an update adapter on page 287
Endeca Developer Studio Developer Studio HelpEndeca Confidential
283Working with Your Pipeline | Adding a pipeline component

An update adapter is part of a partial update pipeline. It writes partial update information toa running Endeca MDEX Engine to perform a live update.
About pipeline components on page 279A pipeline consists of components that perform specific functions during the transformationof your source data into Endeca records. These components are connected by links, givingthe pipeline a sequential flow from inputs to outputs.
Adding a spiderA spider component crawls documents rather than loading records from a file, thereby adding documentcrawling capabilities to your pipeline.
The spider handles URL management and content manipulation. Using spiders, you can configure apipeline that crawls the network at which it is directed, and facilitates the processing of the documentsit finds there using the Endeca Information Transformation Layer (ITL).
Note: The Endeca Crawler, which uses the spider component, has been deprecated and supportfor it will be removed in a future version. It is recommended that you use the Endeca Web Crawlerfor Web crawls and the Endeca CAS Server for file system crawls.
To be able to crawl, a spider component has a dependency on at least one other pipeline component.Upstream, there needs to be a record adapter with a Format of type "document." This record adapterneeds to contain a reference to the spider as its URL source. The two components work together tocrawl a content repository (such as a Web server, file server, or FTP server). Between the recordadapter and the spider, other pipeline components can be implemented. For example, you can havea record manipulator between the record adapter and the spider.
To add a spider component:
1. In the Pipeline Diagram editor, click New, and then choose Spider.The Spider editor appears.
2. In the Name text box, type a unique name for this spider
3. In the General tab, do the following:
a) (Optional) In the Maximum hops text box, type an integer greater than zero to limit the depthof the crawl. If this field is not set, the crawl depth is unlimited.
b) (Optional) In the Maximum depth text box, type an integer greater than zero to limit the depthof the URL path. If this field is not set, the URL depth is unlimited.
c) If you are using a robots.txtfile, in the Agent name text box, type the name of the spideras it will be referred to in the User-agentfield of a robots.txtfile.
d) If the spider is performing a differential crawl, in the Differential crawl URL text box, type thelocation to store the spider's state (as a state.tmp file) between Forge executions
e) If you do not want the spider to conform to the robots.txtstandard, check Ignore robots.f) If you do not want the spider to accept cookies, check Disable cookies.
4. In the Root URLs tab, add one or more URLs from which a crawl can be launched.
5. (Optional) In the URL Configuration tab, add enqueue URLs and URL filters.
6. In the Sources tab, choose a record source from the list.
7. (Optional) In the Comment tab, add a comment for the component.
8. Click OK.
Implementing this feature requires additional work outside of Developer Studio. Please refer to theEndeca Forge Guide for details.
Endeca ConfidentialEndeca Developer Studio Developer Studio Help
Working with Your Pipeline | Adding a pipeline component284

Related LinksAdding a pipeline component on page 283
Add new pipeline components from the Pipeline Diagram editor.
Spider editor on page 285The Spider editor contains a unique name for this spider.
Spider editor
The Spider editor contains a unique name for this spider.
The spider editor contains the following tabs:
General
DescriptionField
Optional. Limits the depth of the crawl to amaximum number of hops from the root URL (see
Maximum hops
below). The value must be an integer greater thanzero. If no value is provided, the maximum numberof hops is unlimited.
Optional. Limits the depth of the crawl to amaximum depth of URL path. The value must be
Maximum depth
an integer greater than zero. If no value isprovided, the maximum path depth is unlimited.
Identifies the name of the spider as it will bereferred to in the User-agent field of a
Agent name
robots.txt file. Required if you arefollowing the robots.txt standard.
Optional. When configuring a spider to perform adifferential crawl, the differential crawl URL
Differential crawl URL
specifies a file location to store the spider's statebetween Forge executions. This file is read in atthe beginning of a differential crawl to enqueueURLs from previous crawls and may be updatedduring the crawl.
When checked, the spider does not adhere to therobots.txt standard, which tells the spider
Ignore robots
which files it can crawl. By default, the spiderfollows the standard and looks for robots.txton the server.
When checked, the spider refuses cookies sentfrom a host server during a crawl.
Disable cookies
Root URLs
Endeca Developer Studio Developer Studio HelpEndeca Confidential
285Working with Your Pipeline | Adding a pipeline component
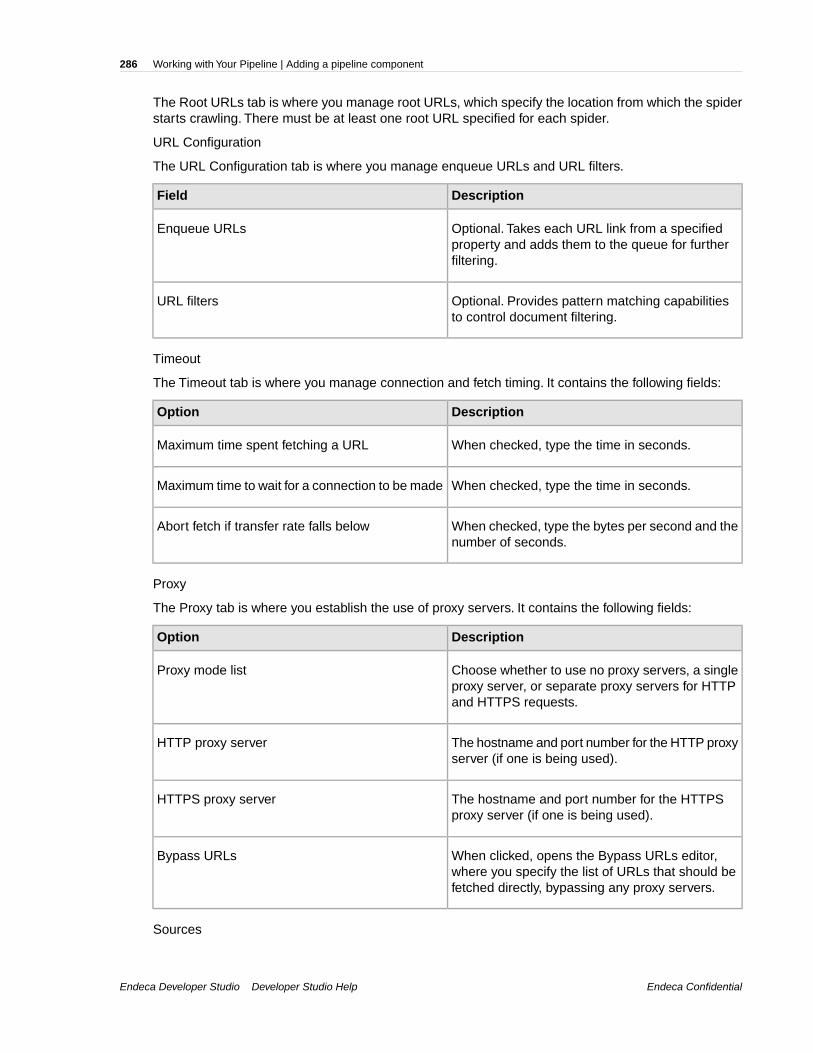
The Root URLs tab is where you manage root URLs, which specify the location from which the spiderstarts crawling. There must be at least one root URL specified for each spider.
URL Configuration
The URL Configuration tab is where you manage enqueue URLs and URL filters.
DescriptionField
Optional. Takes each URL link from a specifiedproperty and adds them to the queue for furtherfiltering.
Enqueue URLs
Optional. Provides pattern matching capabilitiesto control document filtering.
URL filters
Timeout
The Timeout tab is where you manage connection and fetch timing. It contains the following fields:
DescriptionOption
When checked, type the time in seconds.Maximum time spent fetching a URL
When checked, type the time in seconds.Maximum time to wait for a connection to be made
When checked, type the bytes per second and thenumber of seconds.
Abort fetch if transfer rate falls below
Proxy
The Proxy tab is where you establish the use of proxy servers. It contains the following fields:
DescriptionOption
Choose whether to use no proxy servers, a singleproxy server, or separate proxy servers for HTTPand HTTPS requests.
Proxy mode list
The hostname and port number for the HTTP proxyserver (if one is being used).
HTTP proxy server
The hostname and port number for the HTTPSproxy server (if one is being used).
HTTPS proxy server
When clicked, opens the Bypass URLs editor,where you specify the list of URLs that should befetched directly, bypassing any proxy servers.
Bypass URLs
Sources
Endeca ConfidentialEndeca Developer Studio Developer Studio Help
Working with Your Pipeline | Adding a pipeline component286

Required. A choice of record server components in the project.
Comment
Optional. Provides a way to associate comments with a pipeline component.
Related LinksAdding a spider on page 284
A spider component crawls documents rather than loading records from a file, thereby addingdocument crawling capabilities to your pipeline.
Record server components on page 282Describes record server components.
Adding an update adapterAn update adapter is part of a partial update pipeline. It writes partial update information to a runningEndeca MDEX Engine to perform a live update.
The partial update pipeline reads its input as normal records, using a normal record adapter.The inputrecords are transformed into record updates using the update record expression, then written out usingan update adapter. An update adapter is typically the last component of a partial update pipeline.
Forge processing for full updates and partial updates is done in separate pipelines. Therefore, youwould never add an update adapter to a full update pipeline. See the Endeca Partial Updates Guidefor detailed information on how to configure a partial update pipeline.
To add an update adapter:
1. In the Pipeline Diagram editor, click New, and then choose Update Adapter.The Update Adapter editor appears.
2. In the Name text box, type a unique name for this update adapter.
3. In the General tab, do the following:
a) In the Output URL text box, type the location to which Forge writes its files and processedrecords.
b) ( Optional) In the Output prefix text box, type a filename prefix to add when Forge writes itsoutput files. If none is specified, Forge uses the prefix Out.
c) (Optional) Check Multi if you want Forge to be able to read from multiple files.d) If you checked Multi in step C , then in the Multi property text box, type a property name that
indicates the location to which a record coming through Forge should be writtene) If you enabled Filter unknown properties in your full update pipeline's indexer adapter, enable
Filter unknown properties in the update adapter.
4. In the Sources tab, do the following:
a) In the Record Source list, choose a record source.b) (Optional) In the Dimension Sources list, choose one or more dimension sources.
5. (Optional) If you are using an Agraph in your implementation, do the following:
a) Select Enable Agraph support.b) In Number of Agraph partitions, specify the number of child Dgraphs that the Agraph
coordinates.
If you want to change the partition property, open the Properties view and modify which propertiesare enabled for rollup and record spec. For more detailed information, see the Endeca AdvancedDevelopment Guide.
Endeca Developer Studio Developer Studio HelpEndeca Confidential
287Working with Your Pipeline | Adding a pipeline component

6. (Optional) In the Comment tab, add a comment for the component.
7. Click OK.
Fully implementing this feature requires additional work outside of Developer Studio. Please refer tothe Endeca Partial Updates Guide for details.
Related LinksAdding a pipeline component on page 283
Add new pipeline components from the Pipeline Diagram editor.
Update Adapter editor on page 288The Update Adapter editor contains a unique name for this update adapter.
Update Adapter editor
The Update Adapter editor contains a unique name for this update adapter.
The Update Adapter editor contains the following tabs:
General
The General tab contains the following options:
DescriptionOption
Required. Identifies the directory to which Forgewrites its files and processed records. The path is
Output URL
either an absolute path or a path relative to thelocation of the Pipeline.epx file. With an absolutepath, the protocol must be specified in RFC 2396syntax. Usually this means the prefix file:///precedes the path to the data file. Relative URLsmust not specify the protocol and are relative tothe URL used to locate the Pipeline.epx file.
Specifies the filename prefix to add when Forgewrites its output files.
Output prefix
Optional. The Multi and Multi property fieldsspecify which file each record is written to. If Multi
Multi
is checked, Forge checks the Multi property fieldfor the location.
Optional . Specifies a property name that indicatesthe location that a record coming through Forge
Multi property
should be written to. (Forge stores a property oneach record that is the source URL for that record.)Setting this property is useful if you want to processmultiple input files and also keep the output distinct.
Optional. If you enabled Filter unknownproperties in your full update pipeline's indexer
Filter unknown properties
Endeca ConfidentialEndeca Developer Studio Developer Studio Help
Working with Your Pipeline | Adding a pipeline component288

DescriptionOption
adapter , enable Filter unknown properties inthe update adapter.
Optional. Sets the level of compression to beperformed on the data.The values can range from
Custom Compression level
0 to 10, with higher numbers indicating highercompression (smaller size, slower processing).
Sources
The Sources tab contains the following options:
DescriptionOption
Required. A choice of the record servers in theproject.
Record source
A choice of the dimension adapters and dimensionservers in the project.
Dimension source
Agraph
The Agraph tab contains the following options:
DescriptionOption
When checked, enables the Agraph program foruse in a partial update pipeline.
Enable Agraph Support
Specifies the number of child Dgraphs that theAgraph controls. In an Agraph implementation, thismust be a value of 2 or more.
Number of Agraph partitions
The partition property is a read only field thatidentifies the property by which records areassigned to each partition.
Partition property
If you are using rollup capabilities, the rollupproperty displays as the partition property. If youdo not have a roll up property, but do have a recordspec property enabled in your project, the recordspec property functions as the partition property.If neither a rollup nor a record spec property exists,the partition property is empty, and Forge assignsrecords to each partition according to a round-robinstrategy.
Endeca Developer Studio Developer Studio HelpEndeca Confidential
289Working with Your Pipeline | Adding a pipeline component
See the Endeca Advanced Development Guide for detailed information on how to configure, provision,and run an Aggregated MDEX Engine implementation.
Comment
Optional. Provides a way to associate comments with a pipeline component.
Related LinksAdding an update adapter on page 287
An update adapter is part of a partial update pipeline. It writes partial update information toa running Endeca MDEX Engine to perform a live update.
Adding an indexer adapter on page 70Indexer adapters save data that is ready to be indexed by the Dgidx program.
Record server components on page 282Describes record server components.
Editing a pipeline componentSelect a component from the Pipeline Diagram editor to make modifications.
1. In the Pipeline Diagram editor, double-click the component that you want to modify.
2. In the component editor, make the necessary changes.
3. Click OK.
Related LinksWorking with Your Pipeline on page 277
About pipeline components on page 279A pipeline consists of components that perform specific functions during the transformationof your source data into Endeca records. These components are connected by links, givingthe pipeline a sequential flow from inputs to outputs.
Deleting a pipeline componentDelete any pipeline components from the Pipeline Diagram editor.
To delete a pipeline component:
1. In the Pipeline Diagram editor, click the component you want to delete. Use Shift-click to selectmultiple components.
2. Click Delete.
Related LinksWorking with Your Pipeline on page 277
Endeca ConfidentialEndeca Developer Studio Developer Studio Help
Working with Your Pipeline | Editing a pipeline component290

Record Manipulators and ExpressionsRelated Links
Working with Your Pipeline on page 277
Adding a record manipulator on page 291Add record manipulators from the Pipeline Diagram editor.
Editing a record manipulator on page 292Select a manipulator from the Pipeline Diagram to edit.
About expressions on page 292Expressions are analogous to functions, and tell Forge which records, properties, ordimensions to affect, and how to affect them.
Adding an expression to a record manipulator on page 293You add expressions to a record manipulator using the Expressions editor.You can havemore than one Expression editor open at any given time, allowing you to cut or copy andpaste between them.
Adding a record manipulatorAdd record manipulators from the Pipeline Diagram editor.
Several of Endeca's advanced features (namely, the content acquisition system and partial updates)require record manipulator components. Record manipulators contain expressions, which are functionsthat are evaluated against each record as it flows through the pipeline.When an expression is evaluated,it may change the current record. The changes take a variety of forms, from adjustments of propertyvalues to creation of new data.
To add a record manipulator:
1. In the Pipeline Diagram editor, click New.
2. Choose Record > Manipulator .The Record Manipulator editor appears.
3. In the Name text box, type a unique name for this record manipulator.
4. In the Sources tab, use the lists to select a record source and a dimension source.
5. (Optional) In the Record Index tab, do the following:
a) Specify which properties or dimensions you want to use as the record index for this component.b) Indicate whether you want to disregard records with duplicate keys.
Note: Developer Studio performs a case-insensitive search for duplicate keys.
6. (Optional) In the Comment tab, add a comment for the component.
7. Click OK.The new record manipulator appears in the pipeline diagram.
8. Add expressions to your record manipulator.
Note: Implementing this feature requires additional work outside of Developer Studio. Pleaserefer to the following sections in the Endeca Forge Guide for details: Classifying Documents withStratify, and Implementing the Endeca Crawler. See the Endeca Partial Updates Guide for detailson implementing partial updates.
Endeca Developer Studio Developer Studio HelpEndeca Confidential
291Working with Your Pipeline | Record Manipulators and Expressions

Related LinksRecord Manipulators and Expressions on page 291
Editing a record manipulatorSelect a manipulator from the Pipeline Diagram to edit.
To edit a record manipulator:
1. In the Pipeline Diagram, double-click the icon for the record manipulator you want to edit.The Expression editor opens.
2. Click Properties.The Record Manipulator editor opens.
3. Make any required changes.
4. Click OK.
5. In the Expression editor, click Commit Changes.
6. Close the Expression editor.
Implementing this feature requires additional work outside of Developer Studio. Please refer to thefollowing sections in the Endeca Forge Guide for details: Classifying Documents with Stratify, andImplementing the Endeca Crawler. See the Endeca Partial Updates Guide for details on implementingpartial updates.
Related LinksRecord Manipulators and Expressions on page 291
About expressionsExpressions are analogous to functions, and tell Forge which records, properties, or dimensions toaffect, and how to affect them.
Record manipulator components do their work on record data by means of expressions. Recordmanipulator components can contain an arbitrary number of expressions which are evaluated againsteach record as Forge processes it. When Forge evaluates an expression, it may modify the currentrecord. The changes take a variety of forms depending on the expression, from adjusting propertyvalues to creating new data.
Expressions can contain sub-expressions; the sub-expressions may provide values used by the parentexpression, or the parent expression may provide control over which of the sub-expressions areevaluated. Also, many expressions contain expression nodes, which are name/value pairs that specifyproperty names, constant values, dimension IDs, and so forth. Expression nodes represent parametersrequired by the expression. If a parent expression contains both sub-expressions and expressionnodes, the nodes must be placed before the sub-expressions.
In Developer Studio, you write and modify expressions in the Record Manipulator component's XMLeditor. The following is an example of a record manipulator component with expressions,sub-expressions, and expression nodes.
Endeca ConfidentialEndeca Developer Studio Developer Studio Help
Working with Your Pipeline | Record Manipulators and Expressions292
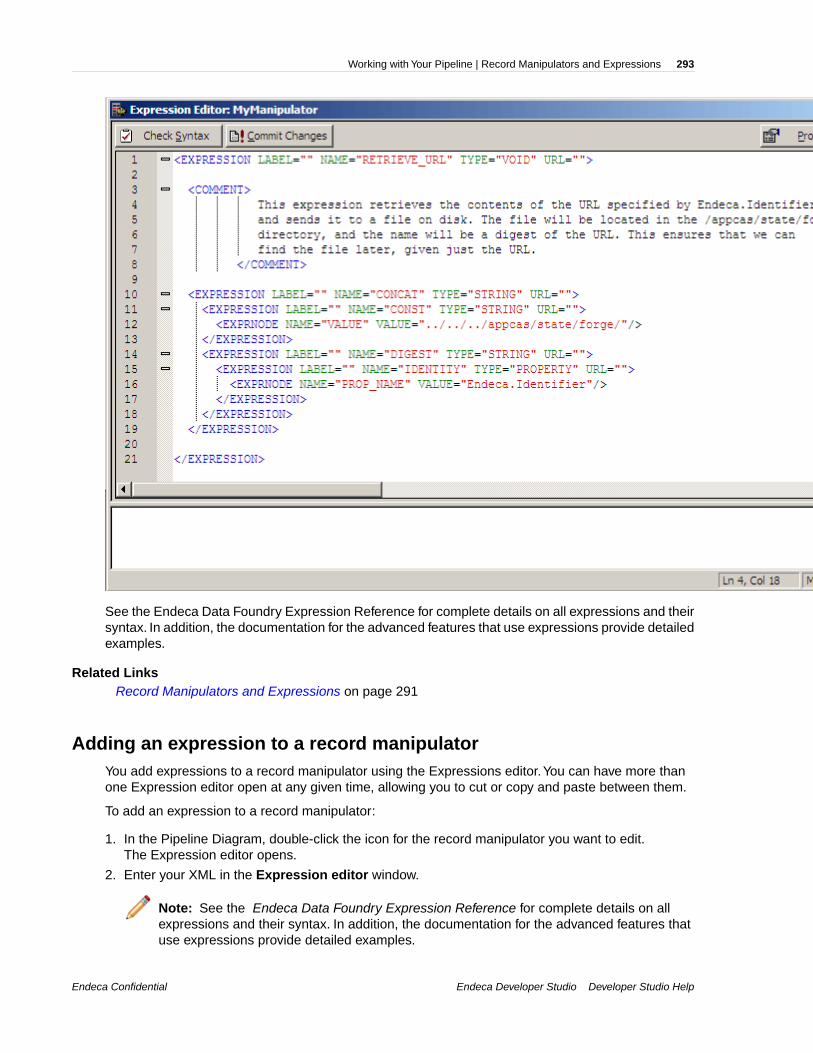
See the Endeca Data Foundry Expression Reference for complete details on all expressions and theirsyntax. In addition, the documentation for the advanced features that use expressions provide detailedexamples.
Related LinksRecord Manipulators and Expressions on page 291
Adding an expression to a record manipulatorYou add expressions to a record manipulator using the Expressions editor.You can have more thanone Expression editor open at any given time, allowing you to cut or copy and paste between them.
To add an expression to a record manipulator:
1. In the Pipeline Diagram, double-click the icon for the record manipulator you want to edit.The Expression editor opens.
2. Enter your XML in the Expression editor window.
Note: See the Endeca Data Foundry Expression Reference for complete details on allexpressions and their syntax. In addition, the documentation for the advanced features thatuse expressions provide detailed examples.
Endeca Developer Studio Developer Studio HelpEndeca Confidential
293Working with Your Pipeline | Record Manipulators and Expressions

3. To check your syntax, click Check Syntax.Syntax issues are displayed at the bottom of the Expression editor window.
4. To commit your changes, click Commit Changes.
5. To view and edit the Record Manipulator component's settings, click Properties.The Record Manipulator editor opens.
6. To close the Expression editor without committing changes, click the close X in the upper rightcorner of the Expression editor window.
Implementing this feature requires additional work outside of Developer Studio. Please refer to thefollowing sections in the Endeca Data Foundry Guide for details: Crawler Implementations, ImplementingPartial Updates, and Classifying Documents with Stratify.
Related LinksRecord Manipulators and Expressions on page 291
Writing Out Data for Diagnostic PurposesRelated Links
Working with Your Pipeline on page 277
Writing out record data on page 294To use a record adapter to save data, you specify Output as the direction of data flow, alongwith the location the data should be saved to and the file format for the saved data.
Writing out dimension data on page 295To use an output dimension adapter to save data, you specify Output as the direction of dataflow, along with the location the data should be saved to and the file format for the saveddata.
Writing out record dataTo use a record adapter to save data, you specify Output as the direction of data flow, along with thelocation the data should be saved to and the file format for the saved data.
Output record adapters are generally used as diagnostic tools or for translation purposes.
To add an output record adapter to your pipeline:
1. In the Pipeline Diagram editor, click New.
2. Choose Record.
3. Choose Adapter.The Record Adapter editor appears.
4. In the Name text box, type a unique name for this record adapter.
5. In the General tab, do the following:
a) In the Direction frame, choose Output.b) In the Format list, choose either delimited, XML, binary, fixed width, or vertical how you
prefer to use the diagnostic data.c) In the URL text box, type the location to which the data will be written.d) In the Encoding text box, enter UTF-8.
Endeca ConfidentialEndeca Developer Studio Developer Studio Help
Working with Your Pipeline | Writing Out Data for Diagnostic Purposes294

e) (Optional) To save on the amount of disk space used, check Custom Compression Level andslide the bar to Endeca's recommended value of 7.
Note: Compressed data consumes less disk space but takes longer to read and write.
6. (Optional) In the Comment tab, add a comment for the component.
7. Click OK.
Related LinksWriting Out Data for Diagnostic Purposes on page 294
Record Adapter editor on page 29The Record Adapter editor contains a unique name for this record adapter.
Writing out dimension dataTo use an output dimension adapter to save data, you specify Output as the direction of data flow,along with the location the data should be saved to and the file format for the saved data.
Output dimension adapters are generally used as diagnostic tools.
To add an output dimension adapter:
1. In the Pipeline Diagram editor, click New.
2. Choose Dimension > Adapter .The Dimension Adapter editor appears.
3. In the Name text box, enter a unique name for the dimension adapter.
4. In the General tab, do the following:
a) In the Direction frame, choose Output.b) In the URL text box, enter the location to which the dimension data will be saved.c) In the Format text box, select XML.d) (Optional) To save on the amount of disk space used, check Custom Compression Level and
slide the bar to Endeca's recommended value of 7.
Note: Compressed data consumes less disk space but takes longer to read and write.
5. In the Sources tab, choose a dimension source.
6. (Optionally) In the Comment tab, add a comment for the component.
7. Click OK.
Related LinksWriting Out Data for Diagnostic Purposes on page 294
Dimension Adapter editor on page 102The Dimension Adapter editor contains a unique name for this dimension adapter.
Dimension Adapter editor on page 102The Dimension Adapter editor contains a unique name for this dimension adapter.
Endeca Developer Studio Developer Studio HelpEndeca Confidential
295Working with Your Pipeline | Writing Out Data for Diagnostic Purposes
Changing the Display of the Pipeline DiagramRelated Links
Working with Your Pipeline on page 277
Resizing the pipeline diagram on page 296Zoom in or out to view your pipeline in better detail, or see more of it at once.
Changing the alignment of selected components in the diagram on page 296To clarify the view of your components in the pipeline, you may realign them.
Returning to the default layout on page 297After moving elements in the pipeline diagram, you can easily return to the default layout.
Displaying components that have dimension sources on page 297The Pipeline Diagram editor gives you the option of looking at your entire pipeline or focusingon a particular data flow. This feature is especially useful when your project becomes verylarge.
Hiding the dimension flow on page 297The Pipeline Diagram editor gives you the option of looking at your entire pipeline or focusingon a particular data flow. This feature is especially useful when your project becomes verylarge.
About specifying data flow among components on page 298You must give every component in your pipeline a unique name that identifies it to the othercomponents.You use these names to specify cross-references between components,effectively creating a flow of data through the pipeline.
Viewing data flow among components on page 299The Pipeline Diagram in Developer Studio displays a graphical representation of thecomponents in your pipeline, making it easy to see the relationships and data flow amongthem.
Connecting pipeline components graphically on page 299You can add and connect pipeline components using their respective editors. Alternatively,you can connect them graphically in the Pipeline Diagram editor.
About adding and removing pipeline components on page 299When you add or remove components, you must be careful to make any data source changesrequired to maintain the correct data flow.
Resizing the pipeline diagramZoom in or out to view your pipeline in better detail, or see more of it at once.
To zoom in or out on the pipeline diagram:
1. In the Pipeline Diagram editor, click Zoom.
2. From the Zoom menu, choose a percentage: Fit in Window, or Always Fit in Window.
Related LinksChanging the Display of the Pipeline Diagram on page 296
Changing the alignment of selected components in the diagramTo clarify the view of your components in the pipeline, you may realign them.
Endeca ConfidentialEndeca Developer Studio Developer Studio Help
Working with Your Pipeline | Changing the Display of the Pipeline Diagram296

To change the alignment of selected components in the diagram:
1. In the Pipeline Diagram editor, hold down the Shift key and click each of the components that youwant to realign.
2. Click Align, and choose the orientation to which you want to align the selected components.
3. (Optional) To undo the last alignment action:
a) Click Align.b) Choose Undo Align.
Related LinksChanging the Display of the Pipeline Diagram on page 296
Returning to the default layoutAfter moving elements in the pipeline diagram, you can easily return to the default layout.
To restore the original layout of the pipeline diagram:
In the Pipeline Diagram editor, click Arrange.
Related LinksChanging the Display of the Pipeline Diagram on page 296
Displaying components that have dimension sourcesThe Pipeline Diagram editor gives you the option of looking at your entire pipeline or focusing on aparticular data flow. This feature is especially useful when your project becomes very large.
To display components that have dimension sources:
Check Dimension Flow.
Dimension flow component outlines and the lines that connect them are red.
Related LinksChanging the Display of the Pipeline Diagram on page 296
Hiding the dimension flowThe Pipeline Diagram editor gives you the option of looking at your entire pipeline or focusing on aparticular data flow. This feature is especially useful when your project becomes very large.
To hide the dimension flow:
Clear the Dimension Flow check box.
What remains, the Record flow, is outlined in green.
Related LinksChanging the Display of the Pipeline Diagram on page 296
Endeca Developer Studio Developer Studio HelpEndeca Confidential
297Working with Your Pipeline | Changing the Display of the Pipeline Diagram

About specifying data flow among componentsYou must give every component in your pipeline a unique name that identifies it to the other components.You use these names to specify cross-references between components, effectively creating a flow ofdata through the pipeline.
For example, starting from the bottom, in the following illustration:
• IndexerAdapter requests its data from PropDimMapper and DimensionServer.• PropDimMapper requests its data from LoadMainData and DimensionServer.• DimensionServer requests its data from Dimensions and TypeDimension.• LoadMainData, Dimensions, and TypeDimension get their data from source files (this is indicated
by the lack of arrows feeding them).
When you specify a data source within a component’s editor, you are indicating which of the othercomponents will provide data to that component. Components can have multiple data sources, suchas the PropDimMapper component below, which has both a record source, LoadMainData, and adimension source, DimensionServer.
Endeca ConfidentialEndeca Developer Studio Developer Studio Help
Working with Your Pipeline | Changing the Display of the Pipeline Diagram298

Related LinksChanging the Display of the Pipeline Diagram on page 296
Viewing data flow among componentsThe Pipeline Diagram in Developer Studio displays a graphical representation of the components inyour pipeline, making it easy to see the relationships and data flow among them.
To display the pipeline diagram editor:
• Choose Pipeline Diagram from the View menu.
Related LinksChanging the Display of the Pipeline Diagram on page 296
Connecting pipeline components graphicallyYou can add and connect pipeline components using their respective editors. Alternatively, you canconnect them graphically in the Pipeline Diagram editor.
To connect pipeline components graphically:
1. Choose Pipeline Diagram from the View menu to display the Pipeline Diagram.
2. Click the component that you want to serve as the data source to highlight it.
3. Drag the black square in the center of the highlighted component to the component you want toconnect it to. A line with an arrow indicating the direction of the data flow appears between thecomponents.
Related LinksChanging the Display of the Pipeline Diagram on page 296
About adding and removing pipeline componentsWhen you add or remove components, you must be careful to make any data source changes requiredto maintain the correct data flow.
To illustrate this point, examine the following pipeline:
Endeca Developer Studio Developer Studio HelpEndeca Confidential
299Working with Your Pipeline | Changing the Display of the Pipeline Diagram

If the example above is modified to include another component, PerlManipulator, that component mustcome between LoadMainData and PropDimMapper in the data flow of the pipeline. AddingPerlManipulator in this location requires that:
• PerlManipulator’s data source is set to LoadMainData.• PropDimMapper’s data source is changed to PerlManipulator.
The resulting pipeline diagram would look like this:
Related LinksChanging the Display of the Pipeline Diagram on page 296
Endeca ConfidentialEndeca Developer Studio Developer Studio Help
Working with Your Pipeline | Changing the Display of the Pipeline Diagram300

Chapter 6
Advanced Features
Restricting Access to RecordsRelated Links
Advanced Features on page 301
About access rules on page 302Access rules, in conjunction with Endeca's Access Control System, allow you to control whichrecords a user can access.
Working with multiple access rules on page 303Having two rules in a single Access Rules component is equivalent to having two AccessRules components, each with a single rule.
Creating the Endeca.ACL.Allow.Read property on page 303In order to use access rules, you must create an Endeca.ACL.Allow.Read property and enableit for record filtering.You only need one instance of this property per project, even if you havemultiple access rules that use it.
Creating an access rule on page 304Allow a group to access records matching a value specified in the access rule.
Running a baseline update for access rules on page 305After modifying rules, send new instance configuration to Endeca Workbench and run abaseline update.
Configuring the Web application to use access rules on page 305You can use access rules with the Endeca Standard Application, or with your own customapplication.
Crawling source data on page 305Oracle Endeca Guided Search supports file system and Web crawlers that gather data fromsource documents and allow you to write out Endeca records based on the source documents.
About implementing partial updates on page 306Pipelines that implement partial updates must incorporate an update adapter.
Working with external taxonomies on page 306You may build all or part of a logical hierarchy for your data set outside of Developer Studioand then transform that logical hierarchy into Endeca dimensions and dimension values foruse in search and Guided Navigation.
About the Agraph on page 307

The Agraph enables scalable search and navigation by partitioning a very large data set intomultiple Dgraphs running in parallel.
About access rulesAccess rules, in conjunction with Endeca's Access Control System, allow you to control which recordsa user can access.
Access rules, in conjunction with Endeca's Access Control System, allow you to control which recordsa user can access. Access rules use an if/then construct of this form:
if <property> equals <value> then grant read permissions to <group name>
For example:
if languageequals italianthen grant read permissions to italians
Access rules add an Endeca.ACL.Allow.Read property to records to identify which groups may accessthem. Any record whose <property> equals <value> has an Endeca.ACL.Allow.Read propertywith a value of <group name> added to it.The MDEX Engine then uses this property to filter recordsaccording to a group's access permissions. Continuing the example above, each record that has thevalue italian for the property language will have an Endeca.ACL.Allow.Read property addedto it with the value italians.
You must manually add the Endeca.ACL.Allow.Read property to your project and enable it for recordfiltering before creating access rules. In other words, the Endeca.ACL.Allow.Read property must existin order for it to be added to records during processing.
You use the Access Rules component, on the Pipeline tab, to create and manage access rules. Eachaccess rules component must have either a property mapper or another access rules component asits record source. For internal reasons, you also must specify a dimension source for an access rulescomponent, even though, externally, access rules do not appear to need them. Use the same dimensionsource that you use for your property mapper (this should be a dimension server).
About the Access Control System
Access rules must be used in conjunction with Endeca's Access Control System.You use the AccessControl System to authenticate a user's identity against and obtain authorization information from avariety of external systems, such as an LDAP directory.The authorization information is used to controlwhich records are retrieved during a query.
After the Access Control System authenticates the user against the specified directory, the returnedgroup information for the user is automatically transformed into a user entitlement filter. The userentitlement filter defines the user's access rights to the data in the Endeca implementation. This filteris automatically added to every query that the user makes to the MDEX Engine, which uses the filterto return only those records that the user has a right to see. In effect, this filtered query returns onlythose records whose Endeca.ACL.Allow.Read property values match the values specified in the filter.
• See the Endeca Security Guide for detailed information on configuring and using the AccessControl System.
• Unlike either of the Endeca crawlers, the Access Control System uses only theEndeca.ACL.Allow.Read permission to determine record access. It ignores all others, includingEndeca.ACL.Deny.Read.
Related LinksRestricting Access to Records on page 301
Creating an access rule on page 304
Endeca ConfidentialEndeca Developer Studio Developer Studio Help
Advanced Features | Restricting Access to Records302

Allow a group to access records matching a value specified in the access rule.
Working with multiple access rulesHaving two rules in a single Access Rules component is equivalent to having two Access Rulescomponents, each with a single rule.
Each Access Rules component can contain multiple rules.You can also have multiple Access Rulescomponents in your pipeline.The way you organize your rules is arbitrary and you can choose whicheverorganizational method works best for your situation.
Access rules do not support boolean ANDs. However, you can add multiple rules to simulate thiseffect. For example, these two rules evaluate the same property but give permissions to two differentgroups.
if language equals english then grant read permissions to canadians
if language equals english then grant read permissions to americans
If language=english for Record A, then both the canadians and americans are given accessto Record A. Records that have permissions granted to multiple users or groups will have multipleinstances of the Endeca.ACL.Allow.Read property. In this case, Record A would have bothEndeca.ACL.Allow.Read=canadians and Endeca.ACL.Allow.Read=americans appended to it.
On the other hand, the following two rules evaluate two different properties but give permissions tothe same group. If either of the If statements evaluate to true, the swiss group is granted permissionto the record.
if language equals french then grant read permissions to swiss
if language equals german then grant read permissions to swiss
Related LinksRestricting Access to Records on page 301
Creating the Endeca.ACL.Allow.Read propertyIn order to use access rules, you must create an Endeca.ACL.Allow.Read property and enable it forrecord filtering.You only need one instance of this property per project, even if you have multipleaccess rules that use it.
Developer Studio automatically creates a mapping for the Endeca.ACL.Allow.Read property in theproperty mapper so you don't have to do it manually.
To create the Endeca.ACL.Allow.Read property with a property mapper:
1. On the Project tab, double-click Properties to open the Properties view.
2. In the Properties view, click New.The New Property editor appears.
3. In the Name box, enter Endeca.ACL.Allow.Read as the property name.
4. In the Type list, choose Alpha.
5. Check Enable for record filters.
6. Disable "Show with record list" and "Show with record."
As a general rule, you should disable 'Show with record list' and 'Show with record,' unless youwant the Endeca.ACL.Allow.Read property to appear in your Web application.
Endeca Developer Studio Developer Studio HelpEndeca Confidential
303Advanced Features | Restricting Access to Records

7. Click OK.
Related LinksRestricting Access to Records on page 301
Creating an access ruleAllow a group to access records matching a value specified in the access rule.
Follow the procedure below to create an Access Rules component in your pipeline and add rules toit.
To create access rules:
1. If you haven't already, create an Endeca.ACL.Allow.Read property and enable it for record filtering.
2. In the Pipeline Diagram, click New > Access Rules .
3. Enter a unique name for the access rule in the Name field.
Note: Access Rule components can only use Property Mappers or other Access Rulecomponents as their record source. The Record Source menu is limited accordingly.
4. Choose a record source from the Record Source menu.
5. Choose a dimension source from the Dimension Source menu. Use the same dimension sourcethat you use for your property mapper. This should be a dimension server.
6. Add access rules:
a) Click the Rules tab.b) Click Add.
The Edit Access Rule editor appears.c) In the If area, select the property you want to use to identify records for access and enter a
value.
Note: The value you enter must be an exact match with the value in the property on therecord. For example, if you enter "merlot" it will not match properties that have a value of"French merlot".
d) In the Then area, enter the name of a group.
Note: This group is allowed access to any records that have the property and value youspecified in the previous step.
e) Click OK to close the Edit Access Rule editor.
7. To add additional access rules, repeat step 6.
8. To remove a rule:
a) Select it in the list.b) Click Remove.
9. To modify a rule:
a) Select it in the list.b) Click Modify.
Endeca ConfidentialEndeca Developer Studio Developer Studio Help
Advanced Features | Restricting Access to Records304

10. When you are done specifying access, click OK to close the Access Rules editor and save yourchanges.
Related LinksRestricting Access to Records on page 301
About access rules on page 302Access rules, in conjunction with Endeca's Access Control System, allow you to control whichrecords a user can access.
Creating the Endeca.ACL.Allow.Read property on page 303In order to use access rules, you must create an Endeca.ACL.Allow.Read property and enableit for record filtering.You only need one instance of this property per project, even if you havemultiple access rules that use it.
Running a baseline update for access rulesAfter modifying rules, send new instance configuration to Endeca Workbench and run a baselineupdate.
Any changes to access rules require you to:
1. Send the new instance configuration to Endeca Workbench.
2. Using Endeca Workbench, run a baseline update.
Related LinksRestricting Access to Records on page 301
Sending the instance configuration to Oracle Endeca Workbench on page 25You need to send your instance configuration to Oracle Endeca Workbench any time youmake and save changes to your instance configuration that you want Workbench to see.
Configuring the Web application to use access rulesYou can use access rules with the Endeca Standard Application, or with your own custom application.
With the exception of enabling authentication, all of the configuration required to use access rules inthe Standard Application has already been done for you.
If you want to use access rules with your own custom application, you will need to configure the AccessControl System from scratch. Refer to the Endeca Security Guide for details on how to do this.
Related LinksRestricting Access to Records on page 301
Crawling source dataOracle Endeca Guided Search supports file system and Web crawlers that gather data from sourcedocuments and allow you to write out Endeca records based on the source documents.
You can modify the records as necessary in your pipeline by adding dimension and property values,and build an Endeca application to access the records. This allows your application users to searchand navigate the document contents contained in the records. The following crawlers are supported:
Endeca Developer Studio Developer Studio HelpEndeca Confidential
305Advanced Features | Restricting Access to Records
• The Endeca Web Crawler is appropriate for large-scale crawling of Web documents. Supportscrawling HTTP and HTTPS sites. Available as part of the Endeca CAS package.
• The Endeca CAS Server can run both file system and CMS (Content Management System) crawls.Supports crawling Windows and UNIX systems. Available as part of the Endeca CAS package.
• The Endeca Crawler is a lightweight crawler that is configured via a Spider component in DeveloperStudio. Supports crawling HTTP, HTTPS, and file systems. Note that the Endeca Crawler isdeprecated, and therefore it is recommended that you use the Endeca Web Crawler or the EndecaCAS Server for your crawling requirements.
For more information on the CAS crawlers, see the Endeca Web Crawler Guide or the Endeca CASServer Guide. For details on the Endeca Crawler, see the Endeca Forge Guide.
Related LinksRestricting Access to Records on page 301
About implementing partial updatesPipelines that implement partial updates must incorporate an update adapter.
The Endeca MDEX Engine processes two types of updates:
• Full updates• Partial updates
A full, or baseline, update fully reprocesses the entire dataset. Full updates occur infrequently—usuallyonce per day or once per week.They usually involve generating an extract from your database systemand making the files accessible either on an FTP server or on the indexing server.This data is processedby Forge and Dgidx and then finally made available through the Endeca MDEX Engine.
A partial update reprocesses a smaller subset of the overall dataset. Partial updates affect a smallpercentage of the total records in the system.They occur much more frequently and consist of a muchsmaller extract from your database that contains volatile information. For example, the price andavailability of products on a retail store site are usually volatile. Pipelines that implement partial updatesmust incorporate an update adapter.
See the Endeca Partial Updates Guide for detailed information on how to configure a partial updatepipeline.
Related LinksRestricting Access to Records on page 301
Working with external taxonomiesYou may build all or part of a logical hierarchy for your data set outside of Developer Studio and thentransform that logical hierarchy into Endeca dimensions and dimension values for use in search andGuided Navigation.
Endeca offers functionality that allows you to work with external taxonomies, or logical data hierarchies.This capability allows you to build all or part of a logical hierarchy for your data set outside of DeveloperStudio and then transform that logical hierarchy into Endeca dimensions and dimension values foruse in search and Guided Navigation.
This topic introduces the external taxonomy features and provides cross-references to the EndecaForge Guide, where you can find complete implementation details.
Endeca ConfidentialEndeca Developer Studio Developer Studio Help
Advanced Features | Restricting Access to Records306

Externally managed
An externally managed taxonomy is a logical hierarchy for a data set that is built and managed usinga third-party tool.You can use the Discover and Load buttons in the Dimensions view to include anexternally managed taxonomy in your project. At that point, the taxonomy becomes a dimension.However, it is a read-only dimension whose hierarchy is managed by the third-party tool that createdit.
In Developer Studio, you can view this type of dimension and delete dimension values from it.Youcannot, however, add dimension values to it. If you want to modify an externally managed dimensionor add dimension values, you have to edit the taxonomy using the third-party tool and then update thetaxonomy in your project.
See "Working with an Externally Managed Dimension" in the Endeca Forge Guide for implementationdetails.
Externally created
An externally created dimension also describes a logical hierarchy for a data set; however, thedimensions are built outside of Developer Studio in an .xml file. The logical hierarchy of the dimensionconforms to Endeca's external interface for describing a data hierarchy-external_dimensions.dtd. Onceyou import an externally created dimension, its ownership is wholly transferred to Developer Studio.As such, you can modify the dimension in any way necessary in Developer Studio, but you can nolonger edit it in the .xml file itself (unless you re-import it).
See "Working with an Externally Created Dimension" in the Endeca Forge Guide for implementationdetails.
The difference between externally managed and externally created taxonomies
It is important to clarify the difference between an externally managed taxonomy and an externallycreated dimension. An externally managed taxonomy is created using a third-party tool, managed bya third party tool, and transformed by Forge via .xslt into a read-only Endeca dimension. By comparison,externally created dimensions are manually created in an .xml file, imported via Developer Studiowithout an .xslt transformation, and are fully editable in Developer Studio.
Using Stratify taxonomies
Integrating a Stratify taxonomy and Stratify document classification capabilities into your pipeline is aspecial case of working with external taxonomies that allows you to classify unstructured sourcedocuments. For more information, see "Classifying Documents with Stratify" in the Endeca ForgeGuide.
Related LinksRestricting Access to Records on page 301
Import External Dimensions dialog box on page 321Specify the external dimsensions file to import, and which dimension adapter will receivethese dimensions.
About the AgraphThe Agraph enables scalable search and navigation by partitioning a very large data set into multipleDgraphs running in parallel.
Endeca Developer Studio Developer Studio HelpEndeca Confidential
307Advanced Features | Restricting Access to Records

Implementing the Agraph program allows your application users to search and navigate very largedata sets.You add Agraph support to a pipeline by configuring the Agraph tab of either the Indexeradapter or the Update adapter.
See the Endeca Advanced Development Guide for detailed information on how to configure, provision,and run an Aggregated MDEX Engine implementation.
Related LinksRestricting Access to Records on page 301
Endeca ConfidentialEndeca Developer Studio Developer Studio Help
Advanced Features | Restricting Access to Records308

Chapter 7
Context Sensitive Help
The topics in this section pertain to the options available for specific windows or dialog boxes inDeveloper Studio.
About automatic phrasingWhen an application user provides individual search terms in a query, the automatic phrasing featuregroups those individual terms into a search phrase and returns query results for the phrase.
Automatic phrasing is similar to placing quotation marks around search terms before submitting themin a query. For example, 'my search terms' is the phrased version of the query my search terms.However, automatic phrasing removes the need for application users to place quotation marks aroundsearch phrases to get phrased results.
The result of automatic phrasing is that a Web application can process a more restricted query andtherefore return fewer and more focused search results.This feature is available only for record search.
The automatic phrasing feature works by:
1. Comparing individual search terms in a query to a list of application-specific search phrases. Thelist of search phrases are stored in a project's phrase dictionary.
2. Grouping the search terms into search phrases.3. Returning query results that are either based on the automatically phrased query, or returning
results based on the original unphrased query along with automatically phrased 'Did You Mean?'(DYM) alternatives.
Point three above suggests the two typical implementation scenarios to choose from when usingautomatic phrasing:
• Process an automatically phrased form of the query and suggest the original unphrased query asa DYM alternative.
In this scenario, the automatic phrasing feature rewrites the original query's search terms into aphrased query before processing it. If you are also using DYM, you can display the unphrasedalternative so the user can opt-out of automatic phrasing and select their original query, if desired.
For example, an application user searches a wine catalog for the terms "low tannin." The MDEXEngine compares the search terms against the phrase dictionary, finds a phrase entry for "lowtannin," and processes the phrased query as "low tannin." The MDEX Engine returns 3 recordsfor the phrased query "low tannin" rather than 16 records for the user's original unphrased query"low tannin." However, the Web application also presents a "Did you mean low tannin?" selectionso the user may opt-out of automatic phrasing, if desired.
• Process the original query and suggest an automatically-phrased form of the query as a DYMalternative.
In this scenario, the automatic phrasing feature processes the unphrased query as entered anddetermines if a phrased form of the query exists. If a phrased form is available, the Web applicationdisplays an automatically-phrased alternative as a "Did you mean?" option. The user can opt-into automatic phrasing, if desired.
For example, an application user searches a wine catalog for low tannin.The MDEX Engine returns16 records for the user's unphrased query low tannin. The Web application also presents a "Didyou mean "low tannin"?" option so the user may opt-in to automatic phrasing, if desired.
There are two tasks to implement automatic phrasing:
• Add phrases to your project using Developer Studio.• Add Presentation API code to support either of the two implementation scenarios described above.
Note: Implementing search features requires additional work outside of Developer Studio. Referto the Endeca Advanced Development Guide for details.
Related LinksEnabling Record Rollups on page 153
Using Automatic Phrasing on page 201
Methods for adding phrases on page 204Import phrases from an XML file, or extract phrases from dimension names.
Importing phrases from an XML file on page 314You import an XML file of phrases using the Import Phrases dialog box in Developer Studio.The Import Phrases dialog box can be accessed from either the File menu or from theAutomatic Phrasing dialog box.
Extracting phrases from dimension names on page 205In addition to importing an XML file of phrases, you can add phrases to your project basedon the dimension values of any dimension you choose.
Adding search characters that support automatic phrasing on page 206Inclusion of original punctuation marks in search query phrases returns more relevant results.
Tips and troubleshooting for automatic phrasing on page 206Depending on how a phrased query is processed it may create dead-end results, for reasonsincluding significance of term order and the fact that the MDEX Engine does not extend userphrases to match those in the phrase dictionary.
Additional Search Characters dialog boxSearch characters are configured globally for all search operations.
To create additional search characters:
Enter search characters in the Additional Search Characters field.
Note: If you have more than one, do not separate them with commas or spaces—simplytype them one after another.
Endeca ConfidentialEndeca Developer Studio Developer Studio Help
Context Sensitive Help | Additional Search Characters dialog box310

Bypass URLs dialog boxAdd, modify, or remove URLs you want access to without using a proxy server.
DescriptionOption
A list of URLs that you want to access withoutusing a proxy server.
Bypass proxy server for these URLs
Type the name of the host you want to accesswithout the use of a proxy server in the field above
Add
and click Add.You can use wildcards to indicatea number of Web servers within a domain. Repeatthis step as necessary for additional URLs.
Used to modify a URL in the bypassed URLs list.Modify
To modify a URL:
1. Select it in the list.2. Make your changes in the editing field.3. Click Modify.
Removes the selected URL from the bypassedURLs list.
Remove
Dimension Mapping dialog boxThis includes the name of the dimension the source property maps to, and which match mode is used.
DescriptionOption
Name of the source property to be mapped.Source property
Name of the dimension the source property willmap to.
Target dimension
Optional. Defines the maximum source propertyvalue length allowed when creating mappings.
Maximum length
Source properties that have values that exceedthis length are not mapped, and a warning is issuedby the Forge Hierarchical Logging system. Thisvalue overrides the default maximum length thatyou set on the Advanced tab of the PropertyMapper editor.
Endeca Developer Studio Developer Studio HelpEndeca Confidential
311Context Sensitive Help | Bypass URLs dialog box

DescriptionOption
The mapping mode to be used.Match mode
• Normal
Normal maps only those source propertyvalues that have a matching dimension valueexplicitly defined in the dimension hierarchy.Forge assigns the IDs for any matchingdimension values to the Endeca records. Anysource property values that do not havematching dimension values in the dimensionhierarchy are ignored.
In order for a source property value to matcha dimension value, the dimension value'sdefinition must contain a synonym that:
• Is an exact text match, including capitalizationand white space, to the source property value.
• Has its Classify option enabled.
Note: There are two types of advanceddimension values, range and sift. Thesedimension value types have differentmatching criteria than standard dimensionvalues. See About range dimension valuesand About sift dimensions, respectively
.
• Must Match
Must Match behaves identically to Normal, withthe exception that Must Match issues a warningfor any source property values that do not havematching dimension values.
• Auto Generate
Auto Generate specifies that Forgeautomatically generates a dimension valuename and ID for any source property value thatdoes not have a matching dimension value inthe dimension hierarchy. Forge uses theseautomatically-generated names and IDs to tagthe Endeca records the same as it wouldexplicitly-defined dimension values.
Auto Generate dramatically reduces theamount of editing you have to do to thedimension hierarchy. However, auto-generateddimensions are always flat. Auto-generatednames and IDs are persisted in a file that youspecify as part of a dimension servercomponent.
Endeca ConfidentialEndeca Developer Studio Developer Studio Help
Context Sensitive Help | Dimension Mapping dialog box312

Related LinksAbout setting a default maximum length for source property values on page 176
The Default Maximum Length option, on the Advanced Tab of the Property Mapper, definesthe maximum source property value length allowed when creating mappings.
About range dimension values on page 126Configuring a dimension to use range dimension values is useful for data that should benavigated as discrete values.
About sift dimensions on page 157Auto sifting is an extension to autogeneration which positions newly generated dimensionvalues within an existing hierarchy.
Edit Static Relevance Rank Module dialog boxThis shows the property or dimension by which records are sorted. Specify record sort order.
DescriptionOption
Indicates the current property or dimension usedto define the sort order of record results. Records
Current property or dimension
are sorted according to their values for thespecified property or dimension.
Indicates the new property or dimension used todefine the sort order of record results.
New property or dimension
Indicates the order of the sort. For example, sortingby Price, descending displays the most expensiveitems first.
Sort records in descending order
Oracle Endeca Workbench Settings dialog boxSpecify the Endeca Workbench host, the port Endeca Workbench listens to, and associate instanceconfiguration files with the application you select.
DescriptionOption
The host the Endeca Workbench is running on.Host
The port the Endeca Workbench is listening to.Port
Select an application from the list.When you finishconfiguring your project and click Set Instance
Application
Configuration, the instance configuration files areassociated with the application you select. If the
Endeca Developer Studio Developer Studio HelpEndeca Confidential
313Context Sensitive Help | Edit Static Relevance Rank Module dialog box
DescriptionOption
application you want is not in this list, theapplication has not been provisioned on the EACCentral Server.
Enqueue URL dialog boxThis shows the property storing URLs to other documents.You may remove Enqueue URL propertyfrom record after value is queued.
DescriptionOption
The name of the property that stores links (URLs)to other documents to crawl.
Property
Optional. Removes the Enqueue URL propertyfrom the record after its value has been queued.
Remove
Importing phrases from an XML fileYou import an XML file of phrases using the Import Phrases dialog box in Developer Studio.The ImportPhrases dialog box can be accessed from either the File menu or from the Automatic Phrasing dialogbox.
Before you import the XML file, it must conform to phrase_import.dtd, in the Endeca Navigation Platformconf/dtd directory.
Here is a simple example of a phrase file that conforms to phrase_import.dtd:
<?xml version='1.0' encoding='UTF-8' standalone='no' ?> <!DOCTYPE PHRASE_IMPORT SYSTEM'phrase_import.dtd'>
<PHRASE_IMPORT>
<PHRASE>Napa Valley</PHRASE>
<PHRASE>low tannin</PHRASE>
</PHRASE_IMPORT>
To import phrases from an XML file:
1. In the Project Explorer, expand Search Configuration.
2. Double-click Automatic Phrasing.The Automatic Phrasing dialog box displays.
3. Click Import Phrases.The Import Phrases dialog box displays.
Endeca ConfidentialEndeca Developer Studio Developer Studio Help
Context Sensitive Help | Enqueue URL dialog box314

Note: Alternatively, you can select Import Phrases from the File menu to invoke the ImportPhrases dialog box.
4. Either type the path to your phrases file or click the Browse button to locate the file.
5. Click OK on the Import Phrases dialog box.
6. Click OK on the Automatic Phrasing dialog box.The Messages pane displays the number of phrases read in from the XML file.
7. Select Save from the File menu.
Related LinksAdding Phrases to a Project on page 203
Methods for adding phrases on page 204Import phrases from an XML file, or extract phrases from dimension names.
About automatic phrasing on page 309When an application user provides individual search terms in a query, the automatic phrasingfeature groups those individual terms into a search phrase and returns query results for thephrase.
Join Entry dialog boxThis shows the record source for this join entry, and options for adding, modifying, or removing keycomponents of this entry's join key.
DescriptionOption
The name of the record source that feeds this joinentry.
Record source
A list of the key components that make up this joinentry's join key.
Keys
Allows you to add a key component to the join key.Add
Allows you to edit the selected key component.Edit
Removes the selected key component.Remove
Moves the selected key component up in the Keyslist.
Up
Moves the selected key component down in theKeys list.
Down
Endeca Developer Studio Developer Studio HelpEndeca Confidential
315Context Sensitive Help | Join Entry dialog box

Key Component dialog boxSelect either a source property or dimension as your key component.
DescriptionOption
Choose "Custom property" if the key componentwill be a source property. Choose "Dimension" ifthe key component will be a dimension.
Type
Appears when Type is set to "Custom property"and allows you to enter the name of a sourceproperty as your key component.
Custom property field
Appears when Type is set to "Dimension" andallows you to select a dimension as your keycomponent.
Dimension drop-down list
Mappings dialog boxThis dialog contains a Mappings table, and options to create new, modify, or remove mappings.
DescriptionOption
This table displays all of the source propertymappings that have been defined for the project.It includes the following columns:
Mappings table
• Source: The source property to be mapped.• Target:The dimension or Endeca property that
the source property will be mapped to.• Match mode: For dimension mappings,
indicates the type of match mode used.
Normal
Normal maps only those source propertyvalues that have a matching dimension valueexplicitly defined in the dimension hierarchy.Forge assigns the IDs for any matchingdimension values to the Endeca records. Anysource property values that do not havematching dimension values in the dimensionhierarchy are ignored.
In order for a source property value to matcha dimension value, the dimension value'sdefinition must contain a synonym that:
• Is an exact text match, including capitalizationand white space, to the source property value.
Endeca ConfidentialEndeca Developer Studio Developer Studio Help
Context Sensitive Help | Key Component dialog box316

DescriptionOption
• Has its Classify option enabled.
Note: There are two types of advanceddimension values, range and sift. Thesedimension value types have differentmatching criteria than standarddimension values. See About rangedimension values and About siftdimensions, respectively.
Must Match
Must Match behaves identically to Normal, withthe exception that Must Match issues a warningfor any source property values that do not havematching dimension values.
Auto Generate
Auto Generate specifies that Forgeautomatically generates a dimension valuename and ID for any source property value thatdoes not have a matching dimension value inthe dimension hierarchy. Forge uses theseautomatically-generated names and IDs to tagthe Endeca records the same as it wouldexplicitly-defined dimension values.
Auto Generate dramatically reduces theamount of editing you have to do to thedimension hierarchy. However, auto-generateddimensions are always flat. Auto-generatednames and IDs are persisted in a file that youspecify as part of a dimension servercomponent.
Click to create a new mapping of one of thefollowing types:
New
• Null Mapping: Indicates that the sourceproperty should be ignored during mapping.
• Property Mapping: Maps the source propertyto an Endeca property.
• Dimension Mapping: Maps the source propertyto a dimension.
Used to modify an existing mapping. To modify amapping:
Modify
1. Select it in the mappings table.2. Click Modify .
Endeca Developer Studio Developer Studio HelpEndeca Confidential
317Context Sensitive Help | Mappings dialog box

DescriptionOption
3. Make your changes in the dialog box thatappears.
4. Click OK .
Removes the selected mapping.Remove
Related LinksAbout range dimension values on page 126
Configuring a dimension to use range dimension values is useful for data that should benavigated as discrete values.
About sift dimensions on page 157Auto sifting is an extension to autogeneration which positions newly generated dimensionvalues within an existing hierarchy.
Establishing a null mapping on page 174Null mappings prevent a source property from being mapped to an Endeca property ordimension.
Establishing a dimension mapping on page 173You must create a dimension before you can map it to a source property.
Establishing a property mapping on page 174You must create an Endeca property before you can map it to a source property.
Member Options dialog box (snippeting)You enable the snippeting feature in the Member Options dialog box. Each member of a searchinterface is enabled and configured separately.
In other words, snippeting results are enabled and configured for each member of a search interfaceand not for all members of a single search interface.
Note: A search interface member is a dimension or property that has been enabled for searchand that has been added to the Selected members pane of the Search Interface editor.
You can enable and configure any number of individual search interface members. Each member thatyou enable produces its own snippet.
Enabling a member in one search interface does not affect that member if it appears in other searchinterfaces. For example, enabling the Description property for Search Interface A does not affect theDescription property in Search Interface B.
DescriptionOption
Enables the snippeting feature for the selectedsearch interface member only.
Enable snippeting
Determines the size of the snippets returned forthe search interface member.
Max snippet size
Endeca ConfidentialEndeca Developer Studio Developer Studio Help
Context Sensitive Help | Member Options dialog box (snippeting)318

New Project dialog boxYou may create a project from a template. This dialog is also where you name and save your project.
DescriptionOption
Select this option to create a new project basedon an existing project template.
From a project template
Appears when "From a project template" isselected. If you are creating a project based on anexisting template, select the template from this list.
Select a project template
Appears when "From a project template" isselected. Describes the current selected templatein the "Select a project template" list.
Description
The name of your project. This name appears inthe Developer Studio title bar to indicate whichproject you are working on.
Project name
The location and name for the .esp project file.Save project as
Related LinksCreating a new project based on a template on page 16
The Endeca Developer Studio offers project templates that can be used as a foundationalbase for new projects.
Null Mapping dialog boxSpecify a source property that will be ignored during mapping.
To use the Null Mapping dialog box:
1. Enter the name of a source property to indicate that it should be ignored during mapping.
2. Click OK.
Using the EAC Admin ConsoleFrom the EAC Admin Console you can run updates and view the status of your Oracle Endeca GuidedSearch components.
To use the EAC Administration Console:
1.Click the Open Workbench button .Oracle Endeca Workbench opens in your browser.
Endeca Developer Studio Developer Studio HelpEndeca Confidential
319Context Sensitive Help | New Project dialog box

2. Log in to Workbench.
3. Select the EAC Administration Console page.
Related LinksWorking with Oracle Endeca Workbench on page 23
Getting the instance configuration from Oracle Endeca Workbench on page 25You can easily retrieve and view the currently-loaded instance configuration from Workbench.
Sending the instance configuration to Oracle Endeca Workbench on page 25You need to send your instance configuration to Oracle Endeca Workbench any time youmake and save changes to your instance configuration that you want Workbench to see.
Properties dialog boxThis shows properties associated with a dimension value.You may add, modify, or remove properties.
DescriptionOption
A list of properties associated with this dimensionvalue.
Properties list
Note: Do not confuse these name/valuepairs with source properties or Endecaproperties. They are purely for descriptiveinformation about a given dimension value.
Field for entering and editing a property's name.Property
Field for entering and editing a property's value.Value
Adds the property entered in the 'Property' and'Value' fields to the Properties list.
Add
Used to modify an existing property. To modify aproperty, select it in the Properties list, make your
Modify
changes to the property name and/or value, andclick Modify.
Removes the selected property from the Propertieslist.
Remove
Related LinksAssociating properties with a dimension value on page 117
You can provide name/value pairs with descriptive information about a given dimension value.
Property dialog boxSpecify a source property.
1. Enter the name of a source property.
Endeca ConfidentialEndeca Developer Studio Developer Studio Help
Context Sensitive Help | Properties dialog box320
2. Click OK.
Property Mapping dialog boxSpecify the source property, target property, and maximum length of property value allowed duringmapping.
DescriptionOption
Name of the source property to be mappedSource property
Name of the Endeca property the source propertywill map to
Target property
Optional. Defines the maximum source propertyvalue length allowed when creating mappings.
Maximum length
Source properties that have values that exceedthis length are not mapped, and a warning is issuedby the Forge Hierarchical Logging system. Thisvalue overrides the default maximum length thatyou set on the Advanced tab of the PropertyMapper editor.
Related LinksAbout setting a default maximum length for source property values on page 176
The Default Maximum Length option, on the Advanced Tab of the Property Mapper, definesthe maximum source property value length allowed when creating mappings.
Import External Dimensions dialog boxSpecify the external dimsensions file to import, and which dimension adapter will receive thesedimensions.
DescriptionOption
The name of the external dimensions file to beimported.
External dimensions file
All imported dimensions must be received by anexisting dimension adapter. Choose the dimensionadapter from this list.
Dimension adapter to receive imported dimensions
Related LinksWorking with external taxonomies on page 306
You may build all or part of a logical hierarchy for your data set outside of Developer Studioand then transform that logical hierarchy into Endeca dimensions and dimension values foruse in search and Guided Navigation.
Endeca Developer Studio Developer Studio HelpEndeca Confidential
321Context Sensitive Help | Property Mapping dialog box

Relevance Ranking Modules dialog boxThe Relevance Ranking Modules editor allows you to associate ranking modules with a search interface.
Ranking modules are selected from a stock list of modules. Only the static module takes parameters;for this reason, it is the only module type for which you can have multiple instances. The RelevanceRanking Module editor contains the following fields:
DescriptionOption
A list of all of the ranking modules that areavailable. Selecting a module causes its full name
All modules
and a brief description to appear in the frame inthe lower left corner of the editor.
A list of all modules currently composing theranking strategy for this search interface.You can
Selected modules
add, remove, and reorder the modules in this listusing the buttons on the editor. In addition, forStatic modules, you can edit associatedparameters.
Adds the selected module, in the "All modules" list,to the "Selected modules" list.
Add
Removes the selected module from the "Selectedmodules" list.
Remove
This option is only available when you have a Staticmodule selected in the "Selected modules" list.
Edit
Click it to edit the parameters associated with theselected module.
Moves the selected module, in the "Selectedmodules" list, up.
Up arrow
Moves the selected module, in the "Selectedmodules" list, down.
Down arrow
Related LinksEditing Static module parameters on page 220
Edit static module parameters from the Relevance Ranking Modules editor.
Search Interface Options dialog boxYou have the option to customize partial match settings.
The Search Interface Options editor allows you to adjust various settings at the search interface level.The Search Interface Options editor contains the following fields:
Endeca ConfidentialEndeca Developer Studio Developer Studio Help
Context Sensitive Help | Relevance Ranking Modules dialog box322

DescriptionOption
Specifies if partial query matches should besupported for this search interface.
Customize partial match settings
• "Match at least" sets the minimum number ofwords that must be matched. The default is 2.
• "Omit at most" sets the maximum number ofwords that can be omitted. The default is 2.
Related LinksCustomizing partial matching on page 214
This section describes customizations available in the Customize Partial Match Settingsfeature of Developer Studio.
Select Dimension Adapter dialog boxAll promoted dimensions must be affiliated with a dimension adapter.
To use the Select Dimension Adapter dialog box:
1. Select a dimension adapter from the menu.
2. Click OK.
Select Dimension editorTo use the Select Dimension editor:
1. Select a dimension from the list.
2. Click OK.
Select Dimension or Property dialog boxSelect a dimension or property from the list and click OK.
Select Dimension Value editor1. Select a dimension value from the list.
2. Click OK.
a) To expand a dimension value and expose its children, click the + sign next to the dimensionvalue.
Note: Selecting a dimension name is equivalent to selecting the dimension's root.
Endeca Developer Studio Developer Studio HelpEndeca Confidential
323Context Sensitive Help | Select Dimension Adapter dialog box

Select Redirect Group dialog boxDescribes available option for the Select Redirect Group dialog box.
DescriptionOption
A drop-down list with the names of the otherkeyword redirect groups. When you delete a
Move the selected redirects in"redirectGroupName" to this redirect group
redirect group, its keyword redirects must bemoved to another redirect group. Use thisdrop-down list to indicate which redirect group willreceive the keyword redirects.
Select Rule Group dialog boxDescribes available options for the Select Rule Group dialog box.
DescriptionOption
A drop-down list with the names of the other rulegroups. When you delete a rule group, its rules
Move the rules in "ruleGroupName" to this rulegroup
must be moved to another rule group. Use thisdrop-down list to indicate which rule group willreceive the rules.
Specifying constraints on spelling dictionary contentConstraining spelling dictionary entries improves the performance of spelling corrected queries.
If you want to fine tune the size of the spelling dictionary and consequently tune the performance ofspelling corrected queries, you can specify constraints to control what words Dgidx adds to the spellingdictionary.You can separately configure entries in the dictionary based for dimension search andrecord search.
To constrain spelling dictionary entries:
1. In the Project Explorer, expand Search Configuration.
2. Double-click Spelling.
3. Select the Dimension Search tab.
4. In the It Occurs at Least ... Times field, provide a number that indicates the minimum number oftimes the word must appear in your source data before the word should be included in the spellingdictionary.
5. In the And Is Between ... and ... Characters Long fields, provide values that represent the minimumand maximum length of a word that should be included in the spelling dictionary.
6. Select the Record Search tab.
7. Repeat steps 4 and 5.
8. Click OK.
Related Links
Endeca ConfidentialEndeca Developer Studio Developer Studio Help
Context Sensitive Help | Select Redirect Group dialog box324

Using the Spelling Dictionary on page 208
About the spelling dictionary on page 208By default, Dgidx creates an application-specific spelling dictionary based on all wordscontained in searchable dimensions and properties. These words become possible spellcorrection recommendations.
Stop word editorTo create a stop word, enter it in the Stop Word field and click OK.
Synonyms dialog boxDefine a synonym and its behaviors, or modify an existing synonym.
DescriptionOption
A list of synonyms of the dimension value.Synonyms list
Use this area to define a synonym and itsbehaviors:
Synonym area
• Synonym field: Use this field to enter and editsynonyms.
• Search: Indicates that the selected synonymwill be used during search.
• Classify: Indicates that the selected synonymwill be during classification.
Adds the synonym entered in the 'Synonym' fieldto the Synonyms list.
Add
Used to modify an existing synonym. To modify asynonym, select it in the Synonyms list, make yourchanges in the Synonym field, and click Modify.
Modify
Sets the selected synonym in the Synonyms listto be used for display. Only one synonym can be
(Display)
set for display, and it is indicated by parenthesesin the Synonyms list.
Removes the selected synonym from theSynonyms list.
Remove
URL Filter dialog boxYou use this dialog box to specify the filters by which the spider includes or excludes URLs during acrawl.
Endeca Developer Studio Developer Studio HelpEndeca Confidential
325Context Sensitive Help | Stop word editor

Filters are expressed as wildcards or Perl regular expressions. URL filters are mutually exclusive; thatis, URL filter A does not influence URL filter B and vice versa. At least one URL filter is required toallow the spider make additional processing loops over the root URL.
DescriptionOption
Enter either a wildcard filter or regular expressionfilter. Filters can be specified either by using
URL filter
wildcard filters for example, *.endeca.com or Perlregular expressions, for example /.*\.html/i.Generally, you should use "Wildcard" patterns for"Host" filters and use "Regular expression" patternsfor "URL" filters.
Note: There are additional samples in theCrawler Implementations section of the DataFoundry Expression Reference.
Select either Host or URL:Type
• Host filters apply only to the host name portionof a URL.
• URL filters are more flexible and can filterURLs based on whether the entire URLmatches the specified pattern. For example,the spider may crawl a file system in which adirectory named "presentations" containsPowerPoint documents that, for some reason,should not be crawled. They can be excludedusing a URL exclusion filter with the pattern/.*\/presentations\/.*\.ppt/.
Select either Include or Exclude:Action
• Include indicates that the spider crawlsdocuments that match the URL filter.
• Exclude indicates that the spider excludesdocuments that match the URL filter.
Note: A URL must pass both inclusion andexclusion filters for the spider to queue it. Inother words, a URL must match at least oneinclusion filter and a URL also must notmatch any exclusion filter.
Select either Wildcard or Regular expressiondepending on the syntax of the filter you specifiedin the "URL filter" field.
Pattern
User Profile editorTo use the User Profile editor:
Endeca ConfidentialEndeca Developer Studio Developer Studio Help
Context Sensitive Help | User Profile editor326

1. Enter a name for the user profile.
2. Click OK.
Endeca Developer Studio Developer Studio HelpEndeca Confidential
327Context Sensitive Help | User Profile editor

Index
6.1.2
A
access rulesabout 302creating 304multiple 303running a baseline update for 305baseline updates for access rules 305
adaptersabout 280
addinga Perl manipulator 62a property mapper 170an Endeca property 74Perl manipulator
adding 62properties
adding 74property mappers
adding 170adding pipeline components 299advanced techniques
about 175aggregated records
about 94, 153Agraph
about 308approximate matching 228assigning multiple mappings to a single source property169auto-generated dimensions
loading and promoting 138automatic phrasing 95, 202, 309
affect on query expansion 203processing order 203tips 206spelling correction
processing order 203did you mean
processing order 203tips
automatic phrasing 206
B
Binary data formatabout 51
C
clipboardcopying messages to 21copying
messages to the clipboard 21closing
all open views 21views
closing all 21collapsible dimension hierarchy
creating 155collapsible dimensions
about 155concepts
Endeca 10Endeca
important concepts 10important Endeca concepts 10
configuringa Web application to use access rules 305access rules
in Web applications 305controlling
the order of record results 88, 144record results
controlling the order of 88, 144cross-field matches
allowing 213custom properties
adding to a rule 258customizing partial matching 214
D
data flow among componentsviewing 299viewing
data flow among components 299data flow among components specifying 298data formats
JDBC 45ODBC 42vertical 39ODBC format 42vertical format 39
datedatetime
and duration property types 78property types for Analytics 78
default maximum length for source property values 177default record sort order 86, 142delimited format 34
Developer Studioexiting 19parts of the window 10exiting Developer Studio 19parts of the Developer Studio window 10
Developer Studio windowMessages pane 20Messages pane
Developer Studio 20Developer Studio workflows 12dimension adapter
adding 101adding a dimension adapter 101
Dimension Adapter editor 102Dimension editor 111Dimension Group editor 273dimension groups
and ranking 274creating 272deleting 273modifying 272versus dimension hierarchy 274creating
dimension groups 272deleting
dimension groups 273dimension hierarchy
versus dimension groups 274modifying
dimension groups 272Dimension Groups view 275dimension IDs
checking 116checking
dimension IDs 116Dimension Mapping dialog box 312dimension names
extracting phrases from 205phrases
extracting from dimension names 205Dimension Search Configuration editor 146dimension server
adding 105adding a dimension server 105
Dimension Server editor 105dimension value
descriptive information 130non-navigable 134
Dimension Value editor 119dimension values
adding 121configuring 122controlling the order of 130deleting 123editing 123editing auto-generated 137making collapsible 156manual versus auto-generated 133neg_inf and pos_inf 128, 161pruning refinements 135
dimension values (continued)range
about 126ranking manually 131, 136renaming 124viewing 117adding
dimension values 121auto-generated dimension values 137collapsible dimension values 156configuring
dimension values 122controlling
the order of dimension values 130deleting
dimension values 123dimension values
editing 123editing
auto-generated dimension values 137manual versus auto-generated dimension values133neg_inf and pos_inf dimension values 128, 161popularity
of dimension value refinements 135pruning dimension value refinements 135ranking dimension values manually 131, 136renaming dimension values 124
dimensionsa typical scenario 135, 156, 163adding to an existing group 273adding to dimension groups 116collapsible
about 155creating 110deleting 111dimension groups
about 270displaying on a record page 140enabling display in a record list 140enabling for range filtering 149enabling wildcard search 150hierarchical 154mapping 173modifying 110multi-select 154
about 154null mappings 174precomputing sort indices 143preventing from appearing in navigation controls 140ranking manually 150setting a collapsible dimension threshold 156setting the primary dimension 163sift
about 157sorting in Dimensions view 109statistics on 151viewing all 108, 270writing out dimension data 295adding a dimension to an existing group 273
Endeca Developer Studio330
Index

dimensions (continued)collapsible dimension threshold 156creating
dimensions 110deleting
dimensions 111dimension statistics
about 151enabling 152
enabling statistics on 152establishing
dimension mappings 173null mappings 174
hierarchical dimensionsand multi-select OR 154multi-select OR
and hierarchical dimensions 154manually ranking dimensions 150precomputing sort indices on a dimension 143preventing dimensions from appearing in navigationcontrols 140primary dimension
setting 163range filters for dimensions 149ranking dimensions manually 150record page
enabling dimension display 140wildcard search
enabling on a dimension 150writing out dimension data 295
dimensions valuessetting a default dimension order 132default dimension value order 132
Dimensions view 108displaying
components with dimension sources 297components
with dimension sources 297document format 49dynamic business rules 240
and content management publishing 239and rule groups 267and the Agraph 268creating 252creating a style 250creating and ordering 254creating rule groups 265keyword redirects
about 234groups
about 236promoting records 239record promotion examples 241record promotion workflow 244rule groups
about 264specifying when to promote records 255styles
about 248
dynamic business rules (continued)Agraph
and dynamic business rules 268creating
a dynamic business rule 254dynamic business rule groups 265ordering
dynamic business rules 254record promotion workflow 244records
promoting 255styles
dynamic business rule 250workflow
for record promotion 244
E
EAC Admin Console 24, 319Edit Static Relevance Rank Module dialog box 313editors
closing 20Indexer Adapter 71Java Manipulator 69Perl Manipulator 63Precedence Rule 181Record Adapter 29Record Assembler 57Record Cache 55Record Manipulator 60Redirect Group 237Rule 260Rule Group 266Search Characters 198Search Interface 212Select Dimension 323Select Dimension Value 323Spider 285Stemming 196Stop Word 325Style 250Update Adapter 288User Profile 326Zone 247closing an editor 20Precedence Rule editor 181Record Adapter editor 29Record Assembler editor 57Record Cache editor 55Record Manipulator editor 60Redirect Group editor 237Rule editor 260Rule Group editor 266Search Characters editor 198Search Interface editor 212Select Dimension editor 323Select Dimension Value editor 323Spider editor 285Stemming editor 196
331
Index

editors (continued)Stop Word editor 325Style editor 250Update Adapter editor 288User Profile editor 326Zone editor 247
Endeca Developer Studiointroduction 9
Endeca propertieschanging 77changing Endeca properties 77
Endeca.ACL.Allow.Read propertycreating 303
enqueue URLdialog box 314
external dimensionsimporting 321
external Perl classes 67external taxonomies 306
F
filteringthesaurus entries 193thesaurus
filtering entries 193Forge
accessing source data 34source data
accessing with Forge 34format
document 49Exchange 48fixed width 38Exchange data format 48fixed width data format 38
formatsdelimited 34XML 49XML
data format 49frequency module
about 224
G
geocode propertiesconfiguring for filtering 94configuring for sort 90mapping by 90configuring
geocode properties for filtering 94geocode properties
sorting by 90geocode properties
presenting by 90sorting
geocode properties 90
geocode source datapreparing 89preparing
geocode source data 89geospatial filtering
about 93geospatial sorting
about 88Glom module
about 224
H
hierarchical searchusing during dimension searches 147
I
Indexer Adapter editor 71indexer adapters
adding 70adding
indexer adapters 70interp 225interpreted 225
J
Java home and class pathoverriding 52overriding Java home and class path settings 52
Java Manipulator editor 69JDBC data format 45Join Entry dialog box 315joins
configuring in a record assembler 58implementing 53configuring
joins in a record assembler 58data
implementing joins 53implementing joins 53
K
key componentdialog box 316
keyword redirect groupscreating 237deleting 237creating
a keyword redirect group 237deleting
keyword redirect groups 237keyword redirects
creating 235deleting 235modifying 235
Endeca Developer Studio332
Index
keyword redirects (continued)creating
keyword redirects 235deleting
keyword redirects 235modifying
keyword redirects 235keywords
Redirect editor 236
M
manipulatorsabout 281
mapping a property to a dimension 117Mapping dialog box 316mapping source properties to like-named dimensions175matching
combining exact and range 128combining
exact and range matching 128Member Options dialog box 318menu bar
about 21messages
clearing 20messages window 22method override
editor 68multi-select dimensions 154
N
New Project dialog box 319null mapping
dialog box 319
O
Oracle Endeca Workbenchabout 11getting instance configuration from 25creating
a connection to Oracle Endeca Workbench 24creating a connection to 24instance configuration
getting from Oracle Endeca Workbench 25sending the instance configuration to 25
Oracle Endeca Workbench Settings 313other dimension value
creating 129, 163
P
partial matchingcustomizing 214
partial updatesimplementing 306
pass-through informationadding 52modifying 52providing 51record adapters
adding pass-through information 52Perl class
requirements 67Perl files
external 66external Perl files 66
Perl manipulatorwriting code in 65writing code in a Perl manipulator 65
Perl Manipulator editor 63Perl Manipulator methods 64Perl manipulators
about 62Phrase 226
with match modes 230Phrase module
and approximate matching 228Phrase module parameters
editing 221, 228relevance ranking modules
Phrase details 221, 228phrases
importing 204importing from an XML file 204, 314importing phrases 204XML files
importing phrases from 204, 314pipeline components
about 279adding 283adding and removing 299connecting graphically 299deleting 290dimension support 99adding
pipeline components 283deleting
pipeline components 290Pipeline Diagram
connecting components in 299pipeline diagram
changing the alignment of components 297resizing 296returning to the default layout 297changing
the alignment of components in the pipelinediagram 297
resizing the pipeline diagram 296returning to the default layout of the pipeline diagram297
Pipeline Diagramdata flow in 299hiding dimension flow 297
333
Index
Pipeline Diagram (continued)hiding
dimension flow in the Pipeline Diagram 297dimensions
displayed in the Pipeline Diagram 297pipeline diagram editor
about 278pipeline tab
about 278pipelines
about 277precedence rules
about 180creating 182deleting 183implicit dimension value selection 184modifying 182standard versus leaf 183view 180deleting
precedence rules 183leaf versus standard precedence rules 183modifying
precedence rules 182standard versus leaf precendence rules 183
precedence rules, when overridden 184prioritzing rule groups 266processing order 203project
opening 17saving 17opening a project 17
project componentsdisplaying 17displaying
project components 17Project Explorer
about 21projects
about 11closing 19saving 17validating 19closing a Developer Studio project 19Developer Studio
about projects 11saving a project 17
promoting dimensionsrelated cleanup 139
promoting recordstime triggers 256dynamic business rules
specifying time triggers 256properties
about 74adding 77associating with a dimension value 117configuring for record sort 85deleting 78displaying on a record page 83
properties (continued)enabling for range filters 93enabling for record rollup 96enabling for record search 91filtering empty properties 51mapping source to Endeca 80mapping to like-named dimensions 175precomputed sort indices 84sorting in the Properties view 76troubleshooting 98troubleshooting source property mapping 177using as record spec 97viewing all 75configuring properties for record sort 85deleting properties 78dimension values
associating properties with 117enabling properties for range filters 93Endeca properties
about 74adding 77adding properties 77
filteringempty properties 51
mapping source properties to Endeca properties 80Properties view 76record page
displaying properties on 83record rollup
for properties 96record search
enabling for properties 91setting
a property to use as a record spec 97tips
properties 98source property mapping 177
viewing all properties 75Properties dialog box 320Property dialog box 320Property editor General tab 80property mapper
using 165Property Mapper editor 171property mapping
about 165choosing a match mode 166establishing 174explicit
about 166using null mappings 176viewing existing mappings 172choosing
a match mode for property mapping 166establishing
property mapping 174null mappings
in property mapping 176viewing
existing property mappings 172
Endeca Developer Studio334
Index
Property Mapping dialog box 321propery mappers
about 282propery mapping
when no mapping is found 175Proximity relevance ranking module 232
R
range dimension valuesconfiguring 126synonym configuration 127troubleshooting 129configuring
range dimension values 126synonym configuration for range dimension values127troubleshooting
range dimension values 129range filters 92, 148ranking modules
changing the order of 220creating 219deleting 220modifying 219changing
the order of ranking modules 220creating
ranking modules 219modifying
ranking modules 219recommended stop word list 200record adapter
adding 27record adapters
to load data 27adding
a record adapter to load data 27record adapters
removing pass-through elements 52pass-through elements
removing 52record assemblers
about 282adding 56adding
a record assembler 56record caches
adding 54adding a record cache 54
record datawriting out 294writing out record data 294
record listenabling property display on 83properties
displaying on a record list 83record manipulators
adding 291
record manipulators (continued)adding expressions to 293editing 292expressions
about 292adding
a record manipulator 291expressions to record manipulators 293
editingrecord manipulators 292
record promotion examples 241record rollup 153record server
componentsabout 282
record sorttroubleshooting 90, 145tips
record sort 90, 145record sort order
specifying a default 86, 142records
with ranges 127classifying
records with ranges 127relevance ranking
about 218applying to rule results 269Exact module 223Field module 223First module 224Phrase module 227, 230Phrase module and stop words 230Phrase module and sub-phrases 227Phrase module and wildcards 231Phrase module summary 229recommended strategies 221Static module 220versus record sort 87, 144Exact relevance ranking module 223Field relevance ranking module 223First relevance ranking module 224Phrase module
and sub-phrases 227and wildcards 231configuring 227summary of option interactions 229with cross-field matches 230configuring
Phrase relevance ranking module 227modules
Phrase and sub-phrases 227Phrase module
with multiple matches 230wild cards
and Phrase module 231recommended relevance ranking strategies 221record sort
versus relevance ranking 87, 144
335
Index

relevance ranking (continued)rule results
applying relevance ranking to 269Static model
editing 220editing
Static relevance ranking module 220stop words
and the Phrase module 230Phrase module
and stop words 230strategies
relevance ranking 221relevance ranking module
Spell 232Spell relevance ranking module 232
relevance ranking modulesMaximum Field
Maximum Field module 225modules
Maximum Field 225Nterms 225Number of Fields 226Proximity 232Static 233Weighted Frequency 233modules
Nterms 225Number of Fields 226Nterms module 225
Number of Fields module 226Static relevance ranking module 233Weighted Frequency module 233
Relevance Ranking Modules dialog box 322removing pipeline components 299rule group
deleting 265name editor 267deleting
rule groups 265dynamic business rules
deleting rule groups 265rule groups
and dynamic business rules 267prioritizing 266dynamic business rules
rule groups 266rule results
adding static records 258presenting in a Web application 263adding
static records in rule results 258rules
ordering 260
S
searchincluding dimension hierarchy 147
search (continued)dimension hierarchy
including in search 147search characters
about 197adding 197deleting 198that support automatic phrasing 206adding
search characters that support automaticphrasing 206
search configurationsabout 189
Search Interface Options dialog box 322search interfaces
about 209creating 211deleting 212modifying 212viewing all 210creating
search interfaces 211deleting
search interfaces 212viewing
all search interfaces 210Search Interfaces view 210Select Dimension Adapter dialog box 323Select Dimension or Property dialog box 323Select Redirect Group dialog box 324Select Rule Group dialog box 324sending the instance configuration to Workbench 25sift dimension
defining as autogenerated 161autogenerated sift dimension 161
sift dimension hierarchycreating 159
snippet format and size 216snippet properties
naming 216snippeting
about 215enabling 217enabling
snippeting 217snippets
troubleshooting 217what are 216tips
snippets 217sort indices
precomputed 84sorting
rules in the Rules view 260stop words 200Rules view
sorting rules in 260stop words
sorting 200
Endeca Developer Studio336
Index

source datacrawling 305crawling
source data 305source properties
adding 60assigning multiple mappings to 169source properties
editing 60adding
source properties 60editing
source properties 60source property mapping
prioritizing 176priority order of source property mapping 176
source property valuessetting a default maximum length 177
spelling correctionthesaurus
stemmingapplying
Phrase module 228spelling dictionary
about 208spelling dictionary content constraints 208, 324spiders
adding 284adding
a spider 284status bar
Developer Studio 22Developer Studio window
status bar 22stemming
about 196enabling 196enabling
stemming 196stop words 200
about 199creating 199deleting 200recommended 200creating
stop words 199deleting
stop words 200synonyms
about 124adding to a dimension value 125dialog box 325adding
synonyms to a dimension value 125
T
taxonomiesexternal 306
text extractscharacter limits in 51character limits in text extracts 51
thesaurusabout 190creating entries 191entry recommendations 193modifying entries 192sorting entries 193creating
thesaurus entries 191modifying
thesaurus entries 192recommendations
thesaurus entries 193sorting
thesaurus entries 193thesaurus entries
deleting 192tips
precedence rules 185precedence rules
tips 185trigger
Add Trigger editor 253troubleshooting
dimensions 164dimensions
troubleshooting 164two-way thesaurus entry
editor 195
U
update adapteradding 287
URL Filter dialog box 326user profiles
about 186creating 186deleting 187dynamic business rule trigger 188modifying 187viewing 186creating
user profiles 186deleting
user profiles 187dynamic business rules
user profile triggers 188modifying
user profiles 187utility components
about 283
V
validating your project 19View menu 18
337
Index
viewingall precedence rules 181precedence rules
viewing all 181views
closing the active 20resizing columns in 19closing the active view 20resizing columns in a view 19
W
wildcard searchenabling for a property 97properties
enabling wildcard search on 97work area 23Workbench
toolbar 23
Z
Zones view 247
Endeca Developer Studio338
Index


