Encode™ Restorative System - Dental Services Group Resources/Biomet... · Indications •...
12
Encode™ Restorative System Procedure & Laboratory Manual Encode Abutment 1/2 Milled Encode Abutment Blank Encode Abutment Completed Encode Virtual Abutment ENCODE ™ RESTORATIVE SYSTEM
Transcript of Encode™ Restorative System - Dental Services Group Resources/Biomet... · Indications •...

Encode™ Restorative SystemProcedure & Laboratory Manual
Encode Abutment1/2 Milled
Encode Abutment Blank
Encode AbutmentCompleted
Encode Virtual Abutment
ENCODE™
R E S T O R A T I V E S Y S T E M
Encode™ Restorative SystemSimply Impressive
Product Description
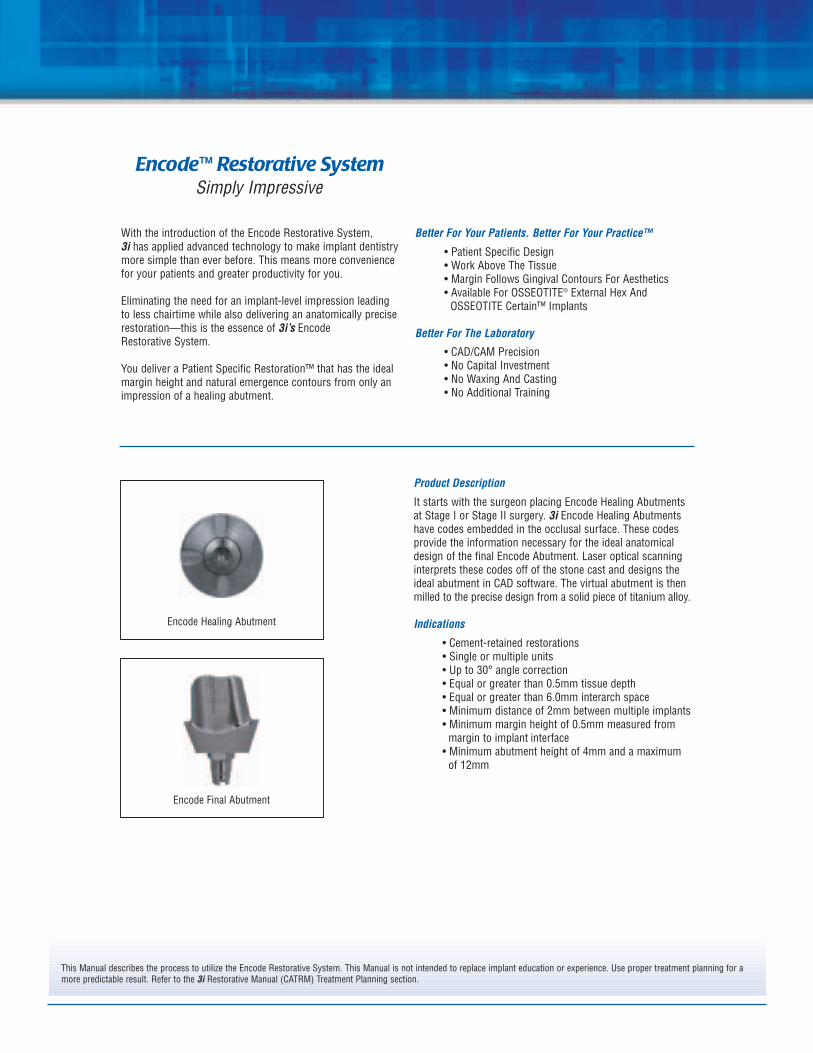
It starts with the surgeon placing Encode Healing Abutmentsat Stage I or Stage II surgery. 3i Encode Healing Abutmentshave codes embedded in the occlusal surface. These codesprovide the information necessary for the ideal anatomicaldesign of the final Encode Abutment. Laser optical scanninginterprets these codes off of the stone cast and designs theideal abutment in CAD software. The virtual abutment is thenmilled to the precise design from a solid piece of titanium alloy.
Indications
• Cement-retained restorations• Single or multiple units • Up to 30° angle correction• Equal or greater than 0.5mm tissue depth• Equal or greater than 6.0mm interarch space• Minimum distance of 2mm between multiple implants• Minimum margin height of 0.5mm measured from
margin to implant interface • Minimum abutment height of 4mm and a maximum
of 12mm
With the introduction of the Encode Restorative System, 3i has applied advanced technology to make implant dentistrymore simple than ever before. This means more conveniencefor your patients and greater productivity for you.
Eliminating the need for an implant-level impression leadingto less chairtime while also delivering an anatomically preciserestoration—this is the essence of 3i’s Encode Restorative System.
You deliver a Patient Specific Restoration™ that has the idealmargin height and natural emergence contours from only animpression of a healing abutment.
Better For Your Patients. Better For Your Practice™
• Patient Specific Design• Work Above The Tissue• Margin Follows Gingival Contours For Aesthetics• Available For OSSEOTITE® External Hex And
OSSEOTITE Certain™ Implants
Better For The Laboratory
• CAD/CAM Precision• No Capital Investment• No Waxing And Casting• No Additional Training
Encode Healing Abutment
Encode Final Abutment
This Manual describes the process to utilize the Encode Restorative System. This Manual is not intended to replace implant education or experience. Use proper treatment planning for amore predictable result. Refer to the 3i Restorative Manual (CATRM) Treatment Planning section.

1
Table Of Contents
Laboratory Work Order Form Instructions......................................................................................................................................2
Analog Placement Jig......................................................................................................................................................................4
Encode™ Healing Abutment Placement ..........................................................................................................................................5
Encode Healing Abutment Impressioning & Laboratory Procedures ..............................................................................................6
Laboratory Procedure & Encode Abutment Fabrication ..................................................................................................................7
Laboratory Procedure & Encode Abutment Placement ..................................................................................................................8
Delivery Of The Provisional Or Final Restoration ............................................................................................................................9
Impressioning & Articulation Guidelines ......................................................................................................................................10

2
Encode™ Restorative SystemLaboratory Work Order Form Instructions
1. Account InformationPlease complete this section clearly. Allrequested information is important to ensurethe necessary communication of the desiredabutment design. Clear and timelycommunication is important from receipt tothe delivery of the finished product.
Please complete one form per case.Incomplete information on the work orderform or missing case requirements maydelay the delivery of the product.
2. Case InformationThis section is important for the scanningand design process. Although most implantinterfaces are recognizable to 3i ’s team ofdesign technicians, providing accurateinformation regarding tooth position ofimplants, implant brand and size willexpedite the process of order entry, designand completion.
3. Screw OrderingPlease select any screws you want topurchase for this case.
4. Design GuidelinesThis section allows the technician to selectthe margin style and location. It alsoprovides 3i with the desired interocclusaldistance information for the type of finalrestoration.
5. Parallelism RequirementsPlease use this section to indicate whichabutments require parallelism for multiple-unit bridges.

6. Contour GuidelinesIllustrations of both anterior and posteriorabutments are provided. Please use thissection to communicate any specific designinstructions relating to margin position,angulation, etc. by sketching in the boxes.
7. Special InstructionsPlease provide any special informationnecessary to ensure the proper design of theEncode™ Abutment. If additional space isneeded, please use the back of the page andplace a check in the box. NOTE: Additional instructions do not replacethe mandatory sections on the work orderform.
8. Preparing Your Case For Shipment This section serves as a checklist for themandatory case requirements.
9. CertificationThe technician’s signature denotes that theabutment design on this Work Order has beencommunicated to the laboratory by theclinician and the team agrees to the design.3i will not fabricate an Encode Abutmentwithout this certification from the laboratory.
3

1. For surgical implant placement of a 3i Implant, follownormal protocol as described in the 3i Surgical Manual.NOTE: Before beginning the next step, we recommenda reverse torque test be performed to establishimplant stability.
Creating an Analog Placement Jig is strongly suggested.This provides the laboratory an option to create provisionalor final crowns. This can be easily accomplished with aPick-Up Impression Coping, or Temporary Cylinder withRetention, and a waxing screw.
CREATING AN ANALOG PLACEMENT JIG2. Select the proper Pick-Up Impression Coping or
Temporary Cylinder by matching the diameter of theimplant platform.
Activate the fingers using the QuickSeat™ ActivatorTool. Place the Pick-Up Impression Coping or TemporaryCylinder into the implant, line up the hex and pressfirmly until feeling the tactile click.
Place the Pick-Up Impression Coping or TemporaryCylinder on the implant and engage the hex.
Thread the Pick-Up Impression Coping Screw or WaxingScrew into the implant until finger-tight. Tighten thescrew using the Large Hex Driver.
3. If a flapless surgery is performed or if the index is madeat Stage II surgery, radiograph the interface to verifycomplete seating of the component on the implant. Placethe film perpendicular to the interface of the componenton the implant.
4
Encode™ Restorative SystemAnalog Placement Jig
Seated Not Seated
Pick-UpImpressionCoping
TemporaryCylinder

5
4. Syringe a medium to heavy body impression materialaround the impression coping or Temporary Cylinderand over the occlusal surfaces of the adjacent teethapproximately 1.5 teeth on either side. Allow theimpression material to set, per the manufacturer’sinstructions. Once the material has set, remove theimpression coping screw or Waxing Screw using theLarge Hex Driver. Remove the Analog Placement Jigfrom the mouth and send it to the restorative clinicianso it may be included in the package to the laboratory.
5. Select an Encode Healing Abutment by matching theimplant platform, and selecting the appropriate EP®
diameter and collar height. The collar height should beselected by measuring from the implant platform to thehighest crest of the gingival tissue and add 1mm. Suturethe tissue around the Encode Healing Abutment. Allowthe tissue to completely heal.NOTE: 1mm of the collar portion of the healingabutment, not including the dome portion, must besupragingival for proper scanning.
Encode™ Restorative SystemEncode Healing Abutment Placement

6
Encode™ Restorative SystemEncode Healing Abutment
Impressioning & Laboratory ProceduresCLINICAL PROCEDURE1. After tissue maturation, the Encode Healing Abutment is
ready for impressioning. Using a medium bodyelastomeric impression material (polyether orpolyvinyl), syringe around the healing abutment. Loadthe impression tray and seat in the mouth. Allow theimpression material to set per the manufacturer’sinstructions.
2. After the impression material has set, remove the trayfrom the mouth. Verify that a clear impression hasbeen made of all the occlusal markings, the entirecircumference of the Encode Healing Abutmentand the tissue contours.
3. Make an impression of the opposing arch, a biteregistration and select a shade for the crown. Disinfectand package the impressions and the bite registration.Place an “Ask For It” sticker on the lab prescription formwith any other instructions including the shade. Ship toyour ARCHITECH PSR™ dental laboratory.NOTE: Larger cases of 3 or more units should includea stone model of the diagnostic wax up.
LABORATORY PROCEDURE4. Inspect the case for an accurate impression of the
Encode Healing Abutment. Pour the casts in yellow diestone. If utilizing the Analog Placement Jig, pour asecond cast of the healing abutment impression. Pindexthe first pour Encode Cast. The pinned sections must beeasily removed and replaced. For proper scanning, thecast must provide the following: visibility of the EncodeHealing Abutment showing 1mm of the collar, a defectfree occlusal surface and a clear view of thesurrounding tissue. NOTE: Yellow die stone must be used for lab scanningpurposes to eliminate glare caused by imperfections.There can be no voids or bubbles in the stone.
❑ Enclosed are implant type, platform, and EP diameter.Please call 3i in the US at 800-342-5454 with any questions.
Please providea genuine 3iEncode™ Abutment
ENCODE™
R E S T O R A T I V E S Y S T E M

7
5. Mount the casts on the 3i recommended articulator(Stratos™, Ivoclar) using the bite registration. Therecommended articulator and mounting plates mustbe used.NOTE: Make sure the casts are centered on thearticulator. The incisal edge of the maxillary teethmust be aligned with the horizontal pin on the incisalguide pin. See reference on back cover.
6. Complete the work order form following theinstructions on pages 2 and 3. Package the casesecurely in bubble wrap, without the articulator. Usingthe provided UPS Airbills, ship the case to 3i, Attention:ARCHITECH PSR™. You may call UPS for pick up at1.888.PickUps.Send to: In USA:*
3i ARCHITECH PSR4555 Riverside DrivePalm Beach GardensFlorida 334101.800.342.5454
7. 3i will design and create an Encode Abutment using theinput from your work order and the codes on thehealing abutment cast. The casts are scanned with astate-of-the-art laser optical scanner. The CADtechnician designs the virtual abutment with uniquelydesigned software. The final abutment is then milledfrom a solid blank. After final polishing, your patientspecific abutment is complete.
8. 3i packages and returns the abutment(s) and caseitems to the laboratory. The turn-around time fromreceipt at 3i to the laboratory is 4 working daysincluding shipping.
*Preprinted UPS® forms are enclosed in the ARCHITECH PSR Start Up Kit. Call 1-800-PICKUPS to schedule case pick up.
Virtual Abutment Solid Blank
1/2 Milled Completed Abutment
Encode™ Restorative SystemLaboratory Procedure &
Encode Abutment Fabrication

8
Encode™ Restorative SystemLaboratory Procedure &
Encode Abutment PlacementLABORATORY PROCEDURE9. A working cast may be created for fabrication of a
provisional crown using the Analog Placement Jig. Grindout the area of the healing abutment on the second pourof the healing abutment cast using a lab bur. Grind downto allow for the depth of the analog or grind through thebottom of the cast. Place the proper diameter implantanalog onto the pick-up coping or temporary cylinderand tighten the screw. Seat the Analog Placement Jigassembly over the occlusal surfaces of the adjacentdentition and into the hole in the cast. Pour stone or addacrylic to secure the analog in place. Unthread theimpression coping or waxing screw and remove the jig.
10. Attach the final Encode Abutment to the analog usinga try-in screw. Fabricate the provisional crown on theEncode Abutment following the margins and theemergence profile and CEJ’s of the adjacent teethon the cast.
Optional: You may also choose to fabricate the finalcrown at this time if you and the restorative clinician arecomfortable with the accuracy of the contacts.
NOTE: If an Analog Placement Jig is not supplied, thelaboratory has the option to fabricate a crown copingon the Encode Abutment. The clinician may then pickup the coping from the Encode Abutment in animpression. The clinician may also place the EncodeAbutment and make a direct crown and bridgeimpression using retraction cord. These optionswould require the clinician to fabricate a chairsideprovisional restoration after impressioning.
CLINICIAN PROCEDURE11. The laboratory returns the Encode Abutment, the
provisional or final crown and all other materials to therestorative clinician. Remove the Encode HealingAbutment using the Large Hex Driver.
Activate the fingers using the QuickSeat™ ActivatorTool. Locate the tooth number on the buccal to orientthe abutment position. Place the Encode Abutment intothe implant, line up the hex and press firmly until feelingthe tactile click. Thread a Certain™ Gold-Tite™ HexedScrew into the implant until finger-tight.
Locate the tooth number on the buccal to orientthe abutment position. Place the Encode Abutment ontothe implant, engaging the hex. Thread a Square Gold-Tite Screw into the implant until finger-tight. NOTE: If there is not enough material to create anumber, a line will be placed on the buccal surfaceof the Encode Abutment for orientation purposes.
Radiograph the interface to verify an accurate fit.

9
Encode™ Restorative SystemDelivery Of The Provisional
Or Final Restoration
12. Try in the provisional or PFM crown on the Encode™Abutment and check the occlusion, marginal fit andinterproximal contacts. Remove the crown.
Torque the Certain™ Gold-Tite™ Screw to 20Ncmusing the Large Hex Driver Tip and a torque device.
Torque the Square Gold-Tite Screw to 32–35Ncmusing the Square Driver Tip and torque device.
13. Place a protective material over the screw head. Seal the access hole with temporary filling material. Cement the crown on the Encode Abutment using a temporary or permanent cement.

Encode™ Restorative SystemImpressioning & Articulation Guidelines
Impressions Of Encode Healing Abutments The impression of the Encode Healing Abutment must be clearlyvisible. The total circumference must be 1mm above the tissue forproper scanning.
Cast Placement On Mounting PlatesCasts must be centered on mounting plates. The scanners readwhere the plates are located. If the cast is off the plate, the cast willnot be correctly scanned.
SUBSIDIARIES
AUSTRALIAPhone: +61-2-9855-4444Fax: +61-2-9888-9900
BELGIUMPhone: +32-2-5410290Fax: +32-2-5410291
BRAZILPhone: +55-11-5081-4405Fax: +55-11-5081-7484
CANADAPhone: +514-956-9843Fax: +514-956-9844
FRANCEPhone: +33-1-41054343Fax: +33-1-41054340
GERMANYPhone: +49-721-6314-220Fax: +49-721-6314-233
MEXICOPhone: +52-55-5679-1619Fax: +52-55-5684-8098
THE NETHERLANDSPhone: +31-70-345-14-82Fax: +31-70-345-39-44
NORDIC REGIONPhone: +46-40-17-6090Fax: +46-40-17-6099
PORTUGALPhone: + 351 21 000 1645Fax: + 351 21 000 1675
SPAINPhone: +34-93-470-59-50Fax: +34-93-372-11-25
SWITZERLANDPhone: +41-1-3804646Fax: +41-1-3834655
U.K.Phone: +44-1628-829314Fax: +44-1628-820182
DISTRIBUTORS
ARGENTINADentalmax, SAPhone: +541-1482-71001Fax: +541-1482-67373
AUSTRIAWieladentPhone: +43-7672-93901Fax: +43-7672-93903
CHILECybel, SAPhone: +56-2-2321883Fax: +56-2-2330176
COLOMBIAImplantes y ComponentesPhone: +571-612-9362Fax: +571-620-5450
COSTA RICAImplantec S.A.Phone: +506-2-256411Fax: +506-2-247620
EL SALVADORDentimerc SA de CVPhone: +503-263-6350Fax: +503-263-6676
GREECEKostas Kornisorlis and Co.Phone: +302310-269-079Fax: +302310-555-573
ISRAELH.A. SystemsPhone: +972-3-6138777Fax: +972-3-6138778
ITALYBiomax, srl.Phone: +39-0444-913410Fax: +39-0444-913695
JAPANImplant Innovations JapanPhone: +81-66-868-3012Fax: +81-66-868-2444
KOREAJungsan Biomed Corp.Phone: +82-2-516-1808Fax: +82-2-514-9434
LEBANONTamer Freres s.a.l.Phone: +961-1-485690Fax: +961-1-510233
PANAMAOdontomedica, S.A.Phone: +507-2-239622Fax: +507-2-239621
PARAGUAYAndres H. Arce y Cia SRLPhone: +595-21-208185Fax: +595-21-496291
POLANDDental DepotPhone: +48-71-341-3091Fax: +48-71-343-6560
SINGAPOREAsia Implant Support & ServicesPhone: +65-6223-2229Fax: +65-6220-3538
TAIWANKuo Hwa Dental Suppliers Co., Ltd.Phone: +886-2-2226-1770Fax: +886-2-2226-8747
THAILANDPT Endeavour Co., Ltd.Phone: +662-264-2574Fax: +662-264-2573
UKRAINEOlimpexPhone: +380-44-246-9678Fax: +380-44-246-9678
URUGUAYPro3implant S.R.L.Phone: +598-2-23160Fax: +598-2-34163
Implant Innovations, Inc.Global Headquarters4555 Riverside DrivePalm Beach Gardens, FL 334101-800-342-5454Outside The U.S.: +1-561-776-6700Fax: +1-561-776-1272www.3i-online.com
3i and design, EP, OSSEOTITE are registered trademarks and ARCHITECH PSR, Better For YourPatients, Better For Your Practice, Certain, ENCODE, Gold-Tite, Patient Specific Restoration, andQuickSeat are trademarks of Implant Innovations, Inc. Stratos is a trademark of Ivoclar.© 2004 Implant Innovations, Inc. All rights reserved. REV A 09/04
ART924
Correct Incorrect
Correct Incorrect