Enclosed Track Conveyors - Conveyors by American...
39
Unibilt ® Enclosed Track Conveyors Enclosed Track Conveyors Quality Quality Reliability Reliability Performance Performance
Transcript of Enclosed Track Conveyors - Conveyors by American...

Unibilt ®
Enclosed Track ConveyorsEnclosed Track Conveyors
QualityQuality
ReliabilityReliability
PerformancePerformance

Designing a Conveyor ............................3 - 11
Conveyor Component Symbols .....................4 - 5
Typical Overhead Conveyor Drawing ............4 - 5
Conveyor Design Procedure ....................... 6 - 11
Conveyor Components ........................12 - 31
Universal Link Chain .........................................12
Enclosed Track .................................................13
Modular Track ...................................................13
Track Splices ....................................................14
Track Accessories .............................................14
Standard Turns and Curves ..............................15
Horizontal Turns ...............................................15
Vertical Curve Charts .................................16 - 18
Traction Wheel ..................................................19
Safety Stops .....................................................19
Drive Units .................................................20 - 21
Chain Take-Ups ................................................21
Chain Load Attachments .......................... 22 - 24
Lubricators ........................................................25
Carriers .............................................................26
Suspension Fittings ......................................... 27
Additional Unibilt Products ..................28-35
Unibilt Over-N-Under ...................................28-29
Hand-Pushed Trolley ........................................30
Deep Track .......................................................30
Hand-Pushed Monorail .....................................31
Stop-N-Flow Power & Free ..........................32-33
Inverted Power & Free .................................34-35
Sales Facilities ................................... Back Cover
CONTENTS

Please Note: This catalog is designed to illustrate the various Unibilt components and their applications in a conveyor system. Although self design and installation of a Unibilt system are possible, we strongly recommend working with Unibilt personnel to achieve the correct application of Unibilt products. You should be aware that environmental and many other conditions may vary with each installation. The Jervis B. Webb Company does not warrant that adherence to any guidelines or suggestions set forth in this brochure will necessarily result in proper selection, manufacture, installation and maintenance of conveyor equipment and/or a conveyor system. Unless there are specifi c written specifi cations or recommendations and pursuant to a written contractual commitment from it, the Jervis B. Webb Company hereby disclaims all responsibility for any equipment and/or system malfunction, any violations of law, property damage, personal injury or any other damages resulting from equipment and/or system selection, design, installation, maintenance, or operation carried out by a contractor, user or any other person.
No purchases of Unibilt components shall constitute the granting (either expressly, by implication, estoppel or otherwise) of any license under any existing or pending patents of the Jervis B. Webb Company, its Divisions, Subsidiaries and Affi liates.
Most conveyors are made to look like a Unibilt conveyor, but they’re just not designed to give the reliable performance of a Unibilt conveyor.
TRACKUnibilt Track is precision roll formed from patented WEBBALLOY II TM Steel– a specially for-mulated high strength carbon steel that is harder, stronger and designed to last longer – an exclusive feature of Unibilt track.
Horizontal Turns and Vertical Curves- 24” and 36” radius horizontal turns and 24” radius vertical curves are heat treated on the wear surface for added anti-wear qualities.
CHAINSide Links- Unibilt chain side links are heat treated for longer life. Wheels- Unibilt wheel races and ball bearings are manufactured from alloy steels, includ-ing high-carbon and high-chromium, 52100 alloy steel. These superior “through-hardened” grades of steel were selected for the superior depth of hardness attainable, superior wear resistance, and improved corrosion resistance.
Symmetrical Chain Pins- Unibilt symmetrical chain pins are precision drop-forged from carbon alloy steel, not stamped.
DRIVESUnibilt 750# drive units feature a compact, high-effi ciency inverter duty motor/reducer com-bination that sends more power directly to the drive. This confi guration immediately reduces noise and maintenance, while improving overload cut-off accuracy and durability.
Unibilt ENCLOSED TRACK CONVEYORS
Designed and manufactured for quality, reliability, and low cost performance by the Jervis B. Webb Company.
®
The Jervis B. Webb Company has supplied Unibilt enclosed track conveyors to industry throughout the world for over 40 years. Jervis B. Webb offers design, fabrication and installation capabilities of its Unibilt enclosed track conveyors on a direct basis or through our extensive distributor network.
Our complete line of modular pre-engineered components are available through stocking distributors strategically located for quick delivery.
For more information on Unibilt enclosed track conveyor equip-ment and systems call:
1-888-UNIBILT
Jervis B. Webb Company, World Headquarters, Farmington Hills, Michigan
Across the country, around the world, there’s a Unibilt Sales Facility near you!
36
(1-888-864-2458)
2
The Jervis B. Webb Company created the Unibilt product line in the early 1960s to provide manufacturers of all types with a multi-purpose enclosed track conveyor. De-signed and built upon principles of increasing productivity, Unibilt Enclosed Track Conveyors incorporate reliability, economy, fl ex-ibility, and simple installation either by welding or bolting.
Unibilt Enclosed Track Conveyors contain many features nor-mally associated with conventional I-Beam conveyors, plus features that are unique to this type of system, such as:
• Completely enclosed chain helps prevent accidental contact with moving parts.
• An enclosed track helps prevent contamination from reaching the chain or track bearing surfaces.
• The Unibilt heavy-duty chain with symmetrical chain pin is designed to provide maximum fl exibility in all directions, featuring easy assembly or disassembly with simple hand tools.
• The enclosed track design helps provide protection from the elements for the chain and other moving parts.
• Shorter radius curves and closer spacing of curve tangents are possible due to the universal link chain.
• Easier installation...no bulky roller turns or traction wheels to erect.
• Caterpillar-type drive units provide fl exibility for all enclosed track power requirements in a single compact package.
Qualifi ed local distributors and regional Unibilt representatives are available to assist you in all phases of a conveying system: design/engineering, plant layout, installation and application.
Unibilt Enclosed Track Conveyors offer a system that has applications in both simple and complex handling problems.
Unibilt Enclosed Track Conveyors

Designing a Unibilt Conveyor System
3
All design should be in compliance with the latest edition of ANSI B20.1, and, among other things, the requirments of OSHA Lockout/Tagout standards. Design work should only be done by personnel with knowledge of these requirements.
On the following pages are illustrations of a typical conveyor layout, component sym-bols, and general step-by-step procedures that have been followed in many cases.
Shown on pages 4 and 5 is a plan view and an elevation view of a typical Unibilt overhead conveyor system. It is an example of the drawing technique and conveyor component symbols used by the conveyor industry in designing a system.
A list of conveyor data is given as a typical example of the components necessary to install the conveyor used in the example.
Designed to provide maximum fl exibility in all directions, universal link chain, de-veloped by Unibilt, features symmetrical chain pins with a true universal joint at each pitch.
Easily assembled or disassembled with hand tools by removal or insertion of a single bolt at every pitch, universal link chain is completely heat-treated to as-sure strength and long life.
Unibilt ®
Heavy-Duty ChainWith Symmetrical Chain Pin

Designing a Conveyor
Conveyor Length ...... 280 ftConveyor Speed ........... 30 fpmOven Temperature ........ 225°Voltage.......................... 230Phase ........................... 3HZ ................................. 60Take-Up Type ............... SpringHorizontal Turns ........... 24” R.Vertical Curves ............. 24” R. 45°Product Weight ............. 40#Carrier Weight .............. 9.5#Carrier Spacing............. 4’0 3/4”Live Load ...................... _____
Conveyor Data:
Page
Step 1. Draw Plant Layout ....................................... 6
Step 2. Draw Path of Conveyor ................................ 6
Step 3. Select the Chain Attachment ....................... 6
Step 4. Design a Carrier ........................................... 6
Step 5. Determine Track Elevations ........................ 6
Step 6. Select Vertical Curves .................................. 7
Step 7. Select Horizontal Turns .............................. 7
Step 8. Determine Guard Requirements ................ 7
Step 9. Determine Required Carriers Per Minute .. 8
Step 10. Determine Carrier Spacing .......................... 8
Step 11. Determine Maximum Conveyor Speed ..... 8
Step 12. Determine Conveyor Length ...................... 8
Step 13. Determine Number of Carriers ................... 8
Step 14. Determine Number of Loaded and
Unloaded Carriers ....................................... 9
Step 15. Determine Live Load ................................... 9
Step 16. Determine Lift Load ..................................... 9
Step 17. Determine Chain Pull ........................ 9 & 10
Step 18. Determine Drive Size and Location ........ 10
Step 19. Suspension Methods ............................... 10
Step 20. Summary and Installation ........................ 11
Design Procedure
ConveyorComponentSymbols
90° 180°
Elevation
Horizontal Straight Conveyor
Direction Hangerof Travel Location
Provided by customer:
Electrical Controls, Carriers, Installation, Supports and Hanging Steel
4
Anti-Runaway
Horizontal Turn
20’
20’ typ.
Take-up Drive
Traction Wheel Turns
Horizontal Turns
90°180°
60° 45° 30°
Vertical CurveChange In Elevation
17’
9’5’
Down
Right HandCaterpillar Drive
Up
17’-0”
17’-0”

Anti-Backup Anti-Runaway Conveyor Guard Booth Enclosure Take-Up Assembly With Limit Switch Oven-Washer Spray etc.
Oven temperature should not exceed 450°F
Lubrication Chain Inspection Take-Up Assembly Gate
Expansion JointSpread
Up Down
Elevation Elevation
Roller Tiurn
Vertical Curve
Down
Up
Unload
Down
Up
Oven
Guard Material
Load
Anti-Backup
DIP TANK
Special
Spread
Installation Gate
Dip Tank
Up
11’
DownUp
9’
5
17’-0”9’-0”9’-0”
17’-0”5’-0”5’-0”17’-0” 9’-0”
9’-0”17’-0”
ertical Curve
Hanger Assembly
Traction Wheel Turn

The following step-by-step procedure will illustrate general principles used indesigning a Unibilt Enclosed Track conveyor system.
6
1 Draw Plant Layout • Draw layout to largest possible scale, for example: 1/4 = 1’-0”.
• Make a plan view of plant area where conveyor is to be erected. Show dimensioned column or bay lines.
• Show and label all obstructions in the path of conveyor, such as columns, walls, machinery, work areas and aisles.
• Indicate “North” direction relative to building. Refer to typical layout for example.
2 Draw Path of Conveyor • On plant layout, locate all loading and unloading areas, as well as any processing stations that will be served by the conveyor. Typical stations: dip tanks, paint booths, bake ovens, etc.
• Draw conveyor route so that it connects all areas in their proper work sequence. Keep parallel conveyor routes as closely spaced as possible. This will reduce amount of supporting members and guards required.
• Be sure the path of conveyor does not interfere with any machine operations or other work areas.
• Indicate location of drives, vertical curves, horizontal turns, etc., relative to column lines. Refer to typical layout and conveyor symbols.
3 Select the Chain Attachment • Chain attachments can be selected from the illustrations on pages 22, 23 and 24.
• Select the attachment to which the load or carrier can most easily be attached, keeping within the load ratings.
• Attachments illustrated on pages 22, 23 and 24 are standard stock attachments. Almost any type of attachment can be fabricated on special order to suit specialized applications. (In our example, we are using attachment 21298.)
4 Design a Carrier • Some examples of carrier designs are shown in this catalog.
• Determine number of parts to be placed on each carrier. Loads must be balanced.
• Design carrier bracket to fi t chain attachment.
• Design of carrier should permit easy loading and unloading of parts, yet hold product securely during transportation.
• Do not design the carrier to sustain more weight than the rated capacity of the attachment.
5 Determine Track Elevations • Elevations are measured from fl oor line to top of track.
• At loading and unloading areas, the conveyor height must permit a person to easily load and unload the carrier.
• Over work areas and aisles, an accepted clearance is 7’0” from fl oor to bottom of guard. However, over aisles where industrial trucks, etc., are used, the conveyor height must allow traffi c to pass freely.
Designing a Conveyor

7 Select Horizontal Turns • Make a plan view layout of horizontal turn as shown in fi gure below. Clearance between adjacent carriers when they are negotiating turns will deter-mine the minimum horizontal turn radius and carrier centers.
• For increased conveyor life, use the largest standard radius horizontal turn possible in your layout. See the horizontal turn section.
8 Determine Guard Requirements • For standard guard methods, refer to Guard Section. All guards must meet OSHA and ANSI B20.1 specifi cations.
• Select type of conveyor guard best suited to your requirements.
• Be sure loaded carriers will clear all guards. It is especially important to check clearances on hori- zontal and vertical curves. Carrier templates can be used for this purpose.
• Locate each guard relative to some adjacent component or column line as shown on Typical Conveyor Layout.
6 Select Vertical Curves • Using the fi gure below, select a degree of incline for vertical curves that will provide a clearance between carriers when they are on incline runs. Also, to assure clearance between carriers, dimension “A” must be greater than single carrier length.
• Select a load spacing.
• Because carriers swing, clearance must be provided between top of carrier and track.
• Select vertical curves from vertical curve section.
• Indicate on drawing the horizontal length of each vertical curve from tangent to tangent.
• Locate each vertical curve relative to some adjacent component or column as shown on Typical Conveyor Layout.
Work Centers - Level Work Centers On Slopes
Nominal Actual 30 Degree 45 Degree 60 Degree
8-1/8” 7-1/16” 5-3/4” 4-1/16” 16-1/4” 14-1/8” 11-1/2” 8-1/8”
2 ft 24-3/8” 21-1/8” 17-1/4” 12-3/16”
32-1/2” 28-3/16” 23” 16-1/4” 40-5/8” 35-3/16” 28-3/4” 20-5/16”
4 ft 48-3/4” 42-1/4” 34-1/2” 24-3/8”
56-7/8” 49-1/4” 40-1/4” 28-7/16” 65” 56-5/16” 46” 32-1/2” 6 ft 73-1/8” 63-3/8” 51-3/4” 39-9/16”
81-1/4” 70-3/8” 57-1/2” 40-5/8” 89-3/8” 77-7/16” 63-1/4” 44-11/16” 8 ft 97-1/2” 84-7/16” 69” 48-3/4”
105-5/8” 91-1/2” 74-3/4” 52-13/16” 113-3/4” 98-9/16” 80-7/16” 56-7/8” 10 ft 121-3/8” 105-9/16” 86-3/16” 60-15/16”
Rounded out to the nearest 1/16”.
Horizontal Turn
Vertical Curve
Work Clearance Limits for Vertical Rises and Drops.
Load Spacing
“A”
Clearance
Clearance
7

Designing a Conveyor
9 Determine Required Carriers Per Minute • How many parts are to be handled per minute at maximum speed?
• You have designed a carrier that will carry a specifi c number of parts. The following typical example will best explain the proper procedure:
a. Assume your production rate is 900 pieces per hour.
b. Assume each carrier holds two (2) parts.
Required number of carriers per hour equals 900/2 or 450 carriers per hour.
Required number of carriers per minute is 450/60 or 7.5 carriers per minute.
Determine Carrier Spacing • Carriers can be spaced on a minimum of 8-1/8” centers or a spacing of any multiple of 8-1/8”.
• Refer to Step “5” and Step “6”, number 1, and note the minimum carrier spacing determined for proper clearances.
• Carriers can now be spaced for adequate clearances at multiples of 8-1/8”.
Determine Maximum Conveyor Speed • A speed of 64.2 feet per minute is usually considered maximum. However, 30 FPM allows easy loading and unloading and assures longer conveyor life.
• Required conveyor speed in feet per minute is equal to the number of carriers per minute multiplied by carrier spacing in feet.
• To illustrate this formula:
a. In Step “9” we determined that 7.5 carriers per minute are required.
b. Assume a carrier spacing of 48-3/4” or 4 feet nominal.
c. 7.5 carriers per minute multiplied by carrier spacing of 4 feet equals a conveyor speed of 30 FPM.
• To allow for variation in production requirements, it is advisable to set a maximum speed of about two times that calculated, and use a variable speed drive with a speed range of about 3-to-1.
a. A speed two times greater than the calculated 30 FPM is 60 FPM.
b. Using a 3-to-1 ratio variable speed drive would give you a speed range of 20 FPM to 60 FPM.
• Refer to drive section for variable and constant speed drive information.
Determine Conveyor Length • Obtain the sum of all straight track dimensions.
• Obtain the sum of all arc lengths on the horizontal turns by using the horizontal turn and take-up developed lengths. See diagram on page 15.
• Obtain the sum of all arc lengths on the vertical curves by using the vertical curve charts on pages 16, 17 and 18.
Determine Number of Carriers • The required number of carriers is equal to the total conveyor length divided by the carrier spacing.
• In our example, conveyor length 280’-3-3/4” ÷ carrier spacing of 48-3/4” = 69 carriers.
10
11
12
13
8
14 Determine Number of Loaded and Unloaded Carriers • Establish distance from loading to unloading points.
• Divide this distance by carrier spacing. In our example:
a. Assume the distance from loading to unloading points is 192’ with a 4-foot nominal carrier spacing.
b. Total number of loaded carriers is 192’÷ 4 or 48 loaded carriers.
15 Determine Live Load • The live load on a conveyor is equal to the sum of the weights of the chain, attachments, carrier and product.
a. Multiply weight of the chain (3.75#) by the number of feet of chain. In our example 280’ X 3.75# = 1050#.
b. Multiply weight of attachments by the required number of empty carriers. In our example .5# X 69 = 34.5#.
c. Multiply weight of empty carrier by required number of carriers. In our example 9.5# X 69 = 655.5#.
d. Multiply weight of product only by number of required loads. In our example 40# X 48 = 1920#.
e. Totals of a, b, c, d = total live load on conveyor = 3660#.
16 Determine Lift LoadThe lift load is the amount of force required to pull the live load upward along the vertical curves in the entire system.
To calculate this force, determine the change in eleva-tion of all the loaded vertical curves traveling upward in the system. This net vertical rise (feet) will be consid-ered the total lifting height of the conveyor.
The lift load for the elevation changes of the conveyor is equal to the total lift height (feet) multiplied by the individual load weight (pounds) then divided by the load spacing feet.
Example:a. Per our sample layout there are three vertical
curves traveling upward adding to a total rise height of 28’ (8’-0 + 8’- 0” + 12’- 0”)
b. The load on each carrier is 40# and carriers are on 4’-0” (four) foot centers.
Lift load = 28’ X 40 ÷ 4 = 280 lbs.
The chain, trolleys, and carriers are excluded from the calculations because they are balanced by the portion of the system that moves down vertical curves.
To pull a loaded moving conveyor up any incline re-quires a certain amount of continuous force or horse-power. This requirement, however, is frequently com-pensated by a loaded decline of the same length further along the conveyor and, therefore, can be ignored.Starting conditions, however, often impose an excep-tion to this rule, since at the start of production when the conveyor is fi rst loaded, inclines could be loaded without normally loaded balancing devices.
17 Determine Chain PullChain pull is the effort necessary to maintain the normal operating speed of a conveyor under a rated capacity load. To arrive at this fi gure, it is necessary to add the lift load and the friction factors, expressed as a small percentage of the live load, which act as resistance to the progress of the conveyor. The live load and the lift load were calculated in Steps 15 and 16.
9

10
Determine Chain Pull Cont.Frictional resistance is found in the bearings of the trol-ley wheels, roller or traction wheel turns, and the drive unit itself. This friction fi gure is represented as a small percentage. It should be noted that these percentages are for average conveyors that travel under normal conditions. When adverse environmental conditions exist or the conveyor is abnormally long or complex and exceeds the chain pull capacity of one drive, a progres-sive chain pull computation is necessary where the friction losses are progressively calculated and accumulated through the path along the conveyor. Contact your Un-ibilt representative for these conditions.
Using a 2-1/2% friction factor will cover most normal conditions.
Note: A large number of vertical and horizontal
curves will create slightly higher friction.
To determine chain pull due to friction, multiply total moving load by selected friction factor. Using fi gures from previous examples, the following illustrates proper procedure.
18 Determine Drive Size and Location • The drive must pull - not push - the load.
• Locate the drive so it will apply a pulling force on the most heavily loaded portion of the system.
• For best results, locate the drive at the highest level in the conveyor system and place the take-up just after the drive in the direction of chain travel, preferably at the lowest point.
• Show selected drive location on conveyor layout. Relate location to some adjacent component as shown in Typical Conveyor Layout.
• Drives are available in 300# and 750# capacities. For multiple drive systems, consult your Unibilt representative.
• Chain pull that is greater than 300# requires a 750# drive.
19 Suspension Methods • Determine the method of attaching hangers to your building as illustrated in the back of the catalog.
• To arrive at the accurate suspension centers, a live load per foot fi gure must be determined. Live load weight per foot is the total weight of all products, carriers, attachments, and chain. Using fi gures from previous examples, the following example illustrates the proper procedure:
A. Total Live Load 3660 lb B. Divided By Chain Length 280 ft C. Live Load Per Foot 13.1 lb/ft
At 13.1 lbs./ft., support centers can be up to 15’-6”.
• Determine the number and type of clamps and track splices required to suspend the conveyor from your building steel.
• The track should be suspended at every splice when using bolted connection 8671.
• When using welded-style splices, the track should be suspended at the horizontal turns, at the top and bottom of the vertical curves and at all four corners of the drive and take-up.
• Determine the approximate length of each hanger and sway brace from the dimensions shown on the typical suspension methods.
Because of the diffi culty of calculating the exact length of each hanger or sway brace, they are shipped in 12’-0” long threaded lengths and cut to suit when the conveyor is erected.
Special hangers or sway braces can be ordered cut to length up to 20’-0” long with 12” of thread on each end.
• If overhead suspension is impossible or impractical, fl oor supports can be furnished to suit individual needs.
a. Total live load (from Step 15) ..................... 3660 lb
b. Multiply by friction factor ................................... 0.025 Friction chain pull ......................................... 91.5 lb
Add lift load to friction chain pull to obtain total chain pull.
a. Friction chain pull ......................................... 91.5 lb
b. Lift load (from Step 16) .............................. 280.0 lb Total chain pull ............................................ 371.5 lb
V20200 Series Track Uniform Live Load - lb/ft
15.0
15.5
0.75
25.0
13.5
0.67
35.0
12.5
0.59
50.0
11.5
0.57
Span - feet
Defl ect - inches
Uniform Live Load - lb/ft
75.0
10.0
0.75
100.0
9.0
0.67
200.0
8.0
0.59
250.0
7.5
0.37
Span - feet
Defl ect - inches
60.0
10.5
0.47
250.0
6.5
0.28
Designing a Conveyor

20 Summary and Installation For quick and easy reference, make a legend on a layout covering the following subjects:
(Refer to typical conveyor layout and legend)
a. Speed of conveyor - mark direction of travel b. Length of conveyor c. Carrier spacing d. Total number of carriers
e. Number of parts on each carrierf. Weight of carrier
g. Weight of part on carrier h. Live load (chain, attachment carrier & load)
i. Electrical specifi cations j. Guard cross-section with dimensions k. Chain pull
Make a list of all components required to complete your conveyor system.
The following is a suggested check list:
a. Horizontal turns (degree and radius) b. Take-up c. Drive & safety guards d. Vertical curves (degree and radius) e. Chain attachments
f. Chain length g. Guard material h. Carriers i. Header and hanger steel j. Maintenance and inspection gate k. Track straight sections
l. Track splices or hangers m. Lubrication
n. Traction turns o. Anti-backup
p. Anti-runaway expansion joints
The design procedure outlined above assumes the existence of certain environmental and other conditions.
For example, the following conditions preclude effective use of the design procedure set forth above:
a. Adverse atmospheric conditions such as alkali washes, bonderite, dust or grit.
b. Oven temperatures above 450° F.
c. Conveyor speed above 60 feet per minute.
d. All vertical curves should be balanced.
To pull a loaded conveyor up an incline requires a defi nite amount of horsepower. To compensate for this require-ment, there is generally a loaded decline of the same length to balance the load being lifted. The horsepower required to lift the load is then not refl ected back into the horsepower requirements of the drive. When the convey-or is loaded at one elevation and is unloaded at a higher elevation, a Webb Regional Manager should be consulted to make sure that the drive capacity is adequate.
The conditions set forth above are intended to be ex-
amples and are not exhaustive. There may be other
conditions that preclude use of the design procedure
set forth above. We recommend that all self-designed
systems be checked by a conveyor engineer who is
thoroughly familiar with the design capabilities of
Unibilt conveyors and the special precautions neces-
sary when operating in adverse conditions or when
conveyors are abnormally long or complex.
You may contact your local Webb Regional Manager. He has had wide experience on all types of conveyor systems and components. His services are available for surveying your plant, inspecting your layout and assisting or designing a system for your needs.
The Unibilt Enclosed Track Overhead Conveyor has beendesigned to be erected either by bolted construction, or by welded construction when experienced welders are avail-able. Sections in this brochure on installation illustrate various methods and components used to erect a Unibilt Enclosed Track Overhead Conveyor. Careful study of this section will help in selecting the equipment and method best suited to install your particular system.
We wish to caution you that conditions at your plant
may be such as to dictate a particular installation
method and specifi c components and such condi-
tions could preclude use of installation methods set
forth in this brochure.
The Jervis B. Webb Company has a staff of erection superintendents strategically located throughout theUnited States and Canada. Webb Regional Manag-ers in your area can procure the services of these experts to assist you in any or all phases of your conveyor installation.
11

Unibilt Conveyor Components
Chain...the Heart of the System
8” nominal load centers
4-1/16” pitch length with a four-way
universal joint at each pitch.
Weight: 3.75 lb per foot
Stamped side links of high carbon steel, heat-treated for maximum strength and wearability.
Unibilt Heavy-Duty Chain
27827 (Nylon)Maximum temperature: up to 120°F w/proper lubrication
Unibilt Heavy-Duty Chain
27826 (Steel)Maximum temperature: up to 450°F w/proper lubrication
12
Unibilt Heavy-Duty Chain with symmetrical chain pin
is designed to provide maximum fl exibility in all
directions with a true universal joint at every pitch.
Some of its outstanding features are:
• Both lateral and vertical load-carrying wheels are ball bearing style, made of machined steel with machined ball bearing races. Heat-treated steel balls are used. All wheel parts are heat-treated to provide maximum life.
• The symmetrical chain pin is high carbon steel and heat-treated for long life, added strength and ease of installation.
• The ultimate strength of this chain is over 10,000 pounds, providing a safety factor of over 16-to-1 when used at recommended chain pulls (item 17, page 10).
• Easily assembled and disassembled, the chain can be disassembled at every pitch by removing the axle bolt on the lateral guide wheel. The chain can then be
fl exed 90 degrees and the side links removed.
• Heavy-duty chain is available with steel core wheels with nylon tires for noise reduction.
• The heavy-duty chain comes in 20’ lengths (nominal).
• 27826 chain (steel) 125 pound capacity on 8” nominal centers.
• 27827 chain (nylon) 75 pound capacity on 8” nominal centers.
➤
➤
➤
➤
Cut-away showing newsymmetrical chain pin
➤
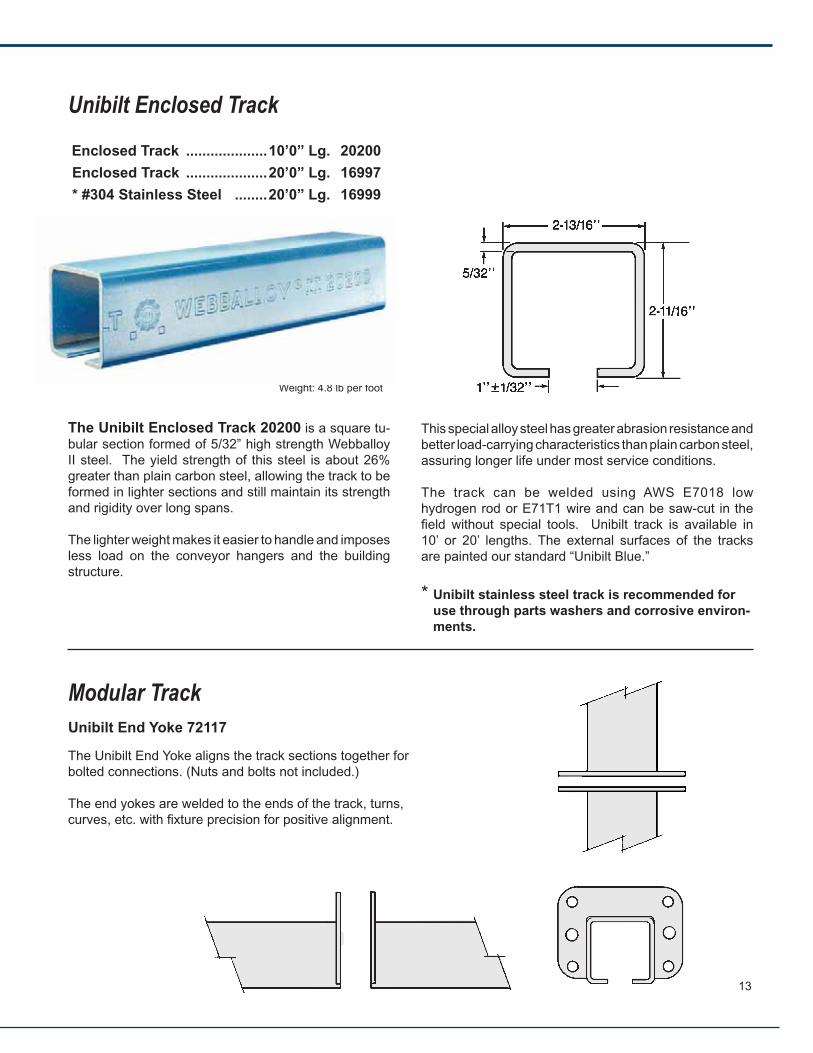
Unibilt Enclosed Track
Enclosed Track ....................10’0” Lg. 20200
Enclosed Track ....................20’0” Lg. 16997
* #304 Stainless Steel ........20’0” Lg. 16999
The Unibilt Enclosed Track 20200 is a square tu-bular section formed of 5/32” high strength Webballoy II steel. The yield strength of this steel is about 26% greater than plain carbon steel, allowing the track to be formed in lighter sections and still maintain its strength and rigidity over long spans.
The lighter weight makes it easier to handle and imposes less load on the conveyor hangers and the building structure.
This special alloy steel has greater abrasion resistance and better load-carrying characteristics than plain carbon steel, assuring longer life under most service conditions.
The track can be welded using AWS E7018 low hydrogen rod or E71T1 wire and can be saw-cut in the fi eld without special tools. Unibilt track is available in 10’ or 20’ lengths. The external surfaces of the tracks are painted our standard “Unibilt Blue.”
* Unibilt stainless steel track is recommended for
use through parts washers and corrosive environ-
ments.
Modular TrackUnibilt End Yoke 72117
The Unibilt End Yoke aligns the track sections together for bolted connections. (Nuts and bolts not included.)
The end yokes are welded to the ends of the track, turns, curves, etc. with fi xture precision for positive alignment.
13
Weight: 4.8 lb per foot

Track Accessories
This removable track section is designed to simplify inspection and maintenance of the conveyor chain.It should never be opened while the conveyor is in operation.
Track Splices
14
Splice Hanger Assembly 8671 securely clamps and holds the joined section of track in alignment. Two heavy cast wedges with serrated edges are drawn to-gether by bolts through the sides of the bracket. When the wedges are tightened, the serrations tightly grip the track and clamp the track ends securely together. This assembly is also used as a suspension bracket. (Power only use,)
This welded type of track splice is recommended where experienced welders are available. It eliminates the necessity for splice hangers and ensures a smooth continuous track.
Splice Clamp 8624 aligns the sides and track tread and holds the two track sections in position for welding.
Weight: 5 lbWeight: 5 lb
Splice Clamp
8624
Welded Splice
Connection
Installation Gate
17095
At least one installation gate is required on every conveyor and is normally located at the exit end of the drive. It should never be opened while the con-veyor is in operation.
Take-Up
Expansion
Joint
20144
This expansion joint is for use on those occa-sions when you have a fi eld-erected take-up (23” closed-31” open).
Weight: 12 lbWeight: 20 lb
Weight: 12 lbWeight: 12 lb
Building and Oven
Expansion Joints
20143
Inspection Gate
20502
This expansion joint should be used to compensate for track expansion caused by heat, for any conveyor pass-ing through an oven. Also, this expansion joint should be installed in line with all building expansion joints.
Splice Hanger
Assembly
8671
Bolted Splice
Connection
3-15/16”
➤
➤
Unibilt Conveyor Components

Rigid “H” Attachment 16975 (Capacity 75 lb)
Similar to 21298 except this attachment remains perpen-dicular to the chain. There is also an extra attaching hole 3-1/4” below the bottom of the track. (Capacity is 75 lb)
Load Bar Attachment 9032Capacity: 250 lb, Level Systems 200 lb, Maximum Degree of Incline 30° 175 lb, Maximum Degree of Incline 45°
Load Bar Attachment 9032 is suspended from two “H” attachments, thereby increasing the capacity of the load carrier. (“H” attachments must be ordered separately.) 5/16” bolt or hardened rivet not included.
Weight: 0.5 lb
Chain Load AttachmentsA number of load-carrying attachments have been de-veloped to suspend a large variety of carriers and loads from the chain.
The standard attachments illustrated below are those that have the widest usage and are adaptable to almost every type of load. Special attachments can be designed to ac-commodate special applications.
The Standard “H” Attachment is the most popular unit for connecting loads to the chain. It engages the load-wheel axle with a scissor like action. The illustrations show how the attachment grips the load-wheel axle and is locked in position by the load-carrying bolt in the bottom hole and cannot be removed until the bolt is removed.
22
Standard “H” Attachment 21298(Capacity 125 lb, Max. 45° Incline)
1-15/16”
1-5/16”
9/16”15/16” 1”
11/32” dia. holes (2)
11/32” dia. hole 13/32”
dia. hole
1”
8-1/8” 1/4”
3/16”
3-2/16”
➤
➤
1-15/16”
Bottomof track
11/32” dia. hole
1/2”
➤
➤1/2”➤
➤
➤3/16”
H Attachment
Standard Turns and CurvesAll horizontal turns are available in 24” and 36” radii and verti-cal curves illustrated are carried in stock for immediate delivery. However, special radius and/or degree turns can be fabricated upon request. For smaller than 24” radius, horizontal traction wheels can be furnished.
Both horizontal turns and vertical curves are formed from 20200 track. Horizontal turns 24” and 36” radius and vertical curves 24” radius are heat-treated in areas of wheel contact to ensure a hard, tough surface for added anti-wear qualities.
Standard turns are fabricated with 8 inches of straight track on each end. However, special turns can be fabricated to order with less for areas where turn tangents are closer than 16 inches.
Horizontal Turns
Horizontal turn with top removed illustrates how the chain passes around the curve. The lateral wheels ride on the side of the track, which guides the chain smoothly around a horizontal turn with-out the use of special guides, traction wheels or roller turns.
Compound Vertical curve with one side removed illustrates how the vertical chain wheels contact the top of the lower curve and the bottom of the upper curve.
Vertical Curves
30° Horizontal Turn
15
For inverted applications, it is suggested that only inverted horizontal turns be used.
Inverted Horizontal Turns Part No. Description Weight
21495 24” R x 30° 11 lb21496 24” R x 45° 13 lb21497 24” R x 60° 16 lb21498 24” R x 90° 21 lb21506 24” R x 180° 35 lb21499 36” R x 30° 13 lb21500 36” R x 45° 17 lb21501 36” R x 60° 21 lb21502 36” R x 90° 28 lb21503 36” R x 180° 49 lb
Overhead Horizontal Turns Part No. Description Weight
20076 24” R x 30° 11 lb20077 24” R x 45° 13 lb20078 24” R x 60° 16 lb20079 24” R x 90° 21 lb20080 24” R x 180° 35 lb20081 36” R x 30° 13 lb20082 36” R x 45° 17 lb20083 36” R x 60° 21 lb20084 36” R x 90° 28 lb20085 36” R x 180° 49 lb20087 48” R x 90° 40 lb
45° Horizontal Turn
90° Horizontal Turn
180° HorizontalTurn
Rad
iusRa
dius
Rad
ius
Rad
ius
8”
8”
8”
8”
Unibilt Conveyor Components

Drop S L C
1’-5-5/8” 0 4’-1-7/8” 5’-9-3/4” 1’-9” 0’-6-3/4” 4’-7-5/8” 6’-4-3/8” 2’-0” 1’-0-3/4” 5’-0-7/8” 6’-10-3/8” 2’-3” 1’-6-3/4” 5’-6” 7’-4” 2’-6” 2’-0-3/4” 5’-11-1/4” 7’-10-3/8” 2’-9” 2’-6-3/4” 6’-4-1/2” 8’-4-3/8” 3’-0” 3’-0-3/4” 6’-9-5/8” 8’-10-3/8” 3’-6” 4’-0-3/4” 7’-8” 9’-10-3/8” 4’-0” 5’-0-3/4” 8’-6-3/8” 10’-10-3/8” 4’-6” 6’-0-3/4” 9’-4-7/8” 11’-10-3/8” 5’-0” 7’-0-3/4” 10’-3-1/4” 12’-10-3/8” 5’-6” 8’-0-3/4” 11’-1-5/8” 13’-10-3/8” 6’-0” 9’-0-3/4” 12’-0” 14’-10-3/8” 6’-6” 10’-0-3/4” 12’-10-3/8” 15’-10-3/8” 7’-0” 11’-0-3/4” 13’-8-3/4” 16’-10-3/8” 7’-6” 12’-0-3/4” 14’-7-1/8” 17’-10-3/8” 8’-0” 13’-0-3/4” 15’-5-5/8” 18’-10-3/8” 8’-6” 14’-0-3/4” 16’-4” 19’-10-3/8” 9’-0” 15’-0-3/4” 17’-2-3/8” 20’-10-3/8” 9’-6” 16’-0-3/4” 18’-0-3/4” 21’-10-3/8” 10’-0” 17’-0-3/4” 18’-11-1/8” 22’-10-3/8” 10’-6” 18’-0-3/4” 19’-9-1/2” 23’-10-3/8” 11’-0” 19’-0-3/4” 20’-7-7/8” 24’-10-3/8” 11’-6” 20’-0-3/4” 21’-6-3/8” 25’-10-3/8” 12’-0” 21’-0-3/4” 22’-4-3/4” 26’-10-3/8” 12’-6” 22’-0-3/4” 23’-3-1/8” 27’-10-3/8”
2’-0” RAD. 30°
Lower Vertical Curve 20112
Weight: 10.8 lb
Vertical Curve Charts
16
3’0” Radius X 30 Degrees2’0” Radius X 30 Degrees
Weight: 10.8 lb
2’-0” RAD. 30°
Upper Vertical Curve 20111
Drop S L C
1’-2-3/8” 0 3’-1-7/8” 4’-9-1/8” 1’-6” 0’-7-1/8” 3’-8” 5’-4-1/4” 1’-9” 1’-1-1/8” 4’-1-1/4” 5’-10-1/4”
2’-0” 1’-7-1/8” 4’-6-3/8” 6’-4-1/4” 2’-3” 2’-1-1/8” 4’-11-5/8” 6’-10-1/4”
2’-6” 2’-7-1/8” 5’-4-7/8” 7’-4-1/4” 2’-9” 3’-1-1/8” 5’-10” 7’-10-1/4”
3’-0” 3’-7-1/8” 6’-3-1/4” 8’-4-1/4” 3’-6” 4’-7-1/8” 7’-1-5/8” 9’-4-1/4”
4’-0” 5’-7-1/8” 8’-0” 10’-4-1/4” 4’-6” 6’-7-1/8” 8’-10-3/8” 11’-4-1/4”
5’-0” 7’-7-1/8” 9’-8-3/4” 12’-4-1/4” 5’-6” 8’-7-1/8” 10’-7-1/8” 13’-4-1/4”
6’-0” 9’-7-1/8” 11’-5-5/8” 14’-4-1/4” 6’-6” 10’-7-1/8” 12’-4” 15’-4-1/4”
7’-0” 11’-7-1/8” 13’-2-3/8” 16’-4-1/4” 7’-6” 12’-7-1/8” 14’-0-3/4” 17’-4-1/4” 8’-0” 13’-7-1/8” 14’-11-1/8” 18’-4-1/4” 8’-6” 14’-7-1/8” 15’-9-1/2” 19’-4-1/4” 9’-0” 15’-7-1/8” 16’-7-7/8” 20’-4-1/4” 9’-6” 16’-7-1/8” 17’-6-3/8” 21’-4-1/4”
10’-0” 17’-7-1/8” 18’-4-3/4” 22’-4-1/4” 10’-6” 18’-7-1/8” 19’-3-1/8” 23’-4-1/4” 11’-0” 19’-7-1/8” 20’-1-1/2” 24’-4-1/4” 11’-6” 20’-7-1/8” 20’-11-7/8” 25’-4-1/4” 12’-0” 21’-7-1/8” 21’-10-1/4” 26’-4-1/4”
12’-6” 22’-7-1/8” 22’-8-5/8” 27’-4-1/4”
Unibilt Conveyor Components
1’-9/16” arc on center line
8”
2’ R
adiu
s
2’ R
adiu
s
1’-9/16” arcon center line 8”
8”
8”
8”8”

Weight: 13.1 lb
Drop S L C
3’-0” 0’-5-1/8” 5’-5-7/8” 7’-9-5/8” 3’-6” 1’-1-5/8” 5’-11-7/8” 8’-6-1/8” 4’-0” 1’-10” 6’-5-7/8” 9’-2-5/8” 4’-6” 2’-6-1/2” 6’-11-7/8” 9’-11-1/8” 5’-0” 3’-3” 7’-5-7/8” 10’-7-5/8” 5’-6” 3’-11-1/2” 7’-11-7/8” 11’-4-1/8” 6’-0” 4’-8” 8’-5-7/8” 12’-0-1/2” 6’-6” 5’-4-1/2” 8’-11-7/8” 12’-9” 7’-0” 6’-1” 9’-5-7/8” 13’-5-1/2” 7’-6” 6’-9-1/2” 9’-11-7/8” 14’-2” 8’-0” 7’-6” 10’-5-7/8” 14’-10-1/2” 8’-6” 8’-2-3/8” 10’-11-7/8” 15’-7” 9’-0” 8’-10-7/8” 11’-5-7/8” 16’3-1/2” 9’-6” 9’-7-3/8” 11’-11-7/8” 17’-0” 10’-0” 10’-3-7/8” 12’-5-7/8” 17’-8-3/8” 10’-6” 11’-0-3/8” 12’-11-7/8” 18’-4-7/8” 11’-0” 11’-8-7/8” 13’-5-7/8” 19’-1-3/8” 11’-6” 12’-5-3/8” 13’-11-7/8” 19’-9-7/8” 12’-0” 13’-1-7/8” 14’-5-7/8” 20’-6-3/8” 12’-6” 13’-10-1/4” 14’-11-7/8” 21’-2-7/8”
Min. Drop is 2’-8-3/8” when S = 0 L = 5’-2-1/4” C = 7’-4-1/2”
Drop S L C
2’-3” 0’-2-1/4” 3’-10-7/8” 6’-0” 2’-6” 0’-6-1/2” 4’-1-7/8” 6’-4-1/4” 2’-9” 0’-10-3/4” 4’-4-7/8” 6’-8-1/2” 3’-0” 1’-3” 4’-7-7/8” 7’-0-3/4” 3’-6” 1’-11-1/2” 5’-1-7/8” 7’-9-1/4” 4’-0” 2’-8” 5’-7-7/8” 8’-5-3/4” 4’-6” 3’-4-1/2” 6’-1-7/8” 9’-2-1/8” 5’-0” 4’-1” 6’-7-7/8” 9’-10-5/8” 5’-6” 4’-9-1/2” 7’-1-7/8” 10’-7-1/8” 6’-0” 5’-6” 7’-7-7/8” 11’-3-5/8” 6’-6” 6’-2-3/8” 8’-1-7/8” 12’-0-1/8” 7’-0” 6’10-7/8” 8’-7-7/8” 12’-8-5/8” 7’-6” 7’-7-3/8” 9’-1-7/8” 13’-5-1/8” 8’-0” 8’-3-7/8” 9’-7-7/8” 14’-1-5/8” 8’-6” 9’-0-3/8” 10’-1-7/8” 14’-10-1/8” 9’-0” 9’-8-7/8” 10’-7-7/8” 15’-6-1/2” 9’-6” 10’-5-3/8” 11’-1-7/8” 16’-3” 10’-0” 11’-1-7/8” 11’-7-7/8” 16’-11-1/2” 10’-6” 11’10-1/4” 12’-1-7/8” 17’-8” 11’-0” 12’-6-3/4” 12’-7-7/8” 18’-4-1/2” 11’-6” 13’-3-1/4” 13’-1-7/8” 19’-1” 12’-0” 13’-11-3/4” 13’-7-7/8” 19’-9-1/2” 12’-6” 14’-8-1/4” 14’-1-7/8” 20’-6”
Min. Drop is 2’-1-3/8” when S = 0
L = 3’-9-1/4” C = 5’-9-3/4”
2’-0” RAD. 45°Lower Vertical Curve 20114
Weight: 13.1 lb
2’0” Radius X 45 Degrees 3’0” Radius X 45 Degrees
2’-0” RAD. 45°
Upper Vertical Curve 20113
17
8”
2’ R
adiu
s
1’ 6-7/8” arcon center line 8”
2’ R
adiu
s
8”
8”
8” 8”
1’ 6-7/8” arcon center line

Drop S L C
3’-6” 0’-4-3/4” 4’-4” 7’-3” 4’-0” 0’-11-3/4” 4’-7-3/8” 7’-10” 4’-6” 1’-6-5/8” 4’-10-7/8” 8’-4-7/8” 5’-0” 2’-1-5/8” 5’-2-3/8” 8’-11-7/8” 5’-6” 2’-8-1/2” 5’-5-7/8” 9’-6-3/4” 6’-0” 3’-3-3/8” 5’-9-1/4” 10’-1-3/4” 6’-6” 3’-10-3/8” 6’-0-3/4” 10’-8-5/8” 7’-0” 4’-5-1/4” 6’-4-1/4” 11’-3-1/2” 7’-6” 5’-0-1/4” 6’-7-5/8” 11’-10-1/2” 8’-0” 5’-7-1/8” 6’-11-1/8” 12’-5-3/8” 8’-6” 6’-2-1/8” 7’-2-5/8” 13’-0-3/8” 9’-0” 6’-9” 7’-6-1/8” 13’-7-1/4” 9’-6” 7’-3-7/8” 7’-9-1/2” 14’-2-1/4” 10’-0” 7’-10-7/8” 8’-1” 14’-9-1/8” 10’-6” 8’-5-3/4” 8’-4-1/2” 15’-4” 11’-0” 9’-0-3/4” 8’-7-7/8” 15’-11” 11’-6” 9’-7-5/8” 8’-11-3/8” 16’-5-7/8” 12’-0” 10’2-5/8” 9’-2-7/8” 17’-0-7/8” 12’-6” 10’-9-1/2” 9’-6-3/8” 17’-7-3/4”
Min. Drop is 3’-1-7/8” when S = 0
L = 4’-1-5/8” C = 6’-10-1/4”
18
2’-0” RAD. 90°Lower Vertical Curve 20118
Weight: 20.1 lbWeight: 20.1 lb
2’-0” RAD. 90°Upper Vertical Curve 20117
2’0” Radius X 60 Degrees 3’0” Radius X 60 Degrees
Drop S L C
4’-6” 0’-4-3/4” 6’-0-3/4” 9’-4-1/8” 5’-0” 0’-11-3/4” 6’-4-1/4” 9’-11-1/8” 5’-6” 1’-6-5/8” 6’-7-5/8” 10’-6” 6’-0” 2’-1-5/8” 6’-11-1/8” 11’-1” 6’-6” 2’-8-1/2” 7’-2-5/8” 11’-7-7/8” 7’-0” 3’-3-3/8” 7’-6-1/8” 12’-2-7/8” 7’-6” 3’-10-3/8” 7’-9-1/2” 12’-9-3/4” 8’-0” 4’-5-1/4” 8’-1” 13’-4-5/8” 8’-6” 5’-0-1/4” 8’-4-1/2” 13’-11-5/8” 9’-0” 5’-7-1/8” 8’-7-7/8” 14’-6-1/2” 9’-6” 6’-2-1/8” 8’-11-3/8” 15’-1-1/2” 10’-0” 6’-9” 9’-2-7/8” 15’-8-3/8” 10’-6” 7’-3-7/8” 9’-6-3/8” 16’-3-3/8” 11’-0” 7’-10-7/8” 9’-9-3/4” 16’-10-1/4” 11’-6” 8’-5-3/4” 10’-1-1/4” 17’-5-1/8” 12’-0” 9’-0-3/4” 10’-4-3/4” 18’-0-1/8” 12’-6” 9’-7-5/8” 10’-8-1/8” 18’-7”
Min. Drop is 4’-1-7/8” when S = 0 L = 5’-10-3/8” C = 8’-11-3/8”
2’-0” RAD. 60°Lower Vertical Curve 20116
Weight: 15.4 lbWeight: 15.4 lb
2’-0” RAD. 60°Upper Vertical Curve 20115
Unibilt Conveyor Components
8” 2’ 1-1/8” arcon center line
2’ Radius
2’ Radius
2’ 1-1/8” arcon center line
8”
8”
8”
8”
8”
3’ 1-11/16” arcon center line
2’ Radius
2’ Radius
3’ 1-11/16” arcon center line
8”
8”

Safety StopsAnti-Backup Safety Stop 9012
The Unibilt Anti-Backup Safety Stop 9012 consists of a heavy pawl pivoted on a shaft, which lifts out of the chain as the chain travels up a vertical incline. If the chain should break and attempt to reverse direction down the incline, the Anti-Backup Safety Stop will stop the chain and hold it securely.
Anti-Backup Safety Stops cannot be used where the chain is traveling down a vertical curve or on reversing conveyors.
Note: On 90° inclines, special modifi cations must be
incorporated. Consult a Unibilt Representative.
Anti-Runaway Safety Stop 20206
Anti-Runaway Safety Stops are used as a precaution against possible chain breakage, the same as the Anti-Backup Safety Stop 9012, except they are utilized on vertical curves where the chain travels down.
The Unibilt Anti-Runaway is an inertia-operated device that is positive in operation and equipped with a limit switch to stop the drive when actuated. Maximum de-cline is 60 degrees.
It can be adjusted in the fi eld to operate only when the chain accelerates beyond its normal maximum speed, which indicates a broken or runaway chain.
The Anti-Runaway Safety Stop is installed in the same position on a vertical curve as the Anti-Backup and can be used on vertical curves with the chain running in either direction and on reversing conveyors.
Traction WheelTraction wheels must be used in place of horizontal turns when the radius is less than 24”. Traction wheels are available with anti-friction bearings in pitch diameters (PD) of:
18” PD 20281 24” PD 20285
30” PD 20289 36” PD 20293
Graphalloy bushings for oven applications (oven temperatures over 250°) are also available in pitch diameters of:
18” PD 20282 24” PD 20286
30” PD 20290 36” PD 20294
Note: On 90 degree declines, special modifi cations must
be incorporated. Consult a Unibilt representative.
Note: 9012 and 20206 are used in areas where a runaway chain would be hazardous. It is general practice to use one
safety stop on vertical curves of 5’-0” drop or less and mount it about 1/3 the distance up from the lower elevation. On
vertical curves over 5’-0” drop, one safety stop should be mounted every 5’-0”, starting near the bottom of the curve.
Weight: 1.5 lb Weight: 16 lb
19
Weight: 150 lb
Direction of travel
➱
1’ 1-1/2”
4-1/2”
2-11/16”4-3/4” x 1-1/4”cutout
4-3/4” x 1-1/4”cutout
Direction of travel
➱3/4”
1/4”1”
7/8”
2”
3” long x 1” wideopening in track

Caterpillar Drive UnitsCaterpillar Drive Unit
750# Chain Pull Capacity
• The drive has a 750 lb chain pull.
• Constant speed or variable speed available.Right handed drives are standard.
• Inverter options for acheiving intermediate speeds mounts to motor terminal as an option.
• Standard speeds are 5 FPM, 17 FPM, and 60 FPM.
• Guard on drive units comply with applicable OSHA and ANSI B20.1 standards.
• The drive has an electrical automatic overload cut-off device, which is factory adjusted at 1100 lb to stop the motor automatically when an overload or jam condition occurs.
• Multiple drives are required when chain pulls exceed 750 lb. Consult your Webb Regional Manager for multiple drive situations.
• Solid fi xed heat-treated steel caterpillar driving dogs eliminate the need for special cams or springs to engage the conveyor chain.
The Unibilt caterpillar drive unit is designed to provide maximum fl exibility for all enclosed track power require-ments in a single compact package. Inverted drives are available upon request.
Many outstanding features make this drive unique in its class.
Weight: 375 lb.
20
5’ 2”
1’ 11-1/4”
2’ 4-1/16” min.2’ 9” max.
Chain Travel
1’ 2-9/16”
Unibilt Conveyor Components
• Fewer parts - direct drive technology eliminates belts and sheaves from the drive, reducing maintenance requirements.
• High-effi ciency gear motor with helical bevel gears.
• 1800 RPM, 230/460 volt, 3 phase, 60 hertz, TEFC inverter-duty motors (5:1ratio) are sup-plied unless otherwise specifi ed.
• Motor controls (push buttons, starters, thermal overloads, etc.) are not included with drives, but can be supplied to your specifi cations.
• Universal end yokes are provided for conve-nient hanging. Drive units should be braced adequately to eliminate vibration. Refer to installation methods for hanging and bracing technique.
• Unibilt caterpillar drives permit positioning the drive at the most advantageous location on the system, rather than confi ning drive location to a horizontal turn, as necessary when driving with a sprocket drive.
• Drive frame and track are painted Unibilt Blue.

Caterpillar Drive Unit
300# Chain Pull Capacity
Standard radius is 2’-0”; however, smaller radii are available with the use of traction wheels. The standard spread is 4’-0” and a recommended maximum is 10’-0”. This dimension should be specifi ed when ordering. Standard travel is 8” with 24” travel also available. The take-up is normally suspended by angle bracing welded or bolted to the frame. The 1/2” diameter rods may also be used to hang the unit.
• Caterpillar drive unit with 300# chain pull capacity. Standard speeds are 5 FPM, 15 FPM, and 60 FPM. Other speeds available upon request. Right handed drives are standard.
• Constant speed or variable speed available.
• 1800 RPM, 230/460 volt, 3 phase, 60 hertz, TEFC inverter-duty motors (5:1 ratio) are supplied unless otherwise specifi ed.
• Inverter duty options for acheiving intermediate speeds mounts to motor terminal as an option.
• Overload protection is a proximity sensor AC/DC.
• Uses same caterpillar drive chain as standard 750# capacity drive unit.
• Motor controls (push button, starters, thermal over loads, etc.) are not included.
• Designed with an economical wormgear reducer and is upgradeable to a 750# drive.
• Gear boxes are completely sealed, maintenance free and “Lube-for-Life”.
Weight: 375 lb
21
4’ 2-15/16”
48”
5’1-1/2”
24” radius(standard)
2-3/4”
42-1/2”21-1/4”
6-13/16”
57-1/2”
1-1/8”Chain Take-ups Spring Take-up 20149
A chain take-up is necessary in every Unibilt Enclosed Track system to remove any slack chain that may accumulate in the system. It compensates for chain growth for most temperature changes that would expand or contract the chain and relieves chain tension to uncouple the chain. Take-ups are available in several styles, however, spring, counterweight, and air are most common.
• The spring take-up 20149 is used for normal conveyor conditions where no temperature extremes are encountered.
Counterweight Take-up 20148
Air Cylinder Operated 20147
The counterweight take-up and air cylinder operated are used when automatic slack chain removal is necessary, generally where oven temperatures elongate the chain during production hours and then cool and contract the chain during off hours.
• All styles of take-ups are self-contained and mounted on a rigid frame, which eliminates binding or twisting and requires no fabricating or welding in the fi eld.
Chain Travel
Weight: 146 lb
2-7/
8”

Rigid “H” Attachment 16975(Capacity 75 lb)
Similar to 21298 except this attachment remains perpen-dicular to the chain. There is also an extra attaching hole 3-1/4” below the bottom of the track. (Capacity is 75 lb)
Load Bar Attachment 9032
Capacity: 250 lb, Level Systems 200 lb, Maximum Degree of Incline 30° 175 lb, Maximum Degree of Incline 45°
Load Bar Attachment 9032 is suspended from two “H”attachments, thereby increasing the capacity of the load carrier. (“H” attachments must be ordered separately.) 5/16” bolt or hardened rivet not included.
Weight: 0.5 lb
Chain Load AttachmentsA number of load-carrying attachments have been de-veloped to suspend a large variety of carriers and loads from the chain.
The standard attachments illustrated below are those that have the widest usage and are adaptable to almost every type of load. Special attachments can be designed to ac-commodate special applications.
The Standard “H” Attachment is the most popular unit for connecting loads to the chain. It engages the load-wheel axle with a scissor like action. The illustrations show how the attachment grips the load-wheel axle and is locked in position by the load-carrying bolt in the bottom hole and cannot be removed until the bolt is removed.
22
Standard “H” Attachment 21298(Capacity 125 lb, Max. 45° Incline)
1-15/16”
1-5/16”
9/16”15/16” 1”
11/32” dia. holes (2)
11/32” dia. hole 13/32”
dia. hole
1”
8-1/8” 1/4”
3/16”
3-2/16”
➤
➤
1-15/16”
Bottomof track
11/32” dia. hole
1/2”
➤
➤1/2”➤
➤
➤3/16”
H Attachment
Unibilt Conveyor Components

Extended “H” Attachment 16984(Capacity 125 lb)
Extended “H” Attachment 16984 is used to extend the carrier or load away from the track for additional clearance when traveling vertically.
Extended Rigid “H” Attachment (Capacity 125 lb, Minimum radius 24”)16988 8” Drop 16989 11” Drop
Extended Rigid “H” Attachment 16988 is used primarily on conveyors with vertical travel. This attachment holds the carrier or load away from the track when traveling vertically. The 8” offset is standard; however, special offsets can be fabricated to order.
Spinner Attachment 21517(Capacity 65 lb, Maximum degree of incline 45°)
Spinner Attachment 21517 is used where continuous rotation of product is necessary through a wash or paint fi nishing operation. The ball bearing roller revolves against a fl at bearing strip by the forward motion of the conveyor. Higher capacity units are available.
90 Degree Star Wheel Indexing Swivel Hook
Assembly 252101 (Capacity 125 lb)
This 90° indexing swivel allows for carrier rotation in 90° increments with the use of a camming device. The swivel hook is made of malleable iron and is shipped loose in two (2) pieces; 16164 swivel & 6513 shank.
Weight: 1 lb
23
Weight: 2 lb
Weight: 1.8 lb6513
16164
2-11/32”
5-7/8”
2-19/32”
1-9/32”
Bottomof track
5/8”
3/16”11/32” dia. hole
Weight 1 lb
8-27/32”
8-1/8”
8” or 11”
11/32” dia. hole
3/16”
5/8”
➤
➤
4-1/32”
➤
➤
➤
Note:Consult your UnibiltRepresentativefor application uses.
➤
9/16”
1”
➤
➤
3/4”
1-1/4”
5-1/2”90°
➤
➤
➤
➤
➤
➤
15/16” ➤
➤
1-3/8”
➤
➤45°45°
➤
➤
➤
➤
5/8”
➤
➤
17/32” dia.
➤ ➤

Inverted Chain Attachment Assembly with Load Bar
27929
This assembly is usedwith a “C” hook application.Attachments have the sameconstruction as 27829.
4 Wheel Chain Attachments
27818
These attachments are a heat-treated, high- strength, drop-forged steel that can be installed in the chain on nominal 8” centers as required. Use of this unit increases indi-vidual load capacity to 250 lb per unit.
4 Wheel Chain Attachments
27919
These attachments have the same construc-tion as 27818 but can have a 1/2” diameter
shaft or bolt inserted in the frame. Ca-pacity is 250 lb
4 Wheel Chain Attachment
27829
These attachments have the same con-struction as 27818 and 27919 but include a guide roller for stability when used in
inverted applications.4 Wheel Capacity is 250 lb
Weight: 3.2 lb
Weight: 1.5 lb
24
4 Wheel Weight: 3.5 lb
Weight: 10 lb
8-1/8”
3/4” Dia. hole
4-9/16”
Load Bar (21033)
3-13/16”
1”
2”
3/4”
GuideRoller
1-1/2”
1-15/32”
3-7/16”
1/2” - 13NG7/8” LG
3-5/8”
4-3/4”
Unibilt Conveyor Components
1/2” dia

Weight: 50 lb
Weight: 4 lb
LubricationBrush-Type Chain Oiler
20053 and 20058
Unibilt chain lubricators provide oil lubrication to the guide and load wheel bearings and to each pivot in the chain assembly. The proper amount of lubricant can be regulated with an adjustable needle valve to assure adequate lubrication at each point without over-oiling and dripping. Proper lubrication is necessary to main-tain the low friction of the conveyor system, decrease system wear and maintenance, and prolong the life of the system. Chain lubricator 20053 includes a one-quart transparent oil reservoir, a visual sight gauge for oil feed, and a manual On/Off Valve. Chain lubricator 20058 (illustrated) is the same as 20053, except that 20058 is equipped with an electric On/Off valve for remote control operation. It can be adjusted to operate automatically only when the conveyor is running. Both lubricators are shipped without a section of track. Slot is to be cut in the fi eld.
Automatic Chain Lubricator
21516WS With Timer
The Unibilt Conveyor Chain Lubricator provides fully automatic oil lubrication at any desired interval.
The nine lubricating nozzles are designed to accu-rately deliver metered amounts of lubricant directly to the load wheel and side guide wheel bearings and to the pivot points in the chain assembly. The single-impulse positive displacement metering pumpprovides the proper amount of lubricant to eachlubrication point, eliminating over-oiling and possible product contamination.
The 21516WS automatic chain lubricator is recom-mended for use on conveyor systems with a high degree of contamination such as fi nishing systems with washers and ovens.
The 21516WS lubricator is provided complete with a 2’-0” long section of conveyor track. This eliminates the need for track modifi cations or special mounting in the fi eld.
25
Note: Not to be used with 4
wheel chain attachments.
Note: Not
recommended
for use in paint
fi nishing systems.

CarriersIllustrated are a variety of carrier styles that have been used in various industries. One might fi t your particular needs. Your local Unibilt sales engineer is experienced in carrier design and is available for assistance or to completely engineer and fabricate special carriers that will enhance your conveyor operation.
26
Unibilt Conveyor Components

Bracing Connector (Double) 8679
Bracing Connector 8679 can be used for sway-bracing in two directions or for supporting the track with a diagonal hanger. Maximum load capacity is 1000 lb
Hanger Bracket 8670 is used when connecting 1/2”-di-ameter threaded rod hanger to Channel Clamp 20270 and Beam Clamp Assembly 9016.
It provides a pivot point at the clamp so the hangers can be used at any angle, and also provides 3-1/2” of hanger adjustment for easy leveling of the conveyor track.Maximum load capacity is 1000 lb
Track Hanger Clamp 8672
Hanger Clamp 8672 is used to suspend the conveyor track with 1/2”-diameter rod hangers when joints are welded at suspension points between bolted splice hanger assemblies.Maximum load capacity is 1000 lb
Suspension FittingsHanger Bracket 8670 Bracing Connector (Single) 9000
Bracing Connector 9000 is utilized when threaded1/2” diameter rod is used for sway-bracing.
This connector can be used with Splice Hanger Assembly 8671 or Hanger Clamp 8672.
Weight: 1 lb
Weight: 0.5 lb
Weight: .05 lb
27
(Power Only Use)
1-3/4”
4-11/16”
9/16” dia hole
9/16” dia. hole
Weight: 6.5 lb
1/2” Threaded Rod 18276
Threaded rod is furnished 12’0” long, with 1/2-13 NC thread. The exact length of hanger rods is often diffi cult to determine; therefore, it is recommended they be ordered 12’0” long and cut to proper length when the conveyor is erected.
Special 1/2” rod hangers can be furnished up to 20’0” long, cut on order to any length, and threaded 12” on each end.
Maximum load capacity is 1000 lb
Note: All load capacities stated are dependent
upon the total building capacity. We recommend you
contact a plant engineer or architect to determine
your individual requirements.
Weight: 1.5 lb1-3/4”
3-15/16”
1/4” 1-1/4”
1/4”
9/16” dia. holes - 3 places
1/4”
9/16” dia. holes - 2 places
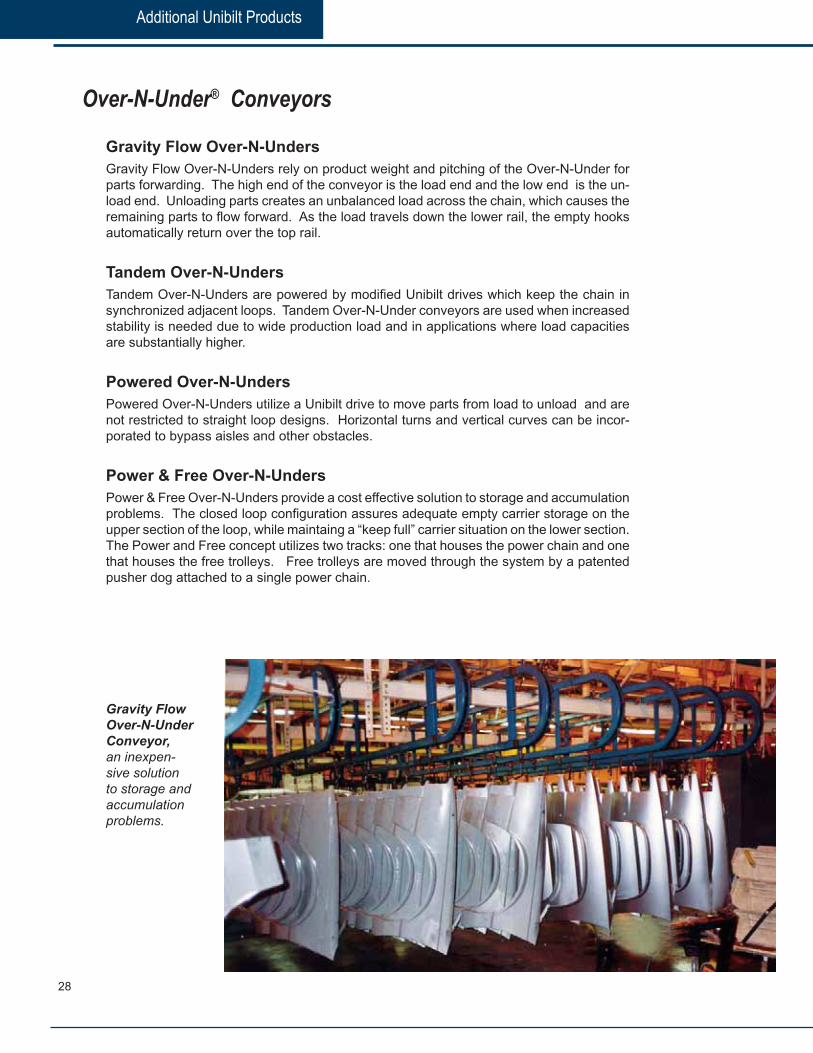
Gravity Flow
Over-N-Under
Conveyor,
an inexpen-sive solution to storage and accumulationproblems.
Over-N-Under® Conveyors
Gravity Flow Over-N-Unders
Gravity Flow Over-N-Unders rely on product weight and pitching of the Over-N-Under for parts forwarding. The high end of the conveyor is the load end and the low end is the un-load end. Unloading parts creates an unbalanced load across the chain, which causes the remaining parts to fl ow forward. As the load travels down the lower rail, the empty hooks automatically return over the top rail.
Tandem Over-N-Unders
Tandem Over-N-Unders are powered by modifi ed Unibilt drives which keep the chain in synchronized adjacent loops. Tandem Over-N-Under conveyors are used when increased stability is needed due to wide production load and in applications where load capacities are substantially higher.
Powered Over-N-Unders
Powered Over-N-Unders utilize a Unibilt drive to move parts from load to unload and are not restricted to straight loop designs. Horizontal turns and vertical curves can be incor-porated to bypass aisles and other obstacles.
Power & Free Over-N-Unders
Power & Free Over-N-Unders provide a cost effective solution to storage and accumulation problems. The closed loop confi guration assures adequate empty carrier storage on the upper section of the loop, while maintaing a “keep full” carrier situation on the lower section. The Power and Free concept utilizes two tracks: one that houses the power chain and one that houses the free trolleys. Free trolleys are moved through the system by a patented pusher dog attached to a single power chain.
28
Additional Unibilt Products
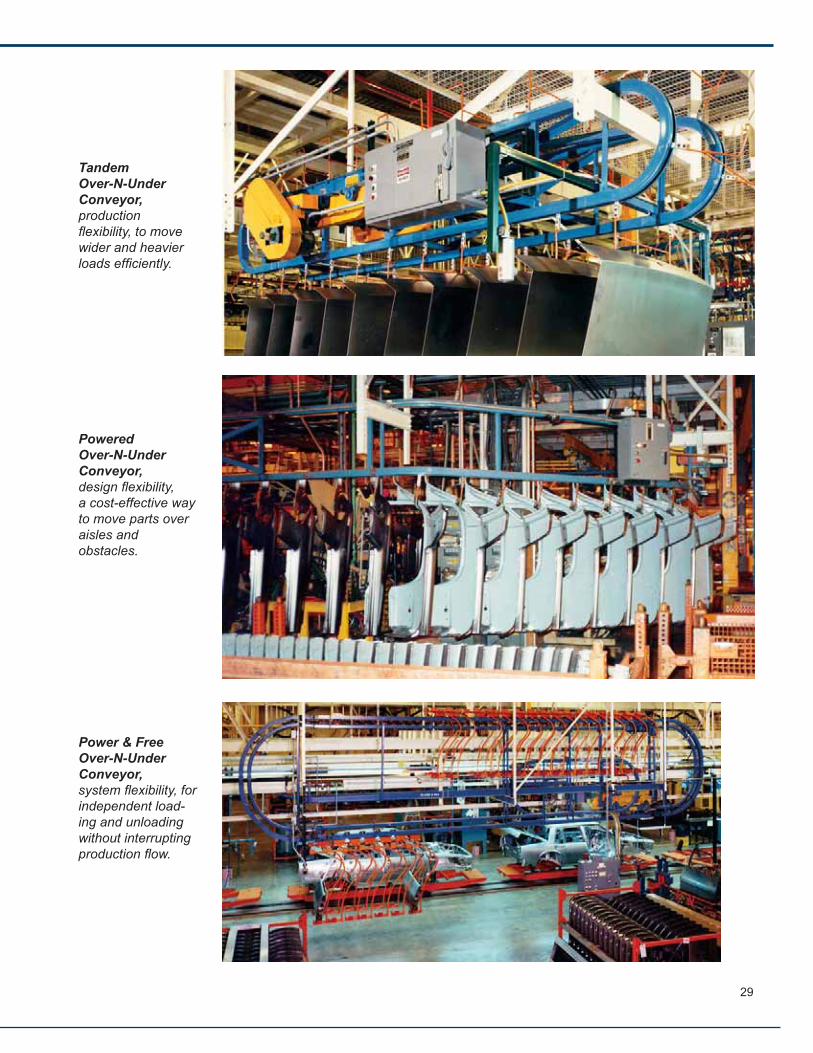
Tandem
Over-N-Under
Conveyor,
productionfl exibility, to move wider and heavier loads effi ciently.
Powered
Over-N-Under
Conveyor,
design fl exibility, a cost-effective way to move parts over aisles and obstacles.
Power & Free
Over-N-Under
Conveyor,
system fl exibility, for independent load-ing and unloading without interrupting production fl ow.
29

• Load capacity is 250 pounds per trolley. Load capacity of four trolleys connected in tandem with load bars is 1000 pounds.
• The unique side guide rollers originated and patented by the Jervis B. Webb Company are the secret that keeps Unibilt hand-pushed trolleys rolling smoothly.The bracket cannot rub against the fl ange of the track when negotiating horizontal curves.
• Rolling action prevents undue wear on the fl ange and offers greater ease in pushing loads. This feature also helps to eliminate sloppy side sway, reducing spillage.
• High-strength cast body provides a high degree of safety, even under heavy shock loading.
• 2-1/4” ball bearing wheels with hardened races and tread minimize pushing effort and prolong trolley life.
• Hardened side guide rollers with stainless steel guide roller pins help eliminate binding or freezing of rollers due to corrosion.
• Three-hole load connection mounts carriers rigidly to the trolleys, when necessary, to prevent excessive pendulum motion. Available with rubber bumpers.
• For hand-pushed
trolleys with
rubber bumpers
order 16980.
This is our most economical four-wheelhand-pushed trolley.
Deep Track Deep Track 20202
The 4-1/2” depth and one-piece construction of Deep Track makes it stronger than conventional free track, requiring fewer supports over long spans.
Deep track can be used in conjunction with Stop-N-Flow conveyors. When the power track is not used, such as in storage spurs, it replaces the conventional free track. Consult your Webb Regional Manager for details.
Hand-Pushed TrolleyHand-Pushed Trolley 20105(Capacity 250 lbs.)
Weight: 7 lb
6”
2-3/8”
1/2”4-3/4”
17/32”dia. holes
1-1/2”
5/8”
Bottom of track
1-3/16” 1-3/16” 1-3/16”
Weight: 6.3 lb
30
Additional Unibilt Products
Note: Trolley is also available with nylon wheels
and nylon side guide rollers.
RubberBumpers

The Unibilt hand-pushed monorail is ideally suited to all types of manually operated mono-rail systems.
It has all the inherent advantages of an enclosed track and utilizes the same Unibilt overhead conveyor track and installation components.
The following equipment is available to suit every system from the simplest to the most complex:
• Stops, manual and automatic
• Switches, manual and automatic
• Turntables (9067)
• Automatic lifts for multi-level operation
Typical Hand-Pushed Layout
Shown here is a Unibilt Deep Track in-process storage spur. Multiple storage of parts on a diago-nal yields greater utilization of storage space.
31
Hand Pushed Monorail
Frog Switch LH-65526 (shown) RH-65527
Universal Switch LH-65528 (shown) RH-65529
1’ 6-1/2”
1’ 2-3/4”
1’ 7-1/2”
1’ 4-1/4”

Ve
Stop-N-Flow® Power & Free ConveyorsThis allows many operations to be performed without shut-ting down the entire line. Webb’s unique “Wide Wing™” design facilitates positive chain-to-chain transfers without the need for push-across transfers, paddle wheels or air cylinder pushers.
The fl exibility of Unibilt power & free conveyors makes them ideal for routing carrier loads to multiple destina-tions. Lateral and vertical routing transfers are easy and inexpensive when compared to other methods. Unibilt power & free is the best choice for simple or complex conveying applications.
Unibilt’s Stop-N-Flow power & free conveyor, from the Jervis B. Webb Company, provides 100% positive me-chanical load control over every carrier in a system at all times. This positive control of carriers through switches, lift sections, and intra-conveyor transfers makes it completely adaptable to computer or PLC level control.
Unlike a continuous-fl ow conveyor, power & free conveyors are not restricted by a moving chain. The retractable dog allows carriers to disengage from the power chain and stop, either individually or in groups, without interrupting the movement of other loads on the conveyor.
1. The stop blade moves into position between carriers 1 & 2. The chain pusher dog, moving carrier 2, encounters the stop blade and pivots up, thus releasing the carrier from the power chain.
2. The chain pusher dog, moving carrier 3, encounters the tail of carrier 2 and pivots up, thus releasing this carrier from the power chain.
3. The above sequence is repeated for carrier 4.
32
Additional Unibilt Products
33

Accumulation/2 Trolley Carriers
Inverted power & free is a variation of Unibilt’s overhead Stop-N-Flow conveyor. The inverted system not only offers all the advantages of power & free, but it actually provides a cleaner product environment as well. Because the power track is located underneath the carrier, dirt and oil from the track cannot contaminate the product. Further-more, because the product is supported from beneath, there is no carrier obstruction to the top and sides of the product. Inverted power and free is especially suited to conditions in which an overhead system cannot be used, for example, where space is limited, or when an existing structure cannot support an overhead conveyor.
The inverted power and free is simpler than most other fl oor-mounted systems because it doesn’t require
Inverted Power & Free Conveyorstransfers and elevators: fl ow is reversed by 180 degree turns, rather than transfers, and vertical curves replace elevators.
The fl oor-mounted inverted power & free conveyor has built-in fl exibility that provides for balanced operations, material recirculation, parts accumulation, carrier switching from line to line, and varying chain speeds to accommo-date different production rates within a system.
Unibilt’s inverted power & free conveyor also is readily adaptable to computer control, which provides positive control of all carriers in a system. The result: greater effi ciency in scheduling, inventory, and material fl ow.
Carrier approaching accumulation
Actuating lever of pivoting dog rides down actuating cam of fi rst carrier releasing the carrier from the chain.
Pivoting dog on accumulating trolley encounters stop blade and is pushed up releasing trolley from drive chain.
3” Webballoy®
fl anged channel(free rail)
End view of inverted conveyor
and carrier
Wide Wing pivoting dog
Wide Wing Pusher DogChain Travel 3” Webballoy® enclosed
track (power rail)
34
Additional Unibilt Products

35

The Jervis B. Webb Company has supplied Unibilt enclosed track conveyors to industry throughout the world for over 40 years. Jervis B. Webb offers design, fabrication and installation capabilities of its Unibilt enclosed track conveyors on a direct basis or through our extensive distributor network.
Our complete line of modular pre-engineered components are available through stocking distributors strategically located for quick delivery.
For more information on Unibilt enclosed track conveyor equip-
ment and systems call:
1-888-UNIBILT
Jervis B. Webb Company, World Headquarters, Farmington Hills, Michigan
Across the country, around the world, there’s a Unibilt Sales Facility near you!
36
(1-888-864-2458)

Unibilt ®
Enclosed Track ConveyorsEnclosed Track Conveyors
QualityQuality
ReliabilityReliabilityPerformancePerformance
Bulletin #8088 052308 ©2001 Jervis B. Webb Company
Data given in this publication are intended only to aid the engineer in preliminary evaluations and is subject to change without notice.
All Trademarks™ and Registermarks® contained in this brochure are owned by Jervis B. Webb Company or its Subsidiaries.
World Headquarters
Jervis B. Webb Company34375 W. Twelve Mile Rd., Farmington Hills, MI 48331-5624 USA
1-888-UNIBILT FAX: 1-248-553-1253E-mail: [email protected]
www.jervisbwebb.com