Enabling Remote Working with Hangouts Meet and Hangouts Chat · C o n t e n t s About this guide 2...
25
Enabling Remote Working with Hangouts Meet and Hangouts Chat: A quick deployment guide Work Transformation: Productivity & Collaboration
Transcript of Enabling Remote Working with Hangouts Meet and Hangouts Chat · C o n t e n t s About this guide 2...

Enabling Remote Working with Hangouts Meet and Hangouts Chat: A quick deployment guide Work Transformation: Productivity & Collaboration

Contents
About this guide 2
1. Requirements 4 1.1 General requirements 4 1.2 Network requirements 4 1.3 Optimize Meet traffic for remote workers 5
2. Set up G Suite 7 2.1 Enroll in G Suite 7 2.2 Verify your domain 12 2.3 Provision your users 14
Step 1: Open the user management interface 14 Step 2: Download the CSV template file 15 Step 3: Add your users to the CSV template 16 Step 4: Upload the CSV file and provision your users 17 Troubleshooting upload errors 17
2.4 Distribute user credentials 18 2.5 Disable out-of-scope G Suite applications 19 2.6 Configure Meet 20 2.7 Configure Chat 22 2.8 Securing your setup 22
3. Appendix: User guide 22 3.1 Documentation hub 22 3.2 Meet/Calendar integrations 23
Schedule your meetings with Google Calendar 23 Deploy the Microsoft Outlook Meet plug-in 24
1

About this guide
Highlights
Purpose To provide companies with a deployment plan and guide to quickly enable remote working using Google Meet and Google Chat.
Intended audience IT administrators
Key assumptions
That the audience has the required access and rights documented in the general requirements.
This document provides guidance for quickly bootstrapping your company with the adoption of Hangouts Meet (for video conferencing) and Hangouts Chat (for instant messaging). Since Hangouts Meet and Hangouts Chat are part of the G Suite offering, this guide will walk you through the steps required to create a G Suite account, configure the billing, create the users, secure your setup, and teach your users how to use the communication suite. G Suite is a full-fledged suite that includes Gmail, Calendar, Drive, Docs, and much more than Hangouts Meet and Hangouts Chat; however, we’ll focus on the communication part for the rest of this document. While most G Suite customers migrate their email to Gmail, this is not a requirement. Your organization can benefit from Meet and Chat while you continue using your current email infrastructure. If you’re interested in adopting the full G Suite offering, you’ll still be able to enable all the included services after following this guide. In that case, we recommend you to work with one of our partners and resellers to get the most out of G Suite. An important note on user experience By enabling only Hangouts Meet and Chat, you are setting up a limited version of G Suite.
2

Users who enjoy the full G Suite experience typically use Google Calendar to schedule meetings, which automatically generates a conference link and adds it to the calendar invite. Such invites are also sent via email, so attendees receive a text-based notification with a link to connect. In either case, attendees are given the opportunity to confirm or decline participation. In order to enable your organization for remote video conferencing, this guide focuses on the deployment and setup of Hangouts Meet and Chat only, which implies that your users will be expected to resort to your existing infrastructure to create meetings on calendars and share meeting information. If you are not using any calendar application, you can simply share the meeting link via email or chat. The user manual, which has been provided as an appendix to this guide, describes the procedure your users are expected to use to leverage the Google communication suite. Once users are enrolled in Hangouts Meet and Chat, you’ll be able to further refine the user experience by enabling the use of other G Suite services, such as Gmail, Calendar, Drive, and Docs. We recommend you work with one of our G Suite partners to ensure your users get the best possible G Suite experience.
3

1. Requirements 1.1 General requirements In order to complete the required enablement steps, make sure you or a member of your staff is able to perform the following operations:
● Create and update DNS records for the domain you will use for your G Suite users. ● Access a company credit card for billing purposes, or work with one of our resellers to
purchase the required licenses. ● Create a CSV file that includes a first name, last name, and current email address, as
well as a user name and initial password to be registered in G Suite for each user you want to provision.
Furthermore, make sure your users can satisfy the following network and hardware requirements.
1.2 Network requirements Refer to the “Prepare your network” Help Center article for a complete overview of the networking requirements for Hangouts Meet. The following is a short summary of what your network administrator needs to know:
● Hangouts Meet traffic is secured and encrypted, so there is no need to restrict traffic. ○ If you have network constraints that require you to restrict traffic, you can
whitelist Meet's media servers. ● Meet generates both TCP (port 443) and UDP (ports 443 and 19302–19309) traffic. ● Internet egress should ideally be as close as possible to the user (for example, avoid
MPLSing your traffic to a central location and egressing from there), avoiding any kind of traffic inspection that could increase latency, resulting in a degraded user experience.
● The average and ideal bandwidths per participant are documented in the following tables. If bandwidth is a concern, the G Suite Administrator can configure Meet to automatically limit the bandwidth used to 1 Mbps ( Apps > G Suite > Google Hangouts > Meet settings > Default video quality).
4

Average bandwidth per participant
Meeting type Outbound Inbound
HD Video 3.2 Mbps 1.8 Mbps
Audio only 12 Kbps 18 Kbps
Ideal bandwidth per participant
Meeting type Outbound Inbound
2-person HD video meetings 3.2 Mbps 2.6 Mbps
Group video meetings 3.2 Mbps 3.2 Mbps
1.3 Optimize Meet traffic for remote workers In a traditional networking model, remote workers connect to the Internet via your corporate network, typically using a VPN connection to your central office. If that’s the case for your organization, in order to remove the strain from your network and to guarantee your users the best experience, we recommend using the user’s Internet connection and egress directly from the user’s location without forcing to pass from your corporate network, at least for Meet traffic. Many VPN solutions allow split tunneling, where whitelisted traffic is not sent through the VPN, but uses the user’s internet connection instead. In this case, Meet traffic would egress directly from the user’s internet connection while the rest of the traffic would flow through your VPN, like in the diagram below.
5

Figure 1.3.1 Meet split-tunneling example
In order to identify Meet traffic, you can follow the table below. You can identify web traffic via the listed URIs and ports and media traffic via the listed IPs and ports.
Whitelist Meet traffic
Web traffic (and APIs, feedback reports, logs upload, signaling)
Media traffic
https://*.google.com/* https://*.googleapis.com/* https://*.gstatic.com/* https://*.googleusercontent.com/* Outbound UDP and TCP port 443
IPv4: 74.125.250.0/24 IPv6: 2001:4860:4864:5::0/64 Outbound UDP ports 19302–19309
Note for livestream: For Livestream media traffic specifically, the listed IPs don’t apply. You can still identify livestream web traffic by using the following URIs: https://*.googlevideo.com/*
6

https://*.youtube-nocookie.com/* https://*.ytimg.com/* Outbound ports are also UDP and TCP port 443 for livestream. Livestream can take place over TCP 443 without issues (UDP is not a strong requirement in this case).
We recommend checking the “Prepare your network” Help Center article for recent updates and for full details on how to best prepare your network for Hangouts Meet.
2. Set up G Suite 2.1 Enroll in G Suite While most G Suite customers migrate their email to Gmail, this is not a requirement. Your organization can benefit from services like Meet and Chat while you continue using your current email infrastructure. The following steps will get you up and running on G Suite in under an hour. In fact, most organizations can start provisioning their users in just about 15 minutes. To begin using the Meet videoconferencing system included in G Suite, you’ll need to purchase licenses. You can determine which options suit your organization and how the available licenses differ from each other in the pricing plan overview. This guide will focus on signing up for G Suite Basic licenses, which are the minimum option to get started, though the enrollment and setup flow described will be the same regardless of the chosen option.
Tip: We have enabled advanced meeting features typically only available in the Enterprise edition of G Suite at no additional cost to all users until July 1, 2020. The advanced features include:
● Meetings for up to 250 participants per call (normally limited to 100 participants in the Basic plan)
● Live streaming for up to 100K viewers within domain (normally not available in the Basic plan)
● Record meetings to Google Drive (normally not available in the Basic plan) Read more about this in the G Suite Updates blog.
7

Tip: In the event you’re considering adopting G Suite in a large organization, or if credit card billing doesn’t suit your need, consider purchasing G Suite licenses offline through a G Suite reseller instead. Skip to the section on verifying your domain once ready.
To enroll, select your chosen G Suite edition–G Suite Basic, G Suite Business, or G Suite Enterprise–and fill out the accompanying form with the required information. For the purpose of this demonstration, the fictional company we’ll be using throughout this document is named “YourDomain,” which owns the domain name “YourDomain.com.”
Figure 2.1.1 Signup landing page
When prompted for a current domain, select Yes, I have one I can use.
Figure 2.1.2 Domain prompt
8

It is recommended, when asked which domain you want to use for G Suite, that you specify a third-level domain you haven’t used before. In this example, and throughout the remainder of this guide, we’ll use “gsuite.YourDomain.com” as the third-level domain. Note that any third-level domain can be used. In the event you plan to use a domain that was used before (mail-enabled) in any context, we strongly recommend reviewing the best practices for managing identities when you move to Google Cloud to better understand the implications of using existing Google consumer accounts under that domain.
Figure 2.1.3 Domain prompt two
Click Continue, then confirm your choice on the next step. Continue through the configuration wizard until you reach the screen that prompts you to configure the username of the first G Suite user that will be created in your new account. This username will also be the first Super Admin (a user role with unlimited access to the administrative panel).
9

We recommend creating an account with the username “Administrator” (and a password of your choice), which will be dedicated only to administrative purposes. Be sure to safely store this login information to avoid locking yourself out of your newly-created G Suite account.
Figure 2.1.4 First user creation
Once you have successfully created your first G Suite user, you will be prompted to login using your new credentials. A review of your payment plan will be displayed, along with any special offers that might be available at the time. In the following screenshot, for example, a free 14-day G Suite trial is being offered. A promotion code can also be entered at the bottom of the prompt.
10
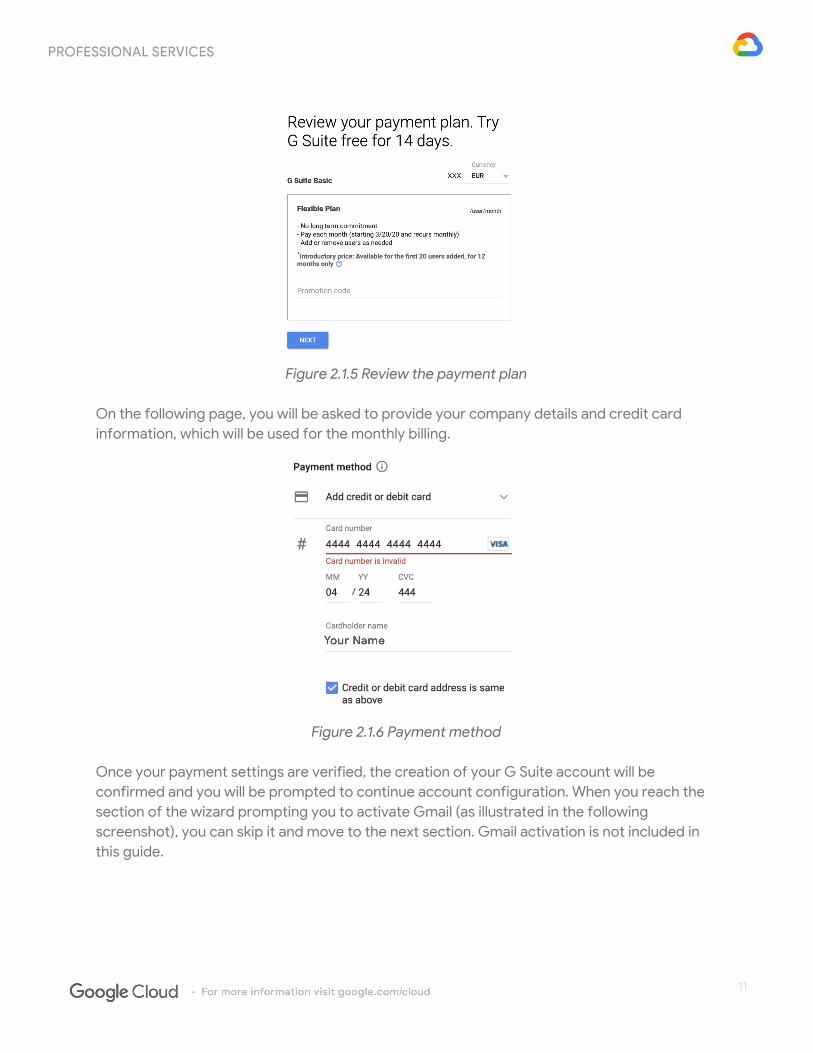
Figure 2.1.5 Review the payment plan
On the following page, you will be asked to provide your company details and credit card information, which will be used for the monthly billing.
Figure 2.1.6 Payment method
Once your payment settings are verified, the creation of your G Suite account will be confirmed and you will be prompted to continue account configuration. When you reach the section of the wizard prompting you to activate Gmail (as illustrated in the following screenshot), you can skip it and move to the next section. Gmail activation is not included in this guide.
11

Figure 2.1.7 Setup wizard - to be skipped
2.2 Verify your domain We have to protect your organization's identity on the Internet. We do this by making sure each new customer is authorized to use their domain with G Suite. In order to verify your domain, you will need to add a TXT record to your DNS. Begin by navigating to the verification page and click Continue.
Figure 2.2.1 TXT Verification splash screen
Copy the verification code.
12

Figure 2.2.2 TXT Verification code
This copied TXT record to the new third-level domain will be used to provision your new users. The Help Center provides host-specific steps for almost every domain registrar and generic instructions for those that aren’t listed. For example, the following steps guide you through adding a TXT record to Google Domains.
1. With the Admin Console open, launch Google Domains in a new tab. 2. In the upper right of the Google Domains homepage, click Sign in. Enter your email
address or phone number and the password you created when you purchased your domain from Google Domains. Click Next.
3. Select My Domains from the left sidebar, then click Manage next to the domain you want to verify for Google services.
4. On the left column, click DNS, then scroll down to Custom resource records. 5. In the Name field, enter the third-level domain name you chose for your G Suite
account. In this case, the name would be “gsuite” since we chose “gsuite.YourDomain.com” for our third-level domain.
6. Select TXT from the Type list. 7. Enter “5m” (five minutes) in the TTL field. 8. Past the entire TXT verification record you copied into the Data/Text field. 9. Click Add to save the TXT verification record to your domain’s DNS records.
Figure 2.2.3 TXT record setup example
Once the TXT record has been added, go back to the Admin Console and click Verify my domain. It may take up to five minutes for the verification to be completed.
13

2.3 Provision your users G Suite offers a variety of methods for provisioning users:
● Manual provisioning using the Admin Console ● Bulk upload users via CSV files ● Google Cloud Directory Sync (GCDS), a tool that can synchronize users from your
AD/LDAP server ● Directory SDK, a set of APIs that allow to programmatically manage users via scripts
and custom software ● Third-party tools, such as GAM
The fastest way to start adding users to your new G Suite domain is with bulk user upload, as it does not require any programming knowledge or effort integrating with existing systems. Bulk user upload requires you to manually provision (create) and deprovision (remove) users when people are hired or leave the company. You can always switch to automated user provisioning (for example, using GCDS) at a later stage.
Step 1: Open the user management interface Click on the Users icon on the Admin Console home page. Alternatively, select Directory > Users from the menu in the upper left corner.
Figure 2.3.1 Admin Console home page
14

Step 2: Download the CSV template file In the Users interface, click on Bulk upload users.
Figure 2.3.2 Users options menu When the Bulk upload users window appears, select Download blank CSV template to save it locally. Make sure to always use a fresh template, as it can change over time.
Figure 2.3.3 Bulk upload two
15

Step 3: Add your users to the CSV template
Note: We recommend testing the following steps with a CSV file containing a single user. This way, you can make sure that the data format is correct. Once you have been able to provision a single user, you can proceed with the following users. If you are uploading a large number of users, it is advised to split your users into different batches (in other words, different CSV files). We recommend uploading no more than 10,000 users per batch, repeating steps 3 and 4, to allow for easier handling of potential errors.
Open the CSV template file with any spreadsheet editor. The template has several columns: some required and some optional. The following elements, which are marked [Required], must be completed for all users:
● First Name, Last Name: Enter the first and last name of the employee. These names will be shown in the employee’s account and in Meet.
● Email Address: This is the primary user ID in G Suite. In our example, it will be in the format [email protected]. Typically this is an email address used for Gmail. However, for the purpose of this deployment, it will be used only as the username to login, and Gmail will be disabled. The email address must be on the same domain you used during the registration.
● Password: Enter an initial password for the user. You must generate a password manually or with any tool of your choice. Note that, by default, G Suite is set to enforce strong passwords. To learn more about password security and how to check your current settings, refer to the G Suite Admin Help’s recommendations for managing your users' password settings. If strong passwords are enforced, the passwords that you supply in the CSV file must comply with the requirements. You can generate passwords that will be considered strong enough by using the following formula in your spreadsheet for the Password field:
=CHAR(RANDBETWEEN(65,90))&CHAR(RANDBETWEEN(65,90))&RANDBETWEEN(1111,9999
)&CHAR(RANDBETWEEN(65,90))&CHAR(RANDBETWEEN(65,90))
● Org Unit Path: Set to “/”. The G Suite Admin Help page offers more information on
how the organizational structure works.
16

Additionally, we strongly recommend setting the following fields: ● Change Password at Next Sign-In: Set to true, which will require users to create a
new password during the first login, reducing the list of the original passwords being leaked.
● Recovery Email/Recovery Phone: These fields allow users to recover lost passwords with login challenges. The Super Admin can also reset passwords, temporarily disable login challenges, or set these fields to allow users to perform the verification themselves. You can set either or both of the two fields.
● Home Secondary Email/Work Secondary Email: If you don’t want to enable the recovery email, these fields can be used to store the user’s main email address, and can be used when processing the CSV file to send the initial password to users.
You are, of course, free to enter data in any other field you might find relevant for your organization.
Step 4: Upload the CSV file and provision your users Once the CSV file is ready, click on ATTACH CSV in the Bulk upload users dialog, select your file, and click UPLOAD.
Figure 2.3.4 Bulk upload three
Troubleshooting upload errors
After you submit the CSV file, the provisioning task begins. To launch the Task Manager and monitor the progress of your upload, click on the Tasks icon ( ) in the upper right part of the G Suite Admin Console.
17

A warning message will appear if the CSV file contains errors.
Figure 2.3.5 Bulk upload errors Click Download Log to save the associated text file, which contains the line number, user name, and error message.
2:[email protected]:ACTION_FAILED:PASSWORD_INVALID
To import log files in a spreadsheet, open it as a CSV, using colons as the separator. The Help Center provides more information about adding several users at once, including:
● Detailed meaning of the columns ● Guidelines on how to correctly format data ● How to troubleshoot common errors
2.4 Distribute user credentials Once you have provisioned the users, distribute user credentials along with the user manual (provided as the appendix to this guide). Consider using a mail merge strategy to distribute the passwords using your current
18

productivity suite (several options are available for integration with G Suite) and the CSV files you used for the bulk upload.
2.5 Disable out-of-scope G Suite applications To prevent a potentially confusing experience for your users, disable all G Suite applications that are not in-scope for group communication. To do so, click Google Admin at the top-left corner of the screen, then select Apps followed by G Suite.
Figure 2.5.1 Navigate to G Suite Core service
19

Select all of the services displayed in the prompt that follows, with the exception of Google Hangouts and Hangouts Chat, then click OFF.
Figure 2.5.2 Disable out-of-scope services
To also disable all non-core Google services for your users, click Google Admin at the top-left corner of the screen once again, and this time select Additional Google services followed by G Suite. Repeat the same procedure: select all of the services displayed in the prompt that follows, with the exception of Google Hangouts and Hangouts Chat, then click OFF.
2.6 Configure Meet You can configure Meet using the Admin Console. For example, as illustrated in Figure 2.6.1, you can set the default video quality of the meetings and enable additional features like livestreaming and recording. We have temporarily extended Meet G Suite Enterprise functionalities to all G Suite licenses until July 2020. As a result, even if you are on a G Suite Basic license, you can benefit from:
20

● Live streaming (must be enabled by the admin) ● Recording (must be enabled by the admin) ● Meetings size up to 250 participants (automatically enabled)
Some Meet configuration options are shown below:
● Set up the default video quality settings.
Figure 2.6.1 Change default video quality
● As part of Meet Enterprise features, you can allow users to record their meetings. The recording will be saved to Google Drive and the meeting organizer will receive a link.
Figure 2.6.2 Enable ability to record meetings
● As part of Meet Enterprise features, you can allow users to stream their meeting. Streamed meetings are assigned a URL that can be shared with others so they can view the meeting as well.
Figure 2.6.3 Enable ability to stream meetings
For more comprehensive information on managing Meet for your organization, refer to the Hangouts Meet section of the G Suite Help Center.
2.7 Configure Chat Chat configuration is extremely straightforward and, in most cases, satisfactory at its default settings.
21
For more comprehensive information on managing Chat for your organization, refer to the Hangouts Chat section of the G Suite Help Center.
2.8 Securing your setup You may want to secure your G Suite setup even further. The following is a list of recommended steps for Super Admins:
● Make sure you add 2-Step Verification (2SV) to your account. We strongly recommend using the Security Key as a 2SV method, at the very least, for the Super Admin accounts.
● Create another user account to use for day-to-day non-administrative operations. Only use your Super Admin account when you need to perform Super Admin operations.
● Make sure you create at least one other Super Admin account. Depending on the size and distribution of your organization, you may want to add even more Super Admin accounts. For specific operations (like Help Desk), you can leverage (non-Super) Admin roles and avoid the proliferation of Super Admin accounts, following the least privilege security principle. You can find more details about the privileges reserved to Super Admins in the G Suite Help Center.
● Make sure your IT Admin or Support team is able to configure the Meet service and can reach Google Support if necessary, by setting up your personnel with Google Hangouts Admin and Support roles as detailed in this article. In particular, we recommend leveraging the following two delegated roles to empower delegated administrators to contact support for Meet-related troubleshooting issues:
○ Services > Google Hangouts ○ Support
3. Appendix: User guide 3.1 Documentation hub The following collection of links will help you delve deeper into using and configuring Hangouts Meet for your organization. Choose your G Suite edition Compare the different G Suite flavors. Use your Admin console
22

Your Google Admin console is the control center for adding users to your account, turning on the services you want them to use, granting administrator access, and otherwise managing Google services for your organization. Hangouts Chat Support Chat documentation hub in the G Suite Admin Help Center. Hangouts Meet Support Meet documentation hub in the G Suite Admin Help Center. Troubleshoot issues with Hangouts Meet This guide will help you troubleshoot the most common issues encountered when using Hangouts Meet. Prepare your network Hangouts Meet traffic is secured and encrypted, and Meet has built-in QoS facilities to make the best out of your available network resources. If you’re looking for advanced tips on how to further improve your network setup or adapt it to your needs, this article will guide you through the required steps. Hangouts Meet Starter Kit Useful materials to read and share within your company when transitioning your organization and users to Hangouts Meet.
3.2 Meet/Calendar integrations
Schedule your meetings with Google Calendar Google Calendar is not in-scope for this document, but if you intend to adopt it, your users will be able to:
● Schedule a video meeting with Google Calendar
○ Create a Calendar event, add participants, and add a video meeting to the Calendar entry.
● Live stream a video meeting ○ You can add view-only live streaming to an event for up to 100,000 people
(within your organization). You can share the meeting information and a URL for the live stream with all guests in one event. Or, create a separate view-only event. Guests in a view-only event cannot participate in the meeting.
23

Deploy the Microsoft Outlook Meet plug-in If your organization is using a compatible version of Microsoft Outlook, users can also create Meet links directly from Outlook that are automatically added to meeting invites.
24