EN manual CyclonX REVE Ed 01-2018 · • Do not immerse the appliance in water (with the excepti on...
19
H0426500_REVE - 2018/01 - EM11 -- More documents on: www.zodiac.com CyclonX™ Instrucons for installaon and use - English Electric cleaner Translaon of the original instrucons in french EN
Transcript of EN manual CyclonX REVE Ed 01-2018 · • Do not immerse the appliance in water (with the excepti on...

H0426500_REVE - 2018/01 - EM11 --
More documents on:www.zodiac.com
CyclonX™
Instructi ons for installati on and use - EnglishElectric cleanerTranslati on of the original instructi ons in french EN

1
WARNINGS
GENERAL WARNINGS• Failure to respect the warnings may cause serious damage to the pool equipment or cause serious injury, even death.• Only a person qualifi ed in the technical fi elds concerned (electricity, hydraulics or refrigerati on) is authorised to perform this procedure. The
qualifi ed technician working on the appliance must use/wear personal protecti ve equipment (such as safety goggles and protecti ve gloves, etc.) in order to reduce the risk of injury occurring when working on the appliance.
• Before handling the appliance, ensure that it is switched off and isolated. • The appliance is intended to be used only for swimming pools and spas; it must not be used for any purpose other than that for which it has
been designed.• It is important that the appliance is operated by people who are competent and qualifi ed (both physically and mentally), aft er having read the
instructi ons for use. All persons not meeti ng these criteria must not approach the appliance in order to avoid exposure to dangerous elements.• Keep the appliance out of the reach of children.• The appliance must be installed according to the manufacturer’s instructi ons and in compliance with local standards. The installer is responsible
for installing the appliance and for compliance with nati onal installati on regulati ons. Under no circumstances may the manufacturer be held liable in the event of failure to comply with applicable local installati on standards.
• For any work other than the simple user maintenance described in this manual, the product should be referred to a qualifi ed professional.• Incorrect installati on and/or use may cause serious damage to property or serious injuries (possibly causing death). • All equipment, even postage and packing paid, travels at the risks and perils of the recipient. The latt er shall issue reserves in writi ng on the
carrier’s delivery slip if damage is detected, caused during transport (confi rmati on to be sent to the carrier within 48 hours by registered lett er). In the event that an appliance containing coolant has been turned on its side, menti on your reservati ons in writi ng to the carrier.
• If the appliance suff ers a malfuncti on, do not try to repair it yourself; instead contact a qualifi ed technician.• Refer to the warranty conditi ons for details of the permitt ed water balance values for operati ng the appliance.• Deacti vati ng, eliminati ng or by-passing any of the safety mechanisms integrated into the appliance shall automati cally void the warranty, in
additi on to the use of spare parts manufactured by unauthorised third-party manufacturers.• Do not spray insecti cide or any other chemical (infl ammable or non-infl ammable) in the directi on of the appliance, as this may damage the body
and cause a fi re.• Zodiac® heat pump, fi ltrati on pump and fi lter appliances are compati ble with the most commonly used types of pool water treatment systems.• Do not touch the fan and/or moving parts or insert a rod or your fi ngers in the vicinity of the moving parts while the appliance is in operati on.
The moving parts may cause severe injury, including death.
WARNINGS ASSOCIATED WITH ELECTRICAL APPLIANCES• The electrical supply to the appliance must be protected by a dedicated 30 mA diff erenti al residual current protecti on device (RCD), complying
with the standards and regulati ons in force in the country where it is installed.• Do not use an extension cord to plug in the appliance; plug it directly into a proper wall socket or outlet.• Before carrying out any operati ons, check that:
- The voltage indicated on the rati ng plate of the appliance corresponds to the mains voltage, - The power grid is adapted to the power requirements of the appliance, and is grounded. - The plug (where applicable) is suitable for the socket.
• In the event of abnormal functi on or signs of overheati ng such as a burning odour from the appliance, turn it of immediately, unplug it from its power supply and contact a professional.
• Before accessing the enclosure for any reason, ensure that all power to the appliance and also power to any accessories or external devices which may be connected to the appliance, is disconnected from the mains power supply.
• Do not disconnect and reconnect the appliance to the power supply when in operati on.• Do not pull on the power cord to disconnect it from the power supply.• If the supply cord is damaged, it must be replaced by the manufacturer, its service agent or similarly qualifi ed persons in order to avoid a hazard.• Do not att empt to carry out any servicing or maintenance operati ons with wet hands or while the appliance is wet.• Ensure that all terminals for mains power are free in good conditi on and free of corrosion and/or dirt/debris.• For any component or sub-assembly containing a batt ery: do not recharge or dismantle the batt ery, or throw it into a fi re. Do not expose it to
high temperatures or direct sunlight.• In stormy weather, unplug the appliance to prevent it from suff ering lightning damage.• Do not immerse the appliance in water (with the excepti on of cleaners) or mud.
SPECIFIC FEATURES APPLICABLE TO "Pool cleaners"• The cleaner must operate in pool water with a temperature of between 15°C and 35°C.• To avoid possible injury and damage to the cleaner, do not operate the cleaner out of the water.• In order to prevent possible injury, bathing is prohibited when your cleaner is in the pool.• Do not use the cleaner during shock chlorinati on.• Do not leave the cleaner unatt ended for an extended period.
WARNING ON THE USE OF A CLEANER IN A POOL WITH A VINYL SURFACE: • Before installing your new cleaner, carefully inspect the lining of your pool. If the liner has eroded in some areas, or if you noti ce gravel, folds,
roots or corrosion caused by metal on the inner surface of the liner, or if you noti ce that the support (bott om and walls) is damaged, do not install the cleaner before performing the necessary repairs or before replacing the liner using a qualifi ed professional. The manufacturer cannot be held liable in any way for damage caused to the liner.
• The surface of certain vinyl patt erned surfaces can wear rapidly and the patt erns disappear on contact from objects such as cleaning brushes, toys, infl atable buoys, chlorine distributors and automati c pool cleaners. The decorati on on some vinyl surfaces can be scratched or worn by basic fricti on such as through the use of a pool brush. The colours of certain patt erns can also be erased during use or when in contact with objects in the pool. The erased patt erns, wear or scratching of vinyl surfaces are not the liability of the manufacturer and are not covered by the limited warranty.
Recycling
This symbol means that your appliance must not be thrown into a normal bin. It will be selecti vely collected for the purpose of reuse, recycling or transformati on. If it contains any substances that may be harmful to the environment, these will be eliminated or neutralised.Contact your retailer for recycling informati on.

2
CONTENTS❶ Specifi cati ons 3
1.1 I Descripti on 3
1.2 I Technical specifi cati ons and marking 4
❷ Installati on 5
2.1 I Set-up 5
2.2 I Att achment to the base or caddy assembly 6
❸ Use 7
3.1 I Operati ng principle 7
3.2 I Pool preparati on 7
3.3 Immersing the cleaner 7
3.4 I Electricity supply connecti ons 8
3.5 I Starti ng the cleaning cycle 9
3.6 I Ending the cleaning cycle 11
❹ Maintenance 12
4.1 I Cleaning the fi lter 12
4.2 I Cleaning the propeller 13
4.3 I Replacing the brushes 14
4.4 I Replacing the tracks 15
❺ Troubleshooti ng 16
5.1 I Appliance behaviour 16
5.2 I User alerts 17
• Before handling the appliance, it is vital that you read this installati on and user manual, as well as the "warnings and warranty" booklet delivered with the appliance. Failure to do so may result in material damage or serious or fatal injury and will void the warranty.
• Keep and pass on these documents for later consultati on during the appliance's service life.• The distributi on or modifi cati on of this document in any way is prohibited, without prior
authorisati on from Zodiac®.• Zodiac® is constantly developing its products to improve their quality. The informati on
contained herein may therefore be modifi ed without noti ce.
Tip: to make it easier to contact your retailerWrite down your retailer's contact details to help you fi nd them more easily and fi ll in the "product" informati on on the back of the manual; your retailer will ask you for this informati on.
EN

3
❶ Specifi cati ons
1.1 I Descripti on
(x2)(x2)
(x2)
(x2)
OC 3300 TILE
OC 3400 - RC 4100 - RC 4130 - RC 4350 - RC 4360 - RC 4370 -RC 4400 RC 4300 RC 4401 RX 4450
A Cleaner A + fl oati ng cable
B Cleaner B + fl oati ng cable
C Control box
D Caddy kit
E Base for control box
F100µ fi ne debris fi lter
200µ large debris fi lter60µ very fi ne debris fi lter
GStandard fl ap brushes
Flap brushes Polyester casings
H PVA brushes ti ling - enamel
I Protecti ve cover
: Supplied
: Available as an opti on

4
Symbol Designati onOC 3300 TILE - OC 3400 - RC 4100 -
RC 4130 - RC 4300 - RC 4350 - RC 4360 - RC 4370 - RX 4450
RC 4400 - RC 4401
Start/Stop the appliance
"Control" indicator
Surface Control System= Surface inspecti on
"Clean fi lter" indicator
Surface to clean Bott om only
Bott om + sides + water line
Increase / Reduce the cleaning ti me
: Available
1.2 I Technical specifi cati ons and marking
1.2.1 Technical specifi cati ons
OC 3300 TILE - RC 4300
RC 4100 - RC 4130 RC 4350 - RC 4360 -
RC 4370 - OC 3400 - RX 4450RC 4400 - RC 4401
Control box power supply voltage 220-240 VAC, 50 HzCleaner power supply voltage 30 VDCMaximum power input 150 WCable length 15 m 18 mCleaner size (L x W x h) 41 x 42 x 28 cmPackage size (L x W x h) 56 x 56 x 38 cm 56 x 56 x 46 cmCleaner weight 9 kgPackaged weight 14.3 kg 18.4 kgTheoreti cal cleaning width 220 mmCycle durati on (depending on cycles chosen) 1h30 1h-1h30-2h
EN
5
1.2.2 Marking
: "Push'n'Go™"
fi lter access hatch lock
: Brushes
: Tracks
: Handle
: Clear window
(depending on model)
: Floati ng cable
: Cartridges
Cleaner A Cleaner B
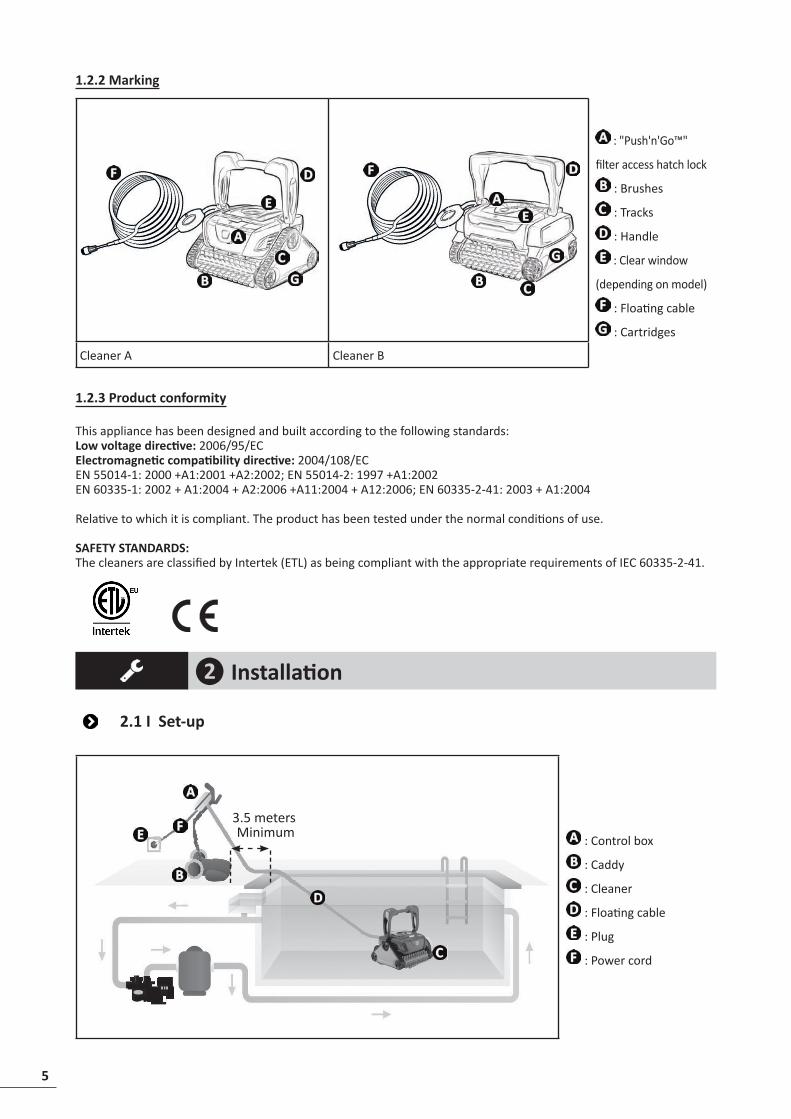
1.2.3 Product conformity
This appliance has been designed and built according to the following standards:Low voltage directi ve: 2006/95/EC Electromagneti c compati bility directi ve: 2004/108/EC EN 55014-1: 2000 +A1:2001 +A2:2002; EN 55014-2: 1997 +A1:2002EN 60335-1: 2002 + A1:2004 + A2:2006 +A11:2004 + A12:2006; EN 60335-2-41: 2003 + A1:2004
Relati ve to which it is compliant. The product has been tested under the normal conditi ons of use.
SAFETY STANDARDS:The cleaners are classifi ed by Intertek (ETL) as being compliant with the appropriate requirements of IEC 60335-2-41.
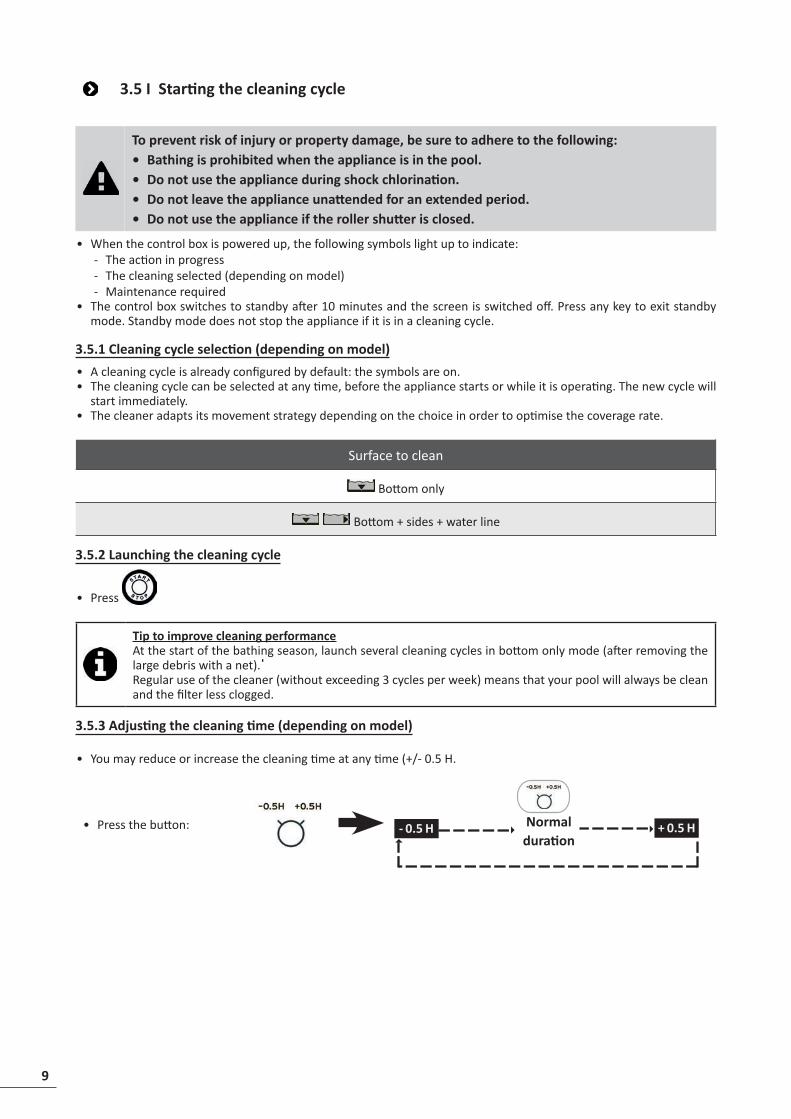
❷ Installati on
2.1 I Set-up
3.5 meters Minimum : Control box
: Caddy
: Cleaner
: Floati ng cable
: Plug
: Power cord

6
2.2 I Att achment to the base or caddy assembly
2.2.1 Att achment to the base
2.2.2 Caddy assembly
Tool-free assembly
(x2)(x2)
(x2)
EN

7
❸ Use
3.1 I Operati ng principleThe cleaner is independent of the fi ltrati on system and can therefore operate autonomously. It just simply needs to be connected to the mains power supply. It fi nds the best route to move around and clean the areas of the pool for which it has been designed (depending on the model: bott om, walls, water line). Debris is sucked in and stored in the cleaner's fi lter.The control box enables the cleaning operati ons to be started, selected and programmed (depending on the model).
3.2 I Pool preparati on
• This product is intended to be used in pools which are permanently installed. Do not use it in pools which may be dismantled. A permanent pool is built into the ground or on the ground and cannot be easily dismantled and stored.
• The appliance must operate in pool water with the following properti es:
Water temperature Between 15°C and 35°CpH Between 6.8 and 7.6
Chlorine < 3 mg/ l
• When the pool is dirty, especially when commissioning, remove the largest debris using a net in order to opti mise the appliance's performances.
• Remove any thermometers, toys and other objects that might damage the appliance.
3.3 Immersing the cleaner• Roll out the full length of the cable alongside the pool to avoid the cable becoming tangled during immersion (see
image ).• Place the cleaner verti cally into the water (see image ).• Move it slightly in all directi ons so that the air contained in the cleaner escapes (see image ).• It is essenti al that the appliance sinks on its own and sett les on the pool bott om. While it is immersed, the cleaner
draws the length of cable it needs into the pool (see image ).
1
2

8
3.4 I Electricity supply connecti ons
To prevent risk electrocuti on, fi re, or serious injury, be sure to adhere to the following:• Use of an electrical extension is prohibited when connecti ng the control box.• Make sure that the socket can be easily accessed at all ti mes and is protected from rain or
splashes.• The control box is splash-proof but must not be immersed. It must not be installed in a
fl oodable area; keep it at least 3.5 metres away from the edge of the pool and avoid exposing it to direct sunlight.
• Place the control box near the socket.
• Connect the fl oati ng cable into the control box (see image ).• Push the connector in unti l you hear 2 clicks (see image ). Make sure the connector is suffi ciently pushed into place.
If it is not, repeat the operati on. • Connect the supply cable (see image ). Only connect the control box to a power outlet protected by a 30 mA max-
imum residual current device (if in doubt contact a qualifi ed technician).• To disconnect the fl oati ng cable from the control box, pinch the 2 clips at the end of the connector and pull at the
same ti me (see image ).
Tip: box positi oning for bett er operati onPlace the control box in the centre of the pool's length, following the safety conditi ons relati ng to the electrical connecti on.
CLICK
CLICK
EN
9
3.5 I Starti ng the cleaning cycle
To prevent risk of injury or property damage, be sure to adhere to the following:• Bathing is prohibited when the appliance is in the pool.• Do not use the appliance during shock chlorinati on.• Do not leave the appliance unatt ended for an extended period.• Do not use the appliance if the roller shutt er is closed.
• When the control box is powered up, the following symbols light up to indicate: - The acti on in progress - The cleaning selected (depending on model) - Maintenance required
• The control box switches to standby aft er 10 minutes and the screen is switched off . Press any key to exit standby mode. Standby mode does not stop the appliance if it is in a cleaning cycle.
3.5.1 Cleaning cycle selecti on (depending on model)• A cleaning cycle is already confi gured by default: the symbols are on.• The cleaning cycle can be selected at any ti me, before the appliance starts or while it is operati ng. The new cycle will
start immediately.• The cleaner adapts its movement strategy depending on the choice in order to opti mise the coverage rate.
Surface to clean
Bott om only
Bott om + sides + water line
3.5.2 Launching the cleaning cycle
• Press
Tip to improve cleaning performanceAt the start of the bathing season, launch several cleaning cycles in bott om only mode (aft er removing the large debris with a net).Regular use of the cleaner (without exceeding 3 cycles per week) means that your pool will always be clean and the fi lter less clogged.
3.5.3 Adjusti ng the cleaning ti me (depending on model)
• You may reduce or increase the cleaning ti me at any ti me (+/- 0.5 H.
• Press the butt on: Duréenormale- 0.5 H + 0.5 HNormal durati on
10
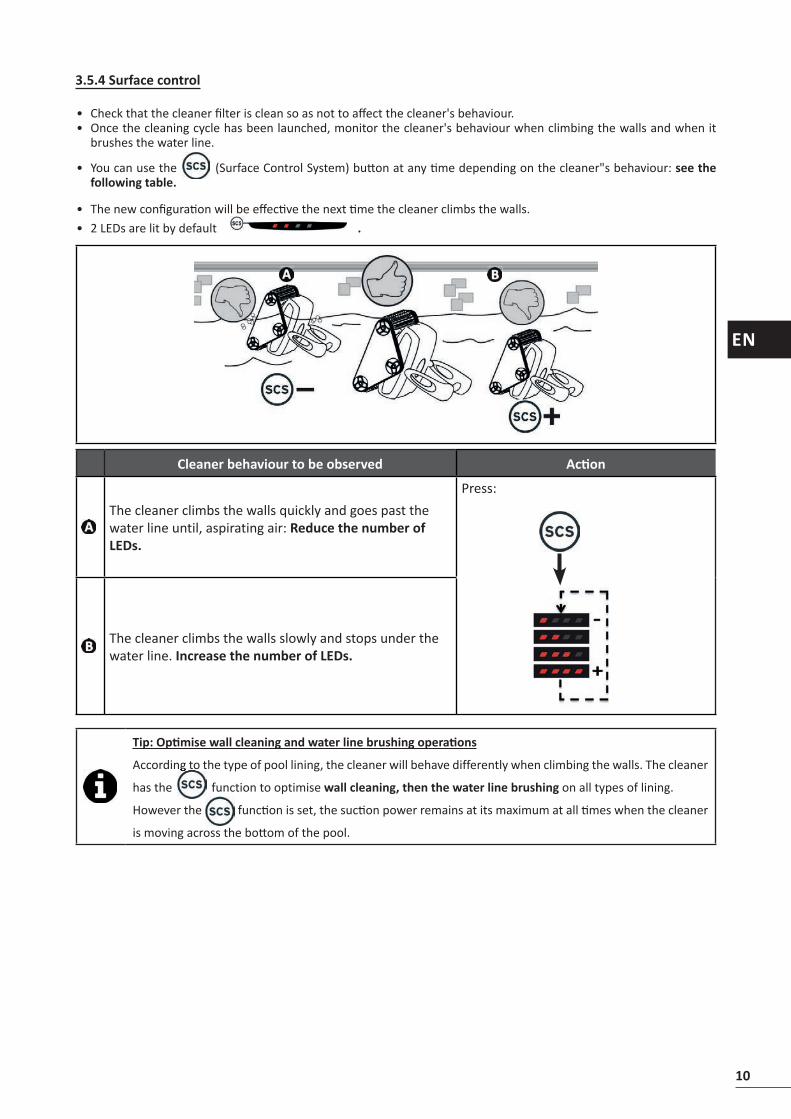
3.5.4 Surface control
• Check that the cleaner fi lter is clean so as not to aff ect the cleaner's behaviour.• Once the cleaning cycle has been launched, monitor the cleaner's behaviour when climbing the walls and when it
brushes the water line.
• You can use the (Surface Control System) butt on at any ti me depending on the cleaner"s behaviour: see the following table.
• The new confi gurati on will be eff ecti ve the next ti me the cleaner climbs the walls.• 2 LEDs are lit by default
The new confi gurati on will be eff ecti ve the next ti me the cleaner climbs the walls..
Cleaner behaviour to be observed Acti on
The cleaner climbs the walls quickly and goes past the water line until, aspirating air: Reduce the number of LEDs.
Press:
The cleaner climbs the walls slowly and stops under the water line. Increase the number of LEDs.
Tip: Opti mise wall cleaning and water line brushing operati ons
According to the type of pool lining, the cleaner will behave differently when climbing the walls. The cleaner
has the
According to the type of pool lining, the cleaner will behave differently when climbing the walls. The cleaner
function to optimise wall cleaning, then the water line brushing on all types of lining.
However the functi on is set, the sucti on power remains at its maximum at all ti mes when the cleaner
is moving across the bott om of the pool.
EN

11
3.6 I Ending the cleaning cycle
• To prevent damage to the equipment, only use the handle to take the cleaner out of the water; do not lift it with the fl oati ng cable.
• Do not leave the appliance to dry out in sunlight aft er use.• Store all the elements away from sunlight, humidity and bad weather.
• Switch off the appliance by pressing .
• To take the cleaner to the edge of the pool, pull on the fl oati ng cable.
• When the cleaner is within arm's reach, pick it up by the handle and lift it gently out of the pool so that the water it
contains drains into the pool (see image and ).
• Place the cleaner verti cally in the locati on provided on the caddy (depending on the model) for it to dry out quickly (see image ).
• Then store it with the control box away from sunlight and any splashes. A protecti ve cover is available as an opti on (see image ).
Tip to prevent the fl oati ng cable from becoming tangledThe cleaner's behaviour is strongly impacted by the tangling of the cable. A cable that is correctly untangled will guarantee bett er coverage of the pool.• Untangle the cable and lay it out in the sun so that it returns to its original shape. • Then wind it up carefully and place it on the caddy handle (depending on the model) or on a fi xed support.

12
❹ Maintenance• The appliance must be cleaned regularly using clean or slightly soapy water. Do not use solvents.• Rinse the appliance thoroughly with clean water. • Do not let your appliance dry in the sun by the pool.
Tip: replace the fi lter and brushes every 2 yearsYou are encouraged to change the fi lter and the brushes every 2 years to preserve the integrity of the appliance and guarantee opti mum performance.
4.1 I Cleaning the fi lter
• The cleaner's performance may be reduced if the fi lter is full or dirty. • Clean the fi lter regularly with clean water for effi cient pool cleaning. • If the fi lter is clogged, clean it with an acidic soluti on (spirit vinegar, for example). It is
recommended that you do this at least once a year, since the fi lter will clog if not used for several months (winterising period).
EN

13
4.2 I Cleaning the propeller
To avoid serious injury:• Disconnect the cleaner from the power supply.
• Wear gloves when handling the propeller
Disconnect the cleaner from the power supply.
.
• Loosen the screw on the grid (see image ).• Remove the grill carefully (see image ).• Wear gloves and pull on the propeller while holding it ti ghtly (see image ). Remove all debris (leaves, stones, etc.)
which may be blocking the propeller.

14
4.3.i I Replacing the brushes• Each brush is equipped with wear indicators; the distance between the indicators and the end of the brush indicates
whether the brush is in good conditi on (see image ). • The brushes are worn and should be replaced when the wear indicators appear as shown in image .• To remove worn brushes, remove the tabs from the holes in which they are fi xed (see image ).• To fi t new brushes, start by fi tti ng the side without tabs under the brush holder (see image ).• Roll the brush around its support, slide the tabs into the att achment holes and pull on the end of each tab unti l its
edge passes through the slit (see image ). • Cut the tabs using a pair of scissors for them to be level with the other blades (see image ).
EN

15
4.4 I Replacing the tracks
• For RX 4450 cleaners, the tracks must be replaced by the retailer.
• Place the cleaner on its side (see image ).• Starti ng with one of the wheels, pull the inside of the track to separate it from the wheel (see image ). Then remove
the track from the cleaner.• To install the new track, positi on the inside of the track on the fi rst wheel's grooves (see image ).• Stretch the track around the second wheel, then around the last one. Press down on the track to positi on it correctly
on the wheel grooves (see image ). Make sure that the track passes under the guides (see image ).

16
❺ Troubleshooti ng
• If a problem occurs, before you contact your retailer, please carry out these few simple checks using the following tables.
• If the problem conti nues, contact your retailer.
• : Acti ons to be performed by a qualifi ed technician only
5.1 I Appliance behaviour
While operati ng, the cleaner does not stay fi rmly on the pool bott om
This may have 3 causes:• There is sti ll air in the appliance's casing. Repeat the cleaner immersion
operati ons (see § “3.3 Immersing the cleaner”).• The fi lter is full or dirty: simply clean it.• The propeller is damaged, contact your dealer:
The cleaner does not or no longer climbs the pool sides
This may have 2 causes:• The fi lter is full or dirty: simply clean it.• Even though the water seems clear, microscopic algae are present in your pool, they are not visible to the naked eye, and they make the sides slippery and prevent the cleaner from climbing. Carry out shock chlorinati on and slightly reduce the pH. Do not leave the cleaner in the water during shock treatment.
• The brushes are worn: check the wear indicators “4.3.i I Replacing the brushes”, then turn the brushes to check the rotati ons. Replace the brushes where necessary.
If the problem conti nues contact your retailer:
The cleaner does not perform any movements on start-up.
• Check that the outlet to which the control box is connected is receiving a power supply.• Check that you have started a cleaning cycle and check that the indicators are on.
If the problem conti nues contact your retailer:
• Check that you have started a cleaning cycle and check that the indicators are on.
The cable gets tangled• Do not unroll the enti re length of the cable into the pool.• Place the required length of cable in the pool and place the rest on the side of the pool.
The cleaner's discharge nozzles or bott om plug holes become blocked
• Stop the fi ltrati on pump and begin a new cleaning cycle.• Place the control box in the centre of the pool's length, following the safety
conditi ons, see “3.4 I Electricity supply connecti ons”. If cleaning is not opti mal, vary the locati on of the control box and the place at which the cleaner enters the pool.
The cleaner climbs the walls slowly and stops under the water line
The cleaner climbs the walls quickly and goes past the water line, aspirati ng air
• The cleaner may behave diff erently depending on the lining of the pool. A parameter may require changing to opti mise the cleaner's behaviour when climbing the wall, see “3.5.4 Surface control”.
If the problem conti nues, contact your retailer.
The control box does not respond to any butt on presses
• Unplug the power cord from the mains socket, wait 10 seconds and plug it back in again.
EN

17
5.2 I User alerts
Flashing LED: Soluti ons
• Check that the cleaner is correctly connected to the control box. If necessary, unplug it and reconnect it following the appropriate procedure.
• Check that nothing is stopping the brushes and tracks from turning correctly (sand, cable, etc.). To do so, raise the tracks to check that there are no external elements jammed in a housing.
• Cleaner operati ng outside the pool. Make sure you start the cleaner when it is in the water (see § “3.3 Immersing the cleaner”).
• Check that there are no stones or hair in the propeller.• Clean or change the fi lter if necessary.
Tip: if you require assistance, inform your retailer about the appliance's conditi on to save ti meProvide this informati on to your retailer

ZODIAC® is a registered trademark of Zodiac Internati onal, S.A.S.U., used under license.
Zodi
ac P
ool C
are
Euro
pe -
Boul
evar
d de
la R
oman
erie
- BP
900
23 -
491
80 S
t Bar
thél
émy
d’An
jou
cede
x - S
.A.S
.U. a
u ca
pita
l de
1 26
7 14
0 €
/ SIR
EN 3
95 0
68 6
79 /
RCS
PARI
S
Votre revendeur Your retailer
Modèle appareil Appliance model
Numéro de série Serial number
Trouvez plus d’informati ons et enregistrez votre produit sur More informati ons and register you product on
www.zodiac.com