EMC Smarts Service Assurance Management Suite … · Service Assurance Management Suite 7.2...
88
EMC Corporation Corporate Headquarters: Hopkinton, MA 01748-9103 1-508-435-1000 www.EMC.com EMC ® Smarts ® Service Assurance Management Suite 7.2 Installation Guide P/N 300-005-567 REV A04
-
Upload
vuongxuyen -
Category
Documents
-
view
222 -
download
1
Transcript of EMC Smarts Service Assurance Management Suite … · Service Assurance Management Suite 7.2...

EMC CorporationCorporate Headquarters:
Hopkinton, MA 01748-9103
1-508-435-1000www.EMC.com
EMC® Smarts®
Service Assurance Management Suite7.2
Installation GuideP/N 300-005-567
REV A04

EMC Smarts Service Assurance Management Suite Installation Guide2
Copyright © 1996 - 2008 EMC Corporation. All rights reserved.
Published June, 2008
EMC believes the information in this publication is accurate as of its publication date. The information is subject to change without notice.
THE INFORMATION IN THIS PUBLICATION IS PROVIDED “AS IS.” EMC CORPORATION MAKES NO REPRESENTATIONS OR WARRANTIES OF ANY KIND WITH RESPECT TO THE INFORMATION IN THIS PUBLICATION, AND SPECIFICALLY DISCLAIMS IMPLIED WARRANTIES OF MERCHANTABILITY OR FITNESS FOR A PARTICULAR PURPOSE.
Use, copying, and distribution of any EMC software described in this publication requires an applicable software license.
For the most up-to-date regulatory document for your product line, go to the Technical Documentation and Advisories section on EMC Powerlink.
For the most up-to-date listing of EMC product names, see EMC Corporation Trademarks on EMC.com.
All other trademarks used herein are the property of their respective owners.

EMC Smarts Service Assurance Management Suite Installation Guide 3
Preface
Chapter 1 OverviewSuite contents..................................................................................... 14Product and release compatibility.................................................. 15Installation tasks overview.............................................................. 16Upgrade tasks overview .................................................................. 17Migration tasks overview ................................................................ 18Uninstallation tasks overview......................................................... 19
Chapter 2 RequirementsOperating system requirements ..................................................... 22Hardware requirements................................................................... 26Web Console and Business Dashboard requirements ................. 28
Java Web Start requirements for Web Console ......................29
Chapter 3 Installing the Service Assurance Management SuiteBefore installation ............................................................................. 32
Determine the location of the EMC Smarts Broker ...............32Install the Service Assurance Management Suite ........................ 33
Install using Wizard mode ........................................................33Install using CLI mode...............................................................36Install using unattended mode.................................................37Where to go next .........................................................................40
Contents

EMC Smarts Service Assurance Management Suite Installation Guide4
Contents
Chapter 4 Upgrading the Service Assurance Management SuiteBefore upgrade.................................................................................. 42
Detect and stop EMC Smarts programs.................................. 42Upgrade the Service Assurance Management Suite ................... 46
Upgrade using Wizard mode ................................................... 46Upgrade using CLI mode.......................................................... 49Reconcile the configuration files .............................................. 50Where to go next......................................................................... 53
Chapter 5 Performing a MigrationOverview of migration tasks........................................................... 56
Chapter 6 Verifying the InstallationObtain and install a temporary license file ................................... 58Start EMC Smarts services............................................................... 59
Starting services on UNIX......................................................... 59Starting services on Windows .................................................. 60
Start EMC Smarts programs ........................................................... 61Starting programs on UNIX...................................................... 61Starting programs on Windows ............................................... 62
Verify the EMC Smarts product status .......................................... 63
Chapter 7 Uninstalling Service Assurance Management SuiteBefore uninstallation ........................................................................ 66
Remove manually installed services ....................................... 66Determine order for removing products (UNIX only) ......... 66Uninstall when the same product suite is installed twice (Windows only) .......................................................................... 67Detect and stop EMC Smarts programs.................................. 67Uninstall the FLEXnet License Server ..................................... 71
Uninstalling Service Assurance Management Suite.................... 73Uninstall using Wizard mode................................................... 73Uninstall using CLI mode ......................................................... 74Uninstall using unattended mode ........................................... 75

5EMC Smarts Service Assurance Management Suite Installation Guide
Contents
Appendix A Manually Installing ServicesOverview ............................................................................................ 78Service Assurance Management Suite services ............................ 79
EMC Smarts Broker ................................................................... 79Service Assurance Manager (Global Manager)/Business Impact Manager ......................................................................... 80Adapter Platform ....................................................................... 81Business Dashboard................................................................... 82Syslog Adapter ........................................................................... 83SNMP Trap Adapter .................................................................. 84
Appendix B Procedures for CD-ROMsMounting a CD-ROM on UNIX systems ....................................... 86Loading a CD-ROM on Windows................................................... 88

EMC Smarts Service Assurance Management Suite Installation Guide6
Contents

EMC Smarts Service Assurance Management Suite Installation Guide 7
Preface
As part of an effort to improve and enhance the performance and capabilities of its product lines, EMC periodically releases revisions of its hardware and software. Therefore, some functions described in this document may not be supported by all versions of the software or hardware currently in use. For the most up-to-date information on product features, refer to your product release notes.
If a product does not function properly or does not function as described in this document, please contact your EMC representative.
Audience This document is part of the Service Assurance Management Suite documentation set, and is intended for use by system administrators and integrators responsible for installing the EMC Smarts Service Assurance Management Suite.
EMC Smarts ServiceAssurance
Management Suiteinstallation directory
In this document, the term BASEDIR represents the location where EMC Smarts software is installed.
For UNIX, this location is: /opt/InCharge<n>/<productsuite>.
For Windows, this location is: C:\InCharge<n>\<productsuite>.
The <n> represents the software platform version number. The <productsuite> represents the EMC Smarts product suite to which the product belongs. For example, on UNIX operating systems, EMC Smarts Service Assurance Management Suite is, by default, installed to /opt/InCharge7/SAM/smarts. On Windows operating systems, this product is, by default, installed to: C:\InCharge7\SAM\smarts. This location is referred to as BASEDIR/smarts.
Optionally, you can specify the root of BASEDIR to be something other than /opt/InCharge7 (on UNIX) or C:\InCharge7 (on
8 EMC Smarts Service Assurance Management Suite Installation Guide
Preface
Windows), but you cannot change the <productsuite> location under the root directory.
For more information about the directory structure of EMC Smarts software, refer to the EMC Smarts System Administration Guide.
EMC Smarts ServiceAssurance
Management Suite
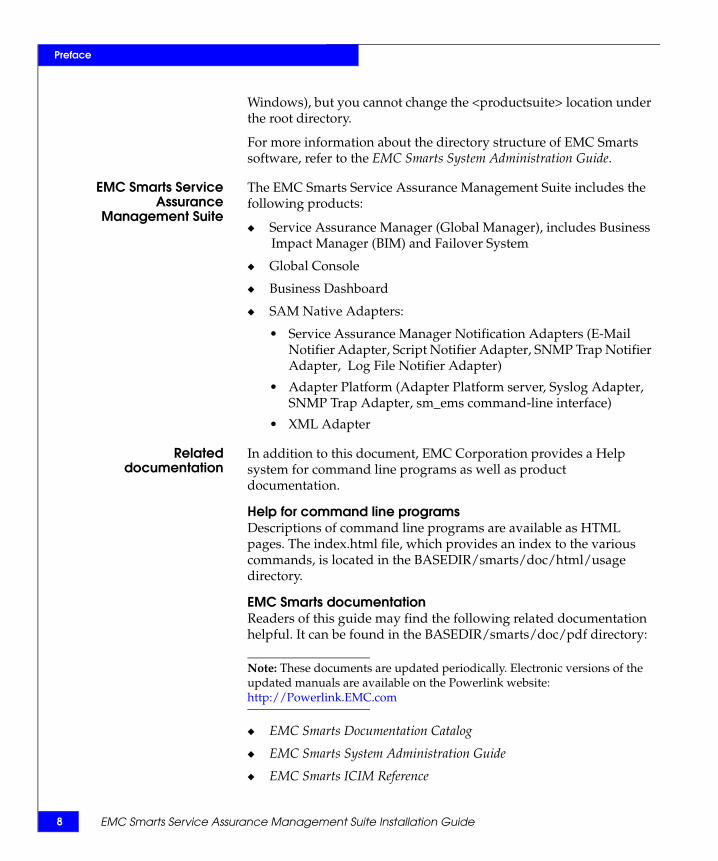
The EMC Smarts Service Assurance Management Suite includes the following products:
◆ Service Assurance Manager (Global Manager), includes Business Impact Manager (BIM) and Failover System
◆ Global Console
◆ Business Dashboard
◆ SAM Native Adapters:
• Service Assurance Manager Notification Adapters (E-Mail Notifier Adapter, Script Notifier Adapter, SNMP Trap Notifier Adapter, Log File Notifier Adapter)
• Adapter Platform (Adapter Platform server, Syslog Adapter, SNMP Trap Adapter, sm_ems command-line interface)
• XML Adapter
Relateddocumentation
In addition to this document, EMC Corporation provides a Help system for command line programs as well as product documentation.
Help for command line programsDescriptions of command line programs are available as HTML pages. The index.html file, which provides an index to the various commands, is located in the BASEDIR/smarts/doc/html/usage directory.
EMC Smarts documentationReaders of this guide may find the following related documentation helpful. It can be found in the BASEDIR/smarts/doc/pdf directory:
Note: These documents are updated periodically. Electronic versions of the updated manuals are available on the Powerlink website:http://Powerlink.EMC.com
◆ EMC Smarts Documentation Catalog
◆ EMC Smarts System Administration Guide
◆ EMC Smarts ICIM Reference

EMC Smarts Service Assurance Management Suite Installation Guide 9
Preface
◆ EMC Smarts Common Information Model Infrastructure Models Chart
◆ EMC Smarts Common Information Model Application⁄Business Models Chart
◆ EMC Smarts ASL Reference Guide
◆ EMC Smarts Perl Reference Guide
EMC Smarts ServiceAssurance
Management Suitedocumentation
The following documents are relevant to users of the EMC Smarts Service Assurance Management Suite:
◆ EMC Smarts Service Assurance Manager Introduction
◆ EMC Smarts Service Assurance Management Suite Deployment Guide
◆ EMC Smarts Service Assurance Management Suite Installation Guide
◆ EMC Smarts Service Assurance Manager Operator Guide
◆ EMC Smarts Service Assurance Manager Configuration Guide
◆ EMC Smarts Service Assurance Manager Dashboard Configuration Guide
◆ EMC Smarts Business Impact Manager User Guide
◆ EMC Smarts Report Manager User Guide
◆ EMC Smarts Service Assurance Manager Failover System User Guide
Refer to the EMC Smarts Documentation Catalog for documentation resources provided with other EMC Smarts product suites.
Suggestions forsearching PDF files
You may search across multiple PDF files using the Adobe Acrobat Reader software:
1. If the documentation is not accessible to all users of the EMC Smarts product suite, copy the contents of the BASEDIR/smarts/doc/pdf directory to a central location, such as a shared drive on your LAN, that operators and others may view.
2. To search throughout the documentation library, open the Acrobat Reader software:
a. Select Edit > Search, and type a word or phrase.
b. Select All PDF Documents in, in the Where would you like to search option, and type the pathname of the location where the PDF documents reside.
If you have more than one EMC Smarts product suite installed, you can set up cross-product document searches by copying files from the
10 EMC Smarts Service Assurance Management Suite Installation Guide
Preface
BASEDIR/smarts/doc/pdf directory for each product suite into this common documentation directory path.
Conventions used inthis document
EMC uses the following conventions for special notices.
Note: A note presents information that is important, but not hazard-related.
CAUTION!A caution contains information essential to avoid data loss or damage to the system or equipment.
IMPORTANT!An important notice contains information essential to operation of the software.
Typographical conventionsEMC uses the following type style conventions in this document:
Normal Used in running (nonprocedural) text for:• Names of interface elements (such as names of windows,
dialog boxes, buttons, fields, and menus)• Names of resources, attributes, pools, Boolean expressions,
buttons, DQL statements, keywords, clauses, environment variables, functions, utilities
• URLs, pathnames, filenames, directory names, computer names, filenames, links, groups, service keys, file systems, notifications
Bold Used in running (nonprocedural) text for:• Names of commands, daemons, options, programs,
processes, services, applications, utilities, kernels, notifications, system calls, man pages
Used in procedures for:• Names of interface elements (such as names of windows,
dialog boxes, buttons, fields, and menus)• What user specifically selects, clicks, presses, or types
Italic Used in all text (including procedures) for:• Full titles of publications referenced in text• Emphasis (for example a new term)• Variables

EMC Smarts Service Assurance Management Suite Installation Guide 11
Preface
Pathname conventionsDirectory pathnames are shown with forward slashes (/). Users of the Windows operating systems should substitute back slashes (\) for forward slashes.
Graphical conventionsIf there are figures illustrating consoles in this document, they represent the consoles as they appear in Windows. Under UNIX, the consoles appear with slight differences. For example, in views that display items in a tree hierarchy such as the Topology Browser, a plus sign appears for Windows and an open circle appears for UNIX.
Smarts ManagerUnless otherwise specified, the term Smarts Manager is used to refer to EMC Smarts programs such as Domain Managers, Global Managers, and adapters.
Where to get help EMC support, product, and licensing information can be obtained as follows.
Product information — For documentation, release notes, software updates, or for information about EMC products, licensing, and service, go to the EMC Powerlink website (registration required) at:
http://Powerlink.EMC.com
Courier Used for:• System output, such as an error message or script • URLs, complete paths, filenames, prompts, and syntax when
shown outside of running text
Courier bold Used for:• Specific user input (such as commands)
Courier italic Used in procedures for:• Variables on command line• User input variables
< > Angle brackets enclose parameter or variable values supplied by the user
[ ] Square brackets enclose optional values
| Vertical bar indicates alternate selections - the bar means “or”
{ } Braces indicate content that you must specify (that is, x or y or z)
... Ellipses indicate nonessential information omitted from the example

12 EMC Smarts Service Assurance Management Suite Installation Guide
Preface
Technical support — For technical support, go to EMC Customer Service on Powerlink. To open a service request through Powerlink, you must have a valid support agreement. Please contact your EMC sales representative for details about obtaining a valid support agreement or to answer any questions about your account.
Your comments Your suggestions will help us continue to improve the accuracy, organization, and overall quality of the user publications. Please send your opinion of this document to:

Overview 13
1
This chapter describes the EMC Smarts Service Assurance Management Suite products, compatibility with other EMC Smarts products, and installation tasks.
This chapter consists of the following topics:
◆ Suite contents...................................................................................... 14◆ Product and release compatibility ................................................... 15◆ Installation tasks overview............................................................... 16◆ Upgrade tasks overview ................................................................... 17◆ Migration tasks overview ................................................................. 18◆ Uninstallation tasks overview.......................................................... 19
Overview

14 EMC Smarts Service Assurance Management Suite Installation Guide
Overview
Suite contentsThe product suite is distributed on a CD-ROM and available for download from Powerlink. It is installed, by default, to the /SUITE subdirectory under the InCharge7 root directory.
The EMC® Smarts® Service Assurance Management Suite includes the following products:
◆ Service Assurance Manager: The EMC Smarts Service Assurance Manager product includes the following components, the:
• Global Manager
• EMC Smarts Broker
• EMC Smarts Business Impact Manager
• EMC Smarts Service Assurance Manager Failover System
• Generic notification adapters such as Log File, SNMP Trap, Script, and E-Mail
Note: Some components, such as Business Impact Manager, require licensing.
◆ Global Console: The Global Console product is the graphical interface for all EMC Smarts products.
Global Console functionality can also be deployed as a Web Console or a Business Dashboard.
◆ Adapter Platform: The SAM Adapter Platform product provides functionality to import and normalize topology and events from outside the EMC Smarts domain.
◆ Syslog Adapter: The Syslog Adapter product reads and processes system log (Syslog) messages. It requires the SAM Adapter Platform.
◆ SNMP Trap Adapter: The SNMP Trap Adapter product reads SNMP traps and forwards traps to any EMC Smarts application. It requires the SAM Adapter Platform.
◆ XML Adapter: The XML Adapter product imports and exports topology from any EMC Smarts application.

Product and release compatibility 15
Overview
Product and release compatibilityThe Service Assurance Management Suite is compatible with the versions of these products in Table 1 on page 15.
Table 1 Interoperability chart
EMC Smarts product suite Versions
EMC Smarts Application Connectivity Monitor 2.2
EMC Smarts IP Management Suite 6.5.1, 6.5.2, 6.5.3, 7.0, 7.0.1, 7.0.2, 7.0.3
EMC Smarts IPv6 Management Suite 2.0
EMC Smarts IT Performance Reporter 1.1
EMC Smarts MPLS Management Suite 2.0.1
EMC Smarts Multicast Manager 1.1.1
EMC Smarts Network Protocol Management Suite 2.1
EMC Smarts Service Assurance Management Adapter Suite 1.1, 1.2
EMC Smarts Service Assurance Management Suite 6.5.1, 6.5.2, 6.5.3, 7.0, 7.1, 7.2
EMC Smarts Storage Insight for Availability 2.0.1.1
EMC Smarts VoIP Availability Management Suite 2.0

16 EMC Smarts Service Assurance Management Suite Installation Guide
Overview
Installation tasks overviewTo install the Service Assurance Management Suite, you need to satisfy or perform the tasks listed in Table 2 on page 16.
Table 2 Service Assurance Management Suite installation requirements and tasks
Before you install:
The Broker and FLEXnet license sost should be installed, configured, and operating.
EMC Smarts System Administration Guide for license information
Review the important release issues for the Service Assurance Management Suite.
EMC Smarts Service Assurance Management Suite Release Notes
Obtain an evaluation or permanent license for the products you will install from the Service Assurance Management Suite.
EMC Smarts System Administration Guide for license information“Obtain and install a temporary license file” on page 58
Determine if the products are supported on your platform. “Operating system requirements” on page 22
Determine if your system meets the hardware requirements.
“Hardware requirements” on page 26
Installation method:
Install the Service Assurance Management Suite. Choose one of the following installation methods:• “Install using Wizard mode” on page 33• “Install using CLI mode” on page 36, UNIX only• “Install using unattended mode” on page 37
After you install:
Save your license in the proper location:• Evaluation license—Save smarts.lic to the
BASEDIR/smarts/local/conf directory. If your evaluation license has a different name, rename it to smarts.lic.
• Permanent license—Use the procedures described in the EMC Smarts System Administration Guide.
EMC Smarts System Administration Guide
If you installed the products as services, start them for the first time.
• “Starting services on UNIX” on page 59• “Starting services on Windows” on page 60
Verify the current state of the products and Broker. “Verify the EMC Smarts product status” on page 63

Upgrade tasks overview 17
Overview
Upgrade tasks overviewTo upgrade Service Assurance Management Suite, you need to satisfy or perform the tasks listed in Table 3 on page 17.
Table 3 Upgrading an existing Service Assurance Management Suite requirements and tasks
Before you install:
The Broker and FLEXnet license should be installed, configured, and operating.
EMC Smarts System Administration Guide for license information
Review the important release issues for the Service Assurance Management Suite.
EMC Smarts Service Assurance Management Suite Release Notes
Obtain an evaluation or permanent license for the products you will install from the Service Assurance Management Suite.
EMC Smarts System Administration Guide for license information“Obtain and install a temporary license file” on page 58
Determine if the products are supported on your platform. “Operating system requirements” on page 22
Determine if your system meets the hardware requirements.
“Hardware requirements” on page 26
Installation and upgrade method:
Install the Service Assurance Management Suite. Choose one of the following installation methods:• “Install using Wizard mode” on page 33• “Install using CLI mode” on page 36, UNIX only• “Install using unattended mode” on page 37
After you install:
Save your license in the proper location:• Evaluation license—Save smarts.lic to the
BASEDIR/smarts/local/conf directory. If your evaluation license has a different name, rename it to smarts.lic.
• Permanent license—Use the procedures described in the EMC Smarts System Administration Guide.
EMC Smarts System Administration Guide
If you installed the products as services, start them for the first time.
• “Starting services on UNIX” on page 59• “Starting services on Windows” on page 60
Verify the current state of the products and Broker. “Verify the EMC Smarts product status” on page 63

18 EMC Smarts Service Assurance Management Suite Installation Guide
Overview
Migration tasks overviewTo migrate to Service Assurance Management Suite, you need to satisfy or perform the tasks listed in Table 4 on page 18.
Table 4 Service Assurance Management Suite migration requirements and tasks
Before you migrate:
Review the release notes for important issues. EMC Smarts Service Assurance Management Suite Release Notes
Obtain a permanent license for the products you will install. EMC Smarts System Administration Guide for license information
Determine if the products are supported for your platform. “Operating system requirements” on page 22
Determine if your system meets the hardware requirements. “Hardware requirements” on page 26
Installation and migration:
Install the Service Assurance Management Suite. Choose one of the following installation methods:• “Install using Wizard mode” on page 33• UNIX only, “Install using CLI mode” on page 36• “Install using unattended mode” on page 37
Migrate configuration and repository files. “Overview of migration tasks” on page 56
After you install:
Save your license in the proper location:• Evaluation license—Save smarts.lic to the
BASEDIR/smarts/local/conf directory. If your evaluation license has a different name, rename it to smarts.lic.
• Permanent license—Use the procedures described in the EMC Smarts System Administration Guide.
EMC Smarts System Administration Guide
If you installed the products as services, start them for the first time. • “Starting services on UNIX” on page 59• “Starting services on Windows” on page 60
Verify the current state of the products and Broker. “Verify the EMC Smarts product status” on page 63

Uninstallation tasks overview 19
Overview
Uninstallation tasks overviewTo uninstall Service Assurance Management Suite, you need to satisfy or perform the tasks listed in Table 5 on page 19.
Table 5 Service Assurance Management Suite uninstallation requirements and tasks
Before you uninstall:
Review uninstall prerequisites: • “Remove manually installed services” on page 66• “Determine order for removing products (UNIX
only)” on page 66• “Uninstall when the same product suite is installed
twice (Windows only)” on page 67• “Detect and stop EMC Smarts programs” on
page 67• “Uninstall the FLEXnet License Server” on page 71
Uninstallation:
Uninstall the Service Assurance Management Suite: • “Uninstall using Wizard mode” on page 73• “Uninstall using CLI mode” on page 74• “Uninstall using unattended mode” on page 75

20 EMC Smarts Service Assurance Management Suite Installation Guide
Overview

Requirements 21
2
This chapter describes the operating system requirements and hardware requirements for the EMC Smarts Service Assurance Management Suite.
This chapter consists of the following topics:
◆ Operating system requirements....................................................... 22◆ Hardware requirements .................................................................... 26◆ Web Console and Business Dashboard requirements .................. 28
Requirements

22 EMC Smarts Service Assurance Management Suite Installation Guide
Requirements
Operating system requirementsTable 6 on page 22 summarizes the operating system platforms that are supported by each product in the EMC Smarts Service Assurance Management Suite.
Note: Service Assurance Management Suite 7.2 has been qualified to work on the following 64-bit operating systems: HP-UX 11.11, Red Hat Enterprise Linux AS 4, Solaris 10, and Windows Server 2003 Enterprise Edition SP2.
Recommended patch levelsTable 7 on page 23 summarizes the operating system patches required for the Service Assurance Management Suite.
Table 6 Supported operating system for the Service Assurance Management Suite
Operating system Supported version
HP-UX 11.11
Red Hat Enterprise Linux AS 4
Solaris 8, 9, 10
Windows Server 2003 Enterprise Edition SP2 and R2Windows XP Professional SP2Windows Vista
Operating system requirements 23
Requirements
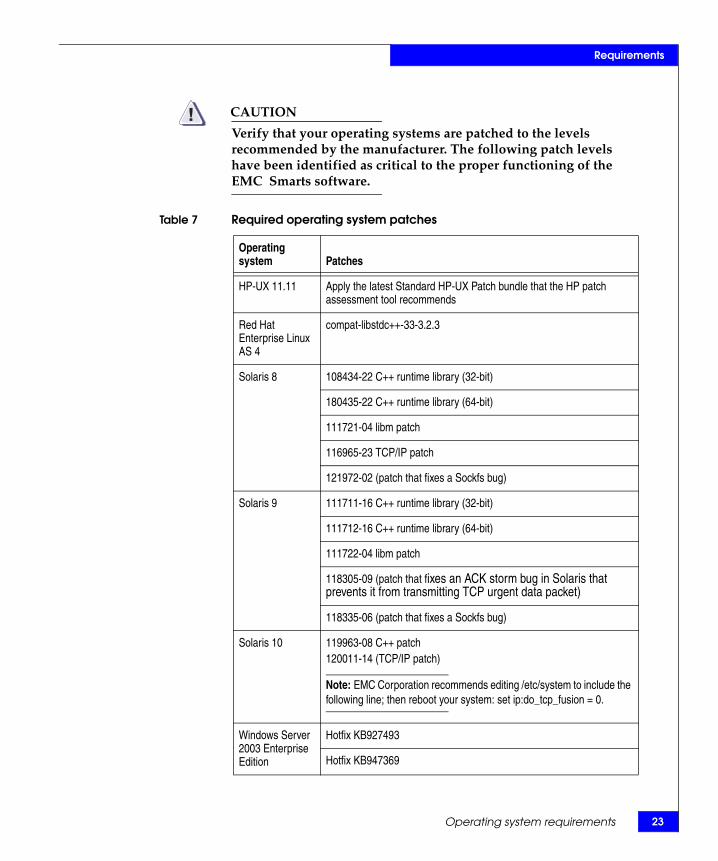
CAUTION!Verify that your operating systems are patched to the levels recommended by the manufacturer. The following patch levels have been identified as critical to the proper functioning of the EMC Smarts software.
Table 7 Required operating system patches
Operating system Patches
HP-UX 11.11 Apply the latest Standard HP-UX Patch bundle that the HP patch assessment tool recommends
Red Hat Enterprise Linux AS 4
compat-libstdc++-33-3.2.3
Solaris 8 108434-22 C++ runtime library (32-bit)
180435-22 C++ runtime library (64-bit)
111721-04 libm patch
116965-23 TCP/IP patch
121972-02 (patch that fixes a Sockfs bug)
Solaris 9 111711-16 C++ runtime library (32-bit)
111712-16 C++ runtime library (64-bit)
111722-04 libm patch
118305-09 (patch that fixes an ACK storm bug in Solaris that prevents it from transmitting TCP urgent data packet)
118335-06 (patch that fixes a Sockfs bug)
Solaris 10 119963-08 C++ patch120011-14 (TCP/IP patch)
Note: EMC Corporation recommends editing /etc/system to include the following line; then reboot your system: set ip:do_tcp_fusion = 0.
Windows Server 2003 Enterprise Edition
Hotfix KB927493
Hotfix KB947369

24 EMC Smarts Service Assurance Management Suite Installation Guide
Requirements
Additional HP-UX requirements
This section lists additional requirements for HP-UX 11.11.
Use the HP-UX system administration manager tool to verify that parameters are set correctly. Use “Choose Kernel Configuration,” “Choose Configurable Parameter” to get to the definition page. The necessary procedures are described in the HP-UX System Administration Tasks manual.
If necessary, make changes. Then, rebuild the kernel and reboot the system. You may want to contact your system administrator if you need additional help.
Note: You can also use the HPjconfig tool that checks kernel parameter values as well as patches. The kernel parameter values required for EMC Smarts software usually exceed the minimum values recommended by HPjconfig. You should use the larger of the two values—either the value based on the formula below or the value recommended by HPjconfig.
Formulas are provided as follows:
◆ The process data size limit kernel parameter (maxdsiz) must be set to at least 2 GB (or the maximum memory).
The value of this parameter is in decimal bytes. If it is below 2 GB (2147483648 bytes), increase it, rebuild the kernel, and restart the system.
◆ The max_thread_proc parameter must be set to at least 256, and the ncallout and nkthread parameters are calculated as follows.
Table 8 HP-UX parameters and values
Parameter Value
maxdsiz at least 2 GB (or the maximum memory)
max_thread_proc at least 256
ncallout nproc + 10*nSMARTS
nkthread 2*nproc + max_thread_proc*nSMARTS

Operating system requirements 25
Requirements
In the formulas, “nSMARTS” is the total number of Smarts Managers and Consoles running simultaneously on the machine and “nproc” is a varying system parameter displayed by HP-UX System Administration Manager. It represents the maximum number of processes on the machine.
◆ The ncallout value must be equal to at least the calculated result, although the HP-UX System Administration Manager default is almost always sufficient:
ncallout = nproc + 10*nSMARTS
◆ The nkthread value must be equal to at least the calculated result:
nkthread = 2*nproc + max_thread_proc*nSMARTS
(The max_thread_proc parameter must be at least 256.)

26 EMC Smarts Service Assurance Management Suite Installation Guide
Requirements
Hardware requirementsFollowing are the hardware requirements for the EMC Smarts Service Assurance Management Suite.
Table 9 on page 26 lists typical hardware for several equipment tiers and operating systems. Table 10 on page 26 represents the minimum hard disk storage requirements.
If you are installing more than one product, then your system must meet the products’ total memory and data disk space requirements.
Table 10 on page 26 lists disk space requirements for installing the Service Assurance Management Suite.
Table 9 Typical hardware for the equipment tiers
Operating system
Platform equipment tier
Small (1–2 low end CPUs, 2 GB RAM)
Medium (2 CPUs, 4 GB RAM)
Large (2 CPUs, 4 GB RAM)
Extra large(2–4 CPUs, 4–8 GB RAM)
HP-UX HPrp4480-8 HPrp4480-8 HPrp4480-8 HPrp4480-8
Red Hat Enterprise Linux
Any vendor, 1-2 Xeon 2.8 GHz
Any vendor, 2 Xeon 2.8 GHz
Any vendor, 2 Xeon 2.8 GHz
Any vendor, 4 Xeon 3.0 GHz
Solaris SunFire V240 SunFire V240 SunFire V440 with fastest CPUs
SunFire V490 with fastest CPUs
Windows Server 2003 Enterprise Edition
Any vendor, 1-2 Xeon 2.8 GHz
Any vendor, 2 Xeon 2.8 GHz
Any vendor, 2 Xeon 2.8 GHz
Any vendor, 4 Xeon 3.0 GHz
Table 10 Required disk space for the Network Protocol Management Suite
Platform Disk space
Solaris 8, 9, and 10 550 MB
HP-UX 11.11 650 MB
Red Hat Enterprise Linux AS 4 425 MB
Windows Server 2003 Enterprise Edition SP2 and R2 450 MB

Hardware requirements 27
Requirements
Table 11 on page 27 lists minimum requirements for CPUs, memory, and data disk space used by the software for writable files such as logs, repository files, and output files.
Note: CPU means the number of physical CPU cores and not the number of CPUs displayed when hyperthreading is activated.
If you are installing more than one product, then your system must meet the products’ total memory and data disk space requirements (disk space listed in Table 10 on page 26 plus RAM plus data disk space listed in Table 11 on page 27).
Table 11 CPU, memory, data disk space requirements
EMC Smarts product CPUsMemory (RAM) Data disk space
Service Assurance Management Suite 2 512 MB 100 MB each

28 EMC Smarts Service Assurance Management Suite Installation Guide
Requirements
Web Console and Business Dashboard requirementsThe EMC Smarts Global Console can also be deployed as either:
◆ EMC Smarts Web Console
◆ EMC Smarts Business Dashboard
Note: Tomcat Servlet Engine version 5.5.X is installed as part of the Web Console/Business Dashboard. The Tomcat Servlet Engine serves the files used by the Web applications.
Users who display Business Dashboard viewlets in a Web browser, or want to use the Web Console, require the following software:
◆ One of the following Web browsers:
• Internet Explorer 6.0 with Service Pack 1
• Internet Explorer 7.0
• Netscape Navigator 8.0
• Firefox 1.5.x
• Browser that supports Java JRE 1.5.x
◆ For Windows, the browser must be JavaScript enabled.
Also, a list of specific versions of browsers that are supported on different platforms can be found at http://java.sun.com/products/plugin.
◆ Java™ 2 Platform Standard Edition 5.0 which includes the 1.5.x Web browser plug-in must be installed on the client workstation.
If you are running any version prior to 1.5, when you try to start up and run the Dashboard or web console, the applets inside the sample views shipped with the software do not display properly.
If your client workstation does not have this version of JRE, you must obtain it and install it.
• For the HP-UX platform, download it from the HP-UX web site, http://www.hp.com/go/java.
• For all other platforms, download it from the Sun Microsystems web site at http://java.sun.com/javase/downloads/index.jsp.
Web Console and Business Dashboard requirements 29
Requirements
If the JRE is not installed on your client workstation, you will be prompted to install it when you launch the Web Console or Business Dashboard.
Java Web Start requirements for Web ConsoleJava Web Start is optional and can be invoked when the Web Console is executed.
Java Web Start must be installed and properly configured on the client machine.
◆ For UNIX, contact your system administrator to install and configure Java Web Start or follow the instructions provided on the Sun Microsystems web page, http://java.sun.com/j2se/1.5.0/install.html.
◆ For Windows, on the client machine, depending upon the type of browser, after you launch the Web Console, you are either prompted to use an automatic installer or directed to follow the instructions provided on the Sun Microsystems web page, http://java.sun.com/j2se/1.5.0/install.html.
To launch the Java Web Start version of the Web Console and use the automatic installer, point your browser to the following URL:
http://<Tomcat_host>:8080/webconsole/globalConsoleCached.html
where <Tomcat_host> refers to the name of the machine where the Tomcat Servlet Engine is installed and 8080 refers to the default port for Tomcat.
For information about using the Web Console, see the EMC Smarts Service Assurance Manager Dashboard Configuration Guide.

30 EMC Smarts Service Assurance Management Suite Installation Guide
Requirements

Installing the Service Assurance Management Suite 31
3
This chapter describes how to install the EMC Smarts Service Assurance Management Suite.
This chapter consists of the following topics:
◆ Before installation .............................................................................. 32◆ Install the Service Assurance Management Suite ......................... 33
Installing the ServiceAssurance
Management Suite

32 EMC Smarts Service Assurance Management Suite Installation Guide
Installing the Service Assurance Management Suite
Before installationPerform the following task before installing EMC Smarts Service Assurance Management Suite.
◆ “Determine the location of the EMC Smarts Broker” on page 32.
The user performing the installation must either be superuser (User ID 0) on UNIX platforms or have administrative privileges on Windows platforms. The installation program will halt if the user does not have the appropriate privileges.
Determine the location of the EMC Smarts BrokerYou must specify the location of the EMC Smarts Broker during installation of the EMC Smarts software. Typically, this location is chosen during the design of the EMC Smarts software deployment and before any installation begins.
Consult with your deployment planner or check the build guide that documents your deployment to determine the name of the host where the Broker was installed and the port that the Broker uses.
If the location is the same host where you are installing this suite, then the installation program will automatically install the Broker if it is not already on the host.
Install the Service Assurance Management Suite 33
Installing the Service Assurance Management Suite
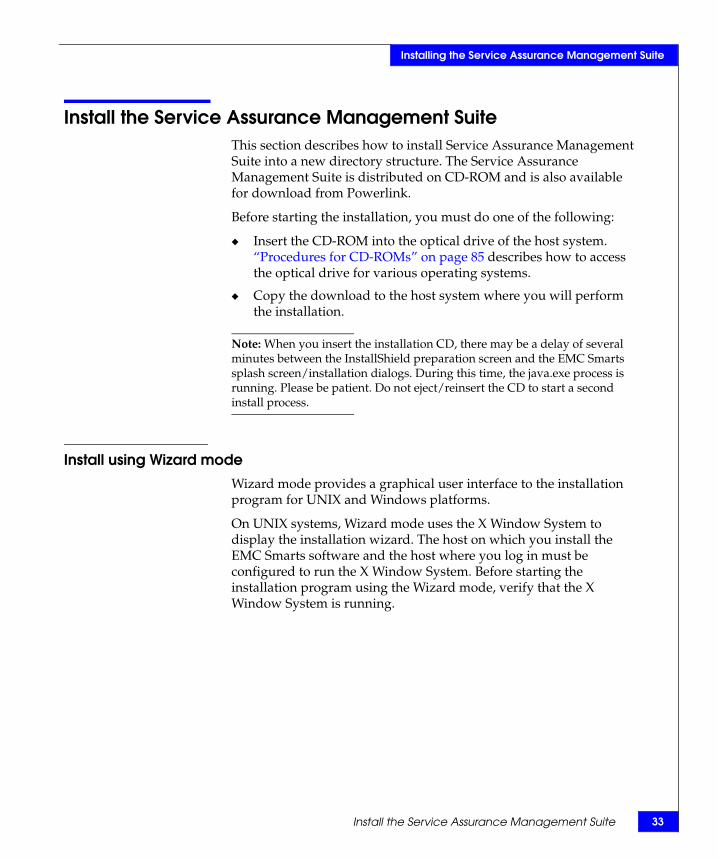
Install the Service Assurance Management SuiteThis section describes how to install Service Assurance Management Suite into a new directory structure. The Service Assurance Management Suite is distributed on CD-ROM and is also available for download from Powerlink.
Before starting the installation, you must do one of the following:
◆ Insert the CD-ROM into the optical drive of the host system. “Procedures for CD-ROMs” on page 85 describes how to access the optical drive for various operating systems.
◆ Copy the download to the host system where you will perform the installation.
Note: When you insert the installation CD, there may be a delay of several minutes between the InstallShield preparation screen and the EMC Smarts splash screen/installation dialogs. During this time, the java.exe process is running. Please be patient. Do not eject/reinsert the CD to start a second install process.
Install using Wizard modeWizard mode provides a graphical user interface to the installation program for UNIX and Windows platforms.
On UNIX systems, Wizard mode uses the X Window System to display the installation wizard. The host on which you install the EMC Smarts software and the host where you log in must be configured to run the X Window System. Before starting the installation program using the Wizard mode, verify that the X Window System is running.

34 EMC Smarts Service Assurance Management Suite Installation Guide
Installing the Service Assurance Management Suite
Running Wizard mode1. Run the Setup command appropriate for the operating system:
The InstallShield wizard dialog box displays and closes. The Shutdown EMC Smarts Programs dialog box and the Welcome screen appear.
2. Click OK in the Warning dialog box.
If stopping services is necessary, you will be prompted with specific instructions later in the installation process.
3. Click Next in the Welcome screen.
Next is disabled if you do not have administrative privileges and a message also appears. To install, you must restart the installation with appropriate privileges.
4. Read and accept the EMC Corporation end user license agreement and click Next.
5. If the installation program detects an existing installation of the same suite, the Installation Type screen displays.
Select Install the product to a new directory.
Note: This screen does not display if you are installing the suite for the first time on the system.
6. Click Next to accept the default installation directory or type your preferred directory and click Next.
The default installation directory is:
• /opt/InCharge7 (on UNIX)
• C:\InCharge7 (on Windows)
Table 12 Setup command syntax for Wizard mode
Operating system Setup command
HP-UX # ./setup-SAM-7_2_0_0-hpux.bin
Linux # ./setup-SAM-7_2_0_0-linux.bin
Solaris # ./setup-SAM-7_2_0_0-sol.bin
Windows setup-SAM-7_2_0_0-win.exe

Install the Service Assurance Management Suite 35
Installing the Service Assurance Management Suite
If you specify a directory, the directory name cannot contain spaces. If the specified directory does not exist, it will be created. If you do not have write privileges, an error message displays.
7. In the Setup screen, select:
• Complete to install all products in the suite, including the Global Console. Click Next.
• Global Console to only install the Java-based user interface, Web Console, or Business Dashboard. Click Next.
In the Global Console Selection screen select:
– Global Console, Web Console, and Business Dashboard. Click Next.
– Global Console. Click Next.• Custom to install a specific product. Click Next.
a. Deselect products that you do not want to install (by default, all products are selected).
b. Click Next.
8. The Services Selection screen displays. Select the products that you want to install as services and click Next. If you do not install services at this point, you will need to install them manually later.
If you have an older version of a service running on the host, you must stop that service before installing a new version of the service.
Note: When installed as services, EMC Smarts products start automatically when the system starts up. If the system is stopped and restarted, the EMC Smarts products restart automatically. EMC Corporation recommends that EMC Smarts products be installed as services whenever possible. If any of the products being installed can be started as services, these products are displayed in the services selection screen.
9. Specify the EMC Smarts Broker.
• If you are installing the Broker as a service, specify the port. The hostname defaults to localhost.
• If the Broker is already running on this host, keep the default values.
• If the Broker is running on another host, specify the hostname of that system and the port the Broker uses.

36 EMC Smarts Service Assurance Management Suite Installation Guide
Installing the Service Assurance Management Suite
Click Next to continue.
10. Review the list of products that will be installed and the target installation directory. At the bottom of the list, the total amount of disk space required for the selected products is provided so that you can verify that adequate disk space is available. To install the products, click Next and the Installation Progress screen displays.
11. Upon completion, the Installation Summary displays informational messages such as successful confirmations, error messages, and warnings. Click Finish to exit the installation. It is not necessary to restart the system after installation.
Investigate any errors or warnings. The log file is a text file with the naming convention Install.<suite>.<productversionNumber>.log. It is located in the BASEDIR/smarts/setup/logs directory. If the installation process fails, the log files are located in the /tmp directory.
12. See “Where to go next” on page 40 for post-installation tasks.
Install using CLI modeCLI mode provides a text-based method for invoking the installation program. This mode is intended for UNIX platforms with non-graphics consoles. The CLI mode follows the same process as the wizard mode but uses text rather than graphics.
Running CLI modeTo start the CLI mode, invoke the setup command with the console option.
User selections and navigation in CLI modeDuring the installation and uninstallation processes, you are prompted with a series of steps and menus:
Table 13 The setup command syntax for CLI-mode
Operating system Executable
HP-UX ./setup-SAM-7_2_0_0-hpux.bin -console
Linux ./setup-SAM-7_2_0_0-linux.bin -console
Solaris ./setup-SAM-7_2_0_0-sol.bin -console
Install the Service Assurance Management Suite 37
Installing the Service Assurance Management Suite
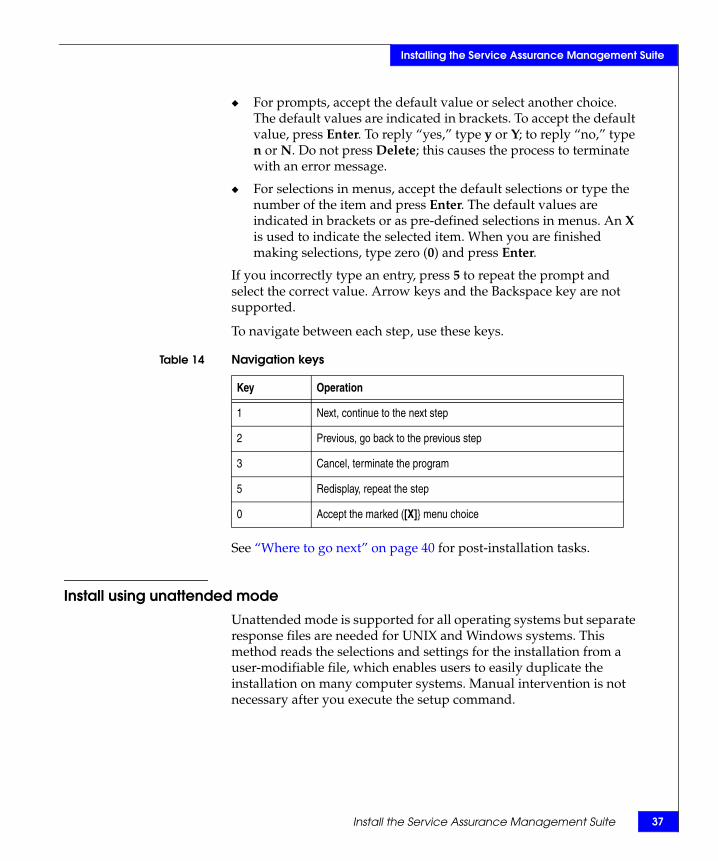
◆ For prompts, accept the default value or select another choice. The default values are indicated in brackets. To accept the default value, press Enter. To reply “yes,” type y or Y; to reply “no,” type n or N. Do not press Delete; this causes the process to terminate with an error message.
◆ For selections in menus, accept the default selections or type the number of the item and press Enter. The default values are indicated in brackets or as pre-defined selections in menus. An X is used to indicate the selected item. When you are finished making selections, type zero (0) and press Enter.
If you incorrectly type an entry, press 5 to repeat the prompt and select the correct value. Arrow keys and the Backspace key are not supported.
To navigate between each step, use these keys.
See “Where to go next” on page 40 for post-installation tasks.
Install using unattended modeUnattended mode is supported for all operating systems but separate response files are needed for UNIX and Windows systems. This method reads the selections and settings for the installation from a user-modifiable file, which enables users to easily duplicate the installation on many computer systems. Manual intervention is not necessary after you execute the setup command.
Table 14 Navigation keys
Key Operation
1 Next, continue to the next step
2 Previous, go back to the previous step
3 Cancel, terminate the program
5 Redisplay, repeat the step
0 Accept the marked ([X]} menu choice
38 EMC Smarts Service Assurance Management Suite Installation Guide
Installing the Service Assurance Management Suite
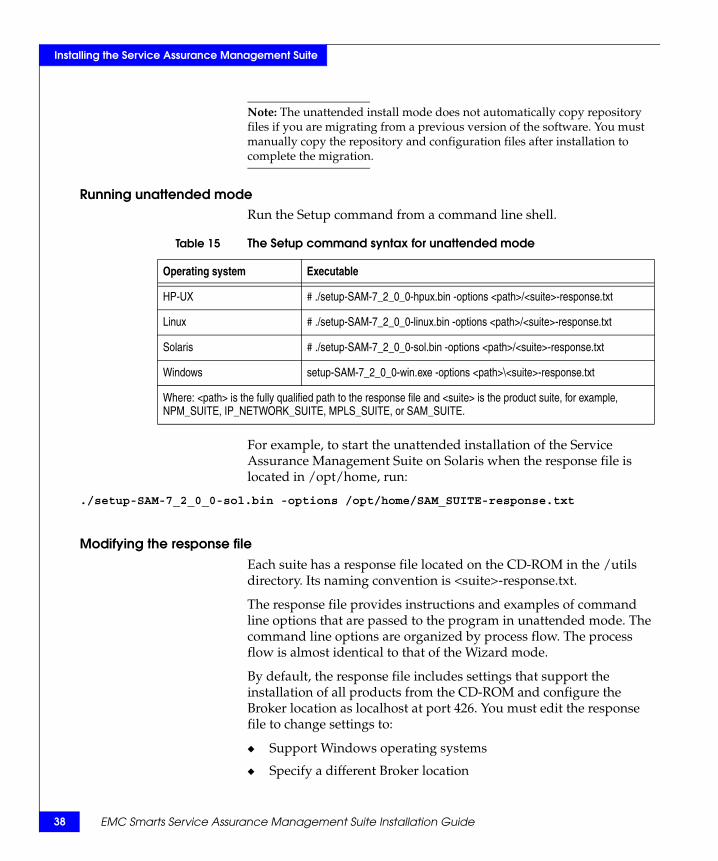
Note: The unattended install mode does not automatically copy repository files if you are migrating from a previous version of the software. You must manually copy the repository and configuration files after installation to complete the migration.
Running unattended modeRun the Setup command from a command line shell.
For example, to start the unattended installation of the Service Assurance Management Suite on Solaris when the response file is located in /opt/home, run:
./setup-SAM-7_2_0_0-sol.bin -options /opt/home/SAM_SUITE-response.txt
Modifying the response fileEach suite has a response file located on the CD-ROM in the /utils directory. Its naming convention is <suite>-response.txt.
The response file provides instructions and examples of command line options that are passed to the program in unattended mode. The command line options are organized by process flow. The process flow is almost identical to that of the Wizard mode.
By default, the response file includes settings that support the installation of all products from the CD-ROM and configure the Broker location as localhost at port 426. You must edit the response file to change settings to:
◆ Support Windows operating systems
◆ Specify a different Broker location
Table 15 The Setup command syntax for unattended mode
Operating system Executable
HP-UX # ./setup-SAM-7_2_0_0-hpux.bin -options <path>/<suite>-response.txt
Linux # ./setup-SAM-7_2_0_0-linux.bin -options <path>/<suite>-response.txt
Solaris # ./setup-SAM-7_2_0_0-sol.bin -options <path>/<suite>-response.txt
Windows setup-SAM-7_2_0_0-win.exe -options <path>\<suite>-response.txt
Where: <path> is the fully qualified path to the response file and <suite> is the product suite, for example, NPM_SUITE, IP_NETWORK_SUITE, MPLS_SUITE, or SAM_SUITE.

Install the Service Assurance Management Suite 39
Installing the Service Assurance Management Suite
To modify the response file:
1. Copy the response file from the CD-ROM /utils directory to a directory on your system, for example, the /tmp directory.
2. Using a text editor, modify the values for the command line options in the response file:
• Specify the target directory.
• Select a directory for the process log file.
• Select the products to install. Ensure that the property value for the product is set to true.
• Select the products to start as services. Ensure that the property value for the product is set to true.
• Specify the location of the Broker.
3. Save the file.

40 EMC Smarts Service Assurance Management Suite Installation Guide
Installing the Service Assurance Management Suite
Where to go nextAfter the installation is finished, you may need to complete the following tasks:
◆ “Performing a Migration” on page 55 describes additional tasks if you are migrating from a previous version of the suite.
◆ “Verifying the Installation” on page 57 describes tasks for verifying the proper installation of the software and starting services.

Upgrading the Service Assurance Management Suite 41
4
This chapter describes steps for upgrading from previous a version of EMC Smarts Service Assurance Management Suite.
This chapter consists of the following topics:
◆ Before upgrade ................................................................................... 42◆ Upgrade the Service Assurance Management Suite..................... 46
Upgrading the ServiceAssurance
Management Suite

42 EMC Smarts Service Assurance Management Suite Installation Guide
Upgrading the Service Assurance Management Suite
Before upgradePerform the following tasks before upgrading :
◆ “Detect and stop EMC Smarts programs” on page 42.
◆ “Back up your configuration” on page 45.
The user performing the upgrade must either be superuser (User ID 0) on UNIX platforms or have administrative privileges on Windows platforms. The installation program will halt if the user does not have the appropriate privileges.
Detect and stop EMC Smarts programsBefore upgrading an EMC Smarts product suite, you must stop all services, scheduled jobs, and other processes that use programs or libraries running from the EMC Smarts product suite you intend to upgrade.
You must also stop the EMC Smarts service daemon, sm_serviced, if it is running from the product suite to be upgraded.
Detecting EMC Smarts programsThe sm_plist utility identifies all EMC Smarts programs that are running for any product suite on your machine. You can use the sm_plist utility whenever you need to identify EMC Smarts programs that are running (for example, before applying a service pack or patch and uninstalling the product suite).
To use the utility, run it from the BASEDIR/smarts/script directory. The utility displays active programs in a window:
1. Go to the BASEDIR/smarts/script directory.
2. Start the sm_plist utility:
For UNIX, type
./sm_plist.sh BASEDIR2
For Windows, type
cscript sm_plist.vbs BASEDIR2
where <BASEDIR> is the directory where the sm_plist utility is installed and <BASEDIR2> represents the location of any EMC Smarts product suite.

Before upgrade 43
Upgrading the Service Assurance Management Suite
Stopping active EMC Smarts programs (UNIX)To stop active EMC Smarts programs (UNIX):
1. Stop active EMC Smarts services using the sm_service utility from BASEDIR/smarts/bin:
./sm_service stop <service_name>
where <service_name> is the name of the service to stop.
Note: sm_serviced waits 30 minutes after sending a shutdown request to a process. If the process is still running after 30 minutes, sm_serviced terminates it.
2. Repeat step 1 for each EMC Smarts service running from the suite to be upgraded.
3. Verify that EMC Smarts services are stopped by using the sm_service utility from BASEDIR/smarts/bin:
./sm_service show
4. If the EMC Smarts service daemon, sm_serviced, is running from the suite to be upgraded, stop it using the proper command:
Solaris:
/etc/init.d/ic-serviced stop
Linux:
/etc/init.d/ic-serviced stop
HP-UX:
/sbin/init.d/ic-serviced stop
5. Determine if any Smarts Managers are running by using the brcontrol utility from BASEDIR/smarts/bin:
./brcontrol
6. Stop any Smarts Manager that is still running from the suite to be upgraded. If the Broker is running from the suite, stop the local Broker:
• To stop any server that is still running, use the dmquit utility from BASEDIR/smarts/bin:
./dmquit --server=<servername>

44 EMC Smarts Service Assurance Management Suite Installation Guide
Upgrading the Service Assurance Management Suite
• To stop the local Broker from BASEDIR/smarts/bin:
./brquit --broker=localhost:<port>
7. Determine if any other EMC Smarts processes are still running from the suite and stop the processes:
• Detect the processes using the following command:
ps -ef | grep “sm_”
If a list is displayed, note the process ID (pid) of these active EMC Smarts processes.
• Shut down these EMC Smarts processes using the following command:
# kill <pid>
Stopping active EMC Smarts programs (Windows)To stop a service from the Windows desktop, use the Microsoft Management Console:
1. Select Settings > Control Panel.
2. At the Control Panel, select Administrative Tools.
3. At the Administrative Tools folder, select Services.
4. At the Services window, locate running Smarts services. These services start with the words “EMC Smarts.” For each service running from the suite to be upgraded, right-click the service and select Stop.
Note: Do not stop the Broker service.
5. Open a command prompt and determine if any Smarts Managers are running by using the brcontrol utility from BASEDIR\smarts\bin:
brcontrol
6. Stop any Smarts Manager that is still running from the suite using the dmquit utility from BASEDIR/smarts/bin:
dmquit --server=<servername>
7. If the Broker is running from the suite to be upgraded, use the brquit utility from BASEDIR/smarts/bin to stop it:
brquit --broker=localhost:<port>

Before upgrade 45
Upgrading the Service Assurance Management Suite
Back up your configuration
Back up your current suite configuration, including all customizations, using the smgetinfo utility. This utility collects version information and saves the /conf, /local, /rules, and /setup directories to an archive file.
For all platforms, to collect information about installed products and components, the Perl interpreter (version 5.0 or later) must be installed.
For Windows, WinZip is required. If WinZip is not installed in its default directory, set the variable ZIPPER to point to the WinZip directory.
To run the smgetinfo utility:
1. Ensure that the value for SM_HOME is set to BASEDIR.
2. Go to the BASEDIR/smarts/script directory.
3. Type the appropriate command and click Enter:
For UNIX, type
./smgetinfo
or
sh smgetinfo
For Windows, type
smgetinfo.cmd
The name and location of the resulting archive file is displayed.
4. Archive the file for later use, if necessary.

46 EMC Smarts Service Assurance Management Suite Installation Guide
Upgrading the Service Assurance Management Suite
Upgrade the Service Assurance Management SuiteThis section describes how to upgrade Service Assurance Management Suite from a previous version of the EMC Smarts Service Assurance Management Suite. The Service Assurance Management Suite is distributed on CD-ROM and is also available for download from Powerlink.
Before starting the upgrade, you must do one of the following:
◆ Insert the CD-ROM into the optical drive of the host system. “Procedures for CD-ROMs” on page 85 describes how to access the optical drive for various operating systems.
◆ Copy the download to the host system where you will perform the installation.
Note: When you insert the installation CD, there may be a delay of several minutes between the InstallShield preparation screen and the EMC Smarts splash screen/installation dialogs. During this time, the java.exe process is running. Please be patient. Do not eject/reinsert the CD to start a second install process
Upgrade using Wizard modeWizard mode provides a graphical user interface to the installation program for UNIX and Windows platforms.
On UNIX systems, Wizard mode uses the X Window System to display the installation wizard. The host on which you install the EMC Smarts software and the host where you log in must be configured to run the X Window System. Before starting the installation program using the Wizard mode, verify that the X Window System is running.

Upgrade the Service Assurance Management Suite 47
Upgrading the Service Assurance Management Suite
Running Wizard mode1. Run the Setup command appropriate for the operating system:
The InstallShield wizard dialog box displays and closes. The InstallShield wizard dialog box displays and closes. The Shutdown EMC Smarts Programs dialog box and the Welcome screen appear.
2. Click OK in the Warning dialog box. If stopping services is necessary, you will be prompted with specific instructions later in the installation process.
3. Click Next in the Welcome screen.
Next is disabled if you do not have administrative privileges and a message also appears. To install, you must restart the installation with appropriate privileges.
4. Read and accept the EMC Corporation end user license agreement and click Next.
5. Select Upgrade existing suite from the Installation Type screen and click Next.
Note: If you are adding additional components to your existing Service Assurance Management suite 7.2 installation, select the Add additional features option from the Installation Type screen.
6. Select the suite to upgrade:
• If the installation program detects a single installation of the suite, it is selected.
• If the installation program detects multiple installations of the suite, select the suite to upgrade.
Click Next. The Upgrade Product screen is displayed.
Table 16 Setup command syntax for Wizard mode
Operating system Setup command
HP-UX # ./setup-SAM-7_2_0_0-hpux.bin
Linux # ./setup-SAM-7_2_0_0-linux.bin
Solaris # ./setup-SAM-7_2_0_0-sol.bin
Windows setup-SAM-7_2_0_0-win.exe

48 EMC Smarts Service Assurance Management Suite Installation Guide
Upgrading the Service Assurance Management Suite
7. Select the product or products you wish to upgrade and click Next. If the suite contains additional uninstalled products, you may add them at this time.
8. If you upgrade the Global Console, select the upgrade type in the Global Console Selection:
• Global Console, Web Console, and Business Dashboard, click Next.
• Global Console, click Next.
9. If the installation program detects services running from the install area, the installation cannot continue. Stop each service listed by the installation program. If sm_serviced is listed, you must also stop sm_serviced.
Note: If you stop sm_serviced, the status of services will be listed as UNKNOWN.
Return to the installation program and click Refresh. All services should now be stopped. Click Next.
10. The Reconcile Files screen displays. Review the effects of the installation process on configuration files by expanding the directories in the screen. A green check indicates that a file does not require manual intervention; any other indicator requires an action after the upgrade. Click Next.
11. Review the list of products that will be installed and the target installation directory. At the bottom, the total amount of disk space required for the selected products is provided so that you can verify that adequate disk space is available. Click Next. The installation progress screen displays:
After this step you will not be able to cancel installation.
12. Click Next. The Reconcile File Action Report displays. Review the report and note its location for later reference. To continue, click Next.
13. The Installation Summary displays informational messages such as successful confirmations, error messages, and warnings. Click Next.
14. Reconcile the configuration files as described in “Reconcile the configuration files” on page 50.

Upgrade the Service Assurance Management Suite 49
Upgrading the Service Assurance Management Suite
Upgrade using CLI modeCLI mode provides a text-based method for invoking the installation program. This mode is intended for UNIX platforms with non-graphics consoles. The CLI mode follows the same process as the wizard mode but uses text rather than graphics.
Running CLI modeTo start the CLI mode, invoke the setup command with the console option.
User selections and navigation in CLI modeDuring the upgrade process, you are prompted with a series of steps and menus:
◆ For prompts, accept the default value or select another choice. The default values are indicated in brackets. To accept the default value, press Enter. To reply “yes,” type y or Y; to reply “no,” type n or N. Do not press Delete; this causes the process to terminate with an error message.
◆ For selections in menus, accept the default selections or type the number of the item and press Enter. The default values are indicated in brackets or as pre-defined selections in menus. An X is used to indicate the selected item. When you are finished making selections, type zero (0) and press Enter.
If you incorrectly type an entry, press 5 to repeat the prompt and select the correct value. Arrow keys and the Backspace key are not supported.
Table 17 The setup command syntax for CLI-mode
Operating system Executable
HP-UX ./setup-SAM-7_2_0_0-hpux.bin -console
Linux ./setup-SAM-7_2_0_0-linux.bin -console
Solaris ./setup-SAM-7_2_0_0-sol.bin -console
50 EMC Smarts Service Assurance Management Suite Installation Guide
Upgrading the Service Assurance Management Suite
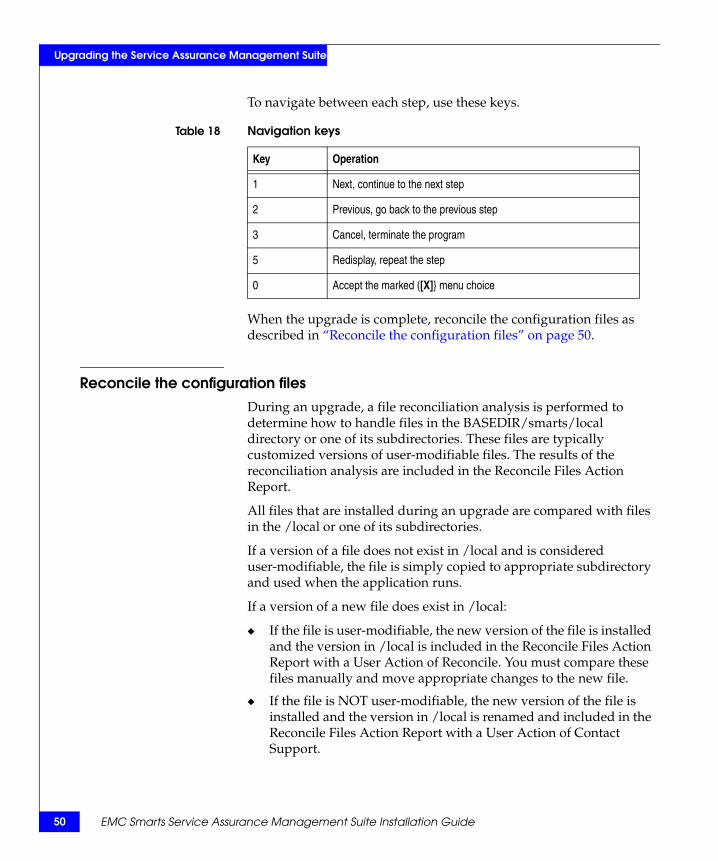
To navigate between each step, use these keys.
When the upgrade is complete, reconcile the configuration files as described in “Reconcile the configuration files” on page 50.
Reconcile the configuration filesDuring an upgrade, a file reconciliation analysis is performed to determine how to handle files in the BASEDIR/smarts/local directory or one of its subdirectories. These files are typically customized versions of user-modifiable files. The results of the reconciliation analysis are included in the Reconcile Files Action Report.
All files that are installed during an upgrade are compared with files in the /local or one of its subdirectories.
If a version of a file does not exist in /local and is considered user-modifiable, the file is simply copied to appropriate subdirectory and used when the application runs.
If a version of a new file does exist in /local:
◆ If the file is user-modifiable, the new version of the file is installed and the version in /local is included in the Reconcile Files Action Report with a User Action of Reconcile. You must compare these files manually and move appropriate changes to the new file.
◆ If the file is NOT user-modifiable, the new version of the file is installed and the version in /local is renamed and included in the Reconcile Files Action Report with a User Action of Contact Support.
Table 18 Navigation keys
Key Operation
1 Next, continue to the next step
2 Previous, go back to the previous step
3 Cancel, terminate the program
5 Redisplay, repeat the step
0 Accept the marked ([X]} menu choice

Upgrade the Service Assurance Management Suite 51
Upgrading the Service Assurance Management Suite
The upgrade process also checks files in /local or one of its subdirectories to ensure that they belong there. If an unknown file is detected, the Reconcile Files Action Report indicates that the User Action is to investigate the file.
1. Using any editor, open and review the reconciliation file report. By default, the file is located in BASEDIR/smarts/setup/info/Patch_Report<number>.txt (where <number> includes the new suite version number).
For each configuration file that was affected during the installation, the report includes the following information:
• The directory path and file name of the file.
• The status of the file: Normal, Critical, or Unknown.
• The Installer Actions that were performed on the file. See “Installer actions” on page 51.
• The User Actions that need to be performed on the file. See “User actions” on page 52.
• The name of the backup file (if any) created
2. If this listing indicates that a User Action is required for a particular configuration file, use sm_edit to make any needed change to the file.
3. Start the EMC Smarts services, as described in the EMC Smarts System Administration Guide or the Installation Guide for your product suite.
During an upgrade, the existing /local files that are affected by the patch are listed in the Reconcile Files Action Report.
Installer actionsIf you have customized a file, the custom version exists in BASEDIR/smarts/local. During the upgrade, the installation updates files in BASEDIR/smarts for your product suite; however, the installer will check in /local to see if a custom version of any file exists. To restore the previous customization, you must reconcile these files manually. See “User actions” on page 52 for more information.
For files not included, the installer takes no action other than reporting:
◆ Unknown File, for a file that is found in /local but not elsewhere in the product directory.

52 EMC Smarts Service Assurance Management Suite Installation Guide
Upgrading the Service Assurance Management Suite
◆ A Critical File error, for a file that is not user-modifiable but appears to be modified, (i.e., a copy is found in the /local directory)
See “User actions” on page 52 for more information on these two possibilities.
User actionsThe installation program may direct you to perform actions based on the status of a file that it detected or that was affected by the installation process. The installer reports:
◆ Unknown File
You must investigate to determine the usage of the file that is in /local. The file may work normally after the upgrade, but there is the chance of incompatibility with the new release.
If it does not belong in /local, you should remove it. If it is part of a customization of your system or the /local/conf/smart.lic file, and you determine it will not conflict with any new features of the release, leave it. If it will conflict with the release, remove it.
◆ A Critical File error
A file that is not user-modifiable appears to be modified because a copy is found in the /local directory. Contact EMC Smarts Global Services to correct the situation.
◆ Manual Merge files
If a user-modifiable file exists in /local and differs from a newly installed file with the same name, you have customized the old file and must manually reconcile the newly installed file with the modified file in order to restore your customization.
Manually merging files1. Determine which files require action by reviewing the Reconcile
Files Action Report generated by the upgrade process. Using any editor, you can open and review the report, which is located in BASEDIR/smarts/setup/info/Patch_Report<number>.txt.
2. To open a file, do the following:
• If the upgrade created a backup of that file, open both the new and the old versions of the file using the sm_edit utility.
• If the upgrade did not create a backup of that file, rename the existing version of the file and then open both the new and the old versions of the file using the sm_edit utility.

Upgrade the Service Assurance Management Suite 53
Upgrading the Service Assurance Management Suite
3. With both versions of the file open, compare the files to find the customizations that you applied. Text can be copied from the older or backup file and pasted into the newly installed file.
4. Close the renamed or backup file without saving.
5. Save and close the newly installed and modified file.
Where to go next“Verifying the Installation” on page 57 describes tasks for verifying the proper installation of the software and starting services.

54 EMC Smarts Service Assurance Management Suite Installation Guide
Upgrading the Service Assurance Management Suite
Performing a Migration 55
5
This chapter describes steps for migrating from previous a version of EMC Smarts Service Assurance Management Suite.
This chapter consists of the following topics:
◆ Overview of migration tasks ............................................................ 56
Performing a Migration

56 EMC Smarts Service Assurance Management Suite Installation Guide
Performing a Migration
Overview of migration tasksService Assurance Management Suite 7.2 can be migrated from the following older versions:
◆ EMC Smarts Service Assurance Management Suite 6.2 SP3
◆ EMC Smarts Service Assurance Management Suite 6.5 SP3
Note: See the EMC Smarts Service Assurance Management Suite Migration Guide for instructions on migrating from Service Assurance Management Suite 6.2 SP3 or 6.5 SP3.
If your current Service Assurance Management Suite installation is not at either of these version levels, you must first install the appropriate SmartPack to bring it to either of these levels before starting the 7.2 installation.
To determine your existing 6.x version level, perform the following:
1. From the Service Assurance Manager BASEDIR/smarts/bin/, enter the following command:
sm_server --version
2. EMC Smarts displays the following:
V<Number> <Date> <Build> Copyright <Date> EMC Corporation

Verifying the Installation 57
6
This chapter describes tasks for confirming proper installation of the EMC Smarts Service Assurance Management Suite.
This chapter consists of the following topics:
◆ Obtain and install a temporary license file .................................... 58◆ Start EMC Smarts services ................................................................ 59◆ Start EMC Smarts programs............................................................. 61◆ Verify the EMC Smarts product status............................................ 63
Verifying theInstallation

58 EMC Smarts Service Assurance Management Suite Installation Guide
Verifying the Installation
Obtain and install a temporary license fileTypically, the EMC Corporation will email a temporary license to you. Copy the license file, smarts.lic, to the BASEDIR/smarts/local/conf directory on the system where the EMC Smarts software is installed. If you installed multiple EMC Smarts product suites on the same system, each suite requires a separate copy of smarts.lic.
If you installed an EMC Smarts product suite on multiple systems, copy the license file, smarts.lic, to the BASEDIR/smarts/local/conf directory on each system where EMC Smarts software is installed.
Edit the SM_LICENSE variable in runcmd_env.sh on each system where EMC Smarts software is installed so that it specifies the full path and filename of a single smarts.lic file. When multiple EMC Smarts product suites are installed on the same system, each suite will include a runcmd_env.sh in its BASEDIR/smarts/local/conf directory.
Temporary licenses for EMC Smarts software are time-limited. At the end of the trial period, the software will no longer start. You can request an extension to your temporary license by emailing [email protected] with your request.
The EMC Smarts System Administration Guide provides information on licensing or instructions for obtaining and installing a permanent license.
Start EMC Smarts services 59
Verifying the Installation
Start EMC Smarts servicesThe following sections describe methods for starting EMC Smarts services.
EMC Corporation recommends installing Smarts Managers as services. If you installed the products as services, you must start them for the first time. These services start automatically upon system reboot, but the following sections describe additional methods to start EMC Smarts services.
Starting services on UNIXVerify the status of the service daemon before starting a service.
Verifying the status of the service daemonUse the ic-serviced command to check the status of the service daemon. The path to the ic-serviced command varies by operating system.
Solaris
On Solaris systems, type the following command to verify the status of the service daemon:
/etc/init.d/ic-serviced status
If the sm_serviced process does not respond, the process is not running. Start the service by typing the command:
/etc/init.d/ic-serviced start
Linux
On Linux systems, type the following command to verify the status of the service daemon:
/etc/init.d/ic-serviced status
If the sm_serviced process does not respond, the process is not running. Start the service by typing the command:
/etc/init.d/ic-serviced start
60 EMC Smarts Service Assurance Management Suite Installation Guide
Verifying the Installation
HP-UX
On HP-UX systems, type the following command to verify the status of the service daemon:
/sbin/init.d/ic-serviced status
If the sm_serviced process does not respond, the process is not running. Start the service by typing the command:
/sbin/init.d/ic-serviced start
Starting EMC Smarts servicesTo start or stop, use the sm_service utility. Type the command from the BASEDIR/smarts/bin directory:
./sm_service start <service_name> [<service_name> ...]
where <service_name> is each service you need to start.
Example of starting a service (UNIX)
The following example shows how to start the <product> service. Invoke the sm_service utility from the BASEDIR/smarts/bin directory:
For UNIX, type:
./sm_service start <service name>
Starting services on WindowsTo start an EMC Smarts service from the Windows desktop, follow these steps:
1. Select Start > Settings > Control Panel > Administrative Tools.
2. Select Services.
3. Right-click the EMC Smarts service to select it and display a menu.
4. Choose Start from the menu.
Note: Start the Broker service first if it is not running.

Start EMC Smarts programs 61
Verifying the Installation
Start EMC Smarts programsYou can start EMC Smarts programs from the terminal when the program is not intended to be long-running or to perform testing. EMC Corporation does not recommend using this method in a production environment.
The EMC Smarts System Administration Guide provides a complete description of the command syntax.
Starting programs on UNIXTo start a program on UNIX, invoke the command with the appropriate options from the BASEDIR/smarts/bin directory.
Starting the EMC Smarts Broker./brstart --port=426 --output
Starting a Smarts Manager▼ ./sm_server --name=<server_name>
--config=<config_directory>--port=0--ignore-restore-errors--output ▲
To run the program in the background, use the daemon option.
Note: ▼▲ indicates the command must be typed on one line.

62 EMC Smarts Service Assurance Management Suite Installation Guide
Verifying the Installation
Starting programs on WindowsTo start a program on Windows, invoke the command with the appropriate options from the C:\BASEDIR\smarts\bin directory.
Starting the EMC Smarts Brokerbrstart --port=426 --output
Starting a Smarts Manager▼ sm_server --name=<server_name>
--config=<config_directory>--port=0--ignore-restore-errors--output ▲
Note: ▼▲ indicates the command must be typed on one line.

Verify the EMC Smarts product status 63
Verifying the Installation
Verify the EMC Smarts product statusYou can determine the current state of the products in the suite that register with the Broker by typing the following command from the BASEDIR/smarts/bin directory:
./brcontrol
This command displays a list of EMC Smarts Managers and adapters registered with the Broker, their states (RUNNING, DEAD, UNKNOWN), process IDs, port numbers, and the last time that their states changed.
Also check any log files for the products. Typically, these log files are in BASEDIR/smarts/local/logs.

64 EMC Smarts Service Assurance Management Suite Installation Guide
Verifying the Installation

Uninstalling Service Assurance Management Suite 65
7
This chapter describes how to uninstall the EMC Smarts Service Assurance Management Suite.
This chapter consists of the following topics:
◆ Before uninstallation.......................................................................... 66◆ Uninstalling Service Assurance Management Suite ..................... 73
Uninstalling ServiceAssurance
Management Suite

66 EMC Smarts Service Assurance Management Suite Installation Guide
Uninstalling Service Assurance Management Suite
Before uninstallationThis section describes tasks you should complete before uninstalling EMC Smarts software.
◆ “Remove manually installed services” on page 66
◆ “Determine order for removing products (UNIX only)” on page 66
◆ “Uninstall when the same product suite is installed twice (Windows only)” on page 67
◆ “Detect and stop EMC Smarts programs” on page 67
◆ “Uninstall the FLEXnet License Server” on page 71
Remove manually installed servicesServices that you manually installed with sm_service command are not removed by the uninstallation program. You must remove these services manually before uninstalling the product suite.
To remove a service, invoke sm_service from the BASEDIR/smarts/bin directory:
1. Use sm_service to list installed services.
./sm_service show
2. Remove the manually installed service.
./sm_service remove ic-<service_name>
where <service_name> is the name of the service. For example, ic-am-server or ic-sam-server.
Determine order for removing products (UNIX only)When uninstalling EMC Smarts suites from the same server, the EMC Smarts suite that was installed first must be uninstalled last. During the installation of the first EMC Smarts suite, the EMC Smarts Service Database is created and the other suites subsequently access it. Uninstalling the suite installed first will also uninstall the Service Database which will disable the sm_service command for those products, prevent their proper operation and uninstallation.

Before uninstallation 67
Uninstalling Service Assurance Management Suite
You can determine what product suite was installed first by perform this check:
1. Use a text editor to open the ic-serviced script.
• For Solaris, ic-serviced is located in the /etc/init.d directory
• For Linux, ic-serviced is located in the /etc/init.d directory
• For HP-UX, ic-serviced is located in the /sbin/init.d directory
2. Find the value of the SMHOME variable.
The value of SMHOME indicates which suite was installed first.
Uninstall when the same product suite is installed twice (Windows only)If you installed the same product suite to different locations on the same host system, do not use Add/Remove Programs to uninstall. Uninstall the EMC Smarts product suite as follows:
1. Use the command prompt to invoke Wizard mode for uninstallation program.
C:\BASEDIR\_uninst\uninstaller.exe
where BASEDIR is the location of the EMC Smarts product suite to uninstall.
2. Complete the uninstallation beginning with step 2 as described in “Uninstall using Wizard mode” on page 73.
Detect and stop EMC Smarts programsBefore upgrading or uninstalling your suite, you must stop all EMC Smarts services, EMC Smarts scheduled jobs, and any other process that uses programs or libraries running from the EMC Smarts suite.
Detecting EMC Smarts programsThe sm_plist utility identifies all EMC Smarts programs that are running for any product suite on your machine. You can use the sm_plist utility whenever you need to identify EMC Smarts programs that are running (for example, before applying a service pack or patch and uninstalling the product suite).
To use the utility, invoke it from the BASEDIR/smarts/script directory. The utility displays active programs in a window:
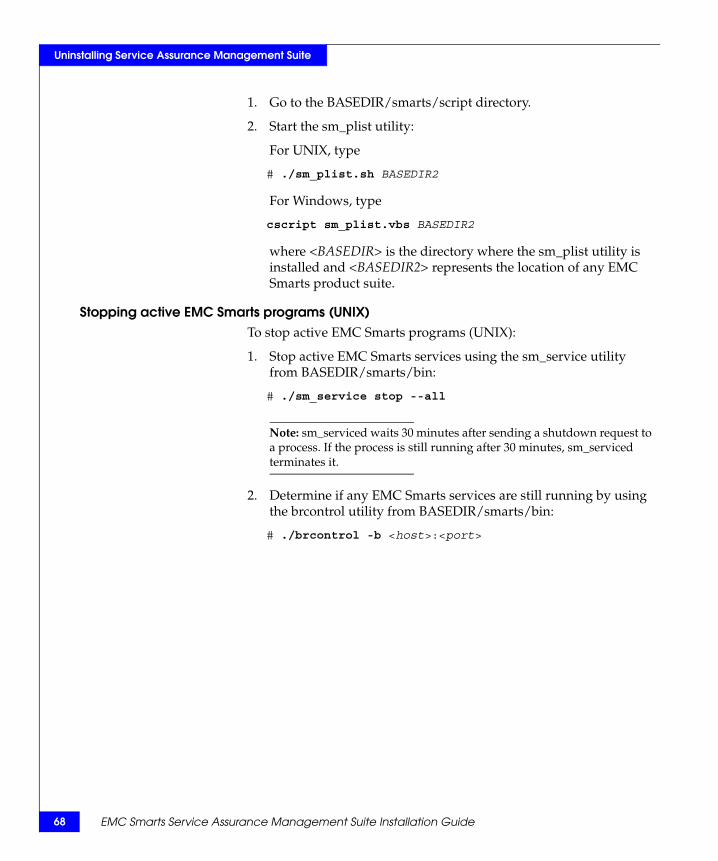
68 EMC Smarts Service Assurance Management Suite Installation Guide
Uninstalling Service Assurance Management Suite
1. Go to the BASEDIR/smarts/script directory.
2. Start the sm_plist utility:
For UNIX, type
# ./sm_plist.sh BASEDIR2
For Windows, type
cscript sm_plist.vbs BASEDIR2
where <BASEDIR> is the directory where the sm_plist utility is installed and <BASEDIR2> represents the location of any EMC Smarts product suite.
Stopping active EMC Smarts programs (UNIX)To stop active EMC Smarts programs (UNIX):
1. Stop active EMC Smarts services using the sm_service utility from BASEDIR/smarts/bin:
# ./sm_service stop --all
Note: sm_serviced waits 30 minutes after sending a shutdown request to a process. If the process is still running after 30 minutes, sm_serviced terminates it.
2. Determine if any EMC Smarts services are still running by using the brcontrol utility from BASEDIR/smarts/bin:
# ./brcontrol -b <host>:<port>

Before uninstallation 69
Uninstalling Service Assurance Management Suite
Based on the location of the Broker, go to the appropriate step, as indicated in Table 19 on page 69:
3. Stop any EMC Smarts server that is still running. If the Broker is on the host, stop the local Broker:
• To stop any server that is still running, use the dmquit utility from BASEDIR/smarts/bin:
# ./dmquit --server=<servername>
• To stop the local Broker from BASEDIR/smarts/bin:
# ./brquit --broker=localhost:<port>
4. Determine if any other EMC Smarts processes are still running and shut the processes down:
• Detect the processes using the following command:
# ps -ef | grep “sm_”
If a list is displayed, note the process ID (pid) of these active EMC Smarts processes.
WARNING
Do not stop or kill the EMC Smarts service daemon process, sm_serviced.
• Shut down these EMC Smarts processes (except sm_serviced) using the following command:
# kill <pid>
Table 19 Next steps for detecting and stopping programs
The Broker is on the And this displays Do this
Same host “Error attaching to Broker” message
The EMC Smarts Broker is not running. Go to Step 4.
List of servers registered with the Broker
• The Broker or service daemon did not shut down.• If any servers are still running on the host, these did not shut down.Go to Step 3.
Different host List of servers registered with the Broker
• If any servers are still running on the host where you will install the EMC Smarts software, these did not shut down. Go to Step 3.

70 EMC Smarts Service Assurance Management Suite Installation Guide
Uninstalling Service Assurance Management Suite
Stopping active EMC Smarts programs (Windows)To stop a service from the Windows desktop, use the Microsoft Management Console:
1. Select Settings > Control Panel.
2. At the Control Panel, select Administrative Tools.
3. At the Administrative Tools folder, select Services.
4. At the Services window, locate any running Smarts services. These services start with the words “EMC Smarts,” “InCharge,” or “Smarts.” For each of these services, right-click the service and then select Stop.
Note: Do not stop the Broker service.
5. Repeat Step 4 until all Smarts services are stopped.
6. Open a command prompt and determine if any Smarts Managers are running by using the brcontrol utility from BASEDIR\smarts\bin:
brcontrol -b <host>:<port>
7. Stop any Smarts server that is still running using the dmquit utility from BASEDIR/smarts/bin:
dmquit --server=<servername>
8. If the Broker is installed on the same host, use the brquit utility from BASEDIR/smarts/bin to stop it:
brquit --broker=localhost:<port>
9. Press Ctrl+Alt+Delete. The Windows Security dialog box appears.
10. Click Task Manager. The Windows Task Manager appears.
11. Select the Processes tab.
CAUTION!Allow up to 30 minutes before performing the next step. Smarts servers with large topologies can take considerable time to stop while saving the topology to the repository. Stopping processes prematurely may corrupt your repository file.

Before uninstallation 71
Uninstalling Service Assurance Management Suite
12. In the Processes tab, look in the column labeled Image Name for sm_server. Right-click each sm_server, and then select End Process.
13. In the Processes tab, look for other Image Names that start with sm_, for example, sm_notify, sm_adapter, sm_beacon, and so on. Right-click each instance, and then select End Process.
Note: Do not shut down any sm_authority or sm_logger processes. The sm_authority and sm_logger processes are child processes of a Smarts server. The child processes will stop when the parent process stops.
Uninstall the FLEXnet License ServerWhen uninstalling all of your EMC Smarts products and suites that use a specific FLEXnet License Server, you must also uninstall the FLEXnet License Server.
Note: If any EMC Smarts products will remain in your network and use the FLEXnet License Server, do not uninstall either the license server or the EMC Smarts product suite where the permanent license file resides.
If you uninstall EMC Smarts products without uninstalling the FLEXnet License Server, a message displays that the FLEXnet (lmgrd) service is still running. Keep in mind that an EMC Smarts application will not start if it is unable to contact the license server.
To stop and uninstall the FLEXnet License Server:
1. Stop the FLEXnet License Server.
Solaris
# /etc/init.d/SMARTS-License stop
HP-UX
# /sbin/init.d/SMARTS-License stop
Linux
# /etc/init.d/SMARTS-License stop
Windows
To manually start the license server on Windows, do the following as administrator:

72 EMC Smarts Service Assurance Management Suite Installation Guide
Uninstalling Service Assurance Management Suite
• Select Start > Settings > Control Panel > Administrative Tools.
• Select Services.
• Select the FLEXnet License Server service.
• Right-click and choose Stop.
2. Run the install_license script with the uninstall command from the BASEDIR/smarts/script directory.
In UNIX, type:
# BASEDIR/smarts/script>install_license.sh uninstall
In Windows, type:
BASEDIR\smarts\script>install_license.cmd uninstall
Uninstalling Service Assurance Management Suite 73
Uninstalling Service Assurance Management Suite
Uninstalling Service Assurance Management SuiteEMC Smarts product suites use InstallShield software to install and uninstall product suites. For UNIX, you invoke the uninstallation program from the system prompt. For Windows, you use the Add/Remove Programs, except when the same product suite is installed in multiple locations on the same host system. Failure to use the appropriate method will result in an unstable system and/or inconsistent product directories. Do not manually delete the installed product directories.
Uninstall using Wizard modeWizard mode provides a graphical user interface to the uninstallation program for UNIX and Windows platforms.
On UNIX systems, Wizard mode uses the X Window System to display the installation wizard. The host on which you install the EMC Smarts software and the host where you log in must be configured to run the X Window System. Before starting the installation program using the Wizard mode, verify that the X Window System is running.
1. Invoke the the uninstaller program:
For UNIX, type:
BASEDIR/_uninst/uninstaller-adapters.bin
For Windows, use Add/Remove Programs:
a. Click Start > Settings > Control Panel.
b. Double-click Add/Remove Programs.
c. From the Add/Remove Programs window, select the appropriate service for your product suite.
d. Click Change/Remove.
2. Click Next in the Welcome screen to continue.
3. In the Product Selection screen, click Next to uninstall the entire suite of products (by default, all products are selected) or deselect products that should remain installed.

74 EMC Smarts Service Assurance Management Suite Installation Guide
Uninstalling Service Assurance Management Suite
4. Review the list of products that will be uninstalled and the target installation directory. Once you click Next, you cannot cancel the uninstallation process.
If necessary, click Back to return to the Product Selection screen to revise your selections.
To uninstall the products, click Next; the Uninstallation Progress screen displays.
5. Upon completion, the Uninstallation Summary displays informational messages such as successful confirmations, error messages, and warnings. If Next displays, your system needs to be rebooted. Click it and then reboot your system. Otherwise, click Finish to exit the uninstallation.
The log file is a text file with the naming convention Uninstall.<suite>.<productversionNumber>.log. It is located in the BASEDIR/smarts/setup/logs directory. If the uninstallation process fails, the log files are located in the /tmp directory.
6. Examine any remaining directories if you plan to re-install EMC Smarts and save customized files located in the /local directory. Depending upon the suite, some or all of the following subdirectories will remain in the BASEDIR/smarts directory after uninstallation because they contain user-modified files:
• /local
• /bin
• /setup
Uninstall using CLI modeTo uninstall an EMC Smarts product or product suite:
1. Type the following command and press Enter:
# BASEDIR/_uninst/uninstaller.bin -console
During the uninstallation processes, you are prompted with a series of steps and menus. You can either accept the default value or select another choice. The default values are indicated in brackets or as pre-defined selections (checkmarks) in menus. To accept the default value, press Enter.
Uninstalling Service Assurance Management Suite 75
Uninstalling Service Assurance Management Suite
When replying to a prompt, you can either accept the default value or select another choice. To reply “yes,” type y or Y; to reply “no,”type n or N. Do not press Delete; this causes the process to terminate with an error message.
For selections in menus, you can accept default selections or type the number of the item and press Enter. An X displays next to the item. When you are finished making selections, type zero (0) and press Enter.
If you incorrectly type an entry, press 5 to repeat the prompt and select the correct value. Arrow keys and the Backspace key are not supported.
2. Upon completion, the Uninstallation Summary displays informational messages such as successful confirmations, error messages, and warnings. Press Enter to continue.
3. If necessary, the installation program will prompt to restart your computer. Press 1 to restart immediately or press 2 to restart later.
4. If you chose not to restart your computer, press 3 to finish.
5. Examine any remaining directories if you plan to re-install the suite and save customized files located in the /local directory. Depending upon the suite, some or all of the following subdirectories will remain in the BASEDIR/smarts directory after uninstallation because they contain user-modified files:
• /local
• /bin
• /setup
The installation log file is a text file with the naming convention Uninstall.<suite>.<productversionNumber>.log. It is located in the BASEDIR/smarts/setup/logs directory. If the uninstallation process fails, the log files are located in the /tmp directory.
Uninstall using unattended modeThe unattended mode enables you to automate the removal of EMC Smarts product suites.
1. Invoke the uninstallation program with appropriate options for the operating system:
• On UNIX systems, use the uninstaller.bin program:
76 EMC Smarts Service Assurance Management Suite Installation Guide
Uninstalling Service Assurance Management Suite
BASEDIR/_uninst/uninstaller.bin -silent -G replaceNewerResponse=”Yes to All”
• On Windows system, use the uninstaller.exe program:
BASEDIR\_uninst\uninstaller.exe -silent -G replaceNewerResponse=”Yes to All”
Note: Type each command as one line.
2. Examine any remaining directories if you plan to re-install the suite and save customized files located in the /local directory. Depending upon the suite, some or all of the following subdirectories will remain in the BASEDIR/smarts directory after uninstallation because they contain user-modified files:
• /local
• /bin
• /setup
The log files from the uninstallation are located in the BASEDIR/smarts/setup/logs directory. If the uninstallation process fails, the log files are located in the /tmp directory. A non-zero status indicates a failure.
Manually Installing Services 77
A
This chapter consists of the following sections:
◆ Overview............................................................................................. 78◆ Service Assurance Management Suite services ............................. 79
Manually InstallingServices

78 EMC Smarts Service Assurance Management Suite Installation Guide
Manually Installing Services
OverviewIf you did not install services when you installed the EMC Smarts products suite, you may install services manually. Services are programs that, once started, are generally intended to run continuously. Components installed as services start automatically upon system reboot; those not installed as services (manual processes or disabled processes) require that you issue commands to start and stop them as necessary.
EMC Corporation recommends that EMC Smarts products be installed as services whenever possible. Typical reasons to install products as services include the following conditions:
◆ During installation of the suite, you choose to start product components manually and now want to run the components as services.
◆ Multiple instances of a single product component running as a service are required. During installation, you can install only a single instance of a product component as a service.
To manually install a product as a service, use the sm_service install command with the appropriate set of options.
The EMC Smarts System Administration Guide provides a complete description of the command syntax.

Service Assurance Management Suite services 79
Manually Installing Services
Service Assurance Management Suite servicesThis section provides default service parameters for the EMC Smarts Service Assurance Management Suite.
EMC Smarts Broker
UNIX ▼ /opt/InCharge7/SAM/smarts/bin/sm_service install--force--startmode=runonce--name=ic-broker--description="EMC Smarts Broker"--env=SM_CLIENTCONNECT=brokerConnect.conf/opt/InCharge7/SAM/smarts/bin/brstart
--port=426--restore=/opt/InCharge7/SAM/smarts/local/repos/
broker/broker.rps--output ▲
Windows ▼ C:\InCharge7\SAM\smarts\bin\sm_service.exe install --force--startmode=runonce--name=ic-broker--description="EMC Smarts Broker"--env=SM_CLIENTCONNECT=brokerConnect.confC:\InCharge7\SAM\smarts\bin\brstart.exe
--port=426 --restore=C:\InCharge7\SAM\smarts\local\repos\
broker\broker.rps ▲
Note: ▼▲ indicates that this command must be typed as one line.

80 EMC Smarts Service Assurance Management Suite Installation Guide
Manually Installing Services
Service Assurance Manager (Global Manager)/Business Impact Manager
UNIX ▼ /opt/InCharge7/SAM/smarts/bin/sm_service install--force--unmanaged--name=ic-sam-server--startmode=runonce --description="EMC Smarts Service Assurance Manager
Server"/opt/InCharge7/SAM/smarts/bin/sm_server--name=INCHARGE-SA--config=ics--port=0--ignore-restore-errors--output ▲
Windows ▼ C:\InCharge7\SAM\smarts\bin\sm_service.exe install--force--name=ic-sam-server--startmode=runonce --description="EMC Smarts Service Assurance Manager
Server"C:\InCharge7\SAM\smarts\bin\sm_server.exe--name=INCHARGE-SA--config=ics--port=0--ignore-restore-errors--output ▲
Note: ▲▼ indicates that this command must be typed as one line.

Service Assurance Management Suite services 81
Manually Installing Services
Adapter Platform
UNIX ▼ /opt/InCharge7/SAM/smarts/bin/sm_service install--force--unmanaged--name=ic-icoi-server--startmode=runonce --description="EMC Smarts SAM Adapter Platform Server"/opt/InCharge7/SAM/smarts/bin/sm_server--name=INCHARGE-OI--config=icoi--port=0--ignore-restore-errors--output ▲
Windows ▼ C:\InCharge7\SAM\smarts\bin\sm_service.exe install--force--name=ic-icoi-server--startmode=runonce --description="EMC Smarts SAM Adapter Platform Server"C:\InCharge7\SAM\smarts\bin\sm_server.exe--name=INCHARGE-OI--config=icoi--port=0--ignore-restore-errors--output ▲
Note: ▲▼ indicates that this command must be typed as one line.
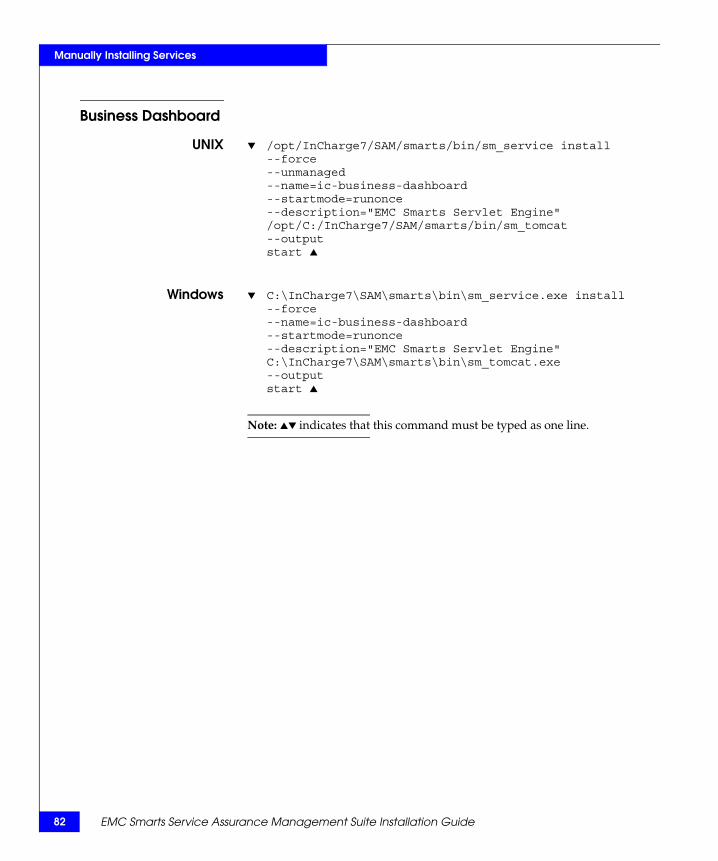
82 EMC Smarts Service Assurance Management Suite Installation Guide
Manually Installing Services
Business Dashboard
UNIX ▼ /opt/InCharge7/SAM/smarts/bin/sm_service install--force--unmanaged--name=ic-business-dashboard--startmode=runonce --description="EMC Smarts Servlet Engine"/opt/C:/InCharge7/SAM/smarts/bin/sm_tomcat--outputstart ▲
Windows ▼ C:\InCharge7\SAM\smarts\bin\sm_service.exe install--force--name=ic-business-dashboard--startmode=runonce --description="EMC Smarts Servlet Engine"C:\InCharge7\SAM\smarts\bin\sm_tomcat.exe--outputstart ▲
Note: ▲▼ indicates that this command must be typed as one line.

Service Assurance Management Suite services 83
Manually Installing Services
Syslog Adapter
UNIX ▼ /opt/InCharge7/SAM/smarts/bin/sm_service install--force--unmanaged--name=ic-syslog-adapter--startmode=runonce--description="EMC Smarts Syslog Adapter"/opt/C:/InCharge7/SAM/smarts/bin/sm_adapter--name=SYSLOG-INCHARGE-OI--rserver=INCHARGE-OI--tail=/var/log/syslog--model=sm_system--model=sm_actions--output--rules=icoi-syslog/syslog_mgr.asl ▲
Windows ▼ C:\InCharge7\SAM\smarts\bin\sm_service.exe install--force--name=ic-syslog-adapter--startmode=runonce--description="EMC Smarts Syslog Adapter"C:\InCharge7\SAM\smarts\bin\sm_adapter.exe--name=SYSLOG-INCHARGE-OI--rserver=INCHARGE-OI--tail=/var/log/syslog--model=sm_system--model=sm_actions--output--rules=icoi-syslog/syslog_mgr.asl ▲
Note: ▲▼ indicates that this command must be typed as one line.
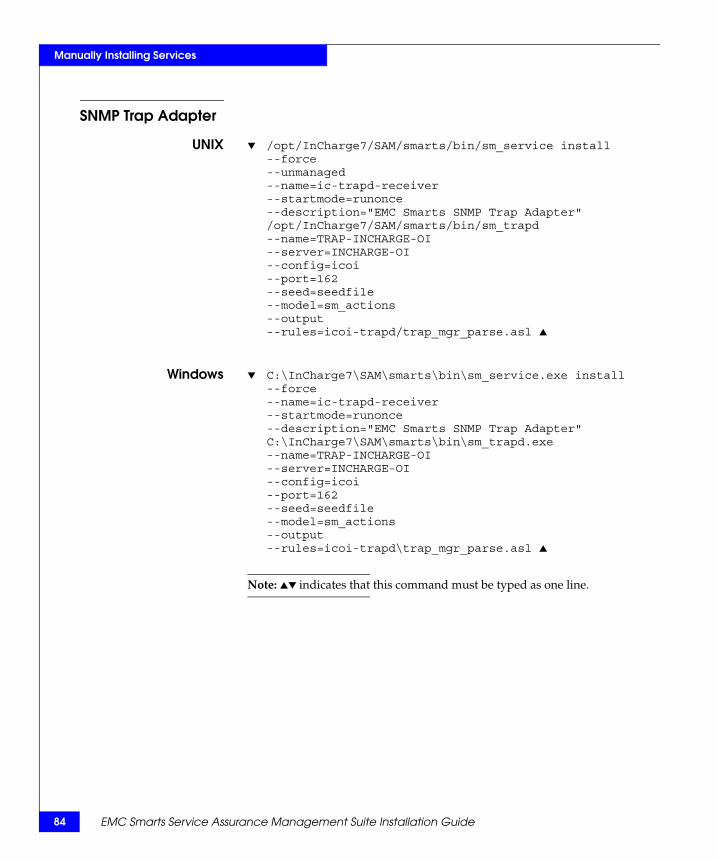
84 EMC Smarts Service Assurance Management Suite Installation Guide
Manually Installing Services
SNMP Trap Adapter
UNIX ▼ /opt/InCharge7/SAM/smarts/bin/sm_service install--force--unmanaged--name=ic-trapd-receiver--startmode=runonce --description="EMC Smarts SNMP Trap Adapter"/opt/InCharge7/SAM/smarts/bin/sm_trapd--name=TRAP-INCHARGE-OI--server=INCHARGE-OI--config=icoi--port=162--seed=seedfile--model=sm_actions--output--rules=icoi-trapd/trap_mgr_parse.asl ▲
Windows ▼ C:\InCharge7\SAM\smarts\bin\sm_service.exe install--force--name=ic-trapd-receiver--startmode=runonce --description="EMC Smarts SNMP Trap Adapter"C:\InCharge7\SAM\smarts\bin\sm_trapd.exe--name=TRAP-INCHARGE-OI--server=INCHARGE-OI--config=icoi--port=162--seed=seedfile--model=sm_actions--output--rules=icoi-trapd\trap_mgr_parse.asl ▲
Note: ▲▼ indicates that this command must be typed as one line.

Procedures for CD-ROMs 85
B
As a reference, this chapter includes commands and examples for working with a CD-ROM to install or upgrade the EMC Smarts Service Assurance Management Suite.
This chapter consists of the following sections:
◆ Mounting a CD-ROM on UNIX systems........................................ 86◆ Loading a CD-ROM on Windows ................................................... 88
Procedures forCD-ROMs

86 EMC Smarts Service Assurance Management Suite Installation Guide
Procedures for CD-ROMs
Mounting a CD-ROM on UNIX systemsUse the following procedure to find the instructions appropriate for your operating system.
1. Insert the CD-ROM into the optical drive.
2. If the CD-ROM is automatically mounted, continue to step 3 . Otherwise, select the appropriate mount command as shown in Table 20 on page 86.
3. Change to the CD-ROM directory by typing the appropriate command from Table 21 on page 87.
Table 20 Mounting the CD-ROM for UNIX operating systems
Operating System Commands and Examples
Solaris # mount -o ro -F hsfs <DEVICE> /mnt
Example:# mount -o ro -F hsfs /dev/dsk/c0t6d0s0 /mnt
HP-UX # mount -ocdcase -o ro -F cdfs <DEVICE> /mnt/cdrom
Example:# mount -ocdcase -o ro -F cdfs /dev/cdrom /mnt/cdrom
Linux # mount <DEVICE>
Example:# mount /dev/cdrom /mnt/cdrom
where <DEVICE> is the mount point for the optical drive.

Mounting a CD-ROM on UNIX systems 87
Procedures for CD-ROMs
Table 21 Changing to the CD-ROM directory in UNIX operating systems
Operating System Command
Solaris If Volume Manager (VM) is running:# cd /cdrom/<suite>-<os><version>/suite
If VM is not running:# cd /mnt/suite
HP-UX # cd /mnt/cdrom/suite
Linux If Automount is running:# cd /cdrom/<suite>-<os><version>/suite
If Automount is not running:# cd /mnt/cdrom/suite
where: <suite> is the product suite, for example, SAM_SUITE or IP_SUITE.<os> is the operating system, for example SOLARIS, LINUX, WIN, or HPUX.<version> is the software version, for example, 701 or 71.

88 EMC Smarts Service Assurance Management Suite Installation Guide
Procedures for CD-ROMs
Loading a CD-ROM on WindowsThe installation program starts automatically on Windows systems when AutoPlay or AutoRun is enabled.
1. Insert the CD-ROM into the optical drive. If AutoPlay or AutoRun is enabled, the installation program starts automatically using the Wizard mode.
2. If the installation program does not start, use Windows Explorer to locate the CD-ROM.
3. Locate the \suite directory on the CD-ROM and double-click the setup executable.