EMC Lesson Planner - Product Supportsupport.emcp.com/.../12/EMC_LessonPlanner_UserGuide... · EMC...
25
EMC Lesson Planner User Guide Call: 800-328-1452 Fax: 800-328-4564 Email: [email protected] Website: www.emcschool.com
Transcript of EMC Lesson Planner - Product Supportsupport.emcp.com/.../12/EMC_LessonPlanner_UserGuide... · EMC...

EMC Lesson Planner
User Guide
Call: 800-328-1452 Fax: 800-328-4564
Email: [email protected] Website: www.emcschool.com

© EMC Publishing, LLC Lesson Planner User Guide Page 2 of 25
End User License Agreement EMC Publishing, Inc. (“EMC”) grants the “End User” (herein defined as any person who accesses the content and software associated with the EMC/Paradigm/Jist/Lawrenceville Press Internet Resource Centers [hereafter referred to as the “Product”]) permission to use both the content and software of the Product. By doing so the End User acknowledges that EMC holds all benefits of copyright in the Product. The End User further agrees that the Product will not be copied, sold for profit, or redistributed in any manner to any third party for any reason whatsoever without the express written consent of EMC. The End User agrees that EMC, at its sole discretion, with or without cause, may revoke this permission at any time. By accessing the content and software, the End User acknowledges having read and understood the terms of this End User License and hereby agrees that he or she will comply with the terms of this End User License. © by EMC Publishing, Inc.

© EMC Publishing, LLC Lesson Planner User Guide Page 3 of 25
TABLE OF CONTENTS
1. Introduction ........................................................................................... 4 2. Installing the EMC Lesson Planner ..................................................... 4 2.1 System Requirements .................................................................. 4 2.2 Install Steps .................................................................................. 4 2.3 Uninstall Steps .............................................................................. 5 3. Using the EMC Lesson Planner ........................................................... 6 3.1 Starting the EMC Lesson Planner ............................................... 6 3.2 Setting Up the EMC Lesson Planner ........................................... 6 3.2.1 Calendar Setup ..................................................................... 6 3.2.2 No-Class Days and Observed Holidays .............................. 7 3.2.3 Add or Remove Other No-Class Days ................................ 8 3.2.4 Standards .............................................................................. 9 3.2.5 Name and Setup a Class Plan ............................................. 10 4. Creating and Managing a Class Plan .................................................. 11 4.1 Select a Class Plan ....................................................................... 11 4.2 Course Outline .............................................................................. 12 4.2.1 Add Action Item .................................................................... 14 4.2.2 Remove Action Item ............................................................. 15 4.2.3 Transfer Action Item ............................................................. 15 4.3 My Resources ............................................................................... 16 4.4 Searchable Components ............................................................. 17 4.5 Add and Delete Items ................................................................... 18 4.6 Day, Week, and Month Views ...................................................... 19 4.7 Print ............................................................................................... 20 4.8 Calendar Options .......................................................................... 21 4.9 Export to Outlook ......................................................................... 22 5. Creating Additional Class Plans .......................................................... 24 6. Ready Reckoner: Toolbar .................................................................... 24 7. Technical Support ................................................................................ 25

© EMC Publishing, LLC Lesson Planner User Guide Page 4 of 25
1. Introduct ion Welcome to the EMC Lesson Planner! With this simple tool, you can create and store your class plans quickly and easily. You can also add activities and notes to your plans, edit and print the plans, display the plans on a calendar, edit and print the calendar, and export the calendar to Microsoft® Outlook®.
Back to top
2. Installing and Uninstalling the EMC Lesson Planner 2.1 System Requirements
Windows Intel® Pentium® III processor (Pentium 4 recommended) Microsoft® Windows® XP Home, Professional, or Tablet PC Edition
with Service Pack 2 or 3, Windows Server® 2003, Windows Vista® Home Premium, Business, Ultimate, or Enterprise (including 64-bit editions) with Service Pack 1, or Windows 7
512MB of RAM (1GB recommended) Macintosh
Intel Core™ Duo or faster processor Mac OS X v10.4, v10.5 or v10.6 512MB of RAM (1GB recommended)
Back to top
2.2 Install Steps To install the EMC Lesson Planner perform the following steps. Once the
installation is complete you will go through a step-by-step process to set up your first calendar.
1. Windows Users: Insert the EMC Lesson Planner CD into your CD-
ROM drive. If you see an AutoPlay window, click the *.exe file to install. Mac Users: Insert the EMC Lesson Planner CD into your CD-ROM drive. Double-click the CD icon to browse. Double-click the *.app file to begin installation.
2. At the “Are you sure you want to install this application…” window, click Install.
3. At the Installation Preferences window, click Continue. 4. Read the product License Agreement, and click I Agree to continue
or Cancel to cancel the installation.

© EMC Publishing, LLC Lesson Planner User Guide Page 5 of 25
5. Once the installation is complete the EMC Lesson Planner will launch.
Back to top
2.3 Uninstall Steps To uninstall the EMC Lesson Planner perform the following steps.
Windows Users 1. Open the Control Panel and select the Add or Remove
Programs. 2. Highlight this EMC Lesson Planner in the list of currently
installed programs and click Remove. 3. When the program has successfully uninstalled, close the
Control Panel. 4. Open the My Documents folder, then open the EMC Publishing
folder. 5. Delete the folder for this EMC Lesson Planner. The folder will be
named for the course supported by the planner—for example, Aventura2.
Mac Users 1. Delete the Lesson Planner application from the Applications
folder. 2. Delete the EMC Publishing folder from your Documents folder.
Back to top

© EMC Publishing, LLC Lesson Planner User Guide Page 6 of 25
3. Using the EMC Lesson Planner This section provides guidance on how to start the EMC Lesson Planner, create and customize lesson plans, manage holidays, and more.
3.1 Starting the EMC Lesson Planner
On the taskbar, click Start, and then point to All Programs. Point to EMC Publishing, and then click EMC Publishing. OR Double-click the Lesson Planner shortcut icon on your desktop.
Back to top
3.2 Setting Up the EMC Lesson Planner
When you open the EMC Lesson Planner for the first time, you are required to set it up. NOTE: The Aventura Lesson Planner is used as an example for demonstration purposes throughout this user guide.
3.2.1 Calendar Setup
Setting up the calendar is the first step in setting up the EMC Lesson Planner. You can use the default calendar file name and location, or enter a different name and location. To choose a different location, click Browse. When you have chosen a location and name, click Next to continue with the setup.
Back to top

© EMC Publishing, LLC Lesson Planner User Guide Page 7 of 25
3.2.2 No-Class Days and Observed Holidays The No-Class Days dialog box allows you to specify the days when there will be no classes or when there will be holidays. Select the appropriate check boxes to mark the weekly no-class days and observed holidays. When you are finished click the Save button.
Back to top

© EMC Publishing, LLC Lesson Planner User Guide Page 8 of 25
3.2.3 Add or Remove Other No-Class Days You can add other no-class days to the list of weekly no-class days and observed holidays by performing the following steps:
1. Click Add. 2. Type a name for the break—for example, “Teachers’
Training.” 3. Enter a start date for the break. You can select the date from
the calendar by clicking the calendar icon. 4. Enter an end date for the break. 5. Click the Add button to save the details.

© EMC Publishing, LLC Lesson Planner User Guide Page 9 of 25
The no-class days that you just added show up in the Enter Other No-Class Days area.
Click the Add button to create additional no-class days. You may create as many other no-class days as you wish. To delete a no-class day after you have added it, select it in the Enter Other No-Class Days area and click the Remove button. Click Next to continue setting up the Lesson Planner.
Back to top
3.2.4 Standards
Choose the standards you wish to see by selecting the check boxes. Click Next to continue.
Back to top

© EMC Publishing, LLC Lesson Planner User Guide Page 10 of 25
3.2.5 Name and Set Up a Class Plan Perform the following steps to set up a class plan:
1. Type an abbreviated 6-character class name—for example,“Span01.”
2. Type the full name of the class—for example, “Spanish, Period 1.”
3. Enter a starting time for the class by using the arrows next to the boxes or typing in the boxes themselves.
4. Select a color for the class. This is the color that the calendar will use to display the lesson plans for the class.
5. Click Finish.
Back to top

© EMC Publishing, LLC Lesson Planner User Guide Page 11 of 25
4. Creating and Managing a Class Plan
4.1 Select a Class Plan Your first class plan is created as part of the EMC Lesson Planner setup. You can modify this plan using the Edit button in the Select a Class Plan Screen. You can also create additional class plans in this screen by using the Add button, or remove existing class plans by using the Remove button.
Back to top
© EMC Publishing, LLC Lesson Planner User Guide Page 12 of 25
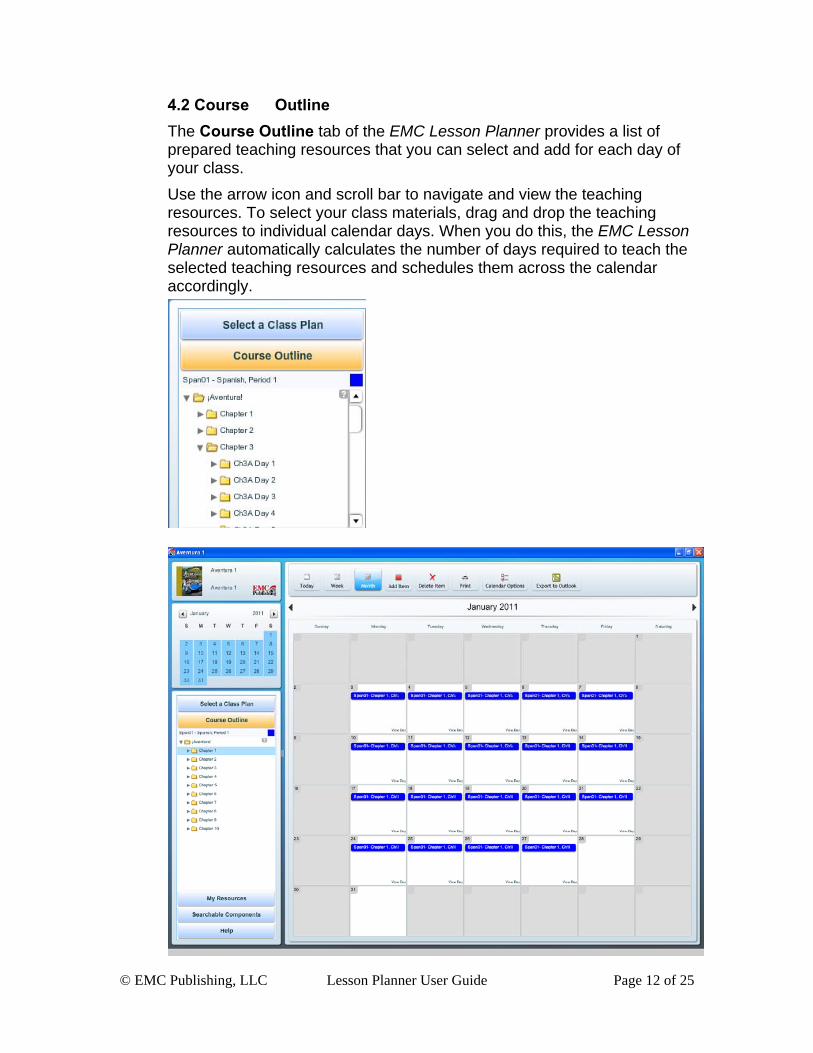
4.2 Course Outline The Course Outline tab of the EMC Lesson Planner provides a list of prepared teaching resources that you can select and add for each day of your class.
Use the arrow icon and scroll bar to navigate and view the teaching resources. To select your class materials, drag and drop the teaching resources to individual calendar days. When you do this, the EMC Lesson Planner automatically calculates the number of days required to teach the selected teaching resources and schedules them across the calendar accordingly.

© EMC Publishing, LLC Lesson Planner User Guide Page 13 of 25
You can view the details of each lesson plan by clicking it to open the Details window. The Details window allows you to view details like objectives, state standards, and the various types of teaching activities for a selected lesson plan. The window also allows you to edit or print the lesson plan.
© EMC Publishing, LLC Lesson Planner User Guide Page 14 of 25
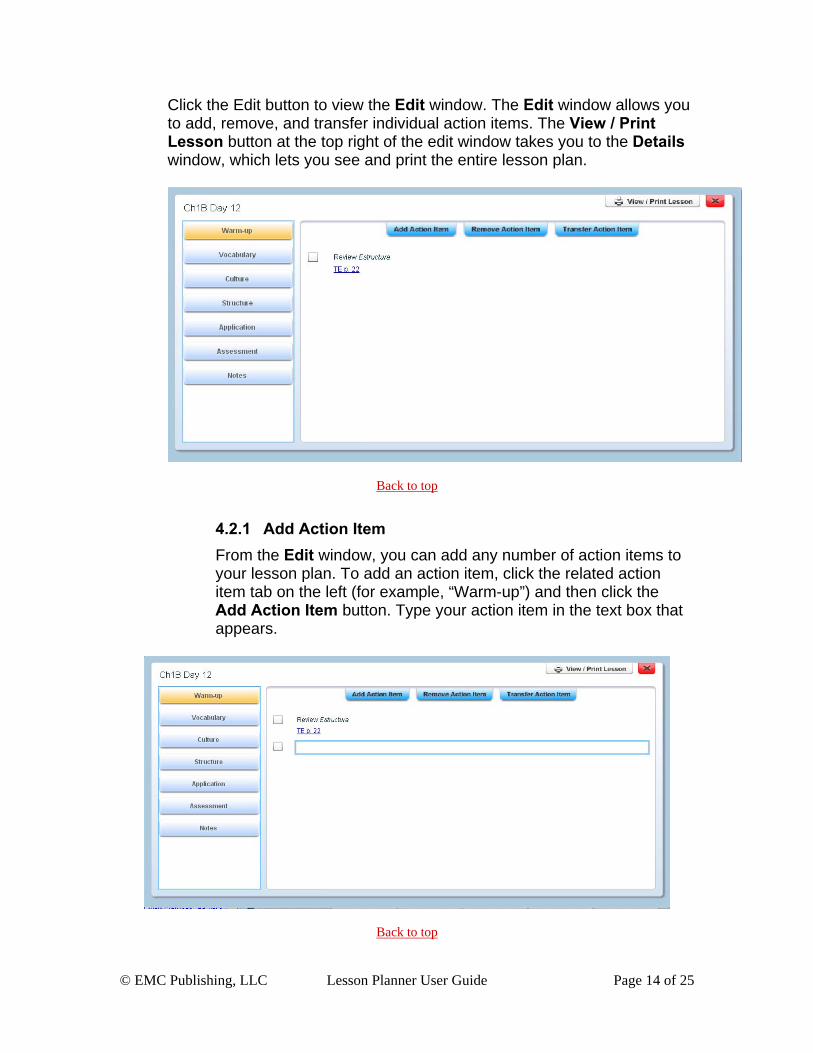
Click the Edit button to view the Edit window. The Edit window allows you to add, remove, and transfer individual action items. The View / Print Lesson button at the top right of the edit window takes you to the Details window, which lets you see and print the entire lesson plan.
Back to top
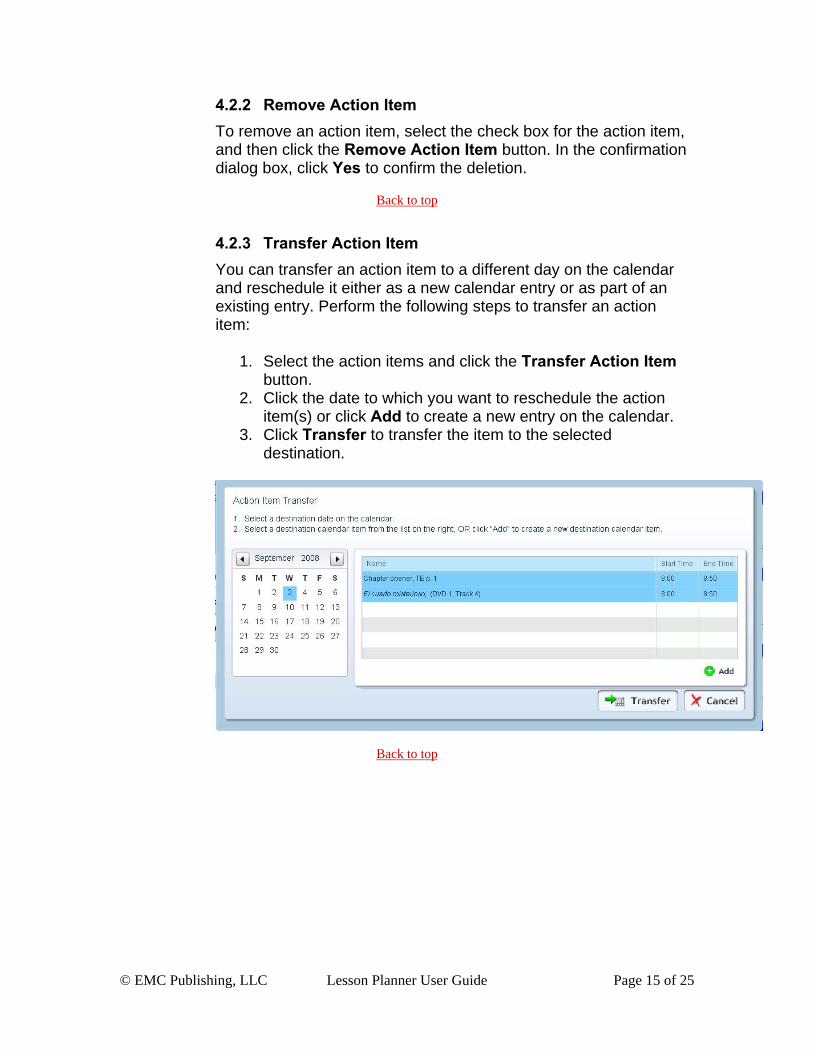
4.2.1 Add Action Item From the Edit window, you can add any number of action items to your lesson plan. To add an action item, click the related action item tab on the left (for example, “Warm-up”) and then click the Add Action Item button. Type your action item in the text box that appears.
Back to top
© EMC Publishing, LLC Lesson Planner User Guide Page 15 of 25
4.2.2 Remove Action Item To remove an action item, select the check box for the action item, and then click the Remove Action Item button. In the confirmation dialog box, click Yes to confirm the deletion.
Back to top
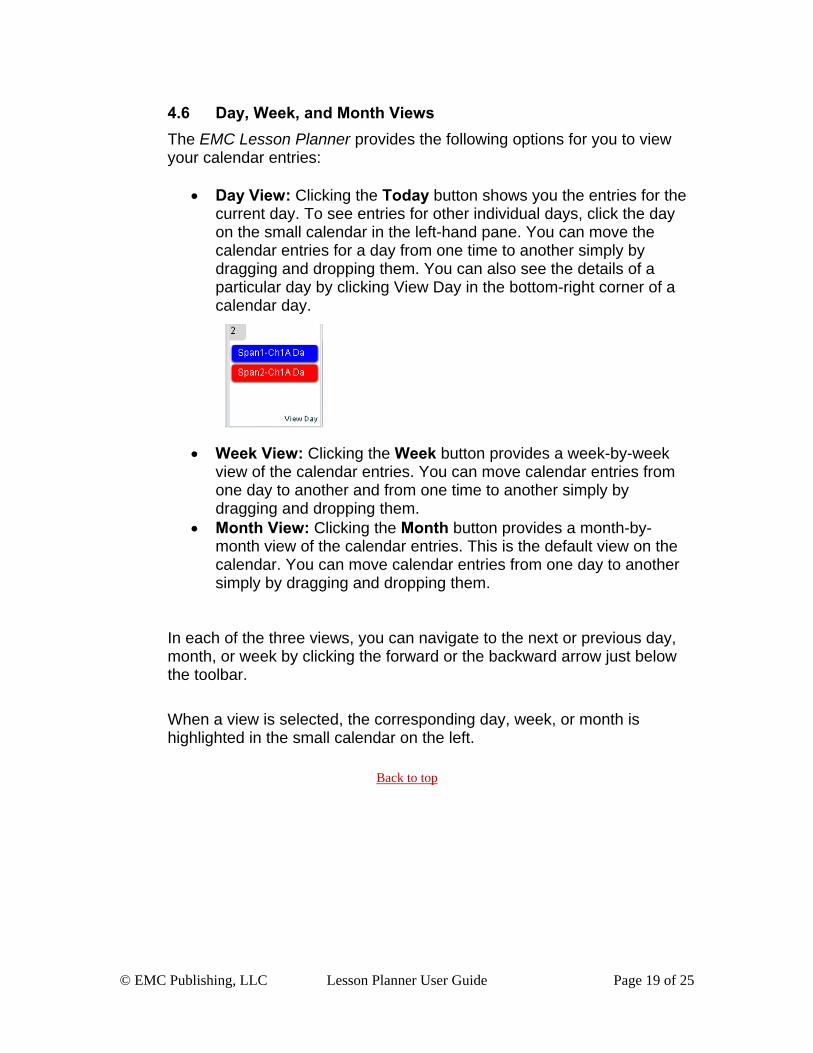
4.2.3 Transfer Action Item You can transfer an action item to a different day on the calendar and reschedule it either as a new calendar entry or as part of an existing entry. Perform the following steps to transfer an action item:
1. Select the action items and click the Transfer Action Item
button. 2. Click the date to which you want to reschedule the action
item(s) or click Add to create a new entry on the calendar. 3. Click Transfer to transfer the item to the selected
destination.
Back to top

© EMC Publishing, LLC Lesson Planner User Guide Page 16 of 25
4.3 M y Resources The My Resources tab helps you add your own teaching resources for your classes and associate them with your calendar entries. These resources can consist of files saved on your computer or resources on the Internet. Perform the following steps to add a resource:
1. Click the Add button. The Add a Resource dialog box opens. 2. Type a name for the resource—for example, “EMC Publishing.” 3. If adding an Internet resource, type the URL of the resource—for
example, http://www.emcp.com. If adding a file, click Browse to select the file from your computer.
4. Click the Add button to add the resource.
5. To associate the resource to a calendar entry, simply drag and drop
the resource to the entry on calendar. 6. To remove a resource, click the resource in My Resources and
then click the Remove button.
Note that you can go to the EMC Instructor Resources Center, download new material, save the files on your hard drive, and add them as links in My Resources.
Back to top

© EMC Publishing, LLC Lesson Planner User Guide Page 17 of 25
4.4 Searchable Components The EMC Lesson Planner includes searchable course components in PDF and other formats. To open a searchable resource, click the resource name in the Searchable Components section of the EMC Lesson Planner.
Back to top

© EMC Publishing, LLC Lesson Planner User Guide Page 18 of 25
4.5 Add and Delete Items The Add Item button in the EMC Lesson Planner toolbar allows you to add an item that is not associated with a class plan—for example, a lunch appointment. Perform the following steps to add items to the calendar:
1. Click the Add Item button on the toolbar. The Create Calendar Item dialog box opens.
2. Type a name for the item—for example, “Lunch.” 3. Enter the start date. You can use the calendar icon to enter the
date. 4. Type the start time. You can use the clock icon to enter the time. 5. Type the end time. 6. Type a description for the item—for example, “Lunch with Fred.”
This information is optional. 7. Click the Save button. The item shows up on your calendar.
To reschedule the item, you can simply drag and drop the entry to another day on the calendar. To delete an existing item, click the item in the calendar and click the Delete Item button on the EMC Lesson Planner toolbar.
Back to top
© EMC Publishing, LLC Lesson Planner User Guide Page 19 of 25
4.6 Day, Week, and Month Views The EMC Lesson Planner provides the following options for you to view your calendar entries:
Day View: Clicking the Today button shows you the entries for the
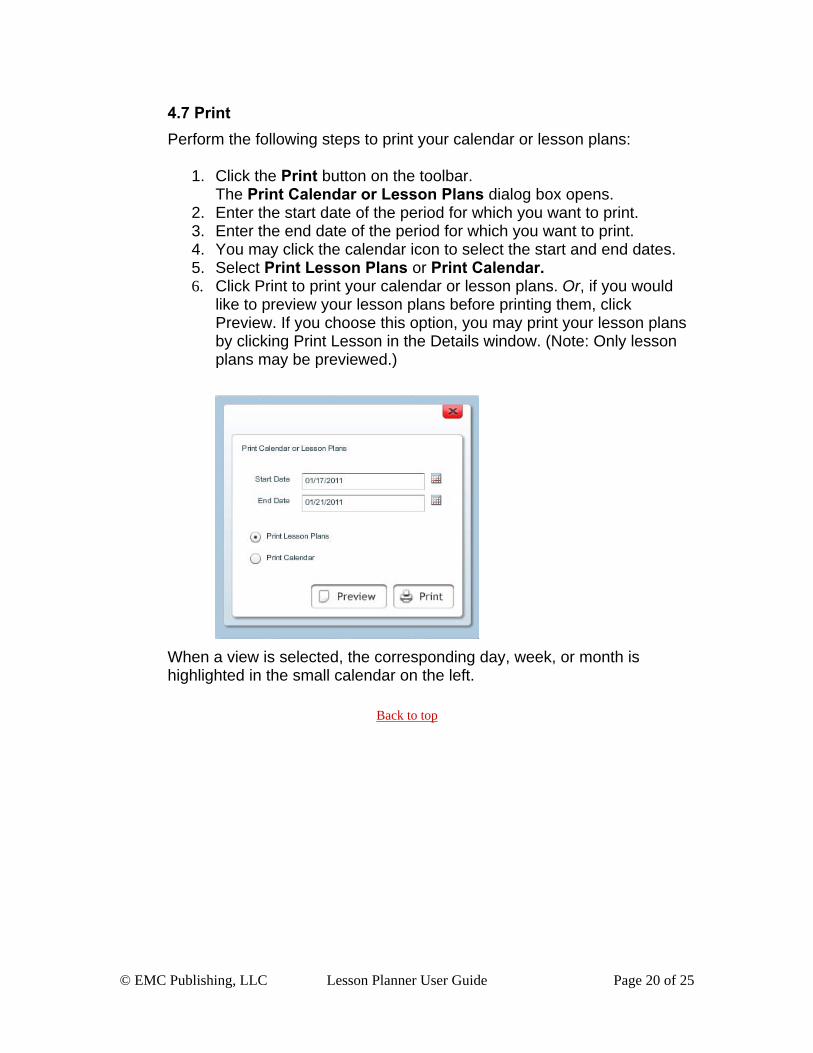
current day. To see entries for other individual days, click the day on the small calendar in the left-hand pane. You can move the calendar entries for a day from one time to another simply by dragging and dropping them. You can also see the details of a particular day by clicking View Day in the bottom-right corner of a calendar day.
Week View: Clicking the Week button provides a week-by-week view of the calendar entries. You can move calendar entries from one day to another and from one time to another simply by dragging and dropping them.
Month View: Clicking the Month button provides a month-by-month view of the calendar entries. This is the default view on the calendar. You can move calendar entries from one day to another simply by dragging and dropping them.
In each of the three views, you can navigate to the next or previous day, month, or week by clicking the forward or the backward arrow just below the toolbar.
When a view is selected, the corresponding day, week, or month is highlighted in the small calendar on the left.
Back to top
© EMC Publishing, LLC Lesson Planner User Guide Page 20 of 25
4.7 Print
Perform the following steps to print your calendar or lesson plans:
1. Click the Print button on the toolbar. The Print Calendar or Lesson Plans dialog box opens.
2. Enter the start date of the period for which you want to print. 3. Enter the end date of the period for which you want to print. 4. You may click the calendar icon to select the start and end dates. 5. Select Print Lesson Plans or Print Calendar. 6. Click Print to print your calendar or lesson plans. Or, if you would
like to preview your lesson plans before printing them, click Preview. If you choose this option, you may print your lesson plans by clicking Print Lesson in the Details window. (Note: Only lesson plans may be previewed.)
When a view is selected, the corresponding day, week, or month is highlighted in the small calendar on the left.
Back to top

© EMC Publishing, LLC Lesson Planner User Guide Page 21 of 25
4.8 Calendar Options
The Calendar Options button on the toolbar allows you to change the settings of your calendar. You can edit the calendar name, create a new calendar, or load a previously saved calendar, add or delete no-class days, and select standards. In addition, you can check for any updates available for the EMC Lesson Planner, for course standards, or for other program materials.

© EMC Publishing, LLC Lesson Planner User Guide Page 22 of 25
To create a new calendar, click the Calendar Options and then click the New Calendar button in the Settings dialog box. On the following screen type the Calendar Name and use the same URL for the file location. Click Next. Follow the next three screens to set your No-Class days, standards and other class information.
To load a previously saved calendar, click the Load a Saved Calendar button, select the desired calendar file, and click Open.
Back to top
4.9 Export to Outlook
Use the Export to Outlook button to export your calendar file to the Microsoft Outlook application on your computer. Click the calendar icons to choose the start and end dates to add to Outlook, then click on the Browse button to enter the file name of the exported vcs file. (NOTE: this File Name is the path to locate the exported file to import into Microsoft Outlook)

© EMC Publishing, LLC Lesson Planner User Guide Page 23 of 25
Once the file is saved, to retrieve the exported vcs file open the calendar in Microsoft Outlook, click File, click Import and Export, select Import an iCalendar or vCalendar file (.vcs), and click Next.
To locate the exported file follow the path of the File Name (C:\Program Files\ EMC Publishing\[name of your EMC product]). NOTE: Change the File of type: to All Files. Double click on the file to import into Microsoft Outlook.
Back to top

© EMC Publishing, LLC Lesson Planner User Guide Page 24 of 25
5. Creating Additional Class Plans Your first class plan is created when you set up the EMC Lesson Planner on your computer. You can create additional class plans by using the Add button in the Select a Class Plan tab on the left side of the EMC Lesson Planner window. You will be prompted to fill in all the details that you completed for your first class plan. For help, refer to the “Name and Set Up a Class Plan” section of this guide.
Similarly, you can add teaching resources for the additional class plans you create, as you did for your first class plan. All the class plans that you create appear with their respective colors on your calendar in the EMC Lesson Planner.
Back to top

© EMC Publishing, LLC Lesson Planner User Guide Page 25 of 25
6. Ready Reckoner: Toolbar The EMC Lesson Planner toolbar is located at the top of the screen. It contains icons of the most frequently used options of the EMC Lesson Planner. The following table describes these icons.
Icon Description
Displays a day view of your class plans
Displays a week view of your class plans
Displays a month view of your class plans
Allows you to add items to your class plans
Allows you to delete items from your class plans
Allows you to print your class plans based on the dates specified by you
Allows you to change the settings of your class plans
Allows you to export your calendar to Microsoft Outlook
Back to top
7. Technical Support For technical assistance, email [email protected] or visit http://support.emcp.com/.
Back to top