
Email Gateway 7.x Virtual Appliances Installation Guide · Transparent router mode ... VMware...
53
Installation Guide Revision B McAfee ® Email Gateway 7.x Virtual Appliances
Transcript of Email Gateway 7.x Virtual Appliances Installation Guide · Transparent router mode ... VMware...

Installation GuideRevision B
McAfee® Email Gateway 7.x VirtualAppliances

COPYRIGHTCopyright © 2013 McAfee, Inc. Do not copy without permission.
TRADEMARK ATTRIBUTIONSMcAfee, the McAfee logo, McAfee Active Protection, McAfee AppPrism, McAfee Artemis, McAfee CleanBoot, McAfee DeepSAFE, ePolicy Orchestrator,McAfee ePO, McAfee EMM, McAfee Enterprise Mobility Management, Foundscore, Foundstone, McAfee NetPrism, McAfee Policy Enforcer, Policy Lab,McAfee QuickClean, Safe Eyes, McAfee SECURE, SecureOS, McAfee Shredder, SiteAdvisor, SmartFilter, McAfee Stinger, McAfee Total Protection,TrustedSource, VirusScan, WaveSecure, WormTraq are trademarks or registered trademarks of McAfee, Inc. or its subsidiaries in the United States andother countries. Other names and brands may be claimed as the property of others.
LICENSE INFORMATION
License AgreementNOTICE TO ALL USERS: CAREFULLY READ THE APPROPRIATE LEGAL AGREEMENT CORRESPONDING TO THE LICENSE YOU PURCHASED, WHICH SETSFORTH THE GENERAL TERMS AND CONDITIONS FOR THE USE OF THE LICENSED SOFTWARE. IF YOU DO NOT KNOW WHICH TYPE OF LICENSE YOUHAVE ACQUIRED, PLEASE CONSULT THE SALES AND OTHER RELATED LICENSE GRANT OR PURCHASE ORDER DOCUMENTS THAT ACCOMPANY YOURSOFTWARE PACKAGING OR THAT YOU HAVE RECEIVED SEPARATELY AS PART OF THE PURCHASE (AS A BOOKLET, A FILE ON THE PRODUCT CD, OR AFILE AVAILABLE ON THE WEBSITE FROM WHICH YOU DOWNLOADED THE SOFTWARE PACKAGE). IF YOU DO NOT AGREE TO ALL OF THE TERMS SETFORTH IN THE AGREEMENT, DO NOT INSTALL THE SOFTWARE. IF APPLICABLE, YOU MAY RETURN THE PRODUCT TO MCAFEE OR THE PLACE OFPURCHASE FOR A FULL REFUND.
2 McAfee® Email Gateway 7.x Virtual Appliances Installation Guide

Contents
Preface 5About this guide . . . . . . . . . . . . . . . . . . . . . . . . . . . . . . . . . . 5
Audience . . . . . . . . . . . . . . . . . . . . . . . . . . . . . . . . . . 5Conventions . . . . . . . . . . . . . . . . . . . . . . . . . . . . . . . . . 5How to use this guide . . . . . . . . . . . . . . . . . . . . . . . . . . . . . 7
Find product documentation . . . . . . . . . . . . . . . . . . . . . . . . . . . . . . 7
1 Introduction to McAfee Email Gateway Virtual Appliance 9What you get in the download package . . . . . . . . . . . . . . . . . . . . . . . . . 9
2 Preparing to install 11Inappropriate use . . . . . . . . . . . . . . . . . . . . . . . . . . . . . . . . . 11Considerations about network modes . . . . . . . . . . . . . . . . . . . . . . . . . 11
Explicit proxy mode . . . . . . . . . . . . . . . . . . . . . . . . . . . . . 12Transparent bridge mode . . . . . . . . . . . . . . . . . . . . . . . . . . . 14Transparent router mode . . . . . . . . . . . . . . . . . . . . . . . . . . . 15VMware vSphere network configuration . . . . . . . . . . . . . . . . . . . . . 16
Deployment strategies for using the device in a DMZ . . . . . . . . . . . . . . . . . . . 19SMTP configuration in a DMZ . . . . . . . . . . . . . . . . . . . . . . . . . . 20
System requirements . . . . . . . . . . . . . . . . . . . . . . . . . . . . . . . . 21Sample installation scenarios . . . . . . . . . . . . . . . . . . . . . . . . . . . . . 22
Running the virtual appliance as the only virtual machine on the host . . . . . . . . . 23Running the virtual appliance with other virtual machines . . . . . . . . . . . . . . 24
3 Installing the McAfee Email Gateway Virtual Appliance 25Overview of the virtual appliance installation process . . . . . . . . . . . . . . . . . . . 25Installation best practices . . . . . . . . . . . . . . . . . . . . . . . . . . . . . . 25Task — Convert from a VMtrial installation . . . . . . . . . . . . . . . . . . . . . . . 26Task — Download the installation software . . . . . . . . . . . . . . . . . . . . . . . 26Task — Install the appliance on VMware vSphere . . . . . . . . . . . . . . . . . . . . . 27Task — Improve performance on VMware vSphere . . . . . . . . . . . . . . . . . . . . 28Configure the virtual appliance . . . . . . . . . . . . . . . . . . . . . . . . . . . . 28Using the Configuration Console . . . . . . . . . . . . . . . . . . . . . . . . . . . 29
Performing a Standard Setup . . . . . . . . . . . . . . . . . . . . . . . . . . 30Performing a Custom Setup . . . . . . . . . . . . . . . . . . . . . . . . . . 30Restoring from a file . . . . . . . . . . . . . . . . . . . . . . . . . . . . . 30ePolicy Orchestrator Managed Setup . . . . . . . . . . . . . . . . . . . . . . . 31Encryption Only Setup . . . . . . . . . . . . . . . . . . . . . . . . . . . . 32
4 A tour of the Dashboard 33The Dashboard . . . . . . . . . . . . . . . . . . . . . . . . . . . . . . . . . . 33
Benefits of using the Dashboard . . . . . . . . . . . . . . . . . . . . . . . . 33Dashboard portlets . . . . . . . . . . . . . . . . . . . . . . . . . . . . . . 34
5 Testing the configuration 37
McAfee® Email Gateway 7.x Virtual Appliances Installation Guide 3

Task — Test connectivity . . . . . . . . . . . . . . . . . . . . . . . . . . . . . . 37Task — Update the DAT files . . . . . . . . . . . . . . . . . . . . . . . . . . . . . 37Task — Test mail traffic and virus detection . . . . . . . . . . . . . . . . . . . . . . . 38Task — Test spam detection . . . . . . . . . . . . . . . . . . . . . . . . . . . . . 38
6 Exploring the appliance features 39Introduction to policies . . . . . . . . . . . . . . . . . . . . . . . . . . . . . . . 39
Encryption . . . . . . . . . . . . . . . . . . . . . . . . . . . . . . . . . 39Task — Identify quarantined email messages . . . . . . . . . . . . . . . . . . . 41Compliance Settings . . . . . . . . . . . . . . . . . . . . . . . . . . . . . 42Data Loss Prevention settings . . . . . . . . . . . . . . . . . . . . . . . . . 45
7 Additional Configuration Options 47Task — Upgrading to the latest version of McAfee Email Gateway Virtual Appliance . . . . . . . 47Task — Change the default Power Off and Reset actions . . . . . . . . . . . . . . . . . . 48Task — Configure the shutdown and restart option . . . . . . . . . . . . . . . . . . . . 48
Index 51
Contents
4 McAfee® Email Gateway 7.x Virtual Appliances Installation Guide

Preface
This guide provides the information you need to install your McAfee product.
Contents About this guide Find product documentation
About this guideThis information describes the guide's target audience, the typographical conventions and icons usedin this guide, and how the guide is organized.
AudienceMcAfee documentation is carefully researched and written for the target audience.
The information in this guide is intended primarily for:
• Administrators — People who implement and enforce the company's security program.
ConventionsThis guide uses these typographical conventions and icons.
Book title, term,emphasis
Title of a book, chapter, or topic; a new term; emphasis.
Bold Text that is strongly emphasized.
User input, code,message
Commands and other text that the user types; a code sample; a displayedmessage.
Interface text Words from the product interface like options, menus, buttons, and dialogboxes.
Hypertext blue A link to a topic or to an external website.
Note: Additional information, like an alternate method of accessing anoption.
Tip: Suggestions and recommendations.
Important/Caution: Valuable advice to protect your computer system,software installation, network, business, or data.
Warning: Critical advice to prevent bodily harm when using a hardwareproduct.
McAfee® Email Gateway 7.x Virtual Appliances Installation Guide 5

Graphical conventionsUse this information to understand the graphical symbols used within this document.
Virtual Appliance Internet or externalnetworks
Mail Server Other servers (such asDNS servers)
User or client computer Router
Switch Firewall
Network zone (DMZ orVLAN)
Network
Actual data path Perceived data path
Definition of terms used in this guideUnderstand some of the key terms used in this document.
Term Definition
demilitarized zone(DMZ)
A computer host or small network inserted as a buffer between a privatenetwork and the outside public network to prevent direct access from outsideusers to resources on the private network.
DAT files Detection definition (DAT) files, also called signature files, containing thedefinitions that identify, detect, and repair viruses, Trojan horses, spyware,adware, and other potentially unwanted programs (PUPs).
operational mode Three operating modes for the product: explicit proxy mode, transparent bridgemode, and transparent router mode.
policy A collection of security criteria, such as configuration settings, benchmarks, andnetwork access specifications, that defines the level of compliance required forusers, devices, and systems that can be assessed or enforced by a McAfeesecurity application.
Reputation Servicecheck
Part of sender authentication. If a sender fails the Reputation Service check, theappliance is set to close the connection and deny the message. The sender's IPaddress is added to a list of blocked connections and is automatically blocked infuture at the kernel level.
PrefaceAbout this guide
6 McAfee® Email Gateway 7.x Virtual Appliances Installation Guide

How to use this guideThis topic gives a brief summary of the information contained within this document.
This guide helps you to:
• Plan and perform your installation.
• Become familiar with the interface.
• Test that the product functions correctly.
• Apply the latest detection definition files.
• Explore some scanning policies, create reports, and get status information.
• Troubleshoot basic issues.
You can find additional information about the product's scanning features in the online help within theproduct and in the latest version of the McAfee Email Gateway Administrators Guide.
Find product documentationMcAfee provides the information you need during each phase of product implementation, frominstallation to daily use and troubleshooting. After a product is released, information about the productis entered into the McAfee online KnowledgeBase.
Task1 Go to the McAfee Technical Support ServicePortal at http://mysupport.mcafee.com.
2 Under Self Service, access the type of information you need:
To access... Do this...
User documentation 1 Click Product Documentation.
2 Select a product, then select a version.
3 Select a product document.
KnowledgeBase • Click Search the KnowledgeBase for answers to your product questions.
• Click Browse the KnowledgeBase for articles listed by product and version.
PrefaceFind product documentation
McAfee® Email Gateway 7.x Virtual Appliances Installation Guide 7

PrefaceFind product documentation
8 McAfee® Email Gateway 7.x Virtual Appliances Installation Guide
1 Introduction to McAfee Email GatewayVirtual Appliance
McAfee Email Gateway Virtual Appliance delivers comprehensive, enterprise‑class protection againstemail threats.
McAfee Email Gateway Virtual Appliance works in the following virtual environments:
• VMware vSphere 4.x or higher
• VMware vSphere Hypervisor (ESXi) 4.x or higher
What you get in the download package The McAfee Email Gateway Virtual Appliance is supplied in a zip file that contains the softwareinstallation files and installation documents to install the virtual appliance on VMware vSphere 4.x.
The download package does not contain the VMware product installation files. If you do not alreadyhave your virtual software set up, go to the VMware website (http://www.vmware.com) to purchaseVMware vSphere, or VMware vSphere Hypervisor (ESXi).
1
McAfee® Email Gateway 7.x Virtual Appliances Installation Guide 9

1 Introduction to McAfee Email Gateway Virtual ApplianceWhat you get in the download package
10 McAfee® Email Gateway 7.x Virtual Appliances Installation Guide

2 Preparing to install
To ensure the safe operation of your McAfee Email Gateway Virtual Appliance, consider the followingbefore you begin the installation.
• Familiarize yourself with its operational modes and capabilities. It is important that you choose avalid configuration.
• Decide how to integrate the appliance into your network and determine what information you needbefore you start. For example, the name and IP address for the device.
Contents Inappropriate use Considerations about network modes Deployment strategies for using the device in a DMZ System requirements Sample installation scenarios
Inappropriate useUse this information to avoid using this product inappropriately.
McAfee Email Gateway Virtual Appliance is:
• Not a firewall — You must use it within your organization behind a correctly configured firewall.
• Not a server for storing extra software and files — Do not install any software on the deviceor add any extra files to it unless instructed by the product documentation or your supportrepresentative.
The device cannot handle all types of traffic. If you use explicit proxy mode, only protocols that are tobe scanned should be sent to the device.
Considerations about network modes Use this information to gain an understanding of the operational (or network) modes in which thedevice can operate.
Before you configure your McAfee Email Gateway, you must decide which network mode to use. Themode you choose determines how you physically connect your VMware ESX host to your network.Different modes also have an impact on your vSwitch configuration to which your virtual appliance willbe connected to. Running the virtual appliance in explicit proxy mode requires the least amount ofconfiguration on your VMware ESX host and is easier to set up. To installing the virtual appliance ineither of the transparent modes, other considerations must be made. All necessary ESX configurationsteps for either of the modes are described below.
2
McAfee® Email Gateway 7.x Virtual Appliances Installation Guide 11
You can choose from the following network modes:
• Explicit proxy mode — The virtual appliance acts as a proxy server and a mail relay.
• Transparent router mode — The virtual appliance acts as a router.
• Transparent bridge mode — The virtual appliance acts as an Ethernet bridge.
If you are still unsure about the mode to use after reading this and the following sections, consult yournetwork expert.
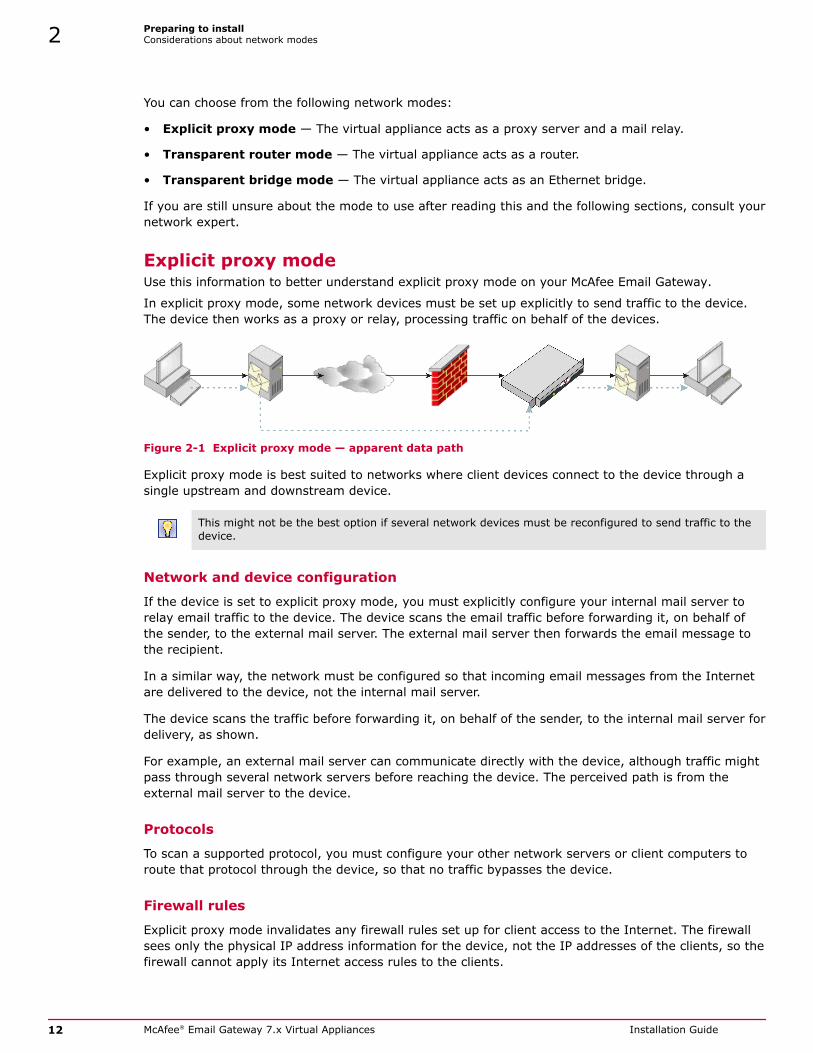
Explicit proxy mode Use this information to better understand explicit proxy mode on your McAfee Email Gateway.
In explicit proxy mode, some network devices must be set up explicitly to send traffic to the device.The device then works as a proxy or relay, processing traffic on behalf of the devices.
Figure 2-1 Explicit proxy mode — apparent data path
Explicit proxy mode is best suited to networks where client devices connect to the device through asingle upstream and downstream device.
This might not be the best option if several network devices must be reconfigured to send traffic to thedevice.
Network and device configuration
If the device is set to explicit proxy mode, you must explicitly configure your internal mail server torelay email traffic to the device. The device scans the email traffic before forwarding it, on behalf ofthe sender, to the external mail server. The external mail server then forwards the email message tothe recipient.
In a similar way, the network must be configured so that incoming email messages from the Internetare delivered to the device, not the internal mail server.
The device scans the traffic before forwarding it, on behalf of the sender, to the internal mail server fordelivery, as shown.
For example, an external mail server can communicate directly with the device, although traffic mightpass through several network servers before reaching the device. The perceived path is from theexternal mail server to the device.
Protocols
To scan a supported protocol, you must configure your other network servers or client computers toroute that protocol through the device, so that no traffic bypasses the device.
Firewall rules
Explicit proxy mode invalidates any firewall rules set up for client access to the Internet. The firewallsees only the physical IP address information for the device, not the IP addresses of the clients, so thefirewall cannot apply its Internet access rules to the clients.
2 Preparing to installConsiderations about network modes
12 McAfee® Email Gateway 7.x Virtual Appliances Installation Guide

Ensure that your firewall rules are updated. The firewall must accept traffic from McAfee® EmailGateway, but must not accept traffic that comes directly from the client devices.
Set up firewall rules to prevent unwanted traffic entering your organization.
Where to place the device
Configure the network devices so that traffic needing to be scanned is sent to the McAfee® EmailGateway. This is more important than the location of the McAfee® Email Gateway.
The router must allow all users to connect to the McAfee® Email Gateway.
Figure 2-2 Positioning in Explicit proxy mode
The McAfee® Email Gateway must be positioned inside your organization, behind a firewall, as shownin Figure 6: Explicit proxy configuration.
Typically, the firewall is configured to block traffic that does not come directly from the device. If youare unsure about your network’s topology and how to integrate the device, consult your networkexpert.
Use this configuration if:
• The device is operating in explicit proxy mode.
• You are using email (SMTP).
For this configuration, you must:
• Configure the external Domain Name System (DNS) servers or Network Address Translation (NAT)on the firewall so that the external mail server delivers mail to the device, not to the internal mailserver.
• Configure the internal mail servers to send email messages to the device. That is, the internal mailservers must use the device as a smart host. Ensure that your client devices can deliver emailmessages to the mail servers within your organization.
• Ensure that your firewall rules are updated. The firewall must accept traffic from the device, butmust not accept traffic that comes directly from the client devices. Set up rules to preventunwanted traffic entering your organization.
Preparing to installConsiderations about network modes 2
McAfee® Email Gateway 7.x Virtual Appliances Installation Guide 13

Transparent bridge mode Use this information to better understand Transparent bridge mode on your McAfee Email Gateway.
In transparent bridge mode, the communicating servers are unaware of the device — the device’soperation is transparent to the servers.
Figure 2-3 Transparent bridge mode — apparent data path
In the figure, the external mail server (A) sends email messages to the internal mail server (C). Theexternal mail server is unaware that the email message is intercepted and scanned by the device (B).
The external mail server seems to communicate directly with the internal mail server — the path isshown as a dotted line. In reality, traffic might pass through several network devices and beintercepted and scanned by the device before reaching the internal mail server.
What the device does in transparent bridge mode
In transparent bridge mode, the device connects to your network using the LAN1 and LAN2 ports. Thedevice scans the traffic it receives, and acts as a bridge connecting two network segments, but treatsthem as a single logical network.
Configuration in transparent bridge mode
Transparent bridge mode requires less configuration than transparent router and explicit proxy modes.You do not need to reconfigure all your clients, default gateway, MX records, Firewall NAT or mailservers to send traffic to the device. Because the device is not a router in this mode, you do not needto update a routing table.
Where to place the device when using transparent bridge mode
For security reasons, you must use the device inside your organization, behind a firewall.
Figure 2-4 Positioning in Transparent bridge mode
In transparent bridge mode, position the device between the firewall and your router, as shown.
In this mode, you physically connect two network segments to the device, and the device treats themas one logical network. Because the devices — firewall, device, and router — are on the same logicalnetwork, they must all have compatible IP addresses on the same subnet.
2 Preparing to installConsiderations about network modes
14 McAfee® Email Gateway 7.x Virtual Appliances Installation Guide

Devices on one side of the bridge (such as a router) that communicate with devices on the other sideof the bridge (such as a firewall) are unaware of the bridge. They are unaware that traffic isintercepted and scanned, therefore the device is said to operate as a transparent bridge.
Figure 2-5 Network structure — Transparent bridge mode
Transparent router mode Use this information to better understand Transparent router mode on your McAfee Email Gateway.
In transparent router mode, the device scans email traffic between two networks. The device has oneIP address for outgoing scanned traffic, and must have one IP address for incoming traffic.
The communicating network servers are unaware of the intervention of the device — the device’soperation is transparent to the devices.
What the device does in transparent router mode
In transparent router mode, the device connects to your networks using the LAN1 and LAN2 ports.The device scans the traffic it receives on one network, and forwards it to the next network device ona different network. The device acts as a router, routing the traffic between networks, based on theinformation held in its routing tables.
Configuration in transparent router mode
Using transparent router mode, you do not need to explicitly reconfigure your network devices to sendtraffic to the device. You need only configure the routing table for the device, and modify some routinginformation for the network devices on either side of it (the devices connected to its LAN1 and LAN2ports). For example, you might need to make the device your default gateway.
Preparing to installConsiderations about network modes 2
McAfee® Email Gateway 7.x Virtual Appliances Installation Guide 15

In transparent router mode, the device must join two networks. The device must be positioned insideyour organization, behind a firewall.
Transparent router mode does not support Multicast IP traffic or non‑IP protocols, such as NETBEUI andIPX.
Firewall rules
In transparent router mode, the firewall connects to the physical IP address for the LAN1/LAN2connection to the management blade.
Where to place the device
Use the device in transparent router mode to replace an existing router on your network.
If you use transparent router mode and you do not replace an existing router, you must reconfigure partof your network to route traffic correctly through the device.
Figure 2-6 Network structure — Transparent bridge mode
You need to:
• Configure your client devices to point to the default gateway.
• Configure the device to use the Internet gateway as its default gateway.
• Ensure your client devices can deliver email messages to the mail servers within your organization.
VMware vSphere network configurationThis group of tasks presents how to prepare your vSwitch configuration for each of the operatingmodes available.
2 Preparing to installConsiderations about network modes
16 McAfee® Email Gateway 7.x Virtual Appliances Installation Guide

Task — Configure VMware vSphere for an explicit proxy mode installationUse this task to configure VMware vSphere to install the virtual appliance in the explicit proxy mode.
Before you beginEnsure that you have at least two different physical interfaces available on your VMwareESX host. A third interface can be used for out‑of‑band management.
For best performance, McAfee recommends that the interfaces used by the McAfee EmailGateway Virtual Appliance virtual machine are not shared with any other virtual machine onthis VMware ESX host. Before you begin to install the virtual appliance, ensure that youhave vSwitches created to which LAN 1 and LAN 2 of the virtual appliance can connect, andthat they have the correct configuration.
When importing the McAfee Email Gateway Virtual Appliance .OVA file ensure that the LAN 1 interfaceis connected to your first vSwitch and that the LAN 2 interface is connected to your second vSwitch.
You must create identical vSwitches on each host in the High Availability (HA) cluster if vMotion is inuse.
Task1 Log on to your vSphere client.
2 In the Hosts and Clusters view, select the host on the left on which you are planning to install thevirtual appliance.
3 On the right hand side, select Configuration.
4 Click Networking.
5 Click Add Networking.
6 In the Add Network Wizard, select Virtual Machine, and click Next.
7 Select Create a virtual switch, and select the physical interface that you would like to use for the LAN1connection of your virtual appliance, and click Next.
8 Type a label for your new network, such as MEG LAN 1.
9 Click Next, then click Finish .
10 Repeat steps 5 – 10 to add a second vSwitch for your LAN 2 interface.
Task — Configure VMware vSphere for a transparent bridge modeinstallationUse this task to configure VMware vSphere to install the virtual appliance in a transparent bridgemode.
Before you beginEnsure that you have at least two different physical interfaces available on your VMwareESX host. The two interfaces used for the bridge must be connected to different broadcastdomains to avoid network loops and cause severe disruption in your network. A thirdinterface can be used for out‑of‑band management.
Preparing to installConsiderations about network modes 2
McAfee® Email Gateway 7.x Virtual Appliances Installation Guide 17

For best performance, McAfee recommends that the interfaces used by the bridge arededicated to the McAfee Email Gateway Virtual Appliance virtual machine and not sharedwith any other virtual machine on this VMware ESX host. Before you begin to install thevirtual appliance, ensure that you have vSwitches created to which LAN 1 and LAN 2 of thevirtual appliance can connect, and that they have the correct configuration.
When importing the McAfee Email Gateway Virtual Appliance .OVA file make sure that the LAN 1interface is connected to your first vSwitch and that the LAN 2 interface is connected to your secondvSwitch.
You must create identical vSwitches on each host in the High Availability (HA) cluster if vMotion is inuse.
Task1 Log on to your vSphere client.
2 In the Hosts and Clusters view, select the host on the left on which you are planning to install thevirtual appliance.
3 On the right hand side, select Configuration.
4 Click Networking.
5 Click Add Networking.
6 In the Add Network Wizard, select Virtual Machine, and click Next.
7 Select Create a virtual switch, and select the physical interface that you would like to use for the LAN1connection of your virtual appliance, and click Next .
8 Type a label for your new network, such as MEG LAN 1.
By default, VMware ESX removes VLAN tags. To have the virtual appliance see VLAN tagged traffic(for example, to create specific policies per VLAN) you have to enable Virtual Guest Tagging. To do so,see VMware Knowledge Base article 1004252.
9 Click Next, then click Finish .
10 Scroll down on the page to the virtual switch you just created, and click Properties.
11 In vSwitch Properties, double‑click the vSwitch entry in the list on the left‑hand side.
12 Click Security.
13 In Promiscuous Mode, change the value to Accept and click OK.
14 Click Close.
15 Repeat steps 5 – 14 to add a second vSwitch for your LAN 2 interface.
The second vSwitch has to be connected to a different physical interface, which is connected to adifferent broadcast domain on your network than the interface used for your first vSwitch.
2 Preparing to installConsiderations about network modes
18 McAfee® Email Gateway 7.x Virtual Appliances Installation Guide
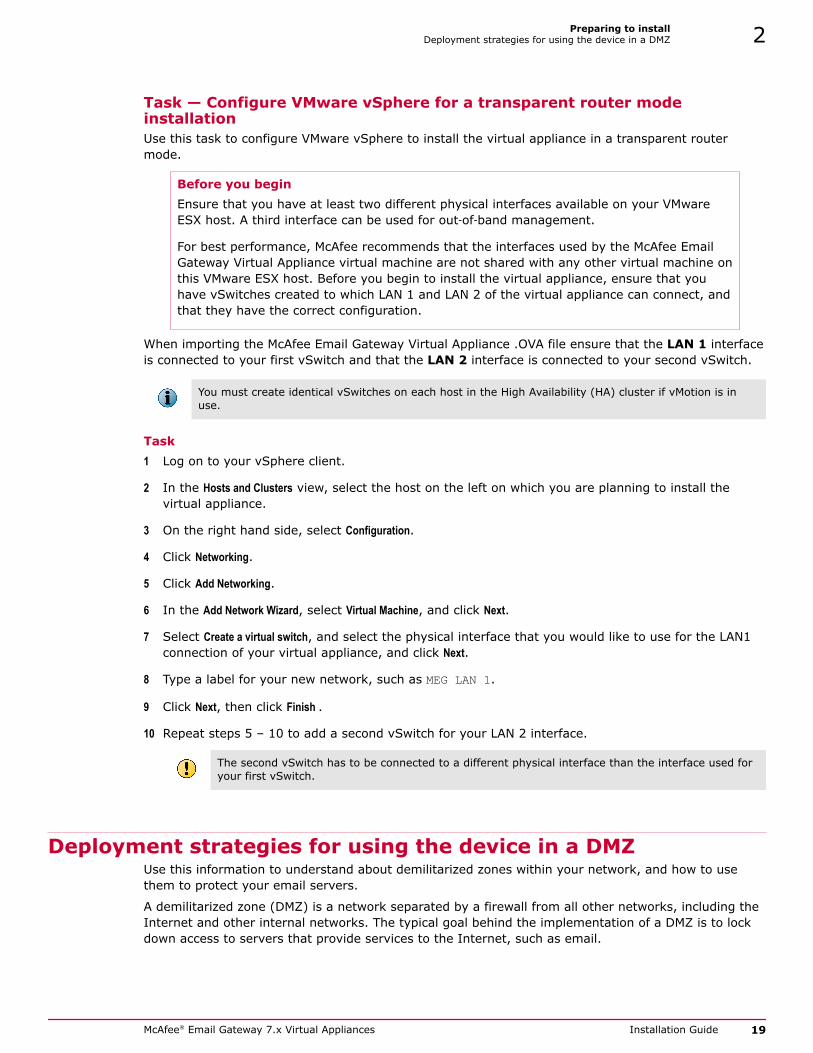
Task — Configure VMware vSphere for a transparent router modeinstallationUse this task to configure VMware vSphere to install the virtual appliance in a transparent routermode.
Before you beginEnsure that you have at least two different physical interfaces available on your VMwareESX host. A third interface can be used for out‑of‑band management.
For best performance, McAfee recommends that the interfaces used by the McAfee EmailGateway Virtual Appliance virtual machine are not shared with any other virtual machine onthis VMware ESX host. Before you begin to install the virtual appliance, ensure that youhave vSwitches created to which LAN 1 and LAN 2 of the virtual appliance can connect, andthat they have the correct configuration.
When importing the McAfee Email Gateway Virtual Appliance .OVA file ensure that the LAN 1 interfaceis connected to your first vSwitch and that the LAN 2 interface is connected to your second vSwitch.
You must create identical vSwitches on each host in the High Availability (HA) cluster if vMotion is inuse.
Task1 Log on to your vSphere client.
2 In the Hosts and Clusters view, select the host on the left on which you are planning to install thevirtual appliance.
3 On the right hand side, select Configuration.
4 Click Networking.
5 Click Add Networking.
6 In the Add Network Wizard, select Virtual Machine, and click Next.
7 Select Create a virtual switch, and select the physical interface that you would like to use for the LAN1connection of your virtual appliance, and click Next.
8 Type a label for your new network, such as MEG LAN 1.
9 Click Next, then click Finish .
10 Repeat steps 5 – 10 to add a second vSwitch for your LAN 2 interface.
The second vSwitch has to be connected to a different physical interface than the interface used foryour first vSwitch.
Deployment strategies for using the device in a DMZ Use this information to understand about demilitarized zones within your network, and how to usethem to protect your email servers.
A demilitarized zone (DMZ) is a network separated by a firewall from all other networks, including theInternet and other internal networks. The typical goal behind the implementation of a DMZ is to lockdown access to servers that provide services to the Internet, such as email.
Preparing to installDeployment strategies for using the device in a DMZ 2
McAfee® Email Gateway 7.x Virtual Appliances Installation Guide 19

Hackers often gain access to networks by identifying the TCP/UDP ports on which applications arelistening for requests, then exploiting known vulnerabilities in applications. Firewalls dramaticallyreduce the risk of such exploits by controlling access to specific ports on specific servers.
The device can be added easily to a DMZ configuration. The way you use the device in a DMZ dependson the protocols you intend to scan.
SMTP configuration in a DMZ Use this information to understand how to configure SMTP devices within a demilitarized zone on yournetwork.
The DMZ is a good location for encrypting mail. By the time the mail traffic reaches the firewall for thesecond time (on its way from the DMZ to the Internet), it has been encrypted.
Devices which scan SMTP traffic in a DMZ are usually configured in explicit proxy mode.
Configuration changes need only be made to the MX records for the mail servers.
NOTE: You can use transparent bridge mode when scanning SMTP within a DMZ. However, if you do notcontrol the flow of traffic correctly, the device scans every message twice, once in each direction. Forthis reason, explicit proxy mode is usually used for SMTP scanning.
Mail relay
Figure 2-7 Configuring as a mail relay
If you have a mail relay already set up in your DMZ, you can replace the relay with the device.
To use your existing firewall policies, give the device the same IP address as the mail relay.
Mail gateway
SMTP does not provide methods to encrypt mail messages — you can use Transport Layer Security(TLS) to encrypt the link, but not the mail messages. As a result, some companies do not allow suchtraffic on their internal network. To overcome this, they often use a proprietary mail gateway, such asLotus Notes® or Microsoft® Exchange, to encrypt the mail traffic before it reaches the Internet.
2 Preparing to installDeployment strategies for using the device in a DMZ
20 McAfee® Email Gateway 7.x Virtual Appliances Installation Guide

To implement a DMZ configuration using a proprietary mail gateway, add the scanning device to theDMZ on the SMTP side of the gateway.
Figure 2-8 Configuring as a mail gateway
In this situation, configure:
• The public MX records to instruct external mail servers to send all inbound mail to the device(instead of the gateway).
• The device to forward all inbound mail to the mail gateway, and deliver all outbound mail usingDNS or an external relay.
• The mail gateway to forward all inbound mail to the internal mail servers and all other (outbound)mail to the device.
• The firewall to allow inbound mail that is destined for the device only.
Firewalls configured to use Network Address Translation (NAT), and that redirect inbound mail tointernal mail servers, do not need their public MX records reconfigured. This is because they aredirecting traffic to the firewall rather than the mail gateway itself. In this case, the firewall must insteadbe reconfigured to direct inbound mail requests to the device.
System requirements Use this information to ensure that your host computer adheres to the system requirements forwhichever VMware virtual environment you choose.
See the VMware Knowledge Base article 1003661 available from http://www.vmware.com to get theminimum system requirements for VMware ESX or VMware ESXi 4.x. You need a computer that has a64bit x86 CPU.
Preparing to installSystem requirements 2
McAfee® Email Gateway 7.x Virtual Appliances Installation Guide 21

Additionally, ensure that the virtual machine where you will run meets the following minimum systemrequirements:
Item Specification
Processor Two virtual processors
Available virtual memory 2 GB
Free hard disk space 80 GB
If you plan to install McAfee Email Gateway Virtual Appliance in transparent bridge mode, you need tohave two external network interfaces on your physical VMware ESX host which are connected todifferent broadcast domains. For best performance, McAfee recommends that these two interfaces arenot shared with any other virtual machines on the same physical host. Connecting both interfaces of abridge to the same broadcast domain creates an STP loop in your network which can cause networkoutages.
Sample installation scenariosThis section contains information about installing the virtual appliance in different serverconfigurations.
2 Preparing to installSample installation scenarios
22 McAfee® Email Gateway 7.x Virtual Appliances Installation Guide

Running the virtual appliance as the only virtual machine onthe hostA possible single server deployment of the virtual appliance on your chosen VMware virtualenvironment.
VMware vSphere or VMware vSphere Hypervisor are dedicated servers to the virtual appliance. Theirhardware specification must exceed the minimum hardware requirements outlined in the McAfee EmailGateway Performance Data Guidelines.
This example assumes you are installing the virtual appliance in the recommended explicit proxy mode.
Figure 2-9 Single server deployment
Preparing to installSample installation scenarios 2
McAfee® Email Gateway 7.x Virtual Appliances Installation Guide 23

Running the virtual appliance with other virtual machinesA possible deployment of the McAfee Email Gateway Virtual Appliance on your chosen virtualenvironment alongside other virtual machines.
In this example, one VMware host is responsible for the virtual appliance as well as other virtualmachines, all of which run on the same hardware. Refer to the VMware website http://www.vmware.com for information on building a resource pool dedicated to the virtual appliance. Theresource pool must also have the minimum levels of CPU and memory allocated to it as stated in theMcAfee Email Gateway Performance Data Guidelines.
This example assumes you are installing the virtual appliance in the recommended explicit proxy mode.
Figure 2-10 Multiple server deployment
2 Preparing to installSample installation scenarios
24 McAfee® Email Gateway 7.x Virtual Appliances Installation Guide

3 Installing the McAfee Email GatewayVirtual Appliance
This information helps you to set up your virtual environment and install the McAfee Email GatewayVirtual Appliance.
Contents Overview of the virtual appliance installation process Installation best practices Task — Convert from a VMtrial installation Task — Download the installation software Task — Install the appliance on VMware vSphere Task — Improve performance on VMware vSphere Configure the virtual appliance Using the Configuration Console
Overview of the virtual appliance installation process This information provides a short overview of the steps needed to install the virtual appliance.
McAfee recommends that you install the virtual appliance in the following order:
1 Install your chosen VMware product.
2 Download the virtual appliance installation files.
3 Install the virtual appliance on the virtual environment.
4 Complete the graphical configuration wizard.
5 Log on to the virtual appliance.
6 Test the configuration.
7 Enable protocols.
Installation best practices This information gives some important considerations to your installation on VMware vSphere.
McAfee recommends that you read and act upon this information before you start theinstallation process.
3
McAfee® Email Gateway 7.x Virtual Appliances Installation Guide 25
• The virtual appliance is easiest to set up and maintain when it runs in the default explicit proxyoperating mode.
• Familiarize yourself with the information about creating clusters and resource pools. See theVMware website http://www.vmware.com.
• Use a Storage Area Network (SAN) rather than a Network File System (NFS) share to achieveoptimal performance.
• If you run the virtual appliance in either of the transparent modes:
• The VMware Distributed Resource Scheduler (DRS) and High Availability (HA) features maycause network interruptions if a failover takes place.
• Ensure that the virtual appliance NICs do not link to the same broadcast domain and that theirIP addresses are not in the same subnet to avoid network loops.
• Ensure that each network adapter on the virtual appliance is connected to a different physicalnetwork on the host computer.
• You will need at least three NICs in your VMware host. The virtual appliance needs two NICs andVMware recommend a dedicated NIC for the Service Console.
Task — Convert from a VMtrial installation Use this task to migrate any configuration settings from a McAfee Email Gateway Appliance (VMtrial)installation to the McAfee Email Gateway Virtual Appliance.
Task1 From your VMtrial installation, select System | System Administration | Configuration Management.
2 Click Backup Configuration to save the configuration details.
3 Install the McAfee Email Gateway Virtual Appliance software onto your chosen virtual environment.
4 Log on, and open the McAfee Email Gateway Virtual Appliance software.
5 Select System | System Administration | Configuration Management, and click Restore From File.
You can also access restore configuration options from System | Setup Wizard.
6 Browse to the VMtrial configuration file you want to restore and click Open.
7 Select the parts of the file that you want to restore and click OK.
8 Check that the settings were imported successfully and apply the changes.
Task — Download the installation softwareUse this task to download the most up‑to‑date version of the McAfee Email Gateway software.
Before you begin• Read your product installation guide.
• Get the McAfee grant ID number that you received when you purchased McAfee EmailGateway.
3 Installing the McAfee Email Gateway Virtual ApplianceTask — Convert from a VMtrial installation
26 McAfee® Email Gateway 7.x Virtual Appliances Installation Guide
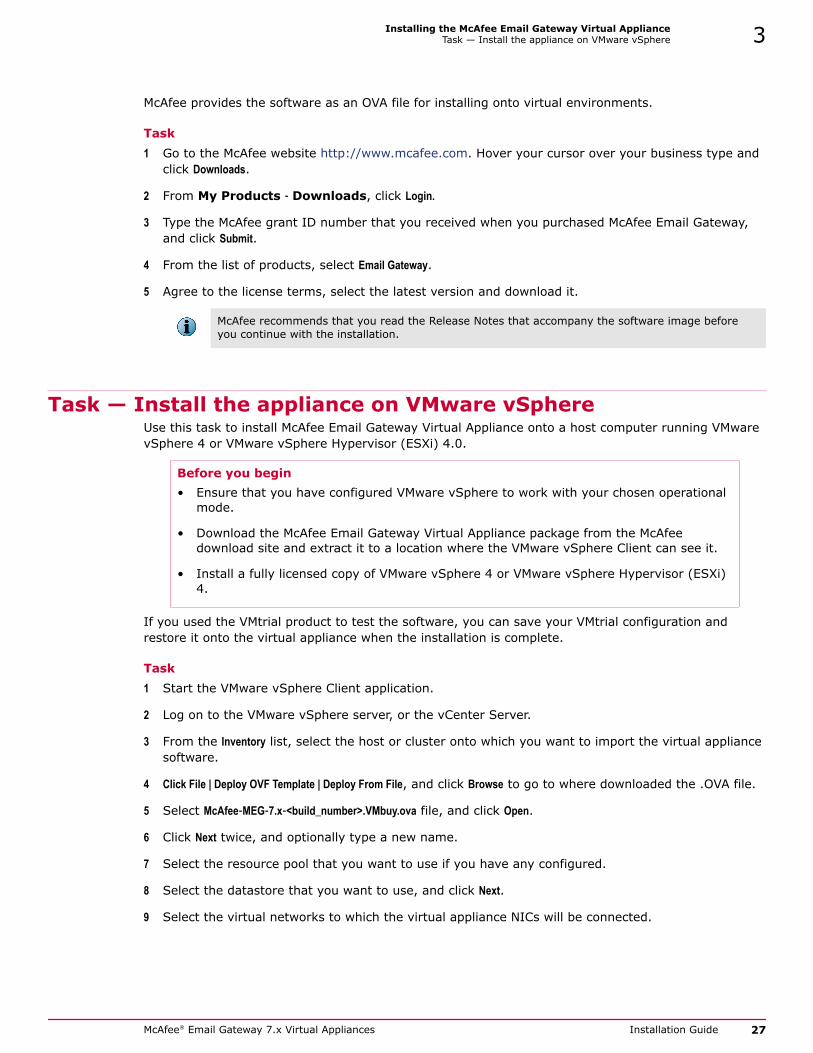
McAfee provides the software as an OVA file for installing onto virtual environments.
Task1 Go to the McAfee website http://www.mcafee.com. Hover your cursor over your business type and
click Downloads.
2 From My Products ‑ Downloads, click Login.
3 Type the McAfee grant ID number that you received when you purchased McAfee Email Gateway,and click Submit.
4 From the list of products, select Email Gateway.
5 Agree to the license terms, select the latest version and download it.
McAfee recommends that you read the Release Notes that accompany the software image beforeyou continue with the installation.
Task — Install the appliance on VMware vSphere Use this task to install McAfee Email Gateway Virtual Appliance onto a host computer running VMwarevSphere 4 or VMware vSphere Hypervisor (ESXi) 4.0.
Before you begin• Ensure that you have configured VMware vSphere to work with your chosen operational
mode.
• Download the McAfee Email Gateway Virtual Appliance package from the McAfeedownload site and extract it to a location where the VMware vSphere Client can see it.
• Install a fully licensed copy of VMware vSphere 4 or VMware vSphere Hypervisor (ESXi)4.
If you used the VMtrial product to test the software, you can save your VMtrial configuration andrestore it onto the virtual appliance when the installation is complete.
Task1 Start the VMware vSphere Client application.
2 Log on to the VMware vSphere server, or the vCenter Server.
3 From the Inventory list, select the host or cluster onto which you want to import the virtual appliancesoftware.
4 Click File | Deploy OVF Template | Deploy From File, and click Browse to go to where downloaded the .OVA file.
5 Select McAfee‑MEG‑7.x‑<build_number>.VMbuy.ova file, and click Open.
6 Click Next twice, and optionally type a new name.
7 Select the resource pool that you want to use if you have any configured.
8 Select the datastore that you want to use, and click Next.
9 Select the virtual networks to which the virtual appliance NICs will be connected.
Installing the McAfee Email Gateway Virtual ApplianceTask — Install the appliance on VMware vSphere 3
McAfee® Email Gateway 7.x Virtual Appliances Installation Guide 27

10 Define the size of the data storage disk to increase the space allocated for quarantined, deferred,and logged items.
You cannot set a disk size smaller than the default 40GB.
11 Click Next, read the summary, then click Finish and wait for the import process to finish.
Task — Improve performance on VMware vSphere Use this task to potentially improve system performance in VMware vSphere environments bychanging the default hard disk, network adapter, memory, and CPU settings.
Task1 To edit the hard disk settings:
a Check that the virtual machine is shut down.
b Right‑click the virtual appliance in the Inventory list, and click Edit Settings.
In the Virtual Machine Properties dialog box, there are three hard disks available to thevirtual appliance:
• Hard disk 1 holds the virtual appliance installation files, and must not be removed orchanged.
• Hard disk 2 is the main hard disk used by the virtual appliance. You can increase its size butMcAfee recommends that you do not reduce it.
• Hard disk 3 will hold the temporary swap space of the virtual appliance.
Putting the second and third hard disks on two separate datastores can potentially improveperformance.
2 To edit the memory and virtual CPU settings:
• Check that the virtual machine is shut down.
• Right‑click the virtual appliance in the Inventory list, and click Edit Settings.
• In the Virtual Machine Properties dialog box, change the settings as necessary.
McAfee recommends that you do not reduce the settings to less than the default settings or therecommended virtual appliance system requirements.
After the appliance is installed, the disk size cannot be changed.
Configure the virtual appliance Use this task to configure the virtual appliance.
Before you beginEnsure your virtual environment is installed and running correctly.
3 Installing the McAfee Email Gateway Virtual ApplianceTask — Improve performance on VMware vSphere
28 McAfee® Email Gateway 7.x Virtual Appliances Installation Guide

Task1 Start the virtual appliance. The installation starts automatically.
2 Read the End‑User License Agreement to continue with the installation, then click y to accept it andstart the installation.
3 At the installation menu, select a to perform a full installation and y to continue.
4 When the installation is complete, the virtual appliance restarts.
5 On the Welcome screen, choose the language that you want to use.
6 Accept the terms of the license agreement.
7 Configure the virtual appliance from the graphical configuration wizard.
8 Apply the configuration to the virtual appliance. Depending on the settings you entered, it mightrestart. You can install the virtual appliance on more than one VMware vSphere, VMware vSphereHypervisor, or VMware Player server. To do so:
a Follow the steps in this task on another VMware vSphere, VMware vSphere Hypervisor, orVMware Player server.
b Return to the previously installed virtual appliance user interface.
c Select System | System Administration | Configuration Push to send the configuration details to thesecond virtual appliance.
Using the Configuration Console Understand how to use the configuration console to set up your McAfee Email Gateway.
You can configure your McAfee Email Gateway either from the Configuration Console, or from theSetup Wizard within the user interface.
The Configuration Console launches automatically at the end of the startup sequence after either:
• an unconfigured McAfee Email Gateway starts,
• or an McAfee Email Gateway is reset to its factory defaults.
When launched, the Configuration Console provides you with options to either configure your device inyour preferred language from the McAfee Email Gateway console, or provides instructions for you toconnect to the Setup Wizard within the user interface from another computer on the same class C (/24)subnet. Both methods provide you with the same options to configure your McAfee Email Gateway.
From the Configuration Console, you can configure a new installation of the appliance software. However, toconfigure your appliance using a previously saved configuration file, you need to log onto the applianceuser interface, and run (System | Setup Wizard).
This version of the software also introduces automatic configuration using DHCP for the followingparameters:
• Host name • DNS server
• Domain name • Leased IP address
• Default gateway • NTP server
Installing the McAfee Email Gateway Virtual ApplianceUsing the Configuration Console 3
McAfee® Email Gateway 7.x Virtual Appliances Installation Guide 29

Further information about each page of the Configuration Console and the Setup Wizard is available onscreen.
Performing a Standard SetupUse this information to understand the purpose of the Standard Setup.
Standard Setup enables you to quickly set up your McAfee Email Gateway using the most commonoptions. Use this option to set up your device in transparent bridge mode, and configure it to protectyour network. The SMTP protocol is enabled by default. You can choose to enable scanning of POP3traffic.
Choosing Standard Setup forces the device to run in transparent bridge mode.
For the Standard Setup, the wizard includes these pages:
• Email Configuration
• Basic Settings
• Summary
Performing a Custom Setup Use this information to understand the purpose of the custom setup.
Use the Custom Setup to give you greater control in the options that you can select, including theoperating mode for your device. You can choose to protect mail traffic using SMTP and POP3 protocols.You should use this configuration option if you need to configure IPv6 and to make other changes tothe default configuration.
For the Custom Setup, the wizard includes these pages:
• Email Configuration • DNS and Routing
• Basic Settings • Time Settings
• Network Settings • Password
• Cluster Management • Summary
Restoring from a fileUse this information to understand the purpose of restoring from a file
When configuring your device from the Setup Wizard within the user interface, using the Restore from a fileoption enables you to import previously saved configuration information and apply it to your device.After this information has been imported you can make changes before applying the configuration.
The Restore from a file option is not available from within the Configuration Console. To make use of this option,you must log into the McAfee Email Gateway and select Restore from a file from the System | Setup Wizardmenu.
Once the configuration information has been imported, you are taken to the Custom Setup options withinthe Setup Wizard (see Performing a custom setup.) All imported options are shown on the wizard pages,giving you the opportunity to make any amendments before applying the configuration.
When using the Restore from a file option, the wizard includes these pages:
• Import Config
• Values to Restore
3 Installing the McAfee Email Gateway Virtual ApplianceUsing the Configuration Console
30 McAfee® Email Gateway 7.x Virtual Appliances Installation Guide

Once this information has been loaded, you are then taken to the Custom Setup pages, so that you canmake further changes before applying the new configuration:
• Email Configuration • DNS and Routing
• Basic Settings • Time Settings
• Network Settings • Password
• Cluster Management • Summary
ePolicy Orchestrator Managed SetupUse this information to understand the purpose of the ePolicy Orchestrator Managed Setup.
McAfee ePolicy Orchestrator enables you to manage all your McAfee® software and hardwareappliances from a single management console.
Use the ePolicy Orchestrator Managed Setup to set up your device so that it can be managed by yourMcAfeeePolicy Orchestrator server.
Only minimal information is needed, as the device will get most of its configuration information fromyour McAfee ePolicy Orchestrator server.
Settings for ePolicy Orchestrator ManagementSelect ePolicy Orchestrator Managed Setup within the Setup Wizard to configure your appliance formanagement by McAfee ePolicy Orchestrator.
Option Definition
ePO Extensions Download the McAfee ePolicy Orchestrator extensions for McAfee Gateway products,including McAfee Email Gateway.
The file MEGv7.x_ePOextensions.zip contains both the EWG and the MEG McAfeeePolicy Orchestrator extensions.
The EWG extension allows reporting from within McAfee ePolicy Orchestrator for thefollowing products:• McAfee Email and Web Security appliances
• McAfee Web Gateway appliances
• McAfee Email Gateway appliances
The MEG Extension provides full McAfee ePolicy Orchestrator management for McAfeeEmail Gateway versions 7.0 onwards.
For you to use McAfee ePolicy Orchestrator for either reporting or management, theMcAfee ePolicy Orchestrator Extensions need to be installed on your McAfee ePolicyOrchestrator server.
ePO HelpExtensions
Download the McAfee ePolicy Orchestrator help extensions.
The file MEGv7.x_ePOhelpextensions.zip contains the online help information for theabove McAfee ePolicy Orchestrator Extensions.
This file installs the help extensions relating to the McAfee ePolicy Orchestratorextensions for McAfee Email and Web Gateway and McAfee Email Gateway appliancesonto your McAfee ePolicy Orchestratorserver.
Import ePOconnectionsettings
Click to browse to the McAfee ePolicy Orchestrator connection settings file, to importthe McAfee ePolicy Orchestrator connection information into the appliance.
Installing the McAfee Email Gateway Virtual ApplianceUsing the Configuration Console 3
McAfee® Email Gateway 7.x Virtual Appliances Installation Guide 31
Task — Configure the appliance to work with ePolicy Orchestrator
Use this task to set up the appliance to be managed by ePolicy Orchestrator:
1 From your McAfee Email Gateway, on Settings for ePO Management, select ePO Extensions and click Save todownload the extension file.
2 From your McAfee Email Gateway, on Settings for ePO Management, select ePO Help Extensions and click Saveto download the help extension file.
3 On your McAfee ePolicy Orchestrator server, install these extensions using Menu | Software | Extensions| Install Extensions.
4 On the McAfee ePolicy Orchestrator server, save the connections settings from Menu | GatewayProtection | Email and Web Gateway | Actions | Export Connection Settings.
5 On the McAfee Email Gateway, return to the Settings for ePO Management page in the Setup Wizard, andclick Import ePO connection settings. Browse to the McAfee ePolicy Orchestrator connections settings file.
6 Click Next to continue to the Basic Settings page in the Setup Wizard.
Encryption Only SetupUse this information to understand the purpose of the Encryption Only setup options.
For small‑to‑medium sized organizations, it is often sufficient to use the same McAfee Email Gatewayto carry out your email scanning tasks and also your email encryption tasks.
However, if you are part of a larger organization, or you work in an industry that requires that all, or ahigh percentage, of your email messages must be delivered in a secure way, then you may want toconfigure one or more of your McAfee Email Gateway appliances as stand‑alone Encryption‑onlyservers.
In this situation, the Encryption Only Setup options within the Setup Wizard provide you with the relevantsettings needed for Encryption only use.
3 Installing the McAfee Email Gateway Virtual ApplianceUsing the Configuration Console
32 McAfee® Email Gateway 7.x Virtual Appliances Installation Guide

4 A tour of the Dashboard
This section describes the Dashboard page, and how to edit its preferences.
The DashboardThe Dashboard provides a summary of the activity of the appliance.
Dashboard
Use this page to access most of the pages that control the appliance.
On a cluster master appliance, use this page also to see a summary of activity on the cluster ofappliances.
Benefits of using the DashboardThe Dashboard provides a single location for you to view summaries of the activities of the appliancethrough a series of portlets.
Figure 4-1 Dashboard portlets
4
McAfee® Email Gateway 7.x Virtual Appliances Installation Guide 33

Some portlets display graphs that show appliance activity over the following periods of time:
• 1 hour • 2 weeks
• 1 day (the default) • 4 weeks
• 1 week
Within the Dashboard, you can make some changes to the information and graphs displayed:
• Expand and collapse the portlet data using the and buttons in the portlet's top right‑handcorner.
• Drill down to specific data using the and buttons.
• See a status indicator that shows whether the item needs attention:
• Healthy — the reported items are functioning normally
• Requires Attention — a warning threshold has been exceeded
• Requires Immediate Attention — a critical threshold has been exceeded
• Disabled — a service is not enabled
• Use and to zoom in and zoom out of a timeline of information. There is a short delay whilethe view is updated. By default, the Dashboard shows data relating to the previous one day.
• Move a portlet to another location on the Dashboard,
• Double‑click the top bar of a portlet to expand it across the top of the Dashboard,
• Set your own alert and warning thresholds to trigger events. To do so, highlight the item and clickit, edit the alert and warning threshold fields, and click Save. When the item exceeds the thresholdyou set, an event is triggered.
Depending on the browser used to view the McAfee Email Gateway user interface, the Dashboard"remembers" the current state of each portlet (whether it is expanded or collapsed, and if you havedrilled down to view specific data), and attempts to re‑create that view if you navigate to another pagewithin the user interface and then return to the Dashboard within the same browsing session.
Dashboard portletsUnderstand the portlets found on the dashboard within the user interface of your McAfee EmailGateway.
Option Definition
Inbound MailSummary
Use the Inbound Mail Summary portlet to get the delivery and status information aboutmessages sent to your organization.
Outbound MailSummary
Use the Outbound Mail Summary portlet to get the delivery and status information aboutmessages sent from your organization.
SMTP Detections Use the SMTP Detections portlet to find out the total number of messages that triggereda detection based on the sender or connection, the recipient, or the content, and toview data specific to either inbound or outbound SMTP traffic.
POP3 Detections Use the POP3 Detections portlet to view how many messages triggered a detectionbased on threats such as viruses, packers, or potentially inappropriate images.
System Summary Use the System Summary portlet displays information about load balancing, the diskspace used for each partition, total CPU usage, used and available memory, andswap details.
4 A tour of the DashboardThe Dashboard
34 McAfee® Email Gateway 7.x Virtual Appliances Installation Guide

Option Definition
HardwareSummary
Use the Hardware Summary portlet uses status indicators to show the status of networkinterfaces, UPS servers, bridge mode (if enabled), and RAID status.
Network Summary Use the Network Summary portlet provides information about the status of yourconnections, network throughput and counters relating to Kernel Mode Blocking
Services Use the Services portlet displays update and service status statistics based onprotocol and external servers used by the appliance.
Clustering Use the Clustering portlet, when you have configured your appliance as part of acluster or are using the blade server hardware, provides information about the entirecluster.
Tasks Use the Tasks portlet to link directly to the areas of the user interface that search themessage queue, view reports, manage policies, configure mail protocol settings andnetwork and system settings, and access troubleshooting features.
A tour of the DashboardThe Dashboard 4
McAfee® Email Gateway 7.x Virtual Appliances Installation Guide 35

4 A tour of the DashboardThe Dashboard
36 McAfee® Email Gateway 7.x Virtual Appliances Installation Guide
5 Testing the configuration
This information describes how to test that the appliance is functioning correctly after installation.
Contents Task — Test connectivity Task — Update the DAT files Task — Test mail traffic and virus detection Task — Test spam detection
Task — Test connectivityUse this task to confirm basic connectivity.
The McAfee Email Gateway checks that it can communicate with the gateway, update servers and DNSservers. It also confirms that the appliance name and domain name are valid.
Task1 From the navigation bar, select Troubleshoot, or from the dashboard, select Run System Tests from the
Tasks area.
2 Click the Tests tab.
3 Click Start Tests.
Each test should return positively.
Task — Update the DAT filesUse this task to ensure that the McAfee Email Gateway has the most up‑to‑date detection definition(DAT) files. We recommend updating them before you configure the scanning options.As you progress using the McAfee Email Gateway, you can choose to update individual types ofdefinition file and change the default scheduled updates to suit your requirements.
Task1 Select System | Component Management | Update Status .
2 To update the anti‑virus engine and anti‑virus database, click Update Now.
To check that the update applied correctly, open the Services portlet in the Dashboard, and expandthe Updates status. The Anti‑virus components will have a green status.
5
McAfee® Email Gateway 7.x Virtual Appliances Installation Guide 37

Task — Test mail traffic and virus detectionUse this task to test that mail traffic is passing successfully through the McAfee Email Gateway andthat threats are correctly identified. We use the EICAR test file, a harmless file that triggers a virusdetection.
Task1 Send an email message from an outside email account (such as Hotmail) to an internal mailbox
and confirm that it arrived.
2 On the Dashboard, look at the Detections areas. The listing for the protocol you used to send themessage should show that a message was received.
3 Copy the following line into a file, making sure you do not include any spaces or line breaks:
X5O!P%@AP[4\PZX54(P^)7CC)7}$EICAR‑STANDARD‑ANTIVIRUS‑TEST‑FILE!$H+H*
4 Save the file with the name EICAR.COM.
Depending on your local anti‑virus software and configuration, this could cause a detection andquarantine on your local machine.
5 From an external email account (SMTP client), create a message that contains the EICAR.COM fileas an attachment and send the message to an internal mailbox.
6 Return to the Dashboard and look at the Detections areas. You should see that a virus wasdetected.
7 Delete the message when you finish testing your installation, to avoid alarming unsuspecting users.
Task — Test spam detectionUse this task to run a General Test mail for Unsolicited Bulk Email (GTUBE) to verify that the McAfeeEmail Gateway is detecting incoming spam.
Task1 From an external email account (SMTP client), create a new email message.
2 In the body of the message, copy the following text:
XJS*C4JDBQADN1.NSBN3*2IDNEN*GTUBE‑STANDARD‑ANTI‑UBE‑TEST‑EMAIL*C.34X
Make sure that you type this line with no line breaks.
3 Send the new email message to an internal mailbox address.
The device scans the message, recognizes it as a junk email message, and deals with itaccordingly. The GTUBE overrides blacklists and whitelists.
For more information about the GTUBE, visit http://spamassassin.apache.org/tests.html.
5 Testing the configurationTask — Test mail traffic and virus detection
38 McAfee® Email Gateway 7.x Virtual Appliances Installation Guide

6 Exploring the appliance features
This information contains tasks to demonstrate the McAfee Email Gateway scanning features in action.It provides step‑by‑step instructions to create and test some sample policies and tells you how togenerate applicable reports.
Introduction to policiesThe appliance uses policies which describe the actions that the appliance must take against threatssuch as viruses, spam, unwanted files, and the loss of confidential information.
Email | Email Policies
Policies are collections of rules or settings that can be applied to specific types of traffic or to groups ofusers.
EncryptionThe Encryption pages enable you to set up McAfee Email Gateway to use the supported encryptionmethods to securely deliver your email messages.
Email | Encryption
The McAfee Email Gateway includes several encryption methodologies, and can be set up to provideencryption services to the other scanning features, or can be set up as an encryption‑only server usedjust to encrypt email messages.
Task — Encrypt all email traffic to a specific customerA common use of the encryption features is to configure a policy to use encryption for email messagesgoing to a specific customer.
This group of tasks show how to configure your McAfee Email Gateway so that all email messagesbeing sent to s specific customer are sent using encryption.
Task — Create a new scanning policyLearn how to create a new scanning policy.
Your appliance uses the policies you create to scan the email messages sent through the appliance.You can create multiple policies to control the way different users use email, or to specify differentactions based on specific circumstances.
6
McAfee® Email Gateway 7.x Virtual Appliances Installation Guide 39

Task1 Select Email | Email Policies | Scanning Policies.
2 Select the required protocol using steps in Task — View policies for SMTP, POP3 or McAfee SecureWeb Mail.
3 Click Add policy.
4 In the Scanning Policies — New Policy page, enter the following information:
a Name for the policy.
b Write an optional description for the new policy.
c Specify where the new policy inherits its settings from.
If you have a similar policy already set up, select this to allow its settings to be inherited by thenew policy.
d Choose if the policy is to apply to inbound or outbound email traffic. (SMTP only)
e Select the required Match logic for the policy.
f Select the type of rule, how it should match, and the value that the rule tests against.
g If required, add additional rules, and use the and buttons to correctly order the rules.
5 Click OK.
The new policy is added to the top of the list of policies.
Task — Configure the encryption settingsConfigure your McAfee Email Gateway to use encryption.
Task1 Select Email | Encryption | Secure Web Mail | Basic Settings.
2 Select Enable the Secure Web Mail Client.
3 Select Email | Encryption | Secure Web Mail | User Account Settings.
Recipients are automatically enrolled, and receive a digitally signed notification in HTML format. Theadministrator chooses whether to do push and/or pull encryption.
4 Select Email | Encryption | Secure Web Mail | Password Management.
The minimum password length is eight characters. The password expires after 365 days.
Task — Enable Encryption for messages matching a compliance ruleEnable the required encryption features on your McAfee Email Gateway for messages that match acompliance rule.
In this example, email messages that match the HIPAA Compliance rules will be encrypted.
Task1 Select Email | Email Policies | Compliance.
2 Click Enable compliance, and select Create new rule from template.
6 Exploring the appliance featuresIntroduction to policies
40 McAfee® Email Gateway 7.x Virtual Appliances Installation Guide

3 Search for the HIPAA Compliance rule and select it.
4 Click Next to progress through the wizard.
5 Select the primary action to Allow Through (Monitor).
6 In And also, select Deliver message using encryption.
7 Click Finish, and click OK to close the dialog box.
8 Select Email | Email Policies | Policy Options | Encryption.
9 In When to Encrypt, select Only when triggered from a scanner action.
10 In On‑box Encryption Options, select Secure Web Mail, and click OK.
11 Apply the changes.
Task — Identify quarantined email messagesUse this task to discover which email messages have been quarantined by your McAfee Email GatewayAppliance.
To view a list of all messages that have been quarantined:
Task1 Click Reports | Message Search.
2 Select Quarantined from the Message status drop‑down list.
3 Click Search/Refresh.
All messages that have been quarantined are displayed in the lower part of the page.
Task — Refine the searchYou can further refine your search for quarantined email messages to show only those that have beenquarantined due to specific triggers. In this example, to find those email messages quarantined due tocompliance issues:
Task1 Complete the steps in Task — Find out which email messages are quarantined.
2 Select Compliance from the Category drop‑down list.
3 Click Search/Refresh.
The lower part of the screen is refreshed to show only the messages that have been quarantined dueto compliance issues.
Task — View a specific email messageYou can view the content of a quarantined email message.
Task1 Complete the steps in Task — Refine the search.
2 Select the relevant quarantined message using the checkbox to the left of the page.
3 Click View Message.
Exploring the appliance featuresIntroduction to policies 6
McAfee® Email Gateway 7.x Virtual Appliances Installation Guide 41

The selected message is displayed in a new window. From this window, you can view the content ofthe email message. You can also choose to view the detailed email header information. After you haveviewed the message, by clicking the relevant buttons, you can choose further actions to perform onthe email message.
Task — Release a quarantined email messageAfter viewing the email message that has been quarantined, you may want to release the messagefrom Quarantine. This task allows you to do this.
To release a selected message from quarantine:
Task1 Complete the steps in Task — View a specific email message.
2 Click Release Selected.
The selected email message is released from quarantine.
Email messages that contain viral content cannot be released from quarantine, as to do so would riskcausing damage to your systems.
Compliance Settings Use this page to create and manage compliance rules.
Email | Email Policies | Compliance | Compliance
Benefits of the compliance settings Use compliance scanning to assist with conformance to regulatory compliance and corporate operatingcompliance. You can choose from a library of predefined compliance rules, or create your own rulesand dictionaries specific to your organization.
Compliance rules can vary in complexity from a straightforward trigger when an individual term withina dictionary is detected, to building on and combining score‑based dictionaries which will only triggerwhen a certain threshold is reached. Using the advanced features of compliance rules, dictionaries canbe combined using logical operations of any of, all of, or except.
Task — Restrict the score contribution of a dictionary termUse this task to restrict the score contribution of a dictionary term.
Before you beginThis task assumes that your rule includes a dictionary which triggers the action based on athreshold score, such as the Compensation and Benefits dictionary.
You can restrict how many times a term can contribute to the overall score.
For example, if ’testterm’ within a dictionary has a score of 10 and is seen five times within an email,it will add 50 to the overall score. Alternatively you can restrict this, for example to contribute onlytwice by setting ‘Maximum term count’ to 2.
6 Exploring the appliance featuresIntroduction to policies
42 McAfee® Email Gateway 7.x Virtual Appliances Installation Guide
Task1 Select Email | Email Policies | Compliance.
2 Expand the rule that you want to edit, then click the Edit icon next to the dictionary whose scoreyou want to change.
3 In Maximum term count, type the maximum number of times that you want a term to contribute to thescore.
Task — Edit the threshold associated with an existing ruleUse this task to edit the threshold associated with an existing rule.
Before you beginThis task assumes that your rule includes a dictionary which triggers the action based on athreshold, such as the Compensation and Benefits dictionary.
Task1 Select Email | Email Policies | Compliance.
2 Expand the rule that you want to edit, then select the Edit icon next to the dictionary whose scoreyou want to change.
3 In dictionary threshold, type the score on which you want the rule to trigger, and click OK.
Task — Create a rule to monitor or block at a thresholdFor score‑based dictionaries you might want to monitor triggers that reach a low threshold, and onlyblock the email when a high threshold is achieved.
Task1 Select Email | Email Policies | Compliance.
2 Click Create new rule, type a name for it such as Discontent ‑ Low, and click Next.
3 Select the Discontent dictionary, and in Threshold, type 20.
4 Click Next, and Next again.
5 In If the compliance rule is triggered, accept the default action.
6 Click Finish.
7 Repeat steps 2 through 4 to create another new rule but name it Discontent ‑ High and assign it athreshold of 40.
8 In If the compliance rule is triggered, select Deny connection (Block).
9 Click Finish.
10 Click OK and apply the changes.
Exploring the appliance featuresIntroduction to policies 6
McAfee® Email Gateway 7.x Virtual Appliances Installation Guide 43
Task — Add a dictionary to a ruleUse this task to add a new dictionary to an existing rule.
Task1 Select Email | Email Policies | Compliance.
2 Expand the rule that you want to edit.
3 Select Add dictionaries.
4 Select the new dictionary that you want to include, and click OK.
Task — Create a complex custom ruleUse this task to create a complex rule that triggers when both Dictionary A and Dictionary B aredetected, except when Dictionary C is also detected.
Task1 Select Email | Email Policies | Scanning Policies and select Compliance.
2 In the Default Compliance Settings dialog box, click Yes to enable the policy.
3 Click Create new rule to open the Rule Creation Wizard.
4 Type a name for the rule, and click Next.
5 Select two dictionaries to include in the rule, and click Next.
6 Select a dictionary that you want to exclude from the rule in the exclusion list.
7 Select the action that you want to take place if the rule triggers.
8 From the And conditionally drop‑down list, select All, and click Finish.
Task — Create a simple custom ruleUse this task to create a simple custom rule that blocks messages that contain social securitynumbers.
Task1 Select Email | Email Policies | Compliance.
2 In the Default Compliance Settings dialog box, click Yes to enable the policy.
3 Click Create new rule to open the Rule Creation Wizard.
4 Type a name for the rule, and click Next.
5 In the Search field, type social.
6 Select the Social Security Number dictionary, and click Next twice.
7 Select the Deny connection (Block) action, and click Finish.
6 Exploring the appliance featuresIntroduction to policies
44 McAfee® Email Gateway 7.x Virtual Appliances Installation Guide

Task — Block messages that violate a policyUse this to task to block messages that violate a threatening language policy.
Task1 Select Email | Email Policies | Compliance.
2 In the Default Compliance Settings dialog box, click Yes to enable the policy.
3 Click Create new rule from template to open the Rule Creation Wizard.
4 Select the Acceptable Use ‑ Threatening Language policy, and click Next.
5 Optionally change the name of the rule, and click Next.
6 Change the primary action to Deny connection (Block), and click Finish.
7 Click OK and apply the changes.
Data Loss Prevention settings Use this page to create a policy that assigns data loss prevention actions against the registereddocument categories.
Email | Email Policies | Compliance | Data Loss Prevention
Benefits of using Data Loss Prevention (DLP)You can choose to restrict the flow of sensitive information sent in email messages by SMTP throughthe appliance using the Data Loss Prevention feature. For example, by blocking the transmission of asensitive document such as a financial report that is to be sent outside of your organization. Detectionoccurs whether the original document is sent as an email attachment, or even as just a section of texttaken from the original document.
Configuring DLP takes place in two phases:
• Registering the documents that you want to protect
• Setting the DLP policy to action, and control the detection (this topic)
If an uploaded registered document contains embedded documents, their content is also fingerprintedso the combined content is used when calculating the percentage match at scan time. To haveembedded documents treated individually, they must be registered separately.
Task — Prevent a sensitive document from being leakedUse this task to block sensitive financial documents from being sent outside your organization.
Before you beginThis example assumes that you have already created a Finance category.
Task1 Select Email | Email Policies | Compliance | Data Loss Prevention.
2 In the Default Data Loss Prevention Settings dialog box, click Yes to enable the policy.
3 Click Create new rule, select the Finance category, and click OK to have the category appear in the Ruleslist.
Exploring the appliance featuresIntroduction to policies 6
McAfee® Email Gateway 7.x Virtual Appliances Installation Guide 45

4 Select the action associated with the category, change the primary action to Deny connection (Block),and click OK.
5 Click OK again, and apply the changes.
Task — Block a section of the documentUse this task to block just a small section of the document from being sent outside your organization.
Task1 Select Email | Email Policies | Compliance | Data Loss Prevention.
2 In the Default Data Loss Prevention Settings dialog box, click Yes to enable the policy.
3 Enable the consecutive signatures setting, and type the number of consecutive signatures againstwhich the DLP policy will trigger a detection. The level is set to 10 by default.
4 Click Create new rule, select the Finance category, and click OK to have the category appear in theRules list.
5 Select the action associated with the category, change the primary action to Deny connection (Block),and click OK.
6 Click OK again, and apply the changes.
Task — Exclude a specific document for a policyUse this task to prevent a specific financial document from triggering the DLP policy settings.
Task1 Select Email | Email Policies | Compliance | Data Loss Prevention.
2 In the Default Data Loss Prevention Settings dialog box, click Yes to enable the policy.
3 Click Create document exclusion, select the document you want to ignore for this policy, and click OK.
4 Click OK again, and apply the changes.
6 Exploring the appliance featuresIntroduction to policies
46 McAfee® Email Gateway 7.x Virtual Appliances Installation Guide

7 Additional Configuration Options
This information gives some best practice tips and some advanced configuration options.
Contents Task — Upgrading to the latest version of McAfee Email Gateway Virtual Appliance Task — Change the default Power Off and Reset actions Task — Configure the shutdown and restart option
Task — Upgrading to the latest version of McAfee EmailGateway Virtual Appliance
Use this task to upgrade to the latest version of McAfee Email Gateway Virtual Appliance from McAfeeEmail Gateway Virtual Appliance version 7.0.2 (or later) using the software .ISO image.
Before you beginYou must have McAfee Email Gateway Virtual Appliance version 7.0.2 (or later) alreadyinstalled and configured.
After an operating system is installed on a virtual appliance, the virtual machine always starts fromthe hard disk first. To work around this feature, you have to shut down the virtual machine andconfigure a power‑on‑boot delay so that you have enough time to access the Boot menu and tell it tostart from the installation CD instead.
Task1 Download the latest version of the McAfee Email Gateway Virtual Appliance .ISO upgrade file from
the McAfee download site and extract it.
2 Shut down the virtual appliance.
a Log on to the virtual appliance user interface and select System | System Administration | SystemCommands.
b Enter the password.
c Select Shutdown Appliance.
3 Log on to VMware ESX Server, or use the VMware Infrastructure Client or the VMware vSphereClient to log on to VMware Virtual Center Server.
4 Enable a Power‑on‑Boot delay to get enough time to force the virtual machine to boot from CD:
a Select the virtual appliance in the Inventory list and click Summary.
b Select Edit Settings | Options | Boot Options.
c In Power‑on‑Boot delay, type 10,000 in the text box, and click OK.
7
McAfee® Email Gateway 7.x Virtual Appliances Installation Guide 47
5 Turn on the virtual appliance.
6 Make sure the cursor focus is on the Virtual Appliance console. Then press the ESC key to open theBoot Menu.
Do not select any options yet.
7 Release the cursor from the console and select Connect CD/DVD1.
8 Browse to the folder where you downloaded the McAfee Email Gateway Virtual Appliance .ISO fileand double‑click <McAfee‑MEG 7.x‑<build‑number>.VMbuy.iso>.
9 When the .ISO file is connected, click back on to the console screen. Select CD‑ROM Drive and pressthe ENTER key.
10 The virtual appliance starts from the .ISO file.
11 Press y to agree to the terms of the license agreement.
12 Select the upgrade option that you want, and press the ENTER key to perform the upgrade.
13 Type y to confirm that you want to continue.
Task — Change the default Power Off and Reset actionsUse this task to change the Power Off and Reset actions in VMware vSphere so the McAfee Email GatewayVirtual Appliance can shut down without corrupting the virtual machine file system.
Task1 Within VMware vSphere Client, right‑click the McAfee Email Gateway Virtual Appliance and select Edit
Settings.
2 Select the Options tab and select VMware Tools.
3 Set the option next to the red square to Shut Down Guest.
4 Next to the Reset icon (red and green arrow), set the option to Restart Guest.
Task — Configure the shutdown and restart optionUse this task to configure the McAfee Email Gateway Virtual Appliance to shut down automatically andrestart if you restart VMware vSphere.
Task1 Select the vSphere Host and click the Configuration tab.
2 Select Virtual Machine Startup/Shutdown in the Software box, click Properties, and do the following:
• Enable the Allow virtual machines to start and stop automatically with the system option.
• Change the Shutdown Action to Guest Shutdown.
3 Select the McAfee Email Gateway Virtual Appliance in the list and click Move Up until it appears asthe first item in the list.
4 Click Edit.
7 Additional Configuration OptionsTask — Change the default Power Off and Reset actions
48 McAfee® Email Gateway 7.x Virtual Appliances Installation Guide

5 In Virtual Machine Autostart Settings, within the Shutdown Settings box, select the Use specified settings optionand choose Guest Shutdown next to Perform shutdown action.
6 Click OK twice to shut down the configuration screen.
The virtual appliance now appears in the list underneath the Automatic Startup heading and the value inthe Shutdown column is Shut down guest.
Additional Configuration OptionsTask — Configure the shutdown and restart option 7
McAfee® Email Gateway 7.x Virtual Appliances Installation Guide 49

7 Additional Configuration OptionsTask — Configure the shutdown and restart option
50 McAfee® Email Gateway 7.x Virtual Appliances Installation Guide
Index
Aabout this guide 5
Bbenefits of data loss prevention 45
benefits of DLP 45
Ccluster configuration
statistics 33
compliance 42
Compliancebenefits of 42
scanning for 42
configuration change messages 33
Configuration console 29
configure the virtual appliance 28
conventions and icons used in this guide 5Custom setup wizard 30
DDashboard 33
data loss preventionbenefits 45
data loss prevention (DLP) 45
demilitarized zoneSMTP configuration 20
demilitarized zone (DMZ) 19
detectionsrates and statistics 33
DHCP 29
dictionariesadding to policies 42
editing scores and terms 42
DLPbenefits 45
DLP (data loss prevention) 45
DMZ 19
SMTP configuration 20
documentationaudience for this guide 5product-specific, finding 7typographical conventions and icons 5
download package 9
EEmail Gateway
package contents 9email policies
compliance 42
email queues 33
email status 33
encryption 39
ePolicy Orchestrator Management setup 31
explicit proxy mode 12
Ffirewall rules
explicit proxy mode 12
Ggraphs
email and network statistics 33
Iimprove performance 28
installationbest practices 25
configure the virtual appliance 28
improve performance 28
installing ePolicy Orchestrator extensions 31
on VMware vSphere 27
process overview 25
installation optionsconvert from VMtrial 26
custom setup 30
standard setup 30
Mmail gateway
with a DMZ 20
mail relayin a DMZ 20
McAfee Global Threat Intelligence 33
McAfee ServicePortal, accessing 7
McAfee® Email Gateway 7.x Virtual Appliances Installation Guide 51
Nnetwork modes
explicit proxy mode 12
installation best practices 25
introduction 11
transparent bridge mode 14
transparent router mode 15
network status 33
Ooperating modes
explicit proxy mode 12
installation best practices 25
transparent bridge mode 14
transparent router mode 15
Pperformance
improve 28
policiesintroduction to 39
status 33
SScanning
for compliance 42
ServicePortal, finding product documentation 7Setup wizard
custom 30
Setup wizard (continued)standard 30
Standard setup wizard 30
statisticsDashboard 33
system requirements 21
TTechnical Support, finding product information 7threat feedback 33
transparent bridge mode 14
system requirements 21
transparent modesinstallation best practices 25
transparent router mode 15
Vvirtual appliance
initial configuration 28
VMtrialconvert to virtual appliance 26
VMware vSphereinstallation steps 27
Wwarning messages
Dashboard 33
web policiescompliance 42
Index
52 McAfee® Email Gateway 7.x Virtual Appliances Installation Guide

B00


![VMware vSphere 6 Software Description vSphere 6...[PRIMEQUEST(VMware) ]VMware vSphere 6.0 Documentation Center ・vSphere 6 Software Description(this document) vSphere Installation](https://static.fdocuments.net/doc/165x107/5a9f00a07f8b9a71178c28f6/pdfvmware-vsphere-6-software-description-vsphere-6primequestvmware-vmware.jpg)