
ELABORAZIONE DIGITALE DELLE...
25
Transcript of ELABORAZIONE DIGITALE DELLE...
EDI - introduzione 2
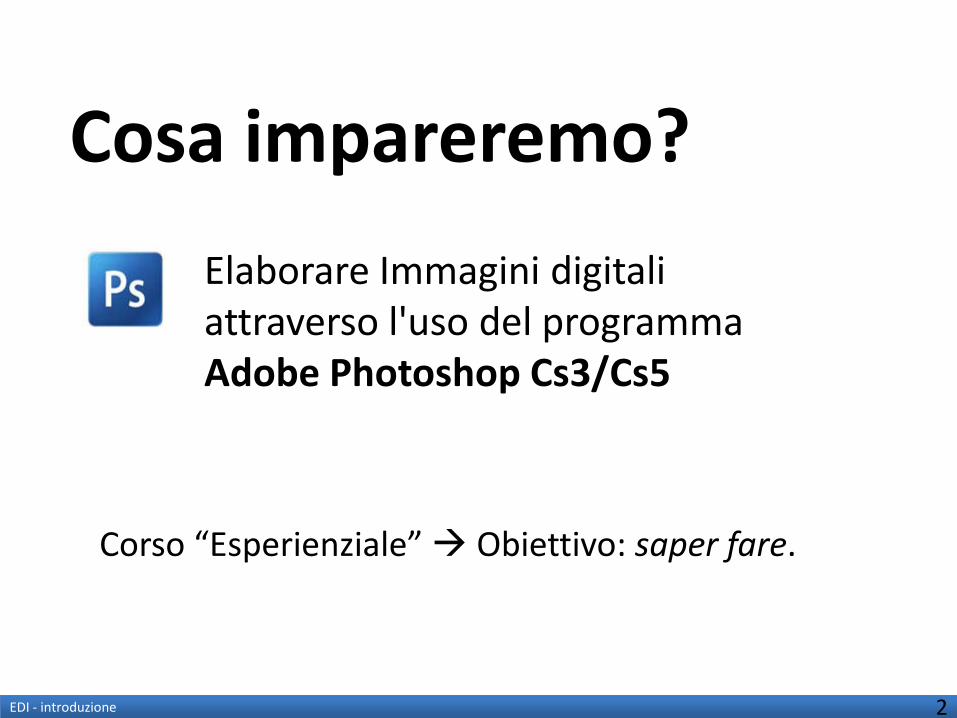
Cosa impareremo?Elaborare Immagini digitali attraverso l'uso del programma Adobe Photoshop Cs3/Cs5
Corso “Esperienziale” Obiettivo: saper fare.
EDI - introduzione 3
Perchè?
In che modo l’elaborazione digitale delle immagini può essere utile e importante per il vostro lavoro?
Obiettivo del corso di Decorazione: assicurare competenze e conoscenze destinate a formare figure professionali operanti nell’ambito della decorazione e dell’interior design, basate sulla padronanza di metodi, materiali e tecniche artistiche, nonché su adeguate conoscenze e una buona pratica di metodologie progettuali concernenti l’uso coerente ed aggiornato degli strumenti della rappresentazione visiva, dell’ornamento e dell’intervento decorativo in contesto pubblico e privato.
EDI - introduzione 4
IDEE?
EDI - introduzione 5
Due suggerimenti (da una grafica...)
Le tecniche di elaborazione digitale delle immagini sono uno strumento di progettazione e produzione artistica. Perchè non fare arte con photoshop?
Le tecniche di elaborazione digitale delle immagini sono uno strumento di “pre-produzione” . Potete ad esempio, fare dei “mockup” digitali delle vostre opere “tradizionali”, piuttosto che elaborare e migliorare rendering di progetti.
EDI - introduzione 6
Come impareremo?

7
Mode> Bitmap Grayscale Duotone Indexed Color... RGB Color CMYK Color Lab Color Multichannel 8 Bits/Channel 16 Bits/Channel 32 Bits/Channel Color Table... Adjustments> Levels... Ctrl+L Auto Levels Shift+Ctrl+L Auto Contrast Alt+Shift+Ctrl+Ltrl+B Curves... Ctrl+M Color Balance... Ctrl+B Brightness/Contrast... Black & White... Alt+Shift+Ctrl+B Hue/Saturation... Ctrl+U Desaturate Shift+Ctrl+U Match Color... Replace Color... Selective Color... Channel Mixer... Gradient Map... Pho
w/Highlight... Exposure... Invert Ctrl+I Equalize Threshold... Posterize... Variations... Duplicate... Apply Image... Calculations... Image Size... Alt+Ctrl+I Canvas Size... Alt+Ctrl+C Pixel Aspect Ratio> Custom Pixel Aspect Ratio... Delete Pixel Aspect Ratio...Ratios... Square D1/DV NTSC (0.9) D4/D16 Standard (0.95) D1/DV PAL (1.07) D1/DV NTSC Widescreen (1.2) HDV 1080/DVCPRO HD 720 (1.33) D1/DV PAL Widescreen (1.42) D4/D16 Anamorphic (1.9) Anamorphic 2:1 (2) DVCPRO HD 1080 (1.5) Rotate Ca90° CCW Arbitrary... Flip Canvas Horizontal Flip Canvas Vertical Crop Trim... Reveal All Variables> Define... Data Sets... Apply Data Set... Trap... Layer New> Layer... Shift+Ctrl+N Background Group... Group from Layers... Layer via Copy Ctrl+J Layer via Cut Ste Layer (Group)... Delete> Delete Layer (Group) Hidden Layers Layer (Group) Properties Layer Style> Blending Options... Drop Shadow... Inner Shadow... Outer Glow... Inner Glow... Bevel and Emboss... Satin... Color Overlay... Gradient Overlay... Pattern.. Copy Layer Style Paste Layer Style Clear Layer Style Global Light... Create Layer Show/Hide All Effects Scale Effects... Smart Filter> Disable Smart Filters Delete Filter Mask Disable Filter Mask Clear Smart Filters New Fill Layer> Solid Color... Gradient.djustment Layer> Levels... Curves... Color Balance... Brightness/Contrast... Black & White... Hue/Saturation... Selective Color... Channel Mixer... Gradient Map... Photo Filter... Exposure... Invert... Threshold... Posterize... Change Layer Content> Sont... Pattern... Levels... Curves... Color Balance... Brightness/Contrast... Black & White... Hue/Saturation... Selective Color... Channel Mixer... Gradient Map... Photo Filter... Exposure... Invert... Threshold... Posterize... Layer Content Options... Layer Mask>l Reveal Selection Hide Selection Delete Apply Enable/Disable Layer Mask Link/Unlink Layer Mask Vector Mask> Reveal All Hide All Current Path Delete Enable/Disable Vector Mask Link/Unlink Vector Mask Create/Release Clipping Mask Alt+Ctrl+G Smat to Smart Object New Smart Object via Copy Edit Contents Export Contents... Replace Contents... Stack Mode> None Entropy Kurtosis Maximum Mean Median Minimum Range Skewness Standard Deviation Summation Variance Rasterize Video Layers>rom File... New Blank Video Layer Insert Blank Frame Duplicate Frame Delete Frame Replace Footage... Interpret Footage... Show Altered Video Restore Frame Restore All Frames Reload Frame Rasterize 3D Layers> New Layer From 3D File... Transforme Textures Rasterize Type> Create Work Path Convert to Shape Horizontal Vertical Anti-Alias None Anti-Alias Sharp Anti-Alias Crisp Anti-Alias Strong Anti-Alias Smooth Convert Text Shape Type Warp Text... Update All Text Layers Replace All Missing Fontshape Fill Content Vector Mask Smart Object Video 3D Layer All Layers New Layer Based Slice Group Layers Ctrl+G Ungroup Layers Shift+Ctrl+G Hide Layers Arrange> Bring to Front Shift+Ctrl+] Bring Forward Ctrl+] Send Backward Ctrl+[ Send to Back Se Align> Top Edges Vertical Centers Bottom Edges Left Edges Horizontal Centers Right Edges Distribute> Top Edges Vertical Centers Bottom Edges Left Edges Horizontal Centers Right Edges Lock All Layers Link/Unlink Layers Select Linked Layers Merge LaVisible Shift+Ctrl+E Flatten Image Matting> Defringe... Remove Black Matte Remove White Matte Select All Ctrl+A Deselect Ctrl+D Reselect Shift+Ctrl+D Inverse Shift+Ctrl+I Shift+F7 All Layers Alt+Ctrl+A Deselect Layers Similar Layers Color Range... Rel+R Modify> Border... Smooth... Expand... Contract... Feather... Alt+Ctrl+D Shift+F6 Grow Similar Transform Selection Load Selection... Save Selection... Extensis> Make Work Path... Mask Pro Select... Filter Last Filter Ctrl+F Convert for Smart Filterl+X Filter Gallery... Liquify... Shift+Ctrl+X Pattern Maker... Alt+Shift+Ctrl+X Vanishing Point... Alt+Ctrl+V Artistic> Colored Pencil... Cutout... Dry Brush... Film Grain... Fresco... Neon Glow... Paint Daubs... Palette Knife... Plastic Wrap... Poster Edges... Rouge Stick... Sponge... Underpainting... Watercolor... Blur> Average Blur Blur More Box Blur... Gaussian Blur... Lens Blur... Motion Blur... Radial Blur... Shape Blur... Smart Blur... Surface Blur... Brush Strokes> Accented Edges... Angled Strokes... Crossha... Ink Outlines... Spatter... Sprayed Strokes... Sumi-e... Distort> Diffuse Glow... Displace... Glass... Lens Correction... Ocean Ripple... Pinch... Polar Coordinates... Ripple... Shear... Spherize... Twirl... Wave... ZigZag... Noise> Add Noise... Despeckle Dust & S
n... Reduce Noise... Pixelate> Color Halftone... Crystallize... Facet Fragment Mezzotint... Mosaic... Pointillize... Render> Clouds Difference Clouds Fibers... Lens Flare... Lighting Effects... Sharpen> Sharpen Sharpen Edges Sharpen More Smart SharpenSketch> Bas Relief... Chalk & Charcoal... Charcoal... Chrome... Conté Crayon... Graphic Pen... Halftone Pattern... Note Paper... Photocopy... Plaster... Reticulation... Stamp... Torn Edges... Water Paper... Stylize> Diffuse... Emboss... Extrude... Find Edg
. Solarize Tiles... Trace Contour... Wind... Texture> Craquelure... Grain... Mosaic Tiles... Patchwork... Stained Glass... Texturizer... Video> De-Interlace... NTSC Colors Other> Custom... High Pass... Maximum... Minimum... Offset... Eye Candy 3.1> Antimate... Cutout... Drop Shadow... Fire... Fur... Glass... Glow... HSB Noise... Inner Bevel... Jiggle... Motion Trail... Outer Bevel... Perspective Shadow... Smoke... Squint... Star... Swirl... Water Drops... Weave... Xenofex 1.1> Baked Earth... Constellation... Crumple..y... Flag... Lightning... Little Fluffy Clouds... Origami... Puzzle... Rounded Rectangle... Shatter... Shower Door... Stain... Stamper... Television... Digimarc> Embed Watermark Read Watermark Extensis> EdgeBlender... Intellihance Pro 4.0... Mask Pro ComposhotoFrame 2.0... PhotoGraphics... Analysis Set Measurement Scale> Default Custom... 200px=50mi (200 pixels = 50.0000 mile) 100px=25mi (100 pixels = 25.0000 mile) Select Data Points> Custom... Record Measurements Shift+Ctrl+M Ruler Tool Count
Marker... View Proof Setup> Custom... Working CMYK Working Cyan Plate Working Magenta Plate Working Yellow Plate Working Black Plate Working CMY Plates Macintosh RGB Windows RGB Monitor RGB Proof Colors Ctrl+Y Gamut Warning Shift+CRatio Correction 32-bit Preview Options... Zoom In Ctrl++ Ctrl+= Zoom Out Ctrl+- Fit on Screen Ctrl+0 Actual Pixels Alt+Ctrl+0 Print Size Screen Mode> Standard Screen Mode Maximized Screen Mode Full Screen Mode With Menu Bar Full Screen Mode ExLayer Edges Selection Edges Target Path Shift+Ctrl+H Grid Ctrl+' Guides Ctrl+; Count Smart Guides Slices Annotations All None Show Extras Options... Rulers Ctrl+R Snap Shift+Ctrl+; Snap To> Guides Grid Layers Slices Document Bounds All None Ll+; Clear Guides New Guide... Lock Slices Clear Slices Window Arrange> Cascade Tile Horizontally Tile Vertically Arrange Icons Match Zoom Match Location Match Zoom and Location New Window Workspace> Save Workspace... Delete Workspac
pace Reset Palette Locations Reset Keyboard Shortcuts Reset Menus Keyboard Shortcuts & Menus... Basic Legacy What's New in CS3 Automation Color and Tonal Correction Image Analysis Painting and Retouching Printing and Proofing Video and Film Wg with Type Untitled-1 Actions Alt+F9 F9 Animation Brushes F5 Channels Character Clone Source Color F6 Histogram History Info F8 Layer Comps Layers F7 Measurement Log Navigator Options Paragraph Paths Styles Swatches Tool Presets Tools Help
1 About Photoshop... Patent and Legal Notices... System Info... Registration... Activate... Deactivate... Updates... Photoshop Online... How to Create Web Images> Create a web photo gallery Creating rollovers Optimize an image for the web Save a file toomize and Automate> Automating tasks Create and use tool presets Customize the workspace How to Fix and Enhance Photos> Add contrast to a photo Crop and straighten photos Dodge or burn areas Make a photo frame Remove a color cast withe red eye Sharpen using Unsharp Mask How to Paint and Draw> Changing the brush cursor Create a brush and set painting options Create a brush tip from an image Create transparency using image clipping paths Draw a circle or square Draw a custom s
el shape Draw curves with the Pen tool Draw multiple shapes in a layer Draw straight line segments with the Pen tool Set pen sensitivity for graphics tablets Stroke paths with color How to Prepare Art for Other Applications> Place PDF or Illustrahop Set output options Use Photoshop artwork in Adobe Illustrator How to Print Photos> Change the print dimensions and resolution Place multiple photos into a picture package How to Work with Color> Convert a color image to black and white Replaareas How to Work with Layers and Selections> Add layer masks Align objects on different layers Create a temporary quick mask Lock layers Remove (cut) an object from a photo Show or hide a layer, group, or style Soften the edges of selections How toAdd a drop shadow to text Change the color of individual letters Change the font on multiple layers Create and edit type on a path Fill type with an image Warp and unwarp type How to Create How Tos> Create your own How To tips Palette Menusut Actions Button Mode New Action... New Set... Duplicate Delete Play Start/Stop Recording Record Again... Insert Menu Item... Insert Stop... Insert Path Action Options... Playback Options... Clear All Actions Reset Actions Load Actions... Replace Acti... Commands Frames Image Effects Production Text Effects Textures Video Actions Animation (Frames) New Frame Delete Frames Delete Animation Copy Frames Paste Frames... Select All Frames Go To> Next Frame Previous Frame First Frame.. Reverse Frames Optimize Animation... Make Frames From Layers Flatten Frames Into Layers Match Layer Across Frames... Create New Layer for Each New Frame New Layers Visible in All Frames Convert to Timeline Palette Options... Animation (Timel
me(s) Keyframe Interpolation> Linear Hold Select All Keyframes Select No Keyframes Copy Keyframe(s) Paste Keyframe(s) Set Start of Work Area Set End of Work Area Go To> Time... Next Frame Previous Frame First Frame Last Frame Work Area Startow Frame Skipping Move Layer In Point to Current Time Move Layer End Point to Current Time Trim Layer Start to Current Time Trim Layer End to Current Time Trim Document Duration to Work Area Split Layer Lift Work Area Extract Work Area Maayers Flatten Frames Into Layers Edit Timeline Comment... Document Settings... Convert to Frame Animation Onion Skin Settings... Enable Onion Skins Show> All Layers Favorite Layers Set Favorite Layers Palette Options... Brushes Expanded View.. Clear Brush Controls Reset All Locked Settings Copy Texture to Other Tools Rename Brush... Delete Brush Text Only Small Thumbnail Large Thumbnail Small List Large List Stroke Thumbnail Preset Manager... Reset Brushes... Load Brushes... Save Brushes... Assorted Brushes Basic Brushes Calligraphic Brushes Drop Shadow Brushes Dry Media Brushes el3sl_com_texture__set4 Emily_aless extreme_by_alwin Faux Finish Brushes Greg_Lindsay_Art_set_1 HPMixed01 missm-dustycorners Natural Brushes pucker_paper_brush SFX_Grunge_1 Smoke Special Effect Brushes Square Brushes SS-tribal-large SS-tribal-small Thick Heavy Brushes Tri_bal_1 Wet Media Brushes Xenon_Tech_2 Channels New Channel... Duplicate Channel... Delete Channel New SpotSpot Channel Channel Options Split Channels Merge Channels... Palette Options... Clone Source Source 1 Source 2 Source 3 Source 4 Source 5 Reset Transform Lock Frame Show Overlay Auto Hide Overlay Invert Overlay Color Grayscale Slider RGB SCMYK Sliders Lab Sliders Web Color Sliders Copy Color as HTML RGB Spectrum CMYK Spectrum Grayscale Ramp Current Colors Make Ramp Web Safe Histogram Uncached Refresh Compact View Expanded View All Channels View Show Statistics Show Cistory Step Forward Shift+Ctrl+Z Step Backward Alt+Ctrl+Z New Snapshot... Delete Clear History New Document History Options... Info Palette Options... Color Samplers Layer Comps New Layer Comp... Duplicate Layer Comp Delete Layer Comp Update Layer Comp Next Layer Comp Previous Layer Comp Restore Last Document State Layer Comp Options... Layers New Layer... Shift+Ctrl+N Duplicate Layer (Group)... Delete Layer (Group) Delete Hidden Layers New Group... New Group from Layers... Lockt to Smart Object Edit Contents Layer (Group) Properties Blending Options... Create/Release Clipping Mask Alt+Ctrl+G Link/Unlink Layers Select Linked Layers Merge Layers Ctrl+E Merge Visible Shift+Ctrl+E Flatten Image Animation Options> Automatic AlHide Palette Options... Measurement Log Set Measurement Scale> Default Custom... 200px=50mi (200 pixels = 50.0000 mile) 100px=25mi (100 pixels = 25.0000 mile) Select Data Points> Custom... Record Measurements Shift+Ctrl+M Select All Deselecd... Delete Selected Auto Display Palette Navigator Palette Options... Paths New Path... Duplicate Path... Delete Path Make Work Path... Make Selection... Fill Path... Stroke Path... Clipping Path... Palette Options... Status Versions... Show in Bridge... Showcument Sizes Document Profile Document Dimensions Measurement Scale Scratch Sizes Efficiency Timing Current Tool 32-bit Exposure Styles New Style... Text Only Small Thumbnail Large Thumbnail Small List Large List Preset Manager... Reset Sty. Save Styles... Replace Styles... Abstract Styles Buttons Dotted Strokes Glass Buttons Image Effects Photographic Effects Text Effects 2 Text Effects Textures Web Styles Swatches New Swatch... Small Thumbnail Large Thumbnail Small List Large List Presetwatches... Load Swatches... Save Swatches... Save Swatches for Exchange... Replace Swatches... ANPA Colors DIC Color Guide FOCOLTONE Colors HKS E Process HKS E HKS K Process HKS K HKS N Process HKS N HKS Z Process HKS Z Mac OS PANTONE c
EC PANTONE color bridge CMYK PC PANTONE color bridge CMYK UP PANTONE metallic coated PANTONE pastel coated PANTONE pastel uncoated PANTONE process coated PANTONE process uncoated PANTONE solid coated PANTONE solid matte PANTOs EURO PANTONE solid to process PANTONE solid uncoated Photo Filter Colors TOYO 94 COLOR FINDER TOYO COLOR FINDER TRUMATCH Colors VisiBone VisiBone2 Web Hues Web Safe Colors Web Spectrum Windows Tool Presets New Tool Preset... Re.. Delete Tool Preset Sort By Tool Show All Tool Presets Show Current Tool Presets Text Only Small List Large List Reset Tool Reset All Tools Preset Manager... Reset Tool Presets... Load Tool Presets... Save Tool Presets... Replace Tool Presets... Art Histond Marquee Text Tools Tools Shortcut Move Tool V Rectangular Marquee Tool M Elliptical Marquee Tool M Single Row Marquee Tool Single Column Marquee Tool Lasso Tool L Polygonal Lasso Tool L Magnetic Lasso Tool L Quick SelectioWand Tool W Crop Tool C Slice Tool K Slice Select Tool K Spot Healing Brush Tool J Healing Brush Tool J Patch Tool J Red Eye Tool J Brush Tool B Pencil Tool B Color Replacement Tool B Clone Stamp Tool S Pattern Stamp Tool S History Brutory Brush Tool Y Eraser Tool E Background Eraser Tool E Magic Eraser Tool E Gradient Tool G Paint Bucket Tool G Blur Tool R Sharpen Tool R Smudge Tool R Dodge Tool O Burn Tool O Sponge Tool O Pen Tool P Freeform Pen Tool P Add An
l h l l l l l l l k l l k l h l l l l l l d d l l llEDI - introduzione 7
8EDI - introduzione
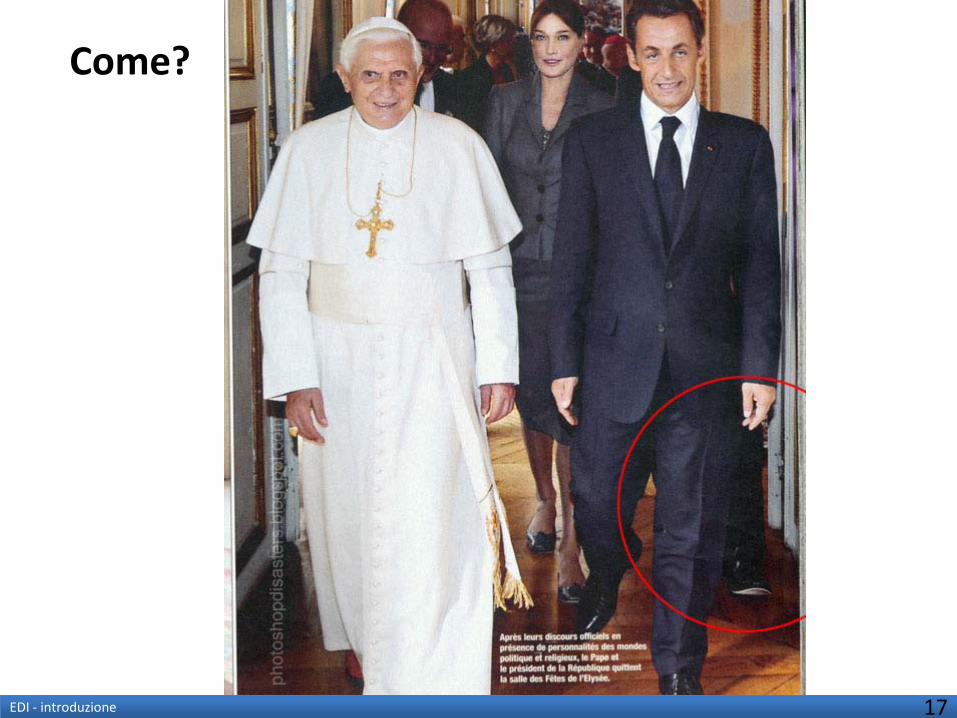
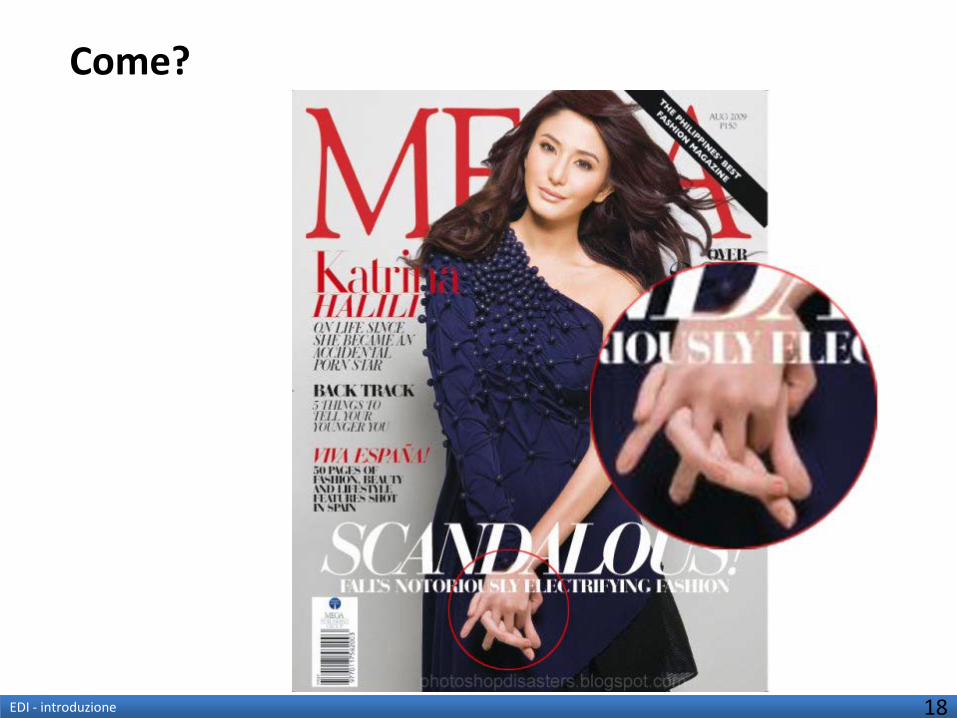
Come?
... Ha molte (molte, molte) funzionalità.
Non le impareremo tutte, ma impareremo a ragionaree a capire dove cercare quando non sappiamo fare qualcosa.
8
9EDI - introduzione
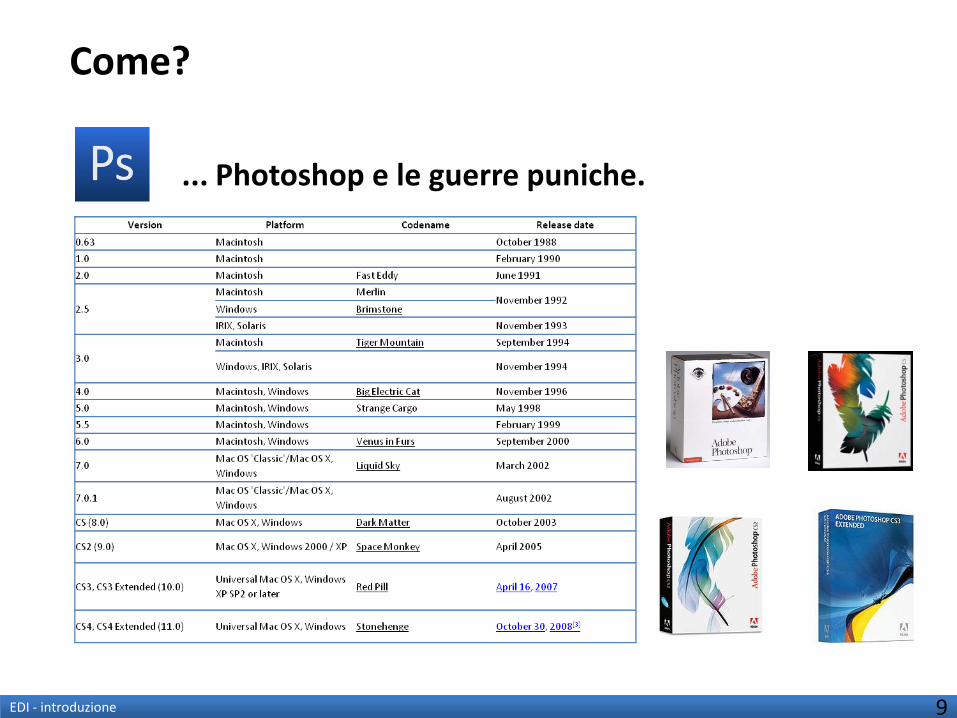
Come?
... Photoshop e le guerre puniche.
9
10EDI - introduzione
Come?
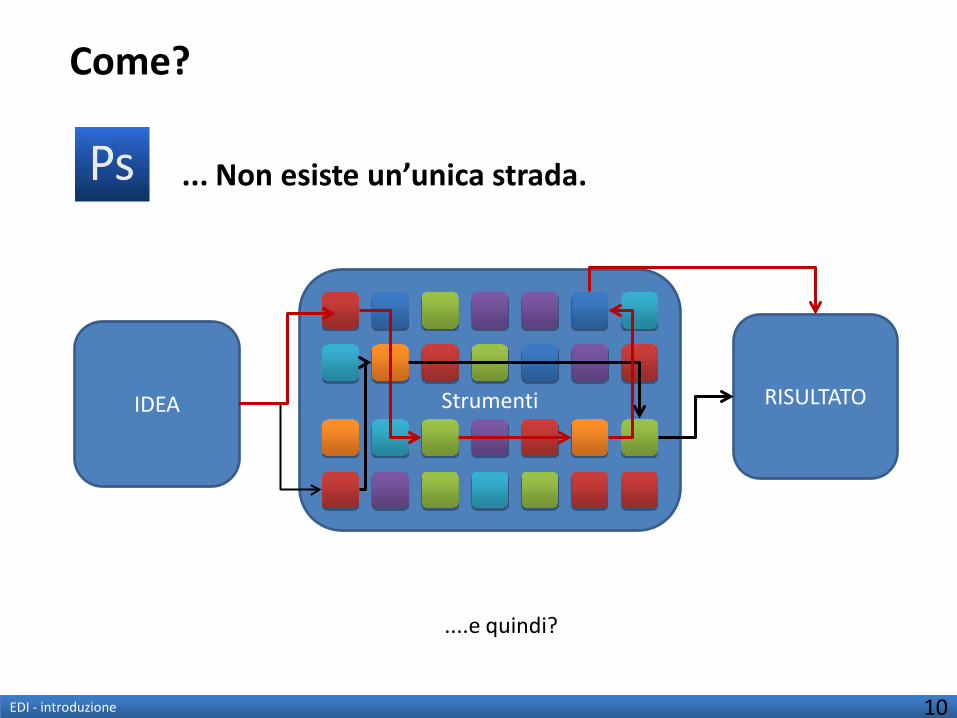
... Non esiste un’unica strada.
IDEA RISULTATOStrumenti
....e quindi?
10
11EDI - introduzione
Come?
... Non esiste un’unica strada.
Osservate come lavorano gli altri
Non esiste una procedura giusta o sbagliata. Esistono procedure migliori o peggiori, in relazione al tempo impiegato per attuarle, alla scalabilità nel tempo, alla qualità del risultato.
Non fossilizzatevi su un solo modo di lavorare, ma imparare a prendere le cose migliori dal lavoro degli altri.
11
12EDI - introduzione
Come?
... Non esiste un’unica strada.
Scegliete, quando ne avete la possibilità, tecniche non distruttive
Il risultato estetico è importante, ma il professionista, sa anche quali sono le tecniche migliori per produrre quel risultato.
Nel “corso del corso” prediligeremo tecniche che permettono di fare modifiche alle immagini, in maniera reversibile. Ciò permette di produrre file di lavoro ordinati, comprensibili (non solo all’autore) e facilmente modificabili in futuro.
NON SOLO IL RISUTLATO, MA SOPRATTUTTO COME LO AVETE OTTENUTO
12
13EDI - introduzione
Come?
13
... Non esiste un’unica strada.
Osservate il lavoro degli altri.
Imparate ad avere un pensiero critico.Guardatevi intorno.
Scovate gli errori.Chiedetevi come potreste ottenere gli stessi effetti sugli elaborati che vi piacciono.

14EDI - introduzione
Come?
14
15EDI - introduzione
Come?
15
16
Come?
EDI - introduzione 16
17EDI - introduzione
Come?
17
18EDI - introduzione
Come?
18
19EDI - introduzione
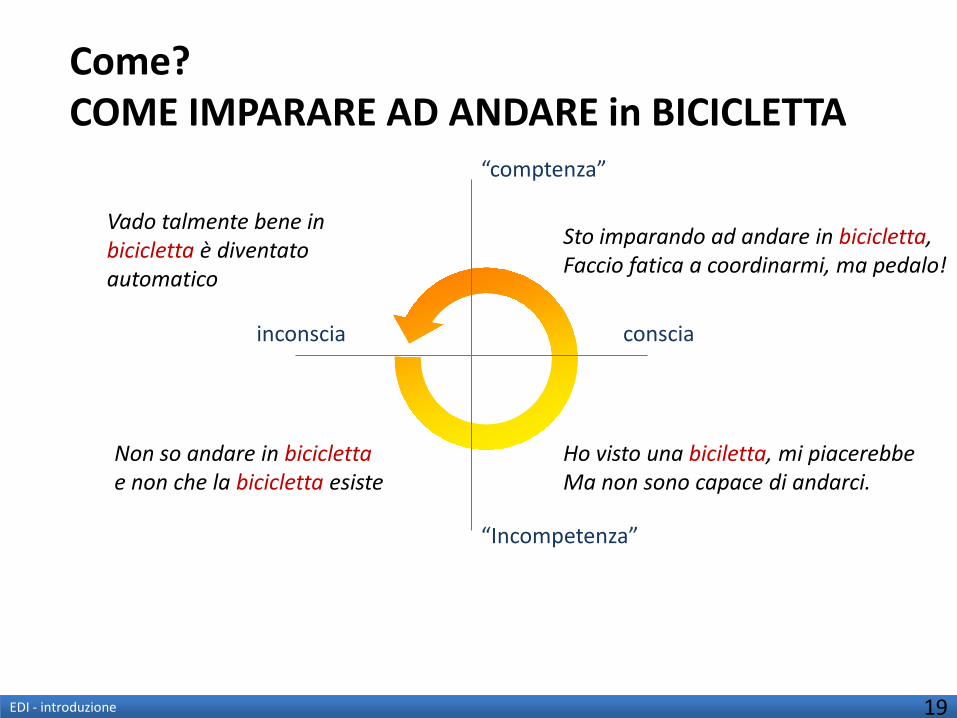
Come?COME IMPARARE AD ANDARE in BICICLETTA
“comptenza”
conscia
“Incompetenza”
inconscia
Non so andare in biciclettae non che la bicicletta esiste
Ho visto una biciletta, mi piacerebbeMa non sono capace di andarci.
Sto imparando ad andare in bicicletta,Faccio fatica a coordinarmi, ma pedalo!
Vado talmente bene in bicicletta è diventato automatico
19
20EDI - introduzione
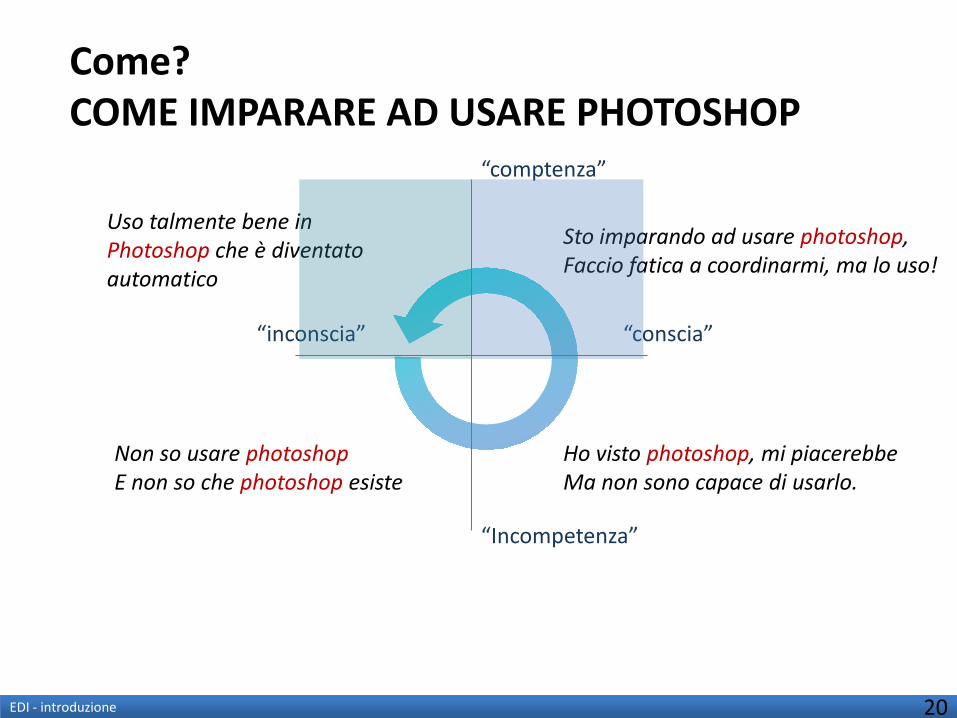
Come?COME IMPARARE AD USARE PHOTOSHOP
“comptenza”
“conscia”
“Incompetenza”
“inconscia”
Non so usare photoshopE non so che photoshop esiste
Ho visto photoshop, mi piacerebbeMa non sono capace di usarlo.
Sto imparando ad usare photoshop,Faccio fatica a coordinarmi, ma lo uso!
Uso talmente bene in Photoshop che è diventato automatico
20
21EDI - introduzione
Come?COME IMPARARE AD USARE PHOTOSHOP
1. Appassionatevi
2. Fare esercizio
3. “Paciugate”: datevi un tempo nel quale vi date il permesso di fare delle schifezze al fine di imparare a maneggiare gli strumenti del programma
4. Finito il tempo del “Paciugo” (ed è essenziale che finisca) cominciate a sviluppare un pensiero critico sui vostri lavori (come potevo farlo meglio?)
PROVATE! PROVATE ! PROVATE!
21
22EDI - introduzione
Consigli
22
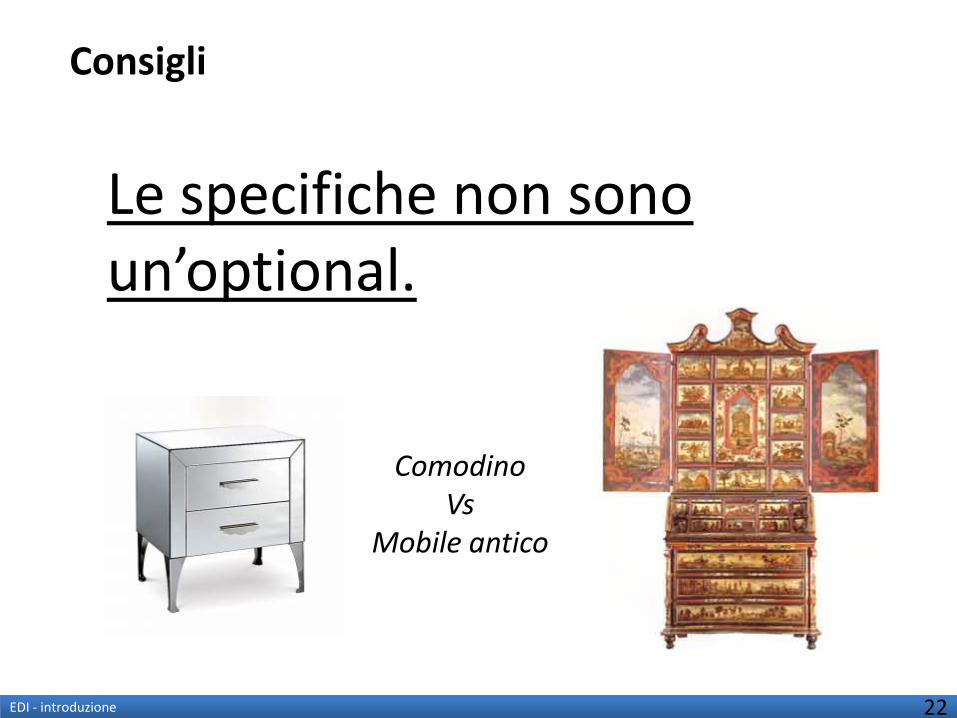
Le specifiche non sono un’optional.
ComodinoVs
Mobile antico
23EDI - introduzione
Consigli
23
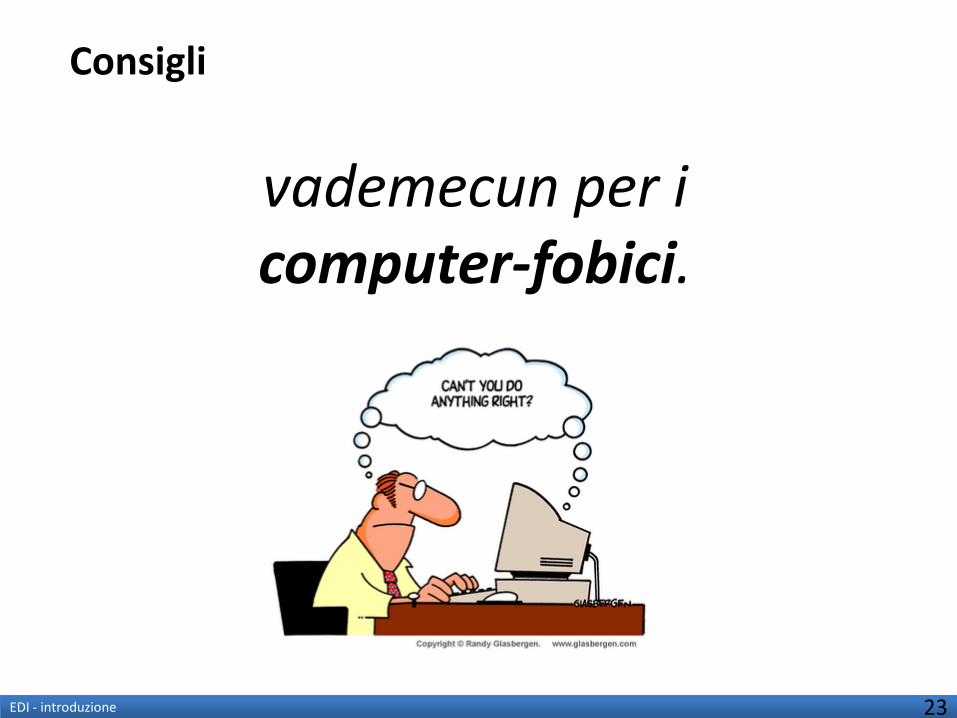
vademecun per i computer-fobici.
24EDI - introduzione
Consigli
24
1 . Hardware: Strumenti adeguati
2 . “L’hardware è quella cosa che viene presa a calci quando il software non funziona.”
a . Salvare spesso
b . Evitate di aprire tanti programmi mentre fate EDI
c . Salvare spesso
d . ...ve l’ho già detto di salvare spesso?
3. Se il punto 1 e 2 sono soddisfatti e siete nei pasticci, in buona approssimazione state sbagliando qualcosa!
I computer sono macchine, e non sono soggetti a simpatie o antipatie.Quindi non ce l'hanno con voi, né tanto meno siete sfortunati.
Solo per aprire il programma psh richiede circa 60 mb di ram. IE ne vuole 22, msn 27.
25EDI - introduzione 25
Buon Lavoro!