EL-Skyport Virtual Flash Studio 3 - Amazon Web Services
42
EL-Skyport 3.1 EL-Skyport 3.1.340 1 EL-Skyport Virtual Flash Studio 3.1 by elinchrom ltd switzerland
Transcript of EL-Skyport Virtual Flash Studio 3 - Amazon Web Services

EL-Skyport 3.1
EL-Skyport 3.1.340 1
EL-Skyport
Virtual
Flash Studio
3.1
by
elinchrom ltd
switzerland

EL-Skyport 3.1
2 EL-Skyport 3.1.340
Contents
Installation .......................................................................................................................................................... 7
Operating Systems .......................................................................................................................................... 7
Installation of the EL-Skyport Virtual Studio Software ................................................................................... 7
MAC OSX ..................................................................................................................................................... 7
WINDOWS ................................................................................................................................................... 8
Installation of the EL-Skyport USB RX driver .................................................................................................. 8
Uninstalling the EL-Skyport USB RX driver (Windows only) ........................................................................... 8
New Software features ...................................................................................................................................... 9
EL-Skyport Home .............................................................................................................................................. 11
Operating Mode ............................................................................................................................................... 12
Direct Control Mode ..................................................................................................................................... 12
Virtual Studio Mode ..................................................................................................................................... 13
EL-Remote Window .......................................................................................................................................... 14
First steps ......................................................................................................................................................... 15
Connect and activate the EL-Skyport USB RX module ................................................................................. 15
Start the EL-Skyport Virtual Studio Software ............................................................................................... 15
Set up Studio frequency channel and EL-Skyport Mode .............................................................................. 15
Change the EL-Skyport WiFi module Studio frequency channel .............................................................. 15
Change Speed Mode for EL-Skyport Transceiver RX modules ................................................................. 16
EL-Skyport Offline Automatic ....................................................................................................................... 16
Activate USB module and setup the frequency channel .............................................................................. 17
Search for all EL-Skyport RX Units and EL-Skyport Receiver ........................................................................ 18
EL-Skyport RX Units and EL-Skyport Receivers ............................................................................................. 18
Remote control of found EL-Skyport RX Units and Receivers ...................................................................... 19
Changing Unit Settings ................................................................................................................................. 20
Changing Unit Settings for all Units .............................................................................................................. 20
Flash Delay .................................................................................................................................................... 20
Camera triggering with EL-Skyport Universal Speed Receiver and EL-Skyport WiFi Module ...................... 20
Creating an EL-Skyport Job ........................................................................................................................... 21
Saving an EL-Skyport Job .............................................................................................................................. 21
Opening an EL-Skyport Job ........................................................................................................................... 21

EL-Skyport 3.1
EL-Skyport 3.1.340 3
Change Studio Dimension ............................................................................................................................ 21
Placing all found EL-Skyport Studio Units ..................................................................................................... 22
Connecting an EL-Skyport Universal module to a Studio flash Unit ............................................................ 22
Add a "free" Studio flash Unit from the Elinchrom Unit database .............................................................. 22
Connecting a "free" Studio flash Unit to an EL-Skyport Universal Module ................................................. 23
Adding a Light shaper to a Unit .................................................................................................................... 23
Setting up or changing the Studio Background ............................................................................................ 24
Adding additional Equipment ....................................................................................................................... 24
Adding a Focus point .................................................................................................................................... 24
Free turn of Object and set focus per mouse ............................................................................................... 24
Select and move more Objects..................................................................................................................... 25
Deleting Units or Equipment ........................................................................................................................ 25
Adding free flash Units without any EL-Skyport ........................................................................................... 25
Adding a thumbnail image (Preview Picture) ............................................................................................... 25
Connect and disconnect found EL-Skyport Units ......................................................................................... 25
Equipment .................................................................................................................................................... 26
Printing an EL-Skyport Job ............................................................................................................................ 26
Ad down Pictures and Symbols inside of the Virtual Studio ........................................................................ 26
Example of a new added picture: ............................................................................................................. 26
Navigator .......................................................................................................................................................... 27
Direct Control Mode ..................................................................................................................................... 27
Virtual Studio Mode ..................................................................................................................................... 27
Studio folder ............................................................................................................................................. 27
Camera ...................................................................................................................................................... 27
Object........................................................................................................................................................ 27
Equipment folder ...................................................................................................................................... 27
Lights folder .............................................................................................................................................. 27
Found EL-Units folder ............................................................................................................................... 28
Library folder ............................................................................................................................................ 28
Unit Setups ....................................................................................................................................................... 28
Configuration window ...................................................................................................................................... 29
Settings ......................................................................................................................................................... 29
Position ......................................................................................................................................................... 29

EL-Skyport 3.1
4 EL-Skyport 3.1.340
Properties ..................................................................................................................................................... 29
Job information ............................................................................................................................................ 30
Picture preview (thumbnail) ............................................................................................................................ 30
Preferences / EL-Skyport Options .................................................................................................................... 31
Categories ..................................................................................................................................................... 31
General ..................................................................................................................................................... 31
Start- up .................................................................................................................................................... 31
Communication ........................................................................................................................................ 32
PnP ............................................................................................................................................................ 32
Printer ....................................................................................................................................................... 32
Author ....................................................................................................................................................... 32
View .......................................................................................................................................................... 32
Colours ...................................................................................................................................................... 33
Short keys ......................................................................................................................................................... 34
Menu bar ...................................................................................................................................................... 34
Virtual Studio mode ...................................................................................................................................... 34
Direkt Mode and EL-Remote View ............................................................................................................... 36
Menu bar .......................................................................................................................................................... 37
EL-Skyport 3.0 (MAC) .................................................................................................................................... 37
Preferences (MAC only) ............................................................................................................................ 37
Quit (MAC) ................................................................................................................................................ 37
Studio ............................................................................................................................................................ 37
New ........................................................................................................................................................... 37
Open ......................................................................................................................................................... 37
Close.......................................................................................................................................................... 37
Save ........................................................................................................................................................... 37
Save as ...................................................................................................................................................... 37
Load Unit Setup ........................................................................................................................................ 37
Save Unit Setup ......................................................................................................................................... 37
Unit Setup Notes ....................................................................................................................................... 37
Print .......................................................................................................................................................... 37
Page setup ................................................................................................................................................ 37
Quit (Windows only) ................................................................................................................................. 37

EL-Skyport 3.1
EL-Skyport 3.1.340 5
Remote ......................................................................................................................................................... 37
Open ......................................................................................................................................................... 37
Close.......................................................................................................................................................... 37
Reset ......................................................................................................................................................... 37
Offline / Online ......................................................................................................................................... 38
Studio Channel .......................................................................................................................................... 38
Mode ......................................................................................................................................................... 38
Search all ................................................................................................................................................... 38
Search new ............................................................................................................................................... 38
Edit ................................................................................................................................................................ 38
Undo ......................................................................................................................................................... 38
Cut, Copy, Insert, Delete ........................................................................................................................... 38
Place Unit .................................................................................................................................................. 38
Add Equipment ......................................................................................................................................... 38
Add Focus Point ........................................................................................................................................ 38
Delete ........................................................................................................................................................ 38
Refresh ...................................................................................................................................................... 38
Extras ............................................................................................................................................................ 38
Add Picture ............................................................................................................................................... 38
Use Virtual Studio Picture Preview ........................................................................................................... 38
Delete Picture ........................................................................................................................................... 39
Restarting units ......................................................................................................................................... 39
Restart Unit / EL-Skyport Module ............................................................................................................. 39
Test EL-Skyport Module ............................................................................................................................ 39
Update Firmware ...................................................................................................................................... 39
Remove all EL-Skyport USB drivers ........................................................................................................... 39
Preferences (Windows) ............................................................................................................................ 39
View .............................................................................................................................................................. 39
EL-Remote ................................................................................................................................................. 39
Status bar .................................................................................................................................................. 39
Tool bar ..................................................................................................................................................... 39
Help............................................................................................................................................................... 39
Help ........................................................................................................................................................... 39

EL-Skyport 3.1
6 EL-Skyport 3.1.340
Elinchrom .................................................................................................................................................. 39
Check Update ............................................................................................................................................ 39
Send EL-Skyport bug report ...................................................................................................................... 39
License ...................................................................................................................................................... 40
About ........................................................................................................................................................ 40
Troubleshooting ............................................................................................................................................... 41

EL-Skyport 3.1
EL-Skyport 3.1.340 7
Installation
Operating Systems
EL-Skyport Virtual Flash Studio Software is available and tested for the following Operation Systems:
Mac OSX TM ® Tiger, Leopard, Snow Leopard Windows TM ®
Windows 2000, Windows XP (X32/X64), Windows Vista (X32/X64), Windows 7
Should any problems occur during installation or in the program, please contact us via the bug report or by using the contact form on our website. The EL-Skyport Flash Virtual Studio Software for MAC OSX and Windows and the necessary EL-Skyport RX USB drivers are also available on our website at www.elinchrom.com.
Installation of the EL-Skyport Virtual Studio Software
Run the appropriate installer file and follow the instructions in the installer.
MAC OSX
The EL-Skyport 3.0 installation file can be downloaded from our website. The EL-Skyport Software 3.0 Virtual Studio and the EL-Skyport USB driver must be installed.
Download the EL-Skyport 3.0 compressed installation file from our website
Unzip the compressed installation file (double-click automatically extracted)
Run the appropriate installer file and follow the instructions in the installer.

EL-Skyport 3.1
8 EL-Skyport 3.1.340
WINDOWS
The EL-Skyport 3.0 installation file can be downloaded from our website. During installation, the EL-Skyport Software 3.0 Virtual Studio and the EL-Skyport USB driver are installed automatically.
Download the EL-Skyport 3.0 compressed installation file from our website
Unzip the compressed installation file (Right Mouse button RMB Extract All..)
Run the appropriate installer file and follow the instructions in the installer. If the installation displays a warning message for unsigned drivers, or the logo test, press "continue with installation". The EL-Skyport USB driver consists of two driver installations and may require a few minutes to install. The USB driver is installed first and then the port driver is installed.
Plug the EL-Skyport USB module into a free USB port of the computer. Windows will automatically install the new EL-Skyport USB module. Then follow the instructions in the installation wizard. Select the automatic installation. If the installation displays a warning message for unsigned drivers, or the logo test, press "continue with Installing".
Installation of the EL-Skyport USB RX driver
For MAC OSX, the EL-Skyport RX USB driver must be installed to run the EL-Skyport software. Download the EL-Skyport USB drivers for MAC from our Website, unzip and start the correct installation file for your MAC operating system. Follow the instructions of the Installation Wizard.
For Windows, the pre installation of the EL-Skyport RX USB driver with the EL-Skyport software is installed automatically. Read and follow the installation instructions of the EL-Skyport software. Then plug in the EL-Skyport USB RX module to an available USB port on the computer. The Hardware Installation Wizard of Windows starts automatically. Follow the instructions of the Wizard. If the installation displays the warning message for "unsigned drivers" or the logo test, press "continue with installation".
Notes:
For the Remote Control of Elinchrom RX flash Units, the EL-Skyport USB RX module is absolutely necessary. The EL-Skyport software can be run and tested without EL-Skyport USB module. Studio set up can be generated and stored. The remote control of Elinchrom RX Studio flash Units, however, is then not possible!
Uninstalling the EL-Skyport USB RX driver (Windows only)
All EL-Skyport USB drivers can be removed completely in the EL-Skyport Software 3.0. To uninstall the drivers, run through the EL-Skyport software menu and go under "Extras - Remove all EL-Skyport USB drivers." To use all remote control functions of the software the complete EL-Skyport software with EL-Skyport USB drivers must be installed again.

EL-Skyport 3.1
EL-Skyport 3.1.340 9
New Software features
Individual two-dimensional drawing of a complete Studio - Virtual Flash Studio
EL-Skyport Home - quick access to important functions, to open last saved EL-Skyport Elinchrom jobs and a direct link to the website and much more..
Consideration of EL-Skyport software updates via a quick button. It searches automatically for software updates. The new EL-Skyport software is automatically downloaded from the Elinchrom download server and installed on the Computer
Quick Search of Elinchrom EL-Skyport RX Units.
Simple remote control of all Elinchrom RX flash Units in the Studio "Direct Control Mode"
Simple device window for quick and easy adjustment of the flash Units
Open and Save Studio Setups (EL-Skyport Jobs)
Embed a thumbnail of a picture.
Document and print from EL-Skyport Jobs
Automatic detection of the operating countries setting and Language.
Individual design of the user interface.
Toolbar for quick access to functions, system status bar, Studio and Equipment Navigator for a quick access to all found RX Units, Studio accessories and Elinchrom device database.
NEW
New “EL-Remote” minimized window with power and modeling lamp setting
Unit Setups can now be saved, viewed and opened (Menu bar Studio) without creating a complete Virtual Studio
Auto Modelling light Indication when selecting a Unit
Keyboard Short-cuts added for quick settings on the Units
Background and Text color can now be changed inside of Software Preferences
Online Internet connection can now be deactivated on Software Start-Up (see Preferences – Startup)
Possible update is checked on Software startup if activated inside of the Preferences and Internet connection is activated. The Status of the software installed is shown on the EL-Skyport Home view under Elinchrom Support.
Virtual Studio Units and Heads display now the actual Power settings
Virtual Studio Measure now also in “CM” and “INCH”.

EL-Skyport 3.1
10 EL-Skyport 3.1.340
Virtual Studio Grid if “cm” is selected is 1m by 1m, if “inch” is selected the Grid is 13 inch by 13 inch (1 feet by 1 feet)
Added Elinchrom Indirect Light formers to the Virtual Studio

EL-Skyport 3.1
EL-Skyport 3.1.340 11
EL-Skyport Home
Inside of EL-Skyport Home you get Informations and News from Elinchrom Online. New Software updates, Elinchrom product News, additional Online Help documents and more.
There is also a list of Templates and last used EL-Skyport Job files you can open by a Mouse click only.
Online Help and News are only available if your computer is connected to the Web and Internet access is available. The status of your Internet connection is shown on the Home header. You can also deactivate this feature inside of the Software Preferences.
Open Elinchrom News Website
Additional Online Help
EL-Skyport Templates
EL-Skyport Support
Elinchrom Online News
Last used EL-Skyport Jobs

EL-Skyport 3.1
12 EL-Skyport 3.1.340
Operating Mode
EL-Skyport Virtual Flash Studio software can be run in two different Modes.
Direct Control Mode
Direct remote control of all Elinchrom RX Studio flash Units with integrated or external connected EL-Skyport radio transceiver.
Automatic detection of all Elinchrom RX flash Units Studio with integrated or external connected EL-Skyport Receiver (Receiver / Transceiver).
Remote operation of any or all EL-Skyport Studio flash Units.
Bidirectional communication between software and Elinchrom RX devices or modules. Automatic updating of the Studio flash settings.
Multi remote control selection by “All Flash units” or by “Flash Group 1..4”
NEW
Save and recall saved Unit Setup’s
Notes:
Direct Control Mode operation is active after software start. In the Direct Control Mode no Unit settings or Unit configurations are stored. To save Unit settings open or create an EL-Skyport Studio Job (menu bar: Studio - Open).
Unit Navigator
Unit Setting
Statusbar
Toolbar
Display of all saved Unit Setups use
mouse double click to load

EL-Skyport 3.1
EL-Skyport 3.1.340 13
Virtual Studio Mode
Create a two-dimensional Virtual flash-Studio-superstructure with Studio flash Equipment, accessories, cameras and objects and Background structures.
Remote control of all Elinchrom RX Studio flash Units with integrated or externally connected EL-Skyport receiver.
Open, Save and document individually designed Studio set up with automatic configuration and setting of all previously stored Unit settings.
Automatic adjustment of previously stored Unit settings configured with light shapers, accessories and various Equipment and Studio set up.
Positioning of all flash Units, Studio accessories, photo-camera and object
Insert a thumbnail Job Photo. Job photo is stored inside of the EL-Skyport Job file in reduced resolution (max. 1024 x 1024).
Add notes to each individual Studio element (Studio flash, light shaping, objects, camera, ....)
Virtual Studio (2-dim.)
Configurations- Bar Unit settings,
position and properties
Configurations- Window

EL-Skyport 3.1
14 EL-Skyport 3.1.340
EL-Remote Window
Minimized EL-Remote View for main control unit features
Integrated key shortcuts for easy access
Display of Flash power and Modelling lamp features (optional)
Display Tom, Bottom, Left, Right or free placement
Selected Elinchrom unit with flash power and modelling
lamp display

EL-Skyport 3.1
EL-Skyport 3.1.340 15
First steps
Connect and activate the EL-Skyport USB RX module
The device driver of the EL-Skyport USB RX module must already be installed, if not, run the installation as per installation instructions. Plug the Elinchrom EL-Skyport USB RX module into a free USB port of the Computer.
Start the EL-Skyport Virtual Studio Software
The software can be found under Programs - EL-Skyport 3.0. After the software starts, the program will automatically detect the EL-Skyport USB RX module (see status bar), if not, open the USB module in the menu bar under Connection - Open. Or by directly using the LMB (left mouse button) on the USB module status indicator.
NOTE:
All EL-Skyport modules and Elinchrom „RX“ Studio flash units with integrated EL-Skyport Receiver must have the same frequency channel selected
Set up Studio frequency channel and EL-Skyport Mode
The current Studio frequency channel can directly changed in the status display via RMB (Right Mouse Button) and so can the EL-Skyport Mode. If the EL-Skyport mode is changed all found and connected Units and Modules will be changed automatically to the new Mode (only EL-Skyport Transceiver RX r20+, EL-Skyport Universal Speed r22+ and all Flash units with integrated EL-Skyport)
Change the EL-Skyport WiFi module Studio frequency channel
If the EL-Skyport module is inside of the found units, and changing the frequency channel of the EL-Skyport Software, can also automatically change the frequency channel of the EL-Skyport WiFi module.
EL-Skyport USB Remote Status (aktiv)
Studio- Status (Studio 1 activ)
EL-Skyport Modus Status (Normal/Speed)

EL-Skyport 3.1
16 EL-Skyport 3.1.340
Change Speed Mode for EL-Skyport Transceiver RX modules
With this software you can also change now the EL-Skyport Transceiver RX modules to Speed mode. This modification cannot be done on the module itself.
Select in the menu bar or in the status bar the new EL-Skyport mode. You will be asked, if you will also change all detected Universal and RX modules.
This Feature is only available for EL-Skyport Transceiver RX with Firmware Version r.20 and above!
The EL-Skyport unit/module Firmware Version is displayed inside of the Unit settings!
EL-Skyport Offline Automatic
The EL-Skyport Software Communication will automatically deactivated if the Focus is changed to another Software or if the EL-Skyport Offline Timeout is reached (check Preferences). If the EL-Skyport Software gets pack the Focus, the Communication is automatically activated again. If not, you can change the Online Status inside of the menu bar or the tool bar.
NOTE:
To get bests performance with triggering via EL-Skyport Transmitter, you should always set the Software to Offline mode.

EL-Skyport 3.1
EL-Skyport 3.1.340 17
Activate USB module and setup the frequency channel
In the status bar the Status indicator and the current Studio channel (Studio 1-8) are shown. Open / Activate the EL-Skyport USB RX module under CONNECTION - OPEN
To communicate, all devices and EL-Skyport modules have to be set to the same Frequency Channel / Studio Channel. Default Frequency Channel is Studio1.
A total of eight different Studio channels are available. If you encounter communication problems due to interference or other transmission devices, try a different Studio Channel.
The Studio Channel setting must be the same on the Elinchrom Studio flash Units and on the EL-Skyport modules.
For the correct setting of the corresponding channel, refer to the corresponding device description.
The setting of the Studio channel in the EL-Skyport software is under PREFERENCES - COMMUNICATION. After saving the Communication Preferences the connected EL-Skyport USB RX module will automatically switch to the new Studio Channel.

EL-Skyport 3.1
18 EL-Skyport 3.1.340
Search for all EL-Skyport RX Units and EL-Skyport Receiver
Run the command CONNECTION - SEARCH ALL and wait until the software has found all EL-Skyport devices or modules. If not all EL-Skyport devices are found, use CONNECTION - SEARCH NEW. If no devices or Units are found, check the channel setting of the devices. Interference (computer networks, walls, ceilings ..) can influence the range of the EL-Skyport wireless system. Notes:
All Studio flash Units (devices) with integrated or external connected EL-Skyport modules must be switched ON.
NEW:
If you change the name of a Unit, the name is automatically saved inside a file of your user documents folder. Whenever you restart the EL-Skyport Software and found this unit or module again the saved named is updated (check Preferences to deactivate this feature).
NOTE:
All used EL-Skyport modules and Studio flash units must have the same Studio frequency channel and the same EL-Skyport mode.
EL-Skyport RX Units and EL-Skyport Receivers
The EL-Skyport Software can control all Elinchrom RX Studio flash Units. New EL-Skyport Software Versions and Features can be updated inside of the EL-Skyport software or downloaded on our website. Check at regular intervals whether a newer version of our Studio software is available. Here is a list of the Elinchrom Studio flash Units that can be currently controlled by the software.
All Elinchrom RX Studio flash Units with integrated EL-Skyport modules (i.e. Ranger RX Quadra AS).
All Elinchrom RX Studio flash Units with attached EL-Skyport Transceiver RX Module , i.e. Style RX, Digital RX and Ranger RX Series.
Also EL-Skyport Universal Receiver can be recognized and operated (restricted settings)
Also EL-Skyport WiFi module can be recognized and operated (restricted settings)
All Studio flash Units and EL-Skyport modules are also improved at regular intervals.

EL-Skyport 3.1
EL-Skyport 3.1.340 19
Remote control of found EL-Skyport RX Units and Receivers
All found EL-Skyport devices are listed inside of the "Lights" Navigator folder. Depending on the Selection of the Navigator, a single device, units with the same flash group setting or all Studio devices together can be remote controlled. The EL-Skyport software automatically detects the Elinchrom Unit type. In the right Configuration window, individual settings of the Unit can be made.
The Elinchrom EL-Skyport system is a bidirectional communication, i.e. all settings you make in the software are automatically transferred to the selected Unit and changes done directly on the Unit are automatically updated in the software.
With LMB on the same Tab the Configuration window can be optimized or minimized.
If you select inside of the Navigator “Lights”, you can modify all or groups of units at the same time. The following settings are available at present:
Free power adjustment, relative to the actual setting
Free Modelling light adjustment, relative to the actual setting
Toggle the modelling light
Switch modelling light on, off, max or min
In addition you can also switch the Photo cell, audio and Stand-By.

EL-Skyport 3.1
20 EL-Skyport 3.1.340
Changing Unit Settings
Select a single Unit inside of the Studio window. In the right Configuration window select Settings to change the Unit settings.
Or select inside in the Navigator Lights or a single Unit to display all Unit settings in the middle Studio window.
Changing Unit Settings for all Units
Select in the Navigator the folder Lights. All found Units are listed in the middle Studio window. In the upper Studio window all found Units can be set up at the same time.
Flash Delay
This Feature is available for all EL-Skyport Receivers and Units with integrated EL-Skyport. The delay can be setup from 5 milli sec. up to approx. 16 sec.
The delay is only available by triggering with the EL-Skyport Transmitter.
In addition the amount of delayed flashes can be configured.
In addition you can set up the amount of delayed flashes. If reached, the delay settings are deactivated.
Press “Set” to activate your settings, press “X” to close this window.
Camera triggering with EL-Skyport Universal Speed Receiver and EL-Skyport WiFi
Module
This modules can be used to trigger a Camera. The Camera trigger pulse can be adjusted from 10 to 2540 milli sec., up of the Camera possibilities. The most Cameras work with 80 milli sec. 12 Pictures/second
Special adapter cables are necessary to connect the module to the Camera, check our homepage or your Elinchrom Dealer for possible adapter cables.
Press “Set” to use the settings, press “X” to close the Camera Settings.

EL-Skyport 3.1
EL-Skyport 3.1.340 21
Creating an EL-Skyport Job
In the menu bar Studio - New, a new EL-Skyport job can be created. The EL-Skyport software is now in the Virtual Studio Flash Mode. A Virtual Studio in two-dimensional view is created. It will automatically create a Background, a camera and an object. Change the properties of the selected object in the right configuration window. All existing devices found in the Direct Control Mode will be automatically added to the Studio.
Saving an EL-Skyport Job
In the menu bar Studio - Save EL-Skyport, the current job will be saved. There are stored all Studio and Equipment settings, including the preview image.
Opening an EL-Skyport Job
In the menu bar Studio - Open an EL-Skyport job can be opened. All Studio and device settings, including the preview image will be updated. All Units already found are automatically added to the EL-Skyport job. If the same Units are available, all settings of the Units will be updated automatically. If not, then link the Units manually.
Change Studio Dimension
Select Studio inside of the Navigator view. Choose Properties in the right configuration window to change the Studio dimensions (in “inch” or in “cm”). The grid has the dimensions of about 1m x 1m or about 1 feet x 1 feet, and helps placing Studio objects.
Even by reducing the Studio dimensions, Objects can be placed outside of the Studio size. Move these symbols inside the new reduction Studio dimensions before.

EL-Skyport 3.1
22 EL-Skyport 3.1.340
Placing all found EL-Skyport Studio Units
All the devices already found in the Direct Mode are placed automatically inside of the open Studio. Select the Studio inside of the Navigator to display the Virtual Studio window.
In the Studio window, move Symbols individually by holding the left mouse button (LMB). The Position, Orientation (Focus), Rotation, .. can be set in the Configuration window under the Placement.
Connecting an EL-Skyport Universal module to a Studio flash Unit
EL-Skyport Universal modules are automatically recognized and inserted into the open Studio. To assign an Elinchrom flash Unit to this EL-Skyport module, select the Universal Module inside of the Navigator or in the Studio window. Then select the Properties tab in the Configuration window and in the list box Unit Type choose the desired flash Unit.
Add a "free" Studio flash Unit from the Elinchrom Unit database
Free Studio flash Units can also be placed in the Studio. These free Units do not have any EL-Skyport connection. Expanding the Library folder in the Navigator and select a free Studio flash Unit. With the RMB select "Add device" or use Drag and Drop from the Navigator to the Studio Window. The device is automatically placed in the Studio.
EL-Skyport 3.1
EL-Skyport 3.1.340 23
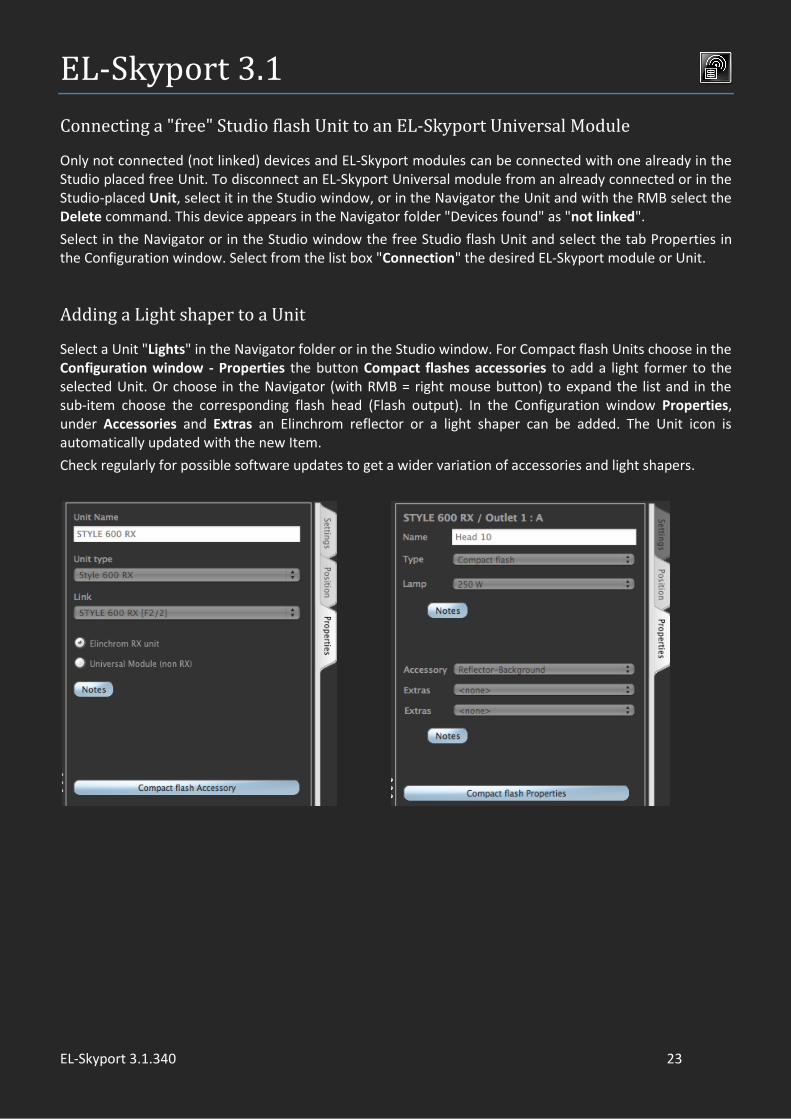
Connecting a "free" Studio flash Unit to an EL-Skyport Universal Module
Only not connected (not linked) devices and EL-Skyport modules can be connected with one already in the Studio placed free Unit. To disconnect an EL-Skyport Universal module from an already connected or in the Studio-placed Unit, select it in the Studio window, or in the Navigator the Unit and with the RMB select the Delete command. This device appears in the Navigator folder "Devices found" as "not linked".
Select in the Navigator or in the Studio window the free Studio flash Unit and select the tab Properties in the Configuration window. Select from the list box "Connection" the desired EL-Skyport module or Unit.
Adding a Light shaper to a Unit
Select a Unit "Lights" in the Navigator folder or in the Studio window. For Compact flash Units choose in the Configuration window - Properties the button Compact flashes accessories to add a light former to the selected Unit. Or choose in the Navigator (with RMB = right mouse button) to expand the list and in the sub-item choose the corresponding flash head (Flash output). In the Configuration window Properties, under Accessories and Extras an Elinchrom reflector or a light shaper can be added. The Unit icon is automatically updated with the new Item.
Check regularly for possible software updates to get a wider variation of accessories and light shapers.

EL-Skyport 3.1
24 EL-Skyport 3.1.340
Setting up or changing the Studio Background
Select the Background in the Studio Navigator under Equipment. Select Properties in the right Configuration window. The Background image can also be changed. In addition, the colour and the size of the Background can also be changed. The Background can always get a different symbol or name. The Background cannot be deleted.
Adding additional Equipment
Select Edit - adds Equipment in the menu bar. There are various accessories available, where size and colour can be changed.
Adding a Focus point
In order to use a flash Unit as Background lighting, the focus point can be placed behind the object. This is achieved by adding an additional focus point. Select Add Focus point in the menu Edit. Select the flash Unit for Background lighting and select Position in the Configuration window, select Focus and set from the list the added focus point.
The focus of a symbol can also be changed as follows:
Select the Flash Unit inside of the Studio window and hold down the key "F" on the keyboard, with the LMB drag the mouse pointer to another object. A focus line is shown and when dragging the mouse over another object a red focus target point is shown inside of this object. Now lift the LMB and the new object is adopted as the new focus target.
Free turn of Object and set focus per mouse
Select an Object
Press and hold „F“ on the keyboard
Press and hold LMB on the selected Object
Release “F”
Drag mouse to the position to turn the Object
The direction is shown by a line
If you release now the LMB, the new view direction will be saved
If you move over another object and a small red ball is shown, and you release now the LMB, this object is used as the new focus of the selected object.

EL-Skyport 3.1
EL-Skyport 3.1.340 25
Select and move more Objects
Hold the SHIFT key on the keyboard and select all Object with the LMB. All selected Objects will have a yellow rectangle displayed. Or hold the LMB and drag the mouse to create a rectangle. All Objects inside of the rectangle will be selected.
Hold now the SHIFT key, select an Object and hold the LMB and drag the mouse to the new position. All selected Object will be moved.
Deleting Units or Equipment
A selected device or Equipment can be deleted from the menu bar under Edit - Delete. In the Navigator or in the Studio window just select with the RMT and then delete. Attention, the EL-Skyport software has no "Undo" - function, this action cannot be restored.
Adding free flash Units without any EL-Skyport
It is possible to add "free" Units without remote control possibility. Select Database in the Navigator in the Studio and add the Unit via Drag and Drop to the Studio View, or use the RMB - and choose "Place Unit".
Adding a thumbnail image (Preview Picture)
A thumbnail image can be added to the current job in the menu bar Extras - Add Picture, with Delete Picture the thumbnail image can be removed. A current view of the Studio can be added also as a preview image. Drag and Drop can also add an image a picture file to the preview window. Similarly functions are available with the RMB inside of the preview window. A scaled image of the inserted image (max. 1024 per side) is stored inside of the EL-Skyport job.
Connect and disconnect found EL-Skyport Units
If the EL-Skyport job Units does not match the found Units, connect (link) them manually. Select inside of the Studio window a "not-linked" device. Then select in the Configuration window - Properties - Link the Unit to connect to the Virtual Studio Unit. A free detected device is displayed with "not linked" in the list box. All devices that are already linked to another Virtual Studio Unit cannot be connected to another device. To disconnect a linked Unit select the Virtual Studio Unit and select "not linked" in the Configuration window - Properties - Link.

EL-Skyport 3.1
26 EL-Skyport 3.1.340
Equipment
Select in the Navigator window "Equipment" to show a complete list of all used Equipment.
Printing an EL-Skyport Job
Select in the menu bar Studio - Print to show the print preview to print different print layouts.
Ad down Pictures and Symbols inside of the Virtual Studio
If you want to add your own Pictures and Symbols to the EL-Skyport Software you have to follow the following restrictions:
1. All pictures should be placed inside of the BIN/PICTURES folder.
2. Use the BIN/PICTURES/USER folder to add your own pictures.
3. The Picture file must be saved as a „PNG“ file
4. The picture dimension: 1000 pixel is approx. 1 meter
5. The MASK-Picture is also needed and must be saved as a „PNG“ file with the same dimension size as
the Picture (white is transparent, black is fully drawn)
6. Use the BIN/PICTURES/USER/MASK folder to add the picture-mask file
7. The picture-mask file must have the same name as the picture file, but with adding „_mask“ to the
picture name (i.e. picture name is „test.png“, the picture-mask name must be „test_mask.png“
8. If no picture-mask file is available, the background of the new picture is not drawn correctly
Example of a new added picture:
Camera.png Camera_mask.png

EL-Skyport 3.1
EL-Skyport 3.1.340 27
Navigator
Direct Control Mode
The Navigator window will only show the folder "Lights" and all found Elinchrom EL-Skyport devices. If the folder "Lights" is selected, all found Units are shown. If only one single Unit is selected inside of the Navigator, only the selected Unit settings are shown.
Virtual Studio Mode
The Virtual Studio Mode has different folders and Groups.
Studio folder
All Devices, Units and Equipment are included.
Camera
Studio camera. Name und Notes can be added.
Object
The object or Model to photograph. Name und Notes can be added. The Symbol / Image can be changed.
Equipment folder
Includes all placed and used Studio Equipment. Edit and add Equipment in the menu bar Edit - Add Equipment. Dimension, Colour, Name and Notes can be added.
Lights folder
A list of all flash lights / Units found and placed inside of the Virtual Studio.

EL-Skyport 3.1
28 EL-Skyport 3.1.340
Found EL-Units folder
Includes a list of all found Units in the Studio (linked and not linked Units). All found Units still placed inside the Studio window are labelled with "linked". All found Units that are not placed inside of the Studio window are labelled with "not linked". All "not linked" Units can be added to the Studio window by Drag and Drop or with the RMB features.
Library folder
Includes a list of all Elinchrom Studio flash Units. All library Units can be added to the Studio window by Drag and Drop or with the RMB features. All library Units are "free Units" and must be connected manually to a found Unit.
Unit Setups
This new feature allows you to save and open Unit setups per mouse click.
All Unit settings will be saved / changed to / from the Unit setup file. With LMB click on the Unit setup a table is shown with all saved units.
With a LMB double click you can open an existing unit setup. All settings of the integrated units will be set, including the accessories, Camera, Object and Equipment. The thumbnail picture is not included.
This feature can be used inside of the direct view and the virtual studio view.
You can also add notes to the setup.

EL-Skyport 3.1
EL-Skyport 3.1.340 29
Configuration window
This window is only available if the EL-Skyport Software is in the Virtual Studio Mode. The Configuration window can be controlled by the right tab bar to change different settings of the selected device. The following tabs are available:
Settings
Only active if a Studio flash Unit is selected. Used for changing all settings of the flash Unit. I.e. Flash Power, Modeling lamp settings and flash settings,.. Additional special settings of the Unit, i.e. Flash- and Power On counters and Unit temperature are shown.
Position
Used for reading and changing the position of a device inside of the Virtual Studio.
Device position
Unit angle
Focus
Orientation
Direct or indirect flash light
Properties
Above of the selected device the properties of a Unit, Equipment or Object can be changed.
Change name of the selected Object. Name will also be changed inside of the navigator view.
Unit / Object type can be changed, i.e. the flash head type. If you select <none> the flash head is deactivated.
Change the used virtual picture
Adding Light formers and accessories
Adding notes for better description of the Set up
Change dimension and color
….

EL-Skyport 3.1
30 EL-Skyport 3.1.340
Job information
Includes different information about the current Job, like Customer information and notes.
Picture preview (thumbnail)
Add a preview picture to the ERS Jobs in the menu bar Extras - Add Picture preview or by Drag and Drop a picture file. Or add the current view of the Studio window. The preview image is stored in the EL-Skyport job and has a reduced resolution of 1024 x 1024 pixels.

EL-Skyport 3.1
EL-Skyport 3.1.340 31
Preferences / EL-Skyport Options
Set up different EL-Skyport Software and Studio preferences.
Use Save to store all settings.
Use Cancel to exit without changing the previous preferences
Use Default to reset the current category to its default values
Use Reset to Installation defaults to reset all categories to its installation default values
Categories
General
Change standard EL-Skyport Software preferences
Standard EL-Skyport Job folder path. Standard path is your user documents folder „..ELSkyport Documents/Jobs“.
Standard EL-Skyport Setups folder path. Standard path is your user documents folder „..ELSkyport Documents/Setups“.
Remember last used Unit name
Automatic Identification of the selected unit by switching the modelling lamp
Change Power steps for EL-Skyport Software
Change Flash delay time steps
Use special Sound
Start- up
Change preferences until EL-Skyport Software start up
Open New Job file on Software start automatically
Open available EL-Skyport USB RX module automatically
Place all EL-Skyport Studio flash Units and Modules automatically
Search all available EL-Skyport Units and add to the Navigator

EL-Skyport 3.1
32 EL-Skyport 3.1.340
Communication
Set up the Communication preferences
Set up and read the EL-Skyport USB RX Module
Configure the EL-Skyport USB RX Module Frequency / Studio channel and the Mode (Speed is only available for EL-Skyport USB RX Modules revision 2.0 and higher).
Set up the Studio frequency channel with display of the module configuration switch
Set up the auto offline mode
Set up the auto offline timeout
Set up Communication time to update the EL-Skyport Software Unit fields and the Communication to the Unit
PnP
Remove EL-Skyport devices automatically if the Communication is lost after adjusted tasks.
Printer
Set up Printer preferences (not available at for the moment!)
Author
Set up the Author information. This information is stored inside of an EL-Skyport Job file.
View
Set up the view settings of the Virtual Studio Mode
Show or hide EL-Skyport Software Warnings
Show or hide Navigator symbols
Save last EL-Skyport Window dimensions

EL-Skyport 3.1
EL-Skyport 3.1.340 33
Colours
Set up the colours inside of the EL-Skyport Software
Set up the colours inside of the Virtual Studio Window

EL-Skyport 3.1
34 EL-Skyport 3.1.340
Short keys
Menu bar
Short keys fort the menu bar check inside of the menu bar commands.
Virtual Studio mode
The following short keys are available for the Virtual Studio Window:
Graphic View
F, f Set up device focus point manually
Select a device inside of the Studio Window, hold LMB (left mouse button) and press "F" on the keyboard. Move the Mouse to another device or object until a red point inside of the target object is shown. Now the focus of the selected device is set to the target object.
I, i Change the Orientation (direct or indirect lightning) of the selected Object
Select a device inside of the Studio Window and press "I" on the keyboard.
L, l Used for “locking” the selected Object
Select a device inside of the Studio Window and press "L" on the keyboard. It is not possible to move the Object anymore with the mouse if this device is locked. If an Object is locked and selected a red Rectangle around the Object is shown.
R, r Used for “reverse” the selected Object
Select a device inside of the Studio Window and press "M" on the keyboard. The Object is mirrored along the longitudinal axis.
1..9 Used select directly the unit with the pressed number
DEL Single Unit inside of the folder “Lights” is selected
Selected units will be deleted inside of the folder “Lights”, but will be available under “Found Units”
Lights are selected inside of the Navigator
All units inside of the folder “Lights” will be deleted
SPACE Changing the next tabulator of the Configuration view

EL-Skyport 3.1
EL-Skyport 3.1.340 35
SHIFT Possibility to select more than one unit or object inside of the Virtual Studio. Hold SHIFT key and select with the LMB all units you want to select. Now select one unit, hold LMB and move all selected unit to the new position. Release the SHIFT key and the LMB.
Unit remote control
T, t Test flash
+, -> increase the flash power
-, <- decrease the flash power
M, m Modelling lamp ON/OFF
A, a Audio ON/OFF
C, c Photo Cell ON/OFF

EL-Skyport 3.1
36 EL-Skyport 3.1.340
Direkt Mode and EL-Remote View
One Unit must be selected to have the short keys available.
T, t Test flash
+, -> increase the flash power
-, <- decrease the flash power
M, m Modelling lamp ON/OFF
A, a Audio ON/OFF
C, c Photo Cell ON/OFF
1..9 Used select directly the unit with the pressed number
TAB, SHIFT+TAB
Selection of the previous or next Flash unit
DEL Unit will be deleted from the List „Lights“ (not available inside of EL-Remote-View)
ESC Close EL-Remote view and returns to EL-Skyport View (only inside of EL-Remote-View)

EL-Skyport 3.1
37 EL-Skyport 3.1.340
Menu bar
EL-Skyport 3.0 (MAC)
Preferences (MAC only)
Change the EL-Skyport Software preferences.
Quit (MAC)
Quit Program.
Studio
New
Open a new EL-Skyport Jobs (Open the Virtual Studio Mode)
Open
Open an existing EL-Skyport Job file
Close
Close the current EL-Skyport Job (Switch back to the Direct Control Mode)
Save
Save the current EL-Skyport Job.
Save as
Save the current EL-Skyport Job with another file name.
Load Unit Setup
Load the actual Unit Setup and update all foun Units.
Save Unit Setup
Save actual Unit Setups into a file
Unit Setup Notes
Add and save notes to the Unit Setup
Show EL-Skyport Print Preview Window to print the different EL-Skyport Job documentation.
Page setup
Set up the page settings of an EL-Skyport Jobs.
Quit (Windows only)
Quit Program.
Remote
Open
Open or activate the EL-Skyport USB RX Module for data communication.
Close
Close the EL-Skyport USB RX Module communication.
Reset
Reset the EL-Skyport USB RX Module.

EL-Skyport 3.1
38 EL-Skyport 3.1.340
Offline / Online
Switch ON/OFF the EL-Skyport USB RX Module communication. When Offline, all communication to the found Elinchrom Units are disabled. This feature will allow maximum speed for EL-Skyport Transmitter real time triggering.
Always switch the EL-Skyport Software in Offline Mode when no Unit settings have to be modified. This will give the maximum performance with the EL-Skyport Trigger system.
Studio Channel
Change the Studio frequency channel.
Mode
Set the EL-Skyport Mode (Normal r.1 or Speed r.2). All found EL-Skyport Units and modules can be switched to the mode selected. Also the newest EL-Skyport Transceiver RX modules can be set to the Speed r.2 mode. Changing of the EL-Skyport is not possible on the EL-Skyport Transceiver RX modules.
Search all
Search for all available EL-Skyport Units and Modules. All found Devices are added to the Navigator list.
Search new
Use always if some EL-Skyport Units are not found with "Search all".
Edit
Undo
This function is not available for the moment.
Cut, Copy, Insert, Delete
These functions are only available for text and note fields.
Place Unit
Insert an EL-Skyport Unit from the Library or insert a "not linked" Unit to the Virtual Studio Window.
Add Equipment
Add an Equipment to the Virtual Studio. I. e. passive Light formers, tables, Backgrounds, ..
Add Focus Point
Add a free focus point to the Virtual Studio.
Delete
Delete a Device inside of the Navigator or the Virtual Studio Window.
Refresh
Refresh the Navigator and the Virtual Studio window.
Extras
Add Picture
Add a thumbnail preview image to the EL-Skyport Job.
Use Virtual Studio Picture Preview
Replace the current preview picture with the current Virtual Studio view.

EL-Skyport 3.0
Version 3.0.336 39
Delete Picture
Delete the current preview Picture.
Restarting units
Restarts all selected EL-Skyport Units.
Restart Unit / EL-Skyport Module
Restart the selected EL-Skyport Unit or Module.
Test EL-Skyport Module
Used to test the EL-Skyport Modules. Select the correct EL-Skyport Module and follow the instructions shown in the window.
Update Firmware
This Feature is used for updating the internal Unit Firmware of an Elinchrom Studio Flash Unit or Module.
Notes:
Do only update a Unit Firmware if a problem appears on the Elinchrom flash device and an Update Note is shown when selecting "Update Firmware". Update is only possible for the newest Elinchrom flash Units and some EL-Skyport Modules. If this feature is not active the selected device cannot be updated. To do an Update the Elinchrom device has to be switched into Update Mode. Check the Update Help button for more detailed information.
Remove all EL-Skyport USB drivers
Uninstalls all EL-Skyport USB drivers of the system. After uninstalling the drivers the Software runs only in DEMO Mode. To use all remote control features a complete new Software installation is necessary.
Preferences (Windows)
Change the EL-Skyport Software preferences.
View
EL-Remote
New minimized control Window for the unit main features only.
Status bar
Show or hide the status bar.
Tool bar
Show or hide the tool bar.
Help
Help
Open the EL-Skyport Software PDF Help file.
Adobe Reader is necessary to show the Help file, check www.adobe.com
Elinchrom
Open the Elinchrom Website www.elinchrom.com
Check Update
Check for new EL-Skyport Software update. If a new version of EL-Skyport Software is available, it is automatically downloaded and installed.
Send EL-Skyport bug report
Send an EL-Skyport Software bug report directly to the Elinchrom Support team. Add your email address to get an feedback or solution of your problem.

EL-Skyport 3.1
40 EL-Skyport 3.1.340
License
Show the EL-Skyport Software License agreement.
About
EL-Skyport Software Information.

EL-Skyport 3.1
41 EL-Skyport 3.1.340
Troubleshooting
EL-Skyport rules for pest communication
EL-Skyport Wireless Communication is influenced by other Wireless networks like Computer networks and mobile phones. Massive walls, objects, metal will reduce the performance because of interferences (overlapping of wireless waves). Follow the following rules to get best performance with your Elinchrom EL-Skyport system: 1. Keep min. 1 meter distance between the EL-Skyport RX module /
Elinchrom RX unit and the wall or other metal objects
Do not place the units directly on the floor
Do not place other objects between the transmitter and receivers
Adjust the EL-Skyport Antennas for best performance
Use the EL-Skyport Normal mode to get maximum distance range
Test different Studio frequency channels
Not all Elinchrom RX units / modules found
Check if Studio frequency channel and Mode (normal/speed) is setup correctly inside of the EL-Skyport Software and all Elinchrom RX units and modules
Use an USB extension cable for the EL-Skyport USB RX module to get best performance
For maximum performance use an RX-Remote extension cable to connect the EL-Skyport RX module to the Elinchrom RX unit (Style RX, Digital RX use #11100 and for Ranger RX use #11106).
Replace the EL-Skyport Transmitter and Receivers. Wireless networks may have black holes without any reception. Moving only 10 cm can help.
EL-Skyport Software closes after showing an Error message
Use “send Bug-Report” and add some information to solve your problem with the EL-Skyport software.
EL-Skyport Software does not start anymore. A Error message is shown or the program closes automatically
NOTE: All EL-Skyport 3.0 Software user settings will be reset to the default values. You have to set your settings inside of the preferences menu again. Solution with automatically Default settings:
Start the EL-Skyport 3 software and keep the key “Alt” pressed on the keyboard. The software will reset to the default settings!
Manual Solution: WINDOWS:
Use the explorer and search for the file „EL Skyport 3.ini“.
Select the file and delete it
Restart the EL-Skyport 3 software MAC:
Use the finder and search for the file „EL Skyport 3.plist“. OR navigate to “../users/username/Library/Preferences/ELINCHROM/EL Skyport

EL-Skyport 3.1
42 EL-Skyport 3.1.340
3.plist”
Select the file and delete it If the software still does not start, reinstall the EL-Skyport software new.
EL-Skyport USB RX module does not work anymore
Some Laptops and MacBooks close the USB interface when going into sleep mode. Deactivate this feature inside of the computer stand-by settings
Try to use an USB Hub to connect the EL-Skyport USB module to your computer. Or try to use an USB extension cable of min. 3 meters.