EKZ SMART HOME - Cloudinary
42
EKZ SMART HOME User Manual EKZ Smart Home Hub EKZ 100
Transcript of EKZ SMART HOME - Cloudinary

EKZ SMART HOME
User Manual
EKZ Smart Home Hub
EKZ 100

2
Table of Contents
Important Safety Information .................................................................... 4
Important Data Privacy Information .......................................................... 5
1. The EKZ SMART HOME ............................................................ 6
2. Setup ......................................................................................... 9
2.1. Install the Hub ............................................................................ 9
2.2. Connect the Hub to the App .................................................... 10
2.3. Home Setup: Create layout ...................................................... 11
3. Add and control Smart Home Devices ..................................... 12
3.1. Manage Devices by App .......................................................... 12
3.2. Manage Devices by Hub Button .............................................. 15
4. Basic App Functions ................................................................ 16
4.1. Control Devices Individually ..................................................... 16
4.2. Control Device Groups with “Smarts” ..................................... 17
4.3. Create Rules ............................................................................ 19
4.4. Dashboard: Access Favorites and More ................................... 21
4.5. Home Setup Configuration ....................................................... 25
4.6. Manage User Account and Hub Connectivity Information ........ 25
5. Voice Control ........................................................................... 27
6. Troubleshooting and Resetting ................................................ 28
6.1. Hub Troubleshooting ................................................................ 28
6.2. Reset Compatible Devices to Factory Settings ........................ 29
7. Overview of LED Colors and Hub Buttons ............................... 37
8. Hub Technical Data .................................................................. 39
9. Conformity Declarations ........................................................... 40
10. Contact and Support ................................................................ 41

3
EKZ SMART HOME Time to rethink how we live
Dear Customer,
Do you enjoy modern living? We do, too!
With EKZ Smart Home, your future home will control itself –
with you still being in charge at any time and from anywhere.
This document contains practical information on installation,
operation and troubleshooting for your EKZ Smart Home.
Do you have any more questions?
You can contact us any time at [email protected] 058 359 56 56
4
Important Safety Information
Before you use the EKZ Smart Home Hub, please read the
following safety information:
1. The installation should be performed by a competent person.
Please do not let your children play with the Hub or Smart
Home devices.
2. Only use the Hub with the original mains adapter supplied. The
device may not be used if the mains adapter or cable are
damaged. The mains adapter of the Hub may only be connected
to a mains supply of ~100–240 V, 50/60 Hz.
3. Only use the Hub in dry interior rooms (not in the bathroom,
kitchen or garden, etc.).
4. Protect the Hub from direct sunlight.
5. Make sure to place Hub at least 10 cm away from furniture,
curtains and walls. This ensures sufficient air circulation. Slight
warming of the Hub is normal during operation.
6. Do not use the Hub in close proximity to devices that generate
a strong magnetic field (such as speakers, motors or
transformers).
7. Never touch the Hub with wet hands.
8. Do not open the Hub or mains adapter. There is a risk of electric
shock.
9. Only use a slightly damp, non-abrasive cloth for cleaning.
Always unplug the Hub from the power supply before cleaning.
Please do not use any cleaning agents.
Please also take note of the service limitations for security-relevant
applications described in Section 9 of our terms of service.

5
Important Data Privacy Information
Data privacy is a matter of trust and your trust is important to us.
We respect your personality and privacy, and we wish to ensure
the protection and legally compliant processing of your personal
data.
We collect personal data and data from your Smart Home to offer
you optimal Smart Home services. Personal data refers to all
information related to an identified or identifiable person (such as
your name and email address). We also collect Smart Home data
generated by Smart Home devices (such as sensor readings,
network status data and your Smart Home names).
Please note that Smart Home data – such as your chosen names
for your rooms and your rules – may also be sent to the EKZ
customer service or third parties under certain circumstances. This
is the case, for example, if our customer service provides support
or if you decide to link your Smart Home with an external voice
service (such as Google Assistant).
Our complete Data Privacy Statement is available here.

6
1. The EKZ SMART HOME
We believe that a modern home should be smart and help
simplify your life. The EKZ Smart Home therefore offers a
complete solution for your intelligent home – making life at home
much easier, more convenient, secure, and fun.
With the EKZ Smart Home Hub, you have received the central
piece of your EKZ Smart Home system. In addition, you only need
– an Internet connection;
– any number of compatible Smart Home devices (such as
motion sensors, smart lighting, flush switches etc.) depending
on the desired application;
– a smartphone or tablet with the EKZ Smart Home App for
controlling your Smart Home system;
for transforming your home into a Smart Home.
The most important elements of the Hub are shown below:
Front side
The large, round Hub button can be found on the front of the
Hub. It is encircled by an LED ring. The LED light indicates the
operating status of the Hub and shines green in normal operation
mode.

7
Rear side
The connections for the power cable (micro USB) and the
Ethernet network cable can be found on the rear side. The small
reset button is also located here.
The functions of the buttons and the meaning of the LED colors
are explained in Chapter 7 in this user manual.

8
The Smart Home System
The complete system comprises the EKZ Smart Home Hub, your
smartphone or tablet with the EKZ Smart Home App, the EKZ
Cloud, your home network router and your Smart Home devices.
Thanks to the EKZ Cloud, you can also control your Smart Home
on the go using the app.
The EKZ Smart Home Hub connects all smart devices in your
home. It supports several wireless standards (Z-Wave, ZigBee
and WIFI). This means that you can connect devices from various
manufacturers to your smart home.

9
2. Setup
2.1. Install the Hub
You can set up your Hub in seven easy steps:
1. Connect the Hub to the power socket using the micro USB
cable.
2. Option 1: Connect by network cable
Connect the Hub to your home network router using the network
cable provided.
Option 2: Connect by WIFI
Select the WIFI of the Hub on your smartphone, tablet or PC and
connect with it. The name of the Hub WIFI (its SSID) starts with
“EKZ...”.
Launch a browser and enter the IP address 192.168.1.1. Click the
“wifi config” button on the left side of the browser window. Now
enter the connection data (SSID/name and password) for your
home WIFI to connect the Hub with your WIFI.
If you do not know the name and password of your home WIFI,
you can usually look it up on the router. It is usually printed on the

10
router label. It consists of the name (SSID) and a password (PW).
Please type this data in the corresponding fields on the “wifi
config” page. If you have ever changed your WIFI’s name and/or
password yourself, you have to enter your own chosen data.
Please note that for security reasons we strongly recommend you
always change your default router password.
3. Once the Internet connection has been successfully
established, the Hub LED will blink green after a short moment.
If this does not happen, please repeat the process.
2.2. Connect the Hub to the App
4. Install the EKZ Smart Home App on your smartphone or tablet.
5. Start the app and log in with your myEKZ account. You have
created this account in the smart home onlineshop or in the
myEKZ portal for energy customers. If you do not have a myEKZ
login yet, please register and create a new account. Confirm the
activation link sent to your email address; then confirm a second
time in the browser window that opened up. Then return to the
app and log in.
6. Tap the “+ Add new hub” button in the slider menu and enter
your Hub’s data.
For secure ID (SID) and serial number (SN) numbers, you can
just scan the QR code from the quickstart guide. Alternatively,
you can enter them manually. They are printed on the label on the
bottom of the hub.
The license key will be automatically filled with your personal
license key. You can also look it up in your order confirmation
email and on the delivery note, or in your user account in the

11
smart home shop. If you have purchased your hub earlier than
May 2020 or from a different distribution channel, you may not
have a valid hub. In this case, please contact our customer
support via [email protected].
Give your Hub a name. Optionally, add your address so the hub
can access your local weather. The hub LED will now shine green
continually once it has been successfully added to your account.
Note: After the hub has been added, it will check for updates. It
will blink red and go offline for a while to install them. This is
normal. Please wait until the update is finished and the hub
comes back online and the hub LED shines green again.
2.3. Home Setup: Create layout
Once you have added the Hub to your user account, you can set
up your smart home. Go to the “Home Setup” tab and click
“Manage layout”. You can either use one of the suggested
layouts. Or you can create your apartment’s custom layout. Just
create all the floors and rooms where you might want to use your
smart home devices.
If you would like to add new rooms later, you can always do so
via the “Home Setup” tab and “Manage layout”.
Note: If you delete a floor, all the rooms on this floor will also be
deleted. Devices located in these rooms will then be shown as
“unsorted”.
12
3. Add and control Smart Home
Devices
You can now connect devices from various manufacturers to your
Hub. The EKZ Smart Home currently supports a range of Smart
Home devices with the wireless standards Z-Wave, ZigBee and
WIFI. The up-to-date list of preferentially supported devices can
be found in Chapter 6.2. We continually expand this list.
These preferred devices are also listed first under “EKZ” in the
app’s device provisioning process. The Hub recognizes
considerably more devices but due to the frequent hardware and
software updates of Smart Home products, we only guarantee
full functionality and hence an optimal Smart Home experience
for our preferred devices.
You can add devices in two different ways:
1. By app (recommended)
2. Using the Hub button on the front of the Hub.
3.1. Manage Devices by App
3.1.1. Add devices by app
Note: There is a short video tutorial on our homepage (in German)
showing how to add a multisensor:
https://smarthome.ekz.ch/de/lernvideos.
Place the new Smart Home device close to your Hub. Please
always connect it to your hub first before bringing the device to
its final destination.
Go to the “Home Setup” tab in the app and select “Manage
devices”.
On the next screen, tap the “+ Add new device” button on the
top of the screen.
Next, choose the type of device you want to add.

13
Next, choose the device model from the list you want to add. The
preferred EKZ devices are listed on top for your convenience.
The Hub network will now open and wait for the selected new
device. The Hub LED will flash blue slowly (around once per
second). For security reasons, the Hub network opens only for
three minutes. The app will show the remaining time as a
countdown.
Follow the instructions below the countdown to set the device to
connection mode. Most devices require a power supply and must
be activated with a button found on the device.
The app will confirm the successful pairing and the Hub LED will
flash pink four times. You can now assign the device to a room
and give it a new name. From now on, you can control the new
device and use it in rules or Smarts.
All successfully added devices show up in the list of devices in
the “Devices” tab as well as in the “Home Setup” tab in
“Manage Devices”.
Information
– Please note that for security reasons Z-Wave and ZigBee
devices can only belong to a single Hub network. If you would
like to move a device from one Hub to another, you first need
to remove the device from the old Hub network. Like the
configuration process, the removal process may vary slightly
depending on the device and manufacturer.
– If you have trouble adding a device, it often helps to perform a
factory reset before trying it again. We have therefore
compiled the factory reset information for all preferred
devices of the EKZ Smart Home at the end of this document
in Chapter 6.2.

14
3.1.2. Remove devices by app
Place the Smart Home device close to the Hub.
Go to the “Home Setup” tab in the app and select “Manage
devices”. You will see the list of devices.
Click on the three-dots menu of the device you would like to
remove, and select “Exclude device”.
Depending on the device type, the app will lead you through the
process:
1. For ZigBee devices: Please confirm that you really want to
delete the device.
2. For Z-Wave devices: The Hub enters removal mode. Please
follow the instructions of the device manufacturer in order to
confirm removal of the device.
3.1.3. Change device name and location
Go to the “Home Setup” tab in the app and select “Manage
devices”. You will see the list of devices.
Click on the three-dots menu of the device you would like to edit
and select “Edit”.
You can now change the device name and assign it to another
room. Confirm the change by pressing “Done”.

15
3.2. Manage Devices by Hub Button
You can also add new devices using the Hub button on the front
of the Hub. Z-Wave devices can also be removed in this way.
3.2.1. Add devices by Hub button
Place the desired Smart Home device close to the Hub.
Briefly press the Hub button twice on the front of the Hub. The
Hub LED will now flash blue slowly (around once per second).
Now set the device to connection mode. Follow the
manufacturer’s instructions to do so. The devices usually require
a power supply and need to be activated with a button on the
device itself.
Successfully added devices show up in the list of devices. The
Hub LED will flash pink four times as confirmation. Now assign
the device to a room and name it as you wish. You can now
control it and apply rules (switch automations).
3.2.2. Remove Z-Wave devices by Hub button
Briefly press the Hub button on the front of the Hub four times.
The Hub LED will now flash blue quickly (around five times per
second).
Now activate removal mode on the Z-Wave device according to
the manufacturer’s information.
The Hub will flash pink four times once the device has
successfully been removed from the Hub network.

16
4. Basic App Functions
The EKZ Smart Home App provides you with all the necessary
control functions for your Smart Home system. The app allows
you to:
1. Control devices individually
2. Control device groups with “Smarts”
3. Create rules (automations)
4. Control favorite devices, rules and Smarts and access
additional services on the Dashboard
5. Configure your home (“Home Setup”)
6. Review and change user account and Hub connection data
The tabs (tiles) at the lower section of the screen allow you to
switch easily between these basic functions.
4.1. Control Devices Individually
All Smart Home devices that you have added to your Hub are
listed in the “Devices” tab.
Device overview screen and filters

17
Each device has a tile displaying the device status (such as
“closed” for a door sensor). Depending on the device type, other
quick control functions may also be available (e.g., to switch lights
on/off or to change a thermostat’s temperature).
You can access a “Device details” sub menu via the three blue
dots menu in the top right corner on a device tile. Here you can
change the device name and the device location and call up
further technical details.
Use the two small icons on the top right corner (see red boxes in
the screenshot above) to filter the shown devices.
The two filters are:
1. By location
Location filter
2. By device type
Type filter
4.2. Control Device Groups with “Smarts”
The app’s second tab allows you to configure and control
“Smarts”. Smarts automatically group similar devices in one
location, offer useful quick control buttons, and present other,

18
more sophisticated functionalities that could not be easily
programmed with rules.
As soon as you have added devices to a location (like a room or a
zone), the app proposes one or more Smarts for this location.
1. New suggested Smarts
Smarts overview screen
2. Activated Smarts
Active Smarts
Smarts have multiple advantages:
Firstly, they give a useful overview of your home’s status. For
example, the “Sensory Smart” displays a location’s average
temperature if multiple temperature measurements are available.
Secondly, you can control important devices with just one button.
For example, the “Light Smart” allows you to turn on and off
multiple lamps at the same time. The “Heating Smart” changes
the temperature of multiple thermostats at once.
Thirdly, some Smarts offer further functionalities that can be
configured in the three-dots menu on the top right corner of a
Smart’s tile that could not easily be configured by rules.

19
In the three-dots menu, the first option is “Device overview”. It
shows all devices that currently belong to this Smart with their
current status.
The second option, “Configure Smart”, customizes the settings
of the respective Smart. For example, you can record up to four
custom light scenes in the “Light Smart”, which will be available
from the quick control buttons on the “Light Smart” tile. In the
“Absence Smart”, you can define your personal daily schedule
and set the activity levels that your devices shall play while the
“Absence Smart” is active.
The third option, “Configure devices” allows you to add and
deselect the devices controlled by the Smart.
Some Smarts can also be used in rules (see section 4.3).
To delete a Smart, go to the “Home Setup” tab and select
“Manage Smarts”. Here you can also always add back available
Smarts, even after dismissing them from the front tab.
You can look forward to more Smarts becoming available in the
future.
4.3. Create Rules
A rule is a logical sequence following the principle: “IF this
happens, THEN that should happen.” This enables you to
automate your smart home, so that your devices respond
automatically or at the touch of the button. A typical application is:
“IF the motion sensor detects a motion, THEN the lamp should
be switched on.” You can create rules for all your devices and
Smarts.
All your rules can be found in the “Rules” tab. Here you can
create new rules, activate or deactivate rules, run rules manually,
and make changes to existing rules.

20
Create a new rule
In order to create a new rule, go to the “Rules” tab and select
“+ Add new rule”. The rule assistant leads you through the
process of creating rules in four steps.
1. Trigger (IF)
Triggers refer to the “IF this happens, ...” part of the rule.
Device triggers
A device trigger executes the rule as soon as a device has a
certain condition (for example, a motion sensor detects a motion,
the door sensor detects the door is open, or the light is on).
Smarts triggers
The Smarts trigger works like a device trigger – just for Smarts.
For example, you can set a Sensory Smarts condition
(“temperature in whole home <15 degrees”) as rule trigger.
Time triggers
A time trigger always executes the rule at a certain time (for
example, always on Wednesdays at 1.00 p.m. or on several
weekdays at the same time).
Multiple triggers
You can also define multiple triggers in a rule. However, at least
one of them must be a device trigger.
2. Status (WHILE)
You can optionally add a status condition (see the section about
statuses) in the next step. As a default – i.e. if you select nothing
here – the rule is always valid (for any status).
If you select one or more statuses, the rule is only active if the
status indicates the entered status (for example: “only during
active holiday status”).
In order to define one or more status conditions for a rule, simply
mark the status and set it to active or inactive. Multiple statuses
are always linked here with “and”.

21
3. Action (THEN)
Actions are the “..., THEN this should happen” part of the rule.
You define what should happen when the rule is executed. This is
configured as an action in an action set. There are four different
kinds of actions:
1. Device actions: switch a specific device on or off.
2. Smarts actions: switch a specific Smart (or a Smart
scene) on or off.
3. Push notifications: send a push notification to your
smartphone.
4. Email notifications: send an email to your stored contact
email address.
5. Status changes: change a status, for example from “Out
of home” to “At home”.
Action sets
Actions are grouped in “action sets”. You can configure Action
sets with time delays in order to implement extended
automations. For example, you can first switch on a lamp and
siren, switch them off again after a time delay of five minutes and
then activate or deactivate further devices in a new action set.
You can add a time delay via the three-dots menu (“More”).
4. Summary
The last screen of the rule assistant sums up all elements of the
rule. If you are satisfied with it, you can hit the “Finish” button
and finally give the rule a meaningful name so that you can easily
recognize it later in the list of rules.
4.4. Dashboard: Access Favorites and More
The tab “Dashboard” provides the following functions:
Quick control of your favorite devices, rules, and Smarts
Control of you active and inactive statuses
Access to EKZ services and other household-related services
Overview of your smart home notifications.
You can set the Dashboard screen as the default start screen of
your app. Slide out the menu on the left and click the con icon to
configure this.

22
4.4.1. Favorites
You can add as many of your devices, rules, and Smarts to the
dashboard as you like. You can then control your favorite devices
quickly and more conveniently without having to scroll through
your entire device list (and the same for rules or Smarts).
To add a device (or rule or Smart) to the Dashboard, just click the
three-dots menu of the respective device tile and click “Pin/unpin
from dashboard”.
In most cases, you can then select which of the available
functions of this device you would like to add. All functions will
then appear as separate tiles on the Dashboard screen.
Dialog for pinning/unpinning devices
to and from the dashboard
Dashboard with some configured
favorites
To delete favorites from the Dashboard, click the pen icon in the
top right corner or use the same menu as for adding them.

23
4.4.2. Statuses
In the top line on the Dashboard screen you can also find your
active and inactive statuses.
A status refers to your home’s current state. Examples include:
– “Alarm on” or “Alarm off”
– “At home” or “Out of home”
– “Heating” or “Cooling”
– “Holiday”
You can manually activate or deactivate all statuses or control
them by custom rules in order to set your individual daily
sequence.
The four daytime statuses “Sunrise”, “Day”, “Sunset” and
“Night” are automatically controlled by the system. The
“Sunrise” status is activated correctly for the time of year. It is
active for 45 minutes and then changes to the “Day” status.
Similarly, the “Sunset” status is active for 45 minutes, followed
by the “Night” status.
You can also create new custom statuses. Scroll to the right of
the status bar and click on the gray Manage button.
Statuses are very useful for Smart Home rules because they
allow you to activate your devices automatically. For example, if
you create a rule for an alarm in the event of motion, you can
define the rule to run only when your home is currently in the
“Holiday” and/or “Alarm on” status. By this you can prevent false
alarms, without having to manually activate and deactivate the
rule each time. Or you can tell a motion sensor to activate a lamp
only during “Night” status, which saves energy.
4.4.3. EKZ Services and household-related services
The second tab of the Dashboard screen (scroll a little to the right
or tab Services) contains “Services.”

24
Firstly, this includes links to other EKZ services besides smart
home like the myEKZ portal, the Energy Assistant, or the
einfachSolar portal.
Secondly, you will find a selection of household-related services.
Examples include an emergency service hotline, home cleaning
service or electrical installations. These services are provided by
EKZ partners. You can send a request to these partners directly
from the Smart Home app.
Services in the second Dashboard screen
Please note that not all services are available throughout
Switzerland yet. We constantly work on expanding the area
covered and the number of services.
4.4.4. Notifications
The third tab of the Dashboard screen lists all your smart home
notifications. You can also access (and delete) them from the left
slider menu.

25
4.5. Home Setup Configuration
In the “Home Setup” tab you can configure all devices and the
home layout of your currently selected Hub. The options are:
– Manage Hub: Change Hub address, look up serial number,
etc.
– Manage layout: Change your home’s floor plan by adding and
removing rooms and floors
– Manage devices: Add new devices to the Hub (see section
3.1.1), change or delete devices
– Manage Smarts: Add, configure or delete Smarts.
4.6. Manage User Account and Hub Connectivity Information
From any place in the app, tap the three horizontal lines in the top
left corner to open a drawer menu.
This drawer menu shows your user account information and lists
all Hubs that are connected to your account.
By clicking on the little icon in the top right corner of this menu
(Hub or person icon), you can switch between these two views.
See red circles in the screenshot below.

26
Drawer menu with two views:
Hub overview
User account and support overview
On the Hub overview page, select the Hub you would like to
control. You can search for software updates, check your recent
notifications, synchronize Hub data with the cloud, check the
Hub’s current software version (“About”), or delete the Hub.
Please note that you cannot control any devices that were
connected to this Hub anymore after deleting the Hub.
At the bottom of the Hub overview page, click “Add new Hub” to
add another Hub to your account. You can connect multiple Hubs
to one user account, for example to control smart homes at both
your residential home and your holiday home.
On the user account overview page, click “Edit” to change your
password and personal data. “About” shows the app’s current
software version. Moreover, you can access this user manual or
log out of the app.
27
5. Voice Control
You can also control your EKZ Smart Home by voice command.
We support the voice services of Google Assistant and Amazon
Alexa. The condition is that you have an account with one of
these voice service providers and your EKZ Smart Home account
is connected to it.
Google Assistant
You can use this service without an additional device with the
Google Assistant app. For Android smartphones with Android
version 6.0 or higher, Google Assistant is already included as
standard. If you have an older version, you can use a Google
Home Smart Speaker. After activating Google Assistant, search
for the EKZ Smart Home Action.
Amazon Alexa
In order to use Amazon Alexa, you require a Smart Speaker from
Amazon. You can find the EKZ Skill under Smart Home Skills.
The language of the voice service (German/English) is determined
by the standard setting of your operating system.

28
6. Troubleshooting and Resetting
6.1. Hub Troubleshooting
6.1.1. Hub restart
As with any other electrical device, a simple restart often solves
the problem. Simply pull out the Hub’s micro USB power cable
and wait for 10 seconds. Then plug it in again and wait for the
Hub LED to show a blue light first, then blue flashing light, and
finally a steady green light again.
6.1.2. Reset network settings
This reset deletes the network connections of the Hub (such as
WIFI). This is necessary if your home network’s WIFI settings
have been changed. Your user data will be kept (including
connected devices, rules, etc.).
In order to reset the network settings,
press the Hub reset button on the rear side of the Hub three
times, for example with the tip of a paper clip.
During this time, the Hub LED will flash red quickly. The Hub will
subsequently restart by itself. If it is still connected to your router
via the network cable, it will automatically reconnect to your
home network. Otherwise, it will activate the WIFI search mode
and you can reconnect it to your WIFI home network. The
relevant details are described in Chapter 2.1.
Note: This reset works either if the hub is still in its existing
network (hub LED is solid green). Or if the hub has lost its
existing network and is looking for it, the hub LED will take turns
to blink blue quickly and show a solid blue LED. Then please
make the network reset while the LED is solid blue (not blinking).
6.1.3. Reset user settings
This reset deletes all user settings, such as connected devices,
network settings and rules.

29
In order to reset the user settings,
press the Hub reset button on the rear side of the Hub six times,
for example with the tip of a paper clip.
During this time, the Hub LED will flash red quickly.
6.1.4. Reset to factory settings
This will reset the Hub to its original factory settings. WARNING:
All network and user data (connected devices, saved rules, etc.)
will be deleted.
In order to reset the Hub to factory settings,
press the Hub reset button on the rear side of the Hub nine
times, for example with the tip of a paper clip.
During this time, the Hub LED will flash red slowly.
6.1.5. Turn off green Hub LED in normal operation mode
If you find the bright green light of the Hub LED during normal
operation mode annoying (for example at night), you can easily
turn it off. Just press and hold the green Hub LED on the Hub’s
front side for five seconds until it turns off. Repeat this to turn it
on again.
6.2. Reset Compatible Devices to Factory Settings
If you have trouble with a device (for example, you are unable to
add the device to the Hub or the functionality does not work as
intended), it often helps to reset the device to factory settings.
Below you will find the list of preferred compatible devices with
the manufacturer and model number and their reset instructions.

30
LED lighting 1
Schwaiger: HAL100, HAL200, HAL300,
HAL400, HAL500, HAL600
Switch the Schwaiger LED lamp
on and off five times in a row in
one-second intervals (via the
power supply). Please not that you
can reset multiple lamps at the
same time if multiple lamps are
connected to the same circuit.
LED ligthing 2
Philips Hue: Hue White & Color
Ambience (E27, E14, GU10), Hue White Ambience (E27, E14, GU10),
Lightstrip, Hue Iris
Option 1 – If the Philips Hue lamp
was separately connected to the
EKZ Hub: Delete the lamp from the
Hub using the EKZ app. This resets
the lamp, and it can then be added
again.
Options 2–4 reset the Philips Hue
lamp if it has only been used in the
Hue system so far:
Option 2 – With Philips Hue
remote control: Hold down the
power button and the first favorite
button at the same time for 5
seconds.
Option 3 – With Philips Hue
Dimmer Switch: Hold down the on
and off button at the same time for
5 seconds.
Option 4 – Via Philips Hue App and
Hue Bridge: The lamp must be
connected to a Philips Hue Bridge.
Delete the lamp in the Philips Hue
app.

31
LED lighting 3
Osram SMART+ Lightify Flex
Switch the Osram lightstrip ON
and OFF five times in succession
for five seconds each time. When
switched on again, it blinks once
briefly as confirmation and can
now be incorporated in the Smart
Home system again.
Flush relays
Schwaiger (Qubino): ZHS01, ZHR01, ZMNHAD1, ZMNHBD1, ZMNHKD1, ZMNHCD1, ZMNHDD1, ZMNHLD1,
ZMNHND1, ZMNHID1
Option 1 – Resetting with the Hub:
Press the switch connected to the
I1 port of the model five times
within 30 seconds. This is only
possible within the first 60
seconds in which the model is
connected to the power supply.
Option 2 – Resetting with a relay:
Press the S button for more than
six seconds. Be careful with the
power connection of the module
(230 V!).
4-in-1 multi sensor
Schwaiger (Philio): ZHS10
To reset the device, press the
black tamper button on the rear
side four times in quick succession
(around 1.5 seconds) and hold
down the button for five seconds
on the fourth time. The sensor will
light up red for some seconds if
the reset was successfully
completed.

32
3-in-1 motion sensor
Schwaiger (Fibaro): ZHS06
Press and hold the small button
inside the device for 4-6 seconds
until the LED lights up yellow.
Then release the button and press
it again once. Upon successful
reset, the LED will light up red
once and then turn off.
Tür-/Fenstersensor
Sensative Strips Guard
Place the small round magnet at
the rounded edge of the sensor.
When the LED blinks, move the
magnet away. Repeat once and
then one more time; at the third
repetition, leave the magnet longer
(10 seconds) at the rounded edge
until the LED blinks long to confirm
reset.
Alarm siren
Philio: PSE02
Quickly press the black tamper
button (strip) on the backside of
the device three times within
around 1.5 seconds and hold it
down as the fourth time. The LED
will light up. Then release the
button. Upon successful reset, the
LED will light up again for about
one second.
Smart plug
TKB TZ69
The smart plug needs to be
plugged into a wall outlet for the
reset. Press the on/off button
three times within 1.5 seconds and
then hold it down for another
second. The LED will light up for
about second and then turn off.

33
Smart Meter 3-phase
Qubino ZMNHXD1
The device needs to be connected
to mains for the rest. Press and
hold the S service button on the
front of the device for about 10 to
20 seconds. Upon successful
reset, the LED will blink green.
Radiator thermostat
Schwaiger (Danfoss): ZHT01
Remove the battery cover and take
out one battery. Hold the middle
button down for five seconds and
re-insert the battery at the same
time.
Temperature sensor
Schwaiger (Danfoss): ZHD01
Remove the battery cover and take
out one battery. Press and hold the
button on the top side of the
device for 5 seconds and re-insert
the battery at the same time. The
LED should light up red upon
successful reset.
34
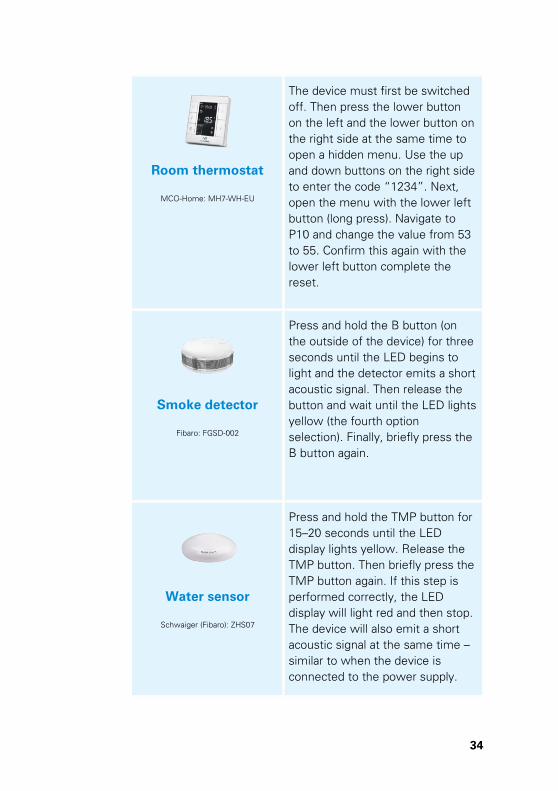
Room thermostat
MCO-Home: MH7-WH-EU
The device must first be switched
off. Then press the lower button
on the left and the lower button on
the right side at the same time to
open a hidden menu. Use the up
and down buttons on the right side
to enter the code “1234”. Next,
open the menu with the lower left
button (long press). Navigate to
P10 and change the value from 53
to 55. Confirm this again with the
lower left button complete the
reset.
Smoke detector
Fibaro: FGSD-002
Press and hold the B button (on
the outside of the device) for three
seconds until the LED begins to
light and the detector emits a short
acoustic signal. Then release the
button and wait until the LED lights
yellow (the fourth option
selection). Finally, briefly press the
B button again.
Water sensor
Schwaiger (Fibaro): ZHS07
Press and hold the TMP button for
15–20 seconds until the LED
display lights yellow. Release the
TMP button. Then briefly press the
TMP button again. If this step is
performed correctly, the LED
display will light red and then stop.
The device will also emit a short
acoustic signal at the same time –
similar to when the device is
connected to the power supply.

35
Battery scene controller
Aeotec Wallmote Quad
1. Remove the magnetic back cover. 2. Press and hold the small circular Action button for 20 seconds. 3. The LED should blink between green, purple, then red, which will flash rapidly until a green LED becomes solid for 2 seconds to indicate the successful factory reset.
4. Release the Action Button.
Infrared transceiver
Hank HKZW-ACC01
Press and hold the button on the
side of the device for 20 seconds,
then release the button. Upon
successful reset, the device LED
will light up for 3 seconds and then
blink.
Speakers
TIBO Choros 2 / 4, Kameleon, Vogue 3
Press and hold the WPS button on
the backside of the device for 5
seconds.
Doorbells
Doorbird D101, D301
You need the doorbird app to
perform a factory reset. Please
make sure that the device is
connected by Ethernet cable and
that your phone is connected to
the same WIFI.
In the doorbird app’s “Settings”,
click on “Reset to factory
defaults”. You will then receive
new connection details by email to
the email address you have
entered as “Owner address”.

36
Follow the instructions to
complete the reset.
Z-Wave repeater
Aeotec Range Extender gen. 6 , 7
Press and hold the button on the
side of the device for about 20
seconds. During the reset process,
the LED will light up in different
colors. When it lights up green,
you can release the button.
Zigbee repeater
IKEA Tradfri Signal Repeater
The reset button is inside the small
hole next to the USB port. Press
and hold this button with a small
pin for at least 5 seconds to reset
the repeater.
Please note that it is necessary to
perform this reset before
connecting the repeater to the EKZ
hub if you purchased the repeater
as a bundle together with another
IKEA Tradfri product.
For further information on any of the devices, please check the
respective user manual from the manufacturer. You can find the
manual links on the device detail pages in our online shop.
If you have any other questions about the devices, please also
checkout our FAQ page on https://smarthome.ekz.ch/de/hilfe.
Moreover, the download page on
https://smarthome.ekz.ch/de/downloads holds more useful
resources like user guides for certain devices (e.g., for connecting
the TIBO speakers or setting up Google Assistant).

37
7. Overview of LED Colors and Hub
Buttons
Front side (“Hub button”)
Push button
LED light
2 x briefly Open Hub network for
device connection
Blue light blinks
1 x per sec.
2 x briefly Close Hub network Green light
4 x briefly Remove device Blue light blinks
5 x per sec.
Rear side (“Reset button”)
Push button
LED light
3 x briefly Network reset Red light blinks
5 x per sec.
6 x briefly User data reset Red light blinks
2 x per sec.
9 x briefly Factory setting reset Red light blinks
1 x per sec.
5 sec. long Hub restart Red light blinks
slowly 5 sec.

38
What does the Hub LED tell me about the Hub status?
LED light Hub status
Green light (solid) Normal operation mode: Everything OK.
Green light (blinks)
Hub has a network connection, but was
not added to your account yet. Please
log into the app and add the hub (see
2.2).
Blue light blinks
5 x per sec.
No network: Please add Hub to network
(see 2.1).
Blue light blinks
1 x per sec.
AP mode (WIFI access point mode): See
2.1.
Pink light (solid)
System error: Perform Hub reset (see
6.1.1) and if unsuccessful, perform
factory reset (see 6.1.4).
Blue light (solid)
Normal operation ongoing (e.g.
switching between operation states):
Please wait.
Red light blinks Ongoing software update or reset: Do
not turn off Hub until completed.
No LED light
a) Hub without power: Check
power cable.
b) Hub in night mode: Press Hub
LED button on the front for five
seconds, until green LED turns
on again.

39
8. Hub Technical Data
Radio protocols Z-Wave plus
ZigBee
IP (WIFI and Ethernet)
Range Up to 15 m
Operational
temperature
0–40 °C
Protection class IP20
Power supply ~110–230 V AC, 50–60 Hz
Power consumption <10 W
Dimensions L 108 mm × B 108 mm × H 26 mm

40
9. Conformity Declarations
EKZ hereby declares that the EKZ Smart Home Hub complies
with the essential requirements and the other pertinent
provisions of the following directives:
– Council Directive LVD (2014/35/EU)
– Council Directive EMC (2014/30/EU)
– Council Directive RED (2014/53/EU)
– Council Directive ROHS (2002/95/EU)

41
10. Contact and Support
You could not find the answer you were looking for in this user
manual? We are happy to help! Check out our FAQ on our
homepage or contact us directly: [email protected] 058 359 56 56
Elektrizitätswerke des Kantons Zürich (EKZ)
Dreikönigstrasse 18
8002 Zurich
Switzerland
Document version: v21, March 25th 2021

Do you have any questions? We are happy to help:
058 359 56 56, [email protected], smarthome.ekz.ch
EKZ SMART HOME
Just live smarter