eHealth Integration for Netcool User...
60
eHealth ® Integration for Netcool ® User Guide MN-NHNETCOOL-004 June 2006
Transcript of eHealth Integration for Netcool User...
eHealth® Integration for Netcool® User Guide
MN-NHNETCOOL-004June 2006

Important Notice
Concord Communications, Inc., eHealth, eHealth Suite, the Concord Logo, eROI, AdvantEDGE, SystemEDGE, Live Health, Network Health, Live Status, System Health, Application Health, Automating Technology Management, Constellation, Enterprise, Enterprise Monitor, Firstsense, FirstSense and design, FirstSense Enterprise, Pulse, Pulsecheck, Token/Net, Token/Scope, We See It Happening, Fault Manager, Empire, Empire Technologies and/or other Concord marks or products referenced herein are either registered trademarks or trademarks of Concord Communications, Inc. Other trademarks are the property of their respective owners.
SMIC. Copyright 1992 SynOptics Communications, Inc. All Rights Reserved. SynOptics makes no representations about the suitability of this software for any particular purpose. The software is supplied “as is”, and SynOptics makes no warranty, either express or implied, as to the use, operation, condition, or performance of the software. SynOptics retains all title and ownership in the software.
eHealth incorporates compression code by the Info-ZIP group. There are no extra charges or costs due to the use of this code, and the original compression sources are freely available from ftp://ftp.cdrom.com/pub/infozip/ on the Internet and from the Concord Communications Web site: http://www.concord.com.
© Copyright Bigelow and Holmes 1986, 1985. Lucida is a registered trademark of Bigelow & Holmes. Sun Microsystems Inc., AT&T, and Bigelow & Holmes make no representations about the suitability of the source code for any purpose. It is provided “as is” without express or implied warranty of any kind.
General Notice: Some of the product names used herein have been used for identification purposes only and may be trademarks of their respective companies.
Proprietary Notice
The information and descriptions contained herein are the property of Concord Communications, Inc. Such information and descriptions may not be copied, disseminated, or distributed without the express written consent of Concord Communications, Inc. Concord Communications, Inc., assumes no responsibility for any inaccuracies that may appear in this document. Concord Communications, Inc., reserves the right to improve its products and change specifications at any time without notice.
U. S. Government Restricted Rights
Use, reproduction, and disclosure by the U.S. Government are subject to the restrictions set forth in FAR §52.227-19 (c) (1) and (2) and DFARS §252.227-7013 (c) (1) (ii).
Patent Information
U. S. Patent 5,615,323 Patents Pending
© 2006 Concord Communications, Inc.All Rights Reserved

Table of Contents
Preface 5
Reference Information . . . . . . . . . . . . . . . . . . . . . . . . . . . . . . . . . . . . 6Documentation Conventions . . . . . . . . . . . . . . . . . . . . . . . . . . . 7
Technical Support . . . . . . . . . . . . . . . . . . . . . . . . . . . . . . . . . . . . . . . . 8
Chapter 1 Overview 9
Integrating eHealth with Netcool. . . . . . . . . . . . . . . . . . . . . . . . . . . . 9How Do They Work Together? . . . . . . . . . . . . . . . . . . . . . . . . . . 9Why Integrate? . . . . . . . . . . . . . . . . . . . . . . . . . . . . . . . . . . . . . . 11
Chapter 2 Installing eHealth – Netcool 13
Preparing for the Installation . . . . . . . . . . . . . . . . . . . . . . . . . . . . . . 13Verifying System Requirements . . . . . . . . . . . . . . . . . . . . . . . . 13Completing the Installation Checklist . . . . . . . . . . . . . . . . . . . 15Installing and Licensing eHealth . . . . . . . . . . . . . . . . . . . . . . . . 17Confirming that the Netcool ObjectServer is Running. . . . . . 17
Installing eHealth – Netcool . . . . . . . . . . . . . . . . . . . . . . . . . . . . . . . 19Installing eHealth – Netcool on UNIX . . . . . . . . . . . . . . . . . . . 21Installing eHealth – Netcool on Windows . . . . . . . . . . . . . . . . 25
Editing the Probe Rules File . . . . . . . . . . . . . . . . . . . . . . . . . . . . . . . 30Restarting a Netcool probe on UNIX . . . . . . . . . . . . . . . . . . . . 33Restarting a Netcool Probe on Windows . . . . . . . . . . . . . . . . . 34
3

4 • Table of Contents
Chapter 3 Using eHealth with Netcool 35
Accessing eHealth from Netcool. . . . . . . . . . . . . . . . . . . . . . . . . . . . 36Using the Event List Browser . . . . . . . . . . . . . . . . . . . . . . . . . . . 37Logging in to eHealth . . . . . . . . . . . . . . . . . . . . . . . . . . . . . . . . . 38Logging in to Live Health . . . . . . . . . . . . . . . . . . . . . . . . . . . . . . 39
Chapter 4 Uninstalling eHealth – Netcool 41
Removing Information from the Probe Rules File . . . . . . . . . . . . . 42Removing Other Components . . . . . . . . . . . . . . . . . . . . . . . . . . . . . 43
Removing Other Components from UNIX . . . . . . . . . . . . . . . 44Removing Other Components from Windows . . . . . . . . . . . . 48
Appendix A Troubleshooting 49
Troubleshooting Problems with eHealth Reports . . . . . . . . . . 49Submitting Log Files to Technical Support . . . . . . . . . . . . . . . 51
Index 55
eHealth Integration for Netcool User Guide
Preface
This guide describes how to integrate the eHealth® software with the Micromuse® Netcool® suite (Netcool). It is intended for eHealth and Netcool administrators who want to use eHealth reporting features to monitor Netcool performance data. This guide includes instructions for installing, using, and removing the eHealth Integration for Netcool module (eHealth – Netcool) on Windows and Solaris and HP-UX Netcool systems.
The following table describes the releases of eHealth that support various versions of Netcool.
Starting with eHealth Release 5.7 Service Pack 5, this module also supports Cisco Info Center (CIC) Release 7.0 and later. It is supported on Solaris and Windows CIC systems only. For information on licensing this module and other requirements, refer to www.cisco.com.
Table 1. Netcool Version Support
eHealth Release Netcool Version
5.6.5 Patch 5 and later 3.4, 3.4.1, 3.5, and 3.6
5.7 Patches 1 through 3 3.5 and 3.6
5.7 Service Pack 5 and later 3.5, 3.6 and 7.0
5

6 • Preface
NOTE
If you are using a later eHealth main release or Service Pack release, refer to the Readme file for the latest information on the versions of Micromuse Netcool that eHealth supports.
Reference InformationTo install the integration module and use all available features, you must install the eHealth software on a dedicated system, enable the eHealth Live Health Suite, and obtain the appropriate licenses.
Refer to the following documentation, as needed:
• For information about installing the eHealth software and starting the eHealth console, refer to the eHealth Installation Guide for the UNIX or Windows platform, as appropriate.
• For information about forwarding alarms from Live Exceptions to Netcool, refer to the eHealth Live Health Administration Guide.
• For information about customizing Health reports to send traps to Netcool, refer to the eHealth Administration Guide.
eHealth Integration for Netcool User Guide
Reference Information • 7
Documentation ConventionsTable 2 lists the conventions used in this guide.
Table 2. Documentation Conventions
Convention Description
File or Directory Name Text that refers to file or directory names.
code Text that refers to system, code, or operating system command line examples.
emphasis Text that refers to guide titles or text that is emphasized.
enter Text that you must type exactly as shown.
Name Text that refers to menus, fields in dialog boxes, or keyboard keys.
New Term Text that refers to a new term, that is, one that is being introduced.
Variable Text that refers to variable values that you substitute.
→ A sequence of menus or menu options. For example, File → Exit means “Choose Exit from the File menu.”
NOTE Important information, tips, or other noteworthy details.
CAUTION Information that helps you avoid data corruption or system failures.
WARNING Information that helps you avoid personal physical danger.
eHealth Integration for Netcool User Guide
8 • Preface
Technical SupportIf you have a Support Contract ID and password, you can access our Support Express knowledgebase at the following URL: http://search.support.concord.com.
If you have a software maintenance contract, you can obtain assistance with this product. For online technical assistance and a complete list of primary service hours and telephone numbers, contact Technical Support at http://support.concord.com.
eHealth Integration for Netcool User Guide
1
Overview
This chapter provides an overview of the eHealth Integration for Netcool module (eHealth – Netcool) and explains how it helps to simplify Information Technology (IT) management.
Integrating eHealth with NetcooleHealth – Netcool enables Netcool operators to access eHealth reports for integrated historical and real-time content. Netcool users can quickly and automatically access detailed analysis to resolve problems quickly and accurately.
This section describes how the eHealth Suite and Micromuse® Netcool/OMNIbus™ work together, and potential benefits.
How Do They Work Together?A trap is a message sent by a Simple Network Management Protocol (SNMP) agent to a console or network management system (NMS) to indicate that a threshold has been reached or another user-defined condition has occurred.
Integration between eHealth and Netcool works in both directions:
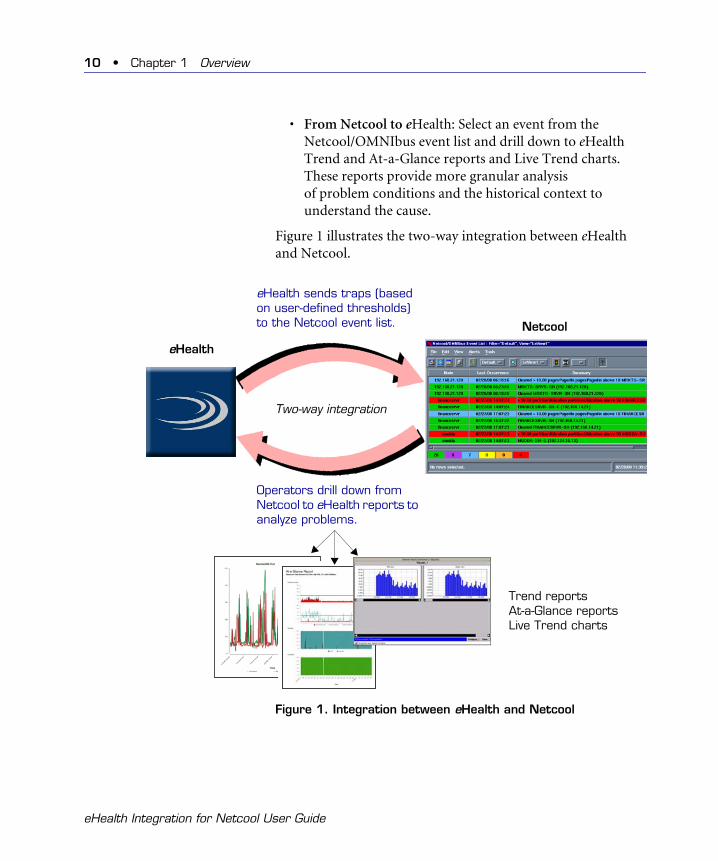
• From eHealth to Netcool: Configure eHealth Live Health to send traps to Netcool when user-defined thresholds are reached. Live Health’s powerful alarm de-duplication capabilities ensure that only significant incidents are passed on to the Netcool console. You can also customize eHealth’s Health reports to send traps to Netcool when operating thresholds are exceeded.
9
10 • Chapter 1 Overview
• From Netcool to eHealth: Select an event from the Netcool/OMNIbus event list and drill down to eHealth Trend and At-a-Glance reports and Live Trend charts. These reports provide more granular analysis of problem conditions and the historical context to understand the cause.
Figure 1 illustrates the two-way integration between eHealth and Netcool.
Figure 1. Integration between eHealth and Netcool
eHealth
eHealth sends traps (based on user-defined thresholds) to the Netcool event list.
Trend reports At-a-Glance reports Live Trend charts
Netcool
Operators drill down from Netcool to eHealth reports to analyze problems.
Two-way integration
eHealth Integration for Netcool User Guide
Integrating eHealth with Netcool • 11
1
Why Integrate?When you integrate eHealth with Netcool, you can achieve the following benefits:
• Smarter traps with less noise. Live Health’s ability to provide alarm de-duplication and proactive notification of potential outages reduces the number of Netcool alarms to be handled by the Netcool console. This helps you to focus on the truly important degradations and outages.
• Complete problem investigation. By launching eHealth from the Netcool event list, you can drill down to eHealth reports to diagnose problems. The links between Netcool and eHealth enable you to get the most out of historical and real-time reports with no additional training.
• Reduced learning curve. Integration of eHealth with Netcool reduces the learning curve for staff and makes eHealth easy to adopt for Netcool users. Concord changes the Netcool event color based on Netcool’s color schemes for trap severity.
eHealth Integration for Netcool User Guide

2
Installing eHealth – Netcool
This chapter describes how to install and configure the eHealth – Netcool software on UNIX and Windows systems.
Preparing for the InstallationBefore installing eHealth – Netcool, perform the following tasks:
• Verify system requirements.
• Complete the installation checklist for your platform.
• Install and license eHealth.
• Confirm that the Netcool ObjectServer™ is running.
The following sections provide details for each of these tasks.
Verifying System RequirementsThe eHealth – Netcool integration module software is available on the eHealth product CD-ROM. You install this software directly on your Netcool systems. The integration module is supported on Windows, Solaris, and HP-UX operating systems.
Multiple eHealth and Netcool SystemsYou can run multiple eHealth and Netcool systems in your infrastructure. One eHealth system can send traps to one or multiple Netcool systems. Multiple eHealth systems can also send traps to the same Netcool system. eHealth and Netcool are
13
14 • Chapter 2 Installing eHealth – Netcool
not required to reside on the same operating system. For example, eHealth can reside on a Solaris operating system and send traps to Netcool that resides on a Windows operating system.
eHealth System RequirementsYou must install eHealth on a dedicated UNIX or Windows system according to the requirements and instructions provided in the eHealth Installation Guide for your platform. Concord recommends that you do not install eHealth on the same system on which Netcool resides.
Netcool System GuidelinesNetcool can be installed on Solaris, HP-UX, and Windows operating systems (OS). For specific OS versions, Web browser, and disk space requirements, refer to your Netcool documentation. Use the following guidelines to ensure that each Netcool system is properly configured before attempting to install the eHealth – Netcool software:
• Verify that you are running a version of Netcool/OMNIbus that the eHealth software supports. Refer to “Netcool Version Support” on page 5.
• If Netcool resides on a Windows system, ensure that the latest Service Pack is installed.
• Ensure that the Netcool system is running a valid version of Netscape Communicator or Internet Explorer (IE). Netscape valid versions are 4.5.1 through 4.7. IE valid versions are 5.0 through 5.5.
NOTENOTE
The browser is used by eHealth to display Web-based reports.
• If you plan to drill down to Live Trend reports from the Netcool desktop, Live Health must be installed on the Netcool system.
eHealth Integration for Netcool User Guide
Preparing for the Installation • 15
1
Live Health RequirementsTo use the Live Health reporting features that this integration module provides, you must install a Live Health license on each eHealth system that will forward traps to Netcool systems. When you install this license, it enables access to the Live Health Suite on the eHealth Web interface. You must also install the Live Health client software on all Netcool systems. When you install this software, it enables you to drill down to Live Trend from Netcool desktops. For information about how to install licenses, refer to the eHealth Installation Guide for your platform. For information about how to install the Live Health client software and configure alarms, refer to the eHealth Live Health User Guide and the eHealth Live Health Administration Guide.Completing the Installation ChecklistBefore installing eHealth – Netcool, photocopy and complete the installation checklist for each Netcool host where you plan to install the software. The checklist helps you gather the information that installation program will prompt you for. This information can also be useful for troubleshooting later if you encounter problems. When you finish installing eHealth – Netcool, store the checklists with the documentation for future reference.
Table 3 on page 16 shows the checklist for UNIX installations (Solaris and HP-UX), and Table 4 on page 17 shows the checklist for Windows installations.
eHealth Integration for Netcool User Guide
16 • Chapter 2 Installing eHealth – Netcool
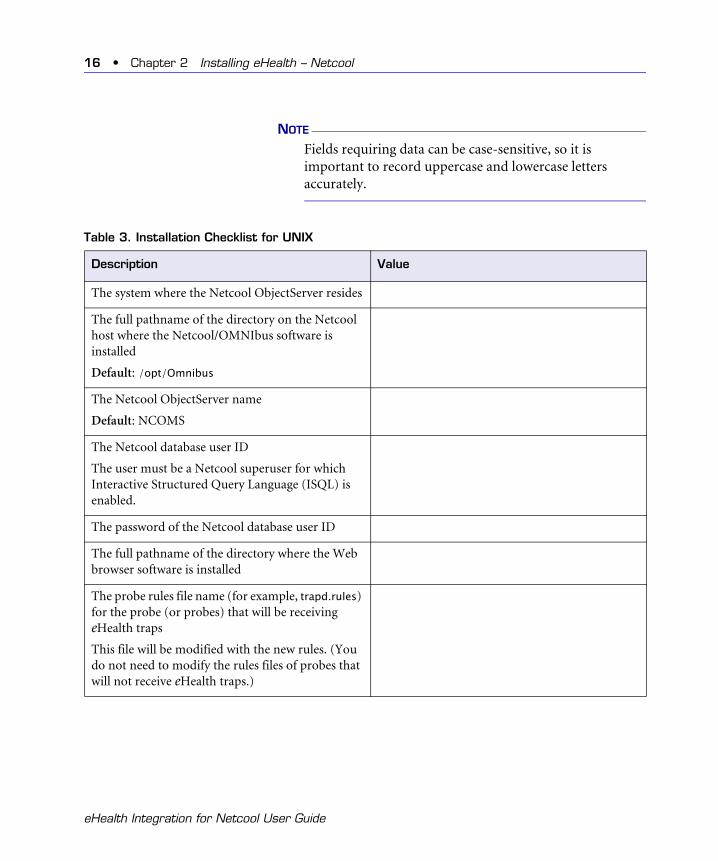
NOTE
Fields requiring data can be case-sensitive, so it is important to record uppercase and lowercase letters accurately.
Table 3. Installation Checklist for UNIX
Description Value
The system where the Netcool ObjectServer resides
The full pathname of the directory on the Netcool host where the Netcool/OMNIbus software is installed
Default: /opt/Omnibus
The Netcool ObjectServer name
Default: NCOMS
The Netcool database user ID
The user must be a Netcool superuser for which Interactive Structured Query Language (ISQL) is enabled.
The password of the Netcool database user ID
The full pathname of the directory where the Web browser software is installed
The probe rules file name (for example, trapd.rules) for the probe (or probes) that will be receiving eHealth traps
This file will be modified with the new rules. (You do not need to modify the rules files of probes that will not receive eHealth traps.)
eHealth Integration for Netcool User Guide
Preparing for the Installation • 17
1
Installing and Licensing eHealth
Before installing eHealth – Netcool for the first time, perform the following steps:
1. On the system that you designate as the eHealth system, install eHealth as described in the eHealth Installation Guide for the UNIX or Windows platform, as appropriate.
2. Start eHealth and enter eHealth – Netcool and Live Health license information following the instructions in the eHealth Installation Guide.
Confirming that the Netcool ObjectServer is Running
Before installing eHealth – Netcool, make sure that the Netcool ObjectServer is running. The ObjectServer must be running in order for the installation procedure to perform correctly.
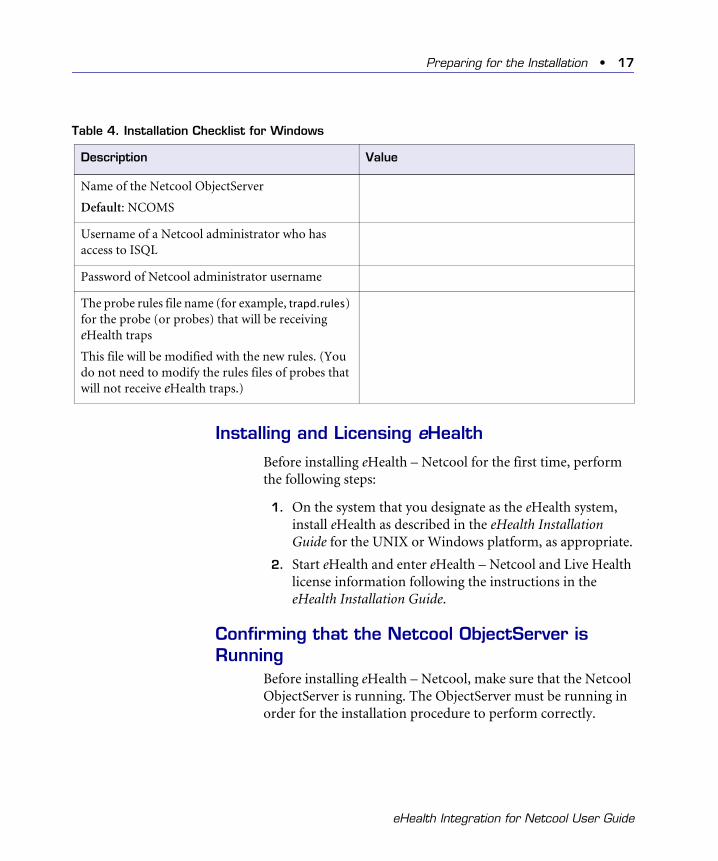
Table 4. Installation Checklist for Windows
Description Value
Name of the Netcool ObjectServer
Default: NCOMS
Username of a Netcool administrator who has access to ISQL
Password of Netcool administrator username
The probe rules file name (for example, trapd.rules) for the probe (or probes) that will be receiving eHealth traps
This file will be modified with the new rules. (You do not need to modify the rules files of probes that will not receive eHealth traps.)
eHealth Integration for Netcool User Guide
18 • Chapter 2 Installing eHealth – Netcool
Confirming the Netcool ObjectServer on UNIXFor complete information about starting and stopping the Netcool ObjectServer on UNIX systems, refer to your Netcool documentation.
To check whether the Netcool ObjectServer is running on a UNIX system, use the following command:
ps -ef | grep nco_
Look for the nco_objserv process with a -name NCOMS switch specified (or a switch that specifies your ObjectServer name, if you do not use the default name of NCOMS).
If the ObjectServer is not running, start it before beginning the installation, as described in the next section.
Starting the Netcool ObjectServer on UNIX. To start a Netcool ObjectServer that uses the Netcool Process Agent, use the following command:
$OMNIHOME/bin/nco_pad &
The $OMNIHOME environment variable defines the home directory for the Netcool/OMNIbus software. The default is /opt/Omnibus.
Stopping the Netcool ObjectServer on UNIX. During the installation procedure (and the uninstallation procedure described in Chapter 4 ), you will need to stop the Netcool ObjectServer.
When instructed to do so, open a new terminal window and use the following command to stop a Netcool ObjectServer that uses the Netcool Process Agent:
$OMNIHOME/bin/nco_pa_shutdown
NOTE
Do not use the UNIX kill command to stop the Netcool ObjectServer, because that command would cause any changes to the ObjectServer to be lost.
eHealth Integration for Netcool User Guide
Installing eHealth – Netcool • 19
1
Confirming the Netcool ObjectServer on WindowsFor complete information about starting and stopping the Netcool ObjectServer on Windows systems, refer to your Netcool documentation.
Use the following procedure to check whether the Netcool ObjectServer is running on a Windows system.
To check the Netcool ObjectServer on Windows:
1. Open the Services dialog box:
a. From the desktop select Start → Settings → Control Panel.
b. For Windows NT, double-click Services. For Windows 2000, double-click Administrative Tools, then double-click Services.
The Services dialog box appears.
2. In the list of services, check whether the NCO ObjectServer is started.
Starting the Netcool ObjectServer on Windows. To start a Netcool ObjectServer, from the desktop select Start → Programs → Netcool OMNIbus 3.x → Restart stopped Netcool Services (where x represents the version of Netcool that you are running).
Stopping the Netcool ObjectServer on Windows. When instructed to do so, stop the Netcool ObjectServer (for example, during installation or uninstallation) as follows: from the desktop select Start → Programs → Netcool OMNIbus 3.x → Stop running Netcool Services (where x represents the version of Netcool that you are running).
Installing eHealth – NetcoolThis section describes the procedure for installing eHealth – Netcool on each Netcool ObjectServer and standalone desktop system.
eHealth Integration for Netcool User Guide
20 • Chapter 2 Installing eHealth – Netcool
On UNIX systems, you install the software using an installation script file. (For instructions, “Installing eHealth – Netcool on UNIX” on page 21.) On Windows systems, you use an InstallShield program to install the software. (For instructions, refer to “Installing eHealth – Netcool on Windows” on page 25.)
The eHealth – Netcool installation supports two types of installations: Scripts Only and Full Install. During the installation procedure, you are asked which type of installation to perform.
• Scripts Only: Adds eHealth scripts, used by the Netcool desktop, for drilling down to eHealth reports. You must install these scripts on each server where the OMNIbus/Conductor desktop resides. Before performing a Scripts Only installation on a desktop host, you must have performed a Full Install on the Netcool ObjectServer host to which the Netcool desktop points.
• Full Install: Intended for the host where the Netcool ObjectServer resides. In addition to the components installed by the Scripts Only installation, the Full Install adds the eHealth menu items, actions, and triggers to the Netcool ObjectServer.
After performing a Full Install, you must manually merge the concord.rules file with the probe rules file (for example, trapd.rules or nnm6.rules). For instructions, refer to “Editing the Probe Rules File” on page 30.
NOTE
Back up your Netcool database before installing eHealth – Netcool.
eHealth Integration for Netcool User Guide
Installing eHealth – Netcool • 21
1
Installing eHealth – Netcool on UNIXThe installation script is located on the eHealth CD-ROM in the directory /PACKAGES/NETCOOL/HP for HP-UX installations or /PACKAGES/NETCOOL/SOL for Solaris installations. Before beginning the installation, make sure that you have completed all preliminary steps described in “Preparing for the Installation” on page 13.
Use the following procedure to install eHealth – Netcool on a UNIX system. Refer to the completed installation checklist presented in Table 3 on page 16.
To install eHealth – Netcool on UNIX:
1. Log in to the superuser account for the Netcool system.
2. Create a temporary directory where the installation files can reside temporarily.
3. Insert the eHealth CD-ROM into the CD-ROM drive of the system where you will be installing eHealth – Netcool.
4. If you are using an HP-UX system or a Solaris system with Volume Management disabled, mount the CD-ROM drive, as follows:
a. Verify that the /cdrom directory exists; if it does not, create it.
b. Verify that the CD-ROM drive is mounted; if it is not, mount it locally or from a remote system.
For detailed instructions on performing these tasks, refer to the eHealth Installation Guide (UNIX platform). Mounting the CD-ROM drive is not required for Solaris systems with Volume Management enabled.
5. Change to the directory where the installation script resides:
• For Solaris, use the following command:
cd CD_drive/PACKAGES/NETCOOL/SOL
eHealth Integration for Netcool User Guide
22 • Chapter 2 Installing eHealth – Netcool
• For HP-UX, use the following command:
cd CD_drive/PACKAGES/NETCOOL/HP
6. Enter the following command to start the installation script:
./INSTALL.NC
The following prompt appears:
Enter the full path to a temporary directory for unpacking the installation files?
7. Specify the name of the temporary directory that you created in Step 2.
The following prompt appears:
What is your choice? (1/2/Q) [1]:
8. Specify the type of installation to perform:
• To perform the Full Install for the Netcool ObjectServer host (installing all integration components), enter 1.
• To perform the Scripts Only installation for Netcool desktops (installing only the eHealth scripts used for the reports), enter 2.
The following prompt appears:
What is NetCool Omnibus base directory on NetCool Machine [/opt/Omnibus]?
9. To accept the default Netcool base directory (/opt/Omnibus), press Return. If you are not using the default directory, specify the full pathname for the directory on the Netcool system where Netcool is installed.
If you chose Scripts Only, go to Step 11.
If you chose Full Install, the following prompt appears:
What is NetCool/Omnibus Object Server Name [NCOMS]?
eHealth Integration for Netcool User Guide
Installing eHealth – Netcool • 23
1
10. To accept the default Netcool/OMNIbus ObjectServername (NCOMS), press Return. If you are not using the default name, specify the Netcool ObjectServer name.
The following prompt appears:
What is database UserId on NetCool Machine?
11. Specify the name of the database user account of the Netcool host.
The following prompt appears:
What is database password on NetCool Machine?
12. Specify the Netcool database user password. (The password is not displayed as you type it.)
The following prompt appears:
What is the path of the web browser on NetCool Omnibus system?
13. Specify the full pathname for the directory on the Netcool system where the Web browser is installed.
The installation script then copies several files, creates some directories, and begins the Netcool database update. It displays the following prompt:
If the object server is not running, start it before continuing with this install. Enter return to continue or q to quit? (y|q) [y]
14. Leave the installation running in its window, open a new window, and verify that the Netcool ObjectServer is running. (If it is not running, start it.) For details, refer to “Confirming the Netcool ObjectServer on UNIX” on page 18.
eHealth Integration for Netcool User Guide
24 • Chapter 2 Installing eHealth – Netcool
15. When you have confirmed that the ObjectServer is started, return to the installation window and press Return at the prompt.
After the installation script completes the Netcool database update, you must shut down the Netcool ObjectServer to allow the installation to finish. The following prompt appears.
Is there a nco_objserv running with a -name objectserver? If so, shut it down before continuing. Enter return to continue or q to quit? (y|q) [y]
16. Leave the installation running in its window, and in another window stop the Netcool ObjectServer. For details, refer to “Stopping the Netcool ObjectServer on UNIX” on page 18.
NOTENOTE
Do not use the UNIX kill command to stop the Netcool ObjectServer, because that command would cause any changes to the ObjectServer to be lost.
17. When you have stopped the ObjectServer, return to the installation window and press Return at the prompt.
The installation continues, and the following prompt appears.
Now re-start the Omnibus Object Server and verify it is running by doing a ‘ps -ef | grep nco’. Enter return to continue or q to quit? (y|q) [y]
18. Leave the installation running in its window, and in another window start the Netcool ObjectServer and confirm that it is running. For details, refer to “Starting the Netcool ObjectServer on UNIX” on page 18.
19. When you have started the ObjectServer, return to the installation window and press Return at the prompt, and allow the installation script to finish.
eHealth Integration for Netcool User Guide

Installing eHealth – Netcool • 25
1
20. If you are using an HP-UX system or a Solaris system withVolume Management disabled, unmount the CD-ROM drive. If the CD-ROM drive is mounted on another system, unmount it from your system and the remote system. For instructions about unmounting a CD-ROM drive, refer to the eHealth Installation Guide (UNIX platform). (This step is not required for Solaris systems with Volume Management enabled.)
If you performed a Full Install, you need to integrate the concord.rules file into the probe rules file for your Netcool installation. For instructions, refer to “Editing the Probe Rules File” on page 30.
Installing eHealth – Netcool on WindowsThe eHealth – Netcool installation program for Windows is located on the eHealth CD-ROM in the directory /Packages/Netcool/NT. Before beginning the installation, make sure that you have completed all preliminary steps described in “Preparing for the Installation” on page 13.
Use the following procedure to install eHealth – Netcool on a Windows system. Refer to the completed installation checklist presented in Table 4 on page 17.
To install eHealth – Netcool on Windows:
1. Log in to a user account with administrator rights on the appropriate system:
• The system where the Netcool ObjectServer resides (for a Full Install)
• Any system where the Netcool remote desktop resides (for a Scripts Only installation)
2. Exit any Windows applications that are currently running.
3. Insert the eHealth CD-ROM into the CD-ROM drive.
4. Use Windows Explorer to view the contents of the CD and navigate to the directory /Packages/Netcool/NT.
eHealth Integration for Netcool User Guide
26 • Chapter 2 Installing eHealth – Netcool
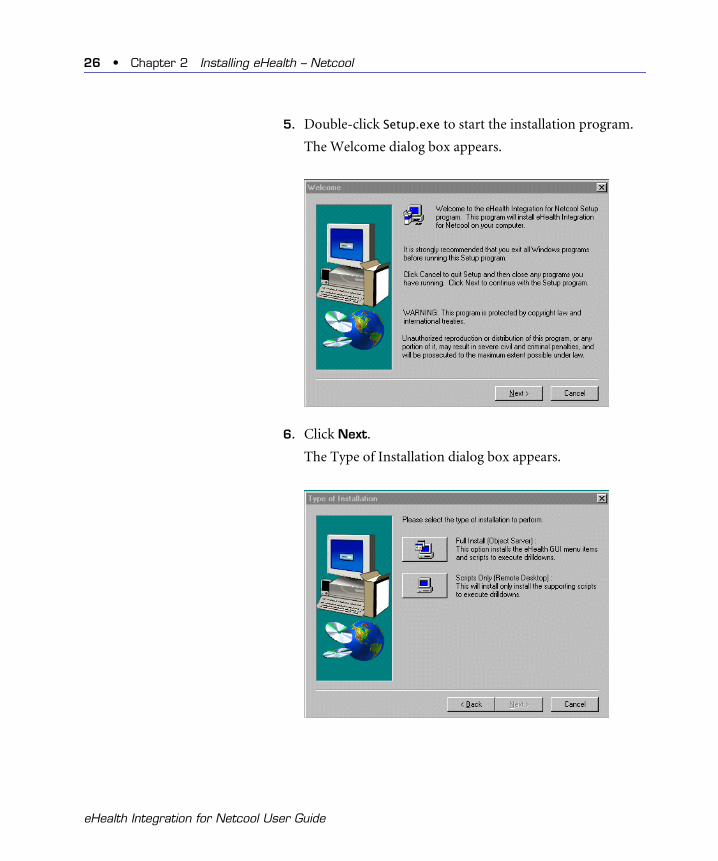
5. Double-click Setup.exe to start the installation program.
The Welcome dialog box appears.
6. Click Next.
The Type of Installation dialog box appears.
eHealth Integration for Netcool User Guide
Installing eHealth – Netcool • 27
1
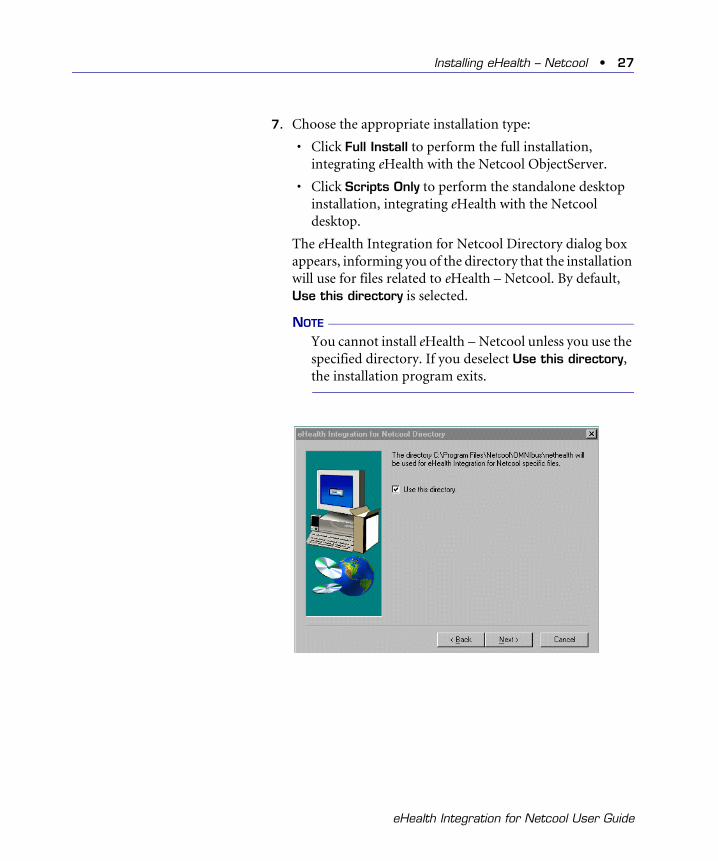
7. Choose the appropriate installation type:• Click Full Install to perform the full installation, integrating eHealth with the Netcool ObjectServer.
• Click Scripts Only to perform the standalone desktop installation, integrating eHealth with the Netcool desktop.
The eHealth Integration for Netcool Directory dialog box appears, informing you of the directory that the installation will use for files related to eHealth – Netcool. By default, Use this directory is selected.
NOTENOTE
You cannot install eHealth – Netcool unless you use the specified directory. If you deselect Use this directory, the installation program exits.
eHealth Integration for Netcool User Guide
28 • Chapter 2 Installing eHealth – Netcool
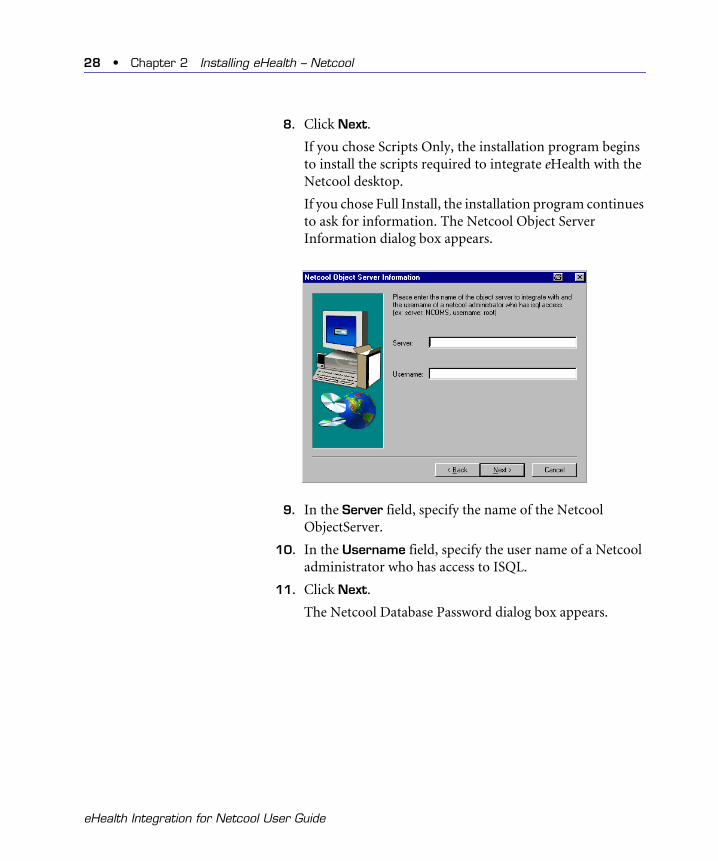
8. Click Next.
If you chose Scripts Only, the installation program begins to install the scripts required to integrate eHealth with the Netcool desktop.
If you chose Full Install, the installation program continues to ask for information. The Netcool Object Server Information dialog box appears.
9. In the Server field, specify the name of the Netcool ObjectServer.
10. In the Username field, specify the user name of a Netcool administrator who has access to ISQL.
11. Click Next.
The Netcool Database Password dialog box appears.
eHealth Integration for Netcool User Guide

Installing eHealth – Netcool • 29
1
12. In the Password and Confirm fields, specify the password of the Netcool administrator user name specified in the previous dialog box, and click Next.
The following question appears, indicating that the installation program is ready to update the Netcool system with eHealth – Netcool. Part of this process involves stopping and restarting the Netcool/OMNIbus servers.
13. Click Yes to proceed with the installation.
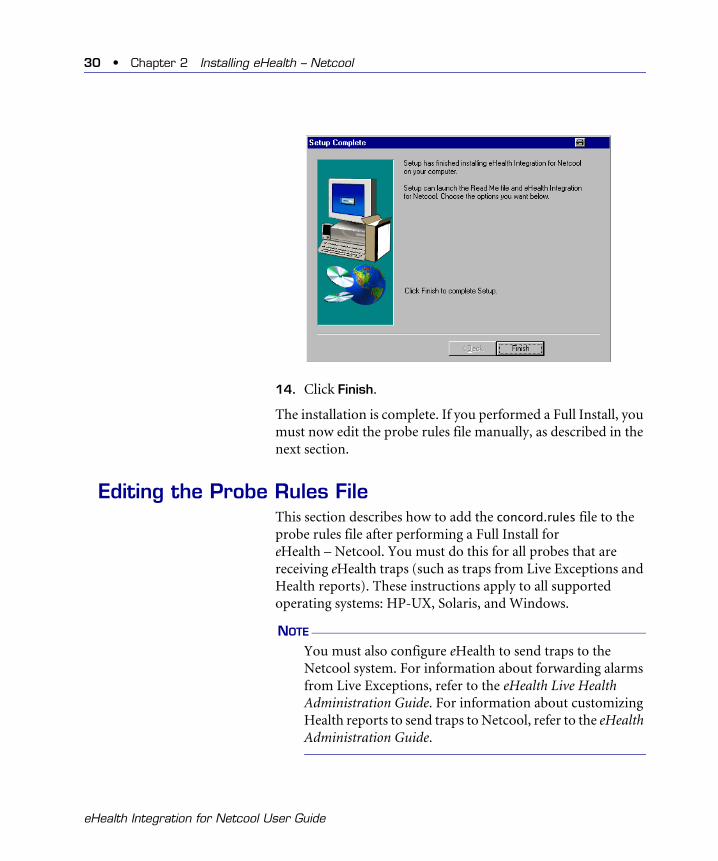
When the installation is complete, the Setup Complete dialog box appears.
eHealth Integration for Netcool User Guide
30 • Chapter 2 Installing eHealth – Netcool
14. Click Finish.
The installation is complete. If you performed a Full Install, you must now edit the probe rules file manually, as described in the next section.
Editing the Probe Rules FileThis section describes how to add the concord.rules file to the probe rules file after performing a Full Install for eHealth – Netcool. You must do this for all probes that are receiving eHealth traps (such as traps from Live Exceptions and Health reports). These instructions apply to all supported operating systems: HP-UX, Solaris, and Windows.
NOTE
You must also configure eHealth to send traps to the Netcool system. For information about forwarding alarms from Live Exceptions, refer to the eHealth Live Health Administration Guide. For information about customizing Health reports to send traps to Netcool, refer to the eHealth Administration Guide.
eHealth Integration for Netcool User Guide
Editing the Probe Rules File • 31
1
This section assumes that you are familiar with the contents of the probe rules file (such as the trapd.rules file) and any modifications to this file that have been made previously. If you are not using the Netcool trapd probe, you can include the concord.rules file in other OMNIbus rules files, such as nnm6.rules for HP OpenView trap probes.The specific location in the probe rules file where you will include concord.rules (or some of the contents of that file) depends on how you have configured your probe rules file. It is recommended (although not required) that you include concord.rules in the enterprise-specific section of the probe rules file.
NOTE
Make a backup copy of the probe rules file before modifying it to include content from concord.rules. This allows you to restore the original probe rules file in the event of a problem with the modified file.
To edit the probe rules file:
1. Copy the concord.rules file to the directory where the probe rules file resides.
When you perform a Full Install of eHealth – Netcool on the Netcool ObjectServer system, concord.rules is placed in the $OMNIHOME/nethealth directory. This file is also available on the eHealth CD-ROM (in the directory /PACKAGES/NETCOOL/operating_system).
2. Use a text editor to familiarize yourself with the contents of the concord.rules file (or use the more command on UNIX).
3. Use a text editor to open the probe rules file for editing.
eHealth Integration for Netcool User Guide
32 • Chapter 2 Installing eHealth – Netcool
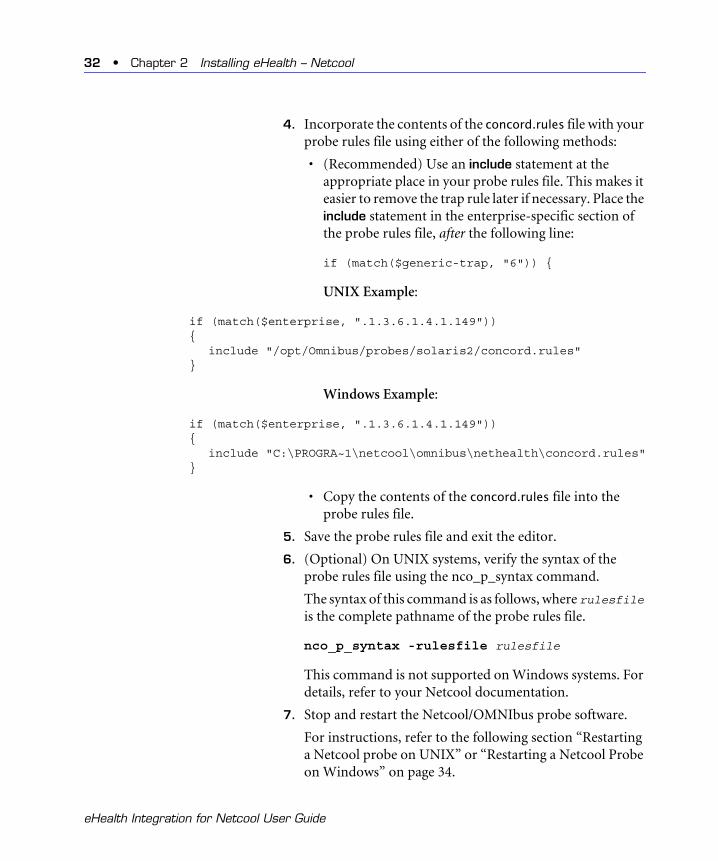
4. Incorporate the contents of the concord.rules file with your probe rules file using either of the following methods:
• (Recommended) Use an include statement at the appropriate place in your probe rules file. This makes it easier to remove the trap rule later if necessary. Place the include statement in the enterprise-specific section of the probe rules file, after the following line:
if (match($generic-trap, "6")) {
UNIX Example:
if (match($enterprise, ".1.3.6.1.4.1.149")) {
include "/opt/Omnibus/probes/solaris2/concord.rules" }
Windows Example:
if (match($enterprise, ".1.3.6.1.4.1.149")) {
include "C:\PROGRA~1\netcool\omnibus\nethealth\concord.rules" }
• Copy the contents of the concord.rules file into the probe rules file.
5. Save the probe rules file and exit the editor.
6. (Optional) On UNIX systems, verify the syntax of the probe rules file using the nco_p_syntax command.
The syntax of this command is as follows, where rulesfile is the complete pathname of the probe rules file.
nco_p_syntax -rulesfile rulesfile
This command is not supported on Windows systems. For details, refer to your Netcool documentation.
7. Stop and restart the Netcool/OMNIbus probe software.
For instructions, refer to the following section “Restarting a Netcool probe on UNIX” or “Restarting a Netcool Probe on Windows” on page 34.
eHealth Integration for Netcool User Guide
Editing the Probe Rules File • 33
1
NOTENOTEYou can delete the temporary installation directory and its contents after completing this procedure.
Restarting a Netcool probe on UNIX
Use the following procedure to stop and restart a Netcool probe on a UNIX system.
To restart a Netcool probe on UNIX:
1. Determine the process ID of the probe by using the following command:
ps -ef | grep nco_p_
2. Use the kill command with the process ID to stop the probe process:
kill process_id
If you run probes under the control of the Netcool/OMNIbus Process Control system, the Process Agent (NCO_PA) automatically restarts the probe after you stop it.
For complete instructions on how to start and stop Netcool probes on UNIX systems, refer to your Netcool documentation.
3. If you do not use Process Control, use the following command to restart the probe:
$OMNIHOME/probes/nco_p_probename
For example, the following command starts a trapd probe:
$OMNIHOME/probes/nco_p_trapd
eHealth Integration for Netcool User Guide

34 • Chapter 2 Installing eHealth – Netcool
Restarting a Netcool Probe on Windows
On Windows, use the Services dialog box to stop and restart the NCO Trapd Probe (or the probe for which you modified the rules).
For complete instructions on how to start and stop Netcool probes on Windows systems, refer to your Netcool documentation.
To restart a Netcool probe on Windows:
1. Open the Services dialog box:
a. From the desktop select Start → Settings → Control Panel.
b. For Windows NT, double-click Services. For Windows 2000, double-click Administrative Tools, then double-click Services.
The Services dialog box appears.
2. In the list of services, scroll down to locate the probe to restart (such as NCO Trapd Probe) and select it.
3. Stop the probe by clicking Stop.
4. Restart the probe by clicking Start.
After you successfully install eHealth – Netcool, you must configure eHealth to send traps to the Netcool systems. For instructions, refer to the eHealth Administration Guide. For information about forwarding alarms from Live Exceptions to Netcool, refer to the eHealth Live Health Administration Guide.
eHealth Integration for Netcool User Guide
3
Using eHealth with Netcool
This chapter describes how you can obtain eHealth reports to investigate eHealth traps and alarms using Netcool/OMNIbus. It also describes how eHealth features operate with Netcool features and provides troubleshooting information.
NOTE
To be able to access Live Trend reports from the Netcool/OMNIbus Event List browser, you must install Live Health on the Netcool system (in addition to the eHealth system) as described in the eHealth Live Health User Guide.
35
36 • Chapter 3 Using eHealth with Netcool
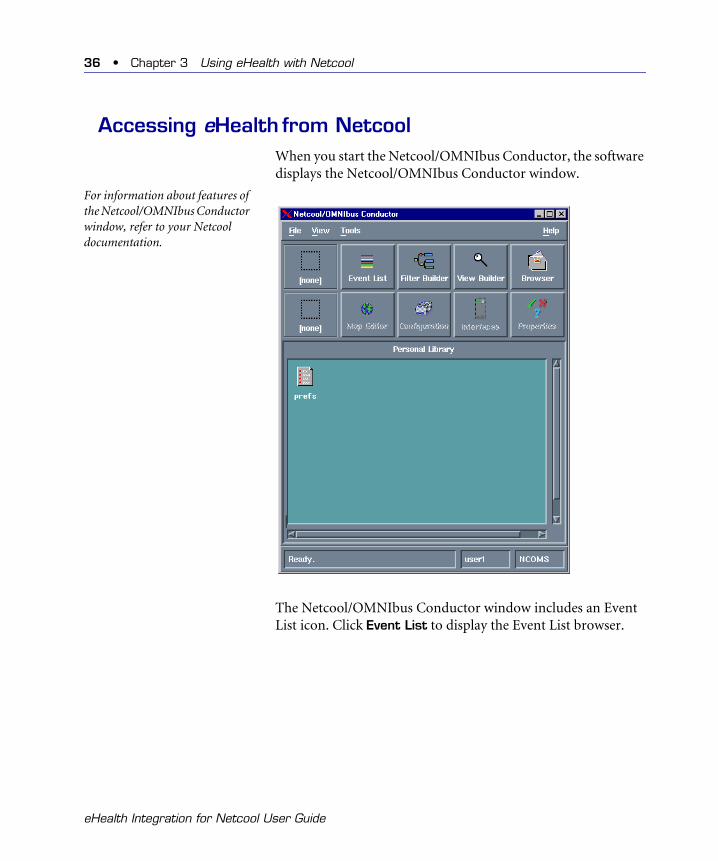
Accessing eHealth from NetcoolWhen you start the Netcool/OMNIbus Conductor, the software displays the Netcool/OMNIbus Conductor window.
For information about features of the Netcool/OMNIbus Conductor window, refer to your Netcool documentation.
The Netcool/OMNIbus Conductor window includes an Event List icon. Click Event List to display the Event List browser.
eHealth Integration for Netcool User Guide
Accessing eHealth from Netcool • 37
1
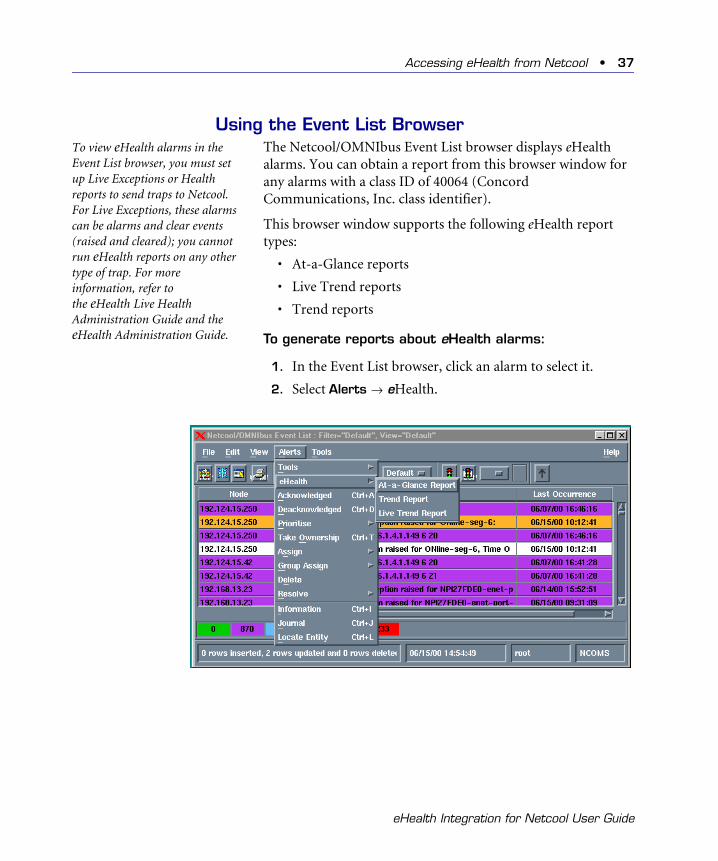
Using the Event List BrowserTo view eHealth alarms in the Event List browser, you must set up Live Exceptions or Health reports to send traps to Netcool. For Live Exceptions, these alarms can be alarms and clear events (raised and cleared); you cannot run eHealth reports on any other type of trap. For more information, refer to the eHealth Live Health Administration Guide and the eHealth Administration Guide.
The Netcool/OMNIbus Event List browser displays eHealth alarms. You can obtain a report from this browser window for any alarms with a class ID of 40064 (Concord Communications, Inc. class identifier).
This browser window supports the following eHealth report types:
• At-a-Glance reports
• Live Trend reports
• Trend reports
To generate reports about eHealth alarms:
1. In the Event List browser, click an alarm to select it.
2. Select Alerts → eHealth.
eHealth Integration for Netcool User Guide

38 • Chapter 3 Using eHealth with Netcool
3. To view a report about the selected eHealth alarm, do the following:
• For an eHealth At-a-Glance report, select At-a-Glance Report. To view the report in a Web browser, you must log in to eHealth. For instructions, refer to “Logging in to eHealth.”
• For an eHealth Trend report, select Trend Report. To view the report in a Web browser, you must log in to eHealth. For instructions, refer to “Logging in to eHealth.”
• For an eHealth Live Trend report, select Live Trend Report. To view the report, you must log in to Live Health. For instructions, refer to “Logging in to Live Health.
NOTENOTE
To view Live Trend reports, you must install Live Health on the Netcool system as described in the eHealth Live Health User Guide.
Logging in to eHealthWhen you run At-a-Glance or Trend reports from Netcool, the software starts the Web browser program configured for your workstation. To view the reports, you must first log in as an eHealth Web user. The Web browser displays the Username and Password Required dialog box.
eHealth Integration for Netcool User Guide

Accessing eHealth from Netcool • 39
1
Specify the user ID and password of an eHealth Web user, then click OK. The server displays the eHealth Web browser page with the selected report. For detailed information about At-a-Glance and Trend reports, refer to eHealth Web help or the eHealth Reports Guide.Logging in to Live HealthWhen you select an alarm and select Alerts → eHealth → Live Trend from the Netcool/OMNIbus Event List browser, the Live Health Login dialog box appears.
For more information about logging into Live Health, refer to the eHealth Live Health User Guide.
To log in to Live Health:
1. From the User tab, in the eHealth System field, specify the name of the eHealth system. Specify a colon and the port only if the eHealth Web server uses a port other than 80 (the default). For example:
newyork:8082
NOTENOTE
If your installation requires a proxy server or secure socket layer connection between the Live Health client and the eHealth system, complete fields on the Network tab instead of the User tab of the Login dialog box. For details, refer to information about logging in to a proxy server in the eHealth Live Health User Guide.
eHealth Integration for Netcool User Guide
40 • Chapter 3 Using eHealth with Netcool
2. In the Web User field, specify the name of the eHealth Web user account. It can be a privileged account such as admin or another user with access to Live Health.
3. In the Password field, specify the password for the eHealth Web user account.
4. (Optional) Select Use as Default Login to save these settings as the default login information. If you select this field, the Login dialog box will not appear the next time you run a Live Trend report from Netcool. Instead it automatically connects to the specified eHealth system using the specified account and password.
5. Click OK.
A Live Trend chart for the selected alarm appears. For information about Live Trend, refer to the Live Trend Web help or the eHealth Live Health User Guide.
eHealth Integration for Netcool User Guide
4
Uninstalling eHealth – Netcool
This appendix describes the procedure for removing eHealth – Netcool from each Netcool ObjectServer or desktop workstation for all supported operating systems.
To remove eHealth – Netcool completely, you must do the following:
1. Remove information about concord.rules from the probe rules file (such as trapd.rules or nnm6.rules).
You must do this for all probes rules files that contain the concord.rules file before uninstalling the remainder of the eHealth – Netcool components.
CAUTION
If you do not remove information about concord.rules from probe rules files before uninstalling eHealth – Netcool, the probes will fail to start after eHealth – Netcool is uninstalled.
2. Remove other components of eHealth – Netcool, including the following:
• Menu items, actions, and trigger additions from the Netcool ObjectServer
• Scripts (used by the Netcool desktop) for displaying eHealth reports
Read the following sections for details on these steps.
41
42 • Chapter 4 Uninstalling eHealth – Netcool
Removing Information from the Probe Rules FileThis section describes how to remove concord.rules from the probe rules file for any of the supported operating systems. It assumes that you are familiar with the contents of the probe rules file and any modifications that have been made to this file.
To remove information about concord.rules from the probe rules file:
1. Use a text editor to edit the probe rules file.
The probe rules file is typically stored in the UNIX directory $OMNIHOME/probes/operating_system or the Windows NT directory %OMNIHOME%\probes\NT.
2. Remove references to concord.rules.
The concord.rules were either copied into the probe rules file or included by reference. Either remove the contents of the concord.rules file that were copied into the probe rules file, or remove the line that included the concord.rules file.
You must do this for all probes where the concord.rules file was included.
3. Save the probe rules file and exit the editor.
4. Restart the Netcool/OMNIbus probe software.
For instructions, refer to “Restarting a Netcool probe on UNIX” on page 33 or “Restarting a Netcool Probe on Windows” on page 34.
eHealth Integration for Netcool User Guide
Removing Other Components • 43
1
Removing Other ComponentsThis section describes how to use an uninstallation script or program to remove components of eHealth – Netcool from a Netcool system.
NOTE
Before using the uninstallation script to remove components of eHealth – Netcool, be sure to edit the probe rules file to remove information about concord.rules, as described in the previous section, “Removing Information from the Probe Rules File.”
The eHealth – Netcool uninstallation supports two types of procedures: Scripts Only and Full Uninstall. During the uninstallation, the system asks which type of procedure to perform:
• Scripts Only: Removes eHealth scripts used by the Netcool desktop for drilling down to the eHealth reports. You must uninstall these from each system where the OMNIbus/Conductor desktop is used.
• Full Uninstall: Intended for the host where the Netcool ObjectServer resides. In addition to the components removed by the Scripts Only uninstallation, the Full Uninstall removes the eHealth menu items, actions, and triggers from the Netcool ObjectServer.
The procedure for removing components of eHealth – Netcool depends on the type of operating system. Refer to the following sections to learn how to remove components from UNIX and Windows, respectively.
eHealth Integration for Netcool User Guide

44 • Chapter 4 Uninstalling eHealth – Netcool
Removing Other Components from UNIX
Use the following procedure to remove eHealth – Netcool from a UNIX system.
To remove eHealth – Netcool from UNIX:
1. Log in to the superuser account for the Netcool host.
2. If you are performing a Full Uninstall, enter the following command:
ps -ef | grep nco_
Verify that the Netcool ObjectServer is running: look for the nco_objserv process with a -name NCOMS switch specified (or a switch that specifies your ObjectServer name, if you do not use the default name of NCOMS).
If the ObjectServer is not running, start it before continuing with this uninstall. For instructions, refer to “Starting the Netcool ObjectServer on UNIX” on page 18.
3. Change directories using the following command:
cd $OMNIHOME/nethealth
4. Start the uninstall script using the following command:
./nhUninstallNc.sh
The software displays a menu and the following prompt:
Please select an option (1|2|Q) [1]:
5. Specify the type of uninstallation to perform:
• To perform the Full Uninstall for the Netcool ObjectServer host (removing all integration components), enter 1.
• To perform the Scripts Only uninstallation for Netcool desktops (removing only the Network Health scripts used for the reports), enter 2.
eHealth Integration for Netcool User Guide

Removing Other Components • 45
1
The following prompt appears.Are you sure you want to continue? (y | n) [y]:
6. Enter Y to confirm that you want to uninstall eHealth – Netcool.
The program displays a message to remind you that you must remove references to the concord.rules file from the probe rules file before running the uninstall script, and the following prompt appears.
Enter return to continue or q to quit? ([RETURN]|q)
7. If you have not removed concord.rules from the probe rules file, type q to quit the uninstall.
For instructions, refer to “Removing Information from the Probe Rules File” on page 42.
If you have already edited the probe rules file to remove concord.rules, press Return to continue.
The following prompt appears:
Please enter the name of the Netcool database to uninstall from (or q to quit) [NCOMS]?
8. Press Return to accept the default Netcool ObjectServer name (NCOMS); or, if you are not using the default name, specify the Netcool database name.
The following prompt appears:
Please enter the Netcool database admin userID (or q to quit): [root]?
9. Enter the name of the database administrator’s user account for the Netcool ObjectServer.
The following prompt appears:
Please enter the Netcool database admin password (or q to quit):
eHealth Integration for Netcool User Guide
46 • Chapter 4 Uninstalling eHealth – Netcool
10. Enter the Netcool database administrator’s user password. (The installation program does not display the password as you type it.)
The uninstallation procedure removes the selected files.
For a Full Uninstall, the script displays a message indicating that you must confirm that the Netcool ObjectServer is running before proceeding, and the following prompt appears:
Enter return to continue or q to quit? ([RETURN]|q)
11. Leave the uninstallation running in its window, and open a new window in which to verify that the Netcool ObjectServer is running. (If it is not running, start it.) For details, refer to “Confirming the Netcool ObjectServer on UNIX” on page 18.
12. When you have confirmed that the ObjectServer is started, return to the uninstallation window and press Return at the prompt.
After the uninstallation script updates the Netcool database, you must shut down the Netcool ObjectServer to complete the uninstallation. The following prompt appears:
Is there a nco_objserv running with a -name objectserver? If so, shut it down before continuing. Enter return to continue or q to quit? (y|q) [y]
13. Leave the uninstallation running in its window, and in another window stop the Netcool ObjectServer. For details, refer to “Stopping the Netcool ObjectServer on UNIX” on page 18.
eHealth Integration for Netcool User Guide
Removing Other Components • 47
1
NOTENOTEDo not use the UNIX kill command to stop the Netcool ObjectServer, because that command would cause any changes to the ObjectServer to be lost.
14. When you have stopped the ObjectServer, return to the uninstallation window and press Return at the prompt.
The uninstallation continues, and the following prompt appears:
Now re-start the Omnibus Object Server and verify it is running by doing a ‘ps -ef | grep nco’. Enter return to continue or q to quit? (y|q) [y]
15. Leave the uninstallation running in its window, and in another window start the Netcool ObjectServer and confirm that it is running. For details, refer to “Starting the Netcool ObjectServer on UNIX” on page 18.
16. When you have started the ObjectServer, return to the uninstallation window and press Return at the prompt.
The uninstallation continues to completion.
eHealth Integration for Netcool User Guide
48 • Chapter 4 Uninstalling eHealth – Netcool
Removing Other Components from Windows
Use the following procedure to remove eHealth – Netcool from a Windows system.
NOTE
To perform a Full Uninstall of eHealth – Netcool, you must know the Netcool database username and password. The uninstallation program prompts you for them when appropriate.
To remove eHealth – Netcool from Windows:
1. Log in to the system from which you want to remove eHealth – Netcool.
2. Access Add/Remove Programs by selecting Start → Settings → Control Panel and double-clicking Add/Remove Programs.
3. Click eHealth Netcool Integration.
4. Click Remove.
The uninstall program begins.
5. Follow the instructions on the screen.
When the uninstall program finishes, eHealth – Netcool should be completely removed from the system.
eHealth Integration for Netcool User Guide
A
Troubleshooting
This chapter describes:
• Possible solutions to problems that you might encounter while trying to run eHealth reports from Netcool.
• The process to submit log files to Technical Support for help with troubleshooting eHealth – Netcool issues.
Troubleshooting Problems with eHealth ReportsThe following sections describe potential problems and possible solutions.
Drill-Downs Are Not SupportedError condition. When you select an alarm in the Netcool/OMNIbus Event List browser and select an eHealth report from the menu, the following error message may appear on the Web page for the report:
Drill-downs are not supported for this type of eHealth trap.
Explanation. This error may occur when you select an alarm in the Netcool/OMNIbus Event List browser and select an eHealth report to run, but the alarm is no longer active. The alarm has cleared from the system but not from the Event List browser.
Solution. Refresh the Event List browser to determine whether the alarm has cleared. Do not attempt to run eHealth reports for alarms that have been cleared.
49
50 • Appendix A Troubleshooting
eHealth Failed to Create the ReportError condition. When you select an alarm in the Netcool/OMNIbus Event List browser and select Alerts → eHealth → Trend Report, the following error message may appear on the Web page for the report:
eHealth failed to create the report. No variable was selected.
Explanation. This error may occur when you try to run eHealth Trend reports for the following trap types:
• Exception raised
• Exception cleared
• Exception updated
eHealth does not support Trend reports for these trap types.
Solution. Do not attempt to run Trend reports for these trap types. Instead, run At-a-Glance or Live Trend reports for information about exceptions.
eHealth Integration for Netcool User Guide
• 51
1
Live Trend Drill-Down Reports FailError condition. On a Windows system, when you select an alarm in the Netcool/OMNIbus Event List browser and select Alerts → eHealth → Live Trend Report, you may receive an error message similar to the following:F:\WINNT\System32\CMD.exe
=========================
E:\Program Files\Netcool\OMNIbus\desktop> "E:\Program Files\Netcool\OMNIbus\nethealth\nhiPerl.exe" "E:\Program Files\Netcool\OMNIbus\nethealth\nhiParseTrap.pl" root LiveTrend "alarm:172.16.7.77:8055:1007019:1012839438:1020202: LanWan: none: xxx: unknown enet port 2"
Explanation. On Windows systems, Netcool Live Trend drill-down reports will fail if you installed Live Trend in a directory name containing spaces (such as C:\livehealth\new folder).
Solution. On the Live Health system, change the %LH_HOME% environment variable to follow Microsoft’s standard conversion scheme. For example, if you installed the software in c:\livehealth\new folder, set the %LH_HOME% variable to c:\livehealth\NEWFOL~1.
Submitting Log Files to Technical SupportIf you experience a problem while using eHealth – Netcool, a member of Technical Support may direct you to create a troubleshooting Zip file which will be used to help diagnose the problem. eHealth provides a troubleshooting tool that collects copies of files from various subdirectories of the eHealth system to create this Zip file. However, because the eHealth – Netcool module runs on the Netcool system, rather than on the eHealth system (as is the case with other integration modules), you must collect the information contained in the nethealth directory and send it to the eHealth system.
eHealth Integration for Netcool User Guide

52 • Appendix A Troubleshooting
To send eHealth - Netcool troubleshooting information to the eHealth system:
1. On the Netcool system, copy the files in the nethealth/data (or nethealth\data) directory and save them in a file.
• On a UNIX Netcool system, create a tar file containing the contents of the data directory in the following path:
$OMNIHOME/nethealth/data
• On a Windows Netcool system, create a Zip file containing the contents of the data directory in the following path:
%OMNIHOME%\nethealth\data
2. Copy the tar or Zip file to the ehealth/tmp directory on the eHealth system (where ehealth is the directory where eHealth is installed).
3. Rename the file so that it can be identified by the troubleshooting tool. The filename must begin with netcool. For example: netcoolLogfiles.zip or netcoolLogfiles.tar.
4. Run the troubleshooting tool by entering the following command at the command prompt:
Run nhGetSupportInfo -type netcool
Or, you can run this tool on the eHealth Web interface, as described in the following procedure.
To access the eHealth troubleshooting tool on the Web Interface:
1. Log in to the eHealth Web interface as the administrator.
2. On the Administration tab, click Site Management and then click Advanced Logging.
3. On the Advanced Logging page, click the Create Technical Support Information link.
eHealth Integration for Netcool User Guide
• 53
1
4. Complete the fields on the Create Technical SupportInformation page and send the troubleshooting Zip file to Technical Support. For instructions, refer to the Web Help for this page.
eHealth Integration for Netcool User Guide

Index
AAdd/Remove Programs 48administrator rights 25alarms
cleared 49viewing in Event List 37
alerts 37At-a-Glance reports, running 37, 38
Ccheck lists
about 15for UNIX 16for Windows 17
class ID 37concord.rules
including in the probe rules file 30location of 31location to include in the probe rules
file 31removing references to 41
Ddrill-down reports
accessing 37not supported 49
EeHealth
installing 17logging in to 38system 39
eHealth – Netcool. See eHealth Integration for Netcool.
eHealth Integration for Netcoolinstalling 9removing 41uninstalling 43using 35
errors 49, 51Event List browser 37exceptions, reporting on 50
55
56 • Index
HHealth reports, customizing 6, 9, 30HP OpenView
trap probes 31HP-UX
editing the probe rules file 30location of installation script 21
Iinclude statement 32installation
check lists 15, 16, 17editing the probe rules file 30Full installation 20preparing for 13Scripts Only 20system requirements 13temporary directory 21types of 20UNIX 21Windows 25
integration, benefits of 11
Kkill command 18, 24, 33
LLive Health
logging in to 39requirements 15
Live Trenderror 51reports 37, 38, 39requirement 14
log files, submitting to Technical Support 51
NNCO Trapd Probe 34nco_objserv process 18nco_p_trapd command 33NCO_PA process 33nco_pa_shutdown command 18nco_pad command 18Netcool desktop
accessing 36, 37installing the integration module 20uninstalling the integration module 41
Netcool probe, restartingon UNIX 33on Windows 34
Netcool Process Agentrestarting 33starting 18stopping 18
Netcool/OMNIbusConductor 36ObjectServer. See ObjectServer.
Netscape Communicator 15nnm6.rules
including concord.rules in 31removing information from 41
OObjectServer
checking status ofon UNIX 18on Windows 19
confirming that it is running 17installing the integration module for 20starting
on UNIX 18on Windows 19
eHealth Integration for Netcool User Guide
Index • 57
stoppingon UNIX 18on Windows 19
OMNIHOME environment variable 18
Pprobe rules file
editing 30location to include concord.rules 31making a backup copy 31removing information from 42
probes, restartingon UNIX 33on Windows 34
Rreports
At-a-Glance 37errors 49, 50, 51generating 37Health 30Live Trend 37Trend 37, 50
requirements 13
SScripts Only
installation 20uninstallation 43
Solarisediting the probe rules file 30location of installation script 21
system requirements 13
Ttemporary directory 21trapd.rules
including concord.rules in 30removing information from 41
trapsreceiving 30trap types 50
Trend reportserrors 50running 38
troubleshooting 49, 51
Uuninstallation 43UNIX
installation check list 16installing the integration module 21ObjectServer
checking status of 18starting 18stopping 18
removing eHealth Integration for Netcool 44
restarting a Netcool probe 33uninstalling the integration module 44
Use as Default Login option 40
WWeb browser, using 38Web user 40Windows
administrator rights 25editing the probe rules file 30installation check list 17installing the integration module 25location of installation program 25
eHealth Integration for Netcool User Guide
58 • Index
ObjectServerchecking status of 19starting 19stopping 19
removing eHealth Integration for Netcool 48
restarting a Netcool probe 34uninstalling the integration module 48
eHealth Integration for Netcool User Guide