EDMopenSimDM Browser Reference Manual (R11) · EDMopenSimDM Application Reference Manual, R11...
72
Simulation Data Management EDMopenSimDM Browser Reference Manual (R11)
Transcript of EDMopenSimDM Browser Reference Manual (R11) · EDMopenSimDM Application Reference Manual, R11...

Simulation Data Management
EDMopenSimDM Browser
Reference Manual (R11)

EDMopenSimDM Application Reference Manual, R11
2015-12-14 Page 2
TABLE OF CONTENT
1 Introduction ........................................................................................................................................ 8
2 Login dialog ....................................................................................................................................... 8
3 Main window ................................................................................................................................... 10
3.1 Main menu ............................................................................................................................... 10
4 Panels ............................................................................................................................................... 11
4.1 Repositories and models .......................................................................................................... 12
4.2 Local file explorer .................................................................................................................... 12
4.3 File associations ....................................................................................................................... 12
4.4 Product Structure browser ........................................................................................................ 12
4.5 CAX viewer ............................................................................................................................. 13
5 File associations ............................................................................................................................... 13
6 User management............................................................................................................................. 15
6.1 Add user to EDMopenSimDM ................................................................................................ 16
7 “Repositories and models” panel ..................................................................................................... 17
7.1 Appearance .............................................................................................................................. 17
7.2 Server panel context menus ..................................................................................................... 17
7.3 Create repository ...................................................................................................................... 18
7.4 Create model ............................................................................................................................ 19
8 “PS browser” panel .......................................................................................................................... 19
8.1 “Tree” view .............................................................................................................................. 20
8.2 “Details” view .......................................................................................................................... 25
8.3 “Properties” view ..................................................................................................................... 25
8.4 Person ....................................................................................................................................... 26
8.4.1 New ...................................................................................................................................... 26
8.4.2 Update .................................................................................................................................. 27
8.4.3 Remove ................................................................................................................................ 28
8.4.4 Assign .................................................................................................................................. 28
8.4.5 Determination of access rights ............................................................................................. 29
8.5 Organization ............................................................................................................................. 30
8.5.1 New ...................................................................................................................................... 30
8.5.2 Update .................................................................................................................................. 30

EDMopenSimDM Application Reference Manual, R11
2015-12-14 Page 3
8.5.3 Remove ................................................................................................................................ 31
8.5.4 Assign .................................................................................................................................. 31
8.6 Methods .................................................................................................................................... 32
8.6.1 New method ......................................................................................................................... 32
8.6.2 New task ............................................................................................................................... 32
8.7 Approval .................................................................................................................................. 33
8.7.1 New ...................................................................................................................................... 33
8.7.2 Assign .................................................................................................................................. 34
8.7.3 Final approval ...................................................................................................................... 34
8.8 Comment .................................................................................................................................. 35
8.8.1 New ...................................................................................................................................... 35
8.8.2 New feedback ....................................................................................................................... 35
8.8.3 Remove ................................................................................................................................ 35
8.9 Property .................................................................................................................................... 36
8.9.1 New ...................................................................................................................................... 36
8.9.2 Remove ................................................................................................................................ 37
8.9.3 Assign .................................................................................................................................. 37
8.10 Export to archive ...................................................................................................................... 38
8.11 Import from archive and model ............................................................................................... 39
8.12 Child folders ............................................................................................................................. 40
8.12.1 New .................................................................................................................................. 40
8.12.2 Remove from this version ................................................................................................ 41
8.12.3 Remove from all versions ................................................................................................ 41
8.12.4 Copy ................................................................................................................................. 41
8.12.5 Cut .................................................................................................................................... 42
8.12.6 Paste ................................................................................................................................. 42
8.12.7 Paste link .......................................................................................................................... 42
8.13 Folder version .......................................................................................................................... 42
8.13.1 New folder version ........................................................................................................... 42
8.13.2 Show version .................................................................................................................... 43
8.13.3 Shift version ..................................................................................................................... 44
8.13.4 Remove version ............................................................................................................... 44
8.14 File handling ............................................................................................................................ 44

EDMopenSimDM Application Reference Manual, R11
2015-12-14 Page 4
8.14.1 Assign and upload files .................................................................................................... 46
8.14.2 New external file reference .............................................................................................. 47
8.14.3 Download ......................................................................................................................... 48
8.14.4 Open ................................................................................................................................. 48
8.14.5 Open with ......................................................................................................................... 48
8.14.6 Query ................................................................................................................................ 48
8.14.6.1 Model Query ............................................................................................................ 50
8.14.6.2 Node Query .............................................................................................................. 50
8.14.6.3 Element Query ......................................................................................................... 51
8.14.6.4 Curve Element Property Query ................................................................................ 51
8.14.6.5 Surface Element Property Query ............................................................................. 51
8.14.6.6 Point Element Property Query ................................................................................. 52
8.14.6.7 Directionally explicit Element Property Query ....................................................... 52
8.14.6.8 Material Property Query .......................................................................................... 52
8.14.6.9 Constraint Element Query ........................................................................................ 52
8.14.6.10 Applied Load Query ................................................................................................ 53
8.14.6.11 Displacement Query ................................................................................................. 53
8.14.6.12 Stress and Strain Query ............................................................................................ 53
8.14.6.13 Element Forces from Node Force Balance Query ................................................... 53
8.14.6.14 Displacement Survey ............................................................................................... 54
8.14.6.15 Stress or Strain Survey ............................................................................................. 54
8.14.6.16 Element Forces from Node Force Balance Survey .................................................. 54
8.14.7 Validate ............................................................................................................................ 54
8.15 Link files and folders to folder ................................................................................................. 56
8.16 Collections ............................................................................................................................... 57
8.16.1 Baselines .......................................................................................................................... 58
8.16.1.1 New baselines .......................................................................................................... 58
8.16.1.2 Show baseline .......................................................................................................... 59
8.16.1.3 Remove baseline ...................................................................................................... 60
8.16.2 In-work package ............................................................................................................... 60
8.16.2.1 New in-work package .............................................................................................. 60
8.16.2.2 Show in-work package ............................................................................................. 61
8.16.2.3 Remove in-work package ........................................................................................ 61

EDMopenSimDM Application Reference Manual, R11
2015-12-14 Page 5
8.16.3 LOTAR Archive .............................................................................................................. 61
8.16.3.1 New LOTAR AIP .................................................................................................... 61
8.16.3.2 Show LOTAR AIP ................................................................................................... 62
8.16.3.3 Remove LOTAR AIP .............................................................................................. 62
8.17 Find .......................................................................................................................................... 62
9 Local file explorer ............................................................................................................................ 65
10 Help panel ........................................................................................................................................ 65
11 Geometry and FEA viewer .............................................................................................................. 65
12 Web client ........................................................................................................................................ 66
12.1 Authentication .......................................................................................................................... 67
12.2 List of projects ......................................................................................................................... 67
12.3 Product structure and meta-data ............................................................................................... 68
12.4 File upload ............................................................................................................................... 69
12.5 Export ZIP package .................................................................................................................. 70
12.6 Add remark .............................................................................................................................. 70
12.7 Add approval ............................................................................................................................ 70
12.8 Import folder (ZIP package) .................................................................................................... 71
12.9 Delete folder ............................................................................................................................. 71
TABLE OF FIGURES
Figure 1. Login dialog ................................................................................................................................ 8
Figure 2. Dialog to manage server connections ......................................................................................... 9
Figure 3. Warning about untrusted secure connection. .............................................................................. 9
Figure 4. Main window ............................................................................................................................ 10
Figure 5. Panel operations ........................................................................................................................ 12
Figure 6. The three panels of the product structure browser ................................................................... 13
Figure 7. “EDMopenSimDM file association management” panel ......................................................... 14
Figure 8. Add a file association via file extension ................................................................................... 15
Figure 9. User management panel ........................................................................................................... 16
Figure 10. Create a new user .................................................................................................................... 16
Figure 11. “Repositories and models” panel ............................................................................................ 17
Figure 12. Context menu for models ....................................................................................................... 18
Figure 13. Context menu if no model is selected ..................................................................................... 18
Figure 14. Dialog to create repository ..................................................................................................... 18

EDMopenSimDM Application Reference Manual, R11
2015-12-14 Page 6
Figure 15. Dialog to create a model / product structure .......................................................................... 19
Figure 16. Tool bar in “PB browser” panel ............................................................................................. 20
Figure 17. Product structure context menu for administrators ................................................................ 21
Figure 18. Folder context menu for administrators ................................................................................. 23
Figure 19. “Details” view ........................................................................................................................ 25
Figure 20. “Properties” part of the “PS browser” panel .......................................................................... 26
Figure 21. Dialog to create a person ........................................................................................................ 27
Figure 22. Examples of a removed, but still assigned person and an organization ................................. 28
Figure 23. Dialog to assign person to folder ............................................................................................ 28
Figure 24. Dialog to add organization ..................................................................................................... 30
Figure 25. Dialog to assign organization to folder .................................................................................. 31
Figure 26. Dialog to add method ............................................................................................................. 32
Figure 27. Dialog to create a task ............................................................................................................ 33
Figure 28. Dialog to define a type of approval ........................................................................................ 33
Figure 29. Dialog to assign approval ....................................................................................................... 34
Figure 30. Dialog for giving final approval ............................................................................................. 35
Figure 31. Dialog to add comment .......................................................................................................... 35
Figure 32. Dialog for the definition of properties .................................................................................... 37
Figure 33. Assigning a property to a folder ............................................................................................. 38
Figure 34. Export to archive options ........................................................................................................ 38
Figure 35. Alert window after ZIP package is downloaded .................................................................... 39
Figure 36. Pop-up window for “Import from model...” ........................................................................... 40
Figure 37. Dialog to create child folder ................................................................................................... 41
Figure 38. Child folder removal from all parent folder versions ............................................................. 41
Figure 39. Child folder version replacement for all parent folder versions ............................................. 41
Figure 40. Link object in the detail view of a folder ............................................................................... 42
Figure 41. Question to create new folder version .................................................................................... 43
Figure 42. “Show version” dialog ............................................................................................................ 43
Figure 43. A folder version in its own product structure browser panel ................................................. 44
Figure 44. “Shift version” dialog ............................................................................................................. 44
Figure 45. Files context menu for AP209e2 files .................................................................................... 45
Figure 46. “New file -> Upload...” dialog ............................................................................................... 46
Figure 47. Alert window after upload is finished .................................................................................... 47
Figure 48. Alert window after file is downloaded ................................................................................... 48
Figure 49. Queries implemented in this release ....................................................................................... 49
Figure 50. The text query panel is to the left ........................................................................................... 49
Figure 51. Validation options .................................................................................................................. 55
Figure 52. Message after completed AP209e2 validation ....................................................................... 55
Figure 53: Information window for “Check STEP-files...” ..................................................................... 56
Figure 54: Overview of STEP-files given by “CheckSTEP-files...” function ......................................... 56

EDMopenSimDM Application Reference Manual, R11
2015-12-14 Page 7
Figure 55. “File reference” dialog ........................................................................................................... 57
Figure 56. “Folder reference” dialog ....................................................................................................... 57
Figure 57. Three collection type sub-menus in top folder context menu ................................................ 58
Figure 58. The baseline creation panel .................................................................................................... 59
Figure 59. “Show baselines” opens another product structure panel on the left side .............................. 60
Figure 60. Creation of an In-work package ............................................................................................. 61
Figure 61. Creation of a LOTAR AIP ..................................................................................................... 62
Figure 62. Example of a “Find”-operation .............................................................................................. 63
Figure 63. Advanced options for Find functionality. ............................................................................... 64
Figure 64. Show assignments .................................................................................................................. 65
Figure 65. “EDMopenSimDM viewer” panel ......................................................................................... 66
Figure 66. Login form .............................................................................................................................. 67
Figure 67. Available repositories and projects ........................................................................................ 67
Figure 68. "Open" menu item .................................................................................................................. 68
Figure 69. Product structure ..................................................................................................................... 68
Figure 70. "Info" tab with meta-data ....................................................................................................... 69
Figure 71. "Files" tab with meta-data ...................................................................................................... 69
Figure 72. "Properties" tab data ............................................................................................................... 69
Figure 73. Form to upload a file .............................................................................................................. 70
Figure 74. Form to add a remark ............................................................................................................. 70
Figure 75. Form to add an approval ......................................................................................................... 71
Figure 76. Form to import folder ............................................................................................................. 71
Figure 77. Delete confirmation in Mozilla Firefox .................................................................................. 72
TABLE OF TABLES
Table 1: Differences in types of folder collections .................................................................................. 57
Table 2. List of wildcard options for the Find... function ........................................................................ 63

EDMopenSimDM Application Reference Manual, R11
2015-12-14 Page 8
1 Introduction This is the reference manual to the EDMopenSimDM application. The reference manual lists all
available functionality. In addition to this reference manual there is a Usage Guide; it is recommended
to read the Usage Guide first to understand the use cases of EDMopenSimDM.
EDMopenSimDM is a client desktop application that communicates via web-services with the
EDMopenSimDM server. The client is also called “SimDM browser”. The application fulfills the
following purposes:
Management of design and engineering analysis data
Product structure driven file management
Resource allocation
Collaboration and communication
Separation of responsibilities
Viewing of design and engineering data
Textual queries into AP209e2
Archival of data packages
Supply chain management via limited web-access.
2 Login dialog After start of the SimDM browser its main window is opened, and the “Login to EDMopenSimDM
server” dialog appears (see Figure 1).
Figure 1. Login dialog
The “Server:” dropdown list contains predefined names of server connections. Connection parameters
can be added or changed in the "Servers" dialog when the "Edit server list" button is selected.

EDMopenSimDM Application Reference Manual, R11
2015-12-14 Page 9
Figure 2. Dialog to manage server connections
By default, connection settings point to the following local URL of the SimDM web server:
http://localhost:8080/EDMWS
If the “Cancel” button is clicked, the dialog disappears and no access is given to the system. It is
possible to launch the dialog again by the “Server” → “Login” menu item.
Click the “Login” button to get access to the selected server.
Some servers require secure connections, that is, the URL of the connection starts with HTTPS.
In this case it is recommended that the server has a SSL certificate, signed by a certificate authority or
certification authority (CA). Only then the client will consider such SSL certificate as trusted.
The server may have a self-signed SSL certificate. In this case the client cannot consider such SSL
certificate as trusted by default. Therefore, the following dialog (see Figure 3) will appear.
Figure 3. Warning about untrusted secure connection.
The certificate can be viewed by clicking the button with yellow triangle. Then the user decides
whether to trust the certificate. If so, the certificate needs to be installed in the system by clicking the
button "Install certificate".

EDMopenSimDM Application Reference Manual, R11
2015-12-14 Page 10
At the next login the "Untrusted Connection" dialog will not appear, if the certificate was installed as
described above.
3 Main window The main window of the application looks like in Figure 4 (left and right panel containers have open
panels).
Figure 4. Main window
The SimDM browser has a dual panel user interface. Such user interface is based on the orthodox file
manager (OFM) principle, also known as Commander-like file managers, the family of file managers
based on the venerable Norton Commander interface. As opposed to file managers, the SimDM
browser serves not only the functionality to work with files; also other types of information are
managed, such as product structures, persons, organization and approvals. These data and their
corresponding functionality are grouped into different types of panels.
Panels are grouped into two panel containers: left and right. Many panels can be open at the same time,
but each panel container shows only one panel at a time. Panel positioning is controlled by the buttons
to the right of the “help” menu entry. It is possible to switch between panels in the panel container; use
“Show open panels list” button (down-arrow) on the tool bar of the panel container for that. A panel
can be moved into the opposite panel container or closed (deleted from both panel containers). And, the
two panel containers can be organized so that only one of them is visible; that is, a single panel may
take your entire screen.
3.1 Main menu The main menu (see Figure 4) contains the following menu items:
Server
Login – “Login” dialog appears (see chapter 2), the same as at system start-up.
Main menu
Status bar
Toolbar to manage panels
Left panel caption
Right panel caption
- Button to move right panel to
left
- Button to get list of open panels
in right panel container
- Button to close window on right
panel
EDMopenSimDM Application Reference Manual, R11
2015-12-14 Page 11
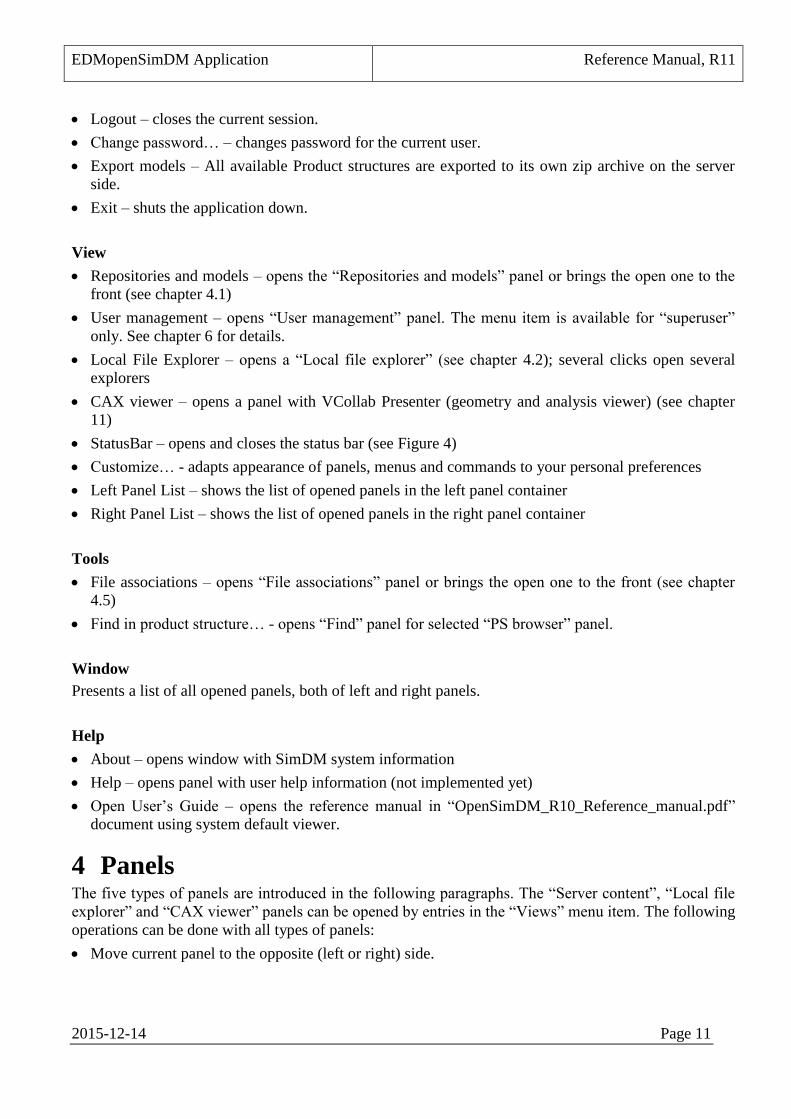
Logout – closes the current session.
Change password… – changes password for the current user.
Export models – All available Product structures are exported to its own zip archive on the server
side.
Exit – shuts the application down.
View
Repositories and models – opens the “Repositories and models” panel or brings the open one to the
front (see chapter 4.1)
User management – opens “User management” panel. The menu item is available for “superuser”
only. See chapter 6 for details.
Local File Explorer – opens a “Local file explorer” (see chapter 4.2); several clicks open several
explorers
CAX viewer – opens a panel with VCollab Presenter (geometry and analysis viewer) (see chapter
11)
StatusBar – opens and closes the status bar (see Figure 4)
Customize… - adapts appearance of panels, menus and commands to your personal preferences
Left Panel List – shows the list of opened panels in the left panel container
Right Panel List – shows the list of opened panels in the right panel container
Tools
File associations – opens “File associations” panel or brings the open one to the front (see chapter
4.5)
Find in product structure… - opens “Find” panel for selected “PS browser” panel.
Window
Presents a list of all opened panels, both of left and right panels.
Help
About – opens window with SimDM system information
Help – opens panel with user help information (not implemented yet)
Open User’s Guide – opens the reference manual in “OpenSimDM_R10_Reference_manual.pdf”
document using system default viewer.
4 Panels The five types of panels are introduced in the following paragraphs. The “Server content”, “Local file
explorer” and “CAX viewer” panels can be opened by entries in the “Views” menu item. The following
operations can be done with all types of panels:
Move current panel to the opposite (left or right) side.

EDMopenSimDM Application Reference Manual, R11
2015-12-14 Page 12
Retrieve list of available (opened before) panels in the left or right panel container1. The appropriate
panel is shown when it is selected from the list.
Close current panel.
These three operations are available in the right (and left) panel captions as three buttons (see Figure 5).
Figure 5. Panel operations
4.1 Repositories and models The “Repositories and models” panel displays repositories and models in the SimDM database. At
system start it appears on the left side. Each model represents a self-contained Product Structure (PS).
References across model boundaries are not supported.
Note: The default server side installation includes the test data model “Ultralight_Glider” in repository
“InitialRepository”.
4.2 Local file explorer This panel represents the file structure on the local client machine as a tree. It is possible to Drag-and-
drop files between “Local file explorer” and “Product Structure browser” panels.
Note: The “Windows Explorer” application can be used instead of the “Local file explorer” panel. But it is
only possible to drag one (or several files) from “Windows Explorer” and drop it into the “Product Structure
browser” panel, not vice versa.
4.3 File associations The “File associations” panel (see 5 for details) is opened by the main menu entry “Tools>File
associations”. Files from the SimDM server are opened according to their extensions. This panel
manages associations between file extensions (.doc, .pdf, .txt and so on) and external applications that
will be used to open files that are stored in or referenced from SimDM.
4.4 Product Structure browser This panel represents Product Structure (PS) data, such as Folder, Approval, Person and attached File.
The panel offers the following three views; these are from left to right the following:
Tree. FOLDER objects are shown in a tree structure, that is, with their parent-child relationships.
The tree-view behaves like a folder structure in a file system.
Details. The Details-view displays the content of a selected folder, such as, child folder objects,
approvals, files and so on. Folder meta data may be viewed by information category; there is one tab
for each category (“Approvals”, “Organizations”, “Persons” and so on). Or, all types of objects can
be seen together in the “All items” tab.
Properties. Each item in the Details-view may have several properties. All properties of a selected
item are presented in the grid of the Properties-view.
1 This operation can be performed by using hot keys (Alt+F1 – for the left panel container, Alt+F2 – for the right
panel container).

EDMopenSimDM Application Reference Manual, R11
2015-12-14 Page 13
Figure 6. The three panels of the product structure browser
Only the Tree-view is shown by default. The other views can be shown/hidden by using tool bar
buttons inside the “Product Structure browser” panel.
Several Product Structure browser panels can be open simultaneously, but maximum two can be
viewed concurrently.
4.5 CAX viewer VCollab Presenter is started in this panel as an ActiveX component. Functionality for loading and
manipulating the view of a 3D model is available from the main menu and from a context menu.
Please, refer to the context menu “Help…” entry for guidance on how to apply this functionality.
Besides opening this panel manually form the “CAX viewer” menu item, it will start automatically
when you open a file that was converted to the CAX format at upload time (AP209e2, AP203 and
NASTRAN files). Starting VCollab may take some time – please, be patient.
5 File associations The “EDMopenSimDM file association management” panel can be shown by choosing the “Tools” →
“File associations” main menu item after having logged in.
The panel presents dependencies between file extensions (.txt, .pdf, .doc), descriptive file type names
and paths to one or several viewer applications that are adequate to open this sort of file.
Descriptive file type names are in the “File type” column. Usually it is a short human readable text; for
example: “ABAQUS FILE”, “CATIA V4”, “NASTRAN Output File”.
Column “External viewer” can contain a path to an external executable that is used by default to open
files of that specific type from the SimDM browser. If a path is not set, the text “By system default” is
shown. This means that such files are opened from the SimDM browser by the application that is
registered for this specific file extension in the client machine, that is, normally VCollab Presenter.
Note: If you should change the default setting and then want to redo your change, simply empty the path in
the “External viewer” field. This will again make VCollab the selected application.

EDMopenSimDM Application Reference Manual, R11
2015-12-14 Page 14
Column “Preferred” indicates whether the entry in column “External viewer” is the preferred tool to
open the correspondent type of file.
Note: Uploaded .stp-files of types “AP203” or “AP209” and NASTRAN-files with extensions .bdf and .op2
are converted to CAX. Unless “Preferred” indicates anything else, the SimDM internal CAX viewer tool,
VCollab Presenter, will be used to open the uploaded file (“Open” context menu item).
Column “Command options” represents command line arguments for specified external viewer.
Command line option <FILE> represents the file that will be opened by the external viewer. Additional
command line parameters that are accepted by the specified external viewer may be added.
Figure 7 shows the panel where the table is grouped by the “Description” column. Any column header
can be dragged and dropped into a place above the table to group the table by that column.
Figure 7. “EDMopenSimDM file association management” panel
The table is editable. New items can be added (“Add” button), edited (“Edit” button) and removed
(“Remove” button).

EDMopenSimDM Application Reference Manual, R11
2015-12-14 Page 15
Figure 8. Add a file association via file extension
A single file extension may be associated with one or several tools. To give the user a selection of
applications to open a file with, use the “File association:” “Add”-command (see Figure 8). Fill into the
pop-up window the same extension name that there is a file association entry for already. Enter a
description into the field “File type:” and into “External viewer:” the path to the executable on your
machine or network
In case of several tools, the following applies:
The file extension editor has a checkbox where you can specify that this tool is the preferred or
default tool (see Figure 8). The preferred tool is the tool that shall be started when you double-click
on a file with the corresponding extension, even with more than one tool being assigned to the file
type.
The “Open with” command (right-click menu for a file) displays a form where you can select which
tool shall be started.
6 User management Each user of EDMopenSimDM has a login identifier, which gives access to the EDMopenSimDM
client and server. Such login identifiers are defined in the “User Management” panel (see Figure 9).
EDMopenSimDM is delivered with several users defined. Each user has password “db”.

EDMopenSimDM Application Reference Manual, R11
2015-12-14 Page 16
Figure 9. User management panel
6.1 Add user to EDMopenSimDM The User management panel enables you to add more users. Selecting “Add” launches the pop-up
window as seen in Figure 10.
Figure 10. Create a new user
EDMopenSimDM users are assigned types of access to the system. Users may play two types of roles:
UserManager2 – can create/update/delete users.
SystemManager – can create new product structures (see 7.4), create new login identifiers and has
the rights of a SystemUser.
SystemUser – can play roles in product structures as Admin, Editor or Reader (see 8.4.4).
A SystemManager typically creates a product structure top item and the main product structure tree
below; SystemUser will extend this with branches as needed.
Note: Persons with login identifiers that are not explicitly assigned to a product structure will only see model
names in the repositories and models panel, but will not be able to open models in the product structure
browser.
2 Only “superuser” is defined with UserManager role.

EDMopenSimDM Application Reference Manual, R11
2015-12-14 Page 17
New users will be given the following default password: “<login identifier>_simdm”.
7 “Repositories and models” panel If login is successful, the “Repositories and models” panel is opened in a panel container. This panel is
closed and opened by the following main menu item:
“View” → “Repositories and models”
7.1 Appearance
Figure 11. “Repositories and models” panel
Appearance of the panel can be seen on Figure 11. It consists of three parts: repositories, models and
information part.
The left side of the panel contains the list of repositories that are available to store models with Product
Structures (PS). New repositories can be created using the context menu (right-click for right-handed
mouse) for this part of the panel.
Each repository can have zero, one or many models. The right side of the panel contains the list of
models for the selected repository. New product structure models can be created either from scratch or
can be imported from an archive package (see 8.11).
The lower part of the panel includes a status view, that is, name, description, created date and so on for
the selected model.
7.2 Server panel context menus The left side with the repositories has only one menu item in its context menu – “Create repository…”
The right side has two context menus, one for a selected model (see Figure 12) and another one if no
model is selected (see Figure 13).

EDMopenSimDM Application Reference Manual, R11
2015-12-14 Page 18
Figure 12. Context menu for models
Figure 13. Context menu if no model is selected
The following menu items are available.
“Open” – opens product structure (PS) in a separate “PS browser” panel (see chapter 8). Mouse
double click can be used instead of this menu item.
“Info” – opens table with information about the product structure.
“Create model…” – opens dialog to create a new model.
“Delete model…” – opens dialog to confirm the permanent removal from the database of the model
and of all the AP209e2 models derived from it.
“Import from archive…” – retrieves an archived product structure or baseline (see 8.11 Import from
archive) into a new model.
7.3 Create repository When “Create repository…” context menu item is selected, the following dialog appears (see Figure
14). Both text fields are empty by default.
Figure 14. Dialog to create repository

EDMopenSimDM Application Reference Manual, R11
2015-12-14 Page 19
ISO 10303 STEP and, thus, EDMopenSimDM require special syntax for repository names. It needs to
start with an ASCII letter, followed by ASCII letters, digits and underscores. Blanks and punctuation
symbols are not allowed. It is not possible to enter invalid symbols.
Description can be multiline text with any characters.
7.4 Create model When the “Create model…” context menu item is selected, the following dialog appears (see Figure
15). The first item to be selected is in the “Type” combo box.
The “Name” text field proposes a default name for the PS.
Figure 15. Dialog to create a model / product structure
The “Model” text field contains the name that will be given to the EDMopenSimDM model for this PS.
The same constraints for valid characters apply as for EDMopenSimDM repository: it should start with
an ASCII letter, followed by ASCII letters, digits and underscores. Blanks and punctuation symbols are
not allowed. It is not possible to enter invalid symbols.
“Description” and “Comment” are optional text fields.
The current user is automatically assigned to the Product Structure. The “Login” attribute of that person
object contains the login credentials of the current EDMopenSimDM user. This person becomes the
manager of this PS.
A top folder object will be created for the PS that contains the following additional attributes:
Creator – the person who created the PS.
Introduced – the date and time when the PS was created. The local time is used.
Model – the name of the EDMopenSimDM model where the PS is stored persistently.
Persons – the person who created the PS; although being an aggregate, only one element is stored.
8 “PS browser” panel The “PS browser” panel is opened either by selecting the “Open” context menu item for models in the
“Repositories and models” panel or by double-clicking on a model name. The “PS browser” panel
opens opposite to the “Repositories and models” panel. The caption at the top of the panel has the
following format:

EDMopenSimDM Application Reference Manual, R11
2015-12-14 Page 20
_Repository_/_Model_ - Person: _user_login_ (_user_role_)
Where _Repository_ is EDMopenSimDM repository name, _Model_ is EDMopenSimDM model
name, _user_login_ is login of logged in user and _user_role_ is user role for the current PS (Admin,
Editor or Reader).
The “PS browser” panel contains three views: Tree, Details and Properties. By default only the Tree-
view is shown. The views can be shown or hidden by using the tool bar in the panel (see Figure 16).
Figure 16. Tool bar in “PB browser” panel
8.1 “Tree” view The left view (Tree) includes the product structure as tree. Top folder and children items have different
context menus (see Figure 17 and Figure 18).
Note, the content of menus is dependent on user access rights for the top folder and each subordinate
folder (see 8.4.5 for how folder access rights are determined). A user with “admin” access rights will be
able to see all menu items represented in Figure 17 and Figure 18. A user with “editor” access rights
will be able to see less menu items. A user with “reader” access rights will be able to see only “Add
comment…”, “Copy”, “Info…” and “Export to archive…” menu items. A user without any access
rights to a folder, will not be able to see any context menu items for this folder.
The top folder represents the product structure itself. Besides children items, it may be assigned the
following types of resources:
persons,
organizations,
approvals,
properties,
methods.
These resources are definitions only. They may be assigned to individual children items as the product
structure evolves. First then a person, for example, gets a role and a property a value. The following
rules apply:
All resources are available to all children items in a product structure, also to new versions of these.
Resources may be removed. If they at that point in time, were already used and assigned, these
assignments will not be removed. However, the resource will not be available any more for new
assignments.
Resources can not be assigned to children items that are in read-only mode (which may be either
because the user only has read-only access or because the item has been finally approved and is,
therefore, frozen).
Three buttons to
show/hide panel views
Opens copy of “PS
browser” panel

EDMopenSimDM Application Reference Manual, R11
2015-12-14 Page 21
The resources themselves, however, can be edited – by users with proper access rights - even though
their assignments may not. All children of a product structure may be frozen; anyhow, it will be
possible to change the name of a person who is assigned to one or several of these children.
Figure 17. Product structure context menu for administrators
The context menu for a product structure top folder consists of the following menu items:
“New approval…” – opens dialog to create “approval” definition object for later use in assigning
approvals to folders (see 8.7.1). The created approval will appear in the middle (Details) view. Only
administrators can perform this function.
“New child…” – opens dialog to create a first level folder (see 8.12).
“New comment…” – opens dialog to create “comment” object (see 8.8). Created comments appear
in the middle (Details) view.
“New task method…” – opens dialog to create “method” object (see 8.6). Methods may later be
used in task descriptions (see 8.6.2). The created method will appear in the middle (Details) view.
Only administrators can perform this function.

EDMopenSimDM Application Reference Manual, R11
2015-12-14 Page 22
“New organization…” – opens dialog to create “organization” object (see 8.5.1). The created
organization will appear in the middle (Details) view. Only administrators can perform this function.
“New person…” – opens dialog to create “person” object (see 8.4.1). The created person will appear
in the middle (Details) view. Only administrators can perform this function.
“New property…” – opens dialog to create “property” object (see 8.9.1). The created property will
appear in the middle (Details) view. Only administrators can perform this function.
“Baseline” -> “New baseline…” – opens dialog to create a baseline and define its contents (see
8.16.1.1). Only administrators can perform this function.
“Baseline” -> “Show” -> ... – lists all available baselines and opens the contents of the one selected
in a separate panel (see 8.16.1.2).
“Baseline” -> “Remove” -> ... – lists all available baselines and removes the selected one after
confirmation (see 8.16.1.3). Only administrators can perform this function.
“In-work package” – contains menu items similar to “Baseline” (see 8.16.2).
“LOTAR package” – contains menu items similar to “Baseline” (see 8.16.3).
“Find…” – opens panel search form to specify criteria for finding text strings in the database (see
8.17).
“Rename…” – opens dialog to change the name of top folder.
“Expand/Collapse” – expands or collapses the branch below the selected top folder.
“Final approval…” – assigns a final approval to the product structure and its entire contents (see
8.7.3). A final approval is required to include a folder in a baseline. Only administrators can perform
this function.
“Export to archive…” – stores a zip-file that includes the AP209e2 STEP file of the
EDMopenSimDM management data and the files that are attached to the entire product structure in
a user-defined location (see 8.10).
“Import from model…” – copies the contents of a different model and possibly different repository
as branch to the current folder.
“Import Product structure…” –
“Paste” – adds a copied or cut tree branch (only “folder” objects, not files) to the selected folder.
Requires that a folder was copied or cut.
“Lock” – locks the entire tree for access by others than the person entitled by this command; the
access rights of this person (admin, editor, reader) will remain unchanged. The menu item will
change to "Unlock". The lock will automatically be removed when the assigned person is deleted.
“Unlock” – this menu item is the toggle to “Lock”. The original access rights will be re-established.
“Info…” – opens table with information about the product structure.
EDMopenSimDM Application Reference Manual, R11
2015-12-14 Page 23
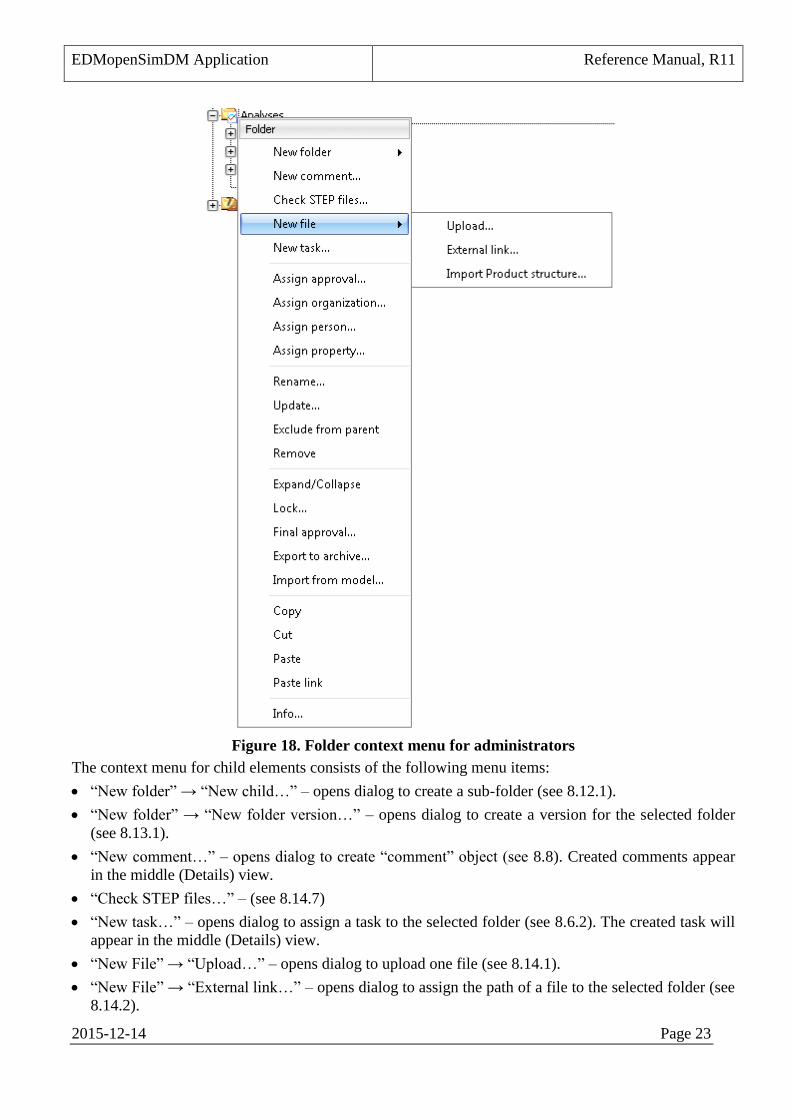
Figure 18. Folder context menu for administrators
The context menu for child elements consists of the following menu items:
“New folder” → “New child…” – opens dialog to create a sub-folder (see 8.12.1).
“New folder” → “New folder version…” – opens dialog to create a version for the selected folder
(see 8.13.1).
“New comment…” – opens dialog to create “comment” object (see 8.8). Created comments appear
in the middle (Details) view.
“Check STEP files…” – (see 8.14.7)
“New task…” – opens dialog to assign a task to the selected folder (see 8.6.2). The created task will
appear in the middle (Details) view.
“New File” → “Upload…” – opens dialog to upload one file (see 8.14.1).
“New File” → “External link…” – opens dialog to assign the path of a file to the selected folder (see
8.14.2).
EDMopenSimDM Application Reference Manual, R11
2015-12-14 Page 24
“New File” → “Import Product structure…” –
“Show version” – This menu item only appears for folders with two or more versions. Versions are
denoted by integer values like the following: “1”, “2”, “3” and so on3. The integer value that
represents the current folder version is greyed and disabled. When selecting a version number, the
correspondent folder version is shown in a new “PS browser” panel (see 8.13.2).
“Shift version” – This menu item only appears for folders with two or more versions. The menu
shows the identifiers of the available folder versions, such as, “1”, “2”, “3” and so on4. When
selecting this menu item, the correspondent folder version will be used as current folder version and
will replace the previous version as child to the current parent folder version (see 8.13.3).
“Assign approval…” – opens dialog to assign one of the approvals that are defined for this product
structure to the selected folder (see 8.7.2). The created approval will appear in the middle (Details)
view. Only administrators can perform this function.
“Assign organization…” – opens dialog to assign an organization to the selected folder (see 8.5.4).
The created organization will appear in the middle (Details) view. Only administrators can perform
this function.
“Assign person…” – opens dialog to assign a person to the selected folder (see 8.4.4). The created
person will appear in the middle (Details) view. Also the default access rights for the person may be
changed here. Only administrators can perform this function.
“Assign property…” – opens dialog to assign a property to the selected folder (see 8.9.3). The
created property will appear in the middle (Details) view.
“Rename…” – opens dialog to change name of selected child element.
“Update…” – opens dialog to update properties (name, description and type) of a selected folder.
“Remove” → “Remove from all versions” – removes selected folder and subordinate branches
permanently from all parent folder versions (see 8.12.3).
“Remove” → “Remove from this version” – removes selected folder from its parent, but only from
the current version of parent folder (see 8.12.2).
“Expand/Collapse” – Expands or collapses the next level below the selected folder.
“Lock” – locks the current branch for access by others than the person entitled by this command; the
access rights of this person (admin, editor, reader) will remain unchanged. The menu item will
change to "Unlock". The lock will automatically be removed when the assigned person is deleted.
“Unlock” – this menu item is the toggle to “Lock”. The original access rights will be re-established.
“Final approval…” – assigns a final approval to a folder and its subordinate branches (see 8.7.3). A
final approval is required to include a folder in a baseline. Only administrators can perform this
function.
“Export to archive…” – stores a zip-file that includes the AP209e2 STEP file of the SimDM
management data and the files that are attached to the selected folder and its subordinate branches in
a user-defined location (see 8.10).
“Import from model…” – copies the contents of a different model and possibly different repository
as branch to the current folder.
“Copy” – remembers selected folder and its subordinate branches (see 8.12.4). The collection can be
pasted to another parent in the same product structure.
3 The count of menu items is equal to the number of folder versions.
4 The number of menu items is equal to the number of folder versions.

EDMopenSimDM Application Reference Manual, R11
2015-12-14 Page 25
“Cut” – remembers selected folder and its subordinate branches and removes them after paste (see
8.12.5). The collection can be added to another parent by “Paste”.
“Paste” – creates previously copied or cut folder and its possibly attached branches below selected
folder; also meta data are pasted (see 0).
“Paste link” – Creates link of copied folder (or file)
“Info…” – opens table with information about the selected folder.
8.2 “Details” view The middle view (Details) represents top folder content (children folders, approvals, persons,
organizations…) or the content of a selected folder (children folders, assignments, attached files,
references, comments…). The view can be shown/hidden by toggling the “Details” button on the tool
bar (see Figure 16).
There are a number of tabs to represent either all kinds of objects (“All items” tab) or objects by their
kind (“Children”, “Approvals”, “Persons” and so on).
“All items” tab represents all kind of objects as a list with an icon for each item (see Figure 19).
Figure 19. “Details” view
The first item of the list is the special item “..”. The “Details” view will display the content of the next
higher level (one level up) of the PS tree by double-click on the “..” item. The same happens if the
“Enter” key is pressed when this item was selected.
The “Details” view displays the content of the next lower level (one level down) of the PS tree by
double-click on the folder item. The same happens if the “Enter” key is pressed when the folder was
selected.
Each object on the list has its own context menu.
The remaining tabs (“Children”, “Approvals”, “Persons” and so on) display one kind of object per tab.
Each item type in “All items” tab has its own context menu items. The content of the context menu
depends on the user’s access rights to the selected top folder. For example, user with “reader” access
rights is not able to use menu items concerning functionality for editing. User, who does not have any
access rights to a folder, is not be able to see any content of a folder, selected in a “Tree” view.
8.3 “Properties” view The right part of the panel (“Properties”) displays scalar and aggregated properties (attributes) of a
selected object (see Figure 20).

EDMopenSimDM Application Reference Manual, R11
2015-12-14 Page 26
Figure 20. “Properties” part of the “PS browser” panel
The values of a selected object cannot be changed in the “Properties” grid, only browsed.
8.4 Person
8.4.1 New
A new person object can be added to the Product Structure as a user. The person is assigned default
access rights, which may be changed (“Assign person” functionality) for each PS folder. The following
dialog appears (see Figure 21) after the “New person…” context menu was selected.

EDMopenSimDM Application Reference Manual, R11
2015-12-14 Page 27
Figure 21. Dialog to create a person
By default all input fields are empty. The greyed texts are proposals for input and select values. The
combo box “Type” contains the following possible types for person access rights (see 6):
Admin
Editor
Reader
Undefined
The administrator (admin) defines the entire infrastructure for his/her product strcuture in terms of
resources, methods, properties, organizations and types of approval status. Administrators can include
other persons with login access to EDMopenSimDM to his/her product structure and restrict the access
rights for these persons to the product structure and to individual folders in it. Only administrators can
apply final approvals as needed for baselining. And only they can create baselines. Administrators may
assign a person as administrator or editor of a branch and will typically include a task description with
this assignment.
Editors fill folders with contents in terms of subordinate folders and files. Different editors may assign
their approvals to folders. The folder responsible will respond with feedback to a task description.
Readers can browse through the product structure contents.
The combo box “Login” contains available SimDM logins, but it is possible to write login names of not
yet created SimDM users instead.
A person has a name in addition to a login name.
Note: It is currently possible to assign different names to the same login-name in different product structures.
This feature will probably change in future EDMopenSimDM releases so that a single login-name is always
assigned the same person name.
Text fields “Description” and “Comment” are optional and can be omitted.
8.4.2 Update
A person object can be edited by selecting “Update…” context menu item for selected person object in
“Details” view. The same dialog (see Figure 21) appears. Text in all fields can be changed. Person
object is updated by clicking “OK” button.
EDMopenSimDM Application Reference Manual, R11
2015-12-14 Page 28
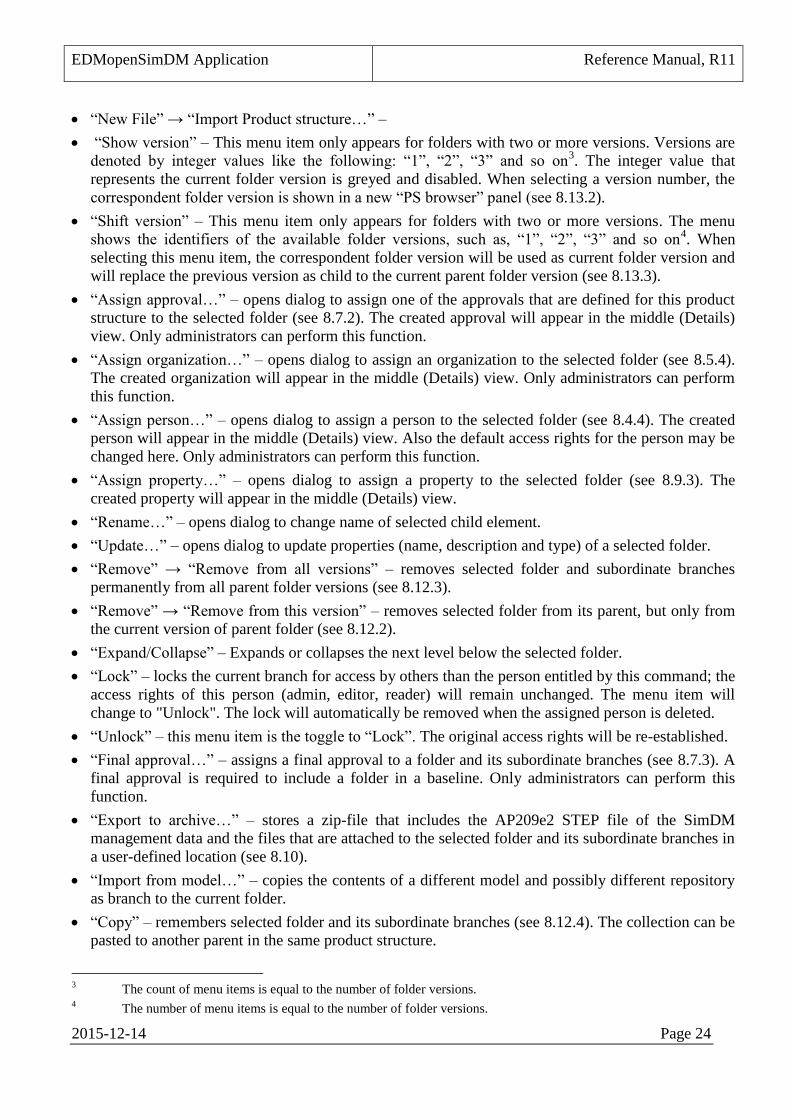
8.4.3 Remove
A person is removed by the “Remove” entry in the context menu when you right-click on a person’s
name in the “All Items”-tab of the detail view.
The same entry is used to remove a person both from its assignment to a folder and from the entire
model.
Figure 22. Examples of a removed, but still assigned person and an organization
To remove a person from the model select the top folder of the model and select “Remove”. If the
person is assigned to a folder within the selected model, he/she will not be removed, but can not be
assigned any more. This is indicated by the name of the person being struck through in the detail view
of the top folder. The assignment occurrences to lower level folders will not change appearances. Such
partial removal can be undone by using the “Update …” entry in the person context menu on the top
folder.
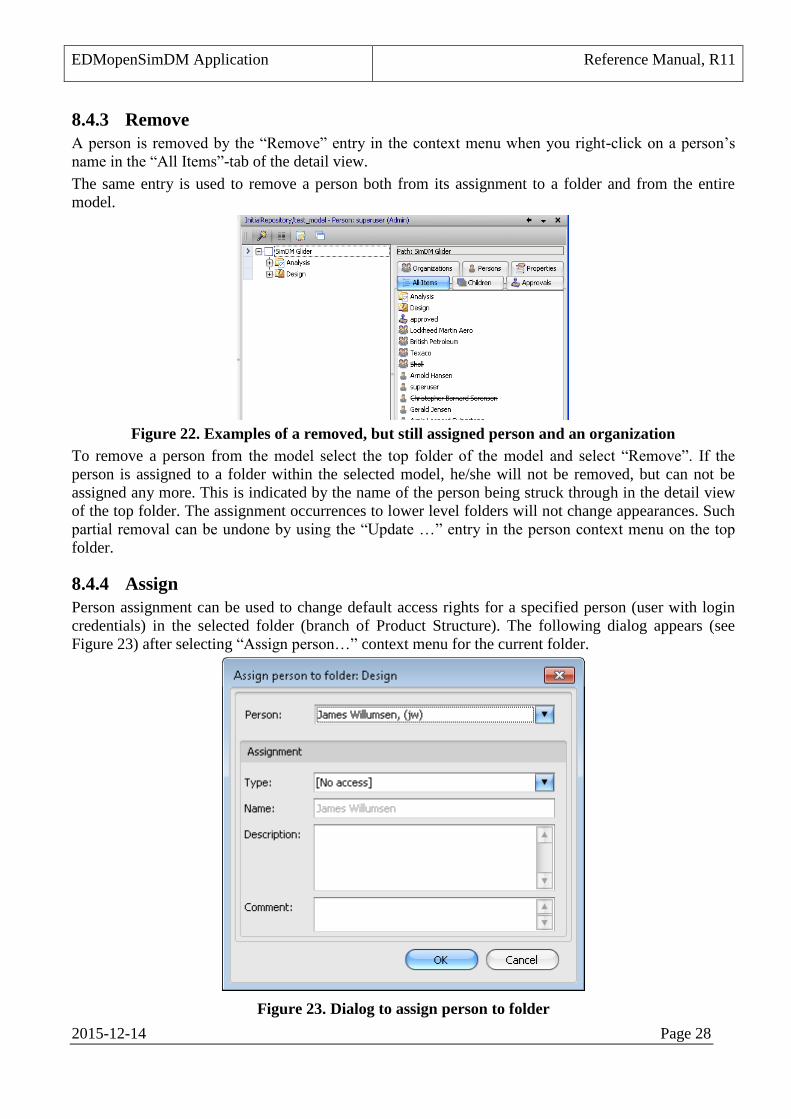
8.4.4 Assign
Person assignment can be used to change default access rights for a specified person (user with login
credentials) in the selected folder (branch of Product Structure). The following dialog appears (see
Figure 23) after selecting “Assign person…” context menu for the current folder.
Figure 23. Dialog to assign person to folder

EDMopenSimDM Application Reference Manual, R11
2015-12-14 Page 29
Combo box “Person” contains all persons that are defined for this PS. Combo box “Type” contains the
following types of access rights:
Admin – user has administrator (manager) access rights. User can create new persons, assign access
rights for them, approve actions and so on.
Editor – user is an editor. User can create new folders, upload files and make some updates.
Reader – user can not update the product structure, but can add comments to objects.
[No access] – user looses all access rights for the specified folder and its underlying branch(es).
An assignment object may be given a name. This should be different from the name of the assigned
person. Text fields “Description” and “Comment” are optional and may be omitted.
Note: For repeated assignments of the same person to the same folder the latest assignment will overwrite the
previous one.
8.4.5 Determination of access rights
The following basic rules apply for granting product structure access rights to persons with a SimDM
login account:
1. Persons who shall have any type of access to a product structure need to be defined in the top
folder of this structure (see menu item “New person...”, 8.4.1). In this operation persons may be
assigned one of the following roles: admin, editor or reader. A person will have this role per
default for all children folders of this product structure unless other roles are assigned locally.
2. A person may be assigned to any sub-folder and, thus, be given a different role than the default
role (see menu item “Assign person...”, 8.4.4). Folders that a person has access to may lie below
folders that this person does not have access to. The person will see the contents of the lower
level folder, but not the details of the parent folder.
3. A person may be member of organizations. An organization may be assigned to sub-folders, and
in that operation the organization and its members are assigned one of the following access
rights: administrator (manager), editor, reader, [Use default type] or [No access].
4. The combination of assignments of person and organization to a folder specifies the access rights
of a person and will result in one of the following four roles: administrator (manager), editor,
reader or [No access].
The calculation of the access rights for a person in a folder is based on the following priorities:
1. Main priority is the role given by the assignment of the person to the folder. E.g. a person with
any default role who may be member of any group could be assigned to a folder with role equal
ADMIN (manager), EDITOR (writer), READER or NO ACCESS (ineligible). After that the
person will have this access level to the folder and its children (unless the person is assigned to
one or several sub-folders with different access rights).
2. Second priority is the role given by the group (organization) assignment. It is taken into account
for persons without explicit person assignment to the sub-folder. Over the folder domain
(including child folders) all members of the assigned group (organization) will be granted the
same role (that could be reassigned on child level).
3. Third priority is the role inherited by the person from the parent (using) folders of the current
folder. Normally a person inherits access rights (role) from the parent folder (if there are no
direct person or organization assignments in the folder). If the folder is child of several parents
(the EDMopenSimDM server provides this feature) the least powerful role is inherited (NO
ACCESS has higher priority than READER, READER has higher priority than EDITOR, etc.).
EDMopenSimDM Application Reference Manual, R11
2015-12-14 Page 30
4. Fourth priority (if there are no direct person or organization assignments from the current folder
and up to the top folder) is the default top folder role of the person (initially defined or later
updated).
5. Fifth priority is the default role of the person's group/organization. If the person is assigned to
several organizations, he/she will be given the richest of the access rights given to these
organizations.
8.5 Organization
8.5.1 New
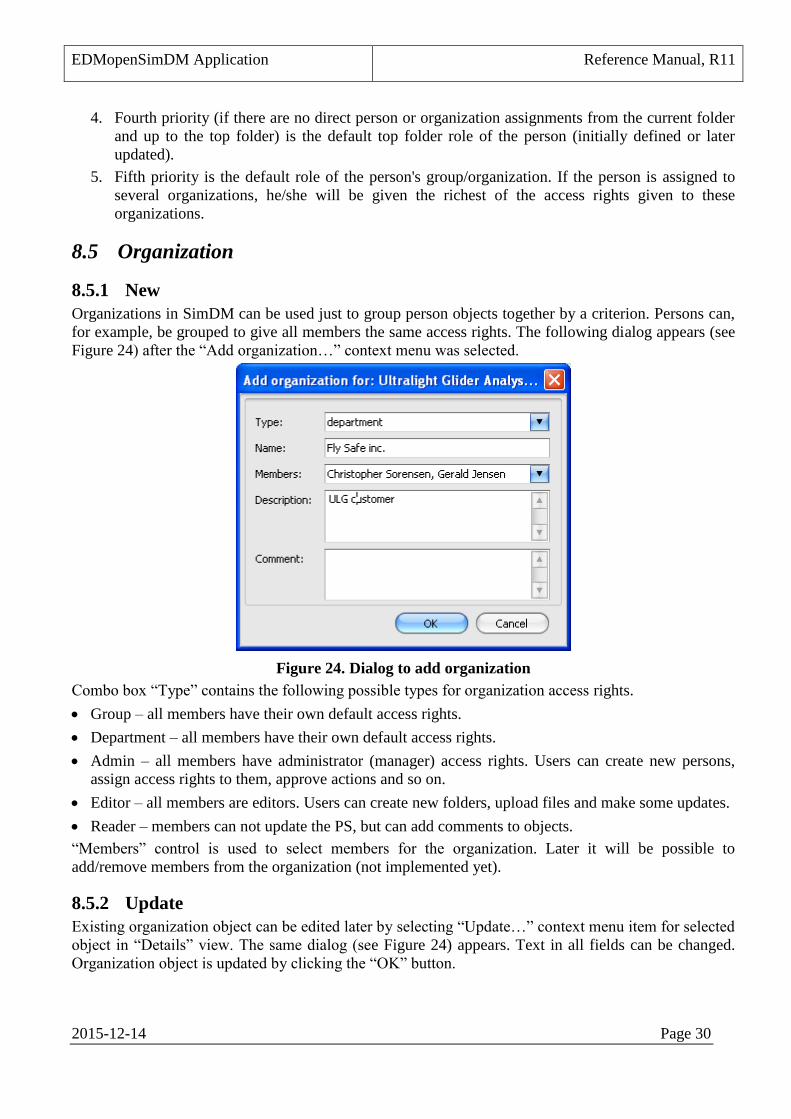
Organizations in SimDM can be used just to group person objects together by a criterion. Persons can,
for example, be grouped to give all members the same access rights. The following dialog appears (see
Figure 24) after the “Add organization…” context menu was selected.
Figure 24. Dialog to add organization
Combo box “Type” contains the following possible types for organization access rights.
Group – all members have their own default access rights.
Department – all members have their own default access rights.
Admin – all members have administrator (manager) access rights. Users can create new persons,
assign access rights to them, approve actions and so on.
Editor – all members are editors. Users can create new folders, upload files and make some updates.
Reader – members can not update the PS, but can add comments to objects.
“Members” control is used to select members for the organization. Later it will be possible to
add/remove members from the organization (not implemented yet).
8.5.2 Update
Existing organization object can be edited later by selecting “Update…” context menu item for selected
object in “Details” view. The same dialog (see Figure 24) appears. Text in all fields can be changed.
Organization object is updated by clicking the “OK” button.
EDMopenSimDM Application Reference Manual, R11
2015-12-14 Page 31
8.5.3 Remove
An organization is removed by the “Remove” entry in the context menu when you right-click on an
organization’s name in the “All Items”-tab of the detail view.
To remove an organization from the entire product structure – not only from its current assignment -
select the top folder of the model and select “Remove”. If the organization has already been assigned to
a folder within the selected model, it will not be removed, but can not be assigned any more. This is
indicated by the name of the organization being struck through in the detail view of the top folder. The
assignment occurrences to lower level folders will not change appearances. Such partial removal can be
undone by using the “Update …” entry in the organization context menu on the top folder.
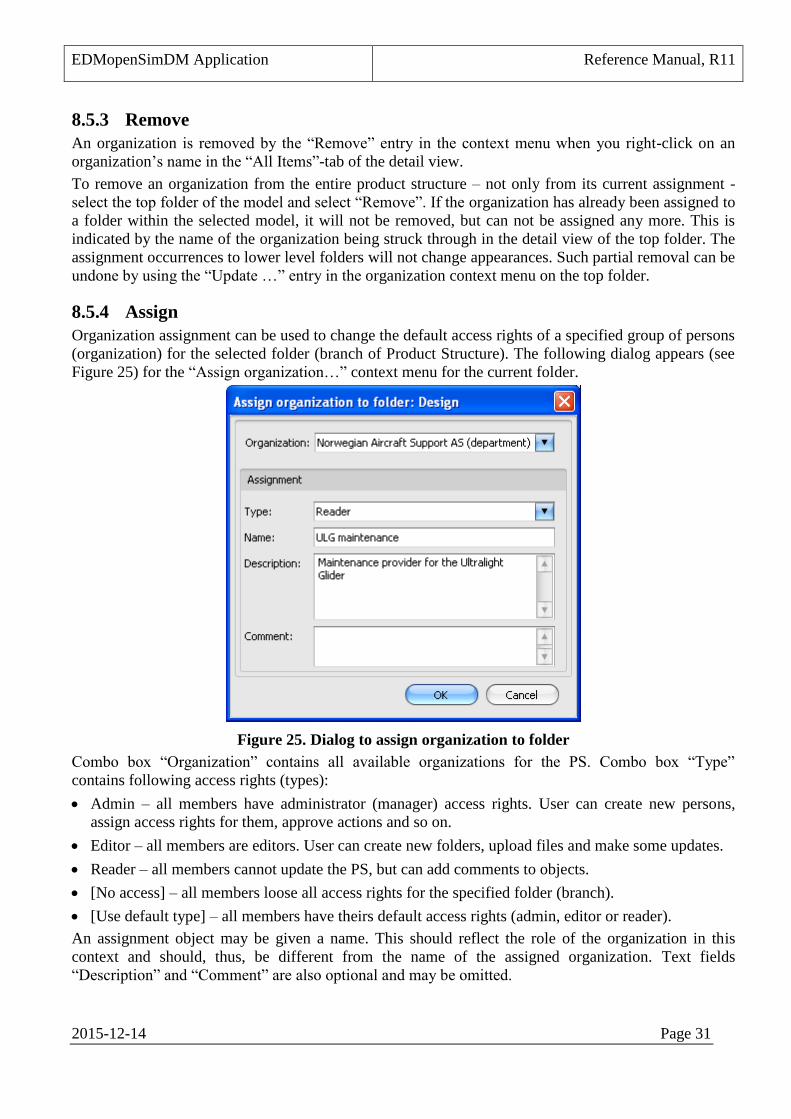
8.5.4 Assign
Organization assignment can be used to change the default access rights of a specified group of persons
(organization) for the selected folder (branch of Product Structure). The following dialog appears (see
Figure 25) for the “Assign organization…” context menu for the current folder.
Figure 25. Dialog to assign organization to folder
Combo box “Organization” contains all available organizations for the PS. Combo box “Type”
contains following access rights (types):
Admin – all members have administrator (manager) access rights. User can create new persons,
assign access rights for them, approve actions and so on.
Editor – all members are editors. User can create new folders, upload files and make some updates.
Reader – all members cannot update the PS, but can add comments to objects.
[No access] – all members loose all access rights for the specified folder (branch).
[Use default type] – all members have theirs default access rights (admin, editor or reader).
An assignment object may be given a name. This should reflect the role of the organization in this
context and should, thus, be different from the name of the assigned organization. Text fields
“Description” and “Comment” are also optional and may be omitted.

EDMopenSimDM Application Reference Manual, R11
2015-12-14 Page 32
Note: For repeated assignments of the same organization to the same folder the latest assignment will
overwrite the previous one.
8.6 Methods Method objects define how tasks shall be done.
8.6.1 New method
Methods are defined for a product structure first, before they can be assigned to individual folders as
part of task descriptions (see 8.6.2 New task). Many product structures may be defined for a product
structure; a folder may be assigned many tasks descriptions.
To define a method use menu item “New Method…” of the context menu of the product structure
folder. The following dialog will pop up:
Figure 26. Dialog to add method
“Description” should contain a clear guidance for how to perform a task.
Text field “Comment” is optional and can be omitted.
The following context menu items exist for task methods:
New comment…: see 8.8 Comment
Remove: If the method is not yet used in a task assignment, it is deleted. If it is in use already, further
use will be disabled, that is, the method can not be used in task assignments any more.
8.6.2 New task
A task object specifies a job that shall be done by a person using one or several methods for a selected
folder. The following dialog appears (see Figure 27) after triggering the “New task…” context menu
item for a folder.
The combo box “Person” contains all available persons for the PS. The combo box “Method” contains
all available methods for the PS.

EDMopenSimDM Application Reference Manual, R11
2015-12-14 Page 33
Figure 27. Dialog to create a task
“Name” is mandatory and shall contain a human interpretable text under which the task shall be known.
“Description” is optional and may contain details of the task specifications potentially with reference to
input data, tools and resources.
The controls “To start” and “To finish” should contain date and time when the task is supposed to be
started and finished.
8.7 Approval Approvals may be assigned to folders for communication among co-workers. Before being assigned,
however, they need to be defined. Each product structure may have its specific set of approvals.
Besides this generic approval functionality EDMopenSimDM offers the concept of a final approval
which is required for baselining folders.
8.7.1 New
New approval definitions can be defined for a Product Structure with the “New approval…” context
menu item. The following dialog appears (see Figure 28).
Figure 28. Dialog to define a type of approval
EDMopenSimDM Application Reference Manual, R11
2015-12-14 Page 34
Combo box “Type” contains the following possible types of approval outcomes:
negative,
neutral,
positive.
This categorization may be used for automatic processing of approvals; it will not appear in the details
view of a folder, only in its property view.
Text field “Name” is the text that this type of approval will be known as. It is mandatory and will
appear in the details view.
Text fields “Description” and “Comment” are optional and can be omitted.
Note: If an existing type of approval is defined once again, the previous definition is updated; no new
approval is created.
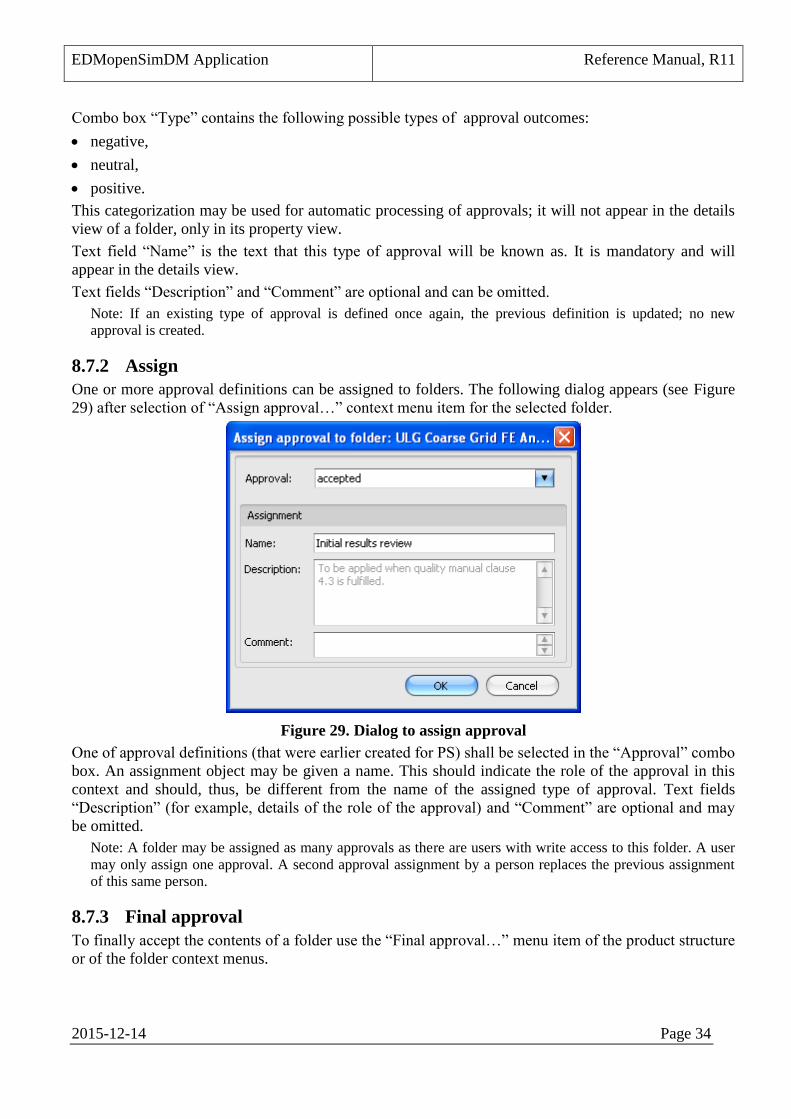
8.7.2 Assign
One or more approval definitions can be assigned to folders. The following dialog appears (see Figure
29) after selection of “Assign approval…” context menu item for the selected folder.
Figure 29. Dialog to assign approval
One of approval definitions (that were earlier created for PS) shall be selected in the “Approval” combo
box. An assignment object may be given a name. This should indicate the role of the approval in this
context and should, thus, be different from the name of the assigned type of approval. Text fields
“Description” (for example, details of the role of the approval) and “Comment” are optional and may
be omitted.
Note: A folder may be assigned as many approvals as there are users with write access to this folder. A user
may only assign one approval. A second approval assignment by a person replaces the previous assignment
of this same person.
8.7.3 Final approval
To finally accept the contents of a folder use the “Final approval…” menu item of the product structure
or of the folder context menus.
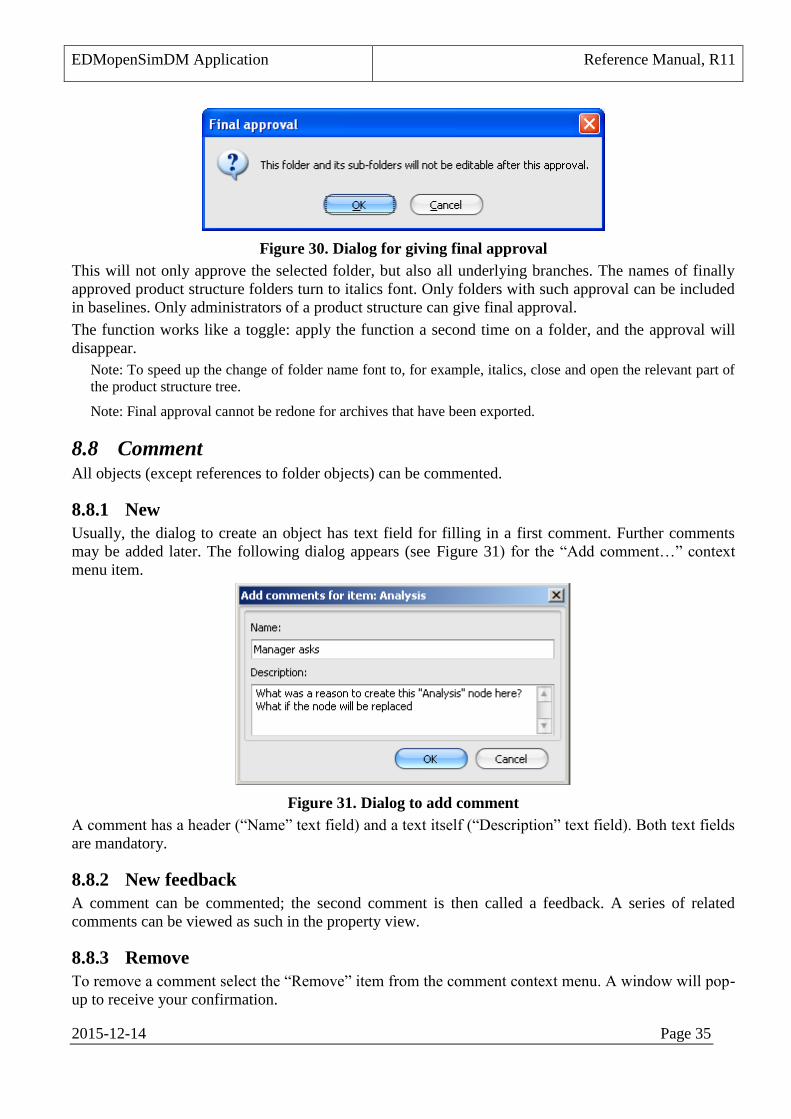
EDMopenSimDM Application Reference Manual, R11
2015-12-14 Page 35
Figure 30. Dialog for giving final approval
This will not only approve the selected folder, but also all underlying branches. The names of finally
approved product structure folders turn to italics font. Only folders with such approval can be included
in baselines. Only administrators of a product structure can give final approval.
The function works like a toggle: apply the function a second time on a folder, and the approval will
disappear.
Note: To speed up the change of folder name font to, for example, italics, close and open the relevant part of
the product structure tree.
Note: Final approval cannot be redone for archives that have been exported.
8.8 Comment All objects (except references to folder objects) can be commented.
8.8.1 New
Usually, the dialog to create an object has text field for filling in a first comment. Further comments
may be added later. The following dialog appears (see Figure 31) for the “Add comment…” context
menu item.
Figure 31. Dialog to add comment
A comment has a header (“Name” text field) and a text itself (“Description” text field). Both text fields
are mandatory.
8.8.2 New feedback
A comment can be commented; the second comment is then called a feedback. A series of related
comments can be viewed as such in the property view.
8.8.3 Remove
To remove a comment select the “Remove” item from the comment context menu. A window will pop-
up to receive your confirmation.
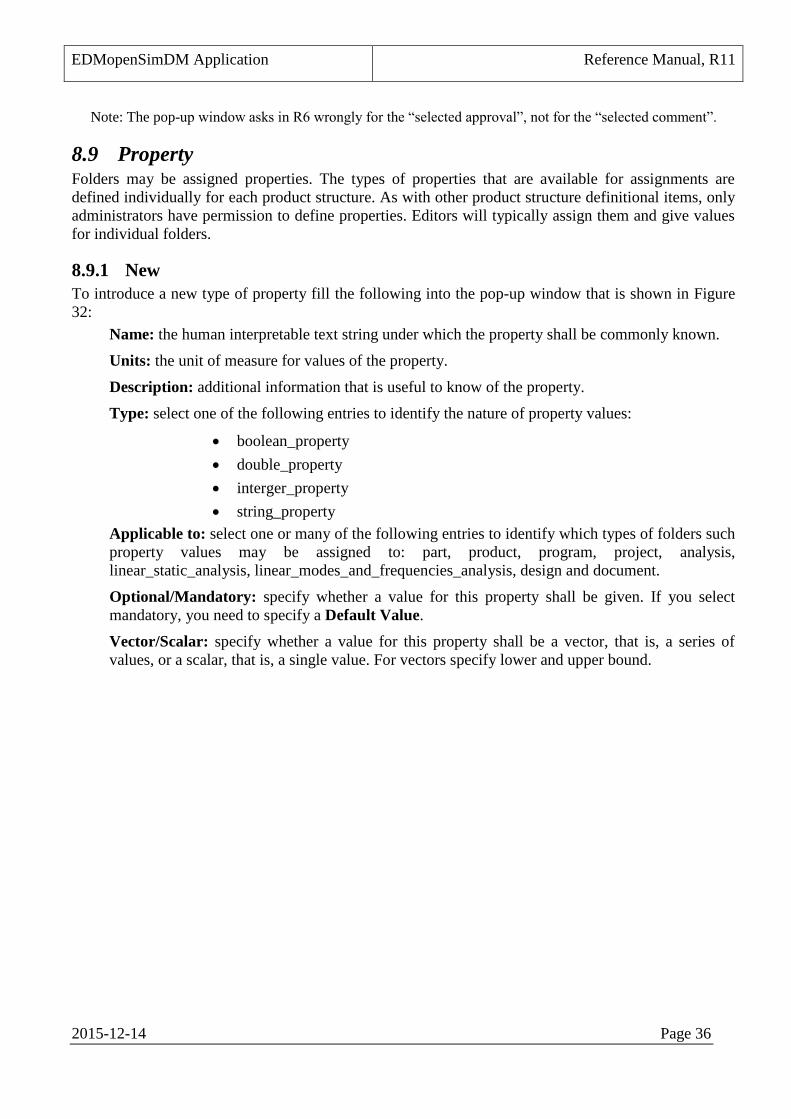
EDMopenSimDM Application Reference Manual, R11
2015-12-14 Page 36
Note: The pop-up window asks in R6 wrongly for the “selected approval”, not for the “selected comment”.
8.9 Property Folders may be assigned properties. The types of properties that are available for assignments are
defined individually for each product structure. As with other product structure definitional items, only
administrators have permission to define properties. Editors will typically assign them and give values
for individual folders.
8.9.1 New
To introduce a new type of property fill the following into the pop-up window that is shown in Figure
32:
Name: the human interpretable text string under which the property shall be commonly known.
Units: the unit of measure for values of the property.
Description: additional information that is useful to know of the property.
Type: select one of the following entries to identify the nature of property values:
boolean_property
double_property
interger_property
string_property
Applicable to: select one or many of the following entries to identify which types of folders such
property values may be assigned to: part, product, program, project, analysis,
linear_static_analysis, linear_modes_and_frequencies_analysis, design and document.
Optional/Mandatory: specify whether a value for this property shall be given. If you select
mandatory, you need to specify a Default Value.
Vector/Scalar: specify whether a value for this property shall be a vector, that is, a series of
values, or a scalar, that is, a single value. For vectors specify lower and upper bound.
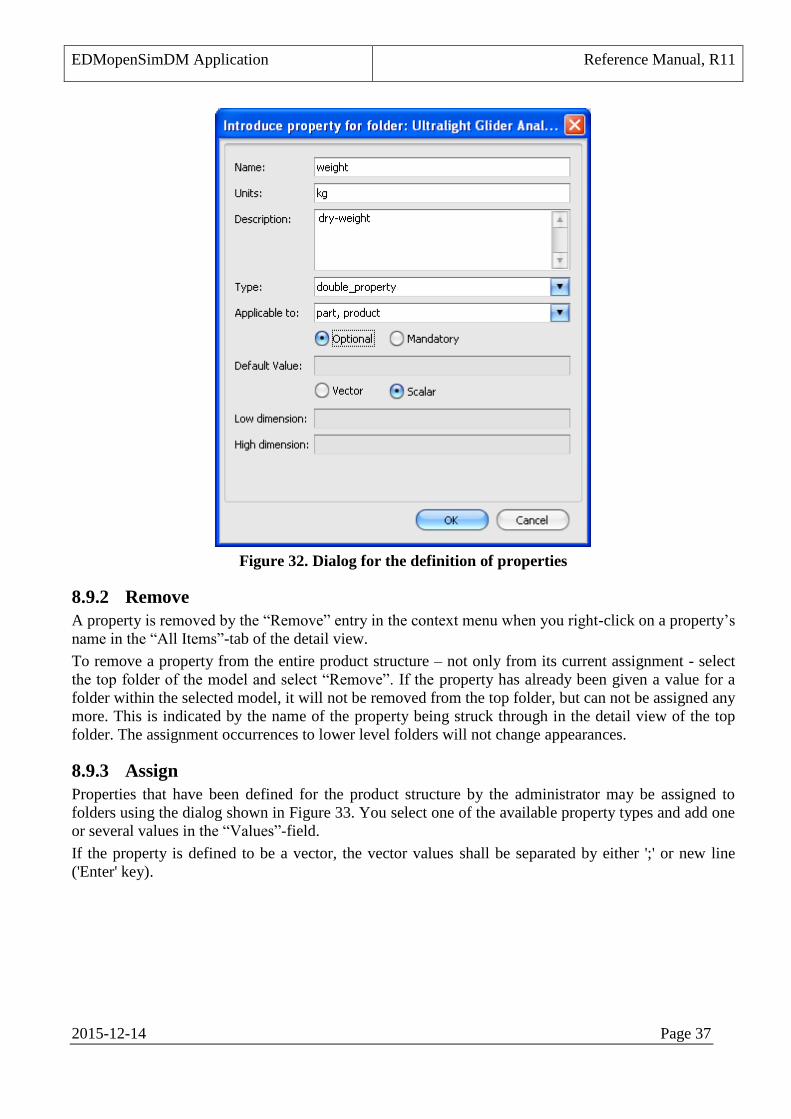
EDMopenSimDM Application Reference Manual, R11
2015-12-14 Page 37
Figure 32. Dialog for the definition of properties
8.9.2 Remove
A property is removed by the “Remove” entry in the context menu when you right-click on a property’s
name in the “All Items”-tab of the detail view.
To remove a property from the entire product structure – not only from its current assignment - select
the top folder of the model and select “Remove”. If the property has already been given a value for a
folder within the selected model, it will not be removed from the top folder, but can not be assigned any
more. This is indicated by the name of the property being struck through in the detail view of the top
folder. The assignment occurrences to lower level folders will not change appearances.
8.9.3 Assign
Properties that have been defined for the product structure by the administrator may be assigned to
folders using the dialog shown in Figure 33. You select one of the available property types and add one
or several values in the “Values”-field.
If the property is defined to be a vector, the vector values shall be separated by either ';' or new line
('Enter' key).
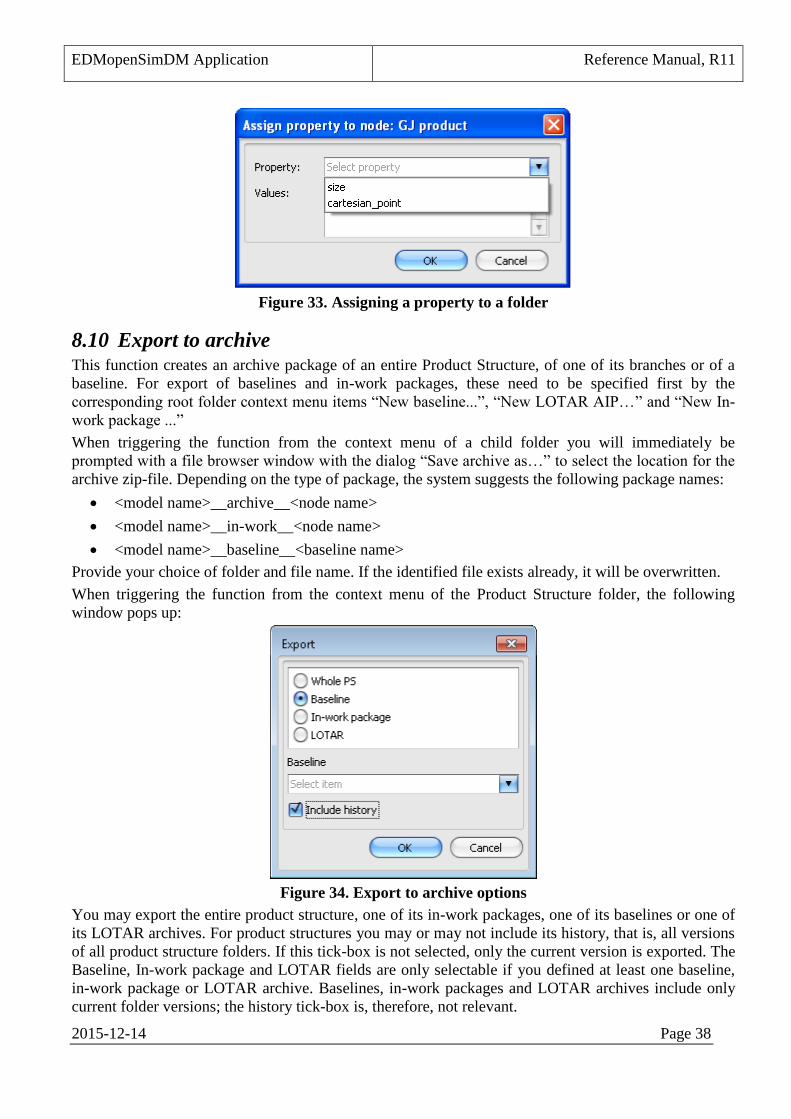
EDMopenSimDM Application Reference Manual, R11
2015-12-14 Page 38
Figure 33. Assigning a property to a folder
8.10 Export to archive This function creates an archive package of an entire Product Structure, of one of its branches or of a
baseline. For export of baselines and in-work packages, these need to be specified first by the
corresponding root folder context menu items “New baseline...”, “New LOTAR AIP…” and “New In-
work package ...”
When triggering the function from the context menu of a child folder you will immediately be
prompted with a file browser window with the dialog “Save archive as…” to select the location for the
archive zip-file. Depending on the type of package, the system suggests the following package names:
<model name>__archive__<node name>
<model name>__in-work__<node name>
<model name>__baseline__<baseline name>
Provide your choice of folder and file name. If the identified file exists already, it will be overwritten.
When triggering the function from the context menu of the Product Structure folder, the following
window pops up:
Figure 34. Export to archive options
You may export the entire product structure, one of its in-work packages, one of its baselines or one of
its LOTAR archives. For product structures you may or may not include its history, that is, all versions
of all product structure folders. If this tick-box is not selected, only the current version is exported. The
Baseline, In-work package and LOTAR fields are only selectable if you defined at least one baseline,
in-work package or LOTAR archive. Baselines, in-work packages and LOTAR archives include only
current folder versions; the history tick-box is, therefore, not relevant.

EDMopenSimDM Application Reference Manual, R11
2015-12-14 Page 39
A background process creates the export package zip-file. You may, therefore, continue with other
tasks during the creation and download processes. When they are completed, you will be notified by an
alert window (see Figure 35).
Figure 35. Alert window after ZIP package is downloaded
The zip-file for archival has the following characteristics:
the folder structure within the zip-file corresponds to the product structure, that is, each product
structure folder represents an operating system folder;
the top folder is always the product structure folder even if the archived folder is several levels
within the product structure;
the names of the files that are attached to the folders are maintained. However, to maintain
uniqueness of folders on the operating system level, those folder names consist of the following
three components: folder name, folder type and folder version. For example for a folder with
only one version: ”STEP Input DOCUMENT”;
the meta data of the product structure and its folders are exported into an ISO 10303-21 file that
corresponds to the EXPRESS model of the EDMopenSimDM master model; this is included in
the top folder of the zip-file;
the EDMopenSimDM master model is converted to AP209e2, and the resulting P21 file is also
included in the top folder of the zip-file.
the text file “pdi.txt” that contains PDI.
Thus, when unzipping an archived file in your operating system, the product structure will be recreated
as folder structure with the attached files within them.
An archived file can be imported back into EDMopenSimDM to create a new model within an arbitrary
repository; see chapter 8.11 Import from archive.
Note: The following limitations apply currently:
1) File names shall be unique within a product structure.
2) Very large files, that is, 1GB and more, may cause the system to stop.
3) The mapping from the EDMopenSimDM master model to AP209e2 needs to be revised and
completed.
8.11 Import from archive and model The function “Import from archive...” can only be executed from the context menu of the repositories
and models panel. You will be prompted with a Windows file browser to find the location of the zip-
file. After having selected an appropriate SimDM zip-file you will be asked for the name of the model.
Provide a name that is unique within the repository and that has a valid syntax (see 7.4). The archive
will be added as a new model to the current repository.

EDMopenSimDM Application Reference Manual, R11
2015-12-14 Page 40
The function “Import from model...” is available from context menus in the product structure panel. It
enables you to reuse a previously defined and exported structure as a copy within the current structure.
Figure 36. Pop-up window for “Import from model...”
You can not import directly into a structure; you need to go via a new model. This is to enable quality
control and adaptation of the imported structure before taking it in use in an operational structure.
The sequence of functions of “Export to archive...”, “Import from archive...” and “Import to model...”
replaces copy/paste across repositories.
The imported product structure will be identical to the archived one, which may be a complete or a
partial product structure, and includes copies of all files.
Note: As an archive does not include access rights, the imported archive has only default access rights.
Note: If an archive contains STEP-files, these are not automatically imported into models of their own; they
will only be imported like any other file as blobs. Before being able to validate or query such STEP-files you
need to execute the file context menu item “Import P21”. The server will find the corresponding file and read
it into EDM. After this, “Validate” etc. will become available.
8.12 Child folders A product structure consists of a single top folder, the product structure folder, and zero, one or many
child folders, also called subordinate folders. Folders are the containers for files and various kinds of
meta data. Folders may have different types. Folders may be versioned and may be configuration
controlled by baselining their versions. In fact, the SimDM browser does not distinguish between
folders and folder versions; the children in a product structure are folder versions.
Note: A folder may not have several parent folders; that is, the folder structure in EDMopenSimDM is not
well suited to model bills of material where sub-assemblies may be used in several locations.
8.12.1 New
This function adds a new folder to an existing product structure, either directly under the top folder or
below any other folder. The following dialog appears (see Figure 37) with the “New child…” context
menu.
Combo box “Type” contains a number of folder types. Those types are treated equally by the
application. Only the icons of the created folder objects are different to carry the different semantics.
The “Name” text field provides the identifier of the folder; this is a mandatory text value. The name
appears aside the folder icon in the product structure. A folder may have several versions. Text field
“Version” is not editable. The text “auto generated” means that the version identifier will be generated
by the application.

EDMopenSimDM Application Reference Manual, R11
2015-12-14 Page 41
Figure 37. Dialog to create child folder
Text fields “Description” and “Comment” are optional and can be omitted.
8.12.2 Remove from this version
Several versions of a parent folder may have the same child folder. This command removes the child
folder only from the current version of the parent folder, not from the other versions. To remove a
child-folder from all versions of a parent folder, see 8.12.3.
8.12.3 Remove from all versions
Selecting the “Remove from all versions” menu item triggers a confirmation message box to pop-up.
If the selected child folder has only one version, the following message is displayed (see Figure 38).
Figure 38. Child folder removal from all parent folder versions
If the selected folder has several versions, the following message is displayed (see Figure 39).
Figure 39. Child folder version replacement for all parent folder versions
8.12.4 Copy
“Folder>Copy” loads a copy of the folder and its underlying branches into memory for being pasted
into another location. Meta data and files are not included. The original copy will not change at all.

EDMopenSimDM Application Reference Manual, R11
2015-12-14 Page 42
8.12.5 Cut
“Folder>Cut” loads a copy of the folder and its underlying branches and meta data into memory for
being pasted into another location. Files are not included. The original copy will be removed after
pasting. The Cut-function can be cancelled by, for example, applying the Copy-function.
8.12.6 Paste
“Folder>Paste” creates a copy of a copied or cut folder and its underlying branches below the selected
folder. Meta data and files are not included.
Note: The copy of a read-only folder will allow write access.
Note: A copied or cut folder can not be pasted outside of the product structure of the original folder.
8.12.7 Paste link
Pasting a copied folder as a link is like drag-and-drop of that folder; the action establishes a reference
in the target folder to the copied folder. A link object appears in the detail view of the target folder.
Double-click on the link object set the product structure tree pointer to that source folder.
Figure 40. Link object in the detail view of a folder
8.13 Folder version To capture the history of the development of a folder it is possible to establish versions of folders.
Several versions of a folder can be modified in parallel. Parent-child relationships are always between
the – in that context – current folder versions, not between the folders themselves. Baselines include
folder versions, not folders.
8.13.1 New folder version
This functionality creates a version of the selected folder. The just created folder version becomes
current instead of the selected one. The following message box (see Figure 41) appears after choosing
the “New folder” → “New folder version” context menu item.

EDMopenSimDM Application Reference Manual, R11
2015-12-14 Page 43
Figure 41. Question to create new folder version
After clicking “Yes”, the new folder version is created. Just like folders, also folder versions have
attributes “Type”, “Name” and “Description” (see “Properties” view) from the previous version. The
new version references the same (identical!) children folders that the previous folder version referenced
and still will reference. Objects of the following types are copied to the new folder version if they were
assigned to the previous one:
Assigned person
Assigned organization
Assigned property.
8.13.2 Show version
A version of a folder can be displayed for itself in another product structure panel by using the folder
context menu as shown below:
Figure 42. “Show version” dialog
The current version number is greyed out; only bolded version numbers can be selected and shown.

EDMopenSimDM Application Reference Manual, R11
2015-12-14 Page 44
Figure 43. A folder version in its own product structure browser panel
8.13.3 Shift version
The folder version that is displayed as part of the product structure is member of this product structure.
You may choose to change the member of the product structure to a different version of the same
folder. You do this by “Shift version”; see Figure 44.
Figure 44. “Shift version” dialog
The current version number is greyed out; only bolded version numbers can be selected and shifted to.
The version number you select will be the current version in this product structure.
8.13.4 Remove version
A folder version is removed using the function for folder removal as there is no difference between a
folder and a folder version; see 8.12.3 .
8.14 File handling Files are a class of objects in itself in SimDM; they are neither meta-data nor folders. Files do not
appear in the product structure, but are always associated to a folder. It may be useful to create
document folders and assign files to only those. Files have their own context menu, which is shown in
Figure 45.

EDMopenSimDM Application Reference Manual, R11
2015-12-14 Page 45
Figure 45. Files context menu for AP209e2 files
The context menu for files consists of the following menu items:
“Open” – launches the application that opens the file (see 8.14.4)
“Open with” → “Select application....” – launches the MS Windows browser so that you can find
the application that you want to open the file with (see 8.14.5).
“Download” → “Attached file…” – opens Windows file browser to let you select the location where
the selected file shall be copied to
“Download” → “CAX file…” – is only available for files that were successfully converted to the
VCollab CAX-format (see chapter 11); such files are not explicitly listed in the detail view. Opens
Windows file browser to let you select the location where the CAX-file shall be copied to.
“Text query…” – opens dialog to specify a query into the selected file (see 8.14.6). This menu item
is only available for AP209e2 files and only if they have been imported into a separate EDM model;
for export packages that have been imported this is not the case.
“Validation” -> “Validate…” – starts a validation of the selected file against its EXPRESS schema
(see 8.14.7). No further user input required. This menu item is only available for AP209e2 files and
only if they have been imported into a separate EDM model; for export packages that have been
imported this is not the case.
“Validation” -> “Open log” – downloads validation log and opens it.
“Validation” -> “Remove log” – removes validation log on the server
“Import P21” – starts the import of a previously uploaded STEP-file. This menu item only appears
for STEP-files that have been re-imported via an export package. After successful completion menu
items “Text query…” and “Validate…” will appear.
“Import P21” -> “Open log” – downloads import log and opens it.
“Remove” – removes selected file from the database after your confirmation.
“Copy” – copies the reference to the current file (see 8.15), not the file itself. A consecutive “Paste”
(Paste link) will establish a two-way link between this file location and the location of the paste-
operation.

EDMopenSimDM Application Reference Manual, R11
2015-12-14 Page 46
8.14.1 Assign and upload files
Files may be assigned to all kinds of folders, not only to folders of type “Document”. The files of a
selected folder are listed in the middle (Details) view of the “PS browser” panel. Use the “Details”
button in the tool bar to show or hide the “Details” view (see Figure 16).
Files from the local file system may be uploaded to the current server by the following three ways:
Via the “Upload…” context menu item on the selected folder.
The file for upload is selected in the “Original name:” field (see Figure 46).
Via Drag-and-drop functionality.
The file for upload is dragged from the “Local File Explorer” panel (View → Local File Explorer)
and dropped into “PS browser” panel (“Tree” or “Details” view).
“Windows explorer” can be used instead of the “Local File Explorer” panel.
Note: Where drag-and-drop are available, multiple files can be uploaded at the same time. The “Upload file”
dialog can appear for each selected file.
Figure 46. “New file -> Upload...” dialog
The field “Original name:” represents the path to file that shall be uploaded. The “Select file” dialog
appears when the “…” button is pressed.
After file selection, the “Type” field displays automatically the textual file type name (see chapter 4.5).
If the file extension is not defined in the “File associations” table, “undefined type” is displayed in the
“Type” field. In this case the logical file type “Document” will be assigned to the selected file. You
may change this behaviour by registering the file extension using the “Tools > File associations” menu
item (see 4.3).

EDMopenSimDM Application Reference Manual, R11
2015-12-14 Page 47
Some file types are during upload converted to the VCollab CAX visualization format (see chapter 11).
Both the original file and the CAX-file are stored in the SimDM database. The GUI, however, will only
show the original file.
Before starting the upload you may add the following file meta data, which are intended as additional
data when archiving the file:
Owner: In the owner field it is possible to enter a person or organization different from the
uploading person as the owner of the file. If you check the check-box “Set current user as
owner”, it will not be possible to enter anything in this field.
Original format: If the uploaded file is transformed from an original format, it is possible to
enter the name of the original format in this field.
Creating system: Denotes the original system that produced the file.
Interface: Denotes the interface software that was used to convert from the original format, if the
file was the result of any conversion.
Operating system: Denotes the operating system requirements of the file.
If files are dragged from Windows Explorer, the dialog represent check box "Use the same meta-data
for the rest of files". It is checked. In this case all uploaded files will have the same meta-data (except
file name and size). And the dialog appears only once for the group of dropped files.
Right after start of a file upload the file name appears in the “Details” view. This does not imply that
the upload is completed already. Upload is an asynchronous process; it is completed when the progress
bar in the lower left corner of the SimDM window disappears. In addition the user is notified by an
alert window (see Figure 47).
Note: Upload time depends among others on the network capacity.
Figure 47. Alert window after upload is finished
8.14.2 New external file reference
The "New file -> External link" command stores only the file path of the file in the EDMopenSimDM
database, not the file itself. In addition it stores file size and last modification time. The file must be
possible to open for read from both the EDMopenSimDM client and the EDMopenSimDM server. It is
only files in the local network with file path like "\\local_machine\folder_name\file_name.ext" that can
be opened by this command.
When creating baselines that include references to external files, it is checked that the last modification
date of the file is equal to the last modification date stored in the database. If the file is modified after
the reference is stored in the database, a warning is given. The same test is performed when a
referenced file is to be copied into an archival package. Here also a warning is given if the file is
modified after the reference is stored in the database.

EDMopenSimDM Application Reference Manual, R11
2015-12-14 Page 48
For files that are converted to the cax-visualization format the resulting .cax-file is stored in the folder
of the external file.
It is emphasized that referenced files are outside the control of the EDMopenSimDM system.
8.14.3 Download
Files from the server can be downloaded to the local file system by using “Download” context menu
for the file object (“Details” view). The “Download” context menu has two items: “Attached file…”
and “CAX file…”. “Attached file…” item is available for any uploaded files. “CAX file…” item is
available only for files that where converted to CAX file during upload.
“Download” requires selecting a local folder to download the file into. In this case standard dialog
“Save file as…” appears. Download can take time for large files. When a file is downloaded, the users
gets a notification as an alert window (see Figure 48).
Figure 48. Alert window after file is downloaded
8.14.4 Open
“Open” downloads the selected file into a temporary folder on the client machine and opens the file by
an appropriate viewer (see chapter 4.5).
Note: Some of the file types (CAD/CAE, AP203/AP209) are automatically opened in the “EDMopenSimDM
viewer” panel (see chapter 11), unless an external viewer was specified for these file types in Tools>File
associations.
8.14.5 Open with
“Open with” menu contains one item for each specified external viewer in addition to the menu item
“Select application…”.
If only the file path of the file was uploaded into the database and not the file itself, the
EDMopenSimDM client will try to open the file with the original file path and download it to the target
file path. If the referenced file had been modified after the reference to it is stored in the
EDMopenSimDM database, a warning is given.
8.14.6 Query
AP209e2 files can be queried. The queries browse through the contents of a single file. The file must
have been imported into EDMopenSimDM so that it exists as a model, not only as a file. This import
will usually have taken place as part of the conversion to CAX.
The “Text query…” menu item will open the panel that is shown in Figure 50.
The following queries are included in this release:

EDMopenSimDM Application Reference Manual, R11
2015-12-14 Page 49
Figure 49. Queries implemented in this release
The input fields in Figure 50 may change title with the selected query. Object ids are specified in these
text input fields. The ids must be separated by space; ids that contain spaces must be enclosed by single
quotes. Numerical ids can be specified as a range with a dash between the minimum and the maximum
range value. Example:
SPC_3.0 12 13 21 120-123 ”Load case 1”
The above line specifies the following ids: SPC_3.0, 12, 13, 21, 120, 121, 122, 123 and Load case 1.
Figure 50. The text query panel is to the left
Maximum values: the query will present maximum values (only applicable to some queries)
Minimum values: the query will present minimum values (only applicable to some queries)

EDMopenSimDM Application Reference Manual, R11
2015-12-14 Page 50
In case of survey queries:
For each specified node over all specified load cases: finds maximum or minimum for each
specified object over all specified load cases
Over all specified nodes and specified load cases: finds maximum or minimum of all specified
objects and load cases
Execute: starts the query
Save as: current query result can be stored as HTML file
Text queries have this name because the results are presented textually in a HTML window. Common
for all text queries is that input parameters are object ids and that the query returns information about
these objects.
There are three different types of text queries. These are:
1. Queries that return information about objects where you specify object id(s).
2. Queries that return information about objects with respect to load cases. You specify both
objects id(s) and load case id(s). The load case id(s) are selected from a list of all load case ids
in the AP209 model.
3. Maximum or minimum tensor value surveys. You specify either maximum or minimum type of
survey by a radio button. The survey finds maximum or minimum by analyzing the specified
objects in the specified load cases. One variant of the surveys finds maximum or minimum of
all specified objects and load cases. Another variant finds maximum or minimum for each
specified object over all specified load cases.
8.14.6.1 Model Query
This query returns information about FEA models. The query key is the fea_model ID.
The information displayed for each model is:
Total number of nodes, total number of coordinate systems, total number of each type of
element and total number of elements.
Total number of control load cases
For each control load case: Total number of constraints and applied loads differentiated on
variable type (pressure, etc.)
For each result load case indicate the existence of:
o Deflections
o Stresses
o Strains
o Element Forces
8.14.6.2 Node Query
This query returns information about the nodes that you specify in the input field. The query returns a
table with one row per node. The table has the following columns:
Node ID: the id of the node.
Node type: the subclass of node. Either Node, Dummy Node, Geometric Node.
Coordinate system ID: the ID of the coordinate system used to found the node (see clause 5.6.2
of 10303-104 for more details).

EDMopenSimDM Application Reference Manual, R11
2015-12-14 Page 51
Coordinate System Type: Either Cartesian, Cylindrical, or Spherical.
Coord1, Coord2, Coord3: The coordinates in point subtype that specifies the position of the
node.
8.14.6.3 Element Query
This query returns information about the elements that you specify in the input field. The query returns
a table with one row per element. The table has the following columns:
Element_ID – the id of the element
Type – “Volume_3D”, “Volume_2D”, “Curve_3D”, ..etc.
Order – For those element types where topology order is relevant: “Linear”, “Quadratic” or
“Cubic”.
Shape – For “Volume_3D” elements this column can be either "Hexahedron", "Wedge",
"Tetrahedron" or "Pyramid". For "Volume_2D" or "Surface_3D" elements the column cn be
either "Quadrilateral" or "Triangle".
Property_ID – ID of the property information of the element.
Material_ID – The id of the element material. It is also a link to the query displaying this
information.
Node_List – The node IDs of the nodes attached to the element. It is also a link to the node
query displaying information about these nodes.
8.14.6.4 Curve Element Property Query
This query returns information about the curve element properties the IDs of which are specified in the
“Curve Element Property ID(s)” input field. The information displayed is:
Description
Cross_sectional_area
Shear area
Second moment of area
Torsional constant
Warping constant
Location of Centroid
Location of shear centre
Location of non structural mass
Non structural mass
Polar moment
In addition information about End Offsets and End Releases is displayed.
8.14.6.5 Surface Element Property Query
This query returns information about the surface element properties the IDs of which are specified in
the “Surface Element Property ID(s)” input field. The information displayed is:
Property_ID
Offset
Non_structural_mass

EDMopenSimDM Application Reference Manual, R11
2015-12-14 Page 52
Non_structural_mass_offset
Thickness
Bending_thickness
Shear_thickness
8.14.6.6 Point Element Property Query
This query returns information about the point element properties the IDs of which are specified in the
“Point Element Property ID(s)” input field. The information displayed is:
Element_ID
Matrix_Type
Mass Matrix
Moments of Inertia
CoordSys_ID
Offset Vector
8.14.6.7 Directionally explicit Element Property Query
This query returns information about the directionally explicit element properties the IDs of which are
specified in the “Directionally explicit Element Property ID(s)” input field. The information displayed
is:
Property ID
Coordinate System ID
Freedom
Coefficient
This query is not implemented, yet.
8.14.6.8 Material Property Query
This query returns information about materials the IDs of which are specified in the “Material ID(s)”
input field. The information displayed is:
Material_ID
Material_Type(s)
Linear elasticity
Mass density
Tangential coefficient of linear thermal expansion
8.14.6.9 Constraint Element Query
This query returns information about constraints on load cases. The constraints are specified by
constraint id in the “Constrrant ID(s)” input field, and the load cases are specified by selecting load
case id(s) in the field “Load Case ID(s)”.
For single point constraints the information displayed is:
Constraint_ID
Load Case_ID
Node_ID

EDMopenSimDM Application Reference Manual, R11
2015-12-14 Page 53
CoordSys_ID
Freedom_Values - (typically x_translation, y_translation, z_translation, x_rotation, y_rotation,
z_rotation)
8.14.6.10 Applied Load Query
This query returns information about applied loads on nodes in load cases. The nodes are specified by
node id in the “Node ID(s)” input field, and the load cases are specified by selecting load case id(s) in
the field “Load Case ID(s)”. The information displayed is:
Load_Case_ID
Node_ID
CoordSys_ID
Load Type
Freedom_Values - (typically x_translation, y_translation, z_translation, x_rotation, y_rotation,
z_rotation)
8.14.6.11 Displacement Query
This query returns information about displacements of nodes in load cases. The nodes are specified by
node id in the “Node ID(s)” input field, and the load cases are specified by selecting load case id(s) in
the field “Load Case ID(s)”. The information displayed is:
Load_Case_ID
Node_ID
CoordSys_ID
Freedom_Values - x_translation, y_translation, z_translation, x_rotation, y_rotation and
z_rotation
8.14.6.12 Stress and Strain Query
This query returns information about stress and strain of elements in load cases. The elements are
specified by element id in the “Element ID(s)” input field, and the load cases are specified by selecting
load case id(s) in the field “Load Case ID(s)”. The information displayed is:
Load_Case_ID
Element_ID
Variable – Either stress or strain
CoordSys_ID
Locations
Values – if variable is stress: σ11, σ12, σ13, σ22, σ23, σ33 and if variable is strain: ε11, ε12,
ε13, ε22, ε23, ε33.
8.14.6.13 Element Forces from Node Force Balance Query
The query keys are Element ID and Load Case ID. The information displayed is a table with the
following columns:
Element ID
Node ID
Load Case ID

EDMopenSimDM Application Reference Manual, R11
2015-12-14 Page 54
Coordinate System
Degree of Freedom.
The table will have one row for each node of each specified load case and each specified element.
8.14.6.14 Displacement Survey
The query keys are Node ID and Load Case ID range, and a selection of maximum or minimum.
For each node the survey reports the maximum or minimum displacement vector value in each
component direction (x, y, z, rx, ry, rz) and resultant displacement value (sqrt(x*x+y*y+z*z)) for a
single or range of node IDs, for a range of load cases.
For each node, the information displayed is the same as for the Displacement Query, but repeated seven
times for the node, once for each component of the displacement vector, and once for the resultant.
Each repeated displacement vector component output line shall have the component that is the
maximum or minimum underlined, and the corresponding Load Case ID output in the Load Case ID
column.
8.14.6.15 Stress or Strain Survey
The query keys are Element ID and Load Case ID range, and a selection of maximum or minimum.
For each element the survey reports the maximum or minimum stress or strain tensor value appropriate
for the element type, the principle stress, and the Von Mises stress for a single or range of element IDs,
for a range of load cases.
For each element, the information displayed is the same as for the Stress or Strain Query, repeated as
many times as there are components in the stress or strain tensor for that type of element. Each
repeated stress or strain tensor component output has the maximum or minimum component
underlined, and the corresponding Load Case ID output in the Load Case ID column.
8.14.6.16 Element Forces from Node Force Balance Survey
The query keys are Element ID and Load Case ID range, and a selection of maximum or minimum.
For each element the survey reports, for each node in the element, the maximum or minimum force
vector component in each component direction (x, y, z, rx, ry, rz) and the resultant translational load
value (sqrt(x*x+y*y+z*z)), for a single or range of element IDs, for a range of load cases.
For each element, the information displayed is the same as for the Element Forces from Node Force
Balance Query, repeated for each of the component directions and the resultant, repeated for each of
the nodes in that type of element. Each repeated force vector component output has the maximum or
minimum component underlined, and the corresponding Load Case ID output in the Load Case ID
column.
8.14.7 Validate
Before archival, STEP-files shall be validated. The validation result files shall be included in archival
packages. Such validations run against the constraints in the EXPRESS schema that the STEP-file is
said to be compliant with.
This release of the SimDM browser allows you to validate AP209e2 files. Other STEP-files are not
validated as their EXPRESS schemas are currently not available to the SimDM browser.
Currently validation options can be specified (see Figure 51).

EDMopenSimDM Application Reference Manual, R11
2015-12-14 Page 55
Figure 51. Validation options
All validations are done against constraints in AP209e2, and a report is created. The report is presented
to you on request after completed validation; see Figure 52.
Figure 52. Message after completed AP209e2 validation
The report file is stored in the database. When repeating the validation, different validation options can
be chosen.
It is also possible to validate several STEP-files at the same time. Right-click on a folder and select
“Check STEP-files”. The following window will pop-up.
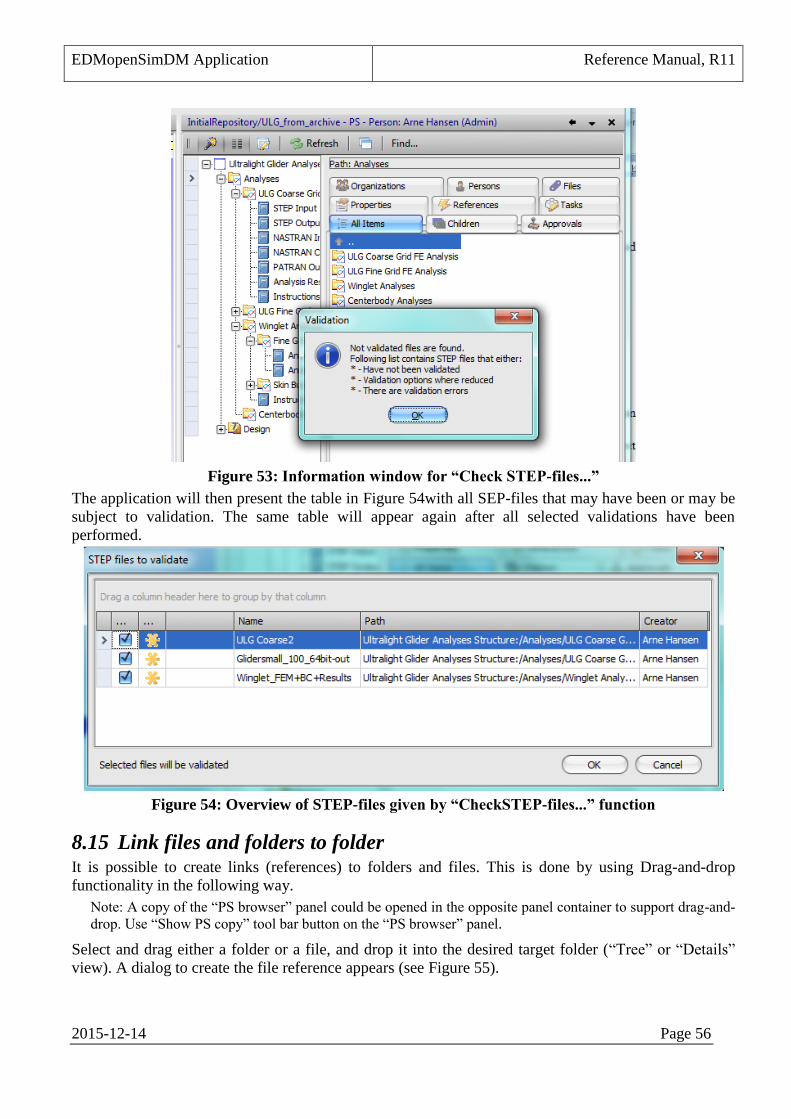
EDMopenSimDM Application Reference Manual, R11
2015-12-14 Page 56
Figure 53: Information window for “Check STEP-files...”
The application will then present the table in Figure 54with all SEP-files that may have been or may be
subject to validation. The same table will appear again after all selected validations have been
performed.
Figure 54: Overview of STEP-files given by “CheckSTEP-files...” function
8.15 Link files and folders to folder It is possible to create links (references) to folders and files. This is done by using Drag-and-drop
functionality in the following way.
Note: A copy of the “PS browser” panel could be opened in the opposite panel container to support drag-and-
drop. Use “Show PS copy” tool bar button on the “PS browser” panel.
Select and drag either a folder or a file, and drop it into the desired target folder (“Tree” or “Details”
view). A dialog to create the file reference appears (see Figure 55).

EDMopenSimDM Application Reference Manual, R11
2015-12-14 Page 57
Figure 55. “File reference” dialog
The text box “Name” is set with file name by default. The name of file reference could be changed.
“Description” and “Comment” fields are optional and may be omitted.
As result a file link icon is placed into the folder that the file was dragged into.
When a folder reference is created, the following dialog appears (see Figure 56).
Figure 56. “Folder reference” dialog
The “Name” field is read only. It represents the name of the referenced folder. The “Description” field
is optional and may be omitted.
As result folder link icons are placed into both the source and the target folder so that a two-ways link
becomes available.
8.16 Collections Folders and their data can be grouped into collections of the following three types:
- Baseline
- In-work package
- LOTAR Archive.
These are explained in the sub-chapters below. Table 1 displays the principle differences.
Table 1: Differences in types of folder collections
Validated Approved Contiguous Export
Baseline - X X X

EDMopenSimDM Application Reference Manual, R11
2015-12-14 Page 58
Validated Approved Contiguous Export
In-work package - - X X
LOTAR Archive X X X X
In all cases folders shall be contiguous, that is, they shall be connected by parent-child relationships or
parent-parent relationships.
The collections sub-menus are only available in the context menu of the top product structure folder;
see Figure 57.
Figure 57. Three collection type sub-menus in top folder context menu
All three types of collections become available for export after having been created (see menu item
“Export to archive...”, 8.10). Baseline and LOTAR Archives require final approval, which will turn
them into read-only collections. Only LOTAR Archives must be validated, that is, the STEP-files in
such archives shall have successfully passed the “Validation>Validate...” function for “Full validation”
(see 8.14.7).
Note: As long as a LOTAR archive has not been exported, yet, its final approval may be reverted. After
export this will not be possible any more, and the archived branch will stay read-only.
8.16.1 Baselines
A baseline is a single folder or a set of folders that can be used as a basis for comparison during a
development process of a product structure. A baseline may also be established as the basis for
subsequent engineering activities. Such activities may be attributed with formal approval.
8.16.1.1 New baselines
Baselines are created by an administrator and from the product structure context menu only. Selecting
the “New baseline…” menu item opens a panel that replaces the product structure panel for the time of
defining the baseline; see Figure 58.

EDMopenSimDM Application Reference Manual, R11
2015-12-14 Page 59
Figure 58. The baseline creation panel
A baseline shall be contiguous. It will always include the product structure folder, which will become
the direct parent of the start folder of the baseline.
Only folders with “Final approval” can be included in baselines. The names of such folders are written
in italic in the baseline panel, whereas folders that can not be selected are shown in grey.
Folders for inclusion into the package are selected by clicking in the tickbox to the left of each folder.
A baseline structure may start at any folder. Subfolders are automatically selected and can not be
deselected.
A baseline shall be given a name and may be given a description.
As soon as a baseline is created its name becomes available in the menu items “Baseline>Show” and
“Baseline>Remove”.
8.16.1.2 Show baseline
Baselines may be reviewed from the product structure context menu only and by any user with read
access. A new product structure panel is opened to display the selected baseline; see left panel in Figure
59. The baseline has read-only access for all types of users that are assigned to the owning product
structure.
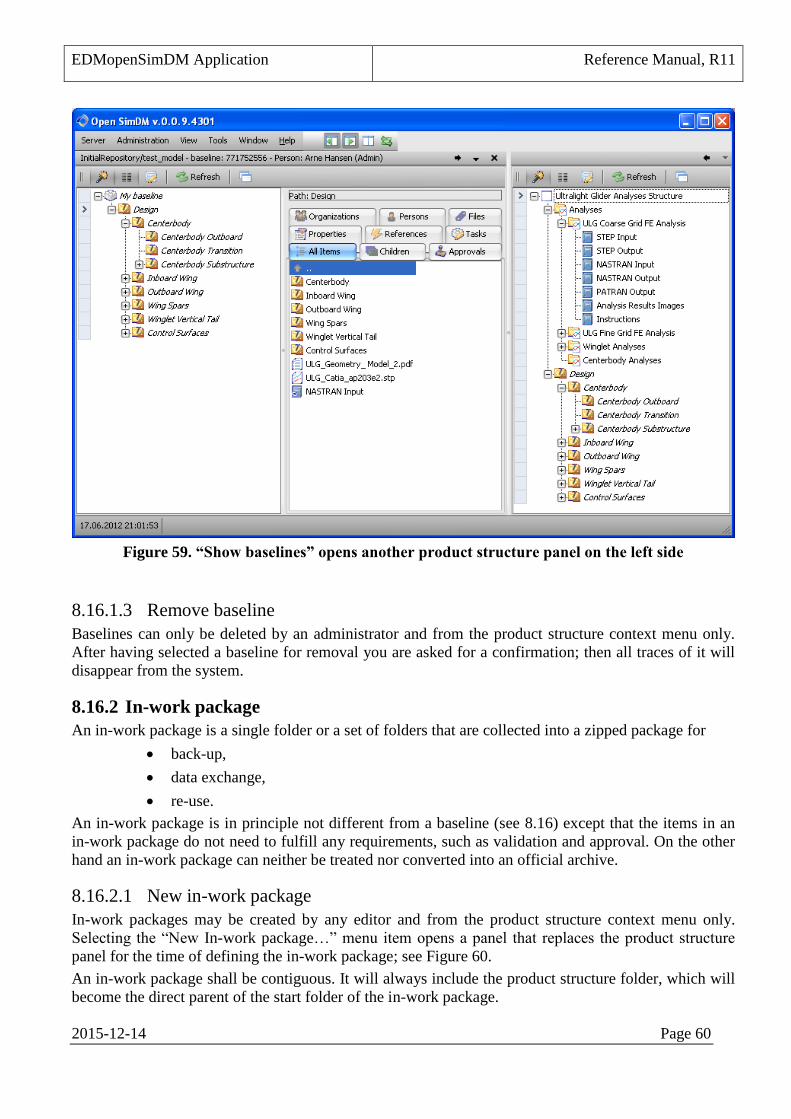
EDMopenSimDM Application Reference Manual, R11
2015-12-14 Page 60
Figure 59. “Show baselines” opens another product structure panel on the left side
8.16.1.3 Remove baseline
Baselines can only be deleted by an administrator and from the product structure context menu only.
After having selected a baseline for removal you are asked for a confirmation; then all traces of it will
disappear from the system.
8.16.2 In-work package
An in-work package is a single folder or a set of folders that are collected into a zipped package for
back-up,
data exchange,
re-use.
An in-work package is in principle not different from a baseline (see 8.16) except that the items in an
in-work package do not need to fulfill any requirements, such as validation and approval. On the other
hand an in-work package can neither be treated nor converted into an official archive.
8.16.2.1 New in-work package
In-work packages may be created by any editor and from the product structure context menu only.
Selecting the “New In-work package…” menu item opens a panel that replaces the product structure
panel for the time of defining the in-work package; see Figure 60.
An in-work package shall be contiguous. It will always include the product structure folder, which will
become the direct parent of the start folder of the in-work package.

EDMopenSimDM Application Reference Manual, R11
2015-12-14 Page 61
Folders for inclusion into the package are selected by clicking in the tickbox to the left of each folder.
An in-work package structure may start at any folder. Subfolders are automatically selected and can not
be deselected.
Figure 60. Creation of an In-work package
An in-work package shall be given a name and may be given a description.
As soon as an in-work package is created its name becomes available in the menu items “In-work
Package>Show” and “In-work Package>Remove”.
8.16.2.2 Show in-work package
In-work packages may be reviewed from the product structure context menu only and by any user with
read access. A new product structure panel is opened to display the selected in-work package; the
appearance is similar to “Show baseline” in Figure 59.
8.16.2.3 Remove in-work package
In-work packages can be deleted by any editor (or only the owner?) and administrators. The function is
available from the product structure context menu only. After having selected an in-work package for
removal you are asked for a confirmation; then all traces of it will disappear from the system.
8.16.3 LOTAR Archive
A LOTAR Archive is a single folder or a set of folders that are ready for export to an archive. The
folder or branch needs to be finally approved (see 8.7.3) and all STEP-files need to have completed full
validation successfully (see 8.14.7).
8.16.3.1 New LOTAR AIP
LOTAR archival information packages (AIP) may be created by administrators and from the product
structure context menu only. Selecting the “New LOTAR AIP…” menu item opens a panel that
replaces the product structure panel for the time of defining the LOTAR AIP; see left panel in Figure
61.
A LOTAR AIP shall be contiguous. It will always include the product structure folder, which will
become the direct parent of the start folder of the archived branch.

EDMopenSimDM Application Reference Manual, R11
2015-12-14 Page 62
Folders for inclusion into the package are selected by clicking in the tickbox to the left of each folder.
A LOTAR AIP structure may start at any folder. Subfolders are automatically selected and cannot be
deselected.
Figure 61. Creation of a LOTAR AIP
A LOTAR AIP shall be given a name and may be given a description.
As soon as a LOTAR AIP is created its name becomes available in the menu items “LOTAR
package>Show” and “LOTAR package>Remove”.
8.16.3.2 Show LOTAR AIP
LOTAR archival information packages may be reviewed from the product structure context menu only
and by any user with read access. A new product structure panel is opened to display the selected in-
work package; the appearance is similar to “Show baseline” in Figure 59.
8.16.3.3 Remove LOTAR AIP
LOTAR archival information packages can only be deleted by the owner and by administrators. The
function is available from the product structure context menu only. After having selected a LOTAR
archival information package for removal you are asked for a confirmation; then all traces of it will
disappear from the system.
8.17 Find The “Find”-function helps you to retrieve items from the EDMopenSimDM server that match a given
text string. The function is triggered from the product structure root folder context menu and will open
a panel of its own aside the product structure panel (see Figure 62).
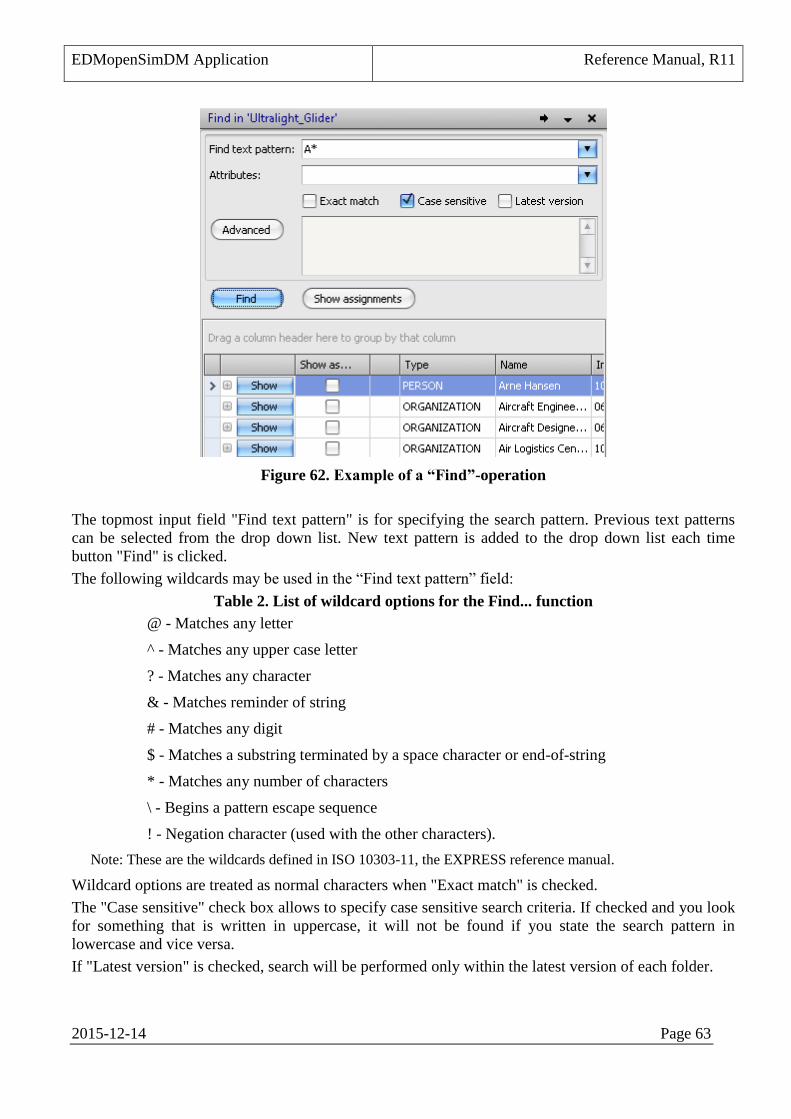
EDMopenSimDM Application Reference Manual, R11
2015-12-14 Page 63
Figure 62. Example of a “Find”-operation
The topmost input field "Find text pattern" is for specifying the search pattern. Previous text patterns
can be selected from the drop down list. New text pattern is added to the drop down list each time
button "Find" is clicked.
The following wildcards may be used in the “Find text pattern” field:
Table 2. List of wildcard options for the Find... function
@ - Matches any letter
^ - Matches any upper case letter
? - Matches any character
& - Matches reminder of string
# - Matches any digit
$ - Matches a substring terminated by a space character or end-of-string
* - Matches any number of characters
\ - Begins a pattern escape sequence
! - Negation character (used with the other characters).
Note: These are the wildcards defined in ISO 10303-11, the EXPRESS reference manual.
Wildcard options are treated as normal characters when "Exact match" is checked.
The "Case sensitive" check box allows to specify case sensitive search criteria. If checked and you look
for something that is written in uppercase, it will not be found if you state the search pattern in
lowercase and vice versa.
If "Latest version" is checked, search will be performed only within the latest version of each folder.

EDMopenSimDM Application Reference Manual, R11
2015-12-14 Page 64
Search can be restricted to selected attributes from the "Attributes" drop down list. One or more of the
following attributes can be selected (marked by tick box).
Name – The name of an item in a breakdown structure, such as folder, attached file, person etc..
Description – The description of items of a breakdown structure.
File link –The original file path of a file attached to a folder (see Figure 46).
File extension – The extension of an attached file; for example: .docx, .pdf, ...
EXPRESS schema name – The name of the EXPRESS schema that a STEP-file complies to; for
example:
AP209_MULTIDISCIPLINARY_ANALYSIS_AND_DESIGN_MIM_LF. This applies to
attached STEP files only.
Folder id – The folder unique identifier; this value is not shown in the GUI.
Folder version – The identifier of a folder version, such as, "1", "2", "3", ...
Person login – The user login credentials.
Property default value – The default value assigned to a property; see "Default value" in Figure
32.
PDI OS – The operating system requirements of a file: see "OS" text field in Figure 46.
PDI original name - The original name of a file when it was uploaded; see "original name" text
field in Figure 46.
PDI original format - The name of the original format of a file; see "original format" text field
in Figure 46.
The matching occurrences will be listed below the input form. Each occurrence has a “Show”-button.
Clicking on this will open the product structure at the location of this occurrence.
A search operation can be even further constrained by using the advanced options that are shown when
you click the "Advanced" button (see Figure 63).
Figure 63. Advanced options for Find functionality.
Search can be performed within a specified branch rather than in the entire product structure. The
branch (folder name) is selected from the "Look in" drop down control.
In addition, time intervals of changes (changed before and changed after) can be specified.
Latest editors (one or more) can also be specified so that search result will only contain items that have
been edited (last update) by specified users.
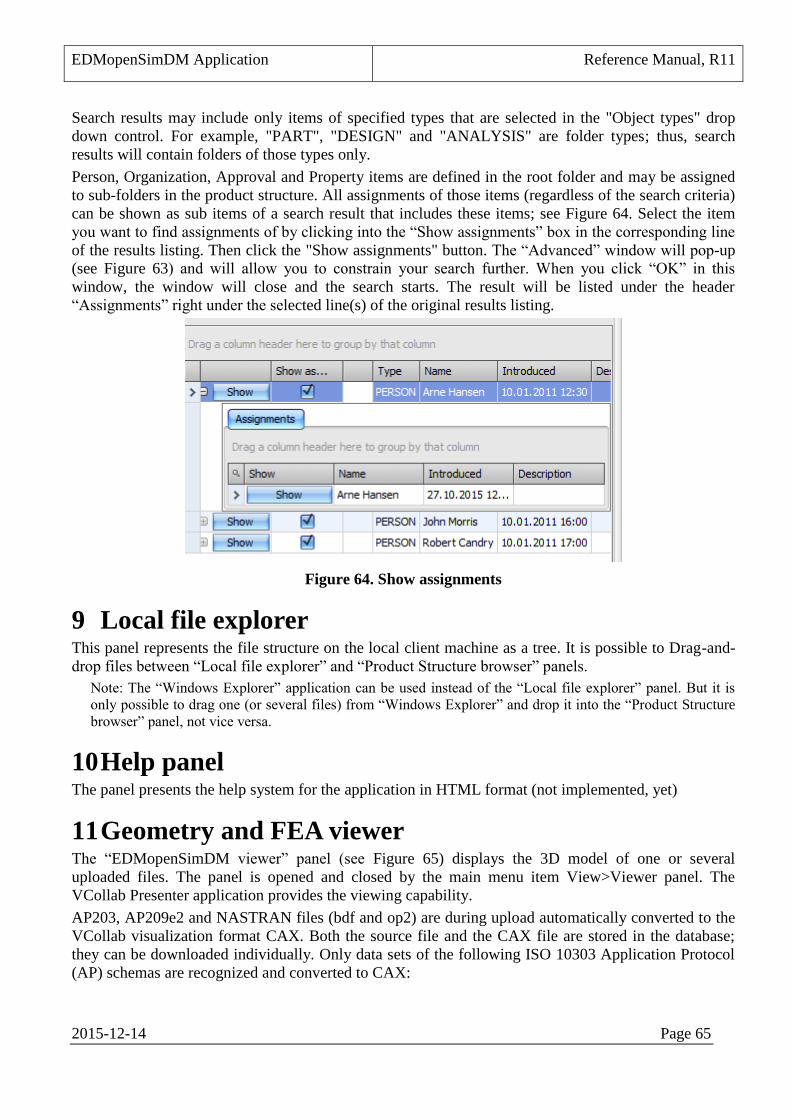
EDMopenSimDM Application Reference Manual, R11
2015-12-14 Page 65
Search results may include only items of specified types that are selected in the "Object types" drop
down control. For example, "PART", "DESIGN" and "ANALYSIS" are folder types; thus, search
results will contain folders of those types only.
Person, Organization, Approval and Property items are defined in the root folder and may be assigned
to sub-folders in the product structure. All assignments of those items (regardless of the search criteria)
can be shown as sub items of a search result that includes these items; see Figure 64. Select the item
you want to find assignments of by clicking into the “Show assignments” box in the corresponding line
of the results listing. Then click the "Show assignments" button. The “Advanced” window will pop-up
(see Figure 63) and will allow you to constrain your search further. When you click “OK” in this
window, the window will close and the search starts. The result will be listed under the header
“Assignments” right under the selected line(s) of the original results listing.
Figure 64. Show assignments
9 Local file explorer This panel represents the file structure on the local client machine as a tree. It is possible to Drag-and-
drop files between “Local file explorer” and “Product Structure browser” panels.
Note: The “Windows Explorer” application can be used instead of the “Local file explorer” panel. But it is
only possible to drag one (or several files) from “Windows Explorer” and drop it into the “Product Structure
browser” panel, not vice versa.
10 Help panel The panel presents the help system for the application in HTML format (not implemented, yet)
11 Geometry and FEA viewer The “EDMopenSimDM viewer” panel (see Figure 65) displays the 3D model of one or several
uploaded files. The panel is opened and closed by the main menu item View>Viewer panel. The
VCollab Presenter application provides the viewing capability.
AP203, AP209e2 and NASTRAN files (bdf and op2) are during upload automatically converted to the
VCollab visualization format CAX. Both the source file and the CAX file are stored in the database;
they can be downloaded individually. Only data sets of the following ISO 10303 Application Protocol
(AP) schemas are recognized and converted to CAX:

EDMopenSimDM Application Reference Manual, R11
2015-12-14 Page 66
AP203_CONFIGURATION_CONTROLLED_3D_DESIGN_OF_MECHANICAL_PARTS_A
ND_ASSEMBLIES_MIM_LF
AP209_MULTIDISCIPLINARY_ANALYSIS_AND_DESIGN_MIM_LF
AP242_MANAGED_MODEL_BASED_3D_ENGINEERING_MIM_LF
AUTOMOTIVE_DESIGN
STRUCTURAL_ANALYSIS_DESIGN
The viewer is launched when you open (“Open” context menu) an AP203, AP209e2 or NASTRAN
file; VCollab Presenter controls become available for manipulating the 3D model.
You may specify a different viewer in the main menu item Tools>File associations.
Figure 65. “EDMopenSimDM viewer” panel
Note: CAX files that are uploaded by you (vice automatically generated) and then opened will not be shown
in the Viewer panel, but by the application that is associated with the CAX extension.
12 Web client Some functionality of the desktop client is available from a web browser by the following URL:
http://localhost:8080/STM_web/?server=127.0.0.1&port=9090

EDMopenSimDM Application Reference Manual, R11
2015-12-14 Page 67
localhost means this computer. That is, localhost can be used when the EDMopenSimDM server is
installed on the machine where you are going to use your web browser.
The network name or IP address of the EDMopenSimDM server shall be used when accessed from
outside.
12.1 Authentication You have to provide your credentials (login and password) before you will be able to browse data. Put
your login and password into the pop up form; see Figure 66. Note, always use "sdai-group" as value of
the Group if prompted for it.
Figure 66. Login form
12.2 List of projects
After successful authentication the list of available repositories and projects will be presented in the left
side panel. An example of available product structures is shown in Figure 67.
Figure 67. Available repositories and projects
Click icon near to the project name of your interest, and a context menu with the single item
"Open" will appear.

EDMopenSimDM Application Reference Manual, R11
2015-12-14 Page 68
Figure 68. "Open" menu item
12.3 Product structure and meta-data
The product structure of the project will be shown on the left side of the web page where repositories
and projects were listed before.
Figure 69. Product structure
Children nodes are shown by clicking or by clicking on node name.
Meta-data of a product structure node is opened from the left panel by clicking the icon and
selecting "Open" menu item from the context menu; the result is depicted in Figure 70.

EDMopenSimDM Application Reference Manual, R11
2015-12-14 Page 69
Figure 70. "Info" tab with meta-data
Tab "Files" contains the list of files attached to a corresponding node.
Figure 71. "Files" tab with meta-data
Product structure nodes may be assigned user-defined property values.
Figure 72. "Properties" tab data
12.4 File upload
Files can be uploaded to a server and attached to a selected node.
Click icon of your favorite node and select the "Add file" menu item from the context menu.
The following form will be shown:

EDMopenSimDM Application Reference Manual, R11
2015-12-14 Page 70
Figure 73. Form to upload a file
A file is selected by clicking the "Browse..." button. Select file type from the "Type" drop-down list.
The description of the file is mandatory.
Click "OK" to start upload. After a while the uploaded file will appear in the "Files" tab.
12.5 Export ZIP package
The content of a folder and all children below including their documents can be exported as a ZIP
package.
Click icon of a required node and select the "Download" menu item from the context menu.
12.6 Add remark A folder can be commented, that is, a new remark may be added.
Click icon of a folder and then select the "Add remark" menu item from the context menu.
Figure 74. Form to add a remark
Give the subject for your remark and the remark itself. Then click "OK".
12.7 Add approval A folder and all its underlying content can be approved (disapproved) by adding an approval tag to the
folder.
Click icon of a folder and then select the "Add approval" menu item from the context menu.

EDMopenSimDM Application Reference Manual, R11
2015-12-14 Page 71
Figure 75. Form to add an approval
Select the resolution type (approved, rejected or not applicable) and add a description.
Then click "OK".
12.8 Import folder (ZIP package) A local folder and all its content (including sub folders) can be imported to a selected node. This,
however, requires that the local folder has been zipped first.
Click icon of a node and then select the "Import folder" menu item from the context menu.
Figure 76. Form to import folder
Select "Folders type" item. All imported folder will be assigned this type.
"Files types" may be empty. In this case the system will set the file type (for each file) according to the
individual file extension.
12.9 Delete folder A folder can be deleted. That is, it can be removed from the product structure.
Click icon of a node and then select the "Delete" menu item from the context menu.

EDMopenSimDM Application Reference Manual, R11
2015-12-14 Page 72
Figure 77. Delete confirmation in Mozilla Firefox