
ECU MASTER ignition CDI - TCI V8 - IMFsoft · ECU MASTER ignition CDI - TCI V8.21. 2/19 Dokument:...
19
© IMFsoft, ltd. ideas make future 27.3.2014 ECU MASTER ignition CDI - TCI V8.21
Transcript of ECU MASTER ignition CDI - TCI V8 - IMFsoft · ECU MASTER ignition CDI - TCI V8.21. 2/19 Dokument:...

1/19
Dokument: 1002-0018-11 [email protected] ignition CDI-TCI V8.21
ideas make future
© IMFsoft, ltd.
ideas make future
27.3.2014
ECU MASTER ignition
CDI - TCIV8.21

2/19
Dokument: 1002-0018-11 [email protected]
Brief DescriptionThe product MASTER ignition is a brand new series of ECU units. Device based on
experience in development of industrial and transport safety systems, ignition units and particularly our customers’ needs which provided a foundation for the idea and realisation of the new model.
The unit MASTER ignition has been functionally designed in order to advance or injection control of combustion engines ranging from one to sixteen cylinders (depending on type), with CDI and TCI outputs. Support different type of Trigger wheel, all types of pick up sensors, 5D maps of advance and injection control, integrated pressure sensor, temperature, tachometer output, strobe lamp, exhaust servo throtle, engine speed and turbo preassure PID regulation, control switching of fuel pump and support CANbus in protocol J1939 / OBD2.
The list of features determines MASTER ignition to be used either for a service or tunning replacement of all conventional motorcycle or automobile ECU units, usable for ignition or injection coil control. The integrated redundancy of sensing, together with other key features makes MASTER ignition very suitable for cogeneration units, marine and aviation applications, thanks to the wide range of operating revolutions can be also used for turbines.
The function of MASTER ignition based on FPGA technology, which 1Msps A/D conversion of Pick up sensor signal, as well as its evaluation and calculation of the mathematical model of the real engine rotation, math operation 64bit. Simultaneously, it deals with other operations i.e. redundancy sensing, full control of CDI converter, advanced features and signal records. FPGA technology is interesting not only for its high operating performance but particularly for its accuracy, which in principle microprocessor-based systems cannot achieve.
Main Featuresü The power supply range of 7 to 36 V (depending on type)ü Working speed from 0 to 65 000 rpmü Operating temperature -40 to 85 °Cü Based on FPGA technology and microprocessor supportü Mathematical model of the real engine rotation, math operation 64bitü Adjustable pick up sensing levels, A/D conversion of signals, ± 25.5 V, 1Mspsü Trigger wheel maps, setting voltage levels for different engine speeds, filters captureü Customizing the input type sensor: Induction, Hall, Optical, Hammer, Proximity NPN/PNPü Redundancy of sensing and other integrated elementsü Advance and Injection control – optional 5D map of ±360° and 0 to 60msü Integrated pressure sensor -80 to + 150kPa (depending on type)ü Integrated oscilloscope, runtime visualisation of pick up and switching, ± 25.5 V, 1Mspsü Coil outputs – MOSFET automotive – TCI, CDI or combined, 3 to 10 outputsü Advanced functions – acceleration brake, temperature, pressure, servo control, PIDü Support CANbus in protocol J1939 / OBD2 (depending on type)ü Datalog to internal flash 8MB – long-term records, engine hours, RPM, inputs and otherü Integrated and full control CDI converter 400V with superb performance of 100Wü User configuration by PC – while in operation with possibility of status visualizationü Galvanic isolated USB – common ground USB protection and EMC disturbationü Measurement of supply voltage, temperature and load of CDI converters ü Convenient Firmware Upgrade – Free regulary and easy updates via the website
MASTER ignition CDI-TCI V8.21
ideas make future

3/19
Dokument: 1002-0018-11 [email protected]
Technical Parameters
Parameters RangeSupply voltage CDI (12V) .... 7-21V
CDI (24V) .... 12-36VTCI .... 7-36V
Current consumption, ECU CDI.... 0-10A, dependent on the speed TCI.... < 100mA
Working speed rate (range management) 0 - 65 000 rpm (0.1 - 65 000 rpm)Working temperature -40 to 85°CPick up (PA, PB) ±25.5V, ±0.1V, max ±100V,sampling 1MspsMaps advance [1]...[8] ±360°, 8 x 256 pts, (0.1 - 65 000 rpm)Maps injection [1]...[8] 0..60ms, 8 x 256 pts, (0.1 - 65 000 rpm)Coil switching (1OA, 1OB, 1OC ... 1OS)2x, 4x or 10x, CDI, TCI (depended on type)
MOSFET automotive 18A/650VOVERVOLTAGE protection 360V
Digital inputs (DI1, DI2, DI3, DI4) 0–2V =L, 3–16V =H (DI3,4 -Pull up 10kΩ)Analog inputs (AI1, AI2, AI3, AI4) AI1,AI2 .. 0 - 5V; AI3,AI4.. 0-5V or 0-10kΩDigital outputs (DO1, DO2) MOSFET BRIDGE 5A/40V (Pull up 1kΩ) Integrated knock sensing (AI5) 0-20kHz, 0-1V (extended type only)Integrated pressure sensor (AI6) -80 to 150kPa (tol. ± 4kPa) (by order type)Measurement of voltage (power supply) 7 to 50V (tol. ±2%)Measurement of temperature (inside) -40 to +125°C (tol. ±2°C)CDI converter (voltage, current, efficiency) 250-400V, 5-45A(pulse), efficiency 75%Resistance of primary winding coils* CDI - Capacitance, resistance 0.1 - 1.5Ω
TCI* - Inductive, resistance 0.2 - 25ΩTCI* - Injection, resistance 0.2 - 25Ω
Communication (CANH, CANL) CANbus – J1939 / OBD2 (extended type only)Datalog record memory 8MB FLASH, 8kB RAMStatus indication by LED Blue, RedUser configuration - USB Freeware software MASTER controlGalvanic isolated USB Common ground USB protection and EMCDegree of protection IP65Package size 105x95x37mm or 105x148x37mm (extended)Weight 350g or 550g (extended)
* measured between terminal 1 and G (ground) for capacitive coil or 1 and + (supply) induction* TCI - possibility for other use (switching, injector jets, fuel pump, stroboscope, speedometer etc.)
MASTER ignition CDI-TCI V8.21
ideas make future

4/19
Dokument: 1002-0018-11 [email protected]
Connector wiring – MASTER front connector (alluminium case - standard)
MARKING DESCRIPTION RANGE, ACTIVE LEVEL+ Voltage supply 7 - 36V
G Power ground Sensors ground 0V
1OA-1OD Switching coils A-Dor user output
CDI - Capacitance, resistance 0.1 - 1.5ΩTCI* - Inductive, resistance 0.2 - 25Ω (Pull up 1kΩ)TCI* - Injection, resistance 0.2 - 25Ω (Pull up 1kΩ)
+5V Power sensors output +5V, 100mAPA, PB Rotation sensor A,B ±25.5V, minimum ±0.1V, sampling 1MspsAI1.. AI4 / DI1.. DI4
Analog input AI1..4Digital input DI1..4
AI1..AI2: 0-5V; AI3..4: 0-5V/ 0-10kΩDI1..DI2: 0-16V; DI3..4: 0-16V (Pull up 10kΩ)
DO1, DO2 Digital output DO1..2 MOSFET BRIDGE 5A/40V (Pull up 1kΩ)* TCI - possibility for other use (switching, injector jets, fuel pump, stroboscope, speedometer etc.)
Connector wiring – MASTER back connector (alluminium case - extended)
MARKING DESCRIPTION RANGE, ACTIVE LEVEL
G Power ground Sensors ground 0V
CAN HCAN L CANbus J1939 / OBD2, 250kbps, 120R
1OE-1OS Switching coils E-Sor user output
CDI - Capacitance, resistance 0.1 - 1.5ΩTCI* - Inductive, resistance 0.2 - 25Ω (Pull up 1kΩ)TCI* - Injection, resistance 0.2 - 25Ω (Pull up 1kΩ)
KI Knock input 0-20kHz, 0-1V* TCI - possibility for other use (switching, injector jets, fuel pump, stroboscope, speedometer etc.)
MASTER ignition CDI-TCI V8.21
ideas make future

5/19
Dokument: 1002-0018-11 [email protected]
Connector wiring – MASTER MINI (orange plastic case)
MARKING DESCRIPTION RANGE, ACTIVE LEVEL+ Voltage supply 7 - 36V
G Power ground Sensors ground 0V
1OA-1OC Switching coils A-Cor user output
TCI* - Inductive, resistance 0.2 - 25Ω (Pull up 1kΩ)TCI* - Injection, resistance 0.2 - 25Ω (Pull up 1kΩ)
+5V Power sensors output +5V, 100mAPA Rotation sensor A ±25.5V, minimum ±0.1V, sampling 1MspsAI1, AI2 / DI1, DI2, DI3
Analog input AI1,2Digital input DI1,2,3
AI1: 0-5V/ 0-10kΩ; AI2: 0-5VDI2: 0-16V; DI1,DI3: 0-16V (Pull up 10kΩ)
DO1 Digital output DO1 MOSFET 1A/100V (Pull up 1kΩ) - not in Bridge* TCI - possibility for other use (switching, injector jets, fuel pump, stroboscope, speedometer etc.)
MASTER MINI do not contain these signals: AI3, AI4, D4, PB, 1OD, but all software function is present.Please choose in MASTER Control Application → HARDWARE VARIANT → V7.x
MASTER ignition CDI-TCI V8.21
ideas make future

6/19
Dokument: 1002-0018-11 [email protected]
ECU MASTER - production type Delivery time 3-5 days
MASTER MINI ignition 3TCI - 3x TCI outputs, 7 – 36V
MASTER ignition 4TCI - 4x TCI outputs, 7 – 36V
MASTER ignition 10TCI - 10x TCI outputs, 7 – 36V
MASTER ignition 1CDI 3TCI – 12V - 1x CDI outputs, 3x TCI outputs, 7 – 21V
MASTER ignition 2CDI 2TCI – 12V - 2x CDI outputs, 2x TCI outputs, 7 – 21V
MASTER ignition 3CDI 1TCI – 12V - 3x CDI outputs, 1x TCI outputs, 7 – 21V
MASTER ignition 4CDI – 12V - 4x CDI outputs, 7 – 21V
MASTER ignition 10CDI – 12V - 10x CDI outputs, 7 – 21V
MASTER ignition 4CDI 6TCI – 12V - 4x CDI outputs, 6x TCI outputs, 7 – 21V
MASTER ignition 5CDI 5TCI – 12V - 5x CDI outputs, 5x TCI outputs, 7 – 21V
MASTER ignition 6CDI 4TCI – 12V - 6x CDI outputs, 4x TCI outputs, 7 – 21V
MASTER ignition 4CDI – 24V - 4x CDI outputs, 12 – 36V
MASTER ignition 10CDI – 24V - 10x CDI outputs, 12 – 36V
MASTER ignition 2CDI 2TCI – 24V - 2x CDI outputs, 2x TCI outputs, 12 – 36V
MASTER ignition 4CDI 6TCI – 24V - 4x CDI outputs, 6x TCI outputs, 12 – 36V
MASTER ignition 6CDI 4TCI – 24V - 6x CDI outputs, 4x TCI outputs, 12 - 36V
Variant with integrated pressure sensor is signed by next symbol – P
Feature of CDI and TCI outputs
Output feature CDI - capacitance TCI - inductiveEnergy efficiency A...B B...DEnergy of spark A...B A...B
Spark slope A++ A...BLow coils weight A++ B...D
Difficulty of construction C...D A++Another use of output* C...D A++
* Possibility for other use (switching, injector jets, fuel pump, stroboscope, spedometer etc.)
MASTER ignition CDI-TCI V8.21
ideas make future

7/19
Dokument: 1002-0018-11 [email protected]
InstallationElectronic spark ignition unit MASTER ignition is powered by safe voltage up to 36V, but there is present a voltage of thousands of volts on ignition coils!!! Therefore, it is necessary to pay maximum attention when manipulating. Any changes to the electrical installation of ignition cannot be carried on unless the power is off!!!
Power supply and all ignition inputs are protected against overvoltage and reverse polarity. Neither overvoltage status nor reverse polarity can last permanently, as it can overload the security elements and cause partial or complete damage to the functionality of the ignition.
Ignition outputs are not protected against short circuit and therefore outputs from 1OA up to 1OS, DO1 or DO2 must not be connected to the power terminal (+). Connection to impendence is also forbidden as it would excess the amount of allowed current and result in overload and following destruction of certain switching elements in the ignition.
Spark plug together with cylinder head and engine block must be connected to negative or positive pole of the power. This is necessary to flow of current from secondary winding of ignition coils.
Aluminium housing if ignition is due to own shielding connected to negative pole. Therefore no other conductor apart from negative pole can be connected to the housing.
Ignition must never be installed at the places with direct exposure to water, chemicals, extreme temperatures and vibrations. The effect of any of these may cause irreversible damage or destruction of ignition functionality.
The correct and reliable function of installed equipment is based on its correct power supply. Power wires (+, G) must have a diameter of 2.5 mm, which is ideal for CDI variant. Variant TCI must follow this condition only in case of ground wire (G). Power
supply must always be done through fuse 10A, which protects ignition in case of reverse polarity, overvoltage or other disorders.
Sparks must be provided with shielding caps. The signal conductor from the rotation sensor cannot be led in parallel way with excitation coil wire (1OA to 1OS), high-voltage conductors or conductors of the alternator excitation. If it is not possible to carry out the wiring in this way it is recommended to lead signal conductor sensors (PA, PB) in twisted (twisted in pair) or shielded conductors in order to eliminate any possible interference of electric-installation.
Connectors crimping Connector crimping requires a similar procedure as with FASTON connectors, although
there is a rubber sealing grommet used here in addition. Regarding tool, it can be done with standard crimping pliers FASTON 1.5mm – 2.5mm. For blocking of unused terminal connectors TYCO it is appropriate to use supplied rubber plugs to comply with IP65 degree of protection.
MASTER ignition CDI-TCI V8.21
ideas make future
8/19
Dokument: 1002-0018-11 [email protected]
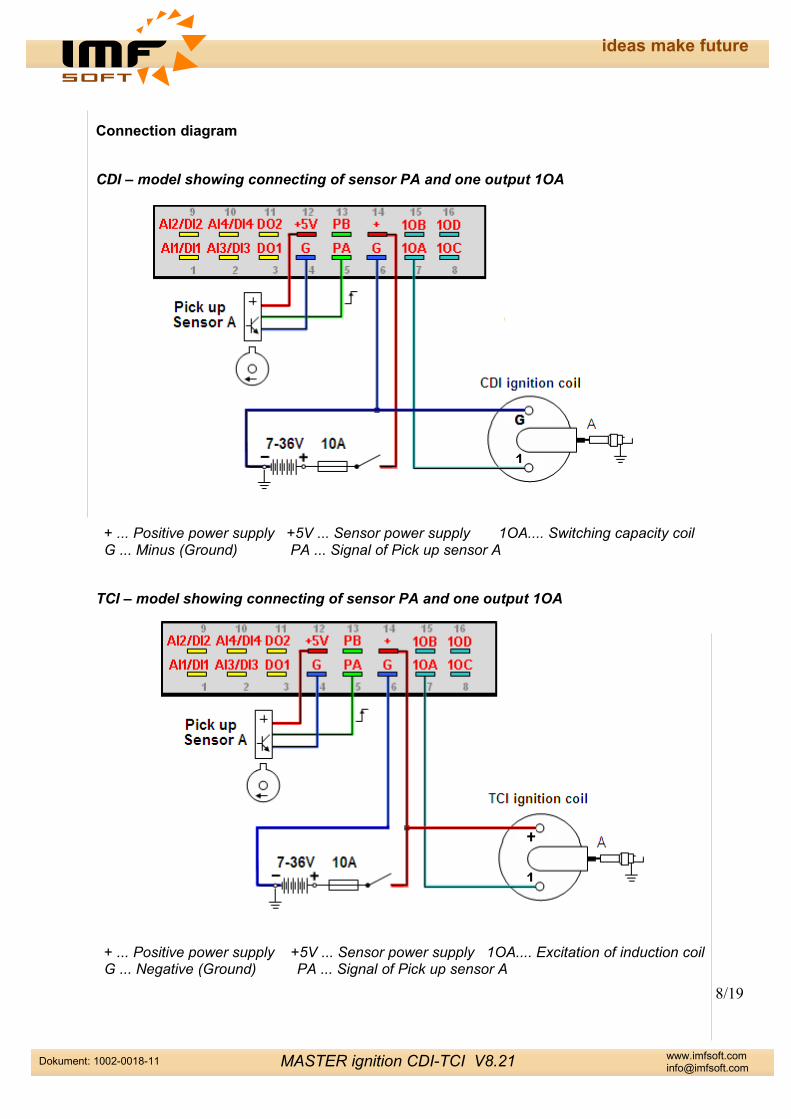
Connection diagram
CDI – model showing connecting of sensor PA and one output 1OA
+ ... Positive power supply +5V ... Sensor power supply 1OA.... Switching capacity coil G ... Minus (Ground) PA ... Signal of Pick up sensor A
TCI – model showing connecting of sensor PA and one output 1OA
+ ... Positive power supply +5V ... Sensor power supply 1OA.... Excitation of induction coil G ... Negative (Ground) PA ... Signal of Pick up sensor A
MASTER ignition CDI-TCI V8.21
ideas make future

9/19
Dokument: 1002-0018-11 [email protected]
Connecting of Pick up sensors PA, PB
Analog inputs AI1, AI2, AI3, AI4It is possible to connect sensors whose output is either voltage or resistance to analog
inputs AI1, AI2, AI3 and AI4, where AI1, AI2 works with voltage 0-5V and AI3, AI4 works with voltage 0-5V or resistance 0-10kΩ. Signal from analog sensors should be lead by Twisted or shielded cable, which helps significantly to eliminate interference.
Digital inputs DI1, DI2, DI3, DI4Change of input status DI3 and DI4 is easily done by input earthing or Bat. supply DI1, DI2.
Digital outputs DO1, DO2
Digital outputs can be used for load switching to zero or to supply with maximum current load 5A. Therefore it is possible to connect e.g. relay coil, fuel pumpe, servo control, indicator of shift revolutions, stroboscope etc.
MASTER ignition CDI-TCI V8.21
ideas make future

10/19
Dokument: 1002-0018-11 [email protected]
MASTER control – Freeware configuration software
Unless the configuration for a particular installation has not been done by the manufacturer then it is necessary to adjust the function of the ignition unit. Configuration is done through a personal computer from MASTER-control application via USB connection. The application is compactable with Windows 98, XP, Win7 and higher.. The installation requires 4MB of free space on your hard disk. Minimum PC configuration is Pentium 166MHz with 32MB RAM.
Making changes to the configuration such as reading and writing of parameters requires installation of application MASTER-control, USB connection and power connection (+, G). When power supply is on it is indicated by flashing blue LED, data transfer is indicated by flashing red LED
Rapid trial changes in the configuration of ignition unit can be made only temporarily by writing them into RAM memory or permanently by storing them in FLASH memory. After starting the application in order to avoid unwanted permanent rewrites is RAM memory selected permanently.
Examples of configurations are part of installation CD.
Function application
Opening configuration Saving configuration Information Help
Online visualisation Maps of advance Advanced features Sensor configuration
Starting visualisation Reading configuration Record configuration Other settings
Selecting RAM Selecting FLASH Local help Switching In-Out
Selecting Advance Selecting Injection Oscilloscope record Acceleration Brake
MASTER ignition CDI-TCI V8.21
ideas make future

11/19
Dokument: 1002-0018-11 [email protected]
Online visualisation
This is an operational display of function and status of ignition unit MASTER. In order to have functional display it is necessary to have USB connection and switch power supply on.
Visualised data
− Engine speed (rpm), advance of engine [ ° ], injection time [ms]− Pick up sensor voltage PA, PB [V]− Power supply [V] and Temperature [ ° ]− Converter CDI – Voltage [V], pulsed current [A] and load [%]− Output signals 1OA – 1OS, DO1, DO2− Input signals DI1 – DI4, AI1 – AI6− Engine work time record [h:m:s]
Starting visualisation
MASTER ignition CDI-TCI V8.21
ideas make future

12/19
Dokument: 1002-0018-11 [email protected]
Oscilloscopic recordOscilloscopic record is used in order to graphically visualise measured and calculated data. This helps to quickly evaluate the proper and accurate function of ignition unit MASTER. It can thus evaluate the correctness of voltage sensing, counting teeth of mathematic model of real rotation and angels of switching output coils.
An example to be given; curve angle of engine angular rotation must be regularly and horizontally increased from 0 to 360°. If there is any change of steepness in the curve or the angle is shorten, the problem is to be found either in wrong angle value set up, number of teeth, the type of synchronisation or unsuitable voltage for sensing.
Visualised data− Pick up sensor voltage, PA, PB [V]− Tooth index of pick up Trigger wheel, Tooth index A-B [-]− Engine rotation, Angle A-B [°]− Engine speed, Speed A-B [%]− Outputs switching 1OA-1OS [-]
In this example, red colour refers to progress of voltage of sensor PA type HALL and INDUCTIVE, which scans three teeth 0-90-180° and in angle 270° 1OA output is switched – grey curve. Blue colour represents teeth (edge) counting and the last curve refers to spinning of engine within the range of 0-360°.
MASTER ignition CDI-TCI V8.21
ideas make future

13/19
Dokument: 1002-0018-11 [email protected]
Maps of Advance and Injection
Maps provide a fast tool to display and model individual curves in advance [1] – [8] in full angle range ±360° (Advance) and 0..60ms (Injection). The given figure influences the moment of output switch from 1OA to 1OS. By using digital DI1- DI4 or Analog outputs AI1- AI6, PA, PB it is possible to operationally switch among the maps.
Modelling tools
− Editor maps – quick draw of maps according to specified points− Mouse modelling – direct editing of maps is possible by mouse movement− Map shifting – whole map shifting or selected parts only − Copying – copies of maps one to another of your choice− Table – direct entry of specific points into table− Filter – in-progress filtration, rounding the edges of maps
MASTER ignition CDI-TCI V8.21
ideas make future

14/19
Dokument: 1002-0018-11 [email protected]
Pick up sensor configuration
Configuring the sensing of engine rotation is the key part of ignition unit MASTER ignition. Within its setting it is possible to select pick up voltage sensing level and adapt this level for more range of engine speed. There are other settings to be selected such as filter setting, angles of Trigger wheel teeth maps or alternatively second level of voltage for synchronisation. Pick up voltage sensing level and Trigger wheel teeth map are predefined for many application Eg. BOSCH 60-2, BOSCH 36-2, BOSCH 2+1, BMW 36-1, FORD 36-1, SUZUKI 24-2, YAMAHA 16-2, HARLEY 32-2.
Instructions for pick up seting
− Sensor type – Induction, Hall, Opto, Hammer, Proximity NPN/PNP− Speed ratio – entering the Ratio engine speed to Trigger wheel speed (1:1, 2:1, 1:2)− Points of scanning – number of samples needed to evaluate the valid edge− Table of signals – entering the sensor voltage levels depending on the engine revolutions− Sensors cooperation – dependency of sensing inputs PA and PB, independent - redundant− Sensor PA, PB – the way of synchronising, i.e. the way of determining the first tooth− Table of angles PA, PB – entering angles of individual edges and teeth − Correction PA, PB – Correction of angles entered in the table in range of ±360°
MASTER ignition CDI-TCI V8.21
ideas make future

15/19
Dokument: 1002-0018-11 [email protected]
Entering Pick up sensor parametersA) Choosing type of sensor
Internally it is decided whether to connect signal resistance to ground by Pull Down or Pull Up.
− Induction – signal load resistance switch internally Pull Down to clamp G− Hall – signal supply resistance switch internally Pull Up to voltage 10V− Opto – signal supply resistance switch internally Pull Up to voltage 10V− Hammer – signal supply resistance switch internally Pull Up to voltage 10V
B) Points of sensingEntering the number of samples allows obtaining valid evaluation of tooth edge. Entering allows filtering off interfering pulse, which prohibits the correct evaluation of teeth. Suitable value is between 2-7.
C) Entering of voltage levelsIt is possible to enter one or more levels of voltage sensing depending on engine revolutions.
−
−
−
− RPM - Entering revolutions from which entered levels of sensing are valid.− Filter [0..9] -Number of engine revolutions needed to synchronise teeth, recommended [0-2]− Tooth H[V] - Entering voltage level for tooth H (increasing voltage), range ±25.5V− Tooth L[V] - Entering voltage level for tooth L (decreasing voltage), range ±25.5V Whereas, entered voltage level Tooth H[V] must be higher than Tooth L[V]
For sensing of HALL or OPTO it is usually sufficient to use one value only for the whole revolution range, thanks to easy switching of Pull Up resistance e.g. Tooth H = 5.0V and Tooth L = 1.9V
For inductive sensing it is important to distinguish voltage for starting and basic operational speed e.g. for start choose Tooth H = 1.0V and Tooth L = -1.0V and for idle motion enter values Tooth H = 1.9V and Tooth L = -1.9V, it is also possible to increase the value according to the nature of sensor.
D) Synchronisation of teeth sensing MODEFrom the perspective of teeth arrangement it is necessary to choose one from three types of modes of synchronisation:1.Without synchronisation – engine rotation is determined by two edges only or for more edges where it is not necessary to divide pulses to individual outputs 1OA to 1OS. 2.Long pause – synchronisation of rotation, thus determining the first tooth (edge) is made on the basis of a long pause.3.Short pause – synchronisation of rotation, thus determining the first tooth (edge) is made on the basis of a short pause.
MASTER ignition CDI-TCI V8.21
ideas make future

16/19
Dokument: 1002-0018-11 [email protected]
E) Entering angles of teeth edges
For a real evaluation of the motor shaft rotation it is necessary to enter a real map of teeth in format of edge angles. You can chose any of predefied Trigger wheel teeth maps Eg. BOSCH 60-2, BOSCH 36-2, BOSCH 2+1, BMW 36-1, FORD 36-1, SUZUKI 24-2, YAMAHA 16-2, HARLEY 32-2. You can set your private maps of teeth. The accuracy of entering can be easily verified by oscilloscope record while engine in rotation, when a linear curve of engine rotation must be drawn within the range 0 - 360°. Common shifting of teeth angle can be done by entering the value correction PA and PB within range ±360°.
F) Entering angles of gripped pistons
Entering angles of gripped pistons is done in “Advanced features” – “output switching”
Advanced features
Switching to table of output switching
Table of output switching
For items from X1 to X10 functions FO.1 for CDI and FO.2 for TCI insert angles of gripped cylinder from 1OA to 1OS and for items XTIME insert period of output switching. Switching time for the CDI is suitable 300us and for TCI from 1 to 5ms depending as the primary coil resistance. Switching time for the Injection coils is creating by Maps of Injection.
In order to determine the output being used it is necessary to choose output switching function.
MASTER ignition CDI-TCI V8.21
ideas make future

17/19
Dokument: 1002-0018-11 [email protected]
Advanced features
Configuration of advanced features gives possibility to sense temperature, pressure and other signals with opportunity to influence operational attributes of ignition unit. Regarding input signals, digital DI1-DI4 can be used or from Analog AI1-AI6, PA or PB can be used.
From operational and internal status, depending on selected function, output signals can be switched. Output signals are marked from 1OA to 1OS, DO1 and DO2.
Switching between the table input/output
Local help
Entering functions
• Option input FI.1 – FI.16 or output from FO.1 to FO.2• Entering parameters of chosen function from XA to XS• Choosing of input/output function and inversion of signal• Description of function you can see in Local help
MASTER ignition CDI-TCI V8.21
ideas make future

18/19
Dokument: 1002-0018-11 [email protected]
Acceleration brake
Acceleration brake is a function for a measure, calculating and visualisation of actual engine power [~kW] and torque [~Nm] solved from the engine acceleration value. When engine accelerates then is used the mass of flywheel as the brake. By the use of acceleration brake can be verified the behavior of the engine throughout the rev range for different advance setting, injection time or other characteristics affecting the behavior of the engine. The measured data and calculated power and torque are only proportional to the actual value, it is not a measurement of real values kW of Nm. These informations can be used only for comparison engine behavior for different ignition settings.
Using of acceleration brake– Open Oscilloscope window and select Brake in menu Record RAM.– Accelerate engine from low to high speed repeatedly 2x .. 7x in sequence– Click to button for a read and show
Visualised data– Power [~kW]– Torque [~Nm]
MASTER ignition CDI-TCI V8.21
ideas make future

19/19
Dokument: 1002-0018-11 [email protected]
Installation Step by Step1. Install MASTER control application on a personal computer with Windows OS such as:
95 / 98 / ME / NT / XP / Vista / Win 7 / Win 8
2. Make a connection to MASTER ignition unit by cable USB A-B, with a personal computer and install the USB driver. Under Win 7 or Win 8 is installed automatically.
3. Connect the power wires to the ignition '+' and 'G' (12V or 24V) only. Once connected, briefly flashes red "SW Boot" and 2 seconds later, the flashing blue LED.
4. Connect the wires of pick up sensor 'PA', 'G' ' and '+5V' or (PB)
5. Run Online visualisation and verify the function of sensing - voltage change of PA (PB) during the tooth passes around the pick up sensor .
6. Open example configuration MASTER ignition according to the application: Example_TCI.ig, Example_CDI.ig, or Example_Injection.ig or another for a particular engine or application.
7. Make adjustment of pick sensor settings teeth according to their actual distribution
8. Make correction or completion of outputs switching angles, but the wires just donot connect yet
9. Make eventual correction advance or injection maps
10. Load configuration into the MASTER ignition unit to FLASH or RAM memory, according to the needs of permanent or temporary storage.
11. Run the starter of engine or otherwise run, and let it read oscilloscop record, to verify the function of the rotation pick up sensor and correct switching outputs angles
12. Connect the outputs as needed 1OA,1OB,1OC,1OD,1OE,1OF,1OG,1OH,1OR,1OS to capacitive, inductive or injection coil.
MASTER ignition CDI-TCI V8.21
ideas make future


![7. The signal check of ignition system - Mr Carscan. Signal Analysis_Ignition.pdf · 2017. 3. 24. · a. Shield crank signal line to 3 [cm] front of ECU : b. Shield wiring of ignition](https://static.fdocuments.net/doc/165x107/6145540a34130627ed50e82b/7-the-signal-check-of-ignition-system-mr-signal-analysisignitionpdf-2017.jpg)

