ECORIDE Manual - e-ta.eu · to get stuck in the tiresome and environmentally hazardous ... The...
36
ECORIDE Manual
Transcript of ECORIDE Manual - e-ta.eu · to get stuck in the tiresome and environmentally hazardous ... The...

ECORIDEManual

Frame number:
Place of purchase:
Thank you for choosing EcoRide! Your choice is important.
Together, with new transportation habits, we may contribute to a better world by reducing our use of fossil fuels. Moreover, by riding your EcoRide each day, you get some extra fresh air and a great start of your day. By actively choosing not to use the car, you often get where you want to go faster, and you don´t have to get stuck in the tiresome and environmentally hazardous traffic congestions. Also, in addition to the reduction of the use of fossil fuels, by biking an EcoRide, you get some extra exercise even though it is an e-bike. And thanks to your EcoRide, you may also bike when you are in a hurry, without getting there sweaty and out of breath.
For you own sake, we recommend writing down the frame-number and place of purchase. The frame number is located on the front of the frame, on the frame head tube.
EcoRide-handbook, ENG, version 5.0
Hi - and contratulations!

Safety regulations Day in, day out - come rain or shineUnique components on your EcoRide Common health of your EcoRideLet´s go – How does an EcoRide work? Quick guide ActiveDrive - operate your EcoRide - AUTO-function - MODE-function - Walk-assist throttle - Lighting Battery - the power source of the e-bike - Battery and charging - Off-season – storing the battery - Range - Technical description - Battery safety regulation Ride safely - Lighting and reflectors - Wear a bicycle helmet!Assembly Mounting the handlebar - Standard type handlebar - Ahead type handlebar Mounting the pedals Mounting the bike basket (optional) Inflating the tiresMaintenance and adjustments The brakes - Roller brake - Hydraulic disc brake - V-brake (rim brake) Quick adjustment of V-brake Adjusting V-brake Checking the brake pads Gears - Adjusting Nexus 3 - Adjusting Nexus 8 - Adjusting Acera / Deore Demounting the motor-wheel Technical specification NotesWarrantyContact
Content
3459
10101111111111121215161718191919202020212222222324242424252525262728293031323334
..............................................................
...........................................................................................................
.........................................................................
.......................................................................................

Safety regulations before use: - Carefully read this manual before your first bike ride. - Before each ride, check that no parts or screws on your bike are unfastened or damaged. - Unfastened or damage parts shall be secured appropriately or replaced.- The rear rack is not intended for mounting of child seat.- Wear parts subject to stress and wear may develop scratches, cracks or discoloring. This means the parts are worn and should be replaced. - Your EcoRide is solely designed for cycling on paved roads and bike paths; recreation and transport. - The construction of your EcoRide is not to be altered or modified. - Safety regulations for charging the battery are specified in chapter “Battery – the power source of the e-bike”.
Safety regulations

4
You will ride a lot on your new EcoRide. The bike is built to be used every day, year round, if you want. To ride an EcoRide is a fast, smart and efficient solution for personal transportation. If you don not want to use the electrical assist system, your EcoRide functions as a normal traditional bicycle. The wheel hub-motor rotates without friction when you pedal. You decide yourself how much “training” and exercise you want during your ride.
Some EcoRide models are equipped with a bike basket and rear luggage carrier for practical reasons. Due to the smart position of the battery along the saddle-tube, the EcoRide e-bikes may be equipped with a standard rear luggage carrier.
Day in, day out - Everyday recommendations

Unique components - only on your ecoride
5
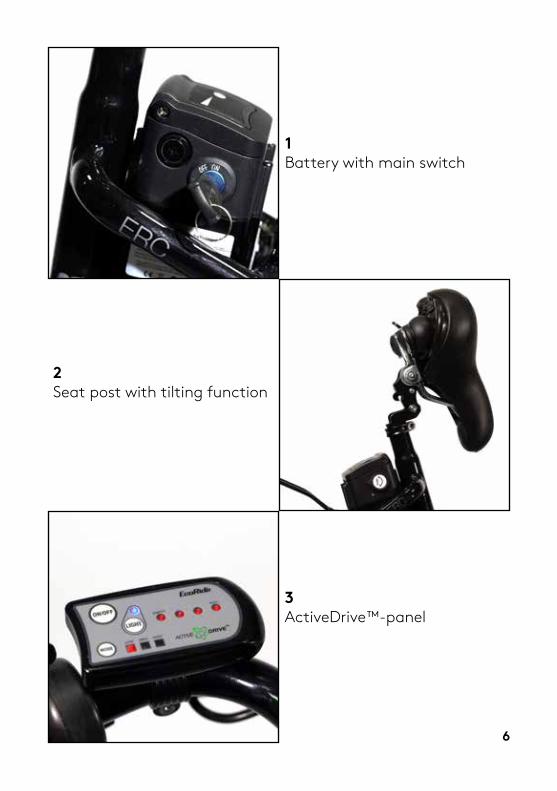
6
3 ActiveDrive™-panel
1 Battery with main switch
2 Seat post with tilting function

5 Brake levers with cut-off switch
4 Walk-assist throttle
7
6 LED-lighting

8
8 Crankshaft with pedaling sensor
9 Control-box compartment under battery
7 Hub-motor

There are some simple things that are recommended for you in order to make your EcoRide work as good as possible. Here are a few steps for a long and trouble-free relationship with your new commuter friend.
Keep it clean!Be active in keeping you EcoRide nice and clean. A clean bike lasts longer and is more enjoyable and safer to ride. Use a damp cloth to wipe of the bike. Do not use high-pressure water systems.
Tighten the screws!Regularly check that screws and nuts are securely attached. Unfastened parts may be very dangerous.
Brake! Make sure to maintain and service the brake system. Well functioning brakes are essential since you will be riding a bit faster with your e-bike.
Lubricate! Keep the chain well lubricated. Also, make sure to wipe off the chain with a cloth before and after lubrication in order to prevent accumulation of dirt in any excess oil.
Charge!Charge the battery. Do not leave the battery in a disscharged state for longer time periods. It will influence the battery life.
Pump! Keep the bicycle tires sufficiently inflated.
Common health - of your ecoride
9

10
Let´s go! - Quick guide
Ready! - Ride your EcoRide by pedaling and braking normally, in a similar manner as on a normal bicycle. The electric assistance system automatically detects your pedaling. Don´t forget your helmet.
Step 2Push the ON/OFF-button on the ActiveDrive-panel on the handlebar. This will activate the electric assistance system.
Step 1Insert the key into the main switch in the battery and turn to ON.

AUTO-functionYour ActiveDrive-panel starts up in a smart AUTO-function mode. In this mode, the electric assistance provided by the system is based on the pedaling speed. You may adjust the assistance level by switching gear. For example, when biking uphill, you may switch to a lower gear which increases the assistance level.
MODE-functionThe ActiveDrive-panel also has three fixed speed limit levels. Push the MODE-button and keep it pressed in for about two seconds, until the LOW-light is lit up. You may switch between LOW, MEDIUM and HIGH by quick-pressing the MODE-button. For switching back to AUTO-function: push in the MODE-button and keep it pressed for two seconds. Walk-assist throttleWhen the ActiveDrive system is activated, you may use the walk-assist throttle when walking by your EcoRide. The walk-assist throttle is limited to walking speed.
Lighting The LED-lighting system of your EcoRide is controlled from the ActiveDrive-panel by pressing the LIGHT-button.
activedrive - operate your EcoRide
11

12
Battery position The EcoRide battery has a smart position and is located under the saddle of your EcoRide. This allows for a low center of gravity of the bike that is closer to the ground, which gives better cycling characteristics in terms of stability and satefy.
Type The battery is a lithim-ion battery and suitable for regular use and recharge. This gives you the possibility to always have a fully charged EcoRide when to leave.
The main switch and battery lock The battery is provided with a main switch (ON/OFF) for activating the battery, and a battery lock for securing the battery to the bicycle. The same key may be used. Charging You may charge the battery when it is mounted in its position under the saddle of the bike. You may also remove the battery and charge it elsewere. Complete charging time of a fully discharged battery is about 5-7 hours. Of course, you may charge the battery even if it is not is fully discharged.
Fuses Your EcoRide is delivered with two additional spare main fuses (30A). If the main fuse is damaged, the battery will not provide power, and the main fuse must be replaced.
Battery - the power source of the e-bike
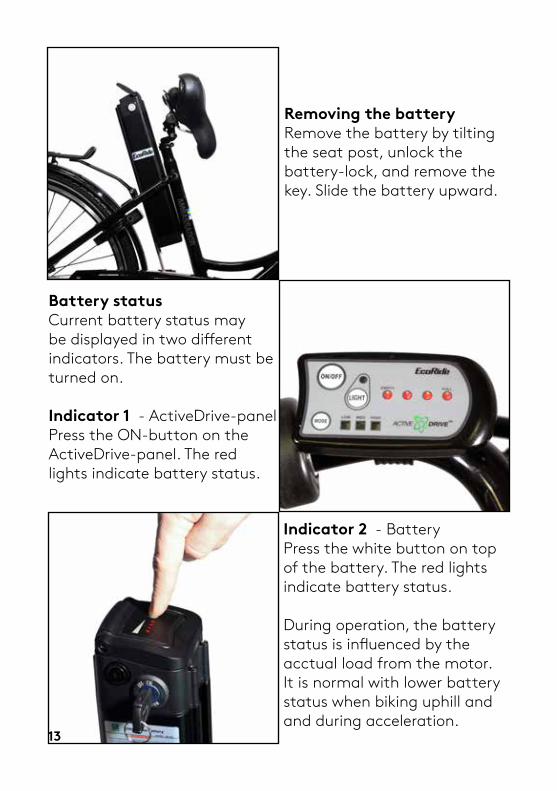
Battery statusCurrent battery status may be displayed in two different indicators. The battery must be turned on. Indicator 1 - ActiveDrive-panel Press the ON-button on the ActiveDrive-panel. The red lights indicate battery status.
Indicator 2 - Battery Press the white button on top of the battery. The red lights indicate battery status.
During operation, the battery status is influenced by the acctual load from the motor. It is normal with lower battery status when biking uphill and and during acceleration.
Removing the battery Remove the battery by tilting the seat post, unlock the battery-lock, and remove the key. Slide the battery upward.
13
14
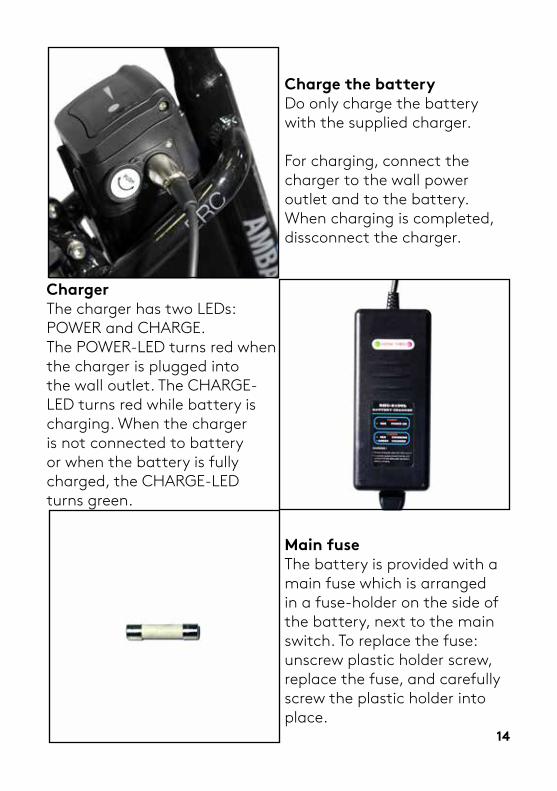
Charger The charger has two LEDs: POWER and CHARGE. The POWER-LED turns red when the charger is plugged into the wall outlet. The CHARGE-LED turns red while battery is charging. When the charger is not connected to battery or when the battery is fully charged, the CHARGE-LED turns green.
Charge the battery Do only charge the battery with the supplied charger.
For charging, connect the charger to the wall power outlet and to the battery. When charging is completed, dissconnect the charger.
Main fuseThe battery is provided with a main fuse which is arranged in a fuse-holder on the side of the battery, next to the main switch. To replace the fuse: unscrew plastic holder screw, replace the fuse, and carefully screw the plastic holder into place.

Tha battery status and health is maintained by regular use and charging. When storing the battery, make sure to perform maintenace charging of the battery according to the specification on the battery. Store the battery indoors, in normal room-temperature.
Recommended maintenece charging interval when storing the battery: charge for two hours, one time each month.
! - Do not leave the battery in a disscharged state for longer time periods. It will influence the battery life.
!! - The battery charger is exclusivly designed for use in dry indoor environment with good ventilation.
!!! - When charging, only use the appropritate type of charged provided with your EcoRide.
15
off season - storing the battery

16
RangeThere are many factors that affect the range of the battery. In the following table you will find some examples of factors and conditions that have negative impact on the range.
BAttery Range - influencing factors
Factors having negative influence on range:
- Headwind- Hilly terrain- Soft ground- Low tire pressure- High assistance level- High speed- No or poor maintenance- Low gear- Low manual pedaling force- High weight, the bike is heavily loaded.
The battery consists of a series of interconnected lithium-ion cells. The battery also contains a control unit (BMS) that monitors the cells during use and during charging of the battery.
The control unit (BMS) turns off the battery at a given voltage level to prevent the cells from damaging. This means the battery is empty and needs recharging.
The control unit also contains a balancing circuit that controls charging so that the individual cells are charged evenly. This improves the performance of battery.
Should there arise an unbalance between the cells, the battery range may be affected. In order to improve the balance between the cells, it is recommended to fully discharge and fully charged the battery 2-3 times (complete discharge and charge cycles).
Technical description -the battery hardware
17

18
- Only use the charger supplied with your EcoRide. - Use the charger only in dry indoor environment.- Do not connect the charger with wet hands.- Do not charge the battery in direct sunlight.- Do not touch the charger during lightning storms. - Charge the battery with good ventilation. - Discontinue charging if you hear unusual noises or notice leakage. - Do not disassemble the battery - warranty void. - Do not heat or hit the battery, it may damage.- Do not immerse the battery in water or other liquid. - Keep the battery out of the reach of children. - Do not connect the charger to the wall outlet, if it is not used for charging.
safety regulations - battery

Use you helmet!Rember to use your helmet. Even if you feel confident in the traffic, there are others who may not be as experienced.
Lights and reflectorsIn order to improve the visibility of you and your EcoRide, the e-bike is equipped with lights powered by the battery, and reflectors. Remember to keep the lights and reflectors clean.
CYCLING WITH CONFIDENCE! - for your sake and others
19
! - Consider supplementing with reflectors if you change to tires without reflective stripes.

Mounting the handlebar 1 – Insert the handlebar stem into the cover piece 1. 2 – Insert the handlebar stem into the headset tube. ! NOTE that the safety markings - 2- on the stem must be fully inserted. 3 – Turn the handlebar to right angle, and secure by tighten the Allen screw. Tighten propertly!4 – Insert and fasten the cover member 4 into the hole.
20
If you bought your bike in a box you need to put it together yourself. It is simple. Your EcoRide is delivered in a box, almost fully assembled. Followthe simple steps in the following installation instructions, and your EcoRide will be assembled and ready within 30 minutes. Even if you bought a fully assembled bike directly from the store, it is recommended to read through the following pages. It gives you a better understanding of your EcoRide, and what adjustments possibilities there are.
Assembly - Assemble your Ecoride
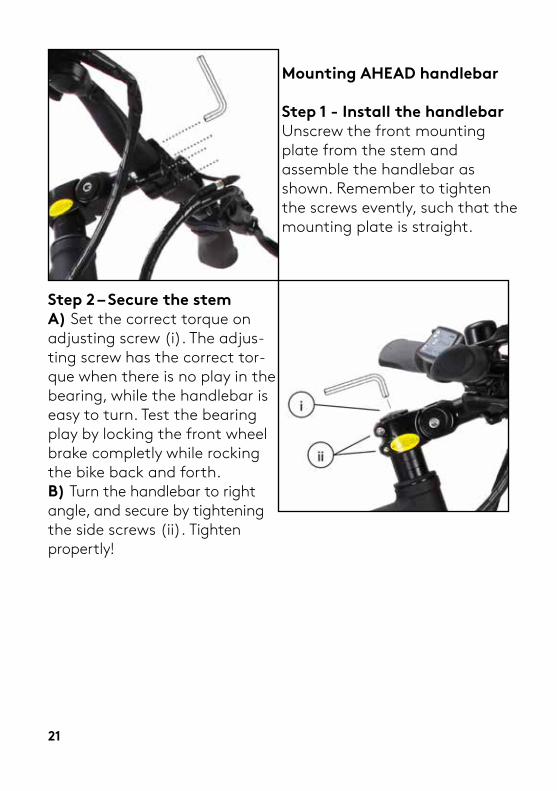
Mounting AHEAD handlebar Step 1 - Install the handlebar Unscrew the front mounting plate from the stem and assemble the handlebar as shown. Remember to tighten the screws evently, such that the mounting plate is straight.
Step 2 – Secure the stemA) Set the correct torque on adjusting screw (i). The adjus-ting screw has the correct tor-que when there is no play in the bearing, while the handlebar is easy to turn. Test the bearing play by locking the front wheel brake completly while rocking the bike back and forth. B) Turn the handlebar to right angle, and secure by tightening the side screws (ii). Tighten propertly!
21
22
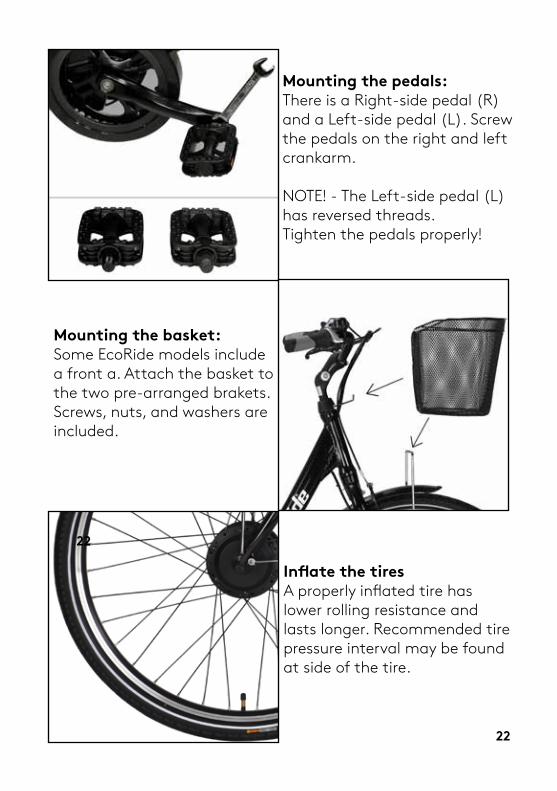
Mounting the pedals:There is a Right-side pedal (R) and a Left-side pedal (L). Screw the pedals on the right and left crankarm.
NOTE! - The Left-side pedal (L) has reversed threads. Tighten the pedals properly!
Mounting the basket: Some EcoRide models include a front a. Attach the basket to the two pre-arranged brakets. Screws, nuts, and washers are included.
Inflate the tiresA properly inflated tire has lower rolling resistance and lasts longer. Recommended tire pressure interval may be found at side of the tire.
22

It is not just nice to have a clean bike, it’s smart too! A clean bike lasts longer than a dirty bike. Wash your bike gently with a damp cloth. Do not use pressure washer systems!
We recommend that you periodically check through the nuts and bolts, so that they are securely attached. It is also recommended to do periodic servicing of your e-bike.
Your EcoRide is best stored indoors, protected from the weather, when not in use.
Take care of your battery and do not expose it to extreme temperatures. Preferably, store the battery indoors when not in use. Do not forget to recharge the battery during periods when not in use. See further instructions in ”Battery - the power source of the e-bike”.
Maintenance and adjustments
23
24
EcoRide bicycles may have different types of brakes systems which are explained below.
The brake lever on the handlebar is equipped with a cut-off sensor which automatically turns off the power assistance during braking action. Roller brakeEcoRide bikes with hub gears are equipped roller brake. This type of brake requires minimum servicing. If you need to service the brakes, it is recommended to contact a professional. Hydraulic disc brakeHydraulic disc brakes provide great braking performance, and requires little servicing. Adjustments and service of this brake should be made by a professional. An additional manual for the hydraulic brake system is provided with EcoRide bikes equipped with this brake system.
V-brake (rim brake)Some EcoRide models are also equipped with front V-brakes, or rim-brakes, having brake pads gripping the front wheel rim during braking action. These brakes provide good and effective braking, but wear out over time. You need to regularly check the brake pads, tighten the braking wire and/or replace the pads when worn out.
! - If you hear a scraping metallic sound when you brake with the rim brake, the brake pads may be completely worn out and need to be replaced immediately. Worn out brake pads causes unnecessary wear on bicycle rim and leads to significantly reduced braking performance.
The brakes - Safe and Secure
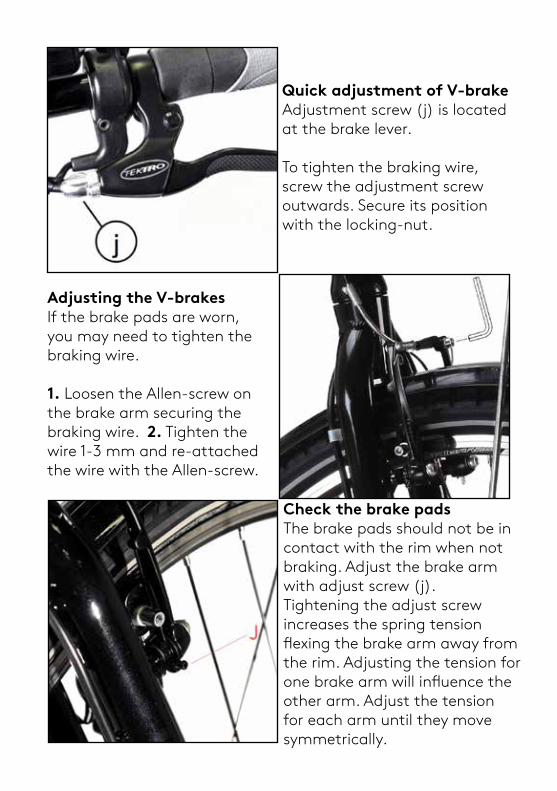
Quick adjustment of V-brakeAdjustment screw (j) is located at the brake lever. To tighten the braking wire, screw the adjustment screw outwards. Secure its position with the locking-nut.
Adjusting the V-brakesIf the brake pads are worn, you may need to tighten the braking wire.
1. Loosen the Allen-screw on the brake arm securing the braking wire. 2. Tighten the wire 1-3 mm and re-attached the wire with the Allen-screw.
Check the brake padsThe brake pads should not be in contact with the rim when not braking. Adjust the brake arm with adjust screw (j). Tightening the adjust screw increases the spring tension flexing the brake arm away from the rim. Adjusting the tension for one brake arm will influence the other arm. Adjust the tension for each arm until they move symmetrically.
26
Your EcoRide has either internal hub-gears, e.g. Nexus, or external (derailleur) gears, e.g. Acera/Deore.
The gears are pre-adjusted upon delivery, but after some time of use, the gears may need some adjustment. (e.g. due to lengthening of the wires, etc.)
See the associated instructions for each gear type below.
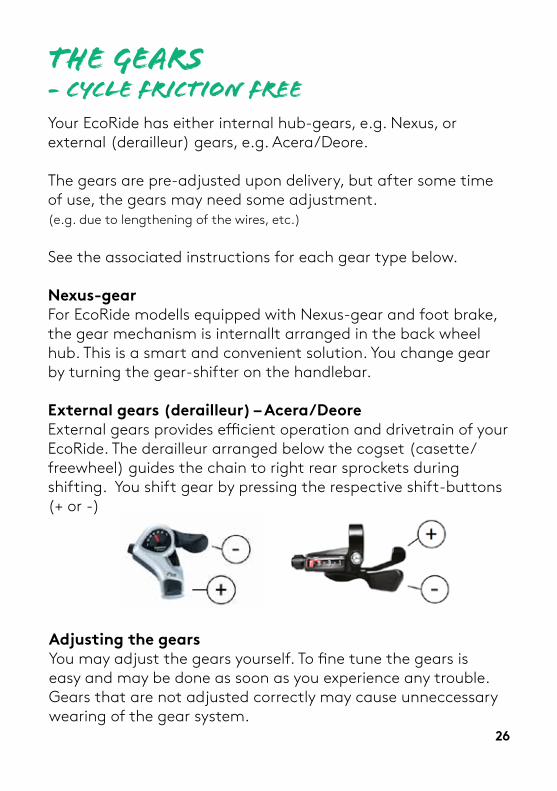
Nexus-gearFor EcoRide modells equipped with Nexus-gear and foot brake, the gear mechanism is internallt arranged in the back wheel hub. This is a smart and convenient solution. You change gear by turning the gear-shifter on the handlebar. External gears (derailleur) – Acera/DeoreExternal gears provides efficient operation and drivetrain of your EcoRide. The derailleur arranged below the cogset (casette/freewheel) guides the chain to right rear sprockets during shifting. You shift gear by pressing the respective shift-buttons (+ or -)
The gears - cycle friction free
Adjusting the gearsYou may adjust the gears yourself. To fine tune the gears is easy and may be done as soon as you experience any trouble. Gears that are not adjusted correctly may cause unneccessary wearing of the gear system.
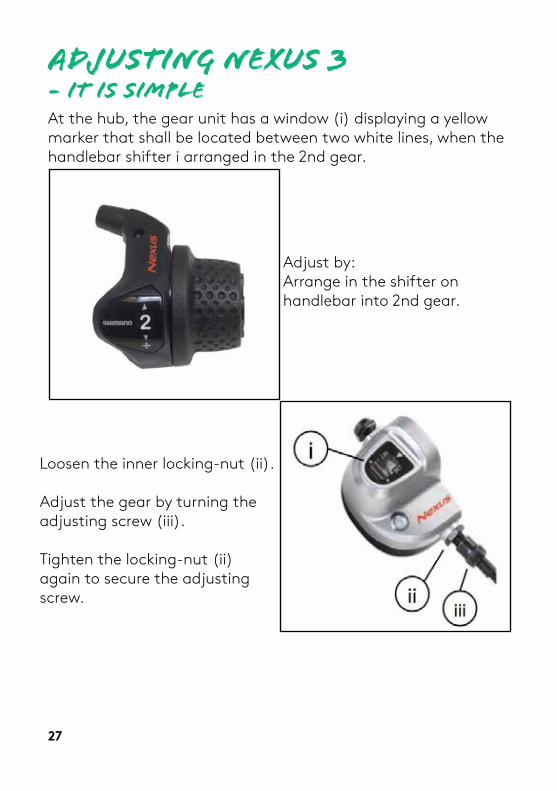
Loosen the inner locking-nut (ii).
Adjust the gear by turning the adjusting screw (iii). Tighten the locking-nut (ii) again to secure the adjusting screw.
adjusting NEXUS 3 - it is simple
Adjust by: Arrange in the shifter on handlebar into 2nd gear.
At the hub, the gear unit has a window (i) displaying a yellow marker that shall be located between two white lines, when the handlebar shifter i arranged in the 2nd gear.
27

28
adjusting NEXUS 8 - it is simple
The yellow lines on the hub move towards each other when you are screwing in the right direction.
Continue until the yellow lines are alligned.
Check that the adjustment is correct by turning the full gear range on the shifter and back to the 4th gear.
Adjust by: Arrange the shifter on the handlebar into the 4th gear.
Fine tune the gear by screwing on the adjustment screw (j) on the shifter on the handlebar.
The hub is provided with two yellow lines which are arranged to be aligned when the gear-shifter on the handlebar is arranged in hte 4th gear.

29
For adjusting the gear, turn the adjustment screw (J) through which the gear wire runs.
Adjusting acera/Deore
By tightening the wire, the derailleur will change to a lower gear more easy.
Tighten the wire by turning the adjustment screw (J) 1-3 steps at a time in a counter clockwise direction.
One step make a big difference – check after each step.
In order to loosen the wire, turn the adjustment screw in the clockwise direction, one step at a time.
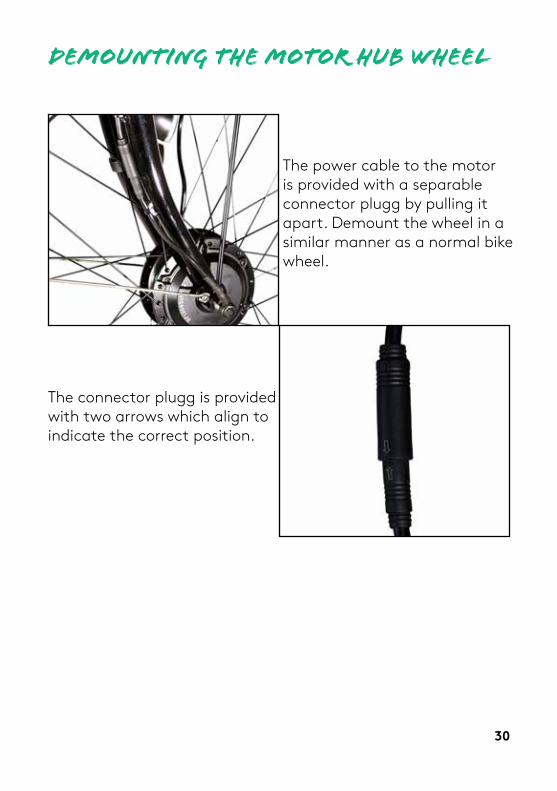
The power cable to the motor is provided with a separable connector plugg by pulling it apart. Demount the wheel in a similar manner as a normal bike wheel.
The connector plugg is provided with two arrows which align to indicate the correct position.
Demounting the motor hub wheel
30
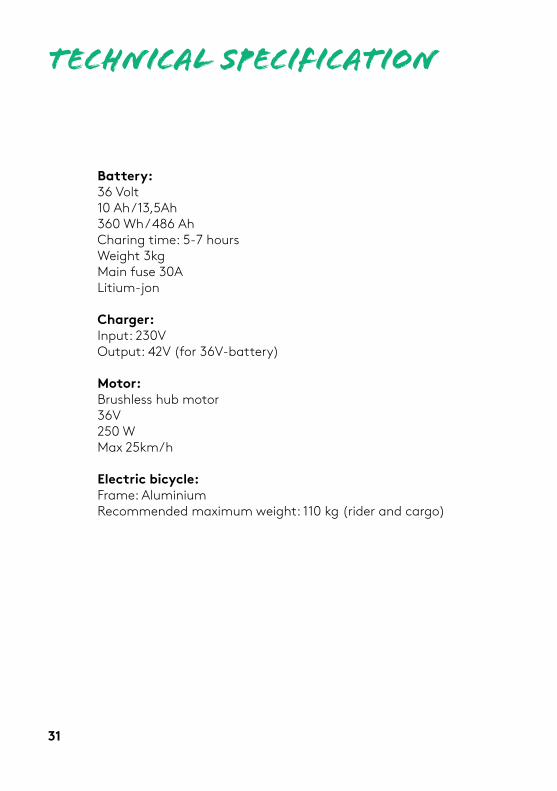
Battery: 36 Volt10 Ah / 13,5Ah360 Wh / 486 AhCharing time: 5-7 hoursWeight 3kgMain fuse 30ALitium-jon Charger: Input: 230VOutput: 42V (for 36V-battery)
Motor:Brushless hub motor36V250 WMax 25km/h Electric bicycle: Frame: AluminiumRecommended maximum weight: 110 kg (rider and cargo)
31
TEchnical specification

32
notes

33
EcoRide extends a warranty under the following conditions: - The warranty is only valid for the first owner
- It is not transferrable
- For repairs, parts must be used that are original or prescribed by EcoRide, otherwise there is no warranty
- The period of the warranty starts on the day of purchase of the bicycle
- The warranty excludes commercial use or hire use
- EcoRide provide a warranty of 3 years on the frame of the bicycle, including front forks
- EcoRide provide a warranty of 1 year for the motor, battery, electrical items and all other items. All warranty issues must be first referred to the original agent or dealer you purchased your bicycle.
warranty
If you have any questions or if there is something you think we should know. Tell us about it! We continually strive to improve our electric bicycles and are grateful for your suggestions.
Again, thank you for choosing EcoRide!
contact
Australian Service Centre Contact Details:
Electric Bike Centre 1300 883413
www.electricbikecentre.com.au [email protected]
34