ECE 385 - theneeloy.github.io
24
ECE 385 Spring 2019 Final Project 2D Match Moving on FPGA Harris Mohamed Neeloy Chakraborty Lab section ABJ - Friday - 2:00 PM TA: David Zhang
Transcript of ECE 385 - theneeloy.github.io

ECE 385 Spring 2019
Final Project
2D Match Moving on FPGA
Harris Mohamed
Neeloy Chakraborty
Lab section ABJ - Friday - 2:00 PM
TA: David Zhang

Introduction 3
System Description 3
Usage Process 3
VGA 3
Camera 4
SoC, USB Mouse, and Software Code 12
Finite State Machine 14
2D Tracking 15
3D Tracking Conceptual Idea 17
Module Descriptions 18
Project Progress Over Time 21
Postlab 23
Conclusions 24

Introduction
The purpose of our final project is to develop a ball tracking bounce game on the FPGA. This
experiment utilizes a 1.3 megapixel camera, USB mouse, VGA monitor, and tracking algorithms
in order to display the path of white ping pong ball in front of the camera. This path was detected
through 2D match moving on hardware given two initial points surrounding the ball. The
overarching goal was to also determine whether or not the ball bounced into a cup, and if not,
project a potential path the user could have bounced in order to make it into the cup. We did not
get to developing the 3D projection algorithm on hardware, but we discuss the two dimensional
algorithm we implemented below.
System Description
Usage Process
There are several steps that the user undergoes in order to calibrate and 2D track a ball. This
process of calibration and camera settings change is mainly handled through the NIOS. When the
FPGA is first programmed, ran, and the C code begins to run, the current camera output will be
displayed on the monitor. There are several settings that the user can change including exposure,
red gain, green gain, and blue gain. Exposure is changed by flipping switches, and color gain
settings are input through the NIOS console. Once the user is ready to see the effect of changing
those settings, they can press KEY[1], and the VGA feed will change to take in those changes.
Those settings take effect in a LUT in the background the the I2C-Config module, described
below. After the best camera settings are achieved, the user enters calibration mode, where they
can choose two points to define the initial position of the ball. In this state, a mouse cursor will
appear on the screen. Holding up the ball to the camera, the user must click once to define the
top left of the ball, and once more to define the bottom right. Finally, through match moving, the
user can see that the ball is being tracked on the screen with a green box surrounding the ball,
two red points that define the top and bottom of the ball, and blue to color anything it sees as the
ball. If the ball moves, the box and those pixels move to track the ball.
VGA
The VGA monitor is an essential component in this project in order to display the results of the
user’s input (mouse cursor and ball tracking movement). In contrast to our work in lab eight, we
used Altera’s VGA Controller IP Core in order to send the correct signals to the monitor, but
they essentially accomplish the same tasks. The VGA Controller sends the horizontal and
vertical sync signals required by the VGA monitor, and the the pixel color value to the monitor
for the current pixel being drawn. Similar to lab eight’s controller, a counter scans from left to
right each row from top to bottom for each frame. DrawX and DrawY pixel position values are

output so that other modules such as Color Mapper and Tracking can accomplish their tasks
based on the current pixel.
Next up, the Color Mapper module uses the current pixel position being drawn, and other
position and boolean variables, in order to send the actual color that the current pixel being
drawn should be to the VGA monitor through combinational logic. Its inputs include the current
pixel being drawn, the current pixel from the camera, a boolean mouse variable, and positions of
the top left, bottom right, top, and bottom of the box and ball (output from the tracking module).
If the the FSM is in the calibration state, a SHOW_BALL signal is set high. So if the current
DrawX/Y is a part of the mouse ball calculated from the Ball module, then a white pixel is sent.
Otherwise, in the tracking state, a box will be displayed based on the top left and bottom right
position variables, blue pixels for the color within the threshold of the tracker, and red pixels to
define the top and bottom of the ball. This RGB value is sent to the VGA controller, which in
turn sends the data to the VGA monitor.
Camera
The camera is inherently a complicated piece of hardware to work with. Most of this code was
heavily based on Altera’s sample code and usage directory, but we made sure to fully understand
the inner workings of the camera rather than treating it like a black box that simply worked. This
was beneficial in that it amplified our understanding of hardware interactions as well as allowed
us to do some fancy operations that wouldn’t be possible without understanding how the camera
works. The camera is complicated, and we will explain how it works by the module it goes
through.
The camera module used is the TRDB_DC2. It houses the MT9M011 image sensor module,
which is a charge-coupled device (CCD) image sensor. Essentially, is is an array of capacitors
that reacts to light and uses a 10-bit ADC to control the amount of charge held in the capacitor.
This allows for a much more rich image than one could get from a CMOS-sensor camera.
However, one downside of using a CCD sensor is that it updates all of its data sequentially,
whereas a CMOS sensor does so in parallel, thus being faster but lower quality.

Figure 1: GPIO Header for the DE2-115
Pictured above is the general purpose input/output pin header on the DE2-115. The TRDB_DC2
camera module uses one camera sensor, specifically the right half the GPIO header (so all the
odd-numbered pins). This is the what each pin maps to, based on the TRDB_DC2 datasheet.

Figure 2: Pin explanations for the camera module
The important things to take away from here are that the camera outputs 10 data bits, a frame
valid signal (FVAL), a pixel clock (PIXCLK), and a line valid signal (LVAL). There are also
I2C connections, which we will detail in a bit. All of the none I2C-related signals go into the
module labeled CCD capture.
The key to using the camera is timing. A frame is an entire picture (640x480 pixels). A line is an
entire row’s worth of pixels (in this case, 640 pixels). Starting from the highest level, the FVAL
signal will first go high, and for every available row (480 in this case), LVAL will go high. This
is shown in the datasheet for the MT9M011.

Figure 3: Timing diagram for frame valid and line valid signals
When LVAL is high, every time pixel clock goes high means there are 10 bits encoding a pixel
available. The timing diagram looks something like this.
Figure 4: Timing diagram for pixel data extractions
It is important to remember that similar to VGA, there are blanking regions outside the image
that is wanted. This is also specified in the datasheet.

Figure 5: Elaboration of camera pixel array
CCD_capture outputs 10 bits of pixel data as well a data valid bit signalling that the data that
comes out of the module is valid. There is also an output that outputs the x and y coordinates, as
well as the frame count.
The data from CCD_capture goes into raw2rgb. This module is responsible for converting the
pixel data into RGB, that can then be converted by the VGA controller. The math in raw2rgb is
not really of interest, mostly additive math based on bounds to determine the RGB value. What is
of interest is the line buffer. Since the data from the camera comes in sequentially, a line (row)
will be transferred before the rest of the image is. In normal FPGA applications, an entire frame
is buffered before being output to the monitor, but that doesn’t make sense here. We used an
extremely interesting piece of hardware provided as an Altera IP core known as a altshift_taps.
This is a shift register with taps, which essentially provides multiple outputs from the shift
register, thus buffering the output. Using this, our camera has a line buffer, to prevent glitches.
Below is a picture from the IP core specifications to detail how it works.

Figure 6: Block-diagram overview of tapped data
Figure 7: Example waveform for tapped data
For the actual storage, we used M9K-blocks to store the line buffers in. From here, it goes into a
module called mirror_col, which, exactly as the name implies, flips the image vertically. This is
because a camera will take in an image inverted and flipped. If you take your phone and turn on
the selfie camera and then move to the right, your image on the phone will move to the right as
well. This does not happen with our camera sensor since the rows aren’t flipped, you will move
to the left (which is extremely counterintuitive).
From here, the image is written into the SDRAM. This was done for no reason other than Altera
had implemented it perfectly and it needed very little modification to get working properly. The
final step is to connect it to the VGA controller, and the image shows up on the monitor that is
connected to. The camera module is not entirely done though, there are a few configuration
options left.

The camera’s configuration methods are separated from the GPIO pins and instead use an I2C
bus. I2C stands for inter-inter integrated circuit, and is a very commonly used protocol in
industry. It is an ID-based messaging protocol. We used Altera’s provided code for the I2C
configuration controller, which worked by creating two modules. One module, known as the I2C
controller, is a module that can take in a GO and END signal. It then takes in an address and data
and proceeds to write the data to the correct location (which is just one big concatenated
message. The protocol takes care of the rest). An example of the timing is shown below.
Figure 8: I2C timing diagram
The second module is the configuration part and is taken care of by using a lookup table that can
hold various data messages for the I2C bus. The address will always stay the same (the datasheet
specifies that the camera is 0xBA).
Through I2C, there are important aspects of the camera that can be toggled including the
exposure settings, red gain, blue gain, green gain, and shutter speeds. These are all registers that
can be toggled.

Figure 9: I2C register descriptions
We created a PIO from the NIOS II that could update the lookup table to change the gain
settings, which proved to be incredibly useful.

SoC, USB Mouse, and Software Code
The system on chip we developed for this project provides the necessary IP Cores and their
interconnections to implement USB mouse input and update gain settings through the NIOS
console. This SoC initially looks similar to lab eight’s because of the USB register PIOs, but in
contrast, one may notice there is no SDRAM controller. This is because the camera had its own
SDRAM controller that was used to write each frame into memory. In order to get around the
idea of having conflicting memory types, we opted to use on-chip memory as the main program
and execution memory of the NIOS. The on-chip memory size was increased to 102,400 bytes,
and the NIOS’s reset and exception vectors now point to the on-chip memory. A more efficient
choice we could have instead went with was to overhaul the camera’s memory, and implement
an SRAM controller, keeping the NIOS with SDRAM. Outside of those changes and the normal
USB PIOs in Platform Designer, we also had to create 32 bit PIOs representing the current
mouse x-y position, clicking, and for controlling red, green, blue gain and exposure. One final
important PIO is calibrate_start, which signals to the FSM when to begin the calibration state
(further explained below).
Figure 10: Platform Designer Shows NIOS Running on On Chip Memory
When the user first programs and runs the SOF onto the FPGA without running the NIOS
program, they’ll notice that the screen is almost black with little highlights. This is because the
color gain settings do not get programmed onto the I2C-CCD Config LUT until they run the
NIOS code. When the NIOS is running, a pointer is memory mapped to the PIOs handling color
gain, and pressing KEY[1] will make the system take in those changes on the next clock cycle.
We implemented a loop in the C code that runs before the calibration phase where the color
settings can be changed with user input. This provides an easier interface for the user rather than
having to use the switches for every single gain type.
After the desired color gain settings have been achieved, the calibration phase has started where
a mouse will show up on the screen. Before the mouse could be recognized and its position was
sent to the VGA monitor, a complex ordering of USB and IO reads/writes were given so that the
mouse’s data packets could be received. These orderings were similar to lab eight, but the main
difference comes from the data packet itself. A USB keyboard sends a data packet in a format
that shows the keys being pressed at any time. The first byte includes modifier keys such as ctrl
or shift, and the actual keycodes themselves are stored from byte two through seven. In contrast,
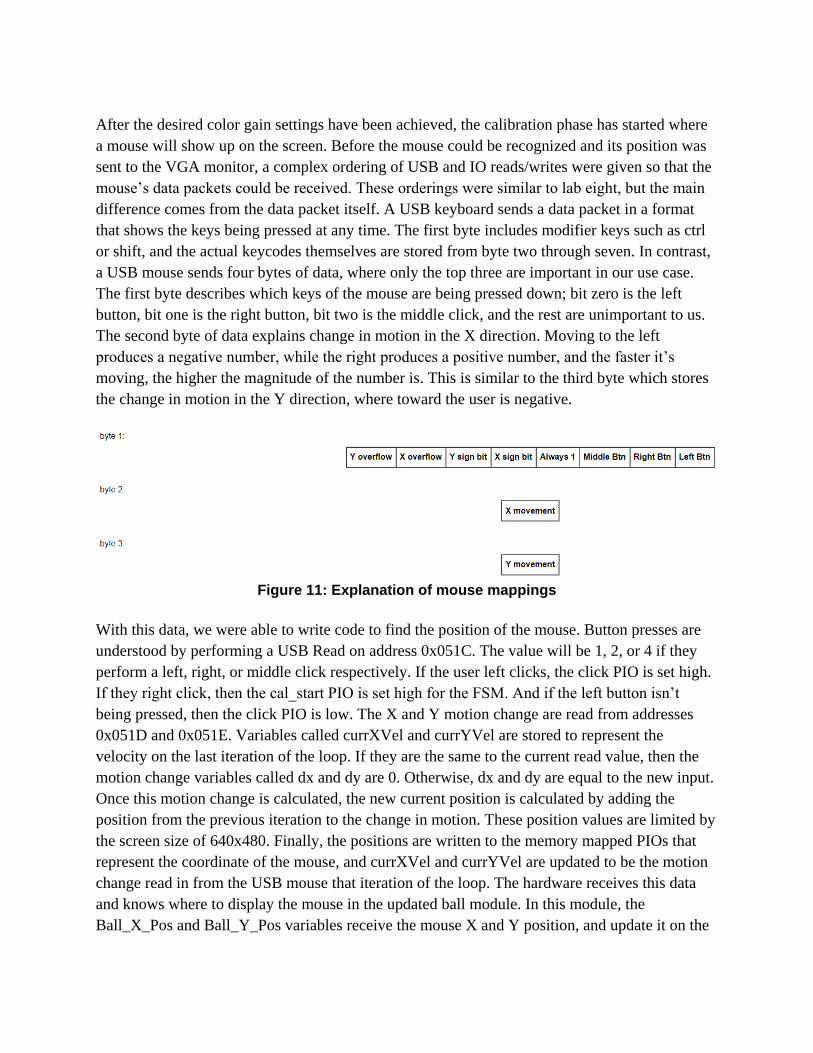
a USB mouse sends four bytes of data, where only the top three are important in our use case.
The first byte describes which keys of the mouse are being pressed down; bit zero is the left
button, bit one is the right button, bit two is the middle click, and the rest are unimportant to us.
The second byte of data explains change in motion in the X direction. Moving to the left
produces a negative number, while the right produces a positive number, and the faster it’s
moving, the higher the magnitude of the number is. This is similar to the third byte which stores
the change in motion in the Y direction, where toward the user is negative.
Figure 11: Explanation of mouse mappings
With this data, we were able to write code to find the position of the mouse. Button presses are
understood by performing a USB Read on address 0x051C. The value will be 1, 2, or 4 if they
perform a left, right, or middle click respectively. If the user left clicks, the click PIO is set high.
If they right click, then the cal_start PIO is set high for the FSM. And if the left button isn’t
being pressed, then the click PIO is low. The X and Y motion change are read from addresses
0x051D and 0x051E. Variables called currXVel and currYVel are stored to represent the
velocity on the last iteration of the loop. If they are the same to the current read value, then the
motion change variables called dx and dy are 0. Otherwise, dx and dy are equal to the new input.
Once this motion change is calculated, the new current position is calculated by adding the
position from the previous iteration to the change in motion. These position values are limited by
the screen size of 640x480. Finally, the positions are written to the memory mapped PIOs that
represent the coordinate of the mouse, and currXVel and currYVel are updated to be the motion
change read in from the USB mouse that iteration of the loop. The hardware receives this data
and knows where to display the mouse in the updated ball module. In this module, the
Ball_X_Pos and Ball_Y_Pos variables receive the mouse X and Y position, and update it on the

next clock cycle. In color mapper, if the SHOW_BALL signal is high, then the mouse ball will
be shown on the screen, and moves as the mouse moves (limited by the screen size).
Finite State Machine
The FSM implemented in this project was critical in order for the user to be able to set color
settings through the NIOS, and proceed through calibration. It also defines what objects may be
seen on the screen at any time. Initially, the user is able to set the color settings of the camera
through the NIOS in the SetCam state. Here, the mouse will not appear on the screen, and
pressing KEY[1] will update the color. Once the user is content with the settings, they can exit
the while loop in the NIOS console by hitting the ‘x’ key, and pressing right click makes the
FSM go into the Cal state, were the mouse will show up on the screen. Here, the user must
choose one point around or on the ball near the top left by left clicking. The Click1 state sends a
write signal to a register that stores the top left pixel coordinate of the box. Once the user lets go
of the mouse, the FSM moves into the Click1_1 state (so as to make sure holding down the
mouse button doesn’t skip through multiple states). After the user clicks one more time, they
reach the Click2 state where the FSM sends a write signal to a register holding the bottom right
coordinate of the box. This is immediately followed by the Track state where the mouse
disappears from the screen, and instead the box appears to track the ball. If the ball stops getting
tracked, meaning the top left and bottom right registers hold values of zero, then the FSM goes
back to the Cal state, so the user can repick points to track the ball. Another important feature to
note is that the FSM sends a signal to a MUX before the hex displays so that it shows the frame
count, red gain, and exposure during the setCam and Track states. In the calibration states, a
signal is sent to instead show whether or not the current area being highlighted by the mouse is
within the threshold of the tracker. This allows the user to see important settings when necessary,
and to look at if the current ball position is good for tracking.
Figure 13: FSM

State Output
SetCam SHOW_BALL = SHOW_BOX = tlxw = brxw
= tlyw = bryw = 1’b0
ShowGain = 1’b1
Cal SHOW_BOX = tlxw = brxw = tlyw = bryw =
showGain = 1’b0
SHOW_BALL = 1’b1
Click1 SHOW_BOX = brxw = bryw = showGain =
1’b0
SHOW_BALL = tlxw = tlyw = 1’b1
Click1_1 SHOW_BOX = tlxw = brxw = tlyw = bryw =
showGain = 1’b0
SHOW_BALL = 1’b1
Click2 SHOW_BOX = tlxw = tlyw = showGain =
1’b0
SHOW_BALL = brxw = bryw = 1’b1
Track SHOW_BALL = tlxw = brxw = tlyw = bryw
= 1’b0
SHOW_BOX = ShowGain = 1’b1
2D Tracking
2 dimensional ball tracking is accomplished in the tracker module. After the Click2 state in the
FSM, four twelve bit registers in the top level called topLeftX, topLeftY, bottomRightX, and
bottomRightY will hold each of their respective coordinate values. Because there is no physical
way to read all bits from the camera in parallel because of the properties of CCD, we made a
design decision to use DrawX and DrawY to our advantage, and sequentially update box
boundaries every frame by scanning left to right, and from top to bottom. The tracker module has
inputs of the VGA clock, top left and bottom right box coordinate values, the current RGB value
of the pixel from the camera, and outputs coordinates of the top and bottom of the ball, new
coordinates of the top left and bottom right of the ball, and write signals for the top left and
bottom right registers.

Every frame, a flag variable, and temporary registers for the top and bottom ball values are
cleared. This flag variable tells the program if the top of the ball has been found in the current
frame yet. If the flag is not already set, and the RGB camera value is within the color threshold,
and the pixel coordinates is within a 5 pixel radius of the current top left and bottom right
register values, the program knows that it found the top of the ball. In this condition, the flag is
set high, and the temporary registers that hold the top coordinates of the ball store the pixel
coordinates. After that, once the flag is set high, the program continues to scan after that top
point to find all pixels within the color threshold and within the boundary box, and updates the
temporary bottom register with those updated coordinates. If the DrawX and DrawY is outside of
the box, then it is ready to update the top left and bottom right bounds. In the next clock cycle,
the actual Top and Bottom registers in the top level store the updated values of the ball. And,
once the DrawX is at 639 and DrawY is at 479, the program knows that it is ready to store the
new values of the top left and bottom right bounds.
The top left Y and bottom right Y are simple assignments equal to the top Y and bottom Y
registers, while the X coordinates are a little trickier to find. Because the shape we are tracking is
a sphere, the top and bottom defines the diameter, and that diameter is equivalent no matter
which direction one slices the ball. So the top left X is equal to the difference between the top X
coordinate and the radius of the ball. Similarly the bottom right X is found by adding the bottom
X with the radius. Finally, once the DrawX and DrawY reaches 640 and 479 respectively, a write
signal is sent to the actual registers in the top level, telling them to take in their new coordinate in
the next frame. This process occurs every frame of capture from the CCD camera and outputs to
Color Mapper and VGA Controller to show the boundary box and top and bottom points of the
ball. The algorithm also ensures that the box can shrink as the ball moves away from the camera,
and expands as it moves closer to the camera because of the five pixel radius the module is given
to detect a white pixel.
Now that the correct values of the boundary box and top/bottom pixels of the ball are stored,
their position can be seen on the VGA monitor. As stated above, in the tracking state, a
SHOW_BOX signal is high which allows for the box to appear on the screen. If the current
DrawX and DrawY are on the line that would define the outline of the box, the monitor outputs a
green pixel, and therefore produces a box around the ball each frame. Similarly, if the pixel is the
same as the detected top and bottom coordinates of the ball, a red pixel is output. One final
module we created outputs whether or not the current pixel being drawn is within the threshold
of detection. The threshold_checker module sends a signal ABOVE_T to Color Mapper, and if it
is high, then a blue pixel will appear. The purpose of the module is to allow the user to see what
the tracking module is considering within the threshold and bounds of the box on the screen.
This essentially was a great way for us to debug and fine tune the correct threshold of the ball.

3D Tracking Conceptual Idea
Although we did not get to the point where we were able to begin projecting the path of the ball
based on the 2D motion track, we think it would be well worth to describe how it would have
been worked. In order to do a 3D projection, we would begin by perfecting a variable color
tracker. We would then modify the state machine to include states where the tracking of a table
could be done (this would be done by taking a flat piece of cardboard that is black and then
making the corners of the cardboard a contrasting color, such as green). The dimension of the
table would be hardcoded. The states following this would be used to designate where the cup is.
Once the table is tracked, the next step would be to store the path of the ball. One possible
implementation of this is to make a 2D matrix where the x and y indexes are the pixel position of
the ball. Another way of doing it is by using a shift register with 2 taps and a large size, to
effectively buffer the coordinates. Once the path is effectively stored (assuming that the issue of
the track being lost once the ball bounces is solved), the processing begins. A module would be
made that calculates the instantaneous second derivative of the ball’s position. Using this, we can
figure out if the ball is bouncing or not (concave up or concave down). Another module would
take in all the coordinates and run a quadratic regression to come up with an equation to classify
the bounce of the ball. Once the first bounce has been detected, the fun begins.
Since system verilog has the coordinates of the table as well as the dimension, it can figure out
how far away the table is from the camera sensor taking into account the focal length for a truly
accurate distance. This is how the distance from the camera (aka the z-coordinate) is calculated.
Once all three are known, and then the first bounce is detected, since the final point (the cup) is
known, there must exist some parabola that has roots at the cup and at the first bounce. The
FPGA can calculate this faster than a bounce takes, and then the output path can be
superimposed over the camera feed in a different color.
These projections can further be used to generate statistics about the attempted bounce. Alas, it is
sad we did not get the chance to pursue it, but it is an intriguing idea.

Module Descriptions
Module: DE2_CCD
Inputs: CLOCK_50, CLOCK_27, [3:0] KEY, [17:0] SW, OTG_INT
Inout: [31:0] DRAM_DQ, [15:0] OTG_DATA, I2C_SDAT, [35:0] GPIO_1
Outputs: [11:0] DRAM_ADDR, DRAM_LDQM, DRAM_UDQM, DRAM_CAS_N,
DRAM_CKE, DRAM_CS_N, DRAM_BA_0, DRAM_BA_1, DRAM_RAS_N, DRAM_WE_N,
DRAM_CLK, [6:0] HEX0, [6:0] HEX1, [6:0] HEX2, [6:0] HEX3, [6:0] HEX4, [6:0] HEX5,
[6:0] HEX6, [6:0] HEX7, [7:0] VGA_R, [7:0] VGA_G, [7:0] VGA-B, VGA_CLK,
VGA_SYNC_N, VGA_BLANK_N, VGA_VS, VGA_HS, [1:0] OTG_ADDR, OTG_CS_N,
OTG_RD_N, OTG_WR_N, OTG_RST_N, [8:0] LEDG, [17:0] LEDR
Description: Module definition for final project top level
Purpose: Connects the NIOS II, FPGA hardware, VGA, and EZ-OTG, GPIO and I2C for the
camera, as well as linking all inputs and outputs.
Module: SEG_LUT_8
Inputs: [31:0] iDIG
Outputs: oSEG0, oSEG1, oSEG2, oSEG3, oSEG4, oSEG5, oSEG6, oSEG7
Description: Module definition for Altera’s hex driver
Purpose: Maps input 32 bits to show up on the hex displays
Module: on_chip_fsm
Inputs: Clk_Clk, [15:0] otg_hpi_data_in_port, reset_reset_n
Outputs: [31:0] blue_export, calibrate_start_export, [31:0] exposure_export, [31:0]
green1_export, [31:0] green2_export, [31:0] mouse_x_export, [31:0] mouse_y_export,
mouse_click_export, [31:0] red_export, [1:0] otg_hpi_address_export, otg_hpi_cs_export, [15:0]
otg_hpi_data_out_port, otg_hpi_r_export, otg_hpi_reset_export, otg_hpi_w_export
Description: SoC definition for NIOS II, EZ-OTG, and PIOs for camera settings and FSM start
signal
Purpose: Contains all relevant inputs and outputs. Has NIOS, EZ-OTG, reset, clock, and PIO
relevant signals.
Module: fsm
Inputs: CLK, RESET, CAL_START, CLICK, [11:0] TLX, [11:0] TLY, [11:0] BRX, [11:0]
BRY
Outputs: SHOW_BALL, SHOW_BOX, Tlxw, Tlyw, Brxw, Bryw, showGain
Description: FSM module for the project that transitions based on click and outputs signals for
VGA
Purpose: Provides the necessary register write signals based on state, and send signals to VGA
controller to display correct objects on screen

Module: register12
Inputs: CLK, RESET, write, [11:0] dataIn
Outputs: dataOut
Description: 12 bit register
Purpose: Holds 12 bits of R/W data
Module: hpio_io_intf
Inputs: Clk, Reset, [1:0] from_sw_address, [15:0] from_sw_data_out, from_sw_r, from_sw_w,
from_sw_cs, from_sw_reset, [15:0] OTG_DATA
Outputs: [15:0] from_sw_data_in,[1:0] OTG_ADDR
Inouts: [15:0] OTG_DATA,
Description: This is the link between the NIOS II/e and the Cypress EZ-OTG chip
Purpose: Enables communication and control between the NIOS and the keyboard. It also
enables the printf() style of debugging for the C code.
Module: color_mapper
Inputs: is_ball, [9:0] DrawX, [9:0] DrawY, [9:0] iRed, [9:0] iGreen, [9:0] iBlue, SHOW_BALL,
SHOW_BOX, ABOVE_T, [9:0] tlx, [9:0] tly, [9:0] brx, [9:0] bry, [9:0] topx, [9:0] topy, [9:0]
bottomx, [9:0] bottomy,
Outputs: [9:0] VGA_R, VGA_G, VGA_B
Description: This determines the color of the pixel that is output by VGA
Purpose: Takes in signals to determine the current pixel being drawn, and outputs a color based
on whether it should be camera feed, green box boundary, red pixel for top and bottom of ball, or
blue threshold detected colors
Module: ball
Inputs: Clk, Reset, frame_clk, [9:0] DrawX, [9:0] DrawY, [9:0] mousex, [9:0] mousey
Outputs: is_ball
Description: This module controls the ball position on the screen
Purpose: By taking in the position of the mouse, the module tells the color mapper if the current
pixel is a part of the ball or not

Module: tracker
Inputs: CLK, RESET, [9:0] DrawX, [9:0] DrawY, [9:0] Tlx, [9:0] Tly, [9:0] Brx, [9:0] Bry, [9:0]
VGA_R, [9:0] VGA_G, [9:0] VGA_B
Outputs: [9:0] Topx, [9:0] Topy, [9:0] Bottomx, [9:0] Bottomy, [9:0] Tracktlx, [9:0] Tracktly,
[9:0] Trackbry, Trtlxw, Trtlyw, Trbrxw, Trbryw
Description: This module uses the current top left and bottom right bounds, and scans to find the
next position of the bounds for the frame.
Purpose: Updates the bounds of the box to track the ball, and outputs the top and bottom pixels
of the detected ball
Module: threshold_checker
Inputs: [9:0] VGA_R, [9:0] VGA_G, [9:0] VGA_B, [9:0] DrawX, [9:0] DrawY, [9:0] TLX,
[9:0] TLY, [9:0] BRX, [9:0] BRY
Outputs: ABOVE_T
Description: calculates whether or not the current pixel being drawn is within the threshold of
detection used in tracker module
Purpose: Allows us to debug and see what pixels are being detected as a ball
Module: VGA_Controller
Inputs: [9:0] iRed, [9:0] iGreen, [9:0] iBlue, iClk, iRST_N
Outputs: oRequest, [9:0] oVGA_R, [9:0] oVGA_G, [9:0] oVGA_B, oVGA_H_SYNC,
oVGA_V_SYNC, oVGA_BLANK, oVGA_CLOCK, [9:0] DrawX, [9:0] DrawY
Description: Controls the VGA controller to output an image onto the monitor
Purpose: Outputs an image onto the monitor
Module: Reset_Delay
Inputs: iCLK, iRST
Outputs: oRST_0, oRST_1, oRST_2
Description: This module takes in the actual reset (key[0]) on the DE2 board and delay the reset
to other modules.
Purpose: To prevent glitches that might arise by resetting everything at once.
Module: CCD_Capture
Inputs: [9:0] iDATA, iFVAL, iLVAL, iSTART, iEND, iCLK, iRST
Outputs: [9:0] oData, [10:0] oX_Cont, [10:0] oY_Cont, [31:0] oFrame_Cont
Description: This module takes in the raw CCD data and transmits it to the rest of the design
Purpose: Sends camera data around the FPGA

Module: RAW2RGB
Inputs: [10:0] iX_Cont, [10:0] iY_Cont, [9:0] iDATA, iDVAL, iCLK, iRST
Outputs: [9:0] oRed, [9:0] oGreen, [9:0] oBlue, oDVAL
Description: Module description of the converter between raw and RGB data
Purpose: This module takes in data from the camera sensor and then converts them into RGB
data which is capable of being output to VGA
Module: I2C_CCD_Config
Inputs: iCLK, iRST_N, [15:0] iExposure, [31:0] redG, [31:0] blueG, [31:0] green1G, [31:0]
green2G, I2C_SDAT
Outputs: I2C_SCLK
Description: A hardware module to communicate over I2C with the camera sensor
Purpose: Sets important settings such as RGB gain, shutter speed, exposure, etc.
Module: Mirror_Col
Inputs: [9:0] iCCD_R, [9:0] iCCD_G, [9:0] iCCD_B, iCCD_DVAL, iCCD_PIXCLK, iRST_N
Outputs: [9:0] oCCD_R, [9:0] oCCD_G, [9:0] oCCD_B, oCCD_DVAL
Description: Module description of the hardware that mirrors the pixel RGB data to look valid on
the VGA monitor
Purpose: When an image is received it is inverted and flipped. This module flips the image from
top to bottom.
Project Progress Over Time
Figure 14: Proof of concept of camera working, colors incorrect

Figure 15: Camera fully functioning, color balance correct
Figure 16: Rudimentary, stationary track of the ball

Figure 17: Final track of the ball. Detected area in blue.
Postlab
LUT 3,842
DSP 8
Memory (BRAM) 1,115,136
Flip-flop 2,607
Frequency 43.55 MHz
Static Power 102.85 mW
Dynamic Power 83.72 mW
Total Power 388.79 mW
We had to decide on several design decisions during the process of this project. This included
considerations on memory type, configuration of camera, algorithms for 2D motion tracking, etc.
For example, we initially were able to run the camera and USB mouse separately, but when we
decided to converge them together, we realized that the camera and NIOS had their own
SDRAM controllers which would collide. We opted to keep using the SDRAM controller for the
camera, and instantiated a larger block of on chip memory for the NIOS C code storage and
execution. If we had more time, we would have instead used an SRAM controller for the camera,
which would produce faster frame rates and access times for pixel data, and would leave a large
space of SDRAM memory for the NIOS to use. Furthermore, this would have allowed us to
create on chip memory for storing the path of the ball over time. We also hope to hone down the
algorithm for the 2D detection because the ball currently drops too fast for the camera to keep up
with it, and the detection box stops following at that time. And in the future, we hope to add a 3D
projection algorithm which would truly use the capabilities of the FPGA and hardware
acceleration to the fullest.
Unlike our labs, we did not do any testbenches. There is no easy way to testbench such a data-
rich project, so instead we optimized our compile time and tested by running the design on the
FPGA. By carefully managing our memory resources, our compile time never went higher than 5
minutes. (By contrast, the same approach on a sprite based game is about 10 to 30 minutes just to
synthesize).
Conclusions
This was by far one of the best projects we’ve ever had the pleasure to work on. Even though we
didn’t get to the 3D projection, we are very proud of how far we’ve come with this project.
References
https://www.intel.com/content/dam/altera-www/global/en_US/portal/dsn/42/doc-us-dsnbk-42-
1404062209-de2-115-user-manual.pdf
https://www.intel.com/content/dam/www/programmable/us/en/pdfs/literature/ug/ug_shift_registe
r_ram_based.pdf
https://wiki.osdev.org/Mouse_Input
https://github.com/slee500/ece385-final