FIGURE P.1 EASI Trend Chart EASI Cumulative Averages 2004 ...
Upload
godwin-freemanCategory
view
226download
7
Easi-Sterilise Easi-Sterilise Information session Information session
for Cliniciansfor Clinicians
““Getting it right, every step of the way”Getting it right, every step of the way”

Why are we here? Patient and staff safety Directives from QH EMT for rapid implementation of
education and training following incidents Implementing a continuous quality improvement
program Acknowledge an absence in effective communication
when changes are made To build on current level of knowledge in light of ever
changing technology, standards, guidelines, advisories and legislation

Aim of this workshop
Provide participants with an overview of the Easi Sterilise Standard Operating Procedures and outline the responsibility of the clinician in ensuring that items have been through the correct reprocessing and are able to be used safely for patient care.

QH Commitment QH Commitment
Is to: Appropriately train and skill staff Provide information and resources so that
step-by-step quality processes are consistently followed
Assist in identifying gaps in knowledge and provide opportunities for improvement

SOPs & WSAsSOPs & WSAs To assist Oral Health facilities operationalise QH policy
and guidelines A resource for staff Update and supersede the OH Critical Instrument Tracking
(2003) A framework to assist staff identify competence and areas
where education and improvement may be needed A resource to identify opportunities for improvement within
the department that will require further education and training


1.1 Standard Precautions1.1 Standard Precautions
Standard precautions are applied as a first-line approach to infection control. These form the basis for your decision-making and practice. Standard precautions are a set of guidelines based on the assumption that all blood and body fluids are potentially infectious.

1.1 Standard Precautions1.1 Standard PrecautionsIn the context of sterilising practice and ALL the Standard Operating Procedures, standard precautions include:
Hand HygieneHand cream – approved by infection control – not in packing area or handling of sterile stockPersonal Protective Equipment
• Gloves • Face shields, hair protection, safety glasses and masks• Fluid resistant gowns/aprons
OHS Requirements

1.2 Soiled Pickup Collection1.2 Soiled Pickup Collection Standard Precautions - PPE Contaminated items - dedicated collection trolley/container Keep instrument sets together Secure sharps
Collection containers are: puncture-resistant leak-proof and made of either plastic or metal with a lid or liner that can be closed

1.3 Sorting Prior To Cleaning1.3 Sorting Prior To CleaningInstruments and items sorted by;
• Type • Method of cleaning e.g. Manual , ultrasonic,
Instruments and items are checked for;• Completeness• Defects• Sharps or blades that have not been removed• Heavily soiled items• Single use only items must not be returned for
reprocessingReport concerns to supervisor

CleaningCleaning Cleaning removes organic and inorganic soil, blood, fats etc
which contain pathogenic micro-organisms
Gross Debris should be removed chairside
Cleaning minimises contamination levels of bioburden (number of micro-organisms) prior to sterilisation
For sterilisation to occur the aim is to have a low number of micro-organisms present on instruments
CleaningCleaning
Steam will not penetrate contamination left on instruments
If the item is not clean it won’t be sterilised

1.5 Pre Cleaning1.5 Pre Cleaning Pre cleaning (initial cleaning) allows for the removal
of visible blood, body fluids and debris from items prior to cleaning (definitive cleaning). Pre cleaning shall be undertaken as soon as possible (e.g. during and post procedure chairside).
If blood, proteins and other debris are allowed to dry or remain in crevices and joints, the instruments become very difficult to clean and are prone to stiffness and accelerated corrosion.

1.5 Pre Cleaning1.5 Pre Cleaning
Pre cleaning can be performed by methods such as dry wiping, damp wiping or use of a commercially available single use only instrument sponge
Place the dry wipe, damp wipe or sponge on the bracket table and carefully wipe the instrument across the material

1.6 Hand Cleaning For Immersible Items1.6 Hand Cleaning For Immersible Items
Drying – As per manufacturer’s instructions Drying cabinet Disposable low-lint cloth for hose, battery and external parts Air pressure gun (for removal of excess moisture) Disposable syringe

1.6 Hand Cleaning For Immersible Items1.6 Hand Cleaning For Immersible Items
Problems associated with incorrect drying
Items should NOT be air dried/ dripped dry Good conditions micro-organisms multiply in 20-30 minutes
Wet packaging result in unsterile item Can cause rusting, corrosion, pitting to the item

HandpiecesHandpieces handpieces
outside surfaces cleaned using detergent wipe,
rinsed by wiping dried
slow speed motors outside surfaces cleaned using
detergent wipe, rinsed by wiping, dried
lubricated (manually or automatic) may need special adaptors Dried, wrapped & processed in a
wrapped cycle

Special adaptors may be neededSpecial adaptors may be needed

Special adaptors may be neededSpecial adaptors may be needed
Ideally, handpieces and slow speed motors are cleaned and lubricated using mechanised cleaning equipment

Special adaptors may be neededSpecial adaptors may be needed

1.8 Ultrasonic Cleaner1.8 Ultrasonic Cleaner
Purpose
Ultrasonic cleaning is a form of mechanical cleaning
that uses high frequency ultrasonic waves (cavitation)
that dislodges fine particles from the surfaces of
instruments.

Ultrasonic cleaning is an effective cleaning method for instruments prior to the reprocessing
1.8 Ultrasonic cleaner1.8 Ultrasonic cleaner

1.9 Washer Disinfector Machines1.9 Washer Disinfector Machines
Batch and continuous type washer disinfectors clean and remove bio burden/micro-organisms (blood and debris)
Thermal (high level) disinfection using time at temperature – final rinse
Means the cleaning process is verifiable Lumened items still require Flush brush Flush Unlock and open items Use appropriate washer baskets/inserts Keep sets together

1.9 Washer Disinfector Machines1.9 Washer Disinfector Machines
REPORT IMMEDIATELY: Cycle parameters not meeting set requirements or
variations to cycle parameters – failed cycles Items that appear dirty or stained are returned to the
cleaning area for recleaning/destaining Excess water – check the following: the machine
temperature, amount of rinse aid going into the machine or the way in which the machine was loaded
Damaged instruments

1.9 Washer Disinfector Machines1.9 Washer Disinfector Machines
Releasing the load and unloading the washer disinfector Authorising release of the load occurs on completion of
washer disinfector cycle and prior to opening the door. Check cycle parameters have been met and print out/log (or
equivalent) is signed
Care opening the doors due to heat and moisture
Inspect load not become dislodged or displaced
Avoid injury and damaging the equipment/instruments

Washer disinfector printout
Section 2Section 2
Packaging and Wrapping Procedures

2.1 Organisation Of Packing Area2.1 Organisation Of Packing Area
Organised packing area ensures a clean, safe work working area that reduces the risk of equipment damage/loss and unsafe work practices.

2.2 Assembly Of Instrument Trays And 2.2 Assembly Of Instrument Trays And HollowwareHollowware
Prepare equipment for sterilization: Check multi-part equipment / instruments can be assembled and functioning then disassembled or loosely assembled for sterilisation as
per manufacturers instructions Hinged or ratchet instruments are opened and unlocked Sharp items protected with a tip protector or enclosed
in a cassette

2.2 Assembly Of Instrument Trays And 2.2 Assembly Of Instrument Trays And HollowwareHollowware
When packaging hollowware sets: Openings are to face in the same direction, Hollowware should not be able to move, and If hollowware is nestled - insert separators
Individual packs do not include combinations of hollowware, instruments, gauze dressings, drapes or tubing

2.3 Wrapping and Packaging2.3 Wrapping and Packaging
Provides a protective barrier against sources of potential contamination. Wrapping/packaging methods must facilitate aseptic removal of contents
2.3 Wrapping, Packaging & 2.3 Wrapping, Packaging & LabellingLabelling
Wrapped items The method shall be envelope fold or square fold technique The type and method of wrapping and packaging is facility
specific Check prior to use the wrapping material is not damaged or
expired The class 1 chemical indicator tape used for sealing will be
specific to the mode of sterilisation (pressure sensitive, non-toxic and adhere to clean surface)
Ensure tape is adhered to wrapping/packaging material

2.3 Wrapping, Packaging & 2.3 Wrapping, Packaging & LabellingLabelling
Flexible packaging materials Check for damage and expiry date Correct size pouch for contents Hollowware openings are against non-laminate
surface Any writing required should be done on the outer
parameter of the flexible packaging material. Self sealing pouches must be sealed by folding the
flap along perforation/dotted line as indicated by the manufacturer.
Pouches shall only be filled up to ¾ of the overall space, allowing approximately 5 cm seal area

2.3 Wrapping, Packaging & 2.3 Wrapping, Packaging & LabellingLabelling
Labelling of packs: All packs, bags, pouches and wrapped items must
be labelled if contents are not visible Use a non-toxic, water resistant, felt tipped
marking pens and rubber stamps using similar ink or pre-printed tape
Writing on wrapping could damage the integrity of the material

2.3 Labelling2.3 Labelling
To occur prior to the sterilizing process utilising: 1. Batch labels (piggyback)
Details on the batch label gun must be checked and updated for each sterilizer cycle. The minimum information required on each label must include;
• Date of sterilization• Sterilizer number• Sterilizer cycle number

Blue = UnprocessedSterilizer number

Colour interpretation chart

2.4 Using and Reloading Batch Label Gun
Upper adjustable print display - Setting the date and the steriliser number
Date must appear as DD(space)MM(space)YY starting from the far left
The sterilizer number must be positioned to the far right

White mark
(L) Side Date - dd mm yy
(R) Side - Steriliser number
Steriliser cycle number
White mark

Chemical IndicatorsChemical Indicators Class 1 – Process indicator – exposure to a sterilisation
process – shows processed/unprocessed e.g sterilising tape, external chemical indicators.
Class 2 – Specific tests e.g Bowie Dick type test Class 3 – Single parameter – critical parameter e.g. dry heat Class 4 – Multi parameter eg. Time at Temp. Class 5 – Integrating indicator – time temp and moisture Class 6 – Emulating indicator (cycle verification) – eg. 134°C @
3.5 min


Chemical Indicators Chemical Indicators do not indicate sterilizationdo not indicate sterilization
Written information about the indicators shall be obtained from the supplier covering:(a) How to interpret indicator results.(b) The factors affecting end-point colour change during
storage of sterilized items.(c) The sterilization conditions that the indicator will
detect.(d) The storage requirements and shelf-life of the
indicator itself.

Packaging Instruments & Class 1 Chemical Indicators

Packaging Instruments

Dental InstrumentsDental Instruments
Sterile at point-of-use must be stored to maintain sterile
conditions
must be tracked when used
Extraction instruments

The
way
we
were……

Section 3Section 3
Sterilising
3.1 Batching & Recording of a load prior 3.1 Batching & Recording of a load prior to sterilisationto sterilisation
MUST HAVE DOCUMENTED EVIDENCE OF ALL ITEMS
of a sterilising process = tracking/tracing proof
Assists in the recall of an item/load
Recording of load contents assists in compiling of
statistical data on production volume

Warning: Warning: Do Not Store Unprocessed Do Not Store Unprocessed Items In The SterilizerItems In The Sterilizer
The sterilization cycle shall be commenced immediately after loading.
Warm, moist atmosphere of the chamber can lead to— (a) release of unprocessed items for use; (b) contamination of packaging by condensate; (c) an increase in bioburden on unprocessed items; and (d) the deterioration of:
(i) chemical indicators, packaging and labelling; and (ii) adhesive of self seal pouches, labelling and sterilizing tape.

. bench top class N downward displacement autoclave capable of processing both wrapped and unwrapped loads
Downward Displacement Validator Plus Steriliser
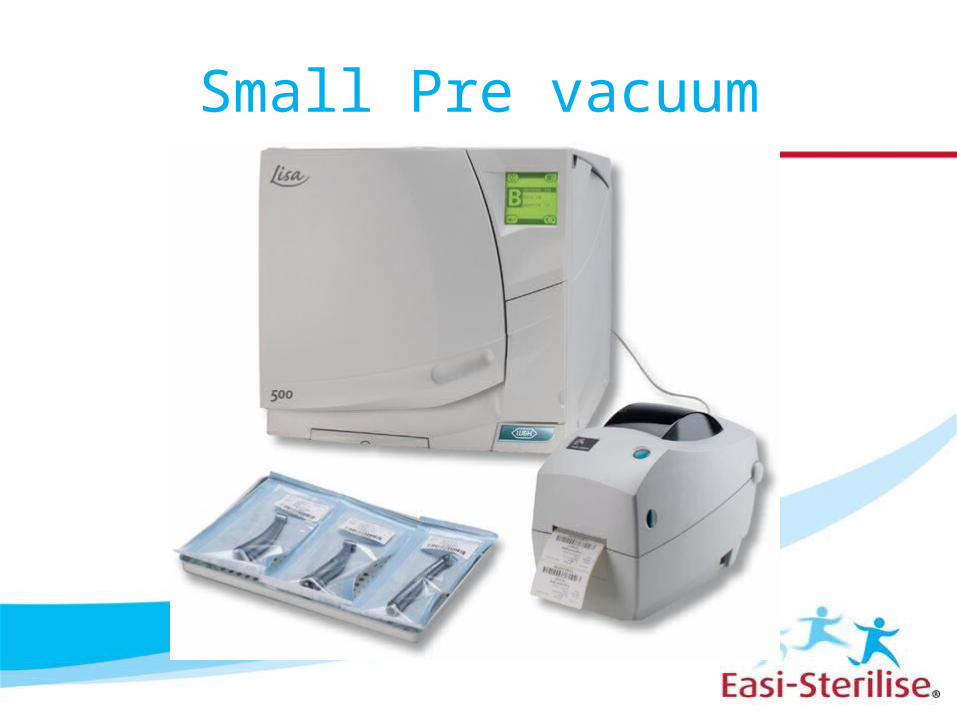
Small Pre vacuum

Lisa 500 series

Large Pre-vacuum SterilisersLarge Pre-vacuum Sterilisers

3.2 LOADING AND RECORDING OF ITEMS 3.2 LOADING AND RECORDING OF ITEMS FOR STEAM STERILISATIONFOR STEAM STERILISATION
Sterilant needs to have contact and/or penetrate all surfaces of the all items
Do not: crush items together allow items to touch the floor, top, door or walls of the chamber Allow enough space between each item for:
air removal, steam penetration, draining of condensate drying to occur

Loading the steriliser
All loads/cycles must have a chemical indicator to distinguish between processed and unprocessed loads
A “control” pouch containing a class 5 or 6 chemical indicator and batch label attached is included in all loads as per direction from the Chief Dental Officer, Jan 2010

Loading of Laminated Packaged Instruments

Loading hollow ware & pouches
Place hollow ware on a 45 degree angle
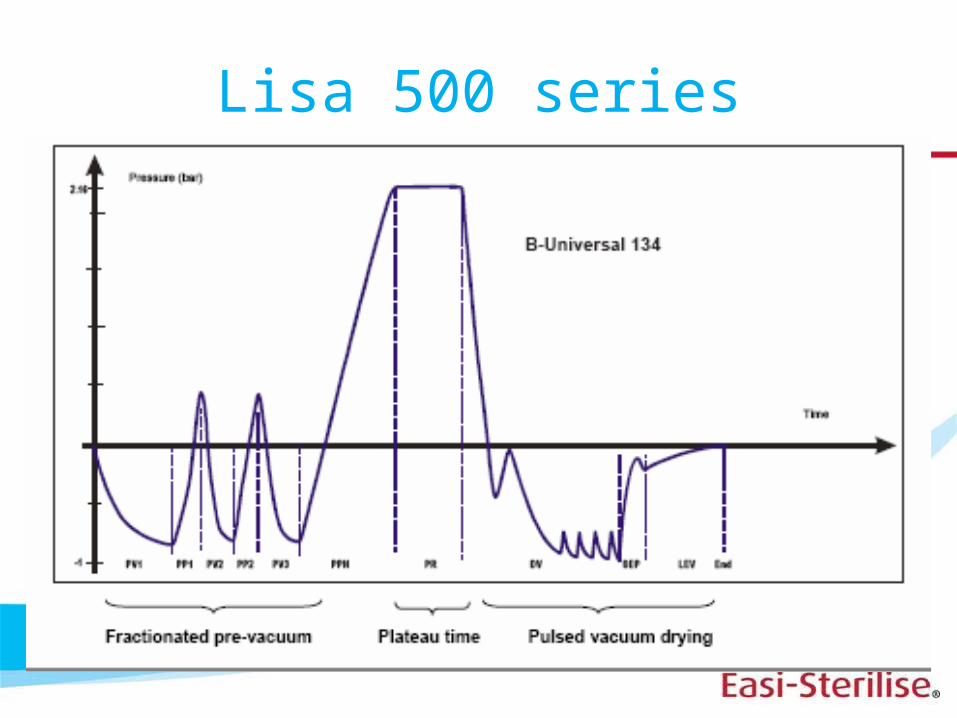
Lisa 500 series

Examples of sterilisation cyclesRecognised International
Temperature, Pressure, Time Relationship
International Units of Pressure
Temp C kPa psi mb bar Holding time (minutes)
121 103 15 1030 1.03 15
126 138 20 1380 1.38 10
132 186 27 1860 1.86 4
134 203 30 2030 2.03 3

Physical checksCycle completed check print out for:
Temperature has reached 134°C
Time at 134°C > 3 mins + penetration time
Pressure 203kpa or 2030mb or 30psi

stand alone printer
In built printer
Other types?

Top of the printout


W&H Lisa™ Manual
New Lisa 500 series manual

3.3 Releasing & Unloading a Sterilised Load3.3 Releasing & Unloading a Sterilised Load
To ensure that the staff unloading the steriliser check that sterilisation has occurred in accordance with the validated process and authorises the release of the load

3.3 Releasing & Unloading a Sterilised Load3.3 Releasing & Unloading a Sterilised Load
Ensures that the sterilant has contact with, and/or penetrates
all surfaces of all items being reprocessed
Immediately cycle has completed - Visually check
Chemical indicators have changed colour correctly
No visible wet packs & packs intact
Printout confirms sterilisation parameters are met – sign
If no printer, check the class 4,5 or 6 chemical indicator

3.3 Releasing & Unloading a Sterilised Load3.3 Releasing & Unloading a Sterilised Load
Only in exceptional circumstances (such as involved in providing direct patient care) would a delay to removing a completed sterilization load, be considered acceptable and no more than 30 minutes from when the cycle has finished.

3.3 Releasing & Unloading a Sterilised Load3.3 Releasing & Unloading a Sterilised Load
When releasing and authorising the load for use : Check items unloaded correspond with load
documentation Check and record results of process challenge
devices (if used) on sterilizing log chart Check and record results of biological indicator (if
used) on sterilizing log chart

3.3 Releasing & Unloading a Sterilised Load3.3 Releasing & Unloading a Sterilised Load
Document in steriliser record/log Sign the sterilizer cycle printout and attach Document time of release Signature or identification of person releasing the load Ensure the items unloaded correspond with load
documentation Attach the “control” pouch batch label Attach the control class 5 chemical indicator Immediately notify the supervisor if not met.

Cooling itemsCooling items
Away from high activity areas Do not use forced cooling by fans or air con. Do not place on solid surfaces, as condensation
from vapour (still within the pack) can result. Items dropped on the floor, placed on a dirty
surface, compressed, torn, have broken seals, or are wet, are considered non-sterile and shall be reprocessed.

The key pieces of legislation relating to recordkeeping are
Public Records Act 2002 Public Services Act 1996 Electronic Transactions (Qld) Act 2001 Evidence Act 1977
See also QH clinical records retention and disposal schedule
http://paweb.sth.health.qld.gov.au/sqrm/hims/records/documents/disposal_retention_sched.pdf

Each Sterilizer’s information is written
once on the front page

Found on
CHRISP Oral
Healthwebsite


In the case where one or more items (but not all) have failed, in a successful cycle

Section 4Section 4
Stock management

4.1 Dedicated Area For Sterile Goods4.1 Dedicated Area For Sterile Goods
Only those sites that can ensure environmental control (temperature and humidity) and meet sterile stock storage requirements of AS/NZS 4815 can move to event related sterility. If these storage requirements can not be met the unused items must be reprocessed after 3 months

4.1 Dedicated Area For Sterile Goods4.1 Dedicated Area For Sterile Goods
Environmental considerations for Event Related Sterility Temperatures in this area are in the range 18◦C - 22◦C
with a relative humidity ranging from 35% - 68% Secure from public access Limited staff thoroughfare/working in this area Sterile goods shall always be segregated from non-
sterile goods Protected from direct sunlight

4.1 Dedicated Area For Sterile Goods4.1 Dedicated Area For Sterile Goods
Environmental considerations for Event Related Sterility For open shelving store items 250mm above floor level
& at least 400mm from ceiling fixtures Surfaces such as walls, floors, ceilings and shelving
shall be non-porous, smooth and easily cleaned Air-conditioning & ventilation conditions should be in
accordance with AS1668.2 New overhead lighting is fitted flush to the ceiling to
minimise dust entrapment

4.1 Dedicated Area For Sterile Goods4.1 Dedicated Area For Sterile Goods
The environment shall be Dedicated storage areas Store in a clean, dry, dust free environment Insects and vermin free Protected from direct sunlight 250mm above floor level & at least 400mm from
ceiling fixtures

4.2 Stock Rotation4.2 Stock Rotation
The purpose of stock rotation is to use sterile stock according to the date of manufacture./sterilisation
Rotate stock so previously sterilised and stored items will be used first
Take from left & replace to the right Handle only when necessary Do not overstock – damage & compromise

Time-Related SterilityTime-Related Sterility
based upon an arbitrary date allocated to sterilised packs/pouches etc by which they should undergo re-processing and sterilisation if they have not been used
if storage & handling conditions are not ideal, or if the packages are frequently handled, items may need to be reprocessed more frequently

Event-Related Sterility Event-Related Sterility This process is a method of determining if an item is
still sterile by assessing whether it has undergone any events, which may have compromised its sterility, such as Incorrect cleaning in storage areas Moisture and condensation Exposure to harsh as well as external climatic conditions Dust, Vermin and insects torn/soiled wrapping or poor storage

Maintain sterile stockMaintain sterile stockDo Not Handle without washing and drying hands Pack in a manner that could damage the wrapping Bundle using rubber bands or similar Stack on top of each other - they should be stored
vertically Place on or near potentially wet surfaces Exposed to aerosolising procedures – only take to
chairside what is needed.

Section 5Section 5
Quality

5.1 Water Quality5.1 Water Quality
To ensure water used in cleaning of re-usable medical devices is of optimum quality for effective and efficient processing

Water quality for cleaning
Water quality affects cleaning procedures Water must be potable (drinking quality) Hard water = calcium and magnesium Damages instruments Damages equipment May prevent chemicals working as intended Unfiltered tap water may contain excessive amounts of
microorganisms depending on source

5.3 Ultrasonic Machine Testing5.3 Ultrasonic Machine Testing
Ensures that the machine is functioning effectively. Testing can be accomplished using validated test
methods to prove that the transducers are working effectively soil is able to be removed – new test methods in development
Daily test or each day of use Document results Report test failures

5.4 Mechanical Washer Cycle Monitoring5.4 Mechanical Washer Cycle Monitoring
Proof that the mechanical washer disinfector attains the correct parameters for the set cycle and thus enables the conditions for effective cleaning and/or thermal disinfection

5.4 Mechanical Washer Cycle Monitoring5.4 Mechanical Washer Cycle Monitoring
Washer/disinfectors usually operate within the following temperature ranges
Rinsing: 40°C - 50°C Washing: 50°C - 60°CDisinfecting: 70º for 100mins
75º for 30 mins80º for 10 mins90º for 1 min
Final rinsing: 80°C - 90°CAll results shall be checked prior to the release of each load and the printout signed

5.5 Internal & External Chemical Control5.5 Internal & External Chemical Control
External and or internal chemical control (indicators) shall be used to identify that an item has been through a sterilising process. The indicators are specific to the sterilising process being used eg. Steam, hydrogen peroxide, ethylene oxide, peracetic acid

5.5 Internal & External Chemical Control5.5 Internal & External Chemical Control
Control Pouch (Mandatory) A separate sterilising pouch with a 'control'
Class 1 chemical indicator and batch label attached and a Class 5 or 6 Chemical Indicator inside, must be placed onto a sterilizer tray and used in every sterilization cycle.

5.5 Internal & External Chemical Control5.5 Internal & External Chemical Control
Internal An appropriate internal multi parameter time and
temperature chemical indicator (Class 5 or 6) is used in the following circumstances:
In the mandatory OH Control pouch Where delays to access to on-site technical support
to undertake calibration, operational qualification and performance qualification for new sterilizers or temporarily loaned sterilizers occur.

5.5 Internal & External Chemical Control5.5 Internal & External Chemical Control
External (Mandatory) – Class 1 chemical indicator
Examples include; sterilizer indicator tape chemical indicators found on commercially
manufactured packs/pouches

5.6 Biological Indicators5.6 Biological Indicators
Biological indicators are used to verify the microbial killing power of 10-6 of the sterilisation process by using a population of calibrated bacterial spores, on, or in, a carrier and packaged in a manner that the integrity of the inoculated carrier is maintained.
Routine biological testing is not mandatory for steam sterilisers if process is validated

5.7 Leak Rate (Vacuum) Test5.7 Leak Rate (Vacuum) Test
To verify that air has not leaked into the sterilising chamber. The leak rate/vacuum test is not a sterilisation cycle. It is a special programmed cycle that draws a vacuum and
holds the vacuum for a minimum of 10 minutes. If the rate of air that leaks into the chamber via a leaking chamber seal or hole in piping, a pressure rise will be measured that is greater than 1.3 kPa/min over 10 minutes, a fault indicator and printout.
The level of vacuum will be different for each machine. The important thing is that it remains within 1.3kPa/min of the vacuum over the 10 minute period.


5.7 Leak Rate (vacuum) Test5.7 Leak Rate (vacuum) Test
Class B and Class S sterilisers with air detector – weekly
Class B and Class S sterilisers without air detector – daily
Record the results.

5.8 Bowie Dick Type Test5.8 Bowie Dick Type Test
To detect air entrapment and evaluate the ability of a pre-vacuum steriliser to remove residual air that will then allow the steam penetration and attainment of the correct conditions for steam sterilisation.
Needs a special cycle Daily on a warmed up steriliser before loads Different types on the market
5.8 BOWIE DICK TYPE TEST
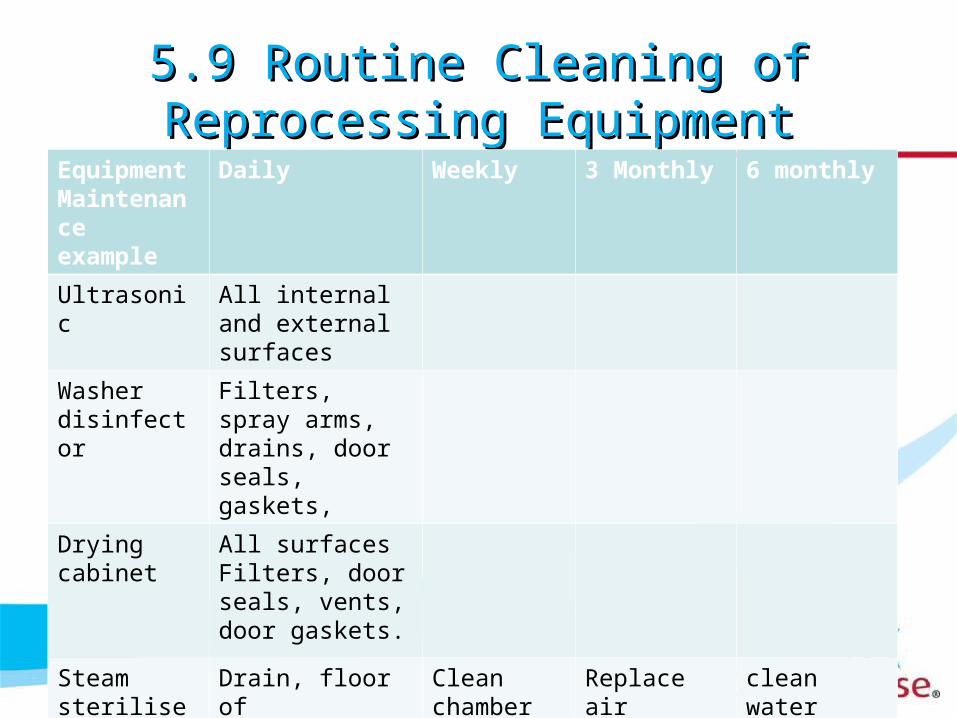
5.9 Routine Cleaning of Reprocessing 5.9 Routine Cleaning of Reprocessing EquipmentEquipment
EquipmentMaintenance example
Daily Weekly 3 Monthly 6 monthly
Ultrasonic All internal and external surfaces
Washer disinfector
Filters, spray arms, drains, door seals, gaskets,
Drying cabinet All surfacesFilters, door seals, vents, door gaskets.
Steam sterilisers
Drain, floor of steriliser, door seal,
Clean chamber
Replace air filter
clean water chambers

Validation DocumentationValidation DocumentationImportant to document all the procedures!1. pre-cleaning2. cleaning3. drying of instruments4. packaging5. loading steriliser6. unloading steriliser7. physical checks8. sterilisation log book9. storage of sterile items10.validation of YOUR sterilisation process

Annual validationAnnual validationperformance qualification (PQ)performance qualification (PQ)
What is validation?A documented procedure for obtaining, recording and interpreting the results required to establish that a process will consistently yield product complying with predetermined specifications.What does this mean?The entire process is documented, challenged and repeatable, and establishes the efficacy (or not) of the sterilising process, that is monitored by the measurement of the critical requirements of time, temperature and pressure and parameters during each cycle.

Commissioning of sterilisersCommissioning of sterilisersInstallation Qualification (IQ)Proves that the steriliser and the where installed comply with the manufacturer’s specifications
Operational Qualifications (OQ)Determines that the installed steriliser and equipment is working within the defined limits when used as per manufacturer’s procedures.These shall documented and recorded and include calibration of all gauges, parameter monitoring, the recording device, specific performance tests (eg leak test) and process indicator tests (bowie dick tests)

ValidationIQ+OQ+PQ
Commissioning(IQ) + (OQ)
InstallationQualification (IQ)
OperationalQualification (OQ)
Performance qualification (PQ)
Physical qualification & testing
Microbiological qualification & testing

Installation qualification (IQ)Installation qualification (IQ)
Heat distribution studyTemperature profile “Cold Spot” Service technician performs (empty chamber)
whilst calibrating the temperature gauge. Or may be provided by the manufacturer. Doesn’t need to be routinely checked every time.

Performance qualification (PQ) Performance qualification (PQ) physical qualificationphysical qualification
Time at temperature and pressure testing Thermocouple testing to ensure the inside of the
packs of your challenge load has reached the selected temperature x 3 times with BI’s
Hold at or slightly above this temperature and at the correct pressure
Must be done at every validation Whole load that will be considered your “validated,
challenged load” needs to be available.

When
Validation shall be repeated annually and every time significant changes are made.
Examples of such changes include, but are not limited to, the following:
(a) Any change to the sterilization parameters(b) Changes in packaging or loading specification which would
provide a greater challenge to the sterilization process.(c) Changes in the items or types of instruments to be sterilized,
such as the addition of a new complex medical item which would provide a greater challenge to the sterilization process.

More Information
Contact:
Email: [email protected] Intranet for SOP & WSA:
http://www.health.qld.gov.au/chrisp/sterilising/oral_health_SOP.asp