The Ear 1. External Ear Auricle or pinnae surrounds the ear Helix Lobule Anatomy of the Ear 2.
description
1
INVINCIBLETHE GAMES OF SHUSAKU
Compiled, Edited & Translatedby JOHN POWER
This chapter about Shusaku’s famous ear-reddening game is taken from Invincible, available in SmartGo Books. Used with permission.
Note that this PDF version is missing the interactive features available in SmartGo Books, in particular replaying the moves directly in the diagrams, or zooming out to see the whole board for partial diagrams. The text in brown represents inline diagrams that SmartGo Books would show as real diagrams when you tap on them.
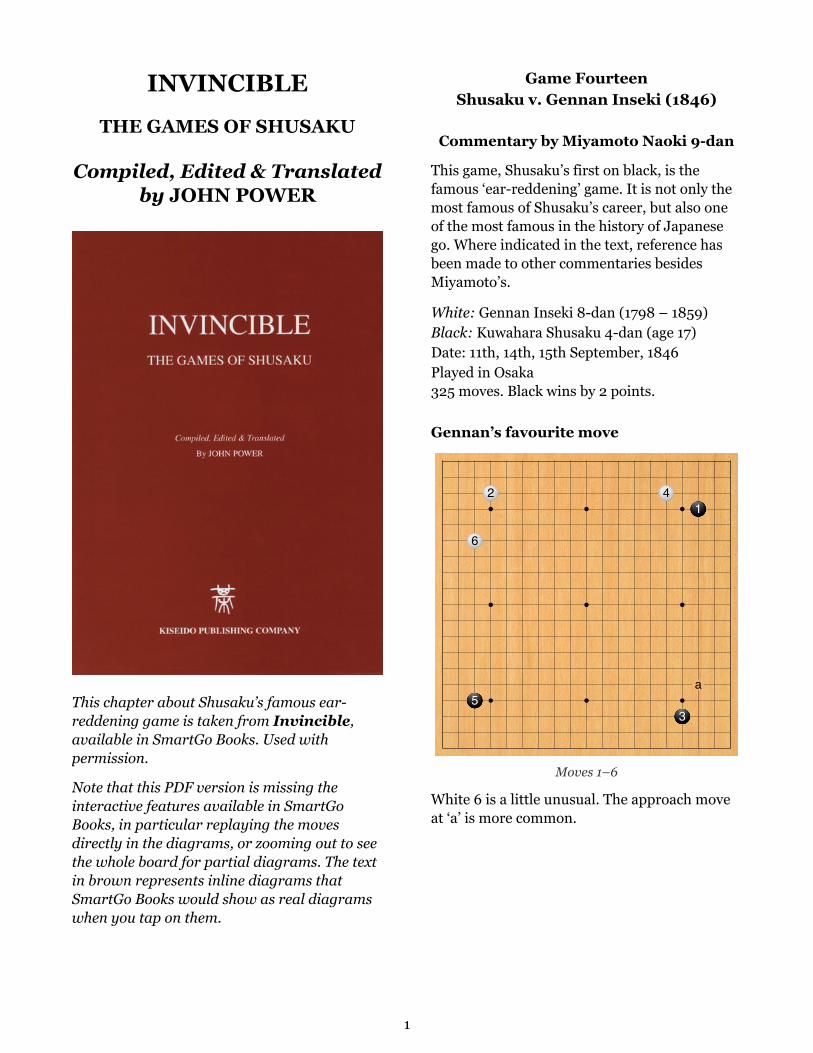
Game FourteenShusaku v. Gennan Inseki (1846)
Commentary by Miyamoto Naoki 9-dan
This game, Shusaku’s first on black, is the famous ‘ear-reddening’ game. It is not only the most famous of Shusaku’s career, but also one of the most famous in the history of Japanese go. Where indicated in the text, reference has been made to other commentaries besides Miyamoto’s.
White: Gennan Inseki 8-dan (1798 – 1859) Black: Kuwahara Shusaku 4-dan (age 17) Date: 11th, 14th, 15th September, 1846 Played in Osaka 325 moves. Black wins by 2 points.
Gennan’s favourite move
a
6
5
2 4
3
1
Moves 1–6
White 6 is a little unusual. The approach move at ‘a’ is more common.
2
b c
a7
9
8
Moves 7–9
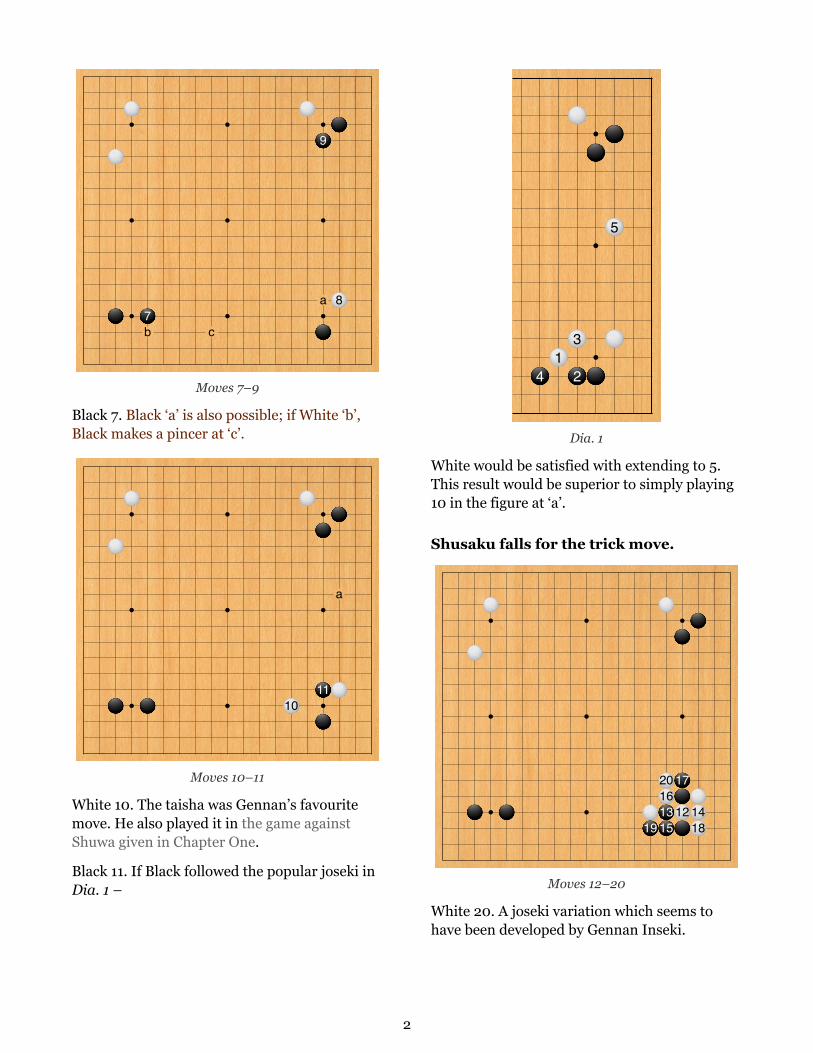
Black 7. Black ‘a’ is also possible; if White ‘b’, Black makes a pincer at ‘c’.
a
1011
Moves 10–11
White 10. The taisha was Gennan’s favourite move. He also played it in the game against Shuwa given in Chapter One.
Black 11. If Black followed the popular joseki in Dia. 1 –
41
3
2
5
Dia. 1
White would be satisfied with extending to 5. This result would be superior to simply playing 10 in the figure at ‘a’.
Shusaku falls for the trick move.
19
20161315
17
12 1418
Moves 12–20
White 20. A joseki variation which seems to have been developed by Gennan Inseki.
3
65
2
7
1
8
43
Dia. 2
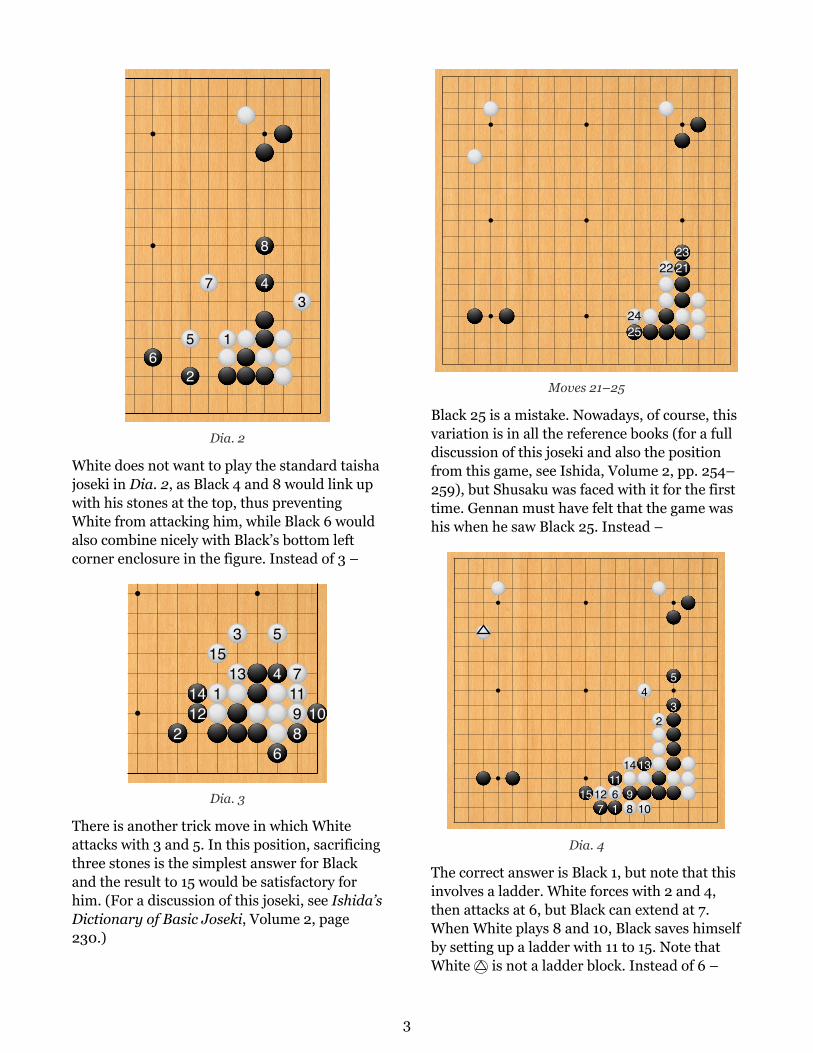
White does not want to play the standard taisha joseki in Dia. 2, as Black 4 and 8 would link up with his stones at the top, thus preventing White from attacking him, while Black 6 would also combine nicely with Black’s bottom left corner enclosure in the figure. Instead of 3 –
2
1412
15
1
3
13
5
4
6
7119810
Dia. 3
There is another trick move in which White attacks with 3 and 5. In this position, sacrificing three stones is the simplest answer for Black and the result to 15 would be satisfactory for him. (For a discussion of this joseki, see Ishida’s Dictionary of Basic Joseki, Volume 2, page 230.)
2425
222321
Moves 21–25
Black 25 is a mistake. Nowadays, of course, this variation is in all the reference books (for a full discussion of this joseki and also the position from this game, see Ishida, Volume 2, pp. 254–259), but Shusaku was faced with it for the first time. Gennan must have felt that the game was his when he saw Black 25. Instead –
15 127
1161
14
98
4
13
10
2
5
3
Dia. 4
The correct answer is Black 1, but note that this involves a ladder. White forces with 2 and 4, then attacks at 6, but Black can extend at 7. When White plays 8 and 10, Black saves himself by setting up a ladder with 11 to 15. Note that White | is not a ladder block. Instead of 6 –
4
dc
b
a17 6
16151
4
2
5
3
9
12
7
1110
813
14
Dia. 5
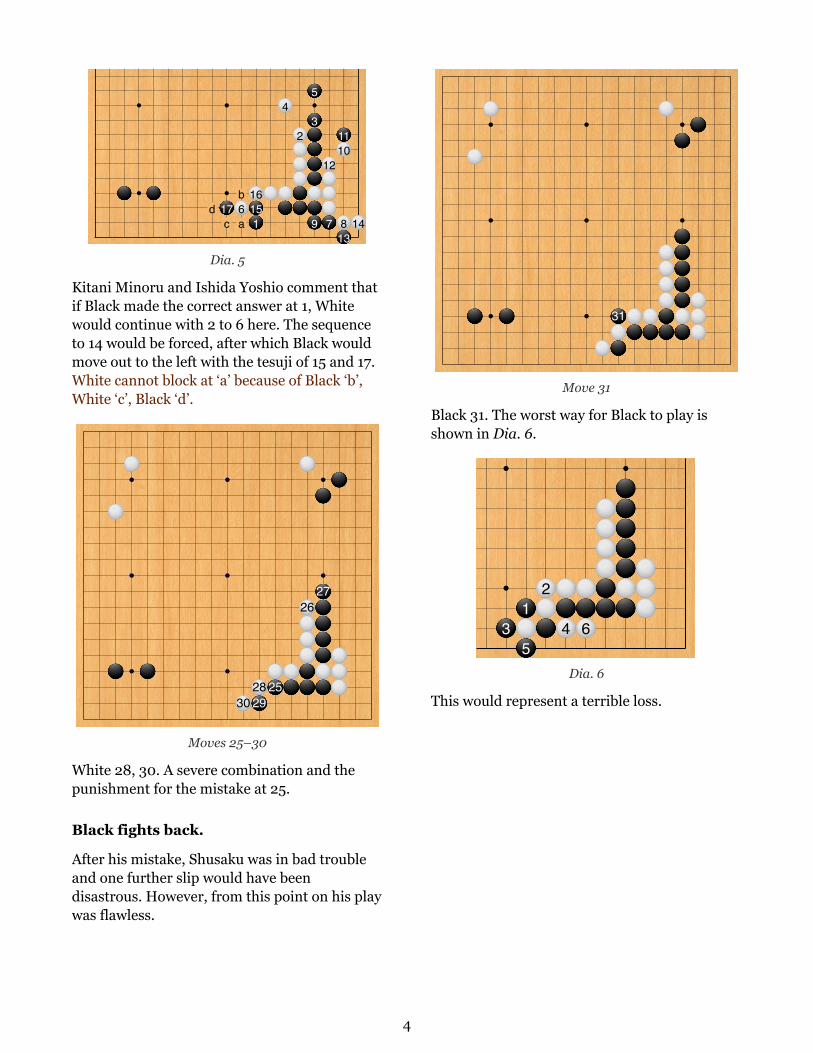
Kitani Minoru and Ishida Yoshio comment that if Black made the correct answer at 1, White would continue with 2 to 6 here. The sequence to 14 would be forced, after which Black would move out to the left with the tesuji of 15 and 17. White cannot block at ‘a’ because of Black ‘b’, White ‘c’, Black ‘d’.
302829
25
2627
Moves 25–30
White 28, 30. A severe combination and the punishment for the mistake at 25.
Black fights back.
After his mistake, Shusaku was in bad trouble and one further slip would have been disastrous. However, from this point on his play was flawless.
31
Move 31
Black 31. The worst way for Black to play is shown in Dia. 6.
31
5
2
4 6
Dia. 6
This would represent a terrible loss.
5
2
17
53 4
6Dia. 7
Dia. 7 is not much better, however. Black manages to live, but in gote, while White gets excellent outside thickness. The game would be over.
b a
3231
33 3435
Moves 31–35
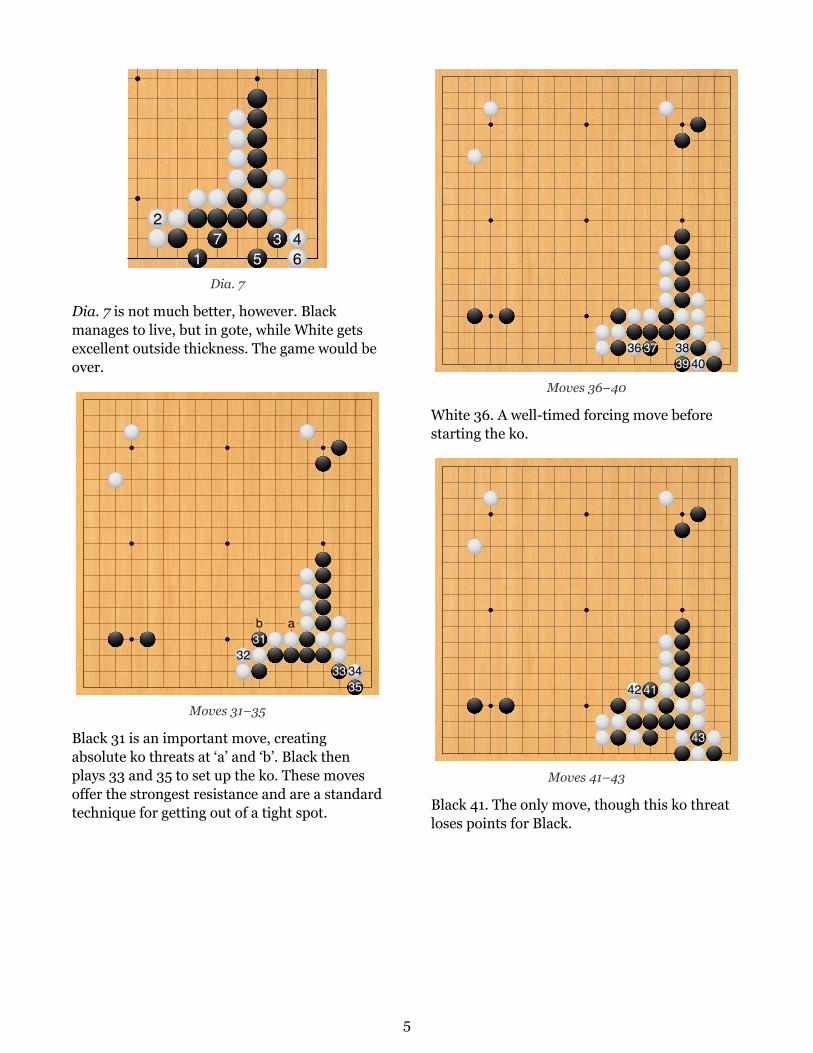
Black 31 is an important move, creating absolute ko threats at ‘a’ and ‘b’. Black then plays 33 and 35 to set up the ko. These moves offer the strongest resistance and are a standard technique for getting out of a tight spot.
36 37 3839 40
Moves 36–40
White 36. A well-timed forcing move before starting the ko.
42 41
43
Moves 41–43
Black 41. The only move, though this ko threat loses points for Black.
6
1
3 245
Dia. 8 6 at 2
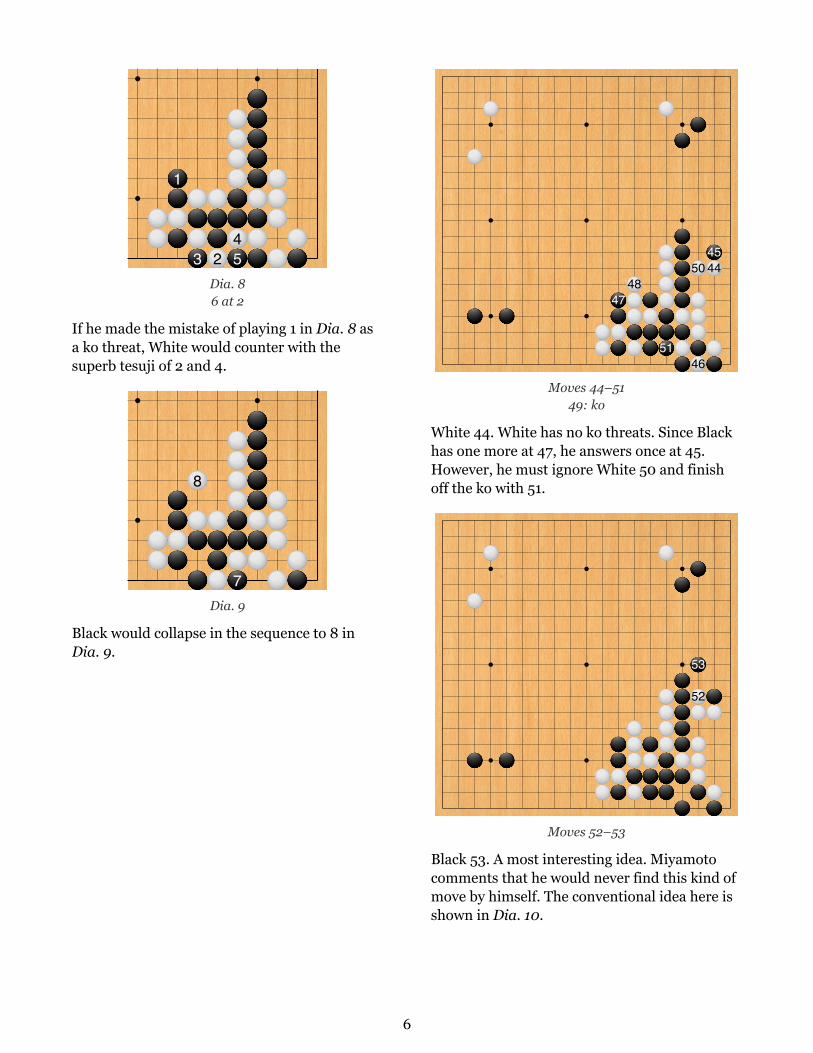
If he made the mistake of playing 1 in Dia. 8 as a ko threat, White would counter with the superb tesuji of 2 and 4.
8
7Dia. 9
Black would collapse in the sequence to 8 in Dia. 9.
4748
51
50
46
4544
Moves 44–51 49: ko
White 44. White has no ko threats. Since Black has one more at 47, he answers once at 45. However, he must ignore White 50 and finish off the ko with 51.
53
52
Moves 52–53
Black 53. A most interesting idea. Miyamoto comments that he would never find this kind of move by himself. The conventional idea here is shown in Dia. 10.
7
a
cb
d
56
7
132
4
Dia. 10
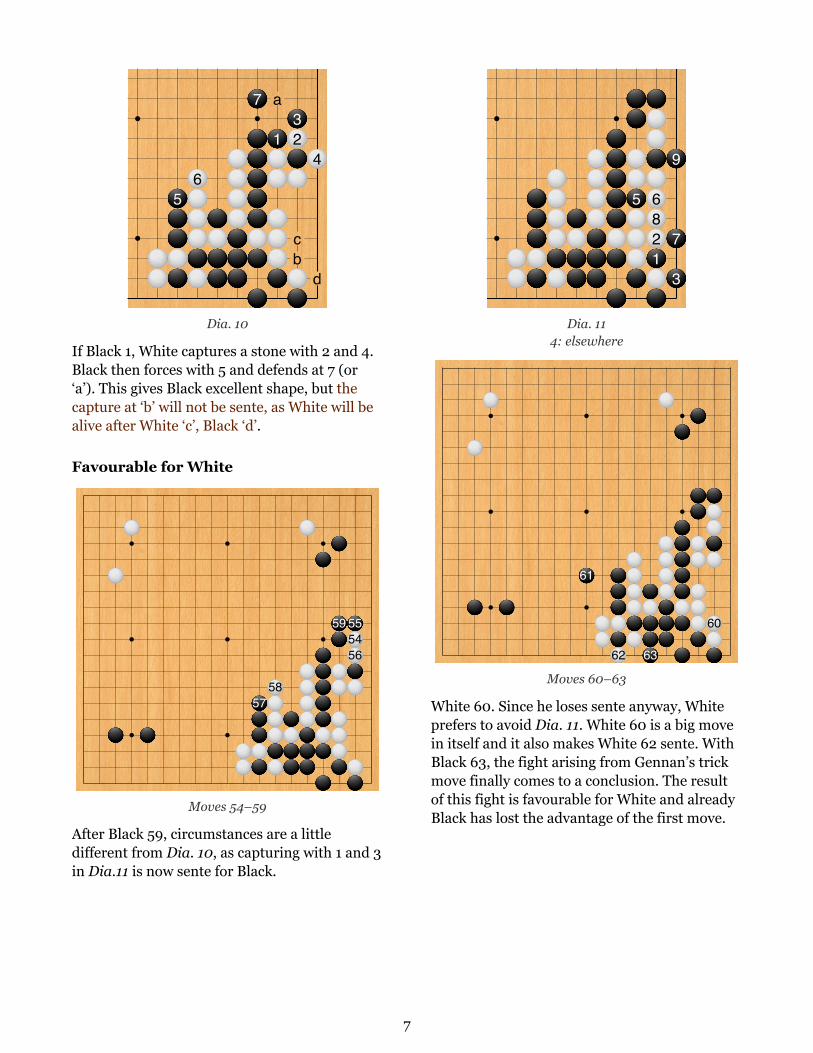
If Black 1, White captures a stone with 2 and 4. Black then forces with 5 and defends at 7 (or ‘a’). This gives Black excellent shape, but the capture at ‘b’ will not be sente, as White will be alive after White ‘c’, Black ‘d’.
Favourable for White
5758
59 555456
Moves 54–59
After Black 59, circumstances are a little different from Dia. 10, as capturing with 1 and 3 in Dia.11 is now sente for Black.
5 6821
9
7
3
Dia. 11 4: elsewhere
61
62 63
60
Moves 60–63
White 60. Since he loses sente anyway, White prefers to avoid Dia. 11. White 60 is a big move in itself and it also makes White 62 sente. With Black 63, the fight arising from Gennan’s trick move finally comes to a conclusion. The result of this fight is favourable for White and already Black has lost the advantage of the first move.
8
a
66
65
64
67
Moves 64–67
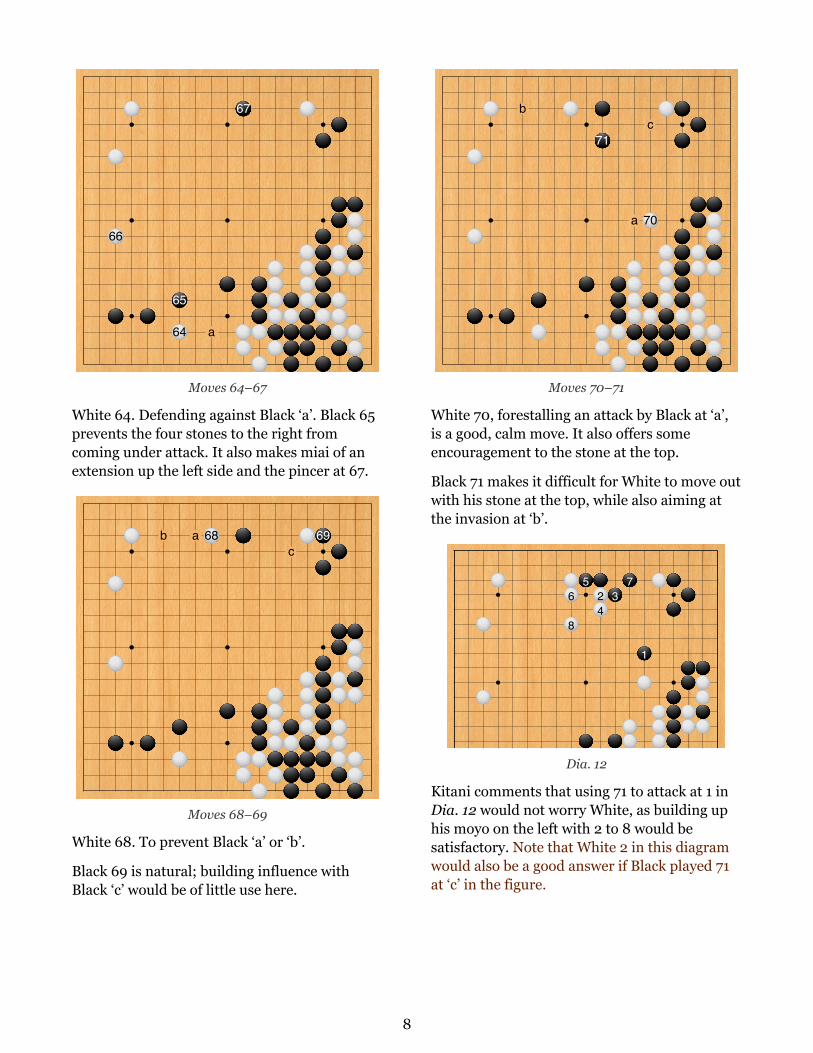
White 64. Defending against Black ‘a’. Black 65 prevents the four stones to the right from coming under attack. It also makes miai of an extension up the left side and the pincer at 67.
b ac
68 69
Moves 68–69
White 68. To prevent Black ‘a’ or ‘b’.
Black 69 is natural; building influence with Black ‘c’ would be of little use here.
b
a
c71
70
Moves 70–71
White 70, forestalling an attack by Black at ‘a’, is a good, calm move. It also offers some encouragement to the stone at the top.
Black 71 makes it difficult for White to move out with his stone at the top, while also aiming at the invasion at ‘b’.
6
8
524
37
1
Dia. 12
Kitani comments that using 71 to attack at 1 in Dia. 12 would not worry White, as building up his moyo on the left with 2 to 8 would be satisfactory. Note that White 2 in this diagram would also be a good answer if Black played 71 at ‘c’ in the figure.
9
a
b72
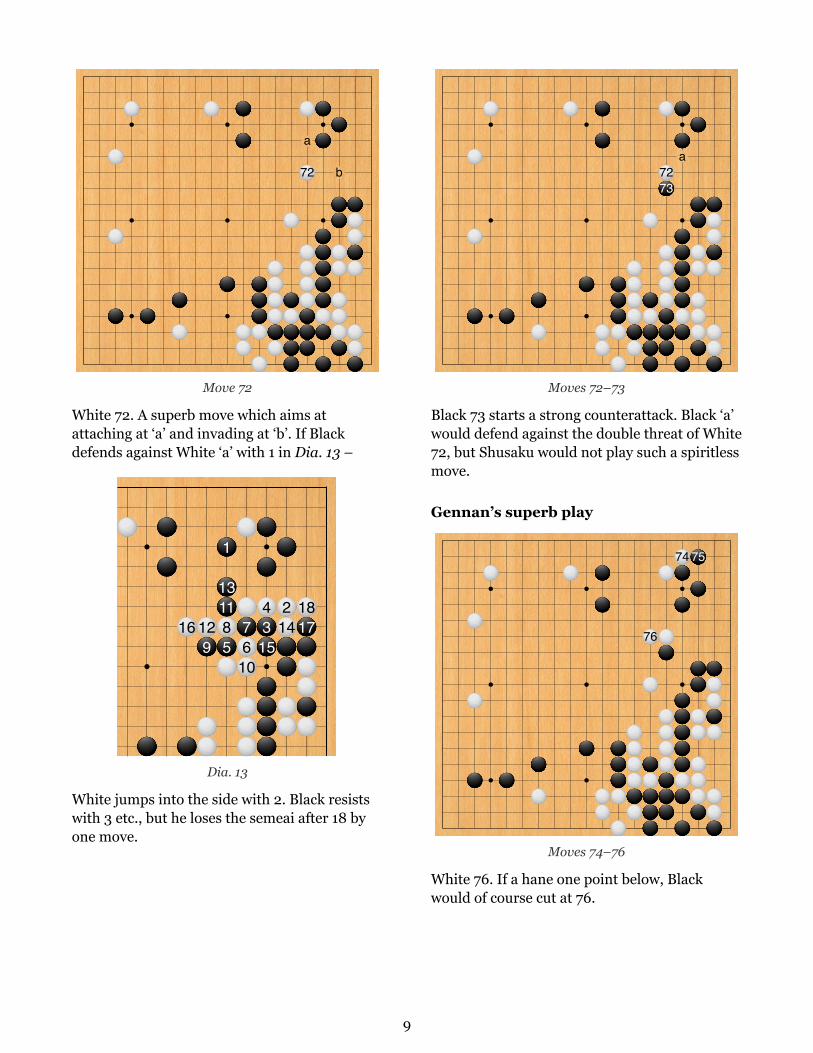
Move 72
White 72. A superb move which aims at attaching at ‘a’ and invading at ‘b’. If Black defends against White ‘a’ with 1 in Dia. 13 –
16 129
1
131185
7610
4315
214
1817
Dia. 13
White jumps into the side with 2. Black resists with 3 etc., but he loses the semeai after 18 by one move.
a7273
Moves 72–73
Black 73 starts a strong counterattack. Black ‘a’ would defend against the double threat of White 72, but Shusaku would not play such a spiritless move.
Gennan’s superb play
76
74 75
Moves 74–76
White 76. If a hane one point below, Black would of course cut at 76.
10
c
b a
7778
79
80
Moves 77–80
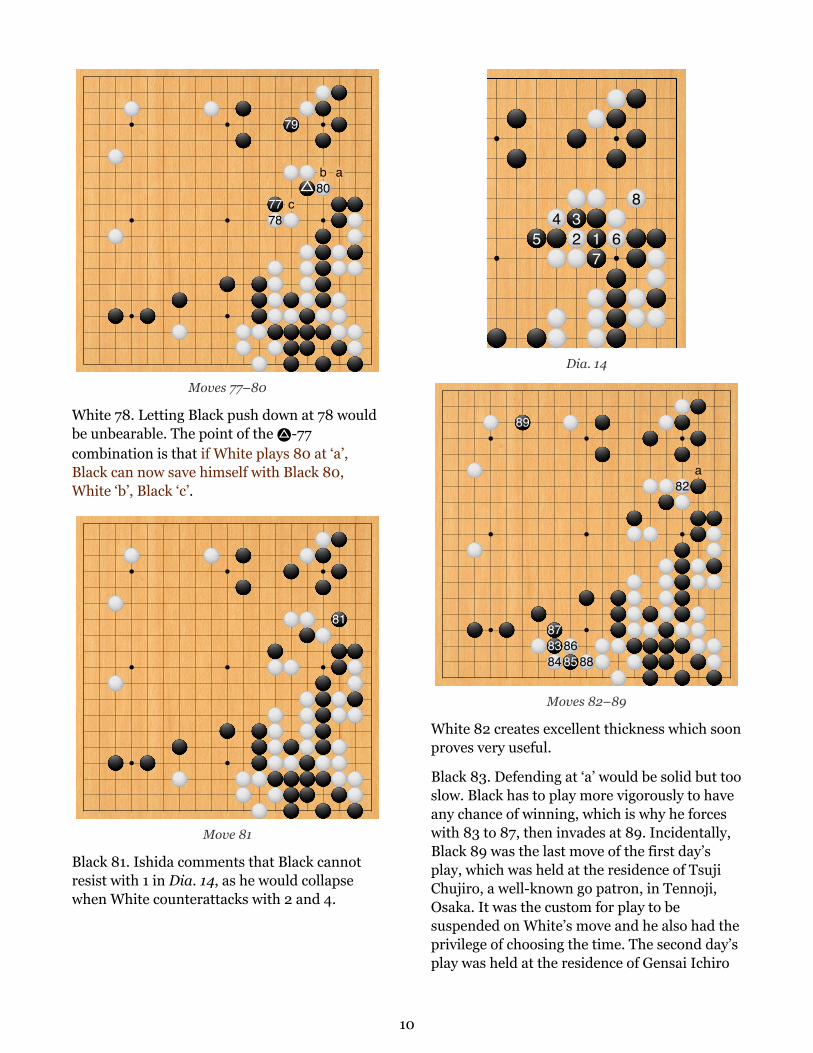
White 78. Letting Black push down at 78 would be unbearable. The point of the \-77 combination is that if White plays 80 at ‘a’, Black can now save himself with Black 80, White ‘b’, Black ‘c’.
81
Move 81
Black 81. Ishida comments that Black cannot resist with 1 in Dia. 14, as he would collapse when White counterattacks with 2 and 4.
54 3
2 17
6
8
Dia. 14
a
89
878384
8685 88
82
Moves 82–89
White 82 creates excellent thickness which soon proves very useful.
Black 83. Defending at ‘a’ would be solid but too slow. Black has to play more vigorously to have any chance of winning, which is why he forces with 83 to 87, then invades at 89. Incidentally, Black 89 was the last move of the first day’s play, which was held at the residence of Tsuji Chujiro, a well-known go patron, in Tennoji, Osaka. It was the custom for play to be suspended on White’s move and he also had the privilege of choosing the time. The second day’s play was held at the residence of Gensai Ichiro
11
and the third at the residence of Nakanoshima Kamiya, at a go meeting organised by Nakagawa Junsetsu.
b
a
939091
949295
Moves 90–95
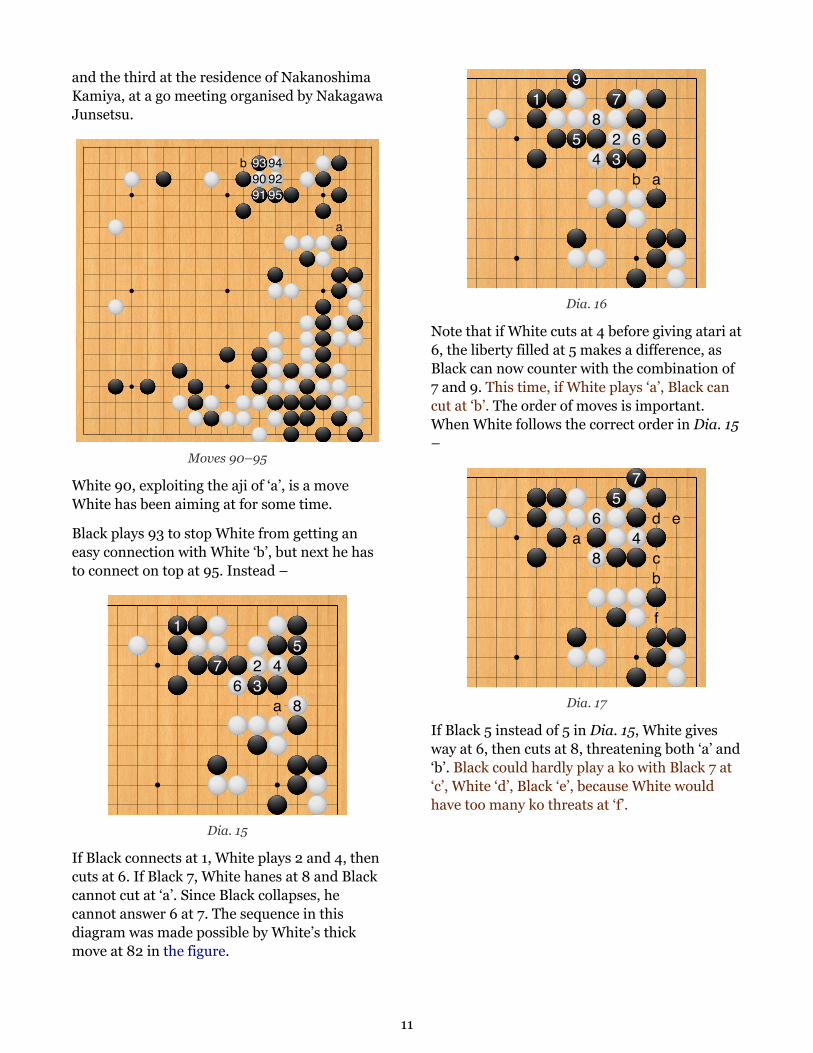
White 90, exploiting the aji of ‘a’, is a move White has been aiming at for some time.
Black plays 93 to stop White from getting an easy connection with White ‘b’, but next he has to connect on top at 95. Instead –
a
1
76
23
45
8
Dia. 15
If Black connects at 1, White plays 2 and 4, then cuts at 6. If Black 7, White hanes at 8 and Black cannot cut at ‘a’. Since Black collapses, he cannot answer 6 at 7. The sequence in this diagram was made possible by White’s thick move at 82 in the figure.
b a
19
58
4
7
23
6
Dia. 16
Note that if White cuts at 4 before giving atari at 6, the liberty filled at 5 makes a difference, as Black can now counter with the combination of 7 and 9. This time, if White plays ‘a’, Black can cut at ‘b’. The order of moves is important. When White follows the correct order in Dia. 15 –
ad
cb
f
e6
8
57
4
Dia. 17
If Black 5 instead of 5 in Dia. 15, White gives way at 6, then cuts at 8, threatening both ‘a’ and ‘b’. Black could hardly play a ko with Black 7 at ‘c’, White ‘d’, Black ‘e’, because White would have too many ko threats at ‘f’.
12
a
97 96
989900
Moves 96–100
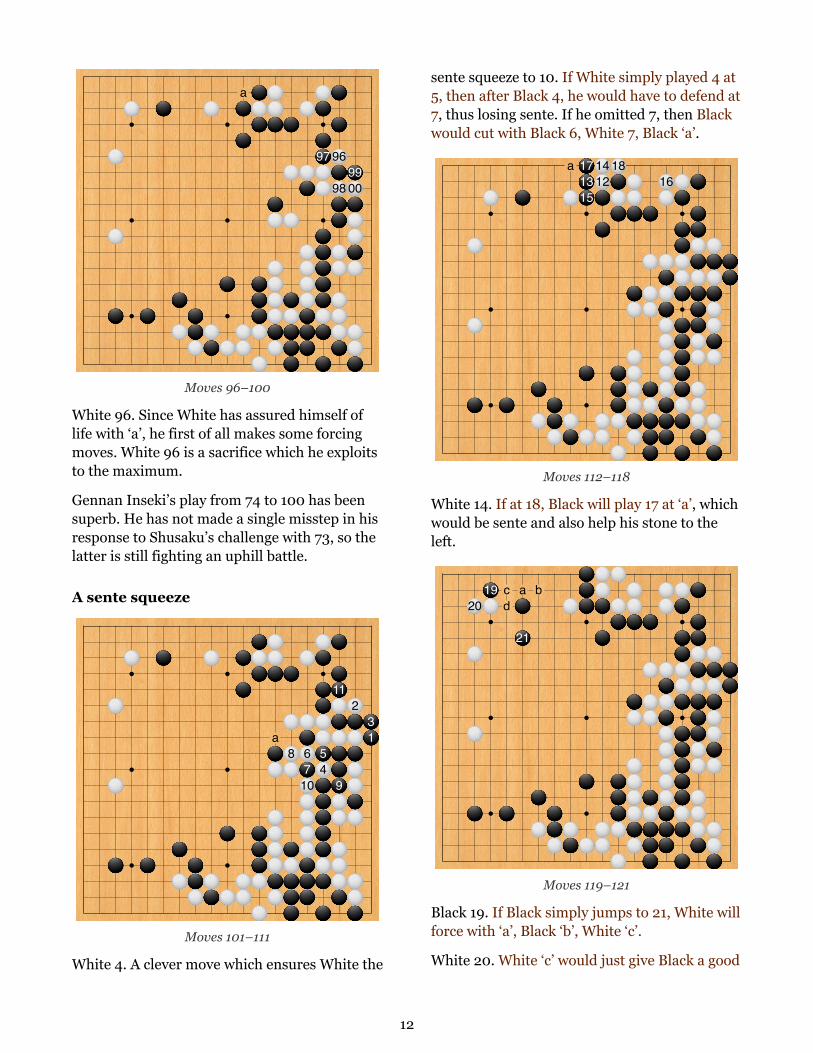
White 96. Since White has assured himself of life with ‘a’, he first of all makes some forcing moves. White 96 is a sacrifice which he exploits to the maximum.
Gennan Inseki’s play from 74 to 100 has been superb. He has not made a single misstep in his response to Shusaku’s challenge with 73, so the latter is still fighting an uphill battle.
A sente squeeze
a8 6
710
54
11
9
231
Moves 101–111
White 4. A clever move which ensures White the
sente squeeze to 10. If White simply played 4 at 5, then after Black 4, he would have to defend at 7, thus losing sente. If he omitted 7, then Black would cut with Black 6, White 7, Black ‘a’.
a 171315
1412
1816
Moves 112–118
White 14. If at 18, Black will play 17 at ‘a’, which would be sente and also help his stone to the left.
cd
a b20
19
21
Moves 119–121
Black 19. If Black simply jumps to 21, White will force with ‘a’, Black ‘b’, White ‘c’.
White 20. White ‘c’ would just give Black a good
13
move at ‘d’.
b
c
a
22
2523
24
Moves 122–125
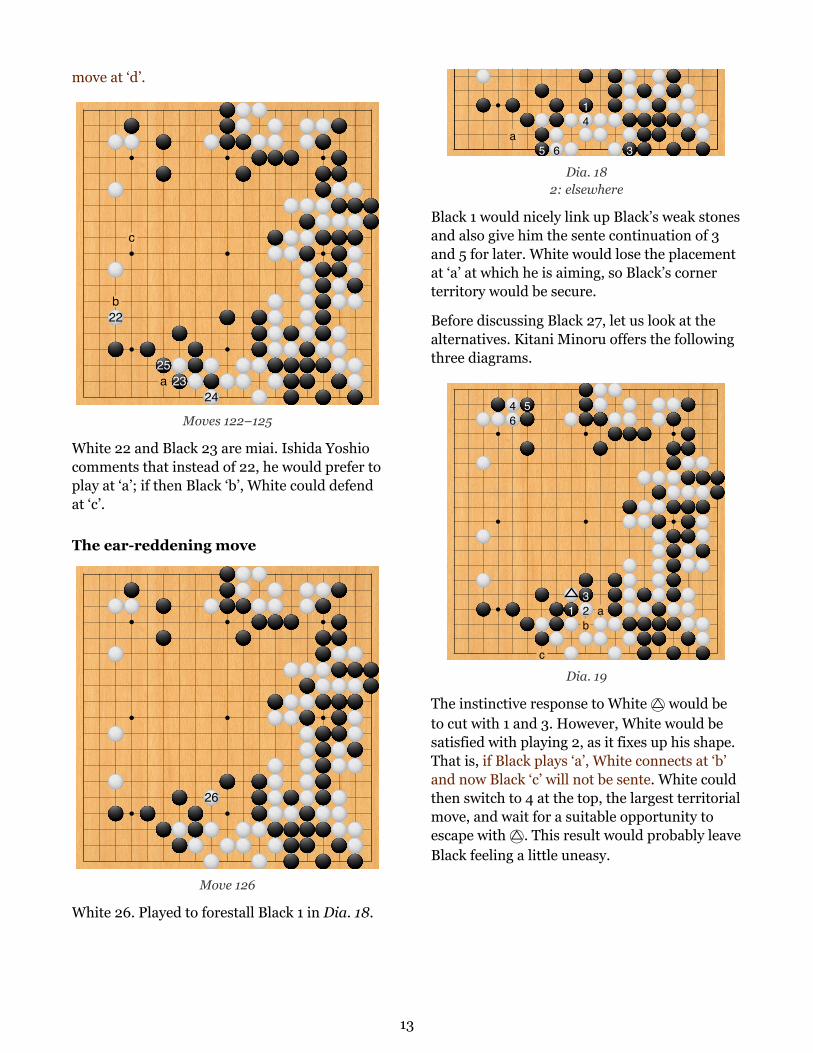
White 22 and Black 23 are miai. Ishida Yoshio comments that instead of 22, he would prefer to play at ‘a’; if then Black ‘b’, White could defend at ‘c’.
The ear-reddening move
26
Move 126
White 26. Played to forestall Black 1 in Dia. 18.
a5 6
14
3
Dia. 18 2: elsewhere
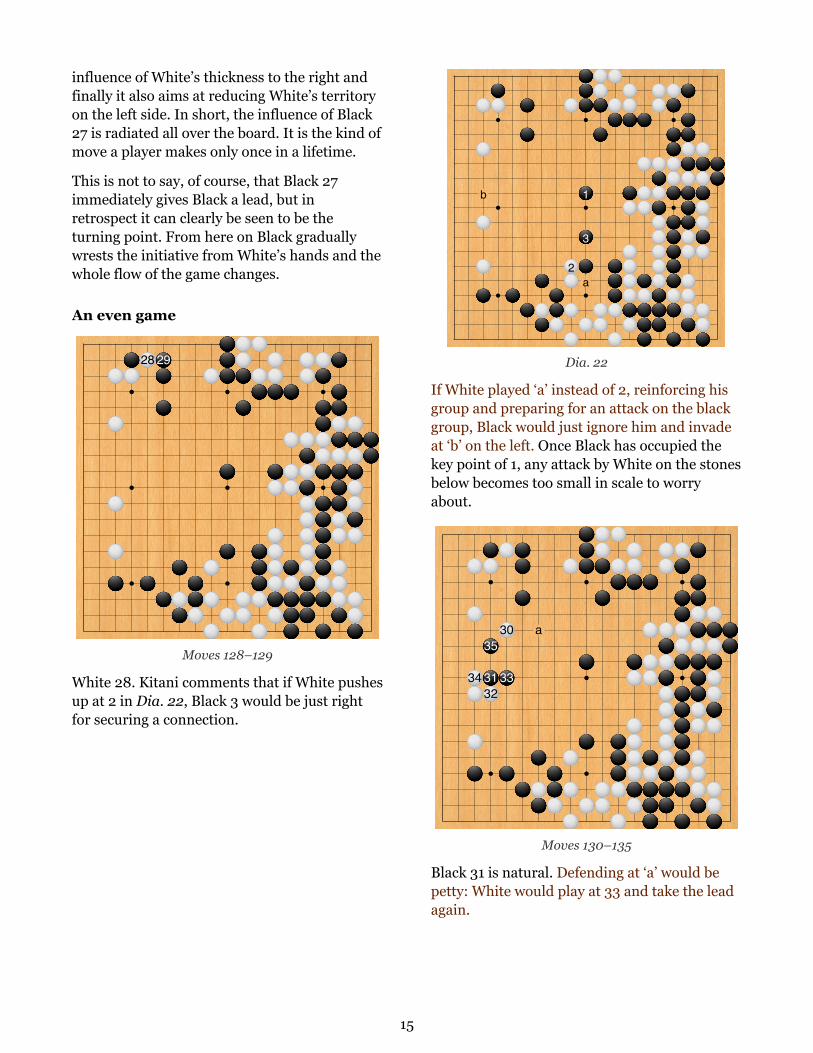
Black 1 would nicely link up Black’s weak stones and also give him the sente continuation of 3 and 5 for later. White would lose the placement at ‘a’ at which he is aiming, so Black’s corner territory would be secure.
Before discussing Black 27, let us look at the alternatives. Kitani Minoru offers the following three diagrams.
c
ba
46
5
132
Dia. 19
The instinctive response to White | would be to cut with 1 and 3. However, White would be satisfied with playing 2, as it fixes up his shape. That is, if Black plays ‘a’, White connects at ‘b’ and now Black ‘c’ will not be sente. White could then switch to 4 at the top, the largest territorial move, and wait for a suitable opportunity to escape with |. This result would probably leave Black feeling a little uneasy.

14
e
ca
d b
18
16141286
1
17151397
23
1154
10
Dia. 20
White does not have to play 2 in the previous diagram, as he can also give way with 2 here, then block at 4. Cutting at 5 is bad shape and makes Black’s stones heavy. Kitani hypothesises the continuation to 18, which would be perfect for White. Black’s wall to 17 has no effect on the white stones to the right, while White’s group at the bottom is alive as it stands. If Black ‘a’, White gives way with ‘b’, Black ‘c’, White ‘d’. White could also play 12 at ‘e’, aiming next to attack Black in the centre.
241 5
3
86
7
10
9
Dia. 21
Black 1 and 3, forestalling White 4 and 6 in Dia. 19, would be very big, but White’s attack with 6 to 10 would punish Black for neglecting the
centre. Black would not be able to face this fight with confidence.
As the above diagrams show, Black was faced with a very difficult position. Up to this point, Gennan must have been quite satisfied with the development of the game. However, Shusaku answered White 26 with a move of genius, a move which for its brilliance and profundity will be remembered as long as go is played.
26
27
Moves 126–127
Black 27 is the move which has made this game immortal. Nakagawa Junsetsu and a number of Gennan’s other disciples, together with some local go fans, were following the progress of the game and analysing it in another room at Gensai Ichiro’s residence. Not one of the go professionals doubted that Gennan was winning, but a doctor who had been watching the game commented that he thought Gennan would lose. When pressed to give his reason, he replied:
‘I don’t know much about go, but when Shusaku played 27, Gennan’s ears flushed red. This is a sign that he had been upset. This move must have taken him by surprise.’
Black 27 is the central point for attack and defence. It lightly parries White’s attack at 26, it offers assistance to the four black stones below, it expands Black’s moyo at the top, it erases the
15
influence of White’s thickness to the right and finally it also aims at reducing White’s territory on the left side. In short, the influence of Black 27 is radiated all over the board. It is the kind of move a player makes only once in a lifetime.
This is not to say, of course, that Black 27 immediately gives Black a lead, but in retrospect it can clearly be seen to be the turning point. From here on Black gradually wrests the initiative from White’s hands and the whole flow of the game changes.
An even game
28 29
Moves 128–129
White 28. Kitani comments that if White pushes up at 2 in Dia. 22, Black 3 would be just right for securing a connection.
b
a2
1
3
Dia. 22
If White played ‘a’ instead of 2, reinforcing his group and preparing for an attack on the black group, Black would just ignore him and invade at ‘b’ on the left. Once Black has occupied the key point of 1, any attack by White on the stones below becomes too small in scale to worry about.
a
34
35
3132
30
33
Moves 130–135
Black 31 is natural. Defending at ‘a’ would be petty: White would play at 33 and take the lead again.
16
38
37
36
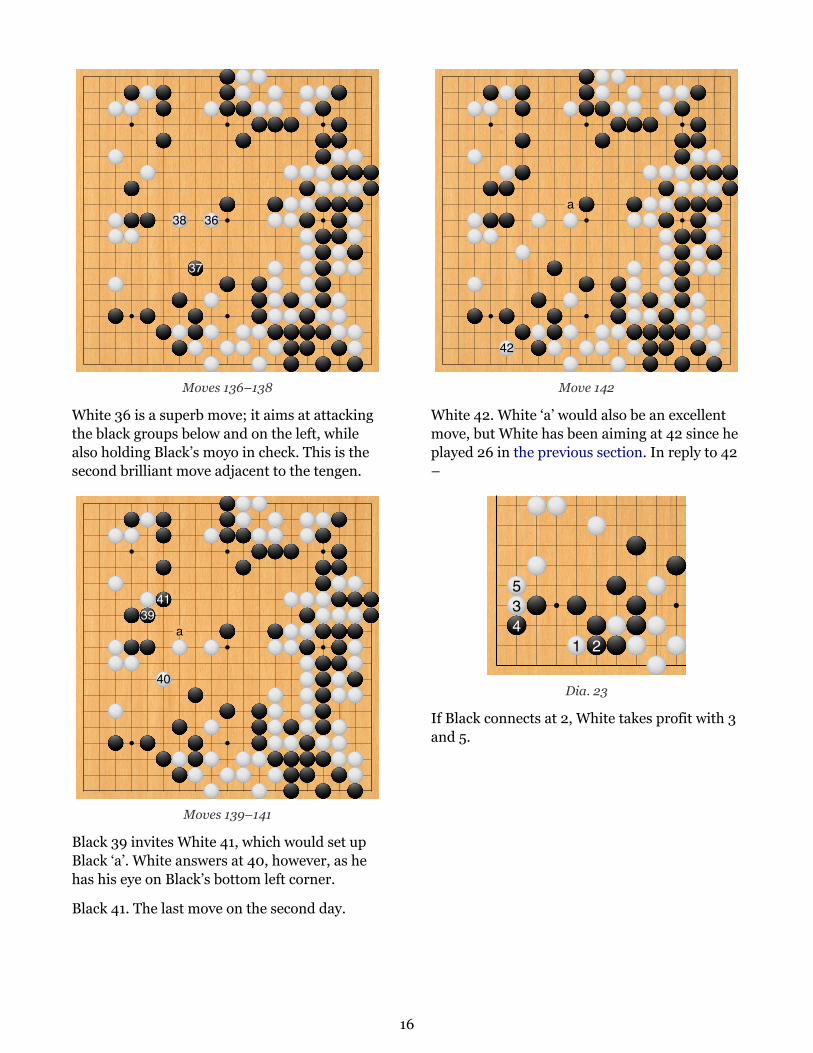
Moves 136–138
White 36 is a superb move; it aims at attacking the black groups below and on the left, while also holding Black’s moyo in check. This is the second brilliant move adjacent to the tengen.
a39
41
40
Moves 139–141
Black 39 invites White 41, which would set up Black ‘a’. White answers at 40, however, as he has his eye on Black’s bottom left corner.
Black 41. The last move on the second day.
a
42
Move 142
White 42. White ‘a’ would also be an excellent move, but White has been aiming at 42 since he played 26 in the previous section. In reply to 42 –
534
1 2
Dia. 23
If Black connects at 2, White takes profit with 3 and 5.

17
b
a10
4369
8
5711
1 2
Dia. 24
If Black counterattacks with 4, White has the tesuji of 5. If Black 6, White plays 7 to 11, making miai of ‘a’ and ‘b’. Note that Black 8 at 10 would be bad, as White would give atari at 8.
a 4345 44 46
Moves 143–146
Black 43. Since Black has no good answer to 42, he counterattacks with 43. For his part, White does not want to answer 43 submissively at ‘a’, for if he later follows Dia. 23, ‘a’ will be superfluous, so he in turn counterattacks with 44. This leads to the third major clash of the game.
504748 49
Moves 147–150
White 50. If White plays 1 in Dia. 25 –

18
b
a
1211
17
10
18161513
76
23
14
4
8
9
5 1
Dia. 25
Black plays 2, then cuts at 4. If White persists in his attack by answering Black 8 at 9, Black cuts with 10 and 12 and wins the semeai after 18. There are other variations, but cutting at 4 is the crucial move. Playing Black 2 at 5, attempting to live here, does not work, as after White 4-Black ‘a’, White cuts at ‘b’. Just for reference, Kitani Minoru offers another variation in the following diagram.
11
12
648
10
75
2
9
3 1
Dia. 26
Black gives atari with 4 and 6, sacrificing his four stones on the right in return for capturing four white stones with 10 and 12. This exchange would be favourable for Black.
d
b a c
5154
55
52 53
Moves 151–155
Black 55. White cannot cut at ‘a’ because of Black ‘b’, White ‘c’, Black ‘d’.
19
b
a
56 57
Moves 156–157
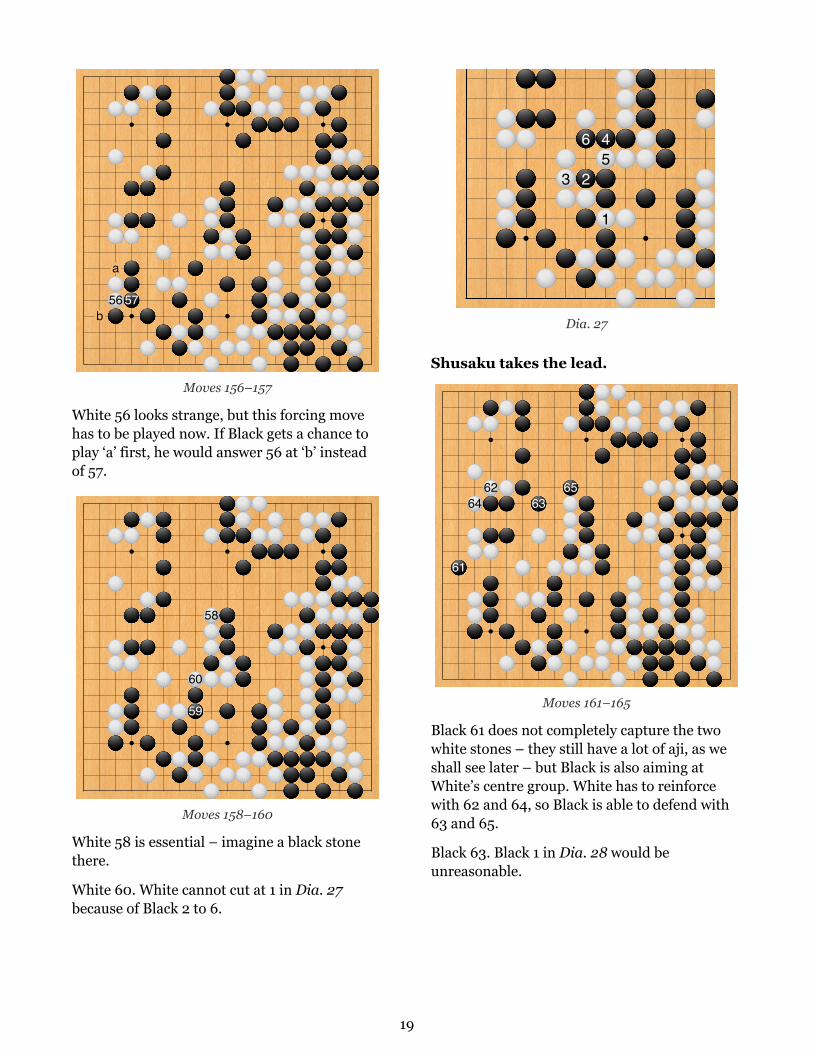
White 56 looks strange, but this forcing move has to be played now. If Black gets a chance to play ‘a’ first, he would answer 56 at ‘b’ instead of 57.
60
59
58
Moves 158–160
White 58 is essential – imagine a black stone there.
White 60. White cannot cut at 1 in Dia. 27 because of Black 2 to 6.
3
6
2
45
1
Dia. 27
Shusaku takes the lead.
61
6462
6365
Moves 161–165
Black 61 does not completely capture the two white stones – they still have a lot of aji, as we shall see later – but Black is also aiming at White’s centre group. White has to reinforce with 62 and 64, so Black is able to defend with 63 and 65.
Black 63. Black 1 in Dia. 28 would be unreasonable.

20
5
1
32
4
6
Dia. 28
White plays 2 and 4, then if Black 5, captures the other stones with 6.
Reviewing the flow of the game since the ‘ear-reddening’ move, it seems clear that despite his preoccupation with the centre, White has achieved very little there. Whatever he does there, his shape remains thin and exposed to attack. Ishida Yoshio sums it up as follows: ‘It is interesting to compare the result to 165 in this figure with the result to 125. There White exchanged the extension to 22 for Black’s capture with 23 and 25. We now find that Black has captured that extension with 61, needless to say, a terrible loss for White. White’s only gain is his connection on the side with 62 and 64, but in exchange Black has walled off the top centre with 63 and 65. Black has thus lost virtually nothing, so he must have upset White’s lead.’
67
66
Moves 166–167
Black 67 is correct.
1512
16
6
111314245
98
37
10
1
Dia. 29
If Black greedily connected at 1 in Dia. 29, White would get a ko with the sequence to 16. Instead of 11 –

21
131112
14
Dia. 30
If Black 11 here, he loses the fight after 14 by one move.
a10
2458
369
7 1
Dia. 31
Instead of Dia. 29, White could also set up the ko in Dia. 31, using the tesuji of 6 and 8. If Black 9 at 10, White plays ‘a’, so Black has to play at 9. Next, after White 10 –
10
79
8
5
6
32
1
4
Dia. 32
Black has to connect at 1, letting White get a ko with 2 to 10. This would be an approach move ko for White, but Black would have much more at stake.
72
73
70 687169
75
74
78
77 80
7679
Moves 168–180
22
a
81
8283
Moves 181–183
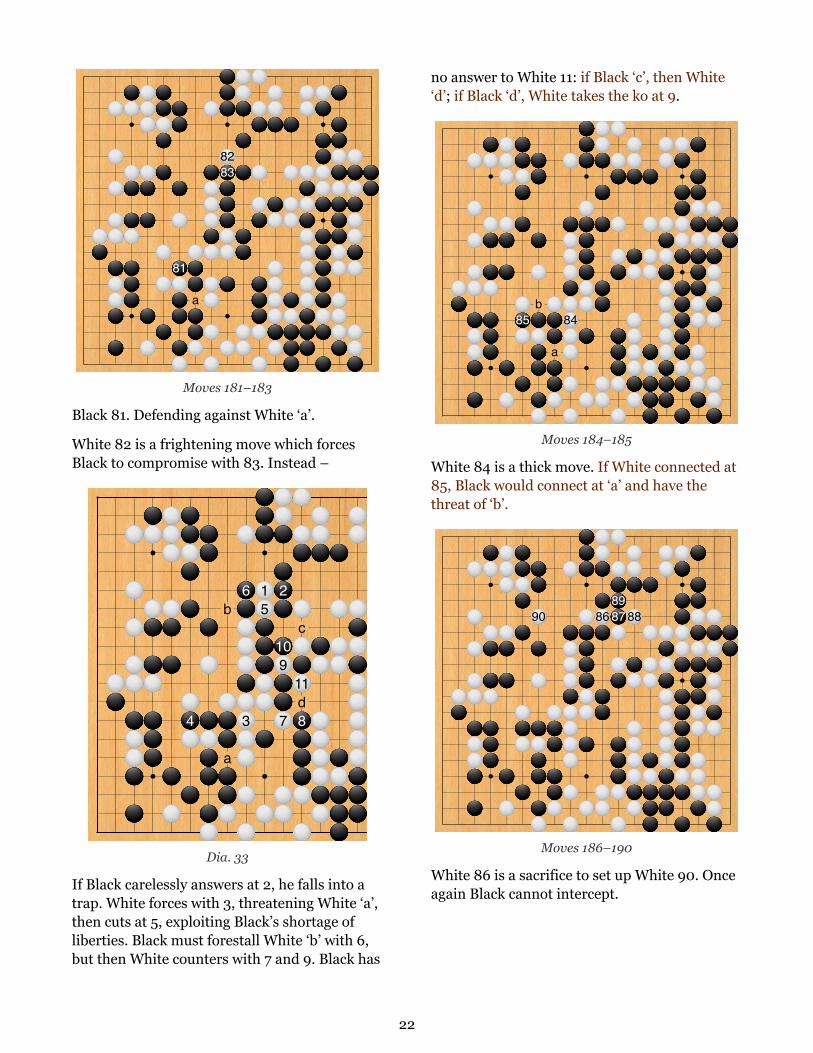
Black 81. Defending against White ‘a’.
White 82 is a frightening move which forces Black to compromise with 83. Instead –
b
a
c
d4
6
3
15
2
109
7
11
8
Dia. 33
If Black carelessly answers at 2, he falls into a trap. White forces with 3, threatening White ‘a’, then cuts at 5, exploiting Black’s shortage of liberties. Black must forestall White ‘b’ with 6, but then White counters with 7 and 9. Black has
no answer to White 11: if Black ‘c’, then White ‘d’; if Black ‘d’, White takes the ko at 9.
b
a
85 84
Moves 184–185
White 84 is a thick move. If White connected at 85, Black would connect at ‘a’ and have the threat of ‘b’.
90 868987 88
Moves 186–190
White 86 is a sacrifice to set up White 90. Once again Black cannot intercept.
23
a b
2 11817910
121116
8
15
13
6
314
19
574
Dia. 34
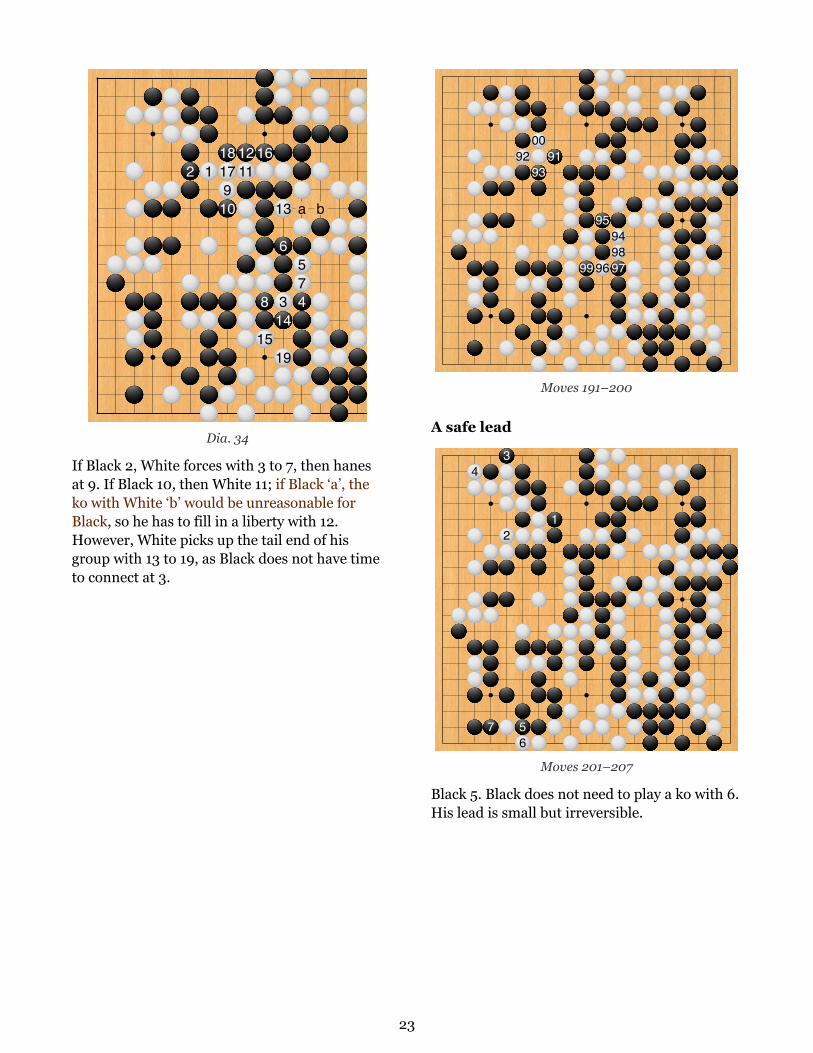
If Black 2, White forces with 3 to 7, then hanes at 9. If Black 10, then White 11; if Black ‘a’, the ko with White ‘b’ would be unreasonable for Black, so he has to fill in a liberty with 12. However, White picks up the tail end of his group with 13 to 19, as Black does not have time to connect at 3.
9200
9391
99
95
96
949897
Moves 191–200
A safe lead
4
7
3
2
56
1
Moves 201–207
Black 5. Black does not need to play a ko with 6. His lead is small but irreversible.
24
a
12
1514
13
10 8 911
Moves 208–215
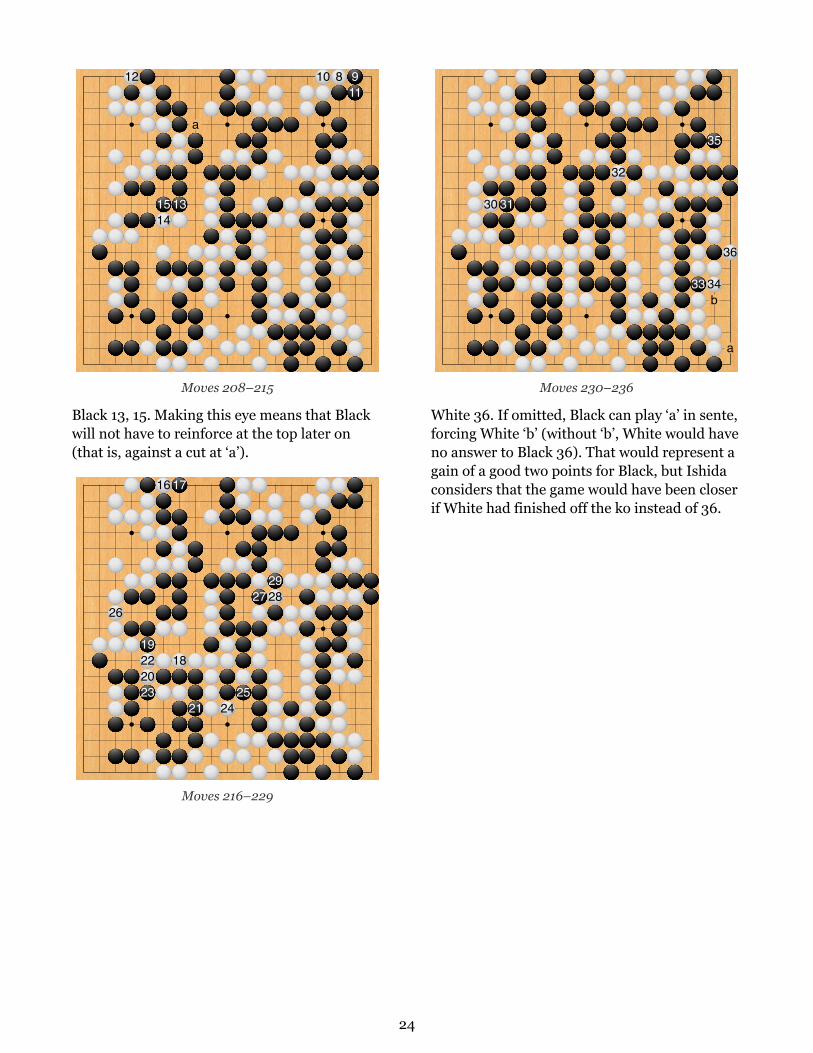
Black 13, 15. Making this eye means that Black will not have to reinforce at the top later on (that is, against a cut at ‘a’).
26
19222023
16 17
18
21 2425
272928
Moves 216–229
b
a
30 31
32
33
35
34
36
Moves 230–236
White 36. If omitted, Black can play ‘a’ in sente, forcing White ‘b’ (without ‘b’, White would have no answer to Black 36). That would represent a gain of a good two points for Black, but Ishida considers that the game would have been closer if White had finished off the ko instead of 36.
25
39 38
47
41
42
4544
48
37
50
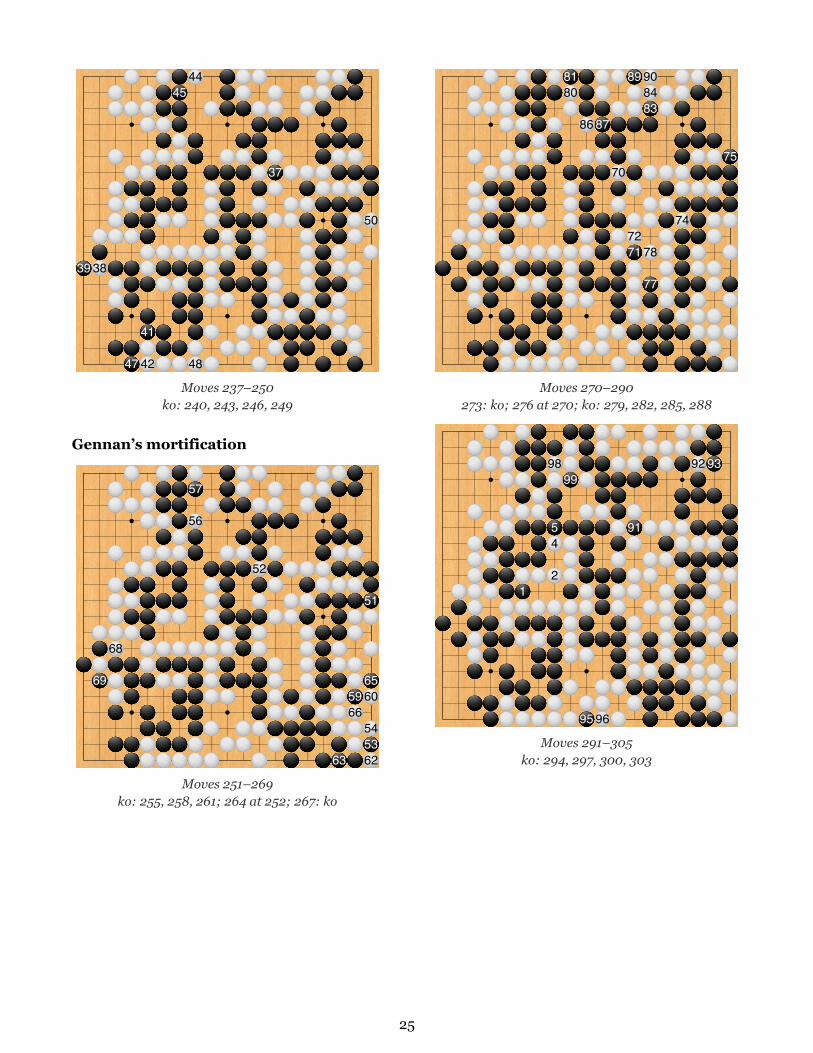
Moves 237–250 ko: 240, 243, 246, 249
Gennan’s mortification
69
68
57
56
52
63
5966
51
6560
545362
Moves 251–269 ko: 255, 258, 261; 264 at 252; 267: ko
8180
86 87
70
89
7271
908483
78
77
74
75
Moves 270–290 273: ko; 276 at 270; ko: 279, 282, 285, 288
1
98
54
2
99
95 96
91
92 93
Moves 291–305 ko: 294, 297, 300, 303
26
1012
13
7 8
6
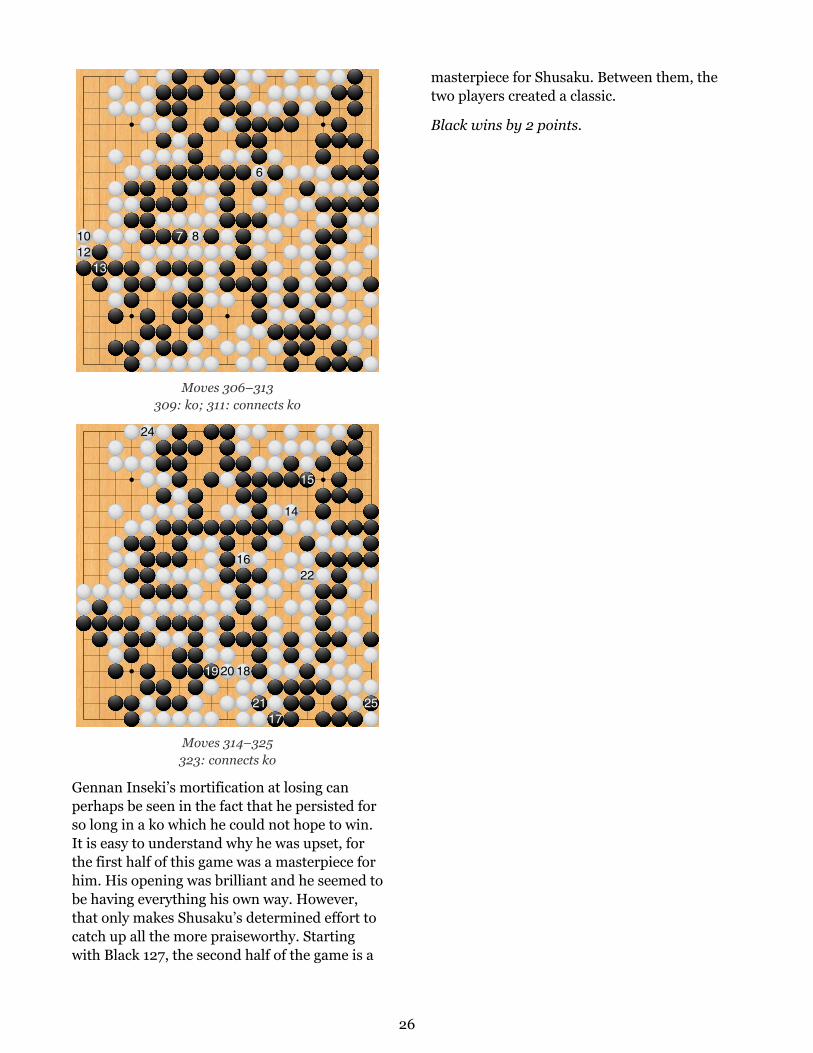
Moves 306–313 309: ko; 311: connects ko
24
19 20
16
18
2117
14
15
22
25
Moves 314–325 323: connects ko
Gennan Inseki’s mortification at losing can perhaps be seen in the fact that he persisted for so long in a ko which he could not hope to win. It is easy to understand why he was upset, for the first half of this game was a masterpiece for him. His opening was brilliant and he seemed to be having everything his own way. However, that only makes Shusaku’s determined effort to catch up all the more praiseworthy. Starting with Black 127, the second half of the game is a
masterpiece for Shusaku. Between them, the two players created a classic.
Black wins by 2 points.