EAP-TLS Authentication with an NPS RADIUS Server
29
To learn more about Aerohive products, visit www.aerohive.com/techdocs EAP-TLS Authentication with an NPS RADIUS Server 802.1X/EAP-TLS (Extensible Authentication Protocol-Transport Layer Security), defined in RFC 5216, provides secure authentication methods. Client devices (RADIUS supplicants) and a RADIUS authentication server verify each other's identity by validating the signature on the computer and server certificates that they send one another. This authentication method uses an infrastructure that includes a RADIUS authentication server that communicates with an external LDAP database. It also needs a mechanism for installing certificates on the server and all the supplicants, which you can do with a Windows NPS (Network Policy Server) using a GPO (Group Policy Object) to distribute computer certificates and an 802.1X SSID client configuration for wireless access. You can also employ the same infrastructure to authenticate users (also referred to as RADIUS supplicants) who submit user names and passwords to the authentication server. This document explains how to set up the following components to provide wireless client and user authentication through 802.1X/EAP-TLS: • (Aerohive) An 802.1X SSID that instructs APs (RADIUS authenticators) to forward authentication requests to an NPS RADIUS server • (Windows) An NPS RADIUS server that accepts authentication requests from the APs and EAP-TLS authentication requests from clients • (Windows) A GPO to deploy computer certificates and a wireless network configuration to clients • (Aerohive and Windows – optional) An Aerohive and NPS configuration in which different RADIUS attributes are returned based on authentication method (EAP-TLS or PEAP-MS-CHAPv2 in this example) assigning one user profile to clients authenticating by certificate and another to users authenticating by user name/password. The Aerohive configuration instructions in this guide are based on HiveManager and HiveOS 6.x. Thomas Munzer November 3, 2015
Transcript of EAP-TLS Authentication with an NPS RADIUS Server

To learn more about Aerohive products, visit www.aerohive.com/techdocs
EAP-TLS Authentication with an NPS RADIUS Server
802.1X/EAP-TLS (Extensible Authentication Protocol-Transport Layer Security), defined in RFC 5216, provides secure authentication methods. Client devices (RADIUS supplicants) and a RADIUS authentication server verify each other's identity by validating the signature on the computer and server certificates that they send one another.
This authentication method uses an infrastructure that includes a RADIUS authentication server that communicates with an external LDAP database. It also needs a mechanism for installing certificates on the server and all the supplicants, which you can do with a Windows NPS (Network Policy Server) using a GPO (Group Policy Object) to distribute computer certificates and an 802.1X SSID client configuration for wireless access.
You can also employ the same infrastructure to authenticate users (also referred to as RADIUS supplicants) who submit user names and passwords to the authentication server.
This document explains how to set up the following components to provide wireless client and user authentication through 802.1X/EAP-TLS:
• (Aerohive) An 802.1X SSID that instructs APs (RADIUS authenticators) to forward authentication requests to an NPS RADIUS server
• (Windows) An NPS RADIUS server that accepts authentication requests from the APs and EAP-TLS authentication requests from clients
• (Windows) A GPO to deploy computer certificates and a wireless network configuration to clients • (Aerohive and Windows – optional) An Aerohive and NPS configuration in which different RADIUS attributes are
returned based on authentication method (EAP-TLS or PEAP-MS-CHAPv2 in this example) assigning one user profile to clients authenticating by certificate and another to users authenticating by user name/password.
The Aerohive configuration instructions in this guide are based on HiveManager and HiveOS 6.x.
Thomas Munzer November 3, 2015

EAP-TLS Authentication with an NPS RADIUS Server | 2
To learn more about Aerohive products, visit www.aerohive.com/techdocs
Contents
1 Aerohive Configuration ..................................................................................................................... 3 SSID Configuration ...................................................................................................................................................................... 3
Create an 802.1X SSID ........................................................................................................................................................ 3 Configure the RADIUS server ............................................................................................................................................. 4 Add a Default User Profile .................................................................................................................................................. 5
2 Windows Configuration ..................................................................................................................... 7 NPS Configuration for EAP-TLS Authentication ...................................................................................................................... 7
Identify RADIUS Clients ........................................................................................................................................................ 7 Define a Network Policy ..................................................................................................................................................... 9
GPO for Certificate Enrollment ............................................................................................................................................... 13 Create a New Certificate Template .............................................................................................................................. 14 Publish the New Certificate Template ........................................................................................................................... 16 Create a New Group Policy for Auto-enrollment ........................................................................................................ 17
GPO for Wireless Access .......................................................................................................................................................... 19
3 Optional Configuration.................................................................................................................... 23 Allow EAP-TLS for Corporate Access and PEAP-MS ChapV2 for BYOD ........................................................................... 23
User Profile ........................................................................................................................................................................... 23 NPS Rule .............................................................................................................................................................................. 26

EAP-TLS Authentication with an NPS RADIUS Server | 3
To learn more about Aerohive products, visit www.aerohive.com/techdocs
1 Aerohive Configuration
The complete setup for 802.1X/EAP-TLS involves the configuration of Aerohive devices and an NPS RADIUS server. For the Aerohive side of the configuration, you simply add an 802.1X SSID to a network policy and configure authentication parameters to point APs to the NPS RADIUS server for the authentication of wireless clients and apply user profiles to their traffic. (You can apply a single default user profile or multiple profiles based on the RADIUS attributes returned.) In a later section, the steps to configure the NPS RADIUS server are explained.
SSID Configuration This section explains how to add an 802.1X SSID, its RADIUS server parameters, and user profiles to a network policy.
Create an 802.1X SSID Define an SSID profile and add it to a network policy.
1. Navigate to your network policy, click Choose next to SSIDs, and then click New in the Choose SSIDs dialog box that appears.
2. In the New SSID panel that appears, enter a name in the Profile Name field, which automatically enters the
same name in the SSID field, select WPA/WAP2 802.1X (Enterprise) for access security, and then click Save.
3. In the Choose SSIDs dialog box, highlight your new SSID, and then click OK to add it to the network policy.

EAP-TLS Authentication with an NPS RADIUS Server | 4
To learn more about Aerohive products, visit www.aerohive.com/techdocs
Configure the RADIUS server Configure the information that the Aerohive RADIUS clients (also referred to as RADIUS authenticators or network access servers) need to forward authentication requests from clients (RADIUS supplicants) to the RADIUS authentication server.
1. Click <RADIUS Settings> and then click New in the Choose RADIUS dialog box that appears.
2. In the New AAA RADIUS Client dialog box, enter a name for your AAA RADIUS client object, the IP address or
domain name of your RADIUS server, and the shared secret that the APs use to authenticate themselves to the server and verify the integrity of the RADIUS messages that they exchange with each other.
Note: The shared secret must be the same on both the access points and RADIUS server. You can define one primary RADIUS server and up to three backup servers. All of them can be deployed on Aerohive devices, or you can use a mix of external RADIUS servers (NPS/IAS, FreeRADIUS, ...) and embedded RADIUS servers.
3. Click Apply to save the RADIUS server settings and apply them to the RADIUS client configuration, and then click Save to save the entire RADIUS client configuration object.
4. Highlight the RADIUS client in the Choose RADIUS dialog box, and then click OK to add it to the SSID configuration.
EAP-TLS Authentication with an NPS RADIUS Server | 5
To learn more about Aerohive products, visit www.aerohive.com/techdocs
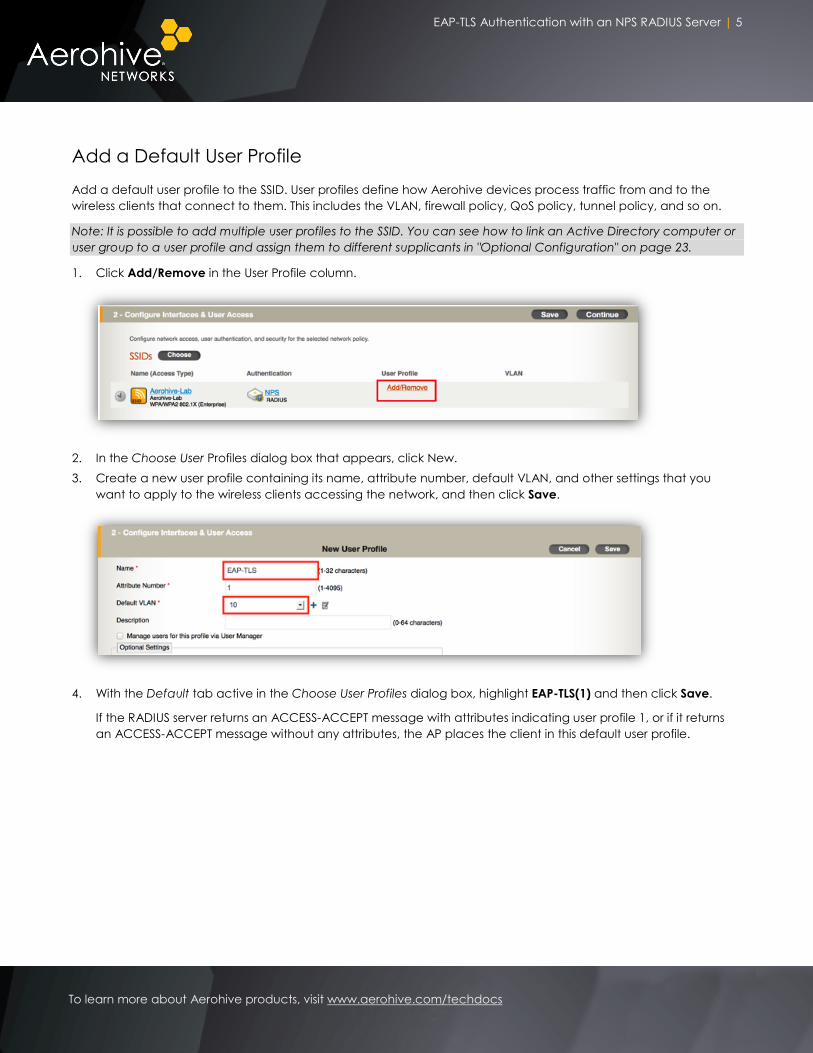
Add a Default User Profile Add a default user profile to the SSID. User profiles define how Aerohive devices process traffic from and to the wireless clients that connect to them. This includes the VLAN, firewall policy, QoS policy, tunnel policy, and so on.
Note: It is possible to add multiple user profiles to the SSID. You can see how to link an Active Directory computer or user group to a user profile and assign them to different supplicants in "Optional Configuration" on page 23.
1. Click Add/Remove in the User Profile column.
2. In the Choose User Profiles dialog box that appears, click New. 3. Create a new user profile containing its name, attribute number, default VLAN, and other settings that you
want to apply to the wireless clients accessing the network, and then click Save.
4. With the Default tab active in the Choose User Profiles dialog box, highlight EAP-TLS(1) and then click Save.
If the RADIUS server returns an ACCESS-ACCEPT message with attributes indicating user profile 1, or if it returns an ACCESS-ACCEPT message without any attributes, the AP places the client in this default user profile.

EAP-TLS Authentication with an NPS RADIUS Server | 6
To learn more about Aerohive products, visit www.aerohive.com/techdocs
5. Click Continue to save the changes and advance to the Configure and Update Devices panel where you can upload the configuration to your Aerohive devices.
Note: Ensure the network policy contains proper settings for the management and native VLANs and NTP server. Certificate validity checks rely on the authentication server, APs, and clients having accurate time settings.

EAP-TLS Authentication with an NPS RADIUS Server | 7
To learn more about Aerohive products, visit www.aerohive.com/techdocs
2 Windows Configuration
This section provides an overview of the Windows server configuration. It explains how to configure the NPS to perform EAP authentication and how to create a GPO (Group Policy Object) that automatically deploys a computer certificate and wireless configuration on wireless clients when they join the Active Directory domain.
Note: GPOs allow you to manage and configure parts of Windows operating systems and users' settings from a centralized management system.
NPS Configuration for EAP-TLS Authentication This example explains the minimum configuration needed for an NPS to accept EAP-TLS requests for the authentication of wireless clients and to include in its responses to successfully authenticated devices the attributes that Aerohive APs need to assign specific user profiles to them.
To perform EAP authentication, the following services have to be installed and configured on the Active Directory domain:
• Active Directory • Certificate Authority • Network Policy Server
Note: Because this section describes the minimum number of required configuration steps, you might have more to configure for your domain.
Identify RADIUS Clients So that the NPS RADIUS server will accept authentication requests from APs, create a NAS (network access server) object in the NPS. When APs contact it, the NPS can identify them as valid RADIUS clients because their IP addresses or DNS domain names and shared secrets will match those you set in the NAS object.
1. Open the Network Policy Center console (nps.msc). 2. To create a new RADIUS client, expand RADIUS Clients and
Servers, right-click RADIUS Clients, and then click New in the pop-up menu that appears.

EAP-TLS Authentication with an NPS RADIUS Server | 8
To learn more about Aerohive products, visit www.aerohive.com/techdocs
3. In the New RADIUS Client dialog box that appears, enter the following and then click OK: Friendly Name: Enter a name for the RADIUS client object. You can later refer to it when defining a condition in an NPS rule. Address (IP or DNS): Enter an individual host IP address, network IP address, or DNS domain name of the RADIUS client. Shared secret: Enter the same case-sensitive text string as the shared secret that you previously entered in the AAA RADIUS Client dialog box in HiveManager.

EAP-TLS Authentication with an NPS RADIUS Server | 9
To learn more about Aerohive products, visit www.aerohive.com/techdocs
Define a Network Policy The NPS network policy rule determines how the NPS will treat the authentication requests it receives. For each rule, you define two elements—conditions and constraints:
• Conditions: Every network policy must have at least one configured condition. The NPS provides many conditions groups that define the properties that the connection requests it receives must have to match the policy.
• Constraints: Constraints are additional (and optional) network policy parameters. Constraints differ from network policy conditions in one substantial way. When a condition does not match a connection request, the NPS continues to evaluate other configured network policies in search of a match for the connection request. However, when a constraint does not match a connection request, the NPS does not evaluate additional network policies. It rejects the connection request and the user or computer is denied network access.
1. Open the Network Policy Center console (nps.msc). 2. Expand Policies, right-click Network Policy, and then click New in the pop-up menu that appears.

EAP-TLS Authentication with an NPS RADIUS Server | 10
To learn more about Aerohive products, visit www.aerohive.com/techdocs
3. Enter a name in the Policy name field and then click Next.
4. Add the conditions that the NPS requires to apply this network policy to wireless clients joining the Active
Directory domain. At a minimum, you must specify a machine group containing the computers that will be connecting to the 802.1X SSID. You can also limit this rule to a specified NAS port type such as “Wireless - IEEE 802.11” for APs.

EAP-TLS Authentication with an NPS RADIUS Server | 11
To learn more about Aerohive products, visit www.aerohive.com/techdocs
Limiting an NPS Rule to a Single SSID
If you want to limit this rule to a specific SSID regardless of NAS device, add the Called Station ID condition with a wildcard for the NAS and the exact name of the SSID. Set the values as follows:
<NAS_ID>:<SSID>
For example, to limit the rule to the “Aerohive-Lab” SSID, define the condition like this:
*:Aerohive-Lab$
Value Description
* A wildcard so that the NPS does not limit this request to a specified NAS
: Separator between the NAS ID and the SSID name
Aerohive-Lab SSID name
$ Indicates the end of the SSID name to avoid connections from other SSIDs that include this text string as part of their name, such as “Aerohive-Lab-1X” for example
5. Click Next to advance to the access permission section, select Access granted, and then click Next again.
6. To select the EAP types, click Add and then select Microsoft: Smart Card or other certificate as the
authentication method. This corresponds to the EAP-TLS authentication method. 7. Clear the check boxes for Microsoft Encrypted Authentication version 2 (MS-CHAP-v2) and Microsoft Encrypted
Authentication (MS-CHAP) and then click OK.

EAP-TLS Authentication with an NPS RADIUS Server | 12
To learn more about Aerohive products, visit www.aerohive.com/techdocs
Note: If you want to use the RADIUS Test tool in HiveManager, you must select Microsoft Encrypted Authentication version 2 (MS-CHAP-v2). The RADIUS test tool only tests RADIUS connectivity through an MS-CHAP-v2 request. It does not test the EAP method.
8. Click Next and then configure the attributes returned with the Access-Accept message. On the Settings tab, click Standard, and in the RADIUS Attributes section, replace the default RADIUS attributes with the following to link authenticated devices to a specific user profile:
Tunnel–Medium-Type: IP (IP version 4)
Tunnel-Type: Generic Route Encapsulation (GRE)
Tunnel-Pvt-Group-ID: <attribute number of the EAP-TLS user profile, which is 1 in this example>

EAP-TLS Authentication with an NPS RADIUS Server | 13
To learn more about Aerohive products, visit www.aerohive.com/techdocs
Note: You can also define the AVPs (attributes value pairs) to send only the VLAN attribute to the wireless client. In this case, replace the previous attributes with these: Tunnel–Medium-Type: 802 (6) Tunnel-Type: VLAN (13) Tunnel-Pvt-Group-ID: <VLAN ID for the wireless clients>
9. Click Next and save the policy.
Note: If the Tunnel-Pvt-Group-ID sent by the RADIUS server does not match the EAP-TLS attribute number, the station will be disconnected.
GPO for Certificate Enrollment You will create two GPOs (group policy objects). The first one is for certificate enrollment. It allows every computer in the domain to get a computer certificate automatically. Each computer will use its certificate to authenticate itself when connecting to the SSID.
Setting up certificate enrollment involves the following steps:
• Creating a certificate template and enabling it for auto-enrollment • Publishing the new template • Creating a GPO so computers will automatically request a certificate as they join the Active Directory domain
Although the example below is based on Windows Server 2012 R2 with CA (certificate authority) services installed, the steps apply to previous versions as well.

EAP-TLS Authentication with an NPS RADIUS Server | 14
To learn more about Aerohive products, visit www.aerohive.com/techdocs
In this example, you create a new GPO for the Workstations OU, where the domain laptops are stored in Active Directory.
Note: To support certificate auto-enrollment, Certificate Services must be deployed on your Active Directory server.
Create a New Certificate Template The Windows Certificate Authority bases each certificate it issues on a template. This template defines all certificate parameters, including its validity period and automatic enrollment. 1. Open the Certificate Templates console (certtmpl.msc), right-click Computer Template, and then click
Duplicate Template.
2. On the General tab in the Properties of New Template dialog box, rename the template display name and
then click the Security tab.

EAP-TLS Authentication with an NPS RADIUS Server | 15
To learn more about Aerohive products, visit www.aerohive.com/techdocs
3. On the Security tab, select Domain Computers (<DOMAIN>\Domain Computers). In the Permissions for Domain Computers section, select Read, Enroll, and Autoenroll. Click OK to save the certificate template.

EAP-TLS Authentication with an NPS RADIUS Server | 16
To learn more about Aerohive products, visit www.aerohive.com/techdocs
Publish the New Certificate Template Now that you have created a certificate template, you must publish it so it can be used to issue new certificates.
1. Open the Certification Authority console (certsrv.msc), right-click Certificate Templates, and then click New > Certificate Template to Issue.
2. Select the template you created, which in this example still uses the default display name Computer AutoEnroll,
and then click OK.

EAP-TLS Authentication with an NPS RADIUS Server | 17
To learn more about Aerohive products, visit www.aerohive.com/techdocs
Create a New Group Policy for Auto-enrollment Now you can create a GPO that configures domain computers to request new computer certificates.
1. Open the Group Policy Management console (gpmc.msc), right-click Workstations, and then click Create a GPO in this domain, and Link it here.
2. Enter a name for the new group policy object, such as Certificate AutoEnroll, and then click OK to save it.
3. To modify the GPO you just created, right-click it and then click Edit.

EAP-TLS Authentication with an NPS RADIUS Server | 18
To learn more about Aerohive products, visit www.aerohive.com/techdocs
4. Click Computer Configuration > Policies > Windows Settings > Security Settings > Public Key Policies, right-click Certificate Services Client - Auto-Enrollment, and then click Properties.
5. Enter the following in the Certificate Services Client – Auto-Enrollment Properties dialog box, and then click OK:
Configuration Model: Enabled
Renew expired certificates, update pending certificates, and remove revoked certificates: (select)
Update certificates that use certificate templates: (select)
Note: To force the GPO update on computers, you can use the gpupdate /force command. Then you must reboot the client computers for them to get the computer certificate when they boot back up. Otherwise, the new GPO will be deployed at the next the next time the computer joins the domain.
EAP-TLS Authentication with an NPS RADIUS Server | 19
To learn more about Aerohive products, visit www.aerohive.com/techdocs
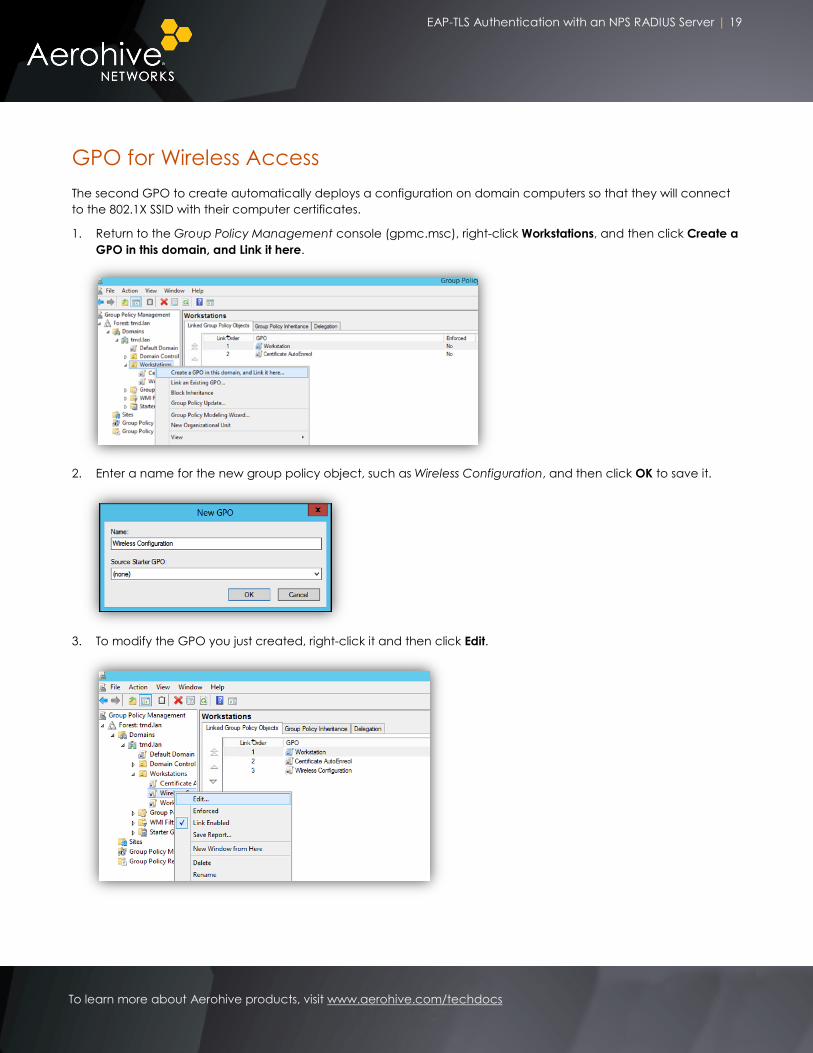
GPO for Wireless Access The second GPO to create automatically deploys a configuration on domain computers so that they will connect to the 802.1X SSID with their computer certificates.
1. Return to the Group Policy Management console (gpmc.msc), right-click Workstations, and then click Create a GPO in this domain, and Link it here.
2. Enter a name for the new group policy object, such as Wireless Configuration, and then click OK to save it.
3. To modify the GPO you just created, right-click it and then click Edit.

EAP-TLS Authentication with an NPS RADIUS Server | 20
To learn more about Aerohive products, visit www.aerohive.com/techdocs
4. Click Computer Configuration > Policies > Windows Settings > Security Settings, right-click Wireless Network (IEEE 802.11) Policies, and then click Create a New Wireless Network Policy for Windows Vista and Later Releases.
5. Enter a name for the policy, such as EAP-TLS, and then click Add > Infrastructure.

EAP-TLS Authentication with an NPS RADIUS Server | 21
To learn more about Aerohive products, visit www.aerohive.com/techdocs
6. On the Connection tab in the New Profile properties dialog box, enter a name such as Aerohive-Lab in the Profile Name field and Network Name(s) (SSID) field. Then click Add to add the network name to the list.
The network name is the broadcast SSID that users will see when scanning for wireless networks.
7. On the Security tab, enter the following, and then click Properties:
Authentication: WPA2-Enterprise Encryption: AES Select a network authentication method: Microsoft: Smart Card or other certificate Authentication Mode: Computer authentication

EAP-TLS Authentication with an NPS RADIUS Server | 22
To learn more about Aerohive products, visit www.aerohive.com/techdocs
8. In the Trusted Root Certification Authorities section of the Smart Card or other Certificate Properties dialog box, select the CA certificate used to sign the RADIUS server certificate, and then click Advanced.
9. Select the computer certificate issuer and then click OK to close the Configure Certificate Selection dialog box.
10. Click OK to save all the settings in the New Profile properties dialog box.
Note: To force the GPO update on computers, you can use the gpupdate /force command. Then you must reboot the client computers for them to get the computer certificate when they boot back up. Otherwise, the new GPO will be deployed at the next the next time the computer joins the domain.

EAP-TLS Authentication with an NPS RADIUS Server | 23
To learn more about Aerohive products, visit www.aerohive.com/techdocs
3 Optional Configuration
You can go further and configure two different rules into the NPS for the same SSID. One rule allows the corporate computers to access the corporate network, and the other rule allows user-owned wireless clients to access a BYOD or Guest network.
Allow EAP-TLS for Corporate Access and PEAP-MS ChapV2 for BYOD By adding another network policy rule, you can configure the NPS to return different RADIUS attributes based on different authentication methods. You already have the Aerohive and Windows configurations necessary to authenticate corporate-issued devices and apply a user profile based on the RADIUS attributes returned for a computers group. Next you configure a users group on the NPS to return the RADIUS attributes that match another user profile for users' personal devices (BYOD) that you add to the SSID configuration. The two network policy rules are as follows:
• Accept EAP-TLS authentication with computer certificates for corporate access (explained above in this document)
• Accept PEAP-MsChapV2 authentication to permit network access for BYOD. Users can use their AD credentials to connect to the same SSID but will be assigned a different user profile, which can have a different VLAN, firewall policy, QoS policy, SLA, scheduled connection times, and so on.
This configuration has two distinct parts. In the first part, you add a new user profile to the network policy in HiveManager. In the second part, you create a specific NPS rule in the NPS.
User Profile Create a new BYOD user profile, assign it to the Aerohive-Lab SSID, and apply it to users by default. APs will assign the EAP-TLS user profile when a user is successfully authenticated and AD returns RADIUS attributes matching the user profile attribute. Because you categorize it as the default user profile, APs will also apply the EAP-TLS user profile when a user is successfully authenticated but AD does not return any RADIUS attributes at all.
1. Open your network policy, and click Add/Remove in the User Profile column.

EAP-TLS Authentication with an NPS RADIUS Server | 24
To learn more about Aerohive products, visit www.aerohive.com/techdocs
2. In the Choose User Profiles dialog box that appears, click New. 3. Create a new user profile that includes a user profile name, attribute number, and a default VLAN. You can
also configure the other user profile parameters to customize the BYOD access. For example, you might rate limit BYO devices, only permit access to the Internet, and set a schedule to restrict network accessibility to certain times of day.
Note: Write down the attribute number for future reference when creating the network policy rule on the NPS.
4. When done, click Save. 5. In the Choose User Profiles dialog box, choose the BYOD user profile as the default.
If the RADIUS server returns an ACCESS-ACCEPT message with attributes indicating user profile 20, or if it returns an ACCESS-ACCEPT message without any attributes, the AP places the user in this user profile.

EAP-TLS Authentication with an NPS RADIUS Server | 25
To learn more about Aerohive products, visit www.aerohive.com/techdocs
Disabling the Default User Profile
If you want to authorize users only if the RADIUS server returns attributes that indicate the BYOD user profile, create a third user profile that assigns users to a nonexistent VLAN. Choose that from the Default tab and choose the other two user profiles—EAP-TLS and BYOD—from the Authentication tab. If the RADIUS server returns an ACCESS-ACCEPT message without any RADIUS attributes, the user will be put in a nonexistent VLAN and be unable to access the network.
6. Click Authentication, choose the corporate user profile EAP-TLS, and then click Save.
7. Click Continue and update your device configuration.

EAP-TLS Authentication with an NPS RADIUS Server | 26
To learn more about Aerohive products, visit www.aerohive.com/techdocs
NPS Rule You configure a second network policy rule on the NPS to authorize PEAP-MsChap-v2 authentication for BYOD. This new rule returns RADIUS attributes that place users in the BYOD user profile configured in the previous section.
Note: Because the BYOD user profile is the default, configuring RADIUS attributes is optional. If the RADIUS server does not include any RADIUS attributes, APs will automatically assign the default user profile to authenticated users.
1. Open the Network Policy Center console (nps.msc), right-click Network Policies, and then click New to open the New Network Policy dialog box.
2. Enter a name in the Policy Name field, leave Type of network access server as Unspecified, and then click Next.

EAP-TLS Authentication with an NPS RADIUS Server | 27
To learn more about Aerohive products, visit www.aerohive.com/techdocs
3. Add the conditions required for the NPS to apply the rule. Specify the users group containing users allowed to connect, such as TMD\Wifi-Users, and limit this rule to the “Wireless – IEEE 802.11” NAS port type for wireless APs.
4. To finish, you can limit the rule to a specific SSID based on the Called Station ID condition. 5. Click Next to advance to the access permissions section, select Access granted, and then click Next again.

EAP-TLS Authentication with an NPS RADIUS Server | 28
To learn more about Aerohive products, visit www.aerohive.com/techdocs
6. For authentication methods, click Add to display the Add EAP dialog box. Select Microsoft: Protected EAP (PEAP), clear the other two authentication methods, and then click OK.
7. To verify that Secured password (EAP-MSCHAP-v2) is enabled, highlight Microsoft: Protected EAP (PEAP), click
Edit, and then check the entry in EAP Types at the bottom of the Edit Protected EAP Properties dialog box.

EAP-TLS Authentication with an NPS RADIUS Server | 29
To learn more about Aerohive products, visit www.aerohive.com/techdocs
8. Click OK to close the Edit Protected EAP Properties dialog box and then click Next to advance to the Configure Settings section.
9. Replace the default RADIUS attributes with the following to link authenticated users to the BYOD user profile: Tunnel–Medium-Type: IP (IP version 4) Tunnel-Type: Generic Route Encapsulation (GRE)
Tunnel-Pvt-Group-ID: <attribute number of the BYOD user profile, which is 20 in the example here>
10. Click Next and then save the policy.
When users connect to the network with their own personal devices and authenticate with a user name and password through Microsoft: Protected EAP (PEAP), the NPS applies this network policy rule and returns RADIUS attributes that inform the Aerohive AP to assign the BYOD user profile to them. On the other hand, when they connect with corporate-issued devices, the machines authenticate themselves using EAP-TLS with certificates. In this case, they are assigned to the user profile with corporate access.


![WPA + EAP-TLS + FreeRADIUS Daniel Martínez [bucomsec.com] 25 Septiembre'05.](https://static.fdocuments.net/doc/165x107/5665b4451a28abb57c9098b4/wpa-eap-tls-freeradius-daniel-martinez-bucomseccom-25-septiembre05.jpg)