E-Verify User Manual for Employers · PDF fileAdd New Hiring Site(s) ... E-Verify User Manual...
88
M-775, E-Verify User Manual for Employers
Transcript of E-Verify User Manual for Employers · PDF fileAdd New Hiring Site(s) ... E-Verify User Manual...
M-775, E-Verify User Manual for Employers
M-775, E-Verify User Manual for Employers
TABLE OF CONTENTS
1.0 INTRODUCTION………………………………………………………………………… 4
1.1 Background and Overview……………………………………………………………… 4
1.2 Basic Website Navigation…………………………..…………………………………... 5
Essential Resources…………………………………………………………………….. 6
1.3 E-Verify Participation: Enrollment vs. Registration…………………………………... 7
1.4 Overview of User Roles…………………………………………………………………. 9
1.5 User Rules and Responsibilities……………………………………………………….. 10
1.6 Privacy and Security Statement……………………………….……………………….. 11
2.0 INITIAL VERIFICATION…………………..……………………………………………. 13
2.1 Form I-9 and E-Verify…….……………………………………………………………… 13
Receipts…………………………………………………………………………………… 14
Rehires……………………………………………………………………………………. 14
2.2 Create a Case……………………………………………………………………………. 15
Hire Date………………………………………………………………………………….. 15
Check Information……………………………………………………………………….. 18
Error: Unexpired Document Required…………………………………………………. 19
E-Verify Photo Matching …………..…………………………………………………… 20
2.3 Initial Case Results……………………………………………………………………… 22
2.4 Employment Authorized………………………………………………………………… 22
Request Name Review…………………………………………………………………. 24
Tentative Nonconfirmation (TNC)..…………………………………………………… 25
2.5 DHS Verification in Process……………………………………………………………. 26
3.0 INTERIM CASE RESULTS….………………………………………………………… 27
3.1 SSA Tentative Nonconfirmation (TNC)……………………………………………….. 27
Notify Employee of SSA TNC…………………………………………………………..
Refer Employee to SSA ………………………………………………………………...
27
30
3.2 Review and Update Employee Data…………………………………………………... 34
3.3 DHS Tentative Nonconfirmation (TNC)……………………………………………….. 35
Notify Employee of DHS TNC…………………………………………………………..
Refer Employee to DHS…………………………………………………………………
35
38
3.4 SSA Case in Continuance and DHS Case in Continuance………………………… 43
4.0 FINAL CASE RESOLUTION..………………………...………………….……...……. 44
4.1 Final Case Results……………………………………………………………………… 44
SSA Final Nonconfirmation and DHS Final Nonconfirmation.……………………… 44
DHS No Show …………………………………………………………………………… 45
Error: Close Case and Resubmit………………………………………………………. 46
4.2 Close Case……………………………………………………………………………….. 47
M-775, E-Verify User Manual for Employers
Case Closure Statements. . ……………………………………………………………. 49
4.3 Case Alerts…….…………………………………………………………………………. 50
Open Cases to be Closed………………………………………………………………. 52
Cases with New Updates……………………………………………………………….. 52
Work Authorization Documents Expiring……………………………………………… 52
5.0 CASE REPORTS………………………………………...……………...………………. 54
5.1 Corporate Overview of Pilot Usage…………………………………………………… 54
5.2 Quick Audit Report………………………………………………………………………. 55
5.3 User Audit Report……………………………………………………………………….. 56
5.4 User Report………………………………………………………………………………. 57
6.0 ACCOUNT ADMINISTRATION………………………………………...……………… 59
6.1 User Roles………………………………………………………………………………... 59
6.2 User ID and Password Creation……………………………………………………….. 59
Change Your Password..……………………………………………………………….. 62
Change Security Questions……………………………………………………………. 62
6.3 Update User Profile Information………………………………………………………... 63
7.0 MY COMPANY – PROGRAM ADMINISTRATORS…………..…………………….. 65
7.1 Add New User…….……………………………………………………………………… 65
7.2 View Existing Users…………………..…………………………………………………. 66
Reset User’s Password………………………………………………………………… 67
Delete User Account…………………………………………………………………….. 68
7.3 Edit Company Profile…………………………………………………………………… 68
Company Information Fields………………………………………………………...…. 70
Update Points of Contact……………………………………………………………... 71
Update North American Industry Classification System (NAICS) Information…. 73
Add New Hiring Site(s)……………..…………………………………………………… 74
View Memorandum of Understanding (MOU)………………………………………… 75
7.4 Close Company Account…………….………………………………………………….. 76
8.0 RESOURCE AND CONTACT INFORMATION………………..…………………..… 78
APPENDIX A: ACRONYMS……………………………………………………………. 80
APPENDIX B: GLOSSARY…………………………………………………………….. 81
Page 4 of 88 | M-775, E-Verify User Manual for Employers |September 2012 www.dhs.gov/E-Verify
1.0 INTRODUCTION
Welcome to the ‘E-Verify User Manual for Employers.’ This manual provides guidance
on E-Verify processes and outlines the rules and responsibilities for employers
enrolled in E-Verify. All users must follow the guidelines set forth in the ‘E-Verify
Memorandum of Understanding for Employers (MOU)’ and the rules and
responsibilities outlined in this manual.
For the purpose of this manual, the term ‘employer’ means any U.S. company,
corporation or business entity that is required to complete Form I-9, Employment
Eligibility Verification (referred to hereafter as Form I-9) including any company
employee with an E-Verify user account.
This section introduces the background and overview, basic website navigation,
participation, user roles, rules and responsibilities, and the privacy and security
guidelines of E-Verify.
1.1 BACKGROUND AND OVERVIEW
In 1996, Congress passed the Illegal Immigration Reform and Immigrant
Responsibility Act (IIRIRA), which required the Social Security Administration (SSA)
and U.S. Citizenship and Immigration Services (USCIS), formerly the Immigration
and Naturalization Service, to initiate an employment verification pilot program.
Under the U.S. Department of Homeland Security (DHS), U.S. Citizenship and
Immigration Services operates the E-Verify program, previously referred to as Basic
Pilot. E-Verify is an internet-based system that implements the requirements in the
IIRIRA by allowing any U.S. employer to electronically verify the employment
eligibility of all its newly hired employees.
E-Verify is a voluntary program for most employers, but mandatory for some, such
as employers with federal contracts or subcontracts that contain the Federal
Acquisition Regulation (FAR) E-Verify clause and employers in certain states that
have legislation that mandates the use of E-Verify for some or all employers.
NOTE: E-Verify cannot provide you with guidance on state or local laws that require
your participation in E-Verify. For help, you should contact the appropriate state
officials, or you may also receive assistance through a local Chamber of Commerce.
Apart from any state or local law that requires participation in E-Verify, employers
are fully responsible for complying with sections 274A (which addresses the
requirements of the Form I-9 process) and 274B (which addresses unfair
immigration-related employment practices) of the Immigration and Nationality Act.
If employers fail to comply with either, then they may be subject to penalties.
E-Verify works by electronically comparing the information on an employee’s Form
I-9 with SSA, DHS, and U.S. Department of State (DOS) records to verify the
identity and employment eligibility of each newly hired employee and/or employee
assigned to a covered federal contract.
At this time, an employer can verify the employment eligibility of only one person at
a time within E-Verify. All new, temporary, seasonal, and rehired employees must be
entered into E-Verify individually.

Page 5 of 88 | M-775, E-Verify User Manual for Employers |September 2012 www.dhs.gov/E-Verify
E-Verify is free and the best means available to determine the employment eligibility
of new hires. E-Verify is currently available in all 50 states, the District of Columbia,
Puerto Rico, Guam and the U.S. Virgin Islands.
NOTE: E-Verify Self Check, referred to as Self Check, is a free, fast, secure and
voluntary online service that allows individuals to perform employment eligibility
checks on themselves. Employers may not ask current or prospective employees to
use Self Check to prove employment eligibility. The service is designed to provide
visibility into government records, and if necessary, guidance on how to correct
those records. Self Check is separate from the E-Verify user interface. For more
information and specific rules visit www.uscis.gov/E-Verifyselfcheck.
Self Check does not satisfy or supersede the requirements of federal contractors
subject to the Federal Acquisition Regulation (FAR) E-Verify clause, or any other
employers, to use E-Verify.
1.2 BASIC WEBSITE NAVIGATION
All E-Verify users need to be familiar with the website navigation links. The figure
below provides a screen shot of the employer user Web page. The navigation links
within each area vary depending upon the type of user.
3 1 2
4
Area 1 displays the E-Verify logo and the telephone number for Customer Support:
888-464-4218. Area 1 also includes a quick shortcut to begin the verification
process. By clicking the green ‘Verify Employee’ button, you will begin the
verification process.
Area 2 contains ‘E-Verify News’ which includes important updates on E-Verify,
information affecting employment verification, best practices and current events.
Area 3 contains E-Verify navigation options which are identified in the ‘Area 3
Navigation Overview.’ Selecting a navigation menu link is the first step in accessing a

Page 6 of 88 | M-775, E-Verify User Manual for Employers |September 2012 www.dhs.gov/E-Verify
task or function in E-Verify. Choosing an option displays the first active page where a
user enters information. Each user’s menu option is based on his or her assigned
user role. For more information, see Section 1.4.
AREA 3 NAVIGATION OVERVIEW
LINK INFORMATION
My Cases ► New Case ► View Cases
► Search Cases
My Profile ► Edit Profile ► Change Password
► Change Security Questions
My Company
(Only program administrators have these options)
► Edit Company Profile
► Add New User ► View Existing Users
► Close Company Account
My Reports ► View Reports
My Resources ► View Essential Resources
► Take Tutorial
► View User Manual
► Contact Us
Area 4 displays ‘Case Alerts’ for cases requiring action. Case alerts inform employers
when an action is required. For more information, see Section 4.3.
ESSENTIAL RESOURCES
‘View Essential Resources’ under ‘My Resources’ contains links to important
documents and tools for employers that participate in E-Verify. The ‘Essential
Resources Overview’ provides specific information on the resources available to
users.
ESSENTIAL RESOURCES OVERVIEW
LINK INFORMATION
E-Verify Essentials ► E-Verify Participation Poster
► Right to Work Poster
► E-Verify User Manuals
E-Verify Notices ► Blank ‘Notice to Employee of Tentative Nonconfirmation,’ ‘Referral to the U.S. Department of Homeland Security’ and ‘Referral to the Social Security Administration’ available in several foreign languages
Form I-9 Resources ► The latest version of Form I-9 in English and Spanish
► The ‘Handbook for Employers: Instructions for Completing Form I-9 (M-274)’
Page 7 of 88 | M-775, E-Verify User Manual for Employers |September 2012 www.dhs.gov/E-Verify
Memorandums of Understanding (MOU)
► Blank copy of the most recent version of the MOU
Resources for Employers ► Websites and links to Web pages of particular interest to employers participating in E-Verify
Select Press Releases and Other Guidance
► Information on photo standards, document guides and announcements related to employment documents
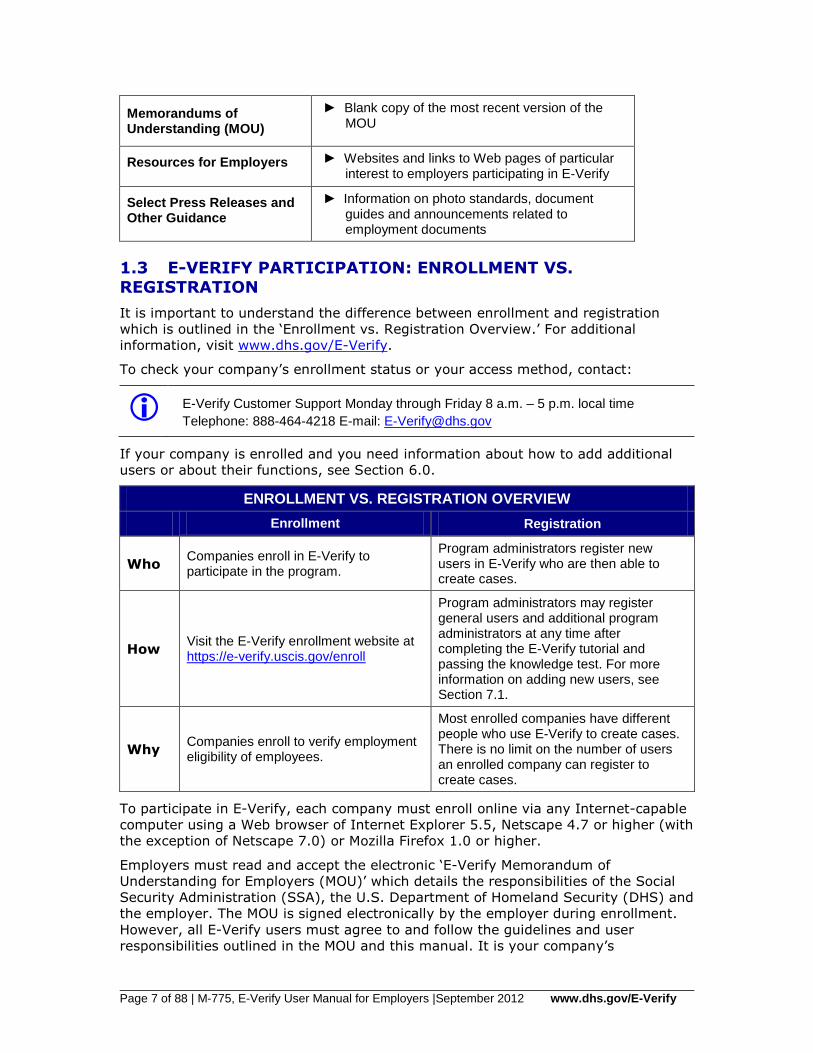
1.3 E-VERIFY PARTICIPATION: ENROLLMENT VS. REGISTRATION
It is important to understand the difference between enrollment and registration
which is outlined in the ‘Enrollment vs. Registration Overview.’ For additional
information, visit www.dhs.gov/E-Verify.
To check your company’s enrollment status or your access method, contact:
E-Verify Customer Support Monday through Friday 8 a.m. – 5 p.m. local time
Telephone: 888-464-4218 E-mail: [email protected]
If your company is enrolled and you need information about how to add additional
users or about their functions, see Section 6.0.
ENROLLMENT VS. REGISTRATION OVERVIEW
Enrollment Registration
Who Companies enroll in E-Verify to participate in the program.
Program administrators register new users in E-Verify who are then able to create cases.
How Visit the E-Verify enrollment website at https://e-verify.uscis.gov/enroll
Program administrators may register general users and additional program administrators at any time after completing the E-Verify tutorial and passing the knowledge test. For more information on adding new users, see Section 7.1.
Why Companies enroll to verify employment eligibility of employees.
Most enrolled companies have different people who use E-Verify to create cases. There is no limit on the number of users an enrolled company can register to create cases.
To participate in E-Verify, each company must enroll online via any Internet-capable
computer using a Web browser of Internet Explorer 5.5, Netscape 4.7 or higher (with
the exception of Netscape 7.0) or Mozilla Firefox 1.0 or higher.
Employers must read and accept the electronic ‘E-Verify Memorandum of
Understanding for Employers (MOU)’ which details the responsibilities of the Social
Security Administration (SSA), the U.S. Department of Homeland Security (DHS) and
the employer. The MOU is signed electronically by the employer during enrollment.
However, all E-Verify users must agree to and follow the guidelines and user
responsibilities outlined in the MOU and this manual. It is your company’s
Page 8 of 88 | M-775, E-Verify User Manual for Employers |September 2012 www.dhs.gov/E-Verify
responsibility to ensure that your users are prepared and capable of using E-Verify
properly. Misuse of E-Verify may lead to legal liability for both the company and the
user.
To enroll in E-Verify, employers visit the enrollment website. This website guides
companies through the enrollment process. Additional information regarding
enrollment is found at www.dhs.gov/E-Verify.
Participating companies use E-Verify through an access method determined during
the enrollment process. An access method is a type of E-Verify account that offers
different features for specific types of organizations. The four access methods
include: employer, E-Verify employer agent, corporate administrator and Web
services.
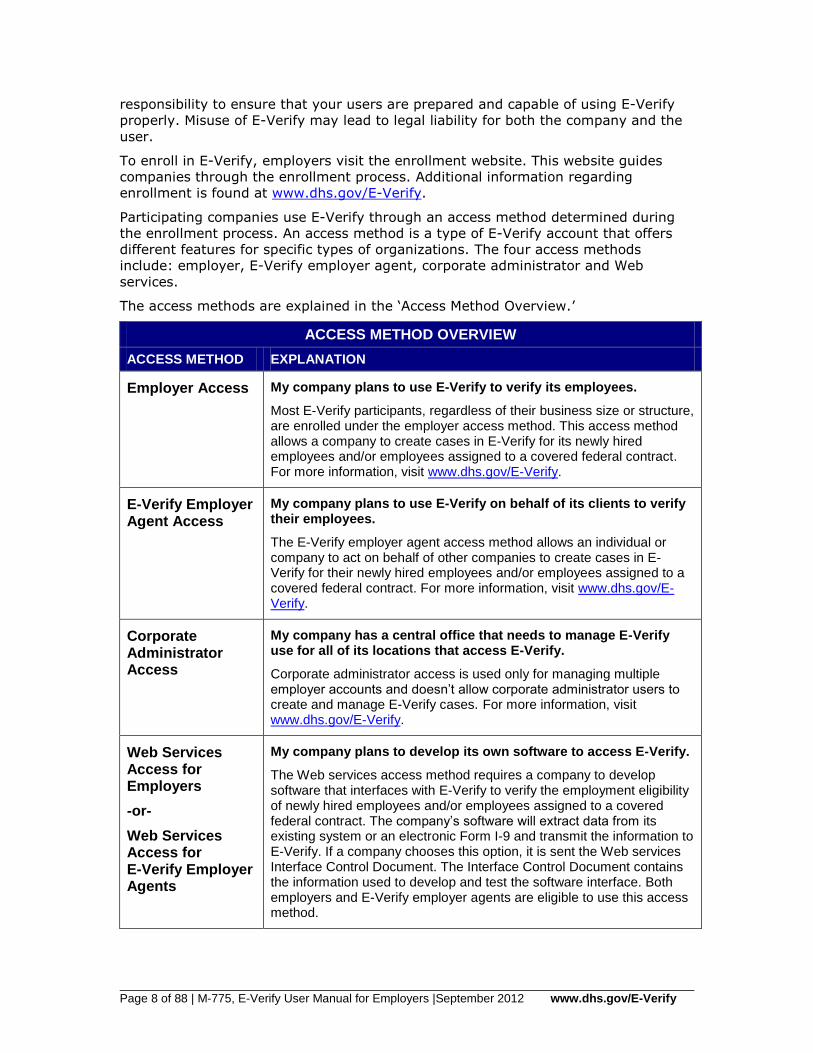
The access methods are explained in the ‘Access Method Overview.’
ACCESS METHOD OVERVIEW
ACCESS METHOD EXPLANATION
Employer Access My company plans to use E-Verify to verify its employees.
Most E-Verify participants, regardless of their business size or structure, are enrolled under the employer access method. This access method allows a company to create cases in E-Verify for its newly hired employees and/or employees assigned to a covered federal contract. For more information, visit www.dhs.gov/E-Verify.
E-Verify Employer Agent Access
My company plans to use E-Verify on behalf of its clients to verify their employees.
The E-Verify employer agent access method allows an individual or company to act on behalf of other companies to create cases in E-Verify for their newly hired employees and/or employees assigned to a covered federal contract. For more information, visit www.dhs.gov/E-Verify.
Corporate Administrator Access
My company has a central office that needs to manage E-Verify use for all of its locations that access E-Verify.
Corporate administrator access is used only for managing multiple employer accounts and doesn’t allow corporate administrator users to create and manage E-Verify cases. For more information, visit www.dhs.gov/E-Verify.
Web Services Access for Employers
-or-
Web Services Access for E-Verify Employer Agents
My company plans to develop its own software to access E-Verify.
The Web services access method requires a company to develop software that interfaces with E-Verify to verify the employment eligibility of newly hired employees and/or employees assigned to a covered federal contract. The company’s software will extract data from its existing system or an electronic Form I-9 and transmit the information to E-Verify. If a company chooses this option, it is sent the Web services Interface Control Document. The Interface Control Document contains the information used to develop and test the software interface. Both employers and E-Verify employer agents are eligible to use this access method.
Page 9 of 88 | M-775, E-Verify User Manual for Employers |September 2012 www.dhs.gov/E-Verify
RREEMMIINNDDEERR
Follow E-Verify procedures for ALL new hires while enrolled in E-Verify.
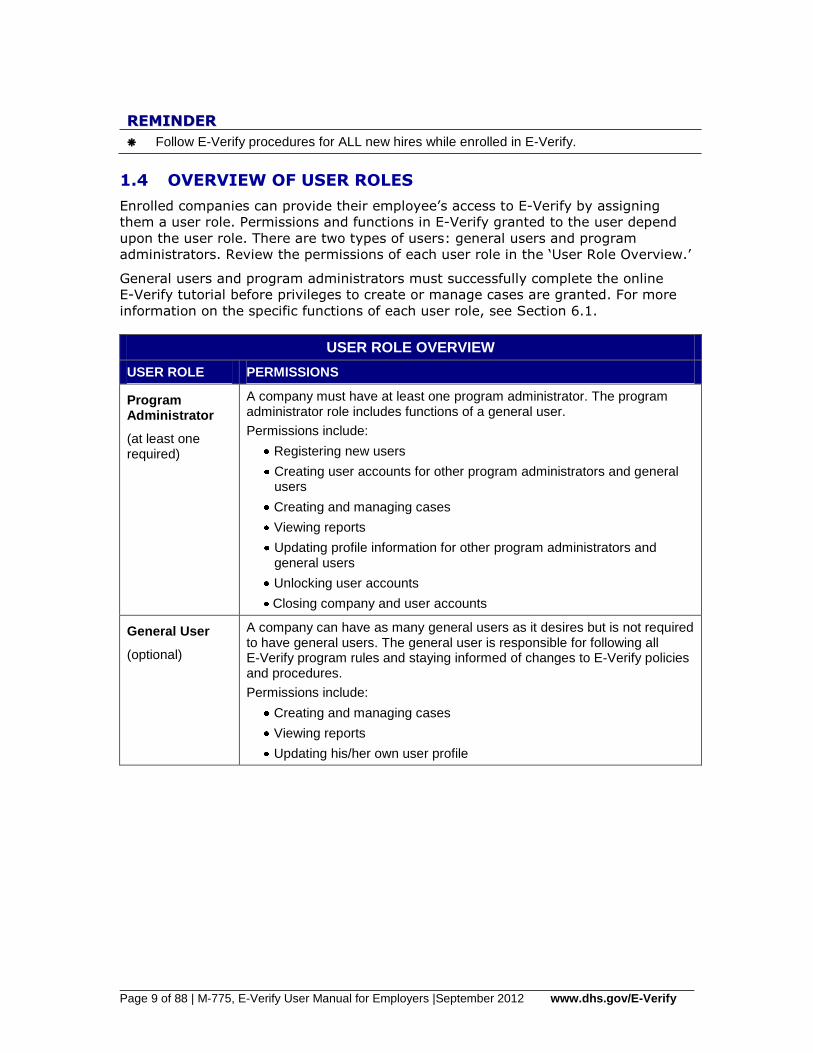
1.4 OVERVIEW OF USER ROLES
Enrolled companies can provide their employee’s access to E-Verify by assigning
them a user role. Permissions and functions in E-Verify granted to the user depend
upon the user role. There are two types of users: general users and program
administrators. Review the permissions of each user role in the ‘User Role Overview.’
General users and program administrators must successfully complete the online
E-Verify tutorial before privileges to create or manage cases are granted. For more
information on the specific functions of each user role, see Section 6.1.
USER ROLE OVERVIEW
USER ROLE PERMISSIONS
Program Administrator
(at least one required)
A company must have at least one program administrator. The program administrator role includes functions of a general user.
Permissions include:
Registering new users
Creating user accounts for other program administrators and general users
Creating and managing cases
Viewing reports
Updating profile information for other program administrators and general users
Unlocking user accounts
Closing company and user accounts
General User
(optional)
A company can have as many general users as it desires but is not required to have general users. The general user is responsible for following all E-Verify program rules and staying informed of changes to E-Verify policies and procedures.
Permissions include:
Creating and managing cases
Viewing reports
Updating his/her own user profile
Page 10 of 88 | M-775, E-Verify User Manual for Employers |September 2012 www.dhs.gov/E-Verify
1.5 USER RULES AND RESPONSIBILITIES
All E-Verify users are bound by the guidelines set forth in the ‘E-Verify Memorandum
of Understanding for Employers (MOU)’ and the rules and responsibilities outlined in
this manual.
It is your responsibility to ensure that all users understand program rules. We
recommend that you review with your users these rules and responsibilities
periodically to ensure proper use of E-Verify and the protection of your employees’
workplace rights.
All E-Verify users must follow the guidelines specified in the ‘Rules and
Responsibilities Overview.’
RULES AND RESPONSIBLITIES OVERVIEW
Employers participating in E-Verify MUST:
Follow E-Verify procedures for each newly hired employee while enrolled/participating in E-Verify.
Notify each job applicant of E-Verify participation.
Clearly display both the English and Spanish ‘Notice of E-Verify Participation’ and the ‘Right to Work’ posters.
Complete Form I-9 for each newly hired employee before creating a case in E-Verify.
Ensure that Form I-9 ‘List B’ identity documents have a photo (Section 2.1).
Create a case for each newly hired employee no later than the third business day after he or she starts work for pay.
Obtain a Social Security number (SSN) from each newly hired employee on Form I-9.
Provide each employee the opportunity to contest a tentative nonconfirmation (TNC).
Allow each newly hired employee to start and continue working during the E-Verify verification process, even if he or she receives a TNC.
Ensure that all personally identifiable information is safeguarded.
Employers participating in E-Verify MUST NOT:
Use E-Verify to prescreen an applicant for employment.
Check the employment eligibility of an employee hired before the company signed the E-Verify MOU.
Take any adverse action against an employee based on a case result unless E-Verify issues a final nonconfirmation.
Specify or request which Form I-9 documentation a newly hired employee must use.
Use E-Verify to discriminate against ANY job applicant or new hire on the basis
Page 11 of 88 | M-775, E-Verify User Manual for Employers |September 2012 www.dhs.gov/E-Verify
of his or her national origin, citizenship or immigration status.
Selectively verify the employment eligibility of a newly hired employee.
Share any user ID and/or password.
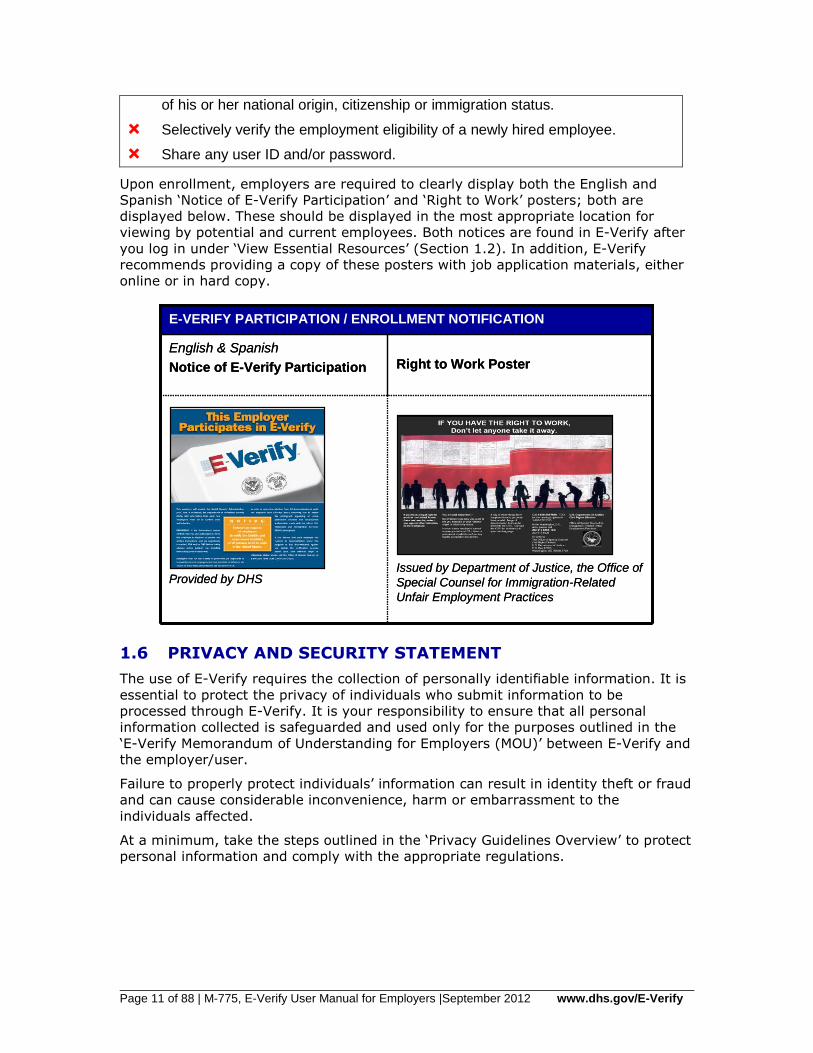
Upon enrollment, employers are required to clearly display both the English and
Spanish ‘Notice of E-Verify Participation’ and ‘Right to Work’ posters; both are
displayed below. These should be displayed in the most appropriate location for
viewing by potential and current employees. Both notices are found in E-Verify after
you log in under ‘View Essential Resources’ (Section 1.2). In addition, E-Verify
recommends providing a copy of these posters with job application materials, either
online or in hard copy.
Issued by Department of Justice, the Office of
Special Counsel for Immigration-Related
Unfair Employment Practices
Provided by DHS
Right to Work Poster
English & Spanish
Notice of E-Verify Participation
E-VERIFY PARTICIPATION / ENROLLMENT NOTIFICATION
Issued by Department of Justice, the Office of
Special Counsel for Immigration-Related
Unfair Employment Practices
Provided by DHS
Right to Work Poster
English & Spanish
Notice of E-Verify Participation
E-VERIFY PARTICIPATION / ENROLLMENT NOTIFICATION
1.6 PRIVACY AND SECURITY STATEMENT
The use of E-Verify requires the collection of personally identifiable information. It is
essential to protect the privacy of individuals who submit information to be
processed through E-Verify. It is your responsibility to ensure that all personal
information collected is safeguarded and used only for the purposes outlined in the
‘E-Verify Memorandum of Understanding for Employers (MOU)’ between E-Verify and
the employer/user.
Failure to properly protect individuals’ information can result in identity theft or fraud
and can cause considerable inconvenience, harm or embarrassment to the
individuals affected.
At a minimum, take the steps outlined in the ‘Privacy Guidelines Overview’ to protect
personal information and comply with the appropriate regulations.
Page 12 of 88 | M-775, E-Verify User Manual for Employers |September 2012 www.dhs.gov/E-Verify
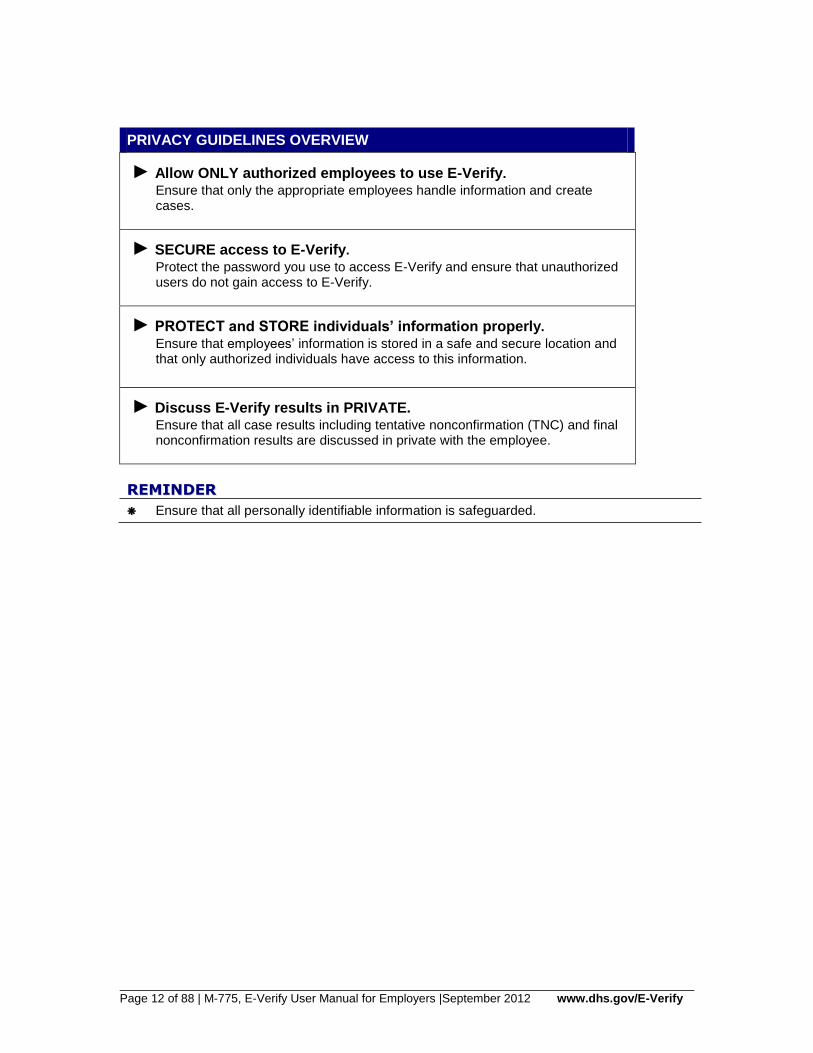
PRIVACY GUIDELINES OVERVIEW
► Allow ONLY authorized employees to use E-Verify.
Ensure that only the appropriate employees handle information and create cases.
► SECURE access to E-Verify.
Protect the password you use to access E-Verify and ensure that unauthorized users do not gain access to E-Verify.
► PROTECT and STORE individuals’ information properly.
Ensure that employees’ information is stored in a safe and secure location and that only authorized individuals have access to this information.
► Discuss E-Verify results in PRIVATE. Ensure that all case results including tentative nonconfirmation (TNC) and final nonconfirmation results are discussed in private with the employee.
RREEMMIINNDDEERR
Ensure that all personally identifiable information is safeguarded.
Page 13 of 88 | M-775, E-Verify User Manual for Employers |September 2012 www.dhs.gov/E-Verify
2.0 INITIAL VERIFICATION
The E-Verify verification process begins with a completed Form I-9. E-Verify makes
employment eligibility determinations by comparing the employee’s Form I-9
information entered in E-Verify with the information contained in Social Security
Administration (SSA), U.S. Department of Homeland Security (DHS), and U.S.
Department of State (DOS) records.
Information from Form I-9 is entered into E-Verify and a case result is provided.
Case results ultimately determine an employee’s work eligibility. E-Verify will
determine a case result based on information in SSA, DHS, and DOS records. Case
results can be initial, interim or final. Every case created in E-Verify receives a final
case result before it is closed, and every case must be closed.
This section outlines the steps required to create a case in E-Verify and the initial
case results provided by E-Verify.
2.1 FORM I-9 AND E-VERIFY
All employers are required to complete Form I-9 no later than the third business day
after the employee starts work for pay and keep a record of the form on file. This
requirement does not change for employers enrolled in E-Verify. Employers enrolled
in E-Verify have chosen to take the additional step of verifying that the employee’s
Form I-9 information matches government records thereby ensuring a legal
workforce.
To view or download Form I-9, go to the following website:
http://www.uscis.gov/I-9
For more information on Form I-9 procedures, refer to the ‘View Essential Resources’ link on the left navigation menu; you will find the ‘Handbook for Employers: Instructions for Completing Form I-9 (M-274).’
To view or download the ‘Handbook for Employers: Instructions for Completing Form I-9 (M-274),’ go to the following website:
http://www.uscis.gov/files/form/m-274.pdf
For additional assistance on Form I-9, contact E-Verify Customer Support Monday through Friday 8 a.m. – 5 p.m. at 888-464-4218.
Newly hired employees must complete Section 1 of Form I-9 in its entirety. Providing
a Social Security number on Form I-9 is usually voluntary; however, a Social
Security number is required by employers who use E-Verify. Therefore all newly
hired employees, including seasonal, temporary and rehires MUST have a Social
Security number.
A case cannot be created in E-Verify without a Social Security number. If a newly
hired employee has applied for but has not yet received his or her Social Security
number (i.e., if he or she is a newly arrived immigrant), make a note on the
employee’s Form I-9 and set it aside. The employee should be allowed to continue to
work. You must create a case in E-Verify using the employee’s Social Security
number as soon as the Social Security number is available.
Page 14 of 88 | M-775, E-Verify User Manual for Employers |September 2012 www.dhs.gov/E-Verify
If the case was not created by the third day after the employee started work for pay,
you must indicate the reason for this delay in E-Verify. You may choose a reason
from the drop-down list or state a specific reason in the field provided.
Employers must complete Section 2 of Form I-9 in its entirety. To complete Section
2, employers must examine documents that establish the identity and employment
eligibility of the hired employee. The employer may not specify which documents
from the list of acceptable documents on Form I-9 an employee may choose to
present.
Some documentation establishes both identity and employment eligibility (List A).
Other documentation establishes identity only (List B) or employment eligibility only
(List C). An employer may accept one document from List A, or a combination of one
document from List B and one document from List C.
Any ‘List B’ document presented to an employer participating in E-Verify MUST
contain a photo. However, if an employee objects to photo document requirements
for religious reasons, call E-Verify at 888-464-4218. If the employee presents a U.S.
Passport, Passport Card, a Permanent Resident Card (Form I-551) or an Employment
Authorization Document (Form I-766) you must obtain a copy of it and retain it with
Form I-9. For more information on Form I-9 retention guidelines, refer to the
‘Handbook for Employers: Instructions for Completing Form I-9 (M-274).’
RECEIPTS
Employers must consider whether or not they can create a case in E-Verify for an
employee who has presented an acceptable receipt to complete Form I-9.
If the employee presents a receipt showing that he or she applied to replace a
document that was lost, stolen or damaged, a case cannot be created in E-Verify.
Presenting a receipt in this situation does not complete the Form I-9 process for
E-Verify. You must wait until the employee presents the actual document for which
the receipt was presented before you can create a case in E-Verify for the
employee.
Employers may create a case in E-Verify for an employee who presents the following
receipts:
• The arrival portion of Form I-94/I-94A with a temporary I-551 stamp and a
photograph of the individual.
• The departure portion of Form I-94/I-94A with a refugee admission stamp.
For more information on acceptable receipts, see the ‘Handbook for Employers:
Instructions for Completing Form I-9 (M-274)’ or visit www.uscis.gov/i-9central.
REHIRES
While employers must use E-Verify to verify the employment eligibility of employees
who are rehired, they should never use E-Verify for reverification.
If you rehire an employee for whom you never created an E-Verify case and the
employee’s previous Form I-9 lists an expired identity document (List B), then you
must complete a new Form I-9 and create a case for the employee in E-Verify.
If you rehire an employee for whom you created an E-Verify case, and the
employee’s previous Form I-9 lists an expired identity document (List B), then you
may either:
Page 15 of 88 | M-775, E-Verify User Manual for Employers |September 2012 www.dhs.gov/E-Verify
Complete Section 3 of the employee’s previous Form I-9 and not create a new case
for the employee in E-Verify; or
Complete a new Form I-9 for the employee and create a new case for the
employee in E-Verify.
RREEMMIINNDDEERR
All newly hired employees need a Social Security number (see exception above)
Do NOT specify or request which document a newly hired employee must use for Form I-9
A ‘List B’ document MUST contain a photo (see exception above)
If the employee presents a U.S. Passport, Passport Card, a Permanent Resident Card (Form I-551) or an Employment Authorization Document (Form I-766) you must obtain a copy of it and retain it with Form I-9
2.2 CREATE A CASE
The next step is to create a case in E-Verify. An E-Verify case must be created no
later than the third business day after the employee starts work for pay. If the
employer learns that he or she has inadvertently failed to create a case by the third
business day after the employee starts work for pay, the employer should bring itself
into compliance immediately by creating a case for the employee. Do not create a
case for an employee hired before the effective date of your memorandum of
understanding (MOU).
In some cases E-Verify prompts you to check the information provided or recreate
the case before it can provide a case result. This section reviews each of these
scenarios in detail.
HIRE DATE
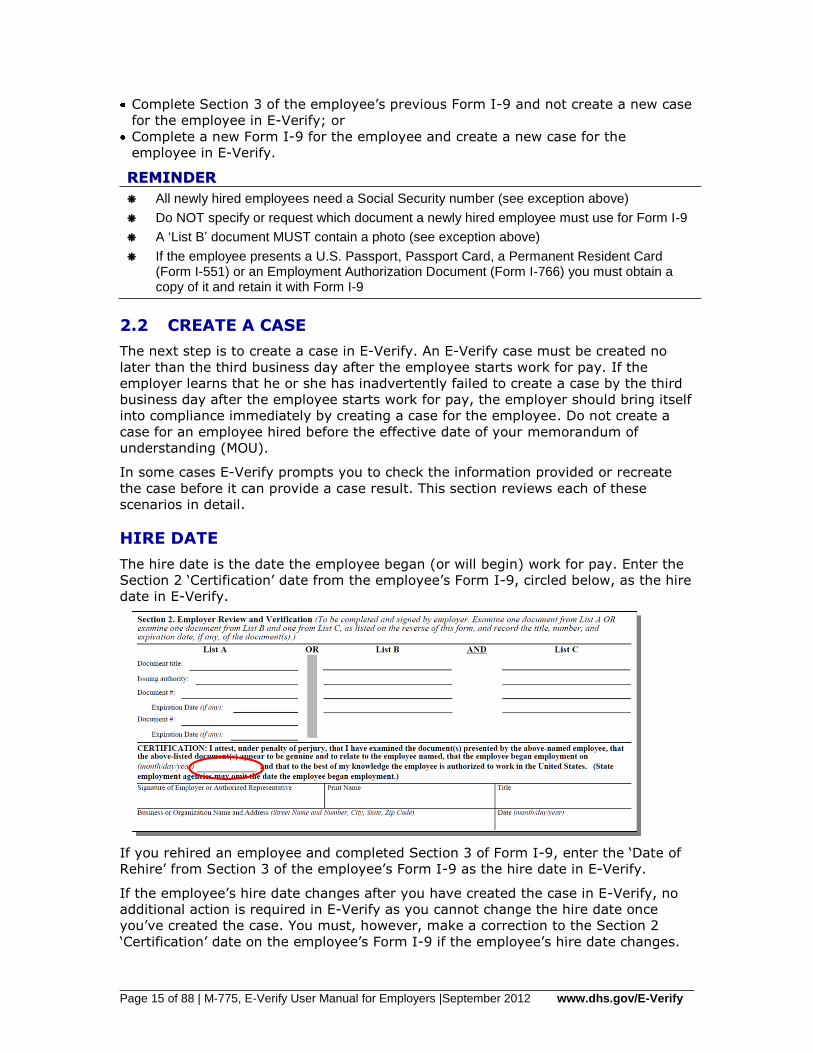
The hire date is the date the employee began (or will begin) work for pay. Enter the
Section 2 ‘Certification’ date from the employee’s Form I-9, circled below, as the hire
date in E-Verify.
If you rehired an employee and completed Section 3 of Form I-9, enter the ‘Date of
Rehire’ from Section 3 of the employee’s Form I-9 as the hire date in E-Verify.
If the employee’s hire date changes after you have created the case in E-Verify, no
additional action is required in E-Verify as you cannot change the hire date once
you’ve created the case. You must, however, make a correction to the Section 2
‘Certification’ date on the employee’s Form I-9 if the employee’s hire date changes.
Page 16 of 88 | M-775, E-Verify User Manual for Employers |September 2012 www.dhs.gov/E-Verify
Consult the ‘Handbook for Employers: Instructions for Completing Form I-9 (M-274)’
for more information.
Employees hired on or before November 6, 1986, are not subject to Form I-9 or
verification through E-Verify. Individuals hired for employment in the Commonwealth
of the Northern Mariana Islands (CNMI) on or before November 27, 2009 are also
not subject to Form I-9 or verification through E-Verify.
To create a case, take the information that the employee completed on his or her
Form I-9 and enter it into E-Verify. To enter this information into E-Verify, you must
first log in with your assigned user ID and password and then follow the steps
outlined in ‘How to Create a Case – Process Overview.’
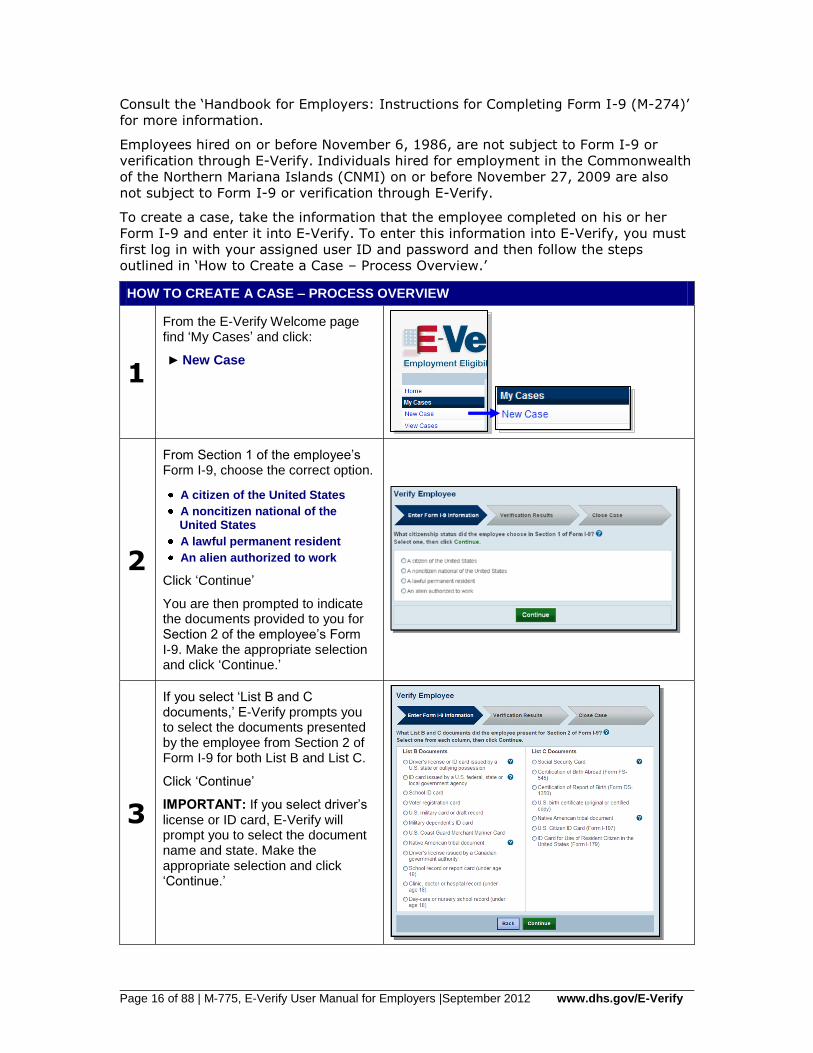
HOW TO CREATE A CASE – PROCESS OVERVIEW
1
From the E-Verify Welcome page find ‘My Cases’ and click:
► New Case
2
From Section 1 of the employee’s Form I-9, choose the correct option.
A citizen of the United States
A noncitizen national of the United States
A lawful permanent resident
An alien authorized to work
Click ‘Continue’
You are then prompted to indicate the documents provided to you for Section 2 of the employee’s Form I-9. Make the appropriate selection and click ‘Continue.’
3
If you select ‘List B and C documents,’ E-Verify prompts you to select the documents presented by the employee from Section 2 of Form I-9 for both List B and List C.
Click ‘Continue’
IMPORTANT: If you select driver’s license or ID card, E-Verify will prompt you to select the document name and state. Make the appropriate selection and click ‘Continue.’

Page 17 of 88 | M-775, E-Verify User Manual for Employers |September 2012 www.dhs.gov/E-Verify
4
A red asterisk () indicates a
required field. Using information from Section 1 and 2 of Form I-9, enter all required information into each field.
IMPORTANT: If you select ‘An alien authorized to work’ you may also be required to indicate that you are entering either the Alien number or I-94 number from the employee’s Form I-9.
Click ‘Continue’
Employer Case ID is an optional field for users who wish to assign an internal tracking code to a case.
5
If an E-Verify case is not created by the third business day after the employee begins work for pay, the user must indicate the reason for the delay. Select from one of the following reasons:
Awaiting Social Security number
Technical Problems
Audit Revealed that New Hire Was Not Run
Other
The user may also enter a specific reason in the field provided.
Click ‘Continue’
Each screen provides additional information simply by clicking any help text symbol.
RREEMMIINNDDEERR
Complete Form I-9 before creating a case in E-Verify.
Create cases for all newly hired employees no later than the third business day after the employee starts work for pay.
CHECK INFORMATION
If the information entered does not immediately match SSA, DHS or DOS records,
the ‘Check Information’ screen appears to confirm that the information was entered
correctly. The user may either confirm that the information matches Form I-9 or
change the information in certain fields if the information was entered incorrectly.
Follow the steps in the ‘Check Information – Process Overview.’
Page 18 of 88 | M-775, E-Verify User Manual for Employers |September 2012 www.dhs.gov/E-Verify
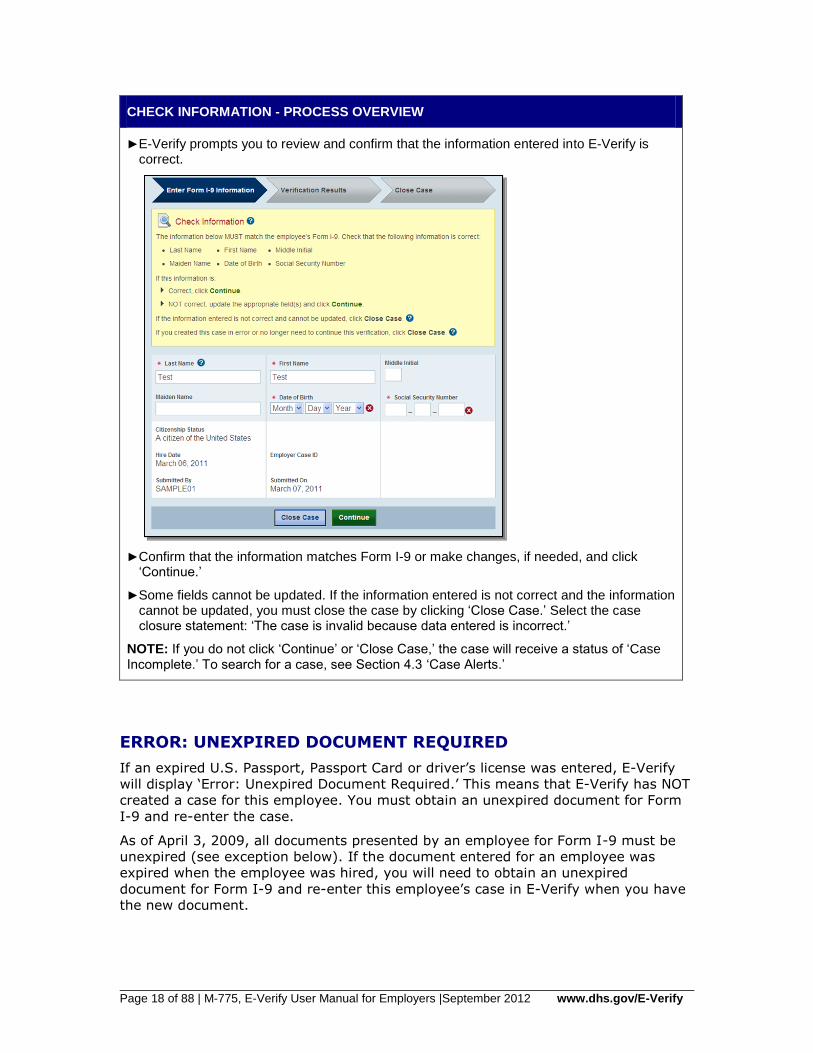
CHECK INFORMATION - PROCESS OVERVIEW
►E-Verify prompts you to review and confirm that the information entered into E-Verify is correct.
►Confirm that the information matches Form I-9 or make changes, if needed, and click ‘Continue.’
►Some fields cannot be updated. If the information entered is not correct and the information cannot be updated, you must close the case by clicking ‘Close Case.’ Select the case closure statement: ‘The case is invalid because data entered is incorrect.’
NOTE: If you do not click ‘Continue’ or ‘Close Case,’ the case will receive a status of ‘Case Incomplete.’ To search for a case, see Section 4.3 ‘Case Alerts.’
ERROR: UNEXPIRED DOCUMENT REQUIRED
If an expired U.S. Passport, Passport Card or driver’s license was entered, E-Verify
will display ‘Error: Unexpired Document Required.’ This means that E-Verify has NOT
created a case for this employee. You must obtain an unexpired document for Form
I-9 and re-enter the case.
As of April 3, 2009, all documents presented by an employee for Form I-9 must be
unexpired (see exception below). If the document entered for an employee was
expired when the employee was hired, you will need to obtain an unexpired
document for Form I-9 and re-enter this employee’s case in E-Verify when you have
the new document.
Page 19 of 88 | M-775, E-Verify User Manual for Employers |September 2012 www.dhs.gov/E-Verify
Just because the employee presented an expired document does not mean that the
employee is not authorized to work. E-Verify will verify the employment eligibility of
this employee once you obtain an unexpired document and re-enter the case.
EXCEPTION: In very limited situations, you may accept an expired document with
Form I-9 only if the U.S. Department of Homeland Security (DHS) has automatically
extended the expiration date of the document via publication in the Federal Register.
When such a document is presented for Form I-9, the expiration date is the
extended date that appears in the DHS guidance or Federal Register Notice. In all
other instances, the document presented with Form I-9 must be unexpired at the
time the employee is hired. For information on this exception, visit
www.uscis.gov/tps.
ERROR: UNEXPIRED DOCUMENT REQUIRED – PROCESS OVERVIEW
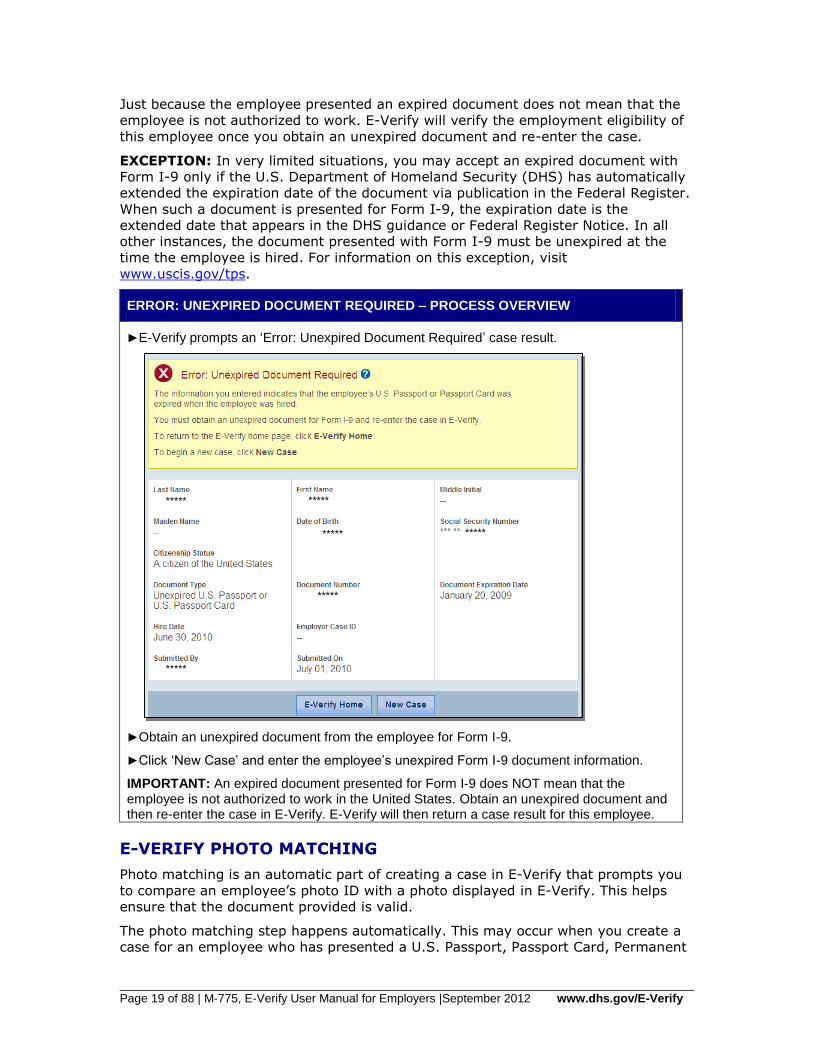
►E-Verify prompts an ‘Error: Unexpired Document Required’ case result.
***** *****
***** *****
*****
*****
►Obtain an unexpired document from the employee for Form I-9.
►Click ‘New Case’ and enter the employee’s unexpired Form I-9 document information.
IMPORTANT: An expired document presented for Form I-9 does NOT mean that the employee is not authorized to work in the United States. Obtain an unexpired document and then re-enter the case in E-Verify. E-Verify will then return a case result for this employee.
E-VERIFY PHOTO MATCHING
Photo matching is an automatic part of creating a case in E-Verify that prompts you
to compare an employee’s photo ID with a photo displayed in E-Verify. This helps
ensure that the document provided is valid.
The photo matching step happens automatically. This may occur when you create a
case for an employee who has presented a U.S. Passport, Passport Card, Permanent

Page 20 of 88 | M-775, E-Verify User Manual for Employers |September 2012 www.dhs.gov/E-Verify
Resident Card (Form I-551) or an Employment Authorization Document (Form I-766)
for his or her Form I-9 documentation. When the employee presents one of these
documents and the Form I-9 information entered by the employer matches DHS or
DOS records, the employee’s photo automatically displays in E-Verify. You must
make a copy of the employee’s Form I-9 photo document and retain it with Form I-9
in order to match the photos.
Matching photos is easy—simply compare the photo displayed by E-Verify to the
photo on the employee’s actual document or a copy of the employee’s document and
determine if the photos are reasonably identical. This means that the photos should
be identical, but you should take into account minor variations in shading and detail
between the two photos based upon the age and wear of the employee’s document
and the quality of your computer monitor.
A watermark has been added to the photo displayed in E-Verify to prevent
unauthorized use. The photo on the document presented by the employee will not
have a watermark. Absence of a watermark on the document photo does not mean
that it is not authentic.
Do not compare the photo displayed by E-Verify to the actual employee. The direct
comparison between the document and the individual happens during Form I-9
completion, prior to using E-Verify. The ‘Photo Matching - Process Overview’ provides
a summary.
PHOTO MATCHING – PROCESS OVERVIEW
►E-Verify prompts you to compare a photo displayed in E-Verify with the employee’s Form I-9 photo document. You must obtain a copy of the employee’s document and retain it with Form I-9.
►Account for minor variations in shading and detail between the two photos and select Yes or No.
►Yes – the photo on the employee’s actual document or a copy matches the photo displayed by E-Verify. Clothing, hair style, facing direction and appearance on the card should be identical to the photo displayed by E-Verify.
►No – the photo on the employee’s actual document or a copy does not match the photo
Page 21 of 88 | M-775, E-Verify User Manual for Employers |September 2012 www.dhs.gov/E-Verify
displayed in E-Verify.
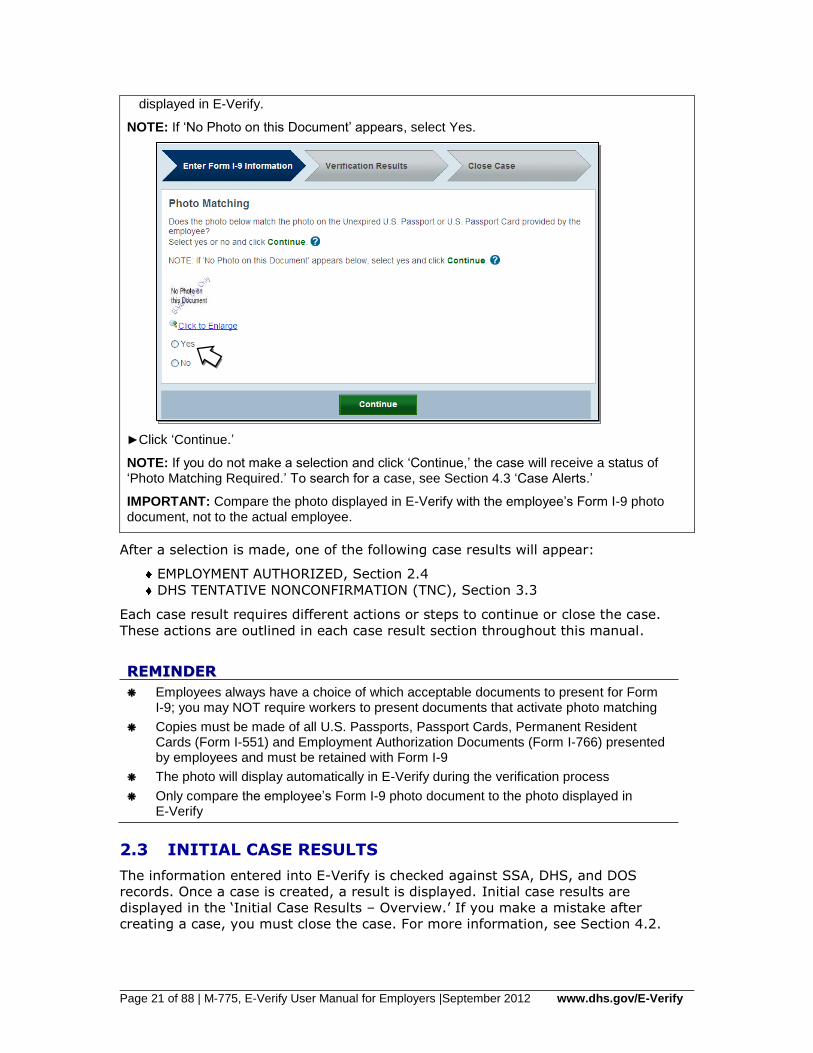
NOTE: If ‘No Photo on this Document’ appears, select Yes.
►Click ‘Continue.’
NOTE: If you do not make a selection and click ‘Continue,’ the case will receive a status of ‘Photo Matching Required.’ To search for a case, see Section 4.3 ‘Case Alerts.’
IMPORTANT: Compare the photo displayed in E-Verify with the employee’s Form I-9 photo document, not to the actual employee.
After a selection is made, one of the following case results will appear:
EMPLOYMENT AUTHORIZED, Section 2.4
DHS TENTATIVE NONCONFIRMATION (TNC), Section 3.3
Each case result requires different actions or steps to continue or close the case.
These actions are outlined in each case result section throughout this manual.
RREEMMIINNDDEERR
Employees always have a choice of which acceptable documents to present for Form I-9; you may NOT require workers to present documents that activate photo matching
Copies must be made of all U.S. Passports, Passport Cards, Permanent Resident Cards (Form I-551) and Employment Authorization Documents (Form I-766) presented by employees and must be retained with Form I-9
The photo will display automatically in E-Verify during the verification process
Only compare the employee’s Form I-9 photo document to the photo displayed in E-Verify
2.3 INITIAL CASE RESULTS
The information entered into E-Verify is checked against SSA, DHS, and DOS
records. Once a case is created, a result is displayed. Initial case results are
displayed in the ‘Initial Case Results – Overview.’ If you make a mistake after
creating a case, you must close the case. For more information, see Section 4.2.
Page 22 of 88 | M-775, E-Verify User Manual for Employers |September 2012 www.dhs.gov/E-Verify
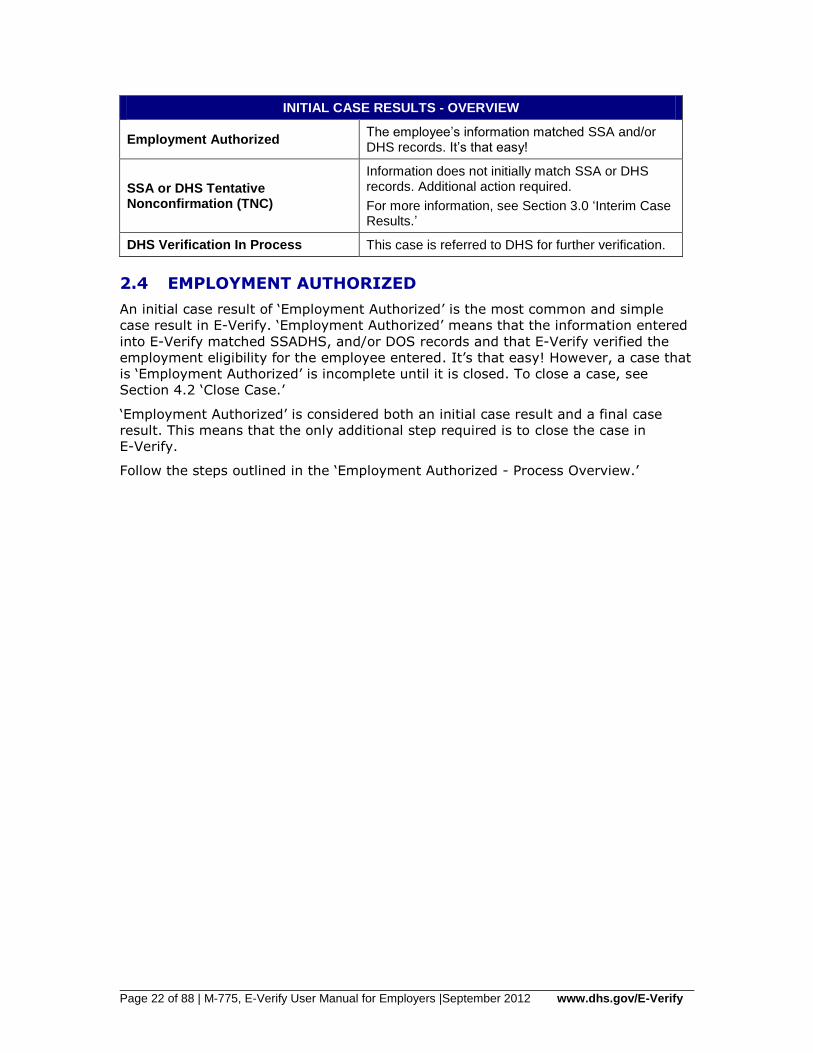
INITIAL CASE RESULTS - OVERVIEW
Employment Authorized The employee’s information matched SSA and/or DHS records. It’s that easy!
SSA or DHS Tentative Nonconfirmation (TNC)
Information does not initially match SSA or DHS records. Additional action required.
For more information, see Section 3.0 ‘Interim Case Results.’
DHS Verification In Process This case is referred to DHS for further verification.
2.4 EMPLOYMENT AUTHORIZED
An initial case result of ‘Employment Authorized’ is the most common and simple
case result in E-Verify. ‘Employment Authorized’ means that the information entered
into E-Verify matched SSADHS, and/or DOS records and that E-Verify verified the
employment eligibility for the employee entered. It’s that easy! However, a case that
is ‘Employment Authorized’ is incomplete until it is closed. To close a case, see
Section 4.2 ‘Close Case.’
‘Employment Authorized’ is considered both an initial case result and a final case
result. This means that the only additional step required is to close the case in
E-Verify.
Follow the steps outlined in the ‘Employment Authorized - Process Overview.’
Page 23 of 88 | M-775, E-Verify User Manual for Employers |September 2012 www.dhs.gov/E-Verify
EMPLOYMENT AUTHORIZED – PROCESS OVERVIEW
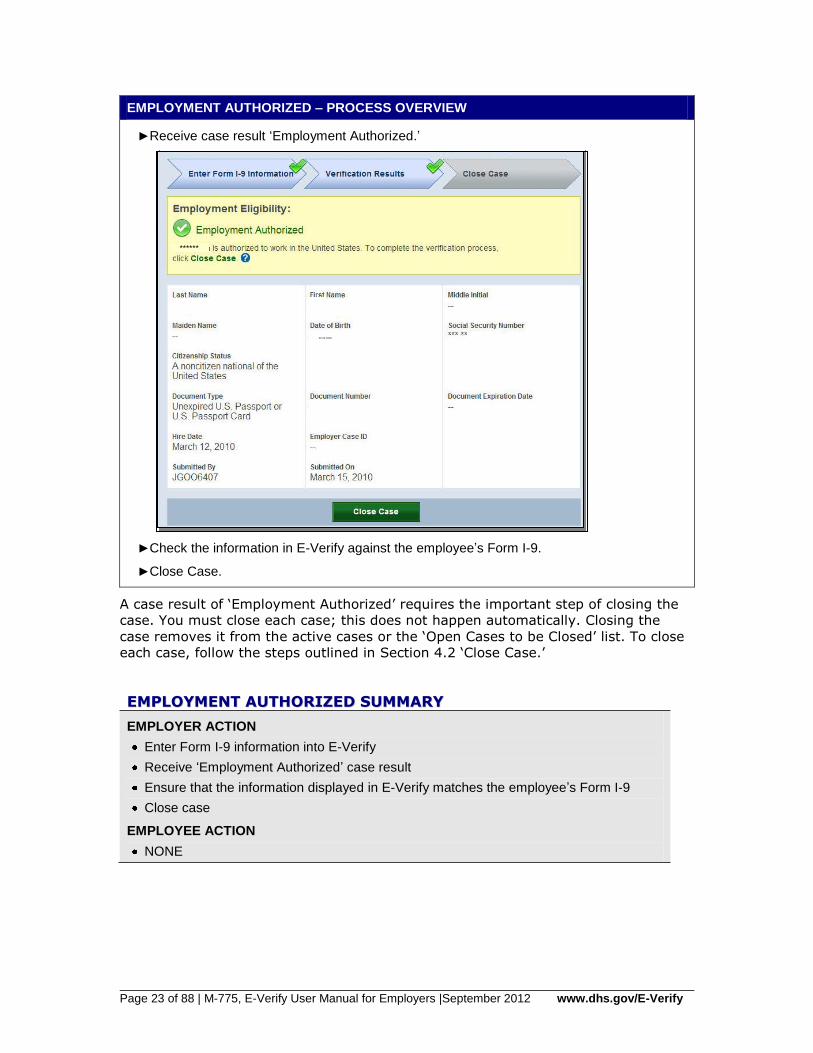
►Receive case result ‘Employment Authorized.’
## ## ####
******
►Check the information in E-Verify against the employee’s Form I-9.
►Close Case.
A case result of ‘Employment Authorized’ requires the important step of closing the
case. You must close each case; this does not happen automatically. Closing the
case removes it from the active cases or the ‘Open Cases to be Closed’ list. To close
each case, follow the steps outlined in Section 4.2 ‘Close Case.’
EEMMPPLLOOYYMMEENNTT AAUUTTHHOORRIIZZEEDD SSUUMMMMAARRYY
EMPLOYER ACTION
Enter Form I-9 information into E-Verify
Receive ‘Employment Authorized’ case result
Ensure that the information displayed in E-Verify matches the employee’s Form I-9
Close case
EMPLOYEE ACTION
NONE
Page 24 of 88 | M-775, E-Verify User Manual for Employers |September 2012 www.dhs.gov/E-Verify
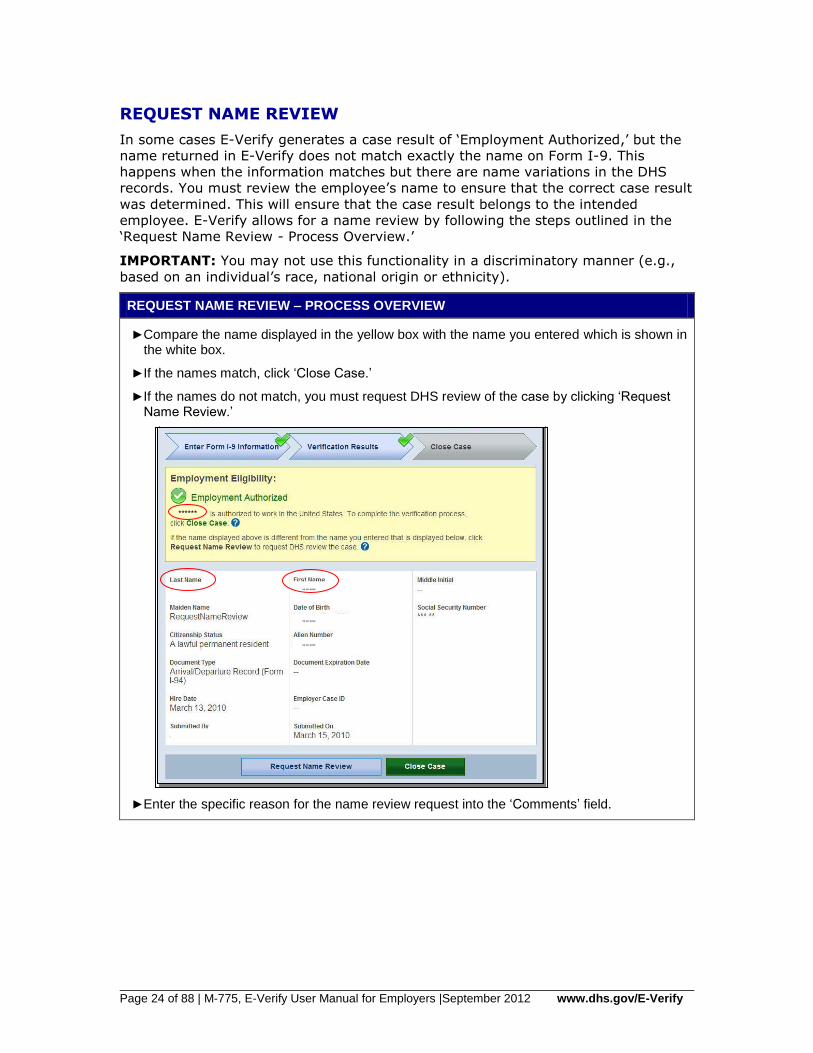
REQUEST NAME REVIEW
In some cases E-Verify generates a case result of ‘Employment Authorized,’ but the
name returned in E-Verify does not match exactly the name on Form I-9. This
happens when the information matches but there are name variations in the DHS
records. You must review the employee’s name to ensure that the correct case result
was determined. This will ensure that the case result belongs to the intended
employee. E-Verify allows for a name review by following the steps outlined in the
‘Request Name Review - Process Overview.’
IMPORTANT: You may not use this functionality in a discriminatory manner (e.g.,
based on an individual’s race, national origin or ethnicity).
REQUEST NAME REVIEW – PROCESS OVERVIEW
►Compare the name displayed in the yellow box with the name you entered which is shown in the white box.
►If the names match, click ‘Close Case.’
►If the names do not match, you must request DHS review of the case by clicking ‘Request Name Review.’
## ## ####
## ## ####
## ## ####
******
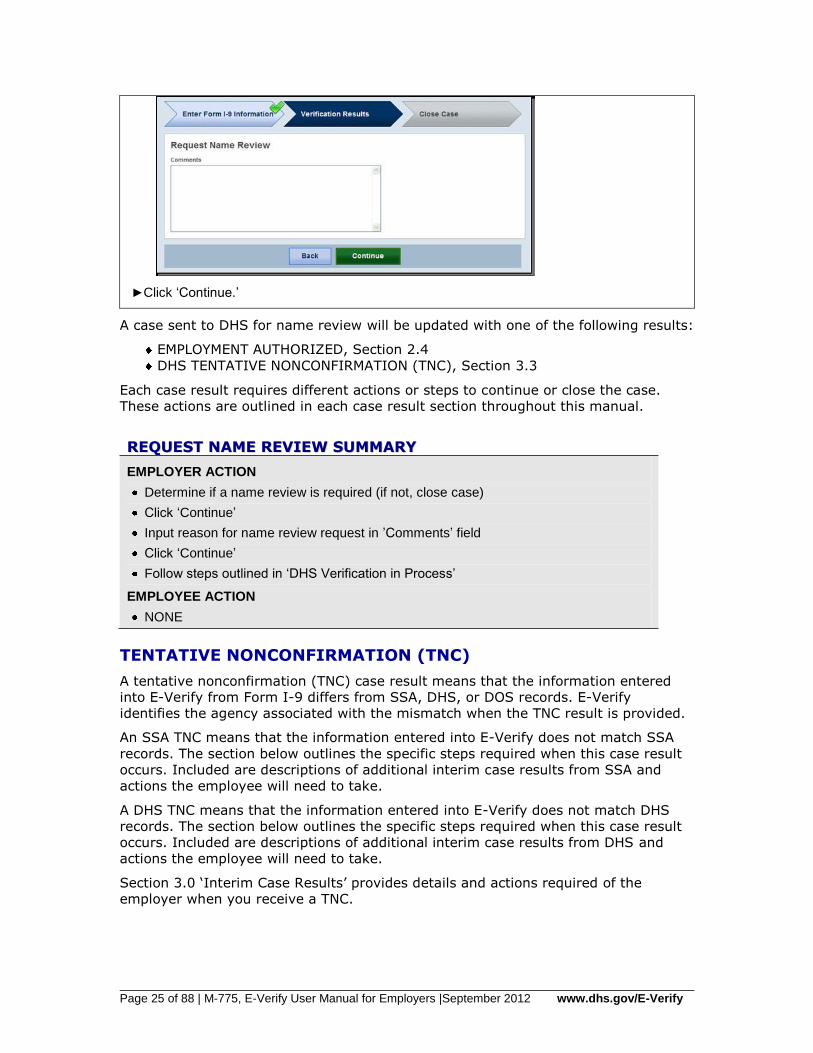
►Enter the specific reason for the name review request into the ‘Comments’ field.
Page 25 of 88 | M-775, E-Verify User Manual for Employers |September 2012 www.dhs.gov/E-Verify
►Click ‘Continue.’
A case sent to DHS for name review will be updated with one of the following results:
EMPLOYMENT AUTHORIZED, Section 2.4
DHS TENTATIVE NONCONFIRMATION (TNC), Section 3.3
Each case result requires different actions or steps to continue or close the case.
These actions are outlined in each case result section throughout this manual.
RREEQQUUEESSTT NNAAMMEE RREEVVIIEEWW SSUUMMMMAARRYY
EMPLOYER ACTION
Determine if a name review is required (if not, close case)
Click ‘Continue’
Input reason for name review request in ’Comments’ field
Click ‘Continue’
Follow steps outlined in ‘DHS Verification in Process’
EMPLOYEE ACTION
NONE
TENTATIVE NONCONFIRMATION (TNC)
A tentative nonconfirmation (TNC) case result means that the information entered
into E-Verify from Form I-9 differs from SSA, DHS, or DOS records. E-Verify
identifies the agency associated with the mismatch when the TNC result is provided.
An SSA TNC means that the information entered into E-Verify does not match SSA
records. The section below outlines the specific steps required when this case result
occurs. Included are descriptions of additional interim case results from SSA and
actions the employee will need to take.
A DHS TNC means that the information entered into E-Verify does not match DHS
records. The section below outlines the specific steps required when this case result
occurs. Included are descriptions of additional interim case results from DHS and
actions the employee will need to take.
Section 3.0 ‘Interim Case Results’ provides details and actions required of the
employer when you receive a TNC.
Page 26 of 88 | M-775, E-Verify User Manual for Employers |September 2012 www.dhs.gov/E-Verify
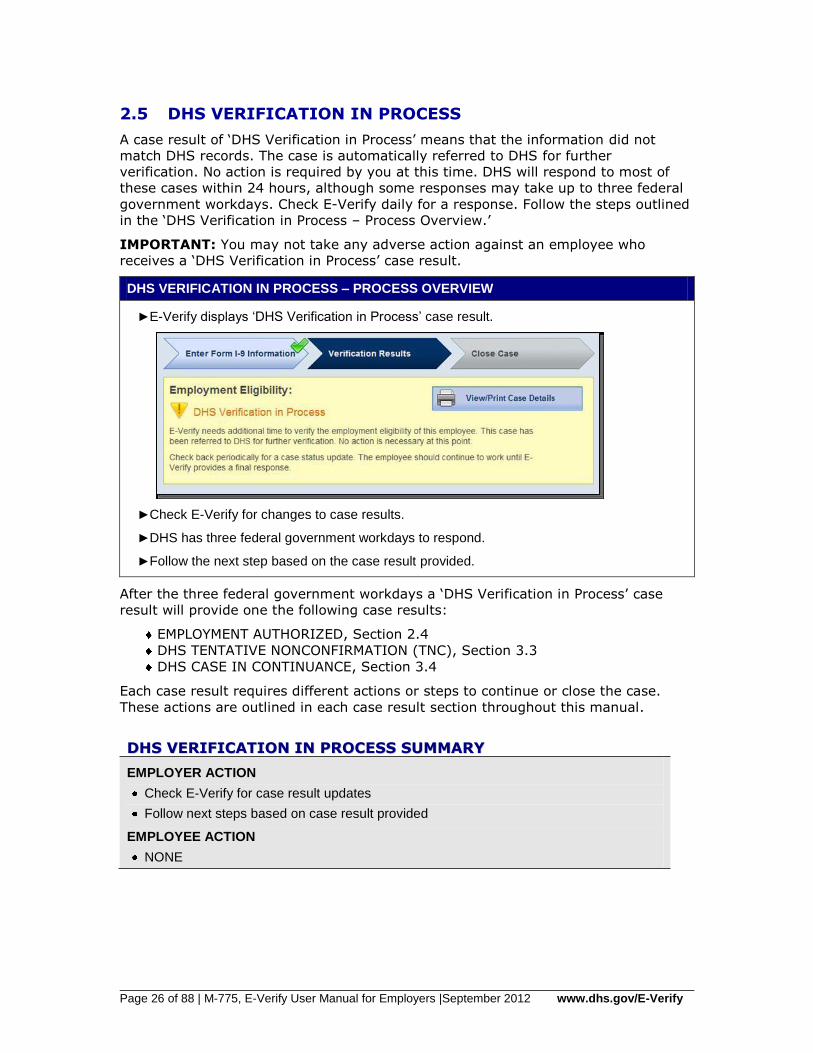
2.5 DHS VERIFICATION IN PROCESS
A case result of ‘DHS Verification in Process’ means that the information did not
match DHS records. The case is automatically referred to DHS for further
verification. No action is required by you at this time. DHS will respond to most of
these cases within 24 hours, although some responses may take up to three federal
government workdays. Check E-Verify daily for a response. Follow the steps outlined
in the ‘DHS Verification in Process – Process Overview.’
IMPORTANT: You may not take any adverse action against an employee who
receives a ‘DHS Verification in Process’ case result.
DHS VERIFICATION IN PROCESS – PROCESS OVERVIEW
►E-Verify displays ‘DHS Verification in Process’ case result.
►Check E-Verify for changes to case results.
►DHS has three federal government workdays to respond.
►Follow the next step based on the case result provided.
After the three federal government workdays a ‘DHS Verification in Process’ case
result will provide one the following case results:
EMPLOYMENT AUTHORIZED, Section 2.4
DHS TENTATIVE NONCONFIRMATION (TNC), Section 3.3
DHS CASE IN CONTINUANCE, Section 3.4
Each case result requires different actions or steps to continue or close the case.
These actions are outlined in each case result section throughout this manual.
DDHHSS VVEERRIIFFIICCAATTIIOONN IINN PPRROOCCEESSSS SSUUMMMMAARRYY
EMPLOYER ACTION
Check E-Verify for case result updates
Follow next steps based on case result provided
EMPLOYEE ACTION
NONE
Page 27 of 88 | M-775, E-Verify User Manual for Employers |September 2012 www.dhs.gov/E-Verify
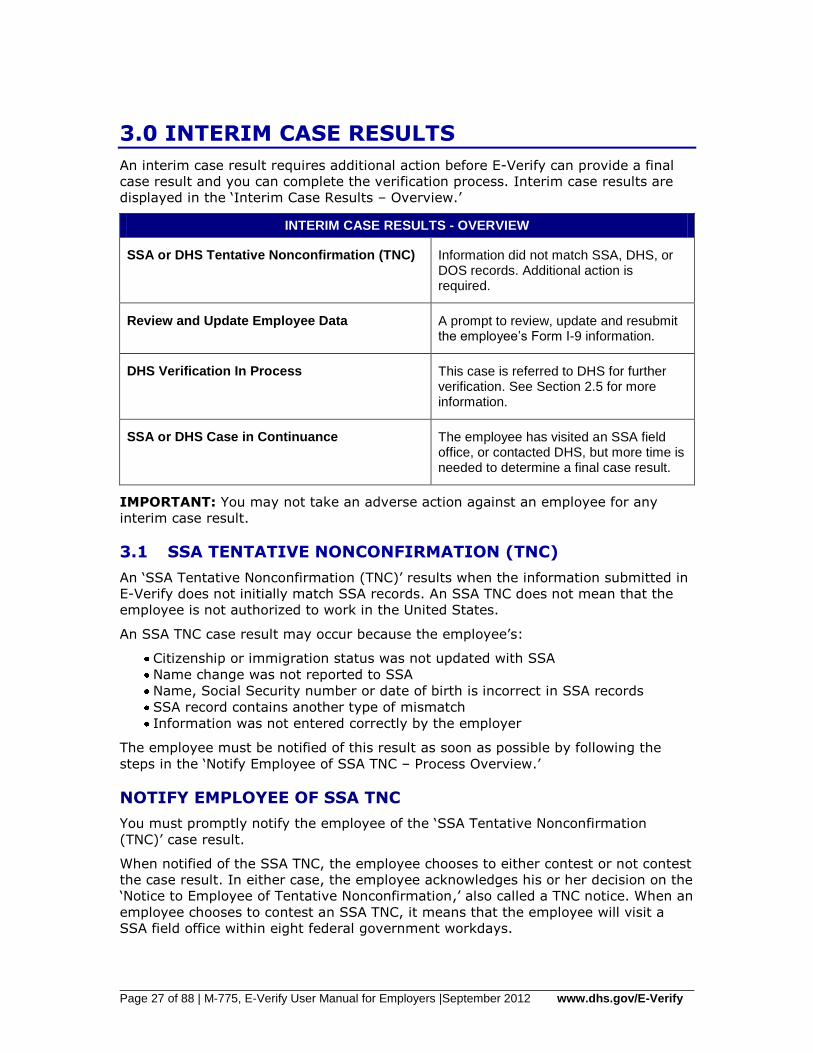
3.0 INTERIM CASE RESULTS
An interim case result requires additional action before E-Verify can provide a final
case result and you can complete the verification process. Interim case results are
displayed in the ‘Interim Case Results – Overview.’
INTERIM CASE RESULTS - OVERVIEW
SSA or DHS Tentative Nonconfirmation (TNC) Information did not match SSA, DHS, or DOS records. Additional action is required.
Review and Update Employee Data A prompt to review, update and resubmit the employee’s Form I-9 information.
DHS Verification In Process This case is referred to DHS for further verification. See Section 2.5 for more information.
SSA or DHS Case in Continuance The employee has visited an SSA field office, or contacted DHS, but more time is needed to determine a final case result.
IMPORTANT: You may not take an adverse action against an employee for any
interim case result.
3.1 SSA TENTATIVE NONCONFIRMATION (TNC)
An ‘SSA Tentative Nonconfirmation (TNC)’ results when the information submitted in
E-Verify does not initially match SSA records. An SSA TNC does not mean that the
employee is not authorized to work in the United States.
An SSA TNC case result may occur because the employee’s:
Citizenship or immigration status was not updated with SSA
Name change was not reported to SSA
Name, Social Security number or date of birth is incorrect in SSA records
SSA record contains another type of mismatch
Information was not entered correctly by the employer
The employee must be notified of this result as soon as possible by following the
steps in the ‘Notify Employee of SSA TNC – Process Overview.’
NOTIFY EMPLOYEE OF SSA TNC
You must promptly notify the employee of the ‘SSA Tentative Nonconfirmation
(TNC)’ case result.
When notified of the SSA TNC, the employee chooses to either contest or not contest
the case result. In either case, the employee acknowledges his or her decision on the
‘Notice to Employee of Tentative Nonconfirmation,’ also called a TNC notice. When an
employee chooses to contest an SSA TNC, it means that the employee will visit a
SSA field office within eight federal government workdays.
Page 28 of 88 | M-775, E-Verify User Manual for Employers |September 2012 www.dhs.gov/E-Verify
If the employee chooses not to contest the SSA TNC, he or she acknowledges that
you may terminate employment with no civil or criminal liability as noted in Article
II, Section C – Responsibilities of the Employer (#6) in the memorandum of
understanding (MOU).
If the employee chooses not to contest the SSA TNC, the case automatically
becomes a final nonconfirmation (FNC). You may close the case in E-Verify and
terminate his or her employment. For more information, see Section 4.2 ‘Close
Case.’
Your employee has ten business days after you have notified them of an SSA TNC to
decide whether they wish to contest or not. If, after you have followed the steps
below to notify your employee, he or she does not notify you of his or her decision,
in ten business days, you may consider this case a FNC. You may close the case in E-
Verify, and you may terminate employment based on this result.
To notify an employee of the SSA TNC case result, follow the steps outlined in the
‘Notify Employee of SSA TNC - Process Overview.’
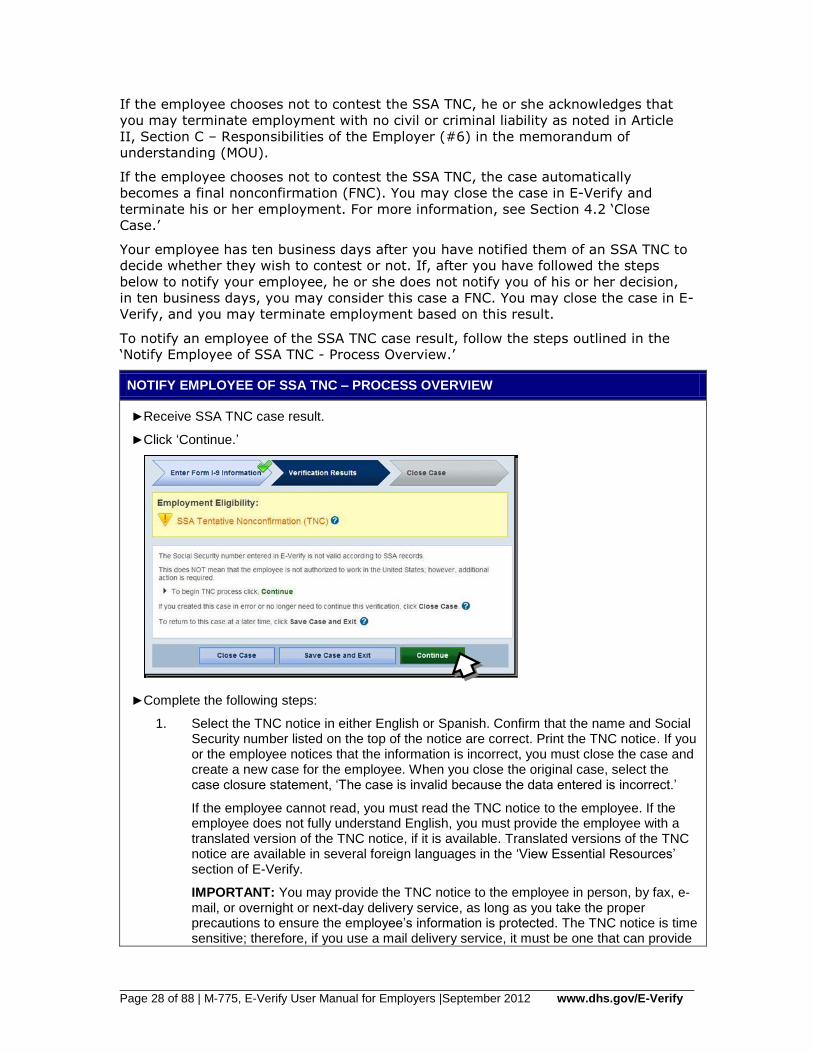
NOTIFY EMPLOYEE OF SSA TNC – PROCESS OVERVIEW
►Receive SSA TNC case result.
►Click ‘Continue.’
►Complete the following steps:
1. Select the TNC notice in either English or Spanish. Confirm that the name and Social Security number listed on the top of the notice are correct. Print the TNC notice. If you or the employee notices that the information is incorrect, you must close the case and create a new case for the employee. When you close the original case, select the case closure statement, ‘The case is invalid because the data entered is incorrect.’
If the employee cannot read, you must read the TNC notice to the employee. If the employee does not fully understand English, you must provide the employee with a translated version of the TNC notice, if it is available. Translated versions of the TNC notice are available in several foreign languages in the ‘View Essential Resources’ section of E-Verify.
IMPORTANT: You may provide the TNC notice to the employee in person, by fax, e-mail, or overnight or next-day delivery service, as long as you take the proper precautions to ensure the employee’s information is protected. The TNC notice is time sensitive; therefore, if you use a mail delivery service, it must be one that can provide
Page 29 of 88 | M-775, E-Verify User Manual for Employers |September 2012 www.dhs.gov/E-Verify
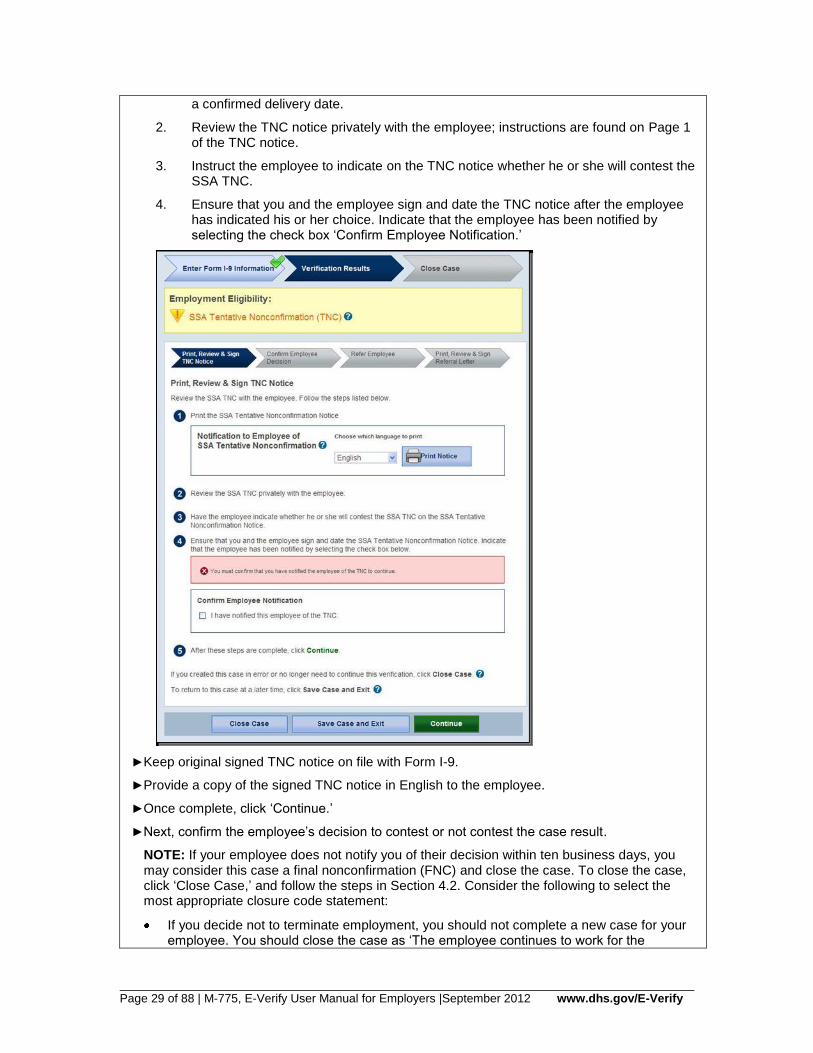
a confirmed delivery date.
2. Review the TNC notice privately with the employee; instructions are found on Page 1 of the TNC notice.
3. Instruct the employee to indicate on the TNC notice whether he or she will contest the SSA TNC.
4. Ensure that you and the employee sign and date the TNC notice after the employee has indicated his or her choice. Indicate that the employee has been notified by selecting the check box ‘Confirm Employee Notification.’
►Keep original signed TNC notice on file with Form I-9.
►Provide a copy of the signed TNC notice in English to the employee.
►Once complete, click ‘Continue.’
►Next, confirm the employee’s decision to contest or not contest the case result.
NOTE: If your employee does not notify you of their decision within ten business days, you may consider this case a final nonconfirmation (FNC) and close the case. To close the case, click ‘Close Case,’ and follow the steps in Section 4.2. Consider the following to select the most appropriate closure code statement:
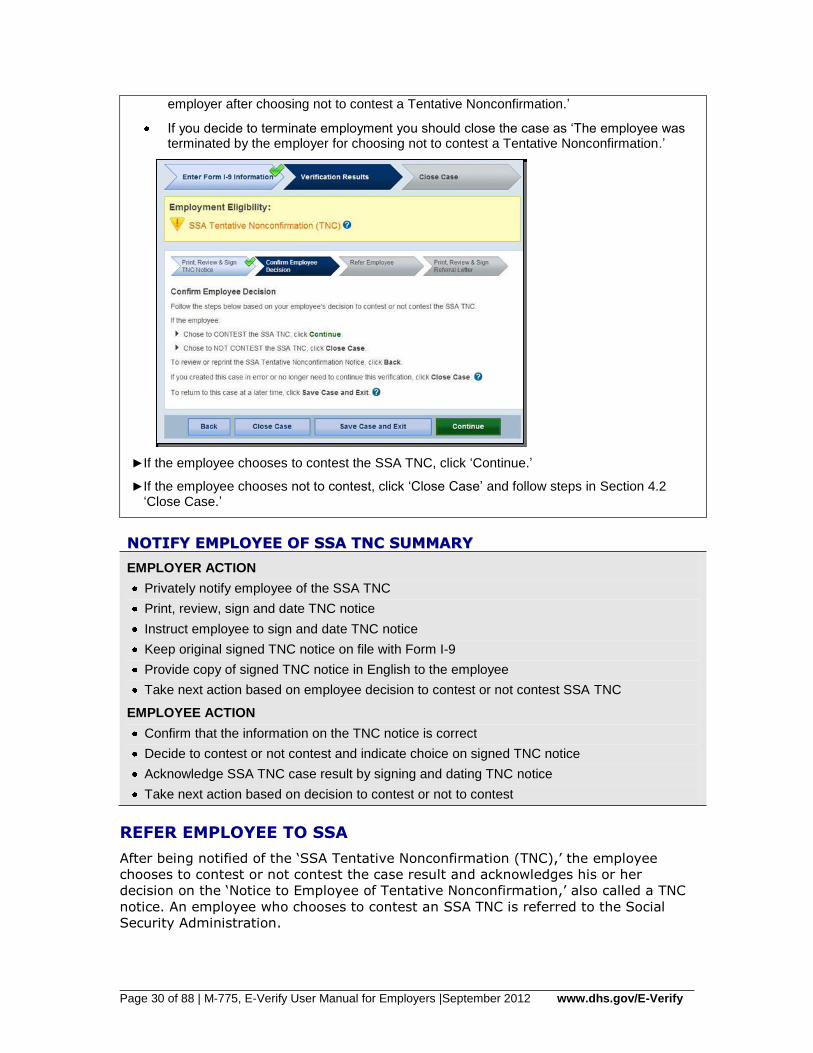
If you decide not to terminate employment, you should not complete a new case for your employee. You should close the case as ‘The employee continues to work for the
Page 30 of 88 | M-775, E-Verify User Manual for Employers |September 2012 www.dhs.gov/E-Verify
employer after choosing not to contest a Tentative Nonconfirmation.’
If you decide to terminate employment you should close the case as ‘The employee was terminated by the employer for choosing not to contest a Tentative Nonconfirmation.’
►If the employee chooses to contest the SSA TNC, click ‘Continue.’
►If the employee chooses not to contest, click ‘Close Case’ and follow steps in Section 4.2 ‘Close Case.’
NNOOTTIIFFYY EEMMPPLLOOYYEEEE OOFF SSSSAA TTNNCC SSUUMMMMAARRYY
EMPLOYER ACTION
Privately notify employee of the SSA TNC
Print, review, sign and date TNC notice
Instruct employee to sign and date TNC notice
Keep original signed TNC notice on file with Form I-9
Provide copy of signed TNC notice in English to the employee
Take next action based on employee decision to contest or not contest SSA TNC
EMPLOYEE ACTION
Confirm that the information on the TNC notice is correct
Decide to contest or not contest and indicate choice on signed TNC notice
Acknowledge SSA TNC case result by signing and dating TNC notice
Take next action based on decision to contest or not to contest
REFER EMPLOYEE TO SSA
After being notified of the ‘SSA Tentative Nonconfirmation (TNC),’ the employee
chooses to contest or not contest the case result and acknowledges his or her
decision on the ‘Notice to Employee of Tentative Nonconfirmation,’ also called a TNC
notice. An employee who chooses to contest an SSA TNC is referred to the Social
Security Administration.
Page 31 of 88 | M-775, E-Verify User Manual for Employers |September 2012 www.dhs.gov/E-Verify
E-Verify generates a ‘Referral to the Social Security Administration’ also called an
SSA referral letter that you must provide to the employee. The employee must
provide this letter to SSA if he or she chooses to contest. You must verify the
information on the letter, then print, sign, and provide the letter to the employee.
The SSA referral letter provides instructions to you and the employee regarding the
next steps. These steps are outlined in the ‘Refer Employee to SSA – Process
Overview.’
An employee who chooses to contest the SSA TNC has eight federal government
workdays to visit an SSA field office to begin resolving the TNC. The employee must
provide this letter to SSA when he or she visits an SSA field office. Federal
government workdays are Monday through Friday except for federal holidays. The
eight federal government workdays begin when the case is referred to SSA in
E-Verify. The date by which the employee must visit SSA is printed on the SSA
referral letter. Because the eight federal government workdays begin on the date the
case is referred, it is important to provide the SSA referral letter to the worker
promptly.
You may not terminate, suspend, delay training, withhold pay, lower pay or take any
other adverse action against an employee based on the employee’s decision to
contest an SSA TNC or while his or her case is still pending with SSA.
To refer an employee to visit an SSA field office, follow the steps outlined in the
‘Refer Employee to SSA - Process Overview.’
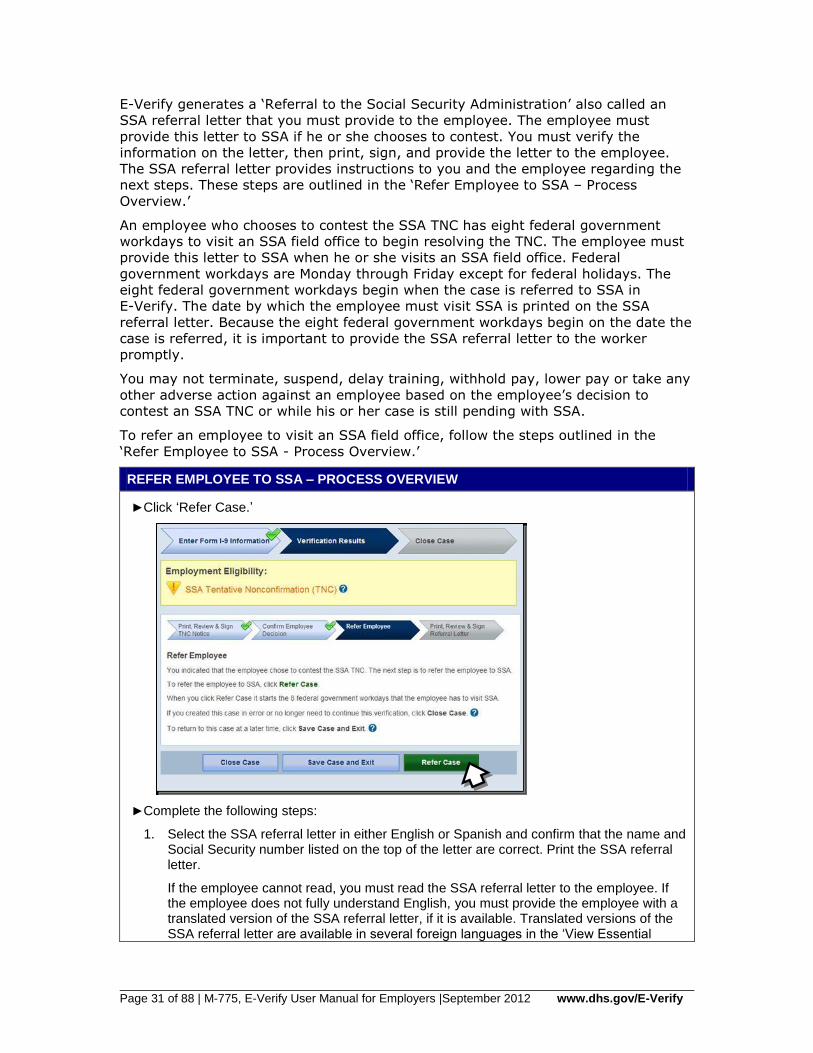
REFER EMPLOYEE TO SSA – PROCESS OVERVIEW
►Click ‘Refer Case.’
►Complete the following steps:
1. Select the SSA referral letter in either English or Spanish and confirm that the name and Social Security number listed on the top of the letter are correct. Print the SSA referral letter.
If the employee cannot read, you must read the SSA referral letter to the employee. If the employee does not fully understand English, you must provide the employee with a translated version of the SSA referral letter, if it is available. Translated versions of the SSA referral letter are available in several foreign languages in the ‘View Essential

Page 32 of 88 | M-775, E-Verify User Manual for Employers |September 2012 www.dhs.gov/E-Verify
Resources’ section of E-Verify.
IMPORTANT: Once the SSA referral letter is signed, you may provide it to the employee in person, by fax, e-mail, overnight or next-day delivery service, as long as you take proper precautions to ensure the employee’s information is protected. The SSA referral letter is time sensitive; therefore, if you use a mail delivery service, it must be one that can provide a confirmed delivery date.
2. Review and explain the next steps to the employee – instructions to the employer are on Page 1 of the SSA referral letter and the employee instructions are on Page 2.
3. Ensure that you and the employee sign and date the SSA referral letter.
4. Provide a copy of the signed SSA referral letter in English to the employee; the employee is required to provide the letter to an SSA field office if he or she chooses to contest. File the original SSA referral letter with Form I-9.
5. After these steps are complete, click ‘Continue.’
►The employee has been referred to SSA, and the case status is ‘Employee Referred to SSA.’ The employee has eight federal government workdays to visit an SSA field office to being resolving the TNC. The employee must provide the SSA referral letter to SSA when he or she visits an SSA field office.

Page 33 of 88 | M-775, E-Verify User Manual for Employers |September 2012 www.dhs.gov/E-Verify
►Check E-Verify for case updates and follow steps based on next case result.
IMPORTANT: You should ONLY close the case when E-Verify provides a final case result or if you no longer need to continue to verify the employment eligibility of the employee.
SSA has 10 federal government workdays to update the case result in E-Verify. You
should check E-Verify periodically for an update in case result. A case referred to
SSA is updated with one the following results:
EMPLOYMENT AUTHORIZED, Section 2.4
SSA FINAL NONCONFIRMATION, Section 4.1
SSA CASE IN CONTINUANCE, Section 3.4
DHS VERIFICATION IN PROCESS, Section 2.5
REVIEW AND UPDATE EMPLOYEE DATA, Section 3.2
Each case result requires different actions or steps to continue or close the case.
These actions are outlined in each case result section throughout this manual.
RREEFFEERR EEMMPPLLOOYYEEEE TTOO SSSSAA SSUUMMMMAARRYY
EMPLOYER ACTION
If employee chooses to contest the SSA TNC, refer case
Ensure that the information on the SSA referral letter is correct
Print, review, sign and date SSA referral letter
Have employee sign and date SSA referral letter
Keep original signed SSA referral letter on file with Form I-9
Provide copy of signed SSA referral letter in English to the employee
Check E-Verify for case result updates and follow steps based on case result provided

Page 34 of 88 | M-775, E-Verify User Manual for Employers |September 2012 www.dhs.gov/E-Verify
EMPLOYEE ACTION
Sign and date SSA referral letter
Visit an SSA field office within eight federal government workdays and present the SSA referral letter
3.2 REVIEW AND UPDATE EMPLOYEE DATA
In some instances, a case result of ‘Review and Update Employee Data’ occurs, and
you will receive a prompt to review and update the employee’s information. This
means that SSA found a discrepancy in the information it received in the E-Verify
referral.
A ‘Review and Update Employee Data’ case result occurs for reasons including
typographical errors and/or incorrect information provided on Form I-9. This case
result does not mean that the employee is not authorized to work.
This requires you to review Form I-9 with the employee, correct the information and
update the case by following the steps provided in the ‘Review and Update Employee
Data - Process Overview.’
REVIEW AND UPDATE EMPLOYEE DATA – PROCESS OVERVIEW
►Review the accuracy of the information provided on Form I-9 with the employee. If the employee made a mistake on Form I-9, correct and update.
►If necessary, modify the employee’s information in the fields provided.
IMPORTANT: You may update a case one time. Ensure that the changes are correct before updating the case.
►Click ‘Continue.’
►Follow next steps based on the case result provided.
A case that is resubmitted to SSA is updated with one of the following case results:
Page 35 of 88 | M-775, E-Verify User Manual for Employers |September 2012 www.dhs.gov/E-Verify
EMPLOYMENT AUTHORIZED, Section 2.4
DHS VERIFICATION IN PROCESS, Section 2.5
DHS TENTATIVE NONCONFIRMATION (TNC), Section 3.3
SSA FINAL NONCONFIRMATION, Section 4.1
Each case result requires different actions or steps to continue the case. These
actions are outlined in each case result section throughout this manual.
RREEVVIIEEWW AANNDD UUPPDDAATTEE EEMMPPLLOOYYEEEE DDAATTAA SSUUMMMMAARRYY
EMPLOYER ACTION
Review the information on Form I-9 and E-Verify with the employee for accuracy
Access the employee’s case
If necessary, modify employee’s information in the fields provided
Click ‘Continue’
Follow steps based on case result provided
EMPLOYEE ACTION
Ensure that the information found on Form I-9 is accurate
3.3 DHS TENTATIVE NONCONFIRMATION (TNC)
A ‘DHS Tentative Nonconfirmation (TNC)’ results when the information submitted to
E-Verify does not initially match DHS or DOS records. A DHS TNC does not mean
that the employee is not authorized to work in the United States.
A DHS TNC case result occurs because the employee’s:
Name, Alien number and/or I-94 number are incorrect in DHS records
U.S. Passport, Passport Card, driver’s license or state ID card information could
not be verified
Information was not updated in the employee’s DHS records
Citizenship or immigration status changed
Record contains another type of error
Information was not entered correctly by the employer
The employee is notified of this result by following the steps in ‘Notify Employee of
DHS TNC – Process Overview.’
NOTIFY EMPLOYEE OF DHS TNC
You must promptly notify the employee of the ‘DHS Tentative Nonconfirmation
(TNC)’ case result.
When notified of the DHS TNC, the employee chooses to contest or not contest the
DHS TNC case result and indicates his or her decision on the ‘Notice to Employee of
Tentative Nonconfirmation,’ also called a TNC notice. When an employee chooses to
contest a DHS TNC, the employee is responsible for contacting DHS within eight
federal government workdays.
If the employee chooses not to contest the DHS TNC, he or she acknowledges that
you may terminate employment with no civil or criminal liability as noted in Article
II, Section C – Responsibilities of the Employer (#6) in the memorandum of
understanding (MOU).

Page 36 of 88 | M-775, E-Verify User Manual for Employers |September 2012 www.dhs.gov/E-Verify
If the employee chooses not to contest the DHS TNC, the case automatically
becomes a final nonconfirmation (FNC). You may close the case in E-Verify and
terminate employment without penalty. For more information, see Section 4.2 ‘Close
Case.’
Your employee has ten business days after you have notified them of an DHS TNC to
decide whether they wish to contest or not. If, after you have followed the steps
below to notify your employee, he or she does not notify you of his or her decision,
in ten business days, you may consider this case a FNC. You may close the case in E-
Verify, and you may terminate employment based on this result.
To notify an employee of the DHS TNC case result, follow the steps outlined in the
‘Notify Employee of DHS TNC - Process Overview.’
NOTIFY EMPLOYEE OF DHS TNC – PROCESS OVERVIEW
►Receive DHS TNC case result.
► Click ‘Continue.’.
►Complete the steps listed below:
1. Select the TNC notice in either English or Spanish. Confirm that the name and Social Security number listed on the top of the notice are correct. Print the TNC notice. If you or the employee notices that the information is incorrect, you must close the case and create a new case for the employee. When you close the original case, select the case closure statement, ‘The case is invalid because the data entered is incorrect.’
If the employee cannot read, you must read the TNC notice to the employee. If the employee does not fully understand English, you must provide the employee with a translated version of the TNC notice, if it is available. Translated versions of the TNC notice are available in several foreign languages in the ‘View Essential Resources’ section of E-Verify.
IMPORTANT: You may provide the TNC notice to the employee in person, by fax, e-mail, overnight or next-day delivery service, as long as you take the proper precautions to ensure the employee’s information is protected. The TNC notice is time sensitive; therefore, if you use a mail delivery service, they must be one that can provide a confirmed delivery date.
2. Review the TNC notice privately with the employee; instructions are found on Page 1 of the TNC notice.
3. Instruct the employee to indicate on the TNC notice whether he or she will contest the
Page 37 of 88 | M-775, E-Verify User Manual for Employers |September 2012 www.dhs.gov/E-Verify
DHS TNC.
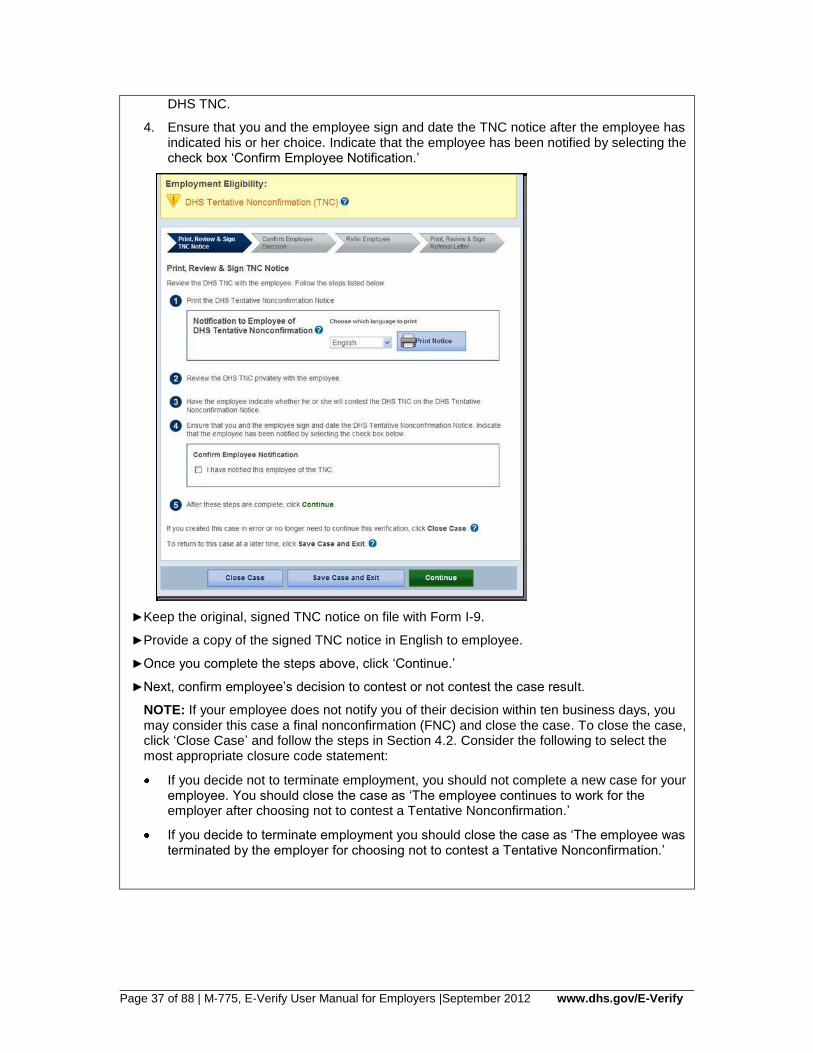
4. Ensure that you and the employee sign and date the TNC notice after the employee has indicated his or her choice. Indicate that the employee has been notified by selecting the check box ‘Confirm Employee Notification.’
►Keep the original, signed TNC notice on file with Form I-9.
►Provide a copy of the signed TNC notice in English to employee.
►Once you complete the steps above, click ‘Continue.’
►Next, confirm employee’s decision to contest or not contest the case result.
NOTE: If your employee does not notify you of their decision within ten business days, you may consider this case a final nonconfirmation (FNC) and close the case. To close the case, click ‘Close Case’ and follow the steps in Section 4.2. Consider the following to select the most appropriate closure code statement:
If you decide not to terminate employment, you should not complete a new case for your employee. You should close the case as ‘The employee continues to work for the employer after choosing not to contest a Tentative Nonconfirmation.’
If you decide to terminate employment you should close the case as ‘The employee was terminated by the employer for choosing not to contest a Tentative Nonconfirmation.’
Page 38 of 88 | M-775, E-Verify User Manual for Employers |September 2012 www.dhs.gov/E-Verify
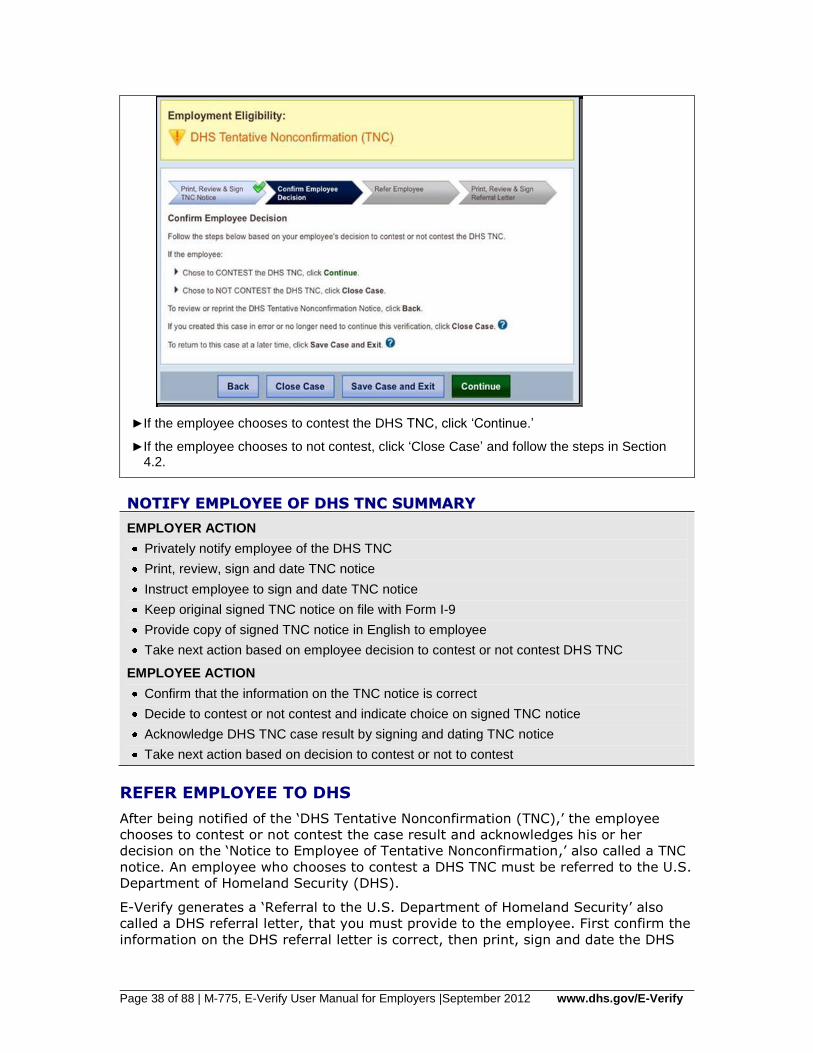
►If the employee chooses to contest the DHS TNC, click ‘Continue.’
►If the employee chooses to not contest, click ‘Close Case’ and follow the steps in Section 4.2.
NNOOTTIIFFYY EEMMPPLLOOYYEEEE OOFF DDHHSS TTNNCC SSUUMMMMAARRYY
EMPLOYER ACTION
Privately notify employee of the DHS TNC
Print, review, sign and date TNC notice
Instruct employee to sign and date TNC notice
Keep original signed TNC notice on file with Form I-9
Provide copy of signed TNC notice in English to employee
Take next action based on employee decision to contest or not contest DHS TNC
EMPLOYEE ACTION
Confirm that the information on the TNC notice is correct
Decide to contest or not contest and indicate choice on signed TNC notice
Acknowledge DHS TNC case result by signing and dating TNC notice
Take next action based on decision to contest or not to contest
REFER EMPLOYEE TO DHS
After being notified of the ‘DHS Tentative Nonconfirmation (TNC),’ the employee
chooses to contest or not contest the case result and acknowledges his or her
decision on the ‘Notice to Employee of Tentative Nonconfirmation,’ also called a TNC
notice. An employee who chooses to contest a DHS TNC must be referred to the U.S.
Department of Homeland Security (DHS).
E-Verify generates a ‘Referral to the U.S. Department of Homeland Security’ also
called a DHS referral letter, that you must provide to the employee. First confirm the
information on the DHS referral letter is correct, then print, sign and date the DHS

Page 39 of 88 | M-775, E-Verify User Manual for Employers |September 2012 www.dhs.gov/E-Verify
referral letter and provide it to the employee. The DHS referral letter provides
instructions to you and the employee regarding the next steps. These steps are
outlined in the ‘Refer Employee to DHS – Process Overview.’
An Employee who chooses to contest a DHS TNC has eight federal government
workdays to contact DHS to begin resolving the TNC. Federal government workdays
are Monday through Friday except for federal holidays. The eight federal government
workdays begin when the case is referred to DHS in E-Verify. The date by which the
employee must contact DHS is printed on the DHS referral letter. Because the eight
federal government workdays begin on the date the case is referred, it is important
to provide the DHS referral letter to the worker promptly.
If the employer fails to match photos during E-Verify photo matching, a photo
mismatch TNC may occur. A photo mismatch TNC requires an additional step but
follows the same guidelines of any TNC. If the employee chooses to contest the
photo mismatch TNC the employee must be referred to DHS, and you must send a
copy of the photo ID document to E-Verify.
You may not terminate, suspend, delay training, withhold pay, lower pay or take any
other adverse action against an employee based on the employee’s decision to
contest a TNC or because the case is still pending with DHS.
To refer an employee to DHS, follow the steps outlined in the ‘Refer Employee to
DHS - Process Overview.’
REFER EMPLOYEE TO DHS – PROCESS OVERVIEW
►Click ‘Refer Case.’
In some cases, E-Verify prompts you to submit a copy of the employee’s photo document to DHS. Follow the steps below to complete this step when prompted.
►First, obtain a copy of the employee’s Form I-9 photo document.
►Then determine how you will submit a copy of this document to DHS. You may submit an electronic copy or send a paper copy by selecting one of the following:
Attach and Submit Copy of Employee’s Photo Document
OR
Page 40 of 88 | M-775, E-Verify User Manual for Employers |September 2012 www.dhs.gov/E-Verify
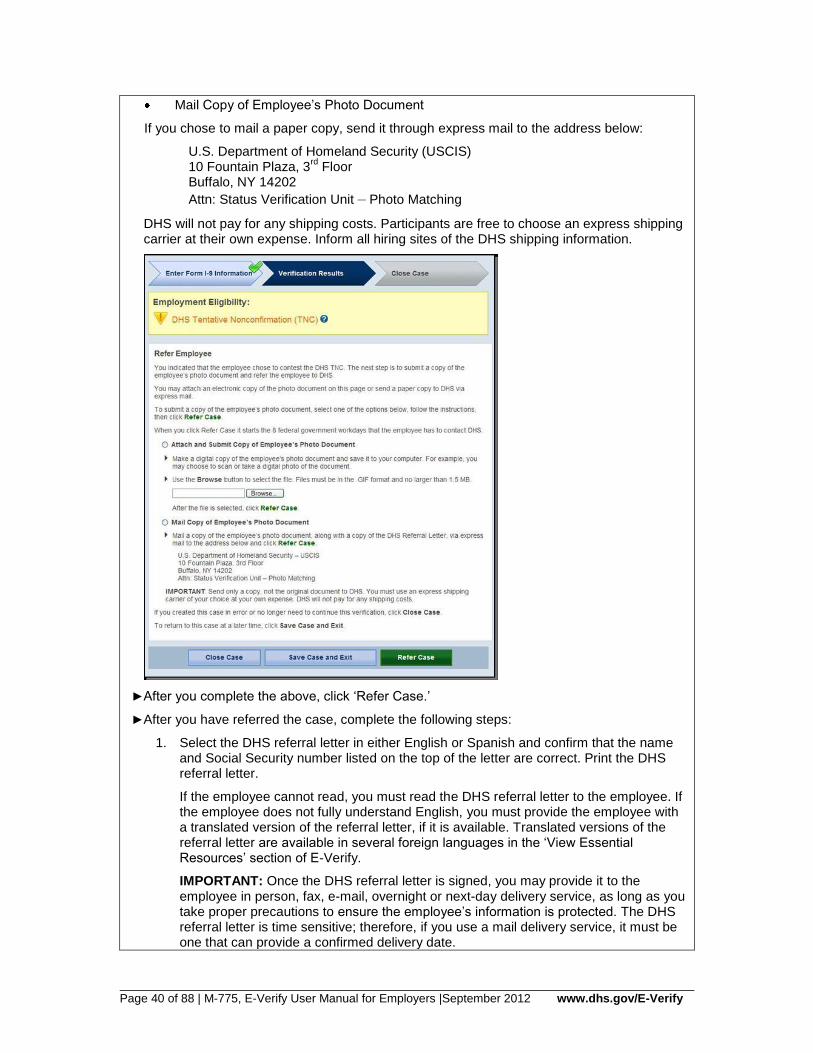
Mail Copy of Employee’s Photo Document
If you chose to mail a paper copy, send it through express mail to the address below:
U.S. Department of Homeland Security (USCIS) 10 Fountain Plaza, 3
rd Floor
Buffalo, NY 14202
Attn: Status Verification Unit – Photo Matching
DHS will not pay for any shipping costs. Participants are free to choose an express shipping carrier at their own expense. Inform all hiring sites of the DHS shipping information.
►After you complete the above, click ‘Refer Case.’
►After you have referred the case, complete the following steps:
1. Select the DHS referral letter in either English or Spanish and confirm that the name and Social Security number listed on the top of the letter are correct. Print the DHS referral letter.
If the employee cannot read, you must read the DHS referral letter to the employee. If the employee does not fully understand English, you must provide the employee with a translated version of the referral letter, if it is available. Translated versions of the referral letter are available in several foreign languages in the ‘View Essential Resources’ section of E-Verify.
IMPORTANT: Once the DHS referral letter is signed, you may provide it to the employee in person, fax, e-mail, overnight or next-day delivery service, as long as you take proper precautions to ensure the employee’s information is protected. The DHS referral letter is time sensitive; therefore, if you use a mail delivery service, it must be one that can provide a confirmed delivery date.
Page 41 of 88 | M-775, E-Verify User Manual for Employers |September 2012 www.dhs.gov/E-Verify
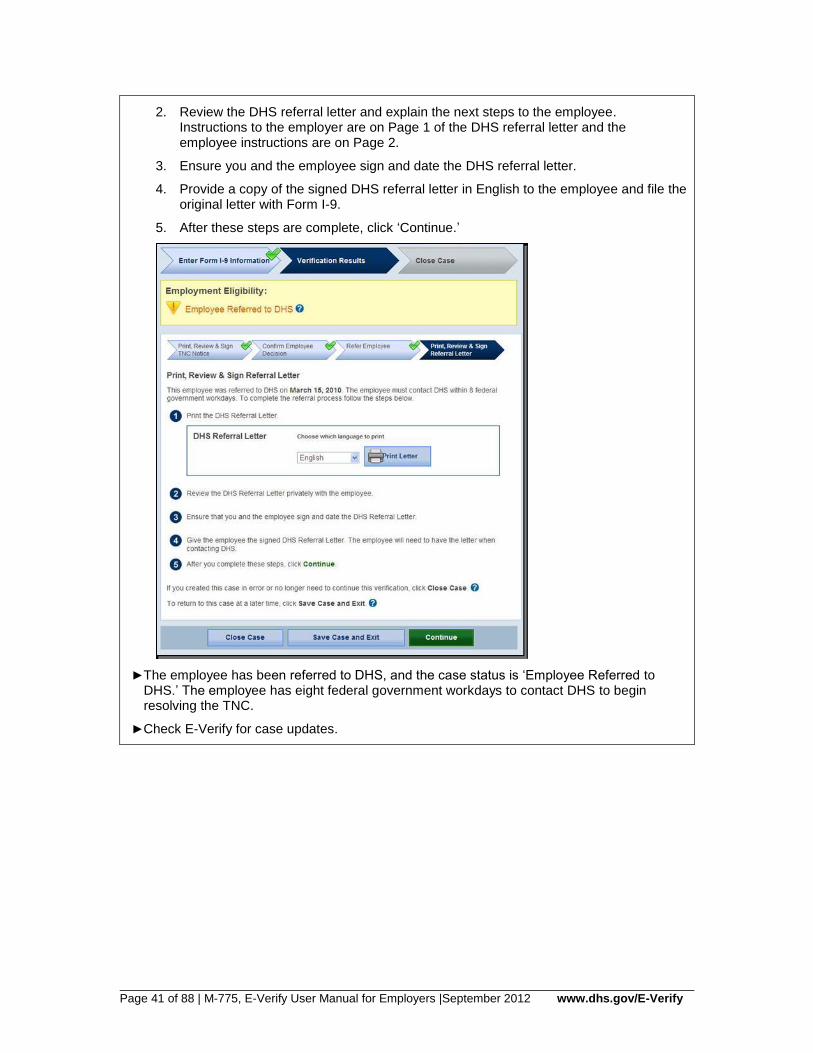
2. Review the DHS referral letter and explain the next steps to the employee. Instructions to the employer are on Page 1 of the DHS referral letter and the employee instructions are on Page 2.
3. Ensure you and the employee sign and date the DHS referral letter.
4. Provide a copy of the signed DHS referral letter in English to the employee and file the original letter with Form I-9.
5. After these steps are complete, click ‘Continue.’
►The employee has been referred to DHS, and the case status is ‘Employee Referred to DHS.’ The employee has eight federal government workdays to contact DHS to begin resolving the TNC.
►Check E-Verify for case updates.
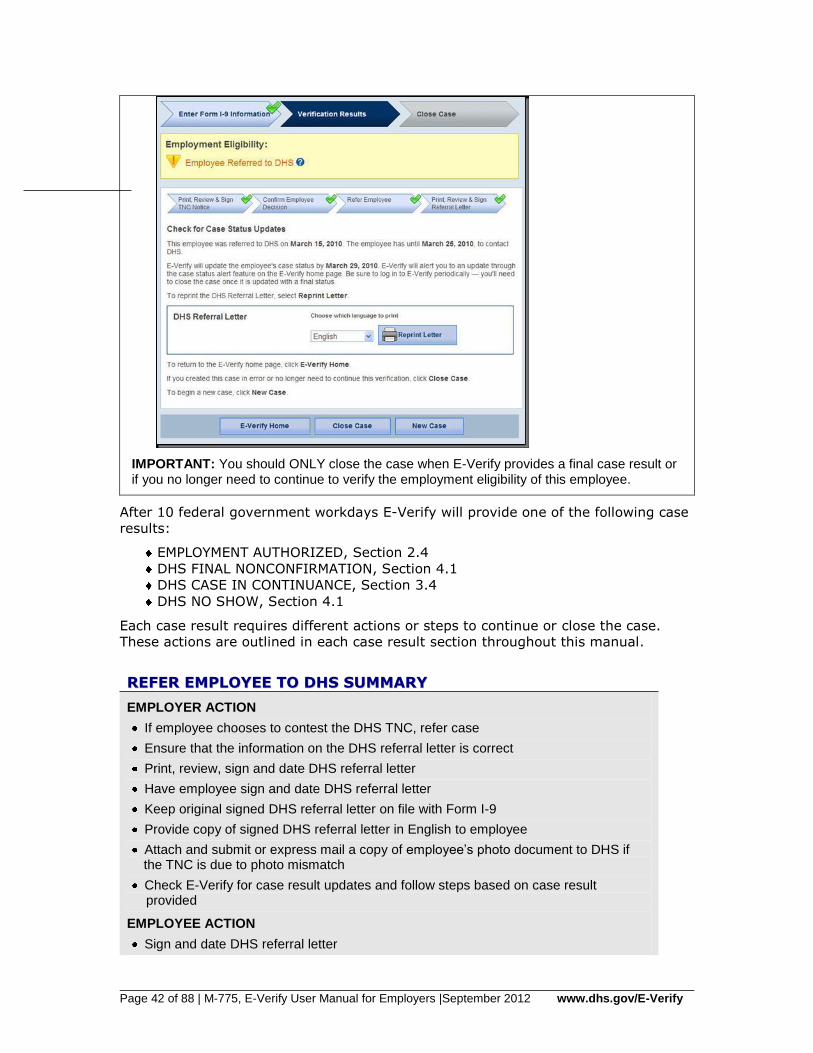
Page 42 of 88 | M-775, E-Verify User Manual for Employers |September 2012 www.dhs.gov/E-Verify
IMPORTANT: You should ONLY close the case when E-Verify provides a final case result or if you no longer need to continue to verify the employment eligibility of this employee.
After 10 federal government workdays E-Verify will provide one of the following case
results:
EMPLOYMENT AUTHORIZED, Section 2.4
DHS FINAL NONCONFIRMATION, Section 4.1
DHS CASE IN CONTINUANCE, Section 3.4
DHS NO SHOW, Section 4.1
Each case result requires different actions or steps to continue or close the case.
These actions are outlined in each case result section throughout this manual.
RREEFFEERR EEMMPPLLOOYYEEEE TTOO DDHHSS SSUUMMMMAARRYY
EMPLOYER ACTION
If employee chooses to contest the DHS TNC, refer case
Ensure that the information on the DHS referral letter is correct
Print, review, sign and date DHS referral letter
Have employee sign and date DHS referral letter
Keep original signed DHS referral letter on file with Form I-9
Provide copy of signed DHS referral letter in English to employee
Attach and submit or express mail a copy of employee’s photo document to DHS if the TNC is due to photo mismatch
Check E-Verify for case result updates and follow steps based on case result provided
EMPLOYEE ACTION
Sign and date DHS referral letter
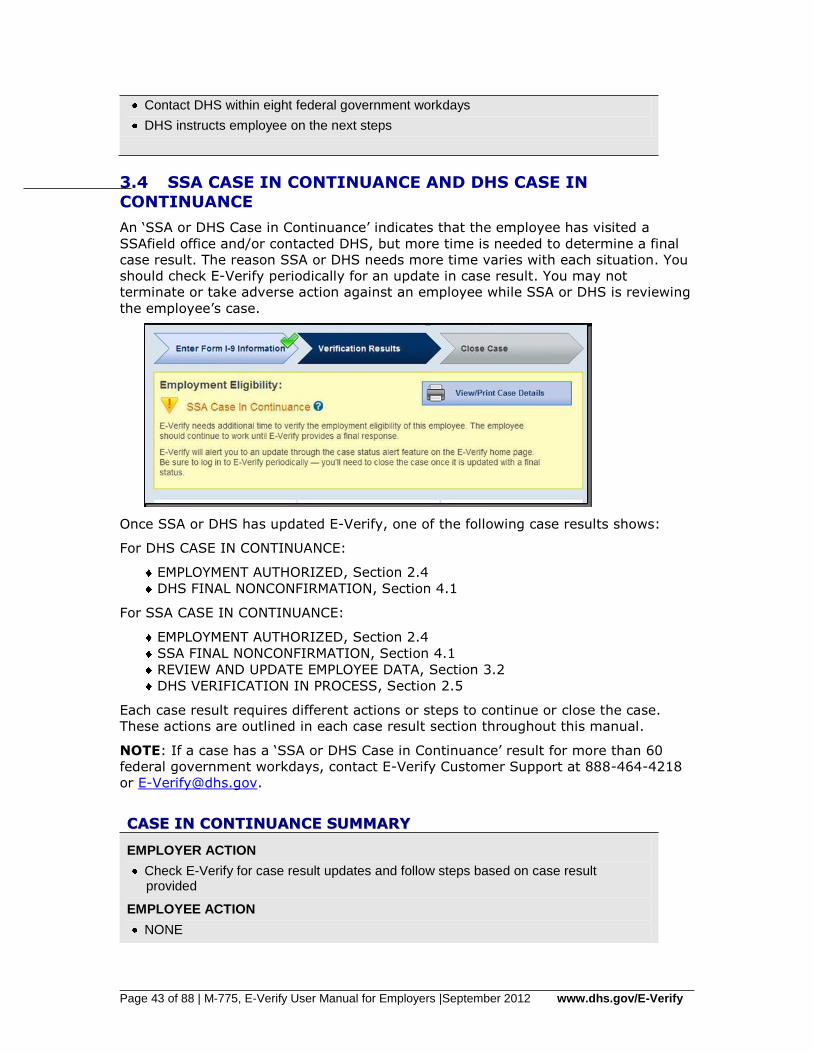
Page 43 of 88 | M-775, E-Verify User Manual for Employers |September 2012 www.dhs.gov/E-Verify
Contact DHS within eight federal government workdays
DHS instructs employee on the next steps
3.4 SSA CASE IN CONTINUANCE AND DHS CASE IN
CONTINUANCE
An ‘SSA or DHS Case in Continuance’ indicates that the employee has visited a
SSAfield office and/or contacted DHS, but more time is needed to determine a final
case result. The reason SSA or DHS needs more time varies with each situation. You
should check E-Verify periodically for an update in case result. You may not
terminate or take adverse action against an employee while SSA or DHS is reviewing
the employee’s case.
Once SSA or DHS has updated E-Verify, one of the following case results shows:
For DHS CASE IN CONTINUANCE:
EMPLOYMENT AUTHORIZED, Section 2.4
DHS FINAL NONCONFIRMATION, Section 4.1
For SSA CASE IN CONTINUANCE:
EMPLOYMENT AUTHORIZED, Section 2.4
SSA FINAL NONCONFIRMATION, Section 4.1
REVIEW AND UPDATE EMPLOYEE DATA, Section 3.2
DHS VERIFICATION IN PROCESS, Section 2.5
Each case result requires different actions or steps to continue or close the case.
These actions are outlined in each case result section throughout this manual.
NOTE: If a case has a ‘SSA or DHS Case in Continuance’ result for more than 60
federal government workdays, contact E-Verify Customer Support at 888-464-4218
CCAASSEE IINN CCOONNTTIINNUUAANNCCEE SSUUMMMMAARRYY
EMPLOYER ACTION
Check E-Verify for case result updates and follow steps based on case result provided
EMPLOYEE ACTION
NONE
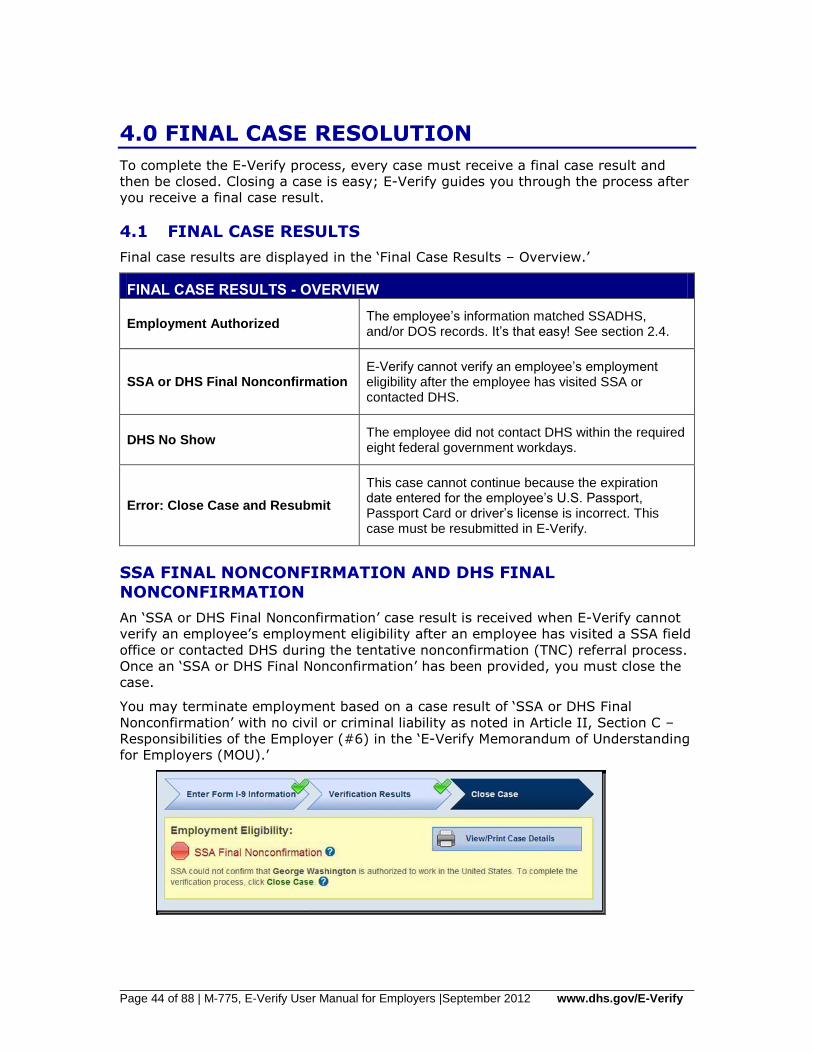
Page 44 of 88 | M-775, E-Verify User Manual for Employers |September 2012 www.dhs.gov/E-Verify
4.0 FINAL CASE RESOLUTION
To complete the E-Verify process, every case must receive a final case result and
then be closed. Closing a case is easy; E-Verify guides you through the process after
you receive a final case result.
4.1 FINAL CASE RESULTS
Final case results are displayed in the ‘Final Case Results – Overview.’
FINAL CASE RESULTS - OVERVIEW
Employment Authorized The employee’s information matched SSADHS, and/or DOS records. It’s that easy! See section 2.4.
SSA or DHS Final Nonconfirmation E-Verify cannot verify an employee’s employment eligibility after the employee has visited SSA or contacted DHS.
DHS No Show The employee did not contact DHS within the required eight federal government workdays.
Error: Close Case and Resubmit
This case cannot continue because the expiration date entered for the employee’s U.S. Passport, Passport Card or driver’s license is incorrect. This case must be resubmitted in E-Verify.
SSA FINAL NONCONFIRMATION AND DHS FINAL
NONCONFIRMATION
An ‘SSA or DHS Final Nonconfirmation’ case result is received when E-Verify cannot
verify an employee’s employment eligibility after an employee has visited a SSA field
office or contacted DHS during the tentative nonconfirmation (TNC) referral process.
Once an ‘SSA or DHS Final Nonconfirmation’ has been provided, you must close the
case.
You may terminate employment based on a case result of ‘SSA or DHS Final
Nonconfirmation’ with no civil or criminal liability as noted in Article II, Section C –
Responsibilities of the Employer (#6) in the ‘E-Verify Memorandum of Understanding
for Employers (MOU).’
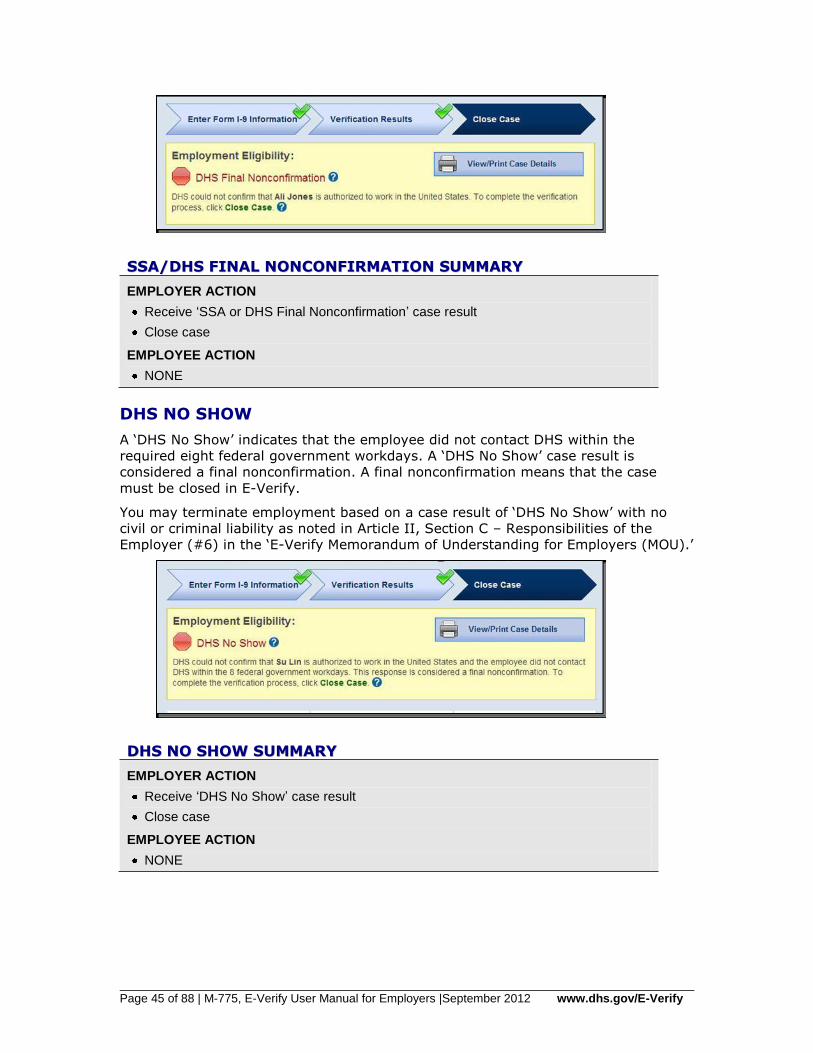
Page 45 of 88 | M-775, E-Verify User Manual for Employers |September 2012 www.dhs.gov/E-Verify
SSSSAA//DDHHSS FFIINNAALL NNOONNCCOONNFFIIRRMMAATTIIOONN SSUUMMMMAARRYY
EMPLOYER ACTION
Receive ‘SSA or DHS Final Nonconfirmation’ case result
Close case
EMPLOYEE ACTION
NONE
DHS NO SHOW
A ‘DHS No Show’ indicates that the employee did not contact DHS within the
required eight federal government workdays. A ‘DHS No Show’ case result is
considered a final nonconfirmation. A final nonconfirmation means that the case
must be closed in E-Verify.
You may terminate employment based on a case result of ‘DHS No Show’ with no
civil or criminal liability as noted in Article II, Section C – Responsibilities of the
Employer (#6) in the ‘E-Verify Memorandum of Understanding for Employers (MOU).’
DDHHSS NNOO SSHHOOWW SSUUMMMMAARRYY
EMPLOYER ACTION
Receive ‘DHS No Show’ case result
Close case
EMPLOYEE ACTION
NONE
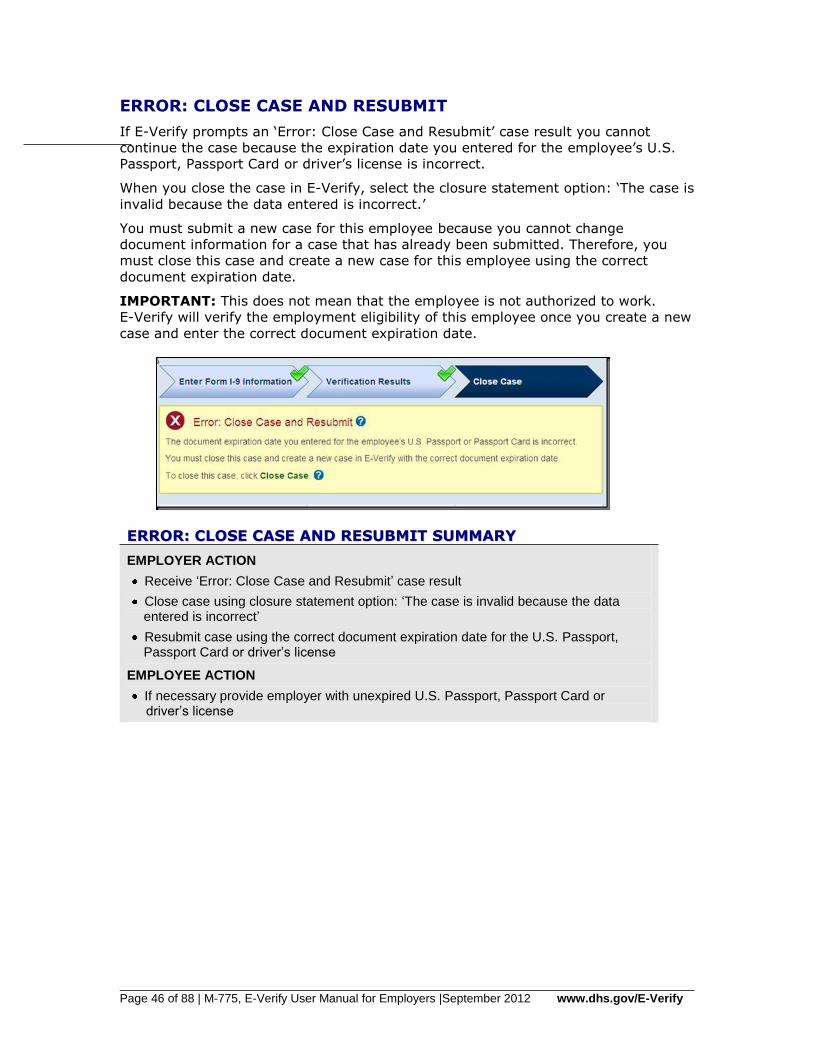
Page 46 of 88 | M-775, E-Verify User Manual for Employers |September 2012 www.dhs.gov/E-Verify
ERROR: CLOSE CASE AND RESUBMIT
If E-Verify prompts an ‘Error: Close Case and Resubmit’ case result you cannot
continue the case because the expiration date you entered for the employee’s U.S.
Passport, Passport Card or driver’s license is incorrect.
When you close the case in E-Verify, select the closure statement option: ‘The case is
invalid because the data entered is incorrect.’
You must submit a new case for this employee because you cannot change
document information for a case that has already been submitted. Therefore, you
must close this case and create a new case for this employee using the correct
document expiration date.
IMPORTANT: This does not mean that the employee is not authorized to work.
E-Verify will verify the employment eligibility of this employee once you create a new
case and enter the correct document expiration date.
EERRRROORR:: CCLLOOSSEE CCAASSEE AANNDD RREESSUUBBMMIITT SSUUMMMMAARRYY
EMPLOYER ACTION
Receive ‘Error: Close Case and Resubmit’ case result
Close case using closure statement option: ‘The case is invalid because the data entered is incorrect’
Resubmit case using the correct document expiration date for the U.S. Passport, Passport Card or driver’s license
EMPLOYEE ACTION
If necessary provide employer with unexpired U.S. Passport, Passport Card or driver’s license
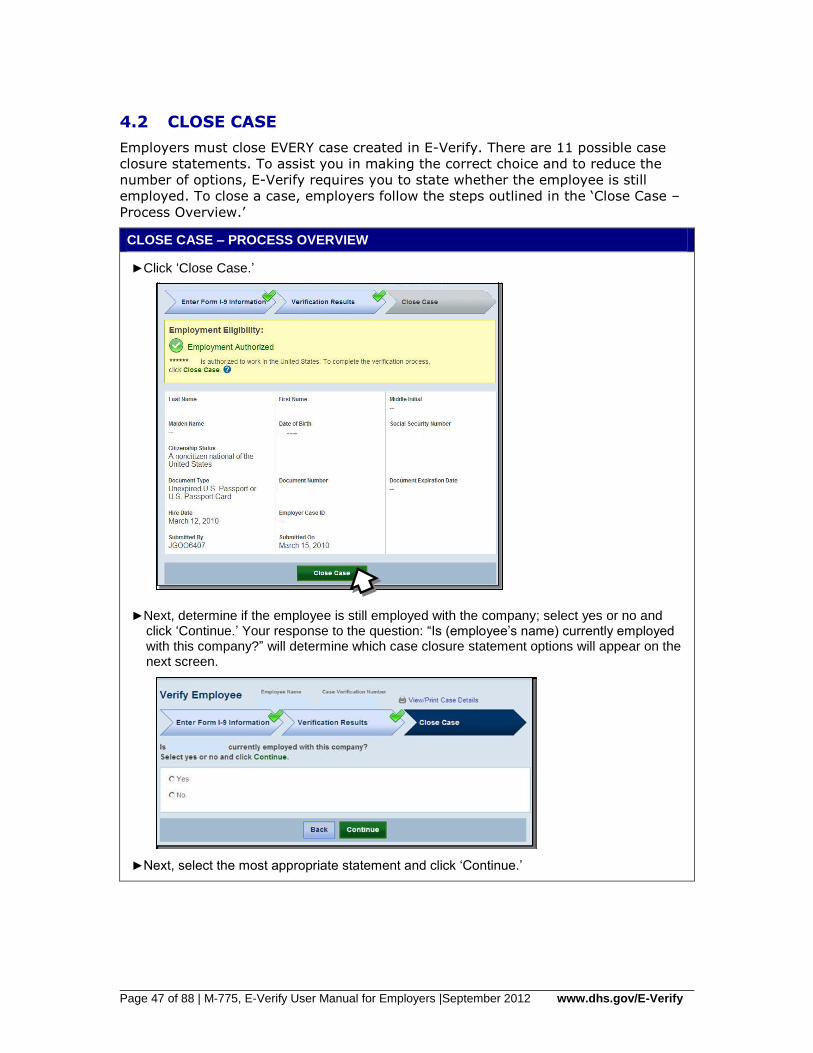
Page 47 of 88 | M-775, E-Verify User Manual for Employers |September 2012 www.dhs.gov/E-Verify
4.2 CLOSE CASE
Employers must close EVERY case created in E-Verify. There are 11 possible case
closure statements. To assist you in making the correct choice and to reduce the
number of options, E-Verify requires you to state whether the employee is still
employed. To close a case, employers follow the steps outlined in the ‘Close Case –
Process Overview.’
CLOSE CASE – PROCESS OVERVIEW
►Click ‘Close Case.’
## ## ####
******
►Next, determine if the employee is still employed with the company; select yes or no and click ‘Continue.’ Your response to the question: “Is (employee’s name) currently employed with this company?” will determine which case closure statement options will appear on the next screen.
►Next, select the most appropriate statement and click ‘Continue.’

Page 48 of 88 | M-775, E-Verify User Manual for Employers |September 2012 www.dhs.gov/E-Verify
►Record the case verification number on the employee’s Form I-9, or print the case details and file it with the employee’s Form I-9.
******
►This completes the E-Verify verification process.
Every case created in E-Verify MUST be closed. To close a case, select one of the
case closure statements. E-Verify will present only those statements that are
relevant to each case. In some scenarios, not all of the case closure statements are
available.
NNOOTTEE –– CCLLOOSSEE CCAASSEE
When answering the question, “Is the employee currently employed with this company?” it is important to consider the following:
►If you have an employee who didn’t contest a tentative nonconfirmation (TNC), or who received a final nonconfirmation or ‘DHS No Show,’ decide whether you will allow the employee to continue working. If you decide to:
Continue the employee’s employment, then select ‘Yes.’
Terminate the employee’s employment, do so, then select ‘No.’
►If you have an employee who has accepted a job offer, but hasn’t yet started work, decide whether you will allow the employee to start working. If you decide to:
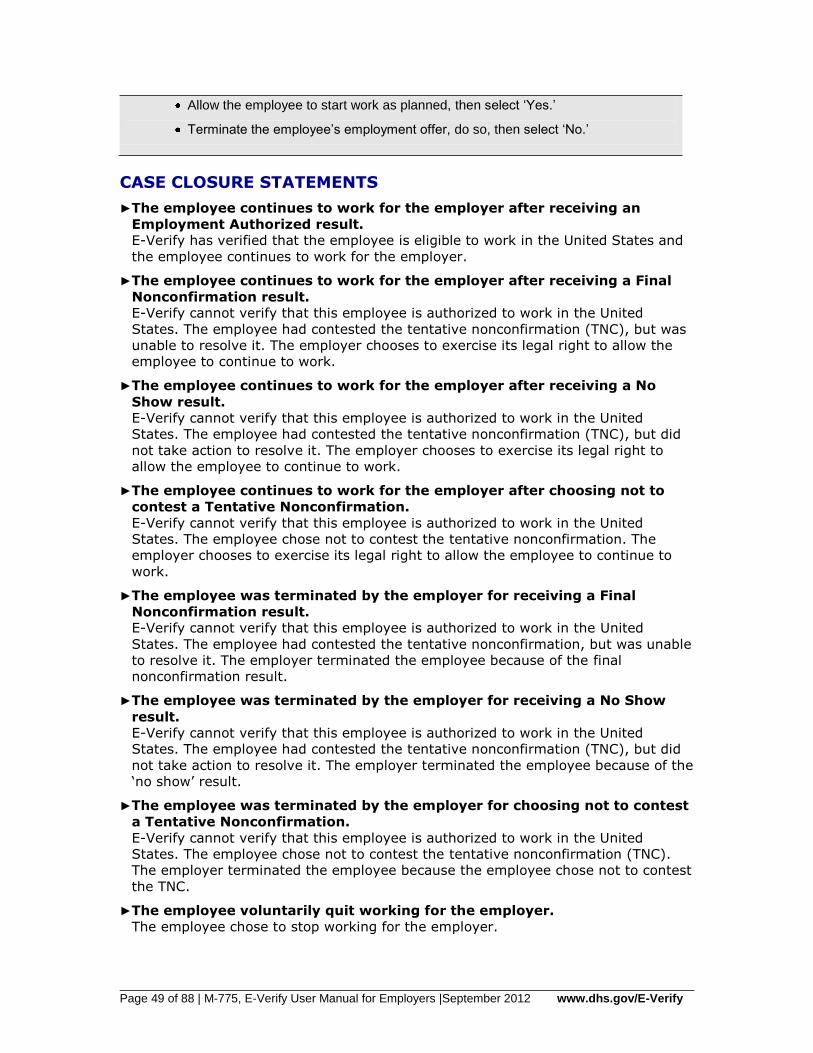
Page 49 of 88 | M-775, E-Verify User Manual for Employers |September 2012 www.dhs.gov/E-Verify
Allow the employee to start work as planned, then select ‘Yes.’
Terminate the employee’s employment offer, do so, then select ‘No.’
CASE CLOSURE STATEMENTS
►The employee continues to work for the employer after receiving an
Employment Authorized result.
E-Verify has verified that the employee is eligible to work in the United States and
the employee continues to work for the employer.
►The employee continues to work for the employer after receiving a Final
Nonconfirmation result.
E-Verify cannot verify that this employee is authorized to work in the United
States. The employee had contested the tentative nonconfirmation (TNC), but was
unable to resolve it. The employer chooses to exercise its legal right to allow the
employee to continue to work.
►The employee continues to work for the employer after receiving a No
Show result.
E-Verify cannot verify that this employee is authorized to work in the United
States. The employee had contested the tentative nonconfirmation (TNC), but did
not take action to resolve it. The employer chooses to exercise its legal right to
allow the employee to continue to work.
►The employee continues to work for the employer after choosing not to
contest a Tentative Nonconfirmation.
E-Verify cannot verify that this employee is authorized to work in the United
States. The employee chose not to contest the tentative nonconfirmation. The
employer chooses to exercise its legal right to allow the employee to continue to
work.
►The employee was terminated by the employer for receiving a Final
Nonconfirmation result.
E-Verify cannot verify that this employee is authorized to work in the United
States. The employee had contested the tentative nonconfirmation, but was unable
to resolve it. The employer terminated the employee because of the final
nonconfirmation result.
►The employee was terminated by the employer for receiving a No Show
result.
E-Verify cannot verify that this employee is authorized to work in the United
States. The employee had contested the tentative nonconfirmation (TNC), but did
not take action to resolve it. The employer terminated the employee because of the
‘no show’ result.
►The employee was terminated by the employer for choosing not to contest
a Tentative Nonconfirmation.
E-Verify cannot verify that this employee is authorized to work in the United
States. The employee chose not to contest the tentative nonconfirmation (TNC).
The employer terminated the employee because the employee chose not to contest
the TNC.
►The employee voluntarily quit working for the employer.
The employee chose to stop working for the employer.
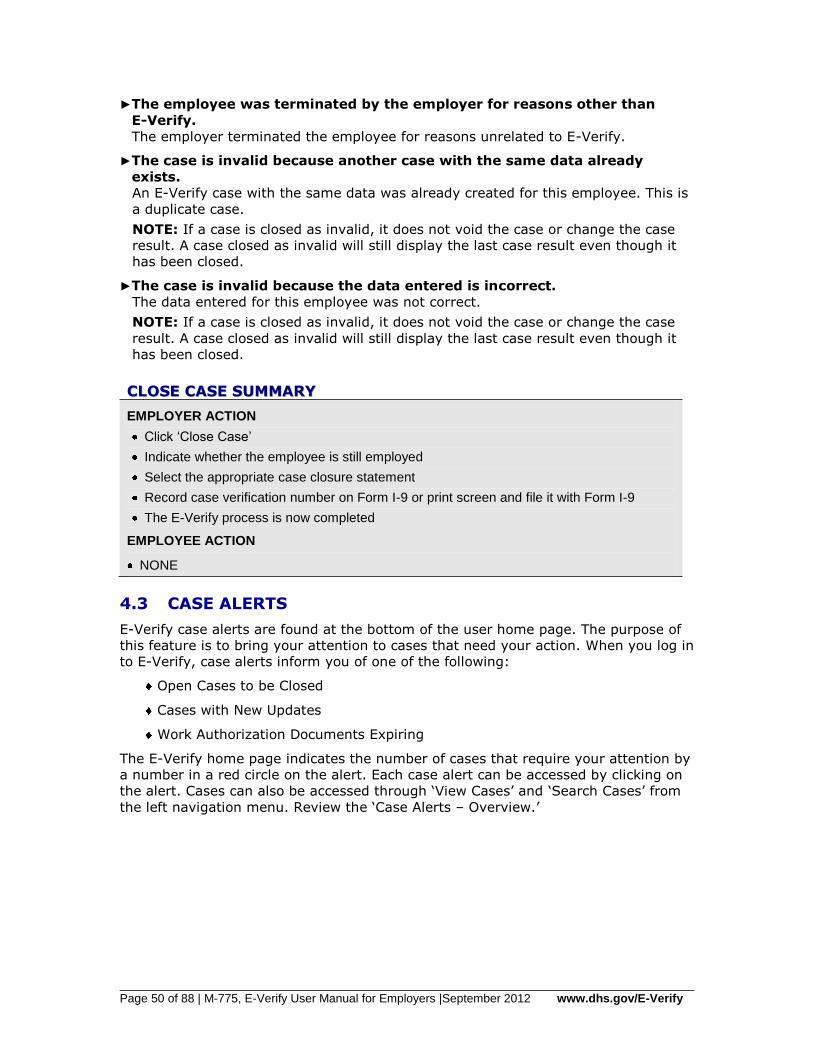
Page 50 of 88 | M-775, E-Verify User Manual for Employers |September 2012 www.dhs.gov/E-Verify
►The employee was terminated by the employer for reasons other than
E-Verify.
The employer terminated the employee for reasons unrelated to E-Verify.
►The case is invalid because another case with the same data already
exists.
An E-Verify case with the same data was already created for this employee. This is
a duplicate case.
NOTE: If a case is closed as invalid, it does not void the case or change the case
result. A case closed as invalid will still display the last case result even though it
has been closed.
►The case is invalid because the data entered is incorrect.
The data entered for this employee was not correct.
NOTE: If a case is closed as invalid, it does not void the case or change the case
result. A case closed as invalid will still display the last case result even though it
has been closed.
CCLLOOSSEE CCAASSEE SSUUMMMMAARRYY
EMPLOYER ACTION
Click ‘Close Case’
Indicate whether the employee is still employed
Select the appropriate case closure statement
Record case verification number on Form I-9 or print screen and file it with Form I-9
The E-Verify process is now completed
EMPLOYEE ACTION
NONE
4.3 CASE ALERTS
E-Verify case alerts are found at the bottom of the user home page. The purpose of
this feature is to bring your attention to cases that need your action. When you log in
to E-Verify, case alerts inform you of one of the following:
Open Cases to be Closed
Cases with New Updates
Work Authorization Documents Expiring
The E-Verify home page indicates the number of cases that require your attention by
a number in a red circle on the alert. Each case alert can be accessed by clicking on
the alert. Cases can also be accessed through ‘View Cases’ and ‘Search Cases’ from
the left navigation menu. Review the ‘Case Alerts – Overview.’

Page 51 of 88 | M-775, E-Verify User Manual for Employers |September 2012 www.dhs.gov/E-Verify
CASE ALERTS – PROCESS OVERVIEW
►E-Verify user home page display with no case alerts.
►E-Verify user home page display with case alerts.
►Click on the alert requiring your attention to access your case alert(s).
Case alerts can also be accessed:
►From ‘My Cases,’ select ‘Search Cases.’
►Determine your search criteria and click ‘Search.’
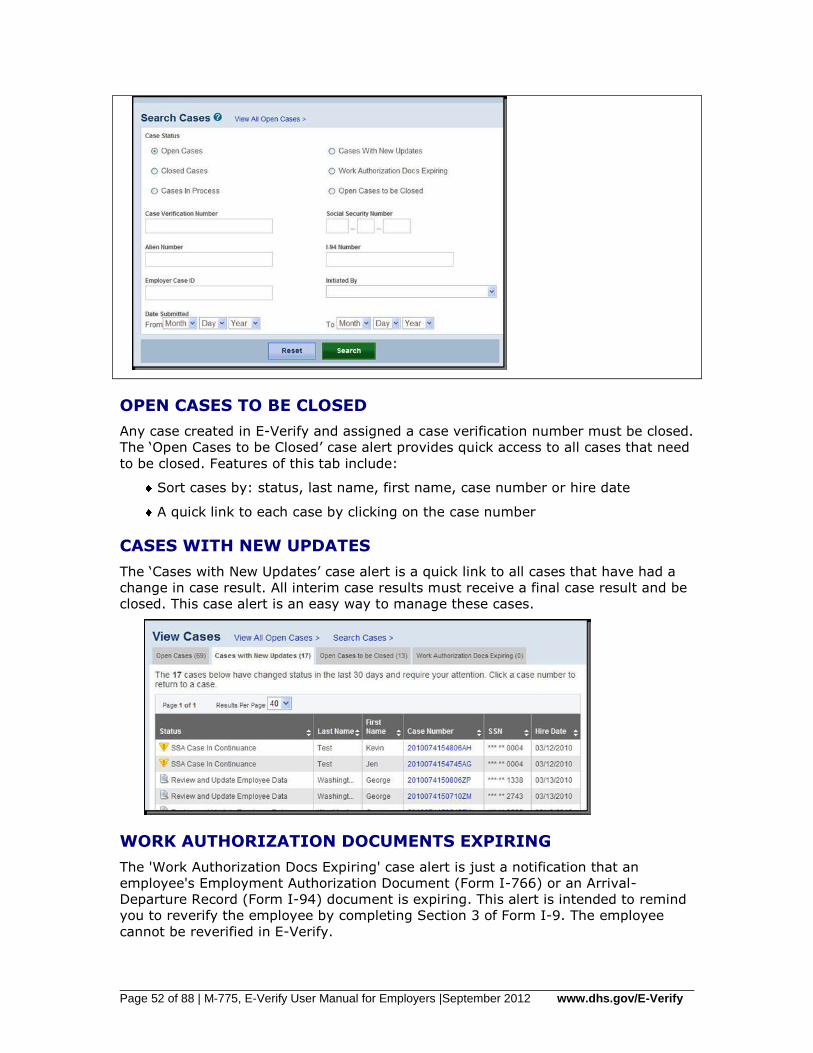
Page 52 of 88 | M-775, E-Verify User Manual for Employers |September 2012 www.dhs.gov/E-Verify
OPEN CASES TO BE CLOSED
Any case created in E-Verify and assigned a case verification number must be closed.
The ‘Open Cases to be Closed’ case alert provides quick access to all cases that need
to be closed. Features of this tab include:
Sort cases by: status, last name, first name, case number or hire date
A quick link to each case by clicking on the case number
CASES WITH NEW UPDATES
The ‘Cases with New Updates’ case alert is a quick link to all cases that have had a
change in case result. All interim case results must receive a final case result and be
closed. This case alert is an easy way to manage these cases.
WORK AUTHORIZATION DOCUMENTS EXPIRING
The 'Work Authorization Docs Expiring' case alert is just a notification that an
employee's Employment Authorization Document (Form I-766) or an Arrival-
Departure Record (Form I-94) document is expiring. This alert is intended to remind
you to reverify the employee by completing Section 3 of Form I-9. The employee
cannot be reverified in E-Verify.
Page 53 of 88 | M-775, E-Verify User Manual for Employers |September 2012 www.dhs.gov/E-Verify
This is simply a reminder; no action is required or permitted in E-Verify. You may
dismiss each alert by clicking ‘Dismiss Alert.’
This alert will only appear if the document the employee presented for the original
E-Verify case was either an Employment Authorization Document (Form I-766) or an
Arrival-Departure Record (Form I-94). Also, the alert only appears the first time the
document expires—subsequent expirations will not activate this case alert.
IMPORTANT: The employee may not be reverified in E-Verify.
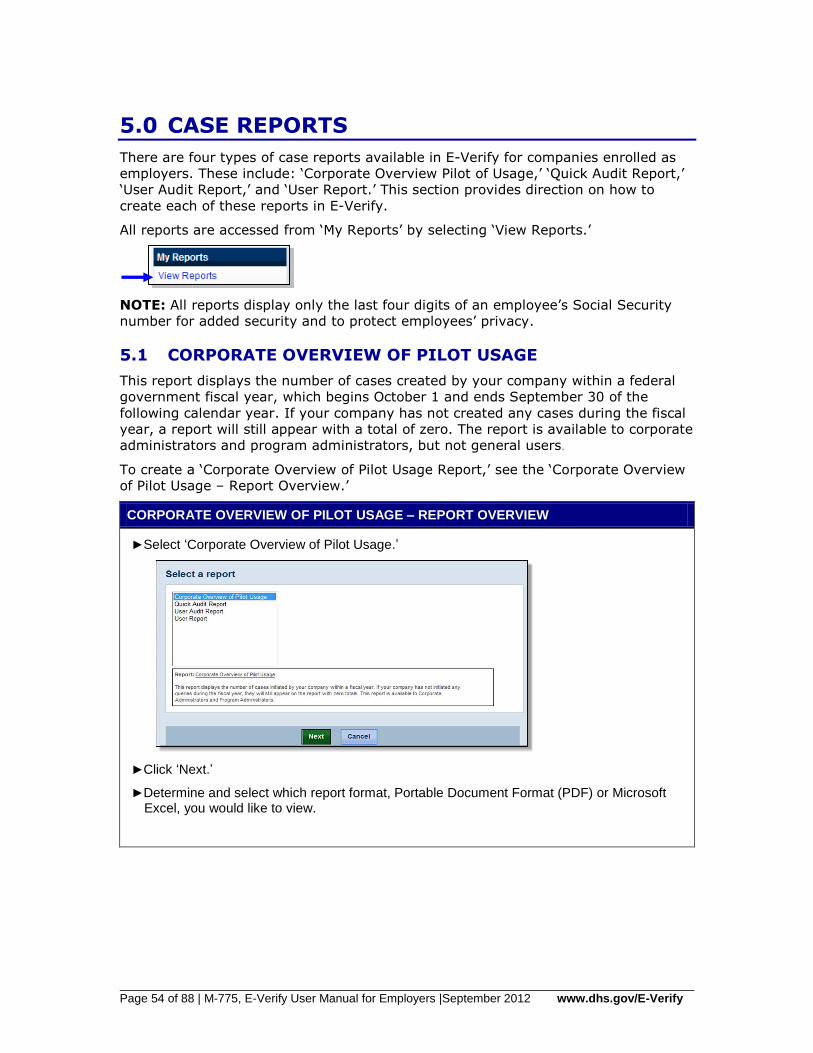
Page 54 of 88 | M-775, E-Verify User Manual for Employers |September 2012 www.dhs.gov/E-Verify
5.0 CASE REPORTS
There are four types of case reports available in E-Verify for companies enrolled as
employers. These include: ‘Corporate Overview Pilot of Usage,’ ‘Quick Audit Report,’
‘User Audit Report,’ and ‘User Report.’ This section provides direction on how to
create each of these reports in E-Verify.
All reports are accessed from ‘My Reports’ by selecting ‘View Reports.’
NOTE: All reports display only the last four digits of an employee’s Social Security
number for added security and to protect employees’ privacy.
5.1 CORPORATE OVERVIEW OF PILOT USAGE
This report displays the number of cases created by your company within a federal
government fiscal year, which begins October 1 and ends September 30 of the
following calendar year. If your company has not created any cases during the fiscal
year, a report will still appear with a total of zero. The report is available to corporate
administrators and program administrators, but not general users.
To create a ‘Corporate Overview of Pilot Usage Report,’ see the ‘Corporate Overview
of Pilot Usage – Report Overview.’
CORPORATE OVERVIEW OF PILOT USAGE – REPORT OVERVIEW
►Select ‘Corporate Overview of Pilot Usage.’
►Click ‘Next.’
►Determine and select which report format, Portable Document Format (PDF) or Microsoft Excel, you would like to view.
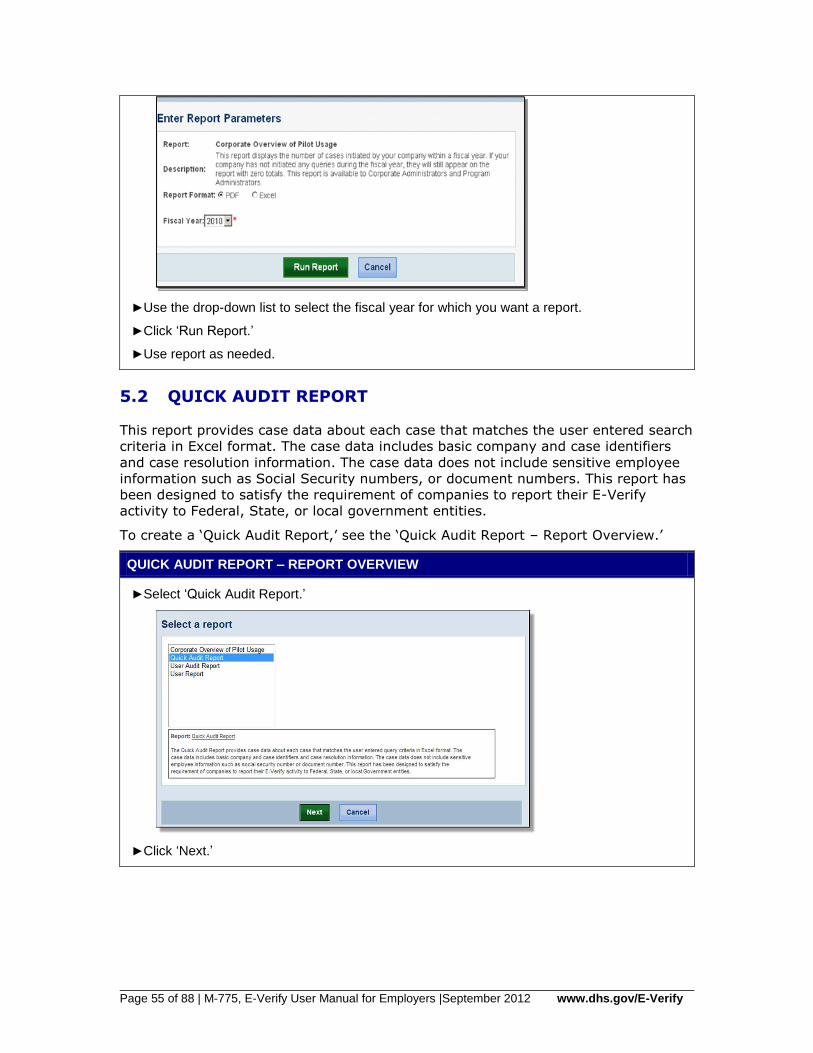
Page 55 of 88 | M-775, E-Verify User Manual for Employers |September 2012 www.dhs.gov/E-Verify
►Use the drop-down list to select the fiscal year for which you want a report.
►Click ‘Run Report.’
►Use report as needed.
5.2 QUICK AUDIT REPORT
This report provides case data about each case that matches the user entered search
criteria in Excel format. The case data includes basic company and case identifiers
and case resolution information. The case data does not include sensitive employee
information such as Social Security numbers, or document numbers. This report has
been designed to satisfy the requirement of companies to report their E-Verify
activity to Federal, State, or local government entities.
To create a ‘Quick Audit Report,’ see the ‘Quick Audit Report – Report Overview.’
QUICK AUDIT REPORT – REPORT OVERVIEW
►Select ‘Quick Audit Report.’
►Click ‘Next.’

Page 56 of 88 | M-775, E-Verify User Manual for Employers |September 2012 www.dhs.gov/E-Verify
►Enter the date range for which you want the report.
►Click ‘Run Report.’
►Use report as needed.
NOTE: This report is available as a Microsoft Excel document only. It is not available as a Portable Document Format (PDF) file.
5.3 USER AUDIT REPORT
This report provides summary case information about each case that matches the user criteria entered. The case information includes the case verification number, thedate the case was submitted, the last four digits of the employee’s Social Security number, alien number, I-94 number, last name, first name, case result, referral information and case closure statement. The report is available to program administrators and general users.
To create a ‘User Audit Report,’ see the ‘User Audit Report - Report Overview.’
USER AUDIT REPORT – REPORT OVERVIEW
►Select ‘User Audit Report.’
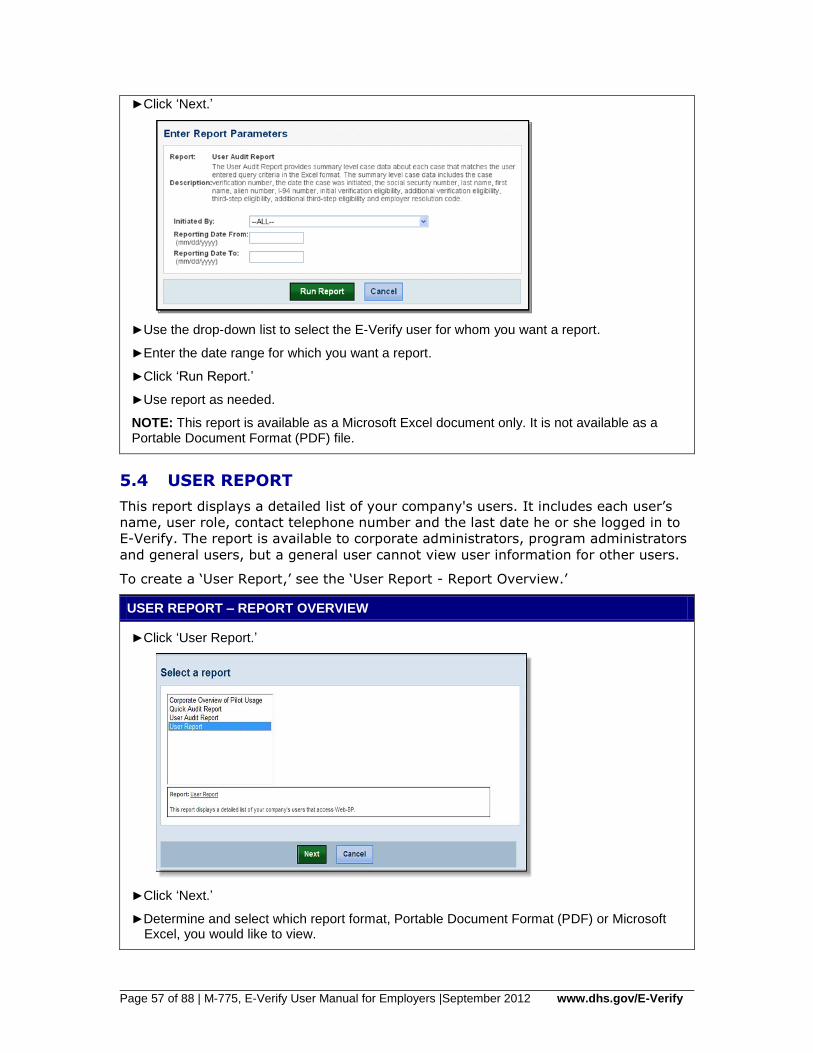
Page 57 of 88 | M-775, E-Verify User Manual for Employers |September 2012 www.dhs.gov/E-Verify
►Click ‘Next.’
►Use the drop-down list to select the E-Verify user for whom you want a report.
►Enter the date range for which you want a report.
►Click ‘Run Report.’
►Use report as needed.
NOTE: This report is available as a Microsoft Excel document only. It is not available as a Portable Document Format (PDF) file.
5.4 USER REPORT
This report displays a detailed list of your company's users. It includes each user’s
name, user role, contact telephone number and the last date he or she logged in to
E-Verify. The report is available to corporate administrators, program administrators
and general users, but a general user cannot view user information for other users.
To create a ‘User Report,’ see the ‘User Report - Report Overview.’
USER REPORT – REPORT OVERVIEW
►Click ‘User Report.’
►Click ‘Next.’
►Determine and select which report format, Portable Document Format (PDF) or Microsoft Excel, you would like to view.

Page 58 of 88 | M-775, E-Verify User Manual for Employers |September 2012 www.dhs.gov/E-Verify
►Use the drop-down list to the select user role for which you want a report.
►Click ‘Run Report.’
►Use report as needed.

Page 59 of 88 | M-775, E-Verify User Manual for Employers |September 2012 www.dhs.gov/E-Verify
6.0 ACCOUNT ADMINISTRATION
User account administration provides individual users specific functions and
permissions to update their accounts, change their passwords and perform other
functions explained in this section.
It is important to distinguish that the user account functions are different for each
user role.
6.1 USER ROLES
Permissions and functions in E-Verify granted to the user differ for each user role.
There are two user roles: program administrator and general user.
Every employer account must have at least one program administrator who provides
support for the general user and manages the company profile. A company can
choose to have general users who will only be able to create and manage their own
cases. General users and program administrators must successfully complete the
online E-Verify tutorial before privileges to create or manage cases are granted.
The ‘User Role Functions Overview’ provides an explanation of the functions of each
user role.
USER ROLE FUNCTIONS - OVERVIEW
ROLE ADD
USERS VIEW
CASES UPDATE CASES
UNLOCK USERS
VERIFY EMPLOYEES
Program Administrator
(at least one required)
x x x x x
General User
(optional) x x x
6.2 USER ID AND PASSWORD CREATION
Program administrator can add users in E-Verify. All users are assigned a user ID
and initial password. Upon being initially registered by the program administrator,
users receive an e-mail with a user ID and password. E-Verify will prompt users to
change the initial password for security purposes. Do not share a password with
other users. Each user must have his or her user ID and password.
Passwords are case-sensitive and must be between 8-14 characters, different from
the assigned user ID, changed every 90 days and have the following characteristics:
At least one uppercase or lowercase letter
At least one number and at least one special character - special characters
include: ! @ $ % * ( ) < > ? : ; { } + - ~
Contain no more than two identical and consecutive characters in any position
from the previous password
Contain a non-numeric in the first and last positions
Not identical to the user ID
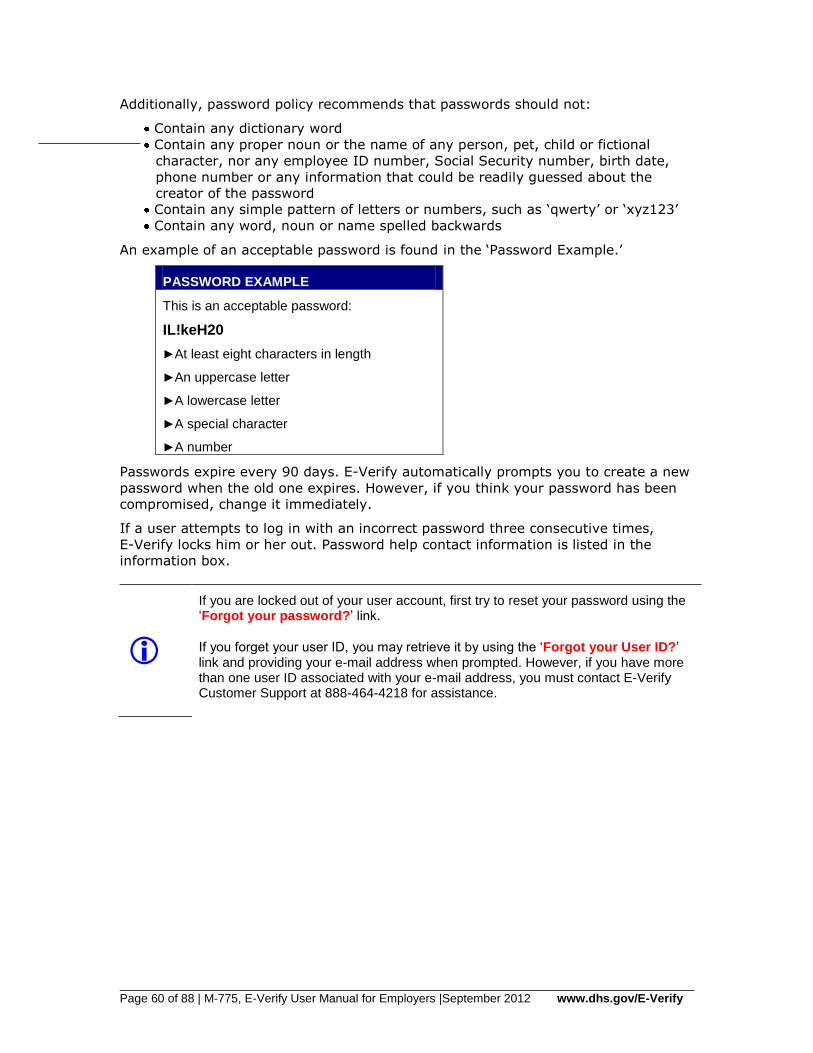
Page 60 of 88 | M-775, E-Verify User Manual for Employers |September 2012 www.dhs.gov/E-Verify
Additionally, password policy recommends that passwords should not:
Contain any dictionary word
Contain any proper noun or the name of any person, pet, child or fictional
character, nor any employee ID number, Social Security number, birth date,
phone number or any information that could be readily guessed about the
creator of the password
Contain any simple pattern of letters or numbers, such as ‘qwerty’ or ‘xyz123’
Contain any word, noun or name spelled backwards
An example of an acceptable password is found in the ‘Password Example.’
PASSWORD EXAMPLE
This is an acceptable password:
IL!keH20
►At least eight characters in length
►An uppercase letter
►A lowercase letter
►A special character
►A number
Passwords expire every 90 days. E-Verify automatically prompts you to create a new
password when the old one expires. However, if you think your password has been
compromised, change it immediately.
If a user attempts to log in with an incorrect password three consecutive times,
E-Verify locks him or her out. Password help contact information is listed in the
information box.
If you are locked out of your user account, first try to reset your password using the ‘Forgot your password?’ link.
If you forget your user ID, you may retrieve it by using the ‘Forgot your User ID?’ link and providing your e-mail address when prompted. However, if you have more than one user ID associated with your e-mail address, you must contact E-Verify Customer Support at 888-464-4218 for assistance.
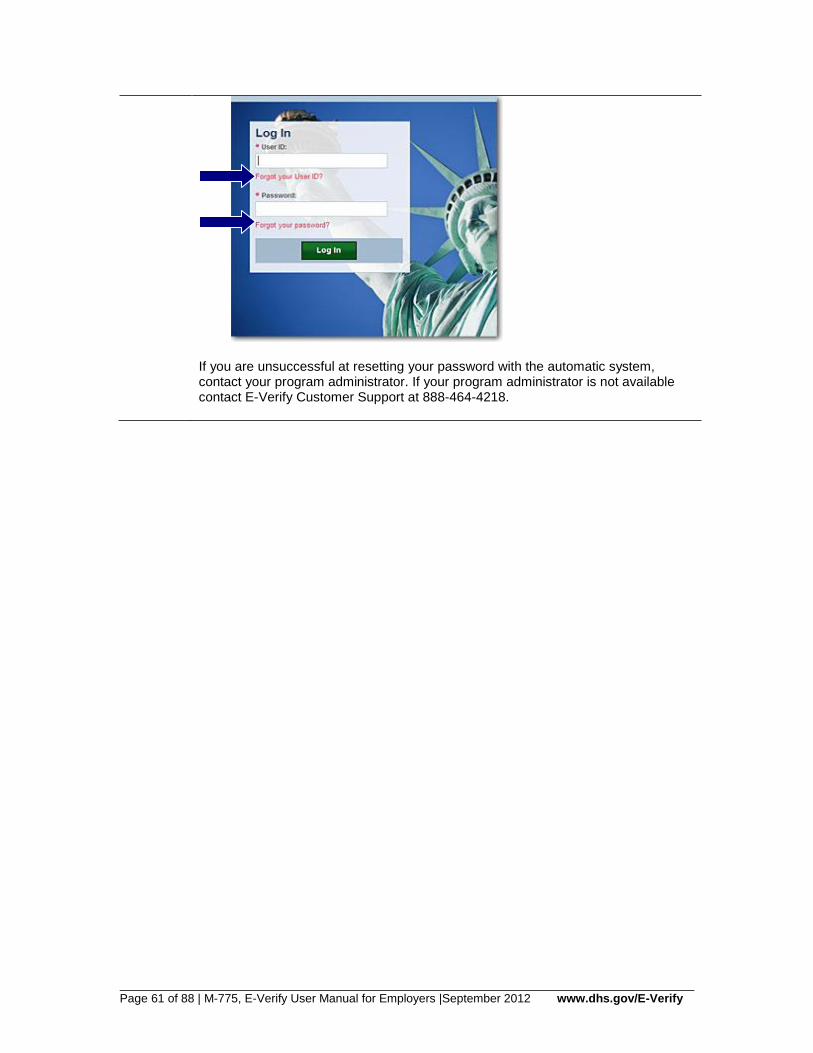
Page 61 of 88 | M-775, E-Verify User Manual for Employers |September 2012 www.dhs.gov/E-Verify
If you are unsuccessful at resetting your password with the automatic system, contact your program administrator. If your program administrator is not available contact E-Verify Customer Support at 888-464-4218.
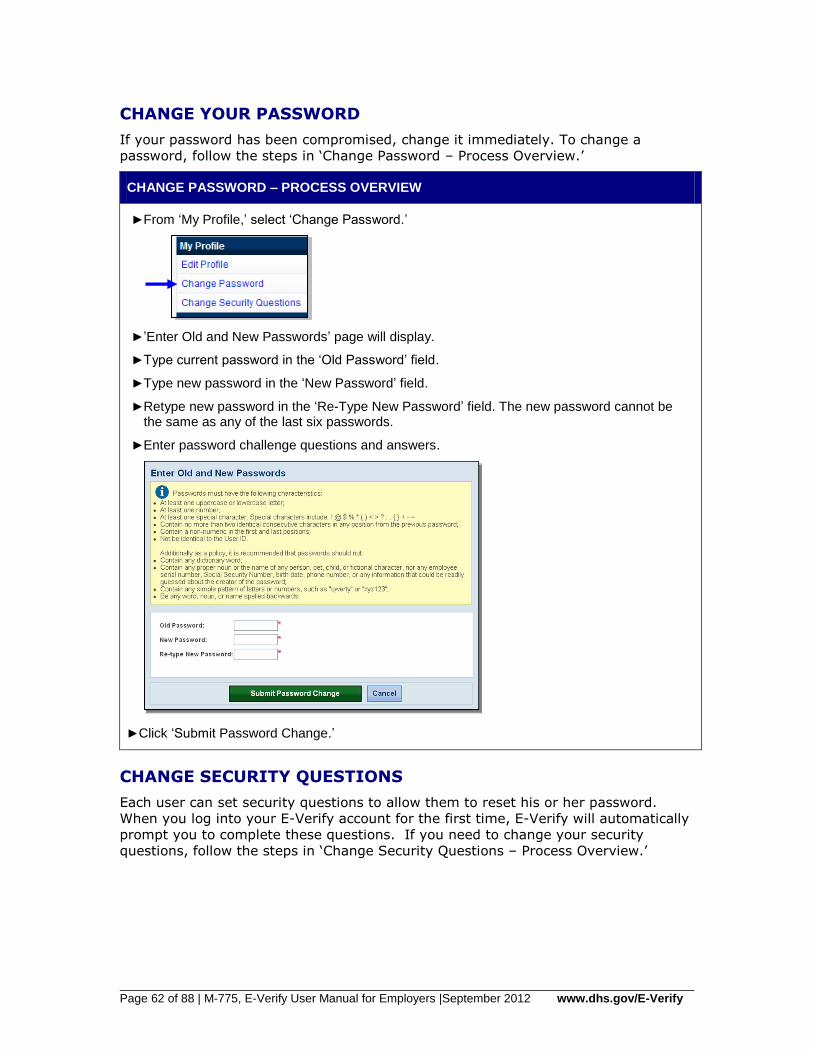
Page 62 of 88 | M-775, E-Verify User Manual for Employers |September 2012 www.dhs.gov/E-Verify
CHANGE YOUR PASSWORD
If your password has been compromised, change it immediately. To change a
password, follow the steps in ‘Change Password – Process Overview.’
CHANGE PASSWORD – PROCESS OVERVIEW
►From ‘My Profile,’ select ‘Change Password.’
►’Enter Old and New Passwords’ page will display.
►Type current password in the ‘Old Password’ field.
►Type new password in the ‘New Password’ field.
►Retype new password in the ‘Re-Type New Password’ field. The new password cannot be the same as any of the last six passwords.
►Enter password challenge questions and answers.
►Click ‘Submit Password Change.’
CHANGE SECURITY QUESTIONS
Each user can set security questions to allow them to reset his or her password.
When you log into your E-Verify account for the first time, E-Verify will automatically
prompt you to complete these questions. If you need to change your security
questions, follow the steps in ‘Change Security Questions – Process Overview.’
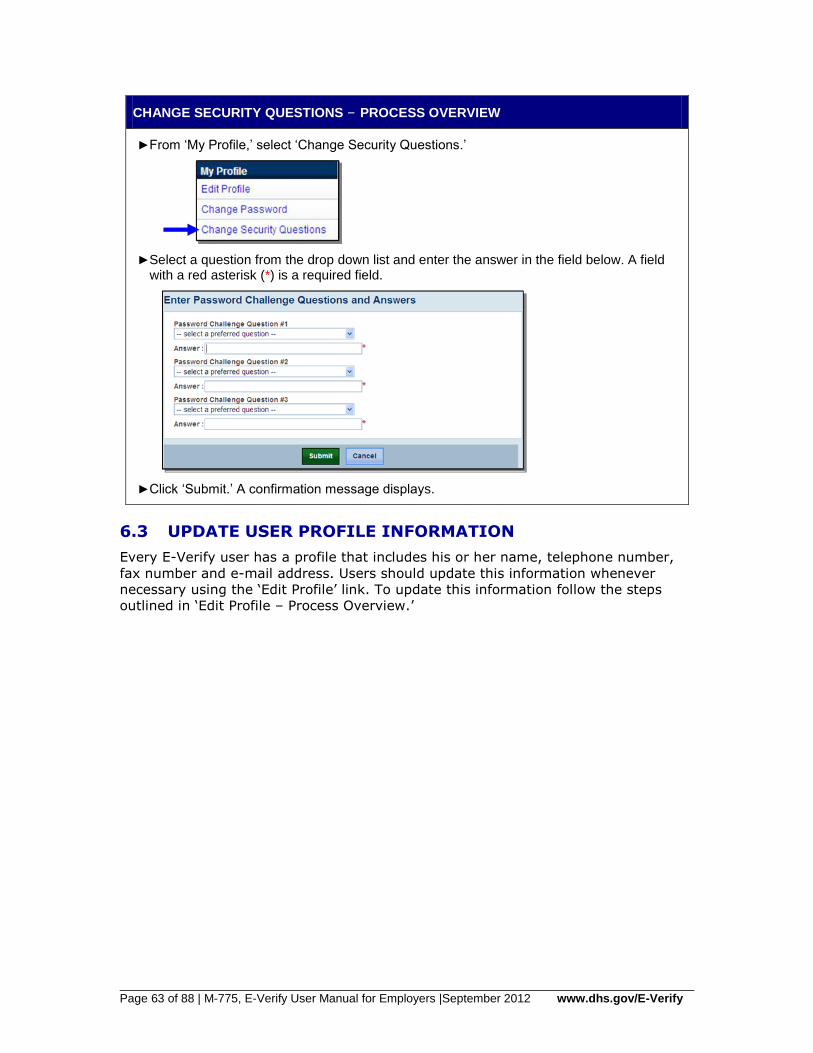
Page 63 of 88 | M-775, E-Verify User Manual for Employers |September 2012 www.dhs.gov/E-Verify
CHANGE SECURITY QUESTIONS – PROCESS OVERVIEW
►From ‘My Profile,’ select ‘Change Security Questions.’
►Select a question from the drop down list and enter the answer in the field below. A field with a red asterisk (*) is a required field.
►Click ‘Submit.’ A confirmation message displays.
6.3 UPDATE USER PROFILE INFORMATION
Every E-Verify user has a profile that includes his or her name, telephone number,
fax number and e-mail address. Users should update this information whenever
necessary using the ‘Edit Profile’ link. To update this information follow the steps
outlined in ‘Edit Profile – Process Overview.’

Page 64 of 88 | M-775, E-Verify User Manual for Employers |September 2012 www.dhs.gov/E-Verify
EDIT PROFILE – PROCESS OVERVIEW
►From ‘My Profile,’ select ‘Edit Profile.’
►Add information or edit fields as necessary. A field with a red asterisk (*) is a required field.
►Click ‘Submit User Profile Changes.’ A confirmation message and your profile information will display.
►Review the confirmation message to see whether the request for profile updates was successful. If E-Verify is unable to process the user profile updates, try again later.

Page 65 of 88 | M-775, E-Verify User Manual for Employers |September 2012 www.dhs.gov/E-Verify
7.0 MY COMPANY – PROGRAM
ADMINISTRATORS
Program administrators also manage the site administration of their company. A
program administrator uses the ‘My Company’ menu to:
Add general users
Add other program administrators
Change or update company profile information
Terminate his or her company’s access to E-Verify
7.1 ADD NEW USER
Only program administrators can add E-Verify users. To add an additional user the
program administrator must provide the user’s name, phone number, fax number
(optional) and e-mail address.
If a user leaves the company or no longer needs access to E-Verify, a program
administrator must delete the user’s account. To delete a user’s account, see ‘Delete
User Account – Process Overview’ in Section 7.2.
If you are a program administrator and you need to add a new E-Verify user, follow
the ‘Add New User - Process Overview.’
ADD NEW USER – PROCESS OVERVIEW
►From ‘My Company,’ select ‘Add New User.’
►Choose general user or program administrator and provide the person’s name, phone number, fax number (optional) and e-mail address and click ‘Next.’
►Accept the system-generated user ID or create a new user ID.

Page 66 of 88 | M-775, E-Verify User Manual for Employers |September 2012 www.dhs.gov/E-Verify
►Review the information submitted and then click ‘Submit New User.’
►The new user will receive his or her user ID and password by e-mail.
NOTE: Most people receive our confirmation e-mail within a few minutes. Instruct your new user to check his or her e-mail inbox as well as spam or junk mail folders because sometimes our e-mails are mistakenly marked as spam. If the e-mail is not received within 48 hours, call E-Verify Customer Support at 888-464-4218 for assistance.
7.2 VIEW EXISTING USERS
Only program administrators can view user information and reset passwords. ‘View
Existing Users’ allows you to view, search and maintain the general users and
program administrators assigned to your company, as demonstrated in the ‘View
Existing Users – Process Overview.’
VIEW EXISTING USERS – PROCESS OVERVIEW
►From, ‘My Company,’ select ‘View Existing Users.’
►Search for a user using the criteria displayed in each field. You can enter a partial name and a percent sign (%) as a wildcard character.
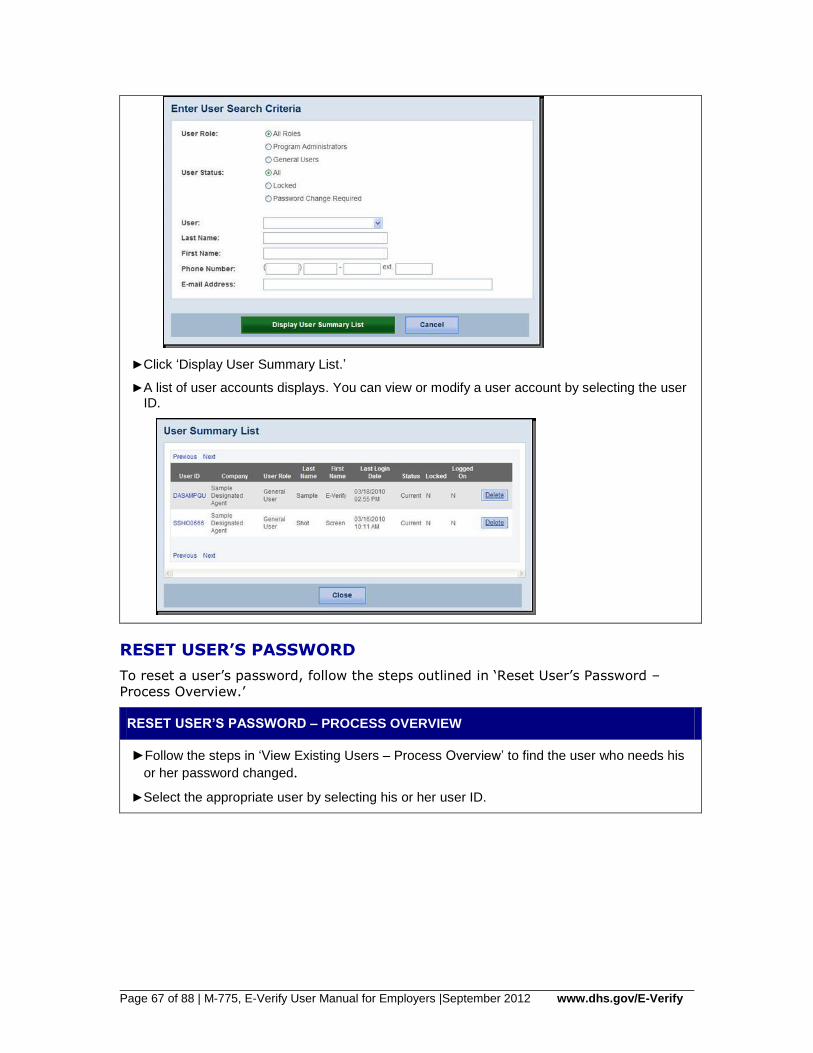
Page 67 of 88 | M-775, E-Verify User Manual for Employers |September 2012 www.dhs.gov/E-Verify
►Click ‘Display User Summary List.’
►A list of user accounts displays. You can view or modify a user account by selecting the user ID.
RESET USER’S PASSWORD
To reset a user’s password, follow the steps outlined in ‘Reset User’s Password –
Process Overview.’
RESET USER’S PASSWORD – PROCESS OVERVIEW
►Follow the steps in ‘View Existing Users – Process Overview’ to find the user who needs his
or her password changed.
►Select the appropriate user by selecting his or her user ID.
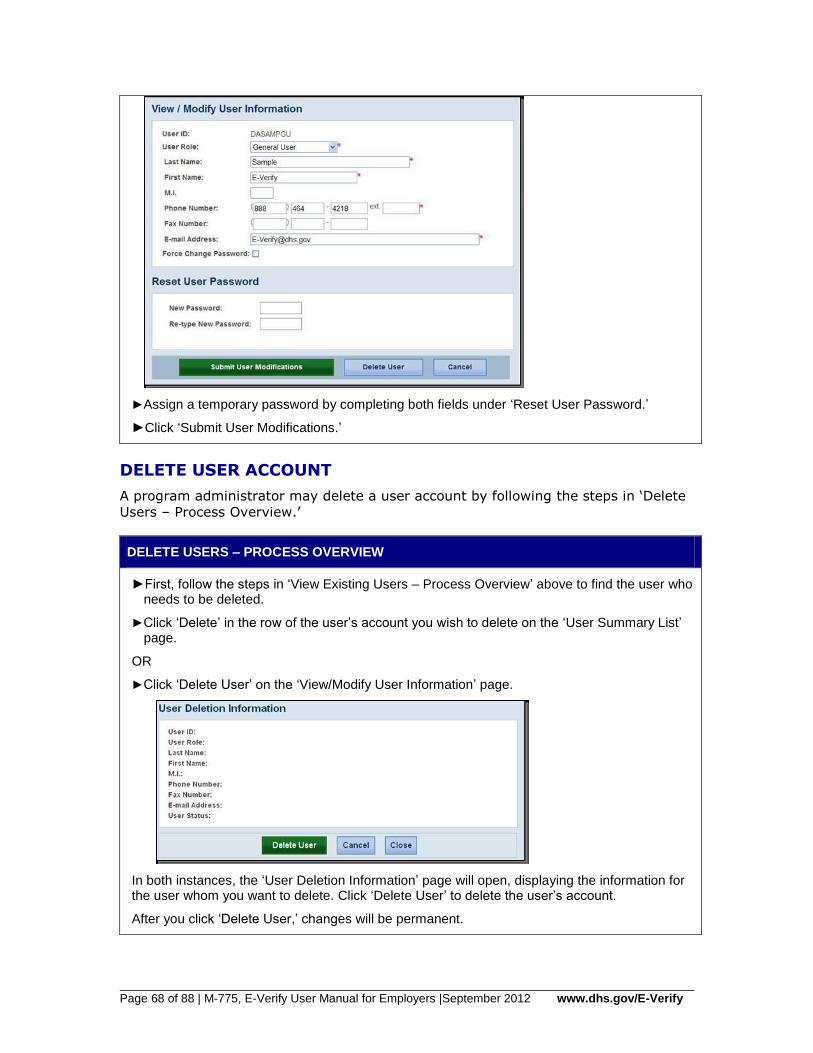
Page 68 of 88 | M-775, E-Verify User Manual for Employers |September 2012 www.dhs.gov/E-Verify
►Assign a temporary password by completing both fields under ‘Reset User Password.’
►Click ‘Submit User Modifications.’
DELETE USER ACCOUNT
A program administrator may delete a user account by following the steps in ‘Delete
Users – Process Overview.’
DELETE USERS – PROCESS OVERVIEW
►First, follow the steps in ‘View Existing Users – Process Overview’ above to find the user who needs to be deleted.
►Click ‘Delete’ in the row of the user’s account you wish to delete on the ‘User Summary List’ page.
OR
►Click ‘Delete User’ on the ‘View/Modify User Information’ page.
In both instances, the ‘User Deletion Information’ page will open, displaying the information for the user whom you want to delete. Click ‘Delete User’ to delete the user’s account.
After you click ‘Delete User,’ changes will be permanent.

Page 69 of 88 | M-775, E-Verify User Manual for Employers |September 2012 www.dhs.gov/E-Verify
7.3 EDIT COMPANY PROFILE
To update company information in E-Verify, complete the steps in the ‘Edit Company
Profile – Process Overview.’ Users may also view the memorandum of understanding
(MOU) between E-Verify and the employer.
Once a program administrator has updated the company’s profile, he or she will be
subject to the rules and requirements associated with the profile and have access to
all online resources specific to the profile.
EDIT COMPANY PROFILE – PROCESS OVERVIEW
►From ‘My Company,’ select ‘Edit Company Profile.’
►To modify any section of the ‘Company Information’ page, click ‘View/Edit’ in the section you want to modify (e.g., company name and physical location, points of contact, North American Industry Classification System (NAICS) code, total hiring sites and total points of contact).
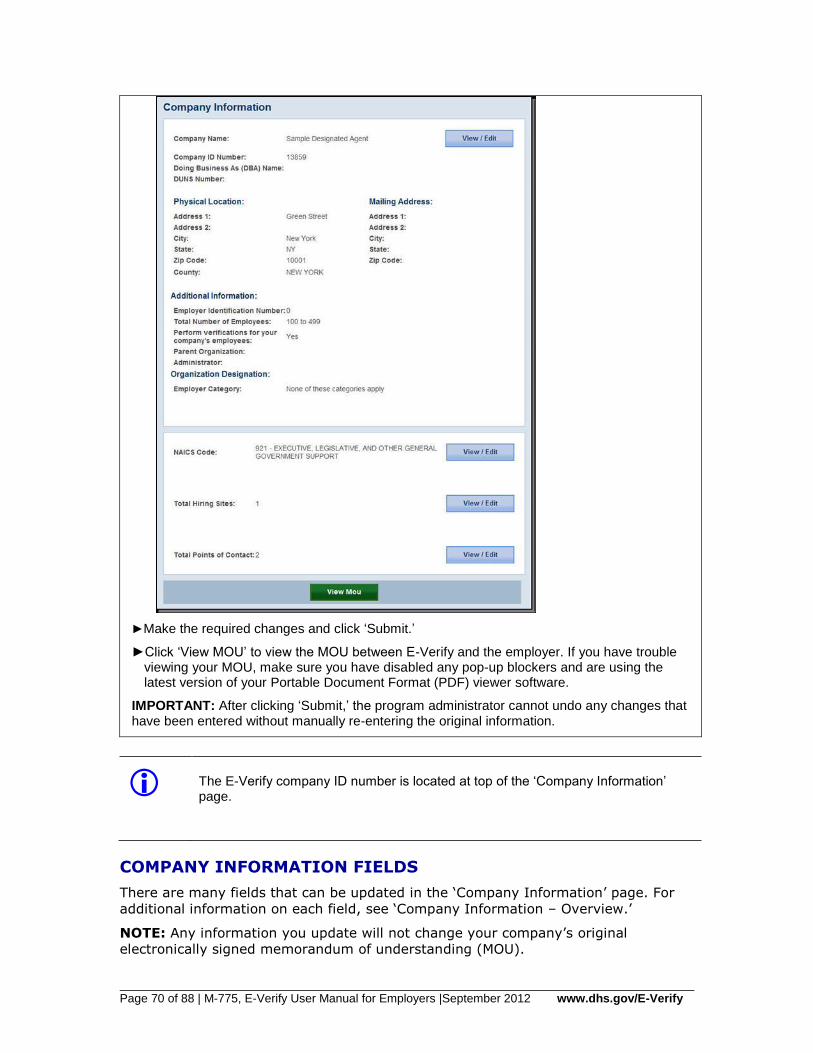
Page 70 of 88 | M-775, E-Verify User Manual for Employers |September 2012 www.dhs.gov/E-Verify
►Make the required changes and click ‘Submit.’
►Click ‘View MOU’ to view the MOU between E-Verify and the employer. If you have trouble viewing your MOU, make sure you have disabled any pop-up blockers and are using the latest version of your Portable Document Format (PDF) viewer software.
IMPORTANT: After clicking ‘Submit,’ the program administrator cannot undo any changes that have been entered without manually re-entering the original information.
The E-Verify company ID number is located at top of the ‘Company Information’ page.
COMPANY INFORMATION FIELDS
There are many fields that can be updated in the ‘Company Information’ page. For
additional information on each field, see ‘Company Information – Overview.’
NOTE: Any information you update will not change your company’s original
electronically signed memorandum of understanding (MOU).
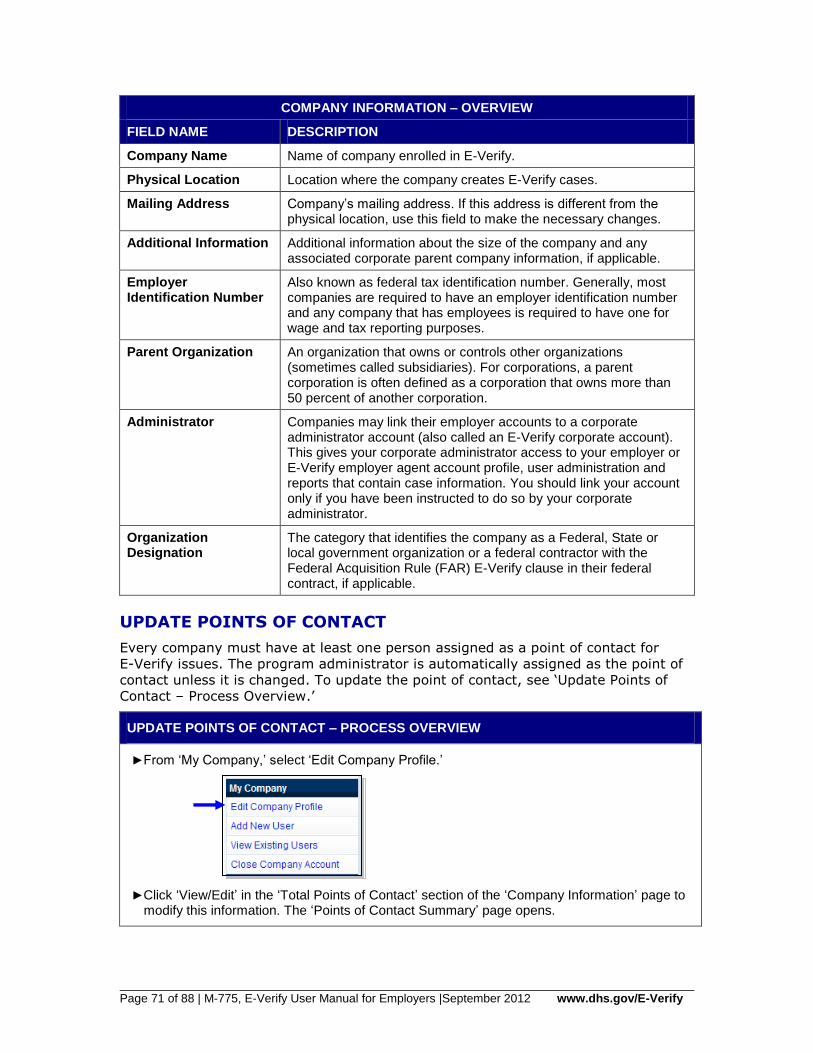
Page 71 of 88 | M-775, E-Verify User Manual for Employers |September 2012 www.dhs.gov/E-Verify
COMPANY INFORMATION – OVERVIEW
FIELD NAME DESCRIPTION
Company Name Name of company enrolled in E-Verify.
Physical Location Location where the company creates E-Verify cases.
Mailing Address Company’s mailing address. If this address is different from the physical location, use this field to make the necessary changes.
Additional Information Additional information about the size of the company and any associated corporate parent company information, if applicable.
Employer Identification Number
Also known as federal tax identification number. Generally, most companies are required to have an employer identification number and any company that has employees is required to have one for wage and tax reporting purposes.
Parent Organization An organization that owns or controls other organizations (sometimes called subsidiaries). For corporations, a parent corporation is often defined as a corporation that owns more than 50 percent of another corporation.
Administrator Companies may link their employer accounts to a corporate administrator account (also called an E-Verify corporate account). This gives your corporate administrator access to your employer or E-Verify employer agent account profile, user administration and reports that contain case information. You should link your account only if you have been instructed to do so by your corporate administrator.
Organization Designation
The category that identifies the company as a Federal, State or local government organization or a federal contractor with the Federal Acquisition Rule (FAR) E-Verify clause in their federal contract, if applicable.
UPDATE POINTS OF CONTACT
Every company must have at least one person assigned as a point of contact for
E-Verify issues. The program administrator is automatically assigned as the point of
contact unless it is changed. To update the point of contact, see ‘Update Points of
Contact – Process Overview.’
UPDATE POINTS OF CONTACT – PROCESS OVERVIEW
►From ‘My Company,’ select ‘Edit Company Profile.’
►Click ‘View/Edit’ in the ‘Total Points of Contact’ section of the ‘Company Information’ page to modify this information. The ‘Points of Contact Summary’ page opens.
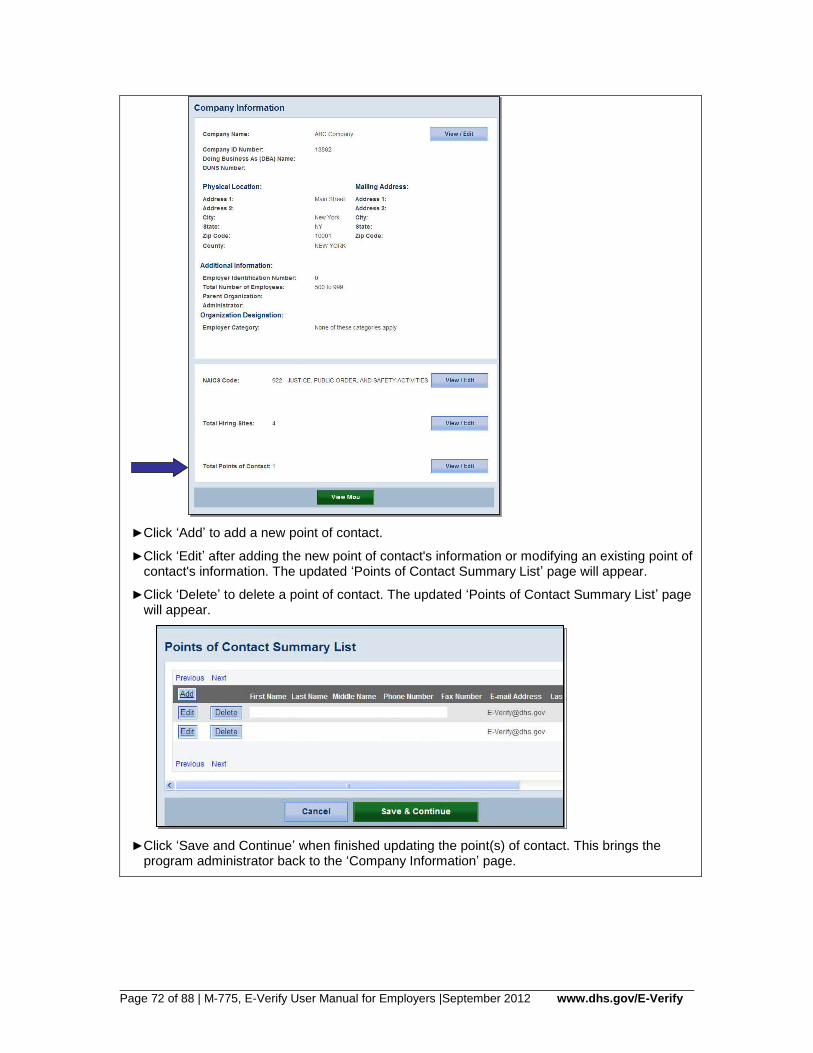
Page 72 of 88 | M-775, E-Verify User Manual for Employers |September 2012 www.dhs.gov/E-Verify
►Click ‘Add’ to add a new point of contact.
►Click ‘Edit’ after adding the new point of contact's information or modifying an existing point of contact's information. The updated ‘Points of Contact Summary List’ page will appear.
►Click ‘Delete’ to delete a point of contact. The updated ‘Points of Contact Summary List’ page will appear.
►Click ‘Save and Continue’ when finished updating the point(s) of contact. This brings the program administrator back to the ‘Company Information’ page.
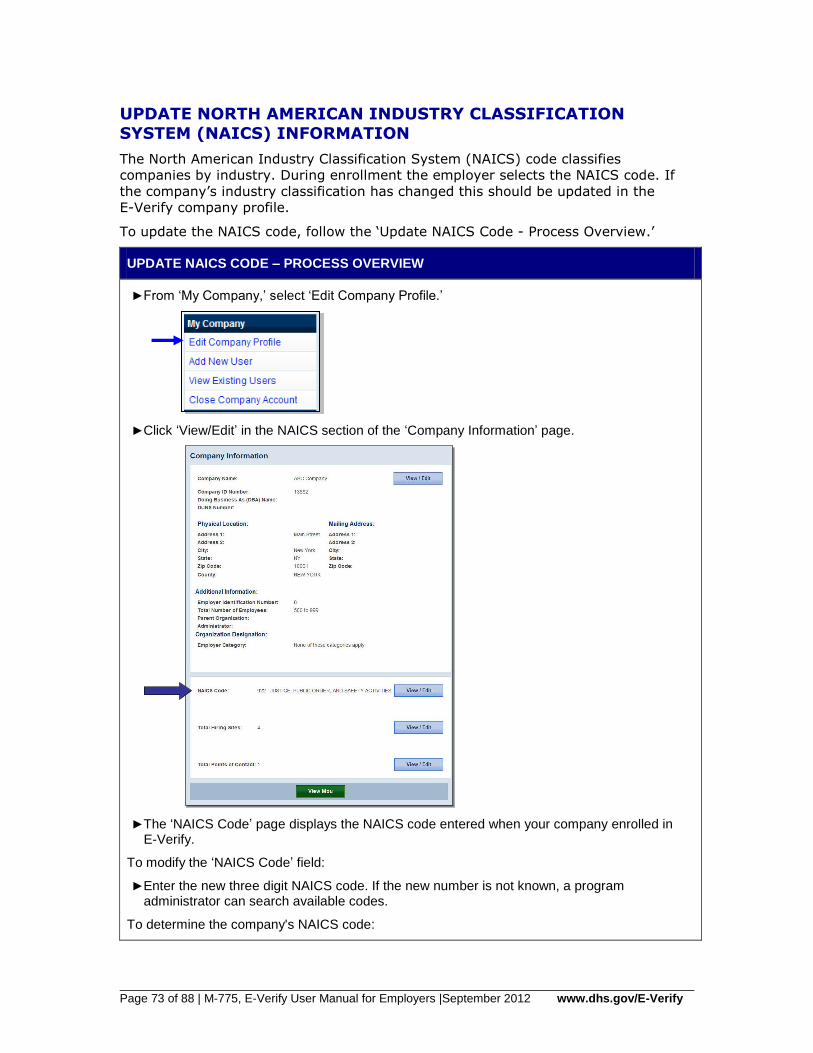
Page 73 of 88 | M-775, E-Verify User Manual for Employers |September 2012 www.dhs.gov/E-Verify
UPDATE NORTH AMERICAN INDUSTRY CLASSIFICATION
SYSTEM (NAICS) INFORMATION
The North American Industry Classification System (NAICS) code classifies
companies by industry. During enrollment the employer selects the NAICS code. If
the company’s industry classification has changed this should be updated in the
E-Verify company profile.
To update the NAICS code, follow the ‘Update NAICS Code - Process Overview.’
UPDATE NAICS CODE – PROCESS OVERVIEW
►From ‘My Company,’ select ‘Edit Company Profile.’
►Click ‘View/Edit’ in the NAICS section of the ‘Company Information’ page.
►The ‘NAICS Code’ page displays the NAICS code entered when your company enrolled in E-Verify.
To modify the ‘NAICS Code’ field:
►Enter the new three digit NAICS code. If the new number is not known, a program administrator can search available codes.
To determine the company's NAICS code:
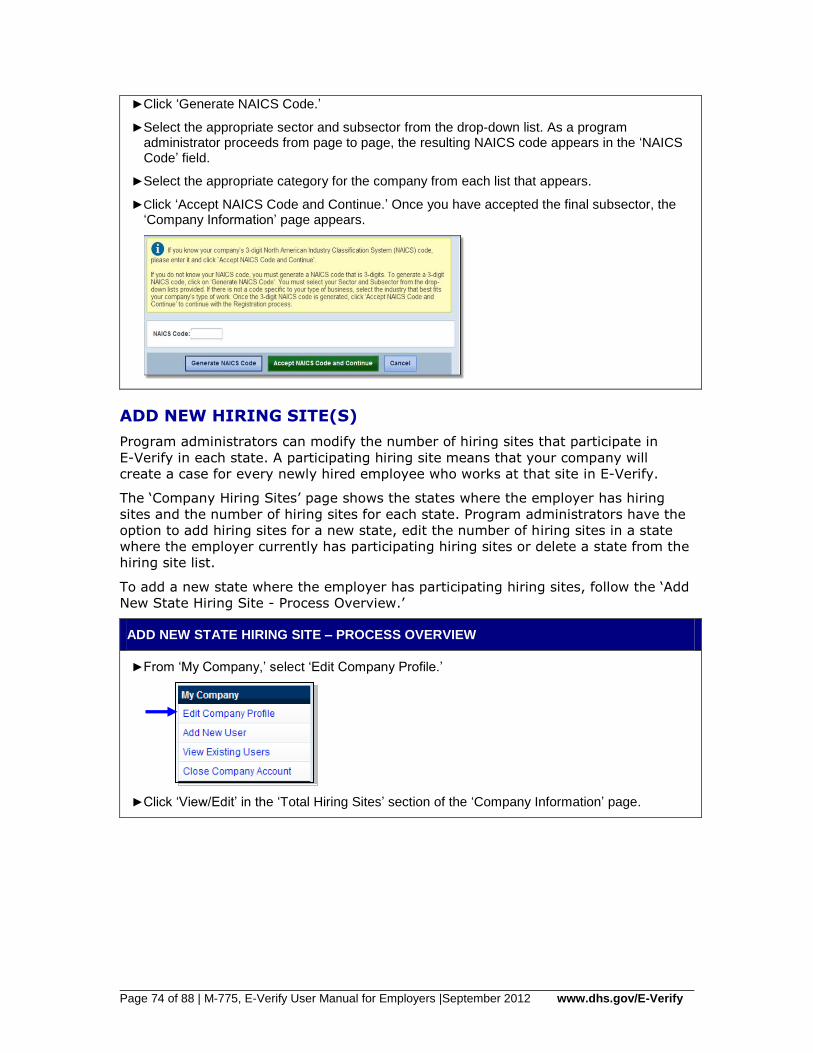
Page 74 of 88 | M-775, E-Verify User Manual for Employers |September 2012 www.dhs.gov/E-Verify
►Click ‘Generate NAICS Code.’
►Select the appropriate sector and subsector from the drop-down list. As a program administrator proceeds from page to page, the resulting NAICS code appears in the ‘NAICS Code’ field.
►Select the appropriate category for the company from each list that appears.
►Click ‘Accept NAICS Code and Continue.’ Once you have accepted the final subsector, the ‘Company Information’ page appears.
ADD NEW HIRING SITE(S)
Program administrators can modify the number of hiring sites that participate in
E-Verify in each state. A participating hiring site means that your company will
create a case for every newly hired employee who works at that site in E-Verify.
The ‘Company Hiring Sites’ page shows the states where the employer has hiring
sites and the number of hiring sites for each state. Program administrators have the
option to add hiring sites for a new state, edit the number of hiring sites in a state
where the employer currently has participating hiring sites or delete a state from the
hiring site list.
To add a new state where the employer has participating hiring sites, follow the ‘Add
New State Hiring Site - Process Overview.’
ADD NEW STATE HIRING SITE – PROCESS OVERVIEW
►From ‘My Company,’ select ‘Edit Company Profile.’
►Click ‘View/Edit’ in the ‘Total Hiring Sites’ section of the ‘Company Information’ page.
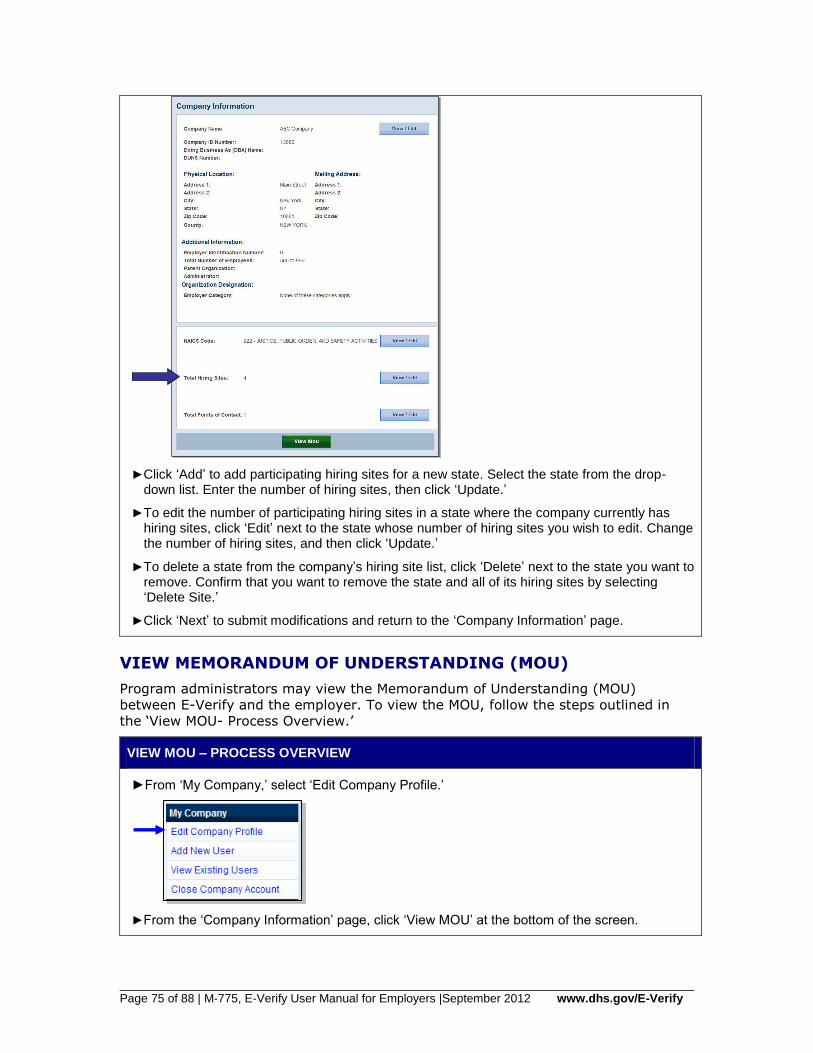
Page 75 of 88 | M-775, E-Verify User Manual for Employers |September 2012 www.dhs.gov/E-Verify
►Click ‘Add’ to add participating hiring sites for a new state. Select the state from the drop-down list. Enter the number of hiring sites, then click ‘Update.’
►To edit the number of participating hiring sites in a state where the company currently has hiring sites, click ‘Edit’ next to the state whose number of hiring sites you wish to edit. Change the number of hiring sites, and then click ‘Update.’
►To delete a state from the company’s hiring site list, click ‘Delete’ next to the state you want to remove. Confirm that you want to remove the state and all of its hiring sites by selecting ‘Delete Site.’
►Click ‘Next’ to submit modifications and return to the ‘Company Information’ page.
VIEW MEMORANDUM OF UNDERSTANDING (MOU)
Program administrators may view the Memorandum of Understanding (MOU)
between E-Verify and the employer. To view the MOU, follow the steps outlined in
the ‘View MOU- Process Overview.’
VIEW MOU – PROCESS OVERVIEW
►From ‘My Company,’ select ‘Edit Company Profile.’
►From the ‘Company Information’ page, click ‘View MOU’ at the bottom of the screen.
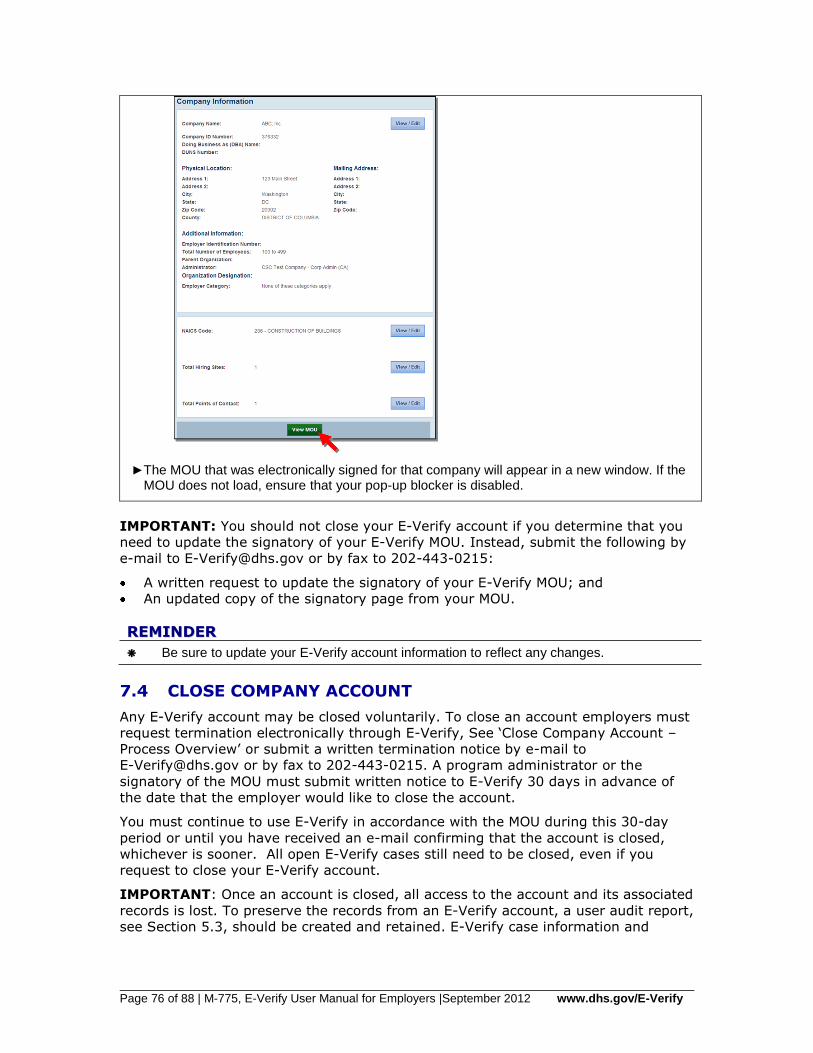
Page 76 of 88 | M-775, E-Verify User Manual for Employers |September 2012 www.dhs.gov/E-Verify
►The MOU that was electronically signed for that company will appear in a new window. If the MOU does not load, ensure that your pop-up blocker is disabled.
IMPORTANT: You should not close your E-Verify account if you determine that you
need to update the signatory of your E-Verify MOU. Instead, submit the following by
e-mail to [email protected] or by fax to 202-443-0215:
A written request to update the signatory of your E-Verify MOU; and
An updated copy of the signatory page from your MOU.
RREEMMIINNDDEERR
Be sure to update your E-Verify account information to reflect any changes.
7.4 CLOSE COMPANY ACCOUNT
Any E-Verify account may be closed voluntarily. To close an account employers must
request termination electronically through E-Verify, See ‘Close Company Account –
Process Overview’ or submit a written termination notice by e-mail to
[email protected] or by fax to 202-443-0215. A program administrator or the
signatory of the MOU must submit written notice to E-Verify 30 days in advance of
the date that the employer would like to close the account.
You must continue to use E-Verify in accordance with the MOU during this 30-day
period or until you have received an e-mail confirming that the account is closed,
whichever is sooner. All open E-Verify cases still need to be closed, even if you
request to close your E-Verify account.
IMPORTANT: Once an account is closed, all access to the account and its associated
records is lost. To preserve the records from an E-Verify account, a user audit report,
see Section 5.3, should be created and retained. E-Verify case information and
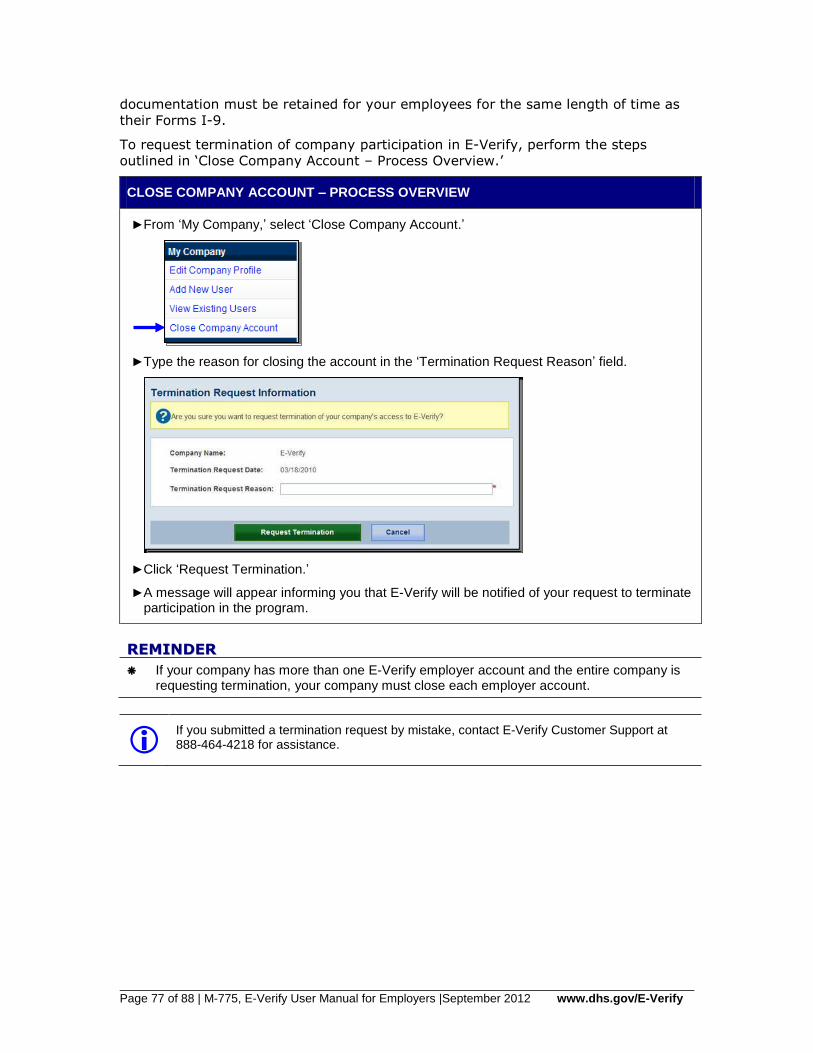
Page 77 of 88 | M-775, E-Verify User Manual for Employers |September 2012 www.dhs.gov/E-Verify
documentation must be retained for your employees for the same length of time as
their Forms I-9.
To request termination of company participation in E-Verify, perform the steps
outlined in ‘Close Company Account – Process Overview.’
CLOSE COMPANY ACCOUNT – PROCESS OVERVIEW
►From ‘My Company,’ select ‘Close Company Account.’
►Type the reason for closing the account in the ‘Termination Request Reason’ field.
►Click ‘Request Termination.’
►A message will appear informing you that E-Verify will be notified of your request to terminate participation in the program.
RREEMMIINNDDEERR
If your company has more than one E-Verify employer account and the entire company is requesting termination, your company must close each employer account.
If you submitted a termination request by mistake, contact E-Verify Customer Support at 888-464-4218 for assistance.
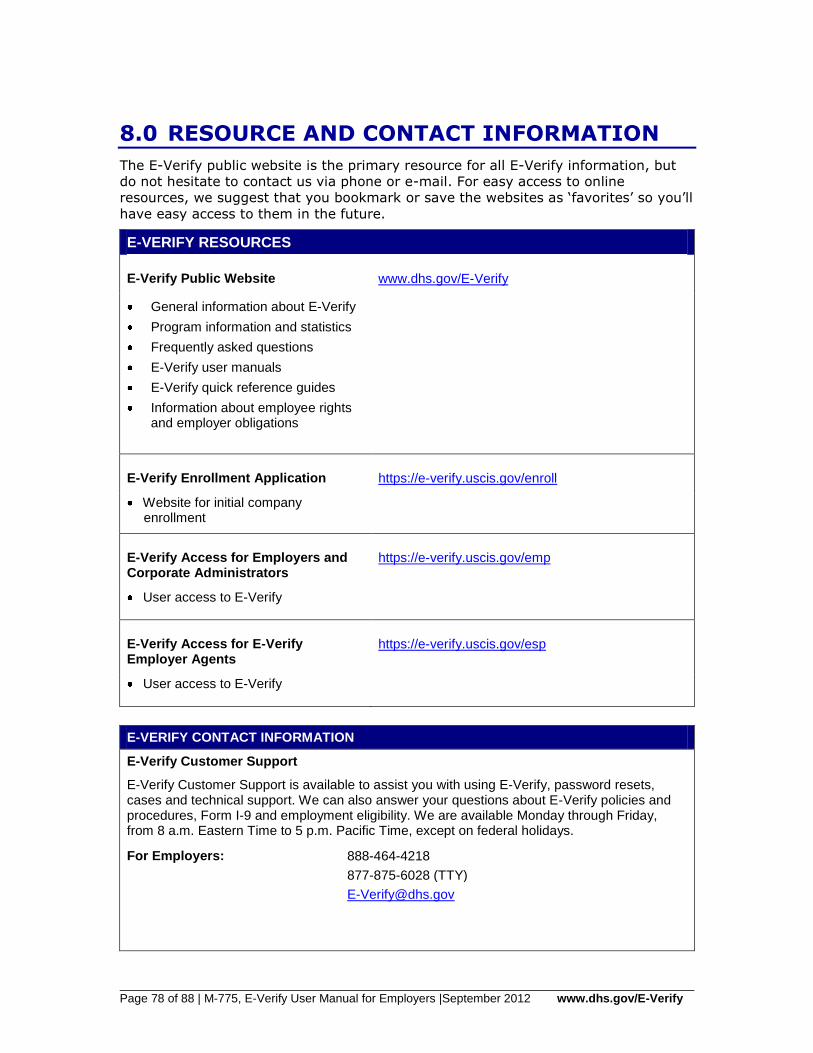
Page 78 of 88 | M-775, E-Verify User Manual for Employers |September 2012 www.dhs.gov/E-Verify
8.0 RESOURCE AND CONTACT INFORMATION
The E-Verify public website is the primary resource for all E-Verify information, but
do not hesitate to contact us via phone or e-mail. For easy access to online
resources, we suggest that you bookmark or save the websites as ‘favorites’ so you’ll
have easy access to them in the future.
E-VERIFY RESOURCES
E-Verify Public Website www.dhs.gov/E-Verify
General information about E-Verify
Program information and statistics
Frequently asked questions
E-Verify user manuals
E-Verify quick reference guides
Information about employee rights and employer obligations
E-Verify Enrollment Application https://e-verify.uscis.gov/enroll
Website for initial company enrollment
E-Verify Access for Employers and Corporate Administrators
https://e-verify.uscis.gov/emp
User access to E-Verify
E-Verify Access for E-Verify Employer Agents
https://e-verify.uscis.gov/esp
User access to E-Verify
E-VERIFY CONTACT INFORMATION
E-Verify Customer Support
E-Verify Customer Support is available to assist you with using E-Verify, password resets, cases and technical support. We can also answer your questions about E-Verify policies and procedures, Form I-9 and employment eligibility. We are available Monday through Friday, from 8 a.m. Eastern Time to 5 p.m. Pacific Time, except on federal holidays.
For Employers: 888-464-4218
877-875-6028 (TTY)
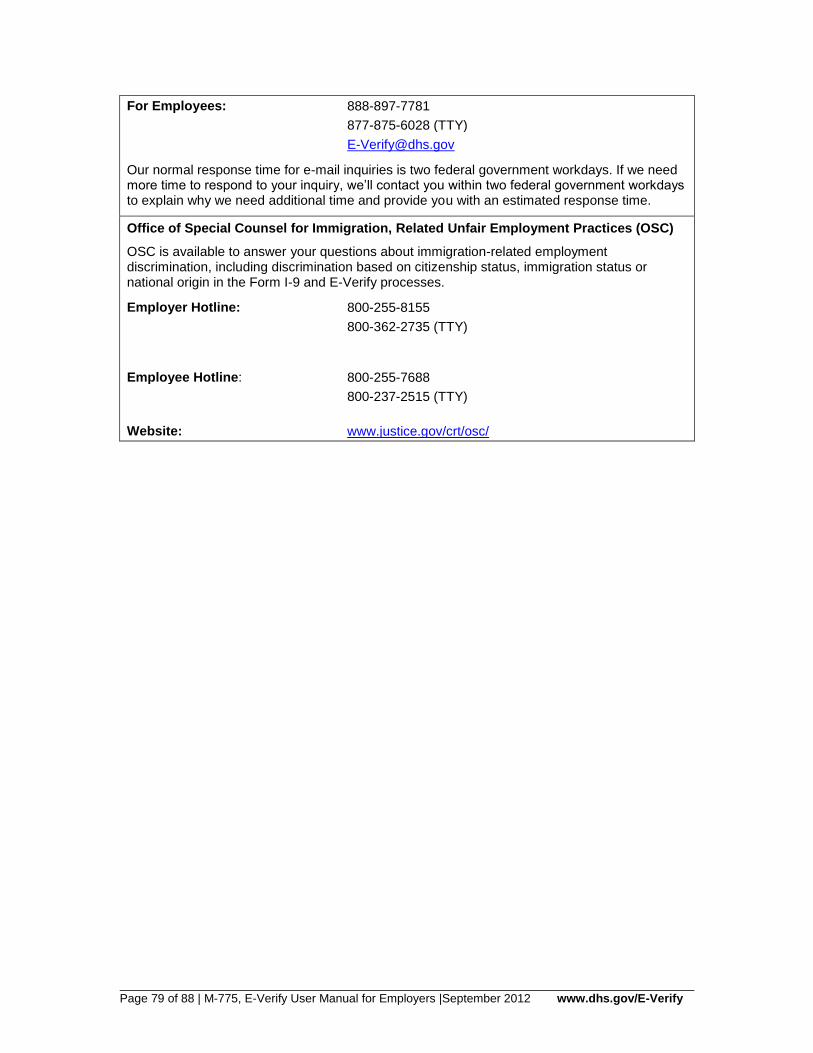
Page 79 of 88 | M-775, E-Verify User Manual for Employers |September 2012 www.dhs.gov/E-Verify
For Employees: 888-897-7781
877-875-6028 (TTY)
Our normal response time for e-mail inquiries is two federal government workdays. If we need more time to respond to your inquiry, we’ll contact you within two federal government workdays to explain why we need additional time and provide you with an estimated response time.
Office of Special Counsel for Immigration, Related Unfair Employment Practices (OSC)
OSC is available to answer your questions about immigration-related employment discrimination, including discrimination based on citizenship status, immigration status or national origin in the Form I-9 and E-Verify processes.
Employer Hotline: 800-255-8155
800-362-2735 (TTY)
Employee Hotline: 800-255-7688
800-237-2515 (TTY)
Website: www.justice.gov/crt/osc/

Page 80 of 88 | M-775, E-Verify User Manual for Employers |September 2012 www.dhs.gov/E-Verify
APPENDIX A: ACRONYMS
Acronym Definition
DHS U.S. Department of Homeland Security
DOS U.S. Department of State
FAR Federal Acquisition Regulation
FNC Final Nonconfirmation
IIRIRA Illegal Immigration Reform and Immigrant Responsibility Act
INA Immigration and Nationality Act of 1952
IRCA Immigration Reform and Control Act of 1986
MOU Memorandum of Understanding
NAICS North American Industry Classification System
OSC Office of Special Counsel for Immigration Related Unfair Employment Practices
PDF Portable Document Format
SSA Social Security Administration
SSN Social Security number
TNC Tentative Nonconfirmation
USCIS United States Citizenship and Immigration Services
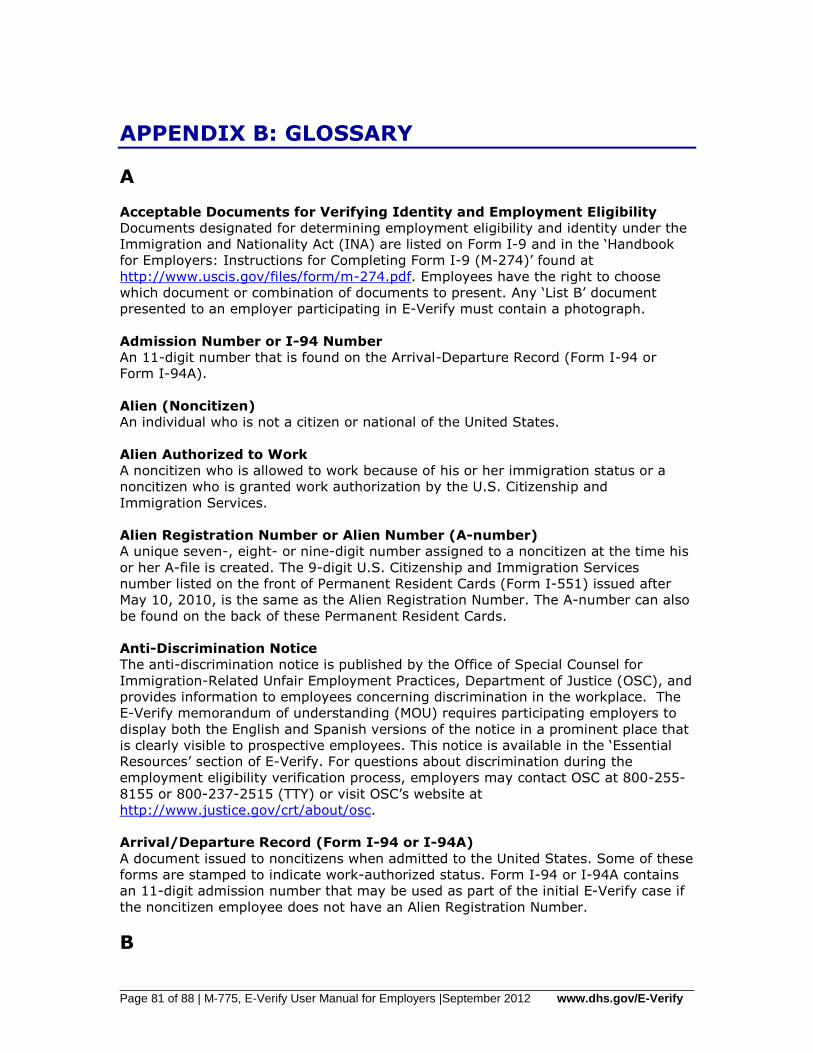
Page 81 of 88 | M-775, E-Verify User Manual for Employers |September 2012 www.dhs.gov/E-Verify
APPENDIX B: GLOSSARY
A
Acceptable Documents for Verifying Identity and Employment Eligibility
Documents designated for determining employment eligibility and identity under the
Immigration and Nationality Act (INA) are listed on Form I-9 and in the ‘Handbook
for Employers: Instructions for Completing Form I-9 (M-274)’ found at
http://www.uscis.gov/files/form/m-274.pdf. Employees have the right to choose
which document or combination of documents to present. Any ‘List B’ document
presented to an employer participating in E-Verify must contain a photograph.
Admission Number or I-94 Number
An 11-digit number that is found on the Arrival-Departure Record (Form I-94 or
Form I-94A).
Alien (Noncitizen)
An individual who is not a citizen or national of the United States.
Alien Authorized to Work
A noncitizen who is allowed to work because of his or her immigration status or a
noncitizen who is granted work authorization by the U.S. Citizenship and
Immigration Services.
Alien Registration Number or Alien Number (A-number)
A unique seven-, eight- or nine-digit number assigned to a noncitizen at the time his
or her A-file is created. The 9-digit U.S. Citizenship and Immigration Services
number listed on the front of Permanent Resident Cards (Form I-551) issued after
May 10, 2010, is the same as the Alien Registration Number. The A-number can also
be found on the back of these Permanent Resident Cards.
Anti-Discrimination Notice
The anti-discrimination notice is published by the Office of Special Counsel for
Immigration-Related Unfair Employment Practices, Department of Justice (OSC), and
provides information to employees concerning discrimination in the workplace. The
E-Verify memorandum of understanding (MOU) requires participating employers to
display both the English and Spanish versions of the notice in a prominent place that
is clearly visible to prospective employees. This notice is available in the ‘Essential
Resources’ section of E-Verify. For questions about discrimination during the
employment eligibility verification process, employers may contact OSC at 800-255-
8155 or 800-237-2515 (TTY) or visit OSC’s website at
http://www.justice.gov/crt/about/osc.
Arrival/Departure Record (Form I-94 or I-94A)
A document issued to noncitizens when admitted to the United States. Some of these
forms are stamped to indicate work-authorized status. Form I-94 or I-94A contains
an 11-digit admission number that may be used as part of the initial E-Verify case if
the noncitizen employee does not have an Alien Registration Number.
B
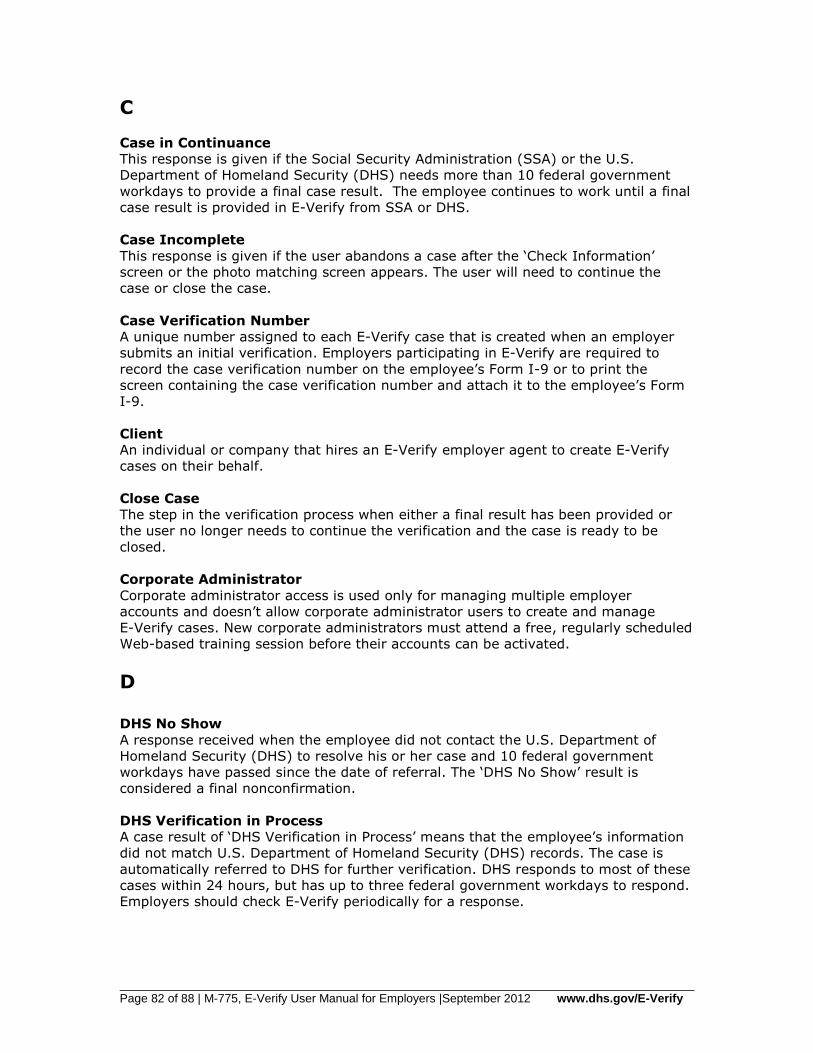
Page 82 of 88 | M-775, E-Verify User Manual for Employers |September 2012 www.dhs.gov/E-Verify
C
Case in Continuance
This response is given if the Social Security Administration (SSA) or the U.S.
Department of Homeland Security (DHS) needs more than 10 federal government
workdays to provide a final case result. The employee continues to work until a final
case result is provided in E-Verify from SSA or DHS.
Case Incomplete
This response is given if the user abandons a case after the ‘Check Information’
screen or the photo matching screen appears. The user will need to continue the
case or close the case.
Case Verification Number
A unique number assigned to each E-Verify case that is created when an employer
submits an initial verification. Employers participating in E-Verify are required to
record the case verification number on the employee’s Form I-9 or to print the
screen containing the case verification number and attach it to the employee’s Form
I-9.
Client
An individual or company that hires an E-Verify employer agent to create E-Verify
cases on their behalf.
Close Case
The step in the verification process when either a final result has been provided or
the user no longer needs to continue the verification and the case is ready to be
closed.
Corporate Administrator
Corporate administrator access is used only for managing multiple employer
accounts and doesn’t allow corporate administrator users to create and manage
E-Verify cases. New corporate administrators must attend a free, regularly scheduled
Web-based training session before their accounts can be activated.
D DHS No Show
A response received when the employee did not contact the U.S. Department of
Homeland Security (DHS) to resolve his or her case and 10 federal government
workdays have passed since the date of referral. The ‘DHS No Show’ result is
considered a final nonconfirmation.
DHS Verification in Process
A case result of ‘DHS Verification in Process’ means that the employee’s information
did not match U.S. Department of Homeland Security (DHS) records. The case is
automatically referred to DHS for further verification. DHS responds to most of these
cases within 24 hours, but has up to three federal government workdays to respond.
Employers should check E-Verify periodically for a response.
Page 83 of 88 | M-775, E-Verify User Manual for Employers |September 2012 www.dhs.gov/E-Verify
Document Type
Type of document(s) presented by a newly hired employee to verify identity and
employment eligibility.
E
Employment Authorized
This is a case result received in E-Verify when the information entered for an
employee matches Social Security Administration (SSA) or U.S. Department of
Homeland Security (DHS) records. This result indicates employment eligibility has
been verified.
Employment Authorization Document (Form I-766)
A document issued to noncitizens who are authorized to work in the United States.
The most recent version of the Employment Authorization Document (Form I-766)
has been issued since January 1997.
Form I-9, Employment Eligibility Verification
The form employers are required to complete with an employee when they hire an
employee to perform labor or services in return for wages or other remuneration.
This requirement applies to all employees hired after November 6, 1986. For
employers in the Commonwealth of the Northern Mariana Islands (CNMI), this
requirement applies to all employees hired after Nov. 27, 2009. In the CNMI,
employers had to complete Form I-9 CNMI for every employee hired for employment
in the CNMI from November 28, 2009 to November 27, 2011 and the standard Form
I-9 for those hired on or after November 28, 2011.
E-Verify Employer Agent
An individual or company that creates E-Verify cases on behalf of employers,
formerly referred to as a designated agent.
E-Verify
E-Verify is an Internet-based program in which the employment eligibility of newly
hired employees and existing employees assigned to a covered federal contract will
be verified after Form I-9 has been completed. This involves separate verification
checks (if necessary) of records maintained by the Social Security Administration
(SSA) and the U.S. Department of Homeland Security (DHS).
E-Verify Participation Notice
The E-Verify Participation Notice informs prospective employees that an employer is
participating in E-Verify. The memorandum of understanding (MOU) requires
participating employers to display both the English and Spanish versions of the
notice in a prominent place that is clearly visible to prospective employees.
F
Final Nonconfirmation
If an employee’s employment eligibility cannot be verified, an employer will receive a
Final Nonconfirmation case result in E-Verify. An employer receiving an ‘SSA or DHS
Final Nonconfirmation’ response may terminate the employee and will not be civilly
or criminally liable under any law for the termination, as long as the action was taken
in good faith reliance on the information provided through E-Verify as noted in Article
Page 84 of 88 | M-775, E-Verify User Manual for Employers |September 2012 www.dhs.gov/E-Verify
II, Section C – Responsibilities of the Employer (#6) in the memorandum of
understanding (MOU).
G
General Users
This user type creates cases, views reports and can update his or her user profile.
H
Handbook for Employers: Instructions for Completing Form I-9 (M-274)
Provides detailed instructions on how to complete and retain Form I-9.
Hire Date
The hire date is the date the employee began (or will begin) work for pay. Enter the
Section 2 ‘Certification’ date from the employee’s Form I-9 as the hire date in
E-Verify. If you rehired an employee and completed Section 3 of Form I-9, enter the
‘Date of Rehire’ from Section 3 of the employee’s Form I-9 as the hire date in
E-Verify.
Hiring Site
A hiring site is the location where your company’s employees are hired and they
complete Form I-9. If your company creates cases in E-Verify at the same location, it
is a verification location AND a hiring site.
I
Illegal Immigration Reform and Immigrant Responsibility Act of 1996
(IIRIRA)
Public Law 104-208 enacted on September 30, 1996 required the Immigration and
Naturalization Service to conduct three types of employment authorization
verification pilot programs. The ‘basic pilot program’ was one of the three programs
and is the only program still in existence. The ‘basic pilot program’ exists today as
E-Verify.
Immigration and Nationality Act of 1952 (INA)
Public Law 82-414 enacted on June 27, 1952 which, along with other immigration
laws, treaties and conventions of the United States, relates to the immigration,
temporary admission, naturalization and removal of noncitizens.
Immigration Reform and Control Act of 1986 (IRCA)
Public Law 99-603 enacted on November 6, 1986 sought to eliminate employment
opportunity as a key incentive for illegal migration to the United States. IRCA
mandates that all U.S. employers verify the employment eligibility and identify of all
new hires through completion of the Form I-9. It provides remedies to employees
and sanctions against employers who knowingly hire undocumented workers or
discriminate against employees based on citizenship or immigration status or based
on national origin.
Page 85 of 88 | M-775, E-Verify User Manual for Employers |September 2012 www.dhs.gov/E-Verify
Initial Case Result
The results displayed in E-Verify once an employee’s information has been submitted
as part of a verification case. Initial case results include ‘Employment Authorized,’
‘Tentative Nonconfirmation (TNC)’ and ‘DHS Verification in Process.’
Interim Case Status
Certain initial E-Verify results that require additional action before E-Verify can
provide a final case result. Interim case results include ‘SSA or DHS Tentative
Nonconfirmation,’ ‘Review and Update Employee Data,’ ‘DHS Verification in Process,’
‘SSA or DHS Case in Continuance.’
J
K
L
Lawful Permanent Resident
A noncitizen who has been lawfully granted the privilege of residing and working
permanently in the United States.
M
Memorandum of Understanding (MOU)
A legal document describing a bilateral or multilateral agreement between/among
parties. It constitutes a legally binding contract when properly executed (i.e., signed)
by all the parties. Employers who participate in E-Verify must sign the E-Verify MOU
between the employer, the U.S. Department of Homeland Security (DHS) and the
Social Security Administration (SSA).
N
Noncitizen National of the United States
Persons born in American Samoa; certain former citizens of the former Trust
Territory of the Pacific Islands who relinquished their U.S. citizenship acquired under
section 301 of Public Law 94-241 (establishing the Commonwealth of the Northern
Mariana Islands) by executing a declaration before an appropriate court that they
intended to be noncitizen nationals rather than U.S. citizens; and certain children of
noncitizen nationals born abroad. Generally, noncitizen nationals are American
Samoans.
Notice to Employee of Tentative Nonconfirmation (TNC)
This is a computer generated notice given to an employee after a tentative
nonconfirmation (TNC) interim case result has been received from the Social Security
Administration (SSA) or the U.S. Department of Homeland Security (DHS). If an
employee contests the TNC, he or she must contact or visit the appropriate agency
within eight federal government workdays to initiate resolution of his or her E-Verify
case.
O
Page 86 of 88 | M-775, E-Verify User Manual for Employers |September 2012 www.dhs.gov/E-Verify
Office of Special Counsel (OSC)
Created by the Immigration Reform and Control Act of 1986 (IRCA), the Office of
Special Counsel for Immigration Related Unfair Employment Practices (OSC), within
the Civil Rights Division of the U.S. Department of Justice, enforces the anti-
discrimination provision of the Immigration and Nationality Act, 8 USC 1324b, which
prohibits discrimination in hiring and discharging based upon citizenship or
immigration status and national origin, and discrimination during the employment
eligibility verification process, which includes Form I-9 and E-Verify.
P
Passport (Foreign)
Any travel document issued by a competent authority showing the bearer’s origin,
identity and nationality, if any, which is valid for the entry of the bearer into a
foreign country.
Passport (United States)
Document issued by the U.S. Department of State to U.S. citizens and noncitizen
nationals.
Password
A unique identifier that allows registered E-Verify users access to E-Verify.
Permanent Resident or Lawful Permanent Resident
A noncitizen who has been lawfully granted the privilege of residing and working
permanently in the United States.
Permanent Resident Card (Form I-551)
Issued by the former Immigration and Naturalization Service beginning in December
1997 and now issued by U.S. Citizenship and Immigration Services, this card is the
current version given to permanent residents. The document is valid for 10 years. In
the current version of the Permanent Resident Card (Form I-551), the name of the
document was changed from Resident Alien Card to Permanent Resident Card.
Photo Matching
During the verification process, employers match the photos on certain documents
provided by employees when completing Form I-9 with the photo that appears in
E-Verify. Photo matching is activated only when an employee has provided a U.S.
Passport, Passport Card, Permanent Resident Card (Form I-551) or an Employment
Authorization Document (Form I-766) as his or her Form I-9 document.
Photo Match
The photo on the employee’s document matches the photo supplied by E-Verify. The
photo transmitted by E-Verify should be the same (identical) photo that appears on
an employee’s U.S. Department of Homeland Security (DHS) issued document.
Employers should be able to determine whether the photos match.
Photo Mismatch
The photo on the employee’s document does not match the photo supplied by
E-Verify. The photo transmitted by E-Verify should be the same (identical) photo that
appears on an employee’s U.S. Department of Homeland Security (DHS) issued
document. If the employer determines that it does not match, a ‘DHS Tentative
Page 87 of 88 | M-775, E-Verify User Manual for Employers |September 2012 www.dhs.gov/E-Verify
Nonconfirmation (TNC)’ case result is issued and the employee must be given the
opportunity to contest.
Point of Contact
An individual in your company who can be contacted about E-Verify issues. This
person may or may not be one of the two user types.
Prescreening
The prohibited practice of creating a case in E-Verify before a job offer has been
accepted and Form I-9 is complete.
Program Administrator
This user type creates user accounts at his or her site. This user can view reports,
create cases, update account information and unlock user accounts.
Q
R
Referral Letter
An employee who has chosen to contest an ‘SSA or DHS Tentative Nonconfirmation
(TNC)’ case result is provided with the appropriate agency referral letter instructing
the employee to contact or visit the appropriate agency within eight federal
government workdays from the date of referral to initiate the resolution of the
employee’s E-Verify case.
Request Name Review
In some cases E-Verify returns a case result of ‘Employment Authorized,’ but the
name shown as authorized does not match exactly the name you entered into
E-Verify from the employee’s Form I-9. This can happen because of name variations
in U.S. Department of Homeland Security (DHS) records.
If the names do not match, the case must be sent to DHS for review. Taking this
step ensures that the record associated with the ‘Employment Authorized’ case result
belongs to the employee whose information was entered into E-Verify.
Review and Update Employee Data
In some instances, a case status of ‘Review and Update Employee Data’ may occur.
This means that the Social Security Administration (SSA) found a discrepancy in the
information it received in the E-Verify referral. This may occur because of
typographical errors and/or incorrect information on Form I-9. The Form I-9 will
need to be reviewed with the employee, the information corrected as applicable and
then the case may be resubmitted.
S
Social Security Administration (SSA)
The federal government agency that administers a national program of contributory
social insurance. SSA and DHS jointly manage the E-Verify program.
Page 88 of 88 | M-775, E-Verify User Manual for Employers |September 2012 www.dhs.gov/E-Verify
Social Security Administration (SSA) Referral
After an employee is advised of an ‘SSA Tentative Nonconfirmation (TNC)’ and has
signed the ‘Notice to Employee of Tentative Nonconfirmation’ also called a TNC
notice, the employee is referred to SSA to resolve the TNC.
T
Tentative Nonconfirmation (TNC)
The employee information was compared to government records and could not be
verified. This does not mean that the employee is not authorized to work, or that the
information provided was incorrect. The employee must contact or visit either the
Social Security Administration (SSA) or the U.S. Department of Homeland Security
(DHS) to resolve the discrepancy and continue employment.
U
U.S. Department of State (DOS)
The federal government department that is responsible for international relations.
DOS issues U.S. Passports and Passport Cards.
USCIS Number
A nine-digit number listed on the front of Permanent Resident Cards (Form I-551)
issued after May 10, 2010 that is the same as the Alien number. The A-number can
also be found on the back of these Permanent Resident Cards (Form I-551).
User ID
The user ID is an assigned ID with letters and numbers that identifies the user of a
computer system or network. All users who create cases in E-Verify must have their
own user IDs. The user ID must be eight characters and may be letters, numbers or
a combination of both. A user ID is not case sensitive.
V
Verification location
A verification location is where your company’s staff takes the information from an
employee’s Form I-9 and creates a case in E-Verify.
W, X, Y, Z