E-Series Digital Video Recorder User Manual
75
Please carefully read these instructions before using this product. Save this manual for future use. E-Series Digital Video Recorder User Manual model no. model no. OE2-E12016 OE2-E12008 OE2-E12004
Transcript of E-Series Digital Video Recorder User Manual

Please carefully read these instructions before using this product. Save this manual for future use.
E-SeriesDigital Video Recorder
User Manual
model no.model no. OE2-E12016OE2-E12008OE2-E12004

ii

27717AP iii
OpenEye® E120 DVR User Guide
Manual Edition 27717AP – FEBRUARY 2013
©2000-2013, OpenEye All Rights Reserved.
No part of this document may be reproduced in any means, electronic or mechanical, for any purpose, except as expressed in the Software License Agreement. OPENEYE shall not be liable for technical or editorial errors or omissions contained herein. The information in this document is subject to change without notice. The information in this publication is provided “as is” without warranty of any kind. The entire risk arising out of the use of this information remains with recipient. In no event shall OPENEYE be liable for any direct, consequential, incidental, special, punitive, or other damages whatsoever (including without limitation, damages for loss of business profits, business interruption or loss of business information), even if OPENEYE has been advised of the possibility of such damages and whether in an action or contract or tort, including negligence. This software and documentation are copyrighted. All other rights, including ownership of the software, are reserved to OPENEYE. OPENEYE and OpenEye are registered trademarks of OPENEYE in the United States and elsewhere. All other brand and product names are trademarks or registered trademarks of the respective owners. OpenEye products may include open source software that are subject to GNU GPL (General Public License), GNU LGPL (Lesser General Public License), and other similar licensing models. If you would like a copy of the source code, as governed by the GPL and LGPL, please send, by registered mail, a certified check for $15.00 to cover production and shipping costs. A CD with the applicable GPL and LGPL source code will be mailed to you. This offer is good for three years from the original date of purchase. Mail To: OpenEye ATTN Open Source Compliance, 23221 E Knox Ave, Liberty Lake WA 99019. The following words and symbols mark special messages throughout this guide:
WARNING: Text set off in this manner indicates that failure to follow directions could result in bodily harm or loss of life. CAUTION: Text set off in this manner indicates that failure to follow directions could result in damage to equipment or loss of information.
OPENEYE Liberty Lake, WA ● U.S.A.

iv
IMPORTANT SAFEGUARDS
1. Read Owner’s Manual – After unpacking this product, read the owner’s manual carefully, and follow all the operating and other instructions.
2. Power Sources – This product should be operated only from the type of power source indicated on the label. If not sure of the type of power supply to your home or business, consult product dealer or local power company.
3. Ventilation – Slots and openings in the cabinet are provided for ventilation and to ensure reliable operation of the product and to protect it from overheating, and these openings must not be blocked or covered. The product should not be placed in a built-in installation such as a bookcase or rack unless proper ventilation is provided or OpenEye’s instructions have been adhered to.
4. Heat – The product should be situated away from heat sources such as radiators, heat registers, stoves, or other products that produce heat.
5. Water and Moisture – Do not use this product near water. Do not exceed the humidity specifications for the product as detailed in the Appendix section in this manual.
6. Cleaning – Unplug this product from the wall outlet before cleaning. Do not use liquid cleaners or aerosol cleaners. Use a damp cloth for cleaning.
7. Power Cord Protection – Power-supply cords should not be routed so that they are likely to be walked on or pinched by items placed against them, paying particular attention to cords at plugs, receptacles, and the point where they exit the product.
8. Overloading – Do not overload wall outlets; extension cords, or integral convenience receptacles as this can result in a risk of fire or electrical shock.
9. Object and Liquid Entry Points – Never insert foreign objects into the DVR, other than the media types approved by OpenEye, as they may touch dangerous voltage points or short-out parts that could result in a fire or electrical shock. Never spill liquid of any kind on the product.
10. Accessories – Do not place this product on an unstable cart, stand, tripod, bracket, or table. The product may fall, causing serious personal injury and serious damage to the product.
11. Disc Tray – Keep fingers well clear of the disc tray as it is closing. Neglecting to do so may cause serious personal injury.
12. Burden – Do not place a heavy object on or step on the product. The object may fall, causing serious personal injury and serious damage to the product.
13. Disc – Do not use a cracked, deformed, or repaired disc. These discs are easily broken and may cause serious personal injury and product malfunction.
14. Fuses – CAUTION: For continued protection against risk of fire, replace only with same type and rating of fuse.
15. Replaceable Batteries – CAUTION: Risk of Risk of Explosion if Battery is replaced by an Incorrect Type. Dispose of Used Batteries According to the Instructions
16. Grounded Outlet – This equipment shall be connected to a properly grounded outlet.
17. Outlet Location – This equipment must be installed within six feet of an easily accessible outlet.
27717AP v
18. Damage Requiring Service – Unplug the unit from the outlet and refer servicing to qualified service personnel under the following conditions: When the power-supply cord or plug is damaged. If liquid has been spilled, or objects have fallen into the unit. If the unit has been exposed to rain or water. If the unit does not operate normally by following the operating instructions. Adjust only those controls that are covered by the operating instructions as an improper adjustment of other controls may result in damage and will often require extensive work by a qualified technician to restore the unit to its normal operation. If the unit has been dropped or the enclosure has been damaged. When the unit exhibits a distinct change in performance – this indicates a need for service.
19. Servicing – Do not attempt to service this product unless instructed to by an OpenEye engineer. Opening or removing covers may expose the user to dangerous voltage or other hazards. Refer all servicing to qualified personnel.
20. Replacement Parts – When replacement parts are required, be sure the service technician has used replacement parts specified by OpenEye or have the same characteristics as the original part. Unauthorized substitutions may result in fire, electric shock or other hazards.
21. Safety Check – Upon completion of any service or repairs to this unit, ask the service technician to perform safety checks to determine that the unit is in proper operating condition.
NOTES ON HANDLING
Please retain the original shipping carton and/or packing materials supplied with this product. To ensure the integrity of this product when shipping or moving, repackage the unit as it was originally received from OpenEye.
Do not use volatile liquids, such as aerosol spray, near this product. Do not leave rubber or plastic objects in contact with this product for long periods of time. They will leave marks on the finish.
The top and rear panels of the unit may become warm after long periods of use. This is not a malfunction.
NOTES ON LOCATING
Place the unit on a level surface. Do not use it on a shaky or unstable surface such as a wobbling table or inclined stand.
If this unit is placed next to a TV, radio, or VCR, the playback picture may become poor and the sound may be distorted. If this happens, place the DVR away from the TV, radio, or VCR.
NOTES ON CLEANING
Use a soft dry cloth for cleaning.
For stubborn dirt, soak the cloth in a weak detergent solution, wring well and wipe. Use a dry cloth to wipe it dry. Do not use any type of solvent, such as thinner and benzene, as they may damage the surface of the DVR.
If using a chemical saturated cloth to clean the unit, follow that product’s instructions.
NOTES ON MAINTENANCE
This DVR is designed to last for long periods of time. To keep the DVR always operational we recommend regular inspection maintenance (cleaning parts or replacement). For details contact the nearest dealer.

vi
NOTES ON MOISTURE CONDENSATION
Moisture condensation could damage the DVR. Read the following information carefully.
Moisture condensation might occur under the following circumstances:
• When this product is brought directly from a cool location to a warm location.
• When this product is moved to a hot and humid location from a cool location.
• When this product is moved to a cool and humid location from a warm location.
• When this product is used in a room where the temperature fluctuates.
• When this product is used near an air-conditioning unit vent
• When this product is used in a humid place.
Do not use the DVR when moisture condensation may occur.
If the DVR is used in such a situation, it may damage discs and internal parts. Remove any CD discs, connect the power cord of the DVR to the wall outlet, turn on the DVR, and leave it for two to three hours. After two to three hours, the DVR will warm up and evaporate any moisture. Keep the DVR connected to the wall outlet and moisture will seldom occur.
WARNING
TO REDUCE THE RISK OF ELECTRICAL SHOCK, DO NOT EXPOSE THIS APPLIANCE TO RAIN OR MOISTURE. DANGEROUS HIGH VOLTAGES ARE PRESENT INSIDE THE ENCLOSURE. DO NOT OPEN THE CABINET. REFER SERVICING TO QUALIFIED PERSONNEL ONLY.
CAUTION: TO REDUCE THE RISK OF ELECTRIC SHOCK, DO NOT REMOVE COVER (OR BACK).
NO USER-SERVICEABLE PARTS INSIDE.REFER SERVICING TO QUALIFIED SERVICE PERSONNEL.
C A U T I O NRISK OF ELECTRIC SHOCK
DO NOT OPEN

27717AP vii
EXPLANATION OF GRAPHICAL SYMBOLS
The lightning flash with arrowhead symbol, within an equilateral triangle, is intended to alert the user to the presence of un-insulated "dangerous voltage" within the product enclosure that may be of sufficient magnitude to constitute a risk of electric shock to persons.
FCC STATEMENT
This equipment has been tested and found to comply with the limits for a Class A digital device, pursuant to Part 15 of the FCC Rules. These limits are designed to provide reasonable protection against harmful interference when the equipment is operated in a commercial environment. This equipment generates, uses, and can radiate radio frequency energy and, if not installed and used in accordance with the instruction manual, may cause harmful interference to radio communications. Operation of this equipment in a residential area is likely to cause harmful interference in which case the user will be required to correct the interference at his own expense.
EN 55022 Class A Notice
WARNING This is a class A product. In a domestic environment this product may cause radio interference in which case the user may be required to take adequate measures.

viii
Standard Warranty
OpenEye warrants all new products to be free from defects in workmanship and material under normal use for a period of two years after the date of purchase. Any defective product that falls under this warranty will, at OpenEye's discretion, be repaired or replaced at no additional charge. OpenEye may elect to replace defective products with new or factory reconditioned products of equal or greater value. Repairs made necessary by reason of misuse, alteration, normal wear, or accident are not covered under this warranty. Exceptions to this are listed below:
• Three Years on all Digital Recorders • Three years on all fixed cameras
All products shall be covered by a one year advance replacement warranty*. OpenEye will warrant all otherwise out of warranty replacement parts and repairs for 90 days from the date of OpenEye shipment. The above warranty is the sole warranty made by OpenEye and is in lieu of all other warranties by OpenEye express and implied, including without limitation the warranties of merchantability and fitness for a particular purpose. Under no circumstances will OpenEye be liable for any consequential, incidental, special or exemplary damages arising out of or connected with the sale, delivery, use or performance of the product, even if OpenEye is apprised of the likelihood of such damages occurring. In no event shall OpenEye liability exceed the purchase price of the product. This warranty gives you specific legal rights and you may also have other rights which vary from state to state or country to country. *Requires corresponding security deposit. Advanced Replacement limited to components only outside of the USA and Canada. For the most up to date information visit www.openeye.net

27717AP ix
Table of Contents
INTRODUCTION ......................................................................................................................................... 13 Product Description ................................................................................................................................ 13 Features ................................................................................................................................................. 14 USB Flash Drive Approved List .............................................................................................................. 14 Quick Start Instructions .......................................................................................................................... 15
INSTALLATION .......................................................................................................................................... 17 Front Panel Controls ............................................................................................................................... 17 Rear Panel Connectors .......................................................................................................................... 18
4 Channel........................................................................................................................................... 18 8 Channel........................................................................................................................................... 19 16 Channel......................................................................................................................................... 19
Remote Control ...................................................................................................................................... 20 Connection Guide ................................................................................................................................... 21
Connecting the Monitor ...................................................................................................................... 21 Video Inputs and Looping Outputs ..................................................................................................... 21 Connecting to a Network .................................................................................................................... 21 Connecting Audio ............................................................................................................................... 21 Connecting a PTZ Camera ................................................................................................................ 21 Connecting to a Sensor Input............................................................................................................. 22 Connecting to a Relay Output ............................................................................................................ 22
Turning on the DVR ................................................................................................................................ 22 Setting the Remote Controller ID ............................................................................................................ 22
SETUP ........................................................................................................................................................ 23 Setup Menus .......................................................................................................................................... 23 System ................................................................................................................................................... 24
System Setup ..................................................................................................................................... 24 Disk Management .............................................................................................................................. 25
Format ........................................................................................................................................... 25 Overwrite ....................................................................................................................................... 25 Check ............................................................................................................................................ 25 SMART Check .............................................................................................................................. 27
User Management ............................................................................................................................. 27 Server ........................................................................................................................................... 27 Client ............................................................................................................................................. 28
Configuration ...................................................................................................................................... 28 Shutdown ........................................................................................................................................... 28
Camera ................................................................................................................................................... 29 Camera Setup .................................................................................................................................... 29
Color Setup (Adjust) ...................................................................................................................... 29 PTZ Setup .......................................................................................................................................... 29 Spot /Sequence Setup ....................................................................................................................... 30 Monitor Setup ..................................................................................................................................... 30
Record .................................................................................................................................................... 31 Record Setup ..................................................................................................................................... 31
Frame Setup ................................................................................................................................. 31

x
Schedule Setup ............................................................................................................................. 31 Audio Setup .................................................................................................................................. 32
Enabling Audio for Recording and Live Video .......................................................................... 32 Mapping Audio to Video ........................................................................................................... 32
Instant Recording Setup ................................................................................................................ 33 Instant Recording ..................................................................................................................... 33
Quick Record Setup ........................................................................................................................... 33 Motion/Event SETUP ......................................................................................................................... 34
Input Setup .................................................................................................................................... 34 Sensor Setup ................................................................................................................................ 34 Action Setup .................................................................................................................................. 35 EA (Emergency Agent) ................................................................................................................. 35
Motion Detection Recording ................................................................................................................... 36 Network .................................................................................................................................................. 37
Network Setup ................................................................................................................................... 37 Enabling Free DDNS ..................................................................................................................... 38
Serial Setup ....................................................................................................................................... 38 Client Setup ....................................................................................................................................... 38 E-mail Setup ...................................................................................................................................... 39
Information.............................................................................................................................................. 40 System Log View ............................................................................................................................... 40 Status View ........................................................................................................................................ 40 Version View ...................................................................................................................................... 40
OPERATION ............................................................................................................................................... 42 INSTANT Recording ............................................................................................................................... 42 Search .................................................................................................................................................... 42
Searching Recorded Data .................................................................................................................. 42 Search Methods ................................................................................................................................. 43
Quick Search................................................................................................................................. 43 Event Search................................................................................................................................. 43 Daylight Savings Search ............................................................................................................... 43 Go To First .................................................................................................................................... 43 Go To Last .................................................................................................................................... 43 Go To Jump .................................................................................................................................. 43
Search Details .................................................................................................................................... 44 Search Popup Menu .......................................................................................................................... 44
Monitoring ............................................................................................................................................... 45 Select Channel ................................................................................................................................... 45 Live Popup Menu ............................................................................................................................... 45
Backup ................................................................................................................................................... 46 Manual Backup .................................................................................................................................. 46 Auto Backup ....................................................................................................................................... 46
Using the Backup Viewer ....................................................................................................................... 47 Controlling Backup Viewer ................................................................................................................. 47 Viewing Backed Up Video .................................................................................................................. 48 Screen Division Buttons ..................................................................................................................... 48
Upgrade Firmware AT the DVR .............................................................................................................. 48 Save Settings ......................................................................................................................................... 49

27717AP xi
Export Settings ................................................................................................................................... 49 Import Settings ................................................................................................................................... 49
PTZ Camera Control .............................................................................................................................. 50 Create PTZ Preset Position ............................................................................................................... 50 Access Camera Menu for Pelco P & D Protocols .............................................................................. 50
PTZ Compatibility List ............................................................................................................................. 51 REMOTE SOFTWARE................................................................................................................................ 52
Setup Remote Connection ..................................................................................................................... 52 Configuring the DVR .......................................................................................................................... 52 Configuring a Remote PC .................................................................................................................. 52
Access Remote E-Series DVR ............................................................................................................... 54 Connecting to Multiple DVRs ............................................................................................................. 54
Using the Remote Software .................................................................................................................... 54 Setting the Time and Date ................................................................................................................. 54 Display Screen ................................................................................................................................... 55
Camera View................................................................................................................................. 56 Screen Division Buttons ................................................................................................................ 57
Setup Overview .................................................................................................................................. 58 Setup Screen Overview ................................................................................................................ 58 Camera Setup ............................................................................................................................... 58
Camera Setup .......................................................................................................................... 58 PanTilt Setup ............................................................................................................................ 58 Sequence Setup ....................................................................................................................... 58 SPOT Setup ............................................................................................................................. 59
Record Setup ................................................................................................................................ 59 Frame Setup............................................................................................................................. 59 Schedule Setup ........................................................................................................................ 59 Audio Setup .............................................................................................................................. 59 Motion / Event Input ................................................................................................................. 60 HDD Setup ............................................................................................................................... 60
Sensor Setup ................................................................................................................................ 60 Sensor ...................................................................................................................................... 60
System Setup ................................................................................................................................ 61 User Management .................................................................................................................... 61 Firmware Upgrade .................................................................................................................... 61
Search Overview ................................................................................................................................ 62 Play Controls ................................................................................................................................. 62 Performing a Basic Search ........................................................................................................... 63 Adjust the Brightness of an Image ................................................................................................ 63 Zooming in on an Image ............................................................................................................... 63 Zooming in on a Portion of an Image ............................................................................................ 63 Time Sync ..................................................................................................................................... 63 Clean Image .................................................................................................................................. 63 Save Clip ....................................................................................................................................... 64
Saving a Single Image or Video Clip ........................................................................................ 64 Printing an Image .......................................................................................................................... 65
Status Search .................................................................................................................................... 65 Performing a Status Search .......................................................................................................... 65

xii
PTZ Overview .................................................................................................................................... 66 Accessing PTZ Menus .................................................................................................................. 66 Controlling a PTZ Camera ............................................................................................................ 66
Using the Graphical PTZ Controller .......................................................................................... 67 Using the On-screen Compass ................................................................................................ 67
APPENDIX .................................................................................................................................................. 69 DVR FAQ................................................................................................................................................ 69 TroubleShooting ..................................................................................................................................... 70 Environmental Specifications.................................................................................................................. 70 Screen Icon Index ................................................................................................................................... 71
Recording Icons ................................................................................................................................. 71 Status Icons ....................................................................................................................................... 71 Search Icons ...................................................................................................................................... 71
Specifications (E120) .............................................................................................................................. 72

27717AP 13
INTRODUCTION
PRODUCT DESCRIPTION
OpenEye’s E-Series DVR is a powerful, yet affordable, video management solution designed for easy installation and operation. Preconfigured for continuous recording and DDNS, with no additional setup required, the E-Series DVR offers quick search, setup, and backup features. The E-Series DVR runs on an embedded Linux operating system which provides stability and protection from viruses. The OpenEye E-Series server comes ready for fast and seamless integration within your existing IT infrastructure. Designed around Linux Embedded, the E-Series server offers unparalleled stability, security, and ease of use in a 2U chassis. Accordingly, your security investment has never been easier to maintain. Multiple users may connect through any network for simultaneous live viewing, and digital search. This powerful software enables users to establish recording schedules, create motion detection zones, and use PTZ controls on available attached video input devices. With the latest advancements in the E-Series server software, searching and indexing your video archive has never been easier. All OpenEye DVRs come with free RADIUS remote management and viewing software allowing you to connect to any number of DVRs from virtually anywhere using your PC or laptop. OpenEye’s suite of applications allow you to remotely manage DVR settings and permissions, view live virtual multiplexed video from multiple DVRs on multiple displays, monitor alarm and sensor events remotely, create custom maps of facilities, and search or backup recorded video.

14
FEATURES
The OpenEye E-Series DVRs include the following features:
• Up to 16 Composite Video Input Connectors
• Compatible with Color (NTSC or PAL) and B&W Video Sources
• Multiple Search Methods (Date/Time, Calendar, Event)
• Records 120 NTSC Pictures Per Second (100 PAL Pictures Per Second)
• Live Real Time Video Display (480 NTSC Pictures Per Second (400 PAL Pictures Per Second))
• Up to 16 Looping Video Outputs
• Auto Termination (75Ohm) on Looping Outputs
• Continuous Recording with Disk Overwrite Mode
• Continuous Recording on Archiving, Transmitting to Remote, and Playback
• Motion Based Recording Uniquely Configurable for Each Channel
• Customizable Motion Detection Grids Uniquely Configurable for Each Channel
• Multiple Recording Modes (Manual / Schedule / Event)
• Audio (Mono) Recording and Playback
• Up to16 Built in Sensor Input (Normally Open or Normally Closed)
• Up to 4 Built in Relay Output (Normally Open or Normally Closed)
• Built-in Alarm Buzzer
• Remote Access via Ethernet and/or Modem
• PTZ Camera Control
• Supports CD-RW & DVD±RW
USB FLASH DRIVE APPROVED LIST
These USB flash drives have been tested and approved to work with the E-Series DVR. Other USB flash drives may also work with the E-Series DVR but have not yet been tested.
Manufacturer Model
SanDisk Cruzer
Talent Flash
Corsair Voyager
Lexar JumpDrive
Kingston Traveler

27717AP 15
QUICK START INSTRUCTIONS
1. Turn on the DVR. Note See the Turning on the DVR section for more details.
2. Log in -- Use the number buttons to enter the password when prompted – By default the password is <none> – Press the ENT Button.
3. Complete System Setup to set up the date, time and system ID. Note See the System Startup section for more details.
Complete Sensor Setup to enable any external devices connected to sensor inputs or relay outputs. Note See the Motion/Event Setup section for more details.
4. Complete Disk Management Setup to set overwrite options and enable SMART Check. Note See the Disk Management section for more details.
5. Complete User Management Setup to change the Admin password and add additional users. Note See the User Management section for more details.
6. Complete Camera Setup for all attached cameras. Note See the Camera Setup section for more detail.
7. Complete PTZ Setup for any attached Pan / Tilt / Zoom cameras. Note See the PTZ Setup section for more details.
8. Create a recording schedule. Note See the Record section for more details.
9. Complete Input Setup to trigger recording on an event: motion, sensor, video loss. Note See the Motion/Event Setup section for more details.
10. The DVR is now configured to record, search and playback video. Note See the Operations section in this manual for more information on using the DVR.

16
NOTES:

27717AP 17
INSTALLATION
FRONT PANEL CONTROLS
USB Ports LED Lights • Power • HDD • Record • Network • Fan
DVD Drive Numeric Keypad* Arrow Buttons
Live Display Setup Menu
Lock (logout)
Search Mode
Rotate
*The numeric keypad layout differs on the 4 and 8 Channel models
Backup Menu
18
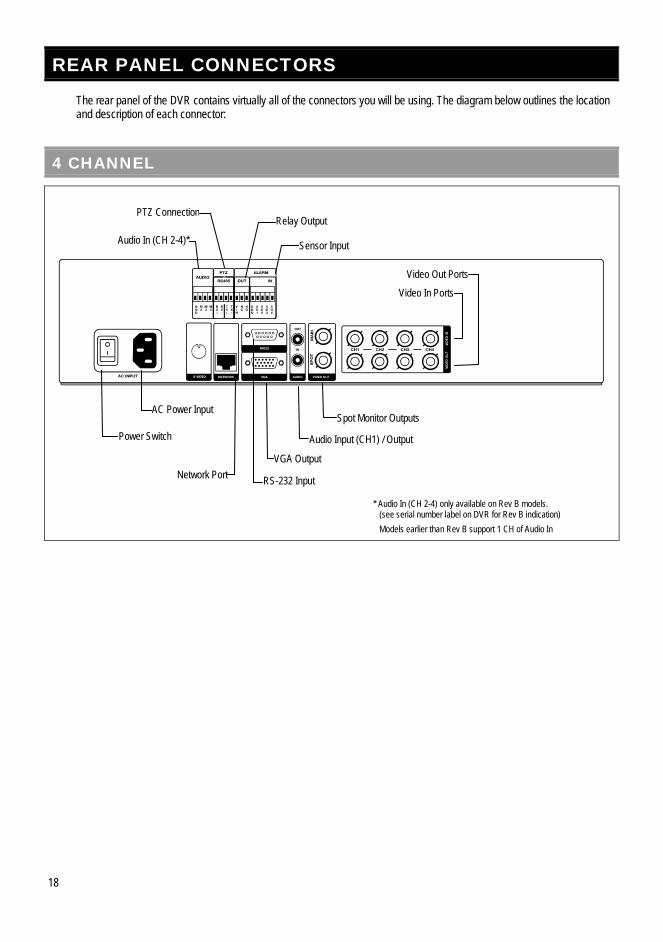
REAR PANEL CONNECTORS
The rear panel of the DVR contains virtually all of the connectors you will be using. The diagram below outlines the location and description of each connector:
4 CHANNEL
Spot Monitor Outputs Power Switch
AC Power Input
Network Port RS-232 Input
VGA Output
Audio Input (CH1) / Output
Video In Ports
Video Out Ports
Relay Output
Sensor Input Audio In (CH 2-4)*
PTZ Connection
* Audio In (CH 2-4) only available on Rev B models. (see serial number label on DVR for Rev B indication) Models earlier than Rev B support 1 CH of Audio In

27717AP 19
8 CHANNEL
16 CHANNEL
Primary and Spot Monitor Outputs
AC Power Input
Power Switch
Network Port
RS-232 Input
VGA Output
Audio Output / Input (CH1)
S-Video Output
Video In Ports
Video Out Ports
Relay Output
Sensor Input
Audio Input (CH 2-4)*
PTZ Connection
* Audio In (CH 2-4) only available on Rev B models. (see serial number label on DVR for Rev B indication) Models earlier than Rev B support 1 CH of Audio In
Spot Monitor Outputs Power Switch
AC Power Input
Network Port RS-232 Input
VGA Output
Audio Input / Output
Video In Ports
Video Out Ports Relay Output
Sensor Input Audio In (CH 2-4)*
PTZ Connection
* Audio In (CH 2-4) only available on Rev B models. (see serial number label on DVR for Rev B indication) Models earlier than Rev B support 1 CH of Audio In

20
REMOTE CONTROL
1 2 3
4 5 6
7 8 9
+10 0
ID Record Toggle ID Select*
Arrow / Panorama
Arrow
Rewind
Pause
Arrow
Arrow / SMART
Play
Fast Forward
Log Off (Lock)
PTZ Controls
*The ID Select Button allows the user to use one remote control for several DVRs.

27717AP 21
CONNECTION GUIDE
CONNECTING THE MONITOR
There are three available monitor outputs on the E-Series DVR. • Composite Monitor output for CCTV monitor – BNC (Marked MAIN) • VGA output for VGA monitor – Mini-Sub D15 • S-Video output – Mini-Din 4 (16 Channel only)
VIDEO INPUTS AND LOOPING OUTPUTS
The E-Series DVR comes with up to 16 BNC video inputs on the rear of its chassis. Each video input has a corresponding looping BNC output beneath it for passing the video signal to another monitoring/recording device.
CONNECTING TO A NETWORK
Use the RJ45 jack on the rear of the DVR when connecting to a network.
CONNECTING AUDIO
To record audio on the DVR connect the audio source to the Audio In Port (White) on the back of the chassis. To listen to live or recorded audio connect the Audio Out Port (Red) to an amplified speaker system. Note The DVR audio output is a line level source which requires an amplified speaker system. The audio input can be from
an amplified source or directly from a microphone.
CONNECTING A PTZ CAMERA
The RS485 connector can be used to control Pan / Tilt / Zoom (PTZ) cameras. See the PTZ camera manufacturer’s manual for configuring the RS485 connection. Note Use the RS485 connector for external control systems such as a control keyboard. Connect RX-/TX- and RX+/TX+ of
the control system to the TX-/RX- and TX+/RX+ (respectively) of the DVR.
RJ45

22
CONNECTING TO A SENSOR INPUT
To make connections on the Alarm Connector Strip: Remove the Alarm In block from the DVR for easy access. Use a small screw driver to open the connection and insert the wire into the hole. To disconnect the wire loosen the connection with the screw driver and pull the wire out.
Alarm In
Use external devices to send a signal to the DVR when an event occurs. Mechanical or electrical switches can be wired to the Alarm In and Ground (GND) connectors.
Note All connectors marked GND are common. Connect the ground side of the alarm input and/or alarm output to the GND connector.
CONNECTING TO A RELAY OUTPUT
To make connections on the Alarm Connector Strip: Remove the Alarm Out block from the DVR for easy access. Use a small screw driver to open the connection and insert the wire into the hole. To disconnect the wire loosen the connection with the screw driver and pull the wire out.
Alarm Out
The DVR can activate external devices such as buzzers or lights. Connect the external device to the Alarm Out and Ground (GND) connectors. See Alarm Setup in the manual for more details.
TURNING ON THE DVR
1. Connect the power cable.
(See the Connection Guide section for more details) 2. Connect camera cables.
3. Connect a network cable and a monitor cable.
4. Flip the power switch on the back of the DVR and wait until the main screen is displayed on the connected monitor; this process several minutes to complete.
SETTING THE REMOTE CONTROLLER ID
When more than one E-Series DVR is installed in the same location, you can use one remote controller to control multiple DVRs – up to 20 DVRs. To control multiple DVRs, you must change the remote controller ID to the SYSTEM ID of the DVR. To change the remote controller ID:
1. On the DVR, go to SYSTEM > SYSTEM SETUP.
2. Enter the desired SYSTEM ID number.
3. On the remote controller, press and hold the ID button and enter the desired SYSTEM ID number to operate the corresponding DVR.
Note The SYSTEM ID must be input as two numbers on the remote controller. Therefore you should input 00 for the system ID 0 and input 01 for 1.

27717AP 23
SETUP
SETUP MENUS
Use the setup menus to configure all of the DVR settings, schedule recording, networking and shutdown. Press SETUP on the front of the DVR or remote control to enter the setup menus and log in. See the Quick Start Guide section if entering setup for the first time. Use the and keys on the front of the DVR or remote control to navigate individual menus, and use the and keys to select a new setup menu.
SYSTEM
SYSTEM SETUPDISK MANAGEMENTUSER MANAGEMENTCONFIGURATIONSHUTDOWN

24
SYSTEM
SYSTEM SETUP
To enter System Setup, press SETUP on the front of the DVR and press ENT to select System Setup. Use the arrow buttons on the front panel of the DVR or the remote control to navigate the display. Select Save and press ENT to update settings.
VIDEO FORMAT – AUTO > NTSC > PAL.
LANGUAGE – ENGLISH > KOREA > SPANISH > PORTUGUESE > RUSSIAN > [User Selectable].
SYSTEM ID – 0 -19. [Required for the operation of multiple units using the supplied IR remote control. Each system must have a unique ID to function properly.]
DATE FORMAT – US (MM-DD-YYYY) > EURO (DD-MM-YYYY) > ASIA (YYYY-MM-DD) – [User Selectable].
DATE – Press ENT to select the Date and use the number keys and/or arrow buttons to set the date. Press ENT again to deselect.
TIME – Press ENT to select the Time and use the number keys and/or arrow buttons to set the time. Press ENT again to deselect.
TIME ZONE – Press ENT to open the Time Zone window. Use the arrow keys to navigate the list and press ENT to make selection. Select Exit and press ENT to close the window.
Note The date and time must be set manually; changing the time zone will not automatically change the Time/Date display.
USE DST – After completing the Time Zone setup, highlight USE DST and press ENT to turn Daylight Saving Time ON / OFF.
NTP – Highlight NTP (Network Time Protocol) and press ENT to SYNC the DVR with the Network Time.
KEYPAD BEEP – ON > OFF [Enables / Disables Audible keypad touch confirmation].
AUTO LOG OFF – OFF or 1-10 Minutes [This feature will close the Setup Menu after XX minutes of inactivity. This is a security feature.]
SYSTEM SETUP
VIDEO FORMATLANGUAGESYSTEM ID
DATE FORMATDATETIMETIME ZONEUSE DSTNTP
KEYPAD BEEPAUTO LOG OFF
NTSCENGLISH0
MM-DD-YYYY11/06/200610:44:48GMT-08:00..OFFOFF
OFFOFF
SAVE CANCEL

27717AP 25
DISK MANAGEMENT
Format
FORMAT – Shows installed Hard Disk Drives and the status of other attached storage devices.
To format a Hard Drive use the arrow keys to select the appropriate device and press ENT. Select OK to confirm formatting and press ENT.
To format a USB device use the arrow keys to select USB FORMAT and press ENT. Select the USB target and select FAT32. Press OK to format.
Tip Refer to the list of Approved USB Flash Drives in the Introduction chapter.
To refresh the list of connected USB devices select USB RESET and press ENT.
Caution All USB devices must be formatted as FAT32 before they can be used with the DVR.
Overwrite
Sets options for overwriting data when the Hard Disk Drive becomes full.
Enable HDD OVERWRITE to allow the DVR to write over previously recorded data, starting with the oldest date, when the HDD is full. If set to Off the DVR will not record any new data once the HDD becomes full.
Enable DISK FULL WARNING for notification when the HDD becomes full and HDD OVERWRITE is disabled.
Check
Manually check the HDD for failure or errors.
1. Select START CHECK and press ENT set to ON or OFF.
2. The DVR will check the system HDD for errors.
Note If there are any HDD errors, the system will display a pop-up detailing the problem.

26

27717AP 27
SMART Check
SMART CHECK – (Self Monitoring Analysis & Reporting Technology) Enable SMART Check to detect signs of HDD failure.
1. Select SMART ENABLE and press ENT to ENABLE or DISABLE.
2. Set a check interval between 1 and 24 HOURS.
3. Define a temperature threshold and select Celsius or Fahrenheit.
Note The recommended upper optimum operating temperature for the HDD is between 40C and 50C (or 104F to 122F).
4. Select a warning to be activated when the HDD reaches the defined threshold.
5. Select SAVE and press ENT to save settings.
Tip Select HDD INFORMATION and press the ENT button to view the current HDD, DVD, and USB drive information.
USER MANAGEMENT
Use the User Management Setup to Add or Delete user accounts on the DVR and accounts for remote access.
Server
Use the SERVER menu to manage users that access the E120 locally. There are three user levels available (Admin, SuperUser, User). Export Viewer – Allow the user to include a copy of the Backup Viewer application when a local backup is made. This is a Server side feature only. Use CD/DVD - Allow the user to use the DVD Drive. This is a Server side feature only. To add a new user:
1. Select the authorization level to display the names of the users in that level (ADMIN, SUPERUSER, USER) by selecting the user type at the top of the screen and pressing ENT to cycle to the next level.
2. Select ADD/CHANGE on an unused row and press ENT.
3. Use the on-screen keyboard to input the user name.
4. Select OK.
5. Set the user password using the onscreen keypad or the key buttons on the front panel or remote control. Repeat the password to confirm.
6. Repeat the above steps to set up more users at appropriate authorization levels.
7. Select SAVE and press ENT to save settings.

28
Client
Use the Client menu to manage users that access the E120 remotely. Remote users must be defined on this page. Only the users defined here can access the DVR remotely. Add up to 18 users in addition to the two Admin users.
To add a new user:
1. Select a LOGIN ID and press ENT.
2. Use the on-screen keyboard to input the user name.
3. Set the user password using the onscreen keypad or the number buttons on the front panel or remote control. Repeat the password to confirm.
4. Set the user permissions.
Playback – ON/OFF Backup – ON/OFF Health Check – ON/OFF
Live View – 1~16, ALL, OFF PTZ Control – 1~16, ALL, OFF
5. Repeat the above steps to set up additional users.
6. Select SAVE and press ENT to save settings.
CONFIGURATION
Import and Export current settings. See details in the Save Settings Section.
SHUTDOWN
Use SHUTDOWN to safely shutdown the system.
1. Select SYSTEM > SHUTDOWN.
2. Select OK to confirm and press ENT to safely shutdown the system.
3. Turn the power off when shutdown is complete using the toggle switch on the back of the DVR.
Note Improperly shutting down the system can cause data loss and system corruption.
USER MANAGEMENT - CLIENT
SAVE CANCEL
SERVER CLIENT
ADMIN1ADMIN2USER1USER2USER3USER4USER5USER6USER7USER8
LOGIN IDadmin1admin2user1user2user3user4user5user6user7user8
PERMISSIONS
P ASS WORD****************************************
PAGE1 PAGE2

27717AP 29
CAMERA
CAMERA SETUP
CH –Camera Channels (on 16 channels DVRs, select 9CH-16CH to display additional channels)
NAME – Use the on-screen keyboard to enter a camera name [user defined]
ENABLE – ON/OFF
HIDDEN – ON/OFF
ADJUST –Detailed camera display settings
Color Setup (Adjust)
CAMERA – 1 ~ 16 [camera to apply color settings to]
SCREEN MODE – Live / Record
BRIGHT – -25 ~ 25
CONTRAST – -25 ~ 25
SATURATION – -25 ~ 25
HUE – -25 ~ 25
POSITION – [position of camera on the screen]
APPLY ALL – Apply current color settings to all cameras
PTZ SETUP
Set PTZ details for each channel.
PORT – Sets the port information for the connected camera. [Consult the documentation provided by the camera manufacturer to obtain this information.]
ID – Sets the PTZ ID from 1 ~ 255
PROTOCOL – Select a PTZ protocol
CAMERA SETUP - CAMERA
CH12345678
NAMEC1C2C3C4C5C6C7C8
ENABLEONONONONONONONON
HIDDENOFFOFFOFFOFFOFFOFFOFFOFF
SAVE CANCEL
ADJUST
CAMERA PTZ SPOT/SEQUENCE MONITOR
9CH-16CH
COLOR SETUP - LIVE
CAMERASCREEN MODEBRIGHTCONTRASTSATURATIONHUEPOSITIONAPPLY ALL
1LIVE0000
SAVE CANCEL
CAMERA SETUP - PTZ
CH12345678
PORT4800-8N14800-8N14800-8N14800-8N14800-8N14800-8N14800-8N14800-8N1
ID11111111
PROTOCOLNONENONENONENONENONENONENONENONE
SAVE CANCEL
CAMERA PTZ SPOT/SEQUENCE MONITOR
9CH-16CH

30
SPOT /SEQUENCE SETUP
SPOT SETUP
SEQUENCE – ON/OFF [sequences through selected cameras].
CAMERA – Select cameras to include in sequence.
INTERVAL – 1 ~ 256 seconds [Set the sequence interval time].
CURRENT – 1 ~ 16 [Set the current camera].
SEQUENCE SETUP
PAGE DWELL TIME – 1 ~ 99 seconds [Set the sequence interval time for full screen on Main Display].
CAMERA DWELL TIME – 1 ~ 99 seconds [Set the sequence interval time for individual cameras on Main Display].
CUSTOM SELECT – 1 ~ 8/16 ~ All [Select cameras to display in Main Display].
MONITOR SETUP
DATE/TIME – ON/OFF [On-screen Date/Time display].
CAMERA LABEL OPTIONS – All / Name / Number / Off.
BORDER COLOR – Black / White / Grey [Set the border color of the grid for the main channel display].
TRANSPARENCY SETUP – 0 / 20 [Set the transparency of the setup windows].
PRIMARY DISPLAY TYPE– VGA/Analog [Set the Display Monitor type].
VGA RESOLUTION – Set monitor resolution.
SCREEN POSITION – Adjust the screen position of the main channel display.
VGA ADJUSTMENT – Set brightness, contrast, saturation and position.
CAMERA SETUP - SPOT / SEQUENCE
NO.123
SEQUENCEOFFOFFOFF
CAMERAALLALLALL
INTERVAL2 SEC2 SEC2 SEC
SAVE CANCEL
CAMERA PTZ SPOT/SEQUENCE MONITOR
SPOT
SEQUENCE
CURRENTCAM 1CAM 1CAM 1
PAGE DWELL TIME 2 SEC
CAMERA DWELL TIMECUSTOM SELECT
2 SECALL
CAMERA SETUP - MONITOR SETUP
DATE/TIMECAMERA LABEL OPTIONSBORDER COLORTRANSPARENCY SETUPPRIMARY DISPLAY TYPEVGA RESOLUTIONSCREEN POSITION
VGA ADJUSTMENT
ONALLBLACK0VGA1024X768 75Hz
SAVE CANCEL
CAMERA PTZ SPOT/SEQUENCE MONITOR

27717AP 31
RECORD
RECORD SETUP
Use RECORD SETUP to configure the recording schedule and frame capture rate. In SCHEDULE SETUP, users can define the recording schedules:
• DAY
• NIGHT
• WEEKEND
Frame Setup
Configure the PPS for each schedule – Day > Night > Weekend.
1. Select the recording schedule time (DAY, NIGHT, WEEKEND).
2. Set the SIZE/Resolution (352 × 240, 704 × 240, 704 × 480).
3. Set the RECORDING MODE (C / M / C+M / N/A).
4. Set the PPS for Continuous and Motion/Event recording (1~30).
5. Set the recording image QUALITY (Low, Normal, Fine, S. Fine).
6. Set the POST ALARM time (5~100 sec - the amount of time the DVR records after a motion/event alarm).
Schedule Setup
NIGHT – Set nighttime (ex. If 18:00 to 6:00 is defined as nighttime, 6:00 to 18:00 is defined as daytime).
WEEKEND – Define weekend.
FRAME AUDIO INSTANTSCHEDULE
RECORD SETUP - SCHEDULE
SAVE CANCEL
FROM00:00:00
N/A
TO00:00:00
N/ANIGHTWEEKEND
N OTE : This DVR is set to record 24 hoursa d ay / 7 d ays a week by default . To specifya different frame rate and/or resolution fornighttime or wee kend s, adjust the NIGHT andWEEKEND schedule option s.

32
Audio Setup Specify volume level and enable Audio for recording according to preset schedules (DAY, NIGHT, WEEKEND) and Live or Search mode. When you select the AUTO setting for Live and Search mode, the DVR will automatically play the audio channel mapped to the video channel you are viewing.
Enabling Audio for Recording and Live Video
Tip If Audio is set to OFF for Live mode, it will not be available for remote monitoring.
1. Select the desired Audio channel (1~4CH, ALL, OFF) to enable for each schedule mode (DAY, NIGHT, WEEKEND).
2. Select the desired Audio channel (1~4CH, AUTO, OFF) to enable for Live and Search modes.
3. Set the audio Volume (1~14).
Mapping Audio to Video
Map the Audio channels to the Video channels. The selected Audio channel will be recorded with the associated video.
1. Associate AUDIO 1CH with the desired VIDEO channel (1~4).
2. Repeat for AUDIO channels 2~4.

27717AP 33
Instant Recording Setup
Configure the recording settings for Instant Recording to use when it is activated.
Tip Instant Recording settings apply to all channels.
PPS – Set the Pictures Per Second to record.
QUALITY – Set the picture quality (affects file size).
SIZE – Set the resolution of the video image.
Instant Recording
Note Instant Recording is only available to Administrator users.
To activate Instant Recording on the DVR:
1. Press the button with the red dot on the front panel of the DVR or remote control.
2. Select OK to Force Continuous Recording.
3. Press ENT. The screen will display the Instant Record message.
To cancel Instant Recording on the DVR:
1. Press the button with the red dot on the front panel of the DVR or remote control.
2. Select OK Resume Scheduled Recording.
3. Press ENT.
QUICK RECORD SETUP
Quick Record Setup allows you to define global recording settings for an easy and custom recording schedule on the DVR.
GLOBAL RESOLUTION – 352 x240 / 704 × 240 / 704 × 480.
MOTION/CONTINUOUS – Motion / Continuous.
AVERAGE DAYS TO RECORD – The estimated days of recording determined by resolution, PPS (Pictures Per Second), Picture Quality, and available storage size.
AVERAGE PPS – 1~8 [Maximum varies with resolution.]
AVERAGE PICTURE QUALITY – Low / Normal / High / Ultra.

34
MOTION/EVENT SETUP
Motion / Event Setup has four sections; Input, Sensor, Action, and EA (Emergency Agent). When and event comes in (Input) the DVR records the image according to its settings (Camera Setup) and triggers an alarm (Action).
Input Setup
CH – Channels 1~8 / Channels 9~16
MOTION – ON/OFF [Specify whether to use motion input or not.]
LEVEL – Low / Normal / High / Highest [Sensitivity]
AREA – Define the motion detection area.
SENSOR/VIDEO LOSS – Specify ON/OFF for each type of event.
Note For Motion Area settings see Motion Detection Recording later in this manual.
Sensor Setup
Sensor Setup
1. Use the arrow buttons to select Sensor 1 and press ENT to change to N/O (Normally Open) or N/C (Normally Closed).
2. Repeat for all sensors.
3. Select SAVE and press ENT to save settings and exit SENSOR SETUP.
Relay Setup
1. Use the arrow buttons to select Relay 1 and press ENT to turn OFF and ON.
2. Repeat for all relays.
3. Select SET and press ENT.
4. Select SAVE and press ENT to save settings exit SENSOR SETUP.
NO.1234
SIGNALONONONON
SET CLEAR
NO.12345678
TYPEN/ON/ON/ON/ON/ON/ON/ON/O
MOTION/EVENT SETUP - SENSOR
SAVE CANCEL
INPUT EASENSOR ACTION
9CH-16CH

27717AP 35
Action Setup
CH – Channels 1~8 / Channels 9~16
ALARM – 1~4 / OFF [Associate an alarm relay with the camera].
DELAY – 0~100 Seconds [The number of seconds after an event before the image popup displays].
DURATION – 0~100 Seconds [The number of seconds the image popup displays before reverting to regular camera view].
PRESET – 0~100 [Enable camera to move to a preset position when an event occurs. See PTZ Control for more information.]
EVENT POPUP – Select / Clear
EA (Emergency Agent)
The Emergency Agent is a utility that streams video across a Local Area Network to a Client PC when an alarm is detected on the DVR unit. The streaming video can be stopped, played forward, backwards, in slow motion or real time. Send event information to a remote client.
1. Select ENABLE and press the ENT button to select ON.
2. Enter the IP ADDRESS of the remote client.
3. Enter the PORT NUMBER.
MOTION/EVENT SETUP - ACTION
SAVE CANCEL
ALARMOFFOFFOFFOFFOFFOFFOFFOFF
PRESETOFFOFFOFFOFFOFFOFFOFFOFF
CH12345678
DELAYOFFOFFOFFOFFOFFOFFOFFOFF
DURATIONOFFOFFOFFOFFOFFOFFOFFOFF
INPUT EASENSOR ACTION
EVENT POPUP
9CH-16CH

36
MOTION DETECTION RECORDING
To record data only when motion is detected:
1. Press SETUP on the front of the DVR or remote control and log in.
2. Select RECORD > EVENT SETUP.
3. Set MOTION to ON.
4. Set the motion Level. [NORMAL > HIGH > HIGHEST > LOW].
5. Select AREA and press ENT to set a motion area (global setting; each channel can be configured individually).
6. Select USER SET to define a specific motion area.
7. Use the arrow buttons and the number buttons 1, 2 and 3 to navigate the motion area grid. (Selected motion areas are highlighted green on the grid.)
1 = Set Mode 2 = Clear Mode 3 = Move Mode
a. Press 3 on the front of the DVR or remote control.
b. Use the arrow buttons to move the cursor to the desired location on the screen.
c. Press 1 on the front of the DVR or remote control.
d. Use the arrow buttons to highlight the desired motion detection area.
e. Repeat the steps above to create additional motion detection areas.
8. When finished selecting motion areas press ENT on the front of the DVR or remote control to save changes.
9. Repeat as necessary for each channel.
10. When motion area setup is complete select SAVE to save settings and exit setup.

27717AP 37
NETWORK
NETWORK SETUP
Configure network settings.
DHCP Select – System gets IP address from DHCP server.
Clear – User must manually define a static IP address. Contact the network administrator for this information.
HOST NAME – Name current network host.
IP ADDRESS – Manually define IP address, Subnet Mask, Gateway and DNS Server. Contact the network administrator for this information.
Note This option is only enabled when the DHCP check box is cleared.
DDNS SETUP
DDNS service enables the DVR to connect to a server that does not have a fixed IP address. Register a User Name a Password on a DDNS server and it will connect to the DVR system (dynamic IP or private IP) when requested. After DDNS is configured, the router to which the DVR is connected needs to be configured to forward ports 80 and 2000 to the IP address of the DVR. For further information on this process, please consult the router manual or contact the router manufacturer’s technical support, Internet service provider or OpenEye. You may also visit portforward.com for assistance. If multiple DVRs exist on the same network, the ports must be set to a unique value for each DVR. The ports can be changed in CLIENT under NETWORK SETUP on the DVR. Modified ports should be reflected in the port forwarding settings on the router. Once DDNS and port forwarding have been configured, the DVR will be accessible from any remote site by entering the HOSTNAME into the address bar of Internet Explorer or the IP address field in Remote Center and Radius. Note This feature may require an outside service contract with a 3rd party provider.
Note See the included DDNS information sheet for the username and password provided with your Free DDNS service.
DDNS SERVER – Select available DDNS server.
HOST NAME – Enter host name.
USER NAME – Enter User Name registered to the DDNS server (not always available).
PASSWORD – Enter the Password registered to the DDNS server.
ROUTER IP – Select the check box for a broadband connection. Clear for an internal connection.
STATUS CHECK – Check the connection status of the DDNS server using the current configuration.

38
Enabling Free DDNS
Your E-Series DVR comes with a free five-year DDNS service, pre-configured using OpenEyeDVR.com. DDNS service enables the DVR to connect remotely to a server that does not have a fixed IP address. Note You must contact your network administrator to complete router configurations for the DDNS service to work.
1. Select NETWORK SETUP > NETWORK.
2. Select DDNS SERVER under DDNS and press ENT.
3. Select openeyedvr.com.
Note The DVR is preconfigured with the appropriate password and settings for the free DDNS service. If you load the default network system settings refer to the DDNS information sheet for your DDNS settings. Please contact Technical Support if assistance is required.
SERIAL SETUP
Configure connected serial devices.
SERIAL TYPE – Set External Controller or None.
MODEL – If External Controller is enabled, select the model from the list.
PORT – Define port setting.
CLIENT SETUP
Configure general remote access
REMOTE PORT – Use this port number when configuring remote access software. The default port is 2000 but can be reconfigured.
WEB PORT – Used for remote connections using a web browser. This port should be left open on the router. Default web port is 80.
REMOTE CONFIGURATION – Enable to allow a remote user to change configurations.
MAX TRANSFER SPEED – Set network bandwidth. If the network is low speed, set this value as the network (aka. Bandwidth Throttling).
200080ENABLE100 Mbps
NETWORK SETUP - CLIENT
SAVE CANCEL
NETWORK SERIAL CLIENT E-MAIL
REMOTE PORTWEB PORTREMOTE CONFIGMAX TRANSFER SPEED

27717AP 39
E-MAIL SETUP
The DVR can send an email notification to up to six defined e-mail addresses when an event occurs.
E-MAIL SERVER – DVR/SMTP [Configure the DVR to use selected e-mail server.]
SCHEDULE – ON/OFF [Enable to send e-mail notifications only for events that occur within a specified range of time.]
TIME – Define the time of day to send e-mail notification of events (example: 19:00-6:00 – after business hours).
OPTION –Define the type of event that will trigger an e-mail notification.
PIC – Enable to send a picture of the event.
E-MAIL ADDRESS – Enter the e-mail address.
E-MAIL OPTIONS
Select options to have an e-mail message sent:
MOTION – after a motion alarm is triggered.
SENSOR – after a sensor alarm is triggered.
VIDEO LOSS – after video loss on a camera
POWER – when the DVR is shutdown and restarted.
SETUP – when a user accesses Setup.
LOGIN FAIL – after one failed login attempt.
DISK FULL – when the HDD reaches the user-defined maximum disk full percentage. See DISK MANAGEMENT – OVERWRITE.
SMART – when the HDD reaches the user-defined maximum temperature. See DISK MANAGEMENT – SMART.
SMTP [email protected]****
EMAIL SERVER SETUP
SAVE CANCEL
MAIL SERVERUSER NAMEUSER E-MAILSERVERPORTIDPASSWORD

40
INFORMATION
SYSTEM LOG VIEW
Displays system log information.
STATUS VIEW
Displays status screens for:
Disk
Record
Audio
VERSION VIEW
Displays system information and software version information for the DVR.
STATUS VIEW
STATUS DISK
CONTENT
RECORDING STARTRECORDING ENDDISK CAPACITYUSED SPACEAVAILABLE SPACEHDD OVERWRITE
STATUS
07/06/07 12:55:4707/11/06 13:05:00249GB533MB (0%)249GB (100%)ENABLE
EXIT
STATUS VIEW
STATUS AUDIO
NO.
1
RECORD
OFF
EXIT
VERSION VIEW
VIDEO FORMATDVR PROGRAMPTZ MODULEDRIVER MODULEFIRMWAREMAC ADDRESSVIDEO MUXVIDEO CODECVIDEO I/O
NTSC2.5.1.102.04.06-16-N6.02.2100:19:19:01:04:8D51005.060115.040618.0
EXIT

27717AP 41
Notes:

42
OPERATION
INSTANT RECORDING
To activate Instant Recording on the DVR:
1. Press the button with the red dot on the front panel of the DVR or remote control.
2. Select OK using the arrow buttons.
3. Press the ENT button.
4. Near the top of the screen the words ‘INSTANT RECORD’ will be visible. Press EXIT or the Instant Record button again to disable Instant Recording.
Note See the RECORD section for details on setting up a recording schedule and event recording.
SEARCH
SEARCHING RECORDED DATA
Search recorded video on the DVR to find a specific time or event.
1. Press SEARCH on the front of the DVR or the remote control to enter Search Mode.
2. Select TARGET media (HDD, DVD-RW, USB)
3. Select the desired search method.
4. Select EXIT to return to Live Mode.
Tip Press PLAY on the front of the DVR or remote control to start playback at any point
SEARCH
QUICK SEARCHEVENT SEARCHGO TO FIRST RECORDED DATAGO TO LAST RECORDED DATA
DAYLIGHT SAVINGS SEARCH
EXIT
TARGET HDD

27717AP 43
SEARCH METHODS
Note When DVD-RW is selected as the target media, only Quick Search, Go To First Recorded Data and Go To Last Recorded Data Search options are available.
Quick Search
Users can select a specific date and time of recorded data to search.
1. Select QUICK SEARCH.
2. Select a DATE from the list.
3. Define time by using the arrow buttons to move the bar across the grid (Highlighted time blocks represent recorded data).
4. Select PLAY.
5. Use the play controls on the front of the DVR or remote control to search video.
Event Search
Define a search based on event recorded data.
1. Select EVENT SEARCH.
2. Define the date and time to search.
3. Define the type of event occurrences to include in search.
4. Define cameras to include in search or select ALL CAMERAS.
Daylight Savings Search
Daylight Savings Search is used to find recorded data after switching the time at the end of Daylight Savings Period. The System will record data with the same time stamp for two hours when they are repeated. If any overlapped time data exists the system will display the times on this page.
Go To First
View the earliest recorded data.
Go To Last
View the most recent recorded data.
Go To Jump
View video from a 24 hour period.
RECORD LIST SEARCH
NO.13121110987654
PREV NEXTEXIT
DATE2007 / 7 / 172007 / 7 / 162007 / 7 / 152007 / 7 / 142007 / 7 / 132007 / 7 / 122007 / 7 / 112007 / 7 / 102007 / 7 / 092007 / 7 / 08

44
SEARCH DETAILS
In Search Mode users can access the Popup Menu for extended options; see the Popup Menu section.
SEARCH POPUP MENU
Use to access display options in Search Mode.
1. Press ENTER to highlight a channel box.
2. Use the arrow keys to select the desired channel.
3. Press ENTER again to open the POPUP MENU.
TIME SELECTION – Change the Date/Time to search.
LIVE CAM CHANGE – Change the channel box to display the selected live channel.
PLAY CAM CHANGE – Change the channel box to display the selected playback channel.
SAVE JPEG – Save a JPEG still image of the current frame. Note SAVE JPEG is only available when a single
camera is selected. To activate, select a single channel (full screen), pause playback, and press ENT twice to open the popup menu.
POPUP MENU 1:1
TIME SELECTIONLIVE CAM CHANGEPLAY CAM CHANGESAVE JPEGEXIT

27717AP 45
MONITORING
SELECT CHANNEL
• Use the number keys on the front of the DVR or remote control to select specific channels for full screen display. (ex. Press 1 to display channel 1)
• Press the LIVE key to change the display mode. Display switches in the following order when the LIVE key is pressed successively.
• Press the ROTATE key to rotate through to the remaining channels within the display mode or rotate the display configuration.
LIVE POPUP MENU
Use to access display options in both Live Mode.
1. Press ENT to highlight a channel box.
2. Use the arrow keys to select the desired channel.
3. Press ENT again to open the POPUP MENU.
LIVE HIDDEN – ON/OFF [Hide live display of the selected camera]
RECORD CHANGE – Change the record settings for that channel including PPS, quality, and resolution.
SEQUENCE – Start/Cancel camera sequence.
POPUP MENU 1:1
LIVE HIDDEN ONRECORD CHANGESEQUENCEEXIT

46
BACKUP
MANUAL BACKUP
Back up recorded data on a CD-RW, DVD-RW or connected USB device.
Tip Refer to the list of Approved USB Flash Drives in the Introduction chapter.
1. Press BACKUP on the front panel or remote control and log in.
2. Insert media.
3. Select TARGET media.
Caution If you are using a new USB device to back up your data, you must format it first as FAT32.
4. Set FROM and TO date and time.
5. Select CHANNELS to include in backup.
6. Select ESTIMATE to display estimated data size and free space available.
Note ESTIMATE must be selected before selecting the WRITE function. If any backup parameters are changed (Date, Time, Channels) you must select ESTIMATE again.
7. Select WRITE to start backup.
Caution Do not shutdown the system during the backup process.
AUTO BACKUP
Create a mirrored backup of recorded data on a connected USB external hard drive. Caution OpenEye recommends the use of hard drives only; the use of flash drives is not recommended for auto backup.
1. Press BACKUP on the front panel or remote control and log in.
2. Select TYPE and press ENT to select AUTO BACKUP.
3. Connect a USB drive to the DVR.
4. Select USB TARGET.
5. Set OVERWRITE ON if you want to write over previous data on the USB device.
6. Enter a TITLE for the backup file.
7. Select CHANNELS to include in backup.
8. Select START to start backup.
Caution Do not shutdown the system during the backup process.
BACKUP
TYPETARGETFROMTOCHANNEL
RECORDING START TIME2007/07/05 10:00:00
RECORDING END TIME2007/07/17 09:59:59
REQUIRED SPACEFREE SPACE
EXIT
MANUAL BACKUPUSB USB FORMAT07/05/2007 12:55:4707/17/2007 13:30:03ALL
0.00MBNONE
ESTIMATE WRITE HELP
BACKUP
TYPE AUTO BACKUPUSB TARGETOPTIONTITLECHANNEL
FREE SPACE
STATUS
EXIT
NONEOVERWRITE OFFdvrALL
NONE
NOT RUNNING. . .
START STOP

27717AP 47
USING THE BACKUP VIEWER
Play recorded video on a PC using Backup Viewer, the proprietary media player included with every backup file.
CONTROLLING BACKUP VIEWER
Stop
Speed
Zoom
Brightness
Contrast
Back Play Forward Play
Previous Frame Next Frame

48
VIEWING BACKED UP VIDEO
1. Insert CD, DVD or connect an external USB device to the PC.
2. Navigate to the files on the CD, DVD, or USB drive.
3. Double-click the DvrPlay application.
4. Click Open to locate the desired backup file saved by Date.
5. Use the play controls to play back the saved file.
6. Use the slider bar on the bottom to go to a specific time.
SCREEN DIVISION BUTTONS
The Screen Division buttons allows you to view cameras in groups such as two by two, three by three and four by four. The button options are shown below.
1st Four Cameras View – Displays cameras 1-4 in the Video Display Area. To return to a different Multi-Camera View, select a different Screen Division button.
2nd Four Cameras View – Displays cameras 5-8 in the Video Display Area. To return to a different Multi-Camera View, select a different Screen Division button.
3rd Four Cameras View – Displays cameras 9-12 in the Video Display Area. To return to a different Multi-Camera View, select a different Screen Division button.
4th Four Cameras View – Displays cameras 13-16 in the Video Display Area. To return to a different Multi-Camera View, select a different Screen Division button.
1st Nine Cameras View – Displays cameras 1-9 in the Video Display Area. To return to a different Multi-Camera View, select a different Screen Division button.
2nd Nine Cameras View – Displays cameras 8-16 in the Video Display Area. To return to a different Multi-Camera View, select a different Screen Division option from the Screen Division Menu.
16 Camera View – Displays cameras 1-16 in the Video Display Area. To return to a different Multi-Camera View, select a different Screen Division button.
UPGRADE FIRMWARE AT THE DVR
Firmware is released occasionally that may contain new features and/or updates. Download the latest firmware and extract the ZIP file contents to a CD, DVD or USB Device. Visit openeye.net or contact Tech Support for the latest firmware. Tip The E-Series firmware can also be upgraded using the remote software. See the remote software section.
1. Insert a CD/DVD or USB Drive containing the update files.
2. Select SYSTEM > SHUTDOWN and select RESTART.
3. Select OK to confirm Restart. The DVR will restart and automatically find the update files.
4. Select START when the upgrade window appears.
5. Remove the upgrade media and select OK when the UPGRADE SUCCESS window appears. The DVR will automatically restart.

27717AP 49
SAVE SETTINGS
Use the System Configuration setup menu to export and import saved or factory default system profiles.
EXPORT SETTINGS
1. Press SETUP on the front of the DVR or remote control to log in.
2. Select SYSTEM > CONFIGURATION.
3. Select EXPORT and press ENT on the front of the DVR.
4. Select TARGET to define the type of media (DVD-RW, USB).
5. Select NAME and press ENT on the front of the DVR to define a name for the settings configuration.
6. Select OK and confirm to continue the export process.
7. Insert a DVD-RW or appropriate media to complete the export process.
IMPORT SETTINGS
1. Press SETUP on the front of the DVR or remote control.
2. Select SYSTEM > CONFIGURATION and log in.
3. Select IMPORT and press ENT on the front of the DVR.
4. Select TARGET to define the medium that previously exported settings are saved on.
5. Select OK and press ENT on the front of the DVR to complete the import process.

50
PTZ CAMERA CONTROL
SPEED SETUP – 1~8 [Set the speed that PTZ cameras move.]
PRESET SETUP – Move/Set [Create preset PTZ camera positions.]
PRESET TOUR – [Create a tour of preset PTZ camera positions.]
PATTERN SETUP – [Create a custom PTZ Pattern]
PATTERN TOUR – [Create a Pattern (mimic) tour]
AUTO FOCUS – [Modify Auto Focus settings]
POWER – ON/OFF
LIGHT – ON/OFF
CREATE PTZ PRESET POSITION
1. Set up a PTZ camera in CAMERA > PTZ SETUP. 2. Press EXIT to exit Setup.
3. Press PTZ to enter PTZ Mode.
4. Select a PTZ enabled camera.
5. Press SETUP to display the PTZ setup menu.
6. Select PRESET SETUP.
7. Select MOVE to move the camera to the preset position.
8. Select a PTZ PRESET ID number and select OK to save.
ACCESS CAMERA MENU FOR PELCO P & D PROTOCOLS
To access the menu of a PTZ camera running the Pelco P or D protocols on an E-Series DVR:
1. Press the PTZ key on the remote or the front of the DVR.
2. Press the Setup Key on the remote or the front of the DVR.
3. Select PRESET SETUP and press ENT.
4. Select SET.
5. Go to preset 95 and select OK. The menu should now appear. Use the arrow keys to navigate through the menu.
PTZ SETUP CH1
SPEED SETUPPRESET SETUPPRESET TOUR
PATTERN SETUPPATTERN TOUR
AUTO FOCUSPOWERLIGHT
EXIT SETUP

27717AP 51
PTZ COMPATIBILITY LIST
The OpenEye E-Series DVRs are compatible with the following PTZ camera protocols:
OpenEye Optix 500 OpenEye Optix 510 OpenEye Optix – Pelco D 360 Vision AcutVista AlphaVision American Dynamics Cynix Speed Dome CoVi EVQ-1000 CRR – 1600I DMP23-H2 Dongyang DRX-500 DRX-502A DS120 DSC-230/240 DY-255RXB DynaColor ERNA Tech Eyeview Dome FastraxII FilTech (DSC-230/PT201) Focvision Ganz-PT Honeywell Max PRO Honeywell VCL Honeywell(GC-655P) Honeywell(HSD-250) Honeywell(HSD-251) HMC-250 HSCP
Inter-M(VRX-2101) Inter-M(VSD-640) KalatelDome LG(LPT-A100L) LG(LVC-A70x s) LG (Multix) LG SpeedDome Merit Li-Lin Merit Li-Lin V6 NVCC-Z42N NICE CAM NIKO Pelco-D Pelco-P PIH-7600 SAE Samsung(SCC-C420X) Samsung(DRX-502A) Samsung(MRX-1000) Samsung(SCC-641) Samsung(SPD-1600) Samsung Techwin Sensormatic Sungjin Tamron Toshiba ViconSpeedDome Visiontech WONWOO WSD-7425D

52
REMOTE SOFTWARE
SETUP REMOTE CONNECTION
The administrator and up to five additional users can access the DVR remotely using software installed on a computer running Windows XP or Windows Vista.
CONFIGURING THE DVR
1. Press SETUP on the front of the DVR or remote control to log in.
2. Select NETWORK > CLIENT SETUP (See the Client Setup section of this manual for more details).
3. Change port settings or write down current port settings.
4. Select SAVE to save current settings.
5. Go to SYSTEM > USER MANAGEMENT > CLIENT to add remote users.
Note Only users defined in SYSTEM > USER MANAGEMENT > CLIENT will be able to access the system remotely.
6. Select SAVE to save current settings.
7. Select NETWORK SETUP (see the NETWORK SETUP section of this manual for more details).
8. Enable or clear DHCP depending on the network (Ask the network administrator for assistance).
9. If DHCP is cleared – define the IP address and additional network information.
10. If DHCP is enabled – write down the IP address supplied by the DVR system.
Note If the DVR does not display the IP Address after setting DHCP to ON, Select Save to change the network and open Network Setup again.
11. Select SAVE to save current settings.
CONFIGURING A REMOTE PC
1. Install the Remote Software on a PC using the software disc provided with your DVR.
2. Open the Remote Software. The Local Setup window will open automatically.
3. Click New.
4. Select OpenEye E-120 as the Site Type.
5. Enter a name for the system in the Site Name Field.
6. Enter the IP address of the DVR – found in Network Setup on the E120 system.
7. Enter the Port number found in Client Setup on the E120 system (default is 2000).
8. Click OK.
9. Enter the user name and password of an authorized remote user as defined in Network > Client Setup > User on the E120 system.
Note User Name and Password are both case sensitive.
10. Click Connect.

27717AP 53

54
ACCESS REMOTE E-SERIES DVR
1. Open the Remote Software.
2. Click the icon of the server as defined previously.
3. Enter the user name and password of an authorized remote user as defined in the Network > Client Setup > User Menu on the E120 system.
Note User Name and Password are both case sensitive.
4. Click Connect.
CONNECTING TO MULTIPLE DVRS
Connect up to 4 E-Series DVRs using the Remote Software and easily switch between DVRs.
1. Configure all DVR connections as described above in Configuring a Remote PC.
2. After connecting to the first DVR, click CONNECT on the Display screen to open the Local Setup window.
3. Select a second pre-configured DVR and click Connect.
4. Use the drop-down menu in the lower left corner of the display screen to switch between the connected DVRs.
USING THE REMOTE SOFTWARE
SETTING THE TIME AND DATE
1. Exit to Windows by clicking EXIT on the Main Display Screen and selecting Restart in Windows Mode.
2. Open Windows Explorer. Do this by right-clicking on the My Computer Icon (located on the top left hand corner of the Desktop) and select Explore.
3. Click Control Panel to open it. If you do not see Control Panel listed, Click My Computer to expand the folder tree.
4. Double Click on Date and Time inside Control Panel.
5. Adjust the Date and Time.
6. When finished, close all open windows and restart the PC. Do this by clicking the Start button (located on the lower left hand side of the Desktop) and selecting Shut Down.

27717AP 55
DISPLAY SCREEN
The following diagram outlines the buttons and features used on the Display screen of the Remote software.
Opens: • Search Display • Setup Display • Connection Setup • PTZ Controller
Current Date / Time
Camera Buttons
Screen Division Buttons Connection Status
Live Audio Site List
Live Video Site List

56
Camera View
The Recording Status is displayed on the upper-right corner of each channel in the Video Display Area.
Recording Status Indicator
The following are the different states for each camera:
Recording Displayed when the camera is currently being recorded to the DVR.
Motion Detection Displayed when a camera (set up for motion detection) detects motion.
Display Displayed when the camera is currently not being recorded to the DVR.
Recording Status
Camera No. and Name

27717AP 57
Screen Division Buttons
The Screen Division buttons allows you to view cameras in groups such as two by two, three by three and four by four. The button options are shown below.
1st Four Cameras View – Displays cameras 1-4 in the Video Display Area. To return to a different Multi-Camera View, select a different Screen Division option from the Screen Division Menu.
2nd Four Cameras View – Displays cameras 5-8 in the Video Display Area. To return to a different Multi-Camera View, select a different Screen Division option from the Screen Division Menu.
3rd Four Cameras View – Displays cameras 9-12 in the Video Display Area. To return to a different Multi-Camera View, select a different Screen Division option from the Screen Division Menu.
4th Four Cameras View – Displays cameras 13-16 in the Video Display Area. To return to a different Multi-Camera View, select a different Screen Division option from the Screen Division Menu.
1st Nine Cameras View – Displays cameras 1-9 in the Video Display Area. To return to a different Multi-Camera View, select a different Screen Division option from the Screen Division Menu.
2nd Nine Cameras View – Displays cameras 8-16 in the Video Display Area. To return to a different Multi-Camera View, select a different Screen Division option from the Screen Division Menu.
16 Camera View – Displays cameras 1-16 in the Video Display Area. To return to a different Multi-Camera View, select a different Screen Division option from the Screen Division Menu.
Full Screen – The Full Screen Option allows you to view the Video Display Area using the entire viewable area on the monitor. When this is selected, no menu options are visible. You can activate the Full Screen Option by clicking on the Full Screen button within the Screen Division Menu. You can deactivate Full Screen mode by right clicking on the screen.
Auto Sequence – Sequences through the Screen Divisions sets. For example, selecting the 1A and then the Loop button will sequence through 1A, 2A, 3A, 4A and then repeat.
58
SETUP OVERVIEW
Setup Screen Overview
Ensure the tree is expanded on the left menu to display Camera, Record and Sensor Setup options. Most of the setup options are the same in both the remote software and in the E120 system. Click Apply after changing any settings.
Camera Setup
Camera Setup
The Camera Setup display allows the user to define camera names, power on and off cameras and define specific cameras as hidden.
Title – Enter camera name – up to seven characters.
Enable – ON/OFF. Enable individual cameras.
Hidden –ON/OFF – ON will hide the camera from users who are not logged in or users who do not specifically have permission to view it.
PanTilt Setup
The PanTilt (PTZ) Setup display allows the user to define the appropriate protocol for connected cameras with PTZ capabilities. Since setup varies between different PTZ cameras; refer to the instructions supplied by the camera’s manufacturer to complete the configuration.
ID – 1 ~ 255 [Set the PTZ ID]
PROTOCOL –Select a PTZ protocol
Sequence Setup
The Sequence Setup display allows the user to set the parameters for:
Page Dwell Time – 1 ~ 100 seconds [Set the sequence interval time for full screen on Main Display]
Camera Dwell Time – 1 ~ 100 seconds [Set the sequence interval time for individual cameras on Main Display]
Channel – 1 ~ 16 / All [Select cameras to display in Main Display]

27717AP 59
SPOT Setup
The SPOT Setup display allows the user to define the sequence display for individual Spot Monitors. This allows users to use different Spot Monitors to display only the video necessary for the person watching the Spot Monitor.
Sequence – ON/OFF [sequences through selected cameras.]
Interval – 1 ~ 60 seconds [Set the sequence interval time.]
Channel – Select cameras to include in sequence.
Record Setup
Frame Setup
Day/Night/Weekend – Adjust the PPS and picture quality for each schedule individually.
[C] PPS – 0 ~25 [Define a global PPS setting for continuous recording or set individually for each channel.]
[M] PPS – 0 ~25 [Define a global PPS setting for motion/event recording or set individually for each channel.]
Record Mode – Continuous / Motion Event / C/M/E[ALL] /N/A
Quality – Low / Normal / High / Ultra [Define a global quality setting or set individually for each channel.]
Post Recording – 0 99 seconds [Recording time after event.]
Continuous Frame –Displays the actual PPS / maximum PPS for continuous recording
Event Frame – Displays the actual PPS / maximum PPS for event recording.
Schedule Setup
Night – Set night time (ex. If 18:00 to 6:00 is defined as night time, 6:00 to 18:00 is defined as day time)
Weekend –Define weekend days
Audio Setup
Specify volume level and audio settings for recording according to preset schedules and live or playback mode.
Audio Day – Enable/Disable
Audio Night – Enable/Disable
Audio Weekend – Enable/Disable
Audio Live – Enable/Disable
Audio Playback – Enable/Disable
Volume – 0 ~14

60
Motion / Event Input
Motion / Event Setup allows you to enable recording or relay response on Motion, Sensor Event, and Video Loss
Motion
Enable– ON/OFF [Enable Event Input.]
Sensitivity – 1~5 [Define Motion sensitivity level. 1=least sensitive.]
Area – Red=selected, White=clear. Click to select/clear boxes.[Create or clear the motion area on the camera.]
Sensor
Sensor – ON/OFF [Enable recording on sensor event.]
Sensor Detail – All / 1~16 / All Channel [Associate sensors with channels. Select the All check box to associate all sensors used to activate recording for that channel; Select the All Channel check box to associate the selected sensors with all channels.]
Video Loss
VideoLoss – ON/OFF [Enable event on video loss.]
Video Loss Detail – All / 1~16 / All Channel [Associate video loss “V” alert with specific viewed channels. Select the All check box to prompt all channels with video loss to provide a “V” alert to the viewed channel; Select the All Channel check box to associate the selected channels to report a “V” alert when video loss occurs.]
HDD Setup
Disk Overwrite – Enable / Disable [Select the check box to enable the DVR to write over old data when the hard drive is full.]
Disk Full Warning – Enable/Disable [Enable Disk Full Warning for notification when the HDD becomes full and HDD Overwrite is disabled.]
Remain Time – 0~60 [Define the amount of remaining recording time to trigger the Disk Full Warning.]
Used Space – 80~99 [Define the percentage HDD used that triggers the Disk Full Warning.]
Disk Full Alarm – 0~8 [Define the relay that will trigger when the HDD is full.]
Disk Full Buzzer – Enable/Disable [Enable a continuous buzzer to sound for Disk Full Warning.]
Disk Full Message– Enable/Disable [Enable a popup message to display for Disk Full Warning.]
Sensor Setup
Sensor
Sensor – NO/NC [Set sensors to Normally Open or Normally Closed.]
Alarm Out – ON/OFF [Set Relay switches to Off or On.]
Note This section located in the Record > Event Setup section on the E120 server.

27717AP 61
System Setup
User Management
ID – Type a new user name. (Available for user1 through user18.)
Password – Type a password for each user.
Permissions – Enable / Disable
Live PTZ Playback
Backup Health
Live Authorization – Enable live access for specific channels.
PTZ Authorization – Enable PTZ control for specific channels.
Firmware Upgrade
The E- Series DVR can be remotely upgraded with the latest firmware found on www.openeye.net.
1. Download the firmware file to your PC.
2. On the Firmware Upgrade screen, click Browse to locate the file.
3. Click Upgrade to update the E-Series DVR.
Note The Embedded DVR will stop recording and then restart once the update has completed. Note The Remote software will disconnect from the Embedded DVR as it reboots. You may need to manually
reconnect after several minutes.
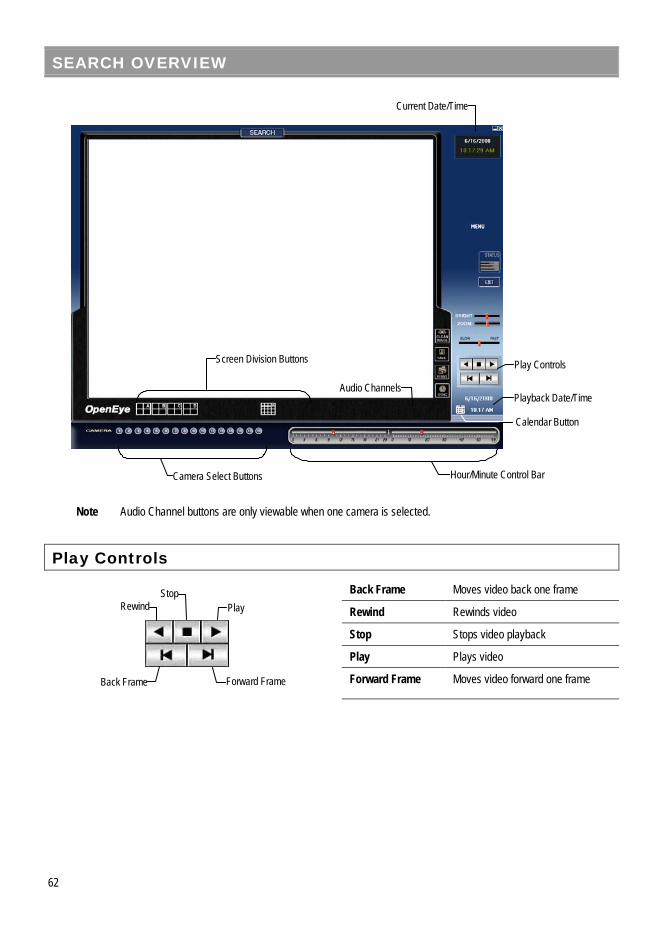
62
SEARCH OVERVIEW
Note Audio Channel buttons are only viewable when one camera is selected.
Play Controls
Back Frame Moves video back one frame
Rewind Rewinds video
Stop Stops video playback
Play Plays video
Forward Frame Moves video forward one frame
Rewind Stop
Play
Back Frame Forward Frame
Current Date/Time
Playback Date/Time Audio Channels
Hour/Minute Control Bar
Screen Division Buttons
Play Controls
Camera Select Buttons
Calendar Button

27717AP 63
Performing a Basic Search
1. Select a date using the Calendar button in the Date Display
2. Select a time using the hour and minute control bars
3. Select one or more cameras
4. Click Play (Video can be played forwards, backwards, or frame-by-frame.)
Adjust the Brightness of an Image
1. Select an image to adjust by double-clicking on the desired image. Multiple images cannot be adjusted at one time.
2. Move the Bright slide bar to the right or left to adjust the brightness.
3. Reset the Brightness by moving the slider back to the center of the bar.
Zooming in on an Image
1. Select an image to adjust by double-clicking on the desired image. Multiple images cannot be adjusted at one time.
2. Move the Zoom slide bar to the right or left to zoom in or out of an image.
3. Reset the Zoom by moving the slider back to its original position on the bar.
Zooming in on a Portion of an Image
1. Using the mouse pointer, point to the area of interest on the image and click the right mouse button.
2. Keep clicking the right mouse button to zoom in further.
3. Continue clicking the right mouse button and the image zoom will cycle back to the original size.
Time Sync
The Time Sync option synchronizes a single channel of video to playback in real time. Ordinarily the video may play slower or faster depending on several factors, including how many PPS are recorded and number of cameras playing at the same time.
1. Select a single image to synchronize by double-clicking on an image.
2. Click the Time Sync button. The video will now playback in real time.
Clean Image
The DVR is capable of recording video using one of three different resolutions. When using the 720 x 480 resolution, two fields are mixed. Because of the timing gap between the two fields, according to the standardized image rules, after image might occur to high speed moving images. The remote software allows the user to remove this by clicking the Clean Image button.

64
Save Clip
The DVR can export single images in the JPG file format, save video clips in the AVI format, or output to a VCR using the s-video port. The JPG and AVI file formats are extremely common with universal computer support making them ideal formats to use. A digital signature is also attached to every JPG and AVI file exported by the DVR for use with the bundled Digital Verifier application. This function is unique to the DVR and its verification software and should not interfere with viewing the files using other applications.
JPG: The format (JPG) is optimized for compressing full-color or grayscale photographic images. JPG images are 24-bit (16.7 million color) graphics. JPG is used to export a single image or frame.
AVI: AVI image data can be stored uncompressed, but it is typically compressed using a Windows-supplied or third party compression and decompression module called a codec. AVI files save a video clip.
Saving a Single Image or Video Clip
1. Perform a basic search to locate the desired clip.
2. Click Save to open the Export Wizard.
3. Click JPEG or AVI to select the desired file type.
AVI File
a. Select Mark Digital Signature.
b. Select an Audio Channel if available.
c. Select a Compression Codec. Each codec provides different levels of quality, compatibility and file-size.
d. Enter the duration (seconds) to record. Although 50 is the longest time displayed, a longer recording may be entered manually.
e. Select Quality – 50>100. When size is not an issue, set quality to 100.
JPEG File
a. Select Mark Digital Signature.
4. Click Next.
5. Define the file name in the Export Name box.
6. Define the location to save the file by using menu tree below Export Path.
7. Click Next.
8. A message displays to confirm that the save was successful.
9. Click OK. The Export Wizard will display the name, location and size of the file.
10. Click Finish.

27717AP 65
Printing an Image
1. Using the Search screen, locate an image to print and double-click the image Note Only one camera can be selected at a time for this function to work.
2. Click the Print button. A Print Preview window appears. Depending on the printer being used, there may be several printing options available. Refer to your printer manual for specific options your printer may support.
3. Click the Page Option button to add a memo to the printout and set the paper size and orientation
4. Click the Print button to print the selected images
Note The message “NO DEFAULT PRINTERS INSTALLED” will display if there is no printer is installed.
STATUS SEARCH
The Status Search option displays a timeline in graph format. Scroll through multiple cameras and easily locate hours with recorded video.
Performing a Status Search
1. In Search mode, click Status.
2. Click the Date button to open the calendar and select a date.
3. Click along the orange recorded video block to select a desired camera or time frame.
4. After locating the desired video, close the Status Search window and use the playback controls to play forward, reverse or frame-by-frame.
Cameras
24 Hours (0-23) AM & PM
Recorded video displayed in Orange

66
PTZ OVERVIEW
Accessing PTZ Menus
Some protocols support the ability to access the Internal PTZ Onscreen Menu. Click PTZ on the remote software Display screen to open the graphical PTZ controller.
Note Use the arrow buttons on the PTZ controller move through the PTZ Menu options and/or highlight options.
Some protocols support the ability to access the Internal PTZ Onscreen Menu.
Since every PTZ camera is different, the functions of these options can vary slightly.
The OpenEye DVR provides an easy way to access the cameras options. For explanations of what those options are please refer to the manual that came with the camera.
Controlling a PTZ Camera
• The first method is to use the Graphical PTZ Controller that appears when PTZ is clicked on the main screen.
• The second method is to use the mouse to control the camera directly from the live video display.
Open PTZ Camera Menu
Arrow Buttons
Select Item on Menu
Close PTZ Camera Menu

27717AP 67
Using the Graphical PTZ Controller
Note Eight directions are available only for select protocols. Only four of the PTZ Control buttons work for all protocols (UP, DOWN, LEFT, RIGHT).
• Use the Arrow buttons to control the direction of the PTZ camera
• To select a new camera, click the video display of a different camera on the Main Screen Display
Using the On-screen Compass
1. Click PTZ on the main screen.
2. Control the PTZ by dragging the mouse on the screen in the desired direction. (A green line will appear to show the direction the PTZ will move. The shorter the line the less the PTZ will move. The longer the line the more the PTZ will travel in the specified direction.)
Activate Corresponding Preset Position
Displays Current Camera
Arrow Buttons

68
NOTES:

27717AP 69
APPENDIX
DVR FAQ
General
Q. What does Embedded Linux mean?
A. Embedded Linux means that the operating system of the DVR has been imprinted on a memory chip on the DVR. This means that the system response time is faster, more stable, and that the core of the DVR is rarely affected by external factors, such as virus, hacking, and system failure due to hard drive abnormalities.
Q. Is the DVR upgradeable by CD or network?
A. Yes. The DVR can be upgraded either way.
Q. How can I reset the DVR to the factory default settings?
A. Easily load the factory default settings from the System Configuration Menu.
Live Monitoring
Q. Is it possible to monitor the live video of specific cameras?
A. You can set the camera sequence through Sequence Setup or by connecting to one of the 3 spot monitor outputs on the rear of the DVR unit.
Recording
Q. How do you record?
A. For information on this topic view the Recording Setup section of this manual.
Q. What is Time Recording?
A. Time recording is recording scheduled to occur regardless of whether a motion or alarm event occurs.
Q. What is Event Recording?
A. Event Recording is recording which is activated when an event occurs (motion, sensor or video loss).
Searching and Playing Video
Q. How do I playback recorded video?
A. For more information on this topic view the Search section of this manual.
Q. Is it possible to backup recorded video?
A. Yes, for more information on this topic view the Backup section of this manual.
Backup
Q. Is it possible to backup to DVD media?
A. Yes, a DVD-RW drive is standard on every E-Series DVR.
Q. Can I backup to a USB memory stick?
A. Yes, for more information on this topic view the Backup section of this manual.

70
Network
Q. Does the E-Series support dynamic IP?
A. Yes. Enable DHCP in Network Setup
Q. E-Mail is not being sent.
A. Please check all the setting in the Network E-Mail Setup.
Miscellaneous
Q. What types of cameras can be used?
A. The OpenEye E120 DVR supports either NTSC or PAL analog cameras. Both standards may not be used simultaneously.
TROUBLESHOOTING
Problem Possible Solutions
No Power Check the power cord connections Check power at the outlet Ensure the power switch on the rear of the DVR is turned on.
No Live Video
Check camera video cable and connections Check monitor video cable and connections Check camera power Check camera lens setting
Live Video Too Bright If a cable is attached to the video channels looping output, make sure that it is properly terminated
DVR has stopped recording
The HDD is full , delete video or set the DVR Overwrite Mode to On in HDD Management
ENVIRONMENTAL SPECIFICATIONS
Operating Temperature 0 – 40C
Storage Temperature 0 – 40C
Operating Relative Humidity 0 – 90% (non-condensing)
Storage Relative Humidity 0 – 90% (non-condensing)

27717AP 71
SCREEN ICON INDEX
RECORDING ICONS
Recording icons appear in the up-right corner of each channel display.
Motion Icon Motion Recording
Sensor Icon Sensor (Alarm) Recording
Continuous Icon
Continuous Recording
Recording Icon Recording Tip This icon always appears in conjunction with the motion
or continuous recording icons.
V Video Loss Video Loss detected
F Freeze Pause Live View
P PTZ PTZ Camera channel
STATUS ICONS
Status icons appear in the up left corner of each channel display.
1: Channel Channel number
C1 Channel Name User defined channel name
SEARCH ICONS
Search icons appear in the up right of each channel display.
Play Playback mode
Pause Pause search video
S Smart Smart search mode
P Panorama Panorama search mode

72
SPECIFICATIONS (E120) Specification 4 Channel 8 Channel 16 Channel
Video
Inputs • 4 Channel Composite • 8 Channel Composite • 16 Channel Composite
Outputs
• CCTV Monitor (NTSC/PAL), • CRT(VGA) Monitor
• CCTV Monitor (NTSC/PAL), • CRT(VGA) Monitor
• CCTV Monitor (NTSC/PAL), • CRT(VGA) Monitor • S-Video (NTSC/PAL)
• 4 CH Looping Composite • 1 Spot CCTV Monitor (NTSC/PAL)
• 8 CH Looping Composite • 1 Spot CCTV Monitor (NTSC/PAL)
• 16 CH Looping Composite • 3 Spot CCTV Monitor (NTSC/PAL)
Monitoring Display • NTSC : 120fps
• PAL : 100fps • NTSC : 480fps • PAL : 400fps
Screen split • 1/4 • 1/4/7/9 • 1/4/7/9/10/13/16
Recording
Performance • NTSC: CIF(120fps), 2CIF(60fps), 4CIF (30fps) • PAL : CIF(100fps), 2CIF (50fps), 4CIF(25fps)
Resolution • NTSC: CIF(352x240), 2CIF(704x240), 4CIF (704x480) • PAL : CIF(352x288), 2CIF (704x288), 4CIF(704x576)
Compression • Enhanced MPEG-4
Mode • Motion detection, Sensor, Schedule • Variable compression rates, recording frame, motion sensitivity
Recording Storage media • Internal 2 x HDD (Option) • USB
Audio • 4 Channel, G.726 Compression
Playback Mode • Multi-channel playback (Max 16ch), Simultaneous/Panorama/Smart
playback
Searching • By Channel, Time, Date, Motion Detection, Sensor Events
Remote Monitoring S/W • Remote Software / Web based viewer
Alarm • 1 • 1 • 4
Sensor • 4 • 8 • 16
Camera Control • Pan/Tilt, Zoom, Focus, Iris
Back-up • DVD-RW • USB
Hardware Spec.
Size(mm) • 380(W) x 380(D) x 88(H) : 2U Rack Mount Kit
Weight • 6.5kg (W/O Packing)
Power • Input Voltage is 110-230V ~ 47/63Hz 1.75-.85A
UPS • External UPS (Option)


0

www.openeye.net 1-888-542-1103
© 2013 OpenEye
All rights reserved. No part of this publication may be reproduced by any means without written permission from OpenEye. The information in this publication is believed to be accurate in all respects. However, OpenEye cannot assume responsibility for any consequences resulting from the use thereof. The information contained herein is subject to change without notice. Revisions or
new editions to this publication may be issued to incorporate such changes.