
Dynamics Data Management System (DDMS) User Guide...The Dynamics Data Management System (DDMS) is a...
53
ISO-NE PUBLIC Dynamics Data Management System (DDMS) User Guide © ISO New England Inc. FEBRUARY 20, 2019
Transcript of Dynamics Data Management System (DDMS) User Guide...The Dynamics Data Management System (DDMS) is a...

ISO-NE PUBLIC
Dynamics Data Management System (DDMS) User Guide © ISO New England Inc.
FEBRUARY 20, 2019

Dynamics Data Management System (DDMS) User Guide page 1 ISO-NE PUBLIC

Dynamics Data Management System (DDMS) User Guide page 2 ISO-NE PUBLIC
Contents Contents ................................................................................................................................................................ 2
About This User Guide ........................................................................................................................................... 3
Section 1 Purpose of DDMS ................................................................................................................................... 4
When Models Should Be Submitted via DDMS .................................................................................................... 4
Types of Data Housed in DDMS ............................................................................................................................ 4
Section 2 Overall Process Summary ....................................................................................................................... 5
Initial Submission .................................................................................................................................................. 5
ISO-NE Review ...................................................................................................................................................... 5
Annual Recertification .......................................................................................................................................... 5
DDMS Process Status Values ................................................................................................................................ 6
Section 3 Accessing DDMS ..................................................................................................................................... 8
Section 4 Step-By-Step Instructions ....................................................................................................................... 9
4.1 Initial Entry to DDMS ........................................................................................................................................... 9
4.2 Creating a Draft Model Submission ..................................................................................................................... 9
4.3 Editing a Draft Submission ................................................................................................................................ 11
4.4 Finalizing and Completing a Draft Submission .................................................................................................. 15
4.5 Submitting a Correction .................................................................................................................................... 19
4.6 Viewing Submitted and Approved Models ........................................................................................................ 26
4.7 Recertifying a Model ......................................................................................................................................... 27
4.8 Declining to Recertify a Model .......................................................................................................................... 29
4.9 Terminating a Model ......................................................................................................................................... 31
4.10 Watching a Model Submission ........................................................................................................................ 33
4.11 Stop Watching a Model Submission ................................................................................................................ 35
4.12 Adding Comments to a Model......................................................................................................................... 37
4.13 Saving Search Filters ........................................................................................................................................ 40
4.14 Managing Search Filters .................................................................................................................................. 42
Section 5 Additional Information on DDMS ......................................................................................................... 46
Section 6 Appendix: File Formats for DDMS Submissions .................................................................................... 47
6.1 RAW File Format ................................................................................................................................................ 47
6.2 DYR File Format ................................................................................................................................................. 49
6.3 User-Defined Models ........................................................................................................................................ 50
6.4 Supporting Documentation ............................................................................................................................... 50
Section 7 Appendix: DDMS Submission Data Element Descriptions ..................................................................... 51

Dynamics Data Management System (DDMS) User Guide page 3 ISO-NE PUBLIC
About This User Guide
The Dynamics Data Management System (DDMS) User Guide details the system supporting the submission and review process of dynamic stability models. The guide is organized into two primary sections: an overview of the submission process (Section 2 Overall Process Summary) and step-by-step DDMS user instructions (Section 4 Step-By-Step Instructions).
This guide is not intended to be read from beginning to end. It is designed to be used as a reference tool when the user needs a refresher or to understand a new function of the system.
Quick Start Links:
• Get an overview of the submission and review process (See Section 2 Overall Process Summary on Page 5)
• Obtain access to DDMS (See Section 3 Accessing DDMS on Page 8) • Submit a draft model, either for new or modified equipment (See Section 4.2 Creating a
Draft Model Submission on Page 9) • Certify a model submission (See Section 4.4 Finalizing and Completing a Draft Submission
on Page 15) • Recertify a previously approved model (See Section 4.7 Recertifying a Model on Page 27)
Throughout this guide, the term “Lead Market Participant” is used to refer to users of the DDMS application. The equipment’s Lead Market Participant may not be determined for planned new equipment that has not been constructed. In this situation, the project’s developer or proponent may take the place of the Lead Market Participant.

Dynamics Data Management System (DDMS) User Guide page 4 ISO-NE PUBLIC
Section 1 Purpose of DDMS The Dynamics Data Management System (DDMS) is a repository for dynamic stability models of generators, HVDC facilities, dynamic reactive power devices, and other FACTS devices connected to the transmission system in ISO New England’s footprint. This system was designed to:
• Provide a centralized single location for all dynamic models • Track modifications and capture new versions • Support ISO-NE’s review and acceptance process • Manage corrections from equipment owners in the event that a model is incorrect or
incompatible • Support the annual re-certification process in order to maintain accurate models
When Models Should Be Submitted via DDMS
For new generator or Elective Transmission Upgrade proposals in the ISO-NE Interconnection Queue, a submission should be made after the System Impact Study has been presented at a Results Meeting. For all other proposed new equipment, a submission should be made once the project’s Proposed Plan Application has been approved at the NEPOOL Reliability Committee. In both cases, an ISO Technical Lead will notify the project’s Lead Market Participant of this requirement at the appropriate time.
Models are present in DDMS for existing equipment that is already included in ISO-NE’s power system models. A new submission to DDMS is necessary whenever modeling data changes, whether due to a data correction, an update for model accuracy, or a physical change to the equipment in the field.
Types of Data Housed in DDMS
The submission of dynamic models to ISO-NE through DDMS satisfies the requirements for model submission in NERC standard MOD-032 and ISO-NE Operating Procedure 14 (OP-14). Additionally, verification of excitation system and governor model parameters through equipment testing in accordance with NERC standards MOD-026 and MOD-027 should be submitted through DDMS.
DDMS is intended only to house data required for transient stability simulations. DDMS is not the system of record for steady-state data, such as generator real and reactive power capability, transmission line and transformer impedance, and transmission system modeling data. This data should be submitted to ISO-NE through other means, such as the NX-9/NX-12 system.

Dynamics Data Management System (DDMS) User Guide page 5 ISO-NE PUBLIC
Section 2 Overall Process Summary Each model submission via the DDMS system passes through a number of statuses on its way to approval and inclusion in an ISO-NE stability model. The figure below shows the entire process flow and documents the different status values that a model passes through. A description of each status is also presented below.
Models are only visible to ISO-NE staff and users associated with the Lead Market Participant of the equipment. Any user who is not associated with ISO-NE or the equipment’s Lead Market Participant will not have access to that equipment’s model.
An approved model is considered final and not subject to modification. Any revisions to an approved model in DDMS should be made by creating a new submission. Once the revised model is approved, the older model will be moved to the “Superseded” status indicating that it should no longer be used in system studies and is no longer considered accurate.
Initial Submission
The process is initiated with the creation of a draft model by the Lead Market Participant (See Section 4.2 Creating a Draft Model on page 9). The Lead Market Participant can modify the model as necessary while it remains a draft submission (See Section 4.3 Editing a Draft Submission on page 11).
Lead Market Participants must certify that the model submitted is an accurate representation of the equipment’s actual behavior for it to be considered officially submitted to ISO-NE for review (See Section 4.4 Finalizing and Completing a Draft Submission on page 15).
ISO-NE Review
ISO-NE will assign the submission to an ISO Technical Lead for review. The ISO Technical Lead will begin the internal review and either notify the Lead Market Participant that there are issues with the model or approve the model.
If the ISO Technical Lead requests corrections to the model, the Lead Market Participant will be able to make the necessary modifications via DDMS and recertify the model (See Section 4.5 Submitting a Correction on page 19).
The model will be incorporated into ISO-NE’s power system models, and any previously approved model will be superseded, once the model is approved by the ISO Technical Lead. The approved model will remain available to the Lead Market Participant for review via DDMS (See Section 4.6 Viewing Submitted and Approved Models on page 26).
Annual Recertification
The process requires an annual recertification to be made by the Lead Market Participant (See Section 4.7 Recertifying a Model on page 27). A recertification request will be sent to the Lead Market Participant of each piece of equipment on an annual basis. Recertification will ensure that each model in DDMS is up-to-date and accurate. It also ensures ISO-NE’s compliance with NERC standards that require periodic recertification of dynamic models.

Dynamics Data Management System (DDMS) User Guide page 6 ISO-NE PUBLIC
If the Lead Market Participant cannot recertify a model’s accuracy for any reason, they should notify ISO-NE (See Section 4.8 Declining to Recertify a Model on page 29) and immediately submit a new model containing the corrected data.
Create Draft Draft
External Party’s Compliance Officer
Submit & Certify Submitted
TerminateDraft
TerminateSubmitted
ISO Technical
Lead Assigned
Pending Review
External Party’s Compliance Officer
External Party’s Compliance Officer
External Party’s Compliance Officer
ISO Transmission Services Studies Manager -or-
ISO Transmission Planning Manager
TerminatePending Review
ISO Review
TerminateISO Review
Start ReviewApproved:
Pending System Model
Approve Submission
Reject Submission
ISO Technical Lead
Model Submission
Approved &System Modeled
Approved Pending System
ModelReplaced/
Superceded
Approved & System Modeled
Replaced/Superceded
Request Correction
Correction Required
Resubmit &Recertify
Correction Submitted
CorrectionReceived
Rejected
Terminated
Superceded
Request Recertification
Approved &Modeled:Pending
Recertification
Decline to Recertify
Errors Found When
Attempted System Model
Recertify
TerminateCorrection Required
DDMS Process Status Values
The following list provides a short summary of the purpose of each status. When a model is viewed in DDMS, its status can be seen at the upper-right hand corner of the screen (as shown below).
• Draft: The draft status is assigned when a model has been initially created by a Lead Market Participant or project proponent (the owner or developer of a generator, FACTS device, SPS, or other equipment type requiring a dynamic model). Models in this status are not considered usable by ISO-NE and are invisible to most ISO-NE DDMS users.

Dynamics Data Management System (DDMS) User Guide page 7 ISO-NE PUBLIC
• Submitted: The model has been completed by the Lead Market Participant, and certified to be an accurate model of their equipment. The submission is awaiting assignment to an ISO Technical Lead for model validation and review.
• Pending Review: The model has been submitted by the Lead Market Participant and assigned to an ISO Technical Lead. The ISO Technical Lead has not yet started the review.
• ISO Review: The assigned ISO Technical Lead has begun the process of reviewing the model to ensure that parameters fall within expected ranges and that the model behaves as expected.
• Correction Required: The ISO Technical Lead has found an issue(s) with the model as originally submitted and has requested that the equipment’s Lead Market Participant submit a correction. The Lead Market Participant has the opportunity to change their model to correct any issues.
• Correction Submitted: The equipment’s Lead Market Participant has addressed the ISO Technical Lead’s request by correcting any issues in their original submission. The Lead Market Participant has also recertified that the corrected model is an accurate representation of their equipment. The ISO Technical Lead has not started reviewing the corrected model.
• Approved Pending System Model: The ISO Technical Lead has reviewed and tested the model without issue. The model is approved for use in planning and operational studies, although it is not yet included in ISO-NE power system model libraries.
• Approved & System Modeled: ISO-NE Power System Model Management engineers have incorporated the model into stability case libraries. Any study using the latest set of stability cases will include this model. The model is visible to the Lead Market Participant, and is considered final.
• Approved & Modeled Pending Recertification: ISO-NE has requested that the equipment’s Lead Market Participant recertify that the model remains an accurate reflection of their equipment’s behavior. This recertification is required by NERC standards to occur on an annual basis. The model is considered accurate and will still be used by ISO-NE while recertification is in progress.
• Terminated: A terminated submission has never been approved by ISO-NE and was cancelled during the drafting or review process. For example, this status could be used if a proposed equipment addition or modification was cancelled before its model was approved. The model is not visible to the Lead Market Participant.
• Rejected: The ISO Technical Lead has determined that no model is necessary for this equipment. This could happen if a model was submitted for equipment that does not require a dynamic model. The model is not visible to the Lead Market Participant.
• Superseded: The model was once approved and used in studies but was later found to be incorrect. This could happen if a newer or more accurate model is made available or if an error is found in a model after the model has been approved. The model is not visible to the Lead Market Participant.

Dynamics Data Management System (DDMS) User Guide page 8 ISO-NE PUBLIC
Section 3 Accessing DDMS Access to DDMS is granted through ISO-NE’s Customer and Asset Management System (“CAMS”) application.
• For NEPOOL Market Participants: The Lead Market Participant’s Security Administrator should register the individual(s) requiring DDMS access as a “DDMS Compliance Officer” in CAMS.
o The individual must first be a registered user in CAMS. o The Security Administrator role is previously assigned in CAMS for each Lead
Market Participant. • For non-NEPOOL Market Participants: The developer or owner of a project should submit a
request for access to DDMS through ISO-NE’s “Ask ISO” application. ISO-NE Customer Service will assist with DDMS registration for these users.
• For projects that are currently under study by ISO-NE: The ISO Technical Lead assigned to the study may be able to offer guidance on the registration process.
Registered users may access the DDMS application from ISO-NE’s SMD Applications website (https://smd.iso-ne.com).
Note: Not every application shown in this figure may be available to all users.

Dynamics Data Management System (DDMS) User Guide page 9 ISO-NE PUBLIC
Section 4 Step-By-Step Instructions
4.1 Initial Entry to DDMS
When user accesses DDMS, the system will initially display the System Dashboard. The System Dashboard (shown in the figure below) contains four major sections:
• “Quick Links” includes a number of helpful links to certain functions in DDMS. The most important of these links are “Search for Issues” (see Section 4.6 Viewing Submitted and Approved Models on page 26) and “Create Issues” (see Section 4.2 Creating a Draft Model on page 9). The “Watches” link can also be used to see a list of watched models (see Section 4.10 Watching a Model Submission on page 33). The remaining functions in this section are not used in the DDMS application.
• The “Favorite Filters” section is not active in the DDMS application. Clicking on the “Create Filter” link in this section will bring the user to the Search screen, in order to search for models (see Section 4.6 Viewing Submitted and Approved Models on page 26) and to create a custom search filter (see Section 4.13 Saving Search Filters on page 40).
• “Assigned to Me” will show models in certain statuses which require action by the user. This is an easy way to access models that require completion or correction. (Note that models that require annual recertification will not appear here, even when action is required.)
• “Watched Issues” shows a list of models that are being watched by the current user. For more information, see Section 4.10 Watching a Model Submission on page 33.
The user may return to the System Dashboard at any time by clicking the “Dynamic Data Management System” title in the DDMS menu at the top of the screen.
4.2 Creating a Draft Model Submission
A new model submission can be started at any time by a Lead Market Participant.
Step #1: From any DDMS screen, the user can submit a new model by clicking the yellow “Create” button, located in the DDMS menu (shown below).

Dynamics Data Management System (DDMS) User Guide page 10 ISO-NE PUBLIC
Step #2: DDMS will display the Create Issue screen (shown below) that the user should use to submit the requested information. Data elements marked with an asterisk (*) are required.
NOTE: Detailed descriptions of each requested data element are provided in Appendix: DDMS Submission Data Element Descriptions on page 51.
Step #3: When all required fields have been completed, the user can click on the “Create” button (circled in the figure below) to complete the submission of this model.
Step #4: DDMS will execute a set of validation rules and present the user with data element specific issues (if any) in red text (see figure below).
Dynamics Data Management System (DDMS) User Guide page 11 ISO-NE PUBLIC
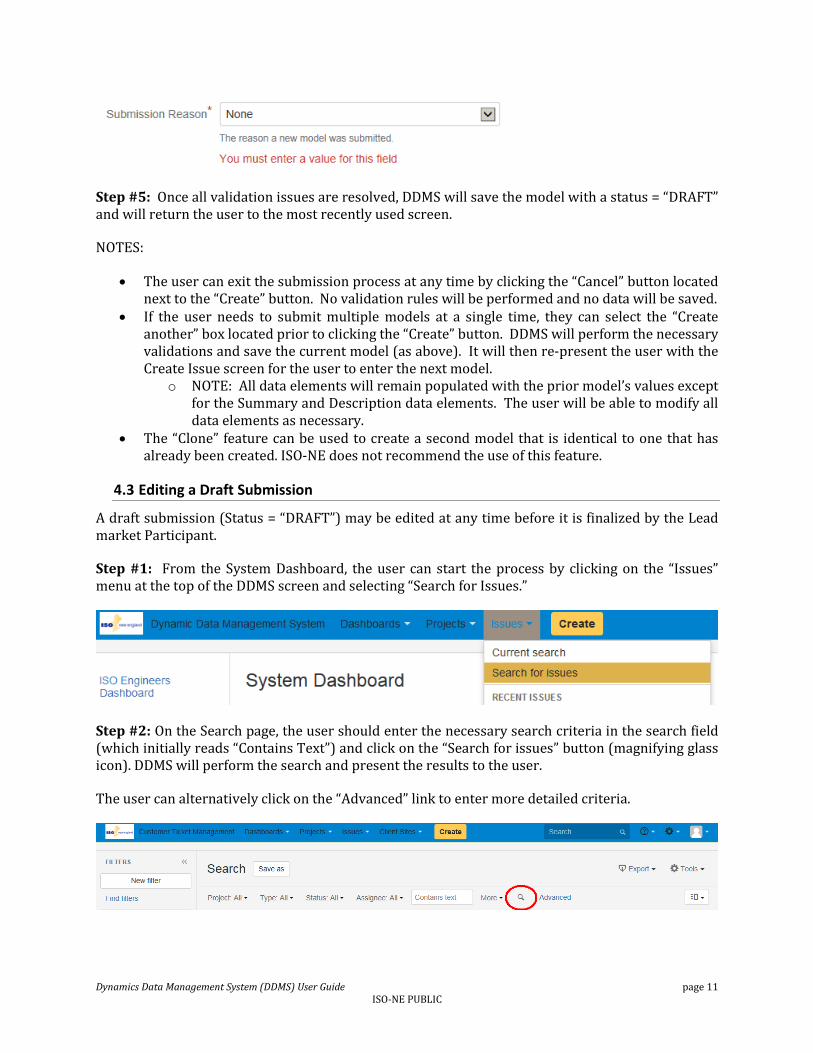
Step #5: Once all validation issues are resolved, DDMS will save the model with a status = “DRAFT” and will return the user to the most recently used screen.
NOTES:
• The user can exit the submission process at any time by clicking the “Cancel” button located next to the “Create” button. No validation rules will be performed and no data will be saved.
• If the user needs to submit multiple models at a single time, they can select the “Create another” box located prior to clicking the “Create” button. DDMS will perform the necessary validations and save the current model (as above). It will then re-present the user with the Create Issue screen for the user to enter the next model.
o NOTE: All data elements will remain populated with the prior model’s values except for the Summary and Description data elements. The user will be able to modify all data elements as necessary.
• The “Clone” feature can be used to create a second model that is identical to one that has already been created. ISO-NE does not recommend the use of this feature.
4.3 Editing a Draft Submission
A draft submission (Status = “DRAFT”) may be edited at any time before it is finalized by the Lead market Participant.
Step #1: From the System Dashboard, the user can start the process by clicking on the “Issues” menu at the top of the DDMS screen and selecting “Search for Issues.”
Step #2: On the Search page, the user should enter the necessary search criteria in the search field (which initially reads “Contains Text”) and click on the “Search for issues” button (magnifying glass icon). DDMS will perform the search and present the results to the user.
The user can alternatively click on the “Advanced” link to enter more detailed criteria.

Dynamics Data Management System (DDMS) User Guide page 12 ISO-NE PUBLIC
Step #3: The user should select the desired model from the Issues List on the left side of the screen. DDMS will present the user with the details of the selected model on the right side of the screen.
Step #4: The user should then click on the “Edit” button underneath the model’s title.

Dynamics Data Management System (DDMS) User Guide page 13 ISO-NE PUBLIC
Step #5: DDMS will present the Edit Issue screen to the user. The user can edit any necessary data elements. Data elements marked with an asterisk (*) are required.
NOTES:
• The Edit Issue screen includes the same data elements as the submission process. However, there are also additional data elements displayed that the user cannot edit. (These are used later in the model approval process.)
• All data elements are organized into 5 different tabs: Dynamic Model Basics, Equipment Basics, Equipment Dates, PSS/E Versions, and System Modeling Details.
• Detailed descriptions of each requested data element are provided in Appendix: DDMS Submission Data Element Descriptions on page 51.
Step #6: Files may be attached by clicking on “Select Files” and navigating to the proper folder. They can also be attached by dragging them directly from a folder into the Submit & Certify screen. The user should ensure that the following model file types are attached:
• Steady-state data, in .RAW format. Section 6.1 RAW File Format on page 47 contains further details on this file type.
• Dynamic simulation data, in .DYR format. Section 6.2 DYR File Format on page 49 contains further details on this file type.
• User-defined model definitions, if any are required. Section 6.3 User-Defined Models on page 50 contains further details on submitting user-defined models.
• Supporting documentation for all data. Section 6.4 Supporting Documentation on page 50 contains suggestions and requirements for supporting documentation.
NOTE: For changes to existing sets of data, the easiest way to create the required files may be to download the existing data from DDMS and edit them as necessary. Please see Section 4.6 Viewing Submitted and Approved Models on page 26 for details on locating previously submitted and approved data.
Step #7: When all desired data elements have been edited, the user can click on the “Update” button (circled in the figure below) to complete the modification of this model.

Dynamics Data Management System (DDMS) User Guide page 14 ISO-NE PUBLIC
Step #8: DDMS will execute a set of validation rules and present the user with data element specific issues (if any) in red text.
Step #9: Once all validation issues are resolved, DDMS will save the modified model with a status = “DRAFT” and will present the user the Search Issue screen with the modified model presented.
NOTE: The user can exit the submission process at any time by clicking the “Cancel” button located next to the “Update” button. If the user has made modifications to the model, DDMS will ask the user to confirm that all of the changes should be lost. No validation rules will be performed and no data will be saved.

Dynamics Data Management System (DDMS) User Guide page 15 ISO-NE PUBLIC
4.4 Finalizing and Completing a Draft Submission
A model must first be finalized and certified before any ISO-NE review will begin. To finalize a model submission, the actual modeling data must be attached and the user must certify that the model is correct and up-to-date.
Step #1: From the System Dashboard, the user can start this process by clicking on the “Issues” menu at the top of the DDMS screen and selecting “Search for Issues.”
Step #2: On the Search page, the user should enter the necessary search criteria in the search field (which initially reads “Contains Text”) and click on the “Search for issues” button (magnifying glass icon). DDMS will perform the search and present the results to the user.
The user can alternatively click on the “Advanced” link to enter more detailed criteria.
Step #3: The user should select the desired model from the Issues List on the left side of the screen. DDMS will present the user with the details of the selected model on the right side of the screen.
Step #4: The user should click on the “Submit & Certify” button underneath the model’s title.

Dynamics Data Management System (DDMS) User Guide page 16 ISO-NE PUBLIC
Step #5: DDMS will present the Submit & Certify screen to the user. The user must populate two additional required fields: “Certification” and “Original Certification Date.” Data elements marked with an asterisk (“*”) are required. Other fields that were previously populated may also be edited at this step.
NOTE:
• Detailed descriptions of other data elements are provided in Appendix: DDMS Submission Data Element Descriptions on page 51.

Dynamics Data Management System (DDMS) User Guide page 17 ISO-NE PUBLIC
Step #6: Files may be attached by clicking on “Select Files” and navigating to the proper folder. They can also be attached by dragging them directly from a folder into the Submit & Certify screen. The user should ensure that the following model file types are attached:
• Steady-state data, in .RAW format. Section 6.1 RAW File Format on page 47 contains further details on this file type.
• Dynamic simulation data, in .DYR format. Section 6.2 DYR File Format on page 49 contains further details on this file type.
• User-defined model definitions, if any are required. Section 6.3 User-Defined Models on page 50 contains further details on submitting user-defined models.

Dynamics Data Management System (DDMS) User Guide page 18 ISO-NE PUBLIC
• Supporting documentation for all data. Section 6.4 Supporting Documentation on page 50 contains suggestions and requirements for supporting documentation.
NOTE: For changes to existing sets of data, the easiest way to create the required files may be to download the existing data from DDMS and edit them as necessary. Please see Section 4.6 Viewing Submitted and Approved Models on page 26 for details on locating previously submitted and approved data.
Step #7: When all desired data elements have been edited, the user can click on the “Submit & Certify” button (circled in the figure below) to submit the model.
Step #8: DDMS will execute a set validation rules and present the user with data element specific issues (if any) in red text.
Step #9: Once all validation issues are resolved, DDMS will save the finalized model with a status = “SUBMITTED” and will present the Search Issue screen with the finalized model displayed.
NOTE: The user can exit the submission process at any time by clicking the “Cancel” button located next to the “Submit & Certify” button. If the user has made modifications to the model, DDMS will ask the user to confirm that all of the changes should be lost. No validation rules will be performed and no changes to the data will be saved.

Dynamics Data Management System (DDMS) User Guide page 19 ISO-NE PUBLIC
4.5 Submitting a Correction
ISO-NE will request the Lead Market Participant make a correction(s) to the submitted model if the assigned ISO Technical Lead identifies any issues. Users will be notified of a request for a data correction made by the ISO Technical Lead via email. This may occur during ISO-NE’s review if:
• Certain types of data are missing • Certain parameters are not within expected ranges • The model conflicts with other models already in use in the power system model.
Step #1: The user should click on the model requiring corrections in the “Assigned to Me” section of the System Dashboard (circled in the figure below). If the model does not appear here, the user can access the model by clicking the direct link in the “Correction Required” email notification, or follow the procedure in the first three steps of Section 4.3 Editing a Draft Submission on page 11.
Step #2: DDMS will display the model submission on the screen. The user should scroll to the “Comments” tab in the “Activity” section at the bottom of the screen to view comments from the ISO Technical Lead assigned to this data submission. The comments will contain specific details regarding the requested correction.
Step #3a: If the user needs to edit any of the model’s attachments, they should download the necessary files from DDMS, make the changes locally, and re-upload the corrected model attachments. Model attachments cannot be edited directly on DDMS.
NOTE: If the user does not need to edit any of the model’s attachments, they can skip to Step #4a below.

Dynamics Data Management System (DDMS) User Guide page 20 ISO-NE PUBLIC
Step #3b: The user should click the “+” symbol next to the Attachments section to upload revised file attachments.
Step #3c: DDMS will present the “Attach Files” screen to the user. The user can click and drag files into the “Attachment” field, or click on the “Select files” button and navigate to the folder where the files are located to choose individual files to upload.
The user may add an optional comment describing the corrections made to the model attachments being uploaded in the “Comment” field. Several formatting functions are available for comments, if necessary.

Dynamics Data Management System (DDMS) User Guide page 21 ISO-NE PUBLIC
Step #3d: When all file uploads have been completed, the user can click on the “Attach” button (circled in the figure below) to attach the desired files to the model.

Dynamics Data Management System (DDMS) User Guide page 22 ISO-NE PUBLIC
NOTE: The user can exit the file attachment process at any time by clicking the “Cancel” button located next to the “Attach” button. No data validation rules will be applied and no new files will be attached.
Step #4a: If the user needs to edit any of the model’s data elements (description, equipment type, etc.), the user can click on the “Edit” button near the top-left corner of the screen. DDMS will present the “Edit Issue” dialog box, where any necessary fields can be changed.
NOTE: If the user does not need to edit any of the model’s data elements, they can skip to Step #5 below.
Step #4b: DDMS will present the Edit Issue screen to the user. The user can edit any necessary data elements. Data elements marked with an asterisk (*) are required.
NOTES:
Dynamics Data Management System (DDMS) User Guide page 23 ISO-NE PUBLIC
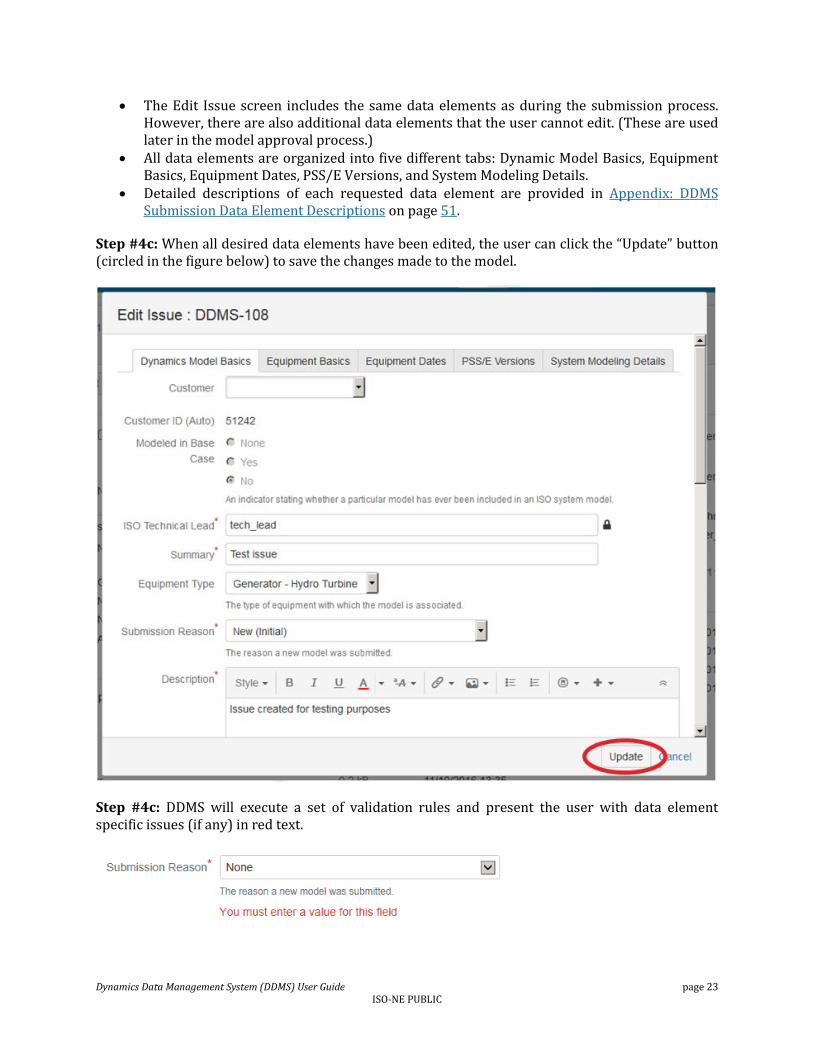
• The Edit Issue screen includes the same data elements as during the submission process. However, there are also additional data elements that the user cannot edit. (These are used later in the model approval process.)
• All data elements are organized into five different tabs: Dynamic Model Basics, Equipment Basics, Equipment Dates, PSS/E Versions, and System Modeling Details.
• Detailed descriptions of each requested data element are provided in Appendix: DDMS Submission Data Element Descriptions on page 51.
Step #4c: When all desired data elements have been edited, the user can click the “Update” button (circled in the figure below) to save the changes made to the model.
Step #4c: DDMS will execute a set of validation rules and present the user with data element specific issues (if any) in red text.
Dynamics Data Management System (DDMS) User Guide page 24 ISO-NE PUBLIC
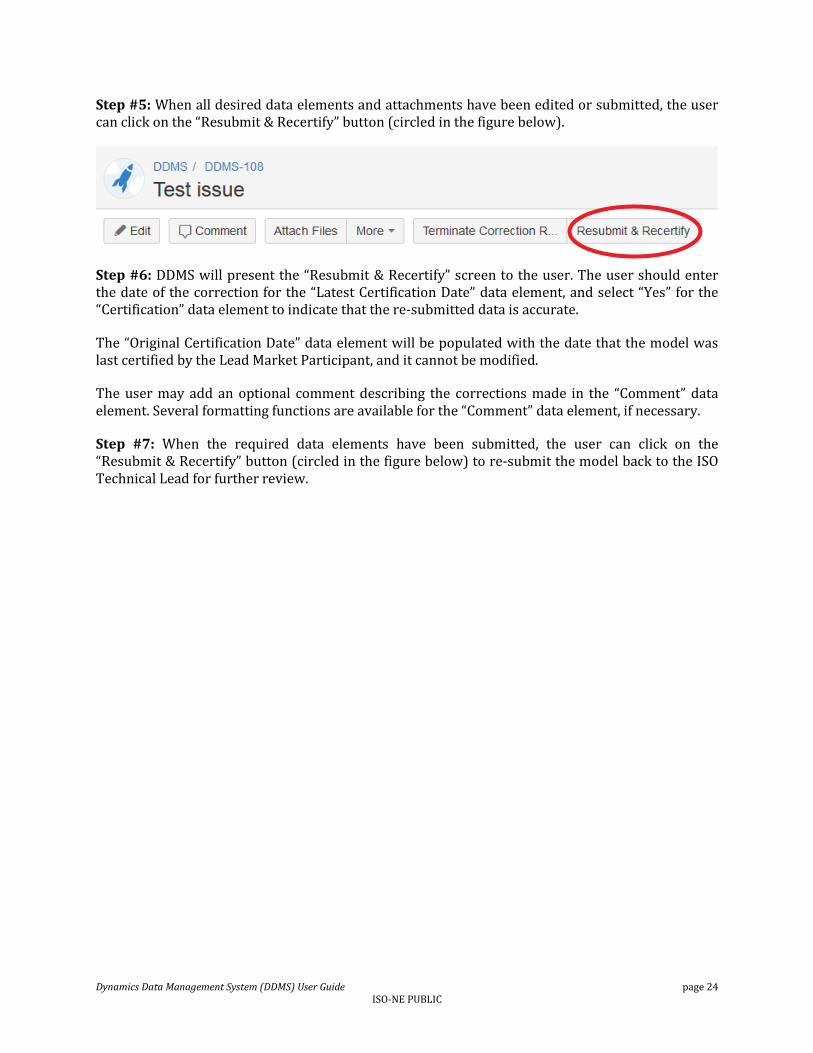
Step #5: When all desired data elements and attachments have been edited or submitted, the user can click on the “Resubmit & Recertify” button (circled in the figure below).
Step #6: DDMS will present the “Resubmit & Recertify” screen to the user. The user should enter the date of the correction for the “Latest Certification Date” data element, and select “Yes” for the “Certification” data element to indicate that the re-submitted data is accurate.
The “Original Certification Date” data element will be populated with the date that the model was last certified by the Lead Market Participant, and it cannot be modified.
The user may add an optional comment describing the corrections made in the “Comment” data element. Several formatting functions are available for the “Comment” data element, if necessary.
Step #7: When the required data elements have been submitted, the user can click on the “Resubmit & Recertify” button (circled in the figure below) to re-submit the model back to the ISO Technical Lead for further review.

Dynamics Data Management System (DDMS) User Guide page 25 ISO-NE PUBLIC
Step #8: DDMS will execute a set of validation rules and present the user with data element-specific issues (if any) in red text.
Step #9: Once all validation issues are resolved, DDMS will save the submitted changes with a status = “CORRECTION SUBMITTED”, present the user with the modified model, and notify the ISO Technical Lead that the correction has been submitted.
The user can exit the correction process at any time by clicking the “Cancel” button located next to the “Resubmit & Recertify” button. No validation rules will be performed, and no new files will be attached.

Dynamics Data Management System (DDMS) User Guide page 26 ISO-NE PUBLIC
4.6 Viewing Submitted and Approved Models
Previously submitted models can be viewed by the associated Lead Market Participant after submission.
Step #1: From the System Dashboard, the user can start the process by clicking on the “Issues” menu at the top of the DDMS screen and selecting “Search for Issues.”
Step #2: On the Search page, the user should enter the necessary search criteria in the search field (which initially reads “Contains Text”) and click on the “Search for issues” button (magnifying glass icon). DDMS will perform the search and present the results to the user.
The user can alternatively click on the “Advanced” link to enter more detailed criteria.
Step #3: The user can select the desired model from the Issues List on the left side of the screen. DDMS will present the user with the details of the selected model on the right side of the screen.
Step #4: The user can view all of the information associated with the model (data elements, comments, attachments, etc.), as shown below.

Dynamics Data Management System (DDMS) User Guide page 27 ISO-NE PUBLIC
4.7 Recertifying a Model
ISO-NE requires the Lead Market Participant to re-certify their models on an annual basis in order to ensure accuracy. If the information remains accurate, a simple re-certification is all that is required.
Step #1: The initial notification that an annual recertification is required will be communicated via email to each DDMS user associated with the submission’s Lead Market Participant. Any of these users can access the model in DDMS by clicking the direct link in the email notification. If the model does not appear, the user can access the model by following the procedure in the first three steps of Section 4.6 Viewing Submitted and Approved Models on page 26.
Step #2: DDMS will present the user with the details of the selected model. The user can review all of the information associated with the mode (data elements, comments, attachments, etc.) to confirm that it remains accurate.
Step #3: If all of the information associated with the model is still accurate, the user should click on the “Recertify” button at the top of the screen.

Dynamics Data Management System (DDMS) User Guide page 28 ISO-NE PUBLIC
Step #4: DDMS will present the “Recertify” screen to the user. The user should enter the current date in the “Latest Certification Date” data element and select “Yes” for the “Certification” data element to indicate that the model housed in DDMS remains accurate.
The “Original Certification Date” data element will be populated with the date the model was first certified by the Lead Market Participant, and cannot be modified.
The user may add an optional comment describing the corrections made in the “Comment” data element. Several formatting functions are available for the “Comment” data element, if necessary.
Step #5: When the required data elements have been submitted, the user can click on the “Recertify” button (circled in the figure below) to recertify the model.

Dynamics Data Management System (DDMS) User Guide page 29 ISO-NE PUBLIC
Step #6: DDMS will execute a set of data validation rules and present the user with data element specific issues (if any) in red text.
Step #7: Once all validation issues are resolved, DDMS will recertify the model with a status = “APPROVED & SYSTEM MODELED” and will present the user with the model.
The user can exit the recertification process at any time by clicking the “Cancel” button located next to the “Recertify” button. If the user has submitted any recertification information, DDMS will ask the user to confirm that all of the information should be lost. No validation rules will be applied and no new information will be saved.
4.8 Declining to Recertify a Model
ISO-NE requires the Lead Market Participant to re-certify their models on an annual basis in order to ensure accuracy. If the information is no longer accurate, the Lead Market Participant should decline to recertify the model and then initiate a new model submission to replace the inaccurate model. Users should follow the procedure outlined in Sections 4.2 through 4.4 of this document to initiate a new model submission.
Step #1: The initial notification that an annual recertification is required will be communicated via email to each DDMS user associated with the submission’s Lead Market Participant. Any of these users can access the model in DDMS by clicking the direct link in the email notification. If the model does not appear, the user can access the model by following the procedure in the first three steps of Section 4.6 Viewing Submitted and Approved Models on page 26.
Step #2: DDMS will present the user with the details of the selected model. The user can review all of the information associated with the mode (data elements, comments, attachments, etc.) to confirm that it remains accurate.
Step #3: If any of the information associated with the model is no longer accurate, the user should click on the “Decline to Recertify” button at the top of the screen.
Step #4: DDMS will present the “Decline to Recertify” screen to the user. The user should enter a comment in the “Comments” data element to communicate the issue(s) with the model to ISO-NE. Several formatting functions are available for the “Comment” data element, if necessary.

Dynamics Data Management System (DDMS) User Guide page 30 ISO-NE PUBLIC
Step #5: When the required comment has been submitted, the user can click on the “Decline to Recertify” button (circled in the figure below) to decline to recertify the model.
Step #6: DDMS will execute a set of validation rules and present the user with data element specific issues (if any) in red text.
Step #7: Once all validation issues are resolved, DDMS will save the model with a resolution = “Not Recertified” and will present the model to the user.
Step #8: Whenever recertification is declined, a new model submission should immediately be entered to replace the out-of-date or inaccurate model. Users should follow the procedure outlined

Dynamics Data Management System (DDMS) User Guide page 31 ISO-NE PUBLIC
in Sections 4.2 through 4.4 of this document to create a new model submission with corrected or revised modeling model.
4.9 Terminating a Model
A model submission may be terminated by the Lead Market Participant at any point before it is approved by ISO-NE. This may be necessary if a planned or proposed project is cancelled before its model is approved, or if required corrections are extensive enough that a user wishes to cancel and restart a model submission. Models with the statuses “DRAFT,” “SUBMITTED,” or “CORRECTION REQUIRED” may be terminated by Lead Market Participants.
Step #1: From the System Dashboard, the user can start the process by clicking on the “Issues” menu at the top of the DDMS screen and selecting “Search for Issues.”
Step #2: On the Search page, the user should enter the necessary search criteria in the search field (which initially reads “Contains Text”) and click on the “Search for issues” button (magnifying glass icon). DDMS will perform the search and present the results to the user.
The user can alternatively click on the “Advanced” link to enter more detailed criteria.
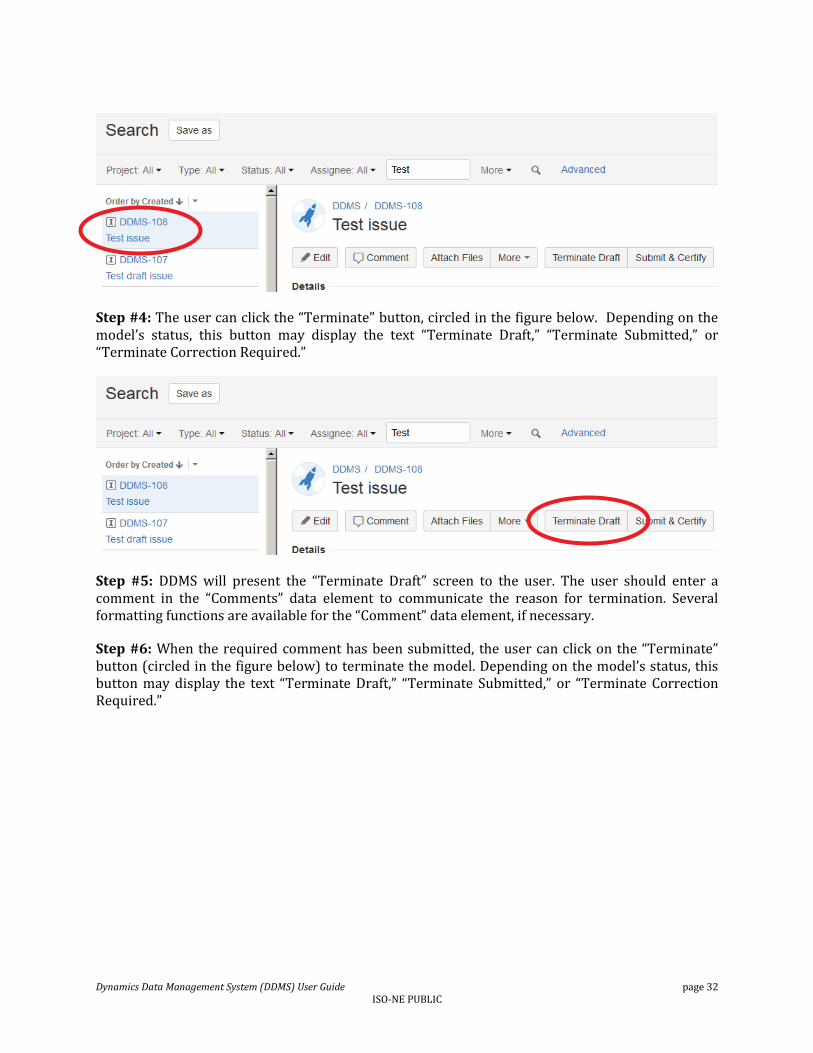
Step #3: The user can select the desired model from the Issues List on the left side of the screen. DDMS will present the user with the details of the selected model on the right side of the screen.
Dynamics Data Management System (DDMS) User Guide page 32 ISO-NE PUBLIC
Step #4: The user can click the “Terminate” button, circled in the figure below. Depending on the model’s status, this button may display the text “Terminate Draft,” “Terminate Submitted,” or “Terminate Correction Required.”
Step #5: DDMS will present the “Terminate Draft” screen to the user. The user should enter a comment in the “Comments” data element to communicate the reason for termination. Several formatting functions are available for the “Comment” data element, if necessary.
Step #6: When the required comment has been submitted, the user can click on the “Terminate” button (circled in the figure below) to terminate the model. Depending on the model’s status, this button may display the text “Terminate Draft,” “Terminate Submitted,” or “Terminate Correction Required.”

Dynamics Data Management System (DDMS) User Guide page 33 ISO-NE PUBLIC
Step #7: DDMS will execute a set of validation rules and present the user with data element specific issues (if any) in red text.
Step #8: Once all validation issues are resolved, DDMS will save the model with a status = “TERMINATED” and will present the model to the user.
The user can exit the Terminate process at any time by clicking the “Cancel” button located next to the “Terminate” button. If the user has submitted any text in the Comment field, DDMS will ask the user to confirm that the text should be lost. No comment will be saved, and the issue will remain in its present status.
4.10 Watching a Model Submission
DDMS offers the ability to watch a model submission that a user is currently not watching. This allows a user to access the model more easily from the System Dashboard screen and enables email

Dynamics Data Management System (DDMS) User Guide page 34 ISO-NE PUBLIC
notifications for any change in the submission’s status. By default, a user is automatically registered as a watcher on a model that they submit.
Step #1: From the System Dashboard, the user can start the process by clicking on the “Issues” menu at the top of the DDMS screen and selecting “Search for Issues.”
Step #2: On the Search page, the user should enter the necessary search criteria in the search field (which initially reads “Contains Text”) and click on the “Search for issues” button (magnifying glass icon). DDMS will perform the search and present the results to the user.
The user can alternatively click on the “Advanced” link to enter more detailed criteria.
Step #3: The user can select the desired model from the Issues List on the left side of the screen. DDMS will present the user with the details of the selected model on the right side of the screen.
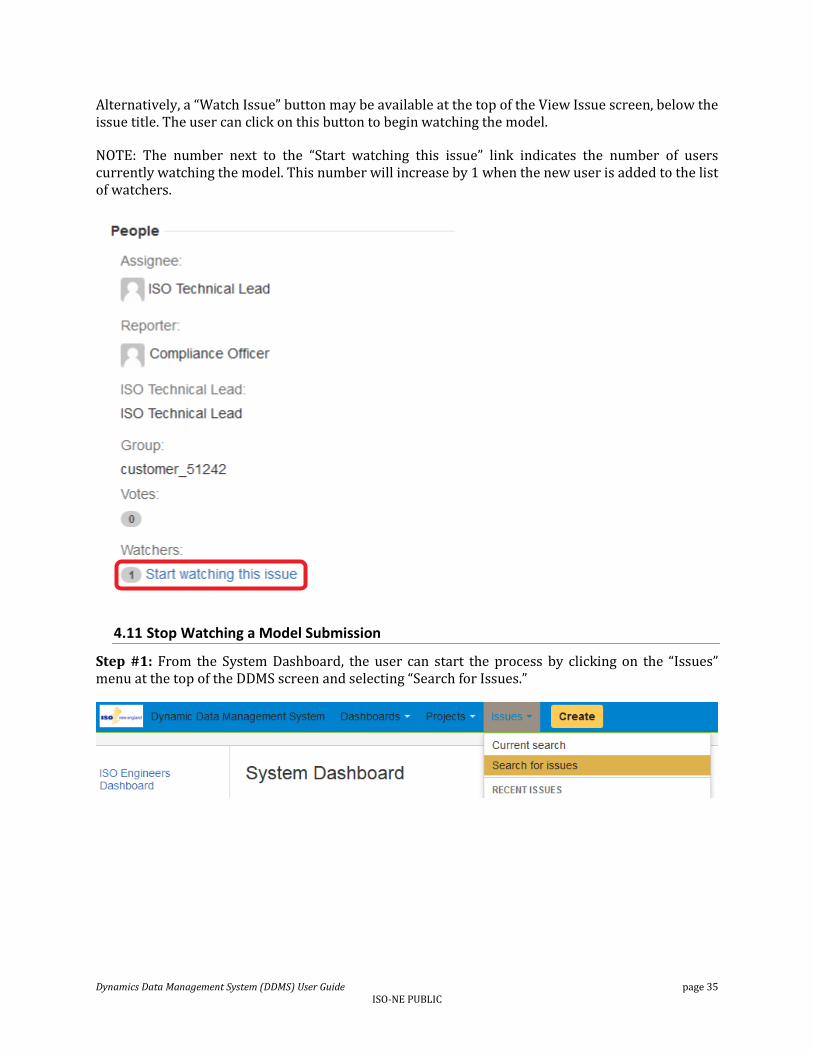
Step #4: The “People” section (see sample below) on the right side of the View Issue screen shows the initial model Reporter and the ISO Technical Lead assigned to review the submission at ISO-NE. The user can start watching the issue by clicking on “Start watching this issue” at the bottom of this section.
Dynamics Data Management System (DDMS) User Guide page 35 ISO-NE PUBLIC
Alternatively, a “Watch Issue” button may be available at the top of the View Issue screen, below the issue title. The user can click on this button to begin watching the model.
NOTE: The number next to the “Start watching this issue” link indicates the number of users currently watching the model. This number will increase by 1 when the new user is added to the list of watchers.
4.11 Stop Watching a Model Submission
Step #1: From the System Dashboard, the user can start the process by clicking on the “Issues” menu at the top of the DDMS screen and selecting “Search for Issues.”

Dynamics Data Management System (DDMS) User Guide page 36 ISO-NE PUBLIC
Step #2: On the Search page, the user should enter the necessary search criteria in the search field (which initially reads “Contains Text”) and click on the “Search for issues” button (magnifying glass icon). DDMS will perform the search and present the results to the user.
The user can alternatively click on the “Advanced” link to enter more detailed criteria.
Step #3: The user can select the desired model from the Issues List on the left side of the screen. DDMS will present the user with the details of the selected model on the right side of the screen.
Step #4: The “People” section (see sample below) on the right side of the View Issue screen shows the initial model Reporter (the user that initially submitted the model) and the ISO Technical Lead assigned to review the submission for ISO-NE. The user can stop watching the issue by clicking on the “Stop watching this issue” link in this section.
Alternatively, a “Stop Watching Issue” button may be available at the top of the View Issue screen, below the issue title. The user can click on this button to stop watching the model.

Dynamics Data Management System (DDMS) User Guide page 37 ISO-NE PUBLIC
NOTE: The number next to the “Stop watching this issue” link indicates the number of users currently watching the model. This number will decrease by 1 when the user is removed from the list of watchers.
4.12 Adding Comments to a Model
A comment can be added to any model in DDMS by any user who is able to view the model.
Step #1: From the System Dashboard, the user can start the process by clicking on the “Issues” menu at the top of the DDMS screen and selecting “Search for Issues.”

Dynamics Data Management System (DDMS) User Guide page 38 ISO-NE PUBLIC
Step #2: On the Search page, the user should enter the necessary search criteria in the search field (which initially reads “Contains Text”) and click on the “Search for issues” button (magnifying glass icon). DDMS will perform the search and present the results to the user.
The user can alternatively click on the “Advanced” link to enter more detailed criteria.
Step #3: The user can select the desired model from the Issues List on the left side of the screen. DDMS will present the user with the details of the selected model on the right side of the screen.
Step #4: The “Activity” pane at the bottom of the View Issue screen shows recent activity related to the model. The user can click on the “Comments” tab in this view to show any comments that have already been added to the model, including those added during steps such as correction requests.
Step #5: To add a new comment, click on the “Comment” button below the “Activity” pane (circled in the figure below).

Dynamics Data Management System (DDMS) User Guide page 39 ISO-NE PUBLIC
Step #6: The user can type the desired comment into the “Comment” data field. A number of formatting options are available if required.
Step #7: The user can change the visibility of the comment by clicking on the padlock icon (circled in the figure above). By default, comments are visible to all users, both external and at ISO-NE. Selecting “Compliance Officer” from the drop-down menu will limit visibility to compliance officers who are associated with the model’s Lead Market Participant.
Step #8: The user can click on the “Add” button to add the comment to the model. DDMS will save the comment and display it with the model when it is viewed.

Dynamics Data Management System (DDMS) User Guide page 40 ISO-NE PUBLIC
The user can exit the Add Comment process at any time by clicking the “Cancel” button located next to the “Add” button. If the user has submitted any text in the Comment field, DDMS will ask the user to confirm that the text should be lost. No comment will be saved.
4.13 Saving Search Filters
Users can save custom search filters for future use in DDMS. This may be useful when the same search for a given set of models is needed on a regular basis.
Step #1: From the System Dashboard, the user can start the process by clicking on the “Issues” menu at the top of the DDMS screen and selecting “Search for Issues.”
Step #2: On the Search page, the user should enter the necessary search criteria in the search field (which initially reads “Contains Text”) and click on the “Search for issues” button (magnifying glass icon). DDMS will perform the search and present the results to the user.
The user can alternatively click on the “Advanced” link to enter more detailed criteria.
Step #3: The user should click on the “Save as” button on the Search screen (circled in the figure below).

Dynamics Data Management System (DDMS) User Guide page 41 ISO-NE PUBLIC
Step #4: DDMS will present the Save Filter screen to the user. The user can enter a unique name for the customized Search Filter in the “Filter Name” data element.
The user should also check the “My filters should be private by default” box. Otherwise, this filter will be visible to all users of DDMS, both at ISO-NE and at other Lead Market Participants.
Step #5: When all of the required data elements have been submitted, the user can click on the “Submit” button to create the filter.
Step #6: DDMS will execute a set of validation rules and present the user with data element specific issues (if any) in red text.
Step #7: Once all validation issues are resolved, DDMS will save the customized search filter.
The user can exit the Save Search Filter process at any time by clicking the “Cancel” button located next to the “Submit” button. If the user has submitted any information, DDMS will ask the user to confirm that the information should be lost. No validation rules will be performed and no information will be saved.
The saved filter can now be accessed at any time from the “Search” screen, at the left side of the screen, as shown below.

Dynamics Data Management System (DDMS) User Guide page 42 ISO-NE PUBLIC
4.14 Managing Search Filters
Step #1: From the DDMS System Dashboard, the user should click on “Manage Filters” in the “Favorite Filters” section of the screen.
Step #2: DDMS will present the Manage Filters screen. From the list at the left side of the screen, select a list of filters:
• “Favorite” will display filters that the current user has designated as Favorites. • “My” will display filters that the current user has created. • “Popular” will display filters that are designated as Favorites by a large number of DDMS
users. • “Search” will allow the user to search for custom search filters by name.

Dynamics Data Management System (DDMS) User Guide page 43 ISO-NE PUBLIC
Step #3: DDMS will present the selected list of custom search filters in the right-hand side of the screen. A number of actions can be taken directly from this screen:
• Clicking on the name of a filter will present the search results associated with the filter. • Clicking on the star next to a filter’s name will add or remove that filter from the user’s list
of Favorite Filters. • The user can set up periodic email notifications of a filter’s contents by clicking on the
“Subscribe” link (see Step #4 below). • For filters created by the current user, the gear icon at the right-hand side can be used to
edit or delete a filter (see Steps #5-7 below).
Step #4: To set up email subscriptions to a filter, click on the “Subscribe” link. DDMS will display the “Filter Subscription” screen, shown below. The user can select a schedule for email notifications. Clicking the box marked “Email this filter, even if there are no issues found” will force the notification email to be sent even if no models meet the filter’s criteria. The user can click on “Subscribe” to start the email notification, or on “Cancel” to cancel the subscription.
Step #5: The user can edit or delete any filter that they created by clicking on the gear icon at the right side of the Manage Filters screen. A drop-down menu will appear, with “Edit” and “Delete” options.

Dynamics Data Management System (DDMS) User Guide page 44 ISO-NE PUBLIC
Step #6: The user can click on “Edit” in the dropdown menu to modify a filter’s name, description, and privacy settings. DDMS will display the “Edit Current Filter” window. From this window, a number of modifications are possible:
• The user can edit the name or a description of the filter • The “Shares” data element shows a list of groups of users who can view the filter. Clicking
on the trash can icon next to any group will make the filter invisible to that group of users. • The filter can be shared with additional groups of users by selecting the group from the last
drop-down menu on the screen, and clicking the “+ Add” button.
The user can click on “Save” to save all modifications to the filter, or on “Cancel” to cancel all modifications and leave the filter unchanged.

Dynamics Data Management System (DDMS) User Guide page 45 ISO-NE PUBLIC
Step #7: The user can click on “Delete” in the gear icon’s dropdown menu to delete the saved filter. DDMS will present a window to confirm the deletion of the filter, and to alert the user to any email subscriptions that are affected by deleting the filter. Clicking on “Delete” will delete the filter, making it unusable by any user. Clicking on “Cancel” will leave the filter unchanged.

Dynamics Data Management System (DDMS) User Guide page 46 ISO-NE PUBLIC
Section 5 Additional Information on DDMS Please reference the following sources for additional information on DDMS:
• A short training video on DDMS is available on the ISO Training and Events Network (ISO-TEN). To access the training, log into ISO-TEN and search for “DDMS.”
• The ISO-NE MOD-032 Compliance Bulletin contains more information on the NERC MOD-032 standard, and ISO-NE’s requirements concerning compliance with this standard. The Compliance Bulletin can be found on ISO-NE’s website at: https://www.iso-ne.com/static-assets/documents/2015/06/iso_new_england_compliance_bulletin_mod_032.pdf
• For projects that are already under study with the ISO-NE Transmission Strategy & Services or Transmission Planning group, please contact the Technical Lead for the study in question. They will be able to assist with any project-specific questions.
• ISO-NE Customer Service can assist with any specific questions, including access to DDMS. Customer Service can be contacted by calling (413) 540-4220 or submitting a question through the Ask ISO online application.

Dynamics Data Management System (DDMS) User Guide page 47 ISO-NE PUBLIC
Section 6 Appendix: File Formats for DDMS Submissions All submissions to DDMS must include the modeling files necessary to simulate the behavior of the equipment in transient stability simulations in PSS/E (Power System Simulator for Engineers, a simulation program produced by Siemens PTI). The exact file formats required are listed below.
The easiest way to create new modeling files for existing equipment may be to download the existing modeling files from DDMS and modify them as necessary rather than to start from scratch.
As of 2016, all models submitted should be compatible with PSS/E version 33. This requirement may be changed in the future to accommodate transitions to future versions of PSS/E.
PSS/E uses six-digit bus identification numbers to uniquely identify each location in the power system. These numbers appear throughout the files described in the sections below. In order to determine the bus numbers applicable to a certain piece of equipment, please contact the ISO Technical Lead assigned to your project, or (for existing equipment) refer to files already posted to DDMS.
6.1 RAW File Format
A .RAW file is a plain-text file used in PSS/E, which lists the steady-state parameters required for modeling part or all of the power system. These files are in plain-text format, and can be opened and modified in any text editor such as Notepad or WordPad.
The figure below shows a .RAW file for a sample 500 MW machine. The most important data to be included in DDMS model submissions is highlighted in yellow and labeled.
All non-highlighted parameters are either data defined by ISO-NE to locate and categorize each unit in power system models, or data that does not officially reside in DDMS. For example, GSU transformer data should be submitted through NX-9 rather than through DDMS, and real and reactive power capability is determined based on interconnection agreements and operational audits. These non-highlighted parameters do not need to be edited by external users of DDMS.
For projects that include extensive steady state data which is not housed in NX-9 or other similar data sources, additional data may need to be included in the RAW file. For example, wind generation facilities with extensive collector systems operated at 34.5 kV may require this data. For details on what would be required, please contact the ISO Technical Lead assigned to the model in DDMS or the technical lead assigned to the project’s System Impact Study.

Dynamics Data Management System (DDMS) User Guide page 48 ISO-NE PUBLIC

Dynamics Data Management System (DDMS) User Guide page 49 ISO-NE PUBLIC
6.2 DYR File Format
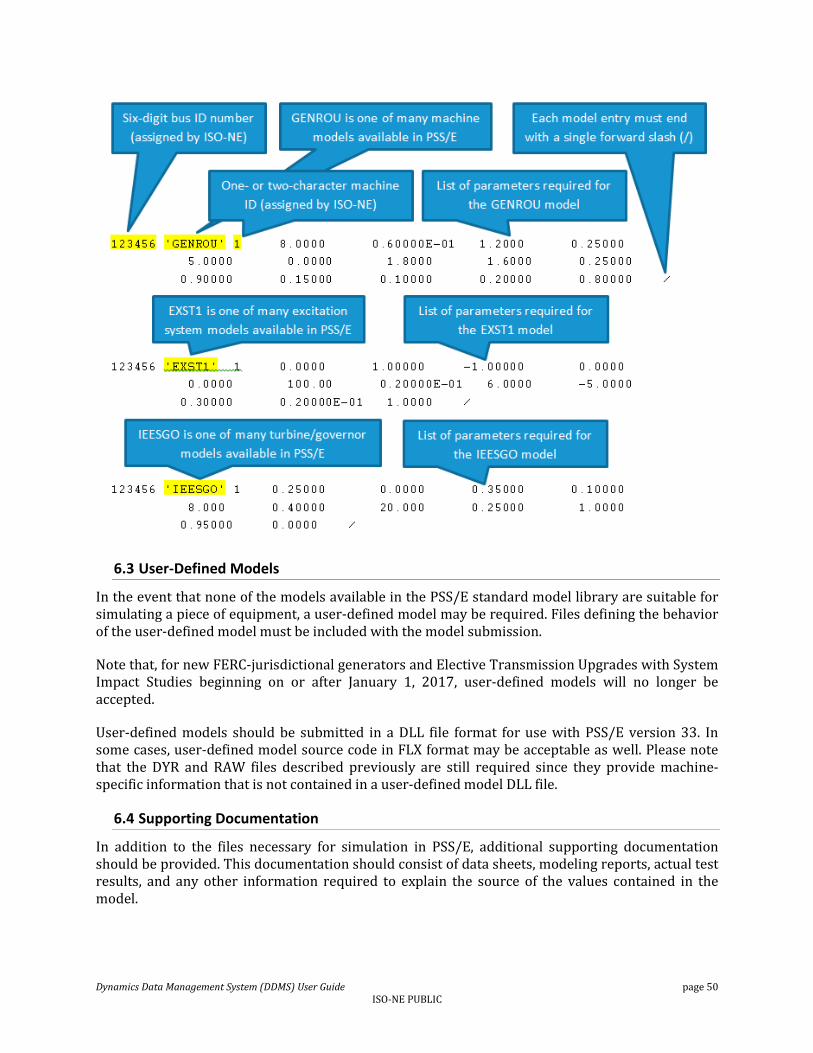
A .DYR file is a plain-text file used in PSS/E that lists the dynamic model parameters for a given set of equipment. These files are in plain-text format and can be opened in any text editor such as Notepad or WordPad.
For each dynamic model used for a generator in PSS/E, the DYR file has the following format:
[bus number] ‘[model name]’ [unit ID] [list of model parameters] /
Most generators will have more than one model listed in this format. For example, excitation system and governor models are typically separate from machine models.
The figure below shows a sample DYR file for a fictitious unit. Please note that spacing, line breaks, and number of decimal digits included have no impact on the contents of the DYR file. The order of the parameter values and the parameter to which each one corresponds is defined in PSS/E’s documentation and is often listed in the supporting documentation that is posted on DDMS. For additional information on the list of parameters required for a specific dynamic model, and their correct order, please contact ISO-NE.
If a given piece of equipment requires a user-defined model for simulation in PSS/E (see Section 6.3 below), please contact the user-defined model’s author for details on the DYR file format for that model. Please also ensure that the bus number and machine ID are replaced with their correct values before submitting the DYR file to ISO-NE.
Dynamics Data Management System (DDMS) User Guide page 50 ISO-NE PUBLIC
6.3 User-Defined Models
In the event that none of the models available in the PSS/E standard model library are suitable for simulating a piece of equipment, a user-defined model may be required. Files defining the behavior of the user-defined model must be included with the model submission.
Note that, for new FERC-jurisdictional generators and Elective Transmission Upgrades with System Impact Studies beginning on or after January 1, 2017, user-defined models will no longer be accepted.
User-defined models should be submitted in a DLL file format for use with PSS/E version 33. In some cases, user-defined model source code in FLX format may be acceptable as well. Please note that the DYR and RAW files described previously are still required since they provide machine-specific information that is not contained in a user-defined model DLL file.
6.4 Supporting Documentation
In addition to the files necessary for simulation in PSS/E, additional supporting documentation should be provided. This documentation should consist of data sheets, modeling reports, actual test results, and any other information required to explain the source of the values contained in the model.

Dynamics Data Management System (DDMS) User Guide page 51 ISO-NE PUBLIC
Section 7 Appendix: DDMS Submission Data Element Descriptions
• Project: The Project data element will be defaulted to “DDMS (DDMS),” and cannot be modified by the user.
• Issue Type: The Issue Type data element will be defaulted to “DDMS,” and cannot be modified by the user.
• Summary: The name of the equipment in question, as well as a short summary of the basis for the data submission. For example, “Anytown Unit G1 Data Correction”
• Description: A longer description of the model submission. For example, “Data correction to accurately reflect excitation system gain constants.” Several formatting functions are available for the Description data element, if necessary.
• Submission Reason: From the drop-down menu, choose the best match for the reason for this data submission. The choices for this data element are as follows:
o None: This is the default value, and should not be used (DDMS’s data validation rules will prevent this choice).
o New (Initial): This value should be used for the initial submission for a new piece of equipment, after the equipment’s System Impact Study is complete.
o New (As-purchased): This value should be used for submissions of as-purchased data for new equipment, typically required approximately 180 days before the equipment’s in-service date.
o New (As-built/tested): This value should be used for submissions of as-built and as-tested data for new equipment, typically required approximately 7 days before the equipment’s commercial operation date.
o Data Correction: This value should be used for a new submission for an existing piece of equipment that requires a correction to match the equipment’s actual characteristics. This may include corrections or model changes requested by ISO-NE.
o New Model – No Change in the Field: This value should be used for a new submission for an existing piece of equipment that has had a model previously approved that requires a new model even without changes in the field.
o Equipment Upgrade or Control Parameter Change: This value should be used when a model change is required due to a physical change to existing equipment, or a control system setting change to existing equipment.
o PSS/E Version Change – Same Equipment: Certain model types (typically user-defined models) are not automatically compatible with all versions of PSS/E. This value should be used when, on request from ISO-NE, a Lead Market Participant

Dynamics Data Management System (DDMS) User Guide page 52 ISO-NE PUBLIC
submits a new model of the same equipment in order to maintain compatibility with updated versions of PSS/E.
o Equipment Replacement: This value should be used when models are revised due to a complete replacement of existing equipment.
• Equipment Name: The Equipment Name data element should contain the name given to the physical machine or, in the case of wind turbines, the collection of machines used for modeling purposes. For example: “Anytown Unit G1”.
• Equipment Type: The Equipment Type data element selection should represent the type of equipment being modeled. “None” is the default value and should NOT be used (will fail data validation rules).
• Effective Model Start Date: The Effective Model Start Date data element should be the date on which the addition/change is planned to begin commercial operation. For any corrections to existing data that do not correspond to a planned future change, the user should enter the date of the submission.
• Effective Model End Date: The Effective Model End Date data element should be the date on which the model will become obsolete (if relevant). For example, this could be used when a current model becomes obsolete due to another planned future change or due to a planned equipment retirement.
• Contains User Model: The Contains User Model data element selection identifies whether a user-defined model is required to model the equipment in PSS/E (see Section 6.3 User-Defined Models on Page 50). “None” is the default value, but it should be modified by the user to either a “Yes” or “No” value.
• PSS/E Version (Original): The PSS/E Version (Original) data element should contain the earliest PSS/E version in which this model can be used. Most submissions that do not include user-defined models will work with multiple versions of PSS/E. In this case, enter version “33”.
Many other data elements are not available for editing by users outside of ISO-NE. These data elements will be populated by the ISO Technical Lead during the model review.


![[Curs Android] C06 - DDMS & LogCat (IPW 2011)](https://static.fdocuments.net/doc/165x107/5478ce85b4795968098b459d/curs-android-c06-ddms-logcat-ipw-2011.jpg)


![Power System Dynamic Simulations using a Parallel Two ... · for power system dynamic simulations can be found in [18]. In general, two-level, or multilevel, DDMs can be exploited](https://static.fdocuments.net/doc/165x107/5f36b32716d4b06638777052/power-system-dynamic-simulations-using-a-parallel-two-for-power-system-dynamic.jpg)
