Dymo Label Maker Manual
24
1 LetraTag ® LT-100T www.dymo.com User Guide . . . . . . . . . . . . . . . . . . . . . . . Page 2 Guide D’Utilisation . . . . . . . . . . . . . . Page 24 Gebruikershandlei ding . . . . . . . . . Pagina 48 Bedienungsan leitung . . . . . . . . . . . Seite 70 T Momentum WEU.indd 1 09-01-2007 17:23:36
-
Upload
playahthepiano -
Category
Documents
-
view
239 -
download
0
Transcript of Dymo Label Maker Manual

7/24/2019 Dymo Label Maker Manual
http://slidepdf.com/reader/full/dymo-label-maker-manual 1/23
1
LetraTag
®
LT-100T
www.dymo.com
User Guide . . . . . . . . . . . . . . . . . . . . . . . Page 2
Guide D’Utilisation . . . . . . . . . . . . . . Page 24
Gebruikershandleiding . . . . . . . . . Pagina 48
Bedienungsanleitung . . . . . . . . . . . Seite 70
Momentum WEU.indd 1 09-01-2007 17

7/24/2019 Dymo Label Maker Manual
http://slidepdf.com/reader/full/dymo-label-maker-manual 2/23
2
LetraTag User Guide
≠ Label ExitÆ Memory Save
ß Memory Recall
± LCD Display
≤ Power Connector
≥ Power
¥ Cutter
µ Insert
∂ Format
∑ Settings∏ Clear
π Space Bar
∫ OK
ª Navigation
º Cancel
Ω Num Lock
æ CAPS
ø Back Space
≠ Æ ß ∞ ± ≤
≥
¥ ∫ µ ª
∂ º
∑ Ω
æ
∏ ø π
Figure 1 DYMO LetraTag Labelmaker
Cancel
Clear
Momentum WEU.indd 2 09-01-2007 17

7/24/2019 Dymo Label Maker Manual
http://slidepdf.com/reader/full/dymo-label-maker-manual 3/23
3
About Your New LabelmakerWith your new DYMO LetraTag® labelmaker, you can create a wide
variety of high-quality, self-adhesive labels. You can choose to printyour labels in many different font sizes and styles. The labelmakeruses DYMO LetraTag (LT) 12 mm label cassettes. LT cassettes areavailable in multiple colors of plastic and metallic tape, and inwhite iron-on tape.
Visit www.dymo.com for information on obtaining labels and
accessories for your labelmaker.Warranty Registration
Please complete the warranty registration card and return it tothe appropriate Customer Support address within seven days. Visitwww.dymo.com/registration for details or to register online.
Getting StartedFollow the instructions in this section to print your first label.
Connecting the PowerThe labelmaker is powered by standard batteries or an AC poweradapter. To save power, the labelmaker will automatically turn offafter two minutes of inactivity.
°
Momentum WEU.indd 3 09-01-2007 17

7/24/2019 Dymo Label Maker Manual
http://slidepdf.com/reader/full/dymo-label-maker-manual 4/23
4
Inserting the BatteriesThe labelmaker uses four high-capacity AA alkaline batteries.
To insert the batteries
1. Remove the battery compartmentcover. See Figure 2.
2. Insert the batteries following thepolarity markings (+ and –).
3. Replace the cover.
Ç Remove the batteries if thelabelmaker will not be used for a longperiod of time. Figure 2
Connecting the Optional Power AdapterAn optional 9 Volt,1.5 A power adapter can also be used to power
the labelmaker. Connecting the AC adapter to the labelmakerdisconnects the batteries as a power source.
To connect the power adapter
1. Plug the power adapter into the power connector on the top ofthe labelmaker.
2. Plug the other end of the power adapter into a power outlet.
Momentum WEU.indd 4 09-01-2007 17
7/24/2019 Dymo Label Maker Manual
http://slidepdf.com/reader/full/dymo-label-maker-manual 5/23
5
Ç Make sure the labelmaker power is turned off before youdisconnect the power adapter from the main power source.
Otherwise, your most recent memory settings will be lost.
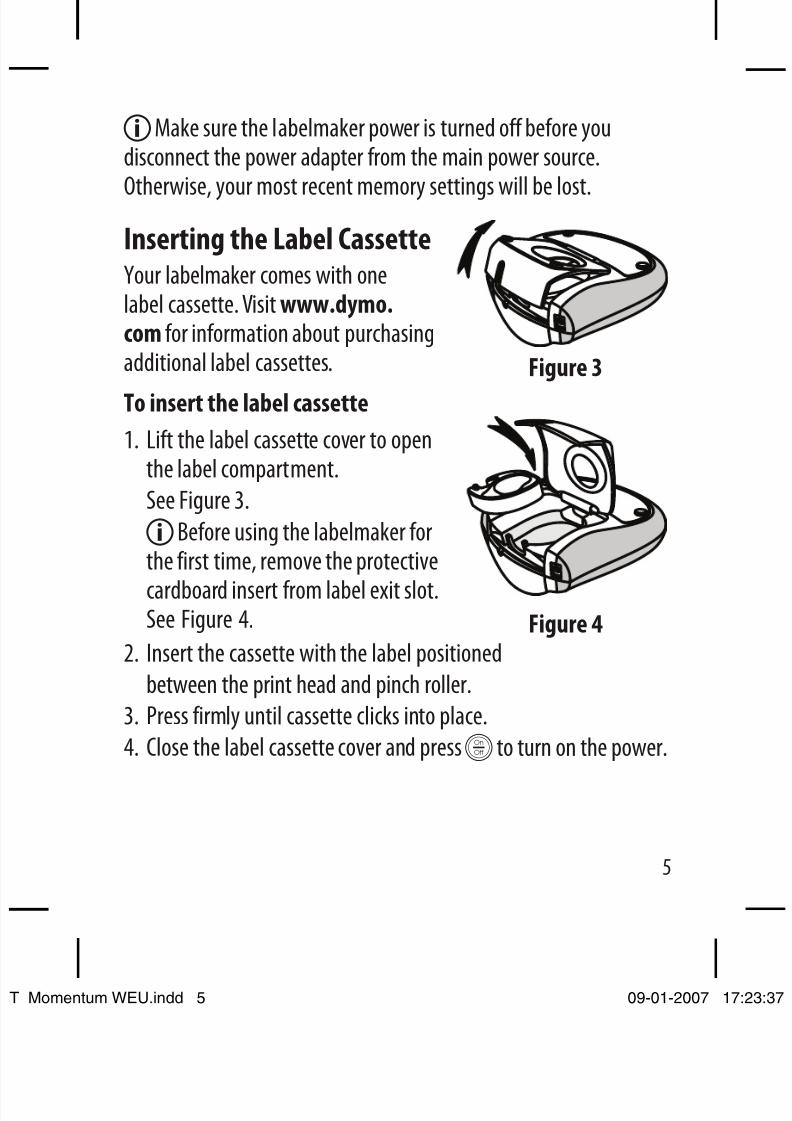
Inserting the Label CassetteYour labelmaker comes with onelabel cassette. Visit www.dymo.com for information about purchasingadditional label cassettes. Figure 3
To insert the label cassette
1. Lift the label cassette cover to openthe label compartment.
See Figure 3.
Ç Before using the labelmaker forthe first time, remove the protective
cardboard insert from label exit slot.See Figure 4. Figure 4
2. Insert the cassette with the label positioned
between the print head and pinch roller.
3. Press firmly until cassette clicks into place.
4. Close the label cassette cover and pressâ to turn on the power.
Momentum WEU.indd 5 09-01-2007 17

7/24/2019 Dymo Label Maker Manual
http://slidepdf.com/reader/full/dymo-label-maker-manual 6/23
6
Selecting a LanguageThe first time you turn on the power, you are asked to select your
desired language. By default, the language is set to English. Thelanguage option you choose determines the character set that isavailable.
To select a language
1. Press ä.
2. Use the up or down arrow key to select Language and pressã.
3. Use the up or down arrow key to select the language you wantand pressã.
Setting the Date and TimeYou need to set the current date and time so that the date is correctif you choose to automatically insert a date on your label.
To set the date and time1. Pressä.
2. Use the up or down arrow key to select Set Date and pressã.
The default date is displayed.
3. Use the left or right arrow key to move the cursor over eachsetting (month, day, and year) and use the up or down arrowkeys to increase or decrease the value.
Momentum WEU.indd 6 09-01-2007 17

7/24/2019 Dymo Label Maker Manual
http://slidepdf.com/reader/full/dymo-label-maker-manual 7/23
7
4. When finished, pressã. The default time is displayed.
5. Use the left or right arrow key to move the cursor over eachsetting (hours and minutes) and use the up or down arrow keysto increase or decrease the value.
6. When finished, pressã.
Printing Your First LabelYou are now ready to print your first label.
To print a label
1. Enter text to create a simple label.
2. Presså.
3. Press the cutter button to cut the label.
Congratulations! You printed your first label. Continue reading tolearn more about the options available for creating labels.
Momentum WEU.indd 7 09-01-2007 17

7/24/2019 Dymo Label Maker Manual
http://slidepdf.com/reader/full/dymo-label-maker-manual 8/23
8
Getting to Know the LabelmakerBecome familiar with the location of the feature and function keys
on your labelmaker. Refer to Figure 1 on the inside front cover. Thefollowing sections describe each feature in detail.
PowerTheâ button turns the power on and off. After two minutes ofno activity, the power is switched off automatically. The last label
created is remembered and displayed when the power is turnedback on. The previously selected style settings are also restored.
You can also pressâ to cancel printing and return to edit mode.
LCD DisplayYou can enter up to 100 characters andspaces on a label; however, the display
will only show a small portion of thecharacters. And, with DYMO’s exclusivegraphical display, any formatting youadd is visible instantly.
For example, the italics and roundedborder added to the text in Figure 5
are clearly displayed.
≠ Font size ß CAPS
Æ # lines ∞ Num Lock
Figure 5
Feature indicators appear along the top of the display to let youknow when a feature is selected.
Momentum WEU.indd 8 09-01-2007 17

7/24/2019 Dymo Label Maker Manual
http://slidepdf.com/reader/full/dymo-label-maker-manual 9/23
9
CAPS ModeThe[ key toggles capitalization on or off. When CAPS mode is
turned on, the CAPS mode indicator is shown on the display and allletters that you enter will be capitalized. The default setting is CAPSmode on. When CAPS mode is off, all letters appear in lower case.
Num LockTheñ key provides access to the numbers located on some ofthe alphabetic keys. When Num Lock mode is turned on, the Num
Lock indicator is shown on the display and the numbers 0 through9 appear when you press the corresponding letter keys. Num Lock isturned off by default.
BackspaceTheó key removes the character to the left of the cursor.
ClearTheî key clears all label text and formatting.
Navigation KeysYou can review and edit your label using the left and right arrow keyson the Navigation key. You can navigate through menu selections
using the up and down arrow keys, and then pressã to make a selection.
Momentum WEU.indd 9 09-01-2007 17

7/24/2019 Dymo Label Maker Manual
http://slidepdf.com/reader/full/dymo-label-maker-manual 10/23
10
CancelTheú key allows you to exit from a menu without making a
selection or to cancel an action.
FormatTheô key displays the Size, Style, and Borders submenus. Theseformatting features are described later in this User Guide.
Insert
Theò key allows you to insert symbols, a second line, or thedate on your label.
SettingsTheä key displays the Preview, Language, Set Date, and SetContrast submenus. These features are described later in this UserGuide.
Formatting Your LabelYou can choose from a number of formatting options to enhancethe appearance of your labels.
Changing the Font Size
Five font sizes are available for your labels: Extra Small, Small, Medium,
Large, and Extra Large. When you select a size, that sizeapplies to all characters on a label.
Momentum WEU.indd 10 09-01-2007 17

7/24/2019 Dymo Label Maker Manual
http://slidepdf.com/reader/full/dymo-label-maker-manual 11/23
11
To set the font size
1. Press theô key.
2. Use the up or down arrow keys to select Size and pressã.3. Use the up or down arrow keys to select the desired font size and
then pressã.
Adding Font StylesYou can choose from six different font styles:
AaAbCc Normal
AaAbCc Bold
AaAbCc Italic
Outline
Shadow
Ä Vertical
When you select a style, that style applies to all characters. Stylescan be used with alphanumeric characters and some symbols.
To set the font style
1. Pressô.
2. Use the up or down arrow key to select Style and pressã.3. Use the up or down arrow key to select a font style and pressã.
Momentum WEU.indd 11 09-01-2007 17

7/24/2019 Dymo Label Maker Manual
http://slidepdf.com/reader/full/dymo-label-maker-manual 12/23
12
Creating Two-Line LabelsYou can print a maximum of two lines on labels.
To create a two-line label
1. Type the text for the first line and pressò.
2. Use the arrow keys to select Second Line and pressã. A multi-line symbol is inserted at the end of the first line, but will notprint on the label.
3. Type the text for the second line.
Adding the DateYou can insert the date on your label. The date format is MMM DD,YY (US) or DD MMM YY (Europe) depending upon the version ofyour labelmaker.
To insert the date
1. Pressò.2. Select Date and pressã.
Momentum WEU.indd 12 09-01-2007 17

7/24/2019 Dymo Label Maker Manual
http://slidepdf.com/reader/full/dymo-label-maker-manual 13/23
13
Adding Box and Underline StylesYou can highlight your text by choosing a box or underline style.
 Underline Ì Edged
Á Square Ò Train
È Pointed Û Sweet Hearts
Î Rounded Ù Flowers
Ô Crocodile
A label can be underlined or enclosed in a box, but not both
together.
To add an underline or box style
1. Pressô.
2. Select Borders, and pressã.
3. Select underline or a box style and pressã.On two-line labels, both lines are underlined. In box style mode, allthe lines are enclosed in one box style.
Momentum WEU.indd 13 09-01-2007 17

7/24/2019 Dymo Label Maker Manual
http://slidepdf.com/reader/full/dymo-label-maker-manual 14/23
14
Using Symbols and Special CharactersSymbols and other special characters can be added to your labels.
Adding SymbolsThe labelmaker supports the extended symbol set shown below.
Momentum WEU.indd 14 09-01-2007 17

7/24/2019 Dymo Label Maker Manual
http://slidepdf.com/reader/full/dymo-label-maker-manual 15/23
15
To insert a symbol
1. Pressò, select Symbols, and pressã. The first row of
symbols shown in the table appears in the display.2. Use the arrow keys to move to the desired symbol. The left and
right arrows move horizontally along a row of symbols. Theup and down arrow keys scroll vertically through the rows ofsymbols.
3. When you locate the symbol, pressã to add the symbol to yourlabel.
The labelmaker remembers the last symbol used. The next timeyou choose to insert a symbol, the last symbol that you used isautomatically selected.
Adding International CharactersThe labelmaker supports the extended Latin character set using
RACE technology. Similar to using a mobile phone keypad, whenyou hold down a letter key for longer than one second, you willscroll through variations on that letter. To insert the character,release the key when the desired character appears.
For example, if French is selected as the language and you holddown the letter a, you will see a à â æ and so on through all thevariations available. The character variations and the order in whichthe variations appear depend on the language you have selectedto use.
Momentum WEU.indd 15 09-01-2007 17

7/24/2019 Dymo Label Maker Manual
http://slidepdf.com/reader/full/dymo-label-maker-manual 16/23
16
Printing OptionsYou can preview your label and adjust the printing contrast.
Previewing Your LabelYou can preview the text or format of your label prior to printing. Atwo-line label is previewed as a single-line label with a line breakcharacter between the two lines.
To preview your label
1. Pressä.2. Select Preview and pressã.
The text of the label scrolls across the display.
Adjusting the Print ContrastYou can adjust the print contrast to fine tune the print quality of
your label.To set the contrast
1. Pressä.
2. Select Set Contrast and pressã.
3. Use the arrow keys to select a contrast setting and pressã.
Momentum WEU.indd 16 09-01-2007 17

7/24/2019 Dymo Label Maker Manual
http://slidepdf.com/reader/full/dymo-label-maker-manual 17/23
17
Using Labelmaker MemoryThe labelmaker has a powerful memory feature that allows you to
store the text of up to nine labels you use frequently.
Storing Label TextYou can store up to nine specific labels you use frequently.
To store the current label text
1. Pressö. The first of the memory fields is displayed.
2. Use the arrow keys to move through the fields. You can store newtext in any of the memory locations.
3. Select a memory location and pressã.
Your label text is saved and you are returned to the label.
Recalling Stored Labels
You can easily recall labels stored in memory to use at a later time.To recall labels
1. Pressõ. The first memory location is displayed similar tostoring a label or format.
2. Use the arrow keys to select a label to recall and pressã.
To clear a memory field, first recall a label and then pressî.
Momentum WEU.indd 17 09-01-2007 17

7/24/2019 Dymo Label Maker Manual
http://slidepdf.com/reader/full/dymo-label-maker-manual 18/23
18
Caring for Your LabelmakerYour labelmaker is designed to give you long and trouble-free
service, while requiring very little maintenance. Clean yourlabelmaker from time to time to keep it working properly. Clean thecutter blade each time you replace the label cassette.
To clean the cutter blade Press in and hold
1. Dampen a cotton ball with alcohol.
2. Remove the label cassette.
3. Place the tip of a ball-point pen orpencil on the black post as shown inFigure 6, and press the post down. Print head
Figure 64. While holding down the post, press andhold the cutter lever to expose the cutter blade.
5. Release the post and clean both sides of the blade with the
cotton ball.6. Release the cutter lever.
Ç You can also follow this procedure if the cutter blade becomeslodged in the forward position and will not move.
Momentum WEU.indd 18 09-01-2007 17
7/24/2019 Dymo Label Maker Manual
http://slidepdf.com/reader/full/dymo-label-maker-manual 19/23
19
To clean the print head
1. Remove the label cassette.
2. Remove the cleaning tool from inside the label compartmentcover.
3. Gently wipe the padded side of the tool across the print head.See Figure 6.
Momentum WEU.indd 19 09-01-2007 17

7/24/2019 Dymo Label Maker Manual
http://slidepdf.com/reader/full/dymo-label-maker-manual 20/23
20
TroubleshootingReview the following possible solutions if you encounter a problem
while using your labelmaker.
Problem/Error Message Solution
No display • Ensure the labelmaker is turned on.
• Replace discharged batteries.
Poor Print Quality • Replace batteries or attach power adapter.• Ensure label cassette is installed properly.• Clean the print head.• Replace the label cassette.
Poor Cutter Performance Clean the cutter blade. See Caring for YourLabelmaker.
Printing No action required.Message disappears when printing is finished.
Too many characters
Exceeded maximum number ofcharacters in buffer. Delete some or all of the buffer text.
Battery lowBatteries almost discharged.
Replace batteries or connect AC power adapter.
Tape JamMotor is stalled due to label jam.
• Remove jammed label; replace label cassette.• Clean cutter blade.
If you still need assistance, contact DYMO Customer Support. SeeContacting Customer Support at the back of this User Guide tolocate the contact number for your country.
Momentum WEU.indd 20 09-01-2007 17

7/24/2019 Dymo Label Maker Manual
http://slidepdf.com/reader/full/dymo-label-maker-manual 21/23
21
Documentation FeedbackWe are constantly working to produce the highest quality
documentation for our products. We welcome your feedback.Send us your comments or suggestions about our user guides.Please include the following information with your feedback:
• Product name, model number, and User Guide page number• Brief description of instructions that are inaccurate or unclear,
areas where more detail is needed, and so onWe also welcome your suggestions about additional topics youwould like to see covered in the documentation.
Send email messages to: [email protected]
Please keep in mind that this email address is only fordocumentation feedback. If you have a technical question, pleasecontact Customer Support.
Momentum WEU.indd 21 09-01-2007 17

7/24/2019 Dymo Label Maker Manual
http://slidepdf.com/reader/full/dymo-label-maker-manual 22/23
22
Environmental informationThe equipment that you bought has required the extraction and use of natural
resources for its production. It may content hazardous substances for the health andthe environment.
In order to avoid the dissemination of those substances in our environment and
to diminish the pressure on the natural resources, we encourage you to use the
appropriate take-back systems. Those systems will reuse or recycle most of the
materials of your end life equipment in a sound way.
The crossed-bin symbol marked in your device invites you to use those systems.
If you need more information on the collection, reuse and recycling systems, please
contact your local or regional waste administration.
You can also contact us for more information on the environmental performances ofour products.
Momentum WEU.indd 22 09-01-2007 17

7/24/2019 Dymo Label Maker Manual
http://slidepdf.com/reader/full/dymo-label-maker-manual 23/23
23
This product is CE marked in accordance with the EMC directive and the low
voltage directive and is designed to conform with the following international
standards:
US FCC Class B Compatibility
Safety - EN 60950, IEC 950, UL 1950
EMC Compatibility EN 61000 3-2/3; EN 61000 4-2/3/4/5/6/8/11; ENV 50204;
EU Immunity - EN 55024 & addendum A1, A2 Electromagnetic Compatibility (EMC) -
Information Technology equipment, Immunity Characteristics
Emissions – EN 61000-6-3: Electromagnetic Compatibility (EMC) - Part 6:
Generic Standards - Section 3: Emission standard for residential, commercial and light industrial
environments.
RoHS 2002/95/EC