
DV-F07 Operations Manual
80
DV-F07 Operating Instructions FILE-TYPE DVD PLAYER
Transcript of DV-F07 Operations Manual
DV-F07
Operating Instructions
FILE-TYPE DVD PLAYER
2
Please read through these operating instructions so you will know how to operate your model properly. After youhave finished reading the instructions, put them away in a safe place for future reference.
• This player is not suitable for commercial use.
The lightning flash with arrowhead symbol, withinan equilateral triangle, is intended to alert the userto the presence of uninsulated "dangerous voltage"within the product's enclosure that may be ofsufficient magnitude to constitute a risk of electricshock to persons.
RISK OF ELECTRIC SHOCKDO NOT OPEN
CAUTIONIMPORTANT
CAUTION:TO PREVENT THE RISK OF ELECTRIC SHOCK,DO NOT REMOVE COVER (OR BACK). NOUSER-SERVICEABLE PARTS INSIDE. REFERSERVICING TO QUALIFIED SERVICEPERSONNEL.
The exclamation point within an equilateral triangleis intended to alert the user to the presence ofimportant operating and maintenance (servicing)instructions in the literature accompanying theappliance.
READ INSTRUCTIONS — All the safety andoperating instructions should be read beforethe product is operated.
RETAIN INSTRUCTIONS — The safety andoperating instructions should be retained forfuture reference.
HEED WARNINGS — All warnings on the productand in the operating instructions should beadhered to.
FOLLOW INSTRUCTIONS — All operating anduse instructions should be followed.
CLEANING — Unplug this product from the walloutlet before cleaning. The product should becleaned only with a polishing cloth or a soft drycloth. Never clean with furniture wax, benzine,insecticides or other volatile liquids since theymay corrode the cabinet.
ATTACHMENTS — Do not use attachments notrecommended by the product manufactureras they may cause hazards.
WATER AND MOISTURE — Do not use thisproduct near water — for example, near abathtub, wash bowl, kitchen sink, or laundrytub; in a wet basement; or near a swimmingpool; and the like.
ACCESSORIES — Do not place this product onan unstable cart, stand, tripod, bracket, ortable. The product may fall, causing seriousinjury to a child or adult, and serious damageto the product. Use only with a cart, stand,tripod, bracket, or table recommended by themanufacturer, or sold with the product. Anymounting of the product should follow themanufacturer’s instructions, and should use amounting accessory recommended by themanufacturer.
CART — A product and cart combination shouldbe moved with care. Quick stops, excessiveforce, and uneven surfaces may cause theproduct and cart combination to overturn.
VENTILATION — Slots and openings in thecabinet are provided for ventilation and toensure reliable operation of the product and toprotect it from overheating, and these openingsmust not be blocked or covered. The openingsshould never be blocked by placing the producton a bed, sofa, rug, or other similar surface.This product should not be placed in a built-ininstallation such as a bookcase or rack unlessproper ventilation is provided or themanufacturer’s instructions have beenadhered to.
POWER SOURCES — This product should beoperated only from the type of power sourceindicated on the marking label. If you are notsure of the type of power supply to yourhome, consult your product dealer or localpower company.
LOCATION – The appliance should be installed ina stable location.
NONUSE PERIODS – The power cord of theappliance should be unplugged from the outletwhen left unused for a long period of time.
GROUNDING OR POLARIZATION
• If this product is equipped with a polarizedalternating current line plug (a plug having oneblade wider than the other), it will fit into theoutlet only one way. This is a safety feature. Ifyou are unable to insert the plug fully into theoutlet, try reversing the plug. If the plug shouldstill fail to fit, contact your electrician to replaceyour obsolete outlet. Do not defeat the safetypurpose of the polarized plug.
• If this product is equipped with a three-wiregrounding type plug, a plug having a third(grounding) pin, it will only fit into a groundingtype power outlet. This is a safety feature. Ifyou are unable to insert the plug into theoutlet, contact your electrician to replace yourobsolete outlet. Do not defeat the safetypurpose of the grounding type plug.
POWER-CORD PROTECTION — Power-supplycords should be routed so that they are notlikely to be walked on or pinched by itemsplaced upon or against them, paying particularattention to cords at plugs, conveniencereceptacles, and the point where they exitfrom the product.
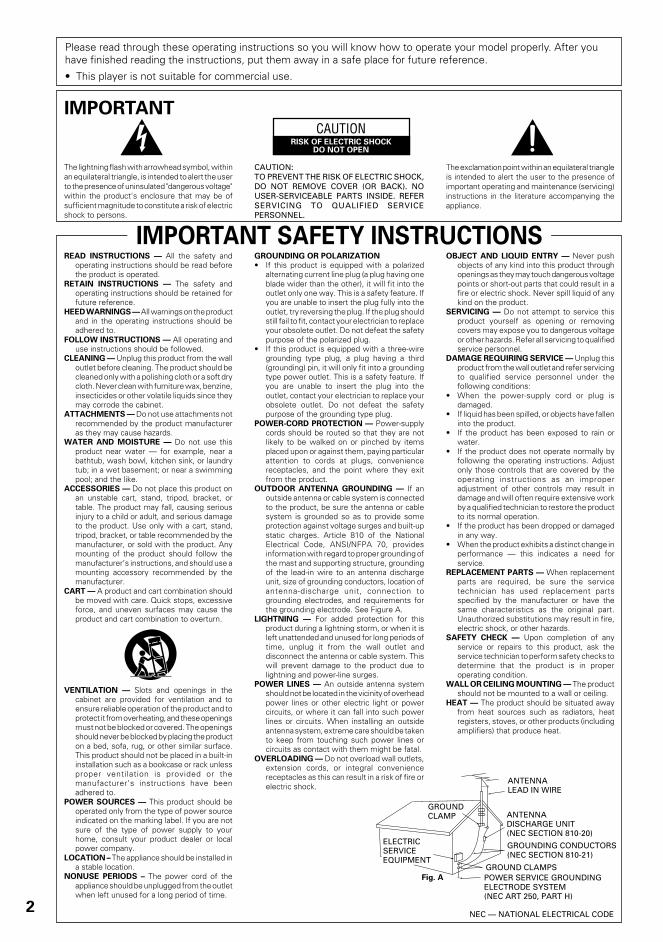
OUTDOOR ANTENNA GROUNDING — If anoutside antenna or cable system is connectedto the product, be sure the antenna or cablesystem is grounded so as to provide someprotection against voltage surges and built-upstatic charges. Article 810 of the NationalElectrical Code, ANSI/NFPA 70, providesinformation with regard to proper grounding ofthe mast and supporting structure, groundingof the lead-in wire to an antenna dischargeunit, size of grounding conductors, location ofantenna-discharge unit, connection togrounding electrodes, and requirements forthe grounding electrode. See Figure A.
LIGHTNING — For added protection for thisproduct during a lightning storm, or when it isleft unattended and unused for long periods oftime, unplug it from the wall outlet anddisconnect the antenna or cable system. Thiswill prevent damage to the product due tolightning and power-line surges.
POWER LINES — An outside antenna systemshould not be located in the vicinity of overheadpower lines or other electric light or powercircuits, or where it can fall into such powerlines or circuits. When installing an outsideantenna system, extreme care should be takento keep from touching such power lines orcircuits as contact with them might be fatal.
OVERLOADING — Do not overload wall outlets,extension cords, or integral conveniencereceptacles as this can result in a risk of fire orelectric shock.
OBJECT AND LIQUID ENTRY — Never pushobjects of any kind into this product throughopenings as they may touch dangerous voltagepoints or short-out parts that could result in afire or electric shock. Never spill liquid of anykind on the product.
SERVICING — Do not attempt to service thisproduct yourself as opening or removingcovers may expose you to dangerous voltageor other hazards. Refer all servicing to qualifiedservice personnel.
DAMAGE REQUIRING SERVICE — Unplug thisproduct from the wall outlet and refer servicingto qualified service personnel under thefollowing conditions:
• When the power-supply cord or plug isdamaged.
• If liquid has been spilled, or objects have falleninto the product.
• If the product has been exposed to rain orwater.
• If the product does not operate normally byfollowing the operating instructions. Adjustonly those controls that are covered by theoperating instructions as an improperadjustment of other controls may result indamage and will often require extensive workby a qualified technician to restore the productto its normal operation.
• If the product has been dropped or damagedin any way.
• When the product exhibits a distinct change inperformance — this indicates a need forservice.
REPLACEMENT PARTS — When replacementparts are required, be sure the servicetechnician has used replacement partsspecified by the manufacturer or have thesame characteristics as the original part.Unauthorized substitutions may result in fire,electric shock, or other hazards.
SAFETY CHECK — Upon completion of anyservice or repairs to this product, ask theservice technician to perform safety checks todetermine that the product is in properoperating condition.
WALL OR CEILING MOUNTING — The productshould not be mounted to a wall or ceiling.
HEAT — The product should be situated awayfrom heat sources such as radiators, heatregisters, stoves, or other products (includingamplifiers) that produce heat.
IMPORTANT SAFETY INSTRUCTIONS
POWER SERVICE GROUNDINGELECTRODE SYSTEM(NEC ART 250, PART H)
GROUND CLAMPS
GROUNDING CONDUCTORS(NEC SECTION 810-21)
ANTENNADISCHARGE UNIT(NEC SECTION 810-20)
GROUNDCLAMP
Fig. A
NEC — NATIONAL ELECTRICAL CODE
ANTENNALEAD IN WIRE
ELECTRICSERVICEEQUIPMENT
3
CONGRATULATIONS ON YOUR PURCHASE OF
THIS FINE PIONEER PRODUCT.
Pioneer is on the leading edge of DVD research forconsumer products and this unit incorporates the latesttechnological developments.
We are sure you will be fully satisfied with the DVDplayer.
Thank you for your support.
WARNING: TO PREVENT FIRE OR SHOCK HAZARD, DONOT EXPOSE THIS APPLIANCE TO RAIN ORMOISTURE.
IMPORTANT NOTICE
[For U.S. and Canadian models]
The serial number for this equipment is located on therear panel. Please write this serial number on yourenclosed warranty card and keep it in a secure area. Thisis for your security.
CAUTION: This product satisfies FCC regulations whenshielded cables and connectors are used to connectthe unit to other equipment. To preventelectromagnetic interference with electric appliancessuch as radios and televisions, use shielded cablesand connectors for connections.
[For Canadian model]
CAUTION: TO PREVENT ELECTRIC SHOCK, DO NOTUSE THIS (POLARIZED) PLUG WITH AN EXTENSIONCORD, RECEPTACLE OR OTHER OUTLET UNLESS THEBLADES CAN BE FULLY INSERTED TO PREVENTBLADE EXPOSURE.
ATTENTION: POUR PREVENIR LES CHOCSELECTRIQUES NE PAS UTILISER CETTE FICHEPOLARISEE AVEC UN PROLONGATEUR, UNE PRISEDE COURANT OU UNE AUTRE SORTIE DE COURANT,SAUF SI LES LAMES PEUVENT ETRE INSEREES AFOND SANS EN LAISSER AUCUNE PARTIE ADECOUVERT.
This equipment has been tested and found to complywith the limits for a Class B digital device, pursuant toPart 15 of the FCC Rules. These limits are designedto provide reasonable protection against harmfulinterference in a residential installation. Thisequipment generates, uses, and can radiate radiofrequency energy and, if not installed and used inaccordance with the instructions, may cause harmfulinterference to radio communications. However,there is no guarantee that interference will not occurin a particular installation. If this equipment doescause harmful interference to radio or televisionreception, which can be determined by turning theequipment off and on, the user is encouraged to tryto correct the interference by one or more of thefollowing measures:
– Reorient or relocate the receiving antenna.
– Increase the separation between the equipment andreceiver.
– Connect the equipment into an outlet on a circuitdifferent from that to which the receiver isconnected.
– Consult the dealer or an experienced radio/TVtechnician for help.
[For Canadian model]
This Class B digital apparatus complies with CanadianICES-003
CAUTION• Use of controls or adjustments or performance of
procedures other than those specified herein mayresult in hazardous radiation exposure.
• The use of optical instruments with this productwill increase eye hazard.
[Pour le modèle Canadien]
Cet appareil numérique de la classe B est conforme àla norme NMB-003 du Canada.
Information to User
Alteration or modifications carried out withoutappropriate authorization may invalidate the user'sright to operate the equipment.
This product incorporates copyright protectiontechnology that is protected by method claims ofcertain U.S. patents and other intellectual propertyrights owned by Macrovision Corporation and otherrights owners. Use of this copyright protectiontechnology must be authorized by MacrovisionCorporation, and is intended for home and otherlimited viewing uses only unless otherwiseauthorized by Macrovision Corporation. Reverseengineering or disassembly is prohibited.
4
Features of This Player
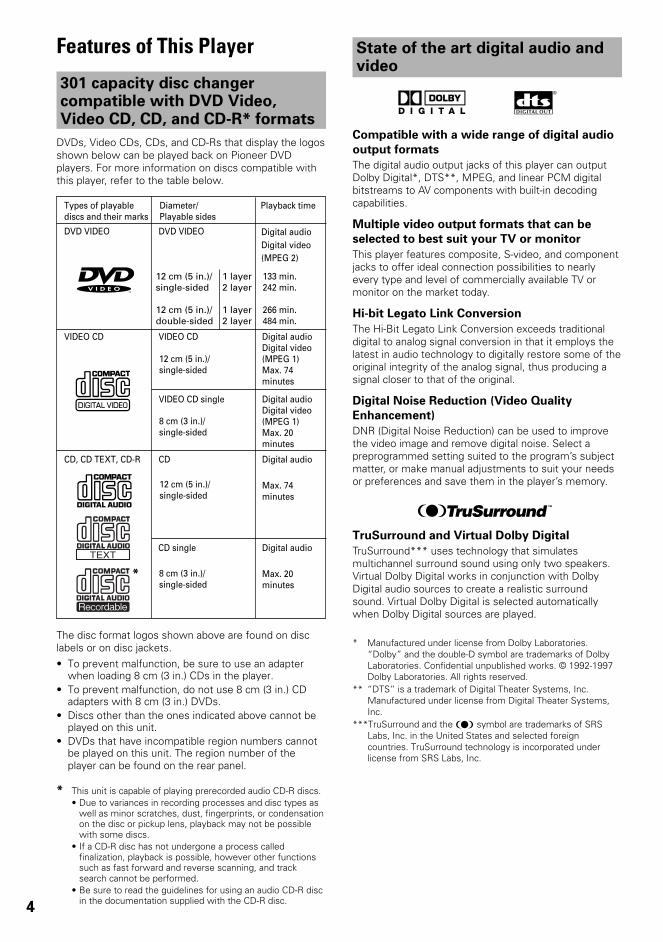
301 capacity disc changercompatible with DVD Video,Video CD, CD, and CD-R* formats
DVDs, Video CDs, CDs, and CD-Rs that display the logosshown below can be played back on Pioneer DVDplayers. For more information on discs compatible withthis player, refer to the table below.
12 cm (5 in.)/single-sided
12 cm (5 in.)/double-sided
1 layer2 layer
1 layer2 layer
DVD VIDEO DVD VIDEO
Types of playablediscs and their marks
Diameter/Playable sides
Playback time
Digital audioDigital video(MPEG 2)
133 min.242 min.
266 min.484 min.
VIDEO CD
CD, CD TEXT, CD-R
VIDEO CD
CD
VIDEO CD single
CD single
Digital audioDigital video(MPEG 1)Max. 74minutes
Digital audioDigital video(MPEG 1)Max. 20minutes
Digital audio
Max. 74minutes
12 cm (5 in.)/single-sided
8 cm (3 in.)/single-sided
12 cm (5 in.)/single-sided
8 cm (3 in.)/single-sided
Digital audio
Max. 20minutes
State of the art digital audio andvideo
Compatible with a wide range of digital audio
output formats
The digital audio output jacks of this player can outputDolby Digital*, DTS**, MPEG, and linear PCM digitalbitstreams to AV components with built-in decodingcapabilities.
Multiple video output formats that can be
selected to best suit your TV or monitor
This player features composite, S-video, and componentjacks to offer ideal connection possibilities to nearlyevery type and level of commercially available TV ormonitor on the market today.
Hi-bit Legato Link Conversion
The Hi-Bit Legato Link Conversion exceeds traditionaldigital to analog signal conversion in that it employs thelatest in audio technology to digitally restore some of theoriginal integrity of the analog signal, thus producing asignal closer to that of the original.
Digital Noise Reduction (Video Quality
Enhancement)
DNR (Digital Noise Reduction) can be used to improvethe video image and remove digital noise. Select apreprogrammed setting suited to the program’s subjectmatter, or make manual adjustments to suit your needsor preferences and save them in the player’s memory.
TruSurround and Virtual Dolby Digital
TruSurround*** uses technology that simulatesmultichannel surround sound using only two speakers.Virtual Dolby Digital works in conjunction with DolbyDigital audio sources to create a realistic surroundsound. Virtual Dolby Digital is selected automaticallywhen Dolby Digital sources are played.
* Manufactured under license from Dolby Laboratories.“Dolby” and the double-D symbol are trademarks of DolbyLaboratories. Confidential unpublished works. © 1992-1997Dolby Laboratories. All rights reserved.
** “DTS” is a trademark of Digital Theater Systems, Inc.Manufactured under license from Digital Theater Systems,Inc.
***TruSurround and the symbol are trademarks of SRSLabs, Inc. in the United States and selected foreigncountries. TruSurround technology is incorporated underlicense from SRS Labs, Inc.
1
*
The disc format logos shown above are found on disclabels or on disc jackets.• To prevent malfunction, be sure to use an adapter
when loading 8 cm (3 in.) CDs in the player.• To prevent malfunction, do not use 8 cm (3 in.) CD
adapters with 8 cm (3 in.) DVDs.• Discs other than the ones indicated above cannot be
played on this unit.• DVDs that have incompatible region numbers cannot
be played on this unit. The region number of theplayer can be found on the rear panel.
* This unit is capable of playing prerecorded audio CD-R discs.• Due to variances in recording processes and disc types as
well as minor scratches, dust, fingerprints, or condensationon the disc or pickup lens, playback may not be possiblewith some discs.
• If a CD-R disc has not undergone a process calledfinalization, playback is possible, however other functionssuch as fast forward and reverse scanning, and tracksearch cannot be performed.
• Be sure to read the guidelines for using an audio CD-R discin the documentation supplied with the CD-R disc.
5
Connection to another discchanger for increased capacity
This unit can be connected to another DV-F07 unit forcombined control of up to 601 discs (page 66).
Quick and easy playback withsingle loader slot
By using the single loader slot, you can quickly loaddiscs, such as rental DVDs, that you may not want tohave loaded in the disc rack all of the time. With thetouch of a single button, this disc can be called up andplayed at any time (page 28).
New graphical control and discmanagement
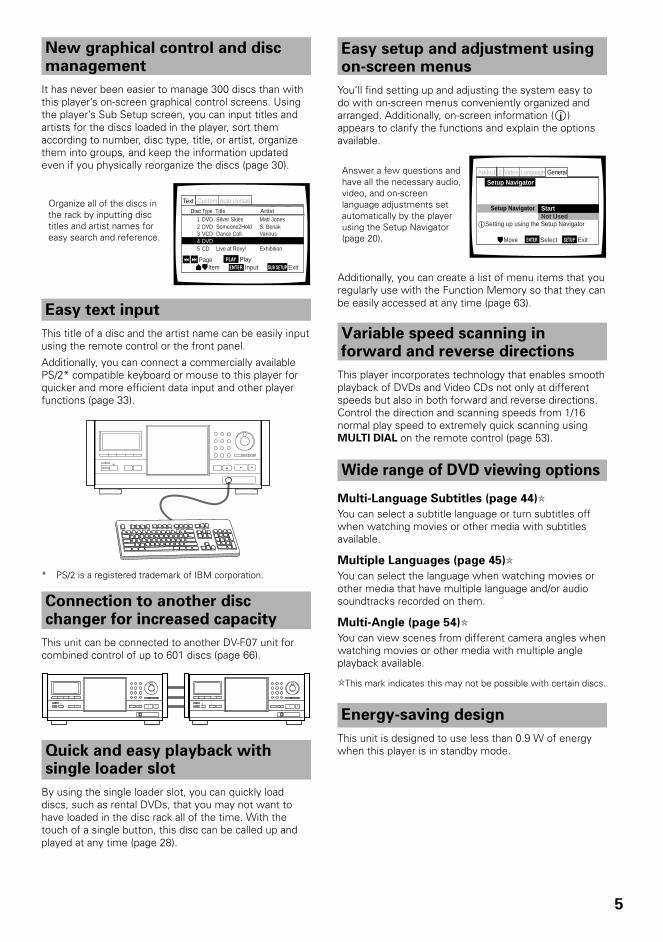
It has never been easier to manage 300 discs than withthis player’s on-screen graphical control screens. Usingthe player’s Sub Setup screen, you can input titles andartists for the discs loaded in the player, sort themaccording to number, disc type, title, or artist, organizethem into groups, and keep the information updatedeven if you physically reorganize the discs (page 30).
Easy text input
This title of a disc and the artist name can be easily inputusing the remote control or the front panel.
Additionally, you can connect a commercially availablePS/2* compatible keyboard or mouse to this player forquicker and more efficient data input and other playerfunctions (page 33).
Î
4
¢
1
¡
7
3
8
Organize all of the discs inthe rack by inputting disctitles and artist names foreasy search and reference.
Text Auto UpdateCustom
Title Artist1 DVD Silver Skies Matt Jones2 DVD Someone2Hold S. Benak3 VCD Dance Coll. Various
5 CD Live at Roxy! Exhibition
TypeDisc
4 DVD
Item SUB SETUPPage
ExitENTER InputPLAY Play4 ¢
* PS/2 is a registered trademark of IBM corporation.
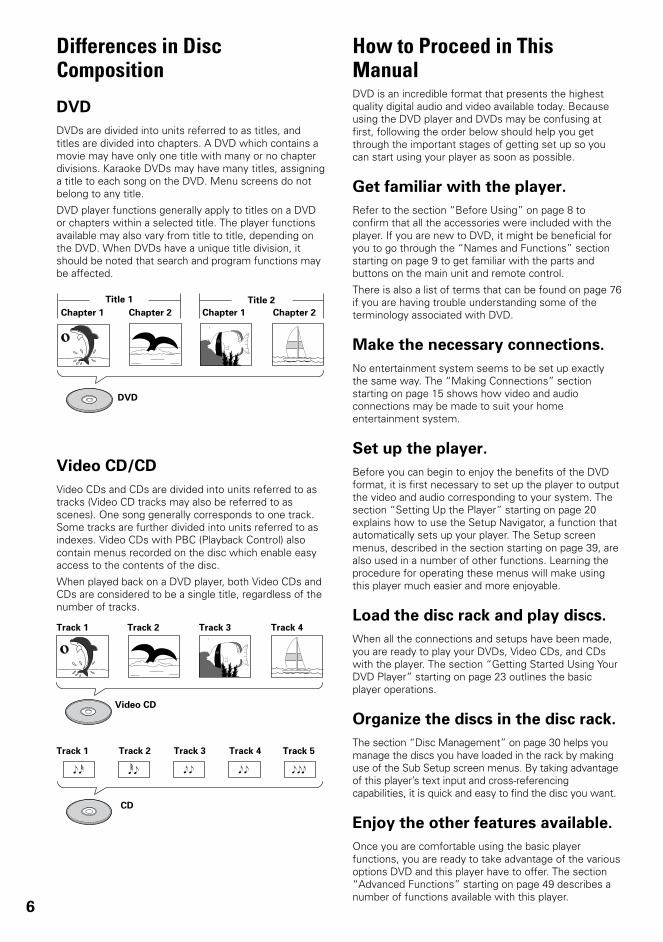
Answer a few questions andhave all the necessary audio,video, and on-screenlanguage adjustments setautomatically by the playerusing the Setup Navigator(page 20).
Setup Navigator
Audio1 GeneralLanguageVideo2
Move ExitSETUPSelectENTER
Setting up using the Setup Navigator
Setup NavigatorNot UsedStart
Easy setup and adjustment usingon-screen menus
You’ll find setting up and adjusting the system easy todo with on-screen menus conveniently organized andarranged. Additionally, on-screen information ( i )appears to clarify the functions and explain the optionsavailable.
Additionally, you can create a list of menu items that youregularly use with the Function Memory so that they canbe easily accessed at any time (page 63).
Wide range of DVD viewing options
Multi-Language Subtitles (page 44)
You can select a subtitle language or turn subtitles offwhen watching movies or other media with subtitlesavailable.
Multiple Languages (page 45)
You can select the language when watching movies orother media that have multiple language and/or audiosoundtracks recorded on them.
Multi-Angle (page 54)
You can view scenes from different camera angles whenwatching movies or other media with multiple angleplayback available.
This mark indicates this may not be possible with certain discs.
Variable speed scanning inforward and reverse directions
This player incorporates technology that enables smoothplayback of DVDs and Video CDs not only at differentspeeds but also in both forward and reverse directions.Control the direction and scanning speeds from 1/16normal play speed to extremely quick scanning usingMULTI DIAL on the remote control (page 53).
Energy-saving design
This unit is designed to use less than 0.9 W of energywhen this player is in standby mode.
Î
4 ¢ 1 ¡
7 3 8Î
4 ¢ 1 ¡
7 3 8
6
How to Proceed in ThisManualDVD is an incredible format that presents the highestquality digital audio and video available today. Becauseusing the DVD player and DVDs may be confusing atfirst, following the order below should help you getthrough the important stages of getting set up so youcan start using your player as soon as possible.
Get familiar with the player.
Refer to the section “Before Using” on page 8 toconfirm that all the accessories were included with theplayer. If you are new to DVD, it might be beneficial foryou to go through the “Names and Functions” sectionstarting on page 9 to get familiar with the parts andbuttons on the main unit and remote control.
There is also a list of terms that can be found on page 76if you are having trouble understanding some of theterminology associated with DVD.
Make the necessary connections.
No entertainment system seems to be set up exactlythe same way. The “Making Connections” sectionstarting on page 15 shows how video and audioconnections may be made to suit your homeentertainment system.
Set up the player.
Before you can begin to enjoy the benefits of the DVDformat, it is first necessary to set up the player to outputthe video and audio corresponding to your system. Thesection “Setting Up the Player” starting on page 20explains how to use the Setup Navigator, a function thatautomatically sets up your player. The Setup screenmenus, described in the section starting on page 39, arealso used in a number of other functions. Learning theprocedure for operating these menus will make usingthis player much easier and more enjoyable.
Load the disc rack and play discs.
When all the connections and setups have been made,you are ready to play your DVDs, Video CDs, and CDswith the player. The section “Getting Started Using YourDVD Player” starting on page 23 outlines the basicplayer operations.
Organize the discs in the disc rack.
The section “Disc Management” on page 30 helps youmanage the discs you have loaded in the rack by makinguse of the Sub Setup screen menus. By taking advantageof this player’s text input and cross-referencingcapabilities, it is quick and easy to find the disc you want.
Enjoy the other features available.
Once you are comfortable using the basic playerfunctions, you are ready to take advantage of the variousoptions DVD and this player have to offer. The section“Advanced Functions” starting on page 49 describes anumber of functions available with this player.
Differences in DiscComposition
DVD
DVDs are divided into units referred to as titles, andtitles are divided into chapters. A DVD which contains amovie may have only one title with many or no chapterdivisions. Karaoke DVDs may have many titles, assigninga title to each song on the DVD. Menu screens do notbelong to any title.
DVD player functions generally apply to titles on a DVDor chapters within a selected title. The player functionsavailable may also vary from title to title, depending onthe DVD. When DVDs have a unique title division, itshould be noted that search and program functions maybe affected.
Video CD/CD
Video CDs and CDs are divided into units referred to astracks (Video CD tracks may also be referred to asscenes). One song generally corresponds to one track.Some tracks are further divided into units referred to asindexes. Video CDs with PBC (Playback Control) alsocontain menus recorded on the disc which enable easyaccess to the contents of the disc.
When played back on a DVD player, both Video CDs andCDs are considered to be a single title, regardless of thenumber of tracks.
Title 1 Title 2
Chapter 1 Chapter 2 Chapter 2
DVD
Chapter 1
Video CD
Track 1 Track 2 Track 3 Track 4
CD
Track 2 Track 4Track 3Track 1 Track 5
7
Table of Contents
Before Using ........................................ 8
Checking Accessories ..................................... 8Preparing the Remote Control ......................... 8
Names and Functions ......................... 9
Front Panel ...................................................... 9Display Window............................................. 10Remote Control ............................................. 12Rear Panel ..................................................... 14
Making Connections ......................... 15
Connecting Your DVD Player ......................... 15Audio Connections ........................................ 17Video Connections ......................................... 18CD-Deck Synchro Connections .....................19System Control Connections ......................... 19
Setting Up the Player ....................... 20
Using the Setup Navigator ............................. 20
Getting Started Using Your DVDPlayer.................................................. 23
Loading DVDs, Video CDs and CDsinto the Player ..........................................23
Playing DVDs, Video CDs and CDs ................ 24Chapter (Track) Skip Forward/Skip Back ........ 27Forward and Reverse Scanning .....................27Playing a Disc That Is Not Loaded in the Rack
(Single Loader Play) .................................. 28Stopping Playback and Switching Power Off .. 29
Disc Management ............................. 30
Registering Information and Inputting Textfor Discs Newly Loaded in the Player ...... 30
Keeping the Disc Order and InformationUpdated ................................................... 31
Inputting and Changing Text Information ...... 31Selecting a Disc On-Screen ........................... 35Searching for a Disc, Title, Chapter, Track, or
Location on a Disc.................................... 35Creating and Selecting Custom Files ............. 37
Adjusting Audio and VideoSettings .............................................. 39
Using the Setup Screen Menus .................... 39 Changing to the Setup Screen “Expert”
Menu Mode ............................................. 40Setting the Digital Audio Output To Be
Compatible with Your AV Component ...... 41Turning the Digital Output On and Off ........... 42Adjusting the OSD (On-Screen Display) ........ 42Setting the TV Screen Size ............................ 43
Setting the Language Options......... 44
Selecting a Subtitle Language(Multi-Language Subtitles) ....................... 44
Changing the Audio Language(Multi-Language Function) ....................... 45
Setting Language and Subtitle Preferencesin the Setup Screen Menus ..................... 46
Advanced Functions ......................... 49
Getting Surround Sound fromStereo Speakers ....................................... 49
Adjusting the Dynamic Range of theAudio Soundtrack ..................................... 49
Adjusting the Video Quality(Digital Noise Reduction) .......................... 50
Still Frame/Slow Play/FrameAdvance Playback .................................... 52
Scanning in Forward and ReverseDirections at Different Speeds................. 53
Viewing from a Desired Camera Angle(Multi-Angle) ............................................. 54
Repeat Play .................................................... 55Random Play .................................................. 56Playback in a Desired Order (Program Play) .... 57To make an ongoing program of your favorite
titles, chapters and tracks (Best play) ...... 59Reviewing Previously Played Discs
(Previous Scan) ........................................ 60Previewing Discs in the Current Play Mode
(Hi-Lite Scan) ............................................ 60Continuing Playback from a Specified
Location (Last Memory) ........................... 61Memorizing Settings for Often Viewed
DVDs (Condition Memory) ....................... 62Memorizing Regularly Used Menu Settings
(Function Memory) ................................... 63Viewing Disc Information .............................. 64Connecting to Another Player for Control
of 601 Discs ............................................. 66Utilizing the Audio-Video Output of
Another AV Component ........................... 68Selecting External Input ................................. 68Setting the Parental Lock Level ..................... 69Turning the Screen Saver On and Off ............ 70Changing the Background Color
of the Screen ........................................... 70
Additional Information ..................... 71
Disc Care ....................................................... 71For Proper and Long Use of This Unit ........... 72Language Code List ....................................... 73Troubleshooting ............................................. 74Resetting the Player to System Settings ....... 75Terms ............................................................. 76Specifications ................................................ 78
8
Preparing the Remote Control
Inserting batteries into the remotecontrol
1 Push down on the tab on the batterycompartment cover, and pull out in thedirection indicated by the arrow.
2 Insert batteries.Make sure to match the plus (+) and minus(–) polarity guides on the batteries with the marksinside the battery compartment.
3 Close the cover.
Notes• Do not mix old and new batteries.• When replacing batteries, use all new batteries.• When not using the remote control for a long period of time
(over 1 month), remove the batteries to avoid possible damagefrom battery corrosion. If battery leakage occurs, wipe thebattery liquid from the battery component, then insert newbatteries.
Before Using
Checking AccessoriesPlease confirm that the following were received with theplayer.
Audio cord
Video cord
Master-Slave control cord
Remote control unit
AA/R6P batteries
Operating instructions (this manual)
Warranty card
30°30°
(23 ft.)7 m
Î
4¢
1¡
73
8
Remote control operation When operating the remote control, point it at the remotesensor (Î) located on the player’s front panel. Theremote control can be used up to 7 m (23 feet) from theplayer and within a 30° angle on each side of the sensor.
Notes• Exposing the remote sensor to direct sunlight or strong light
may cause faulty operation.• When Master-Slave connections are made to another DV-F07
to create a 601-disc changer, only the remote sensor on thefirst DV-F07 will accept signals from the remote control(page 66).
• If the CONTROL IN jack on the player’s rear panel is connectedto the CONTROL OUT jack of another component, point theremote control at the other component to operate the player.Operation will not be possible when pointed at this player(page 19).
9
Names andFunctions
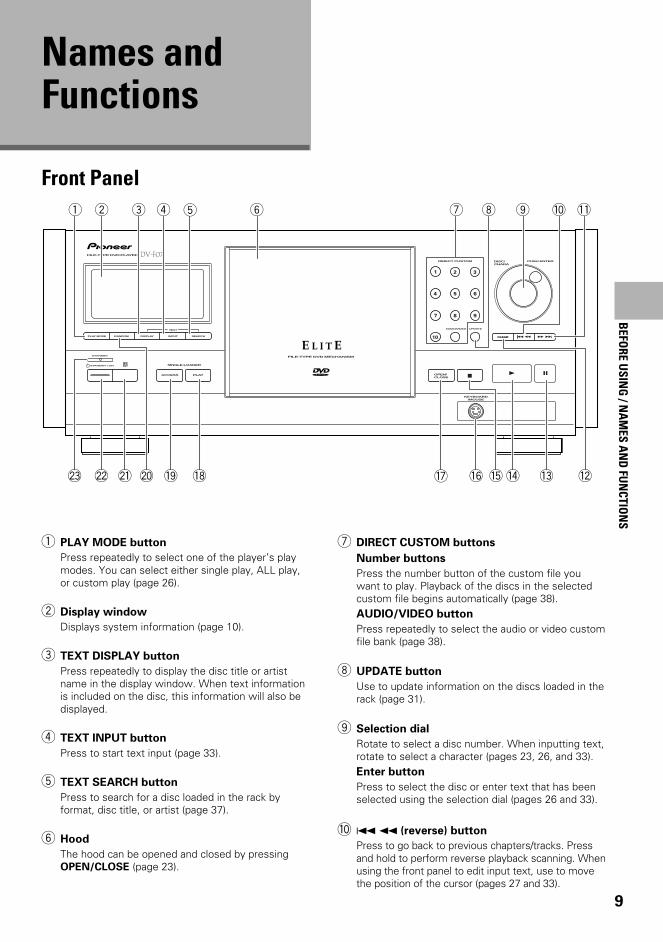
1 PLAY MODE button
Press repeatedly to select one of the player’s playmodes. You can select either single play, ALL play,or custom play (page 26).
2 Display window
Displays system information (page 10).
3 TEXT DISPLAY button
Press repeatedly to display the disc title or artistname in the display window. When text informationis included on the disc, this information will also bedisplayed.
4 TEXT INPUT button
Press to start text input (page 33).
5 TEXT SEARCH button
Press to search for a disc loaded in the rack byformat, disc title, or artist (page 37).
6 Hood
The hood can be opened and closed by pressingOPEN/CLOSE (page 23).
7 DIRECT CUSTOM buttons
Number buttons
Press the number button of the custom file youwant to play. Playback of the discs in the selectedcustom file begins automatically (page 38).AUDIO/VIDEO button
Press repeatedly to select the audio or video customfile bank (page 38).
8 UPDATE button
Use to update information on the discs loaded in therack (page 31).
9 Selection dial
Rotate to select a disc number. When inputting text,rotate to select a character (pages 23, 26, and 33).Enter button
Press to select the disc or enter text that has beenselected using the selection dial (pages 26 and 33).
0 4 1 (reverse) button
Press to go back to previous chapters/tracks. Pressand hold to perform reverse playback scanning. Whenusing the front panel to edit input text, use to movethe position of the cursor (pages 27 and 33).
FILE-TYPE DVD PLAYER
STANDBY / ON
STANDBY
ACCESS
AUDIO/VIDEO UPDATE
CLEAR
PLAY OPEN/CLOSE
DIRECT CUSTOM DISC/CHARA
PUSH ENTER
KEYBOARD/MOUSE
SINGLE LOADER
FILE-TYPE DVD MECHANISM
Î
4 ¢ 1 ¡
7 3 8
987
10
654
321
TEXT
PLAY MODE CLEARRANDOM DISPLAY INPUT SEARCH
ÛN¿X?≥
651 2 3 4 7 9 0 -8
~! =# @$%^&*()
Front Panel
BEFO
RE USIN
G / N
AM
ES AN
D FU
NCTIO
NS
10
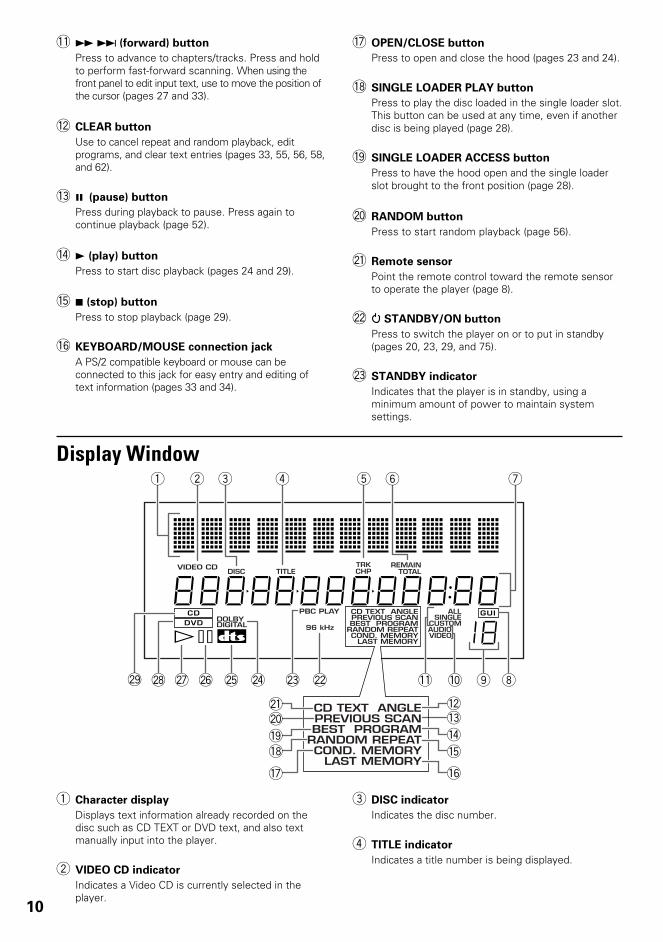
- ¡ ¢ (forward) button
Press to advance to chapters/tracks. Press and holdto perform fast-forward scanning. When using thefront panel to edit input text, use to move the position ofthe cursor (pages 27 and 33).
= CLEAR button
Use to cancel repeat and random playback, editprograms, and clear text entries (pages 33, 55, 56, 58,and 62).
~ 8 (pause) button
Press during playback to pause. Press again tocontinue playback (page 52).
! 3 (play) button
Press to start disc playback (pages 24 and 29).
@ 7 (stop) button
Press to stop playback (page 29).
# KEYBOARD/MOUSE connection jack
A PS/2 compatible keyboard or mouse can beconnected to this jack for easy entry and editing oftext information (pages 33 and 34).
DOLBY96 kHzDIGITAL
CD GUIDVD
TITLEDISCVIDEO CD TRK
CHP
PBC PLAY
REMAINTOTAL
CD TEXT ANGLEPREVIOUS SCANBEST PROGRAM
RANDOM REPEATCOND. MEMORY
LAST MEMORY
CD TEXT ANGLEPREVIOUS SCANBEST PROGRAM
RANDOM REPEATCOND. MEMORY
LAST MEMORY
ALLSINGLE
CUSTOMAUDIOVIDEO#*
1 2 3 64 5 7
890-
=
!@
#
~*
^%
$
&
™ ¡ ()_+£ ¢
Display Window
1 Character display
Displays text information already recorded on thedisc such as CD TEXT or DVD text, and also textmanually input into the player.
2 VIDEO CD indicator
Indicates a Video CD is currently selected in theplayer.
3 DISC indicator
Indicates the disc number.
4 TITLE indicator
Indicates a title number is being displayed.
$ OPEN/CLOSE button
Press to open and close the hood (pages 23 and 24).
% SINGLE LOADER PLAY button
Press to play the disc loaded in the single loader slot.This button can be used at any time, even if anotherdisc is being played (page 28).
^ SINGLE LOADER ACCESS button
Press to have the hood open and the single loaderslot brought to the front position (page 28).
& RANDOM button
Press to start random playback (page 56).
* Remote sensor
Point the remote control toward the remote sensorto operate the player (page 8).
( STANDBY/ON button
Press to switch the player on or to put in standby(pages 20, 23, 29, and 75).
) STANDBY indicator
Indicates that the player is in standby, using aminimum amount of power to maintain systemsettings.
11
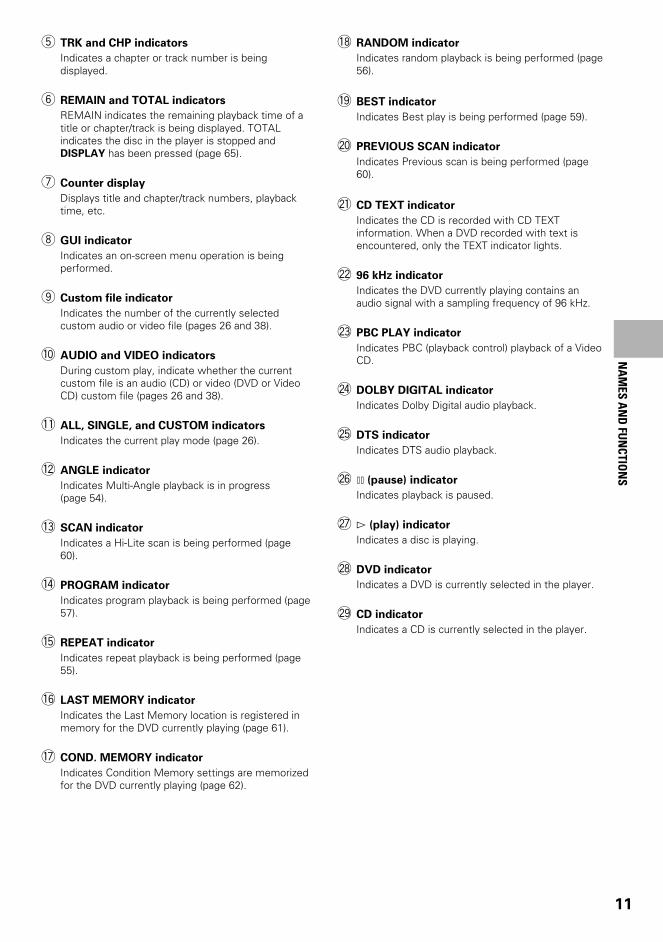
5 TRK and CHP indicators
Indicates a chapter or track number is beingdisplayed.
6 REMAIN and TOTAL indicators
REMAIN indicates the remaining playback time of atitle or chapter/track is being displayed. TOTALindicates the disc in the player is stopped andDISPLAY has been pressed (page 65).
7 Counter display
Displays title and chapter/track numbers, playbacktime, etc.
8 GUI indicator
Indicates an on-screen menu operation is beingperformed.
9 Custom file indicator
Indicates the number of the currently selectedcustom audio or video file (pages 26 and 38).
0 AUDIO and VIDEO indicators
During custom play, indicate whether the currentcustom file is an audio (CD) or video (DVD or VideoCD) custom file (pages 26 and 38).
- ALL, SINGLE, and CUSTOM indicators
Indicates the current play mode (page 26).
= ANGLE indicator
Indicates Multi-Angle playback is in progress(page 54).
~ SCAN indicator
Indicates a Hi-Lite scan is being performed (page60).
! PROGRAM indicator
Indicates program playback is being performed (page57).
@ REPEAT indicator
Indicates repeat playback is being performed (page55).
# LAST MEMORY indicator
Indicates the Last Memory location is registered inmemory for the DVD currently playing (page 61).
$ COND. MEMORY indicator
Indicates Condition Memory settings are memorizedfor the DVD currently playing (page 62).
NA
MES A
ND
FUN
CTION
S% RANDOM indicator
Indicates random playback is being performed (page56).
^ BEST indicator
Indicates Best play is being performed (page 59).
& PREVIOUS SCAN indicator
Indicates Previous scan is being performed (page60).
* CD TEXT indicator
Indicates the CD is recorded with CD TEXTinformation. When a DVD recorded with text isencountered, only the TEXT indicator lights.
( 96 kHz indicator
Indicates the DVD currently playing contains anaudio signal with a sampling frequency of 96 kHz.
) PBC PLAY indicator
Indicates PBC (playback control) playback of a VideoCD.
_ DOLBY DIGITAL indicator
Indicates Dolby Digital audio playback.
+ DTS indicator
Indicates DTS audio playback.
¡ * (pause) indicator
Indicates playback is paused.
™ # (play) indicator
Indicates a disc is playing.
£ DVD indicator
Indicates a DVD is currently selected in the player.
¢ CD indicator
Indicates a CD is currently selected in the player.
12
Remote ControlAll of the command buttons on the remote control glowin the dark for easy control of the player even in the dark.Hold the unit under a light for optimal results.
MULTI DIAL
OPEN/CLOSE
AUDIO SUBTITLE ANGLE
TOP MENU
RETURN
PREVIOUS NEXT REV
PLAY
FWD
PAUSE
PROGRAMREPEAT
A-BLAST
MEMORY
PREVIOUSSCAN
SUBSETUP
CONDITIONMEMORY
PLAYMODE
SEARCH MODE
RANDOM
HI-LITE BEST
STOP
STEP/SLOW
ENTER
SETUP
DISPLAY
DNR DISCF.MEM
SELECT
NUMBER
JOG MODE
JOG
FUNCTIONMEMORY
CLEAR
MENU
4 ¢ 1
87
e E
¡
3
0987
+10654
C321
Î
_
~
•
ª
&
+7
=
9
*
¢
™ ¡
£
§
¶
∞
º
-
@
#
0
8
(
)
!
4
5
6
3
$
%^
2
1
–
(Buttons indicated with * are used for menu operation.)
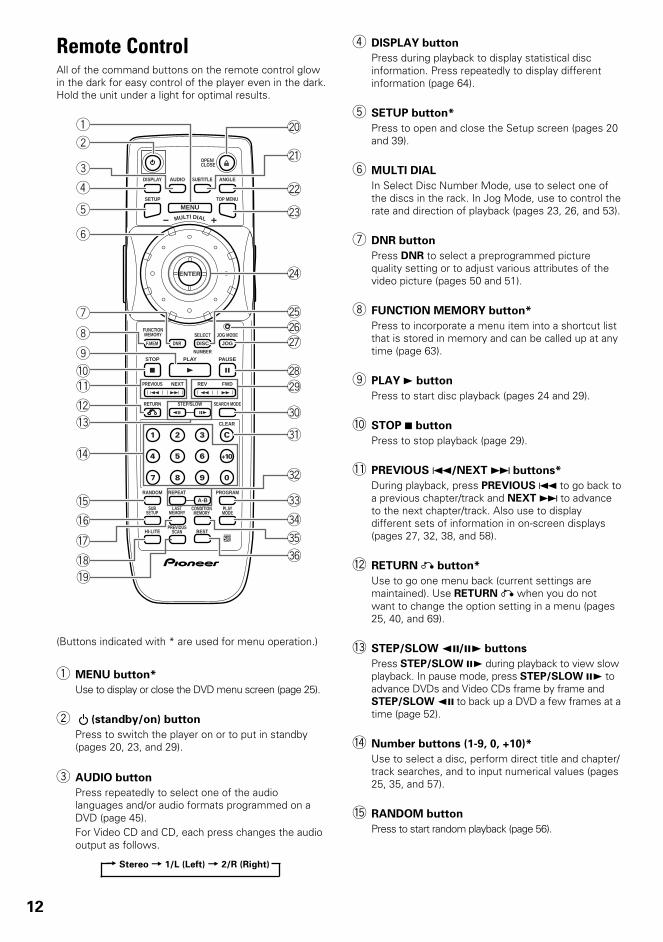
1 MENU button*
Use to display or close the DVD menu screen (page 25).
2 (standby/on) button
Press to switch the player on or to put in standby(pages 20, 23, and 29).
3 AUDIO button
Press repeatedly to select one of the audiolanguages and/or audio formats programmed on aDVD (page 45).For Video CD and CD, each press changes the audiooutput as follows.
= Stereo = 1/L (Left) = 2/R (Right)
4 DISPLAY button
Press during playback to display statistical discinformation. Press repeatedly to display differentinformation (page 64).
5 SETUP button*
Press to open and close the Setup screen (pages 20and 39).
6 MULTI DIAL
In Select Disc Number Mode, use to select one ofthe discs in the rack. In Jog Mode, use to control therate and direction of playback (pages 23, 26, and 53).
7 DNR button
Press DNR to select a preprogrammed picturequality setting or to adjust various attributes of thevideo picture (pages 50 and 51).
8 FUNCTION MEMORY button*
Press to incorporate a menu item into a shortcut listthat is stored in memory and can be called up at anytime (page 63).
9 PLAY 3 button
Press to start disc playback (pages 24 and 29).
0 STOP 7 button
Press to stop playback (page 29).
- PREVIOUS 4/NEXT ¢ buttons*
During playback, press PREVIOUS 4 to go back toa previous chapter/track and NEXT ¢ to advanceto the next chapter/track. Also use to displaydifferent sets of information in on-screen displays(pages 27, 32, 38, and 58).
= RETURN button*
Use to go one menu back (current settings aremaintained). Use RETURN when you do notwant to change the option setting in a menu (pages25, 40, and 69).
~ STEP/SLOW e/E buttons
Press STEP/SLOW E during playback to view slowplayback. In pause mode, press STEP/SLOW E toadvance DVDs and Video CDs frame by frame andSTEP/SLOW e to back up a DVD a few frames at atime (page 52).
! Number buttons (1-9, 0, +10)*
Use to select a disc, perform direct title and chapter/track searches, and to input numerical values (pages25, 35, and 57).
@ RANDOM button
Press to start random playback (page 56).
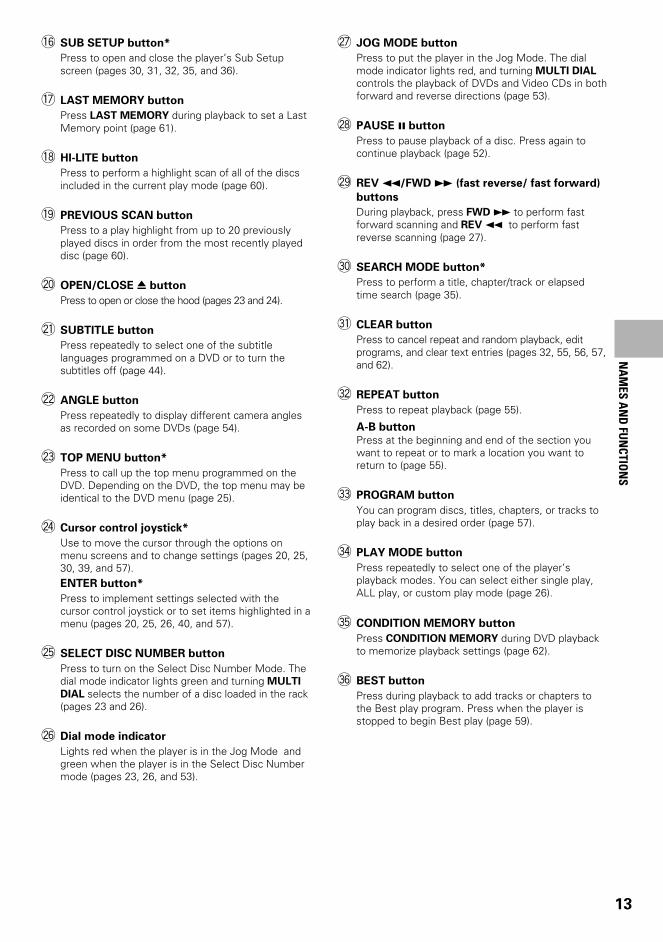
13
# SUB SETUP button*
Press to open and close the player’s Sub Setupscreen (pages 30, 31, 32, 35, and 36).
$ LAST MEMORY button
Press LAST MEMORY during playback to set a LastMemory point (page 61).
% HI-LITE button
Press to perform a highlight scan of all of the discsincluded in the current play mode (page 60).
^ PREVIOUS SCAN button
Press to a play highlight from up to 20 previouslyplayed discs in order from the most recently playeddisc (page 60).
& OPEN/CLOSE 0 button
Press to open or close the hood (pages 23 and 24).
* SUBTITLE button
Press repeatedly to select one of the subtitlelanguages programmed on a DVD or to turn thesubtitles off (page 44).
( ANGLE button
Press repeatedly to display different camera anglesas recorded on some DVDs (page 54).
) TOP MENU button*
Press to call up the top menu programmed on theDVD. Depending on the DVD, the top menu may beidentical to the DVD menu (page 25).
_ Cursor control joystick*
Use to move the cursor through the options onmenu screens and to change settings (pages 20, 25,30, 39, and 57).ENTER button*
Press to implement settings selected with thecursor control joystick or to set items highlighted in amenu (pages 20, 25, 26, 40, and 57).
+ SELECT DISC NUMBER button
Press to turn on the Select Disc Number Mode. Thedial mode indicator lights green and turning MULTI
DIAL selects the number of a disc loaded in the rack(pages 23 and 26).
¡ Dial mode indicator
Lights red when the player is in the Jog Mode andgreen when the player is in the Select Disc Numbermode (pages 23, 26, and 53).
™ JOG MODE button
Press to put the player in the Jog Mode. The dialmode indicator lights red, and turning MULTI DIAL
controls the playback of DVDs and Video CDs in bothforward and reverse directions (page 53).
£ PAUSE 8 button
Press to pause playback of a disc. Press again tocontinue playback (page 52).
¢ REV 1/FWD ¡ (fast reverse/ fast forward)
buttons
During playback, press FWD ¡ to perform fastforward scanning and REV 1 to perform fastreverse scanning (page 27).
∞ SEARCH MODE button*
Press to perform a title, chapter/track or elapsedtime search (page 35).
§ CLEAR button
Press to cancel repeat and random playback, editprograms, and clear text entries (pages 32, 55, 56, 57,and 62).
¶ REPEAT button
Press to repeat playback (page 55).
A-B button
Press at the beginning and end of the section youwant to repeat or to mark a location you want toreturn to (page 55).
• PROGRAM button
You can program discs, titles, chapters, or tracks toplay back in a desired order (page 57).
ª PLAY MODE button
Press repeatedly to select one of the player’splayback modes. You can select either single play,ALL play, or custom play mode (page 26).
º CONDITION MEMORY button
Press CONDITION MEMORY during DVD playbackto memorize playback settings (page 62).
– BEST button
Press during playback to add tracks or chapters tothe Best play program. Press when the player isstopped to begin Best play (page 59).
NA
MES A
ND
FUN
CTION
S
14
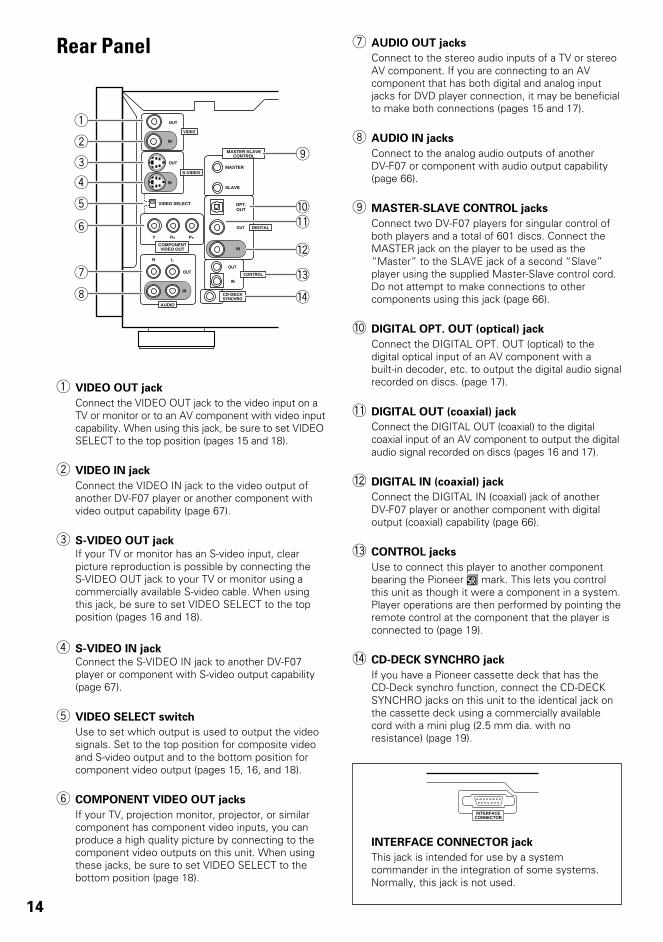
Rear Panel
1 VIDEO OUT jack
Connect the VIDEO OUT jack to the video input on aTV or monitor or to an AV component with video inputcapability. When using this jack, be sure to set VIDEOSELECT to the top position (pages 15 and 18).
2 VIDEO IN jack
Connect the VIDEO IN jack to the video output ofanother DV-F07 player or another component withvideo output capability (page 67).
3 S-VIDEO OUT jack
If your TV or monitor has an S-video input, clearpicture reproduction is possible by connecting theS-VIDEO OUT jack to your TV or monitor using acommercially available S-video cable. When usingthis jack, be sure to set VIDEO SELECT to the topposition (pages 16 and 18).
4 S-VIDEO IN jack
Connect the S-VIDEO IN jack to another DV-F07player or component with S-video output capability(page 67).
5 VIDEO SELECT switch
Use to set which output is used to output the videosignals. Set to the top position for composite videoand S-video output and to the bottom position forcomponent video output (pages 15, 16, and 18).
6 COMPONENT VIDEO OUT jacks
If your TV, projection monitor, projector, or similarcomponent has component video inputs, you canproduce a high quality picture by connecting to thecomponent video outputs on this unit. When usingthese jacks, be sure to set VIDEO SELECT to thebottom position (page 18).
7 AUDIO OUT jacks
Connect to the stereo audio inputs of a TV or stereoAV component. If you are connecting to an AVcomponent that has both digital and analog inputjacks for DVD player connection, it may be beneficialto make both connections (pages 15 and 17).
8 AUDIO IN jacks
Connect to the analog audio outputs of anotherDV-F07 or component with audio output capability(page 66).
9 MASTER-SLAVE CONTROL jacks
Connect two DV-F07 players for singular control ofboth players and a total of 601 discs. Connect theMASTER jack on the player to be used as the“Master” to the SLAVE jack of a second “Slave”player using the supplied Master-Slave control cord.Do not attempt to make connections to othercomponents using this jack (page 66).
0 DIGITAL OPT. OUT (optical) jack
Connect the DIGITAL OPT. OUT (optical) to thedigital optical input of an AV component with abuilt-in decoder, etc. to output the digital audio signalrecorded on discs. (page 17).
- DIGITAL OUT (coaxial) jack
Connect the DIGITAL OUT (coaxial) to the digitalcoaxial input of an AV component to output the digitalaudio signal recorded on discs (pages 16 and 17).
= DIGITAL IN (coaxial) jack
Connect the DIGITAL IN (coaxial) jack of anotherDV-F07 player or another component with digitaloutput (coaxial) capability (page 66).
~ CONTROL jacks
Use to connect this player to another componentbearing the Pioneer Î mark. This lets you controlthis unit as though it were a component in a system.Player operations are then performed by pointing theremote control at the component that the player isconnected to (page 19).
! CD-DECK SYNCHRO jack
If you have a Pioneer cassette deck that has theCD-Deck synchro function, connect the CD-DECKSYNCHRO jacks on this unit to the identical jack onthe cassette deck using a commercially availablecord with a mini plug (2.5 mm dia. with noresistance) (page 19).
CONTROL
DIGITAL
OPT.OUT
VIDEO
R L
S-VIDEO
COMPONENTVIDEO OUT
MASTER-SLAVECONTROL
CD-DECKSYNCHRO
Y PB PR
VIDEO SELECT
OUT
IN
OUT
OUT
SLAVE
MASTER
IN
IN
OUT
IN
OUT
IN
AUDIO
1
2
4
3
5
6
0
7
8
9
-
=
!
~
INTERFACECONNECTOR
INTERFACE CONNECTOR jack
This jack is intended for use by a systemcommander in the integration of some systems.Normally, this jack is not used.
15
CONTROL
DIGITAL
OPT.OUT
VIDEO
R L
S-VIDEO
COMPONENTVIDEO OUT
MASTER-SLAVECONTROL
CD-DECKSYNCHRO
Y PB PR
VIDEO SELECT
OUT
IN
OUT
OUT
SLAVE
MASTER
IN
IN
OUT
IN
OUT
IN
AUDIO
INTERFACECONNECTOR
VIDEO IN S-VIDEO IN
VIDEO SELECT
AUDIO INRL
MakingConnections
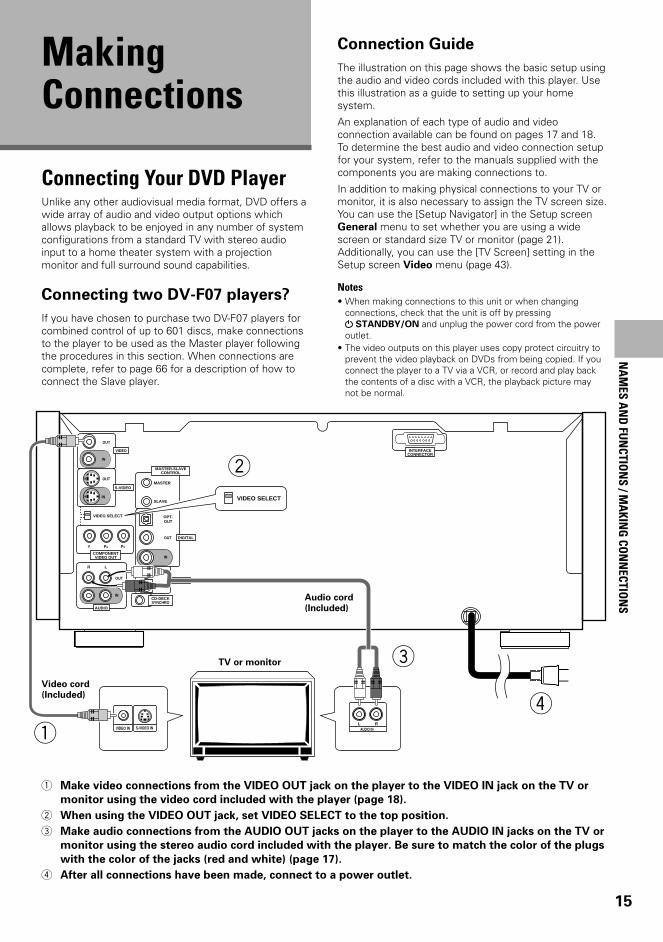
Connection Guide
The illustration on this page shows the basic setup usingthe audio and video cords included with this player. Usethis illustration as a guide to setting up your homesystem.
An explanation of each type of audio and videoconnection available can be found on pages 17 and 18.To determine the best audio and video connection setupfor your system, refer to the manuals supplied with thecomponents you are making connections to.
In addition to making physical connections to your TV ormonitor, it is also necessary to assign the TV screen size.You can use the [Setup Navigator] in the Setup screenGeneral menu to set whether you are using a widescreen or standard size TV or monitor (page 21).Additionally, you can use the [TV Screen] setting in theSetup screen Video menu (page 43).
Notes• When making connections to this unit or when changing
connections, check that the unit is off by pressing STANDBY/ON and unplug the power cord from the power
outlet.• The video outputs on this player uses copy protect circuitry to
prevent the video playback on DVDs from being copied. If youconnect the player to a TV via a VCR, or record and play backthe contents of a disc with a VCR, the playback picture maynot be normal.
Connecting Your DVD PlayerUnlike any other audiovisual media format, DVD offers awide array of audio and video output options whichallows playback to be enjoyed in any number of systemconfigurations from a standard TV with stereo audioinput to a home theater system with a projectionmonitor and full surround sound capabilities.
Connecting two DV-F07 players?
If you have chosen to purchase two DV-F07 players forcombined control of up to 601 discs, make connectionsto the player to be used as the Master player followingthe procedures in this section. When connections arecomplete, refer to page 66 for a description of how toconnect the Slave player.
Audio cord
(Included)
Video cord
(Included)
TV or monitor
1 Make video connections from the VIDEO OUT jack on the player to the VIDEO IN jack on the TV or
monitor using the video cord included with the player (page 18).
2 When using the VIDEO OUT jack, set VIDEO SELECT to the top position.
3 Make audio connections from the AUDIO OUT jacks on the player to the AUDIO IN jacks on the TV or
monitor using the stereo audio cord included with the player. Be sure to match the color of the plugs
with the color of the jacks (red and white) (page 17).
4 After all connections have been made, connect to a power outlet.
NA
MES A
ND
FUN
CTION
S / MA
KING
CON
NECTIO
NS
4
1
2
3
16
CONTROL
DIGITAL
OPT.OUT
VIDEO
R L
S-VIDEO
COMPONENTVIDEO OUT
MASTER-SLAVECONTROL
CD-DECKSYNCHRO
Y PB PR
VIDEO SELECT
OUT
IN
OUT
OUT
SLAVE
MASTER
IN
IN
OUT
IN
OUT
IN
AUDIO
VIDEO SELECT
VIDEO IN S-VIDEO IN
DIGITAL IN
INTERFACECONNECTOR
Coaxial cable
(Not included)
AV amplifier or receiver
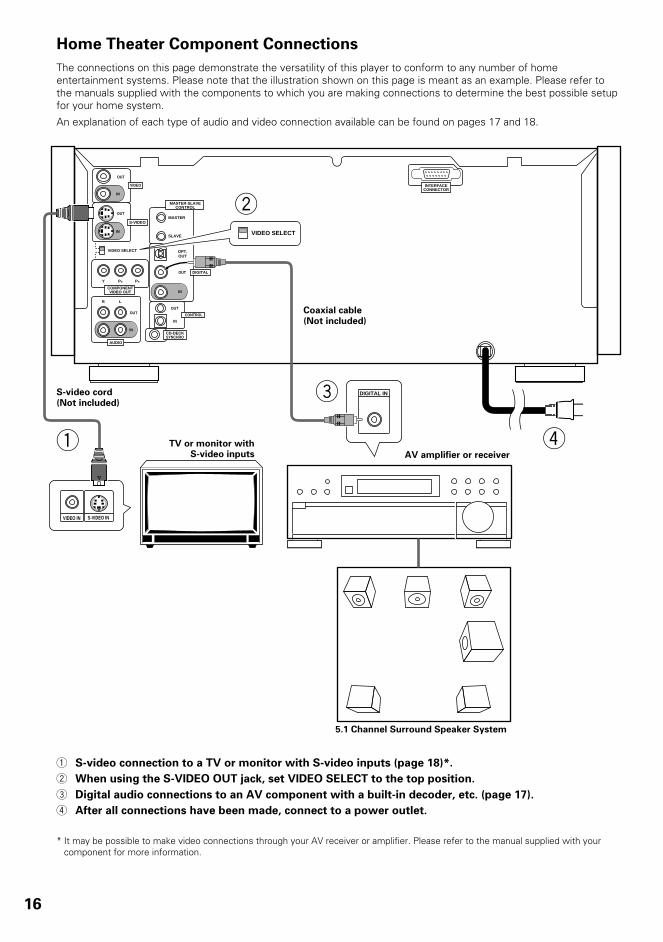
Home Theater Component Connections
The connections on this page demonstrate the versatility of this player to conform to any number of homeentertainment systems. Please note that the illustration shown on this page is meant as an example. Please refer tothe manuals supplied with the components to which you are making connections to determine the best possible setupfor your home system.
An explanation of each type of audio and video connection available can be found on pages 17 and 18.
5.1 Channel Surround Speaker System
S-video cord
(Not included)
41
2
3
1 S-video connection to a TV or monitor with S-video inputs (page 18)*.
2 When using the S-VIDEO OUT jack, set VIDEO SELECT to the top position.
3 Digital audio connections to an AV component with a built-in decoder, etc. (page 17).
4 After all connections have been made, connect to a power outlet.
* It may be possible to make video connections through your AV receiver or amplifier. Please refer to the manual supplied with yourcomponent for more information.
TV or monitor withS-video inputs
17
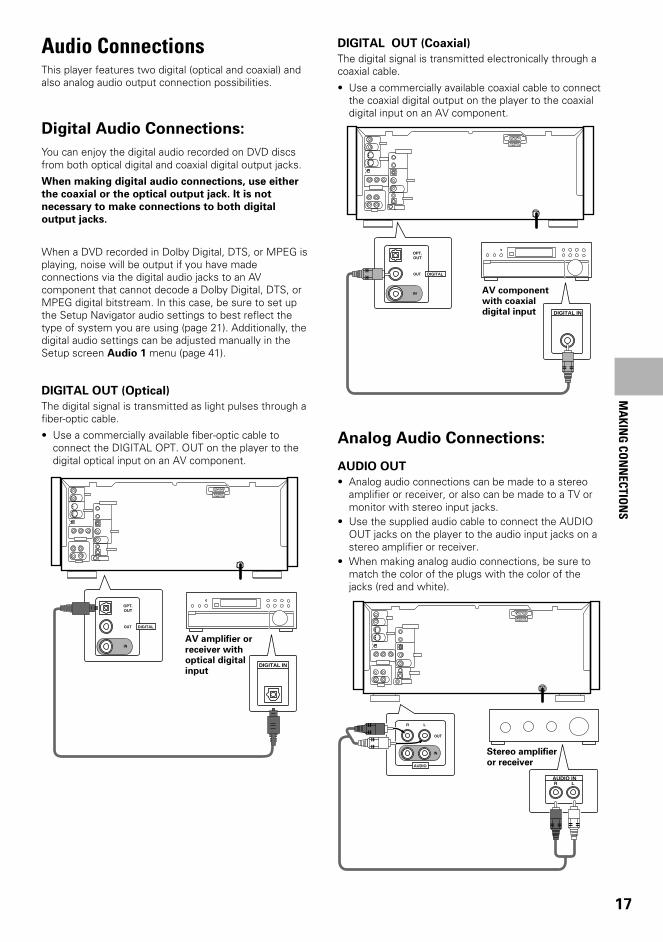
Audio ConnectionsThis player features two digital (optical and coaxial) andalso analog audio output connection possibilities.
Digital Audio Connections:
You can enjoy the digital audio recorded on DVD discsfrom both optical digital and coaxial digital output jacks.
When making digital audio connections, use either
the coaxial or the optical output jack. It is not
necessary to make connections to both digital
output jacks.
When a DVD recorded in Dolby Digital, DTS, or MPEG isplaying, noise will be output if you have madeconnections via the digital audio jacks to an AVcomponent that cannot decode a Dolby Digital, DTS, orMPEG digital bitstream. In this case, be sure to set upthe Setup Navigator audio settings to best reflect thetype of system you are using (page 21). Additionally, thedigital audio settings can be adjusted manually in theSetup screen Audio 1 menu (page 41).
DIGITAL OUT (Optical)
The digital signal is transmitted as light pulses through afiber-optic cable.
• Use a commercially available fiber-optic cable toconnect the DIGITAL OPT. OUT on the player to thedigital optical input on an AV component.
DIGITAL OUT (Coaxial)
The digital signal is transmitted electronically through acoaxial cable.
• Use a commercially available coaxial cable to connectthe coaxial digital output on the player to the coaxialdigital input on an AV component.
AV amplifier or
receiver withoptical digital
input
AV component
with coaxialdigital input
MA
KING
CON
NECTIO
NS
Analog Audio Connections:
AUDIO OUT
• Analog audio connections can be made to a stereoamplifier or receiver, or also can be made to a TV ormonitor with stereo input jacks.
• Use the supplied audio cable to connect the AUDIOOUT jacks on the player to the audio input jacks on astereo amplifier or receiver.
• When making analog audio connections, be sure tomatch the color of the plugs with the color of thejacks (red and white).
Stereo amplifier
or receiver
DIGITAL IN
DIGITAL
OPT.OUT
OUT
IN
INTERFACECONNECTOR
DIGITAL
OPT.OUT
OUT
IN
INTERFACECONNECTOR
DIGITAL IN
AUDIO INR L
R L
OUT
IN
AUDIO
INTERFACECONNECTOR
18
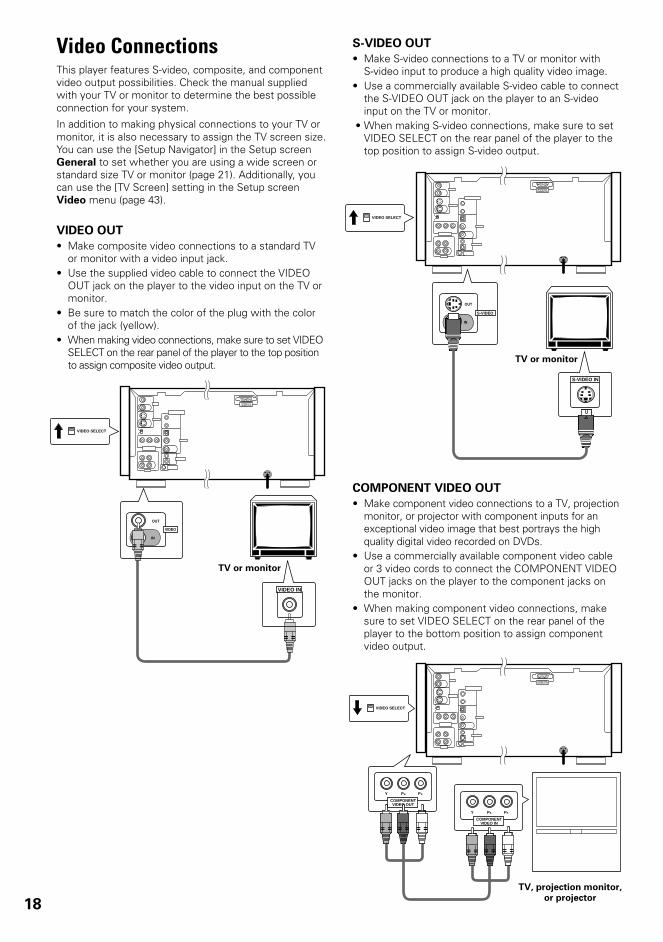
Video ConnectionsThis player features S-video, composite, and componentvideo output possibilities. Check the manual suppliedwith your TV or monitor to determine the best possibleconnection for your system.
In addition to making physical connections to your TV ormonitor, it is also necessary to assign the TV screen size.You can use the [Setup Navigator] in the Setup screenGeneral to set whether you are using a wide screen orstandard size TV or monitor (page 21). Additionally, youcan use the [TV Screen] setting in the Setup screenVideo menu (page 43).
COMPONENT VIDEO OUT
• Make component video connections to a TV, projectionmonitor, or projector with component inputs for anexceptional video image that best portrays the highquality digital video recorded on DVDs.
• Use a commercially available component video cableor 3 video cords to connect the COMPONENT VIDEOOUT jacks on the player to the component jacks onthe monitor.
• When making component video connections, makesure to set VIDEO SELECT on the rear panel of theplayer to the bottom position to assign componentvideo output.
TV or monitor
TV, projection monitor,
or projector
VIDEO OUT
• Make composite video connections to a standard TVor monitor with a video input jack.
• Use the supplied video cable to connect the VIDEOOUT jack on the player to the video input on the TV ormonitor.
• Be sure to match the color of the plug with the colorof the jack (yellow).
• When making video connections, make sure to set VIDEOSELECT on the rear panel of the player to the top positionto assign composite video output.
TV or monitor
S-VIDEO OUT
• Make S-video connections to a TV or monitor withS-video input to produce a high quality video image.
• Use a commercially available S-video cable to connectthe S-VIDEO OUT jack on the player to an S-videoinput on the TV or monitor.
• When making S-video connections, make sure to setVIDEO SELECT on the rear panel of the player to thetop position to assign S-video output.
VIDEO
OUT
IN
VIDEO SELECT
INTERFACECONNECTOR
VIDEO IN
S-VIDEO IN
S-VIDEO
OUT
IN
INTERFACECONNECTOR
VIDEO SELECT
Y PB PR
COMPONENTVIDEO IN
Y PB PR
COMPONENTVIDEO OUT
INTERFACECONNECTOR
VIDEO SELECT
19
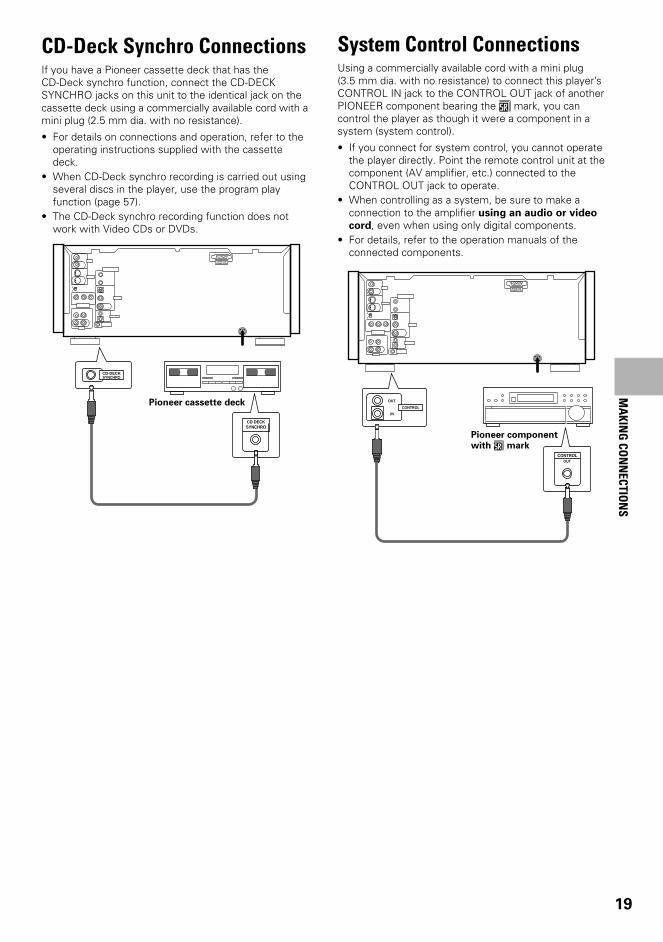
System Control ConnectionsUsing a commercially available cord with a mini plug(3.5 mm dia. with no resistance) to connect this player’sCONTROL IN jack to the CONTROL OUT jack of anotherPIONEER component bearing the Î mark, you cancontrol the player as though it were a component in asystem (system control).
• If you connect for system control, you cannot operatethe player directly. Point the remote control unit at thecomponent (AV amplifier, etc.) connected to theCONTROL OUT jack to operate.
• When controlling as a system, be sure to make aconnection to the amplifier using an audio or video
cord, even when using only digital components.• For details, refer to the operation manuals of the
connected components.
Pioneer component
with Î mark
CD-Deck Synchro ConnectionsIf you have a Pioneer cassette deck that has theCD-Deck synchro function, connect the CD-DECKSYNCHRO jacks on this unit to the identical jack on thecassette deck using a commercially available cord with amini plug (2.5 mm dia. with no resistance).
• For details on connections and operation, refer to theoperating instructions supplied with the cassettedeck.
• When CD-Deck synchro recording is carried out usingseveral discs in the player, use the program playfunction (page 57).
• The CD-Deck synchro recording function does notwork with Video CDs or DVDs.
Pioneer cassette deck
MA
KING
CON
NECTIO
NS
INTERFACECONNECTOR
CD DECKSYNCHRO
CD-DECKSYNCHRO
INTERFACECONNECTOR
CONTROLOUT
CONTROL
OUT
IN
20
Setting Up thePlayer
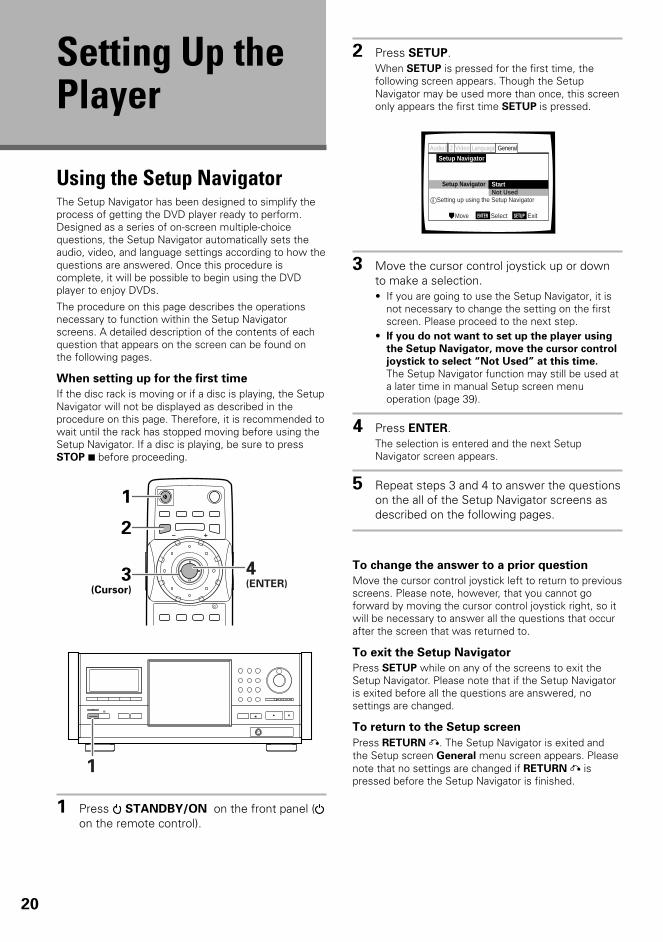
Using the Setup NavigatorThe Setup Navigator has been designed to simplify theprocess of getting the DVD player ready to perform.Designed as a series of on-screen multiple-choicequestions, the Setup Navigator automatically sets theaudio, video, and language settings according to how thequestions are answered. Once this procedure iscomplete, it will be possible to begin using the DVDplayer to enjoy DVDs.
The procedure on this page describes the operationsnecessary to function within the Setup Navigatorscreens. A detailed description of the contents of eachquestion that appears on the screen can be found onthe following pages.
When setting up for the first time
If the disc rack is moving or if a disc is playing, the SetupNavigator will not be displayed as described in theprocedure on this page. Therefore, it is recommended towait until the rack has stopped moving before using theSetup Navigator. If a disc is playing, be sure to pressSTOP 7 before proceeding.
4(ENTER)
2
3(Cursor)
1
1 Press STANDBY/ON on the front panel (on the remote control).
2 Press SETUP.When SETUP is pressed for the first time, thefollowing screen appears. Though the SetupNavigator may be used more than once, this screenonly appears the first time SETUP is pressed.
3 Move the cursor control joystick up or downto make a selection.• If you are going to use the Setup Navigator, it is
not necessary to change the setting on the firstscreen. Please proceed to the next step.
• If you do not want to set up the player using
the Setup Navigator, move the cursor control
joystick to select “Not Used” at this time.
The Setup Navigator function may still be used ata later time in manual Setup screen menuoperation (page 39).
4 Press ENTER.The selection is entered and the next SetupNavigator screen appears.
5 Repeat steps 3 and 4 to answer the questionson the all of the Setup Navigator screens asdescribed on the following pages.
To change the answer to a prior question
Move the cursor control joystick left to return to previousscreens. Please note, however, that you cannot goforward by moving the cursor control joystick right, so itwill be necessary to answer all the questions that occurafter the screen that was returned to.
To exit the Setup Navigator
Press SETUP while on any of the screens to exit theSetup Navigator. Please note that if the Setup Navigatoris exited before all the questions are answered, nosettings are changed.
To return to the Setup screen
Press RETURN . The Setup Navigator is exited andthe Setup screen General menu screen appears. Pleasenote that no settings are changed if RETURN ispressed before the Setup Navigator is finished.
Setup Navigator
Audio1 GeneralLanguageVideo2
Move ExitSETUPSelectENTER
Setting up using the Setup Navigator
Setup NavigatorNot UsedStart
Î
4 ¢ 1 ¡
7 3 8
1
21
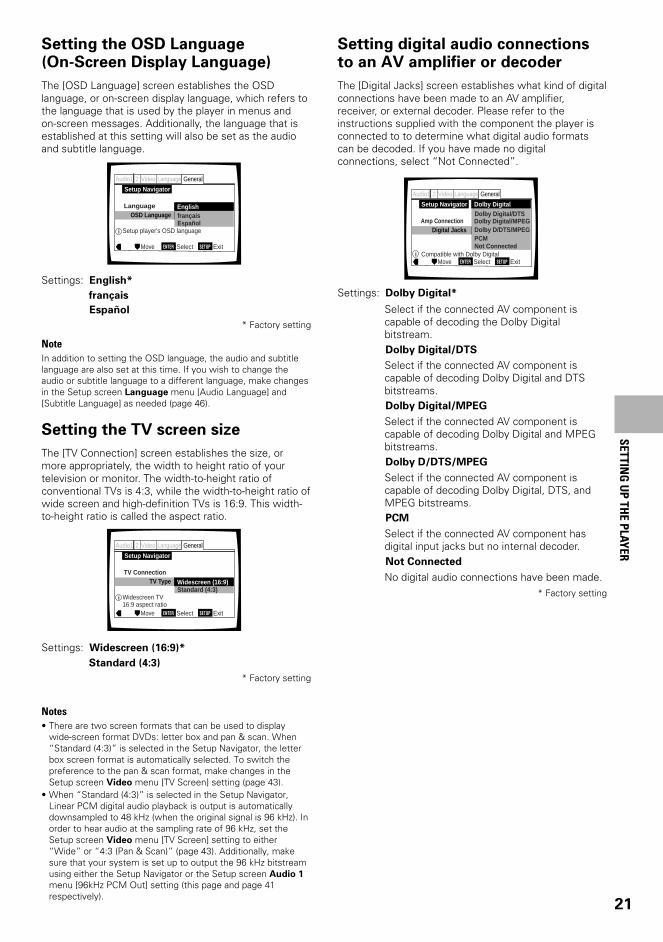
Setting the OSD Language(On-Screen Display Language)
The [OSD Language] screen establishes the OSDlanguage, or on-screen display language, which refers tothe language that is used by the player in menus andon-screen messages. Additionally, the language that isestablished at this setting will also be set as the audioand subtitle language.
Settings: English*
français
Español
* Factory setting
NoteIn addition to setting the OSD language, the audio and subtitlelanguage are also set at this time. If you wish to change theaudio or subtitle language to a different language, make changesin the Setup screen Language menu [Audio Language] and[Subtitle Language] as needed (page 46).
Setting the TV screen size
The [TV Connection] screen establishes the size, ormore appropriately, the width to height ratio of yourtelevision or monitor. The width-to-height ratio ofconventional TVs is 4:3, while the width-to-height ratio ofwide screen and high-definition TVs is 16:9. This width-to-height ratio is called the aspect ratio.
Settings: Widescreen (16:9)*
Standard (4:3)
* Factory setting
Notes• There are two screen formats that can be used to display
wide-screen format DVDs: letter box and pan & scan. When“Standard (4:3)” is selected in the Setup Navigator, the letterbox screen format is automatically selected. To switch thepreference to the pan & scan format, make changes in theSetup screen Video menu [TV Screen] setting (page 43).
• When “Standard (4:3)” is selected in the Setup Navigator,Linear PCM digital audio playback is output is automaticallydownsampled to 48 kHz (when the original signal is 96 kHz). Inorder to hear audio at the sampling rate of 96 kHz, set theSetup screen Video menu [TV Screen] setting to either“Wide” or “4:3 (Pan & Scan)” (page 43). Additionally, makesure that your system is set up to output the 96 kHz bitstreamusing either the Setup Navigator or the Setup screen Audio 1
menu [96kHz PCM Out] setting (this page and page 41respectively).
Setup Navigator
Audio1 GeneralLanguageVideo2
Move ExitSETUPSelectENTER
Setup player's OSD language
OSD LanguageEspañolfrançaisEnglishLanguage
Setup Navigator
Audio1 GeneralLanguageVideo2
Move ExitSETUPSelectENTER
Widescreen TV16:9 aspect ratio
TV TypeStandard (4:3)Widescreen (16:9)
TV Connection
Setting digital audio connectionsto an AV amplifier or decoder
The [Digital Jacks] screen establishes what kind of digitalconnections have been made to an AV amplifier,receiver, or external decoder. Please refer to theinstructions supplied with the component the player isconnected to to determine what digital audio formatscan be decoded. If you have made no digitalconnections, select “Not Connected”.
Settings: Dolby Digital*
Select if the connected AV component iscapable of decoding the Dolby Digitalbitstream.Dolby Digital/DTS
Select if the connected AV component iscapable of decoding Dolby Digital and DTSbitstreams.Dolby Digital/MPEG
Select if the connected AV component iscapable of decoding Dolby Digital and MPEGbitstreams.Dolby D/DTS/MPEG
Select if the connected AV component iscapable of decoding Dolby Digital, DTS, andMPEG bitstreams.PCM
Select if the connected AV component hasdigital input jacks but no internal decoder.Not Connected
No digital audio connections have been made.* Factory setting
Setup Navigator
Audio1 GeneralLanguageVideo2
Move ExitSETUPSelectENTER Compatible with Dolby Digital
Digital Jacks
Not Connected
Dolby D/DTS/MPEGDolby Digital/MPEGDolby Digital/DTS
PCM
Dolby Digital
Amp Connection
SETTING
UP TH
E PLAYER
22
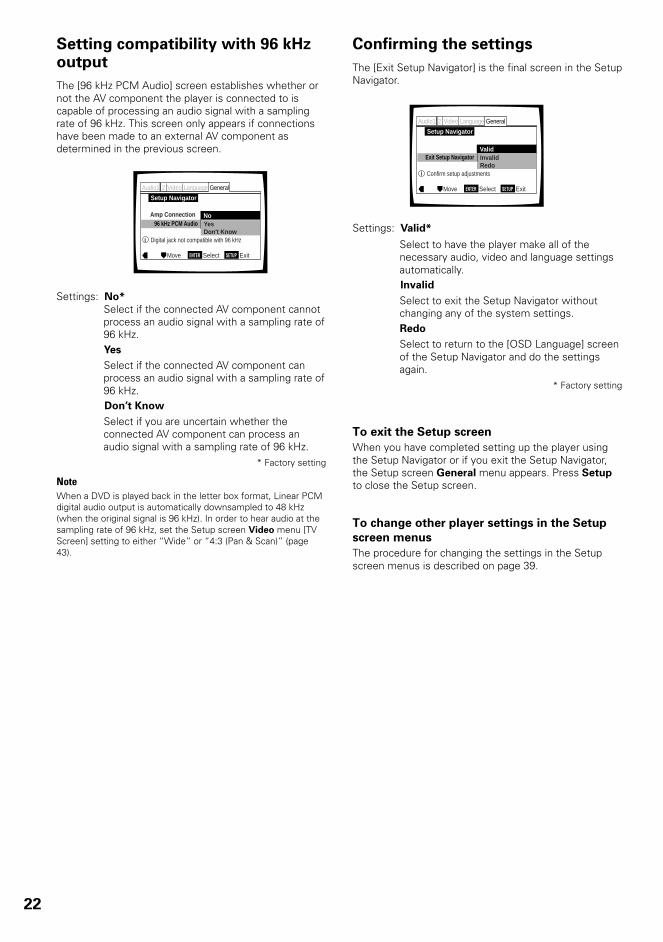
Confirming the settings
The [Exit Setup Navigator] is the final screen in the SetupNavigator.
Settings: Valid*
Select to have the player make all of thenecessary audio, video and language settingsautomatically.Invalid
Select to exit the Setup Navigator withoutchanging any of the system settings.
Redo
Select to return to the [OSD Language] screenof the Setup Navigator and do the settingsagain.
* Factory setting
To exit the Setup screen
When you have completed setting up the player usingthe Setup Navigator or if you exit the Setup Navigator,the Setup screen General menu appears. Press Setup
to close the Setup screen.
To change other player settings in the Setup
screen menus
The procedure for changing the settings in the Setupscreen menus is described on page 39.
Setup Navigator
Audio1 GeneralLanguageVideo2
Move ExitSETUPSelectENTER
Confirm setup adjustments
Exit Setup NavigatorRedoInvalidValid
Setting compatibility with 96 kHzoutput
The [96 kHz PCM Audio] screen establishes whether ornot the AV component the player is connected to iscapable of processing an audio signal with a samplingrate of 96 kHz. This screen only appears if connectionshave been made to an external AV component asdetermined in the previous screen.
Settings: No*
Select if the connected AV component cannotprocess an audio signal with a sampling rate of96 kHz.
Yes
Select if the connected AV component canprocess an audio signal with a sampling rate of96 kHz.Don’t Know
Select if you are uncertain whether theconnected AV component can process anaudio signal with a sampling rate of 96 kHz.
* Factory setting
NoteWhen a DVD is played back in the letter box format, Linear PCMdigital audio output is automatically downsampled to 48 kHz(when the original signal is 96 kHz). In order to hear audio at thesampling rate of 96 kHz, set the Setup screen Video menu [TVScreen] setting to either “Wide” or “4:3 (Pan & Scan)” (page43).
Setup Navigator
Audio1 GeneralLanguageVideo2
Move ExitSETUPSelectENTER
Digital jack not compatible with 96 kHz
96 kHz PCM AudioDon't KnowYesNoAmp Connection
23
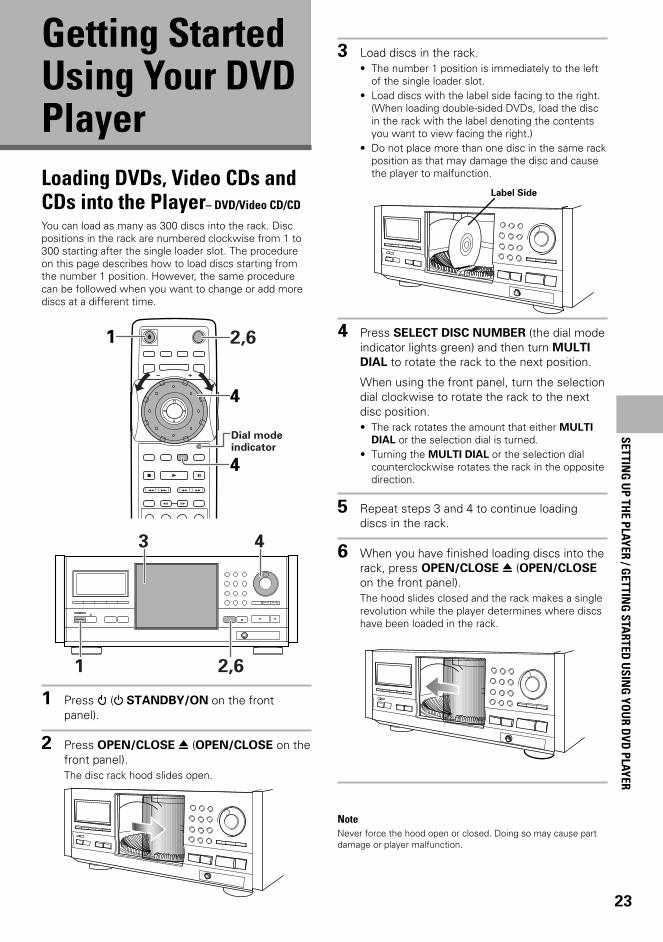
Loading DVDs, Video CDs andCDs into the Player– DVD/Video CD/CD
You can load as many as 300 discs into the rack. Discpositions in the rack are numbered clockwise from 1 to300 starting after the single loader slot. The procedureon this page describes how to load discs starting fromthe number 1 position. However, the same procedurecan be followed when you want to change or add morediscs at a different time.
1 Press ( STANDBY/ON on the frontpanel).
2 Press OPEN/CLOSE 0 (OPEN/CLOSE on thefront panel).The disc rack hood slides open.
Getting StartedUsing Your DVDPlayer
SETTING
UP TH
E PLAYER / GETTIN
G STA
RTED U
SING
YOU
R DVD
PLAYER3 Load discs in the rack.
• The number 1 position is immediately to the leftof the single loader slot.
• Load discs with the label side facing to the right.(When loading double-sided DVDs, load the discin the rack with the label denoting the contentsyou want to view facing the right.)
• Do not place more than one disc in the same rackposition as that may damage the disc and causethe player to malfunction.
4 Press SELECT DISC NUMBER (the dial modeindicator lights green) and then turn MULTI
DIAL to rotate the rack to the next position.
When using the front panel, turn the selectiondial clockwise to rotate the rack to the nextdisc position.• The rack rotates the amount that either MULTI
DIAL or the selection dial is turned.• Turning the MULTI DIAL or the selection dial
counterclockwise rotates the rack in the oppositedirection.
5 Repeat steps 3 and 4 to continue loadingdiscs in the rack.
6 When you have finished loading discs into therack, press OPEN/CLOSE 0 (OPEN/CLOSE
on the front panel).The hood slides closed and the rack makes a singlerevolution while the player determines where discshave been loaded in the rack.
NoteNever force the hood open or closed. Doing so may cause partdamage or player malfunction.
4 ¢ 1
87
e E
¡
3
1 2,6
Dial mode indicator
4
4
Î
4 ¢ 1 ¡
7 3 8
43
1 2,6
Label Side
24
To load a 3 inch (8 cm) CD
3 inch (8 cm) discs cannot be inserted as they are. Besure to attach all 3 inch (8 cm) CDs to a commerciallyavailable disc adapter before loading them in the player.
• Do not load an adapter into the rack without a CDattached. Doing so may cause the player tomalfunction.
• 3 inch (8 cm) DVDs cannot be used with this player.To prevent malfunction, do not use 8 cm (3 in.) CDadapters with 8 cm (3 in.) DVDs.
To remove discs from the rack
1 Press OPEN/CLOSE 0 (OPEN/CLOSE on the frontpanel) to open the hood.
2 Select the disc that you want to remove using one ofthe methods outlined in step 4 of the procedure“Loading DVDs, Video CDs and CDs into the Player”on the previous page.
3 Remove the disc from the rack.
4 Press OPEN/CLOSE 0 (OPEN/CLOSE on the frontpanel) to close the hood when you are finished.
WARNING
Do not put your hand or any other object inside the
rack, as this may result in personal injury and/or part
damage.
• When changing or loading discs, be careful not to
press any buttons on the player or remote control.
The rack may move suddenly, and may catch your
fingers between discs and the side of the hood.
• When changing or loading discs, make sure the
rack is stopped. Do not attempt to insert a disc
while the rack is moving.
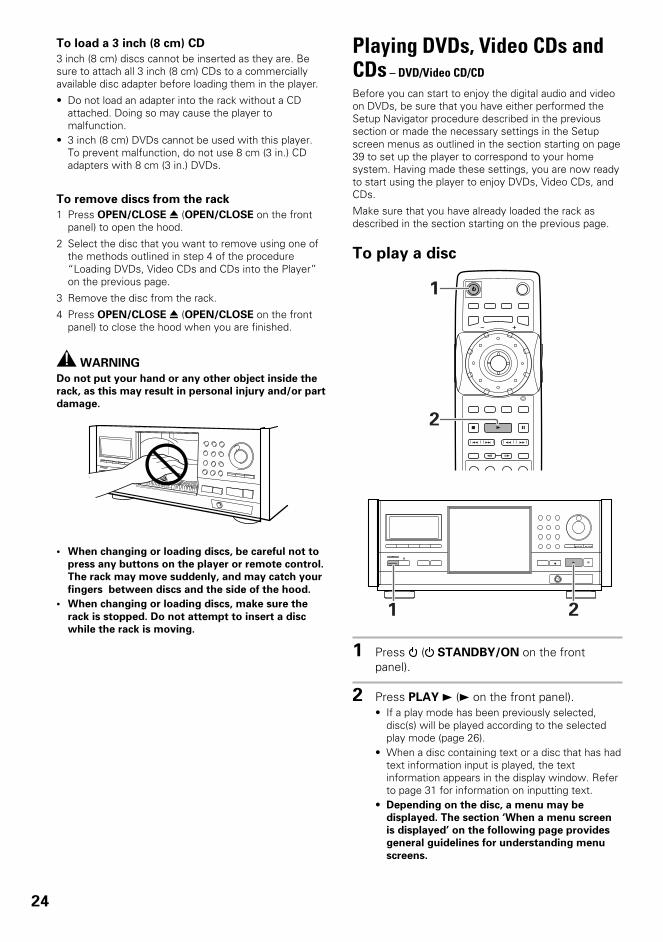
Playing DVDs, Video CDs andCDs – DVD/Video CD/CD
Before you can start to enjoy the digital audio and videoon DVDs, be sure that you have either performed theSetup Navigator procedure described in the previoussection or made the necessary settings in the Setupscreen menus as outlined in the section starting on page39 to set up the player to correspond to your homesystem. Having made these settings, you are now readyto start using the player to enjoy DVDs, Video CDs, andCDs.
Make sure that you have already loaded the rack asdescribed in the section starting on the previous page.
To play a disc
4 ¢ 1
87
e E
¡
3
1
2
Î
4 ¢ 1 ¡
7 3 8
1 2
1 Press ( STANDBY/ON on the frontpanel).
2 Press PLAY 3 (3 on the front panel).• If a play mode has been previously selected,
disc(s) will be played according to the selectedplay mode (page 26).
• When a disc containing text or a disc that has hadtext information input is played, the textinformation appears in the display window. Referto page 31 for information on inputting text.
• Depending on the disc, a menu may be
displayed. The section ‘When a menu screen
is displayed’ on the following page provides
general guidelines for understanding menu
screens.
301–DISC
CDFILE
25
When an operation is prohibited
There are times when you are using the player and attempt toperform an operation, but for some reason it cannot beperformed. When this occurs, one of the two following iconsappears on the screen.
The operation is prohibited by the player.
The operation is prohibited by the programming onthe disc.
Notes• Noise is output if you make digital audio connections to a
receiver or amplifier that does not have a built-in decoder.Check that the digital audio output format selected in theAudio 1 menu corresponds to the audio components you havemade connections to (page 41).
• The TV screen size is factory set to present the wide screenformat (16:9 aspect ratio). If you have a standard TV screen(4:3 aspect ratio), this setting can be changed to match your TVscreen size in the Video menu (page 43).
4 ¢ 1
87
e E
¡
3
Cursor controljoystick
PREVIOUS 4NEXT ¢
Number buttons
MENU
TOP MENU
ENTER
RETURN
STOP 7
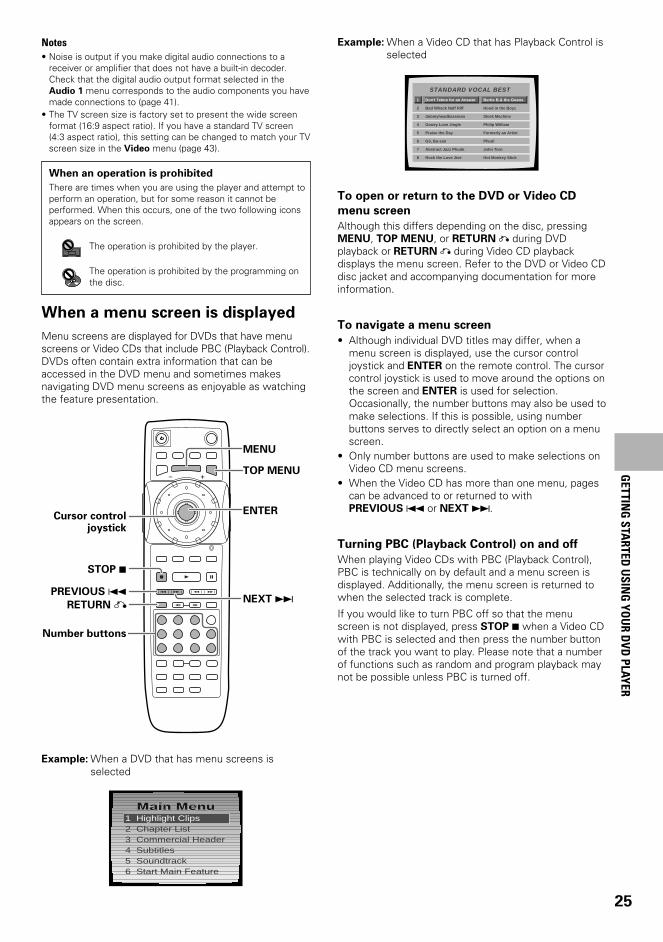
When a menu screen is displayed
Menu screens are displayed for DVDs that have menuscreens or Video CDs that include PBC (Playback Control).DVDs often contain extra information that can beaccessed in the DVD menu and sometimes makesnavigating DVD menu screens as enjoyable as watchingthe feature presentation.
To open or return to the DVD or Video CD
menu screen
Although this differs depending on the disc, pressingMENU, TOP MENU, or RETURN during DVDplayback or RETURN during Video CD playbackdisplays the menu screen. Refer to the DVD or Video CDdisc jacket and accompanying documentation for moreinformation.
To navigate a menu screen
• Although individual DVD titles may differ, when amenu screen is displayed, use the cursor controljoystick and ENTER on the remote control. The cursorcontrol joystick is used to move around the options onthe screen and ENTER is used for selection.Occasionally, the number buttons may also be used tomake selections. If this is possible, using numberbuttons serves to directly select an option on a menuscreen.
• Only number buttons are used to make selections onVideo CD menu screens.
• When the Video CD has more than one menu, pagescan be advanced to or returned to withPREVIOUS 4 or NEXT ¢.
Turning PBC (Playback Control) on and off
When playing Video CDs with PBC (Playback Control),PBC is technically on by default and a menu screen isdisplayed. Additionally, the menu screen is returned towhen the selected track is complete.
If you would like to turn PBC off so that the menuscreen is not displayed, press STOP 7 when a Video CDwith PBC is selected and then press the number buttonof the track you want to play. Please note that a numberof functions such as random and program playback maynot be possible unless PBC is turned off.
1 Highlight Clips2 Chapter List3 Commercial Header4 Subtitles5 Soundtrack6 Start Main Feature
1
2
3
4
5
6
7
8
Don't Tekno for an Answer
Bad Whack Naff Riff
dubmyheadbassman
Gooey Love Jingle
Praise the Day
G3, Ba-san
Abstract Jazz Phunk
Rock the Love Jive
Bertie B.& the Goans
Hood in the Boyz
Sleek Machine
Philip William
Formerly an Artist
Pfeuti
John Torn
Hot Monkey Stick
STANDARD VOCAL BEST
Example: When a DVD that has menu screens isselected
Example: When a Video CD that has Playback Control isselected
GETTIN
G STA
RTED U
SING
YOU
R DVD
PLAYER
26
Selecting a play mode
Press PLAY MODE repeatedly to select one ofthe play modes:ALL : All discs are played back in the order they
appear in the rack. If DVDs or Video CDswith PBC are loaded in the rack, all discsmay not be played back continuously.
SINGLE : One disc is played. Playback stops after thedisc has been played.
CUSTOM : Only discs in the custom file are played back.
The play mode changes each time PLAY MODE ispressed as follows.
While disc playback is stopped:
During disc playback:
• The ALL, SINGLE, CUSTOM AUDIO, or CUSTOMVIDEO indicators appear in the display window toindicate the current play mode.
• ALL play ends after a full revolution of the rack has beenmade from the position of the currently selected disc.
• CUSTOM AUDIO and CUSTOM VIDEO cannot beselected until custom files have been created.
To create and select one of the custom play modes
Refer to the section ‘Creating and Selecting CustomFiles’ on page 37.
Notes• If PLAY MODE is pressed during program play, the program is
erased.• The play mode is stored in memory when the player is turned
off, and is established when the player is turned on again.• If no play mode is selected, the default play mode is ALL play.• The single play mode is automatically set when the disc in the
single loader slot is being played (page 28).
4 ¢ 1
87
e E
¡
3
PLAYMODE
Î
4 ¢1 ¡
7 3 8
PLAY MODE
3 ALL 3 SINGLE
CUSTOM VIDEO 2 CUSTOM AUDIO 2
3 ALL
SINGLE 2
Selecting a disc in the disc rack
1 Press SELECT DISC NUMBER (the dial modeindicator lights green) and then turn MULTI
DIAL to select a disc number.
When using the front panel, turn the selectiondial to select a disc number.• The disc numbers increase when MULTI DIAL or
the selection dial is turned clockwise, anddecrease when MULTI DIAL or the selection dialis turned counterclockwise
2 Press ENTER.
When using the front panel, press the enterbutton in the center of the selection dial.• The disc rack rotates to position of the selected
disc, and playback of the disc starts.
NoteYou can also select a disc on-screen using the Sub Setup screenText menu (page 35).
4 ¢ 1
87
e E
¡
3
Dial mode indicator
1
1
2
Î
4 ¢1 ¡
7 3 8
1 2
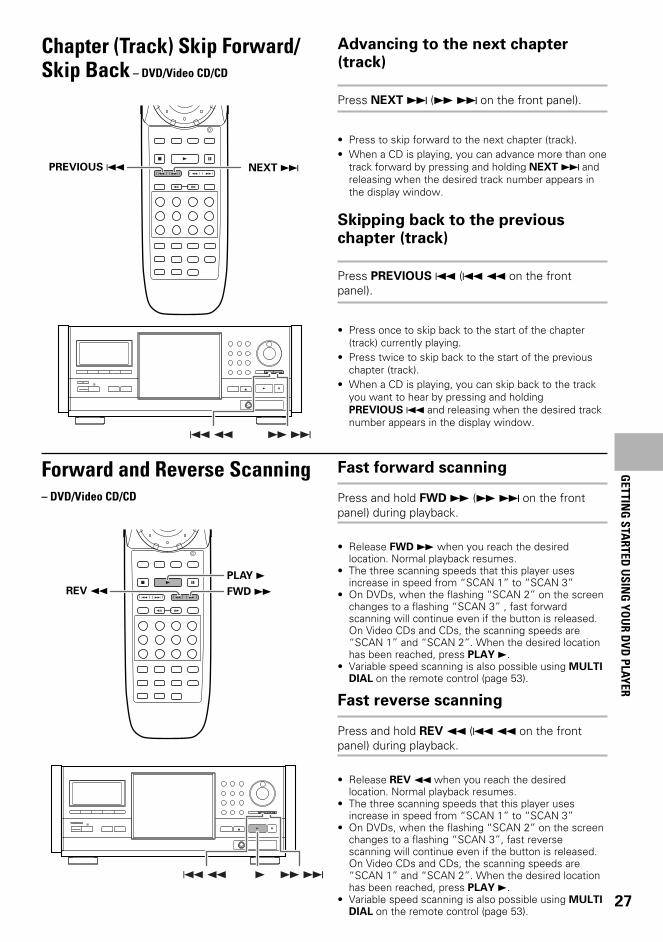
27
Advancing to the next chapter(track)
Press NEXT ¢ (¡ ¢ on the front panel).
• Press to skip forward to the next chapter (track).• When a CD is playing, you can advance more than one
track forward by pressing and holding NEXT ¢ andreleasing when the desired track number appears inthe display window.
Skipping back to the previouschapter (track)
Press PREVIOUS 4 (4 1 on the frontpanel).
• Press once to skip back to the start of the chapter(track) currently playing.
• Press twice to skip back to the start of the previouschapter (track).
• When a CD is playing, you can skip back to the trackyou want to hear by pressing and holdingPREVIOUS 4 and releasing when the desired tracknumber appears in the display window.
Chapter (Track) Skip Forward/Skip Back – DVD/Video CD/CD
4 ¢ 1
87
e E
¡
3
NEXT ¢PREVIOUS 4
Î
4 ¢ 1 ¡
7 3 8
¡ ¢ 4 1
Forward and Reverse Scanning– DVD/Video CD/CD
Fast forward scanning
Press and hold FWD ¡ (¡ ¢ on the frontpanel) during playback.
• Release FWD ¡ when you reach the desiredlocation. Normal playback resumes.
• The three scanning speeds that this player usesincrease in speed from “SCAN 1” to “SCAN 3”
• On DVDs, when the flashing “SCAN 2” on the screenchanges to a flashing “SCAN 3” , fast forwardscanning will continue even if the button is released.On Video CDs and CDs, the scanning speeds are“SCAN 1” and “SCAN 2”. When the desired locationhas been reached, press PLAY 3.
• Variable speed scanning is also possible using MULTIDIAL on the remote control (page 53).
Fast reverse scanning
Press and hold REV 1 (4 1 on the frontpanel) during playback.
• Release REV 1 when you reach the desiredlocation. Normal playback resumes.
• The three scanning speeds that this player usesincrease in speed from “SCAN 1” to “SCAN 3”
• On DVDs, when the flashing “SCAN 2” on the screenchanges to a flashing “SCAN 3”, fast reversescanning will continue even if the button is released.On Video CDs and CDs, the scanning speeds are“SCAN 1” and “SCAN 2”. When the desired locationhas been reached, press PLAY 3.
• Variable speed scanning is also possible using MULTIDIAL on the remote control (page 53).
Î
4 ¢ 1 ¡
7 3 8
¡ ¢ 4 1 3
4 ¢ 1
87
e E
¡
3
FWD ¡ PLAY 3
REV 1
GETTIN
G STA
RTED U
SING
YOU
R DVD
PLAYER
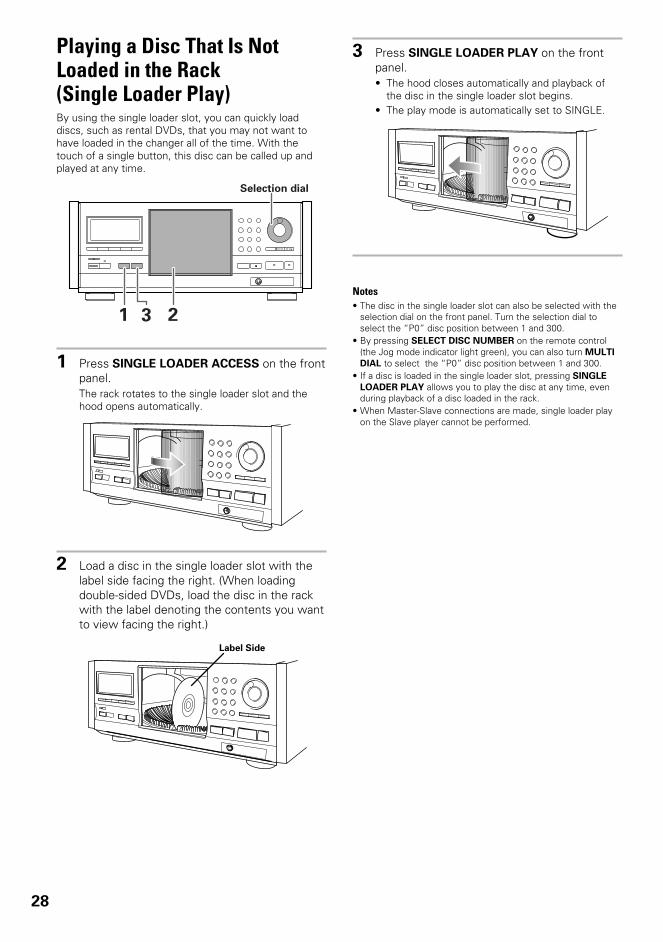
28
3 Press SINGLE LOADER PLAY on the frontpanel.• The hood closes automatically and playback of
the disc in the single loader slot begins.• The play mode is automatically set to SINGLE.
Notes• The disc in the single loader slot can also be selected with the
selection dial on the front panel. Turn the selection dial toselect the “P0” disc position between 1 and 300.
• By pressing SELECT DISC NUMBER on the remote control(the Jog mode indicator light green), you can also turn MULTI
DIAL to select the “P0” disc position between 1 and 300.• If a disc is loaded in the single loader slot, pressing SINGLE
LOADER PLAY allows you to play the disc at any time, evenduring playback of a disc loaded in the rack.
• When Master-Slave connections are made, single loader playon the Slave player cannot be performed.
Playing a Disc That Is NotLoaded in the Rack(Single Loader Play)By using the single loader slot, you can quickly loaddiscs, such as rental DVDs, that you may not want tohave loaded in the changer all of the time. With thetouch of a single button, this disc can be called up andplayed at any time.
1 Press SINGLE LOADER ACCESS on the frontpanel.The rack rotates to the single loader slot and thehood opens automatically.
2 Load a disc in the single loader slot with thelabel side facing the right. (When loadingdouble-sided DVDs, load the disc in the rackwith the label denoting the contents you wantto view facing the right.)
Î
4 ¢ 1 ¡
7 3 8
1 23
Selection dial
Label Side
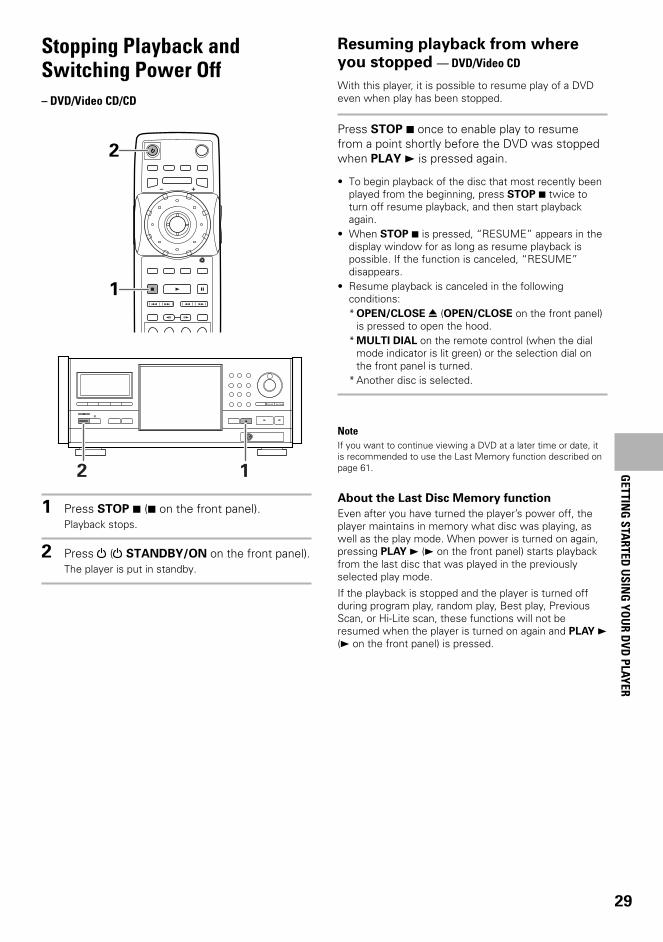
29
1 Press STOP 7 (7 on the front panel).Playback stops.
2 Press ( STANDBY/ON on the front panel).The player is put in standby.
Stopping Playback andSwitching Power Off– DVD/Video CD/CD
Î
4 ¢ 1 ¡
7 3 8
2 1
4 ¢ 1
87
e E
¡
31
2
Resuming playback from whereyou stopped –– DVD/Video CD
With this player, it is possible to resume play of a DVDeven when play has been stopped.
Press STOP 7 once to enable play to resumefrom a point shortly before the DVD was stoppedwhen PLAY 3 is pressed again.
• To begin playback of the disc that most recently beenplayed from the beginning, press STOP 7 twice toturn off resume playback, and then start playbackagain.
• When STOP 7 is pressed, “RESUME” appears in thedisplay window for as long as resume playback ispossible. If the function is canceled, “RESUME”disappears.
• Resume playback is canceled in the followingconditions:* OPEN/CLOSE 0 (OPEN/CLOSE on the front panel)
is pressed to open the hood.* MULTI DIAL on the remote control (when the dial
mode indicator is lit green) or the selection dial onthe front panel is turned.
* Another disc is selected.
NoteIf you want to continue viewing a DVD at a later time or date, itis recommended to use the Last Memory function described onpage 61.
About the Last Disc Memory function
Even after you have turned the player’s power off, theplayer maintains in memory what disc was playing, aswell as the play mode. When power is turned on again,pressing PLAY 3 (3 on the front panel) starts playbackfrom the last disc that was played in the previouslyselected play mode.
If the playback is stopped and the player is turned offduring program play, random play, Best play, PreviousScan, or Hi-Lite scan, these functions will not beresumed when the player is turned on again and PLAY 3(3 on the front panel) is pressed.
GETTIN
G STA
RTED U
SING
YOU
R DVD
PLAYER

30
4 ¢ 1
87
e E
¡
3
4(ENTER)
6
2,3(Cursor)
1
3 Move the cursor control joystick down toselect [Add Disc Update].
4 Press ENTER.Add. Update begins and the rack starts to rotate aseach new disc is read by the player. It takesbetween 10 and 20 seconds for the player to read asingle disc.
5 Input the title of the disc and the artist’s nameas described in the section “Inputting andChanging Text Information” on pages 31 to 34.• If the disc already contains text information on it,
the information is automatically used for the disctitle and artist name, and the confirmation screenis automatically displayed. When this is the case,press NEXT ¢ (¡ ¢ on the front panel) toproceed to the next disc.
• With some DVDs that already contain textinformation, there may be several options tochoose from. When this is the case, a selectionwindow appears.
• After both the disc title and artist’s name havebeen entered, a confirmation screen appears.
6 When the confirmation screen appears, pressNEXT ¢ (¡ ¢ on the front panel) toproceed to the next disc.
• If you would like to go back and change either thedisc title or artist’s name at this time, move thecursor control joystick right or left to select theappropriate field and then press ENTER to returnto the text input screen.
• If you would like to change the disc title or artist’sname when the text information is already on thedisc, go to the text input screen from theconfirmation screen and input the new textinformation with a space “ ” for the firstcharacter. The new text information will bestored in memory.
• When all the newly loaded discs in the rack hasbeen registered, the system restarts.
DiscManagement Text Auto UpdateCustom
Add. Disc Update
New disc update, title/artist info inputThe system resets when finished
All Disc Update
i
Move SUB SETUP ExitENTER SelectThis player makes it easy to manage all the discs in theplayer. The Sub Setup screen contains three menuscreens that allow you to organize your disc library asyou see fit. This section outlines the basic operation ofthe Sub Setup screen menus.
NoteIf the Sub Setup screen is opened during playback of a DVDbeing viewed in the letter box format, the screen may switch tothe wide screen format. This is not a malfunction, and the screenwill return to normal when the Sub Setup screen is closed.
Registering Information andInputting Text for Discs NewlyLoaded in the PlayerAfter you have loaded discs in the player for the firsttime, it is recommended to have the player register theinformation such as text, and disc format data from all ofthe discs in the rack.
It is recommended to use [Add. Disc Update] whenevernew discs are loaded in the player .
• This function cannot be performed while a disc isplaying. Stop playback of the disc before proceeding.
1 Press SUB SETUP.
2 Move the cursor control joystick to the right toselect the Auto Update menu.
Title Artist1 DVD Silver Skies Matt Jones
TypeDisc
STOPNext
CancelENTER Input4 ¢
Text Auto Update: AddCustom
Move
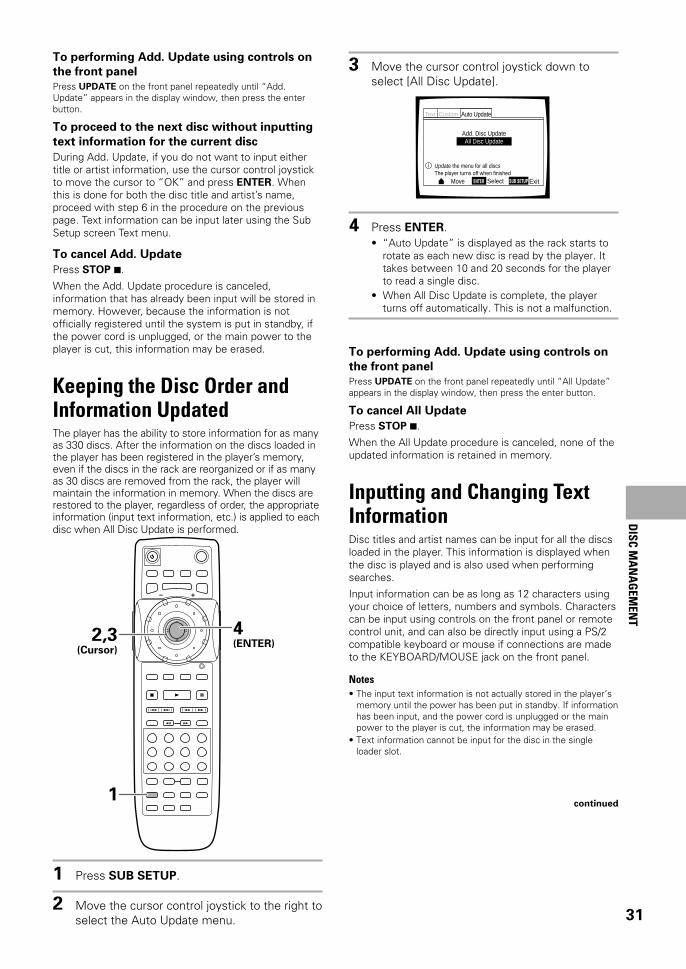
31
DISC M
AN
AG
EMEN
TTo performing Add. Update using controls on
the front panel
Press UPDATE on the front panel repeatedly until “Add.Update” appears in the display window, then press the enterbutton.
To proceed to the next disc without inputting
text information for the current disc
During Add. Update, if you do not want to input eithertitle or artist information, use the cursor control joystickto move the cursor to “OK” and press ENTER. Whenthis is done for both the disc title and artist’s name,proceed with step 6 in the procedure on the previouspage. Text information can be input later using the SubSetup screen Text menu.
To cancel Add. Update
Press STOP 7.
When the Add. Update procedure is canceled,information that has already been input will be stored inmemory. However, because the information is notofficially registered until the system is put in standby, ifthe power cord is unplugged, or the main power to theplayer is cut, this information may be erased.
Keeping the Disc Order andInformation UpdatedThe player has the ability to store information for as manyas 330 discs. After the information on the discs loaded inthe player has been registered in the player’s memory,even if the discs in the rack are reorganized or if as manyas 30 discs are removed from the rack, the player willmaintain the information in memory. When the discs arerestored to the player, regardless of order, the appropriateinformation (input text information, etc.) is applied to eachdisc when All Disc Update is performed.
1 Press SUB SETUP.
2 Move the cursor control joystick to the right toselect the Auto Update menu.
3 Move the cursor control joystick down toselect [All Disc Update].
4 Press ENTER.• “Auto Update” is displayed as the rack starts to
rotate as each new disc is read by the player. Ittakes between 10 and 20 seconds for the playerto read a single disc.
• When All Disc Update is complete, the playerturns off automatically. This is not a malfunction.
To performing Add. Update using controls on
the front panel
Press UPDATE on the front panel repeatedly until “All Update”appears in the display window, then press the enter button.
To cancel All Update
Press STOP 7.
When the All Update procedure is canceled, none of theupdated information is retained in memory.
Inputting and Changing TextInformationDisc titles and artist names can be input for all the discsloaded in the player. This information is displayed whenthe disc is played and is also used when performingsearches.
Input information can be as long as 12 characters usingyour choice of letters, numbers and symbols. Characterscan be input using controls on the front panel or remotecontrol unit, and can also be directly input using a PS/2compatible keyboard or mouse if connections are madeto the KEYBOARD/MOUSE jack on the front panel.
Notes• The input text information is not actually stored in the player’s
memory until the power has been put in standby. If informationhas been input, and the power cord is unplugged or the mainpower to the player is cut, the information may be erased.
• Text information cannot be input for the disc in the singleloader slot.
continued
Text Auto UpdateCustom
Update the menu for all discsThe player turns off when finished
i
Move SUB SETUP ExitENTER Select
Add. Disc UpdateAll Disc Update
4 ¢ 1
87
e E
¡
3
4(ENTER)
2,3(Cursor)
1
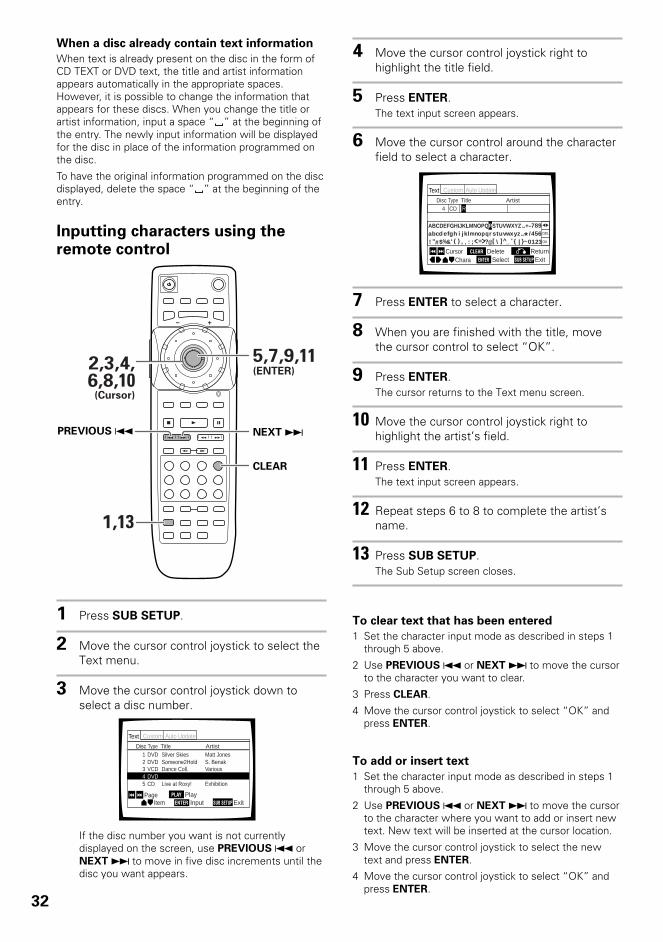
32
When a disc already contain text information
When text is already present on the disc in the form ofCD TEXT or DVD text, the title and artist informationappears automatically in the appropriate spaces.However, it is possible to change the information thatappears for these discs. When you change the title orartist information, input a space “ ” at the beginning ofthe entry. The newly input information will be displayedfor the disc in place of the information programmed onthe disc.
To have the original information programmed on the discdisplayed, delete the space “ ” at the beginning of theentry.
Inputting characters using theremote control
1 Press SUB SETUP.
2 Move the cursor control joystick to select theText menu.
3 Move the cursor control joystick down toselect a disc number.
If the disc number you want is not currentlydisplayed on the screen, use PREVIOUS 4 orNEXT ¢ to move in five disc increments until thedisc you want appears.
4 ¢ 1
87
e E
¡
3
2,3,4,6,8,10
(Cursor)
1,13
5,7,9,11(ENTER)
NEXT ¢
CLEAR
PREVIOUS 4
Text Auto UpdateCustom
Title Artist1 DVD Silver Skies Matt Jones2 DVD Someone2Hold S. Benak3 VCD Dance Coll. Various
5 CD Live at Roxy! Exhibition
TypeDisc
4 DVD
Item SUB SETUPPage
ExitENTER InputPLAY Play4 ¢
4 Move the cursor control joystick right tohighlight the title field.
5 Press ENTER.The text input screen appears.
6 Move the cursor control around the characterfield to select a character.
7 Press ENTER to select a character.
8 When you are finished with the title, movethe cursor control to select “OK”.
9 Press ENTER.The cursor returns to the Text menu screen.
10 Move the cursor control joystick right tohighlight the artist’s field.
11 Press ENTER.The text input screen appears.
12 Repeat steps 6 to 8 to complete the artist’sname.
13 Press SUB SETUP.The Sub Setup screen closes.
To clear text that has been entered
1 Set the character input mode as described in steps 1through 5 above.
2 Use PREVIOUS 4 or NEXT ¢ to move the cursorto the character you want to clear.
3 Press CLEAR.
4 Move the cursor control joystick to select “OK” andpress ENTER.
To add or insert text
1 Set the character input mode as described in steps 1through 5 above.
2 Use PREVIOUS 4 or NEXT ¢ to move the cursorto the character where you want to add or insert newtext. New text will be inserted at the cursor location.
3 Move the cursor control joystick to select the newtext and press ENTER.
4 Move the cursor control joystick to select “OK” andpress ENTER.
Text Auto UpdateCustom
Title ArtistDisc4 CD
DEL
OK
R
ABCDEFGHIJKLMNOPQRSTUVWXYZ +–a * /456
789bcd efgh i jklmnopqr stuvw yx z
!
Type
”#$%&‘ ( ) , . : ;<=>?@[ \ ]^_ ' | ~0123
Chara SUB SETUPCursor
ExitENTER SelectCLEAR Delete Return4 ¢
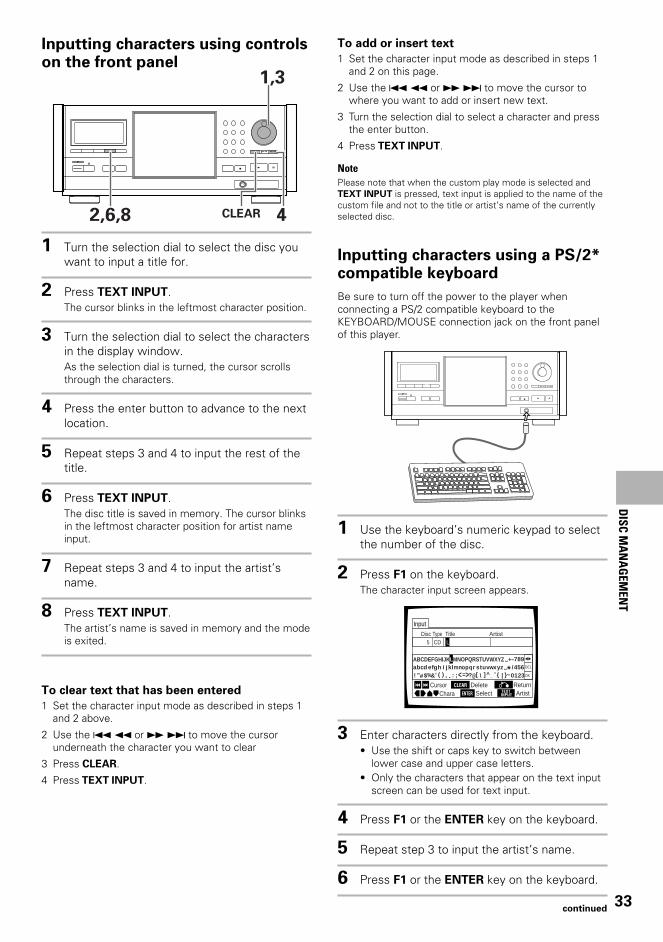
33
Inputting characters using controlson the front panel
1 Turn the selection dial to select the disc youwant to input a title for.
2 Press TEXT INPUT.The cursor blinks in the leftmost character position.
3 Turn the selection dial to select the charactersin the display window.As the selection dial is turned, the cursor scrollsthrough the characters.
4 Press the enter button to advance to the nextlocation.
5 Repeat steps 3 and 4 to input the rest of thetitle.
6 Press TEXT INPUT.The disc title is saved in memory. The cursor blinksin the leftmost character position for artist nameinput.
7 Repeat steps 3 and 4 to input the artist’sname.
8 Press TEXT INPUT.The artist’s name is saved in memory and the modeis exited.
To clear text that has been entered
1 Set the character input mode as described in steps 1and 2 above.
2 Use the 4 1 or ¡ ¢ to move the cursorunderneath the character you want to clear
3 Press CLEAR.
4 Press TEXT INPUT.
To add or insert text
1 Set the character input mode as described in steps 1and 2 on this page.
2 Use the 4 1 or ¡ ¢ to move the cursor towhere you want to add or insert new text.
3 Turn the selection dial to select a character and pressthe enter button.
4 Press TEXT INPUT.
NotePlease note that when the custom play mode is selected andTEXT INPUT is pressed, text input is applied to the name of thecustom file and not to the title or artist’s name of the currentlyselected disc.
Inputting characters using a PS/2*compatible keyboard
Be sure to turn off the power to the player whenconnecting a PS/2 compatible keyboard to theKEYBOARD/MOUSE connection jack on the front panelof this player.
1 Use the keyboard’s numeric keypad to selectthe number of the disc.
2 Press F1 on the keyboard.The character input screen appears.
3 Enter characters directly from the keyboard.• Use the shift or caps key to switch between
lower case and upper case letters.• Only the characters that appear on the text input
screen can be used for text input.
4 Press F1 or the ENTER key on the keyboard.
5 Repeat step 3 to input the artist’s name.
6 Press F1 or the ENTER key on the keyboard.
Î
4
¢
1
¡
7
3
8
Input
Title ArtistDisc5 CD
DEL
OK
L
ABCDEFGHIJKLMNOPQRSTUVWXYZ +–a * /456
789bcd efgh i jklmnopqr stuvw yx z
!
Type
”#$%&‘ ( ) , . : ;<=>?@[ \ ]^_ ' | ~0123
Chara TEXT INPUT
CursorArtistENTER Select
CLEAR Delete Return4 ¢
DISC M
AN
AG
EMEN
T
continued
Î
4 ¢ 1 ¡
7 3 8
1,3
2,6,8 4CLEAR
34
To use a connected keyboard for other player
functions
In addition to character input, the keyboard can be usedin a number of other player operations. The table belowshows the keys that can be used and theircorresponding function.
Notes• If you want to use both the mouse and keyboard, connect
them both using a commercially available “Y” cable. Becausesometimes “Y” cable connections are reversed, if thekeyboard and mouse are ineffective after making connections,try switching the mouse and keyboard connections.
• For compatibility reasons, be sure to use only an IBM*compatible keyboard.
* IBM and PS/2 are registered trademarks of IBM Corporation.
Text Auto UpdateCustom
Title ArtistDisc4 CD
DEL
OK
Rook J
ABCDEFGHIJKLMNOPQRSTUVWXYZ +–a * /456
789bcd efgh i jklmnopqr stuvw yx z
!
Type
”#$%&‘ ( ) , . : ;<=>?@[ \ ]^_ ' | ~0123
Chara SUB SETUPCursor
ExitENTER SelectCLEAR Delete Return4 ¢
Inputting characters using a PS/2*compatible mouse
Be sure to turn off the power to the player whenconnecting a PS/2 compatible mouse to theKEYBOARD/MOUSE connection jack on the front panelof this player.
1 Click both mouse buttons at the same time.The following menu appears at the bottom of thescreen.
Î
4
¢
1
¡
7
3
8
4 3 8 7¢
TOPMENU MENU SETUP SUB
SETUP
4 3 8 7¢
TOPMENU MENU SETUP SUB
SETUP
Text Auto UpdateCustom
Title Artist1 DVD Silver Skies Matt Jones2 DVD Someone2Hold S. Benak3 VCD Dance Coll. Various
5 CD Live at Roxy! Exhibition
TypeDisc
4 DVD
Item SUB SETUPPage
Exit4 ¢
Rook
Key Function
F1 Text input
Sub Setup
Text search
F3
F2
Play modeF4
ReturnESC
ClearDELETE
Cursor controlArrow keys (+,≠,±,=)
Previous/NextPAGE UP/PAGE DOWN
EnterENTER
2 Move the cursor to SUB SETUP in the menubar and click the left button.When the mouse can be used to make a selection,the cursor arrow turns orange.
3 Click on the disc title or artist’s name field thatyou want to input text for.
4 Click on the characters you want to select.
5 Click on “OK” on the text input screen to exitthe text input screen.
6 Repeat steps 3 and 5 to continue input oftitles and artist’s names.
7 When you are finished with input, click on“SUB SETUP”.
Notes• In addition to text input, a connected mouse can be used to
perform other player functions by clicking on on-screencommand icons.
• If you want to use both the mouse and keyboard, connectthem both using a commercially available “Y” cable. Becausesometimes “Y” cable connections are reversed, if thekeyboard and mouse are ineffective after making connections,try switching the mouse and keyboard connections.
• For compatibility reasons, be sure to use only an IBM*compatible mouse.
* IBM and PS/2 are registered trademarks of IBM Corporation.
35
Searching for a Disc, Title,Chapter, Track, or Location ona Disc – DVD/Video CD/CD
This player offers different ways of accessing theinformation on a DVD, Video CD, or CD. Using SEARCH
MODE, you can search for titles or chapters on a DVD,tracks on a Video CD or CD, and even select the point intime to start playback.
4 ¢ 1
87
e E
¡
33
1
2
1 Press SEARCH MODE repeatedly duringplayback of a disc to select the type of search.The type of search changes which each press asfollows.
When playback is stopped, only Disc search isperformed.
2 Press the number button(s) of the desireddisc, title, chapter or track or of the specifictime where you would like to begin playback.• To select number 3, press 3.• To select number 10, press 1 and 0.• To select number 37, press 3 and 7.• To select number 256, press 2, 5, and 6 (disc only).When performing a time search:
• To select 21 minutes, 43 seconds, press2, 1, 4, and 3.
• To select 1 hour, 14 minutes, press 7, 4, 0, and 0.
3 Press PLAY 3.Playback of the selected disc, title, chapter or trackstarts. When a time search is performed, playbackbegins at the appointed time.
3 Title 3 Chapter/Track
Off 2 Disc 2 Time 2
Title : 37
Selecting a Disc On-Screen
1 Press SUB SETUP.
2 Move the cursor control joystick down toenter the Sub Setup screen Text menu.
3 Move the cursor control joystick to highlightthe disc number of the disc you want to play .If the disc you want to play is not displayed on thecurrent screen, use PREVIOUS 4 and NEXT ¢to change the set of discs being displayed.
4 Press PLAY 3.Playback of the selected disc begins.
To input disc title and artist name information
in the Text menu page
Refer to the section “Inputting and Changing TextInformation” starting on page 31.
To perform a disc search for a particular disc
number, title, or artist in the Text menu page
Refer to the section “Searching for a Disc, Title, Chapter,Track, or Location on a Disc” on this page.
To sort the discs in the rack according to
number, title, or artist in the Text menu page
Move the cursor control joystick right or left to select acategory and then press ENTER.• When the Disc column is selected, the discs are sorted by
their order in the disc rack.• When the Type column is selected, the discs are sorted by
their format.• When either Title or Artist columns are selected, the discs are
sorted in alphabetical order.
NoteWhen Master-Slave connections are made, discs on the Master playerare numbered from 1 to 300 and 301 to 600 on the Slave player.
4 ¢ 1
87
e E
¡
3
2,3(Cursor)
1
4NEXT ¢PREVIOUS 4
DISC M
AN
AG
EMEN
T
continued
36
Searching for a disc by format,title, or artist name
There are a number of ways to find a disc that you haveloaded in the player. You can search for a disc by discnumber, format, title, or artist.
1 Press SUB SETUP.
2 Move the cursor control joystick down toenter the Text menu.
3 Move the cursor control joystick to one of thecolumn headings on the screen, that you wantto use as the basis of your search.
4 Press SEARCH MODE.
To perform a direct title or chapter/track
search using the number buttons
Press the number buttons while the disc is stopped toselect a title number.
Press the number buttons while the disc is playing toselect a chapter or track.
• To select number 3, press 3.• To select number 10, press +10 and 0.• To select number 37, press +10, +10, +10 and 7.
Notes• For some discs, selection can be made using the top menu on
the DVD. In this case, press TOP MENU to display the menuscreen and then make your selection.
• With some DVDs, the search operation may not be possibleand may stop shortly after being performed. In this case, the
mark is displayed.• Time search is not possible with CDs.• When performing DVD time search, playback may start from a
slightly different time than that specified.• Time search is not possible during when the disc is stopped.• Search using SEARCH MODE is not possible during PBC
playback of Video CDs.
4 ¢ 1
87
e E
¡
3
2,3,5(Cursor)
1
4
7
6(ENTER)
NEXT ¢PREVIOUS 4
37
5 Input the appropriate search item for eachtype of search as follows.• For a disc number search, move the cursor
control joystick down to the nearest number tothe disc you want to access.
• For a format search, move the cursor controljoystick down to the appropriate format.
• For a title and artist searches, use the cursorcontrol joystick to select a character (letter,number, symbol) corresponding to the firstcharacter of the disc title or artist’s name.
6 Press ENTER.The first group of five titles appears that fit thedescription of the search. If the disc you are lookingfor does not appear initially, press NEXT ¢ tomove to the next group of five titles.
7 Move the cursor control joystick to thenumber of the disc that you want to play, andpress PLAY 3.Playback of the selected disc begins.
Text Auto UpdateCustom
Title ArtistType
51–100
151–200201–250251–300
Disc1–50
101–150
ReturnMove SUB SETUP ExitENTER Select
Text Auto UpdateCustom
Title ArtistType
CDVCD
DiscDVD
ReturnMove SUB SETUP ExitENTER Select
Text Auto UpdateCustom
Title ArtistDisc
DEL
OK
ABCDEFGHIJKLMNOPQRSTUVWXYZ +–a * /456
789bcd efgh i jklmnopqr stuvw yx z
!
Type
”#$%&‘ ( ) , . : ;<=>?@[ \ ]^_ ' | ~0123
Search: J
ReturnChara SUB SETUP ExitENTER Select
To perform a disc search using controls on the
front panel
1 Press TEXT SEARCH.
The type of search changes which each press asfollows.
2 Turn the selection dial to make a selection.
• Turning the selection dial during a Type searchdisplays the disc types.
• Turning the selection dial during a Title or Artistsearch displays the characters that can besearched for.
3 Press the enter button.
4 Turn the selection dial to select the disc you want toplay.
5 Press 3.
Playback of the selected disc begins.
Creating and Selecting CustomFilesThe custom play mode refers to a personalized playbackmode in which you can create as many as 20 customfiles (10 DVD/Video CD and 10 CD) grouping the variousdiscs in the rack as you like up to 300 discs per file.
To create and select custom files
1 Press SUB SETUP.
2 Move the cursor control joystick to the right toselect the Custom menu.
3 Type 3 Title
Artist 2
continued
4 ¢ 1
87
e E
¡
3
2,3,5,7(Cursor)
4,6,8(ENTER)
1,9
5NEXT ¢PREVIOUS 4
DISC M
AN
AG
EMEN
T
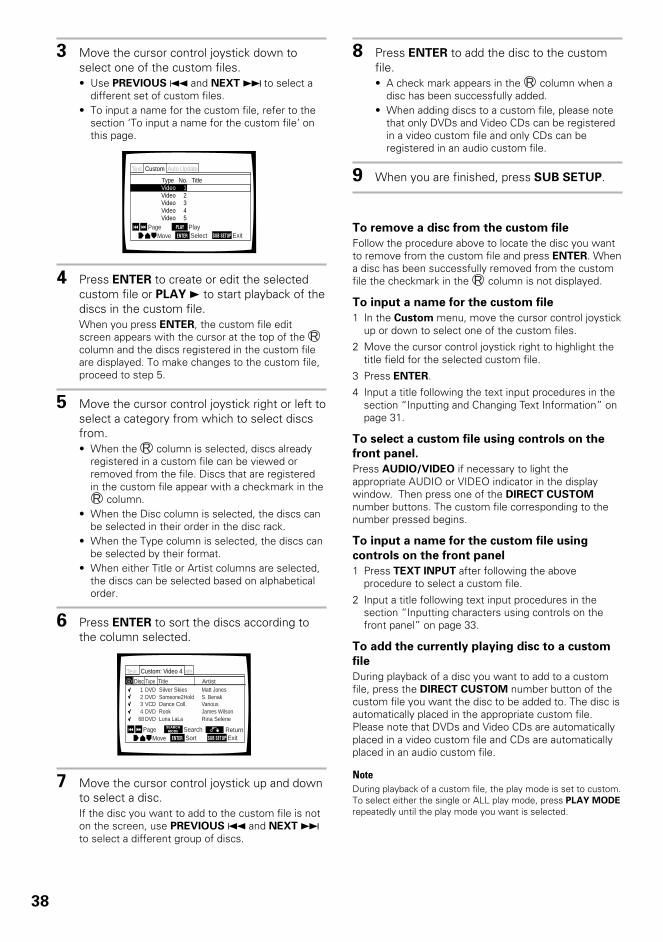
38
3 Move the cursor control joystick down toselect one of the custom files.• Use PREVIOUS 4 and NEXT ¢ to select a
different set of custom files.• To input a name for the custom file, refer to the
section ‘To input a name for the custom file’ onthis page.
4 Press ENTER to create or edit the selectedcustom file or PLAY 3 to start playback of thediscs in the custom file.When you press ENTER, the custom file editscreen appears with the cursor at the top of the Rcolumn and the discs registered in the custom fileare displayed. To make changes to the custom file,proceed to step 5.
5 Move the cursor control joystick right or left toselect a category from which to select discsfrom.• When the R column is selected, discs already
registered in a custom file can be viewed orremoved from the file. Discs that are registeredin the custom file appear with a checkmark in theR column.
• When the Disc column is selected, the discs canbe selected in their order in the disc rack.
• When the Type column is selected, the discs canbe selected by their format.
• When either Title or Artist columns are selected,the discs can be selected based on alphabeticalorder.
6 Press ENTER to sort the discs according tothe column selected.
7 Move the cursor control joystick up and downto select a disc.If the disc you want to add to the custom file is noton the screen, use PREVIOUS 4 and NEXT ¢to select a different group of discs.
Text Auto Update
Title Artist1√
√√√
√DVD Silver Skies Matt Jones
2 DVD Someone2Hold S. Benak3 VCD Dance Coll. Various4 DVD Rook James Wilson
68 DVD Luna LaLa Rina Selene
TypeDiscR
ReturnMove SUB SETUP ExitENTER Sort
Page SEARCHMODE Search4 ¢
Custom: Video 4
Text Auto UpdateCustom
Type No. TitleVideoVideoVideo
Video
123
5Video 4
Move SUB SETUP ExitENTER SelectPage Play4 ¢ PLAY
8 Press ENTER to add the disc to the customfile.• A check mark appears in the R column when a
disc has been successfully added.• When adding discs to a custom file, please note
that only DVDs and Video CDs can be registeredin a video custom file and only CDs can beregistered in an audio custom file.
9 When you are finished, press SUB SETUP.
To remove a disc from the custom file
Follow the procedure above to locate the disc you wantto remove from the custom file and press ENTER. Whena disc has been successfully removed from the customfile the checkmark in the R column is not displayed.
To input a name for the custom file
1 In the Custom menu, move the cursor control joystickup or down to select one of the custom files.
2 Move the cursor control joystick right to highlight thetitle field for the selected custom file.
3 Press ENTER.
4 Input a title following the text input procedures in thesection “Inputting and Changing Text Information” onpage 31.
To select a custom file using controls on the
front panel.
Press AUDIO/VIDEO if necessary to light theappropriate AUDIO or VIDEO indicator in the displaywindow. Then press one of the DIRECT CUSTOM
number buttons. The custom file corresponding to thenumber pressed begins.
To input a name for the custom file using
controls on the front panel
1 Press TEXT INPUT after following the aboveprocedure to select a custom file.
2 Input a title following text input procedures in thesection “Inputting characters using controls on thefront panel” on page 33.
To add the currently playing disc to a custom
file
During playback of a disc you want to add to a customfile, press the DIRECT CUSTOM number button of thecustom file you want the disc to be added to. The disc isautomatically placed in the appropriate custom file.Please note that DVDs and Video CDs are automaticallyplaced in a video custom file and CDs are automaticallyplaced in an audio custom file.
NoteDuring playback of a custom file, the play mode is set to custom.To select either the single or ALL play mode, press PLAY MODE
repeatedly until the play mode you want is selected.
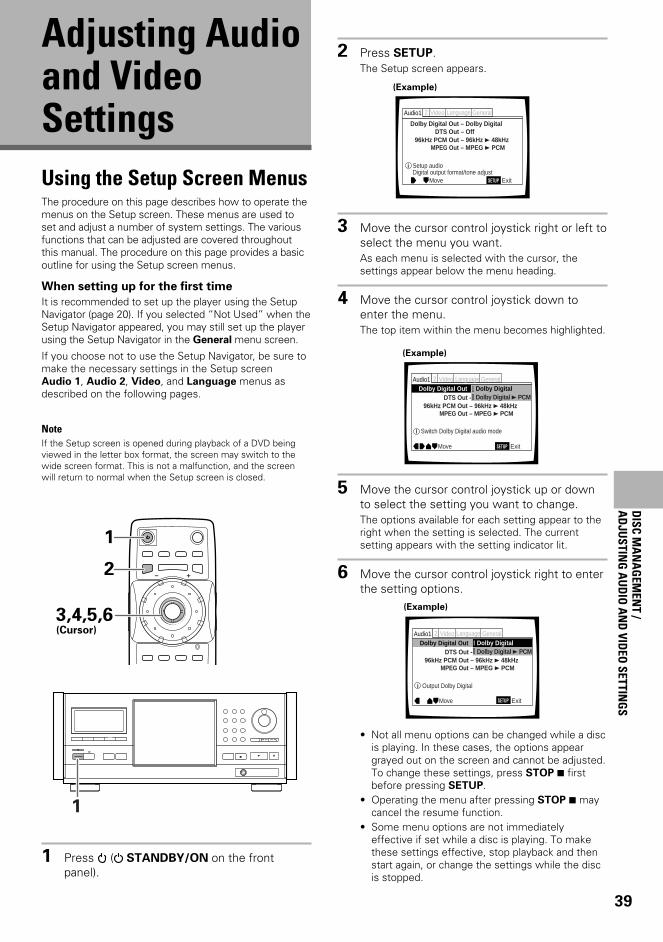
39
Using the Setup Screen MenusThe procedure on this page describes how to operate themenus on the Setup screen. These menus are used toset and adjust a number of system settings. The variousfunctions that can be adjusted are covered throughoutthis manual. The procedure on this page provides a basicoutline for using the Setup screen menus.
When setting up for the first time
It is recommended to set up the player using the SetupNavigator (page 20). If you selected “Not Used” when theSetup Navigator appeared, you may still set up the playerusing the Setup Navigator in the General menu screen.
If you choose not to use the Setup Navigator, be sure tomake the necessary settings in the Setup screenAudio 1, Audio 2, Video, and Language menus asdescribed on the following pages.
NoteIf the Setup screen is opened during playback of a DVD beingviewed in the letter box format, the screen may switch to thewide screen format. This is not a malfunction, and the screenwill return to normal when the Setup screen is closed.
1 Press ( STANDBY/ON on the frontpanel).
2 Press SETUP.The Setup screen appears.
3 Move the cursor control joystick right or left toselect the menu you want.As each menu is selected with the cursor, thesettings appear below the menu heading.
4 Move the cursor control joystick down toenter the menu.The top item within the menu becomes highlighted.
5 Move the cursor control joystick up or downto select the setting you want to change.The options available for each setting appear to theright when the setting is selected. The currentsetting appears with the setting indicator lit.
6 Move the cursor control joystick right to enterthe setting options.
• Not all menu options can be changed while a discis playing. In these cases, the options appeargrayed out on the screen and cannot be adjusted.To change these settings, press STOP 7 firstbefore pressing SETUP.
• Operating the menu after pressing STOP 7 maycancel the resume function.
• Some menu options are not immediatelyeffective if set while a disc is playing. To makethese settings effective, stop playback and thenstart again, or change the settings while the discis stopped.
Dolby Digital Out DTS Out -
96kHz PCM Out – 96kHz 3 48kHzMPEG Out – MPEG 3 PCM
Audio1 GeneralLanguageVideo2
Move Exit
Dolby Digital 3 PCMDolby Digital
SETUP
Output Dolby Digital
(Example)
(Example)
Dolby Digital Out – Dolby DigitalDTS Out – Off
96kHz PCM Out – 96kHz 3 48kHzMPEG Out – MPEG 3 PCM
Audio1 GeneralLanguageVideo2
SETUPMove Exit
Setup audioDigital output format/tone adjust
DTS Out - 96kHz PCM Out – 96kHz 3 48kHz
MPEG Out – MPEG 3 PCM
Audio1 GeneralLanguageVideo2
Move Exit
Dolby Digital 3 PCMDolby Digital
SETUP
Dolby Digital Out
Switch Dolby Digital audio mode
(Example)
1
2
3,4,5,6(Cursor)
Adjusting Audioand VideoSettings
DISC M
AN
AG
EMEN
T /A
DJU
STING
AU
DIO
AN
D VID
EO SETTIN
GS
Î
4 ¢ 1 ¡
7 3 8
1
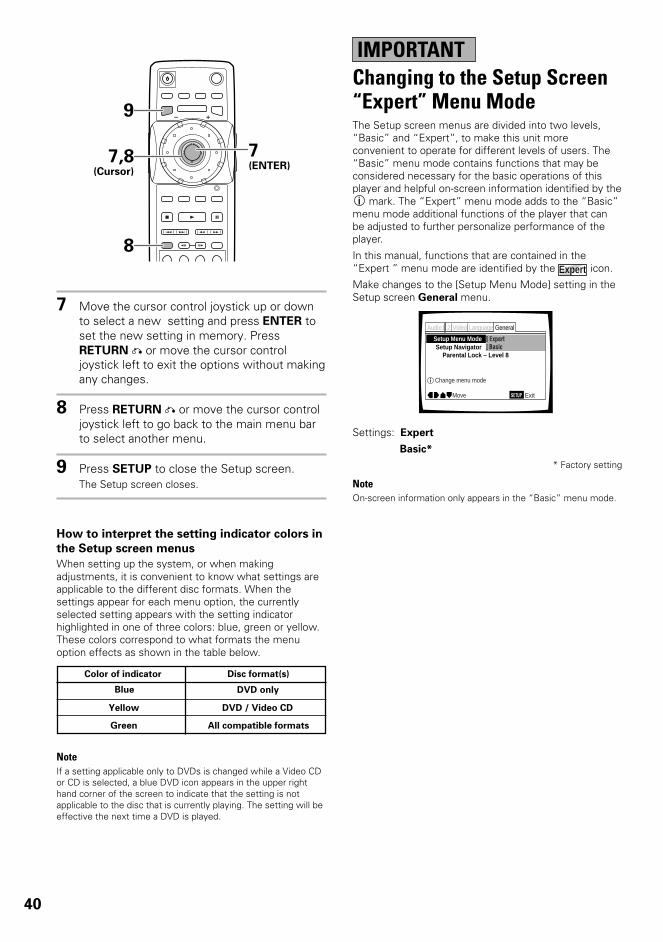
40
IMPORTANTChanging to the Setup Screen“Expert” Menu ModeThe Setup screen menus are divided into two levels,“Basic” and “Expert”, to make this unit moreconvenient to operate for different levels of users. The“Basic” menu mode contains functions that may beconsidered necessary for the basic operations of thisplayer and helpful on-screen information identified by thei mark. The “Expert” menu mode adds to the “Basic”
menu mode additional functions of the player that canbe adjusted to further personalize performance of theplayer.
In this manual, functions that are contained in the“Expert ” menu mode are identified by the Expert icon.
Make changes to the [Setup Menu Mode] setting in theSetup screen General menu.
Settings: Expert
Basic*
* Factory setting
NoteOn-screen information only appears in the “Basic” menu mode.
7 Move the cursor control joystick up or downto select a new setting and press ENTER toset the new setting in memory. PressRETURN or move the cursor controljoystick left to exit the options without makingany changes.
8 Press RETURN or move the cursor controljoystick left to go back to the main menu barto select another menu.
9 Press SETUP to close the Setup screen.The Setup screen closes.
How to interpret the setting indicator colors in
the Setup screen menus
When setting up the system, or when makingadjustments, it is convenient to know what settings areapplicable to the different disc formats. When thesettings appear for each menu option, the currentlyselected setting appears with the setting indicatorhighlighted in one of three colors: blue, green or yellow.These colors correspond to what formats the menuoption effects as shown in the table below.
NoteIf a setting applicable only to DVDs is changed while a Video CDor CD is selected, a blue DVD icon appears in the upper righthand corner of the screen to indicate that the setting is notapplicable to the disc that is currently playing. The setting will beeffective the next time a DVD is played.
Color of indicator Disc format(s)
Blue DVD only
All compatible formats
DVD / Video CD
Green
Yellow
4 ¢ 1
87
e E
¡
3
8
9
7,8(Cursor)
7(ENTER)
Parental Lock – Level 8 Setup Navigator
Setup Menu Mode
Audio1 GeneralLanguageVideo2
Move Exit
ExpertBasic
SETUP
Change menu mode
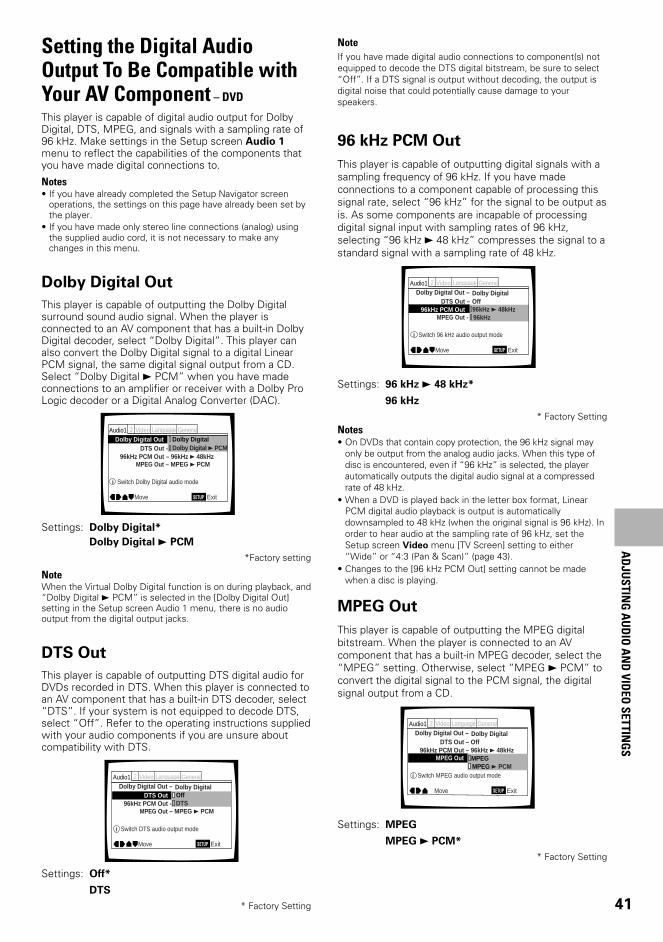
41
Setting the Digital AudioOutput To Be Compatible withYour AV Component – DVD
This player is capable of digital audio output for DolbyDigital, DTS, MPEG, and signals with a sampling rate of96 kHz. Make settings in the Setup screen Audio 1menu to reflect the capabilities of the components thatyou have made digital connections to.
Notes• If you have already completed the Setup Navigator screen
operations, the settings on this page have already been set bythe player.
• If you have made only stereo line connections (analog) usingthe supplied audio cord, it is not necessary to make anychanges in this menu.
Dolby Digital Out
This player is capable of outputting the Dolby Digitalsurround sound audio signal. When the player isconnected to an AV component that has a built-in DolbyDigital decoder, select “Dolby Digital”. This player canalso convert the Dolby Digital signal to a digital LinearPCM signal, the same digital signal output from a CD.Select “Dolby Digital 3 PCM” when you have madeconnections to an amplifier or receiver with a Dolby ProLogic decoder or a Digital Analog Converter (DAC).
Settings: Dolby Digital*
Dolby Digital 3 PCM
*Factory setting
NoteWhen the Virtual Dolby Digital function is on during playback, and“Dolby Digital 3 PCM” is selected in the [Dolby Digital Out]setting in the Setup screen Audio 1 menu, there is no audiooutput from the digital output jacks.
DTS Out
This player is capable of outputting DTS digital audio forDVDs recorded in DTS. When this player is connected toan AV component that has a built-in DTS decoder, select“DTS”. If your system is not equipped to decode DTS,select “Off”. Refer to the operating instructions suppliedwith your audio components if you are unsure aboutcompatibility with DTS.
Settings: Off*
DTS
* Factory Setting
NoteIf you have made digital audio connections to component(s) notequipped to decode the DTS digital bitstream, be sure to select“Off”. If a DTS signal is output without decoding, the output isdigital noise that could potentially cause damage to yourspeakers.
96 kHz PCM Out
This player is capable of outputting digital signals with asampling frequency of 96 kHz. If you have madeconnections to a component capable of processing thissignal rate, select “96 kHz” for the signal to be output asis. As some components are incapable of processingdigital signal input with sampling rates of 96 kHz,selecting “96 kHz 3 48 kHz” compresses the signal to astandard signal with a sampling rate of 48 kHz.
Settings: 96 kHz 3 48 kHz*
96 kHz
* Factory SettingNotes• On DVDs that contain copy protection, the 96 kHz signal may
only be output from the analog audio jacks. When this type ofdisc is encountered, even if “96 kHz” is selected, the playerautomatically outputs the digital audio signal at a compressedrate of 48 kHz.
• When a DVD is played back in the letter box format, LinearPCM digital audio playback is output is automaticallydownsampled to 48 kHz (when the original signal is 96 kHz). Inorder to hear audio at the sampling rate of 96 kHz, set theSetup screen Video menu [TV Screen] setting to either“Wide” or “4:3 (Pan & Scan)” (page 43).
• Changes to the [96 kHz PCM Out] setting cannot be madewhen a disc is playing.
MPEG Out
This player is capable of outputting the MPEG digitalbitstream. When the player is connected to an AVcomponent that has a built-in MPEG decoder, select the“MPEG” setting. Otherwise, select “MPEG 3 PCM” toconvert the digital signal to the PCM signal, the digitalsignal output from a CD.
Settings: MPEG
MPEG 3 PCM*
* Factory Setting
DTS Out - 96kHz PCM Out – 96kHz 3 48kHz
MPEG Out – MPEG 3 PCM
Audio1 GeneralLanguageVideo2
Move Exit
Dolby Digital 3 PCMDolby Digital
SETUP
Dolby Digital Out
Switch Dolby Digital audio mode
Dolby Digital Out – DTS Out
96kHz PCM Out - 96kHz>48kHzMPEG Out – MPEG 3 PCM
Audio1 GeneralLanguageVideo2
Move Exit
DTSOffDolby Digital
SETUP
Switch DTS audio output mode
MPEG Out - PCM
Dolby Digital Out – DTS Out –
96kHz PCM Out
Audio1 GeneralLanguageVideo2
Move Exit
96kHz96kHz 3 48kHz
Dolby DigitalOff
SETUP
Switch 96 kHz audio output mode
Dolby Digital Out – DTS Out – Off
96kHz PCM Out – 96kHz 3 48kHzMPEG Out
Audio1 GeneralLanguageVideo2
Move Exit
MPEG 3 PCMMPEG
Dolby Digital
SETUP
Switch MPEG audio output mode
AD
JUSTIN
G A
UD
IO A
ND
VIDEO
SETTING
S
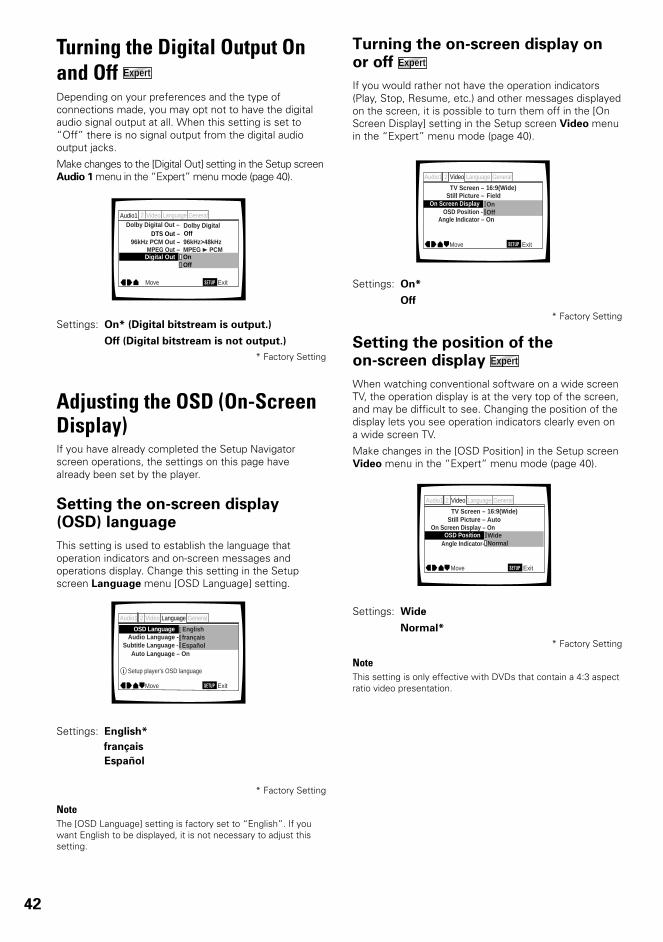
42
Turning the Digital Output Onand Off Expert
Depending on your preferences and the type ofconnections made, you may opt not to have the digitalaudio signal output at all. When this setting is set to“Off” there is no signal output from the digital audiooutput jacks.
Make changes to the [Digital Out] setting in the Setup screenAudio 1 menu in the “Expert” menu mode (page 40).
Settings: On* (Digital bitstream is output.)
Off (Digital bitstream is not output.)
* Factory Setting
Adjusting the OSD (On-ScreenDisplay)If you have already completed the Setup Navigatorscreen operations, the settings on this page havealready been set by the player.
Setting the on-screen display(OSD) language
This setting is used to establish the language thatoperation indicators and on-screen messages andoperations display. Change this setting in the Setupscreen Language menu [OSD Language] setting.
Settings: English*
français
Español
* Factory Setting
NoteThe [OSD Language] setting is factory set to “English”. If youwant English to be displayed, it is not necessary to adjust thissetting.
OSD Language EnglishAudio Language - English
Subtitle Language - JapaneseAuto Language – On
Audio1 GeneralLanguageVideo2
Move Exit
EnglishfrançaisEspañol
SETUP
Setup player's OSD language
Turning the on-screen display onor off Expert
If you would rather not have the operation indicators(Play, Stop, Resume, etc.) and other messages displayedon the screen, it is possible to turn them off in the [OnScreen Display] setting in the Setup screen Video menuin the “Expert” menu mode (page 40).
Settings: On*
Off
* Factory Setting
Setting the position of theon-screen display Expert
When watching conventional software on a wide screenTV, the operation display is at the very top of the screen,and may be difficult to see. Changing the position of thedisplay lets you see operation indicators clearly even ona wide screen TV.
Make changes in the [OSD Position] in the Setup screenVideo menu in the “Expert” menu mode (page 40).
Settings: Wide
Normal*
* Factory Setting
NoteThis setting is only effective with DVDs that contain a 4:3 aspectratio video presentation.
OSD Position - NormalAngle Indicator – On
TV Screen – Still Picture –
On Screen Display
Audio1 GeneralLanguageVideo2
Move Exit
16:9(Wide)FieldOnOff
SETUP
TV Screen – Still Picture –
On Screen Display – OnOSD Position
Angle Indicator-
Audio1 GeneralLanguageVideo2
Move Exit
16:9(Wide)Auto
WideNormal
SETUP
Dolby Digital Out – DTS Out –
Digital Out
96kHz PCM Out – 96kHz>48kHzMPEG Out – MPEG 3 PCM
Audio1 GeneralLanguageVideo2
Move Exit
Off
OffOn
Dolby Digital
SETUP
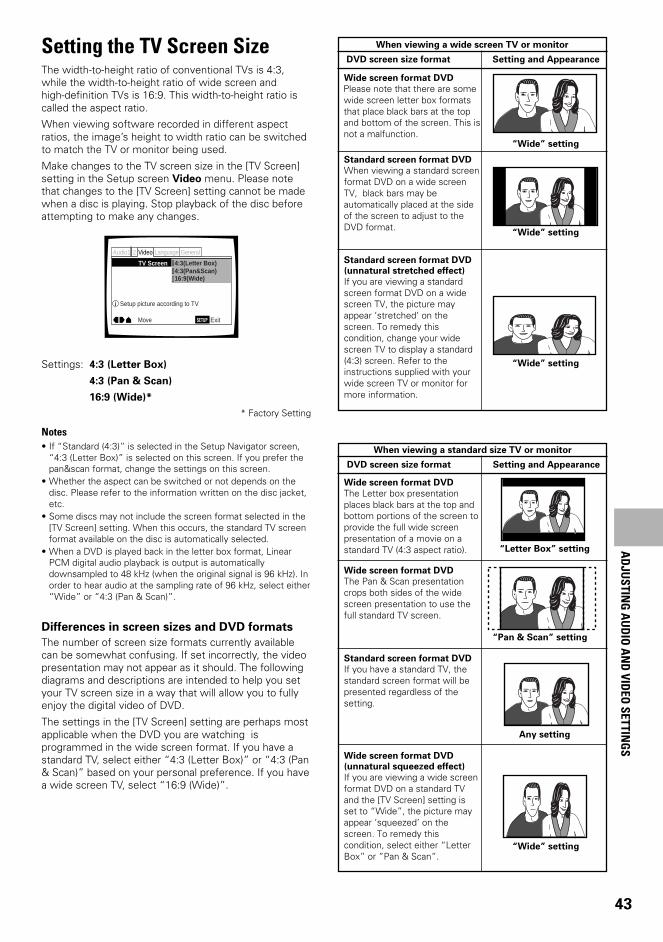
43
Setting the TV Screen SizeThe width-to-height ratio of conventional TVs is 4:3,while the width-to-height ratio of wide screen andhigh-definition TVs is 16:9. This width-to-height ratio iscalled the aspect ratio.
When viewing software recorded in different aspectratios, the image’s height to width ratio can be switchedto match the TV or monitor being used.
Make changes to the TV screen size in the [TV Screen]setting in the Setup screen Video menu. Please notethat changes to the [TV Screen] setting cannot be madewhen a disc is playing. Stop playback of the disc beforeattempting to make any changes.
Settings: 4:3 (Letter Box)
4:3 (Pan & Scan)
16:9 (Wide)*
* Factory Setting
Notes• If “Standard (4:3)” is selected in the Setup Navigator screen,
“4:3 (Letter Box)” is selected on this screen. If you prefer thepan&scan format, change the settings on this screen.
• Whether the aspect can be switched or not depends on thedisc. Please refer to the information written on the disc jacket,etc.
• Some discs may not include the screen format selected in the[TV Screen] setting. When this occurs, the standard TV screenformat available on the disc is automatically selected.
• When a DVD is played back in the letter box format, LinearPCM digital audio playback is output is automaticallydownsampled to 48 kHz (when the original signal is 96 kHz). Inorder to hear audio at the sampling rate of 96 kHz, select either“Wide” or “4:3 (Pan & Scan)”.
Differences in screen sizes and DVD formats
The number of screen size formats currently availablecan be somewhat confusing. If set incorrectly, the videopresentation may not appear as it should. The followingdiagrams and descriptions are intended to help you setyour TV screen size in a way that will allow you to fullyenjoy the digital video of DVD.
The settings in the [TV Screen] setting are perhaps mostapplicable when the DVD you are watching isprogrammed in the wide screen format. If you have astandard TV, select either “4:3 (Letter Box)” or “4:3 (Pan& Scan)” based on your personal preference. If you havea wide screen TV, select “16:9 (Wide)”.
TV Screen
Audio1 GeneralLanguageVideo2
Move Exit
16:9(Wide) 4:3(Pan&Scan) 4:3(Letter Box)
SETUP
Setup picture according to TV
When viewing a wide screen TV or monitor
Standard screen format DVD
When viewing a standard screenformat DVD on a wide screenTV, black bars may beautomatically placed at the sideof the screen to adjust to theDVD format.
“Wide” setting
Wide screen format DVD
Please note that there are somewide screen letter box formatsthat place black bars at the topand bottom of the screen. This isnot a malfunction.
“Wide” setting
“Wide” setting
Standard screen format DVD
(unnatural stretched effect)
If you are viewing a standardscreen format DVD on a widescreen TV, the picture mayappear ‘stretched’ on thescreen. To remedy thiscondition, change your widescreen TV to display a standard(4:3) screen. Refer to theinstructions supplied with yourwide screen TV or monitor formore information.
DVD screen size format Setting and Appearance
Standard screen format DVD
If you have a standard TV, thestandard screen format will bepresented regardless of thesetting.
When viewing a standard size TV or monitor
Wide screen format DVD
The Pan & Scan presentationcrops both sides of the widescreen presentation to use thefull standard TV screen.
“Letter Box” setting
Wide screen format DVD
The Letter box presentationplaces black bars at the top andbottom portions of the screen toprovide the full wide screenpresentation of a movie on astandard TV (4:3 aspect ratio).
“Pan & Scan” setting
Any setting
Wide screen format DVD
(unnatural squeezed effect)
If you are viewing a wide screenformat DVD on a standard TVand the [TV Screen] setting isset to “Wide”, the picture mayappear ‘squeezed’ on thescreen. To remedy thiscondition, select either “LetterBox” or ”Pan & Scan”.
DVD screen size format Setting and Appearance
“Wide” setting
AD
JUSTIN
G A
UD
IO A
ND
VIDEO
SETTING
S
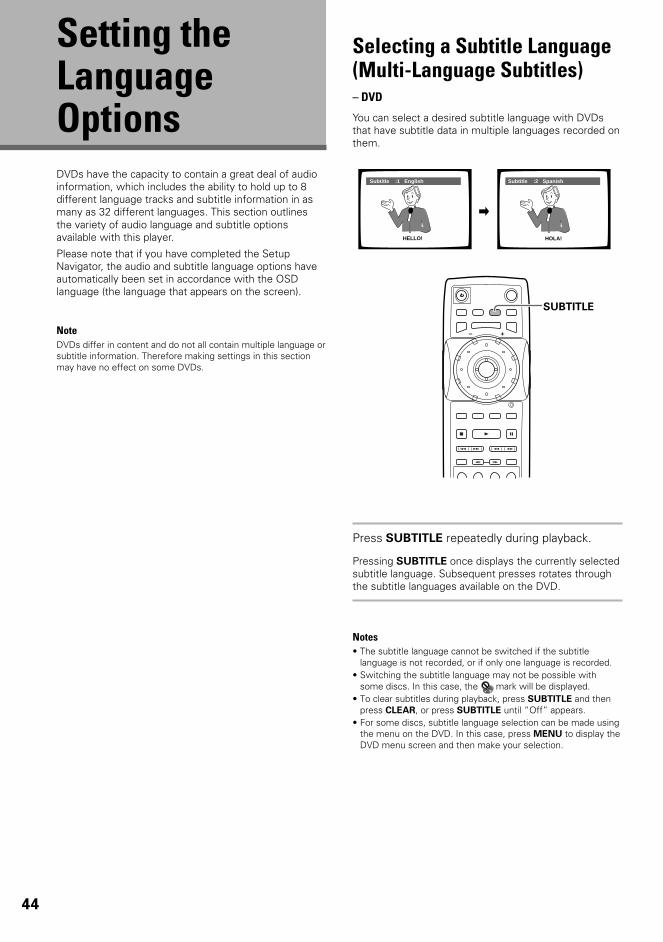
44
Setting theLanguageOptionsDVDs have the capacity to contain a great deal of audioinformation, which includes the ability to hold up to 8different language tracks and subtitle information in asmany as 32 different languages. This section outlinesthe variety of audio language and subtitle optionsavailable with this player.
Please note that if you have completed the SetupNavigator, the audio and subtitle language options haveautomatically been set in accordance with the OSDlanguage (the language that appears on the screen).
NoteDVDs differ in content and do not all contain multiple language orsubtitle information. Therefore making settings in this sectionmay have no effect on some DVDs.
Selecting a Subtitle Language(Multi-Language Subtitles)– DVD
You can select a desired subtitle language with DVDsthat have subtitle data in multiple languages recorded onthem.
Press SUBTITLE repeatedly during playback.
Pressing SUBTITLE once displays the currently selectedsubtitle language. Subsequent presses rotates throughthe subtitle languages available on the DVD.
Notes• The subtitle language cannot be switched if the subtitle
language is not recorded, or if only one language is recorded.• Switching the subtitle language may not be possible with
some discs. In this case, the mark will be displayed.• To clear subtitles during playback, press SUBTITLE and then
press CLEAR, or press SUBTITLE until “Off” appears.• For some discs, subtitle language selection can be made using
the menu on the DVD. In this case, press MENU to display theDVD menu screen and then make your selection.
HELLO! HOLA!
Subtitle :1 English Subtitle :2 Spanish
4 ¢ 1
87
e E
¡
3
SUBTITLE
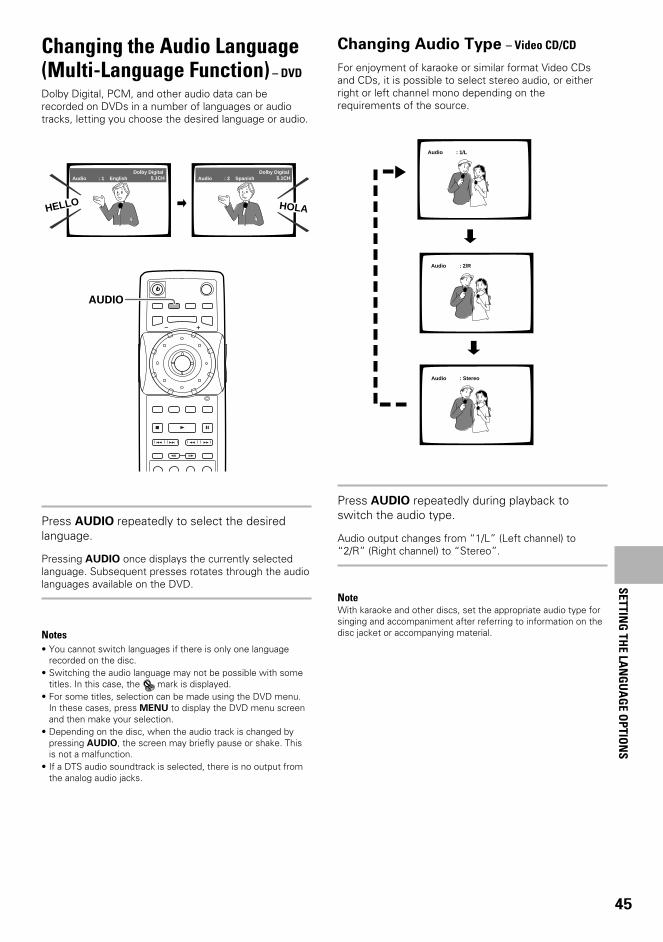
45
Changing the Audio Language(Multi-Language Function) – DVD
Dolby Digital, PCM, and other audio data can berecorded on DVDs in a number of languages or audiotracks, letting you choose the desired language or audio.
Press AUDIO repeatedly to select the desiredlanguage.
Pressing AUDIO once displays the currently selectedlanguage. Subsequent presses rotates through the audiolanguages available on the DVD.
Notes• You cannot switch languages if there is only one language
recorded on the disc.• Switching the audio language may not be possible with some
titles. In this case, the mark is displayed.• For some titles, selection can be made using the DVD menu.
In these cases, press MENU to display the DVD menu screenand then make your selection.
• Depending on the disc, when the audio track is changed bypressing AUDIO, the screen may briefly pause or shake. Thisis not a malfunction.
• If a DTS audio soundtrack is selected, there is no output fromthe analog audio jacks.
Audio : 1 EnglishDolby Digital
5.1CH Audio : 2 Spanish
HELLO HOLA
Dolby Digital 5.1CH
Changing Audio Type – Video CD/CD
For enjoyment of karaoke or similar format Video CDsand CDs, it is possible to select stereo audio, or eitherright or left channel mono depending on therequirements of the source.
Press AUDIO repeatedly during playback toswitch the audio type.
Audio output changes from “1/L” (Left channel) to“2/R” (Right channel) to “Stereo”.
NoteWith karaoke and other discs, set the appropriate audio type forsinging and accompaniment after referring to information on thedisc jacket or accompanying material.
4 ¢ 1
87
e E
¡
3
AUDIO
Audio : 1/L
Audio : 2/R
Audio : Stereo
SETTING
THE LA
NG
UA
GE O
PTION
S
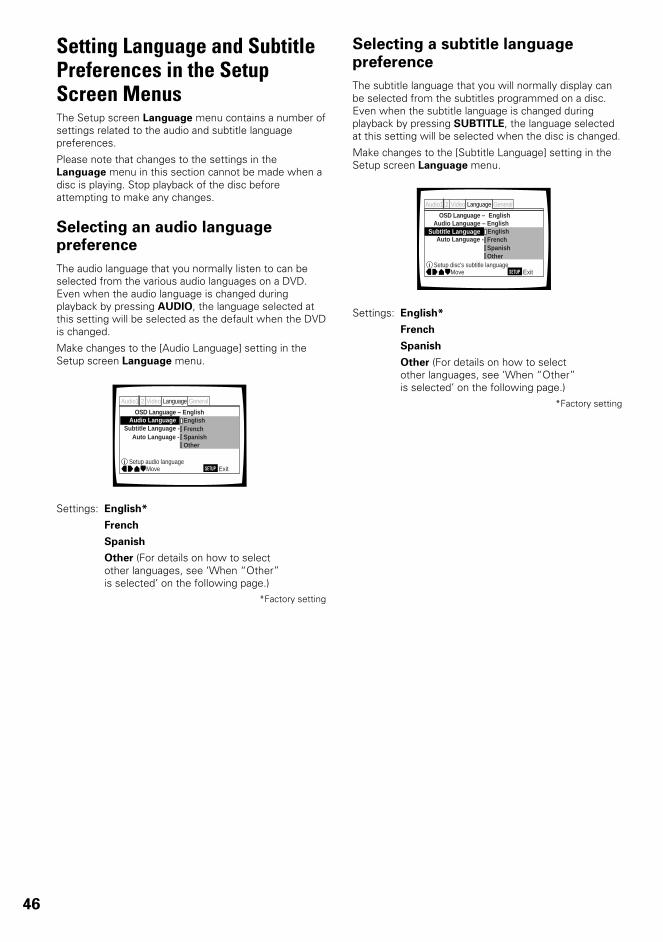
46
Setting Language and SubtitlePreferences in the SetupScreen MenusThe Setup screen Language menu contains a number ofsettings related to the audio and subtitle languagepreferences.
Please note that changes to the settings in theLanguage menu in this section cannot be made when adisc is playing. Stop playback of the disc beforeattempting to make any changes.
Selecting an audio languagepreference
The audio language that you normally listen to can beselected from the various audio languages on a DVD.Even when the audio language is changed duringplayback by pressing AUDIO, the language selected atthis setting will be selected as the default when the DVDis changed.
Make changes to the [Audio Language] setting in theSetup screen Language menu.
Settings: English*
French
Spanish
Other (For details on how to selectother languages, see ‘When “Other”is selected’ on the following page.)
*Factory setting
OSD Language – EnglishAudio Language English
Subtitle Language - JapaneseAuto Language - Japanese
Audio1 GeneralLanguageVideo2
Move Exit
EnglishFrenchSpanishOther
SETUPSetup audio language
Selecting a subtitle languagepreference
The subtitle language that you will normally display canbe selected from the subtitles programmed on a disc.Even when the subtitle language is changed duringplayback by pressing SUBTITLE, the language selectedat this setting will be selected when the disc is changed.
Make changes to the [Subtitle Language] setting in theSetup screen Language menu.
Settings: English*
French
Spanish
Other (For details on how to selectother languages, see ‘When “Other”is selected’ on the following page.)
*Factory setting
OSD Language – EnglishAudio Language – English
Auto Language - EnglishSubtitle Language Japanese
Audio1 GeneralLanguageVideo2
Move Exit
EnglishFrenchSpanishOther
SETUPSetup disc's subtitle language
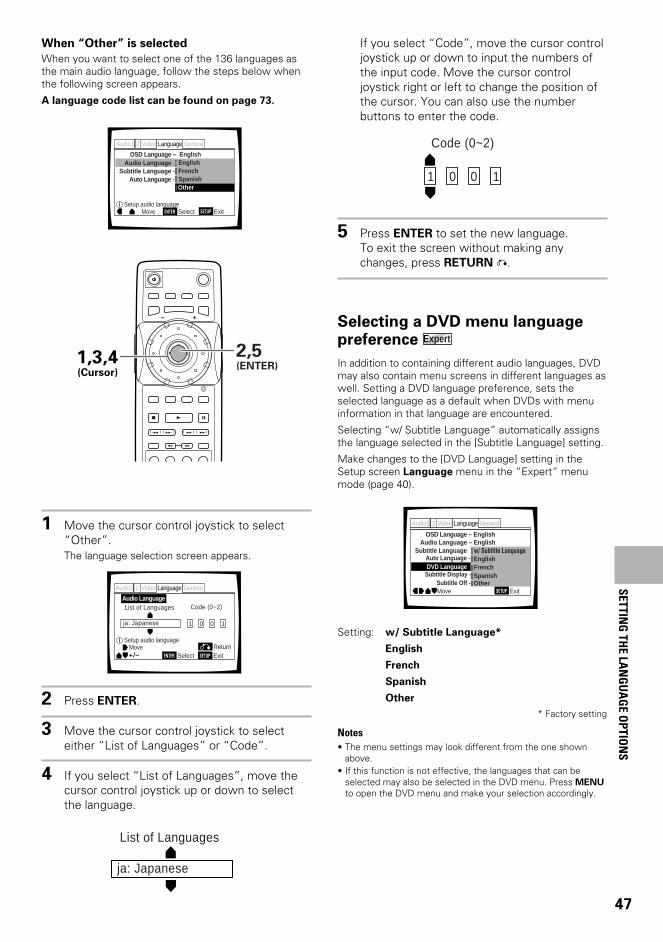
47
ja: Japanese
List of Languages
When “Other” is selected
When you want to select one of the 136 languages asthe main audio language, follow the steps below whenthe following screen appears.
A language code list can be found on page 73.
1 Move the cursor control joystick to select“Other”.The language selection screen appears.
2 Press ENTER.
3 Move the cursor control joystick to selecteither “List of Languages” or “Code”.
4 If you select “List of Languages”, move thecursor control joystick up or down to selectthe language.
OSD Language – English
Auto Language - English
Audio Language EnglishSubtitle Language - Japanese
Audio1 GeneralLanguageVideo2
Move ExitENTER Select
EnglishFrenchSpanishOther
SETUPSetup audio language
+/–
Audio Language
Audio1 GeneralLanguageVideo2
SETUPMove
ExitENTER SelectReturn
ja: Japanese
List of Languages Code (0~2)
1 0 0 1
Setup audio language
4 ¢ 1
87
e E
¡
3
2,5 (ENTER)
1,3,4(Cursor)
If you select “Code”, move the cursor controljoystick up or down to input the numbers ofthe input code. Move the cursor controljoystick right or left to change the position ofthe cursor. You can also use the numberbuttons to enter the code.
5 Press ENTER to set the new language.To exit the screen without making anychanges, press RETURN .
Selecting a DVD menu languagepreference Expert
In addition to containing different audio languages, DVDmay also contain menu screens in different languages aswell. Setting a DVD language preference, sets theselected language as a default when DVDs with menuinformation in that language are encountered.
Selecting “w/ Subtitle Language” automatically assignsthe language selected in the [Subtitle Language] setting.
Make changes to the [DVD Language] setting in theSetup screen Language menu in the “Expert” menumode (page 40).
Setting: w/ Subtitle Language*
English
French
Spanish
Other
* Factory setting
Notes• The menu settings may look different from the one shown
above.• If this function is not effective, the languages that can be
selected may also be selected in the DVD menu. Press MENU
to open the DVD menu and make your selection accordingly.
OSD Language – EnglishAudio Language – English
Subtitle Language Japanese
DVD Language English
Subtitle Off - Selected Subtitle
Auto Language - On
Subtitle Display - On
Audio1 GeneralLanguageVideo2
Move Exit
w/ Subtitle LanguageEnglishFrenchSpanishOther
SETUP
Code (0~2)
1 0 0 1
SETTING
THE LA
NG
UA
GE O
PTION
S
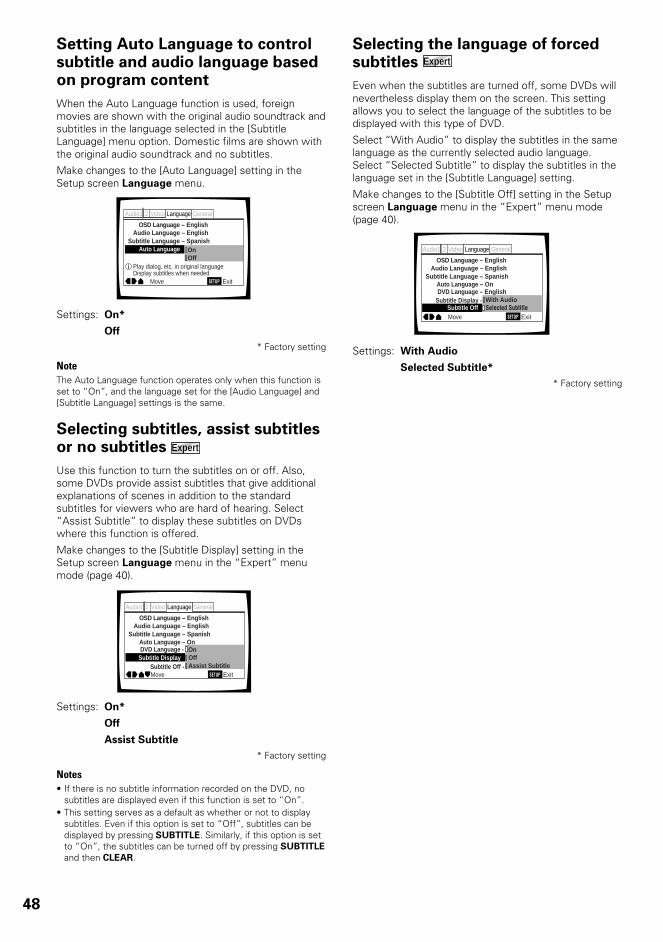
48
Selecting the language of forcedsubtitles Expert
Even when the subtitles are turned off, some DVDs willnevertheless display them on the screen. This settingallows you to select the language of the subtitles to bedisplayed with this type of DVD.
Select “With Audio” to display the subtitles in the samelanguage as the currently selected audio language.Select “Selected Subtitle” to display the subtitles in thelanguage set in the [Subtitle Language] setting.
Make changes to the [Subtitle Off] setting in the Setupscreen Language menu in the “Expert” menu mode(page 40).
Settings: With Audio
Selected Subtitle*
* Factory setting
Setting Auto Language to controlsubtitle and audio language basedon program content
When the Auto Language function is used, foreignmovies are shown with the original audio soundtrack andsubtitles in the language selected in the [SubtitleLanguage] menu option. Domestic films are shown withthe original audio soundtrack and no subtitles.
Make changes to the [Auto Language] setting in theSetup screen Language menu.
Settings: On*
Off
* Factory setting
NoteThe Auto Language function operates only when this function isset to “On”, and the language set for the [Audio Language] and[Subtitle Language] settings is the same.
Selecting subtitles, assist subtitlesor no subtitles Expert
Use this function to turn the subtitles on or off. Also,some DVDs provide assist subtitles that give additionalexplanations of scenes in addition to the standardsubtitles for viewers who are hard of hearing. Select“Assist Subtitle” to display these subtitles on DVDswhere this function is offered.
Make changes to the [Subtitle Display] setting in theSetup screen Language menu in the “Expert” menumode (page 40).
Settings: On*
Off
Assist Subtitle
* Factory setting
Notes• If there is no subtitle information recorded on the DVD, no
subtitles are displayed even if this function is set to “On”.• This setting serves as a default as whether or not to display
subtitles. Even if this option is set to “Off”, subtitles can bedisplayed by pressing SUBTITLE. Similarly, if this option is setto “On”, the subtitles can be turned off by pressing SUBTITLE
and then CLEAR.
OSD Language – EnglishAudio Language – English
Subtitle Language – Spanish
DVD Language – English
Subtitle Off Selected Subtitle
Auto Language – On
Subtitle Display - On
Audio1 GeneralLanguageVideo2
Move Exit
With AudioSelected Subtitle
SETUP
OSD Language – EnglishAudio Language – English
Subtitle Language – SpanishAuto Language On
Audio1 GeneralLanguageVideo2
Move Exit
OffOn
SETUP
Play dialog, etc. in original languageDisplay subtitles when needed
OSD Language – EnglishAudio Language – English
Subtitle Language – Spanish
DVD Language - English
Subtitle Off - Selected Subtitle
Auto Language – On
Subtitle Display On
Audio1 GeneralLanguageVideo2
Move Exit
OffAssist Subtitle
On
SETUP
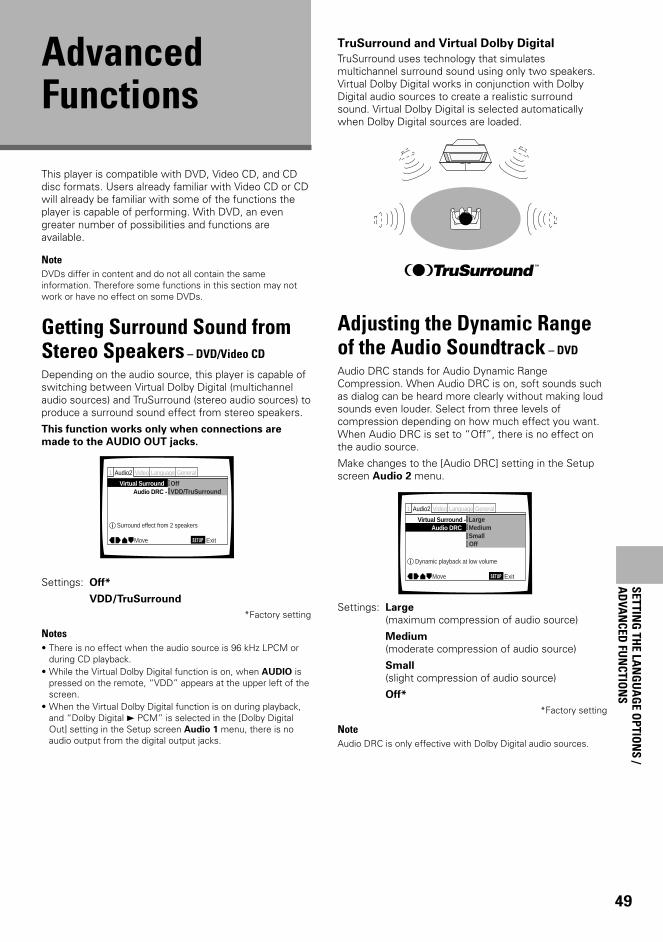
49
Getting Surround Sound fromStereo Speakers – DVD/Video CD
Depending on the audio source, this player is capable ofswitching between Virtual Dolby Digital (multichannelaudio sources) and TruSurround (stereo audio sources) toproduce a surround sound effect from stereo speakers.
This function works only when connections are
made to the AUDIO OUT jacks.
Settings: Off*
VDD/TruSurround
*Factory setting
Notes• There is no effect when the audio source is 96 kHz LPCM or
during CD playback.• While the Virtual Dolby Digital function is on, when AUDIO is
pressed on the remote, “VDD” appears at the upper left of thescreen.
• When the Virtual Dolby Digital function is on during playback,and “Dolby Digital 3 PCM” is selected in the [Dolby DigitalOut] setting in the Setup screen Audio 1 menu, there is noaudio output from the digital output jacks.
AdvancedFunctions
This player is compatible with DVD, Video CD, and CDdisc formats. Users already familiar with Video CD or CDwill already be familiar with some of the functions theplayer is capable of performing. With DVD, an evengreater number of possibilities and functions areavailable.
NoteDVDs differ in content and do not all contain the sameinformation. Therefore some functions in this section may notwork or have no effect on some DVDs.
SETTING
THE LA
NG
UA
GE O
PTION
S /A
DVA
NCED
FUN
CTION
S
Audio DRC - Virtual Surround
Audio2 GeneralLanguageVideo1
Move Exit
OffVDD/TruSurround
SETUP
Surround effect from 2 speakers
Adjusting the Dynamic Rangeof the Audio Soundtrack – DVD
Audio DRC stands for Audio Dynamic RangeCompression. When Audio DRC is on, soft sounds suchas dialog can be heard more clearly without making loudsounds even louder. Select from three levels ofcompression depending on how much effect you want.When Audio DRC is set to “Off”, there is no effect onthe audio source.
Make changes to the [Audio DRC] setting in the Setupscreen Audio 2 menu.
Settings: Large
(maximum compression of audio source)
Medium
(moderate compression of audio source)
Small
(slight compression of audio source)
Off*
*Factory setting
NoteAudio DRC is only effective with Dolby Digital audio sources.
Audio DRC Virtual Surround -
Audio2 GeneralLanguageVideo1
Move Exit
LargeMediumSmallOff
SETUP
Dynamic playback at low volume
TruSurround and Virtual Dolby Digital
TruSurround uses technology that simulatesmultichannel surround sound using only two speakers.Virtual Dolby Digital works in conjunction with DolbyDigital audio sources to create a realistic surroundsound. Virtual Dolby Digital is selected automaticallywhen Dolby Digital sources are loaded.

50
Adjusting the Video Quality(Digital Noise Reduction)– DVD/Video CD
You can either select a preprogrammed setting designedto match certain program types or make adjustments tomatch your own preferences and save them in theplayer’s memory.
Selecting a preprogrammed setting
4 ¢ 1
87
e E
¡
31
3(Cursor)
2,4(ENTER)
1 Press DNR.
2 Press ENTER.
Video Memory SelectVideo Setup
ArtStandardMemory1 Memory2 Memory3
Sports
3 Move the cursor control joystick to select oneof the preprogrammed picture quality settings.Standard*: Preset that presents the source videoas it is, with no special adjustments.Sports: Preset designed to be appropriate forsports and similar media.Art: Preset designed to be appropriate for art filmsand similar media.• If there is a DVD or Video CD playing, the effects
of each setting can be viewed while it ishighlighted on the screen. This may be useful inselecting an appropriate setting.
• “Memory1”, “Memory2”, and “Memory3” areuser programmable settings. Refer to ‘Adjustingthe picture quality settings’ on the following pagefor more information on customizing your ownpicture quality settings.
*Factory setting
4 Press ENTER.The new selection is set.
NoteEach picture quality setting is defined by a number of individualsettings, described in ‘Adjusting the picture quality settings’ onthe following page.
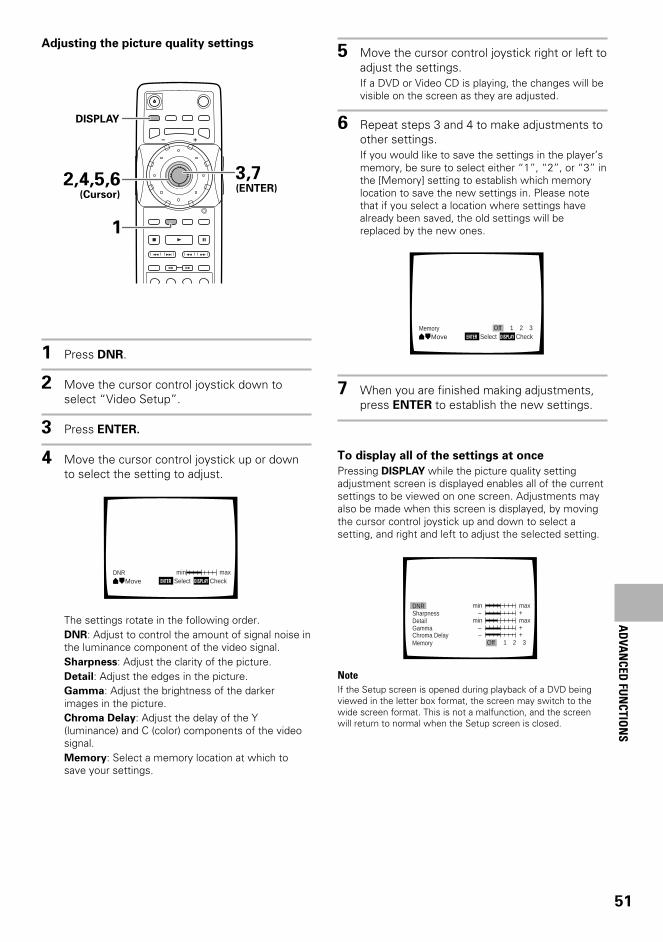
51
Adjusting the picture quality settings
4 ¢ 1
87
e E
¡
31
2,4,5,6(Cursor)
3,7(ENTER)
DISPLAY
1 Press DNR.
2 Move the cursor control joystick down toselect “Video Setup”.
3 Press ENTER.
4 Move the cursor control joystick up or downto select the setting to adjust.
The settings rotate in the following order.DNR: Adjust to control the amount of signal noise inthe luminance component of the video signal.Sharpness: Adjust the clarity of the picture.Detail: Adjust the edges in the picture.Gamma: Adjust the brightness of the darkerimages in the picture.Chroma Delay: Adjust the delay of the Y(luminance) and C (color) components of the videosignal.Memory: Select a memory location at which tosave your settings.
5 Move the cursor control joystick right or left toadjust the settings.If a DVD or Video CD is playing, the changes will bevisible on the screen as they are adjusted.
6 Repeat steps 3 and 4 to make adjustments toother settings.If you would like to save the settings in the player’smemory, be sure to select either “1”, “2”, or “3” inthe [Memory] setting to establish which memorylocation to save the new settings in. Please notethat if you select a location where settings havealready been saved, the old settings will bereplaced by the new ones.
7 When you are finished making adjustments,press ENTER to establish the new settings.
To display all of the settings at once
Pressing DISPLAY while the picture quality settingadjustment screen is displayed enables all of the currentsettings to be viewed on one screen. Adjustments mayalso be made when this screen is displayed, by movingthe cursor control joystick up and down to select asetting, and right and left to adjust the selected setting.
NoteIf the Setup screen is opened during playback of a DVD beingviewed in the letter box format, the screen may switch to thewide screen format. This is not a malfunction, and the screenwill return to normal when the Setup screen is closed.
Move DISPLAYDNR
CheckENTER Selectmin max
Move DISPLAYMemory
CheckENTER SelectOff 321
Memory Off 321
DNR min maxSharpness – +Detail min maxGamma – +Chroma Delay – +
AD
VAN
CED FU
NCTIO
NS
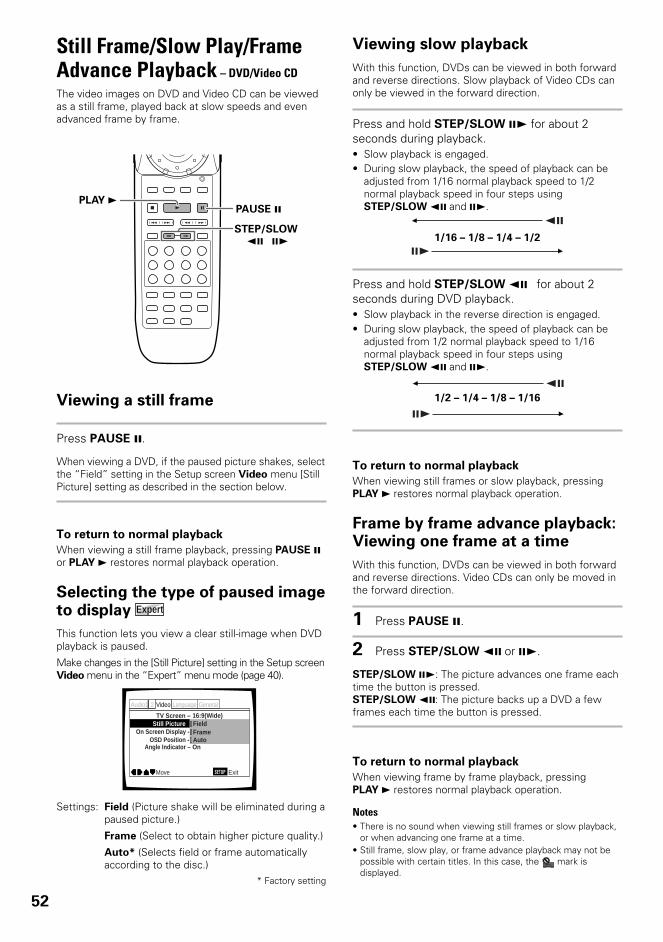
52
Still Frame/Slow Play/FrameAdvance Playback – DVD/Video CD
The video images on DVD and Video CD can be viewedas a still frame, played back at slow speeds and evenadvanced frame by frame.
4 ¢ 1
87
e E
¡
3 PAUSE 8PLAY 3
STEP/SLOW e E
Viewing a still frame
Press PAUSE 8.
When viewing a DVD, if the paused picture shakes, selectthe “Field” setting in the Setup screen Video menu [StillPicture] setting as described in the section below.
To return to normal playback
When viewing a still frame playback, pressing PAUSE 8or PLAY 3 restores normal playback operation.
Selecting the type of paused imageto display Expert
This function lets you view a clear still-image when DVDplayback is paused.
Make changes in the [Still Picture] setting in the Setup screenVideo menu in the “Expert” menu mode (page 40).
Settings: Field (Picture shake will be eliminated during apaused picture.)
Frame (Select to obtain higher picture quality.)
Auto* (Selects field or frame automaticallyaccording to the disc.)
* Factory setting
Viewing slow playback
With this function, DVDs can be viewed in both forwardand reverse directions. Slow playback of Video CDs canonly be viewed in the forward direction.
Press and hold STEP/SLOW E for about 2seconds during playback.• Slow playback is engaged.• During slow playback, the speed of playback can be
adjusted from 1/16 normal playback speed to 1/2normal playback speed in four steps usingSTEP/SLOW e and E.
1/16 – 1/8 – 1/4 – 1/2
Press and hold STEP/SLOW e for about 2seconds during DVD playback.• Slow playback in the reverse direction is engaged.• During slow playback, the speed of playback can be
adjusted from 1/2 normal playback speed to 1/16normal playback speed in four steps usingSTEP/SLOW e and E.
1/2 – 1/4 – 1/8 – 1/16
To return to normal playback
When viewing still frames or slow playback, pressingPLAY 3 restores normal playback operation.
Frame by frame advance playback:Viewing one frame at a time
With this function, DVDs can be viewed in both forwardand reverse directions. Video CDs can only be moved inthe forward direction.
1 Press PAUSE 8.
2 Press STEP/SLOW e or E.
STEP/SLOW E: The picture advances one frame eachtime the button is pressed.STEP/SLOW e: The picture backs up a DVD a fewframes each time the button is pressed.
To return to normal playback
When viewing frame by frame playback, pressingPLAY 3 restores normal playback operation.
Notes• There is no sound when viewing still frames or slow playback,
or when advancing one frame at a time.• Still frame, slow play, or frame advance playback may not be
possible with certain titles. In this case, the mark isdisplayed.
OSD Position - NormalAngle Indicator – On
TV Screen – Still Picture
On Screen Display -
Audio1 GeneralLanguageVideo2
Move Exit
16:9(Wide)FieldFrameAuto
SETUP
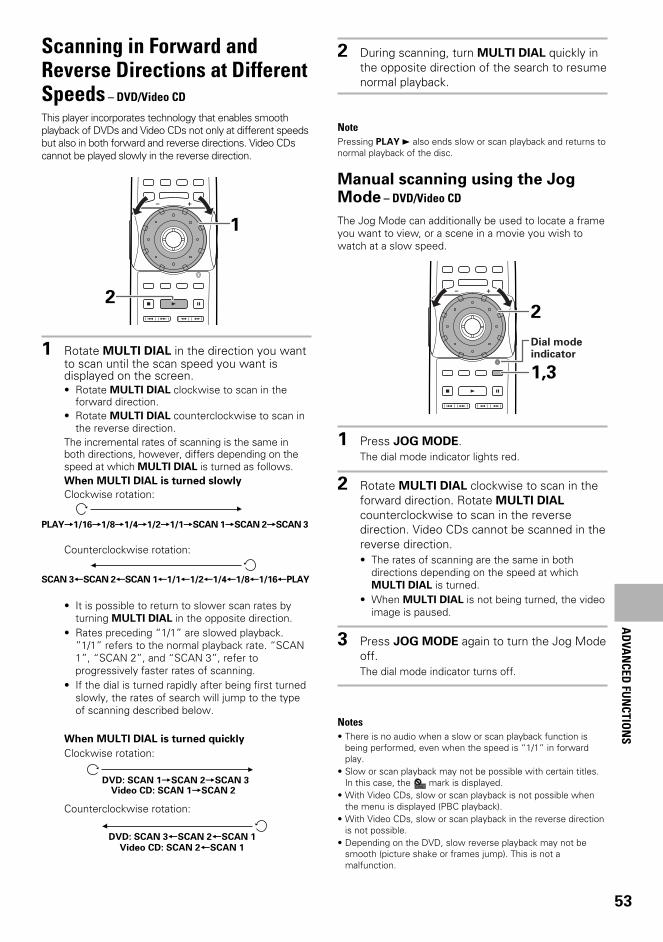
53
2 During scanning, turn MULTI DIAL quickly inthe opposite direction of the search to resumenormal playback.
NotePressing PLAY 3 also ends slow or scan playback and returns tonormal playback of the disc.
Manual scanning using the JogMode – DVD/Video CD
The Jog Mode can additionally be used to locate a frameyou want to view, or a scene in a movie you wish towatch at a slow speed.
1 Press JOG MODE.The dial mode indicator lights red.
2 Rotate MULTI DIAL clockwise to scan in theforward direction. Rotate MULTI DIAL
counterclockwise to scan in the reversedirection. Video CDs cannot be scanned in thereverse direction.• The rates of scanning are the same in both
directions depending on the speed at whichMULTI DIAL is turned.
• When MULTI DIAL is not being turned, the videoimage is paused.
3 Press JOG MODE again to turn the Jog Modeoff.The dial mode indicator turns off.
Notes• There is no audio when a slow or scan playback function is
being performed, even when the speed is “1/1” in forwardplay.
• Slow or scan playback may not be possible with certain titles.In this case, the mark is displayed.
• With Video CDs, slow or scan playback is not possible whenthe menu is displayed (PBC playback).
• With Video CDs, slow or scan playback in the reverse directionis not possible.
• Depending on the DVD, slow reverse playback may not besmooth (picture shake or frames jump). This is not amalfunction.
4 ¢ 1
87
¡
3
2
1,3
Dial modeindicator
4 ¢ 1
87
¡
32
1
AD
VAN
CED FU
NCTIO
NS
Scanning in Forward andReverse Directions at DifferentSpeeds – DVD/Video CD
This player incorporates technology that enables smoothplayback of DVDs and Video CDs not only at different speedsbut also in both forward and reverse directions. Video CDscannot be played slowly in the reverse direction.
1 Rotate MULTI DIAL in the direction you wantto scan until the scan speed you want isdisplayed on the screen.• Rotate MULTI DIAL clockwise to scan in the
forward direction.• Rotate MULTI DIAL counterclockwise to scan in
the reverse direction.The incremental rates of scanning is the same inboth directions, however, differs depending on thespeed at which MULTI DIAL is turned as follows.When MULTI DIAL is turned slowly
Clockwise rotation:
Counterclockwise rotation:
• It is possible to return to slower scan rates byturning MULTI DIAL in the opposite direction.
• Rates preceding “1/1” are slowed playback.”1/1” refers to the normal playback rate. “SCAN1”, “SCAN 2”, and “SCAN 3”, refer toprogressively faster rates of scanning.
• If the dial is turned rapidly after being first turnedslowly, the rates of search will jump to the typeof scanning described below.
When MULTI DIAL is turned quickly
Clockwise rotation:
Counterclockwise rotation:
PLAY=1/16=1/8=1/4=1/2=1/1=SCAN 1=SCAN 2=SCAN 3
SCAN 3+SCAN 2+SCAN 1+1/1+1/2+1/4+1/8+1/16+PLAY
Video CD: SCAN 1=SCAN 2
Video CD: SCAN 2+SCAN 1
DVD: SCAN 1=SCAN 2=SCAN 3
DVD: SCAN 3+SCAN 2+SCAN 1
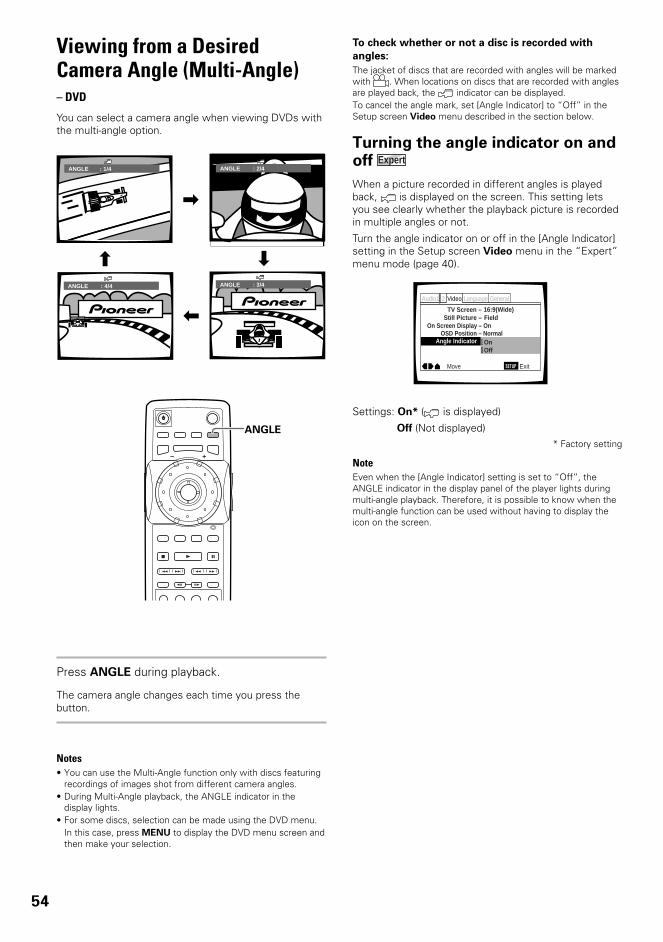
54
Viewing from a DesiredCamera Angle (Multi-Angle)– DVD
You can select a camera angle when viewing DVDs withthe multi-angle option.
Press ANGLE during playback.
The camera angle changes each time you press thebutton.
Notes• You can use the Multi-Angle function only with discs featuring
recordings of images shot from different camera angles.• During Multi-Angle playback, the ANGLE indicator in the
display lights.• For some discs, selection can be made using the DVD menu.
In this case, press MENU to display the DVD menu screen andthen make your selection.
To check whether or not a disc is recorded with
angles:
The jacket of discs that are recorded with angles will be markedwith . When locations on discs that are recorded with anglesare played back, the indicator can be displayed.To cancel the angle mark, set [Angle Indicator] to “Off” in theSetup screen Video menu described in the section below.
Turning the angle indicator on andoff Expert
When a picture recorded in different angles is playedback, is displayed on the screen. This setting letsyou see clearly whether the playback picture is recordedin multiple angles or not.
Turn the angle indicator on or off in the [Angle Indicator]setting in the Setup screen Video menu in the “Expert”menu mode (page 40).
Settings: On* ( is displayed)
Off (Not displayed)* Factory setting
NoteEven when the [Angle Indicator] setting is set to “Off”, theANGLE indicator in the display panel of the player lights duringmulti-angle playback. Therefore, it is possible to know when themulti-angle function can be used without having to display theicon on the screen.
Off
TV Screen – Still Picture –
On Screen Display – OnOSD Position – Normal
Angle Indicator
Audio1 GeneralLanguageVideo2
Move Exit
16:9(Wide)Field
On
SETUP
4 ¢ 1
87
e E
¡
3
ANGLE
ANGLE : 2/4
ANGLE : 3/4
ANGLE : 1/4
ANGLE : 4/4
\
«»
|
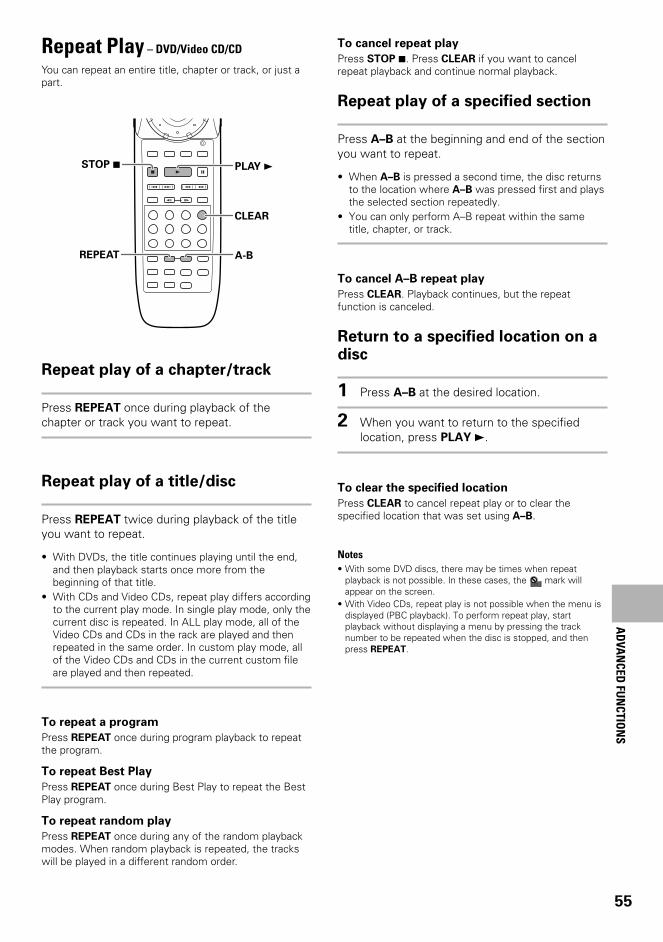
55
Repeat Play – DVD/Video CD/CD
You can repeat an entire title, chapter or track, or just apart.
Repeat play of a chapter/track
Press REPEAT once during playback of thechapter or track you want to repeat.
Repeat play of a title/disc
Press REPEAT twice during playback of the titleyou want to repeat.
• With DVDs, the title continues playing until the end,and then playback starts once more from thebeginning of that title.
• With CDs and Video CDs, repeat play differs accordingto the current play mode. In single play mode, only thecurrent disc is repeated. In ALL play mode, all of theVideo CDs and CDs in the rack are played and thenrepeated in the same order. In custom play mode, allof the Video CDs and CDs in the current custom fileare played and then repeated.
To repeat a program
Press REPEAT once during program playback to repeatthe program.
To repeat Best Play
Press REPEAT once during Best Play to repeat the BestPlay program.
To repeat random play
Press REPEAT once during any of the random playbackmodes. When random playback is repeated, the trackswill be played in a different random order.
4 ¢ 1
87
e E
¡
3
A-BREPEAT
PLAY 3
CLEAR
STOP 7
To cancel repeat play
Press STOP 7. Press CLEAR if you want to cancelrepeat playback and continue normal playback.
Repeat play of a specified section
Press A–B at the beginning and end of the sectionyou want to repeat.
• When A–B is pressed a second time, the disc returnsto the location where A–B was pressed first and playsthe selected section repeatedly.
• You can only perform A–B repeat within the sametitle, chapter, or track.
To cancel A–B repeat play
Press CLEAR. Playback continues, but the repeatfunction is canceled.
Return to a specified location on adisc
1 Press A–B at the desired location.
2 When you want to return to the specifiedlocation, press PLAY 3.
To clear the specified location
Press CLEAR to cancel repeat play or to clear thespecified location that was set using A–B.
Notes• With some DVD discs, there may be times when repeat
playback is not possible. In these cases, the mark willappear on the screen.
• With Video CDs, repeat play is not possible when the menu isdisplayed (PBC playback). To perform repeat play, startplayback without displaying a menu by pressing the tracknumber to be repeated when the disc is stopped, and thenpress REPEAT.
AD
VAN
CED FU
NCTIO
NS
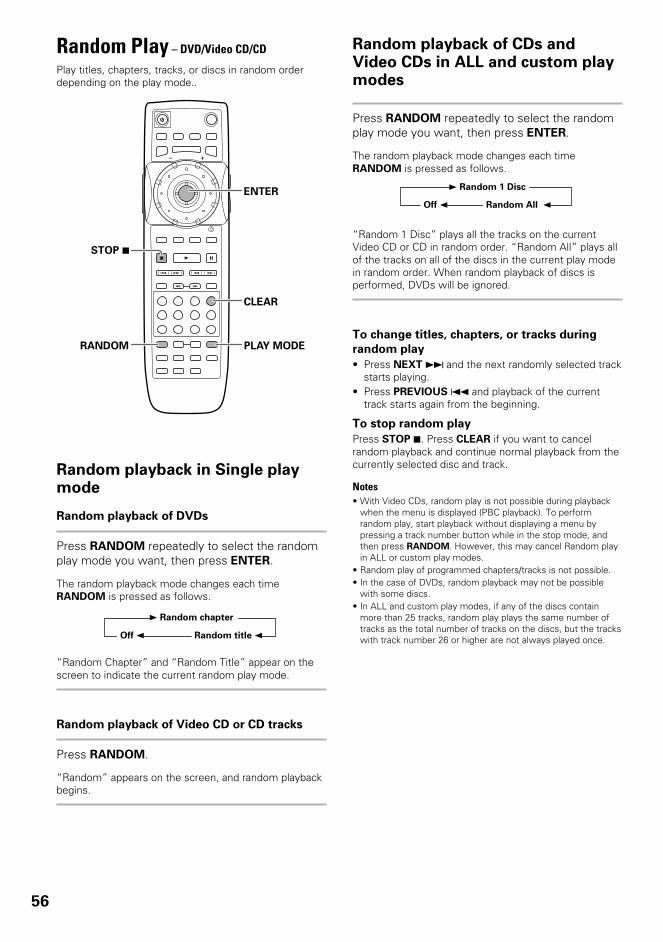
56
Random Play – DVD/Video CD/CD
Play titles, chapters, tracks, or discs in random orderdepending on the play mode..
Random playback in Single playmode
Random playback of DVDs
Press RANDOM repeatedly to select the randomplay mode you want, then press ENTER.
The random playback mode changes each timeRANDOM is pressed as follows.
“Random Chapter” and “Random Title” appear on thescreen to indicate the current random play mode.
Random playback of Video CD or CD tracks
Press RANDOM.
“Random” appears on the screen, and random playbackbegins.
4 ¢ 1
87
e E
¡
3
RANDOM
ENTER
CLEAR
PLAY MODE
STOP 7
Random playback of CDs andVideo CDs in ALL and custom playmodes
Press RANDOM repeatedly to select the randomplay mode you want, then press ENTER.
The random playback mode changes each timeRANDOM is pressed as follows.
“Random 1 Disc” plays all the tracks on the currentVideo CD or CD in random order. “Random All” plays allof the tracks on all of the discs in the current play modein random order. When random playback of discs isperformed, DVDs will be ignored.
To change titles, chapters, or tracks during
random play
• Press NEXT ¢ and the next randomly selected trackstarts playing.
• Press PREVIOUS 4 and playback of the currenttrack starts again from the beginning.
To stop random play
Press STOP 7. Press CLEAR if you want to cancelrandom playback and continue normal playback from thecurrently selected disc and track.
Notes• With Video CDs, random play is not possible during playback
when the menu is displayed (PBC playback). To performrandom play, start playback without displaying a menu bypressing a track number button while in the stop mode, andthen press RANDOM. However, this may cancel Random playin ALL or custom play modes.
• Random play of programmed chapters/tracks is not possible.• In the case of DVDs, random playback may not be possible
with some discs.• In ALL and custom play modes, if any of the discs contain
more than 25 tracks, random play plays the same number oftracks as the total number of tracks on the discs, but the trackswith track number 26 or higher are not always played once.
3 Random chapter
Off 2 Random title 2
3 Random 1 Disc
Off 2 Random All 2
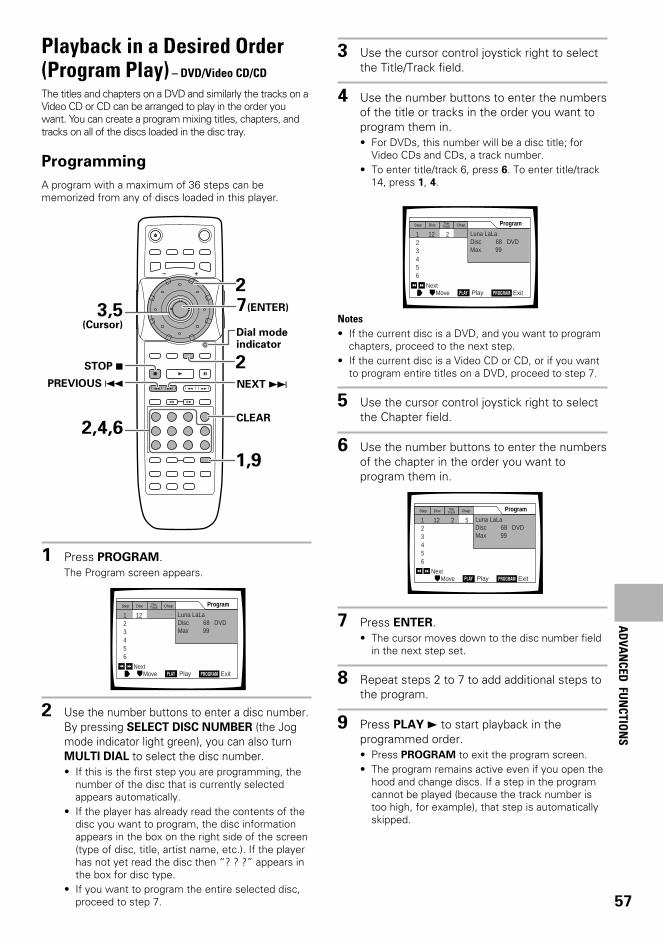
57
Playback in a Desired Order(Program Play) – DVD/Video CD/CD
The titles and chapters on a DVD and similarly the tracks on aVideo CD or CD can be arranged to play in the order youwant. You can create a program mixing titles, chapters, andtracks on all of the discs loaded in the disc tray.
Programming
A program with a maximum of 36 steps can bememorized from any of discs loaded in this player.
1 Press PROGRAM.The Program screen appears.
2 Use the number buttons to enter a disc number.By pressing SELECT DISC NUMBER (the Jogmode indicator light green), you can also turnMULTI DIAL to select the disc number.• If this is the first step you are programming, the
number of the disc that is currently selectedappears automatically.
• If the player has already read the contents of thedisc you want to program, the disc informationappears in the box on the right side of the screen(type of disc, title, artist name, etc.). If the playerhas not yet read the disc then “? ? ?” appears inthe box for disc type.
• If you want to program the entire selected disc,proceed to step 7.
3 Use the cursor control joystick right to selectthe Title/Track field.
4 Use the number buttons to enter the numbersof the title or tracks in the order you want toprogram them in.• For DVDs, this number will be a disc title; for
Video CDs and CDs, a track number.• To enter title/track 6, press 6. To enter title/track
14, press 1, 4.
Notes• If the current disc is a DVD, and you want to program
chapters, proceed to the next step.• If the current disc is a Video CD or CD, or if you want
to program entire titles on a DVD, proceed to step 7.
5 Use the cursor control joystick right to selectthe Chapter field.
6 Use the number buttons to enter the numbersof the chapter in the order you want toprogram them in.
7 Press ENTER.• The cursor moves down to the disc number field
in the next step set.
8 Repeat steps 2 to 7 to add additional steps tothe program.
9 Press PLAY 3 to start playback in theprogrammed order.• Press PROGRAM to exit the program screen.• The program remains active even if you open the
hood and change discs. If a step in the programcannot be played (because the track number istoo high, for example), that step is automaticallyskipped.
4 ¢ 1
87
e E
¡
3
3,5(Cursor)
2,4,6
7(ENTER)
1,9
2
2
CLEAR
Dial modeindicator
STOP 7PREVIOUS 4 NEXT ¢
Step ChapTitleTrackDisc
Luna LaLa Disc 68 DVDMax 99
PROGRAM ExitMoveNext4 ¢
123456
12
Program
PLAY Play
Step ChapTitleTrackDisc
Luna LaLa Disc 68 DVDMax 99
PROGRAM ExitMoveNext4 ¢
123456
12
Program
PLAY Play
2 5
Step ChapTitleTrackDisc
Luna LaLa Disc 68 DVDMax 99
PROGRAM ExitMoveNext4 ¢
123456
12
Program
PLAY Play
2
AD
VAN
CED FU
NCTIO
NS

58
To confirm the contents of a program
1 Press PROGRAM.
2 Use PREVIOUS 4 or NEXT ¢ buttons to jump tothe next/previous page of six steps (4/¢ on thefront panel cannot be used to perform this operation).
3 Press PROGRAM to exit the program screen.
To change the contents of a program
1 Press PROGRAM.
2 Jump to the page of steps with the contents you wantto change using the 4/¢ buttons (4/¢ on thefront panel cannot be used to perform this operation).
3 Move the cursor control joystick up or down to selectthe step you want to change.
4 Move the cursor control joystick right or left to selectthe appropriate field.
5 Press the number button(s) of the number you wantto change.
6 Press PROGRAM to exit the program screen.
To add to a program
Add a new Disc, Title/Track or Chapter at the end of theprogram by following the steps in the section"Programming” on the previous page.
To repeat the contents of a program
During program playback, press REPEAT. The entireprogram will be repeated.
To delete a step in a program
1 Press PROGRAM.2 Jump to the page with the contents you want to
delete using the 4/¢ buttons (4/¢ on thefront panel cannot be used to perform this operation).
3 Move the cursor control joystick up or down to selectthe step you want to delete.
4 Press CLEAR.5 Press PROGRAM to exit the program screen.
To clear the entire program
Pressing CLEAR when the disc is stopped will clear allprogram data.
To stop program play
Press STOP 7.
Notes• If a chapter is programmed for a disc that has not yet been
read by the player (“???” is displayed), and a CD or Video CD islater detected in that disc position, the chapter programinformation is cleared. Additionally, if there is no disc in theselected disc position, or if the programmed chapter number islarger than the number of chapters in the selected title, thechapter program information is erased.
• During DVD playback, when a chapter that cannot be played aspart of program playback is encountered, or isdisplayed, and the program automatically proceeds to the nextchapter.
• Programming is not possible during PBC playback of VideoCDs. To program Video CDs, stop playback before attemptingto make a program.
• During programmed playback, if the rack is rotated to play aDVD, an asterisk may be displayed in the upper right corner ofthe screen. This is to indicate that there is information on thedisc that must be played first (First Play PGC). Depending onthe disc, the asterisk may blink continuously during playback ofchapters that were not programmed and then disappear shortlybefore playback of the desired location on the disc.
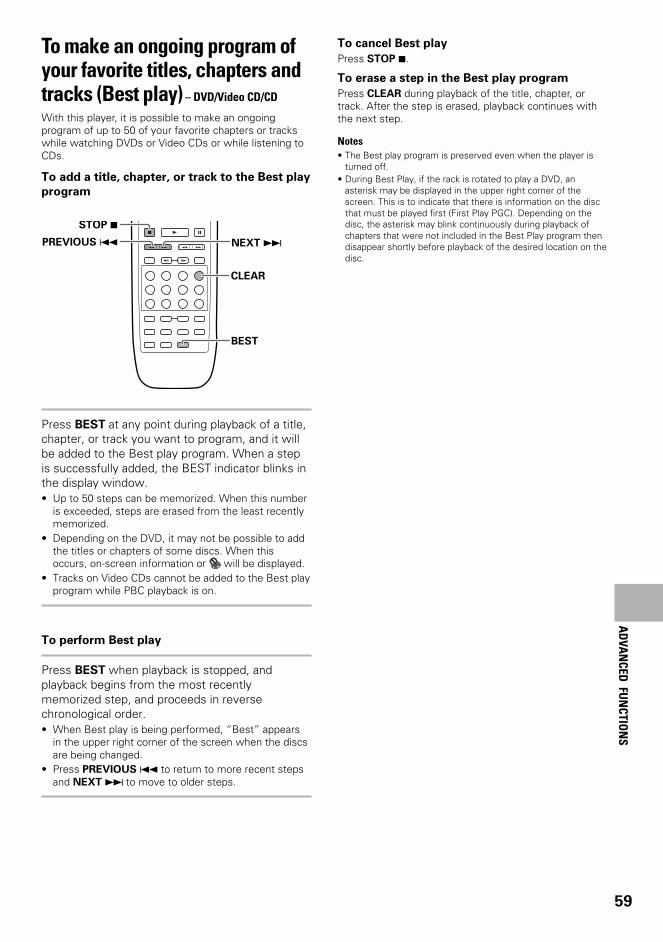
59
AD
VAN
CED FU
NCTIO
NS
To make an ongoing program ofyour favorite titles, chapters andtracks (Best play) – DVD/Video CD/CD
With this player, it is possible to make an ongoingprogram of up to 50 of your favorite chapters or trackswhile watching DVDs or Video CDs or while listening toCDs.
To add a title, chapter, or track to the Best play
program
Press BEST at any point during playback of a title,chapter, or track you want to program, and it willbe added to the Best play program. When a stepis successfully added, the BEST indicator blinks inthe display window.• Up to 50 steps can be memorized. When this number
is exceeded, steps are erased from the least recentlymemorized.
• Depending on the DVD, it may not be possible to addthe titles or chapters of some discs. When thisoccurs, on-screen information or will be displayed.
• Tracks on Video CDs cannot be added to the Best playprogram while PBC playback is on.
To perform Best play
Press BEST when playback is stopped, andplayback begins from the most recentlymemorized step, and proceeds in reversechronological order.• When Best play is being performed, “Best” appears
in the upper right corner of the screen when the discsare being changed.
• Press PREVIOUS 4 to return to more recent stepsand NEXT ¢ to move to older steps.
To cancel Best play
Press STOP 7.
To erase a step in the Best play program
Press CLEAR during playback of the title, chapter, ortrack. After the step is erased, playback continues withthe next step.
Notes• The Best play program is preserved even when the player is
turned off.• During Best Play, if the rack is rotated to play a DVD, an
asterisk may be displayed in the upper right corner of thescreen. This is to indicate that there is information on the discthat must be played first (First Play PGC). Depending on thedisc, the asterisk may blink continuously during playback ofchapters that were not included in the Best Play program thendisappear shortly before playback of the desired location on thedisc.
4 ¢ 1
87
e E
¡
3
BEST
CLEAR
STOP 7PREVIOUS 4 NEXT ¢
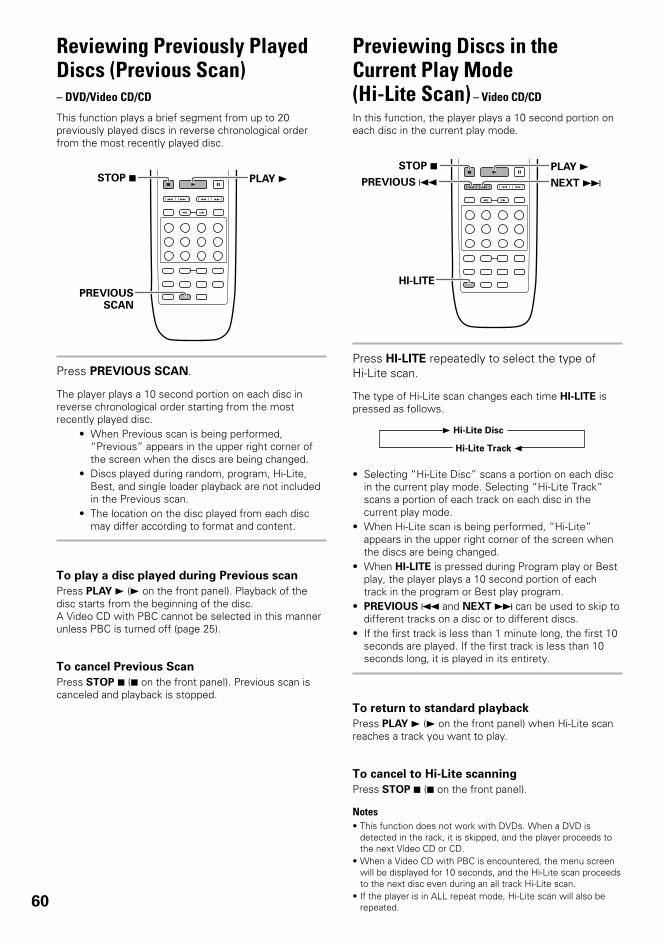
60
Reviewing Previously PlayedDiscs (Previous Scan)– DVD/Video CD/CD
This function plays a brief segment from up to 20previously played discs in reverse chronological orderfrom the most recently played disc.
Press PREVIOUS SCAN.
The player plays a 10 second portion on each disc inreverse chronological order starting from the mostrecently played disc.
• When Previous scan is being performed,“Previous” appears in the upper right corner ofthe screen when the discs are being changed.
• Discs played during random, program, Hi-Lite,Best, and single loader playback are not includedin the Previous scan.
• The location on the disc played from each discmay differ according to format and content.
To play a disc played during Previous scan
Press PLAY 3 (3 on the front panel). Playback of thedisc starts from the beginning of the disc.A Video CD with PBC cannot be selected in this mannerunless PBC is turned off (page 25).
To cancel Previous Scan
Press STOP 7 (7 on the front panel). Previous scan iscanceled and playback is stopped.
Previewing Discs in theCurrent Play Mode(Hi-Lite Scan) – Video CD/CD
In this function, the player plays a 10 second portion oneach disc in the current play mode.
Press HI-LITE repeatedly to select the type ofHi-Lite scan.
The type of Hi-Lite scan changes each time HI-LITE ispressed as follows.
• Selecting “Hi-Lite Disc” scans a portion on each discin the current play mode. Selecting “Hi-Lite Track”scans a portion of each track on each disc in thecurrent play mode.
• When Hi-Lite scan is being performed, “Hi-Lite”appears in the upper right corner of the screen whenthe discs are being changed.
• When HI-LITE is pressed during Program play or Bestplay, the player plays a 10 second portion of eachtrack in the program or Best play program.
• PREVIOUS 4 and NEXT ¢ can be used to skip todifferent tracks on a disc or to different discs.
• If the first track is less than 1 minute long, the first 10seconds are played. If the first track is less than 10seconds long, it is played in its entirety.
To return to standard playback
Press PLAY 3 (3 on the front panel) when Hi-Lite scanreaches a track you want to play.
To cancel to Hi-Lite scanning
Press STOP 7 (7 on the front panel).
Notes• This function does not work with DVDs. When a DVD is
detected in the rack, it is skipped, and the player proceeds tothe next Video CD or CD.
• When a Video CD with PBC is encountered, the menu screenwill be displayed for 10 seconds, and the Hi-Lite scan proceedsto the next disc even during an all track Hi-Lite scan.
• If the player is in ALL repeat mode, Hi-Lite scan will also berepeated.
3 Hi-Lite Disc
Hi-Lite Track 2
4 ¢ 1
87
e E
¡
3
PREVIOUSSCAN
STOP 7 PLAY 34 ¢ 1
87
e E
¡
3
HI-LITE
STOP 7 PLAY 3PREVIOUS 4 NEXT ¢
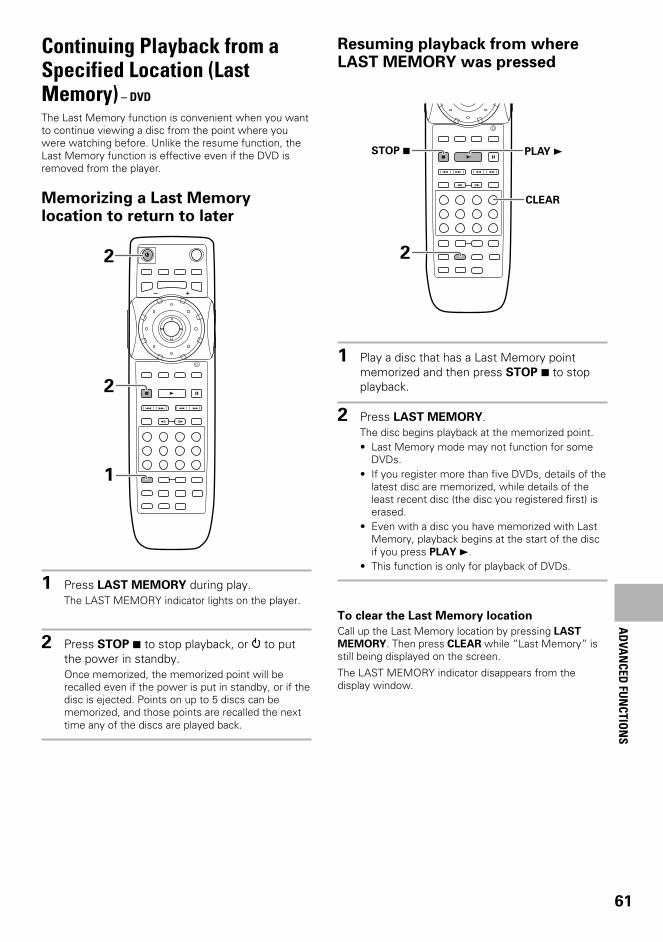
61
Resuming playback from whereLAST MEMORY was pressed
1 Play a disc that has a Last Memory pointmemorized and then press STOP 7 to stopplayback.
2 Press LAST MEMORY.The disc begins playback at the memorized point.• Last Memory mode may not function for some
DVDs.• If you register more than five DVDs, details of the
latest disc are memorized, while details of theleast recent disc (the disc you registered first) iserased.
• Even with a disc you have memorized with LastMemory, playback begins at the start of the discif you press PLAY 3.
• This function is only for playback of DVDs.
To clear the Last Memory location
Call up the Last Memory location by pressing LAST
MEMORY. Then press CLEAR while “Last Memory” isstill being displayed on the screen.
The LAST MEMORY indicator disappears from thedisplay window.
4 ¢ 1
87
e E
¡
3
2
CLEAR
PLAY 3STOP 7
Continuing Playback from aSpecified Location (LastMemory) – DVD
The Last Memory function is convenient when you wantto continue viewing a disc from the point where youwere watching before. Unlike the resume function, theLast Memory function is effective even if the DVD isremoved from the player.
Memorizing a Last Memorylocation to return to later
1 Press LAST MEMORY during play.The LAST MEMORY indicator lights on the player.
2 Press STOP 7 to stop playback, or to putthe power in standby.Once memorized, the memorized point will berecalled even if the power is put in standby, or if thedisc is ejected. Points on up to 5 discs can bememorized, and those points are recalled the nexttime any of the discs are played back.
AD
VAN
CED FU
NCTIO
NS
4 ¢ 1
87
e E
¡
3
2
2
1
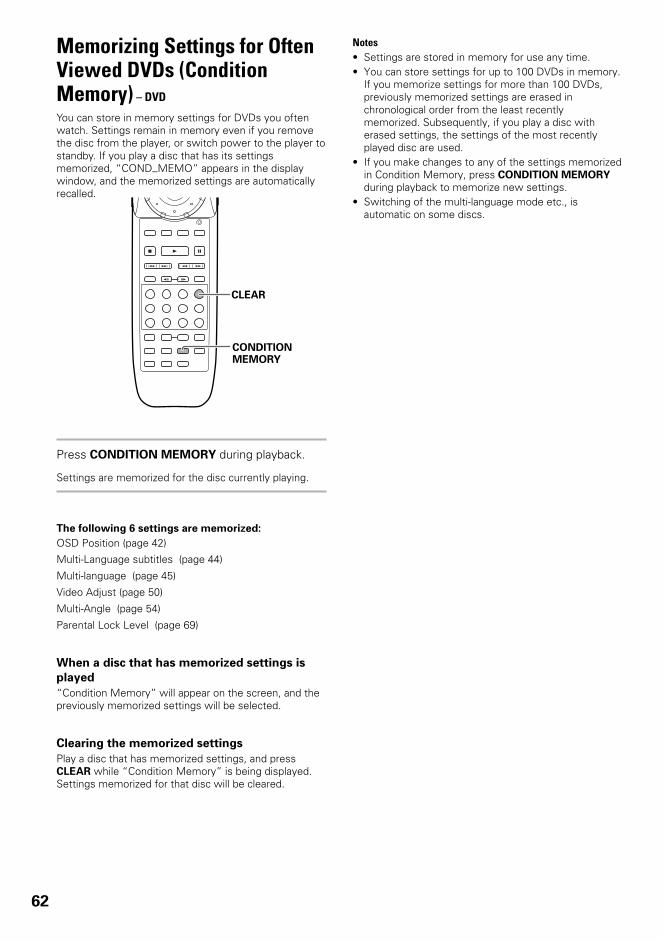
62
Memorizing Settings for OftenViewed DVDs (ConditionMemory) – DVD
You can store in memory settings for DVDs you oftenwatch. Settings remain in memory even if you removethe disc from the player, or switch power to the player tostandby. If you play a disc that has its settingsmemorized, “COND_MEMO” appears in the displaywindow, and the memorized settings are automaticallyrecalled.
Press CONDITION MEMORY during playback.
Settings are memorized for the disc currently playing.
The following 6 settings are memorized:
OSD Position (page 42)
Multi-Language subtitles (page 44)
Multi-language (page 45)
Video Adjust (page 50)
Multi-Angle (page 54)
Parental Lock Level (page 69)
When a disc that has memorized settings is
played
“Condition Memory” will appear on the screen, and thepreviously memorized settings will be selected.
Clearing the memorized settings
Play a disc that has memorized settings, and pressCLEAR while “Condition Memory” is being displayed.Settings memorized for that disc will be cleared.
4 ¢ 1
87
e E
¡
3
CONDITIONMEMORY
CLEAR
Notes• Settings are stored in memory for use any time.• You can store settings for up to 100 DVDs in memory.
If you memorize settings for more than 100 DVDs,previously memorized settings are erased inchronological order from the least recentlymemorized. Subsequently, if you play a disc witherased settings, the settings of the most recentlyplayed disc are used.
• If you make changes to any of the settings memorizedin Condition Memory, press CONDITION MEMORY
during playback to memorize new settings.• Switching of the multi-language mode etc., is
automatic on some discs.
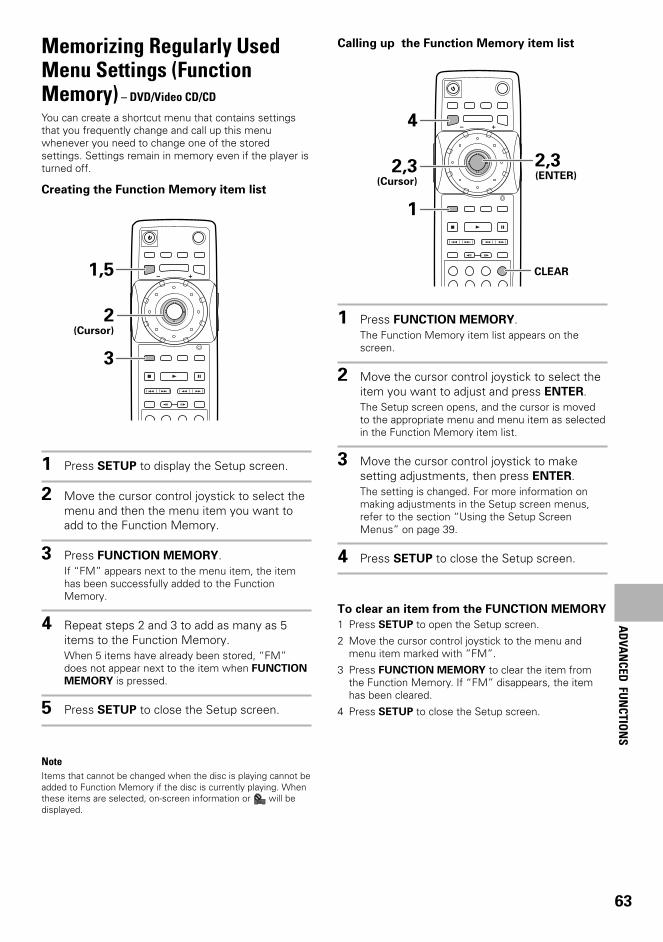
63
Memorizing Regularly UsedMenu Settings (FunctionMemory) – DVD/Video CD/CD
You can create a shortcut menu that contains settingsthat you frequently change and call up this menuwhenever you need to change one of the storedsettings. Settings remain in memory even if the player isturned off.
Creating the Function Memory item list
1 Press SETUP to display the Setup screen.
2 Move the cursor control joystick to select themenu and then the menu item you want toadd to the Function Memory.
3 Press FUNCTION MEMORY.If “FM” appears next to the menu item, the itemhas been successfully added to the FunctionMemory.
4 Repeat steps 2 and 3 to add as many as 5items to the Function Memory.When 5 items have already been stored, “FM”does not appear next to the item when FUNCTION
MEMORY is pressed.
5 Press SETUP to close the Setup screen.
NoteItems that cannot be changed when the disc is playing cannot beadded to Function Memory if the disc is currently playing. Whenthese items are selected, on-screen information or will bedisplayed.
4 ¢ 1
87
e E
¡
3
1,5
3
2(Cursor)
Calling up the Function Memory item list
1 Press FUNCTION MEMORY.The Function Memory item list appears on thescreen.
2 Move the cursor control joystick to select theitem you want to adjust and press ENTER.The Setup screen opens, and the cursor is movedto the appropriate menu and menu item as selectedin the Function Memory item list.
3 Move the cursor control joystick to makesetting adjustments, then press ENTER.The setting is changed. For more information onmaking adjustments in the Setup screen menus,refer to the section “Using the Setup ScreenMenus” on page 39.
4 Press SETUP to close the Setup screen.
To clear an item from the FUNCTION MEMORY
1 Press SETUP to open the Setup screen.
2 Move the cursor control joystick to the menu andmenu item marked with ”FM”.
3 Press FUNCTION MEMORY to clear the item fromthe Function Memory. If “FM” disappears, the itemhas been cleared.
4 Press SETUP to close the Setup screen.
4 ¢ 1
87
e E
¡
3
4
1
2,3(Cursor)
2,3(ENTER)
CLEAR
AD
VAN
CED FU
NCTIO
NS
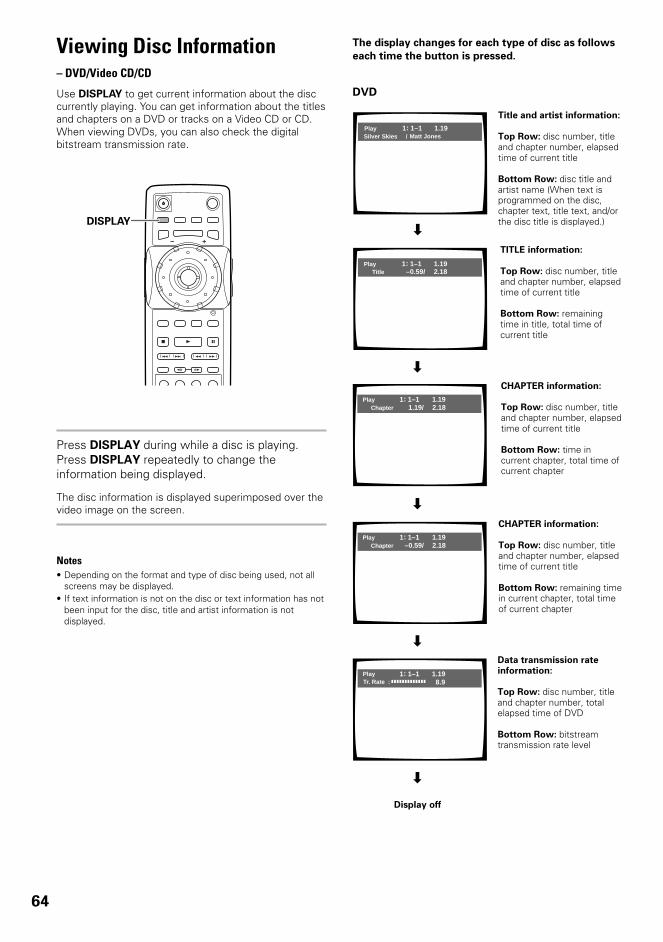
64
The display changes for each type of disc as follows
each time the button is pressed.
DVD
TITLE information:
Top Row: disc number, titleand chapter number, elapsedtime of current title
Bottom Row: remainingtime in title, total time ofcurrent title
CHAPTER information:
Top Row: disc number, titleand chapter number, elapsedtime of current title
Bottom Row: remaining timein current chapter, total timeof current chapter
Data transmission rate
information:
Top Row: disc number, titleand chapter number, totalelapsed time of DVD
Bottom Row: bitstreamtransmission rate level
CHAPTER information:
Top Row: disc number, titleand chapter number, elapsedtime of current title
Bottom Row: time incurrent chapter, total time ofcurrent chapter
Display off
PlayTitle
1–11 1.192.18–0.59/
PlayChapter
1–1 1.192.181.19/
1
PlayTr. Rate :
1–1 1.198.9
1
«
«
«
PlayChapter
1–1 1.192.18–0.59/
1
«
Viewing Disc Information– DVD/Video CD/CD
Use DISPLAY to get current information about the disccurrently playing. You can get information about the titlesand chapters on a DVD or tracks on a Video CD or CD.When viewing DVDs, you can also check the digitalbitstream transmission rate.
Press DISPLAY during while a disc is playing.Press DISPLAY repeatedly to change theinformation being displayed.
The disc information is displayed superimposed over thevideo image on the screen.
Notes• Depending on the format and type of disc being used, not all
screens may be displayed.• If text information is not on the disc or text information has not
been input for the disc, title and artist information is notdisplayed.
4 ¢ 1
87
e E
¡
3
DISPLAY
Silver Skies / Matt JonesPlay 1–11 1.19
Title and artist information:
Top Row: disc number, titleand chapter number, elapsedtime of current title
Bottom Row: disc title andartist name (When text isprogrammed on the disc,chapter text, title text, and/orthe disc title is displayed.)
«
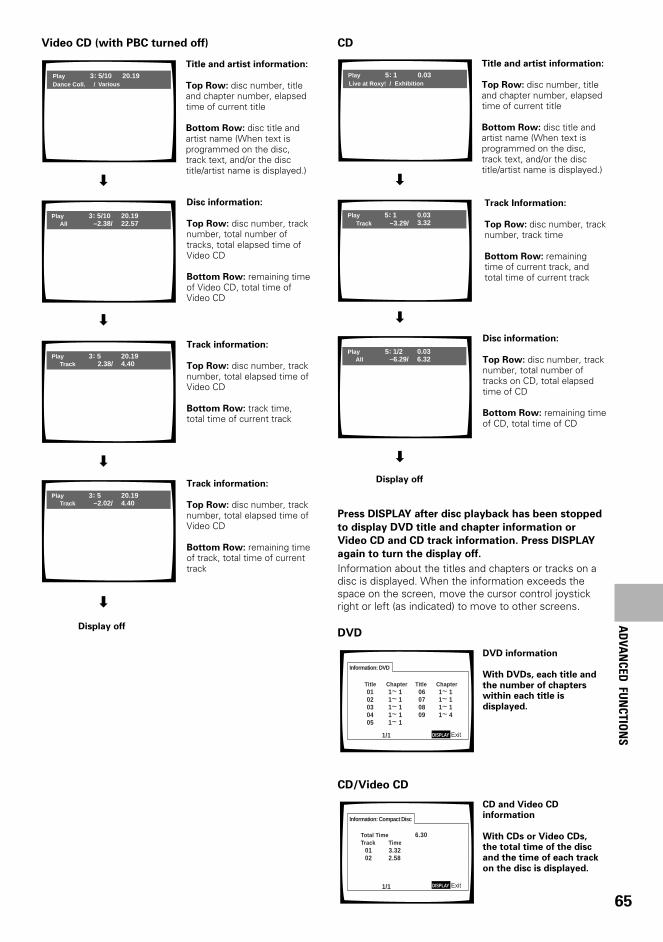
65
Press DISPLAY after disc playback has been stopped
to display DVD title and chapter information or
Video CD and CD track information. Press DISPLAY
again to turn the display off.
Information about the titles and chapters or tracks on adisc is displayed. When the information exceeds thespace on the screen, move the cursor control joystickright or left (as indicated) to move to other screens.
Information: DVD
Title Chapter Title Chapter
DISPLAY Exit
01020304
06070809
05
1~ 11~ 11~ 11~ 1
1~ 11~ 11~ 11~ 4
1~ 1
1/1
Information: Compact Disc
Total TimeTrack Time
DISPLAY Exit
6.30
3.322.58
0102
1/1
CD/Video CD
DVD
DVD information
With DVDs, each title and
the number of chapterswithin each title is
displayed.
CD and Video CDinformation
With CDs or Video CDs,the total time of the disc
and the time of each track
on the disc is displayed.
«
Video CD (with PBC turned off)
PlayAll
5/10 20.1922.57–2.38/
3
PlayTrack
5 20.194.40 2.38/
3
PlayTrack
5 20.194.40 –2.02/
3
«
Display off
«
Disc information:
Top Row: disc number, tracknumber, total number oftracks, total elapsed time ofVideo CD
Bottom Row: remaining timeof Video CD, total time ofVideo CD
Track information:
Top Row: disc number, tracknumber, total elapsed time ofVideo CD
Bottom Row: track time,total time of current track
Track information:
Top Row: disc number, tracknumber, total elapsed time ofVideo CD
Bottom Row: remaining timeof track, total time of currenttrack
Dance Coll. / VariousPlay 5/10 20.193
Title and artist information:
Top Row: disc number, titleand chapter number, elapsedtime of current title
Bottom Row: disc title andartist name (When text isprogrammed on the disc,track text, and/or the disctitle/artist name is displayed.)
«
CD
Display off
Track Information:
Top Row: disc number, tracknumber, track time
Bottom Row: remainingtime of current track, andtotal time of current track
Disc information:
Top Row: disc number, tracknumber, total number oftracks on CD, total elapsedtime of CD
Bottom Row: remaining timeof CD, total time of CD
PlayTrack
1 0.033.32–3.29/
5
PlayAll
1/2 0.036.32–6.29/
5
«
«
Live at Roxy! / ExhibitionPlay 1 0.035
Title and artist information:
Top Row: disc number, titleand chapter number, elapsedtime of current title
Bottom Row: disc title andartist name (When text isprogrammed on the disc,track text, and/or the disctitle/artist name is displayed.)
«
AD
VAN
CED FU
NCTIO
NS
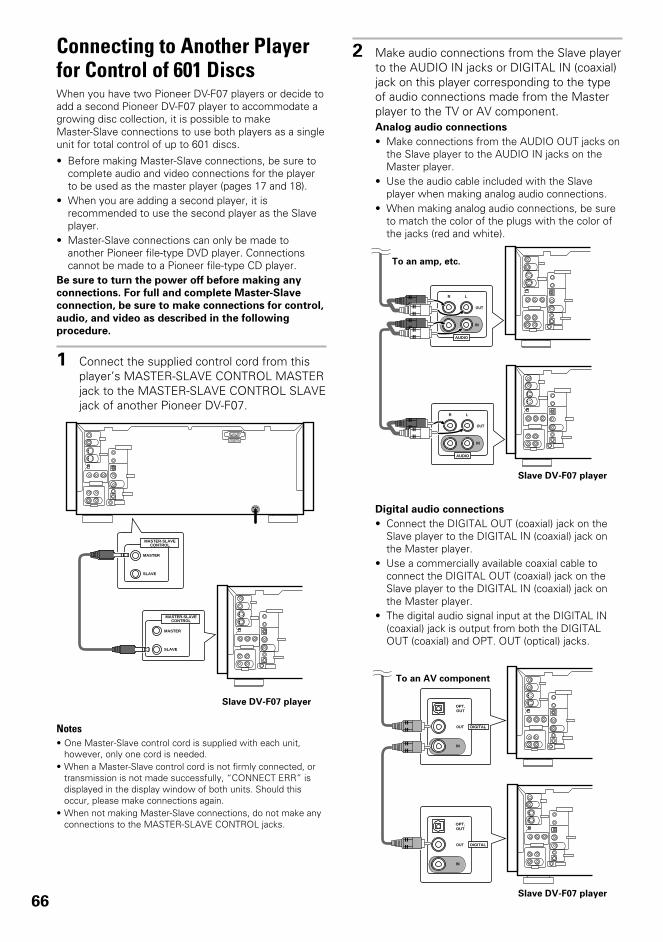
66
Slave DV-F07 player
INTERFACECONNECTOR
MASTER-SLAVECONTROL
SLAVE
MASTER
MASTER-SLAVECONTROL
SLAVE
MASTER
Connecting to Another Playerfor Control of 601 DiscsWhen you have two Pioneer DV-F07 players or decide toadd a second Pioneer DV-F07 player to accommodate agrowing disc collection, it is possible to makeMaster-Slave connections to use both players as a singleunit for total control of up to 601 discs.
• Before making Master-Slave connections, be sure tocomplete audio and video connections for the playerto be used as the master player (pages 17 and 18).
• When you are adding a second player, it isrecommended to use the second player as the Slaveplayer.
• Master-Slave connections can only be made toanother Pioneer file-type DVD player. Connectionscannot be made to a Pioneer file-type CD player.
Be sure to turn the power off before making any
connections. For full and complete Master-Slave
connection, be sure to make connections for control,
audio, and video as described in the following
procedure.
1 Connect the supplied control cord from thisplayer’s MASTER-SLAVE CONTROL MASTERjack to the MASTER-SLAVE CONTROL SLAVEjack of another Pioneer DV-F07.
DIGITAL
OPT.OUT
OUT
IN
DIGITAL
OPT.OUT
OUT
IN
Slave DV-F07 player
R L
OUT
IN
AUDIO
R L
OUT
IN
AUDIO
Slave DV-F07 player
2 Make audio connections from the Slave playerto the AUDIO IN jacks or DIGITAL IN (coaxial)jack on this player corresponding to the typeof audio connections made from the Masterplayer to the TV or AV component.Analog audio connections
• Make connections from the AUDIO OUT jacks onthe Slave player to the AUDIO IN jacks on theMaster player.
• Use the audio cable included with the Slaveplayer when making analog audio connections.
• When making analog audio connections, be sureto match the color of the plugs with the color ofthe jacks (red and white).
Digital audio connections
• Connect the DIGITAL OUT (coaxial) jack on theSlave player to the DIGITAL IN (coaxial) jack onthe Master player.
• Use a commercially available coaxial cable toconnect the DIGITAL OUT (coaxial) jack on theSlave player to the DIGITAL IN (coaxial) jack onthe Master player.
• The digital audio signal input at the DIGITAL IN(coaxial) jack is output from both the DIGITALOUT (coaxial) and OPT. OUT (optical) jacks.
To an amp, etc.
To an AV component
Notes• One Master-Slave control cord is supplied with each unit,
however, only one cord is needed.• When a Master-Slave control cord is not firmly connected, or
transmission is not made successfully, “CONNECT ERR” isdisplayed in the display window of both units. Should thisoccur, please make connections again.
• When not making Master-Slave connections, do not make anyconnections to the MASTER-SLAVE CONTROL jacks.
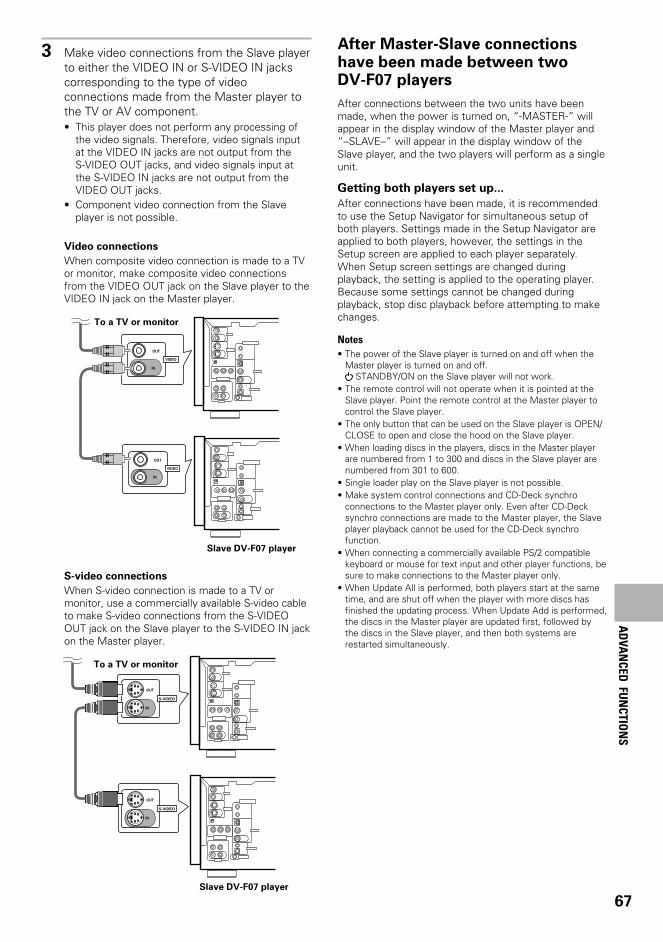
67
3 Make video connections from the Slave playerto either the VIDEO IN or S-VIDEO IN jackscorresponding to the type of videoconnections made from the Master player tothe TV or AV component.• This player does not perform any processing of
the video signals. Therefore, video signals inputat the VIDEO IN jacks are not output from theS-VIDEO OUT jacks, and video signals input atthe S-VIDEO IN jacks are not output from theVIDEO OUT jacks.
• Component video connection from the Slaveplayer is not possible.
Video connections
When composite video connection is made to a TVor monitor, make composite video connectionsfrom the VIDEO OUT jack on the Slave player to theVIDEO IN jack on the Master player.
S-video connections
When S-video connection is made to a TV ormonitor, use a commercially available S-video cableto make S-video connections from the S-VIDEOOUT jack on the Slave player to the S-VIDEO IN jackon the Master player.
VIDEO
OUT
IN
VIDEO
OUT
IN
Slave DV-F07 player
S-VIDEO
OUT
IN
S-VIDEO
OUT
IN
Slave DV-F07 player
After Master-Slave connectionshave been made between twoDV-F07 players
After connections between the two units have beenmade, when the power is turned on, “-MASTER-” willappear in the display window of the Master player and“–SLAVE–” will appear in the display window of theSlave player, and the two players will perform as a singleunit.
Getting both players set up...
After connections have been made, it is recommendedto use the Setup Navigator for simultaneous setup ofboth players. Settings made in the Setup Navigator areapplied to both players, however, the settings in theSetup screen are applied to each player separately.When Setup screen settings are changed duringplayback, the setting is applied to the operating player.Because some settings cannot be changed duringplayback, stop disc playback before attempting to makechanges.
Notes• The power of the Slave player is turned on and off when the
Master player is turned on and off. STANDBY/ON on the Slave player will not work.
• The remote control will not operate when it is pointed at theSlave player. Point the remote control at the Master player tocontrol the Slave player.
• The only button that can be used on the Slave player is OPEN/CLOSE to open and close the hood on the Slave player.
• When loading discs in the players, discs in the Master playerare numbered from 1 to 300 and discs in the Slave player arenumbered from 301 to 600.
• Single loader play on the Slave player is not possible.• Make system control connections and CD-Deck synchro
connections to the Master player only. Even after CD-Decksynchro connections are made to the Master player, the Slaveplayer playback cannot be used for the CD-Deck synchrofunction.
• When connecting a commercially available PS/2 compatiblekeyboard or mouse for text input and other player functions, besure to make connections to the Master player only.
• When Update All is performed, both players start at the sametime, and are shut off when the player with more discs hasfinished the updating process. When Update Add is performed,the discs in the Master player are updated first, followed bythe discs in the Slave player, and then both systems arerestarted simultaneously.
To a TV or monitor
To a TV or monitor
AD
VAN
CED FU
NCTIO
NS
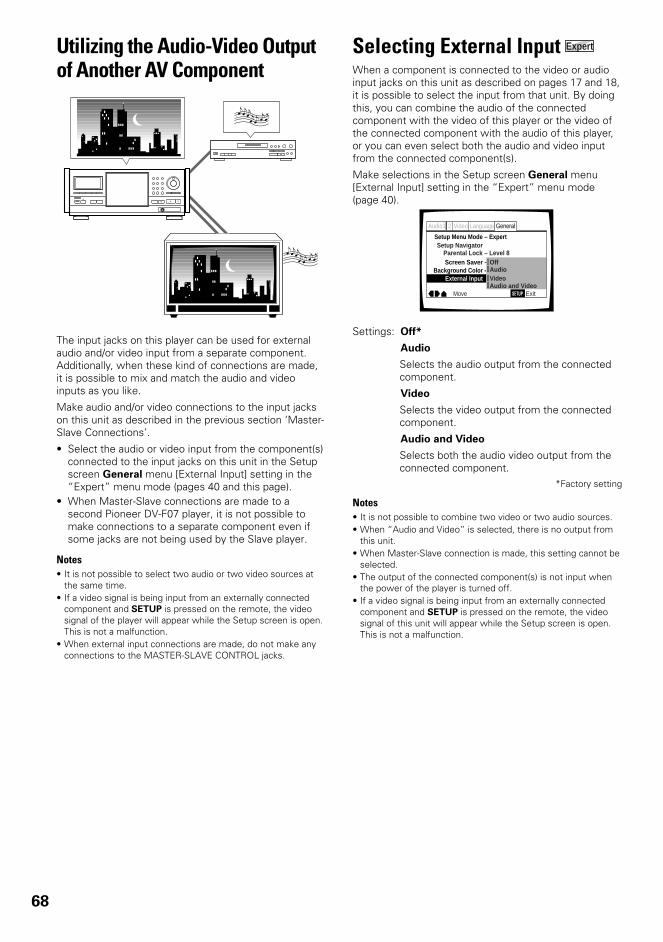
68
Selecting External Input Expert
When a component is connected to the video or audioinput jacks on this unit as described on pages 17 and 18,it is possible to select the input from that unit. By doingthis, you can combine the audio of the connectedcomponent with the video of this player or the video ofthe connected component with the audio of this player,or you can even select both the audio and video inputfrom the connected component(s).
Make selections in the Setup screen General menu[External Input] setting in the “Expert” menu mode(page 40).
Settings: Off*
Audio
Selects the audio output from the connectedcomponent.
Video
Selects the video output from the connectedcomponent.
Audio and Video
Selects both the audio video output from theconnected component.
*Factory setting
Notes• It is not possible to combine two video or two audio sources.• When “Audio and Video” is selected, there is no output from
this unit.• When Master-Slave connection is made, this setting cannot be
selected.• The output of the connected component(s) is not input when
the power of the player is turned off.• If a video signal is being input from an externally connected
component and SETUP is pressed on the remote, the videosignal of this unit will appear while the Setup screen is open.This is not a malfunction.
Screen Saver – Parental Lock – Level 8
Setup Navigator
Background Color -External Input
Audio1 GeneralLanguageVideo2
Move Exit
Audio VideoAudio and Video
Off
SETUP
Setup Menu Mode – Expert
Utilizing the Audio-Video Outputof Another AV Component
The input jacks on this player can be used for externalaudio and/or video input from a separate component.Additionally, when these kind of connections are made,it is possible to mix and match the audio and videoinputs as you like.
Make audio and/or video connections to the input jackson this unit as described in the previous section ‘Master-Slave Connections’.
• Select the audio or video input from the component(s)connected to the input jacks on this unit in the Setupscreen General menu [External Input] setting in the“Expert” menu mode (pages 40 and this page).
• When Master-Slave connections are made to asecond Pioneer DV-F07 player, it is not possible tomake connections to a separate component even ifsome jacks are not being used by the Slave player.
Notes• It is not possible to select two audio or two video sources at
the same time.• If a video signal is being input from an externally connected
component and SETUP is pressed on the remote, the videosignal of the player will appear while the Setup screen is open.This is not a malfunction.
• When external input connections are made, do not make anyconnections to the MASTER-SLAVE CONTROL jacks.
Î
4 ¢ 1 ¡
7 3 8
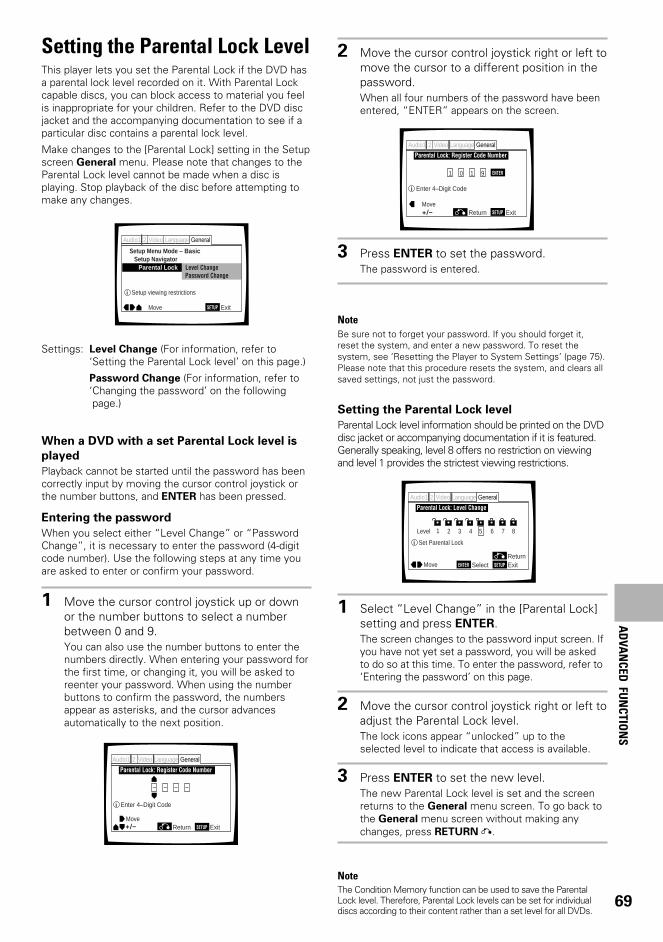
69
Setting the Parental Lock LevelThis player lets you set the Parental Lock if the DVD hasa parental lock level recorded on it. With Parental Lockcapable discs, you can block access to material you feelis inappropriate for your children. Refer to the DVD discjacket and the accompanying documentation to see if aparticular disc contains a parental lock level.
Make changes to the [Parental Lock] setting in the Setupscreen General menu. Please note that changes to theParental Lock level cannot be made when a disc isplaying. Stop playback of the disc before attempting tomake any changes.
Settings: Level Change (For information, refer to‘Setting the Parental Lock level’ on this page.)
Password Change (For information, refer to‘Changing the password’ on the following page.)
When a DVD with a set Parental Lock level is
played
Playback cannot be started until the password has beencorrectly input by moving the cursor control joystick orthe number buttons, and ENTER has been pressed.
Entering the password
When you select either “Level Change” or “PasswordChange”, it is necessary to enter the password (4-digitcode number). Use the following steps at any time youare asked to enter or confirm your password.
1 Move the cursor control joystick up or downor the number buttons to select a numberbetween 0 and 9.You can also use the number buttons to enter thenumbers directly. When entering your password forthe first time, or changing it, you will be asked toreenter your password. When using the numberbuttons to confirm the password, the numbersappear as asterisks, and the cursor advancesautomatically to the next position.
Parental Lock
Setup Menu Mode – BasicSetup Navigator
Audio1 GeneralLanguageVideo2
Move Exit
Level ChangePassword Change
SETUP
Setup viewing restrictions
2 Move the cursor control joystick right or left tomove the cursor to a different position in thepassword.When all four numbers of the password have beenentered, “ENTER” appears on the screen.
3 Press ENTER to set the password.The password is entered.
NoteBe sure not to forget your password. If you should forget it,reset the system, and enter a new password. To reset thesystem, see ‘Resetting the Player to System Settings’ (page 75).Please note that this procedure resets the system, and clears allsaved settings, not just the password.
Setting the Parental Lock level
Parental Lock level information should be printed on the DVDdisc jacket or accompanying documentation if it is featured.Generally speaking, level 8 offers no restriction on viewingand level 1 provides the strictest viewing restrictions.
1 Select “Level Change” in the [Parental Lock]setting and press ENTER.The screen changes to the password input screen. Ifyou have not yet set a password, you will be askedto do so at this time. To enter the password, refer to‘Entering the password’ on this page.
2 Move the cursor control joystick right or left toadjust the Parental Lock level.The lock icons appear “unlocked” up to theselected level to indicate that access is available.
3 Press ENTER to set the new level.The new Parental Lock level is set and the screenreturns to the General menu screen. To go back tothe General menu screen without making anychanges, press RETURN .
NoteThe Condition Memory function can be used to save the ParentalLock level. Therefore, Parental Lock levels can be set for individualdiscs according to their content rather than a set level for all DVDs.
+/–
Parental Lock: Register Code Number
Audio1 GeneralLanguageVideo2
MoveExit
– – – –
Return SETUP
Enter 4–Digit Code
Parental Lock: Register Code Number
Audio1 GeneralLanguageVideo2
MoveExit
1 0 1 9
Return+/– SETUP
ENTER
Enter 4–Digit Code
AD
VAN
CED FU
NCTIO
NS
Parental Lock: Level Change
Audio1 GeneralLanguageVideo2
Move ExitSelect
1 2 3 4 6 7 85
Return
Level
SETUPENTER
Set Parental Lock
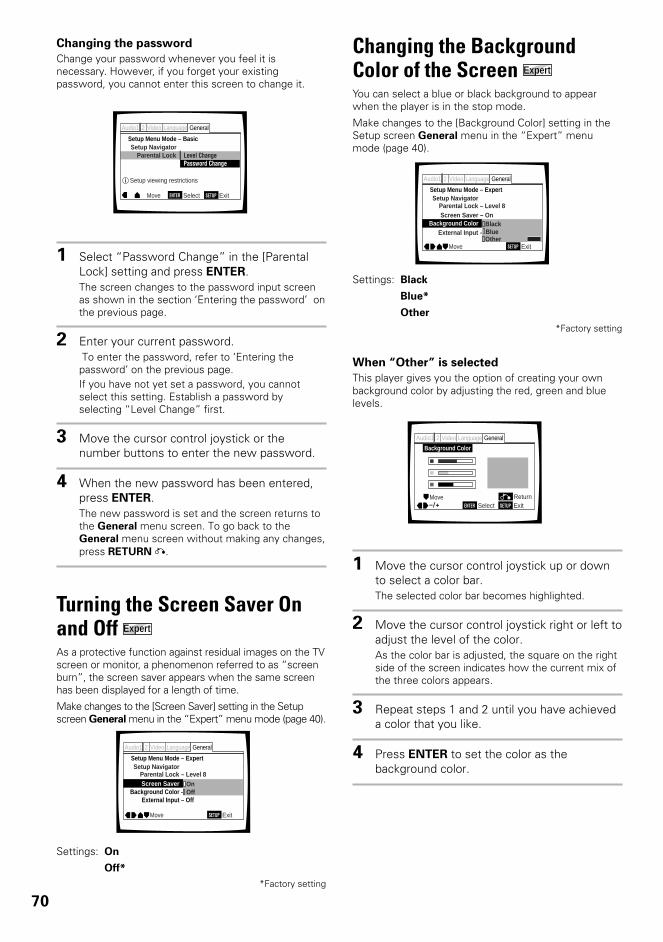
70
Changing the password
Change your password whenever you feel it isnecessary. However, if you forget your existingpassword, you cannot enter this screen to change it.
1 Select “Password Change” in the [ParentalLock] setting and press ENTER.The screen changes to the password input screenas shown in the section ‘Entering the password’ onthe previous page.
2 Enter your current password. To enter the password, refer to ‘Entering thepassword’ on the previous page.If you have not yet set a password, you cannotselect this setting. Establish a password byselecting “Level Change” first.
3 Move the cursor control joystick or thenumber buttons to enter the new password.
4 When the new password has been entered,press ENTER.The new password is set and the screen returns tothe General menu screen. To go back to theGeneral menu screen without making any changes,press RETURN .
Parental Lock Setup Navigator
Audio1 GeneralLanguageVideo2
Move ExitSelect
Level ChangePassword Change
SETUPENTER
Setup Menu Mode – Basic
Setup viewing restrictions
Turning the Screen Saver Onand Off Expert
As a protective function against residual images on the TVscreen or monitor, a phenomenon referred to as “screenburn”, the screen saver appears when the same screenhas been displayed for a length of time.
Make changes to the [Screen Saver] setting in the Setupscreen General menu in the “Expert” menu mode (page 40).
Settings: On
Off*
*Factory setting
Screen Saver Parental Lock – Level 8
Setup Navigator
Background Color -External Input – Off
Audio1 GeneralLanguageVideo2
Move Exit
OffOn
SETUP
Setup Menu Mode – Expert
Changing the BackgroundColor of the Screen Expert
You can select a blue or black background to appearwhen the player is in the stop mode.
Make changes to the [Background Color] setting in theSetup screen General menu in the “Expert” menumode (page 40).
Settings: Black
Blue*
Other
*Factory setting
When “Other” is selected
This player gives you the option of creating your ownbackground color by adjusting the red, green and bluelevels.
1 Move the cursor control joystick up or downto select a color bar.The selected color bar becomes highlighted.
2 Move the cursor control joystick right or left toadjust the level of the color.As the color bar is adjusted, the square on the rightside of the screen indicates how the current mix ofthe three colors appears.
3 Repeat steps 1 and 2 until you have achieveda color that you like.
4 Press ENTER to set the color as thebackground color.
Screen Saver – On
External Input – On
Parental Lock – Level 8Setup Navigator
Background Color
Audio1 GeneralLanguageVideo2
Move Exit
BlueOther
Black
SETUP
Setup Menu Mode – Expert
Background Color
Audio1 GeneralLanguageVideo2
–/+ SETUPMove
ExitENTER SelectReturn
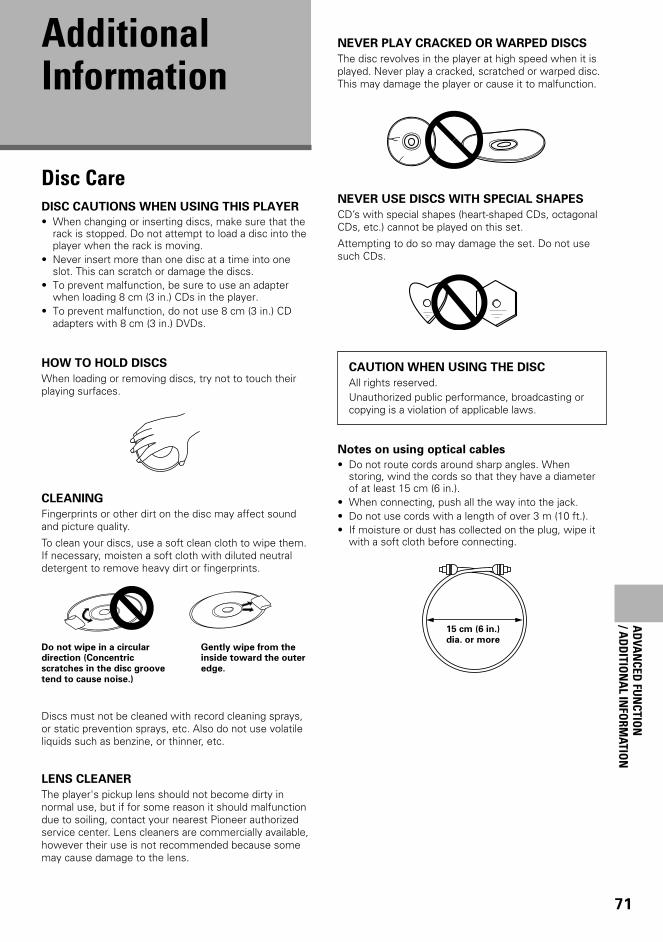
71
AdditionalInformation
NEVER PLAY CRACKED OR WARPED DISCS
The disc revolves in the player at high speed when it isplayed. Never play a cracked, scratched or warped disc.This may damage the player or cause it to malfunction.
NEVER USE DISCS WITH SPECIAL SHAPES
CD’s with special shapes (heart-shaped CDs, octagonalCDs, etc.) cannot be played on this set.
Attempting to do so may damage the set. Do not usesuch CDs.
CAUTION WHEN USING THE DISC
All rights reserved.Unauthorized public performance, broadcasting orcopying is a violation of applicable laws.
Notes on using optical cables
• Do not route cords around sharp angles. Whenstoring, wind the cords so that they have a diameterof at least 15 cm (6 in.).
• When connecting, push all the way into the jack.• Do not use cords with a length of over 3 m (10 ft.).• If moisture or dust has collected on the plug, wipe it
with a soft cloth before connecting.
Disc CareDISC CAUTIONS WHEN USING THIS PLAYER
• When changing or inserting discs, make sure that therack is stopped. Do not attempt to load a disc into theplayer when the rack is moving.
• Never insert more than one disc at a time into oneslot. This can scratch or damage the discs.
• To prevent malfunction, be sure to use an adapterwhen loading 8 cm (3 in.) CDs in the player.
• To prevent malfunction, do not use 8 cm (3 in.) CDadapters with 8 cm (3 in.) DVDs.
HOW TO HOLD DISCS
When loading or removing discs, try not to touch theirplaying surfaces.
CLEANING
Fingerprints or other dirt on the disc may affect soundand picture quality.
To clean your discs, use a soft clean cloth to wipe them.If necessary, moisten a soft cloth with diluted neutraldetergent to remove heavy dirt or fingerprints.
Discs must not be cleaned with record cleaning sprays,or static prevention sprays, etc. Also do not use volatileliquids such as benzine, or thinner, etc.
LENS CLEANER
The player's pickup lens should not become dirty innormal use, but if for some reason it should malfunctiondue to soiling, contact your nearest Pioneer authorizedservice center. Lens cleaners are commercially available,however their use is not recommended because somemay cause damage to the lens.
Gently wipe from theinside toward the outer
edge.
Do not wipe in a circulardirection (Concentric
scratches in the disc groove
tend to cause noise.)
15 cm (6 in.)
dia. or more
AD
VAN
CED FU
NCTIO
N/ A
DD
ITION
AL IN
FORM
ATION
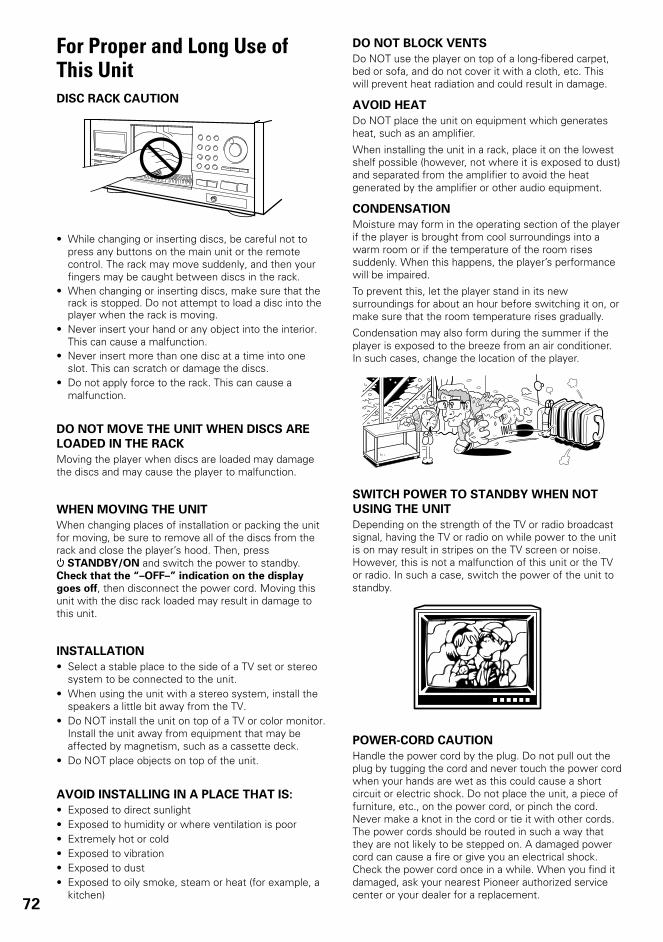
72
For Proper and Long Use ofThis UnitDISC RACK CAUTION
• While changing or inserting discs, be careful not topress any buttons on the main unit or the remotecontrol. The rack may move suddenly, and then yourfingers may be caught between discs in the rack.
• When changing or inserting discs, make sure that therack is stopped. Do not attempt to load a disc into theplayer when the rack is moving.
• Never insert your hand or any object into the interior.This can cause a malfunction.
• Never insert more than one disc at a time into oneslot. This can scratch or damage the discs.
• Do not apply force to the rack. This can cause amalfunction.
DO NOT MOVE THE UNIT WHEN DISCS ARE
LOADED IN THE RACK
Moving the player when discs are loaded may damagethe discs and may cause the player to malfunction.
WHEN MOVING THE UNIT
When changing places of installation or packing the unitfor moving, be sure to remove all of the discs from therack and close the player’s hood. Then, press
STANDBY/ON and switch the power to standby.Check that the “–OFF–” indication on the display
goes off, then disconnect the power cord. Moving thisunit with the disc rack loaded may result in damage tothis unit.
INSTALLATION
• Select a stable place to the side of a TV set or stereosystem to be connected to the unit.
• When using the unit with a stereo system, install thespeakers a little bit away from the TV.
• Do NOT install the unit on top of a TV or color monitor.Install the unit away from equipment that may beaffected by magnetism, such as a cassette deck.
• Do NOT place objects on top of the unit.
AVOID INSTALLING IN A PLACE THAT IS:
• Exposed to direct sunlight• Exposed to humidity or where ventilation is poor• Extremely hot or cold• Exposed to vibration• Exposed to dust• Exposed to oily smoke, steam or heat (for example, a
kitchen)
DO NOT BLOCK VENTS
Do NOT use the player on top of a long-fibered carpet,bed or sofa, and do not cover it with a cloth, etc. Thiswill prevent heat radiation and could result in damage.
AVOID HEAT
Do NOT place the unit on equipment which generatesheat, such as an amplifier.
When installing the unit in a rack, place it on the lowestshelf possible (however, not where it is exposed to dust)and separated from the amplifier to avoid the heatgenerated by the amplifier or other audio equipment.
CONDENSATION
Moisture may form in the operating section of the playerif the player is brought from cool surroundings into awarm room or if the temperature of the room risessuddenly. When this happens, the player’s performancewill be impaired.
To prevent this, let the player stand in its newsurroundings for about an hour before switching it on, ormake sure that the room temperature rises gradually.
Condensation may also form during the summer if theplayer is exposed to the breeze from an air conditioner.In such cases, change the location of the player.
SWITCH POWER TO STANDBY WHEN NOT
USING THE UNIT
Depending on the strength of the TV or radio broadcastsignal, having the TV or radio on while power to the unitis on may result in stripes on the TV screen or noise.However, this is not a malfunction of this unit or the TVor radio. In such a case, switch the power of the unit tostandby.
POWER-CORD CAUTION
Handle the power cord by the plug. Do not pull out theplug by tugging the cord and never touch the power cordwhen your hands are wet as this could cause a shortcircuit or electric shock. Do not place the unit, a piece offurniture, etc., on the power cord, or pinch the cord.Never make a knot in the cord or tie it with other cords.The power cords should be routed in such a way thatthey are not likely to be stepped on. A damaged powercord can cause a fire or give you an electrical shock.Check the power cord once in a while. When you find itdamaged, ask your nearest Pioneer authorized servicecenter or your dealer for a replacement.
301–DISC
CDFILE
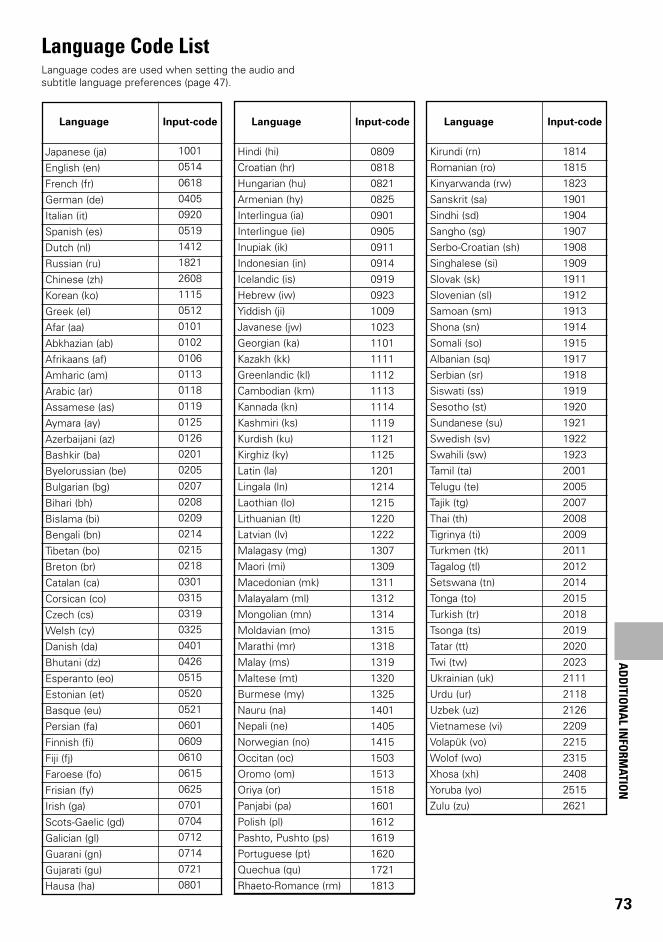
73
Language Code ListLanguage codes are used when setting the audio andsubtitle language preferences (page 47).
Japanese (ja)English (en)French (fr)German (de)Italian (it)Spanish (es)Dutch (nl)Russian (ru)Chinese (zh)Korean (ko)Greek (el)Afar (aa)Abkhazian (ab)Afrikaans (af)Amharic (am)Arabic (ar)Assamese (as)Aymara (ay)Azerbaijani (az)Bashkir (ba)Byelorussian (be)Bulgarian (bg)Bihari (bh)Bislama (bi)Bengali (bn)Tibetan (bo)Breton (br)Catalan (ca)Corsican (co)Czech (cs)Welsh (cy)Danish (da)Bhutani (dz)Esperanto (eo)Estonian (et)Basque (eu)Persian (fa)Finnish (fi)Fiji (fj)Faroese (fo)Frisian (fy)Irish (ga)Scots-Gaelic (gd)Galician (gl)Guarani (gn)Gujarati (gu)Hausa (ha)
10010514061804050920051914121821260811150512010101020106011301180119012501260201020502070208020902140215021803010315031903250401042605150520052106010609061006150625070107040712071407210801
Language Input-code
Hindi (hi)Croatian (hr)Hungarian (hu)Armenian (hy)Interlingua (ia)Interlingue (ie)Inupiak (ik)Indonesian (in)Icelandic (is)Hebrew (iw)Yiddish (ji)Javanese (jw)Georgian (ka)Kazakh (kk)Greenlandic (kl)Cambodian (km)Kannada (kn)Kashmiri (ks)Kurdish (ku)Kirghiz (ky)Latin (la)Lingala (ln)Laothian (lo)Lithuanian (lt)Latvian (lv)Malagasy (mg)Maori (mi)Macedonian (mk)Malayalam (ml)Mongolian (mn)Moldavian (mo)Marathi (mr)Malay (ms)Maltese (mt)Burmese (my)Nauru (na)Nepali (ne)Norwegian (no)Occitan (oc)Oromo (om)Oriya (or)Panjabi (pa)Polish (pl)Pashto, Pushto (ps)Portuguese (pt)Quechua (qu)Rhaeto-Romance (rm)
08090818082108250901090509110914091909231009102311011111111211131114111911211125120112141215122012221307130913111312131413151318131913201325140114051415150315131518160116121619162017211813
Language Input-code
Kirundi (rn)Romanian (ro)Kinyarwanda (rw)Sanskrit (sa)Sindhi (sd)Sangho (sg)Serbo-Croatian (sh)Singhalese (si)Slovak (sk)Slovenian (sl)Samoan (sm)Shona (sn)Somali (so)Albanian (sq)Serbian (sr)Siswati (ss)Sesotho (st)Sundanese (su)Swedish (sv)Swahili (sw)Tamil (ta)Telugu (te)Tajik (tg)Thai (th)Tigrinya (ti)Turkmen (tk)Tagalog (tl)Setswana (tn)Tonga (to)Turkish (tr)Tsonga (ts)Tatar (tt)Twi (tw)Ukrainian (uk)Urdu (ur)Uzbek (uz)Vietnamese (vi)Volapük (vo)Wolof (wo)Xhosa (xh)Yoruba (yo)Zulu (zu)
181418151823190119041907190819091911191219131914191519171918191919201921192219232001200520072008200920112012201420152018201920202023211121182126220922152315240825152621
Language Input-code
AD
DITIO
NA
L INFO
RMATIO
N
74
TroubleshootingIncorrect operations are often mistaken for trouble andmalfunctions. If you think that there is something wrongwith this component, check the points below.Sometimes the trouble may lie in another component.Inspect the other components and electrical appliancesbeing used. If the trouble cannot be rectified even afterexercising the checks listed below, ask your nearestPioneer authorized service center or your dealer to carryout repair work.
The hood opens automatically.
The disc is dirty or warped.\ Refer to “Disc Care” (page 71).
The disc has been loaded in the rack incorrectly.\ Check that the disc has been loaded with the label
side facing the right. (When loading double-sidedDVDs, load the disc in the rack with the labeldenoting the contents you want to view facing theright.)
DVD region number does not conform with this unit.\ If the region number on the DVD does not match
the number on the player, the DVD cannot beused (page 77).
There is condensation on the operating section of theplayer.\ Allow time for condensation to evaporate. If player
is near an air conditioning unit, you should movethe player (page 72).
mark appears on screen.
The selected function does not operate for that disc.
mark appears on screen.
The operation is prohibited by the player.
Picture playback stops and the operation buttons
cannot be used.
\ Stop disc playback (press STOP 7), then startplayback again.
\ Press STANDBY/ON on the front panel to turnthe player off, and then turn the power back onagain.
New settings made in the Setup screen menus while
a disc is playing are ineffective.
Some settings can be changed while a disc is playing,but are not effective. This is not a malfunction.\ Make the same setting when the player is stopped.
\ Stop disc playback (press STOP 7), then startplayback again. When playback is resumed, thenew settings should be in effect. Please note thatmaking settings in the Setup screen menus maycancel the resume function.
When making changes in the Setup screen menus,
is displayed.
There is a Video CD or CD loaded in the player and thesetting that was changed only applies to DVDperformance.\ The settings will be effective the next time a DVD
is loaded.
Settings are canceled.
When the power is turned off by power failure or byunplugging the power cord, settings will be canceled.\ Before unplugging the power cord, press
on the remote control checking that “--OFF--”disappears in the display.
No picture.
Connection is incorrect.\ Check that cord connections are correct and that
plugs are firmly connected.
Player settings are incorrect.\ Check that VIDEO SELECT is set firmly in the
correct position.
Operation (settings) of TV or AV component is notappropriate.\ Be sure that your TV or AV component is set up to
view DVD playback.
External input settings are incorrect.\ Check that the power of the component to be
used for external video input has been turned on.
\ Check that the Setup screen General menu“External Input” setting is correct (page 68).
The screen is stretched or aspect does not change.
The multi aspect setting is not appropriate.\ Change the aspect setting in the [TV Screen]
setting in the Setup screen Video menu to thescreen type most appropriate to the TV or monitoryou are using (page 43).
The screen is suddenly squeezed when the Setup
screen is opened.
If the Setup screen is opened during playback of aDVD being viewed in the letter box format, the screenmay switch to the wide screen format.\ This is not a malfunction. The screen will return to
normal when the Setup screen is closed.
Picture disturbance during playback or dark.
This player is compatible with Macro-Vision Systemcopy guard. Some discs include a copy preventionsignal, and when this type of disc is played back,stripes etc., may appear on some sections of thepicture depending on the TV.\ This is not a malfunction.
Discs respond differently to particular player functionswhich may result in the screen becoming black for abrief instant or shaking slightly when the function isexecuted.\ These problems are largely due to differences
between discs and disc content and are notmalfunctions of this player.
When recorded on a VCR or passed through an AV
selector, there is disturbance in the playback picture.
This is not a malfunction.\ Due to the player’s copy protection circuits,
connection of this device through a VCR or an AVselector may prevent recording or cause pictureproblems.
75
Remote control operation is not possible.
The rear panel control input jack on the player is beingused.\ Point the remote control at the component that
the player is connected to (page 19).
The remote control is too far from the player, or theangle with the remote sensor is too wide.\ Be sure to operate the remote from a location
within its operating range (page 8).
The batteries are exhausted.\ Replace the exhausted batteries with all new
batteries (page 8).
Audio is not output or is distorted.
The Setup screen Audio 1 menu [96 kHz PCM Out]setting is set to “96 kHz”.\ On DVDs that contain copy protection, it may not
be possible to play back the audio at 96 kHz.When this type of disc is encountered, even if “96kHz” is selected, the player automatically outputsthe digital audio output at a compressed rate of 48kHz. This is not a malfunction.
\ The “4:3 (Letter Box)” screen setting is selected.Even if “96 kHz” is selected, the player automaticallydownsamples the audio to a compressed rate of 48kHz. This is not a malfunction.
\ Be sure to make analog audio connections as wellas digital connections (page 17).
The disc is dirty.\ Refer to “Disc Care” (page 71).
The connection plugs are not inserted fully into theterminals or are not connected.\ Check that all connection plugs are firmly inserted.
The connection plug or terminal is dirty.\ Check that the plugs and terminals are wiped
clean of dirt, etc.
Audio cable connection is wrong.\ Check to make sure that the audio cables are
connected correctly (page 17).
Connection is made to the stereo amplifier‘s PHONOinput terminal.\ Change connection to any input terminal except
PHONO.
The pause mode is engaged.\ Press PLAY 3 or PAUSE 8 to exit the pause
mode.
Stereo amplifier operation is incorrect.\ Check input (CD, AUX, etc.) selector to determine
if it is selected for DVD playback.
External input settings are incorrect.\ Check that the power of the component to be
used for external audio input has been turned on.
\ Check that the Setup screen General menu“External Input” setting is correct (page 68).
The DTS audio soundtrack on a DVD has beenselected.\ There is no audio output from the analog jacks
during DTS audio playback. Select anothersoundtrack.
Noticeable difference in DVD and CD volume.
DVDs and CDs use different recording methods.\ This is not a malfunction.
There is no video and/or audio output from a SLAVE
DV-F07 or other component connected to the input
jacks on this unit.
Connections are incorrect.\ Check that connections are made firmly from the
output jacks on the other component to the INjacks on this unit (pages 66 and 67).
Menu settings are incorrect\ Check that the Setup screen Other menu
[External Input] setting is set appropriately (page68).
The SLAVE DV-F07 does not operate when
connected
Connections are incorrect.\ Check that the control cable is connected to the
MASTER jack on this unit and the SLAVE jack onthe connected DV-F07 (page 66).
\ When connections are not made correctly ortransmission cannot be performed between theMaster and Slave player, “CONNECT ERR” isdisplayed in the display window. If this messageis displayed, connect the cord correctly (page 66).
Caution
Static electricity or other external influence may causemalfunctioning of this unit. In this case, unpluggingthe power cord and then re-plugging it in will usuallyreset the unit for proper operation. If this does notcorrect the problem, please consult your nearestPioneer service center.
Resetting the Player to SystemSettingsTo reset the player, press and hold 7 (stop) on the frontpanel when pressing STANDBY/ON on the frontpanel to turn the unit from standby to on.
All input text data, program memory, saved settings
from functions such as Function Memory and
Condition Memory are cleared, and all Setup screen
menus are returned to factory settings.
AD
DITIO
NA
L INFO
RMATIO
N
76
TermsAspect ratio
Aspect ratio refers to the length to height ratio of TVscreens. The ratio of a standard TV is 4:3, while the ratioof a high-definition or wide TV is 16:9. The latter allowsyou to enjoy a picture with a wider perspective.
CD TEXT
CD TEXT is a system in which text information is storedon a CD. CD TEXT can be used to display the disc’s title,the artist's name, and track titles as well as otherinformation. Additionally, this player uses the CD TEXTalready on the CD when the discs are updated in theplayer.
Chapter number
Chapter numbers are the numbers assigned to sectionsof a title on the disc, similar to chapters in a book. If thedisc includes chapter numbers, you can locate thesection you want very quickly using search and otherfunctions.
Component (color difference) video output
The color signal of the TV is divided into the luminance(Y) signal and the color (PB and PR) signals and thenoutput. In this way mutual interference of each signal isavoided. On a TV with component input jacks, thesesignals are synthesized to produce the picture.
Condition memory
“Condition” refers to the various mode settings, etc. Onthis player, various conditions, such as those set duringplayback, can be memorized. This function allows you toplay back the same disc at any time without having toredo your preferred settings.
Digital bitstream
The bitstream does not refer to the audio signal, butrather to the digital data that, once converted, becomesthe audio signal. The player outputs digital bitstreams viathe digital optical or digital coaxial output. If thebitstream cannot be decoded by the connected AVamplifier etc., digital noise is produced. Digital bitstreamformats compatible with different entertainmentsystems can be selected in the Setup screen Audio 1
menu.
Digital output (Coaxial)
Output of the digital audio signal is transmittedelectronically using a coaxial cable. Because the signalbeing transmitted is digital, connection must be made tothe coaxial digital input of another component. Noise willbe output if connected to the analog audio inputs as thedigital signal cannot be decoded.
Digital output (Optical)
Normally, audio is converted to an electric signal andtransmitted through an electric wire from the player tothe amplifier, etc. Changing this signal to a digital signaland transmitting it through an fiber-optic cable is calledoptical digital output. Similarly, optical digital inputreceives digital signals from external units such as an AVamplifier or receiver.
DNR (Digital Noise Reduction)
Digital noise reduction, in reference to video picturequality, refers to the detection and removal of digitalartifacts, or errant video data, which appear as specks onthe screen. When the digital noise reduction function ofthis player is on, some of this data can be detected andkept from appearing on the screen.
Dolby Digital
Using a maximum of 5.1 channels of audio, this highquality surround system (Surround Digital) is used inmany of the finer movie theaters around the world.
In order to enjoy Dolby Digital discs, this unit’s digitaloutput jack (either coaxial or optical) must be connectedto the digital input jack of an AV amplifier or Dolby Digitaldecoder to enjoy the sound of Dolby Digital soundtracks.
DTS
DTS stands for Digital Theater System. DTS is asurround system different from Dolby Digital that hasbecome a popular surround sound format for movies.
In order to enjoy the benefits of DTS encoded discs, thedigital output jack (either coaxial or optical) of this playerneeds to be connected to an AV amplifier or receiver orto a DTS decoder to be able to enjoy the surround soundof DTS audio. DTS audio is not output from the analogaudio outputs.
Dynamic range
Dynamic range refers to the difference between themaximum and minimum levels of the audio soundtrackas measured in decibels (dB).
Compressing the dynamic range raises the minimumsignal level and lowers the maximum signal level. Thisallows you to hear voices and other low level audiosignals clearly while lowering strong audio signals likethe sound of explosions.
Function Memory
Function Memory lets you make a shortcut list of up tofive regularly used settings from the Setup screen page.By selecting a function from the Function Memorywindow, the appropriate Setup screen menu andfunction are automatically opened.
1
77
MASTER-SLAVE CONTROL
MASTER-SLAVE control refers to two identical unitsconnected together for joint control. The first player(Master) receives remote control signals for both unitsand controls the disc selection, audio and video output,and information displays of the second player (Slave).
MPEG
Short for Moving Picture Experts Group. This is aninternational standard for compression of movingimages. On some DVDs, digital audio has beencompressed and recorded in this format.
Multi-angle
In a TV or movie studio, a single image is usually filmedby more than one camera at the same time, and one ofthose images is selected by the program director andtransmitted to your TV. Some DVD discs are recordedwith the angles of more than one camera used forfilming, and these can be selected using this player.These types of discs are called multi-angle discs.
Multi-Language Subtitle
Subtitles are language titles superimposed on movies, orother media. Up to 32 different subtitle languages canbe recorded on a DVD disc. The subtitle function can beused to select the language of your choice.
Multiple Language
The Multiple Language feature refers to the actual audiolanguage that you hear while enjoying DVD playback. Upto 8 different language tracks can be recorded on a DVD.The Multiple Language function can be used to selectthe audio language of your choice.
Parental lock level
This function was suggested by parents concernedabout what type of media their children were able towatch. Parental lock restrictions are restrictionsincorporated into titles which include scenes thatparents may not wish their children to view.
PBC (Playback Control)
This refers to signals recorded on a Video CD (Version2.0) enabling playback control. You can use menusrecorded on discs with PBC for easy, interactive searchfor desired scenes, and playback. You can also enjoyviewing high-resolution/standard resolution still images.
PCM
PCM stands for Pulse Code Modulation and is digitalaudio. The digital audio of CDs is PCM. This player alsohas a function that converts Dolby Digital and MPEGdigital bitstreams into PCM to enable you to listen toquality digital sound even without a special decoder.
Regional restriction codes (region number)
Regional restriction codes are built in to DVD players andDVD discs for each sales region. If the regional code ofthe DVD player does not match one of the regionalcodes of the DVD disc, playback is not possible.
The region number can be found on the rear panel of theDVD player. The illustration below shows the regionsand corresponding region numbers.
Sampling Frequency
When a sound wave is converted to a digital signal, thesound is sampled and converted to data at a specificfrequency rate. For example, a signal with a 96 kHzsampling rate indicates that in one second, the analogsignal was sampled 96000 times to produce the digitalsignal.
S-video
Connecting the S-video output on the player to a TV ormonitor with S-video input via an S-video cable producesclearer picture reproduction by sending separate signalsfor the luminance and the color. These signals are thencombined by the television to produce a better qualitypicture.
System control
When you connect this player via a cord with a mini plugto another Pioneer component such as a receiver or anamplifier bearing the Î mark, you can control the playeras though it were a component in a system. To controlthe player, point the player’s remote control at thecomponent that the player is connected to, and not theplayer itself.
TruSurround
TruSurround is a simulated surround system whichproduces a surround sound effect from stereo speakers.
Virtual Dolby Digital
Virtual Dolby Digital uses Dolby Digital multichannelaudio sources to create a realistic surround sound effectfrom stereo speakers.
AD
DITIO
NA
L INFO
RMATIO
N
78
SpecificationsGeneral
System .......................... File-type DVD system and CompactDisc digital audio system
Power requirements ............................. AC 120 V, 60 HzPower consumption ................................................ 21 WPower consumption in standby mode .... less than 0.9 WWeight ............................................. 9.7 kg (21 lbs. 6 oz.)Dimensions ................... 460 (W) x 434 (D) x 194 (H) mm
(18 1/8 (W) x 17 1/16 (D) x 7 5/8 (H) in.)(Not including protruding cables, etc.)
Operating temperature ... +5°C to +35°C (+36°F to +96°F)Operating humidity .......... 5% to 85% (no condensation)
S-Video input/output
Y (luminance) - Output level ........................ 1 Vp-p (75 Ω)C (color) - Output level ........................ 286 mVp-p (75 Ω)Jacks .......................................................... S-VIDEO jack
Video input/output
Output level ................................................ 1 Vp-p (75 Ω)Jacks ................................................................. RCA jack
Component video output
(Y, PB, PR)Output level ......................................... Y: 1.0 Vp-p (75 Ω)
PB, PR: 0.7 Vp-p (75 Ω)Jacks ................................................................. RCA jack
Audio input/output
Output levelDuring audio output ............. 200 mVrms (1 kHz, –20 dB)Number of channels ....................................................... 2Jacks ................................................................. RCA jack
Digital audio characteristics
Frequency response ..... 4 Hz to 44 kHz (DVD fs: 96 kHz)S/N ratio .............................................. more than 115 dBDynamic range .................................... more than 103 dBTotal harmonic distortion .................................... 0.002%Wow and flutter ............................ Limit of measurement
(±0.001% W. PEAK) or lower
Digital output
Optical digital output ........................... Optical digital jackCoaxial digital input/output ................................ RCA jack
Control jacks
Control input/output ................. Monaural minijack (3.5 ø)MASTER-SLAVE .......................... Stereo minijack (3.5 ø)
Other jacks
CD-DECK SYNCHRO jack ....................... Minijack (2.5 ø)KEYBOARD/MOUSE jack ....... 6-pin DIN connection jack
Accessories
Remote control unit ....................................................... 1AA (R6P) dry cell batteries ............................................. 2Audio cord ...................................................................... 1Video cord ...................................................................... 1Master-Slave control cord .............................................. 1Operating Instructions .................................. this manualWarranty Card ................................................................ 1
NoteThe specifications and design of this product are subject tochange without notice, due to improvement.
79
WeWant You
LISTENINGFor A Lifetime
Selecting fine audio equipment such as the unit you’ve justpurchased is only the start of your musical enjoyment. Nowit’s time to consider how you can maximize the fun andexcitement your equipment offers. This manufacturer andthe Electronic Industries Association’s Consumer ElectronicsGroup want you to get the most out of your equipment byplaying it at a safe level. One that lets the sound come throughloud and clear without annoying blaring or distortion-and,most importantly, without affecting your sensitive hearing.
Sound can be deceiving. Over time your hearing “comfortlevel” adapts to higher volumes of sound. So what sounds“normal” can actually be loud and harmful to your hearing.Guard against this by setting your equipment at a safe levelBEFORE your hearing adapts.
To establish a safe level:• Start your volume control at a low setting.• Slowly increase the sound until you can hear it comfortably
and clearly, and without distortion.
Once you have established a comfortable sound level:• Set the dial and leave it there.
Taking a minute to do this now will help to prevent hearingdamage or loss in the future. After all, we want you listeningfor a lifetime.
We Want You Listening For ALifetime
Used wisely, your new sound equipment will provide alifetime of fun and enjoyment. Since hearing damage fromloud noise is often undetectable until it is too late, thismanufacturer and the Electronic Industries Association’sConsumer Electronics Group recommend you avoid prolongedexposure to excessive noise. This list of sound levels isincluded for your protection.
DecibelLevel Example
30 Quiet library, soft whispers40 Living room, refrigerator, bedroom away from traffic50 Light traffic, normal conversation, quiet office60 Air conditioner at 20 feet, sewing machine70 Vacuum cleaner, hair dryer, noisy restaurant80 Average city traffic, garbage disposals, alarm clock
at two feet.
THE FOLLOWING NOISES CAN BEDANGEROUS UNDER CONSTANT EXPOSURE
90 Subway, motorcycle, truck traffic, lawn mower100 Garbage truck, chain saw, pneumatic drill120 Rock band concert in front of speakers, thunderclap140 Gunshot blast, jet plane180 Rocket launching pad
Information courtesy of the Deafness Research Foundation.
WeWant You
LISTENINGFor A Lifetime
EST 1924
EIAEL
EC
TR
ONI C I ND
US
TR
IES
•A
SS O C I A T I O
N•
EST 1924
EIAEL
EC
TR
ONI C I ND
US
TR
IES
•A
SS O C I A T I O
N•

80
Published by Pioneer Corporation.Copyright © 1999 Pioneer Corporation.All rights reserved.
PIONEER CORPORATION 4-1, Meguro 1-Chome, Meguro-ku, Tokyo 153-8654, Japan
PIONEER ELECTRONICS [USA] INC. P.O. BOX 1540, Long Beach, California 90801-1540, U.S.A.PIONEER ELECTRONICS OF CANADA, INC. 300 Allstate Parkway, Markham, Ontario L3R OP2, CanadaPIONEER ELECTRONIC [EUROPE] N.V. Haven 1087, Keetberglaan 1, 9120 Melsele, Belgium TEL: 03/570.05.11PIONEER ELECTRONICS AUSTRALIA PTY. LTD. 178-184 Boundary Road, Braeside, Victoria 3195, Australia, TEL: 03-9586-6300PIONEER ELECTRONICS DE MEXICO S.A. DE C.V. San Lorenzo Num 1009 3er piso Desp. 302 Col. Del Valle, Mexico D.F. C.P. 03100
TEL: 5-688-52-90
Printed in Japan <VRB1238-B><99L00ZF0G00>
Should this product require service in the U.S.A. and you wish to locate the nearest Pioneer Authorized IndependentService Company, or if you wish to purchase replacement parts, operating instructions, service manuals, oraccessories, please call the number shown below.
Please do not ship your product to Pioneer without first calling the Customer Service Department at the above listednumber for assistance.
PIONEER ELECTRONICS SERVICE, INC.
CUSTOMER SERVICE DEPARTMENT
P.O. BOX 1760, LONG BEACH,
CA 90801-1760, U.S.A.
For warranty information please see the Limited Warranty sheet included with your product.
Si ce produit doit être réparé au Canada, veuillez vous adresser à un distributeur autorisée Pioneer au Canada pourobtenir le nom de la Société de Service Autorisée Pioneer le plus près de chez vous. Ou encore, veuillezcommuniquer avec le Service de Clientèle de Pioneer:
Pioneer électroniques du Canada, Inc.
Département de service aux consommateurs
300 Allstate Parkway, Markham, Ontario L3R OP2
(905) 479-4411
1-877-283-5901
Should this product require service in Canada, please contact a Pioneer Canadian Authorized Dealer to locate thenearest Pioneer Authorized Service Company in Canada.
Alternatively, please contact the Customer Service Department at the following address:
Pioneer Electronics of Canada, Inc.
Customer Service Department
300 Allstate Parkway, Markham, Ontario L3R OP2
(905) 479-4411
1-877-283-5901
Pour obtenir des renseignements sur la garantie, veuillez vous reporter au feuillet sur la Garantie Limitée quiaccompagne le produit.
For warranty information please see the Limited Warranty sheet included with your product.
8 0 0 - 4 2 1 - 1 4 0 4


![PACS numbers: 03.67 - arXivutilize both CV and DV resources at once [8–12]. These re-sources may include CV and DV states as well as CV and DV quantum operations and measurement](https://static.fdocuments.net/doc/165x107/5f7cdd4029c48a5839241de1/pacs-numbers-0367-arxiv-utilize-both-cv-and-dv-resources-at-once-8a12-these.jpg)