DT2 DT520AS DT620 DT620S - SOKKIA 中国 · SURVEYING INSTRUMENTS OPERATOR'S MANUAL DT220 DT520...
59
SURVEYING INSTRUMENTS OPERATOR'S MANUAL DT220 DT520 DT520S DT520A DT520AS DT620 DT620S Electronic Digital Theodolite
-
Upload
truongkhuong -
Category
Documents
-
view
234 -
download
0
Transcript of DT2 DT520AS DT620 DT620S - SOKKIA 中国 · SURVEYING INSTRUMENTS OPERATOR'S MANUAL DT220 DT520...

SURVEYING INSTRUMENTS
OPERATOR'S MANUAL
DT220DT520
DT520SDT520A
DT520ASDT620
DT620SElectronic Digital Theodolite

This is the mark of the Japan Surveying Instruments Manufacturers Association.

DT220DT520
DT520SDT520A
DT520ASDT620
DT620SElectronic Digital Theodolite
• Thank you for selecting the DT220/520/520S/520A/520AS/620/620S.
• Before using the instrument, please read this operator's manual carefully.
• Verify that all equipment is included. "13.1 Standard Equipment"
• The specifications and general appearance of the instrument may be altered at any time and may differ from those appearing in brochures and this manual.
• Some of the diagrams appearing in this manual may be simplified for easier understanding.
SURVEYING INSTRUMENTS
OPERATOR'S MANUAL

ii
HOW TO READ THIS MANUALThe following conventions are used in this manual.• Functions differ depending on the theodolite model used.• Screens and illustrations appearing in this manual are of DT520S.
Symbols
The following conventions are used in this manual.
: Indicates precautions and important items which should be read before operations.
: Indicates the chapter title to refer to for additional information.
: Indicates supplementary explanation.
: Indicates an explanation for a particular term or operation.
{Key} : Indicates operation keys.
ffffffffffffffffffffffffffffffffffffffffffffffffffffffffffffffffffffffffffffffffffffffffffffffffffffff

iii
CONTENTS1. PRECAUTIONS FOR SAFE OPERATION ........ 12. PRECAUTIONS ................................................. 43. PARTS OF THE INSTRUMENT ........................ 64. INSTALLING / REMOVING THE BATTERY...... 95. SETTING UP THE INSTRUMENT................... 11
5.1 Centering .............................................................115.2 Leveling................................................................12
6. FOCUSING AND TARGET SIGHTING............ 157. POWER ON ..................................................... 168. MEASUREMENT ............................................. 17
8.1 Measuring the horizontal angle between 2 points (H angle 0) ................................................................17
8.2 Set Horizontal Circle to a Required Value (Horizon-tal angle hold) ......................................................18
8.3 Changing Horizontal Angle Display Mode............198.4 Changing Vertical Angle Display Mode................198.5 Stadia Survey.......................................................20
9. DATA OUTPUT................................................ 229.1 Connecting a Computer .......................................229.2 Communication Functions Command and Output
......................................................................... 2310. CHANGING INSTRUMENT OPTIONS ............ 2411. ERROR MESSAGES ....................................... 3212. CHECKS AND ADJUSTMENTS ...................... 33
12.1Plate Level ...........................................................3312.2Circular Level .......................................................3412.3Tilt Sensor ............................................................3512.4Reticle ..................................................................3812.5Optical Plummet...................................................41
13. STANDARD EQUIPMENT ............................... 4313.1Standard Equipment ........................................... 4313.2Optional Accessories ...........................................44

iv
CONTENTS13.3Layout Plan ..........................................................46
14. APPENDICES .................................................. 4714.1Battery Selection..................................................47
15. SPECIFICATIONS ........................................... 4816. REGULATIONS ............................................... 51

1
1. PRECAUTIONS FOR SAFE OPERATIONRead this manual before using the instrument.For the safe use of the product and prevention of injury to operators and other persons as well as prevention of property damage, items which should be observed are indicated by an exclamation point within a triangle used with WARNING and CAUTION statements in this operator's manual.The definitions of the indications are listed below. Be sure you understand them before reading the manual's main text.
Definition of Indication
Definition of Symbols
WARNING Ignoring this indication and making an operation error could possibly result in death or serious injury to the operator.
CAUTIONIgnoring this indication and making an operation error could possibly result in personal injury or property damage.
This symbol indicates items for which caution (hazard warnings inclusive) is urged. Specific details are printed in or near the symbol.
This symbol indicates items which are prohibited. Specific details are printed in or near the symbol.
This symbol indicates items which must always be performed. Specific details are printed in or near the symbol.

1. PRECAUTIONS FOR SAFE OPERATION
2
General
WARNING
CAUTION
Do not use the unit in areas exposed to high amounts of dust or ash, in areas where there is inadequate ventilation, or near combustible materials. An explosion could occur.
Do not perform disassembly or rebuilding. Fire, electric shock or burns could result.
Never look at the sun through the telescope. Loss of eyesight could result.
Do not look at reflected sunlight from a prism or other reflecting object through the telescope. Loss of eyesight could result.
Direct viewing of the sun using the telescope during sun observation will cause loss of eyesight. Use a solar filter (option), such as that in “13.2 Optional Accessories”
When securing the instrument in the carrying case make sure that all catches, including the side catches, are closed. Failure to do so could result in the instrument falling out while being carried, causing injury.
Do not use the carrying case as a footstool. The case is slippery and unstable, so a person could slip and fall off it.
Do not place the instrument in a case with a damaged catch, belt or handle. The case or instrument could be dropped and cause injury.
Do not wield or throw the plumb bob. A person could be injured if struck.
Secure handle to main unit with locking screws. Failure to properly secure the handle could result in the unit falling off while being carried, causing injury.
Tighten the adjustment tribrach clamp securely. Failure to properly secure the clamp could result in the tribrach falling off while being carried, causing injury.

3
1. PRECAUTIONS FOR SAFE OPERATION
Power Supply
WARNING
CAUTION
Tripod
CAUTION
Do not short circuit. Heat or ignition could result.
Do not heat or throw batteries into fire. An explosion could occur, resulting in injury.
To prevent shorting of the battery in storage, apply insulating tape or equivalent to the terminals. Otherwise shorting could occur, resulting in fire or burns.
Do not use battery if wet. Resultant shorting could lead to fire or burns.
Do not touch liquid leaking from batteries.Harmful chemicals could cause burns or blisters
When mounting the instrument to a tripod, tighten the centering screw securely. Failure to tighten the screw properly could result in the instrument falling off the tripod, causing injury.
Tighten securely the leg fixing screws of the tripod on which the instrument is mounted. Failure to tighten the screws could result in the tripod collapsing, causing injury.
Do not carry the tripod with the tripod shoes pointed at other persons. A person could be injured if struck by the tripod shoes.
Keep hands and feet away from the tripod shoes when fixing the tripod in the ground. A hand or foot stab wound could result.
Tighten the leg fixing screws securely before carrying the tripod. Failure to tighten the screws could lead to the tripod legs extending, causing injury.

4
2. PRECAUTIONSTribrach Clamp (DT220/520/520A)
• When the instrument is shipped, the tribrach clamp is held firmly in place with a locking screw to prevent the instrument from shifting on the levelling base. Before using the instrument the first time, loosen this screw with a screwdriver. And before transporting it, tighten the locking screw to fasten the tribrach clamp in place so that it will not shift on the levelling base.
Precautions concerning water and dust resistance
DT conforms to IP66 specifications for waterproofing and dust resistance when the battery cover is closed and connector caps are attached correctly. • Be sure to close the battery cover and correctly attach the connector caps to
protect the DT from moisture and dust particles.• Make sure that moisture or dust particles do not come in contact with the inside
of the battery cover, terminal or connectors.Contact with these parts may cause damage to the instrument.
• Make sure that the inside of the carrying case and the instrument are dry before closing the case. If moisture is trapped inside the case, it may cause the instrument to rust.
Other precautions
• If the DT is moved from a warm place to an extremely cold place, internal parts may contract and make the keys difficult to operate. This is caused by cold air trapped inside the hermetically sealed casing. If the keys do not depress, open the battery cover to resume normal functionality. To prevent the keys from becoming stiff, remove the connector caps before moving the DT to a cold place.
• Never place the DT directly on the ground. Sand or dust may cause damage to the screw holes or the centering screw on the base plate.
• Protect the DT from heavy shocks or vibration.• Never carry the DT on the tripod to another site.• Turn the power off before removing the battery.• When placing the DT in its case, first remove its battery and place it in the case
in accordance with the layout plan. "13.3 Layout Plan"
• Consult your local dealer before using the instrument under special conditions such as long periods of continuous use or high levels of humidity. In general,

5
2. PRECAUTIONS
special conditions are treated as being outside the scope of the product warranty.
Maintenance
• Always clean the instrument before returning it to the case. The lens requires special care. First, dust it off with the lens brush to remove tiny particles. Then, after providing a little condensation by breathing on the lens, wipe it with a soft clean cloth or lens tissue.
• If the display is dirty, carefully wipe it with a soft, dry cloth. To clean other parts of the instrument or the carrying case, lightly moisten a soft cloth in a mild detergent solution. Wring out excess water until the cloth is slightly damp, then carefully wipe the surface of the unit. Do not use any organic solvents or alkaline cleaning solutions.
• Store the DT in a dry room where the temperature remains fairly constant.• Check the tripod for loose fit and loose screws.• If any trouble is found on the rotatable portion, screws or optical parts (e.g.
lens), contact your local dealer.• When the instrument is not used for a long time, check it at least once every 3
months."12. CHECKS AND ADJUSTMENTS"
• When removing the DT from the carrying case, never pull it out by force. The empty carrying case should be closed to protect it from moisture.
• Check the DT for proper adjustment periodically to maintain the instrument accuracy.

6
3. PARTS OF THE INSTRUMENT
1. Handle2. Handle securing screw3. Instrument height mark4. Battery cover5. Data input/output connector
(Not included on DT620/620S)6. Operation panel7. Shifting clamp (DT220/520/
520A:Tribrach clamp, Tribrach clamp is not included on DT620)
8. Base plate9. Leveling foot screw10. Circular level adjusting screws11. Circular level12. Display13. Optical plummet eyepiece
screw14. Optical plummet reticle cover 15. Optical plummet focusing ring16. Objective lens
17. Tubular compass slot 18. Horizontal clamp19. Horizontal fine motion screw20. Plate level21. Plate level adjusting screw22. Vertical clamp23. Vertical fine motion screw24. Telescope eyepiece screw25. Telescope focusing ring26. Peep sight27. Instrument center mark

7
3. PARTS OF THE INSTRUMENT
Peep sightUse peep sight to aim the DT in the direction of the measurement point.Turn the instrument until the triangle in the peep sight is aligned with the target.
Instrument height markThe height of the DT is 236mm (from tribrach dish to this mark). "Instrument height" is input when setting instrument station data and is the height from the measuring point (where DT is mounted) to this mark.
Operation panel ~ Display Functions ~
Display symbolsP.SAVE: Power saving mode. Deactivated by key operation or rotation of the
upper part of the instrument.: Vertical angle ±90: %/‰ vertical angle: Tilt angle compensation (DT220/520/520S only)
"10. CHANGING INSTRUMENT OPTIONS": Remaining battery power display (4 levels): gon angle units
Horizontal angle right: Horizontal angle left
Horizontal angle hold
0SET
%
MENU
OFF
P.SAVE
Vertical angleHorizontal angle
Operation keys

3. PARTS OF THE INSTRUMENT
8
Key Operation: Power on
+ : Power offThe ON/OFF power setting may be set so that by itself can be used to turn the power on and off.
"10. CHANGING INSTRUMENT OPTIONS": Select horizontal angle display mode / vertical angle display
mode"8.3 Changing Horizontal Angle Display Mode" and "8.4 Changing Vertical Angle Display Mode"
: Display illumination ON/OFF (Hold for a moment):
Continue holding down the button until "the horizontal angle beep" has or has not been set.The setting can also be changed with the setting screen.
"10. CHANGING INSTRUMENT OPTIONS": Set horizontal angle to 0
"8.1 Measuring the horizontal angle between 2 points (H angle 0)"
: Hold / release horizontal angle"8.2 Set Horizontal Circle to a Required Value (Horizontal angle hold)"
{MENU} : Enter item screen "10. CHANGING INSTRUMENT OPTIONS"

9
4. INSTALLING / REMOVING THE BATTERYMount the new batteries.
:• When removing the batteries, turn the power off.• When installing / removing the batteries, make sure that moisture or dust
particles do not come in contact with the inside of the instrument.• Use alkaline batteries. If batteries other than alkaline batteries are used, the
battery reserve display and the 'Low' warning will not function properly.
PROCEDURE
1. Open the battery cover.
2. Insert 2 batteries (LR14/C).Insert the batteries as depicted by the illustration on the inside of the battery cover.
Press the battery release button downward
Batteryrelease button
Firmly insert the betteries after verifyingthe direction in which they go.

4. INSTALLING / REMOVING THE BATTERY
10
3. Close the battery cover.
• Remaining battery power::90 to 100 %:50 to 90 %:10 to 50 %:0 to 10 % Replace all batteries. If you continue to use the instrument, the
battery mark flashes and a beep sounds. Following this, the power will automatically shut off.
• Measuring cannot be properly performed when the batteries are 'Low' (the battery symbol is flashing and beeping).
Fit the cover into the catch at the top,and press it down until a click is heard.

11
5. SETTING UP THE INSTRUMENT:
• Mount the batteries in the instrument before performing this operation because the instrument will tilt sightly if the batteries are mounted after leveling.
PROCEDURE
1. Make sure the legs are spaced at equal intervals and the head is approximately level.Set the tripod so that the head is positioned over the survey point.Make sure the tripod shoes are firmly fixed in the ground.
2. Place the instrument on the tripod head.Supporting it with one hand, tighten the centering screw on the bottom of the unit to make sure it is secured to the tripod.
3. Looking through the optical plummet eyepiece screw, turn the optical plummet eyepiece to focus on the reticle. Turn the optical plummet focusing ring to focus on the survey point.
5.1 Centering
5. SETTING UP THE INSTRUMENT
12
PROCEDURE
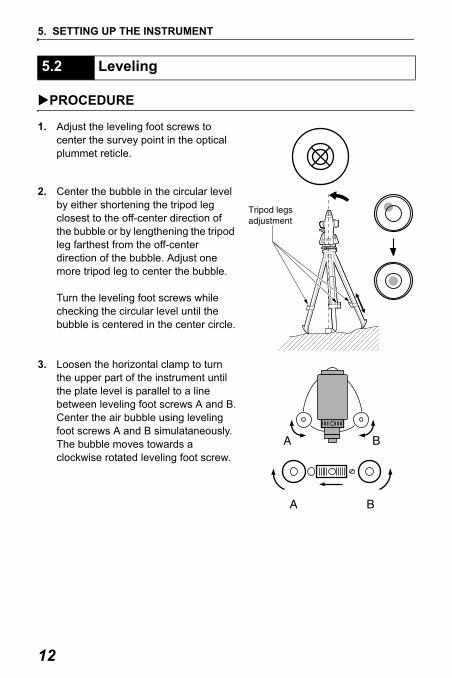
1. Adjust the leveling foot screws to center the survey point in the optical plummet reticle.
2. Center the bubble in the circular level by either shortening the tripod leg closest to the off-center direction of the bubble or by lengthening the tripod leg farthest from the off-center direction of the bubble. Adjust one more tripod leg to center the bubble.
Turn the leveling foot screws while checking the circular level until the bubble is centered in the center circle.
3. Loosen the horizontal clamp to turn the upper part of the instrument until the plate level is parallel to a line between leveling foot screws A and B.Center the air bubble using leveling foot screws A and B simulataneously.The bubble moves towards a clockwise rotated leveling foot screw.
5.2 Leveling

13
5. SETTING UP THE INSTRUMENT
4. Turn the upper part of the instrument though 90°.The plate level is now perpendicular to a line between leveling foot screws A and B.Center the air bubble using leveling foot screw C.
5. Turn the upper part of the instrument a further 90° and check to see if the bubble is still in the center of the plate level. If the bubble is off-center, perform the following:a.Turn leveling foot screws A and B
equally in opposite directions to remove half of the bubble displacement.
b.Turn the upper part a further 90°, and use leveling foot screw C to remove half of the displacement in this direction.
Or adjust the plate level. "12.1 Plate Level"
6. Turn the instrument and check to see if the air bubble is in the center position in all directions.If it is not, repeat the leveling procedure.

5. SETTING UP THE INSTRUMENT
14
7. (DT220/520/520A/620):Loosen the centering screw slightly.Looking through the optical plummet eyepiece, slide the instrument over the tripod head until the surveying point is exactly centered in the reticle.Retighten the centering screw securely.
(DT520S/520AS/620S):Turn the tribrach shifting clamp counterclockwise. Shifting tribrach can be adjusted up to ±8mm.Looking through the optical plummet eyepiece, adjust the instrument position on the tribrach to center the survey point.Tighten the shifting clamp to fix the instrument in the center position.
8. If not, repeat the procedure starting from step 3.

15
6. FOCUSING AND TARGET SIGHTINGPROCEDURE
1. Look through the telescope eyepiece at a bright and featureless background.Turn the eyepiece screw clockwise, then counterclockwise little by little until just before the reticle image becomes focused.Using these procedures, frequent reticle refocusing is not necessary, since your eye is focused at infinity.
2. Loosen the vertical and horizontal clamps, then use the peep sight to bring the target into the field of view. Tighten both clamps.
3. Turn the telescope focusing ring to focus on the target.Turn the vertical and horizontal fine motion screws to align the target with the reticle.The last adjustment of each fine motion screw should be in the clockwise direction.
4. Readjust the focus with the focusing ring until there is no parallax between the target image and the reticle.
Eliminating parallaxThis is the relative displacement of the target image with respect to the reticle when the observer's head is moved slightly before the eyepiece.Parallax will introduce reading errors and must be removed before observations are taken. Parallax can be removed by refocusing the reticle.
16
7. POWER ONPROCEDURE
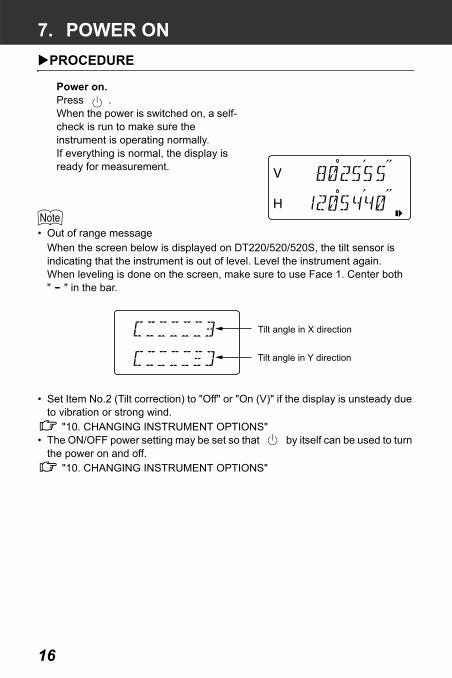
Power on.Press .When the power is switched on, a self-check is run to make sure the instrument is operating normally. If everything is normal, the display is ready for measurement.
• Out of range messageWhen the screen below is displayed on DT220/520/520S, the tilt sensor is indicating that the instrument is out of level. Level the instrument again.When leveling is done on the screen, make sure to use Face 1. Center both " " in the bar.
• Set Item No.2 (Tilt correction) to "Off" or "On (V)" if the display is unsteady due to vibration or strong wind.
"10. CHANGING INSTRUMENT OPTIONS"• The ON/OFF power setting may be set so that by itself can be used to turn
the power on and off. "10. CHANGING INSTRUMENT OPTIONS"
Tilt angle in X direction
Tilt angle in Y direction

17
8. MEASUREMENT Independent Angle Calibration System (IACS)
Independent Angle Calibration System with Single Detection (IACS-SD)• This revolutionary technology provides an even higher level of stability and
reliability for angle measurement. With IACS technology, the DT independently calibrates angle to a high degree of accuracy, and eliminates the need for a reference standard instrument when performing calibration.The IACS-SD system performs angle detection using a combination of IACS technology with a single detector. By employing methods used in conventional angle measurement with diametrical detection, precision equivalent to diametrical detection can now be obtained with a single detector. In addition, the reduced number of detectors leads to an overall reduction in power consumption of the instrument.
Independent angle calibration cannot be performed by the user. Consult your local dealer.
PROCEDURE Setting horizontal angle to 0°
1. Sight the first target as at right.
2. Press twice. The horizontal angle at the first target becomes 0°.
3. Sight the second target.
The displayed horizontal angle is the included angle between two points.
.
8.1 Measuring the horizontal angle between 2 points (H angle 0)

8. MEASUREMENT
18
Horizontal angle hold function can be used to set the horizontal angle of the sighting direction to a required angle.
PROCEDURE Horizontal angle hold
1. Turn the upper part of the instrument and display the horizontal angle you want to set.
2. Press twice. The horizontal angle is in hold status.
3. Sight the direction that you want to set the horizontal angle to in step 2, and press again.The horizontal angle hold-status is released.
8.2 Set Horizontal Circle to a Required Value (Horizontal angle hold)

19
8. MEASUREMENT
PROCEDURE Selecting horizontal angle display mode (Right / left)
1. Set Item No.5 ( function) to " Horizontal angle (Right/left)" in advance.
"10. CHANGING INSTRUMENT OPTIONS"
2. Change the horizontal angle direction on measuring screen.Every time is pressed, horizontal angle right / left is switched.
PROCEDURE Selecting vertical angle display mode (Angle/slope in % / angle/slope in ‰)
1. Set Item No.5 ( function) to "Angle / slope in %" in advance.
"10. CHANGING INSTRUMENT OPTIONS"
2. Change the vertical angle direction on measuring screen.Every time is pressed, vertical angle display is switched between angle/slope in % and angle/slope in ‰.
8.3 Changing Horizontal Angle Display Mode
8.4 Changing Vertical Angle Display Mode

8. MEASUREMENT
20
The telescope reticle is provided with stadia lines (two vertical and two horizontal) which can be used to measure the target distance and height difference as follows:Stadia line separation = 1/100 of the focal distance.
• When the telescope is horizontalHorizontal distance between a and b : L=100Height difference between a and b : h=h1-h2
8.5 Stadia Survey
ι×Δ

21
8. MEASUREMENT
• When the telescope is slantedHorizontal distance between a and b : L= , or
L=Height difference between a and b : h= +h1 - h2,
or h= + h1 - h2
100 ι θzsin2××100 ι θvcos2××
Δ 50 ι θzsin2××Δ 50 ι θzsin2××

22
9. DATA OUTPUTAfter connecting the data output connector on the DT with a computer, the -measurement results can be output.
:• Data output and command operation function are not included on DT620/620S.
Choose the right interface cable for the computer you are connecting."13.2 Optional Accessories"
:• DT will be in "Active Mode ON," when connected to an external instrument
regardless of the setting, "10. CHANGING INSTRUMENT OPTIONS"
Data communicationExternal data collection from the DT uses RS-232C baseband signals.
Data output connector pin assignments
9.1 Connecting a Computer
Synchronization : Asynchronous
Baud rate : 1200 bps
Start bit : 1 bit
Data length : 8 bits
Parity : None
Stop bit : 1 bit
Pin No. Signal name
1 SG (GND)
2 NC
3 SD (TXD)
4 RD (RXD)
5 NC
6 NC
23
9. DATA OUTPUT
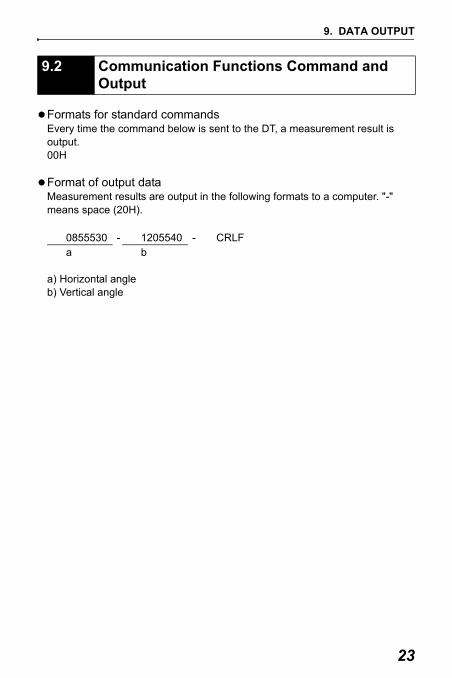
Formats for standard commandsEvery time the command below is sent to the DT, a measurement result is output.00H
Format of output dataMeasurement results are output in the following formats to a computer. "-" means space (20H).
a) Horizontal angleb) Vertical angle
9.2 Communication Functions Command and Output
0855530 - 1205540 - CRLFa b

24
10.CHANGING INSTRUMENT OPTIONSPROCEDURE Setting item options
: Repeat steps 1 to 4 for every item setting.
1. Press {MENU} to display Item screen.
2. Press until the item you want to change is displayed. Details of the items are explained in the table above.
3. Press until the option you want to select is displayed. Details of the items are explained in the table above.
4. Press {MENU} to set the selected option. The measuring screen is restored.
Item NO.Options
25
10. CHANGING INSTRUMENT OPTIONS
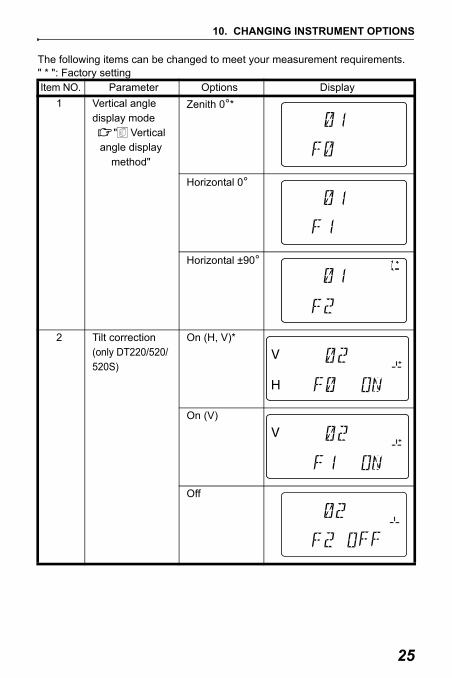
The following items can be changed to meet your measurement requirements." * ": Factory setting Item NO. Parameter Options Display
1 Vertical angle display mode
" Vertical angle display
method"
Zenith 0°*
Horizontal 0°
Horizontal ±90°
2 Tilt correction(only DT220/520/520S)
On (H, V)*
On (V)
Off
10. CHANGING INSTRUMENT OPTIONS
26
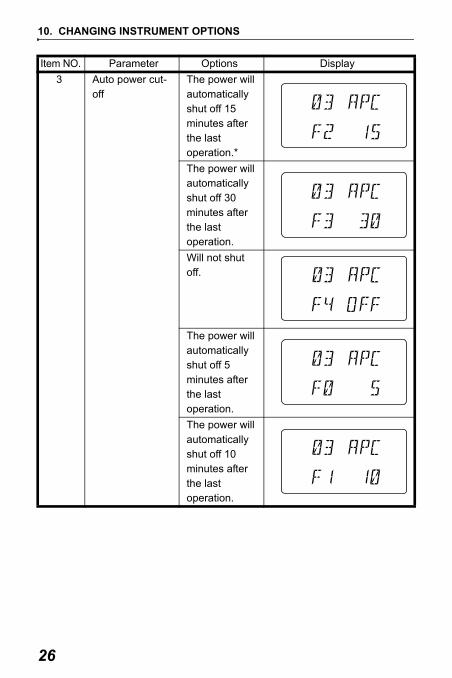
3 Auto power cut-off
The power will automatically shut off 15 minutes after the last operation.*The power will automatically shut off 30 minutes after the last operation.Will not shut off.
The power will automatically shut off 5 minutes after the last operation.The power will automatically shut off 10 minutes after the last operation.
Item NO. Parameter Options Display

27
10. CHANGING INSTRUMENT OPTIONS
4 Reticle illumination (only DT220/520/520S/520A/520AS)
Bright*
Dim
5 function Horizontal angle (Right/left)*
Angle/slope in %
Angle/slope in ‰
6 Minimum display DT220/520/520S/520A/520AS:1"*DT620/620S: 10"
DT220/520/520S/520A/520AS:5"DT620/620S: 5"
Item NO. Parameter Options Display

10. CHANGING INSTRUMENT OPTIONS
28
7 Unit Degree*
Gon
Mil
Instrument constant
"12.3 Tilt Sensor"
8 Procedures for turning the power OFF
+ *
+ (Both methods are possible)
Item NO. Parameter Options Display
29
10. CHANGING INSTRUMENT OPTIONS
• Unit table
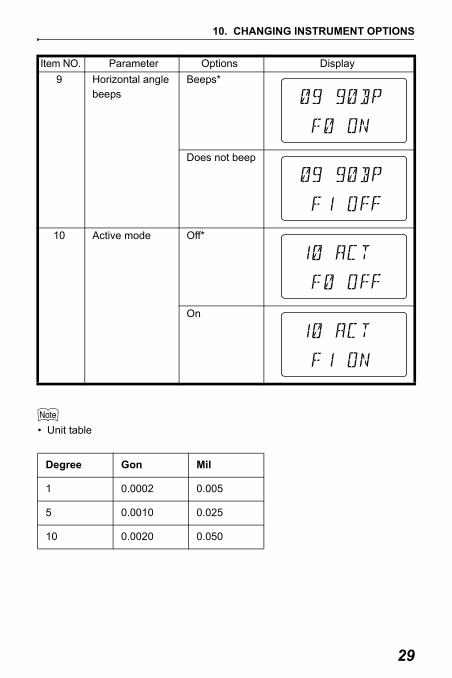
9 Horizontal angle beeps
Beeps*
Does not beep
10 Active mode Off*
On
Degree Gon Mil
1 0.0002 0.005
5 0.0010 0.025
10 0.0020 0.050
Item NO. Parameter Options Display

10. CHANGING INSTRUMENT OPTIONS
30
Vertical angle display method
Horizontal Angle BeepsWhen the setting is set to "Beeps," current horizontal angle values will be announced with beeping.This is useful when standard horizontal angle positions like 90° or 180° degrees are established from the DT 0 set position.Beeping will occur in the positions. So that horizontal angles can be differentiated, rapid and slow beeping alternates in the adjoining positions.Even if the position is beeping, it will stop 3 seconds after the horizontal angles have not been rotated.The beeping sound can be set to beeps/does not beep by holding down the
as well."3. PARTS OF THE INSTRUMENT"
Zenith Vertical Vertical ±90°
270 0
18090
1 to 15 vicinity
75 to 89 vicinity
91 to 105 vicinity165 to 179 vicinity
181 to 195 vicinity
255 to 269 vicinity
271 to 285 vicinity 345 to 359 vicinity

31
10. CHANGING INSTRUMENT OPTIONS
Active ModeActive mode is a setting that is concerned with the refreshing of displays and energy consumption.The angle detector mechanism employs the use of a special absolute encoder, which enables the ON/OFF setting to be selected for active mode.
Active Mode OFF (default setting)Since the display will refresh itself about every 1.5 seconds when the instrument has not been operated for more than 1 minute, energy consumption will be low. When operations are resumed, the display will switch from refreshing itself every 1.5 seconds to 0.5 seconds.This is suitable for operations (setting out, alignment, etc.) whereas the instrument is fixed for a set period of time at a set angle.
Active Mode ONThe display is constantly refreshed about every 0.5 seconds. In comparison to Active Mode OFF, energy consumption is somewhat higher.This is suitable for successive measuring (set collection etc.)
PROCEDURE Displaying the Instrument No.
1. Press and at the same time. Power to the instrument is turned on and the Instrument No. is displayed.
2. After checking, press and at the same time to turn the power off.Press again to turn the power on as usual.
The ON/OFF power setting may be set so that by itself can be used to turn the power on and off.
Instrument No.

32
11. ERROR MESSAGESIf there is a fault in the DT, the following messages are displayed.
• Error messages starting with "E" indicate trouble with the instrument. Contact your local dealer.
If an error occurs when measurement results are being output, the following codes are displayed on the computer. (Only DT220/520/520S/520AS)
Display messages Meaning
_ _ _Either the vertical circle or the horizontal circle is turned too fast to measure the value. After a brief interval the previous display is restored.
(DT220/520/520S only)
The tilt of the instrument exceeds the tilt angle compensation range during measurement. Level the instrument again.
Coded messages Meaning
E114Out of tilt compensation range (- direction of Y-axis). Level the instrument again.
E115Out of tilt compensation range (- direction of X-axis).Level the instrument again.
E116Out of tilt compensation range (+ direction of Y-axis).Level the instrument again.
E117Out of tilt compensation range (+ direction of X-axis).Level the instrument again.

33
12.CHECKS AND ADJUSTMENTSA DT is a precision instrument that requires fine adjustments. It must be inspected and adjusted before use so that it always performs accurate measurements.
• Always perform checking and adjustment in the proper sequence beginning from "12.1 Plate Level" to "12.5 Optical Plummet".
• In addition, the instrument should be inspected with special care after it has been stored a long time, transported, or when it may have been damaged by a strong shock.
• Make sure the instrument is securely set up and stable before performing checks and adjustments.
The bubble tube is made of glass, so it is sensitive to temperature changes or to shock. Check and adjust it as outlined below.
PROCEDURE Checking and adjusting
1. Level the instrument and check the position of the bubble in the plate level.
"5.2 Leveling", steps 3 to 5.
2. Turn the upper part through 180° and check the bubble position. If the bubble is still centered, no adjustment is necessary.If the bubble is off-center, adjust as follows.
3. Correct half of the bubble displacement using leveling foot screw C.
12.1 Plate Level

12. CHECKS AND ADJUSTMENTS
34
4. Correct the remaining half of the displacement by using the adjustment pin to rotate the plate level adjustment screw. When the plate level adjustment screw is turned in the counterclockwise direction, the bubble moves in the same direction.
5. Rotate the top of the instrument and continue adjustments until the bubble remains centered for any position of the upper part.If the bubble does not move to the center even when the adjustment has been repeated, have your local dealer adjust it.
PROCEDURE Checking and adjusting
1. Perform the plate level inspection and adjustment.
"12.1 Plate Level"
2. Check the position of the bubble in the circular level.
"5.2 Leveling" step 1 to 2.If the bubble is not off-center, no adjustment is necessary.If the bubble is off-center, perform the following adjustment.
3. First confirm the off-center direction. Use the adjusting pin to loosen the circular level adjustment screw on the side opposite to the direction the bubble is displaced to move the bubble to the center.
12.2 Circular Level

35
12. CHECKS AND ADJUSTMENTS
4. Adjust the adjusting screws until the tightening tension of the three screws is the same to align the bubble in the middle of the circle.
:• Be careful that the tightening tension is
identical for all the adjusting screws.Also, do not over-tighten the adjusting screws as this may damage the circular level.
If the tilt angle shown on the display shifts from tilt angle 0 (zero point), the instrument is not correctly levelled. This will adversely affect angle measurement.Perform the following procedure to cancel the tilt zero point error.
• Only DT220/520/520S include a tilt sensor function. Set Item No.2 (Tilt corection) to "On (H, V)" or "On (V)" beforehand.
"10. CHANGING INSTRUMENT OPTIONS"
PROCEDURE Check
1. Carefully level the instrument. If necessary, repeat the procedures to check and adjust the bubble levels.
2. In the Item display, select Instrument constant Item. Press {MENU} to display the Item screen, and select Instrument constant Item. Current correction constant is displayed.
3. Accurately sight a clear target in face left.
12.3 Tilt Sensor

12. CHECKS AND ADJUSTMENTS
36
4. Wait a few seconds for the display to stabilize, then read the automatically compensated angles X1 and Y1.
5. Rotate the top of the instrument through 180° and sight the same object in face right. Loosen the horizontal clamp and turn the instrument 180°, sight the object, then retighten the clamp.
6. Wait a few seconds for the display to stabilize, then read the automatically compensated angles X2 and Y2.
7. In this state, calculate the following offset values (tilt zero point error).X offset = (X1 + X2)/2Y offset =(Y1 + Y2)/2If one of the offset values (X offset, Y offset) exceeds ±20", adjust the value using the following procedure.When the offset value falls within the range ±20", adjustment is not necessary. Press {MENU} to return to the measuring screen.
PROCEDURE Adjustment
8. Store values X2 and Y2.Press to store the values.
9. Rotate the top of the instrument through 180° and sight the same object accurately.

37
12. CHECKS AND ADJUSTMENTS
10. Wait a few seconds for the display to stabilize, then store values X1 and Y1.Press to store the values. The new correction constant is displayed.
11. Confirm that the values are in the adjustment range.If both correction angles are within the range 488 ± 146, press to renew the correction angle. Go to step 12.
If the value exceeds the adjustment range, stop the adjustment and contact your local dealer to perform the adjustment.
PROCEDURE Recheck
12. In the Item display, select Instrument constant Item again.
13. Wait a few seconds for the display to stabilize, then read the automatically compensated angles X3 and Y3.
14. Rotate the top of the instrument through 180°.
15. Wait a few seconds for the display to stabilize, then read the automatically compensated angles X4 and Y4.
16. In this state, calculate the following
offset values (tilt zero point error).X offset = (X3+ X4)/2Y offset = (Y3 + Y4)/2
12. CHECKS AND ADJUSTMENTS
38
When the offset value falls within the range ±20", adjustment is completed. Press {MENU} to return to the measuring screen.
If one of the offset values (X offset, Y offset) exceeds ±20", repeat the check and adjustment procedure from the beginning.If the difference continues to exceed ±20" after repeating the check 2 or 3 times, have your local dealer perform the adjustment.
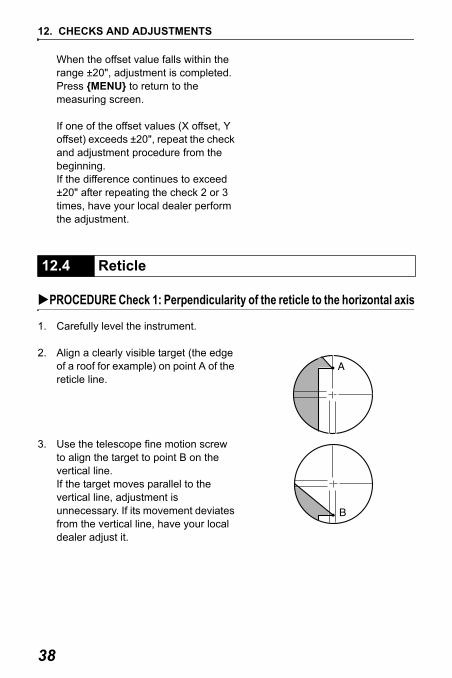
PROCEDURE Check 1: Perpendicularity of the reticle to the horizontal axis
1. Carefully level the instrument.
2. Align a clearly visible target (the edge of a roof for example) on point A of the reticle line.
3. Use the telescope fine motion screw to align the target to point B on the vertical line. If the target moves parallel to the vertical line, adjustment is unnecessary. If its movement deviates from the vertical line, have your local dealer adjust it.
12.4 Reticle

39
12. CHECKS AND ADJUSTMENTS
PROCEDURE Check 2: Vertical and horizontal reticle line positions
:• Perform the check procedure under slightly hazy and weakly scintillating
conditions.
1. Install a target at a point about 100 m in the horizontal direction from the DT.
2. Level the instrument carefully, turn on the instrument's power and index the vertical and horizontal circles.
3. While the Meas mode screen is displayed and the telescope is in face left, sight the center of the target and read out the horizontal angle A1 and the vertical angle B1.Example: Horizontal angle A1=18°34' 00"Vertical angle B1=90°30' 20"
4. While the telescope is in face right, sight the center of the target and read out the horizontal angle A2 and the vertical angle B2.Example: Horizontal angle A2=198°34' 20"Vertical angle B2=269°30' 00"

12. CHECKS AND ADJUSTMENTS
40
5. Do the calculations: A2-A1 and B2+B1If A2-A1 is within 180°±20" and B2 + B1 is within 360°±40", adjustment is unnecessary.Example: A2-A1 (Horizontal angle)
=198°34' 20" - 18°34' 00" =180°00'20"B2 + B1 (Vertical angle)=269°30' 00" + 90°30'20"=360°00' 20"
If the difference is large even after repeating the check 2 or 3 times, have your local dealer perform the adjustment.
41
12. CHECKS AND ADJUSTMENTS
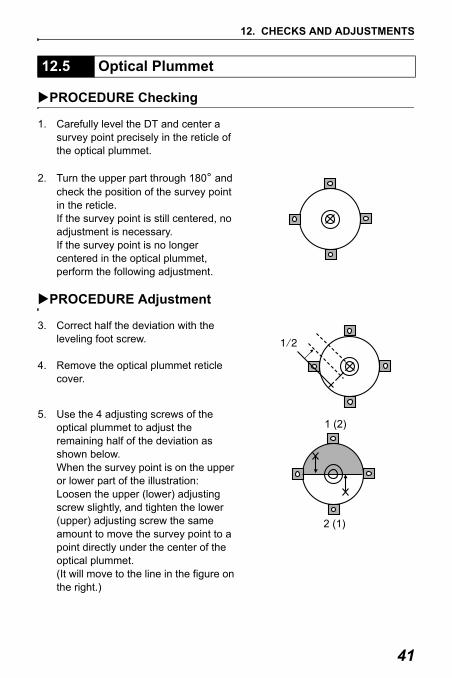
PROCEDURE Checking
1. Carefully level the DT and center a survey point precisely in the reticle of the optical plummet.
2. Turn the upper part through 180° and check the position of the survey point in the reticle. If the survey point is still centered, no adjustment is necessary.If the survey point is no longer centered in the optical plummet, perform the following adjustment.
PROCEDURE Adjustment
3. Correct half the deviation with the leveling foot screw.
4. Remove the optical plummet reticle cover.
5. Use the 4 adjusting screws of the optical plummet to adjust the remaining half of the deviation as shown below. When the survey point is on the upper or lower part of the illustration:Loosen the upper (lower) adjusting screw slightly, and tighten the lower (upper) adjusting screw the same amount to move the survey point to a point directly under the center of the optical plummet.(It will move to the line in the figure on the right.)
12.5 Optical Plummet
1 (2)
2 (1)

12. CHECKS AND ADJUSTMENTS
42
If the survey point is on the solid line (dotted line): Loosen the right (left) adjusting screw slightly and, tighten the left (right) adjusting screw by the same amount to move the survey point to a point in the center of the optical plummet.
:• Be extremely careful to adjust all the
adjustment screws by the same amount so that none will be over-tightened.
6. Check to make sure that the survey point remains centered on the reticle even if the upper part of the instrument is rotated. If necessary, perform the adjustment again.
7. Replace the optical plummet reticle cover.
4 (3)
3 (4)

43
13. STANDARD EQUIPMENT AND OPTIONAL ACCESSORIES
Please verify that all equipment is included.
13.1 Standard Equipment
1 DT main unit. . . . . . . . . . . . . .12 LR14/C alkaline battery . . . . .23 Lens cap . . . . . . . . . . . . . . . .14 Lens hood . . . . . . . . . . . . . . .15 Plumb bob . . . . . . . . . . . . . . .16 Tool pouch . . . . . . . . . . . . . . .17 Screwdriver . . . . . . . . . . . . . .1
8 Lens brush . . . . . . . . . . . . . . .19 Adjusting pin . . . . . . . . . . . . .210 Cleaning cloth . . . . . . . . . . . .111 Operator's manual . . . . . . . . .112 Carrying case (SC181) . . . . .113 Carrying strap . . . . . . . . . . . .1

13. STANDARD EQUIPMENT AND OPTIONAL ACCESSORIES
44
Plumb bob The plumb bob can be used to set up and center the instrument on days when there is little wind. To use the plumb bob, unwind its cord, pass it through the cord grip piece as shown in the figure to adjust its length, then suspend it from the hook attached to the centering screw.
Handle The carrying handle can be removed from the instrument. To remove it, loosen the handle securing screw.
The following are optional accessories which are sold separately from the DT.
Tubular compass (CP7)Slide the tubular compass into the tubular compass slot, loosen the clamp screw, then rotate the top part of the instrument until the compass needle bisects the index lines. The telescope's face left sighting direction in this position will indicate magnetic north. After use, tighten the clamp and remove the compass from the slot.
:• The tubular compass is susceptible to
the influence of nearby magnets or metal. Such influence could cause it to fail to accurately indicate magnetic north. Do not use magnetic north as indicated by this compass for base line surveying.
13.2 Optional Accessories
Handle Handlesecuring screws
Tubular compass slot

45
13. STANDARD EQUIPMENT AND OPTIONAL ACCESSORIES
Telescope eyepiece lens (EL6) Telescope eyepiece lens for DT620/620SMagnification: 30X
Diagonal eyepiece (DE25) The diagonal eyepiece is convenient for observations near the nadir and in narrow spaces. Magnification:30XAfter removing the handle from the DT, loosen the attachment screw to remove the telescope eyepiece. Then screw the diagonal lens into place.
For handle removal method: "13.1 Standard Equipment"
Solar filter (OF1) When sighting targets where glare is present, solar observations for example, attach it to the objective lens of the DT to protect the eyes of the operator.
Battery Unit (BDC55)BDC55 is used as the power source for the ACE5 and LAP1.
Auto-collimation eyepiece (ACE5)The ACE5 is designed to detect a slight shift in inclimation of the reflector. The BDC55 is the power source for the ACE5. The buttons on the BDC55 can also be used to operate the ACE5. For details, see the ACE5 Operator’s manual.
Laser Plummet (LAP1)When using the LAP1, a laser is emitted from the bottom of the main unit making it easier to position the instrument over the surveying point.

13. STANDARD EQUIPMENT AND OPTIONAL ACCESSORIES
46
The BDC55 is the power source for the LAP1. The buttons on the BDC55 can also be used to operate the LAP1. For details, see the LAP1 Operator’s manual.
Interface cableConnects between the DT and a computer for data output.
The following numbers indicate the equipment listed in "13.1 Standard Equipment"
Computer Cable Notes
IBM PC/AC or compatible
DOC26 Length: 2 m
DOC27
Pin Numbers and signal levels: RS-232C compatible
D-Sub connector: DOC26: 25 pins (female)
DOC27: 9 pins (female)
Other personal computers
DOC1 No connector for attachment to a computer.
13.3 Layout Plan
47
14.APPENDICES
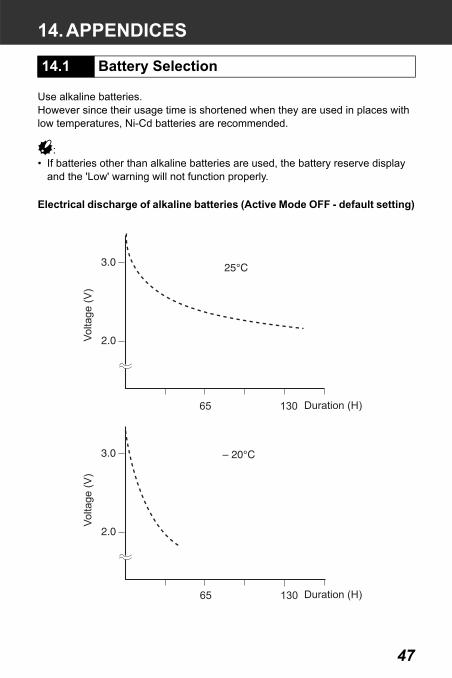
Use alkaline batteries.However since their usage time is shortened when they are used in places with low temperatures, Ni-Cd batteries are recommended.
:• If batteries other than alkaline batteries are used, the battery reserve display
and the 'Low' warning will not function properly.
Electrical discharge of alkaline batteries (Active Mode OFF - default setting)
14.1 Battery Selection
65 130
65 130
Duration (H)
Duration (H)
Volta
ge (V
)Vo
ltage
(V)

48
15.SPECIFICATIONSExcept where stated, the following specifications apply to all DTs.
TelescopeLength: DT220/520/520S/520A/520AS: 165 mm
DT620/620S: 160 mmAperture: DT220/520/520S/520A/520AS: 45 mm
DT620/620S: 35 mmMagnification: DT220/520/520S/520A/520AS: 30X
DT620/620S: 26XImage: ErectResolving power: DT220/520/520S/520A/520AS: 3"
DT620/620S: 3.5"Field of view: 1°30'Minimum focus: 0.9 mReticle illumination: Bright or dim (Selectable with parameter) (only
DT220/520/520S/520A/520AS)Stadia ratio: 1:100Additive constant: 0
Angle measurementHorizontal and Vertical circles type:
Rotary absolute encoderDetecting Horizontal angle DT220/520/520A/520S/520AS: 2 sides
DT620/620S: 1 side Vertical angle DT220/520/520S: 2 sides
DT520A/520AS/620/620S: 1 sideIACS (Independent Angle Calibration System)
DT220 onlyIACS-SD (Independent Angle Calibration System with Single Detection)
DT520A/520AS/620/620SMinimum display: DT220/DT520/520S/520A/520AS: 1" (0.2mg/
0.005 mil)/5" (1 mg/0.02 mil)DT620/620S: 10" (2 mg/0.05 mil)/5" (1 mg/0.02 mil)(Selectable with parameter)
Accuracy: DT220: 2"DT520/520S/520A/520AS: 5"DT620/620S: 7" (ISO 17123-3: 2001)
Measuring time: (Active Mode ON)Every 0.5 sec(Active Mode OFF)Non-operation: Every 1.5 sec
49
15. SPECIFICATIONS
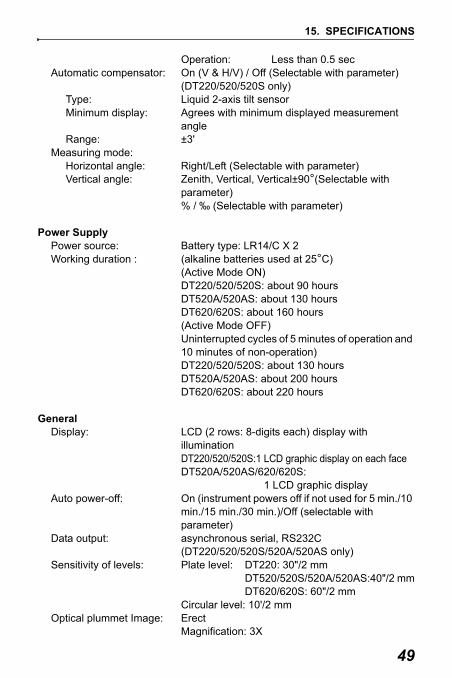
Operation: Less than 0.5 secAutomatic compensator: On (V & H/V) / Off (Selectable with parameter)
(DT220/520/520S only) Type: Liquid 2-axis tilt sensor Minimum display: Agrees with minimum displayed measurement
angle Range: ±3'Measuring mode: Horizontal angle: Right/Left (Selectable with parameter) Vertical angle: Zenith, Vertical, Vertical±90°(Selectable with
parameter)% / ‰ (Selectable with parameter)
Power SupplyPower source: Battery type: LR14/C X 2Working duration : (alkaline batteries used at 25°C)
(Active Mode ON)DT220/520/520S: about 90 hoursDT520A/520AS: about 130 hoursDT620/620S: about 160 hours(Active Mode OFF)Uninterrupted cycles of 5 minutes of operation and 10 minutes of non-operation)DT220/520/520S: about 130 hoursDT520A/520AS: about 200 hoursDT620/620S: about 220 hours
GeneralDisplay: LCD (2 rows: 8-digits each) display with
illuminationDT220/520/520S:1 LCD graphic display on each faceDT520A/520AS/620/620S: 1 LCD graphic display
Auto power-off: On (instrument powers off if not used for 5 min./10 min./15 min./30 min.)/Off (selectable with parameter)
Data output: asynchronous serial, RS232C(DT220/520/520S/520A/520AS only)
Sensitivity of levels: Plate level: DT220: 30"/2 mmDT520/520S/520A/520AS:40"/2 mmDT620/620S: 60"/2 mm
Circular level: 10'/2 mmOptical plummet Image: Erect
Magnification: 3X

15. SPECIFICATIONS
50
Minimum focus: 0.3 m (from base plate)Operating temperature: -20 to 50°CStorage temperature: -30 to 70°CDust and water resistance: IP66 (IEC 60529:2001)Instrument height: 236 mmSize: 165 (W) X 165 (D) X 341 (H) mm (with handle)Weight (with handle): DT220/520S: 4.4 kg (9.6 lb)
DT520: 4.3 kg (9.5 lb)DT520AS/620S: 4.3 kg (9.4 lb)DT520A: 4.2 kg (9.3 lb)DT620: 3.9 kg (8.6 lb)

51
16.REGULATIONSUsers must ensure that their instrument is compliant with the relevant regulations and legal restrictions in place in the country of use.
For users in the US
WARNING: Changes or modifications to this unit not expressly approved by the party responsible for compliance could void the user's authority to operate the equipment.
NOTE: This equipment has been tested and found to comply with the limits for a Class A digital device pursuant to Part 15 of the FCC Rules. These limits are designed to provide reasonable protection against harmful inter-ference when the equipment is operated in a commercial environment. This equipment generates, uses, and can radiate radio frequency energy and, if not installed and used in accordance with the instruction manual, may cause harmful interference to radio communications. Operation of this equipment in a residential area is likely to cause harmful interference in which case the user will be required to correct the interference at his own expense.
For users in Canada
This Class A digital apparatus meets all requirements of Canadian Interference-Causing Equipment Regulations.Cet appareil numérique de la Class A respecte toutes les exigences du Règlement sur le matériel brouilleur du Canada.

16. REGULATIONS
52
For users in the European Economic Area (EEA)

1st ed. 01-0809 Printed in China ©2008 SOKKIA TOPCON CO., LTD.