DS-7200-ST DVR (V1.3.0) HIKVision User Manual of Baseline 20120401 ENG
DS72xxHVIST Series Embedded Net DVR USER’S MANUAL
Hikvision ® Network Digital Video Recorder User Guide Copyright © 2010, Hikvision, Ltd. All rights reserved.
may not be copied in whole or in part or otherwise reproduced without prior written consent This document from Hikvision except where specifically permitted under Europe and international copyright law.
on in this document is subject to change without notice. Hikvision assumes no responsibility or in this book.
The informatiliability for any errors or inaccuracies that may appear This manual is written for DVR firmware version 1.0.2.
Hikvision EURO, Inc. DS-72xxHVI-ST Series Embedded Net DVR User Manual 2
TABLE
........................................................................................... 6
OF CONTENTS CHAP ........................................................................................... 5 TER1 Introduction
............................................................................................................ 6
....................nary TipsPreventive and Cautio
..DVR SpecificationsConnecting Your DVR
................................................................................................ 9
............................................................................................................... 8
Operating Your DVR...............
trol
..............
.............................................................................................. 11 Using the Fro ................................................................................................ 9 nt Panel Controls
...................................................................................................... 12 Using the IR Remote Con
........d
Using a USB Mouse...................................................................................................... 12 Using the Soft Keyboar
Rear Panel Diagram
.............................................................................. 17
........................................
.............................................................................. 14 CHAP .............................................................................. 16 TER2 Getting Started
...................................................................................... 18
...................g Down Your DVRStarting and Shuttin
........................................................................................ 18 Rebooting and Locking Your DVR
me........................................................................................ 20
Setting Date & Ti .....................f Your DVRChecking the Status o
.......................................................................................... 22 CHAP .......................................................................................... 21 TER3 Live Feed
.......................................................................................... 22
....................................d Icons
Watching a Live Feed ....
.......................................................................................... 23 Understanding Live Fee
.......................................................................................... 25 Operating the Live Feed
.............isplays
............u
.......................................................................................... 27 Using the Display Men
.................................................................................... 28 Configuring Live Feed DSetting Camera Order ......................
................................................................................. 30
CHAP .................................................................................... 29 TER4 Record Settings ..............
.................................................................. 30 Configuring Settings for Recording .........
.................................................................. 31 Configuring Recording Settings
......... Recording Schedule
........................ick Recording Schedule
................................................................. 32 Configuring a QuConfiguring an Advanced
............................................................................... 35 CHAP ............................................................................... 34 TER5 Playback
............................................................................... 35
...................................................Interface
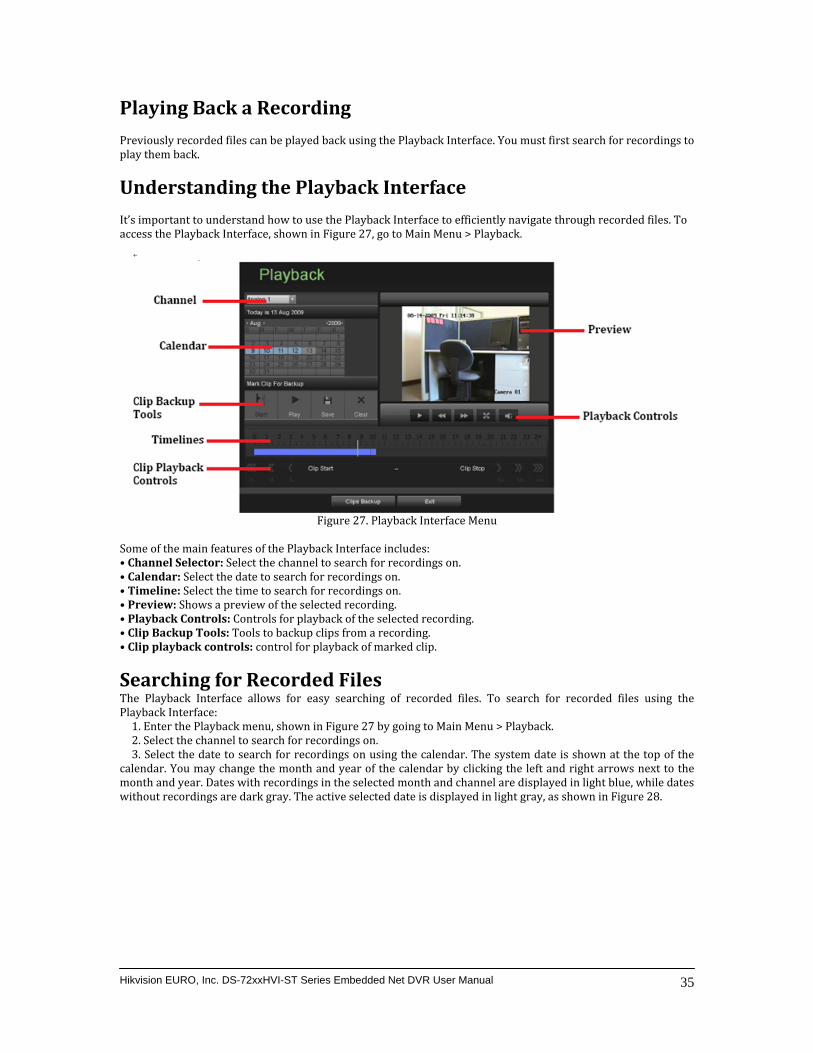
Playing Back a Recording
.............................................................................................. 35
...... Understanding the Playback
ecorded FilesFiles
Searching for RPlaying Back Recorded
............................................................................................................ 39
............................................................................................... 36 CHAP ....................................................................................................... 38 TER6 Backup ..........
................................................................................................. 39 Backing Up Video ClipsSelecting Video Clips ..........
............................................................................................ 41 Backing Up Video Clips
CHAP ............................................................................................ 42
....................................................................................................... 40 Backing Up Recorded Files
..tings
.....tion
............................................................................................ 43 TER7 System Configura
k Setounts
Configuring NetworAccser
Managing User U
................................................................................................... 45
..................................................................................................... 44 Adding a New
........................................................................................... 45
.............................................................................................................. 44 Deleting a User..................
................................................................ 46 Editing a User............................
................................................................ 46 Configuring PTZ Cameras
................................................................ 47
......................................................
PatrolsConfiguring Basic PTZ Settings
................................................................................... 49
........tterns and ptions
Customizing PTZ Presets, Paxceon
Configuring Alarms and Eti
................................................................................................ 50 Setting Up Motion Detec
................................................................................................ 51
............................................................................................... 49
RO, Inc. DS-72xxHVI-ST Series Embedded Net DVR User Manual 3Hikvision EU
Configuring Alarm InputsConfiguring ExceptionsConfiguring E‐mail Settings
..........
................................................................................................ 52

CHAP mentTER8 Camera Manage
........................................................................... 54
............................................................................................... 53 Configuring Cameras
........................................................................... 55
...........................................ection
........................................................................... 54 To setup privacy zones
...................................................................................... 56
..................ring Detetection
Configuring Video Tampe
.................................................................................................... 57 Configuring Video Loss D
SettingsCHAP ent
Configuring OSD
........................................................................................................... 59 TER9 Disk Managem
............................................................................................................. 59
.................................................................................................... 58 Managing Disks.
..................................................................................................... 59 Checking Disk Status
............................................................................................................ 60
......kFormatting Dis
.............................................................................. 61 Enabling Disk Overwrite .......
.............................................................................. 61 Managing Files
................orded Files
.......................................es
.............................................................................. 61 Searching for Recorded Fil
king RecLocking and Unloc
........................................................................................ 64 CHAP ........................................................................................ 63 TER10 DVR Management ..........
........................................................................................... 64
Managing System..............
................................................................................ 64 Upgrading the System Firmware
............................................................................................. 65
.......tingsRestoring Default Set
Vi ........................................................................... 67 Exporting & Importing Configuration
........................................................................................................... 68
.....ewing System LogsLocking and Unlocking System Menus
Hikvision EURO, Inc. DS-72xxHVI-ST Series Embedded Net DVR User Manual 4
CHAPTER1 Introduction
Hikvision EURO, Inc. DS-72xxHVI-ST Series Embedded Net DVR User Manual 5
Preventive and Cautionary Tips DVR, please be advised of the f lilated, dust‐free environment.
Before connecting and operating your t
o lowing tips: • Ensure unit is installed in a well‐ven• Unit is designed for indoor use only. • Keep all liquids away from the DVR. • Ensure environmental conditions meet factory specifications.
the unit as a result of dropping it may • Ensure unit is properly secured to a rack or shelf. Major shocks or jolts to cause damage to the sensitive electronics within the unit.
ion with an Uninterruptible Power Supply (UPS). cting and disconnecting accessories and peripherals.
• Use the DVR in conjunct• Power down the unit before conne
DVR Specifications • Compression:
cluding resolution, frame rate, bit rate, im• Video encoding parameters of each channel can be set separately, inage quality.
nd event compression parameters. . Audio and video streams are strictly synchronized.
• Each channel supports normal a• Supports both composite stream and video only stream• Supports Hikvision watermark. • Supports dual stream. Sub stream up to CIF resolution.
• Local Functions (Monitoring): • Supports 1/4/9/16 screen live view, channel sequence is adjustable.
utomatic cycle, the interval of automatic cycle can be ad• Support live view group switch, manual switch and ajusted. • Supports shielding of an assigned live view channel. • Supports various PTZ protocols, PTZ preset, patrol and pattern.
he administrator can set every guest user’s access right. Users can lo• Support local multi‐user management. Tg off and switch. • Supports mouse, front panel, IR control
ent): D can support max 2TB capacity.
• Local Functions (HDD Managem• Supports up to 2 SATA HDD, each HD• Supports S.M.A.R.T. technology. • Supports HDD hibernation function. • Supports Windows compatible file system format and technology of pre‐allocating hard disk space to avoid
HDD fragments. • Recording and Playback: • Supports continuous and event recording types • Supports 8 recording time periods with separate recording types. • Supports pre/post‐recording time for alarm and motion detection.
kip forward, and skip backward when playback, locating in progress ba• Supports pause, play fast, play slow, sr by dragging the mouse. •Supports up to 16 channels playback.
• Backup: • Supports USB storage device, SATA CD/DVD backup.
ent. • Supports backup device maintenance and managem & Exception:
output. nnect detection, video output standard mismatch detection.
• Alarm• Unified management of DVR alarm input/• Supports motion detection, network disco• Supports auto recovery from exceptions.
• Network:
• Supports 10/100M adaptive network interface.
P, etc. • Supports TCP/IP protocols, DHCP, DNS, DDNS, NTP, and SAD• Supports unicast and multicast, support TCP and UDP for unicast. • Supports remote search, playback and download video files.
f DVR settings. • Supports remote configuration and import and export o• Supports remote acquisition of device status, system log and alarm status. • Supports remote format of hard disk, upgrade, reboot.
te management host. remote users and set their privilege.
Hikvision EURO, Inc. DS-72xxHVI-ST Series Embedded Net DVR User Manual 6
• Supports event alarm and exceptions upload to remoinistrator can create and manage JPEG capture.
• Support user management. Adm• Supports remote instantaneous• Supports remote PTZ control.
• Supports voice talk and broad ac st. • Includes built‐in WEB Server.
• Development: • SDK for Windows and Linux environment is available. Demo software source codes are available. Development support and training of application system are available. ••
Hikvision EURO, Inc. DS-72xxHVI-ST Series Embedded Net DVR User Manual 7
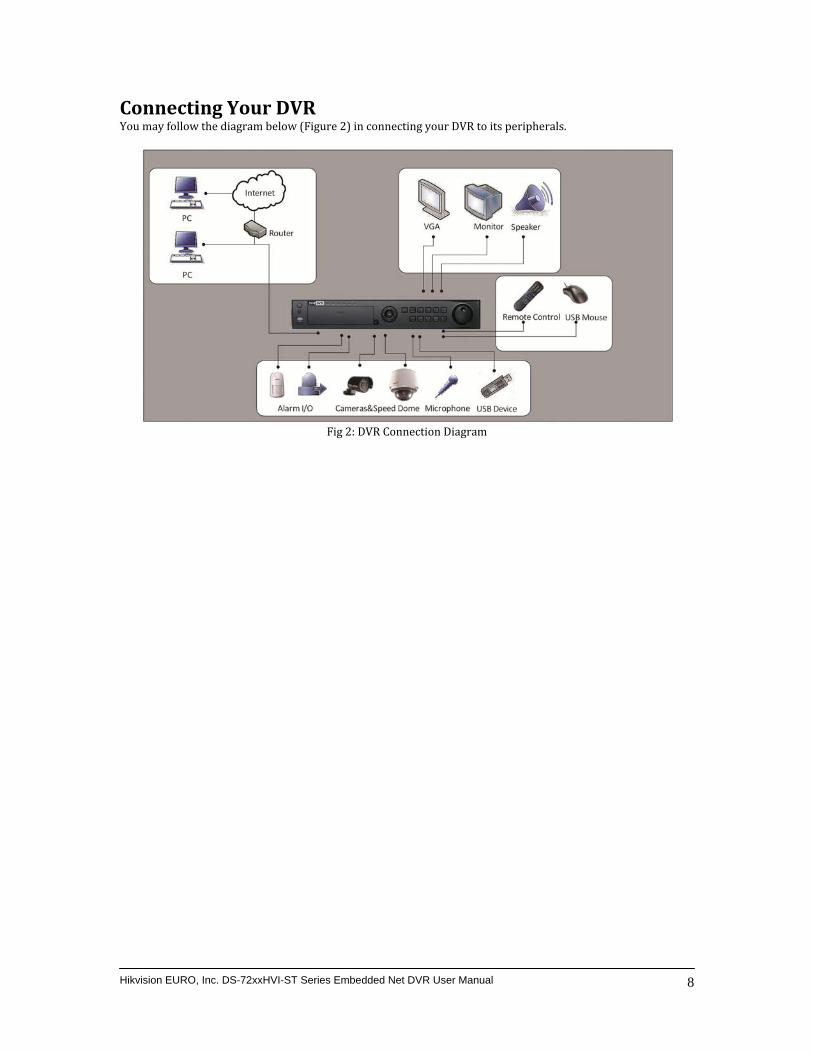
ConnectingYou may follow
Your DVR the diagram below (Figure 2) in connecting your DVR to its peripherals.
Fig 2: DVR Connection Diagram
Hikvision EURO, Inc. DS-72xxHVI-ST Series Embedded Net DVR User Manual 8
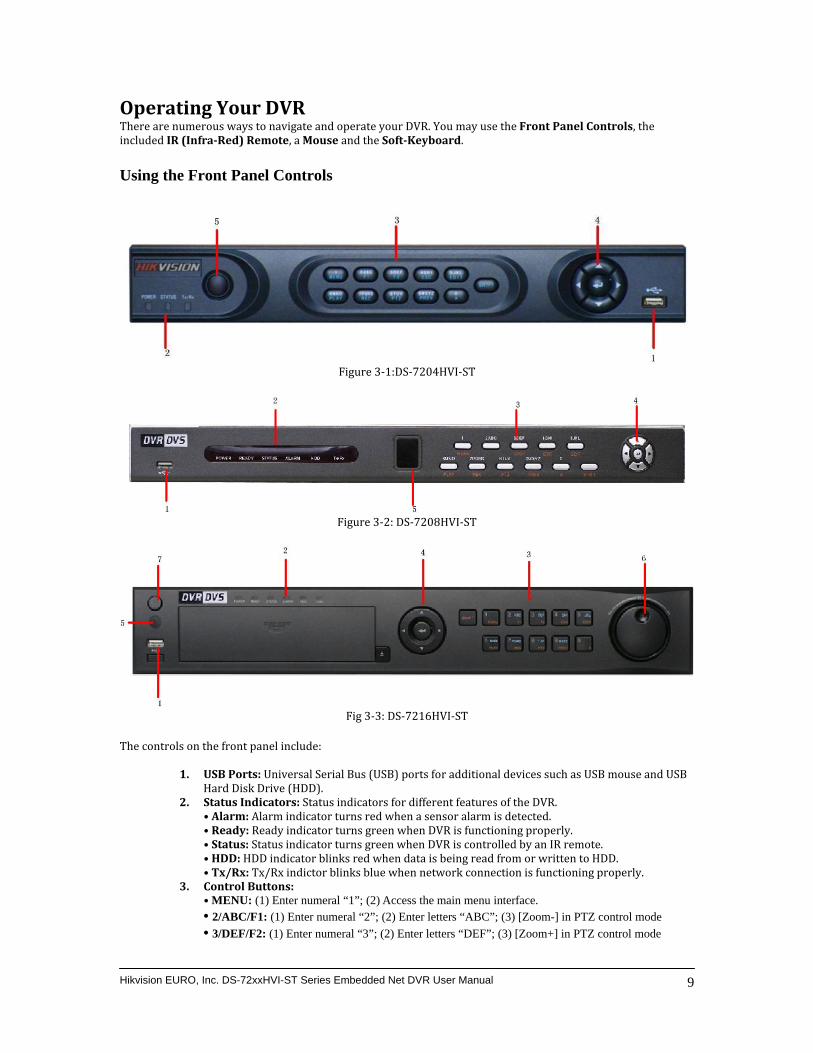
Operating Your DVR There are numerous ways to navigate and operate your DVR. You may use the Front Panel Controls, the included IR (InfraRed) Remote, a Mouse and the SoftKeyboard.
Using the Front Panel Controls
Figure 3‐1:DS‐7204HVI‐ST
Figure 3‐2: DS‐7208HVI‐ST
Fig 3‐3: DS‐7216HVI‐ST
T he controls on the front pa
nel include:
1. USB Ports: Univers h as USB mouse and USB Hard Disk
al Serial Bus (USB) ports for additional devices suc
2. Status In Drive (HDD).
• Alarm: dicators: Status indicators for different features of the DVR.
• ReadyAlarm indicator turns red when a sensor alarm is detected.
• Status: Ready indicator turns green when DVR is functioning properly. :
• HDD: HStatus indicator turns green when DVR is controlled by an IR remote. DD indicator blinks red when data is being read from or written to HDD.
• Tx/Rx: Tx/Rx indictor blinks blue when network connection is functioning properly. 3. Control Buttons:
• MENU: (1) Enter numeral “1”; (2) Access the main menu interface. • 2/ABC/F1: (1) Enter numeral “2”; (2) Enter letters “ABC”; (3) [Zoom-] in PTZ control mode
• 3/DEF/F2: (1) Enter numeral “3”; (2) Enter letters “DEF”; (3) [Zoom+] in PTZ control mode
Hikvision EURO, Inc. DS-72xxHVI-ST Series Embedded Net DVR User Manual 9
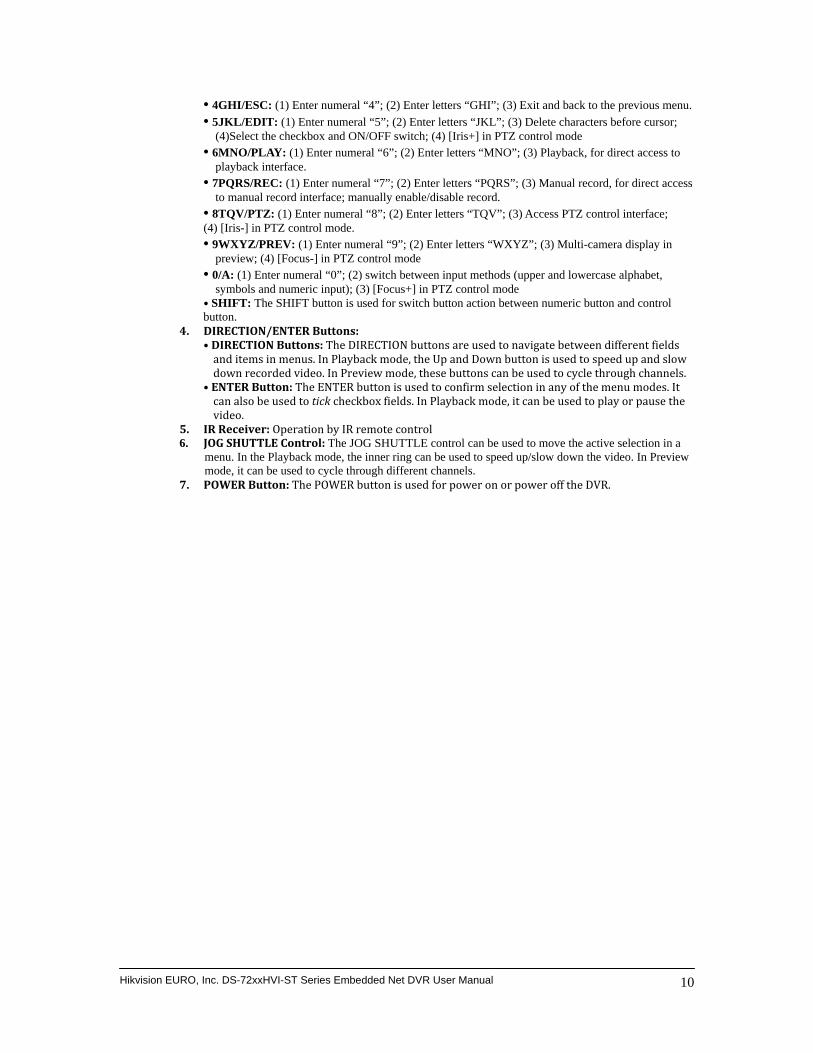
• 4GHI/ESC: (1) Enter numeral “4”; (2) Enter letters “GHI”; (3) Exit and back to the previous menu.
• 5JKL/EDIT: (1) Enter numeral “5”; (2) Enter letters “JKL”; (3) Delete characters before cursor; (4)Select the checkbox and ON/OFF switch; (4) [Iris+] in PTZ control mode
• 6MNO/PLAY: (1) Enter numeral “6”; (2) Enter letters “MNO”; (3) Playback, for direct access to playback interface.
• 7PQRS/REC: (1) Enter numeral “7”; (2) Enter letters “PQRS”; (3) Manual record, for direct access to manual record interface; manually enable/disable record.
• 8TQV/PTZ: (1) Enter numeral “8”; (2) Enter letters “TQV”; (3) Access PTZ control interface; (4) [Iris-] in PTZ control mode. • 9WXYZ/PREV: (1) Enter numeral “9”; (2) Enter letters “WXYZ”; (3) Multi-camera display in
preview; (4) [Focus-] in PTZ control mode • 0/A: (1) Enter numeral “0”; (2) switch between input methods (upper and lowercase alphabet,
symbols and numeric input); (3) [Focus+] in PTZ control mode
• SHIFT: The SHIFT button is used for switch button action between numeric button and control button.
4. DIRECTION/ENTER Buttons: • DIRECTION Buttons: The DIRECTION buttons are used to navigate between different fields and items in me nus. In Playback mode, the Up and Down button is used to speed up and slowdown recorded video. In Preview mode, these buttons can be used to cycle through channels.
• ENTER Button: The ENTER button is used to confirm selection in any of the menu modes. It can also be layback mode, it can be used to play or pause the video.
used to tick checkbox fields. In P
5. IR Receiver: Operation by IR remote control 6. JOG SHUTTLE Control: The JOG SHUTTLE control can be used to move the active selection in a
menu. In the Playback mode, th deo. In Preview mode, it can be us
e inner ring can be used to speed up/slow down the vied to cycle through different channels.
7. POWER Button: The POWER button is used for power on or power off the DVR.
Hikvision EURO, Inc. DS-72xxHVI-ST Series Embedded Net DVR User Manual 10
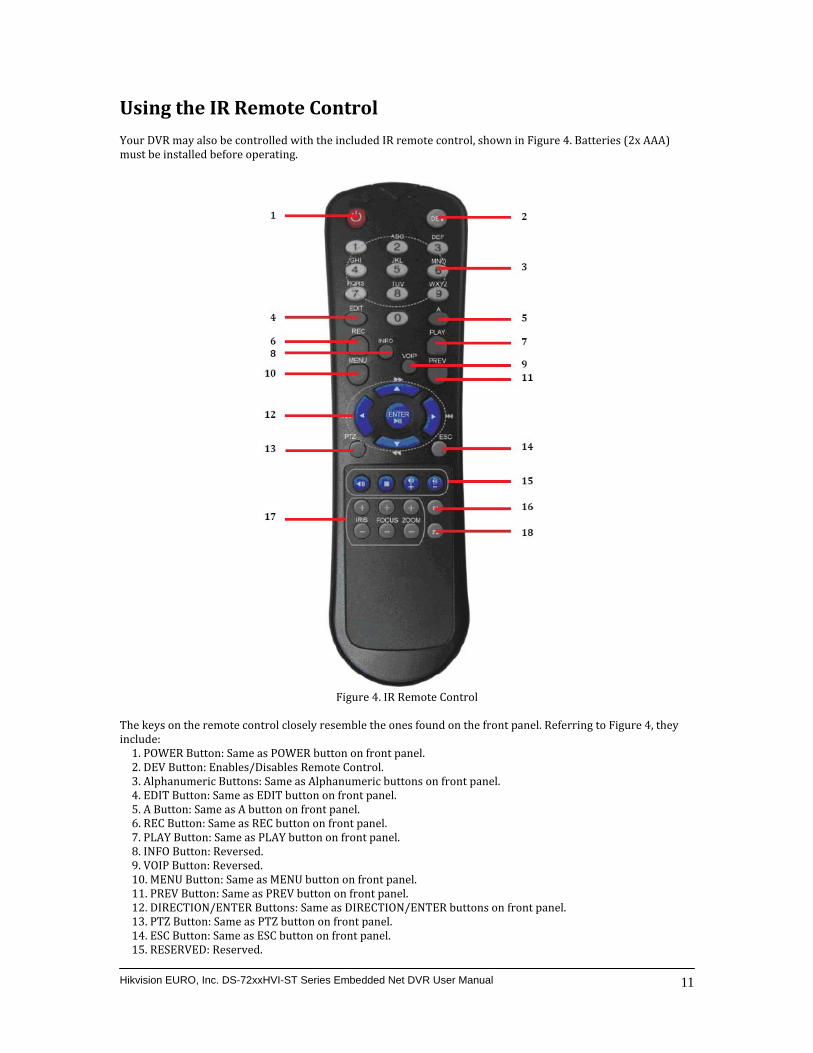
Using the IR Remote Control
also be controlled with the included IR remote control, shown in Figure 4. Batteries (2x AAA) ing.
Your DVR may must be installed before operat
Figure 4. IR Remote Control
Th nd on the front panel. Referring to Figure 4, they ince keys on the remote control closely resemble the ones foulude: 1. POWER Button: Same as POWER button on front panel.
tons on front panel. 2. DEV Button: Enables/Disables Remote Control.
ric butl.
3. Alphanumeric Buttons: Same as Alphanume4. EDIT Button: Same as EDIT button on front pane5. A Button: Same as A button on front panel.
C button on front panel. LAY button on front panel.
6. REC Button: Same as RE7. PLAY Button: Same as P8. INFO Button: Reversed. 9. VOIP Button: Reversed. 10. MENU Button: Same as MENU button on front panel.
el. N/ENTER buttons on front panel.
11. PREV Button: Same as PREV button on front pan
Hikvision EURO, Inc. DS-72xxHVI-ST Series Embedded Net DVR User Manual 11
12. DIRECTION/ENTER Buttons: Same as DIRECTIO button on front panel. button on front panel.
13. PTZ Button: Same as PTZ14. ESC Button: Same as ESC 15. RESERVED: Reserved.
16. F1 Button: Same as F1 button on front panel. to adjust the 17. PTZ CONTROL Buttons: Buttons iris, focus and zoom of a PTZ camera.
18. F2 Button: Same as F2 button on front panel.
response:
Aim the remote control at the IR receiver located at the front of the unit to test operation. If there is no
co1. Using the front control panel or the mouse, go into Main Menu > System Con‐figuration> Display
he default ID# is 255. This ID# is valid for all IR controls. nfiguration.
e No. T2. Check and remember DVR devic3. Press the DEV button on the remote. . Enter the DVR ID# from step 2. 45. Press the ENTER button on the remote.
If rly. If the Status in he following: the Status indicator on the front panel turns blue, the remote control is operating prope
o response from the remote, please check tolarities of the batteries are not reversed.
dicator does not turn blue and there is still nly and the pt of charge.
1. Batteries are installed correct. Batteries are fresh and not ou. IR receiver is not obstructed. 23
Using a USB Mouse
A regular 3‐button (Left/Right/Scroll‐wheel) USB mouse can also be used with this DVR. To use a USB mouse: 1. Plug USB mouse into one of the USB ports on the front panel of the DVR.
matically be detected. If in a rare case that the mouse is not detected, please refer to vider.
2. The mouse should autothe recommended device list from your pro The buttons on the mouse corresponds to: 1. Left Button: SingleClick: S ressing the • elect a component of a menu, such as a button or an input field. This is similar to p
ENTER button on the remote/front panel controls. • DoubleClick: Switch between single screen and multi‐screen mode in Preview/Playback mode. Click and Drag: Clicking and dragging the Left mouse button can be used to control the pan/tilt of a PTZ amera as well as to vary the amount of dig‐ital zoom. It can also be used to setup the alarm areas. •c 2.•
Right Button: SingleClick: Shows pop‐up menu.
3. ScrollWheel: • Scroll Up: In Preview mode, scrolling up will switch to the previous screen. In Menu mode, it will move the selection to the previous item. Scroll Down: In Preview mode, scrolling down will switch to the next screen. In Menu mode, it will move the
he next item. •selection to t
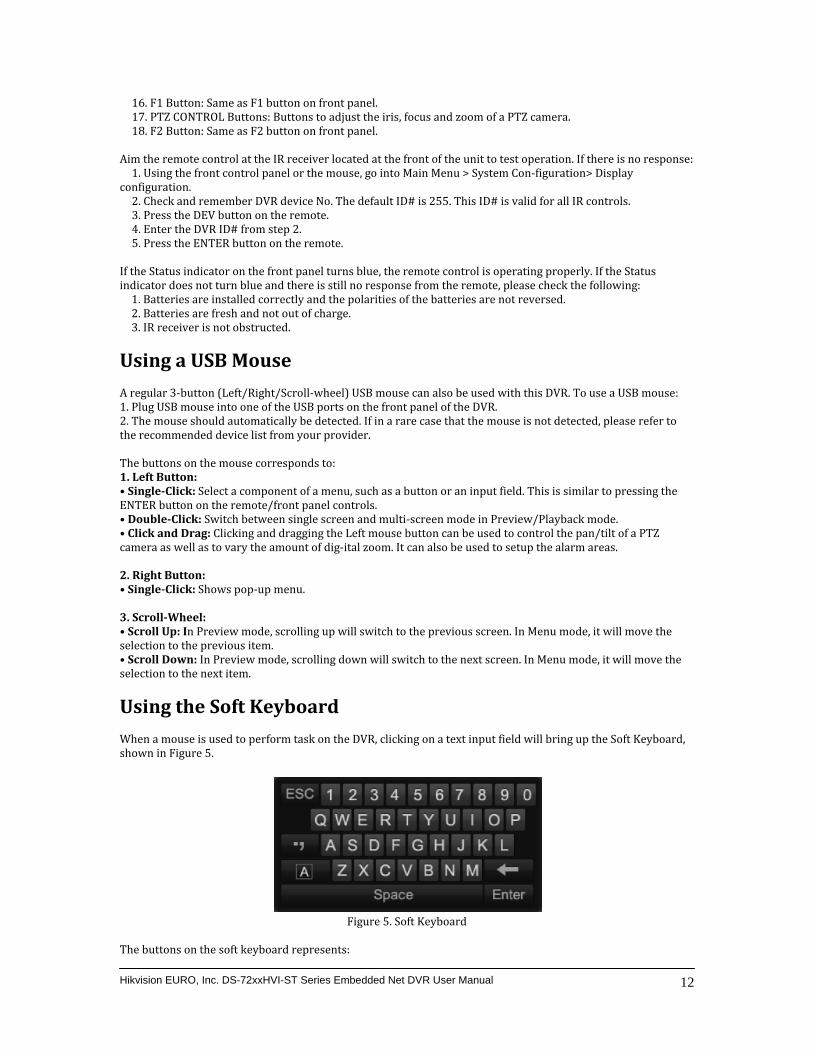
Using the Soft Keyboard
form task on the DVR, clicking on a text input field will bring up the Soft Keyboard, hown in Figure 5. When a mouse is used to pers
F
The buttons on the soft keyboard represents:
igure 5. Soft Keyboard
Hikvision EURO, Inc. DS-72xxHVI-ST Series Embedded Net DVR User Manual 12
Switch to Lowercase: Switch to lowercase input
Switch to Uppercase: Switch to uppercase input
Symbols: Switch to symbols input.
Backspace: Delete the character in front of the cursor.
Enter: Confirm selection.
ESC: Exit out of Soft Keyboard.
Hikvision EURO, Inc. DS-72xxHVI-ST Series Embedded Net DVR User Manual 13
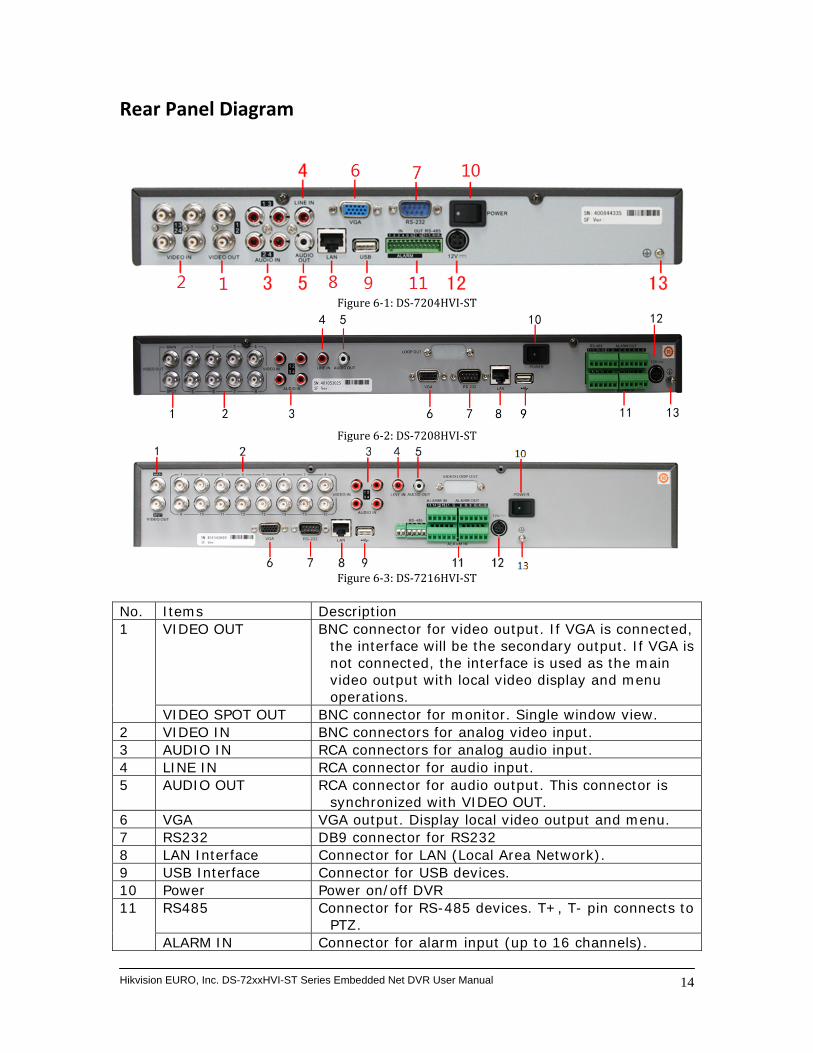
Rear Panel Diagram
Figure 6‐1: DS‐7204HVI‐ST
Figure 6‐2: DS‐7208HVI‐ST
Figure 6‐3: DS‐7216HVI‐ST
No. Items Description
VIDEO OUT BNC connector for video output. If VGA is connected, the interface will be the secondary output. If VGA is not connected, the interface is used as the main video output with local video display and menu operations.
1
VIDEO SPOT OUT BNC connector for monitor. Single window view. 2 VIDEO IN BNC connectors for analog video input. 3 AUDIO IN RCA connectors for analog audio input. 4 LINE IN RCA connector for audio input. 5 AUDIO OUT RCA connector for audio output. This connector is
synchronized with VIDEO OUT. 6 VGA VGA output. Display local video output and menu. 7 RS232 DB9 connector for RS232 8 LAN Interface Connector for LAN (Local Area Network). 9 USB Interface Connector for USB devices. 10 Power Power on/off DVR
RS485 Connector for RS-485 devices. T+, T- pin connects to PTZ.
11
ALARM IN Connector for alarm input (up to 16 channels).
Hikvision EURO, Inc. DS-72xxHVI-ST Series Embedded Net DVR User Manual 14
ALARM OUT Connector for alarm output (4 channels). 12 POWER DC 12V 13 GROUND Ground(needs to be connected when DVR startup)
Hikvision EURO, Inc. DS-72xxHVI-ST Series Embedded Net DVR User Manual 15

CHAPTER2 Getting Started
Hikvision EURO, Inc. DS-72xxHVI-ST Series Embedded Net DVR User Manual 16
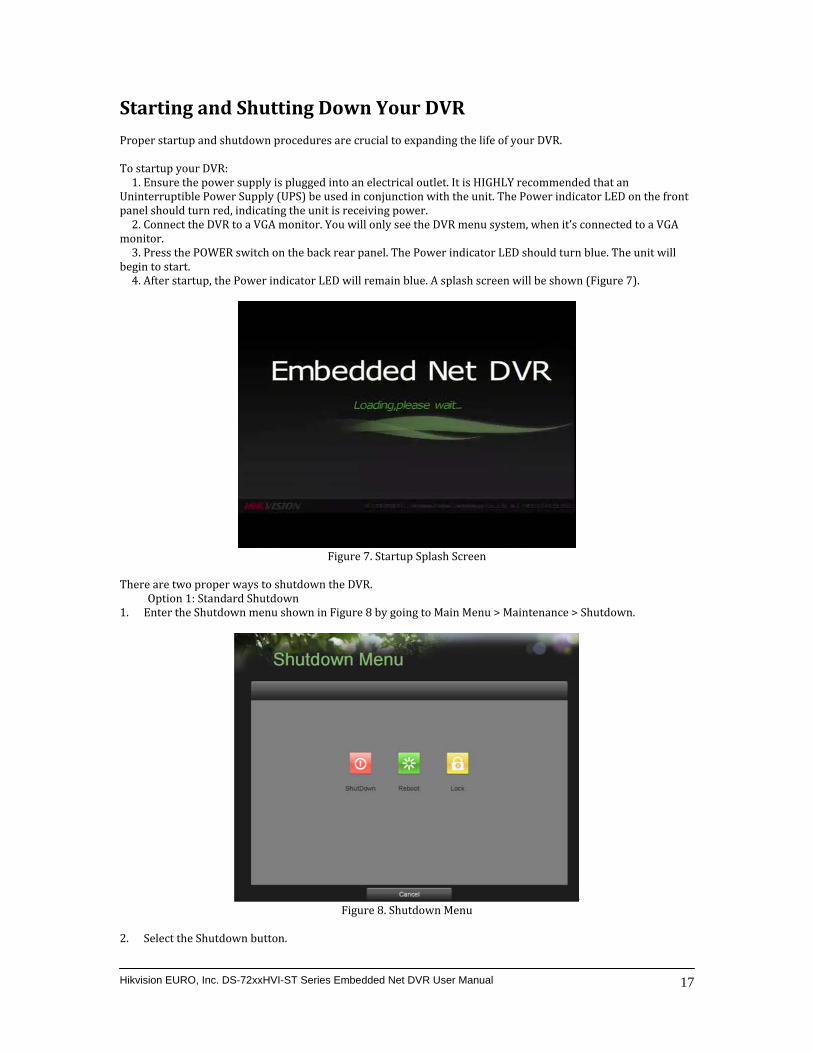
Starting and Shutting Down Your DVR
utdown procedures are crucial to expanding the life of your DVR. Proper startup and sh To startup your DVR: 1. Ensure the power supply is plugged into an electrical outlet. It is HIGHLY recommended that an
Un t interruptible Power Supply (UPS) be used in conjunction with the unit. The Power indicator LED on the fronpanel should turn red, indicating the unit is receiving power. 2. Connect the DVR to a VGA monitor. You will only see the DVR menu system, when it’s connected to a VGA
monitor. it will
be3. Press the POWER switch on the back rear panel. The Power indicator LED should turn blue. The unin to start.
the Power indicator LED will remain blue. A splash screen will be shown (Figure 7). g4. After startup,
Figure 7. Startup Splash Screen
There are two proper ways to shutdown the DVR. Option 1: Standard Shutdown . Enter the Shutdown menu shown in Figure 8 by going to Main Menu > Maintenance > Shutdown. 1
Figure 8. Shutdown Menu
Hikvision EURO, Inc. DS-72xxHVI-ST Series Embedded Net DVR User Manual 17
2. Select the Shutdown button.
3. Click the Yes button. • OPTION 2: Manual Shutdown
WER button for 3 seconds. tor’s username and password in the dialog box for authentication.
1. Press and hold the PO. Enter the administra. Clic23
k the Yes button.
ote: Do not press the POWER button again when the system is shutting down. N
Rebooting and Locking Your DVR While in the Shutdown menu (Figure 8), you may also reboot or lock your DVR. Locking your DVR will return ou to the Live Feed mode, which will require the correct administrator password to exit out of it. The Reboot
ybutton will reboot your DVR.
To reboot or lock your DVR:
ing to Main Menu > Maintenance > Shutdown. ck button to lock the DVR or the Reboot button to reboot the DVR.
1. Enter the Shutdown menu by go2. Select the Lo
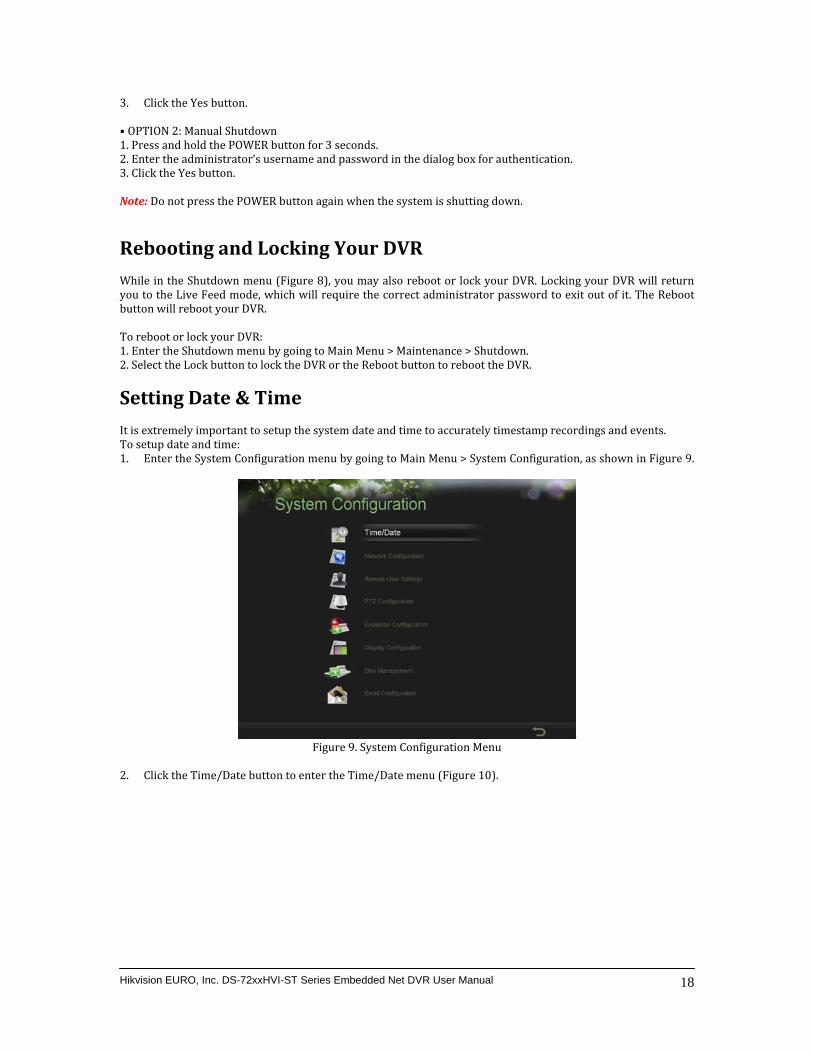
Setting Date & Time It is extremely important to setup the system date and time to accurately timestamp recordings and events. To setup date and time: 1. Enter the System Configuration menu by going to Main Menu > System Configuration, as shown in Figure 9.
Figure 9. System Configuration Menu
2.
Click the Time/Date button to enter the Time/Date menu (Figure 10).
Hikvision EURO, Inc. DS-72xxHVI-ST Series Embedded Net DVR User Manual 18
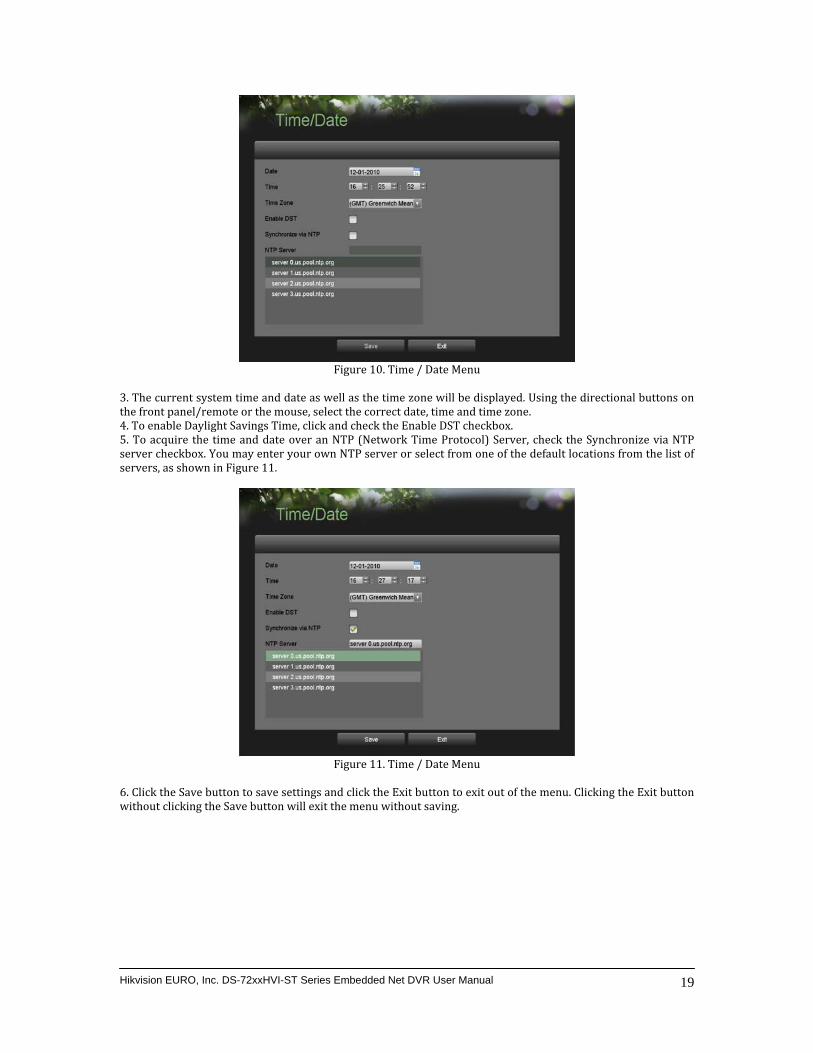
Figure 10. Time / Date Menu
d. Using the directional buttons on 3. The current system time and date as well as the time zone will be displaye
the front panel/remote or the mouse, select the correct date, time and time zone. 4. To enable Daylight Savings Time, click and check the Enable DST checkbox. 5. To acquire the time and date over an NTP (Network Time Protocol) Server, check the Synchronize via NTP erver checkbox. You may enter your own NTP server or select from one of the default locations from the list of
ers, as shown in Figure 11. sserv
Figure 11. Time / Date Menu
Click the Save button to save settings and click the Exit button to exit out of the menu. Clicking the Exit button
licking the Save button will exit the menu without saving. 6. without c
Hikvision EURO, Inc. DS-72xxHVI-ST Series Embedded Net DVR User Manual 19
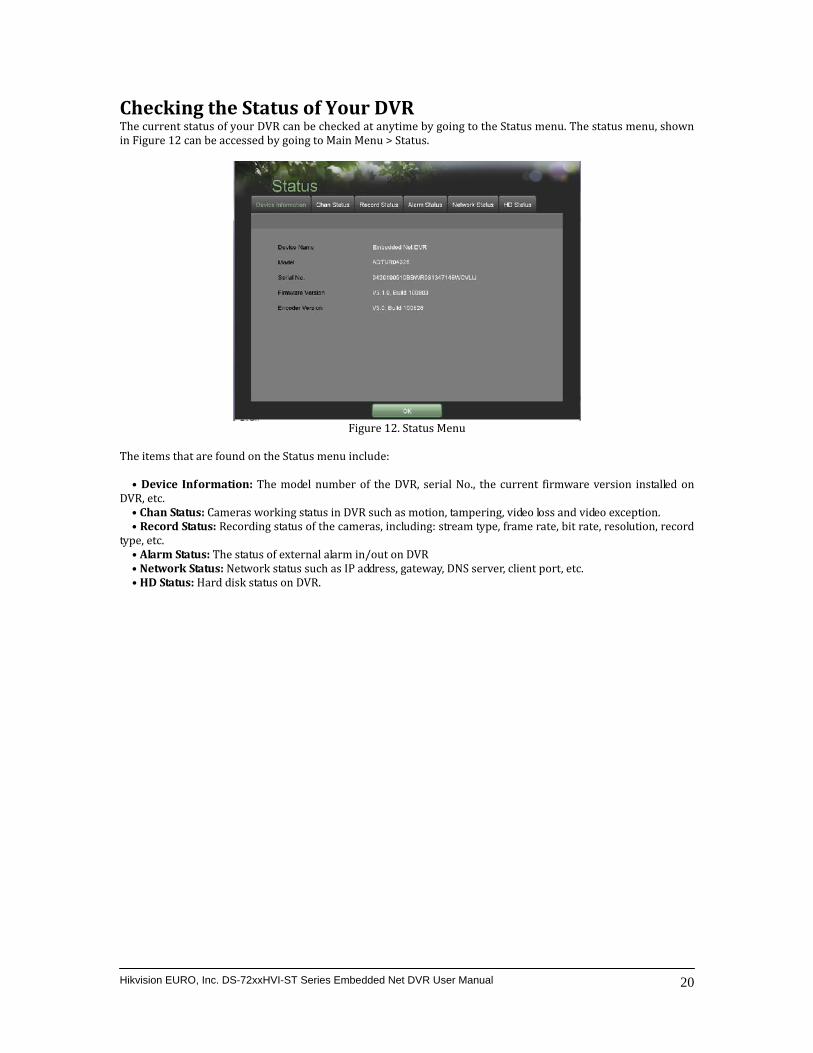
Checking the Status of Your DVR he current status of your DVR can be checked at anytime by going to the Status menu. The status menu, shown
n be accessed by going to Main Menu > Status. Tin Figure 12 ca
Figure 12.
he items that are found o
Status Menu T
n the Status menu include:
Device Info ed on DV , etc. • rmation: The model number of the DVR, serial No., the current firmware version install
tatus: CamerR• Chan S as working status in DVR such as motion, tampering, video loss and video exception. • Record Status : stream type, frame rate, bit rate, resolution, record
typ , etc. : Recording status of the cameras, including
Alarm Statue• alarm in/out on DVR Network S as IP address, gateway, DNS server, client port, etc.
s: The status of external tatus: Network status such
HD Status: Hard disk status on DVR. ••
Hikvision EURO, Inc. DS-72xxHVI-ST Series Embedded Net DVR User Manual 20

CHAPTER3 Live Feed
Hikvision EURO, Inc. DS-72xxHVI-ST Series Embedded Net DVR User Manual 21
Watching a Live Feed The Live Feed mode is automatically started after the DVR boots up. It is also at the very top of the menu
thus hitting the ESC button multiple times (depending on which menu you’re on) will bring you to the Feed mode.
hierarchy, Live
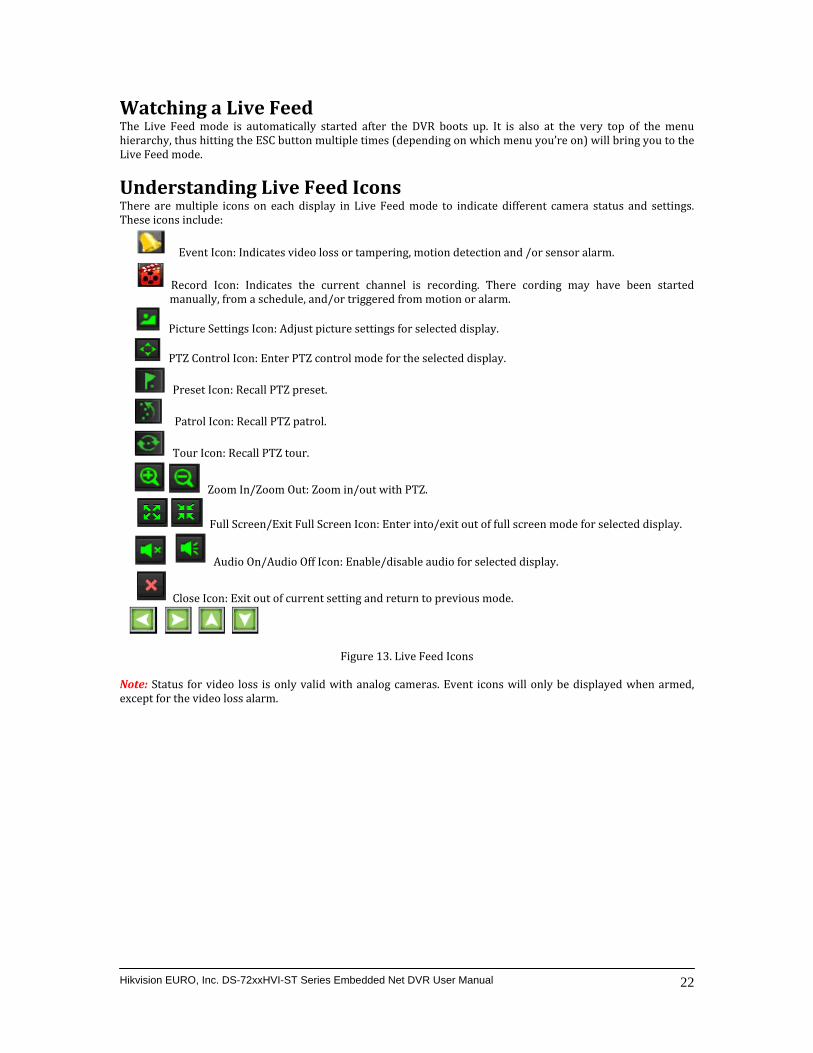
Understanding Live Feed Icons There are multiple icons on each display in Live Feed mode to indicate different camera status and settings. These ico sn include:
Event Icon: Indicates video loss or tampering, m tion detection and /or sensor alarm. o
Record Icon: Indicates the current channel is recording. There cording may have been started . manually, from a schedule, and/or triggered from motion or alarm
Picture Settings Icon: Adjust picture settings for selected display.
trol mode for the selected display. PTZ Control Icon: Enter PTZ con
Preset Icon: Recall PTZ preset.
l. Patrol Icon: Recall PTZ patro
Tour Icon: Recall PTZ tour.
Zoom In/Zoom Out: Zoom in/out with PTZ.
Full Screen/Exit Full Screen Icon: Enter into/exit out of full screen mode for selected display.
Audio On/Audio Off Icon: Enable/disable audio for selected display.
Close Icon: Exit out of current setting and return to previous mode.
Figure 13. Live Feed Icons
Status for video loss is only valid with analog cameras. Event icons will only be displayed when armed,
Note:except for the video loss alarm.
Hikvision EURO, Inc. DS-72xxHVI-ST Series Embedded Net DVR User Manual 22
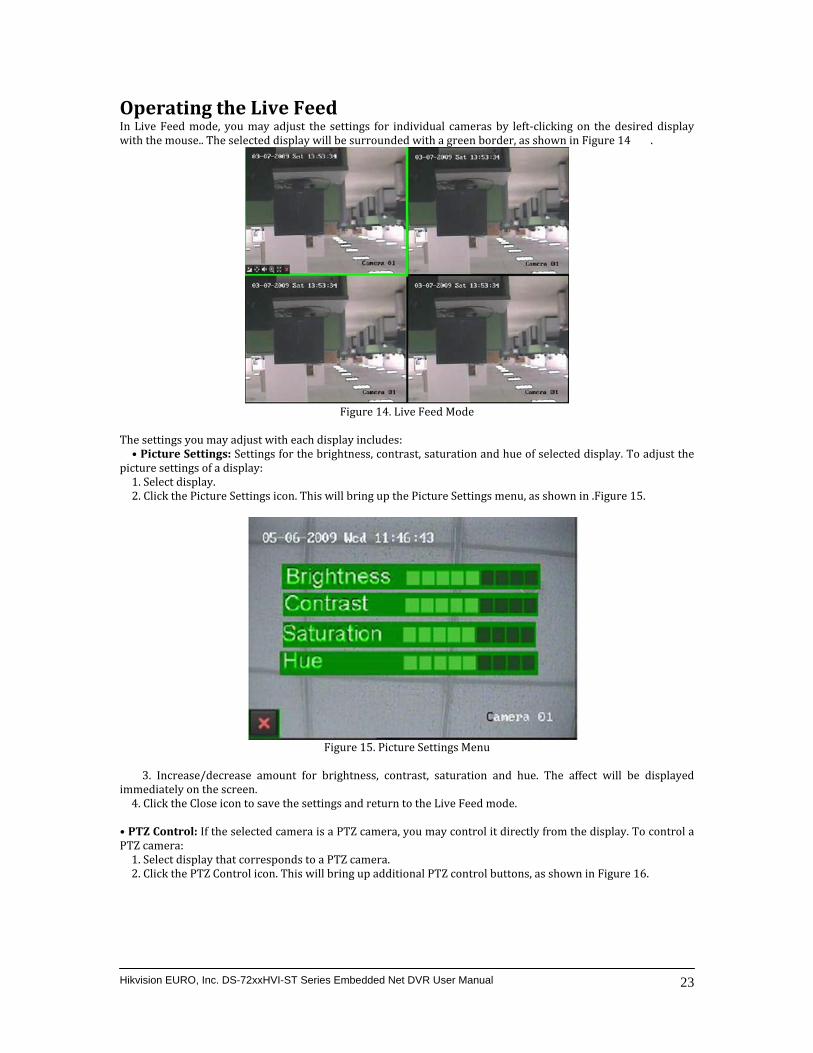
Operating the Live Feed In Live Feed mode, you may adjust the settings for individual cameras by left‐clicking on the desired display with the mouse.. The selected display will be surrounded with a green border, as shown in Figure 14 .
Figure 14. Live Feed Mode
The settings you may adjust with each display includes:
s: Settings for the brightness, contrast, saturation and hue of selected display. To adjust the pi• Picture Settingcture settings of a display: . Select display. . Click the Picture Settings icon. This will bring up the Picture Settings menu, as shown in .Figure 15. 12
Figure 15. Picture Settings Menu
e. The affect will be displayed
im 3. Increase/decrease amount for brightness, contrast, saturation and humediately on the screen. 4. Click the Close icon to save the settings and return to the Live Feed mode.
• PTZ , you may control it directly from the display. To control a PT
Control: If the selected camera is a PTZ cameraZ camera: 1. Select display that corresponds to a PTZ camera. 2. Click the PTZ Control icon. This will bring up additional PTZ control buttons, as shown in Figure 16.
Hikvision EURO, Inc. DS-72xxHVI-ST Series Embedded Net DVR User Manual 23
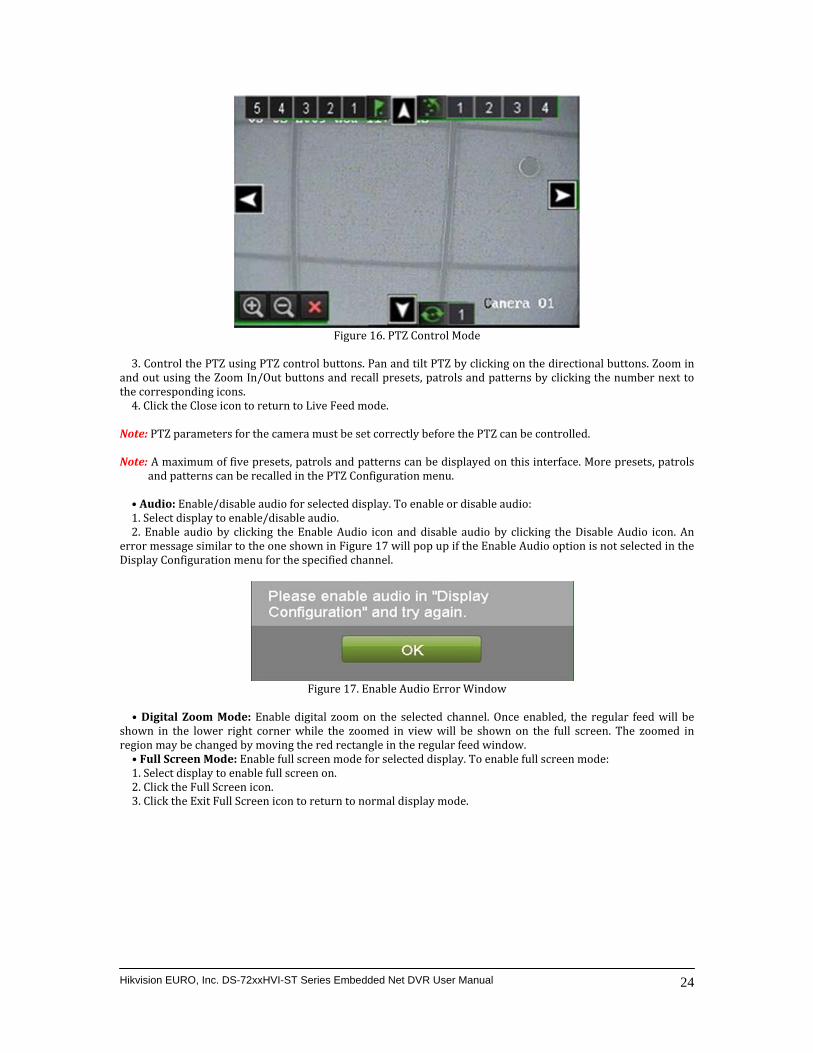
Figure 16. PTZ Control Mode
3. Control the PTZ using PTZ control buttons. Pan and tilt PTZ by clicking on the directional buttons. Zoom in
an sets, patrols and patterns by clicking the number next to hd out using the Zoom In/Out buttons and recall pree corresponding icons. 4. C
tlick the Close icon to return to Live Feed mode.
Note:
PTZ parameters for the camera must be set correctly before the PTZ can be controlled.
Note: A maximum of five presets, patrols and patterns can be displayed on this interface. More presets, patrols and patterns can be recalled in the PTZ Configuration menu.
• Audio: Enable/disable audio for selected display. To enable or disable audio: 1. Select display to enable/disable audio. 2. Enable audio by clicking the Enable Audio icon and disable audio by clicking the Disable Audio icon. An
error message similar to the one shown in Figure 17 will pop up if the Enable Audio option is not selected in the Display Configuration menu for the specified channel.
Figure 17. Enable Audio Error Window
• Digital Zoom Mode: Enable digital zoom on the selected channel. Once enabled, the regular feed will be
shown in the lower rig he zoomed in re
ht corner while the zoomed in view will be shown on the full screen. Tectangle in the regular feed window. ode for selected display. To enable full screen mode:
gion may be changed by moving the red rf ll screen m• Full Screen Mode: Enable u
1. Select display to enable full screen on. 2. Click the Full Screen icon. 3. Click the Exit Full Screen icon to return to normal display mode.
Hikvision EURO, Inc. DS-72xxHVI-ST Series Embedded Net DVR User Manual 24
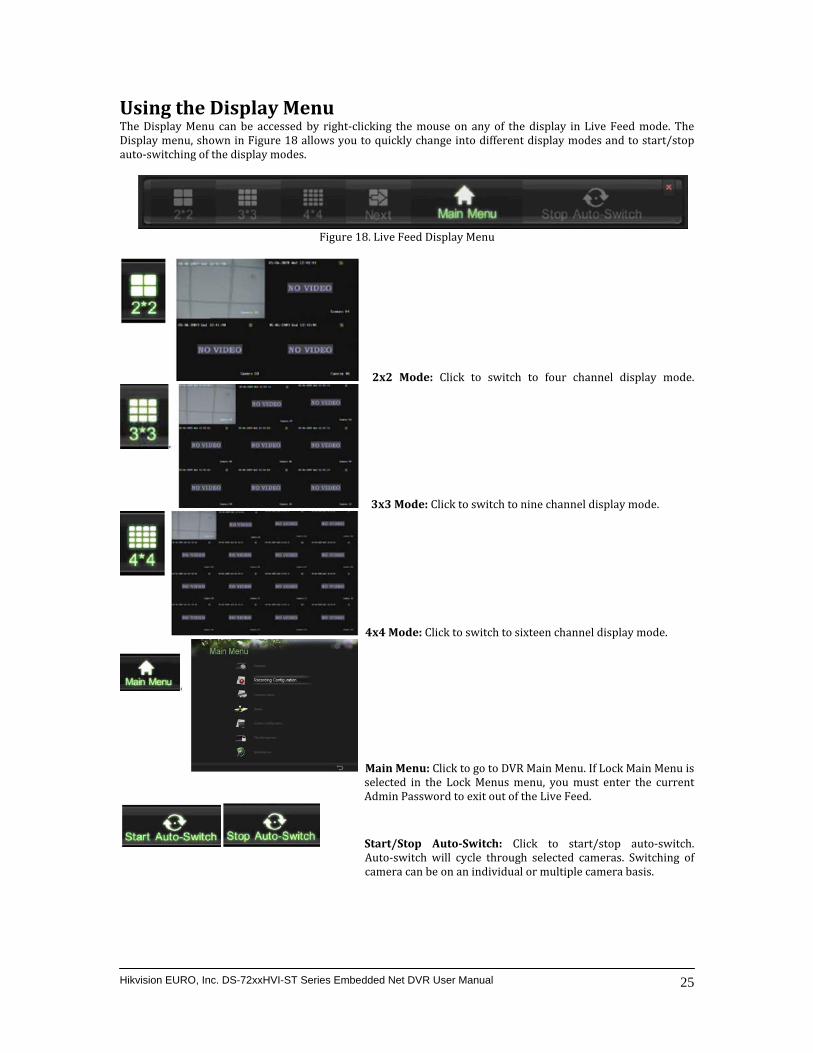
Using the Display Menu The Display Menu can be accessed by right‐clicking the mouse on any of the display in Live Feed mode. The
menu, shown in Figure 18 allows you to quickly change into different display modes and to start/stop of the display modes.
Display auto‐switching
Figure 18. Live Feed Display Menu
2x2 Mode: Click to switch to four channel display mode.
3x3 Mode: Click to switch to nine channel display mode.
4x4 Mode: Click to switch to sixteen channel display mode.
Main Menu: Click to go to DVR Main Menu. If Lock Main Menu is selected in the Lock Menus menu, you must enter the current Admin Password to exit out of the Live Feed.
Start/Stop AutoSwitch: Click to start/stop auto‐switch. Auto‐switch will cycle through selected cameras. Switching of camera can be on an individual or multiple camera basis.
Hikvision EURO, Inc. DS-72xxHVI-ST Series Embedded Net DVR User Manual 25
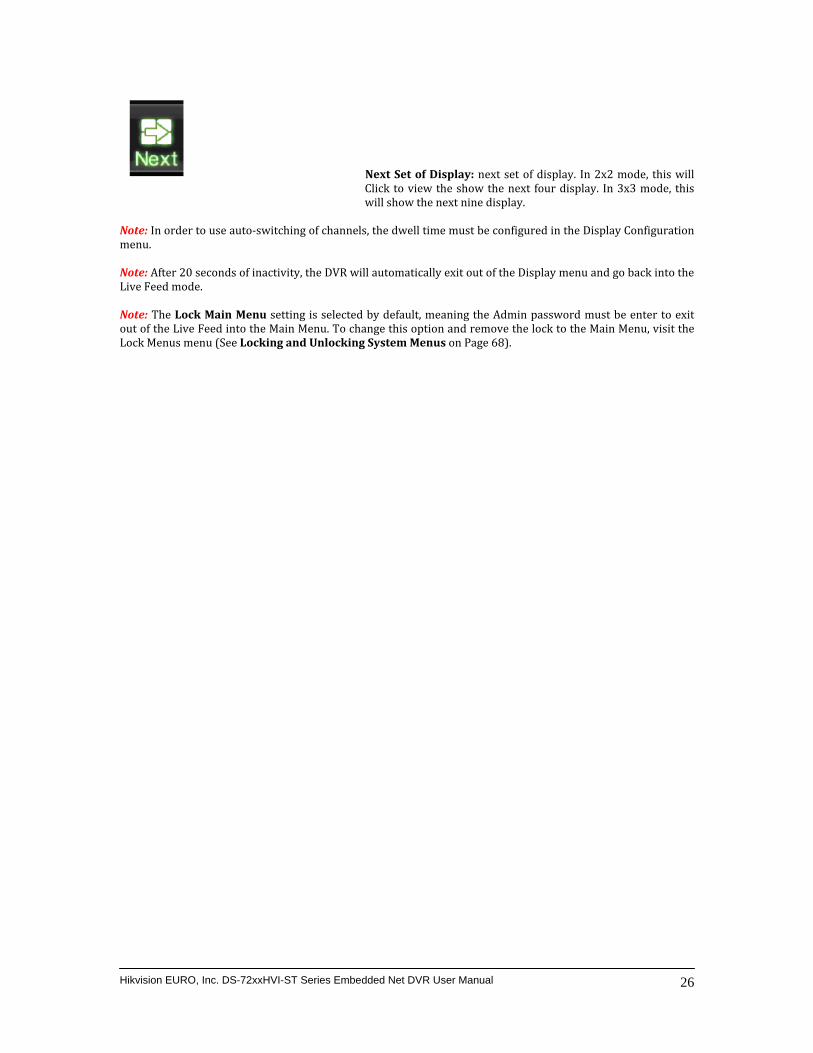
Next Set of Display: next set of display. In 2x2 mode, this will Click to view the show the next four display. In 3x3 mode, this will show the next nine display.
In order to use auto‐switching of channels, the dwell time must be configured in the Display Configuration
enu.Note:m ote: After 20 seconds of inactivity, the DVR will automatically exit out of the Display menu and go back into the ive F ode. NL eed m Note: The Lock Main Menu setting is selected by default, meaning the Admin password must be enter to exit out of the Live Feed into the Main Menu. To change this option and remove the lock to the Main Menu, visit the Lock Menus menu (See Locking and Unlocking System Menus on Page 68).
Hikvision EURO, Inc. DS-72xxHVI-ST Series Embedded Net DVR User Manual 26

Configuring Live Feed Displays ive Feed displays can be customized to your own needs. These settings can be accessed by entering the Display
menu, shown in Figure 19. LConfiguration
Figure 19. Display Configuration Menu
e display settings: onfiguration.
To customizstem Configuration > Display C1. Enter the Display Configuration menu by going to Main Menu > Sy
2. Select the Video Output to configure. You may configure the VGA, Main VOUT or Auxiliary VOUT. 3. The settings available to configure for each video output includes:
Screen Configuration: Sc• reen configuration of each video output. You may select between a 1x1, 2x2, 3x3 or 4x4 configuration (only 1x1 option is available if select Auxiliary).
Sequencing Dw f channels when Start Sequence is se cted in Live eed. • ell Time: The time in seconds to dwell between switching o
hing will disable switching in Live FEnable Aud lected video output.
le Feed. Selecting Disable Switcio: E
Language: You c• nables/disables audio output for the se
an Output Format: D
• select OSD language
Device Name/No• esignates the video output standard.
.: Des VGA Resolution: Desig• ignates the device name and number of the current unit. • nates the resolution of main VGA display. • Mouse Pointer Speed: Pointer speed of the mouse, the higher the amount, the faster the mouse would move.
Hikvision EURO, Inc. DS-72xxHVI-ST Series Embedded Net DVR User Manual 27
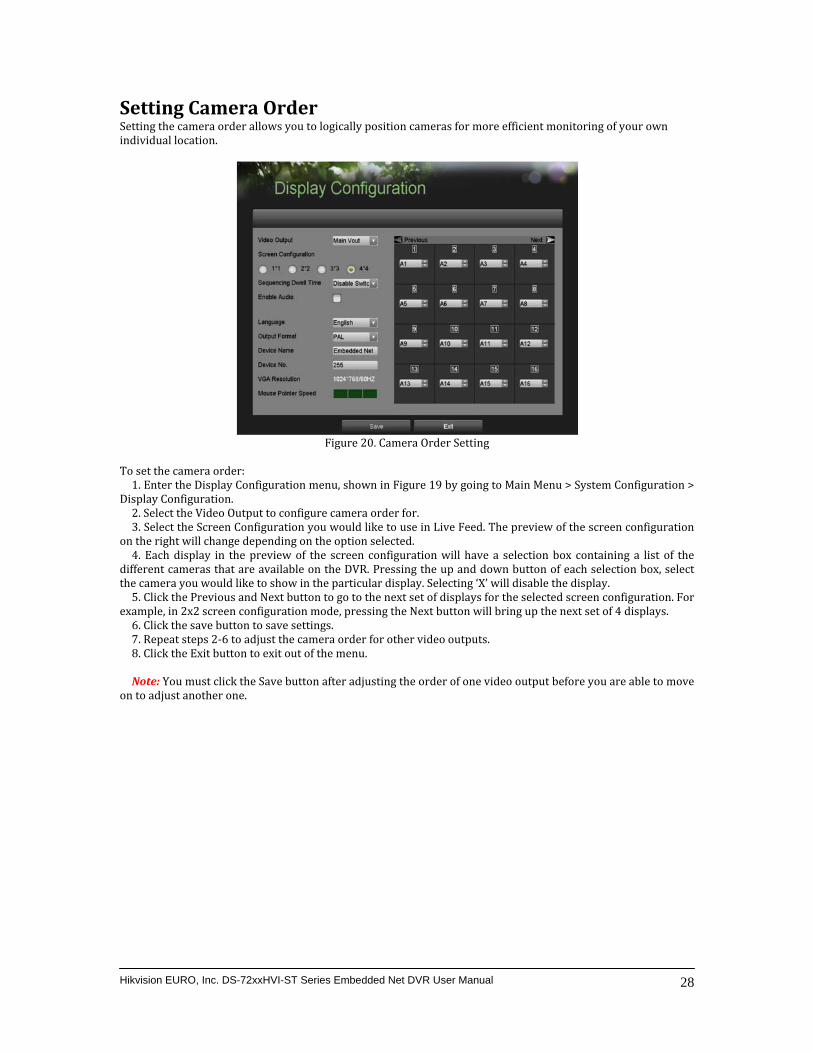
Setting Camera Order u to logically position cameras for more efficient monitoring of your own
location. Setting the camera order allows yoindividual
Figure 20. Camera Order Setting
To set the camera order:
19 by going to Main Menu > System Configuration > Di1. Enter the Display Configuration menu, shown in Figuresplay Configuration. 2. Select the Video Output to configure camera order for. 3. Select the Screen Configuration you would like to use in Live Feed. The preview of the screen configuration
on the right will change depending on the option selected. 4. Each display in the preview of the screen configuration will have a selection box containing a list of the
different cameras that are available on the DVR. Pressing the up and down button of each selection box, select the camera you would like to show in the particular display. Selecting ‘X’ will disable the display.
go to the next set of displays for the selected screen configuration. For ex ring up the next set of 4 displays. 5. Click the Previous and Next button to ample, in 2x2 screen configuration mode, pressing the Next button will b
r other video outputs. 6. Click the save button to save settings. 7. Repeat steps 2‐6 to adjust the camera order fo8. Click the Exit button to exit out of the menu. Note: You must click the Save button after adjusting the order of one video output before you are able to move
on to adjust another one.
Hikvision EURO, Inc. DS-72xxHVI-ST Series Embedded Net DVR User Manual 28

CHAPTER4 Record Settings
Hikvision EURO, Inc. DS-72xxHVI-ST Series Embedded Net DVR User Manual 29
Configuring Settings for Recording There are multiple ways to setup your DVR for recording. They include setting up a recording schedule, triggering a recording by motion detection and/or a sensor alarm, and manually starting the recording.
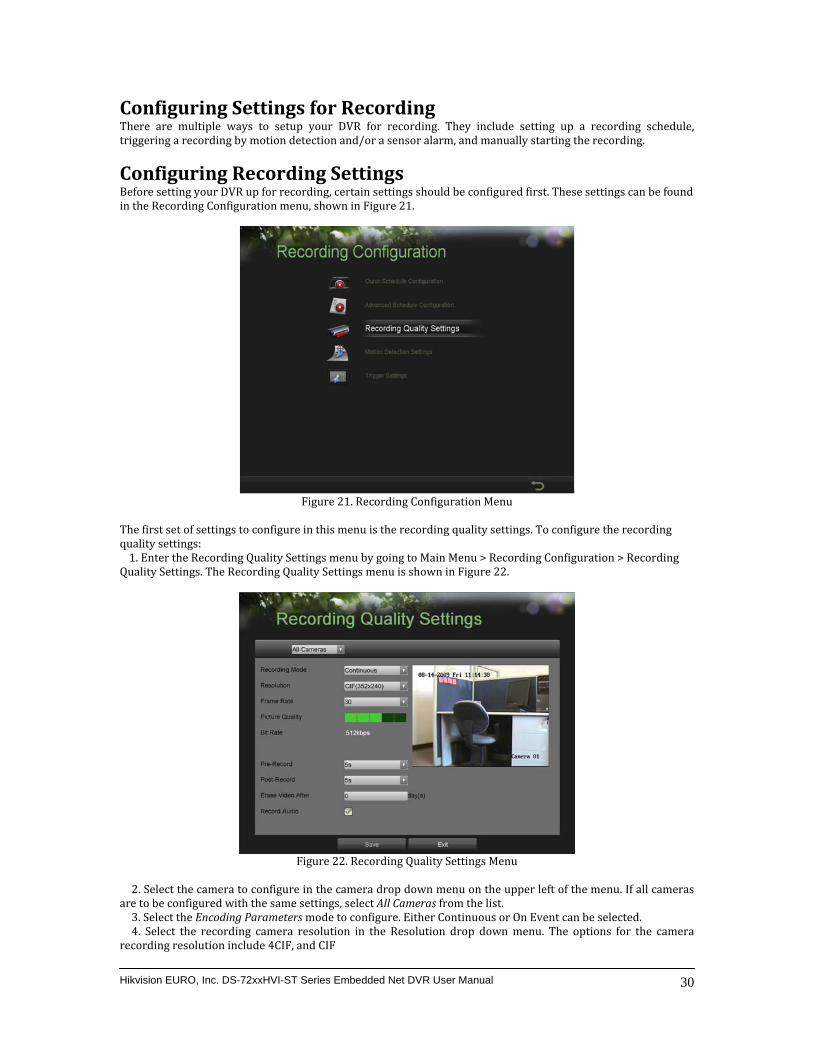
Configuring Recording Settings Before setting your DVR up for recording, certain settings should be configured first. These settings can be found in the Recording Configuration menu, shown in Figure 21.
Figure 21. Recording Configuration Menu
The first set of settings to configure in this menu is the recording quality settings. To configure the recording quality settings: 1. Enter the Recording Quality Settings menu by going to Main Menu > Recording Configuration > Recording
ngs. The Recording Quality Settings menu is shown in Figure 22. Quality Setti
Figure 22. Recording Quality Settings Menu
amera to configure i l cameras
ar u2. Select the c n the camera drop down menu on the upper left of the menu. If al o
Hikvision EURO, Inc. DS-72xxHVI-ST Series Embedded Net DVR User Manual 30
e t be config red with the same settings, select All Cameras from the list. 3. Select the Encoding Parameters mode to configure. Either Continuous or On Event can be selected. 4. Select the recording camera resolution in the Resolution drop down menu. The options for the camera
recording resolution include 4CIF, and CIF
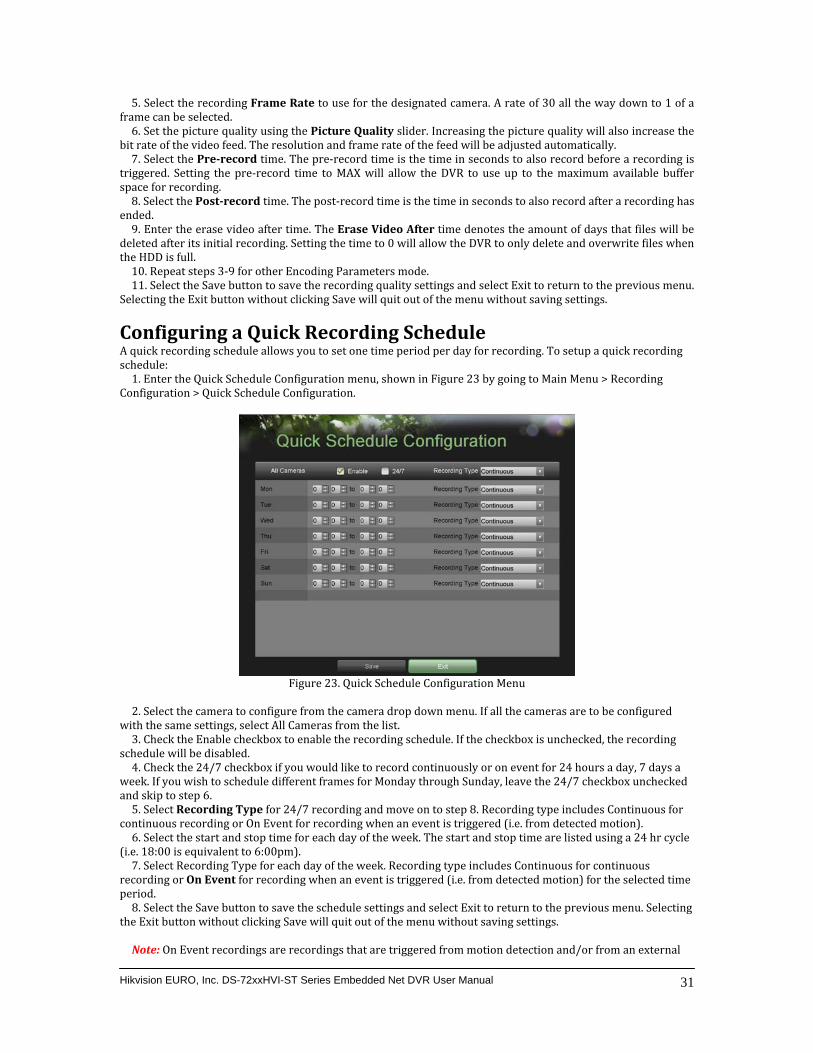
5. Select the recording Frame Rate esignated camera. A rate of 30 all the way down to 1 of a frame can be selected.
ture quality
to use for the d
6. Set the pic using the Picture Quality slider. Increasing the picture quality will also increase the bit rate of the video feed. The resolution and frame rate of the feed will be adjusted automatically. 7. Select the Prerecord time. The pre‐record time is the time in seconds to also record before a recording is
tri ing the pre‐rding.
ggered. Sett ecord time to MAX will allow the DVR to use up to the maximum available buffer space for recor
record time is the 8. Select the Postrecord time. The post‐ time in seconds to also record after a recording has ended. 9. Enter the erase video after time. The Erase Video After time denotes the amount of days that files will be
de ow the DVR to only delete and overwrite files when thleted after its initial recording. Setting the time to 0 will alle HDD is full. 10. Repeat steps 3‐9 for other Encoding Parameters mode. 1. Select the Save button to save the recording quality settings and select Exit to return to the previous menu.
Selecting the Exit button without clicking Save will quit out of the menu without saving settings. 1
Configuring a Quick Recording Schedule A ing quick recording schedule allows you to set one time period per day for recording. To setup a quick recordschedule:
. Enter the Quick Schedule Configuration menu, shown in Figure 23 by going to Main Menu > Recording Configuration > Quick Schedule Configuration. 1
Figure 23. Quick Schedule Configuration Menu
2. Select the camera to configure from the camera drop down menu. If all the cameras are to be configured
with the same settings, select All Cameras from the list. 3. Check the Enable checkbox to enable the recording schedule. If the checkbox is unchecked, the recording
schedule will be disabled. 4. Check the 24/7 checkbox if you would like to record continuously or on event for 24 hours a day, 7 days a
we wish to schedul ek. If you e different frames for Monday through Sunday, leave the 24/7 checkbox uncheckedand skip to step 6. 5. Select Recording Type for 24/7 recording and move on to step 8. Recording type includes Continuous for
continuous recording or On Event for recording when an event is triggered (i.e. from detected motion). r cycle 6. Select the start and stop time for each day of the week. The start and stop time are listed using a 24 h
(i.e. 18:00 is equivalent to 6:00pm). 7. Select Recording Type for each day of the week. Recording type includes Continuous for continuous
recording or On Event for recording when an event is triggered (i.e. from detected motion) for the selected time period. 8. Select the Save button to save the schedule settings and select Exit to return to the previous menu. Selecting
the Exit button without clicking Save will quit out of the menu without saving settings.
Note: On Event recordings are recordings that are triggered from motion detection and/or from an external
Hikvision EURO, Inc. DS-72xxHVI-ST Series Embedded Net DVR User Manual 31
alarm. Note: If an event occurs during Continuous recording, the frame rate will automatically switch to that set for
Event recording.
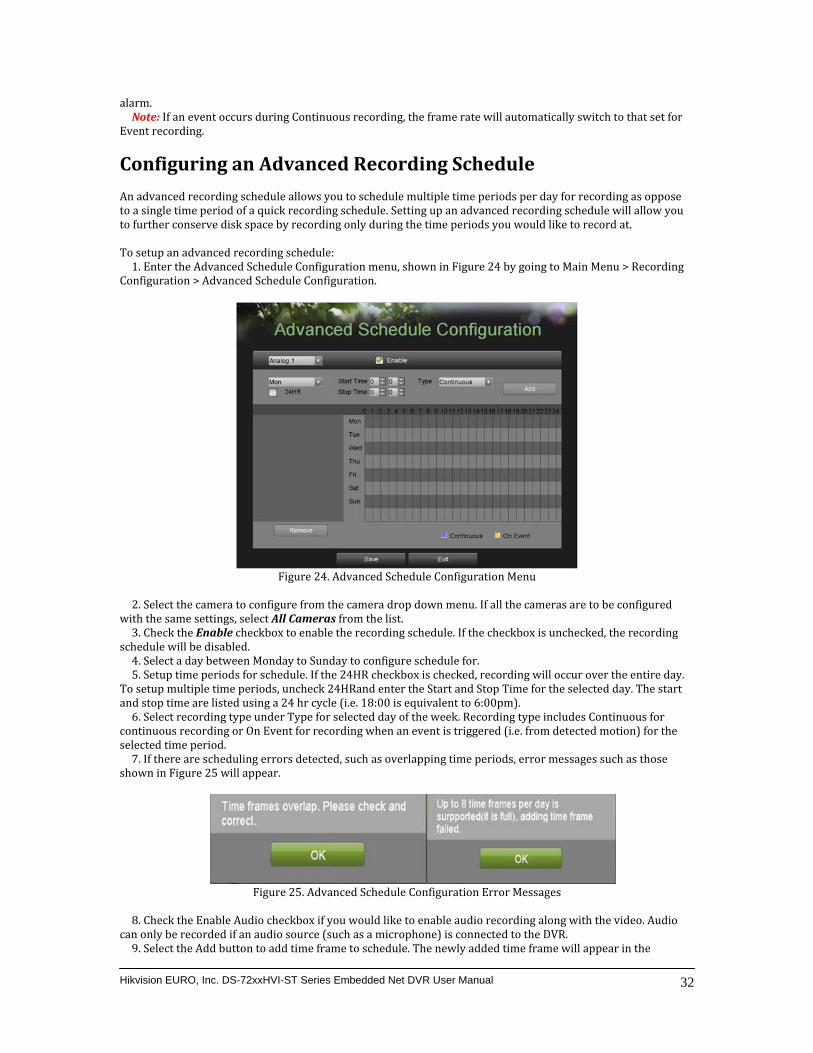
Configuring an Advanced Recording Schedule An advanced recording schedule allows you to schedule multiple time periods per day for recording as oppose o a single time period of a quick recording schedule. Setting up an advanced recording schedule will allow you
only during the time periods you would like to record at. tto further conserve disk space by recording To setup an advanced recording schedule:
. Enter the Advanced Schedule Configuration menu, shown in Figure 24 by going to Main Menu > Recording Configuration > Advanced Schedule Configuration. 1
Figure 24. Advanced Schedule Configuration Menu
2. Select the camera to configure from the camera drop down menu. If all the cameras are to be configured
with the same settings, select All Cameras from the list. checkbox is unchecked, the recording
sch3. Check the Enable checkbox to enable the recording schedule. If the edule will be disabled. 4. Select a day between Monday to Sunday to configure schedule for. 5. Setup time periods for schedule. If the 24HR checkbox is checked, recording will occur over the entire day.
To art setup multiple time periods, uncheck 24HRand enter the Start and Stop Time for the selected day. The stand stop time are listed using a 24 hr cycle (i.e. 18:00 is equivalent to 6:00pm). 6. Select recording type under Type for selected day of the week. Recording type includes Continuous for
co e ntinuous recording or On Event for recording when an event is triggered (i.e. from detected motion) for thselected time period.
. If there are scheduling errors detected, such as overlapping time periods, error messages such as those sh wn in Figure 25 will appear. 7o
Hikvision EURO, Inc. DS-72xxHVI-ST Series Embedded Net DVR User Manual 32
Figure 25. Advanced Schedule Configuration Error Messages
udio ca8. Check the Enable Audio checkbox if you would like to enable audio recording along with the video. An only be recorded if an audio source (such as a microphone) is connected to the DVR. 9. Select the Add button to add time frame to schedule. The newly added time frame will appear in the
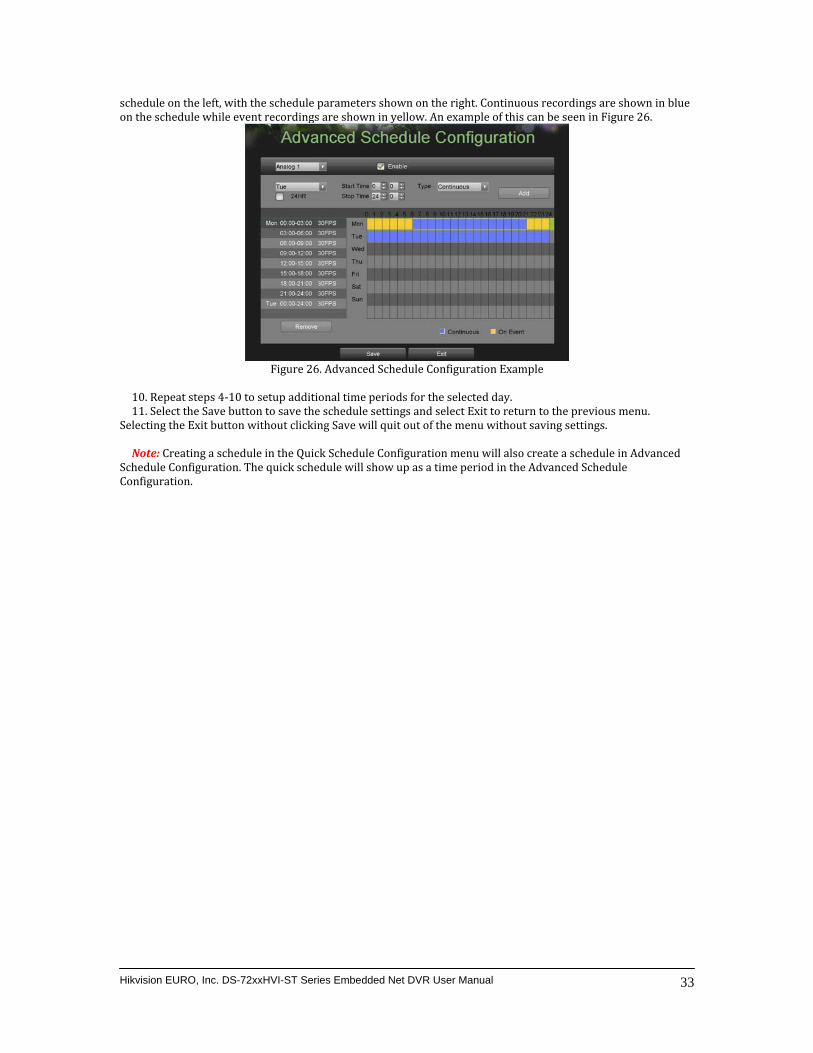
schedule on the left, with the schedule parameters shown on the right. Continuous recordings are shown in blue on the schedule while event recordings are shown in yellow. An example of this can be seen in Figure 26.
Figure 26. Advanced Schedule Configuration Example
10. Repeat steps 4‐10 to setup additional time periods for the selected day. 11. Select the Save button to save the schedule settings and select Exit to return to the previous menu.
Selecting the Exit button without clicking Save will quit out of the menu without saving settings. Note: Creating a schedule in the Quick Schedule Configuration menu will also create a schedule in Advanced
he quick schedule will show up as a time period in the Advanced Schedule
Schedule Configuration. TConfiguration.
Hikvision EURO, Inc. DS-72xxHVI-ST Series Embedded Net DVR User Manual 33

CHAPTER5 Playback
Hikvision EURO, Inc. DS-72xxHVI-ST Series Embedded Net DVR User Manual 34
Playing Back a Recording
e played back using the Playback Interface. You must first search for recordings to lay them back. Previously recorded files can bp
Understanding the Playback Interface
rstand how to use the Playback Interface to efficiently navigate through recorded files. To hown in Figure 27, go to Main Menu > Playback.
It’s important to undeaccess the Playback Interface, s
Figure 27. Playback Int
Some of the
erface Menu udes:
• Channel S ordings on. main features of the Playback Interface incl
• Calendar:elector: Select the channel to search for rec
• Timeline: Select the date to search for recordings on. Select the
• Preview: Shows a p time to search for recordings on. r
• Playback Controls: ording. eview of the selected recording. Cont
Clip Backup Tools: Toolrols for playback of the selected recs to backup clips from a recording.
Clip playback controls: control for playback of marked clip. ••
Searching for Recorded Files Th ecorded files using the Ple Playback Interface allows for easy searching of recorded files. To search for rayback Interface: 1. Enter the Playback menu, shown in Figure 27 by going to Main Menu > Playback. 2. Select the channel to search for recordings on. 3. Select the date to search for recordings on using the calendar. The system date is shown at the top of the
calendar. You may change the month and year of the calendar by clicking the left and right arrows next to the month and year. Dates with recordings in the selected month and channel are displayed in light blue, while dates without recordings are dark gray. The active selected date is displayed in light gray, as shown in Figure 28.
Hikvision EURO, Inc. DS-72xxHVI-ST Series Embedded Net DVR User Manual 35
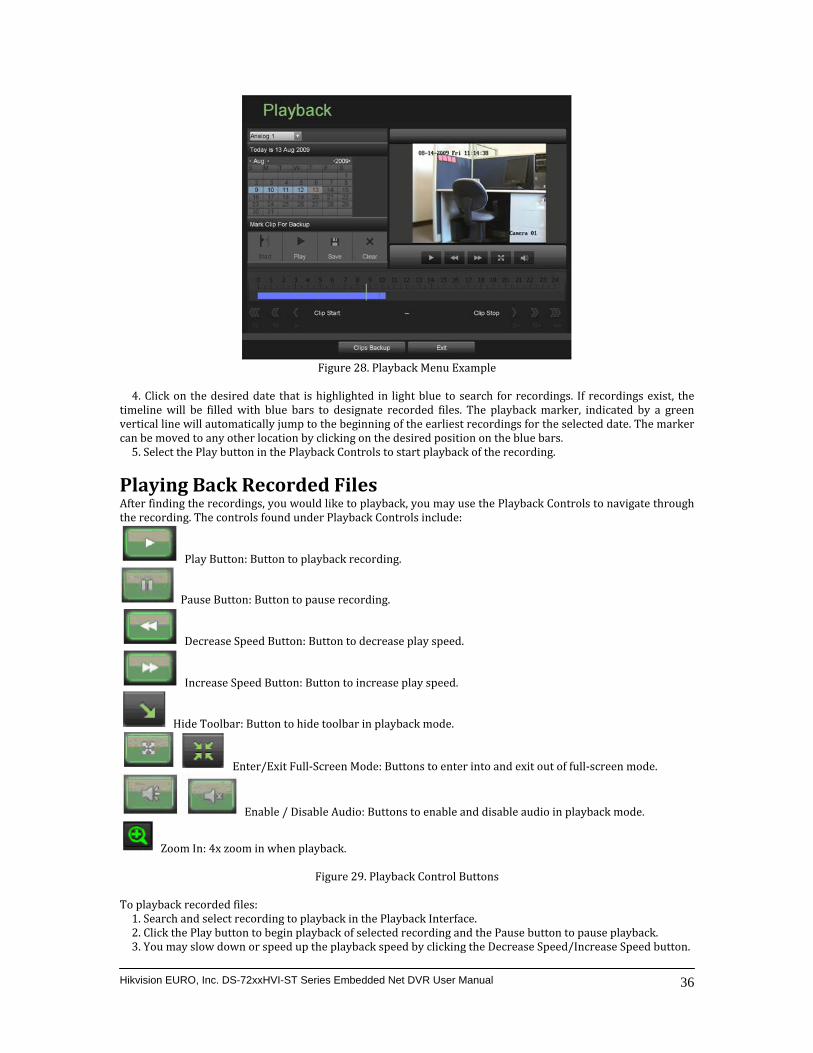
Figure 28. Playback Menu Example
4. Click on the desired date that is highlighted in light blue to search for recordings. If recordings exist, the
timeline will be filled with blue bars to designate recorded files. The playback marker, indicated by a green ve selected date. The marker a . rtical line will automatically jump to the beginning of the earliest recordings for then be moved to any other location by clicking on the desired position on the blue bars5. Select the Play button in the Playback Controls to start playback of the recording.
c
Playing Back Recorded Files After finding the recordings, you would like to playback, you may use the Playback Controls to navigate through the recording. The controls found under Playback Controls include:
Play Button: Button to playback recording.
Pause Button: Button to pause recording.
Decrease Speed Button: Button to decrease play speed.
Increase Speed Button: Button to increase play speed.
Hide Toolbar: Button to hide toolbar in playback mode.
Enter/Exit Full‐Screen Mode: Buttons to enter into and exit out of full‐screen mode.
Enable / Disable Audio: Buttons to enable and disable audio in playback mode.
Zoom In: 4x zoom in when playback.
Figure 29. Playback Control Buttons
To playback recorded files:
Hikvision EURO, Inc. DS-72xxHVI-ST Series Embedded Net DVR User Manual 36
1. Search and select recording to playback in the Playback Interface. 2. Click the Play button to begin playback of selected recording and the Pause button to pause playback. 3. You may slow down or speed up the playback speed by clicking the Decrease Speed/Increase Speed button.
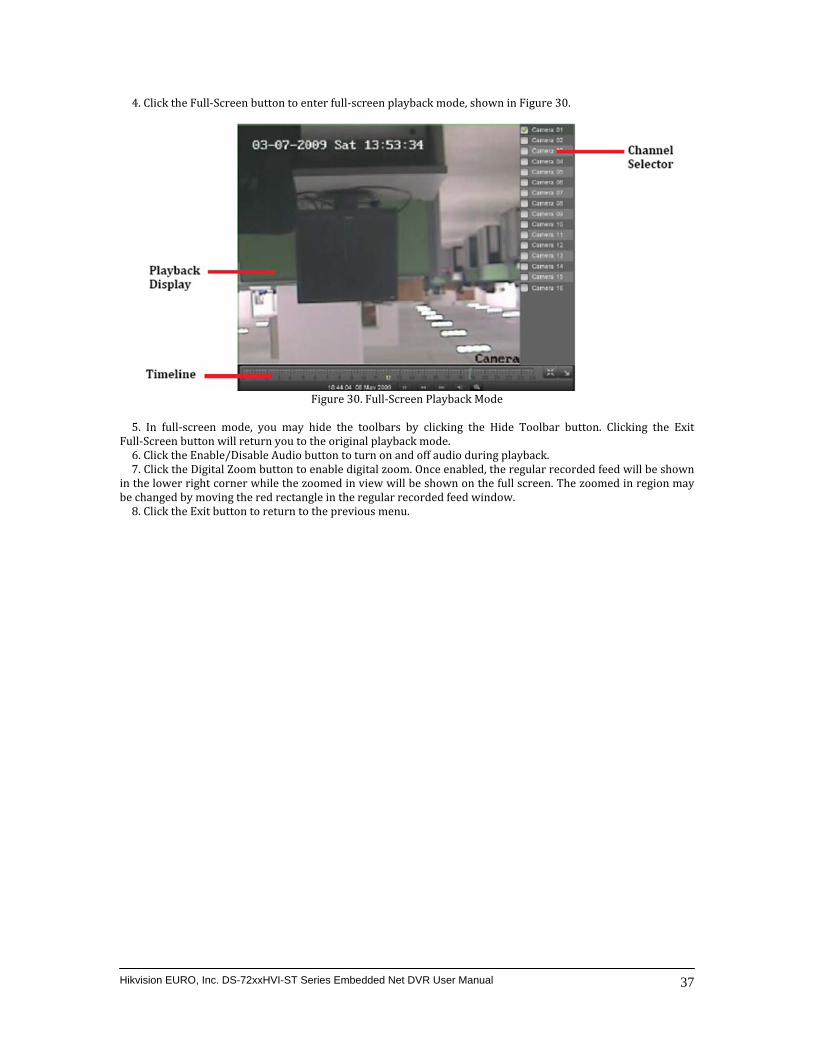
4. Click the Full‐Screen button
to enter full‐screen playback mode, shown in Figure 30.
Figure 30. Full‐Screen Playback Mode
button. Clicking the Exit
Fu5. In full‐screen mode, you may hide the toolbars by clicking the Hide Toolbarll‐Screen button will return you to the original playback mode. 6. Click the Enable/Disable Audio button to turn on and off audio during playback. 7. Click the Digital Zoom button to enable digital zoom. Once enabled, the regular recorded feed will be shown
in e shown on the full screen. The zoomed in region may e orded feed window. the lower right corner while the zoomed in view will b changed by moving the red rectangle in the regular rec8. Click the Exit button to return to the previous menu.
b
Hikvision EURO, Inc. DS-72xxHVI-ST Series Embedded Net DVR User Manual 37

CHAPTER6 Backup
Hikvision EURO, Inc. DS-72xxHVI-ST Series Embedded Net DVR User Manual 38
Backing Up Video Clips Video clips can be backed up to various devices, such as USB flash drives, USB HDDs or a DVD writer.
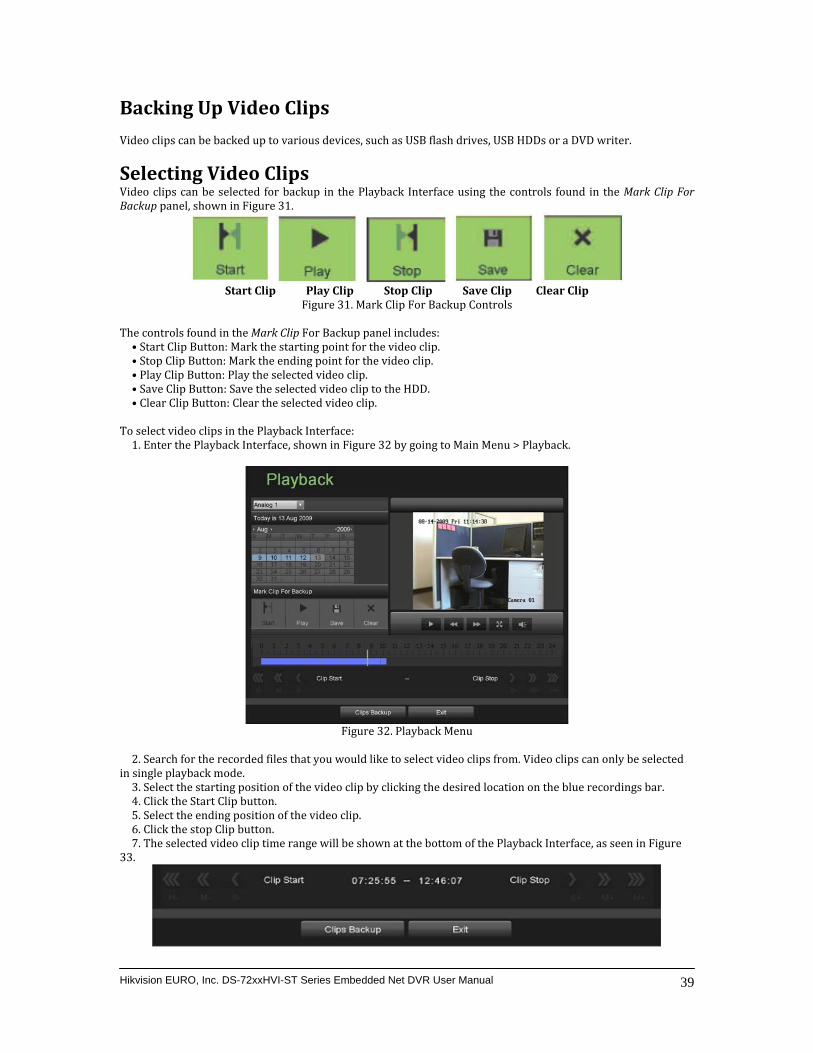
Selecting Video Clips Video clips can be selected for backup in the Playback Interface using the controls found in the Mark Clip For Backup panel, shown in Figure 31.
Start Clip Clear Clip Play Clip Stop Clip Save Clip
kup Controls Figure 31. Mark Clip For Bac The controls found in the Mark Clip For Backup panel includes:
. • Start Clip Button: Mark the starting point for the video clip• Stop Clip Button: Mark the ending point for the video clip.
he HDD. • Play Clip Button: Play the selected video clip. • Save Clip Button: Save the selected video clip to t
lip. • Clear Clip Button: Clear the selected video c To 1
select video clips in the Playback Interface: . Enter the Playback Interface, shown in Figure 32 by going to Main Menu > Playback.
Figure 32. Playback Menu
t d
in 2. Search for the recorded files that you would like to select video clips from. Video clips can only be selec e
y clicking the desired location on the blue recordings bar. single playback mode. 3. Select the starting position of the video clip b4. Click the Start Clip button. 5. Select the ending position of the video clip. 6. Click the stop Clip button. 7. The selected video clip time range will be shown at the bottom of the Playback Interface, as seen in Figure
33.
Hikvision EURO, Inc. DS-72xxHVI-ST Series Embedded Net DVR User Manual 39
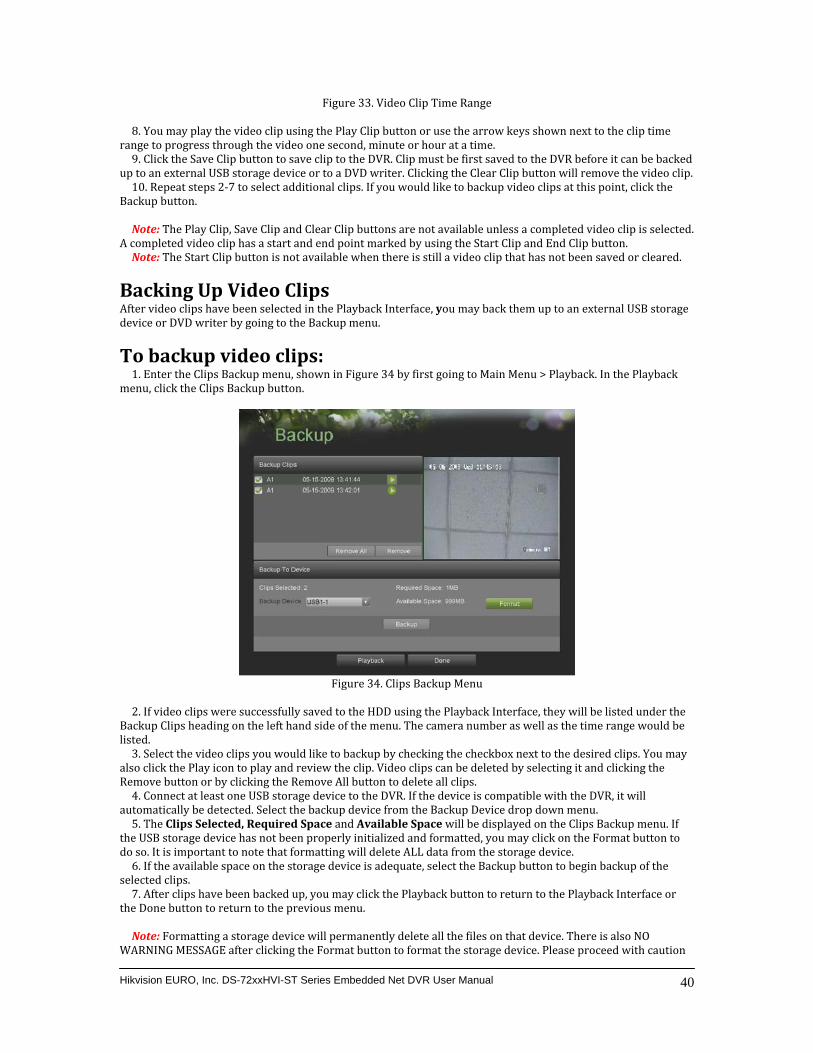
Figure 33. Video Clip Time Range
8. You may play the video clip using the Play Clip button or use the arrow keys shown next to the clip time range to progress through the video one second, minute or hour at a time.
ed lip.
9. Click the Save Clip button to save clip to the DVR. Clip must be first saved to the DVR before it can be backup to an external USB storage device or to a DVD writer. Clicking the Clear Clip button will remove the video c
0. Repeat steps 2‐7 to select additional clips. If you would like to backup video clips at this point, click the Ba kup 1c button. Note: d. compl
The Play Clip, Save Clip and Clear Clip buttons are not available unless a completed video clip is selecteeted video clip has a start and end point marked by using the Start Clip and End Clip button.
Note: The Start Clip button is not available when there is still a video clip that has not been saved or cleared. A
Backing Up Video Clips After video clips have been selected in the Playback Interface, you may back them up to an external USB storage device or DVD writer by going to the Backup menu.
To backup video clips: u, shown in Figure 34 by first going to Main Menu > Playback. In the Playback
menu, click the Clips Backup button. 1. Enter the Clips Backup men
Figure 34. Clips Backup Menu
2. If video clips were successfully saved to the HDD using the Playback Interface, they will be listed under the
Backup Clips heading on the left hand side of the menu. The camera number as well as the time range would be listed. 3. Select the video clips you would like to backup by checking the checkbox next to the desired clips. You may
als the o click the Play icon to play and review the clip. Video clips can be deleted by selecting it and clicking Remove button or by clicking the Remove All button to delete all clips.
ect at least one USB storage device to the DVR. If the d4. Conn evice is compatible with the DVR, it will automatically be detected. Select the backup device from the Backup Device drop down menu. 5. The Clips Selected, Required Space and Available Space will be displayed on the Clips Backup menu. If
th o e USB storage device has not been properly initialized and formatted, you may click on the Format button tdo so. It is important to note that formatting will delete ALL data from the storage device. 6. If the available space on the storage device is adequate, select the Backup button to begin backup of the
selected clips. . After clips have been backed up, you may click the Playback button to return to the Playback Interface or
th Done7e
Hikvision EURO, Inc. DS-72xxHVI-ST Series Embedded Net DVR User Manual 40
button to return to the previous menu. Note: Formatting a storage device will permanently delete all the files on that device. There is also NO
WARNING MESSAGE after clicking the Format button to format the storage device. Please proceed with caution
and backup all critical data fro
m the storage device before formatting.
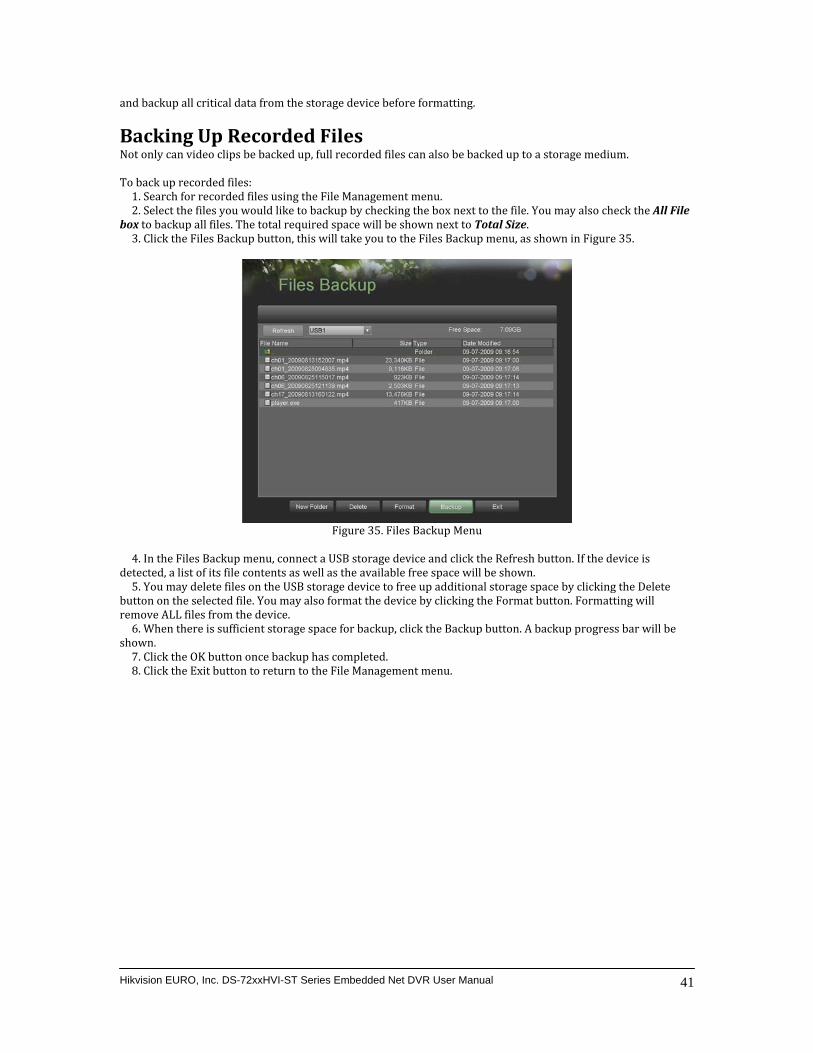
Backing Up Recorded Files backed up, full recorded files can also be backed up to a storage medium. Not only can video clips be
To back up recorded files: 1. Search for recorded files using the File Management menu.
he All File bo2. Select the files you would like to backup by checking the box next to the file. You may also check t to backup all files. The total required space will be shown next to Total Size. . Click the Files Backup button, this will take you to the Files Backup menu, as shown in Figure 35. x3
Figure 35. Files Backup Menu
4. In the Files Backup menu, connect a USB storage device and click the Refresh button. If the device is
detected, a list of its file contents as well as the available free space will be shown. 5. You may delete files on the USB storage device to free up additional storage space by clicking the Delete
button on the selected file. You may also format the device by clicking the Format button. Formatting will remove ALL files from the device.
, click the Backup button. A backup progress bar will be sh6. When there is sufficient storage space for backupown. 7. Click the OK button once backup has completed. 8. Click the Exit button to return to the File Management menu.
Hikvision EURO, Inc. DS-72xxHVI-ST Series Embedded Net DVR User Manual 41
CHAPTER7 System Configuration
Hikvision EURO, Inc. DS-72xxHVI-ST Series Embedded Net DVR User Manual 42

Configuring Network Settings Network settings must be configured before you’re able to use your DVR over the network. To configure network settings:
tion menu, shown in Figure 36 by going to Main Menu > System Configuration > Network Configuration. 1. Enter the Network Configura
Figure 36. Network Settings Menu
2. The current network settings are displayed on the right side of the menu.
ically obtain an IP address and other ne3. If you have a DHCP server running and would like your DVR to automattwork settings from that server, check the DHCP checkbox. 4. If you would like to configure your own settings, enter the settings for: • IP Address: IP address you would like to use for your DVR. • Subnet Mask: Subnet Mask of network. • Default Gateway: IP address of your Gateway. Typically the IP address of your router. • DNS Server: The preferred and alternate Domain Name System (DNS). Server to be used with your
DVR. 5. checkbox. Dynamic DNS allows you to create a hostname
and e internet easier. To configure DDNS: To enable Dynamic DNS (DDNS), check the DDNS associate it to your IP address, making access to your DVR over th1. Enable DDNS by checking the DDNS checkbox. 2. Select a DDNS provider from the DDNS Provider selection box. 3. Enter settings for Server Address, DVR Domain Name, User Name, and Password.
6. If a central monitoring station that is compatible with your DVR is available, you may enter its settings under Central Station IP and Central Station Port. 7. Enter the Client Port and HTTP Port to be use with your DVR. The client port designates the port to be use
with the client software while the HTTP port refers to the one to be use with the built‐in Web Server. 8. To enable extended remote connection, check the extended remote connection checkbox, the total amount
of remote connections can be up to 50 by means of sub stream for 7216HVI‐ST. onfigured; you may test the connection by clicking the Test Connection button.
A confirmation message, similar to the one shown in Figure 37 will pop up if the network is working properly. 9. After all settings have been c
Hikvision EURO, Inc. DS-72xxHVI-ST Series Embedded Net DVR User Manual 43
Figure 37. Test Connection Confirmation 10. Select the Save button to save the network settings and select Exit to return to the previous menu.
Selecting the Exit button without clicking Save will quit out of the menu without saving settings.
Managing User Accounts By default, your DVR comes with two user accounts, the Administrator account and guest account. The Administrator user name is admin and the password is 12345. The default password for Administrator should e changed right away for security reasons. The Administrator has the authority to add, delete or configure arameters for many of the system functions.. bp
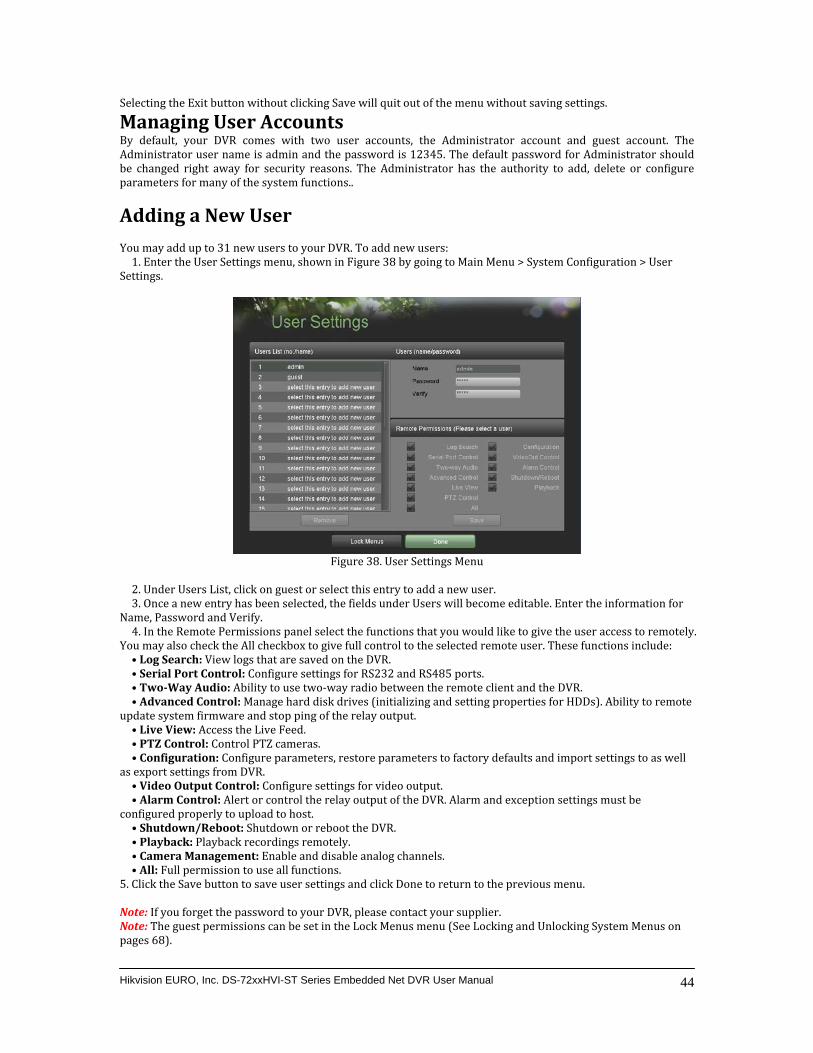
Adding a New User You may add up to 31 new users to your DVR. To add new users:
shown in Figure 38 by going to Main Menu > System Configuration > User Settings. 1. Enter the User Settings menu,
Figure 38. User Settings Menu
2. Under Users List, click on guest or select this entry to add a new user. 3. Once a new entry has been selected, the fields under Users will become editable. Enter the information for
Name, Password and Verify. 4. In the Remo ions that you would like to give the user access to remotely.
You may also che mote user. These functions include: te Permissions panel select the functck the A
• Log Search: View ll checkbox to give full control to the selected re
• Serial Port Contrologs that are saved on the DVR. l: Configure settings for RS232 and RS485 ports.
• TwoWay Audio: Ability to use two‐way radio between the remote client and the DVR. • Advanced Co isk drives (initializing and setting properties for HDDs). Ability to remote
update system f the relay output. ntrol: Manage hard d
ir• Live View: Ac
mware and stop ping of cess the Live Feed.
• PTZ Control: Control PTZ cameras. • Configuration: Configu factory defaults and import settings to as well
as export settings frre parameters, restore parameters to
om DVR. • Video Output Control: Configure settings for video output. • Alarm Control: Aler the DVR. Alarm and exception settings must be
configured prot or control the relay output of
• Shutdownperly to upload to host. /Reboot: Shu
• Playtdown or reboot the DVR.
y. back: Playback recordings remotel• Camera Management: Enable and disable analog channels. • All: Full permission to use all functions. . Clic previous menu. 5
k the Save button to save user settings and click Done to return to the
Hikvision EURO, Inc. DS-72xxHVI-ST Series Embedded Net DVR User Manual 44
Note: If you forget the password to your DVR, please contact your supplier. Note: The guest permissions can be set in the Lock Menus menu (See Locking and Unlocking System Menus on pages 68).
Deleting a User To delete a user from the DVR:
Main Menu > System Configuration > User Se1. Enter the User Settings menu, shown in Figure 38 by going tottings. 2. Select a user to delete in the Users List panel.
ser. 3. Click the Remove button to delete u4. C5. C
lick the OK button to confirm deletion of user. lick the Done button to exit menu. The admin and guest in the users list cannot be deleted. Note:
Editing a
User
To edit a user: re 38 by going to Main Menu > System Configuration > User
Se1. Enter the User Settings menu, shown in Figuttings
panel. nd Remote Permissions panel.
2. Select a user to edit in the Users List3. Edit user information in the Users a4. Click the Done button to exit menu.
Hikvision EURO, Inc. DS-72xxHVI-ST Series Embedded Net DVR User Manual 45
Configuring PTZ Cameras
Configuring Basic PTZ Settings TZ camera must be configured before it can be used. Before proceeding verify that the PTZ and
ected properly. Settings for a PRS‐485 of the DVR are conn To configure PTZ settings:
enu, shown in Figure 42 by going to Main Menu > System Configuration > PTZ Configuration. 1. Enter the PTZ Configuration m
Figure 39. PTZ Configuration Menu
2. Select the Serial Settings tab.
ras 3. Select the camera to configure in the camera drop down menu on the upper left of the menu. If all cameare to be configured with the same settings, select All Cameras from the list.
Rate, Data Bit, Stop Bit, Parity, Flow Ctrl, Protocol and Ad era(s). 4. Configure PTZ settings, including those of Baud dress according to the parameters of the PTZ cam5. Click the Save button to save current settings.
To test and verify PTZ settings: TZ Configuration menu, shown in Figure 42, by
PTZ Configuration. 1. Enter the P going to Main Menu > System Configuration >
On Camera Settings tab. This will open up the On Camera Settings menu, shown in Figure 40. 2. Select the
On Camera Settings Menu Figure 40. PTZ Configuration Menu >
3. Select the camera to test in the camera drop down menu.
Hikvision EURO, Inc. DS-72xxHVI-ST Series Embedded Net DVR User Manual 46
4. Using the Directional buttons and other PTZ control buttons (Zoom In/Out, Focus In/Out, Iris In/Out), test the functionality of the PTZ camera. If PTZ camera and protocol supports it, you may also click the Auto‐Scan button to test its function. PTZ controls buttons are shown in Figure 41.
Figure 41. PTZ Controls Button
Z is connected and configured with the correct settings
n5. If PTZ camera is not working properly, make sure PTder the Serial Settings tab. 6. Click Done to exit and return to the previous menu.
u
Customizing PTZ Presets, Patterns and Patrols Your DVR allows you to customize presets, patterns and patrols for a connected PTZ camera. A PTZ camera must first be configured before PTZ presets, patterns and patrols can be customized. To customize PTZ presets:
, shown in Figure 42 by going to Main Menu > System Configuration > PT1. Enter the PTZ Configuration menuZ Configuration. 2. Select the On Camera Settings tab. 3. Select [Save Presets] and move the camera to the desired position using the PTZ control buttons. 4. Click on a preset number in the upper left corner of the screen. The current position of the PTZ camera will
be set for the selected preset number. 5. To test the newly configured preset, first move the PTZ camera to a different position. Select [Recall Presets]
an cation that was set for the selected preset ud click on the preset number. The camera should move to the lomber. 6. C
nlick the Done button to exit out of the PTZ Configuration menu.
ote: Only the first 23 presets are shown in the table. To save or recall more presets, click on the “...” button.
ring up a selection list for presets up to 200. NClicking the “...” button will b To customize PTZ patterns:
e PTZ Configuration u, shown in Figure 42 by going to Main Menu > System Configuration > PT 1. Enter th menZ Configuration. 2. Select the On Camera Settings tab. 3. Select a Pattern Number to set from the drop down list.
ding the movement of the PTZ. 4. Click the Record button to begin recor5. Move the PTZ to the desired locations using the PTZ control buttons. 6. Click the Save button to save pattern. 7. To test out your new pattern, click the Play button. The PTZ should move as it did during the recording
pr . Clicking the Play button again will start plocess. You may click the Stop button at any time to end the patternying the PTZ pat‐tern again at the initial position.
t out of the PTZ Configuration menu. a8. Click the Done button to exi To customize PTZ patrols:
TZ Configuration m hown in Figure 42 by going to Main Menu > System Configuration > PT1. Enter the P enu, sZ Configuration. 2. Select the On Camera Settings tab. 3. Select a Patrol Number to set from the drop down list.
own list that you would like to add to 4. Select a Preset Number that is next to the Patrol Number from the dropdthe patrol.
Hikvision EURO, Inc. DS-72xxHVI-ST Series Embedded Net DVR User Manual 47
5. Click the Add button. The Preset Number will be added to the patrol list. 6. Repeat steps 4‐5 until you have included all the presets you would like to have on the patrol. 7. Click the Up and Down button at the bottom of the list to change the order of the presets in the patrol.
8. To test out 9. Click the Don
your new preset, click the Play button. The PTZ shoulde button to exit out of the PTZ Configuration menu.
move through the list of added presets.
Hikvision EURO, Inc. DS-72xxHVI-ST Series Embedded Net DVR User Manual 48
Configuring
Alarms and Exceptions
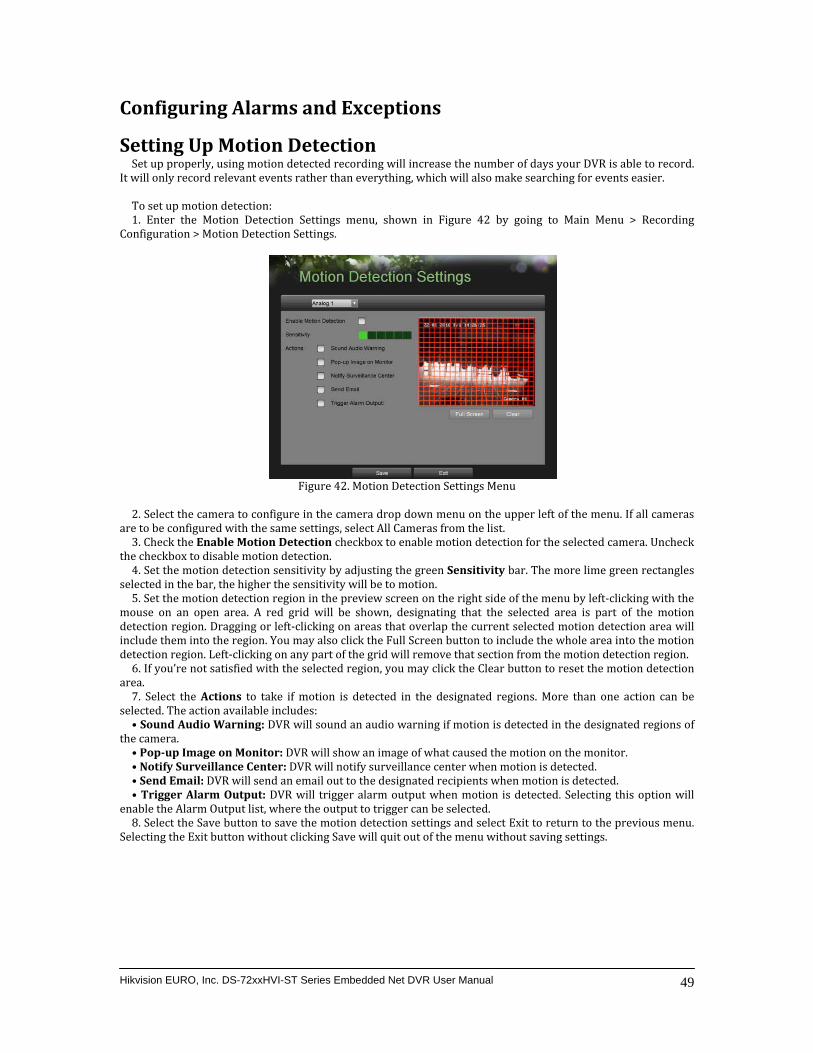
Setting Up Motion Detection et up properly, using motion detected recording will increase the number of days your DVR is able to record.
It w nts rather than everything, which will also make searching for events easier. Sill only record relevant eve
To set up motion detection: Enter the Motion Detection Settings menu, shown in Figure 42 by going to Main Menu > Recording
Configuration > Motion Detection Settings. 1.
Figure 42. Motion Detection Settings Menu
camera to configure in the2. Select the camera drop down menu on the upper left of the menu. If all cameras
are to be configured with the same settings, select All Cameras from the list. n detect3. Check the Enable Motion Detection checkbox to enable motio ion for the selected camera. Uncheck
the checkbox to disable motion detection. 4. Set the motion detection sensitivity by adjusting the green Sensitivity bar. The more lime green rectangles
selected in the bar, the higher the sensitivity will be to motion. 5. Set the motion detection region in the preview screen on the right side of the menu by left‐clicking with the
mouse on an open area. A red grid will be shown, designating that the selected area is part of the motion detection region. Dragging or left‐clicking on areas that overlap the current selected motion detection area will include them into the region. You may also click the Full Screen button to include the whole area into the motion detection region. Left‐clicking on any part of the grid will remove that section from the motion detection region.
t satisfi6. If you’re no ed with the selected region, you may click the Clear button to reset the motion detection area.
. Select the Actions to ta action available
7 ke if motion is detected in the designated regions. More than one action can be selected. The includes:
Sound Audio Warning: DVR regions of the camera. • will sound an audio warning if motion is detected in the designated
Popup Imag • e on Monitor: DVR will show an image of what caused the motion on the monitor. illance Cent
Notify Surve• er: DVR will notify surveillance center when motion is detected.
• Send Email: DVR will send an email out to the designated recipients when motion is detected. • Trigger Alarm Output: DVR will trigger alarm output when motion is detected. Selecting this option will
enable the Alarm Output list, where the output to trigger can be selected. 8. Select the Save button to save the motion detection settings and select Exit to return to the previous menu.
n without clicking Save will quit out of the menu without saving settings. Selecting the Exit butto
Hikvision EURO, Inc. DS-72xxHVI-ST Series Embedded Net DVR User Manual 49
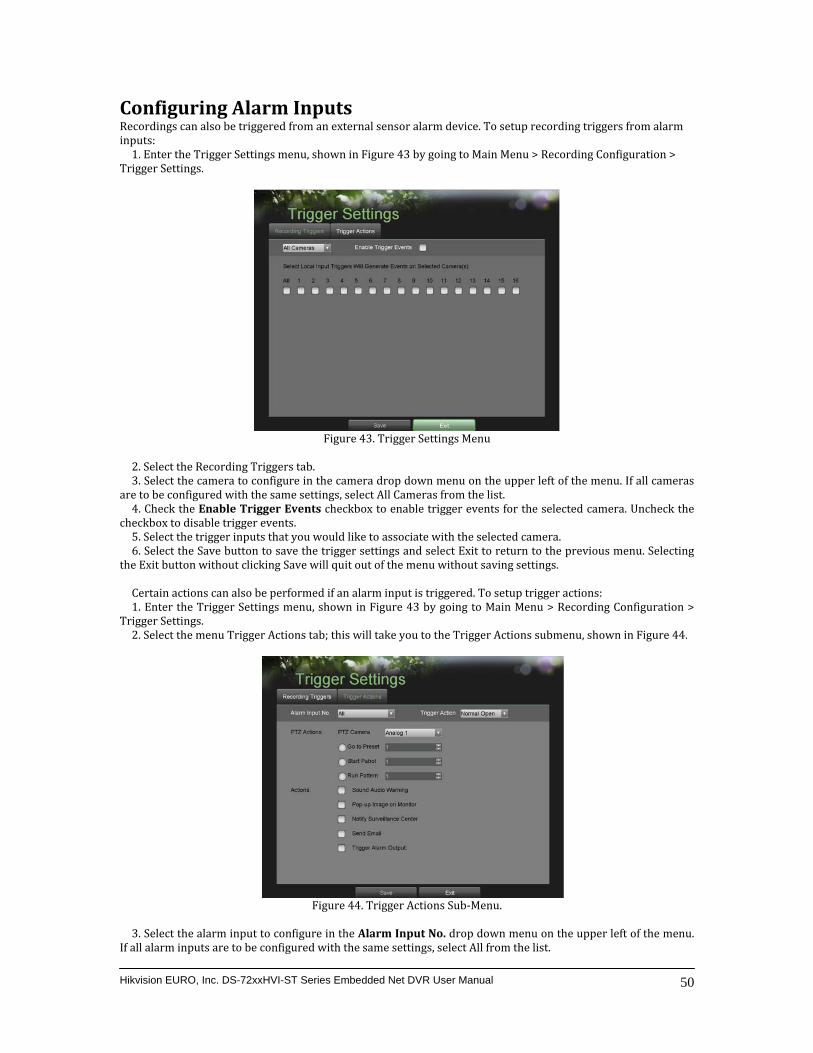
Configuring Alarm Inputs Re cordings can also be triggered from an external sensor alarm device. To setup recording triggers from alarminputs:
nu, shown in Figure 43 by going to Main Menu > Recording Configuration > Trigger Settings. 1. Enter the Trigger Settings me
Figure 43. Trigger Settings Menu
2. Select the Recording Triggers tab.
amera to configure in ts tti
3. Select the c he camera drop down menu on the upper left of the menu. If all cameras are to be configured with the same e ngs, select All Cameras from the list.
ted camera. Uncheck the ch4. Check the Enable Trigger Events checkbox to enable trigger events for the selececkbox to disable trigger events. 5. Select the trigger inputs that you would like to associate with the selected camera. Select the Save button to save the trigger settings and select Exit to return to the previous menu. Selecting
th6. e Exit button without clicking Save will quit out of the menu without saving settings. Certain actions can also be performed if an alarm input is triggered. To setup trigger actions:
Tr1. Enter the Trigger Settings menu, shown in Figure 43 by going to Main Menu > Recording Configuration >gger Settings.
ns tab; this will take you to the Trigger Actions submenu, shown in Figure 44. i2. Select the menu Trigger Actio
Figure 44 Sub‐Menu.
3. Select the alarm input to configure in the Alarm Input No. drop down menu on the upper left of the menu.
If all alarm inputs are to be configured with the same settings, select All from the list.
. Trigger ctions A
Hikvision EURO, Inc. DS-72xxHVI-ST Series Embedded Net DVR User Manual 50
4. Select the Trigger Action for the external alarm input device. Normal Open or Normal Close can be selected. 5. Select the PTZ Actions (only if a PTZ camera is configured on the DVR) to run when the alarm input is
triggered. Only one PTZ action can be selected per alarm input. 6. Select the Actions to run be selected per alarm input.
The action available includes when the alarm input is triggered. Multiple actions can:
und Audio Warning: DVR w• So ill sound an audio warning if alarm is triggered. • Popup Image on Monitor: d with the trigger
input. DVR will show the corresponding channel that is associate
• Notify Surveillance Center: DVR will notify surveillance center when alarm is triggered. • Send Email: DVR will send an email out to the designated recipients when alarm is triggered. • Trigger Alarm Output: DVR will trigger alarm output when input is triggered. Selecting this option will
enable the Alarm Output list, where the output to trigger can be selected. 7. Select the Save button to save the trigger settings and select Exit to return to the previous menu. Selecting
ton without clicking Save will quit out of the menu without saving settings. the Exit but
ConfiguringA
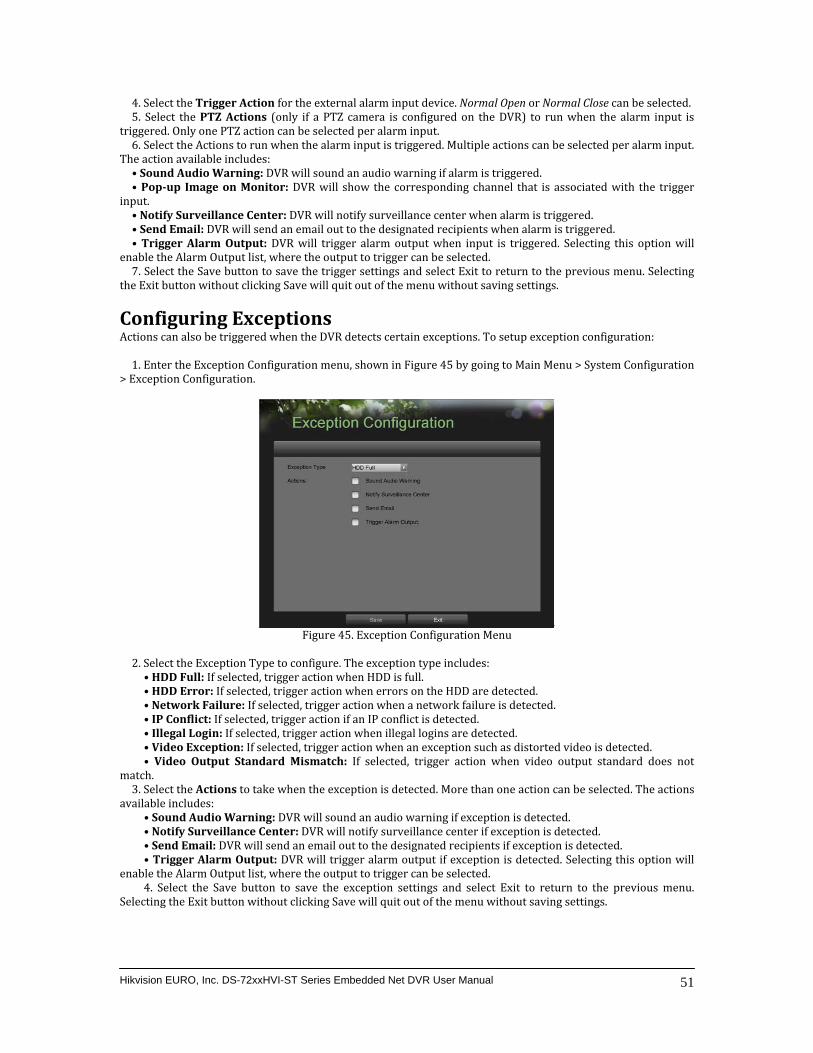
Exceptions ctions can also be triggered when the DVR detects certain exceptions. To setup exception configuration:
. Enter the Exception Configuration menu, shown in Figure 45 by going to Main Menu > System Configuration > Exception Configuration. 1
Figure 45. Exception Configuration M
2. Select the E
enu
xce• HDD Full: If
ption Type to configure. The exception type includes: select
• HDD Error:ed, trigger action when HDD is full.
e detected. • Network Fa tected.
If selected, trigger action when errors on the HDD arilure:
• IP Conflict: If If selected, trigger action when a network failure is de
selec• Illegal Login: If se
ted, trigger action if an IP conflict is detected. lected, trigger action
ideo Exception: If selected, trigger ac n ex when illegal logins are detected.
• V tion when a ception such as distorted video is detected. utput Standard• Video O Mismatch: If selected, trigger action when video output standard does not
match. 3. Select the Actions to take be selected. The actions
available includes: when the exception is detected. More than one action can
• Sound Audio Warning: DVR will sound an audio warning if exception is detected. illance Cent• Notify Surve er: DVR will notify surveillance center if exception is detected.
• Send Email: DVR will send an email out to the designated recipients if exception is detected. • Trigger Alarm Output: DVR will trigger alarm output if exception is detected. Selecting this option will
enable the Alarm Output list, where the output to trigger can be selected. 4. Select the Save button to save the exception settings and select Exit to return to the previous menu.
n without clicking Save will quit out of the menu without saving settings. Selecting the Exit butto
Hikvision EURO, Inc. DS-72xxHVI-ST Series Embedded Net DVR User Manual 51
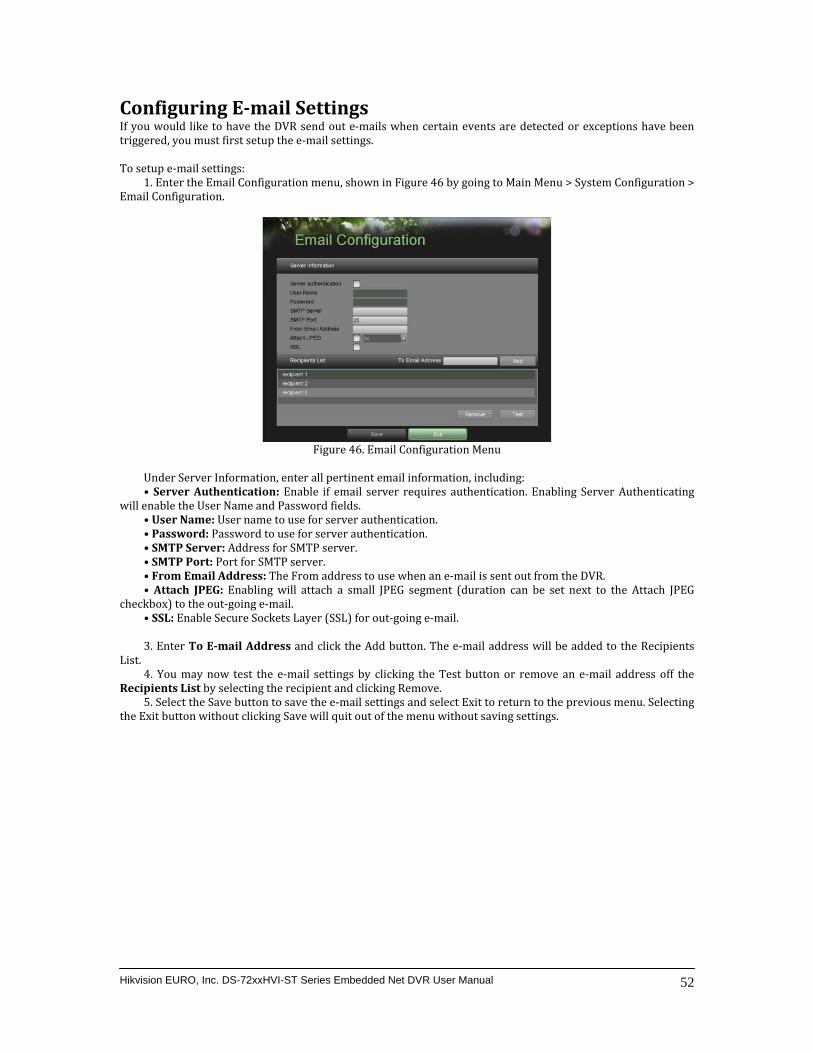
Configuring Email Settings f you would like to have the DVR send out e‐mails when certain events are detected or exceptions have been
etup the e‐mail settings. Itriggered, you must first s To setup e‐mail settings:
. Enter the Email Configuration menu, shown in Figure 46 by going to Main Menu > System Configuration > Email Configuration.
1
Figure 46. Email Configuration Menu
Under Server Information, enter all pertinent email information, including: • Server Auth authentication. Enabling Server Authenticating
will enable the Useentication: Enable if email server requires
• User Name r Name and Password fields. : U authentication.
• Password: Password to use for server authentication. ser name to use for server
• SMTP Server: Address• SMTP Port: Po
for SMTP server.
urt for SMTP server.
• From Email Address: The From address to se when an e‐mail is sent out from the DVR. • Atta duration can be set next to the Attach JPEG
chec box) ch JPEG: Enabling will attach a small JPEG segment (to the out‐going e‐mail. k
• SSL: Enable Secure Sockets Layer (SSL) for out‐going e‐mail.
hList.
3. Enter To Email Address and click the Add button. T e e‐mail address will be added to the Recipients
4. You may now test the e‐mail settings by clicking the Test button or remove an e‐mail address off the Recipients List by selecting the recipient and clicking Remove.
5. Select the Save button to save the e‐mail settings and select Exit to return to the previous menu. Selecting ton without clicking Save will quit out of the menu without saving settings. the Exit but
Hikvision EURO, Inc. DS-72xxHVI-ST Series Embedded Net DVR User Manual 52

CHAPTER8 Camera Management
Hikvision EURO, Inc. DS-72xxHVI-ST Series Embedded Net DVR User Manual 53
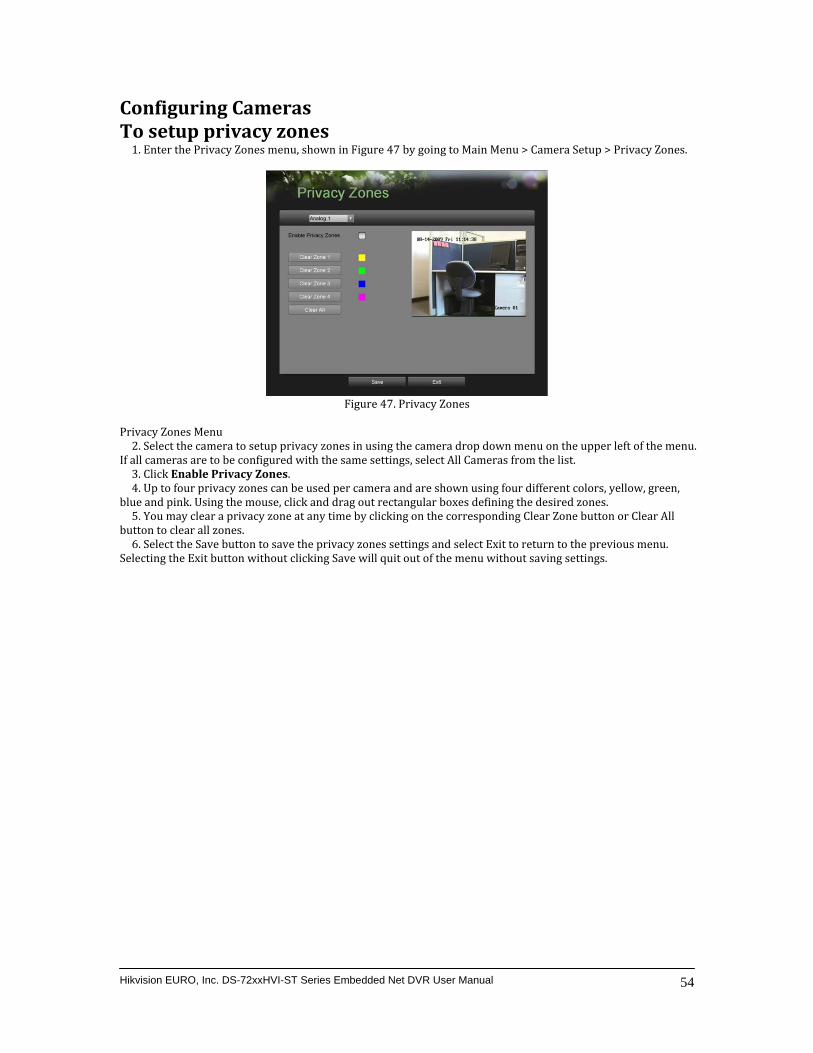
Configuring Cameras To1. Enter the Privacy Zones menu,
setup privacy zones shown in Figure 47 by going to Main Menu > Camera Setup > Privacy Zones.
Figure 47. Privacy Zones
Privacy Zones Menu
the camera to setup p acy zones in using the camera drop down menu on the upper left of the menu. If 2. Select rivall cameras are to be configured with the same settings, select All Cameras from the list. 3. Click Enable Privacy Zones.
4. Up to four privacy zones can be used per camera and are shown using four different colors, yellow, green,blue and pink. Using the mouse, click and drag out rectangular boxes defining the desired zones.
l 5. You may clear a privacy zone at any time by clicking on the corresponding Clear Zone button or Clear Albutton to clear all zones. 6. Select the Save button to save the privacy zones settings and select Exit to return to the previous menu. electing the Exit button without clicking Save will quit out of the menu without saving settings. S
Hikvision EURO, Inc. DS-72xxHVI-ST Series Embedded Net DVR User Manual 54

Configuring Video Tampering Detection
be used to recognize if an area of a camera is purposely covered and to respond Video tampering detection can accordingly. To configure video tampering detection:
eo Tampering Detection menu, shown in Figure 48 by going to Main Menu > Camera Setup > Video Tampering Detection. 1. Enter the Vid
Figure 48. Video Tampering Detection Menu
the camera to setup video tampering detection in using the camera drop down menu on the upper
lef . If all came e same settings, select All Cameras from the list. 2. Selectt of the menu ras are to be configured with th3. Click Enable Video Tampering Detection. 4. Adjust the Sensitivity for video tampering detection.
the mou5. Using se, select the region on the preview screen for where you would like to enable video tampering detection on. Press the Clear button to clear region. 6. Select Actions to take if elected per channel.
These actions include: video tampering is detected. More than one action can be s
d Audio Warning: DV• Soun R will sound an audio warning if tampering is detected. • Popup Image on Monitor: D the tampered
channel. VR will show the corresponding channel that is associated with
• Notify Surveillance Center: DVR will notify surveillance center when tampering is detected. • Send Email: DVR will send an email out to the designated recipients when tampering is detected.
will • Trigger Alarm Output: DVR will trigger alarm output when tampering is detected. Selecting this option enable the Alarm Output list, where the output to trigger can be selected. 7. Select the Save button to save the privacy zones settings and select Exit to return to the previous menu. electing the Exit button without clicking Save will quit out of the menu without saving settings. S
Hikvision EURO, Inc. DS-72xxHVI-ST Series Embedded Net DVR User Manual 55
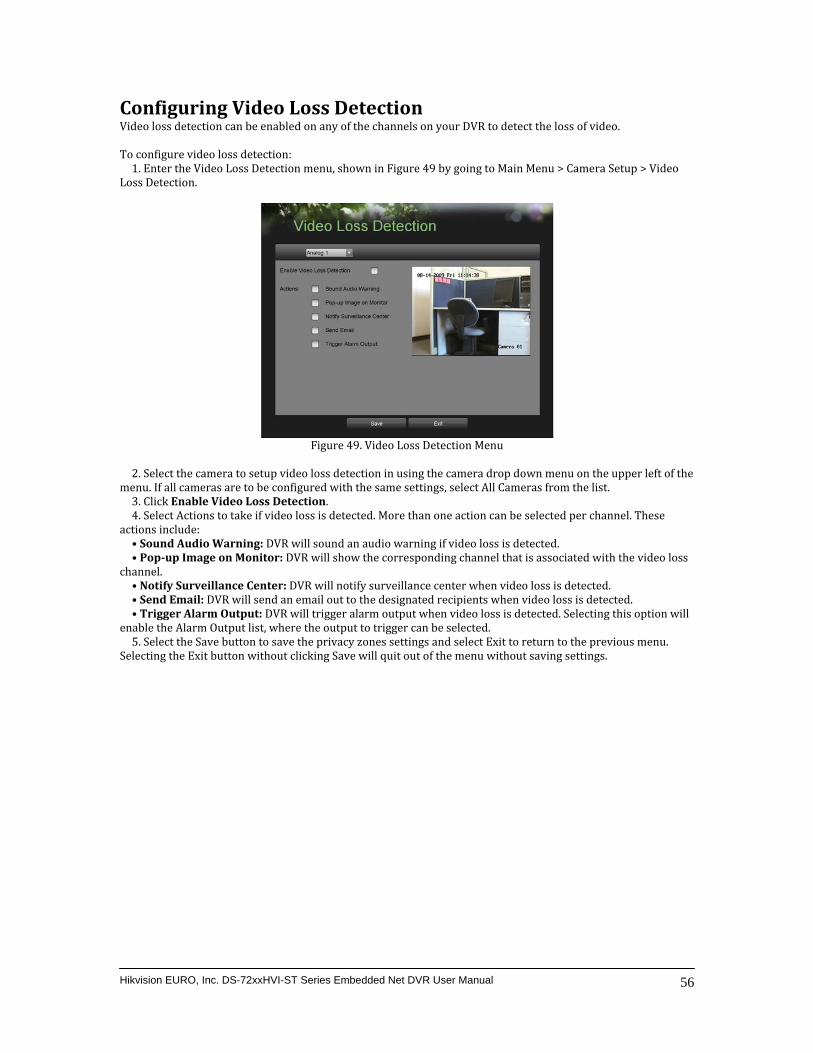
Video Loss Detection d on any of the channels on your DVR to detect the loss of video.
ConfiguringVideo loss detection can be enable To configure video loss detection:
eo Loss Detection menu, shown in Figure 49 by going to Main Menu > Camera Setup > Video Lo on. 1. Enter the Vidss Detecti
Figure 49. Video Loss Detection Menu
the camera to setup video loss detection in using the camera drop down menu on the upper left of the
me2. Selectnu. If all cameras are to be configured with the same settings, select All Cameras from the list. 3. Click Enable Video Loss Detection. 4. Select Actions to take if per channel. These
actions include: video loss is detected. More than one action can be selected
Audio Warning: DVR• Sound will sound an audio warning if video loss is detected. • Popup Image on Monitor: D the video loss
channel. VR will show the corresponding channel that is associated with
• Notify Surveillance Center: DVR will notify surveillance center when video loss is detected. • Send Email: DVR will send an email out to the designated recipients when video loss is detected.
ill • Trigger Alarm Output: DVR will trigger alarm output when video loss is detected. Selecting this option wenable the Alarm Output list, where the output to trigger can be selected.
o save the privacy zones settings and select Exit to return to the previous menu. Selecting the Exit button without clicking Save will quit out of the menu without saving settings. 5. Select the Save button t
Hikvision EURO, Inc. DS-72xxHVI-ST Series Embedded Net DVR User Manual 56
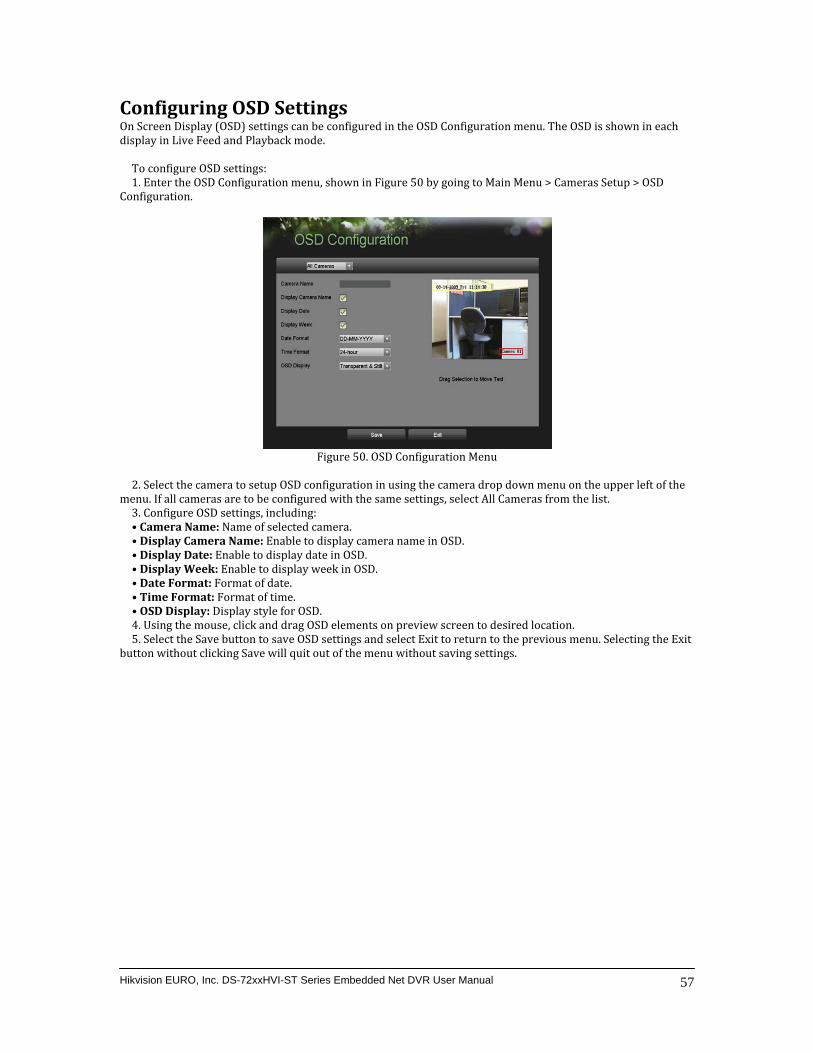
Configuring OSD Settings On Screen Display (OSD) settings can be configured in the OSD Configuration menu. The OSD is shown in each display in Live Feed and Playback mode. To configure OSD settings:
enu, shown in Figure 50 by going to Main Menu > Cameras Setup > OSD Configuration. 1. Enter the OSD Configuration m
Figure 50. OSD Configuration Menu
figuration in using the camera drop down menu on the upper left of the
me he same settings, select All Cameras from the list. 2. Select the camera to setup OSD conu. If all cameras. Configure OSD n are to be configured with t3 settings, • Camera Name
including:
• Display Came ra name in OSD. : Name of selected camera. ra
• Display Date: Name: Enable to display came
y date in OSD. • Display Week week in OSD.
Enable to displa:
• Date Format: Enable to display Format of date.
• Time Format: Format of time. • OSD Display: Display style for OSD. 4. Using the mouse, click and drag OSD elements on preview screen to desired location. 5. Select the Save button to save OSD settings and select Exit to return to the previous menu. Selecting the Exit
thout clicking Save will quit out of the menu without saving settings. button wi
Hikvision EURO, Inc. DS-72xxHVI-ST Series Embedded Net DVR User Manual 57
CHAPTER9 Disk Management
Hikvision EURO, Inc. DS-72xxHVI-ST Series Embedded Net DVR User Manual 58
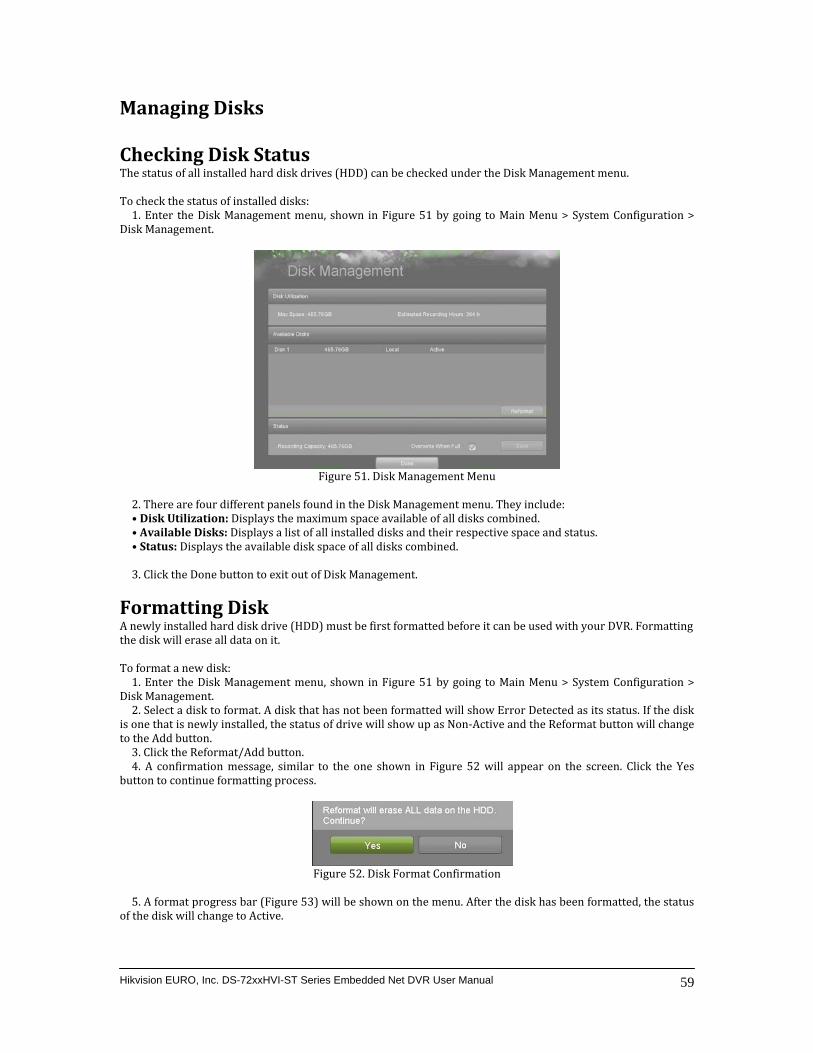
Managing Disks Checking Disk Status
ives (HDD) can be checked under the Disk Management menu. The status of all installed hard disk dr To check the status of installed disks:
. Enter the Disk Management menu, shown in Figure 51 by going to Main Menu > System Configuration > Disk Management. 1
Figure 51. Disk Management Menu
2. There are four different panels found in the Disk Management menu. They include:
isks combined. Availab espective space and status. • Disk Utilization: Displays the maximum space available of all d
le Disks: Displays a list of all installed disks and their rbined.
•• Status: Displays the available disk space of all disks com 3. Click the Done button to exit out of Disk Management.
Formatting Disk newly installed hard disk drive (HDD) must be first formatted before it can be used with your DVR. Formatting
ata on it. Athe disk will erase all d To format a new disk: 1. Enter the Disk Management menu, shown in Figure 51 by going to Main Menu > System Configuration >
Disk Management. 2. Select a disk to format. A disk that has not been formatted will show Error Detected as its status. If the disk
is us of drive will show up as Non‐Active and the Reformat button will change to one that is newly installed, the statthe Add button. 3. Click the Reformat/Add button. . A confirmation message, similar to the one shown in Figure 52 will appear on the screen. Click the Yes
button to continue formatting process. 4
Figure 52. Disk Format Confirmation
. A format progress bar (Figure 53) will be shown on the menu. After the disk has been formatted, the status
of the disk will change to Active. 5
Hikvision EURO, Inc. DS-72xxHVI-ST Series Embedded Net DVR User Manual 59
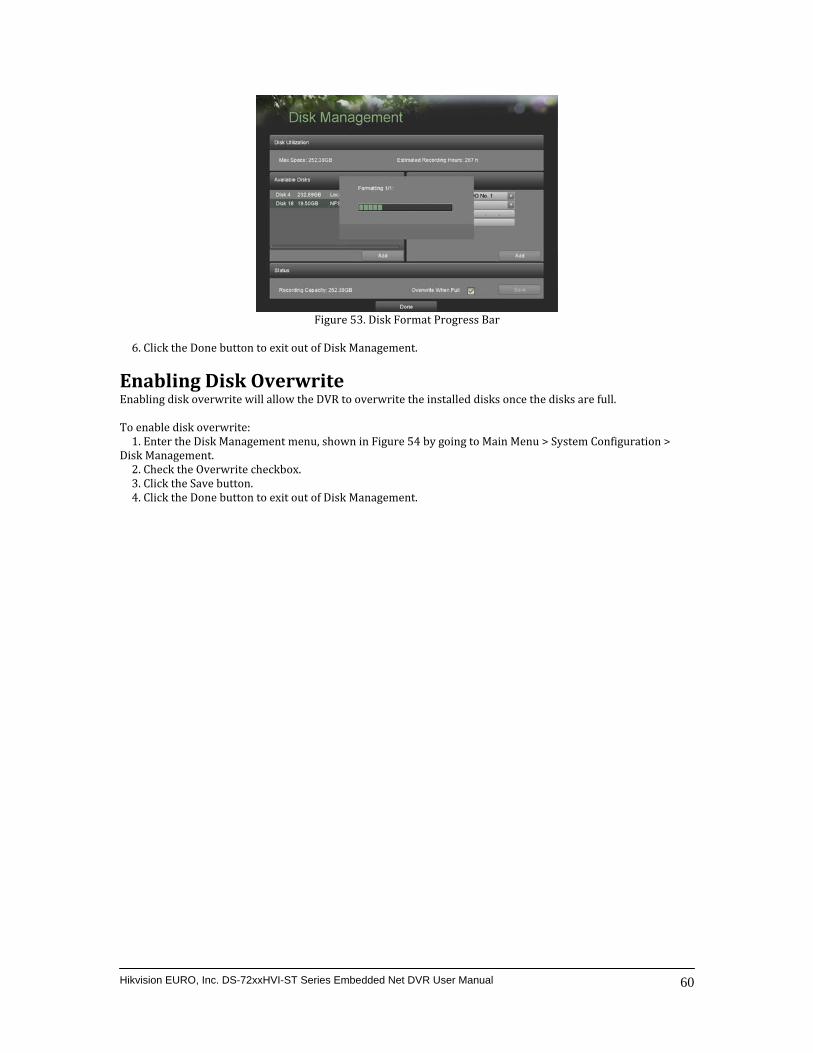
Figure 53. Disk Form
6. Click the Done button to exit out of Disk Management.
at Progress Bar
Enabling Disk Overwrite l allow the DVR to overwrite the installed disks once the disks are full. Enabling disk overwrite wil
To enable disk overwrite:
u, shown in Figure 54 by going to Main Menu > System Configuration > Di1. Enter the Disk Management mensk Management. 2. Check the Overwrite checkbox. 3. Click the Save button. 4. Click the Done button to exit out of Disk Management.
Hikvision EURO, Inc. DS-72xxHVI-ST Series Embedded Net DVR User Manual 60
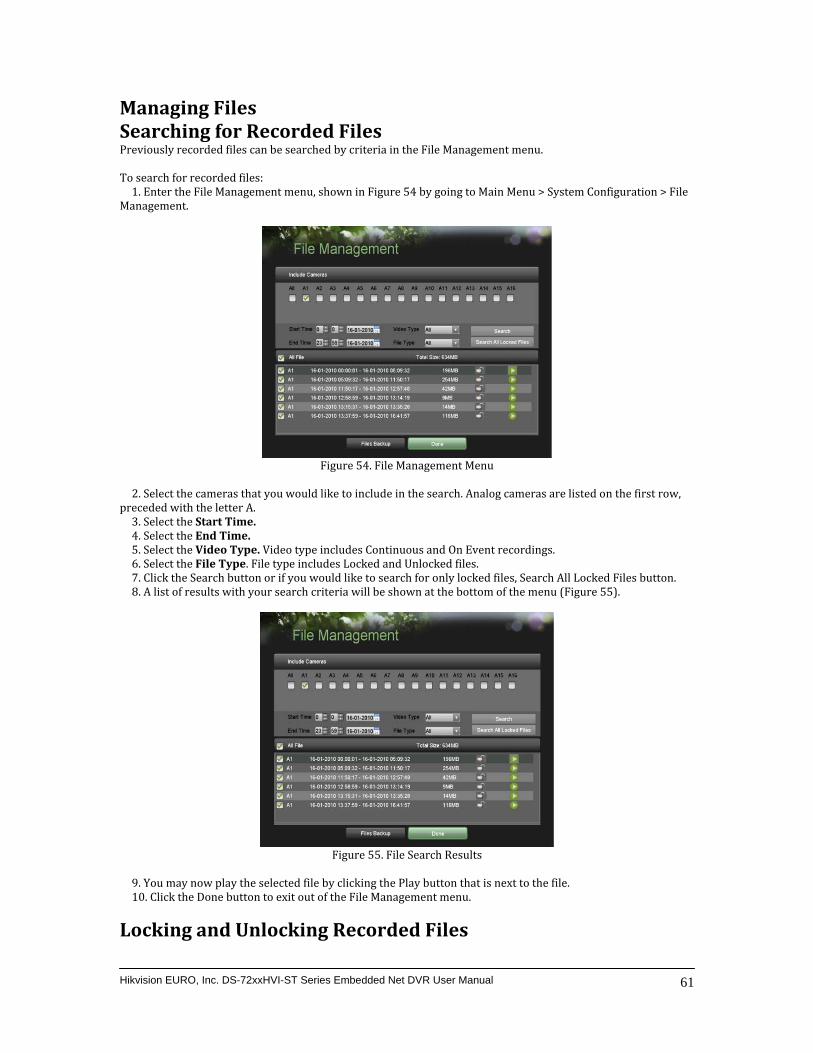
Managing Files Searching for Recorded Files
be searched by criteria in the File Management menu. Previously recorded files can To search for recorded files:
u, shown in Figure 54 by going to Main Menu > System Configuration > File Management. 1. Enter the File Management men
Figure 54. File Management Menu
cameras that ou would like to include in the search. Analog cameras are listed on the first row,
preceded with the letter A. 2. Select the y
Start Time. 3. Select the 4. Select the . End Time5. Select the Video Type. Video type includes Continuous and On Event recordings.
l s button. 6. Select the File Type. File type includes Locked and Unlocked files.
or if you would like to search for only locked files, Search All Locked Fi erch criteria will be shown at the bottom of the menu (Figure 55).
7. Click the Search button 8. A list of results with your sea
Figure 55. File Search Results
t is next to the file.
y now play the selected file by clicking the Play button tha0. Click the Done button to exit out of the File Management menu. 9. You ma1
Locking and Unlocking Recorded Files
Hikvision EURO, Inc. DS-72xxHVI-ST Series Embedded Net DVR User Manual 61
To Lock and unlock recorder files:
ement menu.
anag1. Search for recorded files using the File M2. Select the file you would like to lock/unlock.
k icon for the selected file. . Clic3. Click the Loc4
k the Done button to exit out of the File Management menu.
Note: Locked files will never be overwritten until they are unlocked.
Hikvision EURO, Inc. DS-72xxHVI-ST Series Embedded Net DVR User Manual 62

CHAPTER10 DVR Management
Hikvision EURO, Inc. DS-72xxHVI-ST Series Embedded Net DVR User Manual 63
Managing System the System Firmware
R can be updated from a USB storage device. UpgradingThe system firmware for your DV To update the system firmware:
mware Upgrade menu, shown in Figure 56 by going to Main Menu > Maintenance > Firmware Upgrade. 1. Enter the Fir
Figure 56. Firmware Upgrade Menu
2. Connect the USB storage device to a USB port on the DVR. 3. Click the Refresh button. The contents of the USB storage device will be shown on the screen. 4. Select the firmware file. The firmware file is named digicap.mav. 5. Click the Upgrade button to upgrade the DVR. The DVR will automatically reboot after the upgrade is
upgrade at this point, click the Cancel button. completed. If you do not wish to
Restoring Default Settings To restore factory default settings to your DVR:
. Enter the Factory Default menu, shown in Figure 57 by going to Main Menu > Maintenance > Factory Default. 1
Hikvision EURO, Inc. DS-72xxHVI-ST Series Embedded Net DVR User Manual 64
Figure 57. Factory Default Menu
. Sele 2 ct the OK button to restore factory defaults or select the Cancel button to return to the previous menu.
Network information such as IP address, subnet mask and gateway will not be restored. Note:
Exporting & Importing Configuration Configuration information from your DVR can be exported to a USB storage device and imported into another DV ently setup the same configuration on numerous DVRs. R. This will allow you to effici To export DVR configuration: 1. Enter the Export/Import Configuration menu, shown in Figure 58 by going to Main Menu > Maintenance >
Export/Import Configuration.
Figure 58. Import/Export Configuration Menu
2. Connect the USB storage device to a USB port on the DVR.
Hikvision EURO, Inc. DS-72xxHVI-ST Series Embedded Net DVR User Manual 65
3. Click the Refresh button. The contents of the USB storage device will be shown on the screen. 4. Click the New Folder button to create a new folder or the Delete button to delete a file/folder. 5. Select the location where you would like the configuration to be stored on the USB storage device.
6. Click Export to export a configuration file to USB storage device. The cCfg.bin.
guration menu.
onfiguration file will be named dev7. Click the Exit button to exit out of the Export/Import Confi To import DVR configuration:
igure 61 by going to Main Menu > Maintenance > Ex1. Enter the Export/Import Configuration menu, shown in Fport/Import Configuration.
shown on the screen. 2. Connect the USB storage device to a USB port on the DVR.
The contents of the USB storage device will be 3. Click the Refresh button.4. Select the configuration file. The configuration file is named devCfg.bin. 5. Click the Import button. 6. Click the Exit button to exit out of the Export/Import Configuration menu.
Hikvision EURO, Inc. DS-72xxHVI-ST Series Embedded Net DVR User Manual 66
System Logs gs.
ViewingMany events of your DVR are logged into the system lo To 1. Enter the System Logs menu, s
access the system logs and search for these events: hown in Figure 59 by going to Main Menu > Maintenance > System Logs.
Figure 59. System Logs Menu
2. Select the date from the Calendar to search for system logs in. The current system date is displayed in the
upper left corner of the menu. 3. Select the log type using the Search Type drop down list. Four log types are available: Alarm, Exception,
Operation, and Information. . Click the Search button. The search results will be disabled in a list on the right side of the menu (Figure 60).
If there are more than 2000 entries, click the Prev Page or Next Page button to display more entries 4
Figure 60. System Log Search Results
Hikvision EURO, Inc. DS-72xxHVI-ST Series Embedded Net DVR User Manual 67
5. Select an entry to view more detail information about the entry. 6. If applicable, you may also view the associated video to the selected log entry by clicking the Play button. 7. Log files can also be exported onto a USB storage device. To export a log file, connect a USB storage device
to the DVR, select the log files to export and click the Export button.
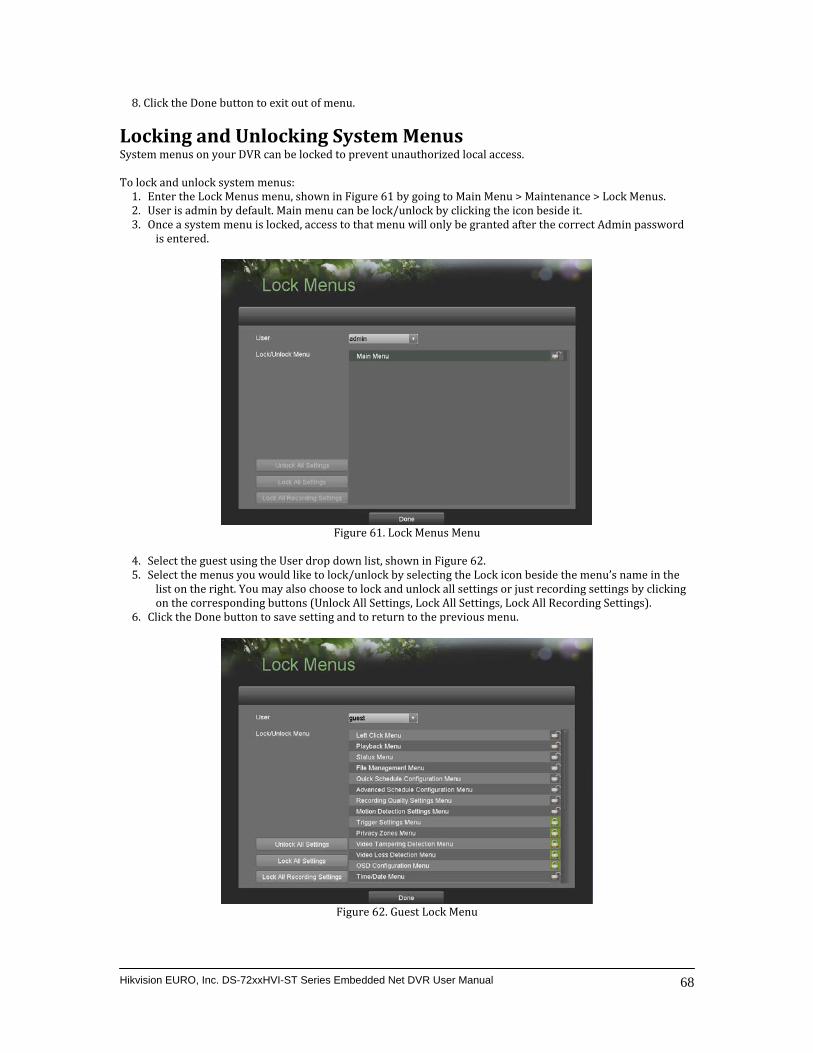
8. Click the Done button to exit out of menu.
Locking and Unlocking System Menus locked to prevent unauthorized local access. System menus on your DVR can be
To lock and unlock system menus:
1. Enter the Lock Menus menu, shown in Figure 61 by going to Main Menu > Maintenance > Lock Menus. 2. User is admin by default. Main menu can be lock/unlock by clicking the icon beside it. 3. Once a system menu is locked, access to that menu will only be granted after the correct Admin password
is entered.
Figure 61. Lock Menus Menu
4. Select the guest using the User drop down list, shown in Figure 62. 5. Select the menus you would like to lock/unlock by selecting the Lock icon beside the menu’s name in the
st recording settings by clicking k All Recording Settings).
list on the right. You may also choose to lock and unlock all settings or juon the corresponding buttons (Unlock All Settings, Lock All Settings, Loc
. Click the Done button to save setting and to return to the previous menu. 6
Figure 62. Guest Lock Menu
Hikvision EURO, Inc. DS-72xxHVI-ST Series Embedded Net DVR User Manual 68