Dreamweaver MX 2004 - wpunj.edu · Dreamweaver MX 2004 ... point to Macromedia , and then click...
12
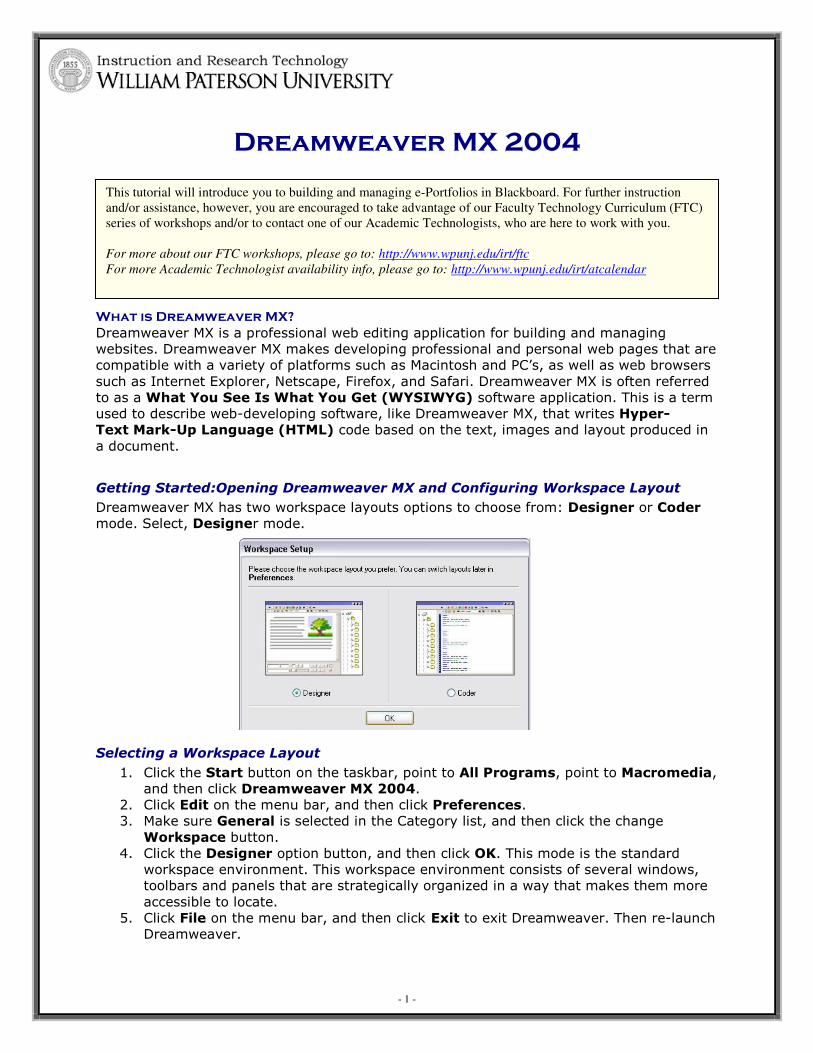
- 1 - Dreamweaver MX 2004 What is Dreamweaver MX? Dreamweaver MX is a professional web editing application for building and managing websites. Dreamweaver MX makes developing professional and personal web pages that are compatible with a variety of platforms such as Macintosh and PC’s, as well as web browsers such as Internet Explorer, Netscape, Firefox, and Safari. Dreamweaver MX is often referred to as a What You See Is What You Get (WYSIWYG) software application. This is a term used to describe web-developing software, like Dreamweaver MX, that writes Hyper- Text Mark-Up Language (HTML) code based on the text, images and layout produced in a document. Getting Started:Opening Dreamweaver MX and Configuring Workspace Layout Dreamweaver MX has two workspace layouts options to choose from: Designer or Coder mode. Select, Designer mode. Selecting a Workspace Layout 1. Click the Start button on the taskbar, point to All Programs, point to Macromedia, and then click Dreamweaver MX 2004. 2. Click Edit on the menu bar, and then click Preferences. 3. Make sure General is selected in the Category list, and then click the change Workspace button. 4. Click the Designer option button, and then click OK. This mode is the standard workspace environment. This workspace environment consists of several windows, toolbars and panels that are strategically organized in a way that makes them more accessible to locate. 5. Click File on the menu bar, and then click Exit to exit Dreamweaver. Then re-launch Dreamweaver. This tutorial will introduce you to building and managing e-Portfolios in Blackboard. For further instruction and/or assistance, however, you are encouraged to take advantage of our Faculty Technology Curriculum (FTC) series of workshops and/or to contact one of our Academic Technologists, who are here to work with you. For more about our FTC workshops, please go to: http://www.wpunj.edu/irt/ftc For more Academic Technologist availability info, please go to: http://www.wpunj.edu/irt/atcalendar
Transcript of Dreamweaver MX 2004 - wpunj.edu · Dreamweaver MX 2004 ... point to Macromedia , and then click...
- 1 -
Dreamweaver MX 2004
What is Dreamweaver MX?
Dreamweaver MX is a professional web editing application for building and managing
websites. Dreamweaver MX makes developing professional and personal web pages that are
compatible with a variety of platforms such as Macintosh and PC’s, as well as web browsers
such as Internet Explorer, Netscape, Firefox, and Safari. Dreamweaver MX is often referred
to as a What You See Is What You Get (WYSIWYG) software application. This is a term
used to describe web-developing software, like Dreamweaver MX, that writes Hyper-
Text Mark-Up Language (HTML) code based on the text, images and layout produced in
a document.
Getting Started:Opening Dreamweaver MX and Configuring Workspace Layout
Dreamweaver MX has two workspace layouts options to choose from: Designer or Coder
mode. Select, Designer mode.
Selecting a Workspace Layout
1. Click the Start button on the taskbar, point to All Programs, point to Macromedia,
and then click Dreamweaver MX 2004.
2. Click Edit on the menu bar, and then click Preferences.
3. Make sure General is selected in the Category list, and then click the change
Workspace button.
4. Click the Designer option button, and then click OK. This mode is the standard
workspace environment. This workspace environment consists of several windows,
toolbars and panels that are strategically organized in a way that makes them more
accessible to locate.
5. Click File on the menu bar, and then click Exit to exit Dreamweaver. Then re-launch
Dreamweaver.
This tutorial will introduce you to building and managing e-Portfolios in Blackboard. For further instruction
and/or assistance, however, you are encouraged to take advantage of our Faculty Technology Curriculum (FTC)
series of workshops and/or to contact one of our Academic Technologists, who are here to work with you.
For more about our FTC workshops, please go to: http://www.wpunj.edu/irt/ftc
For more Academic Technologist availability info, please go to: http://www.wpunj.edu/irt/atcalendar

- 2 -
Exploring the Dreamweaver MX Environment
Dreamweaver MX’s workspace consists of four basic elements. These elements are the
Document Window, Insert Bar, Properties Bar, and Panel Group. Let us take a look at
each of these elements more in depth.
Document Window
The Document Window is the main workspace where web pages are created and edited
using the panels and toolbars. Imbedded within is the document toolbar that includes three
main viewing options: Code, Split, and Design. These three viewing options help you view
and manipulate your web pages.
Code View Split View Design View
This option allows you to
view your web page’s entire
HTML coding as it is
generated by Dreamweaver
MX. Many designers
use this option in order to
enter or edit the HTML code.
This viewing option divides
both the Design and Code
view to allow you to see the
HTML coding as you layout
your website. The upper
pane displays your HTML
code while the lower pane
shows you the page as it will
appear in the web browser.
This view allows a designer
excellent mobility between
the hard coding and the
layout. It is also best used
when you want to debug or
troubleshoot a web page.
This option is the primary
view that allows you to view
your web page the way it will
appear in your web browser.
Take note that when you are
viewing your web page in
this view, all of your HTML
coding is hidden. The finish
product should look the way
it does in this viewing option.
- 3 -
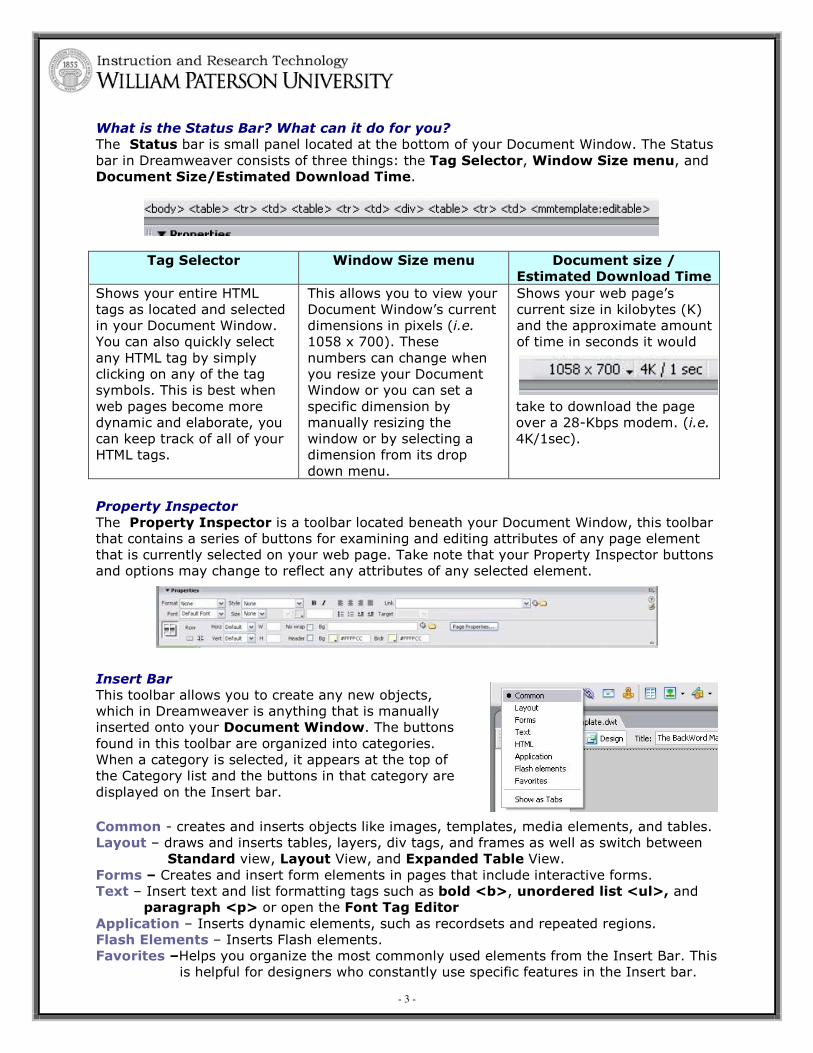
What is the Status Bar? What can it do for you?
The Status bar is small panel located at the bottom of your Document Window. The Status
bar in Dreamweaver consists of three things: the Tag Selector, Window Size menu, and
Document Size/Estimated Download Time.
Tag Selector Window Size menu Document size /
Estimated Download Time
Shows your entire HTML
tags as located and selected
in your Document Window.
You can also quickly select
any HTML tag by simply
clicking on any of the tag
symbols. This is best when
web pages become more
dynamic and elaborate, you
can keep track of all of your
HTML tags.
This allows you to view your
Document Window’s current
dimensions in pixels (i.e.
1058 x 700). These
numbers can change when
you resize your Document
Window or you can set a
specific dimension by
manually resizing the
window or by selecting a
dimension from its drop
down menu.
Shows your web page’s
current size in kilobytes (K)
and the approximate amount
of time in seconds it would
take to download the page
over a 28-Kbps modem. (i.e.
4K/1sec).
Property Inspector
The Property Inspector is a toolbar located beneath your Document Window, this toolbar
that contains a series of buttons for examining and editing attributes of any page element
that is currently selected on your web page. Take note that your Property Inspector buttons
and options may change to reflect any attributes of any selected element.
Insert Bar
This toolbar allows you to create any new objects,
which in Dreamweaver is anything that is manually
inserted onto your Document Window. The buttons
found in this toolbar are organized into categories.
When a category is selected, it appears at the top of
the Category list and the buttons in that category are
displayed on the Insert bar. Common - creates and inserts objects like images, templates, media elements, and tables.
Layout – draws and inserts tables, layers, div tags, and frames as well as switch between
Standard view, Layout View, and Expanded Table View.
Forms – Creates and insert form elements in pages that include interactive forms.
Text – Insert text and list formatting tags such as bold <b>, unordered list <ul>, and
paragraph <p> or open the Font Tag Editor
Application – Inserts dynamic elements, such as recordsets and repeated regions.
Flash Elements – Inserts Flash elements.
Favorites –Helps you organize the most commonly used elements from the Insert Bar. This
is helpful for designers who constantly use specific features in the Insert bar.
- 4 -
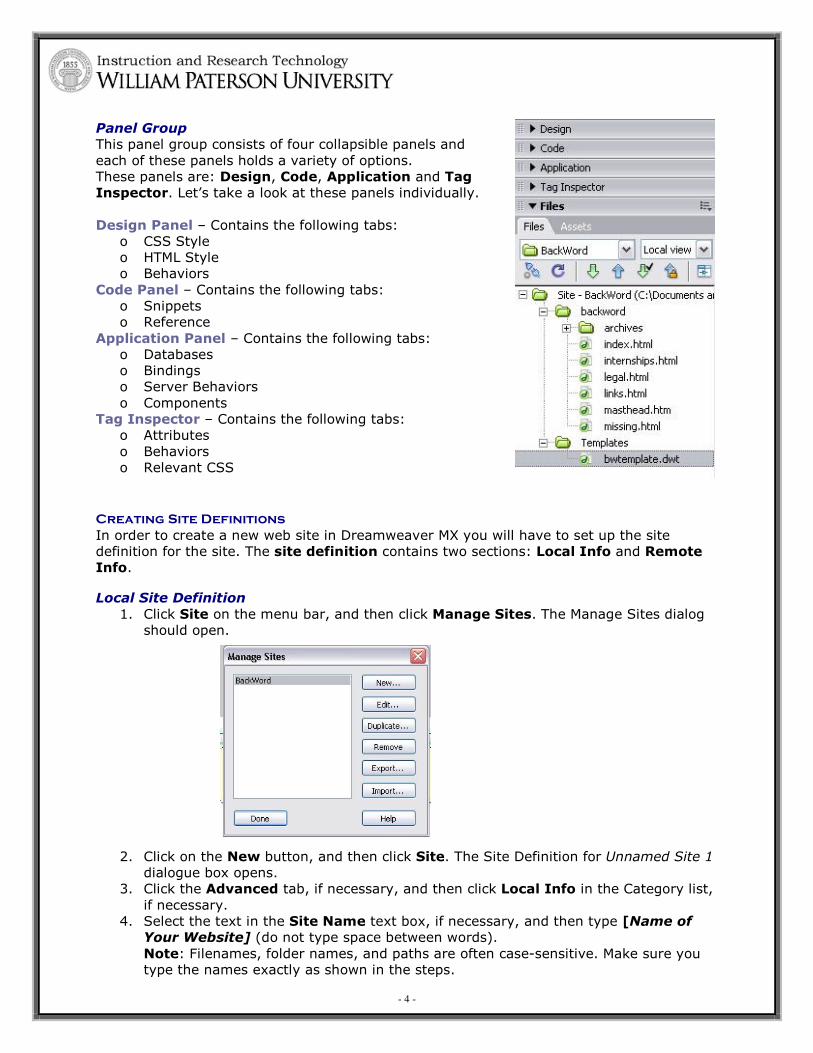
Panel Group
This panel group consists of four collapsible panels and
each of these panels holds a variety of options.
These panels are: Design, Code, Application and Tag
Inspector. Let’s take a look at these panels individually.
Design Panel – Contains the following tabs:
o CSS Style
o HTML Style
o Behaviors
Code Panel – Contains the following tabs:
o Snippets
o Reference
Application Panel – Contains the following tabs:
o Databases
o Bindings
o Server Behaviors
o Components
Tag Inspector – Contains the following tabs:
o Attributes
o Behaviors
o Relevant CSS
Creating Site Definitions
In order to create a new web site in Dreamweaver MX you will have to set up the site
definition for the site. The site definition contains two sections: Local Info and Remote
Info.
Local Site Definition
1. Click Site on the menu bar, and then click Manage Sites. The Manage Sites dialog
should open.
2. Click on the New button, and then click Site. The Site Definition for Unnamed Site 1
dialogue box opens.
3. Click the Advanced tab, if necessary, and then click Local Info in the Category list,
if necessary.
4. Select the text in the Site Name text box, if necessary, and then type [Name of
Your Website] (do not type space between words).
Note: Filenames, folder names, and paths are often case-sensitive. Make sure you
type the names exactly as shown in the steps.

- 5 -
5. Click the Browse button next to the Local Root Folder text box to open the Choose
Local Root Folder for Site [name of website] dialog box, and then navigate to the
location where you will store your Web site files.
6. Click the Create New Folder button in the Choose Local Root Folder for Site
[name of website] dialogue box, type [name of website] as the folder name, and
then press the Enter key. Your web site folder is now created
7. Click Select button to set the path for the local root folder. You can also type the
path to the local root folder in the Local Root Folder text box.
8. Click the Refresh Local File List Automatically check box to check it, if necessary.
9. Click the Browse button next to the Default Images Folder text box to open the
Choose Local Images Folder for [name of site], navigate to your local root folder,
click the Create New Folder button, type images as the folder name, press the
Enter key, click the Open button, and then click the Select button to set the path
for the default images folder. You can also type the path to the Graphics folder in the
Default Images Folder text box.
10. Click the Enable Cache check box to check it, if necessary. The information for the
local site definition is complete.
Creating a Remote Site Definition for FTP Access
The Remote Site Definition is the information that is stored on your computer
that you are using. This information tells Dreamweaver where the remote server is
located and how to connect to it. Creating a remote site definition enables you to
put the website on a Web Server so that it can then be seen on the Web.
- 6 -
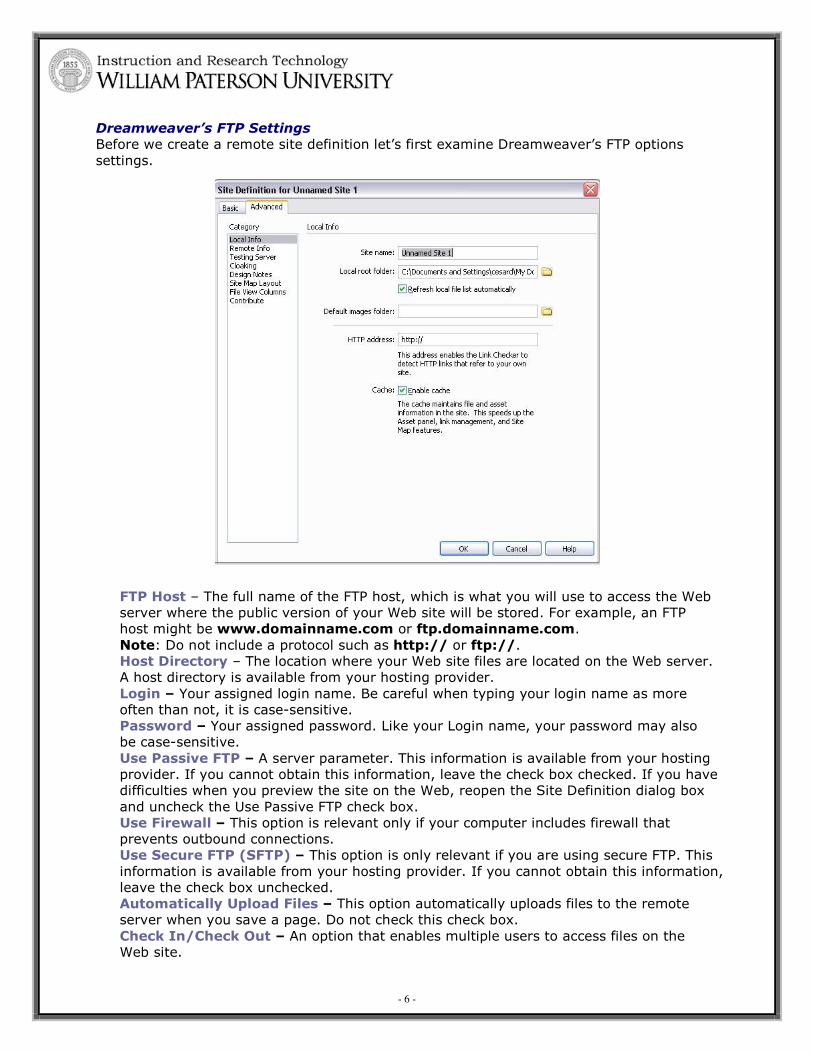
Dreamweaver’s FTP Settings
Before we create a remote site definition let’s first examine Dreamweaver’s FTP options
settings.
FTP Host – The full name of the FTP host, which is what you will use to access the Web
server where the public version of your Web site will be stored. For example, an FTP
host might be www.domainname.com or ftp.domainname.com.
Note: Do not include a protocol such as http:// or ftp://.
Host Directory – The location where your Web site files are located on the Web server.
A host directory is available from your hosting provider.
Login – Your assigned login name. Be careful when typing your login name as more
often than not, it is case-sensitive.
Password – Your assigned password. Like your Login name, your password may also
be case-sensitive.
Use Passive FTP – A server parameter. This information is available from your hosting
provider. If you cannot obtain this information, leave the check box checked. If you have
difficulties when you preview the site on the Web, reopen the Site Definition dialog box
and uncheck the Use Passive FTP check box.
Use Firewall – This option is relevant only if your computer includes firewall that
prevents outbound connections.
Use Secure FTP (SFTP) – This option is only relevant if you are using secure FTP. This
information is available from your hosting provider. If you cannot obtain this information,
leave the check box unchecked.
Automatically Upload Files – This option automatically uploads files to the remote
server when you save a page. Do not check this check box.
Check In/Check Out – An option that enables multiple users to access files on the
Web site.

- 7 -
Creating the Remote Site Definition
1. Click Remote Info in the Category list in the Site Definition for your Web Site.
2. Click Access list arrow, and then click FTP. Additional options appear in the dialog
box.
3. Click in the FTP Host text box and then type the address to the FTP Host, which
enables you to connect to the server where the public version of your Web Site will
be hosted.
4. Press the Tab key to move the insertion point to the Host Directory text box, and
then type the host directory name.
5. Pres the Tab key to move the insertion point to the Login text box, and then type
your login or user name. Remember that on many systems, the login ID is case-
sensitive.
6. Press the Tab key to move the insertion point to the Password text box, and then
type your password. Remember that on many systems, the password is case-
sensitive.
7. Click the Test button. Dreamweaver tests your connecton to ensure that you can
connect to the remote server.
8. Click on Save check box to check it, if necessary. Dreamweaver will remember your
password. If you are working on a public computer, remember to uncheck the Save
check box before you end your work session.
9. Click the OK button. The Site Definition for your Web site dialog box closes and
the site definition is saved.
Formatting HTML Using Dreamweaver MX 2004
Text is inputted into Dreamweaver by either typing directly onto the Document Window or
inserting the text right onto the hard coding using the Code view. Once this text is in the
Document Window you can format it very similarly to using most word processors. The
following are some of the most important formatting tools found in Dreamweaver.
Inserting Paragraph Breaks
1. Insert a paragraph text into your Document Window. This text should be
formatted in paragraph form.
2. Press Return (Enter) and a blank line of white space is inserted below the
paragraph. Pressing this key inserts a single paragraph break (one line of blank
space between paragraphs).
Note: Dreamweaver always assumes that any inserted text is one complete
paragraph. This is unless you apply a proper format, then your text found within the
<p> …</p> tag pair will appear as one complete paragraph.
Inserting Line Breaks
The use of white space is important in the design and readability of any website. In
Dreamweaver, when you press Return (Enter) key, a new <p> is inserted. Follow these
two simple steps in order to insert a line break:
1. Position your cursor within the text where you want to enter a line break.
2. Select Insert, Special Characters, and then Line Break from the menu, or press
Shift + Return or Shift + Enter.
Note: Dreamweaver will also assign a new HTML paragraph for non-breaking space
  entity between the opening and end tags. If you type on this new line, the
non-breaking space is replaced with your content. However, if you leave it blank,

- 8 -
that non-breaking space will remain there. Because the tag is not empty, web
browsers automatically interpret this paragraph as a blank line.
Text Alignment
As previously explained, the formatting tools found in Dreamweaver are very similar to
those of a Microsoft Word. These paragraph alignments are: Left Justify, Center, and
Right Justify. To change the alignments on your text follow these steps:
1. Select the text you want to align and highlight it. You can also insert your cursor at
the beginning of your text.
2. Click Left Justify, Center, or Right Justify on the property inspector or you can
select your alignment from the Text menu.
Text Format
Dreamweaver contains three basic paragraph
styles: paragraph, heading, and preformatting.
They are applied using the Format drop-down list
in the Property Inspector panel.
• Paragraph - This format ignores white space,
so sequential spaces within the paragraph appear
as only one space when viewed in a browser. This
paragraph inserts the HTML code <p>…</p>
which indicates the text will automatically wrap.
• Heading - Headings are used to identify different
sections of content on a page. They range from
largest and boldest <h1> to smallest <h6>. Headings are applied to the entire
paragraph, so you can't mix heading styles within the same line of text.
• Preformatted - The preformatted format enables you to space text exactly as you
want, including using white space and line breaks. Text doesn't automatically word
wrap, so you must press Enter to end a line.
Text Size
Font sizes are relative rather than precise point sizes unless
your Web site uses CSS, which allows you to have better
control of your font sizes. You can select your font and the size
using the Property inspector. Note that sizes 4-7 appear larger
than the default, while sizes 1-2 are smaller. Also, keep in mind
that there are differences in the way your Web sites look on
Windows and Macintosh computers. The standard resolution
for text on Mac is 72 dpi, whereas the standard for Windows is
96 dpi. Text formatted to look good on Mac might look too
large on a Windows platform.
To set the font size, do the following:
1. Select the text to be sized. If no text is selected, the size
change will be applied to subsequent text.
2. In the Property Inspector, click the Size drop-down list.
3. Select a size from the list.

- 9 -
Text Color
The default text color in Dreamweaver is
black (#000000), but the text color can
be modified in the page properties panel.
Follow these steps to change the text
color on your text:
1. Select the text that will change color. In
the Properties Inspector, click the Page
Properties button. The Page Properties
dialog box will open.
2. Select the Color Box titled Text Color and a Color Picker window will appear. You
can now select from a variety of colors such as web safe, hexadecimal, and system
colors.
3. To return text to the default text color, click the Color Picker and then click the
white square with the red strikethrough button.
4. You can also change the text color by simply selecting the Color Box located adjacent
to the Text Size drop down menu.
Fonts
Fonts styles such as bold, italics, strong, and emphasis can be formatted using
the Property Inspector. You choose additional font styles by selecting Text then
Style from the menu bar. The following are the four most used font styles;
• Bold & Italics - Bold and Italics are the most typical font styles used on Web Pages.
These styles can be identified by their <b>…</b> and <i>…</i> tag pairs.
• Strong & Emphasis – Strong makes selected text and numbers appear bold.
Emphasis makes the selected text and numbers appear bold. These styles can be
identified by their <strong>…</strong> and <em>…</em> tag pairs.
Check Spelling
This key combination (Shift + F7) will launch the spell checker to assess the spelling of the
current document. The Check Spelling command ignores HTML tag and attributes values.
It can also be accessed through the menu bar, Text > Check Spelling.
• Add to Personal - The Add to Personal
button is located in the Check Spelling
dialog box. Use this option to add
unrecognized words such as first or last
names of people to a personal spelling book.
• Ignore - This option button overlooks a
single instance of the unrecognized word.
• Ignore All - This option button overlooks
all instances of the unrecognized word in
the current document.
• Change - This option button replaces this
instance of the unrecognized word with text
that you type in the Change to box or with the selection in the Suggestions list.
• Change All - This option button replaces all instances of the unrecognized word in
the current document.
- 10 -
Adding Special Characters
There are times when your text may contain special characters and diacritical marks.
Dreamweaver MX provides most of these special characters such as the copyright symbol
(©), trademark (™), registered (®), or an Em dash (—). The follow are simple steps to
add these special characters to your text:
1. Position your cursor where you want these special characters on your Document
Window.
2. Then click on Insert, HTML, and Special Characters in the menu bar. You will be
presented with a list of special characters and diacritical marks to insert in your text.
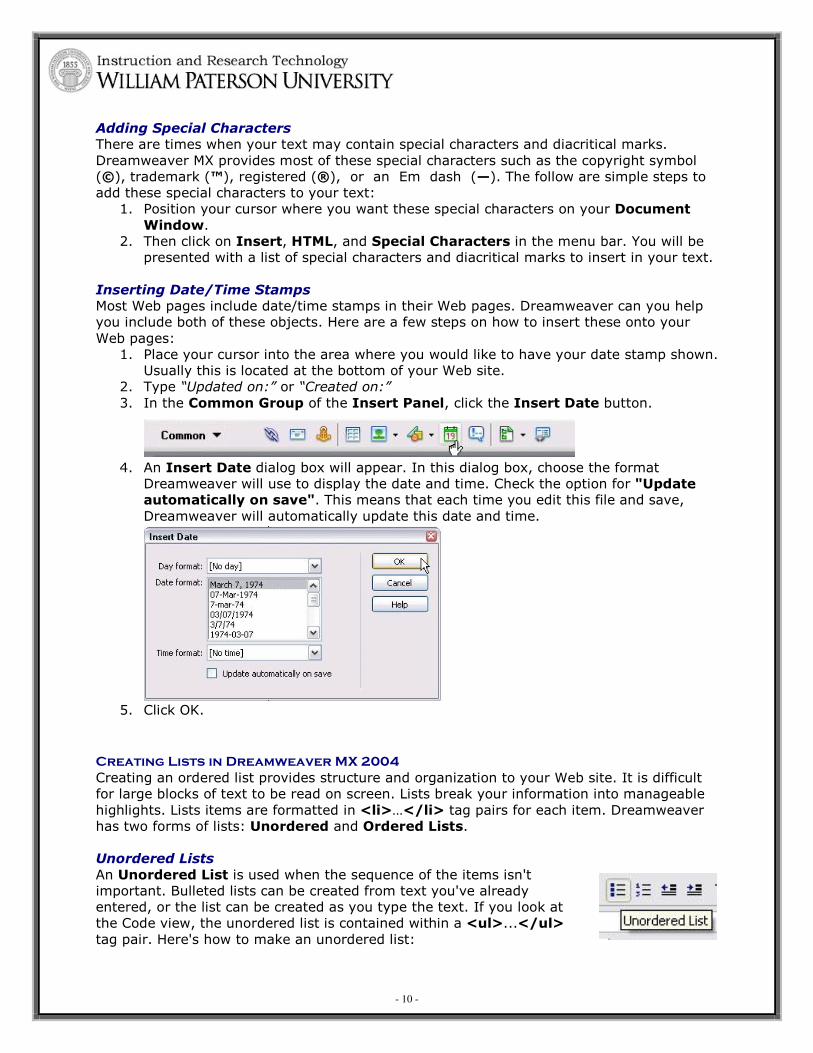
Inserting Date/Time Stamps
Most Web pages include date/time stamps in their Web pages. Dreamweaver can you help
you include both of these objects. Here are a few steps on how to insert these onto your
Web pages:
1. Place your cursor into the area where you would like to have your date stamp shown.
Usually this is located at the bottom of your Web site.
2. Type “Updated on:” or “Created on:”
3. In the Common Group of the Insert Panel, click the Insert Date button.
4. An Insert Date dialog box will appear. In this dialog box, choose the format
Dreamweaver will use to display the date and time. Check the option for "Update
automatically on save". This means that each time you edit this file and save,
Dreamweaver will automatically update this date and time.
5. Click OK.
Creating Lists in Dreamweaver MX 2004
Creating an ordered list provides structure and organization to your Web site. It is difficult
for large blocks of text to be read on screen. Lists break your information into manageable
highlights. Lists items are formatted in <li>…</li> tag pairs for each item. Dreamweaver
has two forms of lists: Unordered and Ordered Lists.
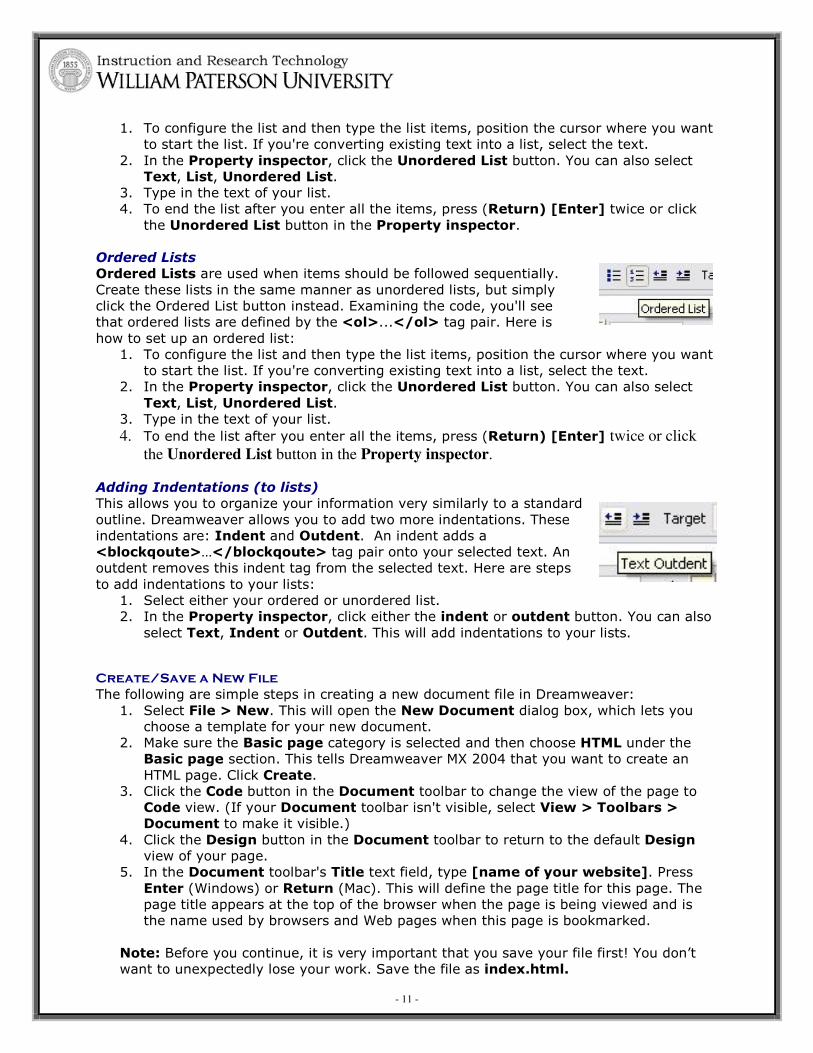
Unordered Lists
An Unordered List is used when the sequence of the items isn't
important. Bulleted lists can be created from text you've already
entered, or the list can be created as you type the text. If you look at
the Code view, the unordered list is contained within a <ul>...</ul>
tag pair. Here's how to make an unordered list:
- 11 -
1. To configure the list and then type the list items, position the cursor where you want
to start the list. If you're converting existing text into a list, select the text.
2. In the Property inspector, click the Unordered List button. You can also select
Text, List, Unordered List.
3. Type in the text of your list.
4. To end the list after you enter all the items, press (Return) [Enter] twice or click
the Unordered List button in the Property inspector.
Ordered Lists
Ordered Lists are used when items should be followed sequentially.
Create these lists in the same manner as unordered lists, but simply
click the Ordered List button instead. Examining the code, you'll see
that ordered lists are defined by the <ol>...</ol> tag pair. Here is
how to set up an ordered list:
1. To configure the list and then type the list items, position the cursor where you want
to start the list. If you're converting existing text into a list, select the text.
2. In the Property inspector, click the Unordered List button. You can also select
Text, List, Unordered List.
3. Type in the text of your list.
4. To end the list after you enter all the items, press (Return) [Enter] twice or click
the Unordered List button in the Property inspector.
Adding Indentations (to lists)
This allows you to organize your information very similarly to a standard
outline. Dreamweaver allows you to add two more indentations. These
indentations are: Indent and Outdent. An indent adds a
<blockqoute>…</blockqoute> tag pair onto your selected text. An
outdent removes this indent tag from the selected text. Here are steps
to add indentations to your lists:
1. Select either your ordered or unordered list.
2. In the Property inspector, click either the indent or outdent button. You can also
select Text, Indent or Outdent. This will add indentations to your lists.
Create/Save a New File
The following are simple steps in creating a new document file in Dreamweaver:
1. Select File > New. This will open the New Document dialog box, which lets you
choose a template for your new document.
2. Make sure the Basic page category is selected and then choose HTML under the
Basic page section. This tells Dreamweaver MX 2004 that you want to create an
HTML page. Click Create.
3. Click the Code button in the Document toolbar to change the view of the page to
Code view. (If your Document toolbar isn't visible, select View > Toolbars >
Document to make it visible.)
4. Click the Design button in the Document toolbar to return to the default Design
view of your page.
5. In the Document toolbar's Title text field, type [name of your website]. Press
Enter (Windows) or Return (Mac). This will define the page title for this page. The
page title appears at the top of the browser when the page is being viewed and is
the name used by browsers and Web pages when this page is bookmarked.
Note: Before you continue, it is very important that you save your file first! You don’t
want to unexpectedly lose your work. Save the file as index.html.

- 12 -
Creating Hyperlinks using Images and Text
The capability to link to pages and sites is what makes the Web dynamic. You can create
text or image hyperlinks using the Property Inspector to associate the text with a specific
file or web page. The following are steps on how to create hyperlinks using text or images.
Creating an Image Link
1. Select an image that you want to become a hyperlink.
2. Click the Browse for File icon, next to the Link option, in the Properties
Inspector. Select an HTML page from your web site. Click OK. This image is now
linked to an HTML page within your Web Site.
3. You have just created your first Relative Link. Why is it relative? It is relative
simply because it linked to a document within this site, not to an external Web site.
Note: If your Properties Inspector panel is smaller than what is shown here, click the
arrow in the lower-right corner to expand it.
Creating a Text Link
The process is almost identical, except you will be selecting text instead of images.
1. Select the text that you want to become a hyperlink.
2. Click the Browse for File icon in the Properties inspector. Select an HTML page
from your web site. Click OK. This text is now linked to an HTML page within your
Web Site.
Note: As you create the text links, you will notice the color of the text change. This
happens because you set the Links color option in the Page Properties to red, and
Dreamweaver MX 2004 is previewing that setting for you.
3. You can also create an Absolute Link to an external website by simply typing the
URL, such as http://www.stedwards.edu into the Link option in the Properties
inspector and press Enter (Windows) or Return (Mac).
4. Congratulations, you just created your first Absolute Link. It's an absolute link
because it begins with an http header and includes the full address.
5. If you want to preview all of your links, press F12 to launch a browser and try them
out.
Creating an Email Link
Aside from creating links to pages, you can create email links that send you correspondence
directly to any email account. Creating an email link is easy; first type the text that you
want to appear as a hyperlink. When users click on this text, the user’s default email
application (Eudora, Outlook, etc) will automatically launch a new email message with your
email already addressed in the To: field. The following steps are ways to create an email
link:
1. Drag-select the text Email. This will highlight the text.
2. Click Insert on the Menu bar and select the Email Link command. This will remove
the text.
3. Drag-select the text in the email field and press the Delete key.
4. Type your email address (i.e. [email protected]) in the email field.
5. Click OK.
Note: You can also type “mailto: [email protected]” in the Link field of the Property
inspector.