DRAWBAR EFFECTS - Hammond USAhammondorganco.com/wp-content/uploads/2015/06/04-DRAWBAR-E… ·...
26
-73 -88 DRAWBAR EFFECTS
Transcript of DRAWBAR EFFECTS - Hammond USAhammondorganco.com/wp-content/uploads/2015/06/04-DRAWBAR-E… ·...
-73
-88
DRAWBAREFFECTS

Drawbar Effects - Vibrato 1
DRAWBAR EFFECTS
You can add Vibrato/Chorus, Leslie, Sustain and Overdrive to the Drawbar sounds of your Sk-series instrument. In
the following section, each effect is explained in detail.
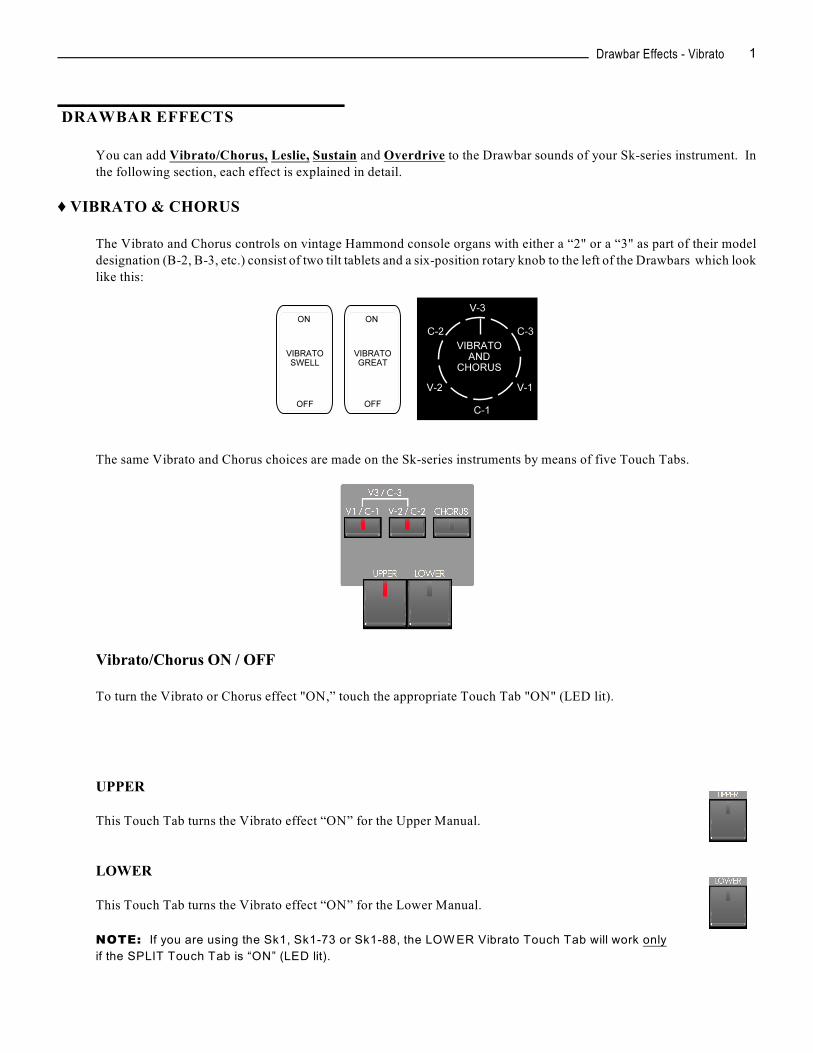
Ë VIBRATO & CHORUS
The Vibrato and Chorus controls on vintage Hammond console organs with either a “2" or a “3" as part of their model
designation (B-2, B-3, etc.) consist of two tilt tablets and a six-position rotary knob to the left of the Drawbars which look
like this:
The same Vibrato and Chorus choices are made on the Sk-series instruments by means of five Touch Tabs.
Vibrato/Chorus ON / OFF
To turn the Vibrato or Chorus effect "ON,” touch the appropriate Touch Tab "ON" (LED lit).
UPPER
This Touch Tab turns the Vibrato effect “ON” for the Upper Manual.
LOWER
This Touch Tab turns the Vibrato effect “ON” for the Lower Manual.
NOTE: If you are using the Sk1, Sk1-73 or Sk1-88, the LOW ER Vibrato Touch Tab will work only
if the SPLIT Touch Tab is “ON” (LED lit).
Drawbar Effects - Vibrato2
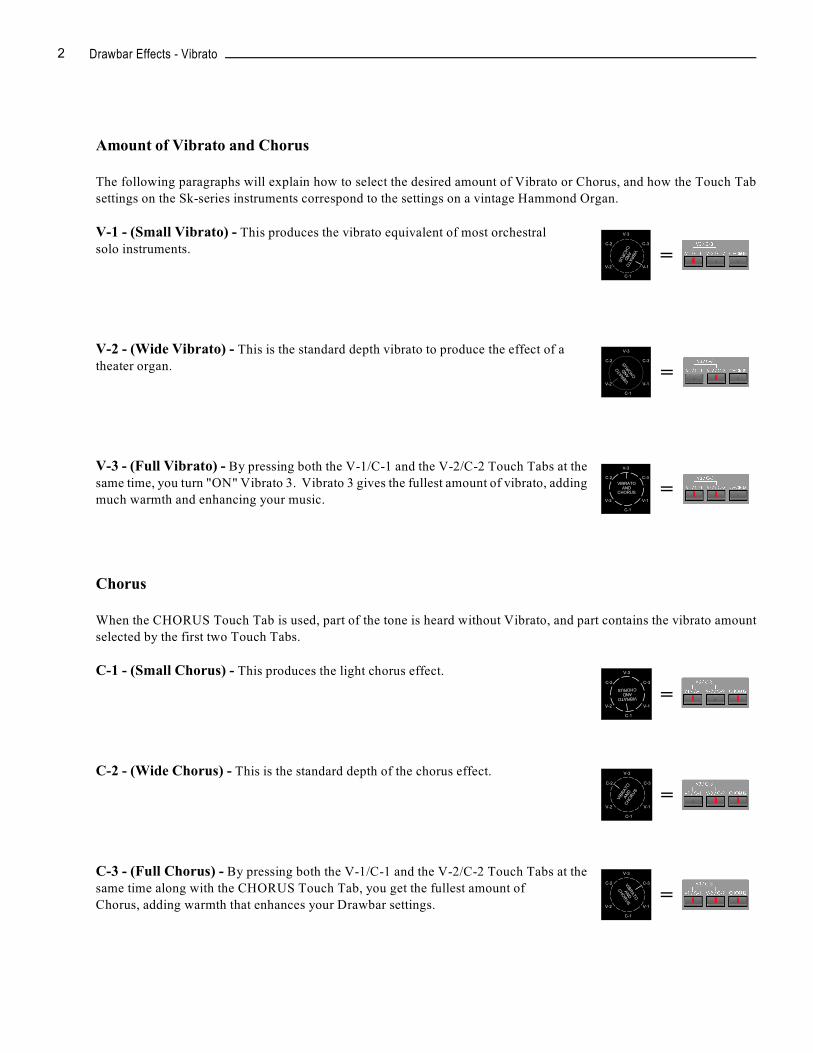
Amount of Vibrato and Chorus
The following paragraphs will explain how to select the desired amount of Vibrato or Chorus, and how the Touch Tab
settings on the Sk-series instruments correspond to the settings on a vintage Hammond Organ.
V-1 - (Small Vibrato) - This produces the vibrato equivalent of most orchestral
solo instruments.
V-2 - (Wide Vibrato) - This is the standard depth vibrato to produce the effect of a
theater organ.
V-3 - (Full Vibrato) - By pressing both the V-1/C-1 and the V-2/C-2 Touch Tabs at the
same time, you turn "ON" Vibrato 3. Vibrato 3 gives the fullest amount of vibrato, adding
much warmth and enhancing your music.
Chorus
When the CHORUS Touch Tab is used, part of the tone is heard without Vibrato, and part contains the vibrato amount
selected by the first two Touch Tabs.
C-1 - (Small Chorus) - This produces the light chorus effect.
C-2 - (Wide Chorus) - This is the standard depth of the chorus effect.
C-3 - (Full Chorus) - By pressing both the V-1/C-1 and the V-2/C-2 Touch Tabs at the
same time along with the CHORUS Touch Tab, you get the fullest amount of
Chorus, adding warmth that enhances your Drawbar settings.
Drawbar Effects - Vibrato 3
Ë VIBRATO Edit Menu (VIB&CHO Menu)
This Advanced Feature Menu allows you to make changes to the Vibrato/Chorus effect.
Accessing the VIBRATO Edit Menu using the MENU/EXIT Touch Button:
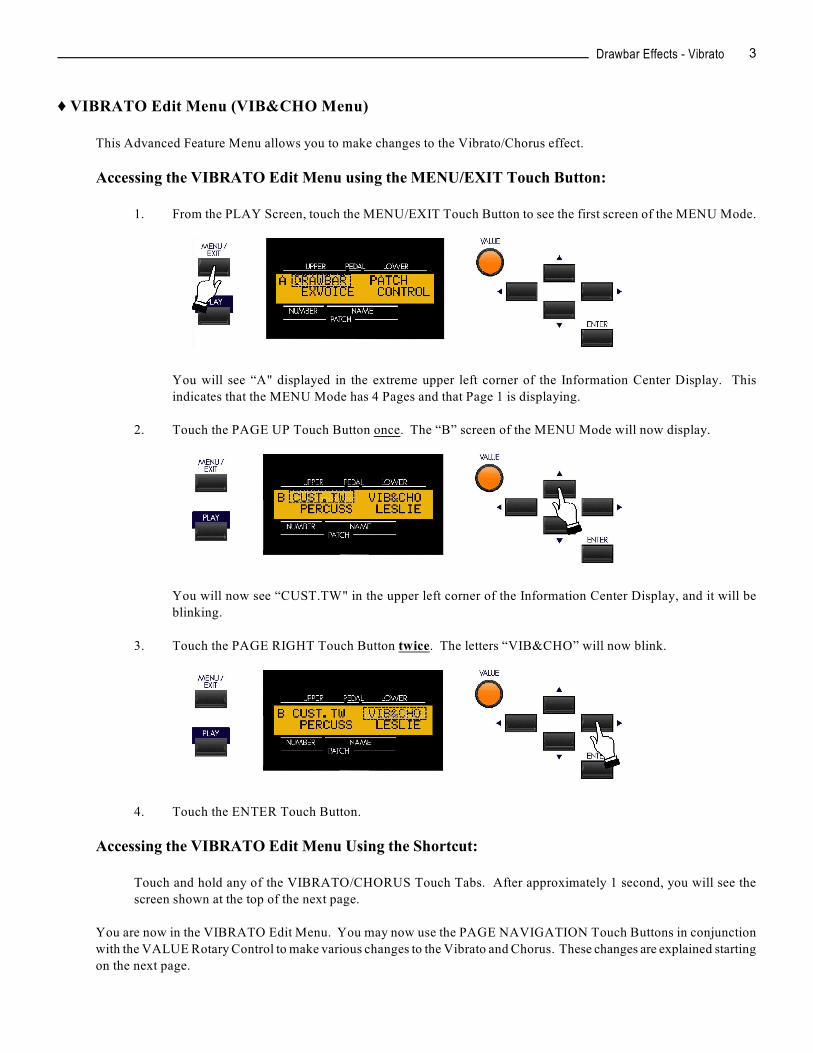
1. From the PLAY Screen, touch the MENU/EXIT Touch Button to see the first screen of the MENU Mode.
You will see “A" displayed in the extreme upper left corner of the Information Center Display. This
indicates that the MENU Mode has 4 Pages and that Page 1 is displaying.
2. Touch the PAGE UP Touch Button once. The “B” screen of the MENU Mode will now display.
You will now see “CUST.TW" in the upper left corner of the Information Center Display, and it will be
blinking.
3. Touch the PAGE RIGHT Touch Button twice. The letters “VIB&CHO” will now blink.
4. Touch the ENTER Touch Button.
Accessing the VIBRATO Edit Menu Using the Shortcut:
Touch and hold any of the VIBRATO/CHORUS Touch Tabs. After approximately 1 second, you will see the
screen shown at the top of the next page.
You are now in the VIBRATO Edit Menu. You may now use the PAGE NAVIGATION Touch Buttons in conjunction
with the VALUE Rotary Control to make various changes to the Vibrato and Chorus. These changes are explained starting
on the next page.
Drawbar Effects - Vibrato4
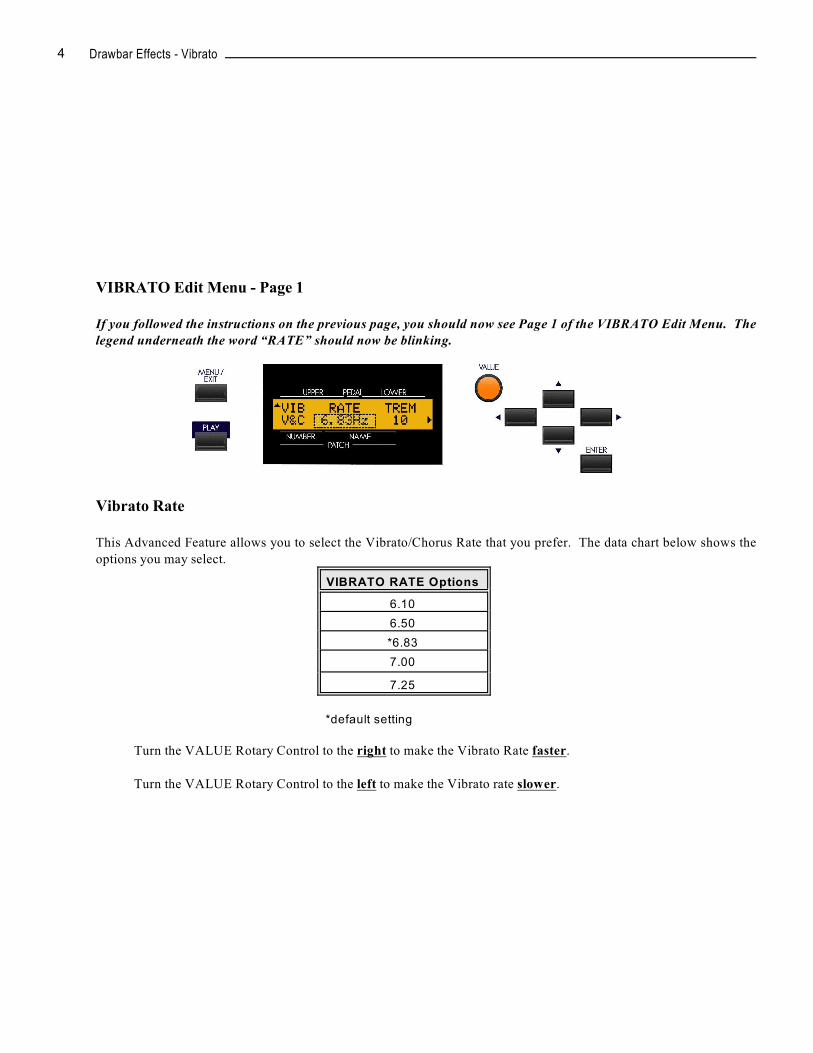
VIBRATO Edit Menu - Page 1
If you followed the instructions on the previous page, you should now see Page 1 of the VIBRATO Edit Menu. Thelegend underneath the word “RATE” should now be blinking.
Vibrato Rate
This Advanced Feature allows you to select the Vibrato/Chorus Rate that you prefer. The data chart below shows the
options you may select.
VIBRATO RATE Options
6.10
6.50
*6.83
7.00
7.25
*default setting
Turn the VALUE Rotary Control to the right to make the Vibrato Rate faster.
Turn the VALUE Rotary Control to the left to make the Vibrato rate slower.
Drawbar Effects - Vibrato 5
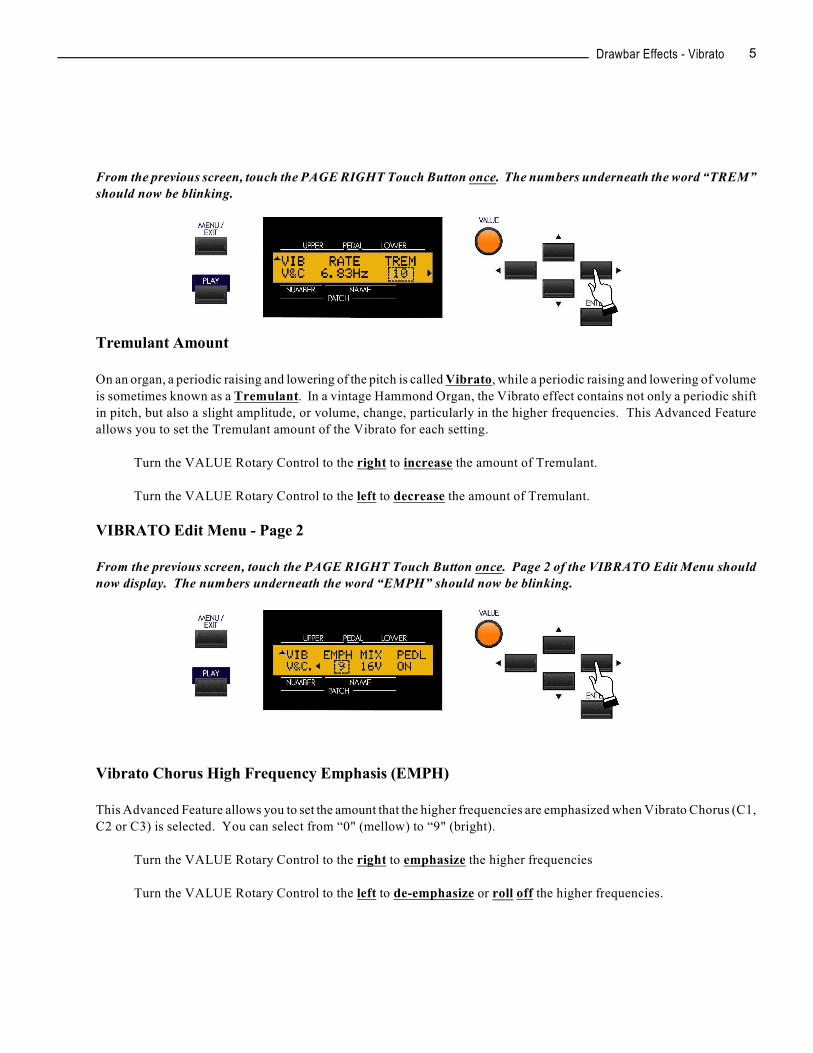
From the previous screen, touch the PAGE RIGHT Touch Button once. The numbers underneath the word “TREM”should now be blinking.
Tremulant Amount
On an organ, a periodic raising and lowering of the pitch is called Vibrato, while a periodic raising and lowering of volume
is sometimes known as a Tremulant. In a vintage Hammond Organ, the Vibrato effect contains not only a periodic shift
in pitch, but also a slight amplitude, or volume, change, particularly in the higher frequencies. This Advanced Feature
allows you to set the Tremulant amount of the Vibrato for each setting.
Turn the VALUE Rotary Control to the right to increase the amount of Tremulant.
Turn the VALUE Rotary Control to the left to decrease the amount of Tremulant.
VIBRATO Edit Menu - Page 2
From the previous screen, touch the PAGE RIGHT Touch Button once. Page 2 of the VIBRATO Edit Menu shouldnow display. The numbers underneath the word “EMPH” should now be blinking.
Vibrato Chorus High Frequency Emphasis (EMPH)
This Advanced Feature allows you to set the amount that the higher frequencies are emphasized when Vibrato Chorus (C1,
C2 or C3) is selected. You can select from “0" (mellow) to “9" (bright).
Turn the VALUE Rotary Control to the right to emphasize the higher frequencies
Turn the VALUE Rotary Control to the left to de-emphasize or roll off the higher frequencies.

Drawbar Effects - Vibrato6
From the previous screen, touch the PAGE RIGHT Touch Button once. The word underneath the word “PEDAL”should now be blinking:
Vibrato Chorus Mix
As explained on page 3, the Chorus effect is produced by mixing two audio signals together - one containing Vibrato and
a “dry” signal with no Vibrato. The amount of Vibrato versus non-Vibrato signal can vary when comparing vintage
organs. This Advanced Feature allows you to control the amount of Vibrato signal versus the amount of “dry” or non-
Vibrato signal. You can select from “D64" (only the dry signal with no Vibrato) through “63V” (only the Vibrato signal,
with no dry signal). The middle or “EVEN” setting will mix the Vibrato and non-Vibrato signals together in equal
amounts.
Turn the VALUE Rotary Control to the right to increase the amount of Vibrato signal.
Turn the VALUE Rotary Control to the left to decrease the amount of Vibrato signal.
From the previous screen, touch the PAGE RIGHT Touch Button once. The word underneath the word “PEDAL”should now be blinking:
Vibrato On Pedal (PEDAL)
This Advanced Feature Menu Page allows you to select whether you want Vibrato to also affect the Pedal Drawbar tones
when the VIBRATO LOWER Touch Tab is “ON.” This replicates the Vibrato function on a vintage Hammond Organ.
Turn the VALUE Rotary Control to turn Vibrato on or off for the Pedal Drawbar tones.
Drawbar Effects - Leslie 7
Ë LESLIE®
Your Hammond Sk-series instrument has a built-in digital Leslie effect that replicates the sound of a twin-rotor LeslieSpeaker cabinet. In addition, the Sk-series instrument can also be used with a variety of different Leslie Speaker cabinets.There is a full explanation of how to use the Sk-series instrument with a Leslie Speaker cabinet starting on page 20.
What Is A “Leslie Speaker?”
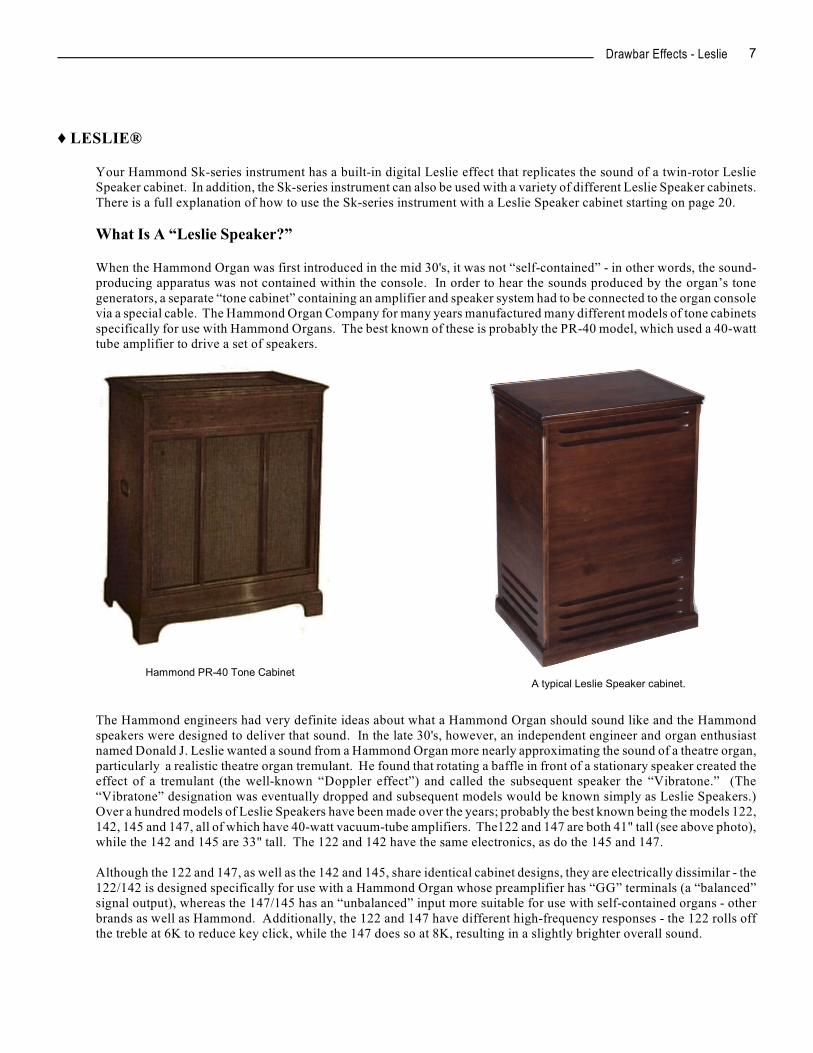
When the Hammond Organ was first introduced in the mid 30's, it was not “self-contained” - in other words, the sound-producing apparatus was not contained within the console. In order to hear the sounds produced by the organ’s tonegenerators, a separate “tone cabinet” containing an amplifier and speaker system had to be connected to the organ consolevia a special cable. The Hammond Organ Company for many years manufactured many different models of tone cabinetsspecifically for use with Hammond Organs. The best known of these is probably the PR-40 model, which used a 40-watttube amplifier to drive a set of speakers.
Hammond PR-40 Tone Cabinet A typical Leslie Speaker cabinet.
The Hammond engineers had very definite ideas about what a Hammond Organ should sound like and the Hammondspeakers were designed to deliver that sound. In the late 30's, however, an independent engineer and organ enthusiastnamed Donald J. Leslie wanted a sound from a Hammond Organ more nearly approximating the sound of a theatre organ,particularly a realistic theatre organ tremulant. He found that rotating a baffle in front of a stationary speaker created theeffect of a tremulant (the well-known “Doppler effect”) and called the subsequent speaker the “Vibratone.” (The“Vibratone” designation was eventually dropped and subsequent models would be known simply as Leslie Speakers.)Over a hundred models of Leslie Speakers have been made over the years; probably the best known being the models 122,142, 145 and 147, all of which have 40-watt vacuum-tube amplifiers. The122 and 147 are both 41" tall (see above photo),while the 142 and 145 are 33" tall. The 122 and 142 have the same electronics, as do the 145 and 147.
Although the 122 and 147, as well as the 142 and 145, share identical cabinet designs, they are electrically dissimilar - the122/142 is designed specifically for use with a Hammond Organ whose preamplifier has “GG” terminals (a “balanced”signal output), whereas the 147/145 has an “unbalanced” input more suitable for use with self-contained organs - otherbrands as well as Hammond. Additionally, the 122 and 147 have different high-frequency responses - the 122 rolls offthe treble at 6K to reduce key click, while the 147 does so at 8K, resulting in a slightly brighter overall sound.
Drawbar Effects - Leslie8
What Are “Horn” and “Bass?”
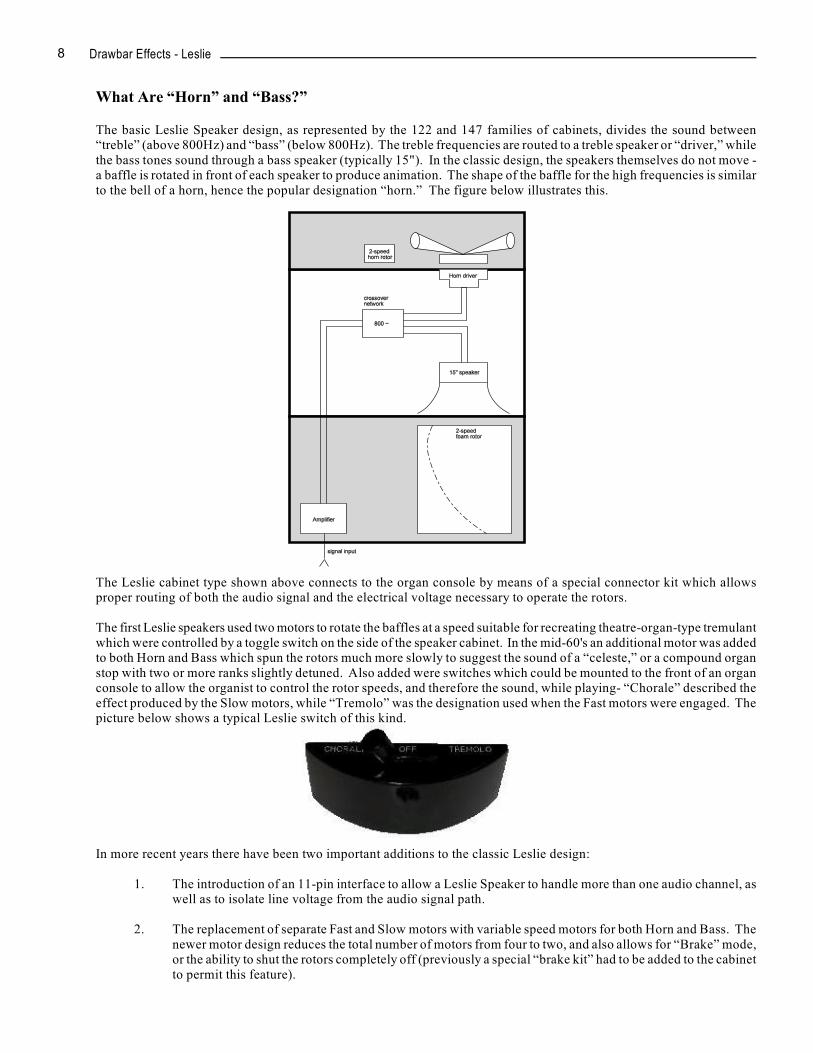
The basic Leslie Speaker design, as represented by the 122 and 147 families of cabinets, divides the sound between“treble” (above 800Hz) and “bass” (below 800Hz). The treble frequencies are routed to a treble speaker or “driver,” whilethe bass tones sound through a bass speaker (typically 15"). In the classic design, the speakers themselves do not move -a baffle is rotated in front of each speaker to produce animation. The shape of the baffle for the high frequencies is similarto the bell of a horn, hence the popular designation “horn.” The figure below illustrates this.
The Leslie cabinet type shown above connects to the organ console by means of a special connector kit which allowsproper routing of both the audio signal and the electrical voltage necessary to operate the rotors.
The first Leslie speakers used two motors to rotate the baffles at a speed suitable for recreating theatre-organ-type tremulantwhich were controlled by a toggle switch on the side of the speaker cabinet. In the mid-60's an additional motor was addedto both Horn and Bass which spun the rotors much more slowly to suggest the sound of a “celeste,” or a compound organstop with two or more ranks slightly detuned. Also added were switches which could be mounted to the front of an organconsole to allow the organist to control the rotor speeds, and therefore the sound, while playing- “Chorale” described theeffect produced by the Slow motors, while “Tremolo” was the designation used when the Fast motors were engaged. Thepicture below shows a typical Leslie switch of this kind.
In more recent years there have been two important additions to the classic Leslie design:
1. The introduction of an 11-pin interface to allow a Leslie Speaker to handle more than one audio channel, aswell as to isolate line voltage from the audio signal path.
2. The replacement of separate Fast and Slow motors with variable speed motors for both Horn and Bass. Thenewer motor design reduces the total number of motors from four to two, and also allows for “Brake” mode,or the ability to shut the rotors completely off (previously a special “brake kit” had to be added to the cabinetto permit this feature).

Drawbar Effects - Leslie 9
New digital technology has now made it possible to recreate the Doppler effect without using moving parts. This
technology has been incorporated into the Sk-series instruments. The following pages explain how the internal digital
Leslie of your Hammond Sk-series instrument works.
LESLIE Touch Tabs
These three Touch Tabs allow you to control either the internal digital Leslie or the rotors of a connected Leslie Speaker
cabinet.
LESLIE BYPASS
When this Touch Tab is "OFF" (LED not lit), the Drawbars will sound through the internal Leslie channel. Touching the
BYPASS Touch Tab "ON" (LED lit) will change the sounds produced by the Drawbars from the Leslie channel to the
stationary channel. The speed of the rotors of either the internal digital Leslie or a connected Leslie Speaker depends upon
the position of the LESLIE FAST Touch Tab.
LESLIE STOP
When this Touch Tab is "OFF" (LED not lit), the Leslie effect is that of an acoustic Leslie Speaker cabinet with the rotors
turning either slowly (Chorale) or Fast (Tremolo). Touching the LESLIE STOP Touch Tab "ON" (LED lit) will cause the
Leslie rotors to stop turning.
LESLIE FAST
When this Touch Tab is "OFF" (LED not lit), the Leslie effect is that of an acoustic Leslie Speaker cabinet with the rotors
turning slowly (Chorale). Touching the LESLIE FAST Touch Tab "ON" (LED lit) will cause the Leslie effect to speed
up and rotate fast (Tremolo) to produce a rich, full sound.
Drawbar Effects - Leslie10
Ë LESLIE Edit Menu
These Advanced Feature Menu Pages allow you to make various changes to the characteristics of the inbuilt digital Leslie.
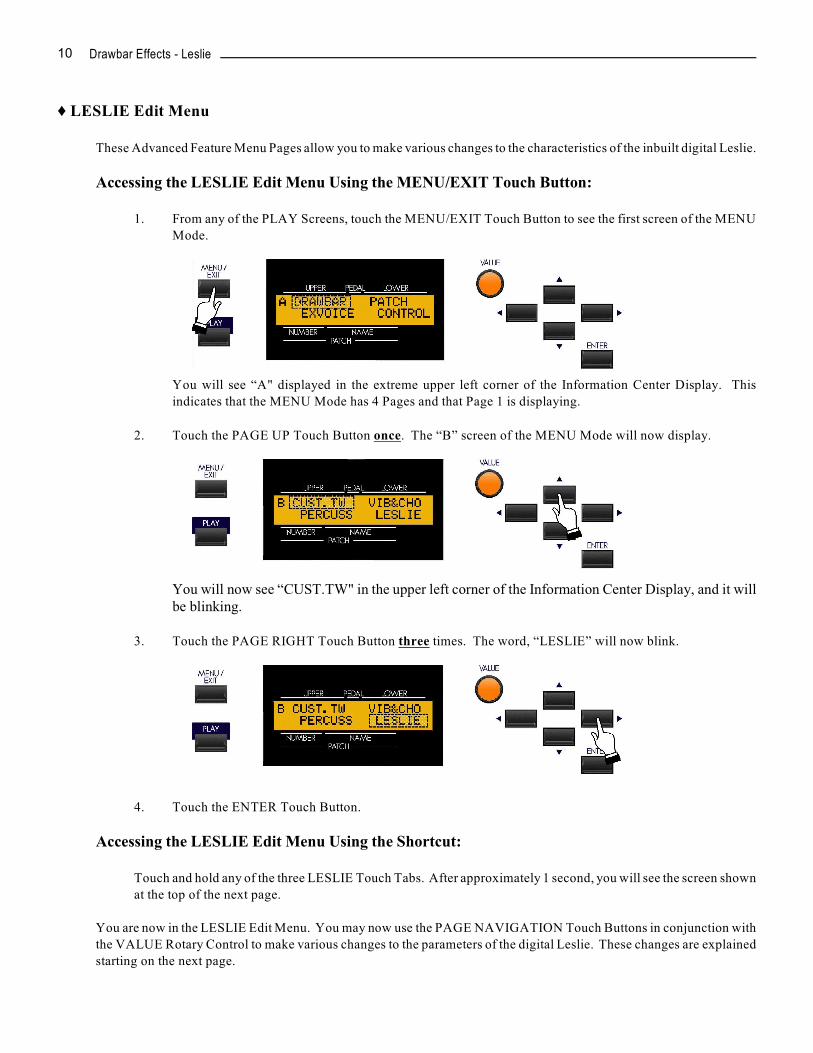
Accessing the LESLIE Edit Menu Using the MENU/EXIT Touch Button:
1. From any of the PLAY Screens, touch the MENU/EXIT Touch Button to see the first screen of the MENU
Mode.
You will see “A" displayed in the extreme upper left corner of the Information Center Display. This
indicates that the MENU Mode has 4 Pages and that Page 1 is displaying.
2. Touch the PAGE UP Touch Button once. The “B” screen of the MENU Mode will now display.
You will now see “CUST.TW" in the upper left corner of the Information Center Display, and it willbe blinking.
3. Touch the PAGE RIGHT Touch Button three times. The word, “LESLIE” will now blink.
4. Touch the ENTER Touch Button.
Accessing the LESLIE Edit Menu Using the Shortcut:
Touch and hold any of the three LESLIE Touch Tabs. After approximately 1 second, you will see the screen shown
at the top of the next page.
You are now in the LESLIE Edit Menu. You may now use the PAGE NAVIGATION Touch Buttons in conjunction with
the VALUE Rotary Control to make various changes to the parameters of the digital Leslie. These changes are explained
starting on the next page.
Drawbar Effects - Leslie 11
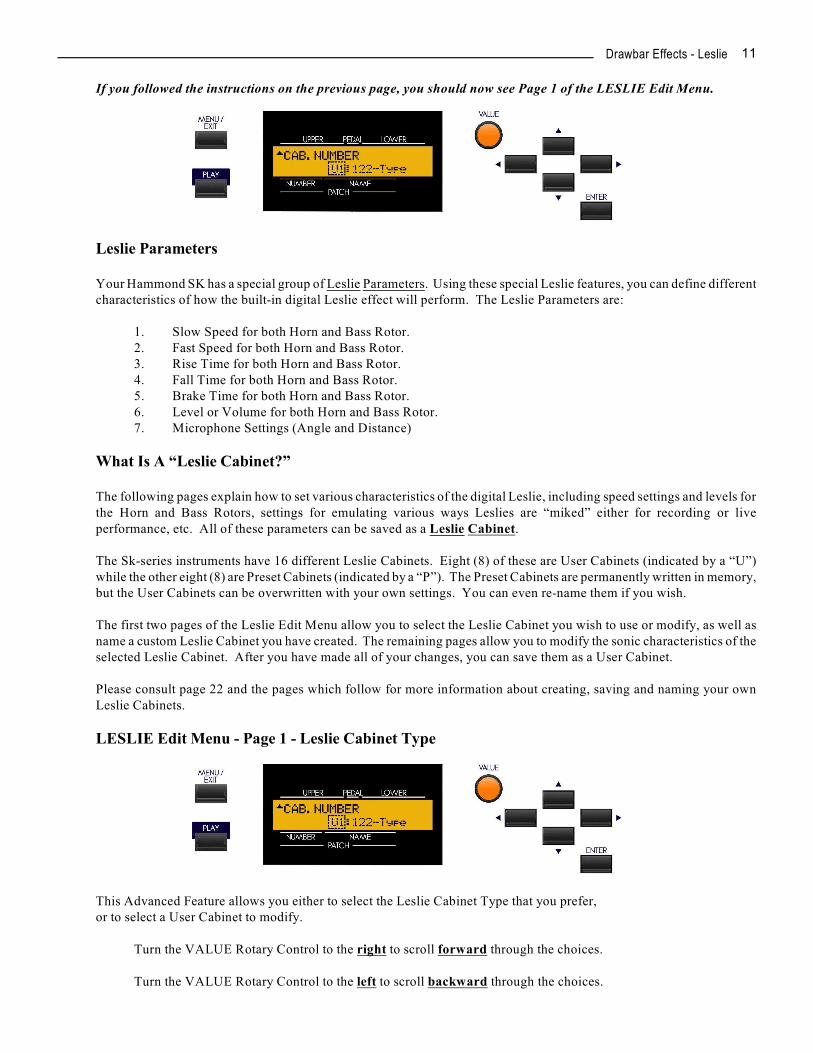
If you followed the instructions on the previous page, you should now see Page 1 of the LESLIE Edit Menu.
Leslie Parameters
Your Hammond SK has a special group of Leslie Parameters. Using these special Leslie features, you can define differentcharacteristics of how the built-in digital Leslie effect will perform. The Leslie Parameters are:
1. Slow Speed for both Horn and Bass Rotor.2. Fast Speed for both Horn and Bass Rotor.3. Rise Time for both Horn and Bass Rotor.4. Fall Time for both Horn and Bass Rotor.5. Brake Time for both Horn and Bass Rotor.6. Level or Volume for both Horn and Bass Rotor.7. Microphone Settings (Angle and Distance)
What Is A “Leslie Cabinet?”
The following pages explain how to set various characteristics of the digital Leslie, including speed settings and levels forthe Horn and Bass Rotors, settings for emulating various ways Leslies are “miked” either for recording or liveperformance, etc. All of these parameters can be saved as a Leslie Cabinet.
The Sk-series instruments have 16 different Leslie Cabinets. Eight (8) of these are User Cabinets (indicated by a “U”)while the other eight (8) are Preset Cabinets (indicated by a “P”). The Preset Cabinets are permanently written in memory,but the User Cabinets can be overwritten with your own settings. You can even re-name them if you wish.
The first two pages of the Leslie Edit Menu allow you to select the Leslie Cabinet you wish to use or modify, as well asname a custom Leslie Cabinet you have created. The remaining pages allow you to modify the sonic characteristics of theselected Leslie Cabinet. After you have made all of your changes, you can save them as a User Cabinet.
Please consult page 22 and the pages which follow for more information about creating, saving and naming your ownLeslie Cabinets.
LESLIE Edit Menu - Page 1 - Leslie Cabinet Type
This Advanced Feature allows you either to select the Leslie Cabinet Type that you prefer,or to select a User Cabinet to modify.
Turn the VALUE Rotary Control to the right to scroll forward through the choices.
Turn the VALUE Rotary Control to the left to scroll backward through the choices.
Drawbar Effects - Leslie12
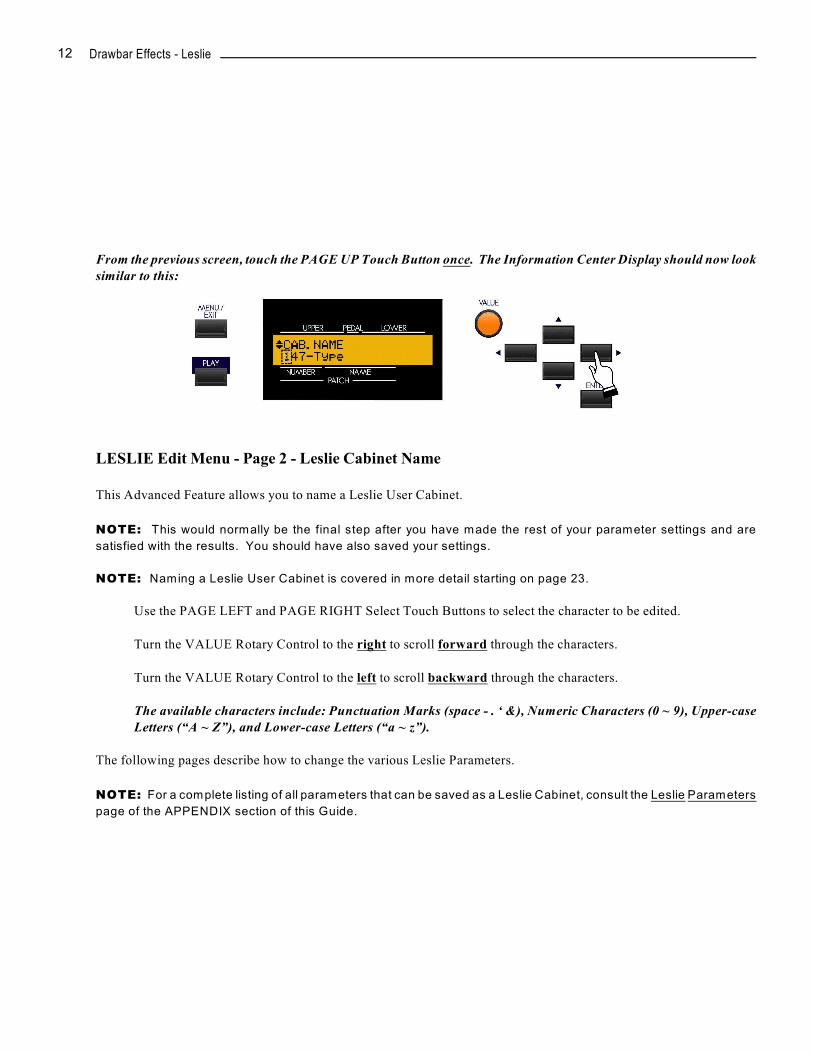
From the previous screen, touch the PAGE UP Touch Button once. The Information Center Display should now looksimilar to this:
LESLIE Edit Menu - Page 2 - Leslie Cabinet Name
This Advanced Feature allows you to name a Leslie User Cabinet.
NOTE: This would normally be the final step after you have made the rest of your parameter settings and are
satisfied with the results. You should have also saved your settings.
NOTE: Naming a Leslie User Cabinet is covered in more detail starting on page 23.
Use the PAGE LEFT and PAGE RIGHT Select Touch Buttons to select the character to be edited.
Turn the VALUE Rotary Control to the right to scroll forward through the characters.
Turn the VALUE Rotary Control to the left to scroll backward through the characters.
The available characters include: Punctuation Marks (space - . ‘ &), Numeric Characters (0 ~ 9), Upper-caseLetters (“A ~ Z”), and Lower-case Letters (“a ~ z”).
The following pages describe how to change the various Leslie Parameters.
NOTE: For a complete listing of all parameters that can be saved as a Leslie Cabinet, consult the Leslie Parameters
page of the APPENDIX section of this Guide.
Drawbar Effects - Leslie 13
SPECIAL NOTE: These Advanced Features DO NOT affect a connected external Leslie Speaker.
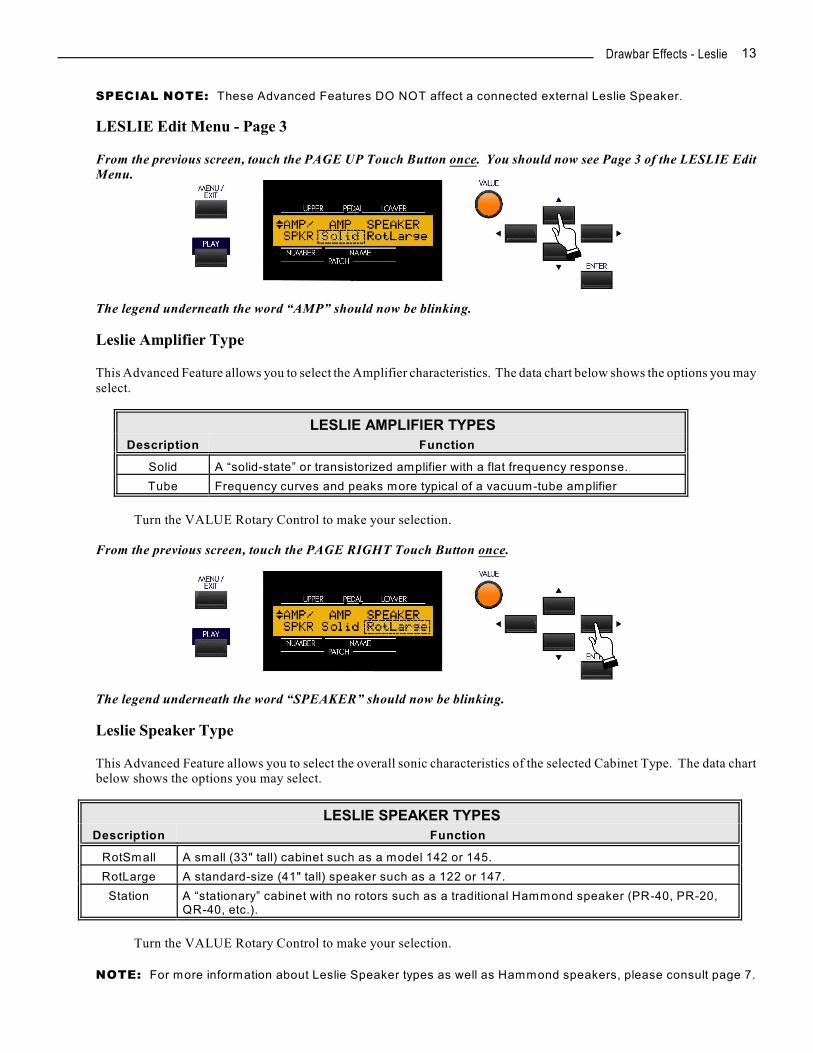
LESLIE Edit Menu - Page 3
From the previous screen, touch the PAGE UP Touch Button once. You should now see Page 3 of the LESLIE EditMenu.
The legend underneath the word “AMP” should now be blinking.
Leslie Amplifier Type
This Advanced Feature allows you to select the Amplifier characteristics. The data chart below shows the options you mayselect.
LESLIE AMPLIFIER TYPES
Description Function
Solid A “solid-state” or transistorized amplifier with a flat frequency response.
Tube Frequency curves and peaks more typical of a vacuum-tube amplifier
Turn the VALUE Rotary Control to make your selection.
From the previous screen, touch the PAGE RIGHT Touch Button once.
The legend underneath the word “SPEAKER” should now be blinking.
Leslie Speaker Type
This Advanced Feature allows you to select the overall sonic characteristics of the selected Cabinet Type. The data chartbelow shows the options you may select.
LESLIE SPEAKER TYPES
Description Function
RotSmall A small (33" tall) cabinet such as a model 142 or 145.
RotLarge A standard-size (41" tall) speaker such as a 122 or 147.
Station A “stationary” cabinet with no rotors such as a traditional Hammond speaker (PR-40, PR-20,QR-40, etc.).
Turn the VALUE Rotary Control to make your selection.
NOTE: For more information about Leslie Speaker types as well as Hammond speakers, please consult page 7.

Drawbar Effects - Leslie14
From the previous screen, touch the PAGE UP Touch Button once. The Information Center Display should now looklike this:
The legend underneath the word “SLOW” should now be blinking.
LESLIE Edit Menu - Page 4 - Leslie Horn Settings
This Advanced Feature allows you to select the settings for the digital Leslie Horn that you prefer. You can change the
Slow and Fast speed settings as well as the Level or volume setting.
Leslie Slow Speed - Horn
This Advanced Feature allows you to set the rate for the Slow Speed of the digital Leslie Horn. The default setting is “36."
You can select “0rpm,” which will cause the Horn Rotor to stop, or from “24" through “318rpm.”
Turn the VALUE Rotary Control to make your selection.
From the previous screen, touch the PAGE RIGHT Touch Button once. The Information Center Display should nowlook like this:
The legend underneath the word “FAST” should now be blinking.
Leslie Fast Speed - Horn
This Advanced Feature allows you to set the rate for the Fast Speed of the digital Leslie Horn. The default setting is “393."
You can select from “0rpm,” which will cause the Horn Rotor to stop, or from “375rpm” through “453rpm.”
Turn the VALUE Rotary Control to make your selection.

Drawbar Effects - Leslie 15
From the previous screen, touch the PAGE RIGHT Touch Button once. The Information Center Display should nowlook like this:
The legend underneath the word “LEV” should now be blinking.
Leslie Level - Horn
This Advanced Feature allows you to adjust the volume level of the digital Horn. You can select from “0” through“-12db.”
Turn the VALUE Rotary Control to make your selection.
From the previous screen, touch the PAGE RIGHT Touch Button once. The Information Center Display should nowlook like this:
The legend underneath the word “RISE” should now be blinking.
Leslie Rise Time - Horn
This Advanced Feature allows you to adjust the amount of time the Horn Rotor will take to accelerate to Fast (Tremolo)speed. You can select from “0.2” through “5” seconds in 0.2-second increments
Turn the VALUE Rotary Control to make your selection.
From the previous screen, touch the PAGE RIGHT Touch Button once. The Information Center Display should nowlook like this:
The legend underneath the word “FALL” should now be blinking.
Leslie Fall Time - Horn
This Advanced Feature allows you to adjust the amount of time the Horn Rotor will take to accelerate to Fast (Tremolo)speed. You can select from “0.2” through “5” seconds in 0.2-second increments.
Turn the VALUE Rotary Control to make your selection.
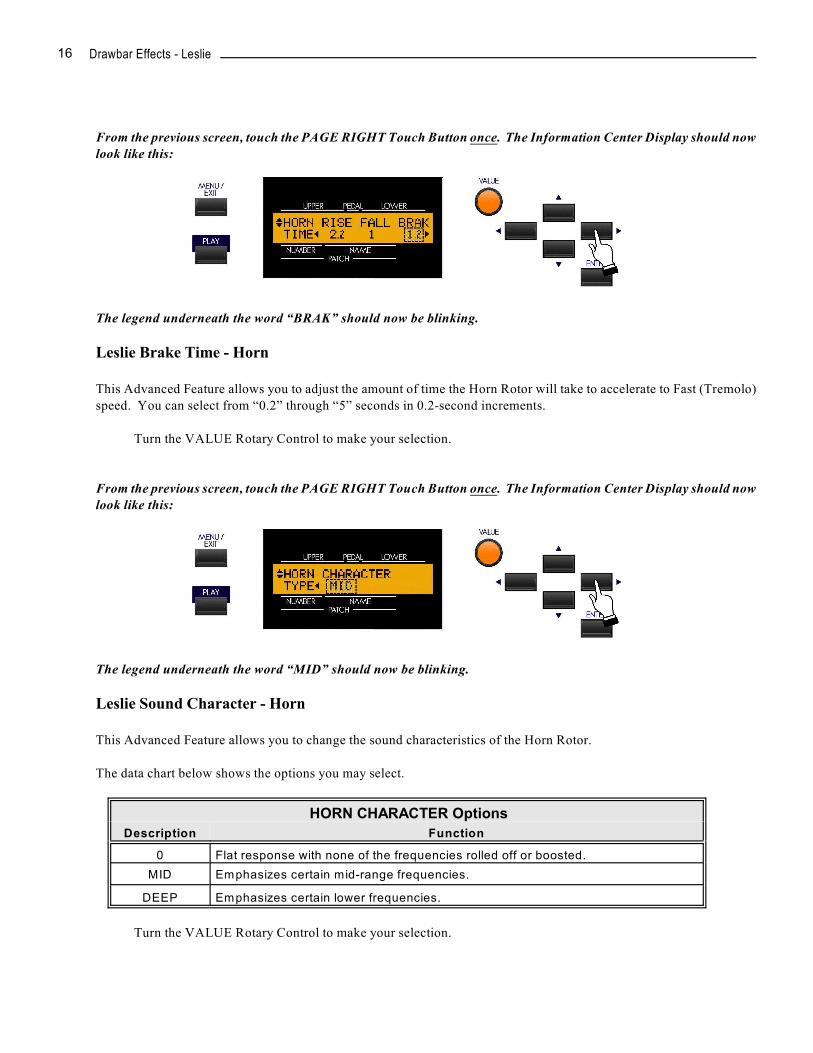
Drawbar Effects - Leslie16
From the previous screen, touch the PAGE RIGHT Touch Button once. The Information Center Display should nowlook like this:
The legend underneath the word “BRAK” should now be blinking.
Leslie Brake Time - Horn
This Advanced Feature allows you to adjust the amount of time the Horn Rotor will take to accelerate to Fast (Tremolo)
speed. You can select from “0.2” through “5” seconds in 0.2-second increments.
Turn the VALUE Rotary Control to make your selection.
From the previous screen, touch the PAGE RIGHT Touch Button once. The Information Center Display should nowlook like this:
The legend underneath the word “MID” should now be blinking.
Leslie Sound Character - Horn
This Advanced Feature allows you to change the sound characteristics of the Horn Rotor.
The data chart below shows the options you may select.
HORN CHARACTER Options
Description Function
0 Flat response with none of the frequencies rolled off or boosted.
MID Emphasizes certain mid-range frequencies.
DEEP Emphasizes certain lower frequencies.
Turn the VALUE Rotary Control to make your selection.
Drawbar Effects - Leslie 17
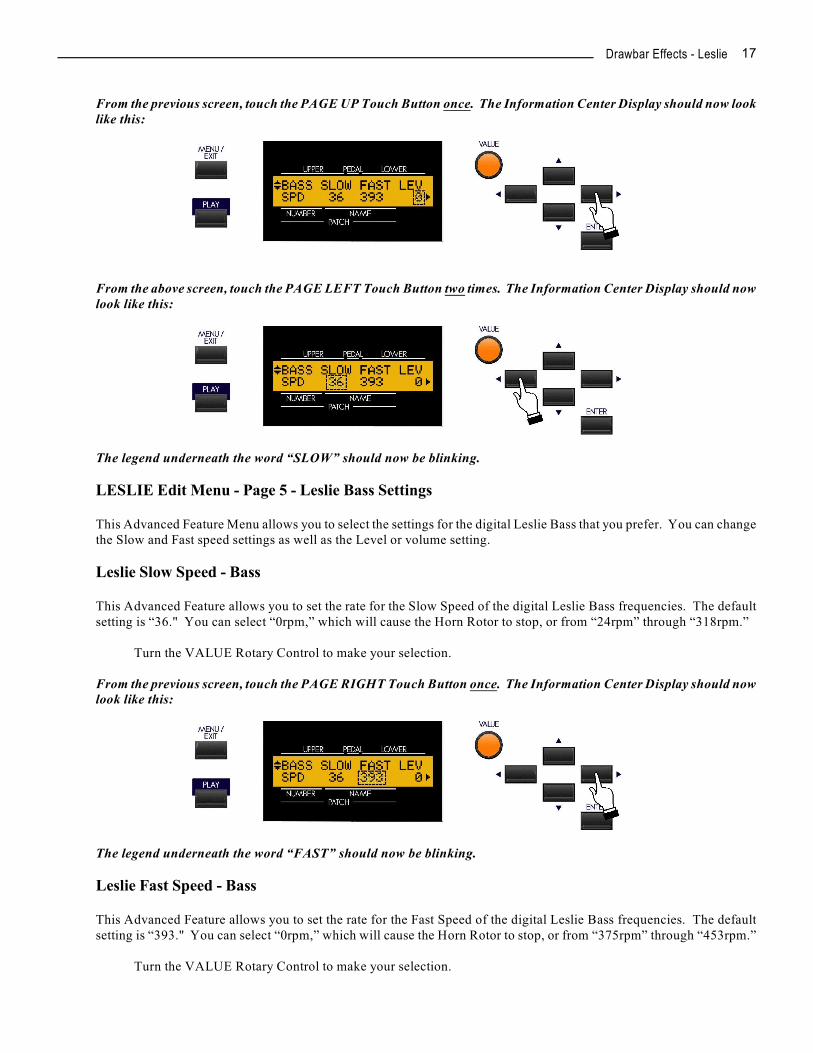
From the previous screen, touch the PAGE UP Touch Button once. The Information Center Display should now looklike this:
From the above screen, touch the PAGE LEFT Touch Button two times. The Information Center Display should nowlook like this:
The legend underneath the word “SLOW” should now be blinking.
LESLIE Edit Menu - Page 5 - Leslie Bass Settings
This Advanced Feature Menu allows you to select the settings for the digital Leslie Bass that you prefer. You can changethe Slow and Fast speed settings as well as the Level or volume setting.
Leslie Slow Speed - Bass
This Advanced Feature allows you to set the rate for the Slow Speed of the digital Leslie Bass frequencies. The defaultsetting is “36." You can select “0rpm,” which will cause the Horn Rotor to stop, or from “24rpm” through “318rpm.”
Turn the VALUE Rotary Control to make your selection.
From the previous screen, touch the PAGE RIGHT Touch Button once. The Information Center Display should nowlook like this:
The legend underneath the word “FAST” should now be blinking.
Leslie Fast Speed - Bass
This Advanced Feature allows you to set the rate for the Fast Speed of the digital Leslie Bass frequencies. The defaultsetting is “393." You can select “0rpm,” which will cause the Horn Rotor to stop, or from “375rpm” through “453rpm.”
Turn the VALUE Rotary Control to make your selection.
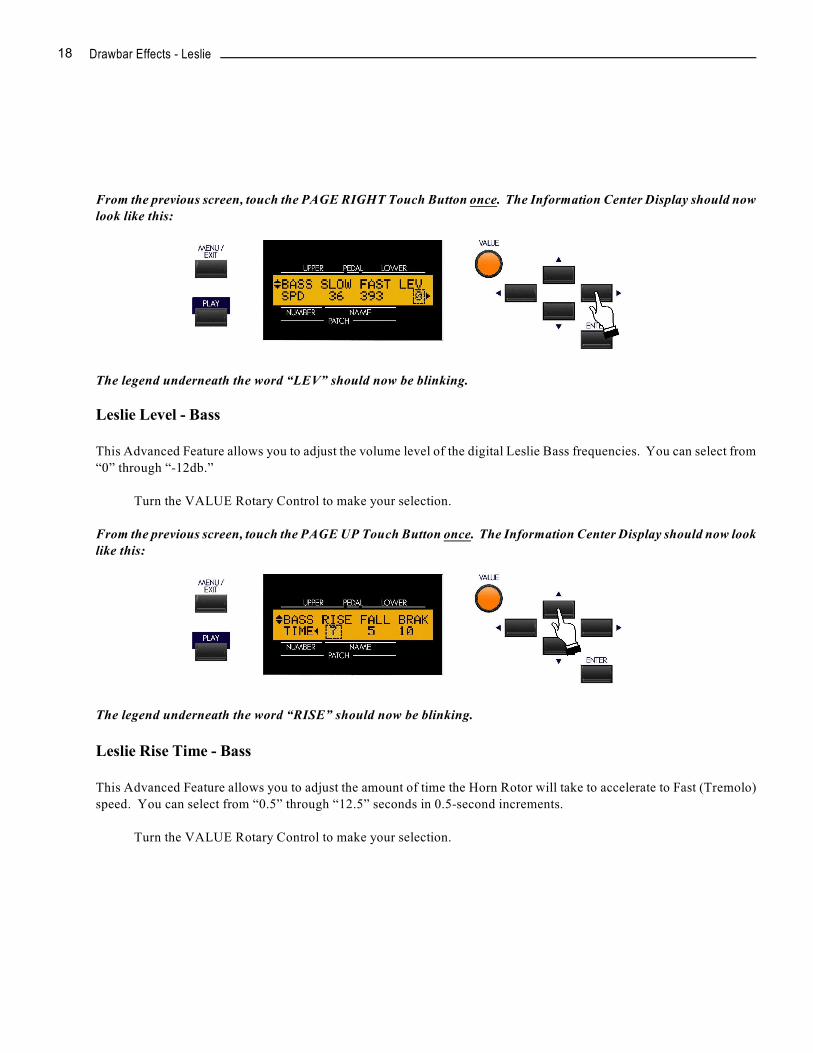
Drawbar Effects - Leslie18
From the previous screen, touch the PAGE RIGHT Touch Button once. The Information Center Display should nowlook like this:
The legend underneath the word “LEV” should now be blinking.
Leslie Level - Bass
This Advanced Feature allows you to adjust the volume level of the digital Leslie Bass frequencies. You can select from
“0” through “-12db.”
Turn the VALUE Rotary Control to make your selection.
From the previous screen, touch the PAGE UP Touch Button once. The Information Center Display should now looklike this:
The legend underneath the word “RISE” should now be blinking.
Leslie Rise Time - Bass
This Advanced Feature allows you to adjust the amount of time the Horn Rotor will take to accelerate to Fast (Tremolo)
speed. You can select from “0.5” through “12.5” seconds in 0.5-second increments.
Turn the VALUE Rotary Control to make your selection.
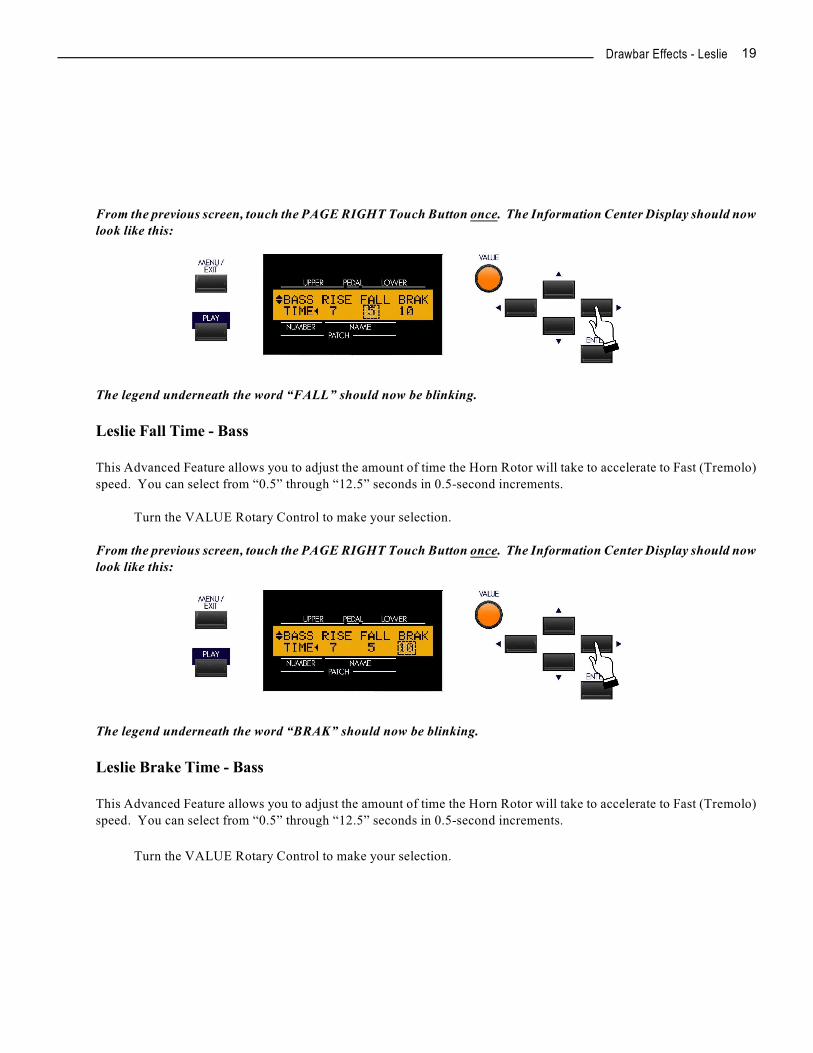
Drawbar Effects - Leslie 19
From the previous screen, touch the PAGE RIGHT Touch Button once. The Information Center Display should nowlook like this:
The legend underneath the word “FALL” should now be blinking.
Leslie Fall Time - Bass
This Advanced Feature allows you to adjust the amount of time the Horn Rotor will take to accelerate to Fast (Tremolo)
speed. You can select from “0.5” through “12.5” seconds in 0.5-second increments.
Turn the VALUE Rotary Control to make your selection.
From the previous screen, touch the PAGE RIGHT Touch Button once. The Information Center Display should nowlook like this:
The legend underneath the word “BRAK” should now be blinking.
Leslie Brake Time - Bass
This Advanced Feature allows you to adjust the amount of time the Horn Rotor will take to accelerate to Fast (Tremolo)
speed. You can select from “0.5” through “12.5” seconds in 0.5-second increments.
Turn the VALUE Rotary Control to make your selection.
Drawbar Effects - Leslie20
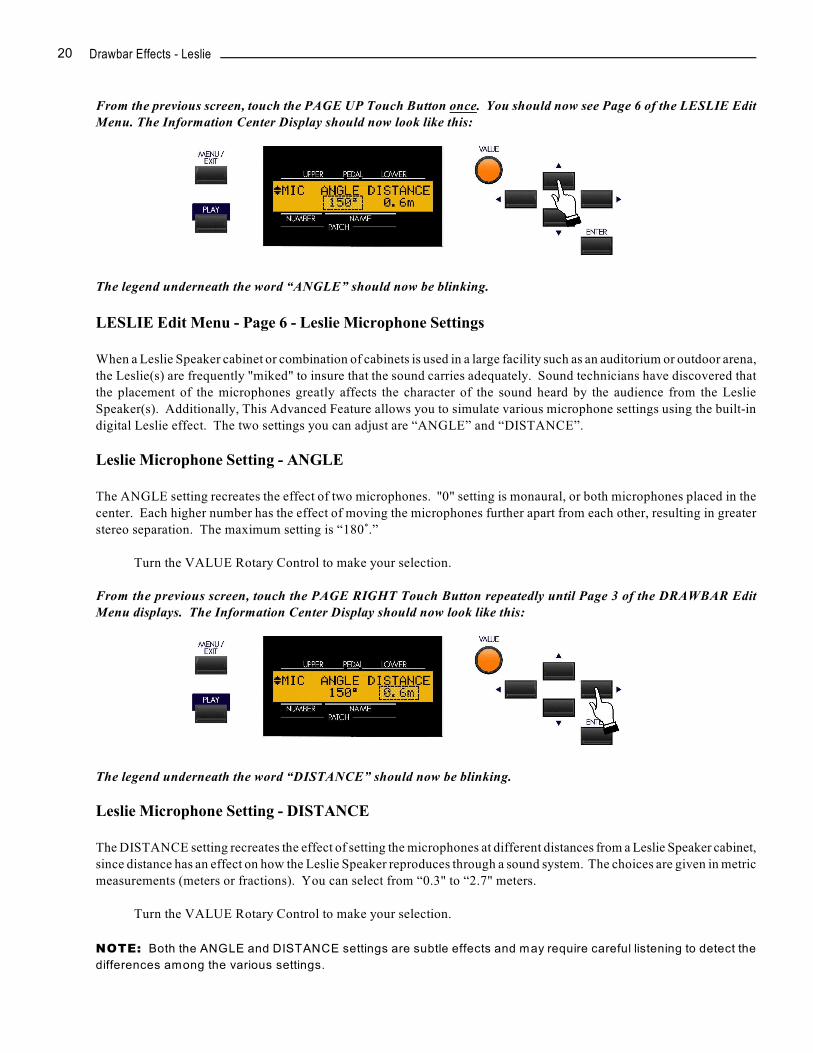
From the previous screen, touch the PAGE UP Touch Button once. You should now see Page 6 of the LESLIE EditMenu. The Information Center Display should now look like this:
The legend underneath the word “ANGLE” should now be blinking.
LESLIE Edit Menu - Page 6 - Leslie Microphone Settings
When a Leslie Speaker cabinet or combination of cabinets is used in a large facility such as an auditorium or outdoor arena,
the Leslie(s) are frequently "miked" to insure that the sound carries adequately. Sound technicians have discovered that
the placement of the microphones greatly affects the character of the sound heard by the audience from the Leslie
Speaker(s). Additionally, This Advanced Feature allows you to simulate various microphone settings using the built-in
digital Leslie effect. The two settings you can adjust are “ANGLE” and “DISTANCE”.
Leslie Microphone Setting - ANGLE
The ANGLE setting recreates the effect of two microphones. "0" setting is monaural, or both microphones placed in the
center. Each higher number has the effect of moving the microphones further apart from each other, resulting in greater
stereo separation. The maximum setting is “180<.”
Turn the VALUE Rotary Control to make your selection.
From the previous screen, touch the PAGE RIGHT Touch Button repeatedly until Page 3 of the DRAWBAR EditMenu displays. The Information Center Display should now look like this:
The legend underneath the word “DISTANCE” should now be blinking.
Leslie Microphone Setting - DISTANCE
The DISTANCE setting recreates the effect of setting the microphones at different distances from a Leslie Speaker cabinet,
since distance has an effect on how the Leslie Speaker reproduces through a sound system. The choices are given in metric
measurements (meters or fractions). You can select from “0.3" to “2.7" meters.
Turn the VALUE Rotary Control to make your selection.
NOTE: Both the ANGLE and DISTANCE settings are subtle effects and may require careful listening to detect the
differences among the various settings.
Drawbar Effects - Leslie 21
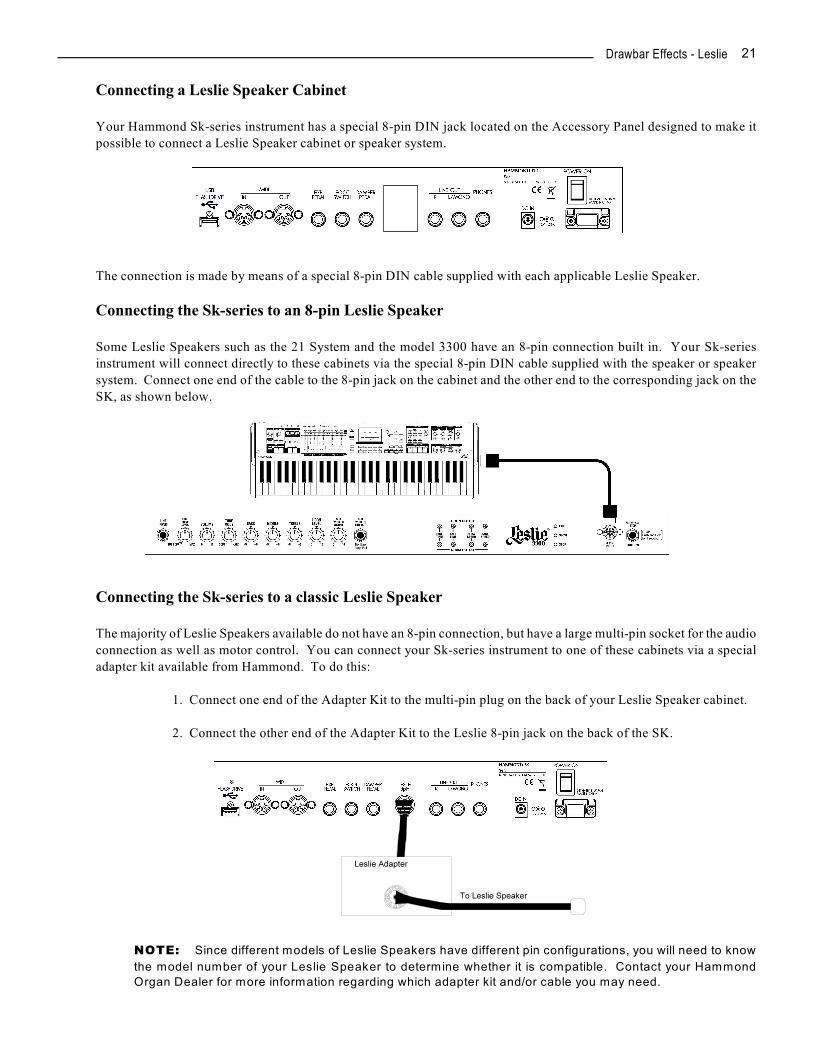
Connecting a Leslie Speaker Cabinet
Your Hammond Sk-series instrument has a special 8-pin DIN jack located on the Accessory Panel designed to make it
possible to connect a Leslie Speaker cabinet or speaker system.
The connection is made by means of a special 8-pin DIN cable supplied with each applicable Leslie Speaker.
Connecting the Sk-series to an 8-pin Leslie Speaker
Some Leslie Speakers such as the 21 System and the model 3300 have an 8-pin connection built in. Your Sk-series
instrument will connect directly to these cabinets via the special 8-pin DIN cable supplied with the speaker or speaker
system. Connect one end of the cable to the 8-pin jack on the cabinet and the other end to the corresponding jack on the
SK, as shown below.
Connecting the Sk-series to a classic Leslie Speaker
The majority of Leslie Speakers available do not have an 8-pin connection, but have a large multi-pin socket for the audio
connection as well as motor control. You can connect your Sk-series instrument to one of these cabinets via a special
adapter kit available from Hammond. To do this:
1. Connect one end of the Adapter Kit to the multi-pin plug on the back of your Leslie Speaker cabinet.
2. Connect the other end of the Adapter Kit to the Leslie 8-pin jack on the back of the SK.
NOTE: Since different models of Leslie Speakers have different pin configurations, you will need to know
the model number of your Leslie Speaker to determine whether it is compatible. Contact your Hammond
Organ Dealer for more information regarding which adapter kit and/or cable you may need.
Drawbar Effects - Leslie22
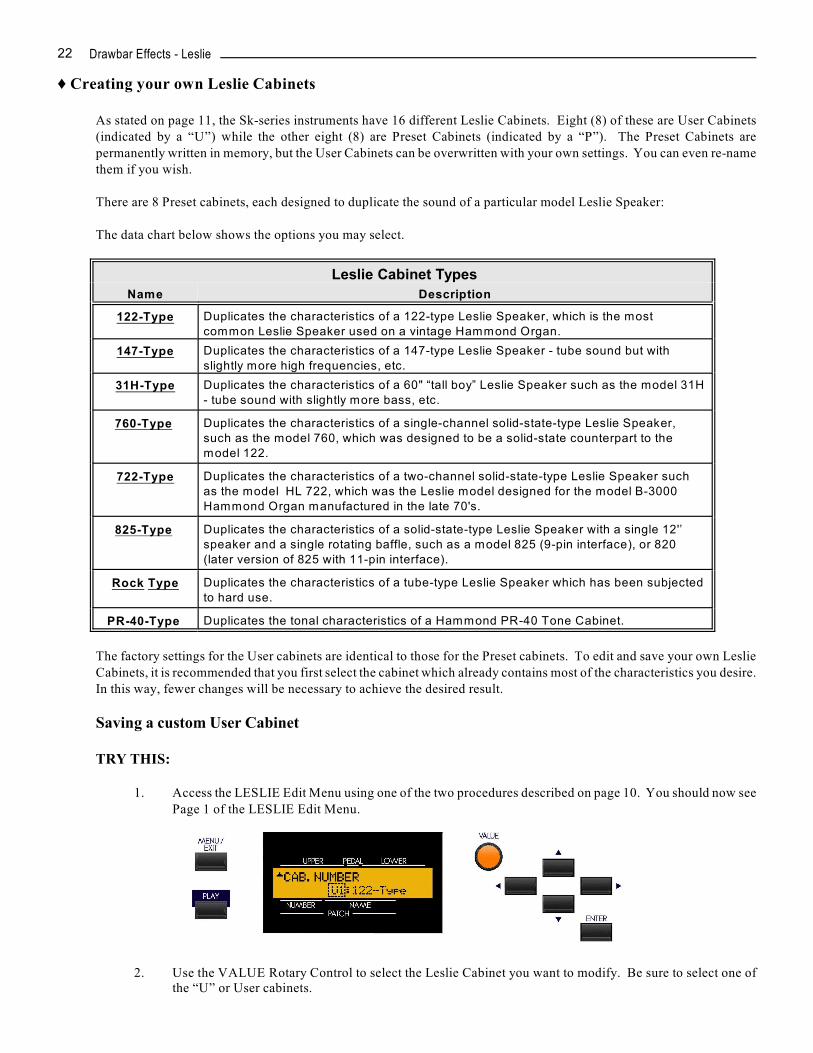
Ë Creating your own Leslie Cabinets
As stated on page 11, the Sk-series instruments have 16 different Leslie Cabinets. Eight (8) of these are User Cabinets(indicated by a “U”) while the other eight (8) are Preset Cabinets (indicated by a “P”). The Preset Cabinets arepermanently written in memory, but the User Cabinets can be overwritten with your own settings. You can even re-namethem if you wish.
There are 8 Preset cabinets, each designed to duplicate the sound of a particular model Leslie Speaker:
The data chart below shows the options you may select.
Leslie Cabinet Types
Name Description
122-Type Duplicates the characteristics of a 122-type Leslie Speaker, which is the most
common Leslie Speaker used on a vintage Hammond Organ.
147-Type Duplicates the characteristics of a 147-type Leslie Speaker - tube sound but with
slightly more high frequencies, etc.
31H-Type Duplicates the characteristics of a 60" “tall boy” Leslie Speaker such as the model 31H
- tube sound with slightly more bass, etc.
760-Type Duplicates the characteristics of a single-channel solid-state-type Leslie Speaker,
such as the model 760, which was designed to be a solid-state counterpart to the
model 122.
722-Type Duplicates the characteristics of a two-channel solid-state-type Leslie Speaker such
as the model HL 722, which was the Leslie model designed for the model B-3000
Hammond Organ manufactured in the late 70's.
825-Type Duplicates the characteristics of a solid-state-type Leslie Speaker with a single 12'’
speaker and a single rotating baffle, such as a model 825 (9-pin interface), or 820
(later version of 825 with 11-pin interface).
Rock Type Duplicates the characteristics of a tube-type Leslie Speaker which has been subjected
to hard use.
PR-40-Type Duplicates the tonal characteristics of a Hammond PR-40 Tone Cabinet.
The factory settings for the User cabinets are identical to those for the Preset cabinets. To edit and save your own LeslieCabinets, it is recommended that you first select the cabinet which already contains most of the characteristics you desire.In this way, fewer changes will be necessary to achieve the desired result.
Saving a custom User Cabinet
TRY THIS:
1. Access the LESLIE Edit Menu using one of the two procedures described on page 10. You should now seePage 1 of the LESLIE Edit Menu.
2. Use the VALUE Rotary Control to select the Leslie Cabinet you want to modify. Be sure to select one ofthe “U” or User cabinets.
Drawbar Effects - Leslie 23
IMPORTANT: It is recommended that you create and then save a Leslie User Cabinet before re-naming it. It is also
recommended that you rename your User Cabinet after saving it.
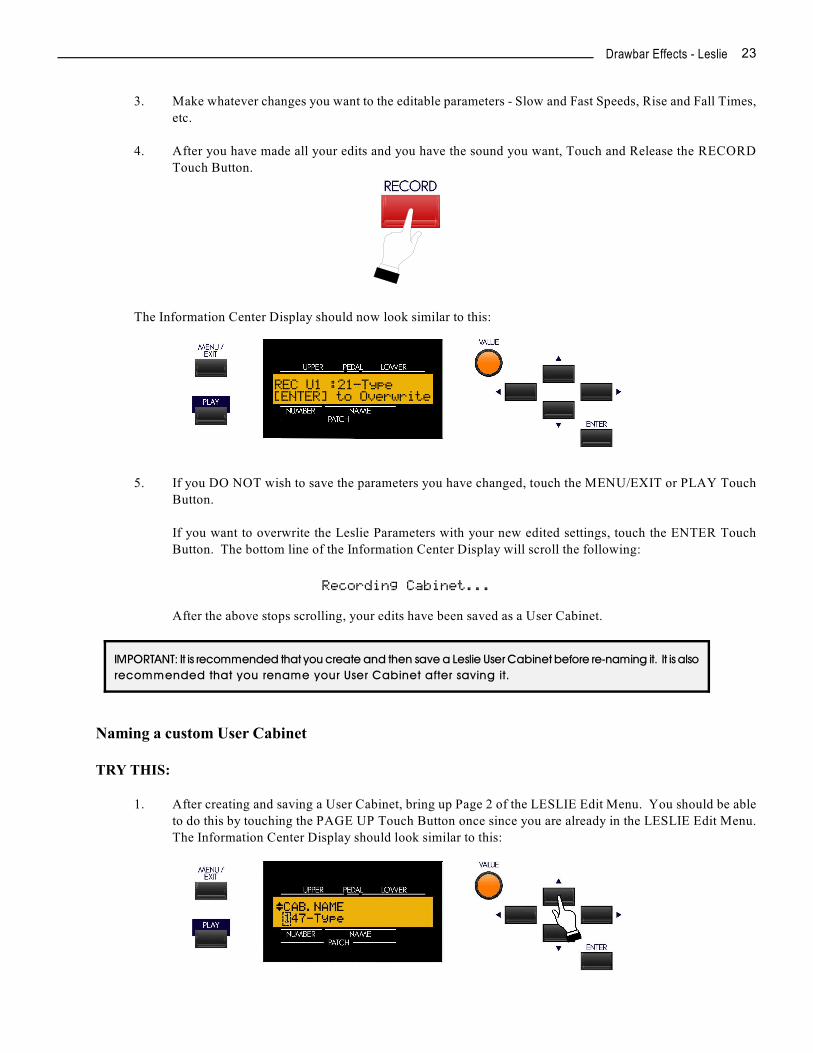
3. Make whatever changes you want to the editable parameters - Slow and Fast Speeds, Rise and Fall Times,
etc.
4. After you have made all your edits and you have the sound you want, Touch and Release the RECORD
Touch Button.
The Information Center Display should now look similar to this:
5. If you DO NOT wish to save the parameters you have changed, touch the MENU/EXIT or PLAY Touch
Button.
If you want to overwrite the Leslie Parameters with your new edited settings, touch the ENTER Touch
Button. The bottom line of the Information Center Display will scroll the following:
Recording Cabinet...
After the above stops scrolling, your edits have been saved as a User Cabinet.
Naming a custom User Cabinet
TRY THIS:
1. After creating and saving a User Cabinet, bring up Page 2 of the LESLIE Edit Menu. You should be able
to do this by touching the PAGE UP Touch Button once since you are already in the LESLIE Edit Menu.
The Information Center Display should look similar to this:
Drawbar Effects - Leslie24
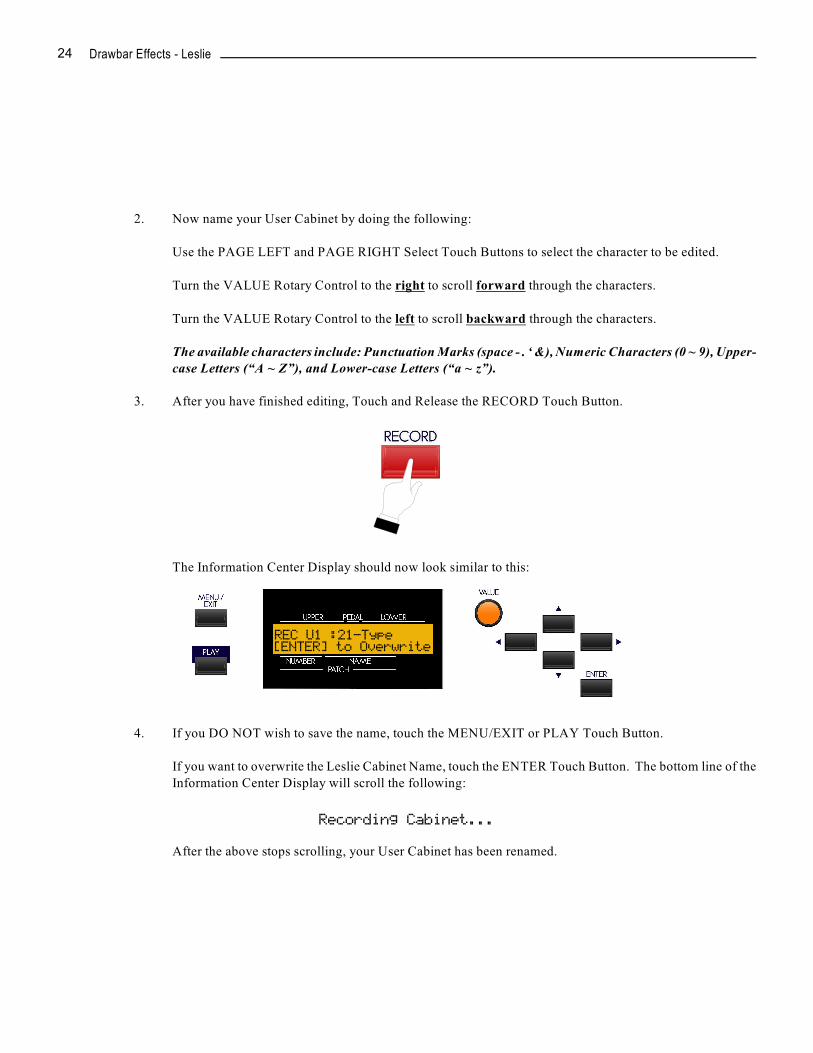
2. Now name your User Cabinet by doing the following:
Use the PAGE LEFT and PAGE RIGHT Select Touch Buttons to select the character to be edited.
Turn the VALUE Rotary Control to the right to scroll forward through the characters.
Turn the VALUE Rotary Control to the left to scroll backward through the characters.
The available characters include: Punctuation Marks (space - . ‘ &), Numeric Characters (0 ~ 9), Upper-case Letters (“A ~ Z”), and Lower-case Letters (“a ~ z”).
3. After you have finished editing, Touch and Release the RECORD Touch Button.
The Information Center Display should now look similar to this:
4. If you DO NOT wish to save the name, touch the MENU/EXIT or PLAY Touch Button.
If you want to overwrite the Leslie Cabinet Name, touch the ENTER Touch Button. The bottom line of the
Information Center Display will scroll the following:
Recording Cabinet...
After the above stops scrolling, your User Cabinet has been renamed.