Dr. A.P.J.Abdul Kalam - WordPress.com. A.P.J.Abdul Kalam ... information are referred as Firmware....
42
Microprocessors and Microcontrollers Page | 1 K SUDHAKAR Unit-1 “Learning gives creativity Creativity leads to thinking Thinking provides knowledge Knowledge makes you great” ….. Dr. A.P.J.Abdul Kalam *** ALL THE BEST ***
Transcript of Dr. A.P.J.Abdul Kalam - WordPress.com. A.P.J.Abdul Kalam ... information are referred as Firmware....

M i c r o p r o c e s s o r s a n d M i c r o c o n t r o l l e r s P a g e | 1
K SUDHAKAR Unit-1
“Learning gives creativity
Creativity leads to thinking
Thinking provides knowledge
Knowledge makes you great” ….. Dr. A.P.J.Abdul Kalam
*** ALL THE BEST ***

M i c r o p r o c e s s o r s a n d M i c r o c o n t r o l l e r s P a g e | 2
K SUDHAKAR Unit-1
Syllabus:
INTRODUCTION: Architecture of 8086 microprocessor, special functions of general purpose registers.
8086 flag register and functions of 8086 flags, addressing modes of 8086, instruction set of 8086. Assembler
directives, simple programs, procedures and macros.
A HISTORICAL BACKGROUND:
The idea of computing system is not new-it has been around long before modern electrical and electronic devices were developed. Babylonians invented the calculating device Abacus, the first mechanical calculator. The Abacus, which used strings of beads to perform calculations .It was used extensively and is still in use today. It was not improved until 1642. The mathematician Blaise Pascal invented a calculator in 1642 that was constructed of gears and wheels.
The motor –driven adding machines were came after the advent of electric motors in 1800’s.These are all based on the mechanical calculator developed by Pascal.
In the early 1870s, Bomar introduced the first small hand –held electronic calculator. In 1889,
Herman Hollerith developed the punched card for storing data. In 1896, Hellerith formed a company called the Tabulating Machine Company, which developed a line of machines that was used punched cards for tabulation. After a number of mergers, the Tabulating Machine Company was formed into International Business machines Corporation, now it is referred more commonly as IBM. The punched cards used in computer systems are often called Hollerith cards.
The first Electronic calculating machine was invented by Konrad Zuse (German) in 1941. It has recently been discovered that the first electronic computer was placed into operation in 1943.This first electronic computing system, which used Vacuum tubes, was invented by Alan Turing .It was a fixed program computer system, today which is often called a special- purpose computer.
The first general –purpose programmable electronic computer system was developed in 1946 at the University of Pennsylvania. The first modern computer was called the ENIAC (Electronics Numerical Integrator and Calculator).The ENIAC was a huge machine, containing over 17,000 vacuum tubes and over 500 miles of wires. This machine weighted over 30 tons, yet performed only about 1, 00,000 operations per second. Another problem with the ENIAC was the life of the vacuum tube components, which required frequent maintenance.
After development of Transistors in 1948 at Bell Labs and invention of the Integrated Circuits in 1958 by Jack Kilby of Texas Instruments, the Intel Corporation introduced the first Microprocessor 4004 in 1971.The device that started the Microprocessor revolution that continues today at an ever-accelerating pace.
INTRODUCTION TO MICROPROCESSORS:
A simple block diagram for microcomputer is shown in fig.1.The major parts are the CPU, memory, and input and output circuitry or I/O. Three sets of parallel lines are used to connect these parts are called buses. The buses are the address bus, the data bus, and the control bus.

M i c r o p r o c e s s o r s a n d M i c r o c o n t r o l l e r s P a g e | 3
K SUDHAKAR Unit-1
Memory: It is a medium that stores binary information. The memory section usually consists of a mixture of RAM and ROM. It may also have magnetic floppy disks, magnetic hard disks, or optical disks. Memory has two purposes .The first purpose is to store the binary code for the sequences instructions you want the computer to carry out. The second purpose of the memory is to store the binary coded data with which the computer is going to be working. Input: It is a device that allows the computer to take in data from the outside world. Output: It is a device that allows the computer to send date to the outside world. Peripherals such as keyboards, video display terminals, printers, and modems are connected to the I/O section. These allow the user and the computer to communicate with each other. The actual physical devices used to interface the computer buses to external systems are often called Ports. An input port allows data from keyboard, an A/D converter, or some other source to be read into the computer under control of the CPU. An output port is used to send data from the computer to some peripheral, such as video display terminal printer, or a D/A converter. CPU: The Central Processing Unit or CPU controls the operation of the computer. In a microcomputer the CPU is a microprocessor. The CPU or Microprocessor fetches binary ceded instructions from the memory, decodes the instructions into a series of simple actions, and carries out these actions in sequence of steps.

M i c r o p r o c e s s o r s a n d M i c r o c o n t r o l l e r s P a g e | 4
K SUDHAKAR Unit-1
Address bus: The address bus consists of 16, 20, 24, or 32… parallel signal lines. These address lines are used to send a address of the memory location or a device address from the microprocessor unit to the memory or the peripheral. The address bus always unidirectional. Address always goes out of the microprocessor. The number of memory locations that the microprocessor can address is determined by the number of address lines. If the microprocessor has N address lines, then it can directly address 2N memory locations. For ex: a microprocessor with 16 address lines can address 216 or 65,536 memory locations. Data bus: The data bus consists of 8,16,or 32…parallel lines .A group of lines used to transfer a data between the microprocessor and peripherals(or memory).The data bus is always bi-directional. Control bus: The control bus consists of 4 to 10 parallel signal lines. The microprocessor sends out signals on the control bus to enable the outputs of addressed memory devices or port devices. Typical control bus signals are Memory Read, Memory Write, I/O Read, and I/O Write.
SOME IMPORTANT TERMS:
Microprocessor: It is a semiconductor device which is manufactured by using LSI or VLSI technology, which includes ALU, Control unit and a group of Registers in a single Integrated circuit. Microcontroller: It is a device that includes microprocessor, memory, and I/O signal lines on a single chip, fabricated using VLSI technology. Microcomputer: A digital computer having a microprocessor as its Central Processing Unit is called Microcomputer. So, a microprocessor combined with memory, an input device and an output device forms a microcomputer. Bus: A group of wires or lines used to transfer bits between the microprocessor and other components of the computer system. Or a path used to carry signals, such as connection between memory and the microprocessor in a digital computer. Hardware: The physical devices and circuitry of the computer is called Hardware. Software: The programs written for the computer is referred to as software. Firmware: The programs stored in ROMs or in other devices which permanently keep their stored information are referred as Firmware. In general the width of the data bus is equal to the bit capacity of the microprocessor. In general the internal architecture of the microprocessor depends on the bit capacity of the
microprocessor. Bit-a binary digit.0 or 1 Nibble-a group of four bits Byte-a group of eight bits Word-a group of 16 bits or a group of bits the computer recognizes and processes at a time. Double word-a group of 32 bits.
Instruction: A command in binary that is recognized and executed by the computer to accomplish a task. Some instructions are designed with one word, and some require multiple words. Mnemonic: A combination of letters to suggest the operation of an instruction.

M i c r o p r o c e s s o r s a n d M i c r o c o n t r o l l e r s P a g e | 5
K SUDHAKAR Unit-1
Program: A set of instructions written in specific sequence for the computer to accomplish a given task. Machine language: The binary medium of communication with a computer through a designed set of instructions specific to each computer. Assembly language: A medium of communication with a computer in which programs are written in mnemonics. Low-level language: A medium of communication that is machine-dependant or specific to a given computer. The machine and the assembly languages of a computer are considered low level languages. Programs written in these languages are not transferable to different types of machines. High-level language: A medium of communication that is independent of a given computer. Programs are written in English like words, and they can be executed on a machine using translator (a compiler or interpreter). Source code: A program written either in mnemonics of as assembly language or in English like statements of high level language (before it is assembled or compiled). Assembler: A computer program that translates an assembly language program from mnemonics to the binary machine code of a computer. Compiler: A program that translates English-like words of a high level language into the machine language of a computer. Interpreter: A program that translates the English –like statements of a high level language into the machine language of a computer. Operating System: A set of programs that manages interaction between hardware and software. ASCII: American Standard Code for Information Interchange. This is 7-bit alphanumeric code with 128 combinations.
DEVELOPMENT OF MICROPROCESSORS (μP):
Intel introduced its first 4-bit microprocessor 4004 in 1971.The 4004 instruction set contained only 45 instructions. It execute instructions at the slow rate of 50 Kilo-instructions per second(KIPS).This was slow when compared to the 100,000 instructions executed per second by the ENIAC computer in1946.The 4-bit microprocessor is used in early video game systems and small microprocessor based control systems.
Intel released 4040(4-bit) microprocessor, an updated version of the earlier 4004.The 4040 microprocessor operated at a higher speed, although it lacked improvements in word width and memory size.
In 1972 Intel Corporation released 8-bit microprocessor 8008, which is an extended version of 4-bit
microprocessor. The 8008 microprocessor is used in more advanced systems because it has an expanded memory size (16KB) and contained a additional instructions(48) .It executes 5,00,000 instructions per second. But it is some what small memory size, slow speed and instruction set limited its usefulness. These microprocessors could not survive as general purpose microprocessors due to their design and performance limitations.

M i c r o p r o c e s s o r s a n d M i c r o c o n t r o l l e r s P a g e | 6
K SUDHAKAR Unit-1
The launch of the first general purpose 8-bit microprocessor 8080 in 1974 by Intel is considered to be the first major stepping stone towards the development of advanced microprocessors. It executes the instruction s10 times faster than the 8008.Also the 8080 was compatible with TTL, where as the 8008 was not directly compatible. This made interfacing much easier and less expensive. The memory size of 8080 is 64KB.
In 1977 Intel Corporation introduced an updated version of the 8080 microprocessor –the
8085.This was to be the last 8-bit general purpose microprocessor developed by Intel. The 8085 executed software at a higher speed. It executes 769230 instructions per second. The main advantages of 8085 were its internal clock generator, internal system controller and higher clock frequency.
The main limitations of the 8-bit microprocessor were their low speed, low memory addressing
capability, limited number of general purpose registers and a less powerful instruction set. All these limitations of the 8-bit microprocessors pushed the designers to build more powerful processors in terms of advanced architecture, more processing capability, larger memory addressing capability and a more powerful instruction set. The 8086 was a result of such development design efforts.
In the family of 16-bit microprocessors, Intel’s 8086 were the first one to be launched in 1978.The introduction of the 16-bit microprocessor was a result of the increasing demand for more powerful and high speed computational resources. The 8086 microprocessor has a much powerful instruction set along with the architectural developments which imparts substantial programming flexibility and improvement in speed over the 8-bit microprocessors. A year or so later Intel released the 8088 microprocessor. It is also a 16-bit microprocessor. The memory size of the 8086/8088 processor is 1MB,which was 16 times more memory than 8085.One another feature found in 8086 was a small 6-byte instruction queue, that prefetched a few instructions before they were executed. Note that these types of microprocessors were called CISC (Complex Instruction Set Computers) because of the number and complexity of instructions. The popularity of the Intel family was ensured in 1981, when IBM Corporation decided to use the 8088 microprocessor in its Personal Computer.
In 1983, Intel introduced the 80286 microprocessor; an updated version of 8086.It is also a 16-bit
microprocessor. It was almost identical to the 8086 and 8088, except memory size. The memory size of 80286 is 16MB.
In 1986, Intel released 80386 microprocessor keeping in mind faster microprocessor speeds, more memory size and wider data paths. It is 32-bit microprocessor. So, it contained 32-bit data bus. The memory size is 4GB (32-bit address bus).
Some of the advanced processors developed by Intel Corporation are 80486, Pentium, PentiumII, PentiumII Xeaon, Pentium III, Pentium-4, etc. The future of microprocessors: No one can really make accurate predictions, but the success of the Intel family should continue for quite a few years. What may occur is a change to RISC Technology, but more likely a change to a new technology being developed jointly by Intel and Hewlett Packard will occur.
MICROPROCESSOR APPLICATIONS
i. Microcomputers
The simplest and cheapest general purpose microprocessor -based systems are “single
board microcomputers” with minimum possible hardware & software configuration.
(a)In universities and educational institutions they are used for imparting training to the
students.
(b)In industries, they are used for evaluation of the microprocessors or for building systems
prototype systems.

M i c r o p r o c e s s o r s a n d M i c r o c o n t r o l l e r s P a g e | 7
K SUDHAKAR Unit-1
ii. Liquid Crystal Display (LCD)
It is commonly used in system where low power consumption is necessary.
Examples: Watches, Calculators, Instrument panels and customer electronic displays.
LCD Display consists of crystal material is arranged in segments or in the form of a dot
matrix. The crystal material can pass or block the light that passes through; thus it creates a
display.
iii. Matrix Keyboard :
It is a commonly used input device when more than 8 keys are necessary. It reduces the
number of interfacing devices are required. It requires 8 lines from the microprocessor to
make all the connections instead of 16 lines, if the keys are connected in a linear format.
When a key is pressed, it shorts one row and column. Otherwise, the row and column do
not have any connection. The interfacing of a matrix keyboard requires 2 ports. (i) Output
port (ii) Input port.
In a matrix keyboard, the major task is to identify a key that is pressed and decode the key
in terms of its binary value. This task is accomplished through either software or hardware.
iv. Domestic Appliances:
Microprocessors are also being incorporated with relatively simple domestic devices such as
Ovens, Washing machines, Air conditioners, Television sets and Alarms. Microprocessor can
be used in Automobiles.
v. Temperature Indicator and Controller:
Microprocessors are used in typical process control applications. Microprocessor monitors a
process temperature and displays it on a 4 digit, seven segment displays. The lower and
upper limits of the temperature being monitored.
vi. Weight Cost System:
It is to provide a digital display of the weight and the price for an amount of goods.
A pressure transducer is used to generate a voltage that corresponds to the weight of the
goods being measured. This voltage is converted within the microprocessor into an 8421
BCD representation of the weight.
vii. Traffic Light Control:
Traffic Light Colors: Green, Yellow and Red
Microprocessors are used to give signal to traffic in traffic light controller.
viii. Instrumentation:
The processing power of the 8 bit microprocessor is more than adequate to satisfy the
requirements of most of the instrumentation applications.
Frequency meters, function generators, frequency synthesizers, spectrum analyzers, and
many other instruments are available, where microprocessors are used as controllers.
Microprocessors are also used in Medical Instrumentation. E.g. Patient Monitoring in
Intensive Care Unit, Pathological Analysis and the measurement of parameters like blood
pressure and temperature.
ix. Communication :
In the telephone Industry, microprocessors are used in digital telephone sets, telephone
exchanges and modems.
Microprocessor is used in Radio, Television and satellite communication.
Microprocessors are making possible implementation of LAN and WAN for communication of
varied information through computer network.
x. Robots:
It is a Numeric controlled machine. Robots are used in the Motor Car and domestic appliance
industries.

M i c r o p r o c e s s o r s a n d M i c r o c o n t r o l l e r s P a g e | 8
K SUDHAKAR Unit-1
ARCHITECTURE OF 8086 MICROPROCESSOR:
Features: Intel released its first 16-bit microprocessor 8086 in 1978.The Intel 8086 is a 16-bit processor ,which is fabricated using HMOS technology and it has 40 pins ,packaged in DIP . The 8086 is a 16-bit microprocessor. The term 16-bit means that its arithmetic logic unit, internal
registers and most of its instructions are designed to work with 16-bit binary words. The 8086 has a 16-bit data bus, so it can read data from or write data to memory and ports either
16 bits or 8 bits at a time. The 8088, however has an 8-bit data bus, so it can only read data from or write data to memory and ports 8 bits at a time.
The 8086 has a 20-bit address bus, so it can directly access 220 or 10, 48,576 (1MB) memory locations. Each of the 10, 48,576 (1MB) memory locations is byte wide. Therefore, a 16-bit word is stored in two consecutive memory locations. The 8088 also has a 20-bit address bus, so it can also address 220 memory locations.
The 8086 can generate 16-bit I/O address, hence it can access 216=65536 I/O ports. The 8086 provides fourteen 16-bit registers. The 8086 has multiplexed address and data bus which reduces the number of pins needed, but
does slow down the transfer of data. The 8086 requires clock with a 33% duty cycle to provide optimized internal timing. The 8086 microprocessor available in three clock rates: 5 MHz (8086), 8 MHz (8086-2) and 10 MHz (8085-1).
The Intel 8086 is designed to operate in two modes: minimum mode and maximum mode. Minimum mode: When only one 8086 CPU is to be used in a microcomputer system, the 8086 is
used in the minimum mode of operation. Maximum mode: More than one processor (multiprocessor) is used in the system, the 8086 is used
in the maximum mode of operation. An interesting feature of the 8086 is that it fetches up to 6 instruction bytes from memory and
queue stores them in order to speed up instruction execution. It requires +5V single power supply.
Architecture: Before we can talk about how to write programs for the 8086, we need to discuss its specific
internal features, such as its ALU, Flags, Registers, instruction byte queue, and segment registers. The internal architecture of 8086 microprocessor is shown in figure below.
Fig.4: 8086 internal block diagram

M i c r o p r o c e s s o r s a n d M i c r o c o n t r o l l e r s P a g e | 9
K SUDHAKAR Unit-1
As shown by the block diagram in figure, the 8086 processor is divided into two independent
functional parts, the Bus Interfacing Unit (BIU), and the Execution Unit (EU). Dividing the work between these two units speeds up processing.
The BIU sends out addresses, fetches instructions from memory, reads data from ports and memory, and writes data to ports and memory. In other words, the BIU handles all transfers of data and addresses on the buses for the execution.
The EU of the 8086 tells the BIU where to fetch instructions or data from, decodes instructions, and executes instructions. 1. Bus Interfacing Unit: The bus interfacing unit in 8086 provides the interface to the outside world. This unit is responsible for performing all external bus operations like fetches instructions from memory, reads data from ports and memory, and writes data to ports and memory.
The queue: To speed up program execution, the BIU fetches six instruction bytes ahead of time from the memory. The BIU stores these perfected bytes in a first-in-first-out register set called a queue. When the EU is ready for its next instruction, it simply reads the instruction byte for the instruction from the queue in the BIU. This is much faster than sending out an address to the system memory and waiting for memory to send back the next instruction byte or bytes. The process is analogous to the way a bricklayer’s assistant fetches bricks ahead of time and keeps a queue of bricks lined up so that the brick layer can just reach out and grab a brick when necessary. Except in the cases of JMP and CALL instructions, where the queue must be damped and then reloaded starting from a new address. So, the queue operates on the principle first in first out (FIFO).So that the execution unit gets the instructions for execution in the order they are fetched. This prefetch-and-queue scheme greatly speeds up processing. Fetches the next instruction while the current instruction executes is called pipelining. 2. Execution Unit: The EU of 8086 tells the BIU from where to fetch instructions or data, decodes instructions and executes instructions. As shown in figure, the EU contains: control unit, decoder, ALU and a registers. Control unit: This directs internal operations. Decoder: A decoder in the EU translates instructions fetched from memory into a series of actions which the EU carries out. ALU: The EU has a 16-bit arithmetic logic unit which can add, subtract, AND, OR, XOR, increment, decrement, complement and shift binary numbers.
MEMORY SEGMENTATION:
Fig.5. One way four 64-Kbyte segments might be positioned within the 1-Mbyte address Space of and 8086

M i c r o p r o c e s s o r s a n d M i c r o c o n t r o l l e r s P a g e | 10
K SUDHAKAR Unit-1
Two types of memory organizations are commonly used. These are linear addressing and
segmented addressing. In linear addressing the entire memory space is available to the processor in one linear array. Where as in the segmented addressing the available memory space is divide into “chunks” called segments. Such a memory is known as segmented memory. The memory in an 8086 based system is organized as segmented memory. In this scheme, the complete physically available 1MB memory may be divided into a number of logical segments. Each segment is 64KB in size and is addressed by one of the segment registers. However, at any given time the 8086 works with only four 64KB segments within this 1,048,576-byte (1MB) range. Four segment registers in the BIU are used to hold the upper 16-bits of the starting addresses of four memory segments that the 8086 is working with at a particular time.
Figure shows how these four segments might be positioned in memory at a given time. The four segments can be separated as shown, or for small programs which do not need all 64 K bytes ion each segment, they can overlap.
Intel designed the 8086 family devices to access memory using the segment: offset approach rather
than accessing memory directly with 20-bit addresses, because the segment :offset scheme requires only a 16-bit number to represent the base address for a segment, and only a 16-bit offset to access any location in a segment. This makes for an easier interface with 8-bit and 16-bit wide memory boards and with the 16-bit registers in the 8086.
The second reason for segmentation is to provide the timesharing system. In a timesharing system,
several users share a processor (CPU). The CPU works on one user’s program for perhaps 20ms, then works on the next user’s program for 20ms.After working 20ms for each of the other users, the CPU comes back to the first user’s program again. Each time the CPU switches from one user’s program to the next, it can access a new section of code and new section of data. Segmentation makes this switching quite easy. Each user’s program can be assigned a separate set of logical segments for its code and data. So, segmentation makes it easy to keep user’s program and data separate from one another, and segmentation makes it easy to switch from one user’s program to another user’s program. Rules for memory segmentation: The four segments can overlap for small programs. In a minimum system all the four segments can
start at the address 00000H. The segment can start at any memory address which is divisible by 16.
Advantages: It allows the memory addressing capacity to be 1 MB even though the address associated with
individual instruction is only 16-bit. It allows instruction code, data, stack, and portion of program to be more than 64 KB long by using
more than one code, data, stack and extra segment. It provides use of separate memory areas for program, data and stack.
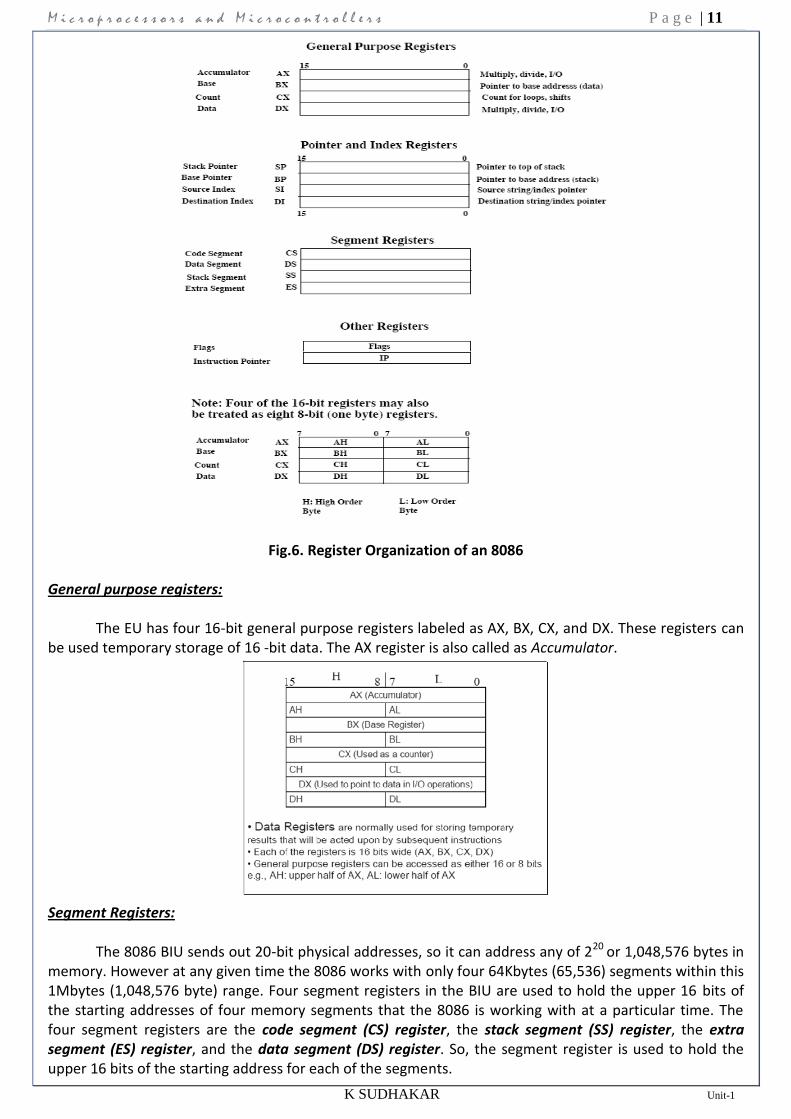
REGISTER ORGANIZATION OF 8086 MICROPROCESSOR:
The 8086 processor has a powerful set of registers. It includes general purpose registers, segment registers, pointers and index registers, and flag register. The figure below shows the register organization of 8086 processor.
M i c r o p r o c e s s o r s a n d M i c r o c o n t r o l l e r s P a g e | 11
K SUDHAKAR Unit-1
Fig.6. Register Organization of an 8086
General purpose registers:
The EU has four 16-bit general purpose registers labeled as AX, BX, CX, and DX. These registers can
be used temporary storage of 16 -bit data. The AX register is also called as Accumulator.
Segment Registers:
The 8086 BIU sends out 20-bit physical addresses, so it can address any of 220 or 1,048,576 bytes in memory. However at any given time the 8086 works with only four 64Kbytes (65,536) segments within this 1Mbytes (1,048,576 byte) range. Four segment registers in the BIU are used to hold the upper 16 bits of the starting addresses of four memory segments that the 8086 is working with at a particular time. The four segment registers are the code segment (CS) register, the stack segment (SS) register, the extra segment (ES) register, and the data segment (DS) register. So, the segment register is used to hold the upper 16 bits of the starting address for each of the segments.

M i c r o p r o c e s s o r s a n d M i c r o c o n t r o l l e r s P a g e | 12
K SUDHAKAR Unit-1
For example, the code segment register holds the upper 16 bits of the starting address for the segment from which the BIU is currently fetching instruction code bytes. The BIU always inserts zeros for the lowest 4 bits (nibble) of the 20-bit starting address for a segment. For example, if the code segment register contains 348AH, then the code segment will start at address 348A0H. In other words, a 64Kbyte segment can be located anywhere within the 1-Mbyte address space, but the segment will always start at an address with zeros in the lowest 4 bits. The part of a segment starting address stored in a segment register is often called the segment base.
A stack is a section of memory set aside to store addresses and data while a subprogram executes. The stack segment register is used to hold the upper 16 bits of the starting address for the program stack.
The extra segment register and data segment register are used to hold the upper 16 bits of the starting addresses of two memory segments that are used for data. Pointer and Index registers:
The EU contains a 16-bit instruction pointer (IP) register, stack pointer register (SP) and base pointer (BP) register. It also contains a 16-bit source index (SI) register and a 16-bit destination index (DI) register. The main use of these pointers and index registers is to hold the 16-bit offset of a data word in one of the segments. For example SI can be used to hold the offset of a data word in the data segment. The physical address of the data in memory will be generated in this case by adding the contents of SI to the segment base address represented by the 16-bit number in the DS register.
The three registers BP, SI, and DI can also be used for temporary storage of data just as the general
purpose registers described above. Flag registers: A flag is a flip-flop which indicates some condition produced by the execution of an instruction or controls certain operations of EU. The flag register contains nine active flags.
SPECIAL FUNCTIONS OF GENERAL PURPOSE REGISTERS:
M i c r o p r o c e s s o r s a n d M i c r o c o n t r o l l e r s P a g e | 13
K SUDHAKAR Unit-1
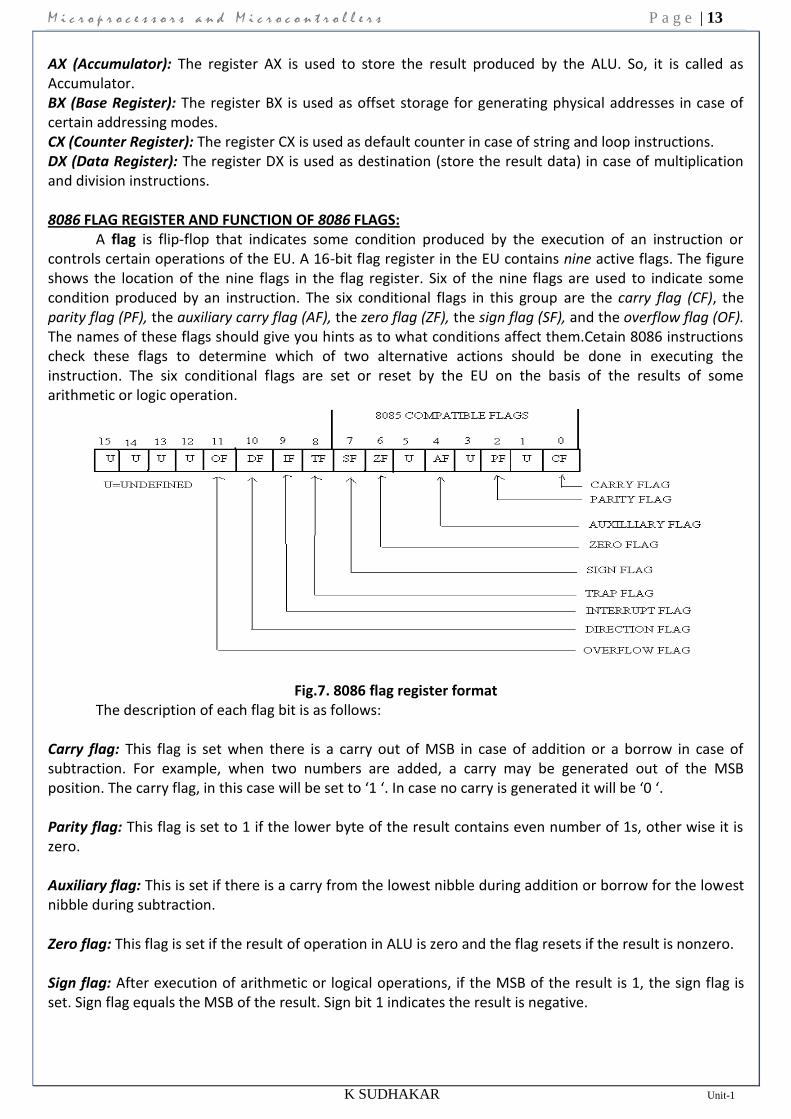
AX (Accumulator): The register AX is used to store the result produced by the ALU. So, it is called as Accumulator. BX (Base Register): The register BX is used as offset storage for generating physical addresses in case of certain addressing modes. CX (Counter Register): The register CX is used as default counter in case of string and loop instructions. DX (Data Register): The register DX is used as destination (store the result data) in case of multiplication and division instructions. 8086 FLAG REGISTER AND FUNCTION OF 8086 FLAGS:
A flag is flip-flop that indicates some condition produced by the execution of an instruction or controls certain operations of the EU. A 16-bit flag register in the EU contains nine active flags. The figure shows the location of the nine flags in the flag register. Six of the nine flags are used to indicate some condition produced by an instruction. The six conditional flags in this group are the carry flag (CF), the parity flag (PF), the auxiliary carry flag (AF), the zero flag (ZF), the sign flag (SF), and the overflow flag (OF). The names of these flags should give you hints as to what conditions affect them.Cetain 8086 instructions check these flags to determine which of two alternative actions should be done in executing the instruction. The six conditional flags are set or reset by the EU on the basis of the results of some arithmetic or logic operation.
Fig.7. 8086 flag register format The description of each flag bit is as follows:
Carry flag: This flag is set when there is a carry out of MSB in case of addition or a borrow in case of subtraction. For example, when two numbers are added, a carry may be generated out of the MSB position. The carry flag, in this case will be set to ‘1 ‘. In case no carry is generated it will be ‘0 ‘. Parity flag: This flag is set to 1 if the lower byte of the result contains even number of 1s, other wise it is zero. Auxiliary flag: This is set if there is a carry from the lowest nibble during addition or borrow for the lowest nibble during subtraction. Zero flag: This flag is set if the result of operation in ALU is zero and the flag resets if the result is nonzero. Sign flag: After execution of arithmetic or logical operations, if the MSB of the result is 1, the sign flag is set. Sign flag equals the MSB of the result. Sign bit 1 indicates the result is negative.

M i c r o p r o c e s s o r s a n d M i c r o c o n t r o l l e r s P a g e | 14
K SUDHAKAR Unit-1
Overflow flag: This flag is set if result is out of range. For addition this flag is set when there is a carry into the MSB and no carry out of the MSB or vice-versa. For subtraction, it is set when the MSB needs a borrow and there is no borrow from the MSB, or vice-versa.
The three remaining flags in the flag register are used to control certain operations of the processor. These flags are different from the six conditional flags described above. The control flags are the trap flag (TF), the interrupt flag (IF), the direction flag (DF). The descriptions of these flags are explained as follows: Trap flag: If this flag is set, the processor enters the single step execution mode. In other words, a trap interrupt is generated after execution of each instruction. The processor executes the current instruction and the control is transferred to the trap interrupt service routine.
Single stepping: One way to debug a program is to run the program one instruction at a time and
see the contents of used registers and memory variables after execution of every instruction. This process is called single stepping through a program. Interrupt flag: If this flag is set, the maskable interrupts are recognized by the processor ,otherwise they are ignored. Direction flag: This is used by string manipulation instructions. If this flag bit is ‘0’, the string is processed beginning from the lowest address to the highest address, i.e.autoincrementing mode. Otherwise, the string is processed from the highest address towards the lowest address, i.e.autodecrementing mode. Example: 1. Give the contents of flag register after execution of following addition. 0110 0101 1101 0001 0010 0011 0101 1001 + -------------------------- 1000 1001 0010 1010 Solution: SF=1, ZF=0, PF=1, CF=0, AF=0, OF=1 2. Give the contents of flag register after execution of following subtraction. 0110 0111 0010 1001 0011 0101 0100 1010 --------------------------- 0011 0001 1101 1111 Solution: SF=0, ZF=0, PF=1, CF=0, AF=1, OF=0
ADDRESSING MODES
Before we can teach you ALP techniques, we need to discuss some of the different ways in which an 8086 can access the data that it operates on. The different ways in which a processor can access data are referred to as its addressing modes.(or) Different ways of specifying the operands in an instruction is known as Addressing modes. In assembly language statements, the addressing mode is indicated in the instruction. We will use the 8086 MOV instruction to illustrate some of the 8086 addressing modes. The MOV instruction has the format
MOV Destination, Source

M i c r o p r o c e s s o r s a n d M i c r o c o n t r o l l e r s P a g e | 15
K SUDHAKAR Unit-1
When executed, this instruction copies a word or a byte from the specified source location to the specified destination location. The source can be a number written directly in the instruction, a specified register, or a memory location specified in 1 of 24 different ways. The destination can be a specified register or a memory location specified in any 1 of 24 different ways. The source and the destination cannot both be memory locations in an instruction. Remember that the destination location is specified in the instruction before the comma, and the source is specified in the instruction after the comma. The addressing modes of 8086 processor are: The 8086 provides total of eight addressing modes for instructions to specify the operands. Two addressing modes are provided for instructions that operate on immediate and register operands.
1. Immediate operand mode
2. Register operand mode
Immediate Operand Mode: In this mode the operand is included in the instruction. Suppose that in a program you need to put the number 4203H in the CX register. The MOV CX, 4203H instruction can be used to do this. When it executes, this instruction will put the immediate hexadecimal number 4203H in the 16-bit CX register. This is referred to as immediate addressing mode. So, here the immediate data is a part of instruction. Example: MOV AX, 0004H MOV AL, 04H MOV CX, 437BH Register Operand Mode: In this mode the operand is located in one of the 8 or 16-bit general purpose register. Register addressing mode means that a register is the source of an operand for an instruction. All the registers, except IP, may be used in this mode. Example: MOV AX, BX MOV CX, AX The instruction MOV CX, AX, copies the contents of the 16-bit AX register into the 16-bit CX register. Remember that the destination location is specified in the instruction before the comma, and the source is specified in the instruction after the comma. Also note that the contents of AX are just copied to CX, not actually moved. In other words, the previous contents of CX are written over, but the contents of AX are not changed. For example, if CX contains 4301H and AX contains 8470H before the MOV CX, AX instruction executes, then after the instruction executes CX will contain 8470H and AX will still contain 8470H. Six modes are provided to specify the location of an operand in memory segment. A memory operand address consists of two 16-bit components: segment selector (segment base) and offset. The offset is calculated by summing any combination of the following three address elements. the displacement (an 8 or 16-bit immediate value contained in the instruction) the base (contents of either BX or BP base registers) the index (contents of either SI or DI index registers) Combination of these three address elements defines the following six addressing modes, described below.
1. Direct Mode
2. Register Indirect Mode
3. Register Relative Mode
4. Indexed Mode
5. Based Indexed Mode
6. Based Indexed Mode with displacement
Direct Mode: The operand’s offset is contained in the instruction as 8 or 16-bit displacement element. Example: MOV BL, [437AH] The square brackets around the 437AH are shorthand for “the contents of the memory location(s) at a displacement from the segment base of”. When executed, this instruction will copy ‘the contents of the memory location at a displacement from the data segment base of ‘437AH into the BL register.

M i c r o p r o c e s s o r s a n d M i c r o c o n t r o l l e r s P a g e | 16
K SUDHAKAR Unit-1
Register Indirect Mode: The operand’s offset is in one of the registers SI, DI, BX or BP. Example: MOV AX, [BX] MOV CX, [BP] Register Relative Mode: The operand’s offset is sum of 8 or 16-bit displacement and the contents of registers SI, DI, BX or BP.
Example: MOV AX, 50H [BX] Indexed Mode: The operand’s offset is contents of index register SI or DI. Example: MOV AX, [SI] MOV AX, [DI] Based Indexed Mode: The operand’s offset is sum of the contents of base register and index register. Example: MOV AX, [BX] [SI] or MOV AX, [BX+SI] Based Indexed Mode with displacement: The operand’s offset in sum of base register contents, an index register contents, and an 8 or 16-bit displacement. Example: MOV AX, 60D [BX] [SI] or MOV AX, 60D [BX+SI]
GENERATION OF 20-BIT PHYSICAL ADDRESS:
To access a specific memory location from any segment we need 20-bit physical address. The 8086 generates this address using the contents of segment register and the offset register associated with it. The figure below shows the way of calculating the physical address.
Let us see the following examples:
1. Code Segment and Instruction Pointer:
The Code segment register holds the upper 16-bits of the starting address of the segment from which the BIU is currently fetching instruction code bytes. The instruction pointer register holds the 16-bit address or offset of the next code byte within this code segment. The value contained in the IP is referred to as an offset, because this value must be offset from (added to) the segment base address in CS to produce the required 20-bit physical address sent out by BIU. The figure below shows the way of calculating physical address by adding CS and IP addresses.
Fig.8. Addition of IP to CS to produce the physical address of the code byte,
(a).Diagram (b). Computation

M i c r o p r o c e s s o r s a n d M i c r o c o n t r o l l e r s P a g e | 17
K SUDHAKAR Unit-1
The CS registers points to the base or start of the current code segment. The IP contains the
distance or offset from this base address to the next instruction byte to be fetched. The fig.(b) shows how the 16-bit in IP is added to the 16-bit segment base address in CS to produce the 20-bit physical address. Note that the two 16-bit numbers are not added directly in line, because the CS register contains only the upper 16-bits of the base address for the code segment. The BIU automatically inserts zeros for the lowest 4 bits of the segment base address.
For example, if the CS register contains 348AH and IP contains offset of 4214H, then the result of
20-bit physical address is 38AB4H. The alternative way of representing a 20-bit physical address is the segment base: offset form. For the address of a code byte, the format for this alternative form will be CS: IP. So, the above physical address can also be represented as 348A:4214. In brief, the CS register contains the upper 16 bits of the starting address of the code segment in the 1 MB address range of the 8086. The instruction pointer register contains a 16-bit offset, which tells where the next instruction byte is to be fetched in that 64KB code segment. The actual physical address sent to memory is produced by adding the offset contained in the IP register to the segment base represented by the upper 16 bits in the CS register.
So, at any time to access a memory, the BIU produces the required 20-bit physical address by
adding an offset to a segment base value represented by the contents of one of the segment registers. 2. Stack Segment register and Stack Pointer register:
A stack is a section of memory set aside to store addresses and data while a subprogram is
executing. The 8086 allows you to set aside an entire 64-Kbyte segment as a stack. The upper 16-bits of the starting address for this segment are kept in the stack segment register. So, the stack segment register holds the upper 16 bits of starting address of stack segment. The stack pointer (SP) register in the execution unit holds the 16-bit offset from the start of the segment to the memory location where a word was most recently stored on the stack. The memory location where a word was most recently stored is called the top of stack. The figure shows calculation of physical address using SS and SP.
Fig.9. Addition of SS and SP to produce the physical address of the top of the stack,
(a). Diagram (b). Computation.
The physical address for a stack read or stack write is produced by adding the contents of the stack pointer register to the segment base address represented by the upper 16 bits of the base address in SS.In

M i c r o p r o c e s s o r s a n d M i c r o c o n t r o l l e r s P a g e | 18
K SUDHAKAR Unit-1
the above example the 5000H in SS represents a segment base address of 50000H.When the FFE0H in the SP is added to this the resultant physical address for the top of the stack will be 5FFE0H. The physical address can be represented either as a single number, 5FFE0H or in SS: SP form as 5000:FFE0H.
DEFAULT AND ALTERNATE REGISTER ASSIGNMENTS:
Below table shows that some memory references and their default and alternate segment definitions. For example, instruction codes can only be stored in the code segment with IP used as an offset. Similarly, for stack operations only SS and SP or BP registers can be used to give segment and offset addresses respectively. On the other hand, for accessing general data, string source, data pointed by BX and BP registers it is possible to use alternate segments by using segment override prefix.
Type of memory reference
Default Segment Alternate Segment Offset (logical address)
Instruction fetch
CS
None
IP
Stack operation
SS
None
SP, BP
General data
DS
CS,ES,SS
Effective address
String source
DS
CS,ES,SS
SI
String destination
ES
None
DI
BX used as pointer
DS
CS,ES,SS
Effective address
BP used as pointer
SS
CS,ES,DS
Effective address
Example: Calculate the physical address for the following instructions.
1. MOV AL,[BP] 2. MOV CX,[BX] 3. MOV AL, [BP+SI] 4. MOV CS:[BX],AL Assume: CS=1000H, DS=2000H, SS=3000H, ES=4000H, BP=0010H, BX=0020H, SP=0030H, SI=0040H, DI=0050H.
Solution:
1. 3000 0H SS +0010H BP
-------------- 30010H---Physical address 2. 2000 0H DS
+0020H BX --------------- 20020H---Physical address

M i c r o p r o c e s s o r s a n d M i c r o c o n t r o l l e r s P a g e | 19
K SUDHAKAR Unit-1
3. 0010H BP +0040H SI ------------- 0050H---Effective address 3000 0H SS +0050H EA -------------- 30050H----Physical address
4. 1000 0H CS
+0020H BX -------------- 10020H----Physical address
Segment Override Prefix: The segment override prefix allows the programmer to deviate from the default segment.
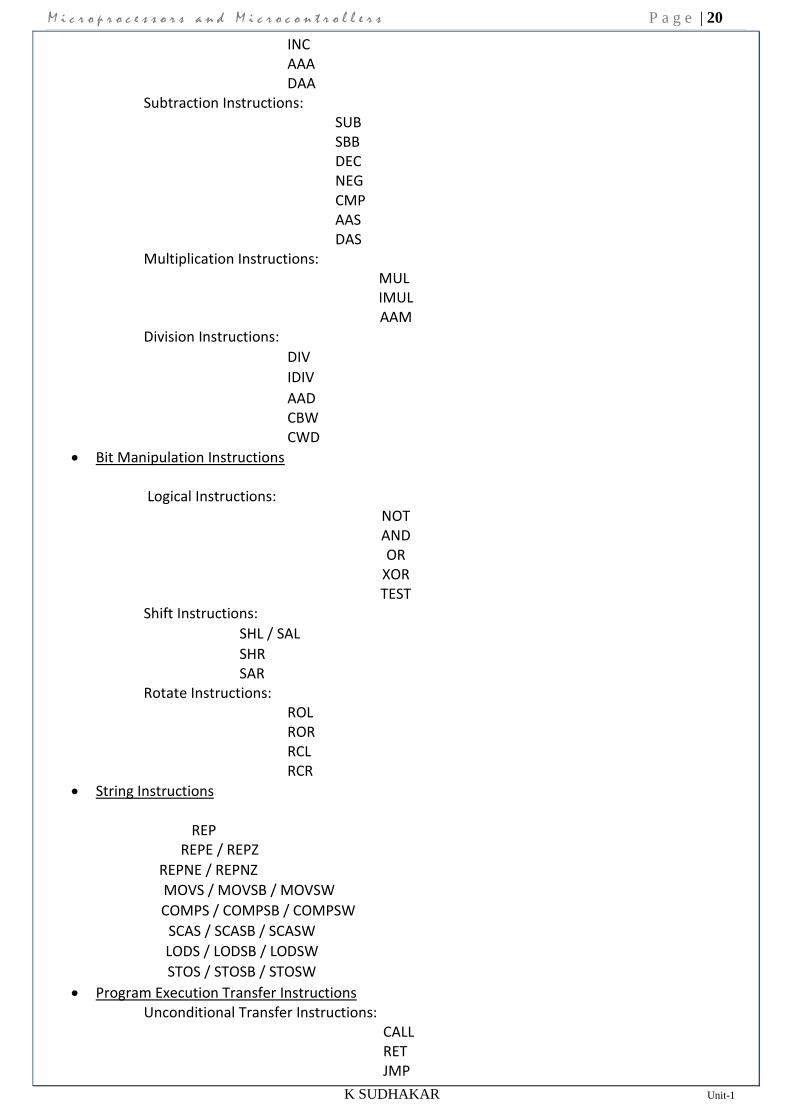
INSTRUCTION SET OF 8086
Data Transfer Instructions
Arithmetic Instructions
Bit Manipulation Instructions
String Instructions
Program Execution Transfer Instructions
Process Control Instructions
Data Transfer Instructions General – purpose byte or word transfer instructions:
MOV PUSH POP
XCHG XLAT
Simple Input and Output Port Transfer Instructions: IN
OUT Special Address Transfer Instructions:
LEA LDS LES
Flag Transfer Instructions: LAHF
SAHF PUSHF POPF
Arithmetic Instructions Addition Instructions:
ADD ADC
M i c r o p r o c e s s o r s a n d M i c r o c o n t r o l l e r s P a g e | 20
K SUDHAKAR Unit-1
INC AAA DAA
Subtraction Instructions: SUB SBB DEC NEG CMP AAS DAS
Multiplication Instructions: MUL
IMUL AAM
Division Instructions:
DIV
IDIV AAD CBW CWD
Bit Manipulation Instructions Logical Instructions:
NOT AND OR
XOR TEST
Shift Instructions:
SHL / SAL SHR SAR
Rotate Instructions: ROL ROR RCL RCR
String Instructions REP
REPE / REPZ
REPNE / REPNZ MOVS / MOVSB / MOVSW
COMPS / COMPSB / COMPSW
SCAS / SCASB / SCASW
LODS / LODSB / LODSW
STOS / STOSB / STOSW
Program Execution Transfer Instructions Unconditional Transfer Instructions:
CALL RET JMP

M i c r o p r o c e s s o r s a n d M i c r o c o n t r o l l e r s P a g e | 21
K SUDHAKAR Unit-1
Conditional Transfer Instructions: JA / JNBE JAE / JNB JB / JNAE JBE / JNA JC JE / JZ
JG / JNLE
JGE / JNL
JL / JNGE
JLE / JNG
JNC
JNE / JNZ
JNO
JNP / JPO
JNS JO
JP / JPE
JS Iteration Control Instructions:
LOOP LOOPE / LOOPZ LOOPNE / LOOPNZ JCXZ
Interrupt Instructions:
INT INTO IRET
Process Control Instructions Flag set / clear instructions:
STC CLC CMC STD CLD STI CLI
External Hardware Synchronization Instructions: HLT WAIT ESC LOCK NOP

M i c r o p r o c e s s o r s a n d M i c r o c o n t r o l l e r s P a g e | 22
K SUDHAKAR Unit-1
INSTRUCTION DESCRIPTION
--------------------------------------------------------------------------------------------------------------------------------------------- AAA Instruction - ASCII Adjust after Addition AAD Instruction - ASCII adjust before Division AAM Instruction - ASCII adjust after Multiplication AAS Instruction - ASCII Adjust for Subtraction ADC Instruction - Add with carry. ADD Instruction - ADD destination, source AND Instruction - AND corresponding bits of two operands ---------------------------------------------------------------------------------------------------------------------------------------------
AAA Instruction: AAA converts the result of the addition of two valid unpacked BCD digits to a valid 2-digit BCD number and takes the AL register as its implicit operand.
Two operands of the addition must have its lower 4 bits contain a number in the range from 0-9.The AAA instruction then adjust AL so that it contains a correct BCD digit. If the addition produce carry (AF=1), the AH register is incremented and the carry CF and auxiliary carry AF flags are set to 1. If the addition did not produce a decimal carry, CF and AF are cleared to 0 and AH is not altered. In both cases the higher 4 bits of AL are cleared to 0.
AAA will adjust the result of the two ASCII characters that were in the range from 30h (“0”) to 39h(“9”).This is because the lower 4 bits of those character fall in the range of 0-9.The result of addition is not a ASCII character but it is a BCD digit. Example:
MOV AH, 0 ; Clear AH for MSD MOV AL, 6 ; BCD 6 in AL ADD AL, 5 ; Add BCD 5 to digit in AL AAA ; AH=1, AL=1 representing BCD 11.
AAD Instruction:
ADD converts unpacked BCD digits in the AH and AL register into a single binary number in the AX register in preparation for a division operation.
Before executing AAD, place the Most significant BCD digit in the AH register and Last significant in the AL register. When AAD is executed, the two BCD digits are combined into a single binary number by setting AL=(AH*10)+AL and clearing AH to 0. Example:
MOV AX, 0205h ; The unpacked BCD number 25 AAD ; After AAD, AH=0 and
; AL=19h (25) After the division AL will then contain the unpacked BCD quotient and AH will contain the unpacked
BCD remainder. Example:
; AX=0607 unpacked BCD for 67 decimal ; CH=09H
AAD ; Adjust to binary before division ; AX=0043 = 43H =67 decimal
DIV CH ; Divide AX by unpacked BCD in CH ; AL = quotient = 07 unpacked BCD ; AH = remainder = 04 unpacked BCD
AAM Instruction: AAM converts the result of the multiplication of two valid unpacked BCD digits into a valid 2-digit unpacked BCD number and takes AX as an implicit operand.
To give a valid result the digits that have been multiplied must be in the range of 0 – 9 and the result should have been placed in the AX register. Because both operands of multiply are required to be 9 or less, the result must be less than 81 and thus is completely contained in AL.

M i c r o p r o c e s s o r s a n d M i c r o c o n t r o l l e r s P a g e | 23
K SUDHAKAR Unit-1
AAM unpacks the result by dividing AX by 10, placing the quotient (MSD) in AH and the remainder (LSD) in AL. Example:
MOV AL, 5 MOV BL, 7 MUL BL ; Multiply AL by BL, result in AX AAM ; After AAM, AX =0305h (BCD 35)
AAS Instruction:
AAS converts the result of the subtraction of two valid unpacked BCD digits to a single valid BCD number and takes the AL register as an implicit operand. The two operands of the subtraction must have its lower 4 bit contain number in the range from 0 to 9.The AAS instruction then adjust AL so that it contain a correct BCD digit.
MOV AX, 0901H ; BCD 91 SUB AL, 9 ; Minus 9 AAS ; Give AX =0802 h (BCD 82)
( a )
; AL =0011 1001 =ASCII 9 ; BL=0011 0101 =ASCII 5
SUB AL, BL ; (9 - 5) Result: ; AL = 00000100 = BCD 04, CF = 0
AAS ; Result: ; AL=00000100 =BCD 04 ; CF = 0 NO Borrow required
( b )
; AL = 0011 0101 =ASCII 5 ; BL = 0011 1001 = ASCII 9
SUB AL, BL ; ( 5 - 9 ) Result: ; AL = 1111 1100 = - 4 ; in 2’s complement CF = 1
AAS ; Results: ; AL = 0000 0100 =BCD 04 ; CF = 1 borrow needed.
ADD Instruction: These instructions add a number from source to a number from some destination and put the
result in the specified destination. The add with carry instruction ADC, also add the status of the carry flag into the result.
The source and destination must be of same type, means they must be a byte location or a word location. If you want to add a byte to a word, you must copy the byte to a word location and fill the upper byte of the word with zeroes before adding.
ADD op1, op2 EXAMPLE:
ADD AL, 74H ; Add immediate number 74H to content of AL ADC CL, BL ; Add contents of BL plus
; carry status to contents of CL. ; Results in CL
ADD DX, BX ; Add contents of BX to contents ; of DX
ADD DX, [SI] ; Add word from memory at ; offset [SI] in DS to contents of DX

M i c r o p r o c e s s o r s a n d M i c r o c o n t r o l l e r s P a g e | 24
K SUDHAKAR Unit-1
; Addition of Un Signed numbers ADD CL, BL ; CL = 01110011 =115 decimal
; + BL = 01001111 = 79 decimal ; Result in CL = 11000010 = 194 decimal ; Addition of Signed numbers
ADD CL, BL ; CL = 01110011 = + 115 decimal ; + BL = 01001111 = +79 decimal ; Result in CL = 11000010 = - 62 decimal ; Incorrect because result is too large to fit in 7 bits.
AND Instruction: This Performs a bitwise Logical AND of two operands. The result of the operation is stored in the
op1 and used to set the flags. AND op1, op2
To perform a bitwise AND of the two operands, each bit of the result is set to 1 if and only if the corresponding bit in both of the operands is 1, otherwise the bit in the result I cleared to 0.
AND BH, CL ; AND byte in CL with byte in BH ; result in BH
AND BX, 00FFh ; AND word in BX with immediate ; 00FFH. Mask upper byte, leave ; lower unchanged
AND CX, [SI] ; AND word at offset [SI] in data ; segment with word in CX ; register. Result in CX register. ; BX = 10110011 01011110
AND BX, 00FFh ; Mask out upper 8 bits of BX ; Result BX = 00000000 01011110 ; CF =0, OF = 0, PF = 0, SF = 0, ZF = 0
------------------------------------------------------------------------------------------------------------------------------------------CALL Instruction
•Direct within-segment (near or intrasegment) •Indirect within-segment (near or intrasegment) •Direct to another segment (far or intersegment) •Indirect to another segment (far or intersegment)
CBW Instruction – Convert signed Byte to signed word CLC Instruction – Clear the carry flag CLD Instruction – Clear direction flag CLI Instruction – Clear interrupt flag CMC Instruction - Complement the carry flag CMP Instruction - Compare byte or word - CMP destination, source. CMPS/CMPSB/ CMPSW Instruction - Compare string bytes or string words CWD Instruction - Convert Signed Word to - Signed Double word ----------------------------------------------------------------------------------------------------------------------------------------------
CALL Instruction:
This Instruction is used to transfer execution to a subprogram or procedure. There are two basic types of CALL’s: Near and Far.
A Near CALL is a call to a procedure which is in the same code segment as the CALL instruction. When 8086 executes the near CALL instruction it decrements the stack pointer by two and copies
the offset of the next instruction after the CALL on the stack. This offset saved on the stack is referred as the return address, because this is the address that execution will returns to after the procedure executes. A near CALL instruction will also load the instruction pointer with the offset of the first instruction in the procedure.
M i c r o p r o c e s s o r s a n d M i c r o c o n t r o l l e r s P a g e | 25
K SUDHAKAR Unit-1
A RET instruction at the end of the procedure will return execution to the instruction after the CALL by coping the offset saved on the stack back to IP.
A Far CALL is a call to a procedure which is in a different from that which contains the CALL instruction. When 8086 executes the Far CALL instruction it decrements the stack pointer by two again and copies the content of CS register to the stack. It then decrements the stack pointer by two again and copies the offset contents offset of the instruction after the CALL to the stack.
Finally it loads CS with segment base of the segment which contains the procedure and IP with the offset of the first instruction of the procedure in segment. A RET instruction at end of procedure will return to the next instruction after the CALL by restoring the saved CS and IP from the stack.
; Direct within-segment (near or intrasegment ) CALL MULTO ; MULTO is the name of the procedure. The assembler determines displacement of MULTO from the instruction after the CALL and codes this displacement in as part of the instruction.
; Indirect within-segment (near or intrasegment ) CALL BX ; BX contains the offset of the first instruction of the procedure. Replaces contents of word of IP with contents o register BX. CALL WORD PTR [BX] ; Offset of first instruction of procedure is in two memory addresses in DS. Replaces contents of IP with contents of word memory location in DS pointed to by BX.
; Direct to another segment- far or intersegment. CALL SMART ; SMART is the name of the Procedure SMART PROC FAR ; Procedure must be declare as an far
CBW Instruction - CBW converts the signed value in the AL register into an equivalent 16 bit signed value in the AX register by duplicating the sign bit to the left.
This instruction copies the sign of a byte in AL to all the bits in AH. AH is then said to be the sign extension of AL. Example:
; AX = 00000000 10011011 = - 155 decimal CBW ; Convert signed byte in AL to signed word in AX.
; Result in AX = 11111111 10011011 ; = - 155 decimal
CLC Instruction: CLC clear the carry flag (CF) to 0, this instruction has no affect on the processor, registers, or other
flags. It is often used to clear the CF before returning from a procedure to indicate a successful termination. It is also use to clear the CF during rotate operation involving the CF such as ADC, RCL, RCR. Example:
CLC ; Clear carry flag.
CLD Instruction: This instruction reset the designation flag to zero. This instruction has no effect on the registers or
other flags. When the direction flag is cleared / reset SI and DI will automatically be incremented when one of the string instruction such as MOVS, CMPS, SCAS, MOVSB and STOSB executes. Example:
CLD ; Clear direction flag so that string pointers auto increment
CLI Instruction: This instruction resets the interrupt flag to zero. No other flags are affected. If the interrupt flag is
reset, the 8086 will not respond to an interrupt signal on its INTR input. This CLI instruction has no effect on the non maskable interrupt input, NMI
CMC Instruction: If the carry flag CF is a zero before this instruction, it will be set to a one after the instruction. If the
carry flag is one before this instruction, it will be reset to a zero after the instruction executes. CMC has no effect on other flags.

M i c r o p r o c e s s o r s a n d M i c r o c o n t r o l l e r s P a g e | 26
K SUDHAKAR Unit-1
Example: CMC ; Invert the carry flag.
CWD Instruction: CWD converts the 16 bit signed value in the AX register into an equivalent 32 bit signed value in DX:
AX register pair by duplicating the sign bit to the left. The CWD instruction sets all the bits in the DX register to the same sign bit of the AX register. The
effect is to create a 32- bit signed result that has same integer value as the original 16 bit operand. Example: Assume AX contains C435h. If the CWD instruction is executed, DX will contain FFFFh since bit 15 (MSB) of AX was 1. Both the original value of AX (C435h) and resulting value of DX: AX (FFFFC435h) represents the same signed number. Example:
; DX = 00000000 00000000 ; AX = 11110000 11000111 = - 3897 decimal
CWD ; Convert signed word in AX to signed double word in DX:AX ; Result DX = 11111111 11111111 ; AX = 11110000 11000111 = -3897 decimal.
---------------------------------------------------------------------------------------------------------------------------------------------- DAA Instruction - Decimal Adjust Accumulator DAS Instruction - Decimal Adjust after Subtraction DEC Instruction - Decrement destination register or memory DEC destination. DIV Instruction - Unsigned divide-Div source ESC Instruction ----------------------------------------------------------------------------------------------------------------------------------------------
DIV Instruction
When a double word is divided by a word, the most significant word of the double word must be in DX and the least significant word of the double word must be in AX. After the division AX will contain the 16 –bit result (quotient) and DX will contain a 16 bit remainder. Again, if an attempt is made to divide by zero or quotient is too large to fit in AX (greater than FFFFH) the 8086 will do a type of 0 interrupt. Example:
DIV CX ; (Quotient) AX= (DX: AX)/CX : (Reminder) DX= (DX: AX) %CX
For DIV the dividend must always be in AX or DX and AX, but the source of the divisor can be a register or a memory location specified by one of the 24 addressing modes. If you want to divide a byte by a byte, you must first put the dividend byte in AL and fill AH with all
0’s. The SUB AH, AH instruction is a quick way to do. If you want to divide a word by a word, put the dividend word in AX and fill DX with all 0’s. The SUB
DX, DX instruction does this quickly. Example:
; AX = 37D7H = 14, 295 decimal ; BH = 97H = 151 decimal
DIV BH ; AX / BH ; AX = Quotient = 5EH = 94 decimal ; AH = Remainder = 65H = 101 decimal
ESC Instruction –
Escape instruction is used to pass instruction to a coprocessor such as the 8087 math coprocessor which shares the address and data bus with an 8086. Instruction for the coprocessor is represented by a 6 bit code embedded in the escape instruction. As the 8086 fetches instruction byte, the coprocessor also catches these bytes from data bus and puts them in its queue. The coprocessor treats all of the 8086

M i c r o p r o c e s s o r s a n d M i c r o c o n t r o l l e r s P a g e | 27
K SUDHAKAR Unit-1
instruction as an NOP. When 8086 fetches an ESC instruction, the coprocessor decodes the instruction and carries out the action specified by the 6 bit code. In most of the case 8086 treats ESC instruction as an NOP. ---------------------------------------------------------------------------------------------------------------------------------------------- HLT Instruction - HALT processing IDIV Instruction - Divide by signed byte or word IDIV source IMUL Instruction - Multiply signed number-IMUL source IN Instruction - Copy data from a port
IN accumulator, port INC Instruction - Increment - INC destination ---------------------------------------------------------------------------------------------------------------------------------------------
HALT Instruction – The HLT instruction will cause the 8086 to stop fetching and executing instructions. The 8086 will enter a halt state. The only way to get the processor out of the halt state are with an interrupt signal on the INTR pin or an interrupt signal on NMI pin or a reset signal on the RESET input.
IDIV Instruction – This instruction is used to divide a signed word by a signed byte or to divide a signed double word by a signed word. Example:
IDIV BL ; Signed word in AX is divided by signed byte in BL
IMUL Instruction - This instruction performs a signed multiplication.
IMUL op ; In this form the accumulator is the multiplicand and op is the multiplier. op may be a register or a memory operand.
IMUL op1, op2 ; In this form op1 is always be a register operand and op2 may be a register or a memory operand.
Example: IMUL BH ; Signed byte in AL times multiplied by signed byte in BH and result in AX.
Example: ; 69 * 14 ; AL = 01000101 = 69 decimal ; BL = 00001110 = 14 decimal
IMUL BL ; AX = 03C6H = + 966 decimal ; MSB = 0 because positive result ; - 28 * 59 ; AL = 11100100 = - 28 decimal ; BL = 00001110 = 14 decimal
IMUL BL ; AX = F98Ch = - 1652 decimal ; MSB = 1 because negative result
IN Instruction:
This IN instruction will copy data from a port to the AL or AX register. For the Fixed port IN instruction type the 8 – bit port address of a port is specified directly in the
instruction. Example:
IN AL, 0C8H ; Input a byte from port 0C8H to AL IN AX, 34H ; Input a word from port 34H to AX A_TO_D EQU 4AH IN AX, A_TO_D ; Input a word from port 4AH to AX

M i c r o p r o c e s s o r s a n d M i c r o c o n t r o l l e r s P a g e | 28
K SUDHAKAR Unit-1
For a variable port IN instruction, the port address is loaded in DX register before IN instruction. DX is 16 bit. Port address range from 0000H – FFFFH. Example:
MOV DX, 0FF78H ; Initialize DX point to port IN AL, DX ; Input a byte from a 8 bit port 0FF78H to AL IN AX, DX ; Input a word from 16 bit port to 0FF78H to AX.
INC Instruction: INC instruction adds one to the operand and sets the flag according to the result. INC instruction is
treated as an unsigned binary number. Example:
; AX = 7FFFh INC AX ; After this instruction AX = 8000h INC BL ; Add 1 to the contents of BL register INC CL ; Add 1 to the contents of CX register.
---------------------------------------------------------------------------------------------------------------------------------------------- INT Instruction - Interrupt program INTO Instruction - Interrupt on overflow. IRET Instruction - Interrupt return JA/JNBE Instruction - Jump if above/Jump if not below nor equal. JAE/JNB/JNC Instructions- Jump if above or equal/ Jump if not below/ Jump if no carry. ----------------------------------------------------------------------------------------------------------------------------------------------
JA / JNBE – This instruction performs the Jump if above (or) Jump if not below or equal operations according to the condition, if CF and ZF = 0. Example:
( 1 ) CMP AX, 4371H ; Compare by subtracting 4371H from AX JA RUN_PRESS ; Jump to label RUN_PRESS if AX above 4371H
( 2 ) CMP AX, 4371H ; Compare ( AX – 4371H) JNBE RUN_PRESS ; Jump to label RUN_PRESS if AX not below or equal to 4371H
JAE / JNB / JNC –
This instructions performs the Jump if above or equal, Jump if not below, Jump if no carry operations according to the condition, if CF = 0. Examples: 1. CMP AX, 4371H ; Compare ( AX – 4371H)
JAE RUN ; Jump to the label RUN if AX is above or equal to 4371H. 2. CMP AX, 4371H ; Compare ( AX – 4371H)
JNB RUN_1 ; Jump to the label RUN_1 if AX is not below than 4371H 3. ADD AL, BL ; Add AL, BL. If result is with in JNC OK
; acceptable range, continue ---------------------------------------------------------------------------------------------------------------------------------------------- JB/JC/JNAE Instruction - Jump if below/Jump if carry/ Jump if not above nor equal JBE/JNA Instructions- Jump if below or equal / Jump if not above JCXZ Instruction - Jump if the CX register is zero JE/JZ Instruction - Jump if equal/Jump if zero JG/JNLE Instruction- Jump if greater/Jump if not less than nor equal --------------------------------------------------------------------------------------------------------------------------------------------

M i c r o p r o c e s s o r s a n d M i c r o c o n t r o l l e r s P a g e | 29
K SUDHAKAR Unit-1
JB/JC/JNAE Instruction – This instruction performs the Jump if below (or) Jump if carry (or) Jump if not below/ equal operations according to the condition,
if CF = 1 Example: 1. CMP AX, 4371H ; Compare (AX – 4371H)
JB RUN_P ; Jump to label RUN_P if AX is below 4371H 2. ADD BX, CX ; Add two words and Jump to
JC ERROR ; label ERROR if CF = 1
JBE/JNA Instruction – This instruction performs the Jump if below or equal (or) Jump if not above operations according to the condition, if CF and ZF = 1 Example:
CMP AX, 4371H ; Compare (AX – 4371H ) JBA RUN ; Jump to label RUN if AX is below or equal to 4371H CMP AX, 4371H ; Compare ( AX – 4371H ) JNA RUN_R ; Jump to label RUN_R if AX is not above than 4371H
JCXZ Instruction:
This instruction performs the Jump if CX register is zero. If CX does not contain all zeros, execution will simply proceed to the next instruction. Example:
JCXZ SKIP_LOOP ; If CX = 0, skip the process NXT: SUB [BX], 07H ; Subtract 7 from data value
INC BX ; BX point to next value LOOP NXT ; Loop until CX = 0
SKIP_LOOP ; Next instruction
JE/JZ Instruction: This instruction performs the Jump if equal (or) Jump if zero operations according to the condition if
ZF = 1 Example:
NXT: CMP BX, DX ; Compare ( BX – DX ) JE DONE ; Jump to DONE if BX = DX, SUB BX, AX ; Else subtract Ax INC CX ; Increment counter JUMP NXT ; Check again DONE: MOV AX, CX ; Copy count to AX
Example: IN AL, 8FH ; read data from port 8FH SUB AL, 30H ; Subtract minimum value JZ STATR ; Jump to label if result of subtraction was 0
JG/JNLE Instruction:
This instruction performs the Jump if greater (or) Jump if not less than or equal operations according to the condition if ZF =0 and SF = OF Example:
CMP BL, 39H ; Compare by subtracting 39H from BL JG NEXT1 ; Jump to label if BL is more positive than 39H CMP BL, 39H ; Compare by subtracting 39H from BL JNLE NEXT2 ; Jump to label if BL is not less than or equal 39H
--------------------------------------------------------------------------------------------------------------------------------------------

M i c r o p r o c e s s o r s a n d M i c r o c o n t r o l l e r s P a g e | 30
K SUDHAKAR Unit-1
JGE/JNL Instruction - Jump if greater than or equal/ Jump if not less than JL/JNGE Instruction - Jump if less than/Jump if not greater than or equal JLE/JNG Instruction - Jump if less than or equal/ Jump if not greater JMP Instruction - Unconditional jump to - specified destination ----------------------------------------------------------------------------------------------------------------------------------------------
JGE/JNL Instruction –
This instruction performs the Jump if greater than or equal / Jump if not less than operation according to the condition if SF = OF Example:
CMP BL, 39H ; Compare by the subtracting 39H from BL JGE NEXT11 ; Jump to label if BL is more positive than 39H or equal to 39H CMP BL, 39H ; Compare by subtracting 39H from BL JNL NEXT22 ; Jump to label if BL is not less than 39H
JL/JNGE Instruction –
This instruction performs the Jump if less than / Jump if not greater than or equal operation according to the condition, if SF ≠ OF Example:
CMP BL, 39H ; Compare by subtracting 39H from BL JL AGAIN ; Jump to the label if BL is more negative than 39H CMP BL, 39H ; Compare by subtracting 39H from BL JNGE AGAIN1 ; Jump to the label if BL is not more positive than 39H or not equal to 39H
JLE/JNG Instruction –
This instruction performs the Jump if less than or equal / Jump if not greater operation according to the condition, if ZF=1 and SF ≠ OF Example:
CMP BL, 39h ; Compare by subtracting 39h from BL JLE NXT1 ; Jump to the label if BL is more negative than 39h or equal to 39h CMP BL, 39h ; Compare by subtracting 39h from BL JNG AGAIN2 ; Jump to the label if BL is not more positive than 39h
------------------------------------------------------------------------------------------------------------------------------------------- JNA/JBE Instruction - Jump if not above/Jump if below or equal JNAE/JB Instruction - Jump if not above or equal/ Jump if below JNB/JNC/JAE Instruction - Jump if not below/Jump if no carry/Jump if above or equal JNE/JNZ Instruction - Jump if not equal/Jump if not zero ----------------------------------------------------------------------------------------------------------------------------------------------
JNE/JNZ Instruction – This instruction performs the Jump if not equal / Jump if not zero operation according to the condition, if ZF=0 Example:
NXT: IN AL, 0F8H ; Read data value from port CMP AL, 72 ; Compare ( AL – 72 ) JNE NXT ; Jump to NXT if AL ≠ 72 IN AL, 0F9H ; Read next port when AL = 72 MOV BX, 2734H ; Load BX as counter
NXT_1: ADD AX, 0002H ; Add count factor to AX DEC BX ; Decrement BX JNZ NXT_1 ; Repeat until BX = 0
----------------------------------------------------------------------------------------------------------------------------------------------

M i c r o p r o c e s s o r s a n d M i c r o c o n t r o l l e r s P a g e | 31
K SUDHAKAR Unit-1
JNG/JLE Instruction - Jump if not greater/ Jump if less than or equal JNGE/JL Instruction - Jump if not greater than nor equal/Jump if less than JNL/JGE Instruction - Jump if not less than/ Jump if greater than or equal JNLE/JG Instruction - Jump if not less than nor equal to /Jump if greater than JNO Instruction – Jump if no overflow JNP/JPO Instruction – Jump if no parity/ Jump if parity odd JNS Instruction - Jump if not signed (Jump if positive) JNZ/JNE Instruction - Jump if not zero / jump if not equal JO Instruction - Jump if overflow ----------------------------------------------------------------------------------------------------------------------------------------------
JNO Instruction – This instruction performs the Jump if no overflow operation according to the condition, if OF=0 Example:
ADD AL, BL ; Add signed bytes in AL and BL JNO DONE ; Process done if no overflow - MOV AL, 00H ; Else load error code in AL
DONE: OUT 24H, AL ; Send result to display
JNP/JPO Instruction – This instruction performs the Jump if not parity / Jump if parity odd operation according to the condition, if PF=0 Example:
IN AL, 0F8H ; Read ASCII char from UART OR AL, AL ; Set flags JPO ERROR1 ; If even parity executed, if not send error message
JNS Instruction – This instruction performs the Jump if not signed (Jump if positive) operation according to the condition, if SF=0 Example:
DEC AL ; Decrement counter JNS REDO ; Jump to label REDO if counter has not decremented to FFH
JO Instruction –
This instruction performs Jump if overflow operation according to the condition OF = 0 Example:
ADD AL, BL ; Add signed bits in AL and BL JO ERROR ; Jump to label if overflow occur in addition MOV SUM, AL ; else put the result in memory location named SUM
---------------------------------------------------------------------------------------------------------------------------------------------- JPE/JP Instruction - Jump if parity even/ Jump if parity JPO/JNP Instruction - Jump if parity odd/ Jump if no parity JS Instruction - Jump if signed (Jump if negative) JZ/JE Instruction - Jump if zero/Jump if equal ----------------------------------------------------------------------------------------------------------------------------------------------
JPE/JP Instruction – This instruction performs the Jump if parity even / Jump if parity operation according to the condition, if PF=1 Example:
IN AL, 0F8H ; Read ASCII char from UART OR AL, AL ; Set flags

M i c r o p r o c e s s o r s a n d M i c r o c o n t r o l l e r s P a g e | 32
K SUDHAKAR Unit-1
JPE ERROR2 ; odd parity is expected, if not send error message
JS Instruction – This instruction performs the Jump if sign operation according to the condition, if SF=1 Example:
ADD BL, DH ; Add signed bytes DH to BL JS JJS_S1 ; Jump to label if result is negative
---------------------------------------------------------------------------------------------------------------------------------------------- LAHF Instruction - Copy low byte of flag register to AH LDS Instruction - Load register and Ds with words from memory –
LDS register, memory address of first word LEA Instruction - Load effective address-LEA register, source LES Instruction -Load register and ES with words from memory –
LES register, memory address of first word. ---------------------------------------------------------------------------------------------------------------------------------------------
LAHF Instruction: LAHF instruction copies the value of SF, ZF, AF, PF, CF, into bits of 7, 6, 4, 2, 0 respectively of AH
register. This LAHF instruction was provided to make conversion of assembly language programs written for 8080 and 8085 to 8086 easier.
LDS Instruction: This instruction loads a far pointer from the memory address specified by op2 into the DS segment
register and the op1 to the register. LDS op1, op2
Example: LDS BX, [4326] ; copy the contents of the memory at displacement 4326H in DS to BL, contents of the 4327H to BH. Copy contents of 4328H and 4329H in DS to DS register.
LEA Instruction – This instruction indicates the offset of the variable or memory location named as the source and put this offset in the indicated 16 – bit register. Example:
LEA BX, PRICE ; Load BX with offset of PRICE in DS LEA BP, SS:STAK ; Load BP with offset of STACK in SS LEA CX, [BX][DI] ; Load CX with EA=BX + DI
---------------------------------------------------------------------------------------------------------------------------------------------- LOCK Instruction - Assert bus lock signal LODS/LODSB/ LODSW Instruction - Load string byte into AL or Load string word into AX. LOOP Instruction - Loop to specified label until CX = 0 LOOPE / LOOPZ Instruction - loop while CX ≠ 0 and ZF = 1 ----------------------------------------------------------------------------------------------------------------------------------------------
LODS/LODSB/LODSW Instruction – This instruction copies a byte from a string location pointed to by SI to AL or a word from a string location pointed to by SI to AX. If DF is cleared to 0, SI will automatically incremented to point to the next element of string. Example:
CLD ; Clear direction flag so SI is auto incremented MOV SI, OFFSET SOURCE_STRING ; point SI at start of the string LODS SOUCE_STRING ; Copy byte or word from string to AL or AX

M i c r o p r o c e s s o r s a n d M i c r o c o n t r o l l e r s P a g e | 33
K SUDHAKAR Unit-1
LOOP Instruction –
This instruction is used to repeat a series of instruction some number of times Example:
MOV BX, OFFSET PRICE ; Point BX at first element in array MOV CX, 40 ; Load CX with number of elements in array
NEXT: MOV AL, [BX] ; Get elements from array ADD AL, 07H ; Ad correction factor DAA ; decimal adjust result MOV [BX], AL ; Put result back in array LOOP NEXT ; Repeat until all elements adjusted.
LOOPE / LOOPZ Instruction –
This instruction is used to repeat a group of instruction some number of times until CX = 0 and ZF = 0 Example:
MOV BX, OFFSET ARRAY ; point BX at start of the array DEC BX MOV CX, 100 ; put number of array elements in CX
NEXT: INC BX ; point to next element in array CMP [BX], 0FFH ; Compare array elements FFH LOOP NEXT
LOOPNE/LOOPNZ Instruction –
This instruction is used to repeat a group of instruction some number of times until CX = 0 and ZF = 1 Example:
MOV BX, OFFSET ARRAY1 ; point BX at start of the array DEC BX MOV CX, 100 ; put number of array elements in CX
NEXT: INC BX ; point to next elements in array CMP [BX], 0FFH ; Compare array elements 0DH LOOPNE NEXT
---------------------------------------------------------------------------------------------------------------------------------------------- MOV Instruction - MOV destination, source MOVS/MOVSB/ MOVSW Instruction - Move string byte or string word-MOVS destination, source MUL Instruction - Multiply unsigned bytes or words-MUL source NEG Instruction - From 2’s complement – NEG destination NOP Instruction - Performs no operation. ----------------------------------------------------------------------------------------------------------------------------------------------
MOV Instruction – The MOV instruction copies a word or a byte of data from a specified source to a specified destination.
MOV op1, op2 Example:
MOV CX, 037AH ; MOV 037AH into the CX. MOV AX, BX ; Copy the contents of register BX to AX MOV DL, [BX] ; Copy byte from memory at BX to DL, BX contains the offset of byte in DS.
MUL Instruction:
This instruction multiplies an unsigned multiplication of the accumulator by the operand specified by op. The size of op may be a register or memory operand.
MUL op Example:
; AL = 21h (33 decimal)

M i c r o p r o c e s s o r s a n d M i c r o c o n t r o l l e r s P a g e | 34
K SUDHAKAR Unit-1
; BL = A1h(161 decimal ) MUL BL ; AX =14C1h (5313 decimal) since AH≠0, CF and OF will set to 1. MUL BH ; AL times BH, result in AX MUL CX ; AX times CX, result high word in DX, low word in AX.
NEG Instruction –
NEG performs the two’s complement subtraction of the operand from zero and sets the flags according to the result.
; AX = 2CBh NEG AX ; after executing NEG result AX =FD35h.
Example: NEG AL ; Replace number in AL with its 2’s complement NEG BX ; Replace word in BX with its 2’s complement NEG BYTE PTR [BX ]; Replace byte at offset BX in DS with its 2’s complement
NOP Instruction:
This instruction simply uses up the three clock cycles and increments the instruction pointer to point to the next instruction. NOP does not change the status of any flag. The NOP instruction is used to increase the delay of a delay loop.
---------------------------------------------------------------------------------------------------------------------------------------------- NOT Instruction - Invert each bit of operand –NOT destination. OR Instruction - Logically OR corresponding of two operands- OR destination, source. OUT Instruction - Output a byte or word to a port – OUT port, accumulator AL or AX. POP Instruction - POP destination ----------------------------------------------------------------------------------------------------------------------------------------------
NOT Instruction - NOT performs the bitwise complement of op and stores the result back into op.
NOT op Example:
NOT BX ; Complement contents of BX register. ; DX =F038h
NOT DX ; after the instruction DX = 0FC7h
OR Instruction – OR instruction perform the bit wise logical OR of two operands. Each bit of the result is cleared to 0 if and only if both corresponding bits in each operand are 0, otherwise the bit in the result is set to 1.
OR op1, op2 Examples:
OR AH, CL ; CL ORed with AH, result in AH. ; CX = 00111110 10100101
OR CX, FF00h ; OR CX with immediate FF00h ; result in CX = 11111111 10100101 ; Upper byte are all 1’s lower bytes are unchanged.
OUT Instruction –
The OUT instruction copies a byte from AL or a word from AX or a double from the accumulator to I/O port specified by op. Two forms of OUT instruction are available: (1) Port number is specified by an immediate byte constant, ( 0 - 255 ).It is also called as fixed port form. (2) Port number is provided in the DX register ( 0 – 65535 ) Example:
(1)

M i c r o p r o c e s s o r s a n d M i c r o c o n t r o l l e r s P a g e | 35
K SUDHAKAR Unit-1
OUT 3BH, AL ; Copy the contents of the AL to port 3Bh OUT 2CH, AX ; Copy the contents of the AX to port 2Ch
(2) MOV DX, 0FFF8H ; Load desired port address in DX OUT DX, AL ; Copy the contents of AL to FFF8h OUT DX, AX ; Copy content of AX to port FFF8H
POP Instruction:
POP instruction copies the word at the current top of the stack to the operand specified by op then increments the stack pointer to point to the next stack. Example:
POP DX ; Copy a word from top of the stack to DX and increments SP by 2. POP DS ; Copy a word from top of the stack to DS and increments SP by 2.
POP TABLE [BX] ; Copy a word from top of stack to memory in DS with EA = TABLE + BX]. ---------------------------------------------------------------------------------------------------------------------------------------------- POPF Instruction - Pop word from top of stack to flag - register. PUSH Instruction - PUSH source PUSHF Instruction - Push flag register on the stack RCL Instruction - Rotate operand around to the left through CF – RCL destination, source. RCR Instruction - Rotate operand around to the right through CF- RCR destination, count ----------------------------------------------------------------------------------------------------------------------------------------------
POPF Instruction – This instruction copies a word from the two memory location at the top of the stack to flag register and increments the stack pointer by 2.
PUSH Instruction: PUSH instruction decrements the stack pointer by 2 and copies a word from a specified source to
the location in the stack segment where the stack pointer pointes. Example:
PUSH BX ; Decrement SP by 2 and copy BX to stack PUSH DS ; Decrement SP by 2 and copy DS to stack PUSH TABLE [BX] ; Decrement SP by 2 and copy word from memory in DS at
; EA = TABLE + [BX] to stack. PUSHF Instruction:
This instruction decrements the SP by 2 and copies the word in flag register to the memory location pointed to by SP.
RCL Instruction: RCL instruction rotates the bits in the operand specified by op1 towards left by the count specified
in op2.The operation is circular, the MSB of operand is rotated into a carry flag and the bit in the CF is rotated around into the LSB of operand.
RCR op1, op2 Example:
CLC ; put 0 in CF RCL AX, 1 ; save higher-order bit of AX in CF RCL DX, 1 ; save higher-order bit of DX in CF ADC AX, 0 ; set lower order bit if needed.
Example: RCL DX, 1 ; Word in DX of 1 bit is moved to left, and MSB of word is given to CF and
; CF to LSB. ; CF=0, BH = 10110011
RCL BH, 1 ; Result: BH =01100110

M i c r o p r o c e s s o r s a n d M i c r o c o n t r o l l e r s P a g e | 36
K SUDHAKAR Unit-1
; CF = 1, OF = 1 because MSB changed ; CF =1, AX =00011111 10101001
MOV CL, 2 ; Load CL for rotating 2 bit position RCL AX, CL ; Result: CF =0, OF undefined
; AX = 01111110 10100110
RCR Instruction – RCR instruction rotates the bits in the operand specified by op1 towards right by the count specified in op2. RCR op1, op2 Example:
( 1) RCR BX, 1 ; Word in BX is rotated by 1 bit towards
; right and CF will contain MSB bit and ; LSB contain CF bit.
( 2) ; CF = 1, BL = 00111000
RCR BL, 1 ; Result: BL = 10011100, CF =0 ; OF = 1 because MSB is changed to 1.
---------------------------------------------------------------------------------------------------------------------------------------------- REP/REPE/REPZ/ REPNE/REPNZ - (Prefix) Repeat String instruction until specified condition exist RET Instruction – Return execution from procedure to calling program. ROL Instruction - Rotate all bits of operand left, MSB to LSB ROL destination, count. ----------------------------------------------------------------------------------------------------------------------------------------------
ROL Instruction – ROL instruction rotates the bits in the operand specified by op1 towards left by the count specified in op2. ROL moves each bit in the operand to next higher bit position. The higher order bit is moved to lower order position. Last bit rotated is copied into carry flag.
ROL op1, op2 Example: ( 1 )
ROL AX, 1 ; Word in AX is moved to left by 1 bit ; and MSB bit is to LSB, and CF ; CF =0, BH =10101110
ROL BH, 1 ; Result: CF, Of =1, BH = 01011101
ROR Instruction - ROR instruction rotates the bits in the operand op1 towards right by count specified in
op2. The last bit rotated is copied into CF.
ROR op1, op2 Example:
( 1 ) ROR BL, 1 ; Rotate all bits in BL towards right by 1 ; bit position, LSB bit is moved to MSB
; and CF has last rotated bit. ( 2 )
; CF =0, BX = 00111011 01110101 ROR BX, 1 ; Rotate all bits of BX of 1 bit position ; towards right and CF =1,
BX = 10011101 10111010 ( 3 )
; CF = 0, AL = 10110011, MOVE CL, 04H ; Load CL ROR AL, CL ; Rotate all bits of AL towards right ; by 4 bits, CF = 0, AL = 00111011
SAHF Instruction:

M i c r o p r o c e s s o r s a n d M i c r o c o n t r o l l e r s P a g e | 37
K SUDHAKAR Unit-1
SAHF copies the value of bits 7, 6, 4, 2, 0 of the AH register into the SF, ZF, AF, PF, and CF respectively. This instruction was provided to make easier conversion of assembly language program written for 8080 and 8085 to 8086.
---------------------------------------------------------------------------------------------------------------------------------------------- SAL/SHL Instruction - Shift operand bits left, put zero in LSB(s) SAL/AHL destination, count SAR Instruction - Shift operand bits right, new MAB = old MSB SAR destination, count. SBB Instruction - Subtract with borrow SBB destination, source ----------------------------------------------------------------------------------------------------------------------------------------------
SAL / SHL Instruction – SAL instruction shifts the bits in the operand specified by op1 to its left by the count specified in op2. As a bit is shifted out of LSB position a 0 is kept in LSB position. CF will contain MSB bit.
SAL op1, op2 Example:
; CF = 0, BX = 11100101 11010011 SAL BX, 1 ; Shift BX register contents by 1 bit position towards left
; CF = 1, BX = 11001011 1010011
SAR Instruction – SAR instruction shifts the bits in the operand specified by op1 towards right by count specified in op2.As bit is shifted out a copy of old MSB is taken in MSB MSB position and LSB is shifted to CF.
SAR op1, op2 Example: ( 1 )
; AL = 00011101 = +29 decimal, CF = 0 SAR AL, 1 ; Shift signed byte in AL towards right (divide by 2 )
; AL = 00001110 = + 14 decimal, CF = 1 ( 2 )
; BH = 11110011 = - 13 decimal, CF = 1 SAR BH, 1 ; Shifted signed byte in BH to right
; BH = 11111001 = - 7 decimal, CF = 1
SBB Instruction – SBB instruction subtracts op2 from op1, then subtracts 1 from op1 is CF flag is set and result is stored in op1 and it is used to set the flag. Example:
SUB CX, BX ; CX – BX. Result in CX SBB CH, AL ; Subtract contents of AL and contents CF from contents of CH. ; Result in CH SBB AX, 3427H ; Subtract immediate number from AX
Example: •Subtracting unsigned number
; CL = 10011100 = 156 decimal ; BH = 00110111 = 55 decimal
SUB CL, BH ; CL = 01100101 = 101 decimal ; CF, AF, SF, ZF = 0, OF, PF = 1
•Subtracting signed number ; CL = 00101110 = + 46 decimal ; BH = 01001010= + 74 decimal
SUB CL, BH ; CL = 11100100 = - 28 decimal ; CF = 1, AF, ZF =0, ; SF = 1 result negative
----------------------------------------------------------------------------------------------------------------------------------------------

M i c r o p r o c e s s o r s a n d M i c r o c o n t r o l l e r s P a g e | 38
K SUDHAKAR Unit-1
STD Instruction - Set the direction flag to 1 STI Instruction - Set interrupt flag ( IF) STOS/STOSB/ STOSW Instruction - Store byte or word in string. SCAS/SCASB/ - Scan string byte or a SCASW Instruction string word. SHR Instruction - Shift operand bits right, put zero in MSB STC Instruction - Set the carry flag to 1 ----------------------------------------------------------------------------------------------------------------------------------------------
SHR Instruction – SHR instruction shifts the bits in op1 to right by the number of times specified by op2. Example:
( 1 ) SHR BP, 1 ; Shift word in BP by 1 bit position to right and 0 is kept to MSB
( 2 ) MOV CL, 03H ; Load desired number of shifts into CL SHR BYTE PYR [BX] ; Shift bytes in DS at offset BX and
; rotate 3 bits to right and keep 3 0’s in MSB ( 3 )
; SI = 10010011 10101101, CF = 0 SHR SI, 1 ; Result: SI = 01001001 11010110
; CF = 1, OF = 1, SF = 0, ZF = 0 ---------------------------------------------------------------------------------------------------------------------------------------------- TEST Instruction – AND operand to update flags WAIT Instruction - Wait for test signal or interrupt signal XCHG Instruction - Exchange XCHG destination, source XLAT/ XLATB Instruction - Translate a byte in AL XOR Instruction - Exclusive OR corresponding bits of two operands –
XOR destination, source ---------------------------------------------------------------------------------------------------------------------------------------------- TEST Instruction - This instruction ANDs the contents of a source byte or word with the contents of specified destination word. Flags are updated but neither operand is changed. TEST instruction is often used to set flags before a condition jump instruction Examples:
TEST AL, BH ; AND BH with AL. no result is stored. Update PF, SF, ZF TEST CX, 0001H ; AND CX with immediate number
; no result is stored, Update PF, ; SF Example:
; AL = 01010001 TEST Al, 80H ; AND immediate 80H with AL to test f MSB of AL is 1 or 0
; ZF = 1 if MSB of AL = 0 ; AL = 01010001 (unchanged) ; PF = 0, SF = 0 ; ZF = 1 because ANDing produced is 00
WAIT Instruction - When this WAIT instruction executes, the 8086 enters an idle condition. This will stay in this state until a signal is asserted on TEST input pin or a valid interrupt signal is received on the INTR or NMI pin.
FSTSW STATUS ; copy 8087 status word to memory FWAIT ; wait for 8087 to finish before- doing next 8086 instruction MOV AX, STATUS ; copy status word to AX to check bits
In this code we are adding up of FWAIT instruction so that it will stop the execution of the command until the above instruction is finishes it’s work. So that you are not loosing data and after that you will allow to continue the execution of instructions.

M i c r o p r o c e s s o r s a n d M i c r o c o n t r o l l e r s P a g e | 39
K SUDHAKAR Unit-1
XCHG Instruction - The Exchange instruction exchanges the contents of the register with the contents of another register (or) the contents of the register with the contents of the memory location. Direct memory to memory exchange is not supported.
XCHG op1, op2 The both operands must be the same size and one of the operand must always be a register. Example:
XCHG AX, DX ; Exchange word in AX with word in DX XCHG BL, CH ; Exchange byte in BL with byte in CH XCHG AL, Money [BX] ; Exchange byte in AL with byte in memory at EA.
XOR Instruction - XOR performs a bit wise logical XOR of the operands specified by op1 and op2. The result of the operand is stored in op1 and is used to set the flag.
XOR op1, op2 Example: (Numerical )
; BX = 00111101 01101001 ; CX = 00000000 11111111
XOR BX, CX ; Exclusive OR CX with BX ; Result BX = 00111101 10010110
ASSEMBLER DIRECTIVES
An assembler directive is a message to the assembler that tells the assembler something it needs to know in order to carry out the assembly process. Or a statement in an assembly-language program that gives instructions to the assembler. They are described below. ---------------------------------------------------------------------------------------------------------------------------------------------- ASSUME DB - Defined Byte. DD - Defined Double Word DQ - Defined Quad Word DT - Define Ten Bytes DW - Define Word ---------------------------------------------------------------------------------------------------------------------------------------------- ASSUME Directive:
The ASSUME directive is used to tell the assembler that the name of the logical segment should be used for a specified segment. The 8086 works directly with only 4 physical segments: a Code segment, a data segment, a stack segment, and an extra segment. Example:
ASUME CS: CODE ; this tells the assembler that the logical segment named CODE contains the instruction statements for the program and should be treated as a code segment.
ASUME DS: DATA ; this tells the assembler that for any instruction which refers to a data in the data segment, data will found in the logical segment DATA.
DB: DB directive is used to declare a byte-type variable or to store a byte in memory location. Example:
1. PRICE DB 49h, 98h, 29h ; Declare an array of 3 bytes, named as PRICE and initialize. 2. NAME DB ‘ABCDEF ’ ; Declare an array of 6 bytes and initialize with ASCII code for letters 3. TEMP DB 100 DUP(?) ; Set 100 bytes of storage in memory and give it the name as TEMP,
;but leave the 100 bytes uninitialized. Program instructions will load ;values into these locations.
DW: The DW directive is used to define a variable of type word or to reserve storage location of type word in memory.

M i c r o p r o c e s s o r s a n d M i c r o c o n t r o l l e r s P a g e | 40
K SUDHAKAR Unit-1
Example: MULTIPLIER DW 437Ah ; this declares a variable of type word and named it as MULTIPLIER.
;This variable is initialized with the value 437Ah when it is loaded into memory to run.
EXP1 DW 1234h, 3456h, 5678h ; this declares an array of 3 words and initialized with specified values.
STOR1 DW 100 DUP(0) ; Reserve an array of 100 words of memory and initialize all words with 0000.Array is named as STOR1.
---------------------------------------------------------------------------------------------------------------------------------------------- END - End Program ENDP - End Procedure ENDS - End Segment EQU - Equate EVEN - Align on Even Memory Address EXTRN --------------------------------------------------------------------------------------------------------------------------------------------- END: END directive is placed after the last statement of a program to tell the assembler that this is the end of the program module. The assembler will ignore any statement after an END directive. Carriage return is required after the END directive. ENDP: ENDP directive is used along with the name of the procedure to indicate the end of a procedure to the assembler Example:
SQUARE_NUM PROCE ; It start the procedure Some steps to find the square root of a number
SQUARE_NUM ENDP ; Hear it is the End for the procedure ENDS - This ENDS directive is used with name of the segment to indicate the end of that logic segment. Example:
CODE SEGMENT ; Hear it Start the logic segment containing code ; Some instructions statements to perform the logical operation
CODE ENDS ; End of segment named as CODE EQU: This EQU directive is used to give a name to some value or to a symbol. Each time the assembler finds the name in the program, it will replace the name with the value or symbol you given to that name. Example:
FACTOR EQU 03H ; you has to write this statement at the starting of your program and later in the program you can use this as follows
ADD AL, FACTOR ; When it codes this instruction the assembler will code it as ADDAL, 03H ; The advantage of using EQU in this manner is, if FACTOR is used many no of times in a program and you want to change the value, all you had to do is change the EQU statement at beginning, it will changes the rest of all.
EVEN: This EVEN directive instructs the assembler to increment the location of the counter to the next even address if it is not already in the even address. If the word is at even address 8086 can read a memory in 1 bus cycle.
If the word starts at an odd address, the 8086 will take 2 bus cycles to get the data. A series of words can be read much more quickly if they are at even address. When EVEN is used the location counter will simply incremented to next address and NOP instruction is inserted in that incremented location. Example:
DATA1 SEGMENT ; Location counter will point to 0009 after assembler reads next statement
SALES DB 9 DUP (?) ; declare an array of 9 bytes

M i c r o p r o c e s s o r s a n d M i c r o c o n t r o l l e r s P a g e | 41
K SUDHAKAR Unit-1
EVEN ; increment location counter to 000AH RECORD DW 100 DUP (0) ; Array of 100 words will start from an even address for quicker read DATA1 ENDS
---------------------------------------------------------------------------------------------------------------------------------------------- GROUP - Group Related Segments LABLE NAME OFFSET ORG - Originate ---------------------------------------------------------------------------------------------------------------------------------------------- GROUP - The GROUP directive is used to group the logical segments named after the directive into one logical group segment. INCLUDE - This INCLUDE directive is used to insert a block of source code from the named file into the current source module. ---------------------------------------------------------------------------------------------------------------------------------------------- PROC - Procedure PTR - Pointer PUBLC SEGMENT SHORT TYPE ---------------------------------------------------------------------------------------------------------------------------------------------- PROC: The PROC directive is used to identify the start of a procedure. The term near or far is used to specify the type of the procedure. Example:
SMART PROC FAR ; This identifies that the start of a procedure named as SMART and instructs the assembler that the procedure is far.
SMART ENDP This PROC is used with ENDP to indicate the break of the procedure.
PTR: This PTR operator is used to assign a specific type of a variable or to a label. Example:
INC [BX] ; this instruction will not know whether to increment the byte pointed to by BX or a word pointed to by BX.
INC BYTE PTR [BX] ; increment the byte ; pointed to by BX This PTR operator can also be used to override the declared type of variable. If we want to access the a byte in an array
WORDS DW 437Ah, 0B97h, MOV AL, BYTE PTR WORDS
PUBLIC - The PUBLIC directive is used to instruct the assembler that a specified name or label will be accessed from other modules. Example:
PUBLIC DIVISOR, DIVIDEND ; these two variables are public so these are available to all modules. If an instruction in a module refers to a variable in another assembly module, we can access that module by declaring as EXTRN directive. TYPE - TYPE operator instructs the assembler to determine the type of a variable and determines the number of bytes specified to that variable. Example:
Byte type variable – assembler will give a value 1 Word type variable – assembler will give a value 2 Double word type variable – assembler will give a value 4
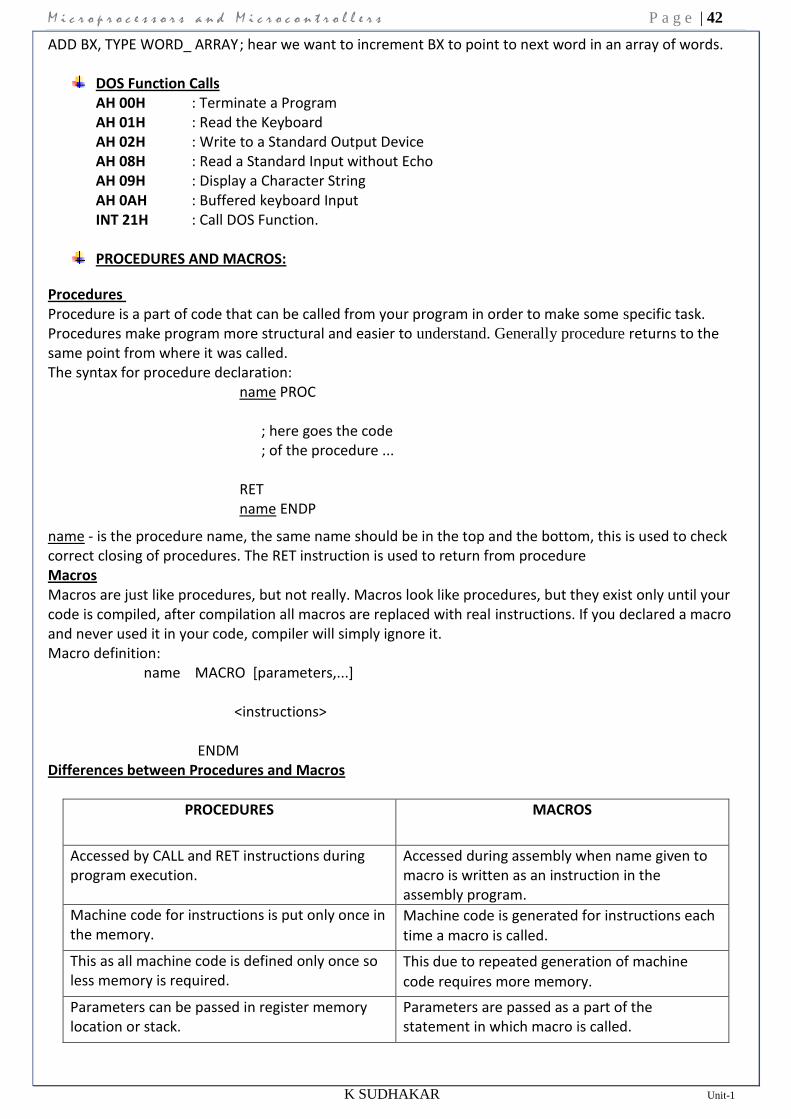
M i c r o p r o c e s s o r s a n d M i c r o c o n t r o l l e r s P a g e | 42
K SUDHAKAR Unit-1
ADD BX, TYPE WORD_ ARRAY ; hear we want to increment BX to point to next word in an array of words.
DOS Function Calls AH 00H : Terminate a Program AH 01H : Read the Keyboard AH 02H : Write to a Standard Output Device AH 08H : Read a Standard Input without Echo AH 09H : Display a Character String AH 0AH : Buffered keyboard Input INT 21H : Call DOS Function.
PROCEDURES AND MACROS:
Procedures Procedure is a part of code that can be called from your program in order to make some specific task. Procedures make program more structural and easier to understand. Generally procedure returns to the same point from where it was called. The syntax for procedure declaration:
name PROC ; here goes the code ; of the procedure ... RET name ENDP
name - is the procedure name, the same name should be in the top and the bottom, this is used to check correct closing of procedures. The RET instruction is used to return from procedure Macros Macros are just like procedures, but not really. Macros look like procedures, but they exist only until your code is compiled, after compilation all macros are replaced with real instructions. If you declared a macro and never used it in your code, compiler will simply ignore it. Macro definition: name MACRO [parameters,...] <instructions> ENDM
Differences between Procedures and Macros
PROCEDURES MACROS
Accessed by CALL and RET instructions during program execution.
Accessed during assembly when name given to macro is written as an instruction in the assembly program.
Machine code for instructions is put only once in the memory.
Machine code is generated for instructions each
time a macro is called.
This as all machine code is defined only once so less memory is required.
This due to repeated generation of machine
code requires more memory.
Parameters can be passed in register memory location or stack.
Parameters are passed as a part of the statement in which macro is called.