Double Oven Slide-in Electric Range - Sears · This Use & Care Manual contains general operating...
76
Use & Care Guide Manual de Uso y Cuidado English / Español P/N 318205842B (1208) Sears Brands Management Corporation Hoffman Estates, IL 60179 U.S.A. www.kenmore.com www.sears.com Kenmore Elite ® Double Oven Slide-in Electric Range Estufa Eléctrica Deslizable con Horno Doble * = Color number, número de color Models/Modelos: 790.4111* ®
-
Upload
duongkhuong -
Category
Documents
-
view
214 -
download
1
Transcript of Double Oven Slide-in Electric Range - Sears · This Use & Care Manual contains general operating...

Use & Care GuideManual de Uso y CuidadoEnglish / Español
P/N 318205842B (1208)Sears Brands Management CorporationHoffman Estates, IL 60179 U.S.A.www.kenmore.comwww.sears.com
Kenmore Elite®
Double Oven Slide-in Electric Range Estufa Eléctrica Deslizable con Horno Doble* = Color number, número de color
Models/Modelos: 790.4111*
®

2
Please carefully read and save these instructionsThis Use & Care Manual contains general operating instructions for your appliance and feature information for several models. Your product may not have all the described features. The graphics shown are representative. The graphics on your appliance may not look exactly like those shown. Common sense and caution must be practiced when installing, operating and maintaining any appliance.
Printed in Canada
Serial Plate LocationYou will find the model and serial number printed on the serial plate. The serial plate is located along the interior side trim and visible when the oven door is opened.
Remember to record the serial number for future reference.
Product RecordIn this space below, record the date of purchase, model and serial number of your product. You will find the model and serial number printed on the serial plate.
Model No. ______________________________________
Serial No. _______________________________________
Date of purchase ________________________________
Save these instructions and your sales receipt for future reference.
790.
Table of ContentsKenmore Elite Warranty ............................................................. 2Product Record ............................................................................. 2Serial Plate Location ................................................................... 2IMPORTANT SAFETY INSTRUCTIONS ................................ 3-5Feature at a Glance .................................................................... 6Before Setting Oven Controls ....................................................7Surface Cookware Recommendations ......................................8Before Setting Surface Controls ...........................................9-10Setting Surface Controls ....................................................... 11-13
Oven Control Functions ............................................................ 14Getting Started ...........................................................................15Setting Oven Controls ..........................................................16-26User Preferences ........................................................................27Self-Cleaning Cycle .............................................................28-29Care & Cleaning ..................................................................30-33Before You Call ....................................................................34-36Protection Agreements ..............................................................37Sears Service ..............................................................................38
Kenmore Elite WarrantyWhen installed, operated and maintained according to all instructions supplied with the product, if this appliance fails due to a defect in material and workmanship within one year from the date of purchase, call 1-800-4-MY-HOME® to arrange for free repair.
This warranty applies for only 90 days from the date of purchase if this appliance is ever used for other than private family purposes.
This warranty covers only defects in material and workmanship. Sears will NOT pay for:1. Cracks in a ceramic glass cooktop that are not a result of thermal shock.2. Stains and scratches on a ceramic glass cooktop resulting from accident or improper operation or maintenance.3. Expendable items that can wear out from normal use, including but not limited to fi lters, belts, light bulbs, and bags. 4. A service technician to instruct the user in correct product installation, operation or maintenance. 5. A service technician to clean or maintain this product. 6. Damage to or failure of this product if it is not installed, operated or maintained according to the all instructions
supplied with the product. 7. Damage to or failure of this product resulting from accident, abuse, misuse or use for other than its intended purpose. 8. Damage to or failure of this product caused by the use of detergents, cleaners, chemicals or utensils other than those
recommended in all instructions supplied with the product. 9. Damage to or failure of parts or systems resulting from unauthorized modifi cations made to this product.
Disclaimer of implied warranties; limitation of remediesCustomer’s sole and exclusive remedy under this limited warranty shall be product repair as provided herein. Implied warranties, including warranties of merchantability or fi tness for a particular purpose, are limited to one year or the shortest period allowed by law. Sears shall not be liable for incidental or consequential damages. Some states and provinces do not allow the exclusion or limitation of incidental or consequential damages, or limitation on the duration of implied warranties of merchantability or fi tness, so these exclusions or limitations may not apply to you.
This warranty applies only while this appliance is used in the United States or Canada.
This warranty gives you specifi c legal rights, and you may also have other rights which vary from state to state.
Sears Brands management corporation, Hoff man estates, IL 60179 - Sears canada Inc., toronto, ontario, canada m5B 2c3

3
A child or adult can tip the • range and be killed.Verify the anti-tip device has • been installed to fl oor or wall.
Tip Over Hazard
Ensure the anti-tip device is re-engaged to • fl oor or wall when the range is moved.Do not operate the range without the anti-• tip device in place and engaged.Failure to follow these instructions can • result in death or serious burns to children and adults.
To check if the anti-tip bracket is installed properly, use both arms and grasp the rear edge of range back. Carefully attempt to
tilt range forward. When properly installed, the range should not tilt forward.Refer to the anti-tip bracket installation instructions supplied with your range for proper installation.
• In case of an emergency, know how to disconnect the electrical power to the appliance at the circuit breaker or fuse box.
• user Servicing. Do not repair or replace any part of the appliance unless specifi cally recommended in the manuals. All other servicing should be done only by a qualifi ed technician to reduce the risk of personal injury and damage to the appliance. Sears Parts & Repair is the recommended repair service for this appliance.
• never modify or alter the construction of an appliance by removing panels, wire covers or any other part of the product.
• remove the oven door from any unused appliance if it is to be stored or discarded.
Stepping, leaning, sitting or pulling down on the door of this appliance can result in serious injuries and may also cause damage to the appliance. Do not allow children to climb or play around the appliance.• Storage on appliance. flammable materials
should not be stored near surface units. This includes paper, plastic and cloth items, such as cookbooks, plasticware and towels, as well as fl ammable liquids. Do not store explosives, such as aerosol cans, on or near the appliance. Flammable materials may explode and result in fi re or property damage.
Do not use the ovens for storage. Do not store items of interest to
children in the cabinets above an appliance. Children climbing on the appliance to reach items could be seriously injured.• Do not leave children alone. children should
not be left alone or unattended in the area where an appliance is in use. They should never be allowed to sit or stand on any part of the appliance.
• remove all tape and packaging before using the appliance. Destroy the carton and plastic bags after unpacking the appliance. Never allow children to play with packaging material.
• proper Installation. Be sure your appliance is properly installed and grounded by a qualifi ed technician in accordance with National electrical code anSI/nfpa no.70 (uSa) or cSa c22.1, part 1 (canada)-latest edition and local code requirements. Install only per installation instructions provided in the literature package for this appliance.
This manual contains important safety symbols and instructions. Please pay attention to these symbols and follow all instructions given.
This symbol will help alert you to situations that may cause serious bodily harm, death or property damage.
This symbol will help alert you to situations that may cause bodily injury or property damage.
Important Safety InStructIonS Read all instructions before using this appliance.
• all appliances can tip.• Injury to persons could result.• Install anti-tip bracket packed with
unit.• See Installation Instructions.
To reduce the risk of tipping, the appliance must be secured by properly installed anti-tip bracket provided with the appliance. To check if the bracket is installed properly; grasp the top rear of the appliance and carefully attempt to tilt it forward. Refer to the Installation Instructions for proper anti-tip bracket installation.

4
Important Safety InStructIonS• Do not toucH Surface unItS, areaS
near tHeSe SurfaceS, oVen HeatInG eLementS or InterIor SurfaceS. Surface units may be hot even though they are dark in color. Areas near surface units may become hot enough to cause burns. During and after use, do not touch, or let clothing or other flammable materials touch these areas until they have had sufficient time to cool. Among these areas are the cooktop, surfaces facing the cooktop, the oven vent openings and surfaces near these openings, oven door and window.
• Wear proper apparel. Loose-fitting or hanging garments should never be worn while using the appliance. Do not let clothing or other flammable materials contact hot surfaces.
Never use your appliance for warming or heating the room.• Do not use Water or flour on Grease fires.
Smother the fire with a pan lid, or use baking soda, a dry chemical or foam-type extinguisher.
• When heating fat or grease, watch it closely. Fat or grease may catch fire if allowed to become too hot.
• use only Dry potholders. moist or damp potholders on hot surfaces may result in burns from steam. Do not let the potholders touch hot heating surface units. Do not use a towel or other bulky cloth instead of a potholder.
• Do not Heat unopened food containers. Buildup of pressure may cause the container to burst and result in injury.
Important—Do not attempt to operate the appliance during a power failure. If power fails, always turn off the appliance. If the appliance is not turned off and the power resumes, it will begin to operate again. Once the power resumes, reset the clock and oven function.
Important InStructIonS for uSInG your cooKtop• Know which knob controls each surface
heating unit. Place a pan of food on the unit before turning it on, and then turn the unit off before removing the pan.
• use proper pan size. This appliance is equipped with one or more surface units of different sizes.
Select utensils having flat bottoms large enough to cover the surface unit. The use of undersized utensils will expose a portion of the surface heating unit to direct contact and may result in ignition of clothing. Proper relationship of utensil to the surface unit will also improve efficiency.
• utensil handles should be turned inward and not extend over adjacent surface units. To reduce the risk of burns, ignition of flammable materials, and spillage due to unintentional contact with the utensil.
• Never leave surface units unattended—Boilovers cause smoking and greasy accumulations that may ignite, or a pan that has boiled dry may melt.
• Glazed cooking utensils—Only certain types of glass, glass/ceramic, ceramic, earthenware, or other glazed utensils are suitable for rangetop service without breaking due to the sudden change in temperature. Check the manufacturer’s recommendations for cooktop use.
Important InStructIonS for uSInG your oVen• use care When opening an oven Door or
a Warmer Drawer—Stand to the side of the appliance when opening the door of a hot oven. Let hot air or steam escape before you remove or replace food in the oven.
• Keep oven Vent Ducts unobstructed. The oven is vented through the back cooktop trim. Touching the surfaces in this area when the oven is operating may cause severe burns. Also, do not place plastic or heat-sensitive items near the oven vent. These items could melt or ignite.
neVer cover any slots, holes or passages in the oven bottom or cover an entire rack with materials such as aluminum foil. Doing so blocks air flow through the oven and may cause carbon monoxide poisoning. Aluminum foil linings may trap heat, causing a fire hazard. • Placement of Oven Racks. Always place oven
racks in desired location while oven is cool. Remove all utensils from the rack before removing rack. If rack must be moved while oven is hot, use extreme caution. Use pot holders and grasp the rack with both hands to reposition. Do not let pot
5
Important Safety InStructIonS
SaVe tHeSe InStructIonS for future reference.
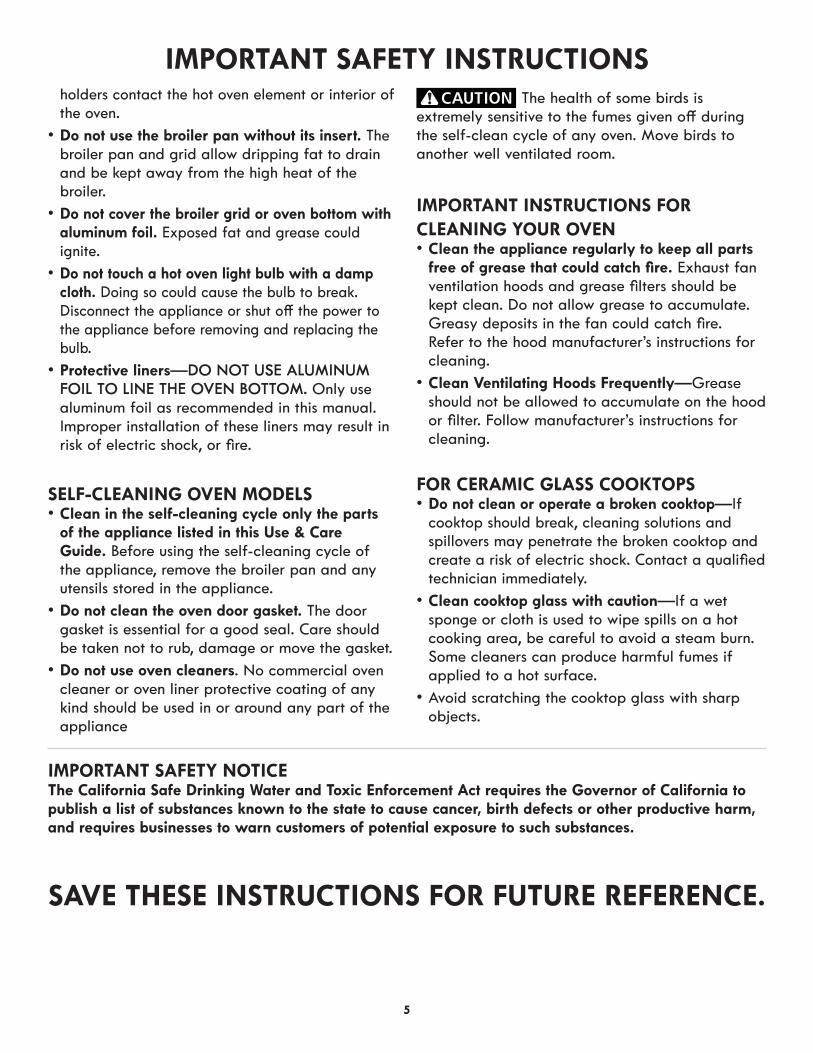
holders contact the hot oven element or interior of the oven.
• Do not use the broiler pan without its insert. The broiler pan and grid allow dripping fat to drain and be kept away from the high heat of the broiler.
• Do not cover the broiler grid or oven bottom with aluminum foil. Exposed fat and grease could ignite.
• Do not touch a hot oven light bulb with a damp cloth. Doing so could cause the bulb to break. Disconnect the appliance or shut off the power to the appliance before removing and replacing the bulb.
• Protective liners—DO NOT USE ALUMINUM FOIL TO LINE THE OVEN BOTTOM. Only use aluminum foil as recommended in this manual. Improper installation of these liners may result in risk of electric shock, or fi re.
SeLf-cLeanInG oVen moDeLS• clean in the self-cleaning cycle only the parts
of the appliance listed in this use & care Guide. Before using the self-cleaning cycle of the appliance, remove the broiler pan and any utensils stored in the appliance.
• Do not clean the oven door gasket. The door gasket is essential for a good seal. Care should be taken not to rub, damage or move the gasket.
• Do not use oven cleaners. No commercial oven cleaner or oven liner protective coating of any kind should be used in or around any part of the appliance
The health of some birds is extremely sensitive to the fumes given off during the self-clean cycle of any oven. Move birds to another well ventilated room.
Important InStructIonS for cLeanInG your oVen• Clean the appliance regularly to keep all parts
free of grease that could catch fi re. Exhaust fan ventilation hoods and grease fi lters should be kept clean. Do not allow grease to accumulate. Greasy deposits in the fan could catch fi re. Refer to the hood manufacturer’s instructions for cleaning.
• clean Ventilating Hoods frequently—Grease should not be allowed to accumulate on the hood or fi lter. Follow manufacturer’s instructions for cleaning.
for ceramIc GLaSS cooKtopS• Do not clean or operate a broken cooktop—If
cooktop should break, cleaning solutions and spillovers may penetrate the broken cooktop and create a risk of electric shock. Contact a qualifi ed technician immediately.
• Clean cooktop glass with caution—If a wet sponge or cloth is used to wipe spills on a hot cooking area, be careful to avoid a steam burn. Some cleaners can produce harmful fumes if applied to a hot surface.
• Avoid scratching the cooktop glass with sharp objects.
Important Safety notIcethe california Safe Drinking Water and toxic enforcement act requires the Governor of california to publish a list of substances known to the state to cause cancer, birth defects or other productive harm, and requires businesses to warn customers of potential exposure to such substances.
Important Safety InStructIonS• Do not toucH Surface unItS, areaS
near tHeSe SurfaceS, oVen HeatInG eLementS or InterIor SurfaceS. Surface units may be hot even though they are dark in color. Areas near surface units may become hot enough to cause burns. During and after use, do not touch, or let clothing or other fl ammable materials touch these areas until they have had suffi cient time to cool. Among these areas are the cooktop, surfaces facing the cooktop, the oven vent openings and surfaces near these openings, oven door and window.
• Wear proper apparel. Loose-fi tting or hanging garments should never be worn while using the appliance. Do not let clothing or other fl ammable materials contact hot surfaces.
Never use your appliance for warming or heating the room.• Do not use Water or flour on Grease fires.
Smother the fi re with a pan lid, or use baking soda, a dry chemical or foam-type extinguisher.
• When heating fat or grease, watch it closely. Fat or grease may catch fi re if allowed to become too hot.
• use only Dry potholders. moist or damp potholders on hot surfaces may result in burns from steam. Do not let the potholders touch hot heating surface units. Do not use a towel or other bulky cloth instead of a potholder.
• Do not Heat unopened food containers. Buildup of pressure may cause the container to burst and result in injury.
Important—Do not attempt to operate the appliance during a power failure. If power fails, always turn off the appliance. If the appliance is not turned off and the power resumes, it will begin to operate again. Once the power resumes, reset the clock and oven function.
Important InStructIonS for uSInG your cooKtop• Know which knob controls each surface
heating unit. Place a pan of food on the unit before turning it on, and then turn the unit off before removing the pan.
• use proper pan size. This appliance is equipped with one or more surface units of diff erent sizes.
Select utensils having fl at bottoms large enough to cover the surface unit. The use of undersized utensils will expose a portion of the surface heating unit to direct contact and may result in ignition of clothing. Proper relationship of utensil to the surface unit will also improve effi ciency.
• utensil handles should be turned inward and not extend over adjacent surface units. To reduce the risk of burns, ignition of fl ammable materials, and spillage due to unintentional contact with the utensil.
• Never leave surface units unattended—Boilovers cause smoking and greasy accumulations that may ignite, or a pan that has boiled dry may melt.
• Glazed cooking utensils—Only certain types of glass, glass/ceramic, ceramic, earthenware, or other glazed utensils are suitable for rangetop service without breaking due to the sudden change in temperature. Check the manufacturer’s recommendations for cooktop use.
Important InStructIonS for uSInG your oVen• use care When opening an oven Door or
a Warmer Drawer—Stand to the side of the appliance when opening the door of a hot oven. Let hot air or steam escape before you remove or replace food in the oven.
• Keep oven Vent Ducts unobstructed. The oven is vented at the at the center trim above the oven. Touching the surfaces in this area when the oven is operating may cause severe burns. Also, do not place plastic or heat-sensitive items near the oven vent. These items could melt or ignite.
neVer cover any slots, holes or passages in the oven bottom or cover an entire rack with materials such as aluminum foil. Doing so blocks air fl ow through the oven and may cause carbon monoxide poisoning. Aluminum foil linings may trap heat, causing a fi re hazard. • Placement of Oven Racks. Always place oven
racks in desired location while oven is cool. Remove all utensils from the rack before removing rack. If rack must be moved while oven is hot, use extreme caution. Use pot holders and grasp the rack with both hands to reposition. Do not let pot

6
features at a Glance
NOTE: The features of your range may vary according to model type & color.
2
1
3 4 5 6
18 20
21
23
22
19
910
1112
15
15
13
16
16
17
14
7
8
your range includes:1. Electronic oven control with kitchen timer.2. Left front element control and electronic display.3. Left rear element control and electronic display.4. Warmer zone control and electronic display.5. Right rear element control and electronic display.6. Right front element control and electronic display.7. Right front element size selector.
8. Lower oven self-clean door latch.9. Broil element.10. Self-cleaning convection oven interior.11. Meat probe receptacle.12. Halogen light.13. Lower oven convection bake cooking system.14. Adjustable interior porcelain oven rack(s).15. Large 1-piece oven door handle.16. Full width oven door with window.
17. Lower and upper oven vents.18. 7” single radiant element.19. 6” Warm and Ready Zone.20. 6” single radiant element.21. 9” Turbo Boil Flex radiant element.22. 6” / 9”/ 12” triple radiant element.23. Ceramic glass cooktop.

7
Before Setting Oven Controls
Oven Vents
oven Vents LocationThe ovens are vented through the back cooktop trim. When the ovens are on, warm air is released through the vent. This venting is necessary for proper air circulation in the ovens and good baking results. Do not block oven vents.
CAUTION Some models are equipped with a blower which runs in baking and self-cleaning mode to keep all internal components at a cool temperature. The blower may keep run-ning even if the oven has been turned off, until the components have cooled down.
1 Oven Rack
Multiple Oven Racks
arranging oven racksCAUTION Always use pot holders or oven mitts when
adjusting the oven racks. Wait until the oven has completely cooled if possible. Oven racks may be HOT and cause burns.
To remove an oven rack, pull the rack forward until it stops. Lift up front of rack and slide out.
To replace an oven rack, fi t the rack onto the guides on the oven walls. Tilt the front of the rack upward and slide the rack back into place.
air circulation in the ovenIf using 1 rack, place in center of oven. If using multiple racks, stagger cookware as shown.
For best air circulation and baking results allow 2-4” (5-10 cm) around the cookware for proper air circulation and be sure pans and cookware do not touch each other, the oven door, sides or back of the oven cavity. The hot air must circulate around the pans and cookware in the oven for even heat to reach around the food.
Rack positions
Types of Oven Racks Always use pot holders or oven mitts when
adjusting the oven racks. Wait until the oven has completely cooled if possible. Oven racks may HOT and cause burns.
Your appliance may be equipped with one or more of the oven rack types shown; flat Handle oven rack and offset Oven Rack.
The flat oven Handle rack has an handle to facilitate the sliding of the rack when large amount of foods weight on it.
To maximize cooking space the offset oven rack can be used in the lowest rack position to roast large cuts of meat and poultry.
flat Handle oven rack offset oven rack
8
Selecting Surface Cooking Cookware
Figure 2
Figure 1
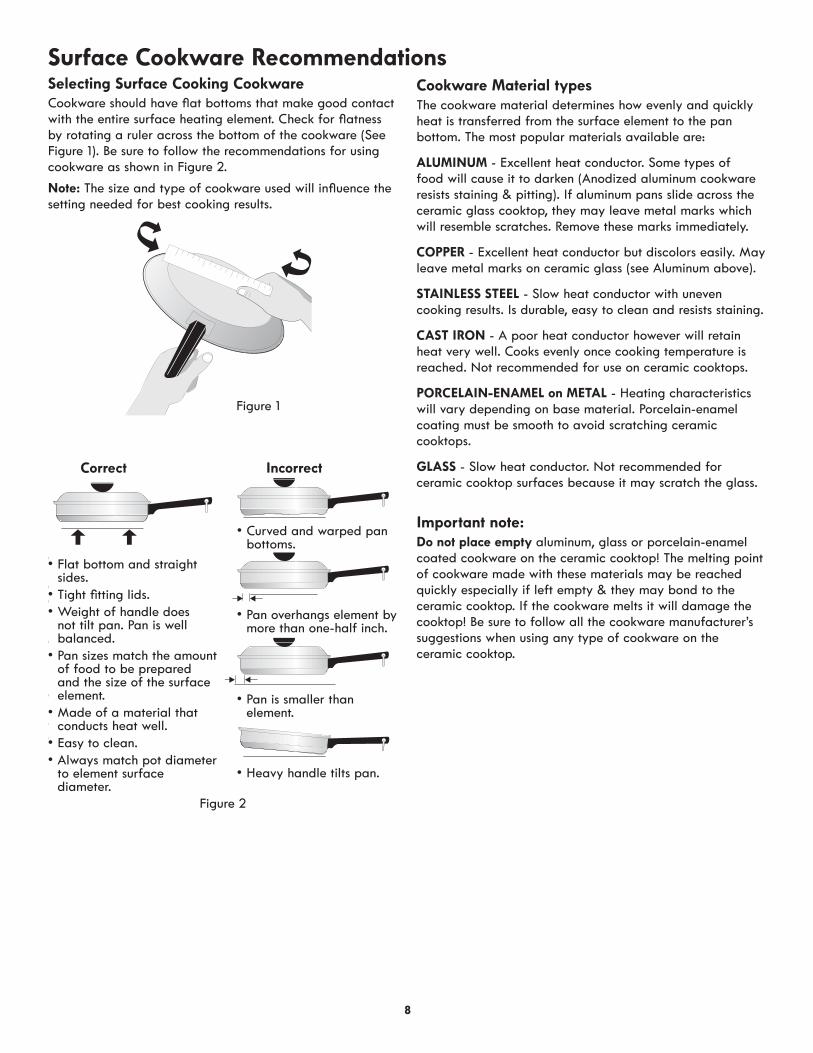
Cookware should have fl at bottoms that make good contact with the entire surface heating element. Check for fl atness by rotating a ruler across the bottom of the cookware (See Figure 1). Be sure to follow the recommendations for using cookware as shown in Figure 2.
Note: The size and type of cookware used will infl uence the setting needed for best cooking results.
Cookware Material typesThe cookware material determines how evenly and quickly heat is transferred from the surface element to the pan bottom. The most popular materials available are:
aLumInum - Excellent heat conductor. Some types of food will cause it to darken (Anodized aluminum cookware resists staining & pitting). If aluminum pans slide across the ceramic glass cooktop, they may leave metal marks which will resemble scratches. Remove these marks immediately.
COPPER - Excellent heat conductor but discolors easily. May leave metal marks on ceramic glass (see Aluminum above).
StaInLeSS SteeL - Slow heat conductor with uneven cooking results. Is durable, easy to clean and resists staining.
caSt Iron - A poor heat conductor however will retain heat very well. Cooks evenly once cooking temperature is reached. Not recommended for use on ceramic cooktops.
porceLaIn-enameL on metaL - Heating characteristics will vary depending on base material. Porcelain-enamel coating must be smooth to avoid scratching ceramic cooktops.
GLaSS - Slow heat conductor. Not recommended for ceramic cooktop surfaces because it may scratch the glass.
Surface Cookware Recommendations
Correct Incorrect
Flat bottom and straight • sides.Tight fi tting lids.• Weight of handle does • not tilt pan. Pan is well balanced.Pan sizes match the amount • of food to be prepared and the size of the surface element.Made of a material that • conducts heat well.Easy to clean.• Always match pot diameter • to element surface diameter.
Curved and warped pan • bottoms.
Pan overhangs element by • more than one-half inch.
Pan is smaller than • element.
Heavy handle tilts pan.•
Important note:Do not place empty aluminum, glass or porcelain-enamel coated cookware on the ceramic cooktop! The melting point of cookware made with these materials may be reached quickly especially if left empty & they may bond to the ceramic cooktop. If the cookware melts it will damage the cooktop! Be sure to follow all the cookware manufacturer’s suggestions when using any type of cookware on the ceramic cooktop.

9
Before Setting Surface Controlsabout the ceramic Glass cooktopThe ceramic cooktop has radiant surface elements located below the surface of the glass. The design of the ceramic cooktop outlines the area of the surface element underneath.
Note: (White glass cooktops only) Due to the high intensity of heat generated by the surface elements, the glass surface will turn green when the element is fi rst turned off . This phenomenon is normal and the glass will come back to its original white color after it has completely cooled down.
Heat is transferred up through the surface of the cooktop to the cookware. Only fl at-bottom cookware should be used. The type and size of cookware, the number of surface elements in use and their settings, are all factors that will aff ect the amount of heat that will spread to areas beyond the surface elements.
The areas surrounding the elements may become hot enough to cause burns.
about the radiant Surface elementsThe element temperature rises gradually and evenly. As the temperature rises, the element will glow red. To maintain the selected setting, the element will cycle on and off . The heating element retains enough heat to provide a uniform and consistent heat during the off cycle. for effi cient cooking, turn off the element several minutes before cooking is complete. This will allow residual heat to complete the cooking process.
Important notes:• Radiant elements have a limiter that allows the element
to cycle ON and OFF, even at the HI setting. This helps to prevent damage to the ceramic cooktop. Cycling at the HI setting is normal and will occur more often if the cookware is too small for the radiant element or if the cookware bottom is not fl at.
• Pressing a cooktop keypad only activates or deactivates the element but will not start the heating process. Activat-ing and powering any surface cooking element requires pressing two keys - the on/off keypad fi rst and then a power level section must be added before the element will begin heating.
• Be sure to read the detailed instructions for ceramic glass cooktop cleaning in the Care & Cleaning and Before You Call checklist sections of this Use & Care Guide.
Home CanningBe sure to read and observe all the following points when home canning with your appliance. Check with the USDA (United States Department of Agriculture) website and be sure to read all the information they have available as well as follow their recommendations for home canning proce-dures.
• Use only quality fl at bottom canners when home canning. Use a straight edge to check canner bottom.
• Use only a completely fl at bottom canner with no ridges that radiate from the bottom center when home canning using a ceramic cooktop.
• Make sure the diameter of the canner does not exceed 1 inch beyond the surface element markings or burner. It is recommended to use smaller diameter canners on electric coil and ceramic glass cooktops.
• Start with hot tap water to bring water to boil more quickly.
• Use the highest heat seating when fi rst bringing water to a boil. Once boiling is achieved, reduce heat level to low-est possible setting to maintain that boil.
• NEVER place or straddle a cooking utensil over two dif-ferent surface cooking areas at the same time. This will cause uneven heating results and may cause the ceramic cooktop to fracture.
turbo Boil flexTM Surface ElementThe Turbo Boil FlexTM feature offers power to melt, warm, simmer and boil without moving the pot from element to element. The Turbo Boil FlexTM will bring food items to boil much quicker and may be used when preparing larger quantities of food. The cooktop graphics will be clearly marked with this feature.

10
Before Setting Surface Controls
Fig. 1
Fig. 5
Fig. 8
Fig. 9
Fig. 10
Fig. 6 Fig. 7
Fig. 2 Fig. 3 Fig. 4
Cooktop Display WindowsThe cooktop controls provide a digital display for each of the radiant surface elements located on the cooktop. Power levels and messages are easily monitored and adjusted using the corresponding control keypads in combination with the window displays.
the available power Level SettingsThe cooktop control will display heat levels ranging from Hi (Figure 1) to Lo (Figure 6) and off (Figure 7). The settings between 9.5 (Figure 2) and 3.0 (Figure 3) decrease or increase in increments of .5 (1/2). The settings between 2.8 (Figure 4) and 1.2 (Figure 5) are Simmer settings which decrease or increase in increments of .2 (1/5) to Lo (Figure 6; lowest Simmer setting) for more precise settings at lower heat levels.
Hot element Indicator message (He)After using any of the radiant element positions the cooktop will become very hot. Even after setting the controls to OFF, the cooktop will remain hot for some time. The cooktop control monitors the temperature of the cooktop and displays the message “HE” (hot element) warning when the cooktop is still too hot to touch (Figure 8). If the HE message appears in the window, the control can still be turned on again for use.
power failure (pf) messageThe pf message (Figure 9) will be displayed whenever there has been a power interruption to the appliance. The pf message will disappear by itself after a few seconds.
Sabbath feature (Sb) messageThe cooktop display windows will show the Sb message whenever the Sabbath feature is active (Figure 10). When activated, the Sabbath feature works for both the oven and cooktop together. Once the Sabbath feature is active, changes to the heat levels for the cooktop heating elements will not show in the displays. The cooktop will react slower to heat level changes. See Sabbath feature section for complete instructions.
Fig. 12
Fig. 11
cooktop Lockout (--)Use the Cooktop Lockout to lock all surface elements from being accidentally turned ON (including Warmer Zone). This feature will only lockout the cooktop features.
To turn the Cooktop Lockout feature ON:1. Be sure all surface element controls are OFF.2. Press and hold Cooktop Lockout keypad until acceptance
tone sounds (about 3 seconds).
When the cooktop is locked, the cooktop locked indicator icon will appear in the oven control display window (Fig. 11).
The (--) message will appear in the cooktop display windows whenever the Cooktop Lockout feature is active (See Fig. 12).
If a triple beep sounds (entry error tone) instead, check and be sure all surface elements are turned OFF before activating the Cooktop Lockout feature.
to turn the cooktop Lockout feature off:Press and hold Cooktop Lockout keypad until acceptance tone sounds (about 3 seconds). The cooktop locked indicator light will turn OFF and the cooktop may be used for normal cooking operations.
Important notes:• If Cooktop Lockout is active and a power failure occurs,
when power is restored the cooktop will remember the setting and remain locked.
• Starting a Flex Clean cycle will automatically turn ON the Cooktop Lockout feature. The cooktop will remain locked until the Flex Clean cycle is finished and the oven door has unlocked.
11
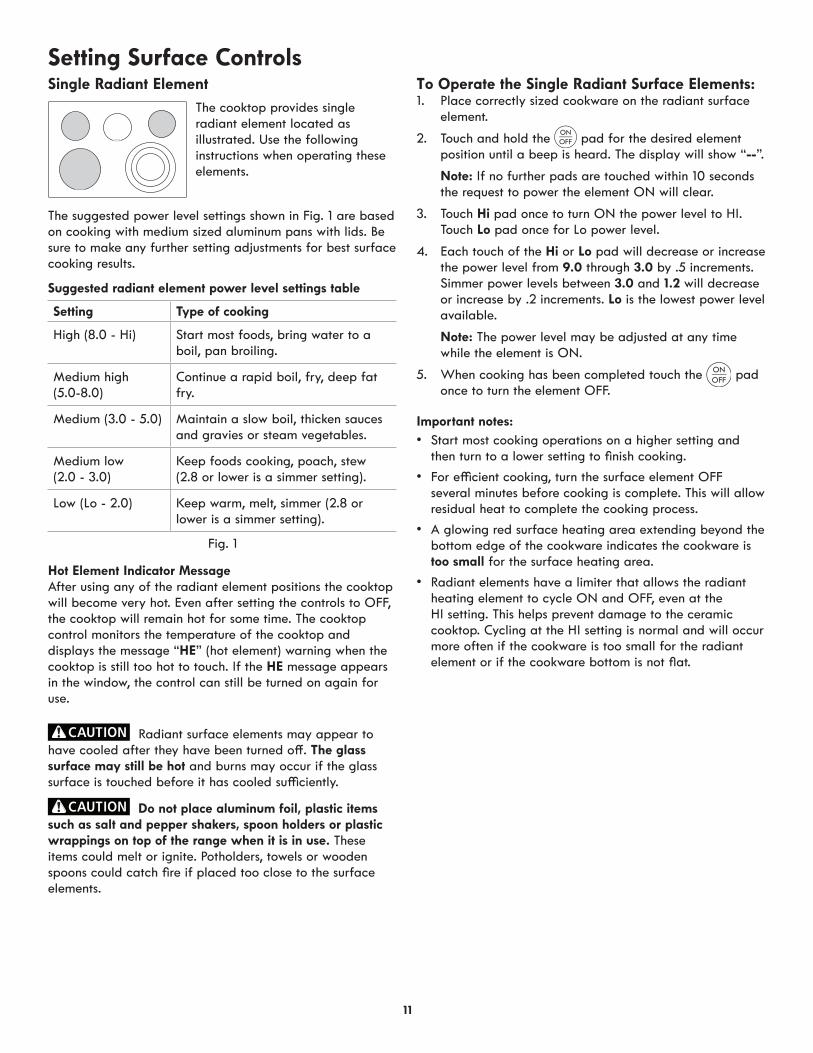
Hot element Indicator messageAfter using any of the radiant element positions the cooktop will become very hot. Even after setting the controls to OFF, the cooktop will remain hot for some time. The cooktop control monitors the temperature of the cooktop and displays the message “HE” (hot element) warning when the cooktop is still too hot to touch. If the HE message appears in the window, the control can still be turned on again for use.
Setting Surface ControlsTo Operate the Single Radiant Surface Elements:1. Place correctly sized cookware on the radiant surface
element.
2. Touch and hold the pad for the desired element position until a beep is heard. The display will show “--”.
Note: If no further pads are touched within 10 seconds the request to power the element ON will clear.
3. Touch Hi pad once to turn ON the power level to HI. Touch Lo pad once for Lo power level.
4. Each touch of the Hi or Lo pad will decrease or increase the power level from 9.0 through 3.0 by .5 increments. Simmer power levels between 3.0 and 1.2 will decrease or increase by .2 increments. Lo is the lowest power level available.
Note: The power level may be adjusted at any time while the element is ON.
5. When cooking has been completed touch the pad once to turn the element OFF.
Radiant surface elements may appear to have cooled after they have been turned off . The glass surface may still be hot and burns may occur if the glass surface is touched before it has cooled suffi ciently.
Do not place aluminum foil, plastic items such as salt and pepper shakers, spoon holders or plastic wrappings on top of the range when it is in use. These items could melt or ignite. Potholders, towels or wooden spoons could catch fi re if placed too close to the surface elements.
Single Radiant ElementThe cooktop provides single radiant element located as illustrated. Use the following instructions when operating these elements.
The suggested power level settings shown in Fig. 1 are based on cooking with medium sized aluminum pans with lids. Be sure to make any further setting adjustments for best surface cooking results.
Suggested radiant element power level settings table
Setting Type of cooking
High (8.0 - Hi) Start most foods, bring water to a boil, pan broiling.
Medium high (5.0-8.0)
Continue a rapid boil, fry, deep fat fry.
Medium (3.0 - 5.0) Maintain a slow boil, thicken sauces and gravies or steam vegetables.
Medium low (2.0 - 3.0)
Keep foods cooking, poach, stew (2.8 or lower is a simmer setting).
Low (Lo - 2.0) Keep warm, melt, simmer (2.8 or lower is a simmer setting).
Fig. 1
Important notes:• Start most cooking operations on a higher setting and
then turn to a lower setting to fi nish cooking.
• For effi cient cooking, turn the surface element OFF several minutes before cooking is complete. This will allow residual heat to complete the cooking process.
• A glowing red surface heating area extending beyond the bottom edge of the cookware indicates the cookware is too small for the surface heating area.
• Radiant elements have a limiter that allows the radiant heating element to cycle ON and OFF, even at the HI setting. This helps prevent damage to the ceramic cooktop. Cycling at the HI setting is normal and will occur more often if the cookware is too small for the radiant element or if the cookware bottom is not fl at.

12
Setting Surface ControlsExpandable Radiant Element
The cooktop provides expandable radiant elements located as illustrated. Use the following instructions when operating these elements.
Use the eLement SIZe keypad (Fig. 1) to select which portions of the expandable element are needed for heating. The expandable element size may be changed anytime the element is ON.
To Operate the Expandable Radiant Element:1. Place correctly sized cookware on the expandable
radiant element.
2. To activate press and hold the keypad for the expandable element until acceptance tone sounds.
3. Press eLement SIZe keypad and toggle to select the single (Fig. 2), double (Fig. 3) or triple (Fig. 4, if available) expandable element size setting.
4. To set power level press Hi or Lo keypad and if needed toggle the Hi or Lo keypads to adjust to the desired power level setting. Each touch of the Hi or Lo key pad will decrease or increase the power level by 1/2 from 9.0 through 3.0. Simmer power levels between 3.0 and 1.2 will decrease or increase by .2 increments. Hi (Fig. 5) is the highest power level. Lo (Fig. 6) is the lowest power level available.
5. Once cooking is fi nished, press keypad to turn the expandable element OFF (Fig. 7).
Hot element Indicator messageAfter using any of the radiant element positions the cooktop will become very hot. Even after setting the controls to OFF, the cooktop will remain hot for some time. The cooktop control monitors the temperature of the cooktop and displays the message “HE” (hot element) warning when the cooktop is still too hot to touch. If the HE message appears in the window, the control can still be turned on again for use.
Radiant surface elements may appear to have cooled after they have been turned off . The glass surface may still be hot and burns may occur if the glass surface is touched before it has cooled suffi ciently.
Do not place aluminum foil, plastic items such as salt and pepper shakers, spoon holders or plastic wrappings on top of the range when it is in use. These items could melt or ignite. Potholders, towels or wooden spoons could catch fi re if placed too close to the surface elements.
Fig. 1
Fig. 2
Fig. 5
Fig. 3
Fig. 6
Fig. 4Triple element only
Fig. 7
Important notes:• If no element size is chosen when the expandable element
is turned ON, only the inner coil will heat by default.• Start most cooking operations on a higher setting and
then turn to a lower setting to fi nish cooking.• For effi cient cooking, turn the surface element OFF
several minutes before cooking is complete. This will allow residual heat to complete the cooking process.
• A glowing red surface heating area extending beyond the bottom edge of the cookware indicates the cookware is too small for the surface heating area.
• Radiant elements have a limiter that allows the radiant heating element to cycle ON and OFF, even at the HI setting. This helps prevent damage to the ceramic cooktop. Cycling at the HI setting is normal and will occur more often if the cookware is too small for the radiant element or if the cookware bottom is not fl at.

13
Setting Surface ControlsWarm & readyTM Zone Unlike other radiant surface elements, the
warmer zone will not glow red when it is HOT. The glass surface may still be hot and burns can occur if the glass surface is touched before it has cooled suffi ciently.
Always use potholders or oven mitts when removing food from the warmer zone as cookware and plates will be hot.
Do not place aluminum foil, plastic items such as salt and pepper shakers, spoon holders or plastic wrappings on top of the range when it is in use. These items could melt or ignite. Potholders, towels or wooden spoons could catch fi re if placed too close to the surface elements.
temperature selection - Refer to the warmer zone recommended food heat settings (Fig. 2). If a particular food is not listed, start with the medium heat setting and adjust as needed. Most foods may be kept at serving temperatures by using the medium heat setting.
Fig. 1
Fig. 2
Warmer Zone indicator light
The warmer zone is located at the center rear element position on the cooktop as shown. The purpose of the warmer zone is to maintain hot cooked foods at serving temperature.
Use the warmer zone feature to keep cooked foods hot such as; vegetables, gravies, casseroles, soups, stews, breads, pastries and oven-safe dinner plates.
Do not heat cold food with the warmer zone. Always start with hot food. All cookware placed on the warmer zone should be covered with a lid to maintain food quality.
Setting warmer zone control:1. Place cookware with hot food on warmer zone.
2. To activate press and hold warmer zone keypad until acceptance tone sounds. The warmer zone indicator light will turn on.
3. To set heat level press Hi or Lo keypad and if needed toggle using these keypads to adjust to the desired power level setting. Release keypad when desired heat level is displayed by the indicator lights. Fig. 1 below shows examples for low, medium and high settings.
4. When ready to serve, press to turn the warmer zone OFF. Be careful when removing food from warmer zone. The cookware will be HOT.
Warmer Zone Settings table
food Item Heating LevelHot Beverages HIFried Foods HIVegetables MEDSoups (Cream) MEDStews MEDSauces MEDMeats MEDGravies LOEggs LODinner Plates with Food LOCasseroles LOBreads/Pastries LO
Important notes:
• For best results, when warming pastries or breads, any covering used should have an opening to allow moisture to escape. Use only cookware and utensils recommended for oven and cooktop use on the warmer zone.
• The warmer zone heat level may be adjusted at any time when the warmer zone is turned ON.
• Use only plates, utensils and cookware recommended for oven and ceramic cooktop use. Do not use plastic wrap or aluminum foil to cover food. Plastic or aluminum foil can melt onto the cooktop.

14
oven control functions
Oven Control Keypads1. timer Set/off - Used to set or cancel Timer.2. add 1 minute - Used to add additional minutes to Timer.3. Cook Time- Used to enter the length of the cook time
desired.4. Delay Start - Used with Bake, Conv Bake, Conv Roast
and Flex Clean functions to program a delay start time or delay start self-cleaning cycle.
5. Slow cook - Used to select the Slow Cook function.6. Warm & Hold - Used to set the Warm & Hold function.7. Preheat - Used to pre-condition the oven.8. Cakes or Breads - Used to select the cakes or breads.9. conv convert - Used to select the Convection Convert
function.10. meat probe - Used to set Meat Probe.11. flex clean - Used to set a 2 to 4 hours Self-Clean cycle.
1
4
7
10 11
12
2
5
8
3
6
9 1513 1614
18 1922 23
212017
12. conv Bake - Used to select the Convection Bake feature.13. Bake - Used to enter the normal bake feature.14. Start - Used to start oven functions.15. Broil - Used to select Broil feature.16. Conv roast - Used to select the Convection Roast function.17. upper oven - Used to select the upper oven.18. Oven Light - Used to turn oven light ON and OFF.19. STOP - Used to cancel any oven function previously
entered except Clock and Timer.20. clock Set - Used to set the time of day.21. Lower oven - Used to select the lower oven.22. Cooktop Lockout - Used to lock the cooktop functions.23. oven Lockout - Used to lock oven functions and doors. 0 thru 9 number - Used to enter temperature and times.
For satisfactory use of your oven, become familiar with the various features and functions of the oven.
minimum & maximum control Settings
All of the features listed below have minimum and maximum time or temperature settings that may be entered into the control. An ENTRY acceptance beep will sound each time a control pad is touched (the Oven Lockout pad is delayed 3 seconds).An ENTRY ERROR tone (3 short beeps) will sound if the entry of the temperature or time is below the minimum or above the maximum settings for the feature.
feature Min. Temp. or time Max. temp. or timePreHeat 170°F/77°C 550°F/288°CBake 170°F/77°C 550°F/288°CBroil 400°F/205°C 550°F/288°CTimer 0:01 Min. 11:59 Hr./Min.Flex Clean 2 hours 4 hoursConv Bake 170°F/77°C 550°F/288°CConv Convert 170°F/77°C 550°F/288°CConv Roast 170°F/77°C 550°F/288°CSlow Cook Lo (225°F/180°C) Hi (225°F/180°C)Cook Time 0:01 Min. 11:59 Hr./Min.Delay Time 12 Hr. 1:00 Hr./Min. 12:59 Hr./Min.Delay Time 24 Hr. 0:00 Hr./Min. 23:59 Hr./Min.
Recommended Rack Position for Broiling, Baking and RoastingFood Rack PositionBroiling meats, chicken or fish 3Cookies, cakes, pies, biscuits & muffins Using 1 rack 2 Using multiple racks 1 (offset rack) and 3Frozen pies, angel food cake, yeast, bread, casseroles, small cuts of meat or poultry
1 or 2
Pizza 3Turkey, roast or ham 1 (offset rack)
Rack positions
We recommend leaving the offset rack in position 1 and moving the flat rack between 2 and 3 as needed.
The preheat temperature display is available with the following cooking modes: • Bake• Preheat• Conv Bake• Conv Roast• Cakes & Breads
The lowest temperature displayed will be 100°F.
15
Getting Started
Setting Timer
See example below to set the timer for 5 minutes:
NOTE: The timer(s) will not aff ect the cooking process.
The timer provided with the oven control serve as extra reminders in the kitchen. When the time runs out the active timer will beep, and “End” will be displayed.
The following time settings apply to the timers:
• Min. time: 1 minute• Max. time: 11 hours 59 minutes
To cancel or end the timer, press the tImer Set/off key again.
1. Press tImer Set/off
2. Enter 5 minutes
3. Press Start
to Set add 1 minute featureThe ADD 1 MINUTE pad is used to set the Add 1 Minute feature. When the pad is pressed, 1 minute is added to the Timer feature if this feature is already active. If the Timer feature is not active and the pad is pressed, the Timer feature will become active and will begin counting down from 1 minute. For further information on how to set the Timer feature see Timer instructions above.
Setting Oven LockoutThe Oven Lockout feature automatically locks the oven door and prevents the oven from being turned on. It does not disable the Timer or the interior oven lights. The ovens can be locked individually.
See example below to lock the oven.
DOOR LOCKED will flash in the display until the door has finished locking. Once the door has been locked the door lock indicator will turn on. DOOR LOCKED will then stay displayed.
Do not attempt to open the oven door while the door lock indicator is flashing.
To lock, select the oven by pressing upper oVen or LoWer oVen and then press and hold oVen LocKout for 3 seconds.
To unlock, select the oven by pressing upper oVen or LoWer oVen and then press and hold oVen LocKout for 3 seconds.
Setting clock at power upYou will be prompted to enter the time of day in the event of a power failure or when you first provide electric power to your appliance.
• When your appliance is first powered up, 12:00 will flash in the display.
• Press the CLOCK key to modify the time of day.
• Enter the time of day using the numeric key pads and press Start to set.
If an invalid time of day is entered, the control will triple beep. Re-enter a valid time of day and press Start. If STOP is pressed your clock will start with the time set for 12:00.
Select the CLOCK key to modify the time of day during other situations such as day light savings.
Preheat Temperature DisplayOnce a cooking feature has been started, the control will display the actual oven temperature while preheating. Once the oven reaches the oven set temperature, only the oven set temperature will be displayed.

16Pan position for two rack
baking.
Pan position for one rack baking.
Setting Oven Controls
See example below to set a preheat to start immediately at the default temperature.
Setting preheat
For best baking performance use the Preheat feature. The Preheat feature will bring the oven up to the set cooking temperature. A reminder tone will sound indicating when the set temperature is reached and to place the food in the oven. Preheating is not necessary when roasting or cooking casseroles.
The following temperature settings apply to the preheat feature:
• Auto-suggest (default) setting: 350°f/177°c
• Min. bake setting: 170°f / 77°c
• Max. bake setting: 550°f / 288°c
Preheat
1. Select the oven by pressing upper oVen or LOWER oVen
2. Press preHeat
If needed, use numeric keypads to enter a different oven temperature.
3. Press Start
When the oven is finished preheating, the controls will beep to remind you to place food in the oven. The preheat feature will perform like the Bake feature and continue to maintain the oven set temperature until cancelled.
"PRE" and the actual oven temperature shown in the display will alternate as the oven heats and reaches set temperature.
NOTE To cancel the function, you may press • STOP at any time when setting the control or during the cooking process.
To change the set temperature while the oven is already • heating, follow the same procedure described above.
During the preheating, the convection fan will be activated • to allow the oven to reach its target temperature faster. The Bake, Broil and Convection elements will also cycle for a better heat distribution.
See example below to set a bake to start immediately at the default temperature.
Once START is pressed the oven will begin heating. The oven display shows the temperature rising.
After the oven reaches set temperature a beep will indicate the oven is ready. The oven will continue to maintain this temperature until the cooking feature is canceled.
NOTETo cancel the function, you may press STOP at any time when setting the control or during the cooking process.
To change the set temperature while the oven is already heating, follow the same procedure described above.
During the preheating, the convection fan will be activated to allow the oven to reach its target temperature faster. The Bake, Broil and Convection elements will also cycle for a better heat distribution.
Setting bake
Use the bake feature to cook most food items that require normal cooking temperatures.
The following temperature settings apply to the bake feature:
• Auto-suggest (default) setting: 350°f/177°c
• Min. bake setting: 170°f / 77°c
• Max. bake setting: 550°f / 288°c
• As much as possible, use only one rack on position 2 or 3 and center the pans. If using two racks, place the oven racks in position 1 and 3.
• When placing multiple food items in the oven allow 2-4” (5-10cm) of space between the food items for proper air circulation.
• Dark or dull pans absorb more heat than shiny bakeware resulting in dark or overbrowning of foods. It may be necessary to reduce the oven temperature or cook time to prevent overbrowning of some foods. Dark pans are recommended for pies. Shiny pans are recommended for cakes, cookies and muffins.
for best results
Bake
1. Select oven by pressing upper oVen or LoWer oVen
2. Press BaKe
If needed, use numeric keypads to enter a different oven temperature.
3. Press Start

17
Setting Oven Controls
WARNING
fooD poISonInG HaZarD. Do not let food sit for more than one hour before or after cooking. Doing so can result in food poisoning or sickness. Foods that can easily spoil such as milk, eggs, fish, meat or poultry, should be chilled in the refrigerator first. Even when chilled, they should not stand in the oven for more than 1 hour before cooking begins, and should be removed promptly when finished cooking.
Cook TimeAdding a cook duration when baking is beneficial when a recipe requires a specific temperature and period of time to cook. Following the recipe cook time helps insure the best possible results.
Cook time may be set with the following features:
• Preheat
• Bake
• Conv Bake
• Conv Roast
• Slow Cook
See example below to set the oven for bake, starting immediately with preheating to the auto-suggest (default) setting of 350°F (177°C) and then to automatically turn off after 30 minutes:
Once START is pressed the oven will cook and after 30 minutes automatically shut-off.
1. Select oven by pressing upper oVen or LoWer oVen
2. Press BaKe
3. Press Start
4. Press cooK tIme
5. Enter 30 minutes
6. Press Start
NOTE To cancel the function, you may press• STOP at any time when setting the control or during the cooking process. The maximum Cook Time setting is 11 hours and 59 • minutes. After the Cook Time feature has been activated, the • display will go back to showing the hour of day. Press the cooK tIme keypad to display any remaining cook time.
• Dark or dull pans absorb more heat than shiny bakeware resulting in dark or overbrowning of foods. It may be necessary to reduce the oven temperature or cook time to prevent overbrowning of some foods. Dark pans are recommended for pies. Shiny pans are recommended for cakes, cookies or muffins.
When the cook time finishes:1. "End" and the time of day will show in display. The oven
will shut off automatically.2. The control will beep 3 times. The control will continue to
beep 3 times every 30 seconds until STOP is pressed.
Delay Start (with cook time)
NOTEWhen setting the • DeLay Start option be sure the correct time of day is set.
You may press • STOP any time when setting the control or during the cooking process.
You may also choose to use • DeLay Start with no COOK tIme.
Delay Start may be set using a 24 hour clock. See Setting 12 • or 24 hour display modes for more information.
Adding a cook duration along with a specific start time gives the same benefits as the cook time option in addition to controlling exactly when the cooking process will begin and end.
Delay start may be set with the following features:
• Bake
• Conv Bake
• Conv Roast
• Slow Cook
• Flex Clean
See example below to set the oven with preheating for bake at 375°F (191°C) for 50 minutes and to automatically start at 5:30:
Once START is pressed, the oven will calculate the start time at which the oven will begin heating.
The oven will continue to maintain this temperature for the selected time or until the cooking feature is canceled.
1. Select oven by pressing upper oVen or LoWer oVen
2. Press BaKe
3. Enter 375°f
4. Press Start
5. Press cooK tIme
6. Enter 50 minutes
7. Press Start
8. Press DeLay Start
9. Enter 5:30
10. Press Start
18
Pan position for two rack baking.
Pan position for one rack baking.
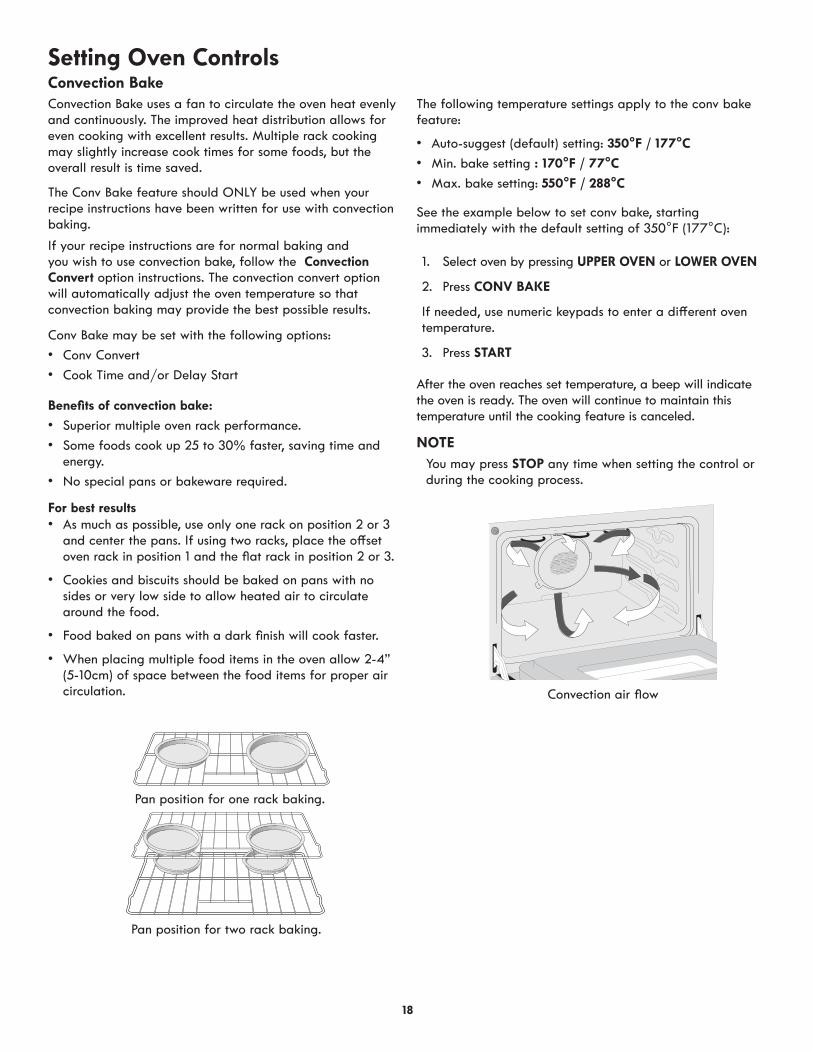
Convection air flow
Setting Oven Controls
Convection Bake uses a fan to circulate the oven heat evenly and continuously. The improved heat distribution allows for even cooking with excellent results. Multiple rack cooking may slightly increase cook times for some foods, but the overall result is time saved.
Convection Bake
Benefits of convection bake:
• Superior multiple oven rack performance.
• Some foods cook up 25 to 30% faster, saving time and energy.
• No special pans or bakeware required.
See the example below to set conv bake, starting immediately with the default setting of 350°F (177°C):
After the oven reaches set temperature, a beep will indicate the oven is ready. The oven will continue to maintain this temperature until the cooking feature is canceled.
Conv Bake may be set with the following options:
• Conv Convert
• Cook Time and/or Delay Start
The following temperature settings apply to the conv bake feature:
• Auto-suggest (default) setting: 350°f / 177°c
• Min. bake setting : 170°f / 77°c
• Max. bake setting: 550°f / 288°c
• As much as possible, use only one rack on position 2 or 3 and center the pans. If using two racks, place the offset oven rack in position 1 and the flat rack in position 2 or 3.
• Cookies and biscuits should be baked on pans with no sides or very low side to allow heated air to circulate around the food.
• Food baked on pans with a dark finish will cook faster.
• When placing multiple food items in the oven allow 2-4” (5-10cm) of space between the food items for proper air circulation.
for best results
The Conv Bake feature should ONLY be used when your recipe instructions have been written for use with convection baking.
If your recipe instructions are for normal baking and you wish to use convection bake, follow the Convection Convert option instructions. The convection convert option will automatically adjust the oven temperature so that convection baking may provide the best possible results.
1. Select oven by pressing upper oVen or LoWer oVen
2. Press conV BaKe
If needed, use numeric keypads to enter a different oven temperature.
3. Press Start
NOTEYou may press STOP any time when setting the control or during the cooking process.

19
Setting Oven Controls
The conv convert option allows you to convert any normal baking recipe using the convection bake feature. The control uses the normal recipe settings and adjusts to a lower temperature for convection baking. Conv convert must be used with Conv Bake feature.
Convection Convert
NOTEYou may press STOP any time when setting the control or during the cooking process.
Benefits of conv bake using conv convert option:• Superior multiple oven rack performance.
• Some foods cook up 25 to 30% faster, saving time and energy.
• No special pans or bakeware required.
• As much as possible, use only one rack on position 2 or 3 and center the pans. If using two racks, place the oven racks in position 1 and 3.
• Cookies and biscuits should be baked on pans with no sides or very low side to allow heated air to circulate around the food.
• Food baked on pans with a dark finish will cook faster.
• When placing multiple food items in the oven allow 2-4” (5-10cm) of space between the food items for proper air circulation.
for best resultsPressing CONV CONVERT will automatically lower the set temperature by 25°F to adjust the bake recipe to a conv bake temperature, and the oven will start baking.
After the oven reaches the converted set temperature, a beep will indicate the oven is ready.
When conv convert is used with cook time “cf” (Check Food) will be displayed when the cook time is 75% complete. The control will also beep at regular intervals until baking has finished. For the Check Food function to operate, the cook time must be entered before the Conv Convert pad is pressed.
See the example below to set conv bake, starting immediately with the auto-suggest (default) setting of 350°F (177°C) and adding the conv convert option.
1. Select oven by pressing upper oVen or LoWer oVen
2. Press conV BaKe
If needed, use numeric keypads to enter a different oven temperature.
3. Press conV conVert
20
Setting Oven Controls
Convection roast combines a cook cycle with the convection fan and element to rapidly roast meats and poultry. Heated air circulates around the meat from all sides, sealing in juices and flavors. Meats cooked with this feature are crispy brown on the outside while staying moist on the inside. In addition, there is no need to reduce the oven temperature when using convection roast.
Convection roast may be set with the following options:
• Cook time or cook time with delay start
The following temperature settings apply to convection roast:
• Factory auto-start default: 350°f/177°c
• Minimum: 170°f / 77°c
• Maximum: 550°f / 288°c
Benefits of convection roast:• Superior multiple oven rack performance.
• Some foods cook up 25 to 30% faster, saving time and energy.
• No special pans or bakeware required.
See example below to set convection roast to start immediately with the auto-suggest (default) setting:
• Preheating is not necessary for most meats and poultry.
• Place the offset oven rack in position 1 for roasting.
• Be sure to carefully follow your recipe’s temperature and time recommendations or refer to the convection roast chart for additional information.
• Do not cover foods when dry roasting - this will prevent the meat from browning properly.
• Since Conv Roast cooks food faster, reduce the cook time by 25% from the recommended cook time of your recipe (check the food at this time). If necessary, increase cook time until the desired doneness is obtained.
for best results
Once START is pressed the oven will begin heating.
1. Select oven by pressing upper oVen or LoWer oVen
2. Press conV roaStIf needed, use numeric keypads to enter a different oven temperature.3. Press Start
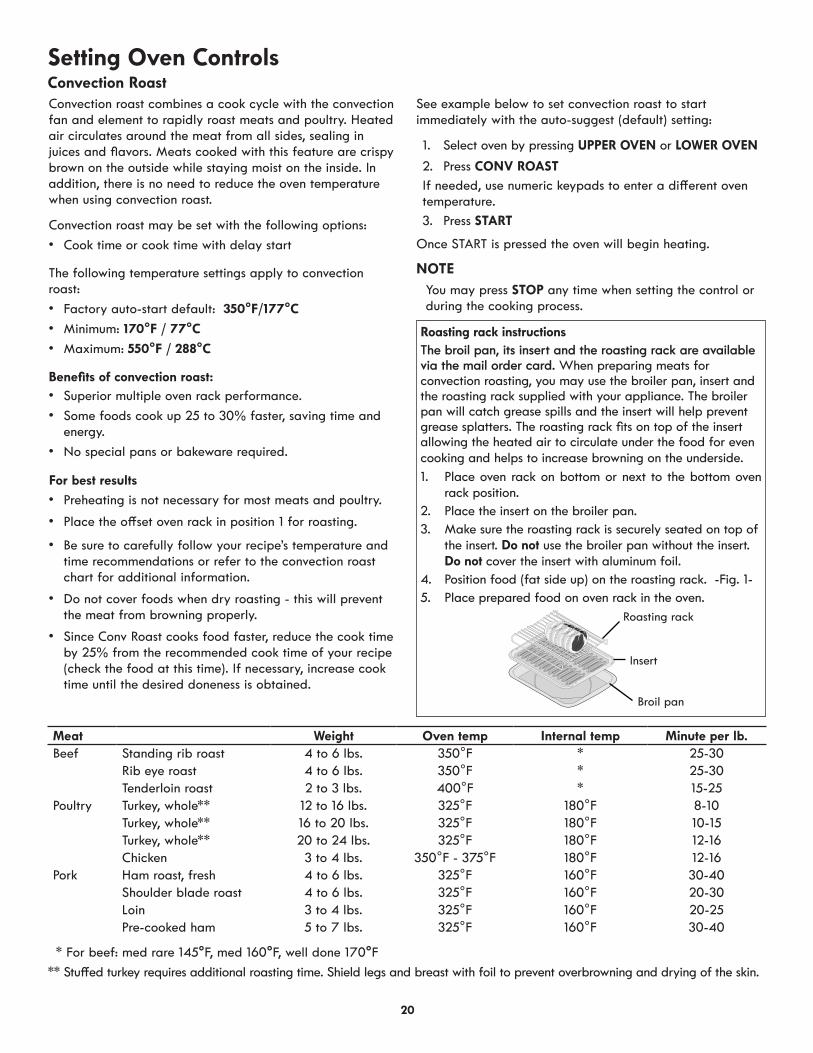
* For beef: med rare 145°F, med 160°F, well done 170°F
** Stuffed turkey requires additional roasting time. Shield legs and breast with foil to prevent overbrowning and drying of the skin.
Roasting rack instructionsThe broil pan, its insert and the roasting rack are available via the mail order card. When preparing meats for convection roasting, you may use the broiler pan, insert and the roasting rack supplied with your appliance. The broiler pan will catch grease spills and the insert will help prevent grease splatters. The roasting rack fits on top of the insert allowing the heated air to circulate under the food for even cooking and helps to increase browning on the underside. 1. Place oven rack on bottom or next to the bottom oven
rack position.2. Place the insert on the broiler pan.3. Make sure the roasting rack is securely seated on top of
the insert. Do not use the broiler pan without the insert. Do not cover the insert with aluminum foil.
4. Position food (fat side up) on the roasting rack. -Fig. 1-5. Place prepared food on oven rack in the oven.
Roasting rack
Insert
Broil pan
Meat Weight Oven temp Internal temp Minute per lb.Beef Standing rib roast 4 to 6 lbs. 350°F * 25-30
Rib eye roast 4 to 6 lbs. 350°F * 25-30Tenderloin roast 2 to 3 lbs. 400°F * 15-25
Poultry Turkey, whole** 12 to 16 lbs. 325°F 180°F 8-10Turkey, whole** 16 to 20 lbs. 325°F 180°F 10-15Turkey, whole** 20 to 24 lbs. 325°F 180°F 12-16Chicken 3 to 4 lbs. 350°F - 375°F 180°F 12-16
Pork Ham roast, fresh 4 to 6 lbs. 325°F 160°F 30-40Shoulder blade roast 4 to 6 lbs. 325°F 160°F 20-30Loin 3 to 4 lbs. 325°F 160°F 20-25Pre-cooked ham 5 to 7 lbs. 325°F 160°F 30-40
Convection Roast
NOTEYou may press STOP any time when setting the control or during the cooking process.

21
Setting Oven ControlsBroil
NOTEYou may press STOP any time when setting the control or during the cooking process.
Use the broil feature to cook meats that require direct exposure to radiant heat for optimum browning results.
The following temperature settings apply to the broil feature:
• Auto-suggest (default) setting: 550°f / 288°c
• Min. broil setting: 400°f / 204°c
• Max. broil setting: 550°f / 288°c
1. Place the broiler insert on the broiler pan, then place the meat on the insert. Remember to follow all warnings and cautions.
2. Arrange the interior oven rack to rack position recommendations. Be sure to place the prepared food and pan directly under broil element. Leave the oven door open at the broil stop position when broiling.
3. Select oven by pressing upper oVen or LoWer oVen
4. Press BroIL
If needed, use numeric keypads to enter a different oven temperature.
5. Press Start
WARNING
Should an oven fire occur, close the oven door. If the fire continues, throw baking soda on the fire or use a fire extinguisher. Do not put water or flour on the fire. Flour may be explosive and water can cause a grease fire to spread and cause personal injury.
CAUTION
• Do not use the broiler pan without the insert.
• Do not cover the broil pan/insert with aluminum foil; the exposed grease could ignite.
• To prevent food from contacting the broil element and to prevent grease splattering, do not use the roasting rack when broiling.
• Use the recommended pans and oven rack positions for the type of meat being prepared.
• For optimum browning results, allow the oven to preheat 5-6 minutes before placing the food in the oven.
for best results
See example below to set broil starting immediately with the auto-suggest (default) setting:
Setting Broil
The broil pan and its insert are available via the mail order card. The broil pan insert contains slots that allows grease from the meat to drain into the broil pan. Place prepared meat on broil pan insert and then place onto broiler pan as shown below. Insert
Broil pan
food Rack position Temp Cook time in minutes Doneness1st side 2nd side
Steak 1” thick 3rd 550°F 6 4 Rare
3rd 550°F 7 5 Medium
3rd 550°F 8 7 Well
Pork chops 3/4” thick 3rd 550°F 8 6 Well
Chicken-bone in 2nd 450°F 20 10 Well
Chicken-boneless 2nd 450°F 8 6 Well
Fish 2nd 500°F 13 0 Well
Shrimp 3rd 550°F 5 0 Well
Hamburger 1” thick 2nd 550°F 9 7 Medium
3rd 550°F 10 8 Well
Broil Stop Position
Be aware that the suggested broil settings table are recommendations only. Increase or decrease broiling times, or move to a different rack position to suit for doneness. If the food you are broiling is not listed in the table, follow the instructions provided in your cookbook and watch the item closely.
Rack positions
22
Setting Oven ControlsCakes Breads
See the example below to set Cakes or Breads.
1. Arrange oven racks when cool. If needed preheat oven as desired and place food in oven.
2. Select oven by pressing upper oVen or LoWer oVen
3. For Cakes, press the caKeS BreaDS keypad until CAKES appears in the oven display.
For Breads, press the caKeS BreaDS keypad until BREADS appears in the oven display.
If needed, use numeric keypads to enter a different oven temperature.
4. Press Start.
The Cakes Breads functions are designed to give optimum baking performance for Cakes or Breads. These functions work well for baking cakes, brownies, pies (fresh or frozen), baked custards, cheesecakes, breads, rolls, biscuits, muffins and cornbread.
The Cakes function provides a preheat with a gentle cycling of heat giving cakes more volume and allowing delicate foods to cook more evenly.
The Breads function adds a special preheat feature to the bake cycle that thoroughly heats the oven from top to bottom to give more evenly browned foods.
NOTEYou may press STOP any time when setting the control or during the cooking process.
• Dark or dull pans absorb more heat than shiny bakeware resulting in dark or overbrowning of foods. It may be necessary to reduce the oven temperature or cook time to prevent overbrowning of some foods. Dark pans are recommended for pies. Shiny pans are recommended for cakes, cookies or muffins.
• Breads will have better results baking on a single oven rack.
• When baking layer cakes or cookies using 2 oven racks, place cookware on rack in position 1 and 3. For best results when baking cakes or cookies using a single oven rack, place rack in position 2 or 3.
for best results
Warm & HoldTM
See example below to set Warm & Hold for the oven to start immediately.
See example below to set Warm & Hold to start after a Cook Time or Delay Start.
1. Select oven by pressing upper oVen or LoWer oVen
2. Press Warm & HoLD
3. Press Start
1. Select oven by pressing upper oVen or LoWer oVen
2. Press BaKe or any other cooking function.
If needed, enter a different temperature.
3. Press Start.
4. Press BaKe tIme.
5. Enter time.
6. Press Start.
If needed, set a DeLay Start feature.
7. Press Warm & HoLD.
8 Press Start
The Warm & Hold feature will keep oven baked foods warm for serving up to 3 hours after cooking has finished. After 3 hours the Warm & Hold feature will shut-off automatically. The Warm & Hold should only be used with foods that are already at serving temperature. The Warm & Hold feature will maintain an oven temperature of 170°F (77°C).
The Warm & Hold feature may be used without any other cooking operations or may be used after cooking has finished using Cook Time or Delay Start.
NOTEYou may press STOP any time when setting the control or during the cooking process.
WARNING
fooD poISonInG HaZarD. Do not let food sit for more than one hour before or after cooking. Doing so can result in food poisoning or sickness. Foods that can easily spoil such as milk, eggs, fish, meat or poultry, should be chilled in the refrigerator first. Even when chilled, they should not stand in the oven for more than 1 hour before cooking begins, and should be removed promptly when finished cooking.

23
Setting Oven ControlsMeat Probe
Proper probe placement
• Always insert the probe so that the tip rests in the center of the thickest part of the meat. Do not allow the probe to touch bone, fat, gristle or the pan.
• For bone-in ham or lamb, insert the probe into the center of the lowest large muscle or joint. For dishes such as meat loaf or casseroles, insert the probe into the center of the food. To find the center of the food visually measure with the probe -Fig. 1-. When cooking fish, insert the probe just above the gill.
• For whole poultry or turkey, insert the probe into the thickest part of the inner thigh, below the leg -Fig. 2-.
When cooking meat such as roasts, hams or poultry you can use the probe to check the internal temperature without any guesswork. For some foods, especially poultry and roasts, testing the internal temperature is the most effective way of insuring that your food has been properly cooked.
The following temperature settings apply to the probe function:
• Default: 170°f / 76°c
• Minimum: 140°f / 60°c
• Maximum: 210°f / 99°cFig. 2
Fig. 11/2
Important note:Changing how the oven reacts after reaching the target temperature must be done before starting the cooking process.
To Set Meat Probe:1. Prepare the food and properly insert the temperature
probe into the food. DO NOT preheat or start cooking before properly inserting the meat probe. The probe should be inserted into the food and receptacle while the oven is still cool.
2. Place the prepared food on the desired oven rack position and slide into the oven.
3. Plug the meat probe into the probe receptacle located on the left front oven cavity top (See Fig. 3 for location of probe receptacle).
IMPORTANT
• Use only the probe supplied with your appliance; any other may result in damage to the probe or the appliance.
• Be sure the probe is fully inserted into the probe receptacle. The probe will not work properly until correctly connected.
• Handle the probe carefully when inserting and removing it from the food and the receptacle.
• Do not use tongs to pull the cable when inserting or removing it from the food or the receptacle.
• Defrost your food completely before inserting the probe to avoid damaging probe.
• Never leave or store the probe inside the oven when not in use.
• To prevent the possibility of burns, carefully unplug the probe using a pot holder.
4. The oven control detects if the meat probe is correctly plugged in to receptacle and when recognized will illuminate the probe icon in the oven control display.
5. Select oven by pressing upper oVen or LoWer oVen
6. To set the target temperature press meat proBe keypad once then enter the desired target internal temperature using the numeric key pads (default setting is 170ºF/77ºC)†. Press Start to accept the meat probe target temperature. Close the oven door.
24
Setting Oven ControlsMeat Probe (cont’d)To Set Meat Probe:7. Set the oven control for Bake, Conv Bake or Conv Roast
and the desired oven temperature. You may use the meat probe with some other baking features, but the meat probe cannot be set with Broil or Flex-Clean.
8. During the cooking process the actual oven temperature will display by default. To view the actual meat probe temperature press the meat proBe keypad once. To view the target meat probe temperature press the meat PROBE keypad a second time. After 6 seconds the display will revert to the oven temperature. If the target temperature needs to be changed during the cooking process, press the meat proBe keypad twice and use the numeric keypads to adjust the target temperature. Press the Start key to accept any change.
9. The oven control will provide 3 beeps when the internal target temperature is reached. By default the oven will continue cooking. Instructions for changing how the oven reacts after reaching the internal target temperature may be found later in this section. Press STOP to cancel cooking at any time.
See the following instructions for changing how the oven reacts after reaching the internal target temperature.
† The U.S. Department of Agriculture states, “Rare fresh beef is popular, but you should know that cooking it to only 140ºF/60ºC means some food poisoning organisms may survive.” (Source: Safe Food Book, Your Kitchen Guide, USDA Rev. June 1958.)
The lowest temperature recommended by the USDA is 145ºF/63ºC for medium rare fresh beef.
To set the oven to continue cooking after reaching the probe target temperature:
1. Press meat proBe keypad and hold for 6 seconds.
2. Press fLeX cLean keypad and toggle until the “Stay On” message appears (Fig. 1) then press Start to accept.
To set the oven to cancel cooking after reaching the probe target temperature:
1. Press meat proBe keypad and hold for 6 seconds.
2. Press fLeX cLean keypad and toggle until the “Stop” message appears (Fig. 2) then press Start to accept.

25
Setting Oven Controls
Slow Cook may be set with the following options:
• Cook Time
• Cook Time and/or Delay Start
Slow Cook
See the example below to set a slow cook.
The Slow Cook feature may be used to cook foods more slowly at lower oven temperatures. Slow Cook provides cooking results much the same way as a slow cooker or Crock-Pot.
This feature is ideal for roasting beef, pork & poultry. Slow cooking meats may result in the exterior of meats becoming dark but not burnt; this is normal.
For Slow Cook two settings are available, high (Hi) or low (Lo). The high setting is best for cooking foods from a 4 to 5 hour time period. The low setting is best for cooking foods from a 8 to 9 hour time period.
• Completely thaw all frozen foods before cooking.
• Position multiple racks to accommodate size of cooking utensils when cooking multiple food item.
• Add any cream or cheese sauces during the last hour of cooking.
• Do not open the oven door often or leave the door open when checking foods. The more heat that is lost, the longer the food will need to cook.
• Cover the foods to keep them moist or use a loose or vented type cover to allow foods to turn crisp or brown.
• Roasts may be left uncovered so browning can occur. Cook times will vary depending on the weight, fat content, bone & the shape of the roast.
• Preheating the oven will not be necessary.
• Use the recipe’s recommended food temperature and a food thermometer to determine when the food is done.
for best results
Fig.1
1. Select oven by pressing upper oVen or LoWer oVen
2. Press SLOW COOK to choose the Hi option -Fig. 1-.
3. Press SLOW COOK again to choose the Lo option -Fig. 2-.
4. Press Start
NOTEYou may press STOP any time when setting the control or during the cooking process.
Recipe Recall
The Recipe Recall feature may be used to record and recall your favorite recipe settings. This feature may store 1 setting for each of the basic cooking pads. The keypads that a recipe may be stored with are Bake, Conv Bake, Conv Roast, Cakes Breads, Preheat and Slow Cook. This feature will also store and recall Cook Time or Warm & Hold added settings.
See example below to store a typical cookie recipe (example for baking at 375°F for 9 minutes and to shut-off automatically).
Preheat* the oven to the desired temperature.
1. Select oven by pressing upper oVen or LoWer oVen
2. Press BaKe.
3. Press 3 7 5.
4. Press Start.
5. Press cooK tIme.
6. Enter the desired baking time. Press 9.
7 Press and hold Start until acceptance tone sounds
(about 3 seconds).
This recipe is now stored with the Bake key pad.See example below to recall a previously stored recipe under BAKE pad.
1. Select oven by pressing upper oVen or LoWer oVen
2. Press BaKe. The stored recipe is recalled.
3. Press Start.
NOTEOnce a recipe has been stored with a keypad, the • recipe information will be recalled when pressing the corresponding keypad in the future.If a recalled recipe includes Cook Time, the oven will • automatically shut-off when the Cook Time is finished.To erase all recipes stored, see section for Restoring • factory default settings.
NOTEPressing the Start pad after entering cooking temperatures and times will start the oven. If you wish to store the recipes but not start the oven press STOP after pressing the Start pad.* The Cook Time you enter does NOT include additional time required to Preheat the oven. The oven will begin to count down the cooking time as soon as the feature is activated.
Fig. 2
26
Setting Oven Controls
NOTEThe only keys available once the appliance is set for the Sabbath mode are BaKe, Start, STOP and the numeric pads.
You may change the oven temperature once baking has started (Jewish holidays only). Press BaKe, enter the oven temperature using the numeric keys and press Start twice. Remember that the oven control will no longer beep or display any further changes once the oven is set in the Sabbath mode.
Sabbath ModeThis appliance provides special settings for use when observing the Jewish Sabbath/Holidays. This mode will turn off all audible tones or visual display changes normally provided by the oven control. BaKe is the only cooking features available while in the Sabbath mode.
You must first set the BaKe feature and the temperature(s) needed, the cooK tIme option if needed before setting the Sabbath mode. Any settings made prior to setting the Sabbath mode will be visible in the displays.
The Sabbath mode will override the factory preset 12 Hour Energy Saving mode and the appliance will stay on until the cooking features are cancelled. If any of the cooking features are cancelled when the appliance is in the Sabbath mode, no audible or visual indicators will be available to verify the cancellation.
If the oven interior lights are needed, be sure to activate them prior to setting the Sabbath mode. Once the oven light is turned ON and the Sabbath mode is active, the oven light will remain on until the Sabbath mode is turned off and the oven lights are turned off. The oven door will not activate the oven interior lights when the oven door is opened or closed.
For further assistance, guidelines for proper usage and a complete list of models with the Sabbath feature, please visit the web at http:\\www.star-k.org.
It is recommended that any oven temperature modification made within an active Sabbath mode be followed with 2 presses of the Start key. This will insure the oven remains ON even if an attempt is made to set the oven temperature outside of its temperature range. If the oven temperature is set outside of the temperature range, the oven will default to the nearest available temperature. Try to set the desired oven temperature again.
Should a power failure or interruption occur during the Sabbath/Holidays, the appliance will shut OFF. When power is restored the appliance will not turn back on automatically to the original BAKE feature settings. Sf will appear in all the control display panels indicating a Sabbath mode failure. After a power failure, the food may be safely removed from the oven while still in the Sabbath mode.
The example below shows how to cancel the Sabbath mode.
The example below shows setting the oven to observe the Sabbath (and Jewish holidays).
Once properly set in Sabbath mode, SAb will show in the oven display until the Sabbath mode is cancelled.
Setting Sabbath Mode
Cancelling Sabbath mode
1. Select oven by pressing upper oVen or LoWer oVen
2. Press BaKe.
3 Press Start
Be sure to make any additional oven setting changes (Oven Light, Cook Time and/or Delay Start, Warm & Hold) before going to step 3.
4. To enter Sabbath mode, press and hold simultaneously both the cooK tIme and DeLay Start keys together for 3 seconds (a beep will sound) and release.
1. Press and hold both the cooK tIme and DeLay Start keys together for 3 seconds (a beep will sound) and release.
2. All cooking features previously set will automatically cancel once Sabbath mode has ended.
NOTEYou may press STOP any time when setting the control or during the cooking process.
27
user preferences
1. Press and hold DeLay Start for 7 seconds until BEEP
appears in the display.
2. Press fLeX cLean to switch between the On and Off mode.
3. Press Start to accept or press STOP to reject.
Setting Silent Control OperationThe silent control operation allows you to control the audio for the oven control. You may turn the audio off and later return to operating with all the normal audible sounds and alerts.
See the example below when changing the audible settings.
1. Press and hold BroIL for 7 seconds until F or C appear
in the display.
2. Press fLeX cLean to switch between the F and C mode.
3. Press Start to accept or press STOP to reject.
changing Between f° or c°Your control has the ability to display and set Fahrenheit or Celsius temperatures. The factory preset temperature display is Fahrenheit.
See the example below to change the default temperature display to Celsius.
1. Press and hold tImer for 7 seconds until “12Hr OFF” or
“StAy On” appear in the display.
2. Press fLeX cLean to switch between the “12Hr OFF” or “StAy On” mode.
3. Press Start to accept or press STOP to reject.
Setting 12hr energy Saving modeThe oven control has a factory preset built-in 12 hour energy saving feature that will shut off the appliance if the oven has been heating for more than 11 hours and 59 minutes. The oven can be programmed to override this feature for continuous baking.
See the example below to turn off 12 hour energy saving mode.
1. Press and hold the 7 numeric keypad until acceptance
tone sounds (about 6 seconds).
2. Press Start. The control will reset all user preference settings back to factory default settings.
restoring factory Default SettingsWhen new, your appliance was set with predetermined oven control settings. Over time, the user may make changes to these default settings. The following features or functions have user options or adjustments that may have been changed from the factory default settings:
• 12 or 24 hour display mode• Continuous bake or 12-Hour Energy Savings mode• Silent or audible control• Oven temperature display (Fahrenheit or Celsius)• Oven temperature adjustments• All stored recipes
Please be aware before restoring to factory default settings that ALL of the above user settings will be restored, including any oven temperature off set and any stored recipe information.
1. Select oven by pressing upper oVen or LoWer oVen
2. Press and hold BaKe for 7 seconds until UPO appear in
the display.3. Enter the desired temperature change using the number
pads. fLeX cLean can be pressed to lower the temperature.
4. Press Start to accept or press STOP to reject.NOTE: Each oven may be adjusted individually.
adjusting oven temperatureuser preference offsetYour appliance has been factory calibrated and tested to ensure an accurate baking temperature. For the first few uses, follow your recipe times and temperature recommendations carefully.
If you feel your oven is too hot or too cool from your baking experience, the oven temperature may be adjusted to your liking. The temperature may be increased up to +35°F (+19°C) or decreased down to -35°F (-19°C) from normal.
See the example below to increase the temperature.
Setting ClockSee the example below to set the clock to 1:30.
1. Press .
2. Enter 1:30 to advance to 1:30.
3. Press Start to accept or press STOP to reject.
1. Press and hold for 7 seconds until “12Hr dAy” or
“24Hr dAy” appear in the display.
2. Press fLeX cLean to switch between the 12 and 24 hour mode.
3. Press Start to accept or press STOP to reject.
The clock display mode allows you to choose between 12 and 24 hour mode. The factory preset clock display mode is 12 hour.
See the example below to change the default mode to 24 hour.
Setting 12 or 24 Hour mode

28
Self-cleaning cycle
What to Expect during CleaningWhile the oven is in operation, the oven heats to temperatures much higher than those used in normal cooking. Sounds of metal expansion and contraction are normal. Odor is also normal as the food soil is being removed. Smoke may appear through the oven vent.
If heavy spillovers are not wiped up before cleaning, they may fl ame and cause more smoke and odor than usual. This is normal and safe and should not cause alarm. If available, use an exhaust fan during the self-cleaning cycle.
DO Hand Clean Frame
DO Hand Clean Door
DO NOT Hand Clean Oven Door Gasket
A self-cleaning oven cleans itself with high temperatures that are well above those used for normal cooking. The high cleaning temperature eliminates soils completely or reduces them to a fi ne powdered ash that you can later easily wipe away with a damp cloth.
adhere to the following precautions when running the self-clean cycle:
• Allow the oven to cool before cleaning.
• Wear rubber gloves when cleaning any exterior parts of the oven manually.
• Do not use oven cleaners or protective coatings in or around the oven interior.
• Do not clean the oven door gasket. The woven material of the oven door gasket is essential for a good seal. Care should be taken not to rub, damage or remove the gasket. -Fig. 1-
• Do not use any cleaning materials on the door gasket. Leaving chemical residue can damage the door gasket.
• Do not force the oven door open. The automatic door locking system can be damaged.
• Remove all utensils and any aluminum foil from the oven. These items cannot withstand high cleaning temperatures.
• This oven comes with lubricated porcelain oven racks, which can remain in the oven during the self-clean cycle. Do not clean this vegetable oil lubrication off the racks. It is important that the sides of the oven racks always have a light coating of vegetable oil. To maintain optimal rack performance, re-apply a thin layer of vegetable oil to the sides of the rack after every self-clean cycle or when the rack becomes diffi cult to slide.
• Remove any excessive spillovers in the oven cavity before starting a self-clean cycle. To clean, use hot, soapy water and a cloth. Large spillovers can cause heavy smoke or fi re when subjected to high temperatures.
• Clean any soil from the oven frame, the door liner outside the oven door gasket and the small area at the front center of the oven bottom with soap and water. These areas heat suffi ciently to burn soil on.
• Do not allow food spills with a high sugar or acid content (such as milk, tomatoes, sauerkraut, fruit juices or pie fi lling) to remain on the porcelain surface, they may leave a dull spot even after cleaning.
Before Starting Self-clean
Fig. 1
WARNING
During the self-clean cycle, the outside of the appliance can become very hot to the touch. DO NOT leave small children unattended near the appliance.
CAUTION
• DO NOT line the oven walls, oven racks, bottom or any other part of the appliance with aluminum foil. Doing so will stop heat distribution, produce poor baking results and cause permanent damage to the oven interior (aluminum foil will melt to the interior surface of the oven).
• DO NOT force the oven door open. This can damage the automatic door locking system. Use caution when opening the door after the self-clean cycle is fi nished. The oven may still be Very Hot.
• The health of some birds is extremely sensitive to the fumes given off during the self-cleaning cycle of any appliance. Move birds to another well-ventilated room.
29
Self-cleaning cycleflex clean cycleThe fLeX cLean pad controls the Self-Cleaning feature. When used with a the Delay Start pad, a delayed Self-Cleaning cycle may also be programmed. The Flex Clean feature allows for any Self-Cleaning cycle time from 2 (2:00) to 4 hours (4:00). You may also choose the clean time in 1 minute increments (for example 2 hours and 50 minutes) by pressing the corresponding number keypads.
If you are planning to use the oven directly after a self-clean cycle remember to allow time for the oven to cool down and the oven door to unlock. This normally takes about one hour. So a 3 hour self-clean cycle will actually take about 4 hours to complete.
*It is recommend to use a 2 hour self-clean cycle for light soils, a 3 hour cycle for average soils, and a 4 hour cycle for heavy soils (to assure satisfactory results).
NOTE: The kitchen area should be well ventilated using an open window, ventilation fan or exhaust hood during the Self-Clean cycle. This will help eliminate the normal odors associated with the Self-Clean cycle.
See example below to start an immediate Self-Cleaning cycle or to set a Delay Start time of 9:00 o’clock and shut-off automatically (example provided is a default 3 hour Self-Clean cycle)
1. Be sure the clock is set with the correct time of day, the oven is EMPTY and the oven door is closed.
2. Select oven by pressing upper oVen or LoWer oVen
3. Press fLeX cLean.
The control will automatically clean for a 3 hour period (default self-cleaning cycle time). Note: If a 2 or 4 hour clean time is desired, press 2 0 0 for 2 hour or press 4 0 0 for a 4 hour clean time. Set the cleaning time based on the amount of soil: light, medium or heavy (*See above).
4. Press Start.
As soon as the control is set, the motor driven oven door lock will begin to close automatically. Once the door has been locked the “DOOR LOCKED” indicator light will stop flashing and remain on.
Note: Allow about 15 seconds for the oven door lock to close.
note: If the optional delay Self-clean feature is needed, finish steps 5-7.
5. Press DeLay Start.
6. Enter the desired Self-Clean starting time using the number pads 9 0 0.
7. Press Start.
The control will calculate forward from the set start time to determine when the Self-Cleaning cycle should end. The Self-Cleaning cycle will turn on automatically at the set time.
When the Self-clean cycle is completed
Once the oven has cooled down for approximately 1 HOUR, and the “DOOR LOCKED” icon is no longer displayed, the oven door can then be opened.
Stopping or Interrupting a Self-cleaning cycle
If it becomes necessary to stop or interrupt a self-cleaning cycle due to excessive smoke or fire in the oven:1. Press STOP.2. Once the oven has cooled down for approximately 1
HOUR, and the “DOOR LOCKED” icon is no longer displayed, the oven door can then be opened.
CAUTION
• To avoid possible burns use care when opening the oven door after the Self-Cleaning cycle. Stand to the side of the oven when opening the door to allow hot air or steam to escape.
• DO NOT force the oven door open. This can damage the automatic door locking system. Use caution and avoid possible burns when opening the door after the Self-Cleaning cycle has completed. The oven may still be VERY HOT.
IMPORTANT• If a self-clean cycle was started but did not finish due
to a power failure, your oven may not be completely cleaned. After power has been restored and the oven door has unlocked, set for another self-clean if needed.
• The cooktop controls will not be available during the self clean cycle.
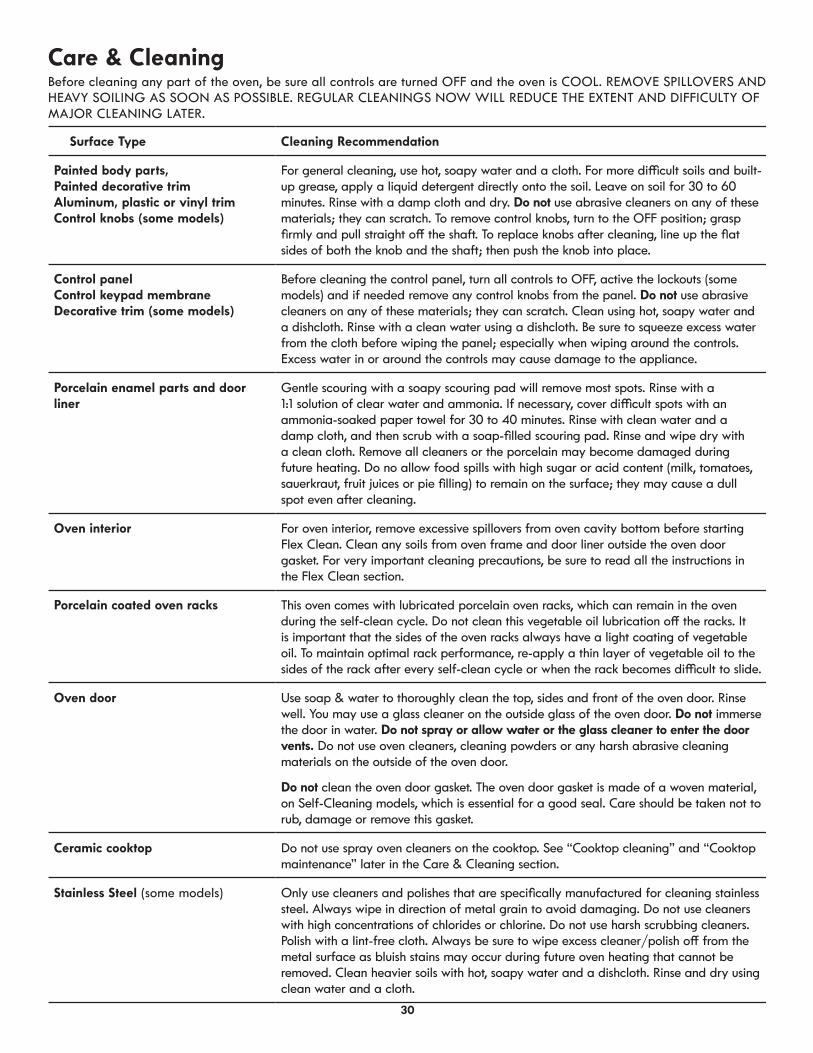
30
care & cleaning
Surface Type Cleaning Recommendation
Painted body parts,Painted decorative trimaluminum, plastic or vinyl trimcontrol knobs (some models)
For general cleaning, use hot, soapy water and a cloth. For more diffi cult soils and built-up grease, apply a liquid detergent directly onto the soil. Leave on soil for 30 to 60 minutes. Rinse with a damp cloth and dry. Do not use abrasive cleaners on any of these materials; they can scratch. To remove control knobs, turn to the OFF position; grasp fi rmly and pull straight off the shaft. To replace knobs after cleaning, line up the fl at sides of both the knob and the shaft; then push the knob into place.
Control panelControl keypad membraneDecorative trim (some models)
Before cleaning the control panel, turn all controls to OFF, active the lockouts (some models) and if needed remove any control knobs from the panel. Do not use abrasive cleaners on any of these materials; they can scratch. Clean using hot, soapy water and a dishcloth. Rinse with a clean water using a dishcloth. Be sure to squeeze excess water from the cloth before wiping the panel; especially when wiping around the controls. Excess water in or around the controls may cause damage to the appliance.
Porcelain enamel parts and door liner
Gentle scouring with a soapy scouring pad will remove most spots. Rinse with a 1:1 solution of clear water and ammonia. If necessary, cover diffi cult spots with an ammonia-soaked paper towel for 30 to 40 minutes. Rinse with clean water and a damp cloth, and then scrub with a soap-fi lled scouring pad. Rinse and wipe dry with a clean cloth. Remove all cleaners or the porcelain may become damaged during future heating. Do no allow food spills with high sugar or acid content (milk, tomatoes, sauerkraut, fruit juices or pie fi lling) to remain on the surface; they may cause a dull spot even after cleaning.
Oven interior For oven interior, remove excessive spillovers from oven cavity bottom before starting Flex Clean. Clean any soils from oven frame and door liner outside the oven door gasket. For very important cleaning precautions, be sure to read all the instructions in the Flex Clean section.
Porcelain coated oven racks This oven comes with lubricated porcelain oven racks, which can remain in the oven during the self-clean cycle. Do not clean this vegetable oil lubrication off the racks. It is important that the sides of the oven racks always have a light coating of vegetable oil. To maintain optimal rack performance, re-apply a thin layer of vegetable oil to the sides of the rack after every self-clean cycle or when the rack becomes diffi cult to slide.
Oven door Use soap & water to thoroughly clean the top, sides and front of the oven door. Rinse well. You may use a glass cleaner on the outside glass of the oven door. Do not immerse the door in water. Do not spray or allow water or the glass cleaner to enter the door vents. Do not use oven cleaners, cleaning powders or any harsh abrasive cleaning materials on the outside of the oven door.
Do not clean the oven door gasket. The oven door gasket is made of a woven material, on Self-Cleaning models, which is essential for a good seal. Care should be taken not to rub, damage or remove this gasket.
Ceramic cooktop Do not use spray oven cleaners on the cooktop. See “Cooktop cleaning” and “Cooktop maintenance” later in the Care & Cleaning section.
Stainless Steel (some models) Only use cleaners and polishes that are specifi cally manufactured for cleaning stainless steel. Always wipe in direction of metal grain to avoid damaging. Do not use cleaners with high concentrations of chlorides or chlorine. Do not use harsh scrubbing cleaners. Polish with a lint-free cloth. Always be sure to wipe excess cleaner/polish off from the metal surface as bluish stains may occur during future oven heating that cannot be removed. Clean heavier soils with hot, soapy water and a dishcloth. Rinse and dry using clean water and a cloth.
Before cleaning any part of the oven, be sure all controls are turned OFF and the oven is COOL. REMOVE SPILLOVERS AND HEAVY SOILING AS SOON AS POSSIBLE. REGULAR CLEANINGS NOW WILL REDUCE THE EXTENT AND DIFFICULTY OF MAJOR CLEANING LATER.

31
care & cleaningCooktop Maintenance
Prior to using your cooktop for the fi rst time, apply the recommended CookTop® Cleaning Creme to the ceramic surface (on the web visit www.sears.com for replacement cooktop cleaner, item number 40079). Buff with a non-abrasive cloth or no-scratch cleaning pad. This will make cleaning easier when soiled from cooking. The special cook-top cleaning cream leaves a protective fi nish on the glass to help prevent scratches and abrasions.
Sliding aluminum or copper clad bottom pans on the cook-top can cause metal markings on the cooktop surface. These marks should be removed immediately after the cooktop has cooled using the cooktop cleaning cream. Metal marks can become permanent if not removed prior to future use.
Cookware (cast iron, metal, ceramic or glass) with rough • bottoms can mark or scratch the cooktop surface.
Do not:Use cookware with dirt or dirt build up on bottom; replace • with clean cookware before using.Slide anything metal or glass across the cooktop. • Use your cooktop as a cutting board or work surface in the • kitchen. Cook foods directly on the cooktop surface without a pan. • Drop heavy or hard objects on the glass cooktop, because • they may cause it to crack.
Consistent and proper cleaning is essential to maintaining your ceramic glass cooktop
Cooktop Cleaning
Before cleaning the cooktop, be sure the con-trols are turned to off and the cooktop is COOL.
DO NOT use a cooktop cleaner on a hot cooktop. The fumes can be hazardous to your health, and can chemically damage the ceramic glass surface.
for light to moderate soil:Apply a few drops of CookTop® Cleaning Creme directly to the cooktop. Use a paper towel or use a non-abrasive plas-tic type no-scratch cleaning pad to clean the entire cooktop surface. Make sure the cooktop is cleaned thoroughly, leaving no residue.for heavy, burned on soil:Apply a few drops of CookTop® Cleaning Creme directly to the soiled area. Rub the soiled area using a non-abrasive plastic type no-scratch cleaning pad, applying pressure as needed. Do not use the pad you use to clean the cooktop for any other purpose.
If soils remain, carefully scrape soils with a metal razor blade scraper, holding scraper at a 30 degree angle to the surface. Remove loosened soils, then apply a few drops of cleaning cream and buff surface clean.
Important note: Damage to the ceramic glass cooktop may occur if you use an abrasive type scratch pad. Only use cleaning products that have been specifi cally designed for ceramic glass cooktop.
Plastic or foods with a high sugar content:These types of soils need be removed immediately if spilled or melted onto the ceramic cooktop surface. Permanent damage (such as pitting of the cooktop surface) may oc-cur if not removed immediately. After turning the surface elements OFF, use a razor blade scraper or a metal spatula with a mitt and scrape the soil from the hot surface (as illus-trated). Allow the cooktop to cool, and use the same method for heavy or burned on soils.

32
care & cleaning
Do not use the following on the cooktop:• Do not use abrasive cleaners and scouring pads, such as
metal and some nylon pads. They may scratch the cooktop, making it more diffi cult to clean.
• Do not use harsh cleaners, such as chlorine bleach, ammonia or oven cleaners, as they may etch or discolor the cooktop.
• Do not use dirty sponges, cloths or paper towels, as they can leave soil or lint on the cooktop which can burn and cause discoloration.
Cooktop Cleaning (cont’d)
HalogenLight Bulb
Lift up and pull out.
Replacing the Halogen Oven Light
The oven lights will automatically turn ON when the oven door is opened. The oven lights may also be manually operated by pressing the pad.
The oven light bulb is covered with a glass shield. The glass shield can be removed to be cleaned manually or to change oven light. THIS GLASS SHIELD MUST BE IN PLACE WHENEVER THE OVEN IS IN USE.
To replace the light bulb: Be Sure tHe oVen IS cooL.
1. Turn the power off at the main source.2. Wear a leather-faced glove for protection against
possible broken glass.3. To remove the glass shield, lift up on side and use force
to pull shield out.4. Replace halogen light appliance bulb taking care not
to touch the bulb with your bare fi ngers. Touching bulb with your skin can leave a fi lm on the bulb that causes it to burn out quickly.
5. Replace glass shield in opposite order and manner of removal.
Special caution for aluminum foil and aluminum cooking utensils
neVer cover any slots, holes or passages in the oven bottom or cover an entire rack with materials such as aluminum foil. aluminum foil linings may trap heat, causing a fi re hazard.
Protective Liners — Do not uSe aLumInum foIL to line the oven bottom. Since the melting point of aluminum is much lower than that of other metals, the aluminum may melt and permanently merge with the porcelain.
• aluminum foil: Use of aluminum foil will damage the cooktop. Do not use under any circumstances.
• aluminum utensils: Since the melting point of aluminum is much lower than that of other metals, care must be taken when aluminum pots or pans are used. Pans that boil dry may permanently damage cooktop by breaking, fusing to, or marking it.

33
Removing and Replacing the Oven Door
Roller pin
Hinge arm notch
Hinge arm hook
Slot bottom
care & cleaning
• Do not close the oven door until all the interior oven racks are fully inserted and retracted to the back of the oven.
• Do not hit the glass with pots, pans, or any other object. The oven door glass may break or even break at a later time unexpectedly.
• Scratching, hitting, jarring or stressing the oven door glass may weaken its structure causing an increased risk of breakage at a later time.
• You may use a glass cleaner on the outside of the oven door glass. Do not spray or allow water or the cleaner to enter or drip down into the oven door vents. Spray cleaner on cloth fi rst and then wipe the oven door clean.
• Do not use strong oven cleaners, powders or any harsh abrasive cleaning materials on the outside of the oven door or glass.
• Never clean the oven door gasket. The oven door gasket should always clean during the Self-clean cycle.
CAUTION The oven door is heavy. Be careful when removing and lifting the door. Do not lift the oven door by the handle.
IMPORTANT Most oven doors contain glass that can break. Read the following recommendations:
To Remove Oven Door:1. Open oven door completely (horizontal with fl oor - See
Figure 1).2. Pull the door hinge locks on both left and right door
hinges down from the oven frame completely towards the oven door (See Figure 2). A tool such as a small fl at-blade screwdriver may be required.
3. Firmly grasp both sides of oven door along the door sides (Do not use the oven door handle - See Figure 3).
4. Close the door to the broil stop position (the oven door will stop into this position just before fully closing).
5. With the oven door in the broil stop position, lift the oven door hinge arms over the roller pins located on each side of the oven frame (See Figure 4).
To Replace Oven Door:1. Firmly grasp both sides of oven door along the door sides
(Do not use the oven door handle - See Figure 3).2. Holding the oven door at the same angle as the removal
position, seat the hook of the hinge arm onto the roller pins located on each side of the oven door frame (See Fig. 4). Also, seat the notch of the hinge arm onto the bottom of the slot at the same time you seat the hook. The hook and notch of the hinge arms must be fully seated onto the roller pins and bottom of the slot.
3. Fully open the oven door (horizontal with fl oor - See Figure 1).
4. Push the door hinge locks up towards and into the oven frame on both left and right oven door hinges (See Figure 2) to the locked position.
5. Close the oven door.
Door Hinge locations
with oven door fully open
figure 1
figure 2
figure 3
figure 4
Oven door
Around
Hinge

34
Oven BakingFor best cooking results, heat the oven before baking cookies, breads, cakes, pies or pastries, etc. There is no need to preheat the oven for roasting meat or baking casseroles.
The cooking times and temperatures needed to bake a product may vary slightly from your previously owned appliance.
Baking Problems and Solutions Chart
BaKInGPROBLEMS
cauSeS correctIonS
Cookies and biscuits burn on the bottom.
• Cookies and biscuits put into the oven before the preheating time is completed.
• Oven rack overcrowded.
• Dark pan absorbs heat too fast.
• Allow oven to preheat to the selected temperature before placing food in oven.
• Choose pan sizes that will permit 5.1cm to 10.2cm (2” to 4”) of air space on all sides when placed in the oven.
• Use a medium-weight aluminum baking sheet.
Cakes too dark on top or bottom.
• Cakes put into the oven before preheating time is completed.
• Rack position too high or low.• Oven too hot.
• Allow oven to preheat to the selected temperature before placing food in the oven.
• Use proper rack position for baking needs.• Set oven temperature 25°F/12°C lower than
recommended.
Cakes not done in the center.
• Oven too hot.
• Incorrect pan size.• Pan not centered in oven.
• Set oven temperature 25°F/12°C lower than recommended.
• Use pan size suggested in recipe.• Use proper rack position and place pan so there is
5.1cm to 10.2cm (2” to 4”) of space on all sides of pan.
Cakes not level. • Range not level.
• Pan too close to oven wall or rack overcrowded.
• Pan warped.
• Place a marked glass measuring cup fi lled with water on the center of the oven rack. If the water level is uneven, refer to the installation instructions for leveling the range.
• Be sure to allow 5.1cm to 10.2cm (2” to 4”) of clearance on all sides of each pan in the oven.
• Do not use pans that are dented or warped.
foods not done when cooking time is up.
• Oven too cool.
• Oven overcrowded.
• Oven door opened too frequently.
• Set oven temperature 25°F/12°C higher than suggested and bake for the recommended time.
• Be sure to remove all pans from the oven except the ones to be used for baking.
• Open oven door only after shortest recommended baking time.
Before you call (Solutions to Common Problems)

35
Before you call (Solutions to Common Problems)Before you call for service, review this list. It may save you time and expense. The list includes common occurrences that are not the result of defective workmanship or materials in this appliance.
occurrence poSSIBLe cauSe/SoLutIon
Oven Control Beeps and Displays any f code error (example f11).
Electronic control has detected a fault condition. Press STOP to clear the display and stop the beeping. Reprogram the oven. If a fault reoccurs, record the fault number. Press STOP and call Sears or another qualifi ed servicer.
“d-o” is displayed. The door was left open and controls set for self-cleaning cycle. Close the door and push STOP pad.
faulty installation. Range not leveled. Bad cooking results.
Place oven rack in center of oven.
Place a level or a marked glass measuring cup fi lled with water on the center of the oven rack.If the water level is uneven, adjust the leveling legs of the unit (refer to the installation instructions for leveling the range).If the level is still uneven, contact an installing agent to adjust the cabinet cutout fl ooring.Kitchen cabinet misalignment may make oven appear to be not level. Be sure cabinets are square and level. Contact cabinet maker to correct problem.
Surface element does not heat. No power to the appliance. Check steps under “Entire range or oven does not operate” in this Before you call checklist.Too low heat setting. Turn control to a slightly higher setting until element comes on.Incorrect control is on. Be sure to use correct control for the element to be used.
Surface element too hot or not hot enough.
Incorrect control setting. Raise or lower setting until proper amount of heat is obtained. Dial markings are an indicator of relative heat settings and will vary slightly.Voltage is incorrect. Be sure appliance is properly connected to the power source specifi ed in the installation instructions. If you are not sure about this requirement call 1-800-4-my-Home® for service (See back cover).Lightweight or warped pans were used. Be sure to use proper cookware. Use only fl at bottom, evenly balanced medium or heavyweight cookware. Heavy and medium weight pans heat evenly. Because lightweight pans heat unevenly, foods may burn easily.
Surface element turns off by itself.
This is normal. The element temperature rises gradually and evenly. As the temperature rises, the element will glow red. To maintain the selected setting, the element will cycle ON and OFF. The heating element retains enough heat to provide a uniform and consistent heat during the OFF cycle.
Warmer zone element does not turn on.
The warmer element will not glow when turned on. The indicator light will turn on when the warmer element is on.
Scratches or abrasions on cooktop surface.
Coarse particles such as salt or sand between cooktop and utensils can cause scratches. Be sure cooktop surface and bottoms of utensils are clean before usage. Small scratches do not aff ect cooking and will become less visible with time.Cleaning materials not recommended for ceramic-glass cooktop have been used. See “cooktop cleaning” section under General Care & Cleaning.Cookware with rough bottom has been used. Use smooth, fl at-bottomed cookware.
Metalmarks. Sliding or scraping of metal utensils on cooktop surface. Do not slide metal utensils on cooktop surface. Use a ceramic-glass cooktop cleaning cream to remove the marks. See “cooktop maintenance” section under General Care & Cleaning.
Brown streaks or specks. Boilovers are cooked onto surface. Use razor blade scraper to remove soil. See “cooktop maintenance” section under General Care & Cleaning.
areas of discoloration with metallic sheen.
Mineral deposits from water and food. Remove using a ceramic glass cooktop cleaning cream. Use cookware with clean, dry bottoms.
Oven light does not work. Burned-out or loose bulb. Follow the instructions under Changing Oven Light to replace or tighten the bulb.
fan noise during cooking operation.
A cooling fan may automatically turn on and off to cool internal parts. This is normal, and the fan may continue to run even after oven is turned off .

36
Before you call (Solutions to Common Problems)
occurrence poSSIBLe cauSe/SoLutIon
Entire oven does not operate. When the oven is fi rst plugged in, or when the power supply to the oven has been interrupted, the display will fl ash. The oven cannot be programmed until the clock is set.Be sure electrical cord is securely connected into the electrical junction box.Cord/plug is not installed and/or connected. Cord is not supplied with oven. Contact Sears or another qualifi ed servicer.Service wiring not complete. Contact Sears or another qualifi ed servicer.Power outage. Check house lights to be sure. Call your local electric company.Short in cord/plug. Replace cord/plug.Controls are not set properly. See instructions under Setting Oven Controls to set the controls.House fuse has blown or circuit breaker has tripped immediately following installation. House fuse may not be fully engaged. Check fuse and screw or engage circuit breaker securely.House fuse has blown or circuit breaker has tripped after the oven has been installed and previously operating. Call Sears or another qualifi ed servicer.
Oven smokes excessively during broiling.
Make sure the oven door is closed. Door should be closed during broiling.Meat too close to the broiler unit. Reposition the rack to provide more clearance between the meat and the broiler. Preheat broil burner for quick searing operation.Meat not properly prepared. Remove excess fat from meat. Slash remaining fatty edges to prevent curling, but do not cut into the lean.Grid on broiler pan wrong side-up. Grease does not drain into broiler pan. Always place the grid on the broiler pan with the ribs up and the slots down to allow grease to drip into the pan.Broiler pan used without grid or grid cover with foil. DO NOT use the broiler pan without the grid or cover the grid with foil.Oven needs to be cleaned. Grease has built up on oven surfaces. Regular cleaning is necessary when broiling frequently. Old grease or food spatters cause excessive smoking.
Poor baking results.Oven too cool or too hot.
Many factors aff ect baking results. See Oven Baking for hints, causes and corrections. See adjusting oven temperature.
Self-cleaning cycle does not work.
Make sure the oven door is closed.
Controls not set properly. Follow Self-Cleaning instructions in this Use & Care Guide.Self-cleaning cycle was interrupted. Stop time must be set 2-4 hours past the start time. Follow steps under “Stopping or Interrupting a Self-Cleaning Cycle” in this Use & Care Guide.
Soil not completely removed after self-cleaning cycle is completed.
Before starting the Self-Cleaning cycle, hand clean any soil from the oven frame, the door liner outside the oven door gasket, and the small area at the front center of the oven. These surfaces are not in the self-cleaning area. Clean with soap and water. Burned-on residue can be cleaned off with a stiff nylon brush and water or nylon scrubber. DO NOT hand clean the oven door gasket or it will be permanently damaged.Excessive spillovers in oven. Set the self-clean cycle for longer cleaning time.
flames inside oven or smoke from vent.
Excessive spillovers in oven. This is normal, especially for high oven temperatures, pie spillovers or for large amounts of grease on bottom of oven. Wipe up excessive pie fi lling spillovers.

Master Protection Agreements
Congratulations on making a smart purchase. Your newKenmore® product is designed and manufactured for years ofdependable operation. But like all products, it may requirepreventive maintenance or repair from time to time. That’s whenhaving a Master Protection Agreement can save you moneyand aggravation.
The Master Protection Agreement also helps extend the life ofyour new product. Here’s what the Agreement* includes:
Parts and labor needed to help keep products operatingproperly under normal use, not just defects. Our coveragegoes well beyond the product warranty. No deductibles,no functional failure excluded from coverage – realprotection.
Expert service by a force of more than 10,000 authorizedSears service technicians, which means someone youcan trust will be working on your product.
Unlimited service calls and nationwide service, asoften as you want us, whenever you want us.
«No-lemon» guarantee – replacement of your coveredproduct if four or more product failures occur within twelvemonths.
Product replacement if your covered product can’t befixed.
Annual Preventive Maintenance Check at your request –no extra charge.
Fast help by phone – we call it Rapid Resolution –phone support from a Sears representative on all products.Think of us as a «talking owner’s manual».
Power surge protection against electrical damage due topower fluctuations.
$250 Food Loss Protection annually for any foodspoilage that is the result of mechanical failure of anycovered refrigerator or freezer.
Rental reimbursement if repair of your covered producttakes longer than promised.
10% discount off the regular price of any non-coveredrepair service and related installed parts.
Once you purchase the Agreement, a simple phone call is allthat it takes for you to schedule service. You can call anytimeday or night, or schedule a service appointment online.
The Master Protection Agreement is a risk free purchase. If youcancel for any reason during the product warranty period, wewill provide a full refund. Or, a prorated refund anytime after theproduct warranty period expires. Purchase your MasterProtection Agreement today!
Some limitations and exclusions apply. For prices andadditional information in the U.S.A. call 1-800-827-6655.
* Coverage in Canada varies on some items. For full detailscall Sears Canada at 1-800-361-6665.
Sears Installation Service
For Sears professional installation of home appliances, garagedoor openers, water heaters, and other major home items, inthe U.S.A. or Canada call 1-800-4-MY-HOME®.
PROTECTION AGREEMENTSAcuerdos maestros de protección
Enhorabuena por haber hecho una compra inteligente. Su nuevo productoKenmore® está diseñado y fabricado para brindarle años de funcionamientofiable. Pero, como cualquier producto, puede necesitar mantenimientopreventivo o reparaciones periódicas. Es por eso que tener un Acuerdo maestrode protección podría ahorrarle dinero y molestias.
El Acuerdo maestro de protección también sirve para prolongar la durabilidadde su nuevo producto. El acuerdo* incluye lo siguiente:
Piezas y mano de obra necesarias para contribuir a mantener elfuncionamiento adecuado de los productos utilizados en condicionesnormales de uso, no sólo en caso de defectos de los productos. Nuestracobertura va mucho más allá que la garantía del producto. No seaplican deducibles ni exclusiones por fallas del funcionamiento: es decir,verdadera protección.
Servicio técnico por expertos (más de 10000 técnicos autorizados deSears), lo cual significa que quien repare o realice el mantenimiento de suproducto será un profesional de confianza.
Servicio técnico a escala nacional y número ilimitado de llamadas desolicitud de servicio técnico: se puede poner en contacto con nosotroscuantas veces lo desee y cuando lo desee.
Garantía «sin sorpresas»: se reemplaza el producto cubierto por elacuerdo si ocurren cuatro o más fallas del producto en un periodo de 12meses.
Reemplazo del producto: en caso de que no se pueda reparar elproducto cubierto por el acuerdo.
Revisión anual preventiva de mantenimiento del producto: puedesolicitarla en cualquier momento, sin costo alguno.
Rápida asistencia telefónica, la cual denominamos Solución rápida: esdecir, asistencia telefónica a través de cualquiera de nuestrosrepresentantes de Sears, sobre cualquiera de nuestros productos. Pienseen nosotros como en un «manual parlante del usuario».
Protección contra fallas eléctricas, contra daños debidos a fluctuacionesde la corriente eléctrica.
$250 al año para cubrir cualquier posible deterioro de alimentos quehaya tenido que desechar debido a una falla mecánica de cualquiera denuestros refrigeradores o congeladores cubiertos por este acuerdo.
Devolución de gastos de alquiler de electrodomésticos si la reparaciónde su producto asegurado toma más que el tiempo prometido.
10% de descuento aplicable tanto a los costos del servicio de reparación,como de las piezas instaladas relacionadas que no hayan quedadocubiertos por este acuerdo.
Una vez que haya realizado el pago de este acuerdo, bastará una simplellamada telefónica para concertar una visita de servicio. Puede llamar acualquier hora del día o de la noche, o bien concertar una visita de servicio porInternet.
La adquisición del Acuerdo maestro de protección es una inversión exenta deriesgos. Si por cualquier motivo decide cancelar dicho acuerdo durante elperiodo de garantía del producto, le haremos un reintegro total del valor. O bienun importe proporcional si cancela el acuerdo en cualquier otro momentoposterior al vencimiento del periodo de garantía del producto. ¡Adquiera hoymismo su Acuerdo maestro de protección!
Algunas limitaciones y exclusiones podrían aplicarse. Para solicitarprecios e información adicional, llame al 1-800-827-6655 (en los EE.UU.).
* La cobertura en Canadá varía en el caso de algunos artículos. Paraobtener detalles completos al respecto, llame al 1-800-361-6665 de Searsde Canadá.
Servicio de instalación de Sears
Para solicitar la instalación por profesionales de Sears de electrodomésticos,abridores de puertas de garaje, calentadores de agua y otros artículos de usoprioritario en el hogar, llame al 1-800-4-MY-HOME en los EE.UU. o Canadá.

® Registered Trademark / TM Trademark of KCD IP, LLC in the United States, or Sears Brands, LLC in other countries ® Marca Registrada / TM Marca de Fábrica de KCD IP, LLC en Estados Unidos, o Sears Brands, LLC in otros países MC Marque de commerce / MD Marque déposée de Sears Brands, LLC
Get it fixed, at your home or ours!Your Home
For troubleshooting, product manuals and expert advice:
www.managemylife.com
For repair – in your home – of all major brand appliances, lawn and garden equipment, or heating and cooling systems,
no matter who made it, no matter who sold it!For the replacement parts, accessories and
owner’s manuals that you need to do-it-yourself. For Sears professional installation of home appliancesand items like garage door openers and water heaters.
1-800-4-MY-HOME® (1-800-469-4663)Call anytime, day or night (U.S.A. and Canada)
www.sears.com www.sears.ca
Our Home For repair of carry-in items like vacuums, lawn equipment,
and electronics, call anytime for the location of your nearest Sears Parts & Repair Service Center
1-800-488-1222 (U.S.A.) 1-800-469-4663 (Canada)www.sears.com www.sears.ca
To purchase a protection agreement on a product serviced by Sears: 1-800-827-6655 (U.S.A.) 1-800-361-6665 (Canada)
Para pedir servicio de reparacióna domicilio, y para ordenar piezas:
1-888-SU-HOGAR®
(1-888-784-6427)www.sears.com
Au Canada pour service en français: 1-800-LE-FOYERMC
(1-800-533-6937)www.sears.ca

Kenmore Elite®
Estufa Eléctrica Deslizable con Horno DobleDouble Oven Slide-in Electric Range* = Número de color, Color number
Manual de Uso y CuidadoUse & Care Guide Español / English
Modelos / Models: 790.4111*
P/N 318205842B (1208)Sears Brands Management CorporationHoffman Estates, IL 60179 U.S.A.www.kenmore.comwww.sears.com
®
2
Tabla de materiasGarantía de electrodomésticos Kenmore Elite ....................... 2Registro del Producto .................................................................. 2Ubicación de la placa de serie ................................................. 2INSTRUCCIONES IMPORTANTES DE SEGURIDAD ........... 3-5Características de la Estufa .......................................................6Antes de Ajustar los Controles del Horno ................................7Recomendaciones de los Utensilios de Cocina ....................... 8Antes de Ajustar los Controles Superiores ..........................9-10Ajuste de los Controles Superiores ...................................... 11-13
Funciones de las Teclas de Control ......................................... 14Primeros Pasos .............................................................................15Ajuste de los Controles del Horno ......................................16-26Preferencias del Usuario ...........................................................27Ciclo de Autolimpieza ........................................................28-29Cuidado y Limpieza ............................................................30-33Antes de Solicitar Servicio Técnico ...................................34-36ACUERDOS DE PROTECCIÓN ................................................37Servicio Sears .............................................................................38
Impreso en Canada
Registro del ProductoEncontrará el modelo y el número de serie impresos en la placa de serie. Asegúrese de tomar nota del número de serie para futura referencia.
No. de Modelo ___________________________________
No. de Serie _____________________________________
Fecha de Compra ________________________________
Conserve estas instrucciones y su recibo de compra para referencia futura.
790.
Leer con detenimiento y guardar estas instrucciones Este Manual de Uso y Mantenimiento contiene instrucciones generales de operación para su electrodoméstico e información sobre las funciones para los diversos modelos. Su producto puede no tener todas las funciones descritas. Los gráficos que se incluyen son sólo representativos. Los gráficos de su electrodoméstico pueden no ser idénticos a los que se muestran. Se debe usar el sentido común y ser cauteloso cuado se instala, usa y mantiene cualquier dispositivo.
Ubicación de la placa de serieRecuerde registrar el número de serie para referencia futura.
Garantía de electrodomésticos Kenmore EliteSi esta cubierta, cuando se instala y se utiliza de acuerdo con las instrucciones de instalación y la guía de uso y cuidado, falla debido a defectos de material y mano de obra durante el primer año a partir de la fecha de compra, llame al 1-800-4-MY-HOME® para hacer arreglos para que sea reparada gratuitamente.
La garantía tiene una duración de cinco años a partir de la fecha de compra, solamente si la estufa es instalada, utilizada y conservada de acuerdo a todas las instrucciones que se proporcionan en el producto. Sears remplazara sin costo alguno los elementos superiores que estén defectuosos, el vidrio de la parrilla, si y solo si la falla es causada debido a un choque térmico. Después del primer año, el cliente deberá pagar los gastos de mano de obra de la instalación.
Si este electrodoméstico se utiliza para otros fi nes que no sean el uso familiar privado, esta garantía rige únicamente durante 90 días a partir de la fecha de compra.
Esta garantía cubre únicamente defectos de material y de fabricación. Sears NO pagará:1. Grietas en la cubierta de vidrio cerámico que no sean resultado de choque térmico.2. Manchas y rayas en la cubierta de vidrio cerámico causadas por mal mantenimiento según todas las instrucciones
proporcionadas con el producto.3. Componentes desechables que pueden gastarse debido al uso habitual, incluyendo, y sin limitarse a los fi ltros, las
correas, las lámparas y las bolsas.4. Técnicos de servicio que instruyan al usuario en la manera adecuada de instalar, utilizar o mantener el producto.5. Un técnico que limpie o realice el mantenimiento de este producto.6. Daños o fallas de este producto si el mismo no fue instalado, utilizado o mantenido de acuerdo con todas las
instrucciones proporcionadas con el producto.7. Daños o fallas en el producto que sean el resultado de accidentes, abuso, mal uso u otra clase de uso que no sea el
apropiado.8. Daños o fallas en el producto causados por el uso de detergentes, limpiadores, productos químicos o elementos que no
sean los recomendados en las instrucciones provistas con el producto.9. Daños o fallas de las piezas o sistemas como resultado de modifi caciones no autorizadas hechas al producto.
Renuncia de responsabilidades de garantías implícitas; limitación de acciones legalesEl único y exclusivo resarcimiento para el cliente en virtud de esta garantía limitada será la reparación del producto según lo indicado en el presente documento. Las garantías implícitas, incluyendo garantías de aptitud para la venta o idoneidad para un fi n en particular, están limitadas a un año o al período más corto permitido por la ley. Sears no se responsabiliza por daños incidentales o consecuentes. Algunos estados y provincias no permiten la exclusión o limitación de daños incidentales o consecuentes o las limitaciones de duración de las garantías implícitas de comercialización o aptitud, por lo que estas exclusiones o limitaciones pueden no aplicarse en su caso.Esta garantía se aplica únicamente mientras este producto se use dentro de los Estados Unidos y Canadá. Esta garantía le otorga derechos legales específi cos. Usted puede tener además otros derechos que varían de un estado a otro.
sears Brands management corporation, Hoff man estates, IL 60179 - sears canada Inc., toronto, ontario, canada m5B 2c3
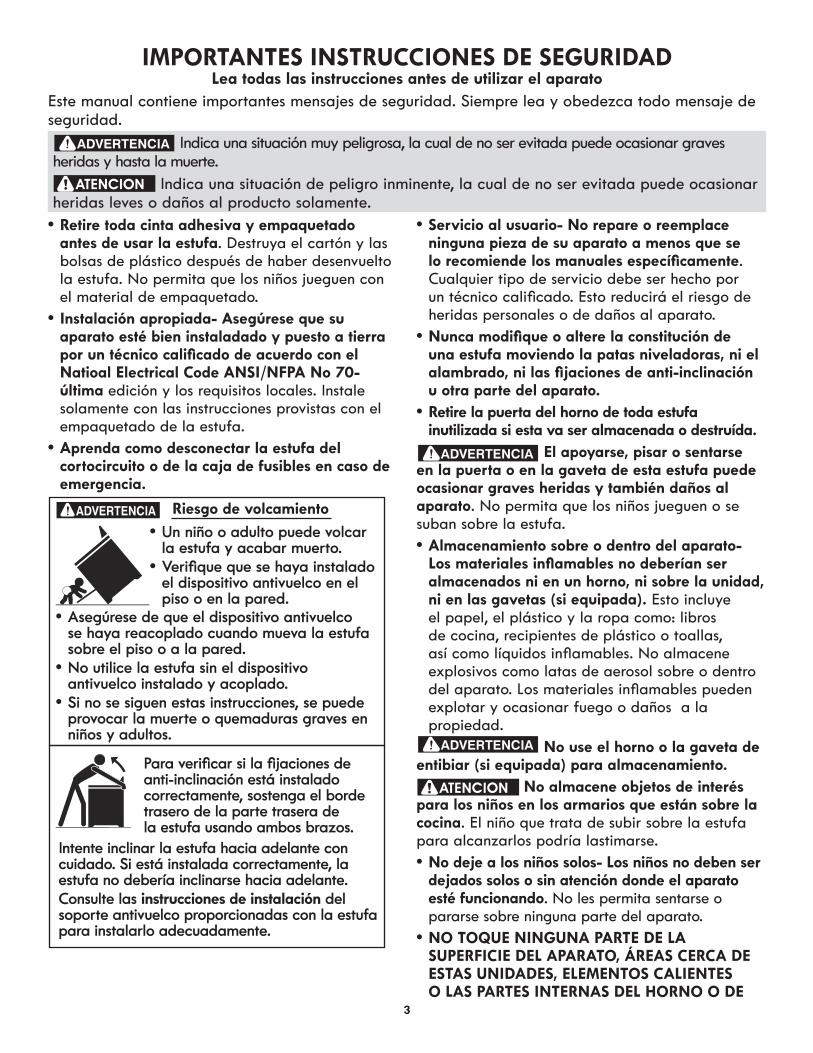
3
Un niño o adulto puede volcar • la estufa y acabar muerto.Verifi que que se haya instalado • el dispositivo antivuelco en el piso o en la pared.
Riesgo de volcamiento
Asegúrese de que el dispositivo antivuelco • se haya reacoplado cuando mueva la estufa sobre el piso o a la pared.No utilice la estufa sin el dispositivo • antivuelco instalado y acoplado.Si no se siguen estas instrucciones, se puede • provocar la muerte o quemaduras graves en niños y adultos.
Para verifi car si la fi jaciones de anti-inclinación está instalado correctamente, sostenga el borde trasero de la parte trasera de la estufa usando ambos brazos.
Intente inclinar la estufa hacia adelante con cuidado. Si está instalada correctamente, la estufa no debería inclinarse hacia adelante.Consulte las instrucciones de instalación del soporte antivuelco proporcionadas con la estufa para instalarlo adecuadamente.
Importantes InstruccIones de segurIdad Lea todas las instrucciones antes de utilizar el aparato
Este manual contiene importantes mensajes de seguridad. Siempre lea y obedezca todo mensaje de seguridad.
• retire toda cinta adhesiva y empaquetado antes de usar la estufa. Destruya el cartón y las bolsas de plástico después de haber desenvuelto la estufa. No permita que los niños jueguen con el material de empaquetado.
• Instalación apropiada- asegúrese que su aparato esté bien instaladado y puesto a tierra por un técnico califi cado de acuerdo con el natioal electrical code ansI/nFpa no 70- última edición y los requisitos locales. Instale solamente con las instrucciones provistas con el empaquetado de la estufa.
• aprenda como desconectar la estufa del cortocircuito o de la caja de fusibles en caso de emergencia.
• servicio al usuario- no repare o reemplace ninguna pieza de su aparato a menos que se lo recomiende los manuales específi camente. Cualquier tipo de servicio debe ser hecho por un técnico califi cado. Esto reducirá el riesgo de heridas personales o de daños al aparato.
• nunca modifi que o altere la constitución de una estufa moviendo la patas niveladoras, ni el alambrado, ni las fi jaciones de anti-inclinación u otra parte del aparato.
• retire la puerta del horno de toda estufa inutilizada si esta va ser almacenada o destruída.
El apoyarse, pisar o sentarse en la puerta o en la gaveta de esta estufa puede ocasionar graves heridas y también daños al aparato. No permita que los niños jueguen o se suban sobre la estufa.• almacenamiento sobre o dentro del aparato-
Los materiales infl amables no deberían ser almacenados ni en un horno, ni sobre la unidad, ni en las gavetas (si equipada). Esto incluye el papel, el plástico y la ropa como: libros de cocina, recipientes de plástico o toallas, así como líquidos infl amables. No almacene explosivos como latas de aerosol sobre o dentro del aparato. Los materiales infl amables pueden explotar y ocasionar fuego o daños a la propiedad.
no use el horno o la gaveta de entibiar (si equipada) para almacenamiento.
ATENCION No almacene objetos de interés para los niños en los armarios que están sobre la cocina. El niño que trata de subir sobre la estufa para alcanzarlos podría lastimarse.• no deje a los niños solos- Los niños no deben ser
dejados solos o sin atención donde el aparato esté funcionando. No les permita sentarse o pararse sobre ninguna parte del aparato.
• no toQue nInguna parte de La superFIcIe deL aparato, Áreas cerca de estas unIdades, eLementos caLIentes o Las partes Internas deL Horno o de
Indica una situación muy peligrosa, la cual de no ser evitada puede ocasionar graves heridas y hasta la muerte.
ATENCION Indica una situación de peligro inminente, la cual de no ser evitada puede ocasionar heridas leves o daños al producto solamente.
La gaVeta de entIBIar (sI eQuIpada). Las superfi cies o los elementos del horno pueden estar calientes aún que estén de color oscuro. Las áreas cerca de la superfi cie pueden estar lo sufi cientemente calientes para causar quemaduras. Después o antes del uso, no permita que la ropa u otros materiales infl amables estén en contacto con estas áreas hasta que hallan enfriado. Estas áreas son: la plancha de cocinar, las áreas frente a la plancha de cocinar , las ranuras de ventilación del horno y las áreas cercanas a ellas, la puerta del horno y la ventanilla.

4
Importantes InstruccIones de segurIdad
• use una vestimenta apropiada- no use ropa que es suelta u holgada cuando utilice el aparato. No ponga la ropa u otros materiales inflamables en contacto con las áreas calientes.
Nunca utilice su aparato para calentare o entibiar la pieza.
• no utilice agua o harina para apagar un fuego- apague el fuego con la tapa de una sartén o use soda cáustica, un químico seco o un extinguidor en aerosol.
• cuando caliente substancias grasosas, tenga cuidado. Puede ocasionar un fuego si es calentado por mucho tiempo.
• utilice únicamente los soportes para recipientes que estén secos- Los soportes que estén húmedos o mojados pueden ocasionar quemaduras a causa del vapor. No permita que los soportes estén en contacto con las superficies calientes. No utilice una toalla o un papel para remplazar al soporte.
• no caliente recipientes de comida que están cerrados- La presión al interior de estos puede hacerlos explotar y ocasionar heridas.
Importante- no trate de utilizar el horno durante un corte de electricidad. si no hay electricidad, apaga su estufa. Si no apaga el horno y que la electricidad es restablecida, el horno puede seguir funcionando. La comida que deja sin cuidado puede quemarse o deteriorarse.
InstruccIones Importantes para utILIZar su pLancHa de cocInar.• saber que perillas controlan cada una de los
quemadores.• utilice una sartén de tamaño apropiado. Este
aparato está equipado con quemadores de diferentes tamaños. Elija utensilios con las bases aplanadas y lo suficientemente grandes para cubrir todo el área del quemador. Utilizar utensilios más pequeños puede exponer parte del quemador y ocasionar quemaduras de las prendas que lleva puesta.
• Los mangos de los utensilios deben ser colocados hacia el interior y no sobre otras unidades de superficie- Para reducir el riesgo de quemaduras, el encendido de materiales inflamables y los derrames ocasionados de casualidad.
• nunca deje los quemadores con alta temperatura sin cuidado- Los derrames ocasionan humo y derrames grasosos que pueden encenderse, o una sartén que ha calentado por mucho tiempo puede derretirse.
• utensilios de cocina en vidriados- Sólo algunos tipos de utensilios de vidrio, de vidrio/cerámica, de cerámica pueden resistir la temperatura del quemador de su plancha de cocinar. Verifique las recomendaciones del fabricante sobre el uso con las planchas de cocinar.
InstruccIones Importantes para utILIZar su Horno.• tenga cuidado cuando abra la puerta del horno
o la gaveta de entibiar (si equipada). Párese al lado de la estufa cuando abra la puerta de un horno caliente. Permita que el humo y el vapor se escapen antes de retirar o de colocar comida en el horno/gaveta de entibiar.
• mantenga el conducto de ventilación del horno sin obstrucción. El horno se ventila en la moldura trasera de la superficie de cocción. Tocar estas areas cuando el horno está encendido puede ocasionar graves quemaduras. No coloque objetos de plástico o sensibles al calor cerca del conducto de ventilación. Estos pueden derretirse o encenderse.
nunca cubra ninguna ranura, agujero o pasaje en el fondo del horno y no cubra una rejilla completa con materiales como el papel de aluminio. Esto obstruye el flujo de aire en el horno y podría causar envenenamiento por monóxido de carbono. Los forros de papel de aluminio pueden atrapar el calor y producir un riesgo de incendio.
La gaVeta de entIBIar (sI eQuIpada). Las superficies o los elementos del horno pueden estar calientes aún que estén de color oscuro. Las áreas cerca de la superficie pueden estar lo suficientemente calientes para causar quemaduras. Después o antes del uso, no permita que la ropa u otros materiales inflamables estén en contacto con estas áreas hasta que hallan enfriado. Estas áreas son: la plancha de cocinar, las áreas frente a la plancha de cocinar , las ranuras de ventilación del horno y las áreas cercanas a ellas, la puerta del horno y la ventanilla.

5
Importantes InstruccIones de segurIdad
guarde estas InstruccIones paraFutura consuLtacIÓn
• no cubra el accesorio de la parrilla con película de aluminio. La grasa que queda fuera podría encenderse.
• no toque la bombilla de luz caliente con una tela mojada. Esto puede romper la bombilla. Antes de retirar o remplazar la bombilla desconecte el aparato o corte el suministro eléctrico.
• revestimientos protectores — NO USAR HOJAS DE ALUMINIO PARA CUBRIR LA PARTE INFERIOR. Usar hojas de aluminio sólo en los casos recomendados en este manual. La instalación incorrecta de estos revestimientos puede producir riesgo de choque eléctrico o incendio.
Horno con auto-LImpIeZa • Limpie en el ciclo de auto-limpieza unicamente
las partes que están en la lista del “manual del usuario”. Antes de auto-limpiar el horno, retire la cubeta parrillera y cualquier otro utensilio o comida del horno.
• no limpie las empaquetadoras del horno- Las empaquetadoras del horno son importantes para un buen sellado. Tenga cuidado de no frotar, dañar o desplazar las empaquetadoras.
• no utilice limpiadores de horno- Ningún limpiador de horno comercial o de capa
protectora de ninguna clase debe ser utilizada en horno.
ATENCION La salud de algunos pájaros está muy sensitiva a los humos que proveen del ciclo de auto-limpieza de cualquier cocina. Desplace los pájaros en otra habitación bien ventilada.
Importantes InstruccIones para LImpIar su cocIna.• Limpie la estufa regularmente para mantener
todas las partes sin grasa que puede encenderse y causar un incendio. La cubierta del escape de ventilación y los fi ltros de grasa deben estar limpios. No permita que la grasa se acumule en la cubierta o en el fi ltro. Los depósitos grasosos pueden encenderse y causar un incendio. Cuando caliente comida bajo la cubierta, encienda el ventilador. Consulte las instrucciones del fabricante para la limpieza.
• Limpie con frecuencia las campanas de ventilación- no deje que se acumule grasaen la campana o en el fi ltro. Siga las instrucciones del fabricante para la limpieza.
para pLancHas de cocInar VIdrIo soLamente• no limpie o utilice una plancha de cocinar
que está rota- Si la plancha de cocinar se rompe, los productos de limpieza o los derrames pueden penetrar en ella y producir un riesgo de electrocución. Llame a un técnico califi cado inmediatamente.
• Limpie el vidrio de la plancha de cocinar con cuidado- Si utiliza una esponja mojada para limpiar derrames en una superfi cie caliente, tenga cuidado de no quemarse con el vapor. Algunos productos de limpieza pueden producir peligrosas emanaciones si se les usa sobre áreas muy calientes.
• Evite de raspar el vidrio de la plancha de cocinar con objetos muy fi liados.
adVertencIa de segurIdad ImportanteEl California Safe Drinking Water y Toxic Enforcement Act requiere al Gobierno de California de publicar una lista de sustancias conocidas por el estado como causa de cáncer, defectos de nacimiento u otros daños reproductivos, y requiere que se avisen los usuarios sobre la exposición eventual a sustancias.
• colocación de las rejillas del horno/gaveta de entibiar (si equipada). Siempre coloque las rejillas del horno en la posición deseada cuando el horno o la gaveta estén fríos. Si la rejilla debe ser desplazada cuando el horno esté funcionando tenga bastante cuidado. Utilice unos soportes para recipientes y coja la rejilla con ambas manos hasta recolocarla. No permita que estos soportes estén en contacto con los elementos calientes del horno o de la gaveta de entibiar.
• no utilice la cubeta parrilla sin su accesorio. La cubeta parrilla y su accesorio permiten que la grasa gotee y esté lejos del calor de la parrilla.

6
Características de la Estufa
nota: Las características de su estufa pueden varia de acuerdo con el tipo y color del modelo.
2
1
3 4 5 6
18 20
21
23
22
19
910
1112
15
15
13
16
16
17
14
7
8
Características de su Estufa: 1. Control electrónico del horno con temporizador 2. Control del elemento delantero izquierdo 3. Control del elemento trasero izquierdo 4. Control del área calentadora Control del elemento trasero derecho5. Control del elemento delantero derecho6. Selector de tamaño del elemento delantero derecho7.
Gancho de la puerta del horno autolimpiante8. Elemento de asado9. Interior del horno de convección con auto-limpieza10. Receptáculo de la sonda para carne11. Halógeno Bombilla12. Ventilador de convección del horno y cubierta13. Parrillas ajustables de porcelana para el horno14. Manija grande de una sola pieza15. Puerta del horno con ventanilla grande16.
Respiraderos del hornos17. Elemento radiante sencillo de 7”18. Área calentadora19. Elemento radiante sencillo de 6”20. Elemento radiante Turbo Boil Flex de 9”21. Elemento radiante triple de 6”-9”-12”22. Superficie de cocción de vidrio cerámico23.

7
Varias Parrillas del Horno
1 Parrilla del Horno
antes de ajustar los controles del Horno
circulación del aire en el HornoSi se usa 1 parrilla, colóquela en el centro del horno. Si se usan varias parrillas, altérnelas como se muestra en la ilustración.
Para mejor circulación del aire y obtener mejores resultados del horneado deje alrededor de 2" a 4" (5 a 10 cm) alrededor del utensilio para circulación adecuada del aire y asegúrese de que las fuentes no se toquen entre si, no toquen la puerta del horno, ni los lados o la parte trasera de la cavidad del horno. El aire caliente debe circular alrededor de las fuentes en el horno para que llegue calor uniforme alrededor de todo el alimento.
disposición de las parrillas del HornoATENCION Siempre use tomaollas o guantes para
hornear cuando ajuste las parrillas del horno. Espere hasta que el horno se haya enfriado completamente si es posible. Las parrillas del horno pueden estar CALIENTES y pueden causar quemaduras.
para quitar, tire de la parrilla hacia adelante hasta el tope. Levante la parte delantera de la parrilla y deslícela hacia afuera. Para colocar, inserte la parrilla en las guías de las paredes del horno. Levante la parte delantera de la parrilla y deslícela a su lugar.
Ubicación del Respiradero del HornoEl horno se ventila en la moldura trasera de la superficie de cocción. Cuando el horno está encendido, el aire caliente se libera a través de la ventilación. Esta ventilación es necesaria para que el aire circule en el horno y para que el horneado sea correcto.
ATENCION algunos modelos vienen equipado con un ventilador que trabaja bajo el ciclo de horneado y auto-limpieza para mantener todos los componentes a una temperatura fría. es posible que este ventilador continue trabajando aun si el horno este apagada y trabajara hasta que el horno este totalmente fría.
Mantenga el conducto de ventilación del horno sin obstrucción.
Respiradero del Horno
Tipos de Parrillas del HornoATENCION Siempre use tomaollas o guantes para
hornear cuando ajuste las parrillas del horno. Espere hasta que el horno se haya enfriado completamente si es posible. Las parrillas del horno pueden estar CALIENTES y pueden causar quemaduras.Su estufa puede estar equipada con uno o más de los tipos de parrillas que se muestran: Parrilla plana con manija y Parrilla irregular.La Parrilla del Horno Plana con manija tiene la manija para facilitar su deslizamiento cuando contiene una gran cantidad de alimento.Use la Parrilla irregular para maximizar el espacio de cocción. Se puede usar la Parrilla irregular en la posición inferior pasar asar cortes grandes de carne de res y de ave.
Parrilla del horno plana con manija
Parrilla irregular
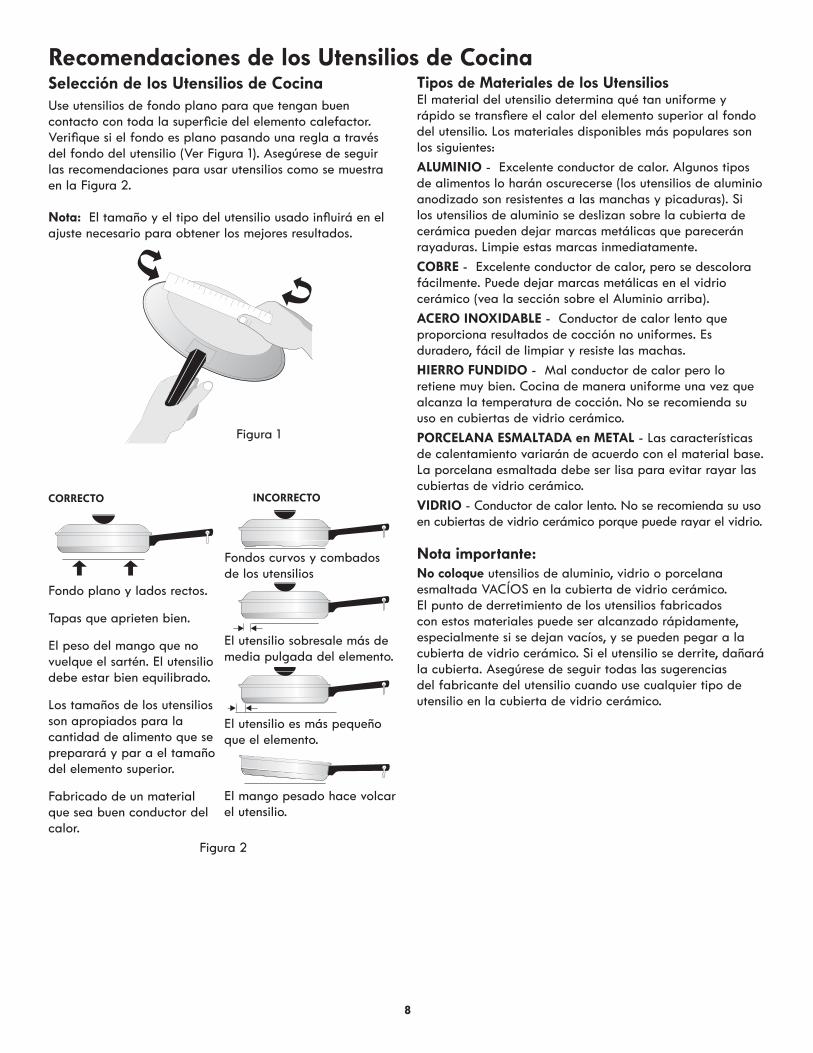
8
Figura 1
Recomendaciones de los Utensilios de CocinaSelección de los Utensilios de CocinaUse utensilios de fondo plano para que tengan buen contacto con toda la superfi cie del elemento calefactor. Verifi que si el fondo es plano pasando una regla a través del fondo del utensilio (Ver Figura 1). Asegúrese de seguir las recomendaciones para usar utensilios como se muestra en la Figura 2.
Nota: El tamaño y el tipo del utensilio usado infl uirá en el ajuste necesario para obtener los mejores resultados.
Tipos de Materiales de los UtensiliosEl material del utensilio determina qué tan uniforme y rápido se transfi ere el calor del elemento superior al fondo del utensilio. Los materiales disponibles más populares son los siguientes:
aLumInIo - Excelente conductor de calor. Algunos tipos de alimentos lo harán oscurecerse (los utensilios de aluminio anodizado son resistentes a las manchas y picaduras). Si los utensilios de aluminio se deslizan sobre la cubierta de cerámica pueden dejar marcas metálicas que parecerán rayaduras. Limpie estas marcas inmediatamente.
COBRE - Excelente conductor de calor, pero se descolora fácilmente. Puede dejar marcas metálicas en el vidrio cerámico (vea la sección sobre el Aluminio arriba).
acero InoXIdaBLe - Conductor de calor lento que proporciona resultados de cocción no uniformes. Es duradero, fácil de limpiar y resiste las machas.
HIerro FundIdo - Mal conductor de calor pero lo retiene muy bien. Cocina de manera uniforme una vez que alcanza la temperatura de cocción. No se recomienda su uso en cubiertas de vidrio cerámico.
porceLana esmaLtada en metaL - Las características de calentamiento variarán de acuerdo con el material base. La porcelana esmaltada debe ser lisa para evitar rayar las cubiertas de vidrio cerámico.
VIdrIo - Conductor de calor lento. No se recomienda su uso en cubiertas de vidrio cerámico porque puede rayar el vidrio.
Fondo plano y lados rectos.
Tapas que aprieten bien.
El peso del mango que no vuelque el sartén. El utensilio debe estar bien equilibrado.
Los tamaños de los utensilios son apropiados para la cantidad de alimento que se preparará y par a el tamaño del elemento superior.
Fabricado de un material que sea buen conductor del calor.
Figura 2
CORRECTO
El mango pesado hace volcar el utensilio.
El utensilio es más pequeño que el elemento.
Incorrecto
Fondos curvos y combados de los utensilios
El utensilio sobresale más de media pulgada del elemento.
Nota importante:no coloque utensilios de aluminio, vidrio o porcelana esmaltada VACÍOS en la cubierta de vidrio cerámico. El punto de derretimiento de los utensilios fabricados con estos materiales puede ser alcanzado rápidamente, especialmente si se dejan vacíos, y se pueden pegar a la cubierta de vidrio cerámico. Si el utensilio se derrite, dañará la cubierta. Asegúrese de seguir todas las sugerencias del fabricante del utensilio cuando use cualquier tipo de utensilio en la cubierta de vidrio cerámico.
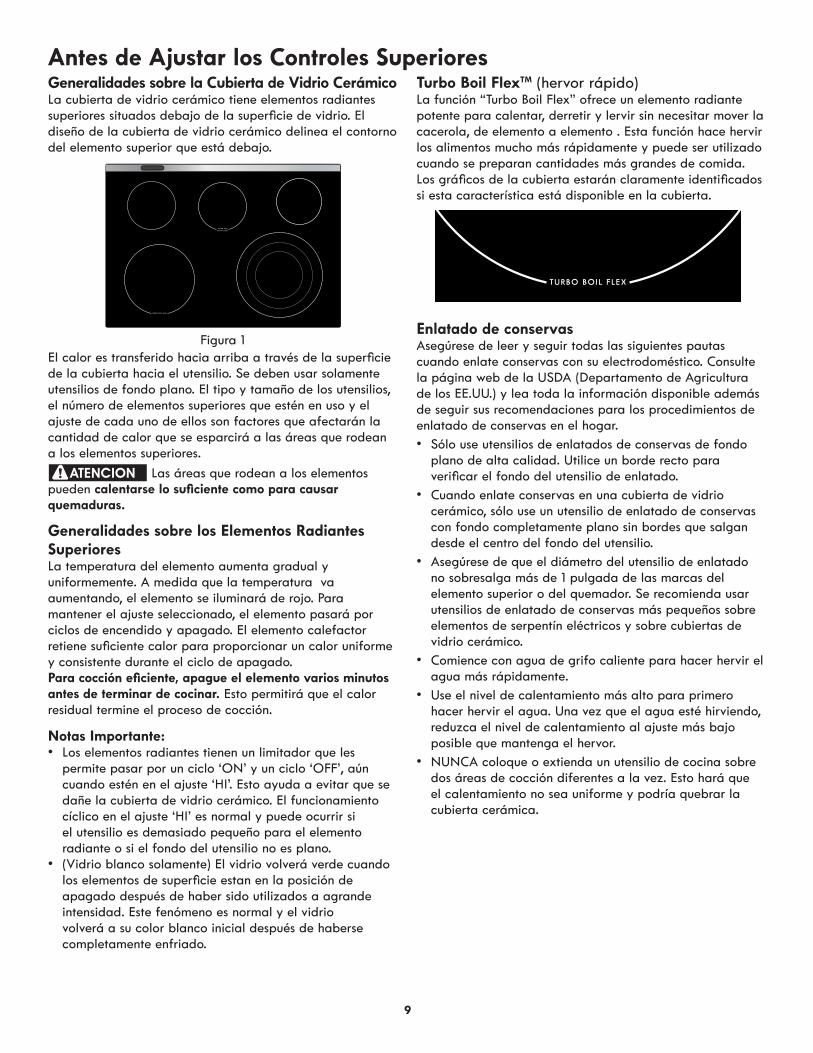
9
generalidades sobre la cubierta de Vidrio cerámicoLa cubierta de vidrio cerámico tiene elementos radiantes superiores situados debajo de la superfi cie de vidrio. El diseño de la cubierta de vidrio cerámico delinea el contorno del elemento superior que está debajo.
Figura 1El calor es transferido hacia arriba a través de la superfi cie de la cubierta hacia el utensilio. Se deben usar solamente utensilios de fondo plano. El tipo y tamaño de los utensilios, el número de elementos superiores que estén en uso y el ajuste de cada uno de ellos son factores que afectarán la cantidad de calor que se esparcirá a las áreas que rodean a los elementos superiores.
ATENCION Las áreas que rodean a los elementos pueden calentarse lo sufi ciente como para causar quemaduras.
Generalidades sobre los Elementos Radiantes SuperioresLa temperatura del elemento aumenta gradual y uniformemente. A medida que la temperatura va aumentando, el elemento se iluminará de rojo. Para mantener el ajuste seleccionado, el elemento pasará por ciclos de encendido y apagado. El elemento calefactor retiene sufi ciente calor para proporcionar un calor uniforme y consistente durante el ciclo de apagado.para cocción efi ciente, apague el elemento varios minutos antes de terminar de cocinar. Esto permitirá que el calor residual termine el proceso de cocción.
notas Importante:• Los elementos radiantes tienen un limitador que les
permite pasar por un ciclo ‘ON’ y un ciclo ‘OFF’, aún cuando estén en el ajuste ‘HI’. Esto ayuda a evitar que se dañe la cubierta de vidrio cerámico. El funcionamiento cíclico en el ajuste ‘HI’ es normal y puede ocurrir si el utensilio es demasiado pequeño para el elemento radiante o si el fondo del utensilio no es plano.
• (Vidrio blanco solamente) El vidrio volverá verde cuando los elementos de superfi cie estan en la posición de apagado después de haber sido utilizados a agrande intensidad. Este fenómeno es normal y el vidrio volverá a su color blanco inicial después de haberse completamente enfriado.
Enlatado de conservasAsegúrese de leer y seguir todas las siguientes pautas cuando enlate conservas con su electrodoméstico. Consulte la página web de la USDA (Departamento de Agricultura de los EE.UU.) y lea toda la información disponible además de seguir sus recomendaciones para los procedimientos de enlatado de conservas en el hogar.• Sólo use utensilios de enlatados de conservas de fondo
plano de alta calidad. Utilice un borde recto para verifi car el fondo del utensilio de enlatado.
• Cuando enlate conservas en una cubierta de vidrio cerámico, sólo use un utensilio de enlatado de conservas con fondo completamente plano sin bordes que salgan desde el centro del fondo del utensilio.
• Asegúrese de que el diámetro del utensilio de enlatado no sobresalga más de 1 pulgada de las marcas del elemento superior o del quemador. Se recomienda usar utensilios de enlatado de conservas más pequeños sobre elementos de serpentín eléctricos y sobre cubiertas de vidrio cerámico.
• Comience con agua de grifo caliente para hacer hervir el agua más rápidamente.
• Use el nivel de calentamiento más alto para primero hacer hervir el agua. Una vez que el agua esté hirviendo, reduzca el nivel de calentamiento al ajuste más bajo posible que mantenga el hervor.
• NUNCA coloque o extienda un utensilio de cocina sobre dos áreas de cocción diferentes a la vez. Esto hará que el calentamiento no sea uniforme y podría quebrar la cubierta cerámica.
turbo Boil FlexTM (hervor rápido)La función “Turbo Boil Flex” ofrece un elemento radiante potente para calentar, derretir y lervir sin necesitar mover la cacerola, de elemento a elemento . Esta función hace hervir los alimentos mucho más rápidamente y puede ser utilizado cuando se preparan cantidades más grandes de comida. Los gráficos de la cubierta estarán claramente identificados si esta característica está disponible en la cubierta.
antes de ajustar los controles superiores
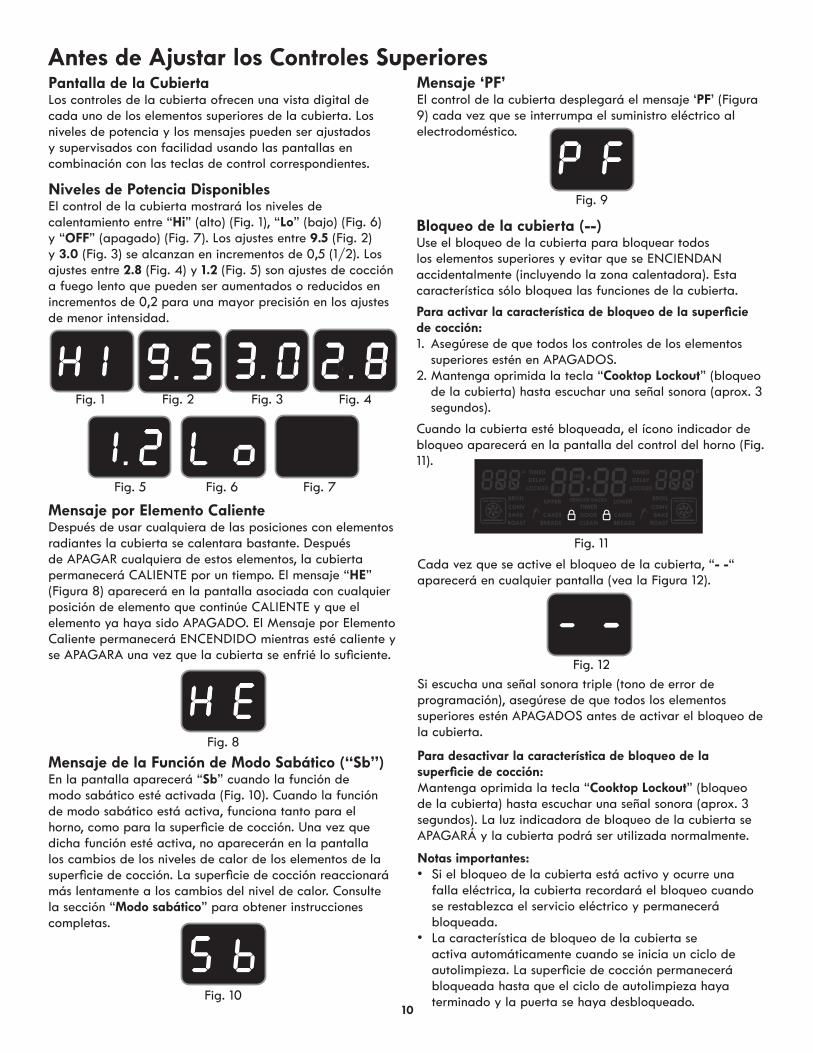
10
antes de ajustar los controles superiores
Fig. 1
Fig. 5
Fig. 8
Fig. 9
Fig. 10
Fig. 6 Fig. 7
Fig. 2 Fig. 3 Fig. 4
Pantalla de la CubiertaLos controles de la cubierta ofrecen una vista digital de cada uno de los elementos superiores de la cubierta. Los niveles de potencia y los mensajes pueden ser ajustados y supervisados con facilidad usando las pantallas en combinación con las teclas de control correspondientes.
niveles de potencia disponiblesEl control de la cubierta mostrará los niveles de calentamiento entre “Hi” (alto) (Fig. 1), “Lo” (bajo) (Fig. 6) y “oFF” (apagado) (Fig. 7). Los ajustes entre 9.5 (Fig. 2) y 3.0 (Fig. 3) se alcanzan en incrementos de 0,5 (1/2). Los ajustes entre 2.8 (Fig. 4) y 1.2 (Fig. 5) son ajustes de cocción a fuego lento que pueden ser aumentados o reducidos en incrementos de 0,2 para una mayor precisión en los ajustes de menor intensidad.
Mensaje por Elemento CalienteDespués de usar cualquiera de las posiciones con elementos radiantes la cubierta se calentara bastante. Después de APAGAR cualquiera de estos elementos, la cubierta permanecerá CALIENTE por un tiempo. El mensaje “HE” (Figura 8) aparecerá en la pantalla asociada con cualquier posición de elemento que continúe CALIENTE y que el elemento ya haya sido APAGADO. El Mensaje por Elemento Caliente permanecerá ENCENDIDO mientras esté caliente y se APAGARA una vez que la cubierta se enfrié lo sufi ciente.
mensaje ‘pF’El control de la cubierta desplegará el mensaje ‘pF’ (Figura 9) cada vez que se interrumpa el suministro eléctrico al electrodoméstico.
mensaje de la Función de modo sabático (“sb”)En la pantalla aparecerá “Sb” cuando la función de modo sabático esté activada (Fig. 10). Cuando la función de modo sabático está activa, funciona tanto para el horno, como para la superfi cie de cocción. Una vez que dicha función esté activa, no aparecerán en la pantalla los cambios de los niveles de calor de los elementos de la superfi cie de cocción. La superfi cie de cocción reaccionará más lentamente a los cambios del nivel de calor. Consulte la sección “Modo sabático” para obtener instrucciones completas.
Fig. 12
Fig. 11
Bloqueo de la cubierta (--)Use el bloqueo de la cubierta para bloquear todos los elementos superiores y evitar que se ENCIENDAN accidentalmente (incluyendo la zona calentadora). Esta característica sólo bloquea las funciones de la cubierta.
para activar la característica de bloqueo de la superficie de cocción:1. Asegúrese de que todos los controles de los elementos
superiores estén en APAGADOS.2. Mantenga oprimida la tecla “Cooktop Lockout” (bloqueo
de la cubierta) hasta escuchar una señal sonora (aprox. 3 segundos).
Cuando la cubierta esté bloqueada, el ícono indicador de bloqueo aparecerá en la pantalla del control del horno (Fig. 11).
Cada vez que se active el bloqueo de la cubierta, “- -“ aparecerá en cualquier pantalla (vea la Figura 12).
Si escucha una señal sonora triple (tono de error de programación), asegúrese de que todos los elementos superiores estén APAGADOS antes de activar el bloqueo de la cubierta.
para desactivar la característica de bloqueo de la superficie de cocción:Mantenga oprimida la tecla “Cooktop Lockout” (bloqueo de la cubierta) hasta escuchar una señal sonora (aprox. 3 segundos). La luz indicadora de bloqueo de la cubierta se APAGARÁ y la cubierta podrá ser utilizada normalmente.
Notas importantes:• Si el bloqueo de la cubierta está activo y ocurre una
falla eléctrica, la cubierta recordará el bloqueo cuando se restablezca el servicio eléctrico y permanecerá bloqueada.
• La característica de bloqueo de la cubierta se activa automáticamente cuando se inicia un ciclo de autolimpieza. La superficie de cocción permanecerá bloqueada hasta que el ciclo de autolimpieza haya terminado y la puerta se haya desbloqueado.
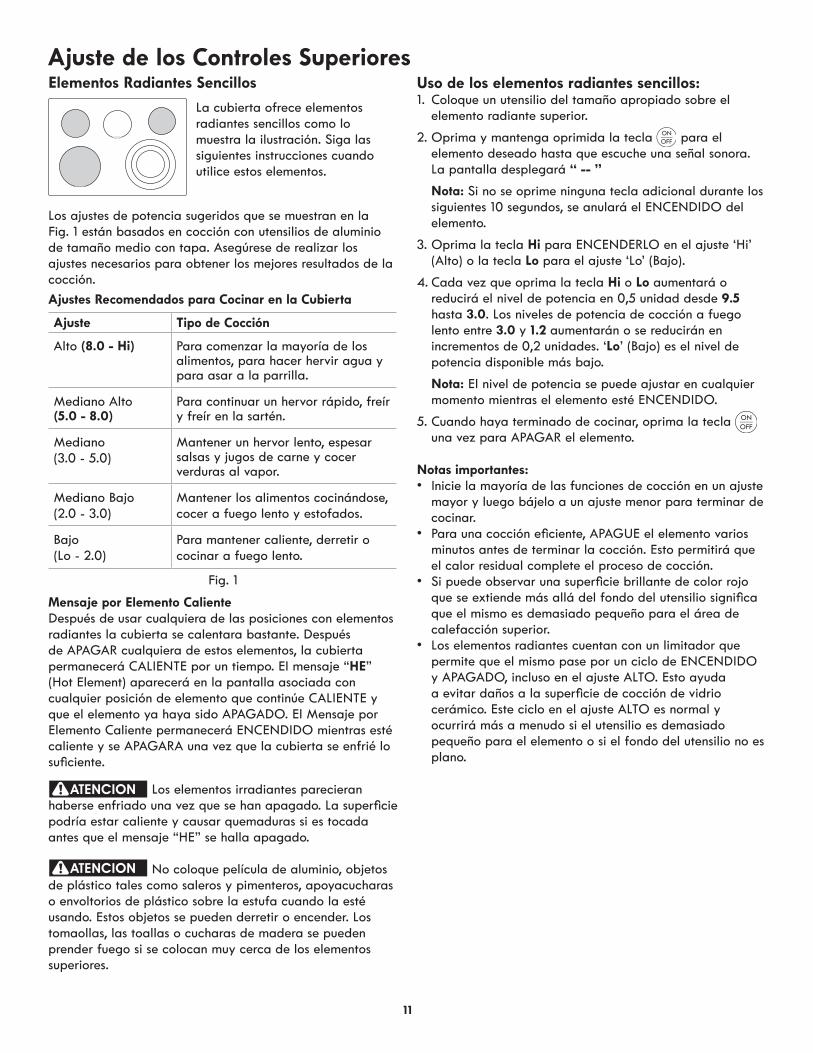
11
ajuste de los controles superioresUso de los elementos radiantes sencillos:1. Coloque un utensilio del tamaño apropiado sobre el
elemento radiante superior.
2. Oprima y mantenga oprimida la tecla para el elemento deseado hasta que escuche una señal sonora. La pantalla desplegará “ -- ”
Nota: Si no se oprime ninguna tecla adicional durante los siguientes 10 segundos, se anulará el ENCENDIDO del elemento.
3. Oprima la tecla Hi para ENCENDERLO en el ajuste ‘Hi’ (Alto) o la tecla Lo para el ajuste ‘Lo’ (Bajo).
4. Cada vez que oprima la tecla Hi o Lo aumentará o reducirá el nivel de potencia en 0,5 unidad desde 9.5 hasta 3.0. Los niveles de potencia de cocción a fuego lento entre 3.0 y 1.2 aumentarán o se reducirán en incrementos de 0,2 unidades. ‘Lo’ (Bajo) es el nivel de potencia disponible más bajo.
Nota: El nivel de potencia se puede ajustar en cualquier momento mientras el elemento esté ENCENDIDO.
5. Cuando haya terminado de cocinar, oprima la tecla una vez para APAGAR el elemento.
Elementos Radiantes Sencillos
La cubierta ofrece elementos radiantes sencillos como lo muestra la ilustración. Siga las siguientes instrucciones cuando utilice estos elementos.
Los ajustes de potencia sugeridos que se muestran en la Fig. 1 están basados en cocción con utensilios de aluminio de tamaño medio con tapa. Asegúrese de realizar los ajustes necesarios para obtener los mejores resultados de la cocción.
ajustes recomendados para cocinar en la cubierta
ajuste Tipo de Cocción
Alto (8.0 - Hi) Para comenzar la mayoría de los alimentos, para hacer hervir agua y para asar a la parrilla.
Mediano Alto(5.0 - 8.0)
Para continuar un hervor rápido, freír y freír en la sartén.
Mediano(3.0 - 5.0)
Mantener un hervor lento, espesar salsas y jugos de carne y cocer verduras al vapor.
Mediano Bajo(2.0 - 3.0)
Mantener los alimentos cocinándose, cocer a fuego lento y estofados.
Bajo(Lo - 2.0)
Para mantener caliente, derretir o cocinar a fuego lento.
Fig. 1
Mensaje por Elemento CalienteDespués de usar cualquiera de las posiciones con elementos radiantes la cubierta se calentara bastante. Después de APAGAR cualquiera de estos elementos, la cubierta permanecerá CALIENTE por un tiempo. El mensaje “HE” (Hot Element) aparecerá en la pantalla asociada con cualquier posición de elemento que continúe CALIENTE y que el elemento ya haya sido APAGADO. El Mensaje por Elemento Caliente permanecerá ENCENDIDO mientras esté caliente y se APAGARA una vez que la cubierta se enfrié lo sufi ciente.
ATENCION Los elementos irradiantes parecieran haberse enfriado una vez que se han apagado. La superfi cie podría estar caliente y causar quemaduras si es tocada antes que el mensaje “HE” se halla apagado.
ATENCION No coloque película de aluminio, objetos de plástico tales como saleros y pimenteros, apoyacucharas o envoltorios de plástico sobre la estufa cuando la esté usando. Estos objetos se pueden derretir o encender. Los tomaollas, las toallas o cucharas de madera se pueden prender fuego si se colocan muy cerca de los elementos superiores.
Notas importantes:• Inicie la mayoría de las funciones de cocción en un ajuste
mayor y luego bájelo a un ajuste menor para terminar de cocinar.
• Para una cocción efi ciente, APAGUE el elemento varios minutos antes de terminar la cocción. Esto permitirá que el calor residual complete el proceso de cocción.
• Si puede observar una superfi cie brillante de color rojo que se extiende más allá del fondo del utensilio signifi ca que el mismo es demasiado pequeño para el área de calefacción superior.
• Los elementos radiantes cuentan con un limitador que permite que el mismo pase por un ciclo de ENCENDIDO y APAGADO, incluso en el ajuste ALTO. Esto ayuda a evitar daños a la superfi cie de cocción de vidrio cerámico. Este ciclo en el ajuste ALTO es normal y ocurrirá más a menudo si el utensilio es demasiado pequeño para el elemento o si el fondo del utensilio no es plano.

12
ajuste de los controles superioresElemento Radiante Extensible
La cubierta ofrece elementos radiantes extensible como lo muestra la ilustración. Siga las siguientes instrucciones cuando utilice estos elementos.
Utilice la tecla de “eLement sIZe” (tamaño de elemento) (Fig. 1) para seleccionar cuáles porciones del elemento extensible necesita para cocinar. El tamaño del elemento extensible puede ser cambiado en cualquier momento mientras el elemento esté ENCENDIDO.
Para Usar el Elemento Radiante Extensible:1. Coloque un utensilio del tamaño apropiado sobre el
elemento radiante extensible.
2. Oprima y mantenga oprimida la tecla para el elemento extensible hasta que escuche una señal sonora.
3. Oprima la tecla de “eLement sIZe” (tamaño de elemento) y navegue por los ajustes de tamaño sencillo (Fig. 2), doble (Fig. 3) o triple (Fig. 4, si es disponible).
4. Para ajustar el nivel de potencia, oprima las teclas “Hi” o “Lo” y, de ser necesario, oprima las teclas “Hi” o “Lo” hasta alcanzar el nivel de potencia deseado. Cada vez que oprima la tecla Hi o Lo aumentará o reducirá el nivel de potencia en 0,5 unidad desde 9.5 hasta 3.0. Los niveles de potencia de cocción a fuego lento entre 3.0 y 1.2 aumentarán o se reducirán en incrementos de 0,2 unidades. ‘Lo’ (Bajo) es el nivel de potencia disponible más bajo.
5. Cuando haya terminado de cocinar, oprima la tecla una vez para APAGAR el elemento.
Fig. 1
Fig. 2
Fig. 5
Fig. 3
Fig. 6
Fig. 4 - Elemento triple solamente
Fig. 7
Mensaje por Elemento CalienteDespués de usar cualquiera de las posiciones con elementos radiantes la cubierta se calentara bastante. Después de APAGAR cualquiera de estos elementos, la cubierta permanecerá CALIENTE por un tiempo. El mensaje “HE” (Hot Element) aparecerá en la pantalla asociada con cualquier posición de elemento que continúe CALIENTE y que el elemento ya haya sido APAGADO. El Mensaje por Elemento Caliente permanecerá ENCENDIDO mientras esté caliente y se APAGARA una vez que la cubierta se enfrié lo sufi ciente.
ATENCION Los elementos irradiantes parecieran haberse enfriado una vez que se han apagado. La superfi cie podría estar caliente y causar quemaduras si es tocada antes que el mensaje “HE” se halla apagado.
ATENCION No coloque película de aluminio, objetos de plástico tales como saleros y pimenteros, apoyacucharas o envoltorios de plástico sobre la estufa cuando la esté usando. Estos objetos se pueden derretir o encender. Los tomaollas, las toallas o cucharas de madera se pueden prender fuego si se colocan muy cerca de los elementos superiores.
Notas importantes:• Si no se selecciona ningún tamaño de elemento cuando
se ENCIENDE el elemento extensible, el control encenderá automáticamente la parte interior únicamente.
• Inicie la mayoría de las funciones de cocción en un ajuste mayor y luego bájelo a un ajuste menor para terminar de cocinar.
• Para una cocción efi ciente, APAGUE el elemento varios minutos antes de terminar la cocción. Esto permitirá que el calor residual complete el proceso de cocción.
• Si puede observar una superfi cie brillante de color rojo que se extiende más allá del fondo del utensilio signifi ca que el mismo es demasiado pequeño para el área de calefacción superior.
• Los elementos radiantes cuentan con un limitador que permite que el mismo pase por un ciclo de ENCENDIDO y APAGADO, incluso en el ajuste ALTO. Esto ayuda a evitar daños a la superfi cie de cocción de vidrio cerámico. Este ciclo en el ajuste ALTO es normal y ocurrirá más a menudo si el utensilio es demasiado pequeño para el elemento o si el fondo del utensilio no es plano.
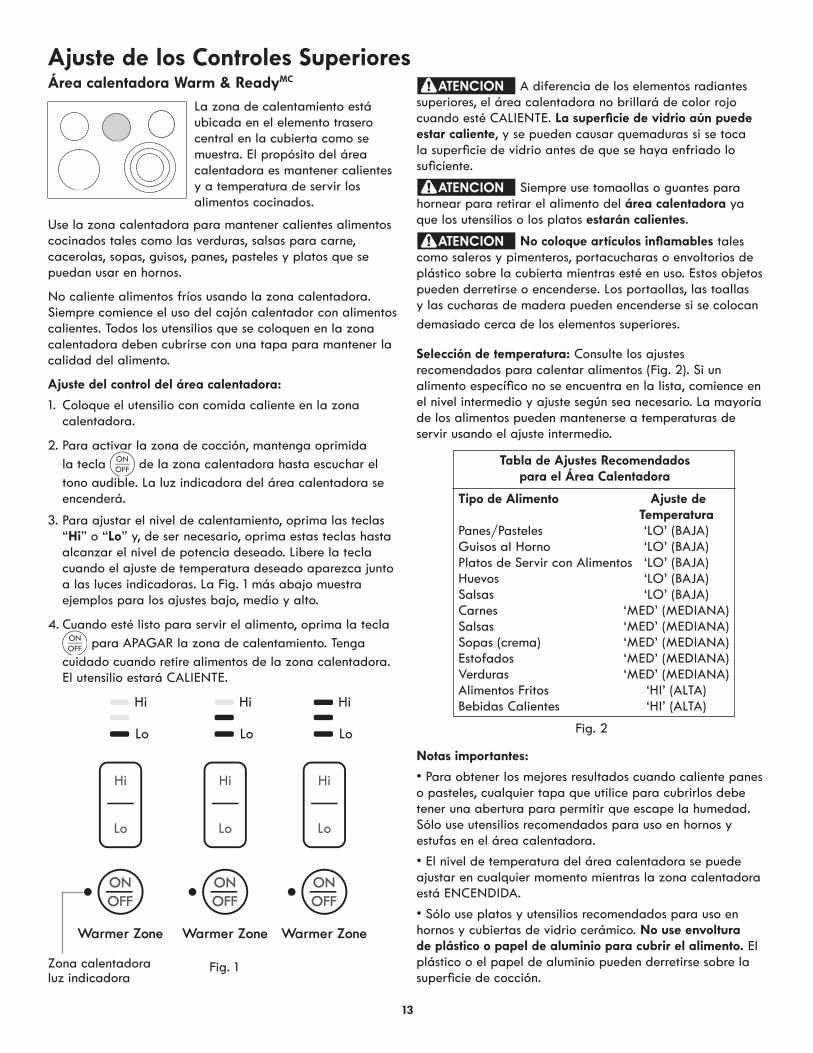
13
ajuste de los controles superioresÁrea calentadora Warm & readyMC ATENCION A diferencia de los elementos radiantes
superiores, el área calentadora no brillará de color rojo cuando esté CALIENTE. La superficie de vidrio aún puede estar caliente, y se pueden causar quemaduras si se toca la superficie de vidrio antes de que se haya enfriado lo suficiente.
ATENCION Siempre use tomaollas o guantes para hornear para retirar el alimento del área calentadora ya que los utensilios o los platos estarán calientes.
ATENCION no coloque artículos inflamables tales como saleros y pimenteros, portacucharas o envoltorios de plástico sobre la cubierta mientras esté en uso. Estos objetos pueden derretirse o encenderse. Los portaollas, las toallas y las cucharas de madera pueden encenderse si se colocan demasiado cerca de los elementos superiores.
Selección de temperatura: Consulte los ajustes recomendados para calentar alimentos (Fig. 2). Si un alimento específico no se encuentra en la lista, comience en el nivel intermedio y ajuste según sea necesario. La mayoría de los alimentos pueden mantenerse a temperaturas de servir usando el ajuste intermedio.
Fig. 1
Fig. 2
Zona calentadoraluz indicadora
La zona de calentamiento está ubicada en el elemento trasero central en la cubierta como se muestra. El propósito del área calentadora es mantener calientes y a temperatura de servir los alimentos cocinados.
Use la zona calentadora para mantener calientes alimentos cocinados tales como las verduras, salsas para carne, cacerolas, sopas, guisos, panes, pasteles y platos que se puedan usar en hornos.
No caliente alimentos fríos usando la zona calentadora. Siempre comience el uso del cajón calentador con alimentos calientes. Todos los utensilios que se coloquen en la zona calentadora deben cubrirse con una tapa para mantener la calidad del alimento.
ajuste del control del área calentadora:
1. Coloque el utensilio con comida caliente en la zona calentadora.
2. Para activar la zona de cocción, mantenga oprimida la tecla de la zona calentadora hasta escuchar el tono audible. La luz indicadora del área calentadora se encenderá.
3. Para ajustar el nivel de calentamiento, oprima las teclas “Hi” o “Lo” y, de ser necesario, oprima estas teclas hasta alcanzar el nivel de potencia deseado. Libere la tecla cuando el ajuste de temperatura deseado aparezca junto a las luces indicadoras. La Fig. 1 más abajo muestra ejemplos para los ajustes bajo, medio y alto.
4. Cuando esté listo para servir el alimento, oprima la tecla para APAGAR la zona de calentamiento. Tenga
cuidado cuando retire alimentos de la zona calentadora. El utensilio estará CALIENTE.
tabla de ajustes recomendados para el Área calentadora
tipo de alimento ajuste de TemperaturaPanes/Pasteles ‘LO’ (BAJA)Guisos al Horno ‘LO’ (BAJA)Platos de Servir con Alimentos ‘LO’ (BAJA)Huevos ‘LO’ (BAJA)Salsas ‘LO’ (BAJA)Carnes ‘MED’ (MEDIANA)Salsas ‘MED’ (MEDIANA)Sopas (crema) ‘MED’ (MEDIANA)Estofados ‘MED’ (MEDIANA)Verduras ‘MED’ (MEDIANA)Alimentos Fritos ‘HI’ (ALTA)Bebidas Calientes ‘HI’ (ALTA)
Notas importantes:
• Para obtener los mejores resultados cuando caliente panes o pasteles, cualquier tapa que utilice para cubrirlos debe tener una abertura para permitir que escape la humedad. Sólo use utensilios recomendados para uso en hornos y estufas en el área calentadora.
• El nivel de temperatura del área calentadora se puede ajustar en cualquier momento mientras la zona calentadora está ENCENDIDA.
• Sólo use platos y utensilios recomendados para uso en hornos y cubiertas de vidrio cerámico. No use envoltura de plástico o papel de aluminio para cubrir el alimento. El plástico o el papel de aluminio pueden derretirse sobre la superficie de cocción.
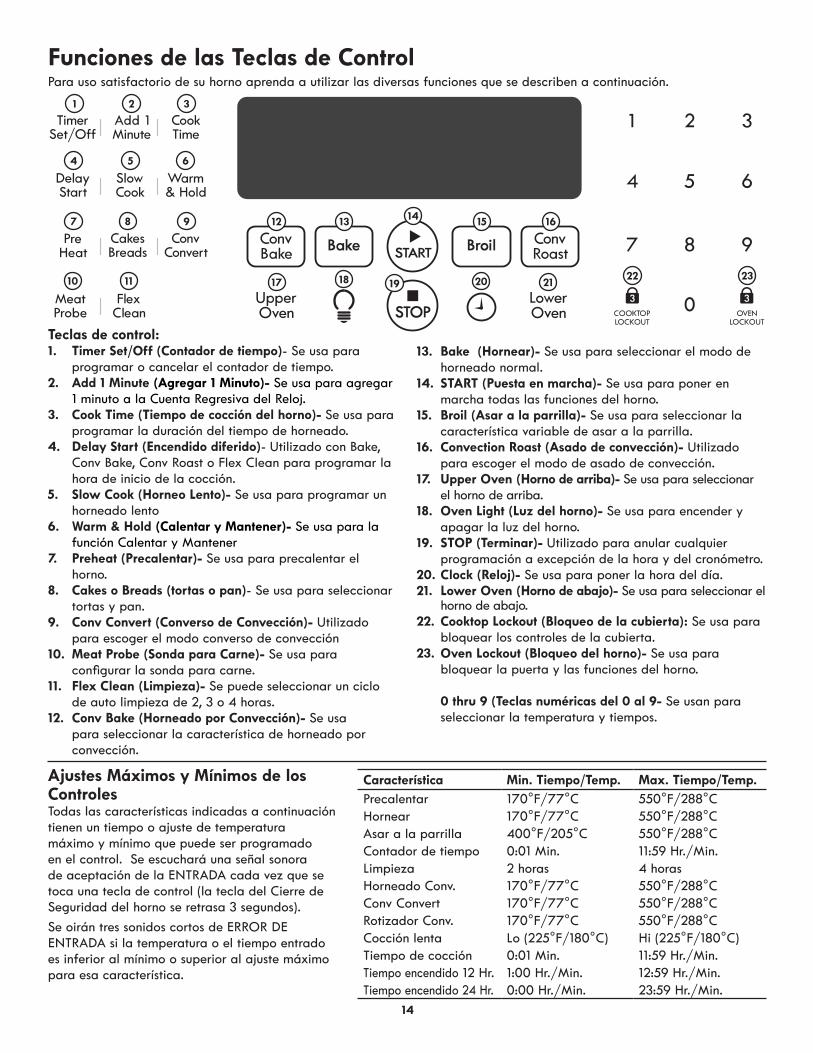
14
Funciones de las teclas de controlPara uso satisfactorio de su horno aprenda a utilizar las diversas funciones que se describen a continuación.
ajustes máximos y mínimos de los Controles Todas las características indicadas a continuación tienen un tiempo o ajuste de temperatura máximo y mínimo que puede ser programado en el control. Se escuchará una señal sonora de aceptación de la ENTRADA cada vez que se toca una tecla de control (la tecla del Cierre de Seguridad del horno se retrasa 3 segundos).
Se oirán tres sonidos cortos de ERROR DE ENTRADA si la temperatura o el tiempo entrado es inferior al mínimo o superior al ajuste máximo para esa característica.
Característica min. tiempo/temp. max. tiempo/temp.Precalentar 170°F/77°C 550°F/288°CHornear 170°F/77°C 550°F/288°CAsar a la parrilla 400°F/205°C 550°F/288°CContador de tiempo 0:01 Min. 11:59 Hr./Min.Limpieza 2 horas 4 horasHorneado Conv. 170°F/77°C 550°F/288°CConv Convert 170°F/77°C 550°F/288°CRotizador Conv. 170°F/77°C 550°F/288°CCocción lenta Lo (225°F/180°C) Hi (225°F/180°C)Tiempo de cocción 0:01 Min. 11:59 Hr./Min.Tiempo encendido 12 Hr. 1:00 Hr./Min. 12:59 Hr./Min.Tiempo encendido 24 Hr. 0:00 Hr./Min. 23:59 Hr./Min.
Teclas de control:timer set/off (contador de tiempo)1. - Se usa para programar o cancelar el contador de tiempo.add 1 minute2. (agregar 1 minuto)- Se usa para agregar 1 minuto a la Cuenta Regresiva del Reloj.cook time (tiempo de cocción del horno)- 3. Se usa para programar la duración del tiempo de horneado.delay start4. (encendido diferido)- Utilizado con Bake, Conv Bake, Conv Roast o Flex Clean para programar la hora de inicio de la cocción.slow cook (Horneo Lento)-5. Se usa para programar un horneado lentoWarm & Hold6. (calentar y mantener)- Se usa para la función Calentar y Mantenerpreheat (precalentar)-7. Se usa para precalentar el horno.Cakes o Breads8. (tortas o pan)- Se usa para seleccionar tortas y pan.conv convert (converso de convección)-9. Utilizado para escoger el modo converso de convecciónmeat probe (sonda para carne)-10. Se usa para configurar la sonda para carne.Flex clean11. (Limpieza)- Se puede seleccionar un ciclo de auto limpieza de 2, 3 o 4 horas. conv Bake (Horneado por convección)-12. Se usa para seleccionar la característica de horneado por convección.
B13. ake (Hornear)- Se usa para seleccionar el modo de horneado normal.start14. (puesta en marcha)- Se usa para poner en marcha todas las funciones del horno.B15. roil (asar a la parrilla)- Se usa para seleccionar la característica variable de asar a la parrilla.C16. onvection roast (asado de convección)- Utilizado para escoger el modo de asado de convección.Upper Oven (17. Horno de arriba)- Se usa para seleccionar el horno de arriba.oven Light (Luz del horno)-18. Se usa para encender y apagar la luz del horno.STOP 19. (terminar)- Utilizado para anular cualquier programación a excepción de la hora y del cronómetro.clock (reloj)-20. Se usa para poner la hora del día.Lower Oven (21. Horno de abajo)- Se usa para seleccionar el horno de abajo.cooktop Lockout (Bloqueo de la cubierta): 22. Se usa para bloquear los controles de la cubierta.oven Lockout (Bloqueo del horno)-23. Se usa para bloquear la puerta y las funciones del horno.
0 thru 9 (teclas numéricas del 0 al 9- Se usan para seleccionar la temperatura y tiempos.
1
4
7
10 11
12
2
5
8
3
6
9 1513 1614
18 1922 23
212017

15
Primeros Pasos
para confi gurar la Función agregar 1 minutoLa tecla add 1 mInute se utiliza para confi gurar la función Agregar 1 Minuto. Al pulsar la tecla, se agrega 1 minuto al Minutero si esta función está activa. Si la función Minutero no está activa y se pulsa la tecla, la función se activará y comenzará la cuenta regresiva desde 1 minuto. Para obtener más información sobre cómo confi gurar la función Minutero, ver las instrucciones de Temporizador.
Bloqueo del HornoEl control puede ser programado para bloquear la puerta del horno y desactivar los controles del horno. No desactiva el contador de tiempo ni las luces interiores del horno.
El siguiente ejemplo muestra cómo bloquear el horno:
door LocKed destellará en la pantalla hasta que la puerta se haya bloqueado completamente. Una vez que la puerta se haya bloqueado, la luz indicadora de bloqueo de la puerta se encenderá. door LocKed se desplegará.
No intente abrir la puerta del horno mientras la luz indicadora esté destellando.
Para bloquear, seleccione oprimiendo upper oVen (horno de arriba) o LoWer oVen (horno de abajo), oprima y mantenga presionada la tecla oVen LocKout (bloqueo del horno) durante 3 segundos.
Para desbloquear, seleccione oprimiendo upper oVen (horno de arriba) o LoWer oVen (horno de abajo), oprima y mantenga presionada la tecla oVen LocKout (bloqueo del horno) durante 3 segundos.
Temporizador
El siguiente ejemplo demuestra cómo programar el temporizador para 5 minutos:
nota: El temporizador no afectarán el proceso de cocción.
Para anular el temporizador después de programarlo, oprima la tecla tImer set/oFF (Temporizador) nuevamente.
1. Oprima tImer set/oFF (Temporizador)
2. Programe 5 minutos
3. Oprima “start” (Encendido)
El temporizador proporcionados con el control del horno sirven a modo de alerta adiciónale en la cocina. Cuando el tiempo acabe, el temporizador activo emitirá una señal sonora y “End” se desplegará en la pantalla.
Los siguientes ajustes aplican a los temporizadores:
• Tiempo mín.: 1 minuto• Tiempo máx.: 11 horas 59 minutos
ajuste Inicial del relojAl enchufar el electrodoméstico o después de una falla eléctrica, deberá programar el reloj.
• La primera vez que enchufe el electrodoméstico, “12:00” destellará en la pantalla.
• Oprima tecla para modificar la hora del día.
• Programe la hora del día usando las teclas numéricas y oprima “start” (Encendido) para fijarla.
Si programa una hora inválida, el control emitirá tres señales sonoras. Programe una hora del día válida y oprima la tecla “start” (Encendido) Si oprime la tecla “STOP” (Terminar), el reloj regresará a las 12:00.
Oprima la tecla para modificar la hora del día durante otras situaciones tales como el ajuste del horario de verano.
El despliegue de la temperatura de precalentamiento puede funcionando con las siguientes funciones: • Bake (horneado)• Conv Bake (convección horneado)• Conv Roast (asado de convección)• Cakes o Breads (tortas o pan)• Preheat (Precalentar)
La temperatura mas baja desplegada sera 100°F.
despliegue de la temperatura de PrecalentamientoUna vez que se haya iniciado una función de cocción, el control del horno mostrará la temperatura actual del horno durante el precalentamiento. Una vez que el horno alcance la temperatura programada, sólo se mostrará la temperatura programada.

16
ajuste de los controles del Horno
Espacio adecuado entre los utensilios usando 2 parrillas.
Espacio adecuado entre los utensilios usando una sola
parrilla.
preheat (Precalentamiento)
Cuando el horno haya terminado de precalentarse, escuchará un tono que le indicará que el horno alcanzó la temperatura programada y que puede colocar la comida en el horno. La función de precalentamiento funcionará como la función de horneado y mantendrá la temperatura del horno hasta que se anule la función.
“PRE” y la temperatura actual del horno alterne a medida que el horno se calienta.
nota
Para cancelar la función, oprima “• STOP” (Terminar) en cualquier momento durante la programación del control o durante el proceso de cocción.
Para cambiar la temperatura mientras el horno se • encuentre calentando, seguir el procedimiento descrito anteriormente.
Durante el primer asenso de temperatura, el ventilador • de convección estará activado para ayudar a que el horno llegue a la temperatura definida más rápido. Los elementos de Horneado, Asado, y de Convección también se alternaran en ciclos para una mejor distribución de calor.
Para obtener el mejor rendimiento del horneado, use la función “preheat” (precalentamiento). La función de precalentamiento aumentará la temperatura del horno a la temperatura programada. Escuchará un tono que le indicará que el horno alcanzó la temperatura programada y que puede colocar la comida en el horno. El precalentamiento no es necesario cuando hace asados o cocina guisos.
Los siguientes ajustes de temperatura aplican a la función de precalentamiento:
• Ajuste sugerido (predeterminado): 350°F/177°c
• Ajuste mínimo del precalentamiento: 170°F / 76°c
• Ajuste máximo del precalentamiento: 550°F / 288°c
Consulte el ejemplo siguiente para usar la función de precalentamiento inmediatamente usando la temperatura predeterminada.
ajuste de la función de precalentamiento
1. Seleccione oprimiendo upper oVen (horno de arriba) o LoWer oVen (horno de abajo).
2. Oprima “preHeat” (Precalentamiento).
Si es necesario, utilice los teclados numéricos para establecer una temperatura diferente.
3. Oprima “start” (Encendido).
Una vez oprimida la tecla “START”, el horno comenzará a calentarse. La pantalla mostrará la temperatura actual del horno.Escuchará un tono que le indicará cuándo colocar la comida en el horno una vez que haya terminado de precalentarse.
Bake (Horneado)
nota Para cancelar la función, oprima “• STOP” (Terminar) en cualquier momento durante la programación del control o durante el proceso de cocción. Para cambiar la temperatura mientras el horno se • encuentre calentando, seguir el procedimiento descrito anteriormente.Durante el primer asenso de temperatura, el ventilador • de convección estará activado para ayudar a que el horno llegue a la temperatura definida más rápido. Los elementos de Horneado, Asado, y de Convección también se alternaran en ciclos para una mejor distribución de calor.
Consulte el ejemplo siguiente para usar la función de horneado inmediatamente usando la temperatura predeterminada.
ajuste de la función de horneado
Use la función de horneado para cocinar la mayoría de los alimentos que requieran temperaturas de cocción normales.Los siguientes ajustes de temperatura aplican a la función de horneado:• Ajuste sugerido (predeterminado): 350°F/177°c• Ajuste mínimo del horneado: 170°F / 76°c• Ajuste máximo del horneado: 550°F / 288°c
• Coloque los alimentos en la parrilla en la posición 2 o 3 y centre las bandejas. Si usando 2 parrillas, coloque los utensilios en las posiciones 2 y 4.
• Cuando coloque varios alimentos en el horno, deje entre 2” y 4” (5 a 10 cm) de espacio entre los alimentos para asegurar la circulación adecuada del aire.
• Los utensilios oscuros u opacos absorben más calor que los utensilios brillantes, lo que puede hacer que los alimentos queden más tostados o dorados de lo esperado. Es posible que sea necesario reducir la temperatura del horno o el tiempo de cocción para evitar que ciertos alimentos se doren demasiado. Se recomienda utilizar los utensilios oscuros para hornear pasteles. Se recomienda utilizar los utensilios brillantes para hornear tortas, galletas y bizcochos.
Para obtener los mejores resultados
1. Seleccione oprimiendo upper oVen (horno de arriba) o LoWer oVen (horno de abajo).
2. Oprima “BaKe” (Horneado).Si es necesario, utilice los teclados numéricos para establecer una temperatura diferente.3. Oprima “start” (Encendido).

17
ajuste de los controles del Horno
peLIgro de IntoXIcacIÓn por aLImentos. No deje reposar el alimento por más de una hora antes o después de la cocción. Esto puede causar intoxicación por alimentos o enfermedades. Los alimentos que se dañan fácilmente, tales como la leche, los huevos, el pescado, la carne de res o la carne de ave, deben refrigerarse en el refrigerador primero. Incluso cuando han sido refrigerados, estos productos no deben permanecer en el horno por más de 1 hora antes de que comience la cocción, y deben ser retirados inmediatamente cuando se termine la cocción.
Cook Time (Tiempo de Cocción)
nota Para cancelar la función, oprima “• STOP” (Terminar) en cualquier momento durante la programación del control o durante el proceso de cocción. El tiempo máximo de programación de cocinado es 11 • horas y 59 minutos. Después que el tiempo de cocinado sea activado, pulsar • la tecla cooK tIme para mostró el tiempo restante de cocinado. Los utensilios oscuros u opacos absorben más calor que los • utensilios brillantes, lo que puede hacer que los alimentos queden más tostados o dorados de lo esperado. Es posible que sea necesario reducir la temperatura del horno o el tiempo de cocción para evitar que ciertos alimentos se doren demasiado. Se recomienda utilizar los utensilios oscuros para hornear pasteles. Se recomienda utilizar los utensilios brillantes para hornear tortas, galletas y bizcochos.
Añadir tiempo de cocción durante el horneado es útil cuando una receta requiere ajustes específicos de temperatura y duración de la cocción. Seguir los tiempos de cocción de la receta ayuda a obtener los mejores resultados posibles.
El tiempo de cocción puede ser programado con las siguientes funciones:• Precalentamiento• Horneado• Horneado por convección• Asado por convección• Cocción lentaConsulte el ejemplo siguiente para usar el horno superior inmediatamente con precalentamiento a la temperatura sugerida (predeterminada) de 350°F (176°C) y apagado automático a los 30 minutos.
Una vez que oprima la tecla “START”, el horno comenzará la cocción y se apagará automáticamente a los 30 minutos.
1. Seleccione oprimiendo upper oVen (horno de arriba) o LoWer oVen (horno de abajo).
2. Oprima “BaKe” (Horneado)
3. Oprima “start” (Encendido)
4. Oprima “cooK tIme” (Tiempo de cocción)
5. Programe 30 minutos
6. Oprima “start” (Encendido)
cuando haya expirado el tiempo de cocción:1. "End" y la hora del día aparecerá en el indicador y el
horno se apagará automáticamente.2. El control emitirá 3 señales sonoras. El control continuará
emitiendo 3 señales sonoras cada 30 segundos hasta que se pulsar STOP.
Una vez que oprima la tecla “START”, el horno calculará la hora de inicio a la que el horno comenzará a calentar.
El horno mantendrá esta temperatura durante el tiempo seleccionado o hasta que se anule la función de cocción elegida.
delay start (with cook time)Encendido Diferido (con tiempo de cocción)
notaCuando programe la opción • deLaY start, asegúrese de que la hora del día esté programada debidamente.Para cancelar la función, oprima “• STOP” (Terminar) en cualquier momento durante la programación del control o durante el proceso de cocción.También puede usar “• cooK tIme” (Tiempo de Cocción) sin “deLaY start” (Encendido Diferido).El encendido diferido puede ser programado usando el • reloj en formato de 24 horas. Consulte la sección “Ajuste del formato de la hora (12 o 24 horas)” para obtener más información.
Añadir tiempo de cocción con encendido diferido específica ofrece los mismos beneficios que la opción de tiempo de cocción, además de permitir controlar el momento preciso de comienzo y finalización del proceso de cocción.
Encendido diferido pueden ser programados con las siguientes funciones:
• Horneado• Horneado por convección• Asado por convección• Cocción lenta• Autolimpieza
Consulte el ejemplo siguiente para programar el horno superior para que precaliente para hornear a 375°F(191°C) durante 50 minutos y para encendido automáticamente a las 5:30:
1. Seleccione oprimiendo upper oVen (horno de arriba) o LoWer oVen (horno de abajo).
2. Oprima “BaKe” (Horneado)
3. Programe 375°F
4. Oprima “cooK tIme” (Tiempo de cocción)
5. Programe 50 minutos
6. Oprima “start” (Encendido)
7. Oprima “deLaY start” (Encendido Diferido)
8. Programe 5:30
9. Oprima “start” (Encendido)

18
Circulación del aire durante el horneado por convección
ajuste de los controles del Horno
Espacio adecuado entre los utensilios usando 2 parrillas.
Espacio adecuado entre los utensilios usando una sola parrilla.
Escuchará un tono que le indicará cuándo colocar la comida en el horno una vez que haya terminado de precalentarse. El horno mantendrá esta temperatura durante el tiempo seleccionado o hasta que se anule la función de cocción elegida.
La función de horneado por convección utiliza un ventilador para hacer circular el calor del horno de manera uniforme y continua. La distribución mejorada del calor ofrece una cocción más uniforme y con excelentes resultados. El horneado con parrillas múltiples puede aumentar ligeramente los tiempos de cocción para algunos alimentos, pero al final se ahorra tiempo.
Convection Bake (Horneado por Convección)
Ventajas del horneado por convección:
• Rendimiento superior en el uso de varias parrillas.
• Algunos alimentos se cocinan entre un 25 y un 30% más rápido, ahorrando tiempo y energía.
• No se necesitan utensilios o bandejas especiales.
Consulte el ejemplo siguiente para usar inmediatamente el horneado por convección con el ajuste de temperatura sugerido (predeterminado) de 350°F (176°C):
El horneado por convección puede ser programado con las siguientes opciones:
• Conversión de Convección
• Tiempo de Cocción y/o Encendido Diferido
Los siguientes ajustes de temperatura aplican a la función de horneado por convección:• Ajuste sugerido (predeterminado): 350°F / 176°c
• Ajuste mínimo del horneado: 170°F / 76°c
• Ajuste máximo del horneado: 550°F / 288°c
• Cuando hornee con una sola parrilla, use la posición 2 o 3. Cuando use 2 parrillas, colóquelas en las posiciones 2 y 4. Cuando use 3 parrillas, colóquelas en las posiciones 1, 3 y 4.
• Las galletas y bizcochos deben hornearse en bandejas sin costados o con costados muy llanos para permitir que el aire caliente circule alrededor del alimento.
• Los alimentos horneados en utensilios con acabado oscuro se cocinarán más rápidamente.
• Cuando coloque varios alimentos en el horno, deje entre 2” y 4” (5 a 10 cm) de espacio entre los alimentos para asegurar la circulación adecuada del aire.
Para obtener los mejores resultados
La función de horneado por convección SÓLO debe ser usada cuando las instrucciones de la receta hayan sido diseñadas para hornear por convección.
Si su receta es para horneado normal y desea usar el horneado por convección, siga las instrucciones de la función “Convection Convert” (Conversión de Convección). La función de conversión de convección ajustará automáticamente la temperatura del horno para ayudarlo a obtener los mejores resultados posibles.
1. Seleccione oprimiendo upper oVen (horno de arriba) o LoWer oVen (horno de abajo).
2. Oprima “conV BaKe” (Horneado por Convección)
Si es necesario, utilice los teclados numéricos para establecer una temperatura diferente.
3. Oprima “start” (Encendido)
nota
Para cancelar la función, oprima “• STOP” (Terminar) en cualquier momento durante la programación del control o durante el proceso de cocción.

19
ajuste de los controles del HornoConvection Convert (Conversión de Convección)
nota
Para cancelar la función, oprima “• STOP” (Terminar) en cualquier momento durante la programación del control o durante el proceso de cocción.
La función de conversión de convección le permite convertir cualquier receta normal de horneado para usar la opción de horneado por convección. El control utiliza la programación normal de la receta y la ajusta a una temperatura más baja para horneado por convección. Esta opción debe ser usada con la función “CONV BAKE” (Horneado por Convección).
Los beneficios del horneado por convección cuando se utiliza la opción de conversión de convección:• Rendimiento superior en el uso de varias parrillas.
• Algunos alimentos se cocinan entre un 25 y un 30% más rápido, ahorrando tiempo y energía.
• No se necesitan utensilios o bandejas especiales.
• Cuando hornee con una sola parrilla, use la posición 2 o 3. Cuando use 2 parrillas, colóquelas en las posiciones 2 y 4. Cuando use 3 parrillas, colóquelas en las posiciones 1, 3 (parrilla irregular) y 4.
• Las galletas y bizcochos deben hornearse en bandejas sin costados o con costados muy llanos para permitir que el aire caliente circule alrededor del alimento.
• Los alimentos horneados en utensilios con acabado oscuro se cocinarán más rápidamente.
• Cuando coloque varios alimentos en el horno, deje entre 2” y 4” (5 a 10 cm) de espacio entre los alimentos para asegurar la circulación adecuada del aire.
Para obtener los mejores resultadosDespués de que el horno alcance la temperatura programada convertida, el horno emitirá una señal sonora para indicarle que está listo.
La opción adicional de conversión de convección bajará automáticamente la temperatura programada indicada en la receta para ajustarla a una temperatura ideal de horneado por convección.
Cuando se usa la conversión de convección con la función de tiempo de cocción, “cF” (Check Food) destella en la pantalla una vez que ha transcurrido el 75% del tiempo. El control también emite una señal sonora a intervalos regulares hasta que el horneado ha terminado. Para que la función “Check Food” (verificar el alimento) funcione, el tiempo de cocción debe ser programado antes de oprimir la tecla “Conv Convert” (conversión a convección).
Consulte el ejemplo siguiente para usar inmediatamente el horneado por convección con el ajuste de temperatura sugerido (predeterminado) de 350°F (176°C) y añadiendo la opción de conversión de convección:
1. Seleccione oprimiendo upper oVen (horno de arriba) o LoWer oVen (horno de abajo).
2. Oprima “conV BaKe” (Horneado por Convección)
Si es necesario, utilice los teclados numéricos para establecer una temperatura diferente.
3. Oprima “conV conVert” (Conversión de Convección)

20
ajuste de los controles del HornoConvection Roast (Asado por Convección)El asado por convección combina un ciclo de cocción con el elemento y ventilador de convección para asar carnes y aves rápidamente. El aire caliente circula alrededor de la carne desde todos los lados, conservando los jugos y sabores. Las carnes cocinadas con esta función quedan doradas y crujientes por fuera y jugosas por dentro. Además, no hay necesidad de reducir la temperatura del horno cuando utiliza el asado por convección.
El asado por convección puede ser programado con las siguientes opciones:
• Tiempo de cocción o tiempo de cocción con encendido diferido
Los siguientes ajustes de temperatura aplican al asado por convección:
• Ajuste predeterminado: 350°F/176°c
• Mínimo: 170°F / 76°c
• Máximo: 550°F / 288°c
Ventajas del asado por convección:• Rendimiento superior en el uso de varias parrillas.• Algunos alimentos se cocinan entre un 25 y un 30% más
rápido, ahorrando tiempo y energía.• No se necesitan utensilios o bandejas especiales.
• No es necesario precalentar el horno para la mayoría de las carnes y carne de ave.
• Coloque los alimentos en las parrillas en las posiciones recomendadas para el tipo de alimento que prepare.
• Cuando coloque varios alimentos en el horno, deje entre 2” y 4” (5 a 10 cm) de espacio entre los alimentos para asegurar la circulación adecuada del aire.
• Asegúrese de seguir cuidadosamente las recomendaciones de temperatura y tiempo de cocción de la receta o consulte la tabla de asado por convección para obtener más información.
Para obtener los mejores resultados
* Para carne de res: semicrudo 145°F, término medio 160°F, bien cocido 170°F ** El pavo relleno requiere tiempo de asado adicional. Cubra las patas y la pechuga con papel de aluminio para evitar que la piel
se dore demasiado o se seque.
Carne Peso temp. del horno Temp. interna Minutos por libraCarne de res
Asado de costilla 4 a 6 lbs. 350°F * 25-30Asado de filete de res 4 a 6 lbs. 350°F * 25-30Asado de solomillo 2 a 3 lbs. 400°F * 15-25
Aves Pavo, entero** 12 a 16 lbs. 325°F 180°F 8-10Pavo, entero** 16 a 20 lbs. 325°F 180°F 10-15Pavo, entero** 20 a 24 lbs. 325°F 180°F 12-16Pollo 3 a 4 lbs. 350°F - 375°F 180°F 12-16
Carnede cerdo
Asado de jamón, fresco 4 a 6 lbs. 325°F 160°F 30-40Asado de paleta 4 a 6 lbs. 325°F 160°F 20-30Lomo 3 a 4 lbs. 325°F 160°F 20-25Jamón precocido 5 a 7 lbs. 325°F 160°F 30-40
Consulte el ejemplo siguiente para usar el asado por convección inmediatamente con los ajustes sugeridos (predeterminados):
Una vez oprimida la tecla “start” (Encendido), el horno comenzará a calentarse.
1. Seleccione oprimiendo upper oVen (horno de arriba) o LoWer oVen (horno de abajo).
2. Oprima “conV roast” (Asado por Convección)
Si es necesario, utilice los teclados numéricos para establecer una temperatura diferente.
3. Oprima “start” (Encendido)
Instrucciones para la parrilla de asarLa asadera, su inserto y la parrilla de asar están disponibles utilizando la tarjeta de pedido por correo. Cuando prepare carnes para asar por convección, puede usar la asadera, el inserto y la parrilla de asar proporcionados con el electrodoméstico. La asadera atrapará los derrames de grasa y el inserto ayudará a evitar las salpicaduras de grasa. La parrilla de asar cabe sobre el inserto, lo que permite que el aire caliente circule debajo del alimento para una cocción uniforme y ayuda a dorar mejor la parte inferior del alimento.1. Coloque la parrilla en la posición inferior o la siguiente
hacia arriba.2. Coloque el inserto en la asadera.3. Asegúrese de que la parrilla de asar esté asentada
firmemente sobre el inserto. No use la asadera sin el inserto. No cubra el inserto de la asadera con papel de aluminio.
4. Coloque el alimento (con la grasa hacia arriba) en la parrilla de asar.
5. Coloque los alimentos preparados en la parrilla en el horno.
Parrilla de asar
Inserto
Asadera
notaPuede oprimir “STOP” (Terminar) en cualquier momento durante la programación del control o durante la cocción.

21
ajuste de los controles del Horno
Rack positions
Broil (Asado a la Parrilla)
notaPuede oprimir “STOP” (Terminar) en cualquier momento durante la programación del control o durante la cocción.
Use la función de asado a la parrilla para cocinar carnes que requieran exposición directa al calor radiante para obtener un dorado ideal.
Los siguientes ajustes de temperatura aplican a la función de asado a la parrilla:
• Ajuste sugerido (predeterminado): 550°F / 288°c
• Ajuste mínimo del asado a la parrilla: 400°F / 204°c
• Ajuste máximo del asado a la parrilla: 550°F / 288°c
1. Coloque el inserto en la asadera y coloque la carne en el inserto. Recuerde seguir todas las advertencias y precauciones.
2. Coloque la parrilla del horno según las recomendaciones. Asegúrese de colocar los alimentos preparados y la bandeja directamente debajo del elemento. deje la puerta del horno abierta hasta el tope de asar cuando ase a la parrilla.
3. Seleccione oprimiendo upper oVen (horno de arriba) o LoWer oVen (horno de abajo).
4. Oprima “BroIL” (Asar a la Parrilla).
Si es necesario, utilice los teclados numéricos para establecer una temperatura diferente.5. Oprima “start” (Encendido)
Consulte el ejemplo siguiente para usar inmediatamente la función de asado a la parrilla con el ajuste sugerido (prede-terminado):
ajuste para asar a la parrilla
alimento Posición de la parrilla
Temp Tiempo de cocción en minutos
Nivel de cocción
1er lado 2do ladoFilete de res de 1” (2,5 cm) de grueso
3 550°F 6 4 Término medio3 550°F 7 5 Medio3 550°F 8 7 Bien cocido
Chuletas de cerdo de 3/4” (1,9 cm) de grueso 3 550°F 8 6 Bien cocido
Pollo - con hueso 2 450°F 20 10 Bien cocidoPollo deshuesado 2 450°F 8 6 Bien cocidoPescado 2 500°F 13 0 Bien cocidoCamarones 3 550°F 5 0 Bien cocido
Hamburguesas de 1” (2,5 cm) de grueso
2 550°F 9 7 Término medio3 550°F 10 8 Bien cocido
ADVERTENCIA
Si ocurre un incendio dentro del horno, cierre la puerta del mismo. Si el fuego persiste, vierta bicarbonato de sodio en el fuego o use un extintor de incendios. No vierta agua o harina en el fuego. La harina puede ser explosiva y el agua puede hacer que el incendio de grasa se disperse y causar lesiones personales.
ATENCION
• No use la asadera sin el inserto.
• No cubra la asadera o el inserto con papel de aluminio ya que la grasa se puede encender.
• Para evitar que el alimento entre en contacto con el elemento de asado y para evitar salpicaduras de grasa, no use la parrilla de asar con la función de asado normal.
• Use las bandejas y posiciones de parrillas recomendadas para el tipo de carne que vaya a cocinar.
• Para obtener un dorado óptimo, precaliente el horno 5 a 6 minutos antes de colocar los alimentos en el horno.
Para obtener los mejores resultados
El inserto de la asadera (si se incluye) cuenta con ranuras que permiten que la grasa de la carne caiga al fondo de la asadera. Coloque la carne preparada en el inserto y luego colóquelo sobre la asadera como se muestra.
Inserto
Asadera
Posición Tope de
Asar a la Parrilla
Tenga en cuenta que las sugerencias de la tabla de ajustes de asado a la parrilla son sólo recomendaciones. Aumente o reduzca los tiempos de asado o mueva el alimento a una posición diferente que se ajuste al nivel de cocción que desea. Si el alimento que está asando no se encuentra en la tabla, siga las instrucciones de su libro de recetas y vigile el alimento atentamente.
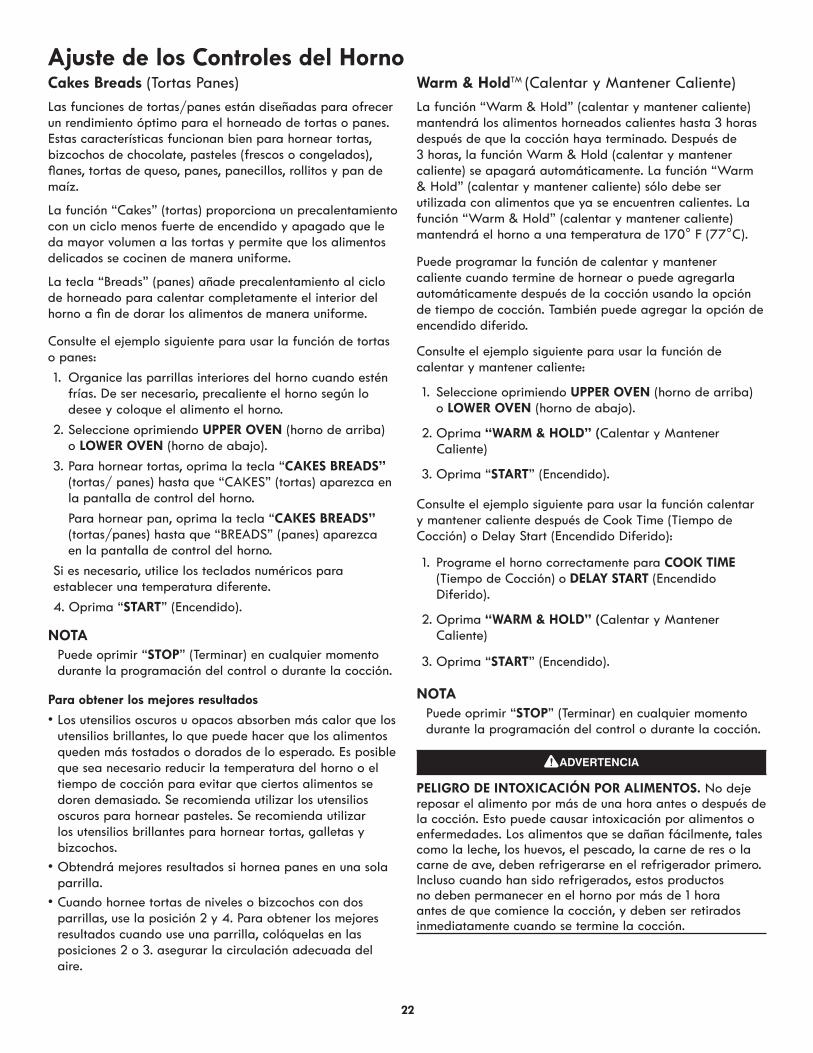
22
ajuste de los controles del HornoCakes Breads (Tortas Panes)
Consulte el ejemplo siguiente para usar la función de tortas o panes:
1. Organice las parrillas interiores del horno cuando estén frías. De ser necesario, precaliente el horno según lo desee y coloque el alimento el horno.
2. Seleccione oprimiendo upper oVen (horno de arriba) o LoWer oVen (horno de abajo).
3. Para hornear tortas, oprima la tecla “caKes Breads” (tortas/ panes) hasta que “CAKES” (tortas) aparezca en la pantalla de control del horno.
Para hornear pan, oprima la tecla “caKes Breads” (tortas/panes) hasta que “BREADS” (panes) aparezca en la pantalla de control del horno.
Si es necesario, utilice los teclados numéricos para establecer una temperatura diferente.
4. Oprima “start” (Encendido).
Las funciones de tortas/panes están diseñadas para ofrecer un rendimiento óptimo para el horneado de tortas o panes. Estas características funcionan bien para hornear tortas, bizcochos de chocolate, pasteles (frescos o congelados), flanes, tortas de queso, panes, panecillos, rollitos y pan de maíz.
La función “Cakes” (tortas) proporciona un precalentamiento con un ciclo menos fuerte de encendido y apagado que le da mayor volumen a las tortas y permite que los alimentos delicados se cocinen de manera uniforme.
La tecla “Breads” (panes) añade precalentamiento al ciclo de horneado para calentar completamente el interior del horno a fin de dorar los alimentos de manera uniforme.
• Los utensilios oscuros u opacos absorben más calor que los utensilios brillantes, lo que puede hacer que los alimentos queden más tostados o dorados de lo esperado. Es posible que sea necesario reducir la temperatura del horno o el tiempo de cocción para evitar que ciertos alimentos se doren demasiado. Se recomienda utilizar los utensilios oscuros para hornear pasteles. Se recomienda utilizar los utensilios brillantes para hornear tortas, galletas y bizcochos.
• Obtendrá mejores resultados si hornea panes en una sola parrilla.
• Cuando hornee tortas de niveles o bizcochos con dos parrillas, use la posición 2 y 4. Para obtener los mejores resultados cuando use una parrilla, colóquelas en las posiciones 2 o 3. asegurar la circulación adecuada del aire.
Para obtener los mejores resultados
notaPuede oprimir “STOP” (Terminar) en cualquier momento durante la programación del control o durante la cocción.
Warm & HoldTM (Calentar y Mantener Caliente)
Consulte el ejemplo siguiente para usar la función de calentar y mantener caliente:
Consulte el ejemplo siguiente para usar la función calentar y mantener caliente después de Cook Time (Tiempo de Cocción) o Delay Start (Encendido Diferido):
1. Seleccione oprimiendo upper oVen (horno de arriba) o LoWer oVen (horno de abajo).
2. Oprima “Warm & HoLd” (Calentar y Mantener Caliente)
3. Oprima “start” (Encendido).
1. Programe el horno correctamente para cooK tIme (Tiempo de Cocción) o deLaY start (Encendido Diferido).
2. Oprima “Warm & HoLd” (Calentar y Mantener Caliente)
3. Oprima “start” (Encendido).
La función “Warm & Hold” (calentar y mantener caliente) mantendrá los alimentos horneados calientes hasta 3 horas después de que la cocción haya terminado. Después de 3 horas, la función Warm & Hold (calentar y mantener caliente) se apagará automáticamente. La función “Warm & Hold” (calentar y mantener caliente) sólo debe ser utilizada con alimentos que ya se encuentren calientes. La función “Warm & Hold” (calentar y mantener caliente) mantendrá el horno a una temperatura de 170° F (77°C).
Puede programar la función de calentar y mantener caliente cuando termine de hornear o puede agregarla automáticamente después de la cocción usando la opción de tiempo de cocción. También puede agregar la opción de encendido diferido.
notaPuede oprimir “STOP” (Terminar) en cualquier momento durante la programación del control o durante la cocción.
peLIgro de IntoXIcacIÓn por aLImentos. No deje reposar el alimento por más de una hora antes o después de la cocción. Esto puede causar intoxicación por alimentos o enfermedades. Los alimentos que se dañan fácilmente, tales como la leche, los huevos, el pescado, la carne de res o la carne de ave, deben refrigerarse en el refrigerador primero. Incluso cuando han sido refrigerados, estos productos no deben permanecer en el horno por más de 1 hora antes de que comience la cocción, y deben ser retirados inmediatamente cuando se termine la cocción.

23
ajuste de los controles del Horno
Colocación adecuada de la sonda de carne• Siempre inserte la sonda de manera que la punta quede
en el centro de la porción más gruesa de la carne. No permita que la sonda toque el hueso, la grasa, el cartílago o la bandeja.
• Para jamón o cordero con hueso, inserte la sonda en el centro del músculo o articulación más bajos. Para platos como pastel de carne o guisos, inserte la sonda en el centro del alimento. Para encontrar el centro del alimento, mida visualmente la distancia usando la sonda (vea la fig. 1). Cuando cocine pescado, inserte la sonda justo por encima de la aleta.
• Para carne de ave o pavo entera, inserte la sonda en la porción más gruesa del muslo interior justo debajo de la pata (vea la fig. 2).
Meat Probe (Sonda para Carne)Cuando cocine carnes como los asados, jamones o carne de ave, puede utilizar la sonda de carne para verificar la temperatura interna del alimento sin tener que adivinar. Para algunos alimentos, especialmente la carne de ave y los asados, verificar la temperatura interna es el mejor método para asegurarse de que queden bien cocidos.
Los siguientes ajustes de temperatura aplican a la función de sonda para carne:
• Ajuste predeterminado: 170°F / 76°c
• Ajuste mínimo: 140°F / 60°c
• Ajuste máximo: 210°F / 99°cFig. 2
Fig. 11/2
IMPORTANTE
• Sólo utilice la sonda proporcionada con el electrodoméstico. Cualquier otra sonda podría dañar la sonda misma o el electrodoméstico.
• Manipule la sonda con cuidado cuando la inserte y retire de los alimentos o del receptáculo.
• No use pinzas para tirar del cable cuando inserte o retire la sonda de los alimentos o del receptáculo.
• Descongele los alimentos completamente antes de insertar la sonda para evitar daños a la misma.
• nunca deje o almacene la sonda en el interior del horno cuando no esté en uso.
• Para evitar quemaduras, después de cocinar los alimentos desenchufe cuidadosamente la sonda usando un tomaollas.
Nota importante:Para cambiar la manera en la que el horno reacciona después de alcanzar la temperatura programada, debe hacerlo antes de iniciar el proceso de cocción.
Para programar la sonda de carne:1. Prepare los alimentos e inserte adecuadamente la
sonda de temperatura. NO precaliente el horno o comience la cocción antes de haber insertado correctamente la sonda de carne. La sonda debe ser insertada en el alimento y en el receptáculo cuando el horno todavía está frío.
2. Coloque los alimentos preparados en la parrilla deseada en el interior del horno.
3. Enchufe la sonda de carne en el receptáculo ubicado en la parte delantera izquierda de la cavidad del horno (vea la ubicación del receptáculo de la sonda en la figura 3).
Fig. 3
4. El control del horno detecta si la sonda fue conectada correctamente al receptáculo y, cuando la detecte, encenderá el ícono en la pantalla de control del horno.
5. Seleccione oprimiendo upper oVen (horno de arriba) o LoWer oVen (horno de abajo).
6. Para programar la temperatura, oprima la tecla “Meat Probe” (sonda para carne) una vez y programe la temperatura que desea que los alimentos alcancen utilizando las teclas numéricas (la temperatura predeterminada es 170ºF/77ºC)†. Oprima start para aceptar la temperatura deseada para la sonda de carne. Cierre la puerta del horno.

24
ajuste de los controles del Hornopara programar la sonda de carne (cont.):7. Programe el control para la función de horneado,
horneado por convección o asado por convección y la temperatura de horneado deseada. Puede usar la sonda de carne con otras funciones de horneado excepto “Broil” (asado a la parrilla) o “Flex Clean” (autolimpieza).
8. Durante el proceso de cocción, la temperatura del horno se mostrará por defecto. Para ver la temperatura real de la sonda, oprima la tecla “Meat Probe” una vez. Para ver la temperatura programada, oprima la tecla “Meat Probe” dos veces. Después de 6 segundos, la pantalla mostrará la temperatura real de la sonda. Si es necesario cambiar la temperatura de cocción de los alimentos durante la cocción, oprima la tecla meat proBe (sonda para carne) dos veces y utilice el teclado numérico para ajustar la temperatura deseada. Oprima la tecla start para aceptar los cambios.
9. El control del horno emitirá 3 señales sonoras cuando alcance la temperatura interna programada. Por defecto del horno continuara la cocción. Puede encontrar las instrucciones para cambiar la manera en la que reaccione después de alcanzar la temperatura interna programada más adelante en esta sección. Oprima la tecla para anular la cocción en cualquier momento.
Consulte las siguientes instrucciones para cambiar la manera en la que el horno reacciona después de alcanzar la temperatura interna programada.
para programar el horno para que siga cocinando después de alcanzar la temperatura programada para la sonda:
1. Oprima y mantenga oprimida la tecla meat proBe (sonda de carne) durante 6 segundos.
2. Oprima la tecla FLeX cLean (autolimpieza) y navegue por las opciones hasta que aparezca el mensaje “Stay On” (Fig. 1) y luego oprima para aceptar.
para programar el horno para anular la cocción después de que alcance la temperatura programada para la sonda.
1. Oprima y mantenga oprimida la tecla meat proBe (sonda de carne) durante 6 segundos.
2. Oprima la tecla FLeX cLean (autolimpieza) y navegue por las opciones hasta que aparezca el mensaje “Stop” (Fig. 2) y luego oprima start para aceptar.
† El departamento de agricultura de los EE.UU. indica que “la carne semicruda es popular, pero debe saber que si cocina la carne sólo hasta alcanzados los 140°F/60°C significa que algunos organismos que causan intoxicación por alimentos pueden sobrevivir”. (Fuente: Safe Food Book, Your Kitchen Guide, USDA Rev. June 1985.)
La temperatura mínima recomendada por el departamento de agricultura de los EE.UU. (USDA) es de 145°F/63°C para carne de res fresca término medio.

25
ajuste de los controles del Horno
Fig.1 Fig. 2
notaPuede oprimir “STOP” (Terminar) en cualquier momento durante la programación del control o durante la cocción.
La cocción lenta puede ser programada con las siguientes opciones:
• Tiempo de cocción• Tiempo de cocción con encendido diferido
Slow Cook (Cocción Lenta)
Consulte el siguiente ejemplo para usar la cocción lenta:
La función de cocción lenta puede ser usada para cocinar alimentos más lentamente a temperaturas más bajas. Los resultados de la cocción serán similares a los obtenidos con una olla de cocción lenta.
Esta función es ideal para asar carne de res, de cerdo y de ave. Cuando usa la cocción lenta para preparar carnes, el exterior de las mismas se oscurece pero no se quema. Esto es normal.
Hay 2 ajustes disponibles para la cocción lenta: “Hi” (alto) o “Lo” (bajo). El ajuste alto es el mejor para cocinar alimentos durante 4 a 5 horas. El ajuste bajo es el mejor para cocinar alimentos durante 8 a 9 horas.
• Descongele completamente todos los alimentos congelados antes de cocinarlos.
• Coloque varias parrillas para ajustarse al tamaño de los utensilios de cocción cuando cocine varios alimentos.
• Añada crema o salsas de queso durante la última hora de cocción.
• No abra frecuentemente la puerta del horno y no la deje abierta cuando revise el alimento. Mientras más pérdida de calor haya, más se tardará en cocinar el alimento.
• Cubra los alimentos para mantener la humedad o use una tapa holgada o ventilada para permitir que los alimentos se doren o tuesten.
• Los asados pueden dejarse descubiertos para que se doren. Los tiempos de cocción variarán dependiendo del peso, del contenido de grasa, del hueso y la forma del asado.
• No es necesario precalentar el horno.• Use la temperatura recomendada en la receta para el
alimento y un termómetro de cocina para determinar cuándo está listo el alimento.
Para obtener los mejores resultados
1. Seleccione oprimiendo upper oVen (horno de arriba) o LoWer oVen (horno de abajo).
2. Oprima la tecla “sLoW cooK” (Cocción Lenta) para elegir la opción “Hi” (alta) -Fig. 1-.
3. Oprima la tecla “sLoW cooK” (Cocción Lenta) nuevamente para seleccionar la opción “Lo” (bajo) (figura 2).
4. Oprima “start” (Encendido).
Recipe Recall (Memoria de Receta)
notaEl presionar el botón de start inmediatamente después de haber introducido las temperaturas y el tiempo de cocción hará que el horno comience a hornear con la programación que usted introdujo. Si usted desea guardar las recetas pero no desea que el horno comience a trabajar presione el botón de STOP después de haber presionado el botón de start.* El tiempo de cocción (Cook Time) introducido NO incluye el tiempo adicional requerido para precalentar (preheat) el horno. El horno iniciará el conteo regresivo del tiempo de cocción en cuanto se active la función.
nota• Una vez que haya guardado la receta con una tecla
de función, la información de la receta será recordada cuando oprima la tecla correspondiente en el futuro.
• Si la receta utilizada incluye tiempo de cocción, el horno se apagará automáticamente una vez que el tiempo de cocción haya transcurrido.
• Para borrar todas las recetas almacenadas, consulte la sección para restablecer los ajustes predeterminados de fábrica.
La función de memoria de recetas se puede usar para guardar y activar los ajustes para sus recetas favoritas. Esta función puede guardar 1 ajuste para cada una de las funciones básicas de cocción. Las teclas que se pueden usar con la memoria de recetas son Bake, Conv Bake, conv roast, cakes Breads, preheat y Slow Cook. Esta característica también guarda y recupera los ajustes adicionales Cook Time (Tiempo de Cocción) o Warm & Hold (Calentar y Mantener Caliente).
Consulte el siguiente ejemplo para guardar en memoria una receta típica de galletas (por ejemplo, para hornear a 375°F durante 9 minutos y apagar automáticamente).
Precalentar* del horno, a la temperatura que prefiera.
1. Seleccione oprimiendo upper oVen (horno de arriba) o LoWer oVen (horno de abajo).
2. Oprima “BaKe” (Hornear)
3. Programe 375°F
4. Oprima “start” (Encendido)
5. Oprima “cooK tIme” (Tiempo de Cocción)
6. Programe 9 minutos
7 Oprima y mantenga pulsada la tecla start (Encendido) durante 3 segundos.
Ahora se guarda la receta con la tecla Bake.
Consulte el siguiente ejemplo para recuperar la receta de galletas guardada bajo la tecla BAKE (hornear).
1. Oprima “BaKe” (Hornear). Se borrará cualquier recetan guardada.
2. Oprima “start” (Encendido).

26
ajuste de los controles del Horno
nota
Las únicas teclas disponibles una vez que se activa el modo sabático son las BaKe, start, STOP y las teclas numéricas.
Puede cambiar la temperatura del horno y cualquier ajuste de la cubierta una vez que haya comenzado el horneado (sólo para fiestas judías). Elija el horno, oprima la tecla “BaKe”, programe el cambio de temperatura y oprima la tecla “start” dos veces. Recuerde que el control del horno no emitirá señales sonoras y la pantalla no mostrará los cambios una vez que el horno esté en modo sabático.
Modo SabáticoEste electrodoméstico ofrece ajustes especiales para cuando observe el Shabat u otras fiestas judías. Este modo apagará todas las señales sonoras o cambios de la pantalla que el control del horno generalmente muestra. La función “BaKe” (Hornear) es la única opciones disponibles en el modo sabático.
Primero debe programar la función “BaKe” (Hornear) y la(s) temperatura(s) requerida(s) para el horno, la opción “COOK tIme” (Tiempo de Cocción) de ser necesario, y cualquier nivel de potencia a usar en la cubierta antes de programar el modo sabático. Cualquier ajuste realizado antes de programar el modo sabático se mostrará en la pantalla.
El modo sabático toma prioridad sobre el modo de ahorro de energía después de 12 horas programado en la fábrica y el electrodoméstico permanecerá encendido hasta que se anulen las funciones de cocción. Si cualquiera de las funciones de cocción son anuladas cuando el electrodoméstico esté en modo sabático, no habrá ninguna señal sonora o en la pantalla para verificar esta cancelación.
Si va a necesitar las luces del horno, asegúrese de encenderlas antes de programar el modo sabático. Una vez que la luz del horno esté ENCENDIDA y el modo sabático esté activado, la luz permanecerá encendida hasta que se apague el modo sabático y se apaguen manualmente las luces. La puerta del horno no activará las luces del horno cuando se abra o se cierre.
Para obtener más asistencia, instrucciones para el uso adecuado y una lista completa de modelos con modo sabático, visite el siguiente sitio en Internet: http:\\www.star-k.org.
Se recomienda que cualquier cambio de temperatura que se realice cuando el modo sabático esté activado se confirme oprimiendo la tecla “start” (iniciar) 2 veces. Esto asegurará que el horno permanezca ENCENDIDO incluso si la temperatura que se intentó programar era menor o mayor que los límites del control. Si programa la temperatura del horno por fuera del rango permitido, el horno se ajustará a la temperatura disponible que más se le acerque. Intente programar la temperatura del horno nuevamente.
Si ocurre una falla o interrupción eléctrica durante el Shabat o las fiestas judías, el electrodoméstico se APAGARÁ. Cuando se reinicie el suministro eléctrico, el electrodoméstico no se encenderá automáticamente con los ajustes de horneado originales. “sF” se desplegará en todas las pantallas para indicar una falla en el modo sabático.
El siguiente ejemplo muestra cómo anular el modo sabático:
El siguiente ejemplo muestra los ajustes del horno para el Shabat (y las fiestas judías):
Una vez que el modo sabático haya sido activado adecuadamente, “Sab” aparecerá en la pantalla hasta que se anule el modo sabático.
ajuste del modo sabático
anulación del modo sabático
1. Seleccione oprimiendo upper oVen (horno de arriba) o LoWer oVen (horno de abajo).
2. Oprima “BaKe” (Hornear)
3 Oprima “start” (Encendido)
Asegúrese de hacer cualquier cambio adicional a los ajustes del horno antes de seguir con el paso 3.
4. Para activar el modo sabático, oprima y mantenga oprimidas las teclas “cooK tIme” y “deLaY start” a la vez durante 3 segundos (escuchará una señal sonora).
1. Oprima y mantenga oprimidas las teclas “COOK tIme” y “deLaY start” a la vez durante 3 segundos (escuchará una señal sonora).
2. Todas las funciones de cocción y de la cubierta programadas previamente se anularán una vez haya terminado el modo sabático.
notaPuede oprimir “STOP” (Terminar) en cualquier momento durante la programación del control o durante la cocción.

27
Preferencias del Usuarioajuste del relojConsulte el siguiente ejemplo para programar el reloj a la 1:30.
1. Oprima .
2. Introduzca 1:30 hasta llegar a 1:30.3. Oprima “start” (Encendido) para aceptar o “STOP”
(Terminar) para deshacer los cambios.
1. Oprima y mantenga oprimida la tecla durante
7 segundos hasta que “12Hr dAy” o “24Hr dAy” aparezcan en la pantalla.
2. Oprima la tecla “FLeX cLean” (autolimpieza) para navegar entre los formatos de hora de 12 y 24 horas.
3. Oprima “start” (Encendido) para aceptar o “STOP” (Terminar) para deshacer los cambios.
El modo de despliegue del reloj le permite elegir el formato de la hora (12 o 24 horas). El ajuste predeterminado de fábrica para el reloj es de 12 horas.Consulte el ejemplo siguiente para cambiar el formato de la hora a 24 horas.
ajuste del Formato de la Hora (12 o 24 horas)
1. Mantenga oprimida la tecla “BroIL” (asar a la parrilla) durante 7 segundos hasta que “F” o “C” aparezcan en la pantalla.
2. Oprima la tecla “FLeX cLean” (autolimpieza) para navegar entre los formatos de temperatura en grados F y C.
3. Oprima “start” (Encendido) para aceptar o “STOP” (Terminar) para deshacer los cambios.
cambio entre °F o °cEl control del horno puede mostrar y programar la temperatura en grados Fahrenheit o Celsius. La confi guración predeterminada de fábrica es en grados Fahrenheit. Consulte el ejemplo siguiente para cambiar el formato de la temperatura a grados Celsius.
1. Mantenga oprimida la tecla “tImer” (temporizador) durante 7 segundos hasta que “12Hr OFF” o “StAy On” aparezca en la pantalla.
2. Oprima la tecla “FLeX cLean” (autolimpieza) para navegar entre los modos “12Hr OFF” o “StAy On”.
3. Oprima “start” (Encendido) para aceptar o “STOP” (Terminar) para deshacer los cambios.
cambio entre horneado continuo y la función de ahorro de energía después de 12 horasEl control del horno tiene incorporada una función programada de fábrica de ahorro de energía después de 12 horas de funcionamiento que apaga el electrodoméstico si se dejan encendidos el horno o la cubierta por más de 11 horas y 59 minutos. El horno puede ser programado para desactivar esta característica y programar horneado continuo.Consulte el siguiente ejemplo para apagar el modo deahorro de energía después de 12 horas.
1. Mantenga oprimida la tecla 7 hasta escuchar una señal sonora (aprox. 6 segundos).
2. Oprima start. El control restablecerá todos los ajustes confi gurados por el usuario de regreso a su estado original de fábrica.
para restablecer las confi guraciones predeterminadas de fábricaSu electrodoméstico sale de la fábrica con ajustes predeterminados para el control del horno. Con el pasar del tiempo el usuario puede cambiar estos ajustes predeterminados. Las siguientes funciones o características tienen opciones confi gurables por el usuario o ajustes de fábrica que pueden ser modifi cados:• Ajuste del formato de la hora (12 o 24 horas)• Horneado continuo o ahorro de energía después de 12 horas• Control en modo silencioso o audible• Pantalla de temperatura del horno (Fahrenheit o Celsius)• Ajustes de temperatura del horno• Todas las recetas guardadas• Ajustes de la sonda para carne• Ajuste de intensidad de la luz decorativaAntes de restablecer los ajustes de fábrica, tenga en cuenta que TODOS los ajustes mencionados anteriormente se restaurarán a su estado original, incluyendo cualquier diferencia de temperatura del horno y cualquier información de recetas almacenadas.
1. Seleccione oprimiendo upper oVen (horno de arriba) o LoWer oVen (horno de abajo).
2. Mantenga oprimida la tecla “BaKe” (hornear) durante 7 segundos hasta que “UPO” aparezca en la pantalla.
3. Programe el cambio de temperatura deseado usando las teclas numéricas . Puede oprimir la tecla “FLeX cLean” (autolimpieza) para bajar la temperatura.
4. Oprima “start” (Encendido) para aceptar o “STOP” (Terminar) para deshacer los cambios.
ajuste de la temperatura del Hornodiferencia de temperatura programable por el usuarioSu electrodoméstico ha sido calibrado en la fábrica y ha sido probado para asegurar una temperatura de horneado precisa. Durante los primeros usos, siga las instrucciones de tiempo y temperatura de sus recetas cuidadosamente. Si siente que su horno está demasiado caliente o no lo suficientemente caliente de acuerdo con su experiencia, usted puede ajustar la temperatura de horneado a su gusto. Puede elevar o reducir la temperatura hasta en 35°F (19°C) de la temperatura normal.Consulte el siguiente ejemplo para reducir la temperatura.
1. Mantenga oprimida la tecla “deLaY start” (encendido diferido) durante 7 segundos hasta que “BEEP” aparezca en la pantalla.
2. Oprima la tecla “FLeX cLean” (autolimpieza) para navegar entre los modos encendido o apagado.
3. Oprima “start” (Encendido) para aceptar o “STOP” (Terminar) para deshacer los cambios.
modo silencioso o modo de control con señal sonoraEl modo silencioso permite que el horno opere sin emitir señales sonoras. El control puede ser programado para funcionamiento silencioso y luego ser reprogramado para que emita todas las señales sonoras normales.Por ejemplo, para programar el modo silencioso:

28
ciclo de autolimpieza
Limpie la puerta
no LImpIe la empaquetadura
Fig. 1
El horno autolimpiante se limpian automáticamente usando temperaturas altas muy por encima de las temperaturas normales de cocción. La función de autolimpieza elimina completamente las manchas o las reduce a cenizas fi nas que puede limpiar fácilmente con un paño húmedo.
Siga estas precauciones cuando use el ciclo de autolimpieza:
• Deje enfriar el horno para efectuar la limpieza previa.
• Use guantes de goma cuando haga la limpieza previa y cuando limpie los residuos después del ciclo de autolimpieza.
• No use agentes de limpieza para hornos o capas protectoras en el interior o alrededor del horno.
• No limpie la junta de la puerta del horno. El tejido del material de la junta de la puerta del horno es esencial para un buen sellado. Se debe tener mucho cuidado de no frotar, dañar ni extraer la junta de la puerta. (Fig. 1)
• No use ningún agente de limpieza en la junta de la puerta. Los residuos químicos que queden en la junta de la puerta pueden dañarla.
• NO fuerce la puerta del horno para abrirla. El sistema de bloqueo automático de la puerta puede dañarse.
• Retire la asadera y el inserto, así como todos los utensilios y el papel de aluminio que pueda haber. Estos objetos no pueden resistir las altas temperaturas de la limpieza.
• El horno tiene parrillas esmaltadas lubricadas, que pueden permanecer en el horno durante el ciclo de autolimpieza. No elimine el aceite vegetal de las parrillas. Es importante que los laterales de las parrillas permanencia con una delgada capa de aceite vegetal. Para mantener el funcionamiento correcto, aplique aceite vegetal después de cada ciclo de autolimpieza o cuando se difi culte el deslisamiento de la parrilla.
• elimine cualquier derrame excesivo del interior del horno antes de iniciar el ciclo de autolimpieza. Para limpiar, use agua caliente con detergente y un paño. Los derrames grandes pueden causar humo denso o un incendio cuando se exponen a altas temperaturas.
• Limpie con agua y jabón toda la suciedad pegada al marco del horno, al revestimiento de la puerta fuera de la junta de la puerta del horno y al área pequeña en la parte delantera central de la parte inferior del horno. Estas áreas se calientan lo sufi ciente como para quemar la suciedad acumulada sobre la superfi cie.
• No deje que queden en la superfi cie de cerámica derrames con alto contenido de azúcar o ácido (tales como leche, tomates, chucrut, jugo de frutas o rellenos de tartas), pues pueden dejar una mancha opaca incluso después de la limpieza.
antes de Iniciar la autolimpieza ADVERTENCIA
Durante el ciclo de autolimpieza, la parte exterior del elec-trodoméstico puede calentarse mucho. NO deje a los niños sin vigilancia cerca del electrodoméstico.
ATENCION
• NO coloque papel de aluminio en las paredes del horno, en las parrillas, en el fondo del horno o en ninguna otra pieza de la estufa. Esto podría afectar la distribución del calor, producir resultados de cocción defi cientes y causar daños permanentes en el interior del horno (el papel de aluminio se derretiría en la superfi cie del interior del horno).
• Tenga cuidado cuando abra la puerta después de que el ciclo de autolimpieza haya terminado. El horno todavía puede estar muY caLIente.
• Los vapores emitidos durante el ciclo de autolimpieza de cualquier estufa pueden afectar la salud de algunos pájaros. Cambie los pájaros a una habitación bien ventilada.
Limpie el armazón
Qué se puede esperar durante la Limpieza:Mientras el horno está en funcionamiento, se calienta a temperaturas mucho más altas que las de cocción normal. Los ruidos de expansión y contracción del metal son normales. También es normal el olor mientras se elimina el resto de comida. Puede salir humo a través de la ventilación del horno.
Si las salpicaduras grandes no se eliminan antes de la limpieza, pueden prenderse fuego y causar más humo y olor que lo usual. Esto es normal y seguro, y no es para alarmarse. De ser posible, usar un ventilador durante el ciclo de autolimpieza.
29
ciclo de autolimpiezaciclo de autolimpiezaLa tecla FLeX cLean se utiliza para iniciar un ciclo de autolimpieza. Cuando se usa junto con la tecla deLaY start (encendido diferido), también se puede programar un ciclo de autolimpieza diferido. La función “FLeX cLean” (limpieza flexible) le permite seleccionar un ciclo de autolimpieza de 2 (2:00) a 4 (4:00) horas de duración. También puede seleccionar el tiempo de limpieza en incrementos de 1 minuto (por ejemplo, 2 horas y 50 minutos) oprimiendo las teclas numéricas 2 5 0.
Si está planeando usar el horno inmediatamente después de un ciclo de autolimpieza recuerde que es necesario esperar un tiempo hasta que el horno se enfríe y la puerta del horno se pueda abrir. Esto normalmente demora aproximadamente una hora. Por lo tanto si desea un ciclo de autolimpieza de 3 horas en realidad demorará 4 horas en completarse.
*Se recomienda usar un ciclo de 2 horas para suciedad leve, un ciclo de 3 horas para suciedad normal y un ciclo de 4 horas para un horno muy sucio (para garantizar resultados satisfactorios)
nota: La cocina debe estar bien ventilada; para ello, se debe dejar una ventana abierta, o usar el ventilador o la campana extractora durante el ciclo de autolimpieza. Esto ayudará a eliminar los olores normales asociados con el ciclo de autolimpieza.
Consulte el ejemplo siguiente para iniciar un ciclo de autolimpieza inmediatamente o para programar un encendido diferido para las 9:00 y que se apague automáticamente (por ejemplo, un ciclo predefinido de 3 horas):
1. Asegúrese de que el reloj muestre la hora correcta del día y que la puerta del horno esté cerrada.
2. Seleccione oprimiendo upper oVen (horno de arriba) o LoWer oVen (horno de abajo).
3. Oprima FLeX cLean.
El control automáticamente limpiará durante un período de tres horas (tiempo implícito del ciclo de limpieza). Nota: Si se desean 2 o 4 horas de tiempo de limpieza, pulsar 2 0 0 para 2 horas u pulsar 4 0 0 para un tiempo de limpieza de 4 horas. Seleccione el tiempo de limpieza basándose en la cantidad de suciedad que tenga el horno: leve, mediana o bastante (*Ver arriba).
4. Oprima start.
Tan pronto como el control sea programado, el cierre mecánico de la puerta comenzará a cerrarse automáticamente. Una vez que la puerta se ha cerrado la luz indicadora “door LocKed” dejará de destellar y permanecerá encendida.
Nota: La puerta del horno demora aproximadamente 15 segundos en cerrarse.
Nota: Si se necesita la función opcional de autolimpieza diferida, complete los pasos 5 al 7.
término del ciclo de autolimpiezaUna vez que el horno se ha enfriado completamente durante aproximadamente 1HORA y el ícono “door LocKed” desaparezca del indicador visual, la puerta del horno puede entonces ser abierta.
parada o Interrupción del ciclo de autolimpiezaSi es necesario detener o interrumpir un ciclo de autolimpieza debido a humo excesivo o incendio en el horno:1. Oprima STOP.2. Una vez que el horno se haya enfriado durante
aproximadamente 1 HORA y el ícono “door LocKed” no aparezca desplegado en el indicador visual, la puerta del horno puede ser abierta (Fig. 1).
ATENCION
• Para evitar quemaduras, tener cuidado al abrir la puerta del horno después del Ciclo de Autolimpieza. Parase al costado del horno cuando se abre la puerta para permitir la salida del aire caliente.
• NO fuerce la puerta del horno para abrirla. Esto puede dañar el sistema de cierre automático de la puerta. Tenga mucho cuidado cuando abra la puerta después de que se haya completado un ciclo de autolimpieza. Colóquese al lado del horno cuando abra la puerta para dejar salir el aire o vapor caliente. El horno puede todavía estar MUY CALIENTE.
IMPORTANTE
Si se inició un ciclo de autolimpieza y ocurre una falla • eléctrica, es posible que el horno no se haya limpiado completamente. Después de que el suministro eléctrico se haya restablecido y la puerta se haya desbloqueado, programe otro ciclo de autolimpieza de ser necesario.Los controladores de la tabla de cocción no seran • disponibles durante el ciclo de autolimpieza.
5. Oprima deLaY start.
6. Programe el tiempo de encendido deseado para la autolimpieza usando las teclas numéricas 9 0 0.
7. Oprima start.
El control calculará hacia adelante a partir del tiempo de encendido para determinar cuándo debe terminar el ciclo de autolimpieza. El ciclo de autolimpieza se encenderá automática-mente a la hora programada.

30
Cuidado y Limpieza
superfi cies Como Limpiar
Piezas pintadas del armazónMoldura decorativa pintadaMoldura de aluminio, plástico o viniloPerillas de control (algunos modelos)
Para limpieza general, use agua caliente jabonosa y un paño. Para manchas más difíciles y grasa acumulada, aplique detergente líquido directamente en la mancha. Déjelo en la mancha por 30 a 60 minutos. Enjuague con un paño húmedo y seque. No use agentes de limpieza abrasivos en ninguno de estos materiales, pues pueden rayar la superfi cie. Para sacar las perillas de control, gírelas hasta la posición “OFF” (apagado); sosténgalas fi rmemente y tire de ellas derecho hacia fuera del eje. Para volver a colocar las perillas después de la limpieza, alinee los lados planos de la perilla y del eje; luego inserte la perilla en su lugar.
Panel de controlMembrana del teclado de controlMolduras decorativas (algunos modelos)
Antes de limpiar el panel de control, APAGUE todos los controles, active el bloqueo del horno (algunos modelos) y, de ser necesario, retire las perillas del panel. No use agentes de limpieza abrasivos en ninguno de estos materiales, pues pueden rayar la superfi cie. Limpie usando agua caliente jabonosa y un paño. Asegúrese de escurrir el exceso de agua del paño antes de limpiar el panel, especialmente cuando esté limpiando alrededor de los controles. El exceso de agua dentro o cerca de los controles puede causar daños al electrodoméstico. Cuando lo enjuague, utilice un paño limpio y agua limpia y asegúrese de escurrir el exceso de agua del paño antes de limpiar el panel de control.
Piezas de porcelana esmaltada y forro de la puerta
Restriegue suavemente con una esponja jabonosa de fregar no abrasiva para sacar la mayoría de las manchas. Enjuague con una solución 1:1 de agua y amoníaco. Si es necesario, cubra las manchas difíciles con una toalla de papel impregnada en amoníaco por 30 a 40 minutos. Enjuague con agua limpia y con un paño húmedo y luego frote con una esponja jabonosa de fregar no abrasiva. Enjuague y seque con un paño limpio. No deje que queden en la superfi cie del horno derrames con alto contenido de azúcar o ácido (tales como leche, tomates, chucrut, jugo de frutas o rellenos de tartas), pues pueden dejar una mancha opaca incluso después de la limpieza.
Interior del horno Para el interior del horno, limpie los derrames excesivos del fondo de la cavidad del horno antes de iniciar la autolimpieza. Limpie todas las manchas del marco del horno y del forro de la puerta por fuera de la junta de la puerta del horno. Para conocer precauciones muy importantes para la limpieza, asegúrese de leer todas las instrucciones de la sección sobre la autolimpieza.
Parrillas recubiertas de porcelana El horno tiene parrillas esmaltadas lubricadas, que pueden permanecer en el horno durante el ciclo de autolimpieza. No elimine el aceite vegetal de las parrillas. Es importante que los laterales de las parrillas permanencia con una delgada capa de aceite vegetal. Para mantener el funcionamiento correcto, aplique aceite vegetal después de cada ciclo de autolimpieza o cuando se difi culte el deslisamiento de la parrilla..
puerta del horno Para limpiar la puerta del horno, limpie con agua caliente jabonosa y un paño limpio. Enjuague bien. Puede usar un limpiavidrios en la parte exterior de la ventana de la puerta del horno. NO sumerja la puerta en agua. NO rocíe las rejillas de ventilación o permita que el limpiavidrios entre en ellas. NO use productos de limpieza de hornos, polvos de limpieza o cualquier limpiador abrasivo fuerte en el exterior de la puerta del horno.NO limpie la junta de la puerta del horno. En los modelos con autolimpieza, la junta de la puerta está hecha de un material tejido que es indispensable para que selle correctamente. Se debe tener mucho cuidado de no frotar, dañar ni sacar la junta de la puerta.
Cubierta de vidrio cerámico No use agentes de limpieza tipo aerosol para hornos en la cubierta. Vea los apartados sobre limpieza y mantenimiento de la cubierta en la sección “Cuidado y limpieza”.
acero inoxidable (algunos modelos) Sólo utilice limpiadores y cremas para pulir fabricadas especialmente para limpiar acero inoxidable. Frote siempre a favor del grano para evitar causar daños. No use limpiadores con altas concentraciones de cloruros o cloro. No use limpiadores ásperos. Pula la superfi cie con un paño libre de pelusas. Siempre asegúrese de limpiar bien el exceso de limpiador o de crema para pulir de las superfi cies pues pueden dejar manchas azuladas con el calor las cuales no pueden ser removidas. Limpie las manchas más fuertes con agua caliente jabonosa y un paño. Enjuague bien con agua limpia y seque con un paño.
Antes de limpiar cualquier parte del horno, asegúrese que todos los controles están apagados y que la estufa está fría. RETIRE LOS DERRAMES Y LAS MANCHAS DIFÍCILES TAN PRONTO COMO PUEDA. LA LIMPIEZA CONSTANTE DISMINUIRÁ EL ESFUERZO DE UNA LIMPIEZA A FONDO.
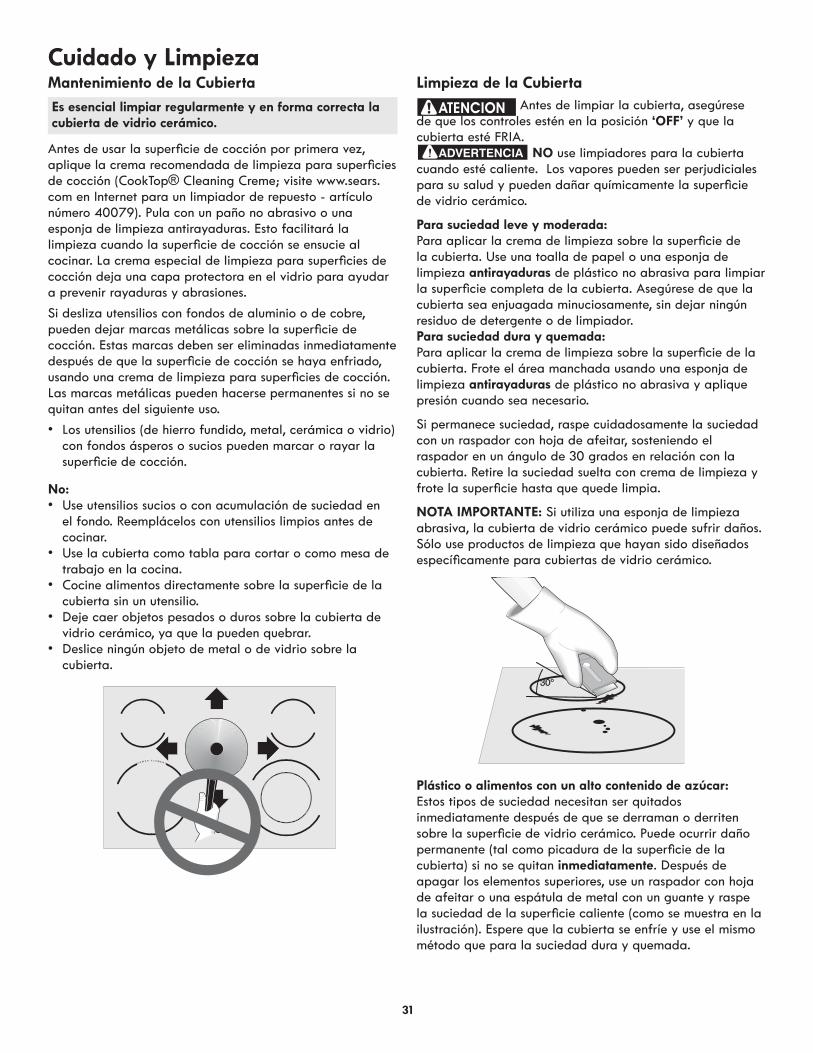
31
Cuidado y LimpiezaMantenimiento de la CubiertaEs esencial limpiar regularmente y en forma correcta la cubierta de vidrio cerámico.
Antes de usar la superfi cie de cocción por primera vez, aplique la crema recomendada de limpieza para superfi cies de cocción (CookTop® Cleaning Creme; visite www.sears.com en Internet para un limpiador de repuesto - artículo número 40079). Pula con un paño no abrasivo o una esponja de limpieza antirayaduras. Esto facilitará la limpieza cuando la superfi cie de cocción se ensucie al cocinar. La crema especial de limpieza para superfi cies de cocción deja una capa protectora en el vidrio para ayudar a prevenir rayaduras y abrasiones.
Si desliza utensilios con fondos de aluminio o de cobre, pueden dejar marcas metálicas sobre la superfi cie de cocción. Estas marcas deben ser eliminadas inmediatamente después de que la superfi cie de cocción se haya enfriado, usando una crema de limpieza para superfi cies de cocción. Las marcas metálicas pueden hacerse permanentes si no se quitan antes del siguiente uso.
Los utensilios (de hierro fundido, metal, cerámica o vidrio) • con fondos ásperos o sucios pueden marcar o rayar la superfi cie de cocción.
No:• Use utensilios sucios o con acumulación de suciedad en
el fondo. Reemplácelos con utensilios limpios antes de cocinar.
• Use la cubierta como tabla para cortar o como mesa de trabajo en la cocina.
• Cocine alimentos directamente sobre la superfi cie de la cubierta sin un utensilio.
• Deje caer objetos pesados o duros sobre la cubierta de vidrio cerámico, ya que la pueden quebrar.
• Deslice ningún objeto de metal o de vidrio sobre la cubierta.
Limpieza de la Cubierta
ATENCION Antes de limpiar la cubierta, asegúrese de que los controles estén en la posición ‘oFF’ y que la cubierta esté FRIA.
NO use limpiadores para la cubierta cuando esté caliente. Los vapores pueden ser perjudiciales para su salud y pueden dañar químicamente la superfi cie de vidrio cerámico.
Para suciedad leve y moderada:Para aplicar la crema de limpieza sobre la superfi cie de la cubierta. Use una toalla de papel o una esponja de limpieza antirayaduras de plástico no abrasiva para limpiar la superfi cie completa de la cubierta. Asegúrese de que la cubierta sea enjuagada minuciosamente, sin dejar ningún residuo de detergente o de limpiador.para suciedad dura y quemada:Para aplicar la crema de limpieza sobre la superfi cie de la cubierta. Frote el área manchada usando una esponja de limpieza antirayaduras de plástico no abrasiva y aplique presión cuando sea necesario.
Si permanece suciedad, raspe cuidadosamente la suciedad con un raspador con hoja de afeitar, sosteniendo el raspador en un ángulo de 30 grados en relación con la cubierta. Retire la suciedad suelta con crema de limpieza y frote la superfi cie hasta que quede limpia.
nota Importante: Si utiliza una esponja de limpieza abrasiva, la cubierta de vidrio cerámico puede sufrir daños. Sólo use productos de limpieza que hayan sido diseñados específi camente para cubiertas de vidrio cerámico.
Plástico o alimentos con un alto contenido de azúcar:Estos tipos de suciedad necesitan ser quitados inmediatamente después de que se derraman o derriten sobre la superfi cie de vidrio cerámico. Puede ocurrir daño permanente (tal como picadura de la superfi cie de la cubierta) si no se quitan inmediatamente. Después de apagar los elementos superiores, use un raspador con hoja de afeitar o una espátula de metal con un guante y raspe la suciedad de la superfi cie caliente (como se muestra en la ilustración). Espere que la cubierta se enfríe y use el mismo método que para la suciedad dura y quemada.

32
Cuidado y LimpiezaLimpieza de la Cubierta (cont.)
No use los siguientes productos en la cubierta:• No use limpiadores abrasivos ni esponjas de restregar, tales como esponjas de metal y algunas esponjas de nilón. Ellas pueden rayar la cubierta, haciendo más difícil su limpieza.
• No use limpiadores abrasivos, tales como blanqueador de cloro, amoníaco o limpiadores de hornos, pues pueden rayar o descolorar la cubierta.
• No use esponjas, paños o toallas de papel sucias, pues pueden dejar suciedad o pelusas en la cubierta que pueden quemarse y causar decoloración.
Papel de aluminio y sus utensilios nunca cubra ninguna ranura, agujero
o pasaje en el fondo del horno ni cubra una parrilla completa con materiales como papel de aluminio. Las envolturas con papel de aluminio pueden atrapar el calor y producir un riesgo de incendio.
Revestimientos protectores — NO use papeL de aLumInIo para revestir la parte inferior del horno. Use papel de aluminio solamente como se recomienda en este manual. El uso inadecuado de estos forros puede causar un riesgo de choque eléctrico o incendio.
Papel de aluminio - El uso del papel de aluminio sobre una cubierta caliente podría dañar la cubierta. No use utensilios de aluminio ligero y no permita que el papel de aluminio entre en contacto con los elementos superiores bajo NINGUNA circunstancia.
Cambio de las Bombillas
Las bombillas están ubicadas en la parte trasera del interior del horno y están cubiertas con un protector de vidrio. El protector de vidrio debe estar en su lugar cada vez que se use el horno.
Para reemplazar las bombillas:
1. Desconecte el suministro eléctrico en la fuente principal o desenchufe la estufa.
2. Retire el protector de las luces interiores del horno inferior como se muestra en la ilustración.
3. Reemplace la bombilla con una bombilla para electrodomésticos de halógeno de 25 W tipo t-4. Tenga en cuenta lo siguiente: no permita que sus dedos toquen la bombilla nueva cuando la reemplace. Esto reducirá la vida útil de la bombilla nueva. Use una toalla de papel para cubrir la bombilla nueva cuando la instale.
4. Vuelva a instalar el protector de vidrio sobre la bombilla.
5. Vuelva a conectar el suministro eléctrico en la fuente principal (o vuelva a enchufar la estufa).
6. Se deberá volver a programar el reloj.
ATENCION
• Asegúrese de que la estufa esté desenchufada y que todas las piezas estén FRÍAS antes de reemplazar las bombillas del horno. Utilice un guante con una cara de cuero como protección en caso de que haya vidrios rotos y para evitar quemaduras.
Levante la parte trasera del protector de vidrio y retire.
Halógeno Bombilla

33
Cuidado y Limpiezadesmontaje y reinstalación de la puerta
ATENCION La puerta es pesada. Tenga cuidado cuando retire y levante la puerta del horno. no levante la puerta del horno por la manija.
IMPORTANTE La mayoría de las puertas tiene piezas de vidrio que se pueden romper. Lea las siguientes recomendaciones:
Bloquear
desbloquear
Ubicación de las bisagras con la puerta completamente abierta
Pasador de rotación
Ranura de apoyo
Gancho del brazo de la bisagra
Parte baja del agujero
• No cierre la puerta del horno hasta que todas las parrillas estén en su lugar en el interior de la cavidad del horno.
• No golpee el vidrio con ollas, sartenes o cualquier otro objeto. El vidrio de la puerta del horno podría romperse en ese momento o podría romperse a un tiempo posteriormente inesperado.
• Si se raya, golpea, raspa o se aplica presión sobre el vidrio, su estructura se puede debilitar, lo que puede aumentar el riesgo de que se rompa más adelante.
• Usted podría utilizar un limpiador de vidrio para el vidrio del horno. No utilizar aerosol o dejar que el limpiador entre o se fi ltre dentro de las ventilas de la puerta. Utilizar limpiador en spray en un paño y después limpie con este paño húmedo.
• No utilicé limpiadores fuertes, polvos o abrasivos para la puerta del horno o el vidrio.
• Nunca limpie la junta de la puerta del horno. La junta de la puerta se debería de autolimpiar durante el ciclo de autolimpieza.
para retirar la puerta del horno:1. Abra completamente la puerta del horno (dejándola
horizontal en relación con el piso – Fig. 1). 2. Tire de los bloqueos de ambas bisagras (izquierda
y derecha) hacia abajo desde el marco del horno completamente hacia la puerta del horno (Fig. 2). Es posible que necesite una herramienta como un destornillador pequeño de cabeza plana.
3. Sostenga fi rmemente ambos lados de la puerta del horno en sus costados (no use la manija de la puerta - Fig. 3).
4. Cierre la puerta hasta el tope de asar vea Fig. 3.5. Con la puerta del horno en la posición de asar, levante los
brazos de las bisagras de la puerta sobre los pasadores de rotación ubicados a cada lado del marco del horno (Fig. 4).
para reinstalar la puerta del horno:1. Sostenga fi rmemente ambos lados de la puerta del horno
en sus costados (no use la manija de la puerta - Fig. 3).2. Sosteniendo la puerta en el mismo ángulo de remoción,
coloque el gancho del brazo de la bisagra sobre los pasadores de rotación ubicados a cada lado del marco de la puerta (Fig. 4). También apoye la ranura de apoyo en la parte baja del agujero del ensamble al mismo tiempo que entra el gancho del brazo de la bisagra. El gancho de los brazos de las bisagras y la ranura de apoyo debe estar completamente asentado sobre los pasadores de rotación y la parte baja del agujero.
3. Abra completamente la puerta del horno (dejándola horizontal en relación con el piso – Fig. 1).
4. Empuje los bloqueos de las bisagras izquierda y derecha hacia arriba y hacia el interior del marco del horno (Fig. 2) a su posición bloqueada.
5. Cierre la puerta del horno.
Figura 1
Figura 2
Figura 3
Puerta del horno
Bisagra
Figura 4
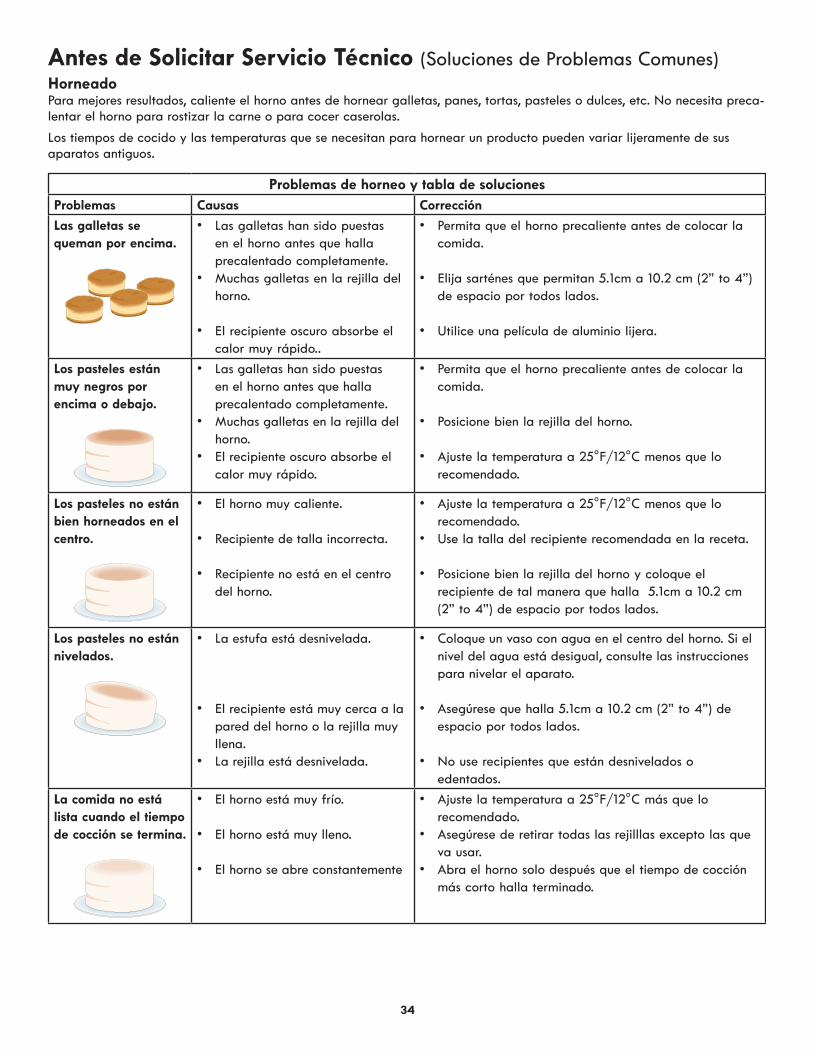
34
antes de solicitar servicio técnico (Soluciones de Problemas Comunes)HorneadoPara mejores resultados, caliente el horno antes de hornear galletas, panes, tortas, pasteles o dulces, etc. No necesita preca-lentar el horno para rostizar la carne o para cocer caserolas.
Los tiempos de cocido y las temperaturas que se necesitan para hornear un producto pueden variar lijeramente de sus aparatos antiguos.
problemas de horneo y tabla de solucionesProblemas Causas Corrección
Las galletas se queman por encima.
• Las galletas han sido puestas en el horno antes que halla precalentado completamente.
• Muchas galletas en la rejilla del horno.
• El recipiente oscuro absorbe el calor muy rápido..
• Permita que el horno precaliente antes de colocar la comida.
• Elija sarténes que permitan 5.1cm a 10.2 cm (2” to 4”) de espacio por todos lados.
• Utilice una película de aluminio lijera.
Los pasteles están muy negros por encima o debajo.
• Las galletas han sido puestas en el horno antes que halla precalentado completamente.
• Muchas galletas en la rejilla del horno.
• El recipiente oscuro absorbe el calor muy rápido.
• Permita que el horno precaliente antes de colocar la comida.
• Posicione bien la rejilla del horno.
• Ajuste la temperatura a 25°F/12°C menos que lo recomendado.
Los pasteles no están bien horneados en el centro.
• El horno muy caliente.
• Recipiente de talla incorrecta.
• Recipiente no está en el centro del horno.
• Ajuste la temperatura a 25°F/12°C menos que lo recomendado.
• Use la talla del recipiente recomendada en la receta.
• Posicione bien la rejilla del horno y coloque el recipiente de tal manera que halla 5.1cm a 10.2 cm (2” to 4”) de espacio por todos lados.
Los pasteles no están nivelados.
• La estufa está desnivelada.
• El recipiente está muy cerca a la pared del horno o la rejilla muy llena.
• La rejilla está desnivelada.
• Coloque un vaso con agua en el centro del horno. Si el nivel del agua está desigual, consulte las instrucciones para nivelar el aparato.
• Asegúrese que halla 5.1cm a 10.2 cm (2” to 4”) de espacio por todos lados.
• No use recipientes que están desnivelados o edentados.
La comida no está lista cuando el tiempo de cocción se termina.
• El horno está muy frío.
• El horno está muy lleno.
• El horno se abre constantemente
• Ajuste la temperatura a 25°F/12°C más que lo recomendado.
• Asegúrese de retirar todas las rejilllas excepto las que va usar.
• Abra el horno solo después que el tiempo de cocción más corto halla terminado.

35
Consulte la lista siguiente antes de solicitar servicio. Puede ahorrarle tiempo y dinero. La lista incluye los incidentes más comunes que no son originados por la fabricación o materiales defectuosos de este electrodoméstico.
sItuacIÓn posIBLe causa/soLucIÓnel control del horno emite señales sonoras y el indicador visual muestra cualquier código ‘F.
El control electrónico ha detectado una anomalía. Pulse STOP para borrar la pantalla y parar el sonido. Reprograme el horno. Si la anomalía se repite, tome nota del número de anomalía. Pulse STOP y consulte un servicio autorizado.
se visualiza d-o. La puerta quedó abierta y los controles están definidos para el ciclo de autolimpieza. Cerrar la puerta y pulsar las teclas STOP del horno.
Instalación defectuosa.
Unidad no nivelado
malos resultados al hornear
1- Colocar la parrilla en el centro del horno.2- Colocar la parrilla del horno a nivel o un vaso con agua en el centro del horno.3- Coloque Si el nivel del agua está desigual, consulte las instrucciones para nivelar el aparato. 4- Si la parrilla y la superficie inferior del gabinete no están niveladas, comunicarse con el instalador.
Armarios de la cocina mal alineados que pueden dar la impresión de que la estufa está desnivelada. Asegúrese de que los armarios estén derechos. Comunicarse con el instalador.
Los elementos de superficie no calientan.
No hay corriente eléctrica hacia el artefacto. Verifique las etapas en “La plancha de cocina no funciona”.
El control el correcto está puesto. Asegúrese de usar la perilla correcta para encender el elemento deseado.
elemento de superficie muy caliente o no suficientemente caliente
El control el correcto está puesto. Asegúrese de usar la perilla correcta para encender el elemento deseado.
Cacerolas ligeras o deformadas fueron utilizadas. Asegúrese de usar los utensilios adecuados. Utilice solamente cacerolas a base plana y de peso medio a robusto. Las cacerolas de peso mediano a robusto calientan más uniformemente. Puesto que las cacerolas de peso ligero no calientan uniformemente, los alimentos pueden quemarse fácilmente.
Marcas de metal. Deslizando o rosando los utensilios de metal sobre la superficie de la plancha de cocinar. No deslize los utensilios de metal sobre la superficie de la plancha de cocinar. Use una crema de limpieza para retirar las marcas de la plancha de estufa cerámica. Vea ”Limpieza y mantenimiento de la cubierta” en la sección Cuidado y limpieza general.
raspaduras o rasguños sobre la plancha de cocinar.
Las partículas gruesas tales como sal o arena entre la cubierta y los utensilios pueden causar rasguños. Asegúrese que la superficie de la cubierta y los fondos de utensilios estén limpios antes de usarse. Los rasguños pequeños no afectan la cocción y llegarán a ser menos visibles con tiempo.
Productos de limpieza no recomendados para cubiertas vitro cerámicas se han utilizado. Vea la sección “Limpieza & mantenimiento de la cubierta Vitro cerámica” bajo cuidado general y limpieza.
Utensilios con el fondo áspero se han utilizados. Utilice utensilios lisos y con base plana.
rayas o manchas marrones. Los derrames han sido cocidos en la superficie . Use una lama de afeitar para retirar las manchas. Vea ”Limpieza y mantenimiento de la cubierta” en la sección Cuidado y limpieza general.
areas de descoloración con brillo metálico.
Depósitos minerales del agua o de la comida. Retirelos con una crema de limpieza. Use recipientes con las bases limpias y secas.
La luz del horno no funciona. Coloque o ajuste la bombilla. Vea “Cambio de la luz del horno” en el Manual del usuario para las instrucciones.
Ruido del ventilador durante la función de cocinado
El ventilador puede encenderse o apagarse automáticamente para enfriar algunos componentes del electrodoméstico. Es normal que el ventilador continue trabajando aún cuando el horno este apagado.
antes de solicitar servicio técnico (Soluciones de Problemas Comunes)
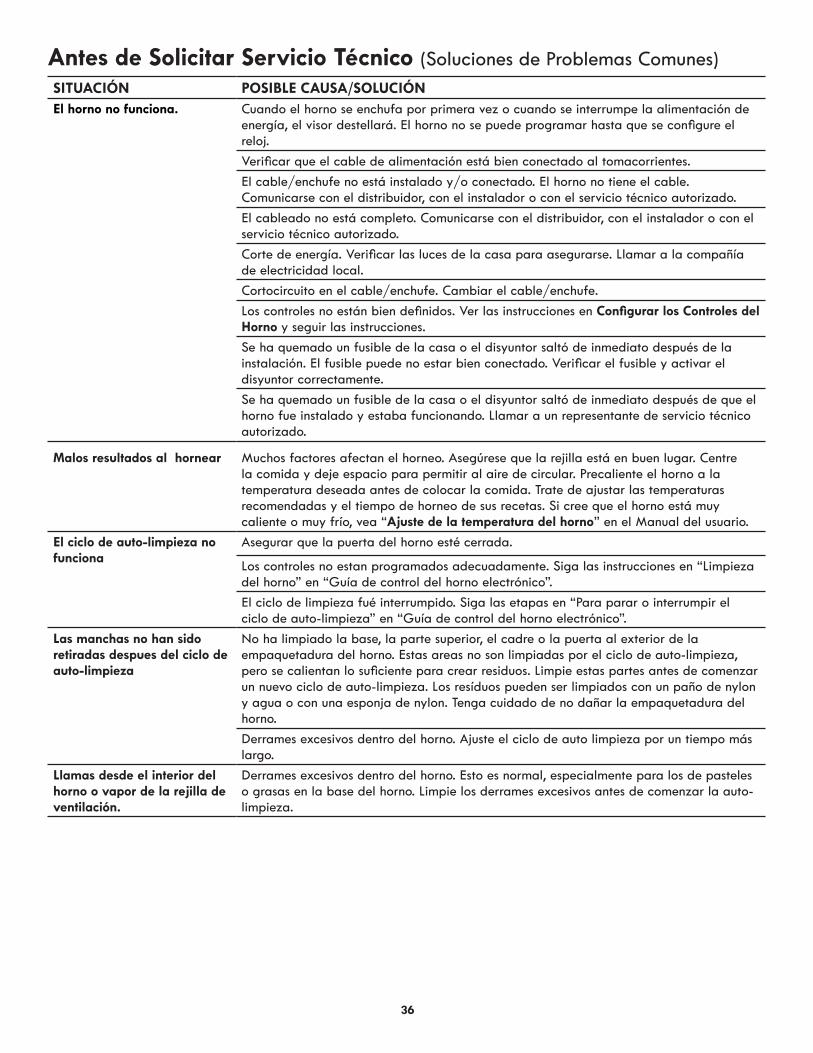
36
sItuacIÓn posIBLe causa/soLucIÓnel horno no funciona. Cuando el horno se enchufa por primera vez o cuando se interrumpe la alimentación de
energía, el visor destellará. El horno no se puede programar hasta que se configure el reloj.
Verificar que el cable de alimentación está bien conectado al tomacorrientes.
El cable/enchufe no está instalado y/o conectado. El horno no tiene el cable. Comunicarse con el distribuidor, con el instalador o con el servicio técnico autorizado.
El cableado no está completo. Comunicarse con el distribuidor, con el instalador o con el servicio técnico autorizado.
Corte de energía. Verificar las luces de la casa para asegurarse. Llamar a la compañía de electricidad local.
Cortocircuito en el cable/enchufe. Cambiar el cable/enchufe.
Los controles no están bien definidos. Ver las instrucciones en configurar los controles del Horno y seguir las instrucciones.
Se ha quemado un fusible de la casa o el disyuntor saltó de inmediato después de la instalación. El fusible puede no estar bien conectado. Verificar el fusible y activar el disyuntor correctamente.
Se ha quemado un fusible de la casa o el disyuntor saltó de inmediato después de que el horno fue instalado y estaba funcionando. Llamar a un representante de servicio técnico autorizado.
malos resultados al hornear Muchos factores afectan el horneo. Asegúrese que la rejilla está en buen lugar. Centre la comida y deje espacio para permitir al aire de circular. Precaliente el horno a la temperatura deseada antes de colocar la comida. Trate de ajustar las temperaturas recomendadas y el tiempo de horneo de sus recetas. Si cree que el horno está muy caliente o muy frío, vea “ajuste de la temperatura del horno” en el Manual del usuario.
el ciclo de auto-limpieza no funciona
Asegurar que la puerta del horno esté cerrada.
Los controles no estan programados adecuadamente. Siga las instrucciones en “Limpieza del horno” en “Guía de control del horno electrónico”.
El ciclo de limpieza fué interrumpido. Siga las etapas en “Para parar o interrumpir el ciclo de auto-limpieza” en “Guía de control del horno electrónico”.
Las manchas no han sido retiradas despues del ciclo de auto-limpieza
No ha limpiado la base, la parte superior, el cadre o la puerta al exterior de la empaquetadura del horno. Estas areas no son limpiadas por el ciclo de auto-limpieza, pero se calientan lo suficiente para crear residuos. Limpie estas partes antes de comenzar un nuevo ciclo de auto-limpieza. Los resíduos pueden ser limpiados con un paño de nylon y agua o con una esponja de nylon. Tenga cuidado de no dañar la empaquetadura del horno.
Derrames excesivos dentro del horno. Ajuste el ciclo de auto limpieza por un tiempo más largo.
Llamas desde el interior del horno o vapor de la rejilla de ventilación.
Derrames excesivos dentro del horno. Esto es normal, especialmente para los de pasteles o grasas en la base del horno. Limpie los derrames excesivos antes de comenzar la auto-limpieza.
antes de solicitar servicio técnico (Soluciones de Problemas Comunes)
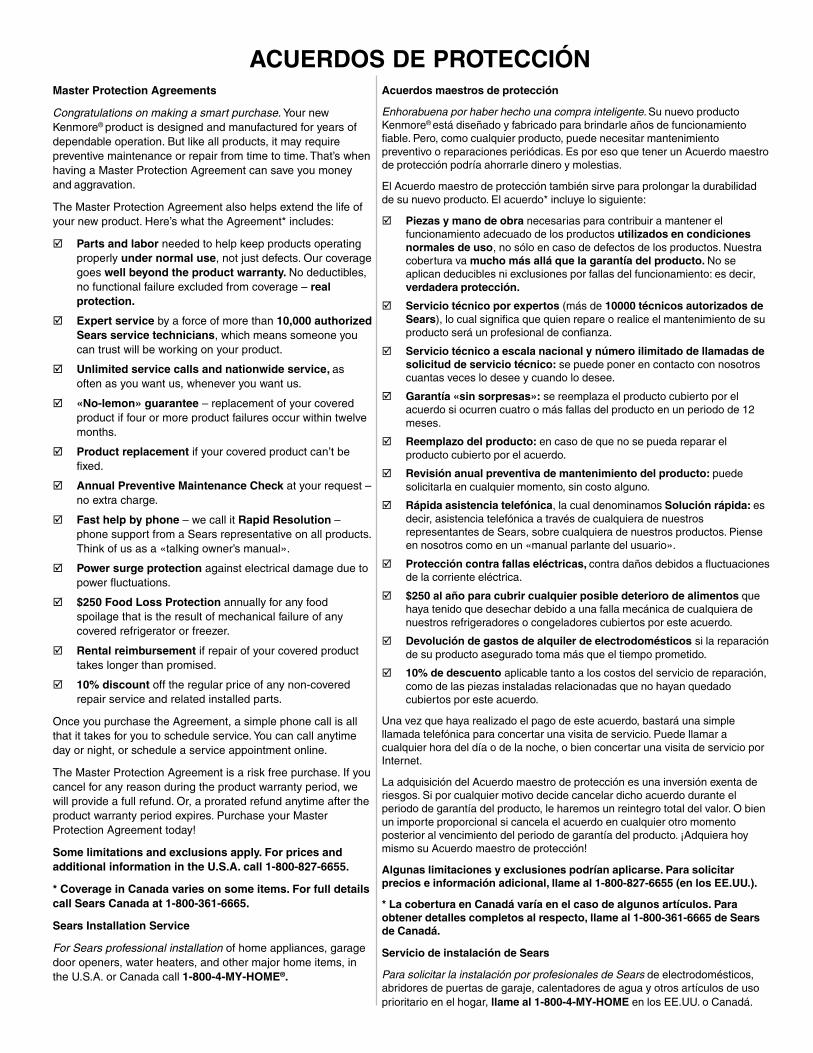
Master Protection Agreements
Congratulations on making a smart purchase. Your newKenmore® product is designed and manufactured for years ofdependable operation. But like all products, it may requirepreventive maintenance or repair from time to time. That’s whenhaving a Master Protection Agreement can save you moneyand aggravation.
The Master Protection Agreement also helps extend the life ofyour new product. Here’s what the Agreement* includes:
Parts and labor needed to help keep products operatingproperly under normal use, not just defects. Our coveragegoes well beyond the product warranty. No deductibles,no functional failure excluded from coverage – realprotection.
Expert service by a force of more than 10,000 authorizedSears service technicians, which means someone youcan trust will be working on your product.
Unlimited service calls and nationwide service, asoften as you want us, whenever you want us.
«No-lemon» guarantee – replacement of your coveredproduct if four or more product failures occur within twelvemonths.
Product replacement if your covered product can’t befixed.
Annual Preventive Maintenance Check at your request –no extra charge.
Fast help by phone – we call it Rapid Resolution –phone support from a Sears representative on all products.Think of us as a «talking owner’s manual».
Power surge protection against electrical damage due topower fluctuations.
$250 Food Loss Protection annually for any foodspoilage that is the result of mechanical failure of anycovered refrigerator or freezer.
Rental reimbursement if repair of your covered producttakes longer than promised.
10% discount off the regular price of any non-coveredrepair service and related installed parts.
Once you purchase the Agreement, a simple phone call is allthat it takes for you to schedule service. You can call anytimeday or night, or schedule a service appointment online.
The Master Protection Agreement is a risk free purchase. If youcancel for any reason during the product warranty period, wewill provide a full refund. Or, a prorated refund anytime after theproduct warranty period expires. Purchase your MasterProtection Agreement today!
Some limitations and exclusions apply. For prices andadditional information in the U.S.A. call 1-800-827-6655.
* Coverage in Canada varies on some items. For full detailscall Sears Canada at 1-800-361-6665.
Sears Installation Service
For Sears professional installation of home appliances, garagedoor openers, water heaters, and other major home items, inthe U.S.A. or Canada call 1-800-4-MY-HOME®.
ACUERDOS DE PROTECCIÓNAcuerdos maestros de protección
Enhorabuena por haber hecho una compra inteligente. Su nuevo productoKenmore® está diseñado y fabricado para brindarle años de funcionamientofiable. Pero, como cualquier producto, puede necesitar mantenimientopreventivo o reparaciones periódicas. Es por eso que tener un Acuerdo maestrode protección podría ahorrarle dinero y molestias.
El Acuerdo maestro de protección también sirve para prolongar la durabilidadde su nuevo producto. El acuerdo* incluye lo siguiente:
Piezas y mano de obra necesarias para contribuir a mantener elfuncionamiento adecuado de los productos utilizados en condicionesnormales de uso, no sólo en caso de defectos de los productos. Nuestracobertura va mucho más allá que la garantía del producto. No seaplican deducibles ni exclusiones por fallas del funcionamiento: es decir,verdadera protección.
Servicio técnico por expertos (más de 10000 técnicos autorizados deSears), lo cual significa que quien repare o realice el mantenimiento de suproducto será un profesional de confianza.
Servicio técnico a escala nacional y número ilimitado de llamadas desolicitud de servicio técnico: se puede poner en contacto con nosotroscuantas veces lo desee y cuando lo desee.
Garantía «sin sorpresas»: se reemplaza el producto cubierto por elacuerdo si ocurren cuatro o más fallas del producto en un periodo de 12meses.
Reemplazo del producto: en caso de que no se pueda reparar elproducto cubierto por el acuerdo.
Revisión anual preventiva de mantenimiento del producto: puedesolicitarla en cualquier momento, sin costo alguno.
Rápida asistencia telefónica, la cual denominamos Solución rápida: esdecir, asistencia telefónica a través de cualquiera de nuestrosrepresentantes de Sears, sobre cualquiera de nuestros productos. Pienseen nosotros como en un «manual parlante del usuario».
Protección contra fallas eléctricas, contra daños debidos a fluctuacionesde la corriente eléctrica.
$250 al año para cubrir cualquier posible deterioro de alimentos quehaya tenido que desechar debido a una falla mecánica de cualquiera denuestros refrigeradores o congeladores cubiertos por este acuerdo.
Devolución de gastos de alquiler de electrodomésticos si la reparaciónde su producto asegurado toma más que el tiempo prometido.
10% de descuento aplicable tanto a los costos del servicio de reparación,como de las piezas instaladas relacionadas que no hayan quedadocubiertos por este acuerdo.
Una vez que haya realizado el pago de este acuerdo, bastará una simplellamada telefónica para concertar una visita de servicio. Puede llamar acualquier hora del día o de la noche, o bien concertar una visita de servicio porInternet.
La adquisición del Acuerdo maestro de protección es una inversión exenta deriesgos. Si por cualquier motivo decide cancelar dicho acuerdo durante elperiodo de garantía del producto, le haremos un reintegro total del valor. O bienun importe proporcional si cancela el acuerdo en cualquier otro momentoposterior al vencimiento del periodo de garantía del producto. ¡Adquiera hoymismo su Acuerdo maestro de protección!
Algunas limitaciones y exclusiones podrían aplicarse. Para solicitarprecios e información adicional, llame al 1-800-827-6655 (en los EE.UU.).
* La cobertura en Canadá varía en el caso de algunos artículos. Paraobtener detalles completos al respecto, llame al 1-800-361-6665 de Searsde Canadá.
Servicio de instalación de Sears
Para solicitar la instalación por profesionales de Sears de electrodomésticos,abridores de puertas de garaje, calentadores de agua y otros artículos de usoprioritario en el hogar, llame al 1-800-4-MY-HOME en los EE.UU. o Canadá.

® Registered Trademark / TM Trademark of KCD IP, LLC in the United States, or Sears Brands, LLC in other countries ® Marca Registrada / TM Marca de Fábrica de KCD IP, LLC en Estados Unidos, o Sears Brands, LLC in otros países MC Marque de commerce / MD Marque déposée de Sears Brands, LLC
Get it fixed, at your home or ours!Your Home
For troubleshooting, product manuals and expert advice:
www.managemylife.com
For repair – in your home – of all major brand appliances, lawn and garden equipment, or heating and cooling systems,
no matter who made it, no matter who sold it!For the replacement parts, accessories and
owner’s manuals that you need to do-it-yourself. For Sears professional installation of home appliancesand items like garage door openers and water heaters.
1-800-4-MY-HOME® (1-800-469-4663)Call anytime, day or night (U.S.A. and Canada)
www.sears.com www.sears.ca
Our Home For repair of carry-in items like vacuums, lawn equipment,
and electronics, call anytime for the location of your nearest Sears Parts & Repair Service Center
1-800-488-1222 (U.S.A.) 1-800-469-4663 (Canada)www.sears.com www.sears.ca
To purchase a protection agreement on a product serviced by Sears: 1-800-827-6655 (U.S.A.) 1-800-361-6665 (Canada)
Para pedir servicio de reparacióna domicilio, y para ordenar piezas:
1-888-SU-HOGAR®
(1-888-784-6427)www.sears.com
Au Canada pour service en français: 1-800-LE-FOYERMC
(1-800-533-6937)www.sears.ca


![Quick Reference - Sears Parts Directof your phone directory under "Appliances-Household --Major --Service and Repair." Call when you: [] Have questions about built-in oven installationor](https://static.fdocuments.net/doc/165x107/60e34255b9e60943c623a7f2/quick-reference-sears-parts-direct-of-your-phone-directory-under-appliances-household.jpg)


